Embed Size (px)
Citation preview

Page 1 of 11
Wooden Garden Wheelbarrow
This project is based on a compilation of internet searches for a garden wheelbarrow. As such, I introduced modifications that suited me.
Contents Materials – Diagram & Requirements ........................................................................................ 2
Wood: ....................................................................................................................................................................... 2 Hardware & Supplies: ............................................................................................................................................... 2 Power Tools .............................................................................................................................................................. 3 Non-Power Tools ...................................................................................................................................................... 3
Building the Wheelbarrow ........................................................................................................... 4
The Sides .................................................................................................................................................................. 4 Building the frame .................................................................................................................................................... 5
Alan’s Tips for the base: ........................................................................................................................................................ 6 Installing the Handles ............................................................................................................................................... 7
Steps ....................................................................................................................................................................................... 7 Installing the Legs ..................................................................................................................................................... 8 Installing the front wheel .......................................................................................................................................... 9 Finishing Touches ................................................................................................................................................... 10
Alan’s TIPs (after wheelbarrow is painted/stained): ............................................................................................................ 11
Page 2 of 11
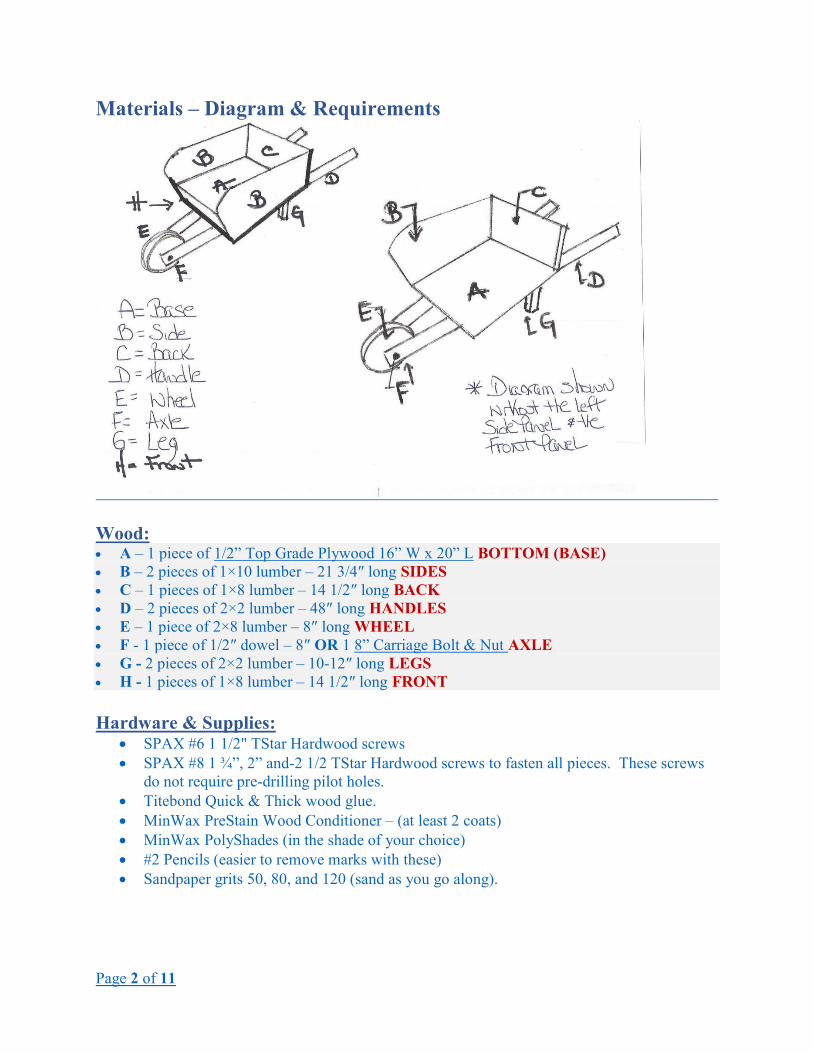
Materials – Diagram & Requirements
Wood: A – 1 piece of 1/2” Top Grade Plywood 16” W x 20” L BOTTOM (BASE) B – 2 pieces of 1×10 lumber – 21 3/4″ long SIDES C – 1 pieces of 1×8 lumber – 14 1/2″ long BACK D – 2 pieces of 2×2 lumber – 48″ long HANDLES E – 1 piece of 2×8 lumber – 8″ long WHEEL F - 1 piece of 1/2″ dowel – 8″ OR 1 8” Carriage Bolt & Nut AXLE G - 2 pieces of 2×2 lumber – 10-12″ long LEGS H - 1 pieces of 1×8 lumber – 14 1/2″ long FRONT
Hardware & Supplies: SPAX #6 1 1/2" TStar Hardwood screws SPAX #8 1 ¾”, 2” and-2 1/2 TStar Hardwood screws to fasten all pieces. These screws
do not require pre-drilling pilot holes. Titebond Quick & Thick wood glue. MinWax PreStain Wood Conditioner – (at least 2 coats) MinWax PolyShades (in the shade of your choice) #2 Pencils (easier to remove marks with these) Sandpaper grits 50, 80, and 120 (sand as you go along).
Page 3 of 11
Power Tools 1. Craftsman 19.2v and Black & Decker 14.4v cordless drills 2. Milwaukee 10 ¼” Circular saw - 40-60 tooth blades 3. DEWALT 10-Inch Compact Job Site Table Saw – 20-40-60 tooth blades 4. Kreg KMA2600 Square Cut 5. Kreg KMA2685 Rip-Cut 6. Kreg KMA2700 Accu-Cut 7. Rockwell RK2863K 20V Cordless Sonicrafter 8. Makita 5” 18v Cordless Orbital Sander 9. RIDGID 15 Amp 10 in. Dual Bevel Miter Saw with Laser 10. Skill 4290-02 Jigsaw
Non-Power Tools 1. Irwin Quick Grip Clamps (various sizes) 2. Swanson 7” and 12” speed squares 3. Stanley 25’ Tape measure 4. DeWalt Drill Bits 5. Tektron Automatic Center Punch for marking screw locations 6. GemRed Digital Angle Finder
Page 4 of 11
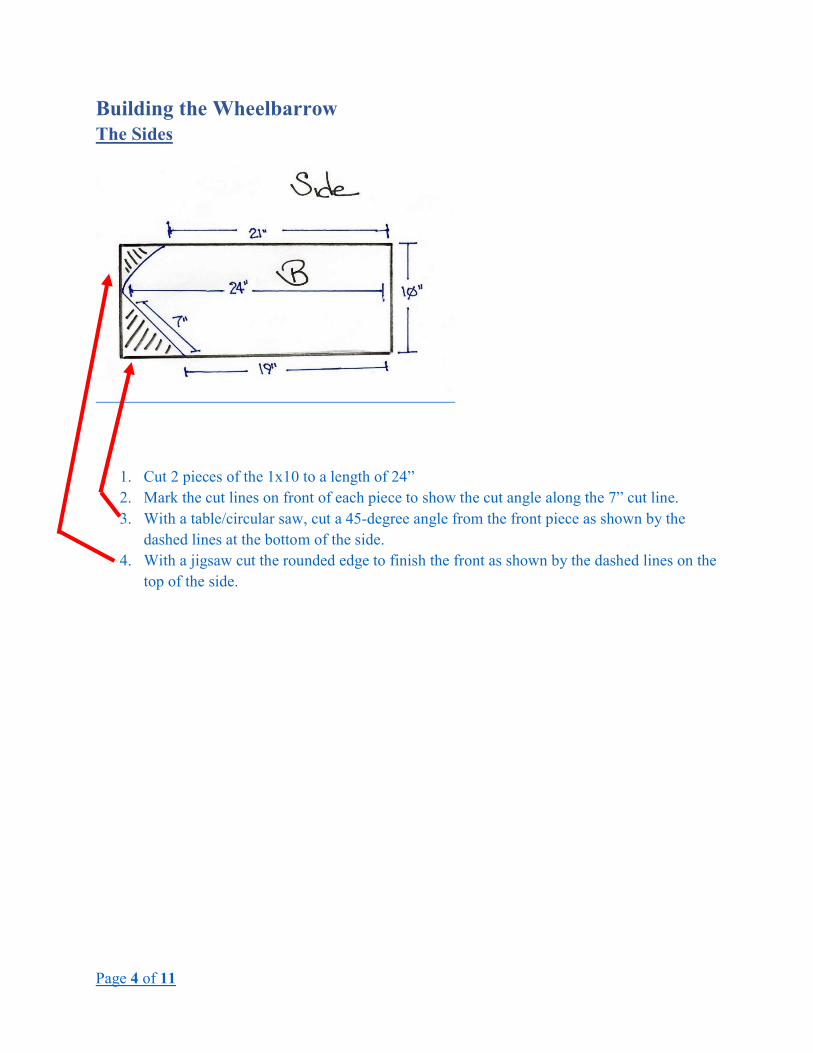
Building the Wheelbarrow The Sides
1. Cut 2 pieces of the 1x10 to a length of 24” 2. Mark the cut lines on front of each piece to show the cut angle along the 7” cut line. 3. With a table/circular saw, cut a 45-degree angle from the front piece as shown by the
dashed lines at the bottom of the side. 4. With a jigsaw cut the rounded edge to finish the front as shown by the dashed lines on the
top of the side.

Page 5 of 11
Building the frame
Steps
1. After cutting the angle on the bottom part of the Sides (B), Lay out all your cut pieces as shown.
2. Attach the side panels (B) to the base (A) 3. Fit the Front (H) and Back panels (C) to the Sides (B)
Page 6 of 11
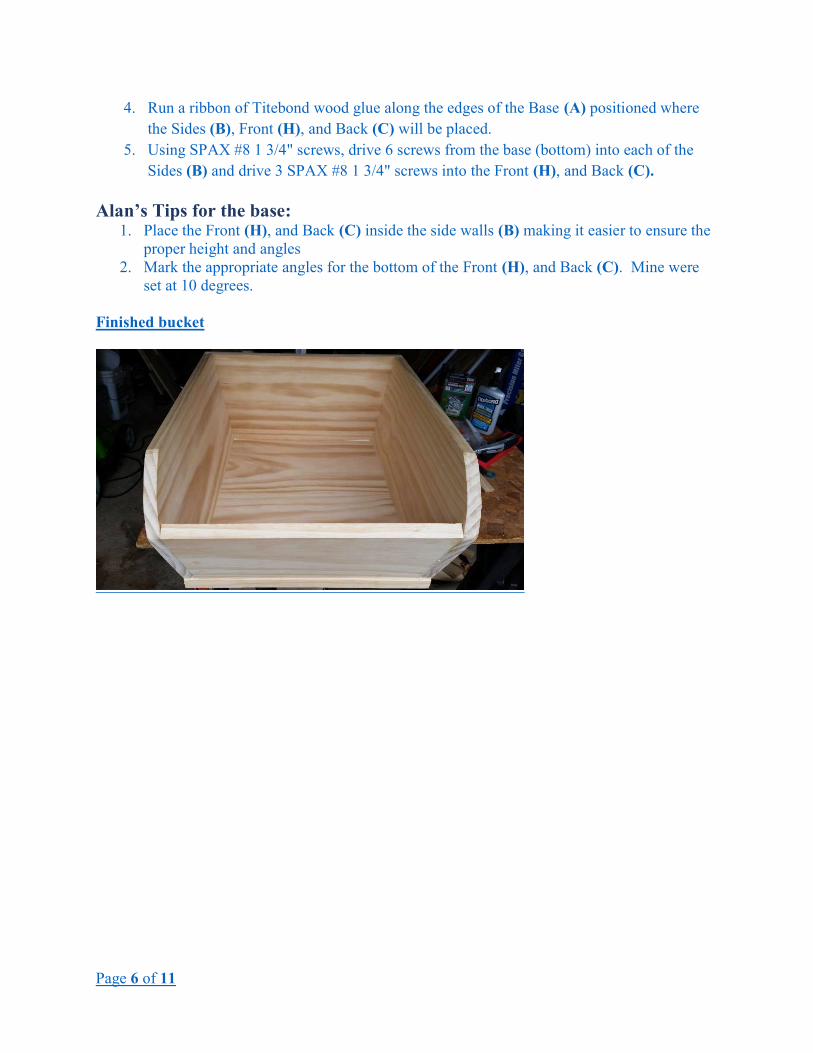
4. Run a ribbon of Titebond wood glue along the edges of the Base (A) positioned where the Sides (B), Front (H), and Back (C) will be placed.
5. Using SPAX #8 1 3/4" screws, drive 6 screws from the base (bottom) into each of the Sides (B) and drive 3 SPAX #8 1 3/4" screws into the Front (H), and Back (C).
Alan’s Tips for the base: 1. Place the Front (H), and Back (C) inside the side walls (B) making it easier to ensure the
proper height and angles 2. Mark the appropriate angles for the bottom of the Front (H), and Back (C). Mine were
set at 10 degrees. Finished bucket
Page 7 of 11
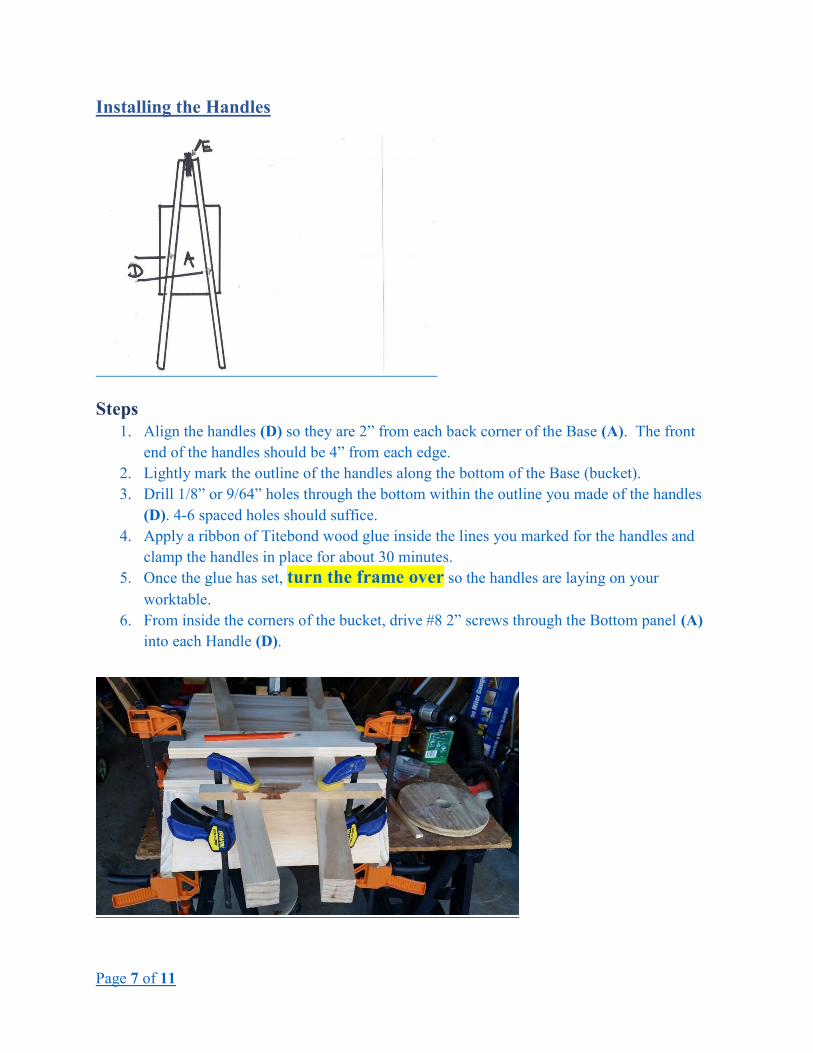
Installing the Handles
Steps 1. Align the handles (D) so they are 2” from each back corner of the Base (A). The front
end of the handles should be 4” from each edge. 2. Lightly mark the outline of the handles along the bottom of the Base (bucket). 3. Drill 1/8” or 9/64” holes through the bottom within the outline you made of the handles
(D). 4-6 spaced holes should suffice. 4. Apply a ribbon of Titebond wood glue inside the lines you marked for the handles and
clamp the handles in place for about 30 minutes. 5. Once the glue has set, turn the frame over so the handles are laying on your
worktable. 6. From inside the corners of the bucket, drive #8 2” screws through the Bottom panel (A)
into each Handle (D).
Page 8 of 11
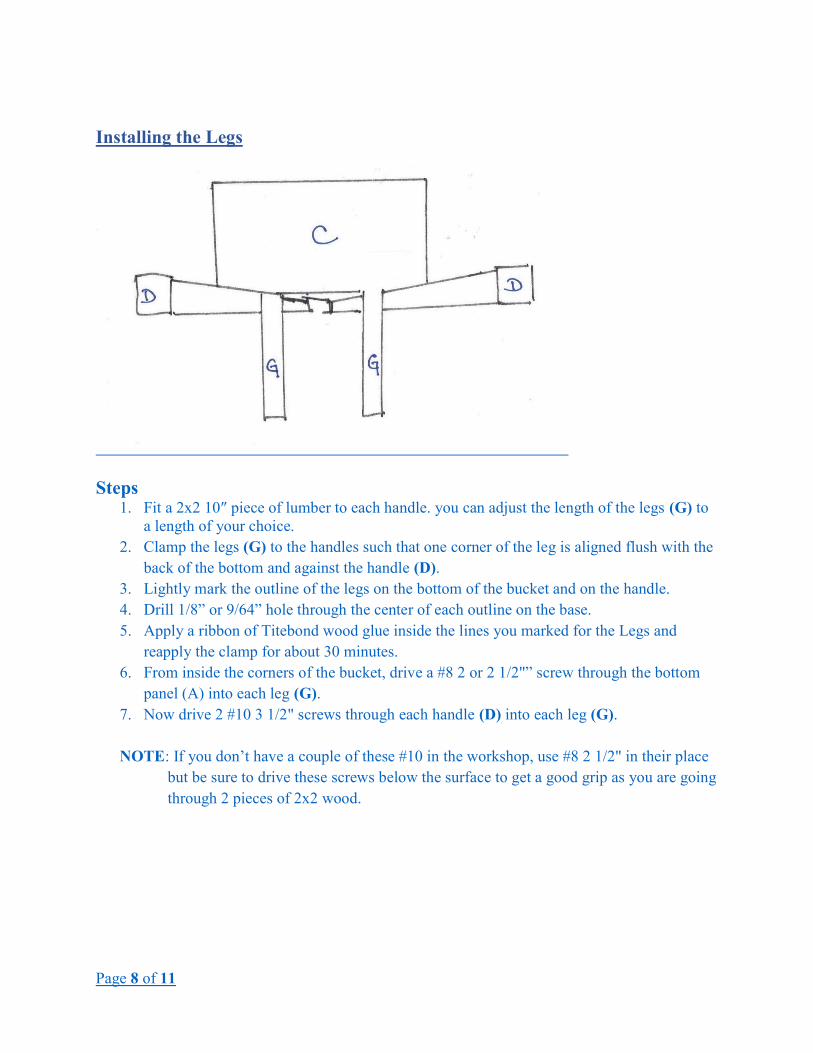
Installing the Legs
Steps 1. Fit a 2x2 10″ piece of lumber to each handle. you can adjust the length of the legs (G) to
a length of your choice. 2. Clamp the legs (G) to the handles such that one corner of the leg is aligned flush with the
back of the bottom and against the handle (D). 3. Lightly mark the outline of the legs on the bottom of the bucket and on the handle. 4. Drill 1/8” or 9/64” hole through the center of each outline on the base. 5. Apply a ribbon of Titebond wood glue inside the lines you marked for the Legs and
reapply the clamp for about 30 minutes. 6. From inside the corners of the bucket, drive a #8 2 or 2 1/2"” screw through the bottom
panel (A) into each leg (G). 7. Now drive 2 #10 3 1/2" screws through each handle (D) into each leg (G).
NOTE: If you don’t have a couple of these #10 in the workshop, use #8 2 1/2" in their place
but be sure to drive these screws below the surface to get a good grip as you are going through 2 pieces of 2x2 wood.
Page 9 of 11
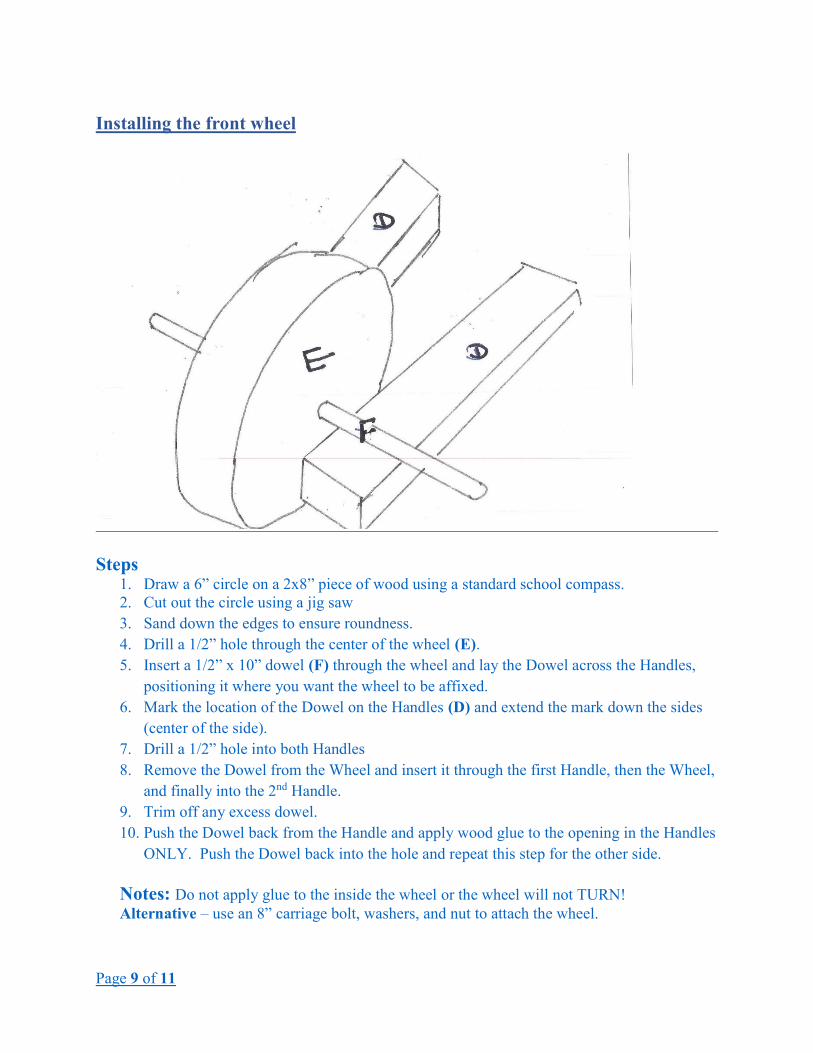
Installing the front wheel
Steps 1. Draw a 6” circle on a 2x8” piece of wood using a standard school compass. 2. Cut out the circle using a jig saw 3. Sand down the edges to ensure roundness. 4. Drill a 1/2” hole through the center of the wheel (E). 5. Insert a 1/2” x 10” dowel (F) through the wheel and lay the Dowel across the Handles,
positioning it where you want the wheel to be affixed. 6. Mark the location of the Dowel on the Handles (D) and extend the mark down the sides
(center of the side). 7. Drill a 1/2” hole into both Handles 8. Remove the Dowel from the Wheel and insert it through the first Handle, then the Wheel,
and finally into the 2nd Handle. 9. Trim off any excess dowel. 10. Push the Dowel back from the Handle and apply wood glue to the opening in the Handles
ONLY. Push the Dowel back into the hole and repeat this step for the other side.
Notes: Do not apply glue to the inside the wheel or the wheel will not TURN! Alternative – use an 8” carriage bolt, washers, and nut to attach the wheel.
Page 10 of 11
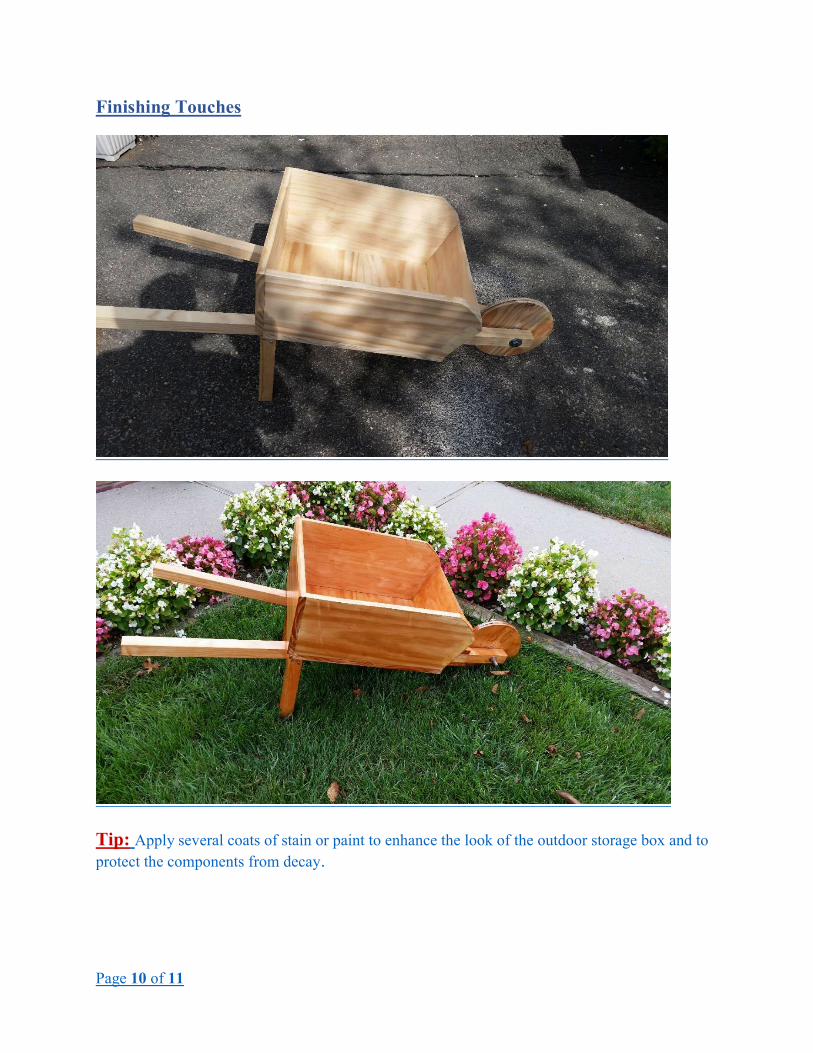
Finishing Touches
Tip: Apply several coats of stain or paint to enhance the look of the outdoor storage box and to protect the components from decay.
Page 11 of 11
Alan’s TIPs (after wheelbarrow is painted/stained): Drill at least 3 weep holes into the front of the bucket where the front panel (C) meets the bottom (A) using a 7/32 or 13/64” drill bit. You also need a plastic drinking straw, and a 20D 4” common nail.
Steps:
1. Drill 2-3 weep holes on an angle where the front (C) panel meets the base (A). 2. Cut a 3” piece off the drinking straw and place it on the end of the 20D nail sliding it
up to the head of the nail. 3. Gently push the nail & straw through the hole from the inside the bucket (A). 4. If it does not go through the hole without the straw crinkling, use the drill bit to
slightly widen the hole and try again. 5. Once you get it through the hole, and it is snug, leave about 1/8” of the straw sticking
out the bottom so drainage goes away from the bucket. That’s why you make the holes on an angle. Be sure to cut the straw on the inside of the bucket flush with the wood frame using a box cutter or razor knife.
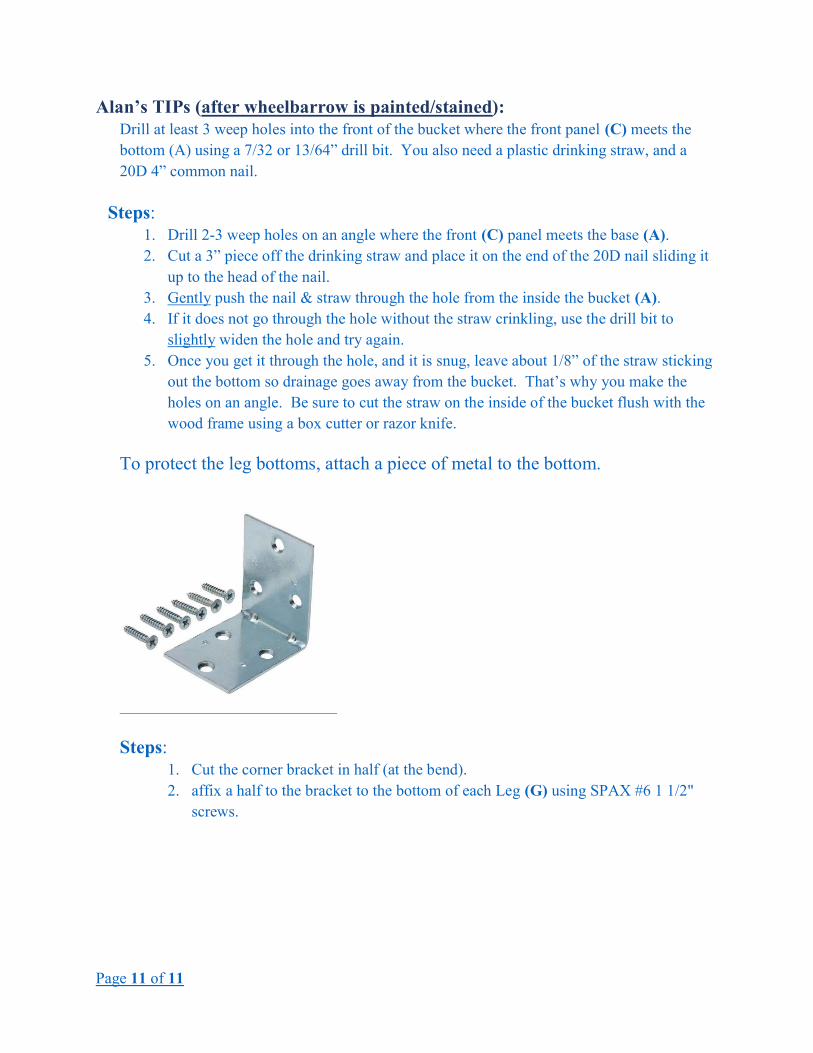
To protect the leg bottoms, attach a piece of metal to the bottom.
Steps:
1. Cut the corner bracket in half (at the bend). 2. affix a half to the bracket to the bottom of each Leg (G) using SPAX #6 1 1/2"
screws.