Embed Size (px)
Citation preview

832019 Woodworking Guide - Basic Joinery
httpslidepdfcomreaderfullwoodworking-guide-basic-joinery 16
WOODWORKINGGUIDE BASIC
JOINERYClose isnt really good enough A perfect fit is what counts
When building furniture there are many ways toconstruct joints The simplest are those that usemechanical fasteners like nails and screwsWhile these are sometimes appropriate theyrenot often used in first-class work especially in
visible areas Whats preferred is a direct jointbetween parts bonded with glue
Of course the type of joint you need depends ona variety of factors like the nature of the materialsbeing joined the function of the joint strength andappearance requirements what machinery andequipment are available and your own level ofskill Whole books are devoted to this disciplinendash and most are far from comprehensive becausethe possibilities are almost endless In light of this
joinery can certainly seem intimidating to thebeginner But it doesnt have to be By masteringtwo primary joints the edge joint and the mortiseand tenon you can build an astounding array offurniture
Edge Joints
The first requirement of a good edge joint is thatthe two mating surfaces must fit together
perfectly This means there are no discerniblegaps Second the mating surfaces must be eitheron the edge or the surface of a board End grainis not a candidate for edge joining because of itsopen cellular structure When glue is applied tothese cells they act like straws pulling the gluedeep into the wood instead of leaving it near thesurface where the bond takes place When endgrain must be joined to edge or face grain the joint of choice is the mortise and tenon More onthis later
For edge joining the mating surfaces must be flat
1-A simple edge joint requires only theproper fit of the parts and a thin coat ofglue Be sure to spread the glue evenly
2-Pull the edge joint tight with clampsMake sure that both boards are alignedcorrectly so that the surface is flat
832019 Woodworking Guide - Basic Joinery
httpslidepdfcomreaderfullwoodworking-guide-basic-joinery 26
and square to both faces of the board To achievethis first scribe a straight reference line on onesurface using a long straightedge Then clampthis board to the side of your worktable and use abench plane to flatten the edge Check your
progress relative to your reference line frequentlyAnd check for square frequently with acombination square
Once youre satisfied with the edge on the firstboard repeat the same process on the matingboard When youve flattened this edge lay thetwo boards together on a flat surface and checkfor fit Usually some additional work will berequired to get a perfect joint When youveachieved it just spread glue on both mating
edges (Photo 1) and clamp the boards togetheruntil the glue sets (Photo 2)
Doweling
One common problem with edge joining is thatthe glue often acts as a lubricant between theboards This can cause the boards to slip whenclamped which makes it difficult to achieve a flat joint There are three common solutions to thisproblem dowels joining plates and splinesBecause the last two require some fairlyspecialized equipment dowels are the bestchoice for the beginner All you need for the job isa drill and a doweling jig
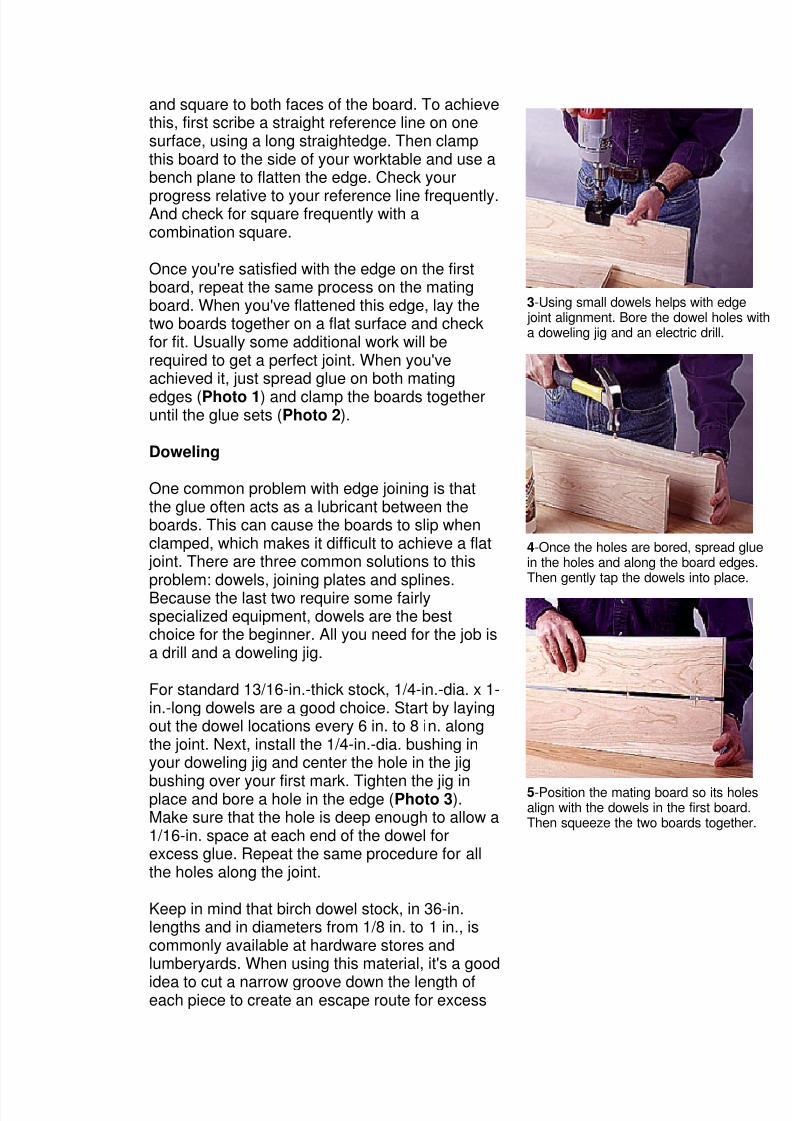
For standard 1316-in-thick stock 14-in-dia x 1-in-long dowels are a good choice Start by layingout the dowel locations every 6 in to 8 in alongthe joint Next install the 14-in-dia bushing inyour doweling jig and center the hole in the jig
bushing over your first mark Tighten the jig inplace and bore a hole in the edge (Photo 3)Make sure that the hole is deep enough to allow a116-in space at each end of the dowel forexcess glue Repeat the same procedure for allthe holes along the joint
Keep in mind that birch dowel stock in 36-inlengths and in diameters from 18 in to 1 in iscommonly available at hardware stores andlumberyards When using this material its a good
idea to cut a narrow groove down the length ofeach piece to create an escape route for excess
3-Using small dowels helps with edge joint alignment Bore the dowel holes witha doweling jig and an electric drill
4-Once the holes are bored spread gluein the holes and along the board edgesThen gently tap the dowels into place
5-Position the mating board so its holesalign with the dowels in the first boardThen squeeze the two boards together
832019 Woodworking Guide - Basic Joinery
httpslidepdfcomreaderfullwoodworking-guide-basic-joinery 36
glue You can use the corner of a sharp chisel toscratch the side of the dowel You also shouldslightly bevel both ends of the dowel with a pieceof sandpaper This bevel makes aligning thedowels in their mating holes easier You can also
buy readymade dowels from mail-order suppliers
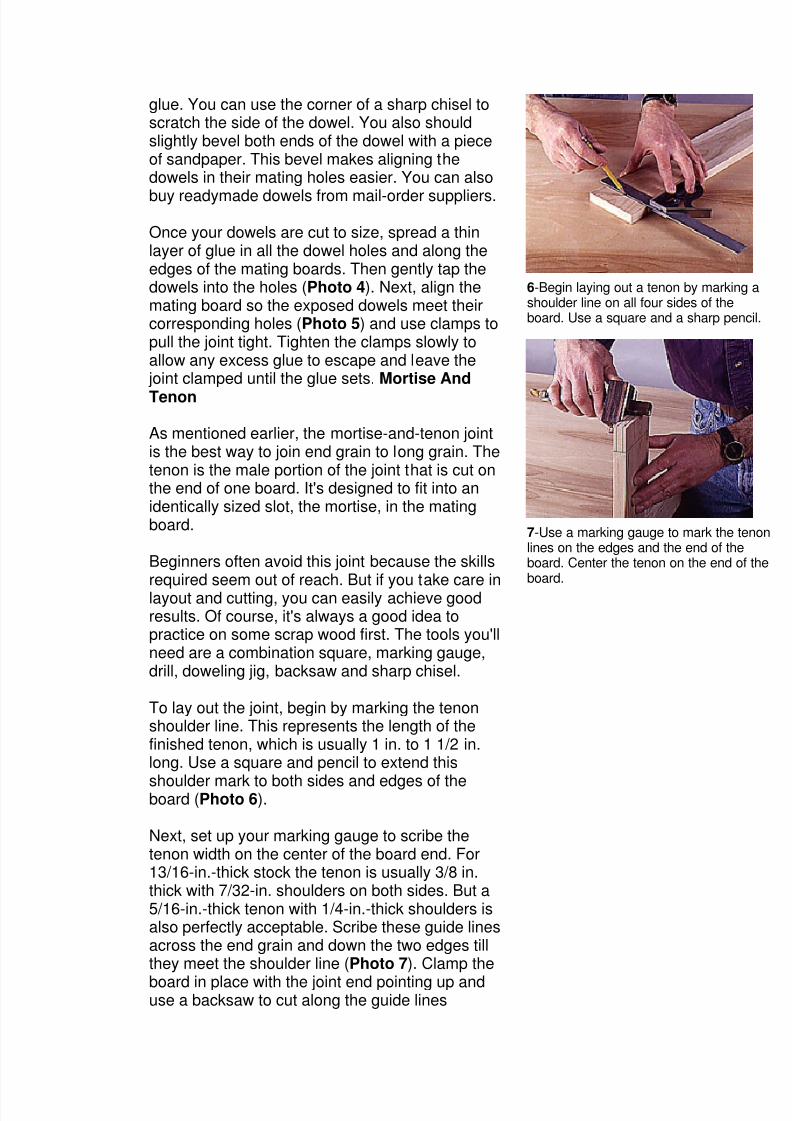
Once your dowels are cut to size spread a thinlayer of glue in all the dowel holes and along theedges of the mating boards Then gently tap thedowels into the holes (Photo 4) Next align themating board so the exposed dowels meet theircorresponding holes (Photo 5) and use clamps topull the joint tight Tighten the clamps slowly toallow any excess glue to escape and leave the joint clamped until the glue sets Mortise And
Tenon
As mentioned earlier the mortise-and-tenon jointis the best way to join end grain to long grain Thetenon is the male portion of the joint that is cut onthe end of one board Its designed to fit into anidentically sized slot the mortise in the matingboard
Beginners often avoid this joint because the skillsrequired seem out of reach But if you take care inlayout and cutting you can easily achieve goodresults Of course its always a good idea topractice on some scrap wood first The tools youllneed are a combination square marking gaugedrill doweling jig backsaw and sharp chisel
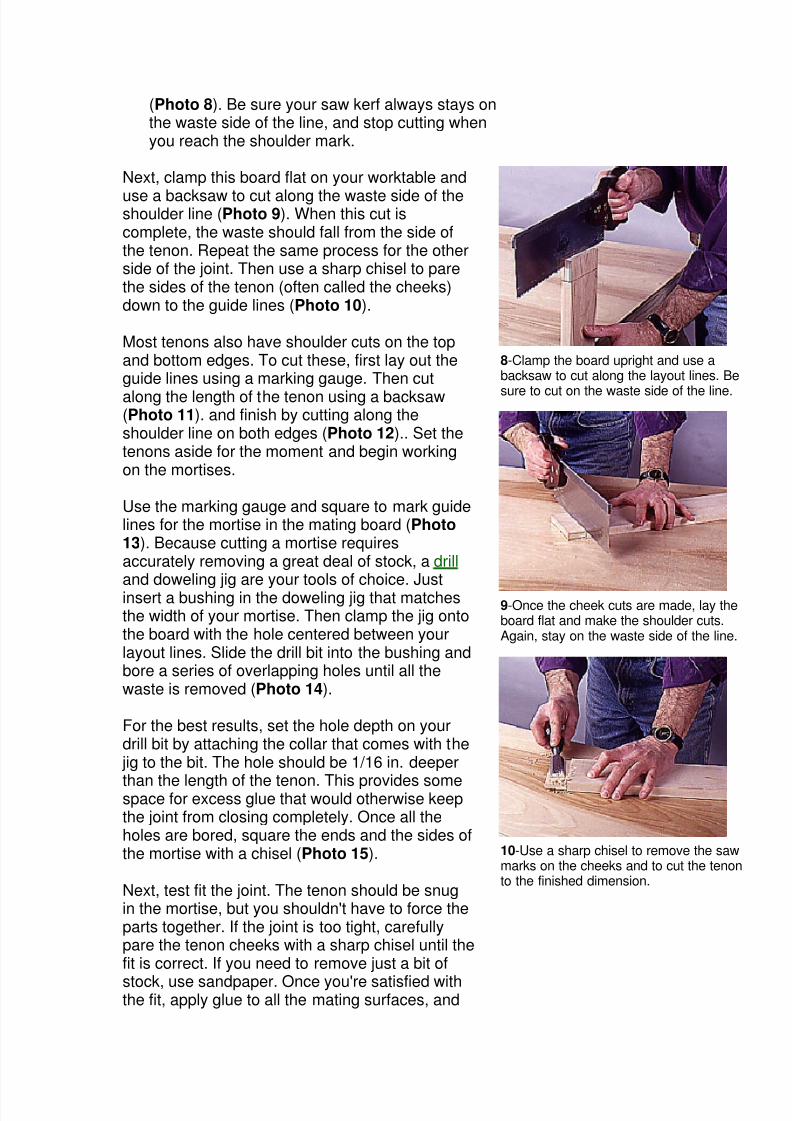
To lay out the joint begin by marking the tenonshoulder line This represents the length of thefinished tenon which is usually 1 in to 1 12 inlong Use a square and pencil to extend this
shoulder mark to both sides and edges of theboard (Photo 6)
Next set up your marking gauge to scribe thetenon width on the center of the board end For1316-in-thick stock the tenon is usually 38 inthick with 732-in shoulders on both sides But a516-in-thick tenon with 14-in-thick shoulders isalso perfectly acceptable Scribe these guide linesacross the end grain and down the two edges tillthey meet the shoulder line (Photo 7) Clamp the
board in place with the joint end pointing up anduse a backsaw to cut along the guide lines
6-Begin laying out a tenon by marking ashoulder line on all four sides of theboard Use a square and a sharp pencil
7-Use a marking gauge to mark the tenonlines on the edges and the end of theboard Center the tenon on the end of theboard
832019 Woodworking Guide - Basic Joinery
httpslidepdfcomreaderfullwoodworking-guide-basic-joinery 46
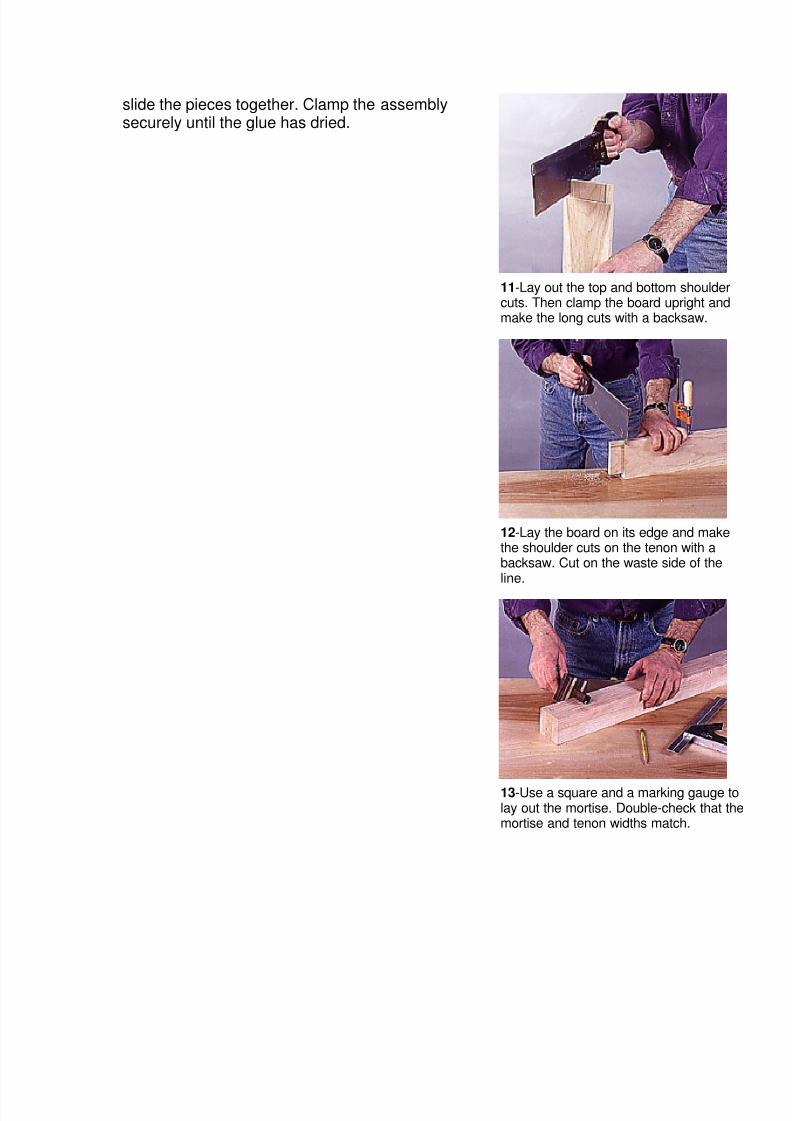
(Photo 8) Be sure your saw kerf always stays onthe waste side of the line and stop cutting whenou reach the shoulder marky
Next clamp this board flat on your worktable and
use a backsaw to cut along the waste side of theshoulder line (Photo 9) When this cut iscomplete the waste should fall from the side ofthe tenon Repeat the same process for the otherside of the joint Then use a sharp chisel to parethe sides of the tenon (often called the cheeks)down to the guide lines (Photo 10)
Most tenons also have shoulder cuts on the topand bottom edges To cut these first lay out theguide lines using a marking gauge Then cut
along the length of the tenon using a backsaw(Photo 11) and finish by cutting along theshoulder line on both edges (Photo 12) Set thetenons aside for the moment and begin workingon the mortises
Use the marking gauge and square to mark guidelines for the mortise in the mating board (Photo13) Because cutting a mortise requiresaccurately removing a great deal of stock a drill and doweling jig are your tools of choice Justinsert a bushing in the doweling jig that matchesthe width of your mortise Then clamp the jig ontothe board with the hole centered between yourlayout lines Slide the drill bit into the bushing andbore a series of overlapping holes until all thewaste is removed (Photo 14)
For the best results set the hole depth on yourdrill bit by attaching the collar that comes with the jig to the bit The hole should be 116 in deeper
than the length of the tenon This provides somespace for excess glue that would otherwise keepthe joint from closing completely Once all theholes are bored square the ends and the sides ofthe mortise with a chisel (Photo 15)
Next test fit the joint The tenon should be snugin the mortise but you shouldnt have to force theparts together If the joint is too tight carefullypare the tenon cheeks with a sharp chisel until thefit is correct If you need to remove just a bit of
stock use sandpaper Once youre satisfied withthe fit apply glue to all the mating surfaces and
8-Clamp the board upright and use abacksaw to cut along the layout lines Be
sure to cut on the waste side of the line
9-Once the cheek cuts are made lay theboard flat and make the shoulder cutsAgain stay on the waste side of the line
10-Use a sharp chisel to remove the sawmarks on the cheeks and to cut the tenonto the finished dimension
832019 Woodworking Guide - Basic Joinery
httpslidepdfcomreaderfullwoodworking-guide-basic-joinery 56
slide the pieces together Clamp the assemblysecurely until the glue has dried
11-Lay out the top and bottom shouldercuts Then clamp the board upright andmake the long cuts with a backsaw
12-Lay the board on its edge and makethe shoulder cuts on the tenon with abacksaw Cut on the waste side of theline
13-Use a square and a marking gauge tolay out the mortise Double-check that themortise and tenon widths match
832019 Woodworking Guide - Basic Joinery
httpslidepdfcomreaderfullwoodworking-guide-basic-joinery 66
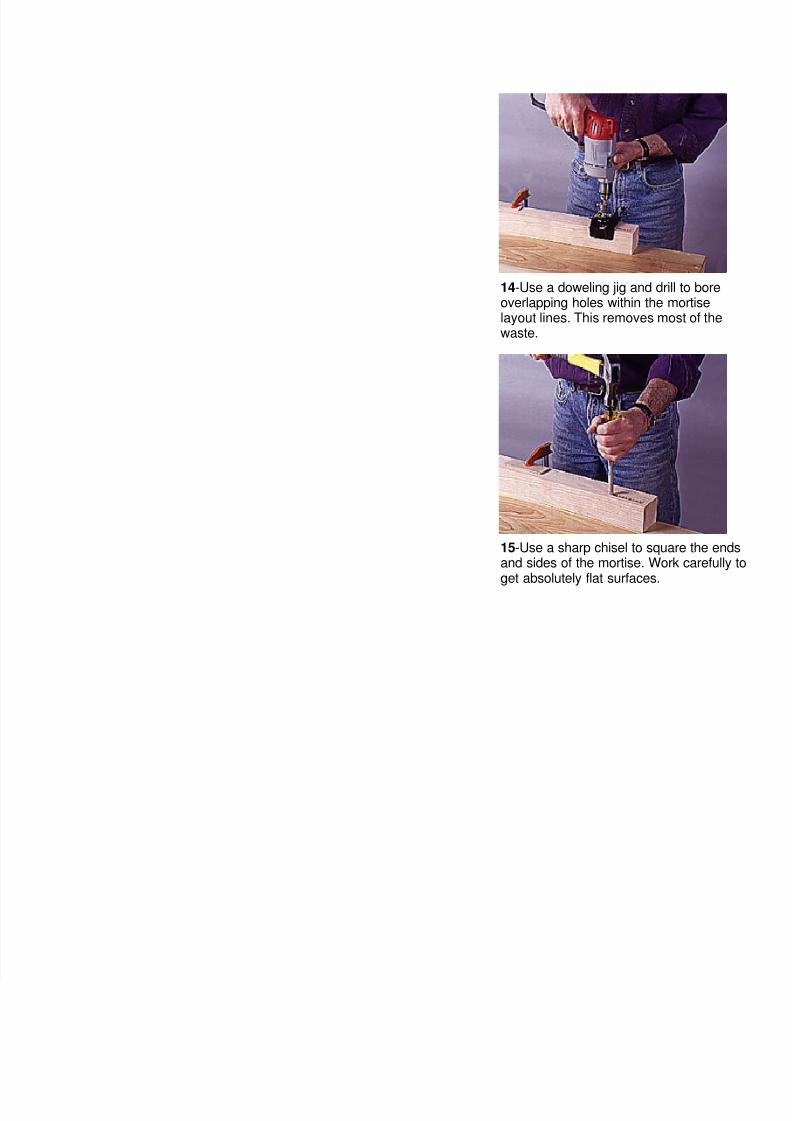
14-Use a doweling jig and drill to boreoverlapping holes within the mortiselayout lines This removes most of thewaste
15-Use a sharp chisel to square the endsand sides of the mortise Work carefully toet absolutely flat surfacesg
832019 Woodworking Guide - Basic Joinery
httpslidepdfcomreaderfullwoodworking-guide-basic-joinery 26
and square to both faces of the board To achievethis first scribe a straight reference line on onesurface using a long straightedge Then clampthis board to the side of your worktable and use abench plane to flatten the edge Check your
progress relative to your reference line frequentlyAnd check for square frequently with acombination square
Once youre satisfied with the edge on the firstboard repeat the same process on the matingboard When youve flattened this edge lay thetwo boards together on a flat surface and checkfor fit Usually some additional work will berequired to get a perfect joint When youveachieved it just spread glue on both mating
edges (Photo 1) and clamp the boards togetheruntil the glue sets (Photo 2)
Doweling
One common problem with edge joining is thatthe glue often acts as a lubricant between theboards This can cause the boards to slip whenclamped which makes it difficult to achieve a flat joint There are three common solutions to thisproblem dowels joining plates and splinesBecause the last two require some fairlyspecialized equipment dowels are the bestchoice for the beginner All you need for the job isa drill and a doweling jig
For standard 1316-in-thick stock 14-in-dia x 1-in-long dowels are a good choice Start by layingout the dowel locations every 6 in to 8 in alongthe joint Next install the 14-in-dia bushing inyour doweling jig and center the hole in the jig
bushing over your first mark Tighten the jig inplace and bore a hole in the edge (Photo 3)Make sure that the hole is deep enough to allow a116-in space at each end of the dowel forexcess glue Repeat the same procedure for allthe holes along the joint
Keep in mind that birch dowel stock in 36-inlengths and in diameters from 18 in to 1 in iscommonly available at hardware stores andlumberyards When using this material its a good
idea to cut a narrow groove down the length ofeach piece to create an escape route for excess
3-Using small dowels helps with edge joint alignment Bore the dowel holes witha doweling jig and an electric drill
4-Once the holes are bored spread gluein the holes and along the board edgesThen gently tap the dowels into place
5-Position the mating board so its holesalign with the dowels in the first boardThen squeeze the two boards together
832019 Woodworking Guide - Basic Joinery
httpslidepdfcomreaderfullwoodworking-guide-basic-joinery 36
glue You can use the corner of a sharp chisel toscratch the side of the dowel You also shouldslightly bevel both ends of the dowel with a pieceof sandpaper This bevel makes aligning thedowels in their mating holes easier You can also
buy readymade dowels from mail-order suppliers
Once your dowels are cut to size spread a thinlayer of glue in all the dowel holes and along theedges of the mating boards Then gently tap thedowels into the holes (Photo 4) Next align themating board so the exposed dowels meet theircorresponding holes (Photo 5) and use clamps topull the joint tight Tighten the clamps slowly toallow any excess glue to escape and leave the joint clamped until the glue sets Mortise And
Tenon
As mentioned earlier the mortise-and-tenon jointis the best way to join end grain to long grain Thetenon is the male portion of the joint that is cut onthe end of one board Its designed to fit into anidentically sized slot the mortise in the matingboard
Beginners often avoid this joint because the skillsrequired seem out of reach But if you take care inlayout and cutting you can easily achieve goodresults Of course its always a good idea topractice on some scrap wood first The tools youllneed are a combination square marking gaugedrill doweling jig backsaw and sharp chisel
To lay out the joint begin by marking the tenonshoulder line This represents the length of thefinished tenon which is usually 1 in to 1 12 inlong Use a square and pencil to extend this
shoulder mark to both sides and edges of theboard (Photo 6)
Next set up your marking gauge to scribe thetenon width on the center of the board end For1316-in-thick stock the tenon is usually 38 inthick with 732-in shoulders on both sides But a516-in-thick tenon with 14-in-thick shoulders isalso perfectly acceptable Scribe these guide linesacross the end grain and down the two edges tillthey meet the shoulder line (Photo 7) Clamp the
board in place with the joint end pointing up anduse a backsaw to cut along the guide lines
6-Begin laying out a tenon by marking ashoulder line on all four sides of theboard Use a square and a sharp pencil
7-Use a marking gauge to mark the tenonlines on the edges and the end of theboard Center the tenon on the end of theboard
832019 Woodworking Guide - Basic Joinery
httpslidepdfcomreaderfullwoodworking-guide-basic-joinery 46
(Photo 8) Be sure your saw kerf always stays onthe waste side of the line and stop cutting whenou reach the shoulder marky
Next clamp this board flat on your worktable and
use a backsaw to cut along the waste side of theshoulder line (Photo 9) When this cut iscomplete the waste should fall from the side ofthe tenon Repeat the same process for the otherside of the joint Then use a sharp chisel to parethe sides of the tenon (often called the cheeks)down to the guide lines (Photo 10)
Most tenons also have shoulder cuts on the topand bottom edges To cut these first lay out theguide lines using a marking gauge Then cut
along the length of the tenon using a backsaw(Photo 11) and finish by cutting along theshoulder line on both edges (Photo 12) Set thetenons aside for the moment and begin workingon the mortises
Use the marking gauge and square to mark guidelines for the mortise in the mating board (Photo13) Because cutting a mortise requiresaccurately removing a great deal of stock a drill and doweling jig are your tools of choice Justinsert a bushing in the doweling jig that matchesthe width of your mortise Then clamp the jig ontothe board with the hole centered between yourlayout lines Slide the drill bit into the bushing andbore a series of overlapping holes until all thewaste is removed (Photo 14)
For the best results set the hole depth on yourdrill bit by attaching the collar that comes with the jig to the bit The hole should be 116 in deeper
than the length of the tenon This provides somespace for excess glue that would otherwise keepthe joint from closing completely Once all theholes are bored square the ends and the sides ofthe mortise with a chisel (Photo 15)
Next test fit the joint The tenon should be snugin the mortise but you shouldnt have to force theparts together If the joint is too tight carefullypare the tenon cheeks with a sharp chisel until thefit is correct If you need to remove just a bit of
stock use sandpaper Once youre satisfied withthe fit apply glue to all the mating surfaces and
8-Clamp the board upright and use abacksaw to cut along the layout lines Be
sure to cut on the waste side of the line
9-Once the cheek cuts are made lay theboard flat and make the shoulder cutsAgain stay on the waste side of the line
10-Use a sharp chisel to remove the sawmarks on the cheeks and to cut the tenonto the finished dimension
832019 Woodworking Guide - Basic Joinery
httpslidepdfcomreaderfullwoodworking-guide-basic-joinery 56
slide the pieces together Clamp the assemblysecurely until the glue has dried
11-Lay out the top and bottom shouldercuts Then clamp the board upright andmake the long cuts with a backsaw
12-Lay the board on its edge and makethe shoulder cuts on the tenon with abacksaw Cut on the waste side of theline
13-Use a square and a marking gauge tolay out the mortise Double-check that themortise and tenon widths match
832019 Woodworking Guide - Basic Joinery
httpslidepdfcomreaderfullwoodworking-guide-basic-joinery 66
14-Use a doweling jig and drill to boreoverlapping holes within the mortiselayout lines This removes most of thewaste
15-Use a sharp chisel to square the endsand sides of the mortise Work carefully toet absolutely flat surfacesg
832019 Woodworking Guide - Basic Joinery
httpslidepdfcomreaderfullwoodworking-guide-basic-joinery 66
14-Use a doweling jig and drill to boreoverlapping holes within the mortiselayout lines This removes most of thewaste
15-Use a sharp chisel to square the endsand sides of the mortise Work carefully toet absolutely flat surfacesg