Embed Size (px)
Citation preview

Word 2013 Supplemental AssignmentsPart 1: Indents
1. Open the file named “Laws” by following these directions:a. Open the Computer Tech folder on your desktopb. Open the Student Files – Office 2010 folderc. Click on the file named “Laws” to open it.d. Click on the File Tab and choose Save As to change the name and the location.e. Browse to your network location. Save this document as:
Your Period Your Last Name Your First Name Lawsf. Click OK.
INDENTING TEXT – this feature changes the space between text and a document’s margin. You can indent (move) text from the left margin, the right margin, or both. You can also indent only the first line of a paragraph or all the lines in a paragraph except the first line. Before beginning this assignment, familiarize yourself with the buttons and markers you will be using, shown in the graphic below.
1
Left indent: entire paragraph moved from left margin
Left and right indents: entire paragraph moved from both left and right margins
First line indent: only the first line is indented. It looks like a TAB.
Hanging indent: all the lines are moved from the margin EXCEPT the first line
Right indent: entire paragraph moved from right margin
Indent markers on the ruler bar. Drag them to create indents. Top marker: first line indent; middle marker: hanging indent; bottom marker: left indent
Right indent marker on the ruler bar: moves the right margin
Increase and Decrease Indent markers: works for left indent only
Paragraph Dialog Box Launcher: opens the Paragraph Dialog Box Right indent marker on
the ruler bar: moves the right margin

You can change indents several ways: by clicking in the paragraph you want to indent and then dragging the appropriate indent marker on the Ruler Bar, by clicking on the Increase Indent or Decrease Indent markers on the Paragraph Group of the Home tab for left indents only, or by using the Paragraph Dialog box to enter exact measurements for your indents. You will be using all of these methods in this exercise.
2. Select the entire document and change to Justify alignment. You will be able to see the indent changes more clearly with both left and right margins even.
3. Select the title (Laughable Laws) and change the font to Broadway, 14 pt., and center aligned.
4. Click your insertion point anywhere in the first paragraph (Utah apparently knows….)
5. Press the Increase Indent button in the Paragraph group twice. Every time you click the button the entire paragraph moves in half an inch from the left margin, so your paragraph is indented one inch.
6. Click the Decrease Indent button once. The paragraph moves back to the left ½ inch, so now the paragraph is only indented ½ inch.
7. Click your insertion point anywhere in the second paragraph (Cedar City, Utah…)
8. Be sure your ruler bar is visible (if necessary) by following these directions:
a. Click on the View tab of the Ribbon.
b. Place a checkmark in the Ruler box of the Show/Hide Group. Your ruler bar should now be visible.
9. Hover your mouse over the indent markers on the left side of the ruler bar (look back at the figure on the previous page to locate it if necessary). Mover your mouse over the bottom marker, and make sure the screen tip reads “Left Indent.” Move the left indent marker to the right so that it is at the 1” mark on the ruler. This moves the left side of the paragraph one inch to the right.
10. Click anywhere in the third paragraph (People who live….) and create a left and right indent by following these directions:
a. There is also one marker at the right edge of the ruler bar. Hover your mouse over it and watch for the screen tip that says “Right Indent.”
b. Drag the Right Indent marker to the left to 5.5” on the ruler bar.
c. Drag the Left Indent marker to the right to .5” on the ruler bar.
d. This will indent both margins of the paragraph inward by ½ inch each.
e. Check the graphic at the end of this assignment to be sure that your indents are correct.
11. Click anywhere in the fourth paragraph (Many things have….). Create a left indent by using the Paragraph Dialog box by following these direction:
a. Click on the Paragraph Dialog Box Launcher button in the bottom right side of the Paragraph group. This will open the Paragraph dialog box.
b. Make sure the Indents and Spacing tab is selected.
c. Under Indentation, change the left measurement to 1”. Change the right measurement to 1”.
d. Click OK. This will change the left and right indents for this paragraph to 1” each.
2

12. Click your insertion point anywhere in the fifth paragraph (A man or woman….).
13. Drag the Hanging Indent marker on the Ruler bar to the .5” mark on the ruler bar (it’s the middle marker). Notice that this will leave the first line of the paragraph at the margin and indent all of the remaining lines by ½ inch.
14. Click in the sixth paragraph (Sugarville, Utah). Open the Paragraph Format dialog box by clicking on the Paragraph Dialog Box Launcher button. Create a hanging indent by following these directions:
a. Make sure the Indents and Spacing tab is selected. Under the Indentation section, click on the drop-down arrow next to Special and choose Hanging.
b. Change the measurement to 1.5”. Click OK. This is another method of creating a hanging indent.
15. Click in the seventh paragraph (Some other dumb laws). Create a first line indent by dragging the first line indent marker (the top marker) to the .5” position on the ruler bar. Notice that a first line indent looks just like you pressed TAB at the beginning of the paragraph.
16. Click at the bottom of the document and type your name.
17. Resave your file so that your changes are updated. Close the document without closing Word.
18. Drag and drop the document into your teacher’s hand-in folder.
3

Part 2: Tabs
1. Create a new blank document by following these directions:a. Be sure Word is open, then click on the File tab.b. Choose New, then Blank Document.
2. Save your document into your network location as
Your Period Your Last Name Your First Name Tabs.
3. Turn on the No Spacing Style on the Home Tab in the Styles Group.
4. On the first line of your new document, key your first and last names and press Enter.
5. On the second line, key Class Schedule.
6. Press Enter twice.
7. Select the first two lines of your document and change to Center Alignment.
8. Press Ctrl+End to move to the end of your document. Check to be sure you are back to Left Alignment.
TABS – this feature allows you to set stops on the page that will let you to line up text horizontally. You will be using the following types of tabs:
Left Tabs - Lines text up at the left edge of that position (it will show as L on the Ruler Bar)Center Tabs – Centers text at that position ()Right Tabs - Lines text up at the right edge of that position (backwards L)Decimal Tabs - Lines decimals up at that position ( with a dot on right)Bar Tab – Vertical line is inserted at a tab position ()Leaders - The tab has a symbol that goes from the end of previous tab to the beginning of this tab
9. Make sure you have a Ruler Bar. If not, click on the View tab, then choose Ruler from the Show/Hide Group.
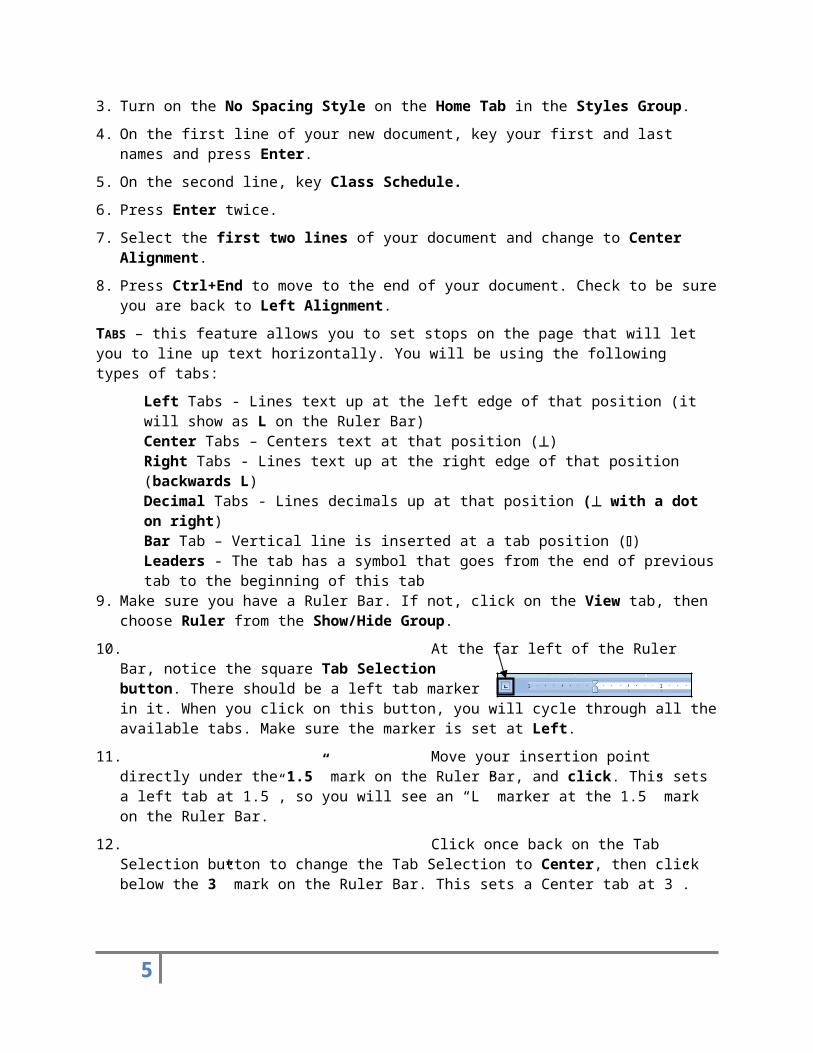
10. At the far left of the Ruler Bar, notice the square Tab Selection button. There should be a left tab marker in it. When you click on this button, you will cycle through all the available tabs. Make sure the marker is set at Left.
11. Move your insertion point directly under the 1.5” mark on the Ruler Bar, and click. This sets a left tab at 1.5”, so you will see an “L” marker at the 1.5” mark on the Ruler Bar.
12. Click once back on the Tab Selection button to change the Tab Selection to Center, then click below the 3” mark on the Ruler Bar. This sets a Center tab at 3”.
13. Click once more on the Tab Selection button to change the Tab Selection to Right, and click under the 4” mark to set a Right tab at 4”.
14. Click once more on the Tab Selection button to change the Tab Section to Decimal, and click under the 5” mark to set a Decimal tab at 5”.
15. Now you are ready to create your tabbed (aligned) text.
4
a. Press TAB and type “Class Name” (but without the “quotation marks).b. Press tab and type “Teacher”c. Press tab and type “Starts"d. Press tab and type “Period”. Notice how each tab behaves a different way as you enter text.e. Press Enter and fill in as appropriate to your schedule (you only need to create either “A” or “B”
day classes). f. Be sure to press TAB before beginning each line.
MOVING TABS ON THE RULER BAR:
16. You can move tabs one line at a time. Click your insertion point on the first line that begins Class Name
17. Point at 1.5” tab marker on the Ruler Bar. Click and drag the marker one inch to the left to 0.5”. Notice that ONLY the first line of your tabbed document is changed.
18. Using the same method, drag the “Starts” tab to 4.5”.
19. Drag the “Period” tab to 5.5”.
20. You can also move tabs for more than one line at a time, but you must select all the lines you want to change. Follow these directions:
a. Select all the text except for the first line.b. On the Ruler Bar, drag the tab for “Class Name” to 0.5”. Notice that all the lines you
had selected are changed.c. Drag the tab for “Starts” to 4.5”.d. Drag the tab for “Period” to 5.5”.
21. Click your insertion point at the end of the tabbed list and press Enter four times.
22. Check out the graphic at the end of this assignment to make sure that your document matches the answer key.
23. Change to Center Alignment and type “Word Processing Class Roll” and press Enter twice.
24. Change the alignment back to Left.
MANIPULATING TABS USING THE TAB DIALOG BOX
25. To access the Tab Dialog Box, click on the Paragraph Dialog Box Launcher and choose Tabs in the lower-left corner. This will open the Tab Dialog Box.
5

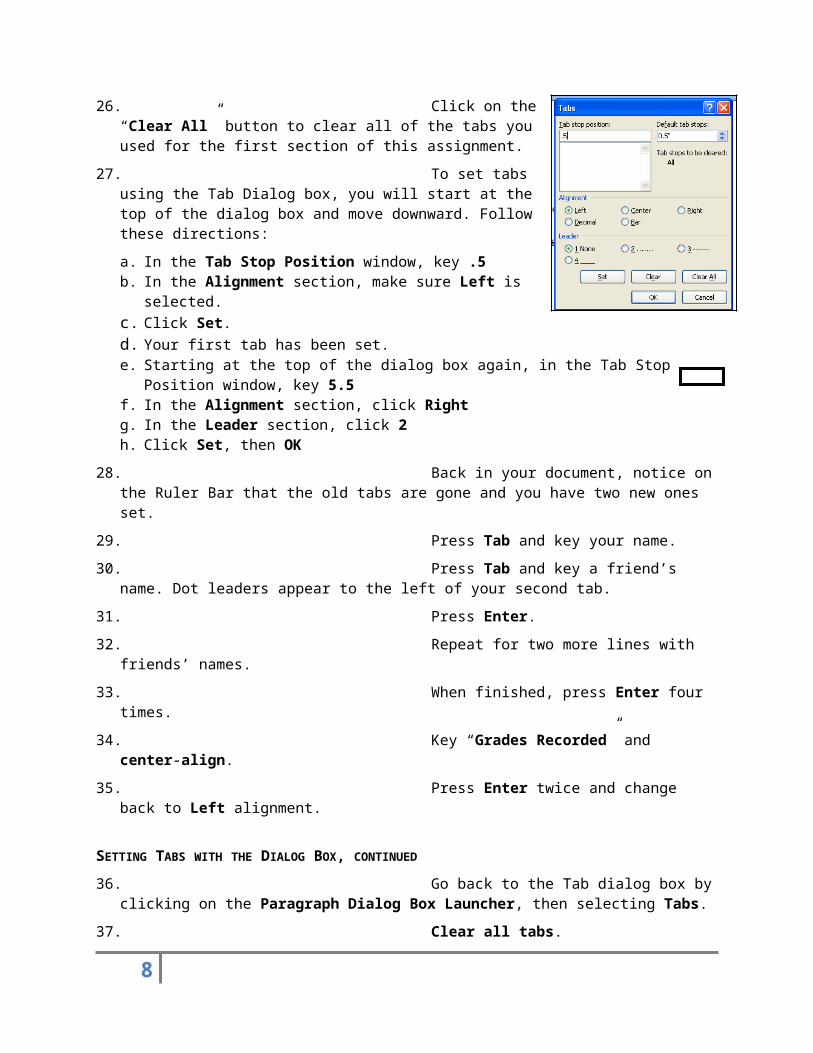
26. Click on the “Clear All” button to clear all of the tabs you used for the first section of this assignment.
27. To set tabs using the Tab Dialog box, you will start at the top of the dialog box and move downward. Follow these directions:
a. In the Tab Stop Position window, key .5b. In the Alignment section, make sure Left is selected. c. Click Set.d. Your first tab has been set.e. Starting at the top of the dialog box again, in the Tab Stop Position
window, key 5.5f. In the Alignment section, click Rightg. In the Leader section, click 2h. Click Set, then OK
28. Back in your document, notice on the Ruler Bar that the old tabs are gone and you have two new ones set.
29. Press Tab and key your name.
30. Press Tab and key a friend’s name. Dot leaders appear to the left of your second tab.
31. Press Enter.
32. Repeat for two more lines with friends’ names.
33. When finished, press Enter four times.
34. Key “Grades Recorded” and center-align.
35. Press Enter twice and change back to Left alignment.
SETTING TABS WITH THE DIALOG BOX, CONTINUED
36. Go back to the Tab dialog box by clicking on the Paragraph Dialog Box Launcher, then selecting Tabs.
37. Clear all tabs.
38. Using the same method (starting at the top of the dialog box and moving downwards) as you just used, set a tab at 1”. Make it a left tab.
39. Set a tab at 3.25”. Make it a center tab.
40. Set a tab at 5.5”. Make it a right tab.
41. Set a tab at 2.5”. Make it a bar tab.
42. Set a tab at 4”. Make it a bar tab.
43. Click OK.
44. Back in your document, press Tab and key Assignment
45. Press Tab and key Points Earned
46. Press Tab and key Points Possible and press Enter one time.
6

47. Press Tab and key Chapter 1
48. Press Tab and key 20
49. Press Tab and key 25, then press Enter one time.
50. Repeat another line with Chapter 2, 30 Earned, and 30 Possible.
51. Repeat another line with Chapter 3, 33 Earned, and 40 Possible. Press Enter.
52. Note the effect of the bar tabs.
RESETTING DEFAULT TABS
53. Go back to the Tabs dialog box.
54. Click Clear All.
55. Click OK. This will restore the default tabs of .5” each.
56. Press Enter twice.
57. To see the effect of default tabs, key A then press Tab. Key B, press Tab, key C, press Tab, and so on for the remainder of the line. The default tabs are set every half-inch.
58. Re-save your document to update the changes, and close Word.
59. Drag and drop your document into your teacher’s hand-in folder.
7
Part 3: Tables
In this section you will review how to create and edit tables.
1. Navigate to the Computer Tech folder on your desktop. Go to the Student Files Office 2010 folder, and open the document called “Tables.”
2. Enable editing, and save this document to your network location as:
Your Period Your Last Name Your First Name Tables
3. In the first section you will convert text to a table. If text has been created with Tabs separating each section, Word will correctly place the data into a table. Select all of the text at the top of the document.
4. Click on the Insert Tab, then click on the drop-down arrow on the Tables command. Choose Convert Text to Table. Your screen will look like this:
5. Word correctly determined that there should be four columns. Click on “AutoFit to Contents” then click OK.
6. Back in Word, your table is created.
7. Now you will make some editing changes. Click somewhere in the table to select it. Note that you have a Design tab and a Layout tab under the Table Tools contextual tab.
8. Click on the Design tab and click on the “More” button in the Table Styles Group. Choose the “Grid Table 5 Dark-Accent 6” option, the last option in the fifth row under Grid Tables.
9. Next you will add a new row at the top of the table to create a title for the table. To do this, click somewhere in the top row of the table (don’t select the row, just click in it). Change to the Layout tab, then Insert Above in the Rows & Columns group, then Merge Cells in the Merge Group. This will create a new row at the top of the table, merged into one cell.
10. Type the text Seasonal Tours into the new cell. Be sure the text is centered in the cell.
11. Select the text you just keyed, and change the font to Arial Rounded MT Bold 18 point. The top cell will automatically expand vertically to fit the text.
12. Select the second row and turn on bold and center-align.
13. Select the last five rows of the table, starting with “Guatemala” through the end of the table. On the Layout Tab, choose A-Z Sort in the Data Group.
14. Sort by “Column 4”, the click OK. This will sort the table with the cheapest cost at the top, moving down to the most expensive cost at the bottom.
8

15. Be sure that your insertion point is still in the table. Center the table on the page by clicking on the Properties command in the Table Group of the Layout Tab. On the Properties dialog box, choose Center in the Alignment section, then click OK. That will center the table horizontally on the page.
16. Now you will create a formula that will add up all of the amounts in the fourth column. First insert a new row at the bottom of the table. Enter the text Total in the first cell. Then click in the last cell in this row, just below the number amounts. Click on the Layout Tab if necessary, then select the last option on the Ribbon, Formula.
17. You will accept the SUM(ABOVE) function, which will add all of the numbers in this column. Change the Number format to 0 as shown here:
18. Click OK. Position your insertion point just before the sum amount, and add a $ sign.
19. Select all of the numbers in the fourth column and Right Align.
20. Your table should now look like this:
21. In the next section you will convert a table back to text. Still in the same document, select all of the second table that has already been created for you.
22. Click on the Layout Tab, then Convert to Text in the Data group. Click OK to accept the defaults. Your table will be converted back to text.
23. Re-save your document to update your changes, then drag and drop it in your teacher’s hand-in folder.
9