Embed Size (px)
Citation preview

WordPress websitesthemes and confi guration
user’s guidev. 1.6

Congratulations on your new website! Northeastern has developed two WordPress themes that are flexible, customizable, and designed to work on all desktop and mobile devices using the latest responsive design techniques. After your initial request was submitted and approved, you should have received a welcome email from Northeastern University Information Services similar to the following:
While the two NU WordPress themes have different configurations and characteristics, there are a couple of common setup procedures to both.
Navigate to the main URL provided in the email (e.g., URL: http://www.northeastern.edu/XXXX)
Hi XXXX,
Per your request, I’ve created an account for your WordPress website.Here’s the information you’ll need to update your site:
URL: http://www.northeastern.edu/XXXXURLs are case-sensitive. Please use only lower-case letters when publicizing your site.
The WordPress database configuration information has already been added to ~/wp-config.php .To begin setting up your WordPress site, just point your browser at the URL above and follow the on-screen directions. Should you need to gain access to your website directly, here’s the info you’ll need:Server: nuwebX.neu.eduUser ID: XXXXPassword: XXXX
To change your password, log onto the server via SSH and type “passwd” at the prompt. Follow the directions on screen from there.
Guidelines for setting up websites according to Northeastern University’s design standards can be found at http://www.northeastern.edu/guidelines/web
To transfer files to the server, you must use a secure protocol like Secure FTP. If you prefer to create and edit your files directly on the server, use Secure Shell (SSH). Telnet and FTP are not supported.
Mac and Linux users have SSH functionality already. Windows users may download the PuTTY client from http://www.chiark.greenend.org.uk/~sgtatham/putty
All platforms may download the FileZilla graphical secure file transfer client fromhttp://filezilla-project.org
Servers are patched as needed on Thursday mornings between 8-9 a.m. Please be advised there may be a brief (less than two minute) outage during this window.
See http://www.northeastern.edu/nuweb for more information about Web hosting at North-eastern University.
Please feel free to contact [email protected] if you have any questions.
1p.1

Follow the prompts and fill out the form on that page, picking your user-name and password in the process (don’t worry, anything on this form can be changed later).
Once you hit submit, you will be sent to the standard WordPress login screen. Enter the username and password that you picked in step #2.
For future reference, you can return to this log-in screen at any time by appending wp-admin to your URL. (e.g., http://www.northeastern.edu/XXXX/wp-admin). Keep your password in a safe place!
Your site is now set up and you should be seeing the main Word-Press dashboard.
2
4
3
p.2

Once at the dashboard, there are a few “housekeeping” tasks that we need to complete before you use your site. Some are specific to whichever theme you are using and some are common to both. We will indicate as we move along as to which is which.
The first place you should go is Appearance > Themes via the left hand menu. Here you should see 2-3 available themes:
Twenty Twelve and Twenty Thirteen are default themes included with every installation of the WordPress CMS platform. You may delete these later but it is usually a good idea to keep one as a generic baseline for any troubleshooting operations you may encounter in the future.
The “Activate” button below the thumbnails will activate that particular theme (and disable the current theme but not remove it) and the theme thumbnail will move to the top of the page.
The two Northeastern themes are called “Columbus” and “Huntington.” While there are common header and footer elements, how the content is displayed on the pages (homepage and interior) are quite different. Ideally
we can configure one of these themes for your specific Web needs using the tools in the Wordpress admin panels.
p.3

Huntington is a one-to three-column layout with right- and left-hand sidebars. The left-hand sidebar is reserved for additional navigation menus.
The number of columns is controlled by the template on a page-by-page basis swappable via: Pages > Edit > Page Attributes > Template dropdown menu
example: www.northeastern.edu/huntington
Northeastern University themes
p.4
Columbus is by default, a two-column layout with right-hand sidebar and additional content modules along the bottom of the page. Pages can have zero to three modules (assignable globally or on a page-by-page basis) and any content from WordPress Widgets to straight HTML can be placed in the mod-ules and/or the sidebar.
example: www.northeastern.edu/columbus
There are two pre-configured Northeastern themes: Columbus and Huntington.
Any site customization not addressed in this manual would have to be done by an outside developer.
Note: The Huntington one-or two-column variant is simpler to set up and configure and may be a good choice for new users or those who do not need the extra functionality of the in-line page module layout as used in Columbus.

The Northeastern themes are based on the use of “Pages” rather than “Posts” (which are more common to a blog format).
HomepageThe header on both Northeastern themes ships with a placeholder logo where the primary logo, college/school lockup, senior leadership lockup, or administrative/ser-vice office identifier goes and must be replaced. You can download primary logo, college/school lockup, and senior leadership lockup at our branding guidelines downloads page (log in with your NUnet password). Please contact [email protected] for your administrative/service office identifier.
HeaderThe header on both NU themes ship with a placeholder logo and it must be replaced. To retrieve your specific logo, go to: www.northeastern.edu/designdownloads and follow the instructions there.
Once you have your logo downloaded to your desktop, navigate to Appear-ance > Header via the left nav in the WordPress dashboard. Use the upload tools to browse your computer and upload your logo.
The text in the gray bar below the navigation is referred to as the “identifier.” This text is entered via Settings > General Settings > Tagline. This text would be the name of your project or department (e.g. Welcome Week, etc.). “Site title” should be the same as your college, school or
administrative idetifier as in the logo “lockup”. For more information on usage and naming conventions associ-ated with the Northeastern brand, please visit our branding guidelines website.
Additional Global configurations
p.5

The preceding instructions apply to both themes and are global settings for both. There are also some particular elements unique to each theme that we will go over in the next section.
MenusThe black bar between the logo and the identifier is the main navigation on both themes. Menus need to be created before they can be assigned to places on the page.
Go to Appearance > Menus. Create a menu called “Navigation” (case sensitive).
Then add Pages from the “Pages” box toward the bottom of the page (avail-able pages will populate this box).
Then make sure the Navigation menu is assigned to the header menu slot. The “Footer” menu is not available in the Northeastern themes.
Menu items added as a “subpage” will display as dropdowns from the parent menu item.
You may make additional menus that can be as-signed to sidebars or modules via the Appearance > Widgets menu but keep the Header Menu option reserved for the main site navigation.
p.6

Images There are several ways to add images depending on how you want them displayed. Images are displayed on a page-by-page basis (i.e., there are no global images other than the header). Note that maximum width for any page is 992 pixels.
Banner Images (i.e., a horizontal image that spans the page as shown below):
Go to Pages > All Pages > [your_page]
Featured Image > Set Featured Image
You will then get a dialog box asking you to either pick an exist-ing item from the Media Browser or upload from your desktop. Note: Banner image should be at least 992px wide and ideally 200px to 300px tall.
1
2p.7

Select your uploaded image or select from previously uploaded images then click “Use As Featured Image. The image is set at a 100 percent width for the content area and will automatically resize to accommodate any columns. You should then see your item in the “Fea-tured Image” box on the main edit page.
Then click “Add Media”
“In-Line” images (i.e., images within the body of a page): While in the Page edit view, place your cursor where you would like the picture to appear.
3
1 2You will get a dialog box asking you to either pick an exist-ing item from the Media Browser or upload from your desktop. Although you can resize in the editing window, we recommend that the in-line images are no wider than 600px to reduce page load time. Exact size is always preferable.
3p.8

If you would like the text to wrap around the image, there is a small piece of html that we have to alter. Click on the “Text” tab to toggle from the WYSIWYG view to the html code view.
Find the bit of code that displays your image (the <img> tag) and re-place the default class with “floatright” (to align photo right and have text wrap around it) or “floatleft” (to align left).
When you are done you should see something like this.
4
p.9

In order to use the line of modules running along the bottom of the main area of con-tent, we must first configure a couple of elements. If you are not using the modules—for example, you want a one-column site without any additional content blocks—you may skip this step. If you change your mind later, you can always come back and com-plete this step. You will only need to do this procedure once.
Go to Plugins via the left-nav on the dashboard and acti-vate “Widgets On Pages.” (Note: if you want comments on your site, leave “Hide Comments” deactivated. Otherwise Activate that Plugin as well.)
Then navigate to Settings > Widgets on Pages. Fill out the options EXACTLY as shown here, paying closeattention to spaces and letter case in the namingconventions.
Columbus: Setup and First Run
1
2
Please see: codex.WordPress.org/Word-Press_Widgets for more on the use of wid-gets and sidebars.
p.10

3 Then navigate over to Appearance > Widgets. You should now see the three named page modules that we set up in Step 2 available on the right hand side. If you look at your website in a browser you will notice that there is still nothing there —we will have to put something in those containers!
One housekeeping note: We request that you remove the default Search widget (drag to the “Inactive Widget” space at the bottom) in the sidebar as we are using a global search function in the Northeastern header.
Note that the page modules set up here are intended to be global, meaning they would be the same three modules on every page and in the same order. If you need a more granular display, you would have to enter HTML directly on a page-by-page basis.
The modules can take any of the available widgets (drag and drop) displayed on this page. However, in our case we will mostly be using them for custom HTML. Any lists or block text will be automatically styled to fit the theme.
The number of modules displayed on a page is dictated by the Page template. In WordPress, each page uses a template to set up its structure. In this case we have provided templates for zero-to-three modules. You will notice that there is a “Default” and a “No Modules” template available. Both display No Modules but the difference is that “Default” can take comments and “No Modules” can-not.
Details on how “Pages” work within WordPress and how they differ from “Posts” may be found at the WordPress Codex: http://codex.WordPress.org/
p.11

Columbus 3-Module
Columbus 2-Module
Columbus 1-Module
p.12

Individual pages can have different module counts, but bear in mind that there are a total of three site-wide and those three will be loaded in order left to right. The different layouts are accessed via the Template dropdown on each page.
p.13

The Huntington theme is somewhat simpler than the Columbus theme to set up. Pages have one-to-three columns as seen below:
Huntington: Setup and First Run
Huntington 1-Column
Huntington 3-Column
Huntington 2-Column
p.14

The Huntington theme enables your website to have individual pages with different column setups. For example, you could have a one-column homepage with a splash banner, two-column interior pages, and a three-column layout for a calendar or blog section with it’s own nav. You can choose the different layouts via the Template dropdown on each page.
Note:Please see WordPress.org/WordPress_Widgets for more on the use of widgets and sidebars.
p.15
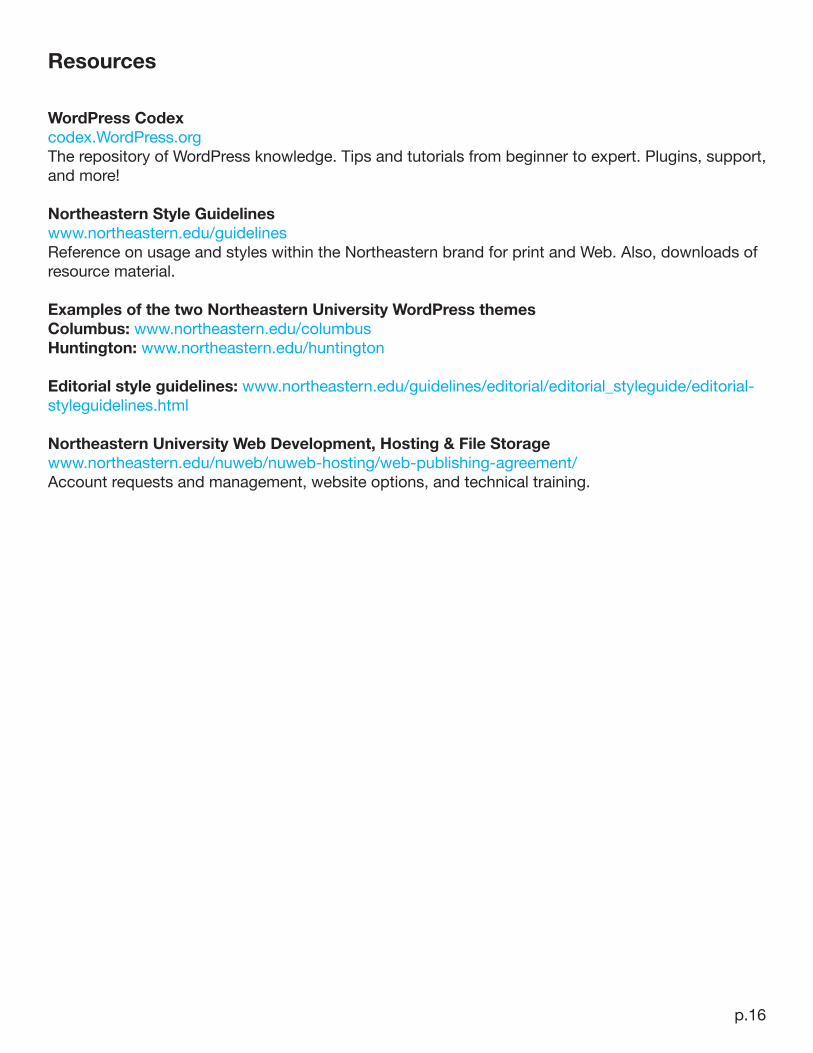
Resources
WordPress Codex codex.WordPress.orgThe repository of WordPress knowledge. Tips and tutorials from beginner to expert. Plugins, support, and more!
Northeastern Style Guidelineswww.northeastern.edu/guidelinesReference on usage and styles within the Northeastern brand for print and Web. Also, downloads of resource material.
Examples of the two Northeastern University WordPress themesColumbus: www.northeastern.edu/columbusHuntington: www.northeastern.edu/huntington
Editorial style guidelines: www.northeastern.edu/guidelines/editorial/editorial_styleguide/editorial-styleguidelines.html
Northeastern University Web Development, Hosting & File Storagewww.northeastern.edu/nuweb/nuweb-hosting/web-publishing-agreement/Account requests and management, website options, and technical training.
p.16