Embed Size (px)
Citation preview
Wo
rkflow Designer User’s Guide3.0
ii
Copyrights and Trademark NoticesCopyright © 2011 Telestream, Inc. All rights reserved. No part of this publication may be reproduced, transmitted, transcribed, altered, or translated into any languages without the written permission of Telestream. Information and specifications in this document are subject to change without notice and do not represent a commitment on the part of Telestream.
Telestream, Vantage, Flip4Mac, FlipFactory, Episode, ScreenFlow, Wirecast, GraphicsFactory, MetaFlip, MotionResolve, and Split-and-Stitch are registered trademarks and Pipeline, Launch, and Videocue are trademarks of Telestream, Inc. All other trademarks are the property of their respective owners.
QuickTime, Mac OS X, and Safari are trademarks of Apple, Inc. Bonjour, the Bonjour logo, and the Bonjour symbol are trademarks of Apple, Inc.
MainConcept is a registered trademark of MainConcept LLC and MainConcept AG. Copyright 2004 MainConcept Multimedia Technologies.
Microsoft, Windows NT|2000|XP|XP Professional|Server 2003|Server 2008, Windows 7, Media Player, Media Encoder, .Net, Internet Explorer, SQL Server 2005, and Windows Media Technologies are trademarks of Microsoft Corporation.
This product is manufactured by Telestream under license from Avid to pending patent applications.
This product is manufactured by Telestream under license from VoiceAge Corporation
Dolby and the double-D symbol are registered trademarks of Dolby Laboratories.
SharpSSH2 Copyright (c) 2008, Ryan Faircloth. All rights reserved. Redistribution and use in source and binary forms, with or without modification, are permitted provided that the following conditions are met:
Redistributions of source code must retain the above copyright notice, this list of conditions and the following disclaimer.
Redistributions in binary form must reproduce the above copyright notice, this list of conditions and the following disclaimer in the documentation and/or other materials provided with the distribution.
Neither the name of Diversified Sales and Service, Inc. nor the names of its contributors may be used to endorse or promote products derived from this software without specific prior written permission.
THIS SOFTWARE IS PROVIDED BY THE COPYRIGHT HOLDERS AND CONTRIBUTORS “AS IS” AND ANY EXPRESS OR IMPLIED WARRANTIES, INCLUDING, BUT NOT LIMITED TO, THE IMPLIED WARRANTIES OF MERCHANTABILITY AND FITNESS FOR A PARTICULAR PURPOSE ARE DISCLAIMED. IN NO EVENT SHALL THE COPYRIGHT OWNER OR CONTRIBUTORS BE LIABLE FOR ANY DIRECT, INDIRECT, INCIDENTAL, SPECIAL, EXEMPLARY, OR CONSEQUENTIAL DAMAGES (INCLUDING, BUT NOT LIMITED TO, PROCUREMENT OF SUBSTITUTE GOODS OR SERVICES; LOSS OF USE, DATA, OR PROFITS; OR BUSINESS INTERRUPTION) HOWEVER CAUSED AND ON ANY THEORY OF LIABILITY, WHETHER IN CONTRACT, STRICT LIABILITY, OR TORT (INCLUDING NEGLIGENCE OR OTHERWISE) ARISING IN ANY WAY OUT OF THE USE OF THIS SOFTWARE, EVEN IF ADVISED OF THE POSSIBILITY OF SUCH DAMAGE.
Other brands, product names, and company names are trademarks of their respective holders, and are used for identification purpose only.
June 2011
Vantage Workflow Designer User’s Guideiii
73465
iv
MPEG Disclaimers
MPEGLA MPEG2 Patent
ANY USE OF THIS PRODUCT IN ANY MANNER OTHER THAN PERSONAL USE THAT COMPLIES WITH THE MPEG-2 STANDARD FOR ENCODING VIDEO INFORMATION FOR PACKAGED MEDIA IS EXPRESSLY PROHIBITED WITHOUT A LICENSE UNDER APPLICABLE PATENTS IN THE MPEG-2 PATENT PORTFOLIO, WHICH LICENSE IS AVAILABLE FROM MPEG LA, LLC, 6312 S. Fiddlers Green circle, Suite 400E, Greenwood Village, Colorado 80111 U.S.A.
MPEGLA MPEG4 VISUAL
THIS PRODUCT IS LICENSED UNDER THE MPEG-4 VISUAL PATENT PORTFOLIO LICENSE FOR THE PERSONAL AND NON-COMMERCIAL USE OF A CONSUMER FOR (i) ENCODING VIDEO IN COMPLIANCE WITH THE MPEG-4 VISUAL STANDARD (“MPEG-4 VIDEO”) AND/OR (ii) DECODING MPEG-4 VIDEO THAT WAS ENCODED BY A CONSUMER ENGAGED IN A PERSONAL AND NON-COMMERCIAL ACTIVITY AND/OR WAS OBTAINED FROM A VIDEO PROVIDER LICENSE IS GRANTED OR SHALL BE IMPLIED FOR ANY OTHER USE. ADDITIONAL INFORMATION INCLUDING THAT RELATING TO PROMOTIONAL, INTERNAL AND COMMERCIAL USES AND LICENSING MAY BE OBTAINED FROM MPEG LA, LLC. SEE HTTP://WWW.MPEGLA.COM.
MPEGLA AVC
THIS PRODUCT IS LICENSED UNDER THE AVC PATENT PORTFOLIO LICENSE FOR THE PERSONAL USE OF A CONSUMER OR OTHER USES IN WHICH IT DOES NOT RECEIVE REMUNERATION TO (i) ENCODE VIDEO IN COMPLIANCE WITH THE AVC STANDARD ("AVC VIDEO") AND/OR (ii) DECODE AVC VIDEO THAT WAS ENCODED BY A CONSUMER ENGAGED IN A PERSONAL ACTIVITY AND/OR WAS OBTAINED FROM A VIDEO PROVIDER LICENSED TO PROVIDE AVC VIDEO. NO LICENSE IS GRANTED OR SHALL BE IMPLIED FOR ANY OTHER USE. ADDITIONAL INFORMATION MAY BE OBTAINED FROM MPEG LA, L.L.C. SEE HTTP://WWW.MPEGLA.COM.
MPEG4 SYSTEMS
THIS PRODUCT IS LICENSED UNDER THE MPEG-4 SYSTEMS PATENT PORTFOLIO LICENSE FOR ENCODING IN COMPLIANCE WITH THE MPEG-4 SYSTEMS STANDARD, EXCEPT THAT AN ADDITIONAL LICENSE AND PAYMENT OF ROYALTIES ARE NECESSARY FOR ENCODING IN CONNECTION WITH (i) DATA STORED OR REPLICATED IN PHYSICAL MEDIA WHICH IS PAID FOR ON A TITLE BY TITLE BASIS AND/OR (ii) DATA WHICH IS PAID FOR ON A TITLE BY TITLE BASIS AND IS TRANSMITTED TO AN END USER FOR PERMANENT STORAGE AND/OR USE. SUCH ADDITIONAL LICENSE MAY BE OBTAINED FROM MPEG LA, LLC. SEE HTTP://WWW.MPEGLA.COM> FOR ADDITIONAL DETAILS.
June 2011
Vantage Workflow Designer User’s Guidev
Limited Warranty and DisclaimersTelestream, Inc. (the Company) warrants to the original registered end user that the product will perform as stated below for a period of one (1) year from the date of shipment from factory:
Hardware and Media. The Product hardware components, if any, including equipment supplied but not manufactured by the Company but NOT including any third party equipment that has been substituted by the Distributor for such equipment (the “Hardware”), will be free from defects in materials and workmanship under normal operating conditions and use.
Software. If software is supplied as part of the product, the software will operate in substantial conformance with specifications set forth in its product user's guide. The Company does not warrant that the software will operate uninterrupted or error-free, will meet your requirements, or that software errors will be corrected.
Warranty Remedies
Your sole remedies under this limited warranty are as follows:
Hardware and Media. The Company will either repair or replace (at its option) any defective Hardware component or part, or Software Media, with new or like new Hardware components or Software Media. Components may not be necessarily the same, but will be of equivalent operation and quality.
Software. If software is supplied as part of the product and it fails to substantially confirm to its specifications as stated in the product user's guide, the Company shall, at its own expense, use its best efforts to correct (with due allowance made for the nature and complexity of the problem) such defect, error or nonconformity.
Software Updates
If software is supplied as part of the product, the Company will supply the registered purchaser/licensee with maintenance releases of the Company’s proprietary Software Version Release in manufacture at the time of license for a period of one year from the date of license or until such time as the Company issues a new Version Release of the Software, whichever first occurs. To clarify the difference between a Software Version Release and a maintenance release, a maintenance release generally corrects minor operational deficiencies (previously non-implemented features and software errors) contained in the Software, whereas a Software Version Release adds new features and functionality. The Company shall have no obligation to supply you with any new Software Version Release of Telestream software or third party software during the warranty period, other than maintenance releases.
Restrictions and Conditions of Limited Warranty
This Limited Warranty will be void and of no force and effect if (i) Product Hardware or Software Media, or any part thereof, is damaged due to abuse, misuse, alteration, neglect, or shipping, or as a result of service or modification by a party other than the Company, or (ii) Software is modified without the written consent of the Company.
Limitations of Warranties
THE EXPRESS WARRANTIES SET FORTH IN THIS AGREEMENT ARE IN LIEU OF ALL OTHER WARRANTIES, EXPRESS OR IMPLIED, INCLUDING, WITHOUT LIMITATION, ANY WARRANTIES OF MERCHANTABILITY OR FITNESS FOR A PARTICULAR PURPOSE. No oral or written information or advice given by the Company, its distributors, dealers or agents, shall increase the scope of this Limited Warranty or create any new warranties.
Geographical Limitation of Warranty. This limited warranty is valid only within the country in which the Product is purchased/licensed.
73465
vi
Limitations on Remedies. YOUR EXCLUSIVE REMEDIES, AND THE ENTIRE LIABILITY OF TELESTREAM, INC. WITH RESPECT TO THE PRODUCT, SHALL BE AS STATED IN THIS LIMITED WARRANTY. Your sole and exclusive remedy for any and all breaches of any Limited Warranty by the Company shall be the recovery of reasonable damages which, in the aggregate, shall not exceed the total amount of the combined license fee and purchase price paid by you for the Product.
Damages. TELESTREAM, INC. SHALL NOT BE LIABLE TO YOU FOR ANY DAMAGES, INCLUDING ANY LOST PROFITS, LOST SAVINGS, OR OTHER INCIDENTAL OR CONSEQUENTIAL DAMAGES ARISING OUT OF YOUR USE OR INABILITY TO USE THE PRODUCT, OR THE BREACH OF ANY EXPRESS OR IMPLIED WARRANTY, EVEN IF THE COMPANY HAS BEEN ADVISED OF THE POSSIBILITY OF THOSE DAMAGES, OR ANY REMEDY PROVIDED FAILS OF ITS ESSENTIAL PURPOSE.
Further information regarding this limited warranty may be obtained by writing:Telestream, Inc.848 Gold Flat Road, Suite 1Nevada City, CA 95959
You can contact Telestream, Inc. via telephone at (530) 470-1300.
June 2011
C o n t e n ts
vii
C o n t e n ts
P r e f a c e
Obtaining Support | Information | Assistance ........................................................................ xvii
Vantage FAQs, Forums & Upgrades ..................................................................................... xvii
Company and Product Information ....................................................................................... xvii
Mail........................................................................................................................................ xvii
International Telestream Distributors..................................................................................... xvii
We'd Like to Hear From You! ................................................................................................ xvii
About Vantage Workflow Designer........................................................................................ xvii
C h a p t e r 1 G e t t i n g S ta r t e dTour 1: Introducing Vantage & Transcoding Workflows..........................................................................2
What is Vantage?.............................................................................................................................2
Vantage Client Programs.................................................................................................................2
Vantage Management Console .................................................................................................3
Vantage Workflow Designer ......................................................................................................3
Vantage Workflow Portal ...........................................................................................................3
Team Management ..........................................................................................................................3
Vantage Enterprise ..........................................................................................................................3
Vantage Dashboard Web App...................................................................................................3
Vantage Job Status Web App....................................................................................................4
Starting Vantage Workflow Designer ...............................................................................................4
User Access ....................................................................................................................................4
Introducing Workflows .....................................................................................................................4
The Workflow Designer Window ...............................................................................................6
Creating a Category and a Workflow ........................................................................................7
Selecting a Workflow.................................................................................................................8
Adding Actions to a Workflow ...................................................................................................8
Contentsviii
Deleting Actions ......................................................................................................................10
Connecting Actions .................................................................................................................10
Working with Workflows.................................................................................................................11
Zooming In and Out on a Workflow.........................................................................................12
Moving the Workflow in the Design Space..............................................................................12
Centering a Workflow..............................................................................................................12
Setting up Actions..........................................................................................................................12
Vantage Folders.............................................................................................................................15
Activating Workflows......................................................................................................................18
Monitoring your Workflow Status ...................................................................................................19
Submitting Jobs .............................................................................................................................20
Playing your New File....................................................................................................................22
Deactivating Workflows .................................................................................................................23
Conclusion.....................................................................................................................................23
Tour 2: Transcoding Files Using Settings You Want ............................................................................24
Tour Overview................................................................................................................................24
Starting Workflow Designer ...........................................................................................................24
Duplicating a Workflow ..................................................................................................................24
Adding Branches to a Workflow.....................................................................................................25
Activating the Workflow and Submitting a Job...............................................................................26
Configuring the Transcode Action .................................................................................................27
Conclusion.....................................................................................................................................29
Tour 3: Using Binders in Workflows .....................................................................................................30
Tour Overview................................................................................................................................30
Introduction to Binders...................................................................................................................30
File Mode vs. Binder Mode............................................................................................................30
Nicknames.....................................................................................................................................31
Adding a Delete Action ..................................................................................................................32
Tracking Nicknames in a Workflow................................................................................................34
Attachment Files and the Associate Action ...................................................................................35
Conclusion.....................................................................................................................................35
Tour 4: Using Variables in Workflows...................................................................................................36
Tour Overview................................................................................................................................36
Introduction to Variables ................................................................................................................36
Starting the Vantage Management Console ..................................................................................36
Creating and Managing Variables..................................................................................................37
Using the Priority Variable .............................................................................................................38
Setting Variable Values in a Workflow ...........................................................................................38
Using Variables in the Workflow ....................................................................................................41
Conclusion.....................................................................................................................................42
June 2011
Vantage Workflow Designer User’s Guide ix
Tour 5: Decision Making in Workflows .................................................................................................43
Tour Overview................................................................................................................................43
Action States..................................................................................................................................43
The Decide Action .........................................................................................................................44
Processing New Files Example .....................................................................................................44
Filtering Old Files Example............................................................................................................45
Conclusion.....................................................................................................................................46
Tour 6: Dynamic Parameters................................................................................................................47
Tour Overview................................................................................................................................47
Parameter Binding.........................................................................................................................47
Cropping out Curtains....................................................................................................................47
Conclusion.....................................................................................................................................48
C h a p t e r 2 U s i n g W o r k f l o w D e s i g n e rStarting and Stopping Vantage Workflow Designer..............................................................................50
Starting Workflow Designer.....................................................................................................50
Logging In ...............................................................................................................................50
Logging in to a Different Vantage Domain............................................................................................51
Changing the Vantage Domain ...............................................................................................51
Manually Connecting to a Domain ..........................................................................................52
Connection Settings ................................................................................................................52
Logging In with a Different Vantage User.............................................................................................53
Changing Vantage User Passwords .......................................................................................53
Adding or Updating a Vantage License...................................................................................54
Stopping Workflow Designer ...................................................................................................54
Using Workflow Designer’s Workspace ...............................................................................................55
Workflows Panel .....................................................................................................................55
Using the Workflow Details Panel ...........................................................................................56
Workflow Designer Detail Panels ............................................................................................56
Using the Workflow Status Buttons .........................................................................................56
Using the Workflows Panel ..................................................................................................................58
Workflows Panel Context Menu ..............................................................................................58
Operations on Categories..............................................................................................................58
Creating a New Category........................................................................................................58
Renaming a Category .............................................................................................................59
Deleting a Category ................................................................................................................59
Operations on Workflows...............................................................................................................59
Creating a New Workflow........................................................................................................59
73465
Contentsx
Renaming a Workflow .............................................................................................................60
Deleting a Workflow ................................................................................................................60
Moving Workflows Between Categories..................................................................................60
Duplicating a Workflow............................................................................................................60
Importing a Workflow ..............................................................................................................60
Printing Workflows ..................................................................................................................60
Using the Workflow Design Tab ...........................................................................................................61
Showing and Hiding Grid Lines...............................................................................................61
Moving the Workflow in the Design Space..............................................................................61
Centering a Workflow..............................................................................................................61
Zooming In and Out on a Workflow.........................................................................................62
Editing a Workflow.........................................................................................................................62
Releasing a Workflow .............................................................................................................62
Activating a Workflow..............................................................................................................62
Deactivating a Workflow..........................................................................................................62
Actions Toolbar........................................................................................................................63
Detailed Action View ...............................................................................................................63
Binder File Nickname | Variables View....................................................................................63
Binder File Nickname View .....................................................................................................63
Variable View ..........................................................................................................................64
Action Summary......................................................................................................................64
Using the Monitor Status tab ................................................................................................................65
Toolbar ....................................................................................................................................65
Using the Job Status & Domain Job Status Tab...................................................................................68
Toolbar ....................................................................................................................................69
Exporting Job Reports.............................................................................................................70
Managing Job Reports ............................................................................................................71
Viewing Binders ......................................................................................................................72
Pausing and Resuming Transcode Actions ............................................................................73
Pause for Priority in Transcode Actions ..................................................................................73
Setting Action Priority..............................................................................................................74
Viewing Action Status..............................................................................................................74
Using the Workflow Analytics Tab ........................................................................................................76
Workflow Analytics.........................................................................................................................76
Jobs Table ...............................................................................................................................77
Table Toolbar...........................................................................................................................77
Bottleneck Analysis .......................................................................................................................78
Execution Analysis ........................................................................................................................78
Submitting Jobs Manually ....................................................................................................................80
June 2011
Vantage Workflow Designer User’s Guide xi
C h a p t e r 3 C r e a t i n g W o r k f l o w sBuilding Workflows...............................................................................................................................84
File and Binder Mode ....................................................................................................................84
Designing a Workflow....................................................................................................................85
Adding Actions to your Workflow...................................................................................................85
Deleting Actions.............................................................................................................................86
Connecting Actions To Control Order of Execution .......................................................................86
Working with Actions............................................................................................................................89
Invalid Action Connections......................................................................................................89
Removing Line Crossings .......................................................................................................89
Re-ordering Actions ................................................................................................................89
Disabling Auto-Arrange ...........................................................................................................89
Configuring Actions - Using the Action Inspector.................................................................................90
Creating an Action Template .........................................................................................................91
Setting Conditional Execution........................................................................................................91
Using Variables in Actions .............................................................................................................91
Manually Adding Variables ............................................................................................................92
Creating New Variables...........................................................................................................94
Binding Parameters to a Variable ..................................................................................................94
Specifying Retry Settings...............................................................................................................96
Specifying Resource Costs............................................................................................................97
Using the Filename Pattern Editor.................................................................................................98
Changing Descriptions ..................................................................................................................99
Action Details .....................................................................................................................................100
Binder Mode Actions ...................................................................................................................100
Action States................................................................................................................................101
Decision-Making using Variables and Action States .............................................................102
Agility Actions ..............................................................................................................................102
Job Profile Action (Binder Workflows)...................................................................................102
Job XML Action (Binder Workflows)......................................................................................102
Analysis Actions ..........................................................................................................................102
Examine Action .....................................................................................................................103
Compare Action (Binder Workflows) .....................................................................................103
Identify Action........................................................................................................................103
Catalog Actions ...........................................................................................................................103
Register Action (Binder Workflows) ......................................................................................103
Common Actions .........................................................................................................................103
Compute Action.....................................................................................................................103
Decide Action ........................................................................................................................103
73465
Contentsxii
Forward Action (Binder Workflows).......................................................................................104
Receive Action (Binder Workflows).......................................................................................104
Synchronize Action (Binder Workflows) ................................................................................104
Communicate Actions..................................................................................................................105
Message Action.....................................................................................................................105
Notify Action ..........................................................................................................................105
Metadata Actions .........................................................................................................................105
Populate Action (Binder Workflows)......................................................................................105
Transform Action (Binder Workflows)....................................................................................105
Monitor Actions............................................................................................................................105
Watch Action .........................................................................................................................105
Associate Action (Binder Workflows) ....................................................................................105
Transcode Actions .......................................................................................................................106
Encode Action .......................................................................................................................106
Transport Actions.........................................................................................................................106
Copy Action...........................................................................................................................106
Move Action (Binder Workflows) ...........................................................................................106
Delete Action (Binder Workflows) .........................................................................................106
Deploy Action (Binder Workflows).........................................................................................106
G l o s s a r y ....................................................................................................................................107
I n d e x ...............................................................................................................................................119
June 2011

F i g u r e s
xiii
C h a p t e r 1 G e t t i n g S t a r t e d
Figure 1. Vantage Workflow Designer desktop shortcut ........................................................................4
Figure 2. Logging in to Workflow Designer ............................................................................................4
Figure 3. Create New Category window ................................................................................................5
Figure 4. Vantage Workflow Designer’s design space...........................................................................6
Figure 5. Vantage Workflow Designer’s design space...........................................................................8
Figure 6. Actions are grouped by functional category............................................................................8
Figure 7. Click and drag actions into your workflow...............................................................................9
Figure 8. Selecting preset actions reduces configuration tasks. ..........................................................10
Figure 9. Bump the new action right up to another action....................................................................11
Figure 10. Release the mouse to auto-connect actions.......................................................................11
Figure 11. You can zoom in and out to display workflow details..........................................................12
Figure 12. Select the type of file you want to poll for. ..........................................................................13
Figure 13. Select the file system you want to poll. ...............................................................................13
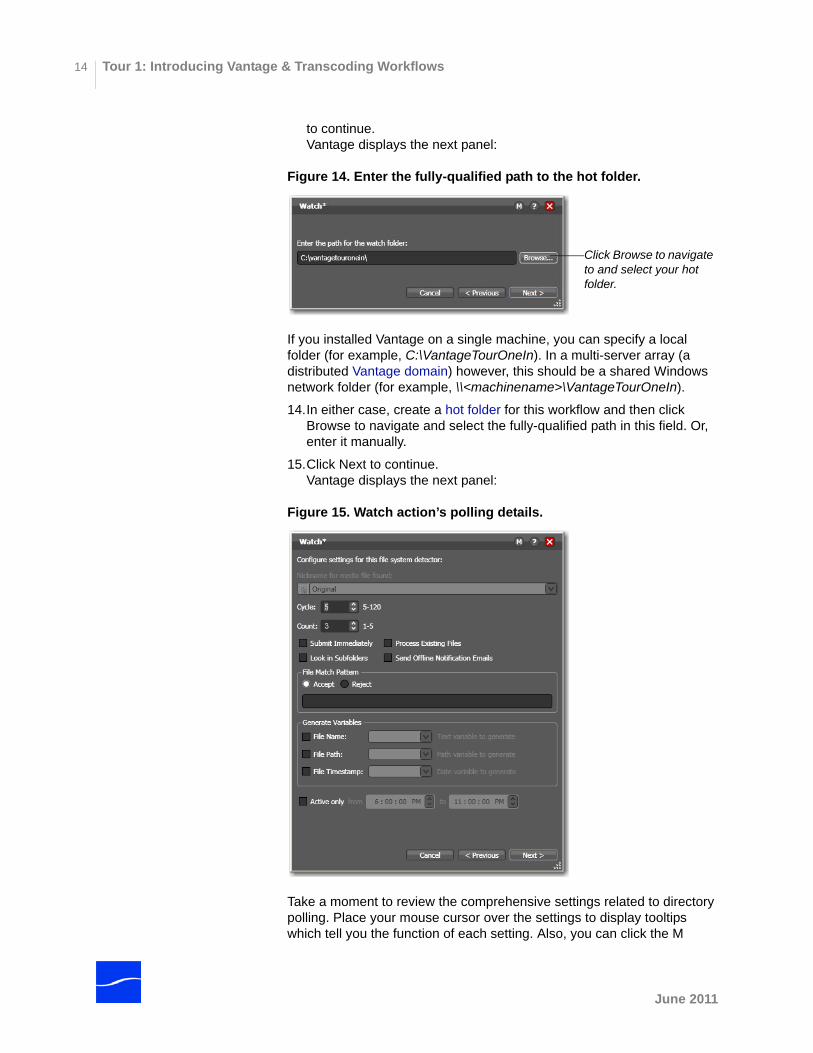
Figure 14. Enter the fully-qualified path to the hot folder. ....................................................................14
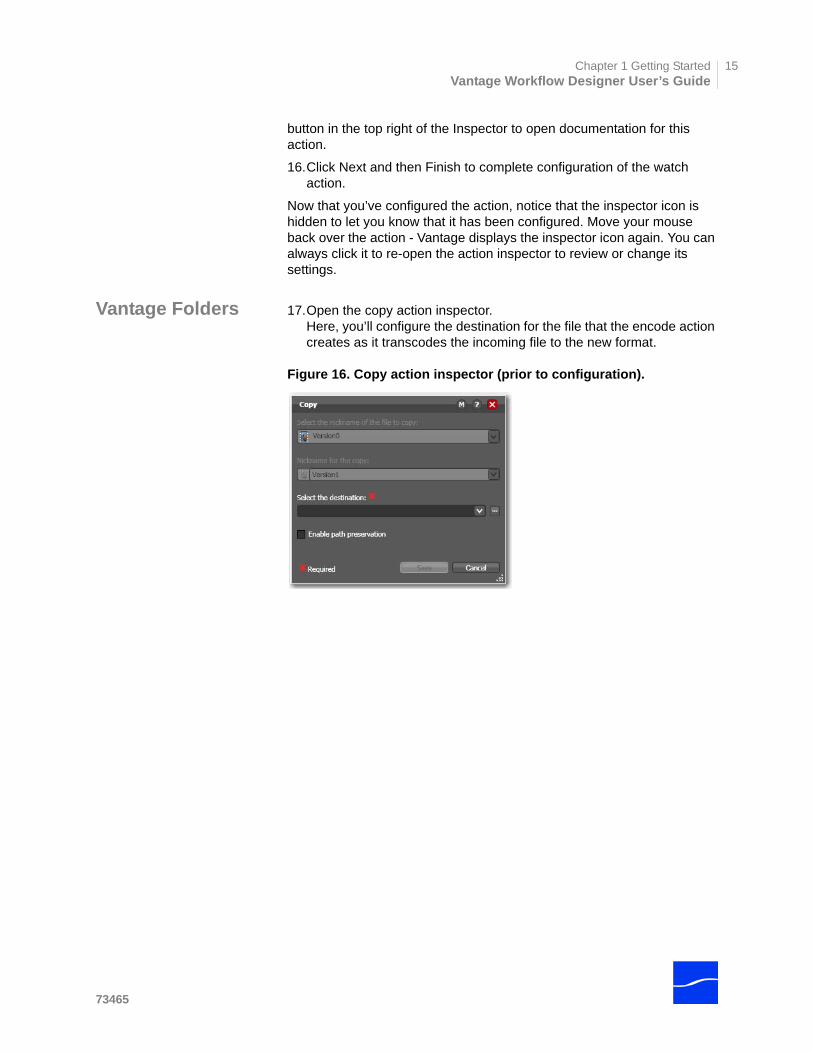
Figure 15. Watch action’s polling details..............................................................................................14
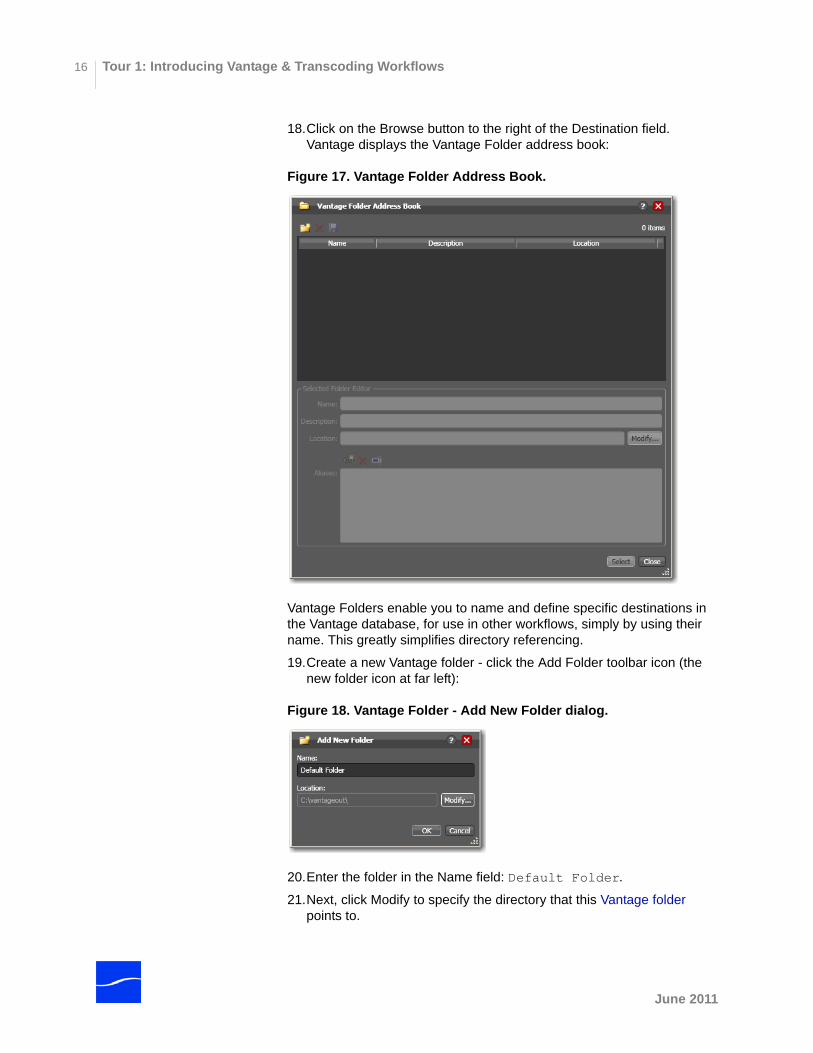
Figure 16. Copy action inspector (prior to configuration). ....................................................................15
Figure 17. Vantage Folder Address Book. ...........................................................................................16
Figure 18. Vantage Folder - Add New Folder dialog............................................................................16
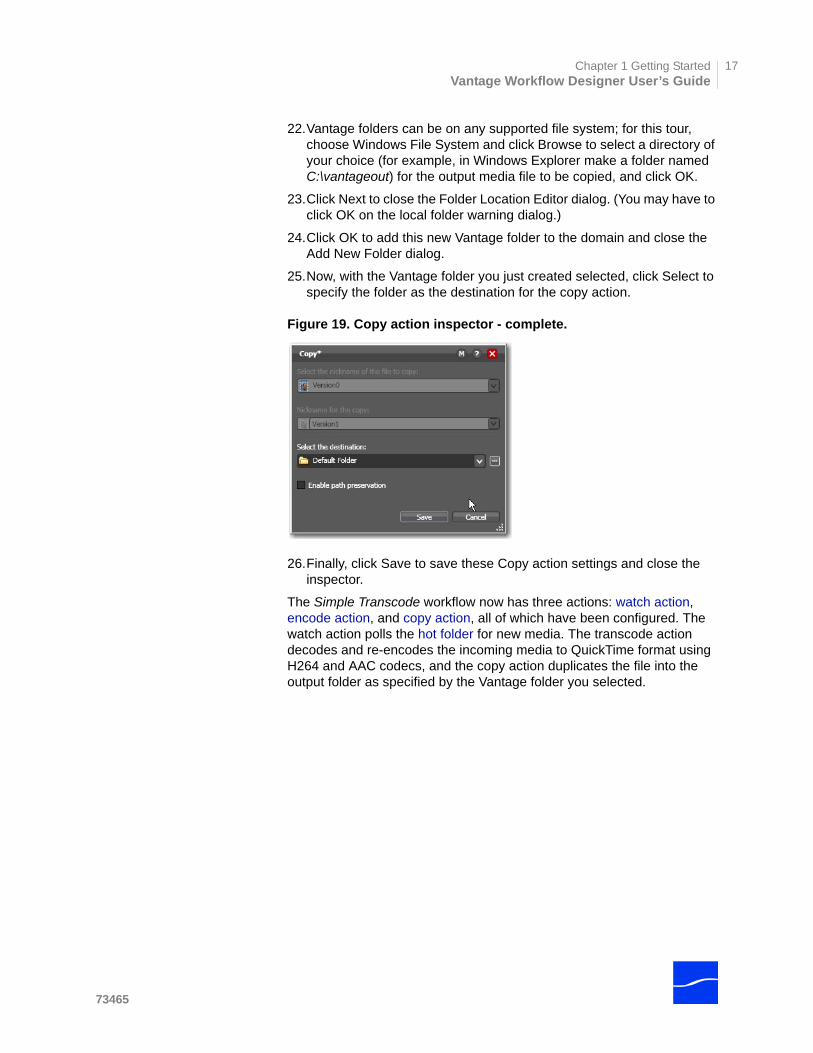
Figure 19. Copy action inspector - complete........................................................................................17
Figure 20. Workflow Status tab. ...........................................................................................................18
Figure 21. Workflow Monitor Status tab. ..............................................................................................19
Figure 22. Workflow Monitor Status Details. ........................................................................................19
Figure 23. Executing actions display a green border ...........................................................................21
Figure 24. Status/History window displays action details.....................................................................22
Figure 25. Completed actions display a blue border............................................................................22
Figure 26. Select a workflow and click Deactivate to stop its watch. ...................................................23
Figure 27. Duplicating a workflow. .......................................................................................................24
Figure 28. Enter the name for the duplicate workflow..........................................................................25
Figure 29. Click the Encode action to select a preset action. ..............................................................26
Figuresxiv
Figure 30. Encode action inspector......................................................................................................27
Figure 31. Use the Inspector to add a video filter. ...............................................................................28
Figure 32. Filters are added to video and audio streams.....................................................................28
Figure 33. Select a component of media to view details......................................................................29
Figure 34. Watch action’s polling details..............................................................................................32
Figure 35. File nicknames display on the face of an action. ................................................................33
Figure 36. Delete action inspector lists files by nickname....................................................................33
Figure 37. Merged branches synchronize actions. ..............................................................................34
Figure 38. Nicknames before and after execution. ..............................................................................35
Figure 39. Vantage Management Console desktop shortcut ...............................................................36
Figure 40. Variables panel in the Management Console. ....................................................................37
Figure 41. Variable details. ..................................................................................................................38
Figure 42. Adding variables to a workflow. ..........................................................................................39
Figure 43. Right-click and select Add Variables...................................................................................39
Figure 44. Select a variable to add to this action. ................................................................................40
Figure 45. Adding variables (and setting values) to encode. ...............................................................40
Figure 46. Adding variables (and setting values) to watch...................................................................41
Figure 47. Rearranging actions in a workflow. .....................................................................................45
Figure 48. Rearranging actions in a workflow. .....................................................................................46
C h a p t e r 2 U s i n g W o r k f l o w D e s i g n e r
Figure 49. Workflow Designer desktop shortcut ..................................................................................50
Figure 50. Logging in to Workflow Designer ........................................................................................50
Figure 51. Change Vantage Domain panel..........................................................................................51
Figure 52. Manually entering the Vantage domain server. ..................................................................52
Figure 53. Change Vantage Domain panel..........................................................................................52
Figure 54. Logging in to Workflow Designer ........................................................................................53
Figure 55. Changing your password in Workflow Designer .................................................................53
Figure 56. The Workflow Designer window..........................................................................................55
Figure 57. Click the title to display workflow details. ............................................................................56
Figure 58. Workflows panel..................................................................................................................58
Figure 59. Create New Workflow panel. ..............................................................................................59
Figure 60. Workflow details panel. .......................................................................................................61
Figure 61. Vantage Workflow Designer ...............................................................................................62
Figure 62. Actions can display binder and file nicknames plus metadata labels, or variables.............63
Figure 63. Action summary text ...........................................................................................................64
Figure 64. Monitor Status displays Watch & other origin actions.........................................................65
Figure 65. Complete monitor action status details ...............................................................................66
Figure 66. Active monitor action status details.....................................................................................66
Figure 67. Session log. ........................................................................................................................67
Figure 68. Job Status displays all jobs for the selected workflow. .......................................................68
June 2011
Vantage Workflow Designer User’s Guide xv
Figure 69. During execution, an action displays a progress bar. .........................................................69
Figure 70. Select a Job Report for this report file.................................................................................71
Figure 71. Select a folder and name this file........................................................................................71
Figure 72. Job Report Manager - configure report templates. .............................................................72
Figure 73. Binder details for the selected job.......................................................................................73
Figure 74. Right-click and select Priority to set a new priority..............................................................74
Figure 75. Right-click and select Priority to set a new priority..............................................................75
Figure 76. Workflow Analytics displays workflow execution history.....................................................77
Figure 77. Click Submit Job on the selected workflow.........................................................................80
Figure 78. Submit Job window - select the file system. .......................................................................80
Figure 79. Submit Job window - select the file.....................................................................................81
Figure 80. Submit Job window - submit the job. ..................................................................................81
C h a p t e r 3 C r e a t i n g W o r k f l o w s
Figure 81. Workflow details panel. .......................................................................................................84
Figure 82. Three independent actions follow a common action...........................................................87
Figure 83. Three independent actions precede a common action. ......................................................87
Figure 84. Three independent actions precede a common action. ......................................................88
Figure 85. Suspend layout optimization with the control key. ..............................................................89
Figure 86. Each action has an Inspector icon. .....................................................................................90
Figure 87. Typical action inspector. .....................................................................................................90
Figure 88. Create Template window. ...................................................................................................91
Figure 89. Add Variables window.........................................................................................................93
Figure 90. Select Variables window. ....................................................................................................93
Figure 91. Use the Create New Variables window to create variables. ...............................................94
Figure 92. Message action inspector - bindable parameters. ..............................................................95
Figure 93. Select Variables window. ....................................................................................................95
Figure 94. Message action inspector with a bound parameter. ...........................................................96
Figure 95. Retry Settings dialog...........................................................................................................97
Figure 96. Resource Cost Settings dialog............................................................................................98
Figure 97. Filename Pattern Editor dialog............................................................................................98
Figure 98. Actions are organized by group and type in the toolbar....................................................100
Figure 99. Action toolbar in file mode.................................................................................................100
Figure 100. Decide actions enable you to branch media processing.................................................102
Figure 101. Decide actions enable you to branch media processing.................................................104
73465

Figuresxvi
June 2011
xvii
P r e f a c e
Obtaining Support | Information | Assistance
Web Site. http://www.telestream.net/telestream-support/vantage/support.htm
Support Email. [email protected]
Terms and times of support services vary, per the terms of your current service contract with Telestream.
Vantage FAQs, Forums & Upgrades
Web Site. http://www.telestream.net/telestream-support/vantage/support.htm
Company and Product Information
For information about Telestream or its products, please contact us via:
Web Site. www.telestream.net
Sales and Marketing Email. [email protected]
Telestream, Inc. 848 Gold Flat RoadNevada City, CA. USA 95959
International Telestream Distributors
See the Telestream Web site at www.telestream.net for your regional authorized Telestream distributor.
We'd Like to Hear From You!
If you have comments or suggestions about improving this document, or other Telestream documents – or if you've discovered an error or omission, please email us at [email protected].
About Vantage Workflow Designer
Version 3.0
Copyright © 2011 Telestream, Inc.

Prefacexviii
June 2011
1
C H A P T E R 1
G e t t i n g S ta r t e d
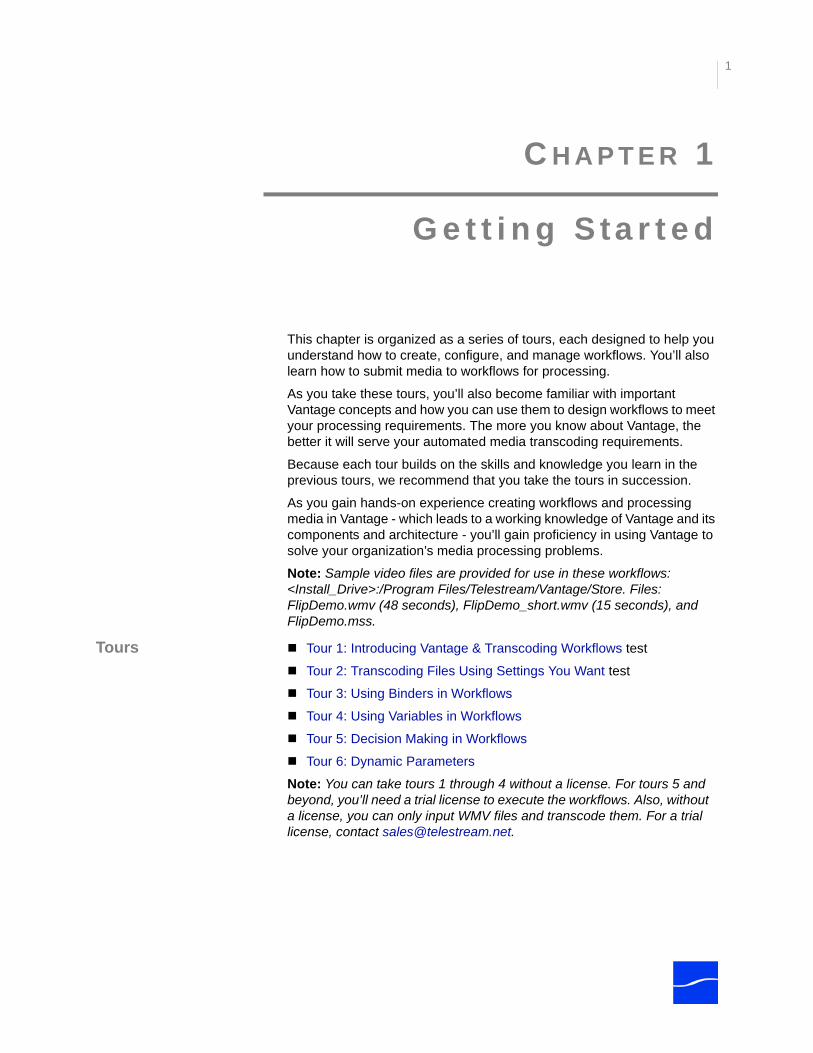
This chapter is organized as a series of tours, each designed to help you understand how to create, configure, and manage workflows. You’ll also learn how to submit media to workflows for processing.
As you take these tours, you’ll also become familiar with important Vantage concepts and how you can use them to design workflows to meet your processing requirements. The more you know about Vantage, the better it will serve your automated media transcoding requirements.
Because each tour builds on the skills and knowledge you learn in the previous tours, we recommend that you take the tours in succession.
As you gain hands-on experience creating workflows and processing media in Vantage - which leads to a working knowledge of Vantage and its components and architecture - you’ll gain proficiency in using Vantage to solve your organization’s media processing problems.
Note: Sample video files are provided for use in these workflows: <Install_Drive>:/Program Files/Telestream/Vantage/Store. Files: FlipDemo.wmv (48 seconds), FlipDemo_short.wmv (15 seconds), and FlipDemo.mss.
Tours Tour 1: Introducing Vantage & Transcoding Workflows test
Tour 2: Transcoding Files Using Settings You Want test
Tour 3: Using Binders in Workflows
Tour 4: Using Variables in Workflows
Tour 5: Decision Making in Workflows
Tour 6: Dynamic Parameters
Note: You can take tours 1 through 4 without a license. For tours 5 and beyond, you’ll need a trial license to execute the workflows. Also, without a license, you can only input WMV files and transcode them. For a trial license, contact [email protected].
Tour 1: Introducing Vantage & Transcoding Workflows2
TOUR 1: INTRODUCING VANTAGE & TRANSCODING WORKFLOWS
This hands-on tour takes about an hour to an hour and a half (the longest of all the tours), and introduces you to the big picture of Vantage - the concept and process of creating a typical transcoding workflow, submitting media to transcode, monitoring your job as it executes, and viewing the results.
Tour Overview This tour is designed to provide your first hands-on experience with Vantage Workflow Designer. In this tour, you’ll learn the following:
What is Vantage?
Vantage Enterprise
Starting Vantage Workflow Designer
Introducing Workflows
Working with Workflows
Setting up Actions
Vantage Folders
Activating Workflows
Monitoring your Workflow Status
Submitting Jobs
Playing your New File
Deactivating Workflows
What is Vantage? Vantage is a powerful workflow design and automation product that allows you to build highly automated, adaptive media processing workflows. Vantage combines a wide range of workflow design and media processing capabilities into a single program, and allows tight coupling between components so that workflows can make decisions and execute custom rules (as necessary) to solve a broad set of operational problems.
Vantage can be installed on a single server or installed as an array of servers, each hosting multiple Vantage transcoding services for example, all working together to provide scalability and durability. In either case, a Vantage database is used as the central point for workflow design and execution. Services execute the workflows, coordinating with each other through the Vantage database; this central database also stores job history and other information about workflows.
Vantage Client Programs
You configure, operate, monitor, and manage Vantage using multi-user Vantage client programs: Vantage Management Console, Vantage Workflow Designer, and Workflow Portal. These programs connect directly to the database, so they can be utilized on any computer that can access the Vantage database.
June 2011
Chapter 1 Getting StartedVantage Workflow Designer User’s Guide
3
Vantage Management Console
The Vantage Management Console (usually referred to as just console) is the program you use to configure and administer your Vantage domain - including Vantage services, licenses, workflow design items, and the workflows themselves.
Vantage Workflow Designer
Vantage Workflow Designer is the program that enables you to design and automate workflows to meet your organization's transcoding requirements.
Workflow Designer allows you to activate and deactivate workflows, and allows you to submit and monitor the jobs that are created as workflows perform transactions on media you've submitted for processing.
Vantage Workflow Portal
Vantage Workflow Portal allows media workflow administrators to quickly design and deploy user interfaces for operator metadata entry, content browsing, stitching, and job submission. Administrators design the task that the operator will perform, and design the back-end process that will fulfill the operator input. Operators can then use Vantage Workflow Portal to access their tasks and submit jobs.
Team ManagementIn a distributed Vantage domain, Team Management provides user accounts to control which users can access workflow categories in Workflow Designer and Workflow Portal, as well as Web-based Job Status and limit access to the Vantage Management Console.
Vantage Enterprise Vantage Enterprise system management products enable a high level of visibility and a deep level of control for large-scale or mission-critical workflows. Vantage Enterprise includes two system management products: Enterprise Control, and Master Control.
Throughout this document, look for these icons to identify features that are specific to each license.
Enterprise Control includes is a workflow management layer and suite of tools that maximizes workflow capacity, resiliency, throughput and reliability for large-scale or mission-critical applications. Enterprise Control features are included in Master Control as well.
Master Control is a higher-tier workflow management layer that adds visibility and management of complex video workflows and allows a unified ecosystem for multi-vendor products with centralized process control and monitoring.
Vantage Dashboard Web App The Vantage Dashboard is a Web app which allows administrators to
monitor Vantage system health and global job status. The Dashboard also provides a comprehensive diagnostic tool which enables you to anticipate and analyze system errors.
73465
Tour 1: Introducing Vantage & Transcoding Workflows4
Vantage Job Status Web App Vantage Job Status is a Web app which enables Vantage administrators
to deploy Web-based job status views for individual workflows. Views can be customized to include columns for specific action types in the workflow.
Starting Vantage Workflow Designer
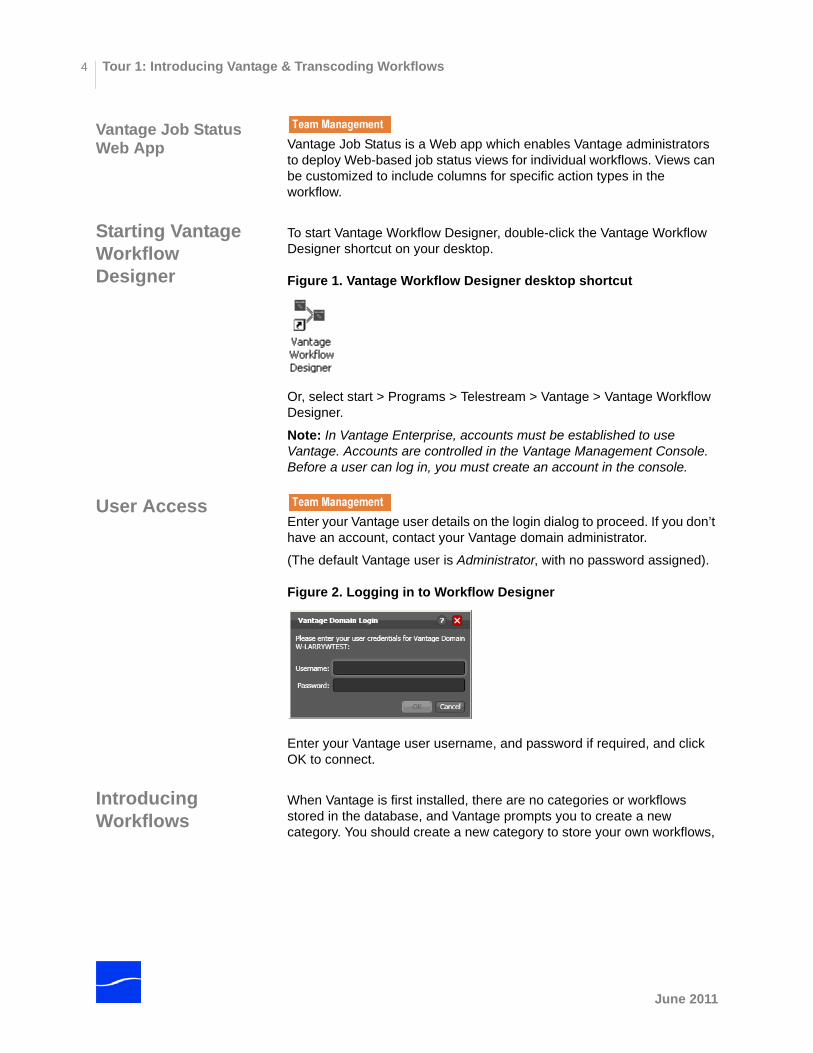
To start Vantage Workflow Designer, double-click the Vantage Workflow Designer shortcut on your desktop.
Figure 1. Vantage Workflow Designer desktop shortcut
Or, select start > Programs > Telestream > Vantage > Vantage Workflow Designer.
Note: In Vantage Enterprise, accounts must be established to use Vantage. Accounts are controlled in the Vantage Management Console. Before a user can log in, you must create an account in the console.
User AccessEnter your Vantage user details on the login dialog to proceed. If you don’t have an account, contact your Vantage domain administrator.
(The default Vantage user is Administrator, with no password assigned).
Figure 2. Logging in to Workflow Designer
Enter your Vantage user username, and password if required, and click OK to connect.
Introducing Workflows
When Vantage is first installed, there are no categories or workflows stored in the database, and Vantage prompts you to create a new category. You should create a new category to store your own workflows,
June 2011
Chapter 1 Getting StartedVantage Workflow Designer User’s Guide
5
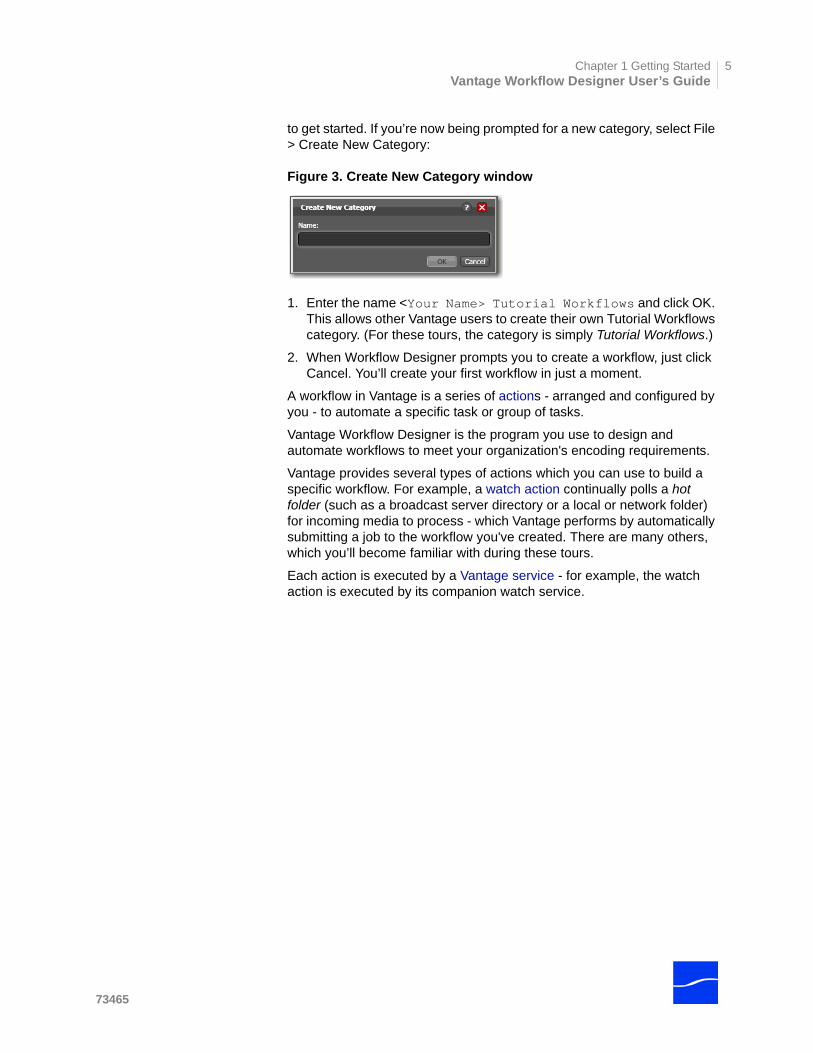
to get started. If you’re now being prompted for a new category, select File > Create New Category:
Figure 3. Create New Category window
1. Enter the name <Your Name> Tutorial Workflows and click OK. This allows other Vantage users to create their own Tutorial Workflows category. (For these tours, the category is simply Tutorial Workflows.)
2. When Workflow Designer prompts you to create a workflow, just click Cancel. You’ll create your first workflow in just a moment.
A workflow in Vantage is a series of actions - arranged and configured by you - to automate a specific task or group of tasks.
Vantage Workflow Designer is the program you use to design and automate workflows to meet your organization's encoding requirements.
Vantage provides several types of actions which you can use to build a specific workflow. For example, a watch action continually polls a hot folder (such as a broadcast server directory or a local or network folder) for incoming media to process - which Vantage performs by automatically submitting a job to the workflow you've created. There are many others, which you’ll become familiar with during these tours.
Each action is executed by a Vantage service - for example, the watch action is executed by its companion watch service.
73465
Tour 1: Introducing Vantage & Transcoding Workflows6
The Workflow Designer Window
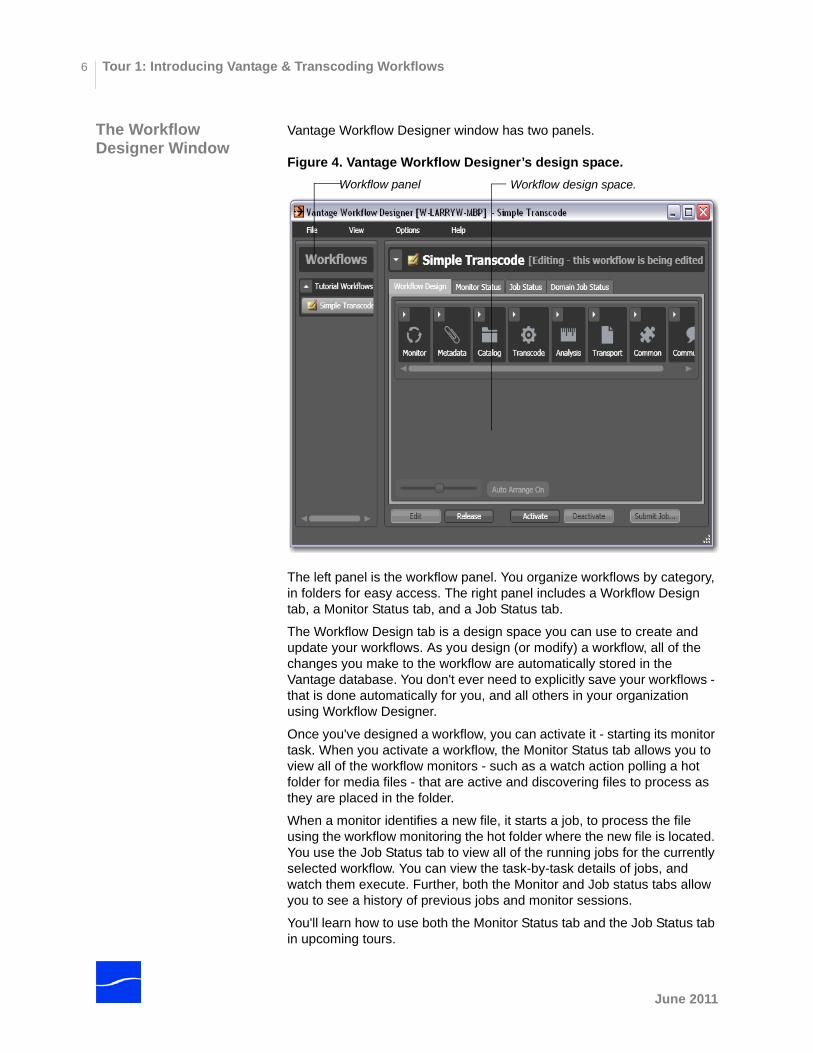
Vantage Workflow Designer window has two panels.
Figure 4. Vantage Workflow Designer’s design space.
The left panel is the workflow panel. You organize workflows by category, in folders for easy access. The right panel includes a Workflow Design tab, a Monitor Status tab, and a Job Status tab.
The Workflow Design tab is a design space you can use to create and update your workflows. As you design (or modify) a workflow, all of the changes you make to the workflow are automatically stored in the Vantage database. You don't ever need to explicitly save your workflows - that is done automatically for you, and all others in your organization using Workflow Designer.
Once you've designed a workflow, you can activate it - starting its monitor task. When you activate a workflow, the Monitor Status tab allows you to view all of the workflow monitors - such as a watch action polling a hot folder for media files - that are active and discovering files to process as they are placed in the folder.
When a monitor identifies a new file, it starts a job, to process the file using the workflow monitoring the hot folder where the new file is located. You use the Job Status tab to view all of the running jobs for the currently selected workflow. You can view the task-by-task details of jobs, and watch them execute. Further, both the Monitor and Job status tabs allow you to see a history of previous jobs and monitor sessions.
You'll learn how to use both the Monitor Status tab and the Job Status tab in upcoming tours.
Workflow panel Workflow design space.
June 2011
Chapter 1 Getting StartedVantage Workflow Designer User’s Guide
7
Creating a Category and a Workflow
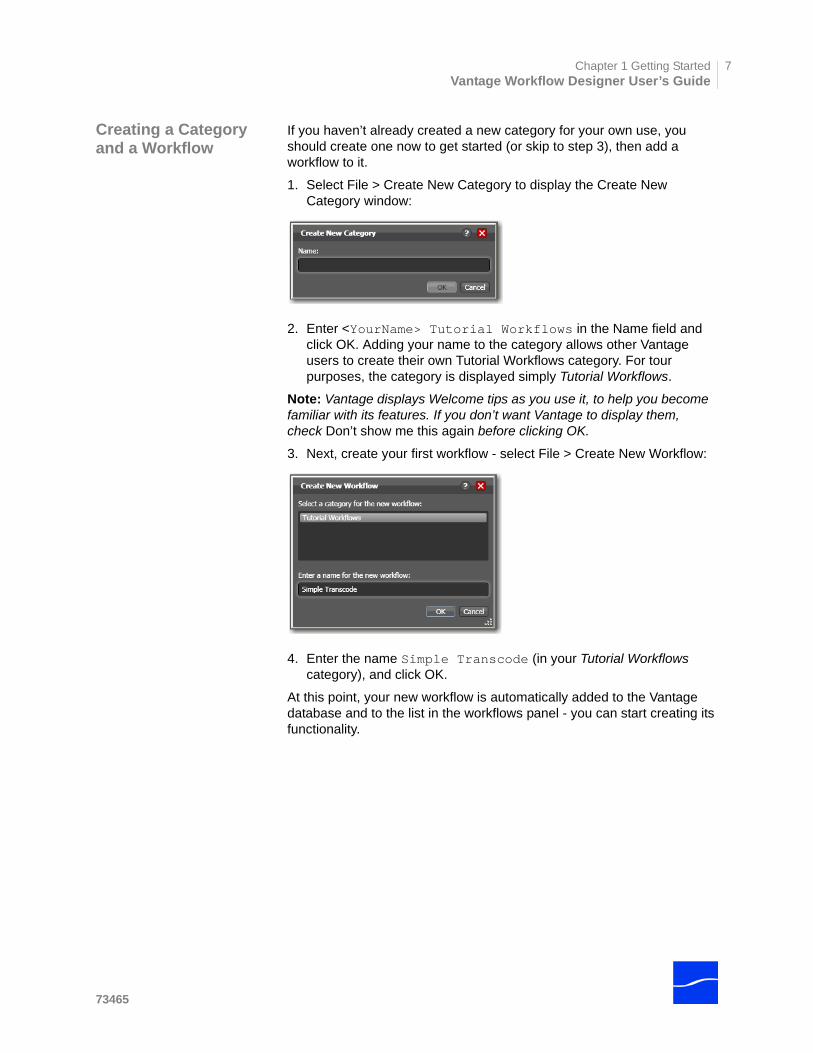
If you haven’t already created a new category for your own use, you should create one now to get started (or skip to step 3), then add a workflow to it.
1. Select File > Create New Category to display the Create New Category window:
2. Enter <YourName> Tutorial Workflows in the Name field and click OK. Adding your name to the category allows other Vantage users to create their own Tutorial Workflows category. For tour purposes, the category is displayed simply Tutorial Workflows.
Note: Vantage displays Welcome tips as you use it, to help you become familiar with its features. If you don’t want Vantage to display them, check Don’t show me this again before clicking OK.
3. Next, create your first workflow - select File > Create New Workflow:
4. Enter the name Simple Transcode (in your Tutorial Workflows category), and click OK.
At this point, your new workflow is automatically added to the Vantage database and to the list in the workflows panel - you can start creating its functionality.
73465
Tour 1: Introducing Vantage & Transcoding Workflows8
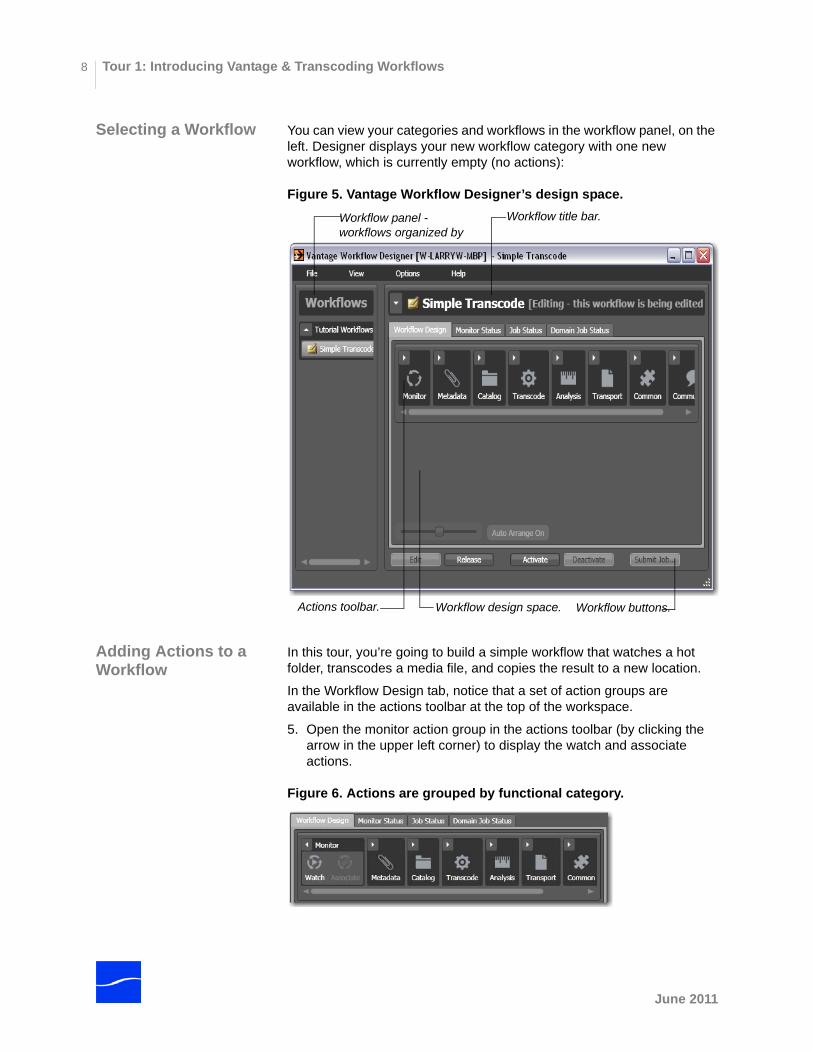
Selecting a Workflow You can view your categories and workflows in the workflow panel, on the left. Designer displays your new workflow category with one new workflow, which is currently empty (no actions):
Figure 5. Vantage Workflow Designer’s design space.
Adding Actions to a Workflow
In this tour, you’re going to build a simple workflow that watches a hot folder, transcodes a media file, and copies the result to a new location.
In the Workflow Design tab, notice that a set of action groups are available in the actions toolbar at the top of the workspace.
5. Open the monitor action group in the actions toolbar (by clicking the arrow in the upper left corner) to display the watch and associate actions.
Figure 6. Actions are grouped by functional category.
Workflow panel - workflows organized by
Workflow title bar.
Actions toolbar. Workflow design space. Workflow buttons.
June 2011
Chapter 1 Getting StartedVantage Workflow Designer User’s Guide
9
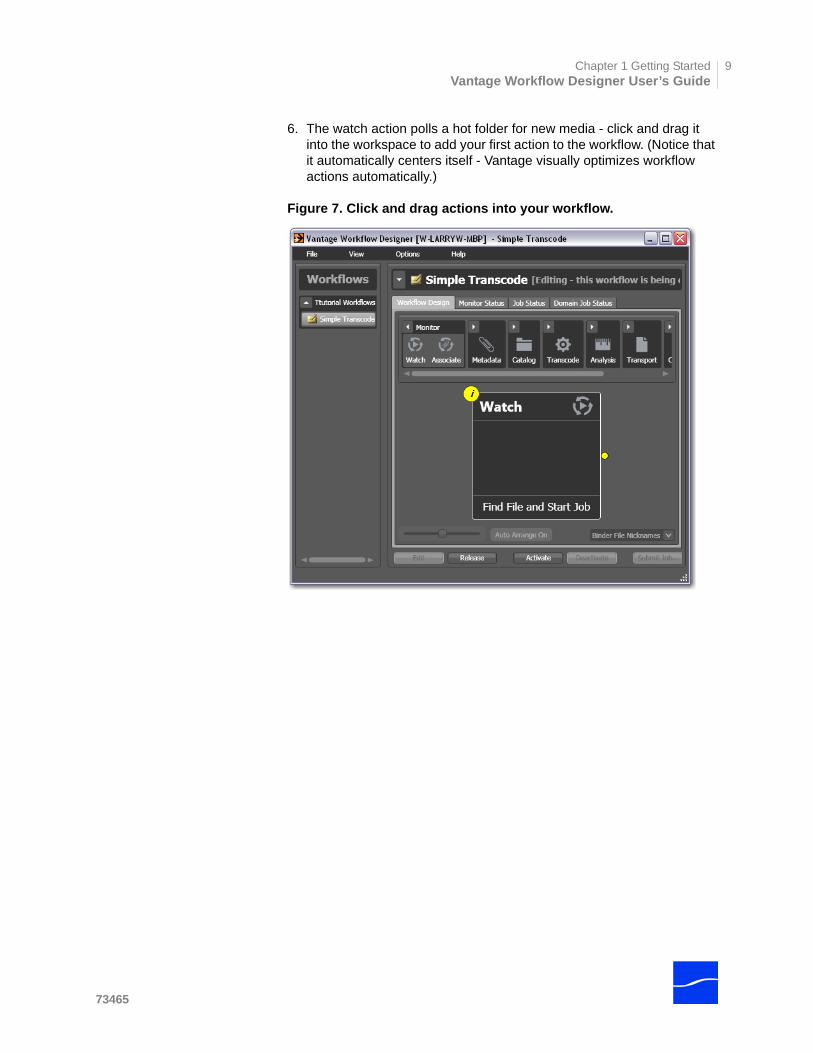
6. The watch action polls a hot folder for new media - click and drag it into the workspace to add your first action to the workflow. (Notice that it automatically centers itself - Vantage visually optimizes workflow actions automatically.)
Figure 7. Click and drag actions into your workflow.
73465
Tour 1: Introducing Vantage & Transcoding Workflows10
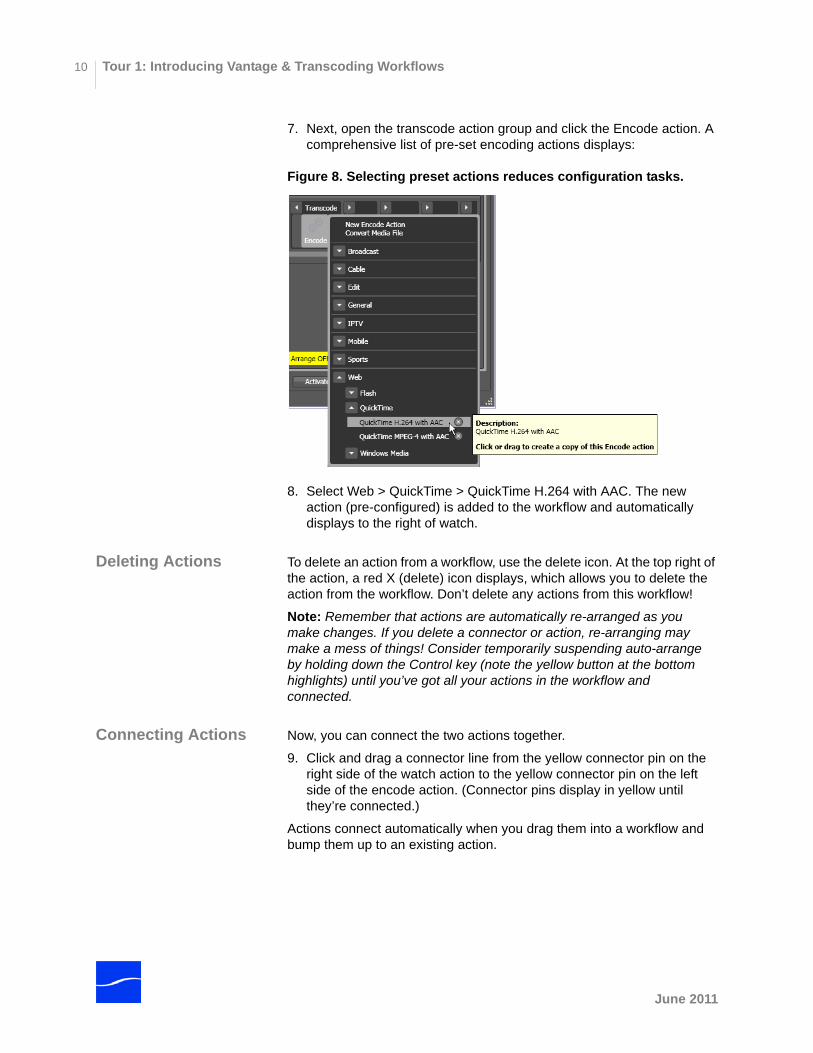
7. Next, open the transcode action group and click the Encode action. A comprehensive list of pre-set encoding actions displays:
Figure 8. Selecting preset actions reduces configuration tasks.
8. Select Web > QuickTime > QuickTime H.264 with AAC. The new action (pre-configured) is added to the workflow and automatically displays to the right of watch.
Deleting Actions To delete an action from a workflow, use the delete icon. At the top right of the action, a red X (delete) icon displays, which allows you to delete the action from the workflow. Don’t delete any actions from this workflow!
Note: Remember that actions are automatically re-arranged as you make changes. If you delete a connector or action, re-arranging may make a mess of things! Consider temporarily suspending auto-arrange by holding down the Control key (note the yellow button at the bottom highlights) until you’ve got all your actions in the workflow and connected.
Connecting Actions Now, you can connect the two actions together.
9. Click and drag a connector line from the yellow connector pin on the right side of the watch action to the yellow connector pin on the left side of the encode action. (Connector pins display in yellow until they’re connected.)
Actions connect automatically when you drag them into a workflow and bump them up to an existing action.
June 2011
Chapter 1 Getting StartedVantage Workflow Designer User’s Guide
11
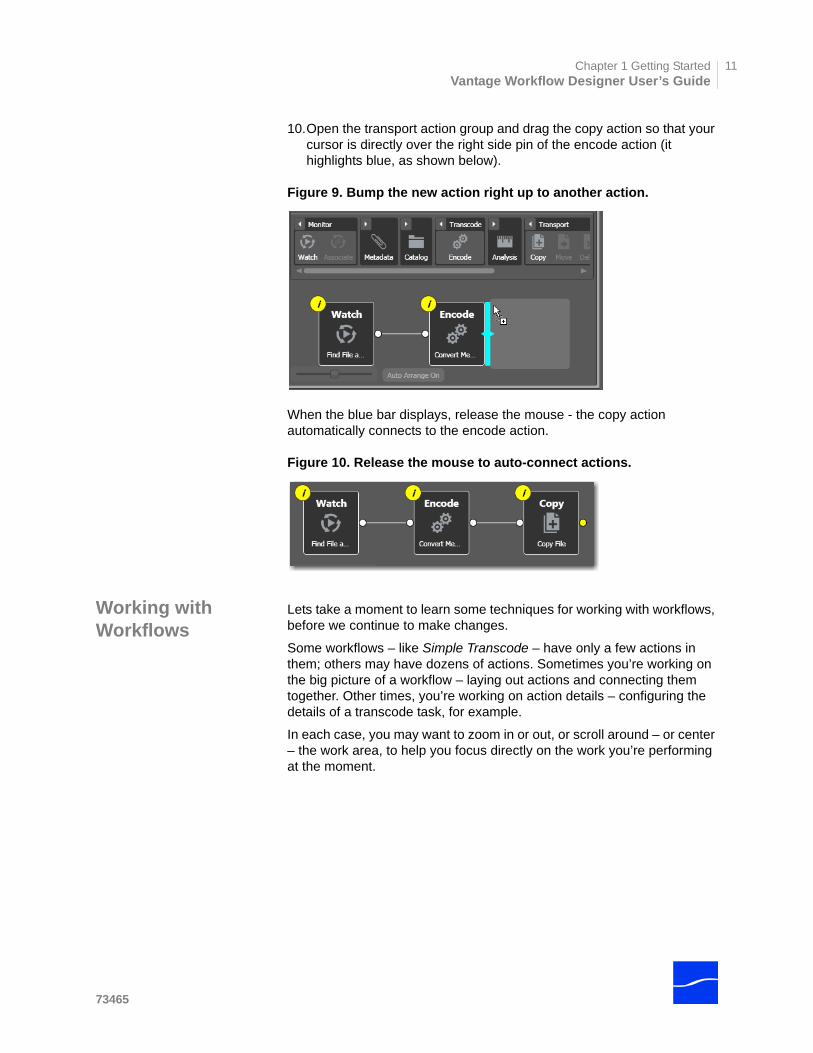
10.Open the transport action group and drag the copy action so that your cursor is directly over the right side pin of the encode action (it highlights blue, as shown below).
Figure 9. Bump the new action right up to another action.
When the blue bar displays, release the mouse - the copy action automatically connects to the encode action.
Figure 10. Release the mouse to auto-connect actions.
Working with Workflows
Lets take a moment to learn some techniques for working with workflows, before we continue to make changes.
Some workflows – like Simple Transcode – have only a few actions in them; others may have dozens of actions. Sometimes you’re working on the big picture of a workflow – laying out actions and connecting them together. Other times, you’re working on action details – configuring the details of a transcode task, for example.
In each case, you may want to zoom in or out, or scroll around – or center – the work area, to help you focus directly on the work you’re performing at the moment.
73465
Tour 1: Introducing Vantage & Transcoding Workflows12
Zooming In and Out on a Workflow
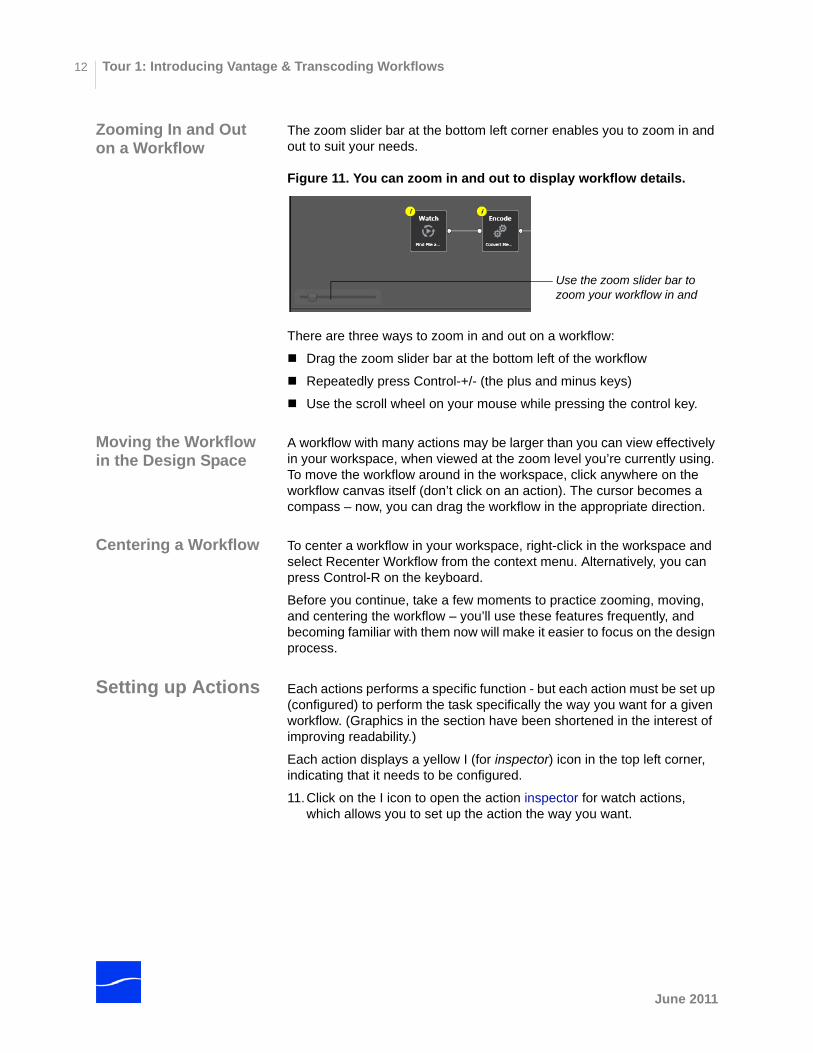
The zoom slider bar at the bottom left corner enables you to zoom in and out to suit your needs.
Figure 11. You can zoom in and out to display workflow details.
There are three ways to zoom in and out on a workflow:
Drag the zoom slider bar at the bottom left of the workflow
Repeatedly press Control-+/- (the plus and minus keys)
Use the scroll wheel on your mouse while pressing the control key.
Moving the Workflow in the Design Space
A workflow with many actions may be larger than you can view effectively in your workspace, when viewed at the zoom level you’re currently using. To move the workflow around in the workspace, click anywhere on the workflow canvas itself (don’t click on an action). The cursor becomes a compass – now, you can drag the workflow in the appropriate direction.
Centering a Workflow To center a workflow in your workspace, right-click in the workspace and select Recenter Workflow from the context menu. Alternatively, you can press Control-R on the keyboard.
Before you continue, take a few moments to practice zooming, moving, and centering the workflow – you’ll use these features frequently, and becoming familiar with them now will make it easier to focus on the design process.
Setting up Actions Each actions performs a specific function - but each action must be set up (configured) to perform the task specifically the way you want for a given workflow. (Graphics in the section have been shortened in the interest of improving readability.)
Each action displays a yellow I (for inspector) icon in the top left corner, indicating that it needs to be configured.
11.Click on the I icon to open the action inspector for watch actions, which allows you to set up the action the way you want.
Use the zoom slider bar to zoom your workflow in and
June 2011
Chapter 1 Getting StartedVantage Workflow Designer User’s Guide
13
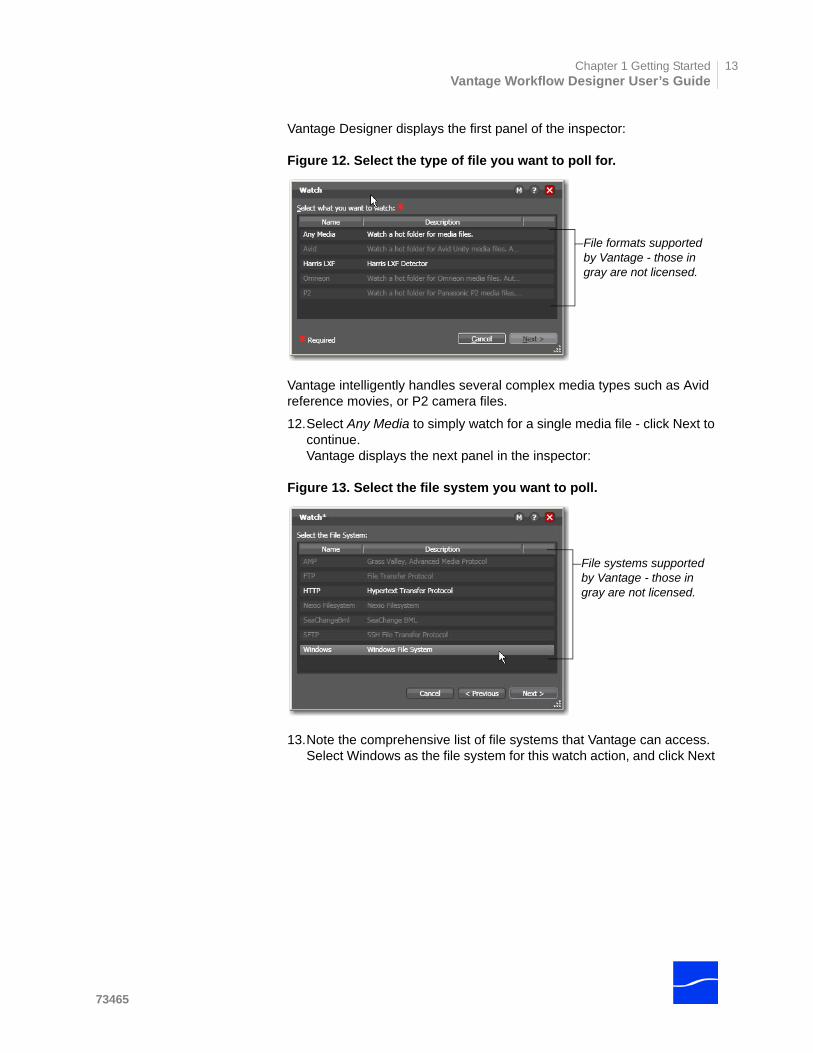
Vantage Designer displays the first panel of the inspector:
Figure 12. Select the type of file you want to poll for.
Vantage intelligently handles several complex media types such as Avid reference movies, or P2 camera files.
12.Select Any Media to simply watch for a single media file - click Next to continue. Vantage displays the next panel in the inspector:
Figure 13. Select the file system you want to poll.
13.Note the comprehensive list of file systems that Vantage can access. Select Windows as the file system for this watch action, and click Next
File formats supported by Vantage - those in gray are not licensed.
File systems supported by Vantage - those in gray are not licensed.
73465
Tour 1: Introducing Vantage & Transcoding Workflows14
to continue. Vantage displays the next panel:
Figure 14. Enter the fully-qualified path to the hot folder.
If you installed Vantage on a single machine, you can specify a local folder (for example, C:\VantageTourOneIn). In a multi-server array (a distributed Vantage domain) however, this should be a shared Windows network folder (for example, \\<machinename>\VantageTourOneIn).
14.In either case, create a hot folder for this workflow and then click Browse to navigate and select the fully-qualified path in this field. Or, enter it manually.
15.Click Next to continue.Vantage displays the next panel:
Figure 15. Watch action’s polling details.
Take a moment to review the comprehensive settings related to directory polling. Place your mouse cursor over the settings to display tooltips which tell you the function of each setting. Also, you can click the M
Click Browse to navigate to and select your hot folder.
June 2011
Chapter 1 Getting StartedVantage Workflow Designer User’s Guide
15
button in the top right of the Inspector to open documentation for this action.
16.Click Next and then Finish to complete configuration of the watch action.
Now that you’ve configured the action, notice that the inspector icon is hidden to let you know that it has been configured. Move your mouse back over the action - Vantage displays the inspector icon again. You can always click it to re-open the action inspector to review or change its settings.
Vantage Folders 17.Open the copy action inspector. Here, you’ll configure the destination for the file that the encode action creates as it transcodes the incoming file to the new format.
Figure 16. Copy action inspector (prior to configuration).
73465
Tour 1: Introducing Vantage & Transcoding Workflows16
18.Click on the Browse button to the right of the Destination field.Vantage displays the Vantage Folder address book:
Figure 17. Vantage Folder Address Book.
Vantage Folders enable you to name and define specific destinations in the Vantage database, for use in other workflows, simply by using their name. This greatly simplifies directory referencing.
19.Create a new Vantage folder - click the Add Folder toolbar icon (the new folder icon at far left):
Figure 18. Vantage Folder - Add New Folder dialog.
20.Enter the folder in the Name field: Default Folder.
21.Next, click Modify to specify the directory that this Vantage folder points to.
June 2011
Chapter 1 Getting StartedVantage Workflow Designer User’s Guide
17
22.Vantage folders can be on any supported file system; for this tour, choose Windows File System and click Browse to select a directory of your choice (for example, in Windows Explorer make a folder named C:\vantageout) for the output media file to be copied, and click OK.
23.Click Next to close the Folder Location Editor dialog. (You may have to click OK on the local folder warning dialog.)
24.Click OK to add this new Vantage folder to the domain and close the Add New Folder dialog.
25.Now, with the Vantage folder you just created selected, click Select to specify the folder as the destination for the copy action.
Figure 19. Copy action inspector - complete.
26.Finally, click Save to save these Copy action settings and close the inspector.
The Simple Transcode workflow now has three actions: watch action, encode action, and copy action, all of which have been configured. The watch action polls the hot folder for new media. The transcode action decodes and re-encodes the incoming media to QuickTime format using H264 and AAC codecs, and the copy action duplicates the file into the output folder as specified by the Vantage folder you selected.
73465
Tour 1: Introducing Vantage & Transcoding Workflows18
Activating Workflows
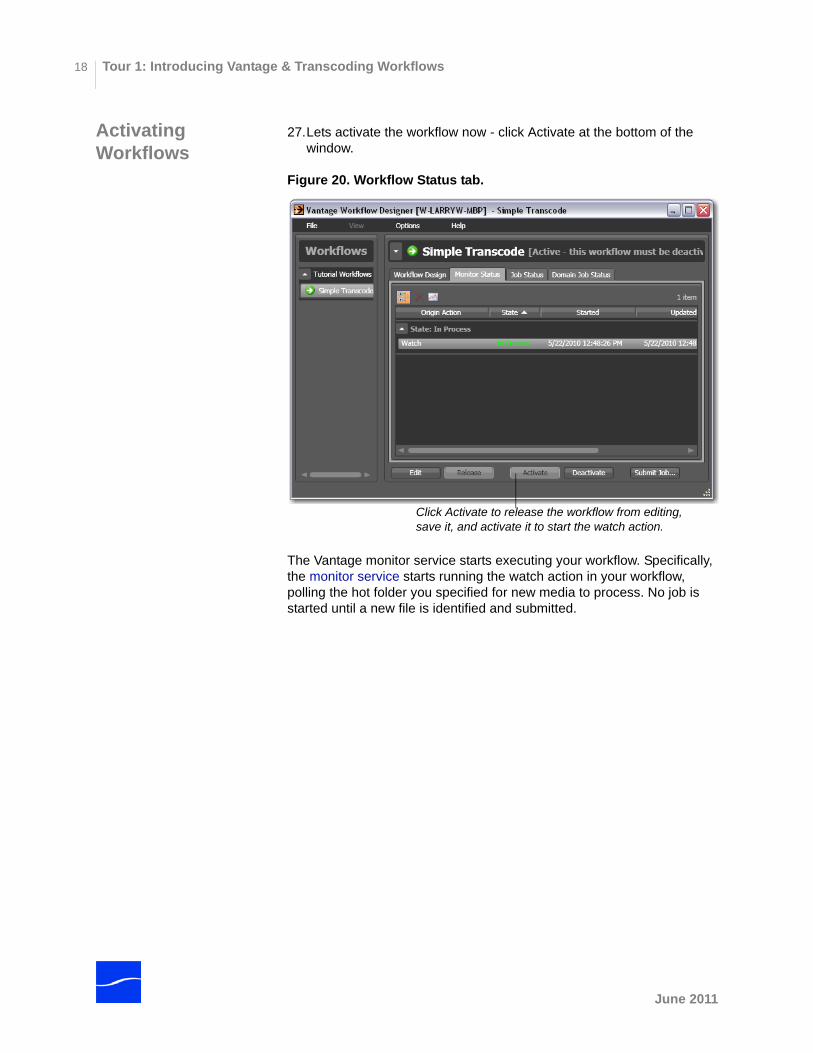
27.Lets activate the workflow now - click Activate at the bottom of the window.
Figure 20. Workflow Status tab.
The Vantage monitor service starts executing your workflow. Specifically, the monitor service starts running the watch action in your workflow, polling the hot folder you specified for new media to process. No job is started until a new file is identified and submitted.
Click Activate to release the workflow from editing, save it, and activate it to start the watch action.
June 2011
Chapter 1 Getting StartedVantage Workflow Designer User’s Guide
19
Monitoring your Workflow Status
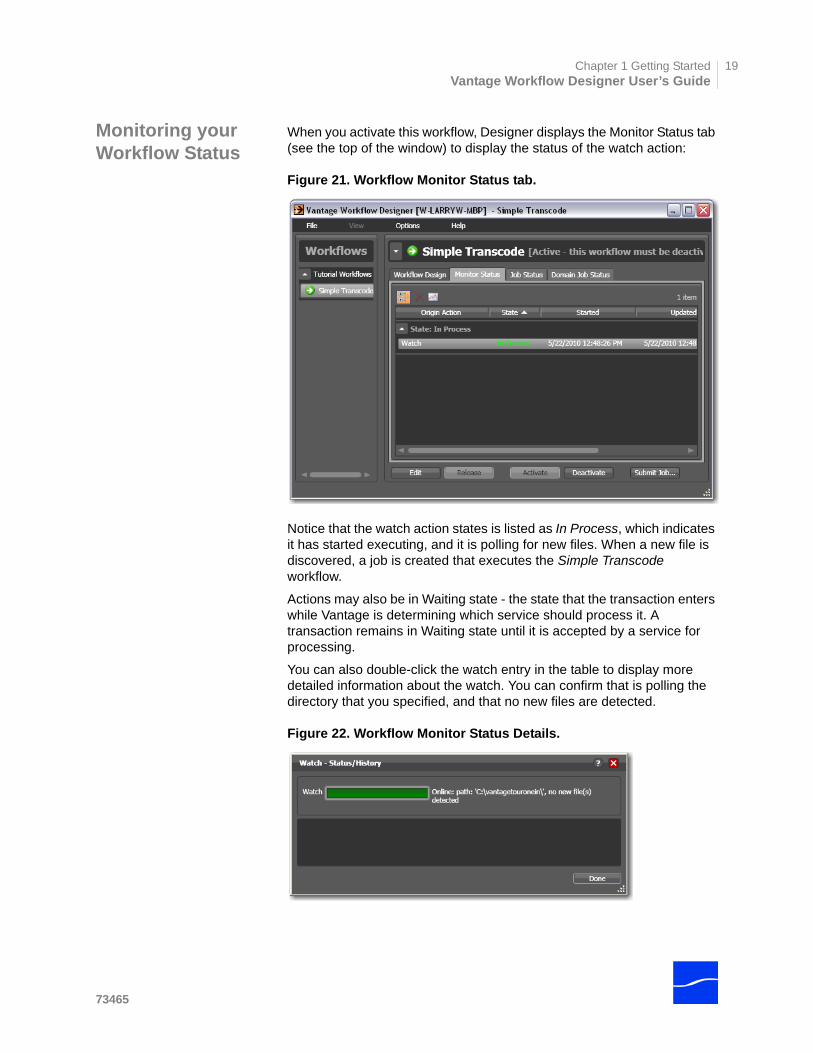
When you activate this workflow, Designer displays the Monitor Status tab (see the top of the window) to display the status of the watch action:
Figure 21. Workflow Monitor Status tab.
Notice that the watch action states is listed as In Process, which indicates it has started executing, and it is polling for new files. When a new file is discovered, a job is created that executes the Simple Transcode workflow.
Actions may also be in Waiting state - the state that the transaction enters while Vantage is determining which service should process it. A transaction remains in Waiting state until it is accepted by a service for processing.
You can also double-click the watch entry in the table to display more detailed information about the watch. You can confirm that is polling the directory that you specified, and that no new files are detected.
Figure 22. Workflow Monitor Status Details.
73465
Tour 1: Introducing Vantage & Transcoding Workflows20
Submitting Jobs You can start a job for workflows in various ways:
Place a media file in the hot folder that is being watched to submit a job automatically
Assign a hot folder to the watch action in your workflow which already has one or more media files - and check Process Existing Media in the Watch inspector. This causes Vantage to process all media pre-exist-ing in the directory, rather than ignore it.
Click the Submit Job button (at the bottom of the window) and select the file to submit a job manually. Just follow the steps in each panel.
When jobs are submitted to Vantage, each action is executed by a specific Vantage service, and can be optimized for execution if multiple services (for example, multiple Vantage Transcode services) are in your domain.
In addition, if you are using Vantage Enterprise Control or Vantage Master Control, jobs may be further optimized for execution, and failed actions may be retried based on rules you establish.
Take time now to use both methods to submit a file to start a job with this workflow.
We suggest that you use one of the sample wmv media files we provide, located at <InstallDrive>:\Program Files\Telestream\Vantage\Store\.
After you submit a job, click the Job Status tab to display the status of running jobs.
June 2011
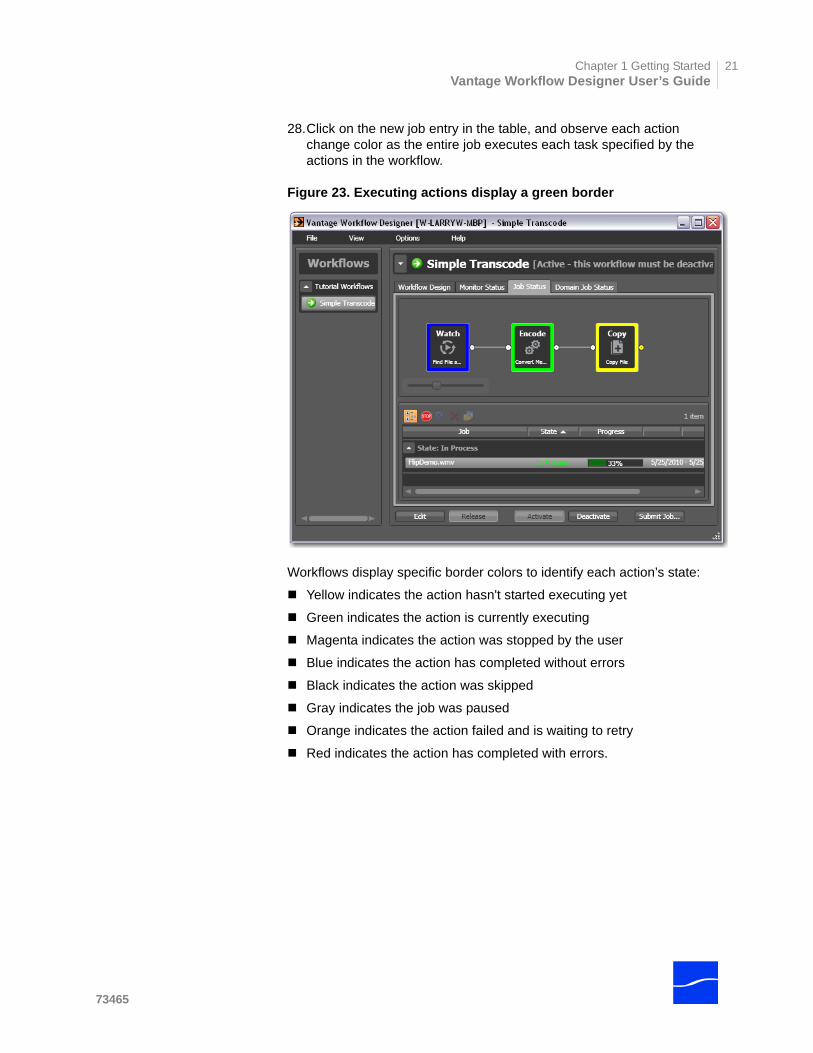
Chapter 1 Getting StartedVantage Workflow Designer User’s Guide
21
28.Click on the new job entry in the table, and observe each action change color as the entire job executes each task specified by the actions in the workflow.
Figure 23. Executing actions display a green border
Workflows display specific border colors to identify each action’s state:
Yellow indicates the action hasn't started executing yet
Green indicates the action is currently executing
Magenta indicates the action was stopped by the user
Blue indicates the action has completed without errors
Black indicates the action was skipped
Gray indicates the job was paused
Orange indicates the action failed and is waiting to retry
Red indicates the action has completed with errors.
73465
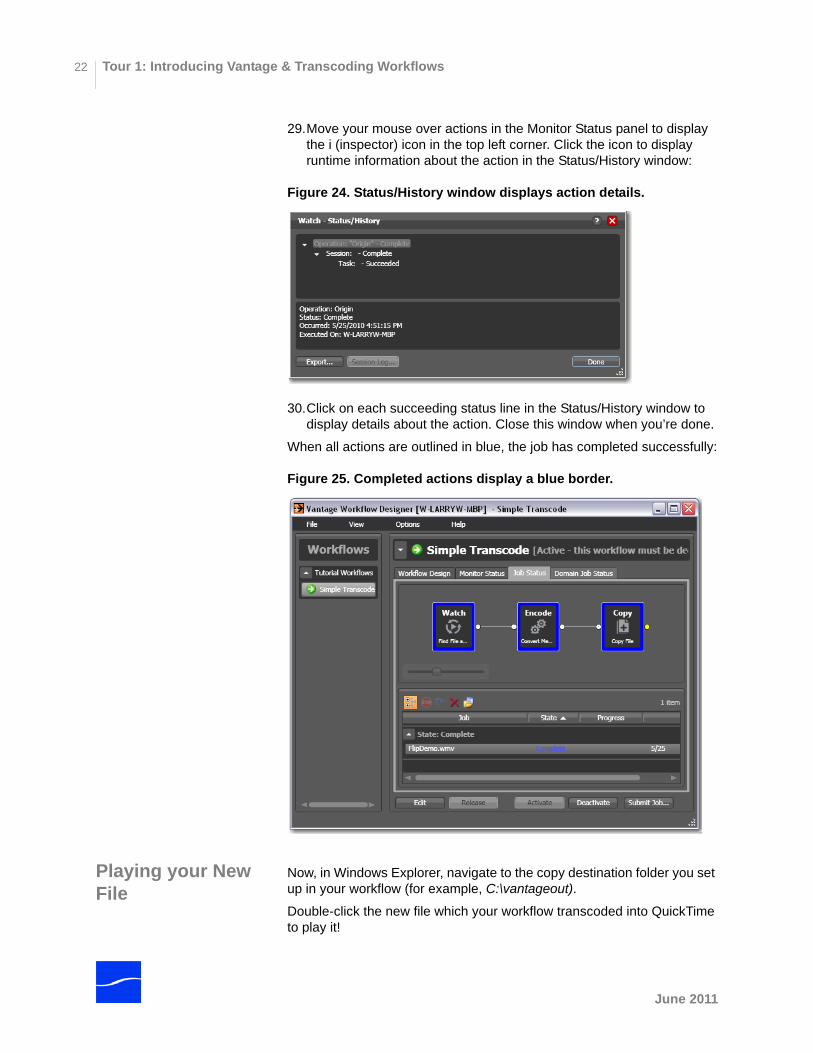
Tour 1: Introducing Vantage & Transcoding Workflows22
29.Move your mouse over actions in the Monitor Status panel to display the i (inspector) icon in the top left corner. Click the icon to display runtime information about the action in the Status/History window:
Figure 24. Status/History window displays action details.
30.Click on each succeeding status line in the Status/History window to display details about the action. Close this window when you’re done.
When all actions are outlined in blue, the job has completed successfully:
Figure 25. Completed actions display a blue border.
Playing your New File
Now, in Windows Explorer, navigate to the copy destination folder you set up in your workflow (for example, C:\vantageout).
Double-click the new file which your workflow transcoded into QuickTime to play it!
June 2011
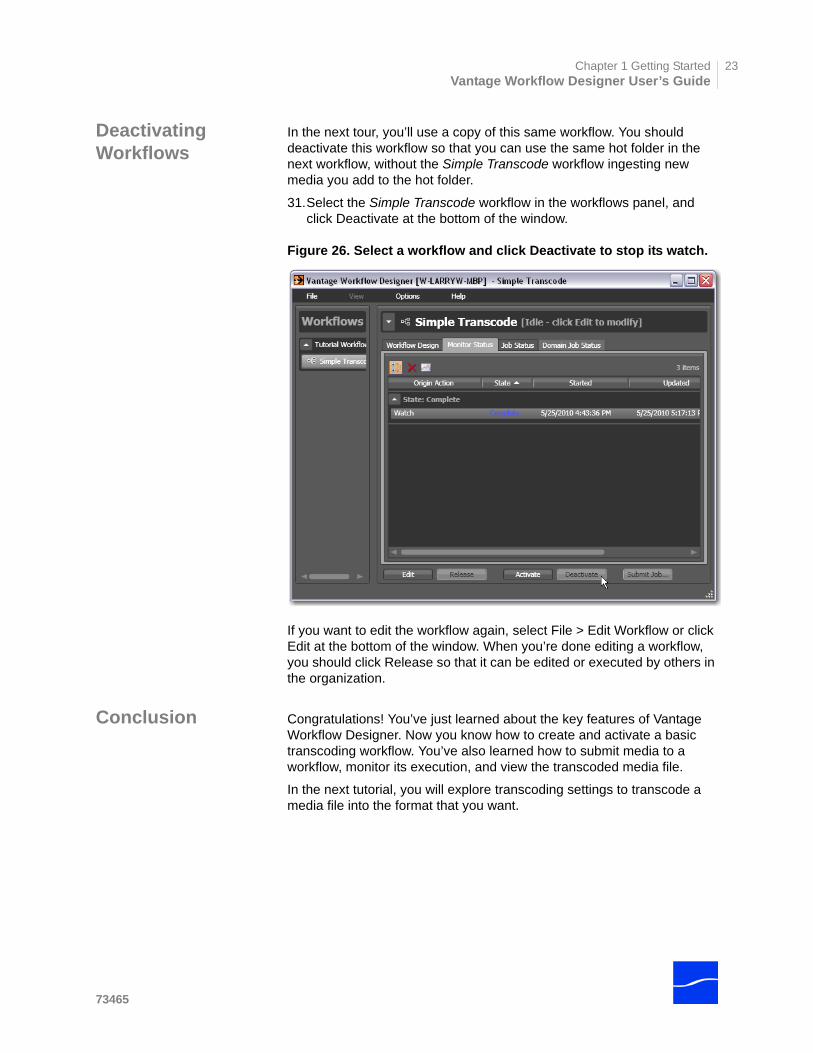
Chapter 1 Getting StartedVantage Workflow Designer User’s Guide
23
Deactivating Workflows
In the next tour, you’ll use a copy of this same workflow. You should deactivate this workflow so that you can use the same hot folder in the next workflow, without the Simple Transcode workflow ingesting new media you add to the hot folder.
31.Select the Simple Transcode workflow in the workflows panel, and click Deactivate at the bottom of the window.
Figure 26. Select a workflow and click Deactivate to stop its watch.
If you want to edit the workflow again, select File > Edit Workflow or click Edit at the bottom of the window. When you’re done editing a workflow, you should click Release so that it can be edited or executed by others in the organization.
Conclusion Congratulations! You’ve just learned about the key features of Vantage Workflow Designer. Now you know how to create and activate a basic transcoding workflow. You’ve also learned how to submit media to a workflow, monitor its execution, and view the transcoded media file.
In the next tutorial, you will explore transcoding settings to transcode a media file into the format that you want.
73465
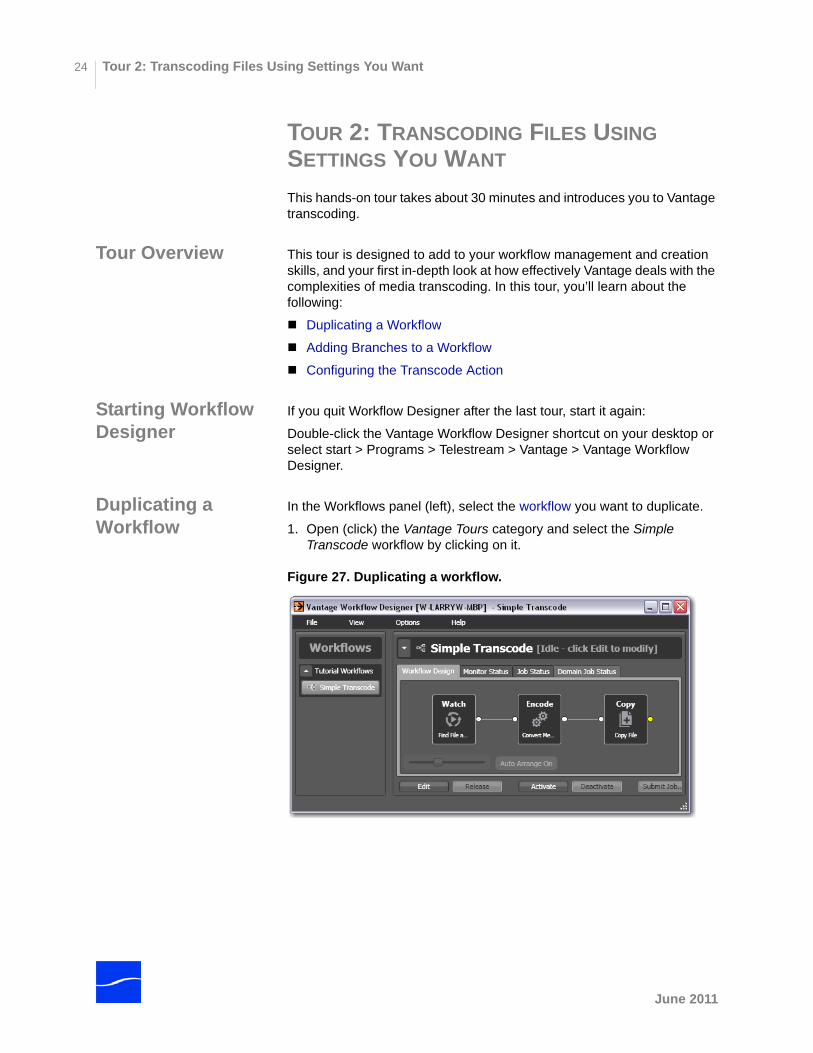
Tour 2: Transcoding Files Using Settings You Want24
TOUR 2: TRANSCODING FILES USING SETTINGS YOU WANT
This hands-on tour takes about 30 minutes and introduces you to Vantage transcoding.
Tour Overview This tour is designed to add to your workflow management and creation skills, and your first in-depth look at how effectively Vantage deals with the complexities of media transcoding. In this tour, you’ll learn about the following:
Duplicating a Workflow
Adding Branches to a Workflow
Configuring the Transcode Action
Starting Workflow Designer
If you quit Workflow Designer after the last tour, start it again:
Double-click the Vantage Workflow Designer shortcut on your desktop or select start > Programs > Telestream > Vantage > Vantage Workflow Designer.
Duplicating a Workflow
In the Workflows panel (left), select the workflow you want to duplicate.
1. Open (click) the Vantage Tours category and select the Simple Transcode workflow by clicking on it.
Figure 27. Duplicating a workflow.
June 2011
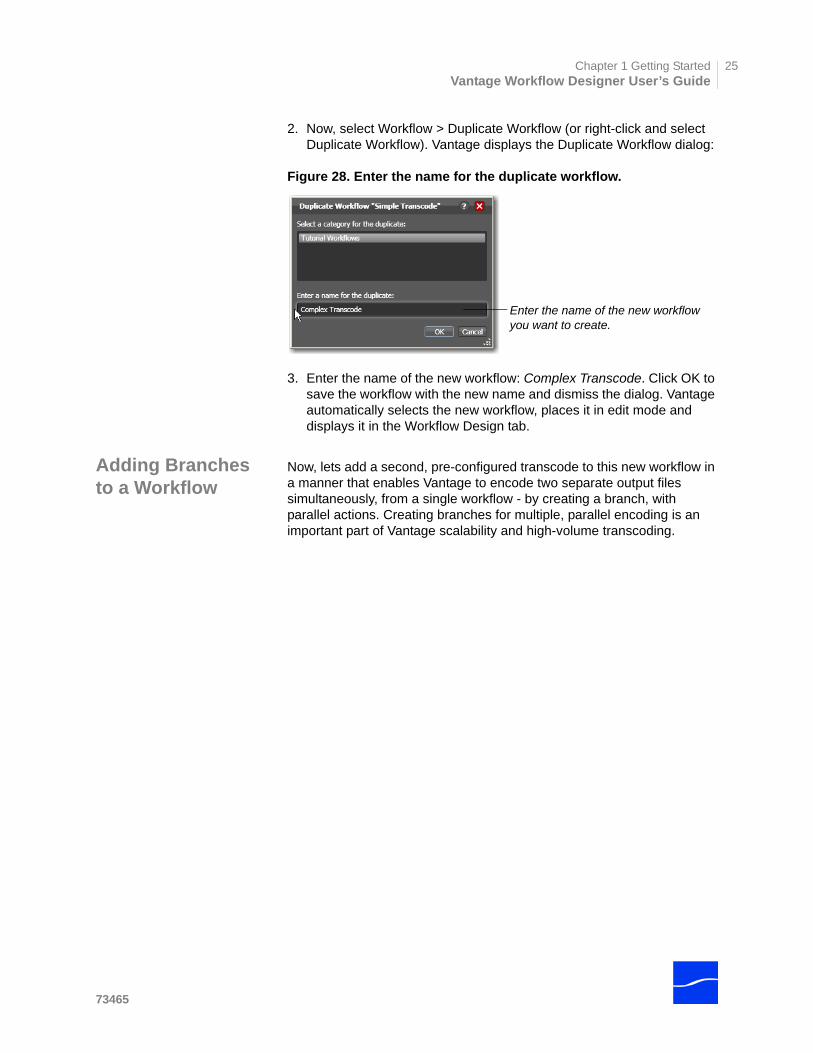
Chapter 1 Getting StartedVantage Workflow Designer User’s Guide
25
2. Now, select Workflow > Duplicate Workflow (or right-click and select Duplicate Workflow). Vantage displays the Duplicate Workflow dialog:
Figure 28. Enter the name for the duplicate workflow.
3. Enter the name of the new workflow: Complex Transcode. Click OK to save the workflow with the new name and dismiss the dialog. Vantage automatically selects the new workflow, places it in edit mode and displays it in the Workflow Design tab.
Adding Branches to a Workflow
Now, lets add a second, pre-configured transcode to this new workflow in a manner that enables Vantage to encode two separate output files simultaneously, from a single workflow - by creating a branch, with parallel actions. Creating branches for multiple, parallel encoding is an important part of Vantage scalability and high-volume transcoding.
Enter the name of the new workflow you want to create.
73465
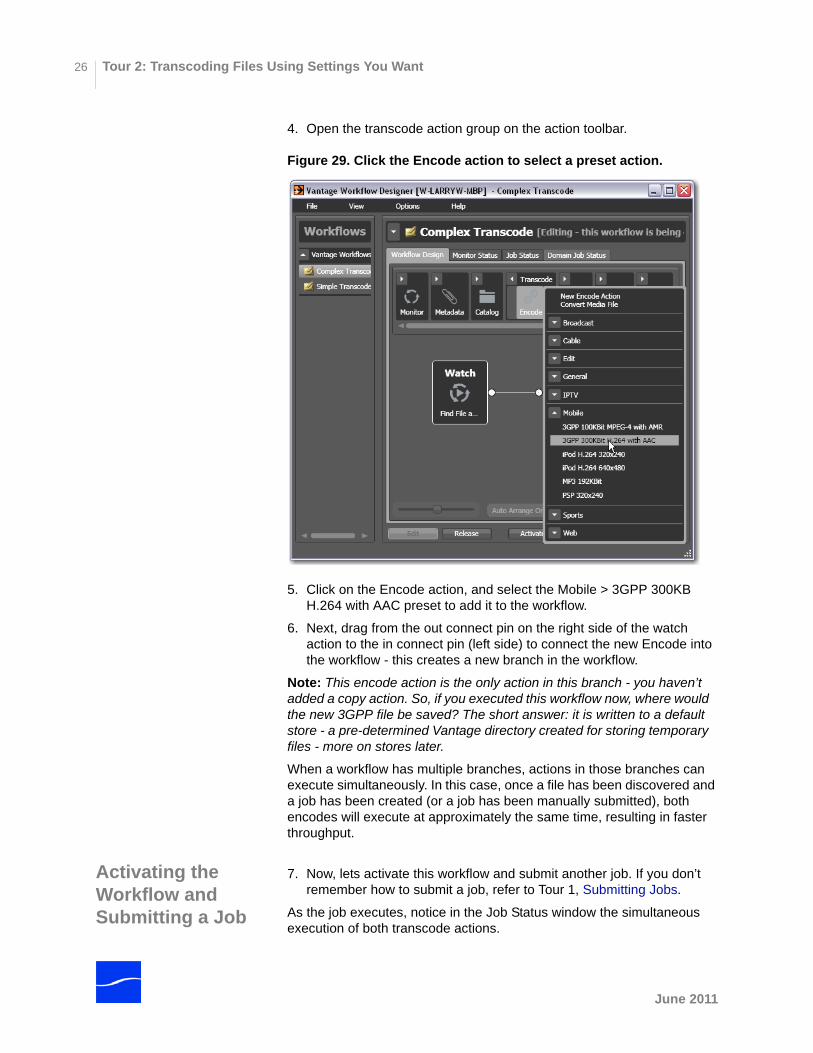
Tour 2: Transcoding Files Using Settings You Want26
4. Open the transcode action group on the action toolbar.
Figure 29. Click the Encode action to select a preset action.
5. Click on the Encode action, and select the Mobile > 3GPP 300KB H.264 with AAC preset to add it to the workflow.
6. Next, drag from the out connect pin on the right side of the watch action to the in connect pin (left side) to connect the new Encode into the workflow - this creates a new branch in the workflow.
Note: This encode action is the only action in this branch - you haven’t added a copy action. So, if you executed this workflow now, where would the new 3GPP file be saved? The short answer: it is written to a default store - a pre-determined Vantage directory created for storing temporary files - more on stores later.
When a workflow has multiple branches, actions in those branches can execute simultaneously. In this case, once a file has been discovered and a job has been created (or a job has been manually submitted), both encodes will execute at approximately the same time, resulting in faster throughput.
Activating the Workflow and Submitting a Job
7. Now, lets activate this workflow and submit another job. If you don’t remember how to submit a job, refer to Tour 1, Submitting Jobs.
As the job executes, notice in the Job Status window the simultaneous execution of both transcode actions.
June 2011
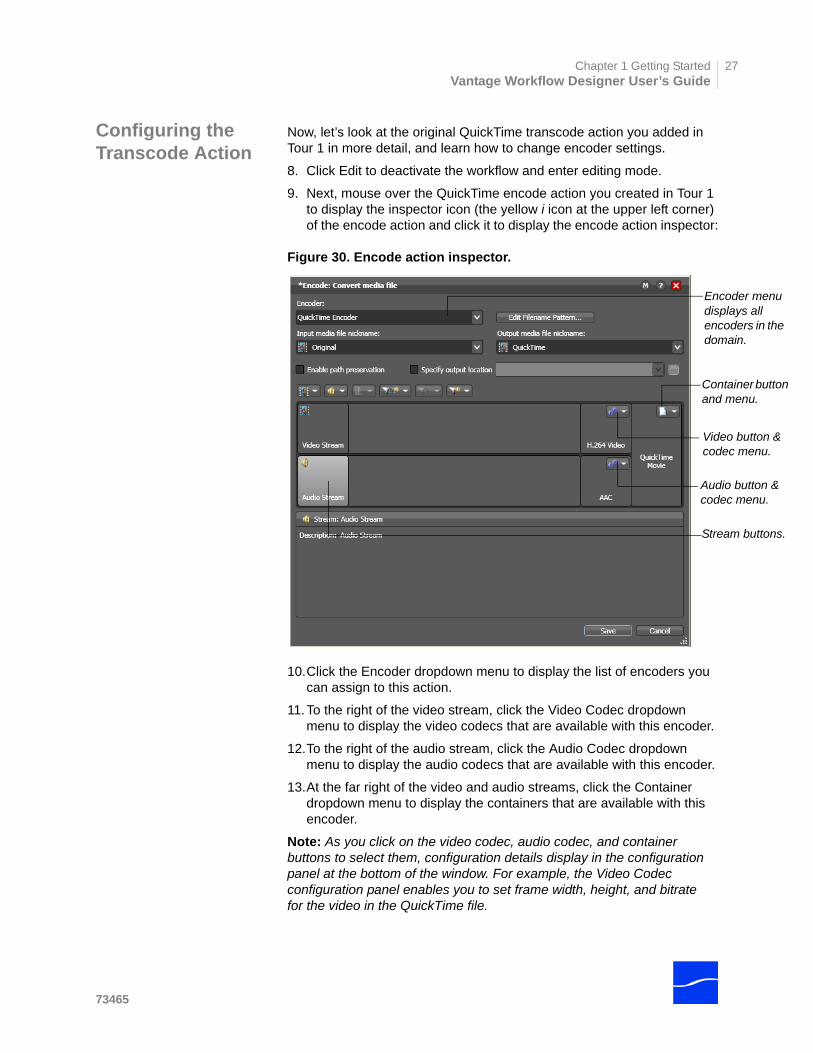
Chapter 1 Getting StartedVantage Workflow Designer User’s Guide
27
der menu ys all
ders in the in.
button & menu.
button & menu.
iner button enu.
buttons.
Configuring the Transcode Action
Now, let’s look at the original QuickTime transcode action you added in Tour 1 in more detail, and learn how to change encoder settings.
8. Click Edit to deactivate the workflow and enter editing mode.
9. Next, mouse over the QuickTime encode action you created in Tour 1 to display the inspector icon (the yellow i icon at the upper left corner) of the encode action and click it to display the encode action inspector:
Figure 30. Encode action inspector.
10.Click the Encoder dropdown menu to display the list of encoders you can assign to this action.
11.To the right of the video stream, click the Video Codec dropdown menu to display the video codecs that are available with this encoder.
12.To the right of the audio stream, click the Audio Codec dropdown menu to display the audio codecs that are available with this encoder.
13.At the far right of the video and audio streams, click the Container dropdown menu to display the containers that are available with this encoder.
Note: As you click on the video codec, audio codec, and container buttons to select them, configuration details display in the configuration panel at the bottom of the window. For example, the Video Codec configuration panel enables you to set frame width, height, and bitrate for the video in the QuickTime file.
Encodisplaencodoma
Videocodec
Audiocodec
Contaand m
Stream
73465
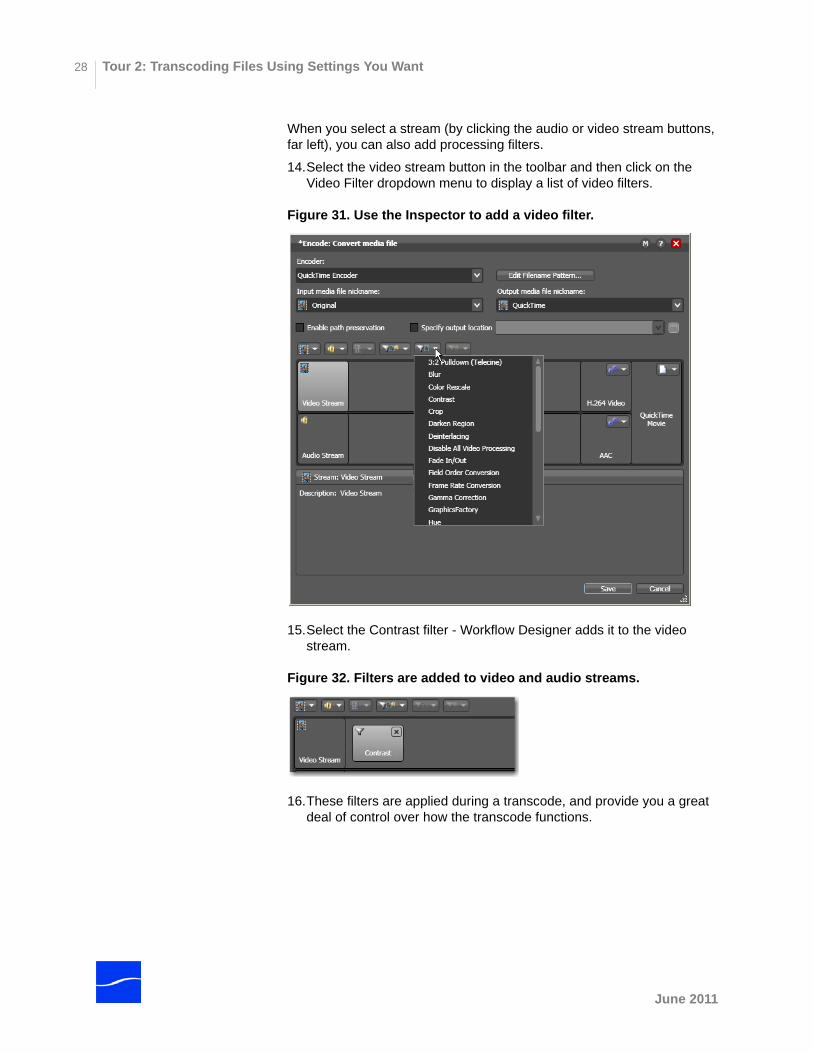
Tour 2: Transcoding Files Using Settings You Want28
When you select a stream (by clicking the audio or video stream buttons, far left), you can also add processing filters.
14.Select the video stream button in the toolbar and then click on the Video Filter dropdown menu to display a list of video filters.
Figure 31. Use the Inspector to add a video filter.
15.Select the Contrast filter - Workflow Designer adds it to the video stream.
Figure 32. Filters are added to video and audio streams.
16.These filters are applied during a transcode, and provide you a great deal of control over how the transcode functions.
June 2011
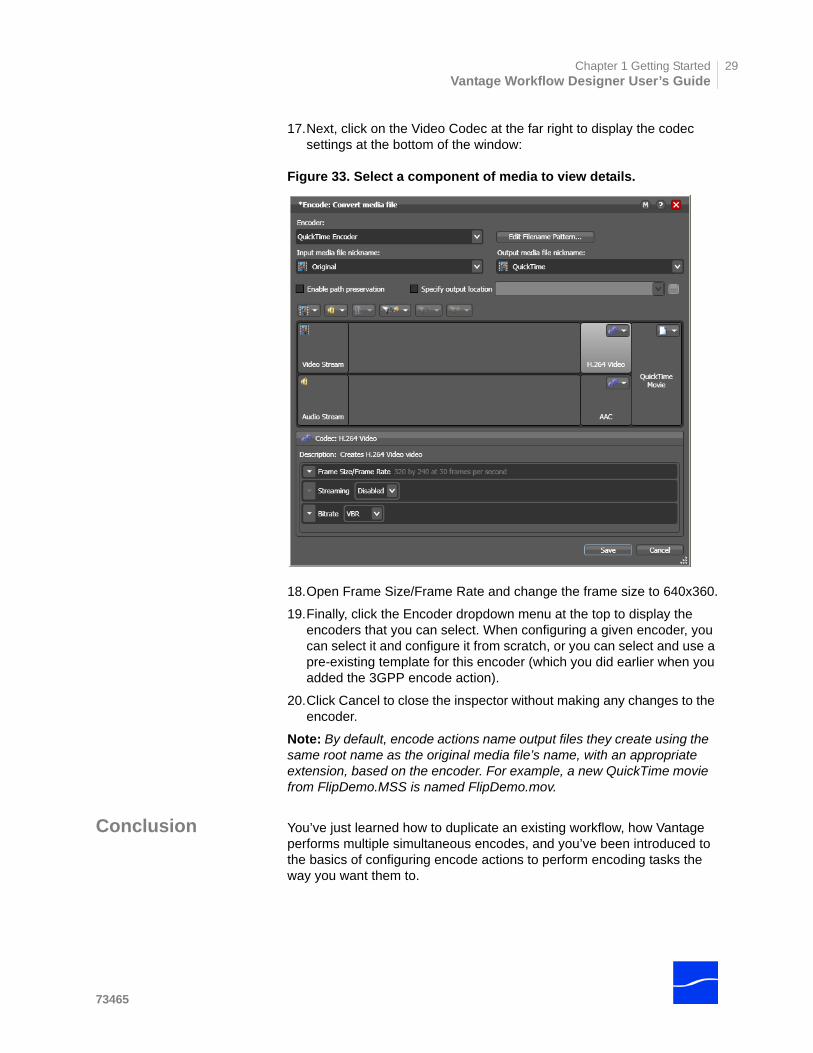
Chapter 1 Getting StartedVantage Workflow Designer User’s Guide
29
17.Next, click on the Video Codec at the far right to display the codec settings at the bottom of the window:
Figure 33. Select a component of media to view details.
18.Open Frame Size/Frame Rate and change the frame size to 640x360.
19.Finally, click the Encoder dropdown menu at the top to display the encoders that you can select. When configuring a given encoder, you can select it and configure it from scratch, or you can select and use a pre-existing template for this encoder (which you did earlier when you added the 3GPP encode action).
20.Click Cancel to close the inspector without making any changes to the encoder.
Note: By default, encode actions name output files they create using the same root name as the original media file’s name, with an appropriate extension, based on the encoder. For example, a new QuickTime movie from FlipDemo.MSS is named FlipDemo.mov.
Conclusion You’ve just learned how to duplicate an existing workflow, how Vantage performs multiple simultaneous encodes, and you’ve been introduced to the basics of configuring encode actions to perform encoding tasks the way you want them to.
73465
Tour 3: Using Binders in Workflows30
TOUR 3: USING BINDERS IN WORKFLOWS
This hands-on tour takes about 30 minutes and introduces you to the concept of a binder in Vantage and how they enable you to easily track and manage multiple files during a workflow, simplifying workflow design.
Tour Overview In this tour, we explore a key and powerful feature in Vantage - binders. Binders enable you to simplify complex workflows, and organize all of the assets for a given version of media in a centrally-accessible manner. In this tour, you’ll learn the following:
Introduction to Binders
File Mode vs. Binder Mode
Nicknames
Adding a Delete Action
Tracking Nicknames in a Workflow
Attachment Files and the Associate Action
Introduction to Binders
A binder is a collection of media files, attachment files, metadata tracks, and metadata labels. Binders are not an actual physical location; rather, they are a collection of references to files and metadata labels. Binders provide Vantage with the mechanism for tracking multiple assets as a workflow executes. This allows you to design very complicated workflows – that can deal with dozens of files simultaneously – and separates your workflow design from the underlying files themselves.
File Mode vs. Binder Mode
By default, Vantage initially starts in file mode, a simplified mode designed for transcoding workflows. In file mode, Vantage automatically assumes that each action operates upon the media file created (or otherwise processed) by the previous action. This makes workflow design easier, particularly for simple transcoding workflows.
However, many actions are not suitable for - or available - in file mode. For example, the delete action is not available – it requires that you identify a specific file - how would you convey to the action which file to delete? Or, if you deleted the only file in the workflow, what file would following actions use?
Further, although file mode allows you to create workflow branches, it doesn’t allow you to merge the branches. That’s because, in file mode, each line represents the flow of a file through the workflow - thus, when the two branches merge, which file would the merged actions operate on?
While the file-based workflow concept is straight-forward and enables fast and easy workflow design, file-based workflow design has some inherent limitations.
To overcome these limitations, Vantage introduces binder mode. In binder mode, workflow lines do not represent the movement of a file - they only represent the order of the execution of actions. This key difference
June 2011
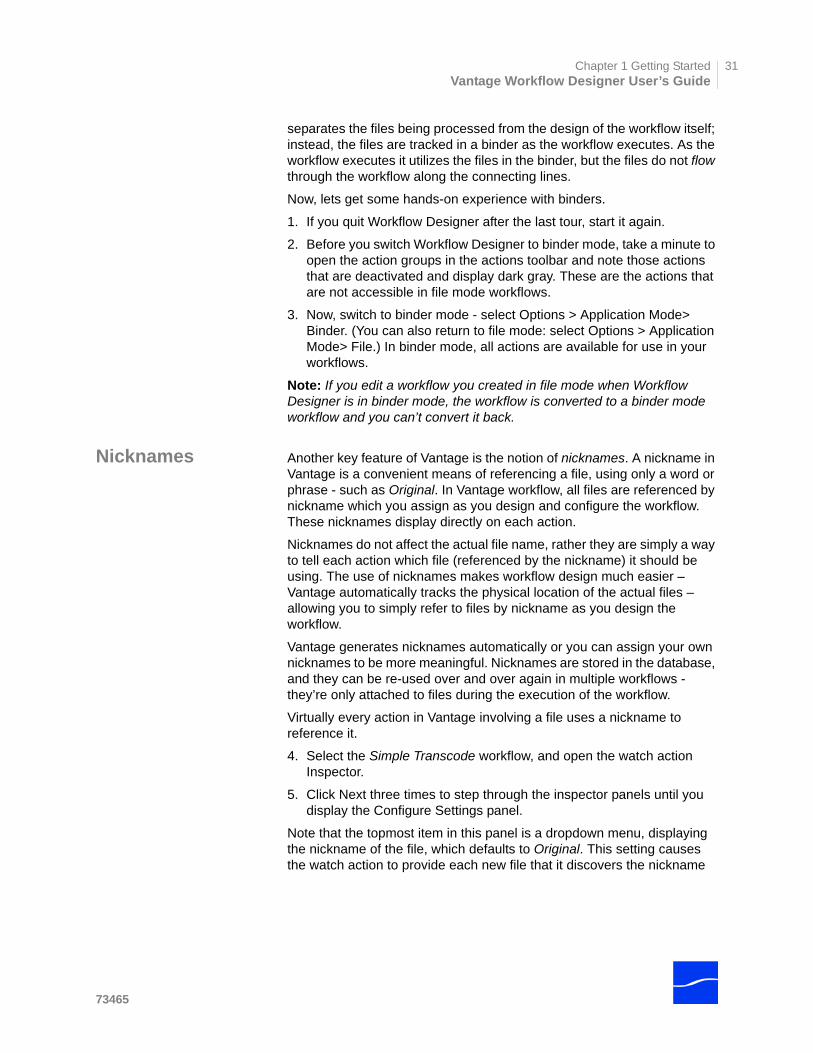
Chapter 1 Getting StartedVantage Workflow Designer User’s Guide
31
separates the files being processed from the design of the workflow itself; instead, the files are tracked in a binder as the workflow executes. As the workflow executes it utilizes the files in the binder, but the files do not flow through the workflow along the connecting lines.
Now, lets get some hands-on experience with binders.
1. If you quit Workflow Designer after the last tour, start it again.
2. Before you switch Workflow Designer to binder mode, take a minute to open the action groups in the actions toolbar and note those actions that are deactivated and display dark gray. These are the actions that are not accessible in file mode workflows.
3. Now, switch to binder mode - select Options > Application Mode> Binder. (You can also return to file mode: select Options > Application Mode> File.) In binder mode, all actions are available for use in your workflows.
Note: If you edit a workflow you created in file mode when Workflow Designer is in binder mode, the workflow is converted to a binder mode workflow and you can’t convert it back.
Nicknames Another key feature of Vantage is the notion of nicknames. A nickname in Vantage is a convenient means of referencing a file, using only a word or phrase - such as Original. In Vantage workflow, all files are referenced by nickname which you assign as you design and configure the workflow. These nicknames display directly on each action.
Nicknames do not affect the actual file name, rather they are simply a way to tell each action which file (referenced by the nickname) it should be using. The use of nicknames makes workflow design much easier – Vantage automatically tracks the physical location of the actual files – allowing you to simply refer to files by nickname as you design the workflow.
Vantage generates nicknames automatically or you can assign your own nicknames to be more meaningful. Nicknames are stored in the database, and they can be re-used over and over again in multiple workflows - they’re only attached to files during the execution of the workflow.
Virtually every action in Vantage involving a file uses a nickname to reference it.
4. Select the Simple Transcode workflow, and open the watch action Inspector.
5. Click Next three times to step through the inspector panels until you display the Configure Settings panel.
Note that the topmost item in this panel is a dropdown menu, displaying the nickname of the file, which defaults to Original. This setting causes the watch action to provide each new file that it discovers the nickname
73465
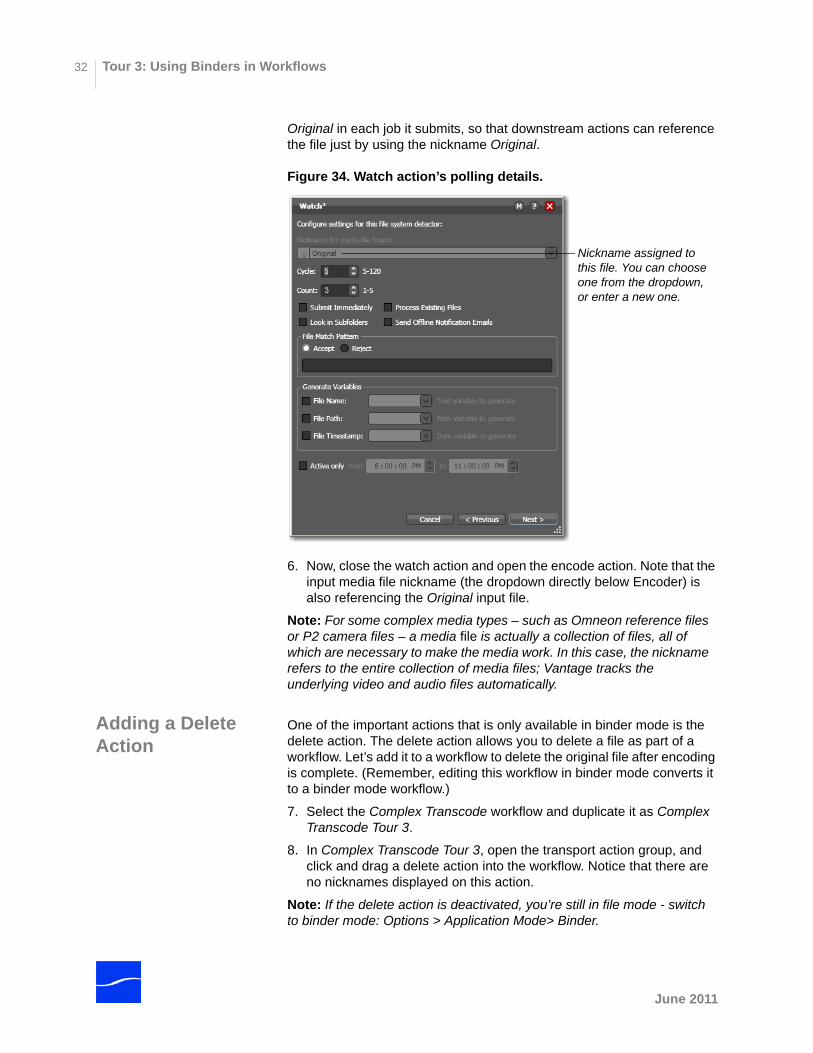
Tour 3: Using Binders in Workflows32
Original in each job it submits, so that downstream actions can reference the file just by using the nickname Original.
Figure 34. Watch action’s polling details.
6. Now, close the watch action and open the encode action. Note that the input media file nickname (the dropdown directly below Encoder) is also referencing the Original input file.
Note: For some complex media types – such as Omneon reference files or P2 camera files – a media file is actually a collection of files, all of which are necessary to make the media work. In this case, the nickname refers to the entire collection of media files; Vantage tracks the underlying video and audio files automatically.
Adding a Delete Action
One of the important actions that is only available in binder mode is the delete action. The delete action allows you to delete a file as part of a workflow. Let’s add it to a workflow to delete the original file after encoding is complete. (Remember, editing this workflow in binder mode converts it to a binder mode workflow.)
7. Select the Complex Transcode workflow and duplicate it as Complex Transcode Tour 3.
8. In Complex Transcode Tour 3, open the transport action group, and click and drag a delete action into the workflow. Notice that there are no nicknames displayed on this action.
Note: If the delete action is deactivated, you’re still in file mode - switch to binder mode: Options > Application Mode> Binder.
Nickname assigned to this file. You can choose one from the dropdown, or enter a new one.
June 2011
Chapter 1 Getting StartedVantage Workflow Designer User’s Guide
33
9. Now, connect the delete action to the copy action on the top encode action branch.
Note: Notice that the nicknames now display on this action. The list on the left are files available before execution; the list on the right are files available after execution. (After configuration, the files used in this action are highlighted.)
Figure 35. File nicknames display on the face of an action.
10.Now, open the delete action inspector (remember to click the yellow I icon in the top left corner).
Figure 36. Delete action inspector lists files by nickname.
The delete action accepts one parameter: The nickname of the file that you want to delete. This delete action displays the nicknames of all files in the workflow - Original (from watch) and Version0, and Version1 (from both encodes).
11.Select Original (which identifies the ingested file) and click Save to close the inspector.
Now - Vantage highlights the other encode action’s Original nickname in red, indicating an error - this file has been deleted. By using nicknames, Vantage can discover many workflow design issues automatically – in this case, you’re attempting to delete a file while it is simultaneously being transcoded by a peer encode action in the other branch!
Nicknames of files in this workflow before execution of this action.
Nicknames of files in this workflow after execution of this action.
73465
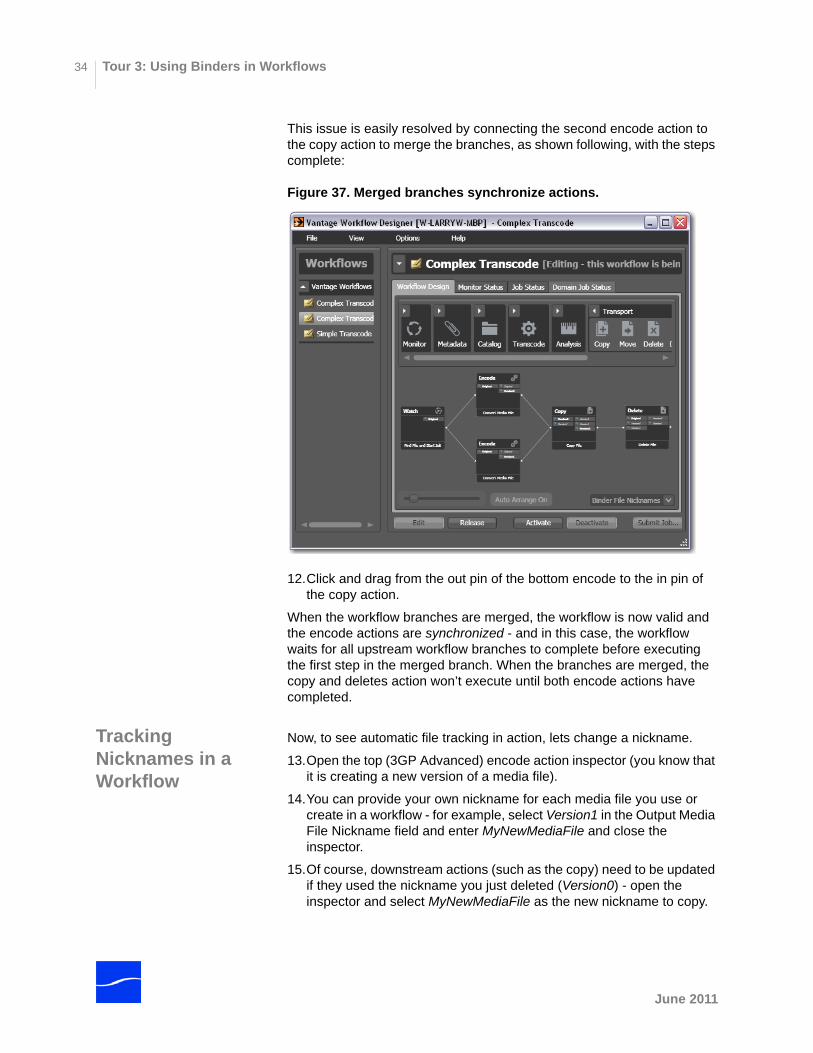
Tour 3: Using Binders in Workflows34
This issue is easily resolved by connecting the second encode action to the copy action to merge the branches, as shown following, with the steps complete:
Figure 37. Merged branches synchronize actions.
12.Click and drag from the out pin of the bottom encode to the in pin of the copy action.
When the workflow branches are merged, the workflow is now valid and the encode actions are synchronized - and in this case, the workflow waits for all upstream workflow branches to complete before executing the first step in the merged branch. When the branches are merged, the copy and deletes action won’t execute until both encode actions have completed.
Tracking Nicknames in a Workflow
Now, to see automatic file tracking in action, lets change a nickname.
13.Open the top (3GP Advanced) encode action inspector (you know that it is creating a new version of a media file).
14.You can provide your own nickname for each media file you use or create in a workflow - for example, select Version1 in the Output Media File Nickname field and enter MyNewMediaFile and close the inspector.
15.Of course, downstream actions (such as the copy) need to be updated if they used the nickname you just deleted (Version0) - open the inspector and select MyNewMediaFile as the new nickname to copy.
June 2011
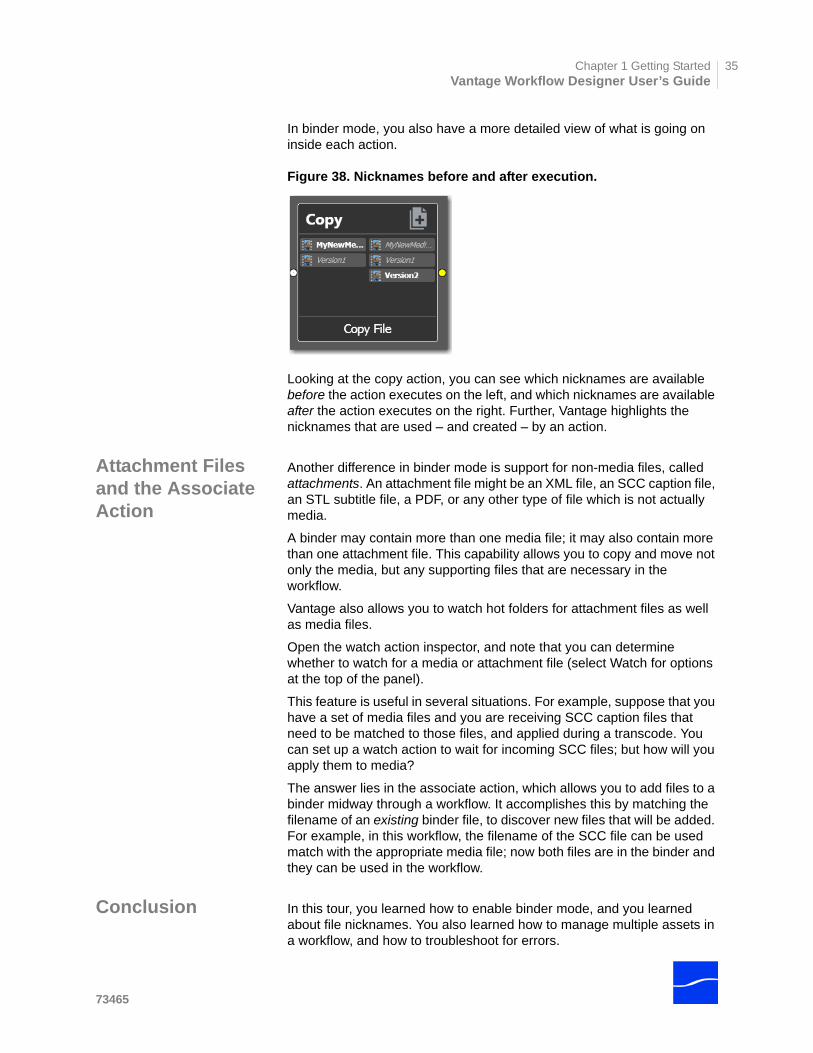
Chapter 1 Getting StartedVantage Workflow Designer User’s Guide
35
In binder mode, you also have a more detailed view of what is going on inside each action.
Figure 38. Nicknames before and after execution.
Looking at the copy action, you can see which nicknames are available before the action executes on the left, and which nicknames are available after the action executes on the right. Further, Vantage highlights the nicknames that are used – and created – by an action.
Attachment Files and the Associate Action
Another difference in binder mode is support for non-media files, called attachments. An attachment file might be an XML file, an SCC caption file, an STL subtitle file, a PDF, or any other type of file which is not actually media.
A binder may contain more than one media file; it may also contain more than one attachment file. This capability allows you to copy and move not only the media, but any supporting files that are necessary in the workflow.
Vantage also allows you to watch hot folders for attachment files as well as media files.
Open the watch action inspector, and note that you can determine whether to watch for a media or attachment file (select Watch for options at the top of the panel).
This feature is useful in several situations. For example, suppose that you have a set of media files and you are receiving SCC caption files that need to be matched to those files, and applied during a transcode. You can set up a watch action to wait for incoming SCC files; but how will you apply them to media?
The answer lies in the associate action, which allows you to add files to a binder midway through a workflow. It accomplishes this by matching the filename of an existing binder file, to discover new files that will be added. For example, in this workflow, the filename of the SCC file can be used match with the appropriate media file; now both files are in the binder and they can be used in the workflow.
Conclusion In this tour, you learned how to enable binder mode, and you learned about file nicknames. You also learned how to manage multiple assets in a workflow, and how to troubleshoot for errors.
73465
Tour 4: Using Variables in Workflows36
TOUR 4: USING VARIABLES IN WORKFLOWS
This hands-on tour takes about 30 minutes and introduces you to the concept of variables in Vantage and provides you a first look at the Vantage Management Console.
Tour Overview This tour discusses the role that variables play in Vantage workflows: passing important job information between actions, controlling execution flow, action priority, and controlling job routing.
In this tour, you’ll learn the following:
Introduction to Variables
Starting the Vantage Management Console
Creating and Managing Variables
Using the Priority Variable
Setting Variable Values in a Workflow
Using Variables in the Workflow
Introduction to Variables
Variables are temporary job metadata; it is information that only lasts as long as the job. A variable is simply a name, a type, and a value – for example, a number named Lines of Black at Top, set to 50.
Variables can be used in several ways in Vantage:
- To allow information to be passed between actions in a workflow
- For job routing to specialized hardware
- For decision-making to determine which branch of actions execute
- To determine the priority of a particular action
In this tour, you’ll learn how to manage and publish variables. In subsequent tours you’ll also learn how to use variables for decision-making and job routing.
Starting the Vantage Management Console
Variables are managed in the Vantage Domain via the Vantage Management Console. (You can also create variables directly in Workflow Designer, when you are implementing a variable.)
To start the console, double-click the Vantage Management Console shortcut on your desktop.
Figure 39. Vantage Management Console desktop shortcut
June 2011
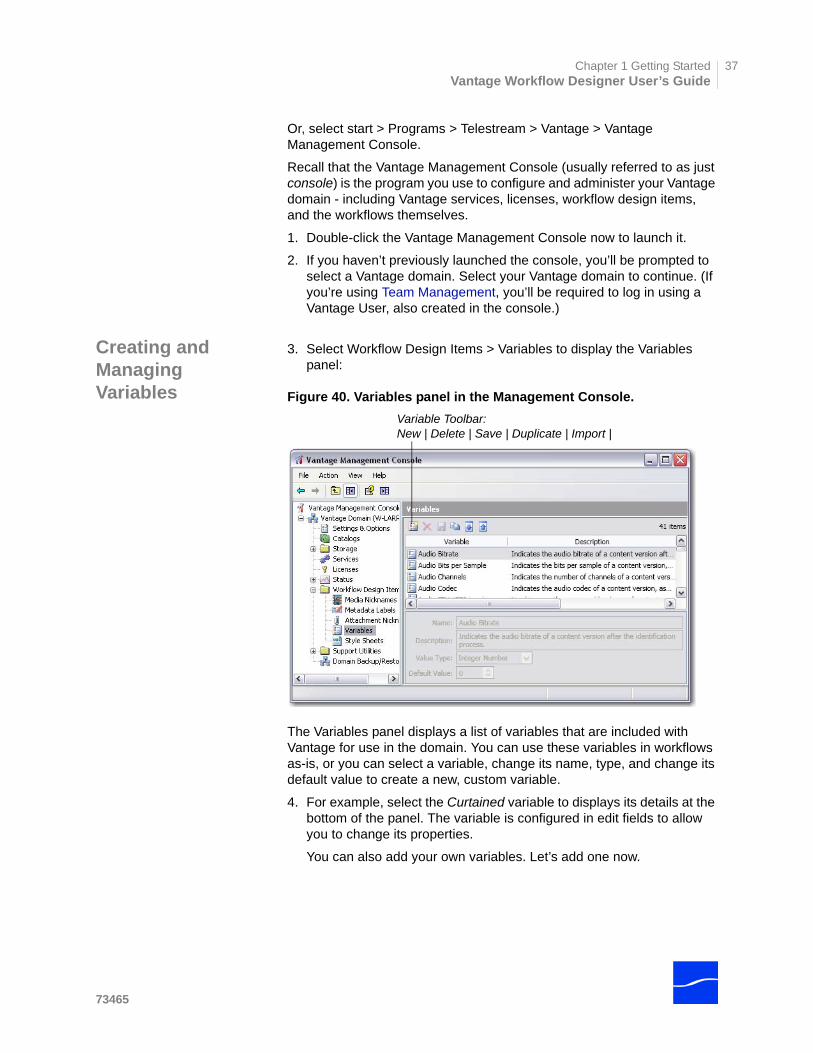
Chapter 1 Getting StartedVantage Workflow Designer User’s Guide
37
Or, select start > Programs > Telestream > Vantage > Vantage Management Console.
Recall that the Vantage Management Console (usually referred to as just console) is the program you use to configure and administer your Vantage domain - including Vantage services, licenses, workflow design items, and the workflows themselves.
1. Double-click the Vantage Management Console now to launch it.
2. If you haven’t previously launched the console, you’ll be prompted to select a Vantage domain. Select your Vantage domain to continue. (If you’re using Team Management, you’ll be required to log in using a Vantage User, also created in the console.)
Creating and Managing Variables
3. Select Workflow Design Items > Variables to display the Variables panel:
Figure 40. Variables panel in the Management Console.
The Variables panel displays a list of variables that are included with Vantage for use in the domain. You can use these variables in workflows as-is, or you can select a variable, change its name, type, and change its default value to create a new, custom variable.
4. For example, select the Curtained variable to displays its details at the bottom of the panel. The variable is configured in edit fields to allow you to change its properties.
You can also add your own variables. Let’s add one now.
Variable Toolbar:New | Delete | Save | Duplicate | Import |
73465
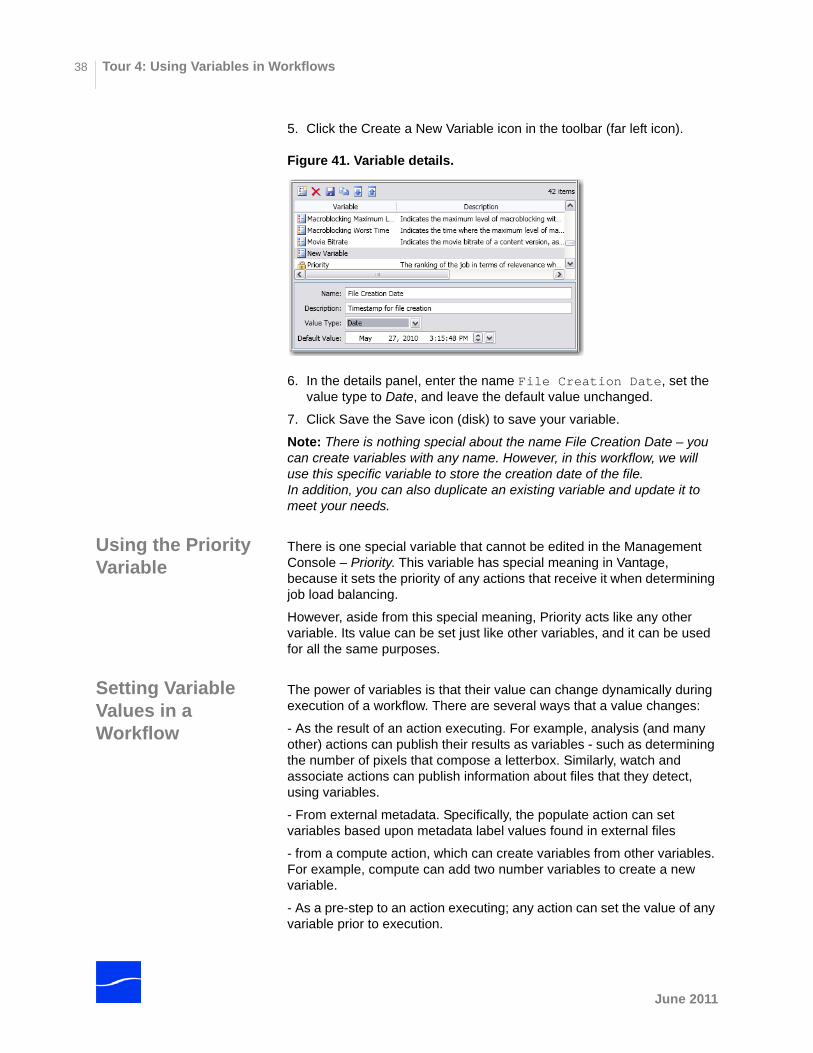
Tour 4: Using Variables in Workflows38
5. Click the Create a New Variable icon in the toolbar (far left icon).
Figure 41. Variable details.
6. In the details panel, enter the name File Creation Date, set the value type to Date, and leave the default value unchanged.
7. Click Save the Save icon (disk) to save your variable.
Note: There is nothing special about the name File Creation Date – you can create variables with any name. However, in this workflow, we will use this specific variable to store the creation date of the file.In addition, you can also duplicate an existing variable and update it to meet your needs.
Using the Priority Variable
There is one special variable that cannot be edited in the Management Console – Priority. This variable has special meaning in Vantage, because it sets the priority of any actions that receive it when determining job load balancing.
However, aside from this special meaning, Priority acts like any other variable. Its value can be set just like other variables, and it can be used for all the same purposes.
Setting Variable Values in a Workflow
The power of variables is that their value can change dynamically during execution of a workflow. There are several ways that a value changes:
- As the result of an action executing. For example, analysis (and many other) actions can publish their results as variables - such as determining the number of pixels that compose a letterbox. Similarly, watch and associate actions can publish information about files that they detect, using variables.
- From external metadata. Specifically, the populate action can set variables based upon metadata label values found in external files
- from a compute action, which can create variables from other variables. For example, compute can add two number variables to create a new variable.
- As a pre-step to an action executing; any action can set the value of any variable prior to execution.
June 2011
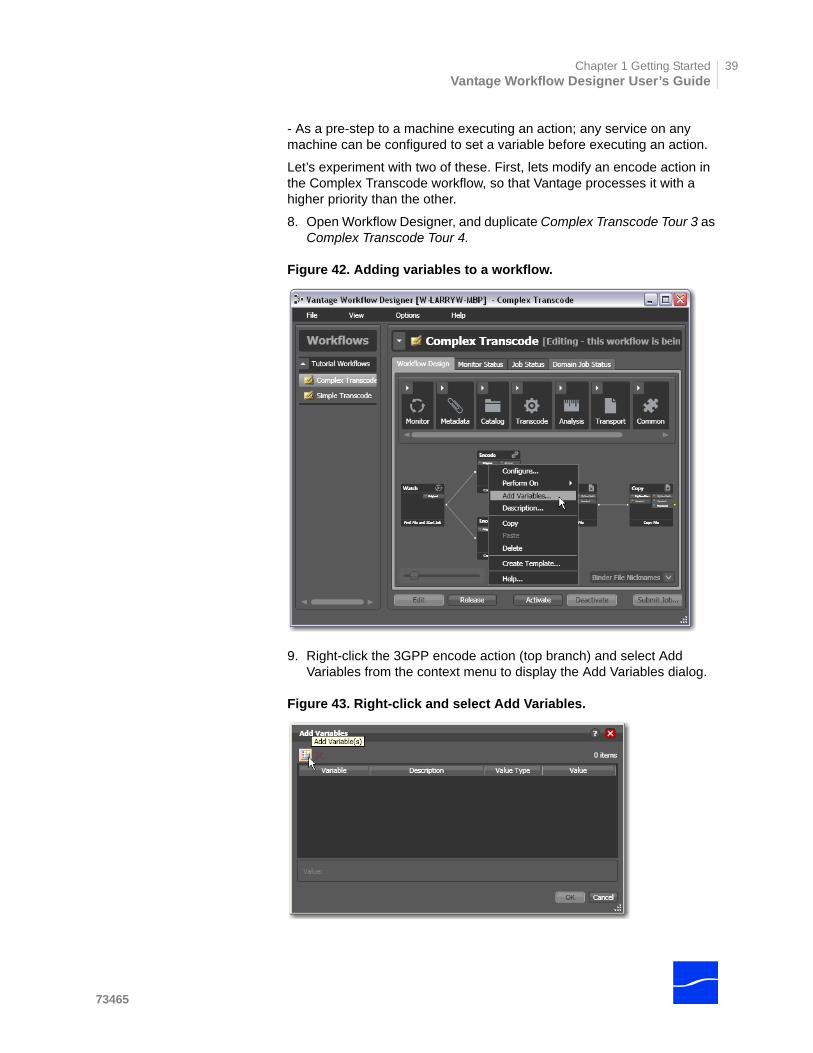
Chapter 1 Getting StartedVantage Workflow Designer User’s Guide
39
- As a pre-step to a machine executing an action; any service on any machine can be configured to set a variable before executing an action.
Let’s experiment with two of these. First, lets modify an encode action in the Complex Transcode workflow, so that Vantage processes it with a higher priority than the other.
8. Open Workflow Designer, and duplicate Complex Transcode Tour 3 as Complex Transcode Tour 4.
Figure 42. Adding variables to a workflow.
9. Right-click the 3GPP encode action (top branch) and select Add Variables from the context menu to display the Add Variables dialog.
Figure 43. Right-click and select Add Variables.
73465
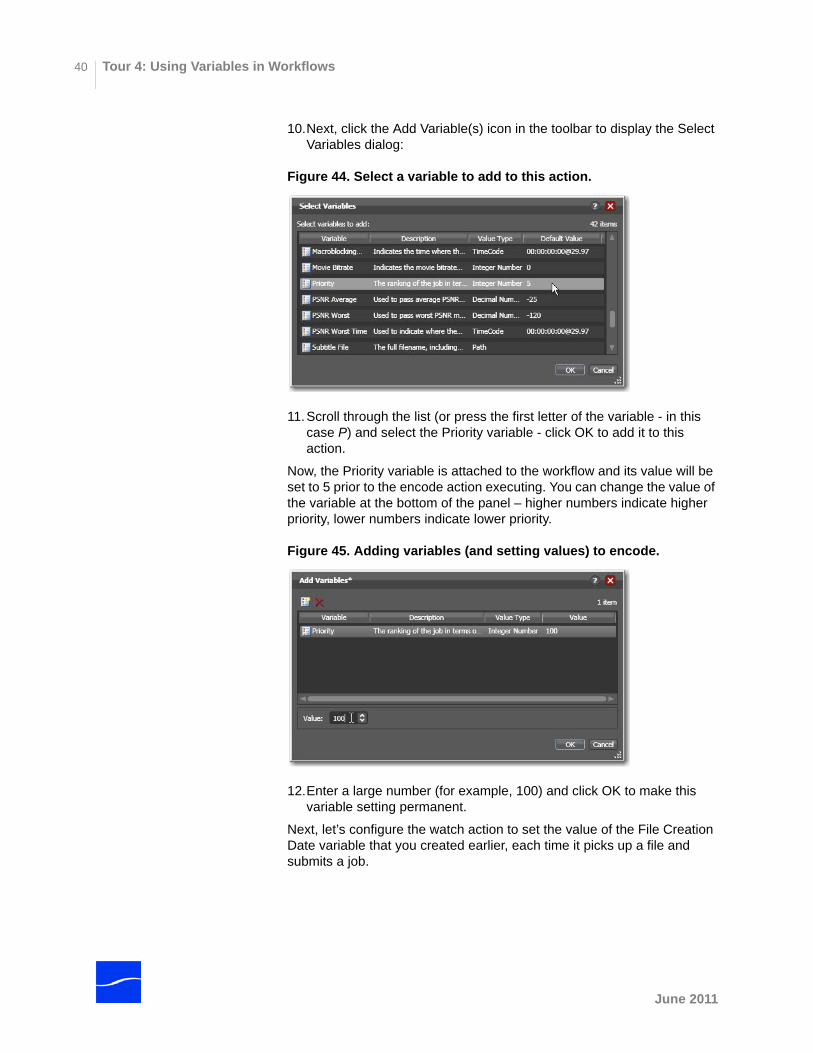
Tour 4: Using Variables in Workflows40
10.Next, click the Add Variable(s) icon in the toolbar to display the Select Variables dialog:
Figure 44. Select a variable to add to this action.
11.Scroll through the list (or press the first letter of the variable - in this case P) and select the Priority variable - click OK to add it to this action.
Now, the Priority variable is attached to the workflow and its value will be set to 5 prior to the encode action executing. You can change the value of the variable at the bottom of the panel – higher numbers indicate higher priority, lower numbers indicate lower priority.
Figure 45. Adding variables (and setting values) to encode.
12.Enter a large number (for example, 100) and click OK to make this variable setting permanent.
Next, let’s configure the watch action to set the value of the File Creation Date variable that you created earlier, each time it picks up a file and submits a job.
June 2011
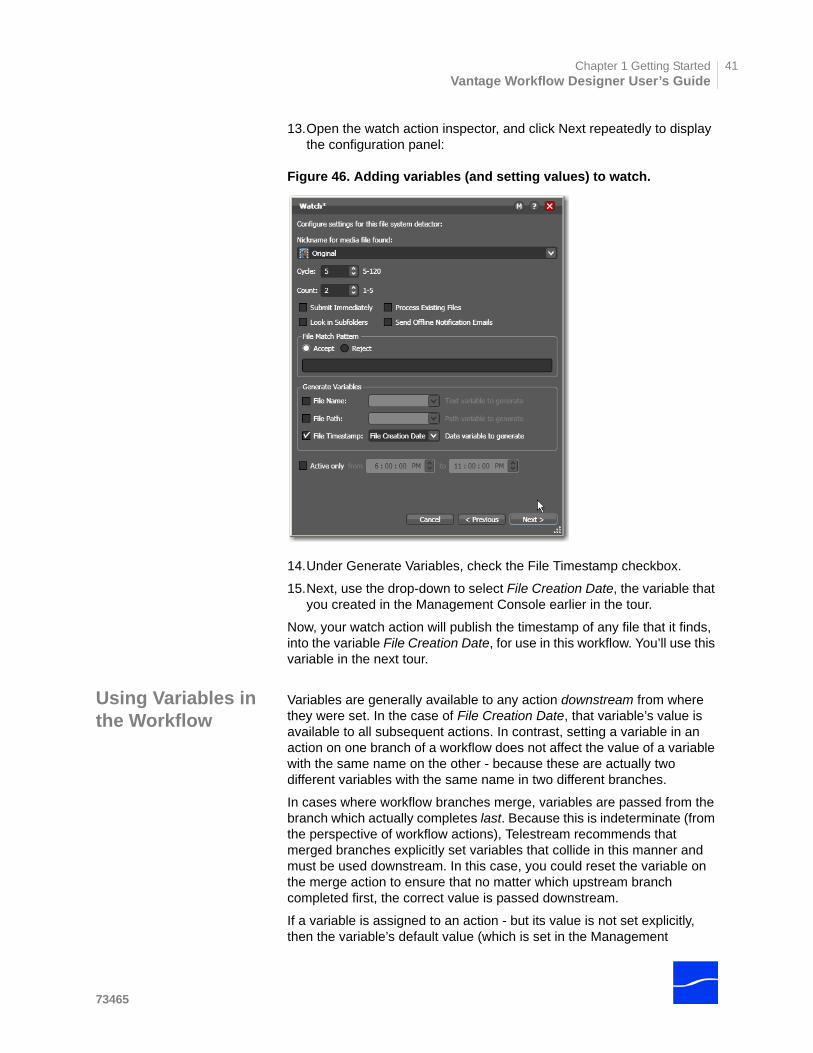
Chapter 1 Getting StartedVantage Workflow Designer User’s Guide
41
13.Open the watch action inspector, and click Next repeatedly to display the configuration panel:
Figure 46. Adding variables (and setting values) to watch.
14.Under Generate Variables, check the File Timestamp checkbox.
15.Next, use the drop-down to select File Creation Date, the variable that you created in the Management Console earlier in the tour.
Now, your watch action will publish the timestamp of any file that it finds, into the variable File Creation Date, for use in this workflow. You’ll use this variable in the next tour.
Using Variables in the Workflow
Variables are generally available to any action downstream from where they were set. In the case of File Creation Date, that variable’s value is available to all subsequent actions. In contrast, setting a variable in an action on one branch of a workflow does not affect the value of a variable with the same name on the other - because these are actually two different variables with the same name in two different branches.
In cases where workflow branches merge, variables are passed from the branch which actually completes last. Because this is indeterminate (from the perspective of workflow actions), Telestream recommends that merged branches explicitly set variables that collide in this manner and must be used downstream. In this case, you could reset the variable on the merge action to ensure that no matter which upstream branch completed first, the correct value is passed downstream.
If a variable is assigned to an action - but its value is not set explicitly, then the variable’s default value (which is set in the Management
73465
Tour 4: Using Variables in Workflows42
Console) is used. For example, in the above workflow, Priority is set to 100 (higher priority) for one of the encode actions; the other uses the default value of 5 (lower priority).
Conclusion In this tour, you learned about managing and creating variables, as well as how to set variable values in a workflow. In the next two tours, you’ll learn about how to use variables for decision-making, and how to use them to pass information between actions in a workflow.
June 2011
Chapter 1 Getting StartedVantage Workflow Designer User’s Guide
43
TOUR 5: DECISION MAKING IN WORKFLOWS
This hands-on tour takes about 30 minutes and introduces you to the concept of decision-making in Vantage and you use variables to make decisions.
Note: To execute workflows you create in this tour, you’ll need a license - certain features (the decide action, for example) won’t execute without one. For a trial license, contact [email protected].
Tour Overview In this tour, you’ll learn the following:
Action States
The Decide Action
Processing New Files Example
Filtering Old Files Example
If you quit Workflow Designer after the last tour, be sure to start it again.
Action States After most actions execute, they set one of three action states to indicate the result of the execution: Pass, Ignore, and Fail. This state is automatically passed to the next action or actions (in the case of a branch) in the workflow; these actions in turn may determine whether or not to execute based upon the incoming state. Action states enable decision-making - causing entire branches of the workflow to not execute.
To understand how to use action states, its important to understand their precedence, whether an action receives states from one or multiple incoming actions (a merge of multiple branches):
- If at least one incoming state is Fail, regardless of other incoming states, the action inherits Fail and must pass it on - Fail has precedence over all action states. Most actions will not execute if they inherit Fail. If one action fails, the entire job fails.
- If there is no Fail state, but at least one Pass state, then the action inherits Pass - which has precedence over Ignore.
- If all incoming states are Ignore, the action inherits Ignore. Ignore has lowest precedence of the three states.
Generally speaking, actions only execute if (1) none of their predecessors set the Fail state, and (2) at least one of the predecessors set the Pass state.
Similarly, if an action sets Ignore, the next action will also likely not execute. Most actions, excluding watch and associate, can be configured to perform on certain states - this allows workflows to send an email for example, if they detect a failure.
Note: Actions can also be configured to execute upon receipt of Fail or Ignore – for example, to send an email when a failure is detected. To configure an action’s execution based on the incoming action state,
73465
Tour 5: Decision Making in Workflows44
right-click and select Perform On.You can also set an action to execute regardless of the state: Right-click and select Perform On > Any.
The Decide Action The Decide action analyzes incoming variables and sets the action state based upon the results of its analysis. Decide effectively acts as a gatekeeper to a branch in a workflow, determining whether the actions that comprise that branch should execute (Pass), not execute (Ignore), or report a failure (Fail).
Because variables are set at run-time, decide allows you to set this state at run-time and may behave differently for every job through a workflow. This action is a powerful action allowing you to build complex decision-making into a workflow.
Note that if you want to have multiple branches in a workflow, and only execute one or some of them for each job, then you’ll need multiple decides – one acting as a gatekeeper for each branch in the workflow.
Processing New Files Example
Let’s look at an example.
1. Open the Complex Transcode Tour 4 workflow and rename it to Complex Transcode Tour 5. We’ll update this workflow to only process new files that are in the hot folder.
Recall that in Tour 4, the watch action was configured to publish a variable named File Creation Date. We’ll use this variable to only process files created after January 1st, 2010.
2. In the actions toolbar, open the Common category and drag a decide action onto the workflow.
June 2011
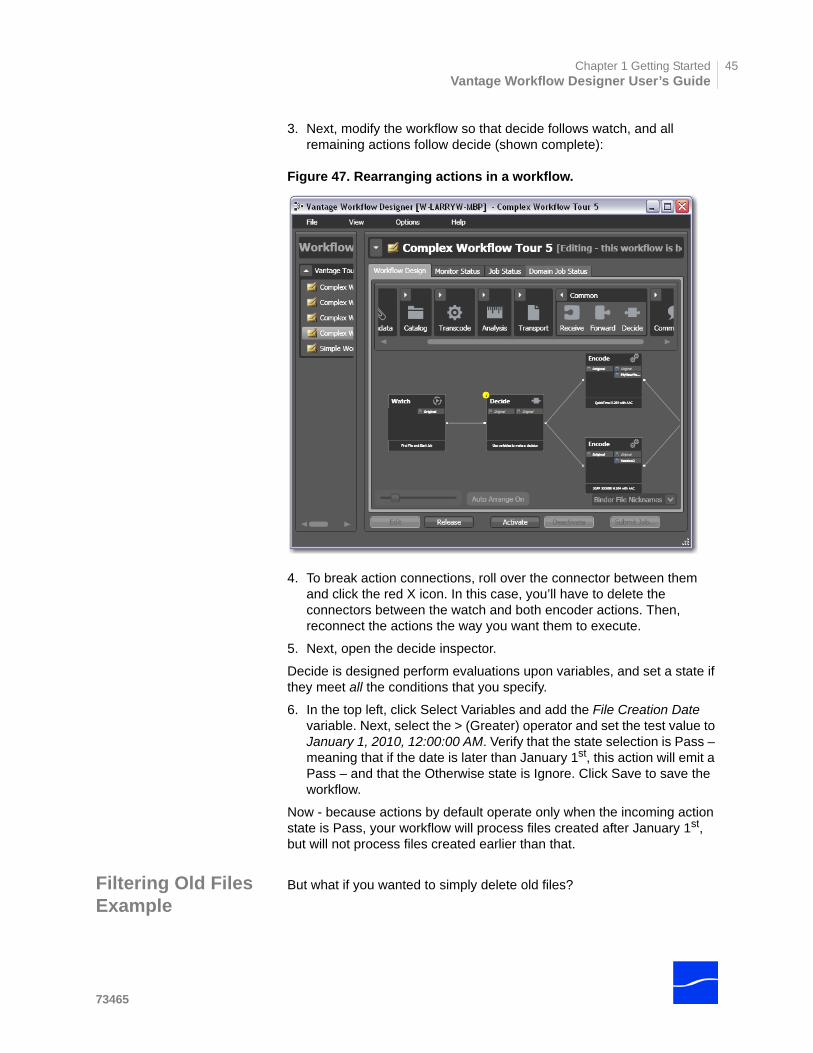
Chapter 1 Getting StartedVantage Workflow Designer User’s Guide
45
3. Next, modify the workflow so that decide follows watch, and all remaining actions follow decide (shown complete):
Figure 47. Rearranging actions in a workflow.
4. To break action connections, roll over the connector between them and click the red X icon. In this case, you’ll have to delete the connectors between the watch and both encoder actions. Then, reconnect the actions the way you want them to execute.
5. Next, open the decide inspector.
Decide is designed perform evaluations upon variables, and set a state if they meet all the conditions that you specify.
6. In the top left, click Select Variables and add the File Creation Date variable. Next, select the > (Greater) operator and set the test value to January 1, 2010, 12:00:00 AM. Verify that the state selection is Pass – meaning that if the date is later than January 1st, this action will emit a Pass – and that the Otherwise state is Ignore. Click Save to save the workflow.
Now - because actions by default operate only when the incoming action state is Pass, your workflow will process files created after January 1st, but will not process files created earlier than that.
Filtering Old Files Example
But what if you wanted to simply delete old files?
73465
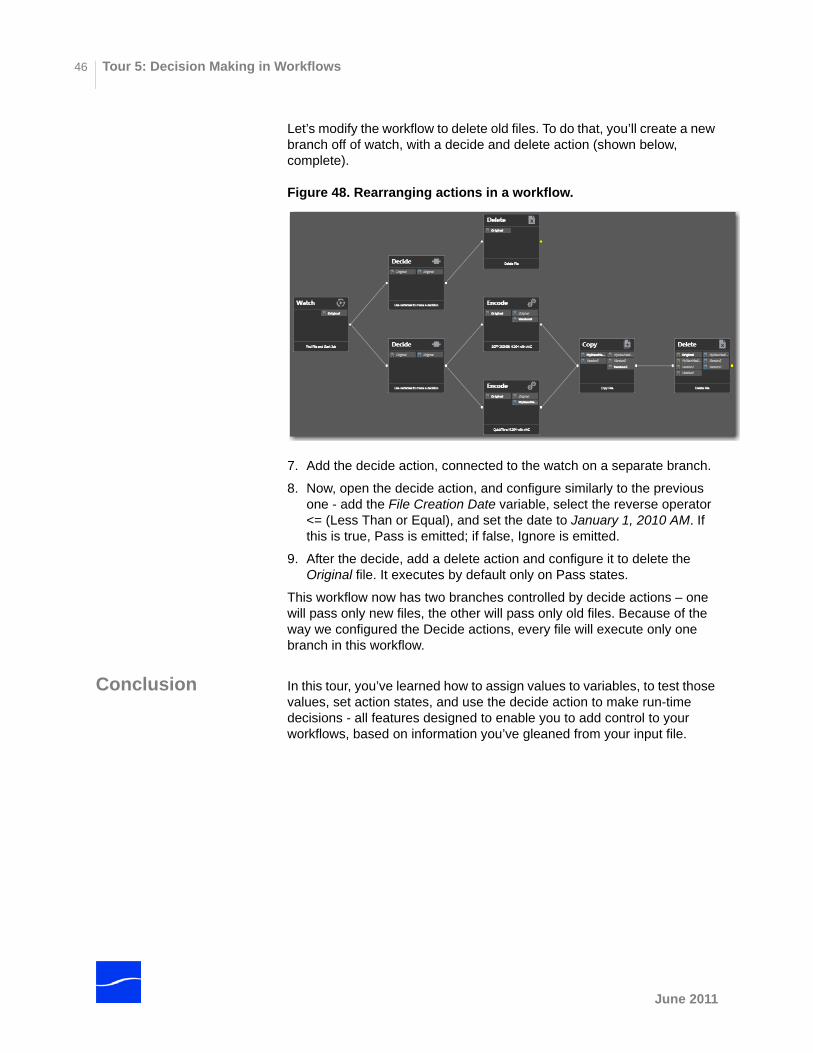
Tour 5: Decision Making in Workflows46
Let’s modify the workflow to delete old files. To do that, you’ll create a new branch off of watch, with a decide and delete action (shown below, complete).
Figure 48. Rearranging actions in a workflow.
7. Add the decide action, connected to the watch on a separate branch.
8. Now, open the decide action, and configure similarly to the previous one - add the File Creation Date variable, select the reverse operator <= (Less Than or Equal), and set the date to January 1, 2010 AM. If this is true, Pass is emitted; if false, Ignore is emitted.
9. After the decide, add a delete action and configure it to delete the Original file. It executes by default only on Pass states.
This workflow now has two branches controlled by decide actions – one will pass only new files, the other will pass only old files. Because of the way we configured the Decide actions, every file will execute only one branch in this workflow.
Conclusion In this tour, you’ve learned how to assign values to variables, to test those values, set action states, and use the decide action to make run-time decisions - all features designed to enable you to add control to your workflows, based on information you’ve gleaned from your input file.
June 2011
Chapter 1 Getting StartedVantage Workflow Designer User’s Guide
47
TOUR 6: DYNAMIC PARAMETERS
This hands-on tour takes about 15 minutes and introduces you to the concept of dynamic parameters in Vantage, and how they can be used to pass information between steps in a workflow.
Note: To execute workflows you create in this tour, you’ll need a license - certain features (the decide action, for example) won’t execute without one. For a trial license, contact [email protected].
Tour Overview In this tour, you’ll learn the following:
Parameter Binding
Cropping out Curtains
Parameter Binding Thus far, when we have configured our actions in a workflow, parameters have been set at a fixed value. For example, the frame size of a transcode output is 320x240. Obviously, by using fixed values the action performs the task the same way each time - creating an output file that is 320x240 - every time this action executes.
How would workflow processing improve, if we could change these settings and parameters job-by-job, on the basis of the media being processed?
Vantage supports this capability to dynamically change the value of parameters and settings by binding parameters to variables. Recall that variables are metadata that is only known at run-time, and this metadata may be different for every single file. In Vantage workflows, you can configure almost any parameter, in almost any action, to use a variable (and its current value) as its input.
Cropping out Curtains
Let's build a real-world example. In this example, we know that some of our content has black on the left and right - curtains - that we want to crop. However, the amount of black is likely to be slightly different for every file being processed in Vantage. Instead of creating many workflows to deal with each situation - and manually measuring the black before processing, we'll build a workflow to crop the curtains automatically, as appropriate for each incoming media file, by combining an examine actions with a transcode with filters implemented.
1. Open the Complex Transcode Tour 4 workflow again, and rename it to Complex Transcode Tour 6.
2. Using Complex Transcode Tour 6, open the Analysis group and drag an examine action out - connect it between watch and the top (QuickTime H.264/AAC) transcode action. (Remember to use Control to suspend auto-arrange to make it easier).
3. Open the examine inspector and click the Analyzer dropdown menu - select Curtain Detection. Designer displays the configuration setting for this analysis tool.
73465
Tour 6: Dynamic Parameters48
4. Open Generate Variables and configure this action to publish two variables (by checking them): Crop Left (select the Curtained Left Pixels variable) and Crop Right (select Curtained Right Pixels).
Note: Vantage provides many predefined variables for use in your actions. While this is convenient, you’re certainly free - and often will need to - create your own variables - they behave just like the ones Vantage provides.
5. Under Input Media File Nickname, select Original as the file to analyze.
6. Click Save to update the action and close the inspector.
7. Next, open the inspector of the transcode action immediately after examine.
8. Click on the Video Stream button, then click the triangle in the Video Filter button (2nd from the right) to display the video filters you can use. Add a Crop video filter to the transcode.
9. Select the Crop filter to display its parameters at the bottom of the window.
10.On the Left value, click the Browse (green with ellipses) button to display a list of available variables, and select the Left parameter to bind to the Curtained Left Pixels variable.
11.Perform these steps to do the same for the Right parameter and the Curtained Right Pixels variable.
12.Click Save when you’re done.
You've now created a dynamic transcode, which will automatically adjust crop settings based upon incoming curtain data from the curtain detection examine step. Every media file that is processed will have its own, custom transcode setting appropriate for that file!
Take a moment to explore the rest of the transcode settings in this inspector, and notice the bind buttons on many parameters. You’ll find the bind button in other actions as well - for example, the Web Service notification action allows you to send variables to external Web Services, and the Email message action allows you to include variables as part of an email.
13.If you have curtained material, submit a job for processing and view the results.
Conclusion In this tour, you learned how to create dynamic parameters that use variables as their inputs. This feature enables you to create powerful, dynamic workflows that adaptively change what they do based upon the metrics of the media being processed.
June 2011
49
C H A P T E R 2
U s i n g W o r k f l o wD e s i g n e r
Vantage Workflow Designer is a multi-user application for creating and managing workflows, and submitting and monitoring Vantage media processing jobs.
This chapter provides information about how you use the major features of Vantage Workflow Designer.
Topics Starting and Stopping Vantage Workflow Designer
Logging in to a Different Vantage Domain
Logging In with a Different Vantage User
Using Workflow Designer’s Workspace
Using the Workflows Panel
Using the Workflow Design Tab
Using the Monitor Status tab
Using the Job Status & Domain Job Status Tab
Using the Workflow Analytics Tab
Submitting Jobs Manually
Starting and Stopping Vantage Workflow Designer50
STARTING AND STOPPING VANTAGE WORKFLOW DESIGNER
Starting Workflow Designer
To start Workflow Designer, double-click the Vantage Workflow Designer shortcut on your desktop.
Figure 49. Workflow Designer desktop shortcut
Or, select start > Programs > Telestream > Vantage > Vantage Workflow Designer.
Logging InIf you are accessing a Vantage domain where Team Management is enabled, you need to provide your Vantage user to log in. (The default Vantage user is Administrator, with no password assigned).
Note: Vantage users - username and password - are maintained in the Vantage Management Console. If you don’t have a Vantage user, ask your Vantage administrator to create one for you.
When you start Workflow Designer, it displays the Vantage Domain Login window:
Figure 50. Logging in to Workflow Designer
Enter your Vantage username, and password if required, and click OK to connect.
The workflow categories that Workflow Designer displays are those that your Vantage user is authorized to access. Access to workflow categories is also controlled in the Vantage Management Console.
June 2011
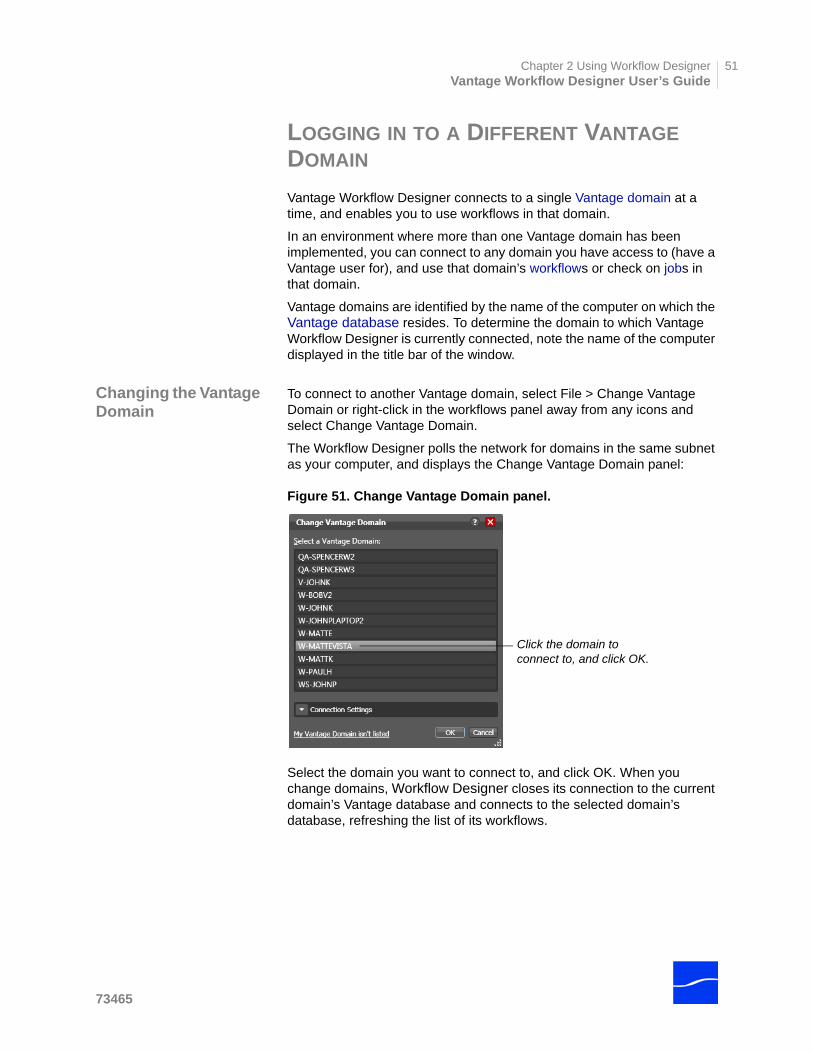
Chapter 2 Using Workflow DesignerVantage Workflow Designer User’s Guide
51
LOGGING IN TO A DIFFERENT VANTAGE DOMAIN
Vantage Workflow Designer connects to a single Vantage domain at a time, and enables you to use workflows in that domain.
In an environment where more than one Vantage domain has been implemented, you can connect to any domain you have access to (have a Vantage user for), and use that domain’s workflows or check on jobs in that domain.
Vantage domains are identified by the name of the computer on which the Vantage database resides. To determine the domain to which Vantage Workflow Designer is currently connected, note the name of the computer displayed in the title bar of the window.
Changing the Vantage Domain
To connect to another Vantage domain, select File > Change Vantage Domain or right-click in the workflows panel away from any icons and select Change Vantage Domain.
The Workflow Designer polls the network for domains in the same subnet as your computer, and displays the Change Vantage Domain panel:
Figure 51. Change Vantage Domain panel.
Select the domain you want to connect to, and click OK. When you change domains, Workflow Designer closes its connection to the current domain’s Vantage database and connects to the selected domain’s database, refreshing the list of its workflows.
Click the domain to connect to, and click OK.
73465
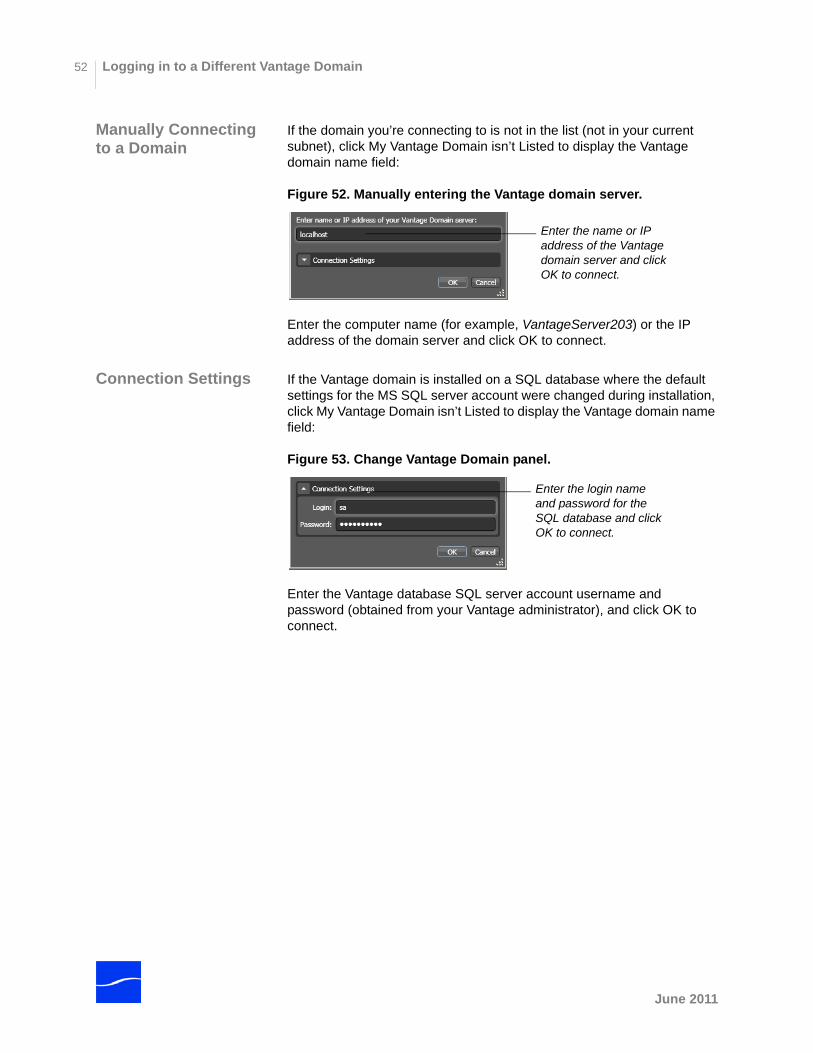
Logging in to a Different Vantage Domain52
Manually Connecting to a Domain
If the domain you’re connecting to is not in the list (not in your current subnet), click My Vantage Domain isn’t Listed to display the Vantage domain name field:
Figure 52. Manually entering the Vantage domain server.
Enter the computer name (for example, VantageServer203) or the IP address of the domain server and click OK to connect.
Connection Settings If the Vantage domain is installed on a SQL database where the default settings for the MS SQL server account were changed during installation, click My Vantage Domain isn’t Listed to display the Vantage domain name field:
Figure 53. Change Vantage Domain panel.
Enter the Vantage database SQL server account username and password (obtained from your Vantage administrator), and click OK to connect.
Enter the name or IP address of the Vantage domain server and click OK to connect.
Enter the login name and password for the SQL database and click OK to connect.
June 2011
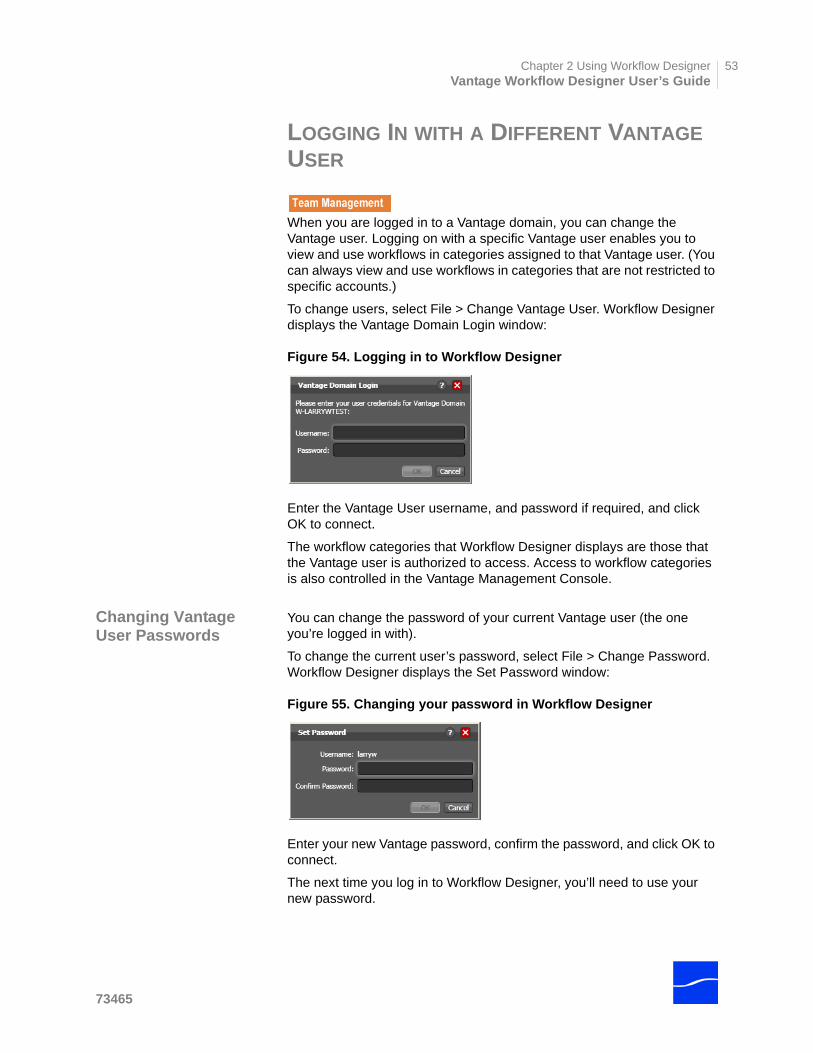
Chapter 2 Using Workflow DesignerVantage Workflow Designer User’s Guide
53
LOGGING IN WITH A DIFFERENT VANTAGE USER
When you are logged in to a Vantage domain, you can change the Vantage user. Logging on with a specific Vantage user enables you to view and use workflows in categories assigned to that Vantage user. (You can always view and use workflows in categories that are not restricted to specific accounts.)
To change users, select File > Change Vantage User. Workflow Designer displays the Vantage Domain Login window:
Figure 54. Logging in to Workflow Designer
Enter the Vantage User username, and password if required, and click OK to connect.
The workflow categories that Workflow Designer displays are those that the Vantage user is authorized to access. Access to workflow categories is also controlled in the Vantage Management Console.
Changing Vantage User Passwords
You can change the password of your current Vantage user (the one you’re logged in with).
To change the current user’s password, select File > Change Password. Workflow Designer displays the Set Password window:
Figure 55. Changing your password in Workflow Designer
Enter your new Vantage password, confirm the password, and click OK to connect.
The next time you log in to Workflow Designer, you’ll need to use your new password.
73465
Logging In with a Different Vantage User54
Adding or Updating a Vantage License
To add a license to your Vantage domain, select File > Add/Update License. Workflow Designer displays a File System dialog. Navigate to and select the license XML file and click Add. For more information on licenses in Vantage, see the Console User’s Guide.
Stopping Workflow Designer
To stop Workflow Designer, select File > Exit. You don’t need to save work you’ve accomplished or workflows you’ve changed. All workflows, monitor status, and job information is stored in the Vantage database and updated automatically as you make changes.
June 2011
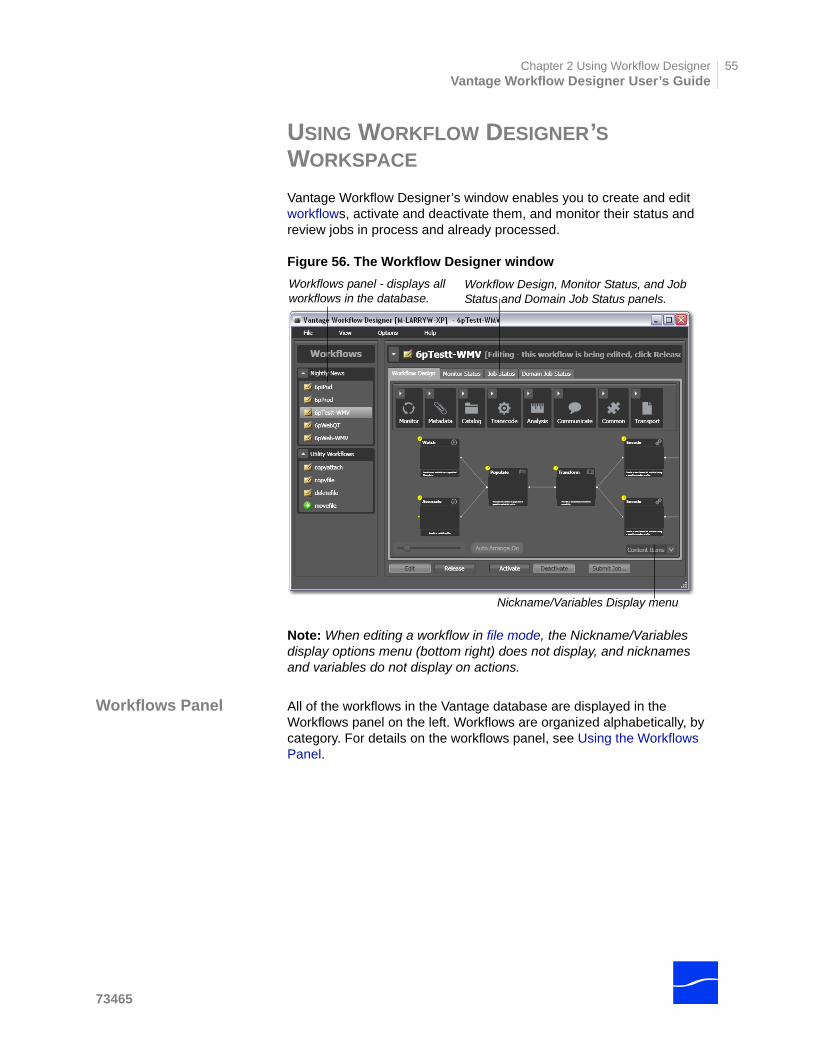
Chapter 2 Using Workflow DesignerVantage Workflow Designer User’s Guide
55
USING WORKFLOW DESIGNER’S WORKSPACE
Vantage Workflow Designer’s window enables you to create and edit workflows, activate and deactivate them, and monitor their status and review jobs in process and already processed.
Figure 56. The Workflow Designer window
Note: When editing a workflow in file mode, the Nickname/Variables display options menu (bottom right) does not display, and nicknames and variables do not display on actions.
Workflows Panel All of the workflows in the Vantage database are displayed in the Workflows panel on the left. Workflows are organized alphabetically, by category. For details on the workflows panel, see Using the Workflows Panel.
Workflows panel - displays all workflows in the database.
Workflow Design, Monitor Status, and Job Status and Domain Job Status panels.
Nickname/Variables Display menu
73465
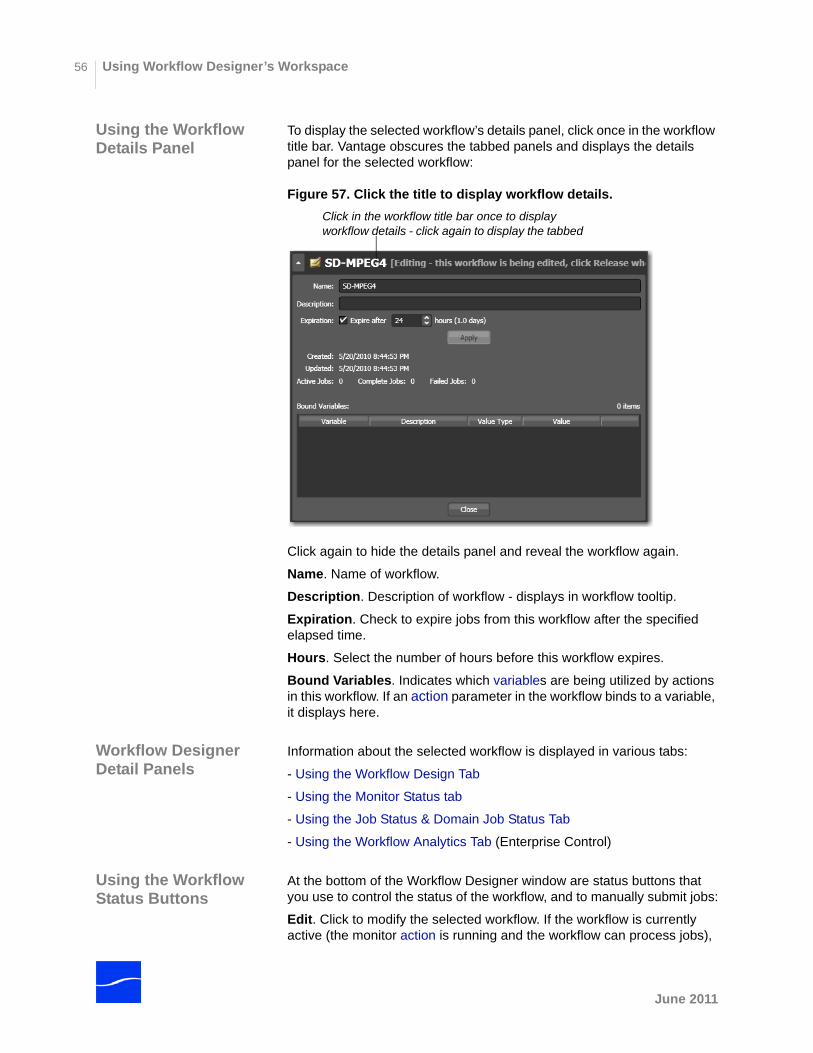
Using Workflow Designer’s Workspace56
Using the Workflow Details Panel
To display the selected workflow’s details panel, click once in the workflow title bar. Vantage obscures the tabbed panels and displays the details panel for the selected workflow:
Figure 57. Click the title to display workflow details.
Click again to hide the details panel and reveal the workflow again.
Name. Name of workflow.
Description. Description of workflow - displays in workflow tooltip.
Expiration. Check to expire jobs from this workflow after the specified elapsed time.
Hours. Select the number of hours before this workflow expires.
Bound Variables. Indicates which variables are being utilized by actions in this workflow. If an action parameter in the workflow binds to a variable, it displays here.
Workflow Designer Detail Panels
Information about the selected workflow is displayed in various tabs:
- Using the Workflow Design Tab
- Using the Monitor Status tab
- Using the Job Status & Domain Job Status Tab
- Using the Workflow Analytics Tab (Enterprise Control)
Using the Workflow Status Buttons
At the bottom of the Workflow Designer window are status buttons that you use to control the status of the workflow, and to manually submit jobs:
Edit. Click to modify the selected workflow. If the workflow is currently active (the monitor action is running and the workflow can process jobs),
Click in the workflow title bar once to display workflow details - click again to display the tabbed
June 2011
Chapter 2 Using Workflow DesignerVantage Workflow Designer User’s Guide
57
Vantage will display a warning dialog that it is about to deactivate the workflow. Click OK to continue.
The Actions toolbar displays at the top of the panel when in design mode, so that you can add new actions to the workflow.
When you are editing a workflow, other Workflow Designer users can view the workflow, but cannot edit or activate it.
Release. When a workflow is in Edit mode, click Release to stop editing it. Released workflows can be activated, and can also be edited by others.
Activate. Click Activate on a deactivated workflow to start any monitor actions so that jobs can be submitted and processed by this workflow.
Deactivate. Click Deactivate to deactivate the workflow. New jobs cannot be submitted and media cannot be processed by the workflow in this state. Existing jobs using this workflow continue executing to completion.
Submit Job. When the workflow is active, click to display the Submit Job window. For details, see Submitting Jobs Manually.
73465
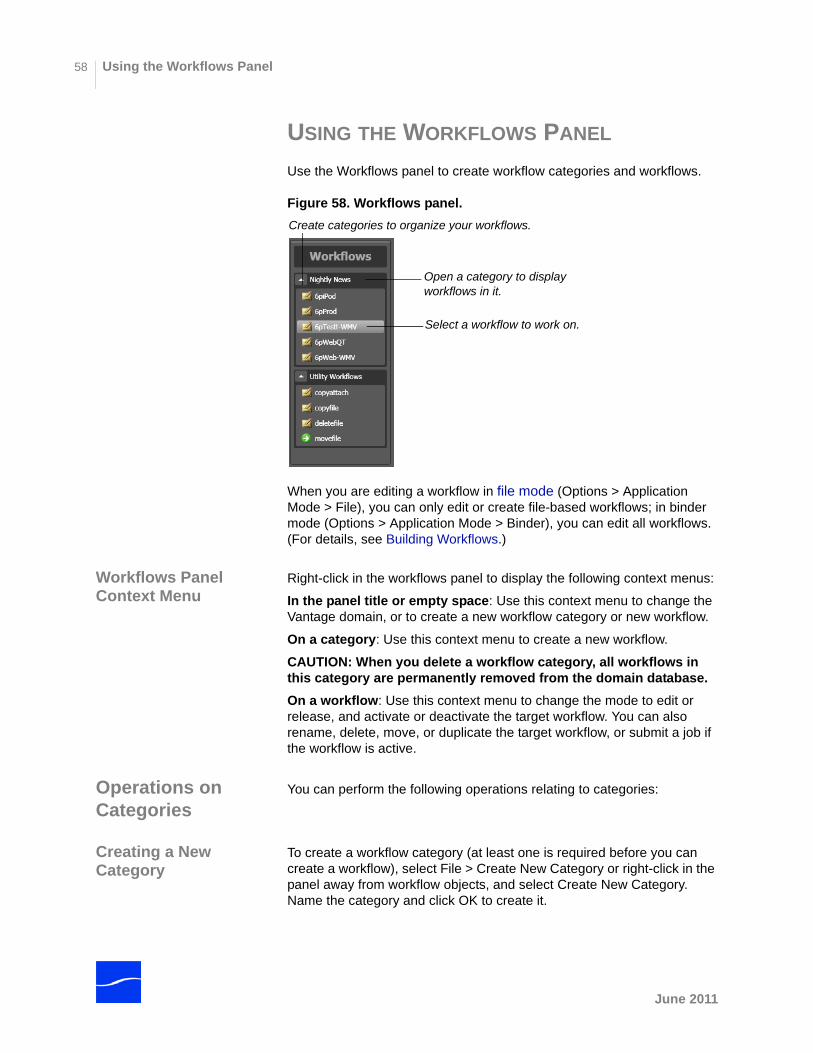
Using the Workflows Panel58
USING THE WORKFLOWS PANEL
Use the Workflows panel to create workflow categories and workflows.
Figure 58. Workflows panel.
When you are editing a workflow in file mode (Options > Application Mode > File), you can only edit or create file-based workflows; in binder mode (Options > Application Mode > Binder), you can edit all workflows. (For details, see Building Workflows.)
Workflows Panel Context Menu
Right-click in the workflows panel to display the following context menus:
In the panel title or empty space: Use this context menu to change the Vantage domain, or to create a new workflow category or new workflow.
On a category: Use this context menu to create a new workflow.
CAUTION: When you delete a workflow category, all workflows in this category are permanently removed from the domain database.
On a workflow: Use this context menu to change the mode to edit or release, and activate or deactivate the target workflow. You can also rename, delete, move, or duplicate the target workflow, or submit a job if the workflow is active.
Operations on Categories
You can perform the following operations relating to categories:
Creating a New Category
To create a workflow category (at least one is required before you can create a workflow), select File > Create New Category or right-click in the panel away from workflow objects, and select Create New Category. Name the category and click OK to create it.
Select a workflow to work on.
Open a category to display workflows in it.
Create categories to organize your workflows.
June 2011
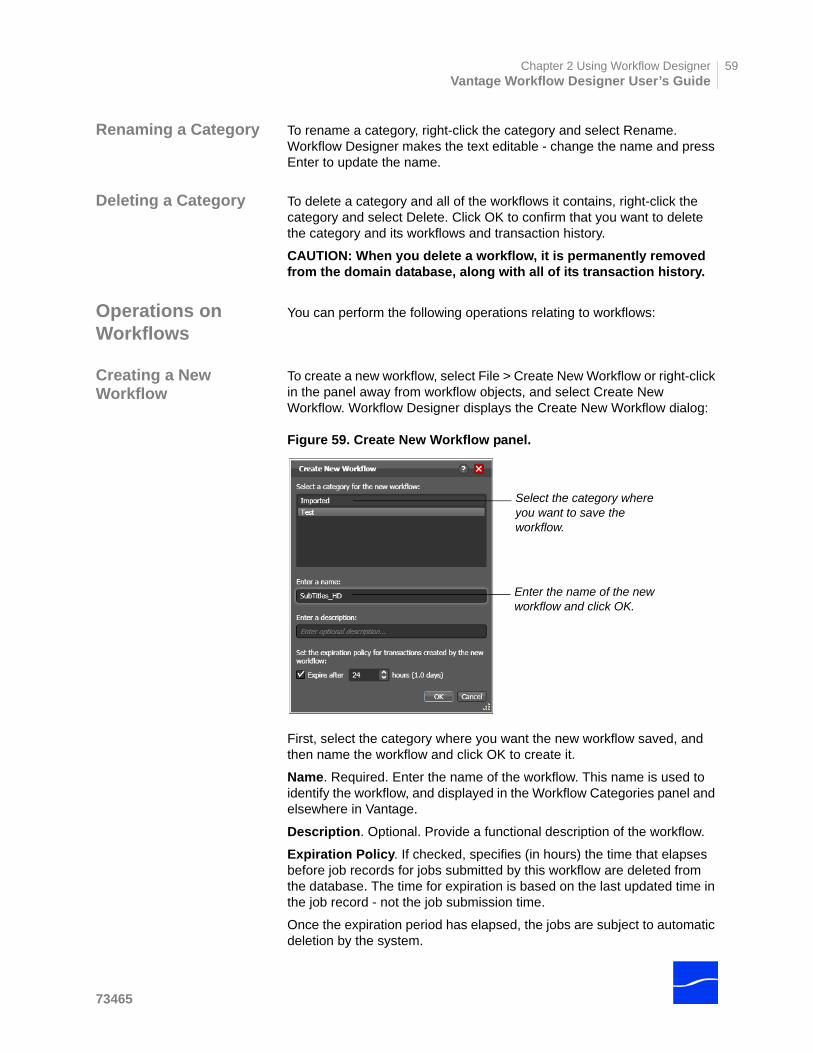
Chapter 2 Using Workflow DesignerVantage Workflow Designer User’s Guide
59
Renaming a Category To rename a category, right-click the category and select Rename. Workflow Designer makes the text editable - change the name and press Enter to update the name.
Deleting a Category To delete a category and all of the workflows it contains, right-click the category and select Delete. Click OK to confirm that you want to delete the category and its workflows and transaction history.
CAUTION: When you delete a workflow, it is permanently removed from the domain database, along with all of its transaction history.
Operations on Workflows
You can perform the following operations relating to workflows:
Creating a New Workflow
To create a new workflow, select File > Create New Workflow or right-click in the panel away from workflow objects, and select Create New Workflow. Workflow Designer displays the Create New Workflow dialog:
Figure 59. Create New Workflow panel.
First, select the category where you want the new workflow saved, and then name the workflow and click OK to create it.
Name. Required. Enter the name of the workflow. This name is used to identify the workflow, and displayed in the Workflow Categories panel and elsewhere in Vantage.
Description. Optional. Provide a functional description of the workflow.
Expiration Policy. If checked, specifies (in hours) the time that elapses before job records for jobs submitted by this workflow are deleted from the database. The time for expiration is based on the last updated time in the job record - not the job submission time.
Once the expiration period has elapsed, the jobs are subject to automatic deletion by the system.
Select the category where you want to save the workflow.
Enter the name of the new workflow and click OK.
73465
Using the Workflows Panel60
For complete workflow design and building details, see Building Workflows.
Renaming a Workflow To rename a workflow, right-click the workflow and select Rename. Workflow Designer makes the text editable - change the name and press Enter to update it.
Deleting a Workflow To delete a workflow, select it and select File > Delete Workflow or right-click the workflow and select Delete Workflow. Click OK to confirm that you want to delete the workflow and all of its transaction history.
CAUTION: When you delete a workflow, it is permanently removed from the domain database, along with all of its transaction history.
Moving Workflows Between Categories
To move a workflow from one category to another, select File > Move Workflow or right-click on the workflow you want to move and select Move. Workflow Designer displays a Category dialog. Select the category you want to move the workflow to, and click OK.
Duplicating a Workflow
To duplicate a workflow, select File > Duplicate Workflow or right-click on the workflow and select Duplicate. Workflow Designer displays a Category dialog. Select the category you want to create the new workflow in, enter a name, and click OK.
Importing a Workflow To import a workflow, select File > Import Workflow or right-click on the workflow and select Import Workflow. Workflow Designer displays a File System dialog. Navigate and select the workflow XML file previously exported, and click Open. Workflow Designer imports the workflow into the Imported category. Move the workflow to the category you want, and you can rename and edit it as necessary.
Printing Workflows Select File > Print Workflow to print the selected workflow using the current workflow settings. The workflow is scaled to fit on a single page (with landscape or portrait mode preset based on workflow shape), unless the workflow is sufficiently large to make it difficult to read when scaled to a single page. Then, Designer provides you the option of printing across multiple pages.
Note
Note: You can also rename a workflow in the Workflow details panel. See Using the Workflow Details Panel for details.
June 2011
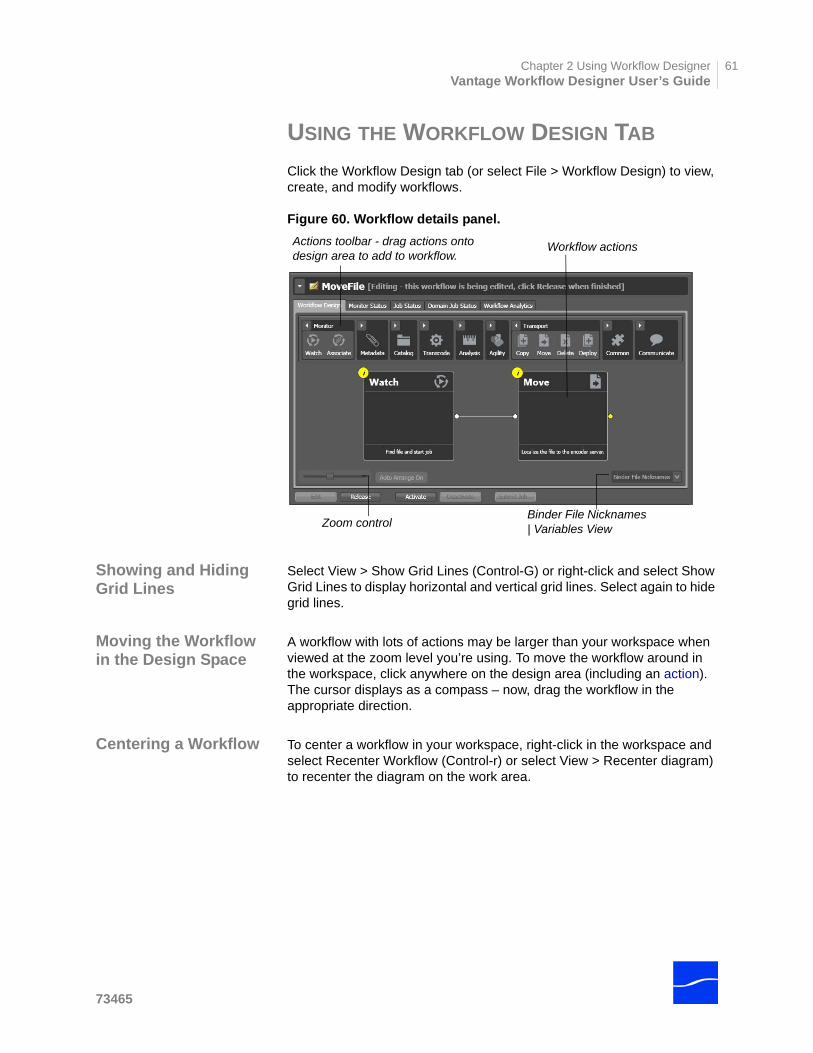
Chapter 2 Using Workflow DesignerVantage Workflow Designer User’s Guide
61
USING THE WORKFLOW DESIGN TAB
Click the Workflow Design tab (or select File > Workflow Design) to view, create, and modify workflows.
Figure 60. Workflow details panel.
Showing and Hiding Grid Lines
Select View > Show Grid Lines (Control-G) or right-click and select Show Grid Lines to display horizontal and vertical grid lines. Select again to hide grid lines.
Moving the Workflow in the Design Space
A workflow with lots of actions may be larger than your workspace when viewed at the zoom level you’re using. To move the workflow around in the workspace, click anywhere on the design area (including an action). The cursor displays as a compass – now, drag the workflow in the appropriate direction.
Centering a Workflow To center a workflow in your workspace, right-click in the workspace and select Recenter Workflow (Control-r) or select View > Recenter diagram) to recenter the diagram on the work area.
Binder File Nicknames | Variables View
Actions toolbar - drag actions onto design area to add to workflow.
Zoom control
Workflow actions
73465
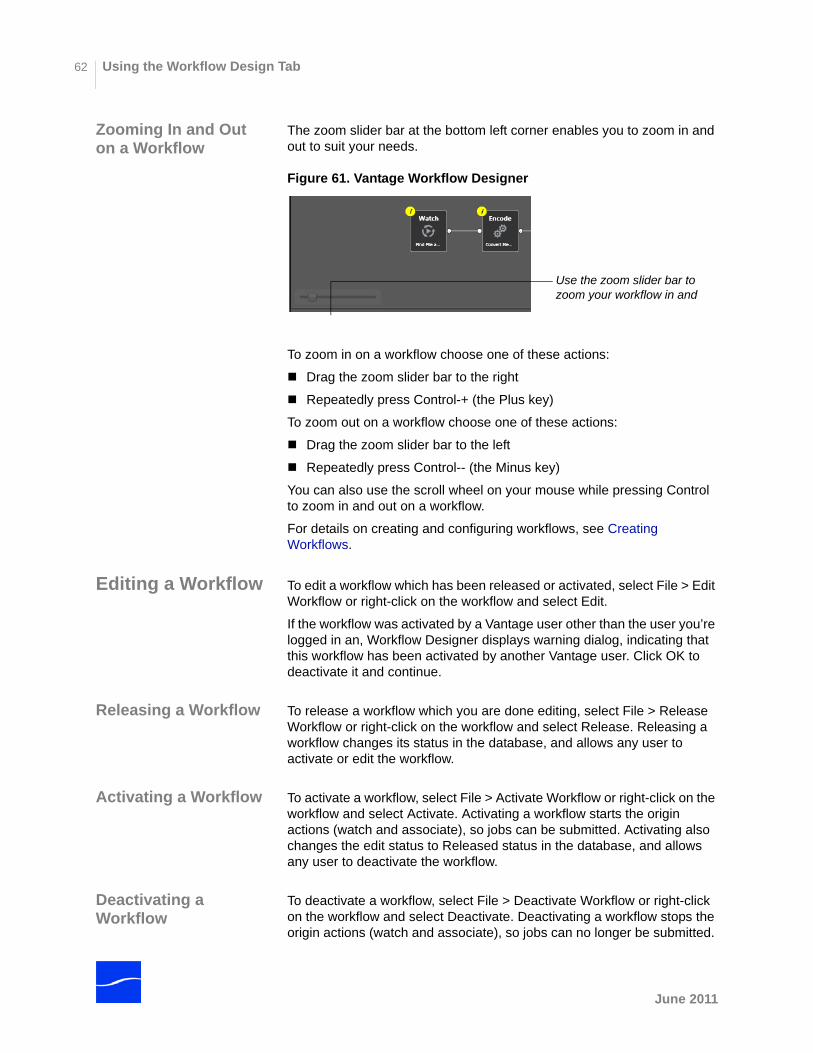
Using the Workflow Design Tab62
Zooming In and Out on a Workflow
The zoom slider bar at the bottom left corner enables you to zoom in and out to suit your needs.
Figure 61. Vantage Workflow Designer
To zoom in on a workflow choose one of these actions:
Drag the zoom slider bar to the right
Repeatedly press Control-+ (the Plus key)
To zoom out on a workflow choose one of these actions:
Drag the zoom slider bar to the left
Repeatedly press Control-- (the Minus key)
You can also use the scroll wheel on your mouse while pressing Control to zoom in and out on a workflow.
For details on creating and configuring workflows, see Creating Workflows.
Editing a Workflow To edit a workflow which has been released or activated, select File > Edit Workflow or right-click on the workflow and select Edit.
If the workflow was activated by a Vantage user other than the user you’re logged in an, Workflow Designer displays warning dialog, indicating that this workflow has been activated by another Vantage user. Click OK to deactivate it and continue.
Releasing a Workflow To release a workflow which you are done editing, select File > Release Workflow or right-click on the workflow and select Release. Releasing a workflow changes its status in the database, and allows any user to activate or edit the workflow.
Activating a Workflow To activate a workflow, select File > Activate Workflow or right-click on the workflow and select Activate. Activating a workflow starts the origin actions (watch and associate), so jobs can be submitted. Activating also changes the edit status to Released status in the database, and allows any user to deactivate the workflow.
Deactivating a Workflow
To deactivate a workflow, select File > Deactivate Workflow or right-click on the workflow and select Deactivate. Deactivating a workflow stops the origin actions (watch and associate), so jobs can no longer be submitted.
Use the zoom slider bar to zoom your workflow in and
June 2011
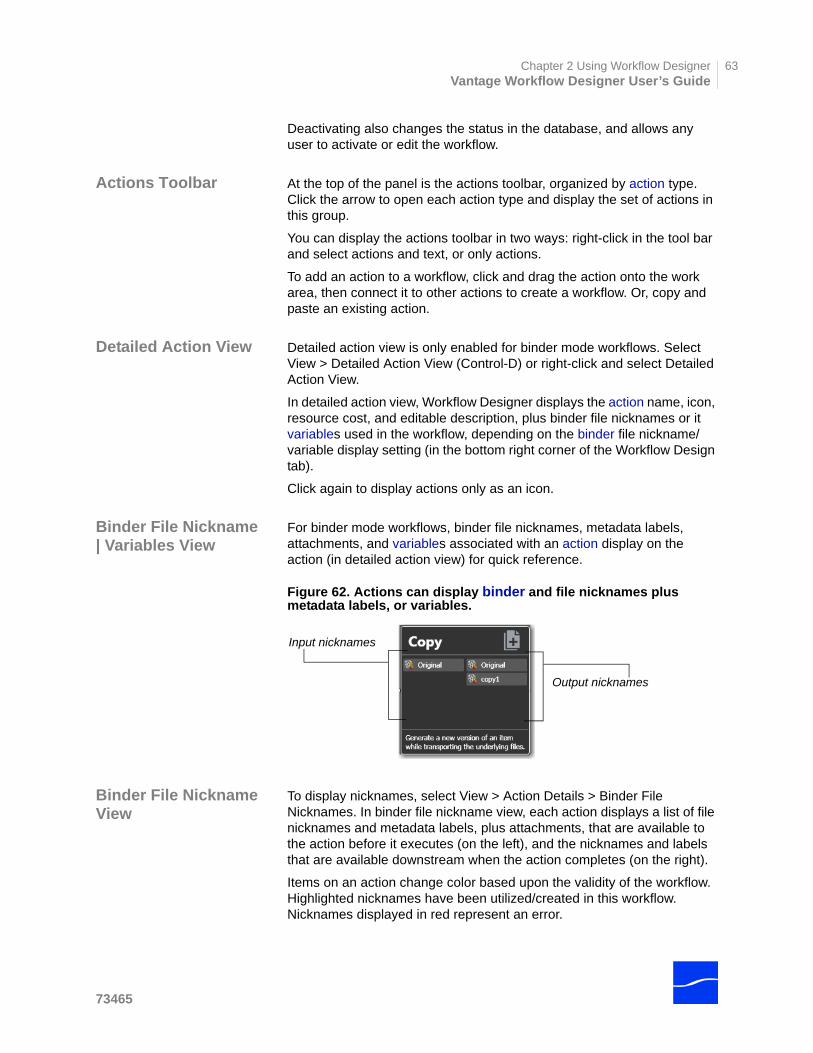
Chapter 2 Using Workflow DesignerVantage Workflow Designer User’s Guide
63
Deactivating also changes the status in the database, and allows any user to activate or edit the workflow.
Actions Toolbar At the top of the panel is the actions toolbar, organized by action type. Click the arrow to open each action type and display the set of actions in this group.
You can display the actions toolbar in two ways: right-click in the tool bar and select actions and text, or only actions.
To add an action to a workflow, click and drag the action onto the work area, then connect it to other actions to create a workflow. Or, copy and paste an existing action.
Detailed Action View Detailed action view is only enabled for binder mode workflows. Select View > Detailed Action View (Control-D) or right-click and select Detailed Action View.
In detailed action view, Workflow Designer displays the action name, icon, resource cost, and editable description, plus binder file nicknames or it variables used in the workflow, depending on the binder file nickname/variable display setting (in the bottom right corner of the Workflow Design tab).
Click again to display actions only as an icon.
Binder File Nickname | Variables View
For binder mode workflows, binder file nicknames, metadata labels, attachments, and variables associated with an action display on the action (in detailed action view) for quick reference.
Figure 62. Actions can display binder and file nicknames plus metadata labels, or variables.
Binder File Nickname View
To display nicknames, select View > Action Details > Binder File Nicknames. In binder file nickname view, each action displays a list of file nicknames and metadata labels, plus attachments, that are available to the action before it executes (on the left), and the nicknames and labels that are available downstream when the action completes (on the right).
Items on an action change color based upon the validity of the workflow. Highlighted nicknames have been utilized/created in this workflow. Nicknames displayed in red represent an error.
Input nicknames
Output nicknames
73465
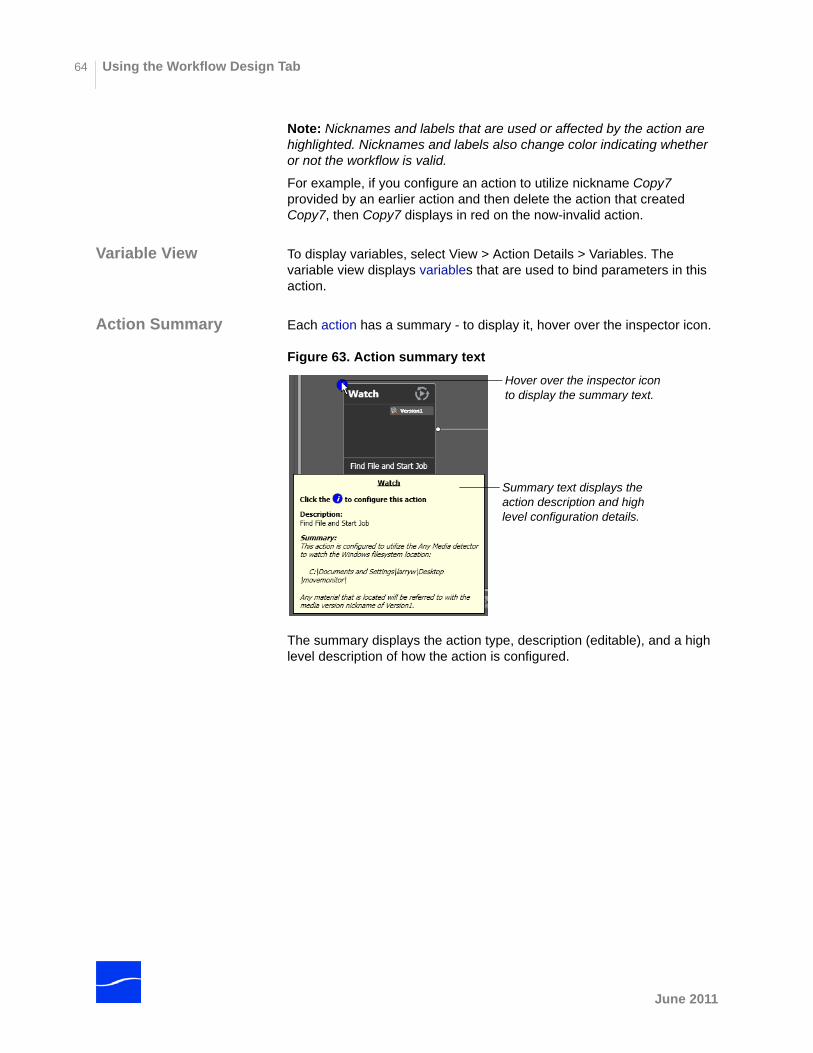
Using the Workflow Design Tab64
Note: Nicknames and labels that are used or affected by the action are highlighted. Nicknames and labels also change color indicating whether or not the workflow is valid.
For example, if you configure an action to utilize nickname Copy7 provided by an earlier action and then delete the action that created Copy7, then Copy7 displays in red on the now-invalid action.
Variable View To display variables, select View > Action Details > Variables. The variable view displays variables that are used to bind parameters in this action.
Action Summary Each action has a summary - to display it, hover over the inspector icon.
Figure 63. Action summary text
The summary displays the action type, description (editable), and a high level description of how the action is configured.
Hover over the inspector icon to display the summary text.
Summary text displays the action description and high level configuration details.
June 2011

Chapter 2 Using Workflow DesignerVantage Workflow Designer User’s Guide
65
USING THE MONITOR STATUS TAB
Click the Monitor Status tab (or click File > Monitor Status) to review the status of Watch (and other active origin) actions for the selected workflow.
Figure 64. Monitor Status displays Watch & other origin actions.
If your workflow is deactivated, the table displays a history of previous activations. If your workflow is active, the table displays active origin actions.
Click any column to make it the primary column and sort it ascending or descending.
Toolbar Groups. Click to organize actions by group, based on the primary column - the one you have selected. Click again to turn grouping off.
Delete. Click to delete the selected row(s). Or, right-click on the row, and select Delete.
Each row is an active origin action, indicating status and other details.
Monitor Status toolbar - Group | Delete | Details.
73465
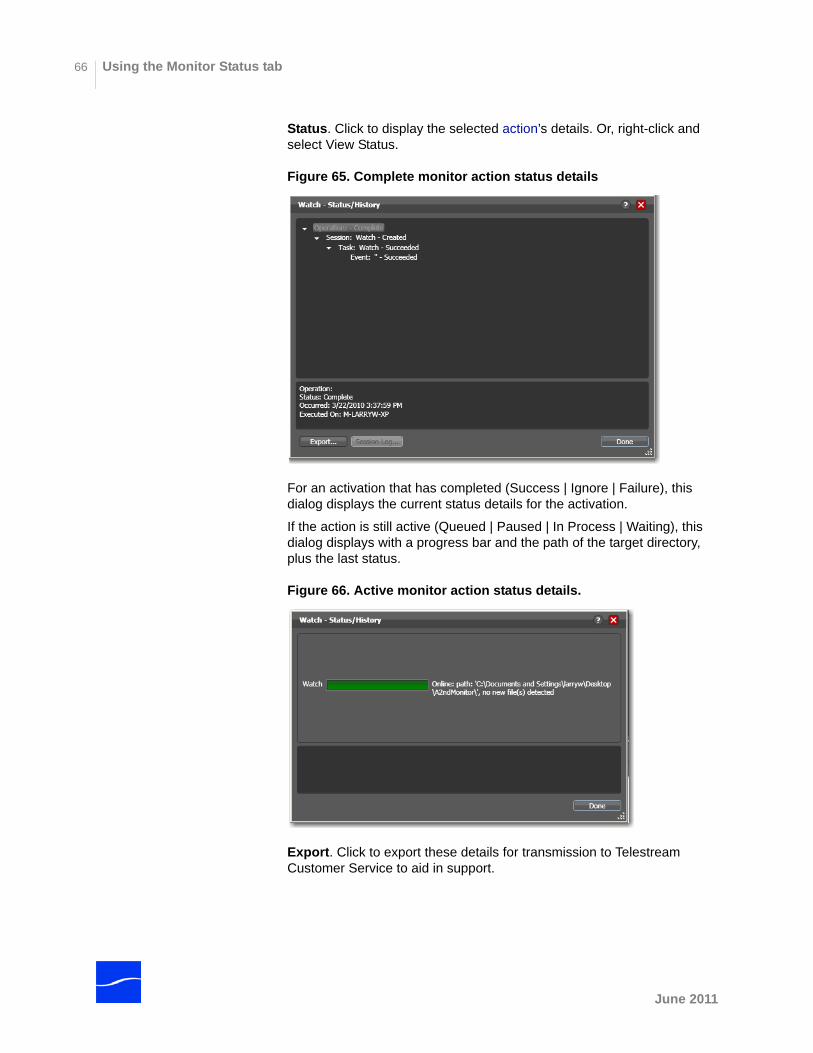
Using the Monitor Status tab66
Status. Click to display the selected action’s details. Or, right-click and select View Status.
Figure 65. Complete monitor action status details
For an activation that has completed (Success | Ignore | Failure), this dialog displays the current status details for the activation.
If the action is still active (Queued | Paused | In Process | Waiting), this dialog displays with a progress bar and the path of the target directory, plus the last status.
Figure 66. Active monitor action status details.
Export. Click to export these details for transmission to Telestream Customer Service to aid in support.
June 2011
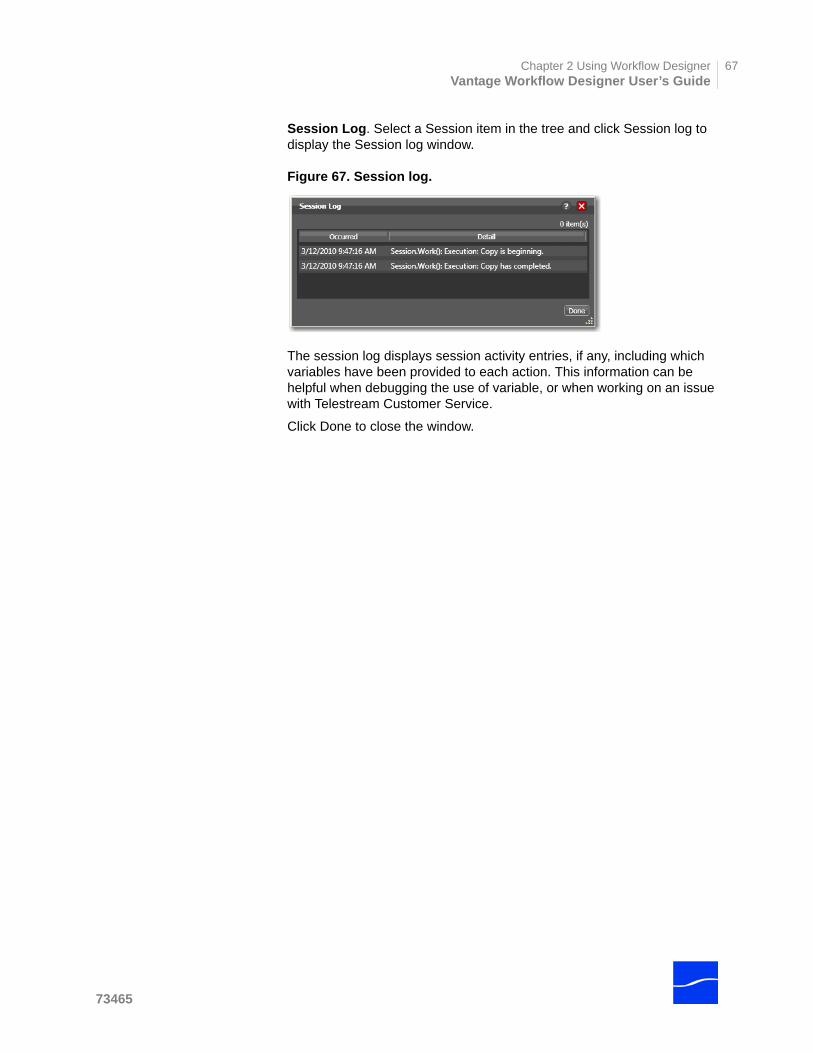
Chapter 2 Using Workflow DesignerVantage Workflow Designer User’s Guide
67
Session Log. Select a Session item in the tree and click Session log to display the Session log window.
Figure 67. Session log.
The session log displays session activity entries, if any, including which variables have been provided to each action. This information can be helpful when debugging the use of variable, or when working on an issue with Telestream Customer Service.
Click Done to close the window.
73465
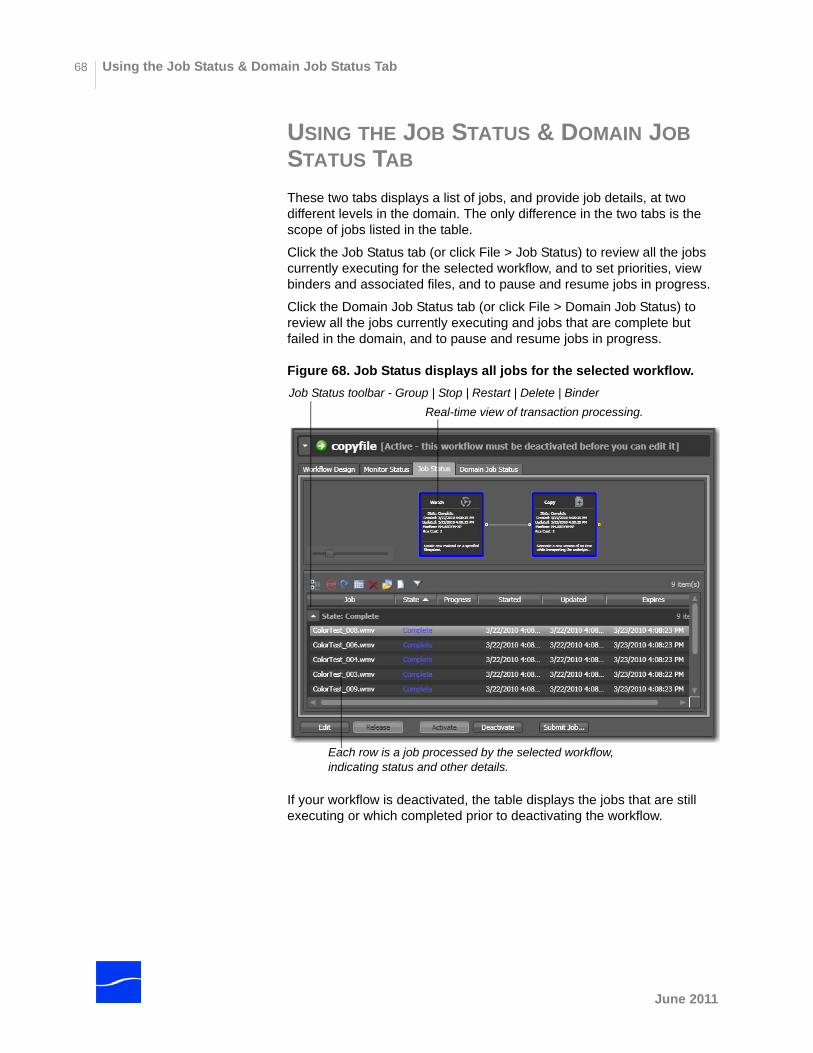
Using the Job Status & Domain Job Status Tab68
USING THE JOB STATUS & DOMAIN JOB STATUS TAB
These two tabs displays a list of jobs, and provide job details, at two different levels in the domain. The only difference in the two tabs is the scope of jobs listed in the table.
Click the Job Status tab (or click File > Job Status) to review all the jobs currently executing for the selected workflow, and to set priorities, view binders and associated files, and to pause and resume jobs in progress.
Click the Domain Job Status tab (or click File > Domain Job Status) to review all the jobs currently executing and jobs that are complete but failed in the domain, and to pause and resume jobs in progress.
Figure 68. Job Status displays all jobs for the selected workflow.
If your workflow is deactivated, the table displays the jobs that are still executing or which completed prior to deactivating the workflow.
Each row is a job processed by the selected workflow, indicating status and other details.
Job Status toolbar - Group | Stop | Restart | Delete | Binder
Real-time view of transaction processing.
June 2011
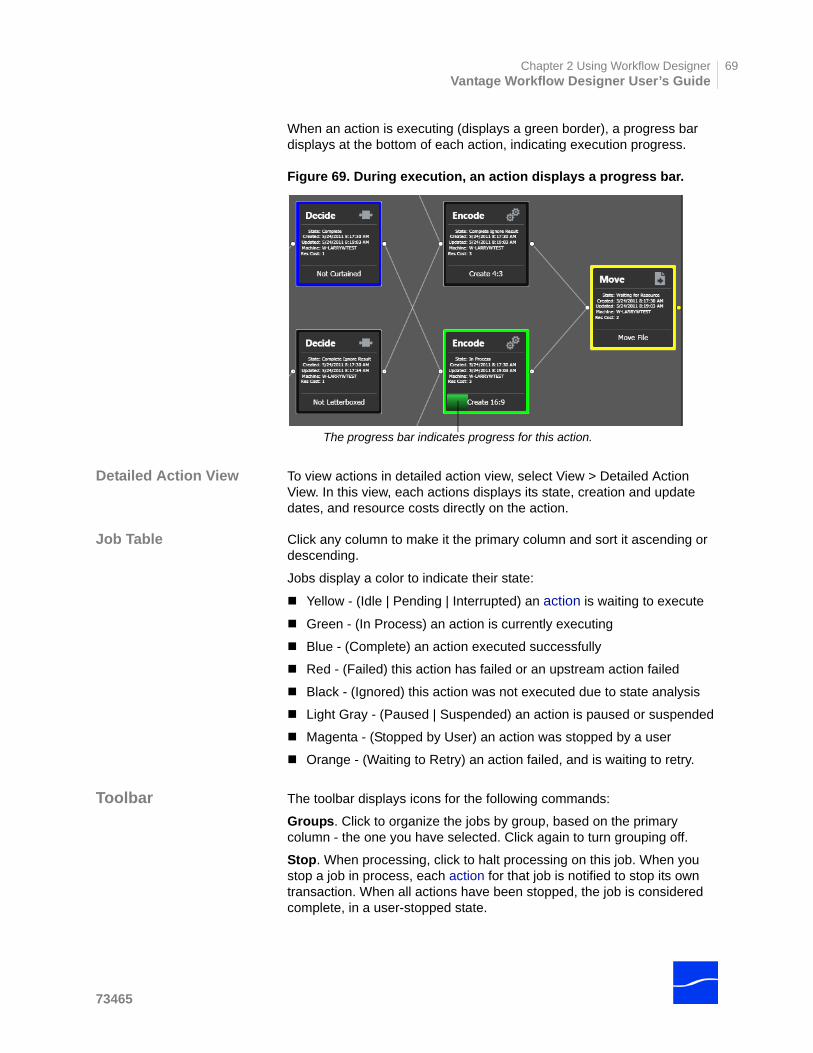
Chapter 2 Using Workflow DesignerVantage Workflow Designer User’s Guide
69
When an action is executing (displays a green border), a progress bar displays at the bottom of each action, indicating execution progress.
Figure 69. During execution, an action displays a progress bar.
Detailed Action View To view actions in detailed action view, select View > Detailed Action View. In this view, each actions displays its state, creation and update dates, and resource costs directly on the action.
Job Table Click any column to make it the primary column and sort it ascending or descending.
Jobs display a color to indicate their state:
Yellow - (Idle | Pending | Interrupted) an action is waiting to execute
Green - (In Process) an action is currently executing
Blue - (Complete) an action executed successfully
Red - (Failed) this action has failed or an upstream action failed
Black - (Ignored) this action was not executed due to state analysis
Light Gray - (Paused | Suspended) an action is paused or suspended
Magenta - (Stopped by User) an action was stopped by a user
Orange - (Waiting to Retry) an action failed, and is waiting to retry.
Toolbar The toolbar displays icons for the following commands:
Groups. Click to organize the jobs by group, based on the primary column - the one you have selected. Click again to turn grouping off.
Stop. When processing, click to halt processing on this job. When you stop a job in process, each action for that job is notified to stop its own transaction. When all actions have been stopped, the job is considered complete, in a user-stopped state.
The progress bar indicates progress for this action.
73465

Using the Job Status & Domain Job Status Tab70
Restart. If a job was stopped or it failed, it can be re-started and will continue processing where it stopped. Actions that fail or are stopped by a user are re-executed. When you restart a job, it is started as a first-time job again. This affects the execution of retry rules.
Set Job Expiration. Click to modify the default expiration time for this job. Workflow Designer displays the Set Job Expiration dialog - specify a new expiration date and click OK.
Delete. Click to delete the selected job row(s). Or, right-click and select Delete.
Binder. Click to display the selected job’s binder. Or, right-click an action or the job row in the table, and select View Binder. For details, see Viewing Binders.
Job Report. To create a job report, select one or more jobs in the table, and click on the Job Report icon in the toolbar. For details, see Exporting Job Reports.
Filter. Click to display only jobs that contain specific text in the job name. Enter the text to begin filtering displayed jobs. Delete the text (or just close the filter by clicking the filter icon) to display all jobs again.
Note: When you stop a job with Agility actions in the workflow, Agility transactions and tasks are also terminated.When you restart a job with Agility actions in the workflow, Agility transactions and tasks are also restarted.When you delete a job with Agility actions in the workflow, Agility transactions and tasks are also deleted.
Exporting Job Reports Workflow Designer provides Job Reports as comma-separated value
(CSV) files, which you can open in spreadsheet applications and others that can display CSV files, or you can use the CSV files in other systems, such as databases or media asset management systems.
Note: If no job reports exist in the domain, Workflow Designer displays a dialog indicating that you need to create one. Click OK to display the Job Report Manager, and create a new report (Managing Job Reports).
To manage job reports - create new job report, edit or make changes to a job report, or delete a job report - click the Job Report icon to display the Job Report Manager. For details, see Managing Job Reports. You can also manage job reports in the Vantage Management Console.
Creating a Job Report To create comma-separated values job report, select one or more jobs in the table, and click on the Job Report icon in the toolbar.
June 2011
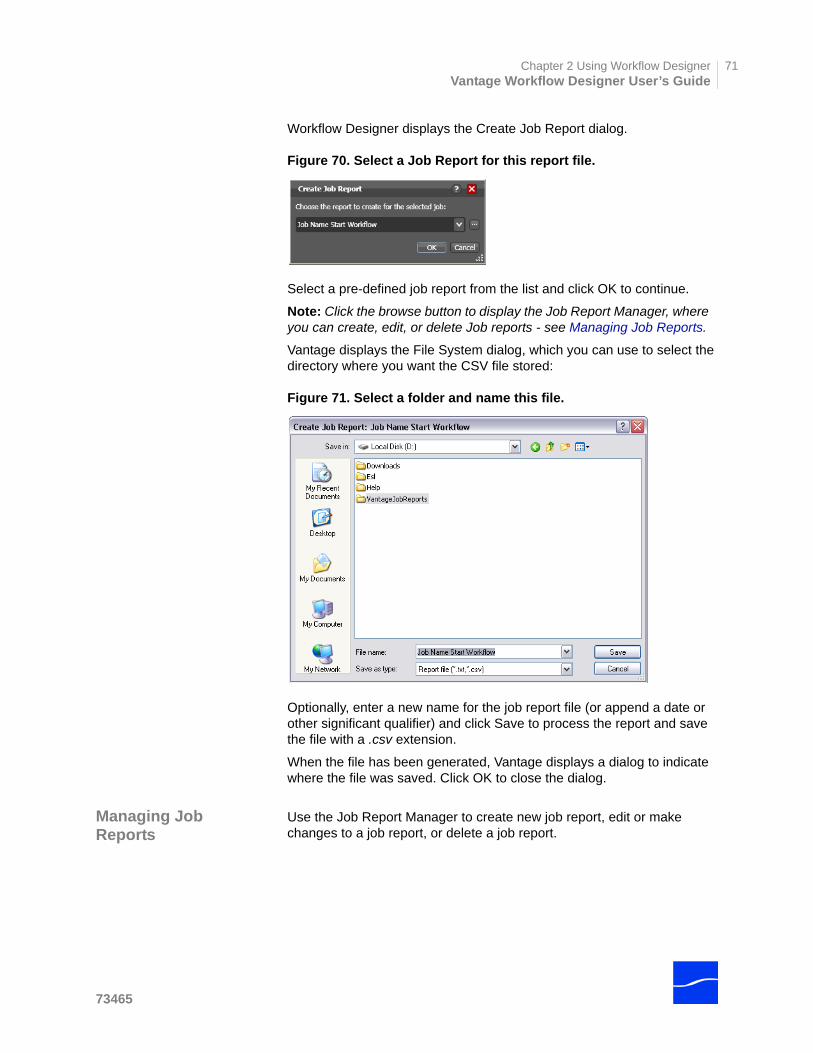
Chapter 2 Using Workflow DesignerVantage Workflow Designer User’s Guide
71
Workflow Designer displays the Create Job Report dialog.
Figure 70. Select a Job Report for this report file.
Select a pre-defined job report from the list and click OK to continue.
Note: Click the browse button to display the Job Report Manager, where you can create, edit, or delete Job reports - see Managing Job Reports.
Vantage displays the File System dialog, which you can use to select the directory where you want the CSV file stored:
Figure 71. Select a folder and name this file.
Optionally, enter a new name for the job report file (or append a date or other significant qualifier) and click Save to process the report and save the file with a .csv extension.
When the file has been generated, Vantage displays a dialog to indicate where the file was saved. Click OK to close the dialog.
Managing Job Reports
Use the Job Report Manager to create new job report, edit or make changes to a job report, or delete a job report.
73465
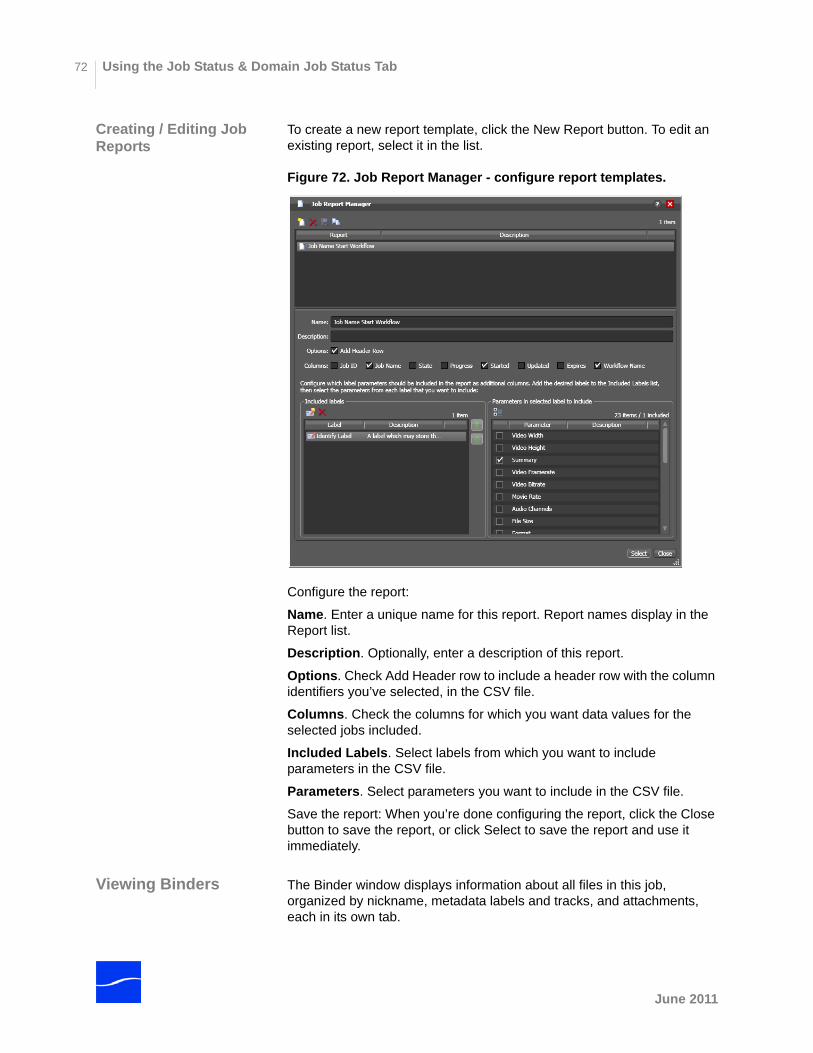
Using the Job Status & Domain Job Status Tab72
Creating / Editing Job Reports
To create a new report template, click the New Report button. To edit an existing report, select it in the list.
Figure 72. Job Report Manager - configure report templates.
Configure the report:
Name. Enter a unique name for this report. Report names display in the Report list.
Description. Optionally, enter a description of this report.
Options. Check Add Header row to include a header row with the column identifiers you’ve selected, in the CSV file.
Columns. Check the columns for which you want data values for the selected jobs included.
Included Labels. Select labels from which you want to include parameters in the CSV file.
Parameters. Select parameters you want to include in the CSV file.
Save the report: When you’re done configuring the report, click the Close button to save the report, or click Select to save the report and use it immediately.
Viewing Binders The Binder window displays information about all files in this job, organized by nickname, metadata labels and tracks, and attachments, each in its own tab.
June 2011
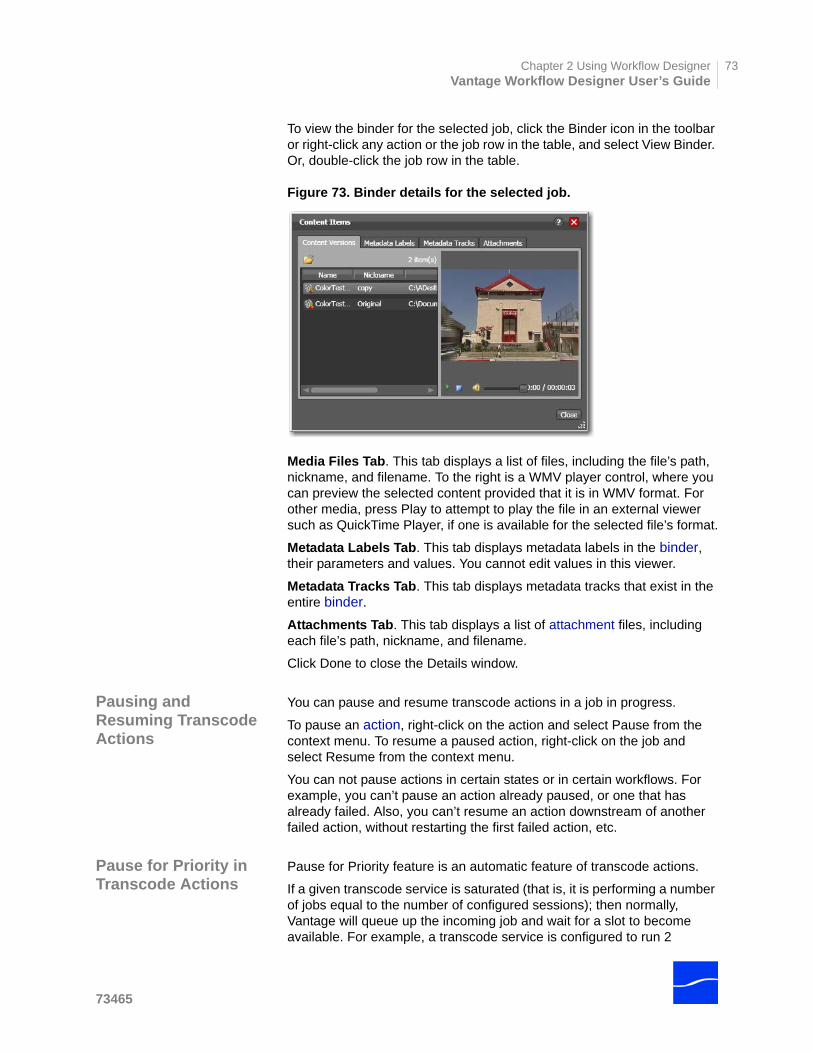
Chapter 2 Using Workflow DesignerVantage Workflow Designer User’s Guide
73
To view the binder for the selected job, click the Binder icon in the toolbar or right-click any action or the job row in the table, and select View Binder. Or, double-click the job row in the table.
Figure 73. Binder details for the selected job.
Media Files Tab. This tab displays a list of files, including the file’s path, nickname, and filename. To the right is a WMV player control, where you can preview the selected content provided that it is in WMV format. For other media, press Play to attempt to play the file in an external viewer such as QuickTime Player, if one is available for the selected file’s format.
Metadata Labels Tab. This tab displays metadata labels in the binder, their parameters and values. You cannot edit values in this viewer.
Metadata Tracks Tab. This tab displays metadata tracks that exist in the entire binder.
Attachments Tab. This tab displays a list of attachment files, including each file’s path, nickname, and filename.
Click Done to close the Details window.
Pausing and Resuming Transcode Actions
You can pause and resume transcode actions in a job in progress.
To pause an action, right-click on the action and select Pause from the context menu. To resume a paused action, right-click on the job and select Resume from the context menu.
You can not pause actions in certain states or in certain workflows. For example, you can’t pause an action already paused, or one that has already failed. Also, you can’t resume an action downstream of another failed action, without restarting the first failed action, etc.
Pause for Priority in Transcode Actions
Pause for Priority feature is an automatic feature of transcode actions.
If a given transcode service is saturated (that is, it is performing a number of jobs equal to the number of configured sessions); then normally, Vantage will queue up the incoming job and wait for a slot to become available. For example, a transcode service is configured to run 2
73465
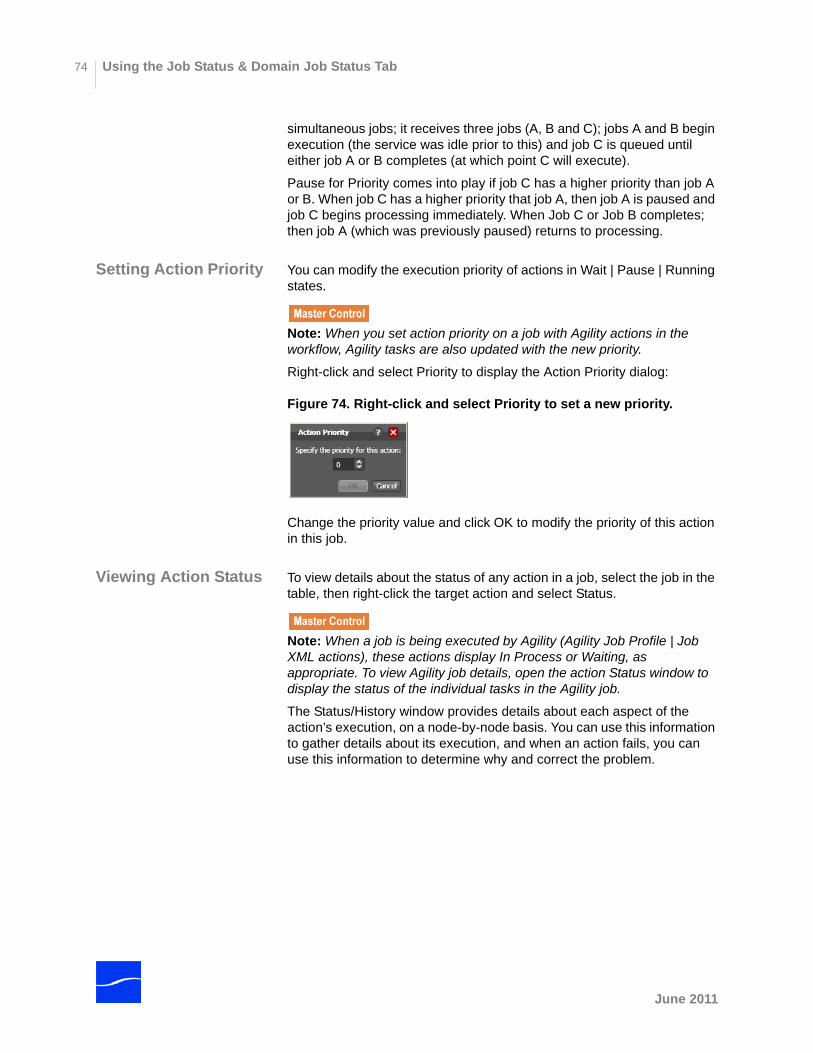
Using the Job Status & Domain Job Status Tab74
simultaneous jobs; it receives three jobs (A, B and C); jobs A and B begin execution (the service was idle prior to this) and job C is queued until either job A or B completes (at which point C will execute).
Pause for Priority comes into play if job C has a higher priority than job A or B. When job C has a higher priority that job A, then job A is paused and job C begins processing immediately. When Job C or Job B completes; then job A (which was previously paused) returns to processing.
Setting Action Priority You can modify the execution priority of actions in Wait | Pause | Running states.
Note: When you set action priority on a job with Agility actions in the workflow, Agility tasks are also updated with the new priority.
Right-click and select Priority to display the Action Priority dialog:
Figure 74. Right-click and select Priority to set a new priority.
Change the priority value and click OK to modify the priority of this action in this job.
Viewing Action Status To view details about the status of any action in a job, select the job in the table, then right-click the target action and select Status.
Note: When a job is being executed by Agility (Agility Job Profile | Job XML actions), these actions display In Process or Waiting, as appropriate. To view Agility job details, open the action Status window to display the status of the individual tasks in the Agility job.
The Status/History window provides details about each aspect of the action’s execution, on a node-by-node basis. You can use this information to gather details about its execution, and when an action fails, you can use this information to determine why and correct the problem.
June 2011
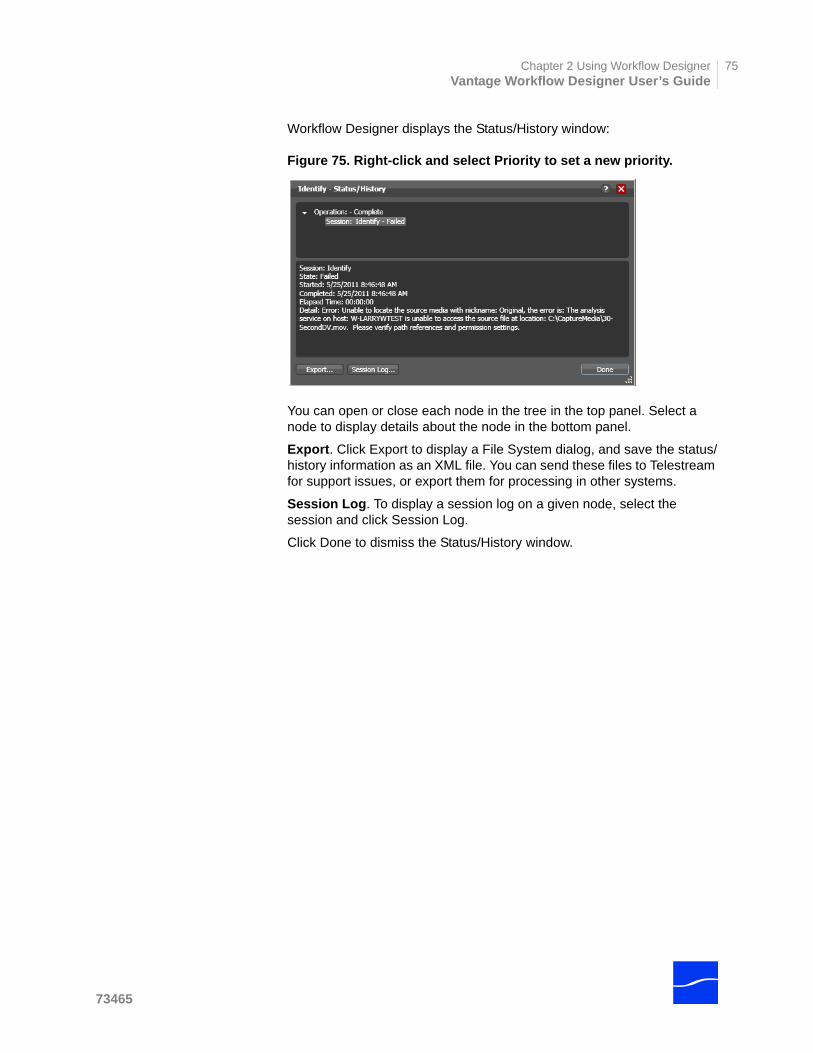
Chapter 2 Using Workflow DesignerVantage Workflow Designer User’s Guide
75
Workflow Designer displays the Status/History window:
Figure 75. Right-click and select Priority to set a new priority.
You can open or close each node in the tree in the top panel. Select a node to display details about the node in the bottom panel.
Export. Click Export to display a File System dialog, and save the status/history information as an XML file. You can send these files to Telestream for support issues, or export them for processing in other systems.
Session Log. To display a session log on a given node, select the session and click Session Log.
Click Done to dismiss the Status/History window.
73465
Using the Workflow Analytics Tab76
USING THE WORKFLOW ANALYTICS TAB
Workflow Analytics is enabled in Vantage Enterprise Control and Master Control.
Workflow Analytics enables you to visually analyze workflows and job history to identify problems and improve overall system performance.
In Workflow Designer, Workflow Analytics enables you to view jobs (based on the job history currently in the domain database)) on a case-by-case basis to:
• Identify performance bottlenecks by action in a workflow
• Analyze workflow execution as a result of decisions in a workflow
• Visualize the progress of multiple jobs submitted to a single workflow
• Rank workflows and actions, based on processing time consumption.
Note: Because workflows may be modified over time, jobs ran in the selected workflow prior to the last change are ignored.
Vantage administrators and personnel responsible for designing and implementing workflows can use this information to modify workflow design and improve Vantage domain performance and efficiency.
Note: In the Vantage Management Console, Workflow Analytics enables you to analyze workflows at the domain level. For details on using Workflow Analytics in the Vantage Management Console, click the Help icon in the toolbar to display the User’s Guide.
Workflow analytics automatically includes new jobs that are submitted, as appropriate, displaying them in the Jobs table and recalculating metrics.
Workflow Analytics
Click the Workflow Analytics tab (or click File > Workflow Analytics), and select the workflow in the Workflows panel to view job history information,
June 2011
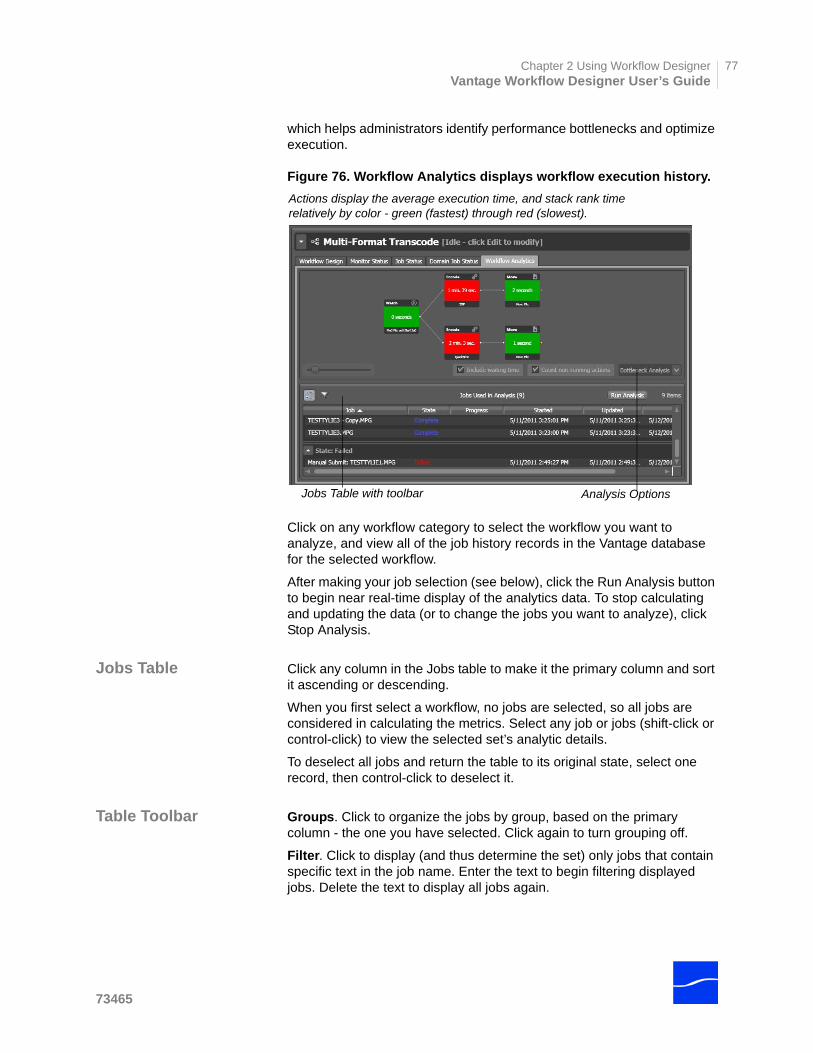
Chapter 2 Using Workflow DesignerVantage Workflow Designer User’s Guide
77
which helps administrators identify performance bottlenecks and optimize execution.
Figure 76. Workflow Analytics displays workflow execution history.
Click on any workflow category to select the workflow you want to analyze, and view all of the job history records in the Vantage database for the selected workflow.
After making your job selection (see below), click the Run Analysis button to begin near real-time display of the analytics data. To stop calculating and updating the data (or to change the jobs you want to analyze), click Stop Analysis.
Jobs Table Click any column in the Jobs table to make it the primary column and sort it ascending or descending.
When you first select a workflow, no jobs are selected, so all jobs are considered in calculating the metrics. Select any job or jobs (shift-click or control-click) to view the selected set’s analytic details.
To deselect all jobs and return the table to its original state, select one record, then control-click to deselect it.
Table Toolbar Groups. Click to organize the jobs by group, based on the primary column - the one you have selected. Click again to turn grouping off.
Filter. Click to display (and thus determine the set) only jobs that contain specific text in the job name. Enter the text to begin filtering displayed jobs. Delete the text to display all jobs again.
Actions display the average execution time, and stack rank time relatively by color - green (fastest) through red (slowest).
Jobs Table with toolbar Analysis Options
73465
Using the Workflow Analytics Tab78
Bottleneck Analysis
Select Bottleneck Analysis from the dropdown menu on the far right. Workflow Designer displays elapsed time for the selected records in the job history set.
In bottleneck analysis (which is enabled by default), you can identify the longest running actions in a workflow, based on color and time values.
Color values are applied to each action from green to red on a sliding scale, based on a comparison of the average of all selected job records. The shortest average execution time displays darkest green; the longest displays red. Those in between display color values through yellow-green, yellow (average), and orange.
Numeric values on each action display the average execution time of the actions which ran, based on the selected job records.
When performing bottleneck analysis, choose:
Include Waiting Time. Check to add wait time to execution time and display the combined total time for each action. Wait time includes time spent in a Waiting state and a Paused state. Uncheck to display only execution time.
Count Non-running Actions. Check to include the execution time (0 seconds) of actions that did not run, thus providing a weighted bottleneck analysis based on which branches in a workflow executed, based on decision actions. This allows you to focus upon the actions which are bottlenecks in real-world operations.
Uncheck to disregard non-running actions when calculating the execution time. This allows you to find the most expensive actions, regardless of whether or not they are commonly run.
Execution Analysis
Select Execution Analysis from the dropdown menu on the far right. Workflow Designer displays percentile and numeric values for the selected records in the job history set.
In execution analysis, you can determine which percentage and number of actions executed, based on the selected job history set, based on color and percentile values.
Color values are applied to each action from black to green on a sliding scale. The lowest average execution displays darkest black; the highest displays green.
Darker actions are those that have not executed yet (near zero percent). Dark green actions are average (near 50 percent), and the highest percentile executing actions are bright green (approaching 100 percent).
For each action, the percent of executions completed is calculated against the total number of jobs, based on your selected job criteria.
When using execution analysis, choose your job criteria:
All Jobs | Only Completed Jobs | Only Successful Jobs. Select to include all selected jobs regardless of their status, only completed jobs (thus excluding running or partially completed jobs), or only successful jobs in the calculations.
June 2011

Chapter 2 Using Workflow DesignerVantage Workflow Designer User’s Guide
79
SUBMITTING JOBS MANUALLY
To submit a job directly to any active workflow directly from Workflow Designer, select the target workflow and click Submit Job.
Figure 77. Click Submit Job on the selected workflow.
Note: You can only submit jobs to active workflows.
Designer displays the Submit Job window:
Figure 78. Submit Job window - select the file system.
73465
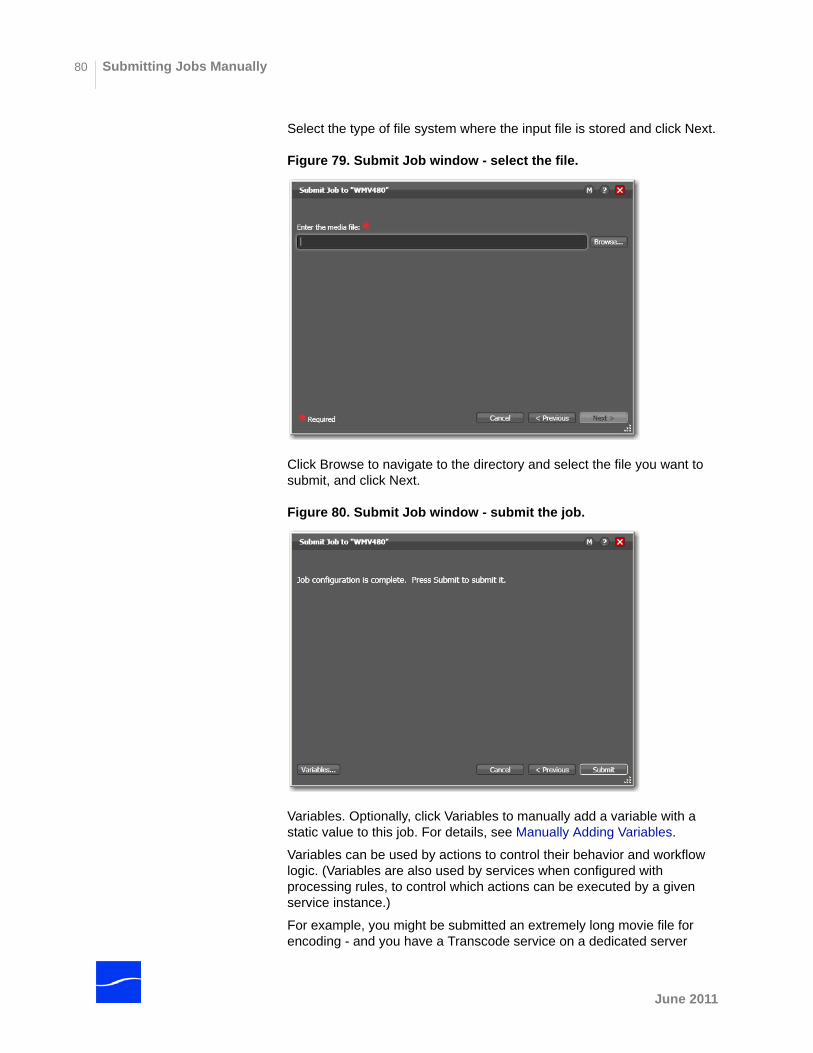
Submitting Jobs Manually80
Select the type of file system where the input file is stored and click Next.
Figure 79. Submit Job window - select the file.
Click Browse to navigate to the directory and select the file you want to submit, and click Next.
Figure 80. Submit Job window - submit the job.
Variables. Optionally, click Variables to manually add a variable with a static value to this job. For details, see Manually Adding Variables.
Variables can be used by actions to control their behavior and workflow logic. (Variables are also used by services when configured with processing rules, to control which actions can be executed by a given service instance.)
For example, you might be submitted an extremely long movie file for encoding - and you have a Transcode service on a dedicated server
June 2011
Chapter 2 Using Workflow DesignerVantage Workflow Designer User’s Guide
81
specifically for processing long jobs. You add the appropriate variable and enter the predetermined value to route this action to this service.
Click Submit to submit the job for processing.
When you have submitted the job, you can view its progress in the Job Status tab (Using the Job Status & Domain Job Status Tab).
73465

Submitting Jobs Manually82
June 2011
83
C H A P T E R 3
C r e a t i n g W o r k f l o w s
Use this to learn how to build workflows and configure them.
Topics Building Workflows
Working with Actions
Configuring Actions - Using the Action Inspector
Action Details
Note: Features in editions for which you don’t have a license are disabled, and indicate that you need a license to use them.

Building Workflows84
BUILDING WORKFLOWS
Workflows in Vantage are created using the workspace in the workflow design tab (Using the Workflow Design Tab), by adding individual actions and connecting them together. A workflow can be a single action.
Figure 81. Workflow details panel.
Generally, you build a workflow in stages: first, conceptualize and design the workflow; next add actions; next, connect them together to control execution. Finally, configure each action in the workflow to perform exactly the way you want.
File and Binder Mode
Vantage supports two workflow design modes: File Mode and Binder Mode. To select a mode, select Options > Application Mode and choose either file or binder mode.
File mode is the simplest mode for designing Vantage workflows. In file mode, lines connecting actions can be viewed as the path that files take through a workflow. In file mode, nicknames are not required; if a new file is created, subsequent actions will operate on that new file automatically, without you specifying it.
Actions in file mode workflows can only operate on the files created by their predecessor actions in the same control flow. You cannot create workflows that have rendezvous connections, where actions in two control branches connect to a single action.
File mode has some action limitations due to the fact that it does not allow the use of nicknames. For example, a delete action cannot be used - it would simply delete the file in the workflow. To access the full range of functionality in Vantage, binder mode is recommended.
File workflows are ideal for simple, transcoding workflows.
Binder File | Variables View
Actions toolbar - drag onto design area to add to workflow.
June 2011
Chapter 3 Creating WorkflowsVantage Workflow Designer User’s Guide
85
Binder mode is the preferred mode for designing Vantage workflows. In binder mode, workflows reference files by nickname and lines connecting actions only indicate the execution flow of those actions. Workflows may have branches that rendezvous (or merge) and all actions are available in binder mode.
By default, Designer operates in file mode. You can switch modes any time you want, but if you modify a file mode workflow, Vantages converts it to a binder workflow. When Workflow Designer is in file mode, you can only edit or create file workflows; in binder mode, you can only edit or create binder workflows.
Automatic Conversion from File to Binder Mode
When Workflow Designer is in file mode, binder mode workflows are displayed in gray and can not be opened. You can select and view file workflows in binder mode, but if you edit them in any way (for example, even changing the action description or opening and progressing through the inspector and clicking OK rather than Cancel), Workflow Designer automatically (and silently) changes the workflow to a binder workflow.
Designing a Workflow
Before beginning the process of building a workflow, it is often helpful to have a solid understanding of what you want to accomplish, what actions (or steps) are necessary to perform the tasks, and where the media (and optionally, metadata and associated files) originates and where any new copies of media, metadata, and associated files should be stored.
Ideally, you should know in advance how you want to encode the media, what file operations you need to perform, what systems you need to interact with, and what metadata processing must be performed. Make certain the Vantage has read and write access to the necessary file systems.
Of course, if you don't have all this information at the start, Vantage will allow you to change your workflow later. And when you build a workflow that you like, features such as Vantage Folders and Action Templates will allow you to save common file locations, or actions, for re-use in other workflows.
Adding Actions to your Workflow
To add actions to a workflow, you open the action categories in the Actions toolbar and drag the action onto the design area.
You can also copy and paste actions in your workflow. Right-click and select Copy to put the action on the clipboard. Next, click on the design area, right-click and select Paste to place the copied action on the design area. Or, right-click on another action of the same type, and select Paste to configure the action identically with the copied action.
When you drag an action onto the design area, Vantage may automatically align it near where you dropped it. Until you connect an action to other actions, you can move it anywhere you want on the work area.
A valid workflow consists of at least two actions, which must be connected. A workflow must start with at least one origin action (watch or receive).
73465
Building Workflows86
Note: An origin action is required as the first action in a workflow, even if you plan to manually submit jobs to this workflow.
Workflows must begin with at least one origin action (such as a Watch or Receive action). Actions may have more than one origin action, but each origin action will function independently of the others. Each origin action may have its own workflow branch with following actions that are unique to that origin.
Workflows are not required to end with a terminating action - an action without an output pin. The only terminating action is the forward action. This action does not have an output pin, so you can't perform any actions after a forward action in a workflow (but terminating actions are not required).
Generally, you should drag and drop actions in a pattern similar to the desired workflow, working from left to right. However, you can drag actions anywhere, and connect them as desired later.
Vantage will tidy up actions - moving them and organizing them by column. Once an action is connected, you can move it vertically (up or down) but it cannot be moved from its column. Alternatively, Vantage can also attempt to optimize the workflow, removing as many line crossings as possible. To remove line crossings right-click on the workflow canvas and select Remove Line Crossings.
Deleting Actions To delete an action, right-click the action and select Delete. When you delete an action, Workflow Designer connects the preceding and succeeding actions, unless you uncheck Fill connections after delete in the Delete confirmation dialog.
Connecting Actions To Control Order of Execution
You connect actions together in a workflow to control the order of execution relative to other actions, and to control the flow of variables and either files or binders (depending on your workflow mode) from one action to another.
Actions can only be connected from an output pin (on the right side of the action) to an input pin (on the left side of the action), and control flows from output to input - from left to right.
To connect actions, click and drag a line from the output pin of one action to the input pin of the action you want to execute next in the workflow, or vice-versa.
Tasks proceed action by action, from left to right: when a workflow executes, actions at the far left execute first, and actions following the lines execute next.
You can connect an action to multiple succeeding actions, as shown following. When you do, none of the actions you connect can execute before the preceding action upon which they depend completes. In this example, three copy actions execute in parallel after the watch action completes. (These three actions execute independently of each other, and their start time and completion time relative to each other is non-
June 2011
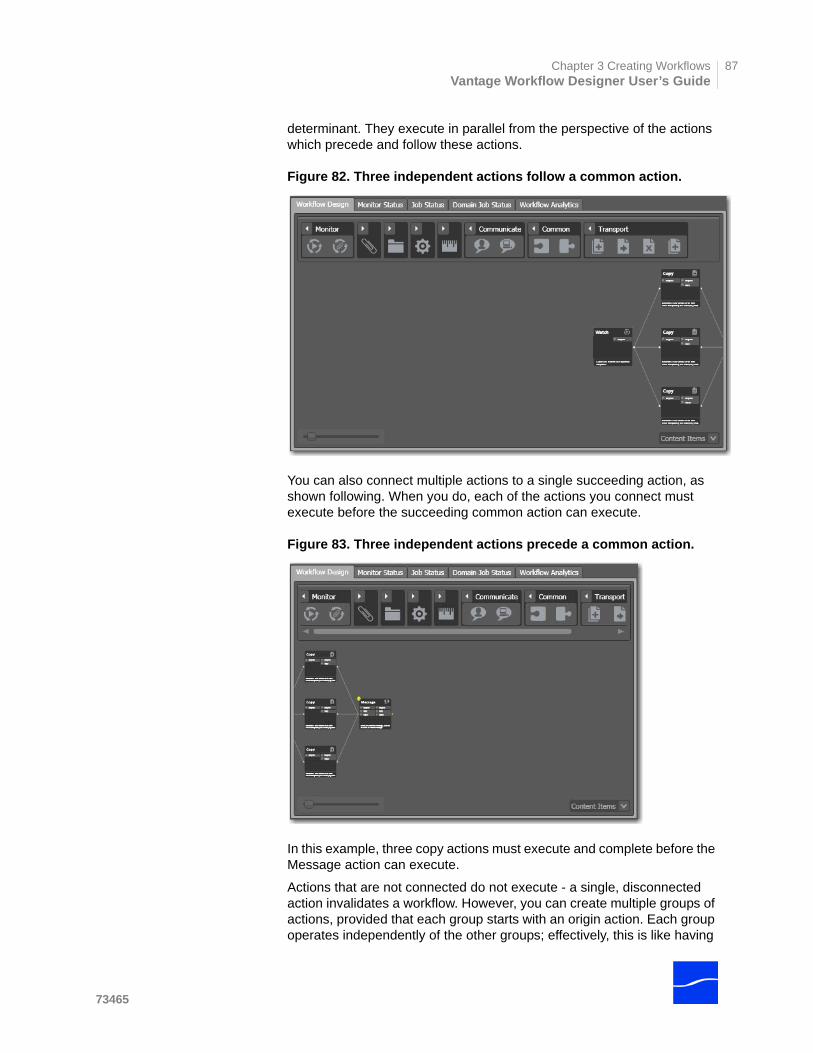
Chapter 3 Creating WorkflowsVantage Workflow Designer User’s Guide
87
determinant. They execute in parallel from the perspective of the actions which precede and follow these actions.
Figure 82. Three independent actions follow a common action.
You can also connect multiple actions to a single succeeding action, as shown following. When you do, each of the actions you connect must execute before the succeeding common action can execute.
Figure 83. Three independent actions precede a common action.
In this example, three copy actions must execute and complete before the Message action can execute.
Actions that are not connected do not execute - a single, disconnected action invalidates a workflow. However, you can create multiple groups of actions, provided that each group starts with an origin action. Each group operates independently of the other groups; effectively, this is like having
73465
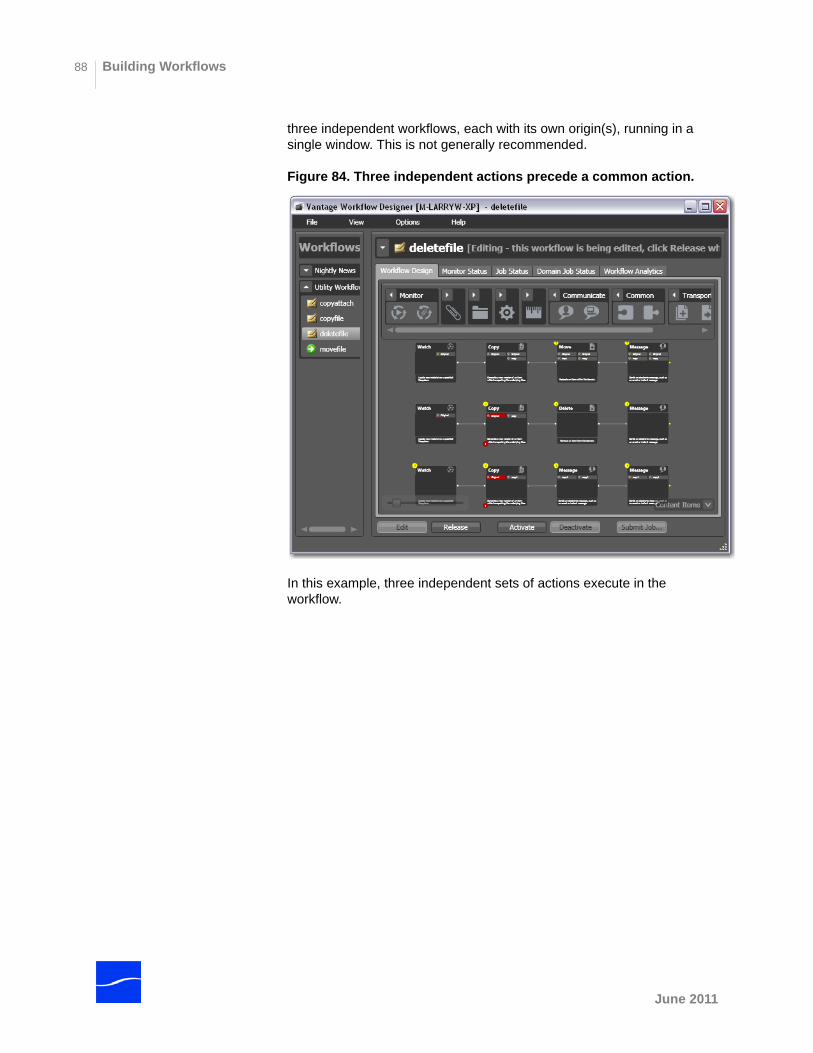
Building Workflows88
three independent workflows, each with its own origin(s), running in a single window. This is not generally recommended.
Figure 84. Three independent actions precede a common action.
In this example, three independent sets of actions execute in the workflow.
June 2011
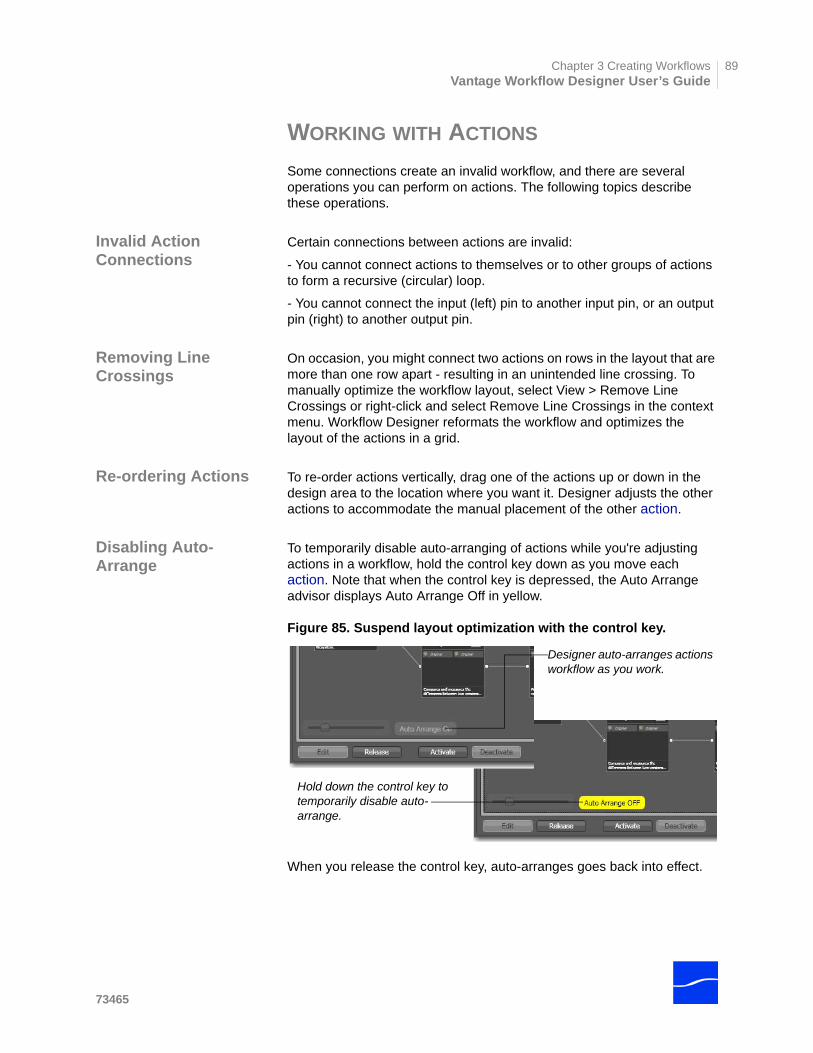
Chapter 3 Creating WorkflowsVantage Workflow Designer User’s Guide
89
WORKING WITH ACTIONS
Some connections create an invalid workflow, and there are several operations you can perform on actions. The following topics describe these operations.
Invalid Action Connections
Certain connections between actions are invalid:
- You cannot connect actions to themselves or to other groups of actions to form a recursive (circular) loop.
- You cannot connect the input (left) pin to another input pin, or an output pin (right) to another output pin.
Removing Line Crossings
On occasion, you might connect two actions on rows in the layout that are more than one row apart - resulting in an unintended line crossing. To manually optimize the workflow layout, select View > Remove Line Crossings or right-click and select Remove Line Crossings in the context menu. Workflow Designer reformats the workflow and optimizes the layout of the actions in a grid.
Re-ordering Actions To re-order actions vertically, drag one of the actions up or down in the design area to the location where you want it. Designer adjusts the other actions to accommodate the manual placement of the other action.
Disabling Auto-Arrange
To temporarily disable auto-arranging of actions while you're adjusting actions in a workflow, hold the control key down as you move each action. Note that when the control key is depressed, the Auto Arrange advisor displays Auto Arrange Off in yellow.
Figure 85. Suspend layout optimization with the control key.
When you release the control key, auto-arranges goes back into effect.
Designer auto-arranges actions workflow as you work.
Hold down the control key to temporarily disable auto-arrange.
73465

Configuring Actions - Using the Action Inspector90
CONFIGURING ACTIONS - USING THE ACTION INSPECTOR
Each action has an action inspector - a series of one or more configuration panels - to access it, either click the inspect icon (round yellow i icon) in the upper left corner or by right-click the action and select Configure.
Figure 86. Each action has an Inspector icon.
Until an action has been configured, the inspector icon displays yellow; an unconfigured action cannot be executed. When an action has been configured, the icon disappears unless you're hovering over the action. If you hover directly over the icon, a summary of the action will display.
The inspector panel or panels vary, depending on the action, and the configuration choices you make. For example, to configure a copy action, you choose the source and copied file, and a destination - all in one panel:
Figure 87. Typical action inspector.
Conversely, the inspector for a watch action typically consists of about 7 or more panels, depending on the file system you configure it to monitor.
When you’re viewing an inspector of an action in a workflow that is activated or someone else is editing it, the term Read Only displays in the inspector’s title bar. Also, if you have changed the configuration, an asterisk (*) displays immediately after the action name: for example, Watch *.
Unconfigured actions display their inspector icon in yellow.
June 2011
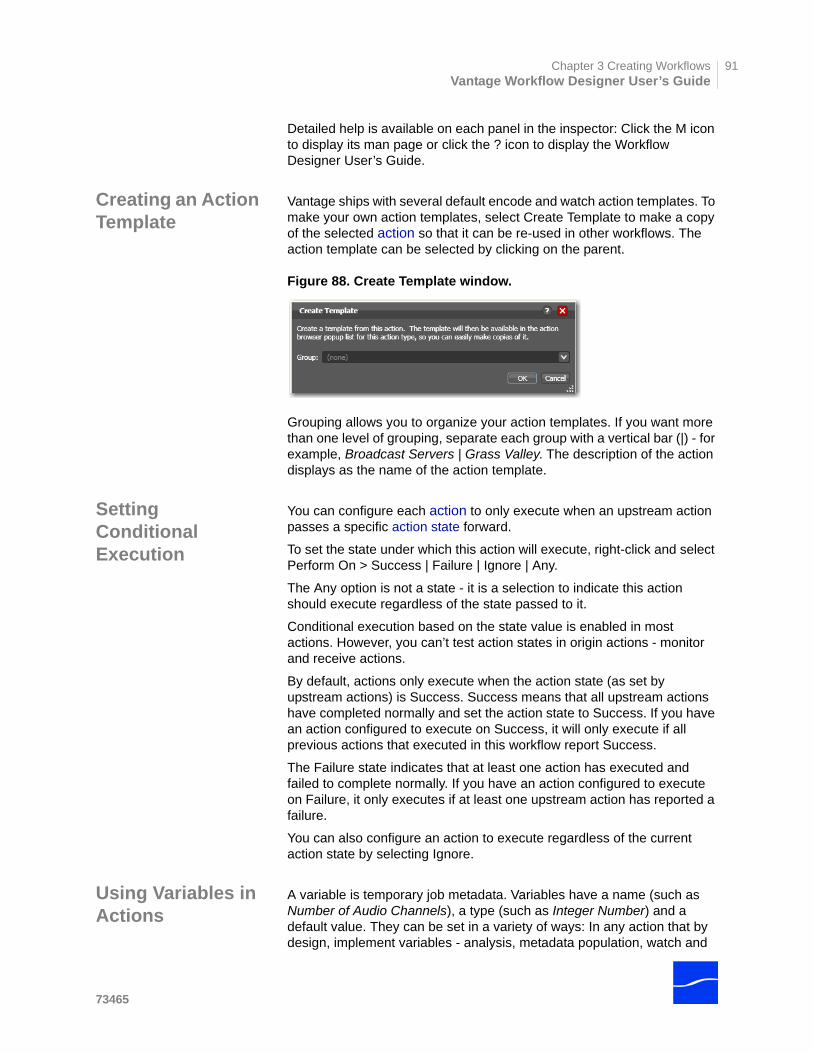
Chapter 3 Creating WorkflowsVantage Workflow Designer User’s Guide
91
Detailed help is available on each panel in the inspector: Click the M icon to display its man page or click the ? icon to display the Workflow Designer User’s Guide.
Creating an Action Template
Vantage ships with several default encode and watch action templates. To make your own action templates, select Create Template to make a copy of the selected action so that it can be re-used in other workflows. The action template can be selected by clicking on the parent.
Figure 88. Create Template window.
Grouping allows you to organize your action templates. If you want more than one level of grouping, separate each group with a vertical bar (|) - for example, Broadcast Servers | Grass Valley. The description of the action displays as the name of the action template.
Setting Conditional Execution
You can configure each action to only execute when an upstream action passes a specific action state forward.
To set the state under which this action will execute, right-click and select Perform On > Success | Failure | Ignore | Any.
The Any option is not a state - it is a selection to indicate this action should execute regardless of the state passed to it.
Conditional execution based on the state value is enabled in most actions. However, you can’t test action states in origin actions - monitor and receive actions.
By default, actions only execute when the action state (as set by upstream actions) is Success. Success means that all upstream actions have completed normally and set the action state to Success. If you have an action configured to execute on Success, it will only execute if all previous actions that executed in this workflow report Success.
The Failure state indicates that at least one action has executed and failed to complete normally. If you have an action configured to execute on Failure, it only executes if at least one upstream action has reported a failure.
You can also configure an action to execute regardless of the current action state by selecting Ignore.
Using Variables in Actions
A variable is temporary job metadata. Variables have a name (such as Number of Audio Channels), a type (such as Integer Number) and a default value. They can be set in a variety of ways: In any action that by design, implement variables - analysis, metadata population, watch and
73465
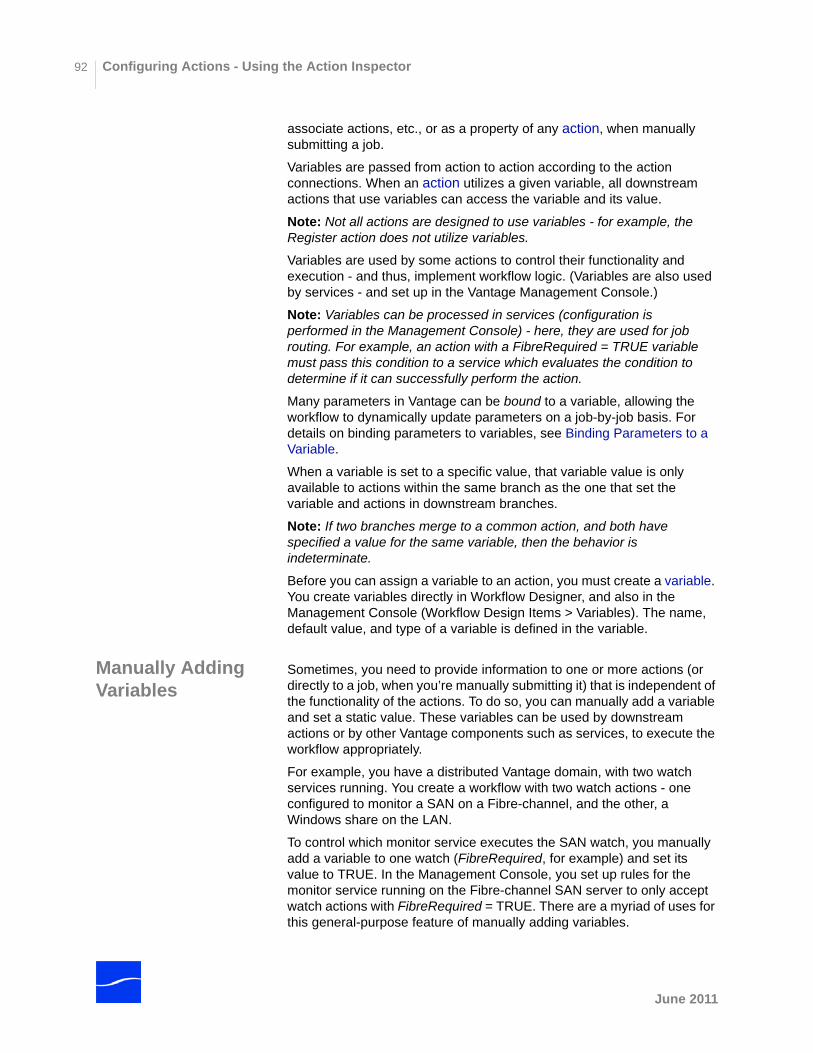
Configuring Actions - Using the Action Inspector92
associate actions, etc., or as a property of any action, when manually submitting a job.
Variables are passed from action to action according to the action connections. When an action utilizes a given variable, all downstream actions that use variables can access the variable and its value.
Note: Not all actions are designed to use variables - for example, the Register action does not utilize variables.
Variables are used by some actions to control their functionality and execution - and thus, implement workflow logic. (Variables are also used by services - and set up in the Vantage Management Console.)
Note: Variables can be processed in services (configuration is performed in the Management Console) - here, they are used for job routing. For example, an action with a FibreRequired = TRUE variable must pass this condition to a service which evaluates the condition to determine if it can successfully perform the action.
Many parameters in Vantage can be bound to a variable, allowing the workflow to dynamically update parameters on a job-by-job basis. For details on binding parameters to variables, see Binding Parameters to a Variable.
When a variable is set to a specific value, that variable value is only available to actions within the same branch as the one that set the variable and actions in downstream branches.
Note: If two branches merge to a common action, and both have specified a value for the same variable, then the behavior is indeterminate.
Before you can assign a variable to an action, you must create a variable. You create variables directly in Workflow Designer, and also in the Management Console (Workflow Design Items > Variables). The name, default value, and type of a variable is defined in the variable.
Manually Adding Variables
Sometimes, you need to provide information to one or more actions (or directly to a job, when you’re manually submitting it) that is independent of the functionality of the actions. To do so, you can manually add a variable and set a static value. These variables can be used by downstream actions or by other Vantage components such as services, to execute the workflow appropriately.
For example, you have a distributed Vantage domain, with two watch services running. You create a workflow with two watch actions - one configured to monitor a SAN on a Fibre-channel, and the other, a Windows share on the LAN.
To control which monitor service executes the SAN watch, you manually add a variable to one watch (FibreRequired, for example) and set its value to TRUE. In the Management Console, you set up rules for the monitor service running on the Fibre-channel SAN server to only accept watch actions with FibreRequired = TRUE. There are a myriad of uses for this general-purpose feature of manually adding variables.
June 2011
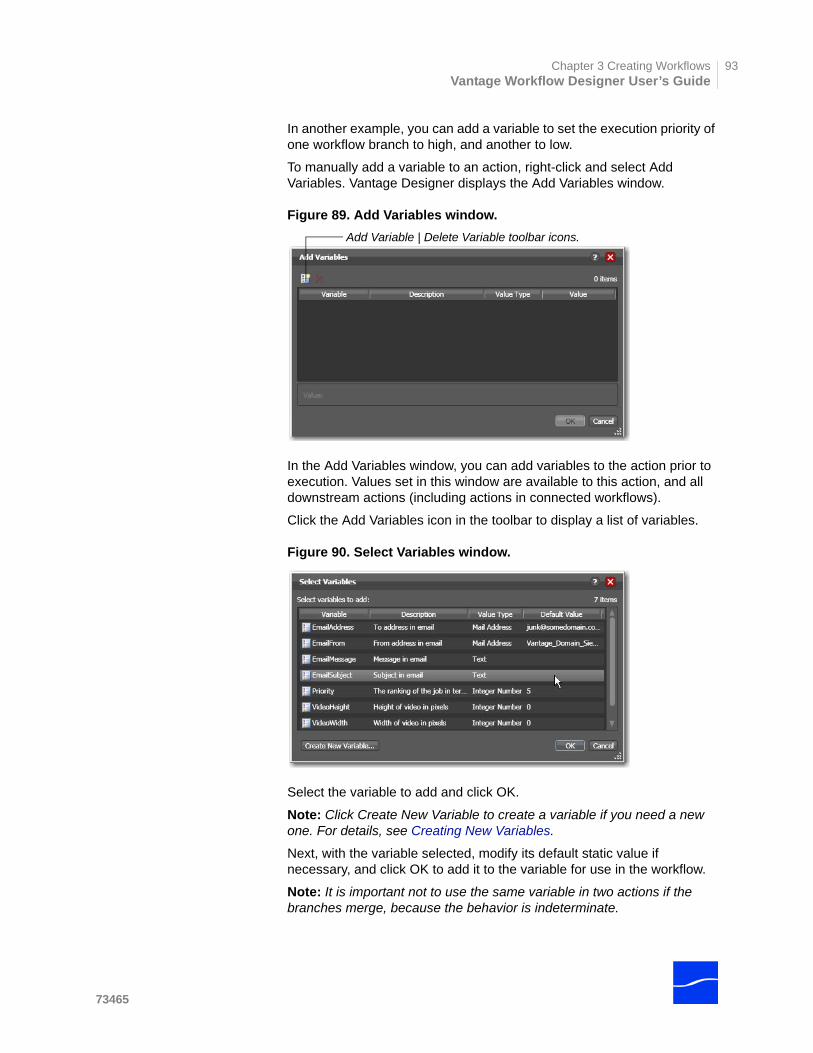
Chapter 3 Creating WorkflowsVantage Workflow Designer User’s Guide
93
In another example, you can add a variable to set the execution priority of one workflow branch to high, and another to low.
To manually add a variable to an action, right-click and select Add Variables. Vantage Designer displays the Add Variables window.
Figure 89. Add Variables window.
In the Add Variables window, you can add variables to the action prior to execution. Values set in this window are available to this action, and all downstream actions (including actions in connected workflows).
Click the Add Variables icon in the toolbar to display a list of variables.
Figure 90. Select Variables window.
Select the variable to add and click OK.
Note: Click Create New Variable to create a variable if you need a new one. For details, see Creating New Variables.
Next, with the variable selected, modify its default static value if necessary, and click OK to add it to the variable for use in the workflow.
Note: It is important not to use the same variable in two actions if the branches merge, because the behavior is indeterminate.
Add Variable | Delete Variable toolbar icons.
73465

Configuring Actions - Using the Action Inspector94
Creating New Variables
In addition to creating variables in the Management Console (Templates > Variables), you can also create new variables in Workflow Designer. On variable selection windows, click the Create New Variable button. Workflow Designer displays the Create New Variable Window:
Figure 91. Use the Create New Variables window to create variables.
Name. Enter an appropriate name for the variable.
Description. Enter a functional description.
Value Type. Select the type of variable to create from the dropdown list.
Default Value. Enter the static value for this variable instance.
Click OK to save the variable.
Binding Parameters to a Variable
Most settings in an action are configured with a static value - one that does not change from job to job. For example, you configure a watch action to poll a specific directory - and job after job, this directory never changes - that is, it is a static value.
However, many actions also have settings whose values change from job to job - and thus, must be assigned a value when the job runs - typically, based on the media being processed.
For example, you may have a message action that generates an email - and the subject line in the email should always be the name of the media file being processed. Of course, you can’t know the value of the file name at design time - only at run time. Or, a variable may be assigned a value by an analysis action to determine how many lines of black are at the top of a video frame; a crop filter later in the workflow can bind to that variable, ensuring that every crop in every job is appropriate to the workflow.
To solve this problem, Vantage enables these settings to be bound to a variable, allowing the workflow to dynamically update the value on a job-by-job basis.
June 2011
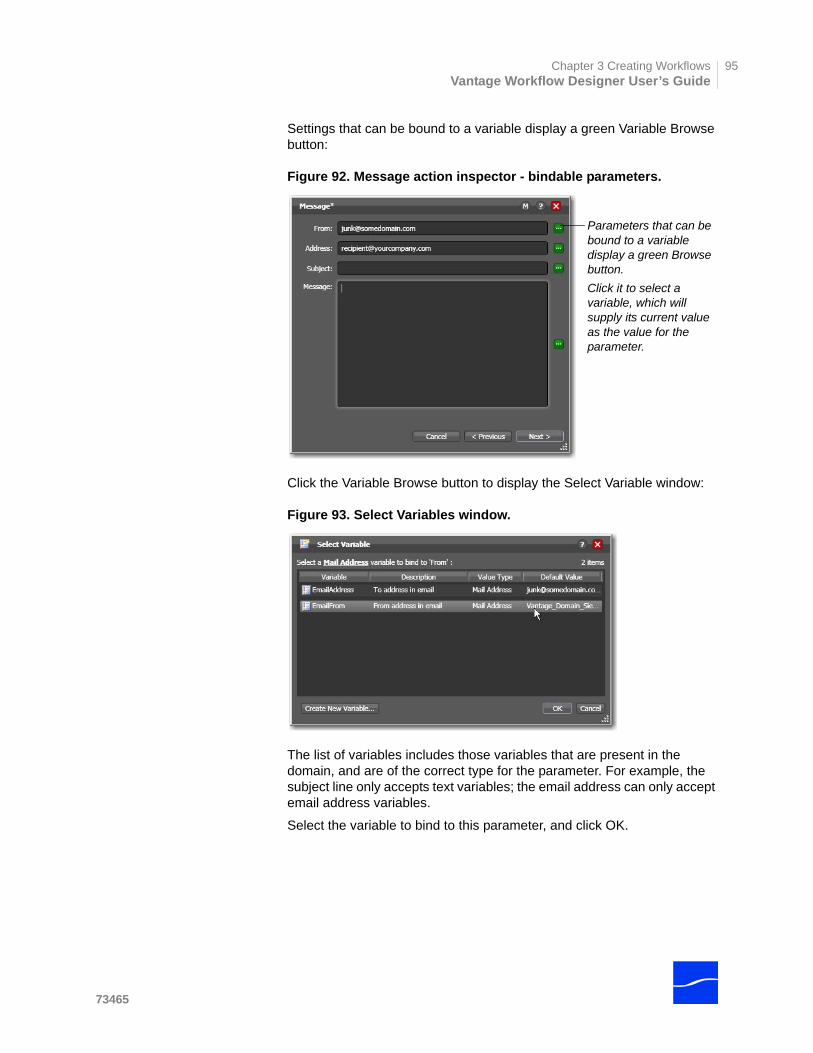
Chapter 3 Creating WorkflowsVantage Workflow Designer User’s Guide
95
Settings that can be bound to a variable display a green Variable Browse button:
Figure 92. Message action inspector - bindable parameters.
Click the Variable Browse button to display the Select Variable window:
Figure 93. Select Variables window.
The list of variables includes those variables that are present in the domain, and are of the correct type for the parameter. For example, the subject line only accepts text variables; the email address can only accept email address variables.
Select the variable to bind to this parameter, and click OK.
Parameters that can be bound to a variable display a green Browse button.
Click it to select a variable, which will supply its current value as the value for the parameter.
73465
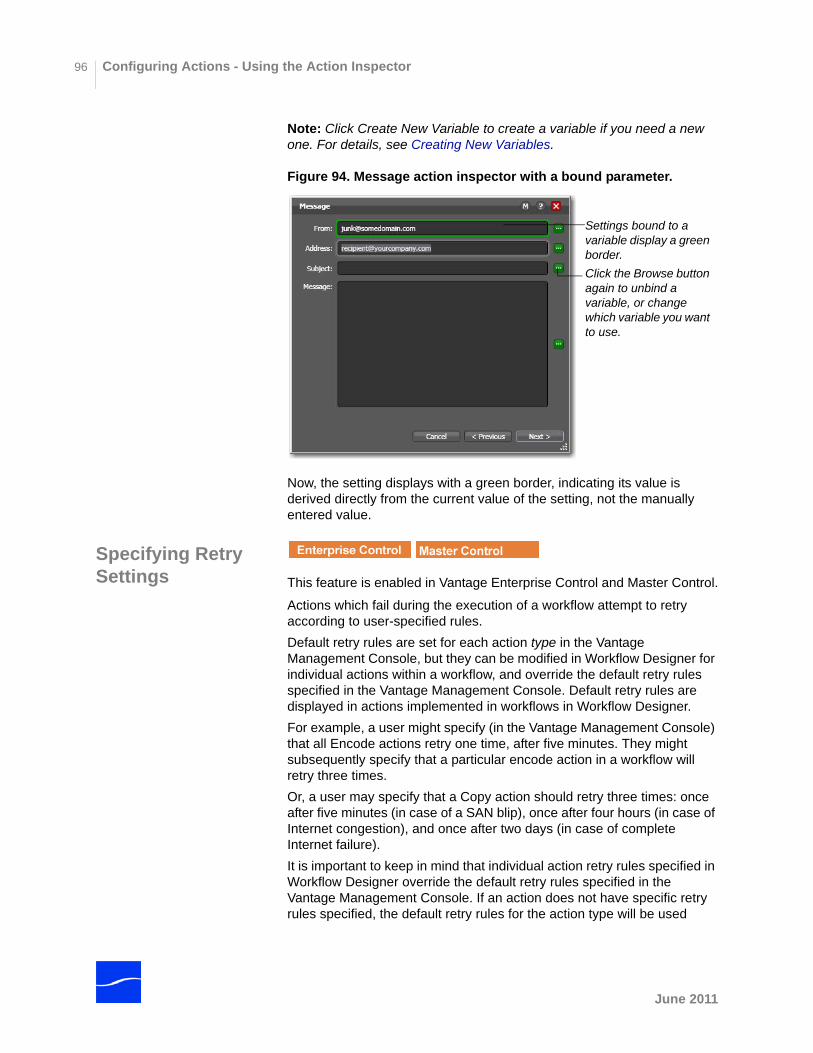
Configuring Actions - Using the Action Inspector96
Note: Click Create New Variable to create a variable if you need a new one. For details, see Creating New Variables.
Figure 94. Message action inspector with a bound parameter.
Now, the setting displays with a green border, indicating its value is derived directly from the current value of the setting, not the manually entered value.
Specifying Retry Settings This feature is enabled in Vantage Enterprise Control and Master Control.
Actions which fail during the execution of a workflow attempt to retry according to user-specified rules.
Default retry rules are set for each action type in the Vantage Management Console, but they can be modified in Workflow Designer for individual actions within a workflow, and override the default retry rules specified in the Vantage Management Console. Default retry rules are displayed in actions implemented in workflows in Workflow Designer.
For example, a user might specify (in the Vantage Management Console) that all Encode actions retry one time, after five minutes. They might subsequently specify that a particular encode action in a workflow will retry three times.
Or, a user may specify that a Copy action should retry three times: once after five minutes (in case of a SAN blip), once after four hours (in case of Internet congestion), and once after two days (in case of complete Internet failure).
It is important to keep in mind that individual action retry rules specified in Workflow Designer override the default retry rules specified in the Vantage Management Console. If an action does not have specific retry rules specified, the default retry rules for the action type will be used
Settings bound to a variable display a green border.
Click the Browse button again to unbind a variable, or change which variable you want to use.
June 2011
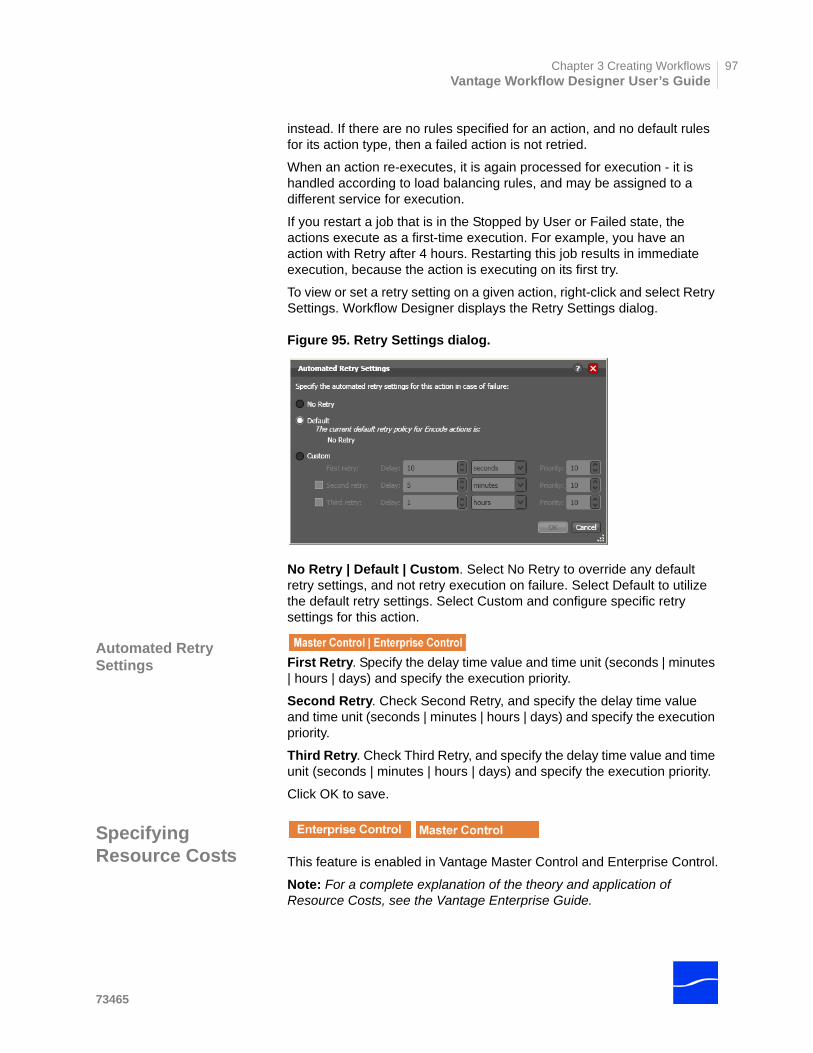
Chapter 3 Creating WorkflowsVantage Workflow Designer User’s Guide
97
instead. If there are no rules specified for an action, and no default rules for its action type, then a failed action is not retried.
When an action re-executes, it is again processed for execution - it is handled according to load balancing rules, and may be assigned to a different service for execution.
If you restart a job that is in the Stopped by User or Failed state, the actions execute as a first-time execution. For example, you have an action with Retry after 4 hours. Restarting this job results in immediate execution, because the action is executing on its first try.
To view or set a retry setting on a given action, right-click and select Retry Settings. Workflow Designer displays the Retry Settings dialog.
Figure 95. Retry Settings dialog.
No Retry | Default | Custom. Select No Retry to override any default retry settings, and not retry execution on failure. Select Default to utilize the default retry settings. Select Custom and configure specific retry settings for this action.
Automated Retry Settings First Retry. Specify the delay time value and time unit (seconds | minutes
| hours | days) and specify the execution priority.
Second Retry. Check Second Retry, and specify the delay time value and time unit (seconds | minutes | hours | days) and specify the execution priority.
Third Retry. Check Third Retry, and specify the delay time value and time unit (seconds | minutes | hours | days) and specify the execution priority.
Click OK to save.
Specifying Resource Costs This feature is enabled in Vantage Master Control and Enterprise Control.
Note: For a complete explanation of the theory and application of Resource Costs, see the Vantage Enterprise Guide.
73465
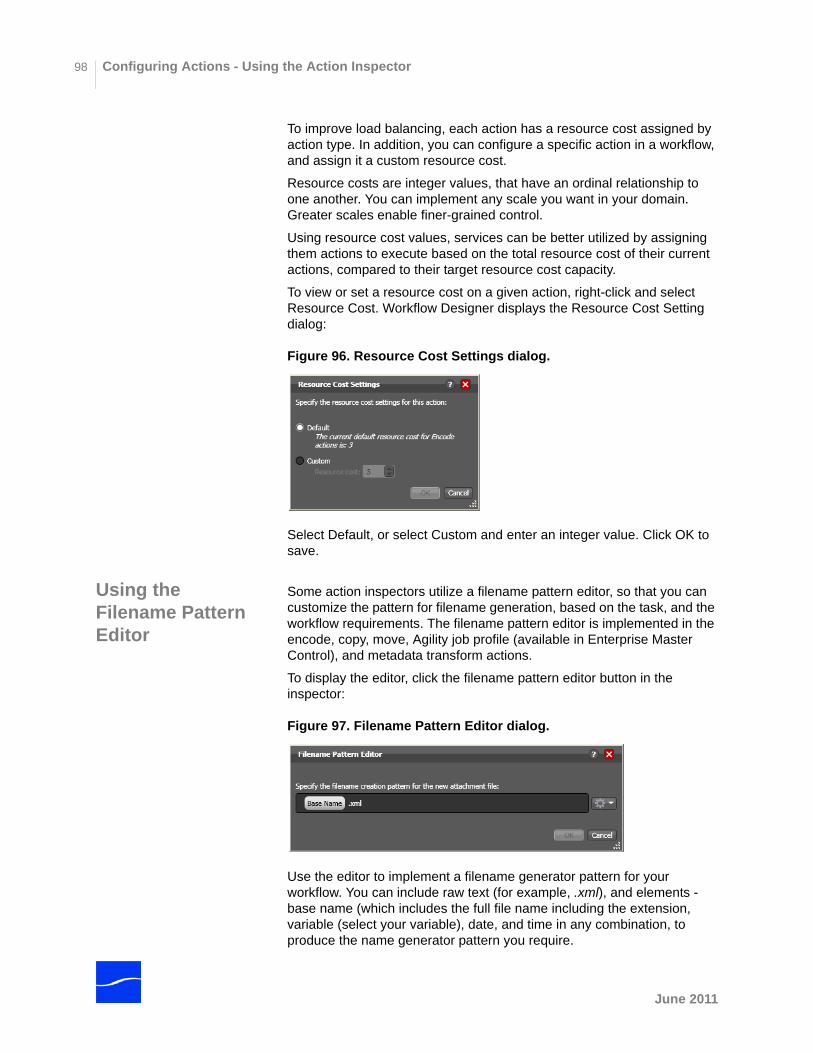
Configuring Actions - Using the Action Inspector98
To improve load balancing, each action has a resource cost assigned by action type. In addition, you can configure a specific action in a workflow, and assign it a custom resource cost.
Resource costs are integer values, that have an ordinal relationship to one another. You can implement any scale you want in your domain. Greater scales enable finer-grained control.
Using resource cost values, services can be better utilized by assigning them actions to execute based on the total resource cost of their current actions, compared to their target resource cost capacity.
To view or set a resource cost on a given action, right-click and select Resource Cost. Workflow Designer displays the Resource Cost Setting dialog:
Figure 96. Resource Cost Settings dialog.
Select Default, or select Custom and enter an integer value. Click OK to save.
Using the Filename Pattern Editor
Some action inspectors utilize a filename pattern editor, so that you can customize the pattern for filename generation, based on the task, and the workflow requirements. The filename pattern editor is implemented in the encode, copy, move, Agility job profile (available in Enterprise Master Control), and metadata transform actions.
To display the editor, click the filename pattern editor button in the inspector:
Figure 97. Filename Pattern Editor dialog.
Use the editor to implement a filename generator pattern for your workflow. You can include raw text (for example, .xml), and elements - base name (which includes the full file name including the extension, variable (select your variable), date, and time in any combination, to produce the name generator pattern you require.
June 2011
Chapter 3 Creating WorkflowsVantage Workflow Designer User’s Guide
99
Note: In Metadata and Encode actions, the basename element is the base name of the file without the extension (for example, myfile), which you must supply. In Copy, Move, and Agility Job Profile (Enterprise Master Control) actions, the basename is the full name of the file, including the extension. For example, myfile.mpg.
Changing Descriptions
You can change an action description by directly clicking on the description text field at the bottom of the action, or right-click and select Description. Enter the new text and click away.
73465
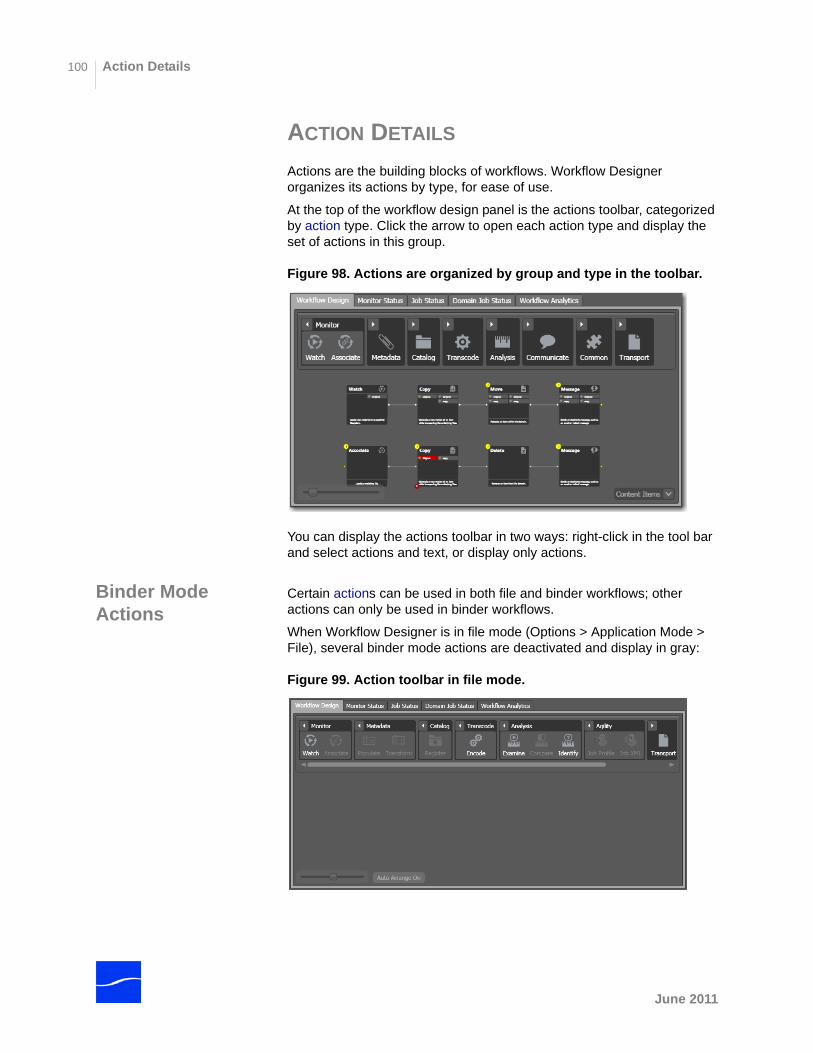
Action Details100
ACTION DETAILS
Actions are the building blocks of workflows. Workflow Designer organizes its actions by type, for ease of use.
At the top of the workflow design panel is the actions toolbar, categorized by action type. Click the arrow to open each action type and display the set of actions in this group.
Figure 98. Actions are organized by group and type in the toolbar.
You can display the actions toolbar in two ways: right-click in the tool bar and select actions and text, or display only actions.
Binder Mode Actions
Certain actions can be used in both file and binder workflows; other actions can only be used in binder workflows.
When Workflow Designer is in file mode (Options > Application Mode > File), several binder mode actions are deactivated and display in gray:
Figure 99. Action toolbar in file mode.
June 2011
Chapter 3 Creating WorkflowsVantage Workflow Designer User’s Guide
101
Notice that in file mode the associate action, both metadata actions, and many others are deactivated. The following actions are binder-mode actions, and cannot be used in file-mode workflows.
Associate Forward Populate
Compare Move Transform & Synchronize
Delete Receive Agility Job Profile
Deploy Register Agility Job XML
Note: Agility actions are only enabled in Enterprise Master Control.
Action States The action state describes the condition of an action execution in process and after completion.
During execution, an action may be Queued | Paused | In Process | Waiting. These keywords display in the job status tab of Workflow Designer.
After execution, an action’s final state is assigned: Success | Ignore | Failure. These keywords may be tested by actions immediately following the target action, to determine whether or not following actions should execute. Note that this final action state is passed to subsequent actions. If an action fails, then the next action inherits the Fail action state and (in most cases) will not execute.
Similarly, if an action sets the Ignore state, the next action inherit the Ignore state and will likely not execute. Certain special actions, such as Message, can be configured to perform on certain states - this allows workflows to send an email if they detect a failure.
If an action receives states from two incoming actions (such as a merge of two branches), then states are given the following priority:
- If at least one incoming state is Failure, regardless of other incoming states, the action will inherit the Failure state - Failure has precedence over all action states.
- If there is no Fail state, but at least one Pass state, then the action will inherit the Pass state- Pass has precedence over Ignore states.
- Only if all incoming states are Ignore, will the action will inherit the Ignore state.
Ignore has lowest precedence of the three states.
73465
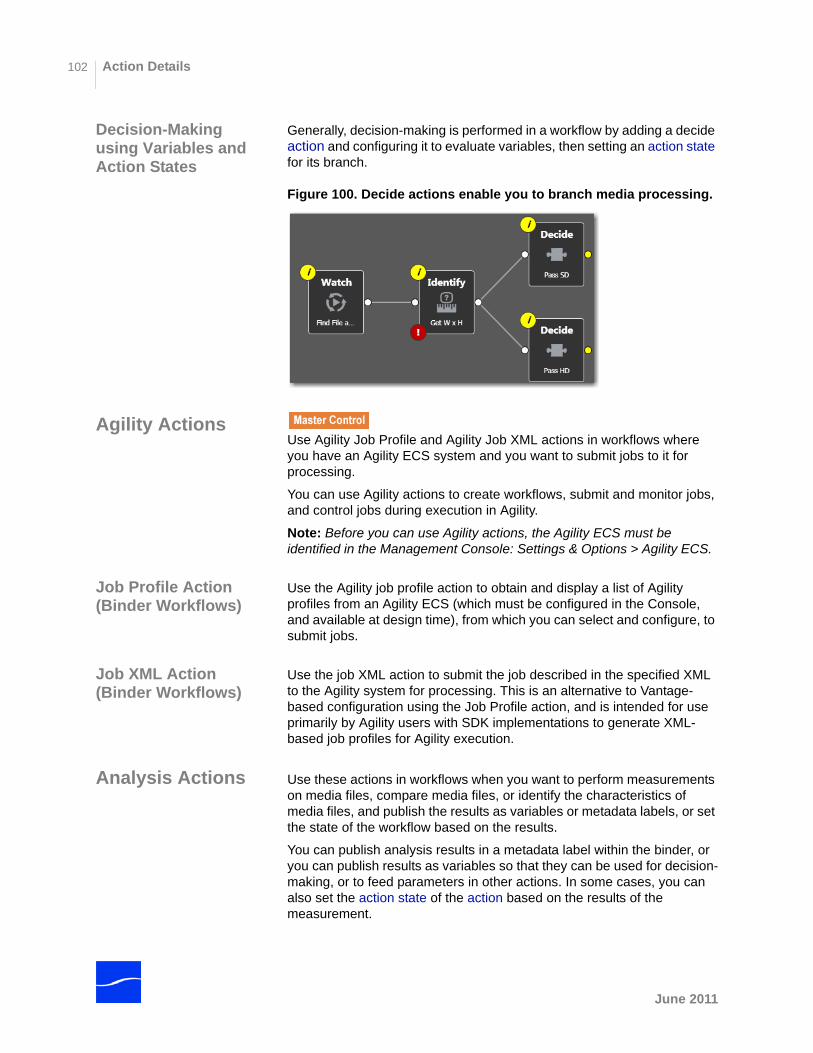
Action Details102
Decision-Making using Variables and Action States
Generally, decision-making is performed in a workflow by adding a decide action and configuring it to evaluate variables, then setting an action state for its branch.
Figure 100. Decide actions enable you to branch media processing.
Agility ActionsUse Agility Job Profile and Agility Job XML actions in workflows where you have an Agility ECS system and you want to submit jobs to it for processing.
You can use Agility actions to create workflows, submit and monitor jobs, and control jobs during execution in Agility.
Note: Before you can use Agility actions, the Agility ECS must be identified in the Management Console: Settings & Options > Agility ECS.
Job Profile Action (Binder Workflows)
Use the Agility job profile action to obtain and display a list of Agility profiles from an Agility ECS (which must be configured in the Console, and available at design time), from which you can select and configure, to submit jobs.
Job XML Action (Binder Workflows)
Use the job XML action to submit the job described in the specified XML to the Agility system for processing. This is an alternative to Vantage-based configuration using the Job Profile action, and is intended for use primarily by Agility users with SDK implementations to generate XML-based job profiles for Agility execution.
Analysis Actions Use these actions in workflows when you want to perform measurements on media files, compare media files, or identify the characteristics of media files, and publish the results as variables or metadata labels, or set the state of the workflow based on the results.
You can publish analysis results in a metadata label within the binder, or you can publish results as variables so that they can be used for decision-making, or to feed parameters in other actions. In some cases, you can also set the action state of the action based on the results of the measurement.
June 2011
Chapter 3 Creating WorkflowsVantage Workflow Designer User’s Guide
103
Examine Action Use the examine action to analyze the video and audio of a media file, by selecting a given analyzer (black detection, macroblocking analysis, slate detection, etc.).
Compare Action (Binder Workflows)
Use the compare action to compare two media files.
Identify Action Use the Identify action to extract the properties of a media or attachment file (for example, file name, extension, size, or path) or to generate an MD5 hash of a media or attachment file, which you can use to compare two files downstream, or in other workflows.
You can also extract metadata from media files (for example, (such as Author or Title).
In addition, you can extract a comprehensive set of properties from media files (for example, frame size, frame rate, codec, bitrate, number of audio channels, etc.).
Extracted values are assigned to variables (which you create in the Management Console ors directly in Workflow Designer), for use later in a workflow. You can also set the workflow state as a result of execution conditions.
Catalog Actions
Register Action (Binder Workflows)
The register action registers the workflow binder in the Vantage catalog. This allows Vantage to preserve the binder - and any temporary files referenced by it - even after a job expires. This is also how binders become visible in to operators in Vantage Workflow Portal. See online help in Vantage Management Console (Application Configurations) for more information about configuring the Vantage Workflow Portal.
Common Actions Common actions do not have a dedicated Vantage service to perform them, and tend to happen instantaneously.
Compute Action A compute action uses variables to set other variables. For example, you can use Compute to add two numbers and assign the result to the selected variable. Compute can perform mathematical operations such as addition, subtraction, division and multiplication. It can also convert variables between types (such as converting a time code to a string), string manipulation, such as appending strings together into an output variable, and comparison functions.
Decide Action A decide action is an action which sets the action state based upon variables. It is commonly used to decide whether or not a branch in a workflow should execute (it sets the Pass state) or not (it sets the Ignore state).
73465
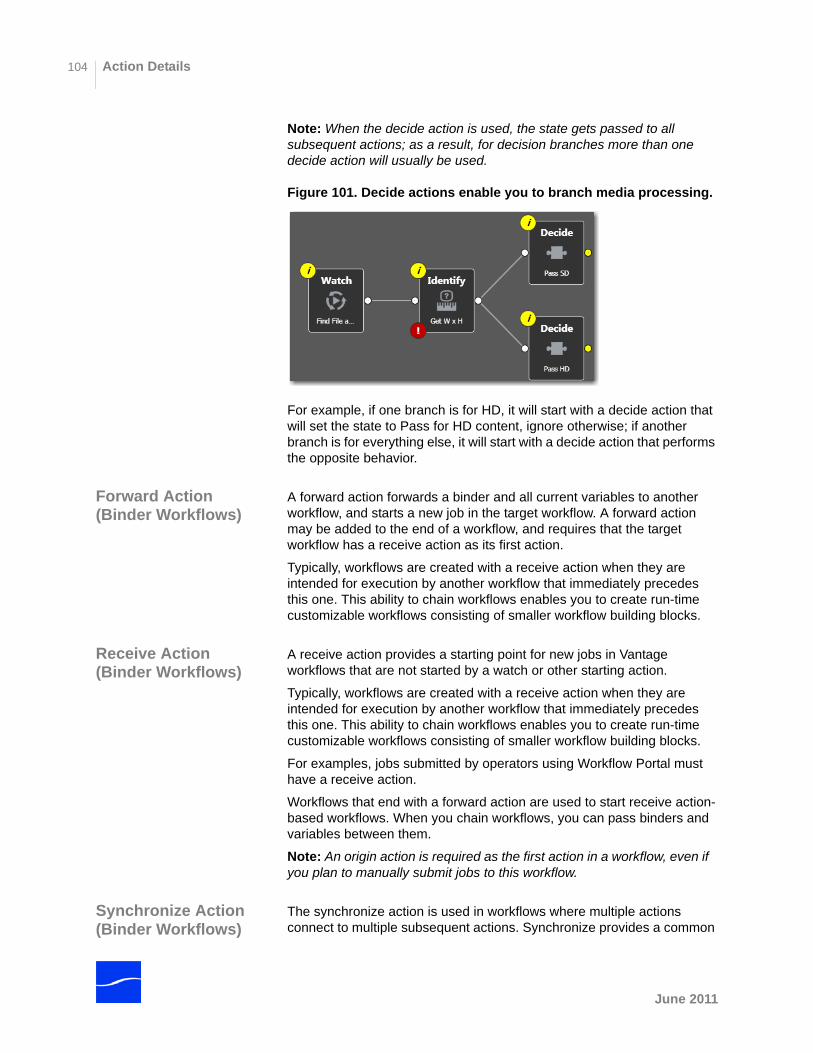
Action Details104
Note: When the decide action is used, the state gets passed to all subsequent actions; as a result, for decision branches more than one decide action will usually be used.
Figure 101. Decide actions enable you to branch media processing.
For example, if one branch is for HD, it will start with a decide action that will set the state to Pass for HD content, ignore otherwise; if another branch is for everything else, it will start with a decide action that performs the opposite behavior.
Forward Action (Binder Workflows)
A forward action forwards a binder and all current variables to another workflow, and starts a new job in the target workflow. A forward action may be added to the end of a workflow, and requires that the target workflow has a receive action as its first action.
Typically, workflows are created with a receive action when they are intended for execution by another workflow that immediately precedes this one. This ability to chain workflows enables you to create run-time customizable workflows consisting of smaller workflow building blocks.
Receive Action (Binder Workflows)
A receive action provides a starting point for new jobs in Vantage workflows that are not started by a watch or other starting action.
Typically, workflows are created with a receive action when they are intended for execution by another workflow that immediately precedes this one. This ability to chain workflows enables you to create run-time customizable workflows consisting of smaller workflow building blocks.
For examples, jobs submitted by operators using Workflow Portal must have a receive action.
Workflows that end with a forward action are used to start receive action-based workflows. When you chain workflows, you can pass binders and variables between them.
Note: An origin action is required as the first action in a workflow, even if you plan to manually submit jobs to this workflow.
Synchronize Action (Binder Workflows)
The synchronize action is used in workflows where multiple actions connect to multiple subsequent actions. Synchronize provides a common
June 2011
Chapter 3 Creating WorkflowsVantage Workflow Designer User’s Guide
105
connection point, where all upstream actions need to be connected to all downstream actions.
Communicate Actions
Communicate actions are used to communicate with external systems.
Message Action A message action is an action which enables you to generate and transmit an electronic message - an email, for example. You must configure Vantage to use an SMTP server before email can be utilized; this can be done in the Vantage Management Console.
Notify Action A notify action is an action which saves job information to an XML file, invoke a command shell and pass data, or interface with an external system via Web Services.
Metadata Actions Metadata actions are used to convert between attachment files, metadata labels, and variables.
Populate Action (Binder Workflows)
Populate actions transform data between variables, attachments, and metadata labels. Populate can also be used to obtain certain system-level information related to the current job and assign it to variables.
Transform Action (Binder Workflows)
A transform action transforms data between XML files (attachments) and labels. XSL stylesheets are used to perform these transformations; stylesheets can be managed through the Vantage Management Console.
Monitor Actions Monitor actions are used to identify new files to be added to a binder, and in the case of the watch action, to start a job for this workflow.
Watch Action A watch action uses the monitor service to continually (and at regular periods) polls a target location (a directory, for example) on a device or file system (FTP, network folder, etc.) to discover new files.
When a new file is discovered, the watch action submits a job to the workflow which it is part of, for processing the file, typically a media file.
Note: An origin action is required as the first action in a workflow, even if you plan to manually submit jobs to this workflow
For details, see the inspector’s man page.
Associate Action (Binder Workflows)
An associate action uses the monitor service to continually (and at regular periods) poll a target location (a directory, for example) on a device or file system (FTP, network folder, etc.) to discover new files.
Generally, the associate action uses the file name of an existing media file or attachment as the basis for discovering new files; for example, if media file Vantage.mpg is currently in the workflow, then the associate action
73465
Action Details106
may look for Vantage.scc. This behavior can be defined in the associate action's inspector dialog.
Associate actions execute until the new file is discovered; subsequent actions do not execute until the file is found. When the new file is discovered, the associate action makes the file available to other actions in the workflow.
Note: An origin action is required as the first action in a workflow, even if you plan to manually submit jobs to this workflow.
For details, see the inspector’s man page.
Transcode Actions The encode action creates a new format of media, using a specific encoder profile.
Encode Action Use the encode action to create media of a new format, and save it as a file, using a prescribed codec profile. How you configure the encoder depends on the encoder you choose.
For details, see the inspector’s man page.
Transport Actions Transport actions perform file operations on files.
Copy Action Use the copy action to copy a file from one directory to another directory on a given file system. In binder mode, the new file will be tracked by the workflow - that is, referenced in the Binder. As a result, the new file must be given a nickname.
Move Action (Binder Workflows)
Use the move action to move a file from one directory to another. This action deletes the original file. In binder mode, the file may also optionally have its nickname changed during the move.
Delete Action (Binder Workflows)
Use the delete action to delete a file on the specified file system. This action also removes the file reference from the binder.
Deploy Action (Binder Workflows)
The deploy action copies one or more files to a destination in a single step, and may perform additional custom steps depending upon the type of deployment.
In binder mode, the deployed files are not referenced in the binder, and are not tracked after the action completes.
June 2011
G l o s s a r y
action An action is the smallest unit of work that can be specified in a Vantage workflow. Actions are connected together in a workflow to perform a useful task. Each action must be configured to perform its task in the context of the workflow, using an action inspector. Action inspectors are specific to each type of action.
Actions are grouped by functional categories: communication, transcoding, file operations, metadata processing, etc. Each action is defined by the specific task they perform. For example, an email action, or a metadata label/file transformation action.
Actions have limited interdependency, and so, are very flexible. You may impose limitations on actions in a workflow. For example, you might require action B to depend on action A in a Vantage workflow.
Actions - during execution - operate on binders, variables, and states, and they generate an action state when they complete. Actions are executed by Vantages services, which perform the requirements of the action.
action state The action state describes the condition of an action execution in process and after completion.
During execution, an action may be Queued | Paused | In Process | Waiting. After execution, an action's final state may be Pass | Ignore | Failure. These states display in the Workflow Designer Job Status tab.
During workflow execution, action states are passed to subsequent actions. These keywords may be tested by downstream actions, to determine whether or not following actions should execute.
You can also specify that an action should execute on any state (right-click and select Perform On > Any.
If an action fails, then the next action will inherit the Failure action state and (in most cases) will not execute. If one action fails, the entire job fails.
Similarly, if an action sets the Ignore state, the next action will inherit the Ignore state and will also likely not execute. Certain special actions, such as Message, can be configured to perform on certain states - this allows workflows to send an email if they detect a failure.
Action states have precedence when an action receives states from multiple incoming actions (a merge of multiple branches):
- If at least one incoming state is Failure, regardless of other incoming states, the action will inherit the Failure state - Failure has precedence over all action states.
- If there is no Fail state, but at least one Pass state, then the action will inherit the Pass state- Pass has precedence over Ignore states.
- Only if all incoming states are Ignore, will the action will inherit the Ignore state. Ignore has lowest precedence of the three states.
Agility service The Agility service is the Vantage component (operating as a Windows service) which executes the actions relating to Agility job submission and interaction with Agility: Job Profile, and Job XML. Agility features are enabled in Vantage Enterprise Master Control.
All-in-one domain An All-in-One (single-server) Vantage domain is one in which ALL components of Vantage - the Microsoft SQL Server Express database, all Vantage services, and client programs - are installed and operate on a single computer.
analysis service The analysis service is the Vantage component (operating as a Windows service) which executes the actions relating to the analysis of content: Examine, Compare, and Identify.
associate action An associate action uses the monitor service to continually (and at regular periods) poll a target location (a directory, for example) on a device or file system (FTP, network folder, etc.) to discover new files, based on some permutation of the name of the file being processed.
Associate actions can be executed on any action state.
Generally, the associate action uses the file name of an existing media file or attachment as the basis for discovering new files. For example, if media file Vantage.mpg is currently in the workflow, then the associate action may look for Vantage.scc. This behavior can be configured in the associate action's inspector.
Associate actions begin executing when a job is submitted, and execute until a new file is discovered - subsequent actions do not execute until the file is found. When the new file is discovered, the associate action makes the file available to the other actions in the workflow.
Configuration is accomplished in the inspector, and is based on the target device/file system being monitored and other requirements.
attachment An attachment is a non-media file that is associated with media during execution of a workflow. For example, an attachment may be an XML file that contains metadata, an SCC caption file, an STL or PAC subtitle file. Attachments may also be a PDF file, Excel spreadsheet, or Word document, for example. Attachments are identified and processed using nicknames for simplicity. Processing is optional - attachments may be simply passed through a workflow for storage with the processed media and registered in the Vantage catalog.
attachment nickname See nickname.
binder A binder is a collection of media files, attachment files, metadata labels, and metadata tracks. All workflows in Vantage operate upon binders. A binder allows a Vantage workflow to keep track of dozens of files while the workflow executes.
Files within binders are referenced by nickname - that is, a binder is not a physical location, rather a collection of references. The underlying files may be moved around without changing the nickname of the file. This allows a binder to be submitted to, or passed between, workflows without requiring that the files be in specific locations.
Binders are referenced by jobs, and by the catalog. If a binder is not in the catalog, and not associated with a job, then the binder will be deleted. When a binder is deleted, any temporary files (such as media files in Vantage Stores) will also be deleted.
binder mode Binder mode is the preferred mode for designing Vantage workflows. In binder mode, workflows reference files by nickname and lines connecting actions only indicate the execution flow of those actions.
See file mode.
catalog See Vantage catalog.
catalog service The catalog service is the Vantage component (operating as a Windows service) that executes actions utilizing the Vantage catalog.
See register action.
common actions Common actions are actions that can be executed by any Vantage service; they do not have a dedicated Vantage service.
See receive action, forward action, decide action.
communicate service The communicate service is the Vantage component (operating as a Windows service) that executes the actions relating to electronic messaging.
See message action, notify action.
compare action A compare action compares media files to calculate certain metrics (for example, PSNR). These metrics can generally be published as variables or as a label.
compute action A compute action performs various arithmetic and string manipulation functions, permitting you to create and modify values in variables, for use in downstream actions.
console The term console is an informal name for the Vantage Management Console.
See Vantage Management Console.
copy action A copy action is used to replicate a file from a source target (file system/device and directory) to a destination target (file system/device and directory). It typically performs this task by copying the file to the destination.
Copy actions can be executed on any action state.
database The term database is the common term used to refer to the Vantage database, where all specifications for the domain are stored, along with workflows and job history.
decide action A decide action is an action which sets the action state based upon variables. It is most commonly used to decide whether or not a branch in a workflow should execute (by setting the Pass state) or not (by setting the Ignore state).
Note that when the decide action is used, the state gets passed to the next action; as a result, for decision branches more than one decide action will usually be used. For example, if one branch is for HD, it will start with a decide action that will set the state to Pass for HD content, ignore otherwise; if another branch is for everything else, it will start with a decide action that performs the opposite behavior.
See variable, action state.
delete action A delete action is used to permanently remove a file from a source target (file system/device and directory).
Delete actions can be executed on any action state.
deploy action A deploy action is used to save the specified files to a destination outside the Vantage domain. Unlike the move or copy actions, deploy actions allow multiple files to be deployed simultaneously, and do not maintain a reference to those files in the binder after it completes.
Deploy actions can be executed on any action state.
domain See Vantage domain.
encode action An encode action implements the specified codec, which is used to transcode a media file into another media file types.
Enterprise Edition Vantage Enterprise is a special edition of Vantage, which adds system management features which enable a high level of visibility and a deep level of control for large-scale or mission-critical workflows. Vantage Enterprise is offered in two licenses: Enterprise Control, and Master Control.
examine action An examine action evaluates the video and audio of a media file to measure certain characteristics, such as audio loudness, or to detect characteristics, such as the presence and size of curtains. You can configure it to publish metadata or variables containing the results of analysis.
failover database The term failover database is the term used to refer to the optional mirrored database, which the Vantage domain will automatically be transitioned to in the event of a failure of the primary database.
file mode File mode is the simplest mode for designing Vantage workflows. In file mode, lines connecting actions represent the path that files take through a workflow. In file mode, nicknames are not required; if a new file is created, subsequent actions will operate on the new file automatically.
File mode has some limitations due to the fact that it does not allow the use of nicknames. For example, a delete action cannot be used in file mode workflow - it would simply delete the file in the workflow, leaving it without a file to process. To access the full functionality of Vantage, binder mode is recommended.
forward action A forward action forwards a binder and all current variables to another workflow, starting a new job with the target workflow. A forward action may be added to the end of a workflow, and requires that the target workflow has a receive action as its first action.
Typically, workflows are created with a receive action when they are intended for execution by another workflow that immediately precedes this one. This ability to chain workflows enables you to create comprehensive, intelligent run-time switching workflows consisting of smaller workflows used as building blocks.
See receive action.
hot folder A hot folder is a slang term for a directory on a server that has been identified as a directory for storing media to be processed by a workflow in Vantage. When the workflow monitor identifies new media in this folder, it is submitted for processing.
inspector An inspector is a series of one or more panels in Vantage Workflow Designer that facilitate the setup and configuration of a given action. Inspectors are unique to each action - for example, configuring a watch action is very different than configuring an encode action.
identify action An identify action determines technical properties of a media file, such as codec type, video bitrate, or file size. This information can then be published as a metadata label, or as variables.
job A job is an execution of a Vantage workflow. Jobs have a state (separate from action states), and jobs are comprised of actions that are executing. Jobs, like actions, may be in-process or they may be complete.
As a job executes, each action may be performed by any service (on any computer) in the Vantage domain that is capable of performing it. The capability of a service to perform a specific job depends on its current operating state, its workload, and its suitability, defined by qualification rules.
Jobs for a given workflow can be viewed in the Workflow Designer by selecting the workflow in the Workflow Designer tab and displaying the Job Status tab. Alternatively, all in-process and failed jobs within a Vantage Domain may be viewed in the Status section of the Management Console.
job profile action Use the job profile action to submit jobs to Agility for processing; definition of the job is provided directly in Vantage by configuring the action.
job XML action Use the XML profile action to submit jobs to Agility for processing; definition of the job is provided in an XML file.
job routing See qualification rule
job state A job state is the current condition of a job. Keyword values are Start | Pause | Success | Fail | In Process.
Job Status Web App The Job Status Web App enables you to view real-time information about jobs in the domain from anywhere on your network with a Web browser. The Job Status Web App is installed on the IIS server on your Vantage Domain database server. This Web app is available in all Vantage Enterprise licenses.
label A metadata label defines a set of metadata by use of name/value pairs associated with content. For example, a spot label may contain Agency, Author, ISCI, and other metadata values; this set of metadata is collectively called a Spot metadata label. Metadata labels are stored in binders with the associated media and attachment files.
Vantage supplies several metadata label templates for use in workflows. In addition, you can create and modify labels for your use using the Management Console (Templates > Metadata Labels).
license A license is stored in the Vantage database. Generally, licenses are imported as XML files into the database through the Management Console.
media nickname See nickname.
message action A message action is an action which enables you to generate and transmit an electronic message - an email, for example. You must configure Vantage to use an SMTP server (Management Console: Vantage Domain > Settings & Options > Email) before email can be utilized.

metadata service The Metadata service is the Vantage component (operating as a Windows service) that executes the actions relating to the transformation of metadata between labels, variables, and XML files.
See also populate action, transform action.
metadata track A metadata track is time-based or temporal metadata associated with media. For example, closed caption metadata is defined as a metadata track.
monitor service The Monitor service is the Vantage component (operating as a Windows service) that executes the actions relating to the discovery of files and starting jobs.
See also watch action, associate action.
move action A Move action is used to move a file from a source target (file system/device and directory) to a destination target (file system/device and directory). It typically performs this task by copying the file to the destination, then deleting the source.
Move actions can be executed on any action state.
nickname Nicknames are user-defined strings that are used to reference files within a Vantage workflow. Nicknames allow users a convenient way to design workflows independent of the actual file locations or underlying file names. As a workflow executes, it maintains a collection of underlying files called a binder; nicknames allow the workflow to access files within the binder.
Nicknames may refer to either media files, or attachment files. Certain actions will only allow the use of certain nickname types; for example, a transcode action only allows media file nicknames to be used as the inputs and outputs. However, other actions (such as move and copy actions) operate on any type of file, and allow the use of any nickname.
The use of a nickname does not affect the actual name of the underlying file, nor do nicknames have any special meaning. For example, providing a media file the nickname Flash does not necessarily mean that the media file is in fact a Flash file.
Nicknames can be managed in the Management Console under Workflow Design Items > Media Nicknames. Nicknames can also be entered manually, directly in the Workflow Designer.
The word Original is a reserved nickname specific to media files.
notify action A notify action is an action which saves job information to a file, or which interfaces with an external system. You can configure a notify action to produce an XML file, and you can invoke a Web service via a URL.
populate action A populate action uses the metadata service to transform data between variables and metadata labels, and publish variable values from the label for use in downstream actions.
Populate actions can be executed on any action state.
qualification rule A qualification rule influences or controls the routing and execution of actions among Vantage services of the same type in a distributed Vantage domain. Qualification rules can be used to ensure that jobs are routed to services that are best suited for the task. Vantage uses values contained in variables to determine the suitability of a given service to execute the action.
For example, one machine in a domain has specialized hardware - a fibre connection. In workflows where move and copy actions require the fibre connection, qualification rules specify that the specialized machine (which hosts a Vantage transport service) execute those workflows. This is accomplished by (1) adding a qualification rule to all other transport services in the domain indicating that they cannot executed actions that require a fibre card or (2) adding a fibre card required variable to the action in the workflow that requires the fibre card.
Qualification rules are exclusively based on variables; they are not based on any actual machine analysis. As a result, it is up to the system administrator to correctly set up variables and qualification rules, and apply variables to the appropriate actions to ensure that jobs are routed correctly.
Qualification rules are created and managed in the Vantage Management Console: Vantage Domain > Services.
receive action A receive action provides a starting point for new jobs in Vantage workflows that are not started by a watch or other starting action.
Typically, workflows are created with a receive action when they are intended for execution by another workflow that immediately precedes this one. This ability to chain workflows enables you to create comprehensive, intelligent run-time switching workflows consisting of smaller workflows used as building blocks.
Workflows that end with a forward action are used to start receive action-based workflows. When you chain workflows, you can pass binders and variables between them.
See forward action.
register action A register action uses the catalog service to place a binder into the Vantage catalog. Register actions can be executed on any action state.
See also Vantage catalog.
resource unit A resource unit is an integer value, implemented in the Vantage Management Console on each action type to specify a relative computer resource consumption value in relation to all other action types. This value enables Vantage to maximize resources and optimize transactions, so that you can tune your Vantage system for the highest possible throughput on your particular hardware.
service See Vantage service.
single-server domain See All-in-one domain.
synchronize action A synchronize action is a connector action, for the purpose of uncluttering workflow connectors. In workflows where there is a many-to-many relationship (for example, 6 encodes connect to 6 deploys, which connect to 6 deletes), instead of drawing all six connects from each action, you can simply connect them to a common synchronize action. There is no inspector for the synchronize action, because no configuration is required.
Transform actions can be executed on any action state.
Team Management Team Management is a licensed feature in a distributed Vantage domain, which adds user access control. By creating specific Vantage users (and optional passwords) in the Vantage domain console, Vantage administrators can control access to workflows in Workflow Designer and Workflow Portal. You can also control access to the Vantage Console, thus limiting who can configure and control the domain itself.
transcode Transcode means the process of decoding media in one format (MPEG2, for example) down to digital baseband and then encoding it in another format (MPEG4, for example).
transcode service The transcode service is the Vantage component (operating as a Windows service) that executes the encode action - transforming media from one format to another.
See encode action.
transport service The transport service is the Vantage component (operating as a Windows service) that executes the actions relating to file operations: move action, delete action, copy action, and deploy action.
transform action A transform action uses the metadata service to transform metadata between XML files (attachments) and labels. XSL stylesheets are used to perform these transformations; stylesheets can be managed in the Vantage Management Console: Vantage Domain > Catalogs.
Transform actions can be executed on any action state.
Vantage catalog The Vantage catalog (or simply catalog) allows the management of binders that you want to exist past the life of an individual job. Folders can be created in the catalog with individual expiration rules.
The catalog and its folders are not a physical location; rather they are a way of organizing binders and controlling when the binders - and the underlying files - are deleted.
Vantage database A Vantage database is a Microsoft SQL Server database which contains all workflows, actions, jobs, binders, licenses, and configuration information for a Vantage domain.
Vantage domain A Vantage domain is a collection of computers, Vantage workflows, actions, Vantage services, jobs, binders, configuration settings and templates all known to and interacting each other, stored in a Vantage database. This collection constitutes a Vantage domain. Vantage domains may exist on a single computer or they may be distributed across many computers for durability and scalability.
Multiple Vantage domains may exist on a network, but they are independent entities that do not communicate with each other. They are not bound together and do not share resources or work. The purpose of storing an entire domain in a database is to provide an easy way to create and manage the domain and to provide access to all the details about each resource in the domain to any other resource that needs it.
Vantage folder A Vantage folder is a directory on a supported file system that is stored in the Vantage database, which is used in move and copy actions. Unlike Vantage Stores, files placed in a Vantage folder are not deleted when the binder is deleted. Vantage folders are used for output folders of files.
Vantage folders are managed in both the Vantage Management Console and Vantage Workflow Designer. Changes to a Vantage folder - such as updating an IP address or a password - immediately affect all workflows.
Vantage ManagementConsole
The Vantage Management Console (usually referred to informally as the console, for short) is a Windows MMC program that enables Vantage system administrators to effectively configure Vantage domains, and scale domains across multiple servers to meet their operating requirements and perform effectively in their environment.
Vantage service The term Vantage service refers to the collection of software components (operating as Windows services) in Vantage that implement and execute the actions in a workflow as it executes as a job.
Vantage store A Vantage store is a directory on a Windows file system that used for storing temporary files. Stores are managed by the Vantage domain for the purpose of centralizing large directories for reading and writing files. Unlike a Vantage folder, files placed in a Vantage store are deleted when the binder is deleted. Vantage stores are generally used to hold temporary files for the duration that a job is executing.
Vantage stores are managed in the Vantage Management Console: Vantage Domain > Storage. Services that create temporary files, such as the Transcode service, can be configured to use specific stores.
Vantage WorkflowDesigner
Vantage Workflow Designer is a client program that enables you to create and edit workflows, activate and deactivate them, and monitor their status and review jobs in process and jobs that have completed.
Vantage Workflow Portal Vantage Workflow Portal is a client program that features a customizable set of functionality to support various operator-related tasks: Selecting media and submitting jobs, updating variables and metadata and forwarding jobs, creating EDL-base jobs, etc.
Customization is implemented in the Vantage Management Console, when Vantage administrators construct the user interface and functionality they want for a given task, then save it. When operators launch Portal, they select the configuration appropriate to the task at hand, and Portal dynamically implements the appropriate user interface from the configuration file.
variable A variable identifies temporary job metadata. Variables have a name (such as Number of Audio Channels), a type (such as Integer Number) and a default value. Variables values can be set inside a job in a variety of ways: Through analysis, through metadata population, in the watch and associate actions, as a property of an action, or by a service as it executes an action.
Variables are used by Vantage services and actions to control their behavior and workflow logic. The majority of parameters in Vantage can be bound (or attached) to variables, allowing the workflow to dynamically update on a job-by-job basis.
For example, a variable may be assigned a value by an analysis action to determine how many lines of black are at the top of a video frame; a crop filter later in the workflow can bind to that variable, ensuring that every crop in every job is appropriate to the workflow requirements.
Variables in services may be also be used for job routing. For example, an action with a FibreRequired=TRUE variable must pass this condition to a service which evaluates the condition to determine if it can successfully perform the action.
Variables can be created in the Management Console (Vantage Domain > Templates > Variables) or in Workflow Designer, and assigned for use in workflows and services.
watch action A watch action uses the monitor service to continually (and at regular periods) poll a target location (a directory, for example) on a device or file system (FTP, Windows network folder, etc.) to discover new files.
When a new file is discovered, the watch action submits a job for the workflow which it is part of, for processing the file - typically, a media file.
Web Dashboard The Web Dashboard enables you to important domain information from anywhere on your network with a Web browser. The Web Dashboard is installed on the IIS server on your Vantage Domain database server. The Web Dashboard is available in Vantage Enterprise Master Control.
workflow A workflow in Vantage is a set of actions designed to perform an automated process. Vantage workflows are created using the Vantage Workflow Designer by adding and configuring actions and connecting
them together. Workflows are stored in the Vantage database, and executed by Vantage services.
Workflow Portal Short for Vantage Workflow Portal. Also sometime called just Portal, for short. See Vantage Workflow Portal.
Workflow Designer Short for Vantage Workflow Designer. Also sometime called just Designer, for short. See Vantage Workflow Designer.
119
I n d e x
A
action state, colors to indicate 69action states 101action status, viewing 74actions
adding to a workflow 85binder mode only 100binding parameters to a variable 94changing description of 99configuring, generally 90connecting together 86deleting 86detailed view, showing/hiding 63details of 100invalid connections 89re-ordering 89setting conditional execution 91specifying resource cost for 97states of 101templates for, creating 91uncrossing connection lines 89using variables with 91
actions toolbar, using 63Activate button (workflow) 56Agility actions 102
setting action priority 74starting and stopping 70
analysis actions 102associate action 105auto-arrange, disabling temporarily 89automated retry settings, configuring 97
B
binder file nickname view 63binder mode, generally 84
bindersviewing 72
binding parameters to variables 94bottleneck analysis, performing 78
C
catalog actions 103category
creating new 58deleting 59renaming 59
changing in Workflow Designer 51color of jobs 69common actions 103communicate actions 105compare action 103compute action 103conditional execution of actions, setting 91connecting manually to a domain 52connecting to a domain 51connection lines, uncrossing 89copy action 106copyright notice iiCSV file job reports 70
D
Deactivate button (workflow) 56decide action 103delete action 106deploy action 106detailed view of actions, showing/hiding 63domain 116
connecting to 51connection settings 52
Domain Job Status tab, generally 68
Index120
domain name, computer name or IP address used 52
domain, manually connecting 52
E
Edit button (workflow) 56encode action 106Enterprise Control, generally 3Enterprise edition, generally 3examine action 103execution analysis, performing 78exporting job reports 70
F
file mode, generally 84File to Binder Mode, changing 85forward action 104
G
generally 61grid lines, showing/hiding 61
I
identify action 103inspectors, using, generally 90
J
job reportscreating 70exporting 70generally 70
job state, colors to indicate 69Job Status tab, generally 68job submitting, manually 80
L
license, changing / updating in Workflow Designer 54
logging in to Workflow Designer 50
M
manual job submission 80manually connecting to a domain 52Master Control, generally 3message action 105metadata actions 105
MMC 116monitor actions 105monitor status tab, generally 65move action 106MPEG disclaimers iv
N
nickname view 63notices, legal, generally iinotify action 105
P
parameters, binding to variable 94pause for priority, in transcode actions 73pausing transcode actions 73populate action 105
R
receive action 104register action 103Release button (workflow) 56resource costs, specifying 97resuming transcode actions 73
S
specifying resource costs 97starting and stopping Workflow Designer 50Submit Job button 57support, obtaining xviisynchronize action 104
T
Team Management, generally 3tech support, obtaining xviiTelestream
contacting vi, xviiinformation about xviiInternational xviimailing address xviisales and marketing xviitechnical support xviiWeb site xvii
Telestream, contacting xviitrademark notice iitrademark notices iitranscode actions 106
pause for priority 73
June 2011
Vantage Workflow Designer User’s Guide 121
transcode actions, pausing and resuming 73transform action 105transport actions 106
U
uncrossing connection lines 89user access 50User access, generally 4
V
Vantage account 4Vantage Dashboard, generally 3Vantage domain
changing 51connection settings 52
Vantage domain, manually connecting 52Vantage Enterprise, generally 3Vantage Job Status, generally 4Vantage license, changing / updating in Workflow
Designer 54Vantage user 50, 51Vantage user password, changing in Workflow
Designer 53Vantage Workflow Designer, see Workflow
Designer 50Vantage, Web site for xviivariables
adding to a workflow 92binding with parameters 94generally 91using for decision making 102
variables view 63
W
warranty vWarranty and Disclaimers vwatch action 105Web Dashboard, generally, Dashboard, generally 3Web Job Status, generally, Job Status Web app,
generally 4Web site for Vantage xviiworkflow
activating 57adding actions 85building, generally 84centering 61centering in workspace 61
workflow (cont’d)creating new 59deactivating 57deleting 60design techniques, generally 85details panel, using 56duplicating 60editing 57importing 60, 62moving in workspace 61moving to another category 60printing 60releasing 57renaming 60zooming in and out 61, 62
Workflow Analytics tab, generally 76workflow analytics, generally 76workflow analytics, performing bottleneck analysis
with 78workflow analytics, performing execution analysis
with 78workflow category
see category 58workflow design tab 61Workflow Designer
changing / updating license via 54logging in 50starting and stopping 50submitting jobs manually 80
workflow status buttons 56workflows panel, generally 58
Z
zooming a workflow 61
73465