Embed Size (px)
Citation preview

Writer Guide
Chapter 14Working with Fields

CopyrightThis document is Copyright © 2008 by its contributors as listed in the section titled Authors. You may distribute it and/or modify it under the terms of either the GNU General Public License, version 3 or later, or the Creative Commons Attribution License, version 3.0 or later.
All trademarks within this guide belong to their legitimate owners.
AuthorsAgnes BelzunceJohn Kane Gary SchnablJean Hollis WeberMichele Zarri
FeedbackPlease direct any comments or suggestions about this document to: [email protected]
AcknowledgmentsMuch of this chapter is adapted and updated from Chapter 5, “Getting the Most from Fields” in Jean Hollis Weber’s book OpenOffice.org Writer: The Free Alternative to Microsoft Word, O’Reilly Community Press, 2004.
Publication date and software versionPublished 30 November 2008. Based on OpenOffice.org 3.0.
You can download an editable version of this document from
http://oooauthors.org/en/authors/userguide3/published/

ContentsCopyright...............................................................................................2
Introduction to fields..............................................................................5
Quick and easy field entry......................................................................5
Using document properties to hold information that changes...............6
Using other fields to hold information that changes..............................7
Using AutoText to insert often-used fields.............................................9
Defining your own numbering sequences............................................10
Create a number range variable.......................................................10
Use AutoText to insert a number range field....................................12
Using automatic cross-references........................................................12
Inserting cross-references................................................................13
Available formats..............................................................................14
Preparing items as targets for cross-referencing..............................15
Using bookmarks...........................................................................15
Setting references.........................................................................15
Using fields in headers and footers......................................................16
Using fields instead of outline numbering for appendix numbering....18
Tricks for working with fields..............................................................19
Keyboard shortcuts for fields............................................................19
Fixing the contents of fields..............................................................19
Converting fields into text................................................................20
Developing conditional content............................................................20
Choose the types of conditional content to use.................................20
Conditional text.............................................................................20
Hidden text....................................................................................21
Hidden paragraphs........................................................................21
Hidden sections.............................................................................21
Plan your conditional content...........................................................21
Choose or define a variable...........................................................22
Define a logical expression (condition) involving the selected variable..........................................................................................22
Working with Fields 3

Create the variable...........................................................................22
DocInformation fields....................................................................22
User-defined variable field.............................................................22
Apply the condition to the content....................................................24
Conditional text.............................................................................24
Hidden text....................................................................................25
Hidden paragraphs........................................................................25
Hidden sections.............................................................................26
Change the value of the variable......................................................27
Using placeholder fields.......................................................................28
Using input fields and input lists.........................................................29
4 Working with Fields

Introduction to fieldsFields are extremely useful features of Writer. They are used for a variety of purposes; for example, data that changes (such as the current date or the total number of pages) or might change (the name of a product or book under development), user-defined numbering sequences, automatic cross-references, and conditional content (words or paragraphs that are visible or printed in some conditions but not others). Index entries are also fields.
This chapter describes some common uses of fields. A full discussion of fields and their use is beyond the scope of this book. Power users can find more details in the application Help.
Tip
Fields have a gray background when viewed on screen, unless you have deselected the Field shadings option or changed the color of field shadings on the Appearance page of the Options – OpenOffice.org dialog box. This gray background will not show when you print the file to hard copy or PDF.To turn field shadings on or off quickly, choose View > Field Shadings or press Control+F8.
Quick and easy field entryYou can quickly insert common fields into your document by choosing Insert > Fields from the menu bar and selecting the required field from the list, as shown in Figure 1.
Figure 1: Inserting common fields
Quick and easy field entry 5

Using document properties to hold information that changesUse the Properties dialog box for any document to enter information that you might want to reference in your document. This is particularly useful if it is information that might change during the course of the project. Click File > Properties and enter the desired data in the Description page (Figure 2) and the User Defined page (Figure 3).
Later in this chapter, we will see how to use this information in fields. You can return to this dialog box at any time and change the information you entered. When you do so, all of the references to that information will change wherever they appear in the document. For example, you might need to change the contents of the Title field from the draft title to the production title.
Figure 2: The Description page of the document’s Properties dialog box
The User Defined page of the Properties dialog box provides four fields for you to use as required. You can change the default names for these fields to more meaningful names. The example in Figure 3 shows that three of the defaults have been changed: Info 1 to Chapter subtitle, Info 2 to Chapter number, and Info 3 to Name of guide.
To change these field names, click the Info fields button near the bottom of the dialog box. In the small pop-up dialog box (Edit Field Names, not shown here), type the field names you want and then click OK.
6 Working with Fields

Figure 3: The User Defined page of the document’s Properties dialog box
Using other fields to hold information that changesOne way that people use fields is to hold information that is likely to change during the course of a project. For example, the name of a manager, a product, or even your entire company may change just before the document is due to be printed. If you have inserted the changeable information as fields, you can change the information in one place, and it will automatically change in all the places where that field occurs.
Writer provides several places where you can store the information referred to by a field. We will look at some of them here.
Seven document properties (Time, Date, Title, Subject, Author, Page Number, and Page Count) are on the Insert > Fields menu (Figure 1). To insert one of these fields, click on it in the menu.
Other document properties are on the DocInformation and Document pages of the Fields dialog box (Figure 4 and Figure 5), reached by clicking Insert > Fields > Other or pressing Ctrl+F2.
Using other fields to hold information that changes 7

To insert one of these fields, select it in the Type list and then select from the Select and Format lists if choices appear. Finally, click Insert.
Figure 4: Inserting a Date Modified field using the DocInformation page of the Fields dialog box
Figure 5: Inserting a File name field using the Document page of the Fields dialog box
Some of these items are picked up from the User Data page of the Options dialog box (covered in Chapter 2, Setting up Writer), so make sure the information on that page is correct.
8 Working with Fields

Tip
Although these fields are often used to hold information that changes, you can make the content unchangeable by selecting the Fixed content option (visible in Figure 4, lower right) when inserting the field. If necessary, you can come back to this dialog box later and deselect this option to make the field variable again.
Using AutoText to insert often-used fieldsIf you use the same fields often, you will want a quick and easy way to insert them. Use AutoText for this purpose. To define an AutoText entry for a field:
1) Insert a field into your document, as described previously.2) Select the field, and then click Edit > AutoText (or press
Ctrl+F3).3) On the AutoText dialog box (Figure 6), choose the group where
this new entry will be stored (in this example, it is going into My AutoText), type a name for the entry, and change the suggested shortcut if you wish.
4) Click the AutoText button and click New to have the entry inserted as a field. Do not choose New (text only) because the AutoText entry will be plain text, not a field. Click Close to close the AutoText dialog box.
Now whenever you want to insert this field at the cursor position, type the shortcut, and then press F3.
Figure 6: Creating a new AutoText entry
Using AutoText to insert often-used fields 9

Defining your own numbering sequencesYou may want to define your own numbering sequences, for example to use in situations where you do not always want the number at the start of the paragraph or where you want more control than the built-in numbering choices give you.
This topic describes how to create and use a numbering sequence, using a “number range variable” field.
Create a number range variableTo create a number range variable using Arabic (1, 2, 3) numbers:
1) Place the insertion point in a blank paragraph in your document.2) Click Insert > Fields > Other and select the Variables page
(Figure 7).
Figure 7: Defining a number range variable
3) In the Type list, select Number range. In the Format list, select Arabic (1 2 3). Type whatever you want in the Name field. (We have used Step in this example.)
4) Click Insert. The name of the variable (Step) now appears in the Selection list, and a number field (showing 1) appears at the insertion point in your document. The Fields dialog box remains
10 Working with Fields

open, so you may need to move it out of the way to see the field in the document.
5) Hover the mouse pointer over this number field and you will see the field code of Step = Step+1. If you click several more times on the Insert button in the Fields dialog box, the numbers 2, 3, 4, and so on will appear in the document.
Now you may want to restart the Step sequence at 1, so you can use the same sequence name more than once in your document (for example, to begin each set of instructions). To do that, you need to insert a new field of the same name, while instructing OOo to force the value to 1.
1) Open the Fields dialog box to the Variables page. Make sure the variable name Step appears in the Name box.
2) In the Value box, type Step=1, as shown in Figure 8. Click Insert.
Now hover the mouse pointer over the new field in your document and you will see the field code of Step = Step=1. To continue with the normal sequence (that is, to have the next item be step 2), you need to delete the contents of the Value box after inserting Step 1.
Figure 8: Defining a field to restart a number range variable
Defining your own numbering sequences 11

Use AutoText to insert a number range fieldYou certainly do not want to go through all of that every time you want to put in a step number. Instead, create two AutoText entries, one for the Step = Step=1 field (call it Step1, for example) and one for the Step = Step+1 field (StepNext). Then insert the fields in the same way you would insert any other AutoText. See “Using AutoText to insertoften-used fields” on page 9.
You can create similar fields for substeps or other sequences that you want to be numbered with letters (a, b, c), Roman numerals (i, ii, iii), or some other sequence. In the Fields dialog box, choose the required format in the Format list when creating the field codes.
Tip
If a user-defined variable is not in use in the document, the icon next to the Value box is active. You can delete the variable by clicking this icon. To remove a variable that is used in the current document, first delete from the document all fields using that variable (or convert them all to text, as described on page 20), and then remove the variable from the list.
Using automatic cross-referencesIf you type in cross-references to other parts of the document, those references can easily get out of date if you reword a heading, add or remove figures, or reorganize topics. Replace any typed cross-references with automatic ones and, when you update fields, all the references will update automatically to show the current wording or page numbers.
Tip
Some people use Writer’s Hyperlink feature for cross-references, but it has the major disadvantage that the visible text of the hyperlink does not change if you change the text of the item to which it links. For that reason, you are advised to use cross-references in most situations. The exception is when you are creating a document to be saved as HTML; cross-references do not become hyperlinks in an HTML document.
The Cross-references page of the Fields dialog box (Figure 9) lists some items, such as headings, numbered paragraphs, and bookmarks. If figure captions, table captions, user-defined number range variables, and some other items have been defined in a document, that type also appears in the list.
12 Working with Fields

Figure 9: The Cross-references page of the Fields dialog box
Inserting cross-referencesTo insert a cross-reference to a heading, figure, or other item shown on the Cross-references page:
1) In your document, place the cursor where you want the cross-reference to appear.
2) If the Fields dialog box is not open, click Insert > Cross Reference. On the Cross-references page (Figure 9), in the Type list, click the type of item you are referencing (for example, Heading or Figure).
3) You can leave this page open while you insert many cross-references.
4) Click on the required item in the Selection list, which shows both automatically created entries (for example Headings) as well as user-defined references (for example bookmarks).
5) In the Insert reference to list, choose the type of reference required. The choices vary with the item being referenced.For headings, usually you will choose Reference (to insert the full text of the heading) or Page (to insert the number of the page the heading is on).For figures, you will usually choose Category and Number (to insert the word “Figure” and its number), Reference (to insert the word “Figure” with its number and the full text of the
Using automatic cross-references 13

caption), Page (to insert the number of the page the figure is on), or Numbering (to insert only the figure number).
6) Click Insert.
For a full list of the reference formats available, and their use, consult the application Help.
Available formatsFor all the types of reference, you can select one of the following formats:
• Page: the page number of the target• Chapter: the number of the chapter where the referenced target
is located.• Reference: the full text set as reference.• Above/Below: Inserts the words above or below depending on the
position of the field relative to the referenced target.• As Page Style: similar to Page, this inserts the page number
where the reference is, but using the formatting specified in the page style. This is very useful when putting a reference to a page in the front matter where roman numerals are usually employed.
If you select Headings or Numbered Paragraphs as type, the following two additional options become available:
• Number (no context): inserts only the number of the heading or of the numbered paragraph. For example, if referencing a numbered item 2.4, it inserts 4.
• Number (full context): inserts the the full number including higher hierarchical levels. For example, if referencing a numbered item 2.4, the full numbering (2.4) is inserted.
Finally, for objects inserted with captions such as a table or a figure, you can choose:
• Category and Number: inserts both the category and number of the referenced object (for example, Figure 6). This is generally the most used formatting for figures and tables.
• Caption Text: inserts the full caption of the referenced object. For example, Figure 6: This is an example figure.
• Numbering: inserts the sequential number of the referenced object, without the category (for example, if referencing Table 2, the field will contain only the number 2).
14 Working with Fields

Preparing items as targets for cross-referencingOccasionally you might want to insert a cross-reference to something that is not automatically shown on the Cross-references page. Before you can insert a cross-reference to such an item, you must prepare the item as a target to be referenced. To do this, you can either use bookmarks or set references.
After a target has been defined, you can cross-reference to it as described on page 13.
For an example of the use of this technique, see “Solving the page count problem” in Chapter 4 (Formatting Pages).
Using bookmarksBookmarks are listed in the Navigator and can be accessed directly from there with a single mouse click. In HTML documents, bookmarks are converted to anchors that you can jump to using a hyperlink.
1) Select the text you want to bookmark. Click Insert > Bookmark.2) On the Insert Bookmark dialog box (Figure 10), the larger box
lists any previously defined bookmarks. Type a name for this bookmark in the top box. Click OK.
Figure 10: Inserting a bookmark
Setting references1) Click Insert > Cross reference.2) On the Cross-references page of the Fields dialog box (Figure 11),
click Set Reference in the Type list. The Selection list shows any references that have been defined.You can leave this page open while you set many items as references.
3) Click in the document and highlight the text of the first item to set as a target for a cross-reference. Click on the Fields dialog
Using automatic cross-references 15

box. The text of the item will appear in the Value box in the lower right. In the Name box, type some text by which you can identify this item.
4) Click Insert. The text you typed in the Name box now appears in the Selection list.
5) Repeat steps 3 and 4 as often as required.
Figure 11: Setting text to be used as a target for a cross-reference
Using fields in headers and footersYou can insert fields into headers or footers, using techniques described earlier in this chapter:
• To insert a page number, document title, author, creation date and time, current date and time, or total page count field, use document properties (see page 6) or the Insert > Fields menu entry.
• You can insert a cross-reference to a bookmark, heading, or other item.
• If you have used Heading 1 for your chapter titles, you can use a document field to insert the current chapter title, so the headers or footers contentschanges from one chapter to the next. See Figure 12. (Writer calls chapter titles Chapter names.) If you have used outline numbering on your Heading 1, you can choose
16 Working with Fields

whether to include these numbers in the field (Chapter number and name).
Figure 12: Inserting the current chapter name and number into your document
• You can insert cross-references to other heading levels by specifying a value in the Level box in the lower right of the Document page of the Fields dialog box (Figure 12). That is, Level 1 = Heading 1, Level 2 = Heading 2, and so on.
NoteA cross-reference field in the header of a page picks up the first heading of that level on the page, and a field in the footer picks up the last heading of that level.
• To include the chapter number with the page number, position the cursor just before the Page field you inserted. Click Insert > Fields > Other. On the Document page of the Fields dialog box, select Chapter in the Type column and Chapter number without separator in the Format column. Click Insert.Go to the header or footer where you inserted this field, type the character you want to appear between the chapter number and the page number—for example, a period or a dash.The table of contents will not automatically pick up these chapter numbers, so you will need to make a change on the Indexes and Tables menu item, as described in Chapter 12 (Creating Tables of Contents, Indexes, and Bibliographies).
Using fields in headers and footers 17
• You can add a page count to the footer—for example “Page 9 of 12”. Type the word “Page” and a space in front of the Page field. Type a space, the word “of”, and a space after the Page field. Then click Insert > Fields > Page Count.
Using fields instead of outline numbering for appendix numberingChapter 6 (Introduction to Styles) describes how to use paragraph styles to define a hierarchy of headings to be included in a table of contents.
This method has one major limitation: only one paragraph style can be selected for each heading level, and only one numbering sequence can be specified in Tools > Outline Numbering. However, many books contain Appendixes (typically designated A, B, C) in addition to the chapters (typically designated 1, 2, 3).
To solve this problem, you can use one paragraph style (Heading 1) for both chapter and appendix names, and define two number range fields for the chapters and appendixes respectively. The number range field for chapters will use numbers, and the number range field for appendixes will use letters. You can then use the same field in the header or footer of chapters and appendixes.
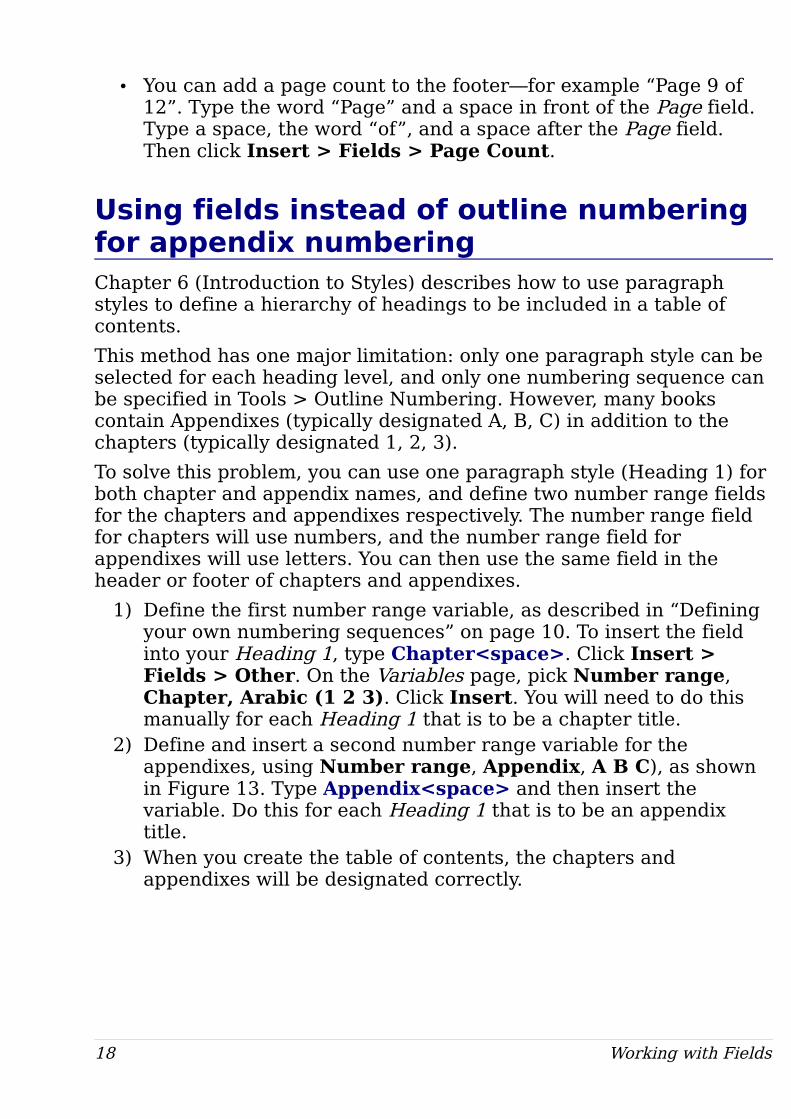
1) Define the first number range variable, as described in “Definingyour own numbering sequences” on page 10. To insert the field into your Heading 1, type Chapter<space>. Click Insert > Fields > Other. On the Variables page, pick Number range, Chapter, Arabic (1 2 3). Click Insert. You will need to do this manually for each Heading 1 that is to be a chapter title.
2) Define and insert a second number range variable for the appendixes, using Number range, Appendix, A B C), as shown in Figure 13. Type Appendix<space> and then insert the variable. Do this for each Heading 1 that is to be an appendix title.
3) When you create the table of contents, the chapters and appendixes will be designated correctly.
18 Working with Fields

Figure 13: Defining a number range variable for Appendixes
Tricks for working with fields
Keyboard shortcuts for fieldsHere are some handy keyboard shortcuts to use when working with fields:
Ctrl+F2 Open the Fields dialog box.Ctrl+F8 Turn field shadings on or off.Ctrl+F9 Show or hide field names.F9 Update fields.
Fixing the contents of fieldsYou can specify Fixed content for many items on the Document and DocInformation pages so the field contents do not update. For example, you might use a field to insert the creation date of a document, and you would not want that date to change. In another place you might use a date field to show the current date, which you do want to change; in that case, deselect Fixed content when you insert the field.
Tricks for working with fields 19

Converting fields into textWriter does not provide any easy way to convert field contents into text. To do this, you need to copy the field contents and paste them back as unformatted text. This is not a very good solution if you have hundreds of fields that you want to change, but you could use a macro to automate the process.
Developing conditional contentConditional content is text and graphics that are included or excluded depending on a condition you specify.
A simple example is a reminder letter for an overdue account. The first and second reminders might have a subject line of “Reminder Notice”,
but the third reminder letter might have the subject “Final Notice” and a different final paragraph.
A more complex example is a software manual for a product that comes in two versions, Pro and Lite. Both product versions have much in common, but the Pro version includes some features that are not in the Lite version. If you use conditional content, you can maintain one file containing information for both versions and print (or create online help) customized for each version. You do not have to maintain two sets of the information that is the same for both versions, so you will not forget to update both versions when something changes.
Choose the types of conditional content to useThis section describes several Writer features that can help you design and maintain conditional content. You can use one or any combination of these features in the same document.
Conditional textWith conditional text, you can have two alternative texts (a word, phrase, or sentence). One text will be displayed and printed if the condition you specify is met, and the other will be displayed and printed if the condition is not met. You cannot include graphics or edit the text except in the field dialog (not in the body of the document). You also cannot format part of the text (for example, bolding one word but not the others), but you can format the field to affect all of the field contents (for example, bolding all of the words). You cannot include a cross-reference or other field in the text.
20 Working with Fields

Hidden textWith hidden text (a word, phrase, or sentence), you have only two choices: show or hide. If the condition you specify is met, the text is hidden; if the condition is not met, the text is displayed. The disadvantages are the same as for conditional text: you cannot include graphics, edit the text in the body of the document, format part of the text, or include a field.
Hidden paragraphsHidden paragraphs are like any other paragraphs, but you can specify a condition under which the paragraph is not displayed or printed. A blank paragraph can also be hidden—for example, if a database field has no content for the current record. This is very useful when merging an address into a letter: if you allow two lines for the street address and the database record uses only one line, you can prevent the blank line from appearing in your document. You can include graphics, edit the text in the body of the document, format any part of the text, and include fields.
Hidden sectionsHidden sections are like hidden paragraphs, but they can include more than one paragraph—for example, a heading plus one or more paragraphs. However, a section cannot contain less than a paragraph, so you cannot use this method for single words or phrases. The contents of a hidden section behave just like the contents of any other part of the document, but you can specify a condition under which the section is not displayed or printed. In addition, you can password protect a section.
Plan your conditional contentConditions are what programmers call logical expressions. You must formulate a logical expression for each condition because a condition is always either true (met) or false (not met). You can use the same condition in many places in your document, for different types of conditional content.
To make conditional content work, you need to:1) Choose or define a variable.2) Define a logical expression (condition) involving the selected
variable.
Developing conditional content 21

Choose or define a variableYou can use the following variables in your condition:
• User-defined variables• Predefined OpenOffice.org variables, which use statistical values
from the document properties• User data• Database field contents—for example from your address book
You cannot use internal variables (for example, page number or chapter name) to formulate conditions.
The examples in this chapter use user-defined variables.
Define a logical expression (condition) involving the selected variableThe condition compares a specified fixed value with the contents of a variable or database field.
To formulate a condition, use the same elements as you would to create a formula: operators, mathematical and statistical functions, number formats, variables, and constants. The possible operators are given in the online help; look in the index under “operators: in formulas”. You can define quite complex expressions, but in most cases a simple condition will do the job.
Create the variableTo create your variable, click Insert > Fields > Other. You can use choices found on the DocInformation, Variables, and Database pages.
DocInformation fields“Using document properties to hold information that changes” on page 6 described how to set up a user-defined document property. You can use that document property as the variable in your condition statement, or you can create another document property field specifically for conditions.
User-defined variable fieldTo set up a variable or user field:
1) Place the cursor where you want the field to be inserted.2) On the Fields dialog box, select the Variables page (Figure 14).
22 Working with Fields

3) Select Set variable in the Type list and Text in the Format list. Type a name for the variable in the Name box, and a value in the Value box. I have chosen ProLite for the name (to remind me that this variable is related to the two product versions), and I set the value as Lite because I can remember “If it is the Lite version, then this text should be hidden.”
4) Select Invisible so the field does not show in the document. Click Insert, then click Close.
Figure 14: Defining a variable to use with conditional content
5) A small gray mark should be visible where you inserted the field. Hover the mouse pointer over this mark and you will see the field formula ProLite = Lite. We will come back to this field later.
Tip
Because the gray mark is so small, you may have trouble finding it again, especially if you have other fields in the document. You may prefer to leave the variable field visible while you work, and change it to invisible just before you create final copy.At any time, you can place the insertion point just before the field and click Edit > Fields or right-click the field, and then click Fields on the pop-up menu. On the Edit Fields dialog box (Figure 18), select or deselect the Invisible option.
Developing conditional content 23

Apply the condition to the contentNow that you have defined the variable, you can use it in a condition statement. This topic describes some of the possibilities.
Conditional textFirst, let us set up some conditional text that will insert the words Great Product Lite into the Lite version and Great Product Pro into the Pro version of the manual. You would use this field whenever you want to mention the name of the product.
1) Place the cursor where you want one of these phrases to appear. (You can move or delete it later, if you wish.)
2) Open the Fields dialog box by clicking Insert > Fields > Other, select the Functions page, and select Conditional text in the Type list.
3) As shown in Figure 15, type ProLite EQ "Lite" in the Condition box, Great Product Lite in the Then box, and Great Product Pro in the Else box.
NoteThese fields are case-sensitive, and quotation marks are required around a text value such as Lite.
4) Click Insert to insert the field, then click Close. You should see Great Product Lite in your text.
Figure 15: Inserting conditional text
Tip
If you want to insert this field into your text in many places (as you probably would for a product name), create an AutoText entry for it. See “Using AutoText to insert often-used fields” on page 9 for instructions.
24 Working with Fields

Hidden textYou might use hidden text for words or short phrases that describe features of Great Product Pro that are not found in the Lite version. You can reuse the same field in several places in your document—for example, by copying and pasting it.
To create a hidden text field:1) Click Insert > Fields > Other and select the Functions page.2) Select Hidden text in the Type list, as shown in Figure 16.3) Type ProLite EQ "Lite" in the Condition box and type the
required text in the Hidden text box. Remember, this is the text that is hidden if the condition is true.
4) Click Insert to create and insert the field.
Figure 16: Creating a condition for hidden text
Hidden paragraphs
Tip
To enable hidden paragraphs, remove the check mark from View > Hidden Paragraphs. When this option is selected, any hidden paragraph you create will always be hidden, whether its condition is true or not.
A paragraph is hidden if the condition is true. To hide a paragraph:1) Click in the paragraph to be hidden.2) Click Insert > Fields > Other and select the Functions page
(Figure 16).3) Select Hidden paragraph in the Type list.4) For this example,type ProLite EQ "Lite" in the Condition box.5) Click Insert to create and insert the field. If an extra paragraph
mark appears, delete it.
Developing conditional content 25

To show hidden paragraphs so you can edit them, do one of the following:
• Select View > Hidden Paragraphs from the menu bar, so it is checked (shows all hidden paragraphs).
• On the Tools > Options > OpenOffice.org Writer > Formatting Aids page, select the Fields: Hidden paragraphs option (shows all hidden paragraphs).
• Double-click in front of the variable that you used to define the condition for hiding the text, and enter a different value for the variable (shows all hidden paragraphs).
• Double-click in front of the hidden text field or the hidden paragraph field, and change the condition statement (changes only the selected hidden paragraph).
Hidden sectionsA conditional section is hidden if the condition is true. To create a conditional section:
1) Select the text that you want to be included in the conditional section. (You can edit this text later, just as you can edit any other text.)
2) Click Insert > Section. On the Insert Section dialog box (Figure17), select Hide and enter the condition in the with Condition box. You can also give the section a name, if you wish (strongly recommended, so you can find it again easily if you have several sections in your document).
3) Click Insert to insert the section into your document.
To show a hidden section so you can edit it:1) Click Format > Sections.2) On the Edit Sections dialog box (similar to the Insert Section
dialog box), select the section from the list.3) Deselect Hide, and then click OK. You can now edit the contents
of the section. Afterwards, you can click Format > Sections again and select Hide to hide the section again.
26 Working with Fields
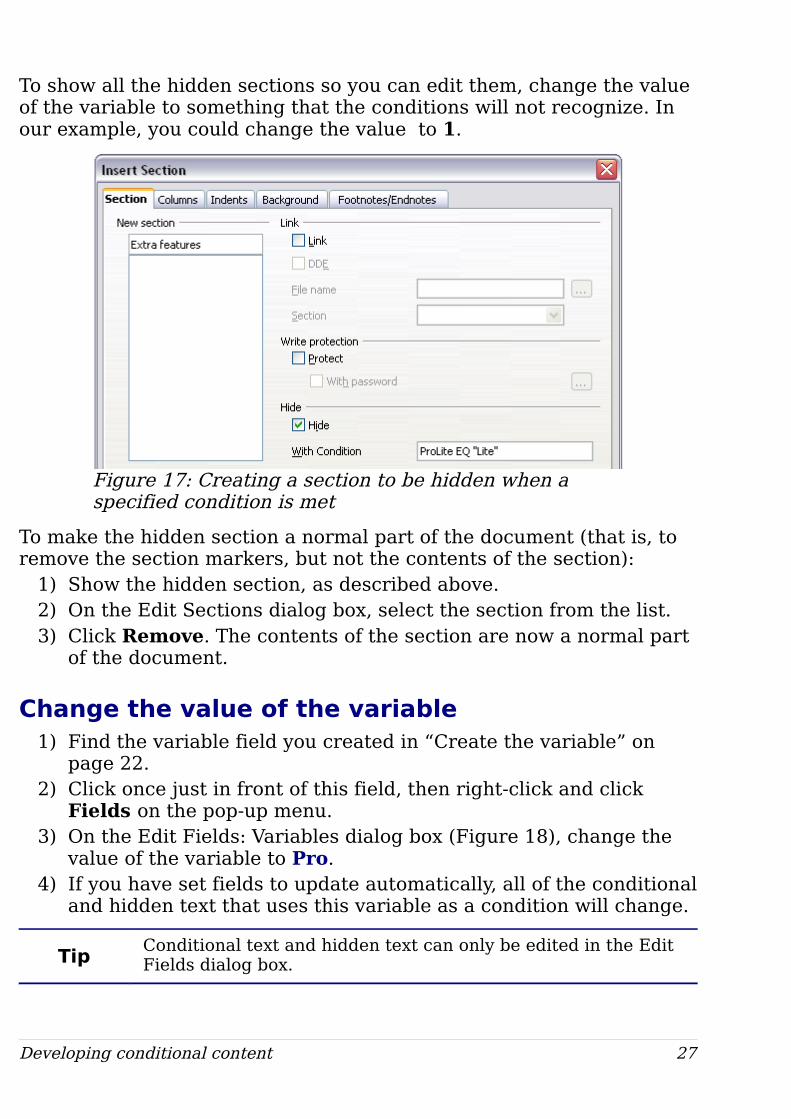
To show all the hidden sections so you can edit them, change the value of the variable to something that the conditions will not recognize. In our example, you could change the value to 1.
Figure 17: Creating a section to be hidden when a specified condition is met
To make the hidden section a normal part of the document (that is, to remove the section markers, but not the contents of the section):
1) Show the hidden section, as described above.2) On the Edit Sections dialog box, select the section from the list.3) Click Remove. The contents of the section are now a normal part
of the document.
Change the value of the variable1) Find the variable field you created in “Create the variable” on
page 22.2) Click once just in front of this field, then right-click and click
Fields on the pop-up menu.3) On the Edit Fields: Variables dialog box (Figure 18), change the
value of the variable to Pro.4) If you have set fields to update automatically, all of the conditional
and hidden text that uses this variable as a condition will change.
TipConditional text and hidden text can only be edited in the Edit Fields dialog box.
Developing conditional content 27

Figure 18: Changing the value of the variable
TipTo turn on automatic updating of fields, click Tools > Options > OpenOffice.org Writer > General, and select Fields under Update: Automatically.
Using placeholder fieldsA placeholder field prompts you to enter something (text, a table, a frame, a graphic, or an object).
To insert a placeholder field into a document:1) On the Functions page of the Fields dialog box, select
Placeholder in the Type column and select what the placeholder is for in the Format column.
2) In the Placeholder box, type the text that you want to appear in the placeholder field.
3) In the Reference box, type the text that you want to display as a help tip when you rest the mouse pointer over the field.
Figure 19 shows the results of inserting a placeholder field for a graphic.
28 Working with Fields

Figure 19: Inserting a placeholder field
Because the <Logo> field is a graphics placeholder, when you click on the field in the document, the Insert picture dialog box opens, prompting you to select a graphic (picture). When you select a picture and click Open, the picture replaces the field in the document.
Similarly, clicking on a table placeholder field opens the Insert Table dialog box, clicking on a frame placeholder field opens the Frame dialog box, and clicking on an object placeholder field opens the Insert OLE Object dialog box. The text placeholder field is different: you simply click on it and type some text in the Placeholder box, which replaces the field.
Using input fields and input lists
Input fieldAn input field is a variable that you can click in a document to open a dialog where you can edit the test displayed in the field. To insert an input field:
1) Choose Insert > Fields > Other and choose the Functions page.2) Choose Input field in the Type list (Figure 20).3) Optionally type some text in the Reference box. This text will
appear as a tooltip when the users hover a mouse cursor over the field.
4) Click Insert. In the small dialog box that opens, type some text for the variable (for example, a brief instruction to the user regarding the purpose of the field); this text can be the same or different from the text in the Reference box in the previous step.
5) Click OK.
Using input fields and input lists 29

To edit an input field, click on it in the document. In the small dialog box that opens, edit the text of the field.
Figure 20: Inserting an input field
To edit the field’s reference, right-click on the field and choose Fields from the pop-up menu. This opens the Edit Fields: Functions dialog box (Figure 21).
Figure 21: Editing an input field
30 Working with Fields

Input listAn input list is a text field that displays one item from a list. To insert an input list field into a document:
1) Choose Insert > Fields > Other; on the Functions page, choose Input list in the Type list (Figure 22).
Figure 22: Defining an input list field
2) Type the names of the list items in the Item box on the upper right, clicking Add after each item. The items then appear in the Items on list box. To change the order of the items, select an item and click the Move Up or Move Down buttons.
3) Type the name of the list in the Name field on the lower right.4) Click Insert.
To display the Choose Item dialog box, click the Input list field.
Using input fields and input lists 31

Figure 23: Choosing an item from an input list
To add, edit, and remove items from this list, and change their order in the list, click the Edit button in the Choose Item dialog box. This displays the Edit Fields: Function dialog box (Figure 24).
Figure 24: Editing the items on an input list
To quickly edit all input fields and lists in a document, press Ctrl+Shift+F9. The first input field or list in the document opens. Clicking OK or Next moves to the next input field or list. After the last input field or list, clicking Next or OK returns you to the document.
32 Working with Fields