Embed Size (px)
Citation preview
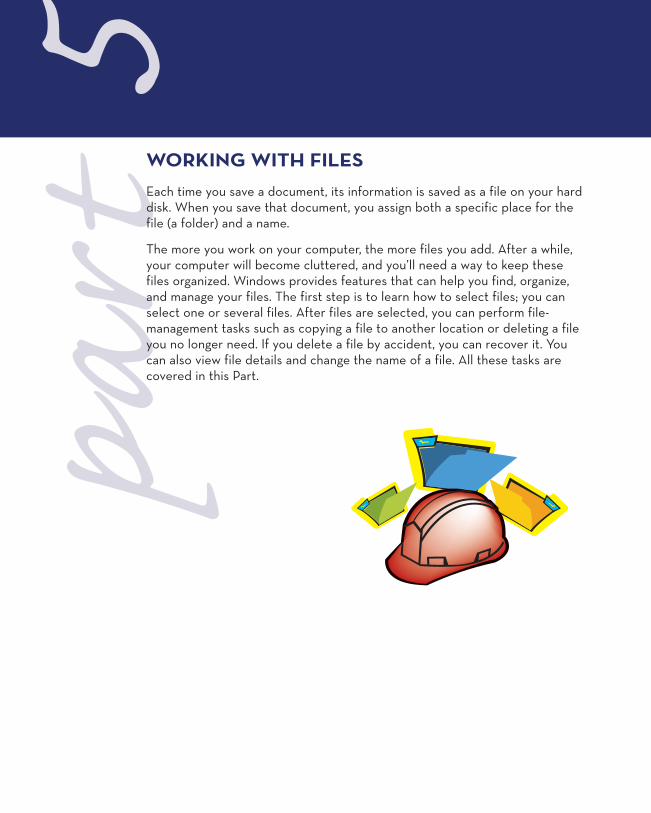
part
5WORKING WITH FILES
Each time you save a document, its information is saved as a file on your harddisk. When you save that document, you assign both a specific place for thefile (a folder) and a name.
The more you work on your computer, the more files you add. After a while,your computer will become cluttered, and you’ll need a way to keep thesefiles organized. Windows provides features that can help you find, organize,and manage your files. The first step is to learn how to select files; you canselect one or several files. After files are selected, you can perform file-management tasks such as copying a file to another location or deleting a fileyou no longer need. If you delete a file by accident, you can recover it. Youcan also view file details and change the name of a file. All these tasks arecovered in this Part.
05_0789735776_ch05.qxd 11/28/06 10:17 AM Page 58

(PT) SCREENSHOT BELOW
WORKING WITH FILES
Address bar Instant Search text box
Menubar
Commandbar
Navigationpane
Contentspane
Selectedfile
Details pane
Previewpane
05_0789735776_ch05.qxd 11/28/06 10:17 AM Page 59
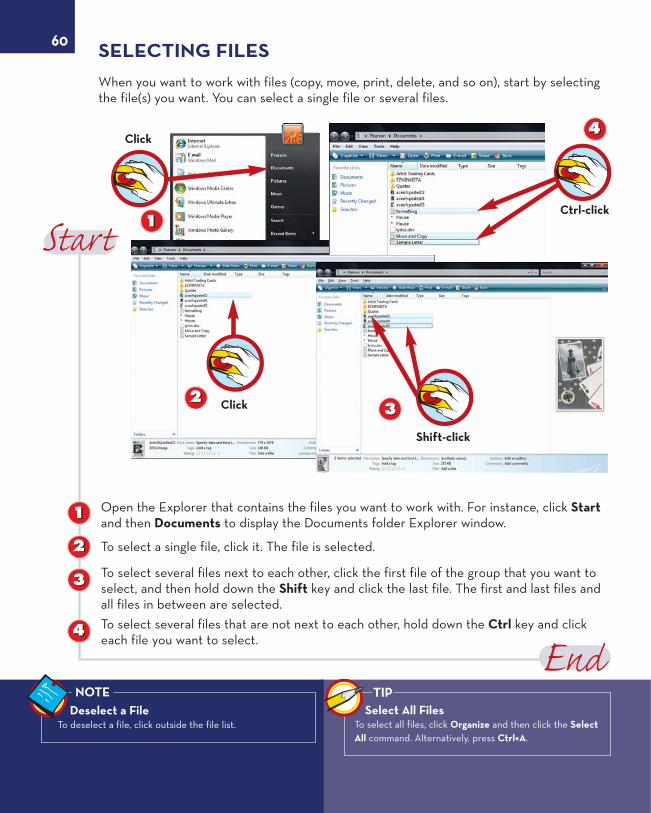
Open the Explorer that contains the files you want to work with. For instance, click Startand then Documents to display the Documents folder Explorer window.
To select a single file, click it. The file is selected.
To select several files next to each other, click the first file of the group that you want toselect, and then hold down the Shift key and click the last file. The first and last files andall files in between are selected.To select several files that are not next to each other, hold down the Ctrl key and clickeach file you want to select.
60 SELECTING FILES
When you want to work with files (copy, move, print, delete, and so on), start by selectingthe file(s) you want. You can select a single file or several files.
22
33
44
11
Select All FilesTo select all files, click Organize and then click the SelectAll command. Alternatively, press Ctrl+A.
TIP
11
Click
Click22
Shift-click
33
44
Ctrl-click
Deselect a FileTo deselect a file, click outside the file list.
NOTE
05_0789735776_ch05.qxd 11/28/06 10:17 AM Page 60

VIEWING FILE DETAILS
When you are working with files, you may not be able to tell from the filename what the filecontains. In that case, you can view basic file information by viewing the file properties. Inpast versions, you used a command in the File menu. In Windows Vista, when you select afile, the file properties are displayed in the Details pane at the bottom of the Explorerwindow.
61
Select the file.
In the Details pane, you see file information on the selected file, including the file type,the key dates (modification, creation, access), and the size.You can also view this and other information by right-clicking the file and clickingProperties.You see most of the same information, but you also see the file’s storage location, whatprogram is used to open the file, and other details. Click the OK button to close theProperties dialog box.
22
33
44
11
Several Files SelectedWhen you select more than one file, you see informationin the Details pane about the total number of filesselected, the total file size of the selected files, and alist of the selected files.
TIPChange Views
Another way to assess the content of a file is to change howthe window content is displayed. You can display a list,icons, tiles, or a detailed list. See Part 4, “Working withFolders,” for information on changing the window view.
NOTE
Click11
22
33
Click
44Click
05_0789735776_ch05.qxd 11/28/06 10:17 AM Page 61

Right-click the file you want to rename and click Rename.
The current name is highlighted. Type a new name and press Enter.
The file is renamed.
62 RENAMING A FILE
If you did not use a descriptive name when you saved the file, you can rename it. You canrename only one file at a time in an Explorer.
22
33
11
Naming RulesYou can type as many as 255 characters, including spaces.You can also include letters, numbers, and other symbols,except the following: | ? / : “ * < > \
TIP
11
Click
Keyboard
22
33
05_0789735776_ch05.qxd 11/28/06 10:17 AM Page 62

MOVING A FILE
You might need to move files from one folder or drive to another (for example, to reorgan-ize folders by putting similar files together in the same folder). You can also move a file thatyou accidentally saved in the wrong folder.
63
Right-click the file you want to move and click Cut.
Navigate to the folder where you want to move the file.
Right-click a blank area of the file list and click Paste.
The file is pasted to the new location.
22
33
44
11
Undo MoveIf you make a mistake, you can undo the move by right-clicking a blank area of the file window and then clickingUndo Move. (Alternatively, press the shortcut key Ctrl+Z.)
TIPDrag to Move
You can also drag a file or group of files in an Explorer fromthe file list to any of the folders in the Navigation pane tomove them.
NOTE
11
Click
22
Click33
44
05_0789735776_ch05.qxd 11/28/06 10:17 AM Page 63

Right-click the file(s) you want to copy and click Copy.
Navigate to the folder where you want to place the copy.
Right-click a blank area of the window and click Paste.
The file is copied to the new location.
64 COPYING A FILE
Windows makes it easy to copy files from one folder to another and from one disk toanother. You might copy files to create a backup copy or to revise one copy while keepingthe original file intact. Like moving, copying a file works just like copying text: You firstcopy the file, and then you paste it to its additional location.
22
33
44
11
Drag-and-Drop CopyingYou can also drag a file to copy it. Hold down the Ctrl keyand drag the file to a folder in the Navigation pane.
TIP
11Right-click
22
Right-click
33
44
05_0789735776_ch05.qxd 11/28/06 10:17 AM Page 64

COPYING A FILE USING THE SEND TO COMMAND
You might want to copy a file to another disk to take the file with you or to make a backupcopy. Windows provides a shortcut (the Send To command) for copying a file to a disk.
65
Right-click the file you want to copy and click Send To, and then choose a location fromthe list. (You can also email a file to someone using this technique.)The file is copied. View the contents of the disk in the Explorer window to double-checkthat the file has been copied.22
11
Copy to CD-ROMIf you choose to copy to a CD-ROM or DVD drive, you’llbe prompted to follow the steps to copy the files. Simplyfollow the onscreen instructions.
TIP
Click11
22
05_0789735776_ch05.qxd 11/28/06 10:17 AM Page 65

Right-click the file you want to delete and then click Delete.
Confirm the deletion by clicking Yes.
The file is deleted and no longer appears in the file list. (The file is actually moved to theRecycle Bin.)
66 DELETING A FILE
Eventually, your computer will become full of files, and you’ll have a hard time organizingand storing them all. You can delete any files you no longer need. Using the steps in theprevious task, you can also make room by copying files you want to keep but don’t need towork with again, to a disk. Then you can delete the files from your hard drive as shown inthis task.
22
33
11
Undo the DeletionYou can undo a deletion by right-clicking a blank part of the windowand clicking Undo. Alternatively, you can retrieve the deleted itemfrom the Recycle Bin, as covered in the next task.
TIP
Click11
Click
33
WARNINGWhen you delete a folder from a disk drive,
that item is not placed in the Recycle Bin; it isimmediately deleted from your system.
22
05_0789735776_ch05.qxd 11/28/06 10:17 AM Page 66

UNDELETING A FILE FROM THE RECYCLE BIN
Sometimes you will delete a file or folder by mistake. If you make a mistake, you canretrieve the file or folder from the Recycle Bin (as long as the Recycle Bin has not beenemptied) and return it to its original location.
67
Double-click the Recycle Bin icon on your desktop.
In the Recycle Bin window that appears, you see all the files, programs, and folders youhave deleted. Right-click the file you want to undelete and click Restore.
Click the Close button to close the Recycle Bin.
You can open the original folder to confirm the file has been restored (as shown here).
22
33
44
11
Deleting Individual FilesPermanentlyIf you want to permanently delete a file inthe Recycle Bin, right-click the file and clickDelete. Confirm the deletion by clicking Yes.
TIPDeleting All Files in Recycle Bin
If you want to permanently delete all the files in the Recycle Bin, youcan empty it. Double-click the Recycle Bin icon and make sure that itdoesn’t contain anything you need to save. Then click Empty RecycleBin in the command bar. Click Yes to confirm that you want to perma-nently delete all these items.
TIP
11Double-click
Click33
Click22
44
05_0789735776_ch05.qxd 11/28/06 10:17 AM Page 67

In the Explorer, double-click the file you want to open.
The associated program is started, and the file is displayed.
When you are done viewing the file, click the Close button to close the document andprogram.
68 OPENING A FILE FROM AN EXPLORER
As you are organizing your files, you may need to open a file to view its contents. You mayalso browse through folder windows to find a particular file and then open it, rather thanopen it from within the program. When you open a file, the associated program is started,and the file is opened.
22
33
11
Error MessageIf Windows Vista does not know which program to use to open the file, you get a dialog box and are prompted to use the Webservice to find the correct program or to select the program from a list of installed programs. To view or set the associated pro-grams for particular file types, see the next task.
TIP
Double-click
11
Click
33
22
05_0789735776_ch05.qxd 11/28/06 10:17 AM Page 68

SETTING FILE ASSOCIATIONS
When you double-click a file icon, Windows opens the program associated with that filetype. If no program is associated, you are prompted to select a program. You can set andcheck program associations so that you don’t have to continually tell Windows which pro-gram to use to open certain types of files.
69
Right-click the file icon for which you want to check or change the associated program.
Click Open With.
If the program you want to use is listed, select it and skip the remaining steps. To select anunlisted program, click Choose Default Program.
Select from any of the recommended or other programs listed and then click OK.
22
33
44
11
Set as Default ProgramTo always use the program you selected to open the file,check Always use the selected program to open this kindof file.
TIPProgram Not Listed?
If the program is not listed, click Browse, navigate to theprogram you want to use, and select it.
TIP
11
Click
22 33
ClickRight-click
44
Click
05_0789735776_ch05.qxd 11/28/06 10:17 AM Page 69

Right-click the file you want to print.
Click Print.
Windows opens the associated program and prints the file(s), and the file is sent to yourprinter.
70 PRINTING A FILE FROM AN EXPLORER
If you do not want to open a document and then print from the program, you can printfrom a folder window. Printing from a folder window is helpful when you want to print sev-eral files; you can select all of the files and print them with one command.
22
33
11
Printer SetupWhen printing from folders, Windows Vista uses thedefault printer you have selected in the Printers controlpanel. For more information on setting up printers andprinting, see Part 6, “Working with Printers.”
TIPEmail a File
You can email a file by selecting it and clicking E-mail inthe command bar. Click the Attach button, complete theemail message, and click Send. See Part 9, “SendingEmail,” for more information on sending emails.
TIP
Right-click Click
11 22
33
05_0789735776_ch05.qxd 11/28/06 10:17 AM Page 70

USING INSTANT SEARCH
It is easy to misplace a file by accidentally saving it in a folder other than the one youintended to use. If you have saved a document but cannot locate it by browsing throughyour folders, search for it. New with Windows Vista is Instant Search, and all the Explorersas well as the Start menu include a search box. You can use this search box to search forfiles by a variety of criteria, including name, content, file tags, and so on. Keep in mind thatto search based on tags, you have to have applied a tag.
71
In an Explorer, click in the Search text box.
Type an identifying word within the file to search for.
Windows displays any matching files. You can double-click the file to open it or performany other file-related tasks.
22
33
11
Search from Start MenuYou can follow this same method of searchingfrom the Start menu. Click the Start button, andthen in the Start Search box at the bottom ofthe Start menu, type a word or phrase to find.
TIPNo Search Results?
If you see a message that says “No items match your search.” Trysearching using another word or phrase to locate the file. Or usethe Advanced Search options by clicking the link and completingthe exact fields and criteria to search. Then click Search.
TIP
Click11
22
Double-click
33
Keyboard
05_0789735776_ch05.qxd 11/28/06 10:17 AM Page 71
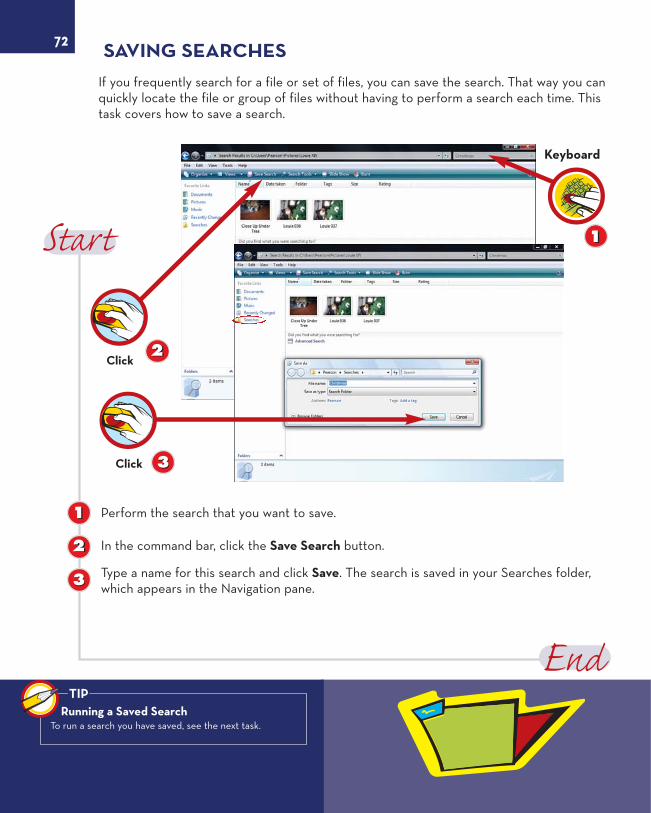
Perform the search that you want to save.
In the command bar, click the Save Search button.
Type a name for this search and click Save. The search is saved in your Searches folder,which appears in the Navigation pane.
72 SAVING SEARCHES
If you frequently search for a file or set of files, you can save the search. That way you canquickly locate the file or group of files without having to perform a search each time. Thistask covers how to save a search.
22
33
11
Running a Saved SearchTo run a search you have saved, see the next task.
TIP
11
22Click
Keyboard
33Click
05_0789735776_ch05.qxd 11/28/06 10:17 AM Page 72

RUNNING A SAVED SEARCH
If you have saved a search that you perform frequently, you can run that same searchquickly by using the Searches folder, a special folder in the Navigation pane. This is a newfeature in Windows Vista that helps you quickly locate a file or group of files.
73
In the Navigation pane, click the Searches folder. You see any searches you have saved, aswell as some of the default searches that Windows Vista has created.
Double-click the search you want to perform.
You see the results of that search. You can open or perform any file- or folder-relatedtasks on the matches.
22
33
11
Running a Windows SearchWindows Vista sets up some default searches, which are common searches that you may want to perform. For instance, for emailyou have sent in the past seven days, you can search for messages with attachments and double-click any of the other listedsearches to execute that search.
TIP
Click
11
Double-click
33
22
05_0789735776_ch05.qxd 11/28/06 10:17 AM Page 73

Select the file you want to add a tag or keyword to. In the Details pane, you see the avail-able properties, including tags that you can add.Click in the Tags field and type the tag. The reminder text for tags will still appear, and asemicolon will be added automatically in case you want to add more than one tag.Continue typing all the tags you want to include.
Click the Save button. The tags are saved to the file properties.
74 ADDING A TAG TO A FILE
One of the most hailed features of Windows Vista is the capability to add tags or key-words to files (and folders). Doing so gives you more options to search for the file; italso helps you group similar files. This task covers how to add a tag to a file.
22
33
11
Editing or Deleting a Tag (or other property)You can click in the Tag field to type other tags. You can also click in the field and delete any tags you don’t want to include byclicking at the end of the tag or property you want to delete and pressing Backspace. (You cannot select the text and then pressDelete.)
TIP
Click
22
11
Keyboard
Click33
05_0789735776_ch05.qxd 11/28/06 10:17 AM Page 74

ADDING OTHER PROPERTIES TO A FILE
In addition to tags, you can add other identifying information to a file. Again, including thisinformation will enable you to search based on any of the properties you add. You can adda title, comments, author, category, subject, rating, camera model, and other information.Note that the properties available for adding depend on the file type. For instance, ratingsare used for pictures, but not for Word documents.
75
Select the file you want to add information to.
Click in the field and type the entry. For instance, click in the Authors field and type theauthor. Press Enter when the entry is complete.Complete any other fields; for instance, for pictures, you can click the stars to rate thepicture.
Click the Save button. The tags are saved to the file properties.
22
33
44
11
Semicolons and Reminder TextWhen you type in a field, the reminder text (such as “Add an author”) appears. Also, after you complete one entry, a semicolon isautomatically added so that you can type additional information as needed.
TIP
11
Click
33
Click
Keyboard
22
Click44
05_0789735776_ch05.qxd 11/28/06 10:17 AM Page 75