Embed Size (px)
Citation preview
5/10/2018 Www.quirkitized.com Wp Page Id=4 - slidepdf.com
http://slidepdf.com/reader/full/wwwquirkitizedcom-wp-page-id4 1/28
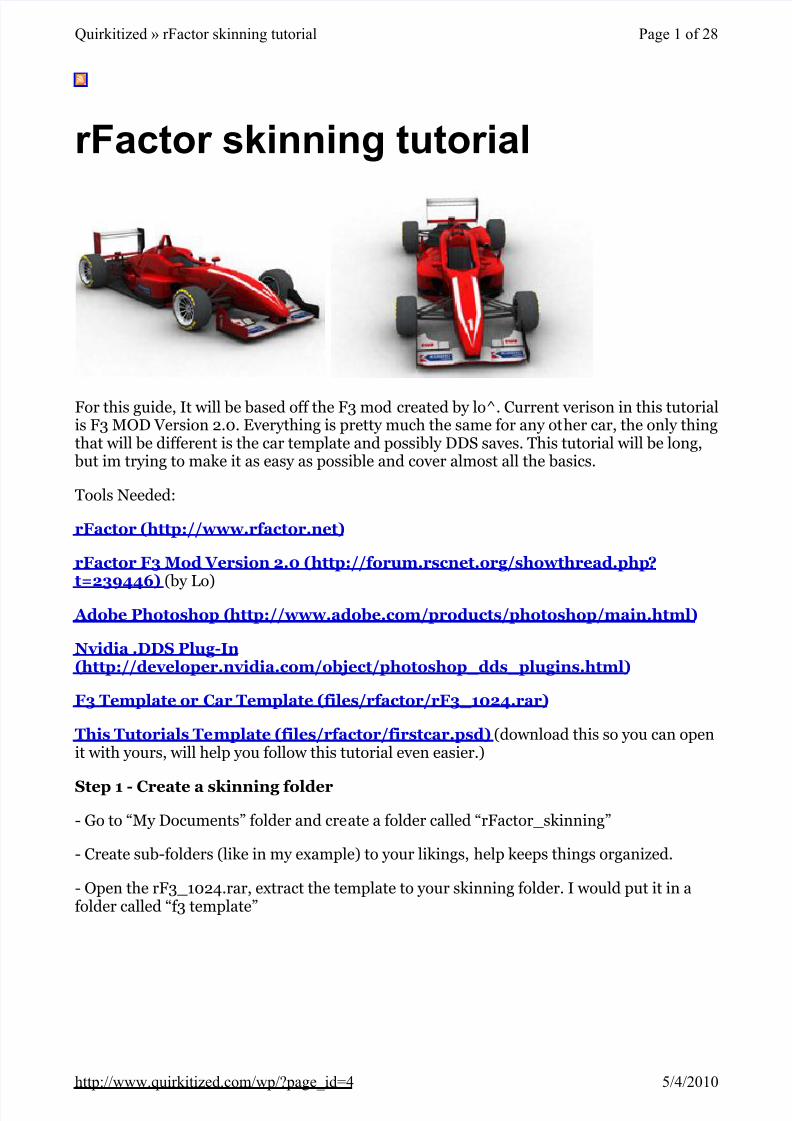
rFactor skinning tutorial
For this guide, It will be based off the F3 mod created by lo^. Current verison in this tutorialis F3 MOD Version 2.0. Everything is pretty much the same for any other car, the only thingthat will be different is the car template and possibly DDS saves. This tutorial will be long,
but im trying to make it as easy as possible and cover almost all the basics.
Tools Needed:
rFactor (http://www.rfactor.net)
rFactor F3 Mod Version 2.0 (http://forum.rscnet.org/showthread.php?
t=239446) (by Lo)
Adobe Pho toshop (http://www.adobe.com/products/photoshop/main.html)
Nvidia .DDS P lug-In(http://develope r.nvidia.com/object/photosho p_dds_plugins.html)
F3 Template or Car Tem plate (files/rfactor /rF3_1024.rar)
This Tutorials Template (files/rfactor /firstcar.psd) (download this so you can openit with yours, will help you follow this tutorial even easier.)
Step 1 - Create a skinning folder
- Go to “My Documents” folder and create a folder called “rFactor_skinning”
- Create sub-folders (like in my example) to your likings, help keeps things organized.
- Open the rF3_1024.rar, extract the template to your skinning folder. I would put it in afolder called “f3 template”
Page 1 of 28Quirkitized » rFactor skinning tutorial
5/4/2010http://www.quirkitized.com/wp/?page_id=4
5/10/2018 Www.quirkitized.com Wp Page Id=4 - slidepdf.com
http://slidepdf.com/reader/full/wwwquirkitizedcom-wp-page-id4 2/28
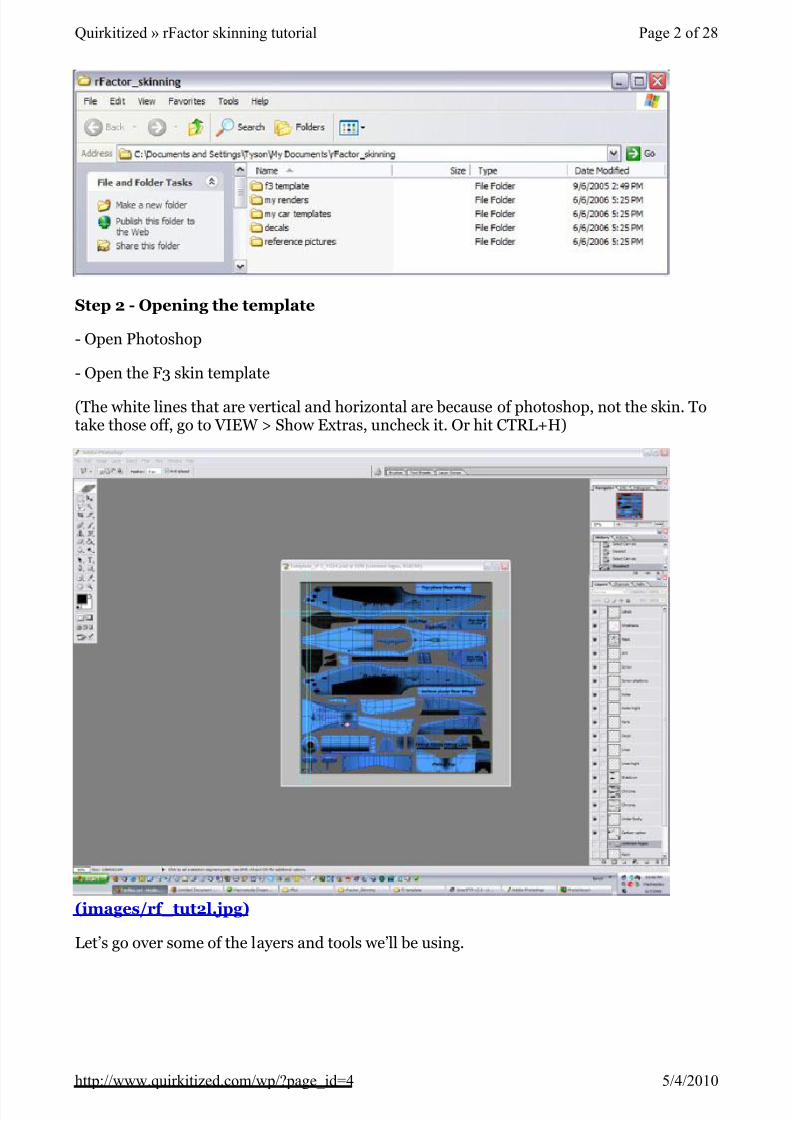
Step 2 - Opening the tem plate
- Open Photoshop
- Open the F3 skin template
(The white lines that are vertical and horizontal are because of photoshop, not the skin. Totake those off, go to VIEW > Show Extras, uncheck it. Or hit CTRL+H)
(images/rf_tut2l.jpg)
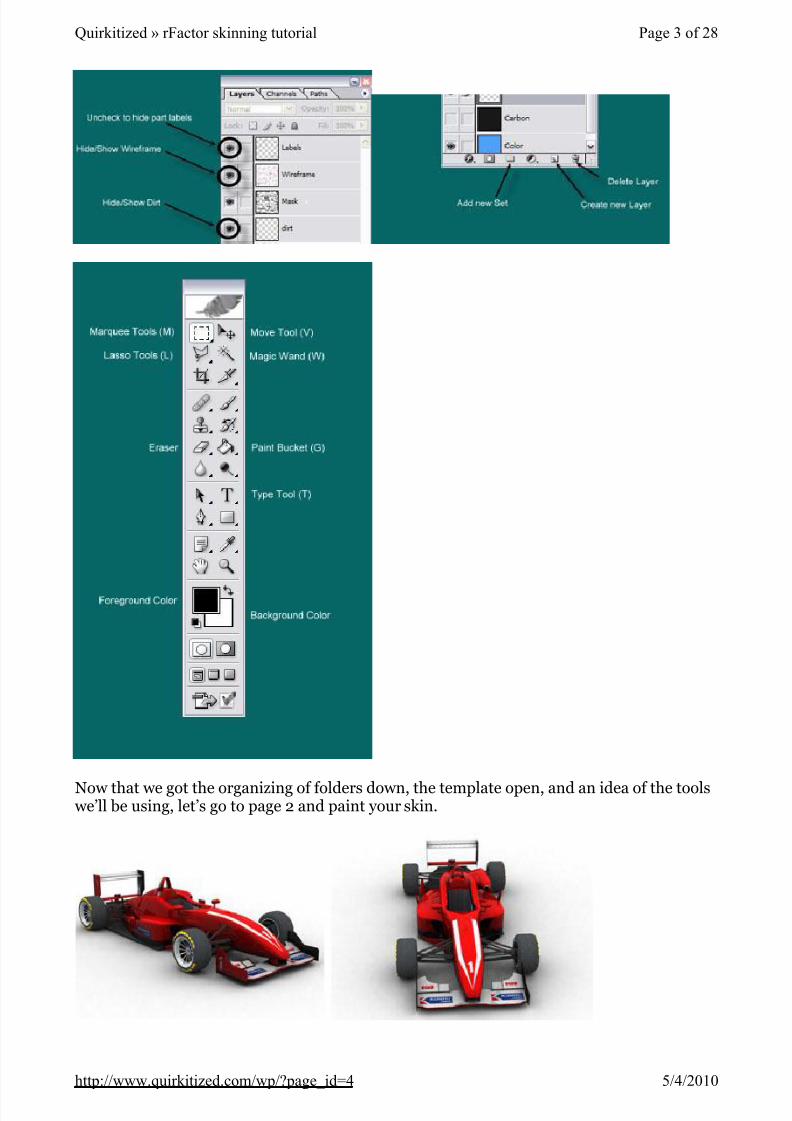
Let’s go over some of the layers and tools we’ll be using.
Page 2 of 28Quirkitized » rFactor skinning tutorial
5/4/2010http://www.quirkitized.com/wp/?page_id=4
5/10/2018 Www.quirkitized.com Wp Page Id=4 - slidepdf.com
http://slidepdf.com/reader/full/wwwquirkitizedcom-wp-page-id4 3/28
Now that we got the organizing of folders down, the template open, and an idea of the tools we’ll be using, let’s go to page 2 and paint your skin.
Page 3 of 28Quirkitized » rFactor skinning tutorial
5/4/2010http://www.quirkitized.com/wp/?page_id=4
5/10/2018 Www.quirkitized.com Wp Page Id=4 - slidepdf.com
http://slidepdf.com/reader/full/wwwquirkitizedcom-wp-page-id4 4/28
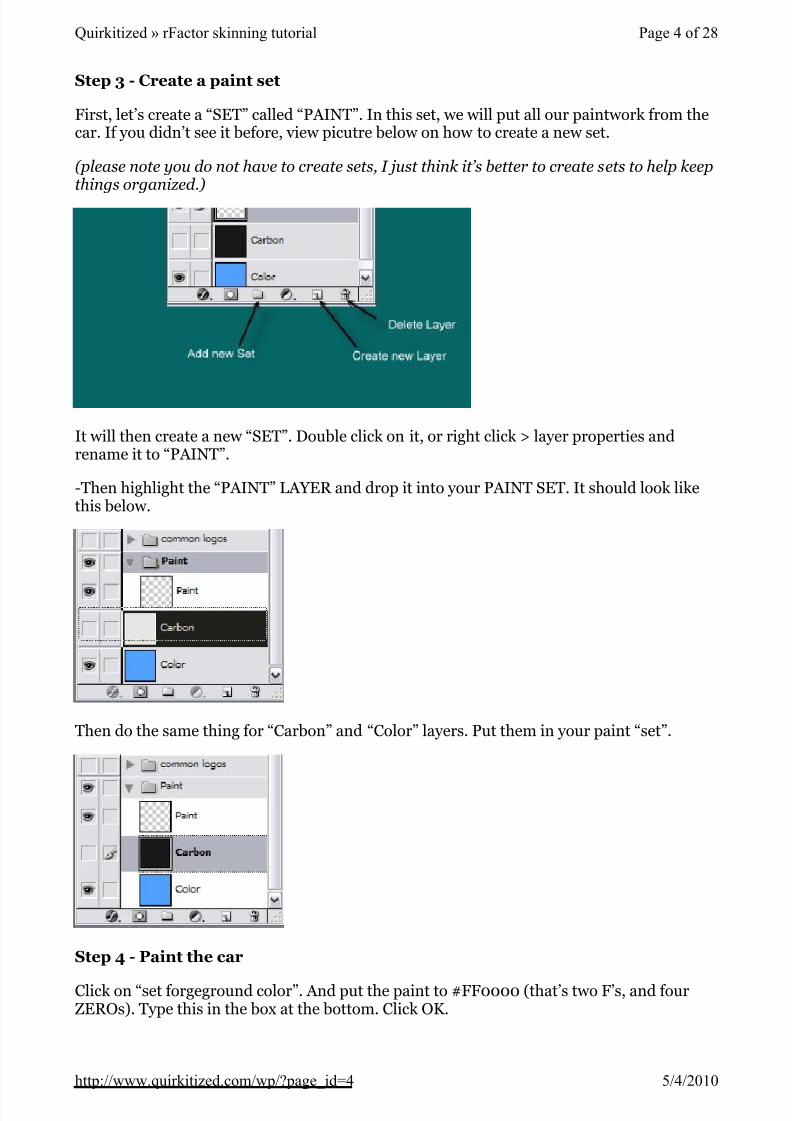
Step 3 - Create a paint set
First, let’s create a “SET” called “PAINT”. In this set, we will put all our paintwork from thecar. If you didn’t see it before, view picutre below on how to create a new set.
(please note you do not have to create sets, I just think it’s better to create sets to help keepthings organized.)
It will then create a new “SET”. Double click on it, or right click > layer properties andrename it to “PAINT”.
-Then highlight the “PAINT” LAYER and drop it into your PAINT SET. It should look likethis below.
Then do the same thing for “Carbon” and “Color” layers. Put them in your paint “set”.
Step 4 - Paint the car
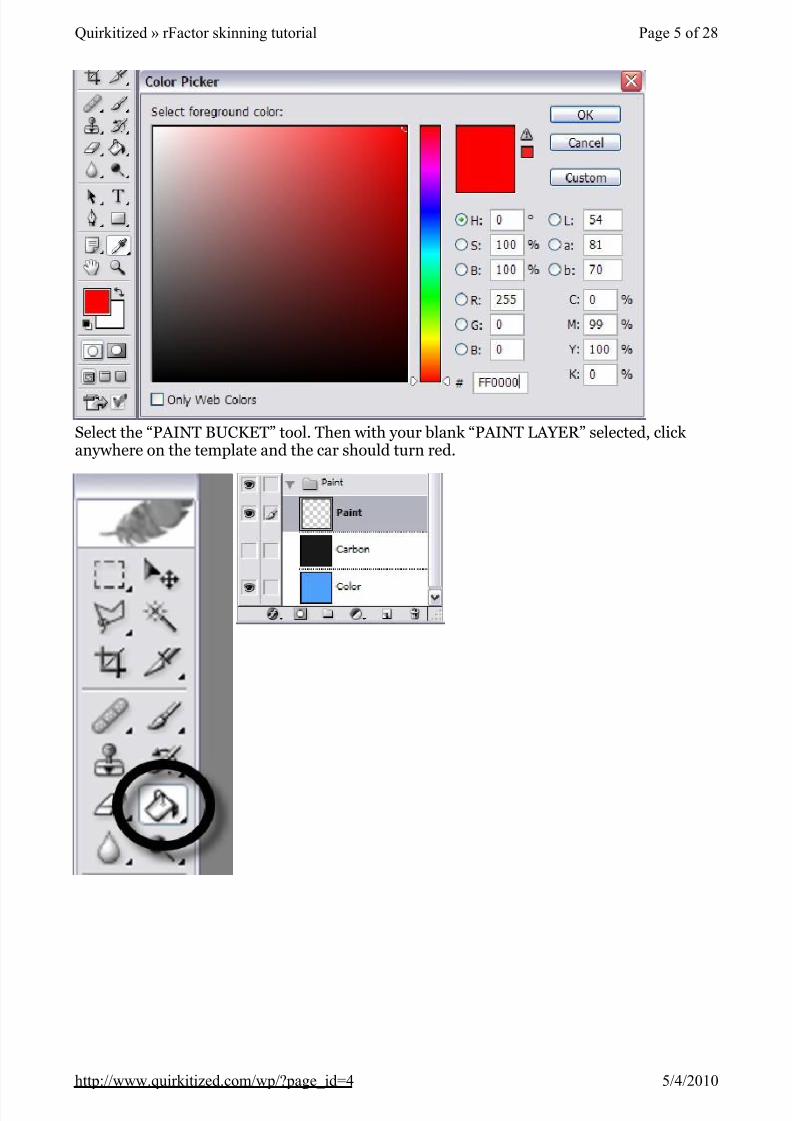
Click on “set forgeground color”. And put the paint to #FF0000 (that’s two F’s, and fourZEROs). Type this in the box at the bottom. Click OK.
Page 4 of 28Quirkitized » rFactor skinning tutorial
5/4/2010http://www.quirkitized.com/wp/?page_id=4
5/10/2018 Www.quirkitized.com Wp Page Id=4 - slidepdf.com
http://slidepdf.com/reader/full/wwwquirkitizedcom-wp-page-id4 5/28
Select the “PAINT BUCKET” tool. Then with your blank “PAINT LAYER” selected, click anywhere on the template and the car should turn red.
Page 5 of 28Quirkitized » rFactor skinning tutorial
5/4/2010http://www.quirkitized.com/wp/?page_id=4
5/10/2018 Www.quirkitized.com Wp Page Id=4 - slidepdf.com
http://slidepdf.com/reader/full/wwwquirkitizedcom-wp-page-id4 6/28
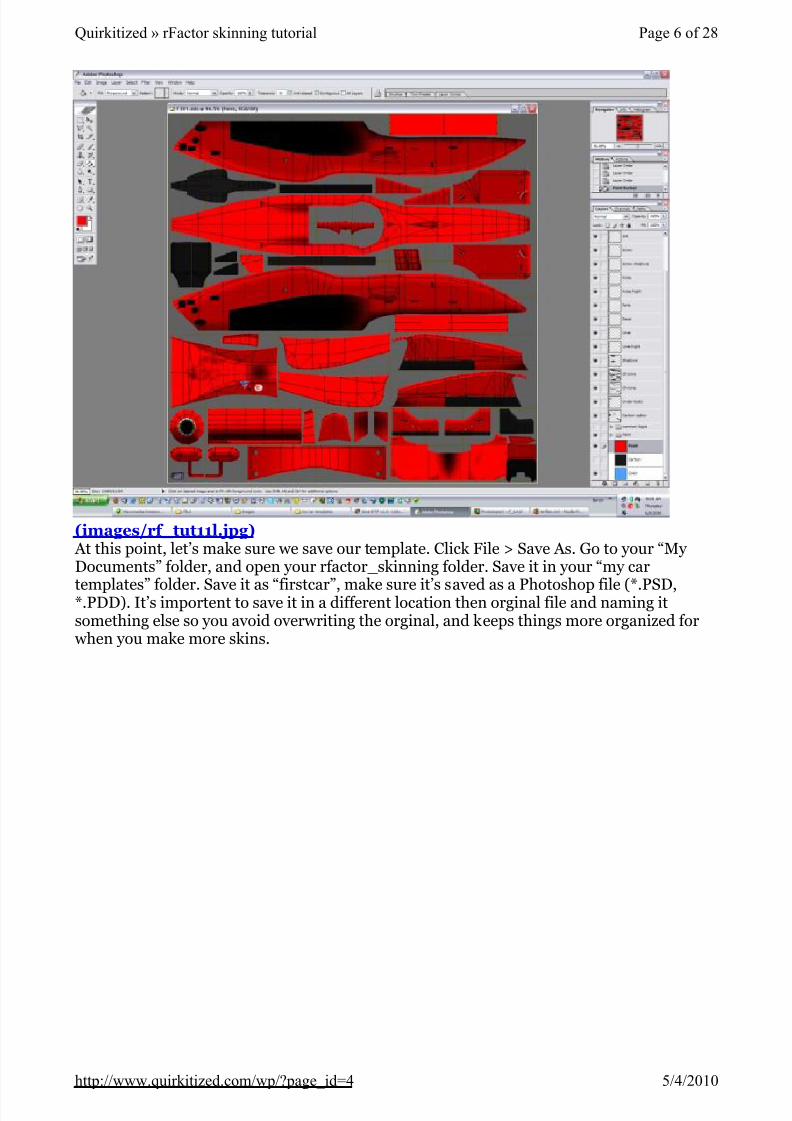
(images/rf_tut11l.jpg)
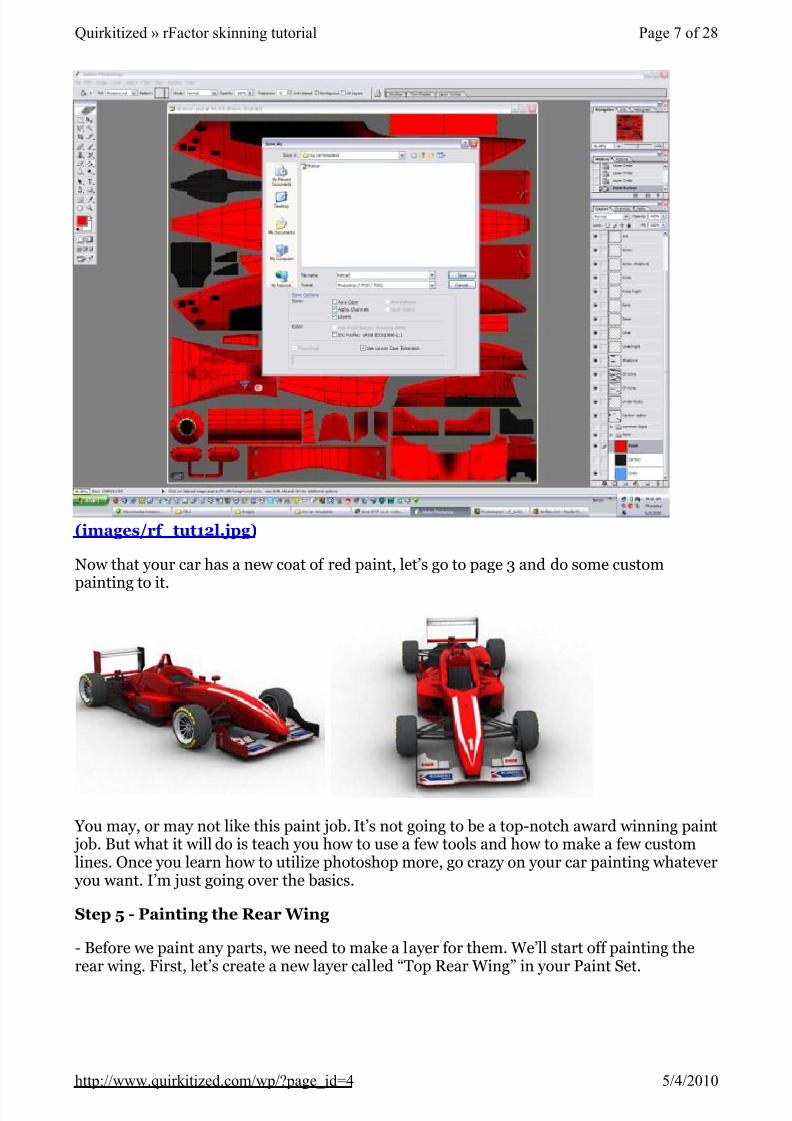
At this point, let’s make sure we save our template. Click File > Save As. Go to your “My Documents” folder, and open your rfactor_skinning folder. Save it in your “my car
templates” folder. Save it as “firstcar”, make sure it’s saved as a Photoshop file (*.PSD,*.PDD). It’s importent to save it in a different location then orginal file and naming itsomething else so you avoid overwriting the orginal, and keeps things more organized for
when you make more skins.
Page 6 of 28Quirkitized » rFactor skinning tutorial
5/4/2010http://www.quirkitized.com/wp/?page_id=4
5/10/2018 Www.quirkitized.com Wp Page Id=4 - slidepdf.com
http://slidepdf.com/reader/full/wwwquirkitizedcom-wp-page-id4 7/28
(images/rf_tut12l.jpg)
Now that your car has a new coat of red paint, let’s go to page 3 and do some custom
painting to it.
You may, or may not like this paint job. It’s not going to be a top-notch award winning paint job. But what it will do is teach you how to use a few tools and how to make a few customlines. Once you learn how to utilize photoshop more, go crazy on your car painting whatever
you want. I’m just going over the basics.
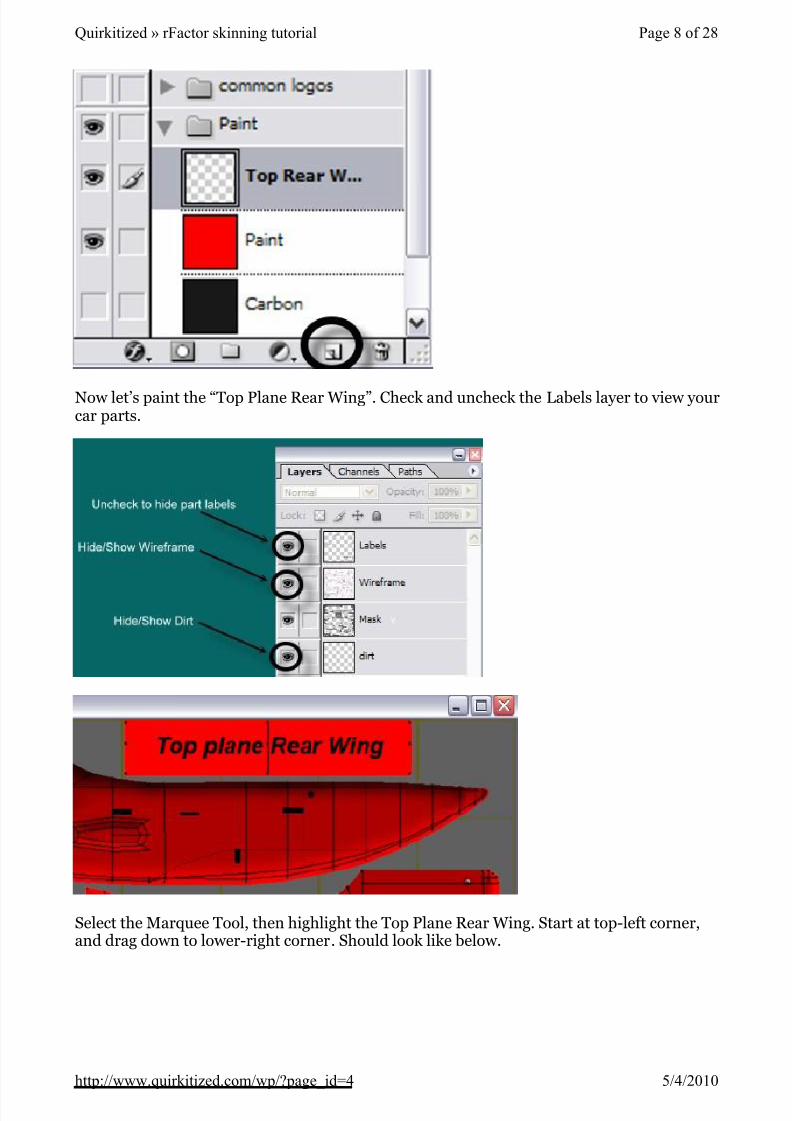
Step 5 - Painting the Re ar W ing
- Before we paint any parts, we need to make a layer for them. We’ll start off painting therear wing. First, let’s create a new layer called “Top Rear Wing” in your Paint Set.
Page 7 of 28Quirkitized » rFactor skinning tutorial
5/4/2010http://www.quirkitized.com/wp/?page_id=4
5/10/2018 Www.quirkitized.com Wp Page Id=4 - slidepdf.com
http://slidepdf.com/reader/full/wwwquirkitizedcom-wp-page-id4 8/28
Now let’s paint the “Top Plane Rear Wing”. Check and uncheck the Labels layer to view yourcar parts.
Select the Marquee Tool, then highlight the Top Plane Rear Wing. Start at top-left corner,and drag down to lower-right corner. Should look like below.
Page 8 of 28Quirkitized » rFactor skinning tutorial
5/4/2010http://www.quirkitized.com/wp/?page_id=4
5/10/2018 Www.quirkitized.com Wp Page Id=4 - slidepdf.com
http://slidepdf.com/reader/full/wwwquirkitizedcom-wp-page-id4 9/28
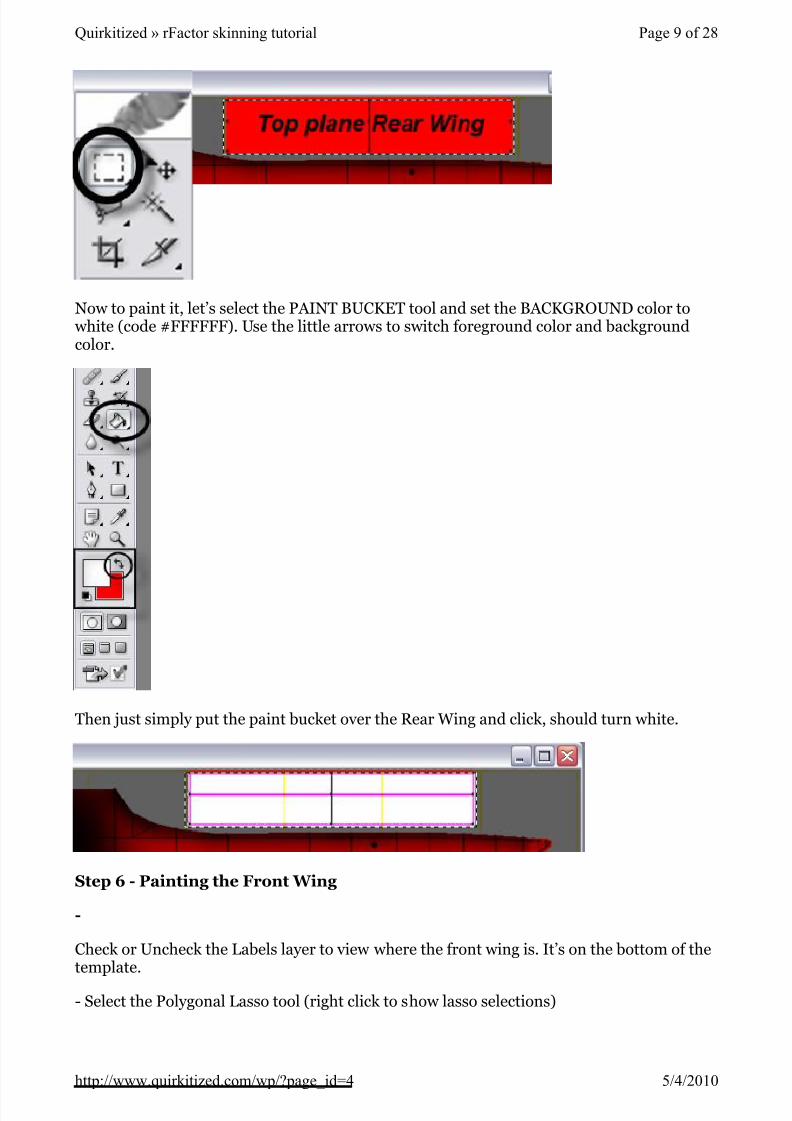
Now to paint it, let’s select the PAINT BUCKET tool and set the BACKGROUND color to white (code #FFFFFF). Use the little arrows to switch foreground color and backgroundcolor.
Then just simply put the paint bucket over the Rear Wing and click, should turn white.
Step 6 - Painting the Front W ing
-
Check or Uncheck the Labels layer to view where the front wing is. It’s on the bottom of thetemplate.
- Select the Polygonal Lasso tool (right click to show lasso selections)
Page 9 of 28Quirkitized » rFactor skinning tutorial
5/4/2010http://www.quirkitized.com/wp/?page_id=4
5/10/2018 Www.quirkitized.com Wp Page Id=4 - slidepdf.com
http://slidepdf.com/reader/full/wwwquirkitizedcom-wp-page-id4 10/28
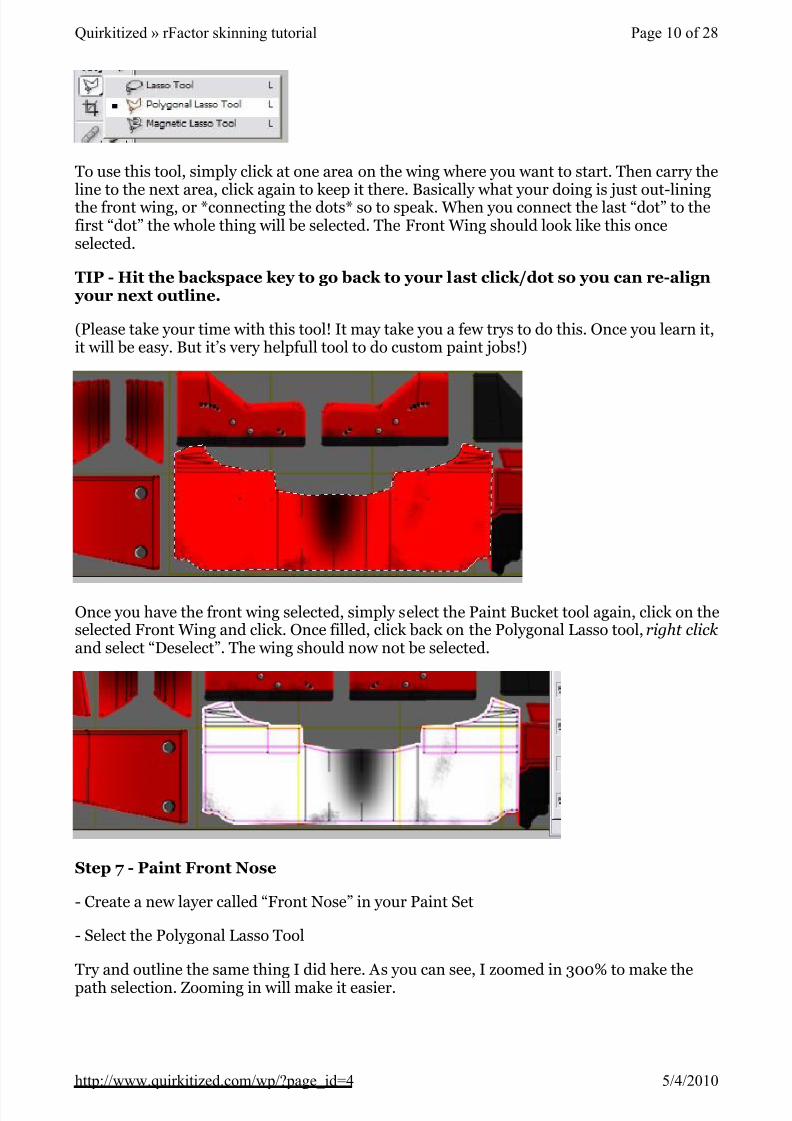
To use this tool, simply click at one area on the wing where you want to start. Then carry the
line to the next area, click again to keep it there. Basically what your doing is just out-liningthe front wing, or *connecting the dots* so to speak. When you connect the last “dot” to thefirst “dot” the whole thing will be selected. The Front Wing should look like this onceselected.
TIP - Hit the backspace k ey to go back to your last click/dot so you can r e-align your next ou tline.
(Please take your time with this tool! It may take you a few trys to do this. Once you learn it,it will be easy. But it’s very helpfull tool to do custom paint jobs!)
Once you have the front wing selected, simply select the Paint Bucket tool again, click on theselected Front Wing and click. Once filled, click back on the Polygonal Lasso tool, right click and select “Deselect”. The wing should now not be selected.
Step 7 - Paint Front Nose
- Create a new layer called “Front Nose” in your Paint Set
- Select the Polygonal Lasso Tool
Try and outline the same thing I did here. As you can see, I zoomed in 300% to make thepath selection. Zooming in will make it easier.
Page 10 of 28Quirkitized » rFactor skinning tutorial
5/4/2010http://www.quirkitized.com/wp/?page_id=4
5/10/2018 Www.quirkitized.com Wp Page Id=4 - slidepdf.com
http://slidepdf.com/reader/full/wwwquirkitizedcom-wp-page-id4 11/28
(images/rf_tut23l.jpg)
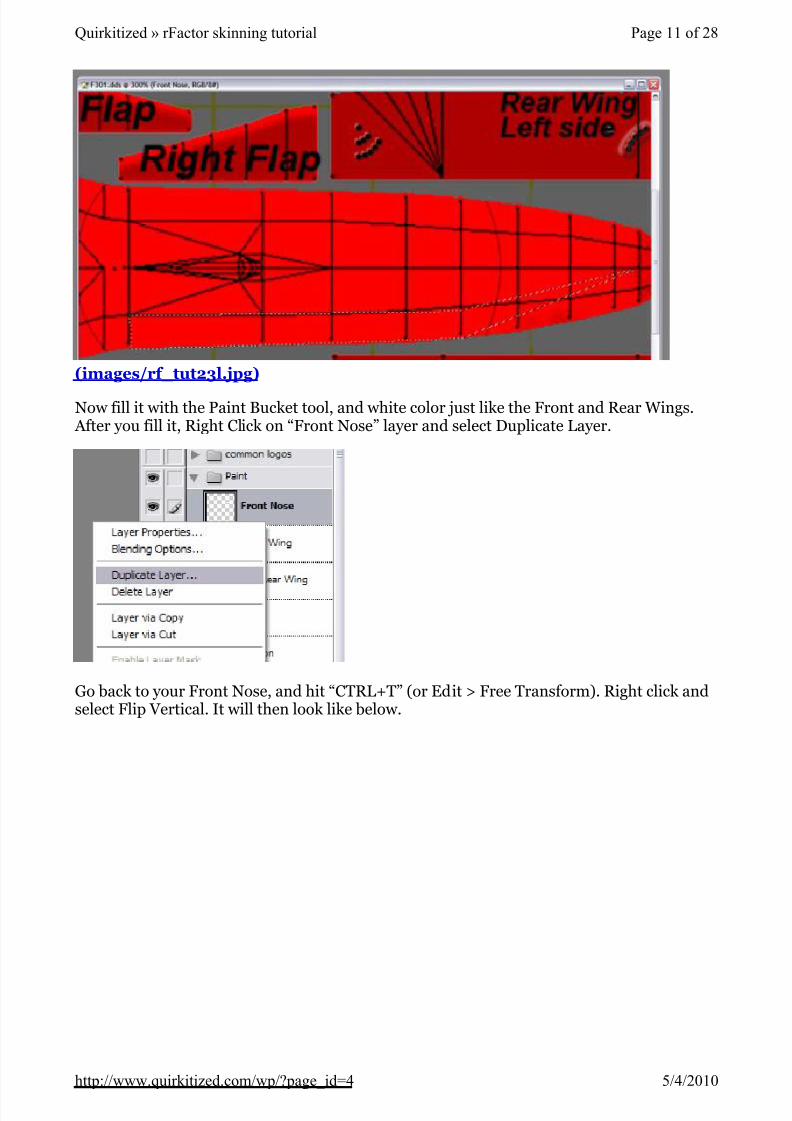
Now fill it with the Paint Bucket tool, and white color just like the Front and Rear Wings. After you fill it, Right Click on “Front Nose” layer and select Duplicate Layer.
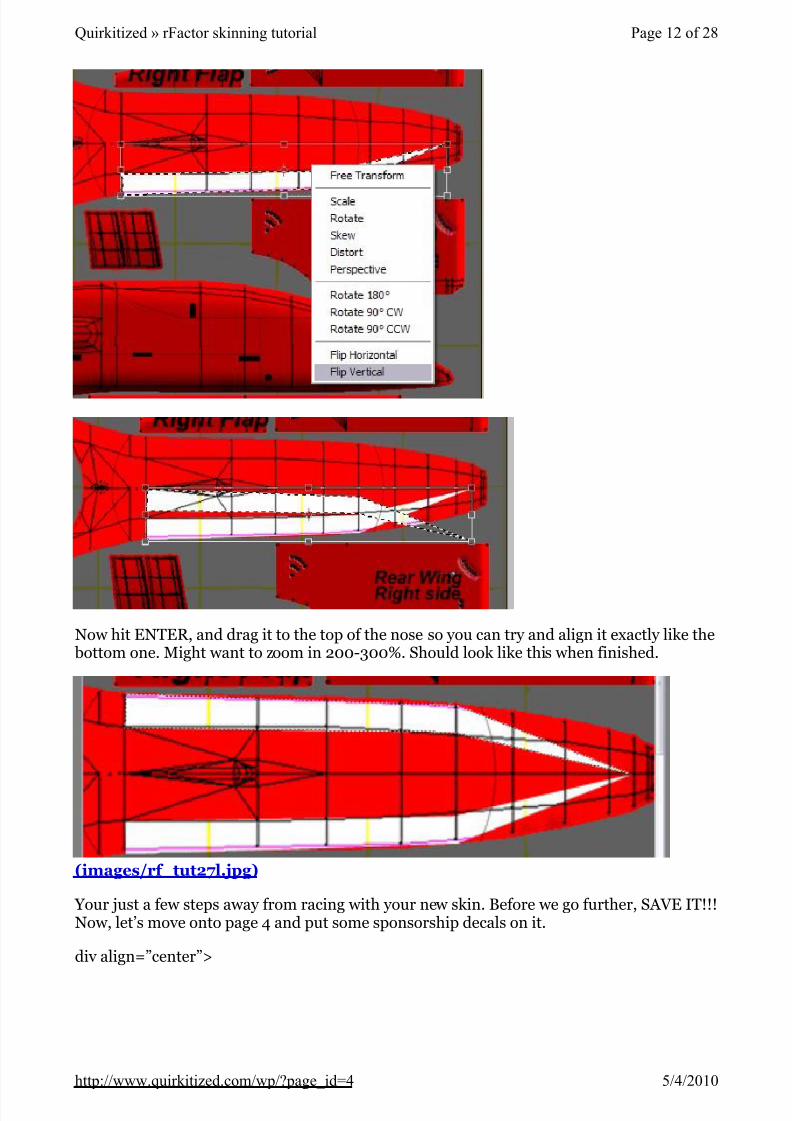
Go back to your Front Nose, and hit “CTRL+T” (or Edit > Free Transform). Right click andselect Flip Vertical. It will then look like below.
Page 11 of 28Quirkitized » rFactor skinning tutorial
5/4/2010http://www.quirkitized.com/wp/?page_id=4
5/10/2018 Www.quirkitized.com Wp Page Id=4 - slidepdf.com
http://slidepdf.com/reader/full/wwwquirkitizedcom-wp-page-id4 12/28
Now hit ENTER, and drag it to the top of the nose so you can try and align it exactly like the bottom one. Might want to zoom in 200-300%. Should look like this when finished.
(images/rf_tut27l.jpg)
Your just a few steps away from racing with your new skin. Before we go further, SAVE IT!!!Now, let’s move onto page 4 and put some sponsorship decals on it.
div align=”center”>
Page 12 of 28Quirkitized » rFactor skinning tutorial
5/4/2010http://www.quirkitized.com/wp/?page_id=4
5/10/2018 Www.quirkitized.com Wp Page Id=4 - slidepdf.com
http://slidepdf.com/reader/full/wwwquirkitizedcom-wp-page-id4 13/28
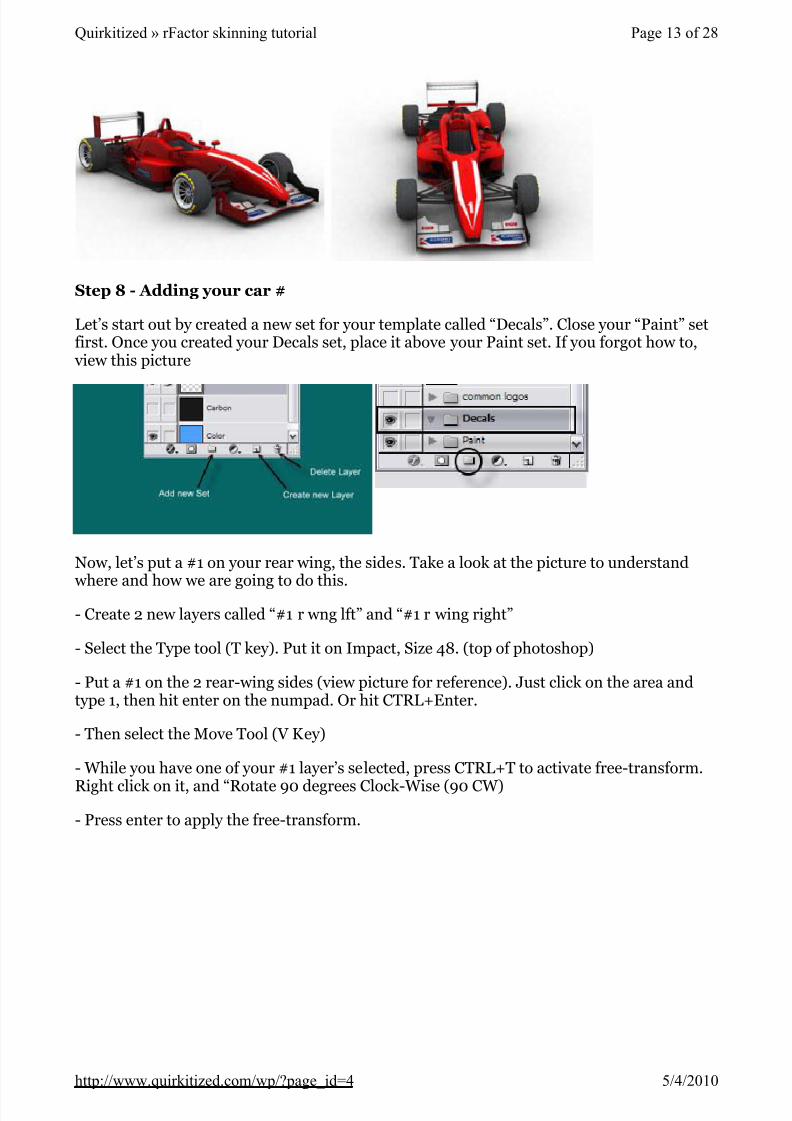
Step 8 - Adding your car #
Let’s start out by created a new set for your template called “Decals”. Close your “Paint” setfirst. Once you created your Decals set, place it above your Paint set. If you forgot how to,
view this picture
Now, let’s put a #1 on your rear wing, the sides. Take a look at the picture to understand
where and how we are going to do this.
- Create 2 new layers called “#1 r wng lft” and “#1 r wing right”
- Select the Type tool (T key). Put it on Impact, Size 48. (top of photoshop)
- Put a #1 on the 2 rear-wing sides (view picture for reference). Just click on the area andtype 1, then hit enter on the numpad. Or hit CTRL+Enter.
- Then select the Move Tool (V Key)
- While you have one of your #1 layer’s selected, press CTRL+T to activate free-transform.
Right click on it, and “Rotate 90 degrees Clock-Wise (90 CW)
- Press enter to apply the free-transform.
Page 13 of 28Quirkitized » rFactor skinning tutorial
5/4/2010http://www.quirkitized.com/wp/?page_id=4
5/10/2018 Www.quirkitized.com Wp Page Id=4 - slidepdf.com
http://slidepdf.com/reader/full/wwwquirkitizedcom-wp-page-id4 14/28
(images/rf_tut29l.jpg)
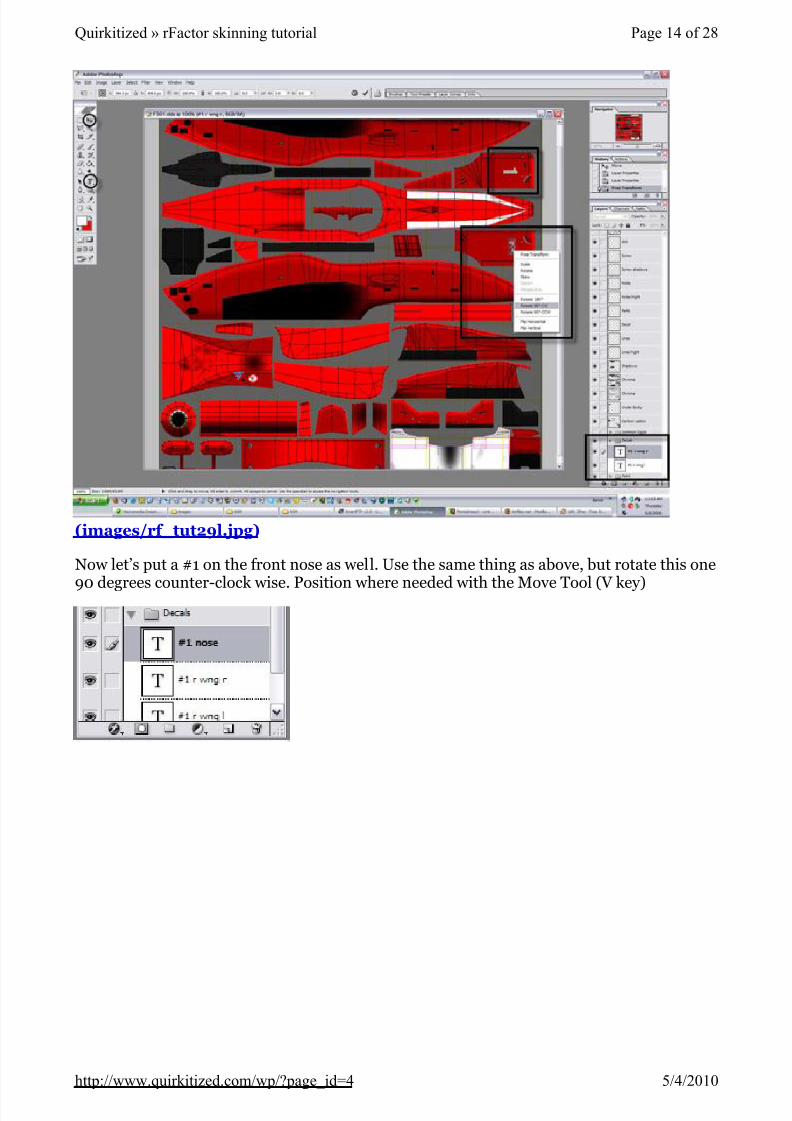
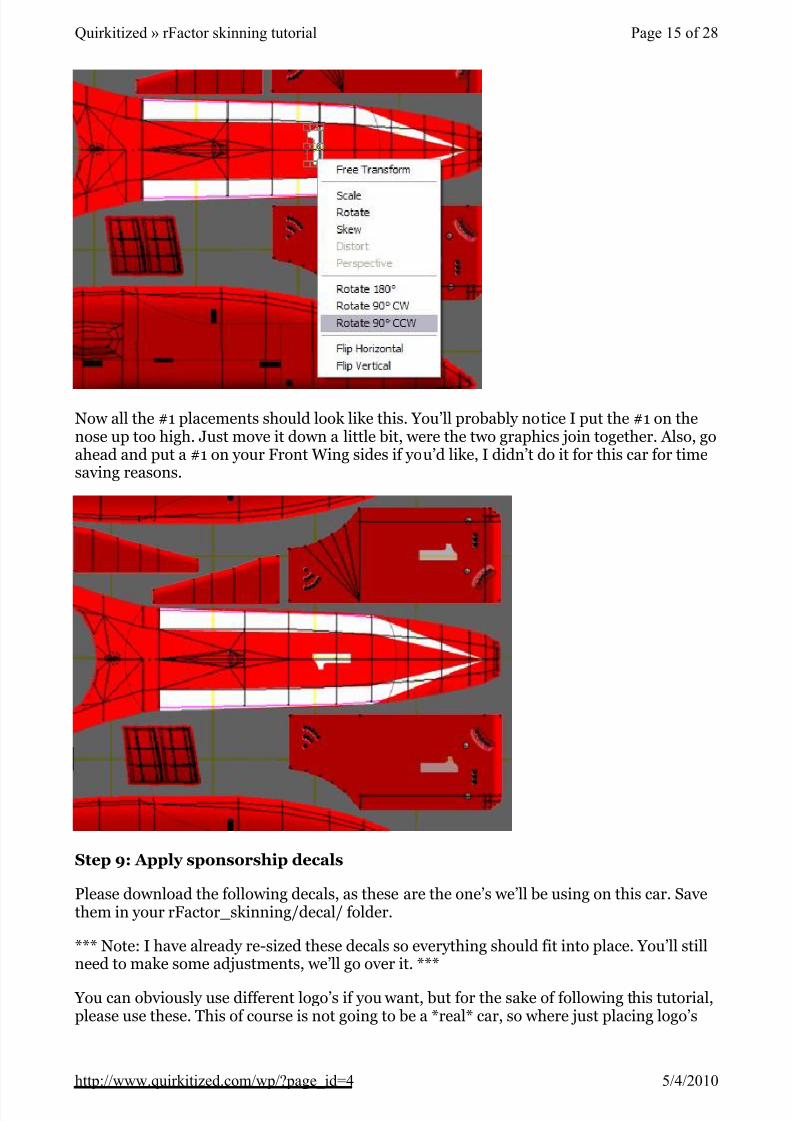
Now let’s put a #1 on the front nose as well. Use the same thing as above, but rotate this one
90 degrees counter-clock wise. Position where needed with the Move Tool (V key)
Page 14 of 28Quirkitized » rFactor skinning tutorial
5/4/2010http://www.quirkitized.com/wp/?page_id=4
5/10/2018 Www.quirkitized.com Wp Page Id=4 - slidepdf.com
http://slidepdf.com/reader/full/wwwquirkitizedcom-wp-page-id4 15/28
Now all the #1 placements should look like this. You’ll probably notice I put the #1 on thenose up too high. Just move it down a little bit, were the two graphics join together. Also, goahead and put a #1 on your Front Wing sides if you’d like, I didn’t do it for this car for timesaving reasons.
Step 9: Apply sponsor ship decals
Please download the following decals, as these are the one’s we’ll be using on this car. Savethem in your rFactor_skinning/decal/ folder.
*** Note: I have already re-sized these decals so everything should fit into place. You’ll stillneed to make some adjustments, we’ll go over it. ***
You can obviously use different logo’s if you want, but for the sake of following this tutorial,please use these. This of course is not going to be a *real* car, so where just placing logo’s
Page 15 of 28Quirkitized » rFactor skinning tutorial
5/4/2010http://www.quirkitized.com/wp/?page_id=4
5/10/2018 Www.quirkitized.com Wp Page Id=4 - slidepdf.com
http://slidepdf.com/reader/full/wwwquirkitizedcom-wp-page-id4 16/28
for your learning experience. No specific theme for this car, once you learn this…go crazy with a real themed car.
RIGHT CLICK > Save As
Ku mho side graphic (files/rfactor/kumh o2.gif)
Spar co side graphic (files/rfactor/sparco.gif)
Ku mho fron t w ing grap hic (files/rfactor /kum ho1.gif)
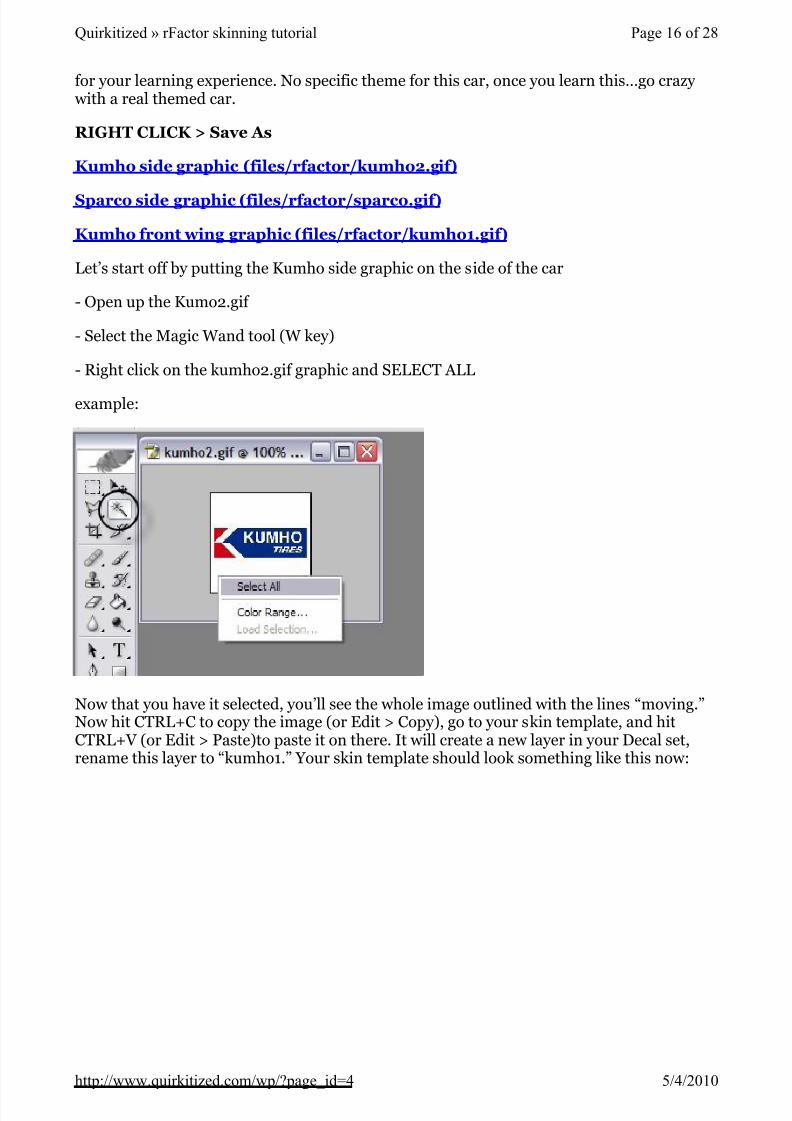
Let’s start off by putting the Kumho side graphic on the side of the car
- Open up the Kumo2.gif
- Select the Magic Wand tool (W key)
- Right click on the kumho2.gif graphic and SELECT ALL
example:
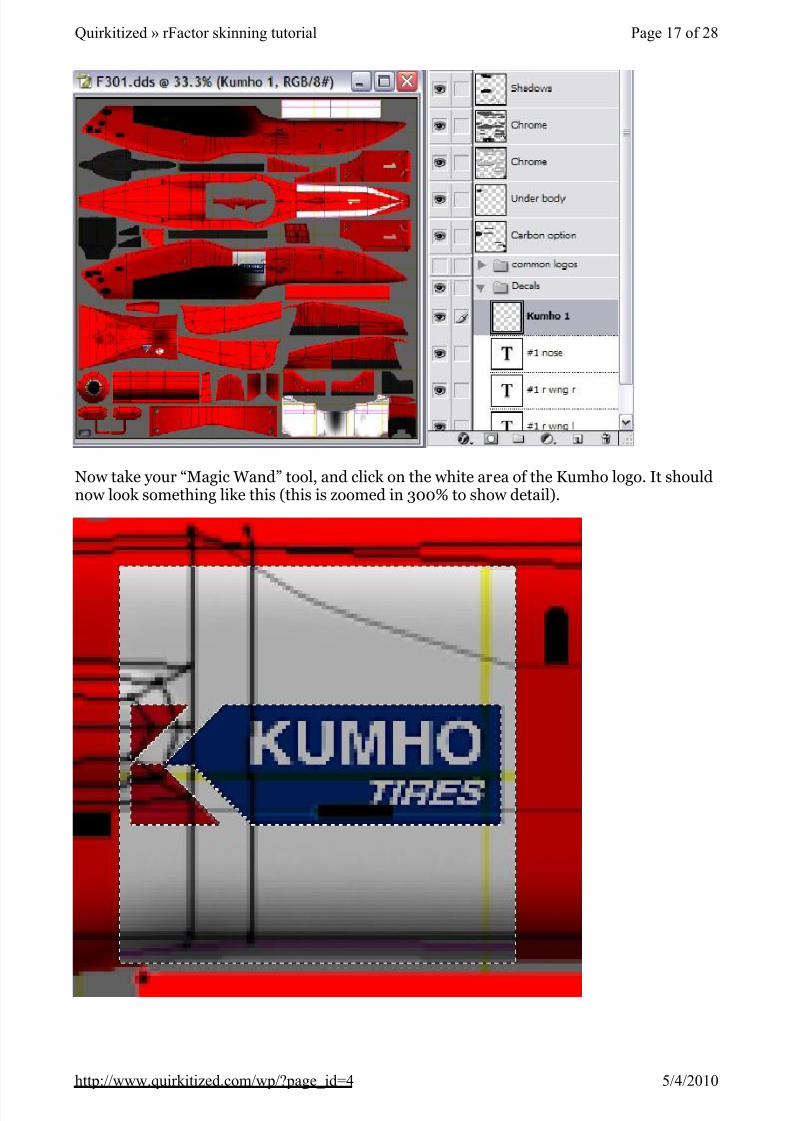
Now that you have it selected, you’ll see the whole image outlined with the lines “moving.”Now hit CTRL+C to copy the image (or Edit > Copy), go to your skin template, and hitCTRL+V (or Edit > Paste)to paste it on there. It will create a new layer in your Decal set,rename this layer to “kumho1.” Your skin template should look something like this now:
Page 16 of 28Quirkitized » rFactor skinning tutorial
5/4/2010http://www.quirkitized.com/wp/?page_id=4
5/10/2018 Www.quirkitized.com Wp Page Id=4 - slidepdf.com
http://slidepdf.com/reader/full/wwwquirkitizedcom-wp-page-id4 17/28
Now take your “Magic Wand” tool, and click on the white area of the Kumho logo. It shouldnow look something like this (this is zoomed in 300% to show detail).
Page 17 of 28Quirkitized » rFactor skinning tutorial
5/4/2010http://www.quirkitized.com/wp/?page_id=4
5/10/2018 Www.quirkitized.com Wp Page Id=4 - slidepdf.com
http://slidepdf.com/reader/full/wwwquirkitizedcom-wp-page-id4 18/28
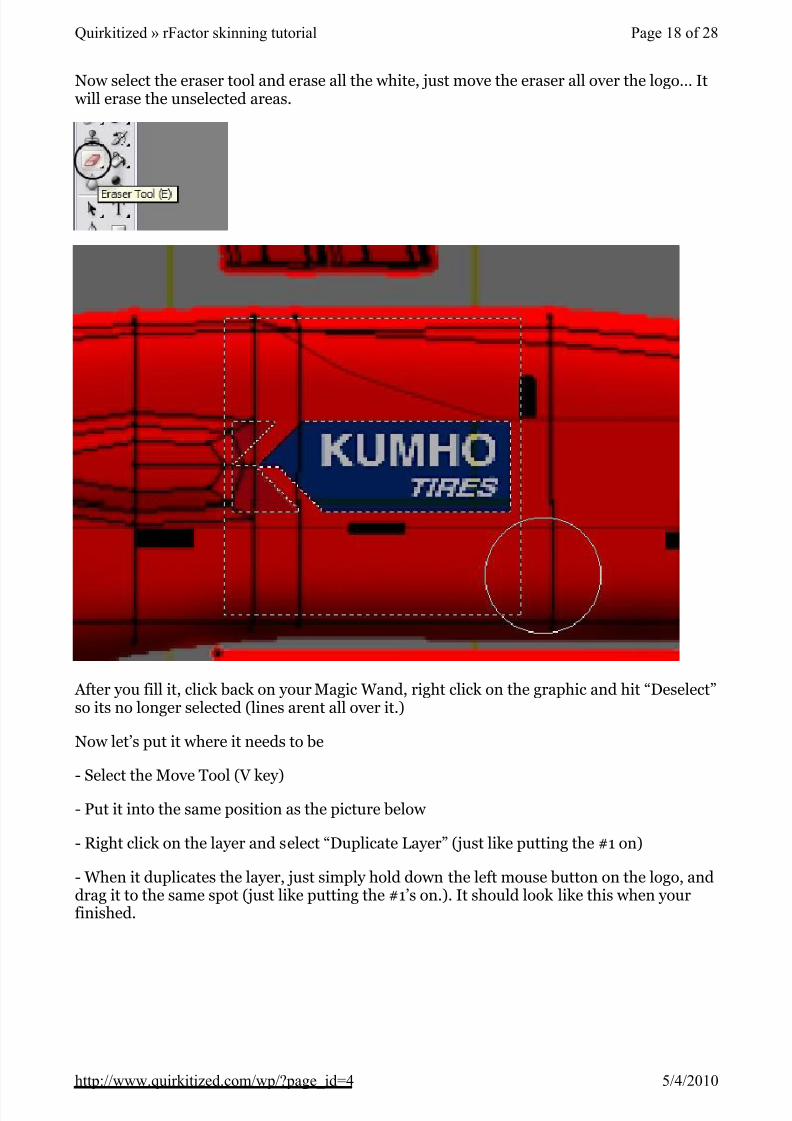
Now select the eraser tool and erase all the white, just move the eraser all over the logo… It will erase the unselected areas.
After you fill it, click back on your Magic Wand, right click on the graphic and hit “Deselect”so its no longer selected (lines arent all over it.)
Now let’s put it where it needs to be
- Select the Move Tool (V key)- Put it into the same position as the picture below
- Right click on the layer and select “Duplicate Layer” (just like putting the #1 on)
- When it duplicates the layer, just simply hold down the left mouse button on the logo, anddrag it to the same spot (just like putting the #1’s on.). It should look like this when yourfinished.
Page 18 of 28Quirkitized » rFactor skinning tutorial
5/4/2010http://www.quirkitized.com/wp/?page_id=4
5/10/2018 Www.quirkitized.com Wp Page Id=4 - slidepdf.com
http://slidepdf.com/reader/full/wwwquirkitizedcom-wp-page-id4 19/28
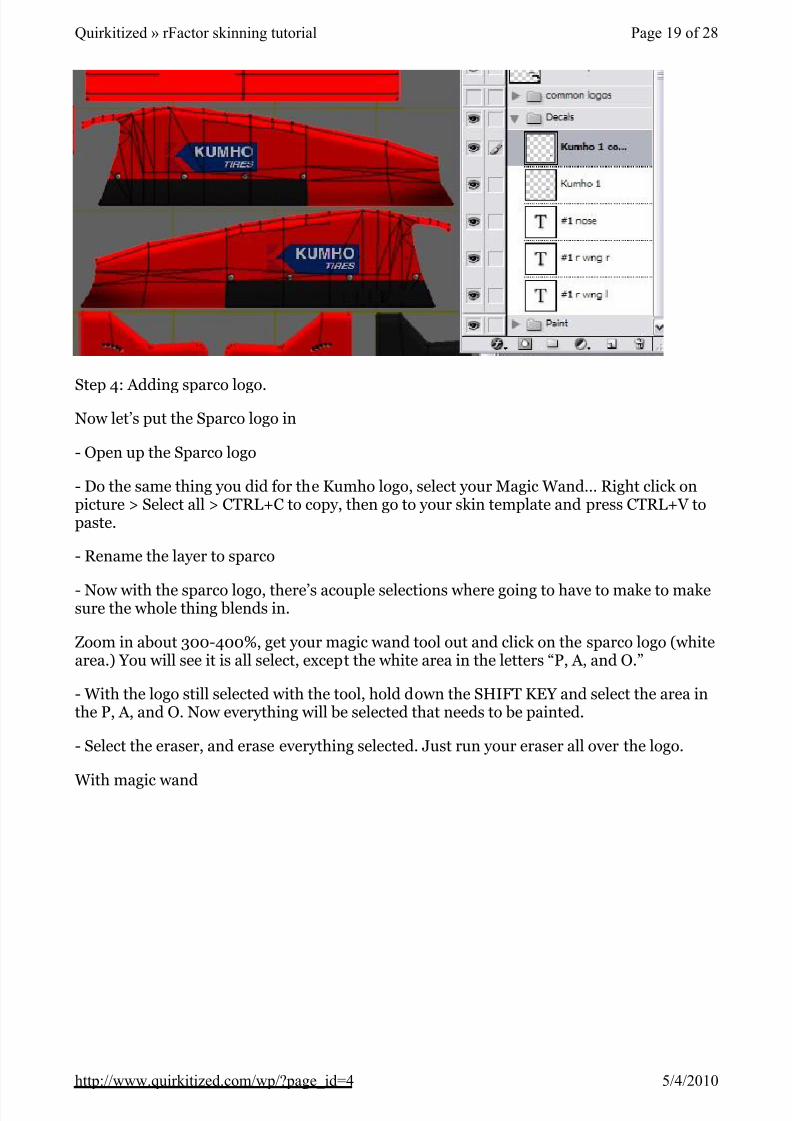
Step 4: Adding sparco logo.
Now let’s put the Sparco logo in
- Open up the Sparco logo
- Do the same thing you did for the Kumho logo, select your Magic Wand… Right click onpicture > Select all > CTRL+C to copy, then go to your skin template and press CTRL+V topaste.
- Rename the layer to sparco
- Now with the sparco logo, there’s acouple selections where going to have to make to makesure the whole thing blends in.
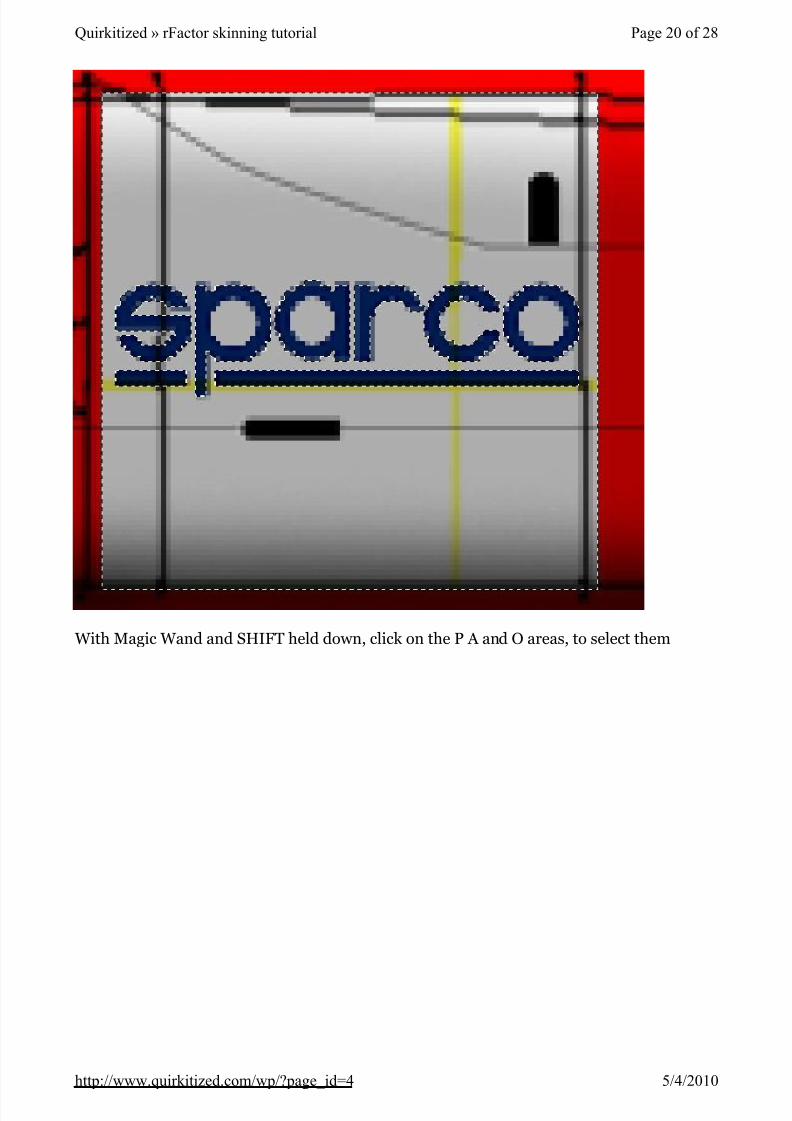
Zoom in about 300-400%, get your magic wand tool out and click on the sparco logo (whitearea.) You will see it is all select, except the white area in the letters “P, A, and O.”
- With the logo still selected with the tool, hold down the SHIFT KEY and select the area inthe P, A, and O. Now everything will be selected that needs to be painted.
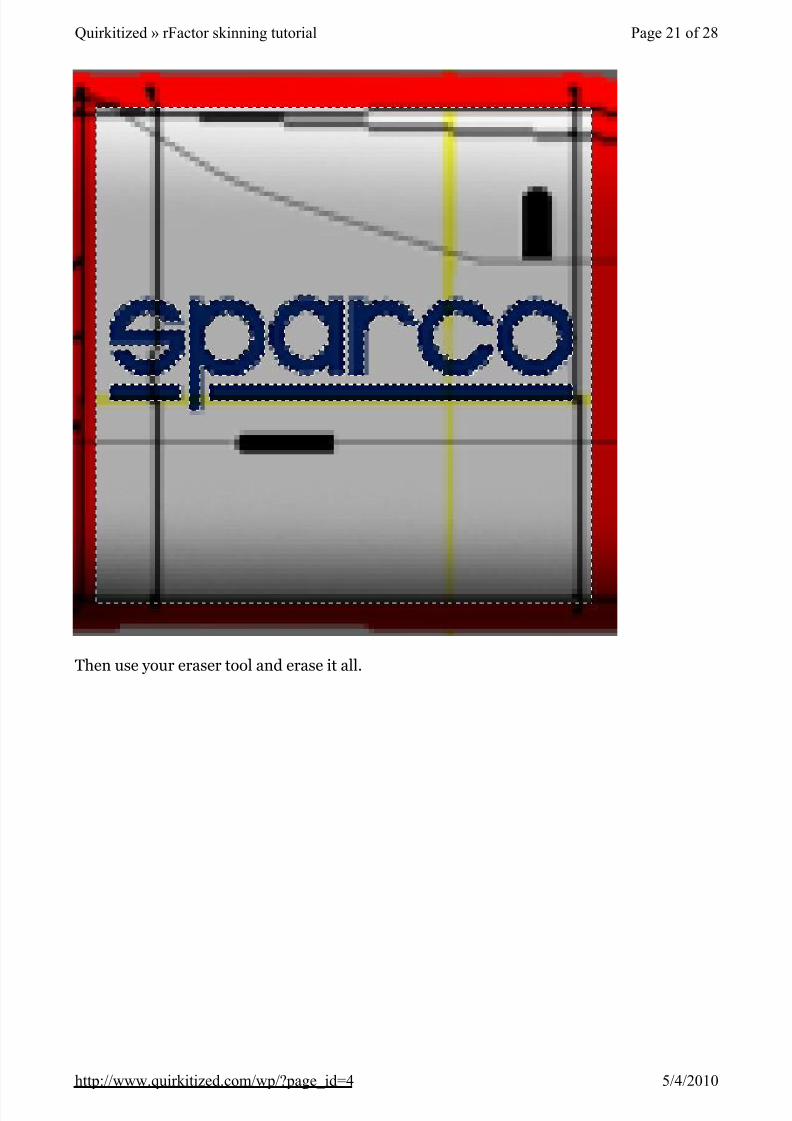
- Select the eraser, and erase everything selected. Just run your eraser all over the logo.
With magic wand
Page 19 of 28Quirkitized » rFactor skinning tutorial
5/4/2010http://www.quirkitized.com/wp/?page_id=4
5/10/2018 Www.quirkitized.com Wp Page Id=4 - slidepdf.com
http://slidepdf.com/reader/full/wwwquirkitizedcom-wp-page-id4 20/28
With Magic Wand and SHIFT held down, click on the P A and O areas, to select them
Page 20 of 28Quirkitized » rFactor skinning tutorial
5/4/2010http://www.quirkitized.com/wp/?page_id=4
5/10/2018 Www.quirkitized.com Wp Page Id=4 - slidepdf.com
http://slidepdf.com/reader/full/wwwquirkitizedcom-wp-page-id4 21/28
Then use your eraser tool and erase it all.
Page 21 of 28Quirkitized » rFactor skinning tutorial
5/4/2010http://www.quirkitized.com/wp/?page_id=4
5/10/2018 Www.quirkitized.com Wp Page Id=4 - slidepdf.com
http://slidepdf.com/reader/full/wwwquirkitizedcom-wp-page-id4 22/28
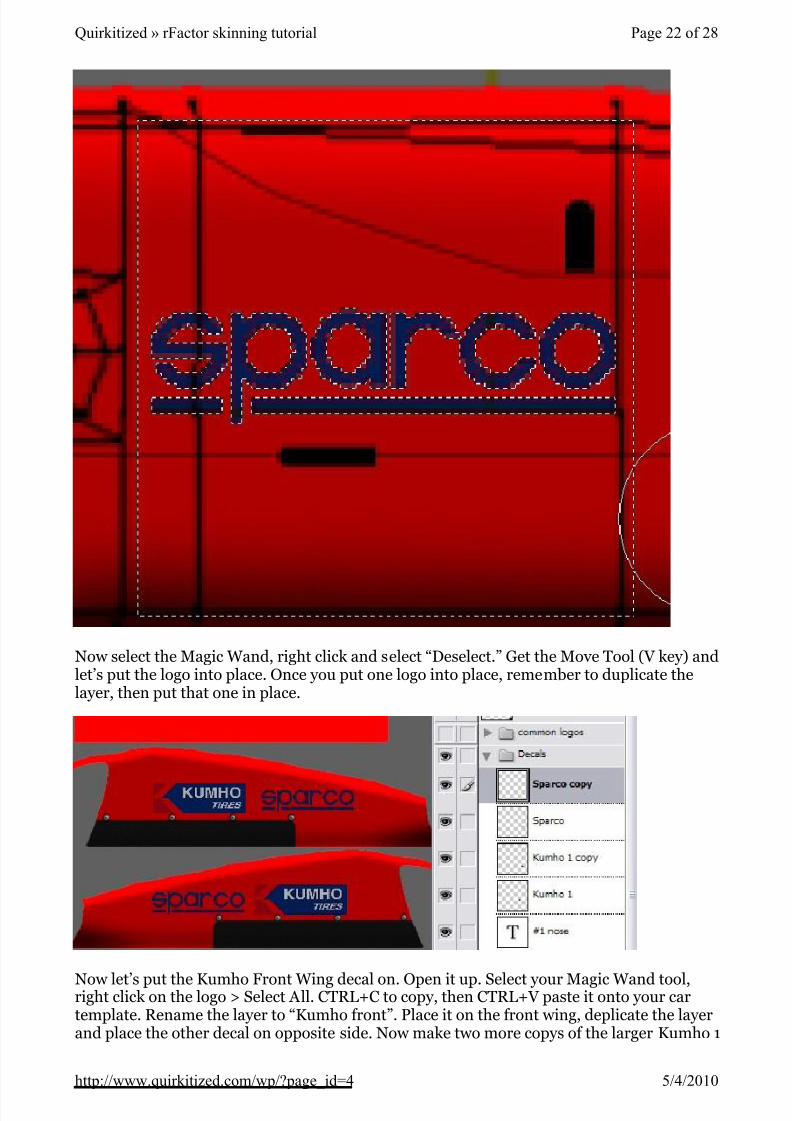
Now select the Magic Wand, right click and select “Deselect.” Get the Move Tool (V key) andlet’s put the logo into place. Once you put one logo into place, remember to duplicate thelayer, then put that one in place.
Now let’s put the Kumho Front Wing decal on. Open it up. Select your Magic Wand tool,right click on the logo > Select All. CTRL+C to copy, then CTRL+V paste it onto your cartemplate. Rename the layer to “Kumho front”. Place it on the front wing, deplicate the layerand place the other decal on opposite side. Now make two more copys of the larger Kumho 1
Page 22 of 28Quirkitized » rFactor skinning tutorial
5/4/2010http://www.quirkitized.com/wp/?page_id=4
5/10/2018 Www.quirkitized.com Wp Page Id=4 - slidepdf.com
http://slidepdf.com/reader/full/wwwquirkitizedcom-wp-page-id4 23/28
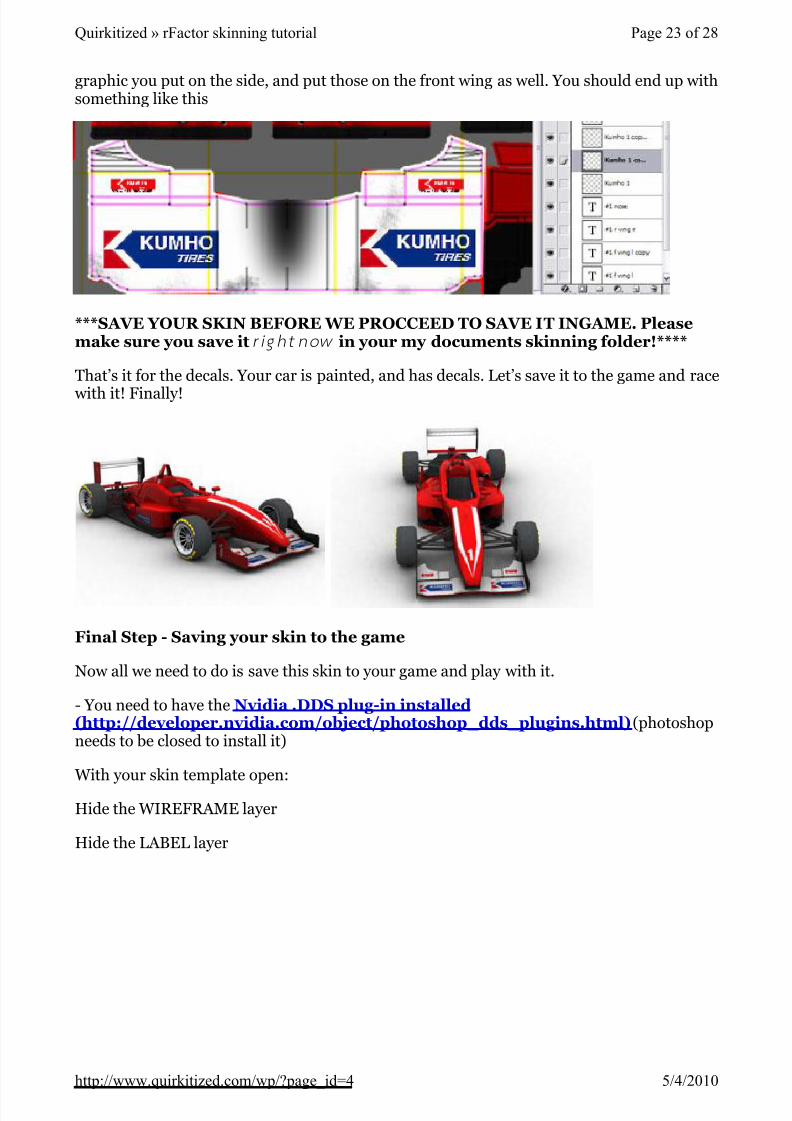
graphic you put on the side, and put those on the front wing as well. You should end up withsomething like this
***SAVE Y OUR SK IN BEFORE W E PROCCEED TO SAVE IT INGAME. Pleasemake sur e you save it r ig h t n o w in your my do cume nts skinning folder!****
That’s it for the decals. Your car is painted, and has decals. Let’s save it to the game and race
with it! Finally!
Final Step - Saving your skin to the game
Now all we need to do is save this skin to your game and play with it.
- You need to have the Nvidia .DDS plug-in installed(http://develope r.nvidia.com/object/photosho p_dds_plugins.html) (photoshopneeds to be closed to install it)
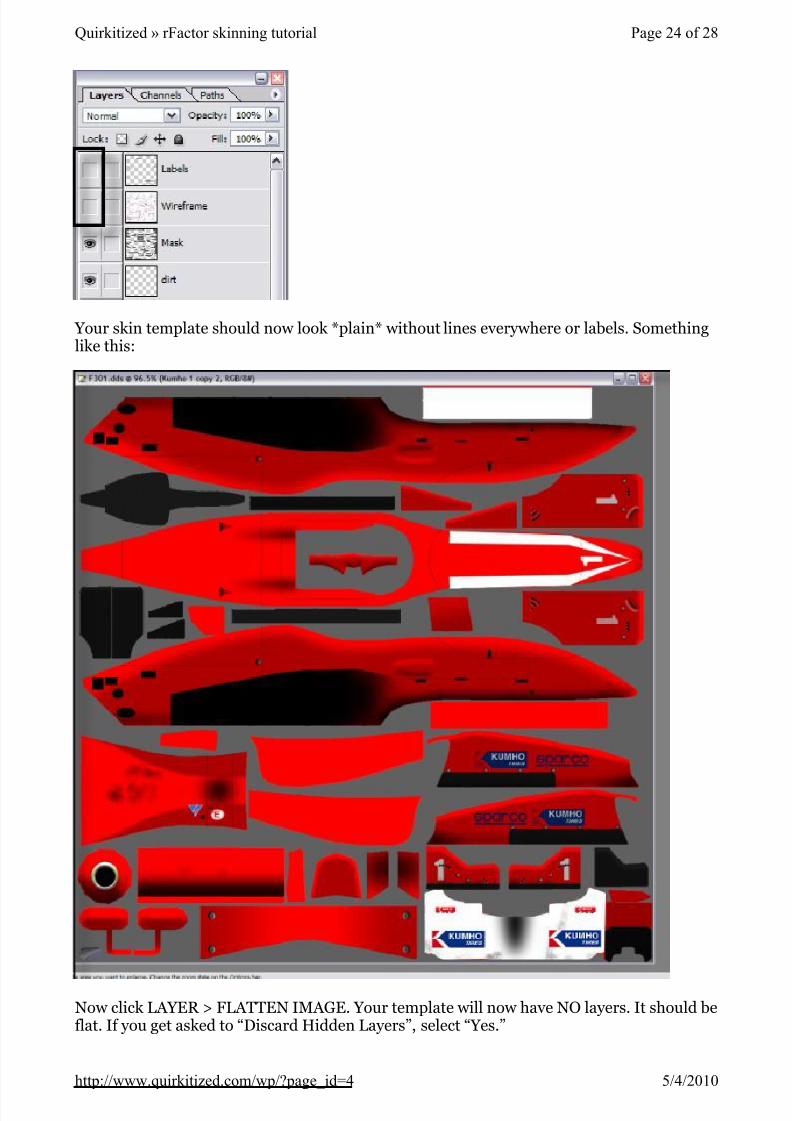
With your skin template open:Hide the WIREFRAME layer
Hide the LABEL layer
Page 23 of 28Quirkitized » rFactor skinning tutorial
5/4/2010http://www.quirkitized.com/wp/?page_id=4
5/10/2018 Www.quirkitized.com Wp Page Id=4 - slidepdf.com
http://slidepdf.com/reader/full/wwwquirkitizedcom-wp-page-id4 24/28
Your skin template should now look *plain* without lines everywhere or labels. Somethinglike this:
Now click LAYER > FLATTEN IMAGE. Your template will now have NO layers. It should beflat. If you get asked to “Discard Hidden Layers”, select “Yes.”
Page 24 of 28Quirkitized » rFactor skinning tutorial
5/4/2010http://www.quirkitized.com/wp/?page_id=4
5/10/2018 Www.quirkitized.com Wp Page Id=4 - slidepdf.com
http://slidepdf.com/reader/full/wwwquirkitizedcom-wp-page-id4 25/28
Page 25 of 28Quirkitized » rFactor skinning tutorial
5/4/2010http://www.quirkitized.com/wp/?page_id=4
5/10/2018 Www.quirkitized.com Wp Page Id=4 - slidepdf.com
http://slidepdf.com/reader/full/wwwquirkitizedcom-wp-page-id4 26/28
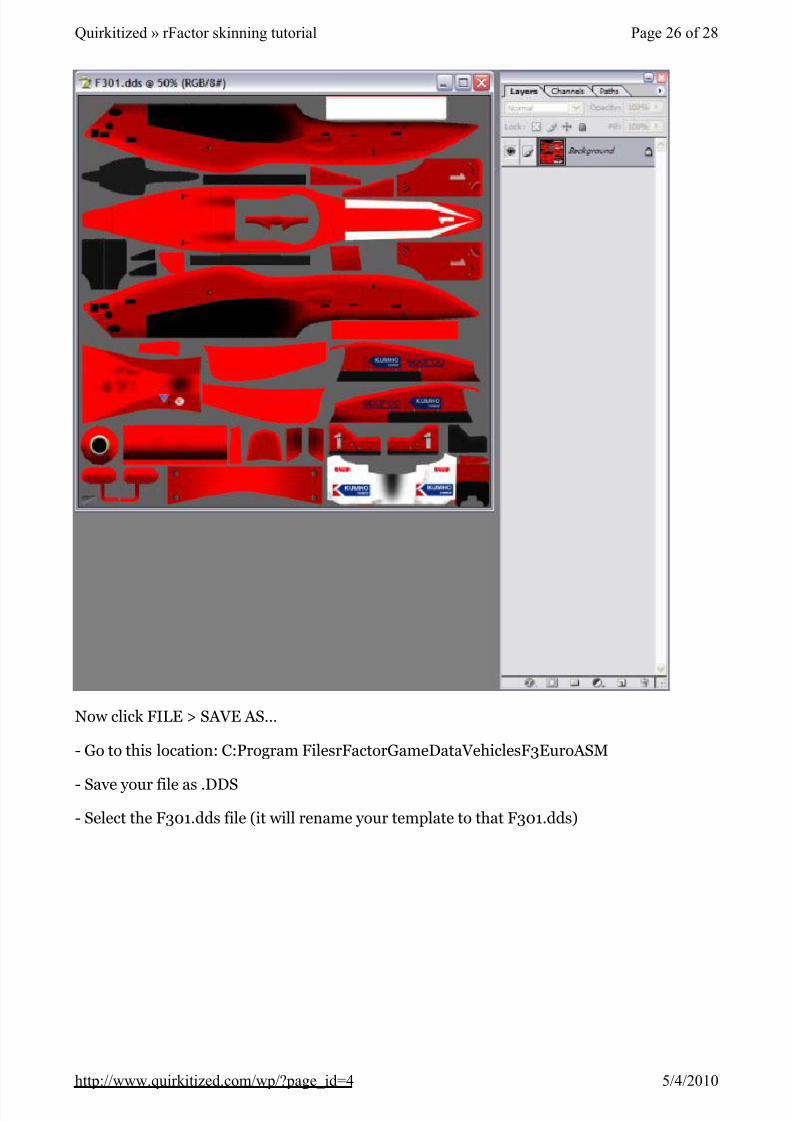
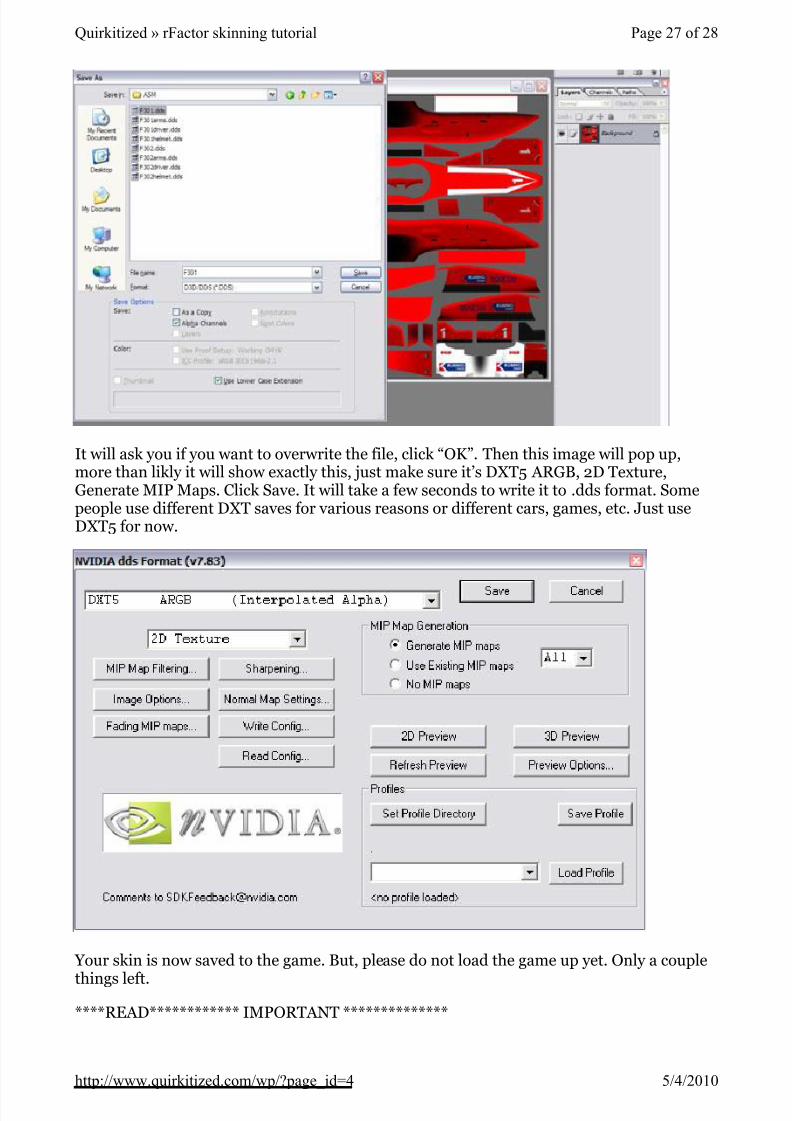
Now click FILE > SAVE AS…
- Go to this location: C:Program FilesrFactorGameDataVehiclesF3EuroASM
- Save your file as .DDS
- Select the F301.dds file (it will rename your template to that F301.dds)
Page 26 of 28Quirkitized » rFactor skinning tutorial
5/4/2010http://www.quirkitized.com/wp/?page_id=4
5/10/2018 Www.quirkitized.com Wp Page Id=4 - slidepdf.com
http://slidepdf.com/reader/full/wwwquirkitizedcom-wp-page-id4 27/28
It will ask you if you want to overwrite the file, click “OK”. Then this image will pop up,more than likly it will show exactly this, just make sure it’s DXT5 ARGB, 2D Texture,Generate MIP Maps. Click Save. It will take a few seconds to write it to .dds format. Somepeople use different DXT saves for various reasons or different cars, games, etc. Just useDXT5 for now.
Your skin is now saved to the game. But, please do not load the game up yet. Only a couple
things left.
****READ************ IMPORTANT **************
Page 27 of 28Quirkitized » rFactor skinning tutorial
5/4/2010http://www.quirkitized.com/wp/?page_id=4
5/10/2018 Www.quirkitized.com Wp Page Id=4 - slidepdf.com
http://slidepdf.com/reader/full/wwwquirkitizedcom-wp-page-id4 28/28
Now go ba ck to your skin temp late and click EDIT > Step Backw ard. This willgive you all your layer s back. Do this and sa ve it just incase you didnt save it
before . Make sure you do no t save it wh ile the image is flattened an d you exitphotoshop, all your w ork is gone by a accident.
***********************************************
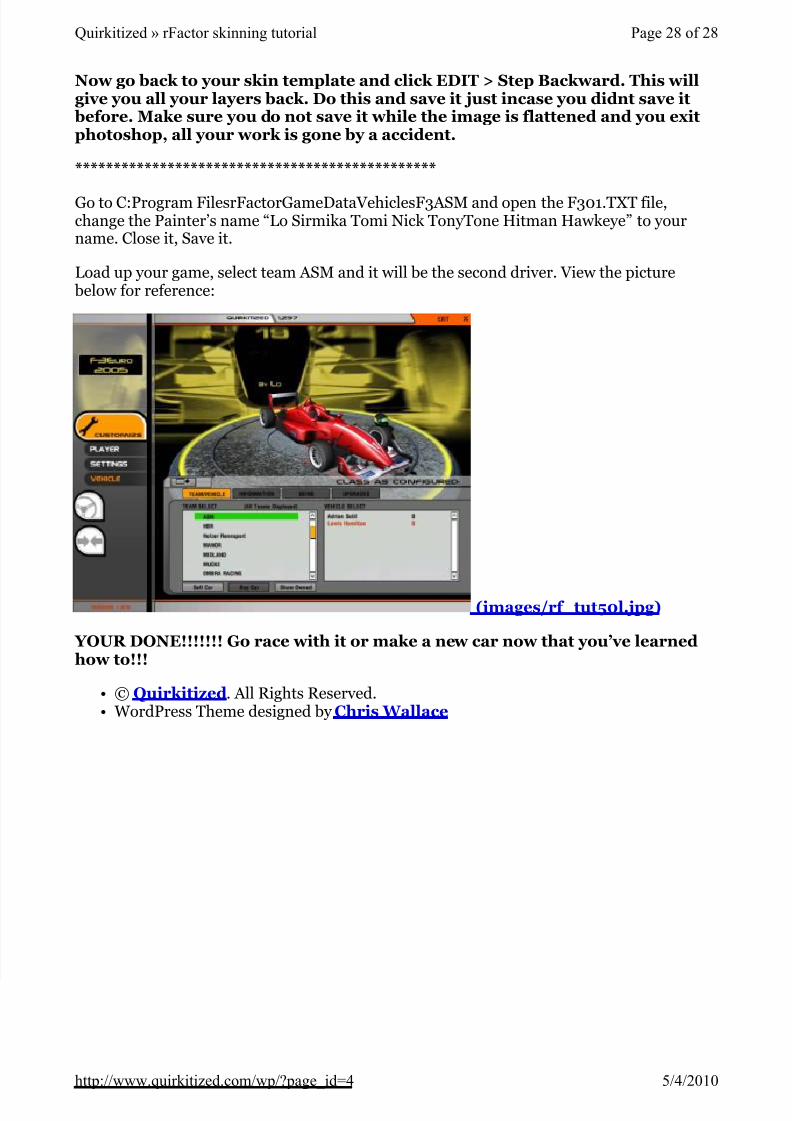
Go to C:Program FilesrFactorGameDataVehiclesF3ASM and open the F301.TXT file,change the Painter’s name “Lo Sirmika Tomi Nick TonyTone Hitman Hawkeye” to yourname. Close it, Save it.
Load up your game, select team ASM and it will be the second driver. View the picture below for reference:
(images/rf_tut50l.jpg)
YOUR DONE!!!!!!! Go race w ith it or m ake a new car n ow that you’ve learne dhow to!!!
© Quirkitized. All Rights Reserved.• WordPress Theme designed by Chris W allace•
Page 28 of 28Quirkitized » rFactor skinning tutorial
5/4/2010http://www.quirkitized.com/wp/?page_id=4