Embed Size (px)
Citation preview
Getting Started Guide
Online & Desktop

© 2011-2013 by Xactware. All rights reserved.
Xactimate, XactNet, XactAnalysis, Xactware ID and/or other Xactware products referenced herein are either trademarks or registered trademarks of Xactware Solutions, Inc. Other product and company names
mentioned herein may be the trademarks of their respective owners. (061813)
Xactware.com
Xactimate Getting Started Guide Page 1
Xactimate Installation
Welcome . . . . . . . . . . . . . . . . . . . . . . . . . . . . . . . . . . . . . . . . . . . . . . . . . . . . . . . . . . . . . 3Xactware ID . . . . . . . . . . . . . . . . . . . . . . . . . . . . . . . . . . . . . . . . . . . . . . . . . . . . . . . . 4The Xactware Cloud. . . . . . . . . . . . . . . . . . . . . . . . . . . . . . . . . . . . . . . . . . . . . . . . . . 4XactNet and the Xactware Cloud . . . . . . . . . . . . . . . . . . . . . . . . . . . . . . . . . . . . . . . . 4System Requirements - Online & Desktop . . . . . . . . . . . . . . . . . . . . . . . . . . . . . . . . . 6
Online - Run Xactimate . . . . . . . . . . . . . . . . . . . . . . . . . . . . . . . . . . . . . . . . . . . . . . . . . . 7Xactimate Online Instances . . . . . . . . . . . . . . . . . . . . . . . . . . . . . . . . . . . . . . . . . . . . 9
Desktop - New Install of Xactimate . . . . . . . . . . . . . . . . . . . . . . . . . . . . . . . . . . . . . . . . 10Download the Install . . . . . . . . . . . . . . . . . . . . . . . . . . . . . . . . . . . . . . . . . . . . . . . . . 10DVD Installation . . . . . . . . . . . . . . . . . . . . . . . . . . . . . . . . . . . . . . . . . . . . . . . . . . . . 12
For Windows XP . . . . . . . . . . . . . . . . . . . . . . . . . . . . . . . . . . . . . . . . . . . . . . . . . 12For Windows Vista . . . . . . . . . . . . . . . . . . . . . . . . . . . . . . . . . . . . . . . . . . . . . . . 12For Windows 7 . . . . . . . . . . . . . . . . . . . . . . . . . . . . . . . . . . . . . . . . . . . . . . . . . . 12For Windows 8 . . . . . . . . . . . . . . . . . . . . . . . . . . . . . . . . . . . . . . . . . . . . . . . . . . 12
Run the Installation. . . . . . . . . . . . . . . . . . . . . . . . . . . . . . . . . . . . . . . . . . . . . . . . . . 13Get an Xactware ID . . . . . . . . . . . . . . . . . . . . . . . . . . . . . . . . . . . . . . . . . . . . . . . . . 18
Forgot your Xactware Password . . . . . . . . . . . . . . . . . . . . . . . . . . . . . . . . . . . . . 21Forgot your Xactware ID . . . . . . . . . . . . . . . . . . . . . . . . . . . . . . . . . . . . . . . . . . . 23
Upgrade Xactimate version 27.5 to 28 . . . . . . . . . . . . . . . . . . . . . . . . . . . . . . . . . . . 24New Multi-version Install. . . . . . . . . . . . . . . . . . . . . . . . . . . . . . . . . . . . . . . . . . . . . . 27Add a Multi-Version Install . . . . . . . . . . . . . . . . . . . . . . . . . . . . . . . . . . . . . . . . . . . . 29
Transferring Estimates. . . . . . . . . . . . . . . . . . . . . . . . . . . . . . . . . . . . . . . . . . . . . . . . . . 34Transfer estimates from Xactimate desktop to the Xactware Cloud. . . . . . . . . . . . . 34Transfer a claim from Xactimate mobile to Xactimate desktop . . . . . . . . . . . . . . . . 36
Xactimate Network Installation
Introduction . . . . . . . . . . . . . . . . . . . . . . . . . . . . . . . . . . . . . . . . . . . . . . . . . . . . . . . . . . 37System Requirements - Network Install . . . . . . . . . . . . . . . . . . . . . . . . . . . . . . . . . . 38
Install Xactimate on the Server . . . . . . . . . . . . . . . . . . . . . . . . . . . . . . . . . . . . . . . . . . . 39Install SQL Server Express . . . . . . . . . . . . . . . . . . . . . . . . . . . . . . . . . . . . . . . . . . . 39Enable Network Protocols . . . . . . . . . . . . . . . . . . . . . . . . . . . . . . . . . . . . . . . . . . . . 40Start and Stop Services . . . . . . . . . . . . . . . . . . . . . . . . . . . . . . . . . . . . . . . . . . . . . . 42Open the Windows Firewall . . . . . . . . . . . . . . . . . . . . . . . . . . . . . . . . . . . . . . . . . . . 45Setup a Mapped Network Data Location . . . . . . . . . . . . . . . . . . . . . . . . . . . . . . . . . 48
Pre-configure the Workstation. . . . . . . . . . . . . . . . . . . . . . . . . . . . . . . . . . . . . . . 49DVD Install . . . . . . . . . . . . . . . . . . . . . . . . . . . . . . . . . . . . . . . . . . . . . . . . . . . . . 49
Contents
Xactimate Getting Started Guide Page 2
For Windows XP . . . . . . . . . . . . . . . . . . . . . . . . . . . . . . . . . . . . . . . . . . . . . . 49For Windows Vista. . . . . . . . . . . . . . . . . . . . . . . . . . . . . . . . . . . . . . . . . . . . . 49For Windows 7. . . . . . . . . . . . . . . . . . . . . . . . . . . . . . . . . . . . . . . . . . . . . . . . 49For Windows 8. . . . . . . . . . . . . . . . . . . . . . . . . . . . . . . . . . . . . . . . . . . . . . . . 49
Download the Install . . . . . . . . . . . . . . . . . . . . . . . . . . . . . . . . . . . . . . . . . . . . . . 50Run the Install . . . . . . . . . . . . . . . . . . . . . . . . . . . . . . . . . . . . . . . . . . . . . . . . . . . 50
Configure the Initial Workstation and Network. . . . . . . . . . . . . . . . . . . . . . . . . . . . . . . . 53Add an Additional Xactimate Workstation to an Existing Network . . . . . . . . . . . . . . 56
Upgrade Xactimate version 27.5 to 28. . . . . . . . . . . . . . . . . . . . . . . . . . . . . . . . . . . . . . 58Download the Installation . . . . . . . . . . . . . . . . . . . . . . . . . . . . . . . . . . . . . . . . . . . . . 58Run the Install. . . . . . . . . . . . . . . . . . . . . . . . . . . . . . . . . . . . . . . . . . . . . . . . . . . . . . 59
Install Xactimate to a Networked Workstation . . . . . . . . . . . . . . . . . . . . . . . . . . . . . . . . 63
Add an Additional Workstation using the Native Client . . . . . . . . . . . . . . . . . . . . . . . . . 64
Additional Resources
Xactware eService Center . . . . . . . . . . . . . . . . . . . . . . . . . . . . . . . . . . . . . . . . . . . . . . . 65Get Training . . . . . . . . . . . . . . . . . . . . . . . . . . . . . . . . . . . . . . . . . . . . . . . . . . . . . . . 65Xactimate Help . . . . . . . . . . . . . . . . . . . . . . . . . . . . . . . . . . . . . . . . . . . . . . . . . . . . . 65
No part of this document may be reproduced, transferred, distributed, or stored in any format or by any means, electronically or manually, for any purpose without express written permission of
Xactware Solutions, Inc.
Xactimate Getting Started Guide Page 3
1Xactimate Installation
WELCOME
Welcome to the Xactimate Getting Started Guide. Xactimate is a leading property insurance repair estimating solution that is currently used by thousands of people in the United Kingdom, Ireland, the Netherlands, France, Belgium, Canada, and the United States. This solution can be used to quickly create a variety of different estimate types, ranging from small water losses to large residential and commercial fire losses.
Xactimate is currently available on three platforms: online, desktop, and mobile. This Getting Started Guide covers two of the three Xactimate platforms: online and desktop. (For a complete list of features offered in each of these three platforms, visit the Xactware web site at: https://www.xactware.com.
The goal of this Getting Started Guide is to provide you with all the information and step-by-step instructions that you need to install, access, and start using Xactimate online and Xactimate desktop. Xactimate can be used on a single computer or on a workstation connected to a network. This Guide also includes upgrade information if you are using a previous version of Xactimate and are now looking to upgrade to the latest version.
Before installing Xactimate on your computer, it is critical that your computer meets the minimum system requirements for Xactimate. These requirements are listed in “System Requirements - Online & Desktop” on page 6.
Xactimate Getting Started Guide Page 4
Welcome
XACTWARE ID
In order to access Xactimate, you are required to create an Xactware ID, a user authentication mechanism that enables you to sign on and use Xactware products using a single Xactware user ID and password. The Xactware ID also gives you the ability to access any of your estimates in the Xactware Cloud from any plat-form (e.g., Xactimate online, desktop, or mobile).
To create an Xactware ID, visit: http://www.xactware.com/XID/. Once you sign up for an Xactware ID, you will receive an email from Xactware saying you have successfully created an Xactware ID. Then, simply click on the link contained in the email to confirm your email address and activate your new Xactware ID. Once this step is completed, you can begin using your Xactware ID immediately. (For more information and specific instructions, please see “Get an Xactware ID” on page 17)
After you have logged in with your Xactware ID, the project list for Xactimate online, desktop, or mobile displays all available estimates which are stored on the Xactware Cloud. You can select the estimate you want to access, and when you are done, sync with the cloud or upload directly to XactAnalysis, Xactware claim management solution. If you will be disconnected for field estimating, you can check-out files from the cloud in advance. If you are connected to the Internet, idle time is used to sync changes automatically with the cloud.
THE XACTWARE CLOUD
Cloud computing is the next phase in the Internet’s evolution. The Xactware Cloud is a set of technology applications, platforms, infrastructure, highly secure data storage solutions, and user interfaces that enable Xactware to deliver its solutions over the Internet as either a complete platform or as separate components based on our customers’ demands and preferences. That way, no matter where you are or on what device you are working to create an estimate (e.g., Xactimate online, desktop, or mobile), your work is always updated on all your devices via the Xactware Cloud.
XACTNET AND THE XACTWARE CLOUD
The cloud maintains a single qualified XactNet address. This XactNet address allows the cloud to work with XactAnalysis - receiving and uploading estimates. After an claim is sent from XactAnalysis to the cloud, you can access the claim from any of your devices that are connected to the cloud.
You (or someone in your company) will initially create an XactNet Address when you register Xactimate. You can use any format you want for this Address, but Xactware recommends that it be something easy to memorize and possibly descriptive of your company, such as COMPANYNAME.CITY.STATE. Some companies require XactNet formats, so be sure to check with your supervisor first.
If you have a network install of Xactimate, the XactNet Address is the same for all the computers running on your network. Your XactNet Address is required to receive and send estimates, as well as to send messages back and forth between other Xactimate users. If you have not yet set up your XactNet Address, please be sure to do so.
Once you have set up your XactNet Address, you can go to the About Xactimate window to view your Product Key and XactNet Address.

Xactimate Getting Started Guide Page 5
Welcome
To access the About Xactimate dialog box, go to the Xactimate tab, on the left side, select Help, and then click About Xactimate. This brings up a window that displays your Product Key, Xactimate Version, Serial Number, and XactNet Address. Your XactNet Address is also displayed in the top left title bar of the Control Center.
Note: Both Xactimate desktop and online need to be registered using their own unique XactNet address. If you try to register using the same XactNet address, a message is returned informing you the address is already in use.
Xactimate Getting Started Guide Page 6
Welcome
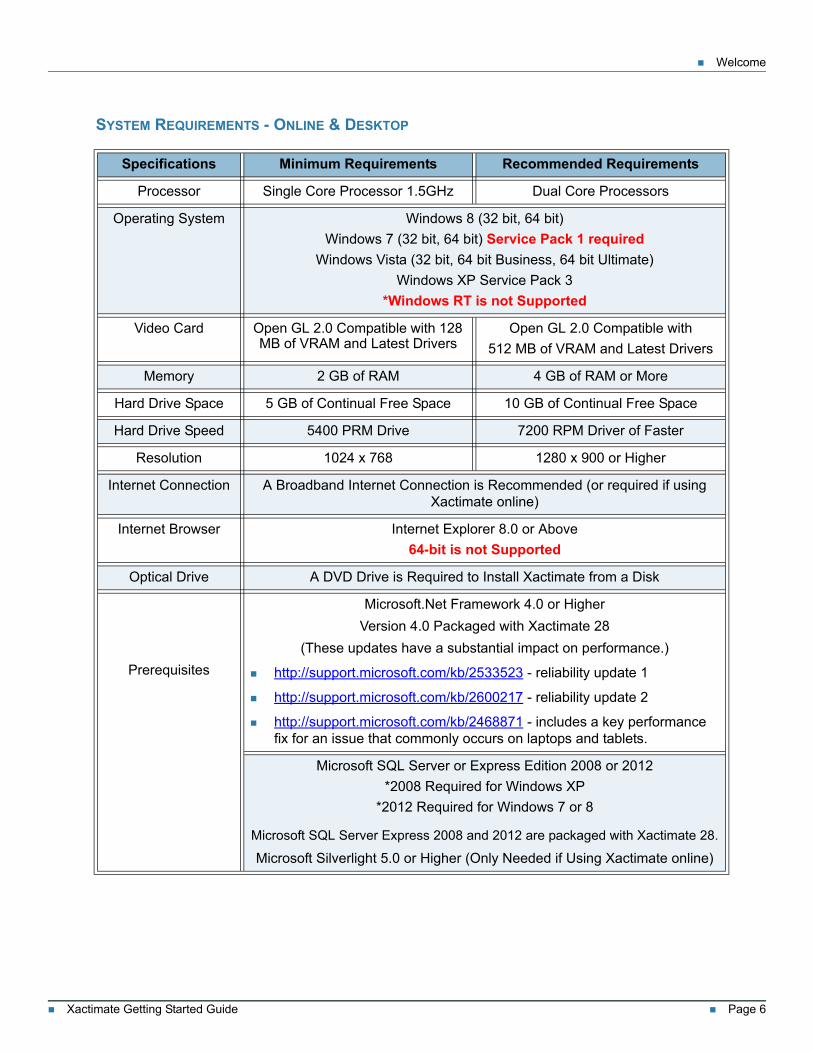
SYSTEM REQUIREMENTS - ONLINE & DESKTOP
Specifications Minimum Requirements Recommended Requirements
Processor Single Core Processor 1.5GHz Dual Core Processors
Operating System Windows 8 (32 bit, 64 bit)
Windows 7 (32 bit, 64 bit) Service Pack 1 required
Windows Vista (32 bit, 64 bit Business, 64 bit Ultimate)
Windows XP Service Pack 3
*Windows RT is not Supported
Video Card Open GL 2.0 Compatible with 128 MB of VRAM and Latest Drivers
Open GL 2.0 Compatible with
512 MB of VRAM and Latest Drivers
Memory 2 GB of RAM 4 GB of RAM or More
Hard Drive Space 5 GB of Continual Free Space 10 GB of Continual Free Space
Hard Drive Speed 5400 PRM Drive 7200 RPM Driver of Faster
Resolution 1024 x 768 1280 x 900 or Higher
Internet Connection A Broadband Internet Connection is Recommended (or required if using Xactimate online)
Internet Browser Internet Explorer 8.0 or Above
64-bit is not Supported
Optical Drive A DVD Drive is Required to Install Xactimate from a Disk
Prerequisites
Microsoft.Net Framework 4.0 or Higher
Version 4.0 Packaged with Xactimate 28
(These updates have a substantial impact on performance.)
http://support.microsoft.com/kb/2533523 - reliability update 1
http://support.microsoft.com/kb/2600217 - reliability update 2
http://support.microsoft.com/kb/2468871 - includes a key performance fix for an issue that commonly occurs on laptops and tablets.
Microsoft SQL Server or Express Edition 2008 or 2012
*2008 Required for Windows XP
*2012 Required for Windows 7 or 8
Microsoft SQL Server Express 2008 and 2012 are packaged with Xactimate 28.
Microsoft Silverlight 5.0 or Higher (Only Needed if Using Xactimate online)
Xactimate Getting Started Guide Page 7
Online - Run Xactimate
ONLINE - RUN XACTIMATE
1. To access Xactimate online, do one of the following:
Click the link to go to Xactimate online.
The browser window opens and redirects to Xactimate online.
Open the browser window and type the URL:
– United States: xactimate.com/xo/
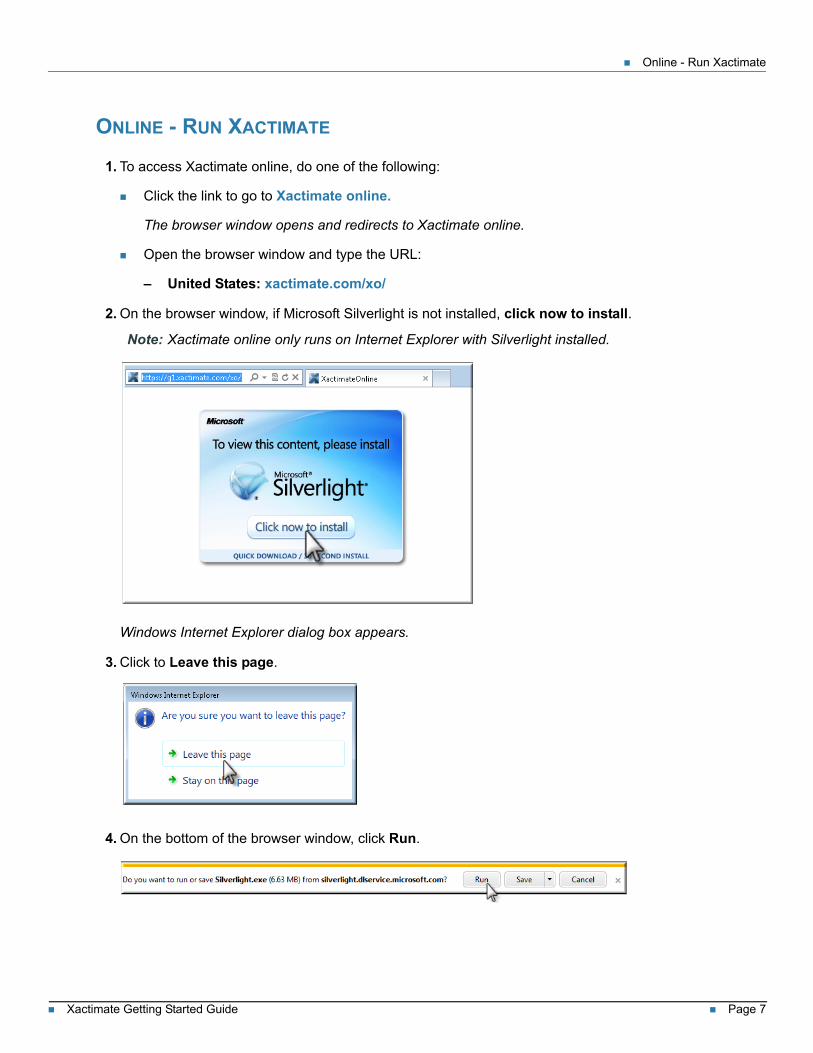
2. On the browser window, if Microsoft Silverlight is not installed, click now to install.
Note: Xactimate online only runs on Internet Explorer with Silverlight installed.
Windows Internet Explorer dialog box appears.
3. Click to Leave this page.
4. On the bottom of the browser window, click Run.
Xactimate Getting Started Guide Page 8
Online - Run Xactimate
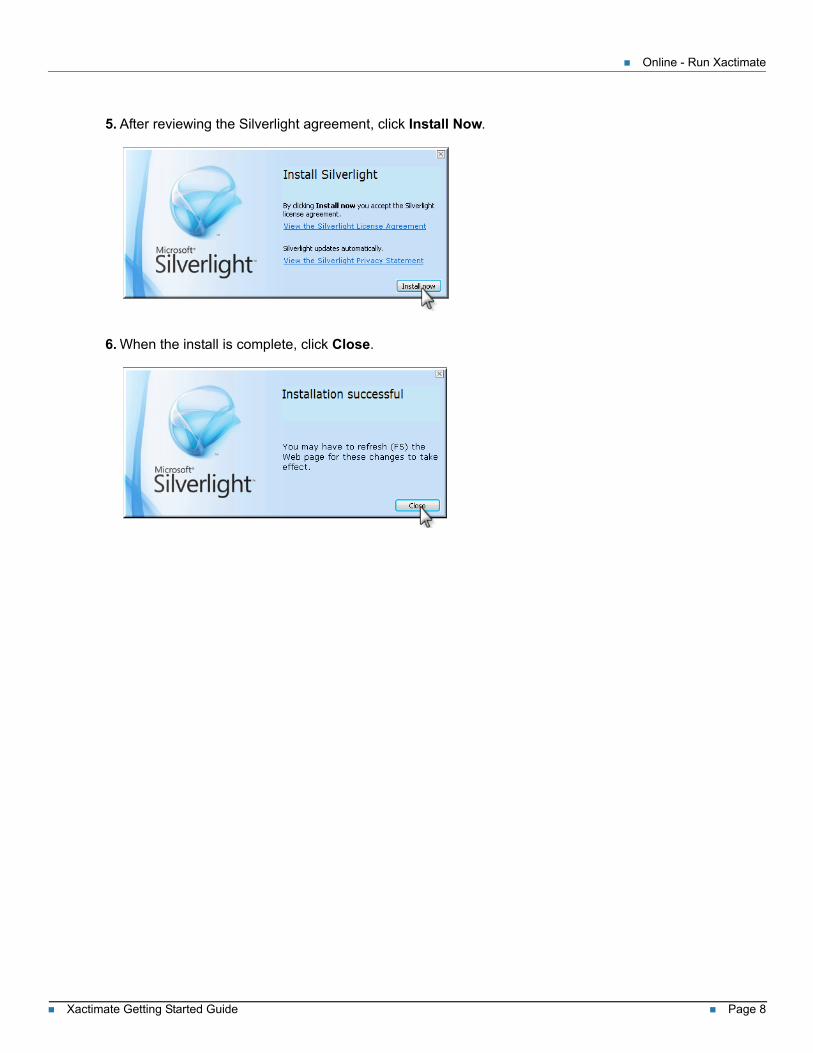
5. After reviewing the Silverlight agreement, click Install Now.
6. When the install is complete, click Close.
Xactimate Getting Started Guide Page 9
Online - Run Xactimate
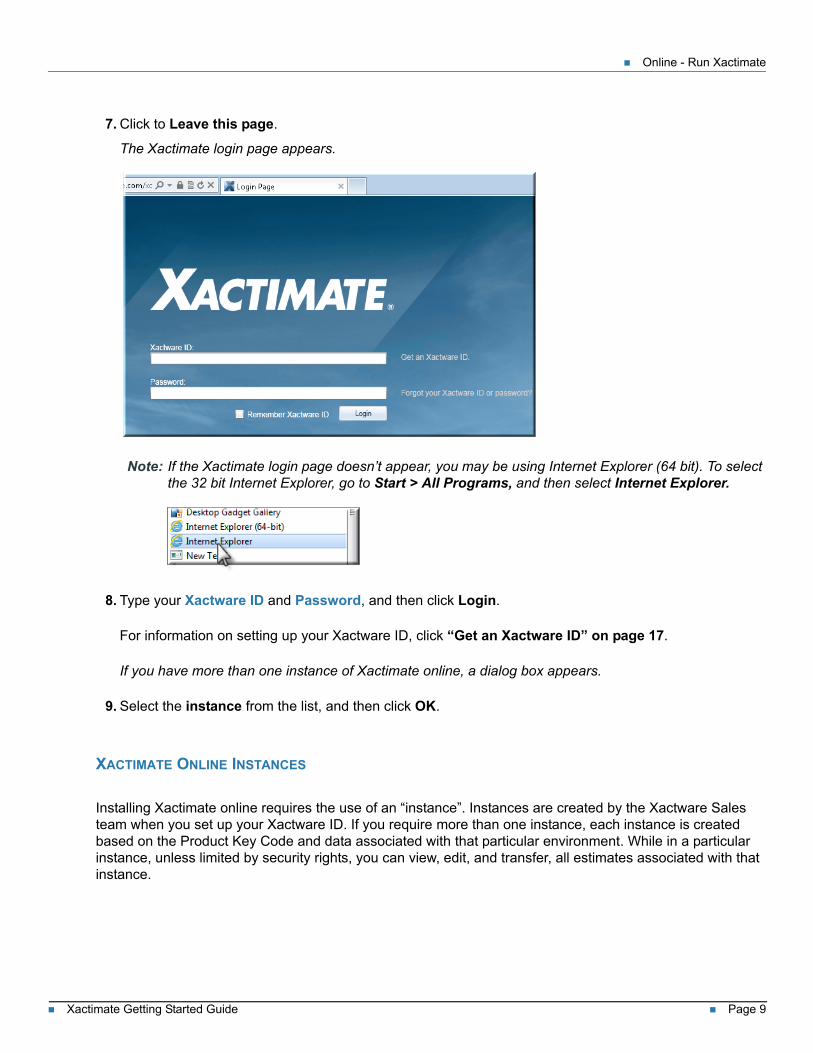
7. Click to Leave this page.
The Xactimate login page appears.
Note: If the Xactimate login page doesn’t appear, you may be using Internet Explorer (64 bit). To select the 32 bit Internet Explorer, go to Start > All Programs, and then select Internet Explorer.
8. Type your Xactware ID and Password, and then click Login.
For information on setting up your Xactware ID, click “Get an Xactware ID” on page 17.
If you have more than one instance of Xactimate online, a dialog box appears.
9. Select the instance from the list, and then click OK.
XACTIMATE ONLINE INSTANCES
Installing Xactimate online requires the use of an “instance”. Instances are created by the Xactware Sales team when you set up your Xactware ID. If you require more than one instance, each instance is created based on the Product Key Code and data associated with that particular environment. While in a particular instance, unless limited by security rights, you can view, edit, and transfer, all estimates associated with that instance.
Xactimate Getting Started Guide Page 10
Desktop - New Install of Xactimate
DESKTOP - NEW INSTALL OF XACTIMATE
DOWNLOAD THE INSTALL
1. Click Download.
Note: A Security Warning dialog box may appear. To allow this document to connect to the download location, click Allow.
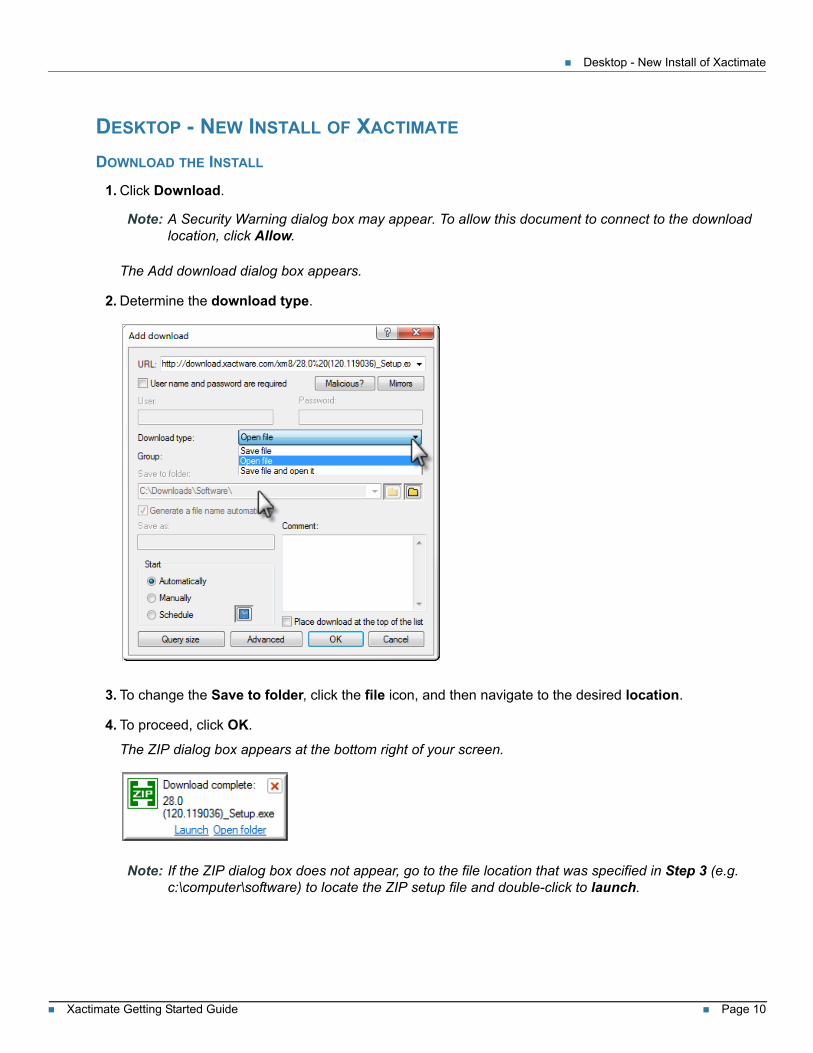
The Add download dialog box appears.
2. Determine the download type.
3. To change the Save to folder, click the file icon, and then navigate to the desired location.
4. To proceed, click OK.
The ZIP dialog box appears at the bottom right of your screen.
Note: If the ZIP dialog box does not appear, go to the file location that was specified in Step 3 (e.g. c:\computer\software) to locate the ZIP setup file and double-click to launch.
Xactimate Getting Started Guide Page 11
Desktop - New Install of Xactimate
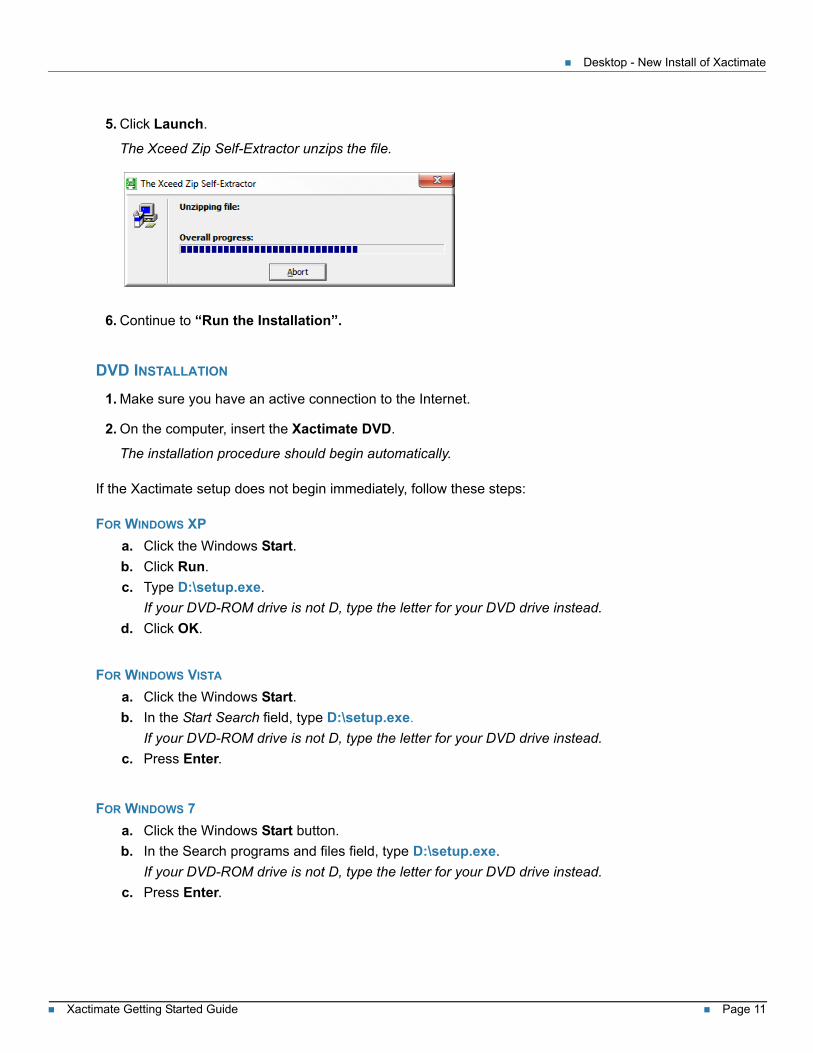
5. Click Launch.
The Xceed Zip Self-Extractor unzips the file.
6. Continue to “Run the Installation”.
DVD INSTALLATION
1. Make sure you have an active connection to the Internet.
2. On the computer, insert the Xactimate DVD.
The installation procedure should begin automatically.
If the Xactimate setup does not begin immediately, follow these steps:
FOR WINDOWS XP
a. Click the Windows Start.
b. Click Run.
c. Type D:\setup.exe.
If your DVD-ROM drive is not D, type the letter for your DVD drive instead.
d. Click OK.
FOR WINDOWS VISTA
a. Click the Windows Start.
b. In the Start Search field, type D:\setup.exe.
If your DVD-ROM drive is not D, type the letter for your DVD drive instead.
c. Press Enter.
FOR WINDOWS 7
a. Click the Windows Start button.
b. In the Search programs and files field, type D:\setup.exe.
If your DVD-ROM drive is not D, type the letter for your DVD drive instead.
c. Press Enter.
Xactimate Getting Started Guide Page 12
Desktop - New Install of Xactimate
FOR WINDOWS 8
a. Type D:\setup.exe.
If your DVD-ROM drive is not D, type the letter for your DVD drive instead.
b. Press Enter.
3. Continue to “Run the Installation” on page 12.
RUN THE INSTALLATION
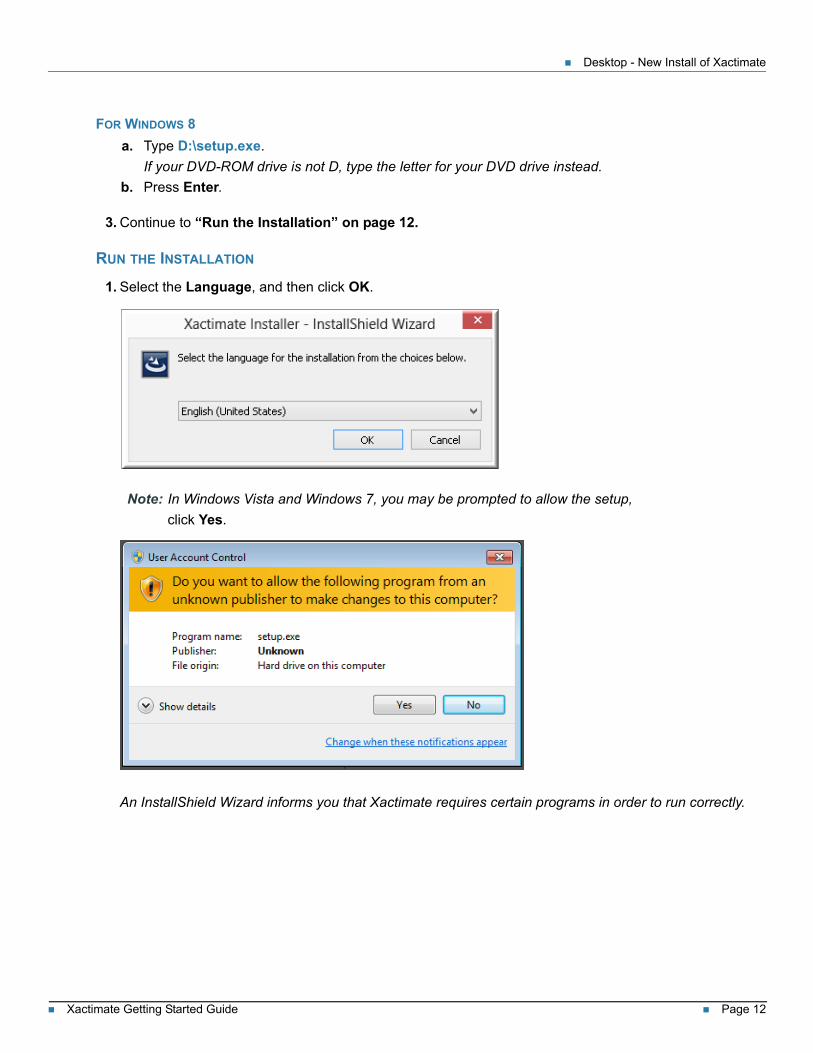
1. Select the Language, and then click OK.
Note: In Windows Vista and Windows 7, you may be prompted to allow the setup,
click Yes.
An InstallShield Wizard informs you that Xactimate requires certain programs in order to run correctly.
Xactimate Getting Started Guide Page 13
Desktop - New Install of Xactimate
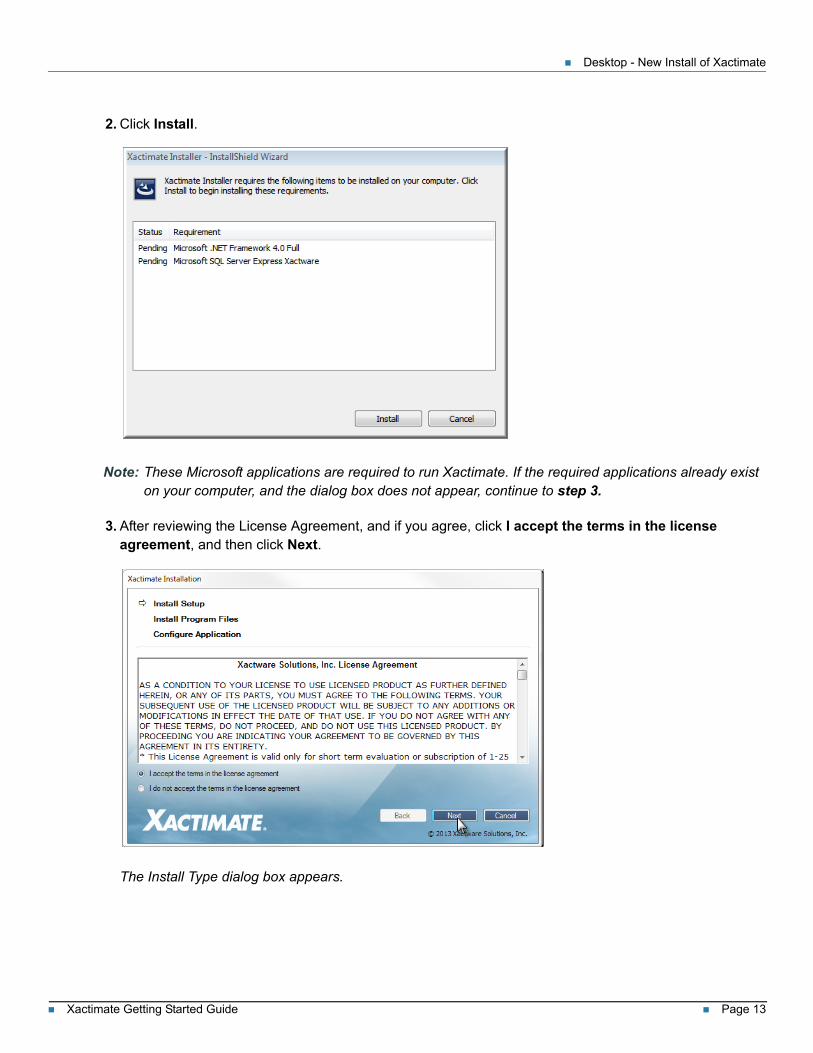
2. Click Install.
Note: These Microsoft applications are required to run Xactimate. If the required applications already exist on your computer, and the dialog box does not appear, continue to step 3.
3. After reviewing the License Agreement, and if you agree, click I accept the terms in the license agreement, and then click Next.
The Install Type dialog box appears.
Xactimate Getting Started Guide Page 14
Desktop - New Install of Xactimate
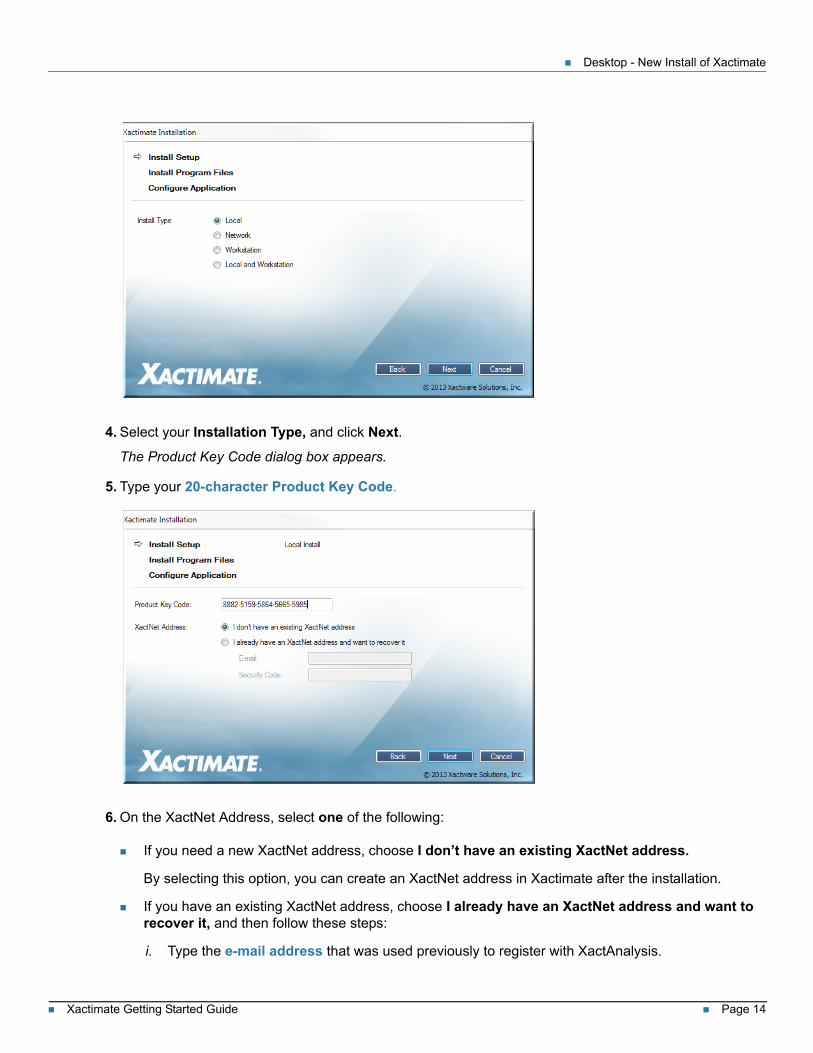
4. Select your Installation Type, and click Next.
The Product Key Code dialog box appears.
5. Type your 20-character Product Key Code.
6. On the XactNet Address, select one of the following:
If you need a new XactNet address, choose I don’t have an existing XactNet address.
By selecting this option, you can create an XactNet address in Xactimate after the installation.
If you have an existing XactNet address, choose I already have an XactNet address and want to recover it, and then follow these steps:
i. Type the e-mail address that was used previously to register with XactAnalysis.
Xactimate Getting Started Guide Page 15
Desktop - New Install of Xactimate
ii. Click the Request an e-mail with Security Codes.
Within a few minutes, Xactware sends a message to the e-mail address you entered. This e-mail message contains a security code.
iii. Type (or paste) the security code into the appropriate box.
Note: The XactNet address is created when you register with XactAnalysis. This address works much like an email address; it gives you the ability to receive estimates/projects, price lists, small updates and service updates, and transfer data.
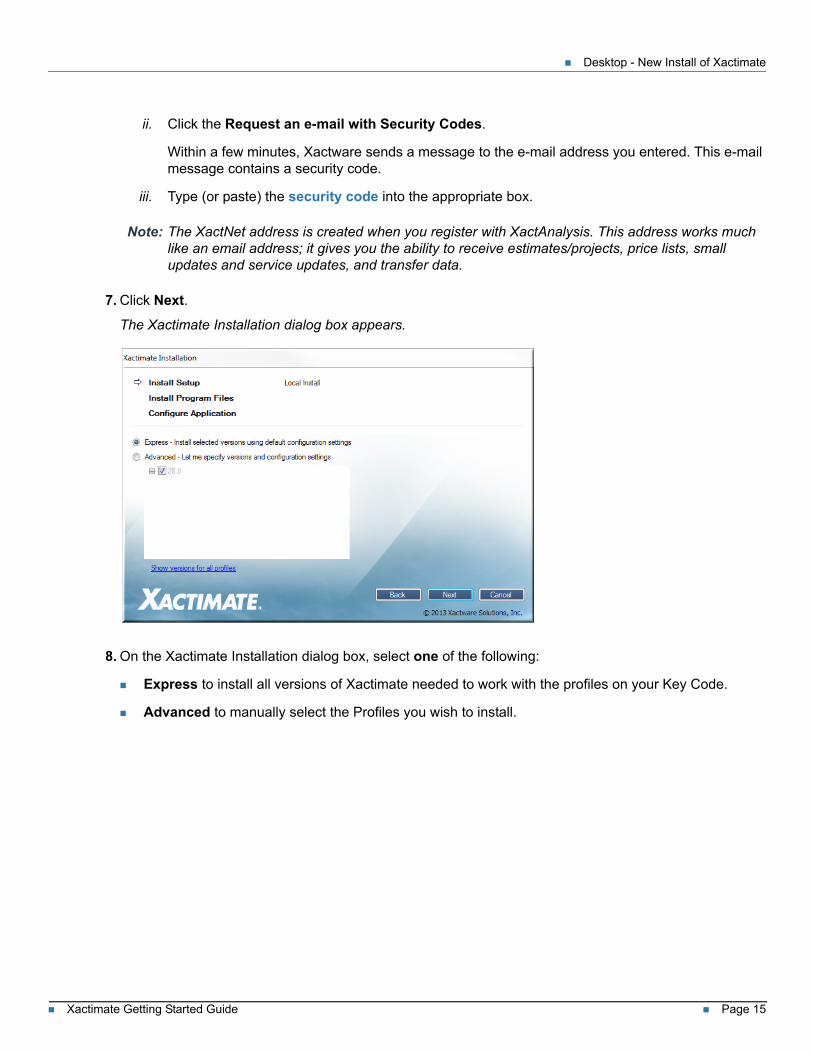
7. Click Next.
The Xactimate Installation dialog box appears.
8. On the Xactimate Installation dialog box, select one of the following:
Express to install all versions of Xactimate needed to work with the profiles on your Key Code.
Advanced to manually select the Profiles you wish to install.
Xactimate Getting Started Guide Page 16
Desktop - New Install of Xactimate
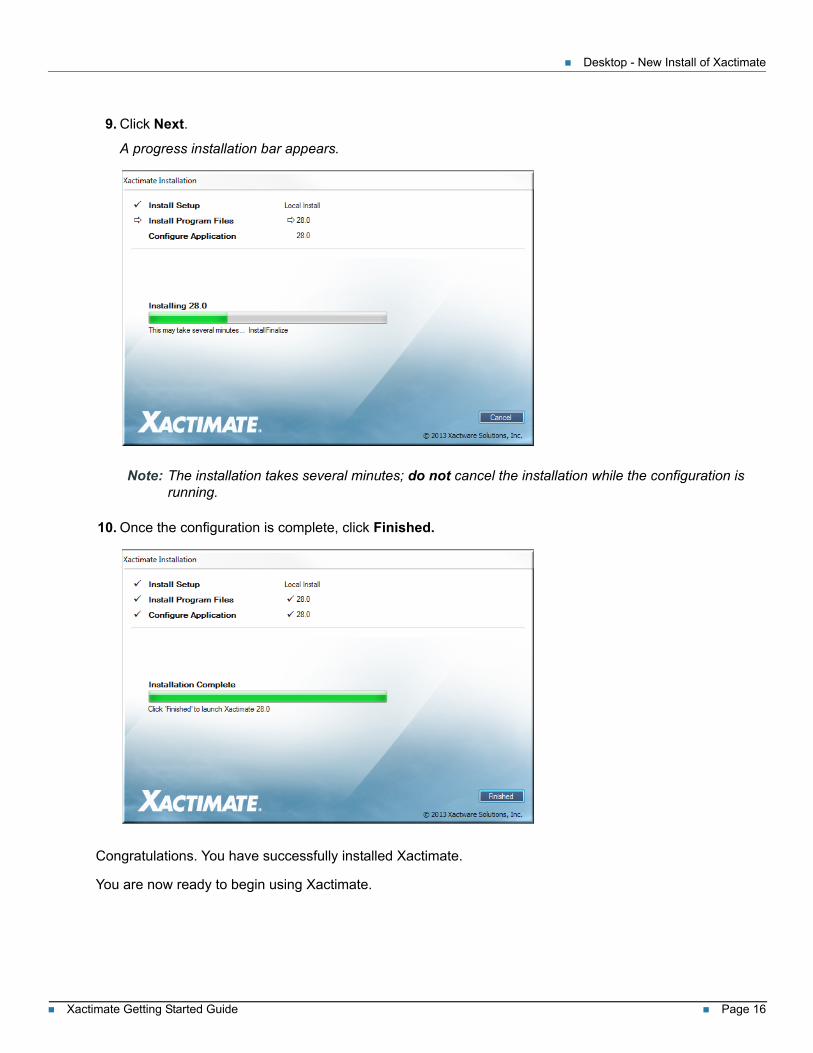
9. Click Next.
A progress installation bar appears.
Note: The installation takes several minutes; do not cancel the installation while the configuration is running.
10. Once the configuration is complete, click Finished.
Congratulations. You have successfully installed Xactimate.
You are now ready to begin using Xactimate.
Xactimate Getting Started Guide Page 17
Desktop - New Install of Xactimate
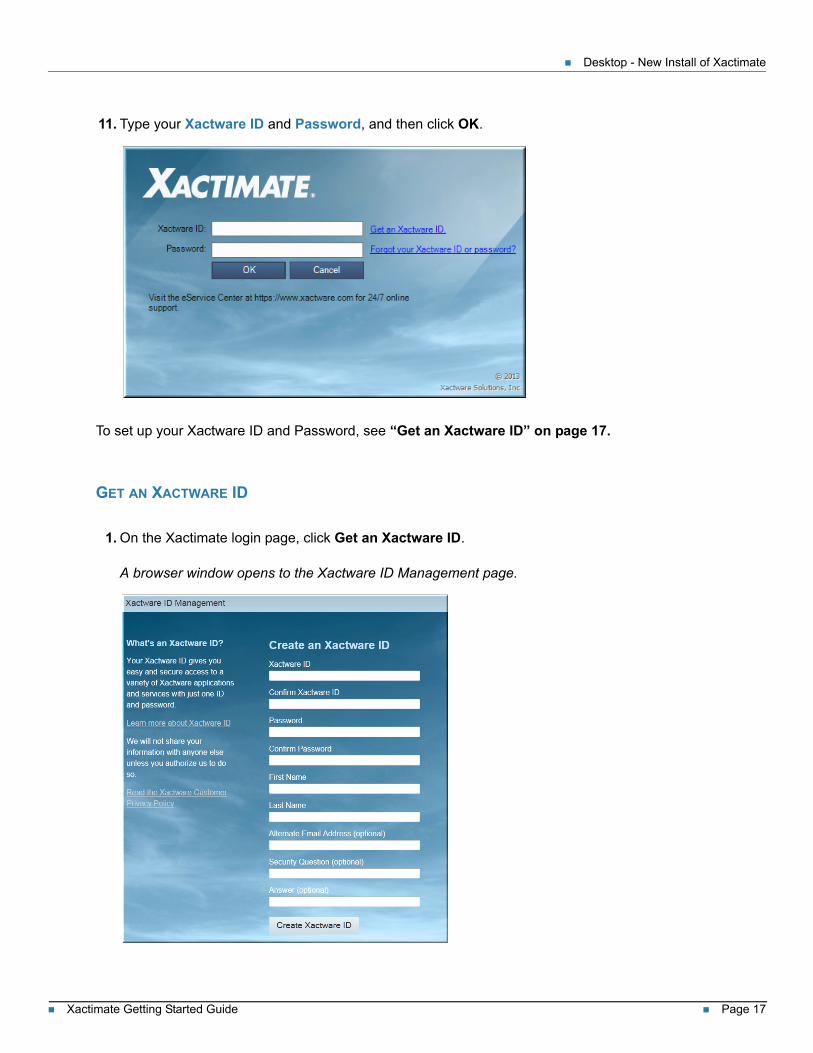
11. Type your Xactware ID and Password, and then click OK.
To set up your Xactware ID and Password, see “Get an Xactware ID” on page 17.
GET AN XACTWARE ID
1. On the Xactimate login page, click Get an Xactware ID.
A browser window opens to the Xactware ID Management page.
Xactimate Getting Started Guide Page 18
Desktop - New Install of Xactimate
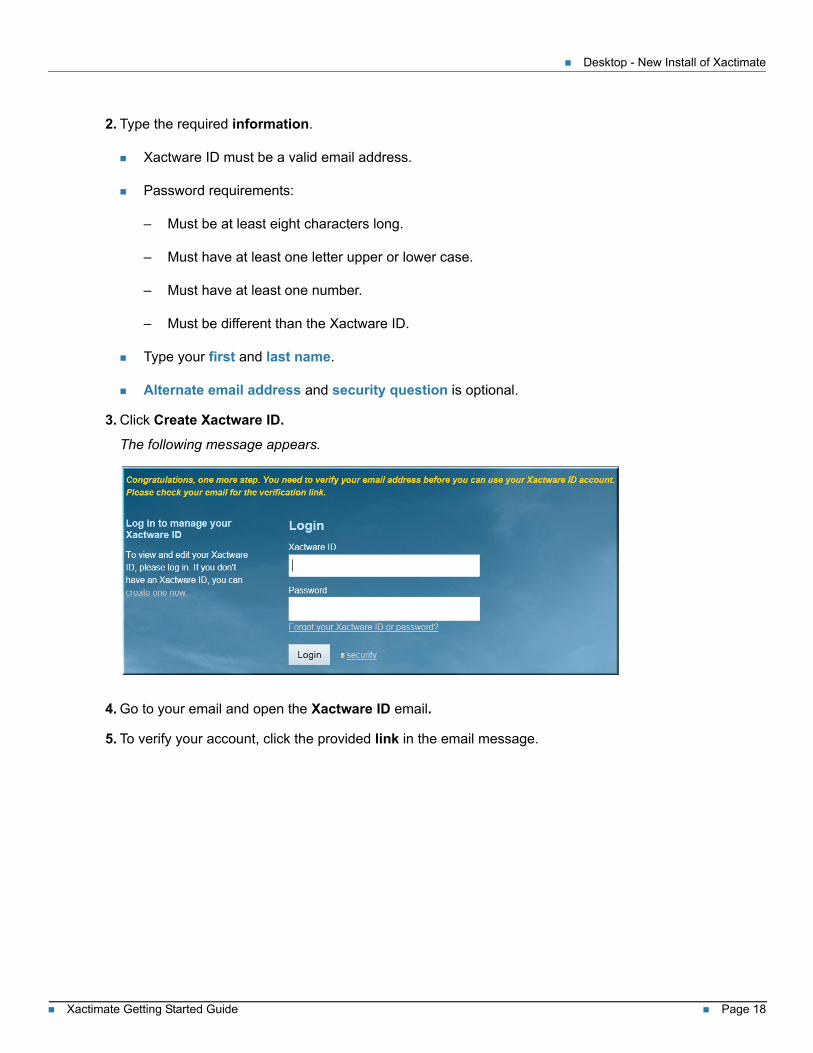
2. Type the required information.
Xactware ID must be a valid email address.
Password requirements:
– Must be at least eight characters long.
– Must have at least one letter upper or lower case.
– Must have at least one number.
– Must be different than the Xactware ID.
Type your first and last name.
Alternate email address and security question is optional.
3. Click Create Xactware ID.
The following message appears.
4. Go to your email and open the Xactware ID email.
5. To verify your account, click the provided link in the email message.
Xactimate Getting Started Guide Page 19
Desktop - New Install of Xactimate
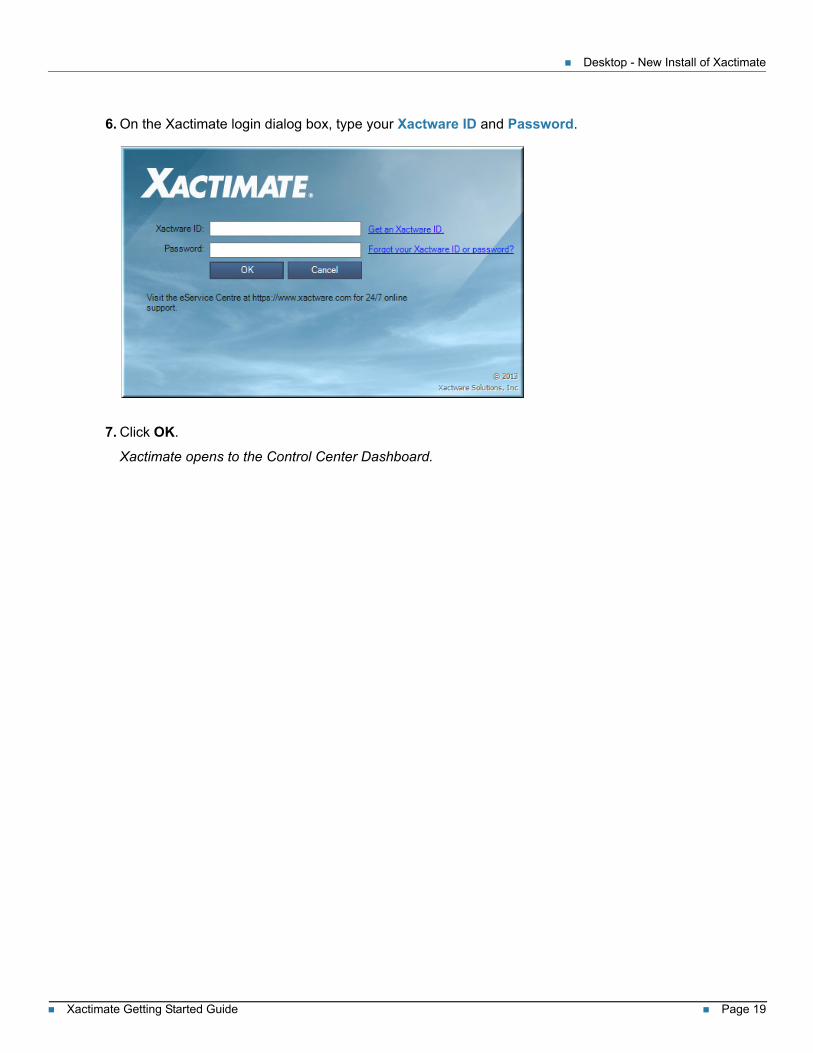
6. On the Xactimate login dialog box, type your Xactware ID and Password.
7. Click OK.
Xactimate opens to the Control Center Dashboard.
Xactimate Getting Started Guide Page 20
Desktop - New Install of Xactimate
FORGOT YOUR XACTWARE PASSWORD
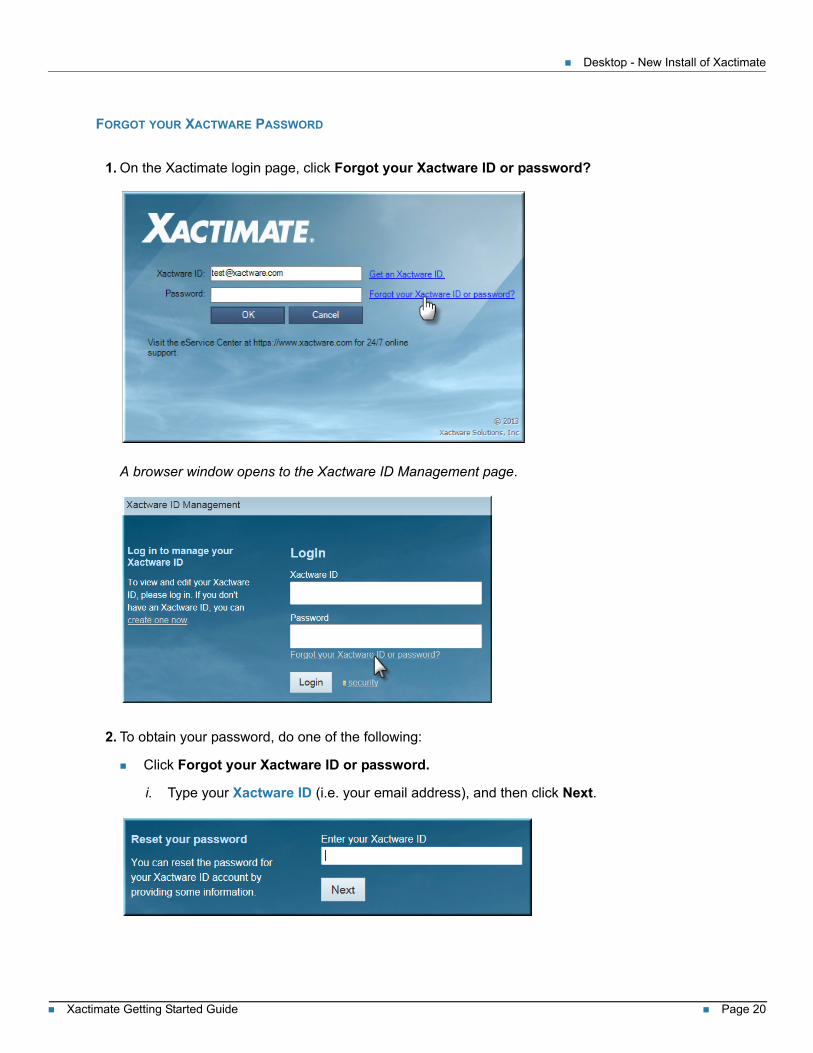
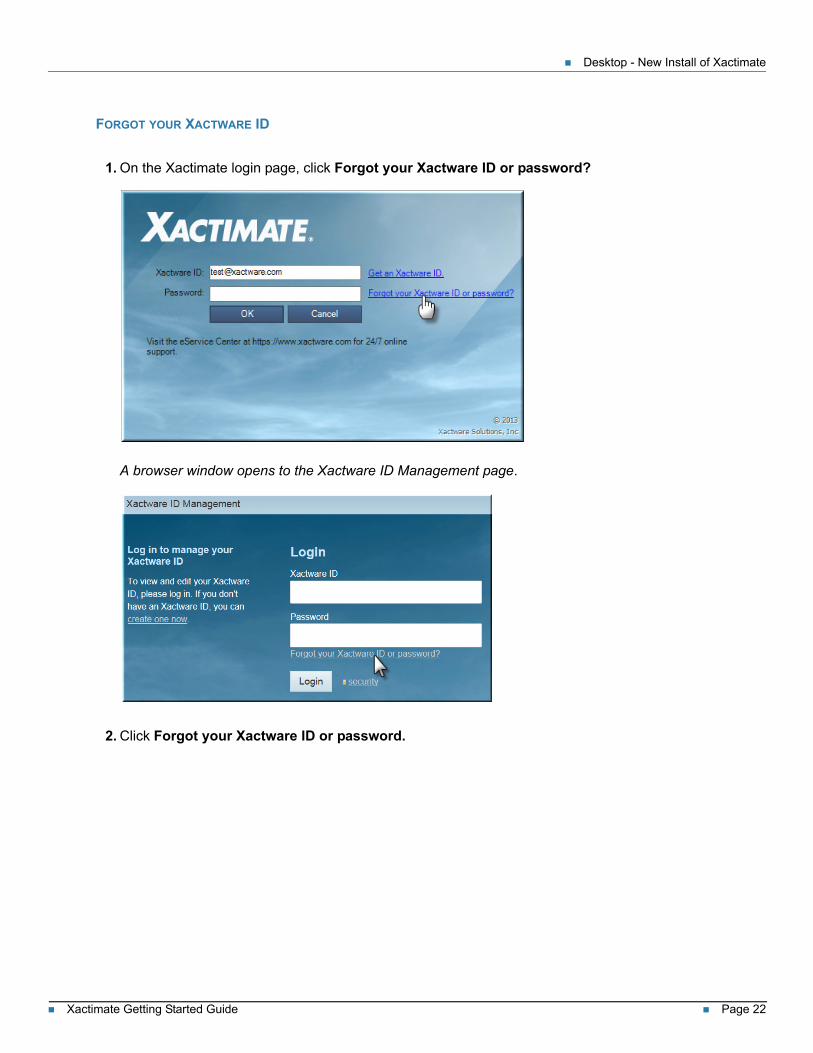
1. On the Xactimate login page, click Forgot your Xactware ID or password?
A browser window opens to the Xactware ID Management page.
2. To obtain your password, do one of the following:
Click Forgot your Xactware ID or password.
i. Type your Xactware ID (i.e. your email address), and then click Next.
Xactimate Getting Started Guide Page 21
Desktop - New Install of Xactimate
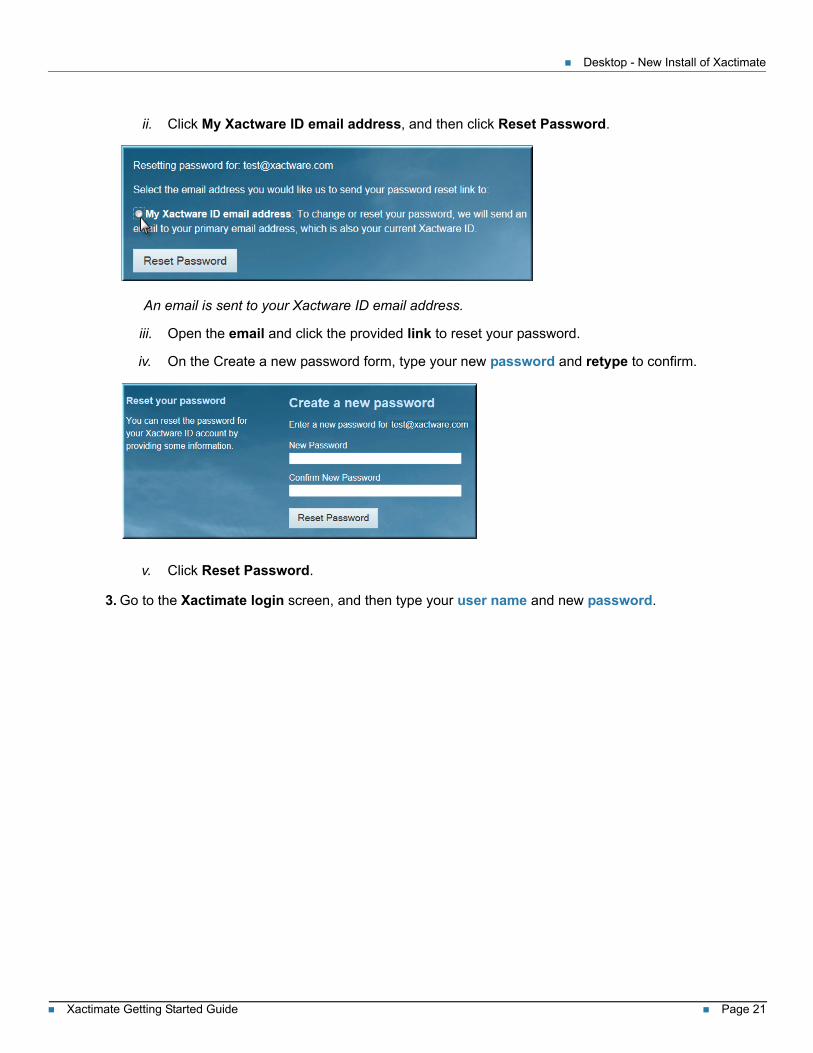
ii. Click My Xactware ID email address, and then click Reset Password.
An email is sent to your Xactware ID email address.
iii. Open the email and click the provided link to reset your password.
iv. On the Create a new password form, type your new password and retype to confirm.
v. Click Reset Password.
3. Go to the Xactimate login screen, and then type your user name and new password.
Xactimate Getting Started Guide Page 22
Desktop - New Install of Xactimate
FORGOT YOUR XACTWARE ID
1. On the Xactimate login page, click Forgot your Xactware ID or password?
A browser window opens to the Xactware ID Management page.
2. Click Forgot your Xactware ID or password.
Xactimate Getting Started Guide Page 23
Desktop - New Install of Xactimate
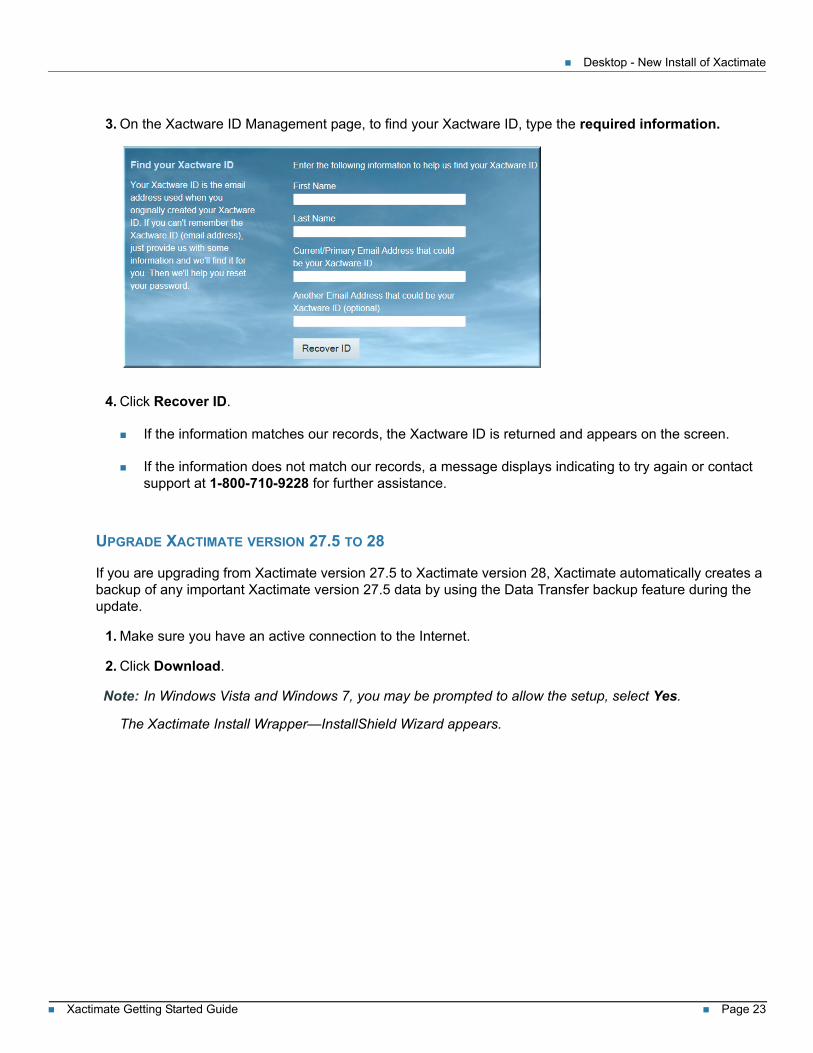
3. On the Xactware ID Management page, to find your Xactware ID, type the required information.
4. Click Recover ID.
If the information matches our records, the Xactware ID is returned and appears on the screen.
If the information does not match our records, a message displays indicating to try again or contact support at 1-800-710-9228 for further assistance.
UPGRADE XACTIMATE VERSION 27.5 TO 28If you are upgrading from Xactimate version 27.5 to Xactimate version 28, Xactimate automatically creates a backup of any important Xactimate version 27.5 data by using the Data Transfer backup feature during the update.
1. Make sure you have an active connection to the Internet.
2. Click Download.
Note: In Windows Vista and Windows 7, you may be prompted to allow the setup, select Yes.
The Xactimate Install Wrapper—InstallShield Wizard appears.
Xactimate Getting Started Guide Page 24
Desktop - New Install of Xactimate
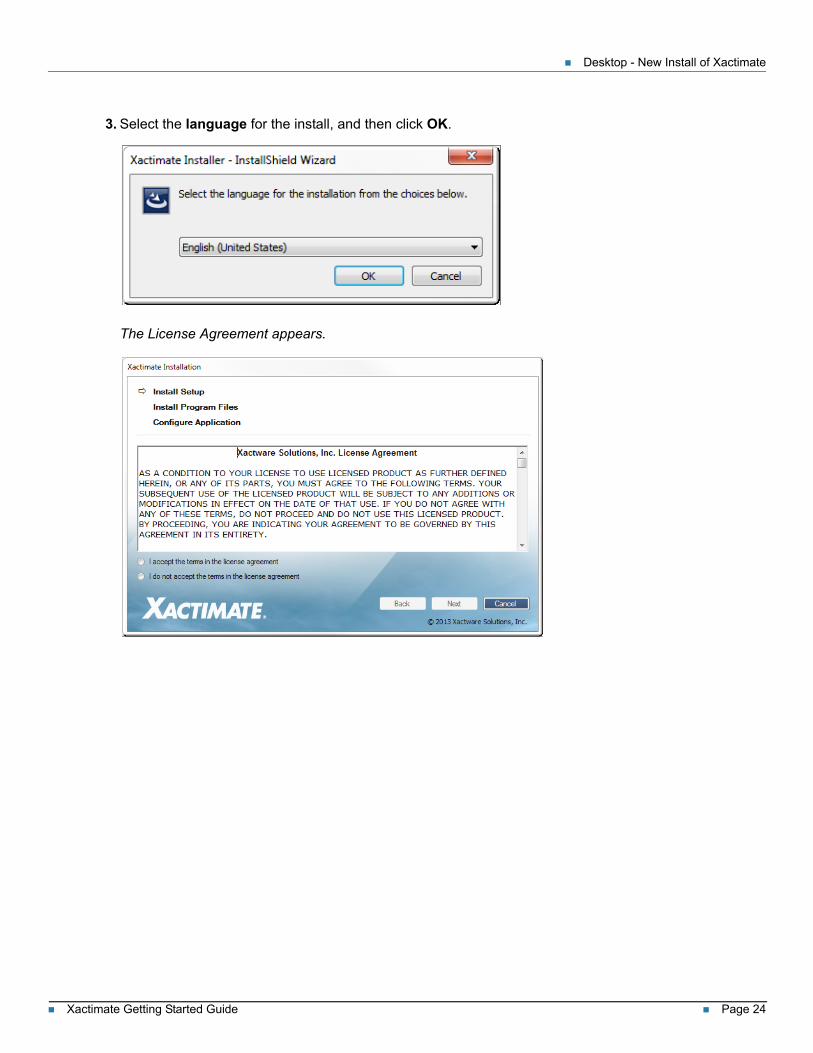
3. Select the language for the install, and then click OK.
The License Agreement appears.
Xactimate Getting Started Guide Page 25
Desktop - New Install of Xactimate
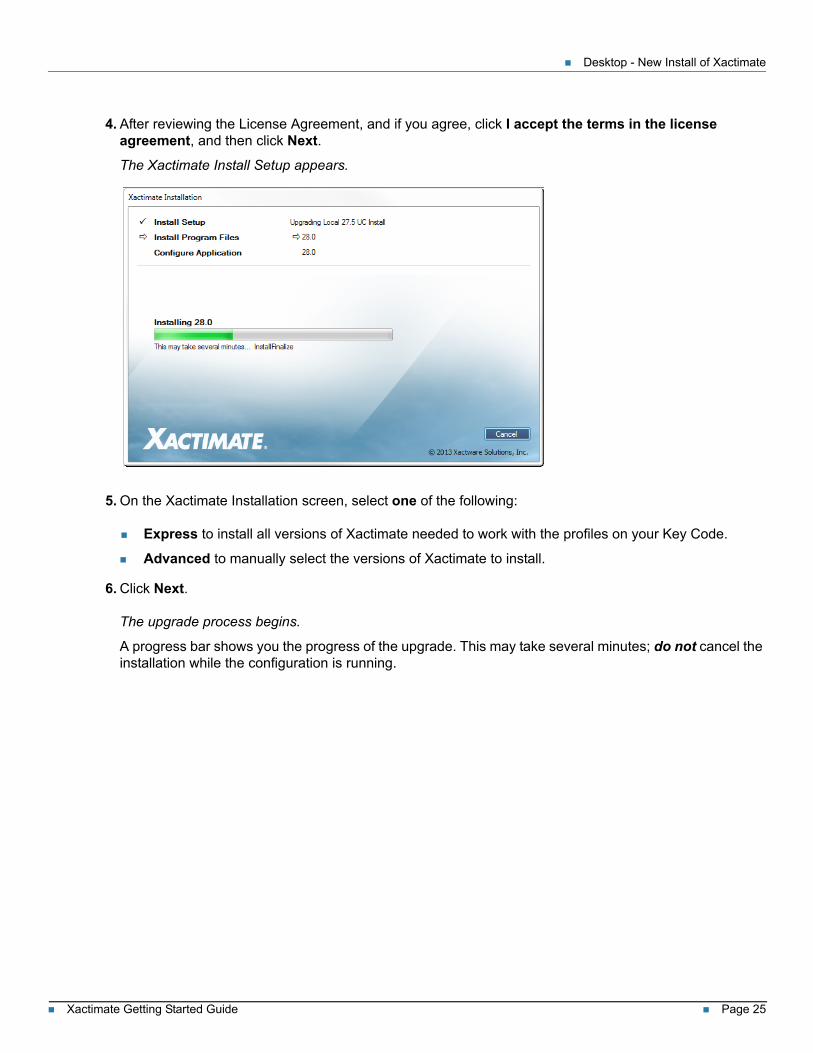
4. After reviewing the License Agreement, and if you agree, click I accept the terms in the license agreement, and then click Next.
The Xactimate Install Setup appears.
5. On the Xactimate Installation screen, select one of the following:
Express to install all versions of Xactimate needed to work with the profiles on your Key Code.
Advanced to manually select the versions of Xactimate to install.
6. Click Next. The upgrade process begins.
A progress bar shows you the progress of the upgrade. This may take several minutes; do not cancel the installation while the configuration is running.
Xactimate Getting Started Guide Page 26
Desktop - New Install of Xactimate
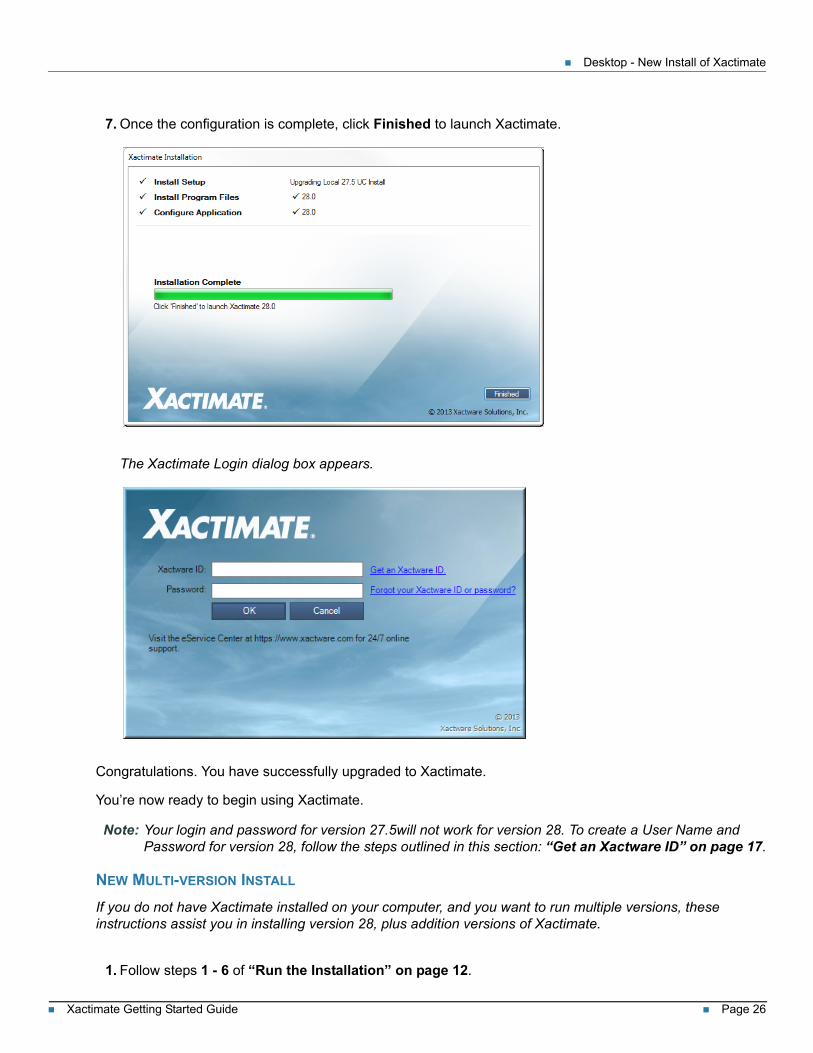
7. Once the configuration is complete, click Finished to launch Xactimate.
The Xactimate Login dialog box appears.
Congratulations. You have successfully upgraded to Xactimate.
You’re now ready to begin using Xactimate.
Note: Your login and password for version 27.5will not work for version 28. To create a User Name and Password for version 28, follow the steps outlined in this section: “Get an Xactware ID” on page 17.
NEW MULTI-VERSION INSTALL
If you do not have Xactimate installed on your computer, and you want to run multiple versions, these instructions assist you in installing version 28, plus addition versions of Xactimate.
1. Follow steps 1 - 6 of “Run the Installation” on page 12.

Xactimate Getting Started Guide Page 27
Desktop - New Install of Xactimate
2. Click Next.
The Xactimate Installation dialog box appears.
3. On the Xactimate Installation dialog box, select one of the following:
Express to install all versions of Xactimate needed to work with the profiles on your Key Code.
Advanced to manually select the Profiles you wish to install.
4. Click Next.
A progress installation bar appears.
Note: The installation takes several minutes; do not cancel the installation while the configuration is running.
Xactimate Getting Started Guide Page 28
Desktop - New Install of Xactimate
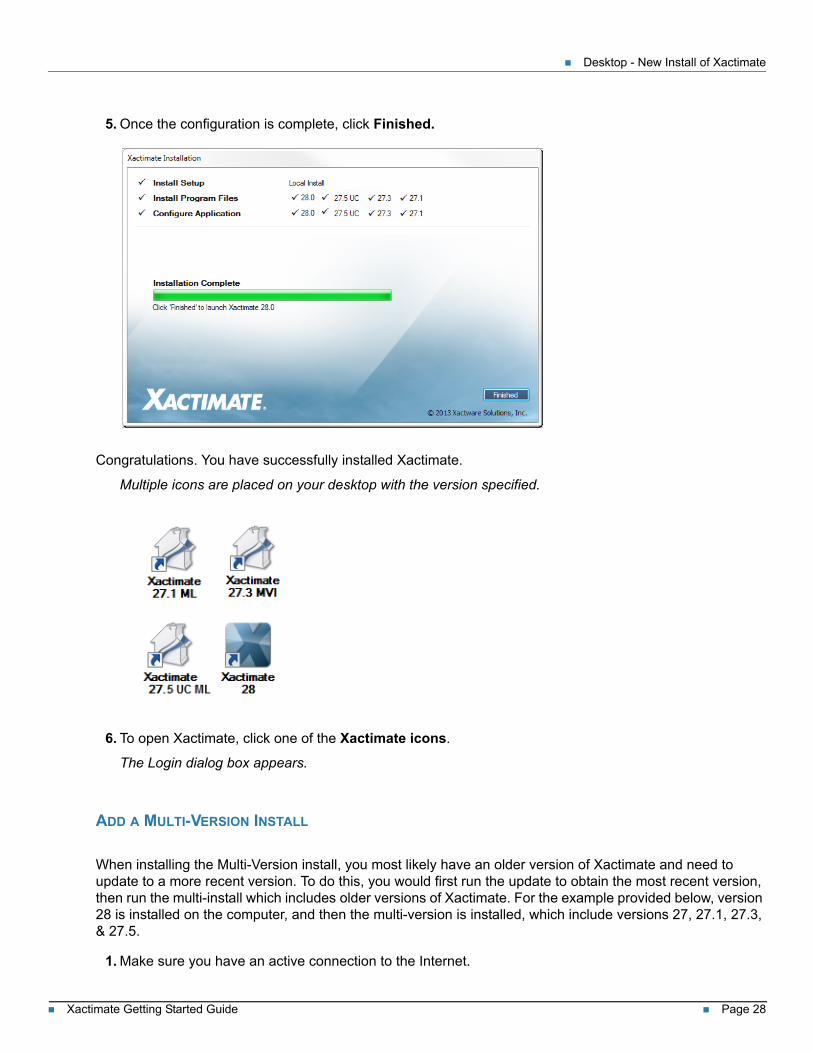
5. Once the configuration is complete, click Finished.
Congratulations. You have successfully installed Xactimate.
Multiple icons are placed on your desktop with the version specified.
6. To open Xactimate, click one of the Xactimate icons.
The Login dialog box appears.
ADD A MULTI-VERSION INSTALL
When installing the Multi-Version install, you most likely have an older version of Xactimate and need to update to a more recent version. To do this, you would first run the update to obtain the most recent version, then run the multi-install which includes older versions of Xactimate. For the example provided below, version 28 is installed on the computer, and then the multi-version is installed, which include versions 27, 27.1, 27.3, & 27.5.
1. Make sure you have an active connection to the Internet.
Xactimate Getting Started Guide Page 29
Desktop - New Install of Xactimate
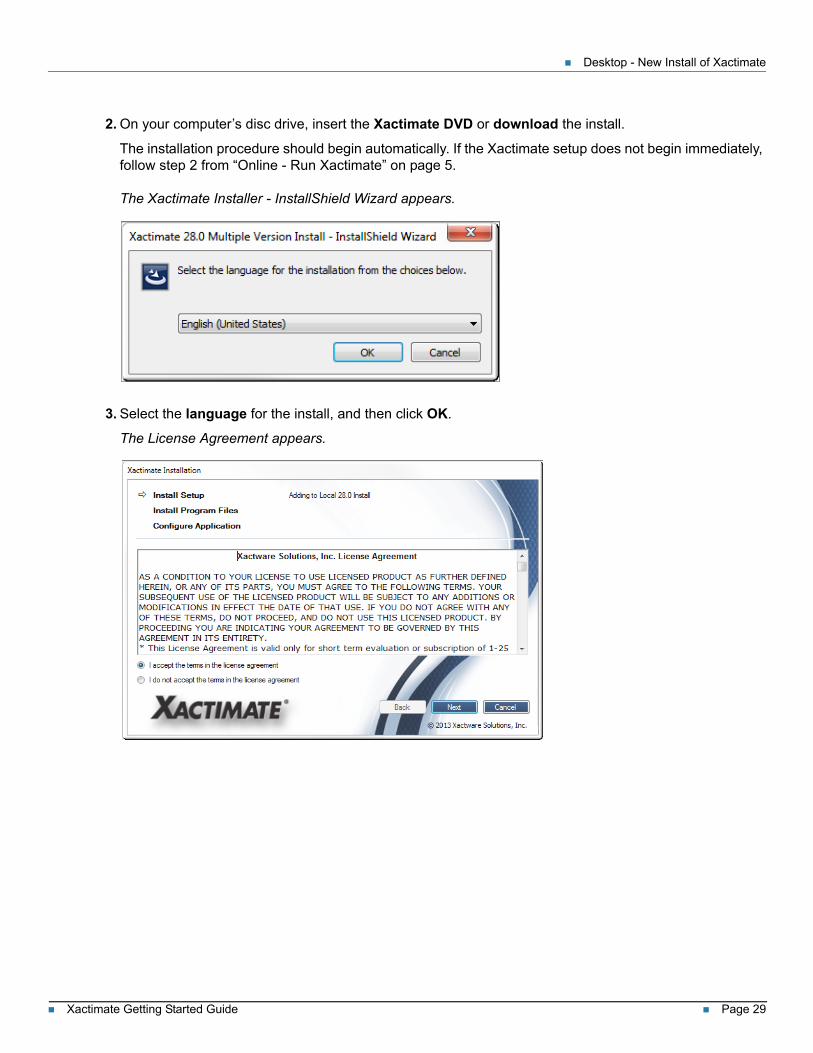
2. On your computer’s disc drive, insert the Xactimate DVD or download the install.
The installation procedure should begin automatically. If the Xactimate setup does not begin immediately, follow step 2 from “Online - Run Xactimate” on page 5.
The Xactimate Installer - InstallShield Wizard appears.
3. Select the language for the install, and then click OK.
The License Agreement appears.
Xactimate Getting Started Guide Page 30
Desktop - New Install of Xactimate
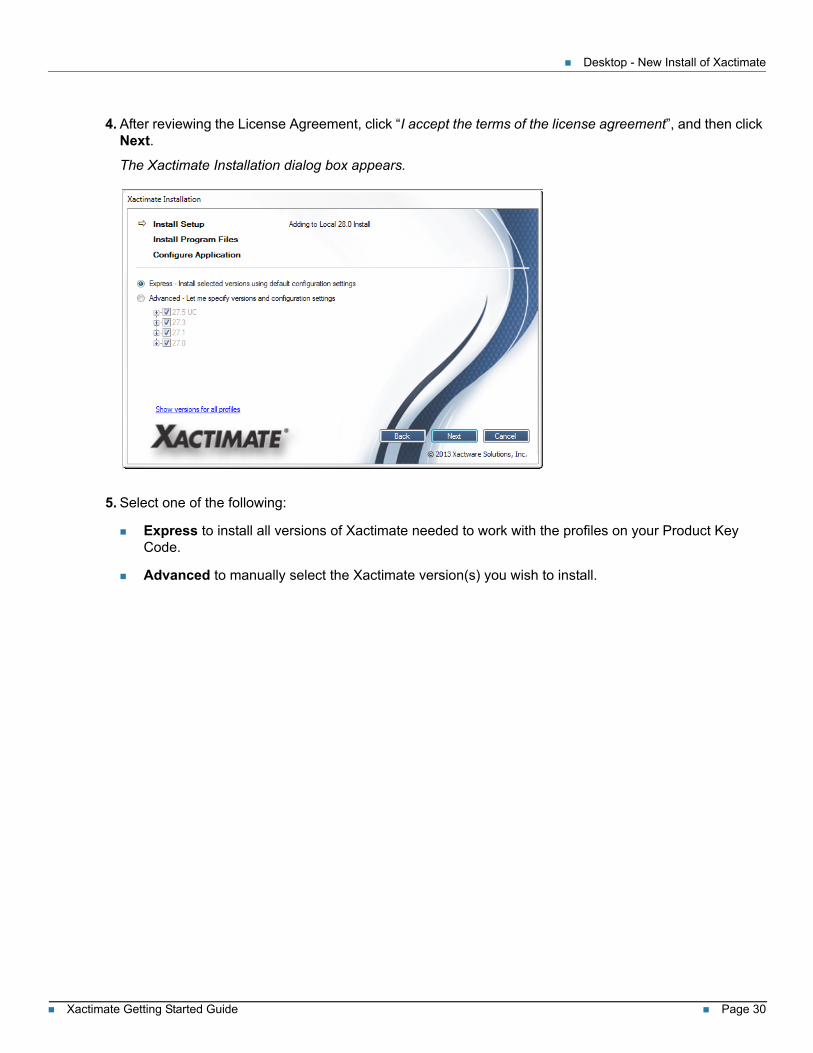
4. After reviewing the License Agreement, click “I accept the terms of the license agreement”, and then click Next.
The Xactimate Installation dialog box appears.
5. Select one of the following:
Express to install all versions of Xactimate needed to work with the profiles on your Product Key Code.
Advanced to manually select the Xactimate version(s) you wish to install.
Xactimate Getting Started Guide Page 31
Desktop - New Install of Xactimate
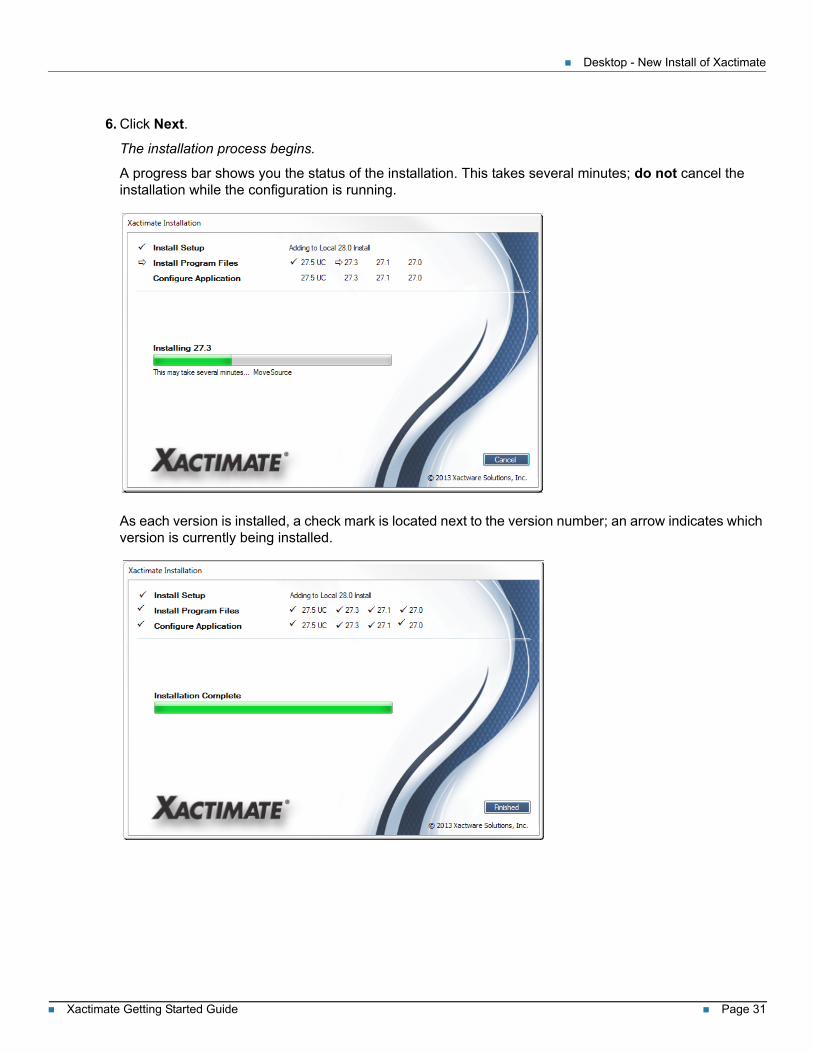
6. Click Next.
The installation process begins.
A progress bar shows you the status of the installation. This takes several minutes; do not cancel the installation while the configuration is running.
As each version is installed, a check mark is located next to the version number; an arrow indicates which version is currently being installed.
Xactimate Getting Started Guide Page 32
Desktop - New Install of Xactimate
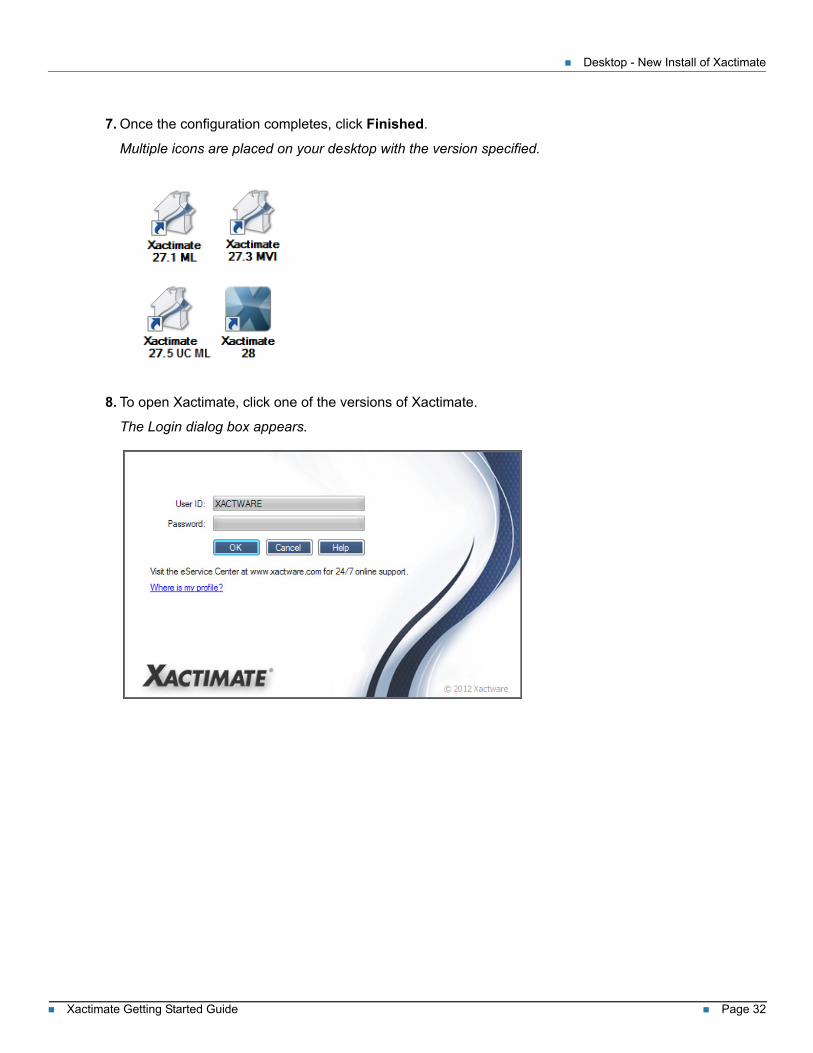
7. Once the configuration completes, click Finished.
Multiple icons are placed on your desktop with the version specified.
8. To open Xactimate, click one of the versions of Xactimate.
The Login dialog box appears.
Xactimate Getting Started Guide Page 33
Transferring Estimates
TRANSFERRING ESTIMATES
Regardless of whether you are using Xactimate online, desktop, or mobile, there will be times when you may want to transfer estimates from either Xactimate desktop to the Xactware Cloud or from Xactimate mobile to Xactimate desktop. Below are instructions on how to do that.
TRANSFER ESTIMATES FROM XACTIMATE DESKTOP TO THE XACTWARE CLOUD
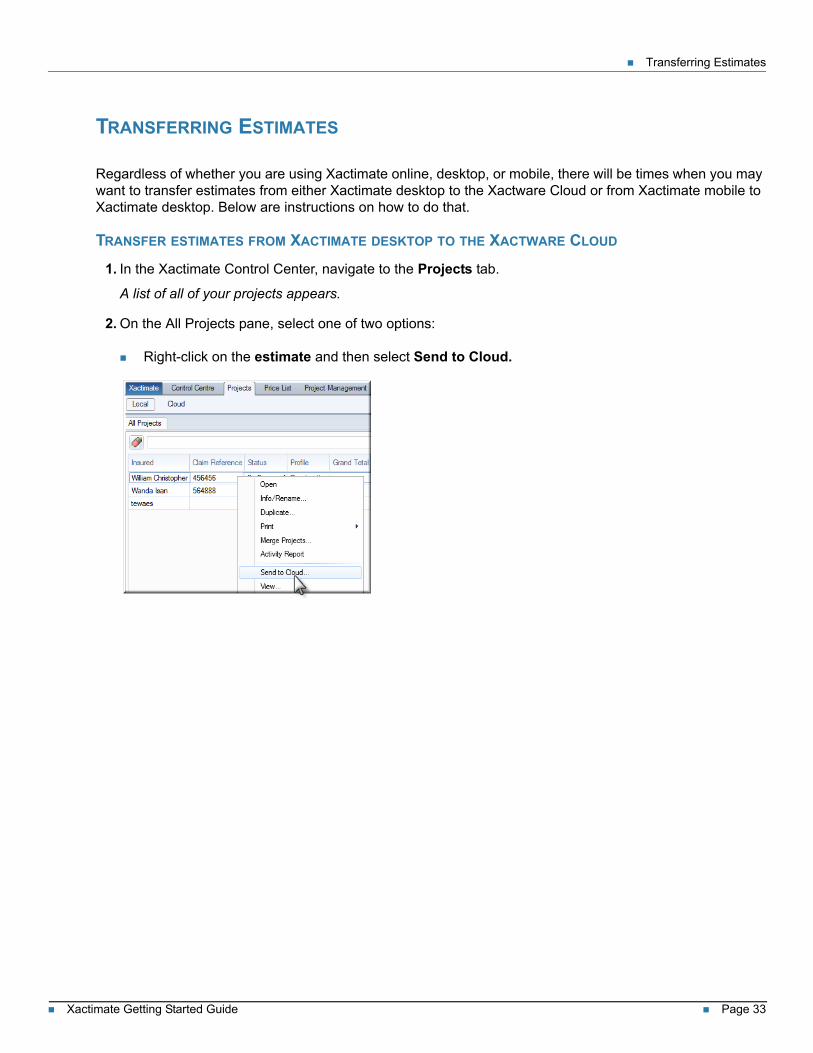
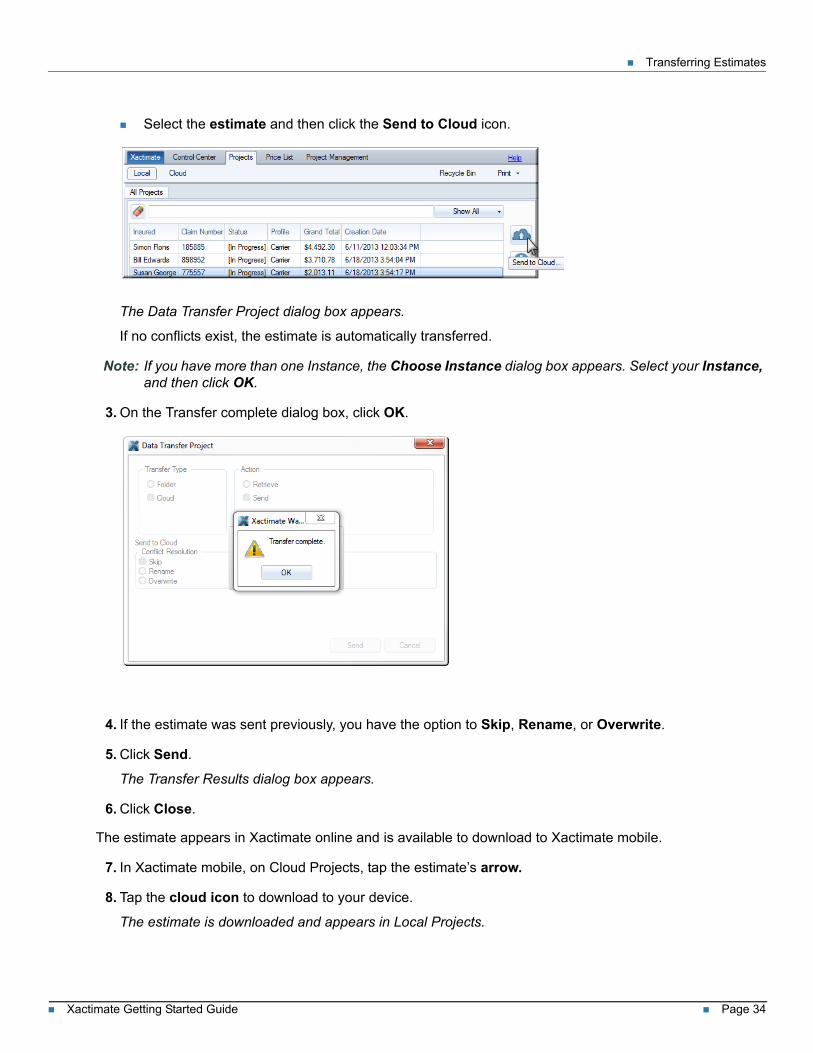
1. In the Xactimate Control Center, navigate to the Projects tab.
A list of all of your projects appears.
2. On the All Projects pane, select one of two options:
Right-click on the estimate and then select Send to Cloud.
Xactimate Getting Started Guide Page 34
Transferring Estimates
Select the estimate and then click the Send to Cloud icon.
The Data Transfer Project dialog box appears.
If no conflicts exist, the estimate is automatically transferred.
Note: If you have more than one Instance, the Choose Instance dialog box appears. Select your Instance, and then click OK.
3. On the Transfer complete dialog box, click OK.
4. If the estimate was sent previously, you have the option to Skip, Rename, or Overwrite.
5. Click Send.
The Transfer Results dialog box appears.
6. Click Close.
The estimate appears in Xactimate online and is available to download to Xactimate mobile.
7. In Xactimate mobile, on Cloud Projects, tap the estimate’s arrow.
8. Tap the cloud icon to download to your device.
The estimate is downloaded and appears in Local Projects.
Xactimate Getting Started Guide Page 35
Transferring Estimates
9. To view the estimate, go to your Local Projects.
The estimate appears in your Local Projects list.
TRANSFER A CLAIM FROM XACTIMATE MOBILE TO XACTIMATE DESKTOP
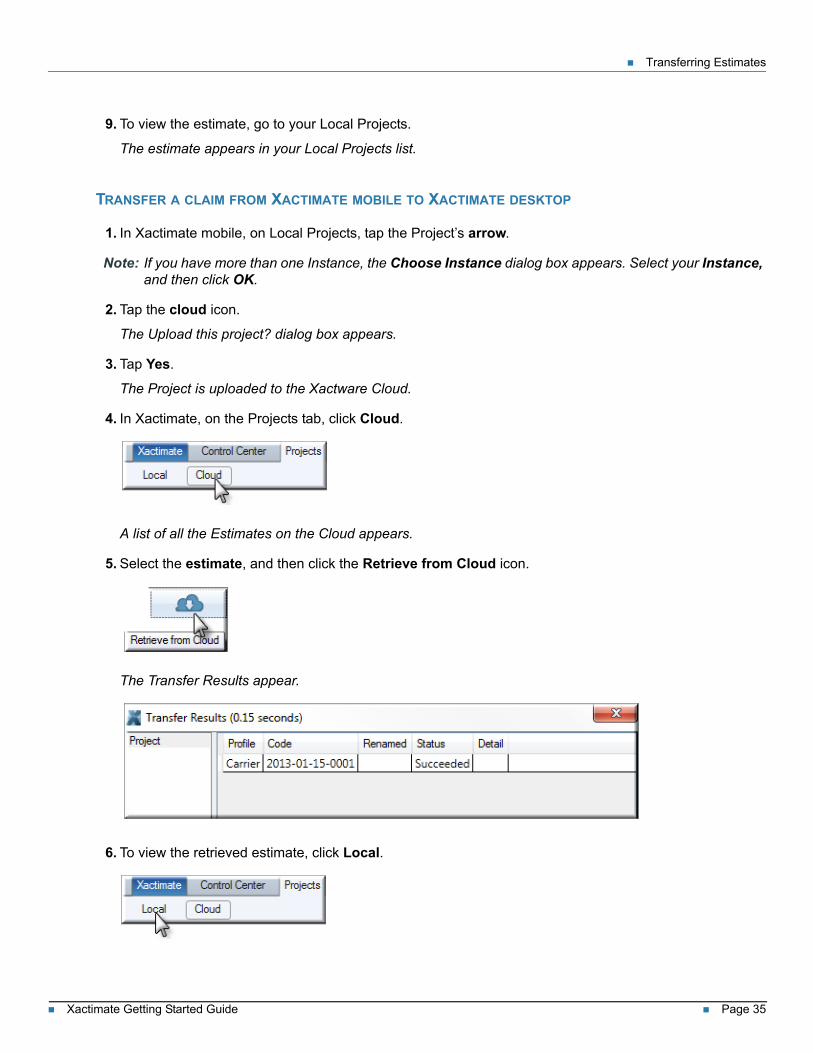
1. In Xactimate mobile, on Local Projects, tap the Project’s arrow.
Note: If you have more than one Instance, the Choose Instance dialog box appears. Select your Instance, and then click OK.
2. Tap the cloud icon.
The Upload this project? dialog box appears.
3. Tap Yes.
The Project is uploaded to the Xactware Cloud.
4. In Xactimate, on the Projects tab, click Cloud.
A list of all the Estimates on the Cloud appears.
5. Select the estimate, and then click the Retrieve from Cloud icon.
The Transfer Results appear.
6. To view the retrieved estimate, click Local.

Xactimate Getting Started Guide Page 37
2Xactimate Network Installation
INTRODUCTION
Like all networked software applications, Xactimate must be installed on a workstation connected to a network that has been properly set up and mapped to a shared drive (this document uses the X drive as an example). Xactware recommends that a certified network technician set up and administer the network.
Xactimate Getting Started Guide Page 38
Introduction
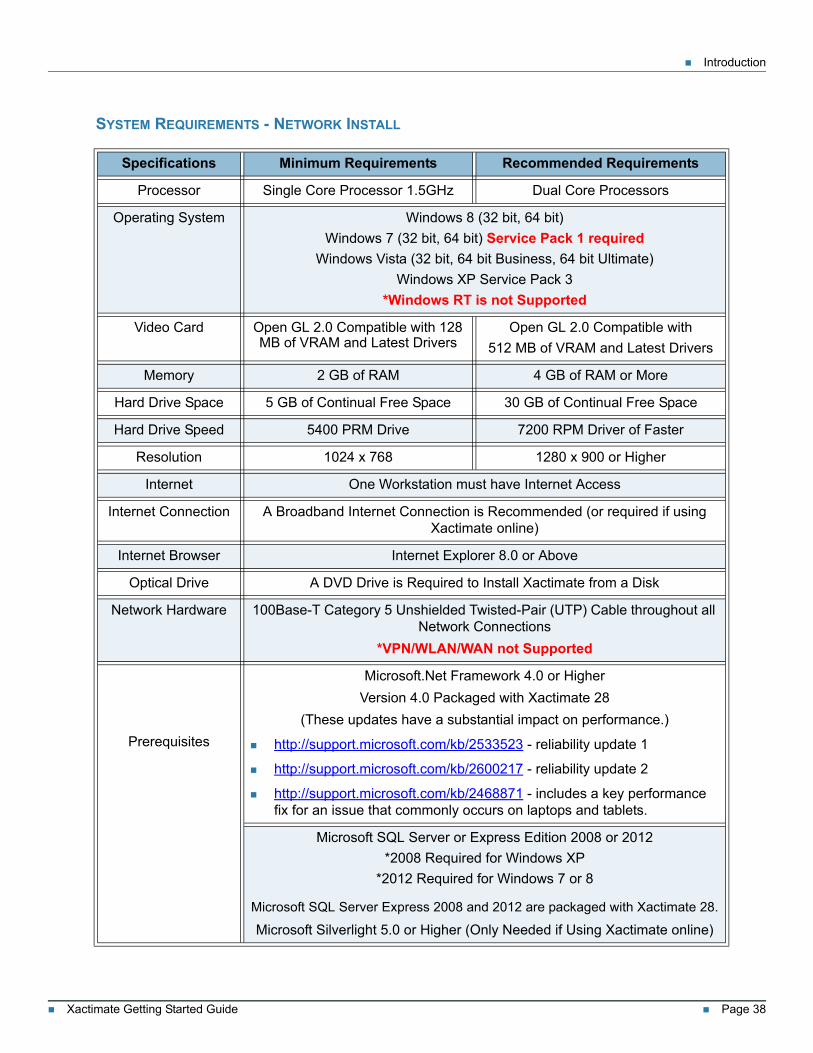
SYSTEM REQUIREMENTS - NETWORK INSTALL
Specifications Minimum Requirements Recommended Requirements
Processor Single Core Processor 1.5GHz Dual Core Processors
Operating System Windows 8 (32 bit, 64 bit)
Windows 7 (32 bit, 64 bit) Service Pack 1 required
Windows Vista (32 bit, 64 bit Business, 64 bit Ultimate)
Windows XP Service Pack 3
*Windows RT is not Supported
Video Card Open GL 2.0 Compatible with 128 MB of VRAM and Latest Drivers
Open GL 2.0 Compatible with
512 MB of VRAM and Latest Drivers
Memory 2 GB of RAM 4 GB of RAM or More
Hard Drive Space 5 GB of Continual Free Space 30 GB of Continual Free Space
Hard Drive Speed 5400 PRM Drive 7200 RPM Driver of Faster
Resolution 1024 x 768 1280 x 900 or Higher
Internet One Workstation must have Internet Access
Internet Connection A Broadband Internet Connection is Recommended (or required if using Xactimate online)
Internet Browser Internet Explorer 8.0 or Above
Optical Drive A DVD Drive is Required to Install Xactimate from a Disk
Network Hardware 100Base-T Category 5 Unshielded Twisted-Pair (UTP) Cable throughout all Network Connections
*VPN/WLAN/WAN not Supported
Prerequisites
Microsoft.Net Framework 4.0 or Higher
Version 4.0 Packaged with Xactimate 28
(These updates have a substantial impact on performance.)
http://support.microsoft.com/kb/2533523 - reliability update 1
http://support.microsoft.com/kb/2600217 - reliability update 2
http://support.microsoft.com/kb/2468871 - includes a key performance fix for an issue that commonly occurs on laptops and tablets.
Microsoft SQL Server or Express Edition 2008 or 2012
*2008 Required for Windows XP
*2012 Required for Windows 7 or 8
Microsoft SQL Server Express 2008 and 2012 are packaged with Xactimate 28.
Microsoft Silverlight 5.0 or Higher (Only Needed if Using Xactimate online)
Xactimate Getting Started Guide Page 39
Install Xactimate on the Server
INSTALL XACTIMATE ON THE SERVER
Before installing Xactimate on a workstation, the server must first be prepared. If the network meets all the minimum system requirements, then follow the steps below to install SQL Server Express on the server.
Note: If there is not a dedicated server, use a workstation that meets the minimum system requirements as the SQL Server Express server (that workstation is now referred to as the “server” for purposes of installing Xactimate).
This “server” computer can still be used as a workstation with minimal impact for the user. If Xactimate needs to be installed on the server (as when using a peer-to-peer network), Xactware recommends installing the workstation version of Xactimate on the server after the other workstations have been properly installed and configured. If there is a dedicated server, it is possible to install just SQL Server or SQL Server Express, and not Xactimate. Dedicated server networks do not need the Xactimate workstation install performed on the server.
Note: An install of SQL Server Express is available on the Xactimate Installation and should allow up to ten users to access the network with minimal effect to network performance. For networks with more than ten users, Xactware recommends that a full version of SQL Server be installed on the server.
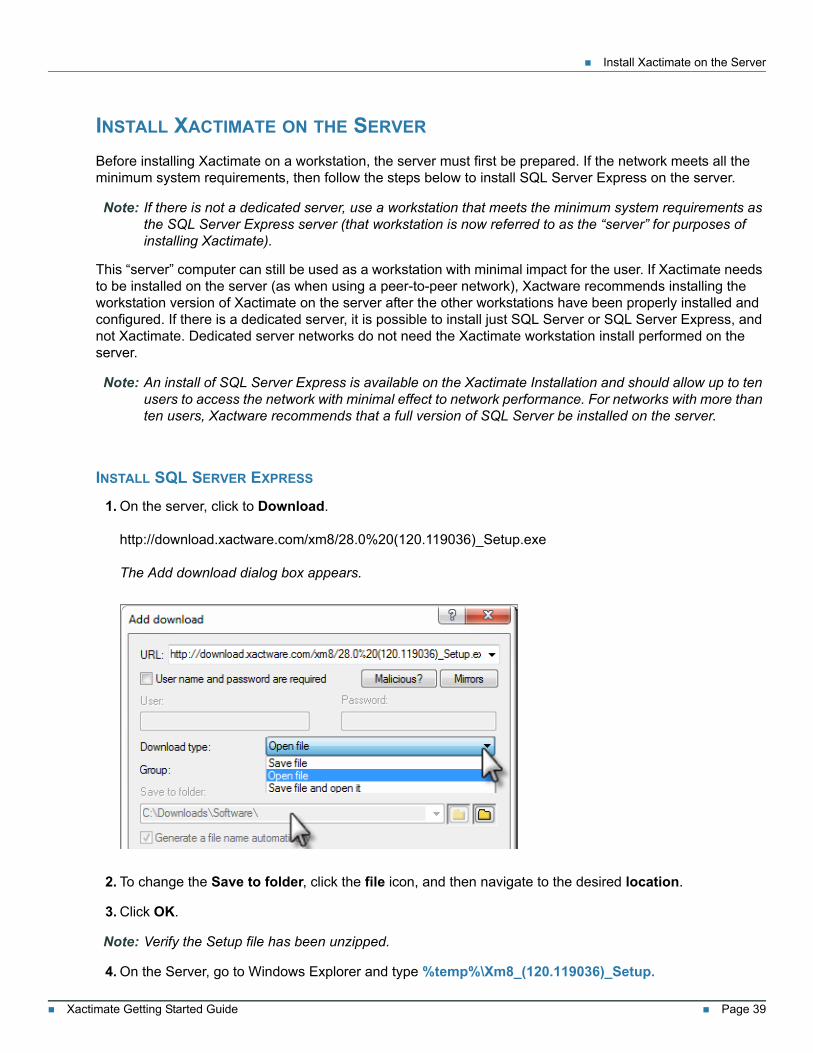
INSTALL SQL SERVER EXPRESS
1. On the server, click to Download.
http://download.xactware.com/xm8/28.0%20(120.119036)_Setup.exe
The Add download dialog box appears.
2. To change the Save to folder, click the file icon, and then navigate to the desired location.
3. Click OK.
Note: Verify the Setup file has been unzipped.
4. On the Server, go to Windows Explorer and type %temp%\Xm8_(120.119036)_Setup.
Xactimate Getting Started Guide Page 40
Install Xactimate on the Server
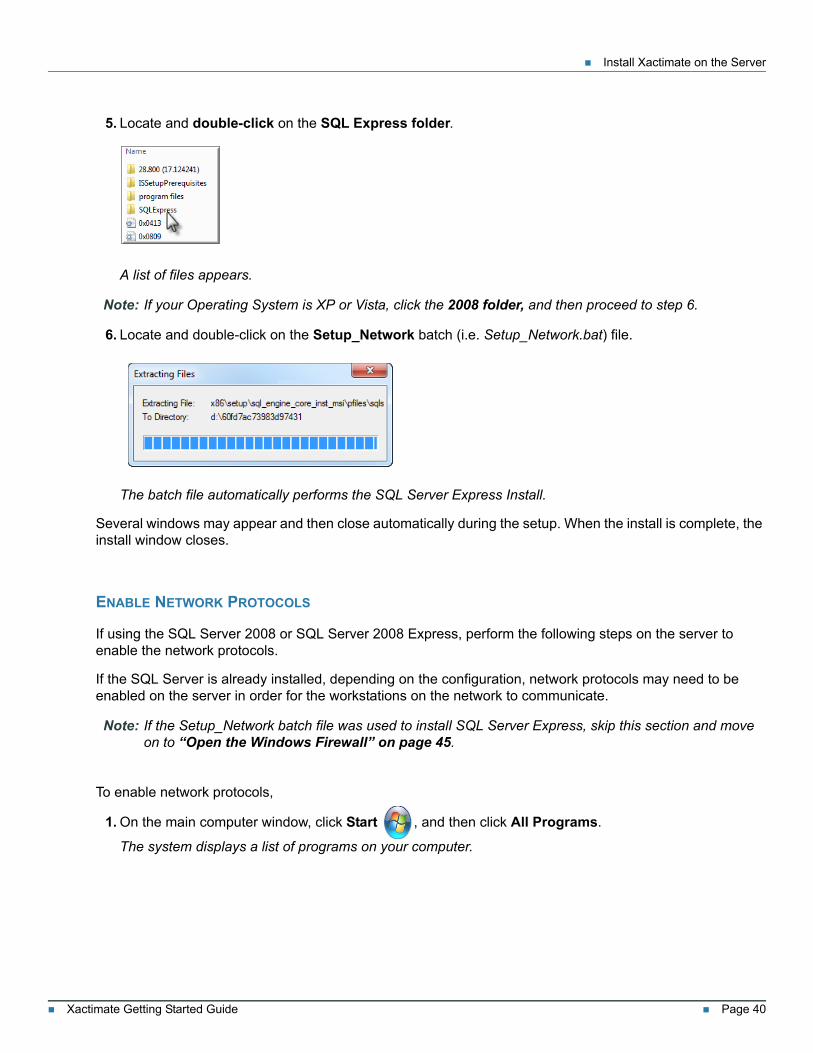
5. Locate and double-click on the SQL Express folder.
A list of files appears.
Note: If your Operating System is XP or Vista, click the 2008 folder, and then proceed to step 6.
6. Locate and double-click on the Setup_Network batch (i.e. Setup_Network.bat) file.
The batch file automatically performs the SQL Server Express Install.
Several windows may appear and then close automatically during the setup. When the install is complete, the install window closes.
ENABLE NETWORK PROTOCOLS
If using the SQL Server 2008 or SQL Server 2008 Express, perform the following steps on the server to enable the network protocols.
If the SQL Server is already installed, depending on the configuration, network protocols may need to be enabled on the server in order for the workstations on the network to communicate.
Note: If the Setup_Network batch file was used to install SQL Server Express, skip this section and move on to “Open the Windows Firewall” on page 45.
To enable network protocols,
1. On the main computer window, click Start , and then click All Programs.
The system displays a list of programs on your computer.
Xactimate Getting Started Guide Page 41
Install Xactimate on the Server
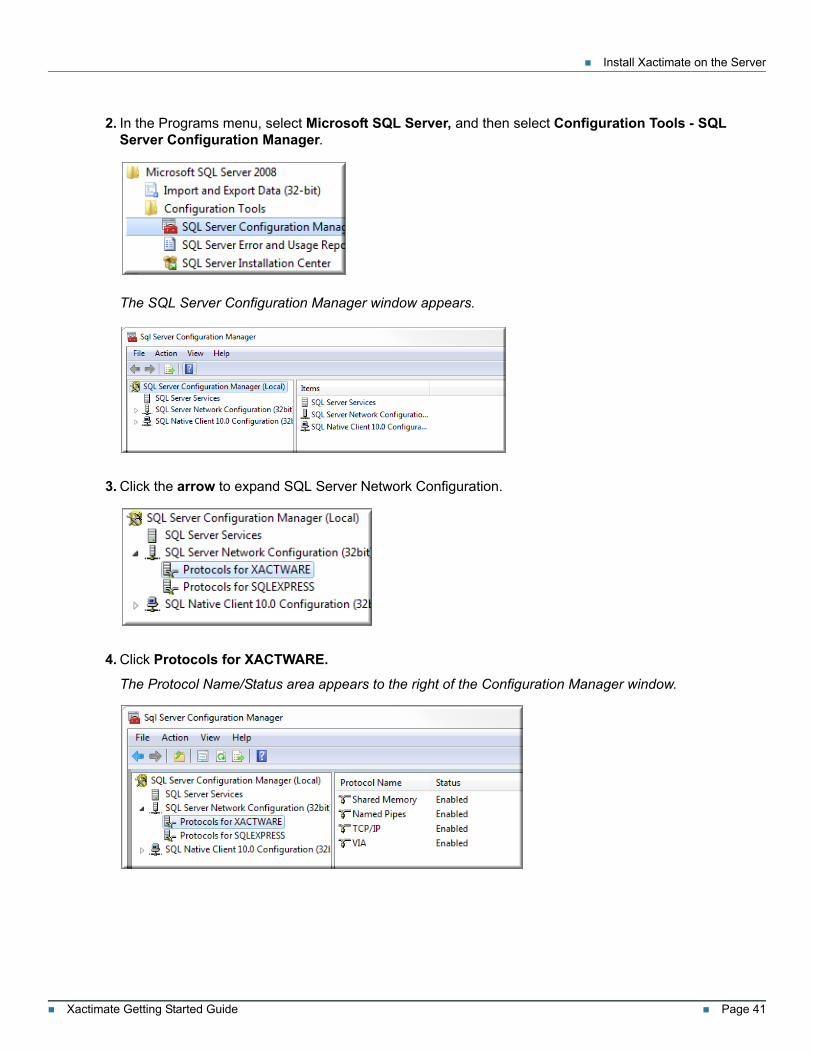
2. In the Programs menu, select Microsoft SQL Server, and then select Configuration Tools - SQL Server Configuration Manager.
The SQL Server Configuration Manager window appears.
3. Click the arrow to expand SQL Server Network Configuration.
4. Click Protocols for XACTWARE.
The Protocol Name/Status area appears to the right of the Configuration Manager window.
Xactimate Getting Started Guide Page 42
Install Xactimate on the Server
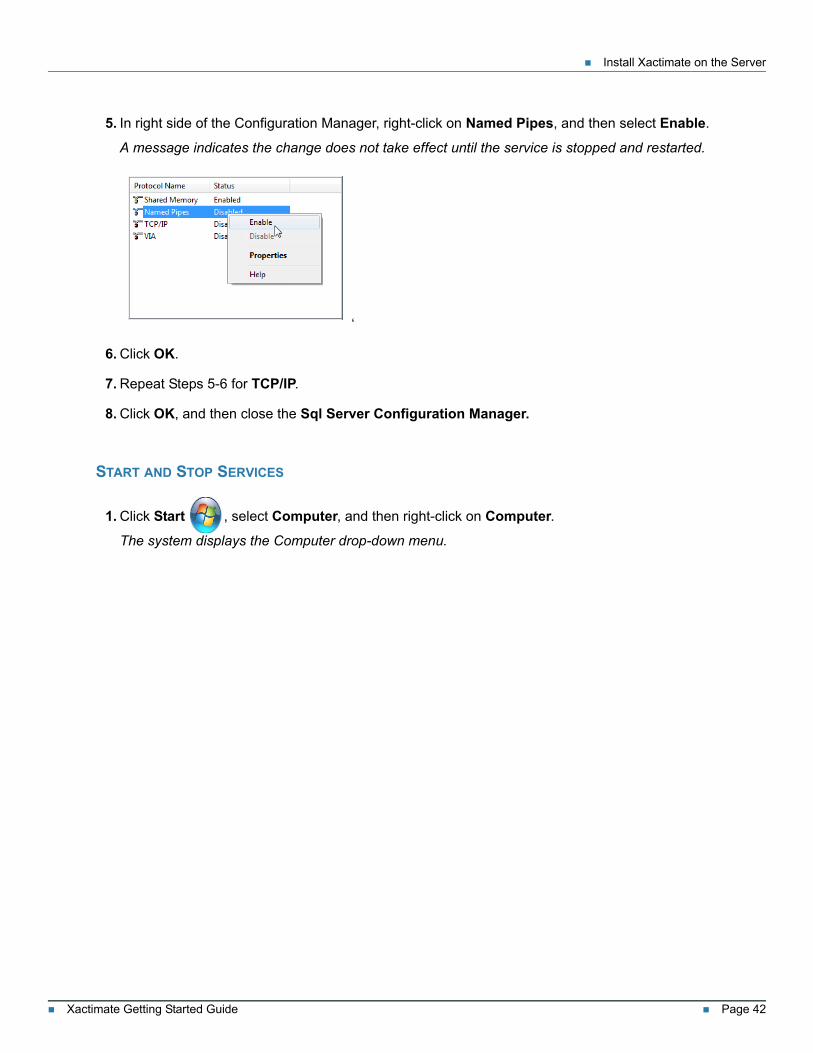
5. In right side of the Configuration Manager, right-click on Named Pipes, and then select Enable.
A message indicates the change does not take effect until the service is stopped and restarted.
‘
6. Click OK.
7. Repeat Steps 5-6 for TCP/IP.
8. Click OK, and then close the Sql Server Configuration Manager.
START AND STOP SERVICES
1. Click Start , select Computer, and then right-click on Computer.
The system displays the Computer drop-down menu.
Xactimate Getting Started Guide Page 43
Install Xactimate on the Server
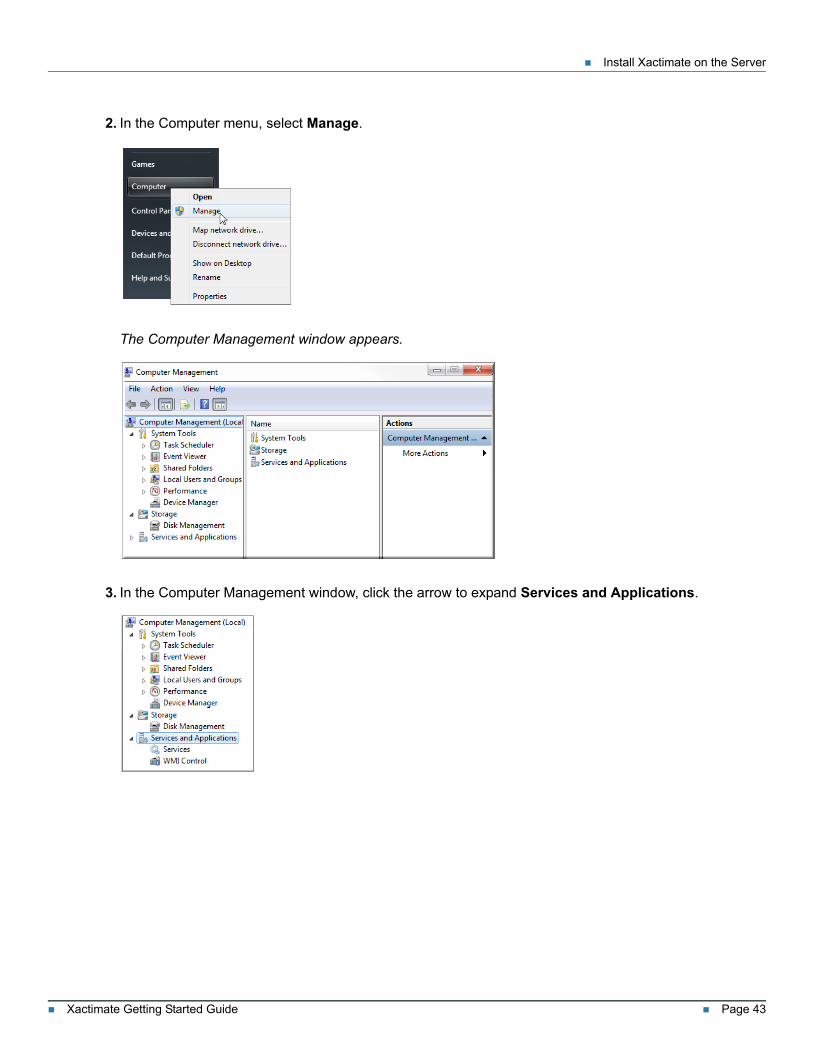
2. In the Computer menu, select Manage.
The Computer Management window appears.
3. In the Computer Management window, click the arrow to expand Services and Applications.
Xactimate Getting Started Guide Page 44
Install Xactimate on the Server
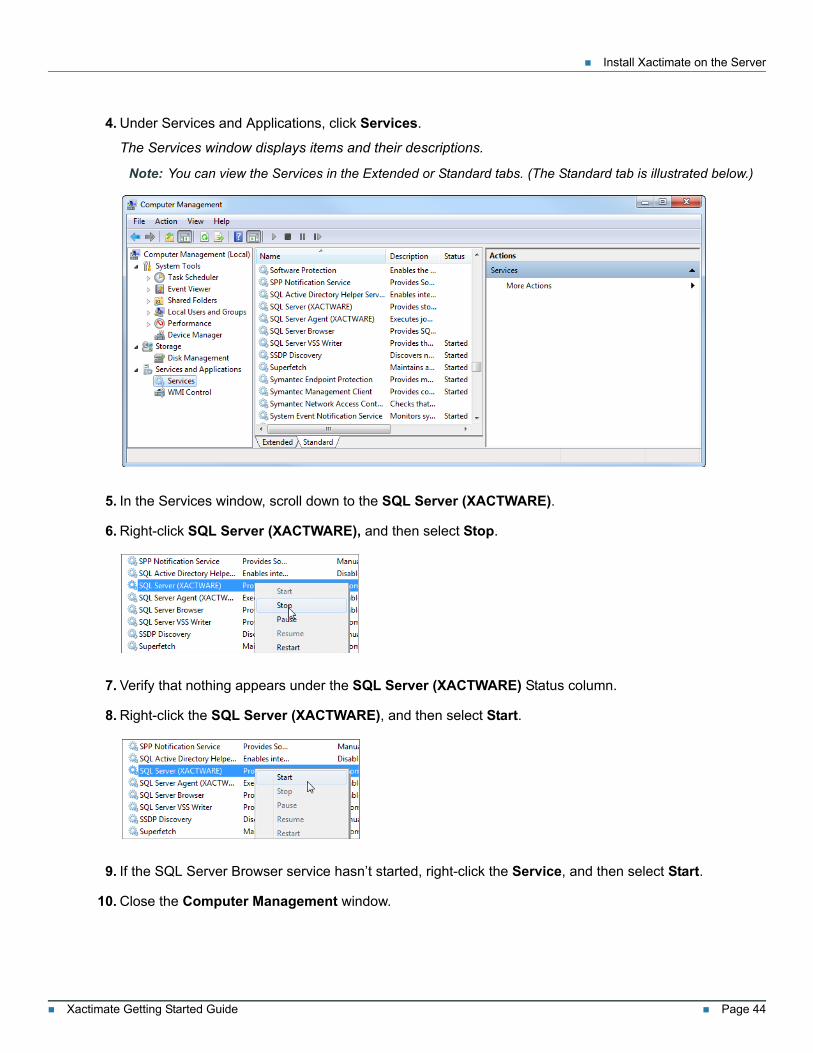
4. Under Services and Applications, click Services.
The Services window displays items and their descriptions.
Note: You can view the Services in the Extended or Standard tabs. (The Standard tab is illustrated below.)
5. In the Services window, scroll down to the SQL Server (XACTWARE).
6. Right-click SQL Server (XACTWARE), and then select Stop.
7. Verify that nothing appears under the SQL Server (XACTWARE) Status column.
8. Right-click the SQL Server (XACTWARE), and then select Start.
9. If the SQL Server Browser service hasn’t started, right-click the Service, and then select Start.
10. Close the Computer Management window.
Xactimate Getting Started Guide Page 45
Install Xactimate on the Server
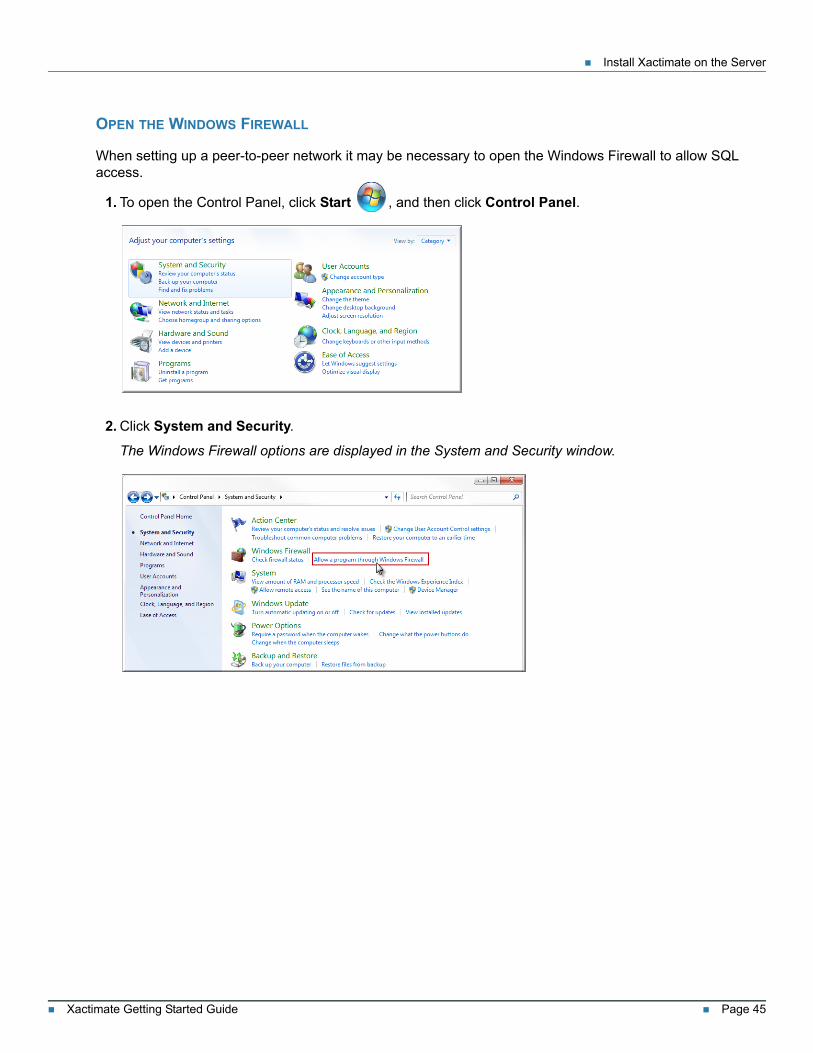
OPEN THE WINDOWS FIREWALL
When setting up a peer-to-peer network it may be necessary to open the Windows Firewall to allow SQL access.
1. To open the Control Panel, click Start , and then click Control Panel.
2. Click System and Security.
The Windows Firewall options are displayed in the System and Security window.
Xactimate Getting Started Guide Page 46
Install Xactimate on the Server
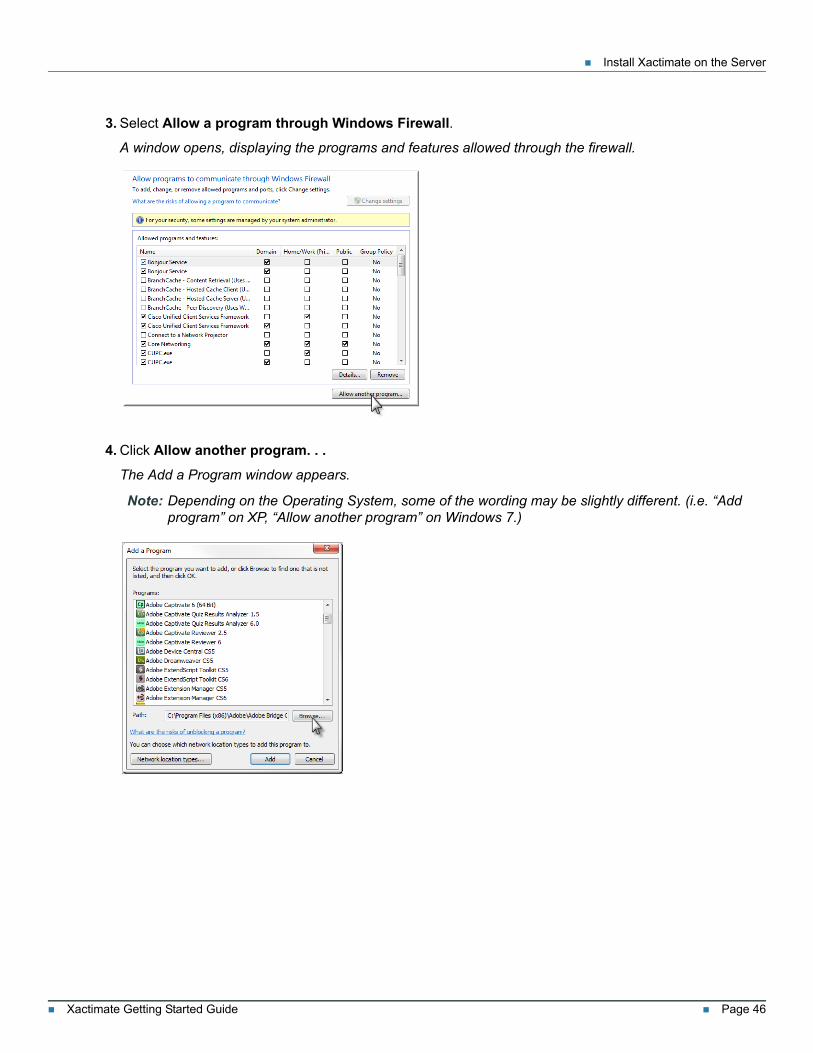
3. Select Allow a program through Windows Firewall.
A window opens, displaying the programs and features allowed through the firewall.
4. Click Allow another program. . .
The Add a Program window appears.
Note: Depending on the Operating System, some of the wording may be slightly different. (i.e. “Add program” on XP, “Allow another program” on Windows 7.)
Xactimate Getting Started Guide Page 47
Install Xactimate on the Server
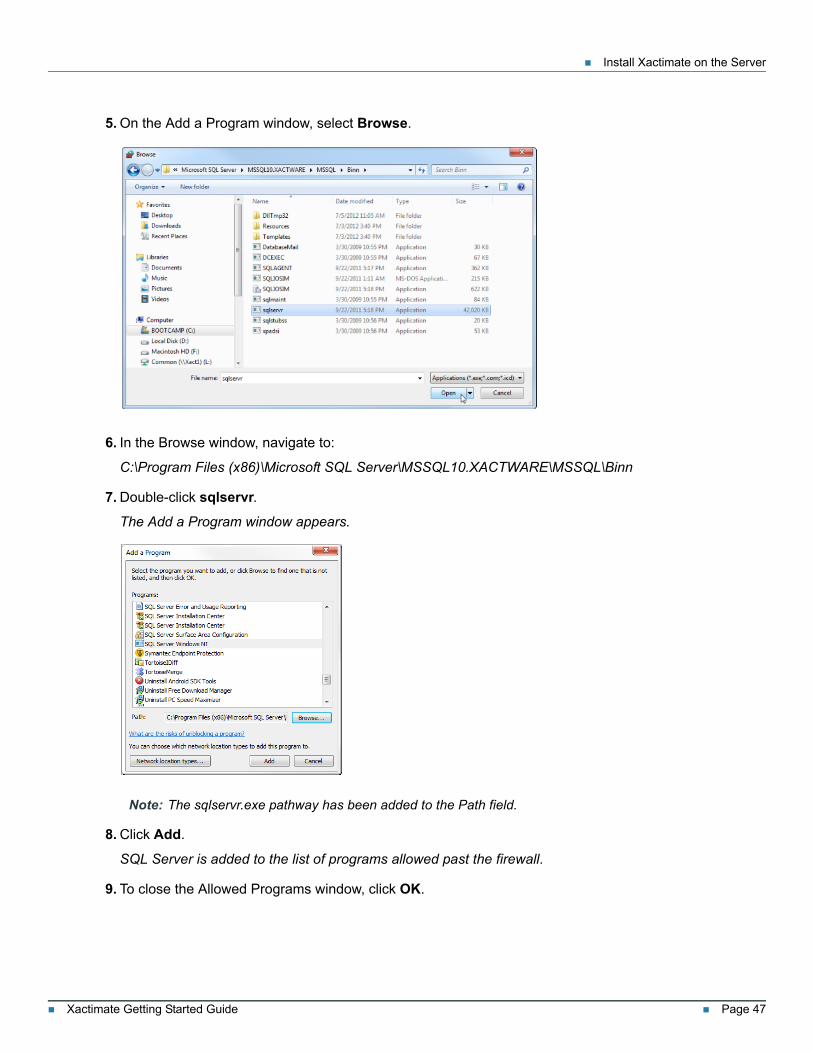
5. On the Add a Program window, select Browse.
6. In the Browse window, navigate to:
C:\Program Files (x86)\Microsoft SQL Server\MSSQL10.XACTWARE\MSSQL\Binn
7. Double-click sqlservr.
The Add a Program window appears.
Note: The sqlservr.exe pathway has been added to the Path field.
8. Click Add.
SQL Server is added to the list of programs allowed past the firewall.
9. To close the Allowed Programs window, click OK.
Xactimate Getting Started Guide Page 48
Install Xactimate on the Server
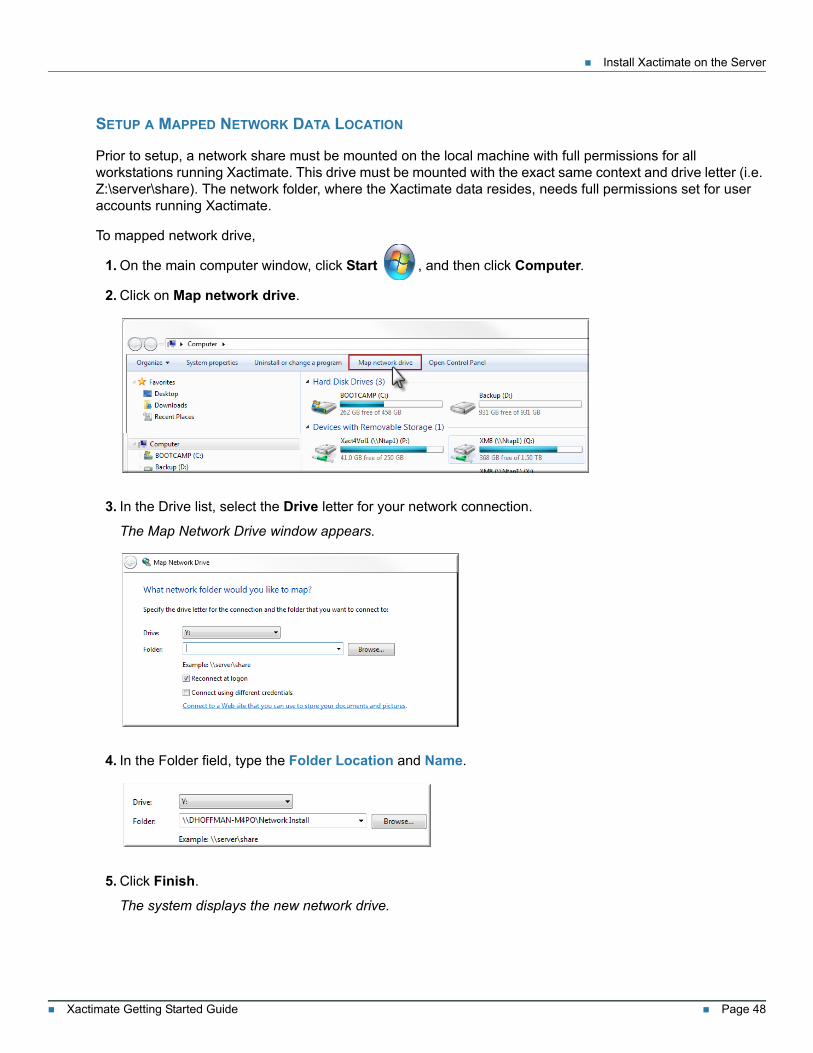
SETUP A MAPPED NETWORK DATA LOCATION
Prior to setup, a network share must be mounted on the local machine with full permissions for all workstations running Xactimate. This drive must be mounted with the exact same context and drive letter (i.e. Z:\server\share). The network folder, where the Xactimate data resides, needs full permissions set for user accounts running Xactimate.
To mapped network drive,
1. On the main computer window, click Start , and then click Computer.
2. Click on Map network drive.
3. In the Drive list, select the Drive letter for your network connection.
The Map Network Drive window appears.
4. In the Folder field, type the Folder Location and Name.
5. Click Finish.
The system displays the new network drive.
Xactimate Getting Started Guide Page 49
Install Xactimate on the Server
PRE-CONFIGURE THE WORKSTATION
Follow the steps below to install Xactimate to your server from a workstation.
Note: No part of this installation is done on a dedicated server.
DVD INSTALL
1. Establish an Internet Connection.
2. On your workstation, insert your Xactimate DVD.
The installation procedure should begin automatically.
If the Xactimate setup does not begin immediately, follow these steps:
For Windows XP
a. Click the Windows Start.
b. Click Run.
c. Type D:\setup.exe.
If your DVD-ROM drive is not D, type the letter for your DVD drive instead.
d. Click OK.
For Windows Vista
a. Click the Windows Start.
b. In the Start Search field, type D:\setup.exe.
If your DVD-ROM drive is not D, type the letter for your DVD drive instead.
c. Press Enter.
For Windows 7
a. Click the Windows Start button.
b. In the Search programs and files field, type D:\setup.exe.
If your DVD-ROM drive is not D, type the letter for your DVD drive instead.
c. Press Enter.
For Windows 8
a. Type D:\setup.exe.
If your DVD-ROM drive is not D, type the letter for your DVD drive instead.
b. Press Enter.
The Xactimate Install Wrapper—InstallShield Wizard appears.
3. Continue to “Run the Install” on page 50.
Xactimate Getting Started Guide Page 50
Install Xactimate on the Server
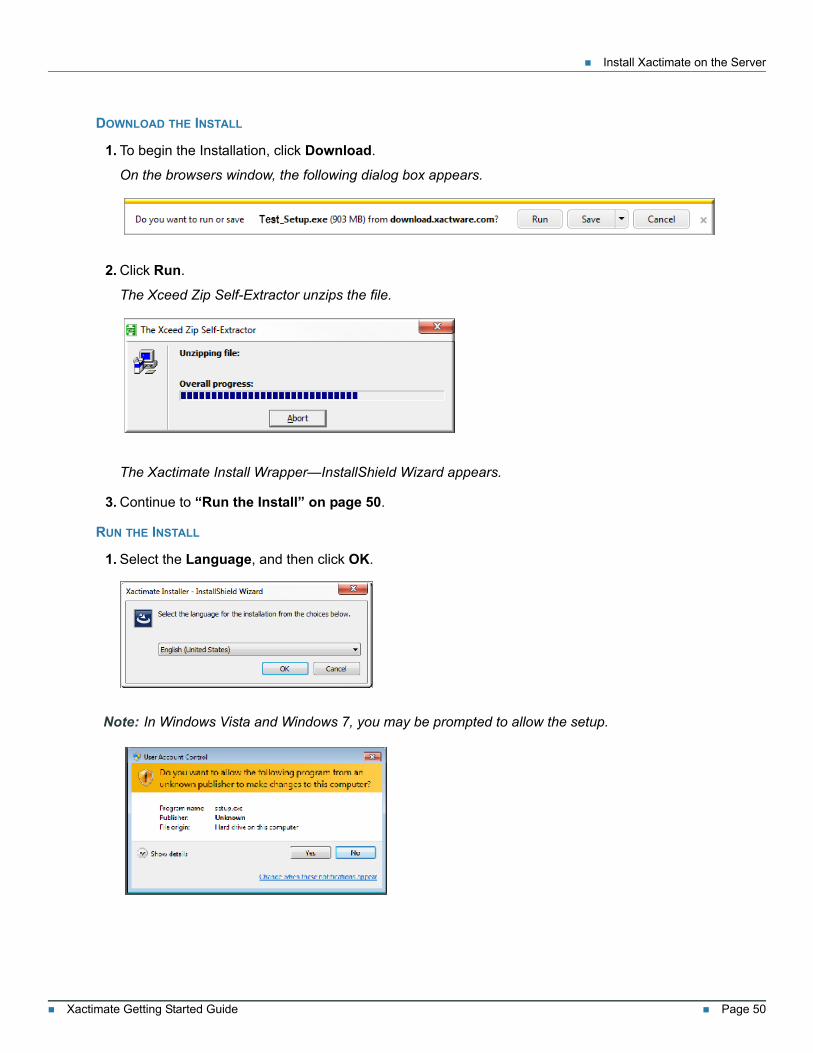
DOWNLOAD THE INSTALL
1. To begin the Installation, click Download.
On the browsers window, the following dialog box appears.
2. Click Run.
The Xceed Zip Self-Extractor unzips the file.
The Xactimate Install Wrapper—InstallShield Wizard appears.
3. Continue to “Run the Install” on page 50.
RUN THE INSTALL
1. Select the Language, and then click OK.
Note: In Windows Vista and Windows 7, you may be prompted to allow the setup.
Xactimate Getting Started Guide Page 51
Install Xactimate on the Server
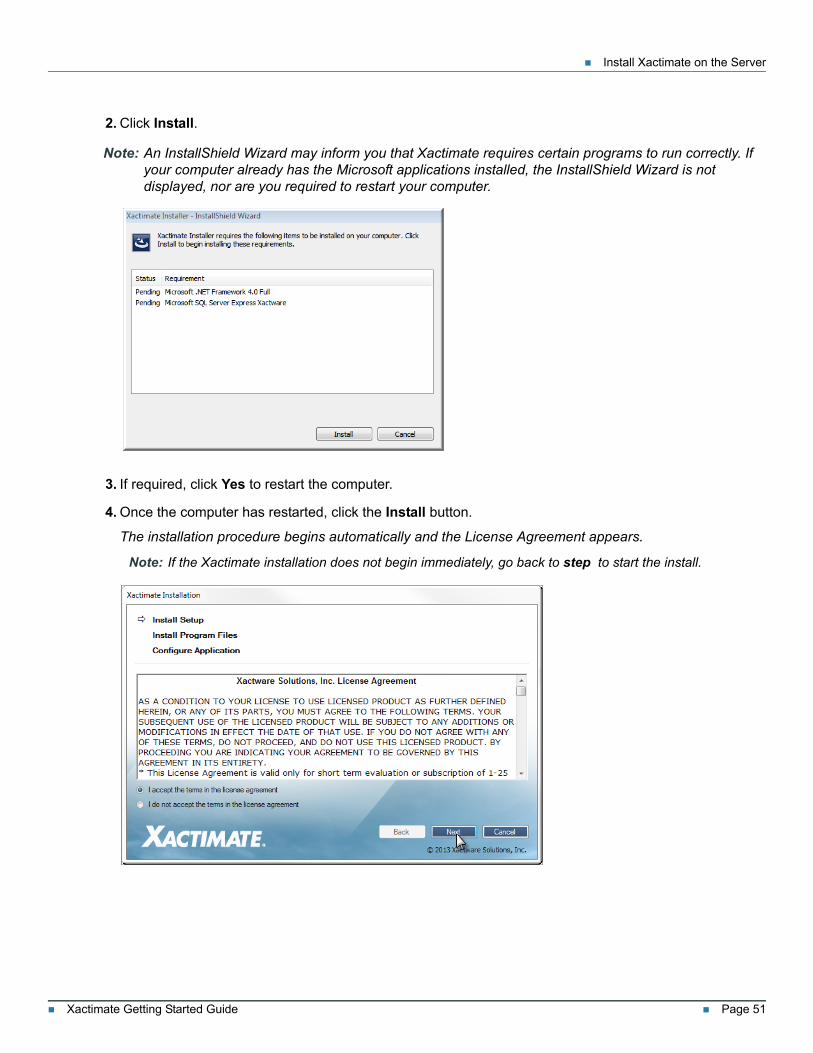
2. Click Install.
Note: An InstallShield Wizard may inform you that Xactimate requires certain programs to run correctly. If your computer already has the Microsoft applications installed, the InstallShield Wizard is not displayed, nor are you required to restart your computer.
3. If required, click Yes to restart the computer.
4. Once the computer has restarted, click the Install button.
The installation procedure begins automatically and the License Agreement appears.
Note: If the Xactimate installation does not begin immediately, go back to step to start the install.
Xactimate Getting Started Guide Page 52
Install Xactimate on the Server
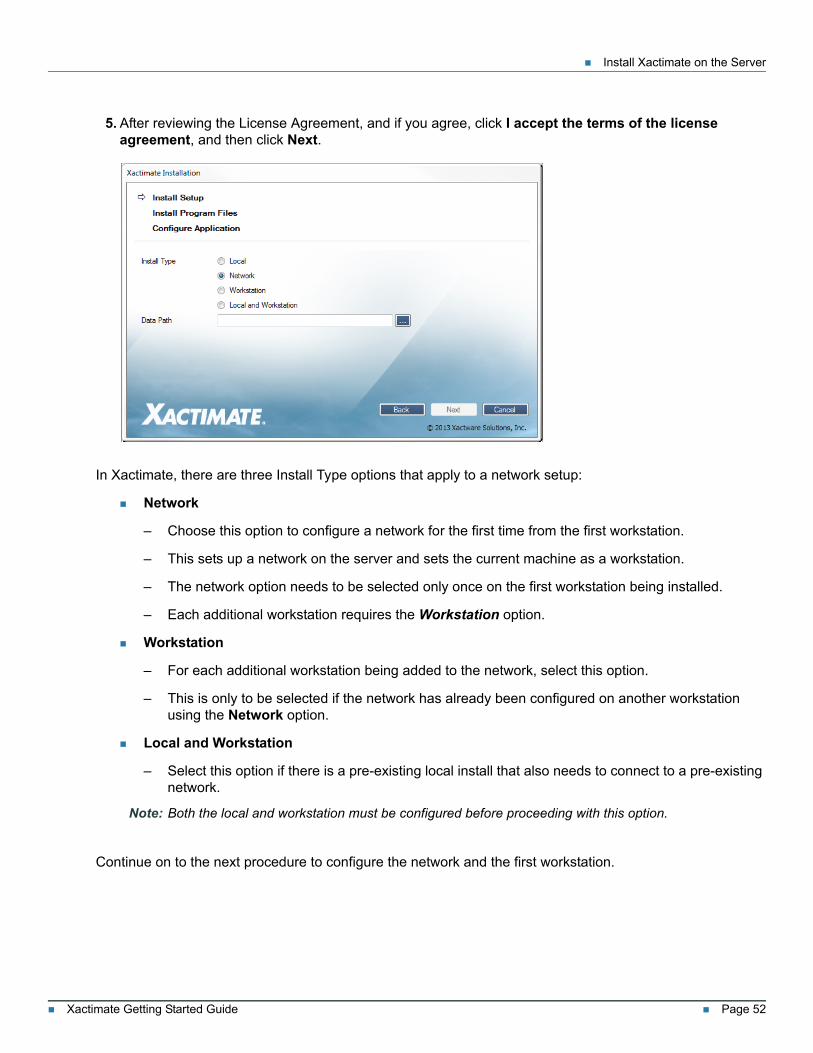
5. After reviewing the License Agreement, and if you agree, click I accept the terms of the license agreement, and then click Next.
In Xactimate, there are three Install Type options that apply to a network setup:
Network
– Choose this option to configure a network for the first time from the first workstation.
– This sets up a network on the server and sets the current machine as a workstation.
– The network option needs to be selected only once on the first workstation being installed.
– Each additional workstation requires the Workstation option.
Workstation
– For each additional workstation being added to the network, select this option.
– This is only to be selected if the network has already been configured on another workstation using the Network option.
Local and Workstation
– Select this option if there is a pre-existing local install that also needs to connect to a pre-existing network.
Note: Both the local and workstation must be configured before proceeding with this option.
Continue on to the next procedure to configure the network and the first workstation.
Xactimate Getting Started Guide Page 53
Configure the Initial Workstation and Network
CONFIGURE THE INITIAL WORKSTATION AND NETWORK
These steps are only to be followed for the first workstation to be added to the network. If the network has already been set up, please skip these steps and continue to the next section “Add an Additional Xactimate Workstation to an Existing Network” on page 56.
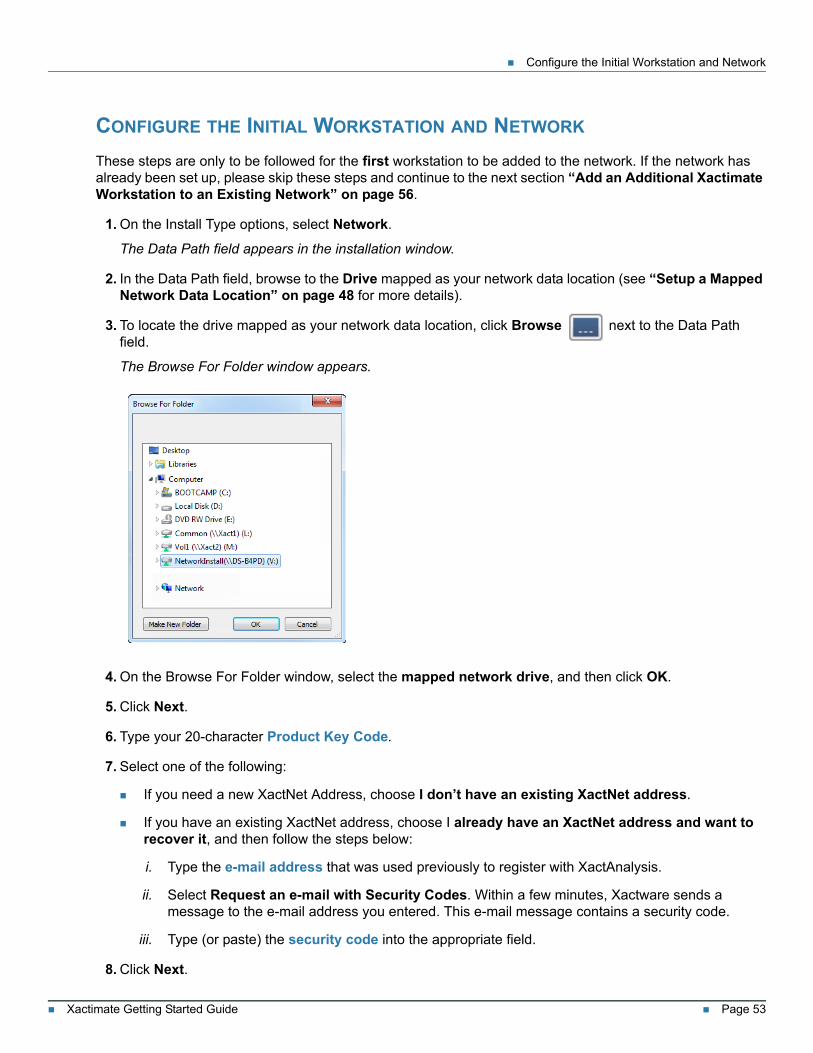
1. On the Install Type options, select Network.
The Data Path field appears in the installation window.
2. In the Data Path field, browse to the Drive mapped as your network data location (see “Setup a Mapped Network Data Location” on page 48 for more details).
3. To locate the drive mapped as your network data location, click Browse next to the Data Path field.
The Browse For Folder window appears.
4. On the Browse For Folder window, select the mapped network drive, and then click OK.
5. Click Next.
6. Type your 20-character Product Key Code.
7. Select one of the following:
If you need a new XactNet Address, choose I don’t have an existing XactNet address.
If you have an existing XactNet address, choose I already have an XactNet address and want to recover it, and then follow the steps below:
i. Type the e-mail address that was used previously to register with XactAnalysis.
ii. Select Request an e-mail with Security Codes. Within a few minutes, Xactware sends a message to the e-mail address you entered. This e-mail message contains a security code.
iii. Type (or paste) the security code into the appropriate field.
8. Click Next.
Xactimate Getting Started Guide Page 54
Configure the Initial Workstation and Network
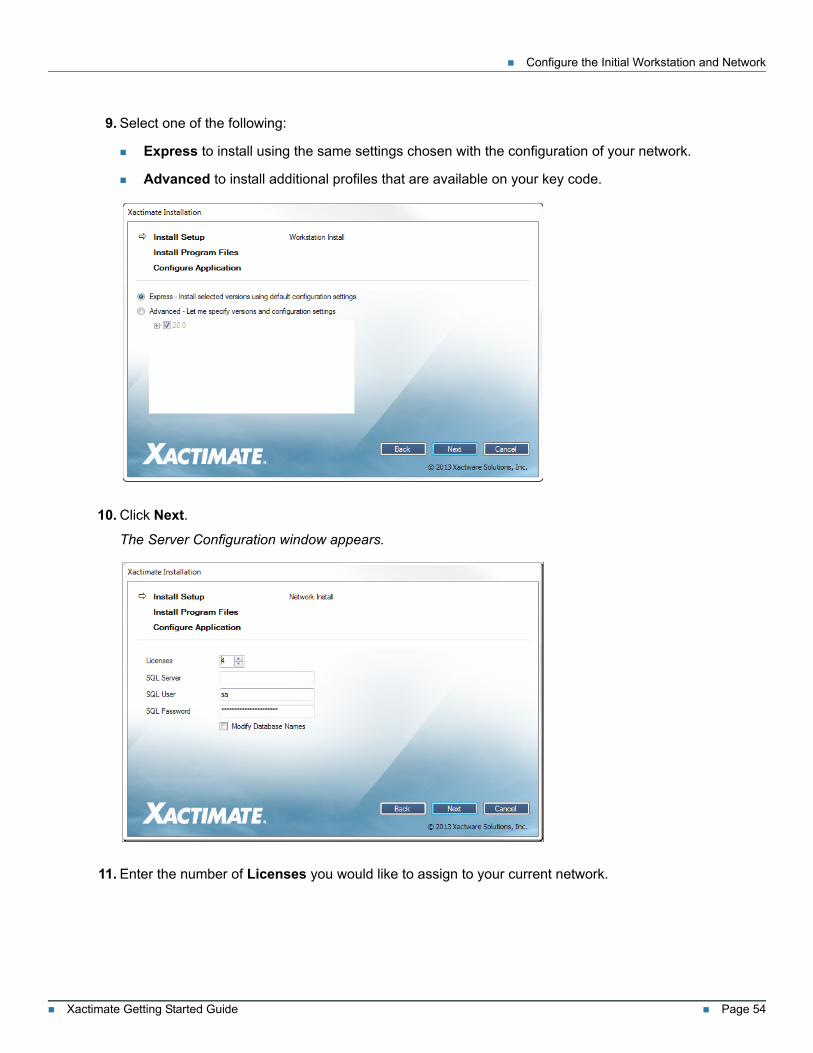
9. Select one of the following:
Express to install using the same settings chosen with the configuration of your network.
Advanced to install additional profiles that are available on your key code.
10. Click Next.
The Server Configuration window appears.
11. Enter the number of Licenses you would like to assign to your current network.
Xactimate Getting Started Guide Page 55
Configure the Initial Workstation and Network
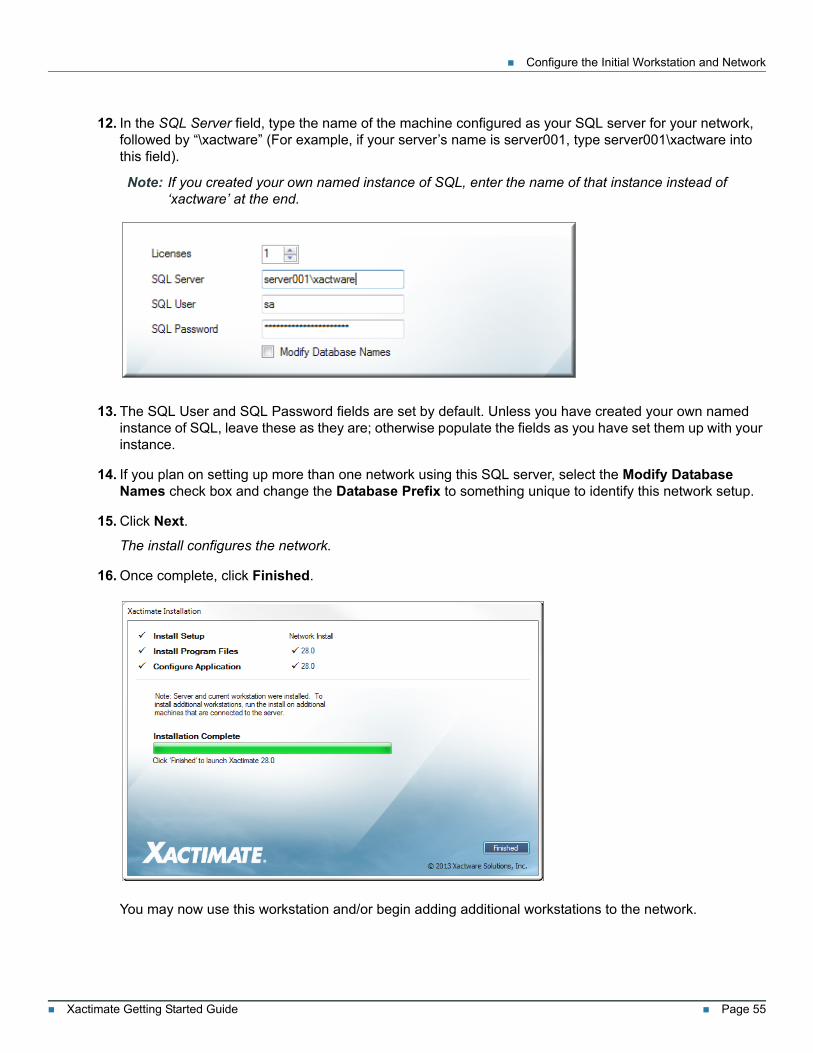
12. In the SQL Server field, type the name of the machine configured as your SQL server for your network, followed by “\xactware” (For example, if your server’s name is server001, type server001\xactware into this field).
Note: If you created your own named instance of SQL, enter the name of that instance instead of ‘xactware’ at the end.
13. The SQL User and SQL Password fields are set by default. Unless you have created your own named instance of SQL, leave these as they are; otherwise populate the fields as you have set them up with your instance.
14. If you plan on setting up more than one network using this SQL server, select the Modify Database Names check box and change the Database Prefix to something unique to identify this network setup.
15. Click Next.
The install configures the network.
16. Once complete, click Finished.
You may now use this workstation and/or begin adding additional workstations to the network.
Xactimate Getting Started Guide Page 56
Configure the Initial Workstation and Network
ADD AN ADDITIONAL XACTIMATE WORKSTATION TO AN EXISTING NETWORK
These steps are to be followed only after the network you are adding the workstation to has been setup and configured. If you have not completed those steps, please return to the previous section and complete the steps to set up an Xactimate network.
Important: Map a drive on your current machine to the shared network data location (see “Setup a Mapped Network Data Location” on page 48).
To begin the installation process,
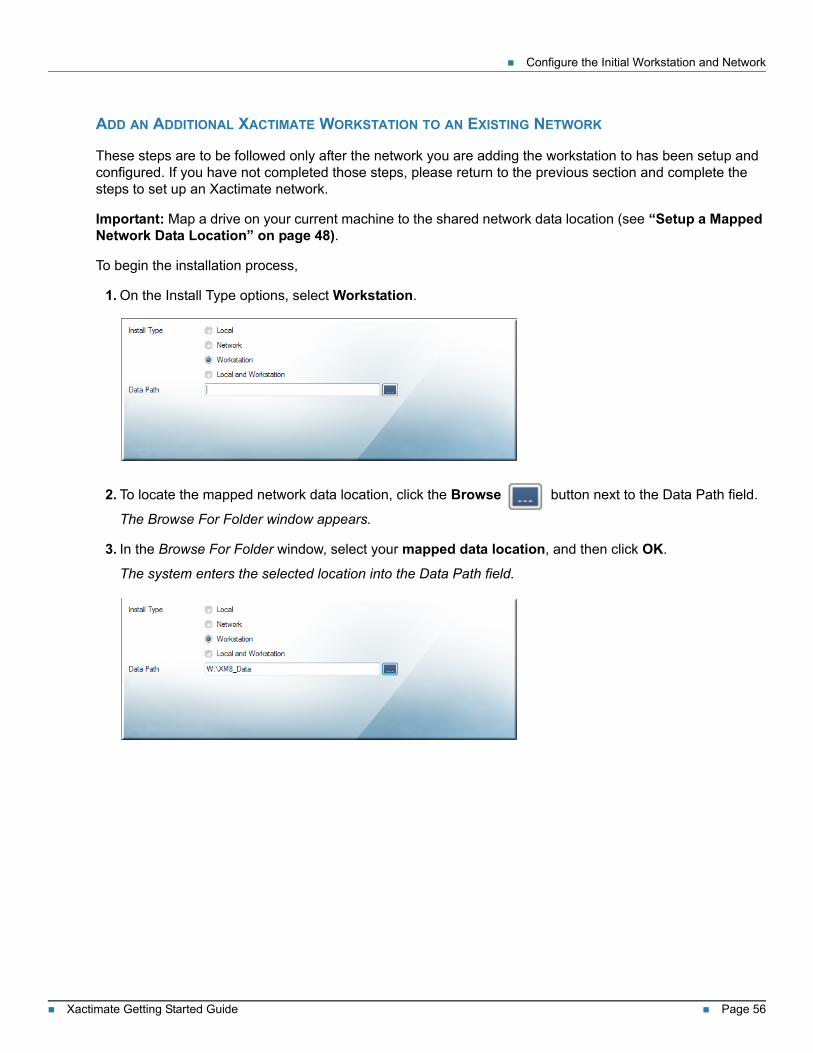
1. On the Install Type options, select Workstation.
2. To locate the mapped network data location, click the Browse button next to the Data Path field.
The Browse For Folder window appears.
3. In the Browse For Folder window, select your mapped data location, and then click OK.
The system enters the selected location into the Data Path field.
Xactimate Getting Started Guide Page 57
Configure the Initial Workstation and Network
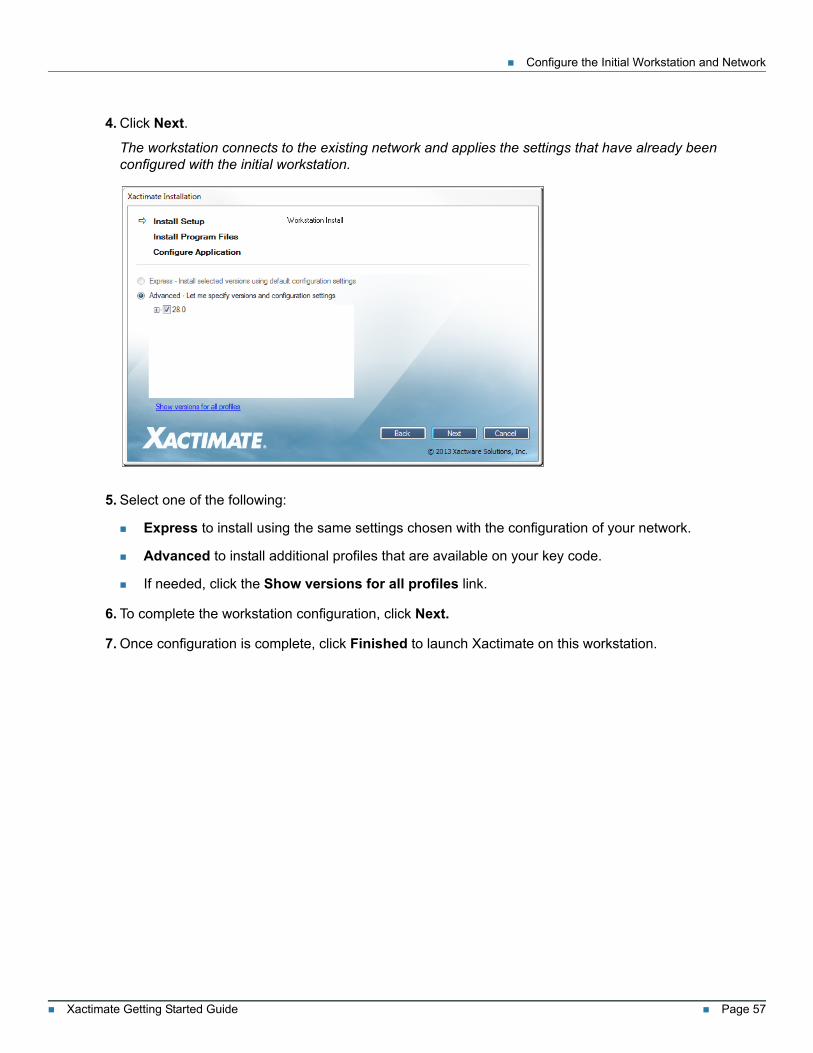
4. Click Next.
The workstation connects to the existing network and applies the settings that have already been configured with the initial workstation.
5. Select one of the following:
Express to install using the same settings chosen with the configuration of your network.
Advanced to install additional profiles that are available on your key code.
If needed, click the Show versions for all profiles link.
6. To complete the workstation configuration, click Next.
7. Once configuration is complete, click Finished to launch Xactimate on this workstation.
Xactimate Getting Started Guide Page 58
Upgrade Xactimate version 27.5 to 28
UPGRADE XACTIMATE VERSION 27.5 TO 28
For DVD installation, see “DVD Install” on page 49.
To download the install, see “Download the Install” on page 50.
RUN THE INSTALL
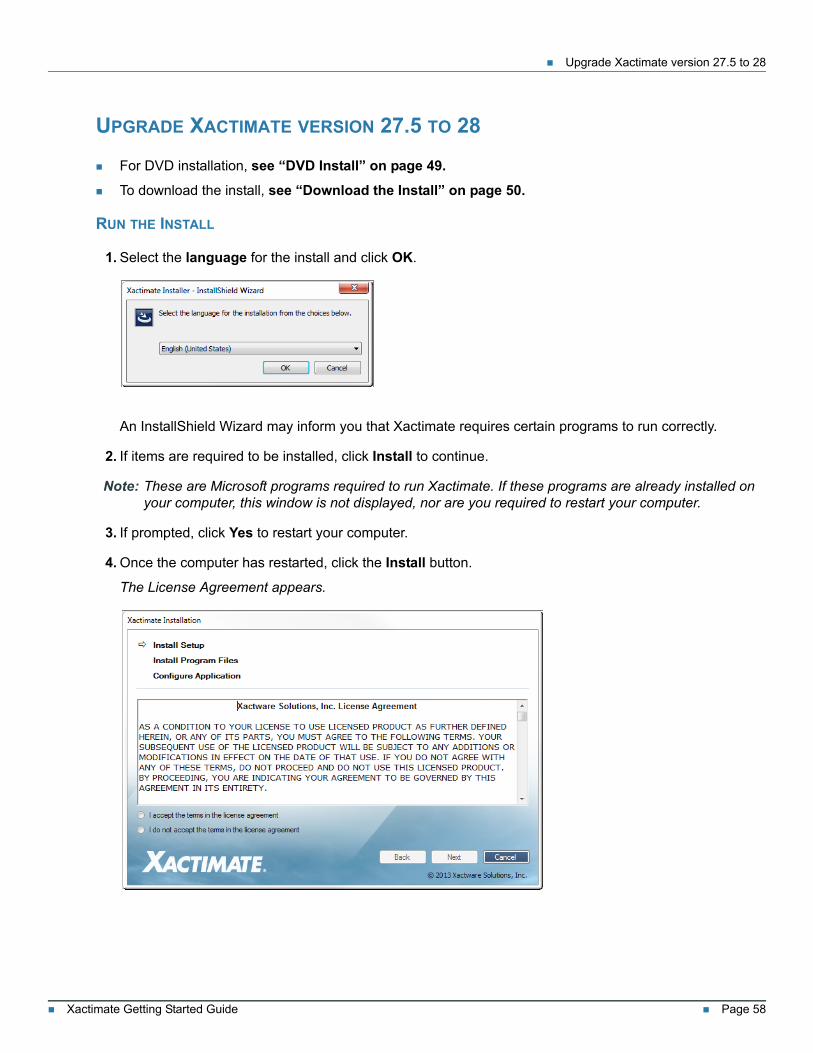
1. Select the language for the install and click OK.
An InstallShield Wizard may inform you that Xactimate requires certain programs to run correctly.
2. If items are required to be installed, click Install to continue.
Note: These are Microsoft programs required to run Xactimate. If these programs are already installed on your computer, this window is not displayed, nor are you required to restart your computer.
3. If prompted, click Yes to restart your computer.
4. Once the computer has restarted, click the Install button.
The License Agreement appears.

Xactimate Getting Started Guide Page 59
Upgrade Xactimate version 27.5 to 28
5. After reviewing the License Agreement, and if you agree, click I accept the terms in the license agreement, and then click Next.
The Xactimate Install Setup appears.
6. In the Xactimate Installation screen, select one of the following:
Express to install all profiles on your Key Code.
Advanced to manually select the profiles to install.
7. Click Next. The upgrading process begins.
A progress bar shows you the progress of the upgrade. This may take several minutes; do not cancel the installation while the configuration is running.
Xactimate Getting Started Guide Page 60
Upgrade Xactimate version 27.5 to 28
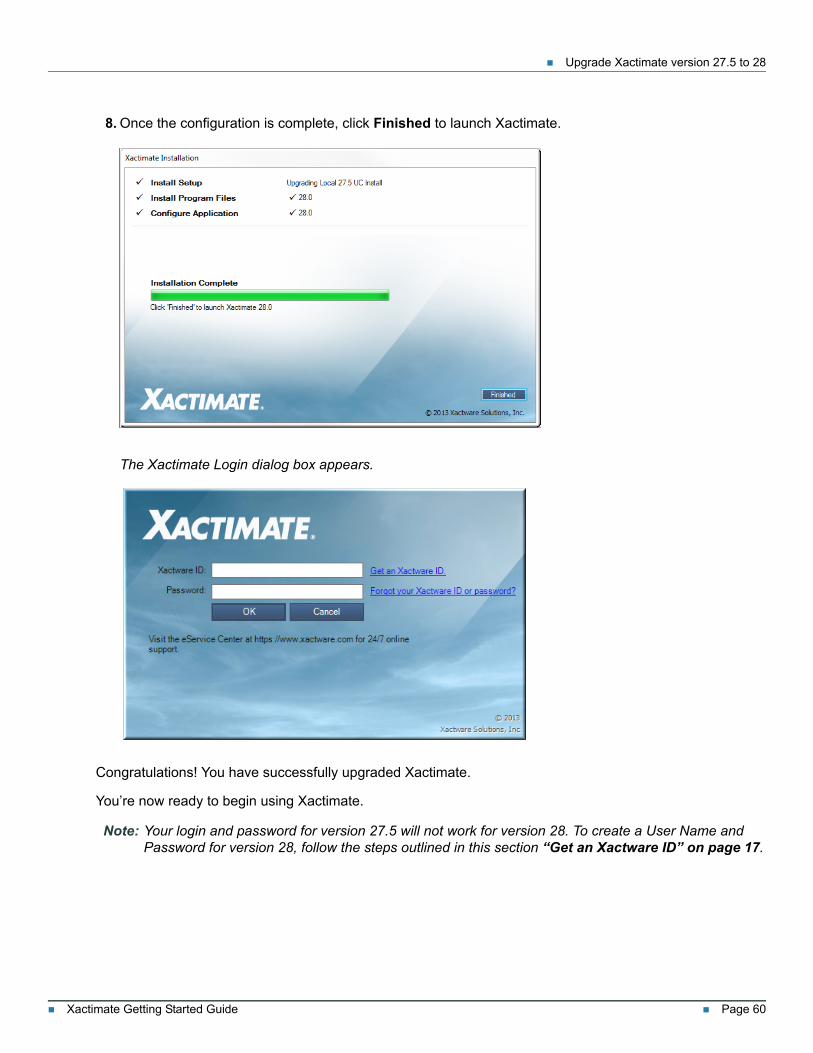
8. Once the configuration is complete, click Finished to launch Xactimate.
The Xactimate Login dialog box appears.
Congratulations! You have successfully upgraded Xactimate.
You’re now ready to begin using Xactimate.
Note: Your login and password for version 27.5 will not work for version 28. To create a User Name and Password for version 28, follow the steps outlined in this section “Get an Xactware ID” on page 17.
Xactimate Getting Started Guide Page 61
Install Xactimate to a Networked Workstation
INSTALL XACTIMATE TO A NETWORKED WORKSTATION
Note: No part of this installation is done on a dedicated server.
1. To begin setting up a new workstation, perform step from “For DVD installation, see “DVD Install” on page 49.” and “Run the Install” on page 58.
The system displays the Install Type window.
2. On the list of Install Type options, select Workstation.
3. In The Data Path field, browse to the drive you have mapped as your network data location.
Note: If this is a new machine being added to the network, please follow the steps from “Setup a Mapped Network Data Location” on page 48 for more details on how to configure your mapped drive.
4. In the Browse For Folder window, select the Drive where your network data is installed, and then click OK.
5. Click Next.
The workstation connects to the existing network and applies the settings that have already been configured with the initial workstation.
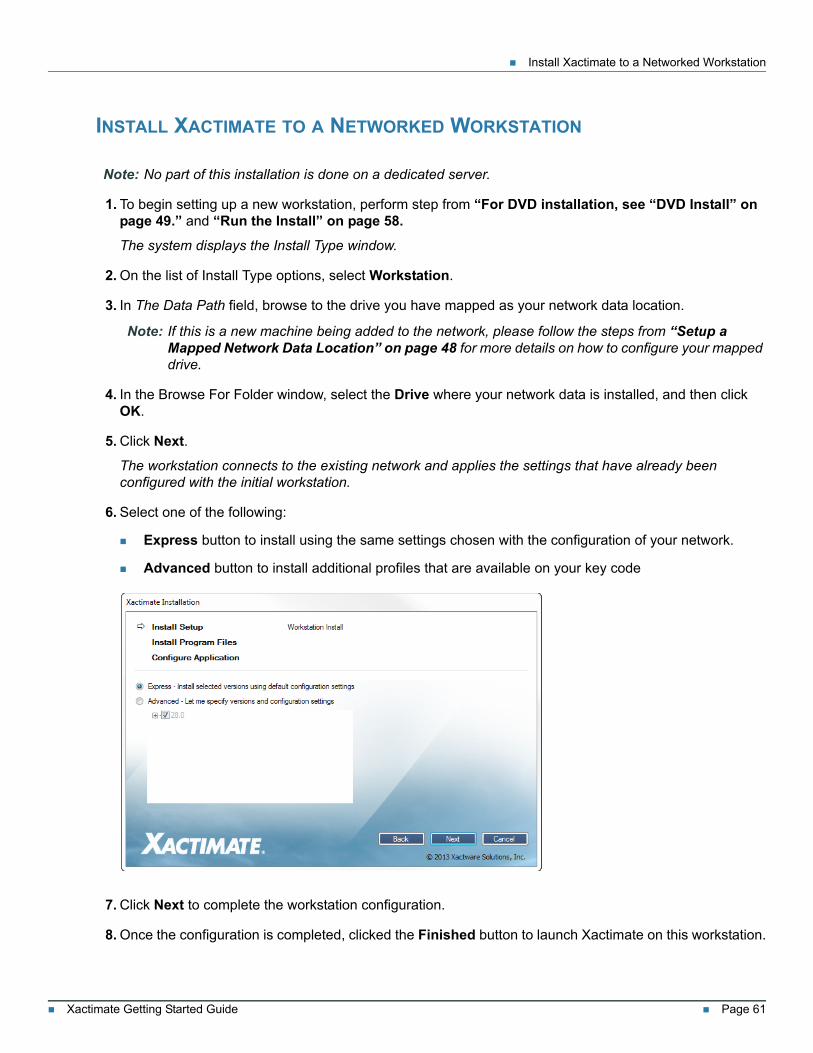
6. Select one of the following:
Express button to install using the same settings chosen with the configuration of your network.
Advanced button to install additional profiles that are available on your key code
7. Click Next to complete the workstation configuration.
8. Once the configuration is completed, clicked the Finished button to launch Xactimate on this workstation.
Xactimate Getting Started Guide Page 62
Add an Additional Workstation using the Native Client
ADD AN ADDITIONAL WORKSTATION USING THE NATIVE CLIENT
Note: Follow these steps after the network you are adding the workstation to has been set up and configured. If you have not completed those steps, please return to the previous section “Configure the Initial Workstation and Network” on page 53.
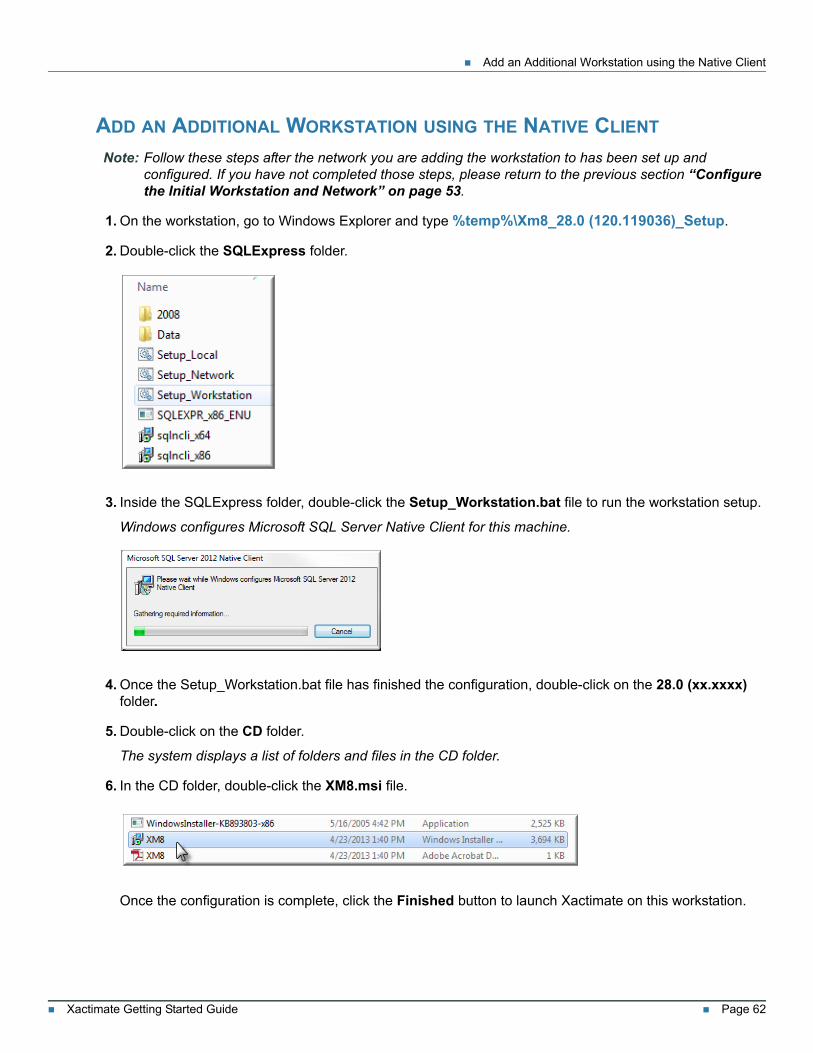
1. On the workstation, go to Windows Explorer and type %temp%\Xm8_28.0 (120.119036)_Setup.
2. Double-click the SQLExpress folder.
3. Inside the SQLExpress folder, double-click the Setup_Workstation.bat file to run the workstation setup.
Windows configures Microsoft SQL Server Native Client for this machine.
4. Once the Setup_Workstation.bat file has finished the configuration, double-click on the 28.0 (xx.xxxx) folder.
5. Double-click on the CD folder.
The system displays a list of folders and files in the CD folder.
6. In the CD folder, double-click the XM8.msi file.
Once the configuration is complete, click the Finished button to launch Xactimate on this workstation.
Xactimate Getting Started Guide Page 65
Xactware eService Center
3Additional ResourcesXACTWARE ESERVICE CENTER
The Xactware eService Center contains helpful support documents to answer many of your questions. If you need to be connected with a support person, the eService Center can connect you with knowledgeable support staff via online chat.The eService Center is open 24 hours a day, every day of the year with the exception of Christmas and New Year’s Day).
Existing customers can login to Xactware’s eService Center on the top right-hand corner of Xactware’s web site at either http://www.xactware.com/.
If you are a new customer, please register with the eService Center by calling 1-800-710-9228.
GET TRAINING
Click the link to go to Classroom Training.
Click the link to go to the Virtual Classroom.
Click the link to go to Self-Paced Training.
Click the link to go to Xactware Webcasts.
XACTIMATE HELP
Xactimate Help System includes step-by-step directions on preforming a particular task within the application. Some of the topics covered include, XactNet addresses, company specific information, customizing Profile settings, downloading a Price List, using Sketch, and transferring data.
To access the Help system, do one of the following:
In the Control Center, on the top right corner, click Help.
On the Xactimate tab, select Help, and then click Xactimate Help.


![XACTIMATE - Amazon S3 · 2018-06-12 · Xactimate 28 - [ACTIONABLE INSIGHTS - PRICING.FEEDBACK.SAN_DIEGO.CA] This is especially important due to the fact that, over the last decade,](https://img.pdfslide.net/doc/110x75/5fadb6fe4fddee6ad25b9c4b/xactimate-amazon-s3-2018-06-12-xactimate-28-actionable-insights-pricingfeedbacksandiegoca.jpg)