Embed Size (px)
Citation preview

xPression 3xDesign Style and Formatting Guide

© 2001-2008 by EMC Document Sciences Corporation. All rights reserved. The copyright protection claimed includes all formats of copyrightable material and information governed by current or future statutory or judicial law. This includes, without limitations, any material generated by the software programs that display icons or other screen interfaces. You may not copy or transmit any part of this document in electronic or printed format without the express written permission of Document Sciences Corporation. xPression, CompuSet, and all other Document Sciences Corporation products mentioned in this publication are trademarks of Document Sciences Corporation. For complete copyright information, please see the file xPression Licensing Document.pdf located on your eBook Library CD.EMC Document Sciences Corporation, 5958 Preistly Drive, Carlsbad, CA 92008www.docscience.com
Document Sciences Corporation

Table of Contents
Table of Contents
Introduction .................................................................................................. 11
Boxes and Revision Bars ................................................................................................................................. 11Solution Support .............................................................................................................................................. 12
Using Microsoft Word ................................................................................. 13
Using Microsoft Word 2007 ............................................................................................................................. 13Configuring Microsoft Word ............................................................................................................................. 13
Setting Up Security for Your Template ............................................................................................... 13Setting the Microsoft Word Macro Security Level ............................................................................... 13Displaying Chinese Characters ........................................................................................................... 14About Digital Signatures and Templates ............................................................................................. 14Changing the Default Paper Size for Content Items ........................................................................... 14Setting Up the Default Font ................................................................................................................. 15
The Microsoft Word Template ......................................................................................................................... 15Microsoft Word 2007 Template Format Not Supported ...................................................................... 16What Are All Those Files in My Template Directory? ........................................................................ 16
Microsoft Styles and Why You Should Use Them ........................................................................................... 16Creating a New Style .......................................................................................................................... 17Modifying a Style ................................................................................................................................. 19Deleting a Style ................................................................................................................................... 19Adding Styles to a Template ............................................................................................................... 20Style Usage in Word 2002 .................................................................................................................. 21
The xDesign Word Template Toolbars ............................................................................................................ 22Known Issues .................................................................................................................................................. 24
Copy/Paste is Not Supported for xPublish Images ............................................................................. 24
Document Sciences Corporation
Table of Contents4
The xPression Publishers ........................................................................... 25
About CompuSet ............................................................................................................................................. 25About xPublish ................................................................................................................................................. 25Differences in Font Support ............................................................................................................................. 26Differences in Image Type Support ................................................................................................................. 26
Supported Formats ............................................................................................................................. 27Differences in Formatting Features ................................................................................................................. 28
Data Driven Charts ............................................................................................................................. 29Headers and Footers .......................................................................................................................... 29Two-Column to One-Column Changes Across Page Boundaries ...................................................... 30
From Paper to xDesign ............................................................................... 31
A Sample Letter ............................................................................................................................................... 31xDesign and Microsoft Word ............................................................................................................................ 32First Step: Gathering Some Background Information ...................................................................................... 33Second Step: Configuring Your xPression Environment ................................................................................. 35Third Step: Creating a Document .................................................................................................................... 35Fourth Step: Creating the Rules ...................................................................................................................... 36
The First Rule ..................................................................................................................................... 36The Second Rule ................................................................................................................................ 37The Third Rule .................................................................................................................................... 39
Step Five: Testing the Output .......................................................................................................................... 39Which Publisher Should You Use? .................................................................................................................. 40
Page Level Formatting ................................................................................ 41
Configuring Page Setup Options ..................................................................................................................... 41Microsoft Word Page Setup: Margins Options .................................................................................... 42Microsoft Word Page Setup: Paper Options ....................................................................................... 44Microsoft Word Page Setup: Layout Options ...................................................................................... 45
Page, Section, and Column Breaks ................................................................................................................. 47About Text Wrapping Break Support .................................................................................................. 47Managing Section Definitions in xPublish ........................................................................................... 48
Columns ........................................................................................................................................................... 48Column Balancing ............................................................................................................................... 49Inserting a Column Into Your Document ............................................................................................. 49
Headers and Footers ....................................................................................................................................... 49Header and Footer Options in Microsoft Word 2003 .......................................................................... 50
Document Sciences Corporation
Table of Contents5
Header and Footer Options in Microsoft Word 2007 .......................................................................... 50Creating Headers and Footers in Microsoft Word 2003 ...................................................................... 52Creating Headers and Footers in Microsoft Word 2007 ...................................................................... 52Inserting Data Source Replacements in Headers and Footers ........................................................... 52Changing Headers and Footers .......................................................................................................... 52“Flexible” Headers and Footers .......................................................................................................... 53
Page Numbering .............................................................................................................................................. 55Inserting Page Number ....................................................................................................................... 56Inserting Page Numbers with the PAGE Field .................................................................................... 56Inserting Page Numbers with the NUMPAGES Field ......................................................................... 57Inserting Page Numbers with the Seq Field ........................................................................................ 57Inserting Page X of Y into Headers and Footers in Microsoft Word 2003 .......................................... 58Inserting Page X of Y into Headers and Footers in Microsoft Word 2007 .......................................... 59Restarting Page Numbering for a Subdocument ................................................................................ 59
Paragraph Level Formatting ....................................................................... 60
Configuring Paragraph-Level Formatting ......................................................................................................... 60Paragraph Options: Indents and Spacing ........................................................................................... 61Paragraph Options: Tabs .................................................................................................................... 62Paragraph Options: Line and Page Breaks ........................................................................................ 63
Hyphenation ..................................................................................................................................................... 64Supported Hyphens ............................................................................................................................ 64Hyphenation Options .......................................................................................................................... 65Enabling Automatic Hyphenation ........................................................................................................ 65Overriding Automatic Hyphenation ..................................................................................................... 66
Tables .............................................................................................................................................................. 66Insert Table Options ............................................................................................................................ 67Table Properties: Table Tab Options .................................................................................................. 68Table Properties: Row Tab Options .................................................................................................... 69Table Properties: Column Tab Options ............................................................................................... 70Table Properties: Cell Tab Options ..................................................................................................... 71Borders and Shading Options ............................................................................................................. 72Known Issue with Tables in Microsoft Word 2000 ............................................................................... 72Creating Tables ................................................................................................................................... 72
Borders and Shading ....................................................................................................................................... 73Borders and Shading: Borders Tab Options ....................................................................................... 74Borders and Shading: Page Borders Tab Options .............................................................................. 74Borders and Shading: Shading Tab Options ...................................................................................... 75
Bulleted Lists ................................................................................................................................................... 76Bulleted Lists in CompuSet ................................................................................................................. 76Bulleted List Options ........................................................................................................................... 77
Document Sciences Corporation
Table of Contents6
Creating a Simple Bulleted List ........................................................................................................... 78Creating Bulleted Lists with Microsoft Styles ...................................................................................... 78Creating Bulleted Lists for AFP Output ............................................................................................... 79Creating and Implementing Custom Bulleted Lists (CompuSet only) ................................................. 79
Numbered Lists ................................................................................................................................................ 83Numbered List Options ....................................................................................................................... 83Outlined Numbered List Options ......................................................................................................... 84Creating a Simple Numbered List ....................................................................................................... 85Restarting a Simple Numbered List .................................................................................................... 86Creating Numbered Lists with the Seq Field ....................................................................................... 86Multiple-Level Numbered Lists with the Seq Field .............................................................................. 87Creating Numbered Lists with Styles .................................................................................................. 88
Enhanced Widow and Orphan Control ............................................................................................................ 89Implementing an xPublish Command ................................................................................................. 90Paragraph Orphans Options ............................................................................................................... 91Paragraph Widows Options ................................................................................................................ 92Keep Table Rows Together Options ................................................................................................... 93Table Row Orphans Options ............................................................................................................... 94Table Row Widows Options ................................................................................................................ 95Using the Table Continuation Text Commands ................................................................................... 95Implementing the Continue From Previous Page Command .............................................................. 96Implementing the Continue to Next Page Command .......................................................................... 98Implementing the Turn Off Continuated Text Command ................................................................... 102Removing xPublish Commands ........................................................................................................ 103
Character Level Formatting ...................................................................... 104
Configuring Character-Level Formatting ........................................................................................................ 104Font Options ..................................................................................................................................... 105Font Options: Character Spacing ...................................................................................................... 106Font Options: Text Effects ................................................................................................................ 107Additional Font Options ..................................................................................................................... 107
Special Characters ........................................................................................................................................ 107Microsoft Word Special Character Support for xPublish ................................................................... 108ALT + Number Combinations ........................................................................................................... 109
AutoText ........................................................................................................................................................ 110
Using Images ............................................................................................. 111
Image Support for CompuSet and xPublish ...................................................................................................111Managing Your CompuSet Images ................................................................................................................ 112Managing Your xPublish Images ................................................................................................................... 113
Document Sciences Corporation
Table of Contents7
Inserting Images Into Your Document ........................................................................................................... 113Inserting a CompuSet Image From File ............................................................................................ 114Inserting an xPublish Image From File ............................................................................................. 116Inserting Images from the xPression database ................................................................................. 117
External Images ............................................................................................................................................. 118Inserting Images Using External Links .............................................................................................. 119
Printer Resident Images ................................................................................................................................ 121Using Printer Resident Images with xPublish ................................................................................... 121Inserting Printer Resident Images with CompuSet ........................................................................... 121
Using ECM Images ........................................................................................................................................ 122Inserting an ECM Image Reference .................................................................................................. 123Importing an ECM Image .................................................................................................................. 124
Merging Images Inline with Text .................................................................................................................... 126Rotating xPublish Images in an xPression Document ................................................................................... 127Resizing Images ............................................................................................................................................ 127Deleting CompuSet Images ........................................................................................................................... 127
Special Microsoft Word Features ............................................................. 128
Text Boxes/Frames ........................................................................................................................................ 128Text Box/Frame Options ................................................................................................................... 129
Color .............................................................................................................................................................. 130Tables of Content for xPublish ....................................................................................................................... 130
Table of Contents Options ................................................................................................................ 130Inserting a Table of Contents ............................................................................................................ 131Building Your Own Table of Contents ............................................................................................... 131Inserting a Table of Contents with TC and TOC Field Codes ........................................................... 132Table of Contents with Entries from Separate Content Items ........................................................... 133
PDF Bookmarks ............................................................................................................................................. 134Form Controls for Fillable PDF Documents ................................................................................................... 134
Adding a Text Box to Your Document ............................................................................................... 134Adding a Check Box to Your Document ............................................................................................ 135Adding a Drop-Down Box to Your Document .................................................................................... 136Publishing Forms to Non-PDF Formats ............................................................................................ 137
Hyperlinks ...................................................................................................................................................... 137Inserting Bookmark Hyperlink Targets .............................................................................................. 138Inserting PDF Hyperlinks in the Same Content Item ........................................................................ 138Hyperlinking Between Separate Content Items in CompuSet .......................................................... 138
Merging Paragraphs Across Content Items ................................................................................................... 139Creating Merged Paragraphs ............................................................................................................ 139Creating Consecutive Merged Paragraphs ....................................................................................... 141
Document Sciences Corporation
Table of Contents8
Using Microsoft Word Date/Time Functionality .............................................................................................. 141Protecting Content ......................................................................................................................................... 141
Document Protection ........................................................................................................................ 142Working with Protected Documents .................................................................................................. 143About Document Protection Passwords ........................................................................................... 143
Horizontal and Vertical Rules ........................................................................................................................ 143
Special xPression Features ...................................................................... 144
Variable Rules and Variable Replacements .................................................................................................. 144How are Variable Rules Used? ......................................................................................................... 144How Do I Create a Variable Rule? .................................................................................................... 146Variables with Large Values .............................................................................................................. 146How Do I Insert a Data Source or Field Replacement? .................................................................... 146Replacement Restrictions ................................................................................................................. 147Tips and Tricks: Removing “Empty” Lines From a Replacement Series ........................................... 148Formatting Replacements ................................................................................................................. 149Controlling Variable Color ................................................................................................................. 166
Merging Paragraphs Across Content Items ................................................................................................... 167Creating Merged Paragraphs ............................................................................................................ 167Creating Consecutive Merged Paragraphs ....................................................................................... 168
xPublish Commands ...................................................................................................................................... 169Setting Continuation Text .................................................................................................................. 169Turning Continuation Text Off ........................................................................................................... 170Removing xPublish Commands from the Document ........................................................................ 171
Working With CompuSet ........................................................................... 172
About CompuSet ........................................................................................................................................... 172Using the CompuSet Command Wizard ........................................................................................................ 173Updating CompuSet Commands ................................................................................................................... 175CompuSet Named Strings ............................................................................................................................. 175
What are Named Strings? ................................................................................................................. 176Inserting Named String Definitions ................................................................................................... 176
Using the DSCdls Paragraph Style ................................................................................................................ 177CompuSet Tray Pulls ..................................................................................................................................... 178
Override Automatically Generated NP Commands .......................................................................... 178Add NP, NPR, or NPV Commands ................................................................................................... 179Define Your Paper Tray .................................................................................................................... 179Using Word’s Tray Pull Functions ..................................................................................................... 179
Document Sciences Corporation
Table of Contents9
Document Merging and Using Variable Merge Frames ................................................................................. 180Adding Variable Merge Frames ........................................................................................................ 180Create Named Strings ...................................................................................................................... 183Insert the Image ................................................................................................................................ 184Assemble the Document ................................................................................................................... 184
Multiple Imposition ......................................................................................................................................... 184Creating a Booklet ............................................................................................................................ 185Create Booklet Text .......................................................................................................................... 186Invoke the CompuSet MIMP Command ........................................................................................... 186
PDF Bookmarks with Outline Levels ............................................................................................................. 187Setting Outline Levels on a Paragraph ............................................................................................. 187
Enabling HTML Formatting in Variables ........................................................................................................ 188
Supported Functionality ........................................................................... 189
Page Setup Options ....................................................................................................................................... 189Microsoft Word Page Setup: Margins Options .................................................................................. 189Microsoft Word Page Setup: Paper Options ..................................................................................... 190Microsoft Word Page Setup: Layout Options .................................................................................... 190
Page, Section, and Column Breaks ............................................................................................................... 191Columns ......................................................................................................................................................... 191Headers and Footer Toolbar Options ............................................................................................................ 192Page Numbering ............................................................................................................................................ 192Paragraph Options ......................................................................................................................................... 193
Paragraph Options: Indents and Spacing ......................................................................................... 193Paragraph Options: Tabs .................................................................................................................. 193Paragraph Options: Line and Page Breaks ...................................................................................... 194
Hyphenation ................................................................................................................................................... 194Hyphenation Options ........................................................................................................................ 194
Tables ............................................................................................................................................................ 195Insert Table Options .......................................................................................................................... 195Table Properties: Table Tab Options ................................................................................................ 195Table Properties: Row Tab Options .................................................................................................. 196Table Properties: Column Tab Options ............................................................................................. 196Table Properties: Cell Tab Options ................................................................................................... 196
Borders and Shading Options ........................................................................................................................ 197Borders and Shading: Borders Tab Options ..................................................................................... 197Borders and Shading: Page Borders Tab Options ............................................................................ 197Borders and Shading: Shading Tab Options .................................................................................... 198
Bulleted Lists ................................................................................................................................................. 198
Document Sciences Corporation

Table of Contents10
Numbered List Options .................................................................................................................................. 199Outlined Numbered List Options ....................................................................................................... 199
Borders and Shading ..................................................................................................................................... 200Borders and Shading: Borders Tab Options ..................................................................................... 200
Font Options .................................................................................................................................................. 200Font Options: Character Spacing ...................................................................................................... 201Additional Font Options ..................................................................................................................... 201
Microsoft Word Special Character Support for xPublish ................................................................................ 202AutoText ........................................................................................................................................................ 202Image Support for CompuSet and xPublish .................................................................................................. 203Text Boxes/Frames ........................................................................................................................................ 203
Text Box/Frame Options ................................................................................................................... 204Color .............................................................................................................................................................. 204Tables of Content .......................................................................................................................................... 205Form Controls ................................................................................................................................................ 205
Forms: Text Box Options ................................................................................................................... 205Forms: Check Box Options ............................................................................................................... 206Forms: Drop-Down Box Options ....................................................................................................... 207
Document Sciences Corporation
Welcome to the xDesign Style and Formatting Guide. This book provides in-depth information about designing and formatting your content. Additionally, it provides a full listing of Microsoft Word features supported by CompuSet and xPublish.
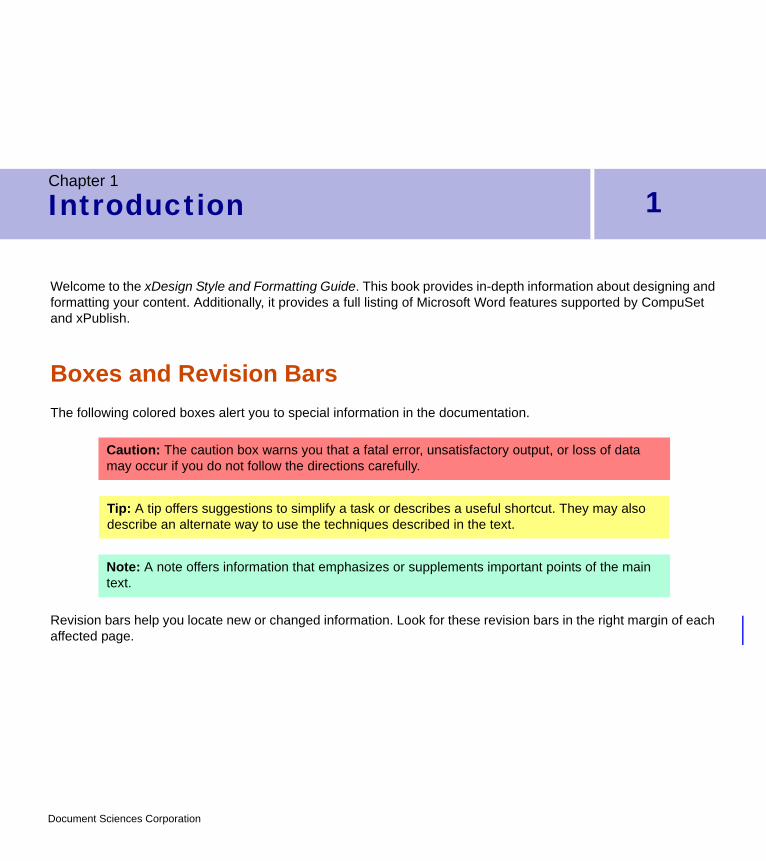
Boxes and Revision BarsThe following colored boxes alert you to special information in the documentation.
Revision bars help you locate new or changed information. Look for these revision bars in the right margin of each affected page.
Chapter 1
Introduction 1
Caution: The caution box warns you that a fatal error, unsatisfactory output, or loss of data may occur if you do not follow the directions carefully.
Tip: A tip offers suggestions to simplify a task or describes a useful shortcut. They may also describe an alternate way to use the techniques described in the text.
Note: A note offers information that emphasizes or supplements important points of the main text.
Document Sciences Corporation

Table of Contents12
Solution SupportFor more information or to solve a problem, contact Document Sciences Solution Support:
Telephone: (760) 602-1500
Fax: (760) 602-1515
World Wide Web: http://support.docscience.com
E-mail: [email protected]
Document Sciences Corporation
This chapter discusses how Microsoft Word is used and how it should be configured.
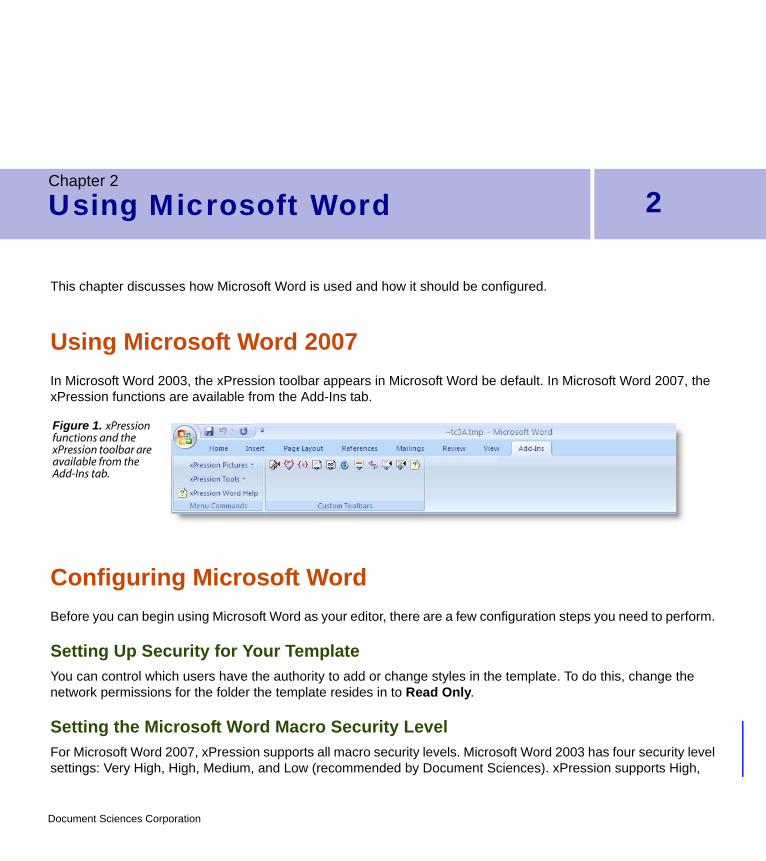
Using Microsoft Word 2007In Microsoft Word 2003, the xPression toolbar appears in Microsoft Word be default. In Microsoft Word 2007, the xPression functions are available from the Add-Ins tab.
Configuring Microsoft WordBefore you can begin using Microsoft Word as your editor, there are a few configuration steps you need to perform.
Setting Up Security for Your TemplateYou can control which users have the authority to add or change styles in the template. To do this, change the network permissions for the folder the template resides in to Read Only.
Setting the Microsoft Word Macro Security Level For Microsoft Word 2007, xPression supports all macro security levels. Microsoft Word 2003 has four security level settings: Very High, High, Medium, and Low (recommended by Document Sciences). xPression supports High,
Chapter 2
Using Microsoft Word 2
Figure 1. xPression functions and the xPression toolbar are available from the Add-Ins tab.
Document Sciences Corporation
Chapter 2 - Using Microsoft Word14
Medium, and Low. Very High is not supported. When security is Very High, Word only runs signed and unsigned macros installed in trusted locations and disables all others. Make sure Word Macro setting is set to High, Medium or low to create or edit content in xDesign. To set your Macro security:
1. Open Microsoft Word.
2. Click the Tools menu, select Macro and click Security
3. Select High, Medium, or Low and click OK.
Displaying Chinese CharactersTo display Chinese characters in xDesign on a non-Chinese version of Windows, you must install the Windows Chinese language pack. Select Chinese for the locale and ensure that the Language for Non-Unicode programs option is set to Chinese (PRC).
About Digital Signatures and TemplatesWord detects templates that do not have digital signatures. Independent vendors insert a signature to indicate that the macros in the template are virus-free. However, templates lose the signature when you change them in any way. Even if you do not change any macros, adding or modifying style definitions is enough to change the content of the template and delete the signature. You can sign one or more of your xPression templates, but you must repeat the digital signature process each time you modify a template.
Changing the Default Paper Size for Content ItemsYou can change the default paper size for your content items. If you commonly use a paper size other than the 8.5 X 11 inch Letter size, you can change the default paper size in the template from the Page Setup dialog box.
For Microsoft Word 2003:
1. Click Page Setup on the File menu.
2. Select the desired paper size in the Paper Size tab.
3. At the bottom-left corner of the dialog box, click the Default button.
4. Confirm your change in the pop-up message by clicking Yes.
5. Close the dialog box.
For Microsoft Word 2007:
1. Click the Page Layout tab.
2. In the Page Setup section, click the down-arrow to show the Page Setup dialog box.
3. Click the Paper tab.
4. Select the desired paper size.
Document Sciences Corporation

Chapter 2 - Using Microsoft Word15
5. At the bottom-left corner of the dialog box, click the Default button.
6. Confirm your change in the pop-up message by clicking Yes.
7. Close the dialog box.
Setting Up the Default FontTo set the default font for your content items in Microsoft Word 2003:
1. Click Font on the Format menu.
2. Select the font and font properties you want to use.
3. At the bottom-left corner of the dialog box, click the Default button.
4. Confirm your change in the pop-up message by clicking Yes.
5. Close the dialog box.
To set the default font for your content items in Microsoft Word 2007:
1. Click the Home tab.
2. In the Font section, click the down arrow to display the Font dialog box.
3. Select the font and font properties you want to use.
4. At the bottom-left corner of the dialog box, click the Default button.
5. Confirm your change in the pop-up message by clicking Yes.
6. Close the dialog box.
The Microsoft Word TemplateStyle definitions are stored in a Microsoft Word template. This template enables you to add styles and use them in any document that uses the same template. It also contains macros that allow xDesign to integrate with Microsoft Word. Document Sciences supplies the following sample template:
C:\Program Files\xPression\Design\Template\xPressionWordTemplate.dot
Sharing the same style template across different documents enables you to ensure your documents all have the same “look and feel”. If you decide to use different templates for different documents, make sure that you use the template Document Sciences provides to create your new templates. Simply make a copy of the Document Sciences template, save it to a new location, and then make your changes.
We strongly encourage you, as it is easier and less error-prone, to use the Microsoft Word Organizer utility to add the user-defined styles from your template to the xPression Design Word template, rather than copy the xPression
Document Sciences Corporation
Chapter 2 - Using Microsoft Word16
Design styles, toolbars, and macro project items into your Word 2000, Word 2002, and Word 2003 templates. You can rename the xPression Design templates after you finish copying your styles.
Microsoft Word 2007 Template Format Not SupportedThe Microsoft Word 2007 template format (.dotm or .dotx) is not supported by xPression. If you are using Microsoft Word 2007, you can use the Save As feature to save the template as a .dot file (Microsoft Word 97-2003).
What Are All Those Files in My Template Directory? Word 2003 users will note the appearance of three files in their [drive:]\xPression\Design\Template folder in addition to xPressionWordTemplate.dot:
• xPressionWordTemplate.htm
• xPressionWordTemplate_filelist.xml
• xPressionWordTemplate_header.htm
If your template is named differently, you will see similarly named files. For example, MyTemplate_filelist.xml, and so on. If you’re a Word 2000 or Word 2002 user, you’ll see only xPressionWordTemplate.htm in addition to xPressionWordTemplate.dot in this folder.
Microsoft Styles and Why You Should Use ThemStyles enable you to apply more than one formatting action at a time, and they enable you to maintain consistent formatting throughout your documents. You can save styles to a template and use them with many documents. Microsoft Word uses two types of styles: Paragraph styles and Character styles. Paragraph styles apply to the paragraph as a whole, character styles apply only to selected text.
Using styles makes it easy to apply global formatting changes. If you apply direct formatting to a document and later decide to change the formatting, you need to revise each instance of direct formatting manually. Styles allow you to change something in every place it appears at one time. You can save styles to a template and use them with many documents.
Note: Make sure you store your templates in a folder on your network where it can be accessed by every user.
Caution: If your authoring tool is Word 2003 or 2007, it is possible to apply different paragraph styles to different parts of the same paragraph. xPression does not support this. Ensure that paragraphs use a single paragraph style.
Document Sciences Corporation

Chapter 2 - Using Microsoft Word17
Always add new Word styles to the xDesign document template. This ensures consistent formatting across your documents. Each time you open a content item, Design performs a document-wide style update based on the style definitions in the template. Automatic updates guarantee that styles used in multiple content items share the same definition.
As you decide how to design your document, try to handle most layout functions with styles. For example, notice the signature line in the sample Withdrawal Notice letter shown here.
The signature line contains more space above it than the other lines. Instead of adding carriage returns to move the signature line, use the Space Above option to automatically add the correct amount of space to the line.
Creating a New StyleTo create new Paragraph or Character styles:
1. For Microsoft Word 2003, click Styles and Formatting on the Format menu to open the Styles and Formatting pane in the Word window, and click New Style.
For Microsoft Word 2007, click the Home tab, click the down-arrow in the Styles section, and click the New Style button at the bottom of the pane.
2. Use the options on this page to configure your new style. Please see Character Level Formatting for a complete list of supported functionality.
Figure 2. Use styles to handle paragraph spacing.
Note: For earlier versions of Word you can access the style organizer from the Style dialog box by clicking Organize; in Word 2003 you can access the style organizer through the Templates and Add-Ins dialog box by selecting Templates and Add-Ins from the Tools menu and then clicking Organize. For Word 2007, click the Developer tab, click Document Template, and click Organizer.
Further InformationShould you decide to exercise this right of cancellation, sign and date the form attached to the letter and return along with your policy. The postmark on the envelope must be on or before the latest date permitted for cancellation as described in this notice.Sincerely,
Andrew GoldenPresident
Signature Line
Document Sciences Corporation
Chapter 2 - Using Microsoft Word18
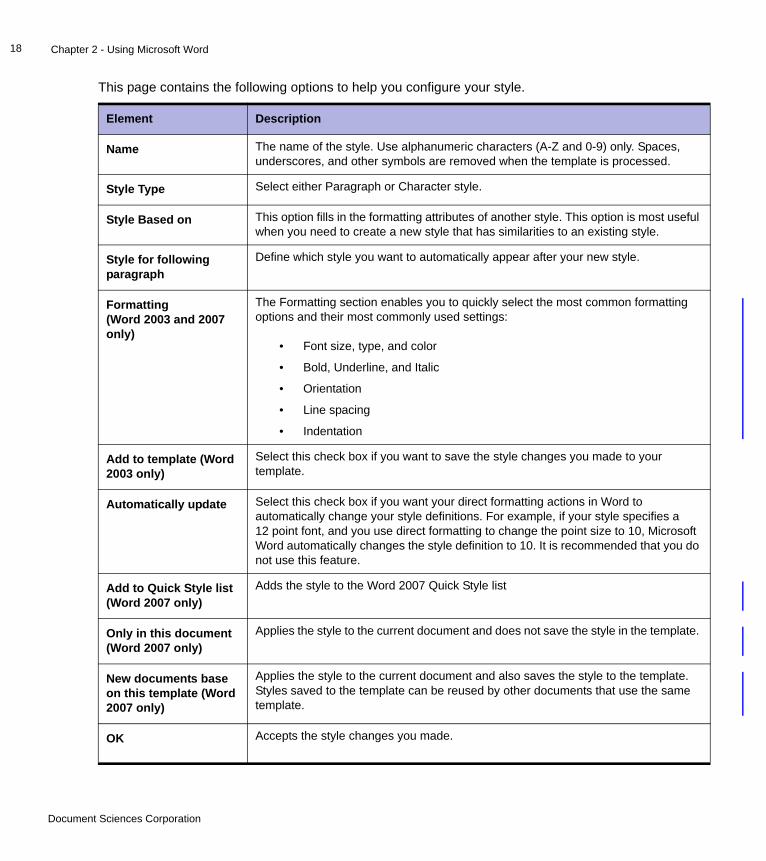
This page contains the following options to help you configure your style.
Element Description
Name The name of the style. Use alphanumeric characters (A-Z and 0-9) only. Spaces, underscores, and other symbols are removed when the template is processed.
Style Type Select either Paragraph or Character style.
Style Based on This option fills in the formatting attributes of another style. This option is most useful when you need to create a new style that has similarities to an existing style.
Style for following paragraph
Define which style you want to automatically appear after your new style.
Formatting(Word 2003 and 2007 only)
The Formatting section enables you to quickly select the most common formatting options and their most commonly used settings:
• Font size, type, and color
• Bold, Underline, and Italic
• Orientation
• Line spacing
• Indentation
Add to template (Word 2003 only)
Select this check box if you want to save the style changes you made to your template.
Automatically update Select this check box if you want your direct formatting actions in Word to automatically change your style definitions. For example, if your style specifies a 12 point font, and you use direct formatting to change the point size to 10, Microsoft Word automatically changes the style definition to 10. It is recommended that you do not use this feature.
Add to Quick Style list (Word 2007 only)
Adds the style to the Word 2007 Quick Style list
Only in this document (Word 2007 only)
Applies the style to the current document and does not save the style in the template.
New documents base on this template (Word 2007 only)
Applies the style to the current document and also saves the style to the template. Styles saved to the template can be reused by other documents that use the same template.
OK Accepts the style changes you made.
Document Sciences Corporation

Chapter 2 - Using Microsoft Word19
Modifying a StyleYou can modify individual elements of an existing style.
To modify a style in Microsoft Word 2003:
1. Open the Styles and Formatting pane by clicking Styles and Formatting on the Format menu. For earlier versions of Word, access the main style screen by clicking Style on the Format menu.
2. Select the style name from the styles list, click the down arrow, and then click Modify. For earlier versions of Word, simply select the style and click Modify.
3. Change any of the style attributes, except Style type, that you need to change.
4. Ensure that you select the Add to template check box before clicking OK.
To modify a style in Microsoft Word 2007:
1. For Microsoft Word 2007, click the Home tab and click the down-arrow in the Styles section.
2. Select the style name from the styles list, click the down arrow, and then click Modify.
3. Change any of the style attributes, except Style type, that you need to change.
Deleting a StyleTo delete an existing style in Word 2003:
1. Open the Styles and Formatting pane by clicking Styles and Formatting on the Format menu. For earlier versions of Word, access the main style screen by clicking Style on the Format menu.
2. Select the style name from the styles list, click the down arrow, and then click Delete. For earlier versions of Word, select the style and click Delete. Microsoft Word prompts you to confirm the removal of the style.
3. Click Yes.
Cancel Cancels all style changes you made.
Format This button accesses all the formatting features you can apply to text. The available categories are: Font, Paragraph, Tabs, Border, Language, Frames, and Numbering.
Caution: Do not modify standard Word styles. Instead, create a new style based on the standard style for use with your xPression documents. When you create a new style, use alphanumeric characters (A-Z and 0-9) only for the name. Spaces, underscores, punctuation marks, and other symbols are removed when the template is processed.
Element Description
Document Sciences Corporation

Chapter 2 - Using Microsoft Word20
To delete a style in Microsoft Word 2007:
1. Click the Home tab and click the down-arrow in the Styles section.
2. Select the style name from the styles list, click the down arrow, and then click Delete <StyleName> where <StyleName> is the name of the style you want to delete.
3. Microsoft Word prompts you to confirm the removal of the style, click Yes.
Adding Styles to a TemplateYou can add styles to your template while working within your content item as shown in Creating a New Style, or you can add them to your template directly. You can add the styles to your template directly in two ways: by importing styles from another template, or by opening the template in Microsoft Word and adding them from the main style screen the same way you add them from within a content item.
To import styles from another template:
1. For Microsoft Word 2003, click the Tools menu and click Templates and Add-ins. For Microsoft Word 2007, click the Developer tab and click Document Template. In pre-2003 versions of Word, open the main style screen by clicking Style on the Format menu.
Note: Update styles in the template by opening the template from Microsoft Word. Do not attempt to open the style template by double-clicking it from Windows Explorer, as it will result in the following error: 5151 Error in SaveHTMLTemplate macro
Figure 3. Microsoft Word 2003 Templates and Add-Ins dialog box. The Microsoft Word 2007 version will look slightly different.
Document Sciences Corporation
Chapter 2 - Using Microsoft Word21
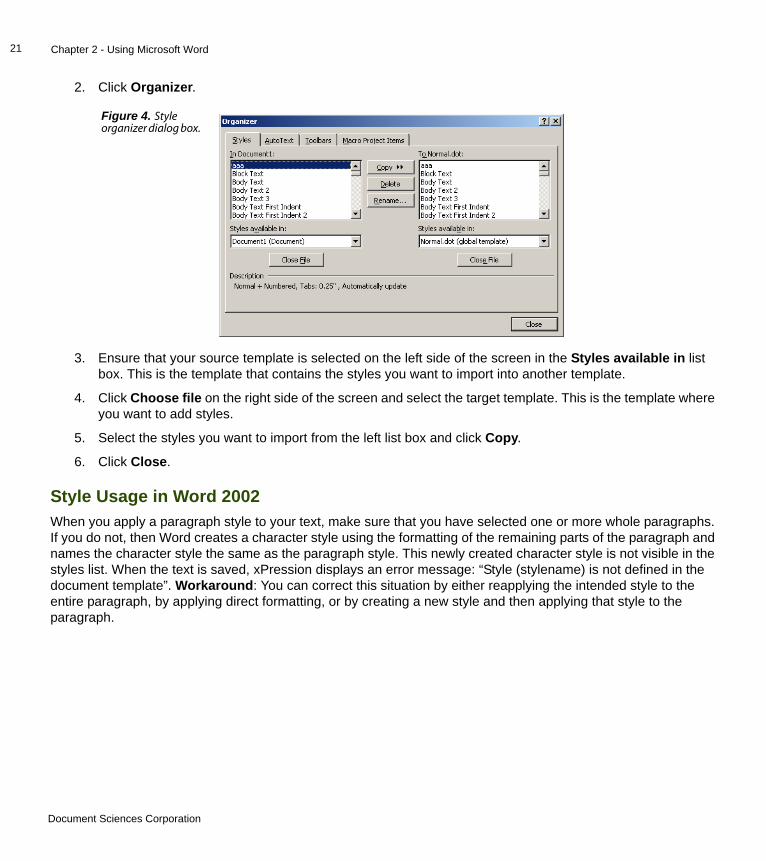
2. Click Organizer.
3. Ensure that your source template is selected on the left side of the screen in the Styles available in list box. This is the template that contains the styles you want to import into another template.
4. Click Choose file on the right side of the screen and select the target template. This is the template where you want to add styles.
5. Select the styles you want to import from the left list box and click Copy.
6. Click Close.
Style Usage in Word 2002When you apply a paragraph style to your text, make sure that you have selected one or more whole paragraphs. If you do not, then Word creates a character style using the formatting of the remaining parts of the paragraph and names the character style the same as the paragraph style. This newly created character style is not visible in the styles list. When the text is saved, xPression displays an error message: “Style (stylename) is not defined in the document template”. Workaround: You can correct this situation by either reapplying the intended style to the entire paragraph, by applying direct formatting, or by creating a new style and then applying that style to the paragraph.
Figure 4. Style organizer dialog box.
Document Sciences Corporation
Chapter 2 - Using Microsoft Word22
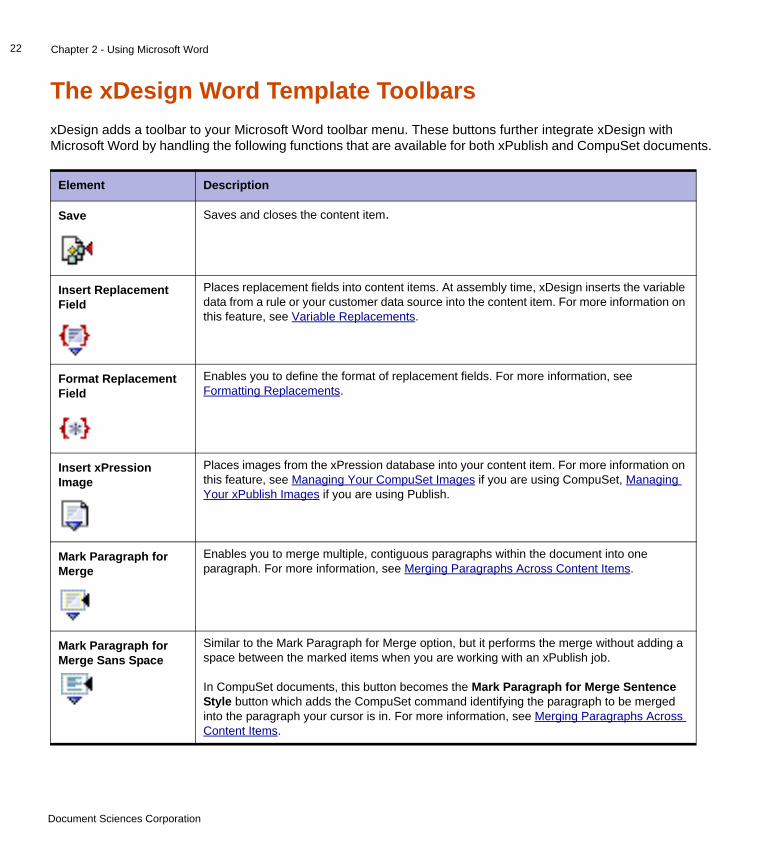
The xDesign Word Template ToolbarsxDesign adds a toolbar to your Microsoft Word toolbar menu. These buttons further integrate xDesign with Microsoft Word by handling the following functions that are available for both xPublish and CompuSet documents.
Element Description
Save Saves and closes the content item.
Insert Replacement Field
Places replacement fields into content items. At assembly time, xDesign inserts the variable data from a rule or your customer data source into the content item. For more information on this feature, see Variable Replacements.
Format Replacement Field
Enables you to define the format of replacement fields. For more information, see Formatting Replacements.
Insert xPression Image
Places images from the xPression database into your content item. For more information on this feature, see Managing Your CompuSet Images if you are using CompuSet, Managing Your xPublish Images if you are using Publish.
Mark Paragraph for Merge
Enables you to merge multiple, contiguous paragraphs within the document into one paragraph. For more information, see Merging Paragraphs Across Content Items.
Mark Paragraph for Merge Sans Space
Similar to the Mark Paragraph for Merge option, but it performs the merge without adding a space between the marked items when you are working with an xPublish job.
In CompuSet documents, this button becomes the Mark Paragraph for Merge Sentence Style button which adds the CompuSet command identifying the paragraph to be merged into the paragraph your cursor is in. For more information, see Merging Paragraphs Across Content Items.
Document Sciences Corporation

Chapter 2 - Using Microsoft Word23
When you are working with a CompuSet document, the following buttons are added to the toolbar:
Task-Based Help Provides task-specific help for content design functions.
Button What Does It Do?
Insert Printer Resident Image
Opens a Wizard where you can identify a link in your document to an image that resides on a printer for CompuSet jobs. For more information, see Printer Resident Images.
Insert CompuSet Command
Places CompuSet commands into your Microsoft Word content items to ensure that xPression supports the CompuSet features that Word does not recognize. For more information, see Using the CompuSet Command Wizard.
Insert Named String Inserts CompuSet names strings, which can be used to place customer data in image areas and variable merge frames, as well as for other purposes. For more information, see CompuSet Named Strings.
Update CompuSet Commands
Enables you to update or change CompuSet commands you have already inserted into your content item. For more information, see Updating CompuSet Commands.
Element Description
Document Sciences Corporation

Chapter 2 - Using Microsoft Word24
When you are working with an xPublish document, the following buttons are added to the toolbar:
Known IssuesThis section contains known issues with Microsoft Word.
Copy/Paste is Not Supported for xPublish ImagesPlacing images using Copy and Paste is not supported with xPublish. Always use the Insert Image button to add images to your xPublish document.
Element Description
Insert External Image Reference
Places a link to an image stored in another location into the content item in an xPublish job. For more information, see Inserting Images Into Your Document.
Insert Chart Opens the xPression Chart Wizard where you can configure a template for your chart. The chart functions are available only in content contained in a Chart rule. For more information, see The xPublish Chart Rule.
Edit Chart Enables you to edit an existing chart template in your content item. The chart functions are available only in content contained in a Chart rule.
Edit Chart Data Enables you to edit the chart data for an existing chart in your content item. The chart functions are available only in content contained in a Chart rule.
Rotate xPression Image
Enables you to rotate images in 90° clockwise increments.
Insert Documentum Image
This button is available if you have configured xPression to access the Documentum DocBase. You can insert references to images stored in DocBase, or you can import Documentum images to the xPression database.
Document Sciences Corporation
The xPression publishers are responsible for formatting and distributing assembled documents according to the specifications of the document designer. They also perform any required post-composition processing that groups documents into streams, adds finishing information, and distributes the final documents to the designated output format.
xPression provides two different publishing engines, CompuSet and xPublish. The two publishing engines have different feature sets and support a variety of options. When choosing a publishing engine, consider which features and options are most important in each case. You can convert a CompuSet document to Publish, but you cannot convert a Publish document to CompuSet. For a complete description and listing of differences between xPublish and CompuSet, see The xPression Publishers in the xPression Enterprise Edition System Overview book.
About CompuSet CompuSet is a native code composition engine that is is configurable through a complex, highly configurable tagging language. The CompuSet command language is used to implement many Microsoft Word formatting features, as well as output processing functionality such as sorting, grouping, recipient processing, and barcodes. Although CompuSet supports many of the same output processing features that xPublish supports, implementing these features in CompuSet requires extensive configuration and coding.
About xPublishxPublish is a pure Java composition engine that is easy to use and provides WYSIWYG functionality with Microsoft Word for document formatting. It enables advanced output processing functionality, true multi-threading in batch mode, integration with ECM Documentum, and greater out-of-the-box support for fonts and image types. xPublish can supports nearly all of the features that CompuSet supports, plus many key features that CompuSet cannot support. The configuration process for xPublish is drastically easier than the CompuSet configuration. Additionally, xPublish processing performs about 4 times faster than CompuSet processing.
Chapter 3
The xPression Publishers 3
Document Sciences Corporation

Chapter 3 - The xPression Publishers26
Differences in Font SupportThere are major differences in the level of support for font types and level of configuration needed to use the font of your choice.
CompuSet requires extensive configuration for fonts. The fonts you use when editing a document (Windows fonts) will not work when publishing to an output type (production fonts). You cannot simply select a font in Microsoft Word while you are editing and expect it to work when you create PDF, AFP, or Metacode output. You must set up a series of external font configuration files for each of your fonts. Additionally, you must map your Windows fonts to your production fonts.
The xPublish composition engine was designed to support the same TrueType fonts (TTF) used in Microsoft Word. This enables you to publish documents in any supported format using any font available to Microsoft Word. TrueType fonts are the xPublish master format.
xPublish also supports OpenType and Type 1 fonts for PDF and PostScript, and True Type fonts in an Open Type wrapper. xPublish also supports the AFP fonts that meet the following characteristics.
• Must be an AFP Outline font
• Must have been created from TrueType font masters stored in the content repository
• Supports double-byte (Unicode) through TTF fonts and single-byte through AFP Outline fonts
• Fonts must use the Latin alphabet
Additionally, xPublish provides out-of-the-box support for Unicode fonts and double-byte fonts, such as those used in Chinese, Turkish, and Japanese characters.
Differences in Image Type SupportBoth CompuSet and xPublish images are stored in the xPression database, but they are stored in separate locations. You cannot access xPublish images from a CompuSet document and you cannot access CompuSet images from an xPublish application.
With CompuSet you can insert an image from the xPression database, from an external location (Metacode only), or from your printer memory. You cannot resize an image or change the rotation of an image from within Word. You can rotate black and white TIFF and Xerox images using CompuSet commands. Additionally, CompuSet can instruct supported printers to rotate an image. Scaling of images is allowed in CompuSet for some output types, such as PCL, PostScript, and Metacode. Scaling is supported through the CompuSet IMG command.
If your output is produced in more than one output format and requires more than one version of the same image (such as an EPG and a JPEG), you must import both formats into the content repository separately.
Document Sciences Corporation

Chapter 3 - The xPression Publishers27
You can use xPublish images that are stored in the xPression database, at an external location, in the printer memory, or in a Documentum docbase. With xPublish, you can resize and rotate your image directly in Microsoft Word without having to alter your source image. xPublish was designed to automatically handles the image format selection by converting your image to the most suitable format for your output type. For this reason, you do not need to place multiple formats of the same image in the content repository. If the content repository does not contain an image compatible with your output format, xPression will automatically perform the conversion.
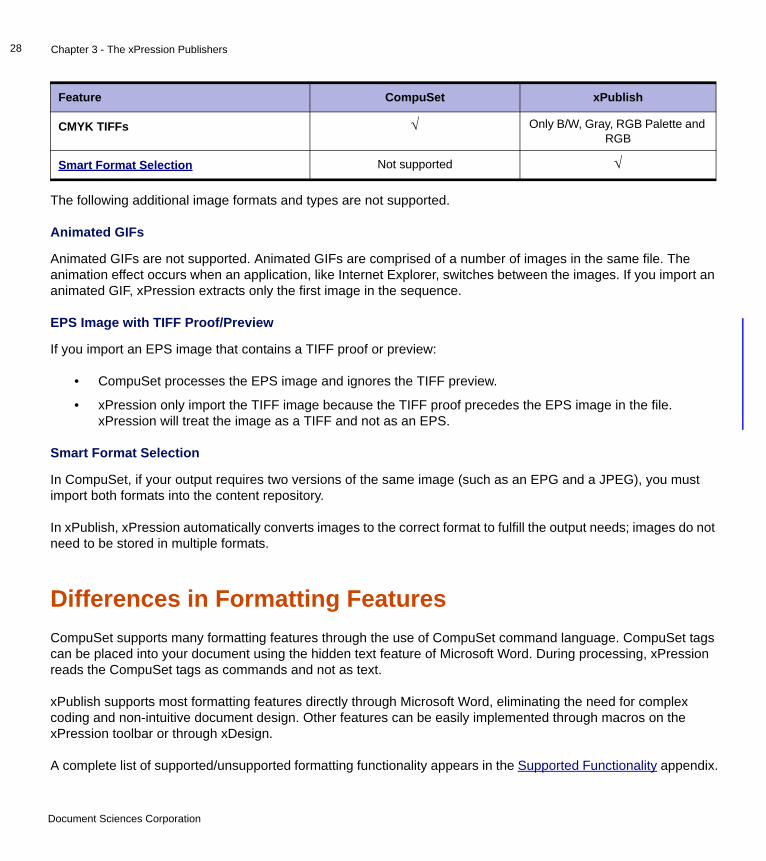
Supported FormatsThe following table shows the types of images currently supported by CompuSet and xPublish.
Feature CompuSet xPublish
BMP Not supported √
EPS √ √
Flate Not supported √
GIF Not supported √
Group4 √ √
IMG (Xerox) √ √
JPEG √ √
PDF as an image Not supported √
PNG Not supported √
TIFF Only black and white images with one bit per pixel. Must be
uncompressed, CCITT 1D, Group 3, Group 4, LZW, or PackBits.
Only Uncompressed, Huffman RLE (CCITT 1D), Group 4, LZW
and PackBits
External Images Metacode only √
Images Resizable in Word Not supported √
Highlight Color √ Not supported
Animated GIFs Not supported Not supported
Document Sciences Corporation
Chapter 3 - The xPression Publishers28
The following additional image formats and types are not supported.
Animated GIFs
Animated GIFs are not supported. Animated GIFs are comprised of a number of images in the same file. The animation effect occurs when an application, like Internet Explorer, switches between the images. If you import an animated GIF, xPression extracts only the first image in the sequence.
EPS Image with TIFF Proof/Preview
If you import an EPS image that contains a TIFF proof or preview:
• CompuSet processes the EPS image and ignores the TIFF preview.
• xPression only import the TIFF image because the TIFF proof precedes the EPS image in the file. xPression will treat the image as a TIFF and not as an EPS.
Smart Format Selection
In CompuSet, if your output requires two versions of the same image (such as an EPG and a JPEG), you must import both formats into the content repository.
In xPublish, xPression automatically converts images to the correct format to fulfill the output needs; images do not need to be stored in multiple formats.
Differences in Formatting FeaturesCompuSet supports many formatting features through the use of CompuSet command language. CompuSet tags can be placed into your document using the hidden text feature of Microsoft Word. During processing, xPression reads the CompuSet tags as commands and not as text.
xPublish supports most formatting features directly through Microsoft Word, eliminating the need for complex coding and non-intuitive document design. Other features can be easily implemented through macros on the xPression toolbar or through xDesign.
A complete list of supported/unsupported formatting functionality appears in the Supported Functionality appendix.
CMYK TIFFs √ Only B/W, Gray, RGB Palette and RGB
Smart Format Selection Not supported √
Feature CompuSet xPublish
Document Sciences Corporation

Chapter 3 - The xPression Publishers29
Some key differences are listed below.
Data Driven ChartsBoth CompuSet and xPublish support creating data driven charts. The following paragraphs outline the differences in how each publisher supports them.
CompuSet
To create data driven charts using the CompuSet composition engine, you’ll need to use CompuSet commands, as there is no graphical user interface for the functionality. You should be familiar with CompuSet commands, especially those required to produce charts. You must assemble and view the document to troubleshoot or refine the chart.
xPublish
xPublish has a graphical user interface that makes creating and adding charts to your document fairly easy. You can also create a template that you can use again and again. xPression places a placeholder chart, complete with your formatting, in your document. You can move and adjust the placeholder charts as necessary, without having to assemble the document first.
Headers and FootersCompuSet and xPublish have the following differences in header and footer support.
Remittance Stub Formatting
Remittance stub formatting can be accomplished through CompuSet by creating three different footers. The footer on the first page is the front of the remittance stub, the footer on the second page is the back of the stub, and the footer on the third page is for all subsequent pages. In this situation, the content must flow naturally from the top of
Feature CompuSet xPublish
Data Driven Charts √ √
Image Rotation √ √
Image Resizing √ √
Headers and Footers √ √
Special Characters Additional configuration needed √
Bulleted Lists Additional configuration needed √
Table of Contents Additional configuration needed √
Document Sciences Corporation
Chapter 3 - The xPression Publishers30
page one, and onto page three. This can’t be resolved by section break logic, since in order to set a third page footer, a section break requires knowing where the page will break. If the content being set is, for example, transactional information of unknown length, there is no way to know at assembly time where the pages will break.
xPublish doesn’t support footer changes beyond a different first page, or different odd or even pages, when content flows naturally beyond two pages. This is because footer changes are determined by page breaking section breaks. This limits the ability to produce remittance stubs. If the content only flows to two pages maximum, you can accomplish this through Word. If you are using xPublish, consider Creating an End-Page Stub.
Two-Column to One-Column Changes Across Page BoundariesYou may have a situation where variable content starts in one column of a two-column page (with other unrelated content in the other column), and then flows on to the next page, where it must be in a one-column format. You can accomplish this dynamically with CompuSet. This type of functionality is not supported in Word, and therefore, not in xPublish.
Document Sciences Corporation
In this chapter you will learn the process you might follow when designing an xPression Design document that creates a relatively simple letter.
A Sample LetterYou probably have an existing electronic or paper document set that you’re charged with “converting” to xDesign documents. Your first task is to work backwards through these documents to determine the conditions under which particular sections should be included in the assembled for each customer.
Using this “reverse engineering” method, you’ll identify an ordered set of conditions and content you can use as your guide when you create the document in xPression Design.
Chapter 4
From Paper to xDesign 4
Document Sciences Corporation
Chapter 4 - From Paper to xDesign32
We’ll describe one way of designing a document in this chapter, but it’s certainly not the only approach. You’re the best judge of your documents, and the data that’s used to build them. Use the information we present here as a guide as you prepare your documents for xDesign.
xDesign and Microsoft WordxDesign interfaces with Microsoft Word to give you a familiar design environment to define your page size, layout, format styles, add images and text, and integrate data from your data sources. For more information about preparing Word for use with xDesign, see Configuring Microsoft Word.
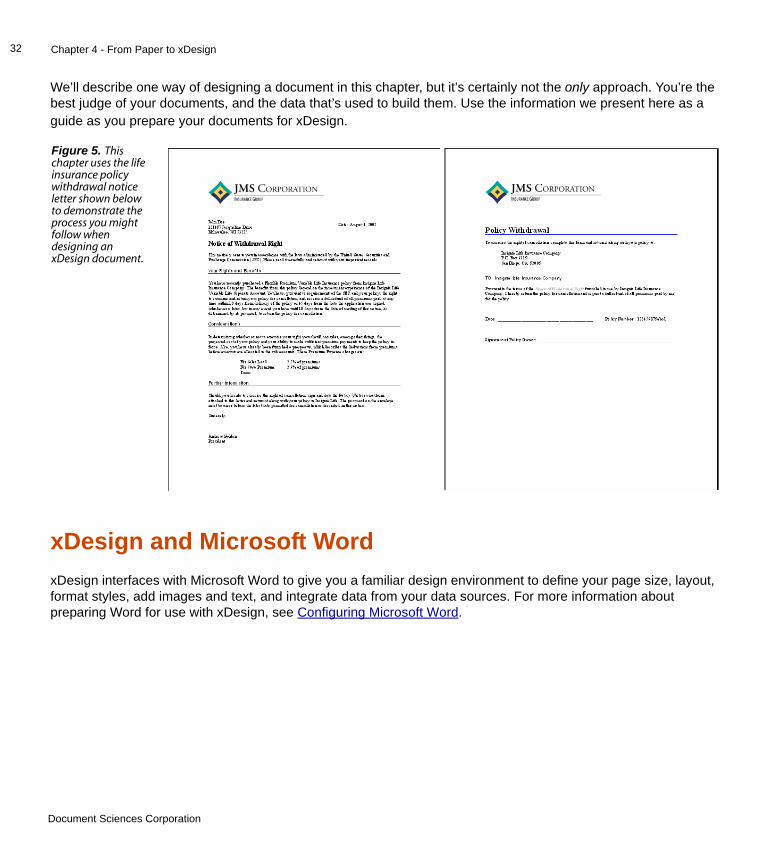
Figure 5. This chapter uses the life insurance policy withdrawal notice letter shown below to demonstrate the process you might follow when designing an xDesign document.
Document Sciences Corporation
Chapter 4 - From Paper to xDesign33
First Step: Gathering Some Background InformationExamine the sample letter above and try to identify its components and where they come from. In a later step, we will walk you through creating this document in xPression. Consider asking the following questions.
Question Why Ask?
What is the purpose of this document? What information must it contain? Will there be any others like it? If so, do they all share any of the same attributes?
These questions are asked with an eye toward the creation of categories and attribute sets. Attributes enable you to decide which fields from your customer data source to use for evaluating business rules and logic (you do not have to map all fields in the data source, just the fields you want to use).
Where does the data you use to personalize it come from, and what format is it in?
The customer data source refers to the data you will use to personalize your documents and in the criteria in rules. xPression uses this data to evaluate the rules in the document to determine what content should be assembled for each customer. A data source group can refer to multiple sources of data, called data sources, that can be contained in either XML documents or relational databases.
Can any of your data be used to personalize the document?
You can use xDesign to add variable replacement fields, often called simply “replacements”, to personalize documents. When a document is assembled for a specific customer, xDesign replaces these variables with the specific data contained in the fields referenced by the replacement variables.
Can any of the content be shared? xDesign enables you to use a single copy of a content item in more than one document, or use the content item several times within a single document. For example, if all your documents contain a logo and address information, you could create one shared content item that contains this information and use it as needed in your documents. Other uses of shared content include signature pieces and actuarial tables that contain variable replacement fields.
Do you use a Word template with your own corporate styles?
As noted in xDesign and Microsoft Word, templates are a crucial part of xPression document design. Make sure you’re familiar with the use, creation, and maintenance of Word styles, and consider restricting access to the templates.
Does it use any images? Where are they stored?
Gather the names and locations of any images used in the document. xPression content items can reference images that are currently in the xPression database or insert an image that will then be copied into the xPression database. Documents using xPublish can also reference images that are not in the xPression database, including images in the file system or Documentum. See Differences in Image Type Support for a list of the supported image types for each publisher.
What fonts are used? Identify the fonts you use in your documents, then make sure that they match the fonts used by your production printers. While having matching fonts isn’t required, we strongly recommend that you do. If you can’t get the Windows equivalent of a printer font, try to find the closest match that you can.
Document Sciences Corporation
Chapter 4 - From Paper to xDesign34
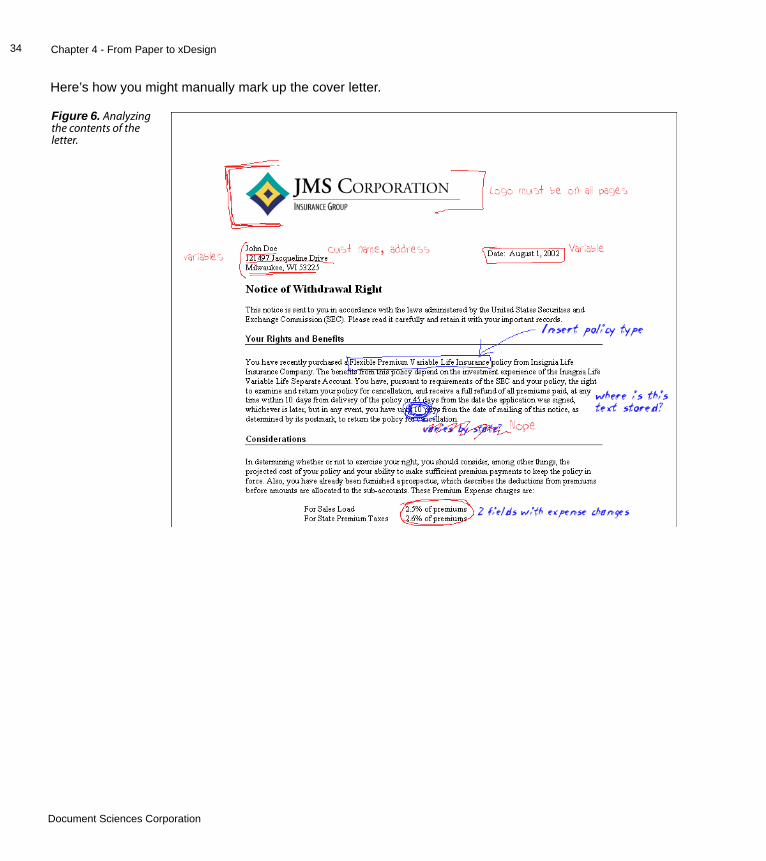
Here’s how you might manually mark up the cover letter.
Figure 6. Analyzing the contents of the letter.
Document Sciences Corporation

Chapter 4 - From Paper to xDesign35
Some prefer to capture this sort of information in a table, such as the one shown here.
Second Step: Configuring Your xPression EnvironmentAfter you’ve gathered the information described in the previous section, contact your xPression system administrator to begin the process of creating categories and attributes, locating and configuring your data sources, mapping the attributes to your data sources, and more. For more information, see the xAdmin Enterprise Edition User Guide.
Third Step: Creating a DocumentWhen your environment is up and running, it’s time to get to the good part: starting xPression Design and creating a document. Log on to xDesign and create a document as described in the xDesign User Guide.
Parameter Definition
Purpose of Document
Similar Documents
Category Name
Document Name
Data Sources and Formats
Data Attributes
Word Template
Fonts and Images
Output Format
Document Sciences Corporation
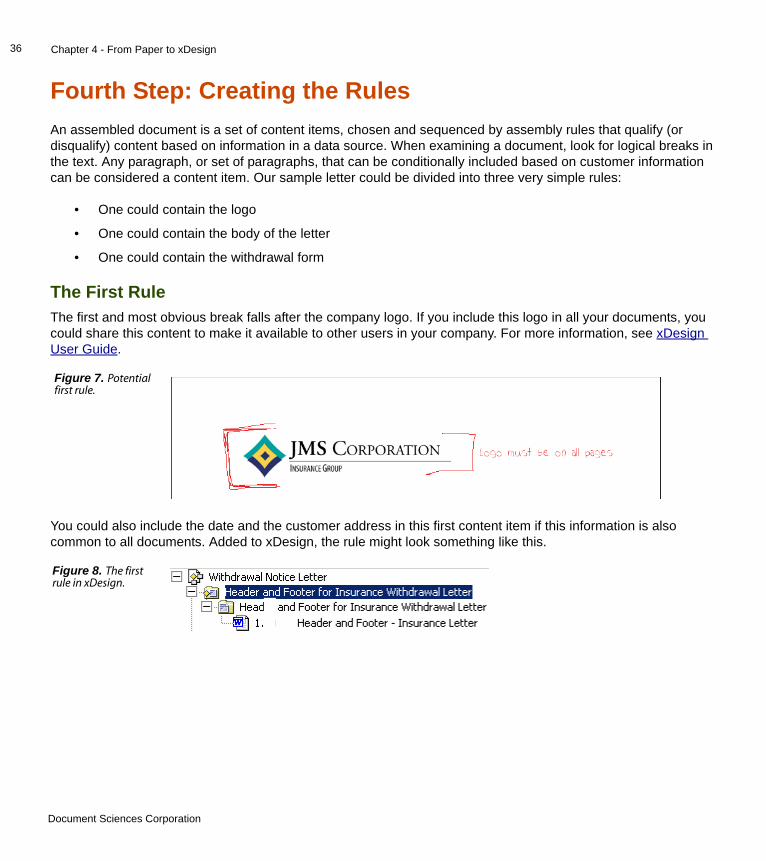
Chapter 4 - From Paper to xDesign36
Fourth Step: Creating the RulesAn assembled document is a set of content items, chosen and sequenced by assembly rules that qualify (or disqualify) content based on information in a data source. When examining a document, look for logical breaks in the text. Any paragraph, or set of paragraphs, that can be conditionally included based on customer information can be considered a content item. Our sample letter could be divided into three very simple rules:
• One could contain the logo
• One could contain the body of the letter
• One could contain the withdrawal form
The First RuleThe first and most obvious break falls after the company logo. If you include this logo in all your documents, you could share this content to make it available to other users in your company. For more information, see xDesign User Guide.
You could also include the date and the customer address in this first content item if this information is also common to all documents. Added to xDesign, the rule might look something like this.
Figure 7. Potential first rule.
Figure 8. The first rule in xDesign.
Document Sciences Corporation
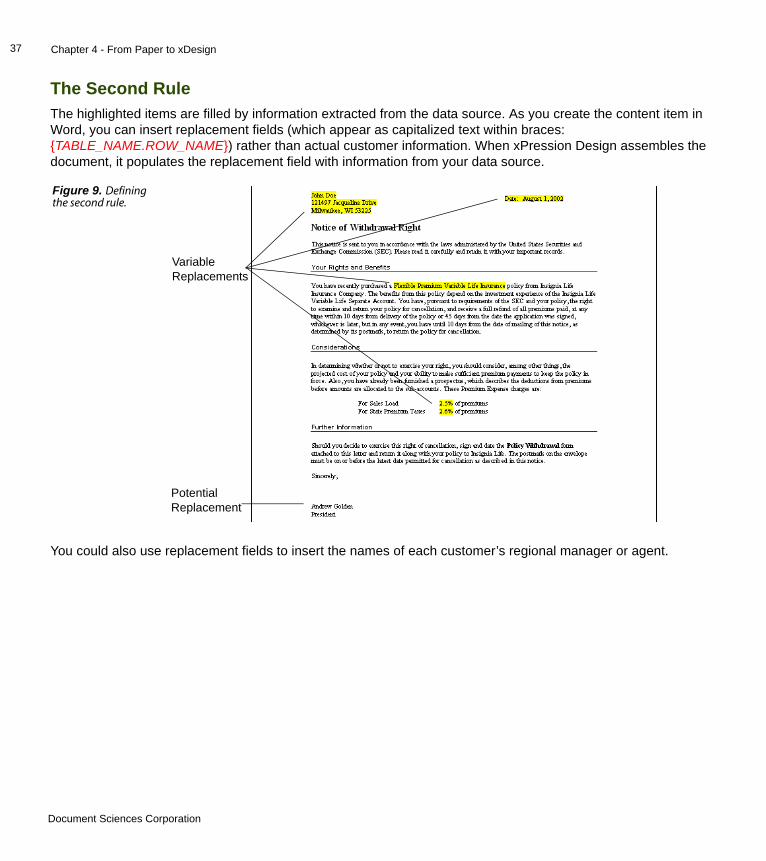
Chapter 4 - From Paper to xDesign37
The Second RuleThe highlighted items are filled by information extracted from the data source. As you create the content item in Word, you can insert replacement fields (which appear as capitalized text within braces: {TABLE_NAME.ROW_NAME}) rather than actual customer information. When xPression Design assembles the document, it populates the replacement field with information from your data source.
You could also use replacement fields to insert the names of each customer’s regional manager or agent.
Figure 9. Defining the second rule.
Variable Replacements
Potential Replacement
Document Sciences Corporation

Chapter 4 - From Paper to xDesign38
Added to xDesign, the rule might look something like what appears below. Note the appearance of the replacement fields.
Figure 10. The second rule in xDesign.
Second Rule
Variable Replacements
Document Sciences Corporation
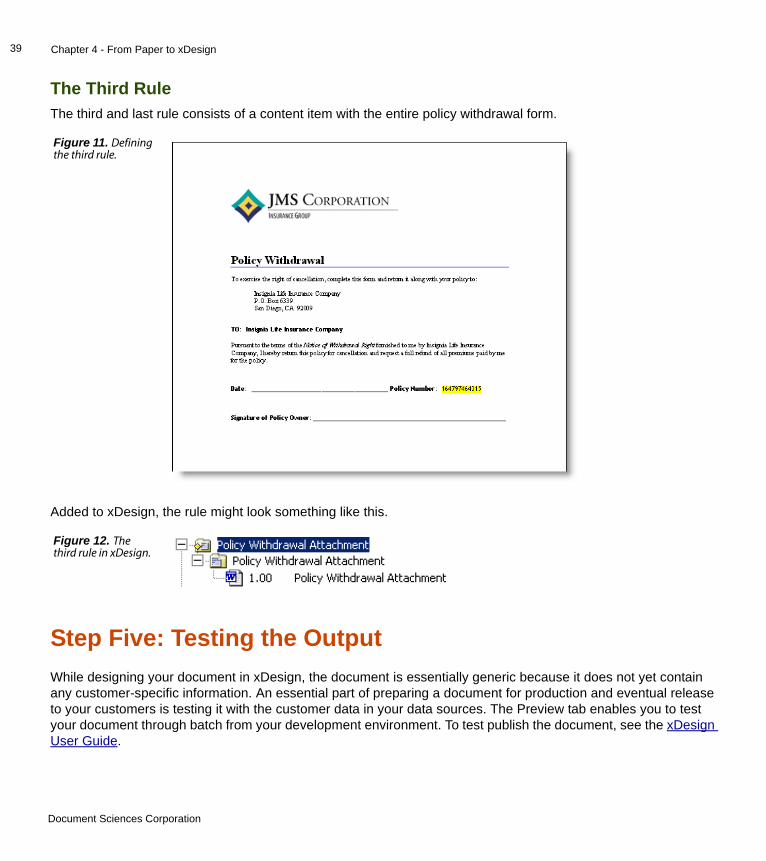
Chapter 4 - From Paper to xDesign39
The Third RuleThe third and last rule consists of a content item with the entire policy withdrawal form.
Added to xDesign, the rule might look something like this.
Step Five: Testing the OutputWhile designing your document in xDesign, the document is essentially generic because it does not yet contain any customer-specific information. An essential part of preparing a document for production and eventual release to your customers is testing it with the customer data in your data sources. The Preview tab enables you to test your document through batch from your development environment. To test publish the document, see the xDesign User Guide.
Figure 11. Defining the third rule.
Figure 12. The third rule in xDesign.
Document Sciences Corporation
Chapter 4 - From Paper to xDesign40
Which Publisher Should You Use?Before beginning that actual creation of your document, you need to decide which publishing engine you want to use to produce the final output. Both publishing engines provide distinct features and capabilities. You should match the requirements of your document to the features of the publisher. For example, does your document require IBM OnDemand AFP Indexing? Then you should use the CompuSet publishing engine. Maybe your document requires the use of Unicode fonts, then you should choose the xPublish publishing engine. For more information, see The xPression Publishers.
Caution: Your choice of publisher is important, because although you can convert a CompuSet document to an xPublish document, you can’t convert an xPublish document to a CompuSet document.
Document Sciences Corporation
This chapter covers all page-level formatting features that CompuSet and xPublish support. Page-level formatting features include: all options available from the Microsoft Word Page Setup dialog box, page and section breaks, columns, headers and footers, and page numbering.
Configuring Page Setup OptionsYou can set the page size, margin width and depth, paper type, orientation, and other page setup options for your xPression document by defining these settings in the first section of the first content item for your document. To change any of these settings later in your document, insert a page-breaking section break before the change in format, deselect the “Same as previous” option for any new headers and footers, and make your changes to the section after the new section break. This allows you to define your page layout entirely in Word.
The page setup options you define in the first content item will apply to the rest of the content items in your document when the document is assembled for viewing or publishing.
Chapter 5
Page Level Formatting 5
Note: For xPublish documents, the page settings will not appear in other content items you are editing unless you set the new page options as the default prior to creating the other content items. This will duplicate the page setup options for each new content item you create. Click Default from the Page Setup screen, and click Yes. The default page layout that is used in the first content item of your xPression document will carry through to all the rest of the content in the document, unless you specify a Section break and change the layout.
Document Sciences Corporation
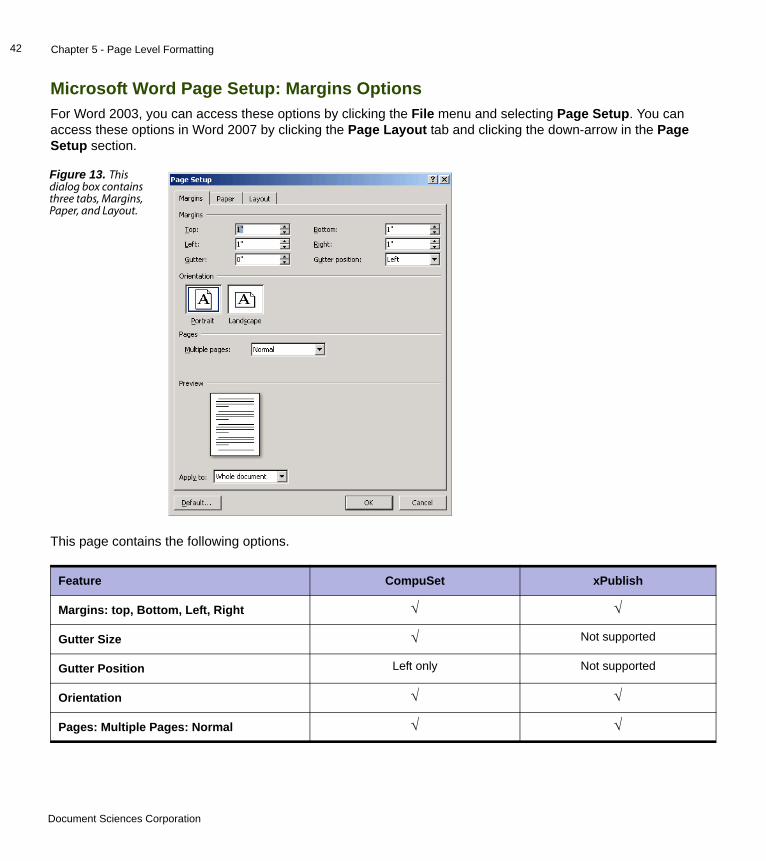
Chapter 5 - Page Level Formatting42
Microsoft Word Page Setup: Margins OptionsFor Word 2003, you can access these options by clicking the File menu and selecting Page Setup. You can access these options in Word 2007 by clicking the Page Layout tab and clicking the down-arrow in the Page Setup section.
This page contains the following options.
Figure 13. This dialog box contains three tabs, Margins, Paper, and Layout.
Feature CompuSet xPublish
Margins: top, Bottom, Left, Right √ √
Gutter Size √ Not supported
Gutter Position Left only Not supported
Orientation √ √
Pages: Multiple Pages: Normal √ √
Document Sciences Corporation
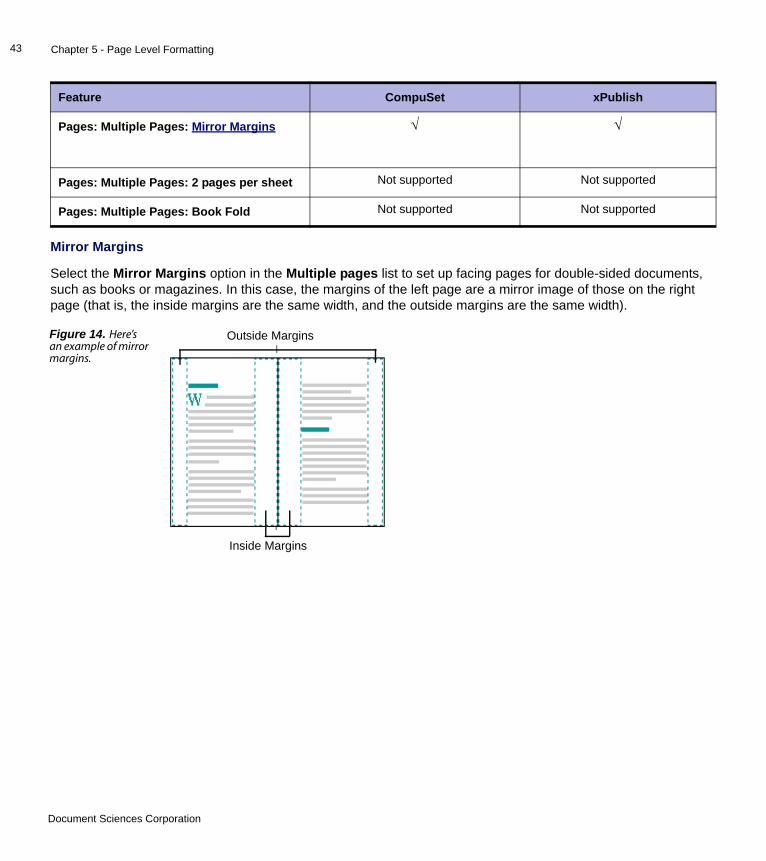
Chapter 5 - Page Level Formatting43
Mirror Margins
Select the Mirror Margins option in the Multiple pages list to set up facing pages for double-sided documents, such as books or magazines. In this case, the margins of the left page are a mirror image of those on the right page (that is, the inside margins are the same width, and the outside margins are the same width).
Pages: Multiple Pages: Mirror Margins √ √
Pages: Multiple Pages: 2 pages per sheet Not supported Not supported
Pages: Multiple Pages: Book Fold Not supported Not supported
Figure 14. Here’s an example of mirror margins.
Feature CompuSet xPublish
Outside Margins
Inside Margins
Document Sciences Corporation
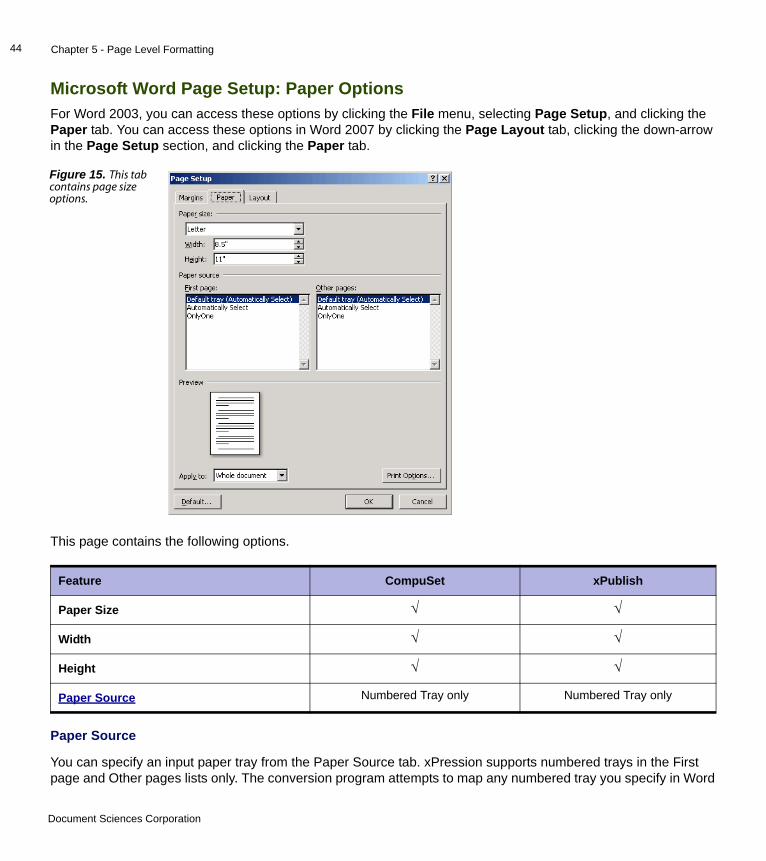
Chapter 5 - Page Level Formatting44
Microsoft Word Page Setup: Paper OptionsFor Word 2003, you can access these options by clicking the File menu, selecting Page Setup, and clicking the Paper tab. You can access these options in Word 2007 by clicking the Page Layout tab, clicking the down-arrow in the Page Setup section, and clicking the Paper tab.
This page contains the following options.
Paper Source
You can specify an input paper tray from the Paper Source tab. xPression supports numbered trays in the First page and Other pages lists only. The conversion program attempts to map any numbered tray you specify in Word
Figure 15. This tab contains page size options.
Feature CompuSet xPublish
Paper Size √ √
Width √ √
Height √ √
Paper Source Numbered Tray only Numbered Tray only
Document Sciences Corporation
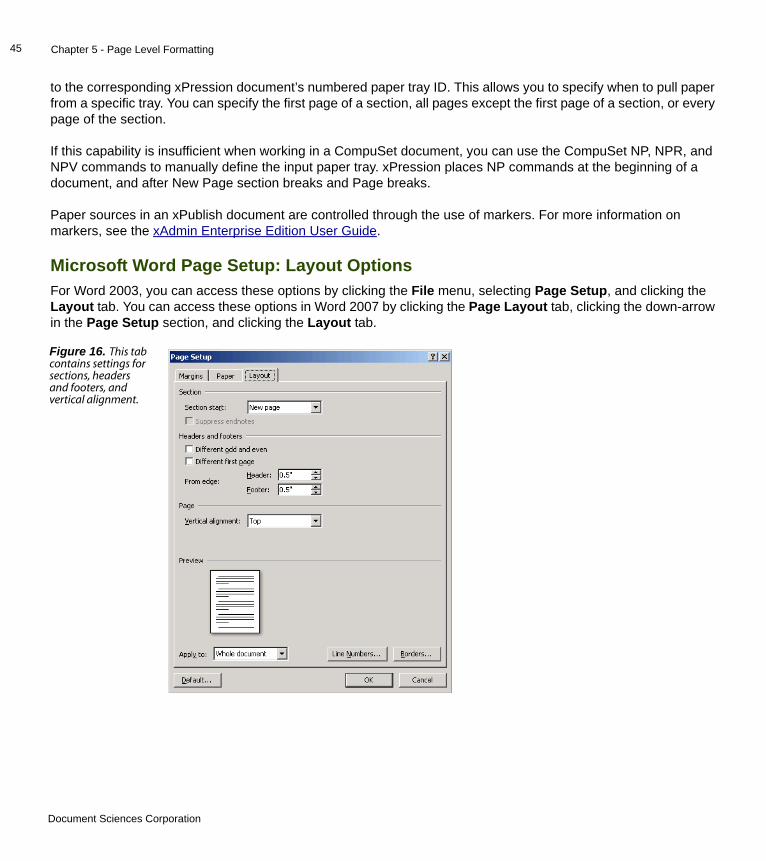
Chapter 5 - Page Level Formatting45
to the corresponding xPression document’s numbered paper tray ID. This allows you to specify when to pull paper from a specific tray. You can specify the first page of a section, all pages except the first page of a section, or every page of the section.
If this capability is insufficient when working in a CompuSet document, you can use the CompuSet NP, NPR, and NPV commands to manually define the input paper tray. xPression places NP commands at the beginning of a document, and after New Page section breaks and Page breaks.
Paper sources in an xPublish document are controlled through the use of markers. For more information on markers, see the xAdmin Enterprise Edition User Guide.
Microsoft Word Page Setup: Layout OptionsFor Word 2003, you can access these options by clicking the File menu, selecting Page Setup, and clicking the Layout tab. You can access these options in Word 2007 by clicking the Page Layout tab, clicking the down-arrow in the Page Setup section, and clicking the Layout tab.
Figure 16. This tab contains settings for sections, headers and footers, and vertical alignment.
Document Sciences Corporation
Chapter 5 - Page Level Formatting46
This page contains the following options.
Vertical Alignment
xPublish supports vertical text justification, flush up, flush down, and center. Vertical justification is achieved by adjusting inter-paragraph spacing (referred to as "blocking") or by adjusting inter-paragraph and inter-line spacing (referred to as "carding"), as specified by the composition input.
Feature CompuSet xPublish
Section Start Not supported Not supported
Suppress endnotes Not supported Not supported
Headers & Footers: Different odd and even √ √
Headers & Footers: Different first page √ √
From Edge √ Not supported
Vertical Alignment √ √
Line Numbers Not supported Not supported
Borders Simple (single line, non-patterned, non-shaded) style page borders are supported. Dotted or dashed borders
with a single, unalterable weight.
Not supported
Document Sciences Corporation
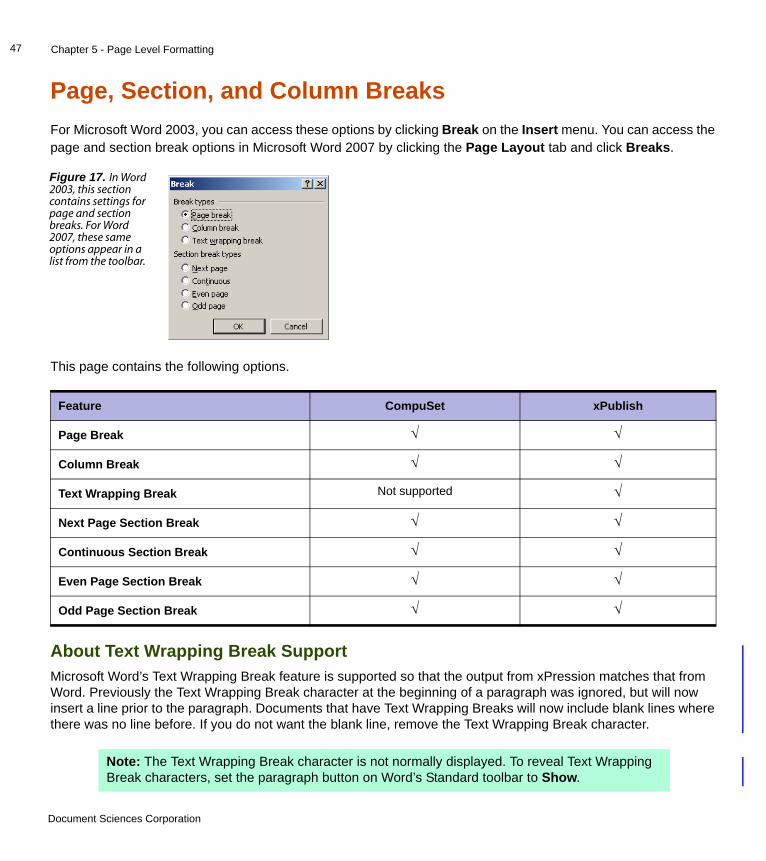
Chapter 5 - Page Level Formatting47
Page, Section, and Column BreaksFor Microsoft Word 2003, you can access these options by clicking Break on the Insert menu. You can access the page and section break options in Microsoft Word 2007 by clicking the Page Layout tab and click Breaks.
This page contains the following options.
About Text Wrapping Break SupportMicrosoft Word’s Text Wrapping Break feature is supported so that the output from xPression matches that from Word. Previously the Text Wrapping Break character at the beginning of a paragraph was ignored, but will now insert a line prior to the paragraph. Documents that have Text Wrapping Breaks will now include blank lines where there was no line before. If you do not want the blank line, remove the Text Wrapping Break character.
Figure 17. In Word 2003, this section contains settings for page and section breaks. For Word 2007, these same options appear in a list from the toolbar.
Feature CompuSet xPublish
Page Break √ √
Column Break √ √
Text Wrapping Break Not supported √
Next Page Section Break √ √
Continuous Section Break √ √
Even Page Section Break √ √
Odd Page Section Break √ √
Note: The Text Wrapping Break character is not normally displayed. To reveal Text Wrapping Break characters, set the paragraph button on Word’s Standard toolbar to Show.
Document Sciences Corporation
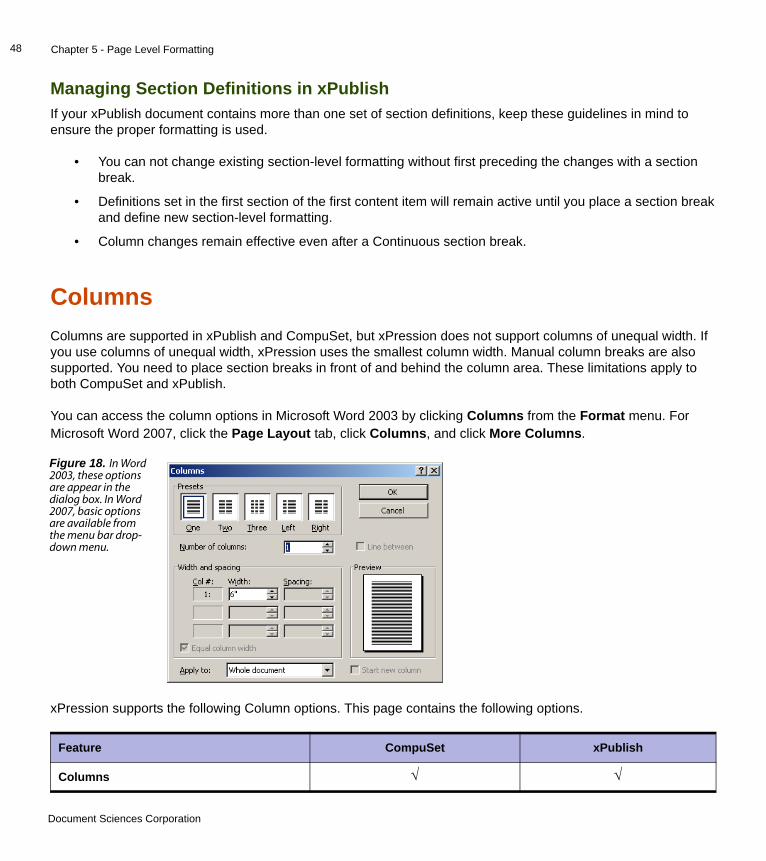
Chapter 5 - Page Level Formatting48
Managing Section Definitions in xPublish If your xPublish document contains more than one set of section definitions, keep these guidelines in mind to ensure the proper formatting is used.
• You can not change existing section-level formatting without first preceding the changes with a section break.
• Definitions set in the first section of the first content item will remain active until you place a section break and define new section-level formatting.
• Column changes remain effective even after a Continuous section break.
ColumnsColumns are supported in xPublish and CompuSet, but xPression does not support columns of unequal width. If you use columns of unequal width, xPression uses the smallest column width. Manual column breaks are also supported. You need to place section breaks in front of and behind the column area. These limitations apply to both CompuSet and xPublish.
You can access the column options in Microsoft Word 2003 by clicking Columns from the Format menu. For Microsoft Word 2007, click the Page Layout tab, click Columns, and click More Columns.
xPression supports the following Column options. This page contains the following options.
Figure 18. In Word 2003, these options are appear in the dialog box. In Word 2007, basic options are available from the menu bar drop-down menu.
Feature CompuSet xPublish
Columns √ √
Document Sciences Corporation

Chapter 5 - Page Level Formatting49
Column BalancingIn xPublish documents with multiple columns of text, xPression balances the columns to ensure that each column contains the same amount of text. Microsoft Word inserts a continuous section break to balance the text equally among the columns.
Inserting a Column Into Your DocumentTo use Word column formatting:
1. Place your cursor where you want to create the column area and insert a section break. If you want the column to start on a new page, choose a Next Page section break.
2. Access the column options from the toolbar. For Microsoft Word 2003, click Columns from the Format menu, and select the number of columns to apply.
In Microsoft Word 2007, click the Page Layout tab, click Columns, select one of the pre-set column options available from the drop-down list or click More Columns to see more options.
3. The columns appear in your content item with the cursor placed in the left column. When your text reaches the bottom of the first column, Microsoft Word automatically continues the text flow in the second column. To manually break a column and move on to the next, use a Column Break.
Headers and FootersYou can create headers and footers that alternate between odd and even pages, use one header for the first page and a different one for all subsequent pages, or any other combination. Both publishers fully support Headers and Footers.
Microsoft Word automates the process for the following combinations:
• Different odd and even headers and footers
• Different first page headers and footers
Line Between Not supported Not supported
Width and spacing Values for the first column will apply to all columns
√
Equal column width √ √
Column Balancing √ √
Feature CompuSet xPublish
Document Sciences Corporation

Chapter 5 - Page Level Formatting50
• Special headers and footers
xPression takes the header and footer formatting, as well as all other page and section level formatting, from the first section of the first content item of an assembled document. When you change headers and footers in the middle of a document, you must manually place a page-breaking section break at the place in your content item where you want to go to a new page with redefined headers and footers. A page-breaking section break is any Word section break other than a Continuous section break. xPression supports styles in header and footer text.
Header and Footer Options in Microsoft Word 2003To access the header and footer options in Microsoft Word 2003, click the View menu and click Header and Footer. The Header and Footer toolbar appears.
This toolbar contains the following options.
Header and Footer Options in Microsoft Word 2007To access the header and footer options in Microsoft Word 2007, click the Insert tab. The Header and Footer options appear in the Header & Footer group.
Figure 19. The header and footer toolbar in Microsoft Word 2003.
Feature CompuSet xPublish
Page Number √ √
Number of Pages √ √
Insert Date √ √
Insert Time √ √
Figure 20. The header and footer section in Microsoft Word 2007.
Document Sciences Corporation

Chapter 5 - Page Level Formatting51
The Header & Footer group contains the following options.
After you insert a header or footer, or begin editing an existing header or footer, Microsoft Word displays the Header & Footer Tools Design tab. This tab contains the Header & Footer, Insert, Navigation, Options, and Position groups. Each of the items in these groups apply to your header or footer. The Header & Footer group contains the following options.
Feature CompuSet xPublish
Header √ Only the “Blank” pre-made headers are supported
Footer √ Only the “Blank” pre-made footers are supported
Page Number √ Page Margins not supported, only “Plain” Current Postion supported, Format Page Number supported.
Feature CompuSet xPublish
Insert Group: Data and Time √ √
Insert Group: Quick Parts Not supported Only Field is supported.
Insert Group: Picture √ √
Insert Group: Clip Art Not supported Not supported
Navigation Group: √ √
Options Group: Different First Page √ √
Options Group: Different Odd & Even Pages
√ √
Options Group: Show Document Text Does not affect output Does not affect output
Position Group: Header from Top √ √
Position Group: Footer from Bottom √ √
Position Group: Insert Alignment Tab √ √
Document Sciences Corporation

Chapter 5 - Page Level Formatting52
Creating Headers and Footers in Microsoft Word 2003To create headers and footers:
1. For Microsoft Word 2003, click the View menu and select Header and Footer.
2. Using the Header and Footer toolbar, add text, images, the Date/Time function, or page numbers to your header or footer.
Creating Headers and Footers in Microsoft Word 2007To create headers and footers:
1. Click the Insert tab.
2. From the Header and Footer group, click Header or Footer. The Header or Footer is added to your document.
3. Add text, images, the Date/Time function, or page numbers to your header or footer.
Inserting Data Source Replacements in Headers and FootersYou can insert xPression data source replacements into the headers and footers in your content items. At assembly time, xPression inserts the variable data from a rule or your customer data source in the location of the replacement.
To insert a data source replacement into a header or footer:
1. Create your header or footer.
2. Place the cursor where you want the replacement to appear in the header or footer and click Insert Replacement Field from the xPression toolbar (in Microsoft Word 2003) or xPression group (in Microsoft Word 2007).
3. Select the data source field or variable you want to insert from the list in the Replacement Fields dialog box and click Insert.
For more information on working with replacements, see the xDesign User Guide.
Changing Headers and FootersTo redefine your headers and footers in the middle of your document:
1. Insert a page-breaking section break to start the new page with redefined headers and footers.
2. Place your cursor in the section following that section break.
3. Add your header or footer.
Document Sciences Corporation
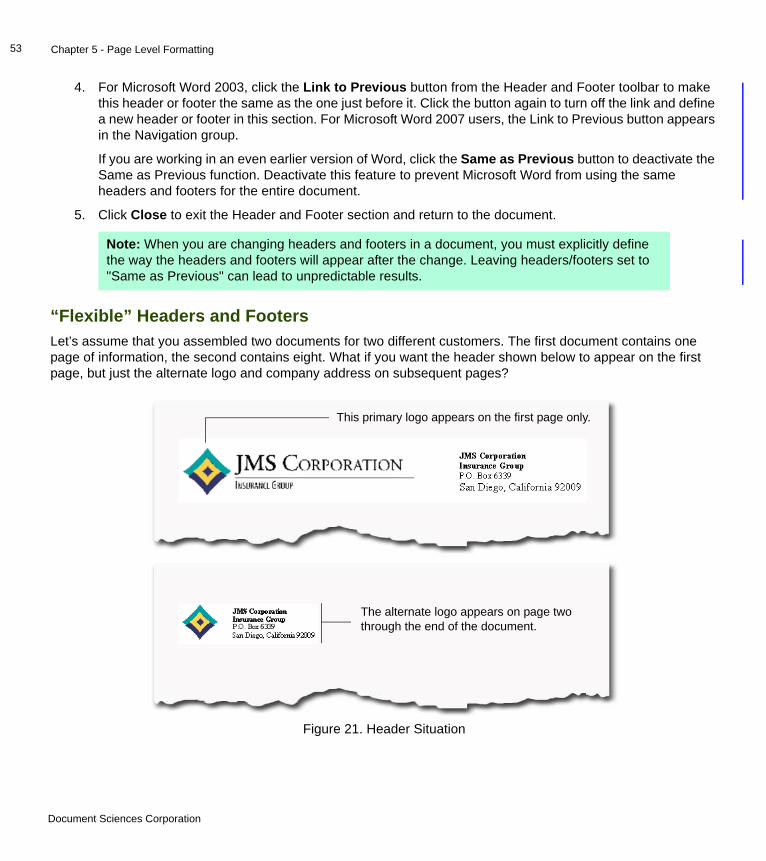
Chapter 5 - Page Level Formatting53
4. For Microsoft Word 2003, click the Link to Previous button from the Header and Footer toolbar to make this header or footer the same as the one just before it. Click the button again to turn off the link and define a new header or footer in this section. For Microsoft Word 2007 users, the Link to Previous button appears in the Navigation group.
If you are working in an even earlier version of Word, click the Same as Previous button to deactivate the Same as Previous function. Deactivate this feature to prevent Microsoft Word from using the same headers and footers for the entire document.
5. Click Close to exit the Header and Footer section and return to the document.
“Flexible” Headers and FootersLet’s assume that you assembled two documents for two different customers. The first document contains one page of information, the second contains eight. What if you want the header shown below to appear on the first page, but just the alternate logo and company address on subsequent pages?
Note: When you are changing headers and footers in a document, you must explicitly define the way the headers and footers will appear after the change. Leaving headers/footers set to "Same as Previous" can lead to unpredictable results.
Figure 21. Header Situation
This primary logo appears on the first page only.
The alternate logo appears on page two through the end of the document.
Document Sciences Corporation
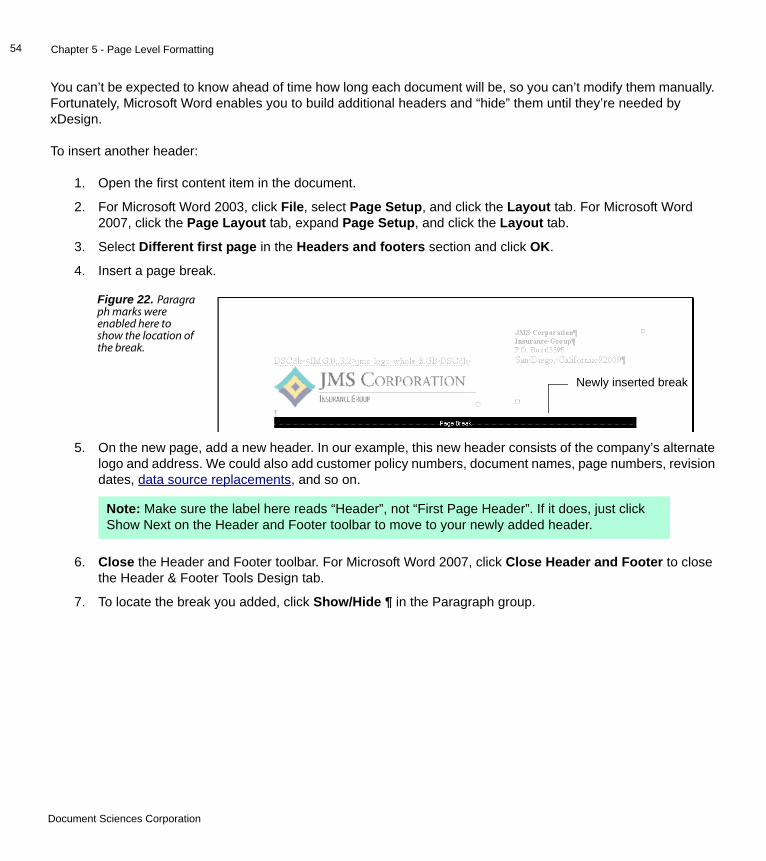
Chapter 5 - Page Level Formatting54
You can’t be expected to know ahead of time how long each document will be, so you can’t modify them manually. Fortunately, Microsoft Word enables you to build additional headers and “hide” them until they’re needed by xDesign.
To insert another header:
1. Open the first content item in the document.
2. For Microsoft Word 2003, click File, select Page Setup, and click the Layout tab. For Microsoft Word 2007, click the Page Layout tab, expand Page Setup, and click the Layout tab.
3. Select Different first page in the Headers and footers section and click OK.
4. Insert a page break.
5. On the new page, add a new header. In our example, this new header consists of the company’s alternate logo and address. We could also add customer policy numbers, document names, page numbers, revision dates, data source replacements, and so on.
6. Close the Header and Footer toolbar. For Microsoft Word 2007, click Close Header and Footer to close the Header & Footer Tools Design tab.
7. To locate the break you added, click Show/Hide ¶ in the Paragraph group.
Figure 22. Paragraph marks were enabled here to show the location of the break.
Note: Make sure the label here reads “Header”, not “First Page Header”. If it does, just click Show Next on the Header and Footer toolbar to move to your newly added header.
Newly inserted break
Document Sciences Corporation
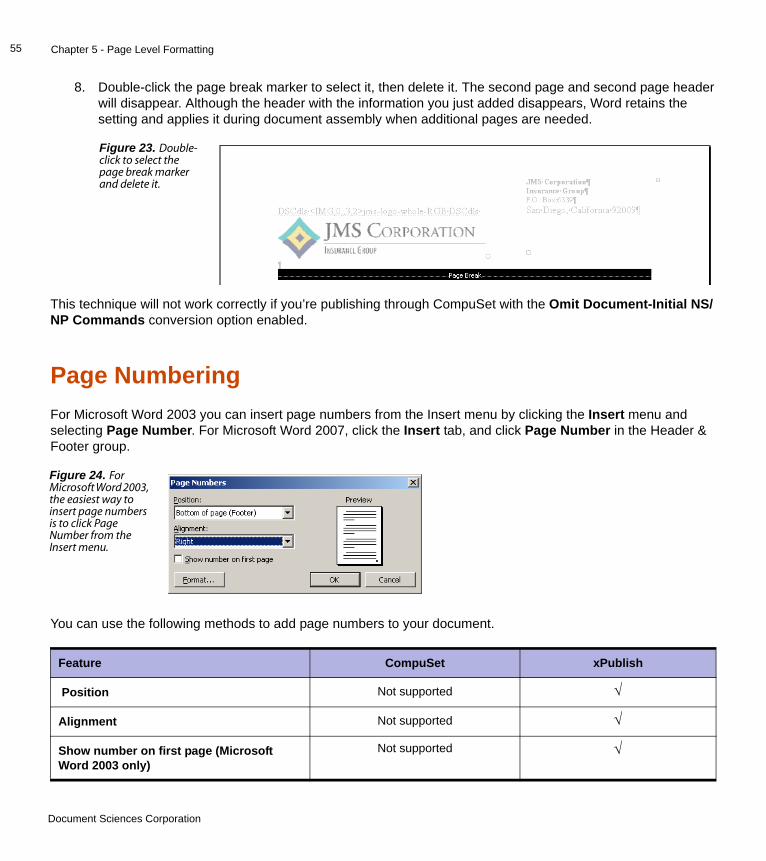
Chapter 5 - Page Level Formatting55
8. Double-click the page break marker to select it, then delete it. The second page and second page header will disappear. Although the header with the information you just added disappears, Word retains the setting and applies it during document assembly when additional pages are needed.
This technique will not work correctly if you’re publishing through CompuSet with the Omit Document-Initial NS/NP Commands conversion option enabled.
Page NumberingFor Microsoft Word 2003 you can insert page numbers from the Insert menu by clicking the Insert menu and selecting Page Number. For Microsoft Word 2007, click the Insert tab, and click Page Number in the Header & Footer group.
You can use the following methods to add page numbers to your document.
Figure 23. Double-click to select the page break marker and delete it.
Figure 24. For Microsoft Word 2003, the easiest way to insert page numbers is to click Page Number from the Insert menu.
Feature CompuSet xPublish
Position Not supported √
Alignment Not supported √
Show number on first page (Microsoft Word 2003 only)
Not supported √
Document Sciences Corporation
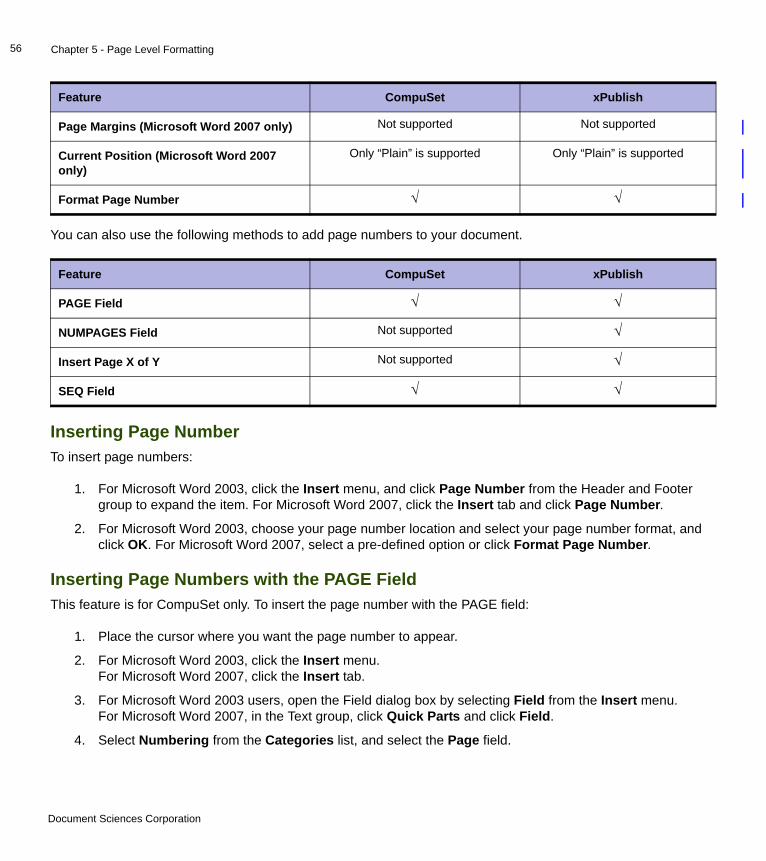
Chapter 5 - Page Level Formatting56
You can also use the following methods to add page numbers to your document.
Inserting Page NumberTo insert page numbers:
1. For Microsoft Word 2003, click the Insert menu, and click Page Number from the Header and Footer group to expand the item. For Microsoft Word 2007, click the Insert tab and click Page Number.
2. For Microsoft Word 2003, choose your page number location and select your page number format, and click OK. For Microsoft Word 2007, select a pre-defined option or click Format Page Number.
Inserting Page Numbers with the PAGE FieldThis feature is for CompuSet only. To insert the page number with the PAGE field:
1. Place the cursor where you want the page number to appear.
2. For Microsoft Word 2003, click the Insert menu. For Microsoft Word 2007, click the Insert tab.
3. For Microsoft Word 2003 users, open the Field dialog box by selecting Field from the Insert menu.For Microsoft Word 2007, in the Text group, click Quick Parts and click Field.
4. Select Numbering from the Categories list, and select the Page field.
Page Margins (Microsoft Word 2007 only) Not supported Not supported
Current Position (Microsoft Word 2007 only)
Only “Plain” is supported Only “Plain” is supported
Format Page Number √ √
Feature CompuSet xPublish
PAGE Field √ √
NUMPAGES Field Not supported √
Insert Page X of Y Not supported √
SEQ Field √ √
Feature CompuSet xPublish
Document Sciences Corporation
Chapter 5 - Page Level Formatting57
5. In the Field Properties area, select your numbering format from the Format list. Options range from formats such as 1, 2, 3... to Roman Numerals and more. If you are working in an earlier version of Word, click the Formatting button to open the format options area and make your selections.
6. Click Field codes to display the Advanced Field Properties area where you can type an identifier for the PAGE field. The identifier can be a letter, number, or word. For example, PAGE 1.
7. Click OK.
Inserting Page Numbers with the NUMPAGES FieldTo insert the number of pages with the NUMPAGES field:
1. Place the cursor where you want the page number to appear.
2. For Microsoft Word 2003, click the Insert menu. For Microsoft Word 2007, click the Insert tab.
3. For Windows 2003 users, open the Field dialog box by selecting Field from the Insert menu.For Microsoft Word 2007, in the Text group, expand Quick Parts and click Field.
4. Under Categories, select Document Information.
5. Under Field names, select NumPages.
6. Click the Field Codes button to open the Advanced field properties area where you can add an identifier for the NUMPAGES field. The identifier can be a letter, number, or word (for example, NUMPAGES 1).
For earlier versions of Word, type an identifier after NUMPAGES in the Field codes area. Click Options to open the Field Options dialog box where you can choose your alpha and numeric formats, and then click Add to Field.
7. Click OK.
Inserting Page Numbers with the Seq FieldTo insert the number of pages with the Seq field:
1. Place the cursor where you want the page number to appear.
2. For Microsoft Word 2003, click the Insert menu. For Microsoft Word 2007, click the Insert tab.
3. For Windows 2003 users, open the Field dialog box by selecting Field from the Insert menu.For Microsoft Word 2007, in the Text group, expand Quick Parts and click Field.
4. Under Categories, select Numbering.
5. Under Field names, select Seq.
6. The Advanced Field Properties section displays the Field Codes box. Each Seq field contains an identifier, or name, that relates it to other identically named Seq fields. The identifier is a name that distinguishes
Document Sciences Corporation
Chapter 5 - Page Level Formatting58
one list of fields from another. Under Field codes, type an identifier after SEQ. The identifier must contain one of the numbers between 400-409. For example List404, Steps401, or Alpha403.
7. Click Options.
8. The Field Options dialog box appears. On the General Switches tab, under Formatting, choose a numbering format such as 1, 2, 3..., then click Add to Field.
9. Click OK twice. The first number appears in your content item.
10. Manually format the Seq field by adding a period or parenthesis after the number.
Inserting Page X of Y into Headers and Footers in Microsoft Word 2003You can insert the page number and number of pages into headers and footers using the Page X of Y function. xPression uses Word’s PAGE and NUMPAGES fields to provide this information when the document is assembled. Once placed, you can change the font formatting for either the page number field, the number of pages field, or both. This feature is sometimes referred to as “Page N of M.”
Document Sciences Corporation
Chapter 5 - Page Level Formatting59
To insert Page X of Y in the Header or Footer:
1. Click the Insert tab.
2. From the Header and Footer group, click Page Number to expand the item.
3. Choose your page number location and select the Page X of Y format.
For Word 2003 users, click the Insert menu, point to Autotext, Header/Footer, and then click Page X of Y.
4. The page number and number of pages appears at the selected location. You can toggle between displaying the field codes (PAGE and NUMPAGES) and the field results by pressing ALT + F9.
Inserting Page X of Y into Headers and Footers in Microsoft Word 2007You can insert the page number and number of pages into headers and footers using the PAGE and NUMPAGES fields. Once inserted, you can change the font formatting for either the page number field, the number of pages field, or both. This feature is sometimes referred to as “Page N of M.”
Restarting Page Numbering for a SubdocumentThe page count for Page X of Y will continue into a subdocument by default, but the subdocument’s numbering can proceed independently for documents that use xPublish as the publisher and PDF as their only output. This feature is not supported by xRevise because it conflicts with the Revision Unit concept.
To restart page numbering in a subdocument:
1. Insert a “Next Page” Break prior to the subdocument.
2. From the xDesign tree pane, right-click the subdocument rule and select Properties.
3. Click the Document tab, and select the Retain Subdocument Page Numbering checkbox. The value presented in the Page field follows these rules:
• When the first section of the sub document specifies a start page number, that value is used.
• When the sub document rule specifies to reset the page number, its value is 1.
• If neither of those conditions is satisfied, the value continues from the previous page number in the main document.
The value presented in the NumPages field follows these rules:
• When the sub document rule specifies to reset the number of the pages, its value is the number of the pages of the sub document.
• Otherwise, its value is the number of the pages of the entire document.
Page number formatting in subdocuments always follows the format established in the subdocument, never the master document.
Document Sciences Corporation

This chapter covers all paragraph-level formatting features available from the Paragraph dialog box.
Configuring Paragraph-Level FormattingMost paragraph-level formatting features appear on the Paragraph dialog box. For Microsoft Word 2003, click the Format menu and select Paragraph. For Microsoft 2007, access these options by clicking the Home tab and expanding the Paragraph group.
Chapter 6
Paragraph Level Formatting 6
Figure 25. The Paragraph dialog box contains settings for paragraph alignment, outline level, indentation, before and after spacing, and line and page breaks.
Document Sciences Corporation

Chapter 6 - Paragraph Level Formatting61
Paragraph Options: Indents and SpacingFor Microsoft Word 2003, click the Format menu and select Paragraph. The Indents and Spacing tab contain the following options. To access paragraph-level formatting features for Microsoft 2007, access these options by clicking the Home tab and expanding the Paragraph group.
Line Spacing
Microsoft Word’s Line Spacing setting enables the user to specify exactly how much space should appear between lines.
In previous versions of xPression, users may have experienced unexpected large gaps between paragraphs or after content in tables, headers, footers, and other locations where blank paragraphs had the “At Least” setting applied. Now xPression will create a blank space of the specified size.
In previous xPression versions line spacing could be impacted when fonts of varying sizes were used within the paragraph. When using the Exactly line spacing option, the line spacing is now preserved regardless of font size. Note that if a font larger than the line spacing is used with this option the font will interfere with the line above the larger font. This differs from Word; Word clips the infringing text. To set exact line spacing, from Word’s Format menu click Paragraph. Select Exactly from the Line Spacing list and set the desired spacing in the At field.
Justified Alignment
When Justified is selected, xPression aligns both the left and right sides of the paragraph by increasing the size of the spaces between each word until the line fills the entire width of the text area. No spaces are added between words. Horizontal Justification is not applied to the last line of the paragraph.
Feature CompuSet xPublish
Alignment √ √
Outline Level Not Supported Not Supported
Indentation √ √
Indentation: Special (first line, hanging) √ √
Mirror Indents √ √
Spacing: Before and After √ √
Line Spacing At least and Exactly are supported At least and Exactly are supported
Don’t add space between paragraphs of the same style
Not Supported Not Supported
Document Sciences Corporation

Chapter 6 - Paragraph Level Formatting62
Indentation
xPublish supports positive and negative paragraph indentation to allow both normal indentation of the first line of a paragraph and drop caps. In the By box, you can set the measure by which the text will be indented when you have specified a First line or Hanging indentation. xPublish supports the same measurement units as Word. You can either type in the unit you want to use for the measure (for example, “20 pi”, “10 mm”) or set the default unit on the General tab of the Options dialog accessed by selecting Options from the Tools menu.
The default settings available in the Options dialog box (along with the abbreviation you should use if you choose to type the measure you want to apply in the By edit box) are: Inches (in), Centimeters (cm), Millimeters (mm), points (pt), and picas (pi).
Paragraph Options: TabsFor Microsoft Word 2003, click the Format menu, select Paragraph and click Tabs. To access paragraph-level formatting Tab features for Microsoft 2007, access these options by clicking the Home tab, expanding the Paragraph group, and clicking Tabs.
The Tabs dialog box contains the following options.
Figure 26. The Tabs dialog box contains settings for tab position, alignment, and leader style.
Feature CompuSet xPublish
Tab Stop Position √ √
Alignment All supported except Center and Bar. All supported except Bar.
Leader √ √
Document Sciences Corporation
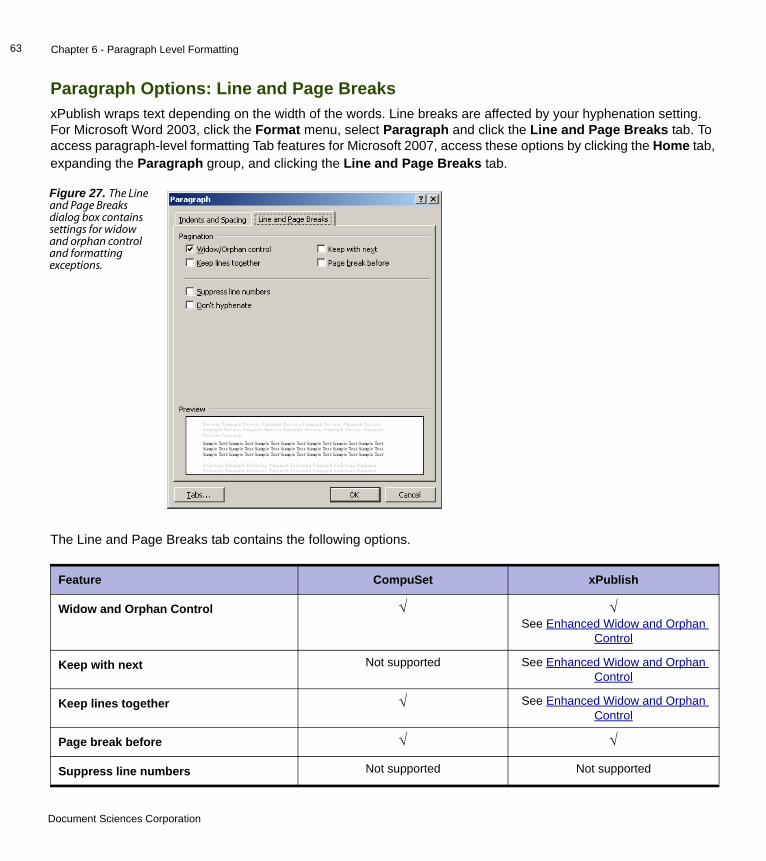
Chapter 6 - Paragraph Level Formatting63
Paragraph Options: Line and Page BreaksxPublish wraps text depending on the width of the words. Line breaks are affected by your hyphenation setting. For Microsoft Word 2003, click the Format menu, select Paragraph and click the Line and Page Breaks tab. To access paragraph-level formatting Tab features for Microsoft 2007, access these options by clicking the Home tab, expanding the Paragraph group, and clicking the Line and Page Breaks tab.
The Line and Page Breaks tab contains the following options.
Figure 27. The Line and Page Breaks dialog box contains settings for widow and orphan control and formatting exceptions.
Feature CompuSet xPublish
Widow and Orphan Control √ √See Enhanced Widow and Orphan
Control
Keep with next Not supported See Enhanced Widow and Orphan Control
Keep lines together √ See Enhanced Widow and Orphan Control
Page break before √ √
Suppress line numbers Not supported Not supported
Document Sciences Corporation
Chapter 6 - Paragraph Level Formatting64
HyphenationxPublish performs algorithmic and dictionary word look-ups to determine how to break a word at the end of a line. If you need to make changes to the hyphenation dictionary, you will find xPublish’s dictionary in the xPression home directory under Publish/Hyphenation. This dictionary uses an XML format and follows industry FOP standards.
You can specify hyphenation of the last word in a column or page as the default setting. When a single word is too long to fit on the current line, xPublish automatically places the word on the next available line.
Publish recognizes manual hyphens and attempts to break them logically. However, if you use field replacements in table cells, it is possible that improper line breaks may occur.
Supported HyphensxPression provides support for the following hyphen characters:
• Plain hyphen (U+002D), also known as the minus sign (-)
• Optional hyphen (U+00Ad)
• Non-breaking hyphen (U+2011)
xPression’s hyphenation algorithm for plain hyphen differs from the way Microsoft Word handles the plain hyphen. Microsoft Word 2003 treats a plain hyphen as a normal character. Consequently, a word may not break at the position of a plain hyphen.
xPression’s algorithm ensures that plain hyphen has a higher priority than optional hyphen and the hyphen automatically created by hyphenation dictionary.
Don’t hyphenate √ √
Textbox options: Tight wrap Not supported Not supported
Feature CompuSet xPublish
Document Sciences Corporation
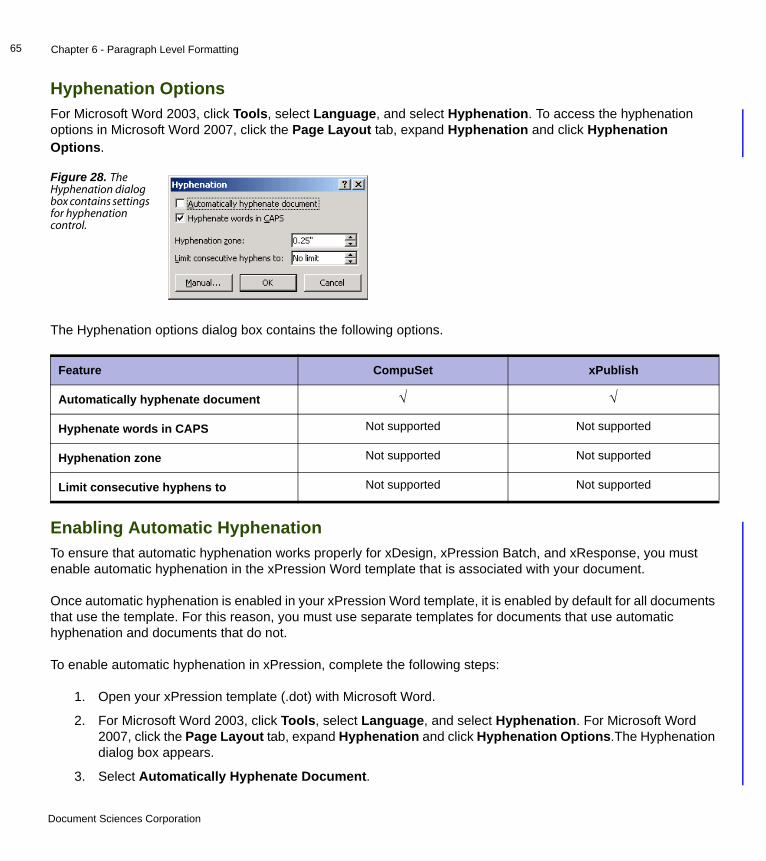
Chapter 6 - Paragraph Level Formatting65
Hyphenation OptionsFor Microsoft Word 2003, click Tools, select Language, and select Hyphenation. To access the hyphenation options in Microsoft Word 2007, click the Page Layout tab, expand Hyphenation and click Hyphenation Options.
The Hyphenation options dialog box contains the following options.
Enabling Automatic HyphenationTo ensure that automatic hyphenation works properly for xDesign, xPression Batch, and xResponse, you must enable automatic hyphenation in the xPression Word template that is associated with your document.
Once automatic hyphenation is enabled in your xPression Word template, it is enabled by default for all documents that use the template. For this reason, you must use separate templates for documents that use automatic hyphenation and documents that do not.
To enable automatic hyphenation in xPression, complete the following steps:
1. Open your xPression template (.dot) with Microsoft Word.
2. For Microsoft Word 2003, click Tools, select Language, and select Hyphenation. For Microsoft Word 2007, click the Page Layout tab, expand Hyphenation and click Hyphenation Options.The Hyphenation dialog box appears.
3. Select Automatically Hyphenate Document.
Figure 28. The Hyphenation dialog box contains settings for hyphenation control.
Feature CompuSet xPublish
Automatically hyphenate document √ √
Hyphenate words in CAPS Not supported Not supported
Hyphenation zone Not supported Not supported
Limit consecutive hyphens to Not supported Not supported
Document Sciences Corporation

Chapter 6 - Paragraph Level Formatting66
4. Click OK.
5. Click File and select Save As.
6. Save the template under a different name. Only use this new template for documents that need automatic hyphenation.
Overriding Automatic HyphenationTo override the automatic hyphenation, and prevent certain parts of a document from being hyphenated:
1. Select the text you don’t want to hyphenate.
2. Display the Line and Page Breaks tab. For Microsoft Word 2003, click the Format menu, select Paragraph and click the Line and Page Breaks tab. For Microsoft 2007, access these options by clicking the Home tab, expanding the Paragraph group, and clicking the Line and Page Breaks tab.
3. Select the Don’t hyphenate option on the Line and Page Breaks tab and click OK to apply the setting.
TablesxPression supports most commonly-used features of Word tables, including basic cell structure, simple borders and shading, table identification, header rows, and horizontal cell merging.
CompuSet is limited to 30 total cells per table row. This limit can be made smaller by the limitations on the use of borders and shading within a single row. One table row can support a combined total of 30 left/right cell borders and/or shaded cells. Inter-cell borders count as one border. Dotted or dashed borders publish through CompuSet with a single, unalterable weight (thickness). xPression supports tables with up to 29 unshaded columns, or 14 shaded columns.
xPression also enables you to add Table rules to your document. Table rules enable you to dynamically create tables based on the data in your data source. For more information, see the xDesign User Guide.
Document Sciences Corporation

Chapter 6 - Paragraph Level Formatting67
Insert Table OptionsTo access the insert table options for Microsoft Word 2003, click the Table menu, select Insert, and click Table. For Microsoft Word 2007, click the Insert tab, in the Tables group click Tables, and select Insert Table.
The Insert Table dialog box contains the following options.
Figure 29. The Insert Table dialog box enables you to create a new table.
Feature CompuSet xPublish
Number of columns √ √
Number of rows √ √
Fixed column width √ Auto is not supported. You may supply a fixed value.
Auto fit to contents Not Supported Not Supported
Auto fit to window Not Supported Not Supported
Remember dimensions for new tables Not Supported Not Supported
Document Sciences Corporation

Chapter 6 - Paragraph Level Formatting68
Table Properties: Table Tab OptionsAfter you have inserted your table, place your cursor in the table body, right-click the table and select Table Properties.
The Table tab contains the following options.
Figure 30. The Table Properties dialog box contains four tabs, Table, Row, Column, and Cell.
Feature CompuSet xPublish
Preferred Width √ Not Supported. Only fixed table widths are supported.
Alignment Left only √
Indent from left √ √
Text Wrapping Not Supported Not Supported
Options: Default cell margins Not Supported Not Supported
Options: Default cell spacing Not Supported Not Supported
Options: Automatically resize to fit contents
Not Supported √
Document Sciences Corporation
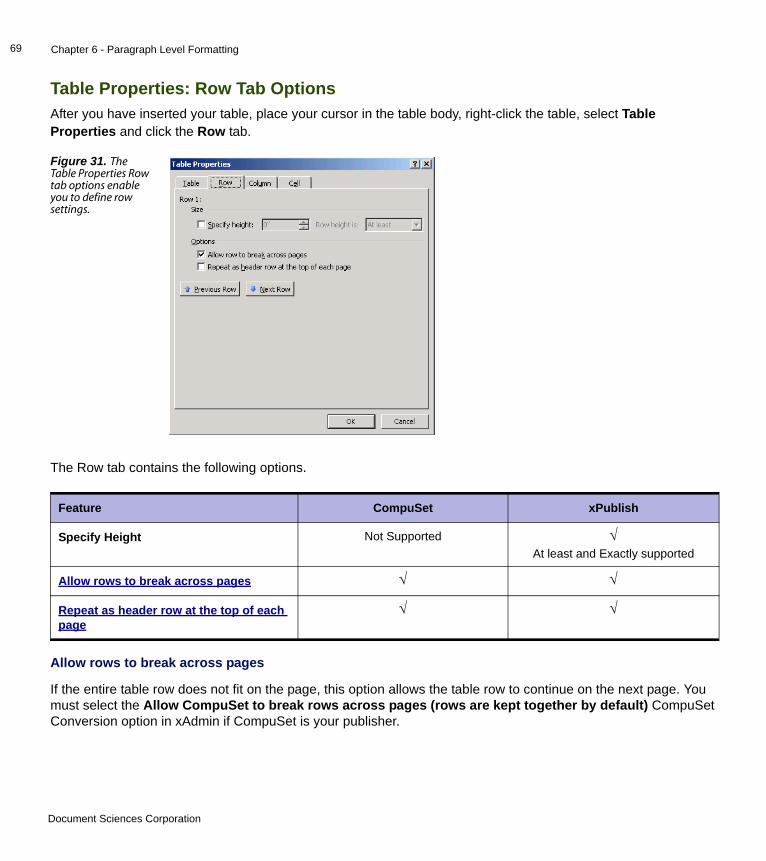
Chapter 6 - Paragraph Level Formatting69
Table Properties: Row Tab OptionsAfter you have inserted your table, place your cursor in the table body, right-click the table, select Table Properties and click the Row tab.
The Row tab contains the following options.
Allow rows to break across pages
If the entire table row does not fit on the page, this option allows the table row to continue on the next page. You must select the Allow CompuSet to break rows across pages (rows are kept together by default) CompuSet Conversion option in xAdmin if CompuSet is your publisher.
Figure 31. The Table Properties Row tab options enable you to define row settings.
Feature CompuSet xPublish
Specify Height Not Supported √ At least and Exactly supported
Allow rows to break across pages √ √
Repeat as header row at the top of each page
√ √
Document Sciences Corporation
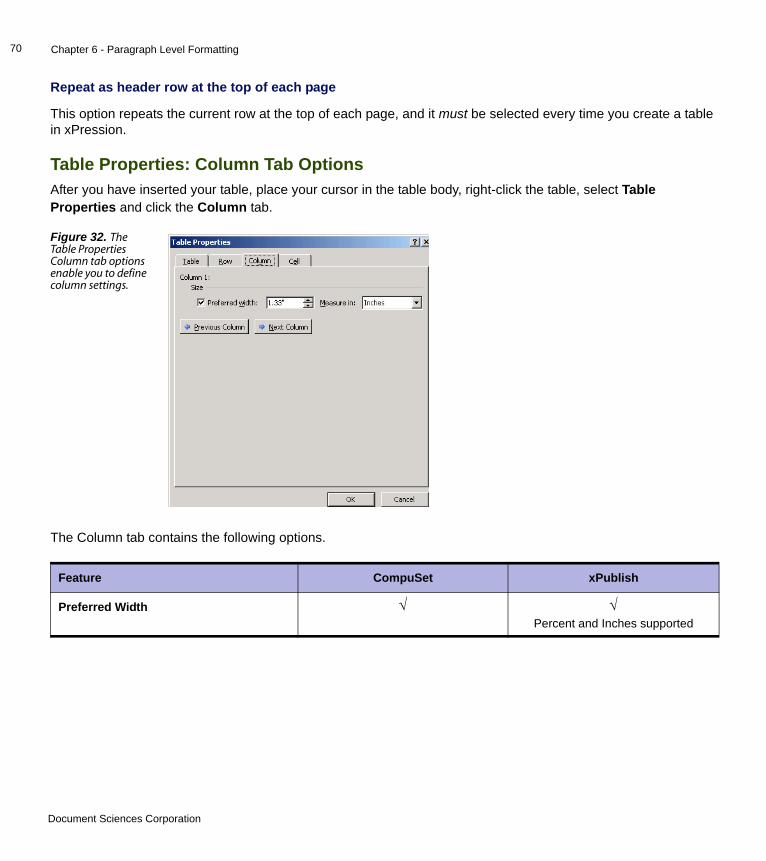
Chapter 6 - Paragraph Level Formatting70
Repeat as header row at the top of each page
This option repeats the current row at the top of each page, and it must be selected every time you create a table in xPression.
Table Properties: Column Tab OptionsAfter you have inserted your table, place your cursor in the table body, right-click the table, select Table Properties and click the Column tab.
The Column tab contains the following options.
Figure 32. The Table Properties Column tab options enable you to define column settings.
Feature CompuSet xPublish
Preferred Width √ √ Percent and Inches supported
Document Sciences Corporation
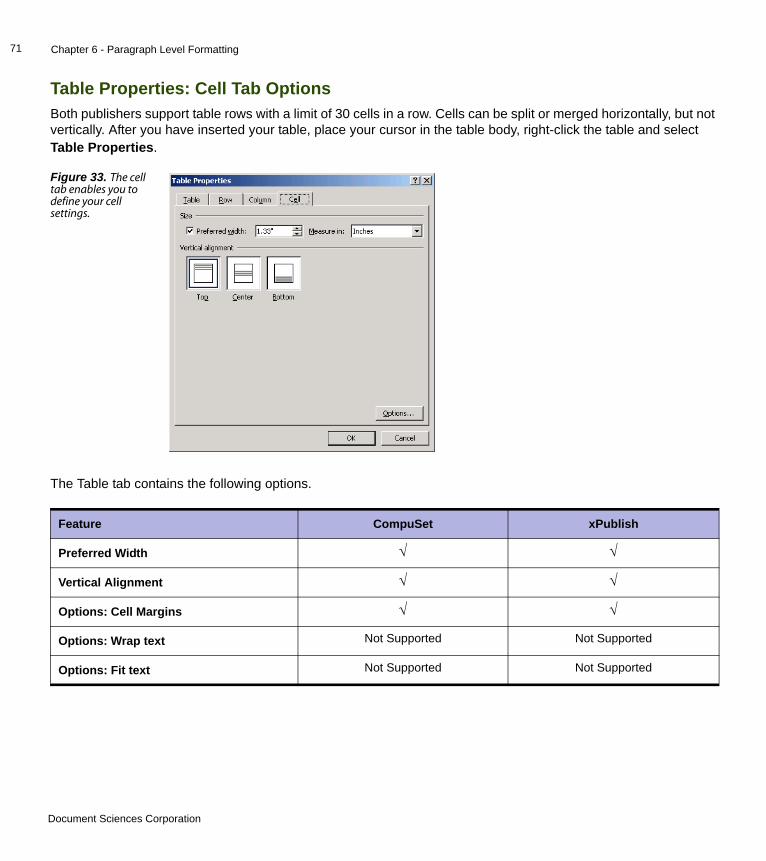
Chapter 6 - Paragraph Level Formatting71
Table Properties: Cell Tab OptionsBoth publishers support table rows with a limit of 30 cells in a row. Cells can be split or merged horizontally, but not vertically. After you have inserted your table, place your cursor in the table body, right-click the table and select Table Properties.
The Table tab contains the following options.
Figure 33. The cell tab enables you to define your cell settings.
Feature CompuSet xPublish
Preferred Width √ √
Vertical Alignment √ √
Options: Cell Margins √ √
Options: Wrap text Not Supported Not Supported
Options: Fit text Not Supported Not Supported
Document Sciences Corporation
Chapter 6 - Paragraph Level Formatting72
Cell Content Alignment
In addition to the vertical alignment, you can define cell content alignment by right-clicking a table cell and choosing Cell Alignment. All the Cell Alignment options are supported.
Borders and Shading OptionsCompuSet supports the same cell border and shading options as it supports for paragraphs. xPublish does not support Diagonal Line, Pattern, or Double Line borders. Each table row can support a combined total of 30 left and right cell borders and/or shaded cells. Inter-cell borders count as one border. The total number of vertical cell borders and shaded cells cannot exceed 30.
CompuSet does not support the use of paragraph borders and/or shading within a table cell that uses borders and /or shading. Also, dotted or dashed borders publish through CompuSet with a single, unalterable weight (thickness). For complete details, see Borders and Shading.
Known Issue with Tables in Microsoft Word 2000Microsoft Word 2000 is unable to retain the “Allow row to break across pages” table property when your document is saved. For this reason, table rows will always break across pages when using Microsoft Word 2000. Users are unable to control this setting. Later versions of Microsoft Word are not affected by this problem. For more information about this Microsoft limitation, see the following article at the Microsoft website:WD2000: 'Allow Row to Break Across Pages' Check Box Setting Is Not Preserved When Document Is Reopened
Article ID : 220486 Last Review : August 28, 2003 Revision : 1.0
URL: http://support.microsoft.com/kb/220486/en-us
Creating TablesYou can use Microsoft Word tables in xPression documents to format and align text, and place images. You can create a table from either the Tables and Borders toolbar, or the Tables menu.
To create a table:
Document Sciences Corporation
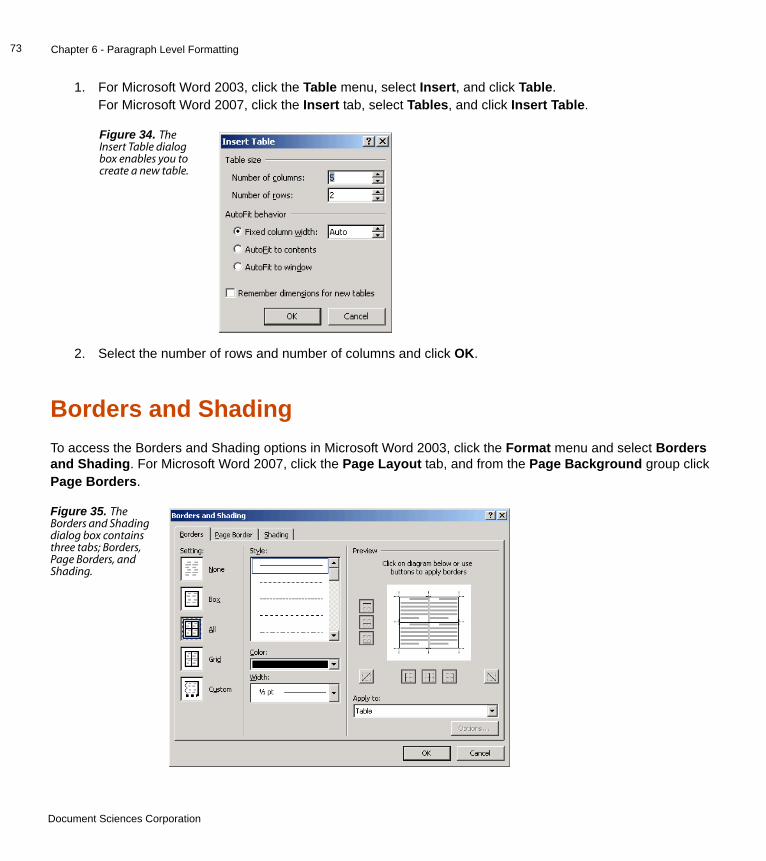
Chapter 6 - Paragraph Level Formatting73
1. For Microsoft Word 2003, click the Table menu, select Insert, and click Table.For Microsoft Word 2007, click the Insert tab, select Tables, and click Insert Table.
2. Select the number of rows and number of columns and click OK.
Borders and Shading To access the Borders and Shading options in Microsoft Word 2003, click the Format menu and select Borders and Shading. For Microsoft Word 2007, click the Page Layout tab, and from the Page Background group click Page Borders.
Figure 34. The Insert Table dialog box enables you to create a new table.
Figure 35. The Borders and Shading dialog box contains three tabs; Borders, Page Borders, and Shading.
Document Sciences Corporation

Chapter 6 - Paragraph Level Formatting74
Borders and Shading: Borders Tab OptionsThe Borders tab contains the following options.
Borders and Shading: Page Borders Tab OptionsTo access the Page Borders tab options, click the Format menu, select Borders and Shading, then click the Page Borders tab.
Feature CompuSet xPublish
Border Style Simple (single line, non-patterned, non-shaded) style page borders are supported. Dotted or dashed borders
with a single, unalterable weight.
All supported except wavy.
Border Color √ √
Border Width √ √
Figure 36. The Page Borders tab contains enables you to define page borders.
Document Sciences Corporation
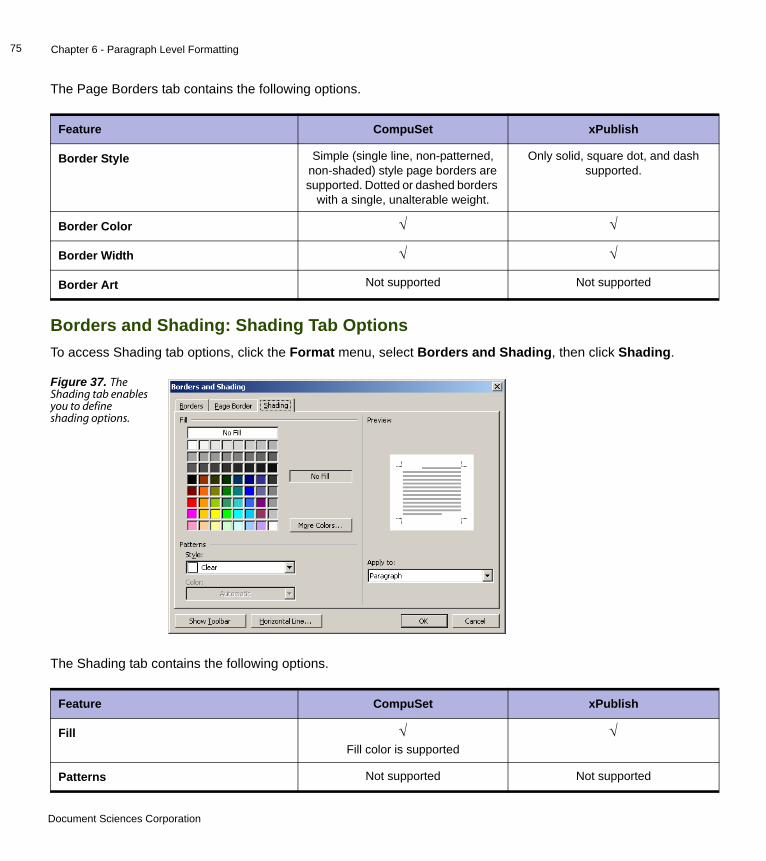
Chapter 6 - Paragraph Level Formatting75
The Page Borders tab contains the following options.
Borders and Shading: Shading Tab OptionsTo access Shading tab options, click the Format menu, select Borders and Shading, then click Shading.
The Shading tab contains the following options.
Feature CompuSet xPublish
Border Style Simple (single line, non-patterned, non-shaded) style page borders are supported. Dotted or dashed borders
with a single, unalterable weight.
Only solid, square dot, and dash supported.
Border Color √ √
Border Width √ √
Border Art Not supported Not supported
Figure 37. The Shading tab enables you to define shading options.
Feature CompuSet xPublish
Fill √ Fill color is supported
√
Patterns Not supported Not supported
Document Sciences Corporation
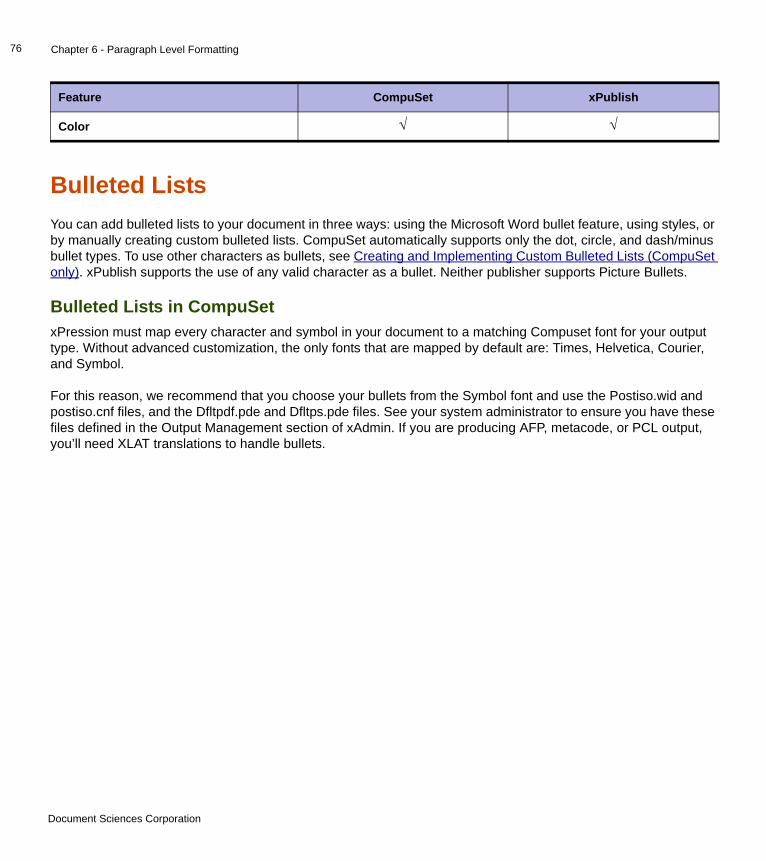
Chapter 6 - Paragraph Level Formatting76
Bulleted ListsYou can add bulleted lists to your document in three ways: using the Microsoft Word bullet feature, using styles, or by manually creating custom bulleted lists. CompuSet automatically supports only the dot, circle, and dash/minus bullet types. To use other characters as bullets, see Creating and Implementing Custom Bulleted Lists (CompuSet only). xPublish supports the use of any valid character as a bullet. Neither publisher supports Picture Bullets.
Bulleted Lists in CompuSetxPression must map every character and symbol in your document to a matching Compuset font for your output type. Without advanced customization, the only fonts that are mapped by default are: Times, Helvetica, Courier, and Symbol.
For this reason, we recommend that you choose your bullets from the Symbol font and use the Postiso.wid and postiso.cnf files, and the Dfltpdf.pde and Dfltps.pde files. See your system administrator to ensure you have these files defined in the Output Management section of xAdmin. If you are producing AFP, metacode, or PCL output, you’ll need XLAT translations to handle bullets.
Color √ √
Feature CompuSet xPublish
Document Sciences Corporation
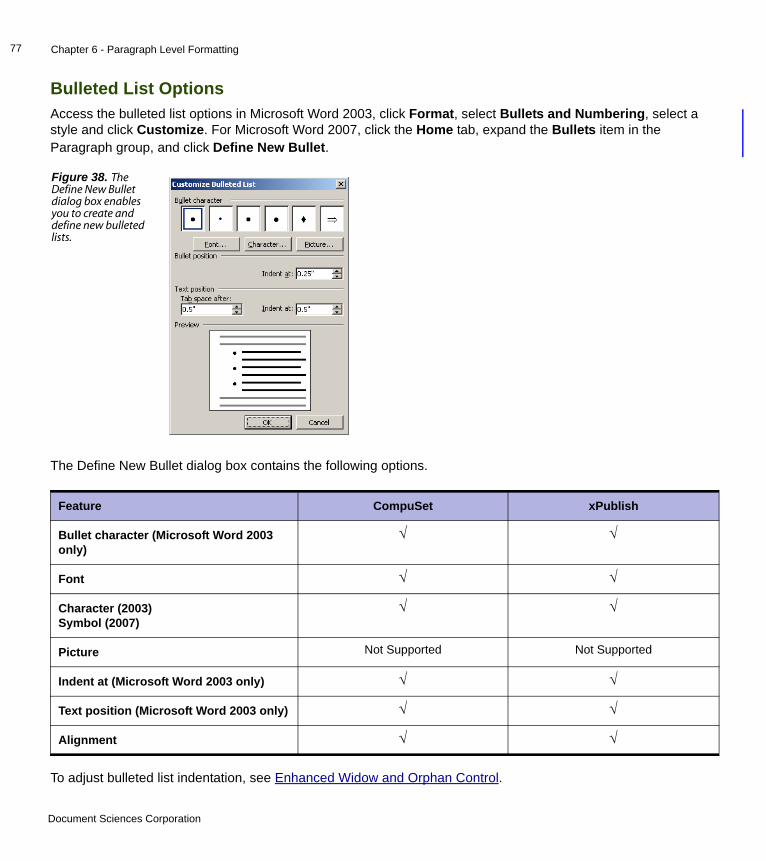
Chapter 6 - Paragraph Level Formatting77
Bulleted List OptionsAccess the bulleted list options in Microsoft Word 2003, click Format, select Bullets and Numbering, select a style and click Customize. For Microsoft Word 2007, click the Home tab, expand the Bullets item in the Paragraph group, and click Define New Bullet.
The Define New Bullet dialog box contains the following options.
To adjust bulleted list indentation, see Enhanced Widow and Orphan Control.
Figure 38. The Define New Bullet dialog box enables you to create and define new bulleted lists.
Feature CompuSet xPublish
Bullet character (Microsoft Word 2003 only)
√ √
Font √ √
Character (2003)Symbol (2007)
√ √
Picture Not Supported Not Supported
Indent at (Microsoft Word 2003 only) √ √
Text position (Microsoft Word 2003 only) √ √
Alignment √ √
Document Sciences Corporation
Chapter 6 - Paragraph Level Formatting78
Creating a Simple Bulleted List To create a simple bulleted list:
1. Place your cursor at the position where you would like to insert a bulleted list.
2. For Microsoft Word 2003, click Format and select Bullets and Numbering. For Microsoft Word 2007, click the Home tab and click Bullets.
3. Select a bullet style or click Define New Bullet to create a new bullet style.
Creating Bulleted Lists with Microsoft StylesTo create a bulleted list using styles:
1. Place your cursor at the position where you would like to create the bulleted style.
2. For Microsoft Word 2003, click Format, select Styles and Formatting, and click New Style. For Microsoft Word 2007, click the Home tab, expand the Styles Group, and click New Style.
3. Define your style name and style formatting options.
4. Click Format and choose Numbering.
5. Click the Bullets tab.
6. Select an existing style, or click Define New Bullet to create your own and click OK.
Document Sciences Corporation
Chapter 6 - Paragraph Level Formatting79
Creating Bulleted Lists for AFP OutputIf you are using xPublish as your publisher to produce AFP output and need to create a bulleted list, you must use the T1001252 codepage because the recommended codepage, T1001148, does not include a bullet character.
To create a bulleted list for AFP output using xPublish:
1. Place your cursor at the position where you would like to insert a bulleted list.
2. For Microsoft Word 2003, click Format and select Bullets and Numbering. For Microsoft Word 2007, click the Home tab, click Bullets, and click Define New Bullet.
3. Click Symbol. For Microsoft Word 2003, select a bullet style, click Customize and then click Character.
4. Select your font from the Font list.
5. In the Character Code text field, type 2022 and select Unicode (hex) from the from list.
6. Click OK to close each open dialog box. Word will use the bullet symbol from the T1001252 codepage.
Creating and Implementing Custom Bulleted Lists (CompuSet only)If the bullet you want to use is not available by default, you can still use it as long as the bullet character is taken from a font that is mapped to a corresponding CompuSet font. To get the best results with bullets:
• Use the xPressionWordTemplate.dot template installed with xDesign.
• Use the Postiso.wid Widths file and Postiso.cnf Configuration file.
• Use the Dfltpdf.pde and Dfltps.pde PDEF files.
xPression does not support custom Word Picture Bullets.
To create a custom bulleted list, follow these steps.
1. For this example, we will select a character from the Windows Symbol font because this font is already included in the Pdfiso.Wid file. Open the content item that will contain the bulleted list.
2. Place your cursor on the line where you want to create the bulleted list.
3. Click Symbol from the Insert tab.
Document Sciences Corporation

Chapter 6 - Paragraph Level Formatting80
4. Select the bullet character.
5. Click Insert and Close. The bullet appears in your content item.
6. Use direct formatting to set the style and spacing for the bulleted list. To create more rows in the list, copy and paste the bullet symbol.
7. Close and Save your Content Item.
8. Next, create a mapping file which maps the font you used to place the bullet character in your content item (in this example, the Symbol font) to a font in your .wid file.
Double-click Font Mapping in xPression CompuSet Tools.
9. Select the Font Mapping folder and click OK.
Figure 39. For the example shown here, we will use the open-arrow symbol.
Figure 40. This folder contains the .wid file you are mapping to.
Document Sciences Corporation

Chapter 6 - Paragraph Level Formatting81
10. The xPression Font Mappings dialog box appears. Select the Page Definition Language for your output type. For this example, select PDF.
11. Click Browse to locate an xPression Widths file to use with this font mapping profile. For this example, select the Pdfiso.wid file.
12. Select the default font that xPression should use when it detects an unmapped font. The default setting is NONE (a blank field).
13. Map the Microsoft Windows fonts you use to the corresponding xPression fonts. Select a Windows font and assign an equivalent xPression font from the adjacent list.
Figure 41. The xPression Font Mappings dialog box.
Figure 42. For this example, map the Windows Symbol font to the Symbol font from the xPression .wid file.
Document Sciences Corporation

Chapter 6 - Paragraph Level Formatting82
14. Click OK, then Close.
15. Next, configure a font definition to point to the .wid file. In this example, point the Format Definition to Pdfiso.wid. You may have to request help from your system administrator if you don’t have access to xAdmin.
Start xAdmin.
16. Click Font Definition from the CompuSet Output Management screen.
17. Create a new font definition by clicking Add, or edit an existing one by clicking a Font Definition from the list.
18. Define the .wid file you mapped (Pdfiso.wid in our example) as the Primary .wid file.
19. Define the font database used to create the .wid file.
20. Define the font map file name of the map you created above.
21. Click Save.
22. Next, configure a format definition to point to the correct font definition and PDEF file.
23. Click Format Definition from the CompuSet Output Management screen.
24. Create a new format definition by clicking Add, or edit an existing one by clicking a Font Definition from the list.
25. Define the output format.
26. Define the PDEF file location.
27. Define the font definition you created above.
28. Click Save.
29. Next, configure an output profile to point to the correct format definition. Start xAdmin.
30. Click Output Profiles from the Output Management screen.
31. Define the format definition you created in Next, configure a format definition to point to the correct font definition and PDEF file..
32. Click Save.
33. Next, associate the output profile you just created with the document that contains the custom bullet list. Start xDesign.
34. Open the document that contains the bulleted list.
35. Click Properties on the Document menu.
36. Click the Output Profiles tab.
37. Select the new Output Profile you created in Next, configure an output profile to point to the correct format definition. Start xAdmin..
Document Sciences Corporation
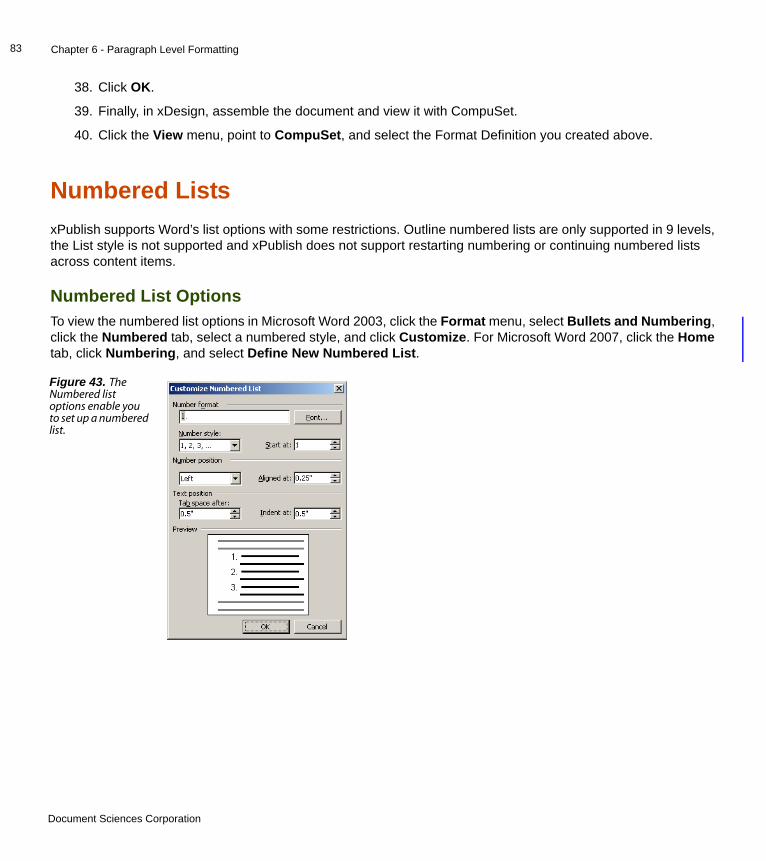
Chapter 6 - Paragraph Level Formatting83
38. Click OK.
39. Finally, in xDesign, assemble the document and view it with CompuSet.
40. Click the View menu, point to CompuSet, and select the Format Definition you created above.
Numbered ListsxPublish supports Word’s list options with some restrictions. Outline numbered lists are only supported in 9 levels, the List style is not supported and xPublish does not support restarting numbering or continuing numbered lists across content items.
Numbered List OptionsTo view the numbered list options in Microsoft Word 2003, click the Format menu, select Bullets and Numbering, click the Numbered tab, select a numbered style, and click Customize. For Microsoft Word 2007, click the Home tab, click Numbering, and select Define New Numbered List.
Figure 43. The Numbered list options enable you to set up a numbered list.
Document Sciences Corporation
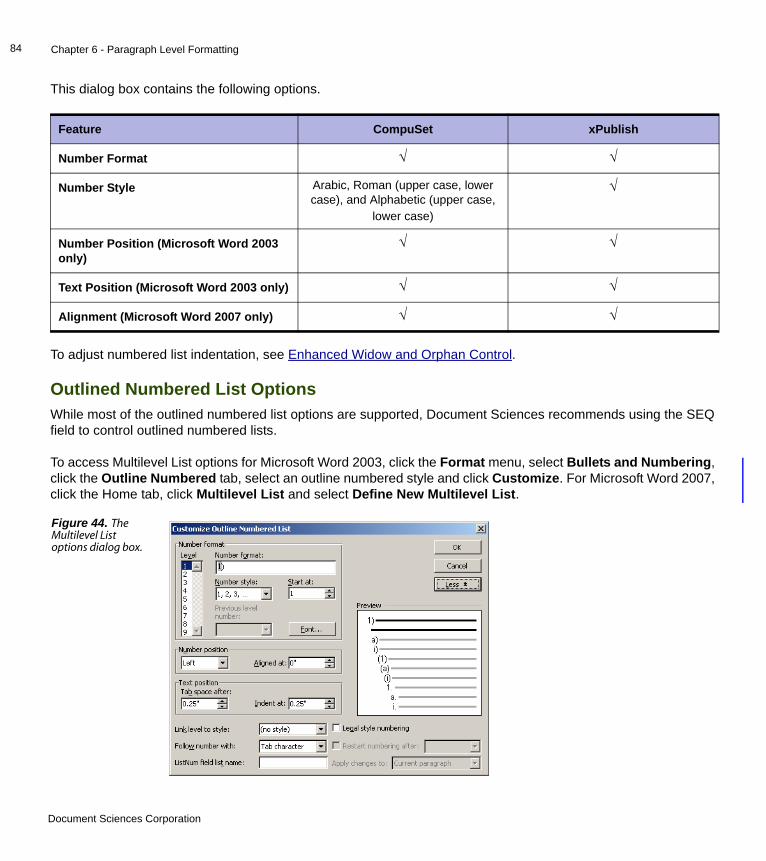
Chapter 6 - Paragraph Level Formatting84
This dialog box contains the following options.
To adjust numbered list indentation, see Enhanced Widow and Orphan Control.
Outlined Numbered List OptionsWhile most of the outlined numbered list options are supported, Document Sciences recommends using the SEQ field to control outlined numbered lists.
To access Multilevel List options for Microsoft Word 2003, click the Format menu, select Bullets and Numbering, click the Outline Numbered tab, select an outline numbered style and click Customize. For Microsoft Word 2007, click the Home tab, click Multilevel List and select Define New Multilevel List.
Feature CompuSet xPublish
Number Format √ √
Number Style Arabic, Roman (upper case, lower case), and Alphabetic (upper case,
lower case)
√
Number Position (Microsoft Word 2003 only)
√ √
Text Position (Microsoft Word 2003 only) √ √
Alignment (Microsoft Word 2007 only) √ √
Figure 44. The Multilevel List options dialog box.
Document Sciences Corporation
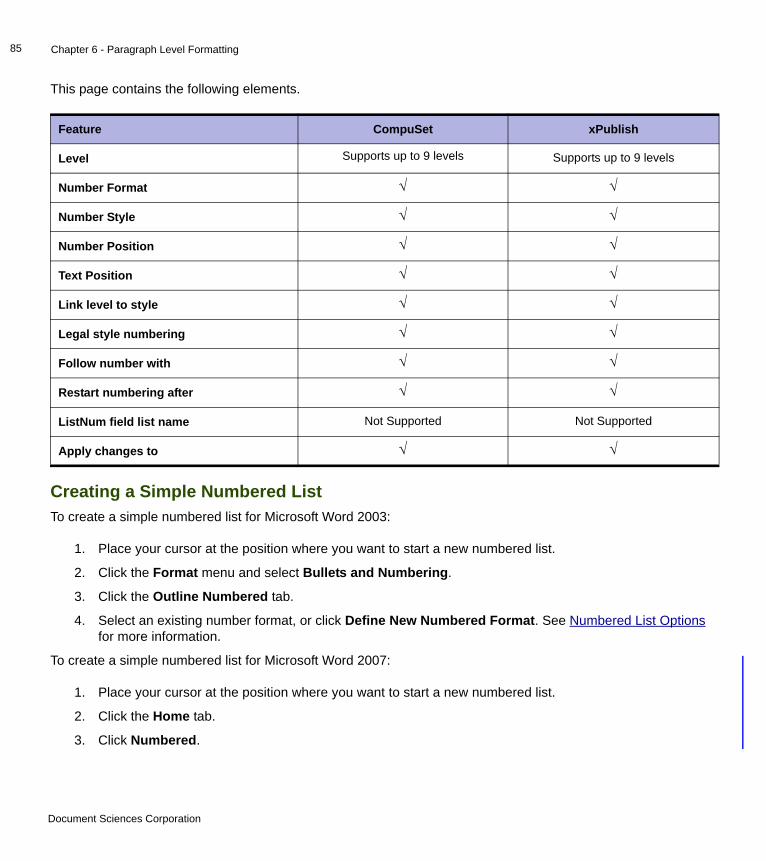
Chapter 6 - Paragraph Level Formatting85
This page contains the following elements.
Creating a Simple Numbered ListTo create a simple numbered list for Microsoft Word 2003:
1. Place your cursor at the position where you want to start a new numbered list.
2. Click the Format menu and select Bullets and Numbering.
3. Click the Outline Numbered tab.
4. Select an existing number format, or click Define New Numbered Format. See Numbered List Options for more information.
To create a simple numbered list for Microsoft Word 2007:
1. Place your cursor at the position where you want to start a new numbered list.
2. Click the Home tab.
3. Click Numbered.
Feature CompuSet xPublish
Level Supports up to 9 levels Supports up to 9 levels
Number Format √ √
Number Style √ √
Number Position √ √
Text Position √ √
Link level to style √ √
Legal style numbering √ √
Follow number with √ √
Restart numbering after √ √
ListNum field list name Not Supported Not Supported
Apply changes to √ √
Document Sciences Corporation
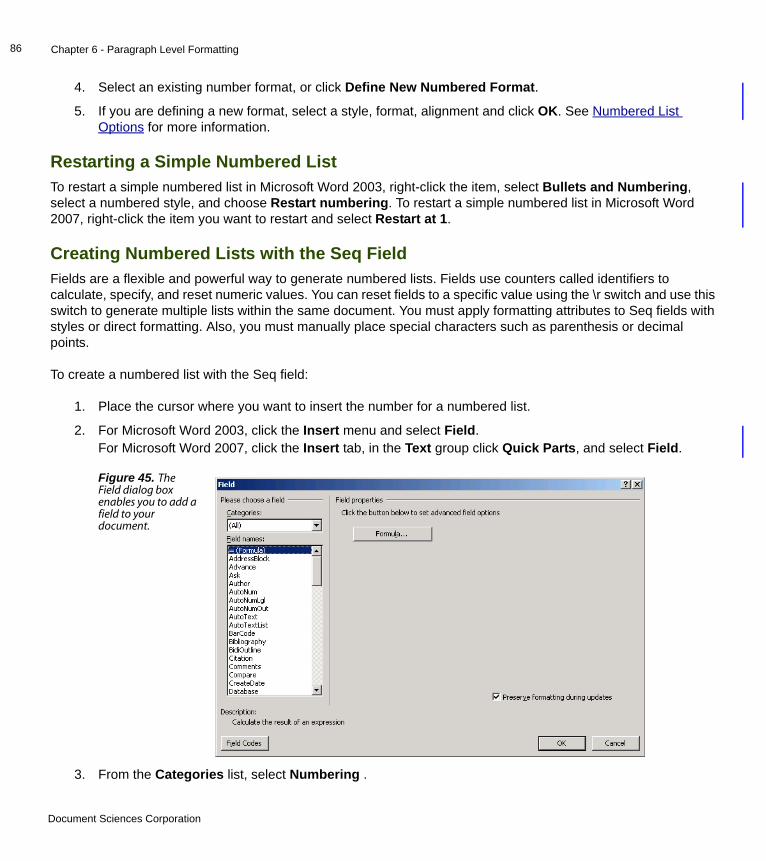
Chapter 6 - Paragraph Level Formatting86
4. Select an existing number format, or click Define New Numbered Format.
5. If you are defining a new format, select a style, format, alignment and click OK. See Numbered List Options for more information.
Restarting a Simple Numbered ListTo restart a simple numbered list in Microsoft Word 2003, right-click the item, select Bullets and Numbering, select a numbered style, and choose Restart numbering. To restart a simple numbered list in Microsoft Word 2007, right-click the item you want to restart and select Restart at 1.
Creating Numbered Lists with the Seq FieldFields are a flexible and powerful way to generate numbered lists. Fields use counters called identifiers to calculate, specify, and reset numeric values. You can reset fields to a specific value using the \r switch and use this switch to generate multiple lists within the same document. You must apply formatting attributes to Seq fields with styles or direct formatting. Also, you must manually place special characters such as parenthesis or decimal points.
To create a numbered list with the Seq field:
1. Place the cursor where you want to insert the number for a numbered list.
2. For Microsoft Word 2003, click the Insert menu and select Field. For Microsoft Word 2007, click the Insert tab, in the Text group click Quick Parts, and select Field.
3. From the Categories list, select Numbering .
Figure 45. The Field dialog box enables you to add a field to your document.
Document Sciences Corporation
Chapter 6 - Paragraph Level Formatting87
4. From the Field names list, select Seq.
5. The Advanced Field Properties section displays the Field Codes box. Each Seq field contains an identifier, or name, that relates it to other identically named Seq fields. The identifier is a name that distinguishes one list of fields from another. Under Field codes, type an identifier after SEQ. The identifier must contain one of the numbers between 400-409. For example List404, Steps401, or Alpha403.
6. Click Options.
7. The Field Options dialog box appears. On the General Switches tab, under Formatting, choose a numbering format such as 1, 2, 3..., then click Add to Field.
8. Click OK twice. The first number appears in your content item.
9. Manually format the Seq field by adding a period or parenthesis after the number.
10. Use styles or apply direct formatting for font, size, and layout as your document dictates.
11. To reproduce the Seq field and all the formatting applied to it, select the Seq field and any associated formatting characters and use copy and paste.
Multiple-Level Numbered Lists with the Seq FieldYou can also use the Seq field in conjunction with styles to create numbered lists with multiple levels. A multiple-level list uses multiple styles to create the tiered effect.
To create the first level of numbering:
1. Create a first level paragraph style.
2. From the Paragraph Options: Indents and Spacing dialog box, locate the Indentation section. In the Special list, select Hanging to create a hanging indent for the style.
3. In the By list, specify a value for the handing indent and click OK.
4. Place the cursor at the beginning of the line.
5. Define a Seq field, specify an identifier, and click Options.
6. Specify formatting for the field.
7. Click OK and click OK again.
8. Apply the style and copy the Seq field to all first-level paragraphs.
9. On a new line, create the second level of numbering by creating the second level paragraph style.
10. On the Paragraph tab, under Indentation, specify a left indent to create the second level of indentation.
11. In the Special list, select Hanging to create a hanging indent for the style.
12. In the By list, specify a value for the handing indent and click OK.
13. Place the cursor at the beginning of the first level 2 line of text.
Document Sciences Corporation

Chapter 6 - Paragraph Level Formatting88
14. Define a Seq field, specify an identifier, and click Options.
15. Specify formatting for the field.
16. Click OK and click OK again.
17. Apply the style and copy the Seq field to all second-level paragraphs.
18. Right-click each Seq field, and click Update field.
Restarting Numbering on Seq Lists
To restart a numbered Seq list:
1. Place your cursor where you would like to restart a numbered list or start a new numbered list using the same Seq identifier.
2. For Microsoft Word 2003, click the Insert menu and select Field. For Microsoft Word 2007, click the Insert tab, click Quick Parts, and select Field.
3. Under Categories, select Numbering.
4. Under Field names, select Seq.
5. Type a new identifier after SEQ, and click Options.
6. Click the Field Specific Switches tab.
7. Select the \r switch and click Add to Field. The \r switch sets the field to any value you define after the \r switch in the Field Code text box.
8. Type the number 1 after the \r switch. The Field Code text box should now conform to the following syntax:
SEQ <identifier>\r 1
where <identifier> is the identifier you created in step 5.
9. Click OK twice. The number 1 appears as the field code.
Creating Numbered Lists with StylesYou can create Numbered Lists using Styles if you use CompuSet, however this option does not support restarting numbering. Due to the limitations associated with List styles, it is recommended that you use Seq fields instead. Refer to Creating Numbered Lists with the Seq Field. xPublish does not support List Style.
To create a numbered list using styles:
1. Place your cursor at the position where you would like to create the bulleted style.
2. For Microsoft Word 2003, click Format, select Styles and Formatting, and click New Style.For Microsoft Word 2007, click the Home tab, expand the Styles Group, and click New Style.
3. Define your style name and style formatting options.
Document Sciences Corporation
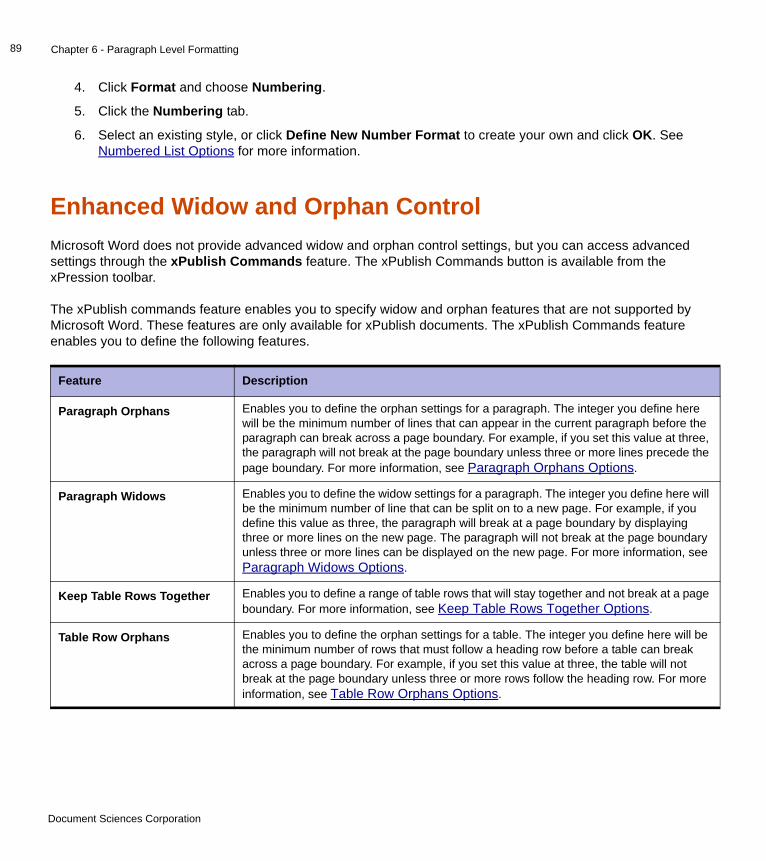
Chapter 6 - Paragraph Level Formatting89
4. Click Format and choose Numbering.
5. Click the Numbering tab.
6. Select an existing style, or click Define New Number Format to create your own and click OK. See Numbered List Options for more information.
Enhanced Widow and Orphan ControlMicrosoft Word does not provide advanced widow and orphan control settings, but you can access advanced settings through the xPublish Commands feature. The xPublish Commands button is available from the xPression toolbar.
The xPublish commands feature enables you to specify widow and orphan features that are not supported by Microsoft Word. These features are only available for xPublish documents. The xPublish Commands feature enables you to define the following features.
Feature Description
Paragraph Orphans Enables you to define the orphan settings for a paragraph. The integer you define here will be the minimum number of lines that can appear in the current paragraph before the paragraph can break across a page boundary. For example, if you set this value at three, the paragraph will not break at the page boundary unless three or more lines precede the page boundary. For more information, see Paragraph Orphans Options.
Paragraph Widows Enables you to define the widow settings for a paragraph. The integer you define here will be the minimum number of line that can be split on to a new page. For example, if you define this value as three, the paragraph will break at a page boundary by displaying three or more lines on the new page. The paragraph will not break at the page boundary unless three or more lines can be displayed on the new page. For more information, see Paragraph Widows Options.
Keep Table Rows Together Enables you to define a range of table rows that will stay together and not break at a page boundary. For more information, see Keep Table Rows Together Options.
Table Row Orphans Enables you to define the orphan settings for a table. The integer you define here will be the minimum number of rows that must follow a heading row before a table can break across a page boundary. For example, if you set this value at three, the table will not break at the page boundary unless three or more rows follow the heading row. For more information, see Table Row Orphans Options.
Document Sciences Corporation
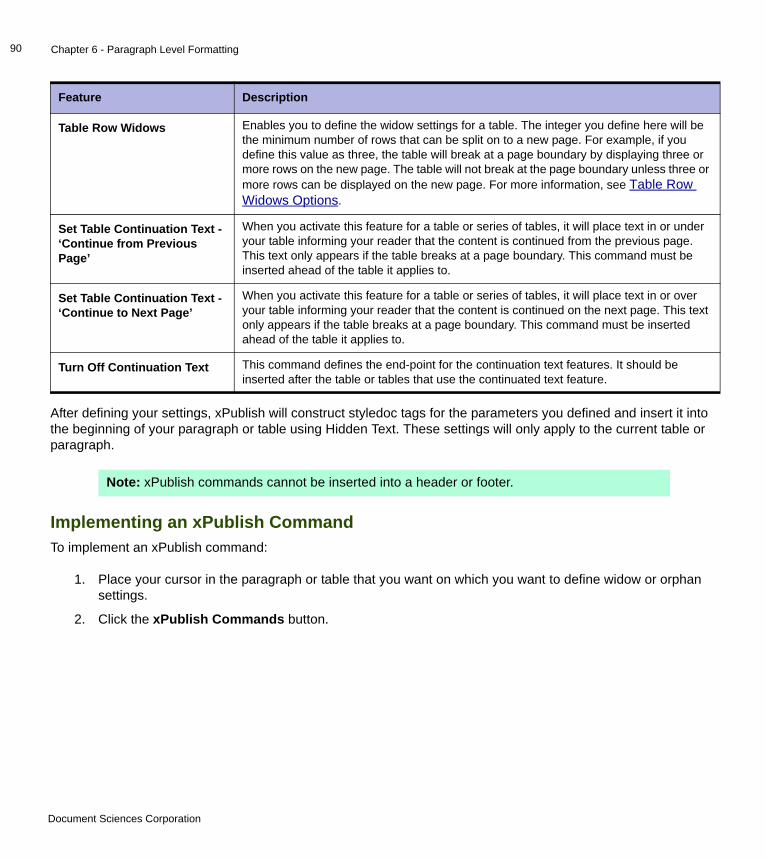
Chapter 6 - Paragraph Level Formatting90
After defining your settings, xPublish will construct styledoc tags for the parameters you defined and insert it into the beginning of your paragraph or table using Hidden Text. These settings will only apply to the current table or paragraph.
Implementing an xPublish CommandTo implement an xPublish command:
1. Place your cursor in the paragraph or table that you want on which you want to define widow or orphan settings.
2. Click the xPublish Commands button.
Table Row Widows Enables you to define the widow settings for a table. The integer you define here will be the minimum number of rows that can be split on to a new page. For example, if you define this value as three, the table will break at a page boundary by displaying three or more rows on the new page. The table will not break at the page boundary unless three or more rows can be displayed on the new page. For more information, see Table Row Widows Options.
Set Table Continuation Text - ‘Continue from Previous Page’
When you activate this feature for a table or series of tables, it will place text in or under your table informing your reader that the content is continued from the previous page. This text only appears if the table breaks at a page boundary. This command must be inserted ahead of the table it applies to.
Set Table Continuation Text - ‘Continue to Next Page’
When you activate this feature for a table or series of tables, it will place text in or over your table informing your reader that the content is continued on the next page. This text only appears if the table breaks at a page boundary. This command must be inserted ahead of the table it applies to.
Turn Off Continuation Text This command defines the end-point for the continuation text features. It should be inserted after the table or tables that use the continuated text feature.
Note: xPublish commands cannot be inserted into a header or footer.
Feature Description
Document Sciences Corporation

Chapter 6 - Paragraph Level Formatting91
3. The xPublish Commands list appears.
4. Select the command you want to implement and click OK.
5. Define the settings for the command you chose. To see more information about the commands, see Paragraph Orphans Options, Paragraph Widows Options, Keep Table Rows Together Options, Table Row Orphans Options, or Table Row Widows Options.
6. Click OK when finished.
Paragraph Orphans OptionsTo see the paragraph orphan options, access the xPublish commands as shown in Implementing an xPublish Command and selecting Paragraph Orphans.
Figure 46. This page lists all of the xPublish Commands.
Figure 47. Enables you to define the orphan settings for a paragraph.
Document Sciences Corporation
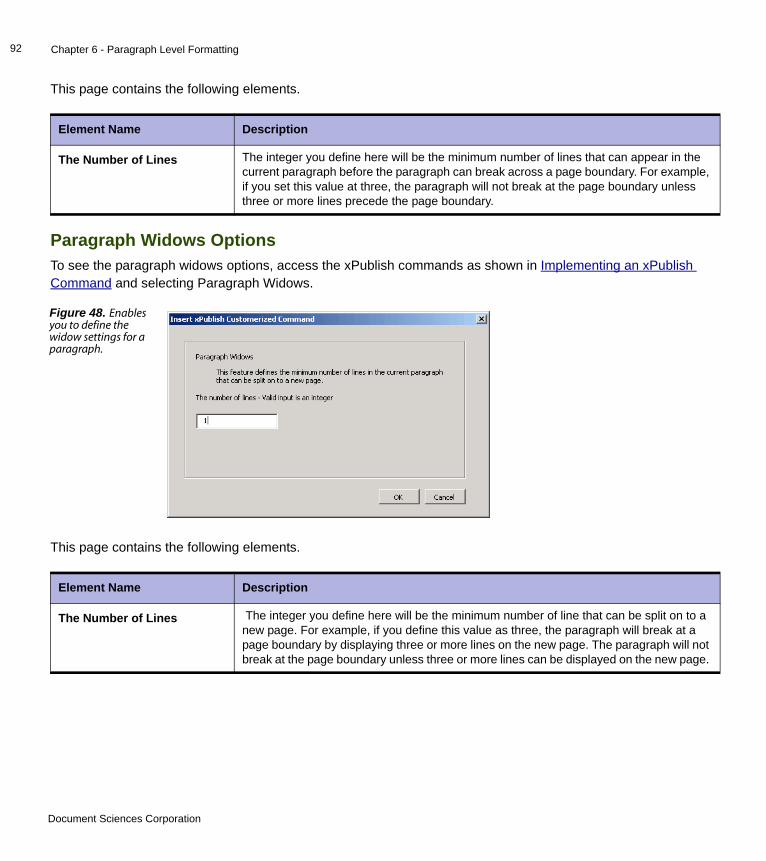
Chapter 6 - Paragraph Level Formatting92
This page contains the following elements.
Paragraph Widows OptionsTo see the paragraph widows options, access the xPublish commands as shown in Implementing an xPublish Command and selecting Paragraph Widows.
This page contains the following elements.
Element Name Description
The Number of Lines The integer you define here will be the minimum number of lines that can appear in the current paragraph before the paragraph can break across a page boundary. For example, if you set this value at three, the paragraph will not break at the page boundary unless three or more lines precede the page boundary.
Figure 48. Enables you to define the widow settings for a paragraph.
Element Name Description
The Number of Lines The integer you define here will be the minimum number of line that can be split on to a new page. For example, if you define this value as three, the paragraph will break at a page boundary by displaying three or more lines on the new page. The paragraph will not break at the page boundary unless three or more lines can be displayed on the new page.
Document Sciences Corporation
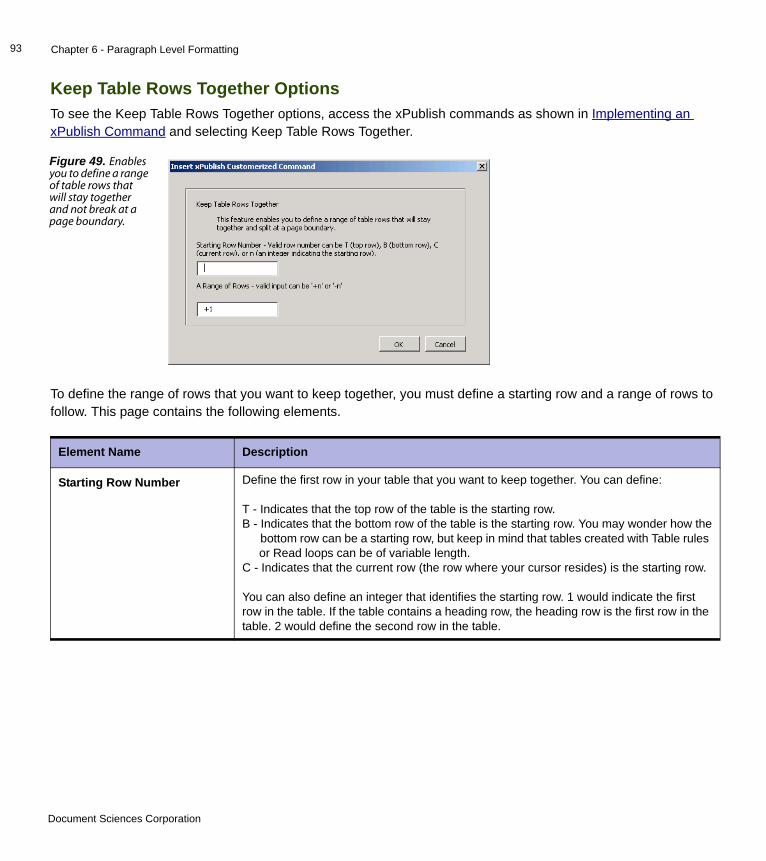
Chapter 6 - Paragraph Level Formatting93
Keep Table Rows Together OptionsTo see the Keep Table Rows Together options, access the xPublish commands as shown in Implementing an xPublish Command and selecting Keep Table Rows Together.
To define the range of rows that you want to keep together, you must define a starting row and a range of rows to follow. This page contains the following elements.
Figure 49. Enables you to define a range of table rows that will stay together and not break at a page boundary.
Element Name Description
Starting Row Number Define the first row in your table that you want to keep together. You can define:
T - Indicates that the top row of the table is the starting row.B - Indicates that the bottom row of the table is the starting row. You may wonder how the
bottom row can be a starting row, but keep in mind that tables created with Table rules or Read loops can be of variable length.
C - Indicates that the current row (the row where your cursor resides) is the starting row.
You can also define an integer that identifies the starting row. 1 would indicate the first row in the table. If the table contains a heading row, the heading row is the first row in the table. 2 would define the second row in the table.
Document Sciences Corporation
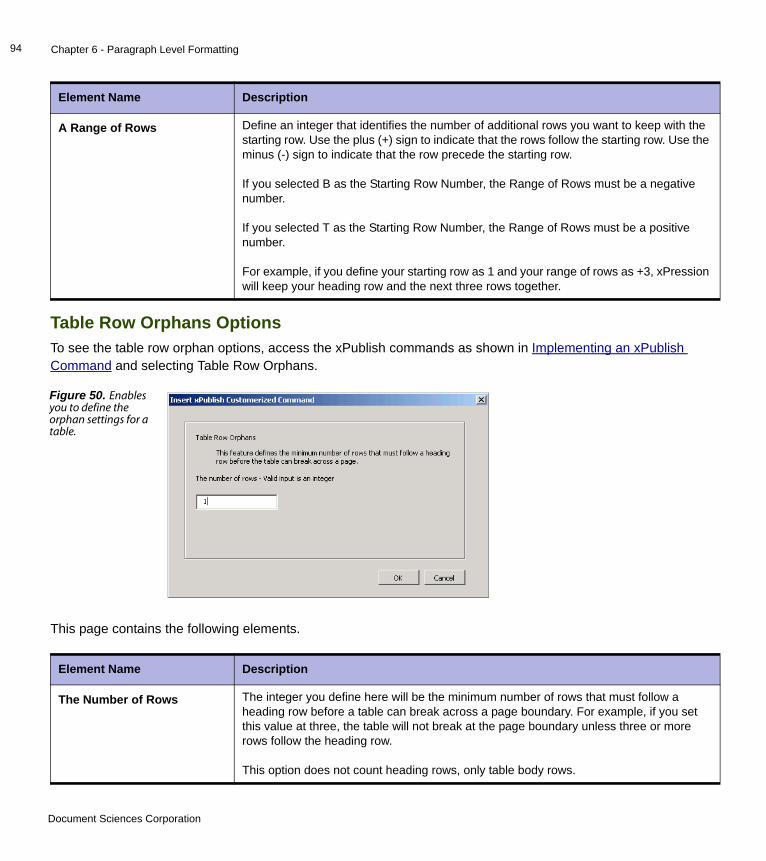
Chapter 6 - Paragraph Level Formatting94
Table Row Orphans OptionsTo see the table row orphan options, access the xPublish commands as shown in Implementing an xPublish Command and selecting Table Row Orphans.
This page contains the following elements.
A Range of Rows Define an integer that identifies the number of additional rows you want to keep with the starting row. Use the plus (+) sign to indicate that the rows follow the starting row. Use the minus (-) sign to indicate that the row precede the starting row.
If you selected B as the Starting Row Number, the Range of Rows must be a negative number.
If you selected T as the Starting Row Number, the Range of Rows must be a positive number.
For example, if you define your starting row as 1 and your range of rows as +3, xPression will keep your heading row and the next three rows together.
Figure 50. Enables you to define the orphan settings for a table.
Element Name Description
The Number of Rows The integer you define here will be the minimum number of rows that must follow a heading row before a table can break across a page boundary. For example, if you set this value at three, the table will not break at the page boundary unless three or more rows follow the heading row.
This option does not count heading rows, only table body rows.
Element Name Description
Document Sciences Corporation
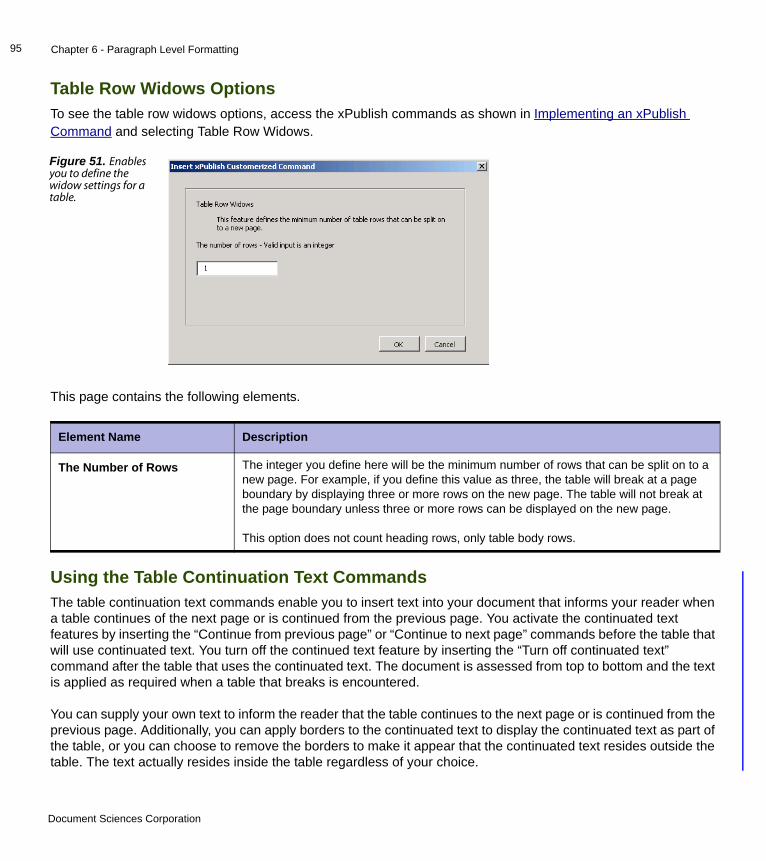
Chapter 6 - Paragraph Level Formatting95
Table Row Widows OptionsTo see the table row widows options, access the xPublish commands as shown in Implementing an xPublish Command and selecting Table Row Widows.
This page contains the following elements.
Using the Table Continuation Text CommandsThe table continuation text commands enable you to insert text into your document that informs your reader when a table continues of the next page or is continued from the previous page. You activate the continuated text features by inserting the “Continue from previous page” or “Continue to next page” commands before the table that will use continuated text. You turn off the continued text feature by inserting the “Turn off continuated text” command after the table that uses the continuated text. The document is assessed from top to bottom and the text is applied as required when a table that breaks is encountered.
You can supply your own text to inform the reader that the table continues to the next page or is continued from the previous page. Additionally, you can apply borders to the continuated text to display the continuated text as part of the table, or you can choose to remove the borders to make it appear that the continuated text resides outside the table. The text actually resides inside the table regardless of your choice.
Figure 51. Enables you to define the widow settings for a table.
Element Name Description
The Number of Rows The integer you define here will be the minimum number of rows that can be split on to a new page. For example, if you define this value as three, the table will break at a page boundary by displaying three or more rows on the new page. The table will not break at the page boundary unless three or more rows can be displayed on the new page.
This option does not count heading rows, only table body rows.
Document Sciences Corporation
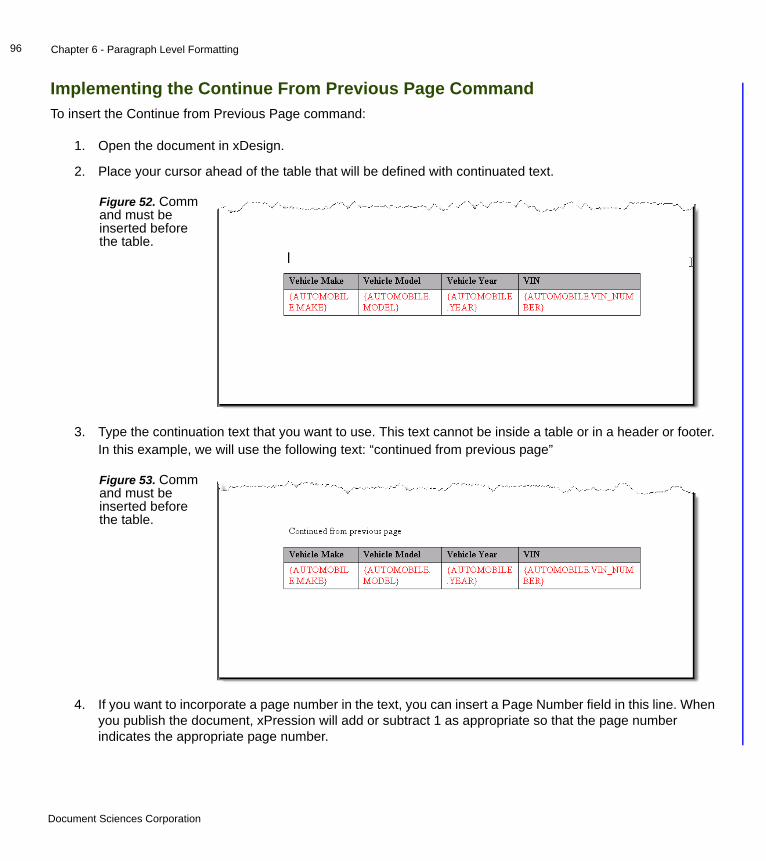
Chapter 6 - Paragraph Level Formatting96
Implementing the Continue From Previous Page CommandTo insert the Continue from Previous Page command:
1. Open the document in xDesign.
2. Place your cursor ahead of the table that will be defined with continuated text.
3. Type the continuation text that you want to use. This text cannot be inside a table or in a header or footer. In this example, we will use the following text: “continued from previous page”
4. If you want to incorporate a page number in the text, you can insert a Page Number field in this line. When you publish the document, xPression will add or subtract 1 as appropriate so that the page number indicates the appropriate page number.
Figure 52. Command must be inserted before the table.
Figure 53. Command must be inserted before the table.
Document Sciences Corporation
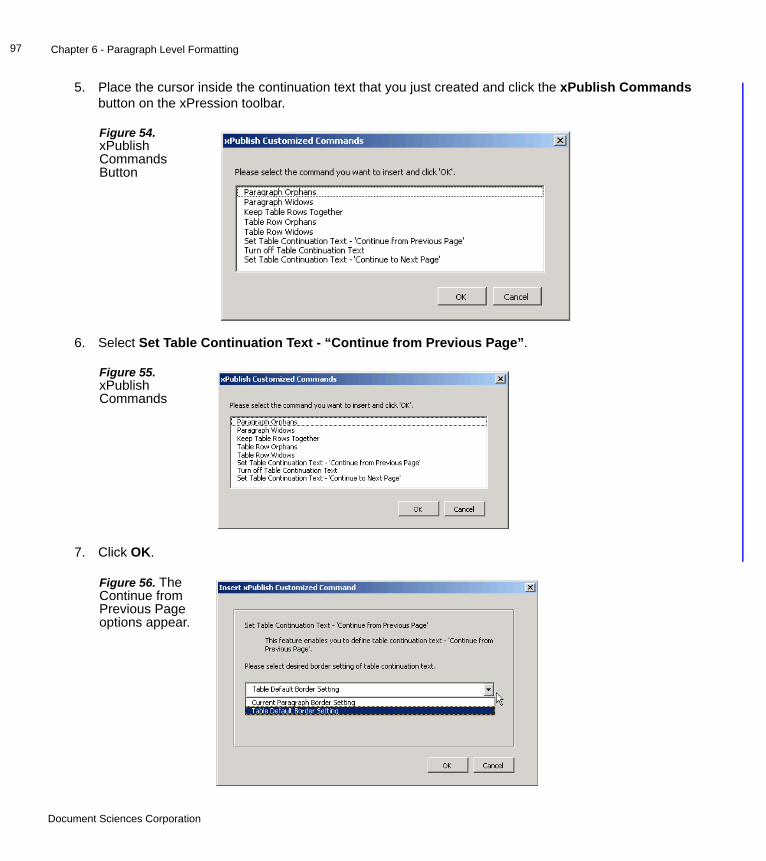
Chapter 6 - Paragraph Level Formatting97
5. Place the cursor inside the continuation text that you just created and click the xPublish Commands button on the xPression toolbar.
6. Select Set Table Continuation Text - “Continue from Previous Page”.
7. Click OK.
Figure 54. xPublish Commands Button
Figure 55. xPublish Commands
Figure 56. The Continue from Previous Page options appear.
Document Sciences Corporation

Chapter 6 - Paragraph Level Formatting98
8. Select the border option that you want to apply to the text. You can choose Current Paragraph Border Setting or Table Default Border Setting. Your selection will determine whether the text appears to be inside or outside of the table. In either case, the text actually resides inside the table.
The Current Paragraph Border Setting uses the border setting from the current paragraph.
The Table Default Border Setting uses the border from the table.
9. Click OK.
Implementing the Continue to Next Page CommandTo insert the Continue to Next Page command:
1. Open the document in xDesign.
Figure 57. The text that you provided in step 1 will be converted to hidden text.
Document Sciences Corporation
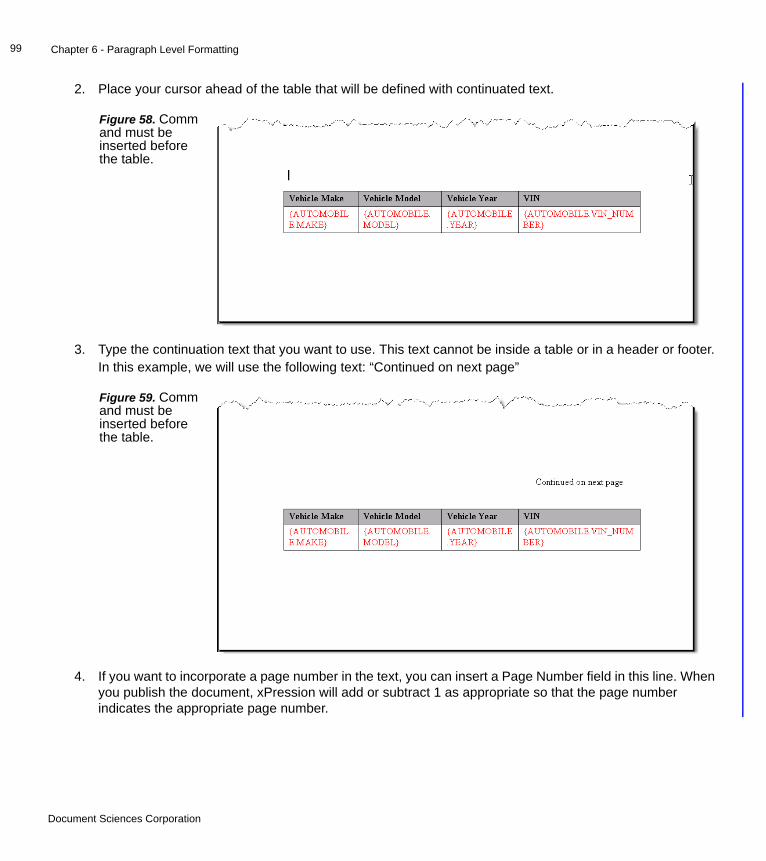
Chapter 6 - Paragraph Level Formatting99
2. Place your cursor ahead of the table that will be defined with continuated text.
3. Type the continuation text that you want to use. This text cannot be inside a table or in a header or footer. In this example, we will use the following text: “Continued on next page”
4. If you want to incorporate a page number in the text, you can insert a Page Number field in this line. When you publish the document, xPression will add or subtract 1 as appropriate so that the page number indicates the appropriate page number.
Figure 58. Command must be inserted before the table.
Figure 59. Command must be inserted before the table.
Document Sciences Corporation
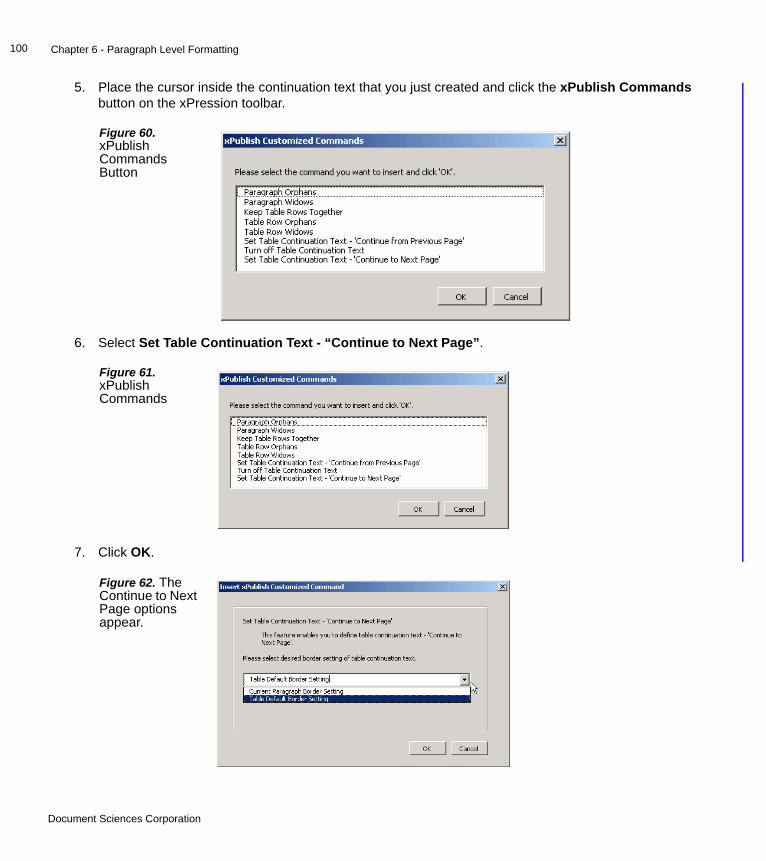
Chapter 6 - Paragraph Level Formatting100
5. Place the cursor inside the continuation text that you just created and click the xPublish Commands button on the xPression toolbar.
6. Select Set Table Continuation Text - “Continue to Next Page”.
7. Click OK.
Figure 60. xPublish Commands Button
Figure 61. xPublish Commands
Figure 62. The Continue to Next Page options appear.
Document Sciences Corporation
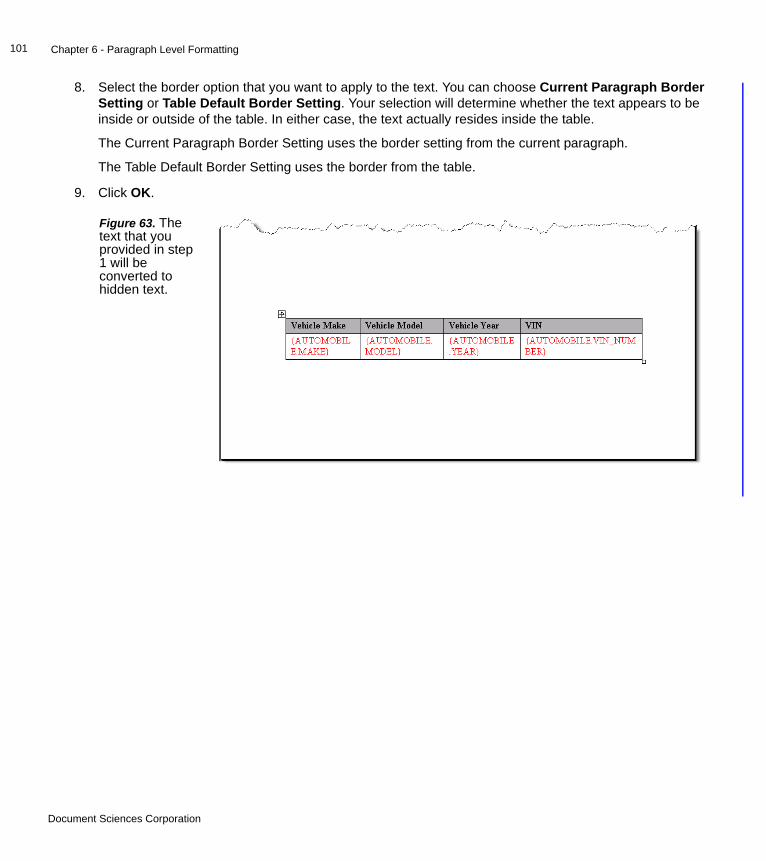
Chapter 6 - Paragraph Level Formatting101
8. Select the border option that you want to apply to the text. You can choose Current Paragraph Border Setting or Table Default Border Setting. Your selection will determine whether the text appears to be inside or outside of the table. In either case, the text actually resides inside the table.
The Current Paragraph Border Setting uses the border setting from the current paragraph.
The Table Default Border Setting uses the border from the table.
9. Click OK.
Figure 63. The text that you provided in step 1 will be converted to hidden text.
Document Sciences Corporation

Chapter 6 - Paragraph Level Formatting102
Implementing the Turn Off Continuated Text CommandTo insert the Turn Off Continuated Text command:
1. Open the document in xDesign.
2. Place your cursor after the table or tables that were defined with continuated text.
3. Select Turn Off Continuation Text.
Figure 64. Command must be inserted before the table.
Figure 65. xPublish Commands
Document Sciences Corporation

Chapter 6 - Paragraph Level Formatting103
4. Click OK.
5. Select whether you want to turn off Continue to Next Page, Continue from Previous Page, or Both.
6. Click OK.
Removing xPublish CommandsTo remove xPublish commands:
1. Click the Remove xPublish Commands button from the xPression toolbar.
2. The Remove xPublish Commands pop-up box appears.
3. Select the xPublish command that you want to remove. You can select more than one command.
4. Click Remove.
5. xPression will inform you if you have removed all xPublish commands from the content item. If you have removed all xPublish commands, the pop-up box will close automatically. If your content item still contains xPublish commands, click Exit to close the pop-up box.
Figure 66. The Turn off continuation text page appears.
Figure 67. The Remove xPublish Commands box lists all commands in the current content item.
Document Sciences Corporation

This chapter covers all character-level formatting features available from the Font dialog box.
Configuring Character-Level FormattingMost character-level formatting features appear on the font dialog box. For Microsoft Word 2003, click the Format menu and select Font. For Microsoft 2007, access these options by clicking the Home tab and expanding the Font group.
Chapter 7
Character Level Formatting 7
Figure 68. The Font dialog box contains settings for font family, style, size, color, and many other font formatting options.
Document Sciences Corporation
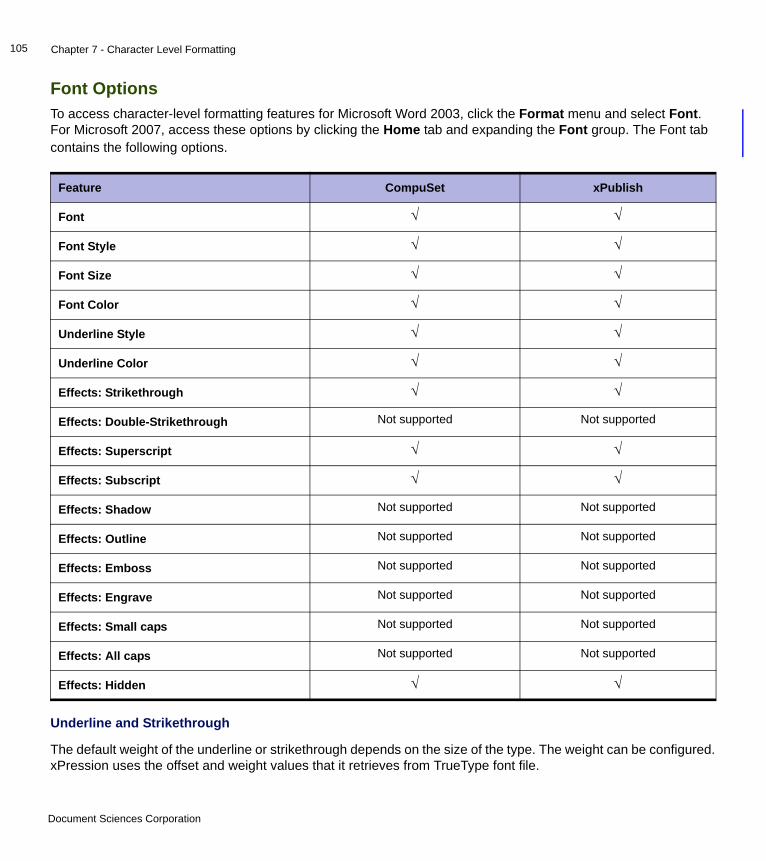
Chapter 7 - Character Level Formatting105
Font OptionsTo access character-level formatting features for Microsoft Word 2003, click the Format menu and select Font. For Microsoft 2007, access these options by clicking the Home tab and expanding the Font group. The Font tab contains the following options.
Underline and Strikethrough
The default weight of the underline or strikethrough depends on the size of the type. The weight can be configured. xPression uses the offset and weight values that it retrieves from TrueType font file.
Feature CompuSet xPublish
Font √ √
Font Style √ √
Font Size √ √
Font Color √ √
Underline Style √ √
Underline Color √ √
Effects: Strikethrough √ √
Effects: Double-Strikethrough Not supported Not supported
Effects: Superscript √ √
Effects: Subscript √ √
Effects: Shadow Not supported Not supported
Effects: Outline Not supported Not supported
Effects: Emboss Not supported Not supported
Effects: Engrave Not supported Not supported
Effects: Small caps Not supported Not supported
Effects: All caps Not supported Not supported
Effects: Hidden √ √
Document Sciences Corporation
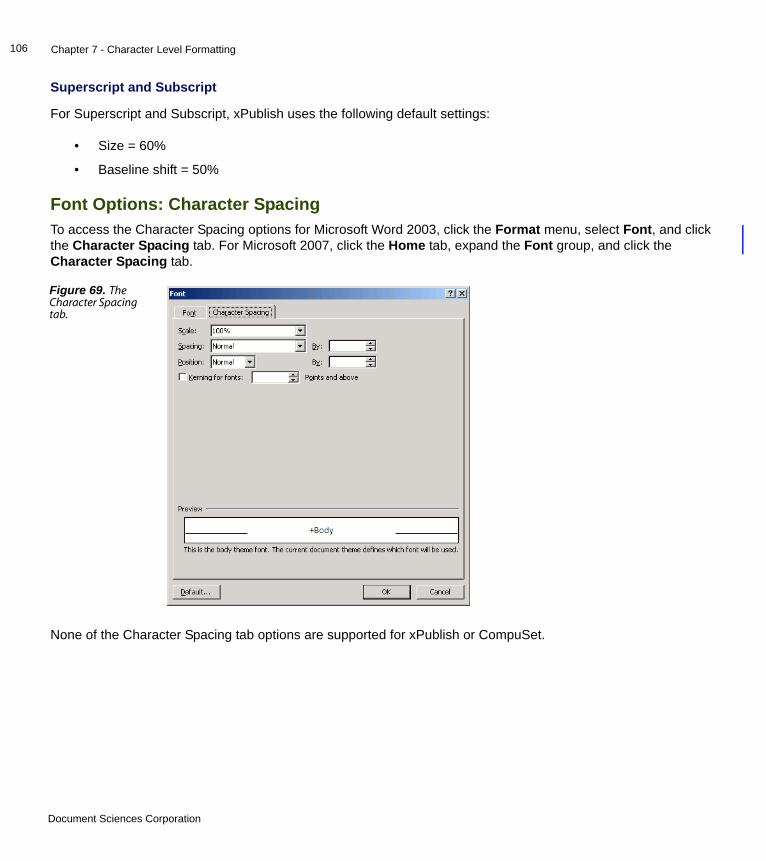
Chapter 7 - Character Level Formatting106
Superscript and Subscript
For Superscript and Subscript, xPublish uses the following default settings:
• Size = 60%
• Baseline shift = 50%
Font Options: Character SpacingTo access the Character Spacing options for Microsoft Word 2003, click the Format menu, select Font, and click the Character Spacing tab. For Microsoft 2007, click the Home tab, expand the Font group, and click the Character Spacing tab.
None of the Character Spacing tab options are supported for xPublish or CompuSet.
Figure 69. The Character Spacing tab.
Document Sciences Corporation

Chapter 7 - Character Level Formatting107
Font Options: Text EffectsTo access the Character Spacing options for Microsoft Word 2003, click the Format menu, select Font, and click the Text Effects tab. For Microsoft 2007, click the Home tab, expand the Font group, and click the Character Spacing tab. None of the options on this tab are supported.
Additional Font OptionsThe following table lists some additional font options available from Microsoft Word.
Special CharactersxPression supports the ISO Latin-1 character set. This character set contains all Latin alphabet letters used in all Western European languages, including accented vowels and the copyright symbol. Published documents often require special fonts, symbols, and international characters.
For CompuSet documents, xPression supports Windows fonts and special characters if you map each Windows font that you use to a corresponding CompuSet font. To use special characters in a CompuSet document may require manipulation of XLAT and ILAT commands in your Configuration and Widths files. For more information, see the xPression CompuSet Reference.
To use special characters in an xPublish document, use characters from the Symbol font.
Feature CompuSet xPublish
Text Animation Not supported Not supported
Highlight Not supported √
Background Shading √ √
Document Sciences Corporation

Chapter 7 - Character Level Formatting108
Microsoft Word Special Character Support for xPublishYou can see a list of Microsoft Word special characters in Microsoft Word 2003, click the Insert menu, select Symbol, and click the Special Characters tab. For Microsoft Word 2007, click the Insert tab, in the Symbols group click Symbol, select More Symbols, and click the Special Characters tab.
The following table lists the supported special characters for xPublish.
Figure 70. The Special Characters tab.
Feature xPublish
Em Space Not supported
En Space Not supported
Non-Breaking Space √
1/4 Em space Not supported
Em Dash √
En Dash √
Optional Hyphen √
Nonbreaking Hyphen √
Symbols √
Document Sciences Corporation
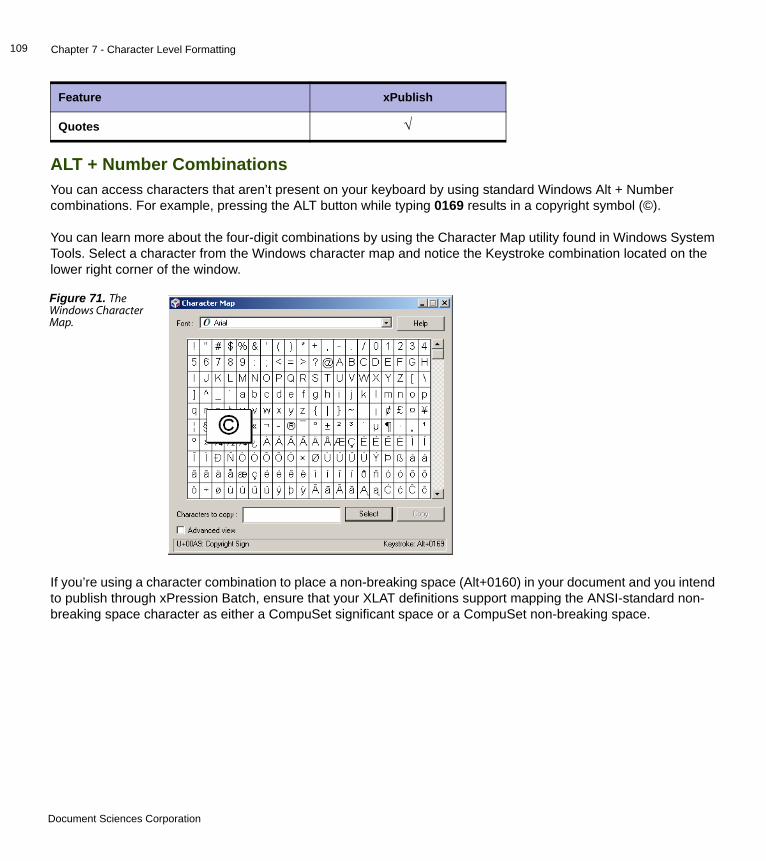
Chapter 7 - Character Level Formatting109
ALT + Number CombinationsYou can access characters that aren’t present on your keyboard by using standard Windows Alt + Number combinations. For example, pressing the ALT button while typing 0169 results in a copyright symbol (©).
You can learn more about the four-digit combinations by using the Character Map utility found in Windows System Tools. Select a character from the Windows character map and notice the Keystroke combination located on the lower right corner of the window.
If you’re using a character combination to place a non-breaking space (Alt+0160) in your document and you intend to publish through xPression Batch, ensure that your XLAT definitions support mapping the ANSI-standard non-breaking space character as either a CompuSet significant space or a CompuSet non-breaking space.
Quotes √
Figure 71. The Windows Character Map.
Feature xPublish
Document Sciences Corporation
Chapter 7 - Character Level Formatting110
AutoTextThe following AutoText settings are supported.
Element Name Description
Current Page Number The number of the current page.
Total Page Number Calculates the total number of pages and places that value in your document.
Arabic Number Style 1, 2, 3, 4, ...
Roman Number Style I, II, III, i, ii, iii, ...
Alphabetic Number Style A, B, C, a, b, c, ...
Document Sciences Corporation
Graphics enhance the appearance of content items, drawing more attention and interest than plain text. Images break up sections of text and make documents easier to read. Readers generally remember and pay more attention to text that is accompanied by graphics.
xPression enables you to insert graphics into your documents. You can also insert precomposed documents into content items as graphic images. Many xPression users receive forms in compressed electronic formats. Because converting and migrating electronic forms into content items takes a lot of processor time, the ability to insert these files as images directly into documents becomes essential.
You can insert documents sequentially into your content items, as you can with graphics files. However, xPression inserts document resources differently than image resources. You must insert a page break or page-breaking section break between each document you insert. If you don’t place breaks between each inserted document, xPression assigns the same insertion point to each resource, and “stacks” the documents instead of placing them sequentially.
Images do not have to be placed in the xPression database prior to placing them in your documents. Inserting an image into an xPublish document from Word simultaneously places the image in your xPression database, you just need to supply a name for the image. If you do not want your image to reside in the xPression database, you can use an xPublish external image reference to place a reference in your content item to an external image located on your desktop or network. For more information, see Inserting Images Using External Links.
Image Support for CompuSet and xPublishImage support for CompuSet and xPublish differs significantly. CompuSet and xPublish support a slightly different set of image formats, their images are stored in separate places, and their processes for storing and maintaining images is different.
Chapter 8
Using Images 8
Caution: You will encounter performance issues if you attempt to import an image or precomposed document larger than 10 MB.
Document Sciences Corporation
Chapter 8 - Using Images112
xPression supports the following image types, depending on the composition engine selected for your document.
EPS format works only for AFP or PostScript. It does not work for Metacode, PCL, or PDF output.
Managing Your CompuSet ImagesCompuSet images are stored in the xPression database, but they are stored separately from xPublish images. You cannot access xPublish images from a CompuSet document and you cannot access CompuSet images from an xPublish document.
There are two methods you can use to upload CompuSet images to your xPression database:
• You can independently upload images to the xPression database using the CompuSet Image Utility which is part of the CompuSet Tools. You do not need to be logged into xDesign to use the CompuSet Image Utility. Once images are uploaded, they are selectable from the Insert xPression Picture from xPression database function. For a more detailed discussion of the CompuSet Image Utility, see the xPression CompuSet Reference.
File type File extensions or formats CompuSet xPublish
EPS .eps √ √
Flate zlib/zip Not supported √
GIF .gif Not supported √
Group 4 black and white images √ √
IMG (Xerox) .img √ √
JPEG .jpeg, .jpg, .jfif, .jpe √ √
PCL .pcl √ √
PDF .pdf Not supported √
PNG .png Not supported √
TIFF .tif, .tiff √ √
Windows Bitmap .bmp Not supported √
Documentum Image
Image from Documentum Docbase
Not supported √
Document Sciences Corporation
Chapter 8 - Using Images113
• You can upload images while editing an xPression document in Microsoft Word using the Import Image Wizard.
Managing Your xPublish ImagesxPublish documents allow you to insert images from a number of places and in a variety of ways:
• From a file
• From the xPression database
• As an external reference
• From an ECM system
Images can be imported to the xPression database through the Image Utility in xAdmin or they can be automatically imported as you add them to your content. For information about the Image Utility, see the xAdmin Enterprise Edition User Guide.
You can also reference a pre-composed PDF document that is stored in a file or in the xPression database. For more information, see Inserting Images Using External Links. xPublish supports the resizing and rotation of images from Microsoft Word.
For more information on using ECM images, refer to Using ECM Images.
Inserting Images Into Your DocumentYou can insert images in a number of ways, depending on which composition engine you’ve chosen for your document, and where the images reside. xPression does not support using “Copy” and “Paste” to place images in your xDesign document. Always use the functions described in this section to place images in your document.
• Inserting a CompuSet Image From File
• Inserting an xPublish Image From File
Caution: If you insert a CompuSet image reference in Microsoft Word (as a xPression database image, a new image, or printer resident image), the line spacing of the paragraph is automatically set to the size of the image. When you add a carriage return following the image, the new paragraph will have the same line spacing value as the previous paragraph. Therefore, the line spacing of the new paragraph will be set to the size of the preceding image. To change the line spacing value of the new paragraph, you must manually change it through the paragraph options dialog.
Document Sciences Corporation
Chapter 8 - Using Images114
• Inserting Images from the xPression database
• Inserting Images Using External Links
• Using Printer Resident Images with xPublish
• Inserting Printer Resident Images with CompuSet
• Inserting an ECM Image Reference
• Importing an ECM Image
Inserting a CompuSet Image From File You can insert an image into your document directly from your file system. When you select an image to insert in this manner, xPression starts the Import Image Wizard. The Import Image Wizard imports the image into your xPression database at the same time that the image is inserted into your document.
To insert an image into your CompuSet document from a file:
1. Place your cursor at the position where you want to place the image.
2. For Microsoft Word 2003, click the Insert menu, click Picture, and then From File. For Microsoft Word 2007, click the Insert tab and from the Illustration group, click Picture.
3. Select an image from any location on your desktop or network and click Insert.
4. The Import Image wizard welcome page appears. Click Next.
Caution: If you insert an image into a content item, ensure that the image is not too wide for the page. If it is, xPression looks for the next page that is wide enough for the image. When it does not find a page that is sufficiently wide, it generates the following error:Fatal Composition Error. Runaway Page Ejects
Document Sciences Corporation
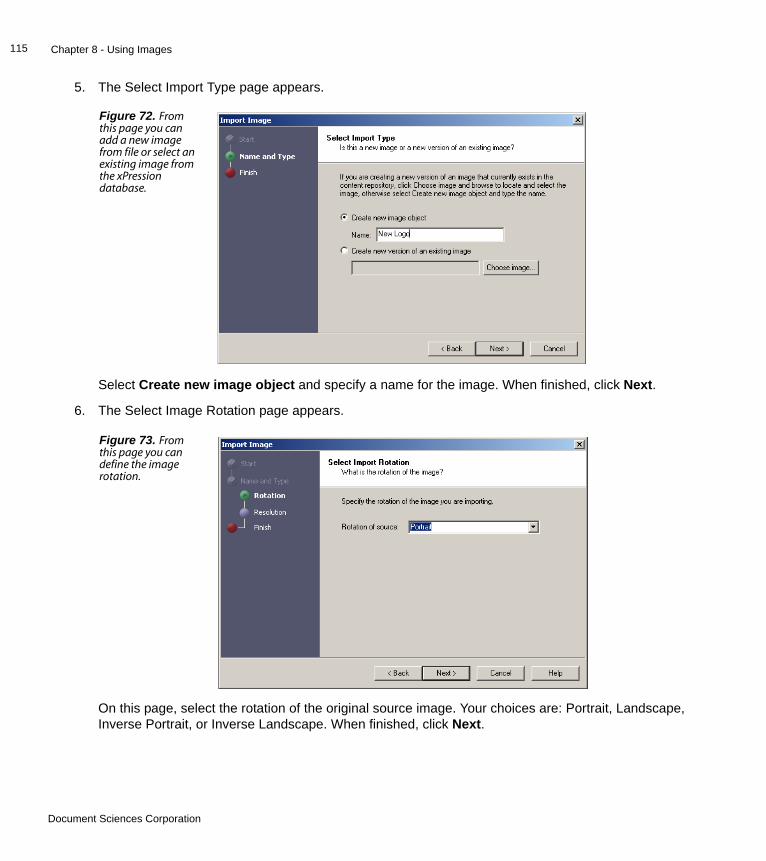
Chapter 8 - Using Images115
5. The Select Import Type page appears.
Select Create new image object and specify a name for the image. When finished, click Next.
6. The Select Image Rotation page appears.
On this page, select the rotation of the original source image. Your choices are: Portrait, Landscape, Inverse Portrait, or Inverse Landscape. When finished, click Next.
Figure 72. From this page you can add a new image from file or select an existing image from the xPression database.
Figure 73. From this page you can define the image rotation.
Document Sciences Corporation
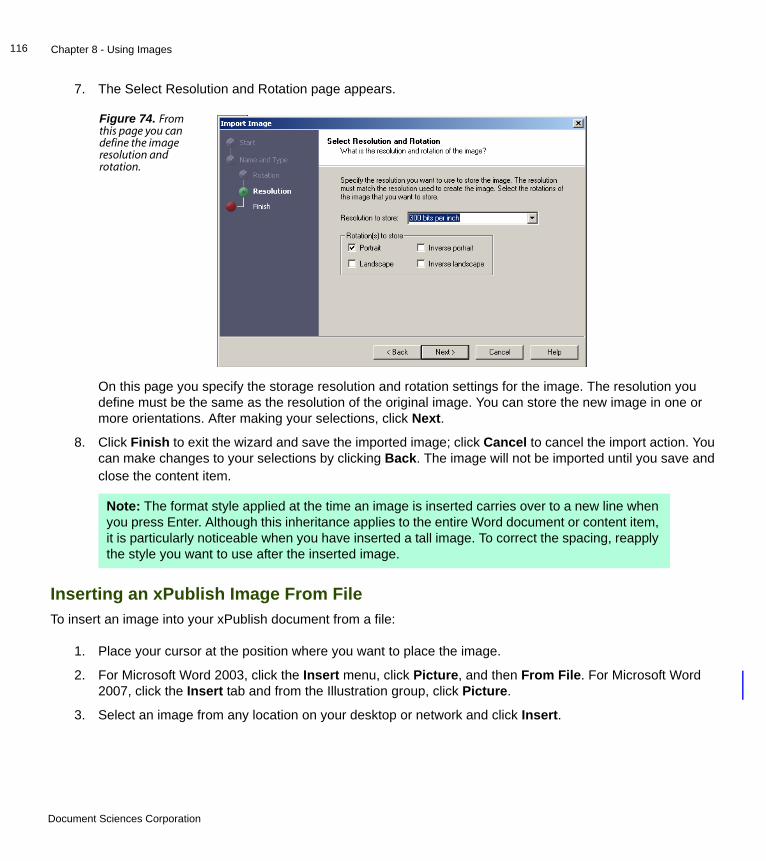
Chapter 8 - Using Images116
7. The Select Resolution and Rotation page appears.
On this page you specify the storage resolution and rotation settings for the image. The resolution you define must be the same as the resolution of the original image. You can store the new image in one or more orientations. After making your selections, click Next.
8. Click Finish to exit the wizard and save the imported image; click Cancel to cancel the import action. You can make changes to your selections by clicking Back. The image will not be imported until you save and close the content item.
Inserting an xPublish Image From FileTo insert an image into your xPublish document from a file:
1. Place your cursor at the position where you want to place the image.
2. For Microsoft Word 2003, click the Insert menu, click Picture, and then From File. For Microsoft Word 2007, click the Insert tab and from the Illustration group, click Picture.
3. Select an image from any location on your desktop or network and click Insert.
Figure 74. From this page you can define the image resolution and rotation.
Note: The format style applied at the time an image is inserted carries over to a new line when you press Enter. Although this inheritance applies to the entire Word document or content item, it is particularly noticeable when you have inserted a tall image. To correct the spacing, reapply the style you want to use after the inserted image.
Document Sciences Corporation
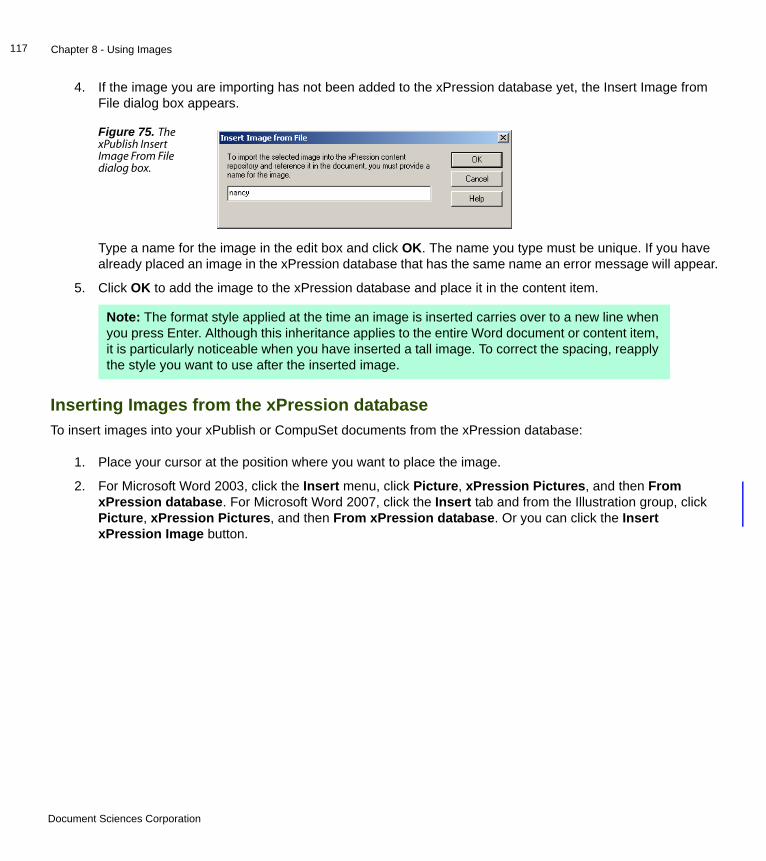
Chapter 8 - Using Images117
4. If the image you are importing has not been added to the xPression database yet, the Insert Image from File dialog box appears.
Type a name for the image in the edit box and click OK. The name you type must be unique. If you have already placed an image in the xPression database that has the same name an error message will appear.
5. Click OK to add the image to the xPression database and place it in the content item.
Inserting Images from the xPression databaseTo insert images into your xPublish or CompuSet documents from the xPression database:
1. Place your cursor at the position where you want to place the image.
2. For Microsoft Word 2003, click the Insert menu, click Picture, xPression Pictures, and then From xPression database. For Microsoft Word 2007, click the Insert tab and from the Illustration group, click Picture, xPression Pictures, and then From xPression database. Or you can click the Insert xPression Image button.
Figure 75. The xPublish Insert Image From File dialog box.
Note: The format style applied at the time an image is inserted carries over to a new line when you press Enter. Although this inheritance applies to the entire Word document or content item, it is particularly noticeable when you have inserted a tall image. To correct the spacing, reapply the style you want to use after the inserted image.
Document Sciences Corporation

Chapter 8 - Using Images118
3. In the Insert from xPression database dialog box, select an image or document from the list. An image preview appears in the right pane.
4. Click Insert. The image appears in your content item.
To see a demonstration of this feature, click here.
External ImagesxPublish documents enable you to embed a link to an image that resides either in the xPression database or in another location. When the document is assembled, the image is referenced, but not copied into either the xPression database or the document.
The first time xPression references an external image, it locates the image by either URL or path and, if necessary, converts it to a format suitable for the current output device. xPression caches the image by name and includes it in an intermediate format file called a DIF. Subsequent references to the image retrieve the converted form from the image cache and pass the reference to the DIF. This means that xPression converts the image once only, and only one copy of the image is stored in the DIF together with multiple references.
Figure 76. A list of images appears on the left and a preview of the selected image appears on the right.
Caution: If you intend to insert references to an external image using Universal Naming Convention (UNC) names to an image on a mapped drive or an image on a shared drive, you must ensure that you start your Windows application server with the .bat file supplied with the version of the application server you’re running (for example, adminserver.bat with WebSphere 4.0.7). Do not start the server with the Windows Services tool. Additionally, the domain user must have appropriate permissions on all servers and in all folders referenced by the external image link.
Document Sciences Corporation
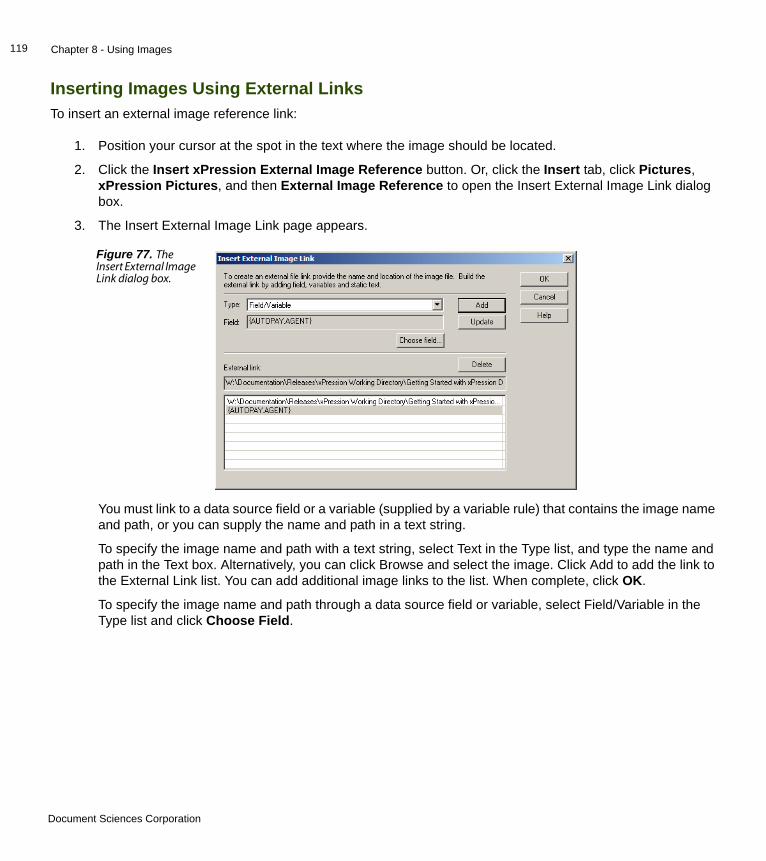
Chapter 8 - Using Images119
Inserting Images Using External LinksTo insert an external image reference link:
1. Position your cursor at the spot in the text where the image should be located.
2. Click the Insert xPression External Image Reference button. Or, click the Insert tab, click Pictures, xPression Pictures, and then External Image Reference to open the Insert External Image Link dialog box.
3. The Insert External Image Link page appears.
You must link to a data source field or a variable (supplied by a variable rule) that contains the image name and path, or you can supply the name and path in a text string.
To specify the image name and path with a text string, select Text in the Type list, and type the name and path in the Text box. Alternatively, you can click Browse and select the image. Click Add to add the link to the External Link list. You can add additional image links to the list. When complete, click OK.
To specify the image name and path through a data source field or variable, select Field/Variable in the Type list and click Choose Field.
Figure 77. The Insert External Image Link dialog box.
Document Sciences Corporation
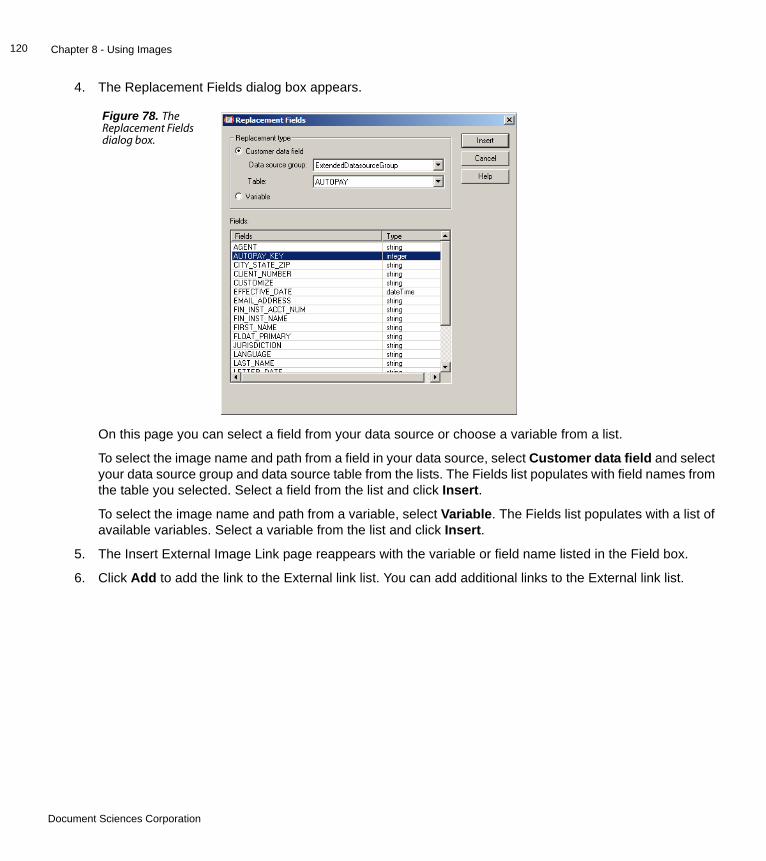
Chapter 8 - Using Images120
4. The Replacement Fields dialog box appears.
On this page you can select a field from your data source or choose a variable from a list.
To select the image name and path from a field in your data source, select Customer data field and select your data source group and data source table from the lists. The Fields list populates with field names from the table you selected. Select a field from the list and click Insert.
To select the image name and path from a variable, select Variable. The Fields list populates with a list of available variables. Select a variable from the list and click Insert.
5. The Insert External Image Link page reappears with the variable or field name listed in the Field box.
6. Click Add to add the link to the External link list. You can add additional links to the External link list.
Figure 78. The Replacement Fields dialog box.
Document Sciences Corporation
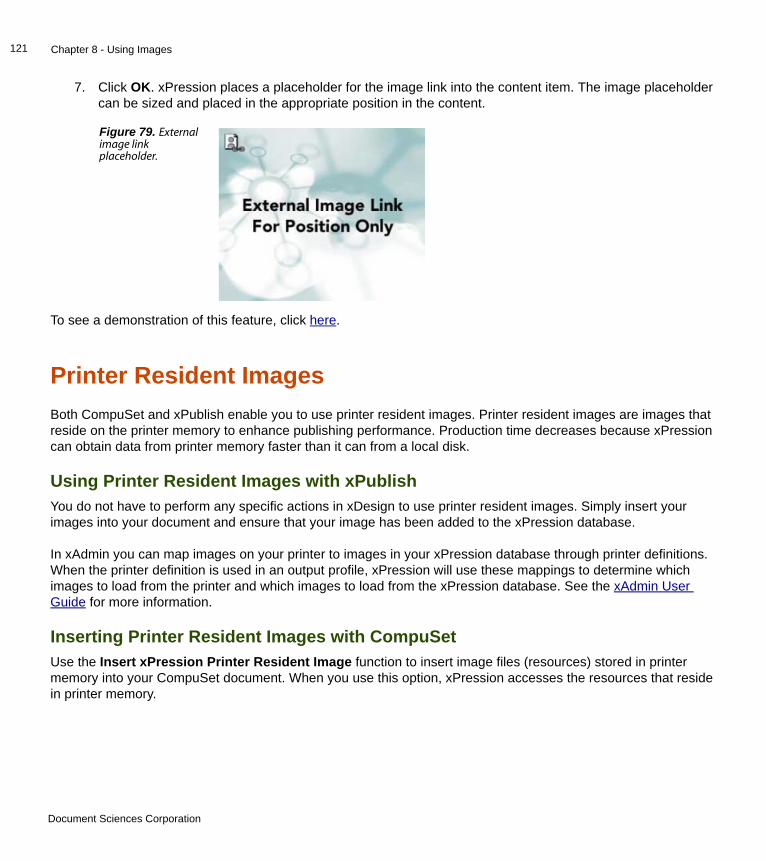
Chapter 8 - Using Images121
7. Click OK. xPression places a placeholder for the image link into the content item. The image placeholder can be sized and placed in the appropriate position in the content.
To see a demonstration of this feature, click here.
Printer Resident ImagesBoth CompuSet and xPublish enable you to use printer resident images. Printer resident images are images that reside on the printer memory to enhance publishing performance. Production time decreases because xPression can obtain data from printer memory faster than it can from a local disk.
Using Printer Resident Images with xPublishYou do not have to perform any specific actions in xDesign to use printer resident images. Simply insert your images into your document and ensure that your image has been added to the xPression database.
In xAdmin you can map images on your printer to images in your xPression database through printer definitions. When the printer definition is used in an output profile, xPression will use these mappings to determine which images to load from the printer and which images to load from the xPression database. See the xAdmin User Guide for more information.
Inserting Printer Resident Images with CompuSetUse the Insert xPression Printer Resident Image function to insert image files (resources) stored in printer memory into your CompuSet document. When you use this option, xPression accesses the resources that reside in printer memory.
Figure 79. External image link placeholder.
Document Sciences Corporation
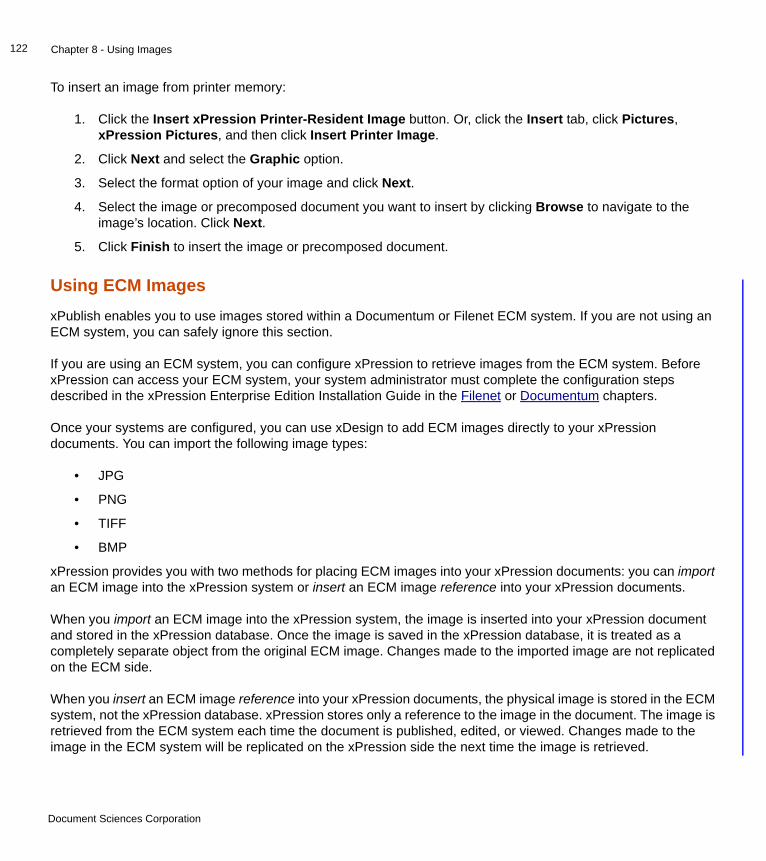
Chapter 8 - Using Images122
To insert an image from printer memory:
1. Click the Insert xPression Printer-Resident Image button. Or, click the Insert tab, click Pictures, xPression Pictures, and then click Insert Printer Image.
2. Click Next and select the Graphic option.
3. Select the format option of your image and click Next.
4. Select the image or precomposed document you want to insert by clicking Browse to navigate to the image’s location. Click Next.
5. Click Finish to insert the image or precomposed document.
Using ECM ImagesxPublish enables you to use images stored within a Documentum or Filenet ECM system. If you are not using an ECM system, you can safely ignore this section.
If you are using an ECM system, you can configure xPression to retrieve images from the ECM system. Before xPression can access your ECM system, your system administrator must complete the configuration steps described in the xPression Enterprise Edition Installation Guide in the Filenet or Documentum chapters.
Once your systems are configured, you can use xDesign to add ECM images directly to your xPression documents. You can import the following image types:
• JPG
• PNG
• TIFF
• BMP
xPression provides you with two methods for placing ECM images into your xPression documents: you can import an ECM image into the xPression system or insert an ECM image reference into your xPression documents.
When you import an ECM image into the xPression system, the image is inserted into your xPression document and stored in the xPression database. Once the image is saved in the xPression database, it is treated as a completely separate object from the original ECM image. Changes made to the imported image are not replicated on the ECM side.
When you insert an ECM image reference into your xPression documents, the physical image is stored in the ECM system, not the xPression database. xPression stores only a reference to the image in the document. The image is retrieved from the ECM system each time the document is published, edited, or viewed. Changes made to the image in the ECM system will be replicated on the xPression side the next time the image is retrieved.
Document Sciences Corporation
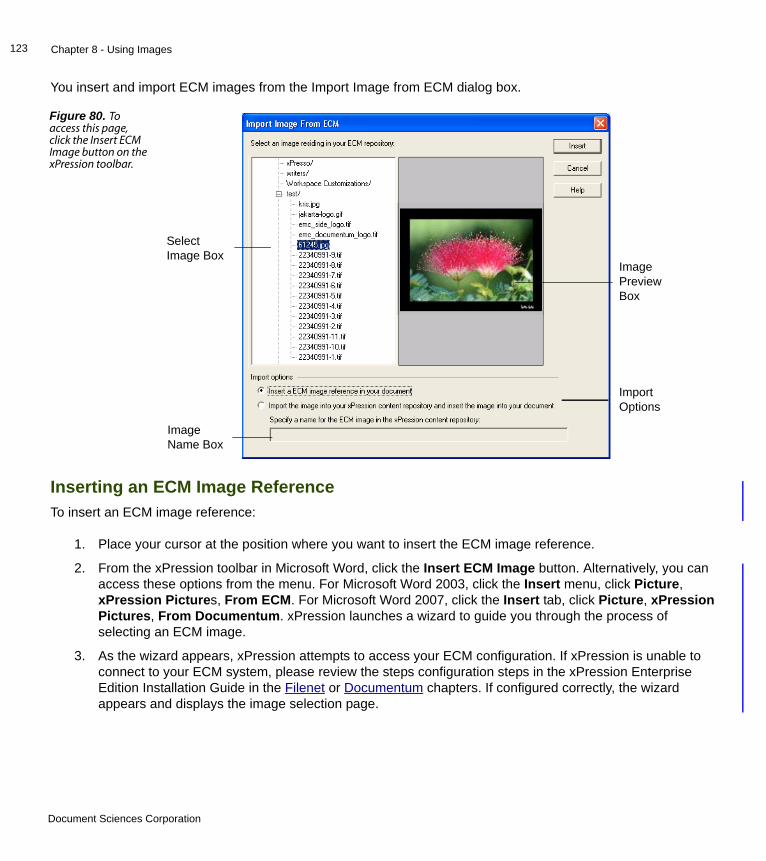
Chapter 8 - Using Images123
You insert and import ECM images from the Import Image from ECM dialog box.
Inserting an ECM Image ReferenceTo insert an ECM image reference:
1. Place your cursor at the position where you want to insert the ECM image reference.
2. From the xPression toolbar in Microsoft Word, click the Insert ECM Image button. Alternatively, you can access these options from the menu. For Microsoft Word 2003, click the Insert menu, click Picture, xPression Pictures, From ECM. For Microsoft Word 2007, click the Insert tab, click Picture, xPression Pictures, From Documentum. xPression launches a wizard to guide you through the process of selecting an ECM image.
3. As the wizard appears, xPression attempts to access your ECM configuration. If xPression is unable to connect to your ECM system, please review the steps configuration steps in the xPression Enterprise Edition Installation Guide in the Filenet or Documentum chapters. If configured correctly, the wizard appears and displays the image selection page.
Figure 80. To access this page, click the Insert ECM Image button on the xPression toolbar.
Image Name Box
Image Preview Box
Import Options
Select Image Box
Document Sciences Corporation

Chapter 8 - Using Images124
4. First, you need to select the image from the image selection box. Navigate the folder structure to locate the image you want to import. When you find the image, click to select it.
5. From the Import Options section, select Insert a ECM image reference in your document. When you select this option, the image name box is disabled.
6. Click Insert.
Importing an ECM Image To import an ECM image:
1. Place your cursor at the position where you want to import the ECM image.
2. From the xPression toolbar in Microsoft Word, click the Insert ECM Image button. Alternatively, you can access these options from the menu. For Microsoft Word 2003, click the Insert menu, click Picture, xPression Pictures, From ECM. For Microsoft Word 2007, click the Insert tab, click Picture, xPression Pictures, From Documentum. xPression launches a wizard to guide you through the process of selecting an ECM image.
3. As the wizard appears, xPression attempts to access your ECM configuration. If xPression is unable to connect to your ECM system, please review the steps configuration steps in the xPression Enterprise
Figure 81. When you select an image, xPression displays a preview of the image in the image preview box. If the image file is large, it may take several seconds for the image to appear in the image box.
Document Sciences Corporation
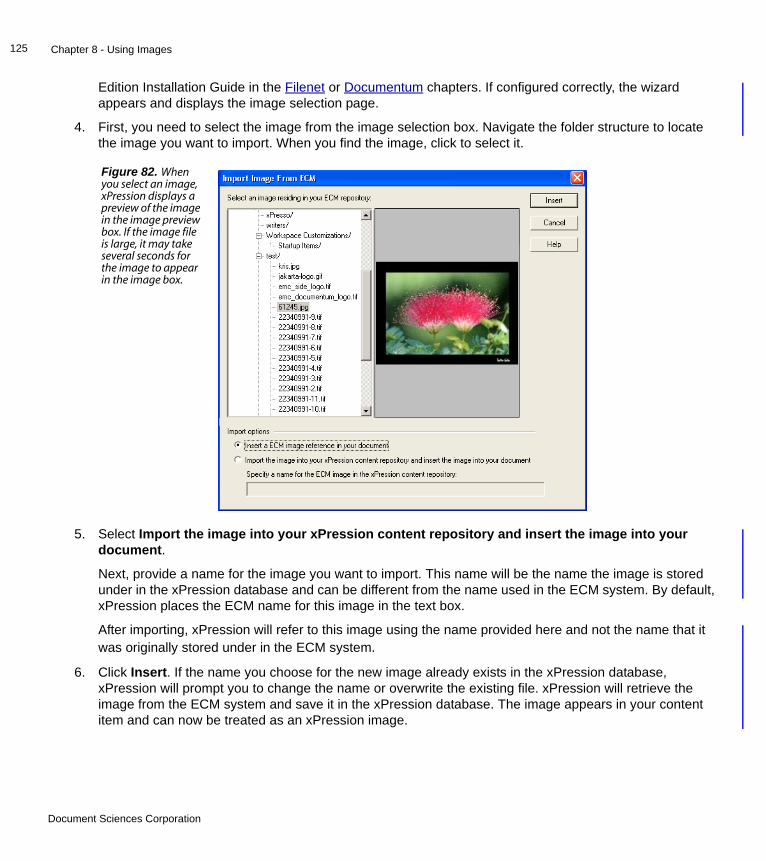
Chapter 8 - Using Images125
Edition Installation Guide in the Filenet or Documentum chapters. If configured correctly, the wizard appears and displays the image selection page.
4. First, you need to select the image from the image selection box. Navigate the folder structure to locate the image you want to import. When you find the image, click to select it.
5. Select Import the image into your xPression content repository and insert the image into your document.
Next, provide a name for the image you want to import. This name will be the name the image is stored under in the xPression database and can be different from the name used in the ECM system. By default, xPression places the ECM name for this image in the text box.
After importing, xPression will refer to this image using the name provided here and not the name that it was originally stored under in the ECM system.
6. Click Insert. If the name you choose for the new image already exists in the xPression database, xPression will prompt you to change the name or overwrite the existing file. xPression will retrieve the image from the ECM system and save it in the xPression database. The image appears in your content item and can now be treated as an xPression image.
Figure 82. When you select an image, xPression displays a preview of the image in the image preview box. If the image file is large, it may take several seconds for the image to appear in the image box.
Document Sciences Corporation
Chapter 8 - Using Images126
Merging Images Inline with TextTo place an image inline with your text, use a single-cell table to prevent the image from overlapping your text. To place an image inline with your text:
1. Place your cursor where you want to insert your image.
2. Display the Insert Table options. For Microsoft Word 2003, from the Table menu click Insert and select Table. For Microsoft Word 2007, click the Insert menu, click Tables, and select Insert Table.
3. The Insert Table options appear. Under Table size, select 1 for the number of columns and rows.
4. Under AutoFit behavior, select Fixed column width and specify the width of your image.
5. Click OK. The table will appear on your screen at the incorrect position. This is OK for now. Select the table and remove the table borders.
6. Right-click the table and click Table Properties.
7. In the Text wrapping section, click Around.
8. Click the Positioning button.
9. Modify the Left and Right settings under Distance from surrounding text to control how much space appears between the text and your image. Click OK.
10. Click Options.
11. Modify the settings under Default cell margins to control how much space appears between your image and the margins of the cell. Click OK.
12. Click OK to close the Table Properties.
13. Manually move the table to the desired position.
14. Place your cursor in the table and insert your image into the document. Adjust the table margins as needed.
Document Sciences Corporation

Chapter 8 - Using Images127
Rotating xPublish Images in an xPression DocumentOnly xPublish images can be rotated from within an xPression document. Word 2000 doesn’t support inline image rotation. You won’t be able to see the rotated image until you save the content item and return to xDesign. To rotate an image:
1. Select the image you want to rotate.
2. Click the Rotate xPression Image button from the xPression toolbar..
3. xPression will rotate your image in 90° clockwise increments with every click. It also inserts the appropriate image tag that xPublish needs to create the correct output. Do not use the image rotation tools available in Word.
Resizing ImagesOnce inserted, you can resize the image by selecting it and dragging the sizing handles or setting the size from Picture Properties.
Under certain circumstances, Word displays reduced images as a plain black rectangle. If this occurs, try creating a smaller version of the image with your graphics application and use the smaller image instead.
Deleting CompuSet ImagesWhen you delete a CompuSet image from a content item, the image proof disappears, but Microsoft Word retains the CompuSet command hidden text formatting. Save the content item and xPression removes the hidden text.
Document Sciences Corporation

This chapter covers additional Microsoft Word features that are supported in xPression. This chapter covers, hyperlinks, rules and boxes, support for colors, and tables of content.
Text Boxes/FramesCompuSet does not support text boxes or frames. xPublish does not directly support text boxes, but does support text boxes that have been converted to frames. Text boxes/Frames can be placed at a fixed position on your page and body text can be set to flow around the text box/frame.
To insert a text box and convert it to a frame:
1. For Microsoft Word 2003, click the Insert menu and select Text Box. For Microsoft Word 2007, click the Insert tab, from the Text group click Text Box, and select Draw Text box.
2. Draw the text box by clicking at the starting point and dragging the mouse to draw the box to the desired height and width. Do not place the text box inside the Microsoft Word drawing canvas that automatically appears on the page. Simply draw the text outside of the canvas and the canvas will disappear.
3. Right-click the newly drawn text box and choose Format Text Box.
4. Click Convert to Frame and click OK on the pop-up box.
Chapter 9
Special Microsoft Word Features 9
Document Sciences Corporation
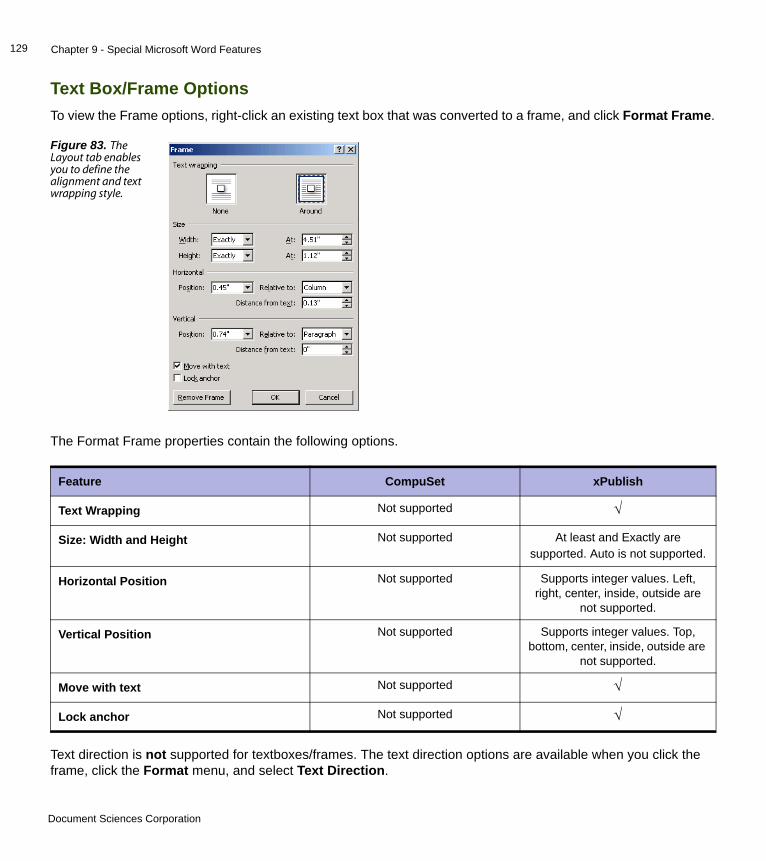
Chapter 9 - Special Microsoft Word Features129
Text Box/Frame OptionsTo view the Frame options, right-click an existing text box that was converted to a frame, and click Format Frame.
The Format Frame properties contain the following options.
Text direction is not supported for textboxes/frames. The text direction options are available when you click the frame, click the Format menu, and select Text Direction.
Figure 83. The Layout tab enables you to define the alignment and text wrapping style.
Feature CompuSet xPublish
Text Wrapping Not supported √
Size: Width and Height Not supported At least and Exactly are supported. Auto is not supported.
Horizontal Position Not supported Supports integer values. Left, right, center, inside, outside are
not supported.
Vertical Position Not supported Supports integer values. Top, bottom, center, inside, outside are
not supported.
Move with text Not supported √
Lock anchor Not supported √
Document Sciences Corporation
Chapter 9 - Special Microsoft Word Features130
You can also apply borders and shading to a frame. For shading, xPublish only supports Fill Color. For borders, see Borders and Shading.
ColorxPublish provides the ability to select an arbitrary color for use in text, rules, and other compositional elements. It supports RGB color which is explicitly set in Word.
Tables of Content for xPublishxPublish documents can include a table of contents using some of the basic Word TOC functions. A table of contents can be defined in just one of your content items and it will be applied to the entire document. You should be very careful if you define more than one table of contents for your document. Depending on which table of contents content qualifies to be included in the document, that table of contents definition and its style will be applied to your output, which may not by necessarily what you may have wanted.
If you define the table of contents in content that does not qualify for inclusion in the document your table of contents will not appear in the finished product. Make sure that wherever you place the table of contents, that content will qualify in whatever output you need it to appear.
The field codes associated with a table of contents entry are normally hidden text. To turn on or off the display of the field codes, click the Show/Hide button on the Standard Word toolbar. There are two ways to insert a Table of Contents in xPublish Word text: using the Index and Tables dialog box settings, and manually defining your field codes from the Field dialog box.
Table of Contents OptionsTo accsess the Table of Contents options forMicrosoft Word 2003, click the Insert menu, select Reference, and then click Index and Tables to open the Index and Tables dialog box . For Microsoft Word 2007, click the References tab, in the Table of Contents group click Table of Contents, and select Insert Table of Contents.
Feature CompuSet xPublish
Show page numbers Not supported √
Right align page numbers Not supported √
Tab leader Not supported √
User hyperlinks instead of page numbers Not supported Not supported
Document Sciences Corporation
Chapter 9 - Special Microsoft Word Features131
Inserting a Table of ContentsTo insert a Table of Contents for an xPublish document:
1. Position the cursor where you want to insert the TOC in your content.
2. For Microsoft Word 2003, from the Insert menu, select Reference, and then Index and Tables to open the Index and Tables dialog box. For Microsoft Word 2007, click the References tab, from the Table of Contents group click Table of Contents, and select Insert Table of Contents.
3. Click the Table of Contents tab.
4. By default, Microsoft Word enables you to create a three-level table of contents based on Headings 1-3. You can accept this table of contents, or specify a different set of styles to base your table of contents on. To specify different styles, click Options and define the new styles.
5. Click OK as many times as necessary to back out of the dialogs you have open and insert the table of contents.
Building Your Own Table of ContentsYou can bypass Word’s automatic table of contents functionality and assemble your own using TC and TOC field codes. The TC field code defines the text and page numbers for entries in a table of contents and in lists of tables, figures, and similar contents. Insert a TC field immediately before the text you want to include in the contents. The TOC field collects entries for a table of contents using heading levels, specified styles, or entries specified by your TC fields. xPublish supports the ability to insert a Table of Contents from the field level and manually set up your TOC switches. The following table identifies which switches xPression supports and which it does not.
Formats Not supported Only Classic, Distinctive, Formal, and Simple are supported
Show levels Not supported Only levels 1-2 are supported
Options: Outline Levels Not supported Not supported
Options: Table entry fields Not supported Not supported
Modify button Not supported √
Switch Definition
\f Builds a table from TC fields. If EntryIdentifier is specified, the table is built only from TC fields with the same identifier (typically a letter). For example, { TOC \f t } builds a table of contents from TC fields such as { TC "Entry Text" \f t }.
Feature CompuSet xPublish
Document Sciences Corporation
Chapter 9 - Special Microsoft Word Features132
xPression does not support switches for TC fields.
Inserting a Table of Contents with TC and TOC Field CodesTo insert a Table of Contents at the field level:
1. Position the cursor where you want to insert the TOC in your content.
2. For Microsoft Word 2003, from the Insert menu, click Field to open the Field dialog box.For Microsoft Word 2007, click the Insert tab, from the Text group click Quick Parts, and select Field.
3. Select Index and Tables in the Categories list.
4. Select TOC in the Field names list.
5. To manually specify the switches you want to use in your TOC, click Field Codes. xPression displays the switches that have been specified for the TOC in the Field codes box. The Options button also becomes available.
\h Not supported
\l Not supported
\n Omits page numbers from the table of contents. Page numbers are omitted from all levels unless a range of entry levels is specified. For example, {TOC \n 3-4} omits page numbers from levels 3 and 4. Remove this switch if you want to include the page numbers.
\o Builds a table of contents from paragraphs formatted with built-in heading styles (in Word that will be the Heading 1 through Heading 9 styles). If you want to display only the first three levels of those styles your field would look like this: {TOC \o "1-3"}. If no heading range is specified, all built-in heading levels used in the document are listed. The range number must be enclosed in quotes.
\t Builds a table of contents from paragraphs formatted with styles other than the built-in heading styles. For example, {TOC \t "chaptertitle,1,chapterhead,2"} builds a table of contents from paragraphs formatted with the styles "chaptertitle" and "chapterhead." The number after each style name indicates the table of contents entry level that corresponds to that style. Text that you select as paragraph level TOC entries can't be formatted in columns.
\u Builds a table of contents by using the applied paragraph outline level.
\z Not supported
Switch Definition
Document Sciences Corporation

Chapter 9 - Special Microsoft Word Features133
6. Click Options to open the Field Options dialog box.
From this page you can select each of the switches you want to use and add them by clicking Add to Field. When a switch is added, it appears in the edit box. In the edit box you can type any parameters you want to use for that switch. When you have added all your switches and parameters, click OK and view the results in the Field codes edit box.
7. Click OK again and the TOC you designed appears in the document. You can use the Toggle Field Codes command in the shortcut menu to switch back and forth between viewing the field code or the result.
Table of Contents with Entries from Separate Content ItemsWhen your table of contents resides in a separate content item from the content items that make up the entries in your table of contents, you must perform the following steps:
1. Open the content item that you want to use for your table of contents.
2. In order to create a table of contents, we need to add text to the content item so that Microsoft Word can create an initial table of contents using just the styles from this content item. Create a few paragraphs of temporary text that uses the same styles you want to base your final table of contents on.
3. Create the table of contents.
4. Delete the temporary text, but leave the table of contents intact.
5. Close the content item. Microsoft Word will generate an error message stating that the entries are not defined for the TOC. This is okay, since the entries that will make up the table of contents are defined in other content items (and styled with the appropriate styles). When your content items are assembled and published, the table of contents will be recreated based on all of your content items.
Figure 84. TOC Field options for switches.
Document Sciences Corporation

Chapter 9 - Special Microsoft Word Features134
PDF BookmarksYou can enable PDF bookmarks for your xPublish documents.
Each Microsoft Word paragraph style has an outline level setting. xPression uses this setting to determine which paragraph styles will be included as PDF bookmarks.
The number of bookmark levels is set in a PDF output definition. If you set your bookmark level in the PDF output definition at 3, then xPression will create bookmarks from all paragraph styles that have outline levels of 1-3. For more information, see Enable PDF Bookmarks.
Form Controls for Fillable PDF DocumentsxPublish-enabled documents can use form controls to create fillable PDFs. Fillable PDFs are PDF documents that contain elements that can be manipulated by the recipient of the PDF. Through xDesign, you can add three different form controls to your documents for PDF output: Text Boxes, Check Boxes, and Drop-Down Boxes.
Adding a Text Box to Your DocumentTo add a text box to your xPublish document:
Figure 85. PDF bookmarks appear in the left pane and enable users to jump to different sections in a document.
Document Sciences Corporation
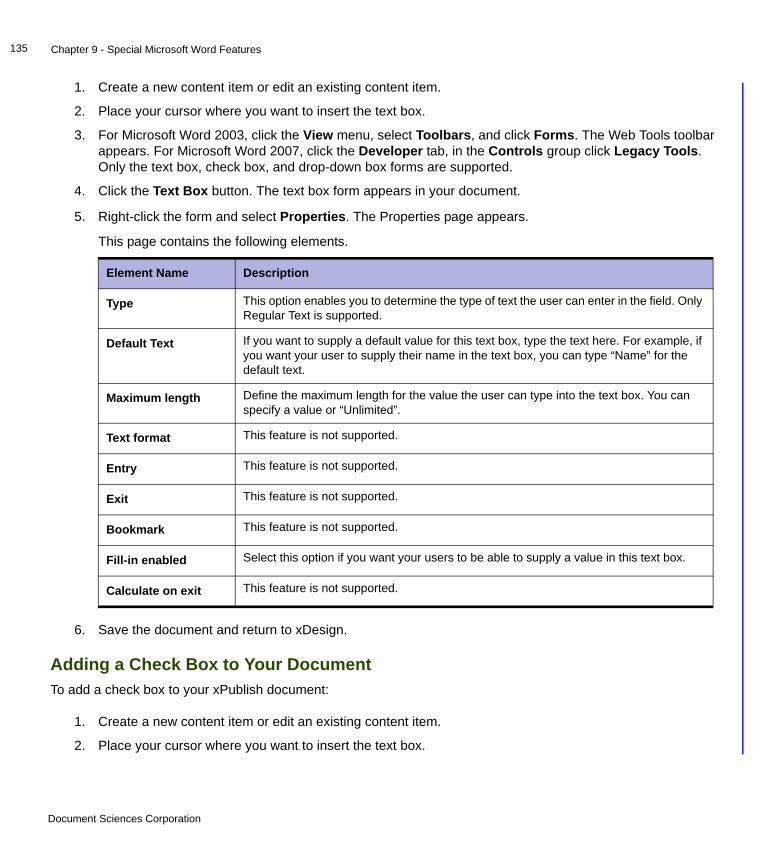
Chapter 9 - Special Microsoft Word Features135
1. Create a new content item or edit an existing content item.
2. Place your cursor where you want to insert the text box.
3. For Microsoft Word 2003, click the View menu, select Toolbars, and click Forms. The Web Tools toolbar appears. For Microsoft Word 2007, click the Developer tab, in the Controls group click Legacy Tools. Only the text box, check box, and drop-down box forms are supported.
4. Click the Text Box button. The text box form appears in your document.
5. Right-click the form and select Properties. The Properties page appears.
This page contains the following elements.
6. Save the document and return to xDesign.
Adding a Check Box to Your DocumentTo add a check box to your xPublish document:
1. Create a new content item or edit an existing content item.
2. Place your cursor where you want to insert the text box.
Element Name Description
Type This option enables you to determine the type of text the user can enter in the field. Only Regular Text is supported.
Default Text If you want to supply a default value for this text box, type the text here. For example, if you want your user to supply their name in the text box, you can type “Name” for the default text.
Maximum length Define the maximum length for the value the user can type into the text box. You can specify a value or “Unlimited”.
Text format This feature is not supported.
Entry This feature is not supported.
Exit This feature is not supported.
Bookmark This feature is not supported.
Fill-in enabled Select this option if you want your users to be able to supply a value in this text box.
Calculate on exit This feature is not supported.
Document Sciences Corporation
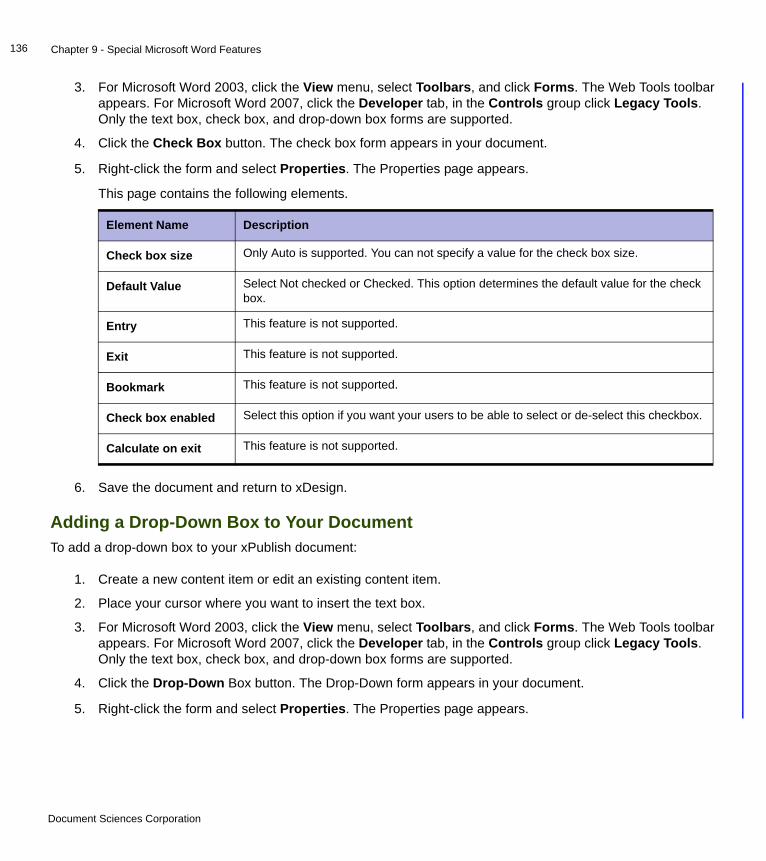
Chapter 9 - Special Microsoft Word Features136
3. For Microsoft Word 2003, click the View menu, select Toolbars, and click Forms. The Web Tools toolbar appears. For Microsoft Word 2007, click the Developer tab, in the Controls group click Legacy Tools. Only the text box, check box, and drop-down box forms are supported.
4. Click the Check Box button. The check box form appears in your document.
5. Right-click the form and select Properties. The Properties page appears.
This page contains the following elements.
6. Save the document and return to xDesign.
Adding a Drop-Down Box to Your DocumentTo add a drop-down box to your xPublish document:
1. Create a new content item or edit an existing content item.
2. Place your cursor where you want to insert the text box.
3. For Microsoft Word 2003, click the View menu, select Toolbars, and click Forms. The Web Tools toolbar appears. For Microsoft Word 2007, click the Developer tab, in the Controls group click Legacy Tools. Only the text box, check box, and drop-down box forms are supported.
4. Click the Drop-Down Box button. The Drop-Down form appears in your document.
5. Right-click the form and select Properties. The Properties page appears.
Element Name Description
Check box size Only Auto is supported. You can not specify a value for the check box size.
Default Value Select Not checked or Checked. This option determines the default value for the check box.
Entry This feature is not supported.
Exit This feature is not supported.
Bookmark This feature is not supported.
Check box enabled Select this option if you want your users to be able to select or de-select this checkbox.
Calculate on exit This feature is not supported.
Document Sciences Corporation
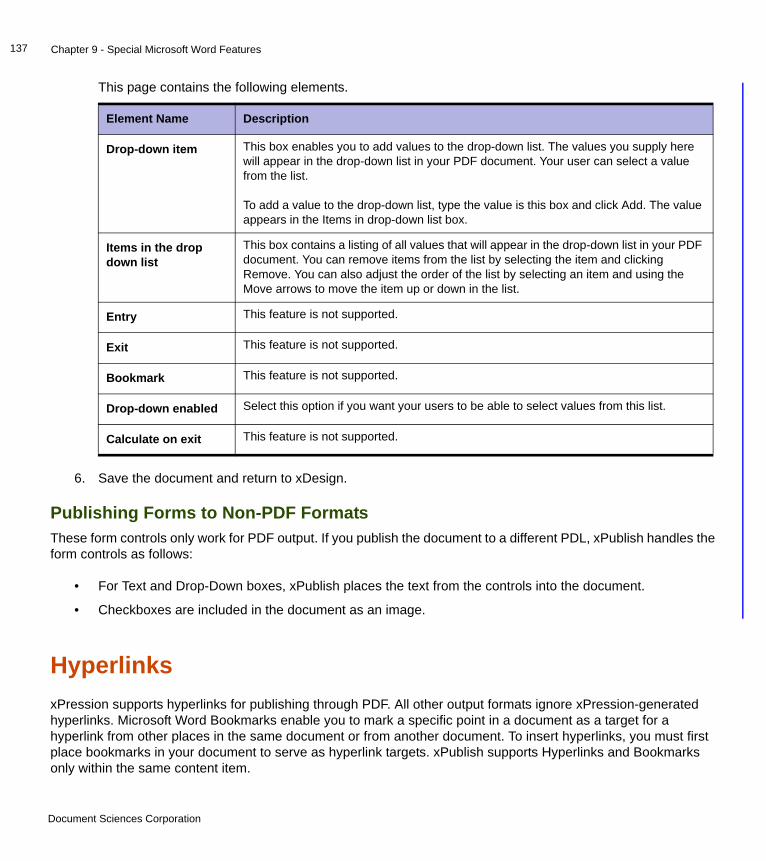
Chapter 9 - Special Microsoft Word Features137
This page contains the following elements.
6. Save the document and return to xDesign.
Publishing Forms to Non-PDF FormatsThese form controls only work for PDF output. If you publish the document to a different PDL, xPublish handles the form controls as follows:
• For Text and Drop-Down boxes, xPublish places the text from the controls into the document.
• Checkboxes are included in the document as an image.
HyperlinksxPression supports hyperlinks for publishing through PDF. All other output formats ignore xPression-generated hyperlinks. Microsoft Word Bookmarks enable you to mark a specific point in a document as a target for a hyperlink from other places in the same document or from another document. To insert hyperlinks, you must first place bookmarks in your document to serve as hyperlink targets. xPublish supports Hyperlinks and Bookmarks only within the same content item.
Element Name Description
Drop-down item This box enables you to add values to the drop-down list. The values you supply here will appear in the drop-down list in your PDF document. Your user can select a value from the list.
To add a value to the drop-down list, type the value is this box and click Add. The value appears in the Items in drop-down list box.
Items in the drop down list
This box contains a listing of all values that will appear in the drop-down list in your PDF document. You can remove items from the list by selecting the item and clicking Remove. You can also adjust the order of the list by selecting an item and using the Move arrows to move the item up or down in the list.
Entry This feature is not supported.
Exit This feature is not supported.
Bookmark This feature is not supported.
Drop-down enabled Select this option if you want your users to be able to select values from this list.
Calculate on exit This feature is not supported.
Document Sciences Corporation
Chapter 9 - Special Microsoft Word Features138
Inserting Bookmark Hyperlink TargetsTo place a bookmark hyperlink target:
1. Select the text to act as the hyperlink target.
2. For Microsoft Word 2003, from the Insert menu click Bookmark. For Microsoft Word 2007, click the Insert tab and click Bookmark.
3. Under Bookmark name, type a unique name for the bookmark. This name must be unique in the xPression document and in all possible assemblies of the content item. If the content item is shared, the unique name may need to apply across multiple xPression documents
4. Click Add.
Inserting PDF Hyperlinks in the Same Content ItemTo link to a bookmark that resides in the same content item:
1. Select the text to act as the hyperlink.
2. For Microsoft Word 2003, from the Insert menu click Hyperlink. For Microsoft Word 2007, click the Insert tab and click Hyperlink.
3. The Hyperlink dialog box appears. From this page you need to identify the target for your hyperlink. Click Bookmark.
4. The Select Place in Document pop-up window appears. Select the bookmark you want to use as your target and click OK.
5. Click OK again. The hyperlink is displayed in your content item. To test the link, CTRL-click the hyperlink.
Hyperlinking Between Separate Content Items in CompuSetThis feature is not supported by xPublish. To insert a hyperlink to an item found in a separate content item:
1. Place a bookmark to act as a target for your hyperlink. Make note of the name you gave to the bookmark.
2. Close and save the content item.
3. Create or open the content item you want to hyperlink from.
4. For Microsoft Word 2003, from the Insert menu click Hyperlink. For Microsoft Word 2007, click the Insert tab and click Hyperlink.
5. Type the bookmark name preceded by a number sign (#) in the Type the file or Web page name box. The link will be ineffective unless the content item is assembled with the content item that holds the bookmark.
Click OK to save the bookmark hyperlink and exit.
Document Sciences Corporation

Chapter 9 - Special Microsoft Word Features139
Merging Paragraphs Across Content ItemsBy default, each content item begins a new paragraph during assembly. The Mark Paragraph for Merge functions enable you to indicate to xPression that a series of paragraphs, possibly from separate content items, should be merged into a single paragraph at the time of assembly.
Paragraphs can be marked for merging from Microsoft Word when you create or edit a content item. You can choose to insert a space between the paragraphs being merged, or if they are already spaced the way you want them to be, merge them without inserting space. Paragraph merging also works with Shared content items.
The merge paragraph feature is not supported in table cells, or headers and footers.
xPression merges all consecutively marked paragraphs into a single paragraph. The resulting paragraph will be formatted according to the paragraph formatting applied to the first paragraph. xPression inserts spaces as required between merged content items.
Marked paragraph markers remain invisible until you enable the Word Show/Hide functionality. When a marker is visible, you can view its description, and edit or delete the comment with the Edit Comment and Delete Comment commands in the shortcut menu.
Creating Merged ParagraphsTo mark paragraphs for merging:
1. Place your cursor in the first paragraph you want to merge with another paragraph.
2. Click the Mark Paragraph for Merge or Mark Paragraph for Merge (no space) button on the Microsoft Word xDesign toolbar. This inserts a comment into the content item that indicates the paragraph has been marked for merging.
Figure 86. Marking a paragraph for merge.
Document Sciences Corporation
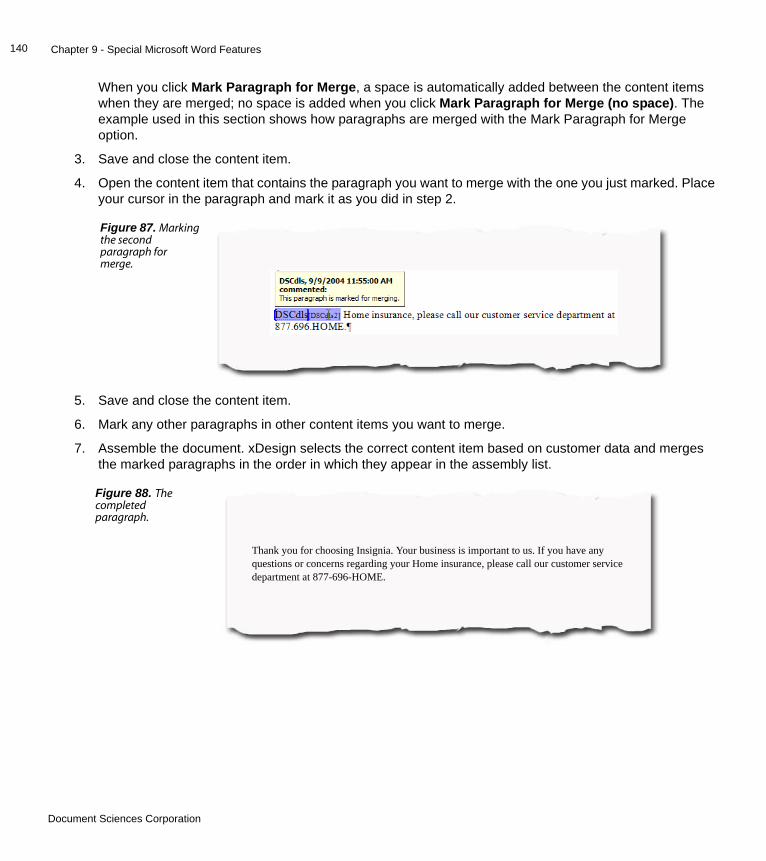
Chapter 9 - Special Microsoft Word Features140
When you click Mark Paragraph for Merge, a space is automatically added between the content items when they are merged; no space is added when you click Mark Paragraph for Merge (no space). The example used in this section shows how paragraphs are merged with the Mark Paragraph for Merge option.
3. Save and close the content item.
4. Open the content item that contains the paragraph you want to merge with the one you just marked. Place your cursor in the paragraph and mark it as you did in step 2.
5. Save and close the content item.
6. Mark any other paragraphs in other content items you want to merge.
7. Assemble the document. xDesign selects the correct content item based on customer data and merges the marked paragraphs in the order in which they appear in the assembly list.
Figure 87. Marking the second paragraph for merge.
Figure 88. The completed paragraph.
Thank you for choosing Insignia. Your business is important to us. If you have any questions or concerns regarding your Home insurance, please call our customer service department at 877-696-HOME.
Document Sciences Corporation
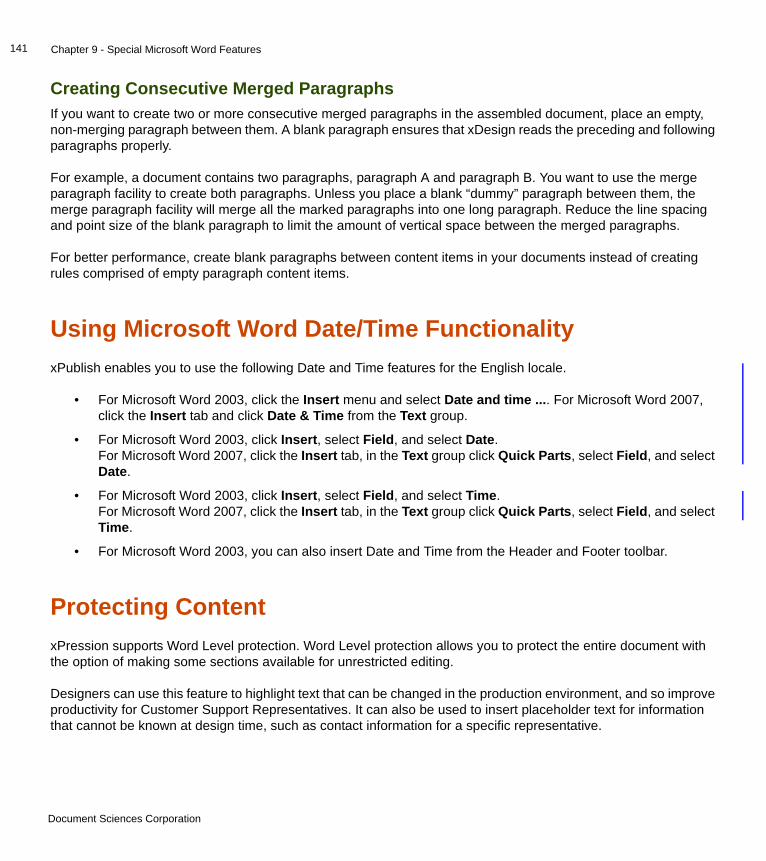
Chapter 9 - Special Microsoft Word Features141
Creating Consecutive Merged ParagraphsIf you want to create two or more consecutive merged paragraphs in the assembled document, place an empty, non-merging paragraph between them. A blank paragraph ensures that xDesign reads the preceding and following paragraphs properly.
For example, a document contains two paragraphs, paragraph A and paragraph B. You want to use the merge paragraph facility to create both paragraphs. Unless you place a blank “dummy” paragraph between them, the merge paragraph facility will merge all the marked paragraphs into one long paragraph. Reduce the line spacing and point size of the blank paragraph to limit the amount of vertical space between the merged paragraphs.
For better performance, create blank paragraphs between content items in your documents instead of creating rules comprised of empty paragraph content items.
Using Microsoft Word Date/Time FunctionalityxPublish enables you to use the following Date and Time features for the English locale.
• For Microsoft Word 2003, click the Insert menu and select Date and time .... For Microsoft Word 2007, click the Insert tab and click Date & Time from the Text group.
• For Microsoft Word 2003, click Insert, select Field, and select Date. For Microsoft Word 2007, click the Insert tab, in the Text group click Quick Parts, select Field, and select Date.
• For Microsoft Word 2003, click Insert, select Field, and select Time. For Microsoft Word 2007, click the Insert tab, in the Text group click Quick Parts, select Field, and select Time.
• For Microsoft Word 2003, you can also insert Date and Time from the Header and Footer toolbar.
Protecting ContentxPression supports Word Level protection. Word Level protection allows you to protect the entire document with the option of making some sections available for unrestricted editing.
Designers can use this feature to highlight text that can be changed in the production environment, and so improve productivity for Customer Support Representatives. It can also be used to insert placeholder text for information that cannot be known at design time, such as contact information for a specific representative.
Document Sciences Corporation
Chapter 9 - Special Microsoft Word Features142
Document ProtectionDocument Protection allows you to apply protection to the entire document and to designate certain sections–from a single word to a series of paragraphs–as editable to any users. You can designate multiple, non-continuous sections as editable. Sections not designated as editable can be edited only if the user turns protection off. You can apply password protection to control turning protection off in xResponse.
To apply document protection:
1. Open the document in the xDesign editor.
2. For Microsoft Word 2003, click the Tools menu and select Protect Document. For Microsoft Word 2007, click the Review tab, click Protect Document from the Protect group, and click Restrict Formatting and Editing.
3. Under Formatting Restrictions, ensure that Limit formatting to a selection of styles is NOT selected. This option is not supported.
4. Under Editing Restrictions, select Allow only this type of editing in the document.
5. Select No changes (Read only) from the list.
6. Select (highlight) a section of text that you want to make available for editing to anyone. Content that you do not select can be edited only if the user turns protection off. In other words, the entire document is protected by default and the sections that you select are editable by anyone.
7. Under Groups, select Everyone. No other option is allowed since the available groups may be different for the transactional application users.
8. Continue selecting text and choosing the Everyone until all editable text is identified.
9. Under Start Enforcement, Click Yes, Start Enforcing Protection.
10. An option to apply a password is presented. Any password that you provide here will be ignored by xPression, so there is no need to provide a password at this time. Passwords are applied through the xDesign interface in Document Properties on the Templates tab (see step 13). Also see About Document Protection Passwords for more information.
Once protection is applied, areas that can be edited will be highlighted and you will be provided with some navigation options.
Use the Find Next Region I Can Edit button to highlight the next editable region and the Show All Regions I Can Edit button to highlight all editable regions. Select and deselect Highlight the regions I can edit to toggle between showing and not showing the highlights on editable sections.
11. Save the document and return to xDesign.
12. From the Document menu select Properties.
13. On the Templates tab provide a password in the Document Password box.
14. Click Ok.
Document Sciences Corporation
Chapter 9 - Special Microsoft Word Features143
Working with Protected DocumentsSections identified as editable can be changed as required without any special action. To edit other sections, you must turn protection off. You can turn protection off either by clicking Stop Protection on the Protect Document pane, or by selecting Unprotect Document from the Tools menu. Passwords do not apply in xDesign, and any password applied through the Word interface are discarded. If you applied a password on the Templates tab of Document Properties in xDesign, then xResponse users will be required to present the password to turn protection off and make changes to sections not marked as editable.
About Document Protection PasswordsWhen a password is set, xRevise, and xResponse users will not be able to edit or view the protected content unless they supply the password. xDesign users will be able to view and edit the protected content (after unprotecting it) without a password. If you do not supply a password in Document Properties, any xResponse user can unprotect and edit protected content.
Horizontal and Vertical RulesxPublish and CompuSet do not support the ability to draw horizontal, vertical, or any other type of rules (lines).
Document Sciences Corporation
This chapter covers additional xPression features that are available from the xPression toolbar.
Variable Rules and Variable ReplacementsVariable rules (the variables in them are often referred to as “replacements”) are where you build variables that can be used to personalize documents when specified criteria is met. You can define them as fields from your data source, by using a literal value that you hand-code into the variable, as a reference to another variable of comparable type, or as a calculated value.
When you select a specific customer record and assemble the document, if the customer data meets the variable rule’s criteria, xPression Design will replace the variables in your document with the specific data contained in the customer data for those fields.
The following sections describe these topics:
• How are Variable Rules Used?
• How Do I Create a Variable Rule?
• How Do I Insert a Data Source or Field Replacement?
• Replacement Restrictions
• Tips and Tricks: Removing “Empty” Lines From a Replacement Series
• Formatting Replacements
• Controlling Variable Color
How are Variable Rules Used?You can use a Variable rule to qualify a variable to be included in the confines of a content item. You create the rule with its criteria and then any number of variables within it. Each of the variables then becomes eligible to be placed
Chapter 10
Special xPression Features 10
Document Sciences Corporation
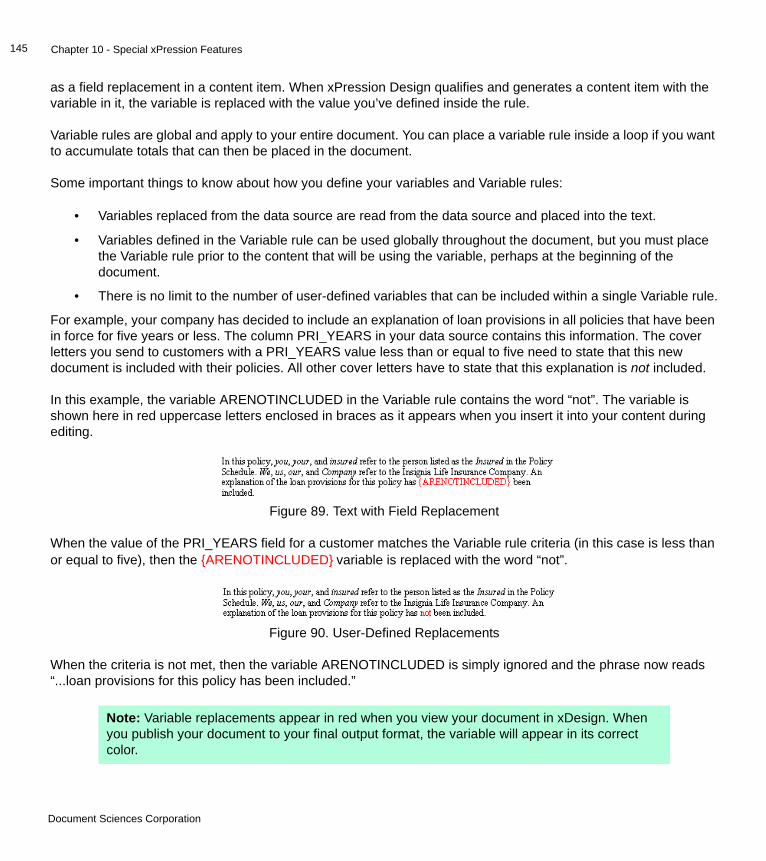
Chapter 10 - Special xPression Features145
as a field replacement in a content item. When xPression Design qualifies and generates a content item with the variable in it, the variable is replaced with the value you’ve defined inside the rule.
Variable rules are global and apply to your entire document. You can place a variable rule inside a loop if you want to accumulate totals that can then be placed in the document.
Some important things to know about how you define your variables and Variable rules:
• Variables replaced from the data source are read from the data source and placed into the text.
• Variables defined in the Variable rule can be used globally throughout the document, but you must place the Variable rule prior to the content that will be using the variable, perhaps at the beginning of the document.
• There is no limit to the number of user-defined variables that can be included within a single Variable rule.
For example, your company has decided to include an explanation of loan provisions in all policies that have been in force for five years or less. The column PRI_YEARS in your data source contains this information. The cover letters you send to customers with a PRI_YEARS value less than or equal to five need to state that this new document is included with their policies. All other cover letters have to state that this explanation is not included.
In this example, the variable ARENOTINCLUDED in the Variable rule contains the word “not”. The variable is shown here in red uppercase letters enclosed in braces as it appears when you insert it into your content during editing.
When the value of the PRI_YEARS field for a customer matches the Variable rule criteria (in this case is less than or equal to five), then the {ARENOTINCLUDED} variable is replaced with the word “not”.
When the criteria is not met, then the variable ARENOTINCLUDED is simply ignored and the phrase now reads “...loan provisions for this policy has been included.”
Figure 89. Text with Field Replacement
Figure 90. User-Defined Replacements
Note: Variable replacements appear in red when you view your document in xDesign. When you publish your document to your final output format, the variable will appear in its correct color.
Document Sciences Corporation

Chapter 10 - Special xPression Features146
How Do I Create a Variable Rule?A Variable rule is created in similar fashion to the way you create a Content rule, but with some additional parameters. Complete instructions for creating the Variable rule and its criteria can be found in Variable Rules. To see a demonstration of this feature, click here.
Variables with Large ValuesWhen the value of a variable is sufficiently large, it is represented in scientific notation. When this occurs, the value must be converted to double type, which is limited to a length of 16. The 16 characters are the most significant positions, including both sides of the decimal point if present. Therefore, variable values should not exceed 16 places, including positions to the right of the decimal point.
How Do I Insert a Data Source or Field Replacement?To insert a data source or field replacement in your content item:
1. Open the content item.
2. Place the cursor at the point where you want to insert the variable and click Insert Replacement Field on the Word tool bar. The Replacement Fields window appears.
Figure 91. Replacement Fields List
List of Tables in Data Source
List of Columns in Table
Data Source Group List
Document Sciences Corporation
Chapter 10 - Special xPression Features147
By default, the Replacement type that is selected is the Customer data field option, and the data source group that contains your primary data source appears in Data source group. If you want to read a record from a different data source in a different data source group, choose an alternate group name from the list.
Why would you want to use a different data source? Say your primary data source is an XML database, but you have information in another DB2 data source that you want to use for the replacement. Select the DB2 data source group and the table you need. xDesign will pull the data from the alternate data source and add it to your content item.
3. Select the table in your data source that contains the information you want to insert. The columns in the data source table you select appear in the Fields list.
4. Select the Variable option to list the field replacements if you want to use a variable that you defined in a Variable rule.
5. If you need to reformat the data after it’s inserted in the document, click Choose Format. By default, xPression Design uses the formatting of the data as it appears in your data source. For more information, see Replacement Restrictions.
6. Click Insert. The variable appears in your document as red uppercase letters, enclosed by braces: {TABLE NAME.COLUMN NAME}. Don’t worry if different tables in your data source use the same column names. xPression Design adds the TABLENAME. prefix to help you determine the source of each variable. When you assemble the document, xPression Design replaces the variable with the value in the variable field.
To see a demonstration of this feature, click here.
Replacement RestrictionsKeep the following items in mind when you create replacements:
• Variable replacements from the rule are global – they apply across the entire document.
• Your variable replacement data must not contain the pipe, or vertical bar character (|). Because xPression Design uses this character internally, unpredictable results may occur if it encounters a vertical bar in your data.
Note: You must add a Read rule that reads the secondary data source before the location where you use it in the document.
Tip: xPression applies a character style, DLSVAR, to the replacement fields you add to a content item. If you place your cursor after the field and add some text, your new text is also liable to “inherit” the DLSVAR character style, like this: {MYTABLE.FIFTHCOLUMN} Thank you for your inquiry. Publish this content item and you’ll notice that the text “Thank you for your inquiry” doesn’t appear in your final output. To avoid this problem, press CTRL+[spacebar] when you place the cursor after a replacement field to remove the character style from any subsequent text that you add.
Document Sciences Corporation

Chapter 10 - Special xPression Features148
• If there is only a variable replacement on a line, and the replacement has no value, the line will not appear in the output. If you want the line to appear whether there is qualified data or not, put a “hard space” after the replacement. xDesign will see the space as a qualified character and output a blank line.
• xPression does not support the formatting of replacements placed inside hidden CompuSet tag definitions. For example, printing a document that contains a hidden tag that looks like this:
DSCdls<#RS1= {CUSTDATA.CUSTNAME} S:UPPER>DSCdls
Would result in something like this: JOHN DOE S:UPPER
• Using variable replacement to replace an image with a reference to a field in customer data will usually fail in a similar manner to that described in the preceding item and will result in an error. Using a variable replacement with the IMG tag can only be safely accomplished by replacing the name of the image with the data reference enclosed in braces: {CUSTDATA.CUSTIMAGE}.
Tips and Tricks: Removing “Empty” Lines From a Replacement SeriesYour document contains a series of replacements, a customer name and mailing address, set in a manually indented paragraph similar to the one shown here.
Figure 92. Replacements in a Mailing Address
Tabs used to indent name and address text.
Document Sciences Corporation

Chapter 10 - Special xPression Features149
If a customer doesn’t have a value for the {YOUR_DATA.STREET_ADDRESS_2} field, her address will appear like this after you assemble the document.
When xPression encounters a variable in a paragraph that doesn’t contain text during document assembly, it normally deletes the paragraph. However, the xPression definition of “text” includes not only alphanumeric symbols, but also items such as tab and space characters. xPression “sees” the tab indenting the {YOUR_DATA.STREET_ADDRESS_2} field as text and the result is the empty line shown in Figure 93.
You can avoid this problem by using a paragraph style to create the indentation, rather than using the Tab key. Be sure to test a record with a null field, to be sure that the result is satisfactory.
Formatting ReplacementsxPression Design enables you to apply your own formatting to data after it’s inserted during document assembly. For example, a date column in your data source may contain dates like this: 1997 Dec 14, but you want the date to appear in your documents as December 14, 1997.
Rather than changing the format of the date column, which isn’t very practical, you can apply the formatting you want to the data after it appears in your content item. You can format variable replacements as you add the replacement field to your document, or you can format replacement fields already in a document.
You can also use the formatting controls to pass through special characters used in HTML or CompuSet code (for example, <, >, &) so that they can be read and executed by the CompuSet composition engine. This functionality is available for String variables. For more information, see page 155.
To format a field replacement:
Figure 93. Empty Line After Assembly
Note: If you delete a formatted field replacement, “show” the variable’s formatting by clicking the Show/Hide button on the standard Word toolbar before you delete it. If any of the formatting remains after you delete the field replacement, it could be inherited by a variable inserted later at that location.
Empty line isn’t removed.
Renata Soderholm3701 McKinley Road
Kannapolis, NC 34567
Document Sciences Corporation
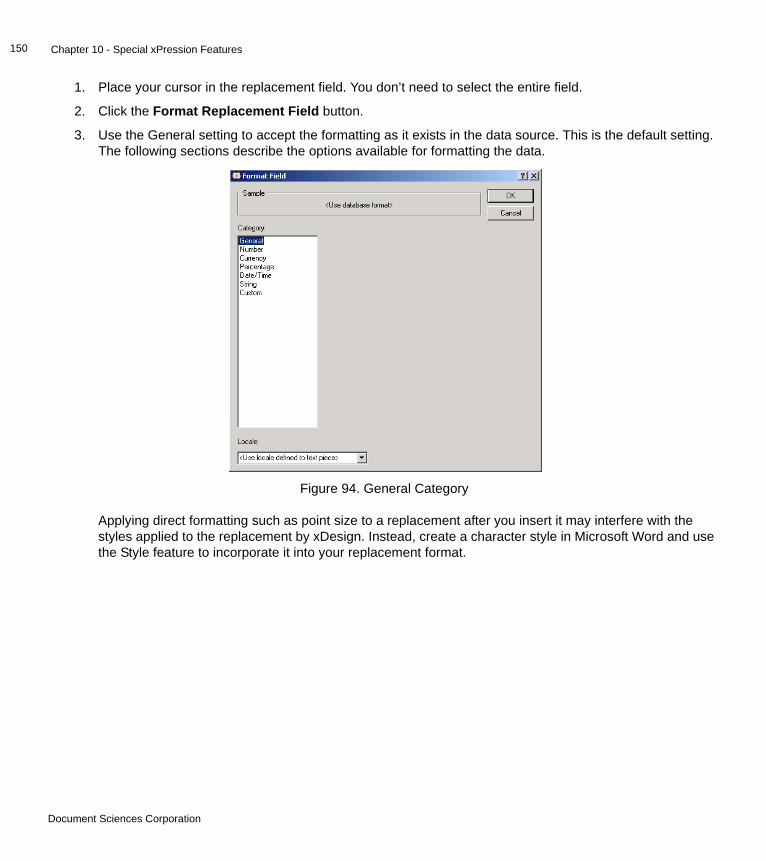
Chapter 10 - Special xPression Features150
1. Place your cursor in the replacement field. You don’t need to select the entire field.
2. Click the Format Replacement Field button.
3. Use the General setting to accept the formatting as it exists in the data source. This is the default setting. The following sections describe the options available for formatting the data.
Applying direct formatting such as point size to a replacement after you insert it may interfere with the styles applied to the replacement by xDesign. Instead, create a character style in Microsoft Word and use the Style feature to incorporate it into your replacement format.
Figure 94. General Category
Document Sciences Corporation
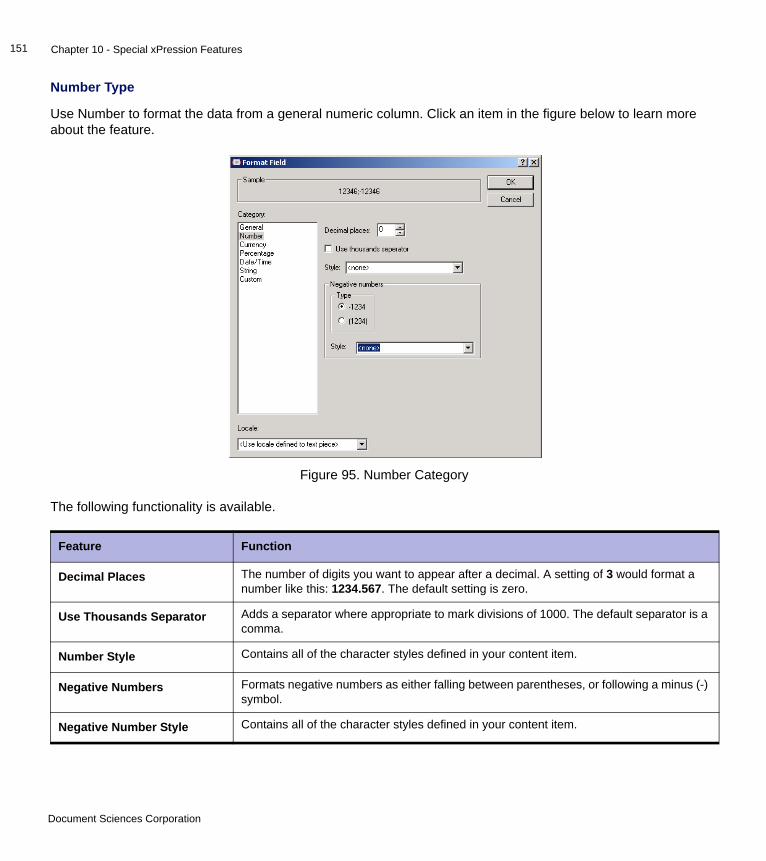
Chapter 10 - Special xPression Features151
Number Type
Use Number to format the data from a general numeric column. Click an item in the figure below to learn more about the feature.
The following functionality is available.
Figure 95. Number Category
Feature Function
Decimal Places The number of digits you want to appear after a decimal. A setting of 3 would format a number like this: 1234.567. The default setting is zero.
Use Thousands Separator Adds a separator where appropriate to mark divisions of 1000. The default separator is a comma.
Number Style Contains all of the character styles defined in your content item.
Negative Numbers Formats negative numbers as either falling between parentheses, or following a minus (-) symbol.
Negative Number Style Contains all of the character styles defined in your content item.
Document Sciences Corporation

Chapter 10 - Special xPression Features152
Locale Locale is an optional setting that xPression uses for two purposes:
(1) For applying specific regional date and numeric formatting to the variable replacement fields xDesign users insert into their documents. For example, a German reader might be accustomed to seeing a period symbol used as thousands separator (15.000.000 DM), and a comma as a decimal (25,6°C). A German locale would enable you to format the data placed in your document to meet the expectations of a German-speaking reader.
(2) To define the extended attribute called Language. If you add at least one locale to your system, xPression automatically adds Language to the extended attribute table. Extended attributes are associated with the content as they are a property of the content, not its usage.
The setting Use locale defined to content means that the replacement format will default to the Language attribute assigned to the content item when it was created. Choose a new locale here to override this attribute.
Feature Function
Document Sciences Corporation
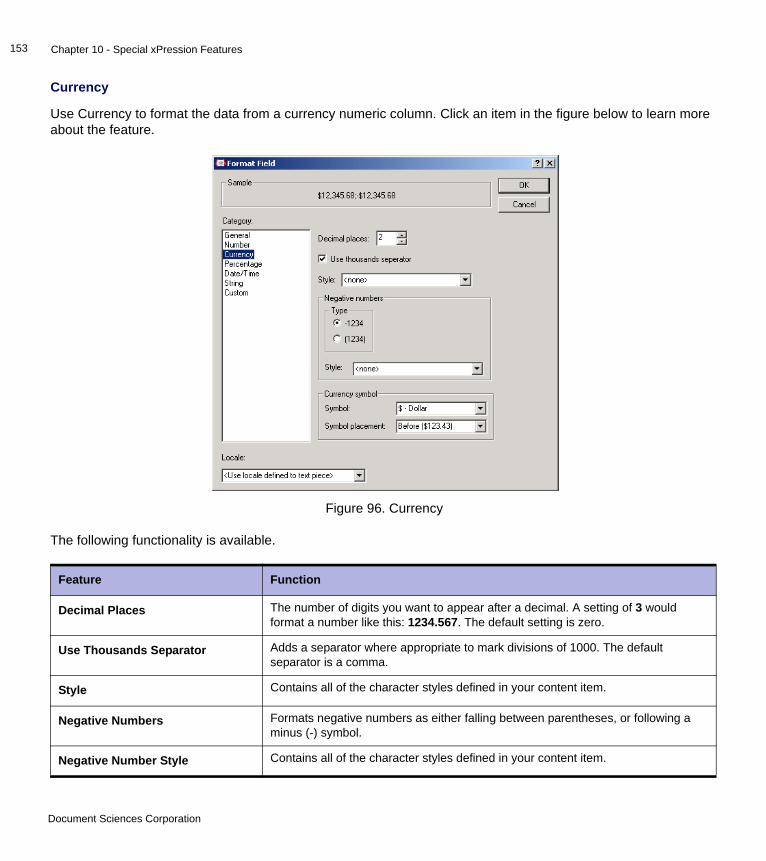
Chapter 10 - Special xPression Features153
Currency
Use Currency to format the data from a currency numeric column. Click an item in the figure below to learn more about the feature.
The following functionality is available.
Figure 96. Currency
Feature Function
Decimal Places The number of digits you want to appear after a decimal. A setting of 3 would format a number like this: 1234.567. The default setting is zero.
Use Thousands Separator Adds a separator where appropriate to mark divisions of 1000. The default separator is a comma.
Style Contains all of the character styles defined in your content item.
Negative Numbers Formats negative numbers as either falling between parentheses, or following a minus (-) symbol.
Negative Number Style Contains all of the character styles defined in your content item.
Document Sciences Corporation
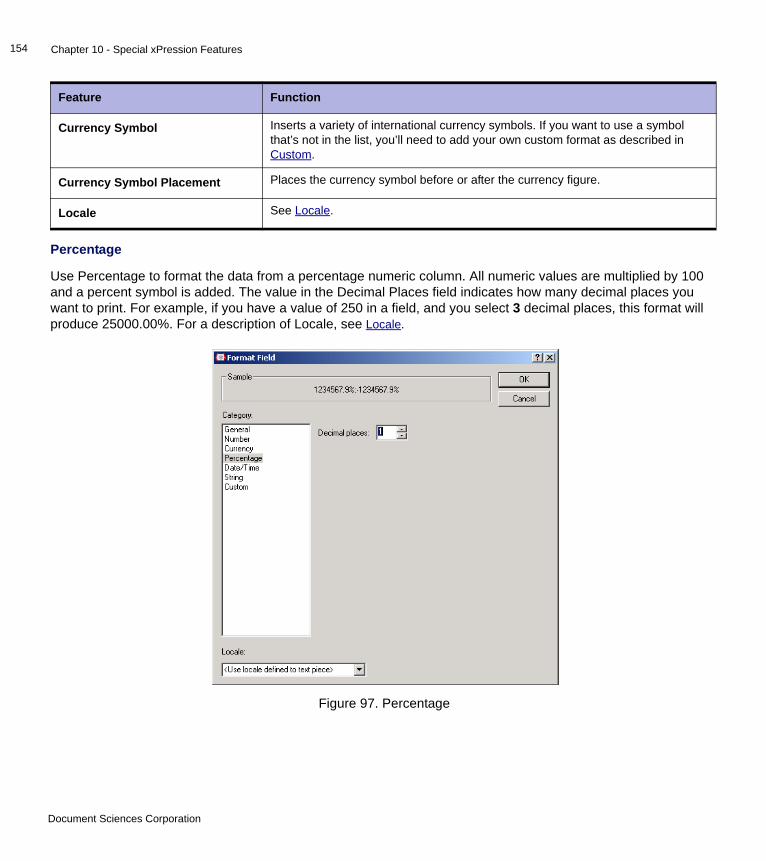
Chapter 10 - Special xPression Features154
Percentage
Use Percentage to format the data from a percentage numeric column. All numeric values are multiplied by 100 and a percent symbol is added. The value in the Decimal Places field indicates how many decimal places you want to print. For example, if you have a value of 250 in a field, and you select 3 decimal places, this format will produce 25000.00%. For a description of Locale, see Locale.
Currency Symbol Inserts a variety of international currency symbols. If you want to use a symbol that’s not in the list, you’ll need to add your own custom format as described in Custom.
Currency Symbol Placement Places the currency symbol before or after the currency figure.
Locale See Locale.
Figure 97. Percentage
Feature Function
Document Sciences Corporation
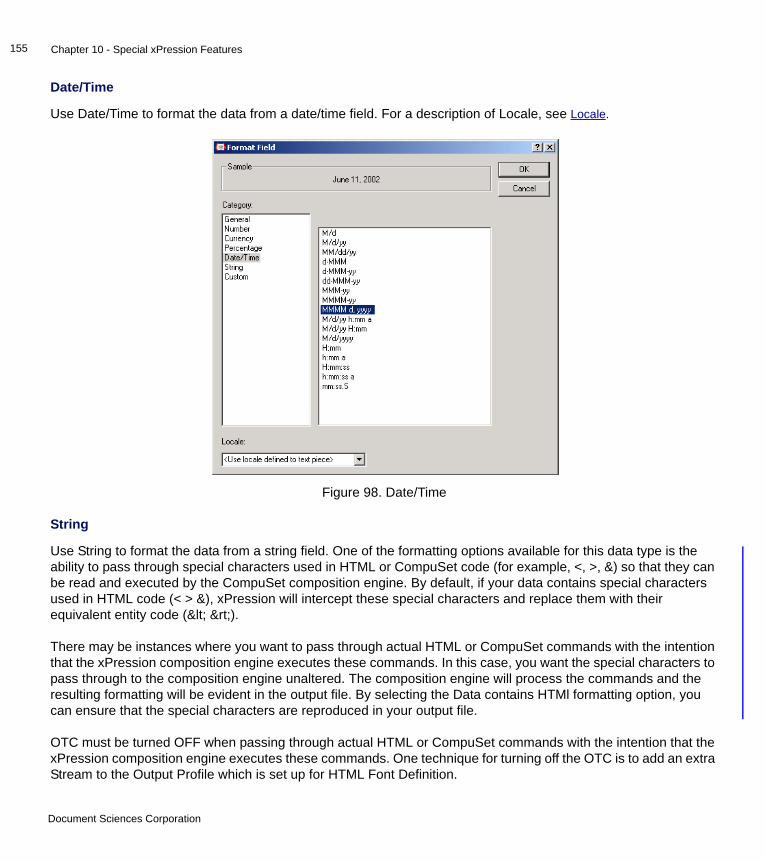
Chapter 10 - Special xPression Features155
Date/Time
Use Date/Time to format the data from a date/time field. For a description of Locale, see Locale.
String
Use String to format the data from a string field. One of the formatting options available for this data type is the ability to pass through special characters used in HTML or CompuSet code (for example, <, >, &) so that they can be read and executed by the CompuSet composition engine. By default, if your data contains special characters used in HTML code (< > &), xPression will intercept these special characters and replace them with their equivalent entity code (< &rt;).
There may be instances where you want to pass through actual HTML or CompuSet commands with the intention that the xPression composition engine executes these commands. In this case, you want the special characters to pass through to the composition engine unaltered. The composition engine will process the commands and the resulting formatting will be evident in the output file. By selecting the Data contains HTMl formatting option, you can ensure that the special characters are reproduced in your output file.
OTC must be turned OFF when passing through actual HTML or CompuSet commands with the intention that the xPression composition engine executes these commands. One technique for turning off the OTC is to add an extra Stream to the Output Profile which is set up for HTML Font Definition.
Figure 98. Date/Time
Document Sciences Corporation

Chapter 10 - Special xPression Features156
Click an item in the figure below to learn more about the feature.
The following functionality is available.
Figure 99. String
Feature Function
Data Contains HTML Formatting This option prevents xPression from intercepting and converting special characters used by HTML and CompuSet (for example, <, >, &) to their equivalent entity code (<, &rt;). The special characters are passed through to the composition unaltered where they can be read and executed.
This selection works in conjunction with the HTMLFormatting property in customerdata.properties. If the “Data Contains HTML Formatting” option is not selected in xDesign, then HTML formatting will be applied if HTMLFormatting in customerdata.properties is TRUE. Otherwise, formatting will not be applied and the HTML tags will be included in the output. Note that the default value of HTMLFormatting is FALSE. This is a global setting; it is not possible to apply this setting selectively. If Data Contains HTML Formatting is selected, then HTML formatting will be applied in the output regardless of the value for HTMLFormatting.
Case Changes the case of the text in the field.
Document Sciences Corporation
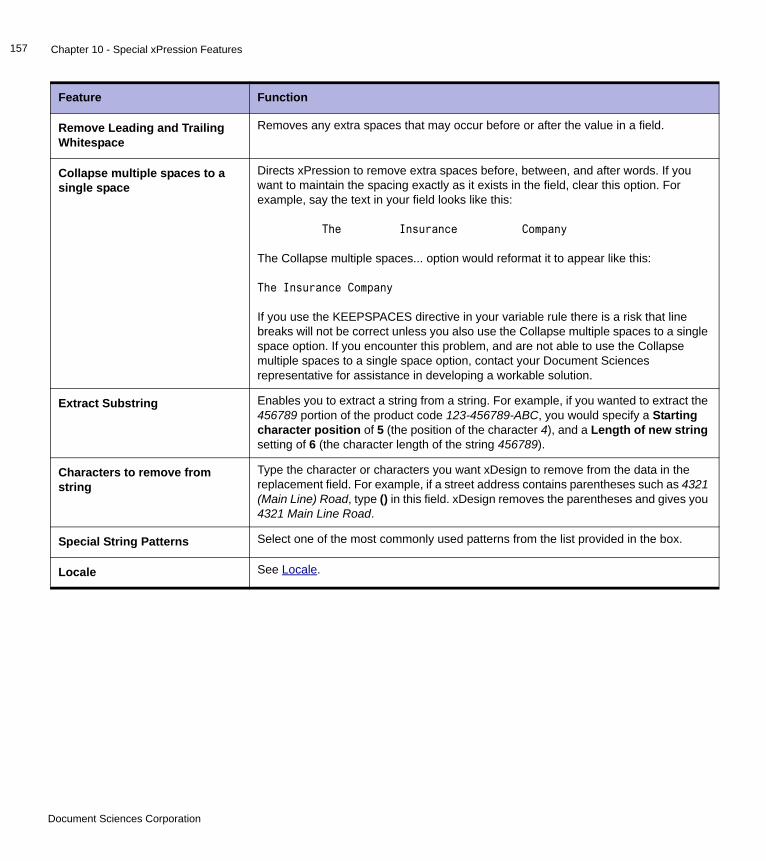
Chapter 10 - Special xPression Features157
Remove Leading and Trailing Whitespace
Removes any extra spaces that may occur before or after the value in a field.
Collapse multiple spaces to a single space
Directs xPression to remove extra spaces before, between, and after words. If you want to maintain the spacing exactly as it exists in the field, clear this option. For example, say the text in your field looks like this:
The Insurance Company
The Collapse multiple spaces... option would reformat it to appear like this:
The Insurance Company
If you use the KEEPSPACES directive in your variable rule there is a risk that line breaks will not be correct unless you also use the Collapse multiple spaces to a single space option. If you encounter this problem, and are not able to use the Collapse multiple spaces to a single space option, contact your Document Sciences representative for assistance in developing a workable solution.
Extract Substring Enables you to extract a string from a string. For example, if you wanted to extract the 456789 portion of the product code 123-456789-ABC, you would specify a Starting character position of 5 (the position of the character 4), and a Length of new string setting of 6 (the character length of the string 456789).
Characters to remove from string
Type the character or characters you want xDesign to remove from the data in the replacement field. For example, if a street address contains parentheses such as 4321 (Main Line) Road, type () in this field. xDesign removes the parentheses and gives you 4321 Main Line Road.
Special String Patterns Select one of the most commonly used patterns from the list provided in the box.
Locale See Locale.
Feature Function
Document Sciences Corporation
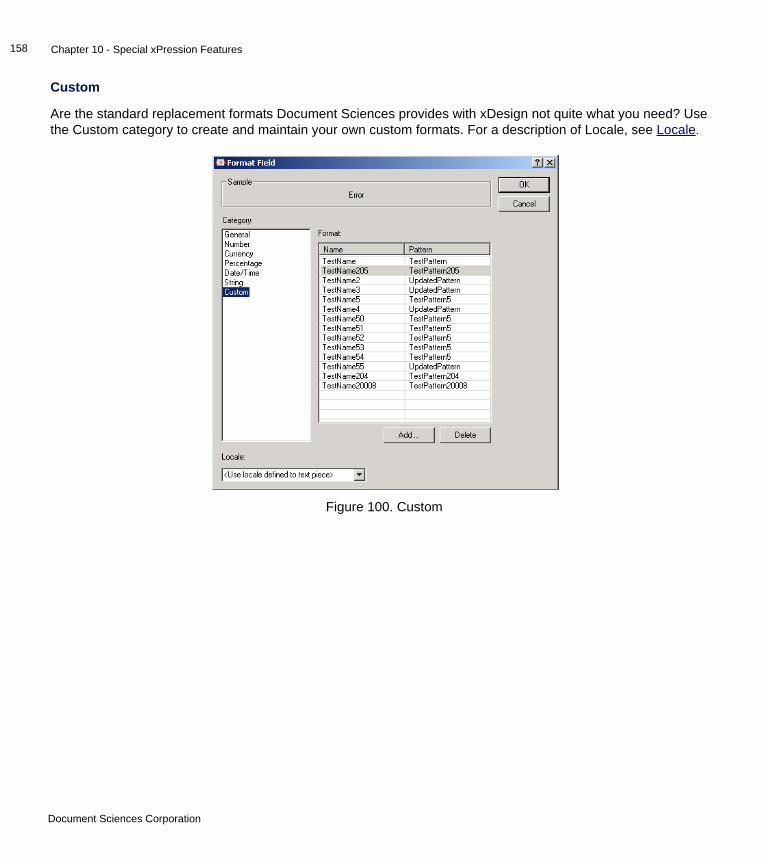
Chapter 10 - Special xPression Features158
Custom
Are the standard replacement formats Document Sciences provides with xDesign not quite what you need? Use the Custom category to create and maintain your own custom formats. For a description of Locale, see Locale.
Figure 100. Custom
Document Sciences Corporation
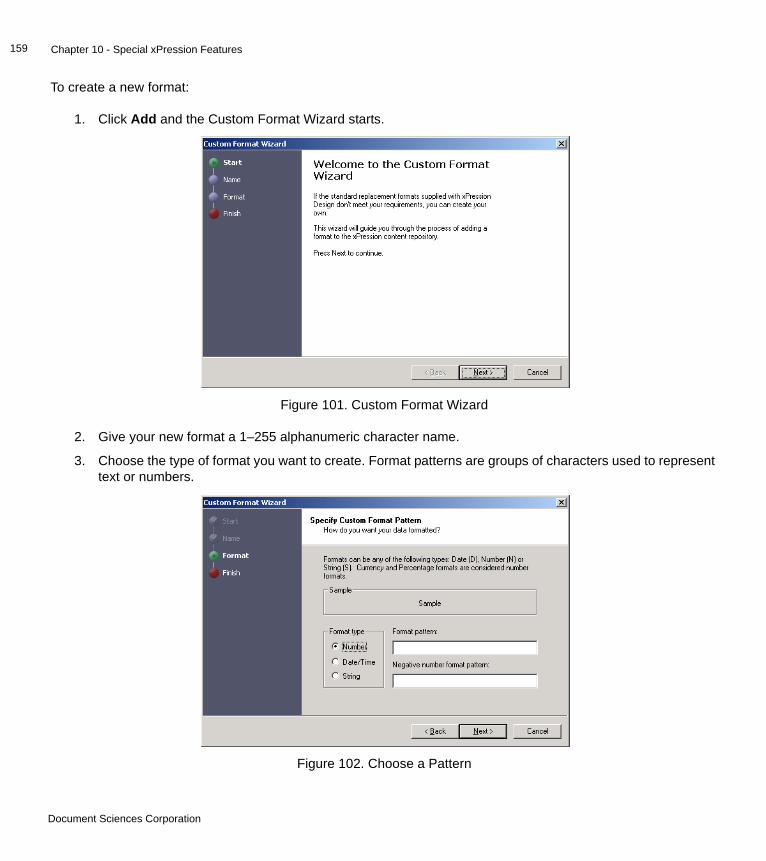
Chapter 10 - Special xPression Features159
To create a new format:
1. Click Add and the Custom Format Wizard starts.
2. Give your new format a 1–255 alphanumeric character name.
3. Choose the type of format you want to create. Format patterns are groups of characters used to represent text or numbers.
Figure 101. Custom Format Wizard
Figure 102. Choose a Pattern
Document Sciences Corporation
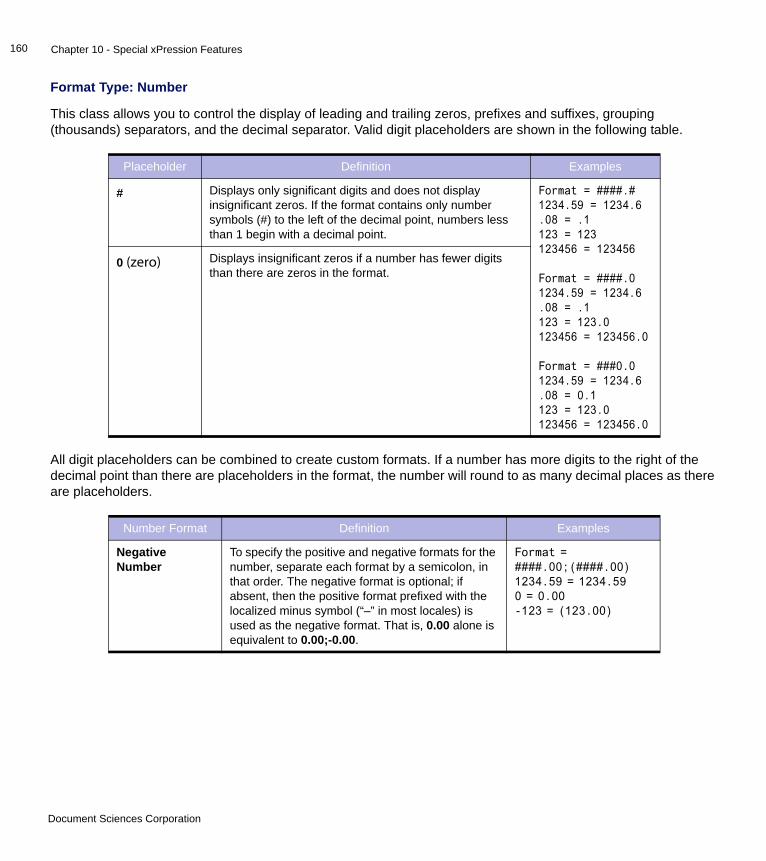
Chapter 10 - Special xPression Features160
Format Type: Number
This class allows you to control the display of leading and trailing zeros, prefixes and suffixes, grouping (thousands) separators, and the decimal separator. Valid digit placeholders are shown in the following table.
All digit placeholders can be combined to create custom formats. If a number has more digits to the right of the decimal point than there are placeholders in the format, the number will round to as many decimal places as there are placeholders.
Placeholder Definition Examples
# Displays only significant digits and does not display insignificant zeros. If the format contains only number symbols (#) to the left of the decimal point, numbers less than 1 begin with a decimal point.
Format = ####.#1234.59 = 1234.6.08 = .1123 = 123123456 = 123456
Format = ####.01234.59 = 1234.6.08 = .1123 = 123.0123456 = 123456.0
Format = ###0.01234.59 = 1234.6.08 = 0.1123 = 123.0123456 = 123456.0
0 (zero) Displays insignificant zeros if a number has fewer digits than there are zeros in the format.
Number Format Definition Examples
Negative Number
To specify the positive and negative formats for the number, separate each format by a semicolon, in that order. The negative format is optional; if absent, then the positive format prefixed with the localized minus symbol (“–” in most locales) is used as the negative format. That is, 0.00 alone is equivalent to 0.00;-0.00.
Format = ####.00;(####.00)1234.59 = 1234.590 = 0.00-123 = (123.00)
Document Sciences Corporation
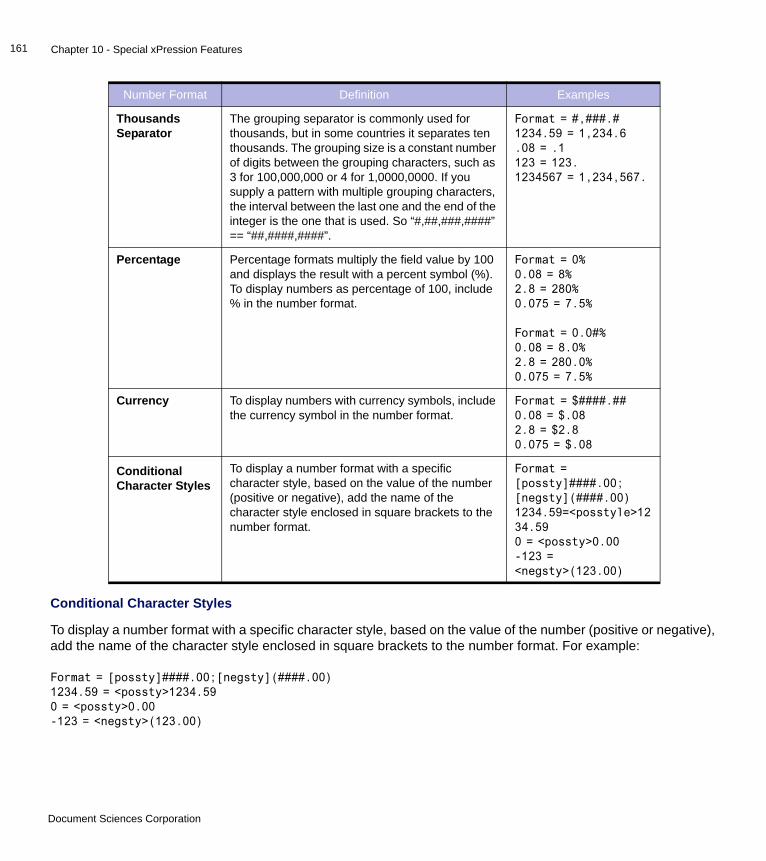
Chapter 10 - Special xPression Features161
Conditional Character Styles
To display a number format with a specific character style, based on the value of the number (positive or negative), add the name of the character style enclosed in square brackets to the number format. For example:
Format = [possty]####.00;[negsty](####.00)1234.59 = <possty>1234.590 = <possty>0.00-123 = <negsty>(123.00)
Thousands Separator
The grouping separator is commonly used for thousands, but in some countries it separates ten thousands. The grouping size is a constant number of digits between the grouping characters, such as 3 for 100,000,000 or 4 for 1,0000,0000. If you supply a pattern with multiple grouping characters, the interval between the last one and the end of the integer is the one that is used. So “#,##,###,####” == “##,####,####”.
Format = #,###.#1234.59 = 1,234.6.08 = .1123 = 123.1234567 = 1,234,567.
Percentage Percentage formats multiply the field value by 100 and displays the result with a percent symbol (%). To display numbers as percentage of 100, include % in the number format.
Format = 0%0.08 = 8%2.8 = 280% 0.075 = 7.5%
Format = 0.0#%0.08 = 8.0%2.8 = 280.0% 0.075 = 7.5%
Currency To display numbers with currency symbols, include the currency symbol in the number format.
Format = $####.##0.08 = $.082.8 = $2.8 0.075 = $.08
Conditional Character Styles
To display a number format with a specific character style, based on the value of the number (positive or negative), add the name of the character style enclosed in square brackets to the number format.
Format = [possty]####.00; [negsty](####.00)1234.59=<posstyle>1234.590 = <possty>0.00-123 = <negsty>(123.00)
Number Format Definition Examples
Document Sciences Corporation
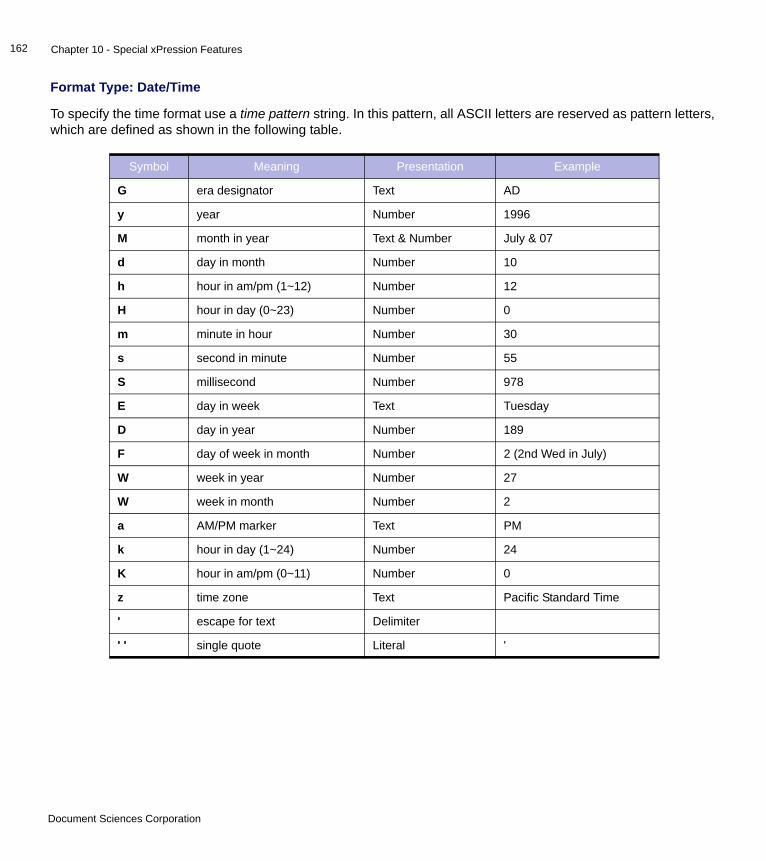
Chapter 10 - Special xPression Features162
Format Type: Date/Time
To specify the time format use a time pattern string. In this pattern, all ASCII letters are reserved as pattern letters, which are defined as shown in the following table.
Symbol Meaning Presentation Example
G era designator Text AD
y year Number 1996
M month in year Text & Number July & 07
d day in month Number 10
h hour in am/pm (1~12) Number 12
H hour in day (0~23) Number 0
m minute in hour Number 30
s second in minute Number 55
S millisecond Number 978
E day in week Text Tuesday
D day in year Number 189
F day of week in month Number 2 (2nd Wed in July)
W week in year Number 27
W week in month Number 2
a AM/PM marker Text PM
k hour in day (1~24) Number 24
K hour in am/pm (0~11) Number 0
z time zone Text Pacific Standard Time
' escape for text Delimiter
' ' single quote Literal '
Document Sciences Corporation
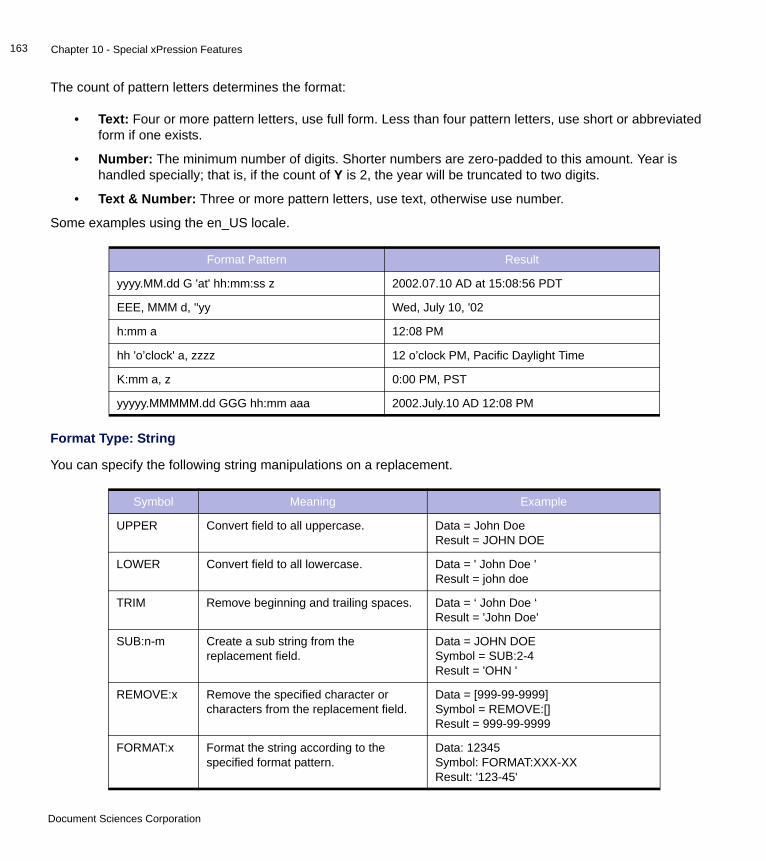
Chapter 10 - Special xPression Features163
The count of pattern letters determines the format:
• Text: Four or more pattern letters, use full form. Less than four pattern letters, use short or abbreviated form if one exists.
• Number: The minimum number of digits. Shorter numbers are zero-padded to this amount. Year is handled specially; that is, if the count of Y is 2, the year will be truncated to two digits.
• Text & Number: Three or more pattern letters, use text, otherwise use number.
Some examples using the en_US locale.
Format Type: String
You can specify the following string manipulations on a replacement.
Format Pattern Result
yyyy.MM.dd G 'at' hh:mm:ss z 2002.07.10 AD at 15:08:56 PDT
EEE, MMM d, ''yy Wed, July 10, '02
h:mm a 12:08 PM
hh 'o’clock' a, zzzz 12 o’clock PM, Pacific Daylight Time
K:mm a, z 0:00 PM, PST
yyyyy.MMMMM.dd GGG hh:mm aaa 2002.July.10 AD 12:08 PM
Symbol Meaning Example
UPPER Convert field to all uppercase. Data = John DoeResult = JOHN DOE
LOWER Convert field to all lowercase. Data = ' John Doe 'Result = john doe
TRIM Remove beginning and trailing spaces. Data = ‘ John Doe ‘Result = 'John Doe'
SUB:n-m Create a sub string from the replacement field.
Data = JOHN DOESymbol = SUB:2-4Result = 'OHN '
REMOVE:x Remove the specified character or characters from the replacement field.
Data = [999-99-9999]Symbol = REMOVE:[]Result = 999-99-9999
FORMAT:x Format the string according to the specified format pattern.
Data: 12345Symbol: FORMAT:XXX-XXResult: '123-45'
Document Sciences Corporation
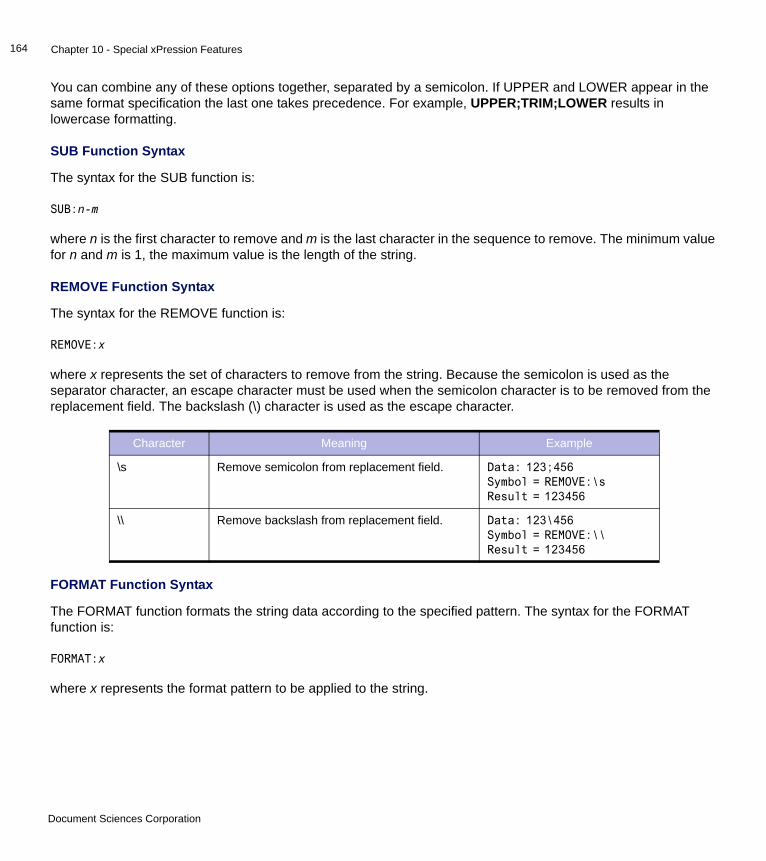
Chapter 10 - Special xPression Features164
You can combine any of these options together, separated by a semicolon. If UPPER and LOWER appear in the same format specification the last one takes precedence. For example, UPPER;TRIM;LOWER results in lowercase formatting.
SUB Function Syntax
The syntax for the SUB function is:
SUB:n-m
where n is the first character to remove and m is the last character in the sequence to remove. The minimum value for n and m is 1, the maximum value is the length of the string.
REMOVE Function Syntax
The syntax for the REMOVE function is:
REMOVE:x
where x represents the set of characters to remove from the string. Because the semicolon is used as the separator character, an escape character must be used when the semicolon character is to be removed from the replacement field. The backslash (\) character is used as the escape character.
FORMAT Function Syntax
The FORMAT function formats the string data according to the specified pattern. The syntax for the FORMAT function is:
FORMAT:x
where x represents the format pattern to be applied to the string.
Character Meaning Example
\s Remove semicolon from replacement field. Data: 123;456Symbol = REMOVE:\sResult = 123456
\\ Remove backslash from replacement field. Data: 123\456Symbol = REMOVE:\\Result = 123456
Document Sciences Corporation
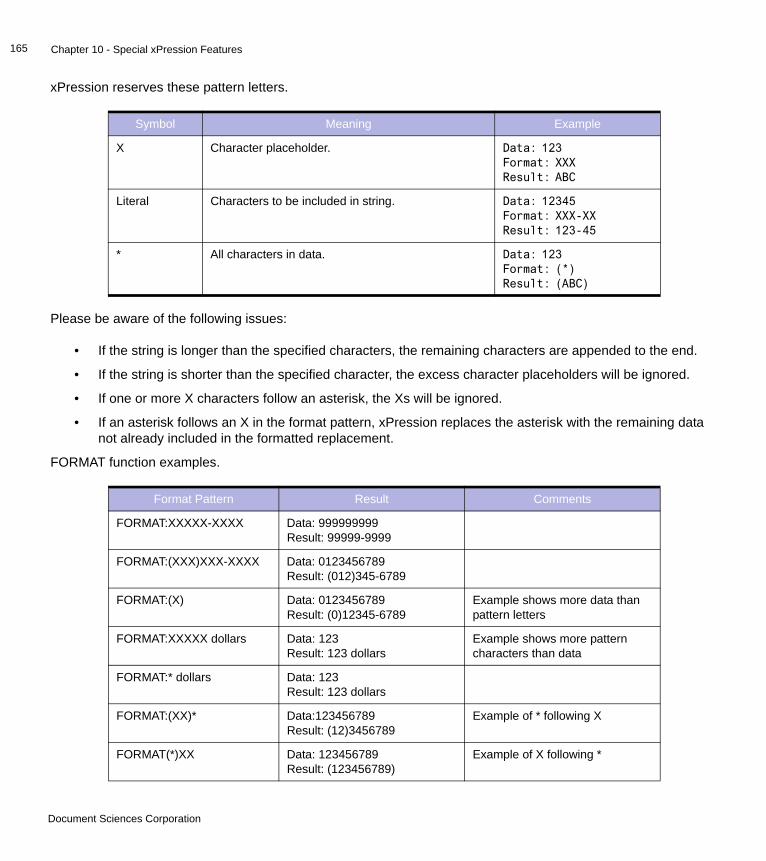
Chapter 10 - Special xPression Features165
xPression reserves these pattern letters.
Please be aware of the following issues:
• If the string is longer than the specified characters, the remaining characters are appended to the end.
• If the string is shorter than the specified character, the excess character placeholders will be ignored.
• If one or more X characters follow an asterisk, the Xs will be ignored.
• If an asterisk follows an X in the format pattern, xPression replaces the asterisk with the remaining data not already included in the formatted replacement.
FORMAT function examples.
Symbol Meaning Example
X Character placeholder. Data: 123Format: XXXResult: ABC
Literal Characters to be included in string. Data: 12345Format: XXX-XXResult: 123-45
* All characters in data. Data: 123Format: (*)Result: (ABC)
Format Pattern Result Comments
FORMAT:XXXXX-XXXX Data: 999999999Result: 99999-9999
FORMAT:(XXX)XXX-XXXX Data: 0123456789Result: (012)345-6789
FORMAT:(X) Data: 0123456789Result: (0)12345-6789
Example shows more data than pattern letters
FORMAT:XXXXX dollars Data: 123Result: 123 dollars
Example shows more pattern characters than data
FORMAT:* dollars Data: 123Result: 123 dollars
FORMAT:(XX)* Data:123456789Result: (12)3456789
Example of * following X
FORMAT(*)XX Data: 123456789Result: (123456789)
Example of X following *
Document Sciences Corporation
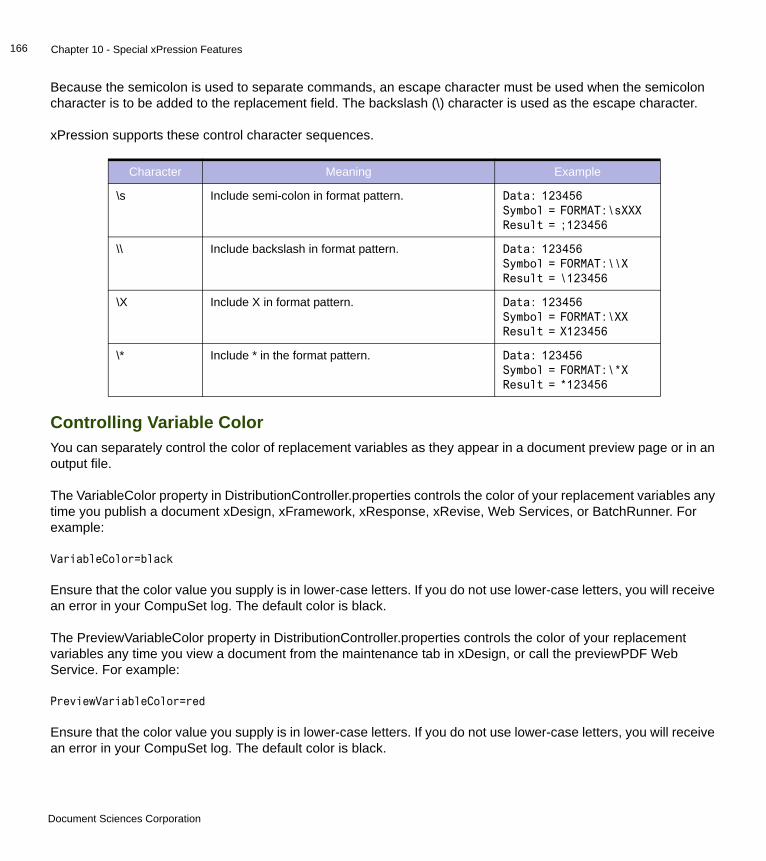
Chapter 10 - Special xPression Features166
Because the semicolon is used to separate commands, an escape character must be used when the semicolon character is to be added to the replacement field. The backslash (\) character is used as the escape character.
xPression supports these control character sequences.
Controlling Variable ColorYou can separately control the color of replacement variables as they appear in a document preview page or in an output file.
The VariableColor property in DistributionController.properties controls the color of your replacement variables any time you publish a document xDesign, xFramework, xResponse, xRevise, Web Services, or BatchRunner. For example:
VariableColor=black
Ensure that the color value you supply is in lower-case letters. If you do not use lower-case letters, you will receive an error in your CompuSet log. The default color is black.
The PreviewVariableColor property in DistributionController.properties controls the color of your replacement variables any time you view a document from the maintenance tab in xDesign, or call the previewPDF Web Service. For example:
PreviewVariableColor=red
Ensure that the color value you supply is in lower-case letters. If you do not use lower-case letters, you will receive an error in your CompuSet log. The default color is black.
Character Meaning Example
\s Include semi-colon in format pattern. Data: 123456Symbol = FORMAT:\sXXXResult = ;123456
\\ Include backslash in format pattern. Data: 123456Symbol = FORMAT:\\XResult = \123456
\X Include X in format pattern. Data: 123456Symbol = FORMAT:\XXResult = X123456
\* Include * in the format pattern. Data: 123456Symbol = FORMAT:\*XResult = *123456
Document Sciences Corporation
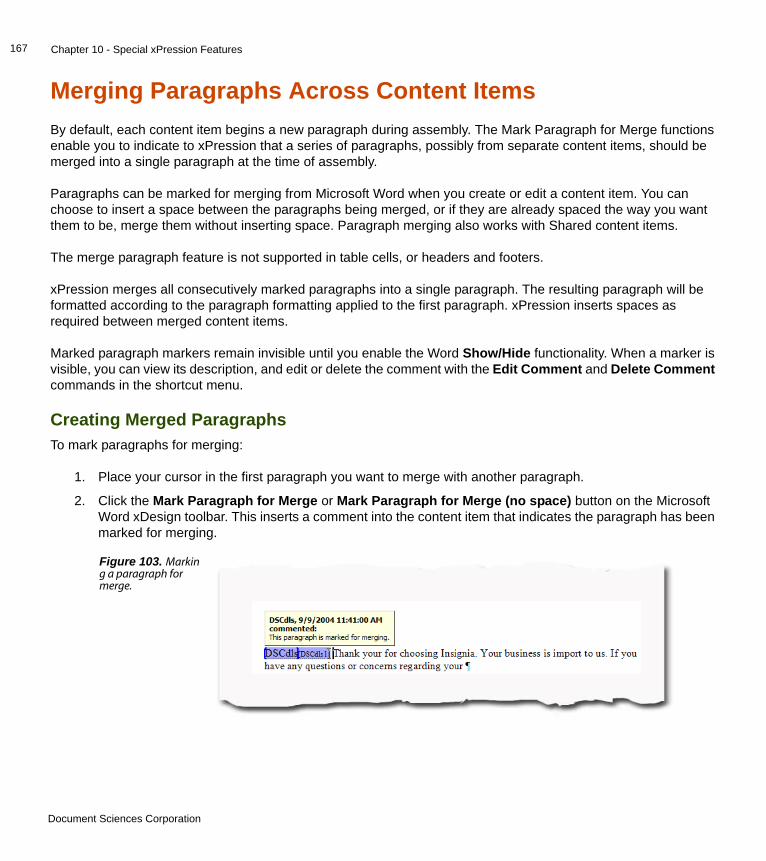
Chapter 10 - Special xPression Features167
Merging Paragraphs Across Content ItemsBy default, each content item begins a new paragraph during assembly. The Mark Paragraph for Merge functions enable you to indicate to xPression that a series of paragraphs, possibly from separate content items, should be merged into a single paragraph at the time of assembly.
Paragraphs can be marked for merging from Microsoft Word when you create or edit a content item. You can choose to insert a space between the paragraphs being merged, or if they are already spaced the way you want them to be, merge them without inserting space. Paragraph merging also works with Shared content items.
The merge paragraph feature is not supported in table cells, or headers and footers.
xPression merges all consecutively marked paragraphs into a single paragraph. The resulting paragraph will be formatted according to the paragraph formatting applied to the first paragraph. xPression inserts spaces as required between merged content items.
Marked paragraph markers remain invisible until you enable the Word Show/Hide functionality. When a marker is visible, you can view its description, and edit or delete the comment with the Edit Comment and Delete Comment commands in the shortcut menu.
Creating Merged ParagraphsTo mark paragraphs for merging:
1. Place your cursor in the first paragraph you want to merge with another paragraph.
2. Click the Mark Paragraph for Merge or Mark Paragraph for Merge (no space) button on the Microsoft Word xDesign toolbar. This inserts a comment into the content item that indicates the paragraph has been marked for merging.
Figure 103. Marking a paragraph for merge.
Document Sciences Corporation
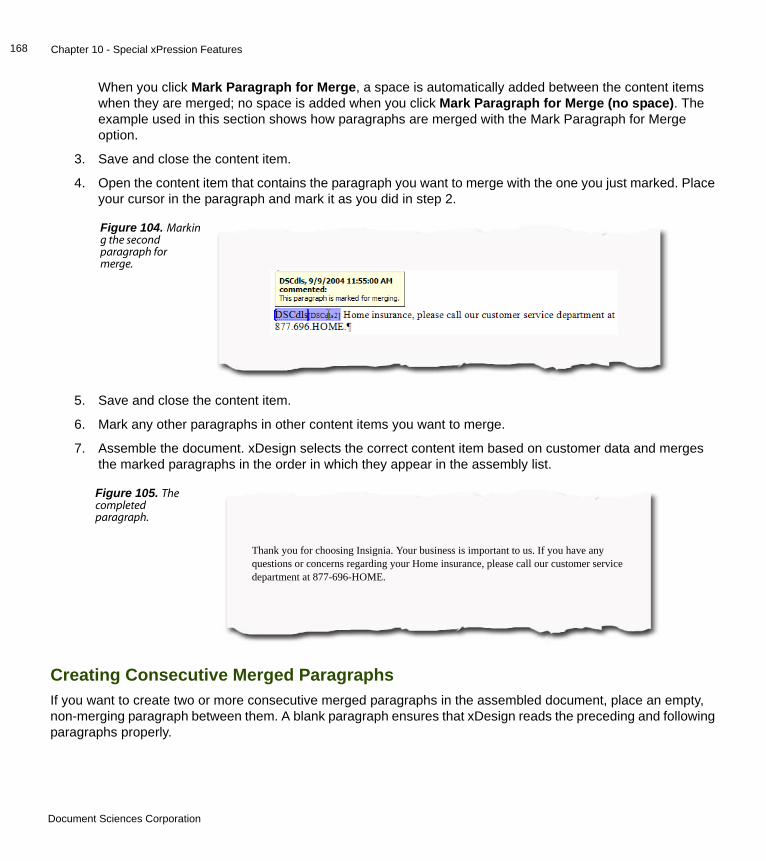
Chapter 10 - Special xPression Features168
When you click Mark Paragraph for Merge, a space is automatically added between the content items when they are merged; no space is added when you click Mark Paragraph for Merge (no space). The example used in this section shows how paragraphs are merged with the Mark Paragraph for Merge option.
3. Save and close the content item.
4. Open the content item that contains the paragraph you want to merge with the one you just marked. Place your cursor in the paragraph and mark it as you did in step 2.
5. Save and close the content item.
6. Mark any other paragraphs in other content items you want to merge.
7. Assemble the document. xDesign selects the correct content item based on customer data and merges the marked paragraphs in the order in which they appear in the assembly list.
Creating Consecutive Merged ParagraphsIf you want to create two or more consecutive merged paragraphs in the assembled document, place an empty, non-merging paragraph between them. A blank paragraph ensures that xDesign reads the preceding and following paragraphs properly.
Figure 104. Marking the second paragraph for merge.
Figure 105. The completed paragraph.
Thank you for choosing Insignia. Your business is important to us. If you have any questions or concerns regarding your Home insurance, please call our customer service department at 877-696-HOME.
Document Sciences Corporation

Chapter 10 - Special xPression Features169
For example, a document contains two paragraphs, paragraph A and paragraph B. You want to use the merge paragraph facility to create both paragraphs. Unless you place a blank “dummy” paragraph between them, the merge paragraph facility will merge all the marked paragraphs into one long paragraph. Reduce the line spacing and point size of the blank paragraph to limit the amount of vertical space between the merged paragraphs.
For better performance, create blank paragraphs between content items in your documents instead of creating rules comprised of empty paragraph content items.
xPublish CommandsxPublish commands allow you to specify text in tables that break across pages to indicate that the table continues to the next page or from the previous page.
Setting Continuation TextYou can set text that will appear at the point in a table where it breaks to the next page, continues from the previous page, or both. The process is similar for both “continue to” and “continued from” text. It consists of placing commands in hidden text in the document. The document is assessed from top to bottom and the text is applied as required when a table that breaks is encountered.
To set continuation text:
1. Open the document in xDesign.
2. Type the continuation text that you want to apply. For example, “Continue on Next Page” or “Continued from Previous Page”. You can incorporate a page number by inserting a Page Number field. When you publish the document, xPression will add or subtract 1 as appropriate so that the page number indicates the appropriate page number.
This text cannot be inside a table or in a header or footer. It should be placed prior to the table where you want to start using it.
3. Place the cursor inside the continuation text that you just created.
Document Sciences Corporation

Chapter 10 - Special xPression Features170
4. Click the xPublish Commands button on the xPression toolbar.
5. Select the xPublish Command that you want to apply to the text.
For continuation text, choose either Set Table Continuation Text - “Continue from Previous Page” or Set Table Continuation Text - “Continue to Next Page”.
The Turn Off Continuation Text option is covered in Turning Continuation Text Off.
6. Click OK. The text that you provided in step 1 will be converted to hidden text along with the formatting command.
7. Select the border option that you want to apply to the text. You can choose Current Paragraph Border Setting or Table Default Border Setting. Your selection will determine whether the text appears to be inside or outside of the table. In either case, the text actually resides inside the table.
8. Click OK.
Continuation text applies to any table that breaks across a page following the Set Table Continuation Text command until a Turn Off Continuation Text command is encountered. The text is placed out
Turning Continuation Text OffIf you do not want to apply continuation text to certain tables, place a Turn Continuation Text Off command following the last table where you want to use continuation text.
Figure 106. xPublish Commands Button
Figure 107. xPublish Commands
Document Sciences Corporation
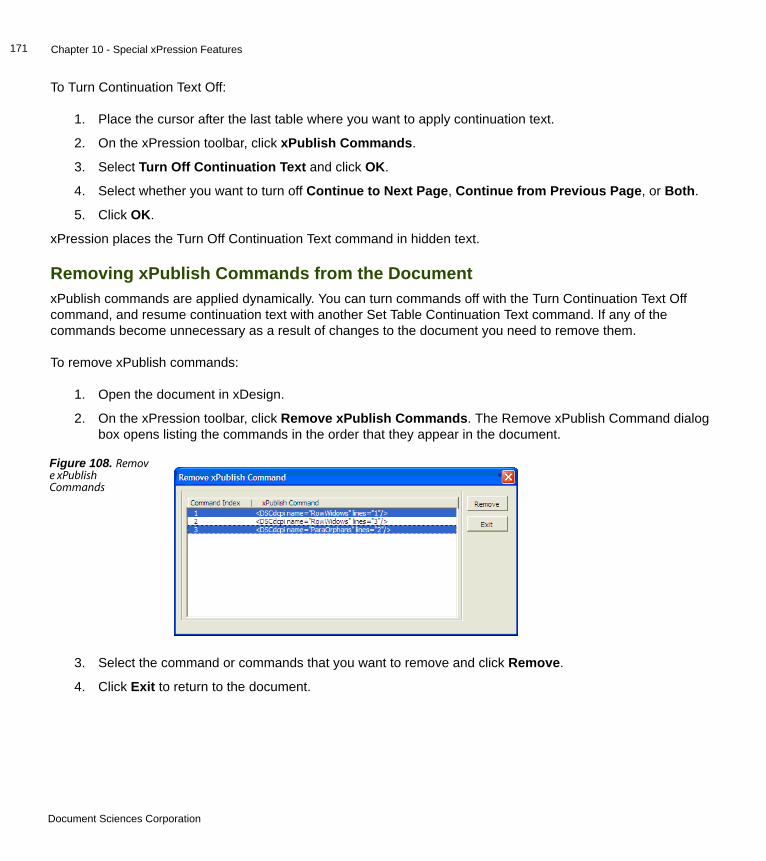
Chapter 10 - Special xPression Features171
To Turn Continuation Text Off:
1. Place the cursor after the last table where you want to apply continuation text.
2. On the xPression toolbar, click xPublish Commands.
3. Select Turn Off Continuation Text and click OK.
4. Select whether you want to turn off Continue to Next Page, Continue from Previous Page, or Both.
5. Click OK.
xPression places the Turn Off Continuation Text command in hidden text.
Removing xPublish Commands from the DocumentxPublish commands are applied dynamically. You can turn commands off with the Turn Continuation Text Off command, and resume continuation text with another Set Table Continuation Text command. If any of the commands become unnecessary as a result of changes to the document you need to remove them.
To remove xPublish commands:
1. Open the document in xDesign.
2. On the xPression toolbar, click Remove xPublish Commands. The Remove xPublish Command dialog box opens listing the commands in the order that they appear in the document.
3. Select the command or commands that you want to remove and click Remove.
4. Click Exit to return to the document.
Figure 108. Remove xPublish Commands
Document Sciences Corporation

This chapter covers some of the CompuSet specific processes you will need to use when creating CompuSet documents.
About CompuSetCompuSet is one of the xPression composition engines. CompuSet is a tagging language that enables you to produce composed pages and documents that are processed by printer emitter software to produce high quality printed or online documents. While most formatting can be accomplished entirely with Microsoft Word, there are instances where you may want to place CompuSet commands into your xDesign content items. For example, you may want to:
• Access functionality beyond the capabilities of Microsoft Word.
• Address gaps in the xDesign HTML to CompuSet conversion.
To convert your Microsoft Word MSOHTML content items to CompuSet command language, xPression executes a conversion program each time you publish an MSOHTML document through CompuSet. xPression maps most Microsoft Word MSOHTML functionality to CompuSet commands to provide the best possible integration. The mapped functionality should satisfy the formatting requirements of most documents.
For situations where a mapping is not available, xPression provides the CompuSet Command Wizard, a utility you can use to insert CompuSet commands directly into xPression content items.
CompuSet experts who want to override certain automatic HTML conversion results can use the CompuSet Conversion Options. Before you develop a document that you intend to publish with CompuSet, be sure you understand how each Word formatting feature maps to CompuSet. Functionality that’s not supported by CompuSet is listed throughout this chapter.
Chapter 11
Working With CompuSet 11
Document Sciences Corporation
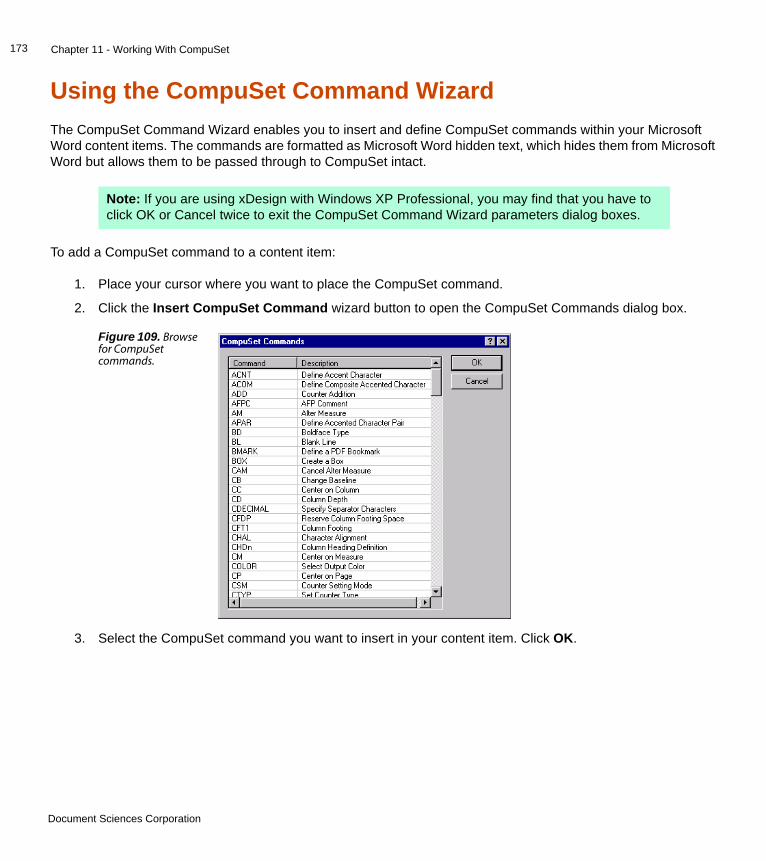
Chapter 11 - Working With CompuSet173
Using the CompuSet Command WizardThe CompuSet Command Wizard enables you to insert and define CompuSet commands within your Microsoft Word content items. The commands are formatted as Microsoft Word hidden text, which hides them from Microsoft Word but allows them to be passed through to CompuSet intact.
To add a CompuSet command to a content item:
1. Place your cursor where you want to place the CompuSet command.
2. Click the Insert CompuSet Command wizard button to open the CompuSet Commands dialog box.
3. Select the CompuSet command you want to insert in your content item. Click OK.
Note: If you are using xDesign with Windows XP Professional, you may find that you have to click OK or Cancel twice to exit the CompuSet Command Wizard parameters dialog boxes.
Figure 109. Browse for CompuSet commands.
Document Sciences Corporation
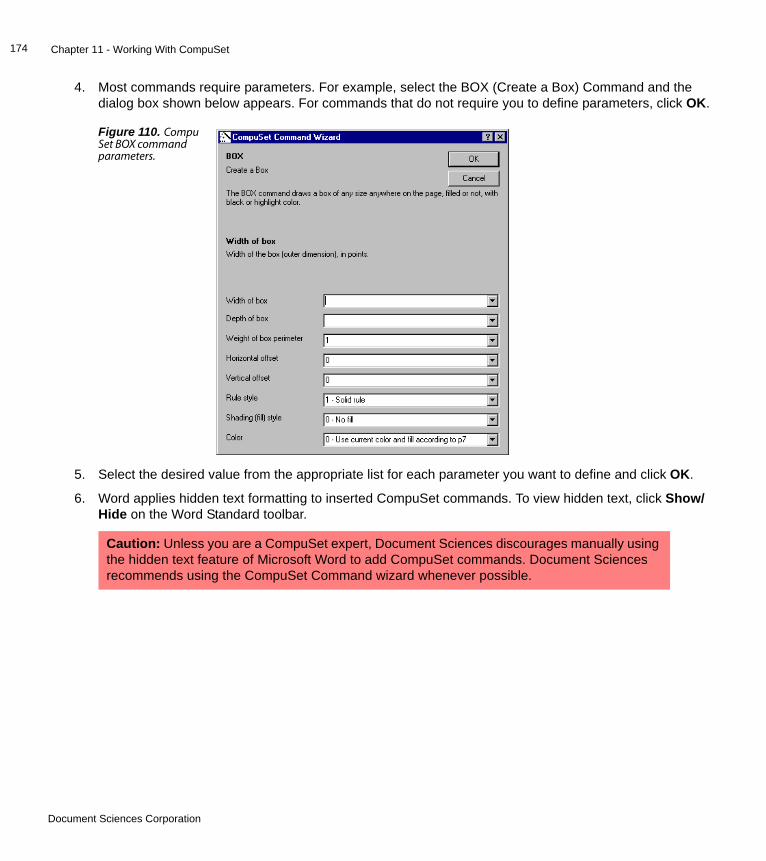
Chapter 11 - Working With CompuSet174
4. Most commands require parameters. For example, select the BOX (Create a Box) Command and the dialog box shown below appears. For commands that do not require you to define parameters, click OK.
5. Select the desired value from the appropriate list for each parameter you want to define and click OK.
6. Word applies hidden text formatting to inserted CompuSet commands. To view hidden text, click Show/Hide on the Word Standard toolbar.
Figure 110. CompuSet BOX command parameters.
Caution: Unless you are a CompuSet expert, Document Sciences discourages manually using the hidden text feature of Microsoft Word to add CompuSet commands. Document Sciences recommends using the CompuSet Command wizard whenever possible.
Document Sciences Corporation

Chapter 11 - Working With CompuSet175
Updating CompuSet CommandsYou may need to change specific values of the CompuSet commands and named strings after you insert them. To update a CompuSet command or named string:
1. Open a content item that contains user-added CompuSet commands.
2. Click Update CompuSet Commands on the xDesign toolbar.
3. Select the command you want to update and click Edit. The editing dialog box shown here appears, enabling you to manually change the parameter values attributed to this command.
4. When you finish, click OK.
5. Click Exit.
6. Click Close to save your content item and return to xDesign.
For more information about CompuSet commands, see the xPression CompuSet Reference.
CompuSet Named StringsNamed strings give you a way to place variable data from your xDesign data source into elements of your document that originate outside of xDesign, such as CompuSet image areas and variable merge frames. By creating named strings, you create custom CompuSet style tags and define them with xDesign variable data.
The named string enables the xDesign variable data to be placed into the CompuSet tagged text file when the document is assembled. CompuSet can then use the variable data when composing the document.
Figure 111. The Update CompuSet Commands dialog box.
Figure 112. Edit a CompuSet command.
Document Sciences Corporation
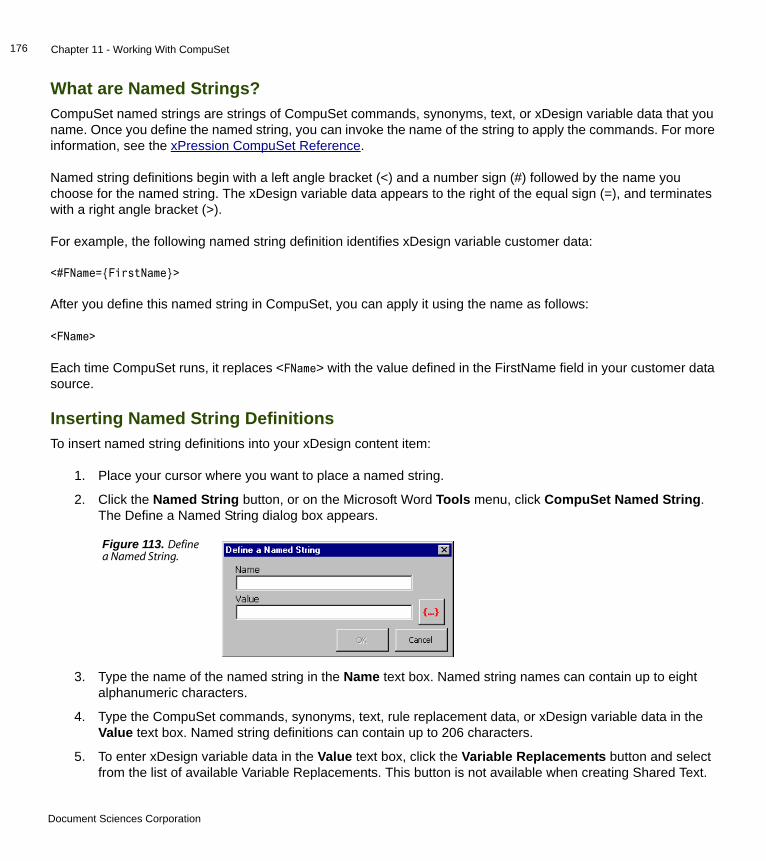
Chapter 11 - Working With CompuSet176
What are Named Strings?CompuSet named strings are strings of CompuSet commands, synonyms, text, or xDesign variable data that you name. Once you define the named string, you can invoke the name of the string to apply the commands. For more information, see the xPression CompuSet Reference.
Named string definitions begin with a left angle bracket (<) and a number sign (#) followed by the name you choose for the named string. The xDesign variable data appears to the right of the equal sign (=), and terminates with a right angle bracket (>).
For example, the following named string definition identifies xDesign variable customer data:
<#FName={FirstName}>
After you define this named string in CompuSet, you can apply it using the name as follows:
<FName>
Each time CompuSet runs, it replaces <FName> with the value defined in the FirstName field in your customer data source.
Inserting Named String DefinitionsTo insert named string definitions into your xDesign content item:
1. Place your cursor where you want to place a named string.
2. Click the Named String button, or on the Microsoft Word Tools menu, click CompuSet Named String. The Define a Named String dialog box appears.
3. Type the name of the named string in the Name text box. Named string names can contain up to eight alphanumeric characters.
4. Type the CompuSet commands, synonyms, text, rule replacement data, or xDesign variable data in the Value text box. Named string definitions can contain up to 206 characters.
5. To enter xDesign variable data in the Value text box, click the Variable Replacements button and select from the list of available Variable Replacements. This button is not available when creating Shared Text.
Figure 113. Define a Named String.
Document Sciences Corporation

Chapter 11 - Working With CompuSet177
6. Click OK. xDesign adds the variable replacement field to the Value text box.
7. Click OK.
Word applies hidden text formatting to the named string as follows:
DSCdls<#FName={FirstName}>DSCdls
Using the DSCdls Paragraph StyleYou may encounter a situation where you want to manually apply numerous CompuSet commands at once. The easiest way to manually apply bulk CompuSet commands is to use the DSCdls style. This style, available from the Microsoft Word style list, makes the contents of the style invisible to xDesign. This allows you to place CompuSet commands directly in your content item without xDesign processing the commands as textual content.
To add CompuSet Commands with the DSCdls style:
1. In an xDesign content item, place your cursor where you want to insert the command.
2. From the Microsoft Word style list, select DSCdls.
3. Type the CompuSet commands you want to use. For example: <IMPO,1>
4. The text is visible in the Microsoft Word content item, but will be hidden from xDesign upon assembly.
Figure 114. An example of variable data in a named string.
Note: CompuSet commands entered with the DSCdls style are not available for updating through the Update CompuSet Commands feature.
Document Sciences Corporation

Chapter 11 - Working With CompuSet178
CompuSet Tray PullsYou can manually define an input paper tray using CompuSet commands. The CompuSet NP, NPR, and NPV commands allow you to specify paper input trays. But before you insert these commands, you must override the NP commands automatically generated by xDesign.
To define an input paper tray with CompuSet commands:
1. Override Automatically Generated NP Commands
2. Add NP, NPR, or NPV Commands
3. Define Your Paper Tray
If you have a job that requires only simple tray switches, you can use the Word tray pull function instead of using the CompuSet commands method. See Using Word’s Tray Pull Functions.
Override Automatically Generated NP CommandsTo override the automatically generated NP commands:
1. Use the Conversion Options in xAdmin to override the automatically generated NP commands. Access the conversion options from Category Management.
2. Select the category your document resides in and click Conversion Options. The Conversion Options tab appears.
3. Select one or both of the following options:
• Omit document initial NS/NP commands overrides the NS or NP command that xDesign automatically places at the beginning of every document.
• Omit direct coded NP commands derived from Word formatting overrides NP commands that xDesign automatically places after New Page section breaks and Page breaks.
4. Click Save.
5. Insert the NP, NPV, or NPR CompuSet command in the appropriate content item with the CompuSet Command Wizard.
Document Sciences Corporation

Chapter 11 - Working With CompuSet179
Add NP, NPR, or NPV CommandsTo add an NP command to your content item:
1. Open the first content item of your document.
2. Click Insert CompuSet Commands.
3. Select the NP command.
4. Click OK.
Define Your Paper TrayTo define your paper tray:
1. The NP command contains eight parameters. The second one defines the paper tray. For more information on CompuSet command parameters, see the CompuSet Command Reference.
2. In the second parameter, define your paper tray.
• 0 — No action needed.
• 1-15 — Corresponds to tray ID defined by the emitter command (FEED, DTRA, LTRA, or TRAY).
Using Word’s Tray Pull FunctionsIf your job does not require any of the more advanced printing options such as stapling or jogging, you can use standard Word tray pull settings, along with certain xAdmin conversion options, as described below:
1. Set the following options for your selected Category in the Conversion Option tab of the Category Management area of xAdmin. If you do not have access to xAdmin, ask your Administrator to set the options for you.
• Clear the Omit document initial NS/NP option.
• Select the Begin each document on an odd/recto page option.
2. Remove any hidden CompuSet NP or NPR commands from the content items in your document.
3. Open the Page Setup dialog box from the Word File menu and click the Paper tab.
4. Choose your special tray from the First Page list.
Document Sciences Corporation

Chapter 11 - Working With CompuSet180
5. For the other pages make your selection depending on how you want the rest of the document to print:
• Select the Default option if you want only the first page to pull from the special tray you selected. This sets the NP or NPR CompuSet commands to 2,1.
• Select any option other than the Default if you want the pages to pull from the special tray until you choose a different tray or paper source for another content item. The NP and NPR CompuSet commands are set to 2, 0 with this choice.
For more information on CompuSet command parameters, see the CompuSet Command Reference.
Document Merging and Using Variable Merge FramesA Variable Merge Frame (VMF) is a flexible method for merging data onto precomposed forms or documents. It is a collection of information that allocates space and defines placement coordinates and formatting attributes for variable data that is to be merged on a precomposed form or document. You can use the Merge Document Viewer to create, open, delete, or save VMFs. You can also rename a VMF or view VMF properties. For more information on VMFs, see the xPression CompuSet Reference.
To place data in a precomposed document using variable merge frames:
1. Add variable merge frames to an existing image or document in your merge library.
2. Create named strings in your content item that reference the merge frames on the image.
3. Place the image or document into your content item.
4. Assemble the document to verify your work.
Adding Variable Merge FramesThe Image Utility uses the Merge Document Viewer to display precomposed documents in the content repository. To view a document, double-click the document in the Tree view. You can navigate through the document using the arrows on the Merge Document Viewer toolbar. You can also use the Merge Document Viewer to examine other aspects of your document.
Caution: Be very careful that all document designers use the same printer driver when setting up the Paper Source options. If the printer driver page and tray options differ, you may not get the results you expect.
Document Sciences Corporation
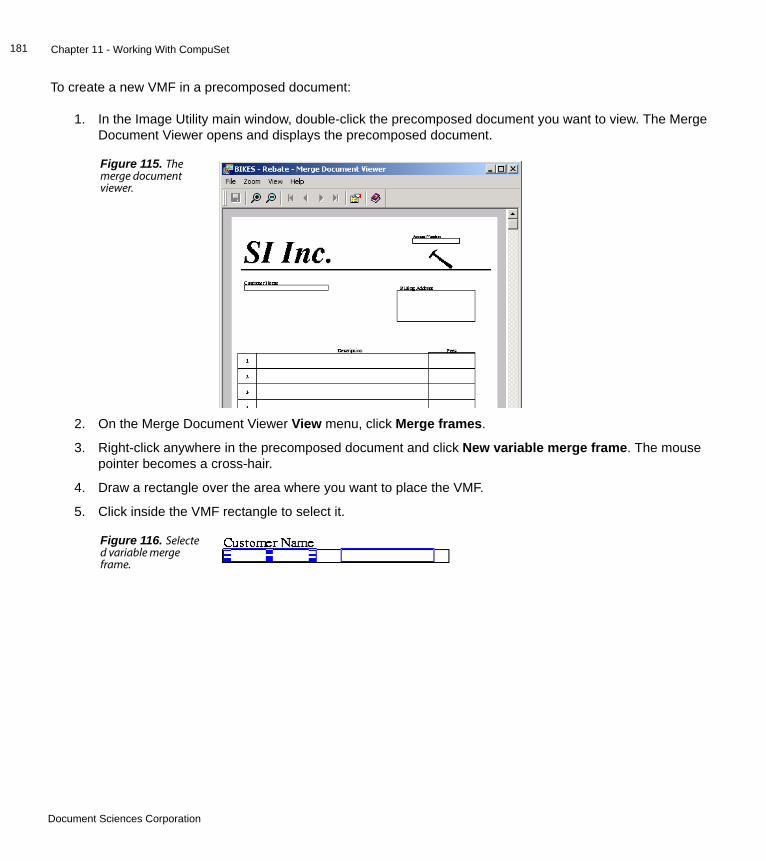
Chapter 11 - Working With CompuSet181
To create a new VMF in a precomposed document:
1. In the Image Utility main window, double-click the precomposed document you want to view. The Merge Document Viewer opens and displays the precomposed document.
2. On the Merge Document Viewer View menu, click Merge frames.
3. Right-click anywhere in the precomposed document and click New variable merge frame. The mouse pointer becomes a cross-hair.
4. Draw a rectangle over the area where you want to place the VMF.
5. Click inside the VMF rectangle to select it.
Figure 115. The merge document viewer.
Figure 116. Selected variable merge frame.
Document Sciences Corporation

Chapter 11 - Working With CompuSet182
6. Right-click in the VMF rectangle and click Variable Merge Frame Properties. The Merge Frame Properties dialog box displays.
7. Specify the properties for the VMF in the dialog box. The Merge Document Viewer automates much of the VMF definition for you, depending on the placement and size of your VMF on the current precomposed document. You can modify this information as needed in the Merge Frame Properties dialog box. In the CompuSet Tag box, type the name you want to associate with the merge frame. This is the tag you will reference in xDesign when defining which data from your customer data source to place in the merge frame. For this example we will use CUSTNAME.
8. Click Save As to save the VMF properties. The Save Variable Merge Frame dialog box appears.
9. Browse to the location where you want to save the VMF.
10. Type the name of the VMF in the Variable Merge Frame Name text box.
11. Click Save to return to the Merge Document Viewer.
12. Close the Merge Document Viewer and save your changes when prompted.
Figure 117. Merge frame properties dialog box.
Document Sciences Corporation
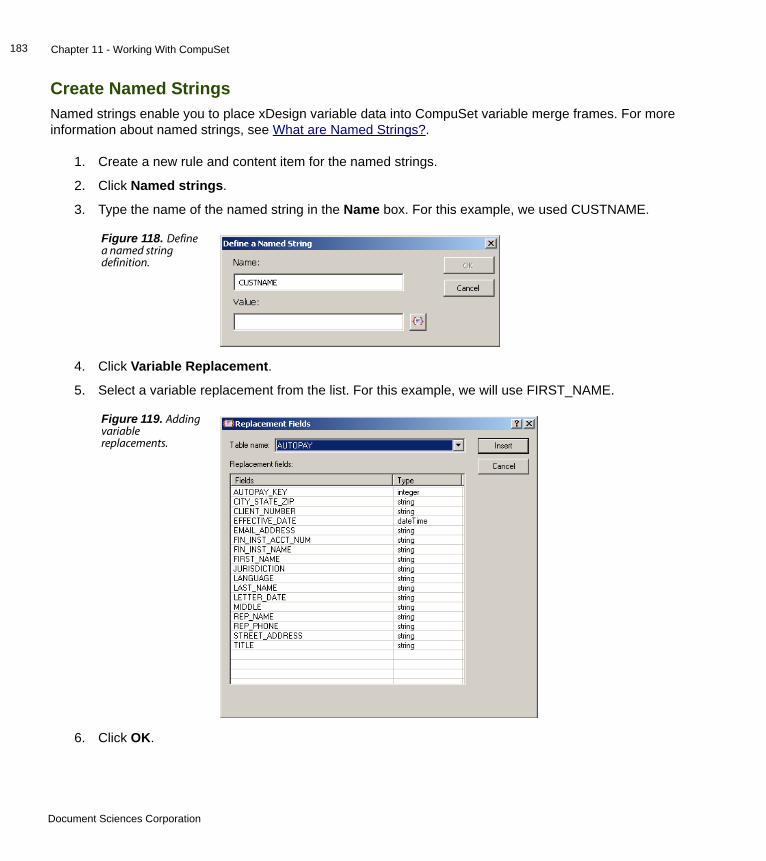
Chapter 11 - Working With CompuSet183
Create Named StringsNamed strings enable you to place xDesign variable data into CompuSet variable merge frames. For more information about named strings, see What are Named Strings?.
1. Create a new rule and content item for the named strings.
2. Click Named strings.
3. Type the name of the named string in the Name box. For this example, we used CUSTNAME.
4. Click Variable Replacement.
5. Select a variable replacement from the list. For this example, we will use FIRST_NAME.
6. Click OK.
Figure 118. Define a named string definition.
Figure 119. Adding variable replacements.
Document Sciences Corporation
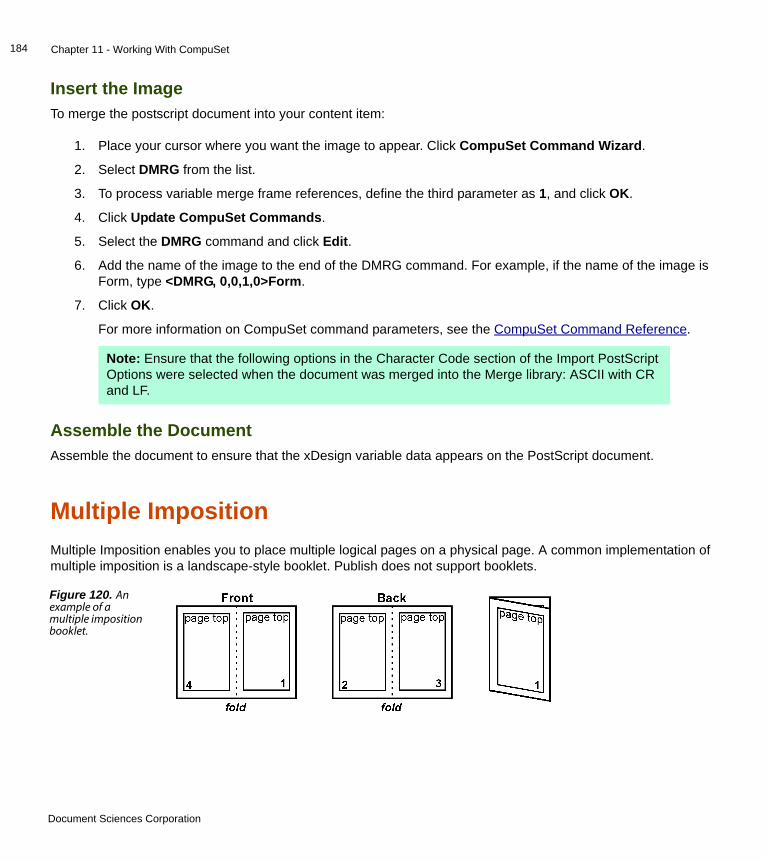
Chapter 11 - Working With CompuSet184
Insert the ImageTo merge the postscript document into your content item:
1. Place your cursor where you want the image to appear. Click CompuSet Command Wizard.
2. Select DMRG from the list.
3. To process variable merge frame references, define the third parameter as 1, and click OK.
4. Click Update CompuSet Commands.
5. Select the DMRG command and click Edit.
6. Add the name of the image to the end of the DMRG command. For example, if the name of the image is Form, type <DMRG, 0,0,1,0>Form.
7. Click OK.
For more information on CompuSet command parameters, see the CompuSet Command Reference.
Assemble the DocumentAssemble the document to ensure that the xDesign variable data appears on the PostScript document.
Multiple ImpositionMultiple Imposition enables you to place multiple logical pages on a physical page. A common implementation of multiple imposition is a landscape-style booklet. Publish does not support booklets.
Note: Ensure that the following options in the Character Code section of the Import PostScript Options were selected when the document was merged into the Merge library: ASCII with CR and LF.
Figure 120. An example of a multiple imposition booklet.
Document Sciences Corporation

Chapter 11 - Working With CompuSet185
In this example, a single physical page contains four logical pages. If the text is longer than four logical pages, CompuSet outputs the pages as described in the following eight page example:
• The first page contains page 8 in the left column and page 1 in the right. This is the front and back cover.
• The backside of the first page contains page 2 in the left column and page 7 in the right. This is the inside of the front and back cover.
• The second page contains page 6 in the left column and page 3 in the right. These logical pages face the insides of the front and back covers.
• The backside of the second page contains page 4 in the left column and page 5 in the right. These logical pages face one another in the middle of the book.
Creating a BookletTo create a booklet from an 8.5 x 11 paper size, complete the following tasks:
1. Set the Page Size
2. Create Booklet Text
3. Invoke the CompuSet MIMP Command
Set the Page Size
When creating your content item, set the Microsoft Word Page Setup parameters to meet the logical page size of the imposed pages. CompuSet takes the page width, page height, and margin settings to define the logical page size.
To set the page size:
1. Create a new content item in the first rule of your xDesign document.
2. For Microsoft Word 2003, click the File menu and select Page Setup.
3. Click the Page Size tab.
4. Set the Page width to 5.5 inches and the Page height to 8.5 inches.
This action sets the CompuSet logical page size to 5.5 inches (half the length of an 8.5 x 11 inch page in landscape orientation), allowing CompuSet to place two logical pages side-by-side on the page. The page height matches the height of an 8.5 x 11 inch page in landscape format.
5. Click the Margins tab.
Note: The booklet example uses the Landscape-Head-to-Head orientation. CompuSet allows you to select from eight different orientations.
Document Sciences Corporation
Chapter 11 - Working With CompuSet186
6. Set the margin size for Top and Bottom to one inch. This makes the CompuSet logical page column width 4.5 inches wide.
7. Click OK.
Create Booklet TextCreate the text for your booklet. If the text spans more that one content item, you may want to reset the default page size for your content items. This will ensure that all content items you create with the current template have the same page setup parameters.
Invoke the CompuSet MIMP CommandOpen the Output Format tool for your output type from the CompuSet tools and complete these steps:
1. Click Manual Edit.
2. Add the following command to your PDEF file:
MIMP ,,,,,,,,,,,,,,,
3. Click OK.
4. When prompted, click Save.
For information about the MIMP command parameters, see the xPression CompuSet Reference.
Document Sciences Corporation

Chapter 11 - Working With CompuSet187
PDF Bookmarks with Outline LevelsxPression translates Microsoft Word outline levels to Adobe Acrobat PDF bookmarks that appear in the left pane of the PDF when viewed in Adobe Acrobat Reader. xPression supports four levels of PDF bookmarks.
A Microsoft Word paragraph style with an outline level of 1 creates a root-level bookmark. An outline level of 2 creates a subordinate bookmark under the 1 outline level, and an outline level of 3 creates a subordinate bookmark under the 2 outline level. Microsoft Word provides nine total outline levels.
Setting Outline Levels on a ParagraphTo set outline levels for your styles:
1. Place your cursor in the paragraph that uses the style on which you want to define an outline level.
2. For Microsoft Word 2003, click the Format menu and select Styles and Formatting.
3. Locate the style in the list, click the drop-arrow for the style name, and choose Modify.
Figure 121. PDF bookmarks appear in the left pane and enable users to jump to different sections in a document.
Document Sciences Corporation
Chapter 11 - Working With CompuSet188
4. Click the Format button and select Paragraph.
5. Define outline levels in the Outline level list.
Enabling HTML Formatting in VariablesCompuSet can render HTML formatting tags in all string type replacement variables. To enable the HTML formatting, you must make the following global change to your system.
1. Locate the customerdata.properties file in the xPressionHome directory on your server.
2. Type the following text at the end of the file:
HTMLFormatting = true
When set to true, this property enables HTML formatting of variables.
3. To disable this feature, set the value to false.
Caution: You cannot use direct formatting to specify outline levels on paragraph styles that do not define an outline level, or that are set to Automatically Update. You will lose the outline level when you save the content item to xPression.
Document Sciences Corporation

This chapter contains a series of tables that outline supported Microsoft Word functionality for xPublish and CompuSet documents. These tables also appear throughout this book wherever the functionality is described. The tables are reproduced here in the appendix to provide a single location for this information.
Page Setup Options
Microsoft Word Page Setup: Margins OptionsThis page contains the following options.
Appendix A
Supported Functionality
Feature CompuSet xPublish
Margins: top, Bottom, Left, Right √ √
Gutter Size √ Not supported
Gutter Position Left only Not supported
Orientation √ √
Pages: Multiple Pages: Normal √ √
Pages: Multiple Pages: Mirror Margins √ √
Pages: Multiple Pages: 2 pages per sheet Not supported Not supported
Pages: Multiple Pages: Book Fold Not supported Not supported
Document Sciences Corporation
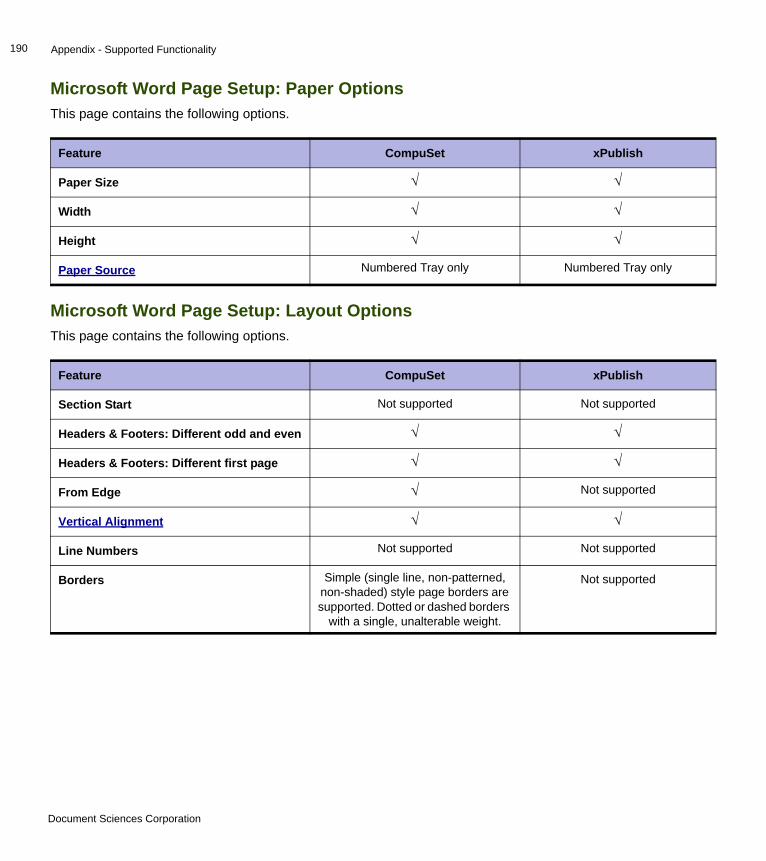
Appendix - Supported Functionality190
Microsoft Word Page Setup: Paper OptionsThis page contains the following options.
Microsoft Word Page Setup: Layout OptionsThis page contains the following options.
Feature CompuSet xPublish
Paper Size √ √
Width √ √
Height √ √
Paper Source Numbered Tray only Numbered Tray only
Feature CompuSet xPublish
Section Start Not supported Not supported
Headers & Footers: Different odd and even √ √
Headers & Footers: Different first page √ √
From Edge √ Not supported
Vertical Alignment √ √
Line Numbers Not supported Not supported
Borders Simple (single line, non-patterned, non-shaded) style page borders are supported. Dotted or dashed borders
with a single, unalterable weight.
Not supported
Document Sciences Corporation
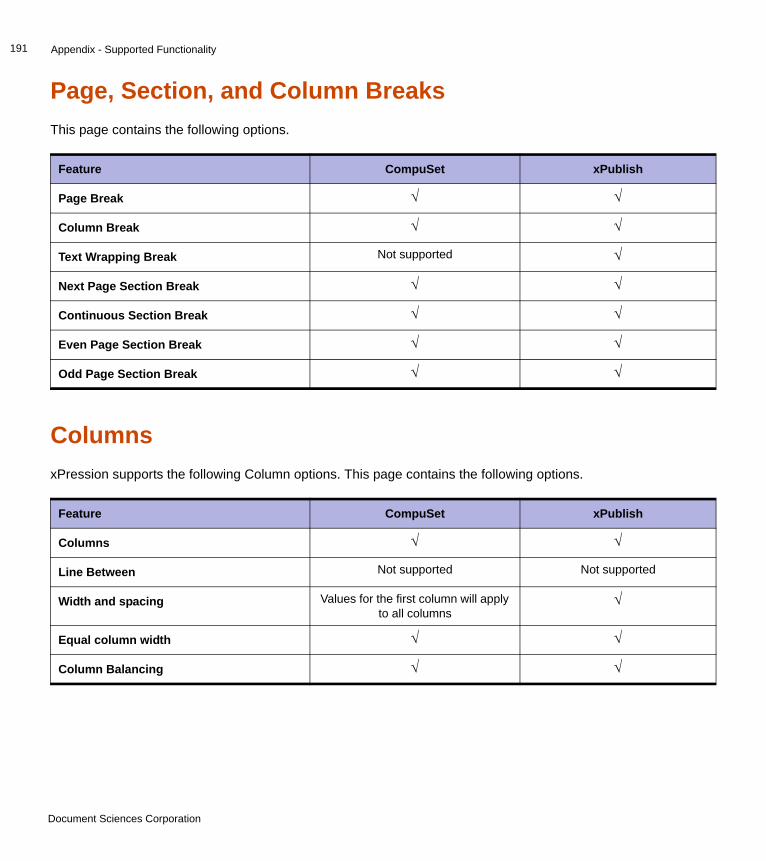
Appendix - Supported Functionality191
Page, Section, and Column BreaksThis page contains the following options.
ColumnsxPression supports the following Column options. This page contains the following options.
Feature CompuSet xPublish
Page Break √ √
Column Break √ √
Text Wrapping Break Not supported √
Next Page Section Break √ √
Continuous Section Break √ √
Even Page Section Break √ √
Odd Page Section Break √ √
Feature CompuSet xPublish
Columns √ √
Line Between Not supported Not supported
Width and spacing Values for the first column will apply to all columns
√
Equal column width √ √
Column Balancing √ √
Document Sciences Corporation
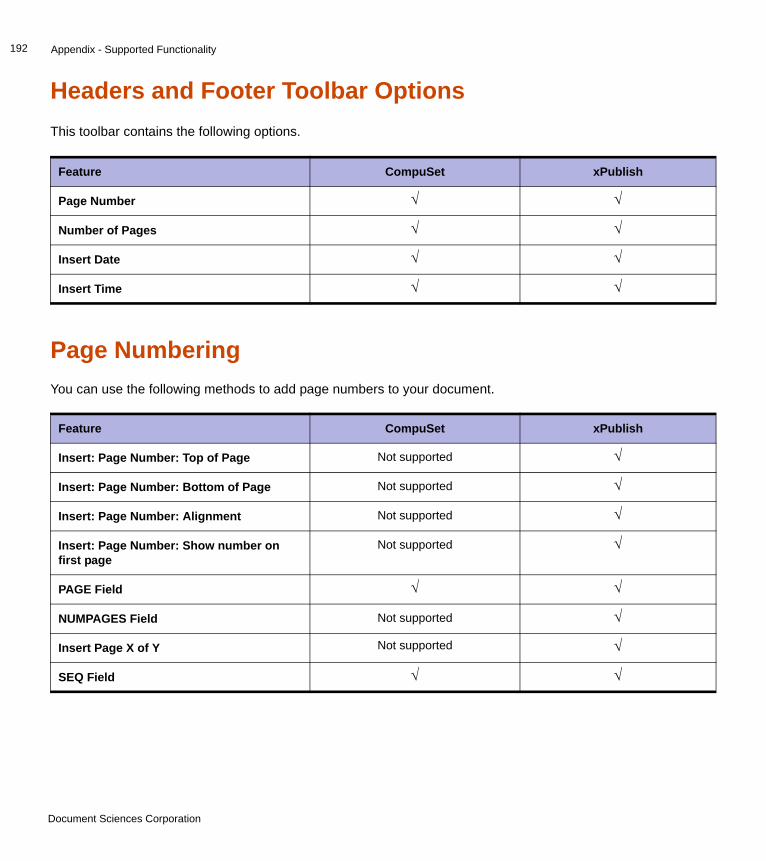
Appendix - Supported Functionality192
Headers and Footer Toolbar OptionsThis toolbar contains the following options.
Page NumberingYou can use the following methods to add page numbers to your document.
Feature CompuSet xPublish
Page Number √ √
Number of Pages √ √
Insert Date √ √
Insert Time √ √
Feature CompuSet xPublish
Insert: Page Number: Top of Page Not supported √
Insert: Page Number: Bottom of Page Not supported √
Insert: Page Number: Alignment Not supported √
Insert: Page Number: Show number on first page
Not supported √
PAGE Field √ √
NUMPAGES Field Not supported √
Insert Page X of Y Not supported √
SEQ Field √ √
Document Sciences Corporation
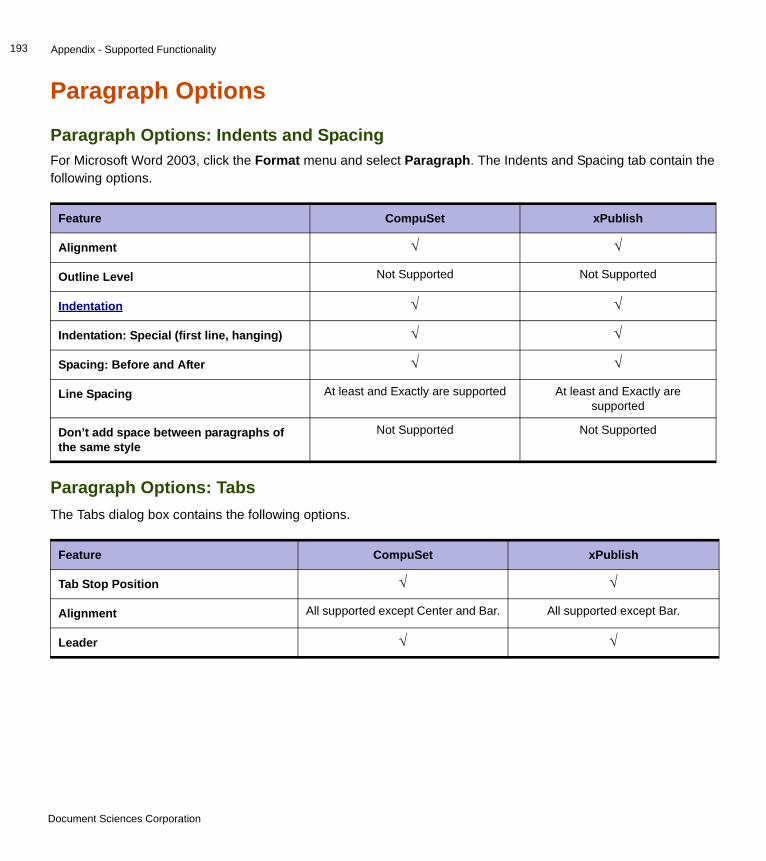
Appendix - Supported Functionality193
Paragraph Options
Paragraph Options: Indents and SpacingFor Microsoft Word 2003, click the Format menu and select Paragraph. The Indents and Spacing tab contain the following options.
Paragraph Options: TabsThe Tabs dialog box contains the following options.
Feature CompuSet xPublish
Alignment √ √
Outline Level Not Supported Not Supported
Indentation √ √
Indentation: Special (first line, hanging) √ √
Spacing: Before and After √ √
Line Spacing At least and Exactly are supported At least and Exactly are supported
Don’t add space between paragraphs of the same style
Not Supported Not Supported
Feature CompuSet xPublish
Tab Stop Position √ √
Alignment All supported except Center and Bar. All supported except Bar.
Leader √ √
Document Sciences Corporation

Appendix - Supported Functionality194
Paragraph Options: Line and Page BreaksThe Line and Page Breaks tab contains the following options.
HyphenationxPression provides support for the following hyphen characters:
• Plain hyphen (U+002D), also known as the minus sign (-)
• Optional hyphen (U+00Ad)
• Non-breaking hyphen (U+2011)
Hyphenation OptionsThe Hyphenation options dialog box contains the following options.
Feature CompuSet xPublish
Widow and Orphan Control √ √See Borders and Shading
Keep with next Not supported See Borders and Shading
Keep lines together √ See Borders and Shading
Page break before √ √
Suppress line numbers Not supported Not supported
Don’t hyphenate √ √
Feature CompuSet xPublish
Automatically hyphenate document √ √
Hyphenate words in CAPS Not supported Not supported
Hyphenation zone Not supported Not supported
Limit consecutive hyphens to Not supported Not supported
Document Sciences Corporation
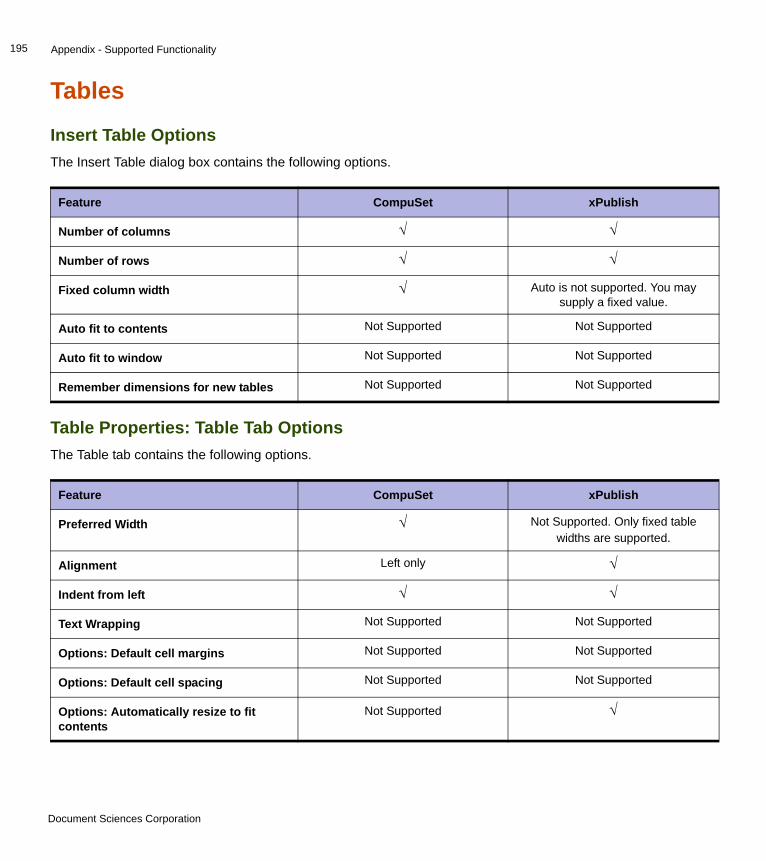
Appendix - Supported Functionality195
Tables
Insert Table OptionsThe Insert Table dialog box contains the following options.
Table Properties: Table Tab OptionsThe Table tab contains the following options.
Feature CompuSet xPublish
Number of columns √ √
Number of rows √ √
Fixed column width √ Auto is not supported. You may supply a fixed value.
Auto fit to contents Not Supported Not Supported
Auto fit to window Not Supported Not Supported
Remember dimensions for new tables Not Supported Not Supported
Feature CompuSet xPublish
Preferred Width √ Not Supported. Only fixed table widths are supported.
Alignment Left only √
Indent from left √ √
Text Wrapping Not Supported Not Supported
Options: Default cell margins Not Supported Not Supported
Options: Default cell spacing Not Supported Not Supported
Options: Automatically resize to fit contents
Not Supported √
Document Sciences Corporation
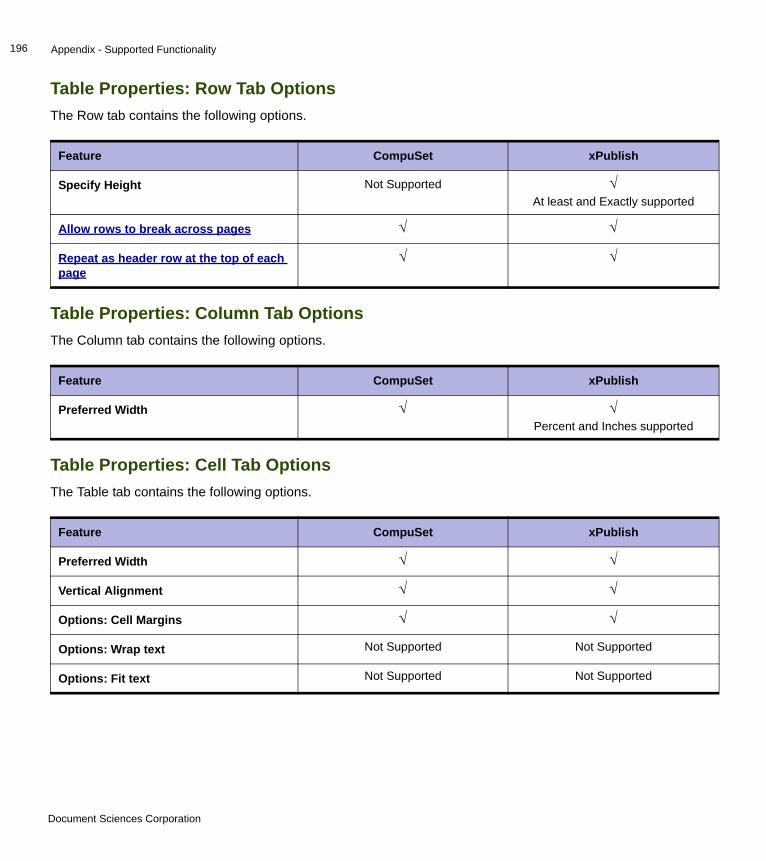
Appendix - Supported Functionality196
Table Properties: Row Tab OptionsThe Row tab contains the following options.
Table Properties: Column Tab OptionsThe Column tab contains the following options.
Table Properties: Cell Tab OptionsThe Table tab contains the following options.
Feature CompuSet xPublish
Specify Height Not Supported √ At least and Exactly supported
Allow rows to break across pages √ √
Repeat as header row at the top of each page
√ √
Feature CompuSet xPublish
Preferred Width √ √ Percent and Inches supported
Feature CompuSet xPublish
Preferred Width √ √
Vertical Alignment √ √
Options: Cell Margins √ √
Options: Wrap text Not Supported Not Supported
Options: Fit text Not Supported Not Supported
Document Sciences Corporation
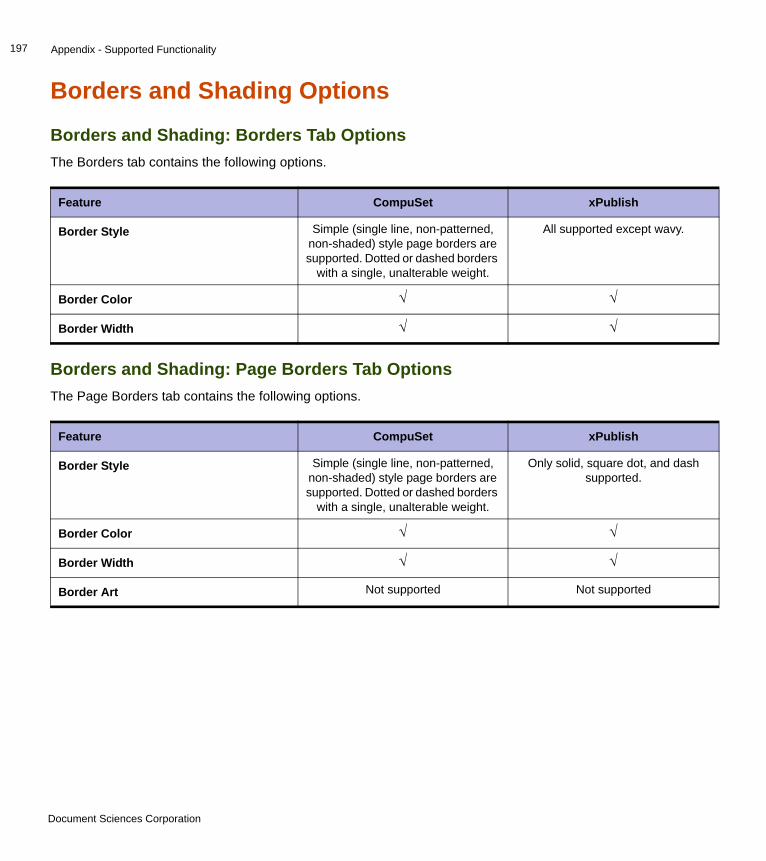
Appendix - Supported Functionality197
Borders and Shading Options
Borders and Shading: Borders Tab OptionsThe Borders tab contains the following options.
Borders and Shading: Page Borders Tab OptionsThe Page Borders tab contains the following options.
Feature CompuSet xPublish
Border Style Simple (single line, non-patterned, non-shaded) style page borders are supported. Dotted or dashed borders
with a single, unalterable weight.
All supported except wavy.
Border Color √ √
Border Width √ √
Feature CompuSet xPublish
Border Style Simple (single line, non-patterned, non-shaded) style page borders are supported. Dotted or dashed borders
with a single, unalterable weight.
Only solid, square dot, and dash supported.
Border Color √ √
Border Width √ √
Border Art Not supported Not supported
Document Sciences Corporation
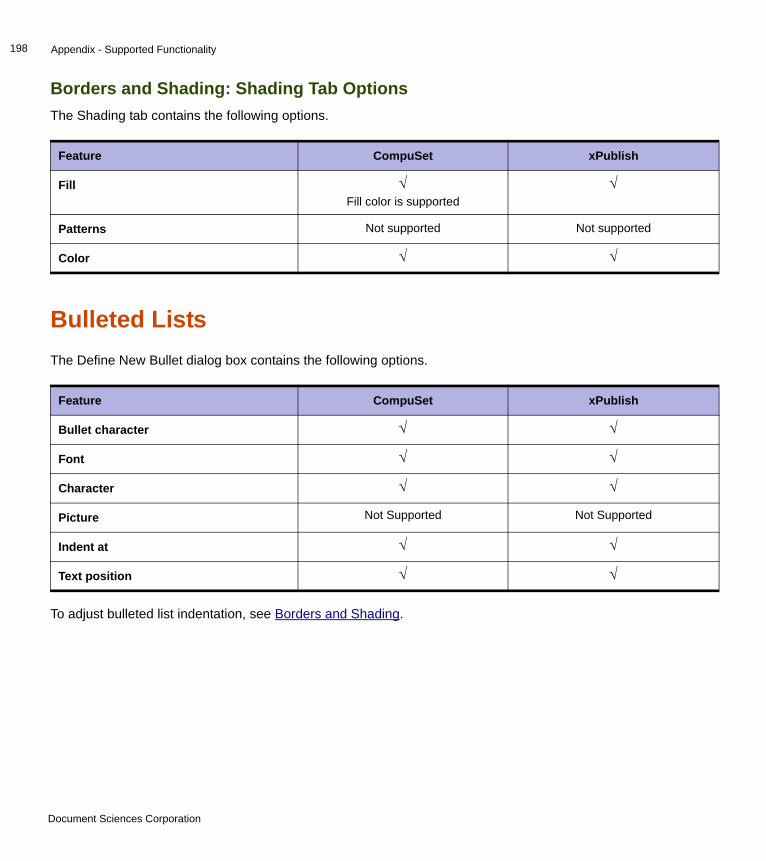
Appendix - Supported Functionality198
Borders and Shading: Shading Tab OptionsThe Shading tab contains the following options.
Bulleted ListsThe Define New Bullet dialog box contains the following options.
To adjust bulleted list indentation, see Borders and Shading.
Feature CompuSet xPublish
Fill √ Fill color is supported
√
Patterns Not supported Not supported
Color √ √
Feature CompuSet xPublish
Bullet character √ √
Font √ √
Character √ √
Picture Not Supported Not Supported
Indent at √ √
Text position √ √
Document Sciences Corporation
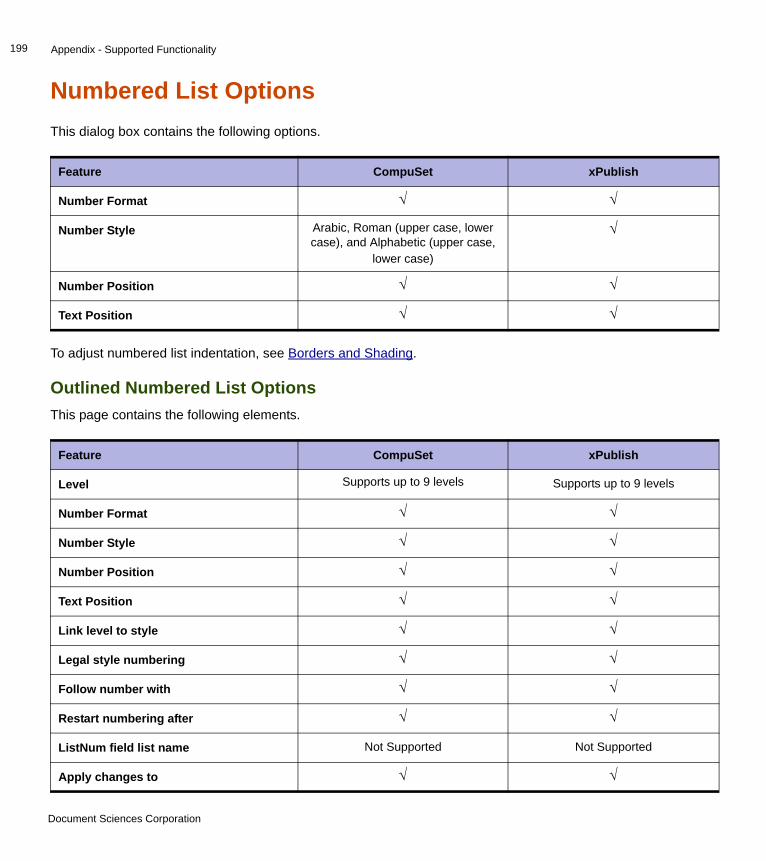
Appendix - Supported Functionality199
Numbered List OptionsThis dialog box contains the following options.
To adjust numbered list indentation, see Borders and Shading.
Outlined Numbered List OptionsThis page contains the following elements.
Feature CompuSet xPublish
Number Format √ √
Number Style Arabic, Roman (upper case, lower case), and Alphabetic (upper case,
lower case)
√
Number Position √ √
Text Position √ √
Feature CompuSet xPublish
Level Supports up to 9 levels Supports up to 9 levels
Number Format √ √
Number Style √ √
Number Position √ √
Text Position √ √
Link level to style √ √
Legal style numbering √ √
Follow number with √ √
Restart numbering after √ √
ListNum field list name Not Supported Not Supported
Apply changes to √ √
Document Sciences Corporation
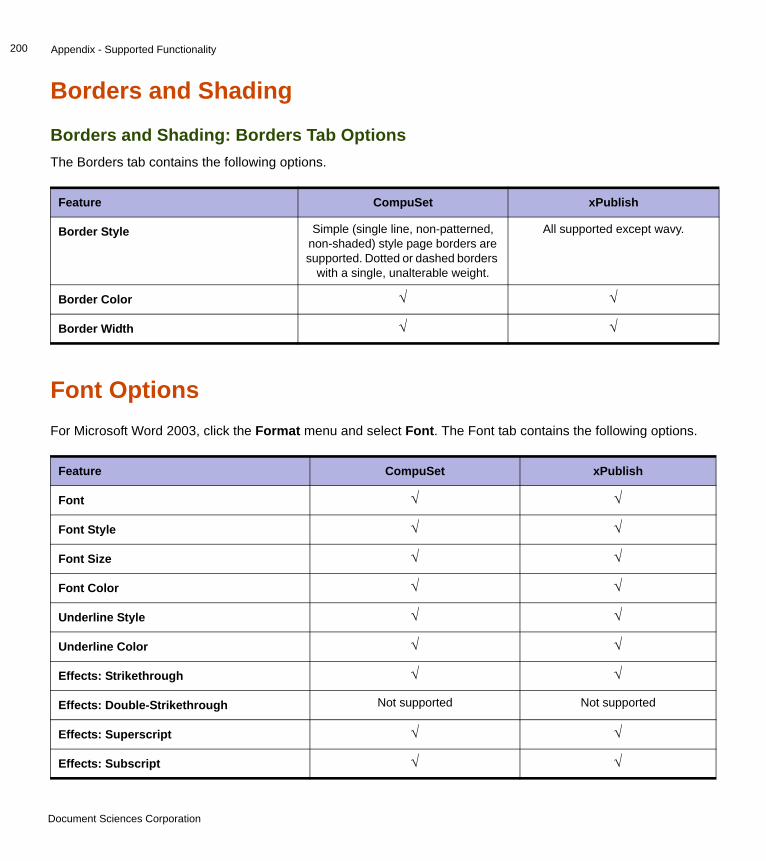
Appendix - Supported Functionality200
Borders and Shading
Borders and Shading: Borders Tab OptionsThe Borders tab contains the following options.
Font OptionsFor Microsoft Word 2003, click the Format menu and select Font. The Font tab contains the following options.
Feature CompuSet xPublish
Border Style Simple (single line, non-patterned, non-shaded) style page borders are supported. Dotted or dashed borders
with a single, unalterable weight.
All supported except wavy.
Border Color √ √
Border Width √ √
Feature CompuSet xPublish
Font √ √
Font Style √ √
Font Size √ √
Font Color √ √
Underline Style √ √
Underline Color √ √
Effects: Strikethrough √ √
Effects: Double-Strikethrough Not supported Not supported
Effects: Superscript √ √
Effects: Subscript √ √
Document Sciences Corporation
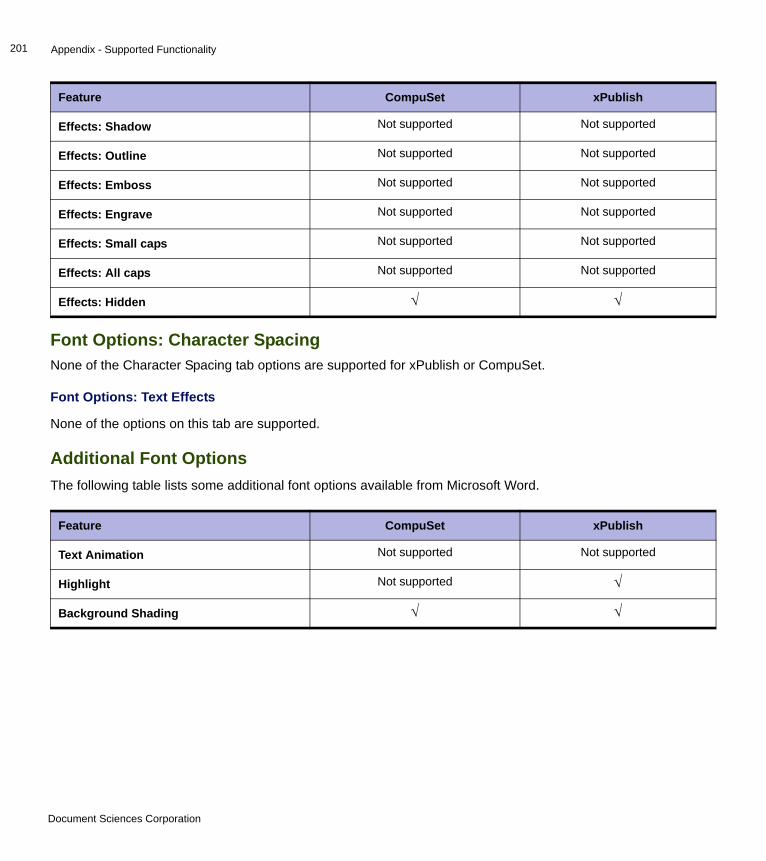
Appendix - Supported Functionality201
Font Options: Character SpacingNone of the Character Spacing tab options are supported for xPublish or CompuSet.
Font Options: Text Effects
None of the options on this tab are supported.
Additional Font OptionsThe following table lists some additional font options available from Microsoft Word.
Effects: Shadow Not supported Not supported
Effects: Outline Not supported Not supported
Effects: Emboss Not supported Not supported
Effects: Engrave Not supported Not supported
Effects: Small caps Not supported Not supported
Effects: All caps Not supported Not supported
Effects: Hidden √ √
Feature CompuSet xPublish
Text Animation Not supported Not supported
Highlight Not supported √
Background Shading √ √
Feature CompuSet xPublish
Document Sciences Corporation
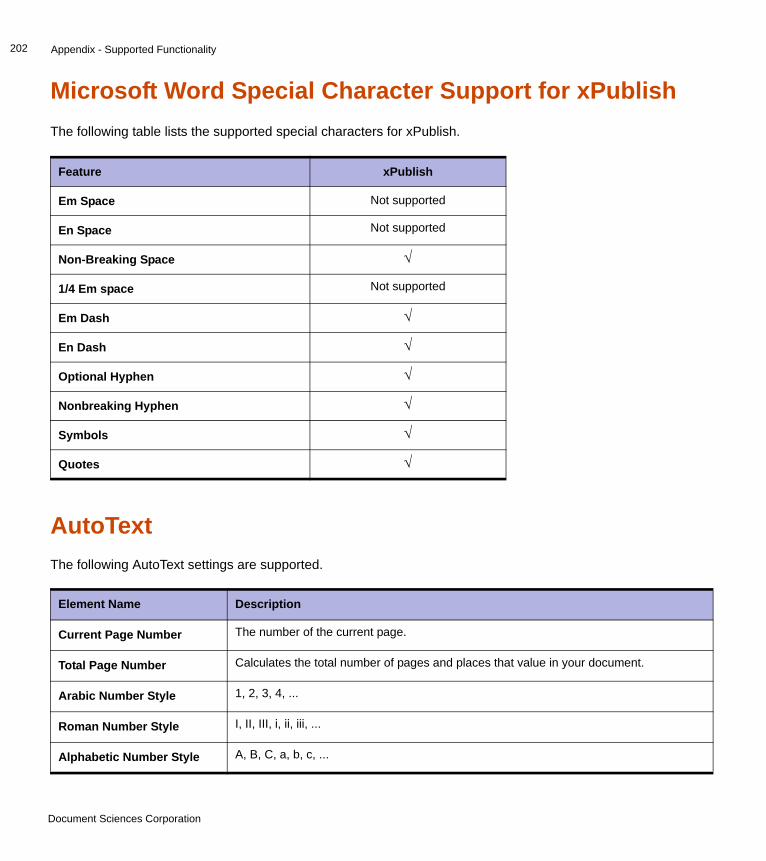
Appendix - Supported Functionality202
Microsoft Word Special Character Support for xPublishThe following table lists the supported special characters for xPublish.
AutoTextThe following AutoText settings are supported.
Feature xPublish
Em Space Not supported
En Space Not supported
Non-Breaking Space √
1/4 Em space Not supported
Em Dash √
En Dash √
Optional Hyphen √
Nonbreaking Hyphen √
Symbols √
Quotes √
Element Name Description
Current Page Number The number of the current page.
Total Page Number Calculates the total number of pages and places that value in your document.
Arabic Number Style 1, 2, 3, 4, ...
Roman Number Style I, II, III, i, ii, iii, ...
Alphabetic Number Style A, B, C, a, b, c, ...
Document Sciences Corporation
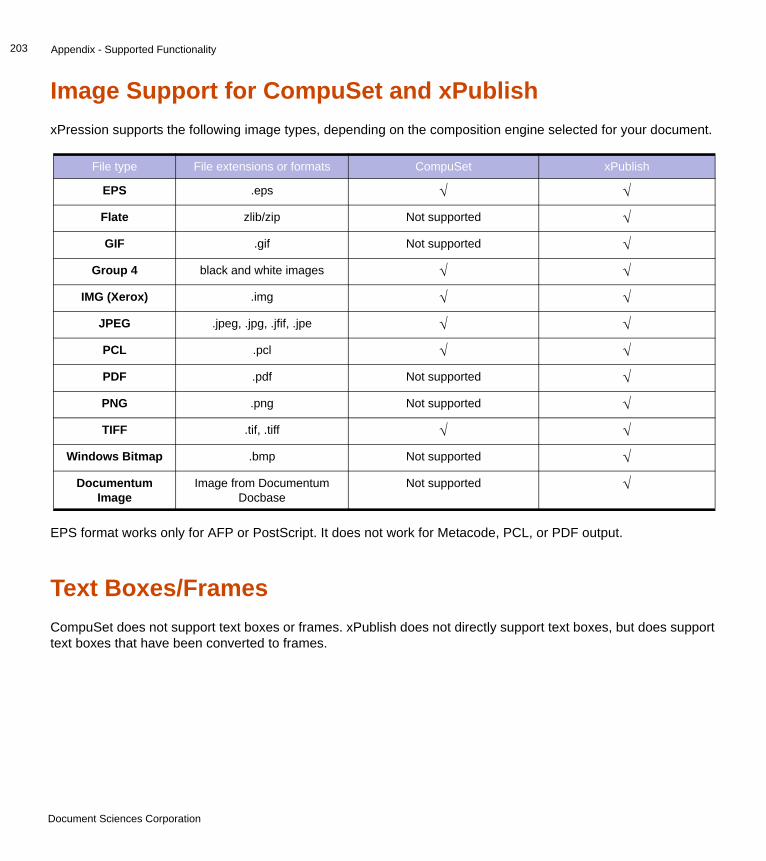
Appendix - Supported Functionality203
Image Support for CompuSet and xPublishxPression supports the following image types, depending on the composition engine selected for your document.
EPS format works only for AFP or PostScript. It does not work for Metacode, PCL, or PDF output.
Text Boxes/FramesCompuSet does not support text boxes or frames. xPublish does not directly support text boxes, but does support text boxes that have been converted to frames.
File type File extensions or formats CompuSet xPublish
EPS .eps √ √
Flate zlib/zip Not supported √
GIF .gif Not supported √
Group 4 black and white images √ √
IMG (Xerox) .img √ √
JPEG .jpeg, .jpg, .jfif, .jpe √ √
PCL .pcl √ √
PDF .pdf Not supported √
PNG .png Not supported √
TIFF .tif, .tiff √ √
Windows Bitmap .bmp Not supported √
Documentum Image
Image from Documentum Docbase
Not supported √
Document Sciences Corporation
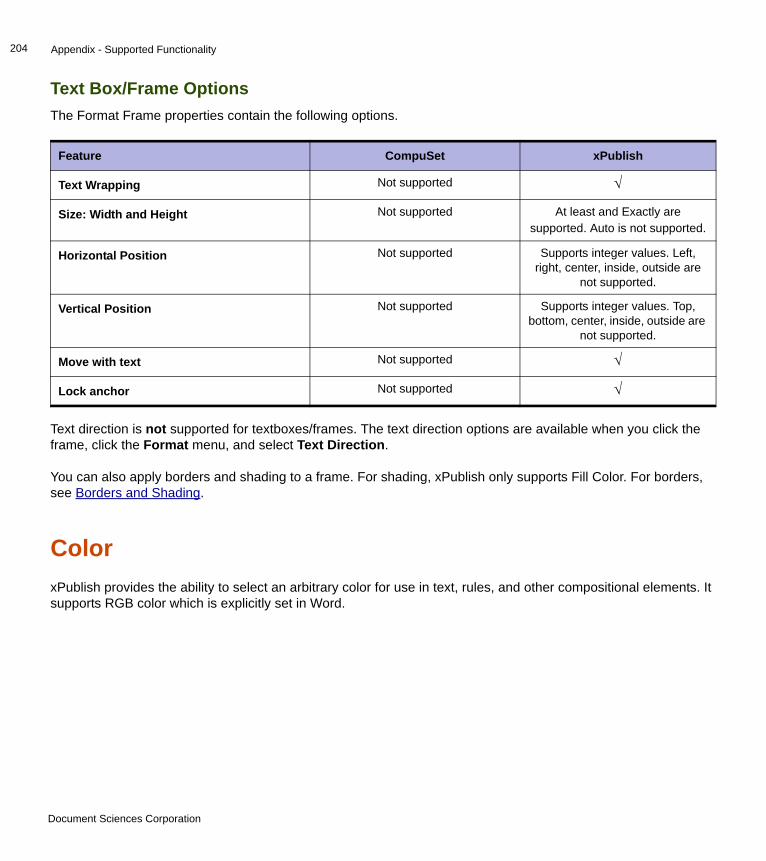
Appendix - Supported Functionality204
Text Box/Frame OptionsThe Format Frame properties contain the following options.
Text direction is not supported for textboxes/frames. The text direction options are available when you click the frame, click the Format menu, and select Text Direction.
You can also apply borders and shading to a frame. For shading, xPublish only supports Fill Color. For borders, see Borders and Shading.
ColorxPublish provides the ability to select an arbitrary color for use in text, rules, and other compositional elements. It supports RGB color which is explicitly set in Word.
Feature CompuSet xPublish
Text Wrapping Not supported √
Size: Width and Height Not supported At least and Exactly are supported. Auto is not supported.
Horizontal Position Not supported Supports integer values. Left, right, center, inside, outside are
not supported.
Vertical Position Not supported Supports integer values. Top, bottom, center, inside, outside are
not supported.
Move with text Not supported √
Lock anchor Not supported √
Document Sciences Corporation
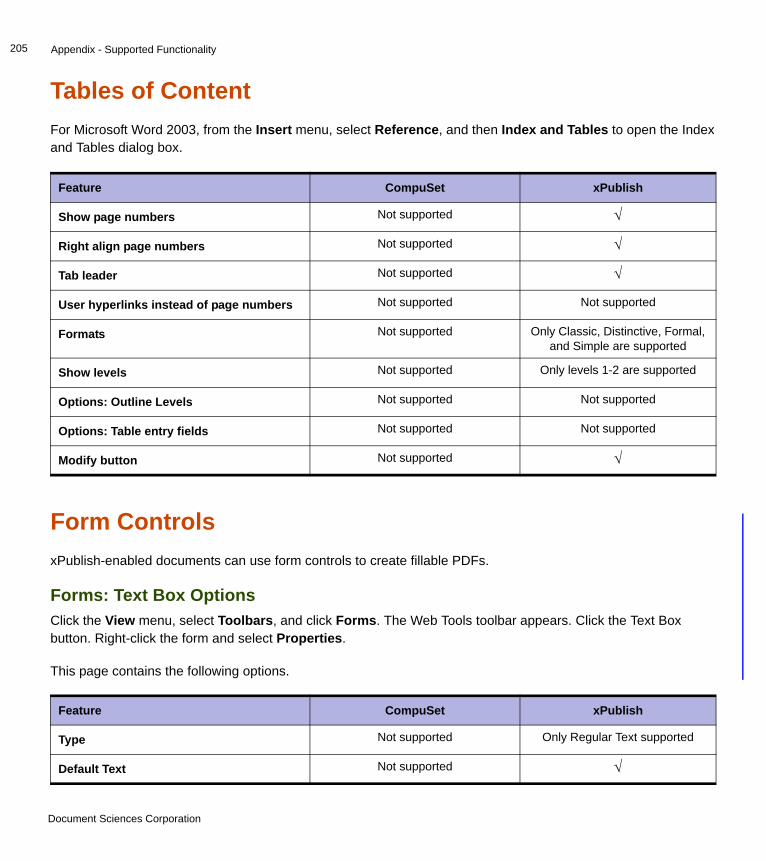
Appendix - Supported Functionality205
Tables of Content For Microsoft Word 2003, from the Insert menu, select Reference, and then Index and Tables to open the Index and Tables dialog box.
Form Controls xPublish-enabled documents can use form controls to create fillable PDFs.
Forms: Text Box OptionsClick the View menu, select Toolbars, and click Forms. The Web Tools toolbar appears. Click the Text Box button. Right-click the form and select Properties.
This page contains the following options.
Feature CompuSet xPublish
Show page numbers Not supported √
Right align page numbers Not supported √
Tab leader Not supported √
User hyperlinks instead of page numbers Not supported Not supported
Formats Not supported Only Classic, Distinctive, Formal, and Simple are supported
Show levels Not supported Only levels 1-2 are supported
Options: Outline Levels Not supported Not supported
Options: Table entry fields Not supported Not supported
Modify button Not supported √
Feature CompuSet xPublish
Type Not supported Only Regular Text supported
Default Text Not supported √
Document Sciences Corporation
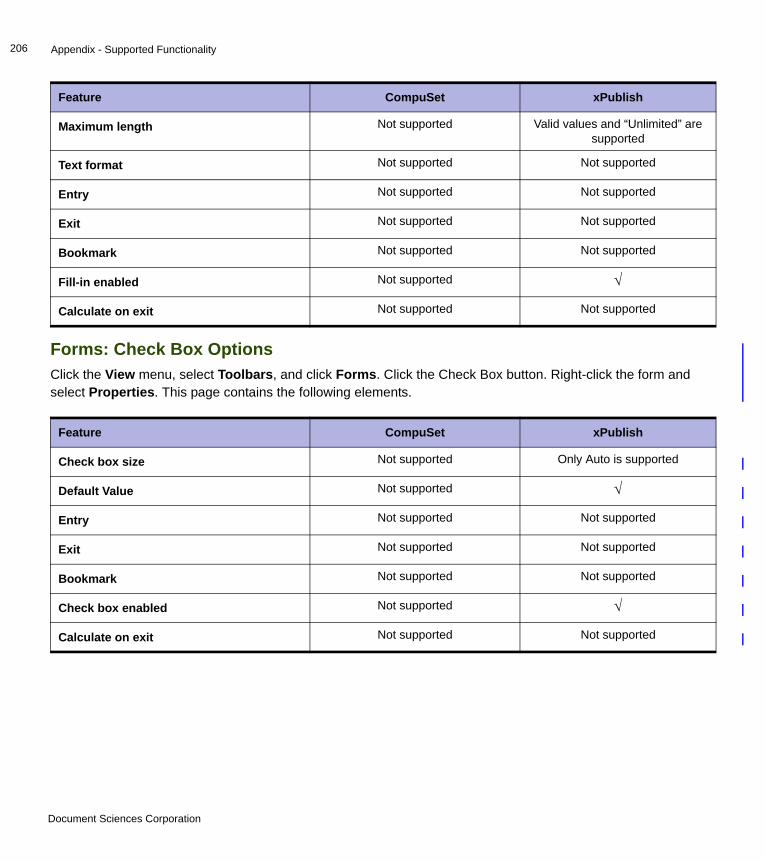
Appendix - Supported Functionality206
Forms: Check Box OptionsClick the View menu, select Toolbars, and click Forms. Click the Check Box button. Right-click the form and select Properties. This page contains the following elements.
Maximum length Not supported Valid values and “Unlimited” are supported
Text format Not supported Not supported
Entry Not supported Not supported
Exit Not supported Not supported
Bookmark Not supported Not supported
Fill-in enabled Not supported √
Calculate on exit Not supported Not supported
Feature CompuSet xPublish
Check box size Not supported Only Auto is supported
Default Value Not supported √
Entry Not supported Not supported
Exit Not supported Not supported
Bookmark Not supported Not supported
Check box enabled Not supported √
Calculate on exit Not supported Not supported
Feature CompuSet xPublish
Document Sciences Corporation
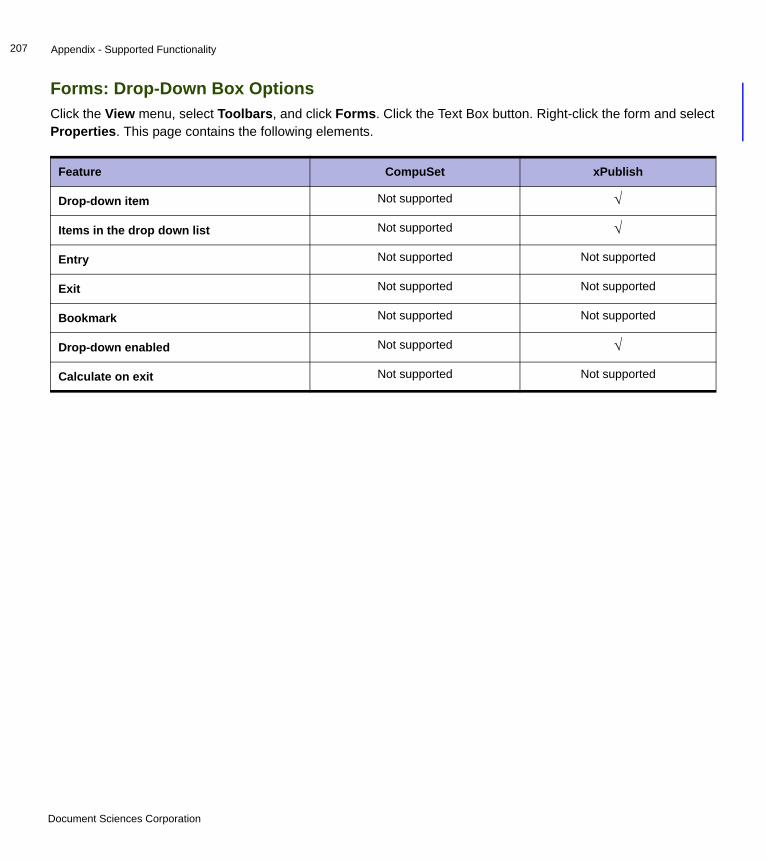
Appendix - Supported Functionality207
Forms: Drop-Down Box OptionsClick the View menu, select Toolbars, and click Forms. Click the Text Box button. Right-click the form and select Properties. This page contains the following elements.
Feature CompuSet xPublish
Drop-down item Not supported √
Items in the drop down list Not supported √
Entry Not supported Not supported
Exit Not supported Not supported
Bookmark Not supported Not supported
Drop-down enabled Not supported √
Calculate on exit Not supported Not supported
Document Sciences Corporation

© 2011 - 2013 EMC Corporation. All Rights Reserved. EMC believes the information in this publication is accurate as of its publication date. The information is subject to change
without
notice.
THE INFORMATION IN THIS PUBLICATION IS PROVIDED “AS IS.” EMC CORPORATION MAKES NO
REPRESENTATIONS OR
WARRANTIES OF ANY KIND WITH RESPECT TO THE INFORMATION IN THIS PUBLICATION, AND
SPECIFICALLY
DISCLAIMS IMPLIED WARRANTIES OF MERCHANTABILITY OR FITNESS FOR A PARTICULAR PURPOSE.
Use, copying, and distribution of any EMC software described in this publication requires an applicable software license.
EMC2, EMC, and the EMC logo are registered trademarks or trademarks of EMC Corporation in the United State and other
countries.
All other trademarks used herein are the property of their respective owners.