Embed Size (px)
DESCRIPTION
Describes how to program your MOTIF XS in master mode. The Motif series has been replaced by the Montague.
Citation preview

1
yPOWER USER
Understanding Master Mode
Phil ClendeninnSenior Product Specialist
Technology Products©Yamaha Corporation of America
“This synthesizer is loaded with such a wealth ofdifferent features, functions and operations, you mayfind it difficult to locate and call up the particular featureyou need. This is where the Master function comes inhandy. You can use it to memorize the operations youuse most often in each mode, and call them up instantlyanytime you need them with a single button press. TheMOTIF XS has space for a total of 128 of your own UserMaster settings. Press the [MASTER] button to enter theMaster Play mode.”
The Master programs can be used to organize andmemorize your MOTIF XS programs into one neat bank.It can also function as a place to store your externalMIDI Controller setups when using the MOTIF XS as an8-Zone Master MIDI controller. Familiarize yourself withbasic MOTIF XS modes and operations before diving inthis end of the pool. Save any personal data beforefollowing this document.
The principal modes of MOTIF XS are VOICE,PERFORMANCE, SONG and PATTERN. A Master modesetup can be used to recall a Voice, a Performance, aSong or a Pattern. Rather than jumping back and forth
between modes, organize things in one Bank to rulethem all. You can then easily access setups via a FootSwitch (FS). The programmable FS assigned to cc98 willincrement you through the Master setups.
A second use for Master setups is to integrate andorganize your external MIDI gear, as well. This is withthe ZONE Switch active. You can send a Bank Selectand Program Change message on eight different MIDIchannels simultaneously when you recall a MASTERsetup. The Bank Select and Program Change data canbe “preset” so that you can address internal MOTIF XSVoices and/or external device setups from your 8 Zones.
Although Master setups are non-volatile (they do remainin memory between power cycles), often the data theypoint to is volatile - this can present a problem if youare not organized and aware of this fact. For example, ifyou load new data into a location or are pointing tovolatile User sample data, this can cause the Master tonot sound properly. In general, if you are going to setupand use MASTERS you will want to save your data in ALLdata files. This way you restore all the information thatyour MASTER programs might be accessing. Read on…

2
MASTERING MASTER MODEIf you are using a MOTIF XS alone (that is, noexternal MIDI devices), Master Mode can be usedto assemble your on-board MOTIF XS setups(Programs) in one convenient bank. A Masterlocation can point to a Voice, a Performance, aSong Mix or a Pattern Mix. You can use aFootswitch to advance through the Master setupsduring a live session. Study the Factory“AutoLoad” data for examples of this type ofusage of the Master setups. The MASTER setupsare used to recall different Performances, Voices,Patterns, or Songs. You can set up a Footswitch(FS) assigned to Control Change 98 to advancethrough the Master setups. If you want to use thisfunction you will need to program it for eachPerformance and Mixing setup… More on thisfunction a bit later.
To learn from these MASTER setups:• Press [EDIT]• Press [COMMON EDIT]• Press [F2] OTHER
Here you can see how they are directly associated(linked) with a “MODE”: Voice, Performance, Songor Pattern. Master number 008 is associated with“MODE”: SONG; “MEMORY”:01 [Demo Song 1]
Master mode has a second more complex use –with ZONE control. You see the “Zone Switch” isset to ON in the screen shot above. Master modecan be used to control internal sounds, and/orcomplex configurations where both internal andexternal sounds are used together, that is, setupswhere some “Zones” are controlling InternalMOTIF XS Voices or a MOTIF XS Performancewhile other Zones might be controlling externaldevices. By the time you reach the level ofcreating your own Master setups you should havegained a thorough knowledge of the MOTIF XSand its modes. We will state them here so that
you can fully understand what is possible andwhat is impossible from a Master setup. Then wewill look at a few possible scenarios.
Rule 1: A Voice is the fundamental playableentity in the MOTIF XS. The internal Voices aremade up of up to eight multi-sampled soundscalled Elements. Each Voice has a Dual Insertioneffect, a reverb and a chorus processor available.The Dual Insertion effect can be real-timecontrolled via MIDI controllers and has an intricaterelationship to the individual Elements of theVoice. The Dual Insertion effect is an importantcomponent – and is often the “personality” of theVoice. A Voice occupies a single MIDI channel andin Voice mode, significantly only one Voice can berecalled at a time. There are 1024 Preset Voices in8 banks of 128. There are 384 User Voices in 3banks. There are 128 Normal General MIDI Voicesand a GM Drum Kit; 64 Preset Drum Kits; and 32User Drum Kits. When you associate a MASTERwith VOICE mode, you will be able to play justone VOICE (Voice mode rules will apply). Even ifyou activate the ZONE SWITCH, only one Zonewill be able to access an internal sound – becausein VOICE mode only one Voice can be recalled at atime.
Rule 2: A Performance is a combination of up tofour Voices. Each Performance has a reverb, achorus effect processor and all four of theassigned Voices can recall their own DualInsertion effects from Voice mode (including thereal-time effect controller assignments). All fourVoices can recall their full compliment ofarpeggios, as well, because the XS features up tofour simultaneous arpeggios. It is important torealize that Performances are made up of soundsfound in Voice mode. It places up to four of theminto what are called “PARTS”. Through these,PARTS, you can edit the sound of a Voice in aPerformance without changing the original Voice

3
data. This is accomplished by applying “offsets” tothe original data. All Voices in a Performanceoccupy the same basic MIDI channel and only onePerformance can be recalled at a time. There are384 USER Performances in 3 Banks of 128. Infact, all the Performances are USER. APerformance can be copied into a Song and/orPattern, as necessary. This actually places thePARTS (up to 4) in a MIX with each one set to thesame Basic Receive Channel. A Performance canbe recorded directly to either a SONG or PATTERNvia the new innovative DIRECT PERFORMANCERECORD feature. When you associate a MASTERwith PERFORMANCE mode, you will be able to playjust one (Performance mode rules will apply).Even if you activate the ZONE SWITCH, only oneZone will be able to access an internalPerformance – because in PERFORMANCE modeonly one PERFORMANCE can be recalled at a time.All four PARTS of the PERFORMANCE will beaddressed together by a single ZONE.
These two modes, Voice and Performance, are theprincipal playable programs on the MOTIF XS.
Rule 3: Then there are the SEQUENCERMODES: Song and Pattern. These have multi-part setups (called MIXING) to hold up to 16PARTS, typically used when playing back from thesequencer. When you enter a Song or Pattern youcan play on one MIDI channel at a time (unlessyou use a MASTER Zone setup – at which pointyou can play on up to 8 MIDI channelsimultaneously). Several PARTS, however, can beassigned to the same MIDI channel, as necessaryto accomplish very complex setups. Thus it ispossible to transmit from a single channel yet playmultiple VOICES (PARTS). But typically a SONGMIXING and/or PATTERN MIXING program is usedto place 16 different sounds on 16 different MIDIchannels for play from a sequencer. You can, asmentioned, use the Master Mode ZONE function to
actually play on 8 separate MIDI channelssimultaneously. That is how powerful thecombination of MIXING and MASTER mode canbe… as we will see. When you associate a MASTERwith a SONG MIXING or PATTERN MIXING setup –the Masters can be routed internally and/orexternally as necessary in any number ofcombinations totaling eight Zones. Therefore youcan use this to address multiple internal PARTS ondiscreet MIDI channels (which is not possible inVoice or Performance mode).
Rule 4: 128 MASTER Control setups can becreated with a MOTIF XS Voice, Performance,Song or Pattern MEMORY location associated(memorized) with it. You have the option ofactivating the ZONE switch with any of them -which adds communication to both internal andexternal sounds to create your own Master setups.You can have up to 8 Zones. The MOTIF XS cantransmit to itself and OUT via MIDI on up to 8Zones. Zones can address internal sounds and/orexternal sounds.
To understand rule 4 please take your time withthis article. We have all ready seen how MASTERsetups can be used to simply recall a Voice, aPerformance, a Song or a Pattern. Now, we needto understand how a MASTER can work as a“multi-zoned” controller setup, controlling bothinternal and external tone modules. Thearchitecture of the MOTIF XS is extremely flexible.
NOTE: Your mileage will vary depending on theexternal MIDI module you may be using. Pleaserefer to the Owner’s Manuals of your external gearfor Bank Select and Program Change numbers.Also find out what information they are capable ofreceiving in this fashion. Some modules requireyou store the Volume and Pan information locallyin their own setup, which you recall. Somemodules can receive Volume and Pan commands

4
directly. Additionally, you can control parameterson each ZONE ‘live’ from within a Master program.
When a Master Zone Switched Setup is recalledyou can have it send a Bank Select and ProgramChange both to the internal tone generator andOUT via MIDI or, if you wish, to one or the other,as is necessary to setup your rig. The key thing toknow is that you can control up to 8 individualZONES. That said you might find some uniqueuses for the Master setups as you get to knowthem better.
Learning About Bank Select and ProgramChange informationAlthough you do not necessarily need to use MSBand LSB Bank Select commands to “associate” aMASTER program with an internal sound, we willlearn about these here so that you can see howthey can be used to add flexibility. This is the typeof information you will need to find about for anyof your external MIDI modules, keyboards, etc.Bank Select messages are actually MIDI ControlChange messages. MSB (Most Significant Byte) isControl Change message 000, and LSB (LeastSignificant Byte) is Control Change message 032.In spite of the name, both are (significant)important. They are used together to allow MIDIdevices to have 128 x 128 banks (That’s 16,384banks for you math majors). Not that you willneed all of these but they are there for you if youneed that many banks. Each will have 128 places,000-127, to store program data.
The Bank Select messages for the Motif XS areshown below.
Bank MSB LSB PC rangePre1 063 000 1-128Pre2 063 001 1-128Pre3 063 002 1-128Pre4 063 003 1-128Pre5 063 004 1-128Pre6 063 005 1-128Pre7 063 006 1-128Pre8 063 007 1-128User1 063 008 1-128User2 063 009 1-128User3 063 010 1-128Preset Drum 063 032 1-64User Drum 063 040 1-32User Sample 063 050 1-128*Mix Voice 063 060 1-16 ~GM 000 000 1-128GM Drum 127 000 1
* (63/50) A User Sample Voice is one that is recordeddirectly to the Integrated Sampling Sequencer using the“sample+note” or “slice+seq” sample record types. This
Voice is only local to the current Song or Pattern inwhich it is created.
~ (63/60) A Mix Voice can be recalled if you are withinthe Song or Pattern Mix for which it was created … Thereare 16 per Song or Pattern but a maximum of 256 MIXVOICES total.
MOTIF XS Performances can be recalled via thesame type of Bank Select messages. You can usea Performance only when a Performance Memorylocation is associated with the Master setup.
Bank MSB LSB PC rangePerformance 063 064 1-128
I will reiterate this important point – you do nothave to use MSB/LSB number to associate aVoice, Performance with a MASTER. If, forexample, you want a MASTER to recall the OrganVoice: You could simply associate the MASTERwith the VOICE without activating the ZONESwitch and without using MSB/LSB numbers.But, so we can learn about all of this: let’s seehow you could use the MSB/LSB screen to addressinternal sounds… and then we will give you auseful trick that can go along with this.
Make sure the ZONE Switch is set to ON:• Press [EDIT]• Press [COMMON EDIT]• Press [F2] OTHER page.• Memorize MODE = VOICE and MEMORY = PRE
1: 085(F05) First 3 w/Perc
• Set ZONE SWITCH = ON• Set the Knob Control Assign = ZONE• Press Track [1]
This will select ZONE 1 for editing…
The MSB/LSB Preset page is [F4] PRESET:

5
The Tone Wheel organ sound: “First 3 w/Perc”located in PRESET 1, position 085(F05), translatesto MSB = 063; LSB = 000 (to select Preset 1) andProgram Change 085.
To recall an entire Performance you would have toassociate the MASTER with PERFORMANCE modeand then send MSB = 063/ LSB = 064 followed bythe Program Change number to recall the desiredPerformance.
You cannot use Bank Select commands to addressa single Voice within a Performance. Nor can youswitch from Performance Mode to Voice Mode orvice versa with these types of commands. If youselect the MASTER to associate with a VOICE youcan select a VOICE. If you associate the MASTERwith a PERFORMNACE you can select aPERFORMANCE.
A Performance must be recalled as a unit. Thereason should be obvious but let’s state it againanyway: A Performance addresses all of itscomponent PARTS (Voices) on the same (Basic)MIDI channel and only one Performance can berecalled at a time. There would be no way torecall with a Program Change different Voiceswithin the PERFORMANCE – it is a unit.
Notice that when you activate the MASTER modethe Voice, Performance, Song, or Pattern modeLED is also illuminated signifying that you areactually in that mode… Its rules will apply! Don’tfight this – this is a rule.
When Zone is ON and the associated Memorymode is “VOICE”, you will be able to address oneinternal Voice via the Zones. The other Zones areavailable for external communication, only.Technically speaking, you are in Voice mode.Voice mode rules apply: i.e., In Voice mode onlyone internal Voice can be recalled at a time.
When a Master Zone is associated with a“Performance” mode Memory, you will be able toaddress up to 4 internal Voices via a single Zone(i.e., one internal Performance). The other Zonesat that point will be available for externalcommunication, only. Depending on how youhave configured your Performance, you can havecomplex split/layers. Technically speaking, youare in Performance mode. Performance moderules apply. In Performance mode only onePerformance can be recalled at a time.
When a Zone is associated with a “Song” modeMix or a “Pattern” mode Mix, however, you will beable to address up to 8 separate MIDI channels,simultaneously and you can transmit to anycombination of internal and/or external ZONES.This is because these are MULTI-TIMBRAL/MULTI-MIDI Channel modes. This can be very flexibledepending on how you have configured your MIX.Now you can address individually eight separatePARTS of a MIX. That said, if you have copied aPerformance into the MIX of your Song or Pattern,it can have multiple PARTS assigned to the sameMIDI channel. Then you can still address theMOTIF XS internally with the other availableZones. Go crazy. But know the rules!
Combining internal and external:--Tips and Tricks--
The Basic Receive Channel and the KeyboardTransmit Channel are global for when the MOTIFXS is in Voice or Performance mode. When youare in a multi-timbral SONG/PATTERN MIX yourtransmit channel will be determined by the trackyou select. However, when in MASTER Mode yourtransmit channel will depend on what Zones areactive in the current Master program.
• Press [UTILITY]• Press [F5] CONTROL• Press [SF2] MIDI

6
In the “CHANNEL” area of the screen above yousee the MIDI channel parameters; These apply toVOICE and PERFORMANCE mode only.1
• Set the Keyboard Transmit Channel = OFF• Set the Basic Receive Channel = 1• Press [STORE]
This will write the changes in the UTLITY modesettings to FLASH ROM. Setting the keyboardtransmit channel OFF is typical when you aregoing to use the MOTIF XS as a MASTER ModeMIDI CONTROLLER in a large setup. Now all ofyour settings will be determined by your MASTERconfigurations. Setting the MIDI channel transmitto OFF will mean that you will play only theinternal MOTIF XS sounds when you are in[VOICE] mode or [PERFORMANCE] mode,however, when you activate the MASTER MODEyou can be transmitting on the MIDI channels asdefined by the current Master settings.
This is a useful when you want to break thefulltime MIDI connection between the MOTIF XSand your rig. When you recall a MASTER that isassociated with either Voice or Performance mode(without the ZONE SWITCH active) you willcommunicate with the internal Voice andPerformance as normal. If you activate the ZoneSwitch for a MASTER with a Voice or PerformanceMemory associated, as we’ll see, it then willreceive according to the Basic Receive Channelselected in [UTILITY] mode. You will address anyexternal modules only when you activate theMASTER Zone control function – giving youcomplete control over MIDI transmit via yourMASTER setups.2 When a MASTER ZONE setup isassociated with a Song or Pattern MIX you canaddress the MIX on eight independent channelsvia the eight ZONES.
Let’s create a MASTER program. First let’sassociate it with an internal MODE and MEMORYlocation:• Recall [MASTER] and Initialize MASTER 001.
Press [JOB]/ [F1] INIT and check the ALL box.Press [ENTER]/ [YES] to execute.
• From the main MASTER 001 screen press[EDIT] > [COMMON EDIT] > [F2] OTHER. Toassociate this memory location select “VOICE”as the MODE, and “PRE1: 001(A01): FullConcert Grand” as the MEMORY.
1 Device Number is a parameter that lets youdifferentiate between multiple units. For example, if youowned two Motif XS synthesizers you could set them tounique Device numbers and address them individually.2 The Motif XS can only receive on one MIDI channelwhile in Voice mode and Performance mode.
• Press [F6] GET NAME (if you wish to capturethe name of the associated program). Handy.
• Press [STORE] / [ENTER] / [YES] to store thisMaster setup to location 001 (A01).
This is how a Master is associated with a particularProgram location. You have 4 different Modechoices, as we have been speaking about: Voice,Performance, Pattern or Song. Each MASTER willalways be associated with one of these 4 Modes.Just thought I’d mention it again as now you cansee where this takes place (screen above). Nowlet’s use the knowledge of MASTER mode to getcreative – a real world application:
Scenario 1: On the opening number of theevening you need to start with a single Voice, asolo MOTIF XS acoustic piano, (Full ConcertGrand). Later you will need the MOTIF XS pianoVoice layered with an external MIDI module set toa string-pad sound.
There are a several ways to accomplish this. Wewill use the Master 001 that we just stored toconnect to the complex setup. This example willgive some idea of the flexibility of the MASTERmode when used as a Zone Controller.
• We are already associated with the VOICEmode Memory location “PRE1: 001 FullConcert Grand”. We will activate the ZONEparameters to recall both the internal pianosound and the external string sound.
• Activate Zone Switch = ON.• Set the Knob Control Assign = ZONE• Now we will assign the Zones to select the
sounds. This will entail going to MASTER-EDIT.
• Press [EDIT]• Press Track [1]-[8] for Zone parameters.
7
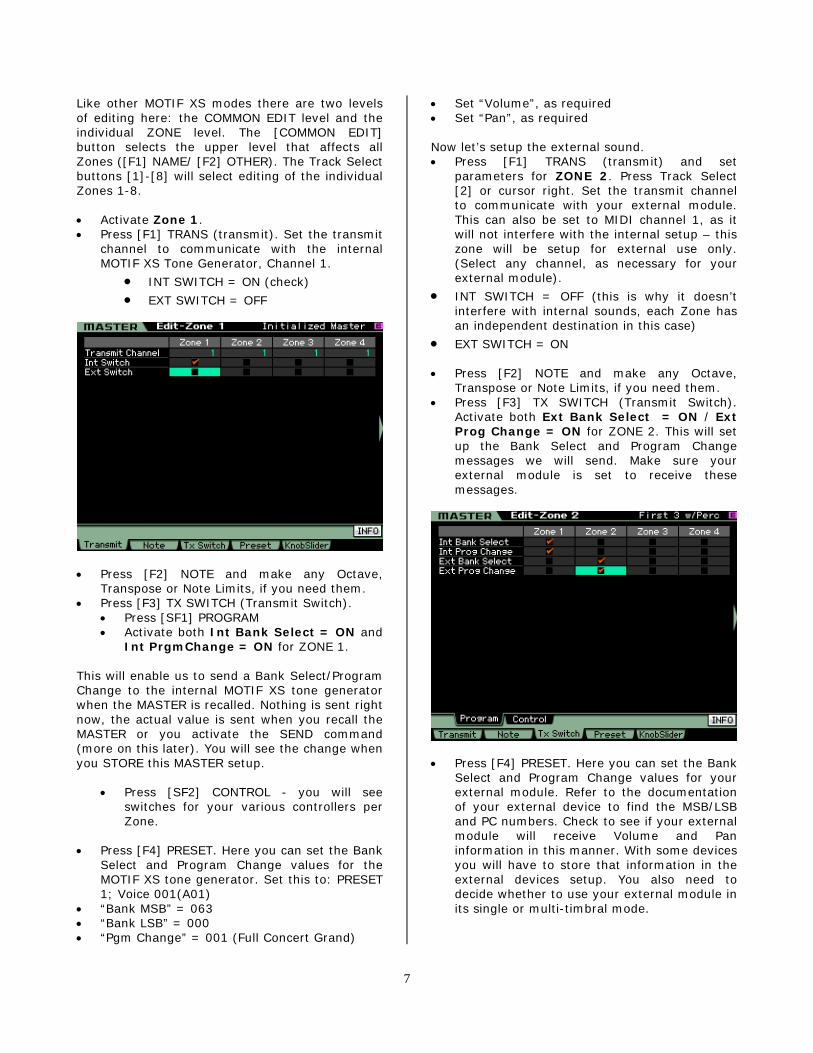
Like other MOTIF XS modes there are two levelsof editing here: the COMMON EDIT level and theindividual ZONE level. The [COMMON EDIT]button selects the upper level that affects allZones ([F1] NAME/ [F2] OTHER). The Track Selectbuttons [1]-[8] will select editing of the individualZones 1-8.
• Activate Zone 1.• Press [F1] TRANS (transmit). Set the transmit
channel to communicate with the internalMOTIF XS Tone Generator, Channel 1.
• INT SWITCH = ON (check)
• EXT SWITCH = OFF
• Press [F2] NOTE and make any Octave,Transpose or Note Limits, if you need them.
• Press [F3] TX SWITCH (Transmit Switch).• Press [SF1] PROGRAM• Activate both Int Bank Select = ON and
Int PrgmChange = ON for ZONE 1.
This will enable us to send a Bank Select/ProgramChange to the internal MOTIF XS tone generatorwhen the MASTER is recalled. Nothing is sent rightnow, the actual value is sent when you recall theMASTER or you activate the SEND command(more on this later). You will see the change whenyou STORE this MASTER setup.
• Press [SF2] CONTROL - you will seeswitches for your various controllers perZone.
• Press [F4] PRESET. Here you can set the BankSelect and Program Change values for theMOTIF XS tone generator. Set this to: PRESET1; Voice 001(A01)
• “Bank MSB” = 063• “Bank LSB” = 000• “Pgm Change” = 001 (Full Concert Grand)
• Set “Volume”, as required• Set “Pan”, as required
Now let’s setup the external sound.• Press [F1] TRANS (transmit) and set
parameters for ZONE 2. Press Track Select[2] or cursor right. Set the transmit channelto communicate with your external module.This can also be set to MIDI channel 1, as itwill not interfere with the internal setup – thiszone will be setup for external use only.(Select any channel, as necessary for yourexternal module).
• INT SWITCH = OFF (this is why it doesn’tinterfere with internal sounds, each Zone hasan independent destination in this case)
• EXT SWITCH = ON
• Press [F2] NOTE and make any Octave,Transpose or Note Limits, if you need them.
• Press [F3] TX SWITCH (Transmit Switch).Activate both Ext Bank Select = ON / ExtProg Change = ON for ZONE 2. This will setup the Bank Select and Program Changemessages we will send. Make sure yourexternal module is set to receive thesemessages.
• Press [F4] PRESET. Here you can set the BankSelect and Program Change values for yourexternal module. Refer to the documentationof your external device to find the MSB/LSBand PC numbers. Check to see if your externalmodule will receive Volume and Paninformation in this manner. With some devicesyou will have to store that information in theexternal devices setup. You also need todecide whether to use your external module inits single or multi-timbral mode.

8
• You can change the NAME of the MASTER ifyou prefer. [COMMON EDIT] > [F1] NAME
• [STORE] your MASTER setup. [ENTER]/[YES].
When setting up the MASTER location, we“associated” it with VOICE mode. In our examplewe associated the Voice “Full Concert Grand” asthat single Voice. We also used the MASTERZone’s MSB/LSB function to point to the “FullConcert Grand” sound, internally, and the String-pad sound, externally. When this [MASTER]program is recalled, the Full ConcertGrand/External layer sound will play. To play justthe “Full Concert Grand” simply press the [VOICE]mode button – this will exit MASTER mode andrecall the Full Concert Grand piano sound inVOICE mode. To play the internal/external layer,press the MASTER button. This will return you toyour Internal/External layered program.
This works because when you recall the MASTERprogram it will send out the Bank Select andProgram Change information to the internalMOTIF XS controlled Zone. Also it will send it tothe external Zone, and when you select [VOICE]mode you are not transmitting out via MIDI (MIDITransmit OUT parameter, which effects Voicemode, is set to OFF, remember?) so that the FullConcert Grand Voice is played withouttransmitting out via MIDI. Cool!
This tip will work anytime your principal sound, inthis case a MOTIF XS Voice, and your Zonecontrolled sound is also a MOTIF XS Voice. It willwork if your associated sound is a Performanceand your Zone controlled sound is also a MOTIFXS Performance. In other words, you cannot usethis trick to switch from an associated Voice to aZone-selected Performance (or vice versa) withthis power tip. This should not present a problemsince a Performance can be made that contain anysingle Voice you need, if necessary. In fact, thesounds that are active when a MOTIF XSPerformance is recalled are programmable. Forexample, the Volume slider position is storable ina Performance; therefore a Performance thatnormally contains a Piano layered with stringscould be recalled with the Volume of the stringsstored at zero. You can fade them in or out, asyou need, with a CS (control slider).
Summary: A Master setup can be activated(associated) with a single MOTIF XS Voice, or asingle MOTIF XS Performance. Basically, aMASTER memorizes the MOTIF XS MODE and theselection (Voice or Performance). If the ZoneSwitch is active, a MASTER can additionallyinclude all the setup parameters forcommunication, internally to the memorized
mode, and externally to your connected MIDImodules. Yes, you could attempt to create asetting where you were simultaneously attemptingto communicate with the MOTIF XS TG via 4different channels while in association with a Voiceor Performance. Nothing in the parameter pageprevents you from setting this up…however youwould be deluding yourself. It ain’t gonna happen!Although you can make these settings, they willbe illogical and ignored. By definition, Rules 1 and2, the MOTIF XS Voices and Performances occupya single MIDI channel and only one can be activeat a time. If you wish to address four MOTIF XSVoices simultaneously, then you need to create aMOTIF XS Performance. (Again, by definition, thisis what a Performance is). If you want to addressthe MOTIF XS on four separate MIDI channels viafour discreet Zones you would have to associatethe MASTER with a SONG or a PATTERN MIX andsetup a 4-ZONE program. Then you can addressmultiple PARTS of the MIX, independently. In fact,you can address the internal Motif XS on as manyas 8 Zones.
ZONE TemplatesThe MOTIF XS gives you several templates forsetting up ZONE configurations. To use thesetemplates from MASTER mode, you would press[JOB]/ [F1] INIT. Uncheck the box that says ALLand highlight the box that says, for example,ZONE. Press [YES] to check it. You can select aSPLIT (2 Zones will be activated with a defaultsplit point at C3), ZONE (the first four will beactivated/while Zones 5-8 will be Off) and LAYER(2 Zones will be activated across the MIDI keyrange). Select a template, set MIDI channels (forSplit or Layer) and press [ENTER]/ [YES] toexecute.
Initializing with the 4-Zone routine will create aNote Limit arrangement dividing the keyboard into4 discreet Zones. You can, however, divide it inany manner that you need including overlappingZones.
If the “Note Limit Low” is set higher than the“Note Limit High” a region in the middle will activeand notes above and below this region will wesilent. This can be useful in some instances tocreate special regions of play and no-play.
KNOBS and SLIDERSIn a MASTER you can set up how the Knobs andSliders behave per Master setup. You can selectwhich row of Knob Control functions will be lit andactive for your Master Program.
If your Master program is associated with aninternal VOICE you can select between TONE 1,

9
TONE 2, ARP FX and ZONE. What this refers to ishow the KNOBS in the [SELECTED PARTCONTROL] are set when the MASTER setup isrecalled.
If your Master program is associated with aPERFORMANCE, SONG/PATTERN MIX, you canselect between TONE 1, TONE 2, ARP FX, REVERBSEND, CHORUS SEND, PAN, and ZONE. This willgive you, additionally, real time access send levelsin the [MULTI PART CONTROL] knobs.
If you select TONE 1, for example, the LED at thetop of the Knob Control Function will illuminateand you will have access to:
• Knob1 = Cutoff• Knob2 = Resonance• Knob3 = Attack• Knob4 = Decay• Knob5 = Sustain• Knob6 = Release• Knob7 = Assign 1• Knob8 = Assign 2
If you select TONE 2 then the eight knobs will be:
• EQ LOW (gain)• EQ MID Frequency• EQ MID (gain)• EQ MID Q (bandwidth)• EQ HI (gain)• PAN• REVERB SEND• CHORUS SEND
If you select ARP FX the knobs will access realtime control over the assigned arpeggio playfunction, if any… recalling what the Knobs wereprogrammed to do in the original Voice orPerformance with which it is associated).
If ARP FX is selected you will have control over:
• Swing• Swing Quantize• Quantize Strength• Gate time• Velocity• Octave Range• Unit Multiply• Tempo
If your MASTER program is a “Zoned” setup youmay want to select Knob Control Assign = ZONE.This will make the settings you make per eachZone, active. Use Track buttons [1]-[4], or [5]-[8]to view individual Zone parameters.
The default assignment when you select ZONE isfor PAN (10) for the KNOBS and Volume (7) forthe CONTROL SLIDERS.
You can set the KNOBS per Zone to any MIDIcontrol change message from 1-95 (except 32),per MASTER setup. Likewise, the Sliders can beprogrammed per MASTER setup, per Zone to anycontrol change number from 1-95 when “ZONE” isselected as the Control Function option.
There is a difference between the ElementVOLUME assignment of the Control Sliders, aswhen you are in [VOICE] mode, and when theZONE assignment is set to control VOLUME. InVOICE mode the SLIDERS assignment will becontrolling the internal Voice’s Element Volumes1-8. If you are in a MASTER program and set theZONE SWITCH = ON, then the Sliders will becontrolling the Volume of the entire Voiceassigned to that ZONE (not individual Elements asin Voice mode).
10
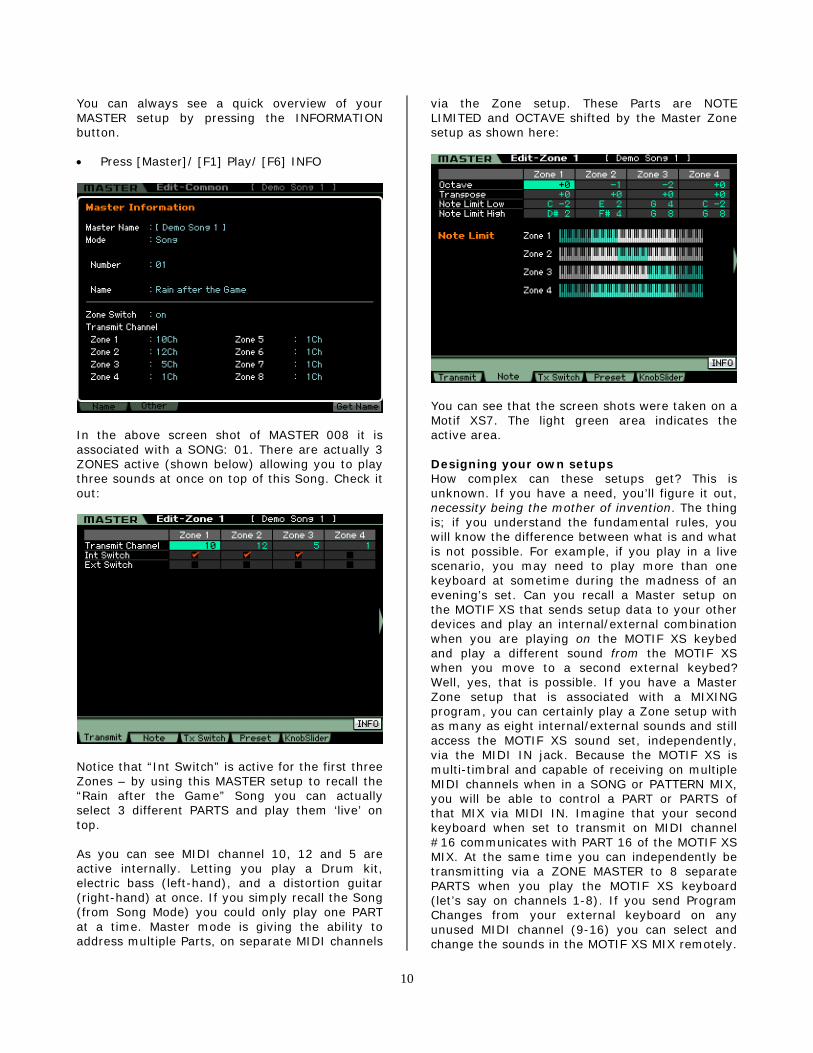
You can always see a quick overview of yourMASTER setup by pressing the INFORMATIONbutton.
• Press [Master]/ [F1] Play/ [F6] INFO
In the above screen shot of MASTER 008 it isassociated with a SONG: 01. There are actually 3ZONES active (shown below) allowing you to playthree sounds at once on top of this Song. Check itout:
Notice that “Int Switch” is active for the first threeZones – by using this MASTER setup to recall the“Rain after the Game” Song you can actuallyselect 3 different PARTS and play them ‘live’ ontop.
As you can see MIDI channel 10, 12 and 5 areactive internally. Letting you play a Drum kit,electric bass (left-hand), and a distortion guitar(right-hand) at once. If you simply recall the Song(from Song Mode) you could only play one PARTat a time. Master mode is giving the ability toaddress multiple Parts, on separate MIDI channels
via the Zone setup. These Parts are NOTELIMITED and OCTAVE shifted by the Master Zonesetup as shown here:
You can see that the screen shots were taken on aMotif XS7. The light green area indicates theactive area.
Designing your own setupsHow complex can these setups get? This isunknown. If you have a need, you’ll figure it out,necessity being the mother of invention. The thingis; if you understand the fundamental rules, youwill know the difference between what is and whatis not possible. For example, if you play in a livescenario, you may need to play more than onekeyboard at sometime during the madness of anevening’s set. Can you recall a Master setup onthe MOTIF XS that sends setup data to your otherdevices and play an internal/external combinationwhen you are playing on the MOTIF XS keybedand play a different sound from the MOTIF XSwhen you move to a second external keybed?Well, yes, that is possible. If you have a MasterZone setup that is associated with a MIXINGprogram, you can certainly play a Zone setup withas many as eight internal/external sounds and stillaccess the MOTIF XS sound set, independently,via the MIDI IN jack. Because the MOTIF XS ismulti-timbral and capable of receiving on multipleMIDI channels when in a SONG or PATTERN MIX,you will be able to control a PART or PARTS ofthat MIX via MIDI IN. Imagine that your secondkeyboard when set to transmit on MIDI channel#16 communicates with PART 16 of the MOTIF XSMIX. At the same time you can independently betransmitting via a ZONE MASTER to 8 separatePARTS when you play the MOTIF XS keyboard(let’s say on channels 1-8). If you send ProgramChanges from your external keyboard on anyunused MIDI channel (9-16) you can select andchange the sounds in the MOTIF XS MIX remotely.

11
If that external keyboard can send Bank Selectand Program Changes you can select VOICESfrom the entire MOTIF XS palette.
No one article can outline all the possibilities. Butif you understand MIDI and you understand howthe MOTIF XS behaves in response to your MIDIsettings you will be able to design some prettycomplex but thoroughly useful setups. This articlecan only hope to get you started.
You cannot, however, slave MASTER mode. Youcan when using an external controller to controlthe Motif XS Voice mode, Performance mode,Song Mixing mode or Pattern Mixing mode. Inother words, your external controller can addressthe Motif XS in these modes… but there are nocommands that you can send in via MIDI tomanipulate Master mode… it is after all, MASTERmode.
Tricky StuffWhen you are using the Motif XS as your Masterkeyboard controller – meaning that the ZONESwitch is ON – we stated that the rules of theassociated mode will apply. For example, say youhave a Master program associated with an internalVOICE, but you only want the external Zone toplay. Many of the physical controllers are designedto be routed to the internal tone engine (such asthe [AF1], [AF2] buttons, and the AS1 and AS2knobs) – these can be used as controllers forexternal devices as well because they can bemade to send specific Control Change messages.For example, [AF1] and [AF2] by default sendcc086 and cc087, but can be programmed inVOICE/Utility mode to send different ControlChange messages and in a PERFORMANCE orMIXING setup can be customized on a perPERFORMANCE, per MIXING basis. So you can getvery flexible with these. The AS1 and AS2 knobssend cc016 and cc017 by default when you are inVOICE mode, and likewise can be customized. Ifyou want to use these physical controls on anexternal device but not have an internal programrespond – you must make the internal ZONEactive and make the physical controller active.However, you can prevent the internal programfrom sounding by note limiting its range off thekeyboard (for example, set the low note limit toC-2 and set the high note limit also to C-2).
Storage issuesYour MASTER setups will be saved as part of an“ALL” data FILE type (.X0A). Master setups willremain in memory after power down but will becleared if you perform a Factory Reset or you loadin another ALL data file (.X0A). Backup all data bysaving an “ALL” file type to an optional USB drive
or via Ethernet to your computer. The data thatthey “point” to must be returned to its appropriateplace, i.e., Voice data, Performance data,Song/Pattern. If you change or replace any of thetarget data, then the MASTER setups will bealtered. The MASTER actually stores ‘pointers’, notthe actual data. So a MASTER setup may be therebut the song, pattern or sound it is referencingmay not. For example, if your MASTER setuptargets a USER bank Voice, if you do not havethat USER Voice in the proper location, the datafor the MASTER will be incorrect. It will simply‘target’ the Voice in that location. If the MASTER isassociated with a SONG MEMORY location and thesong data is not loaded into that location, theMASTER will point to the location but the data willnot be there. For this reason Master’s cannotlogically be loaded individually – they depend onall the components being in the proper places,because all a Master is, is a collection of pointers.To restore your MASTER setups you would need torestore ALL data. It is simply a matter of logic.
Phil ClendeninnSenior Product Specialist
Product Support GroupPro Audio & Combo Division
©Yamaha Corporation of America