Embed Size (px)
Citation preview

Precision BalancesXSR models
Ope
ratin
g In
stru
ctio
ns
30357086B 9/20/2017 1:42 PM - Schema ST4 PDF engine - Layout by Victor Mahler
Prec
isio
n Ba
lanc
es


Table of Contents
1 Introduction 51.1 Conventions and symbols used in these operating instructions ......................................... 6
2 Safety Information 72.1 Definition of signal warnings and symbols...................................................................... 72.2 Product safety information ............................................................................................ 7
3 Design and Function 93.1 Overview S weighing platform ....................................................................................... 9
3.1.1 Balances 1 mg ............................................................................................. 93.1.2 Balances 10 mg and 0.1 g............................................................................ 103.1.3 Interface board.............................................................................................. 10
3.2 Overview L weighing platform........................................................................................ 113.2.1 Balances with readability of 0.1 g / 1 g ........................................................... 113.2.2 Interface board.............................................................................................. 11
3.3 Terminal ..................................................................................................................... 123.4 User interface .............................................................................................................. 13
3.4.1 Method work screen ...................................................................................... 133.4.2 Input dialogs ................................................................................................ 143.4.2.1 Entering characters and numbers .............................................................. 143.4.2.2 Changing the date and time...................................................................... 15
4 Basic Navigation 164.1 Main sections at a glance ............................................................................................. 164.2 Opening a section/function............................................................................................ 174.3 Scrolling ..................................................................................................................... 17
5 Installation and Putting into Operation 185.1 Unpacking the balance ................................................................................................. 185.2 Scope of delivery ......................................................................................................... 18
5.2.1 S weighing platform ...................................................................................... 185.2.2 L weighing platform....................................................................................... 19
5.3 Selecting the location ................................................................................................... 195.4 Assembling the balance................................................................................................ 19
5.4.1 Models with S weighing platform .................................................................... 195.4.1.1 Attaching the terminal to the weighing platform........................................... 195.4.1.2 Installing the MagicCube Draft Shield......................................................... 205.4.2 Models with L weighing platform..................................................................... 235.4.2.1 Attaching the terminal to the weighing platform........................................... 235.4.2.2 Balances 0.1 g and 1 g........................................................................... 24
5.5 Connecting the balance to the mains.............................................................................. 245.6 Setting up the balance .................................................................................................. 25
5.6.1 Switching on the balance ............................................................................... 255.6.2 Leveling the balance...................................................................................... 255.6.3 Performing a simple weighing ........................................................................ 265.6.3.1 Zeroing .................................................................................................. 265.6.3.2 Taring.................................................................................................... 265.6.3.3 Performing General Weighing ................................................................... 265.6.4 Setting the balance to standby mode ............................................................... 265.6.5 Switching off the balance ............................................................................... 26
5.7 Below-the-balance weighing ......................................................................................... 265.7.1 S weighing platform ...................................................................................... 275.7.2 L weighing platform....................................................................................... 27
5.8 Transporting the balance .............................................................................................. 275.8.1 Carrying the balance over short distances ........................................................ 27
Table of Contents 1Precision Balances

5.8.2 Transporting the balance over long distances ................................................... 28
6 Methods 296.1 Methods list ................................................................................................................ 29
6.1.1 Creating new method..................................................................................... 296.1.2 Editing method ............................................................................................. 296.1.3 Cloning method ............................................................................................ 296.1.4 Deleting method............................................................................................ 306.1.5 General Weighing ......................................................................................... 316.1.5.1 Creating new method type General Weighing.............................................. 316.1.5.2 Performing General Weighing ................................................................... 316.1.5.3 Method settings....................................................................................... 326.1.6 Simple Formulation ....................................................................................... 406.1.6.1 Creating new method type Simple Formulation............................................ 406.1.6.2 Performing Simple Formulation ................................................................. 406.1.6.3 Method settings....................................................................................... 416.1.7 Piece Counting ............................................................................................. 496.1.7.1 Creating new method type Piece Counting.................................................. 496.1.7.2 Performing Piece Counting ....................................................................... 496.1.7.3 Method settings....................................................................................... 496.1.8 Using templates ............................................................................................ 566.1.8.1 Defining templates................................................................................... 566.1.8.2 Working with templates............................................................................ 57
6.2 Tests .......................................................................................................................... 576.2.1 Sensitivity test............................................................................................... 576.2.2 Repeatability test........................................................................................... 576.2.3 Eccentricity test ............................................................................................. 586.2.4 Creating a test .............................................................................................. 586.2.5 Performing a test........................................................................................... 586.2.6 Test settings ................................................................................................. 586.2.6.1 Sensitivity test settings ............................................................................. 586.2.6.2 Repeatability test settings ......................................................................... 626.2.6.3 Eccentricity test settings ........................................................................... 65
6.3 Adjustments ................................................................................................................ 676.3.1 Internal adjustment........................................................................................ 676.3.1.1 Editing internal adjustment ....................................................................... 676.3.1.2 Performing internal adjustment ................................................................. 686.3.1.3 Parameters............................................................................................. 686.3.2 External adjustment....................................................................................... 696.3.2.1 Editing external adjustment....................................................................... 696.3.2.2 Defining external test weights.................................................................... 696.3.2.3 Parameters............................................................................................. 706.3.2.4 Performing external adjustment................................................................. 70
7 Balance Menu 717.1 Leveling aid ................................................................................................................ 717.2 History ....................................................................................................................... 71
7.2.1 Adjustments ................................................................................................. 717.2.2 Tests ........................................................................................................... 717.2.3 Service......................................................................................................... 72
7.3 Balance info................................................................................................................ 727.4 Settings ...................................................................................................................... 72
7.4.1 Balance ....................................................................................................... 727.4.1.1 Weighing instrument................................................................................ 727.4.1.2 Weighing / Quality................................................................................... 727.4.1.3 Date / Time / Language / Format............................................................... 757.4.1.4 Screen / StatusLight / Sound..................................................................... 767.4.1.5 General .................................................................................................. 76
Table of Contents2 Precision Balances
7.4.2 Interfaces ..................................................................................................... 777.4.2.1 Ethernet ................................................................................................. 777.4.3 Devices / Printers .......................................................................................... 787.4.4 LabX / Services ............................................................................................. 78
7.5 Maintenance ............................................................................................................... 787.5.1 Import / Export.............................................................................................. 797.5.1.1 Exporting data and settings ...................................................................... 797.5.1.2 Importing data and settings ...................................................................... 797.5.2 Firmware update ........................................................................................... 797.5.2.1 Updating the firmware.............................................................................. 807.5.2.2 Restoring the firmware to the previous version ............................................ 807.5.3 Reset ........................................................................................................... 807.5.3.1 Resetting the balance............................................................................... 807.5.4 Service......................................................................................................... 807.5.4.1 View adjustment state .............................................................................. 807.5.4.2 Save support file ..................................................................................... 807.5.4.3 Import log configuration ........................................................................... 80
8 Maintenance 818.1 Cleaning..................................................................................................................... 818.2 Disposal ..................................................................................................................... 81
9 Troubleshooting 829.1 System messages icons ............................................................................................... 829.2 Weight status icons...................................................................................................... 829.3 What to do if...?........................................................................................................... 83
10 Technical Data 8410.1 General technical data.................................................................................................. 85
10.1.1 S Platform .................................................................................................... 8510.1.2 L Platform .................................................................................................... 86
10.2 Model-specific data...................................................................................................... 8710.2.1 S platform .................................................................................................... 8710.2.1.1 Readability 1 mg, with MagicCube Draft Shield and SmartPan...................... 8710.2.1.2 Readability 1 mg, with SmartPan.............................................................. 8810.2.1.3 Readability 10 mg, with SmartPan............................................................ 8910.2.1.4 Readability 0.1 g .................................................................................... 9110.2.2 L platform .................................................................................................... 9310.2.2.1 Readability 0.1 g .................................................................................... 9310.2.2.2 Readability 1 g ....................................................................................... 95
10.3 Dimensions................................................................................................................. 9610.3.1 S platform, readability 1 mg, with MagicCube Draft Shield and SmartPan ............ 9610.3.2 S platform, readability 1 mg, with SmartPan .................................................... 9710.3.3 S platform, readability 10 mg, with SmartPan .................................................. 9810.3.4 S platform, readability 0.1 g........................................................................... 9910.3.5 L platform, readability 0.1 g / 1 g ................................................................... 100
11 Accessories and Spare Parts 10111.1 Accessories................................................................................................................. 10111.2 Spare parts ................................................................................................................. 106
11.2.1 Balances with S weighing platform.................................................................. 10611.2.2 S platform miscellaneous............................................................................... 10711.2.3 Balances with L weighing platform.................................................................. 10711.2.4 L platform miscellaneous ............................................................................... 10811.2.5 MagicCube Draft shield.................................................................................. 10911.2.6 Packaging.................................................................................................... 109
Index 111
Table of Contents 3Precision Balances

Table of Contents4 Precision Balances

Introduction 5Precision Balances
1 IntroductionThank you for choosing a METTLER TOLEDO balance.The balances of the XSR line combine a large number of weighing and adjustment possibilities with excep-tionally convenient operation.The XSR line comprises a range of balances which differ from each other in relation to their weighing rangeand resolution.The following features are common to all models of the XSR line:• Fully automatic adjustment using internal weights.• Built-in level sensor and leveling aid for fast and easy leveling.• 4.3 inch capacitive color TFT touchscreen.• Different methods that can be defined individually.• Different routine tests that can be defined individually.
Software versionThese operating instructions refer to the originally installed firmware (software) version V 2.01.
Finding more information
u www.mt.com/balances
For further questions, please contact your authorized METTLER TOLEDO dealer or service representative.
u www.mt.com/contact
Introduction6 Precision Balances
1.1 Conventions and symbols used in these operating instructionsRefers to an external document.
Key and/or button designations and display texts are shown in graphic or bold text (e.g. , Balancemenu).
Note (no symbol) for useful information about the product.
These symbols indicate an instruction:
§ prerequisites
1 steps2 ...ð results
Safety Information 7Precision Balances
2 Safety Information• Read and understand the information in these Operating Instructions before you use the instrument.• Keep these Operating Instructions for future reference.• Include these Operating Instructions if you pass on the instrument to other parties.If the instrument is not used according to the information in these Operating Instructions or if it is modified,the safety of the instrument may be impaired and Mettler-Toledo GmbH assumes no liability.
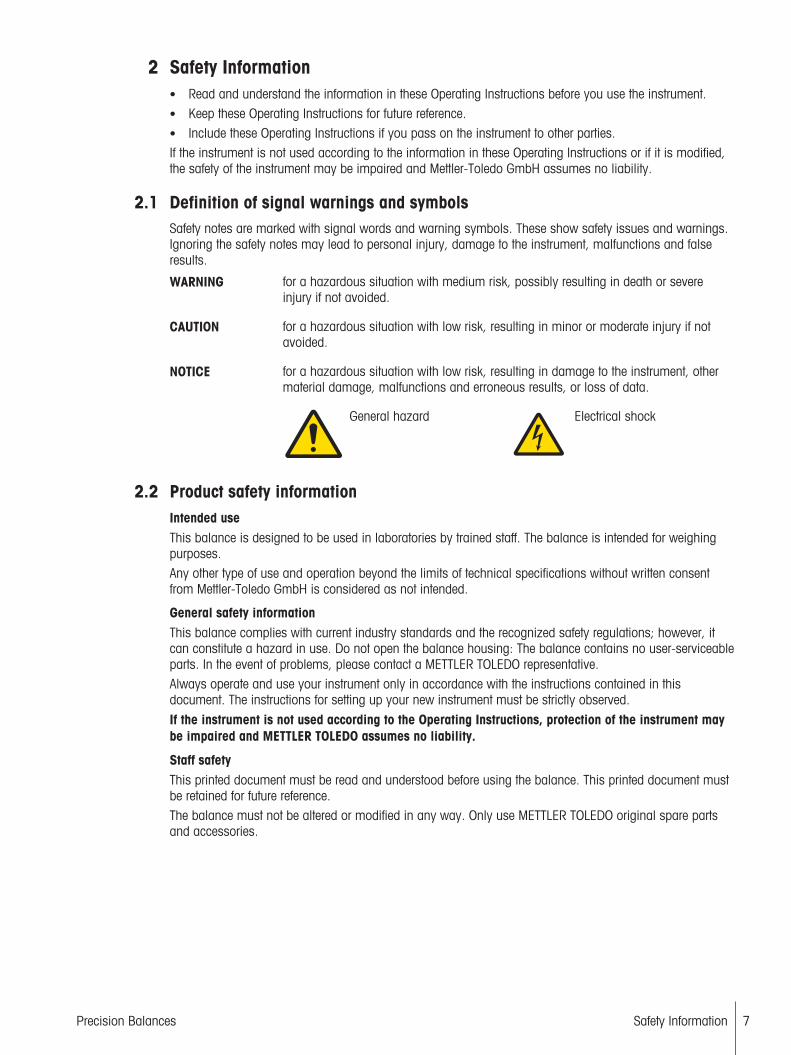
2.1 Definition of signal warnings and symbolsSafety notes are marked with signal words and warning symbols. These show safety issues and warnings.Ignoring the safety notes may lead to personal injury, damage to the instrument, malfunctions and falseresults.
WARNING for a hazardous situation with medium risk, possibly resulting in death or severeinjury if not avoided.
CAUTION for a hazardous situation with low risk, resulting in minor or moderate injury if notavoided.
NOTICE for a hazardous situation with low risk, resulting in damage to the instrument, othermaterial damage, malfunctions and erroneous results, or loss of data.
General hazard Electrical shock
2.2 Product safety informationIntended useThis balance is designed to be used in laboratories by trained staff. The balance is intended for weighingpurposes.Any other type of use and operation beyond the limits of technical specifications without written consentfrom Mettler-Toledo GmbH is considered as not intended.
General safety informationThis balance complies with current industry standards and the recognized safety regulations; however, itcan constitute a hazard in use. Do not open the balance housing: The balance contains no user-serviceableparts. In the event of problems, please contact a METTLER TOLEDO representative.Always operate and use your instrument only in accordance with the instructions contained in thisdocument. The instructions for setting up your new instrument must be strictly observed.
If the instrument is not used according to the Operating Instructions, protection of the instrument maybe impaired and METTLER TOLEDO assumes no liability.
Staff safetyThis printed document must be read and understood before using the balance. This printed document mustbe retained for future reference.The balance must not be altered or modified in any way. Only use METTLER TOLEDO original spare partsand accessories.

Safety Information8 Precision Balances
Safety notes
WARNINGDanger of death or serious injury due to electric shock!Contact with parts that contain a live current can lead to injury and death. If the balancecannot be shut down in an emergency situation, people can be injured or the balance canbe damaged.1 Only use the original universal AC/DC adapter delivered with your balance.2 Check that the voltage printed on the balance is the same as your local power supply
voltage.ð If this is not the case, under no circumstances connect the AC/DC adapter to the
power supply, but contact a METTLER TOLEDO representative.3 Only plug the adapter into a socket which is grounded.
NOTICEDamage to the balance due to wrong usage.1 Only use indoors in dry locations.2 Do not use pointed objects to operate the touchscreen.3 Only use original METTLER TOLEDO accessories and peripheral devices.4 Do not open the balance housing. It contains no user-serviceable parts. Contact a
METTLER TOLEDO representative in case of any issue.

Design and Function 9Precision Balances
3 Design and Function
3.1 Overview S weighing platform
3.1.1 Balances 1 mg
3
4
1
2
2
5
6
8
3
910
8
10 9
7
1 MagicCube Draft Shield 6 MagicCube Draft Shield side door
2 DripTray 7 MagicCube Draft Shield side door handler
3 SmartPan weighing pan 8 Weighing platform with protective cover
4 Weighing pan 9 Leveling foot
5 MagicCube Draft Shield top door 10 Terminal with protective cover

Design and Function10 Precision Balances
3.1.2 Balances 10 mg and 0.1 g
7
910
10 mg 0.1 g
11
6
11
22
33
44
55
55
7 6
910 8
1 Weighing pan support cap 6 Safety foot
2 DripTray 7 Weighing platform with protective cover
3 SmartPan weighing pan 8 Fastening plate with positioning screws
4 Weighing pan support 9 Leveling foot
5 Weighing pan with protective cover 10 Terminal with protective cover
3.1.3 Interface board
11 2 3 6 75 4
1 Ethernet port 5 USB host port
2 USB device ports 6 Socket for terminal connection cable
3 Fixations for optional terminal stand 7 Socket for AC/DC adapter
4 Service seal
Design and Function 11Precision Balances
3.2 Overview L weighing platform
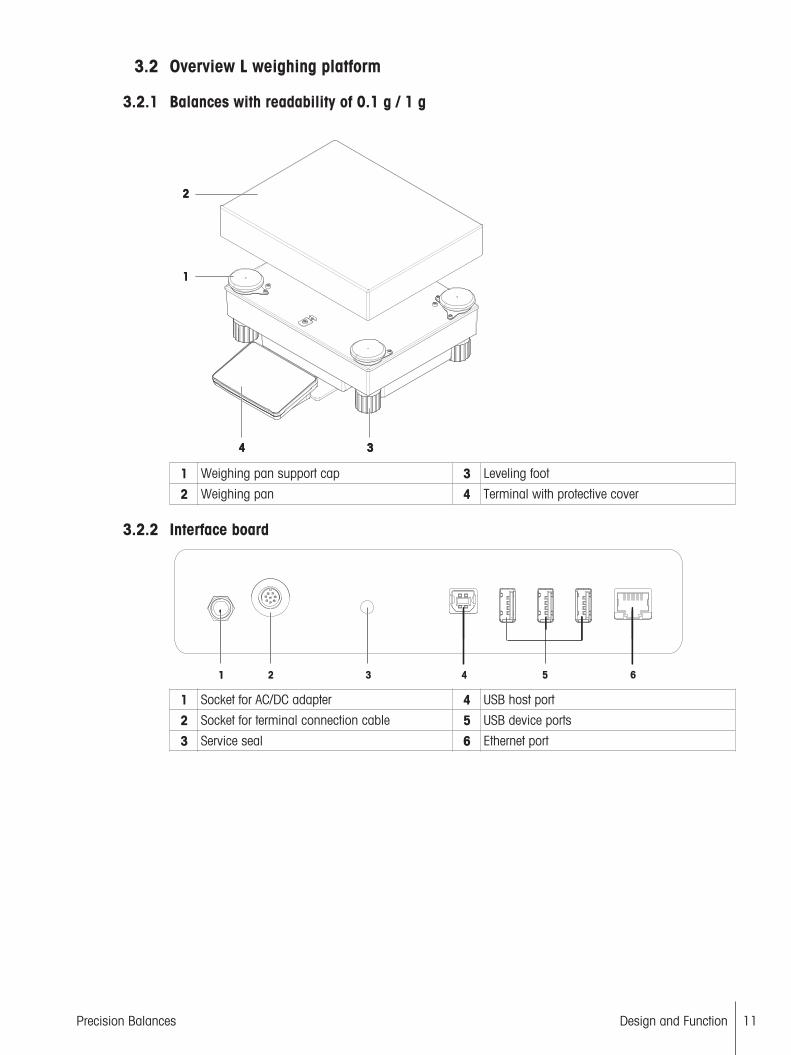
3.2.1 Balances with readability of 0.1 g / 1 g
11
22
3344
1 Weighing pan support cap 3 Leveling foot
2 Weighing pan 4 Terminal with protective cover
3.2.2 Interface board
11 22 4 5 63
1 Socket for AC/DC adapter 4 USB host port
2 Socket for terminal connection cable 5 USB device ports
3 Service seal 6 Ethernet port

Design and Function12 Precision Balances
3.3 Terminal
11
22
33
4455667788
No. Key Name Explanation
1 Methods Opens the section Methods.
2 Protocol Opens the section Protocol.
3 Balance menu Opens the section Balance menu.
4 Home To return from any menu level to the method work screen.
5 Zero Zeroes the balance.The balance must always be zeroed before starting theweighing process. After zeroing, the balance sets a new zeropoint.
6 Tare Tares the balance.This function is used when the weighing process involvescontainers. After taring the balance, the screen shows which indicates that all displayed weights are net.
7 - 4.3 inch capacitiveTFT touchscreen
The touchscreen shows information about the current weighingprocess.
8 ON/OFF Switches the balance on/off.By tapping on the button , the balance is not completelyswitched off but goes into standby mode. To switch thebalance completely off, it must be unplugged from the powersupply.NoteDo not disconnect the balance from the power supply unlessthe balance is not used for an extended period of time.

Design and Function 13Precision Balances
3.4 User interface
3.4.1 Method work screenThe method work screen is the basic screen that appears when working with the balance. Depending on themethod, the method work screen can slightly differ, but the basic elements appear for all methods.
No. Name Explanation
1 Method name Shows the name of the current method.
2 Level indicator Indicates if the balance is leveled.
3 Weighing value field Shows the current weighing value.
4 Button Add toprotocol
Adds the result to the protocol. Depending on the selected method the button can have a different functions.
5 Weighing actionfield
This field contains actions referring to the current task.
6 Method informationarea
Contains information about sample IDs, method IDs or task IDs.
7 Weighing-in aid Defines a target weight with upper und lower tolerances.
8 Weighing value area In this area the value of the current weighing process is shown.
Design and Function14 Precision Balances
3.4.2 Input dialogs
3.4.2.1 Entering characters and numbers
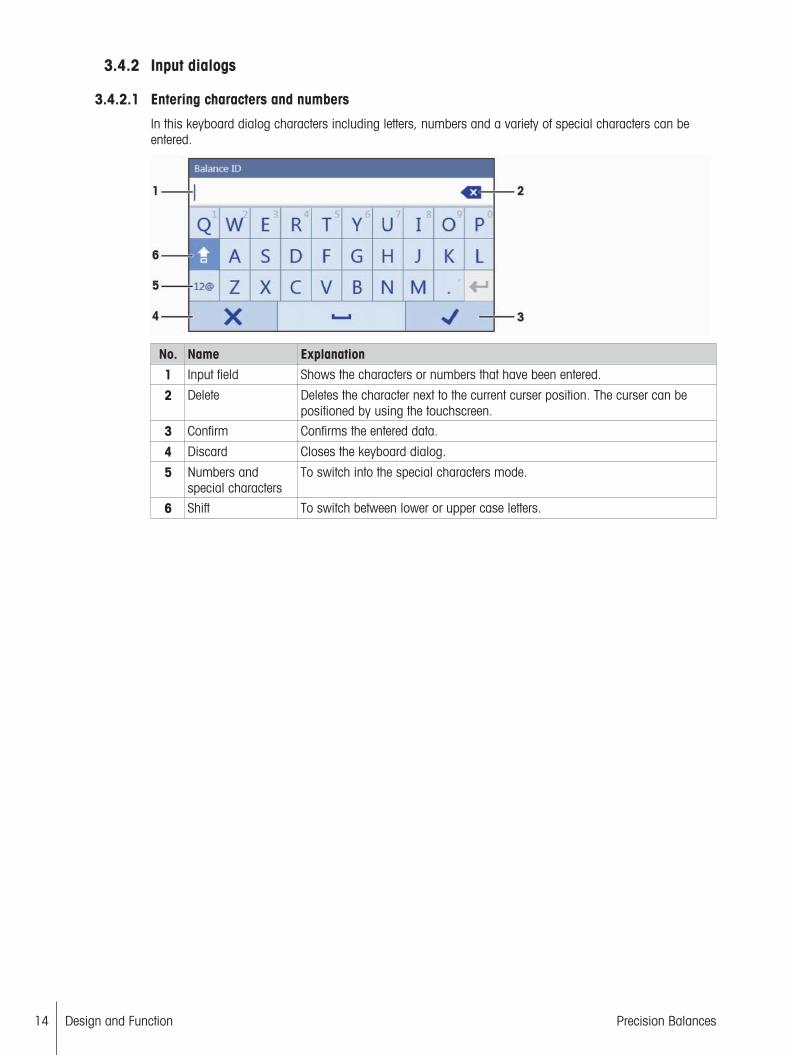
In this keyboard dialog characters including letters, numbers and a variety of special characters can beentered.
No. Name Explanation
1 Input field Shows the characters or numbers that have been entered.
2 Delete Deletes the character next to the current curser position. The curser can bepositioned by using the touchscreen.
3 Confirm Confirms the entered data.
4 Discard Closes the keyboard dialog.
5 Numbers andspecial characters
To switch into the special characters mode.
6 Shift To switch between lower or upper case letters.
Design and Function 15Precision Balances
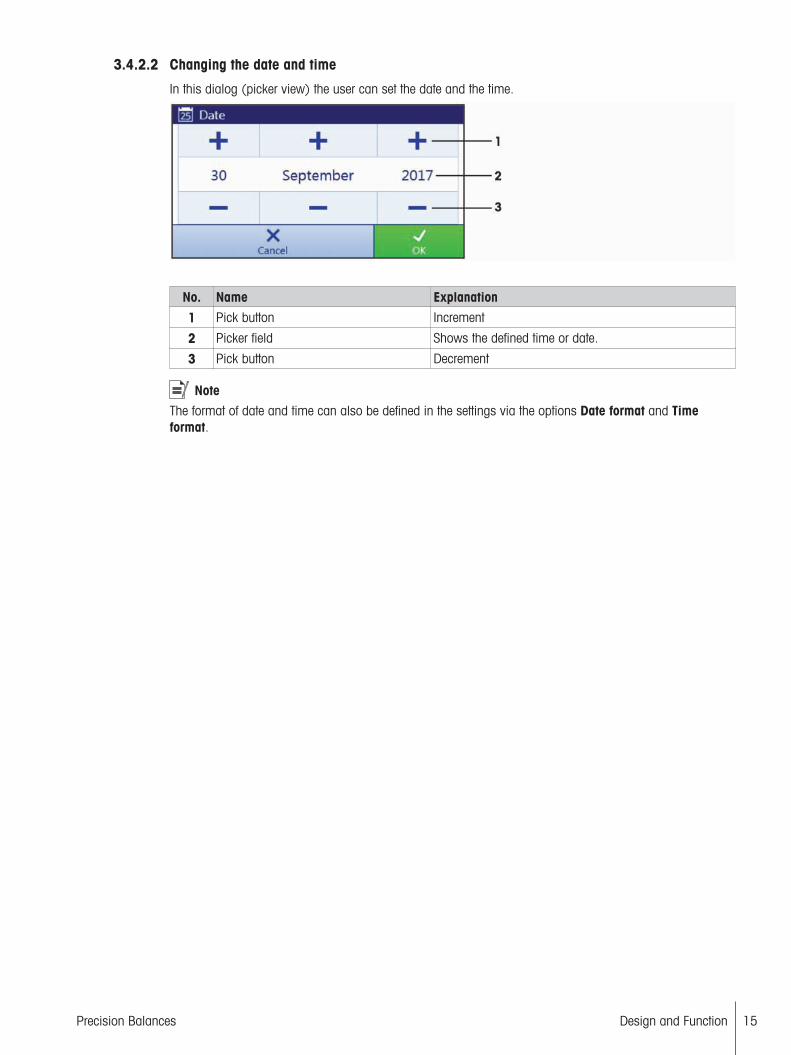
3.4.2.2 Changing the date and time
In this dialog (picker view) the user can set the date and the time.
No. Name Explanation
1 Pick button Increment
2 Picker field Shows the defined time or date.
3 Pick button Decrement
NoteThe format of date and time can also be defined in the settings via the options Date format and Timeformat.

Basic Navigation16 Precision Balances
4 Basic Navigation
4.1 Main sections at a glanceThe method work screen shows information about the current weighing process and the selected method(the picture shows the method work screen of the method General Weighing). The sections Methods,Protocol and Balance menu can be opened by tapping on the corresponding button on the right hand sideof the touch screen.
Basic Navigation 17Precision Balances
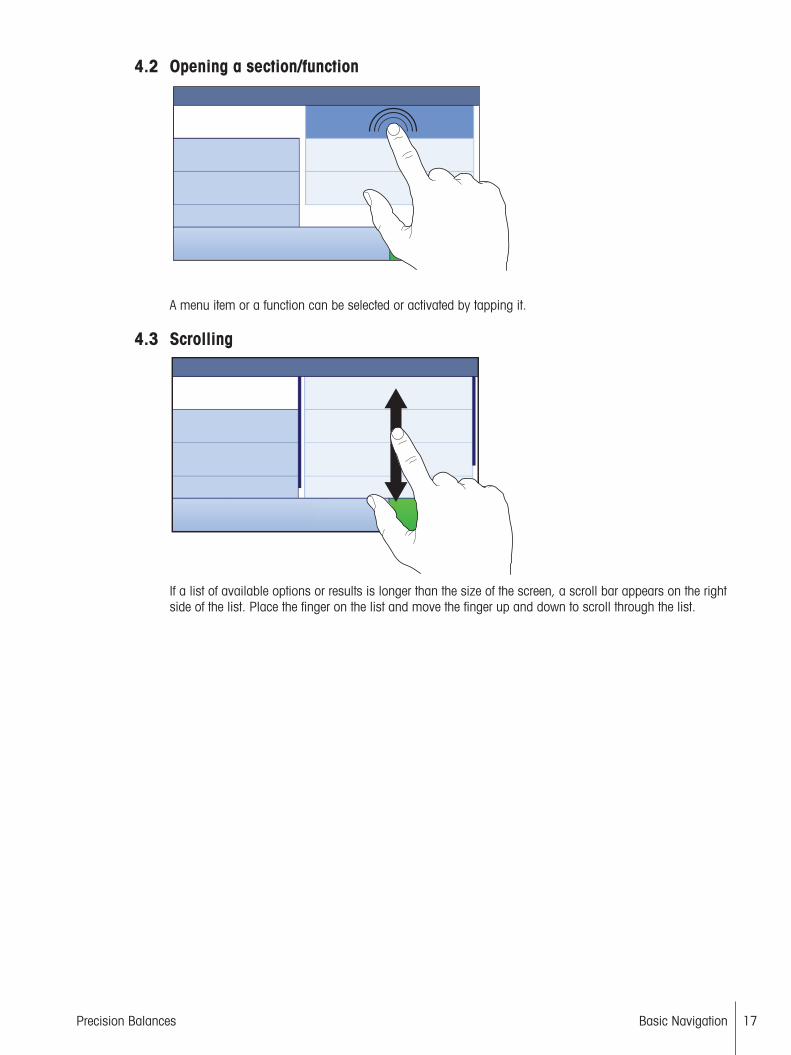
4.2 Opening a section/function
A menu item or a function can be selected or activated by tapping it.
4.3 Scrolling
If a list of available options or results is longer than the size of the screen, a scroll bar appears on the rightside of the list. Place the finger on the list and move the finger up and down to scroll through the list.
Installation and Putting into Operation18 Precision Balances
5 Installation and Putting into Operation
5.1 Unpacking the balanceOpen the balance packaging and check for transportation damage or missing parts. Please inform aMETTLER TOLEDO representative in the event of missing or defective parts.We recommend retaining the original box with its packaging elements. The packaging elements aredesigned to protect the balance. Use the packaging elements and the original box to store and transport thebalance.
5.2 Scope of delivery
NOTICERisk of damage to the instrument due to the use of unsuitable parts!Using unsuitable parts with the instrument can damage the Instrument or cause it tomalfunction.− Only use parts from METTLER TOLEDO that are intended to be used with your
instrument.
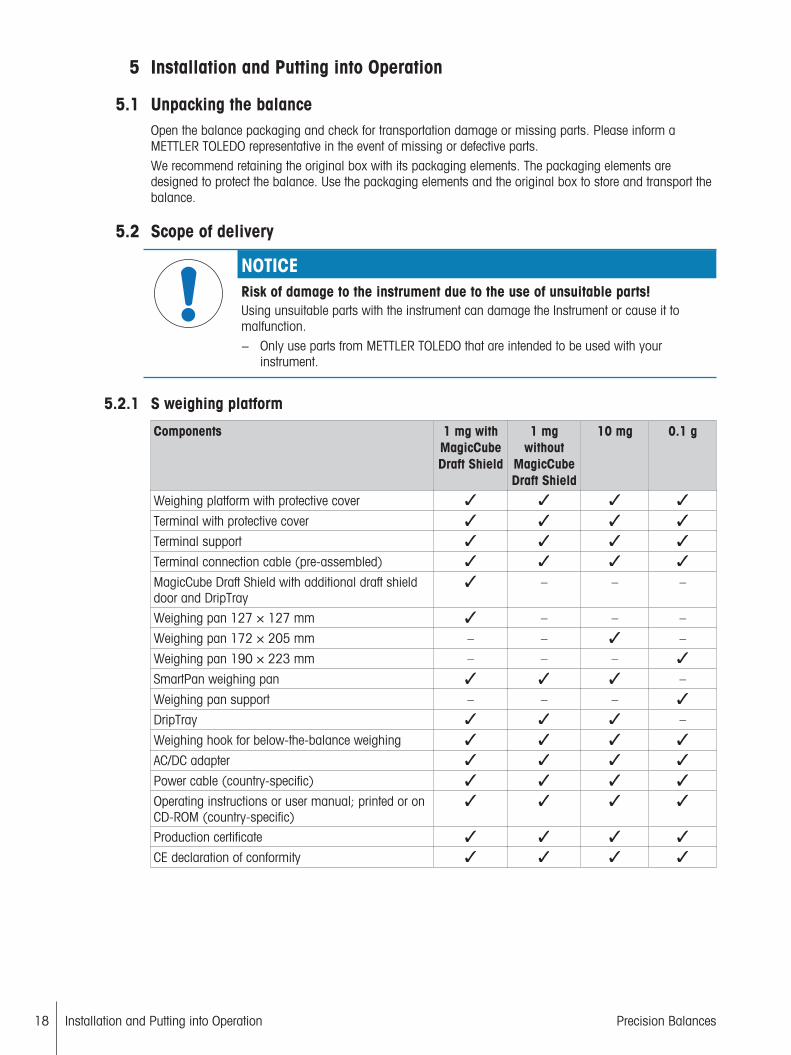
5.2.1 S weighing platform
Components 1 mg withMagicCubeDraft Shield
1 mgwithout
MagicCubeDraft Shield
10 mg 0.1 g
Weighing platform with protective cover
Terminal with protective cover
Terminal support
Terminal connection cable (pre-assembled)
MagicCube Draft Shield with additional draft shielddoor and DripTray
– – –
Weighing pan 127 × 127 mm – – –
Weighing pan 172 × 205 mm – – –
Weighing pan 190 × 223 mm – – –
SmartPan weighing pan –
Weighing pan support – – –
DripTray –
Weighing hook for below-the-balance weighing
AC/DC adapter
Power cable (country-specific)
Operating instructions or user manual; printed or onCD-ROM (country-specific)
Production certificate
CE declaration of conformity

Installation and Putting into Operation 19Precision Balances
5.2.2 L weighing platform
Components 0.1 g 1 gWeighing platform
Terminal with protective cover
Terminal support (pre-assembled)
Terminal connection cable
Weighing pan
Power cable (country-specific)
Operating instructions and user manuals printed oron CD-ROM (country-specific)
Production certificate
CE declaration of conformity
5.3 Selecting the locationA balance is a sensitive precision instrument. The location where it is placed will have a profound effect onthe accuracy of the weighing results.
• Choose a solid table that is as horizontal as possible.Choose the table according to the maximum capacity of thebalance.The balance must only be used indoors and up to amaximum altitude of 4,000 m above sea level.
• Before switching on the balance, wait until all parts are atroom temperature (+10 °C to +30 °C). The humidity must be between 10% and 80% non-condensing.
• The power plug must be accessible.• Vibration-free location• No direct sunlight• No excessive temperature fluctuations• No strong drafts
5.4 Assembling the balance
5.4.1 Models with S weighing platform
5.4.1.1 Attaching the terminal to the weighing platform
The terminal is usually placed in front of the weighing platform on the terminal support. The terminal canalso be placed individually, e.g. beside the weighing platform or it can be fixed on an additional terminalstand.
NOTICEDamage to the balanceThe weighing platform and the terminal are not safely fixed by the terminal support andmay fall off when carrying.− Remove the terminal from the weighing platform and place it on the weighing pan
when carrying the balance.

Installation and Putting into Operation20 Precision Balances
11
2
1 Place the weighing platform on a flat surface.2 Position the terminal support (1) in front of the
weighing platform. The plug of the pre-mountedterminal connection cable (2) must lie between theterminal support (1) and the weighing platform.
3 4
3 Push the terminal support (3) towards the weighingplatform. The far end of the terminal support (3)must be pushed into the lock element (4) at thebottom of the weighing platform.
4 Use the terminal connection cable to connect theterminal to the weighing platform.
5 Place the terminal on top of the terminal support.6 Push the terminal towards the weighing platform
until the terminal locks into the terminal support.ð The terminal is mounted and connected to the
weighing platform.
5.4.1.2 Installing the MagicCube Draft Shield
Balances with readability of 1 mg with MagicCube Draft Shield and SmartPan weighing pan
NOTICEDamage to weighing platform and the MagicCube Draft Shield when carryingThe U-shaped MagicCube Draft Shield glass is not fixed to the MagicCube Draft Shieldhousing.1 Always close the cover before carrying the MagicCube Draft Shield.2 Always hold the MagicCube Draft Shield on the housing underneath the glass. Always
hold the MagicCube Draft Shield with both hands and on both sides and keep it in ahorizontal position.

Installation and Putting into Operation 21Precision Balances
1 Place the MagicCube Draft Shield on top of theweighing platform.
3
2
1
2 Open the MagicCube Draft Shield top door.3 Place the DripTray (1) into the MagicCube Draft
Shield.4 Place the SmartPan weighing pan (2) into the
MagicCube Draft Shield on top of the DripTray (1).5 The weighing pan (3) is optional and can be
placed into the MagicCube Draft Shield on top ofthe SmartPan weighing pan (2).
Install the additional MagicCube Draft Shield door1 Open the MagicCube Draft Shield top door.2 Take the additional MagicCube Draft Shield door (1) out of the rear panel.3 Insert the additional MagicCube Draft Shield door into the housing from the left or the right side.4 Insert the additional MagicCube Draft Shield door into the fixation holes at the bottom of the housing and
then at the top of the housing.
Installation and Putting into Operation22 Precision Balances
1
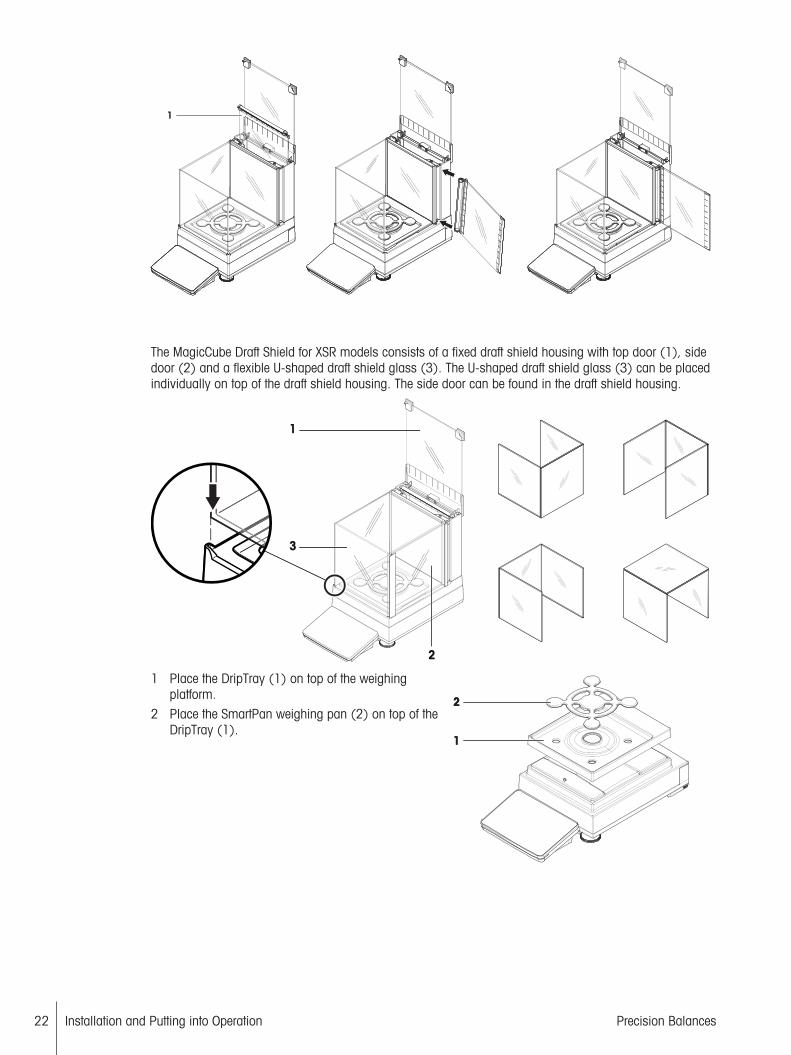
The MagicCube Draft Shield for XSR models consists of a fixed draft shield housing with top door (1), sidedoor (2) and a flexible U-shaped draft shield glass (3). The U-shaped draft shield glass (3) can be placedindividually on top of the draft shield housing. The side door can be found in the draft shield housing.
3
1
2
11
22
1 Place the DripTray (1) on top of the weighingplatform.
2 Place the SmartPan weighing pan (2) on top of theDripTray (1).
Installation and Putting into Operation 23Precision Balances
11
22
33
44
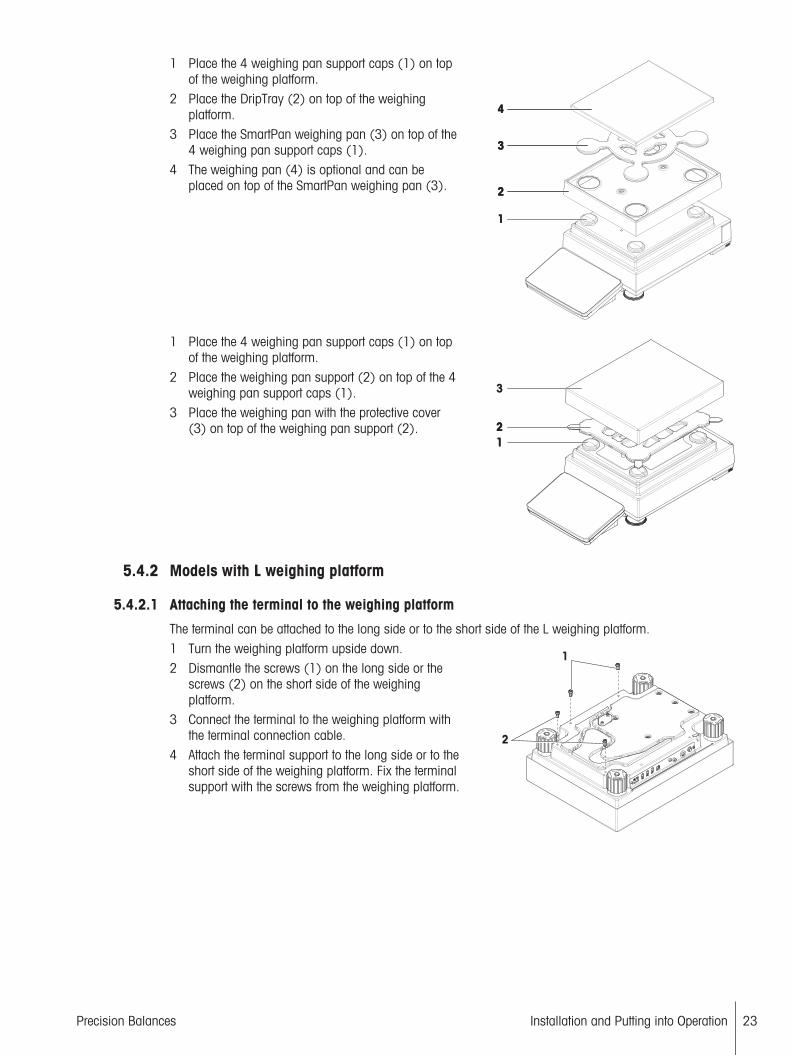
1 Place the 4 weighing pan support caps (1) on topof the weighing platform.
2 Place the DripTray (2) on top of the weighingplatform.
3 Place the SmartPan weighing pan (3) on top of the4 weighing pan support caps (1).
4 The weighing pan (4) is optional and can beplaced on top of the SmartPan weighing pan (3).
11
22
3
1 Place the 4 weighing pan support caps (1) on topof the weighing platform.
2 Place the weighing pan support (2) on top of the 4weighing pan support caps (1).
3 Place the weighing pan with the protective cover(3) on top of the weighing pan support (2).
5.4.2 Models with L weighing platform
5.4.2.1 Attaching the terminal to the weighing platform
The terminal can be attached to the long side or to the short side of the L weighing platform.
1
2
1 Turn the weighing platform upside down.2 Dismantle the screws (1) on the long side or the
screws (2) on the short side of the weighingplatform.
3 Connect the terminal to the weighing platform withthe terminal connection cable.
4 Attach the terminal support to the long side or to theshort side of the weighing platform. Fix the terminalsupport with the screws from the weighing platform.

Installation and Putting into Operation24 Precision Balances
35 Insert the terminal connection cable (3) into thecable channel.
NoteWhen inserting the terminal connection cable into the cable channel, the terminal connection cable must beinserted simultaneously from both directions. The terminal connection cable must not have any playbetween the plug and the cable channel (see picture).6 Turn the weighing platform.
5.4.2.2 Balances 0.1 g and 1 g
2
11
1 Place the weighing pan support caps (1) on top ofthe weighing platform.
2 Place the weighing pan (2) on top of the weighingpan support caps (1).
5.5 Connecting the balance to the mains
WARNINGDanger of death or serious injury due to electric shock.Contact with parts that contain a live current can lead to injury and death.1 To connect the balance, only use the supplied three-core power cable with equipment
grounding conductor.2 Only use a three-pin power socket with earthing contact.3 Only use standardized extension cable with equipment grounding conductor.4 Do not disconnect the equipment grounding conductor.
Installation and Putting into Operation 25Precision Balances
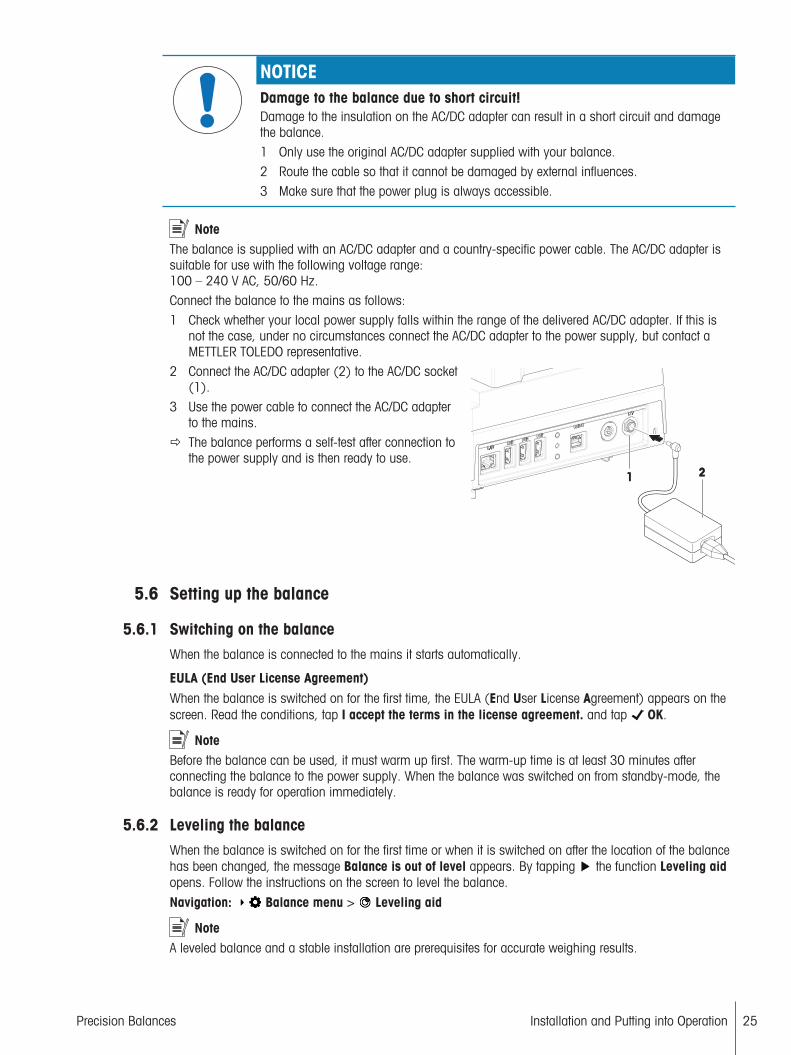
NOTICEDamage to the balance due to short circuit!Damage to the insulation on the AC/DC adapter can result in a short circuit and damagethe balance.1 Only use the original AC/DC adapter supplied with your balance.2 Route the cable so that it cannot be damaged by external influences.3 Make sure that the power plug is always accessible.
NoteThe balance is supplied with an AC/DC adapter and a country-specific power cable. The AC/DC adapter issuitable for use with the following voltage range: 100 – 240 V AC, 50/60 Hz.Connect the balance to the mains as follows:1 Check whether your local power supply falls within the range of the delivered AC/DC adapter. If this is
not the case, under no circumstances connect the AC/DC adapter to the power supply, but contact aMETTLER TOLEDO representative.
11 22
2 Connect the AC/DC adapter (2) to the AC/DC socket(1).
3 Use the power cable to connect the AC/DC adapterto the mains.
ð The balance performs a self-test after connection tothe power supply and is then ready to use.
5.6 Setting up the balance
5.6.1 Switching on the balanceWhen the balance is connected to the mains it starts automatically.
EULA (End User License Agreement)When the balance is switched on for the first time, the EULA (End User License Agreement) appears on thescreen. Read the conditions, tap I accept the terms in the license agreement. and tap OK.
NoteBefore the balance can be used, it must warm up first. The warm-up time is at least 30 minutes afterconnecting the balance to the power supply. When the balance was switched on from standby-mode, thebalance is ready for operation immediately.
5.6.2 Leveling the balanceWhen the balance is switched on for the first time or when it is switched on after the location of the balancehas been changed, the message Balance is out of level appears. By tapping the function Leveling aidopens. Follow the instructions on the screen to level the balance.
Navigation: Balance menu > Leveling aid
NoteA leveled balance and a stable installation are prerequisites for accurate weighing results.

Installation and Putting into Operation26 Precision Balances
5.6.3 Performing a simple weighingWhen the balance is switched on for the first time, the method work screen of the method GeneralWeighing opens (the method work screen is described in more detail in the section Method work screen).
5.6.3.1 Zeroing
1 Clear the weighing pan.2 Close the weighing chamber if the balance has a draft shield.
3 Tap to zero the balance.ð The balance is zeroed.
5.6.3.2 Taring
If a weighing container is used, the balance must be tared.1 Clear the weighing pan.2 Close the weighing chamber if a draft shield is being used.
3 Tap to zero the balance.4 Open the weighing chamber if a draft shield is being used.5 Place the container on the weighing pan.6 Close the weighing chamber if a draft shield is being used.
7 Tap to tare the balance.ð The balance is tared.
5.6.3.3 Performing General Weighing
1 Place the weight on top of the weighing pan and wait until the weight value is stable.
2 Tap Add to protocol.ð The weighing process was successfull. The weight value has been transferred to the section Protocol.
5.6.4 Setting the balance to standby modeThe balance can be set to standby mode by holding . The standby mode can be finished by holding again.
5.6.5 Switching off the balanceTo completely switch off the balance it must be disconnected from the mains. By holding the balancegoes only into standby mode.
NoteWhen the balance was completely switched off for some time, it must be warmed up for at least 30 minutesbefore it can be used.
5.7 Below-the-balance weighingAll models with S weighing platform are equipped with a weighing hook for below-the-balance weighing.Models with L weighing platform are not equipped with a weighing hook. The weighing hook for L weighingplatforms can be ordered as an accessory.
NoteBefore preparing the balance for below-the-balance weighing, the balance must be switched off, discon-nected from the mains and all components (e.g. draft shield, terminal or weighing pan) must be removedfrom the weighing platform.

Installation and Putting into Operation 27Precision Balances
5.7.1 S weighing platform1 Turn the weighing platform upside down.
22
11
2 Dismantle the screws (1) and remove the coverplate (2).
3 Turn the weighing platform to its normal positionand reinstall all components.
ð The weighing hook is accessible and can be usedfor below-the-balance weighing.
5.7.2 L weighing platform1 Turn the weighing platform upside down.
2
11
2 Dismantle the screws (1) and remove the coverplate (2).
3 Install the weighing hook.4 Turn the weighing platform to its normal position.ð The balance is prepared for below-the-balance
weighing.
5.8 Transporting the balance
NOTICEDamage to the draft shield, terminal or additional terminal standDo not hold the balance only by the glass draft shield, by the terminal or by the terminalstand when carrying the balance.− Remove the terminal of the S weighing platform from the terminal support and place
the terminal on top of the weighing pan. Always hold the weighing platform with bothhands when carrying the balance.
5.8.1 Carrying the balance over short distances1 Switch off the balance and disconnect the balance from the mains.2 Unplug all interface cables if necessary.3 Hold the weighing platform with both hands.4 Remove the terminal from the terminal support element and place the terminal on top of the weighing
platform (only for S weighing platform).5 Carry the balance in horizontal position to the new location.

Installation and Putting into Operation28 Precision Balances
5.8.2 Transporting the balance over long distancesWe recommend using the original packaging for transportation or shipment of the balance or balancecomponents over long distances. The elements of the original packaging are developed specifically for thebalance and its components and ensure maximum protection during transportation.

Methods 29Precision Balances
6 MethodsThe section Methods includes the weighing methods as well as test and adjustment procedures to checkthe accuracy of the balance.A weighing method is an application for carrying out specific weighing tasks. The balance offers variouspredefined methods with default parameters. You can use this methods for your weighing task or editingthem according to your requirements. Predefined methods can also be deleted or cloned.To support you while configuring new methods, a configuration wizard leads you through the wholeprocess. The changes performed to a method are recorded in the change history. To ensure that onlyprivileged user can edit the method settings, methods can get locked.
Navigation: MethodsThe section Methods is divided into the following sub-sections:
• Methods list (see section [Methods list } Page 29])
• Tests (see section [Tests } Page 57])
• Adjustments (see section [Adjustments } Page 67])
6.1 Methods listIn the section Methods list new methods can be defined, existing methods can be edited, cloned orcancelled. It is also the starting point of using any method in a weighing procedure.
Navigation: Methods > Methods listThe following methods are available:
• General Weighing (see section [General Weighing } Page 31])
• Simple formulation (see section [Simple Formulation } Page 40])
• Piece Counting (see section [Piece Counting } Page 49])
6.1.1 Creating new methodTo create a new method tap New in the action bar. A stepwise wizard will lead you through the methoddefinition.
6.1.2 Editing method1 Open the Methods section.
2 Tap the method that you want to edit.
3 Tap Edit.ð The dialogue screen Edit method - {0} opens.
4 Define the settings of the method.
NoteAn overview of the method settings can be found at the end of every method section.
6.1.3 Cloning methodTo simplify the process to create a method, an existing method can be cloned one or several times. Thecloned method will have the same parameter values as the original one. If weighing item templates exist,those will be cloned as well.The name of the cloned method is always similar to its original name. Additionally there is always anumber at the end of the method name.To clone an existing method proceed as follows:
1 Open the Methods section.
2 Tap the method that you want to clone.ð The line color of the selected method becomes blue.

Methods30 Precision Balances
3 Tap More.
4 Tap Clone.
ð A copy of the selected method appears in the list. The cloned method has the same settings like theoriginal method.
NoteA method can be cloned several times. The name of the cloned method is always similar to its originalname. Additionally there is always a number at the end of the method name.
6.1.4 Deleting methodBoth factory defined methods and user defined methods can be deleted if they are not needed. For thispurpose proceed as follows:
1 Open the Methods section.
2 Tap the method that you want to delete.ð The line color of the selected method becomes blue.
3 Tap More.
4 Tap Delete.
ð The message Delete method and cancel tasks? appears on the screen.
5 Tap Yes to delete the selected method.
ð The system returns to the method list. The method has been deleted and does not appear on the listanymore.
NoteThere is always a method activated in the background. This method can not be directly deleted. To deletethe method, another method must be started instead. Now the method is not activated anymore and can bedeleted.
Methods 31Precision Balances
6.1.5 General WeighingThis section describes the method General Weighing. The method General Weighing offers the basicweighing functions (zeroing, taring, weighing) with no process support. The method is used for simpleweighing tasks or to perform a series of check weighing or dosing.This section describes how to create a new method with the method wizard, how to work with the methodand the method settings. The parameter of the weighing item (e.g. sample ID and target weight) can eitherbe entered manually or by using a template. Therefore two different methods exist:
• General Weighing: Select this method if you want to define the parameters for the weighing item ad-hocwhile weighing or pre-defined on a method level for all weighing items.
• General Weighing with templates: Select this method if you want to use a template to define theparameters for the weighing item. Templates are helpful to safe time while weighing items with the sameparameters and to ensure the consistent use of the parameters. For further information see [Usingtemplates } Page 56].
In the section [Method settings } Page 41] the settings for both methods General Weighing and GeneralWeighing with templates can be found.
6.1.5.1 Creating new method type General Weighing
1 Open the Methods section.
2 Tap New in the action bar.
ð The method wizard opens, starting at 1. Method type.
3 Tap Method type and select the method type General Weighing or General Weighing with templates.
4 Follow the stepwise wizard through the creating process.
5 Tap Save method at the end of the wizard.
ð The method has been created and appears in the list.
6.1.5.2 Performing General Weighing
This section describes how the method General Weighing is being used in a task. In this example we areweighing one single weight without any tare weight.
1 Open the Methods section.
2 Select a method from the list or define a new method.
3 Tap Start method.
ð The method work screen of the selected method opens.
4 Press to zero the balance.5 Place the weight on the weighing pan.6 Wait until the weight is stable.
7 Tap Add to protocol.ð The weighing result has been added to the protocol.
8 When the weighing process is finished, tap Protocol.9 Tap Complete in the action bar.
ð The window Complete task appears. The result of the task can be printed on a label printer, theprotocol can be printed manually or the result can be exported on an external storage device.
ð The task General Weighing was successfully completed.
NoteWhen you tap Delete protocol the current weighing process will close without saving any data. Thewindow Complete task always appears after completing the task, even if the results will be saved automat-ically.

Methods32 Precision Balances
6.1.5.3 Method settings
In this section, the settings of the methods General Weighing and General Weighing with templates arebeing described.
The section Edit method - {0} is divided into the following sub-sections:
• General• ID format• Templates (Only available for the method General Weighing with templates)
• Weighing item (Only available for the method General Weighing)
• Weighing• Automation• Print / Export
6.1.5.3.1 General
The following parameters can be defined:
Parameter Explanation ValuesMethod name Defines the name of the method. The system copies the method
name that has been defined with the function Method wizard.Text (1...22characters)
Comment The method can be described with a comment. Text (0...128characters)
Lock method Locks the method for other users and from further editing whilerunning.
Active | Inactive*
* Factory setting
NoteThe option Method type has been defined in the wizard and cannot be changed.
6.1.5.3.2 ID format
The following parameters can be defined:
Task IDs
Parameter Explanation ValuesNumber of taskIDs
For a method up to three task identifiers (task IDs), such asSOP Id, Lot Id etc. can be defined.
If the value of the option Number of task IDs is set to 1, theoptions Task ID 1, Description and Prefix/Default valueappear.
0 | 1*
Task ID 1 Defines the value of the task ID.
Manual with default: The value of the task ID can be enteredmanually at method execution time.
Automatic timestamp: The system provides a value createdfrom a prefix with the current date and time appended.
Manual with default* |Automatic timestamp
Description Describes the option Task ID 1. Text (0...32characters)
Prefix Defines a prefix for the task ID.
This option only appears when the option Automatictimestamp is activated.
Text (0...32characters)

Methods 33Precision Balances
Default value Defines a default value for the task ID. The value of the task IDcan be changed manually while executing the method.
This option only appears when the option Manual with defaultis activated.
Text (0...32characters)
* Factory setting
Result IDs
Parameter Explanation ValuesNumber of resultIDs
Defines the number of result IDs.
If the value of the option Number of result IDs is set to 1, theoptions Result ID 1, Description and Prefix/Default valueappear.
0 | 1*
Result ID 1 Defines the value of the result ID.
Manual with default: The value of the result ID can be enteredmanually at method execution time.
Automatic counter: The system provides a value created froma prefix with an unique number (counter) appended.
Manual with default |Automatic counter*
Description Describes the option Result ID 1. Text (0...32characters)
Prefix Defines a prefix for the result ID.
This option only appears when the option Automatic counter isactivated.
Text (0...32characters)
Default value Defines a default value for the result ID. The value of the resultID can be changed manually while executing the method.
This option only appears when the option Manual with defaultis activated.
Text (0...32characters)
* Factory setting
6.1.5.3.3 Weighing item
In this section a target weight with tolerance limits can be defined. Depending on the selected method, theparameters for the weighing item are defined directly in the method (General Weighing) or in one or moretemplates (General Weighing with templates).
The following parameters can be defined:
NoteThis option is only available for the method General Weighing.
Initial values for weighing
Parameter Explanation ValuesUnit Defines the unit of the primary weighing result. The available units
depend on the balancemodel.
Target weight Defines the target weight. The target weight will be shown in theweighing-in aid of the balance (SmartTrac). When a targetweight including tolerances is defined, the SmartTrac indicatesif the current display weight is in tolerance or not.
Numeric
Tolerance (min.) Defines the under tolerance limit.
This option only appears when the option Target weight isactivated.
Numeric

Methods34 Precision Balances
Tolerance (max.) Defines the upper tolerance limit.
This option only appears when the option Target weight isactivated.
Numeric
6.1.5.3.4 Templates
In this section a target weight with tolerance limits can be defined. Depending on the selected method, theparameters for the weighing item are defined directly in the method (General Weighing) or in one or moretemplates (General Weighing with templates).
NoteThis Option is only available for the method General Weighing with templates.
The following parameters can be defined:
Parameter Explanation ValuesUnit Defines the unit of the primary weighing result. The available units
depend on the balancemodel.
Target weight Defines the target weight. The target weight will be shown in theweighing-in aid of the balance (SmartTrac). When a targetweight including tolerances is defined, the SmartTrac indicatesif the current display weight is in tolerance or not.
Numeric
Tolerance (min.) Defines the under tolerance limit.
This option only appears when the option Target weight isactivated.
Numeric
Tolerance (max.) Defines the upper tolerance limit.
This option only appears when the option Target weight isactivated.
Numeric
6.1.5.3.5 Weighing
The following parameters can be defined:
Parameter Explanation ValuesShow info weight With this option activated a secondary info weight appears on
the weighing screen on top of the weighing result.Active | Inactive*
Info unit Defines the unit of the info weight.
This option only appears when the option Show info weight isactivated.
The available unitsdepend on the balancemodel.
* Factory setting
Custom unit
Parameter Explanation ValuesDefine customunit
With this option activated a specific weighing unit can bedefined. This allows calculations (e.g. surfaces or volumes) tobe carried out directly during determination of the weighingresult.The custom units are available in all menus and input fields inwhich weighing units can be selected.
Active | Inactive*
Name Defines the name of the custom unit. Text (0...6 characters)
Methods 35Precision Balances
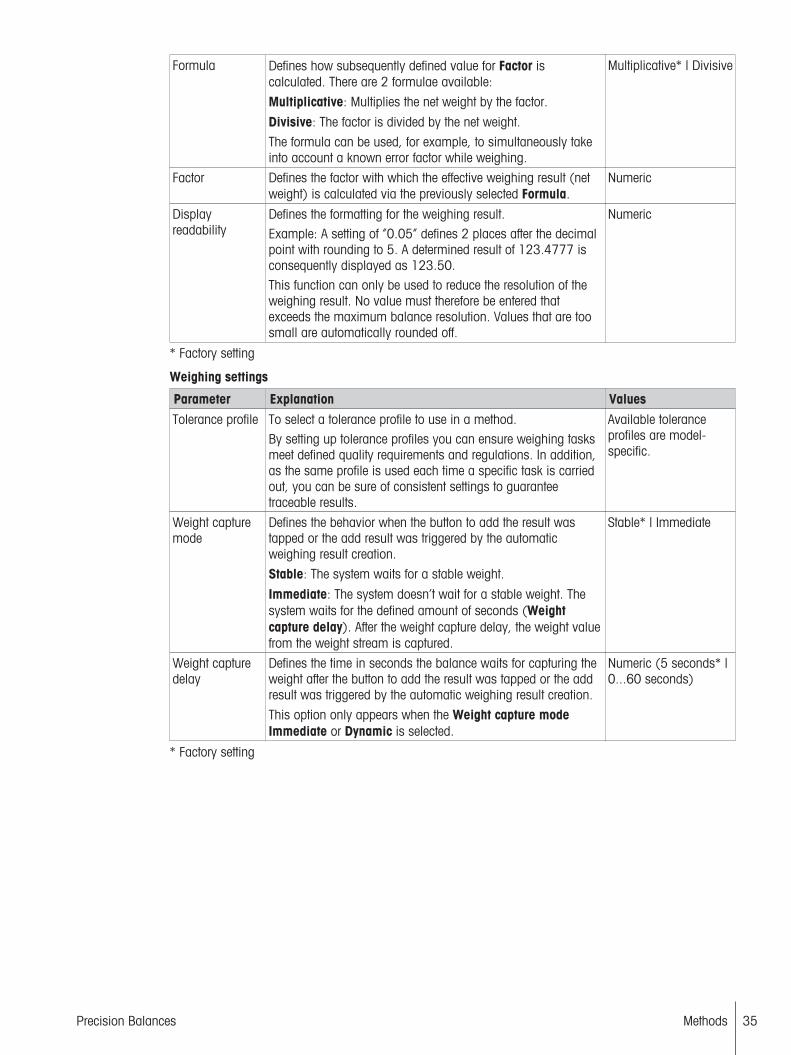
Formula Defines how subsequently defined value for Factor iscalculated. There are 2 formulae available:
Multiplicative: Multiplies the net weight by the factor.
Divisive: The factor is divided by the net weight.
The formula can be used, for example, to simultaneously takeinto account a known error factor while weighing.
Multiplicative* | Divisive
Factor Defines the factor with which the effective weighing result (netweight) is calculated via the previously selected Formula.
Numeric
Displayreadability
Defines the formatting for the weighing result.Example: A setting of “0.05” defines 2 places after the decimalpoint with rounding to 5. A determined result of 123.4777 isconsequently displayed as 123.50.This function can only be used to reduce the resolution of theweighing result. No value must therefore be entered thatexceeds the maximum balance resolution. Values that are toosmall are automatically rounded off.
Numeric
* Factory setting
Weighing settings
Parameter Explanation ValuesTolerance profile To select a tolerance profile to use in a method.
By setting up tolerance profiles you can ensure weighing tasksmeet defined quality requirements and regulations. In addition,as the same profile is used each time a specific task is carriedout, you can be sure of consistent settings to guaranteetraceable results.
Available toleranceprofiles are model-specific.
Weight capturemode
Defines the behavior when the button to add the result wastapped or the add result was triggered by the automaticweighing result creation.
Stable: The system waits for a stable weight.
Immediate: The system doesn’t wait for a stable weight. Thesystem waits for the defined amount of seconds (Weightcapture delay). After the weight capture delay, the weight valuefrom the weight stream is captured.
Stable* | Immediate
Weight capturedelay
Defines the time in seconds the balance waits for capturing theweight after the button to add the result was tapped or the addresult was triggered by the automatic weighing result creation.
This option only appears when the Weight capture modeImmediate or Dynamic is selected.
Numeric (5 seconds* |0...60 seconds)
* Factory setting

Methods36 Precision Balances
Statistics
Activate statistics If Activate statistics is set to Active, the following statistics willbe calculated:
• Count: Number of items used for the statistics.
• Sum: The displayed values are summed up.
• Minimum: The minimal displayed value.
• Maximum: The maximum displayed value.
• Average: The displayed values are summed up and dividedby the count of values summed up. The result is rounded tothe balance resolution.
• Standard deviation• Relative standard deviationThe statistical values are calculated and visualized as soon asa result is added or updated.
Active | Inactive*
* Factory setting
6.1.5.3.6 Automation
The following parameters can be defined:
Parameter Explanation ValuesBarcode datatarget
If a barcode reader is connected to the balance, this optiondefines how the data is to be processed.
Keyboard Input: The data is written in the currently open inputwindow. If no input window is open, the data is ignored.
Target weight value: The barcode data is interpreted as a valuefor the target weight.
Task ID 1: The received barcode data is treated as identificationtext for the Task ID.
Result ID 1: The received barcode data is treated as identifi-cation text for the Result ID.
Keyboard Input* |Target weight value |Task ID 1 | Result ID 1
* Factory setting
Weighing automation
Parameter Explanation ValuesAutomatic result Automatically generates a weighing result after a threshold is
reached.
None: No automatic result will be generated.
With sample tare: After a weight value that reached thethreshold is being removed from the weighing pan, the balanceis being tared.
Without sample tare: After a weight value that reached thethreshold is being removed from the weighing pan, the balanceis not being tared.
None* | With sampletare | Without sampletare
Automatic resultthreshold
Defines the threshold of the option Automatic result.This option only appears when the option Automatic result isactivated.
Numeric

Methods 37Precision Balances
Weight trigger Defines the behaviour of the option Automatic result threshold.
Exceeding: The weighing result is generated when the weightexceeds the defined threshold.
Falling below: The weighing result is generated when theweight falls below the defined threshold.
This option only appears when the option Automatic result isset to Without sample tare.
Exceeding* | Fallingbelow
Automatic zero If Automatic zero is set to Active, the balance automaticallyzeros the balance when the weight falls below a predefinedthreshold.
Active | Inactive*
Automatic zerothreshold
Defines the threshold of the option Automatic zero.
This option only appears when the option Automatic zero isactivated.
Numeric
Tare Mode Defines the tare mode.
None: No automatic tare.
Automatic tare: The balance stores automatically the firststable weight as the tare weight.
Pretare: Allows you to enter manually a numerical entry of afixed tare weight.
None* | Automatic tare |Pretare
Automatic tarethreshold
Defines the threshold of the option Tare Mode.
This value defines the minimum weight that must be applied tothe weighing pan so that it is automatically stored as the tareweight. If the weight is below the limits, it is not automaticallytransferred to the tare memory.Instead of entering the weight, the lightest tare container can beplaced on the weighing pan and the button subsequentlypressed. The applied weight is directly taken over as a limit.
This option only appears when the option Tare Mode is set toAutomatic tare.
Numeric
Pretare value Defines a weight value for the pretare function.Instead of entering the value, the respective tare container canbe placed on the weighing pan and the button subsequentlypressed. The weight is directly taken over as pretare value.
This option only appears when the option Tare Mode is set toPretare.
Numeric
* Factory setting
6.1.5.3.7 Print / Export
In this section the options for printing and exporting can be defined.This section is divided into the following sub-sections:
• Protocol printout and data export• Label printout for task• Label printout for weighing item
Protocol printout and data export
The following parameters can be defined:
Methods38 Precision Balances
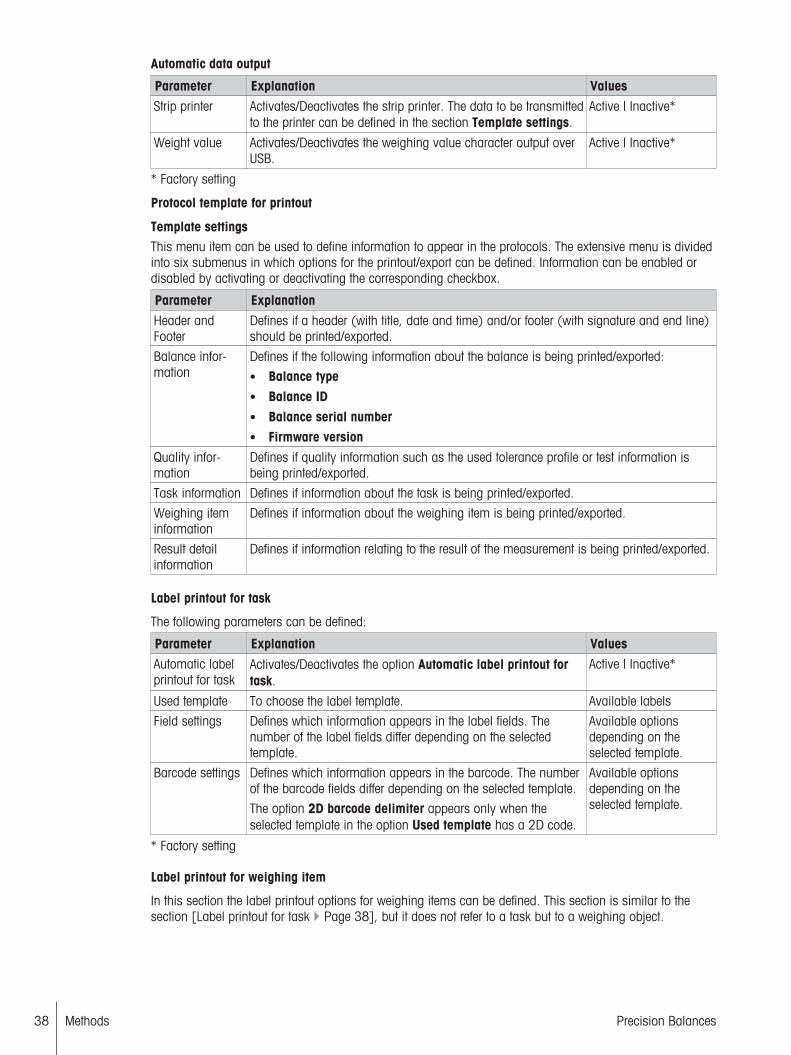
Automatic data output
Parameter Explanation ValuesStrip printer Activates/Deactivates the strip printer. The data to be transmitted
to the printer can be defined in the section Template settings.Active | Inactive*
Weight value Activates/Deactivates the weighing value character output overUSB.
Active | Inactive*
* Factory setting
Protocol template for printout
Template settingsThis menu item can be used to define information to appear in the protocols. The extensive menu is dividedinto six submenus in which options for the printout/export can be defined. Information can be enabled ordisabled by activating or deactivating the corresponding checkbox.
Parameter ExplanationHeader andFooter
Defines if a header (with title, date and time) and/or footer (with signature and end line)should be printed/exported.
Balance infor-mation
Defines if the following information about the balance is being printed/exported:
• Balance type• Balance ID• Balance serial number• Firmware version
Quality infor-mation
Defines if quality information such as the used tolerance profile or test information isbeing printed/exported.
Task information Defines if information about the task is being printed/exported.
Weighing iteminformation
Defines if information about the weighing item is being printed/exported.
Result detailinformation
Defines if information relating to the result of the measurement is being printed/exported.
Label printout for task
The following parameters can be defined:
Parameter Explanation ValuesAutomatic labelprintout for task
Activates/Deactivates the option Automatic label printout fortask.
Active | Inactive*
Used template To choose the label template. Available labels
Field settings Defines which information appears in the label fields. Thenumber of the label fields differ depending on the selectedtemplate.
Available optionsdepending on theselected template.
Barcode settings Defines which information appears in the barcode. The numberof the barcode fields differ depending on the selected template.
The option 2D barcode delimiter appears only when theselected template in the option Used template has a 2D code.
Available optionsdepending on theselected template.
* Factory setting
Label printout for weighing item
In this section the label printout options for weighing items can be defined. This section is similar to thesection [Label printout for task } Page 38], but it does not refer to a task but to a weighing object.

Methods 39Precision Balances
NoteSupported printers for labels are P-56RUE, P-58RUE and Citizen CLS631 (for more information see section[Accessories } Page 101]).
Available labels
The following label printouts can be selected:
5 large fields 5 small fields
10 small fields 1D barcode with 3 large fields
1D barcode with 3 small fields 1D barcode with 6 small fields
2D barcode with 5 large fields 2D barcode with 5 small fields
2D barcode with 2 large fields and 6 small fields 2D barcode with 8 small fields

Methods40 Precision Balances
6.1.6 Simple FormulationThis section describes the method Simple formulation. With the method Simple formulation the concen-tration of a substance can automatically be calculated.This section describes how to create a new method with the method wizard, how to work with the methodand the method settings. The parameter of the weighing item (e.g. sample ID and target weight) can eitherbe entered manually or by using a template. Therefore two different methods exist:
• Simple formulation: Select this method if you want to define the parameters for the weighing item ad-hoc while weighing or pre-defined on a method level for all weighing items.
• Simple formulation with templates: Select this method if you want to use a template to define theparameters for the weighing item. Templates are helpful to safe time while weighing items with the sameparameters and to ensure the consistent use of the parameters. For further information see [Usingtemplates } Page 56].
In the section [Method settings } Page 41] the settings for both methods Simple formulation and Simpleformulation with templates can be found.
6.1.6.1 Creating new method type Simple Formulation
1 Open the Methods section.
ð The section Methods list opens.
2 Tap New method in the action bar.
ð The method wizard opens, starting at step 1. Method type.
3 Tap Method type and select the method type Simple formulation or Simple formulation withtemplates.
4 Follow the step-wise wizard.
5 Tap Save method at the end of the wizard.
ð The method has been created and appears in the list.
6.1.6.2 Performing Simple Formulation
This example describes how to perform a simple formulation with two different components. It explains thebasic functions of the method without the use of any templates. Advanced functions such as the calculationof the concentration of a component can be defined in the method settings.
1 Open the Methods section.
2 Select a method of the type Simple formulation or define a new method.
3 Tap Start method.
ð The method work screen opens.4 Define the target weight and the tolerance limits for the first component.
5 Select Component ID to define the first component.
6 Select Task ID to define the whole task.
7 Place the weight on the weighing pan.
8 Tap Add to protocol.ð The weight value is being transferred to the section Protocol.
9 Define the target weight and the tolerance limits for the second component.
10 Select Component ID to define the second component.
11 Place the weight on the weighing pan.
12 Tap Add to protocol.ð The weight value is being transferred to the section Protocol.
13 Tap Complete and select if you want to print or to export the task protocol.
ð The weight task is finished and the balance returns to the method work screen.

Methods 41Precision Balances
6.1.6.3 Method settings
In this section, the settings of the methods Simple formulation and Simple formulation with templates arebeing described.
The section Edit method - {0} consists of the following sub-sections:
• General• Formulation• ID format• Templates (Only available for the method Simple formulation with templates)
• Weighing item (Only available for the method Simple formulation)
• Weighing• Automation• Print / Export
6.1.6.3.1 General
In this section general settings like the name of the method and a comment can be defined.The following parameters can be defined:
Parameter Explanation ValuesMethod name Defines the name of the method. The system copies the method
name that has been defined with the function Method wizard.Text (1...22characters)
Comment The method can be described with a comment. Text (0...128characters)
Lock method Locks the method for other users and from further editing whilerunning.
Active | Inactive*
* Factory setting
NoteThe option Method type has been defined in the wizard and cannot be changed.
6.1.6.3.2 Formulation
The following parameters can be defined:
Parameter Explanation ValuesCalculate target In this section the flask volume and the concentration of the
target can be defined.
Flask volume: Calculates the target weight according to thereference flask volume and the actual flask volume.
Target concentration: Calculates the target weight according tothe desired target concentration.
This option only appears for the method Simple formulationwith templates.
None* | Flask volume |Target concentration
Calculateconcentration percomponent
Calculates the concentration of the substance based on themolecular weight, purity volume and dosed amount ofsubstance, e.g. mmol/l.
If this option is activated, the sub-options Reference weight(100%) and Concentration unit appear in the list.
Active | Inactive*
Calculateamount ofcomponent
Calculates the effective amount of a component based on thecurrent weighing value.
Active | Inactive*

Methods42 Precision Balances
Concentrationunit
Defines the concentration unit. mol/l* l mmol/l l mg/mll mg/l l ug/ml l g/ml lg/l l %
Calculate target In this section the flask volume and the concentration of thetarget can be defined.
Flask volume: Calculates the target weight according to thereference flask volume and the actual flask volume.
Target concentration: Calculates the target weight according tothe desired target concentration.
This option only appears for the method Simple formulationwith templates.
None* | Flask volume |Target concentration
Reference flaskvolume
Defines the volume of the reference flask. Numeric (1 ml* |1...999999 ml)
Reference weight(100%)
Defines the reference weight.Instead of entering the reference weight manually, press subse-quently the button . The applied weight is directly taken overas a reference weight.
Depending on thecapacity of the balance.
* Factory setting
Production and expiry date
Parameter Explanation ValuesProduction date Defines the production date.
Current date: The production date is set automatically to thedate when starting the weighing task.
Manual input: The production date can be entered manuallywhen starting the weighing task.
None | Current date* |Manual input
Expiry date Defines the expiry date of the substance.
Period: The expiry date is set automatically when starting theweighing task (expiry date = date when starting the weighingtask + number of days defined in the field Period.
Manual input: The expiry date can be entered manually whenstarting the weighing task.
None* | Period |Manual input
Period Defines the period of the expiry date.
This option only appears when the option Expiry date is set toPeriod.
Numeric (1 day* |1...9999 days)
* Factory setting
6.1.6.3.3 ID format
The following parameters can be defined:
Task IDs
Parameter Explanation ValuesNumber of taskIDs
For a method up to three task identifiers (task IDs), such asSOP Id, Lot Id etc. can be defined.
If the value of the option Number of task IDs is set to 1, theoptions Task ID 1, Description and Prefix/Default valueappear.
0 | 1*
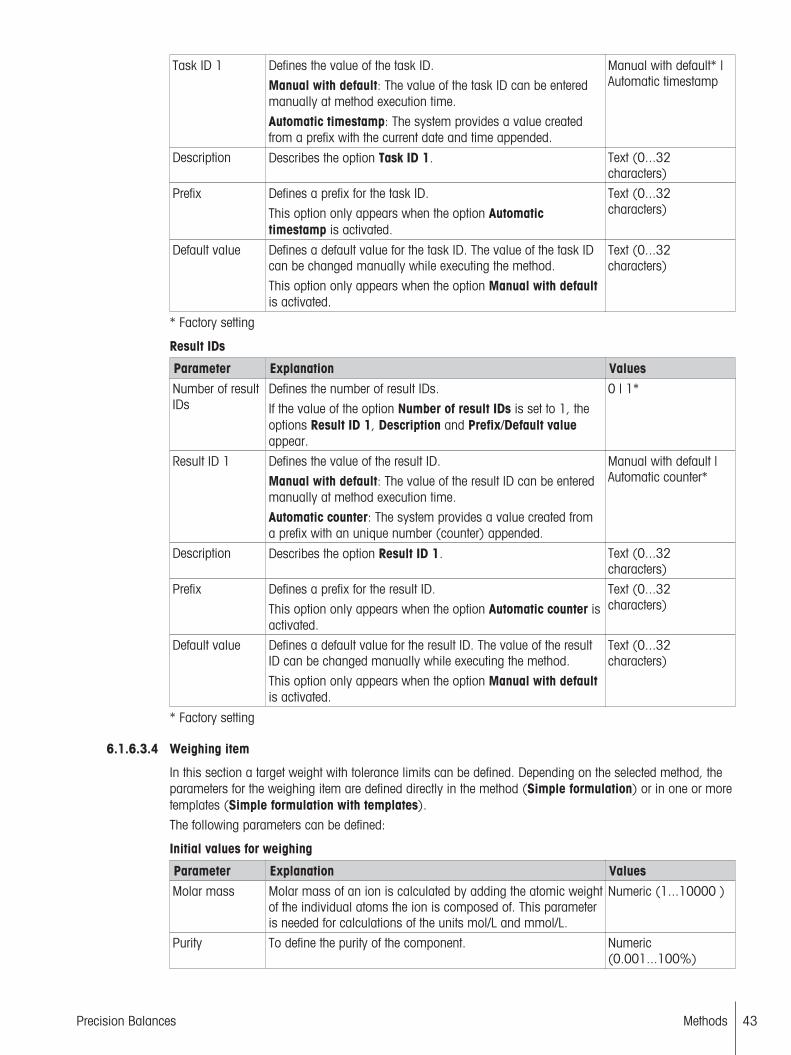
Methods 43Precision Balances
Task ID 1 Defines the value of the task ID.
Manual with default: The value of the task ID can be enteredmanually at method execution time.
Automatic timestamp: The system provides a value createdfrom a prefix with the current date and time appended.
Manual with default* |Automatic timestamp
Description Describes the option Task ID 1. Text (0...32characters)
Prefix Defines a prefix for the task ID.
This option only appears when the option Automatictimestamp is activated.
Text (0...32characters)
Default value Defines a default value for the task ID. The value of the task IDcan be changed manually while executing the method.
This option only appears when the option Manual with defaultis activated.
Text (0...32characters)
* Factory setting
Result IDs
Parameter Explanation ValuesNumber of resultIDs
Defines the number of result IDs.
If the value of the option Number of result IDs is set to 1, theoptions Result ID 1, Description and Prefix/Default valueappear.
0 | 1*
Result ID 1 Defines the value of the result ID.
Manual with default: The value of the result ID can be enteredmanually at method execution time.
Automatic counter: The system provides a value created froma prefix with an unique number (counter) appended.
Manual with default |Automatic counter*
Description Describes the option Result ID 1. Text (0...32characters)
Prefix Defines a prefix for the result ID.
This option only appears when the option Automatic counter isactivated.
Text (0...32characters)
Default value Defines a default value for the result ID. The value of the resultID can be changed manually while executing the method.
This option only appears when the option Manual with defaultis activated.
Text (0...32characters)
* Factory setting
6.1.6.3.4 Weighing item
In this section a target weight with tolerance limits can be defined. Depending on the selected method, theparameters for the weighing item are defined directly in the method (Simple formulation) or in one or moretemplates (Simple formulation with templates).
The following parameters can be defined:
Initial values for weighing
Parameter Explanation ValuesMolar mass Molar mass of an ion is calculated by adding the atomic weight
of the individual atoms the ion is composed of. This parameteris needed for calculations of the units mol/L and mmol/L.
Numeric (1...10000 )
Purity To define the purity of the component. Numeric(0.001...100%)
Methods44 Precision Balances
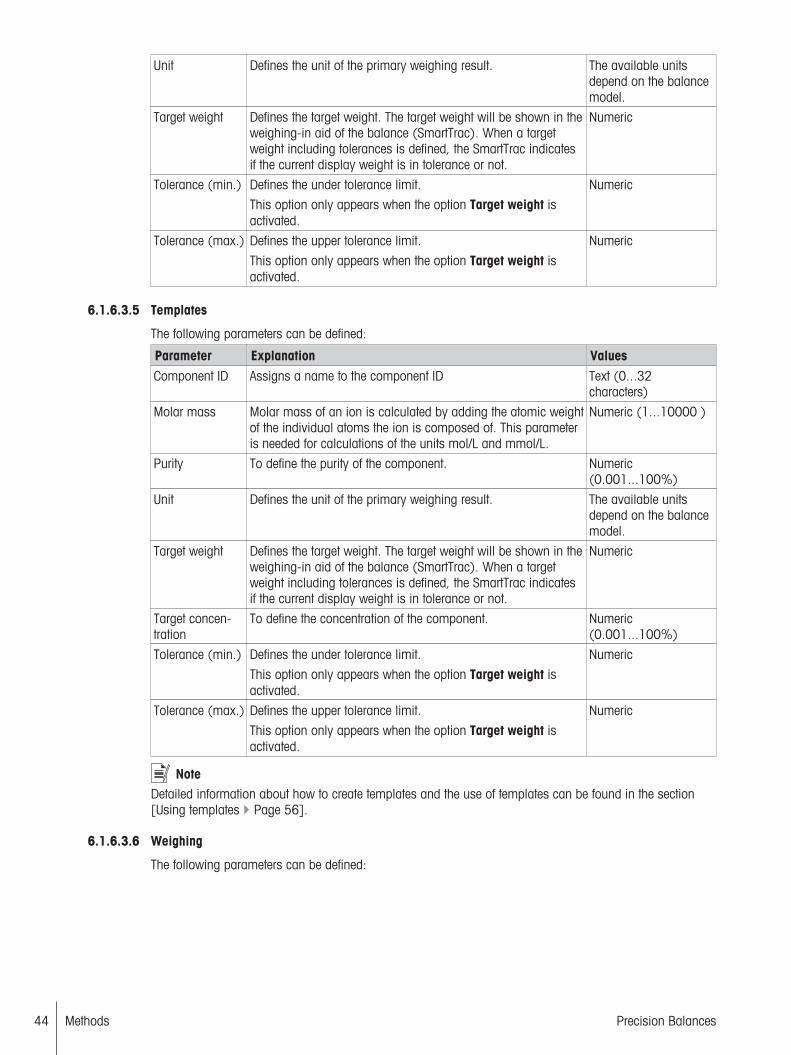
Unit Defines the unit of the primary weighing result. The available unitsdepend on the balancemodel.
Target weight Defines the target weight. The target weight will be shown in theweighing-in aid of the balance (SmartTrac). When a targetweight including tolerances is defined, the SmartTrac indicatesif the current display weight is in tolerance or not.
Numeric
Tolerance (min.) Defines the under tolerance limit.
This option only appears when the option Target weight isactivated.
Numeric
Tolerance (max.) Defines the upper tolerance limit.
This option only appears when the option Target weight isactivated.
Numeric
6.1.6.3.5 Templates
The following parameters can be defined:
Parameter Explanation ValuesComponent ID Assigns a name to the component ID Text (0...32
characters)
Molar mass Molar mass of an ion is calculated by adding the atomic weightof the individual atoms the ion is composed of. This parameteris needed for calculations of the units mol/L and mmol/L.
Numeric (1...10000 )
Purity To define the purity of the component. Numeric(0.001...100%)
Unit Defines the unit of the primary weighing result. The available unitsdepend on the balancemodel.
Target weight Defines the target weight. The target weight will be shown in theweighing-in aid of the balance (SmartTrac). When a targetweight including tolerances is defined, the SmartTrac indicatesif the current display weight is in tolerance or not.
Numeric
Target concen-tration
To define the concentration of the component. Numeric(0.001...100%)
Tolerance (min.) Defines the under tolerance limit.
This option only appears when the option Target weight isactivated.
Numeric
Tolerance (max.) Defines the upper tolerance limit.
This option only appears when the option Target weight isactivated.
Numeric
NoteDetailed information about how to create templates and the use of templates can be found in the section[Using templates } Page 56].
6.1.6.3.6 Weighing
The following parameters can be defined:

Methods 45Precision Balances
Weighing settings
Parameter Explanation ValuesTolerance profile To select a tolerance profile to use in a method.
By setting up tolerance profiles you can ensure weighing tasksmeet defined quality requirements and regulations. In addition,as the same profile is used each time a specific task is carriedout, you can be sure of consistent settings to guaranteetraceable results.
Available toleranceprofiles are model-specific.
6.1.6.3.7 Automation
The following parameters can be defined:
Parameter Explanation ValuesBarcode datatarget
If a barcode reader is connected to the balance, this optiondefines how the data is to be processed.
Keyboard Input: The data is written in the currently open inputwindow. If no input window is open, the data is ignored.
Target weight value: The barcode data is interpreted as a valuefor the target weight.
Task ID 1: The received barcode data is treated as identificationtext for the Task ID.
Result ID 1: The received barcode data is treated as identifi-cation text for the Result ID.
Keyboard Input* |Target weight value |Task ID 1 | Result ID 1
* Factory setting
Weighing automation
Parameter Explanation ValuesAutomatic zero If Automatic zero is set to Active, the balance automatically
zeros the balance when the weight falls below a predefinedthreshold.
Active | Inactive*
Automatic zerothreshold
Defines the threshold of the option Automatic zero.
This option only appears when the option Automatic zero isactivated.
Numeric
Tare Mode Defines the tare mode.
None: No automatic tare.
Automatic tare: The balance stores automatically the firststable weight as the tare weight.
Pretare: Allows you to enter manually a numerical entry of afixed tare weight.
None* | Automatic tare |Pretare
Automatic tarethreshold
Defines the threshold of the option Tare Mode.
This value defines the minimum weight that must be applied tothe weighing pan so that it is automatically stored as the tareweight. If the weight is below the limits, it is not automaticallytransferred to the tare memory.Instead of entering the weight, the lightest tare container can beplaced on the weighing pan and the button subsequentlypressed. The applied weight is directly taken over as a limit.
This option only appears when the option Tare Mode is set toAutomatic tare.
Numeric

Methods46 Precision Balances
Pretare value Defines a weight value for the pretare function.Instead of entering the value, the respective tare container canbe placed on the weighing pan and the button subsequentlypressed. The weight is directly taken over as pretare value.
This option only appears when the option Tare Mode is set toPretare.
Numeric
* Factory setting
6.1.6.3.8 Print / Export
In this section the label printout options for weighing items can be defined.This section is divided into the following sub-sections:
• Protocol printout and data export• Label printout for task• Label printout for weighing item
Protocol printout and data export
The following parameters can be defined:
Automatic data output
Parameter Explanation ValuesStrip printer Activates/Deactivates the strip printer. The data to be transmitted
to the printer can be defined in the section Template settings.Active | Inactive*
Weight value Activates/Deactivates the weighing value character output overUSB.
Active | Inactive*
* Factory setting
Protocol template for printout
Template settingsThis menu item can be used to define information to appear in the protocols. The extensive menu is dividedinto six submenus in which options for the printout/export can be defined. Information can be enabled ordisabled by activating or deactivating the corresponding checkbox.
Parameter ExplanationHeader andFooter
Defines if a header (with title, date and time) and/or footer (with signature and end line)should be printed/exported.
Balance infor-mation
Defines if the following information about the balance is being printed/exported:
• Balance type• Balance ID• Balance serial number• Firmware version
Quality infor-mation
Defines if quality information such as the used tolerance profile or test information isbeing printed/exported.
Task information Defines if information about the task is being printed/exported.
Weighing iteminformation
Defines if information about the weighing item is being printed/exported.
Result detailinformation
Defines if information relating to the result of the measurement is being printed/exported.
Label printout for task
In this section the settings for the label printout can be defined.
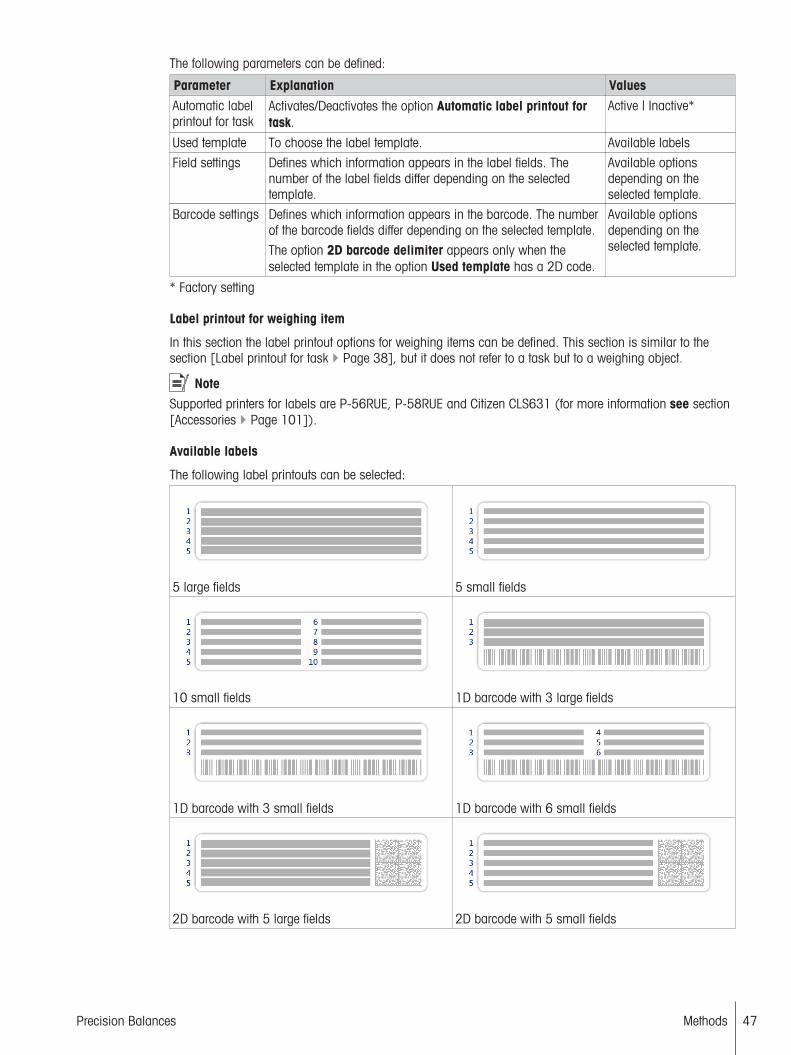
Methods 47Precision Balances
The following parameters can be defined:
Parameter Explanation ValuesAutomatic labelprintout for task
Activates/Deactivates the option Automatic label printout fortask.
Active | Inactive*
Used template To choose the label template. Available labels
Field settings Defines which information appears in the label fields. Thenumber of the label fields differ depending on the selectedtemplate.
Available optionsdepending on theselected template.
Barcode settings Defines which information appears in the barcode. The numberof the barcode fields differ depending on the selected template.
The option 2D barcode delimiter appears only when theselected template in the option Used template has a 2D code.
Available optionsdepending on theselected template.
* Factory setting
Label printout for weighing item
In this section the label printout options for weighing items can be defined. This section is similar to thesection [Label printout for task } Page 38], but it does not refer to a task but to a weighing object.
NoteSupported printers for labels are P-56RUE, P-58RUE and Citizen CLS631 (for more information see section[Accessories } Page 101]).
Available labels
The following label printouts can be selected:
5 large fields 5 small fields
10 small fields 1D barcode with 3 large fields
1D barcode with 3 small fields 1D barcode with 6 small fields
2D barcode with 5 large fields 2D barcode with 5 small fields
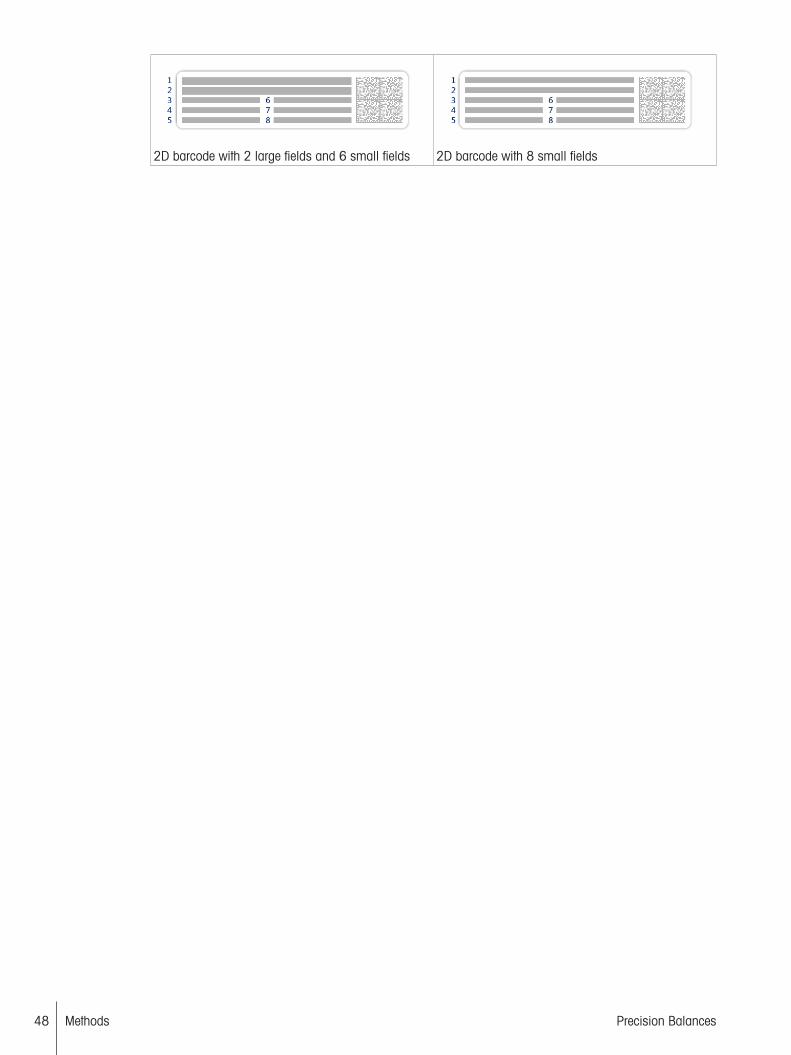
Methods48 Precision Balances
2D barcode with 2 large fields and 6 small fields 2D barcode with 8 small fields

Methods 49Precision Balances
6.1.7 Piece CountingThis section describes the method Piece Counting. The method Piece Counting allows you to determinethe number of pieces put on the weighing pan. It is advantageous if all pieces are of approximately equalweight, since the unit quantity is determined on the basis of average weight. Various methods can be usedto determine the reference unit weight.
6.1.7.1 Creating new method type Piece Counting
A stepwise wizard leads you through the creating process.
1 Open the Methods section.
2 Tap New method in the action bar.
ð The method wizard opens, starting at 1. Method type.
3 Tap Method type and select the method type Piece Counting.
4 Tap Next.5 Follow the stepwise wizard through the creating process.
6 Tap Save method to save the method.
ð The method has been created and appears in the list.
6.1.7.2 Performing Piece Counting
1 Open the Methods section.
2 Select a defined method from the list or define a new method.
3 Tap Start method.
ð The method work screen of the selected method opens. The balance displays the defined targetvalue, the tolerance and the current average weight of one piece.
4 Press to zero the balance.5 If not yet done, enter the average weight for one piece. This serves as reference for the piece counting.6 Place all the pieces on the weighing pan.7 Wait until the weight is stable.
8 Tap Add to protocol.ð The weighing result is being copied to the protocol area.
9 When the weighing process is finished, tap on the right hand side of the screen.ð The protocol section opens.
10 When the weighing process is finished, tap Complete.
ð The window Complete task appears. The result of the task can be printed on a label printer, theprotocol can be printed manually or the result can be exported on an external storage device.
ð The task Piece Counting was successfully completed.
NoteWhen you tap Delete protocol the current weighing process will close without saving any data. Thewindow Complete task always appears after completing the task, even if the results will be saved automat-ically.
6.1.7.3 Method settings
In this section, the settings of the method Piece Counting are being described.
The section Edit method - {0} consists of the following sub-sections:
• General• ID format• Weighing item• Weighing

Methods50 Precision Balances
• Automation• Print / Export
6.1.7.3.1 General
The following parameters can be defined:
Parameter Explanation ValuesMethod name Defines the name of the method. The system copies the method
name that has been defined with the function Method wizard.Text (1...22characters)
Comment The method can be described with a comment. Text (0...128characters)
Lock method Locks the method for other users and from further editing whilerunning.
Active | Inactive*
* Factory setting
NoteThe option Method type has been defined in the wizard and cannot be changed.
6.1.7.3.2 ID format
The following parameters can be defined:
Task IDs
Parameter Explanation ValuesNumber of taskIDs
For a method up to three task identifiers (task IDs), such asSOP Id, Lot Id etc. can be defined.
If the value of the option Number of task IDs is set to 1, theoptions Task ID 1, Description and Prefix/Default valueappear.
0 | 1*
Task ID 1 Defines the value of the task ID.
Manual with default: The value of the task ID can be enteredmanually at method execution time.
Automatic timestamp: The system provides a value createdfrom a prefix with the current date and time appended.
Manual with default* |Automatic timestamp
Description Describes the option Task ID 1. Text (0...32characters)
Default value Defines a default value for the task ID. The value of the task IDcan be changed manually while executing the method.
This option only appears when the option Manual with defaultis activated.
Text (0...32characters)
Prefix Defines a prefix for the task ID.
This option only appears when the option Automatictimestamp is activated.
Text (0...32characters)
* Factory setting
Result IDs
Parameter Explanation ValuesNumber of resultIDs
Defines the number of result IDs.
If the value of the option Number of result IDs is set to 1, theoptions Result ID 1, Description and Prefix/Default valueappear.
0 | 1*

Methods 51Precision Balances
Result ID 1 Defines the value of the result ID.
Manual with default: The value of the result ID can be enteredmanually at method execution time.
Automatic counter: The system provides a value created froma prefix with an unique number (counter) appended.
Manual with default |Automatic counter*
Description Describes the option Result ID 1. Text (0...32characters)
Default value Defines a default value for the result ID. The value of the resultID can be changed manually while executing the method.
This option only appears when the option Manual with defaultis activated.
Text (0...32characters)
Prefix Defines a prefix for the result ID.
This option only appears when the option Automatic counter isactivated.
Text (0...32characters)
* Factory setting
6.1.7.3.3 Weighing item
The following parameters can be defined:
Initial values for weighing
Parameter Explanation ValuesReference PCS Defines a reference unit quantity. This allows you to determine
the reference unit weight with a defined, fixed number of pieces.Numeric (10* |1...10000)
Referenceaverage weight
Defines the average weight for one piece. The average weight ofone piece serves as basis for the piece counting. During taskexecution, the balance calculates the actual number of pieceson the weighing pan based on the measured weight and theaverage weight of one piece.
Numeric
Target weight Defines the target weight. The target weight will be shown in theweighing-in aid of the balance (SmartTrac). When a targetweight including tolerances is defined, the SmartTrac indicatesif the current display weight is in tolerance or not.
Numeric
Tolerance (min.) Defines the under tolerance limit.
This option only appears when the option Target weight isactivated.
Numeric
Tolerance (max.) Defines the upper tolerance limit.
This option only appears when the option Target weight isactivated.
Numeric
* Factory setting
6.1.7.3.4 Weighing
The following parameters can be defined:
Weighing settings
Parameter Explanation ValuesTolerance profile To select a tolerance profile to use in a method.
By setting up tolerance profiles you can ensure weighing tasksmeet defined quality requirements and regulations. In addition,as the same profile is used each time a specific task is carriedout, you can be sure of consistent settings to guaranteetraceable results.
Available toleranceprofiles are model-specific.

Methods52 Precision Balances
Weight capturemode
Defines the behavior when the button to add the result wastapped or the add result was triggered by the automaticweighing result creation.
Stable: The system waits for a stable weight.
Immediate: The system doesn’t wait for a stable weight. Thesystem waits for the defined amount of seconds (Weightcapture delay). After the weight capture delay, the weight valuefrom the weight stream is captured.
Stable* | Immediate
Weight capturedelay
Defines the time in seconds the balance waits for capturing theweight after the button to add the result was tapped or the addresult was triggered by the automatic weighing result creation.
This option only appears when the Weight capture modeImmediate is selected.
Numeric (5 seconds* |0...60 seconds)
* Factory setting
Statistics
Activate statistics If Activate statistics is set to Active, the following statistics willbe calculated:
• Count: Number of items used for the statistics.
• Sum: The displayed values are summed up.
• Minimum: The minimal displayed value.
• Maximum: The maximum displayed value.
• Average: The displayed values are summed up and dividedby the count of values summed up. The result is rounded tothe balance resolution.
• Standard deviation• Relative standard deviationThe statistical values are calculated and visualized as soon asa result is added or updated.
Active | Inactive*
* Factory setting
6.1.7.3.5 Automation
The following parameters can be defined:
Parameter Explanation ValuesBarcode datatarget
If a barcode reader is connected to the balance, this optiondefines how the data is to be processed.
Keyboard Input: The data is written in the currently open inputwindow. If no input window is open, the data is ignored.
Target weight value: The barcode data is interpreted as a valuefor the target weight.
Task ID 1: The received barcode data is treated as identificationtext for the Task ID.
Result ID 1: The received barcode data is treated as identifi-cation text for the Result ID.
Keyboard Input* |Target weight value |Task ID 1 | Result ID 1
* Factory setting

Methods 53Precision Balances
Weighing automation
Parameter Explanation ValuesAutomatic result Automatically generates a weighing result after a threshold is
reached.
None: No automatic result will be generated.
Without sample tare: After a weight value that reached thethreshold is being removed from the weighing pan, the balanceis not being tared.
None* | Withoutsample tare
Automatic resultthreshold
Defines the threshold of the option Automatic result.This option only appears when the option Automatic result isactivated.
Numeric
Weight trigger Defines the behaviour of the option Automatic result threshold.
Exceeding: The weighing result is generated when the weightexceeds the defined threshold.
Falling below: The weighing result is generated when theweight falls below the defined threshold.
This option only appears when the option Automatic result isset to Without sample tare.
Exceeding* | Fallingbelow
Automatic zero If Automatic zero is set to Active, the balance automaticallyzeros the balance when the weight falls below a predefinedthreshold.
Active | Inactive*
Automatic zerothreshold
Defines the threshold of the option Automatic zero.
This option only appears when the option Automatic zero isactivated.
Numeric
Tare Mode Defines the tare mode.
None: No automatic tare.
Automatic tare: The balance stores automatically the firststable weight as the tare weight.
Pretare: Allows you to enter manually a numerical entry of afixed tare weight.
None* | Automatic tare |Pretare
Automatic tarethreshold
Defines the threshold of the option Tare Mode.
This value defines the minimum weight that must be applied tothe weighing pan so that it is automatically stored as the tareweight. If the weight is below the limits, it is not automaticallytransferred to the tare memory.Instead of entering the weight, the lightest tare container can beplaced on the weighing pan and the button subsequentlypressed. The applied weight is directly taken over as a limit.
This option only appears when the option Tare Mode is set toAutomatic tare.
Numeric
Pretare value Defines a weight value for the pretare function.Instead of entering the value, the respective tare container canbe placed on the weighing pan and the button subsequentlypressed. The weight is directly taken over as pretare value.
This option only appears when the option Tare Mode is set toPretare.
Numeric
* Factory setting
6.1.7.3.6 Print / Export
In this section the options for printing and exporting can be defined.

Methods54 Precision Balances
This section is divided into the following sub-sections:
• Protocol printout and data export• Label printout for task• Label printout for weighing item
Protocol printout and data export
In this section the settings for printout protocol and export can be defined.The following parameters can be defined:
Automatic data output
Parameter Explanation ValuesStrip printer Activates/Deactivates the strip printer. The data to be transmitted
to the printer can be defined in the section Template settings.Active | Inactive*
Weight value Activates/Deactivates the weighing value character output overUSB.
Active | Inactive*
* Factory setting
Protocol template for printout
Template settingsThis menu item can be used to define information to appear in the protocols. The extensive menu is dividedinto six submenus in which options for the printout/export can be defined. Information can be enabled ordisabled by activating or deactivating the corresponding checkbox.
Parameter ExplanationHeader andFooter
Defines if a header (with title, date and time) and/or footer (with signature and end line)should be printed/exported.
Balance infor-mation
Defines if the following information about the balance is being printed/exported:
• Balance type• Balance ID• Balance serial number• Firmware version
Quality infor-mation
Defines if quality information such as the used tolerance profile or test information isbeing printed/exported.
Task information Defines if information about the task is being printed/exported.
Weighing iteminformation
Defines if information about the weighing item is being printed/exported.
Result detailinformation
Defines if information relating to the result of the measurement is being printed/exported.
Label printout for task
In this section the settings for the label printout can be defined.The following parameters can be defined:
Parameter Explanation ValuesAutomatic labelprintout for task
Activates/Deactivates the option Automatic label printout fortask.
Active | Inactive*
Used template To choose the label template. Available labels
Field settings Defines which information appears in the label fields. Thenumber of the label fields differ depending on the selectedtemplate.
Available optionsdepending on theselected template.

Methods 55Precision Balances
Barcode settings Defines which information appears in the barcode. The numberof the barcode fields differ depending on the selected template.
The option 2D barcode delimiter appears only when theselected template in the option Used template has a 2D code.
Available optionsdepending on theselected template.
* Factory setting
Label printout for weighing item
In this section the label printout options for weighing items can be defined. This section is similar to thesection Label printout for task, but it does not refer to a task but to a weighing object.
Available labels
The following label printouts can be selected:
5 large fields 5 small fields
10 small fields 1D barcode with 3 large fields
1D barcode with 3 small fields 1D barcode with 6 small fields
2D barcode with 5 large fields 2D barcode with 5 small fields
2D barcode with 2 large fields and 6 small fields 2D barcode with 8 small fields

Methods56 Precision Balances
6.1.8 Using templatesThis section describes how to work with templates.Working with templates simplifies the task and improves the quality of the whole working process. Charac-teristic information such as a certain target weight can be defined in a template and must not be defined forevery single weighing task. This may safe time especially when the weighing process consists of multiplesteps.
The methods General Weighing with templates and Simple formulation with templates are methods inwhich templates are being used.
6.1.8.1 Defining templates
Before a template can be used in the weighing process, it must be defined. There are two ways to definetemplates:• The templates can be defined directly in the method creating process.• The templates can be defined ad-hoc during a task.
NoteDefining templates is a single step in the method creating process. In this section we only describe how tocreate templates. For more information about how defining a method see in the sections of the differentmethods.
6.1.8.1.1 Defining templates in the method defining process
This example describes how to define a template for the method General Weighing with templates.
1 Open the Methods section.
2 Tap New method.
3 Select Method type General Weighing with templates.
4 Step through the method wizard until step 4. Templates.
ð The dialog screen 4. Templates appears, the sample 1 can be defined.
5 Tap Unit to select the template unit.
6 Tap Target weight to define the target weight.
ð The options Tolerance (min.) and Tolerance (max.) appear.
7 Tap Tolerance (min.) to define the lower tolerance.
8 Tap Tolerance (max.) to define the upper tolerance.
9 Tap Next.10 Tap Save method.
ð The method has been created and appears in the method list.
NoteThis example only describes how to create templates for the method General Weighing with templates. Forthe other methods there might be several other options that can be defined.
6.1.8.1.2 Defining templates in a current task
It is also possible to create templates ad-hoc in a current task. This example describes how to createtemplates for the method General Weighing, respectively for the method General Weighing withtemplates.
1 Start the method General Weighing.
2 Perform 3 weighings and add the results to the protocol by tapping Add to protocol.ð The results are being transferred to the Protocol section.
ð Tap on the right side of the screen to open the Protocol section.
3 Tap More.

Methods 57Precision Balances
4 Tap Save as method with templates.
5 Define Method name.
6 Tap OK.
ð The method General Weighing has changed to the method General Weighing with templates. Tap theresults in the section Protocol and define the options for the template.
6.1.8.2 Working with templates
After the template has been created within a method, it can be used in a task.
1 Open the Methods section.
2 Select a method from the list or define a new method.
3 Tap Start method.
ð The method work screen opens. The target weight and the tolerance limits that have been defined inthe template appear.
6.2 TestsIn this section routine tests such as sensitivity tests, repeatability tests or eccentricity tests can be defined,edited and performed. Routine tests can be performed to ensure accurate weighing results according toGWP® or other QM systems. Therefore the tests should be performed in fixed, regular intervals dependingon your QM system and the results should be documented in a traceable way.
Navigation: Methods > Tests
6.2.1 Sensitivity testThe sensitivity of the balance defines the degree of responsiveness to a change of load. In other words thesensitivity defines the minimal variation in mass the balance can detect. Therefore, a mass smaller than thesensitivity of a balance will not be detectable. The sensitivity test allows you to measure the sensitivity usingone or two test points.The following test types are available:
• Sensitivity - 1 test point: To test sensitivity of the balance with one test weight.
• Sensitivity - 2 test points: To test sensitivity of the balance with two test weights.
• Sensitivity - Tare - 1 test point: To test sensitivity of the balance with two test weights. The first testweight (tare weight) is used to simulate a tare container.
• Sensitivity - Tare - 2 test points: To test sensitivity of the balance with three test weights. The first testweight (tare weight) is used to simulate a tare container.
6.2.2 Repeatability testThe repeatability test calculates the mean and standard deviation of a series of measurements with a singletest weight in order to determine the repeatability of the balance.Repeatability is a measure of the ability of a balance to supply the same result in repetitive weighings withone and the same load under the same measurement conditions. During the test, the same load is placedand measured in different parts of the weighing pan. Afterwards, the difference between the measuredweight values is calculated. The spread of the measured results implies the repeatability.
NoteRepeatability is highly affected by the ambient conditions (drafts, temperature fluctuations and vibrations)and also by the skill of the person performing the weighing. Therefore, the series of measurements must becarried out by the same operator, in the same location, under constant ambient conditions and withoutinterruption.The following test types are available:
• Repeatability - 1 test point: To test repeatability of the balance without tare weight.

Methods58 Precision Balances
• Repeatability - Tare - 1 test point: To test repeatability of the balance with tare weight. The first testweight (tare weight) is used to simulate a tare container.
6.2.3 Eccentricity testThe purpose of the eccentricity test is to ensure that every eccentric load deviation (corner-load deviation) iswithin the necessary user SOP tolerances. The corner-load is the deviation of the measurement valuethrough off-center (eccentric) loading. The corner-load increases with the weight of the load and its distancefrom the center of the pan support. If the display remains consistent, even when the same load is placed ondifferent parts of the weighing pan, the balance does not have corner-load deviation.
11
22
33 44
55
The result corresponds to the highest of the four determined eccentric loaddeviations (2–5).
6.2.4 Creating a testBefore a test can be performed, the test has to be created and the test settings have to be defined. A testwizard is leading you step-by-step through the creation process.To create a test proceed as follows:
1 Open the Methods section.
2 Tap Tests.
3 Tap New.
ð The wizard Create new test starts.
4 Select the test type.
5 Work through the process by using the button Next to go to the next step or the button Back to goback to the step before.
For information concerning the settings for the different test types see the following chapters:
• [Sensitivity test settings } Page 58]• [Repeatability test settings } Page 62]• [Eccentricity test settings } Page 65]
6.2.5 Performing a testTo perform a test proceed as follows:
1 Open the Methods section.
2 Tap Tests.
ð The test(s) previously defined appear on the list.
3 Select the test you wish to perform and tap Startð The test sequence starts. Follow the instructions.
ð When the test was successfully finished, the test results can be exported or printed.
6.2.6 Test settings
6.2.6.1 Sensitivity test settings
The following parameters can be defined:

Methods 59Precision Balances
1. Name and type
Parameter Explanation ValuesTest type The test type has been pre-defined and cannot be changed in
this menu.Available test types
Name Defines the name of the test. Text (1...22characters)
Test activated Enables/disables the test. Active* | Inactive
Show prepa-rationinstructions
If activated, a predefined preparatory instruction is displayed inthe test sequence.
Active* | Inactive
Automatic print When activated test results are immediately printed after the testresult has been calculated on the enabled printer.
Active | Inactive*
* Factory setting
2. Test specification
Parameter Explanation ValuesResult calcu-lation
Select whether the nominal weight or the conventional massvalue (CMV) is used for the result calculation.
On nominal weight: Nominal value of a weight with a specificweight class.
On actual weight (CMV): Conventional mass value (CMV) of aweight from the weight calibration certificate.
On nominal weight* |On actual weight(CMV)
* Factory setting
Tare
NoteThis section only appears when the option Test type is set to Sensitivity - Tare - 1 test point or Sensitivity- Tare - 2 test points.
Parameter Explanation ValuesTare name Defines a name for the tare weight. Text (1...22
characters)
Minimum tareweight
Defines the minimum weight for the tare container. The test isonly continued if a tare container with at least this weight isplaced on the balance.
Numeric
Test pointDepending on the selected test, the following options can be defined for one or two test points:
Parameter Explanation ValuesNominal weight Defines the value for the nominal weight. The nominal weight is
defined as the expected weight of the measured object.Numeric
Weight class Defines the weight class according to OIML or ASTM. E1 | E2 | F1 | F2 | M1 |M2 | M3 | ASTM000 |ASTM00 | ASTM0 |ASTM0 | ASTM1 |ASTM2 | ASTM3 |ASTM4 | ASTM5 |ASTM6 | ASTM7 | Own*

Methods60 Precision Balances
Control limit Defines the control limit.The control limit is the error tolerance of a process with respectto its set value. Exceeding the control limit is a violation ofquality requirements and therefore requires a correction of theprocess.Result if the control limit is exceeded: The test failed, thebalance is out of specification.
Numeric | 0.2 %*(0.001 ... 100%)
Warning limit Defines the warning limit.The warning limit is an upper or lower limit, which if exceededor not reached, makes more stringent process monitoringnecessary. The warning limit has to be smaller than the controllimit.Result if the warning limit is exceeded: The test is passed, butthe difference is higher than expected.
Numeric | (0.001 ...100%)
* Factory setting
3. Test weightsIn this section a test weight must be defined. For information concerning the test weight settings see[Defining external test weights } Page 69].
4. Error management
Parameter Explanation ValuesBlock balance Defines the behavior of the balance if a test has failed.
Active: The balance will be blocked after a specified amount offailed tests. In this case, the balance cannot be used anymoreuntil a user with the appropriate right unblocks the balance.
Inactive: Blocking is not activated.
Active | Inactive*
Allowed numberof retries
Defines the maximum allowed retries until the balance will beblocked.
Numeric (3* | 0...9)
* Factory setting
5. Test planning
Parameter Explanation ValuesPlanning type Specifies the schedule for the test to be performed.
Manually: The test must be performed manually.
Daily: The test will be performed automatically every day at thespecified time.
Weekly: The test is performed automatically at least once aweek. Additional days can be selected if required.
Monthly: The test will be performed automatically every monthat the specified day and time.
Quarterly: The test will be performed automatically every threemonths at the specified time.
Annually: The test will be performed automatically once a yearat the specified time.
Manually* | Daily |Weekly | Monthly |Quarterly | Annually
Start time Defines the start time for executing the task. Time
* Factory setting
Notification
NoteThis section does not appear when the option Planning type is set to Manually.

Methods 61Precision Balances
Parameter Explanation Values(x) hours beforetest
Defines the time period before the notification informs about theupcoming expiry date.
Different valuesdepending on theselected frequency(Planning type).
Notification every(x) hours
Defines the time interval before the next notification is issued. Different valuesdepending on theselected frequency(Planning type).
Preferred days
NoteThis option only appears when the option Planning type is set to Weekly.
Parameter Explanation ValuesPreferred days Defines the preferred weekday for the execution of the test. Monday | Tuesday |
Wednesday | Thursday| Friday | Saturday |Sunday
Preferred day for execution
NoteThis section only appears when the option Planning type is set to Monthly.
Day Defines the preferred day for execution of the test. None* | Monday |Tuesday | Wednesday |Thursday | Friday |Saturday | Sunday
Occurrence ofday
Defines the occurrence of a given day of week within a month. First* | Second | Third |Fourth
* Factory setting
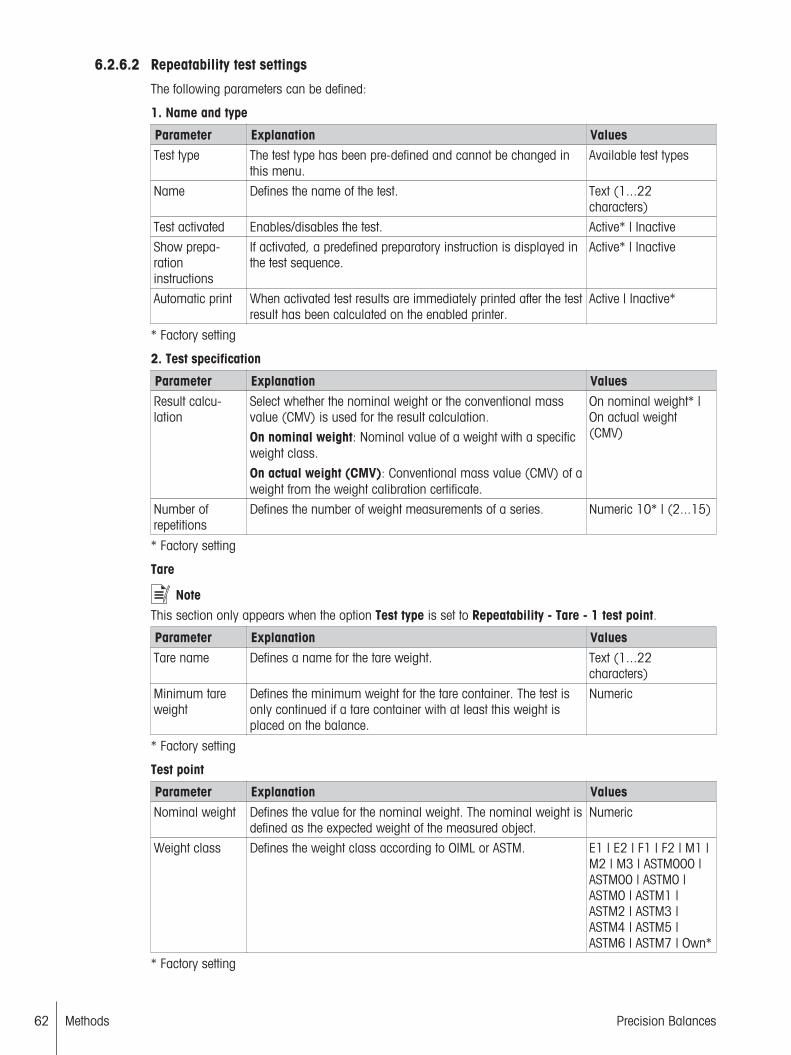
Methods62 Precision Balances
6.2.6.2 Repeatability test settings
The following parameters can be defined:
1. Name and type
Parameter Explanation ValuesTest type The test type has been pre-defined and cannot be changed in
this menu.Available test types
Name Defines the name of the test. Text (1...22characters)
Test activated Enables/disables the test. Active* | Inactive
Show prepa-rationinstructions
If activated, a predefined preparatory instruction is displayed inthe test sequence.
Active* | Inactive
Automatic print When activated test results are immediately printed after the testresult has been calculated on the enabled printer.
Active | Inactive*
* Factory setting
2. Test specification
Parameter Explanation ValuesResult calcu-lation
Select whether the nominal weight or the conventional massvalue (CMV) is used for the result calculation.
On nominal weight: Nominal value of a weight with a specificweight class.
On actual weight (CMV): Conventional mass value (CMV) of aweight from the weight calibration certificate.
On nominal weight* |On actual weight(CMV)
Number ofrepetitions
Defines the number of weight measurements of a series. Numeric 10* | (2...15)
* Factory setting
Tare
NoteThis section only appears when the option Test type is set to Repeatability - Tare - 1 test point.
Parameter Explanation ValuesTare name Defines a name for the tare weight. Text (1...22
characters)
Minimum tareweight
Defines the minimum weight for the tare container. The test isonly continued if a tare container with at least this weight isplaced on the balance.
Numeric
* Factory setting
Test point
Parameter Explanation ValuesNominal weight Defines the value for the nominal weight. The nominal weight is
defined as the expected weight of the measured object.Numeric
Weight class Defines the weight class according to OIML or ASTM. E1 | E2 | F1 | F2 | M1 |M2 | M3 | ASTM000 |ASTM00 | ASTM0 |ASTM0 | ASTM1 |ASTM2 | ASTM3 |ASTM4 | ASTM5 |ASTM6 | ASTM7 | Own*
* Factory setting

Methods 63Precision Balances
Test limits
Parameter Explanation ValuesControl limit Defines the control limit.
The control limit is the error tolerance of a process with respectto its set value. Exceeding the control limit is a violation ofquality requirements and therefore requires a correction of theprocess.Result if the control limit is exceeded: The test failed, thebalance is out of specification.
Numeric | 0.2 %*(0.001 ... 100%)
Warning limit Defines the warning limit.The warning limit is an upper or lower limit, which if exceededor not reached, makes more stringent process monitoringnecessary. The warning limit has to be smaller than the controllimit.Result if the warning limit is exceeded: The test is passed, butthe difference is higher than expected.
Numeric | (0.001 ...100%)
* Factory setting
3. Test weightsIn this section a test weight must be defined. For information concerning the test weight settings see[Defining external test weights } Page 69].
4. Error management
Parameter Explanation ValuesBlock balance Defines the behavior of the balance if a test has failed.
Active: The balance will be blocked after a specified amount offailed tests. In this case, the balance cannot be used anymoreuntil a user with the appropriate right unblocks the balance.
Inactive: Blocking is not activated.
Active | Inactive*
Allowed numberof retries
Defines the maximum allowed retries until the balance will beblocked.
Numeric (3* | 0...9)
* Factory setting
5. Test planning
Parameter Explanation ValuesPlanning type Specifies the schedule for the test to be performed.
Manually: The test must be performed manually.
Daily: The test will be performed automatically every day at thespecified time.
Weekly: The test is performed automatically at least once aweek. Additional days can be selected if required.
Monthly: The test will be performed automatically every monthat the specified day and time.
Quarterly: The test will be performed automatically every threemonths at the specified time.
Annually: The test will be performed automatically once a yearat the specified time.
Manually* | Daily |Weekly | Monthly |Quarterly | Annually
Start time Defines the start time for executing the task. Time
* Factory setting
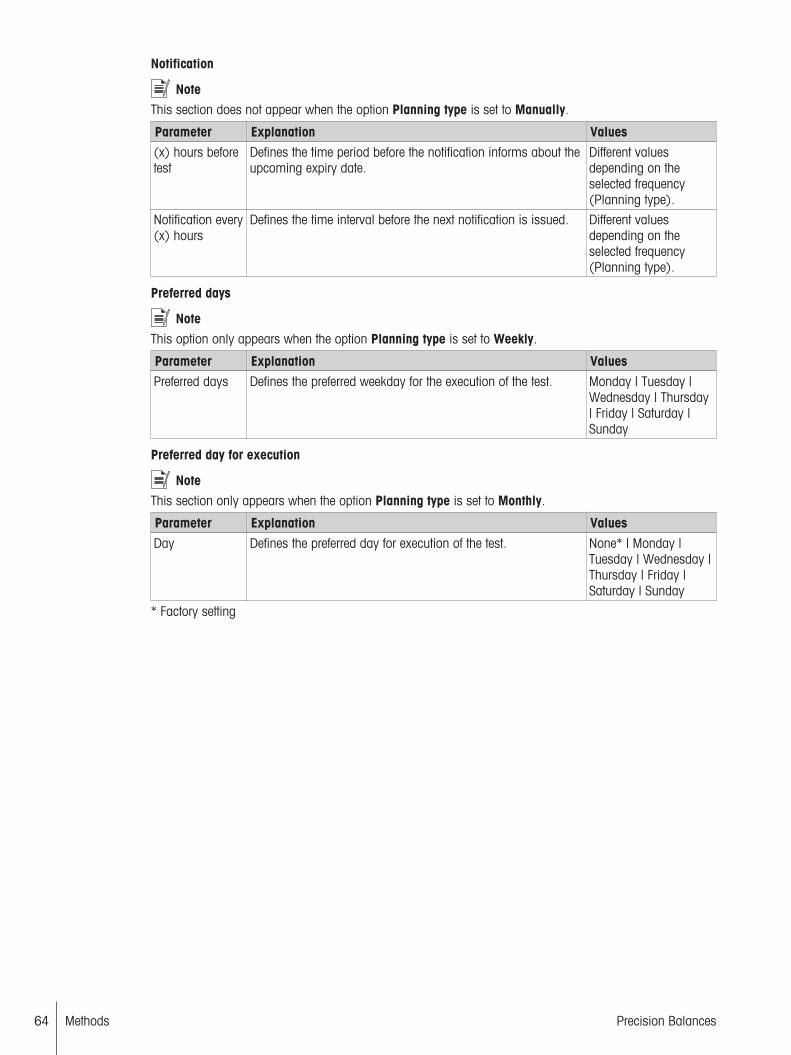
Methods64 Precision Balances
Notification
NoteThis section does not appear when the option Planning type is set to Manually.
Parameter Explanation Values(x) hours beforetest
Defines the time period before the notification informs about theupcoming expiry date.
Different valuesdepending on theselected frequency(Planning type).
Notification every(x) hours
Defines the time interval before the next notification is issued. Different valuesdepending on theselected frequency(Planning type).
Preferred days
NoteThis option only appears when the option Planning type is set to Weekly.
Parameter Explanation ValuesPreferred days Defines the preferred weekday for the execution of the test. Monday | Tuesday |
Wednesday | Thursday| Friday | Saturday |Sunday
Preferred day for execution
NoteThis section only appears when the option Planning type is set to Monthly.
Parameter Explanation ValuesDay Defines the preferred day for execution of the test. None* | Monday |
Tuesday | Wednesday |Thursday | Friday |Saturday | Sunday
* Factory setting
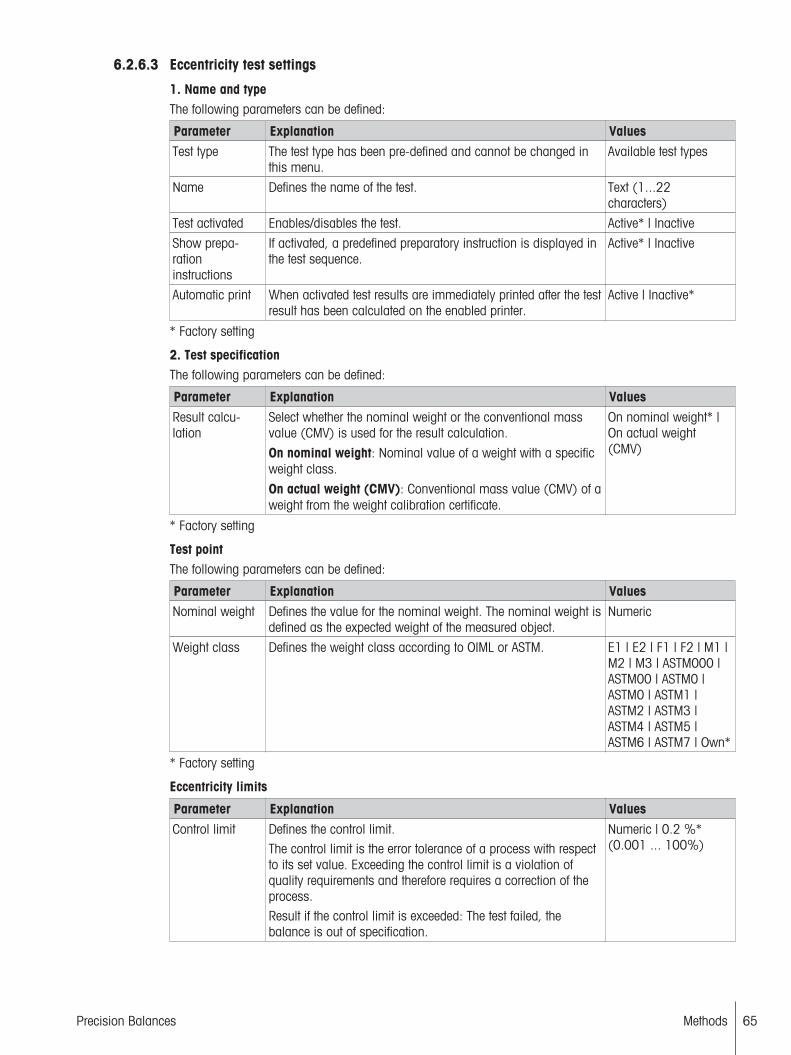
Methods 65Precision Balances
6.2.6.3 Eccentricity test settings
1. Name and typeThe following parameters can be defined:
Parameter Explanation ValuesTest type The test type has been pre-defined and cannot be changed in
this menu.Available test types
Name Defines the name of the test. Text (1...22characters)
Test activated Enables/disables the test. Active* | Inactive
Show prepa-rationinstructions
If activated, a predefined preparatory instruction is displayed inthe test sequence.
Active* | Inactive
Automatic print When activated test results are immediately printed after the testresult has been calculated on the enabled printer.
Active | Inactive*
* Factory setting
2. Test specificationThe following parameters can be defined:
Parameter Explanation ValuesResult calcu-lation
Select whether the nominal weight or the conventional massvalue (CMV) is used for the result calculation.
On nominal weight: Nominal value of a weight with a specificweight class.
On actual weight (CMV): Conventional mass value (CMV) of aweight from the weight calibration certificate.
On nominal weight* |On actual weight(CMV)
* Factory setting
Test pointThe following parameters can be defined:
Parameter Explanation ValuesNominal weight Defines the value for the nominal weight. The nominal weight is
defined as the expected weight of the measured object.Numeric
Weight class Defines the weight class according to OIML or ASTM. E1 | E2 | F1 | F2 | M1 |M2 | M3 | ASTM000 |ASTM00 | ASTM0 |ASTM0 | ASTM1 |ASTM2 | ASTM3 |ASTM4 | ASTM5 |ASTM6 | ASTM7 | Own*
* Factory setting
Eccentricity limits
Parameter Explanation ValuesControl limit Defines the control limit.
The control limit is the error tolerance of a process with respectto its set value. Exceeding the control limit is a violation ofquality requirements and therefore requires a correction of theprocess.Result if the control limit is exceeded: The test failed, thebalance is out of specification.
Numeric | 0.2 %*(0.001 ... 100%)

Methods66 Precision Balances
Warning limit Defines the warning limit.The warning limit is an upper or lower limit, which if exceededor not reached, makes more stringent process monitoringnecessary. The warning limit has to be smaller than the controllimit.Result if the warning limit is exceeded: The test is passed, butthe difference is higher than expected.
Numeric | (0.001 ...100%)
* Factory setting
3. Test weightsIn this section a test weight must be defined. For information concerning the test weight settings see[Defining external test weights } Page 69].
4. Error managementThe following parameters can be defined:
Parameter Explanation ValuesBlock balance Defines the behavior of the balance if a test has failed.
Active: The balance will be blocked after a specified amount offailed tests. In this case, the balance cannot be used anymoreuntil a user with the appropriate right unblocks the balance.
Inactive: Blocking is not activated.
Active | Inactive*
Allowed numberof retries
Defines the maximum allowed retries until the balance will beblocked.
Numeric (3* | 0...9)
* Factory setting
5. Test planningThe following parameters can be defined:
Parameter Explanation ValuesPlanning type Specifies the schedule for the test to be performed.
Manually: The test must be performed manually.
Daily: The test will be performed automatically every day at thespecified time.
Weekly: The test is performed automatically at least once aweek. Additional days can be selected if required.
Monthly: The test will be performed automatically every monthat the specified day and time.
Quarterly: The test will be performed automatically every threemonths at the specified time.
Annually: The test will be performed automatically once a yearat the specified time.
Manually* | Daily |Weekly | Monthly |Quarterly | Annually
Start time Defines the start time for executing the task. Time
* Factory setting
Notification
NoteThis section does not appear when the option Planning type is set to Manually.
The following parameters can be defined:

Methods 67Precision Balances
Parameter Explanation Values(x) hours beforetest
Defines the time period before the notification informs about theupcoming expiry date.
Different valuesdepending on theselected frequency(Planning type).
Notification every(x) hours
Defines the time interval before the next notification is issued. Different valuesdepending on theselected frequency(Planning type).
Preferred days
NoteThis option only appears when the option Planning type is set to Weekly.
The following parameters can be defined:
Parameter Explanation ValuesPreferred days Defines the preferred weekday for the execution of the test. Monday | Tuesday |
Wednesday | Thursday| Friday | Saturday |Sunday
Preferred day for execution
NoteThis section only appears when the option Planning type is set to Monthly.
The following parameters can be defined:
Parameter Explanation ValuesDay Defines the preferred day for execution of the test. None* | Monday |
Tuesday | Wednesday |Thursday | Friday |Saturday | Sunday
* Factory setting
6.3 AdjustmentsThis section describes how internal and external adjustments can be defined and performed.
Navigation: Methods > Adjustments
6.3.1 Internal adjustment
6.3.1.1 Editing internal adjustment
This section describes how to edit the function Internal adjustment. There is no wizard function, the sub-sections must be defined manually.
1 Open the Methods section.
2 Tap Adjustments.
3 Select the defined adjustment.
4 Tap Edit.5 Select Internal adjustment.6 Define the adjustment parameters.ð Tap OK when all the parameters have been defined.

Methods68 Precision Balances
6.3.1.2 Performing internal adjustment
After the internal adjustment has been defined, it can be performed.
1 Open the Methods section.
2 Tap Adjustments.
3 Tap the internal adjustment.
4 Tap Start.ð The function Internal adjustment is being executed.
ð When the adjustment has been completed, an overview of the adjustment results appears.
5 Tap Print to print the results.
6 Tap Finish adjustment.
6.3.1.3 Parameters
1. StrategyThe following parameters can be defined:
Parameter Explanation ValuesStrategy Defines the adjustment method.
When the options No adjustment or External adjustment areactivated other options are not available.
Internal adjustment* |External adjustment |No adjustment
Automatic print When activated adjustment results are immediately printed afterthe result has been calculated on the enabled strip printer.
Active | Inactive*
* Factory setting
2. Specification
Parameter Explanation Values'As found' test At the start of the adjustment sequence, an internal test (sensi-
tivity) is performed to ascertain the actual status. The input testhas automatically started when the adjustment sequence isactivated and the result is displayed and recorded.
Active | Inactive*
'As left' test When the adjustment is complete, an internal test (sensitivity)is performed.
Active | Inactive*
* Factory setting
Limits
NoteThis settings only appear when one of the options 'As found' test or 'As left' test is activated.
Parameter Explanation ValuesControl limit Defines the control limit.
The control limit is the error tolerance of a process with respectto its set value. Exceeding the control limit is a violation ofquality requirements and therefore requires a correction of theprocess.Result if the control limit is exceeded: The adjustment failed, thebalance is out of specification.
Numeric | 0.1 %*(0.001 ... 100%)
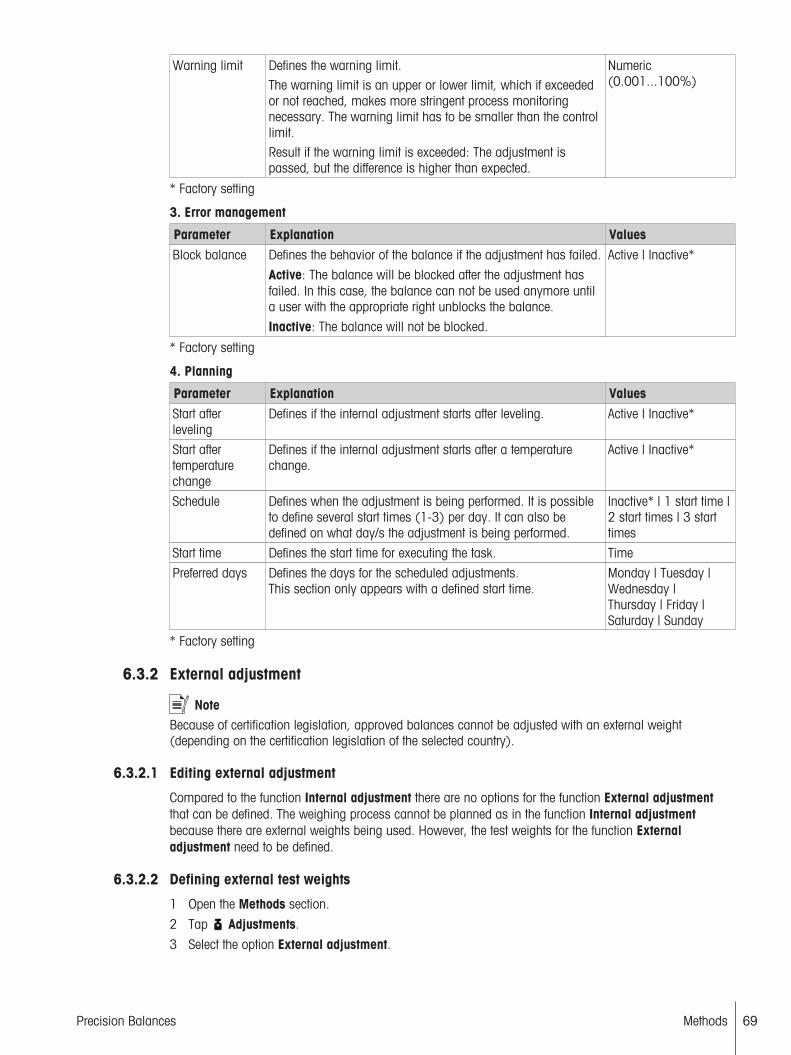
Methods 69Precision Balances
Warning limit Defines the warning limit.The warning limit is an upper or lower limit, which if exceededor not reached, makes more stringent process monitoringnecessary. The warning limit has to be smaller than the controllimit.Result if the warning limit is exceeded: The adjustment ispassed, but the difference is higher than expected.
Numeric(0.001...100%)
* Factory setting
3. Error management
Parameter Explanation ValuesBlock balance Defines the behavior of the balance if the adjustment has failed.
Active: The balance will be blocked after the adjustment hasfailed. In this case, the balance can not be used anymore untila user with the appropriate right unblocks the balance.
Inactive: The balance will not be blocked.
Active | Inactive*
* Factory setting
4. Planning
Parameter Explanation ValuesStart afterleveling
Defines if the internal adjustment starts after leveling. Active | Inactive*
Start aftertemperaturechange
Defines if the internal adjustment starts after a temperaturechange.
Active | Inactive*
Schedule Defines when the adjustment is being performed. It is possibleto define several start times (1-3) per day. It can also bedefined on what day/s the adjustment is being performed.
Inactive* | 1 start time |2 start times | 3 starttimes
Start time Defines the start time for executing the task. Time
Preferred days Defines the days for the scheduled adjustments.This section only appears with a defined start time.
Monday | Tuesday |Wednesday |Thursday | Friday |Saturday | Sunday
* Factory setting
6.3.2 External adjustment
NoteBecause of certification legislation, approved balances cannot be adjusted with an external weight(depending on the certification legislation of the selected country).
6.3.2.1 Editing external adjustment
Compared to the function Internal adjustment there are no options for the function External adjustmentthat can be defined. The weighing process cannot be planned as in the function Internal adjustmentbecause there are external weights being used. However, the test weights for the function Externaladjustment need to be defined.
6.3.2.2 Defining external test weights
1 Open the Methods section.
2 Tap Adjustments.
3 Select the option External adjustment.
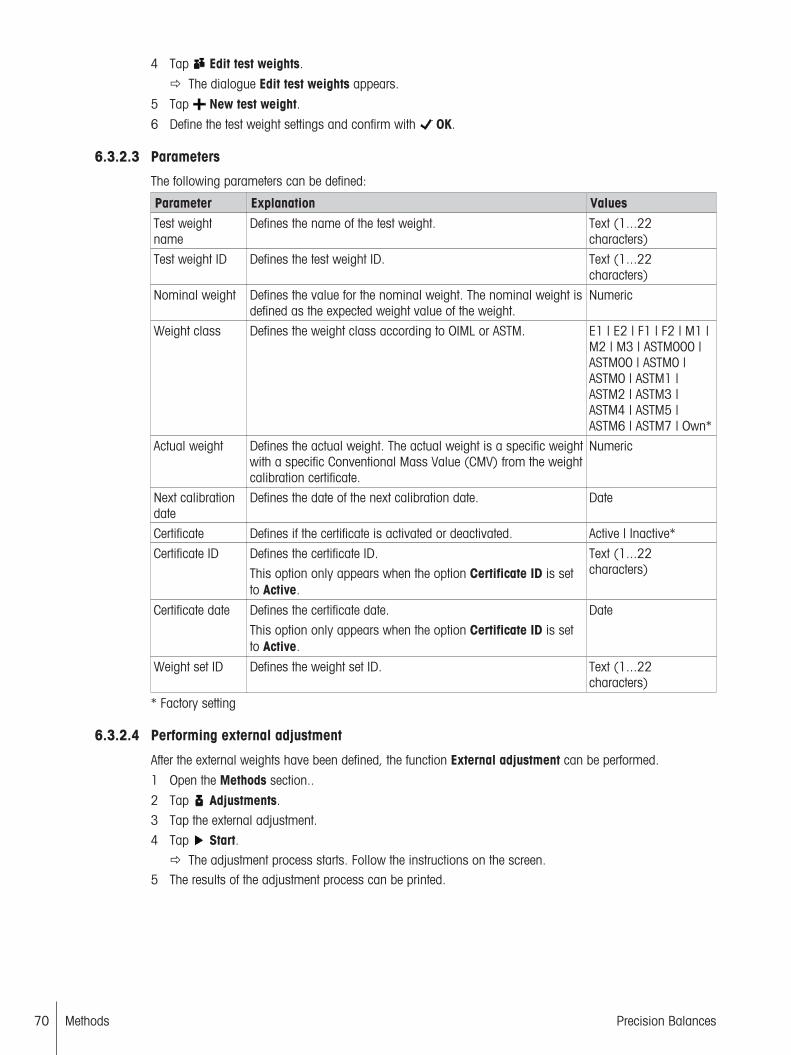
Methods70 Precision Balances
4 Tap Edit test weights.
ð The dialogue Edit test weights appears.
5 Tap New test weight.6 Define the test weight settings and confirm with OK.
6.3.2.3 Parameters
The following parameters can be defined:
Parameter Explanation ValuesTest weightname
Defines the name of the test weight. Text (1...22characters)
Test weight ID Defines the test weight ID. Text (1...22characters)
Nominal weight Defines the value for the nominal weight. The nominal weight isdefined as the expected weight value of the weight.
Numeric
Weight class Defines the weight class according to OIML or ASTM. E1 | E2 | F1 | F2 | M1 |M2 | M3 | ASTM000 |ASTM00 | ASTM0 |ASTM0 | ASTM1 |ASTM2 | ASTM3 |ASTM4 | ASTM5 |ASTM6 | ASTM7 | Own*
Actual weight Defines the actual weight. The actual weight is a specific weightwith a specific Conventional Mass Value (CMV) from the weightcalibration certificate.
Numeric
Next calibrationdate
Defines the date of the next calibration date. Date
Certificate Defines if the certificate is activated or deactivated. Active | Inactive*
Certificate ID Defines the certificate ID.
This option only appears when the option Certificate ID is setto Active.
Text (1...22characters)
Certificate date Defines the certificate date.
This option only appears when the option Certificate ID is setto Active.
Date
Weight set ID Defines the weight set ID. Text (1...22characters)
* Factory setting
6.3.2.4 Performing external adjustment
After the external weights have been defined, the function External adjustment can be performed.
1 Open the Methods section..
2 Tap Adjustments.
3 Tap the external adjustment.
4 Tap Start.ð The adjustment process starts. Follow the instructions on the screen.
5 The results of the adjustment process can be printed.

Balance Menu 71Precision Balances
7 Balance MenuIn the section Balance menu the basic settings of the balance can be defined. These settings are of ageneral character and are not directly related to any specific method. To open the section Balance menu tapthe button on the right hand side of the touch screen.
The section Balance menu is devided into the following sub-sections:
• Leveling aid (see section [Leveling aid } Page 71])
• History (see section [History } Page 71])
• Balance info (see section [Balance info } Page 72])
• Settings (see section [Settings } Page 72])
• Maintenance (see section [Maintenance } Page 78])
7.1 Leveling aidExact horizontal positioning and stable installation are prerequisites for repeatable and accurate weighingresults. With the option Leveling aid the balance can be leveled.
For detailed information see section Leveling the balance.
Navigation: Balance menu > Leveling aid
NoteWhen using an L weighing platform tap Change orientation depending if the terminal is installed on thelong side or on the short side of the weighing platform.
NoteTo guarantee correct weighing results the balance must always be leveled. After leveling the balance aninternal adjustment must be performed.
7.2 HistoryThe balance permanently records the tests and adjustments that are performed. In the section Historydetailed information about performed adjustments, tests and service modifications can be displayed.
Navigation: Balance menu > HistoryThe section History is divided into the following sub-sections:
• Adjustments (see section [Adjustments } Page 71])
• Tests (see section [Tests } Page 71])
• Service (see section [Service } Page 72])
7.2.1 AdjustmentsIn the section Adjustments a list of the performed adjustments is displayed. Tap into the list to displaydetailed information about a specific adjustment. Tap Filter to filter the performed adjustments by adefined date range or by a user ID. Tap Print to print the list or tap Close to return to the sectionHistory.
Navigation: Balance menu > History > Adjustments
7.2.2 TestsIn the section Tests a list of the performed tests is displayed. Tap into the list to display detailed informationabout a specific test. Tap Filter to filter the performed tests by a defined date range or by a user ID. Tap
Print to print the list or tap Close to return to the section History.
Navigation: Balance menu > History > Tests

Balance Menu72 Precision Balances
7.2.3 ServiceIn the section Service a list of executed services is displayed. Tap into the list to display detailed infor-mation about the service action. Tap Filter to filter the performed service actions by a defined date rangeor by technician. Tap Print to print the list of service actions. Tap Close to return to the sectionHistory.
Navigation: Balance menu > History > Service
7.3 Balance infoThe section Balance info shows numerous information about the balance such as version numbers,maintenance information and used licenses.
Navigation: Balance menu > Balance info
7.4 SettingsNavigation: Balance menu > SettingsThe section Settings is divided into the following sub-sections:
• Balance (see section [Balance } Page 72])
• Interfaces (see section [Interfaces } Page 77])
• Devices / Printers (see section [Devices / Printers } Page 78])
• LabX / Services (see section [LabX / Services } Page 78])
NoteThe system settings can be printed by tapping Print the settings in the action bar at the bottom of thescreen.
7.4.1 BalanceNavigation: Balance menu > Settings > BalanceThe section Balance consists of the following sub-sections:
• Weighing instrument (see section [Weighing instrument } Page 72])
• Weighing / Quality (see section [Weighing / Quality } Page 72])
• Date / Time / Language / Format (see section [Date / Time / Language / Format } Page 75])
• Screen / StatusLight / Sound (see section [Screen / StatusLight / Sound } Page 76])
• General (see section [General } Page 76])
7.4.1.1 Weighing instrument
The following parameters can be defined:
Parameter Explanation ValuesLeveling warning Defines the behaviour of the option Leveling warning.
When the option Forced leveling is selected and the balance isout of level, a weighing value cannot be added to the protocol(green button disabled).
Inactive | Optionalleveling* | Forcedleveling
* Factory setting
7.4.1.2 Weighing / Quality
In this section the quality settings for the weighing process can be defined.The following parameters can be defined:

Balance Menu 73Precision Balances
Parameter Explanation ValuesToleranceprofiles
By setting up tolerance profiles you can ensure weighing tasksmeet defined quality requirements and regulations. In addition,as the same profile is used each time a specific task is carriedout, you can be sure of consistent settings to guaranteetraceable results.This option has several sub-sections and is described later inthis chapter.
Automatic weightvalue output
Defines if and in which manner (MT-SICS or HID) the weighingvalues should be exported.This option has several sub-sections and is described later inthis chapter.
GWP Approvedmode
Good Weighing Practice (GWP®) is a program started byMETTLER TOLEDO to help customers operate their weighingequipment in a safe and efficient way. It covers every relevantstep in the life cycle of the instrument and provides clearguidance on how to specify, calibrate and operate weighinginstruments.The GWP Approved mode observes if the following conditionsare given:• Use of an appropriate tolerance profile.• FACT was successful.• Required tests were successful.• Setting up of enforced leveling.• No MinWeigh violation.If all conditions are given, the balance adds the GWP Approvedsign behind every weighing result.
The GWP Approved mode can only be enabled by a METTLERTOLEDO service technician.
Active | Inactive*
Balance recali-bration reminder
Defines whether the user is reminded about the upcomingexipry date of the calibration.
Active* | Inactive
Days in advance Defines the number of days before the reminder informs aboutthe upcoming expiry date.
Days (30 days* |0...400 days)
Action whencalibrationexpired
Defines the action when the calibration has expired.
Block: The balance will be blocked. In this case, the balancecan not be used anymore until a user with the appropriate rightunblocks the balance.
None* | Block
Days beforeblocking
Defines the number of days before the reminder informs aboutthe upcoming blocking of the balance.
Days (0 days* |0...400 days)
Test weightrecalibrationreminder
Defines whether the user is reminded about the upcomingexpiry date of the test weight calibration.
Active | Inactive*
Days in advance Defines the number of days before the reminder informs aboutthe upcoming expiry date.
Days (30 days* |0...400 days)
Service reminder Defines whether the user is reminded about the upcoming duedate of the service.
Active | Inactive*
Days in advance Defines the number of days before the reminder informs aboutthe upcoming due date.
Days (30 days* |0...400 days)
* Factory setting
Tolerance profilesIn this section profiles for weighing settings and tolerances can be defined.

Balance Menu74 Precision Balances
Creating Tolerance profile1 Tap New to create a new profile.
2 Define the profile settings.
3 When all the settings have been defined, tap OK.
ð The system returns to the profile list and the new profile appears on the list.
NoteBy tapping an existing profile, its settings can be changed, the profile can be deleted or be set as defaultvalue. Several profiles can be created. A default profile must be selected.The following parameters can be defined:
Parameter Explanation ValuesName Defines the name of the profile. Text (0...22
characters)
Calibrationcertificate
To select a calibration certificate. Calibration certificate |None*
Environment Defines the environmental conditions of the balance.
Stable: For an environment which is practically free from draftsand vibrations.
Standard: For an average working environment subject tomoderate variations in the ambient conditions.
Unstable: For an environment where the conditions are contin-uously changing.
Stable | Standard |Unstable
Weighing mode Defines the filter settings of the balance.
Universal: For all standard weighing applications.
Sensor mode: Depending on the setting of the ambientconditions, this setting delivers a filtered weighing signal ofvarying strength. The filter has a linear characteristic in relationto time (not adaptive) and is suitable for continuous measuredvalue processing.
Dynamic: The dynamic weighing function determines theaverage weight of a moving sample.
Universal* | Sensormode | Dynamic
Value release Defines how fast a measured value is recognized by thebalance as stable and released.
Very fast: For fast value release with increased repeatability.
Very reliable: For extended settling time with low repeatability.
Very fast* | Fast | Fastand reliable | Reliable |Very reliable
Displayreadability
Determines the readability [d] of the balance display.
1d: Shows the maximum resolution
2d: Shows the final digit in increments of 2
5d: Shows the final digit in increments of 5
10d: 10x smaller resolution
100d: 100x smaller resolution
1000d: 1000x smaller resolution
1d* | 2d | 5d | 10d |100d | 1000d
Zero driftcompensation
The function Zero drift compensation performs ongoingcorrections of deviations from zero which may occur, forexample, as a result of small amounts of dirt on the weighingpan.This menu option is not available for "Approved balances", asthe settings are predefined.
Active* | Inactive

Balance Menu 75Precision Balances
Allowed units Defines the units that are allowed in this tolerance profile. The available valuesare model-specific.
* Factory setting
Automatic weight value outputThe balance can be connected to a PC with a USB cable. That way, the weighing data can be transferred tothe PC and weighing results can be directly transferred into an application (e.g. Microsoft Excel).The following parameters can be defined:
Parameter Explanation ValuesTarget Defines the way the weighing values are transferred.
HID: Transfers simple character streams (e.g. weight values) toa desktop computer without installing additional drivers(comparable to a keyboard). The format of a transferredweighing value can be configured.
MT-SICS: The data is transferred in MT-SICS format (METTLERTOLEDO Standard Interface Command Set). MT-SICS operatesbidirectional, i.e. the balance can also receive confirmations orcommands from the host. A separate reference manual isavailable for MT-SICS.
HID* | MT-SICS | Both
Weight fieldlength
Defines the number of digits that will be transferred into theapplication on the PC, e.g. into an Excel field
Numeric (1* | 0...20)
Sign Defines if the weighing result is displayed with an algebraicsign.
For all values: Each weighing result is preceded by a plus orminus sign.
For negative values: Only negative values are preceded by aminus sign. Positive values are transferred without algebraicsign.
For all values | Fornegative values*
Sign position Defines if the algebraic sign is positioned at the first place of theweight field or directly in front of the weight digits.
Left of weight field | Leftof weight digits*
Decimal delimiter Defines the character used to separate the whole and fractionalpart of a numeric value.
, | .*
Net indicator In the standard output format, net weights are not speciallymarked. To place an N in front of net weights, this function canbe activated. The net symbol is left-justified in the field.
Active | Inactive*
Net indicator fieldlength
Defines the field length of the Net indicator.
This option only appears when the option Net indicator is setto Active.
Numeric (2* | 1 ... 2)
Unit Defines if a weighing unit is being shown in the weighing field. Active* | Inactive
Unit field length Defines the field length of the weighing unit.
This option only appears when the option Unit is set to Active.
Numeric (1* | 1...6)
Field delimiter Defines a character or sequence of characters to separate datafields.
No* | TAB | , | ;
End of linecharacter
Defines a character or sequence of characters signifying theend of a line.
CRLF* | CR | LF | TAB |No | Enter
* Factory setting
7.4.1.3 Date / Time / Language / Format
The following parameters can be defined:

Balance Menu76 Precision Balances
Parameter Explanation ValuesDate Defines the current date. Use the pick buttons Increment/
Decrement to define the date.Date
Time Defines the current time.Use the pick buttons Increment/Decrement to define the time.
Time
Language Defines the language of the interface navigation. English | Deutsch |Français | 日本語 | 中文 | Español | Italiano |Русский | Português |Polski | Magyar |Čeština
Time zone To select a time zone. see list on the screen
Date format To select the date format. D.MMM.YYYY* | MMMD YYYY | DD.MM.YYYY |MM/DD/YYYY | YYYY-MM-DD | YYYY/MM/DD
Time format To select the time format. 24:MM* | 12:MM |24.MM | 12.MM
Keyboard layout Defines the language of the keyboard layout. English | German |French | Spanish |Japanese | SimplifiedChinese | Russian |Czech | Polish |Hungarian
* Factory setting
7.4.1.4 Screen / StatusLight / Sound
The following parameters can be defined:
Parameter Explanation ValuesScreenbrightness
Defines the brightness of the display. 20 % | 40 % | 60 % |80 %* | 100 %
Sound volume Defines the volume of the terminal sound. Inactive | 20 % | 40 %| 60 %* | 80 % |100 %
Sound on keypress
Defines if there is a sound when a key is pressed. Active* | Inactive
Sound on info Defines if there is a sound when an information appears on thescreen.
Active* | Inactive
Sound onwarning
Defines is there is a sound when a warning appears on thescreen.
Active* | Inactive
Sound on error Defines is there is a sound in case of an error. Active* | Inactive
StatusLight Activates/deactivates the status light. Active* | Active (withoutgreen light) | Inactive
StatusLightbrightness
Defines the brightness of the activated status light.
This option appears only when the option StatusLight is set toActive or Active (without green light).
20 % | 40 % | 60 %* |80 % | 100 %
* Factory setting
7.4.1.5 General
The following parameters can be defined:
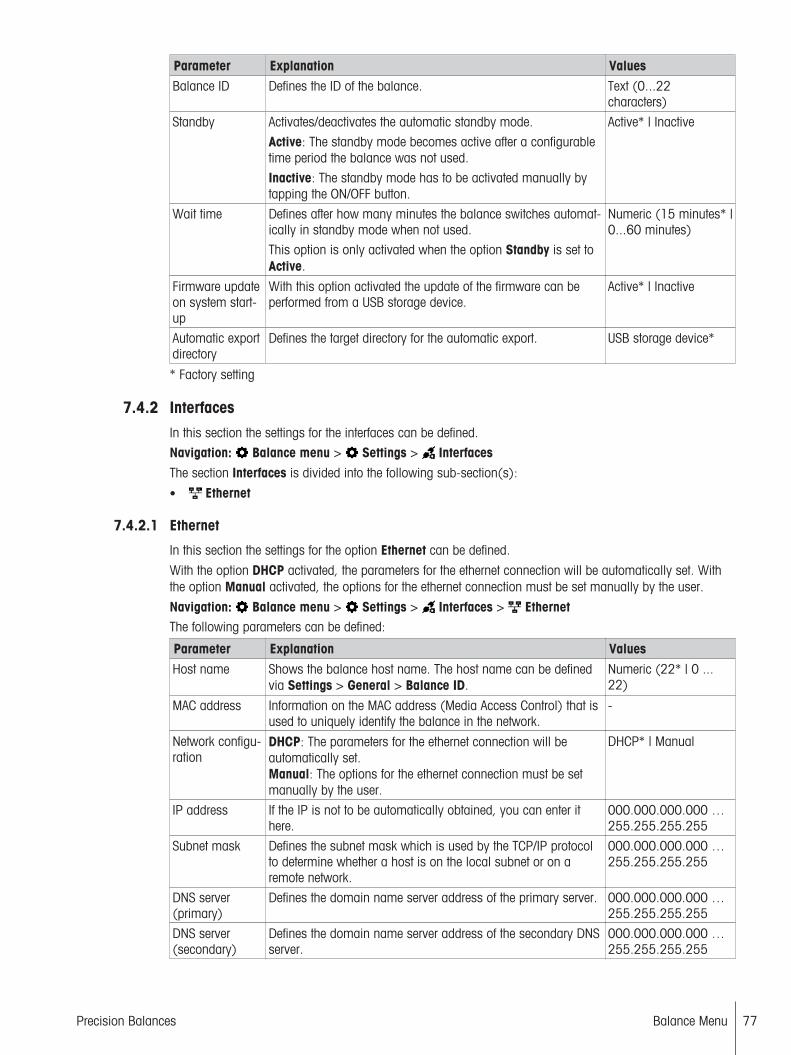
Balance Menu 77Precision Balances
Parameter Explanation ValuesBalance ID Defines the ID of the balance. Text (0...22
characters)
Standby Activates/deactivates the automatic standby mode.
Active: The standby mode becomes active after a configurabletime period the balance was not used.
Inactive: The standby mode has to be activated manually bytapping the ON/OFF button.
Active* | Inactive
Wait time Defines after how many minutes the balance switches automat-ically in standby mode when not used.
This option is only activated when the option Standby is set toActive.
Numeric (15 minutes* |0...60 minutes)
Firmware updateon system start-up
With this option activated the update of the firmware can beperformed from a USB storage device.
Active* | Inactive
Automatic exportdirectory
Defines the target directory for the automatic export. USB storage device*
* Factory setting
7.4.2 InterfacesIn this section the settings for the interfaces can be defined.
Navigation: Balance menu > Settings > InterfacesThe section Interfaces is divided into the following sub-section(s):
• Ethernet
7.4.2.1 Ethernet
In this section the settings for the option Ethernet can be defined.
With the option DHCP activated, the parameters for the ethernet connection will be automatically set. Withthe option Manual activated, the options for the ethernet connection must be set manually by the user.
Navigation: Balance menu > Settings > Interfaces > EthernetThe following parameters can be defined:
Parameter Explanation ValuesHost name Shows the balance host name. The host name can be defined
via Settings > General > Balance ID.Numeric (22* | 0 ...22)
MAC address Information on the MAC address (Media Access Control) that isused to uniquely identify the balance in the network.
-
Network configu-ration
DHCP: The parameters for the ethernet connection will beautomatically set. Manual: The options for the ethernet connection must be setmanually by the user.
DHCP* | Manual
IP address If the IP is not to be automatically obtained, you can enter ithere.
000.000.000.000 …255.255.255.255
Subnet mask Defines the subnet mask which is used by the TCP/IP protocolto determine whether a host is on the local subnet or on aremote network.
000.000.000.000 …255.255.255.255
DNS server(primary)
Defines the domain name server address of the primary server. 000.000.000.000 …255.255.255.255
DNS server(secondary)
Defines the domain name server address of the secondary DNSserver.
000.000.000.000 …255.255.255.255
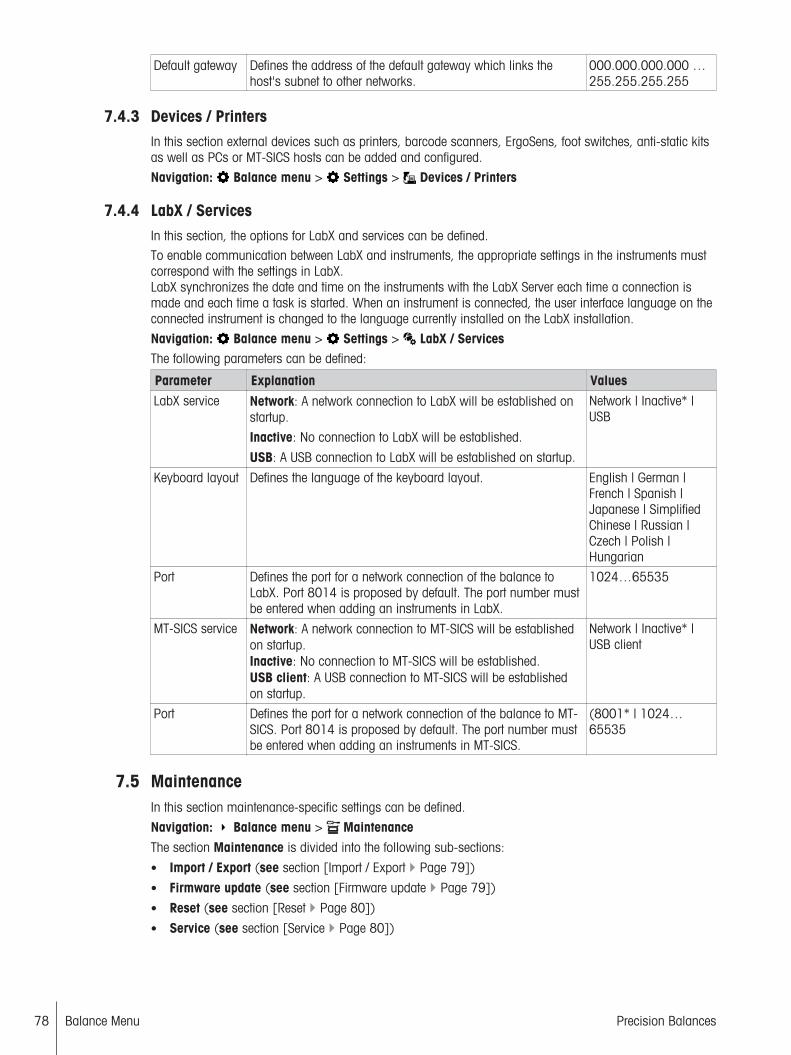
Balance Menu78 Precision Balances
Default gateway Defines the address of the default gateway which links thehost's subnet to other networks.
000.000.000.000 …255.255.255.255
7.4.3 Devices / PrintersIn this section external devices such as printers, barcode scanners, ErgoSens, foot switches, anti-static kitsas well as PCs or MT-SICS hosts can be added and configured.
Navigation: Balance menu > Settings > Devices / Printers
7.4.4 LabX / ServicesIn this section, the options for LabX and services can be defined.To enable communication between LabX and instruments, the appropriate settings in the instruments mustcorrespond with the settings in LabX.LabX synchronizes the date and time on the instruments with the LabX Server each time a connection ismade and each time a task is started. When an instrument is connected, the user interface language on theconnected instrument is changed to the language currently installed on the LabX installation.
Navigation: Balance menu > Settings > LabX / ServicesThe following parameters can be defined:
Parameter Explanation ValuesLabX service Network: A network connection to LabX will be established on
startup.
Inactive: No connection to LabX will be established.
USB: A USB connection to LabX will be established on startup.
Network | Inactive* |USB
Keyboard layout Defines the language of the keyboard layout. English | German |French | Spanish |Japanese | SimplifiedChinese | Russian |Czech | Polish |Hungarian
Port Defines the port for a network connection of the balance toLabX. Port 8014 is proposed by default. The port number mustbe entered when adding an instruments in LabX.
1024…65535
MT-SICS service Network: A network connection to MT-SICS will be establishedon startup.Inactive: No connection to MT-SICS will be established.USB client: A USB connection to MT-SICS will be establishedon startup.
Network | Inactive* |USB client
Port Defines the port for a network connection of the balance to MT-SICS. Port 8014 is proposed by default. The port number mustbe entered when adding an instruments in MT-SICS.
(8001* | 1024…65535
7.5 MaintenanceIn this section maintenance-specific settings can be defined.
Navigation: Balance menu > MaintenanceThe section Maintenance is divided into the following sub-sections:
• Import / Export (see section [Import / Export } Page 79])
• Firmware update (see section [Firmware update } Page 79])
• Reset (see section [Reset } Page 80])
• Service (see section [Service } Page 80])
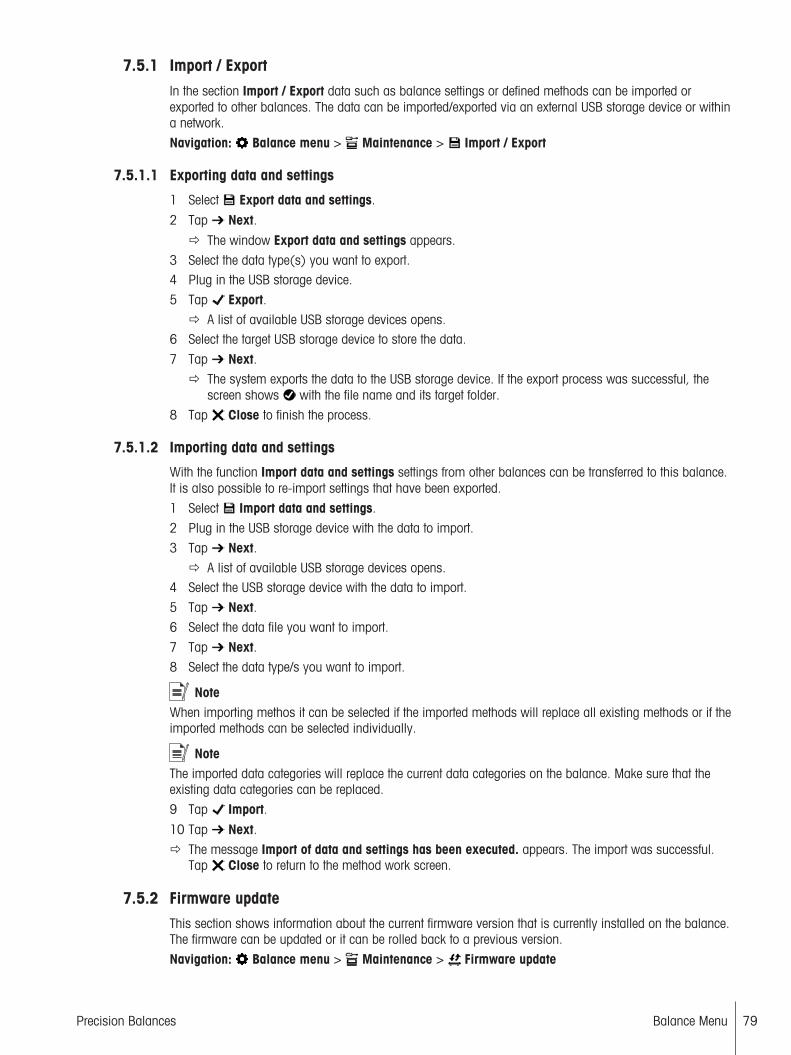
Balance Menu 79Precision Balances
7.5.1 Import / ExportIn the section Import / Export data such as balance settings or defined methods can be imported orexported to other balances. The data can be imported/exported via an external USB storage device or withina network.
Navigation: Balance menu > Maintenance > Import / Export
7.5.1.1 Exporting data and settings
1 Select Export data and settings.
2 Tap Next.ð The window Export data and settings appears.
3 Select the data type(s) you want to export.4 Plug in the USB storage device.
5 Tap Export.ð A list of available USB storage devices opens.
6 Select the target USB storage device to store the data.
7 Tap Next.ð The system exports the data to the USB storage device. If the export process was successful, the
screen shows with the file name and its target folder.
8 Tap Close to finish the process.
7.5.1.2 Importing data and settings
With the function Import data and settings settings from other balances can be transferred to this balance.It is also possible to re-import settings that have been exported.
1 Select Import data and settings.
2 Plug in the USB storage device with the data to import.
3 Tap Next.ð A list of available USB storage devices opens.
4 Select the USB storage device with the data to import.
5 Tap Next.6 Select the data file you want to import.
7 Tap Next.8 Select the data type/s you want to import.
NoteWhen importing methos it can be selected if the imported methods will replace all existing methods or if theimported methods can be selected individually.
NoteThe imported data categories will replace the current data categories on the balance. Make sure that theexisting data categories can be replaced.
9 Tap Import.10 Tap Next.ð The message Import of data and settings has been executed. appears. The import was successful.
Tap Close to return to the method work screen.
7.5.2 Firmware updateThis section shows information about the current firmware version that is currently installed on the balance.The firmware can be updated or it can be rolled back to a previous version.
Navigation: Balance menu > Maintenance > Firmware update

Balance Menu80 Precision Balances
NOTICEFirmware update causes data loss.After a firmware update all saved data and user settings will be deleted. Save all relevantdata before the update.
7.5.2.1 Updating the firmware
In this section the balance firmware can be updated. Select Update firmware and tap Next. An updatewizard will lead you stepwise through the whole updating process.
7.5.2.2 Restoring the firmware to the previous version
In this section the current firmware version can be rolled back to the previous software version. SelectRestore the firmware to the previous version. and tap Next. This process is guided by a stepwisewizard.
7.5.3 ResetIn this section the balance firmware can be reset to the factory state.
Navigation: Balance menu > Maintenance > Reset
NOTICEReset causes data lossResetting the balance will delete all user application data and set the user configurationback to factory state.
NoteThe history data for Changes, Tests and Adjustments will not be affected by resetting the balance. If youwant to delete these data, activate the option Also delete change history, test and adjustment history.
7.5.3.1 Resetting the balance
1 To delete the change history data and the data for test history and adjustment history, activate the optionAlso delete change history, test and adjustment history.
2 Tap Next.ð The window Reset balance opens and warns that some data will be lost by resetting the balance.
3 Tap Reset balance.
ð The balance firmware restarts in factory state.
7.5.4 ServiceIn this section the settings for the service menu can be defined.
Navigation: Balance menu > Maintenance > Service
7.5.4.1 View adjustment state
In this section a list of adjustment states appears.
7.5.4.2 Save support file
In this section support files can be saved on external USB storage devices.
7.5.4.3 Import log configuration
To import log configuration data from an external USB storage device.

Maintenance 81Precision Balances
8 Maintenance
8.1 CleaningWe recommend periodically cleaning the draft shield, the weighing platform, and the terminal. For cleaningthe weighing chamber use the brush supplied with it. The maintenance interval depends on your standardoperating procedure (SOP). The balance is made of high-quality, resistant materials and can therefore becleaned with a commercially available, mild cleaning agent.
WARNINGDanger of death or serious injury due to electric shock!Contact with parts that contain a live current can lead to injury and death. If the devicecannot be shut down in an emergency situation, people can be injured or the device canbe damaged.1 Disconnect the device from the power supply prior to cleaning and maintenance.2 Only use METTLER TOLEDO power cables, if these need to be replaced.3 Make sure that no liquid enters the device or AC/DC adapter.4 Do not open the device or AC/DC adapter. These do not contain any user-serviceable
parts.
NOTICEDamage of the balance due to the use of inappropriate cleaning agents!− On no account use cleaning agents which contain solvents or abrasive ingredients, as
this can result in damage to the terminal overlay.
NotePlease contact your METTLER TOLEDO dealer for details of the available service options. Regular servicingby an authorized service engineer ensures constant accuracy for years to come and prolongs the life of yourbalance.
8.2 DisposalIn conformance with the European Directive 2012/19/EU on Waste Electrical andElectronic Equipment (WEEE) this device may not be disposed of in domestic waste. Thisalso applies to countries outside the EU, per their specific requirements. Please dispose of this product in accordance with local regulations at the collecting pointspecified for electrical and electronic equipment. If you have any questions, please contactthe responsible authority or the distributor from which you purchased this device. Shouldthis device be passed on to other parties (for private or professional use), the content ofthis regulation must also be related.Thank you for your contribution to environmental protection.
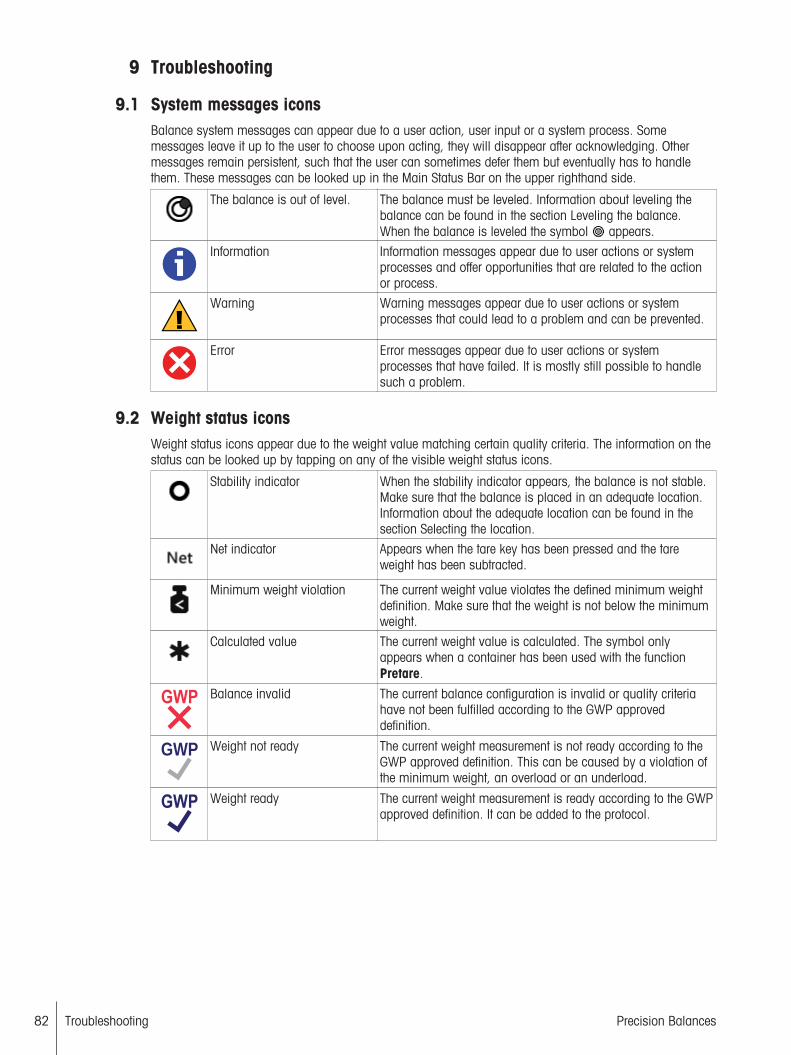
Troubleshooting82 Precision Balances
9 Troubleshooting
9.1 System messages iconsBalance system messages can appear due to a user action, user input or a system process. Somemessages leave it up to the user to choose upon acting, they will disappear after acknowledging. Othermessages remain persistent, such that the user can sometimes defer them but eventually has to handlethem. These messages can be looked up in the Main Status Bar on the upper righthand side.
The balance is out of level. The balance must be leveled. Information about leveling thebalance can be found in the section Leveling the balance.When the balance is leveled the symbol appears.
Information Information messages appear due to user actions or systemprocesses and offer opportunities that are related to the actionor process.
Warning Warning messages appear due to user actions or systemprocesses that could lead to a problem and can be prevented.
Error Error messages appear due to user actions or systemprocesses that have failed. It is mostly still possible to handlesuch a problem.
9.2 Weight status iconsWeight status icons appear due to the weight value matching certain quality criteria. The information on thestatus can be looked up by tapping on any of the visible weight status icons.
Stability indicator When the stability indicator appears, the balance is not stable.Make sure that the balance is placed in an adequate location.Information about the adequate location can be found in thesection Selecting the location.
Net indicator Appears when the tare key has been pressed and the tareweight has been subtracted.
Minimum weight violation The current weight value violates the defined minimum weightdefinition. Make sure that the weight is not below the minimumweight.
Calculated value The current weight value is calculated. The symbol onlyappears when a container has been used with the functionPretare.
GWP Balance invalid The current balance configuration is invalid or quality criteriahave not been fulfilled according to the GWP approveddefinition.
GWP Weight not ready The current weight measurement is not ready according to theGWP approved definition. This can be caused by a violation ofthe minimum weight, an overload or an underload.
GWP Weight ready The current weight measurement is ready according to the GWPapproved definition. It can be added to the protocol.

Troubleshooting 83Precision Balances
9.3 What to do if...?
Symptom CountermeasureThe following symbol appearson the screen:
Underload• Check if the weighing pan is positioned correctly.
The following symbol appearson the screen:
Overload• Reduce the sample weight.
The screen remains dark afterswitching on the balance.
• Ensure that the terminal is correctly connected to the weighingplatform.
• Ensure that the balance in correctly connected to the power supply.• If the problem persists, contact a METTLER TOLEDO representative.
The balance cannot belevelled.
• Ensure that the terminal connection cable is not squeezed between thelevelling foot and the bottom of the weighing platform.
• If the problem persists, contact a METTLER TOLEDO representative.
The weighing pan does slightlymove.
• Ensure that the weighing pan is correctly placed on the weighingplatform.
• When using a SmartPan weighing pan make sure that the SmartPanweighing pan is locked.
An external device doesn'twork.
• Ensure that the device is correctly connected.• Ensure that the device is correctly configured in the system settings of
the balance.• Ensure that the settings of the device are correctly configured.• If the problem persists, contact a METTLER TOLEDO representative.

Technical Data84 Precision Balances
10 Technical DataFCC RulesThis device complies with Industry Canada licence-exempt RSS standard(s) and part 15 of the FCC Rules.Operation is subject to the following two conditions: (1) this device may not cause interference, and (2)this device must accept any interference, including interference that may cause undesired operation of thedevice.Changes or modifications not expressly approved by the party responsible for compliance could void theuser's authority to operate the equipment.This equipment has been tested and found to comply with the limits for a Class A digital device, pursuant topart 15 of the FCC Rules. These limits are designed to provide reasonable protection against harmful inter-ference when the equipment is operated in a commercial environment. This equipment generates, uses, andcan radiate radio frequency energy and, if not installed and used in accordance with the instruction manual,may cause harmful interference to radio communications. Operation of this equipment in a residential areais likely to cause harmful interference in which case the user will be required to correct the interference at hisown expense.
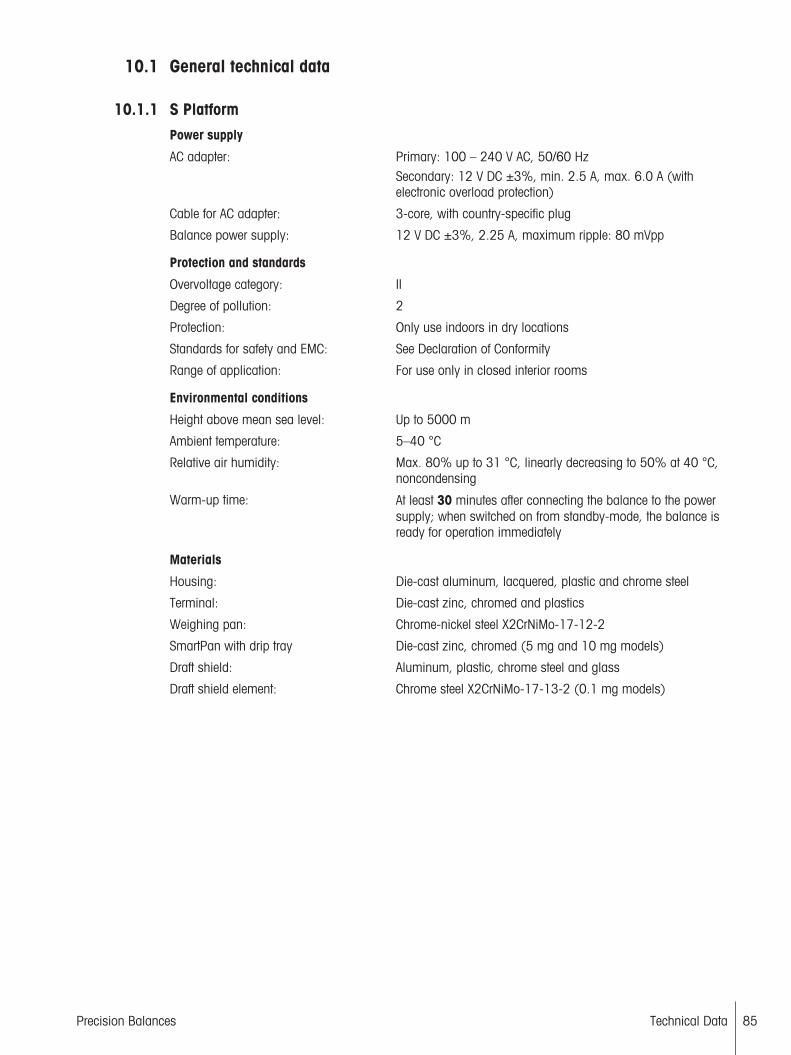
Technical Data 85Precision Balances
10.1 General technical data
10.1.1 S PlatformPower supply
AC adapter: Primary: 100 – 240 V AC, 50/60 HzSecondary: 12 V DC ±3%, min. 2.5 A, max. 6.0 A (withelectronic overload protection)
Cable for AC adapter: 3-core, with country-specific plug
Balance power supply: 12 V DC ±3%, 2.25 A, maximum ripple: 80 mVpp
Protection and standards
Overvoltage category: II
Degree of pollution: 2
Protection: Only use indoors in dry locations
Standards for safety and EMC: See Declaration of Conformity
Range of application: For use only in closed interior rooms
Environmental conditions
Height above mean sea level: Up to 5000 m
Ambient temperature: 5–40 °C
Relative air humidity: Max. 80% up to 31 °C, linearly decreasing to 50% at 40 °C,noncondensing
Warm-up time: At least 30 minutes after connecting the balance to the powersupply; when switched on from standby-mode, the balance isready for operation immediately
Materials
Housing: Die-cast aluminum, lacquered, plastic and chrome steel
Terminal: Die-cast zinc, chromed and plastics
Weighing pan: Chrome-nickel steel X2CrNiMo-17-12-2
SmartPan with drip tray Die-cast zinc, chromed (5 mg and 10 mg models)
Draft shield: Aluminum, plastic, chrome steel and glass
Draft shield element: Chrome steel X2CrNiMo-17-13-2 (0.1 mg models)
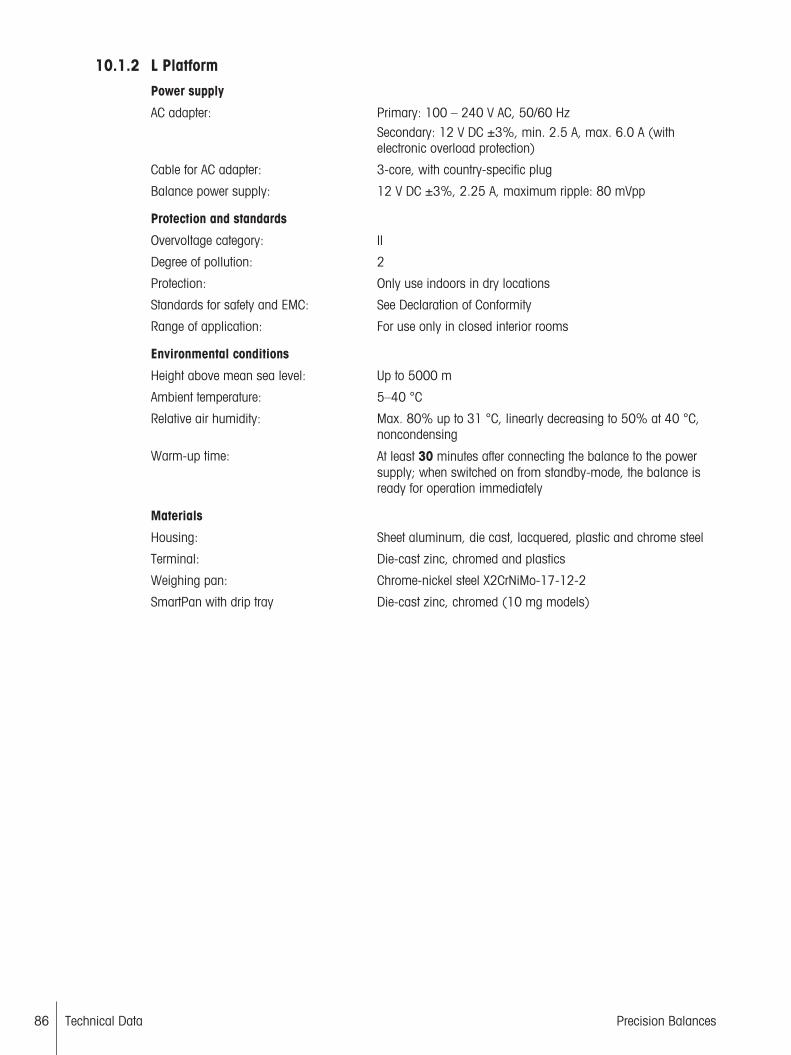
Technical Data86 Precision Balances
10.1.2 L PlatformPower supply
AC adapter: Primary: 100 – 240 V AC, 50/60 HzSecondary: 12 V DC ±3%, min. 2.5 A, max. 6.0 A (withelectronic overload protection)
Cable for AC adapter: 3-core, with country-specific plug
Balance power supply: 12 V DC ±3%, 2.25 A, maximum ripple: 80 mVpp
Protection and standards
Overvoltage category: II
Degree of pollution: 2
Protection: Only use indoors in dry locations
Standards for safety and EMC: See Declaration of Conformity
Range of application: For use only in closed interior rooms
Environmental conditions
Height above mean sea level: Up to 5000 m
Ambient temperature: 5–40 °C
Relative air humidity: Max. 80% up to 31 °C, linearly decreasing to 50% at 40 °C,noncondensing
Warm-up time: At least 30 minutes after connecting the balance to the powersupply; when switched on from standby-mode, the balance isready for operation immediately
Materials
Housing: Sheet aluminum, die cast, lacquered, plastic and chrome steel
Terminal: Die-cast zinc, chromed and plastics
Weighing pan: Chrome-nickel steel X2CrNiMo-17-12-2
SmartPan with drip tray Die-cast zinc, chromed (10 mg models)

Technical Data 87Precision Balances
10.2 Model-specific data
10.2.1 S platform
10.2.1.1 Readability 1 mg, with MagicCube Draft Shield and SmartPan
XSR303S XSR603S XSR1203S
Limit Values
Maximum capacity 310 g 610 g 1210 g
Readability 1 mg 1 mg 1 mg
Maximum capacity in fine range - - -
Readability in fine range - - -
Tare range (from…to) 0 … 310 g 0 … 610 g 0 … 1210 g
Repeatability (sd) 0.9 mg (100 g) 0.9 mg (200 g) 0.8 mg (500 g)
Repeatability in fine range (sd) - - -
Linearity deviation 2 mg (50 g) 2 mg (200 g) 2 mg (200 g)
Eccentricity deviation (test load) 2) 3 mg (100 g) 3 mg (200 g) 3 mg (500 g)
Sensitivity offset (at nominal load) 1) 6 mg (300 g) 4.5 mg (600 g) 6 mg (1.2 kg)
Sensitivity temperature drift 3) 0.0005 %/°C 0.0002 %/°C 0.0002 %/°C
Sensitivity stability 3) 0.0025 %/a 0.001 %/a 0.001 %/a
Typical values
Repeatability (sd) 0.5 mg 0.5 mg 0.4 mg
Repeatability in fine range (sd) - - -
Linearity deviation 0.6 mg 0.6 mg 0.6 mg
Eccentricity deviation (test load) 2) 1 mg (100 g) 1 mg (200 g) 1 mg (500 g)
Sensitivity offset (at nominal load) 1) 1.2 mg (300 g) 1.2 mg (600 g) 1.5 mg (1.2 kg)
USP minimum sample weight (k=2, U=0.10%) 1 g 1 g 820 mg
USP minimum sample weight in fine range (k=2,U=0.10%)
- - -
Minimum sample weight (k=2, U=1%) 100 mg 100 mg 82 mg
Minimum sample weight in fine range (k=2, U=1%) - - -
Settling time 1.5 s 1.5 s 1.5 s
Settling time in fine range - - -
Dimensions & other specifications
Balance dimensions (W × D × H) 197 × 391 × 281 mm 197 × 391 × 281 mm 197 × 391 × 281 mm
Weighing pan dimensions (W × D) 127 × 127 mm 127 × 127 mm 127 × 127 mm
Usable height of draft shield 175 mm 175 mm 175 mm
Weight of the balance 7 kg 7 kg 7 kg
Weights for routine testing
OIML CarePac #11123001 #11123007 #11123008
Weights 200 g F2, 10 g F1 500 g F2, 20 g F1 1000 g F2, 50 g F1
ASTM CarePac #11123101 #11123107 #11123108
Weights 200 g 1, 10 g 1 500 g 1, 20 g 1 1000 g 1, 50 g 1
sd = Standard deviation
1) After adjustment with internal reference weight 2) According to OIML R763) In the temperature range 10 ... 30 °C
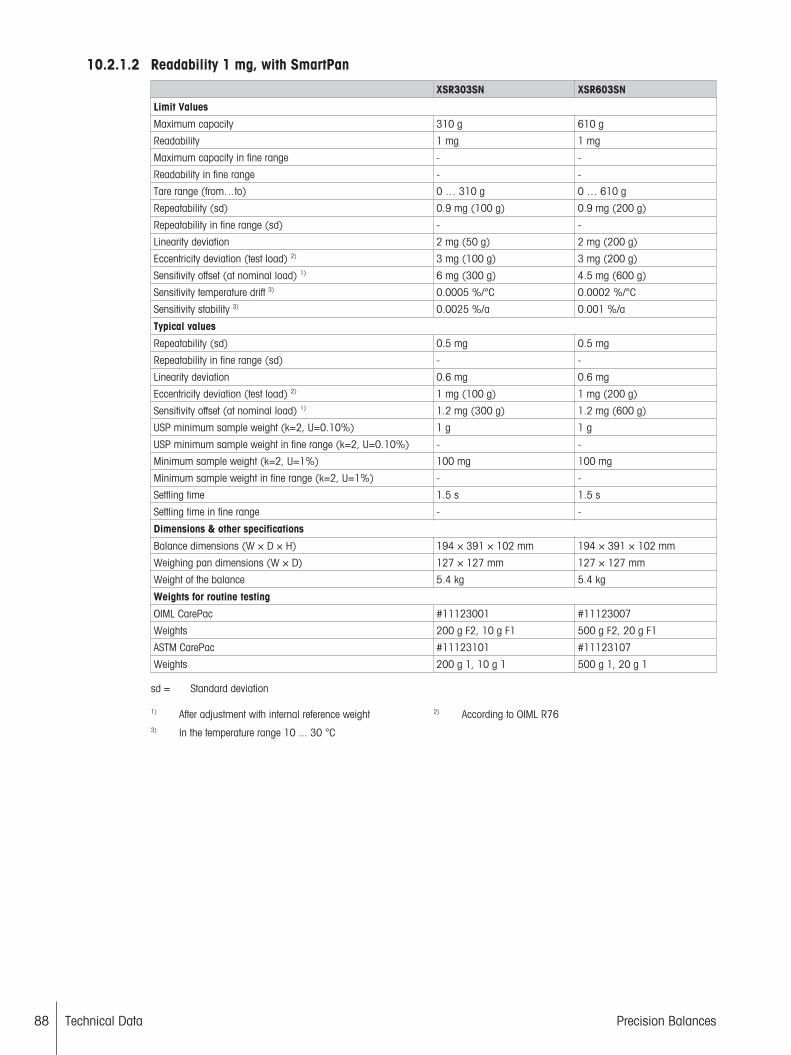
Technical Data88 Precision Balances
10.2.1.2 Readability 1 mg, with SmartPan
XSR303SN XSR603SN
Limit Values
Maximum capacity 310 g 610 g
Readability 1 mg 1 mg
Maximum capacity in fine range - -
Readability in fine range - -
Tare range (from…to) 0 … 310 g 0 … 610 g
Repeatability (sd) 0.9 mg (100 g) 0.9 mg (200 g)
Repeatability in fine range (sd) - -
Linearity deviation 2 mg (50 g) 2 mg (200 g)
Eccentricity deviation (test load) 2) 3 mg (100 g) 3 mg (200 g)
Sensitivity offset (at nominal load) 1) 6 mg (300 g) 4.5 mg (600 g)
Sensitivity temperature drift 3) 0.0005 %/°C 0.0002 %/°C
Sensitivity stability 3) 0.0025 %/a 0.001 %/a
Typical values
Repeatability (sd) 0.5 mg 0.5 mg
Repeatability in fine range (sd) - -
Linearity deviation 0.6 mg 0.6 mg
Eccentricity deviation (test load) 2) 1 mg (100 g) 1 mg (200 g)
Sensitivity offset (at nominal load) 1) 1.2 mg (300 g) 1.2 mg (600 g)
USP minimum sample weight (k=2, U=0.10%) 1 g 1 g
USP minimum sample weight in fine range (k=2, U=0.10%) - -
Minimum sample weight (k=2, U=1%) 100 mg 100 mg
Minimum sample weight in fine range (k=2, U=1%) - -
Settling time 1.5 s 1.5 s
Settling time in fine range - -
Dimensions & other specifications
Balance dimensions (W × D × H) 194 × 391 × 102 mm 194 × 391 × 102 mm
Weighing pan dimensions (W × D) 127 × 127 mm 127 × 127 mm
Weight of the balance 5.4 kg 5.4 kg
Weights for routine testing
OIML CarePac #11123001 #11123007
Weights 200 g F2, 10 g F1 500 g F2, 20 g F1
ASTM CarePac #11123101 #11123107
Weights 200 g 1, 10 g 1 500 g 1, 20 g 1
sd = Standard deviation
1) After adjustment with internal reference weight 2) According to OIML R763) In the temperature range 10 ... 30 °C

Technical Data 89Precision Balances
10.2.1.3 Readability 10 mg, with SmartPan
XSR1202S XSR2002S XSR4002S
Limit Values
Maximum capacity 1210 g 2.1 kg 4.1 kg
Readability 0.01 g 0.01 g 0.01 g
Maximum capacity in fine range - - -
Readability in fine range - - -
Tare range (from…to) 0 … 1210 g 0 … 2.1 kg 0 … 4.1 kg
Repeatability (sd) 8 mg (500 g) 8 mg (1 kg) 8 mg (2 kg)
Repeatability in fine range (sd) - - -
Linearity deviation 20 mg (200 g) 20 mg (500 g) 20 mg (1 kg)
Eccentricity deviation (test load) 2) 20 mg (500 g) 30 mg (1 kg) 30 mg (2 kg)
Sensitivity offset (at nominal load) 1) 60 mg (1200 g) 60 mg (2 kg) 60 mg (4 kg)
Sensitivity temperature drift 3) 0.0003 %/°C 0.0003 %/°C 0.0003 %/°C
Sensitivity stability 3) 0.0025 %/a 0.0025 %/a 0.0015 %/a
Typical values
Repeatability (sd) 4 mg 4 mg 4 mg
Repeatability in fine range (sd) - - -
Linearity deviation 6 mg 6 mg 6 mg
Eccentricity deviation (test load) 2) 6 mg (500 g) 10 mg (1 kg) 10 mg (2 kg)
Sensitivity offset (at nominal load) 1) 15 mg (1200 g) 25 mg (2 kg) 25 mg (4 kg)
USP minimum sample weight (k=2, U=0.10%) 8.2 g 8.2 g 8.2 g
USP minimum sample weight in fine range (k=2,U=0.10%)
- - -
Minimum sample weight (k=2, U=1%) 820 mg 820 mg 820 mg
Minimum sample weight in fine range (k=2, U=1%) - - -
Settling time 1.2 s 1.2 s 1.2 s
Settling time in fine range - - -
Dimensions & other specifications
Balance dimensions (W × D × H) 194 × 391 × 102 mm 194 × 391 × 102 mm 194 × 391 × 102 mm
Weighing pan dimensions (W × D) 172 × 205 mm 172 × 205 mm 172 × 205 mm
Weight of the balance 7.9 kg 7.9 kg 7.9 kg
Weights for routine testing
OIML CarePac #11123008 #11123009 #11123010
Weights 1000 g F2, 50 g F2 2 kg F2, 100 g F2 2 kg F2, 200 g F2
ASTM CarePac #11123108 #11123109 #11123110
Weights 1000 g 1, 50 g 1 2 kg 1, 100 g 1 2 kg 4, 200 g 4
sd = Standard deviation
1) After adjustment with internal reference weight 2) According to OIML R763) In the temperature range 10 ... 30 °C

Technical Data90 Precision Balances
XSR6002S XSR6002SDR XSR10002S
Limit Values
Maximum capacity 6.1 kg 6.1 kg 10.1 kg
Readability 0.01 g 0.1 g 0.01 g
Maximum capacity in fine range - 1200 g -
Readability in fine range - 0.01 g -
Tare range (from…to) 0 … 6.1 kg 0 … 6.1 kg 0 … 10.1 kg
Repeatability (sd) 8 mg (2 kg) 60 mg (2 kg) 8 mg (5 kg)
Repeatability in fine range (sd) - 8 mg (500 g) -
Linearity deviation 20 mg (1 kg) 60 mg (1 kg) 20 mg (2 kg)
Eccentricity deviation (test load) 2) 30 mg (2 kg) 100 mg (2 kg) 40 mg (5 kg)
Sensitivity offset (at nominal load) 1) 60 mg (6 kg) 150 mg (6 kg) 50 mg (10 kg)
Sensitivity temperature drift 3) 0.0003 %/°C 0.0003 %/°C 0.00025 %/°C
Sensitivity stability 3) 0.0015 %/a 0.0015 %/a 0.0015 %/a
Typical values
Repeatability (sd) 4 mg 40 mg 4 mg
Repeatability in fine range (sd) - 5 mg -
Linearity deviation 6 mg 20 mg 6 mg
Eccentricity deviation (test load) 2) 10 mg (2 kg) 30 mg (2 kg) 12 mg (5 kg)
Sensitivity offset (at nominal load) 1) 12 mg (6 kg) 30 mg (6 kg) 12 mg (10 kg)
USP minimum sample weight (k=2, U=0.10%) 8.2 g 82 g 8.2 g
USP minimum sample weight in fine range (k=2,U=0.10%)
- 8.2 g -
Minimum sample weight (k=2, U=1%) 0.82 g 10 g 0.82 g
Minimum sample weight in fine range (k=2, U=1%) - 1 g -
Settling time 1.2 s 1.2 s 1.5 s
Settling time in fine range - 1.2 s -
Dimensions & other specifications
Balance dimensions (W × D × H) 194 × 391 × 102 mm 194 × 391 × 102 mm 194 × 391 × 102 mm
Weighing pan dimensions (W × D) 170 × 203 mm 170 × 203 mm 170 × 203 mm
Weight of the balance 7.9 kg 7.9 kg 7.5 kg
Weights for routine testing
OIML CarePac #11123011 #11123011 -
Weights 5 kg F2, 200 g F2 5 kg F2, 200 g F2 10 kg F2, 500 g F2
ASTM CarePac #11123111 #11123111 -
Weights 5 kg 4, 200 g 4 5 kg 4, 200 g 4 10 kg 4, 500 g 4
sd = Standard deviation
1) After adjustment with internal reference weight 2) According to OIML R763) In the temperature range 10 ... 30 °C

Technical Data 91Precision Balances
10.2.1.4 Readability 0.1 g
XSR4001S XSR6001S
Limit Values
Maximum capacity 4.1 kg 6.1 kg
Readability 0.1 g 0.1 g
Maximum capacity in fine range - -
Readability in fine range - -
Tare range (from…to) 0 … 4.1 kg 0 … 6.1 kg
Repeatability (sd) 80 mg (2 kg) 80 mg (2 kg)
Repeatability in fine range (sd) - -
Linearity deviation 60 mg (1 kg) 60 mg (2 kg)
Eccentricity deviation (test load) 2) 200 mg (2 kg) 200 mg (2 kg)
Sensitivity offset (at nominal load) 1) 240 mg (4 kg) 240 mg (6 kg)
Sensitivity temperature drift 3) 0.0015 %/°C 0.0015 %/°C
Sensitivity stability 3) 0.005 %/a 0.005 %/a
Typical values
Repeatability (sd) 40 mg 40 mg
Repeatability in fine range (sd) - -
Linearity deviation 20 mg 20 mg
Eccentricity deviation (test load) 2) 60 mg (2 kg) 60 mg (2 kg)
Sensitivity offset (at nominal load) 1) 50 mg (4 kg) 50 mg (6 kg)
USP minimum sample weight (k=2, U=0.10%) 82 g 82 g
USP minimum sample weight in fine range (k=2, U=0.10%) - -
Minimum sample weight (k=2, U=1%) 8.2 g 8.2 g
Minimum sample weight in fine range (k=2, U=1%) - -
Settling time 0.8 s 0.8 s
Settling time in fine range - -
Dimensions & other specifications
Balance dimensions (W × D × H) 194 × 391 × 99 mm 194 × 391 × 99 mm
Weighing pan dimensions (W × D) 190 × 223 mm 190 × 223 mm
Weight of the balance 6.3 kg 6.3 kg
Weights for routine testing
OIML CarePac #11123010 #11123011
Weights 2 kg F2, 200 g F2 5 kg F2, 200 g F2
ASTM CarePac #11123110 #11123111
Weights 2 kg 4, 200 g 4 5 kg 4, 200 g 4
sd = Standard deviation
1) After adjustment with internal reference weight 2) According to OIML R763) In the temperature range 10 ... 30 °C
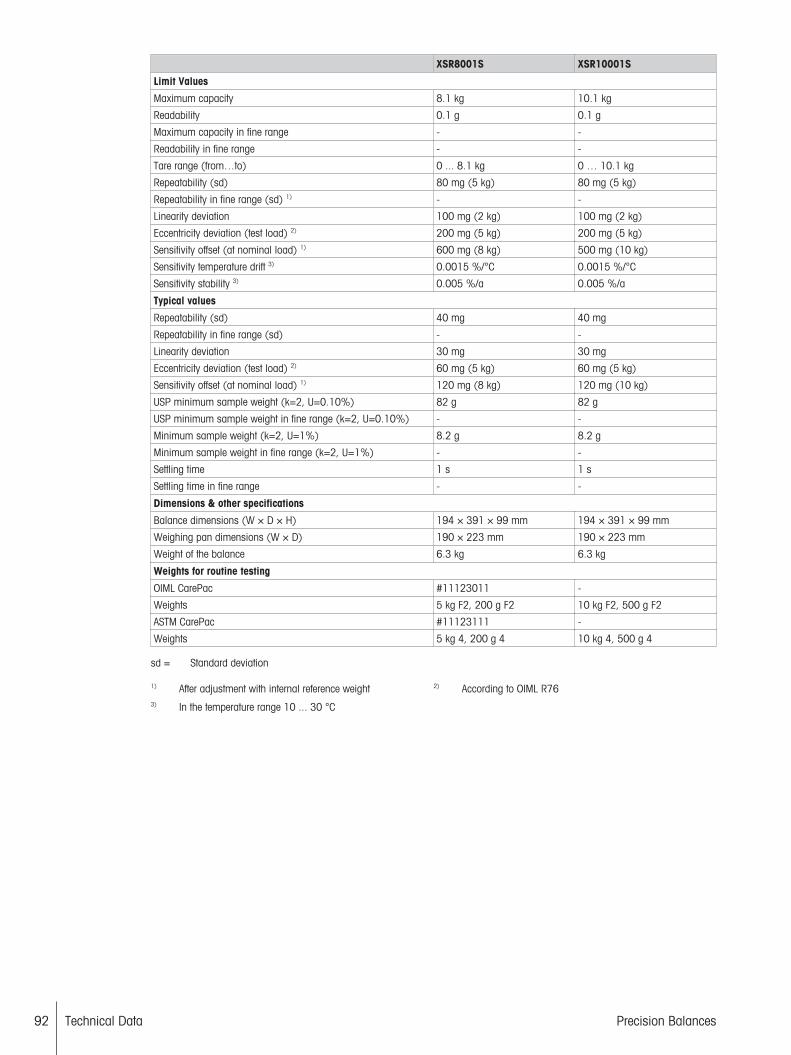
Technical Data92 Precision Balances
XSR8001S XSR10001S
Limit Values
Maximum capacity 8.1 kg 10.1 kg
Readability 0.1 g 0.1 g
Maximum capacity in fine range - -
Readability in fine range - -
Tare range (from…to) 0 ... 8.1 kg 0 … 10.1 kg
Repeatability (sd) 80 mg (5 kg) 80 mg (5 kg)
Repeatability in fine range (sd) 1) - -
Linearity deviation 100 mg (2 kg) 100 mg (2 kg)
Eccentricity deviation (test load) 2) 200 mg (5 kg) 200 mg (5 kg)
Sensitivity offset (at nominal load) 1) 600 mg (8 kg) 500 mg (10 kg)
Sensitivity temperature drift 3) 0.0015 %/°C 0.0015 %/°C
Sensitivity stability 3) 0.005 %/a 0.005 %/a
Typical values
Repeatability (sd) 40 mg 40 mg
Repeatability in fine range (sd) - -
Linearity deviation 30 mg 30 mg
Eccentricity deviation (test load) 2) 60 mg (5 kg) 60 mg (5 kg)
Sensitivity offset (at nominal load) 1) 120 mg (8 kg) 120 mg (10 kg)
USP minimum sample weight (k=2, U=0.10%) 82 g 82 g
USP minimum sample weight in fine range (k=2, U=0.10%) - -
Minimum sample weight (k=2, U=1%) 8.2 g 8.2 g
Minimum sample weight in fine range (k=2, U=1%) - -
Settling time 1 s 1 s
Settling time in fine range - -
Dimensions & other specifications
Balance dimensions (W × D × H) 194 × 391 × 99 mm 194 × 391 × 99 mm
Weighing pan dimensions (W × D) 190 × 223 mm 190 × 223 mm
Weight of the balance 6.3 kg 6.3 kg
Weights for routine testing
OIML CarePac #11123011 -
Weights 5 kg F2, 200 g F2 10 kg F2, 500 g F2
ASTM CarePac #11123111 -
Weights 5 kg 4, 200 g 4 10 kg 4, 500 g 4
sd = Standard deviation
1) After adjustment with internal reference weight 2) According to OIML R763) In the temperature range 10 ... 30 °C

Technical Data 93Precision Balances
10.2.2 L platform
10.2.2.1 Readability 0.1 g
XSR10001L XSR16001L
Limit Values
Maximum capacity 10.1 kg 16.1 kg
Readability 0.1 g 0.1 g
Maximum capacity in fine range - -
Readability in fine range - -
Tare range (from…to) 0 … 10.1 kg 0 ... 16.1 kg
Repeatability (sd) 80 mg (5 kg) 80 mg (5 kg)
Repeatability in fine range (sd) - -
Linearity deviation 200 mg (2 kg) 200 mg (4 kg)
Eccentricity deviation (test load) 2) 300 mg (5 kg) 300 mg (5 kg)
Sensitivity offset (at nominal load) 1) 500 mg (10 kg) 800 mg (16 kg)
Sensitivity temperature drift 3) 0.0015 %/°C 0.0015 %/°C
Sensitivity stability 3) 0.005 %/a 0.005 %/a
Typical values
Repeatability (sd) 40 mg 40 mg
Repeatability in fine range (sd) - -
Linearity deviation 60 mg 60 mg
Eccentricity deviation (test load) 2) 100 mg (5 kg) 100 mg (5 kg)
Sensitivity offset (at nominal load) 1) 120 mg (10 kg) 120 mg (16 kg)
USP minimum sample weight (k=2, U=0.10%) 82 g 82 g
USP minimum sample weight in fine range (k=2, U=0.10%) - -
Minimum sample weight (k=2, U=1%) 8.2 g 8.2 g
Minimum sample weight in fine range (k=2, U=1%) - -
Settling time 1.5 s 1.5 s
Settling time in fine range - -
Dimensions & other specifications
Balance dimensions (W × D × H) 360 × 412 × 122 mm 360 × 412 × 122 mm
Weighing pan dimensions (W × D) 360 × 280 mm 360 × 280 mm
Weight of the balance 10.1 kg 10.1 kg
Weights for routine testing
OIML CarePac - -
Weights 10 kg F2, 500 g F2 10 kg F2, 500 g F2
ASTM CarePac - -
Weights 10 kg 4, 500 g 4 10 kg 4, 500 g 4
sd = Standard deviation
1) After adjustment with internal reference weight 2) According to OIML R763) In the temperature range 10 ... 30 °C
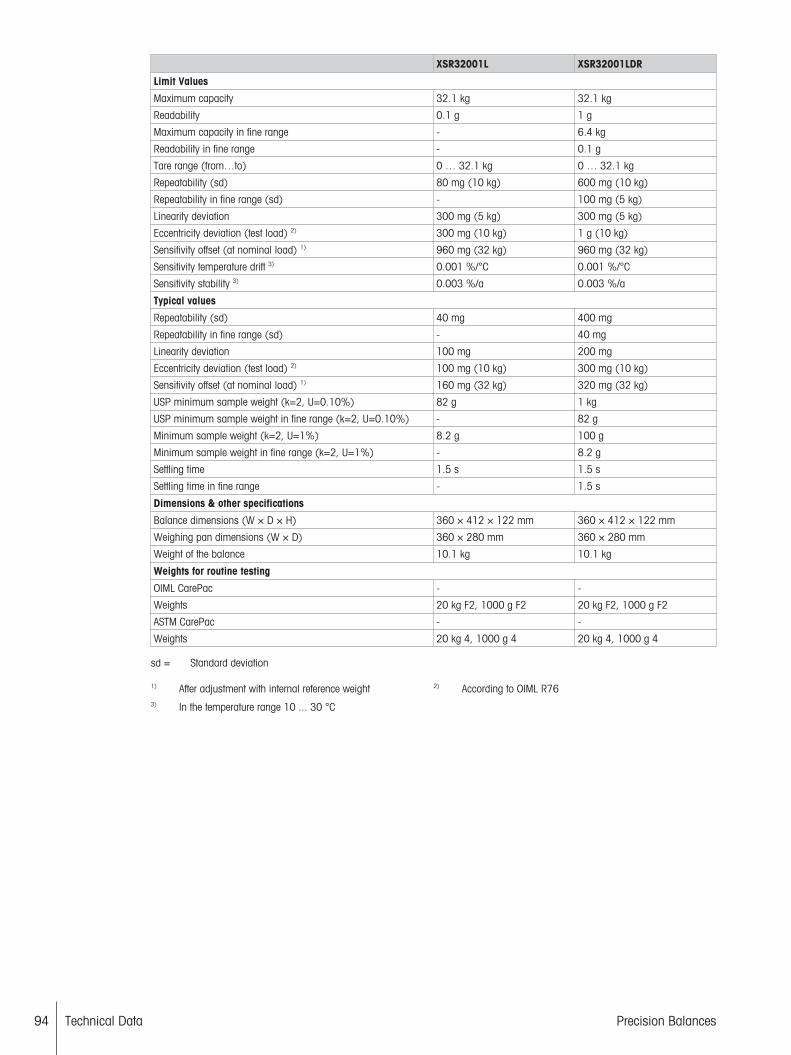
Technical Data94 Precision Balances
XSR32001L XSR32001LDR
Limit Values
Maximum capacity 32.1 kg 32.1 kg
Readability 0.1 g 1 g
Maximum capacity in fine range - 6.4 kg
Readability in fine range - 0.1 g
Tare range (from…to) 0 … 32.1 kg 0 … 32.1 kg
Repeatability (sd) 80 mg (10 kg) 600 mg (10 kg)
Repeatability in fine range (sd) - 100 mg (5 kg)
Linearity deviation 300 mg (5 kg) 300 mg (5 kg)
Eccentricity deviation (test load) 2) 300 mg (10 kg) 1 g (10 kg)
Sensitivity offset (at nominal load) 1) 960 mg (32 kg) 960 mg (32 kg)
Sensitivity temperature drift 3) 0.001 %/°C 0.001 %/°C
Sensitivity stability 3) 0.003 %/a 0.003 %/a
Typical values
Repeatability (sd) 40 mg 400 mg
Repeatability in fine range (sd) - 40 mg
Linearity deviation 100 mg 200 mg
Eccentricity deviation (test load) 2) 100 mg (10 kg) 300 mg (10 kg)
Sensitivity offset (at nominal load) 1) 160 mg (32 kg) 320 mg (32 kg)
USP minimum sample weight (k=2, U=0.10%) 82 g 1 kg
USP minimum sample weight in fine range (k=2, U=0.10%) - 82 g
Minimum sample weight (k=2, U=1%) 8.2 g 100 g
Minimum sample weight in fine range (k=2, U=1%) - 8.2 g
Settling time 1.5 s 1.5 s
Settling time in fine range - 1.5 s
Dimensions & other specifications
Balance dimensions (W × D × H) 360 × 412 × 122 mm 360 × 412 × 122 mm
Weighing pan dimensions (W × D) 360 × 280 mm 360 × 280 mm
Weight of the balance 10.1 kg 10.1 kg
Weights for routine testing
OIML CarePac - -
Weights 20 kg F2, 1000 g F2 20 kg F2, 1000 g F2
ASTM CarePac - -
Weights 20 kg 4, 1000 g 4 20 kg 4, 1000 g 4
sd = Standard deviation
1) After adjustment with internal reference weight 2) According to OIML R763) In the temperature range 10 ... 30 °C

Technical Data 95Precision Balances
10.2.2.2 Readability 1 g
XSR16000L XSR32000L
Limit Values
Maximum capacity 16.1 kg 32.1 kg
Readability 1 g 1 g
Maximum capacity in fine range - -
Readability in fine range - -
Tare range (from…to) 0 … 16.1 kg 0 … 32.1 kg
Repeatability (sd) 0.6 g (5 kg) 600 mg (10 kg)
Repeatability in fine range (sd) 1) - -
Linearity deviation 0.6 g (4 kg) 600 mg (5 kg)
Eccentricity deviation (test load) 2) 1 g (5 kg) 1 g (10 kg)
Sensitivity offset (at nominal load) 1) 1.1 g (16 kg) 1.6 g (32 kg)
Sensitivity temperature drift 3) 0.0015 %/°C 0.0015 %/°C
Sensitivity stability 3) 0.005 %/a 0.005 %/a
Typical values
Repeatability (sd) 400 mg 400 mg
Repeatability in fine range (sd) - -
Linearity deviation 0.4 g 0.4 g
Eccentricity deviation (test load) 2) 0.3 g (5 kg) 0.3 g (10 kg)
Sensitivity offset (at nominal load) 1) 0.35 g (16 kg) 0.65 g (32 kg)
USP minimum sample weight (k=2, U=0.10%) 820 g 820 g
USP minimum sample weight in fine range (k=2, U=0.10%) - -
Minimum sample weight (k=2, U=1%) 82 g 82 g
Minimum sample weight in fine range (k=2, U=1%) - -
Settling time 1.2 s 1.2 s
Settling time in fine range - -
Dimensions & other specifications
Balance dimensions (W × D × H) 360 × 412 × 122 mm 360 × 434 × 122 mm
Weighing pan dimensions (W × D) 360 × 280 mm 360 × 280 mm
Weight of the balance 10.1 kg 10.3 kg
Weights for routine testing
OIML CarePac - -
Weights 10 kg F2, 500 g F2 20 kg F2, 1000 g F2
ASTM CarePac - -
Weights 10 kg 4, 500 g 4 20 kg 4, 1000 g 4
sd = Standard deviation
1) After adjustment with internal reference weight 2) According to OIML R763) In the temperature range 10 ... 30 °C

Technical Data96 Precision Balances
10.3 Dimensions
10.3.1 S platform, readability 1 mg, with MagicCube Draft Shield and SmartPanModels: XSR303S, XSR603S, XSR1203S
251
107
47
281
390
194
127
263
160
127127
194
205
All dimensions in mm
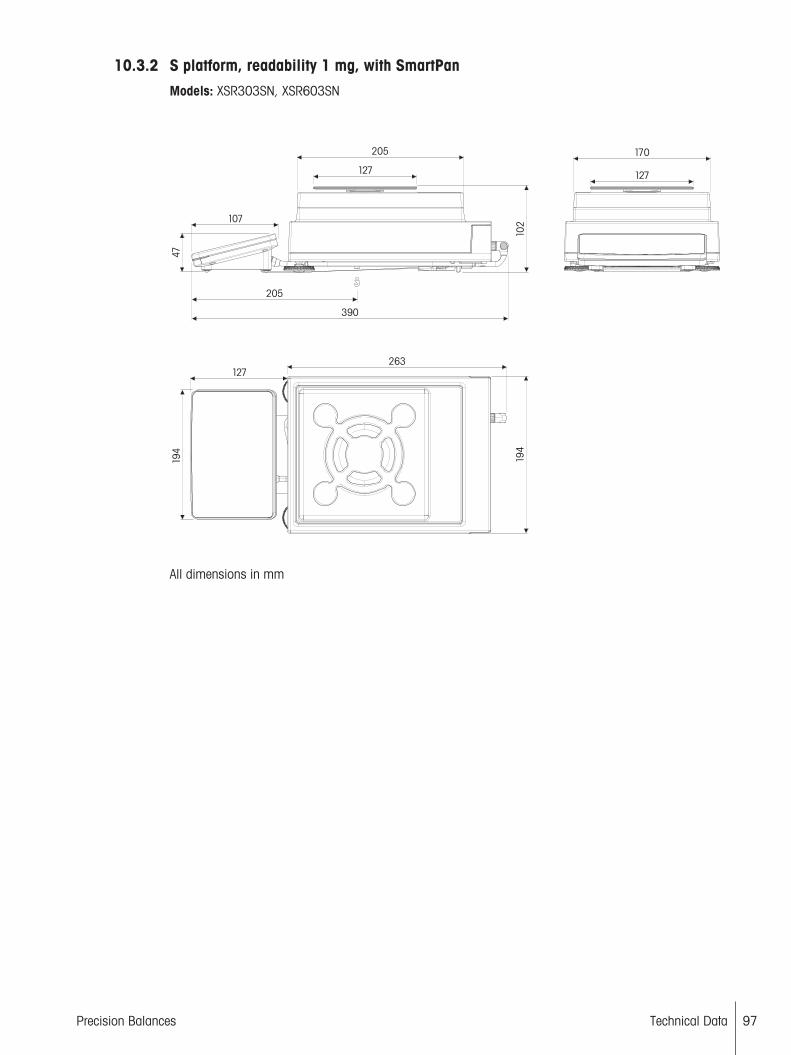
Technical Data 97Precision Balances
10.3.2 S platform, readability 1 mg, with SmartPanModels: XSR303SN, XSR603SN
205
107
47
205
102
390
194
127
263
194
127
170
127
All dimensions in mm
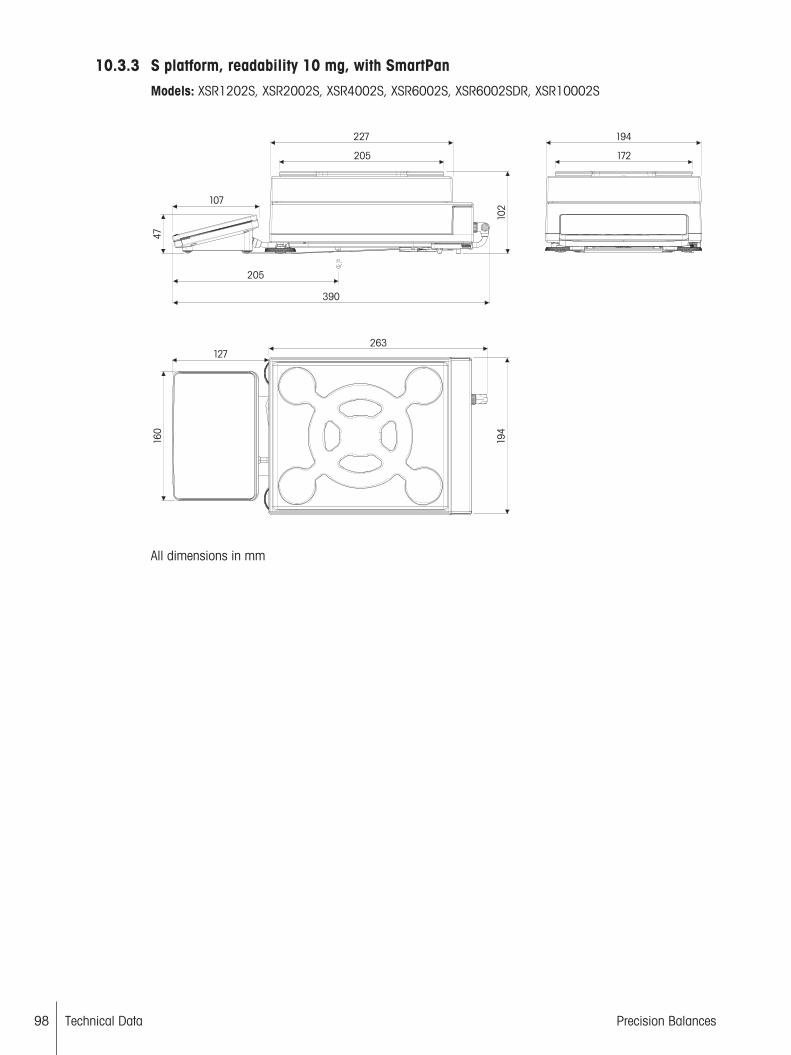
Technical Data98 Precision Balances
10.3.3 S platform, readability 10 mg, with SmartPanModels: XSR1202S, XSR2002S, XSR4002S, XSR6002S, XSR6002SDR, XSR10002S
227
107
47
205
102
390
194
127
263
160
205
194
172
All dimensions in mm
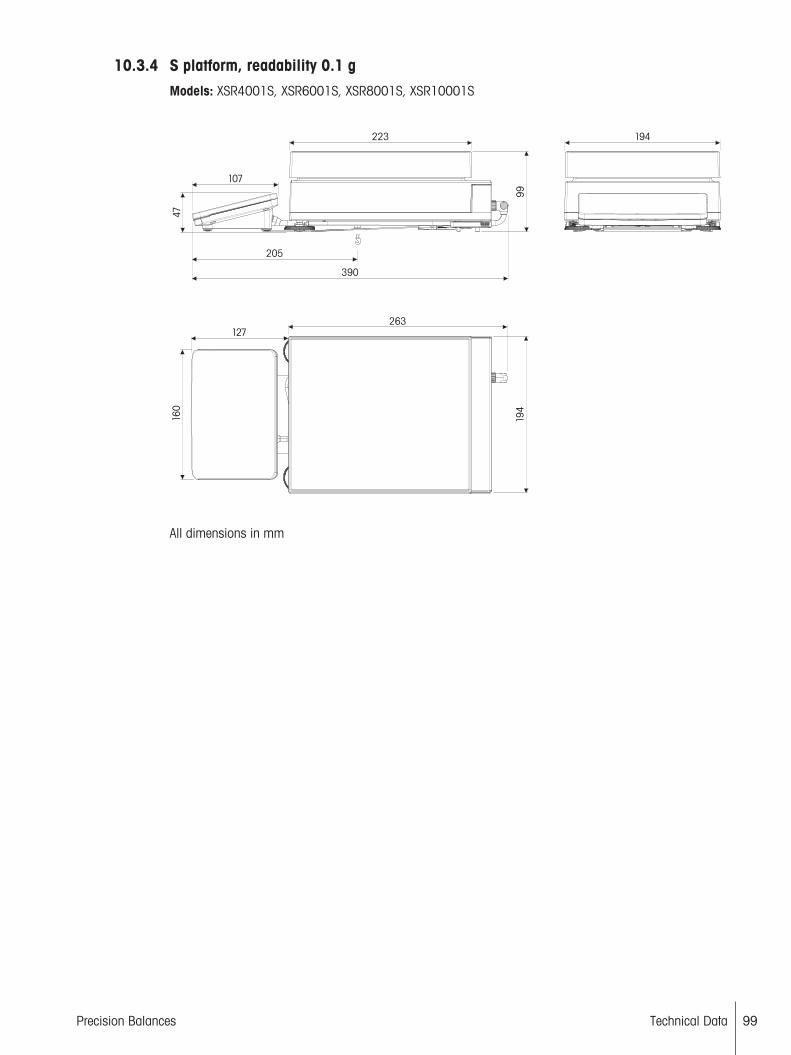
Technical Data 99Precision Balances
10.3.4 S platform, readability 0.1 gModels: XSR4001S, XSR6001S, XSR8001S, XSR10001S
223
10747
205
99
390
194
127
263
160
194
All dimensions in mm
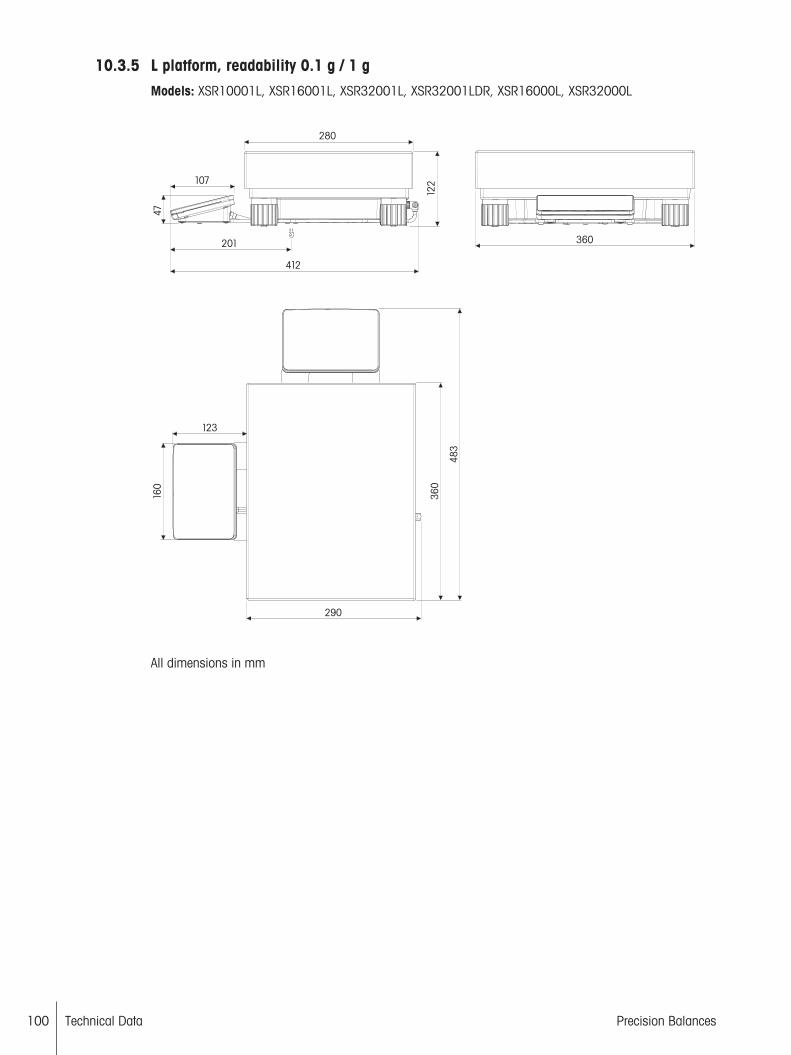
Technical Data100 Precision Balances
10.3.5 L platform, readability 0.1 g / 1 gModels: XSR10001L, XSR16001L, XSR32001L, XSR32001LDR, XSR16000L, XSR32000L
280
107
47
122
412
360
123
160
360
290
483
201
All dimensions in mm
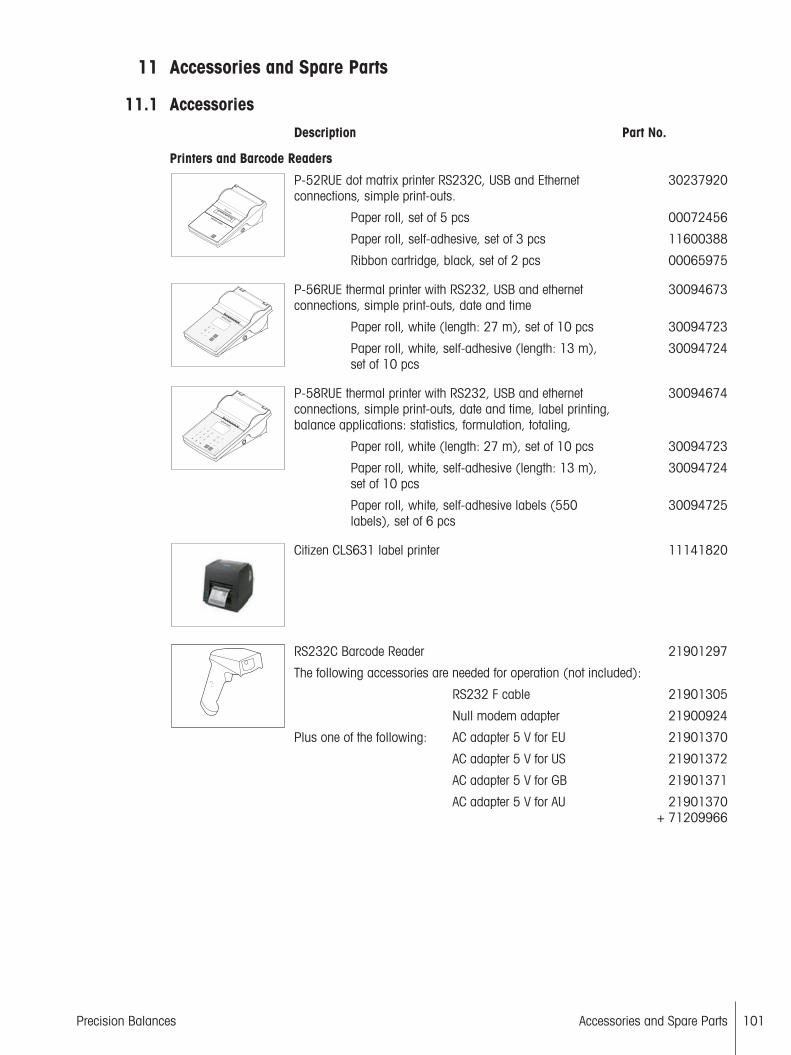
Accessories and Spare Parts 101Precision Balances
11 Accessories and Spare Parts
11.1 Accessories
Description Part No.
Printers and Barcode Readers
P-52RUE dot matrix printer RS232C, USB and Ethernetconnections, simple print-outs.
30237920
Paper roll, set of 5 pcs 00072456
Paper roll, self-adhesive, set of 3 pcs 11600388
Ribbon cartridge, black, set of 2 pcs 00065975
P-56RUE thermal printer with RS232, USB and ethernetconnections, simple print-outs, date and time
30094673
Paper roll, white (length: 27 m), set of 10 pcs 30094723
Paper roll, white, self-adhesive (length: 13 m),set of 10 pcs
30094724
P-58RUE thermal printer with RS232, USB and ethernetconnections, simple print-outs, date and time, label printing,balance applications: statistics, formulation, totaling,
30094674
Paper roll, white (length: 27 m), set of 10 pcs 30094723
Paper roll, white, self-adhesive (length: 13 m),set of 10 pcs
30094724
Paper roll, white, self-adhesive labels (550labels), set of 6 pcs
30094725
Citizen CLS631 label printer 11141820
RS232C Barcode Reader 21901297
The following accessories are needed for operation (not included):
RS232 F cable 21901305
Null modem adapter 21900924
Plus one of the following: AC adapter 5 V for EU 21901370
AC adapter 5 V for US 21901372
AC adapter 5 V for GB 21901371
AC adapter 5 V for AU 21901370+ 71209966

Accessories and Spare Parts102 Precision Balances
RS232C Barcode Reader – Cordless 21901299
The following accessories are needed for operation (not included):
Cradle 21901300
RS232 F cable 21901305
Null modem adapter 21900924
Plus one of the following: AC adapter 12 V for EU 21901373
AC adapter 12 V for US 21901375
AC adapter 12 V for GB 21901374
AC adapter 12 V for AU 21901373+ 71209966
Draft shields
Pro Draft Shield for 0.1 mg and 1 mg models, Height:248 mm
30300926
Pro Draft Shield glass free (food industry) for 0.1 mg and 1mg models, Height: 248 mm
30409092
Draft shield XP-W12, dimensions (W x D x H): 300 mm× 450 mm × 450 mm, for S weighing platform
11134430
Draft shield XP-W64, dimensions (W x D x H): 550 mm× 470 mm × 580 mm, for L weighing platform
11134470
"MagicCube" Draft shield for 1 mg models, usable height175 mm, S platform
30136284
"Simple" Draft shield with draft shield element for 5 mg and10 mg models, usable height 175 mm, S platform
30113496
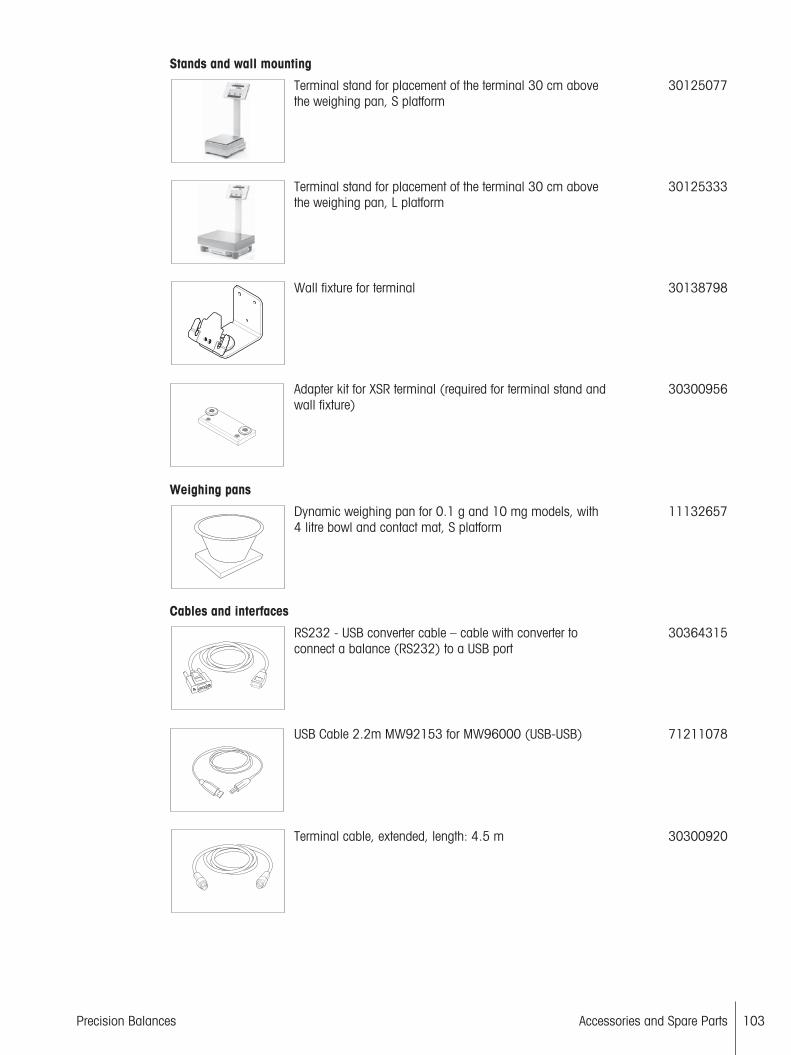
Accessories and Spare Parts 103Precision Balances
Stands and wall mounting
Terminal stand for placement of the terminal 30 cm abovethe weighing pan, S platform
30125077
Terminal stand for placement of the terminal 30 cm abovethe weighing pan, L platform
30125333
Wall fixture for terminal 30138798
Adapter kit for XSR terminal (required for terminal stand andwall fixture)
30300956
Weighing pans
Dynamic weighing pan for 0.1 g and 10 mg models, with4 litre bowl and contact mat, S platform
11132657
Cables and interfaces
RS232 - USB converter cable – cable with converter toconnect a balance (RS232) to a USB port
30364315
USB Cable 2.2m MW92153 for MW96000 (USB-USB) 71211078
Terminal cable, extended, length: 4.5 m 30300920

Accessories and Spare Parts104 Precision Balances
Antistatic kits
Universal AntiStatic Kit complete (U-shaped), includingelectrode and power supply
11107767
Optional: Second U-electrode* for universal AntiStatic Kit 11107764
* Power supply for optional, second U-elektrode(11107764)
11107766
USB Antistatic kit for Microbalance including one stand andone compact ionizer
30215452
Optional second compact ionizer for Antistatic kitMicrobalance
30300921
Sensors and Switches
ErgoSens, optical sensor for remote operation (USBconnection)
30300915
Foot switch, optional switch for remote operation (USBconnection)
30312558
Filling process control
LV12 automatic feeder 30315631
LV12 ProDraft Shield door for 0.1 mg and 1 mg models withS weighing platformMust be combined with the ProDraft Shield (30300926)
11132711
Software
LabX balance express (standalone system) 11153120
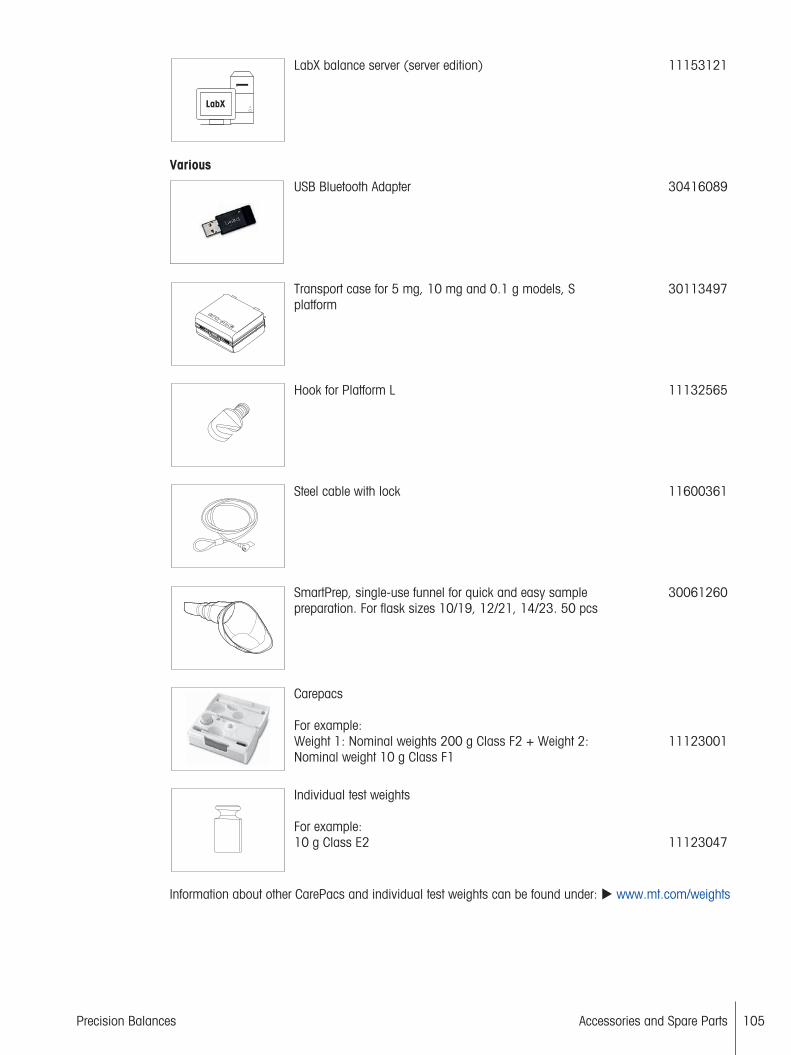
Accessories and Spare Parts 105Precision Balances
LabX balance server (server edition) 11153121
Various
USB Bluetooth Adapter 30416089
Transport case for 5 mg, 10 mg and 0.1 g models, Splatform
30113497
Hook for Platform L 11132565
Steel cable with lock 11600361
SmartPrep, single-use funnel for quick and easy samplepreparation. For flask sizes 10/19, 12/21, 14/23. 50 pcs
30061260
Carepacs
For example:Weight 1: Nominal weights 200 g Class F2 + Weight 2:Nominal weight 10 g Class F1
11123001
Individual test weights
For example:10 g Class E2 11123047
Information about other CarePacs and individual test weights can be found under: u www.mt.com/weights
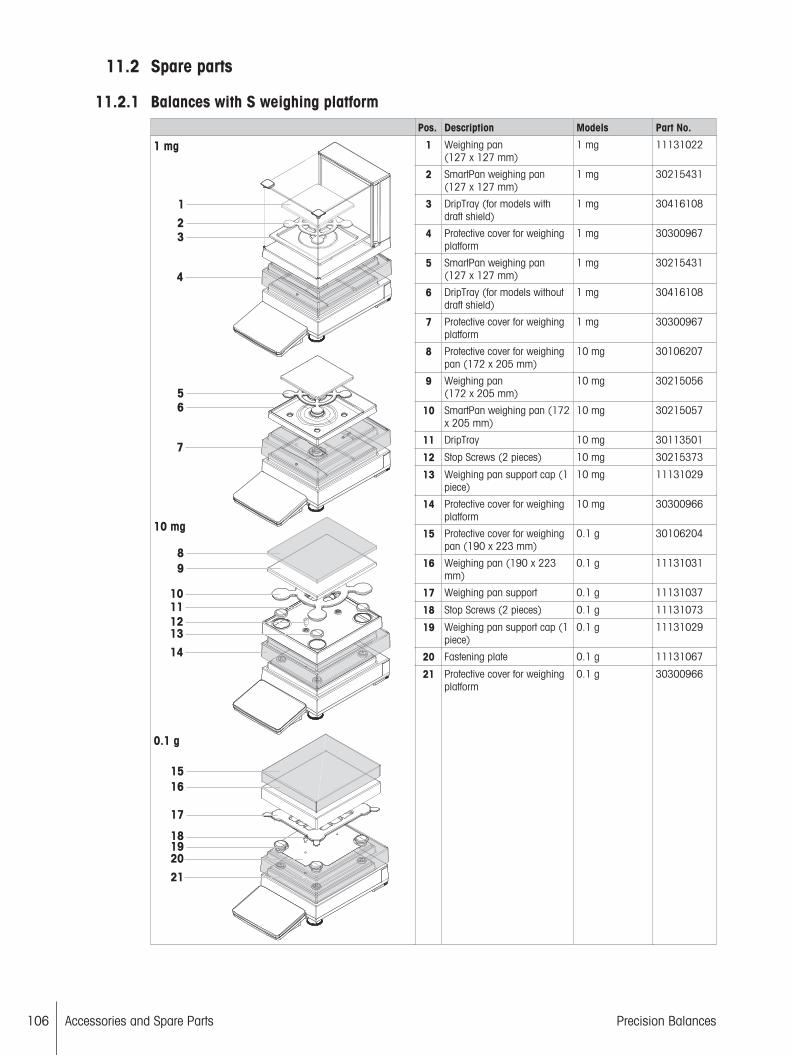
Accessories and Spare Parts106 Precision Balances
11.2 Spare parts
11.2.1 Balances with S weighing platformPos. Description Models Part No.
1 mg
2
1
3
4
5
6
7
8
9
10
11
12
13
14
10 mg
15
16
17
0.1 g
1819
20
21
1 Weighing pan(127 x 127 mm)
1 mg 11131022
2 SmartPan weighing pan(127 x 127 mm)
1 mg 30215431
3 DripTray (for models withdraft shield)
1 mg 30416108
4 Protective cover for weighingplatform
1 mg 30300967
5 SmartPan weighing pan(127 x 127 mm)
1 mg 30215431
6 DripTray (for models withoutdraft shield)
1 mg 30416108
7 Protective cover for weighingplatform
1 mg 30300967
8 Protective cover for weighingpan (172 x 205 mm)
10 mg 30106207
9 Weighing pan(172 x 205 mm)
10 mg 30215056
10 SmartPan weighing pan (172x 205 mm)
10 mg 30215057
11 DripTray 10 mg 30113501
12 Stop Screws (2 pieces) 10 mg 30215373
13 Weighing pan support cap (1piece)
10 mg 11131029
14 Protective cover for weighingplatform
10 mg 30300966
15 Protective cover for weighingpan (190 x 223 mm)
0.1 g 30106204
16 Weighing pan (190 x 223mm)
0.1 g 11131031
17 Weighing pan support 0.1 g 11131037
18 Stop Screws (2 pieces) 0.1 g 11131073
19 Weighing pan support cap (1piece)
0.1 g 11131029
20 Fastening plate 0.1 g 11131067
21 Protective cover for weighingplatform
0.1 g 30300966
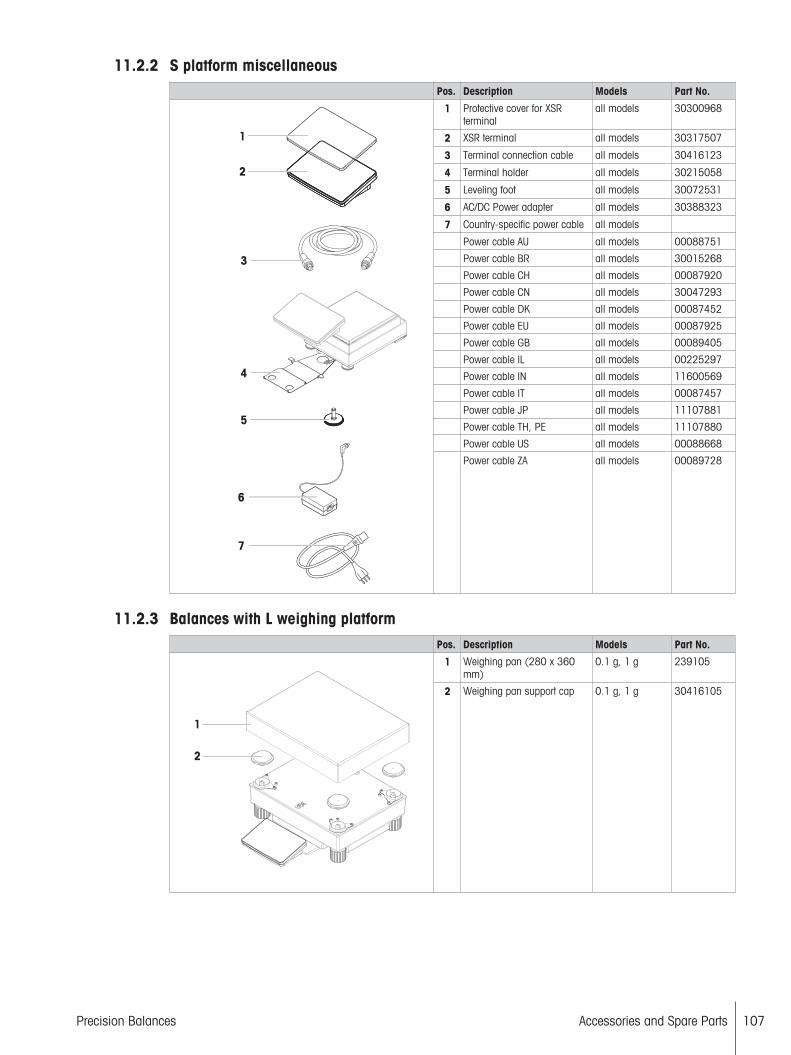
Accessories and Spare Parts 107Precision Balances
11.2.2 S platform miscellaneousPos. Description Models Part No.
1
2
3
4
5
6
7
1 Protective cover for XSRterminal
all models 30300968
2 XSR terminal all models 30317507
3 Terminal connection cable all models 30416123
4 Terminal holder all models 30215058
5 Leveling foot all models 30072531
6 AC/DC Power adapter all models 30388323
7 Country-specific power cable all models
Power cable AU all models 00088751
Power cable BR all models 30015268
Power cable CH all models 00087920
Power cable CN all models 30047293
Power cable DK all models 00087452
Power cable EU all models 00087925
Power cable GB all models 00089405
Power cable IL all models 00225297
Power cable IN all models 11600569
Power cable IT all models 00087457
Power cable JP all models 11107881
Power cable TH, PE all models 11107880
Power cable US all models 00088668
Power cable ZA all models 00089728
11.2.3 Balances with L weighing platformPos. Description Models Part No.
1
2
1 Weighing pan (280 x 360mm)
0.1 g, 1 g 239105
2 Weighing pan support cap 0.1 g, 1 g 30416105
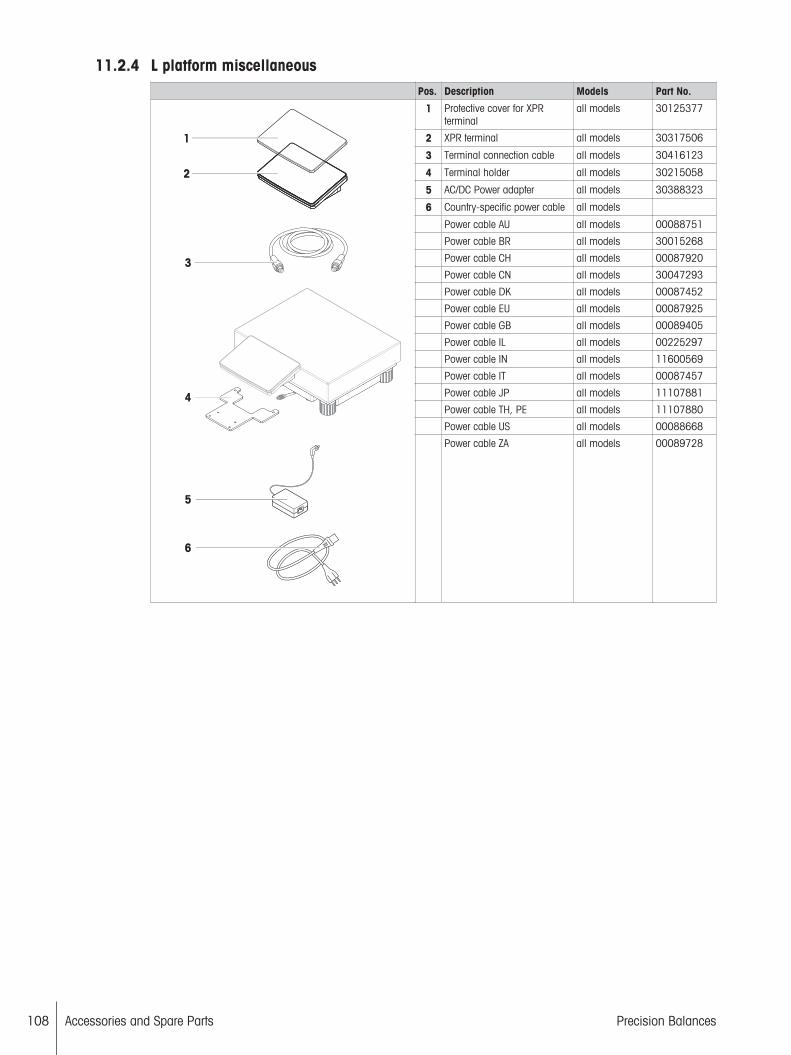
Accessories and Spare Parts108 Precision Balances
11.2.4 L platform miscellaneousPos. Description Models Part No.
1
2
3
5
6
4
1 Protective cover for XPRterminal
all models 30125377
2 XPR terminal all models 30317506
3 Terminal connection cable all models 30416123
4 Terminal holder all models 30215058
5 AC/DC Power adapter all models 30388323
6 Country-specific power cable all models
Power cable AU all models 00088751
Power cable BR all models 30015268
Power cable CH all models 00087920
Power cable CN all models 30047293
Power cable DK all models 00087452
Power cable EU all models 00087925
Power cable GB all models 00089405
Power cable IL all models 00225297
Power cable IN all models 11600569
Power cable IT all models 00087457
Power cable JP all models 11107881
Power cable TH, PE all models 11107880
Power cable US all models 00088668
Power cable ZA all models 00089728
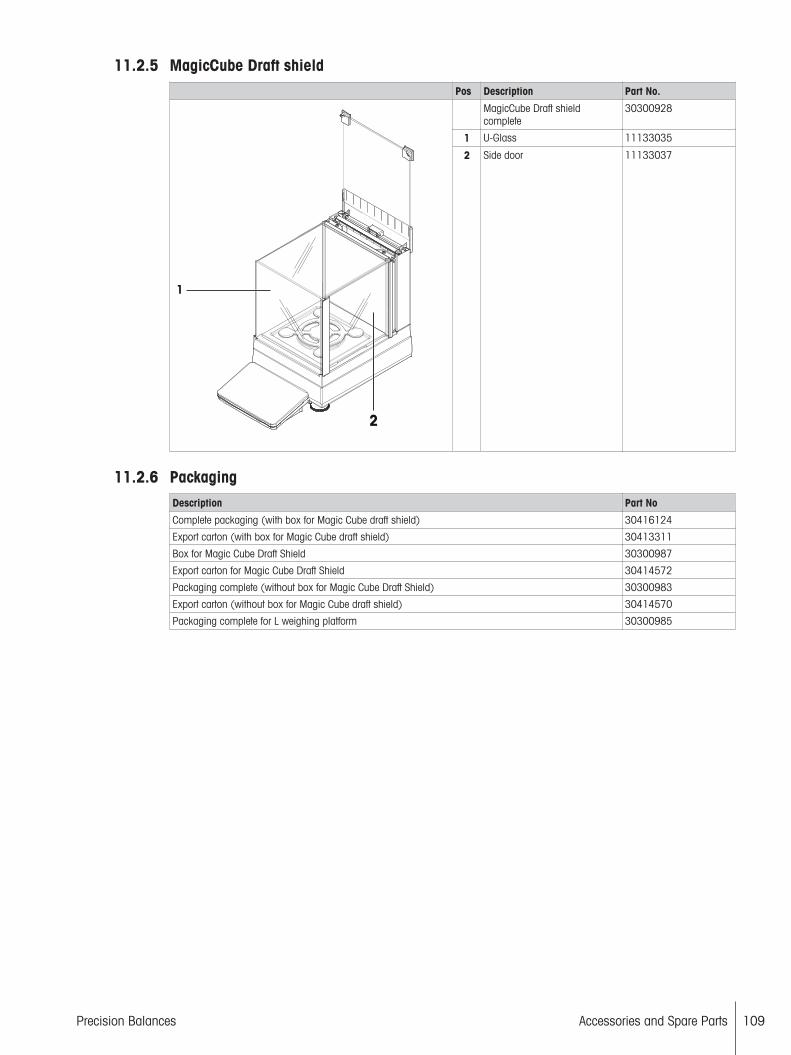
Accessories and Spare Parts 109Precision Balances
11.2.5 MagicCube Draft shieldPos Description Part No.
1
2
MagicCube Draft shieldcomplete
30300928
1 U-Glass 11133035
2 Side door 11133037
11.2.6 PackagingDescription Part No
Complete packaging (with box for Magic Cube draft shield) 30416124
Export carton (with box for Magic Cube draft shield) 30413311
Box for Magic Cube Draft Shield 30300987
Export carton for Magic Cube Draft Shield 30414572
Packaging complete (without box for Magic Cube Draft Shield) 30300983
Export carton (without box for Magic Cube draft shield) 30414570
Packaging complete for L weighing platform 30300985

Accessories and Spare Parts110 Precision Balances

Index 111Precision Balances
IndexAAC adapter 85, 86Action when calibration expired 73Actual weight 70Adjustment
external 69internal 67
Adjustments 67, 71Allowed number of errors until blocking 60, 63, 66Allowed units 75Applications
see Methods 29As found test 68As left test 68Automatic export directory 77Automatic label printout for task 38, 47, 54Automatic print 59, 62, 65, 68Automatic result 36, 53Automatic zero 37, 45, 53
BBalance ID 77Balance info 72Balance information 38, 46, 54Balance menu 71Balance recalibration reminder 73Balance settings 72Barcode data target 36, 45, 52Barcode settings 38, 47, 55Block balance 60, 63, 66, 69
CCalculate amount of component 41Calculate concentration per component 41Calculate target 41, 42Calibration Certificate 74Certificate 70Certificate date 70Certificate ID 70Change date 15Change time 15Cleaning 81Cloning method 29Comment 32, 41, 50Concentration unit 42
Control limit 60, 63, 65, 68Conventions and symbols 6Creating method
General Weighing 31General Weighing with template 31Piece Counting 49Simple Formulation 40Simple Formulation with template 40
Creating test 58
DDate 76Date format 76Days before expiration 73Decimal delimiter 75Default gateway 78Default value Result ID 33, 43, 51Default value Task ID 33, 43, 50Define custom unit 34Defining external test weights 69Defining templates 56Deleting method 30Description Result ID 33, 43, 51Description Task ID 32, 43, 50Devices 78Display brightness 76Display readability 35, 74Disposal 81DNS server (primary) 77DNS server (secondary) 77
EEccentricity test
creating 58performing 58settings 65
Editingexternal adjustment 69internal adjustment 67method 29
Enable statistical evaluation 36, 52End of line character 75Environment 74Environmental conditions 85, 86Ethernet 77EULA 25
Index112 Precision Balances
Expiry date 42External adjustment 69
editing 69performing 70
External test weight 69
FFactor 35Features 5Field delimiter 75Field settings 38, 47, 54Firmware update 79, 80Firmware update on system start-up 77Formula 35
GGeneral data 85General safety information 7General weighing 31
creating method 31creating method with template 31performing method 31
GWP Approved mode 73
HHeader and Footer 38, 46, 54History 71Home 12Host name 77
IInfo unit 34Intended use 7Interfaces 77Internal adjustment 67
editing 67performing 68
IP address 77
KKeyboard Layout 76, 78
LLabX 78LabX service 78Language 76Level indicator 13Leveling aid 25, 71Leveling the balance 25
Leveling warning 72Location 19Lock method 32, 41, 50
MMAC address 77Maintenace 78Materials 85, 86Method name 32, 41, 50Method settings
General Weighing 32General Weighing with templates 32Piece Counting 49Simple Formulation 41Simple Formulation with templates 41
Method work screen 13Methods 29
cloning 29deleting 30editing 29
Methods list 29Minimum tare weight 59, 62MT-SICS service 78
NName
custom unit 34Method 32, 41, 50profile 74test 59, 62, 65
Net indicator 75Net indicator field length 75Network configuration 77Next calibration date 70Nominal weight 59, 62, 65, 70Notification all (x) hours 61, 64, 67Number of repetitions 62Number of Result IDs 33, 43, 50Number of Task IDs 32, 42, 50
OOccurrence of day 61
Index 113Precision Balances
PPerforming
external adjustment 70internal adjustment 68
Performing methodGeneral Weighing 31Piece Counting 49Simple Formulation 40
Performing test 58Period 42Picker view 15Piece Counting 49
creating method 49performing method 49
Planning type 60, 63, 66Port
LabX 78MT-SICS service 78
Power cable 25Power supply 85, 86Power supply voltage 25Preferred days 61, 64, 67Prefix Result ID 33, 43, 51Prefix Task ID 32, 43, 50Pretare value 37, 46, 53Printers 78Production date 42Protection and standards 85, 86
QQuality information 38, 46, 54
RReference 51Reference average weight 51Reference flask volume 42Reference weight (100%) 42Repeatability test
creating 58performing 58settings 62
Reset 80Result calculation 59, 62, 65Result detail information 38, 46, 54Result ID 33, 43, 51Rollback 80
SSafety Information
General 7Intended use 7Signal words 7Staff safety 7Warning Symbols 7
Schedule 69Sensitivity test
creating 58performing 58
Sensivity testsettings 59
Service 72Service date reminder 73Settings 72
Eccentricity test 65Repeatability test 62Sensitivity test 59
Show info weight 34Show preparation instructions 59, 62, 65Sign 75Sign position 75Signal words 7Simple Formulation 40
creating method 40creating method with template 40Method Settings 41performing method 40
Soundon error 76on info 76on key press 76on warning 76
Sound volume 76Staff safety 7Standby 77Standby mode 12, 26Start after leveling 69Start after temperature change 69Start time 60, 63, 66, 69Status light 76Status light brightness 76Strategy 68Strip printer 38, 46, 54Subnet mask 77

Index114 Precision Balances
Switching off the balance 26Switching on the balance 25Symbols 6
TTare 12Tare mode 37, 45, 53Tare name 59, 62Target 75Target weight 33, 34, 44, 51Taring the balance 26Task ID 32, 43, 50Task information 38, 46, 54Technical data 85, 86Template
defining ad-hoc 56defining in Method 56using 57
Templates 56Test
creating 58performing 58
Test activated 59, 62, 65Test type 59, 62, 65Test weight ID 70Test weight name 70Test weight recalibration reminder 73Tests 57, 71Time 76Time format 76Time zone 76Tolerance (max) 34, 44, 51Tolerance (min) 33, 34, 44, 51Tolerance profile 35, 45, 51Tolerance profiles 73Transport over long distances 28
UUnit 33, 34, 44, 75Unit field length 75Unpacking 18Used template 38, 47, 54Using templates 56
VValue release 74
WWait time 77Warning limit 60, 63, 66, 69Warning Symbols 7Weighing item information 38, 46, 54Weighing mode 74Weight capture delay 35, 52Weight capture mode 35, 52Weight class 59, 62, 65, 70Weight field length 75Weight set ID 70Weight trigger 37, 53Weight value character output over USB 38, 46, 54Weight value output over USB 73
Xx hours before test 61, 64, 67
ZZero 12Zero drift compensation 74


Mettler-Toledo GmbHIm Langacher 448606 Greifensee, Switzerlandwww.mt.com/contact
Subject to technical changes.© Mettler-Toledo GmbH 09/201730357086B en
For more informationwww.mt.com/xsr-precision
30357086
30357086B 9/20/2017 1:42 PM - Schema ST4 PDF engine - Layout by Victor Mahler