Embed Size (px)
Citation preview
Robert Bosch GmbHPower Tools Division70745 Leinfelden-EchterdingenGermany
www.bosch-pt.com
1 619 929 K00 (2011.07) O / 11 XXX
PHO 2-82
en Original instructions
OBJ_DOKU-27534-001.fm Page 1 Thursday, July 28, 2011 11:18 AM
1 619 929 K00 | (28.7.11) Bosch Power Tools
2 |
8
6
3
9
7
21
5
4
3
PHO 2-82
OBJ_BUCH-1529-001.book Page 2 Thursday, July 28, 2011 11:20 AM
| 3
Bosch Power Tools 1 619 929 K00 | (28.7.11)
FE
D 6 mm max.
23 mmmin.
C
BA
11
10
12
18
2017
16 15
11
17
19
16 15
1
15
14
16
13
OBJ_BUCH-1529-001.book Page 3 Thursday, July 28, 2011 11:20 AM
1 619 929 K00 | (28.7.11) Bosch Power Tools
4 |
82 mmmax
9 mmmax
I
45°
HG
8211
222
OBJ_BUCH-1529-001.book Page 4 Thursday, July 28, 2011 11:20 AM
English | 5
Bosch Power Tools 1 619 929 K00 | (28.7.11)
English
Safety NotesGeneral Power Tool Safety Warnings
Read all safety warnings and all in-structions. Failure to follow the warnings
and instructions may result in electric shock, fire and/or seri-ous injury.Save all warnings and instructions for future reference.The term “power tool” in the warnings refers to your mains-operated (corded) power tool or battery-operated (cordless) power tool.
Work area safetyKeep work area clean and well lit. Cluttered or dark areas invite accidents.Do not operate power tools in explosive atmospheres, such as in the presence of flammable liquids, gases or dust. Power tools create sparks which may ignite the dust or fumes.Keep children and bystanders away while operating a power tool. Distractions can cause you to lose control.
Electrical safetyPower tool plugs must match the outlet. Never modify the plug in any way. Do not use any adapter plugs with earthed (grounded) power tools. Unmodified plugs and matching outlets will reduce risk of electric shock.Avoid body contact with earthed or grounded surfaces, such as pipes, radiators, ranges and refrigerators. There is an increased risk of electric shock if your body is earthed or grounded.Do not expose power tools to rain or wet conditions. Water entering a power tool will increase the risk of electric shock.Do not abuse the cord. Never use the cord for carrying, pulling or unplugging the power tool. Keep cord away from heat, oil, sharp edges and moving parts. Damaged or entangled cords increase the risk of electric shock.When operating a power tool outdoors, use an exten-sion cord suitable for outdoor use. Use of a cord suitable for outdoor use reduces the risk of electric shock.If operating a power tool in a damp location is unavoid-able, use a residual current device (RCD) protected supply. Use of an RCD reduces the risk of electric shock.
Personal safetyStay alert, watch what you are doing and use common sense when operating a power tool. Do not use a power tool while you are tired or under the influence of drugs, alcohol or medication. A moment of inattention while op-erating power tools may result in serious personal injury.Use personal protective equipment. Always wear eye protection. Protective equipment such as dust mask, non-skid safety shoes, hard hat, or hearing protection
used for appropriate conditions will reduce personal inju-ries.Prevent unintentional starting. Ensure the switch is in the off-position before connecting to power source and/or battery pack, picking up or carrying the tool. Carrying power tools with your finger on the switch or en-ergising power tools that have the switch on invites acci-dents.Remove any adjusting key or wrench before turning the power tool on. A wrench or a key left attached to a ro-tating part of the power tool may result in personal injury.Do not overreach. Keep proper footing and balance at all times. This enables better control of the power tool in unexpected situations.Dress properly. Do not wear loose clothing or jewel-lery. Keep your hair, clothing and gloves away from moving parts. Loose clothes, jewellery or long hair can be caught in moving parts.If devices are provided for the connection of dust ex-traction and collection facilities, ensure these are con-nected and properly used. Use of dust collection can re-duce dust-related hazards.
Power tool use and careDo not force the power tool. Use the correct power tool for your application. The correct power tool will do the job better and safer at the rate for which it was designed.Do not use the power tool if the switch does not turn it on and off. Any power tool that cannot be controlled with the switch is dangerous and must be repaired.Disconnect the plug from the power source and/or the battery pack from the power tool before making any adjustments, changing accessories, or storing power tools. Such preventive safety measures reduce the risk of starting the power tool accidentally.Store idle power tools out of the reach of children and do not allow persons unfamiliar with the power tool or these instructions to operate the power tool. Power tools are dangerous in the hands of untrained users.Maintain power tools. Check for misalignment or bind-ing of moving parts, breakage of parts and any other condition that may affect the power tool’s operation. If damaged, have the power tool repaired before use. Many accidents are caused by poorly maintained power tools.Keep cutting tools sharp and clean. Properly maintained cutting tools with sharp cutting edges are less likely to bind and are easier to control.Use the power tool, accessories and tool bits etc. in ac-cordance with these instructions, taking into account the working conditions and the work to be performed. Use of the power tool for operations different from those intended could result in a hazardous situation.
ServiceHave your power tool serviced by a qualified repair per-son using only identical replacement parts. This will en-sure that the safety of the power tool is maintained.
WARNING
OBJ_BUCH-1529-001.book Page 5 Thursday, July 28, 2011 11:20 AM
6 | English
1 619 929 K00 | (28.7.11) Bosch Power Tools
Planer Safety RulesWait for the cutter to stop before setting the tool down. An exposed rotating cutter may engage the surface leading to possible loss of control and serious injury.Hold the power tool by insulated gripping surfaces on-ly, because the cutter may contact its own cord. Cutting a “live” wire may make exposed metal parts of the power tool “live” and could give the operator an electric shock.Use clamps or another practical way to secure and sup-port the workpiece to a stable platform. Holding the work by your hand or against the body leaves it unstable and may lead to loss of control.Use suitable detectors to determine if utility lines are hidden in the work area or call the local utility company for assistance. Contact with electric lines can lead to fire and electric shock. Damaging a gas line can lead to explo-sion. Penetrating a water line causes property damage or may cause an electric shock.Do not reach into the saw dust ejector with your hands. They could be injured by rotating parts.Apply the machine to the workpiece only when switched on. Otherwise there is danger of kickback when the cutting tool jams in the workpiece.When working, always hold the planer in such a manner that the planer base plate faces flat on the workpiece. Otherwise the planer can become wedged and lead to inju-ries.Never plane over metal objects, nails or screws. The planer blade and the blade shaft can become damaged and lead to increased vibrations.
Products sold in GB only: Your product is fitted with a BS 1363/A approved electric plug with internal fuse (ASTA approved to BS 1362).If the plug is not suitable for your socket outlets, it should be cut off and an appropriate plug fitted in its place by an author-ised customer service agent. The replacement plug should have the same fuse rating as the original plug.The severed plug must be disposed of to avoid a possible shock hazard and should never be inserted into a mains sock-et elsewhere.Products sold in AUS and NZ only: Use a residual current de-vice (RCD) with a rated residual current of 30 mA or less.
Product Description and Specifica-tions
Read all safety warnings and all instruc-tions. Failure to follow the warnings and in-structions may result in electric shock, fire and/or serious injury.
Intended UseThe machine is intended for planing of firmly supported wooden materials, such as beams and boards. It is also suita-ble for beveling edges and rebating.
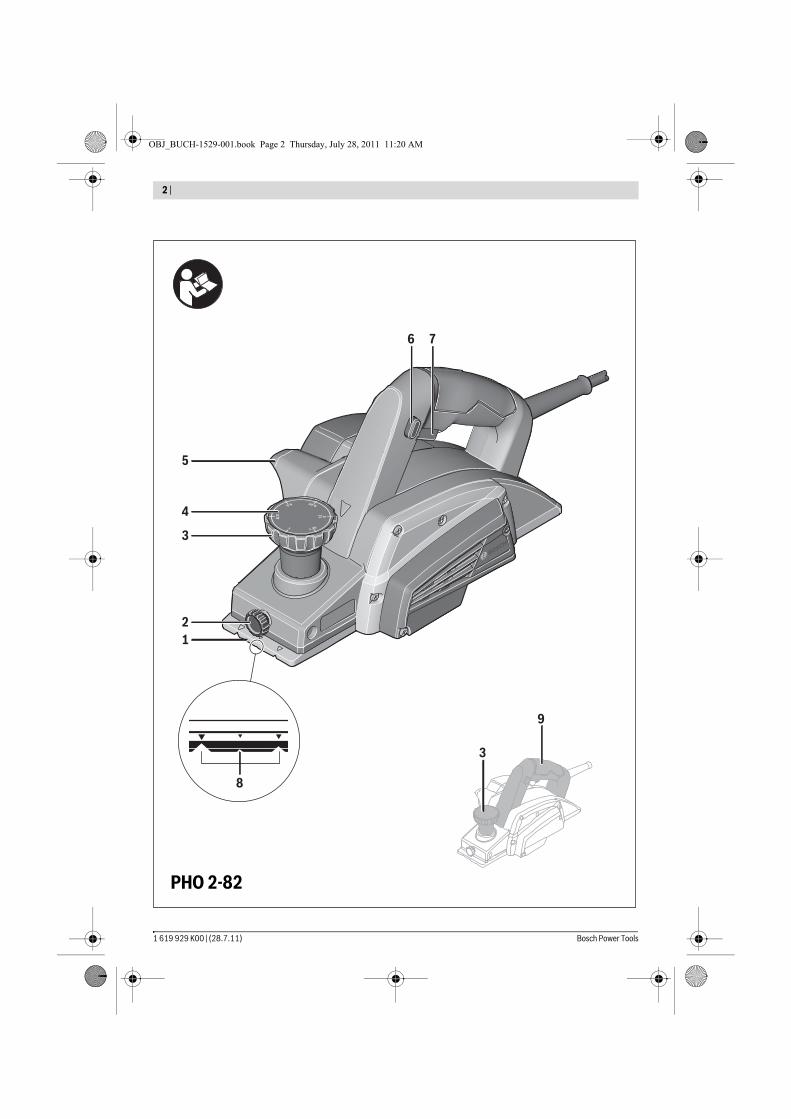
Product FeaturesThe numbering of the product features refers to the illustra-tion of the machine on the graphics page.
1 Planer base plate2 Fastening bolt for parallel guide3 Depth adjustment knob (insulated gripping surface)4 Planing depth scale5 Sawdust ejector6 Lock-on button for On/Off switch7 On/Off switch8 V-grooves9 Handle (insulated gripping surface)
10 T-handle wrench11 Fastening screw for clamping jaw12 Clamping jaw13 Blade drum14 Guide groove for planer blade15 HSS planer blade16 HSS planer-blade retainer17 Fastening screw for HSS planer-blade retainer18 Sharpening device for HSS planer blade*19 Setting gauge for HSS planer blade*20 Screwdriver*21 Park rest22 Parallel guide*
* Accessories shown or described are not part of the standard de-livery scope of the product. A complete overview of accessories can be found in our accessories program.
Technical Data
AssemblyBefore any work on the machine itself, pull the mains plug.
Planer PHO 2-82Article number 3 603 B10 0..Rated power input W 710Output power W 400No-load speed min-1 16000Planing depth mm 0 – 2.0Rebating depth mm 0 – 7Planing width, max. mm 82Weight according to EPTA-Procedure 01/2003 kg 2.9Protection class /IIThe values given are valid for a nominal voltage [U] of 230 V. For differ-ent voltages and models for specific countries, these values can vary.
Please observe the article number on the type plate of your machine. The trade names of the individual machines may vary.
OBJ_BUCH-1529-001.book Page 6 Thursday, July 28, 2011 11:20 AM
English | 7
Bosch Power Tools 1 619 929 K00 | (28.7.11)
Planer Blade SelectionWhen replacing planer blades, always replace both blades; otherwise an imbalance can generate vibrations, which can reduce the service life of the power tool.
Changing HSS Planer BladesBe cautious when replacing the planer blades. Do not grasp the planer blades by the cutting edges. Possible danger of injury due to the sharp cutting edges of the plan-er blades.
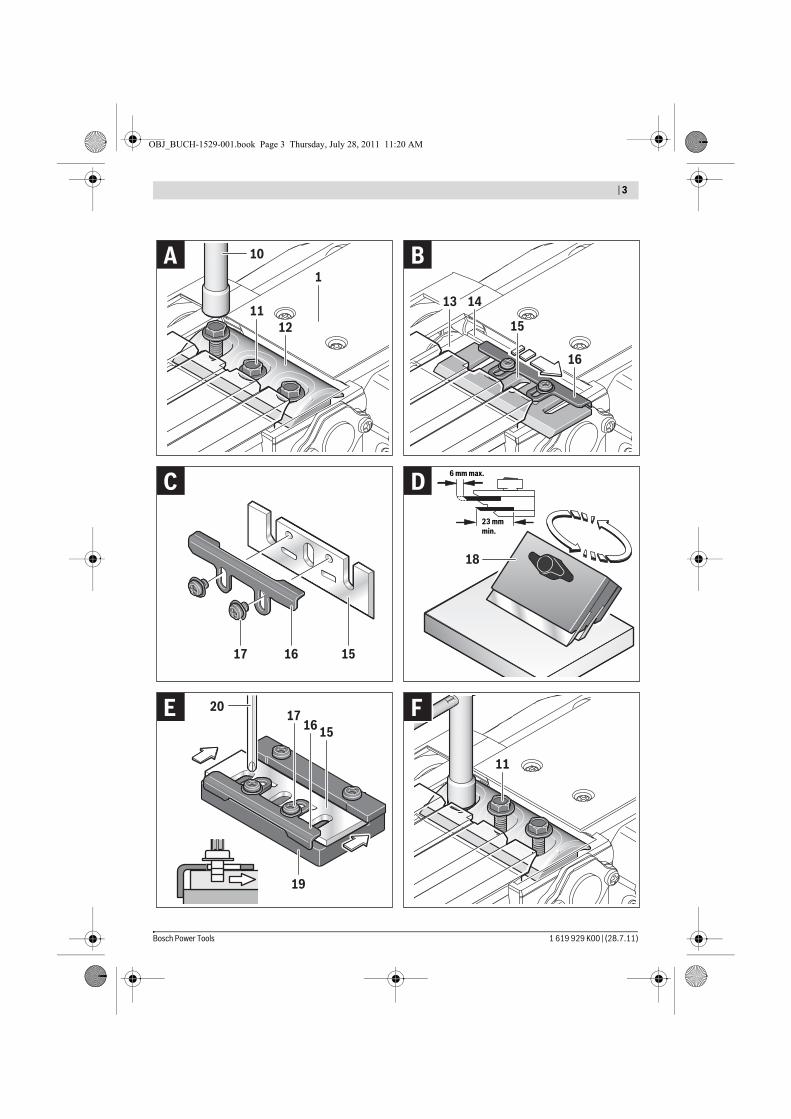
Disassembling the Planer Blade(s) (see figures A–C)– To reverse the planer blades, rotate the blade drum 13 un-
til the clamping jaw 12 is parallel to the planer base plate 1.– Unscrew the 3 fastening screws 11 with the t-handle
wrench 10 and remove the clamping jaw 12.– Slide the planer-blade retainer 16 together with the planer
blade 15 out of the guide groove 14 of the blade drum 13.– Turn the blade drum by 180° and disassemble the 2nd
planer blade.Note: Before replacing or resharpening the planer blades, re-move the HSS planer-blade retainer 16 by loosening the fas-tening screws 17.
Resharpening HSS Planer Blades (see figure D)Worn or dull HSS planer blades can be resharpened with the sharpening device 18 (accessory) and a commercially availa-ble whetstone.Insert both planer blades into the sharpening device and clamp them by tightening the wing bolt. Make sure that both planer blades are completely inserted to the stop.Move the sharpening device with the inserted planer blades uniformly and with light pressure across the whetstone.Note: Never regrind the planer blades by more than 6 mm, based on a minimum width of 23 mm. Thereafter, both planer blades must be replaced.
Assembling the Planer Blade(s) (see figures E–F)Before reinserting new or resharpened planer blades, clean the blade drum 13 and the planer blades 15, if required, as well as the HSS planer-blade retainer 16. Clean heavily gummed planer blades with spirits or petroleum.Note: Before assembling new or resharpened planer blades, their correct height setting must be adjusted first.The setting gauge 19 (accessory) is used for adjusting the height of the planer blades. Place the planer blade 15 and the blade retainer 16 on the setting gauge. Make sure that the blade retainer 16 engages in the groove inteneded for this purpose. Press the planer blade 15 against the stop and lock the blade retainer 16 in this position with the fastening screws 17. This will automatically adjust the correct height.Each planer blade must be assembled and aligned centered to the planer base plate 1. Afterwards, tighten the three fas-tening screws 11 with the t-handle wrench 10.Note: Before starting operation, check the fastening screws 11 for tight seating. Rotate the blade head 13 manually and ensure that the planer blades do not graze.
Dust/Chip ExtractionDusts from materials such as lead-containing coatings, some wood types, minerals and metal can be harmful to one’s health. Touching or breathing-in the dusts can cause allergic reactions and/or lead to respiratory infections of the user or bystanders.Certain dusts, such as oak or beech dust, are considered as carcinogenic, especially in connection with wood-treat-ment additives (chromate, wood preservative). Materials containing asbestos may only be worked by specialists.
– As far as possible, use a dust extraction system suita-ble for the material.
– Provide for good ventilation of the working place.– It is recommended to wear a P2 filter-class respirator.
Observe the relevant regulations in your country for the materials to be worked.
Clean the chip ejector 5 regularly. Use a suitable tool (e.g., a piece of wood, compressed air, etc.) to clean a clogged chip ejector.
Do not reach into the saw dust ejector with your hands. They could be injured by rotating parts.
OperationOperating ModesAdjusting the Planing DepthWith the adjustment knob 3, the planing depth can be adjust-ed variably from 0–2.0 mm using the planing depth scale 4 (scale graduation = 0.25 mm).
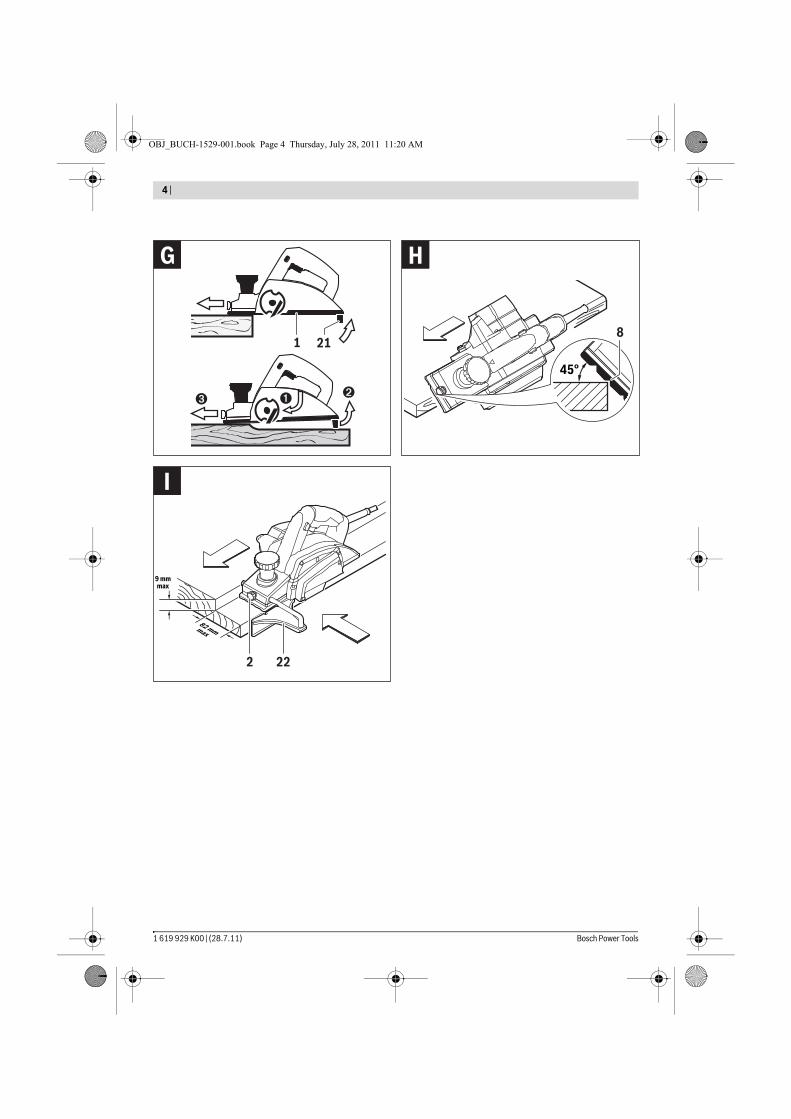
Park Rest (see figure G)The park rest 21 allows the machine to be set down directly after operation, without danger of damaging the working sur-face or the planer blade. While planing, the park rest 21 is tilt-ed upwards thus enabling full contact of the rear part of the planer base plate 1.
Starting OperationObserve correct mains voltage! The voltage of the pow-er source must agree with the voltage specified on the nameplate of the machine. Power tools marked with 230 V can also be operated with 220 V.
Switching On and OffTo start the machine, press the On/Off switch 7 and keep it pressed.To lock the pressed On/Off switch 7, press the lock-on button 6.To switch off the machine, release the On/Off switch 7 or when it is locked with the lock-on button 6, briefly press the On/Off switch 7 and then release it.
Working AdvicePlaning (see figure G)Set the required planing depth and place the front part of the planer base plate 1 against the workpiece.
OBJ_BUCH-1529-001.book Page 7 Thursday, July 28, 2011 11:20 AM
8 | English
1 619 929 K00 | (28.7.11) Bosch Power Tools
Apply the machine to the workpiece only when switched on. Otherwise there is danger of kickback when the cutting tool jams in the workpiece.
Switch the machine on and guide the machine with even feed over the surface to be planed.To achieve high-grade surfaces, work only with low feed and apply pressure on the centre of the planer base plate.When machining hard materials (e.g. hardwood) as well as when utilising the maximum planer width, set only low planing depths and reduce planer feed, as required.Excessive feed reduces the surface quality and can lead to rapid clogging of the chip ejector.Only sharp blades achieve good cutting capacity and give the machine longer life.The integrated park rest 21 also allows for continued planing at any given location on the workpiece after an interruption:– With the park rest folded down, place the machine on the
location of the workpiece where the planing is to be contin-ued.
– Switch on the machine.– Apply the supporting pressure onto the front part of the
planer base plate and slowly push the machine forward ( ). This tilts the park rest upward ( ) so that the rear part of the planer base plate faces on the workpiece again.
– Guide the machine over the surface to be planed ( ) with even feed.
Beveling Edges (see figure H)The V-grooves in the front planer base plate allow quick and easy beveling of workpiece edges. Depending on required bevel width, use the corresponding V-groove. For this, place the planer with the V-groove onto the edge of the workpiece and guide it along the edge.
Planing with Parallel/Beveling Guide (see figure I)Mount the parallel guide 22 to the machine using the fasten-ing bolt 2.Carry out the planing procedure several times until the re-quested rebating depth is reached. Guide the planer applying sideward supporting pressure.
Maintenance and ServiceMaintenance and Cleaning
Before any work on the machine itself, pull the mains plug.For safe and proper working, always keep the machine and ventilation slots clean.
Ensure easy operation of the park rest 21 and clean it regular-ly.
When the carbon brushes wear below acceptable service tol-erances, the machine will automatically cut out. The machine must be sent to customer service for maintenance (for ad-dress, see the “After-sales Service and Customer Assistance” section.If the machine should fail despite the care taken in manufac-turing and testing procedures, repair should be carried out by an after-sales service centre for Bosch power tools.In all correspondence and spare parts order, please always in-clude the 10-digit article number given on the type plate of the machine.
After-sales Service and Customer AssistanceOur after-sales service responds to your questions concern-ing maintenance and repair of your product as well as spare parts. Exploded views and information on spare parts can al-so be found under:www.bosch-pt.comOur customer service representatives can answer your ques-tions concerning possible applications and adjustment of products and accessories.
Great BritainRobert Bosch Ltd. (B.S.C.)P.O. Box 98Broadwater ParkNorth Orbital RoadDenhamUxbridgeUB 9 5HJTel. Service: +44 (0844) 736 0109Fax: +44 (0844) 736 0146E-Mail: [email protected]
IrelandOrigo Ltd.Unit 23 Magna DriveMagna Business ParkCity WestDublin 24Tel. Service: +353 (01) 4 66 67 00Fax: +353 (01) 4 66 68 88
Australia, New Zealand and Pacific IslandsRobert Bosch Australia Pty. Ltd.Power ToolsLocked Bag 66Clayton South VIC 3169Customer Contact CenterInside Australia:Phone: +61 (01300) 307 044Fax: +61 (01300) 307 045Inside New Zealand:Phone: +64 (0800) 543 353Fax: +64 (0800) 428 570Outside AU and NZ:Phone: +61 (03) 9541 5555www.bosch.com.au
Groove to be used Dimension a (mm)
none 0 – 4small 2 – 6medium 4 – 9large 6 – 10
OBJ_BUCH-1529-001.book Page 8 Thursday, July 28, 2011 11:20 AM
English | 9
Bosch Power Tools 1 619 929 K00 | (28.7.11)
Republic of South AfricaCustomer serviceHotline: +27 (011) 6 51 96 00
Gauteng – BSC Service Centre35 Roper Street, New CentreJohannesburgTel.: +27 (011) 4 93 93 75Fax: +27 (011) 4 93 01 26E-Mail: [email protected]
KZN – BSC Service CentreUnit E, Almar Centre143 Crompton StreetPinetownTel.: +27 (031) 7 01 21 20Fax: +27 (031) 7 01 24 46E-Mail: [email protected]
Western Cape – BSC Service CentreDemocracy Way, Prosperity ParkMilnertonTel.: +27 (021) 5 51 25 77Fax: +27 (021) 5 51 32 23E-Mail: [email protected]
Bosch HeadquartersMidrand, GautengTel.: +27 (011) 6 51 96 00Fax: +27 (011) 6 51 98 80E-Mail: [email protected]
DisposalThe machine, accessories and packaging should be sorted for environmental-friendly recycling.Do not dispose of power tools into household waste!
Subject to change without notice.
OBJ_BUCH-1529-001.book Page 9 Thursday, July 28, 2011 11:20 AM

1 619 929 K00 | (1.8.11) Bosch Power Tools
10 |
1 619 PA2 313
OBJ_DOKU-27536-002.fm Page 10 Monday, August 1, 2011 7:42 AM


![k00 - Metalika Kacin d[1].o.o](https://img.pdfslide.net/doc/110x75/56d6c0831a28ab30169aae46/k00-metalika-kacin-d1oo.jpg)

