Embed Size (px)
Citation preview

f
Yale Budgeting Tool (YBT)
User Manual
October 25, 2021
pg. 1

Table of Contents Introduction................................................................................................................................................ 4
System Requirements (cont.)................................................................... Error! Bookmark not defined.
Shortcuts.................................................................................................. Error! Bookmark not defined.
Getting Started ........................................................................................................................................... 5
System Requirements ............................................................................................................................. 5
Launching YBT ......................................................................................................................................... 5
Where to Get Assistance......................................................................................................................... 5
YBT Home Page....................................................................................................................................... 6
YBT Tabs.................................................................................................................................................. 6
Pasting .................................................................................................................................................... 8
Scrolling .................................................................................................................................................. 8
The GoTo Button..................................................................................................................................... 9
Colors in YBT ........................................................................................................................................... 9
Icons / Indicators in YBT.......................................................................................................................... 9
Sorting and Filtering ..............................................................................................................................11
Labor Planning in YBT ...............................................................................................................................12
Opening Your Labor Plan.......................................................................................................................12
The Labor Planning Tab.........................................................................................................................12
Common Processes ..............................................................................................................................19
Terminating an Employee.................................................................................................................19
Salary Increase (%)............................................................................................................................ 20
Salary Increase ($).............................................................................................................................21
Plan for an Unpaid Leave of Absence ...............................................................................................22
Add a New “To Be Named” (TBN) Position.......................................................................................23
Add a C&T “To Be Named” (TBN) Position with Split Charging.........................................................27
Lump Sum Planning for Other Salary Categories ..............................................................................31
Promotion from Administrative & Technical employee to Manager & Professional .......................32
What is a Split? .................................................................................................................................35
Financial Planning in YBT...........................................................................................................................37
Opening Your Financial Plan..................................................................................................................37
The FP Working Plan .............................................................................................................................37
Total Input vs. Monthly Input................................................................................................................39
pg. 2

Common Processes...............................................................................................................................41
Add a New Row/Ledger Account......................................................................................................41
Seeding .............................................................................................................................................42
Enter a Detail Total Block..................................................................................................................44
Add a New COA Block .......................................................................................................................45
Central Load (CL) Ledger Account Codes ...............................................................................................46
For Current Year Forecast (CYF):.......................................................................................................46
For Next Year Plan (NYP):..................................................................................................................46
Reporting in YBT........................................................................................................................................48
Reports Library......................................................................................................................................48
To Open a Report..............................................................................................................................48
To Retrieve Data ...............................................................................................................................49
Drilling in YBT Reports...........................................................................................................................51
Double-click drilling.......................................................................................................................51
Drilling options..............................................................................................................................52
To Save a Report ...............................................................................................................................53
To Export a Report............................................................................................................................55
Available Reports ..................................................................................................................................57
Appendix 1: Glossary of Terms.............................................................................................................58
pg. 3

1 Introduction
About the Yale Budgeting Tool The Yale Budgeting Tool (YBT) creates a common system for budgeting, forecasting, and financial management at Yale, vastly improving our labor and financial planning processes.
YBT is Yale’s customized version of software developed by Syntellis, Portland, Oregon.
Our Philosophy Yale University utilizes an efficient and effective set of standard processes to enable the timely, accurate, and comprehensive management of its financial resources through planning, budgeting, forecasting, monitoring, financial reporting, and risk management.
pg. 4

2 Getting Started
System Requirements The following are required in order for YBT to operate effectively:
• The YBT Windows Client contains many Excel functions in dropdown menus. It also processes large amounts of data, in both plan files and reports, quickly.
• YBT does not work on the Macintosh platform.
Launching YBT
The software components needed to use YBT are automatically “pushed” to your computer in the background. When you need to use YBT, direct access is available via the login page located at: https://your.yale.edu/work-yale/learn-and-grow/training/financial-training/yale-budgeting-tool-ybt
Where to Get Assistance If you need assistance with the YBT application or encounter problems, contact YBT Support at [email protected].
pg. 5

YBT Home Page
1. Contacts- key contact for getting assistance and System Last Closed Month
2. Navigation area - links to training resources and related information
3. System Availability
4. Bulletin - time sensitive updates
YBT Tabs In the Windows Client, you can quickly navigate between open files by using the tabs at the top of the screen. You can also perform certain basic file actions directly from these tabs.
The File Tab The File tab will vary slightly based on the client you are using. The example below is for Windows Client which is allowing you to access Excel files and common commands.
New Start a new file
Open Open an existing file
Close Close an open file
Print Print a file
Save Save a file
Help Open online help
About Axiom EPM Axiom-related details (software version, etc.)
Close Axiom EPM Close the YBT application
pg. 6

The Axiom Tab YBT Workbooks, Reports and features are accessed using the Axiom tab on the ribbon at the top of your screen. A down arrow () next to a button indicates that sub-selections are available; press the down arrow to see available options.
The Axiom tab contains the following groups:
Group Description File Groups Access files for Labor Planning, Financial Planning and Institutional Planning. Not
all users will have Institutional Planning. Reports Access existing reports. File Options Perform actions such as saving the file, changing the view in the file, refreshing
data, and inserting planning rows File Output Perform file output actions on YBT files, such as taking snapshot copies Display Manage display options. Show or hide the formula bar, or sheet headings
Exit Close Yale Budgeting Tool
The Home Tab The Home tab includes some Excel functionality that can be used in the YBT Windows Client.
pg. 7

Pasting When pasting data into YBT fields, be sure to use the following process to ensure that no formatting, formulas, or any other attributes are copied into the cell.
1. Right click on the destination cell and select Paste Special…
2. Select the Values button, as shown in the image at right.
3. Click OK.
Windows Client: Click on the Home tab then on the dropdown under Paste and select Paste Values.
Scrolling You can scroll both up and down, and left and right to see all of your data.
pg. 8

The GoTo Button The GoTo button takes you to a specific section within YBT.
Labor Planning Workbook –
• Job Category…sub categories
• Employee (to locate and select a particular employee)
Financial Planning Workbook –
• Detail - Cost Center
• Detail - Dimension Blocks
• Summary - Cost Center
• Summary - Dimension Blocks
Colors in YBT The following colors are used consistently in all YBT modules:
Color Description Blue shading Editable cell available for data input or modification.
Gray or white (no shading) Locked (not editable)
Red shading 1.) Indicates a difference noted in the labor planning worksheet. If an employee’s allocations are over/under 100%, it will be marked in red highlight. Note: This does not apply to splits-in employees.
2.) Red numbers in the monthly allocation buckets mean that a Grant is past the end date of the month in which the allocation is to hit (i.e., the COA will not be charged).
Blue Italic text Shortcut that will do what is described in text (example: << Add Employee to Manager & Professional section >>)
Icons / Indicators in YBT Input table for all new icons/indicators
Icon/Indicator Workbook DESCRIPTON Notes Lock icon Financial Planning (FP) Cell or row that cannot
be edited. Note: If using the Windows client this will appear as LK rather than with Lock icon.
CL Financial Planning (FP) Central Load data ME Financial Planning (FP) Manual Entry made to
the assessments section.
SB Financial Planning (FP) Summary Budget “increment/decrement”
pg. 9
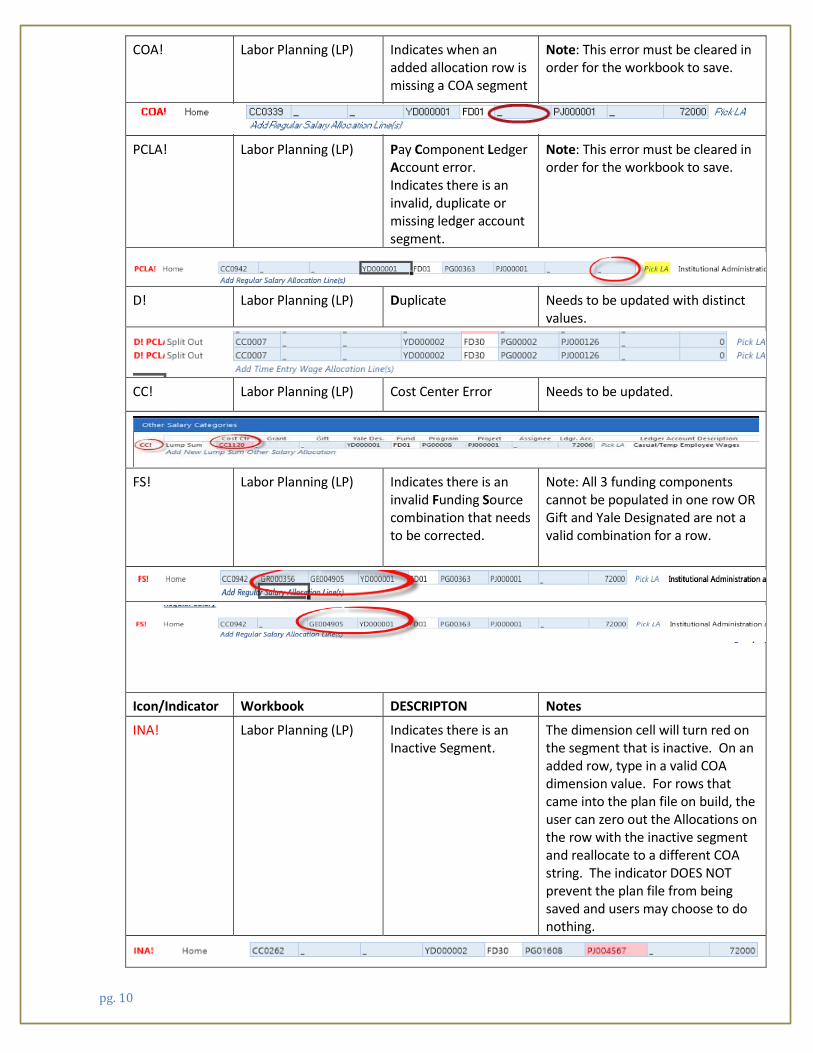
COA! Labor Planning (LP) Indicates when an added allocation row is missing a COA segment
Note: This error must be cleared in order for the workbook to save.
PCLA! Labor Planning (LP) Pay Component Ledger Account error. Indicates there is an invalid, duplicate or missing ledger account segment.
Note: This error must be cleared in order for the workbook to save.
D! Labor Planning (LP) Duplicate Needs to be updated with distinct values.
CC! Labor Planning (LP) Cost Center Error Needs to be updated.
FS! Labor Planning (LP) Indicates there is an invalid Funding Source combination that needs to be corrected.
Note: All 3 funding components cannot be populated in one row OR Gift and Yale Designated are not a valid combination for a row.
Icon/Indicator Workbook DESCRIPTON Notes
INA! Labor Planning (LP) Indicates there is an Inactive Segment.
The dimension cell will turn red on the segment that is inactive. On an added row, type in a valid COA dimension value. For rows that came into the plan file on build, the user can zero out the Allocations on the row with the inactive segment and reallocate to a different COA string. The indicator DOES NOT prevent the plan file from being saved and users may choose to do nothing.
pg. 10

Sorting and Filtering Many YBT popup windows can be filtered and sorted for easier viewing. A filterable list is indicated by the dropdown arrow next to the column heading. This can be handy when selecting from a long list of available plans (shown in the example below), as well as selecting from lists of Ledger Account codes, position names, employee names, and the like.
• To sort a list on a particular column, click on the column heading.
• To filter a list, click the drop-down arrow next to the column name; then type your search string in the dialog box.
• You can then apply another filter to another column.
pg. 11

3 Labor Planning in YBT
Opening Your Labor Plan 1. Click the Labor Planning button on the Axiom ribbon.
2. Click LP Working Plan. 3. Select from the plans available to you.
You can open more than one plan at a time by holding down the Ctrl key and clicking on multiple files.
The Labor Planning Tab
The Labor Planning workbook contains 3 views, Roster, Employee Planning and Allocations, all of which are described below.
To switch your view, simply go to File Options >> Change View, once you are in a particular view, the box to the left of the view option will be in bold to inform you as to which view you are currently in. This screenshot illustrates “Roster” as the active view.
In addition, you can determine what view you are in by the header information, see Current View: Allocations.
pg. 12

Roster View - Within the Roster view there is one row of data per employee for managing information about employees, including:
• UPI • Employee Name • Job Profile Name • Planned Range: Start and End Dates • Fringe Code • FTE % • FTE salary
Employees listed are grouped by Job Class, with one block for each type of employee:
• Faculty • Other Academic (example: Post Doctorates) • Manager & Professional • Administrative & Technical • Service Worker • Other (example: Consultant, Retiree, Student or Temporary/Casual) • Splits In Employees • Other Salary Categories (examples: lump sum entries)
When your plan is built at the beginning of the fiscal year, all current employees will be added automatically; students and casuals (Other and Other Salary Categories) will need to be added manually. You will need to manually adjust the labor plan throughout the year, as new employees join your department or as there are changes to existing employee data or allocations. Other than in the ‘Current Position Data’ columns, no new information is brought into the plan file after it has been built. No labor actuals are brought into the file. A labor report must be run in order to see the combination of actuals for closed months and projections for open months.
pg. 13

Roster View – (partial view)
The Roster view contains one row of data per person using the default column set defined below.
The following columns and their definitions apply to the Roster View only.
Name Description Source Updates Comment(s) UPI University Personal Identifier Workday Daily Employee Name Employee’s name (Last, First Workday Daily Job Profile Name Employee’s job title Workday Daily Plan Start Date Effective date of the plan in
YBT Workday Daily By default, plans in
YBT have duration of 2 years. Plan End Date End date of the plan in YBT Workday Daily
Current Position Data Fringe Code Code for fringe associated
with the job (H, S or P) Workday Daily Updated daily in YBT
files. FTE % Full Time Equivalent Workday Daily Updated daily in YBT FTE Salary Full Time Equivalent
annual salary (assuming 100%)
Workday Daily Updated daily in YBT files.
Job Category Job category code (examples; Faculty, Postdoctoral Associate, Professional, Manager, Technician, Administrative Support)
Workday Daily Updated daily in YBT files.
Home Cost Center Home Cost Center Workday Daily Updated daily in YBT files.
Current Year Employee Salary
T Employee’s actual salary based on start date
Workday Daily
Allocated Salary Portion of salary charged to a specific COA
Workday Daily
Variance Salary V
Difference between employee salary and allocated salary
Workday Daily
Non-Yale Salary W
Any additional Yale salary (e.g., VA Hospital)
Workday Daily
Total Salary X
Total of employee and other salary
Workday Daily
pg. 14

Merit Increase % Z
Percentage of employee’s salary increase
University Parameter
One-time
Merit Increase Effective Date A
Effective date of employee’s salary increase
University Default
One-time
Next Year Plan Employee Salary Employee’s salary for next
fiscal year, including planned increase
Workday Daily
Allocated Salary Portion of salary for next fiscal year charged to a specific COA
Workday Daily
Variance Salary Difference between employee salary and allocated salary for next fiscal year
Workday Daily
Non-Yale Salary Any additional Yale salary for next fiscal year
Workday Daily
Total Salary G
Total of employee and other salary for next fiscal year
Workday Daily
Fringe Fringe – total columns for CYF and NYP
–
Fringe – total columns for CYF and NYP
Data is displayed over 2 columns (for current and next year plan)
Burden Burden – total columns for CYF and NYP
–
G
Burden – total columns for CYF and NYP
Data is displayed over 2 columns (for current and next year plan)
YSM Sabbatical **YSM only** YSM SABB – total columns for
J CYF and NYP YSM Sabbatical – total columns for CYF and NYP
Data is displayed over 2 columns (for current and next year plan)
J –
YSM Tack-on **YSM only** YSM Tack-On – total columns for CYF and NYP
YSM Tack-on – total columns for CYF and NYP
Data is displayed over 2 columns (for current and next year plan)
% Over Pension Cap
pg. 15

% Over the Pension Cap
–
Faculty and M&P with salaries over a defined amount
Data is displayed over 2 columns (for current and next year plan)
9 Over 9 Program for Faculty 9 Over 9 Program for Faculty
O -
Provides 12 months of salary, allocated over 9 months.
User defined User defined
Data is displayed over 2 columns (for current and next year plan)
Can add comments for this employee
User defined User defined Allows up to 150 characters max
Users can add comments for this employee
Employee Data @ July Job Category
T Job category code (examples; Faculty, Postdoctoral Associate, Professional, Manager, Technician, Administrative Support)
Workday
Fringe Code Code for fringe associated with the job (H, S or P)
Workday Daily Updated daily in YBT files.
FTE% V
Full Time Equivalent percentage
Workday Daily Updated daily in YBT files.
Employee Planning view – (partial view)
Provides the same data as the Roster view, in addition to the columns listed below. Go to File Options >> Change View, and select Employee Planning.
The following columns and their definitions are applicable to the Employee Planning View only.
pg. 16

Column Name Description Source Updates Comment(s)
EI - ET ALLOCATION – Current Year Forecast (CYF) – FYxx (includes: the following 4 rows of data in monthly buckets)
FTE Percentage The percentage that the employee will be working
For each employee, these rows are added in Detailed View by one column for each month of the current fiscal year
FTE Salary Employee’s annual salary, adjusted for their FTE percentage
Monthly Salary FTE salary divided by 12, except for Administrative & Technical, and Service Worker. salaries which are based on the number of days in the month times their hourly rate times their FTE percent.
Fringe Code Salary (S), Hourly (H) or Part Time (P)
EU - FF ALLOCATION – Next Year Plan (NYP) – FYxx (includes: the following 4 rows of data)
FTE Percentage The percentage that the employee will be working
For each employee, these rows are added in Detailed View by one column for each month of the next fiscal year
FTE Salary Employee’s annual salary, adjusted for their FTE percentage
Monthly Salary FTE salary divided by 12, except for Administrative & Technical, and Service Worker. salaries which are based on the number of days in the month times their hourly rate times their FTE percent.
Fringe Code Salary (S), Hourly (H) or Part Time (P)
Allocations view – (partial view)
The Allocations View contains the default column set defined above in the Roster (excluding the Merit Increase % and Merit Increase Effective Date) and Employee Planning views, plus some additional columns and rows to allow for more granular control of your data. Go to File Options >> Change View, and select Allocations.
Use the Allocations view to charge employees to specific COAs as needed.
On build, employees are listed alphabetically within their respective job categories, Home Employees first, followed by Split-In Employees, and Other Salary Categories. Each section includes the Employee’s UPI, name and Home Cost Center, as well as the COAs used to pay for the employee’s salary.
pg. 17

The Allocations view includes the same information from the Roster and Employee Planning views, in addition to the information below.
Name Description UPI/Split University Personal Identifier/Identifies whether the allocation for the
employee is a home or splits in or out Employee Name Cost Center Employee Name
Cost Center field for the COA allocation string Grant Grant field for the COA allocation string Gift Gift field for the COA allocation string Yale Designated Yale Designated field for the COA allocation string Fund Derived Leaf level code for restriction level (is not editable) Program Program field for the COA allocation string Project Project field for the COA allocation string Assignee Assignee field for the COA allocation string (Individual responsible) Ledger Account Ledger Account s associated with Pay Components Funding Component Description associated with the Grant, Gift or YD on the COA string CY FTE Total Current Year Forecast FTE total CY Salary Total Current Year Forecast salary total NY FTE Total Next Year Plan FTE total NY Salary Total Next Year Plan salary total Allocation - CY Forecast Current Year Forecast percentage allocation (monthly) Allocation – NY Plan Next Year Plan percentage allocation (monthly) Salary - CY Forecast Current Year Forecast salary (monthly) Salary - NY Plan Next Year Plan salary (monthly) Fringe - CY Forecast Total Current Year Forecast fringe (monthly) Fringe - NY Plan Total Next Year Plan fringe (monthly) Burden - CY Forecast Total Current Year Forecast burden (monthly) Burden - NY Plan Total Next Year Plan burden (monthly)
J YSM SABB - CY Forecast Total Current Year Forecast YSM Sabbatical (monthly) J YSM SABB - NY Plan Total Next Year Plan YSM Sabbatical (monthly)
YSM Tack-On - CY Forecast Total Current Year Forecast YSM Tack-on (monthly) YSM Tack-On - NY Plan Total Next Year Plan YSM Tack-on (monthly)
pg. 18

Common Processes
Terminating an Employee Situation: You have an employee who is leaving Yale in January.
1. Terminating an employee is best done in the Allocations view
2. Select the Planned Range End Date (column DL) for the employee being terminated, then click the dropdown button to choose the date. It will update automatically.
3. Scroll to the right to see the effect on monthly employee FTE % and Salary. In this example, you will see that the employee has data in the months before the end date, but after the end date there is no longer allocated any data.
4. On the Allocation rows, you must also zero out the allocation percentages for the corresponding months. If you do not, you will have inaccurate FTE % in reporting.
Whether an employee is leaving Yale or just leaving
your department, the above steps will be the same.
pg. 19

Salary Increase (%) Situation: You need to give a Manager or Professional employee a 10% salary increase in December.
1. Go to the Roster or Employee Planning view in the Labor Planning Workbook.
2. Select the Salary Inc % column cell. • Type 10. • Press the Tab key.
3. By default, the increase will take effect on July 1. To change the effective date, click the drop-down menu in the Incr. Eff. Dt. column and select the appropriate month for the increase to take effect. This will automatically update for desired month.
4. To verify this update, change your view to either the Employee Planning or Allocations view, scroll to the right to validate that the amount after the selected date is 10% higher than the amount before the selected date.
pg. 20

Salary Increase ($) Situation: Following a recently completed job audit, a Manager or Professional employee in your department will receive a $5,000 increase in January 2018.
1. Go to either the Employee Planning or Allocations view in the Labor Planning workbook.
2. Scroll to the right to access the monthly buckets.
• Highlight the cell in Column EO in the FTE Salary row.
• Press F2 to edit the formula in this cell.
• Position the cursor at the end parentheses in the formula. Type +5000, then press Enter.
3. Compare the salaries. The value in the cell where the increase was entered and after will be $5,000 greater.
pg. 21
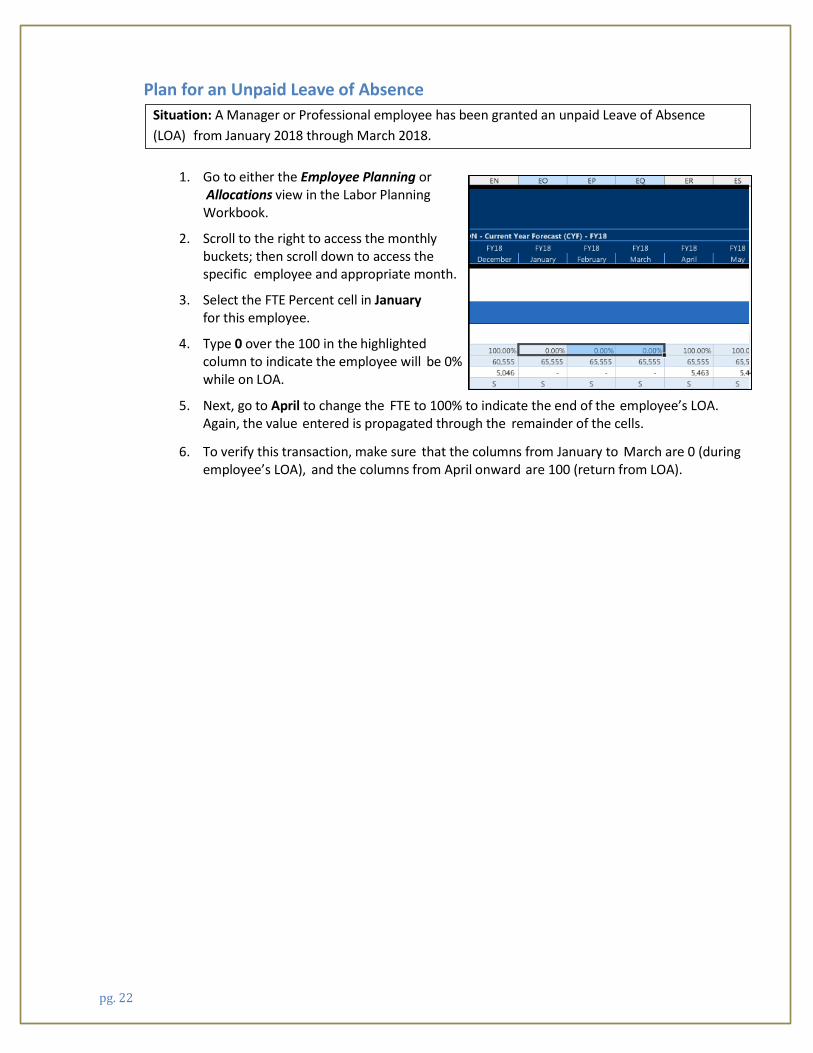
Plan for an Unpaid Leave of Absence Situation: A Manager or Professional employee has been granted an unpaid Leave of Absence (LOA) from January 2018 through March 2018.
1. Go to either the Employee Planning or Allocations view in the Labor Planning Workbook.
2. Scroll to the right to access the monthly buckets; then scroll down to access the specific employee and appropriate month.
3. Select the FTE Percent cell in January for this employee.
4. Type 0 over the 100 in the highlighted column to indicate the employee will be 0% while on LOA.
5. Next, go to April to change the FTE to 100% to indicate the end of the employee’s LOA. Again, the value entered is propagated through the remainder of the cells.
6. To verify this transaction, make sure that the columns from January to March are 0 (during employee’s LOA), and the columns from April onward are 100 (return from LOA).
pg. 22

Add a New “To Be Named” (TBN) Position Situation: You have an approved open Manager or Professional position and would like to plan for it. The position, a Manager, will be filled in July 2017 and the annual salary will be $52,000.
1. On the Axiom ribbon, select Add Row(s) >> Employees >> Add Employee – Manager & Professional OR double click on the <<Add Employee to Manager and Professional section>>
Note: The new employee record displays with “To Be Named” in the Employee Name field. If the new employee is a current Yale employee, choose them from the UPI pick list in the Calc Method variables box.
2. Choose the Job Category name: • click the Job Category pick list
• Select Manager
• Click OK.
3. Select the Planned Start Date from the pull-down menu.
4. Confirm that the fringe code and FTE % are populated and correct (or enter information).
5. Tab to the FTE Salary Column. Type the annual salary and press Enter.
6. Double click <<change job category>> to select the appropriate value for the position added.
3 654
pg. 23

Note: To add the Allocation row, you must be in the Allocations view.
7. Double click on << Add New Pay Component >>.
The Insert Calc Method(s) in Sheet Allocations dialog window appears.
8. Select Regular from the list and click OK.
The Calc Method Variables dialog window appears.
9. Click the Choose Value… button.
The Calc Methods Variables dialog window appears.
10. Select Regular Salary; click OK.
A regular salary block displays in the employee’s record.
pg. 24

11. Double-click the << Add Regular Salary Allocation Line(s)>> link.
A box will appear to specify how many allocation lines you would like to add. Enter the number and click OK.
The Calc Method Variables box appears. Select your COA information or click OK to enter the information manually (see Note below).
pg. 25

Note: You can also choose to click ok and a row will be added for manual input. This option will automatically generate the PCLA! Error until values are entered into the COA segments.
Enter the Cost Center, Funding Component (Grant, Gift or Yale Designated), Program, Project, Assignee (if applicable) and Ledger Account information. To pick the Ledger Account from a list, use the Pick LA pick list link).
IMPORTANT REMINDER: No cell in the COA segment can be null or empty. An “underscore” needs to be present in any COA segment cell that does not contain a specified value.
Note: FUND is derived based on the Funding Component (Grant, Gift or Yale Designated). It is important to know the order of the entries will be important to derive the correct fund value. “Grant” should always be added first if it is included in the COA string you are entering.
Note: The “Home” and Splits-Out/In are determined by the Cost Center value entered for the allocation row.
12. Scroll right to the ALLOCATION Current Year Forecast (CYF) – FY2018 cells and allocate the TBN at 100% beginning July 2017 (the start date for this example).
Know the different types of COAs available:
COA Home: Your department or planning unit’s COA COA – Split In:
Another department or planning unit’s employee; your COA
COA – Split Out: Your employee; another department or planning unit’s COA
pg. 26

Add a C&T “To Be Named” (TBN) Position with Split Charging Situation: You are filling a TBN Administrative & Technical position (Administrative Assistant) with split charging to two Home COAs and two split out COAs allocated at 25% each.
1. On the Axiom ribbon, select Add Row(s) >> Employees >> Add Employee – Administrative & Technical.
The new employee record displays with “To Be Named” in the Employee Name field. If the new employee is a current Yale employee, choose them from the UPI pick list.
2. Choose the Job Category name: • Select Administrative Support • Click OK.
3. Select the Planned Start Date from the pull-down menu (in this case, July 2017).
4. Confirm that the fringe code and FTE % are correct or select/enter the information.
Tab to FTE Salary column. Type the annual salary and press Enter.
pg. 27

To add the Allocation row, you must be in the Allocations view.
5. Double click on << Add Pay Component >>.
The Insert Calc Method(s) in Sheet Labor Planning dialog window appears.
6. Select Regular from the list and click OK.
The Calc Method Variables dialog window appears.
7. Click the Choose Value… button.
The Choose Value dialog window appears.
8. Select Time Entry Wages; click OK.
A Time Entry Wage block displays in the employee’s record.
pg. 28
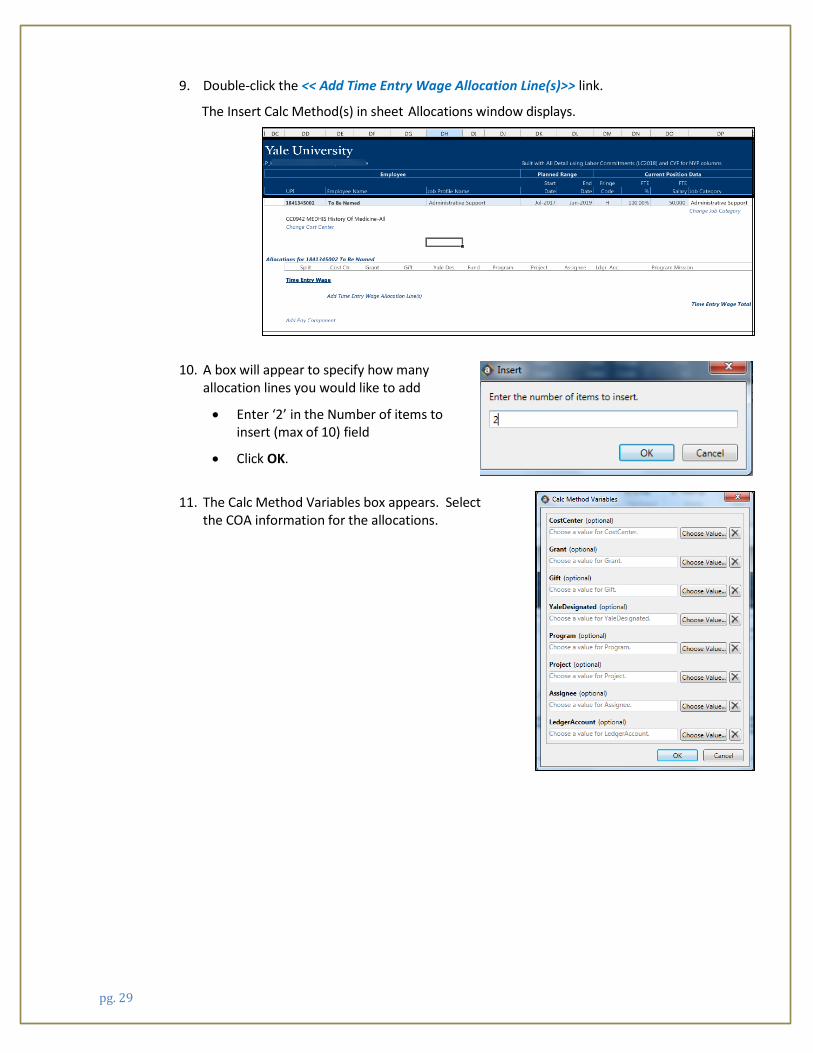
9. Double-click the << Add Time Entry Wage Allocation Line(s)>> link.
The Insert Calc Method(s) in sheet Allocations window displays.
10. A box will appear to specify how many allocation lines you would like to add
• Enter ‘2’ in the Number of items to insert (max of 10) field
• Click OK.
11. The Calc Method Variables box appears. Select the COA information for the allocations.
pg. 29

Note: The COA values that you choose will create a second block with the same (or duplicate) information that the user will need to update.
Note: You can also choose to click ok and the row(s) will be added for manual input. This option will automatically generate the PCLA! Error until values are entered into the COA segments. Notice that two COA lines are added to the employee record.
Enter the Cost Center, Funding Component (Grant, Gift or Yale Designated), Program, Project, Assignee (if applicable) and Ledger Account information. To pick the Ledger Account from a list, use the P ick LA pick list link). The Fund will automatically be populated based on the Funding Component entered.
IMPORTANT REMINDER: No cell in the COA segment can be null or empty. An “underscore” needs to be present in any COA segment cell that does not contain a specified value. If one or more required segments are missing, the COA! Indicator will appear next to the allocation row.
12. Scroll right to the July 2017 cells and allocate each line appropriately.
pg. 30

Lump Sum Planning for Other Salary Categories
Situation: Casuals In this example, you plan to spend $20,000 for casuals from July through June of next year. These steps also apply when lump sum planning.
1. Go to the Allocations view in the Labor Planning tab and select Other Salary Categories.
• Go To >> Employees >> Add Lump Sum
• Salary Allocation
2. Enter the COA information in the appropriate row.
3. Enter the lump sum amount (20,000) in the appropriate fiscal period: • CY Salary • NY Salary
4. Enter 100% in the columns representing the months the casuals will work.
5. Scroll across columns displaying salary dollars by month (Current Year Forecast (CYF)) to see the entire planned monthly salary.
pg. 31

Promotion from Administrative & Technical employee to Manager & Professional Situation: An Administrative & Technical employee has accepted a new Manager & Professional position in your department, and you would like to plan for it.
1. Go to the Roster view on the Labor Planning Tab. Scroll down to locate the employee being promoted.
2. Select the Planned End Date field. Click the down arrow and indicate the last month the employee will be an Administrative & Technical employee.
3. On the Axiom ribbon, select Add Row(s) >> Employees >> Add Employee – Manager & Professional OR double click on the <<Add Employee to Manager and Professional section>>
4. Select the employee who is being promoted to the Manager & Professional position.
5. Enter the Job Profile name to identify the new Manager & Professional position.
6. To indicate when the employee will start the M&P role, click the down arrow in the Plan Start Date field and select the month and year of the promotion.
7. Change the Fringe Code, and Salary: • Type S in FTE % column • Type the Annual Salary in the
FTE Salary column
pg. 32

8. To add the new Pay Component (regular salary) to the employee’s record, go to the Allocations view.
9. Double click on << Add Pay Component >>.
The Calc Method Variables dialog window appears.
10. Click on the Choose Value button and select Regular Salary from the list and click OK.
pg. 33

11. Click <<Add Regular Salary Allocation Line(s)>> to add the COA block.
NOTE: To split charges across more than one COA, indicate the number of COAs which will be used in “Number of items to insert” box.
12. The Calc Method Variables box appears. Select the COA information for the allocations.
Note: You can also choose to click ok without choosing values and the row(s) will be added for manual input. This option will automatically If the COA you want to use is located generate the PCLA! Error until values are elsewhere in the file, use Copy and Paste entered into the COA segments
(Special/Values) to copy and paste.
NOTE: This is a 2-step process as fund is derived and cannot be copied. Be careful when copying COA values down as the values increase by one digit.
13. Scroll to the right to end the allocations to the old COA (Administrative & Technical) for Dec. 2017 and allocate the charges to the new COA (Manager & Professional) in Jan of 2018.
• Change ‘100’ to ‘0’ and ’0’ to ‘100’ for the relevant months.
14. Scroll across the Columns to verify that the allocations and salary are correct from the current year’s plan to the next.
pg. 34

What is a Split? If the employee’s salary is split over multiple COAs, all COAs will be listed here, along with monthly allocations for each COA. You’ll also find links to add a new allocation and add a new Pay Component.
Split Out A Split Out is your employee, but another department’s COA. Split out employees are listed in the section appropriate for their job category (Faculty, Other Academic, M&P, A&T, SW, etc.).
Like all employees, split-out employees have a record in the Allocations view of the labor plan. At least one of their allocations will be labeled “Split Out”. Split out information is not shown in YBT reports but entering Split Out information into the Labor Plan allows you to see that 100% of an employee’s salary is allocated. Split Out allocations may be submitted to Workday using Make It So.
The Split-out indicator is derived based on the (outside) Cost Center selected in the COA string.
To split out an existing Faculty employee: 1. Locate the employee’s record in the Allocations view of the Labor Plan.
2. Double-click the << Add Regular Salary Academic Pay Allocation Lines >> link in the employee’s record.
3. Enter the COA.
4. Allocate the appropriate % across the COA rows.
pg. 35

Split In A Split In is another department’s employee, who is allocated to your COA. Split-in employees are listed at the bottom of the labor planning tab. Split In information will show in YBT reports. Most Split In allocation percentages will not equal 100 % as you are only entering the percentage of salary that your department is responsible for.
To add a new split-in employee, use the << Add Employee to Splits In Employee section>> link at the end of the Split In section at the bottom of the labor planning tab.
1. Enter the Employee information
2. Add an Allocation row
3. Enter the COA
4. Allocate the appropriate % across the COA rows
pg. 36

4 Financial Planning in YBT How the FP Working Plan is Built
In August of every year, the FP Working Plans are built. The Current Year Forecast in every plan file is seeded from the Next Year Plan data that was in the previous year’s file (LYNYP). Exceptions to this are: Central Load data which is loaded from Budget; Labor data which is coming from the current year Labor Plans; Assessment data which is calculated based on the Current Year Forecast Revenue data for certain Ledger Accounts, and Beginning Balance data which comes from the Actuals.
Opening Your Financial Plan 1. Click the Financial Planning button on the Axiom ribbon. 2. Click FP Working Plan. 3. Select from the plans available to you.
The FP Working Plan The FP Working Plan displays information about any COAs in your department which has activity during the year.
Rows on the FP Working Plan COAs are displayed in blocks, below. Each block displays information for one COA in the following rows:
• Beginning Balance • Revenue • Revenue Assessments • Labor Expense (from Labor Plans) • Non-Labor Expense • Transfers • Ending Balance
pg. 37

Columns on the FP Working Plan
The FP Working Plan displays the columns as defined below: Name Description Source Updates Comment(s) Ledger Account/Description
Code for the Ledger Account Workday
LY Actuals Total actuals from last fiscal year
Workday
CYTD Actuals Total of all actuals for closed months in current fiscal year
Workday Monthly
CY Budget Total Current year budget CY Forecast (total) Total Current Year
Forecast (actuals plus projections)
Variance CYF vs. CYB
Difference between current year forecast and current year budget
CY Forecast (monthly) Monthly projections for current year forecast (closed months are actuals; open months are projections).
After a month-end process, projections are replaced with actuals.
CYF Comments Remarks related to current year forecast
Comments are saved to the database.
CY Dept Plan Total Current year Department Plan
Data entry is optional
NY Dept Plan Total Next Year Department Plan
Data entry is optional
NY Plan (total) Total Next Year Plan
NY Plan/Budget (monthly)
Monthly projections for Next Year Plan/Budget for the next fiscal year
NYP Comments Remarks related to Next Year Plan/Budget for the next fiscal year
Comments are saved to the database
pg. 38

Total Input vs. Monthly Input A Calc Method (CM) is a row that has been saved back to a central location for re-use. The Calc Method can contain formatting, formulas and values, and needs to be adaptable for use in any relevant plan.
By default, Financial Planning Workbooks are built in the total input method. • Enter a total yearly amount in one column (blue cell) • The total amount spread evenly across unclosed months
NOTE: In the total input method, monthly amounts are: • Not directly editable • Automatically adjusted when actuals hit
(the unclosed months are adjusted such that the Total Amount remains unchanged)
Any row can be changed to Monthly Input; this could be useful with large one-time purchases. • Enter amounts in specific month(s) they are expected • Monthly amounts, including any actuals, are summed and displayed in the Total
column • Total Column is not editable
YBT refers to the input method (total or monthly) as the Calc Method.
Available Calc Methods include: 1.) Default Monthly 2.) Default Total 3.) Detail Monthly (this option allows the users to enter specific notes that roll-up to the
Ledger Account row). 4.) Detail Total (this option allows the users to enter specific notes that roll-up to the
Ledger Account row).
pg. 39

To Change the Calc Method of a row: 1. Click on the Ledger Account you want to change. The example below is changing total
method to monthly method.
2. Right-click to access the Add Rows menu. Click Add Rows>> Change Calc Method >> from the File Options section.
3. Choose the desired Calc Method (default total or monthly or detail total of monthly); click OK.
4. Click Yes to confirm your decision.
pg. 40

Common Processes Add a New Row/Ledger Account
1. Double-click on the appropriate link:
<<Add Revenue Account>>
<<Add Expenses Account>>
<<Add Transfers Account>>
2. A dialog box showing the available Calc Methods displays.
• Select the appropriate Calc Method.
• Click OK.
3. In the Calc Method Variables window, select a Ledger Account by clicking the Choose Value… button.
4. A dialog box showing the available Ledger Account displays.
• Choose the Ledger Account type and click OK (you can also type in the box at the top to select a Ledger Account).
• Confirm your choice by clicking OK again.
5. Repeat the same process as it applies to the appropriate sections.
pg. 41

Seeding Seeding is a method of pre-populating numbers into the CY Forecast or NY Plan structures based on specific criteria.
Example: Current Year Forecast (CYF) from Last Year Actuals (LYA) You can populate your Current Year Forecast (CYF) with Last Year Actuals (LYA), all zeros, Annualized YTD actuals formula, or CY Department Plan. The Next Year Plan (NYP) can be populated with the Current Year Forecast. This is the process is known as “seeding.”
1. Choose the Seed option in the Refresh Action dropdown menu, as shown.
2. Click the Refresh button on the Axiom toolbar.
3. The Refresh Variables dialog box will appear.
pg. 42

4. Select a Seeding Destination and Methodology. The available options are listed below:
Seeding Destination: The column into which data will go CY Forecast NY Plan NY DPT Plan
Seeding Methodology: The destination and source columns CYF with zeros Current Year Forecast will be zero CYF with Last Year Actuals Current Year Forecast from Last Year Actuals CYF with Annualized YTD actuals formula
Current Year Forecast with Annualized YTD actuals formula Note: this formula is dynamic and will change with every month that closes.
CYF with CY Dept Plan Current Year Forecast will be populated with data from the Current Year Department Plan
Next Year Plan with CY Forecast Next Year Plan from Current Year Forecast NY Dept Plan with Next Year Plan Next Year Dept Plan from Next Year Plan NY Dept Plan with CY Dept Plan Next Year Dept Plan from Current Year Dept Plan
5. Click OK.
The following is an example of seeding CY Forecast from Last Year Actuals:
pg. 43

Enter a Detail Total Block
1. Double click the << Add Expenses Account >> link.
2. Click Detail Total block; click OK.
3. Enter the value for the Ledger Account, if known. Otherwise, click Choose Value to use the Ledger Account lookup.
4. Select 81018 (Supplies and Materials Expense): click OK.
5. Click on the blue shaded cell in the top row of the detail block; enter the amount of the planned expense (10,000). Note the changes in the columns to the right.
Note: Notice that the cell in the second row of the block is not editable. This cell’s value changes as you enter additional travel expenses and continues to decrease as you add additional trip expense lines.
pg. 44

Add a New COA Block Situation: You want to plan for a new funding source which is about to come in. To help you plan, enter a new COA.
1. In the Workbook header, double click in the “Double click to add block” box.
The “add a dimension block” will appear to populate your COA.
2. Once the COA block is added, build out the various sections as needed, using the links provided in each section to add revenue, expenses and transfers.
3. Enter the COAs Note: You can not edit the COA block once you click <submit> and it is added to the workbook.
pg. 45

Central Load (CL) Ledger Account Codes Central Load data are budgeted revenue and expense dollars that come from central departments such as Facilities, ITS, Gift Administration (Endowments), etc. and are allocated to departments. For example, Facilities prepares a file of utility expenses projected for next year for all University departments. The budgeted amounts will be loaded directly into departmental FP working plans, subject to certain rules.
For Current Year Forecast (CYF): • The central load Ledger Accounts are “pre-seeded” with data from the current
year budget and are noted with the “CL” icon in the FP workbook.
• This data is populated in the monthly buckets and summed into the total. Some are loaded evenly across the months; others have different distributions in different months.
• Some Ledger Accounts are locked and some are unlocked allowing for data entry. If you need to make an adjustment to a locked account, please contact your budget analyst.
For Next Year Plan (NYP): • The central load Ledger Accounts are editable from the time the workbook is built
until the central load data for Budget is interfaced into the workbooks (in the December timeframe), when the lock/unlock rules are applied (if a code is locked in CY Forecast, it will be locked in NY Plan. The same is true for unlocked CL codes).
o If you choose to seed NYP from CYF before the central load data is interfaced, the central load Ledger Accounts will be populated with CYF data.
o After the budget central load data is loaded in YBT, any data that was populated prior to this will be zeroed out or replaced with the new information and the central load lock/unlock rules apply.
• The central load budget data will be loaded into NYP in the workbooks, replacing any data on central load codes. Any data that was entered into a budget-only code as a placeholder for additional central load data may need to be adjusted or removed based on the new interfaced data.
Drilling into a Labor Ledger Account
In an FP, double click on a labor Ledger Account to launch the 'Labor Drill Report.' This report will automatically open and display the person level data for the FP labor row that was drilled.
pg. 46

Automatic Gift Assessment and Offset Calculation
The GA offset to the Gift Assessment is automatically calculated on a hidden row in the Financial Plans. It should not be manually entered. Please note that this data does not show in the Financial Plans, but is available in reports.
Adding a Labor Row into an FP to Enter Dept Plan Data only
A Labor row can be added into Financial Plan files only for the purpose of entering data into CY or NY Dept Plan. There are no automatic calculations associated with these rows so any Fringe or other information that is automatically calculated in an LP will need to be manually calculated and entered. Note that all CY Forecast and NY Plan cells in this added row will be locked just as labor rows that come from the LP are.
pg. 47

5 Reporting in YBT
YBT has two types of reports available to the entire University:
• University Submission Reports are the reports used to complete forecasts and budgets and the reports provided to the Budget Office as part of the submission.
• University Standard Reports are financial management reports that can be run ad-hoc to assist with financial analysis. Some of these may also be used as Submission Reports at the determination of the budget office.
The School of Medicine has an additional suite of reports located in the YSM Report Library
YBT Reports Library Reports are stored in the folder structure known as the YBT Report Library where each report is assigned to a folder. You can navigate through the Report Library structure to quickly locate the report you want.
To Open a Report 1. On the Axiom tab, click Reports to bring up the menu. Use the YBT Reports Library folder at
the bottom of the menu to navigate to the specific report that you want to open.
2. Click on the subfolder containing your report.
3. Click on the name of the report you want to open. Note: The list of folders you see in the YBT Report Library may differ slightly from this screen.
pg. 48

Most reports will initially open with just column headings, (i.e., there will be no data).
To Retrieve Data 1. Click the Refresh button on Axiom Tab
>> File Options area >> Refresh
2. The Refresh Variables dialog box appears, prompting you to specify the values for the variables needed in the chosen report. The items included will vary from report to report. A sample is displayed below:
The Cost Center View option allows you to filter this report on any level of the University Hierarchy shown in the callout above. For instance, if you choose to filter the report on Department, the SubCategory Choose Value variable will populate with the list of departments from which you can choose. This approach provides significant flexibility in reporting, enabling you to look at the data from many different angles.
Remember: to run a report, click the Refresh button. When you have finished making your choices, click the OK button in the Refresh Variables Dialog box to run the report. Your report will be populated with data according to your YBT permissions and access rights.
pg. 49

When presented with a Refresh Variables dialog box similar to the one above, you’ll be able to summarize the data at the Ledger Account Summary, Ledger Account Grouping or Ledger Account level. Some report variables will prompt for a year, others may ask whether you want to include actuals or budget figures in the report. Each report will prompt you (when you click Refresh,) displaying the variables appropriate for the report.
Many reports offer the option of more complex filtering. Say, for example, you want to filter on multiple Cost Centers and a Project. Use the Filter Wizard box at the top-right of the report (see screen shot below.). Right click on the box that says, “RIGHT CLICK HERE”, select Filter Wizard, and create the appropriate filter for the report. This filter will be applied, along with whatever other filters are selected in the Refresh Variables box.
NOTE: The screen shot shows part of the Axiom Ribbon. Many of the buttons shown above provide added functionality within reporting.
Use the Change view button to switch between available views in a report. Drilling shows the detail behind summary figures. When using “Quick filter” you cannot save your selections.
Blue cells at the top of the columns in YBT reports are selectable options. View the screenshots for an example.
pg. 50

Drilling in YBT Reports
You can drill down a row in many YBT reports to view the data at a different level of detail. For example, if a row of data in the report shows budget totals for the Department, you can drill the row to see the values for each individual Cost Center in that Department. This type of drilling is known as "drilling down."
If a row is eligible for drilling, you can drill down hierarchies that have been set up for the data. For example, drill on an account summary row to get to the ledger detail.
To drill down a row of data:
1. Place your cursor in the cell of data that you want to drill.
2. You can click the Axiom tab, in the File Options group, click Drill, and then select the desired drill level from the Drill Down sub-menu.
A temporary file will open, named Drill_Filename.xlsx. This file contains a drill sheet which shows the results of the selected drill. If you want to continue to drill, you can either:
• Return to the original sheet (or a different sheet) in the original file, and then select a new drill level; or
• Select a cell in the drill sheet and continue drilling to a lower level of detail. A new drill sheet will be created in the temporary file with the results.
• When you are finished viewing the drill results, close the temporary file. (You do not need to save the file.)
• If you want to share the drill results with someone else, the best approach is to create a snapshot copy of the temporary drill file.
Double-click drilling You can drill a row of data by double-clicking it. In this case, a dialog box opens, listing the drilling options for the current row selection. Select the desired drill level and then click OK.
pg. 51

Drilling options
Drill option Description
Hierarchies Hierarchies are defined per dimension (on the relevant reference table), and YBT has defined hierarchies that outline logical drilling paths which maps to the Yale Chart of Accounts (see the COA website coa.yale.edu for more information.
On the Drill menu, hierarchies are listed first if defined. Only hierarchies relating to the current data are shown.
All Detail Selecting All Detail takes you directly to the very "bottom" of the data. Essentially, you are drilling based on all dimensions at once, rather than on one specific dimension.
The drill sheet will contain one column for each dimension (key column) in the data, including a description column for each (if applicable).
NOTE: If the row contains data from more than one data table, then this option is only available if the tables share the exact same key columns and all of the key columns are lookup columns.
Choose Columns Selecting Choose Columns allows you to drill based on any relevant column for the current data, including non-lookup key columns.
In the Select Columns dialog, select the column (or columns) that you want to drill by. You can select from any column in the primary data table, as well as any column in linked reference tables.
This drilling option is entirely free form. There is no validation to determine if a particular column selection makes sense in relation to the current data.
NOTES:
Calculated fields do not display and cannot be used for drilling.
pg. 52

To Save a Report 1. Open a report from the Report Library as shown in the Open a Report section in
the beginning of the Reporting section of this manual. (In this example, we will use F15 Account Balances Detail.)
2. Enter any report specific parameters and Refresh the report:
pg. 53
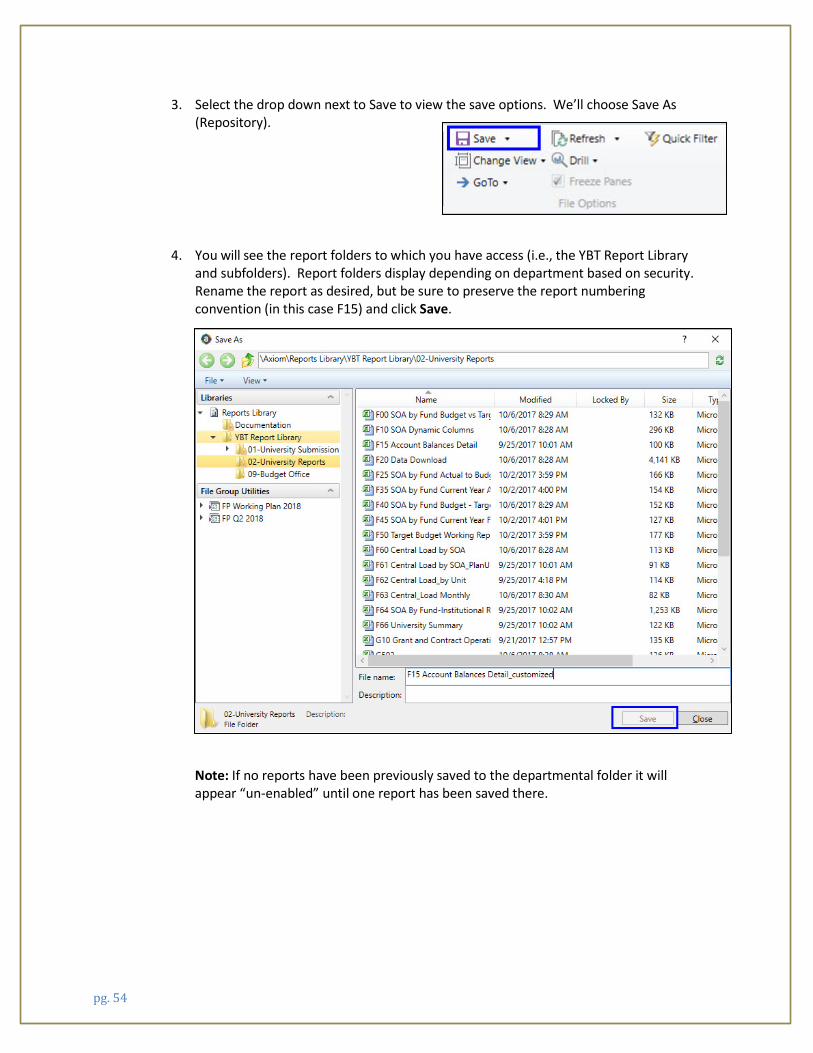
3. Select the drop down next to Save to view the save options. We’ll choose Save As (Repository).
4. You will see the report folders to which you have access (i.e., the YBT Report Library and subfolders). Report folders display depending on department based on security. Rename the report as desired, but be sure to preserve the report numbering convention (in this case F15) and click Save.
Note: If no reports have been previously saved to the departmental folder it will appear “un-enabled” until one report has been saved there.
pg. 54

To Export a Report 1. Repeat steps 1 and 2 described in previous section on How to Open report. 2. After the report results appear, select the desired option in the File Output section in the Axiom Tab
>> File Output).
a. Print- Opens the Print Sheets dialog box. Select View/Edit Print Details to open the Print Options dialog box. Click OK when finished selecting options.
b. Snapshot- Saves a snapshot to a local folder. Choose the Snapshot options. Select OK to create snapshot.
pg. 55

To save a report snapshot, Click the down area on the Axiom Save button and select Save As (Local File).
c. Email- Opens the Email Active Workbook dialog box, shown below, where you can set options. Click OK when finished selecting options (it is recommended that you use the ‘Convert All Formulas’ selection).
pg. 56

Available Reports This is the set of reports available as of this posting of the User Guide.
University Reports Report Name Comments
F00 SOA by Fund Summary - Budget vs Target Budget vs Prior Year Budget (University Submission - Budget Submission folder)
F10 SOA Dynamic Columns
F15 Account Balances Detail
F20 Data Download
F25 SOA by Fund Summary – Dynamic Columns In both University Reports and University Submission folders
F35 SOA by Fund - Current Year Actual (B/(W) Budget, Q2 and Prior Year Actuals). In both University Reports and University Submission folders.
F40 SOA by Fund Summary Budget, Target and Next Year Plan Report can be run for the following cycle selections: CY Forecast, NY Plan, Q2 Forecast, Budget, Q0 Plan. In both University Reports and University Submission folders.
F45 SOA by Fund Summary - Current Year Forecast
F50 Target Budget Working Report (GA Only)
G10 Grant & Contract Operating Budget
L08 Labor Data Download
L10 Salary by Person Dynamic Columns
L15 Salary and Fringe All Projections
L20 Salary by Person Current Yr Act and Fcst
L25 Salary by Person – by Mission and Fund Summary
L30 Salary and FTE Growth with Fringe
L31 Salary and FTE Growth Report can be run for the following cycle selections: CY Forecast, NY Plan, Q2 Forecast, Budget, Q0 Plan
L50 Salary and FTE In both University Reports and University Submission folders
L60 Labor Commitments vs YBT
pg. 57

6 Appendices
Appendix 1: Glossary of Terms Term Definition Actuals Amount already expended or revenue already received Allocated Salary Percent Allocated By COA Axiom EPM Enterprise Performance Management Budget An estimate of costs, revenues and resources over a specified period. Also serves
as a plan of action, and a standard for measuring performance. Budgets generally need to be approved by an authorized party.
Burden The Indirect Direct Costs (IDC) associated with a grant. Based on the IDC rate, determined by the funding source, the university collects a percentage of the budgeted dollars.
CM Calculation Method; a row in spreadsheet that has been saved back to a central location for re-use
CYA Current Year Actual CYB Current Year Budget CYF Current Year Forecast which is Current Year Actuals + Projections (Forecast for the
current year) Detail Block Allows additional detail information to be added below the level of Ledger
Account (example: 81036 Travel Expenses can add detail for individual trips)
Employee Salary Full Salary X FTE % Forecast Activity whereby a business unit states its expected year-end financial position
based on actual and projections. Snapshots of a forecast are saved (versioned) for required cyclical reporting (quarterly forecasting).
FTE Full Time Equivalent FTE Salary Salary for Full Time Employee FP Working Plan Various Financial workbooks for your unit Input By Total or Monthly Columns
Total allows you to put in the amount into one column in the Financial Workbook, and it automatically spreads data over the remaining months; Monthly input allows you to distribute the dollars over 12 months
IP Institutional Plan LP Working Plan Various Labor Plan workbooks for your unit LYA Last Year Actual LYNYP The Next Year Plan columns in the prior year’s workbook (Last Year Next Year Plan)
pg. 58

Term Definition Monitoring Continuous process of reviewing variances and adjusting activities or forecast as
necessary. NYP Next Year Plan (Allows for planning for the next year) Projections Educated estimates of future revenues and expenditures informed by past actuals
and commitments. A projection would encompass commitments. Think of this as something that is likely to happen (e.g., a position that you plan to hire).
Regular Salary Salary for Faculty and M&Ps Regular Wages Monthly salary for individuals that are paid weekly, such as C&Ts Seeding Populating your Forecast or Next Year Plan, with various options
Split In Percent of Labor cost for a person allocated from another department or unit that your unit pays for (other department's employee, my COA)
Split Out Percent of Labor cost for a person you allocate to another department or unit (my employee, other department's COA)
SME Subject Matter Expert UPI University Person Identifier (a unique, numeric identifier for each member of the
Yale community) YBT Yale Budgeting Tool
pg. 59