Embed Size (px)
Citation preview
G4 N
Acc
eler
ated
Incl
usi
ve M
ath
emat
ics
Pro
ject
YuMi Deadly Maths
AIM Module G4 Year C, Term 2
Geometry: Projective and Topology
Prepared by the YuMi Deadly Centre
Queensland University of Technology
Kelvin Grove, Queensland, 4059

Page ii AIM Module G4: Geometry – Projective and Topology YuMi Deadly Maths AIM
ACKNOWLEDGEMENT
The YuMi Deadly Centre acknowledges the traditional owners and custodians of the lands in
which the mathematics ideas for this resource were developed, refined and presented in
professional development sessions.
YUMI DEADLY CENTRE
The YuMi Deadly Centre is a research centre within the Faculty of Education at the Queensland University of
Technology which is dedicated to enhancing the learning of Indigenous and non-Indigenous children, young
people and adults to improve their opportunities for further education, training and employment, and to equip
them for lifelong learning.
“YuMi” is a Torres Strait Islander Creole word meaning “you and me” but is used here with permission from the
Torres Strait Islanders’ Regional Education Council to mean working together as a community for the
betterment of education for all. “Deadly” is an Aboriginal word used widely across Australia to mean smart in
terms of being the best one can be in learning and life.
YuMi Deadly Centre’s motif was developed by Blacklines to depict learning, empowerment, and growth within
country/community. The three key elements are the individual (represented by the inner seed), the community
(represented by the leaf), and the journey/pathway of learning (represented by the curved line which winds
around and up through the leaf). As such, the motif illustrates the YuMi Deadly Centre’s vision: Growing
community through education.
The YuMi Deadly Centre (YDC) can be contacted at [email protected]. Its website is http://ydc.qut.edu.au.
CONDITIONS OF USE AND RESTRICTED WAIVER OF COPYRIGHT
Copyright and all other intellectual property rights in relation to this booklet (the Work) are owned by the
Queensland University of Technology (QUT). Except under the conditions of the restricted waiver of copyright
below, no part of the Work may be reproduced or otherwise used for any purpose without receiving the prior
written consent of QUT to do so.
The Work may only be used by schools that have received professional development as part of a YuMi Deadly
Centre project. The Work is subject to a restricted waiver of copyright to allow copies to be made, subject to the
following conditions:
1. all copies shall be made without alteration or abridgement and must retain acknowledgement of the
copyright;
2. the Work must not be copied for the purposes of sale or hire or otherwise be used to derive revenue;
3. the restricted waiver of copyright is not transferable and may be withdrawn if any of these conditions are
breached.
DEVELOPMENT OF THE AIM MODULES
The Accelerated Inclusive Mathematics (AIM) modules were originally developed from 2010 to 2013 as part of
the Accelerated Indigenous Mathematics project funded under the Commonwealth Government’s Closing the
Gap: Expansion of Intensive Literacy and Numeracy program for Indigenous students. The project aimed to
assist secondary schools with beginning junior-secondary Indigenous students who were at Year 2/3 level in
mathematics by developing a junior-secondary mathematics program that accelerates the students’ learning to
enable access to mathematics subjects in the senior-secondary years and therefore enhance employment and
life chances. The project developed three years of modules (Years A to C) that are vertical sequences of
learning to take students from their ability level to their age level in mathematics. The YuMi Deadly Centre
acknowledges the role of the Department of Education, Employment and Workplace Relations in the
development of the AIM project and these modules.
© 2014 Queensland University of Technology
through the YuMi Deadly Centre
© QUT YuMi Deadly Centre 2014 AIM Module G4: Geometry – Projective and Topology Page iii
Contents
Page
Module Overview ....................................................................................................................................... 1 Background information for teaching projective and topology ............................................................. 1 Sequencing for projective and topology ............................................................................................... 6 Relation to Australian Curriculum: Mathematics .................................................................................. 8
Unit 1: Visualisation Experiences ................................................................................................................ 9 1.1 Overview of visualisation activities .............................................................................................. 9 1.2 Visualisation RAMR cycle: Mental rotation................................................................................. 12
Unit 2: Projective Experiences................................................................................................................... 15 2.1 Overview of projective activities ................................................................................................ 15 2.2 Projective RAMR cycle: Perspective ........................................................................................... 17
Unit 3: Topological Experiences ................................................................................................................ 19 3.1 Overview of topological activities .............................................................................................. 19 3.2 Topology RAMR cycle 1: Topological relationships ..................................................................... 21 3.3 Overview of networks ............................................................................................................... 23 3.4 Topology RAMR cycle 2: Networks ............................................................................................. 25
Unit 4: Similarity and Scale ....................................................................................................................... 27 4.1 Overview of similarity activities ................................................................................................. 27 4.2 Similarity RAMR cycle: Similar shapes ........................................................................................ 29
Unit 5: Trigonometry ................................................................................................................................ 33 5.1 Overview of trigonometric activities .......................................................................................... 33 5.2 Trigonometry RAMR cycle: Using trigonometry .......................................................................... 34
Test Item Types ......................................................................................................................................... 37 Instructions ....................................................................................................................................... 37 Subtest item types............................................................................................................................. 39
Appendix A: Visualisation Perspective Drawing ........................................................................................ 45
Appendix B: Worksheets for Projective and Topology .............................................................................. 46 B1 Jordan curve worksheet ............................................................................................................ 46 B2 Map colouring worksheet .......................................................................................................... 47 B3 Networks worksheet ................................................................................................................. 48
Appendix C: RAMR Cycle ........................................................................................................................... 50
Appendix D: AIM Scope and Sequence...................................................................................................... 51

© QUT YuMi Deadly Centre 2014 AIM Module G4: Geometry – Projective and Topology Page 1
Module Overview
Human thinking has two aspects: verbal logical and visual spatial. Verbal logical thinking, associated in some
literature with the left hemisphere of the brain, is the conscious processing of which we are always aware. It
tends to operate sequentially and logically and to be language and symbol (e.g. number) oriented. On the other
hand, visual spatial thinking, associated in some literature with the right hemisphere of the brain, can occur
unconsciously without us being aware of it. It tends to operate holistically and intuitively, to be oriented
towards the use of pictures and seems capable of processing more than one thing at a time – as such it can be
associated with what some literature calls simultaneous processing.
Our senses and the world around us have enabled both these forms of thinking to evolve and develop. To
understand and to modify our environment has required the use of logic and the development of language and
number plus an understanding of the space that the environment exists in and an understanding of shape, size
and position that enables these to be visualised (what we call geometry). Thus, as it is a product of human
thinking that has emerged from solving problems in the world around us, mathematics has, historically and
presently, two aspects at the basis of its structure: number and geometry. (Note: School geometry appears to
be the strand which is not so confronting to non-Western cultures, and to be an area in which nearly all
cultures have excelled, particularly with respect to the geometric aspects of art.)
This module, G4 Projective and Topology, looks at the teaching of the second of these bases, geometry. It is the
fourth and final geometry module, following G1 Shape, G2 Euclidean Transformations and G3 Coordinates and
Graphing (see AIM Scope and Sequence in Appendix D). In particular, it looks at projective and topological
transformations that lead to similarity, trigonometry and networks. It therefore has a change perspective to
geometry, similar to G2 and different to the relationship perspective of G1 and G3. The geometric
understandings that lead to trigonometry are a major focus of the module. However, there will also be time for
investigating projective and topological activities such as perspective drawing, networks and Möbius strips.
Background information for teaching projective and topology
This section describes approaches to teaching geometry, describes and defines the major content topics in
projective and topology, and briefly discusses connections and big ideas.
Approaches to teaching geometry
As stated above, geometry can be seen from two directions, as relationship and as change (where every
relationship can be reinterpreted as a change and vice versa) as follows. Projective and topology comes from
the perspective of change. This subsection briefly looks at the two approaches to geometry.
Relationship geometry
Relationship geometry has to do with how shapes relate to each other and this is best seen through studying
3D and 2D shape and line and angle. There are two particular approaches to teaching relationship geometry
that are worth discussing here.
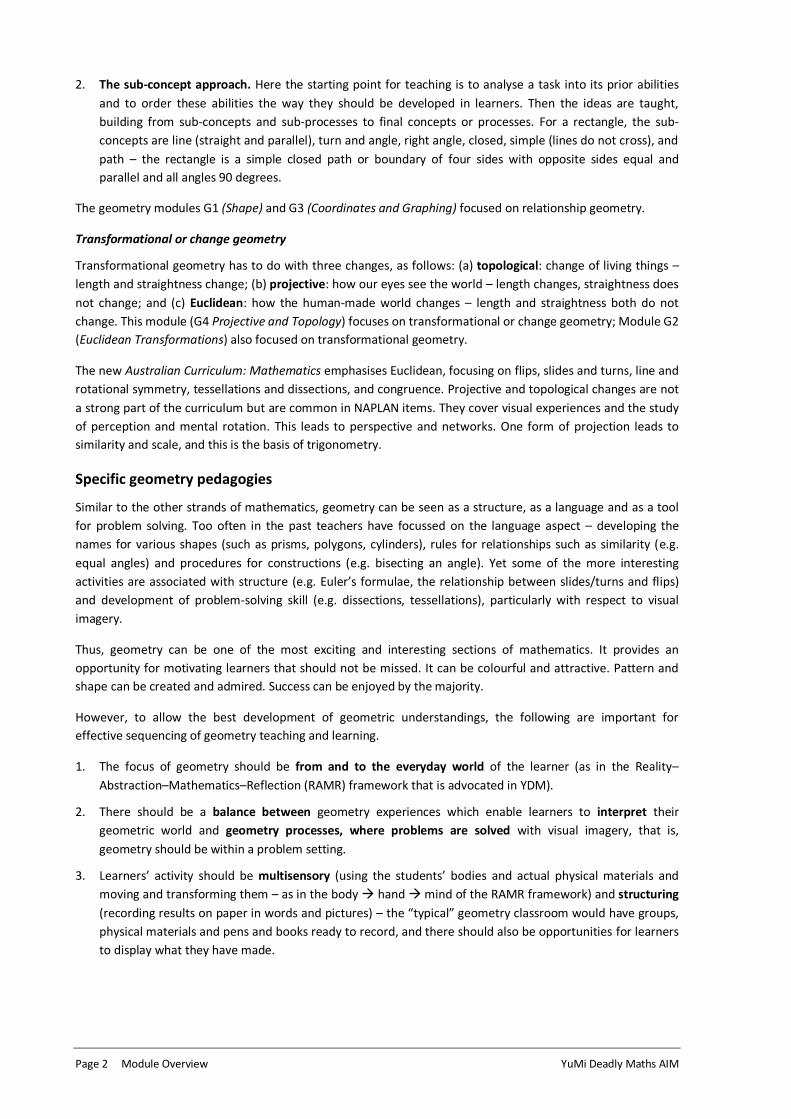
1. The environmental approach (or 3D
approach). Here the starting point and
organising imperative for teaching is the
environment, the everyday 3D world around
the learners. Ideas are first developed from
instances in the world and these ideas then
improve the observation powers, as on right.
Page 2 Module Overview YuMi Deadly Maths AIM
2. The sub-concept approach. Here the starting point for teaching is to analyse a task into its prior abilities
and to order these abilities the way they should be developed in learners. Then the ideas are taught,
building from sub-concepts and sub-processes to final concepts or processes. For a rectangle, the sub-
concepts are line (straight and parallel), turn and angle, right angle, closed, simple (lines do not cross), and
path – the rectangle is a simple closed path or boundary of four sides with opposite sides equal and
parallel and all angles 90 degrees.
The geometry modules G1 (Shape) and G3 (Coordinates and Graphing) focused on relationship geometry.
Transformational or change geometry
Transformational geometry has to do with three changes, as follows: (a) topological: change of living things –
length and straightness change; (b) projective: how our eyes see the world – length changes, straightness does
not change; and (c) Euclidean: how the human-made world changes – length and straightness both do not
change. This module (G4 Projective and Topology) focuses on transformational or change geometry; Module G2
(Euclidean Transformations) also focused on transformational geometry.
The new Australian Curriculum: Mathematics emphasises Euclidean, focusing on flips, slides and turns, line and
rotational symmetry, tessellations and dissections, and congruence. Projective and topological changes are not
a strong part of the curriculum but are common in NAPLAN items. They cover visual experiences and the study
of perception and mental rotation. This leads to perspective and networks. One form of projection leads to
similarity and scale, and this is the basis of trigonometry.
Specific geometry pedagogies
Similar to the other strands of mathematics, geometry can be seen as a structure, as a language and as a tool
for problem solving. Too often in the past teachers have focussed on the language aspect – developing the
names for various shapes (such as prisms, polygons, cylinders), rules for relationships such as similarity (e.g.
equal angles) and procedures for constructions (e.g. bisecting an angle). Yet some of the more interesting
activities are associated with structure (e.g. Euler’s formulae, the relationship between slides/turns and flips)
and development of problem-solving skill (e.g. dissections, tessellations), particularly with respect to visual
imagery.
Thus, geometry can be one of the most exciting and interesting sections of mathematics. It provides an
opportunity for motivating learners that should not be missed. It can be colourful and attractive. Pattern and
shape can be created and admired. Success can be enjoyed by the majority.
However, to allow the best development of geometric understandings, the following are important for
effective sequencing of geometry teaching and learning.
1. The focus of geometry should be from and to the everyday world of the learner (as in the Reality–
Abstraction–Mathematics–Reflection (RAMR) framework that is advocated in YDM).
2. There should be a balance between geometry experiences which enable learners to interpret their
geometric world and geometry processes, where problems are solved with visual imagery, that is,
geometry should be within a problem setting.
3. Learners’ activity should be multisensory (using the students’ bodies and actual physical materials and
moving and transforming them – as in the body hand mind of the RAMR framework) and structuring
(recording results on paper in words and pictures) – the “typical” geometry classroom would have groups,
physical materials and pens and books ready to record, and there should also be opportunities for learners
to display what they have made.
© QUT YuMi Deadly Centre 2014 AIM Module G4: Geometry – Projective and Topology Page 3
4. Teaching activities should move through three levels of development (based on van Hiele levels):
the experiential level, at which learners learn through their own interaction with their
environment (shapes are identified and named – e.g. this is a triangle);
the informal/analysis level, in which certain shapes and concepts are singled out for investigation
at an active, non-theoretical level (e.g. triangles have three sides and three angles); and
the formal/synthesis level, where a systematic study is undertaken and relationships identified
(e.g. interior angle sum of triangles is 180°).
At the experiential level, learners should be allowed to learn through experience with materials, not the
teacher’s words. Shape can be labelled and described but not broken into its component parts. Learners should
not be expected to be accurate in their statements.
At the informal level, experiences can include analysing shapes for their properties/principles and constructing
shapes from their properties. The sub-concept approach discussed later would be appropriate here.
At the formal level, the focus should be on synthesis and relationships and principles such as congruence and
similarity can be investigated, and formulae discovered. There should be no attempt at deductive proof and
posing abstract systems.
Projective and topological content
Projections and perspective
There are three projections: the first of these (which we will call the perspective projection) is from diverging
light (e.g. casting shadows from a torch or candle). This form of projection is how we see the world – it is how
reality forms pictures on the back of our retina. To study it is to understand the difference between the world
and what our eyes see (and also what photographs and video see). Studying the changes that are possible
between a shape and shadows (where shapes are not parallel to the screen for casting shadows) cast by it as it
is turned provides an understanding of this projection. Euclidean transformations leave length and straightness
unchanged (and, therefore, angle unchanged); similarity projections (because shape and enlargement are
parallel) leave straightness unchanged and keep sides in ratio (which means angle is unchanged). Perspective
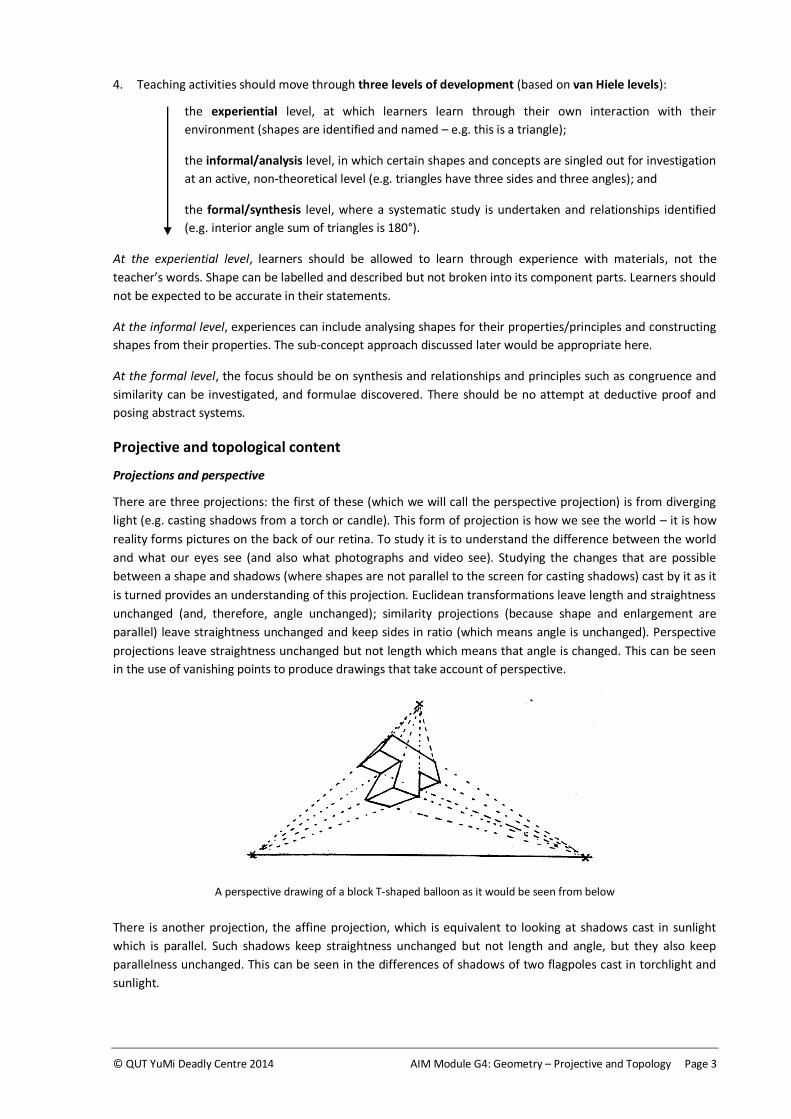
projections leave straightness unchanged but not length which means that angle is changed. This can be seen
in the use of vanishing points to produce drawings that take account of perspective.
A perspective drawing of a block T-shaped balloon as it would be seen from below
There is another projection, the affine projection, which is equivalent to looking at shadows cast in sunlight
which is parallel. Such shadows keep straightness unchanged but not length and angle, but they also keep
parallelness unchanged. This can be seen in the differences of shadows of two flagpoles cast in torchlight and
sunlight.
Page 4 Module Overview YuMi Deadly Maths AIM
Topology and networks
The final form of transformation useful in PP-9 mathematics is topology. This is the change produced by living
growing things – it allows for both straightness and length to change (it allows bending, stretching, and twisting
but not cutting, tearing, punching holes and joining). It is the basis of such puzzles as the Möbius strip and has
interesting activities based around open-closed and inside-outside. One important application of topology is
networks, a particular type of map that connects centres (or points) with lines
(or arcs).
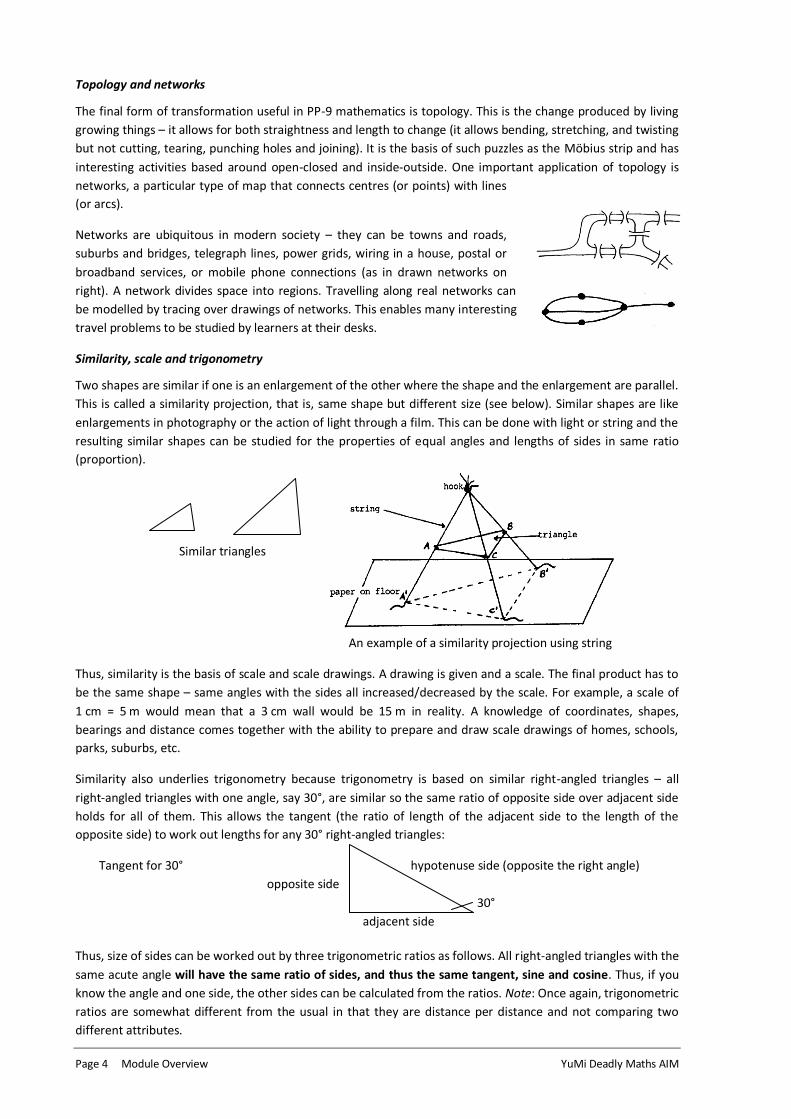
Networks are ubiquitous in modern society – they can be towns and roads,
suburbs and bridges, telegraph lines, power grids, wiring in a house, postal or
broadband services, or mobile phone connections (as in drawn networks on
right). A network divides space into regions. Travelling along real networks can
be modelled by tracing over drawings of networks. This enables many interesting
travel problems to be studied by learners at their desks.
Similarity, scale and trigonometry
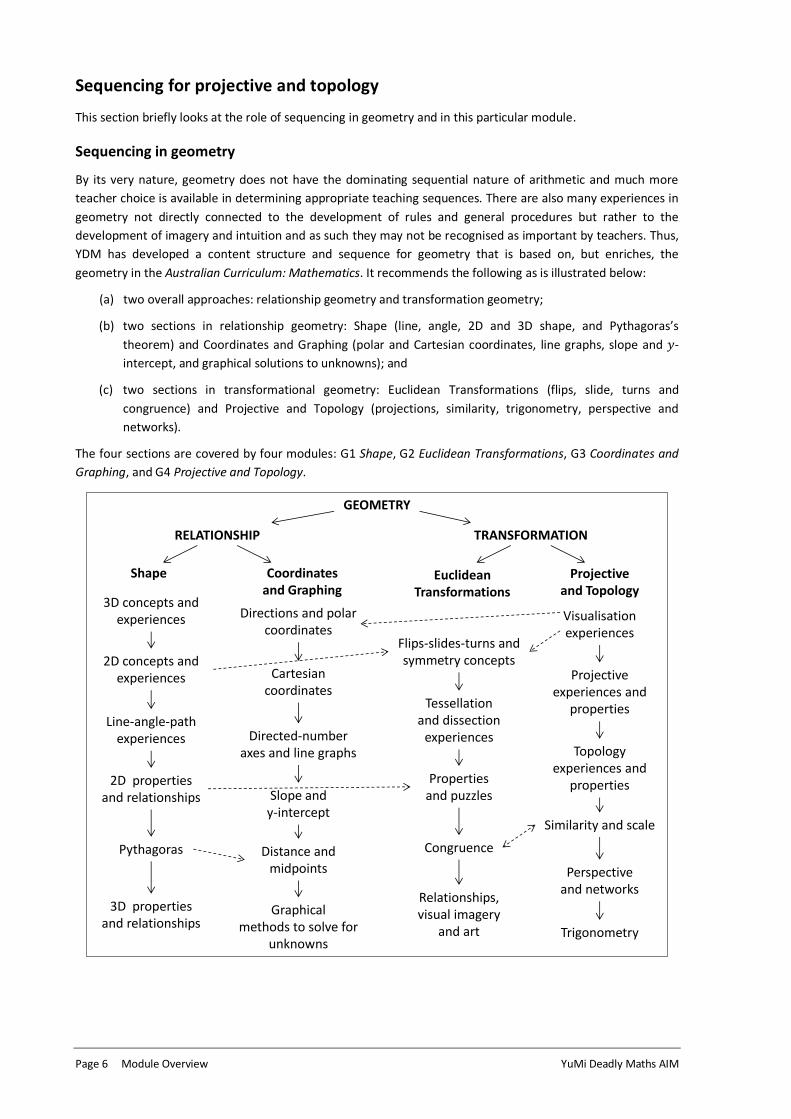
Two shapes are similar if one is an enlargement of the other where the shape and the enlargement are parallel.
This is called a similarity projection, that is, same shape but different size (see below). Similar shapes are like
enlargements in photography or the action of light through a film. This can be done with light or string and the
resulting similar shapes can be studied for the properties of equal angles and lengths of sides in same ratio
(proportion).
Similar triangles
An example of a similarity projection using string
Thus, similarity is the basis of scale and scale drawings. A drawing is given and a scale. The final product has to
be the same shape – same angles with the sides all increased/decreased by the scale. For example, a scale of
1 cm = 5 m would mean that a 3 cm wall would be 15 m in reality. A knowledge of coordinates, shapes,
bearings and distance comes together with the ability to prepare and draw scale drawings of homes, schools,
parks, suburbs, etc.
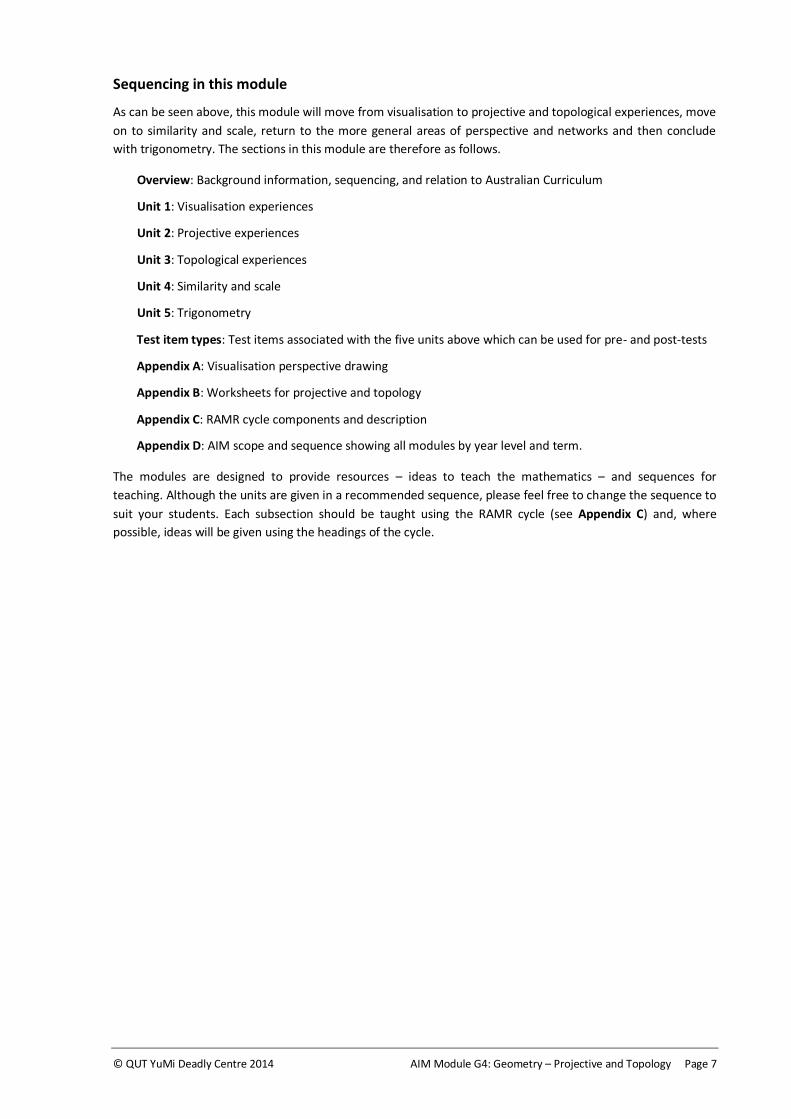
Similarity also underlies trigonometry because trigonometry is based on similar right-angled triangles – all
right-angled triangles with one angle, say 30°, are similar so the same ratio of opposite side over adjacent side
holds for all of them. This allows the tangent (the ratio of length of the adjacent side to the length of the
opposite side) to work out lengths for any 30° right-angled triangles:
Tangent for 30° hypotenuse side (opposite the right angle)
opposite side
30°
adjacent side
Thus, size of sides can be worked out by three trigonometric ratios as follows. All right-angled triangles with the
same acute angle will have the same ratio of sides, and thus the same tangent, sine and cosine. Thus, if you
know the angle and one side, the other sides can be calculated from the ratios. Note: Once again, trigonometric
ratios are somewhat different from the usual in that they are distance per distance and not comparing two
different attributes.

© QUT YuMi Deadly Centre 2014 AIM Module G4: Geometry – Projective and Topology Page 5
Tangent = opposite ÷ adjacent
Sine = opposite ÷ hypotenuse
Cosine = adjacent ÷ hypotenuse
Connections and big ideas
The major connections that projective and topology have are: (a) their role in bridging number and algebra
with geometry and measurement; and (b) their integration within the three transformational geometries.
The major big ideas are as below. They are generalities and assist recall, last the learner many years, provide
mathematics to cover many situations, and can be applied to solve many mathematics problems. Thus, they
are a powerful way to learn mathematics.
1. Change vs relationship. Mathematics has three components – objects, relationships between objects, and
changes/transformations between objects. Everything can be seen as a change (e.g. 2 goes to 5 by +3,
similar shapes are formed by “blowing one up” using a projector) or as a relationship (e.g. 2 and 3 relate to
5 by addition, similar shapes have angles the same and sides in proportion or equivalent ratio). Geometry
can be the study of shape or transformations between shapes (e.g. flips, slides and turns).
2. Interpretation vs construction. Things can either be interpreted (e.g. what operation for this problem,
what principles for this shape) or constructed (write a problem for 2+3=5; construct a shape of four sides
with two sides parallel). This is particularly true of geometry – shapes can be interpreted or constructed.
3. Parts vs wholes. Parts (these can also be seen as groups) can be combined to make wholes (this can also
be seen as a total), and wholes can be partitioned to form parts (e.g. fraction is part to whole, ratio is part
to part; addition is knowing parts and wanting whole, division is partitioning a whole into many equal
parts, the whole area can be partitioned into equal square units). In geometry, this big idea is particularly
applicable to dissections and tessellations.
4. Identity. These are actions that leave things unchanged, for example, 0 and 1 do not change things for
operations +/− and ×/÷ respectively (e.g. 4+0=4, 26÷1=26). In geometry, a 360 degree turn does not
change things for flips, slides, turns. It is useful to also look at changes that do not change anything.
5. Inverse. These are actions that undo other actions, for example, + is inverse of −, × is inverse of ÷ for
operations (e.g. +2 and −2; ×3 and ÷3). For geometry, 90° turns are inverse of 270° turns, and a flip is the
inverse of itself. Projections can be inversed.
6. Transformational invariance. Topological transformations change straightness and length, projective
transformations change length but not straightness, and Euclidean transformations change neither. (Note:
affine projections leave parallelness unchanged, while similarity projections leave parallelness unchanged
and sides in ratio.) This gives implications for shape, angle and what does not change (invariance) for each
of the types of transformations.
7. Euler’s formula. Nodes/corners plus regions/surfaces equals lines/edges plus 2 (holds for 3D shapes and
networks).
A more complete set of geometry big ideas is in a separate YDC publication called Supplementary Resource 1:
Big Ideas.
Page 6 Module Overview YuMi Deadly Maths AIM
Sequencing for projective and topology
This section briefly looks at the role of sequencing in geometry and in this particular module.
Sequencing in geometry
By its very nature, geometry does not have the dominating sequential nature of arithmetic and much more
teacher choice is available in determining appropriate teaching sequences. There are also many experiences in
geometry not directly connected to the development of rules and general procedures but rather to the
development of imagery and intuition and as such they may not be recognised as important by teachers. Thus,
YDM has developed a content structure and sequence for geometry that is based on, but enriches, the
geometry in the Australian Curriculum: Mathematics. It recommends the following as is illustrated below:
(a) two overall approaches: relationship geometry and transformation geometry;
(b) two sections in relationship geometry: Shape (line, angle, 2D and 3D shape, and Pythagoras’s
theorem) and Coordinates and Graphing (polar and Cartesian coordinates, line graphs, slope and -
intercept, and graphical solutions to unknowns); and
(c) two sections in transformational geometry: Euclidean Transformations (flips, slide, turns and
congruence) and Projective and Topology (projections, similarity, trigonometry, perspective and
networks).
The four sections are covered by four modules: G1 Shape, G2 Euclidean Transformations, G3 Coordinates and
Graphing, and G4 Projective and Topology.
Shape
GEOMETRY
3D concepts and experiences
Euclidean Transformations
2D concepts and experiences
Projective and Topology
Line-angle-path experiences
3D properties and relationships
Relationships, visual imagery
and art
Flips-slides-turns and symmetry concepts
Congruence
2D properties and relationships
Pythagoras
Tessellation and dissection
experiences
Properties and puzzles
Visualisation experiences
Perspective and networks
Projective experiences and
properties
Similarity and scale
Coordinates and Graphing
Directions and polar coordinates
Cartesian coordinates
Directed-number axes and line graphs
Distance and midpoints
Slope and y-intercept
Graphical methods to solve for
unknowns
Topology experiences and
properties
TRANSFORMATIONRELATIONSHIP
Trigonometry
© QUT YuMi Deadly Centre 2014 AIM Module G4: Geometry – Projective and Topology Page 7
Sequencing in this module
As can be seen above, this module will move from visualisation to projective and topological experiences, move
on to similarity and scale, return to the more general areas of perspective and networks and then conclude
with trigonometry. The sections in this module are therefore as follows.
Overview: Background information, sequencing, and relation to Australian Curriculum
Unit 1: Visualisation experiences
Unit 2: Projective experiences
Unit 3: Topological experiences
Unit 4: Similarity and scale
Unit 5: Trigonometry
Test item types: Test items associated with the five units above which can be used for pre- and post-tests
Appendix A: Visualisation perspective drawing
Appendix B: Worksheets for projective and topology
Appendix C: RAMR cycle components and description
Appendix D: AIM scope and sequence showing all modules by year level and term.
The modules are designed to provide resources – ideas to teach the mathematics – and sequences for
teaching. Although the units are given in a recommended sequence, please feel free to change the sequence to
suit your students. Each subsection should be taught using the RAMR cycle (see Appendix C) and, where
possible, ideas will be given using the headings of the cycle.
Page 8 Module Overview YuMi Deadly Maths AIM
Relation to Australian Curriculum: Mathematics
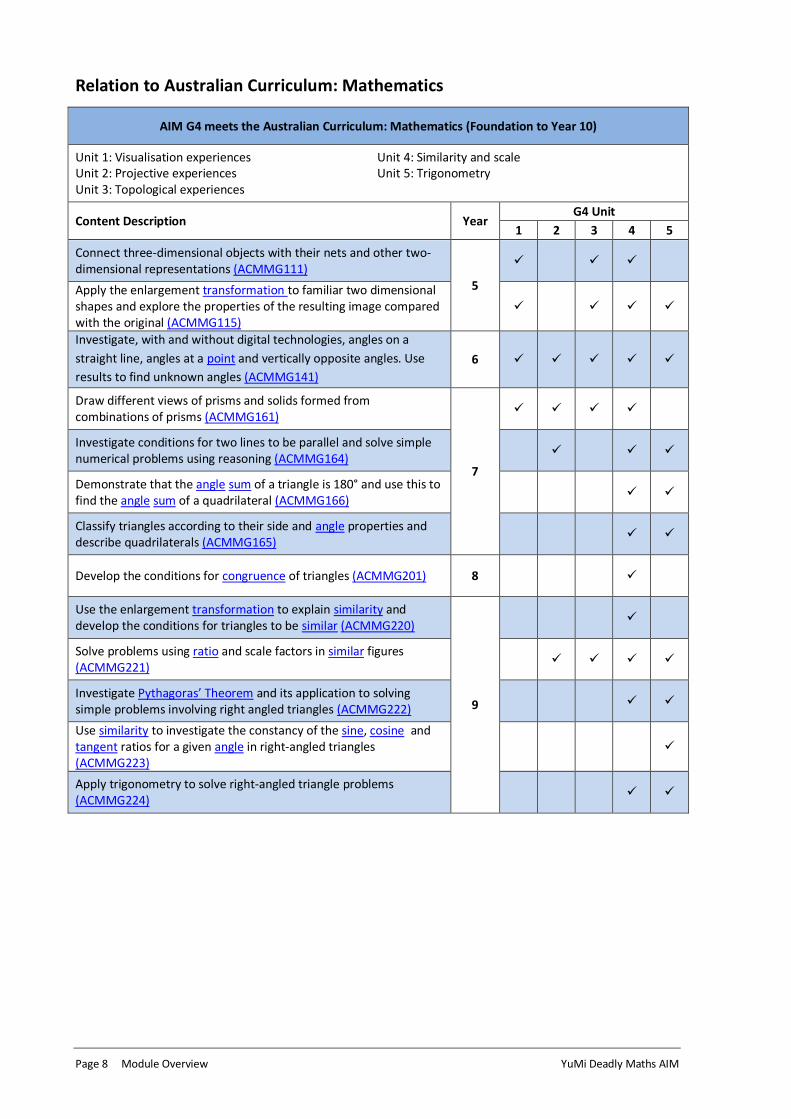
AIM G4 meets the Australian Curriculum: Mathematics (Foundation to Year 10)
Unit 1: Visualisation experiences Unit 4: Similarity and scale Unit 2: Projective experiences Unit 5: Trigonometry Unit 3: Topological experiences
Content Description Year G4 Unit
1 2 3 4 5
Connect three-dimensional objects with their nets and other two-dimensional representations (ACMMG111)
5
Apply the enlargement transformation to familiar two dimensional shapes and explore the properties of the resulting image compared with the original (ACMMG115)
Investigate, with and without digital technologies, angles on a
straight line, angles at a point and vertically opposite angles. Use
results to find unknown angles (ACMMG141)
6
Draw different views of prisms and solids formed from combinations of prisms (ACMMG161)
7
Investigate conditions for two lines to be parallel and solve simple numerical problems using reasoning (ACMMG164)
Demonstrate that the angle sum of a triangle is 180° and use this to find the angle sum of a quadrilateral (ACMMG166)
Classify triangles according to their side and angle properties and describe quadrilaterals (ACMMG165)
Develop the conditions for congruence of triangles (ACMMG201) 8
Use the enlargement transformation to explain similarity and develop the conditions for triangles to be similar (ACMMG220)
9
Solve problems using ratio and scale factors in similar figures (ACMMG221)
Investigate Pythagoras’ Theorem and its application to solving simple problems involving right angled triangles (ACMMG222)
Use similarity to investigate the constancy of the sine, cosine and tangent ratios for a given angle in right-angled triangles (ACMMG223)
Apply trigonometry to solve right-angled triangle problems (ACMMG224)

© QUT YuMi Deadly Centre 2014 AIM Module G4: Geometry – Projective and Topology Page 9
Unit 1: Visualisation Experiences
Visualisation has two parts: (a) perception of shapes, figures and collections of objects (and the built
environment) from different directions and distances; and (b) mental rotation in the mind of objects, figures
and collections or mental rotation in the mind of self around these things. We will look at these two geometric
ideas in two sections: the first is an overview of activities that could be done under this unit; the second is a
RAMR lesson that is designed to cover the work in this unit in one cycle. Note: This may not work for your
students and they may require prerequisite knowledge teaching and extra cycles.
1.1 Overview of visualisation activities
This section covers visualisation activities under three headings: informal drawings, visual imagery, and formal
geometric drawing.
Informal drawings
These are activities in the early years to build understandings of perception and mental rotation.
1. Perception. Get students to draw what they see in many situations, and then to draw what they would
imagine they would see from different places in those situations, and finally to begin to choose from
alternatives. The teaching framework has ideas – some of these are given here.
(a) Put two identical objects out to be drawn so that one is close to students and one is far from students,
and ask students to draw what they see. Put a large object well away and a smaller object close to the
students and repeat. Reverse the position of the objects. Discuss what objects faraway look like in
relation to those that are close.
(b) Build a small town out of blocks. Place it on a table. Draw it as it is. Back-light it and draw it as framed
in front of the light from different directions. Discuss how things change in light, at dusk and at night.
(c) Photograph things from different positions and ask students where the photographs were taken or
which photograph was taken from what position. Reverse this – ask the students to predict what a
photograph will look like, take the photograph and compare to predictions.
(d) Introduce language of position and perception, set up divided situations where students are on
opposite sides and cannot see what the other students have, have built or have drawn. Ask students
on the side that has the information to use words to describe what they have to allow the other
students to identify the object, make the figure, or draw the design.
(e) A divided activity can be done simply by placing students back to back (one facing
forward and one facing back) and showing a design (as on right) to the front-facing
students. These students use language to describe what they see and to direct other
students to draw it.
2. Mental rotation. Again the start is to get students to draw things from different directions – front, back,
right, left, above, and below. Again the teaching framework has some ideas, of which some are below.
(a) Put an object or toy on a table, divide students up into four groups and place
one group on each of the four sides of table (sides of table labelled front,
back, left, and right), hand students paper with four areas marked and
labelled (front, back, left, and right), students given time to do drawing from
their position, then every group moves around 90° and draws again. This is

Page 10 Unit 1: Visualisation Experiences YuMi Deadly Maths AIM
repeated until all four sides are drawn. Students discuss drawings and how
close they were to what they imagined.
(b) Repeat (a) but this time, turn the object/toy 90°, without moving the students.
(c) Repeat (a) and (b) but, this time, add in drawings from above and below (good to have a glass table).
(d) Repeat (c) but use photography – students predict first and construct front, back, left, right, top and
bottom collages from pictures.
(e) Build in to (c) above activities where students have to predict what something will look like from
various directions, determine direction of photograph when given a photograph of an
object/construction, and choose from options as to which photograph is from a given direction.
(f) Reverse all the above and build solid objects/constructions from 2D pictures/drawings taken from
different directions (i.e. teach views object as well as object views).
Visual imagery
The purpose of these activities is to (a) develop spatial visualisation (the ability to mentally manipulate, twist,
rotate, reflect, slide or invert shapes); (b) develop spatial orientation (the ability to picture the arrangement of
a set of shapes in relation to each other or to some other object); (c) develop the ability to remain unconfused
by the changing orientation of a shape or set of shapes; and (d) develop the ability to determine spatial
relations in which the body orientations of the observer is an essential part of the problem). Materials are
dotted paper, pencil, MAB ones, and plain paper; processes are constructing and thinking flexibly and visually;
and problem-solving strategies are patterning and modelling.
1. Which is the correct bird’s eye view of the building on the left?
2. Copy the given shape on the right on dot paper (isometric dot paper). Copy
two other shapes from (5) below onto the same paper.
3. Which plan below is the base plan for the building shown below? (“1” means
1 storey, “2” means 2 storeys, etc.)
4. How many blocks would you need to make the large cube on the right? Imagine
that you've glued all the blocks together and then dropped the cube into a tin of
red paint. If you then separated all the individual blocks, how many of them would
have: (a) all 6 faces painted, (b) 5 faces painted, (c) 4 faces painted, (d) 3 faces
painted, (e) 2 faces painted, (f) 1 face painted, and (g) 0 faces painted?

© QUT YuMi Deadly Centre 2014 AIM Module G4: Geometry – Projective and Topology Page 11
5. There are four pairs of matching blocks in those drawn below. See if you can find them.
Geometric drawing
For these activities, objectives, processes and problem-solving strategies are the same as for visual imagery;
materials are pencil, compasses, plain paper, and coloured pencils.
1. Construct and colour as many of the shapes below as you
can.
2. Using your compasses, draw larger versions of the shapes below and then colour them.
(a) If you were to draw the diagonals of the square in A above, where do you think they would intersect?
Find out if your guess was correct.
(b) If you were to draw a line through Points X and Y in B above, would it be perpendicular to the line
joining the centre points? Find out.
(c) Find three examples of concentric circles in the shapes above.
(d) Add another link to the chain in B above.
X
Y
Page 12 Unit 1: Visualisation Experiences YuMi Deadly Maths AIM
1.2 Visualisation RAMR cycle: Mental rotation
This cycle will develop abilities of students in terms of mental rotation – rotating themselves around an object
and mentally rotating the object (a combination of the four abilities at the start of this unit).
Reality
1. Discuss with students how they work out what things look like in their mind. Discuss how things might look
from a different position than where you are standing (can they do this?). Discuss how you know what
things look like that you cannot see (like the back or side of a building) from their memory.
2. Pick a focus for the students – could be a toy or object, could be a building or construction. Ask them to
draw it from the side or the back.
3. Do the drawing activities “perception” (b) and (e) above – can the students do this?
Abstraction
If there are problems with the reality, try to give students experience with visualisation through “perception”
and “mental rotation” activities above and as follows:
1. Introduce language of position and perception, set up divided situations where students are on opposite
sides and cannot see what the other students have, have built or have drawn. Ask students on the side
that has the information to use words to describe what they have to allow the other students to identify
the object, make the figure, or draw the design. Let students see the errors being made so they can get
better language.
2. Put two identical objects out to be drawn so that one is close to students and one is far from students, and
ask students to draw what they see. Put a large object well away and a smaller object close to the students
and repeat. Reverse the position of the objects. Discuss what objects faraway look like in relation to those
that are close.
3. Build a small town out of blocks. Place it on a table. Draw it as it is. Back-light it and draw it as framed in
front of the light from different directions. Discuss how things change in light, at dusk and at night. Can
students determine the position of the person seeing from the outline being seen?
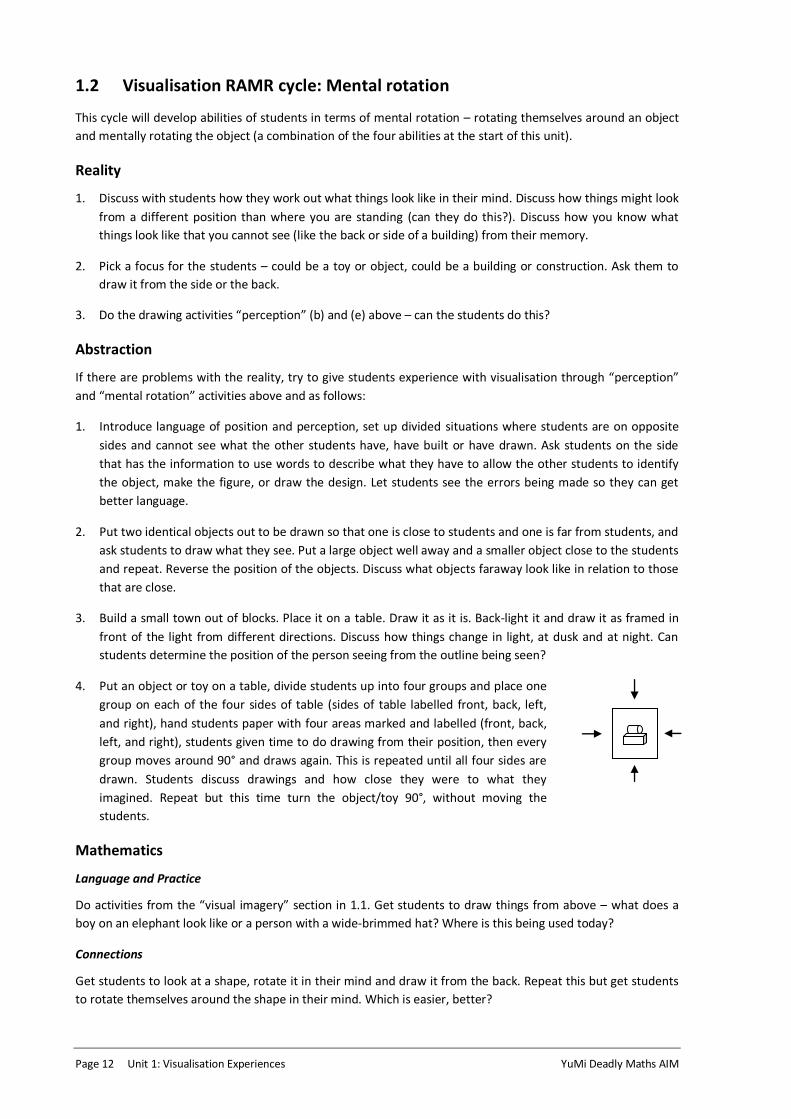
4. Put an object or toy on a table, divide students up into four groups and place one
group on each of the four sides of table (sides of table labelled front, back, left,
and right), hand students paper with four areas marked and labelled (front, back,
left, and right), students given time to do drawing from their position, then every
group moves around 90° and draws again. This is repeated until all four sides are
drawn. Students discuss drawings and how close they were to what they
imagined. Repeat but this time turn the object/toy 90°, without moving the
students.
Mathematics
Language and Practice
Do activities from the “visual imagery” section in 1.1. Get students to draw things from above – what does a
boy on an elephant look like or a person with a wide-brimmed hat? Where is this being used today?
Connections
Get students to look at a shape, rotate it in their mind and draw it from the back. Repeat this but get students
to rotate themselves around the shape in their mind. Which is easier, better?
© QUT YuMi Deadly Centre 2014 AIM Module G4: Geometry – Projective and Topology Page 13
Compare the two ideas – see that some are better in some situations. For example, if fixing or constructing
something mechanical, it is best to think of the object rotating. However, when want to know how the town
looks in the setting sun, it is better to rotate yourself.
Which of the two ideas, rotating object or rotating self, is most useful in the students’ daily lives? What about
for finding their way home when close to lost?
Reflection
Validation
Ask the students to draw local things from different perspectives. Some Indigenous art is drawn from the
perspective of a bird – do they know of this? [Dots are berries on trees seen from above.]
Applications
Find computer games that rotate objects (the National Library of Virtual Materials – Google NLVM – has a good
rotating activity for polyhedra). Try mazes, and jigsaws – things that have a single point of direction.
Extension
Flexibility. Really focus on many situations and activities – become flexible in visualisation.
Reversing. Reverse the direction of visualisation activities – for example, ask for a drawing from a certain
perspective AND show pictures from many perspectives and ask the students to pick out the right-hand view,
that is, picture position AND position picture.
Generalising and changing parameters. See if students can go from 3D picture to front, back, side and top
views and vice versa – technical drawing.

© QUT YuMi Deadly Centre 2014 AIM Module G4: Geometry – Projective and Topology Page 15
Unit 2: Projective Experiences
This unit deals with projections. There are three – the similarity projection, the affine projection and the
divergent or perspective projection. The similarity projection is like a data projector (shadows in divergent light
with shape and shadow parallel) where shape is the same – it just gets larger (angles the same, sides in ratio).
The affine projection is shadows in parallel light from the sun – straightness and parallelness stays the same,
length and angles do not. The divergent projection is shadows in divergent light with any position for the shape
in relation to the screen – straightness stays the same, parallelness, length and angles do not. This leads on to
perspective drawings.
This unit looks at affine and divergent projections – similarity is in Unit 4 (where we also compare the three
types of projections). These projections are concerned with straightness but not length. Because the size of the
angles and lines may change, the shape may change. Some activities are below. These can be simplified for
young students.
2.1 Overview of projective activities
Shadow activities
These activities develop an understanding of projective geometry and its transformations; and investigate the
properties of shadows and the effect of different lights. The materials are: butcher’s paper; texta pens;
cardboard; scissors; projector light; whiteboard; whiteboard markers; ruler; plain paper. The directions are as
follows.
1. Parallel light activities. Go out into the sunlight and make your shadow move, make it jump – make it as
long as possible and then as wide as possible – trace your partner's shadow (on butcher's paper). Get into
a group and move around without bumping into each other's shadow – try to catch each other's shadow.
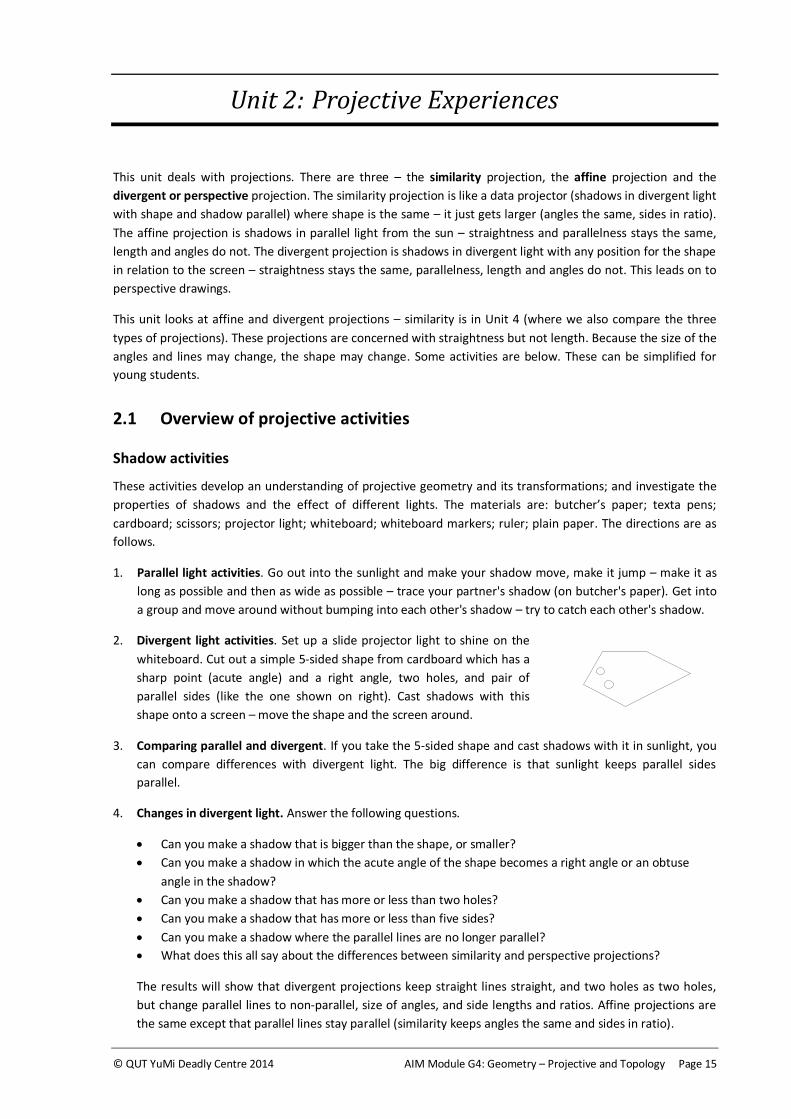
2. Divergent light activities. Set up a slide projector light to shine on the
whiteboard. Cut out a simple 5-sided shape from cardboard which has a
sharp point (acute angle) and a right angle, two holes, and pair of
parallel sides (like the one shown on right). Cast shadows with this
shape onto a screen – move the shape and the screen around.
3. Comparing parallel and divergent. If you take the 5-sided shape and cast shadows with it in sunlight, you
can compare differences with divergent light. The big difference is that sunlight keeps parallel sides
parallel.
4. Changes in divergent light. Answer the following questions.
Can you make a shadow that is bigger than the shape, or smaller?
Can you make a shadow in which the acute angle of the shape becomes a right angle or an obtuse
angle in the shadow?
Can you make a shadow that has more or less than two holes?
Can you make a shadow that has more or less than five sides?
Can you make a shadow where the parallel lines are no longer parallel?
What does this all say about the differences between similarity and perspective projections?
The results will show that divergent projections keep straight lines straight, and two holes as two holes,
but change parallel lines to non-parallel, size of angles, and side lengths and ratios. Affine projections are
the same except that parallel lines stay parallel (similarity keeps angles the same and sides in ratio).
Page 16 Unit 2: Projective Experiences YuMi Deadly Maths AIM
Other materials activities
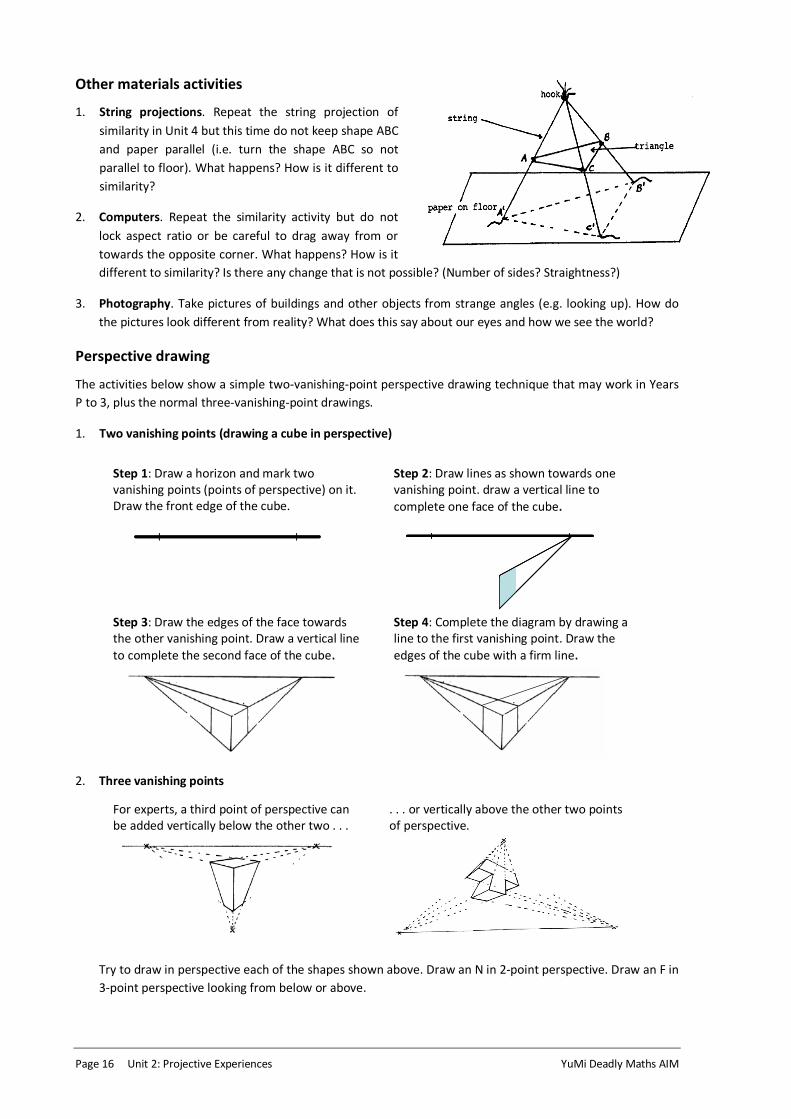
1. String projections. Repeat the string projection of
similarity in Unit 4 but this time do not keep shape ABC
and paper parallel (i.e. turn the shape ABC so not
parallel to floor). What happens? How is it different to
similarity?
2. Computers. Repeat the similarity activity but do not
lock aspect ratio or be careful to drag away from or
towards the opposite corner. What happens? How is it
different to similarity? Is there any change that is not possible? (Number of sides? Straightness?)
3. Photography. Take pictures of buildings and other objects from strange angles (e.g. looking up). How do
the pictures look different from reality? What does this say about our eyes and how we see the world?
Perspective drawing
The activities below show a simple two-vanishing-point perspective drawing technique that may work in Years
P to 3, plus the normal three-vanishing-point drawings.
1. Two vanishing points (drawing a cube in perspective)
Step 1: Draw a horizon and mark two vanishing points (points of perspective) on it. Draw the front edge of the cube.
Step 2: Draw lines as shown towards one vanishing point. draw a vertical line to
complete one face of the cube.
Step 3: Draw the edges of the face towards the other vanishing point. Draw a vertical line
to complete the second face of the cube.
Step 4: Complete the diagram by drawing a line to the first vanishing point. Draw the
edges of the cube with a firm line.
2. Three vanishing points
For experts, a third point of perspective can be added vertically below the other two . . .
. . . or vertically above the other two points of perspective.
Try to draw in perspective each of the shapes shown above. Draw an N in 2-point perspective. Draw an F in
3-point perspective looking from below or above.
© QUT YuMi Deadly Centre 2014 AIM Module G4: Geometry – Projective and Topology Page 17
2.2 Projective RAMR cycle: Perspective
This cycle looks at divergent and affine (parallel light) projections ending in perspective drawings.
Reality
Discuss with students how our eyes see the world and what we can miss (some things happen behind buildings
– we can only see in line of sight). Relate to films and pictures. Discuss that we have two eyes (giving us depth
perception) and how films are copying this.
Discuss things that do not look right – e.g. edges of roads and railway tracks going together.
Abstraction
Body
Complete the “shadow activities” 1 in section 2.1.
Hand
Complete the “shadow activities” 2 and 3 in section 2.1. Complete the “other materials activities” 1 and 2 (and
3 if possible). Give particular attention to the string projection – turn object/shape so that not parallel to floor
and see all the different projections that can be made.
Mind
Complete the “shadow activities” 4 in section 2.1 – try to find all rules for the three forms of projection.
Mathematics
Language
Ensure students have and understand the projection language.
Practice
Do a variety of shadow activities – to see what is possible in change from shape to shadow.
Connections
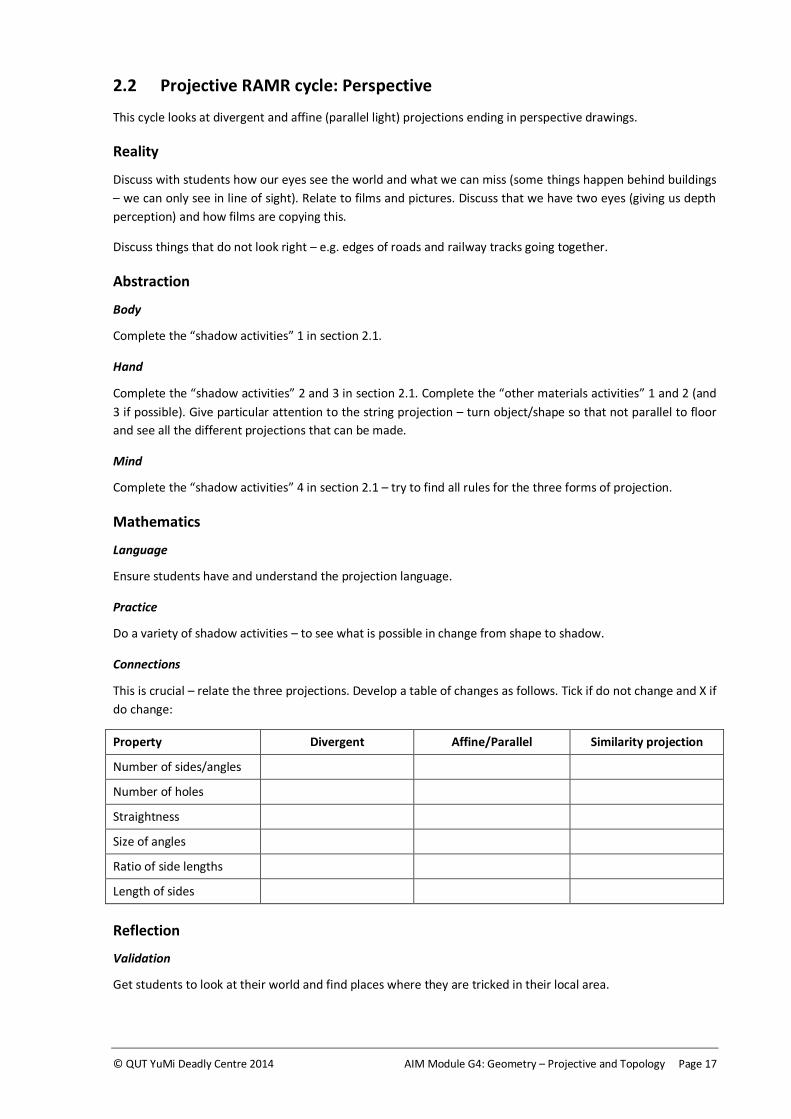
This is crucial – relate the three projections. Develop a table of changes as follows. Tick if do not change and X if
do change:
Property Divergent Affine/Parallel Similarity projection
Number of sides/angles
Number of holes
Straightness
Size of angles
Ratio of side lengths
Length of sides
Reflection
Validation
Get students to look at their world and find places where they are tricked in their local area.

Page 18 Unit 2: Projective Experiences YuMi Deadly Maths AIM
Application
Complete the “Perspective drawing activities” in section 2.1. See extra information in Appendix A. Try to draw
in perspective each of the shapes shown in the perspective drawing activities above – also draw an N in 2-point
perspective and an F in 3-point perspective looking from below or above.
Extension
Flexibility. This is important for shadows.
Reversing. Students need to be able to move shadow to shape as well as shape to shadow.
Generalising. It is very important to generalise the rules for the three projections.

© QUT YuMi Deadly Centre 2014 AIM Module G4: Geometry – Projective and Topology Page 19
Unit 3: Topological Experiences
Topology is the transformation that deals with natural growth and change – changes straightness, length, angle
and shape because it allows twisting, bending, deforming, and stretching but does not change inside-outside,
closed-open or order along a line because it does not allow punching holes or joining together. It leads to the
study of networks.
This unit looks at topology with emphasis on networks. It has two cycles – one on general topology and one on
networks.
3.1 Overview of topological activities
Topological classification activities
The purpose is to develop the understanding that there is more than one type of geometry; and to develop the
notion that topological shapes are classified differently from Euclidean shapes. The materials are plasticine or
play dough, balloons, and texta colours. The processes are twisting, tearing, rolling, and distorting, and the
problem-solving strategy is modelling.
A surface with no holes A surface with one hole (a broken surface)
Topologists would say that these shapes are the
same because all the shapes could be made from the
same amount of plasticine which had an unbroken
surface. No plasticine would be added to or taken
away from the original piece of plasticine nor would
the surface be broken.
Topologists would say that these shapes are the
same because all the shapes could be made from the
same amount of plasticine which had a broken
surface. No plasticine would be added to or taken
away from the original piece of plasticine. As well,
the original piece of plasticine would have no joins in
its surface.
Shown below is the topological classification of surfaces:
1. Start with a lump of plasticine or play dough with no holes in its surface. Make a sphere and a cube. Did
you change the amount of plasticine you started with? Did you put a hole through the plasticine? Are the
shapes topologically the same? What genus would these shapes be classified as?
2. Start with a lump of plasticine or play dough and put a hole right through it (use a pencil) like a donut.
Make this donut shape into a cup shape (do not make any joins). Does each shape have just one hole? Did
Genus 0
(0 holes)
Genus 1
(1 hole)Genus 2
(2 holes)
Genus 3
(3 or more holes)
Genus 0
(0 holes)
Genus 1
(1 hole)Genus 2
(2 holes)
Genus 3
(3 or more holes)

Page 20 Unit 3: Topological Experiences YuMi Deadly Maths AIM
you change the amount of plasticine you started with? Are the shapes topologically the same? What genus
would these shapes be classified as?
3. Construct each of the everyday shapes below and then classify each shape topologically. Which shapes are
topologically the same?
4. Make, then classify topologically, the digits 0–9, all the letters in your name (do they belong to one
particular genus?). Is it possible to have a given name in which all the letters are genus 0? What about
genus 1? Genus 2? Genus 3?
5. Topological shapes are not usually concerned with straightness or length. Try the following activities. Draw
a face below on a round balloon. Blow the balloon up. Bend and distort the balloon. Draw the faces that
you see. Which of the faces below can you make? Why can't you make the others? Can you make the faces
bigger? Smaller?
6. Draw the snake on the long balloon. Blow it up, then bend and distort the balloon. Can you make the
following shapes?
Möbius strip and other oddity activities
The purpose is to explore topological shapes and changes. Materials are paper, scissors, glue or sticky tape, and
coloured pencils.
Möbius strip oddities
1. Make a Möbius strip. Cut out a flat strip of paper about 50 cm long. Twist the paper (once) and then join
the two ends to make a closed ring.
2. Try to colour one side of the strip red and the other side green (use any two different colours). What do
you notice?
3. Try to draw a line along the centre of the strip continuing until you come back to the same point from
which you started. Are you convinced that this strip has only one side?

© QUT YuMi Deadly Centre 2014 AIM Module G4: Geometry – Projective and Topology Page 21
4. Predict what you think will happen if you cut along the middle of the strip as shown. Validate by cutting.
(Cut along the line you have already drawn.) Were you surprised by what
happened?
5. Make another Möbius strip. This time draw a line that is one third of the width.
Continue to draw the line the same distance from the edge until you come back
to the same point from which you started. Cut along the line you have just
drawn. Do you have a chain of Möbius strips?
6. Make a Möbius strip where one end is twisted twice before it is glued to the
other end. Repeat activities above. Make Möbius strips that have three or four twists and repeat activities
above again. Can you discover a pattern emerging?
Other oddity activities
1. The maze of mirrors
Although you and your image look very different, topologically they are the same.
2. A bottle with no insides
A German mathematician named Felix Klein (1849–1925) devised a bottle that has an outside but no
inside. Nobody will ever see an actual Klein bottle because it can never be made. The Klein bottle exists
only in a topologist’s imagination.
Start with a tube. Flare out one end of the tube. Stretch the neck so that it goes “inside” to meet the base.
3. Tricks
Tricky wickets Baffling box Stairs to nowhere
3.2 Topology RAMR cycle 1: Topological relationships
This cycle looks at the rules for topological change – comparing it to Euclidean and projective change.
Reality
Discuss puzzles and tricks with the students, for example, a man putting on his bathers without taking off his
pants. Show the “oddity activities” three drawings – the tricks. Ask how these were done. Check if students
have any puzzles where two components are connected but there is a way of separating them.
State that we are going to look at the change of the living world – where straightness and length both can
change. Say that things can bend, twist, stretch but not tear, punch holes or combine. Say that this means that
many things change but some do not – insides, closedness, order on a line, number of wholes, and so on.
Page 22 Unit 3: Topological Experiences YuMi Deadly Maths AIM
Abstraction
Mind
Think about how a man can put on bathers without taking off pants – could even act it out.
Body
Do the following – “topological classification activities” 1 to 4 with play dough, “topological classification
activities” 5 and 6 with balloons, and “Möbius strip activities” with pen, paper, tape and scissors.
Mind
Think about changes allowed and develop rules for topological change.
Mathematics
Language
Ensure that all topological language is known.
Practice
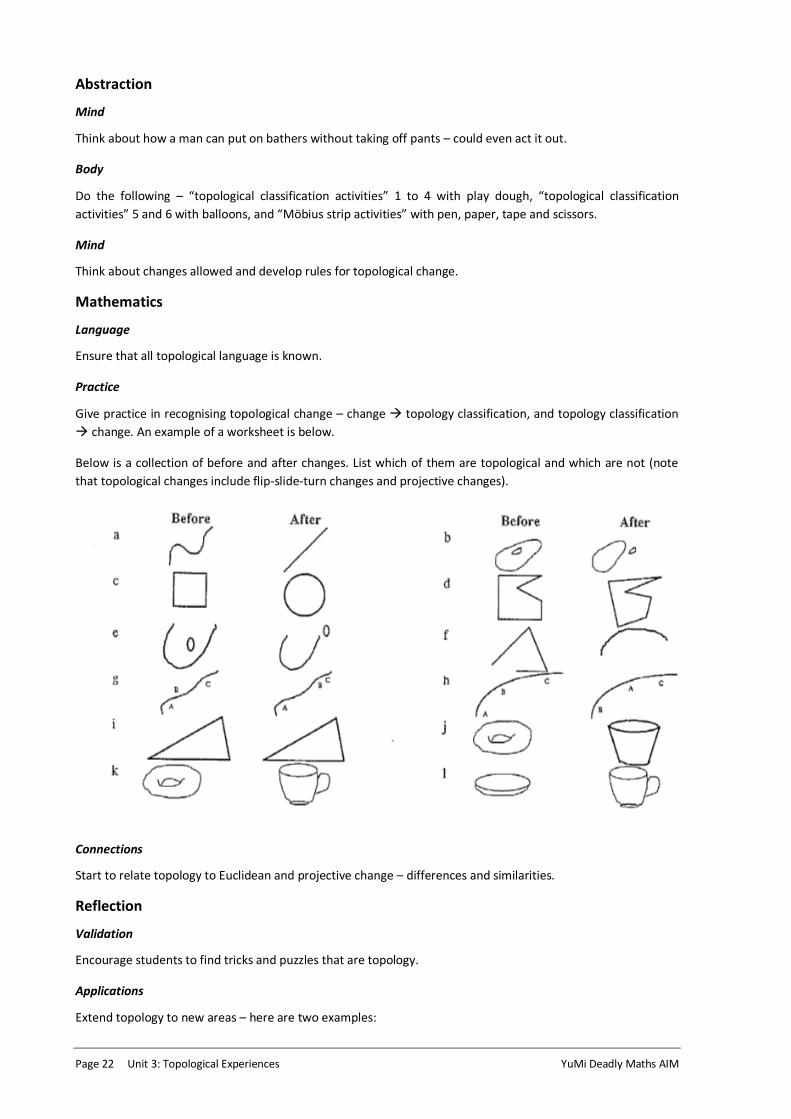
Give practice in recognising topological change – change topology classification, and topology classification
change. An example of a worksheet is below.
Below is a collection of before and after changes. List which of them are topological and which are not (note
that topological changes include flip-slide-turn changes and projective changes).
Connections
Start to relate topology to Euclidean and projective change – differences and similarities.
Reflection
Validation
Encourage students to find tricks and puzzles that are topology.
Applications
Extend topology to new areas – here are two examples:

© QUT YuMi Deadly Centre 2014 AIM Module G4: Geometry – Projective and Topology Page 23
1. Complete the Jordan curve activity using the worksheet in Appendix B1.
2. Complete the map colouring activity using the worksheet in Appendix B2. Maps are coloured so that no
two states/countries with a common border have the same colour. A famous postulate was made that four
colours would suffice for any map (and it took centuries to prove it).
(a) Colour the maps in item 1 of the worksheet. How many colours are needed?
(b) Complete the table for item 2 from the maps in item 1. (Note: An odd vertex has an odd number of
lines coming out of it; an even vertex has an even number of lines coming out of it.)
(c) Determine a pattern or rule that gives how many colours are needed from the table and apply it in
item 3. Count the vertices, predict the colours and check.
Extension
Flexibility. This is very important in topology because there are so many unusual things.
Reversing. It is important to go from classification to change and reverse.
Generalising. It is very important to build a generalisation of properties for projective in relation to Euclidean
and projective, looking at similarities and differences.
3.3 Overview of networks
The purpose is to investigate network theory and to discover the mathematics underlying this theory. Materials
are the networks worksheet below right. Networks are like maps – lines connecting nodes. Problem-solving
strategy is “looking for patterns”; thinking to be used is visual and flexible.
Network connection activities
1. Traversability. The problem here is to determine
which networks can be traversed (that is, traced
without crossing or retracing a line or lifting your
pencil from the paper). You can pass through any
point (vertex) more than once. Some networks to
practice on are on right.
2. Euler’s rule for traversability. Euler developed a
rule for when a network was traversable. He did it
in relation to the town of Königsberg in Germany
which was built on an island and two sides of a river
with many bridges. The interest for the
townspeople was whether you could walk around
Königsberg and cross each bridge only once (see below for more on Euler).
This can also be seen as the road painter problem in terms of the need to be always painting and not
wasting time travelling a road that has been painted.
3. Bell telephone problem. This is a problem for networks that came from running out telephone lines. To
save money, the telephone company does not want redundant wiring – it wants networks where the least
length of cable is used to reach every household (so only one line into each node – if possible). This is
almost the inverse of traversability (which needs at least two ways in/out of each node/household). What
would such an efficient network look like?
4. Salesperson problem (one-visit networks). This is the problem of salespersons who travel around all the
nodes (towns or businesses) and wish to do this in the least time (and with the least petrol). What is the
Page 24 Unit 3: Topological Experiences YuMi Deadly Maths AIM
most efficient network/map for them to follow? Is it when they can visit all nodes with only one visit – so
only two ways into each node (going in and coming out)? What would such a network look like?
5. Investigation. What is the “six degrees of separation” based on the game involving the actor Kevin Bacon?
How has it affected networks?
Euler’s rule and formula for networks
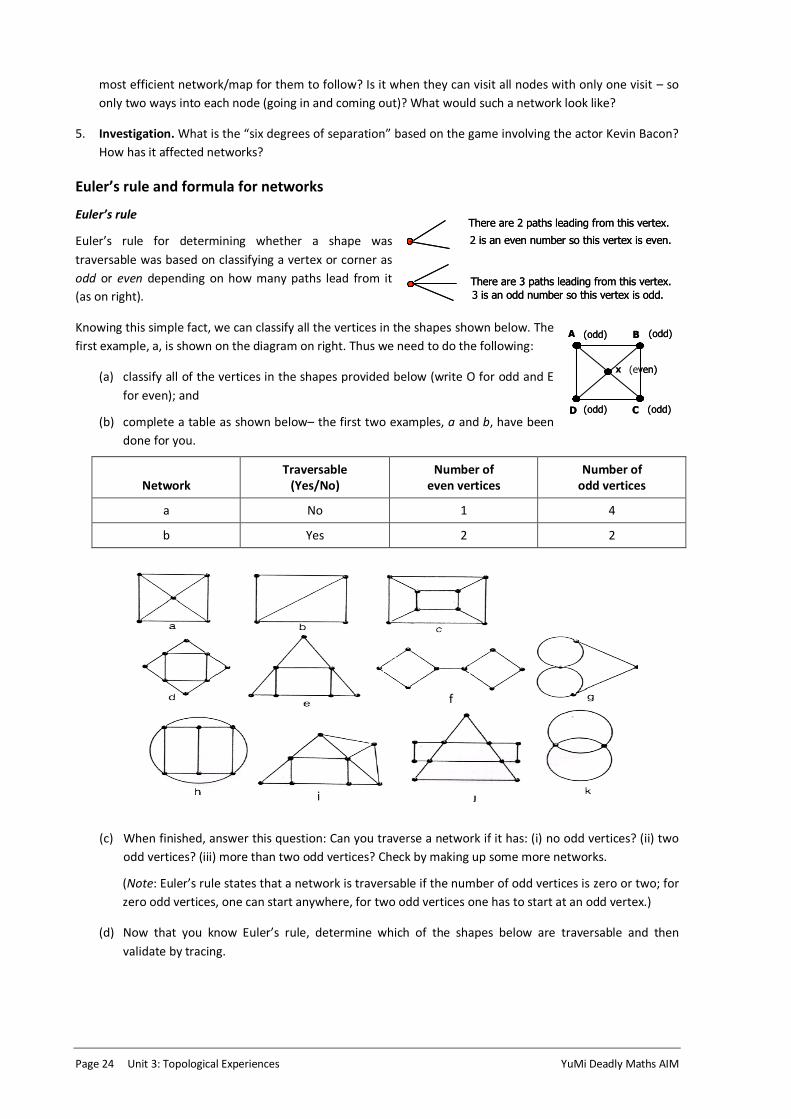
Euler’s rule
Euler’s rule for determining whether a shape was
traversable was based on classifying a vertex or corner as
odd or even depending on how many paths lead from it
(as on right).
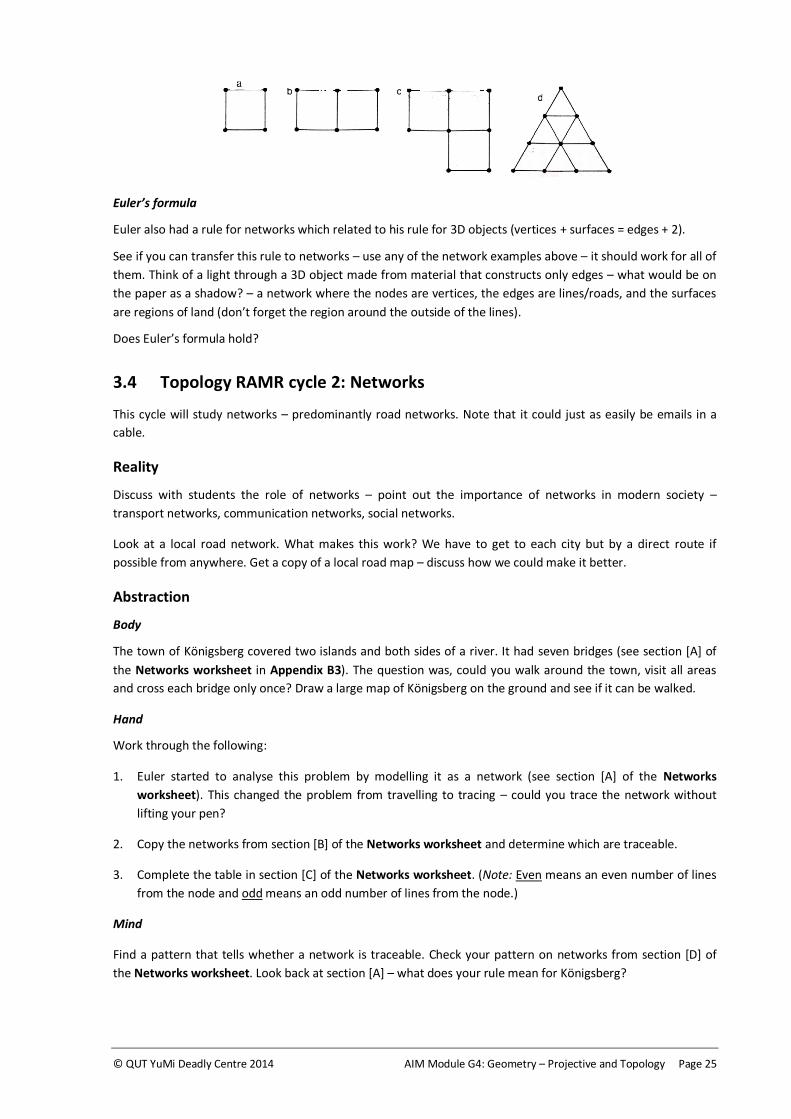
Knowing this simple fact, we can classify all the vertices in the shapes shown below. The
first example, a, is shown on the diagram on right. Thus we need to do the following:
(a) classify all of the vertices in the shapes provided below (write O for odd and E
for even); and
(b) complete a table as shown below– the first two examples, a and b, have been
done for you.
Network Traversable
(Yes/No) Number of
even vertices Number of
odd vertices
a No 1 4
b Yes 2 2
(c) When finished, answer this question: Can you traverse a network if it has: (i) no odd vertices? (ii) two
odd vertices? (iii) more than two odd vertices? Check by making up some more networks.
(Note: Euler’s rule states that a network is traversable if the number of odd vertices is zero or two; for
zero odd vertices, one can start anywhere, for two odd vertices one has to start at an odd vertex.)
(d) Now that you know Euler’s rule, determine which of the shapes below are traversable and then
validate by tracing.
f
i
There are 2 paths leading from this vertex.
2 is an even number so this vertex is even.
There are 3 paths leading from this vertex.
3 is an odd number so this vertex is odd.
There are 2 paths leading from this vertex.
2 is an even number so this vertex is even.
There are 3 paths leading from this vertex.
3 is an odd number so this vertex is odd.
A B
CD
(odd) (odd)
(odd) (odd)
x (even)
A B
CD
(odd) (odd)
(odd) (odd)
x (even)
© QUT YuMi Deadly Centre 2014 AIM Module G4: Geometry – Projective and Topology Page 25
Euler’s formula
Euler also had a rule for networks which related to his rule for 3D objects (vertices + surfaces = edges + 2).
See if you can transfer this rule to networks – use any of the network examples above – it should work for all of
them. Think of a light through a 3D object made from material that constructs only edges – what would be on
the paper as a shadow? – a network where the nodes are vertices, the edges are lines/roads, and the surfaces
are regions of land (don’t forget the region around the outside of the lines).
Does Euler’s formula hold?
3.4 Topology RAMR cycle 2: Networks
This cycle will study networks – predominantly road networks. Note that it could just as easily be emails in a
cable.
Reality
Discuss with students the role of networks – point out the importance of networks in modern society –
transport networks, communication networks, social networks.
Look at a local road network. What makes this work? We have to get to each city but by a direct route if
possible from anywhere. Get a copy of a local road map – discuss how we could make it better.
Abstraction
Body
The town of Königsberg covered two islands and both sides of a river. It had seven bridges (see section [A] of
the Networks worksheet in Appendix B3). The question was, could you walk around the town, visit all areas
and cross each bridge only once? Draw a large map of Königsberg on the ground and see if it can be walked.
Hand
Work through the following:
1. Euler started to analyse this problem by modelling it as a network (see section [A] of the Networks
worksheet). This changed the problem from travelling to tracing – could you trace the network without
lifting your pen?
2. Copy the networks from section [B] of the Networks worksheet and determine which are traceable.
3. Complete the table in section [C] of the Networks worksheet. (Note: Even means an even number of lines
from the node and odd means an odd number of lines from the node.)
Mind
Find a pattern that tells whether a network is traceable. Check your pattern on networks from section [D] of
the Networks worksheet. Look back at section [A] – what does your rule mean for Königsberg?

Page 26 Unit 3: Topological Experiences YuMi Deadly Maths AIM
Mathematics
Language/symbols
Ensure students understand the language of networks and how to draw networks, which are the symbols of
networks.
Practice
Practise drawing networks and looking at traceability (traversability). Then extend to start and finish problems
and many-trip networks.
1. Look at the networks from [B] (Networks worksheet – Appendix B3) that are traceable – can you start and
finish from anywhere for all traceable networks?
2. If not, is there a rule for which ones can be started from anywhere and which ones can’t and where the
start and finish has to be for those that can’t? Check your rule on section [E] of the Networks worksheet.
3. How many trips. For this one we look at the networks that are not traceable. If we allow the pen to be
lifted once – it may be that we can trace in two trips. For some complicated ones, we may have to lift the
pen twice before we can finish – this is three trips. In this way, we can label untraceable networks with the
number of trips required.
4. Label the networks in [B] that cannot be traced in one trip with the number of trips. See if there is a
relationship between the number of trips and the number of odd vertices.
Connections
Try to relate the different types of networks and to relate them to real-world networks. Also stress connection
polyhedral to networks in terms of Euler.
Reflection
Validation
Ensure students can apply things to networks that are local. Can they trace their local road map?
Applications
Further extend networks to Euler’s formula and one-visit networks as follows:
1. Look at the networks in section [F] (Appendix B3). Regions are spaces inside the network or completely
outside. Count the number of regions, corners or nodes and arcs or lines in each network. Remember
there is the region outside.
2. Complete a table with headings: Network, Number of regions, Number of corners, Number of arcs. Use it
to find Euler’s formula. Hint: It is similar to Euler’s formula for solids. Why would this be?
3. Of special interest are networks where you can travel and visit each corner only once. Look at the
networks in section [G]. Which of these can be travelled so that you visit each corner only once? Which
cannot? What is the pattern/rule for this to be possible?
Extension
Flexibility. Students need to be able to apply networks to all areas of life.
Reversing. Go from network to rule and rule to network (construct networks for rules).
Generalising. Ensure all rules/formulae are known.
© QUT YuMi Deadly Centre 2014 AIM Module G4: Geometry – Projective and Topology Page 27
Unit 4: Similarity and Scale
This unit focuses on the similarity projection – a projection that enlarges or reduces a shape without changing
the shape or orientation – this is a better definition of similarity, as two shapes where one is an enlargement of
the other. This means that angles stay the same and lengths are in the same ratio. It leads to two important
mathematical ideas:
(a) scale, which is how a small plan can show a large construction; and
(b) trigonometry, which uses similarities between right-angled triangles to allow distances to be
measured at a distance.
4.1 Overview of similarity activities
Meaning of similarity activities
The idea is to develop similarity as enlargement and then discover the properties.
1. Shadows. Use a diverging light (e.g. projector, candle, or torch) to cast shadows – look at how things get
larger but shape does not change if things are kept parallel. (It is useful to show what happens when things
do not remain parallel but we will leave this to
next section.)
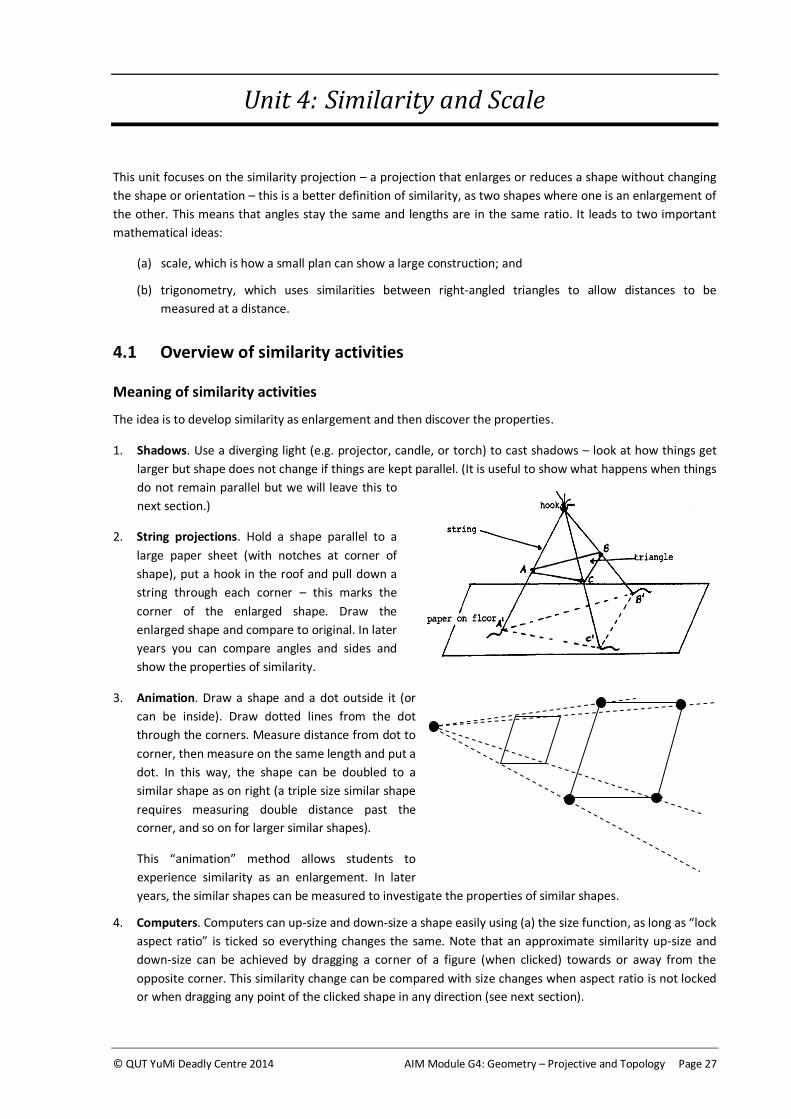
2. String projections. Hold a shape parallel to a
large paper sheet (with notches at corner of
shape), put a hook in the roof and pull down a
string through each corner – this marks the
corner of the enlarged shape. Draw the
enlarged shape and compare to original. In later
years you can compare angles and sides and
show the properties of similarity.
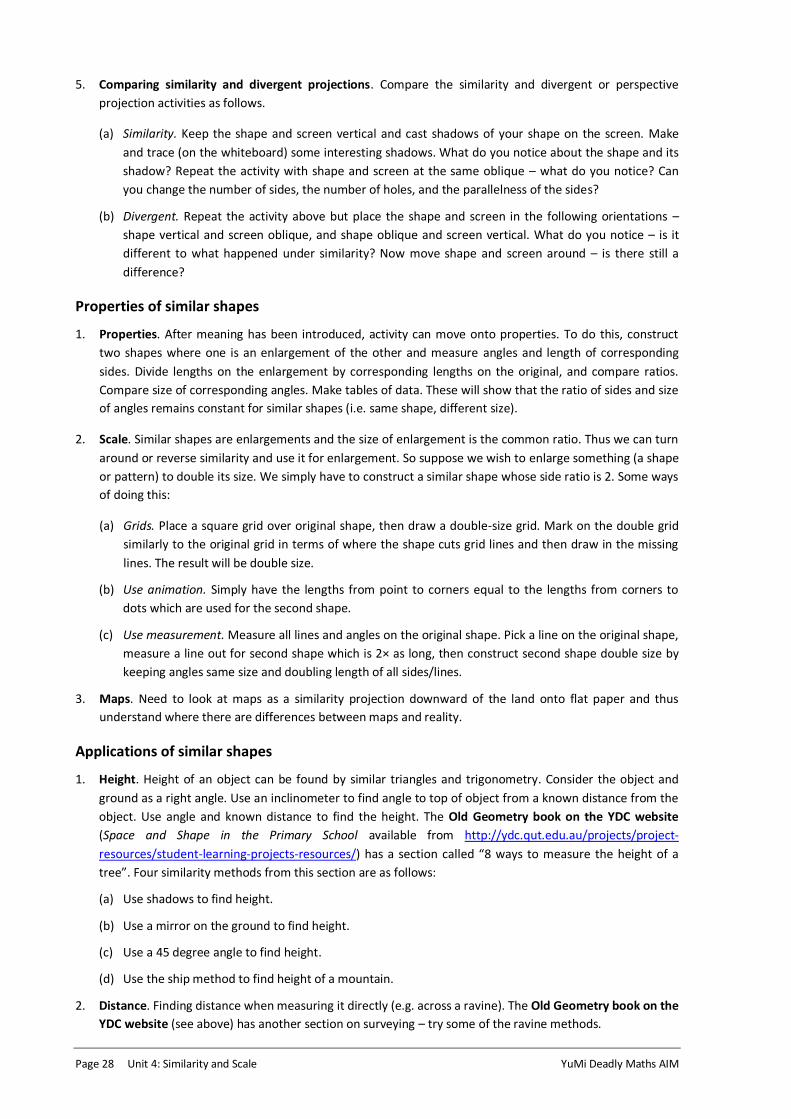
3. Animation. Draw a shape and a dot outside it (or
can be inside). Draw dotted lines from the dot
through the corners. Measure distance from dot to
corner, then measure on the same length and put a
dot. In this way, the shape can be doubled to a
similar shape as on right (a triple size similar shape
requires measuring double distance past the
corner, and so on for larger similar shapes).
This “animation” method allows students to
experience similarity as an enlargement. In later
years, the similar shapes can be measured to investigate the properties of similar shapes.
4. Computers. Computers can up-size and down-size a shape easily using (a) the size function, as long as “lock
aspect ratio” is ticked so everything changes the same. Note that an approximate similarity up-size and
down-size can be achieved by dragging a corner of a figure (when clicked) towards or away from the
opposite corner. This similarity change can be compared with size changes when aspect ratio is not locked
or when dragging any point of the clicked shape in any direction (see next section).
Page 28 Unit 4: Similarity and Scale YuMi Deadly Maths AIM
5. Comparing similarity and divergent projections. Compare the similarity and divergent or perspective
projection activities as follows.
(a) Similarity. Keep the shape and screen vertical and cast shadows of your shape on the screen. Make
and trace (on the whiteboard) some interesting shadows. What do you notice about the shape and its
shadow? Repeat the activity with shape and screen at the same oblique – what do you notice? Can
you change the number of sides, the number of holes, and the parallelness of the sides?
(b) Divergent. Repeat the activity above but place the shape and screen in the following orientations –
shape vertical and screen oblique, and shape oblique and screen vertical. What do you notice – is it
different to what happened under similarity? Now move shape and screen around – is there still a
difference?
Properties of similar shapes
1. Properties. After meaning has been introduced, activity can move onto properties. To do this, construct
two shapes where one is an enlargement of the other and measure angles and length of corresponding
sides. Divide lengths on the enlargement by corresponding lengths on the original, and compare ratios.
Compare size of corresponding angles. Make tables of data. These will show that the ratio of sides and size
of angles remains constant for similar shapes (i.e. same shape, different size).
2. Scale. Similar shapes are enlargements and the size of enlargement is the common ratio. Thus we can turn
around or reverse similarity and use it for enlargement. So suppose we wish to enlarge something (a shape
or pattern) to double its size. We simply have to construct a similar shape whose side ratio is 2. Some ways
of doing this:
(a) Grids. Place a square grid over original shape, then draw a double-size grid. Mark on the double grid
similarly to the original grid in terms of where the shape cuts grid lines and then draw in the missing
lines. The result will be double size.
(b) Use animation. Simply have the lengths from point to corners equal to the lengths from corners to
dots which are used for the second shape.
(c) Use measurement. Measure all lines and angles on the original shape. Pick a line on the original shape,
measure a line out for second shape which is 2× as long, then construct second shape double size by
keeping angles same size and doubling length of all sides/lines.
3. Maps. Need to look at maps as a similarity projection downward of the land onto flat paper and thus
understand where there are differences between maps and reality.
Applications of similar shapes
1. Height. Height of an object can be found by similar triangles and trigonometry. Consider the object and
ground as a right angle. Use an inclinometer to find angle to top of object from a known distance from the
object. Use angle and known distance to find the height. The Old Geometry book on the YDC website
(Space and Shape in the Primary School available from http://ydc.qut.edu.au/projects/project-
resources/student-learning-projects-resources/) has a section called “8 ways to measure the height of a
tree”. Four similarity methods from this section are as follows:
(a) Use shadows to find height.
(b) Use a mirror on the ground to find height.
(c) Use a 45 degree angle to find height.
(d) Use the ship method to find height of a mountain.
2. Distance. Finding distance when measuring it directly (e.g. across a ravine). The Old Geometry book on the
YDC website (see above) has another section on surveying – try some of the ravine methods.
© QUT YuMi Deadly Centre 2014 AIM Module G4: Geometry – Projective and Topology Page 29
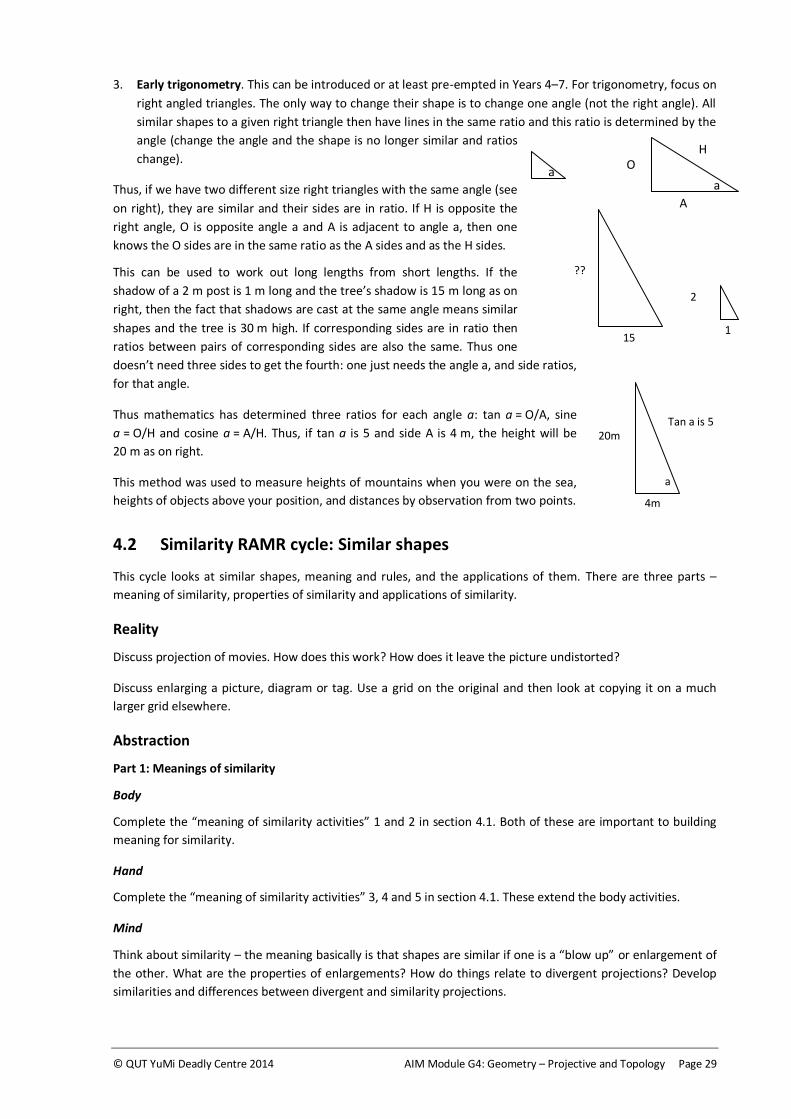
3. Early trigonometry. This can be introduced or at least pre-empted in Years 4–7. For trigonometry, focus on
right angled triangles. The only way to change their shape is to change one angle (not the right angle). All
similar shapes to a given right triangle then have lines in the same ratio and this ratio is determined by the
angle (change the angle and the shape is no longer similar and ratios
change).
Thus, if we have two different size right triangles with the same angle (see
on right), they are similar and their sides are in ratio. If H is opposite the
right angle, O is opposite angle a and A is adjacent to angle a, then one
knows the O sides are in the same ratio as the A sides and as the H sides.
This can be used to work out long lengths from short lengths. If the
shadow of a 2 m post is 1 m long and the tree’s shadow is 15 m long as on
right, then the fact that shadows are cast at the same angle means similar
shapes and the tree is 30 m high. If corresponding sides are in ratio then
ratios between pairs of corresponding sides are also the same. Thus one
doesn’t need three sides to get the fourth: one just needs the angle a, and side ratios,
for that angle.
Thus mathematics has determined three ratios for each angle a: tan a = O/A, sine
a = O/H and cosine a = A/H. Thus, if tan a is 5 and side A is 4 m, the height will be
20 m as on right.
This method was used to measure heights of mountains when you were on the sea,
heights of objects above your position, and distances by observation from two points.
4.2 Similarity RAMR cycle: Similar shapes
This cycle looks at similar shapes, meaning and rules, and the applications of them. There are three parts –
meaning of similarity, properties of similarity and applications of similarity.
Reality
Discuss projection of movies. How does this work? How does it leave the picture undistorted?
Discuss enlarging a picture, diagram or tag. Use a grid on the original and then look at copying it on a much
larger grid elsewhere.
Abstraction
Part 1: Meanings of similarity
Body
Complete the “meaning of similarity activities” 1 and 2 in section 4.1. Both of these are important to building
meaning for similarity.
Hand
Complete the “meaning of similarity activities” 3, 4 and 5 in section 4.1. These extend the body activities.
Mind
Think about similarity – the meaning basically is that shapes are similar if one is a “blow up” or enlargement of
the other. What are the properties of enlargements? How do things relate to divergent projections? Develop
similarities and differences between divergent and similarity projections.
a a
O
A
H
15
2
??
m
1
Tan a is 5 20m
4m
a
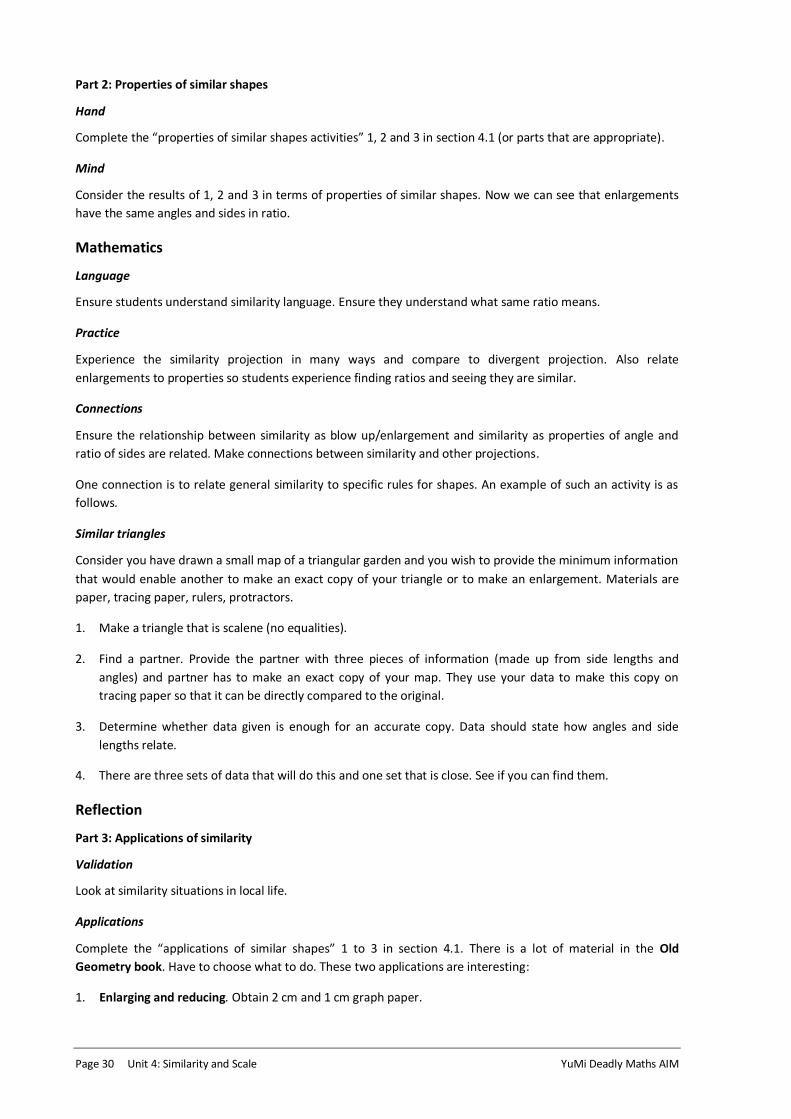
Page 30 Unit 4: Similarity and Scale YuMi Deadly Maths AIM
Part 2: Properties of similar shapes
Hand
Complete the “properties of similar shapes activities” 1, 2 and 3 in section 4.1 (or parts that are appropriate).
Mind
Consider the results of 1, 2 and 3 in terms of properties of similar shapes. Now we can see that enlargements
have the same angles and sides in ratio.
Mathematics
Language
Ensure students understand similarity language. Ensure they understand what same ratio means.
Practice
Experience the similarity projection in many ways and compare to divergent projection. Also relate
enlargements to properties so students experience finding ratios and seeing they are similar.
Connections
Ensure the relationship between similarity as blow up/enlargement and similarity as properties of angle and
ratio of sides are related. Make connections between similarity and other projections.
One connection is to relate general similarity to specific rules for shapes. An example of such an activity is as
follows.
Similar triangles
Consider you have drawn a small map of a triangular garden and you wish to provide the minimum information
that would enable another to make an exact copy of your triangle or to make an enlargement. Materials are
paper, tracing paper, rulers, protractors.
1. Make a triangle that is scalene (no equalities).
2. Find a partner. Provide the partner with three pieces of information (made up from side lengths and
angles) and partner has to make an exact copy of your map. They use your data to make this copy on
tracing paper so that it can be directly compared to the original.
3. Determine whether data given is enough for an accurate copy. Data should state how angles and side
lengths relate.
4. There are three sets of data that will do this and one set that is close. See if you can find them.
Reflection
Part 3: Applications of similarity
Validation
Look at similarity situations in local life.
Applications
Complete the “applications of similar shapes” 1 to 3 in section 4.1. There is a lot of material in the Old
Geometry book. Have to choose what to do. These two applications are interesting:
1. Enlarging and reducing. Obtain 2 cm and 1 cm graph paper.
© QUT YuMi Deadly Centre 2014 AIM Module G4: Geometry – Projective and Topology Page 31
(a) Draw a design with straight line sides and corners where lines meet (not too complicated – better if a
simple shape or diagram) on the 2 cm graph paper. Get your partner to copy this onto the 1 cm graph
paper by marking corners so that is reduced in size.
(b) Repeat (a) above but put design on the 1 cm graph paper and enlarge to the 2 cm graph paper. Take
turns being the designer.
(c) Repeat (b) above but with a simple picture that has curved edges and does not necessarily have
corners on places where lines meet.
(d) How would we further enlarge if we do not have any more graph paper? How could we take a simple
tag or design and enlarge it many times so it could be, with permission, painted (with easily removable
paint) on an oval as a very large design?
2. Mirror method for measuring height. Obtain mirror and paper/pen to record and draw.
(a) Obtain a mirror. Place mirror on floor between you and the object whose height is to be measured
(e.g. the wall).
(b) Stand up straight. Move mirror so that you can see the top of wall in it. Measure height to your eyes,
distance from you to mirror and distance of mirror to wall.
(c) Divide distance of mirror to wall by distance of mirror from you and multiply this by the height to your
eyes. This is height of the wall. Calculate it and check.
(d) Why does this work? (Hint: Draw a diagram of you, the wall, the mirror and lines from your eyes to
mirror to top of wall.)
Extension
Flexibility. Students need to see many applications.
Reversing. It is important to go from properties to similarity and similarity to properties.
Generalising. It is essential that students see the generalising in how similarity in right-angled triangles leads to
one angle providing common relationships.


© QUT YuMi Deadly Centre 2014 AIM Module G4: Geometry – Projective and Topology Page 33
Unit 5: Trigonometry
Similar shapes are ones where the larger shape is a blow up or enlargement of the smaller (where the
enlargement is regular, that is, the smaller and large shape are parallel as the divergent light is used to cast the
shadow.) This unit: (a) formalises properties of similar shapes, (b) looks at how trigonometry develops from
similarity, and (c) shares some initial applications of trigonometry.
Right-angle triangles (right triangles) form an interesting subclass of similar shapes. Because one angle is 90°,
determination of the angle at one other corner determines all angles. This means that all right triangles of the
same first angle are similar (e.g. a right triangle with an angle of 30° is similar to all other right triangles with an
angle of 30° no matter what the size). (Note: We are using division although it is ratio – they are the same.)
X Y Z
a c p r opposite hypotenuse
b
q adjacent
The two right triangles X and Y above are similar – they have the same angles. Thus p/a, q/b and r/c are in
proportion, that is, same ratio (p/a=q/b=r/c). Because of the nature of proportion, this means that sides are in
ratio within a triangle, that is, p/q=a/b, a/c=p/r and b/c=q/r. It also means that these sides are in the same ratio
for any right triangle with the same angle as X and Y.
Therefore, if we know the angle of a right triangle, we know the three proportions that have been designated
with special names as below. For triangle Z with angle above:
Longest side is called hypotenuse, side next to angle is called adjacent, and side opposite to angle is
called opposite; and
Sine = opposite/hypotenuse, cosine = adjacent/hypotenuse, tangent =opposite/adjacent.
5.1 Overview of trigonometric activities
These activities cover: (a) formalising the properties of similar shapes, (b) checking that right-angle similar
triangles with the same angle have the same ratios of sides, and (c) looking at some applications.
Properties of similar shapes
The activity below can be first done with two similar shapes made by animation where the increase in the
animation is double or triple. It will then be seen that the similar shapes have equal angles and sides doubled
and tripled.
1. Use an enlargement situation to make two similar shapes as in section 4.1.
2. Measure the angles and the side lengths of the smaller and larger shapes. Calculate the ratios of the sides.
3. Place these on a table as below. Repeat this for three examples.
Shape Angle 1 Angle 2 Angle 3 Side 1 Side 2 Side 3 Ratio
Sides 1 Ratio
Sides 2 Ratio
Sides 3
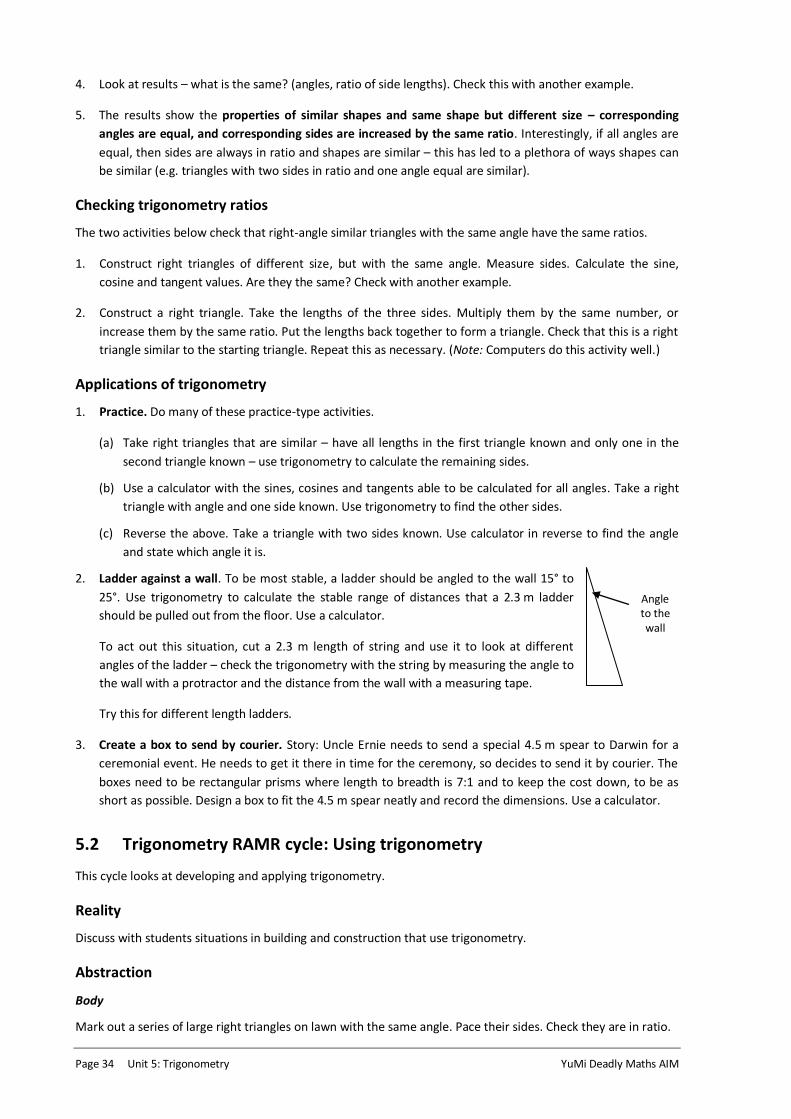
Page 34 Unit 5: Trigonometry YuMi Deadly Maths AIM
4. Look at results – what is the same? (angles, ratio of side lengths). Check this with another example.
5. The results show the properties of similar shapes and same shape but different size – corresponding
angles are equal, and corresponding sides are increased by the same ratio. Interestingly, if all angles are
equal, then sides are always in ratio and shapes are similar – this has led to a plethora of ways shapes can
be similar (e.g. triangles with two sides in ratio and one angle equal are similar).
Checking trigonometry ratios
The two activities below check that right-angle similar triangles with the same angle have the same ratios.
1. Construct right triangles of different size, but with the same angle. Measure sides. Calculate the sine,
cosine and tangent values. Are they the same? Check with another example.
2. Construct a right triangle. Take the lengths of the three sides. Multiply them by the same number, or
increase them by the same ratio. Put the lengths back together to form a triangle. Check that this is a right
triangle similar to the starting triangle. Repeat this as necessary. (Note: Computers do this activity well.)
Applications of trigonometry
1. Practice. Do many of these practice-type activities.
(a) Take right triangles that are similar – have all lengths in the first triangle known and only one in the
second triangle known – use trigonometry to calculate the remaining sides.
(b) Use a calculator with the sines, cosines and tangents able to be calculated for all angles. Take a right
triangle with angle and one side known. Use trigonometry to find the other sides.
(c) Reverse the above. Take a triangle with two sides known. Use calculator in reverse to find the angle
and state which angle it is.
2. Ladder against a wall. To be most stable, a ladder should be angled to the wall 15° to
25°. Use trigonometry to calculate the stable range of distances that a 2.3 m ladder
should be pulled out from the floor. Use a calculator.
To act out this situation, cut a 2.3 m length of string and use it to look at different
angles of the ladder – check the trigonometry with the string by measuring the angle to
the wall with a protractor and the distance from the wall with a measuring tape.
Try this for different length ladders.
3. Create a box to send by courier. Story: Uncle Ernie needs to send a special 4.5 m spear to Darwin for a
ceremonial event. He needs to get it there in time for the ceremony, so decides to send it by courier. The
boxes need to be rectangular prisms where length to breadth is 7:1 and to keep the cost down, to be as
short as possible. Design a box to fit the 4.5 m spear neatly and record the dimensions. Use a calculator.
5.2 Trigonometry RAMR cycle: Using trigonometry
This cycle looks at developing and applying trigonometry.
Reality
Discuss with students situations in building and construction that use trigonometry.
Abstraction
Body
Mark out a series of large right triangles on lawn with the same angle. Pace their sides. Check they are in ratio.
Angle to the wall

© QUT YuMi Deadly Centre 2014 AIM Module G4: Geometry – Projective and Topology Page 35
Hand
1. Complete all activities in “properties of similar shapes” in section 5.1.
2. Draw right triangles, mark one of the angles. Mark the sides as opposite, adjacent and hypotenuse in
relation to the right angle and the angle. Calculate sine, cosine and tangent. Use a calculator.
3. Repeat this with sufficient right triangles so students become familiar with names of sides and ratios.
4. Complete all activities from “checking trigonometry ratios” in section 5.1.
Mind
Imagine a right triangle, name sides, name ratios.
Mathematics
Language/symbols
Ensure all students have these for trigonometry.
Practice
Need worksheets to practise until very familiar with names of sides and ratios. Try activity 1 in “applications of
trigonometry” in section 5.1.
Reverse the practice – give sides and ask for angle.
Connections
Spend time revisiting similar right triangles and the special situation when one angle is known.
Reflection
Validation
Students find something trigonometric in their world.
Applications
Complete the applications 2 and 3 from section 5.1.
Extension
Flexibility. Look at situations where trigonometry applies.
Reversing. Do angle to side and side to angle.
Generalising. The properties of right triangles and the three ratios.

© QUT YuMi Deadly Centre 2014 AIM Module G4: Geometry – Projective and Topology Page 37
Test Item Types
This section presents instructions and the test item types for the subtests associated with the units. These will
form the bases of the pre-test and post-test for this module.
Instructions
Selecting the items and administering the pre-post tests
This section provides an item bank of test item types, constructed around the units in the module. From this
bank, items should be selected for the pre-test and post-test; these selected items need to suit the students
and may need to be modified, particularly to make post-test items different to pre-test items. The purpose of
the tests is to measure students’ performance before and after the module is taught. The questions should be
selected so that the level of difficulty progresses from easier items to more difficult items. In some modules
this will follow the order of the units and subtests, and in other modules it will not, depending on the
sequencing across the module and within units. The pre-test items need to allow for students’ existing
knowledge to be shown but without continual failure, and the post-test items need to cover all the sections in a
manner that maximises students’ effort to show what they can do.
In administering the pre-test, the students should be told that the test is not related to grades, but is to find
out what they know before the topic is taught. They should be told that they are not expected to know the
work as they have not been taught it. They should show what they know and, if they cannot do a question,
they should skip it, or put “not known” beside questions. They will be taught the work in the next few weeks
and will then be able to show what they know. Stress to students that any pre-test is a series of questions to
find out what they know before the knowledge is taught. They should do their best but the important
questions come at the end of the module. For the post-test, the students should be told that this is their
opportunity to show how they have improved.
For all tests, teachers should continually check to see how the students are going. Items in later subtests, or
more difficult items within a particular subtest, should not be attempted if previous similar items in earlier
subtests show strong weaknesses. Students should be allowed to skip that part of the test, or the test should
be finished. Students can be marked zero for these parts.
Information on the projective and topology item types
The projective and topology item types are divided into five subtests, one for each of the five units in this
module. Units 1, 2, 4 and 5 form a sequence with respect to projective geometry, while Unit 3 is on topology.
However, Units 4 and 5 are junior secondary level mathematics with their focus on similarity, scale and
trigonometry, while Units 1, 2 and 3 are below this level, focusing on visualisation, projective and topological
experiences. Thus, the five units can be considered to be in sequence.
This means that the pre-test can begin with item types from Subtests 1, 2 and 3 while the post-test should
ensure that all Subtest 4 and 5 items are included. Also remember that it is important that sufficient content is
covered in the pre-test to ensure that: (a) teaching begins where students are at; (b) what is missed out is
because the students cannot answer the questions; and (c) the pre-test provides both achievement level and
diagnostic information. It is also important to include sufficient content in the post-test to ensure that: (a) what
is not included is because students can do this; (b) what is included will give the level of achievement at the
end of the module; and (c) legitimate comparisons can be made between pre- and post-tests in terms of effect.

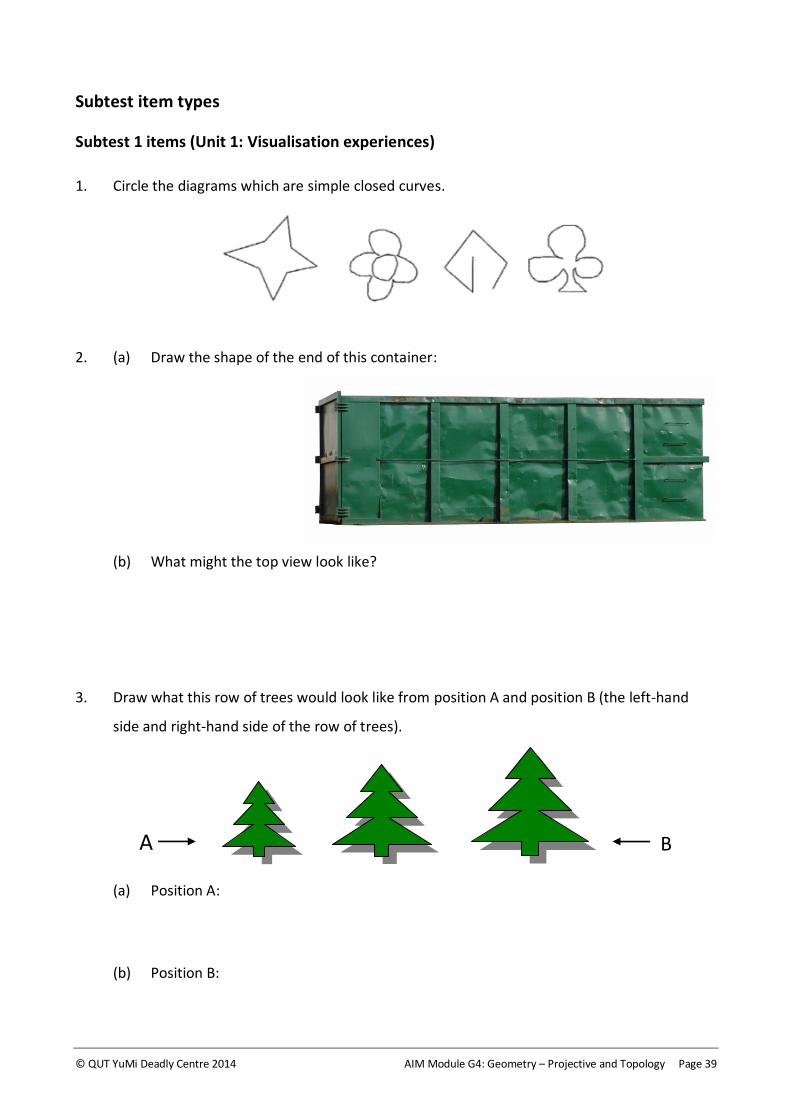
© QUT YuMi Deadly Centre 2014 AIM Module G4: Geometry – Projective and Topology Page 39
Subtest item types
Subtest 1 items (Unit 1: Visualisation experiences)
1. Circle the diagrams which are simple closed curves.
2. (a) Draw the shape of the end of this container:
(b) What might the top view look like?
3. Draw what this row of trees would look like from position A and position B (the left-hand
side and right-hand side of the row of trees).
A
B
(a) Position A:
(b) Position B:
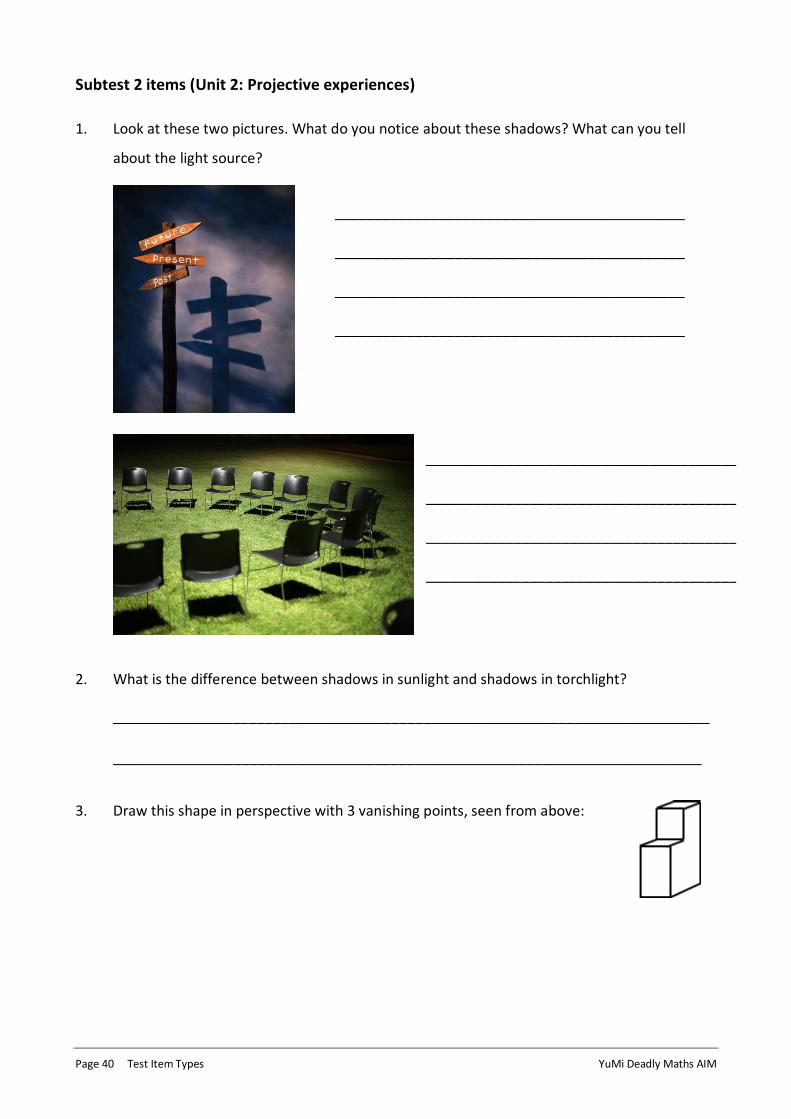
Page 40 Test Item Types YuMi Deadly Maths AIM
Subtest 2 items (Unit 2: Projective experiences)
1. Look at these two pictures. What do you notice about these shadows? What can you tell
about the light source?
2. What is the difference between shadows in sunlight and shadows in torchlight?
___________________________________________________________________________
__________________________________________________________________________
3. Draw this shape in perspective with 3 vanishing points, seen from above:
____________________________________________
____________________________________________
____________________________________________
____________________________________________
_______________________________________
_______________________________________
_______________________________________
_______________________________________

© QUT YuMi Deadly Centre 2014 AIM Module G4: Geometry – Projective and Topology Page 41
Subtest 3 items (Unit 3: Topological experiences)
1. A long balloon is blown up and shapes drawn on it. Can it be changed into the other shapes
(a, b, c or d)? Circle the shapes with the markings that are possible.
2. What is a Möbius strip? ________________________________________________________
__________________________________________________________________________
What is the difference between it and a strip joined into a flat cylinder without any twists?
__________________________________________________________________________
Describe one activity that uses a Möbius strip.
3. Which of these networks is traversable (can be traced without crossing or retracing a line or
lifting your pen from the paper)?
(a) (b) (c)
4. What is the rule for traversability? _______________________________________________
___________________________________________________________________________
__________________________________________________________________________
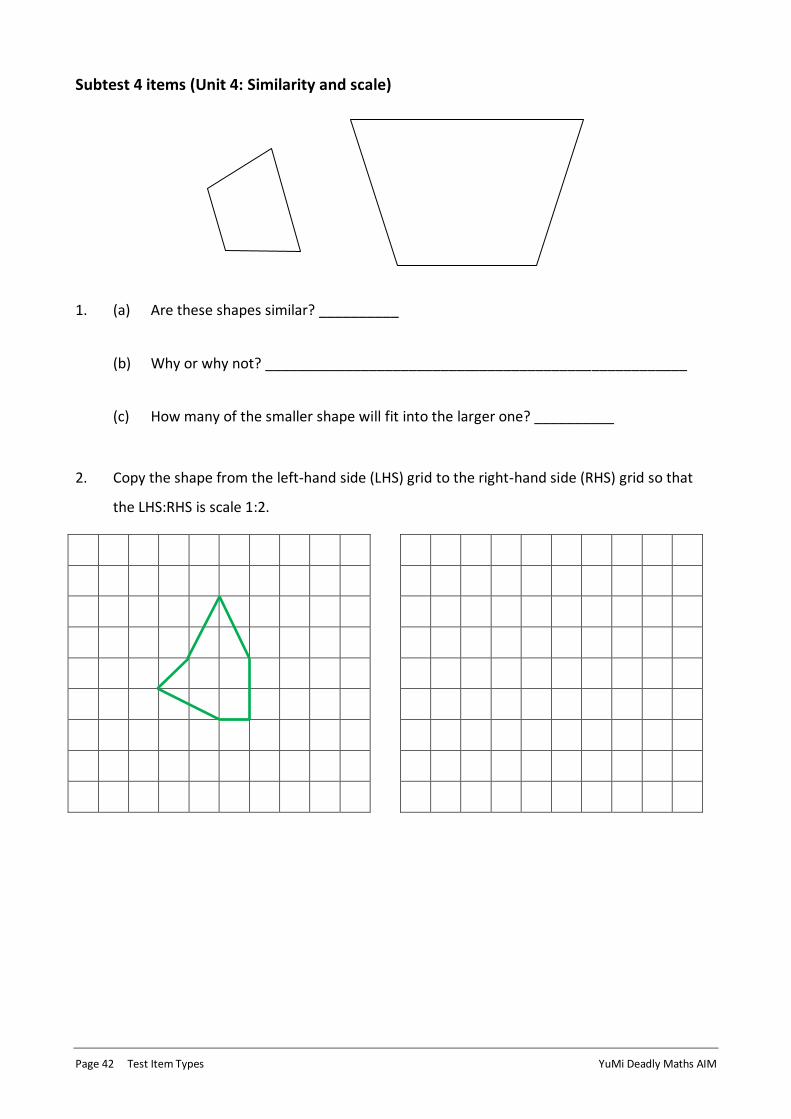
Page 42 Test Item Types YuMi Deadly Maths AIM
Subtest 4 items (Unit 4: Similarity and scale)
1. (a) Are these shapes similar? __________
(b) Why or why not? _____________________________________________________
(c) How many of the smaller shape will fit into the larger one? __________
2. Copy the shape from the left-hand side (LHS) grid to the right-hand side (RHS) grid so that
the LHS:RHS is scale 1:2.
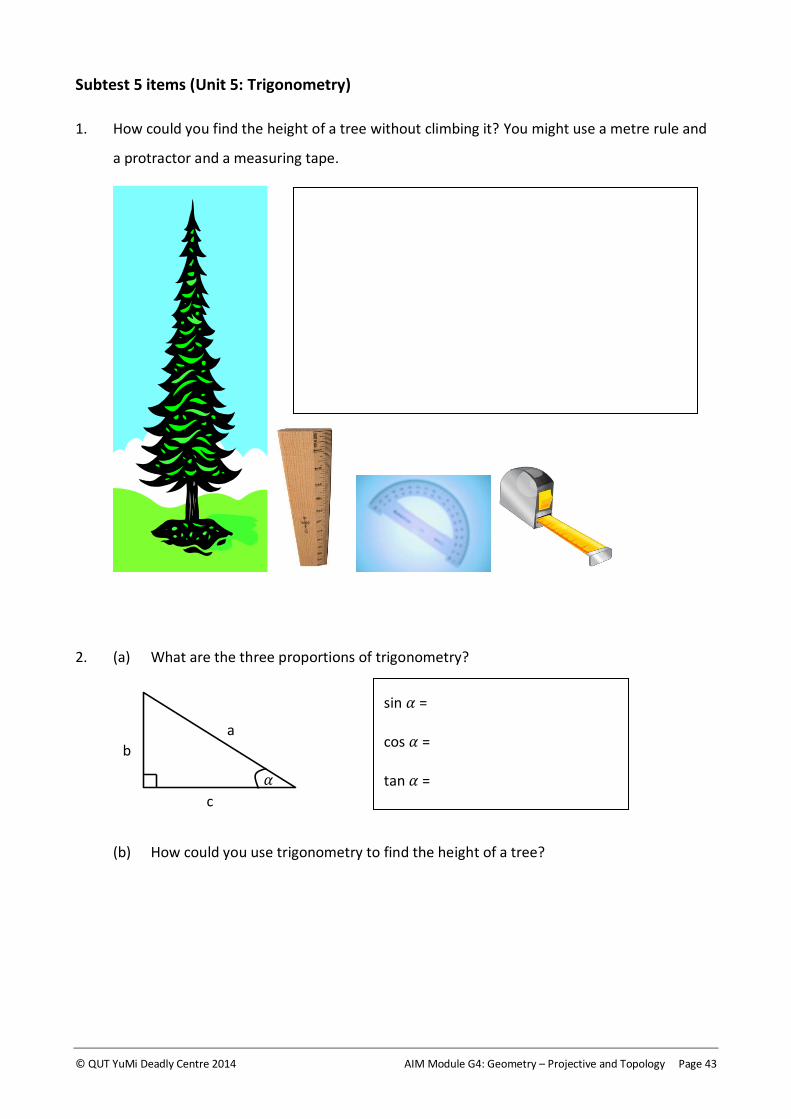
© QUT YuMi Deadly Centre 2014 AIM Module G4: Geometry – Projective and Topology Page 43
Subtest 5 items (Unit 5: Trigonometry)
1. How could you find the height of a tree without climbing it? You might use a metre rule and
a protractor and a measuring tape.
2. (a) What are the three proportions of trigonometry?
(b) How could you use trigonometry to find the height of a tree?
a
b
c
sin =
cos =
tan =


© QUT YuMi Deadly Centre 2014 AIM Module G4: Geometry – Projective and Topology Page 45
Appendix A: Visualisation Perspective Drawing
Three steps to 3-vanishing-point drawings from above
Step 1 – draw the 3 vanishing points
Step 2 – put in first line and add dotted vanishing point lines
Step 3 – complete the drawing
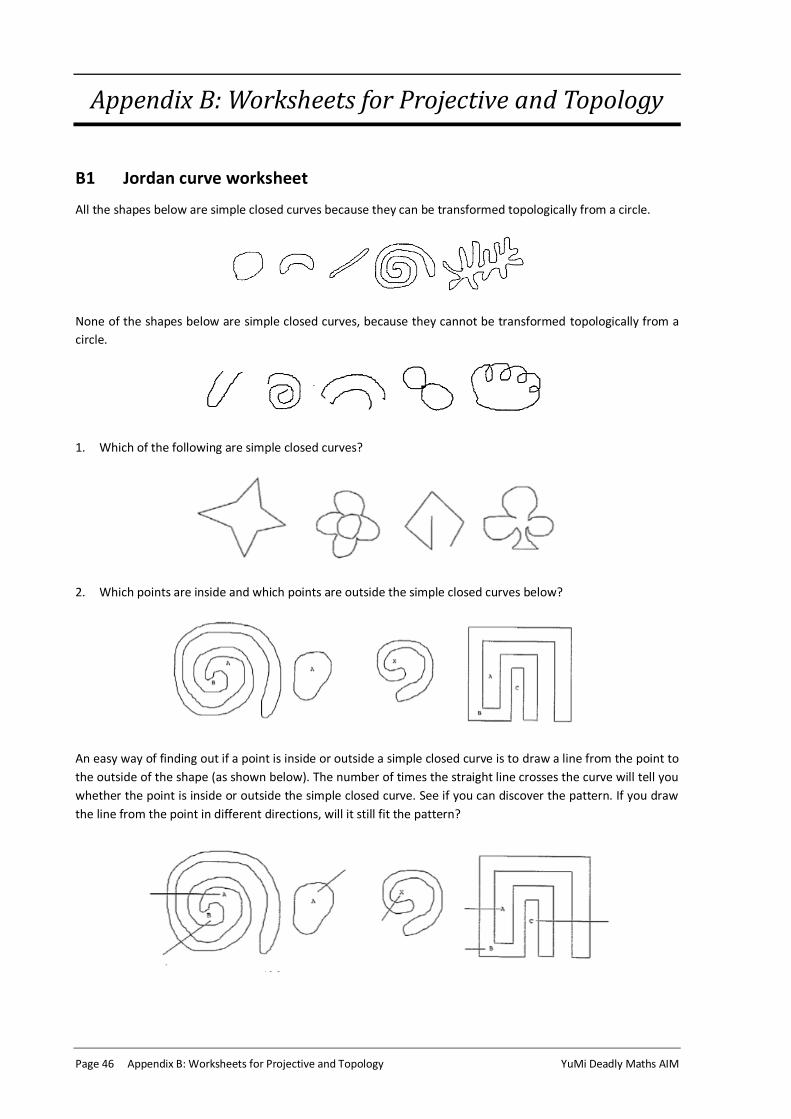
Page 46 Appendix B: Worksheets for Projective and Topology YuMi Deadly Maths AIM
Appendix B: Worksheets for Projective and Topology
B1 Jordan curve worksheet
All the shapes below are simple closed curves because they can be transformed topologically from a circle.
None of the shapes below are simple closed curves, because they cannot be transformed topologically from a
circle.
1. Which of the following are simple closed curves?
2. Which points are inside and which points are outside the simple closed curves below?
An easy way of finding out if a point is inside or outside a simple closed curve is to draw a line from the point to
the outside of the shape (as shown below). The number of times the straight line crosses the curve will tell you
whether the point is inside or outside the simple closed curve. See if you can discover the pattern. If you draw
the line from the point in different directions, will it still fit the pattern?
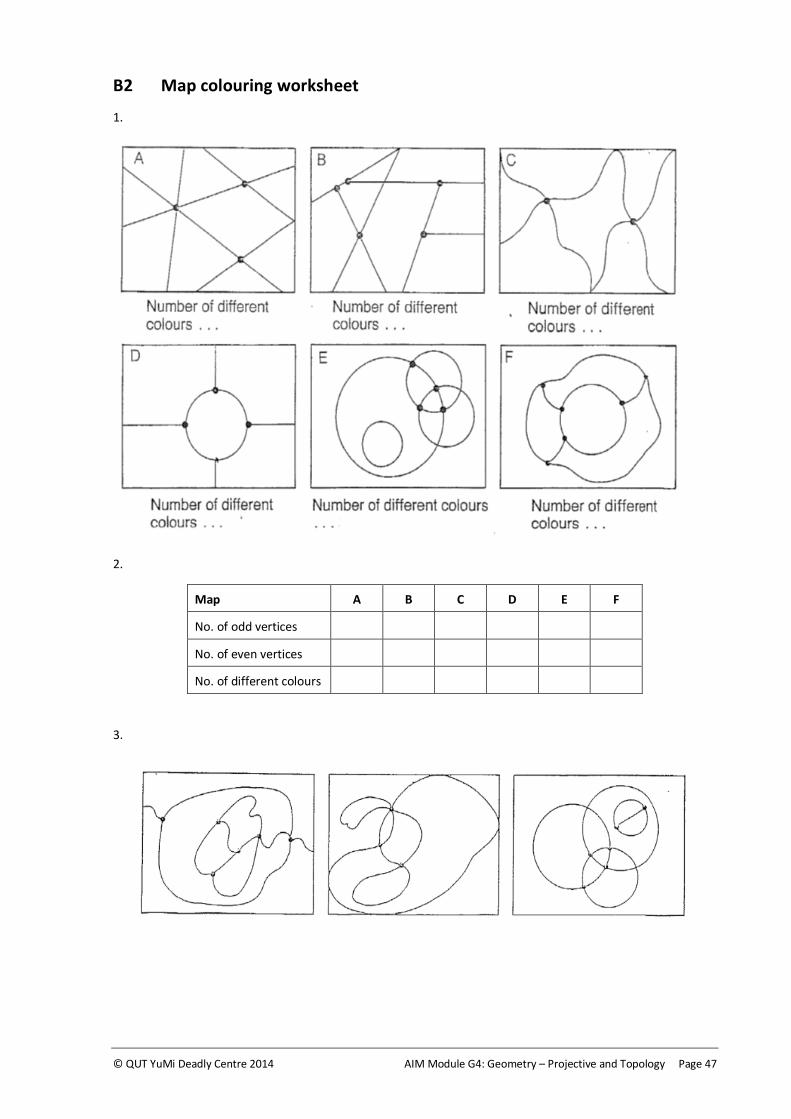
© QUT YuMi Deadly Centre 2014 AIM Module G4: Geometry – Projective and Topology Page 47
B2 Map colouring worksheet
1.
2.
Map A B C D E F
No. of odd vertices
No. of even vertices
No. of different colours
3.
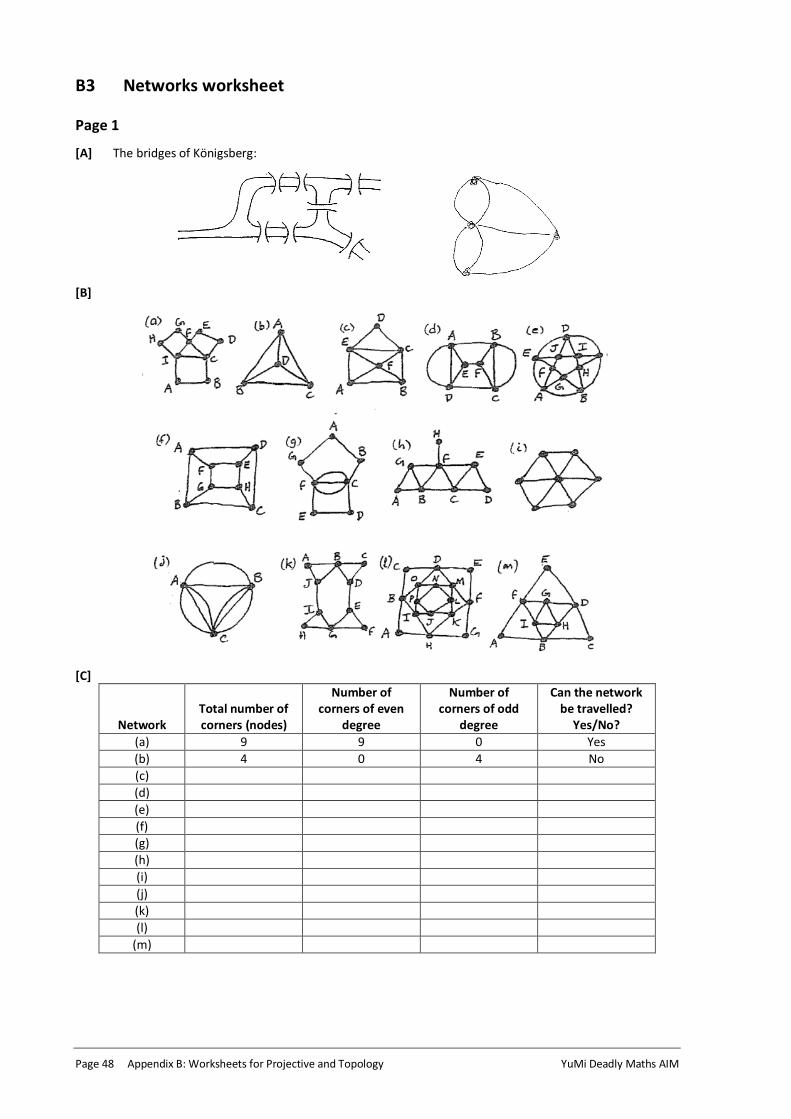
Page 48 Appendix B: Worksheets for Projective and Topology YuMi Deadly Maths AIM
B3 Networks worksheet
Page 1
[A] The bridges of Königsberg:
[B]
[C]
Network Total number of corners (nodes)
Number of corners of even
degree
Number of corners of odd
degree
Can the network be travelled?
Yes/No?
(a) 9 9 0 Yes
(b) 4 0 4 No
(c)
(d)
(e)
(f) (g)
(h)
(i)
(j)
(k)
(l)
(m)

© QUT YuMi Deadly Centre 2014 AIM Module G4: Geometry – Projective and Topology Page 49
Page 2
[D]
[E]
[F]
[G]
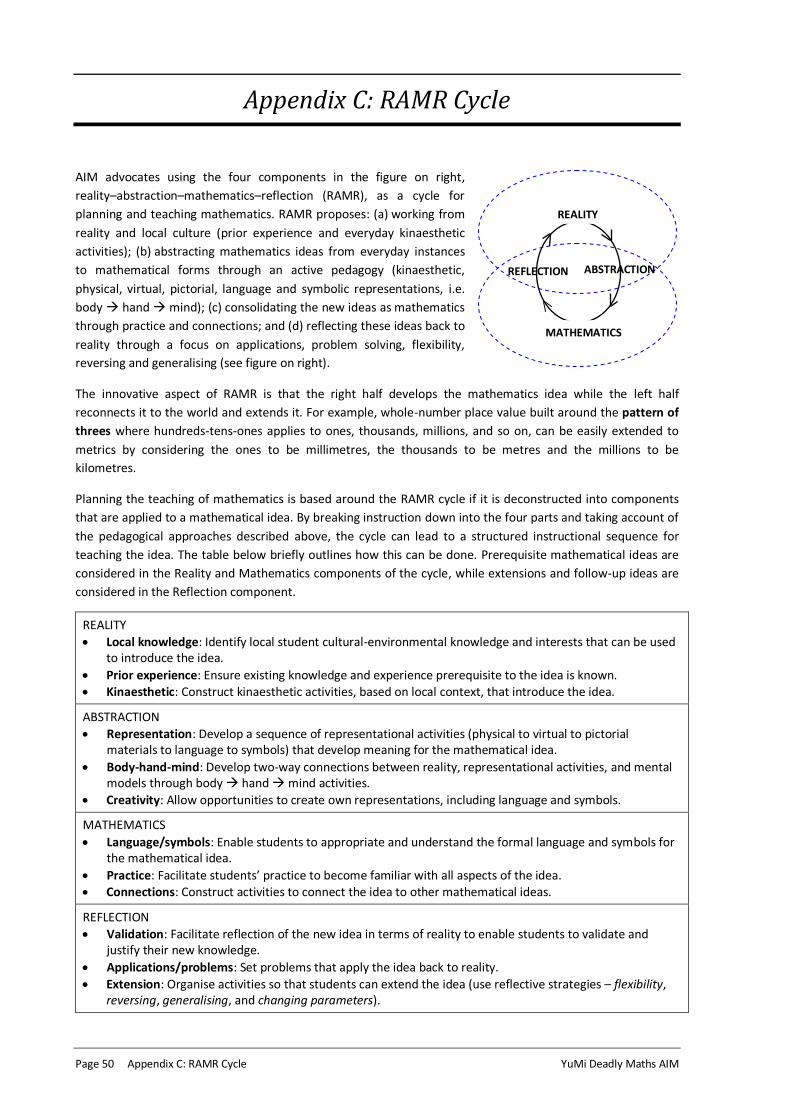
Page 50 Appendix C: RAMR Cycle YuMi Deadly Maths AIM
REALITY
MATHEMATICS
ABSTRACTION REFLECTION
Appendix C: RAMR Cycle
AIM advocates using the four components in the figure on right,
reality–abstraction–mathematics–reflection (RAMR), as a cycle for
planning and teaching mathematics. RAMR proposes: (a) working from
reality and local culture (prior experience and everyday kinaesthetic
activities); (b) abstracting mathematics ideas from everyday instances
to mathematical forms through an active pedagogy (kinaesthetic,
physical, virtual, pictorial, language and symbolic representations, i.e.
body hand mind); (c) consolidating the new ideas as mathematics
through practice and connections; and (d) reflecting these ideas back to
reality through a focus on applications, problem solving, flexibility,
reversing and generalising (see figure on right).
The innovative aspect of RAMR is that the right half develops the mathematics idea while the left half
reconnects it to the world and extends it. For example, whole-number place value built around the pattern of
threes where hundreds-tens-ones applies to ones, thousands, millions, and so on, can be easily extended to
metrics by considering the ones to be millimetres, the thousands to be metres and the millions to be
kilometres.
Planning the teaching of mathematics is based around the RAMR cycle if it is deconstructed into components
that are applied to a mathematical idea. By breaking instruction down into the four parts and taking account of
the pedagogical approaches described above, the cycle can lead to a structured instructional sequence for
teaching the idea. The table below briefly outlines how this can be done. Prerequisite mathematical ideas are
considered in the Reality and Mathematics components of the cycle, while extensions and follow-up ideas are
considered in the Reflection component.
REALITY
Local knowledge: Identify local student cultural-environmental knowledge and interests that can be used to introduce the idea.
Prior experience: Ensure existing knowledge and experience prerequisite to the idea is known. Kinaesthetic: Construct kinaesthetic activities, based on local context, that introduce the idea.
ABSTRACTION
Representation: Develop a sequence of representational activities (physical to virtual to pictorial materials to language to symbols) that develop meaning for the mathematical idea.
Body-hand-mind: Develop two-way connections between reality, representational activities, and mental models through body hand mind activities.
Creativity: Allow opportunities to create own representations, including language and symbols.
MATHEMATICS
Language/symbols: Enable students to appropriate and understand the formal language and symbols for the mathematical idea.
Practice: Facilitate students’ practice to become familiar with all aspects of the idea. Connections: Construct activities to connect the idea to other mathematical ideas.
REFLECTION
Validation: Facilitate reflection of the new idea in terms of reality to enable students to validate and justify their new knowledge.
Applications/problems: Set problems that apply the idea back to reality.
Extension: Organise activities so that students can extend the idea (use reflective strategies – flexibility, reversing, generalising, and changing parameters).
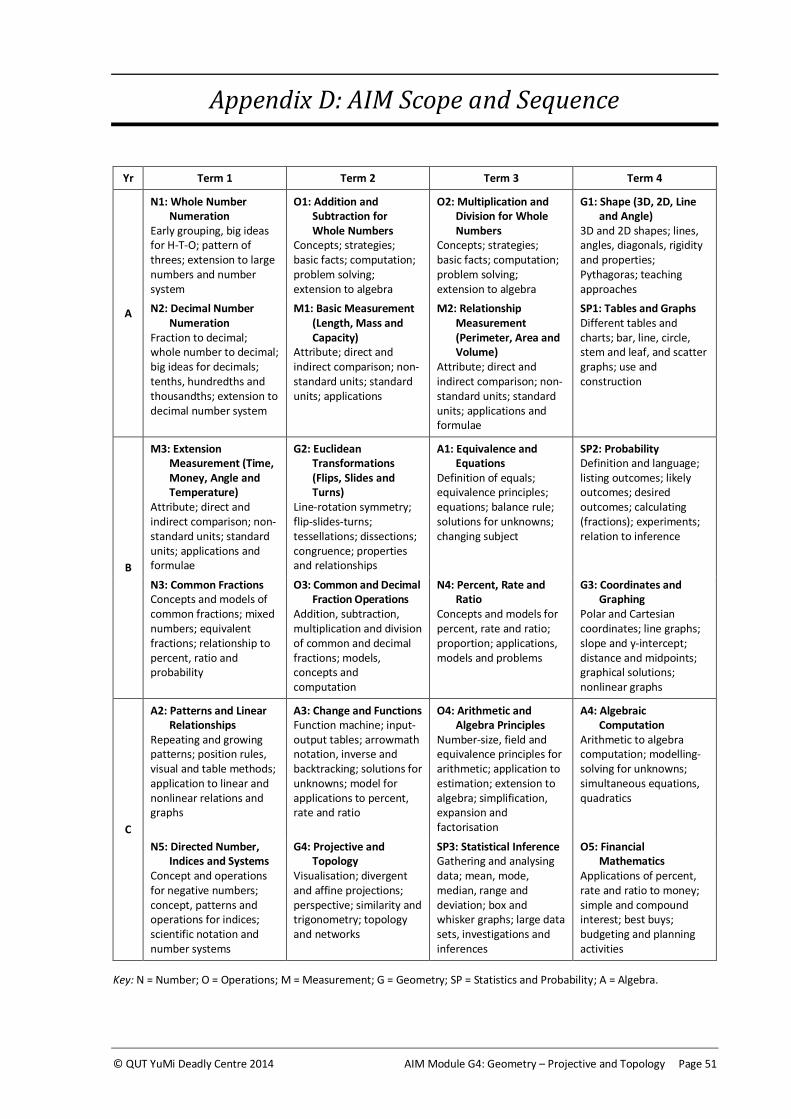
© QUT YuMi Deadly Centre 2014 AIM Module G4: Geometry – Projective and Topology Page 51
Appendix D: AIM Scope and Sequence
Yr Term 1 Term 2 Term 3 Term 4
A
N1: Whole Number Numeration
Early grouping, big ideas for H-T-O; pattern of threes; extension to large numbers and number system
O1: Addition and Subtraction for Whole Numbers
Concepts; strategies; basic facts; computation; problem solving; extension to algebra
O2: Multiplication and Division for Whole Numbers
Concepts; strategies; basic facts; computation; problem solving; extension to algebra
G1: Shape (3D, 2D, Line and Angle)
3D and 2D shapes; lines, angles, diagonals, rigidity and properties; Pythagoras; teaching approaches
N2: Decimal Number Numeration
Fraction to decimal; whole number to decimal; big ideas for decimals; tenths, hundredths and thousandths; extension to decimal number system
M1: Basic Measurement (Length, Mass and Capacity)
Attribute; direct and indirect comparison; non-standard units; standard units; applications
M2: Relationship Measurement (Perimeter, Area and Volume)
Attribute; direct and indirect comparison; non-standard units; standard units; applications and formulae
SP1: Tables and Graphs Different tables and charts; bar, line, circle, stem and leaf, and scatter graphs; use and construction
B
M3: Extension Measurement (Time, Money, Angle and Temperature)
Attribute; direct and indirect comparison; non-standard units; standard units; applications and formulae
G2: Euclidean Transformations (Flips, Slides and Turns)
Line-rotation symmetry; flip-slides-turns; tessellations; dissections; congruence; properties and relationships
A1: Equivalence and Equations
Definition of equals; equivalence principles; equations; balance rule; solutions for unknowns; changing subject
SP2: Probability Definition and language; listing outcomes; likely outcomes; desired outcomes; calculating (fractions); experiments; relation to inference
N3: Common Fractions Concepts and models of common fractions; mixed numbers; equivalent fractions; relationship to percent, ratio and probability
O3: Common and Decimal Fraction Operations
Addition, subtraction, multiplication and division of common and decimal fractions; models, concepts and computation
N4: Percent, Rate and Ratio
Concepts and models for percent, rate and ratio; proportion; applications, models and problems
G3: Coordinates and Graphing
Polar and Cartesian coordinates; line graphs; slope and y-intercept; distance and midpoints; graphical solutions; nonlinear graphs
C
A2: Patterns and Linear Relationships
Repeating and growing patterns; position rules, visual and table methods; application to linear and nonlinear relations and graphs
A3: Change and Functions Function machine; input-output tables; arrowmath notation, inverse and backtracking; solutions for unknowns; model for applications to percent, rate and ratio
O4: Arithmetic and Algebra Principles
Number-size, field and equivalence principles for arithmetic; application to estimation; extension to algebra; simplification, expansion and factorisation
A4: Algebraic Computation
Arithmetic to algebra computation; modelling-solving for unknowns; simultaneous equations, quadratics
N5: Directed Number, Indices and Systems
Concept and operations for negative numbers; concept, patterns and operations for indices; scientific notation and number systems
G4: Projective and Topology
Visualisation; divergent and affine projections; perspective; similarity and trigonometry; topology and networks
SP3: Statistical Inference Gathering and analysing data; mean, mode, median, range and deviation; box and whisker graphs; large data sets, investigations and inferences
O5: Financial Mathematics
Applications of percent, rate and ratio to money; simple and compound interest; best buys; budgeting and planning activities
Key: N = Number; O = Operations; M = Measurement; G = Geometry; SP = Statistics and Probability; A = Algebra.
Acc
eler
ated
Incl
usi
ve M
ath
emat
ics
Pro
ject
© 2014 Queensland University of Technology through the YuMi Deadly Centre
Faculty of Education School of Curriculum
S Block, Room 404 Victoria Park Road
KELVIN GROVE QLD 4059
CRICOS No. 00213J
Phone: +61 7 3138 0035 Fax: +61 7 3138 3985
Email: [email protected] Website: ydc.qut.edu.au