Embed Size (px)
Citation preview
English
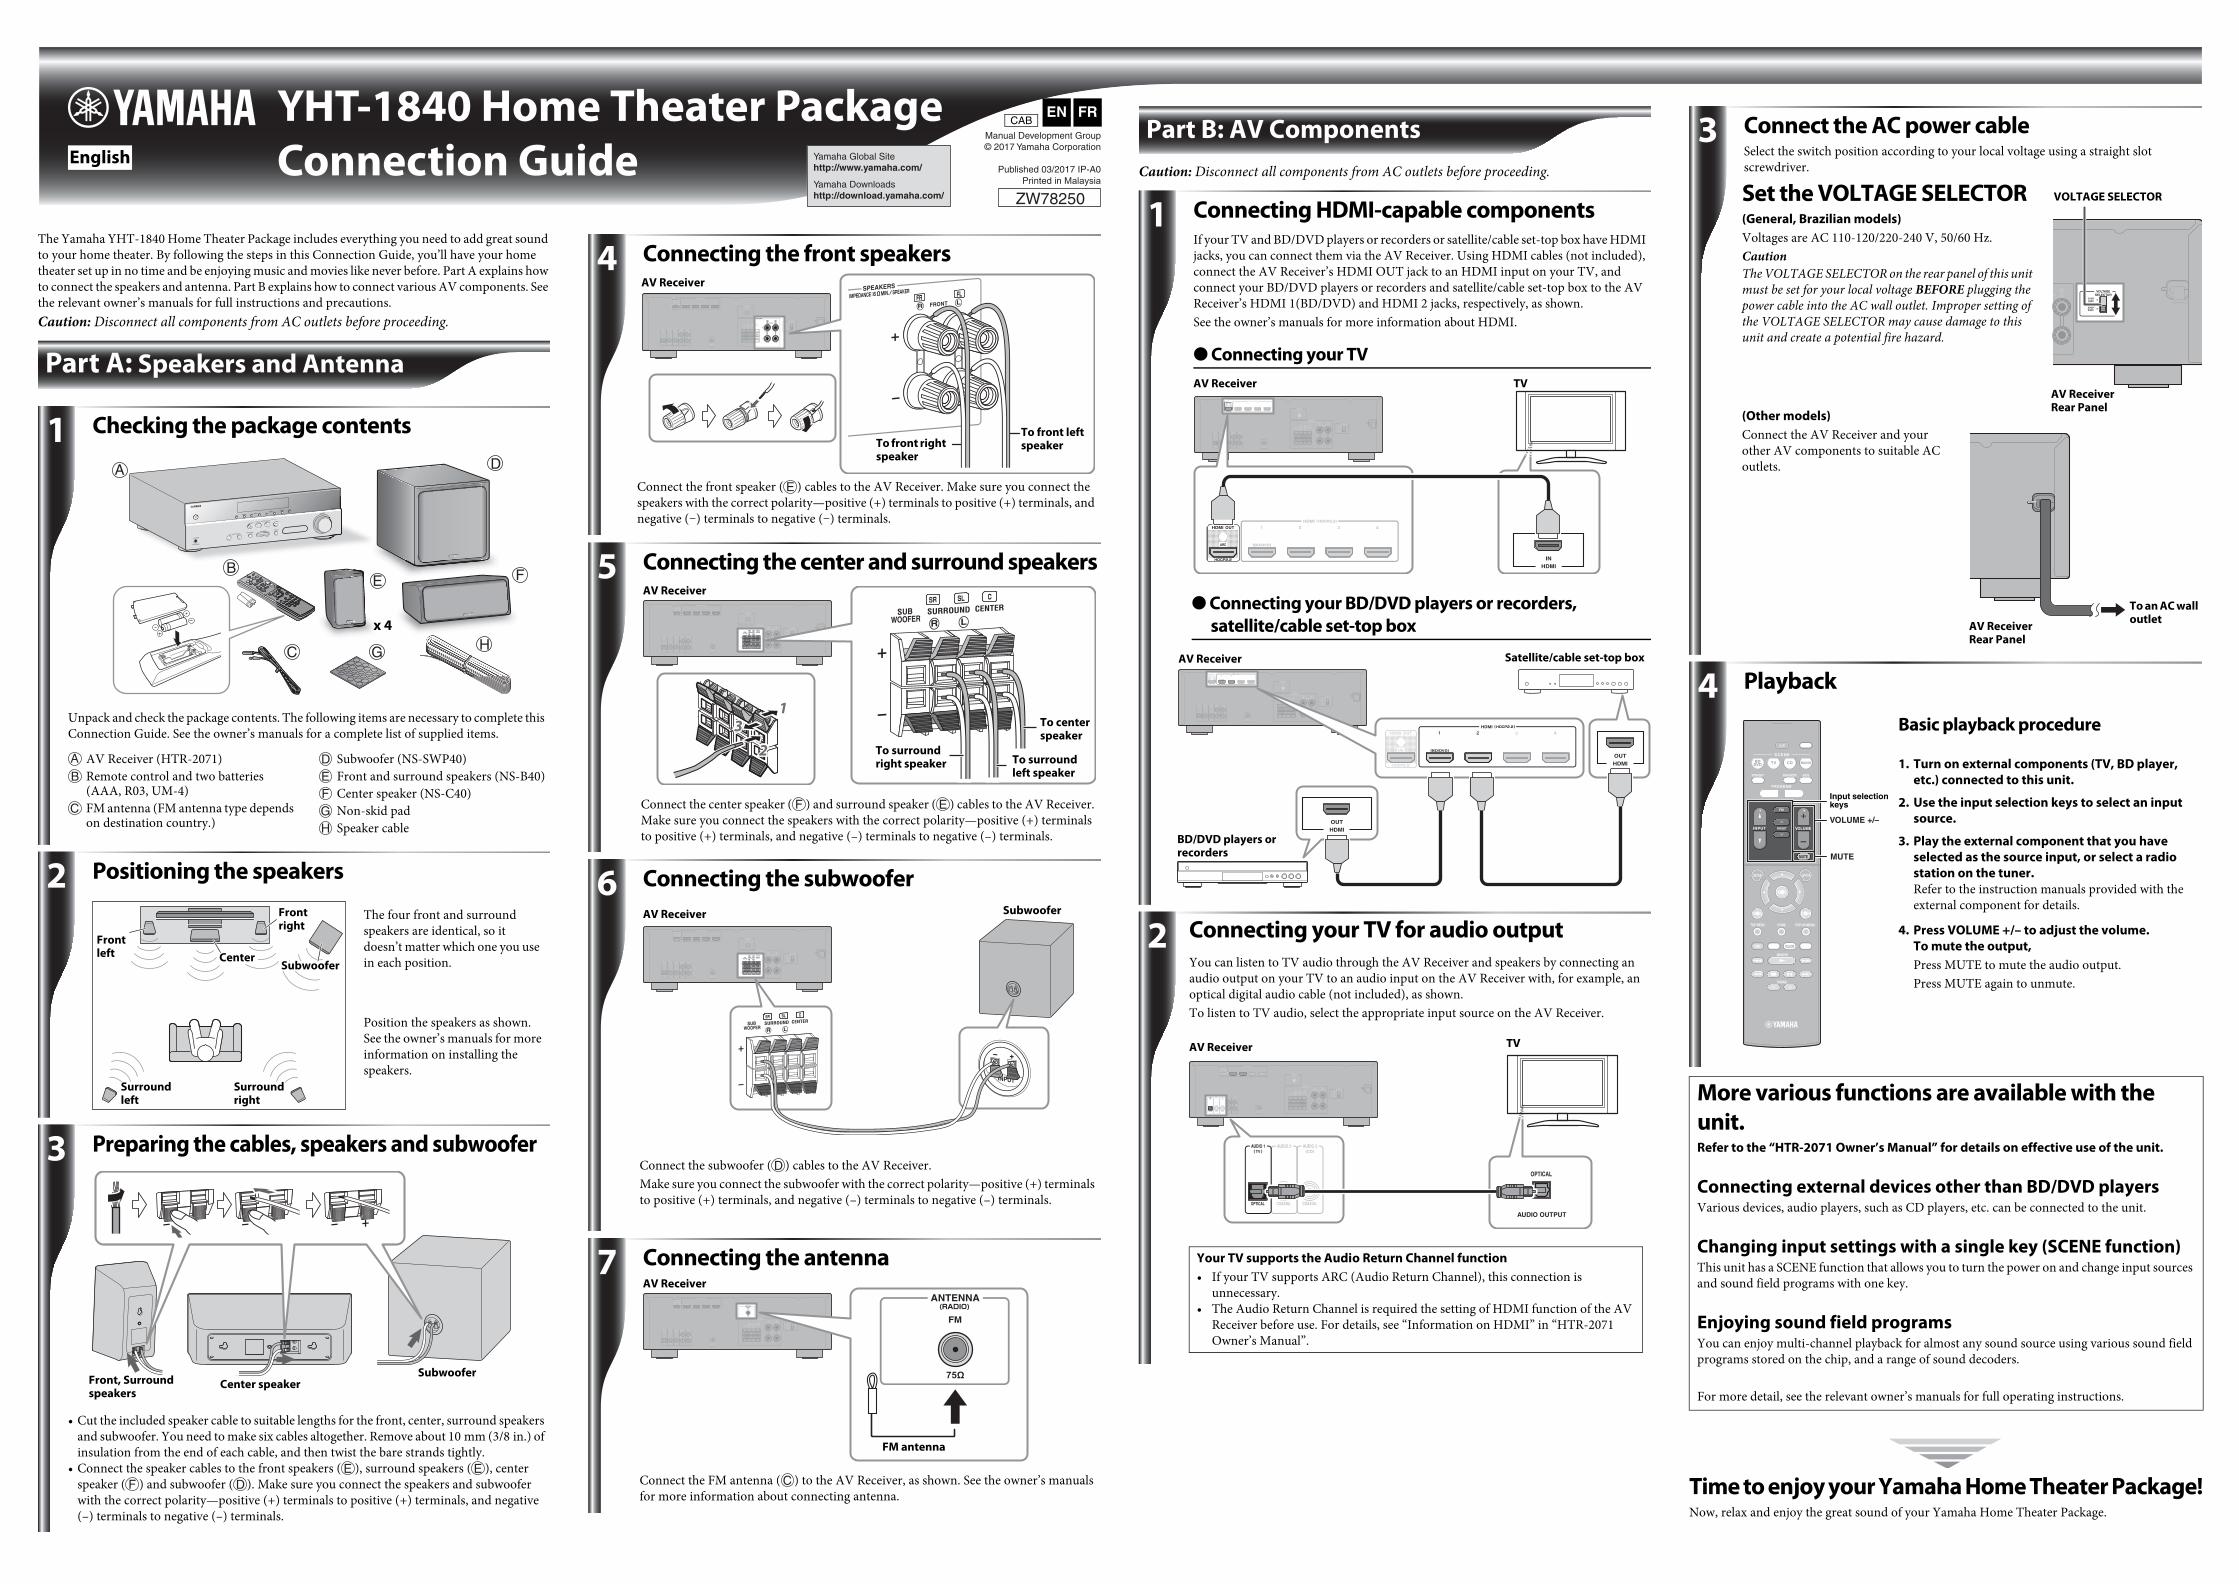
YHT-1840 Home Theater PackageConnection Guide
CABManual Development Group© 2017 Yamaha Corporation
Published 03/2017 IP-A0
ZW78250Printed in Malaysia
FR
Yamaha Global Sitehttp://www.yamaha.com/
Yamaha Downloadshttp://download.yamaha.com/
EN
The Yamaha YHT-1840 Home Theater Package includes everything you need to add great sound to your home theater. By following the steps in this Connection Guide, you’ll have your home theater set up in no time and be enjoying music and movies like never before. Part A explains how to connect the speakers and antenna. Part B explains how to connect various AV components. See the relevant owner’s manuals for full instructions and precautions.Caution: Disconnect all components from AC outlets before proceeding.
Part A: Speakers and Antenna
1
Unpack and check the package contents. The following items are necessary to complete this Connection Guide. See the owner’s manuals for a complete list of supplied items.
AV Receiver (HTR-2071)Remote control and two batteries (AAA, R03, UM-4)FM antenna (FM antenna type depends on destination country.)
Subwoofer (NS-SWP40)Front and surround speakers (NS-B40)Center speaker (NS-C40)Non-skid padSpeaker cable
Checking the package contents
x 4
2The four front and surround speakers are identical, so it doesn’t matter which one you use in each position.
Position the speakers as shown. See the owner’s manuals for more information on installing the speakers.
Positioning the speakers
Front left
Front right
Subwoofer
Surround left
Surround right
Center
3
• Cut the included speaker cable to suitable lengths for the front, center, surround speakers and subwoofer. You need to make six cables altogether. Remove about 10 mm (3/8 in.) of insulation from the end of each cable, and then twist the bare strands tightly.
• Connect the speaker cables to the front speakers ( ), surround speakers ( ), center speaker ( ) and subwoofer ( ). Make sure you connect the speakers and subwoofer with the correct polarity—positive (+) terminals to positive (+) terminals, and negative (–) terminals to negative (–) terminals.
Preparing the cables, speakers and subwoofer
Center speakerSubwoofer
Front, Surround speakers
4AV Receiver
Connect the front speaker ( ) cables to the AV Receiver. Make sure you connect the speakers with the correct polarity—positive (+) terminals to positive (+) terminals, and negative (–) terminals to negative (–) terminals.
To front left speakerTo front right
speaker
Connecting the front speakers
Connecting the center and surround speakers5AV Receiver
Connect the center speaker ( ) and surround speaker ( ) cables to the AV Receiver. Make sure you connect the speakers with the correct polarity—positive (+) terminals to positive (+) terminals, and negative (–) terminals to negative (–) terminals.
To surround right speaker
To center speaker
To surround left speaker
AV Receiver
6Subwoofer
Connect the subwoofer ( ) cables to the AV Receiver.Make sure you connect the subwoofer with the correct polarity—positive (+) terminals to positive (+) terminals, and negative (–) terminals to negative (–) terminals.
Connecting the subwoofer
Connecting the antenna7AV Receiver
Connect the FM antenna ( ) to the AV Receiver, as shown. See the owner’s manuals for more information about connecting antenna.
FM antenna
Caution: Disconnect all components from AC outlets before proceeding.
Part B: AV Components
Connecting HDMI-capable components1
AV Receiver TV
If your TV and BD/DVD players or recorders or satellite/cable set-top box have HDMI jacks, you can connect them via the AV Receiver. Using HDMI cables (not included), connect the AV Receiver’s HDMI OUT jack to an HDMI input on your TV, and connect your BD/DVD players or recorders and satellite/cable set-top box to the AV Receiver’s HDMI 1(BD/DVD) and HDMI 2 jacks, respectively, as shown.See the owner’s manuals for more information about HDMI.
● Connecting your TV
● Connecting your BD/DVD players or recorders, satellite/cable set-top box
AV Receiver
BD/DVD players or recorders
Satellite/cable set-top box
2
AV Receiver TV
You can listen to TV audio through the AV Receiver and speakers by connecting an audio output on your TV to an audio input on the AV Receiver with, for example, an optical digital audio cable (not included), as shown. To listen to TV audio, select the appropriate input source on the AV Receiver.
Connecting your TV for audio output
Your TV supports the Audio Return Channel function• If your TV supports ARC (Audio Return Channel), this connection is
unnecessary.• The Audio Return Channel is required the setting of HDMI function of the AV
Receiver before use. For details, see “Information on HDMI” in “HTR-2071 Owner’s Manual”.
Time to enjoy your Yamaha Home Theater Package!Now, relax and enjoy the great sound of your Yamaha Home Theater Package.
More various functions are available with the unit.Refer to the “HTR-2071 Owner’s Manual” for details on effective use of the unit.
Connecting external devices other than BD/DVD playersVarious devices, audio players, such as CD players, etc. can be connected to the unit.
Changing input settings with a single key (SCENE function)This unit has a SCENE function that allows you to turn the power on and change input sources and sound field programs with one key.
Enjoying sound field programsYou can enjoy multi-channel playback for almost any sound source using various sound field programs stored on the chip, and a range of sound decoders.
For more detail, see the relevant owner’s manuals for full operating instructions.
3
Set the VOLTAGE SELECTOR(General, Brazilian models)Voltages are AC 110-120/220-240 V, 50/60 Hz.CautionThe VOLTAGE SELECTOR on the rear panel of this unit must be set for your local voltage BEFORE plugging the power cable into the AC wall outlet. Improper setting of the VOLTAGE SELECTOR may cause damage to this unit and create a potential fire hazard.
Connect the AC power cableSelect the switch position according to your local voltage using a straight slot screwdriver.
VOLTAGE SELECTOR
To an AC wall outlet
(Other models)Connect the AV Receiver and your other AV components to suitable AC outlets.
AV ReceiverRear Panel
AV Receiver Rear Panel
4 Playback
TUNING
MUTE
MEMORY
TOP MENU HOME POP-UP/MENU
DISPLAYRETURN
SETUP OPTION
ENTER
FM
PRESET VOLUME
PROGRAM
STRAIGHT ENHANCER BASS
INPUT
BDDVD TV CD
SCENE
RADIO
SLEEP
BLUEYELLOWGREENRED
MUTE
FM
PRESET VOLUMEINPUT
Basic playback procedure
1. Turn on external components (TV, BD player, etc.) connected to this unit.
2. Use the input selection keys to select an input source.
3. Play the external component that you have selected as the source input, or select a radio station on the tuner.Refer to the instruction manuals provided with the external component for details.
4. Press VOLUME +/– to adjust the volume.To mute the output,Press MUTE to mute the audio output.Press MUTE again to unmute.
Input selection keys
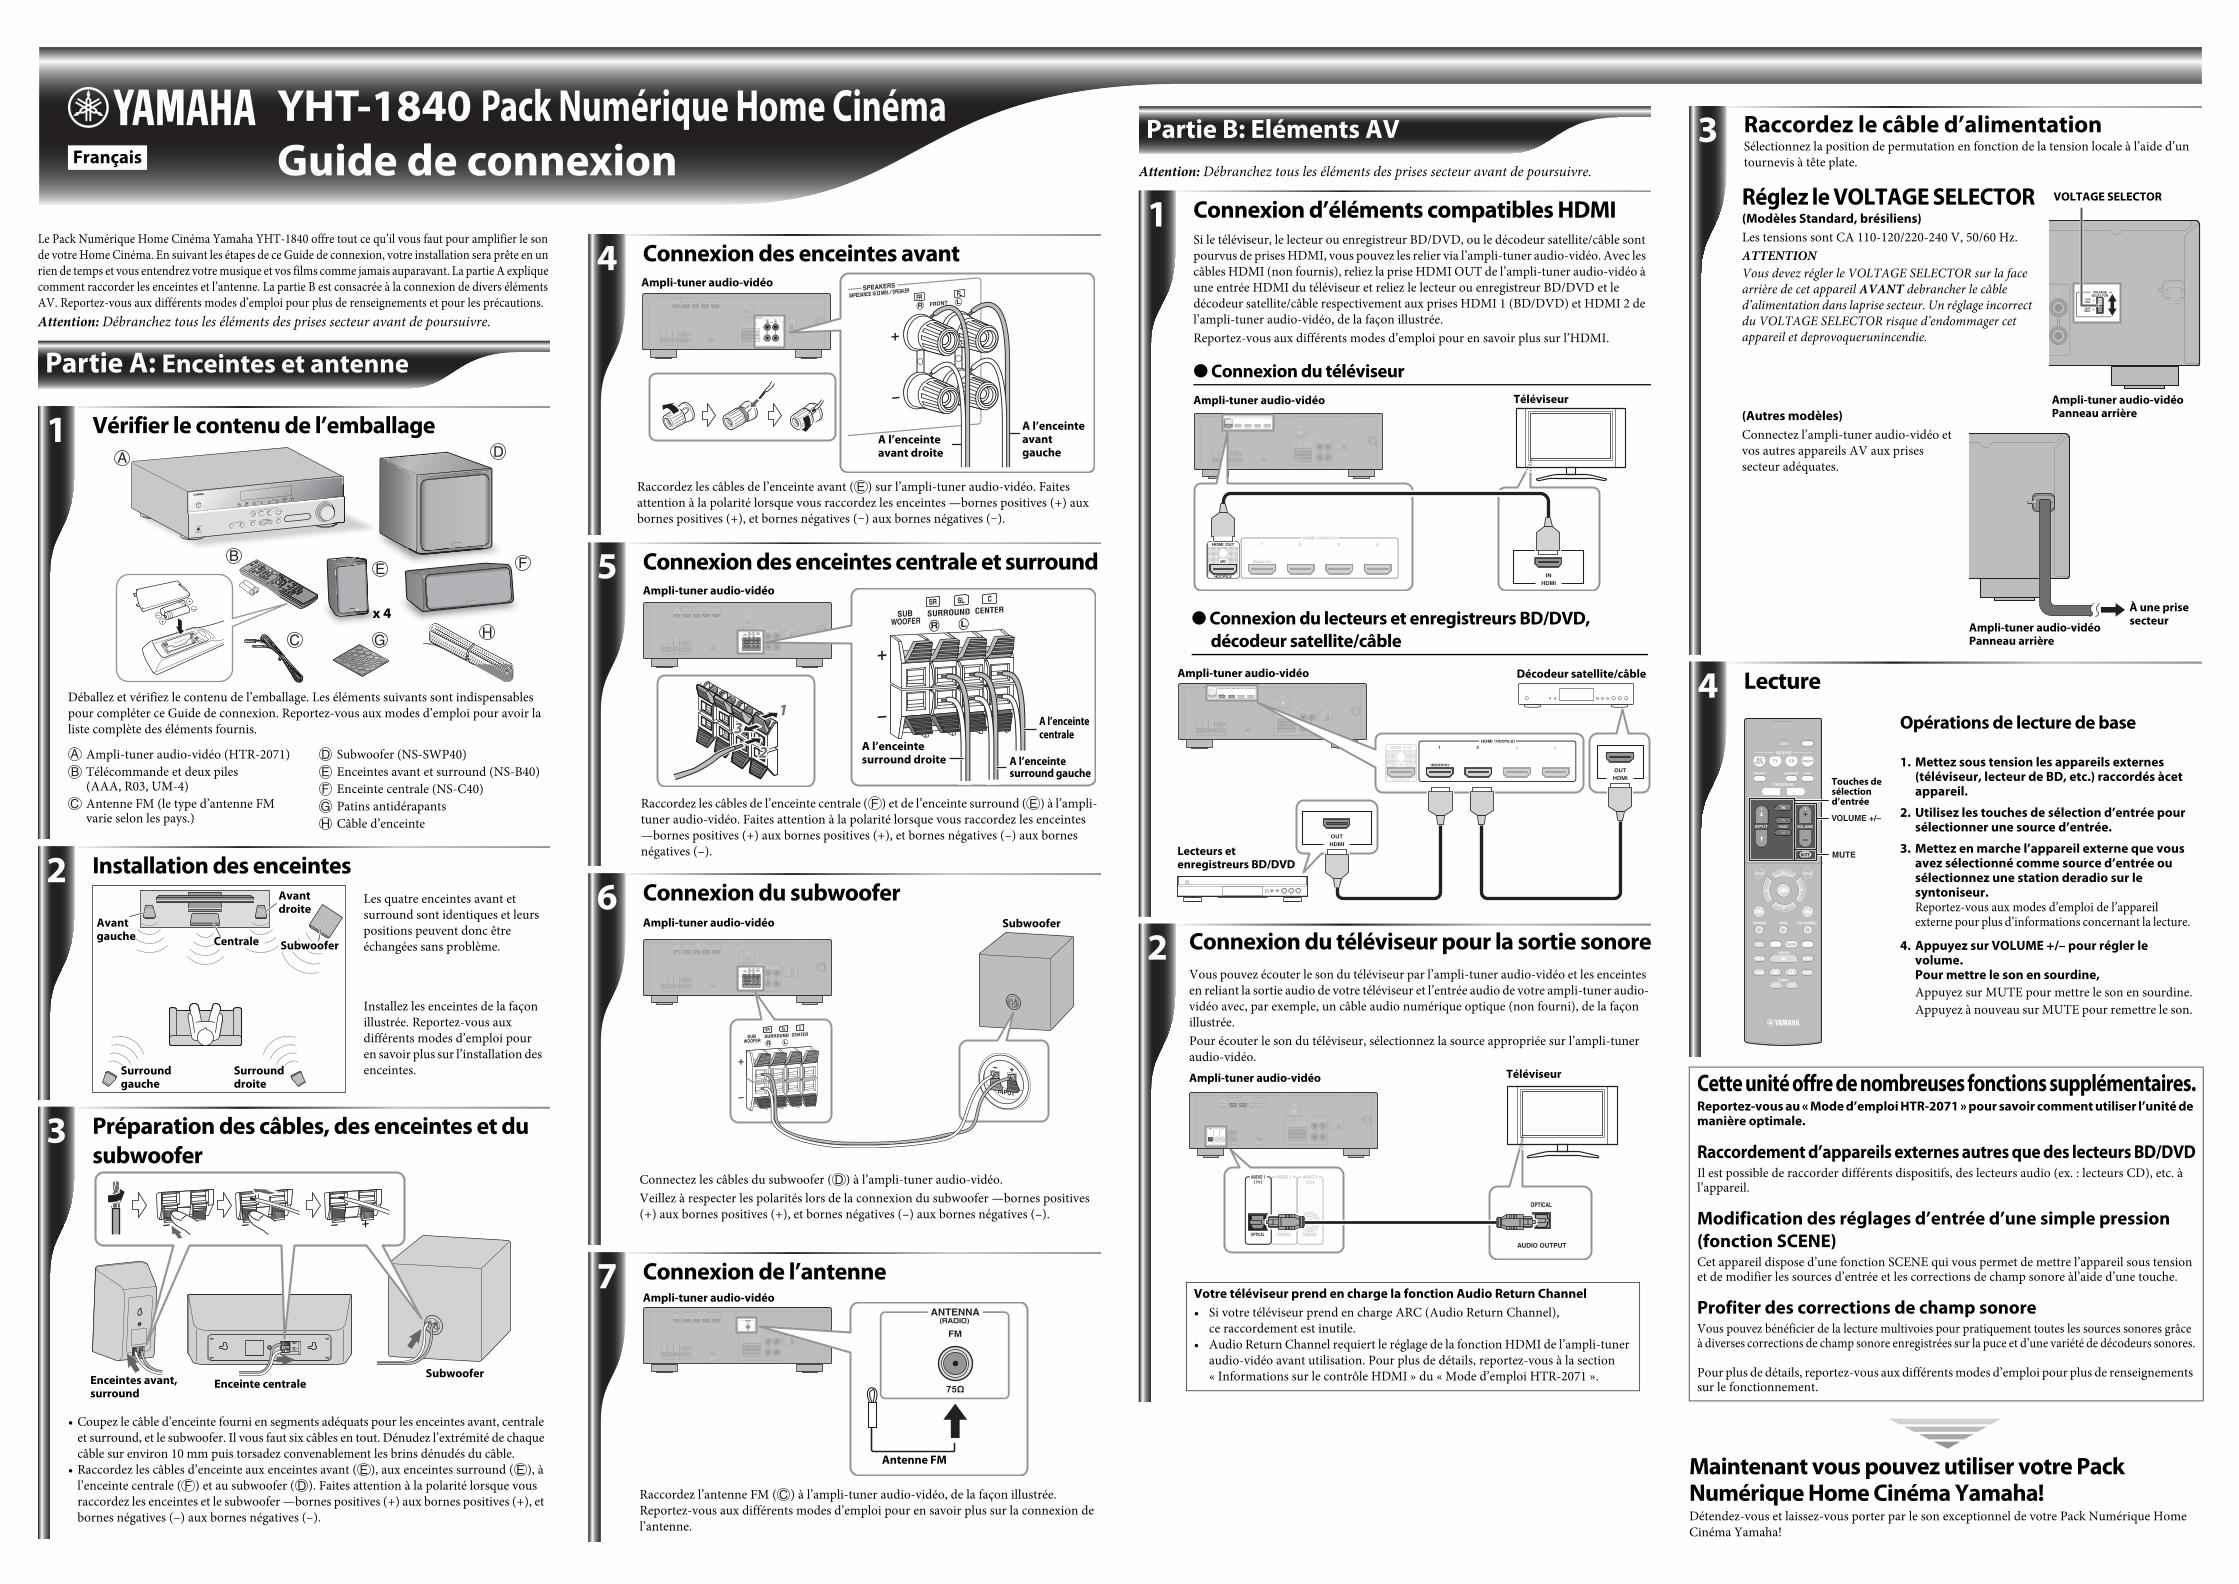
Français
YHT-1840 Pack Numérique Home CinémaGuide de connexion
Le Pack Numérique Home Cinéma Yamaha YHT-1840 offre tout ce qu’il vous faut pour amplifier le son de votre Home Cinéma. En suivant les étapes de ce Guide de connexion, votre installation sera prête en un rien de temps et vous entendrez votre musique et vos films comme jamais auparavant. La partie A explique comment raccorder les enceintes et l’antenne. La partie B est consacrée à la connexion de divers éléments AV. Reportez-vous aux différents modes d’emploi pour plus de renseignements et pour les précautions.Attention: Débranchez tous les éléments des prises secteur avant de poursuivre.
Partie A: Enceintes et antenne
1
Déballez et vérifiez le contenu de l’emballage. Les éléments suivants sont indispensables pour compléter ce Guide de connexion. Reportez-vous aux modes d’emploi pour avoir la liste complète des éléments fournis.
Ampli-tuner audio-vidéo (HTR-2071)Télécommande et deux piles (AAA, R03, UM-4)Antenne FM (le type d’antenne FM varie selon les pays.)
Subwoofer (NS-SWP40)Enceintes avant et surround (NS-B40)Enceinte centrale (NS-C40)Patins antidérapantsCâble d’enceinte
Vérifier le contenu de l’emballage
x 4
2Les quatre enceintes avant et surround sont identiques et leurs positions peuvent donc être échangées sans problème.
Installez les enceintes de la façon illustrée. Reportez-vous aux différents modes d’emploi pour en savoir plus sur l’installation des enceintes.
Installation des enceintesAvant droite
Subwoofer
Surround gauche
Surround droite
CentraleAvant gauche
3
• Coupez le câble d’enceinte fourni en segments adéquats pour les enceintes avant, centrale et surround, et le subwoofer. Il vous faut six câbles en tout. Dénudez l’extrémité de chaque câble sur environ 10 mm puis torsadez convenablement les brins dénudés du câble.
• Raccordez les câbles d’enceinte aux enceintes avant ( ), aux enceintes surround ( ), à l’enceinte centrale ( ) et au subwoofer ( ). Faites attention à la polarité lorsque vous raccordez les enceintes et le subwoofer —bornes positives (+) aux bornes positives (+), et bornes négatives (–) aux bornes négatives (–).
Préparation des câbles, des enceintes et du subwoofer
Enceinte centraleEnceintes avant, surround
Subwoofer
4Ampli-tuner audio-vidéo
Raccordez les câbles de l’enceinte avant ( ) sur l’ampli-tuner audio-vidéo. Faites attention à la polarité lorsque vous raccordez les enceintes —bornes positives (+) aux bornes positives (+), et bornes négatives (–) aux bornes négatives (–).
A l’enceinte avant gauche
A l’enceinte avant droite
Connexion des enceintes avant
Connexion des enceintes centrale et surround5Ampli-tuner audio-vidéo
Raccordez les câbles de l’enceinte centrale ( ) et de l’enceinte surround ( ) à l’ampli-tuner audio-vidéo. Faites attention à la polarité lorsque vous raccordez les enceintes —bornes positives (+) aux bornes positives (+), et bornes négatives (–) aux bornes négatives (–).
A l’enceinte surround droite
A l’enceinte centrale
A l’enceinte surround gauche
Ampli-tuner audio-vidéo6
Subwoofer
Connectez les câbles du subwoofer ( ) à l’ampli-tuner audio-vidéo.Veillez à respecter les polarités lors de la connexion du subwoofer —bornes positives (+) aux bornes positives (+), et bornes négatives (–) aux bornes négatives (–).
Connexion du subwoofer
Connexion de l’antenne7Ampli-tuner audio-vidéo
Raccordez l’antenne FM ( ) à l’ampli-tuner audio-vidéo, de la façon illustrée. Reportez-vous aux différents modes d’emploi pour en savoir plus sur la connexion de l’antenne.
Antenne FM
Attention: Débranchez tous les éléments des prises secteur avant de poursuivre.
Partie B: Eléments AV
Connexion d’éléments compatibles HDMI1
Ampli-tuner audio-vidéo Téléviseur
Si le téléviseur, le lecteur ou enregistreur BD/DVD, ou le décodeur satellite/câble sont pourvus de prises HDMI, vous pouvez les relier via l’ampli-tuner audio-vidéo. Avec les câbles HDMI (non fournis), reliez la prise HDMI OUT de l’ampli-tuner audio-vidéo à une entrée HDMI du téléviseur et reliez le lecteur ou enregistreur BD/DVD et le décodeur satellite/câble respectivement aux prises HDMI 1 (BD/DVD) et HDMI 2 de l’ampli-tuner audio-vidéo, de la façon illustrée.Reportez-vous aux différents modes d’emploi pour en savoir plus sur l’HDMI.
● Connexion du téléviseur
● Connexion du lecteurs et enregistreurs BD/DVD, décodeur satellite/câble
Ampli-tuner audio-vidéo
Lecteurs et enregistreurs BD/DVD
Décodeur satellite/câble
2
Ampli-tuner audio-vidéo Téléviseur
Vous pouvez écouter le son du téléviseur par l’ampli-tuner audio-vidéo et les enceintes en reliant la sortie audio de votre téléviseur et l’entrée audio de votre ampli-tuner audio-vidéo avec, par exemple, un câble audio numérique optique (non fourni), de la façon illustrée. Pour écouter le son du téléviseur, sélectionnez la source appropriée sur l’ampli-tuner audio-vidéo.
Connexion du téléviseur pour la sortie sonore
Votre téléviseur prend en charge la fonction Audio Return Channel• Si votre téléviseur prend en charge ARC (Audio Return Channel),
ce raccordement est inutile.• Audio Return Channel requiert le réglage de la fonction HDMI de l’ampli-tuner
audio-vidéo avant utilisation. Pour plus de détails, reportez-vous à la section « Informations sur le contrôle HDMI » du « Mode d’emploi HTR-2071 ».
Maintenant vous pouvez utiliser votre Pack Numérique Home Cinéma Yamaha!Détendez-vous et laissez-vous porter par le son exceptionnel de votre Pack Numérique Home Cinéma Yamaha!
Cette unité offre de nombreuses fonctions supplémentaires.Reportez-vous au « Mode d’emploi HTR-2071 » pour savoir comment utiliser l’unité de manière optimale.
Raccordement d’appareils externes autres que des lecteurs BD/DVDIl est possible de raccorder différents dispositifs, des lecteurs audio (ex. : lecteurs CD), etc. à l’appareil.
Modification des réglages d’entrée d’une simple pression (fonction SCENE)Cet appareil dispose d’une fonction SCENE qui vous permet de mettre l’appareil sous tension et de modifier les sources d’entrée et les corrections de champ sonore àl’aide d’une touche.
Profiter des corrections de champ sonoreVous pouvez bénéficier de la lecture multivoies pour pratiquement toutes les sources sonores grâce à diverses corrections de champ sonore enregistrées sur la puce et d’une variété de décodeurs sonores.
Pour plus de détails, reportez-vous aux différents modes d’emploi pour plus de renseignements sur le fonctionnement.
Raccordez le câble d’alimentationSélectionnez la position de permutation en fonction de la tension locale à l’aide d’un tournevis à tête plate.
3
Réglez le VOLTAGE SELECTOR(Modèles Standard, brésiliens)Les tensions sont CA 110-120/220-240 V, 50/60 Hz.ATTENTIONVous devez régler le VOLTAGE SELECTOR sur la face arrière de cet appareil AVANT debrancher le câble d’alimentation dans laprise secteur. Un réglage incorrect du VOLTAGE SELECTOR risque d’endommager cet appareil et deprovoquerunincendie.
(Autres modèles)Connectez l’ampli-tuner audio-vidéo et vos autres appareils AV aux prises secteur adéquates.
VOLTAGE SELECTOR
À une prise secteur
Ampli-tuner audio-vidéoPanneau arrière
Ampli-tuner audio-vidéoPanneau arrière
Lecture4
TUNING
MUTE
MEMORY
TOP MENU HOME POP-UP/MENU
DISPLAYRETURN
SETUP OPTION
ENTER
FM
PRESET VOLUME
PROGRAM
STRAIGHT ENHANCER BASS
INPUT
BDDVD TV CD
SCENE
RADIO
SLEEP
BLUEYELLOWGREENRED
MUTE
FM
PRESET VOLUMEINPUT
Opérations de lecture de base
1. Mettez sous tension les appareils externes (téléviseur, lecteur de BD, etc.) raccordés àcet appareil.
2. Utilisez les touches de sélection d’entrée pour sélectionner une source d’entrée.
3. Mettez en marche l’appareil externe que vous avez sélectionné comme source d’entrée ou sélectionnez une station deradio sur le syntoniseur.Reportez-vous aux modes d’emploi de l’appareil externe pour plus d’informations concernant la lecture.
4. Appuyez sur VOLUME +/– pour régler le volume.Pour mettre le son en sourdine,Appuyez sur MUTE pour mettre le son en sourdine.Appuyez à nouveau sur MUTE pour remettre le son.
Touches de sélection d’entrée