Embed Size (px)
Citation preview

You are Going to Learn to Play the
Recorder!
Presentation designed by Linda Barnhart
Paramount Elementary School

Note to teachers:You know when you have students that come in the middle of the year, it can be difficult to catch them up on the recorder. I tend to forget to cover the basics and they end up jumping in in the middle. This was developed to help with that problem. It introduces the student to the recorder and gets them started. I do not normally move this quickly in the classroom, but here the student can practice and repeat the lesson as necessary. I hope that you will find this a helpful tool in your classroom.
Note to students:This presentation was designed to help you learn to play the recorder. You move through the lesson by clicking the mouse to move from slide to slide. Click on the symbol to play sound clips. Take your time to read and practice each slide. You should be able to play a song on the recorder when you finish this lesson.

This is a “halo” holder that I have on my recorder.
This is a recorder

Your Recorder Comes with a cleaner.
We don’t use the cleaners in my room.In my class we use these to conduct with.
Why?
•The part that you need to clean is the mouthpiece.
•This rod does not clean the mouthpiece.
•You need to add a small strip of cloth to the rod to use it to clean. Many students end up with too big a strip of cloth and the rod gets stuck in the recorder.

1. Turn the recorder so that the thumb hole is away from your body
2. Cover the area below the mouthpiece with your thumb and give a quick blow into the mouthpiece. (If you do this correctly you should not hear it.)
3. Wipe off any moisture that is on your thumb and repeat two more times.
To Clean Your Recorder

The Recorder has been around for a long time.
• The recorder was very popular in Europe in the 1500s and 1600s. It was then almost forgotten until the early 1900s, when instrument maker Arnold Dolmetsch became interested in it. Through an accident his recorder was lost. Luckily, he had taken careful measurements and based a new instrument on the old design. This was the beginning of a revival for the recorder. 1
1. Taken from the Kingfisher Young People’s Book of Music 1996

This is a little song to help you learn how to hold the recorder.
• The recorder in your right hand is where we will begin…...
• Be sure to hold the bottom and move it to your chin……

• With your left hand give a thumbs up….
• On the back it must go.

Add 2 it’s A
Add 3 it’s G you know!
Add 1 it’s B

This is the proper way to hold the recorder.
This is too high.
This is too low
Proper Hold

It is important to completely cover the hole with your finger!If you don’t, air will escape and you will squeak.
This hole is completely coveredand no air can escape.
This hole has a small placewhere air is escaping.
If you are covering the holes correctly you will see small round “bubbles” on your fingers.
Cover the Holes Completely

There is a correct way to blow into a recorder.
•First, you should blow GENTLY. Think about blowing bubbles.•You should start and stop the sound with your tongue. Put your tongue on the roof of your mouth behind your teeth. The sound should start and stop there. •Some people think of saying the sound dud or doot when they play,but be careful not to vocalize the sound and end up saying it out loud.
Listen to this sound produced correctly.
Listen to this sound that is not produced correctly.
Can you hear the difference?
Proper sound production

For the recorder we play in the Treble Clef
This is a Treble clef
This is a staffMusic is written on the Staff

These lines are labeled E G B D F
We use many silly sentences to remember these: Every Good Boy Does FineEmpty Garbage Before Dad FlipsEvery Gorgeous Babe Does FlirtElephants Get Big Dirty FeetElvis Goes Belly Dancing Fridays
The staff is made up of five lines
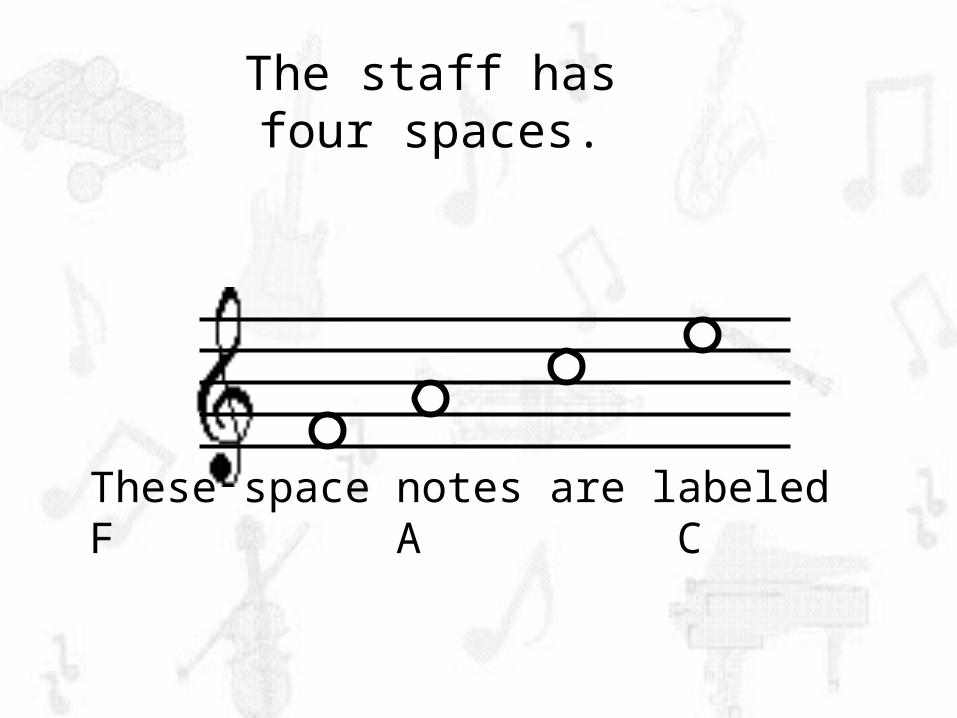
These space notes are labeledF A C E
The staff has four spaces.

B A G
For the first song on the recorder we will use:

This is a B on the recorder.
This is a B on the Staff.
Play four short B’s. It should sound like this.

This is an A on the recorder.
This is an A on the Staff.
Play four short A’s. It should sound like this.

This is a G on the recorder.
This is a G on the Staff.
Play four short G’s. It should sound like this.

Now Play B-A-GThe pattern we are going to play is quarter, quarter, half note or ta, ta, ta-a.It sounds like this:On the staff it looks like this:
B A G
Click to play movie

Repeat that phrase.
B A G
A phrase is a musical sentence.
Click to play movie

Now for the third phrase.We will play four g’s, then four a’s. These notes are eight notes and we count them ti-ti-ti-ti ti-ti-ti-ti. It will sound like this:
And it will look like this:
Click to play movie

Play the fourth phrase
B A G
Click to play movie

You just played your first song!The song is “HOT CROSS BUNS” and the whole thing looks like this:
Click here to hear the whole song:
Hot cross buns!
Hot cross buns!
Hot cross buns!
One a pen - ny, two a pen- ny,
Click to play movie

Hot cross buns!
Hot cross buns!
Hot cross buns!
One a pen - ny, two a pen- ny,
Practice this until you can play it!
Click to play movie

Now let’s review what you’ve learned.This is called a _______Staff
A staff is made up of _____ lines.5
This is called a __________Treble clef
This note is a _____B
This note is a _____
This note is a _____
A
G
A phrase is ________________a musical sentence

Review the notes
on the recorder
Three fingers and the thumbplay what note? ______
Two fingers and the thumb play what note? ______
One finger and the thumbPlay what note? ______B
A
G

You have learned a lot!
Now you can go play your song for your teacher and you are ready to really
get started with the recorder!
Congratulations!