Embed Size (px)
Citation preview
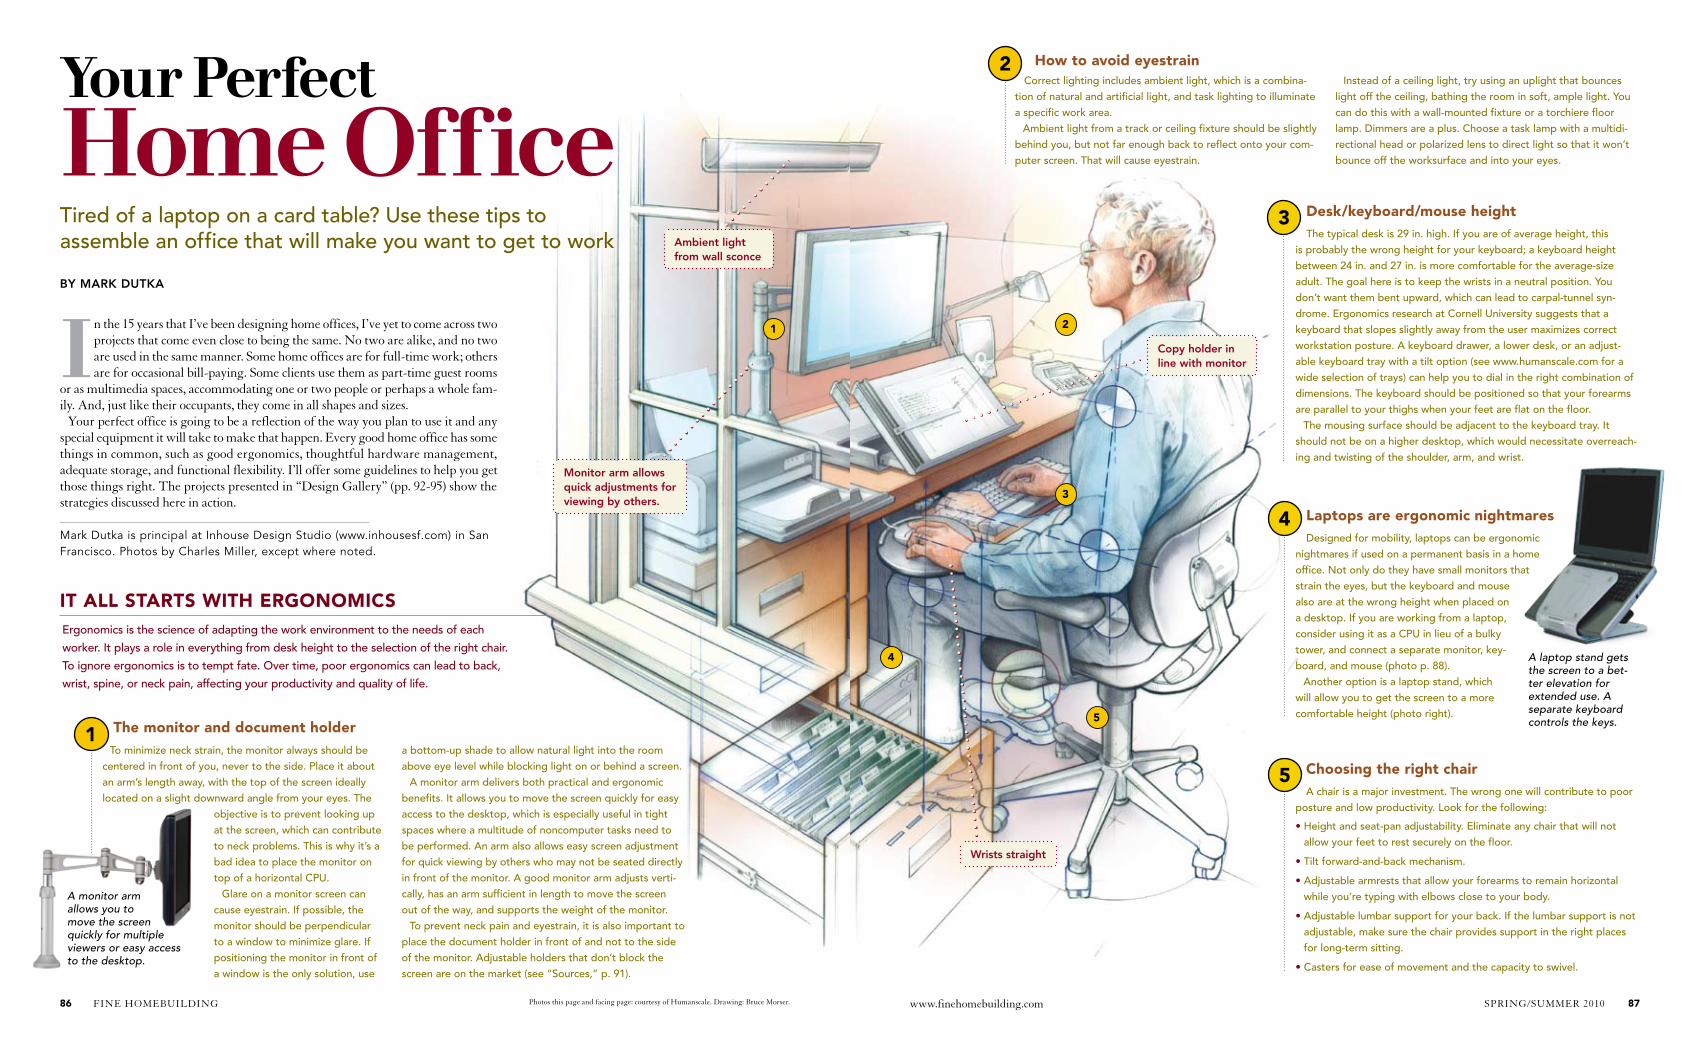
It all starts wIth ergonomIcs
choosing the right chairA chair is a major investment. The wrong one will contribute to poor
posture and low productivity. Look for the following:
• Height and seat-pan adjustability. Eliminate any chair that will not allow your feet to rest securely on the floor.
• Tilt forward-and-back mechanism.
• Adjustable armrests that allow your forearms to remain horizontal while you’re typing with elbows close to your body.
• Adjustable lumbar support for your back. If the lumbar support is not adjustable, make sure the chair provides support in the right places for long-term sitting.
• Casters for ease of movement and the capacity to swivel.
Ergonomics is the science of adapting the work environment to the needs of each
worker. It plays a role in everything from desk height to the selection of the right chair.
To ignore ergonomics is to tempt fate. Over time, poor ergonomics can lead to back,
wrist, spine, or neck pain, affecting your productivity and quality of life.
Desk/keyboard/mouse heightThe typical desk is 29 in. high. If you are of average height, this
is probably the wrong height for your keyboard; a keyboard height between 24 in. and 27 in. is more comfortable for the average-size adult. The goal here is to keep the wrists in a neutral position. You don’t want them bent upward, which can lead to carpal-tunnel syn-drome. Ergonomics research at Cornell University suggests that a keyboard that slopes slightly away from the user maximizes correct workstation posture. A keyboard drawer, a lower desk, or an adjust-able keyboard tray with a tilt option (see www.humanscale.com for a wide selection of trays) can help you to dial in the right combination of dimensions. The keyboard should be positioned so that your forearms are parallel to your thighs when your feet are flat on the floor.
The mousing surface should be adjacent to the keyboard tray. It should not be on a higher desktop, which would necessitate overreach-ing and twisting of the shoulder, arm, and wrist.
Correct lighting includes ambient light, which is a combina-tion of natural and artificial light, and task lighting to illuminate a specific work area.
Ambient light from a track or ceiling fixture should be slightly behind you, but not far enough back to reflect onto your com-puter screen. That will cause eyestrain.
Instead of a ceiling light, try using an uplight that bounces light off the ceiling, bathing the room in soft, ample light. You can do this with a wall-mounted fixture or a torchiere floor lamp. Dimmers are a plus. Choose a task lamp with a multidi-rectional head or polarized lens to direct light so that it won’t bounce off the worksurface and into your eyes.
2
3
5
1 2
3
5
4
laptops are ergonomic nightmaresDesigned for mobility, laptops can be ergonomic
nightmares if used on a permanent basis in a home office. Not only do they have small monitors that strain the eyes, but the keyboard and mouse also are at the wrong height when placed on a desktop. If you are working from a laptop, consider using it as a CPU in lieu of a bulky tower, and connect a separate monitor, key-board, and mouse (photo p. 88).
Another option is a laptop stand, which will allow you to get the screen to a more comfortable height (photo right).
4
how to avoid eyestrain
A laptop stand gets the screen to a bet-ter elevation for extended use. A separate keyboard controls the keys.
To minimize neck strain, the monitor always should be centered in front of you, never to the side. Place it about an arm’s length away, with the top of the screen ideally located on a slight downward angle from your eyes. The
objective is to prevent looking up at the screen, which can contribute to neck problems. This is why it’s a bad idea to place the monitor on top of a horizontal CPU.
Glare on a monitor screen can cause eyestrain. If possible, the monitor should be perpendicular to a window to minimize glare. If positioning the monitor in front of a window is the only solution, use
a bottom-up shade to allow natural light into the room above eye level while blocking light on or behind a screen.
A monitor arm delivers both practical and ergonomic benefits. It allows you to move the screen quickly for easy access to the desktop, which is especially useful in tight spaces where a multitude of noncomputer tasks need to be performed. An arm also allows easy screen adjustment for quick viewing by others who may not be seated directly in front of the monitor. A good monitor arm adjusts verti-cally, has an arm sufficient in length to move the screen out of the way, and supports the weight of the monitor.
To prevent neck pain and eyestrain, it is also important to place the document holder in front of and not to the side of the monitor. Adjustable holders that don’t block the screen are on the market (see “Sources,” p. 91).
the monitor and document holder1
A monitor arm allows you to move the screen quickly for multiple viewers or easy access to the desktop.
Wrists straight
Copy holder in line with monitor
Ambient light from wall sconce
Monitor arm allows quick adjustments for viewing by others.
In the 15 years that I’ve been designing home offices, I’ve yet to come across two projects that come even close to being the same. No two are alike, and no two are used in the same manner. Some home offices are for full-time work; others are for occasional bill-paying. Some clients use them as part-time guest rooms
or as multimedia spaces, accommodating one or two people or perhaps a whole fam-ily. And, just like their occupants, they come in all shapes and sizes.
Your perfect office is going to be a reflection of the way you plan to use it and any special equipment it will take to make that happen. Every good home office has some things in common, such as good ergonomics, thoughtful hardware management, adequate storage, and functional flexibility. I’ll offer some guidelines to help you get those things right. The projects presented in “Design Gallery” (pp. 92-95) show the strategies discussed here in action.
Mark Dutka is principal at Inhouse Design Studio (www.inhousesf.com) in San Francisco. Photos by Charles Miller, except where noted.
by MArk DutkA
Tired of a laptop on a card table? Use these tips to assemble an office that will make you want to get to work
Your Perfect Home Office
FINE HOMEBUILDING86 www.finehomebuilding.comPhotos this page and facing page: courtesy of Humanscale. Drawing: Bruce Morser. SPrING/SUMMEr 2010 87

electronic components in cabinetsWhether they want to minimize clutter or just keep the cat away from the printer, my clients have lots of reasons for wanting to keep various pieces of office equipment behind closed doors. Here are some tips for hiding the equipment. • Put equipment on full-extension pullout shelves to
allow access to all sides of any component for ease of maintenance and connectivity. There should be a 2-in. gap between the back of the shelf and the back of the cabinet for wires.
• Provide adequate ventilation for each machine. There are plenty of variables here, depending on the type and the number of components. One rule of thumb is that the interior cabinet temperature should stay within a range be-tween 55°F and 90°F. Dell advises that a CPU in a cabinet should have 4 in. of clearance above and on all sides and that at least 30% of the cabinet-door area be open. This is a good place for a decorative grille as a door panel. Another way to keep the equipment in the right temperature range is with fans. Cool Components is one source.
• Although it doesn’t exactly hide the CPU, suspending it under the desk frees valuable worksurface space.
• Design cabinets for equipment bigger than the devices you currently own to accommodate new equipment in the future.
• Create a charging drawer for small items (iPods, cameras, PDAs, cell phones, smart phones) that need regular charging. Inside the drawer, attach a surge pro-tector connected to a retractable extension cord. This is a surefire way to keep desktop clutter to a minimum.
managIng YoUr eQUIPment
Power supplyA typical home office needs a 20-amp circuit at 120v. That’s enough power to run a CPU, a monitor, a fax machine, a copy machine, a printer, and a charg-ing station for cell phones and other battery-powered devices. Putting a home office on a dedicated circuit minimizes the chances that someone in an adjacent room will overload a shared circuit and cause a data loss.
An uninterruptable power supply pro-vides backup power for your CPU (or anything else plugged into it) should there be a blackout. It ensures that information not yet saved on your computer at the
Wire channels mounted under a desk keep the cables from turning into a tangled mess. Rip-Tie touch-fastener cable ties stick to the cabi-net sides.
A pop-up power grommet from Doug Mockett
A CPU holder from Doug Mockett frees up desktop work-space without com-promising ventilation.
The Socket Sense power strip (above) expands to allow tubby little transform-ers enough space to fit next to one an-other. At right, a retractable extension cord by Zip-Linq is just the ticket for a drawer full of battery-powered gadgets at the charging trough.
time of the blackout will not be lost. I’ve had good luck with the backup power supplies made by APC (see “Sources,” p. 91).
Desktop outlets are helpful for the occasional plug-in item. They rise above the desktop for use, then retract behind a low-profile cover plate. Doug Mockett and Häfele are two sources.
Protect your computer against the occasional voltage spike with a surge protector. Power strips frequently, but not always, include surge protec-
tion. A clever one that does is called the Socket Sense, manufactured by Ideative. It expands to accommodate bulky transform-ers next to one another.
An energy-saving surge protector by Belkin (BG-108000-04) uses a remote control to turn off equipment that would otherwise be wasting energy on standby mode while not in use.
A Zip-Linq retractable extension cord is a useful way to hook up a power strip in a charging drawer. You can open and close the drawer without worrying about the cord bunching up when the drawer is closed.
Select outlets on Belkin’s surge pro-tector can be turned off and on with a remote.
wireless? not quite yetThe wireless revolution is upon us, but even in this era of Bluetooth technology and wireless keyboards and mice, we have not completely eliminated annoying cables. Your challenge is organizing and hiding wires while still retaining accessibility. Here are some tips for handling the mess.• Look at the equipment you intend to house on top of
the worksurface. Examine their power and connec-tivity requirements. Select the number and location of grommet holes you want to accommodate these needs. The diameter of each hole is determined by the number of wires it will hold. Grommets come in various sizes, shapes, finishes, and materials. Doug Mockett and Häfele are good resources.
• Grommet holes either feed wires from the desktop to outlets below or into wire channels affixed to the underside of the desktop and the sides of the cabinet (photos right). The channels then feed the wires to an outlet or into an adjacent cabinet. This minimizes the unsightly wires that are so often visible hanging at the rear underside of the desk. Channels come in various lengths, configurations, and colors, and they are easily cut.
• Touch-fastener cable ties are invaluable for wire management (photo right bottom). They make it easy to group and label wires for ease of movement and identification.
Leave the laptop for laps. using a laptop with a docking station turns it into a CPu that is controlled by a full-size keyboard and is viewed on the desktop monitor.
Pullout shelves keep bulky stuff at arm’s length. Heavy-duty full-extension drawer slides support the weight of a deep file drawer and a shelf for the printer in this armoire-style cabinet.
Ambient light reduces eye strain by reducing contrast with monitor. Leave a 2-in. gap at the
back of the cabinet for wires to hang vertically.
FINE HOMEBUILDING88 Photos: this page top and facing page, courtesy of Doug Mockett; this page bottom, courtesy of Belkin. SPrING/SUMMEr 2010 89www.finehomebuilding.com
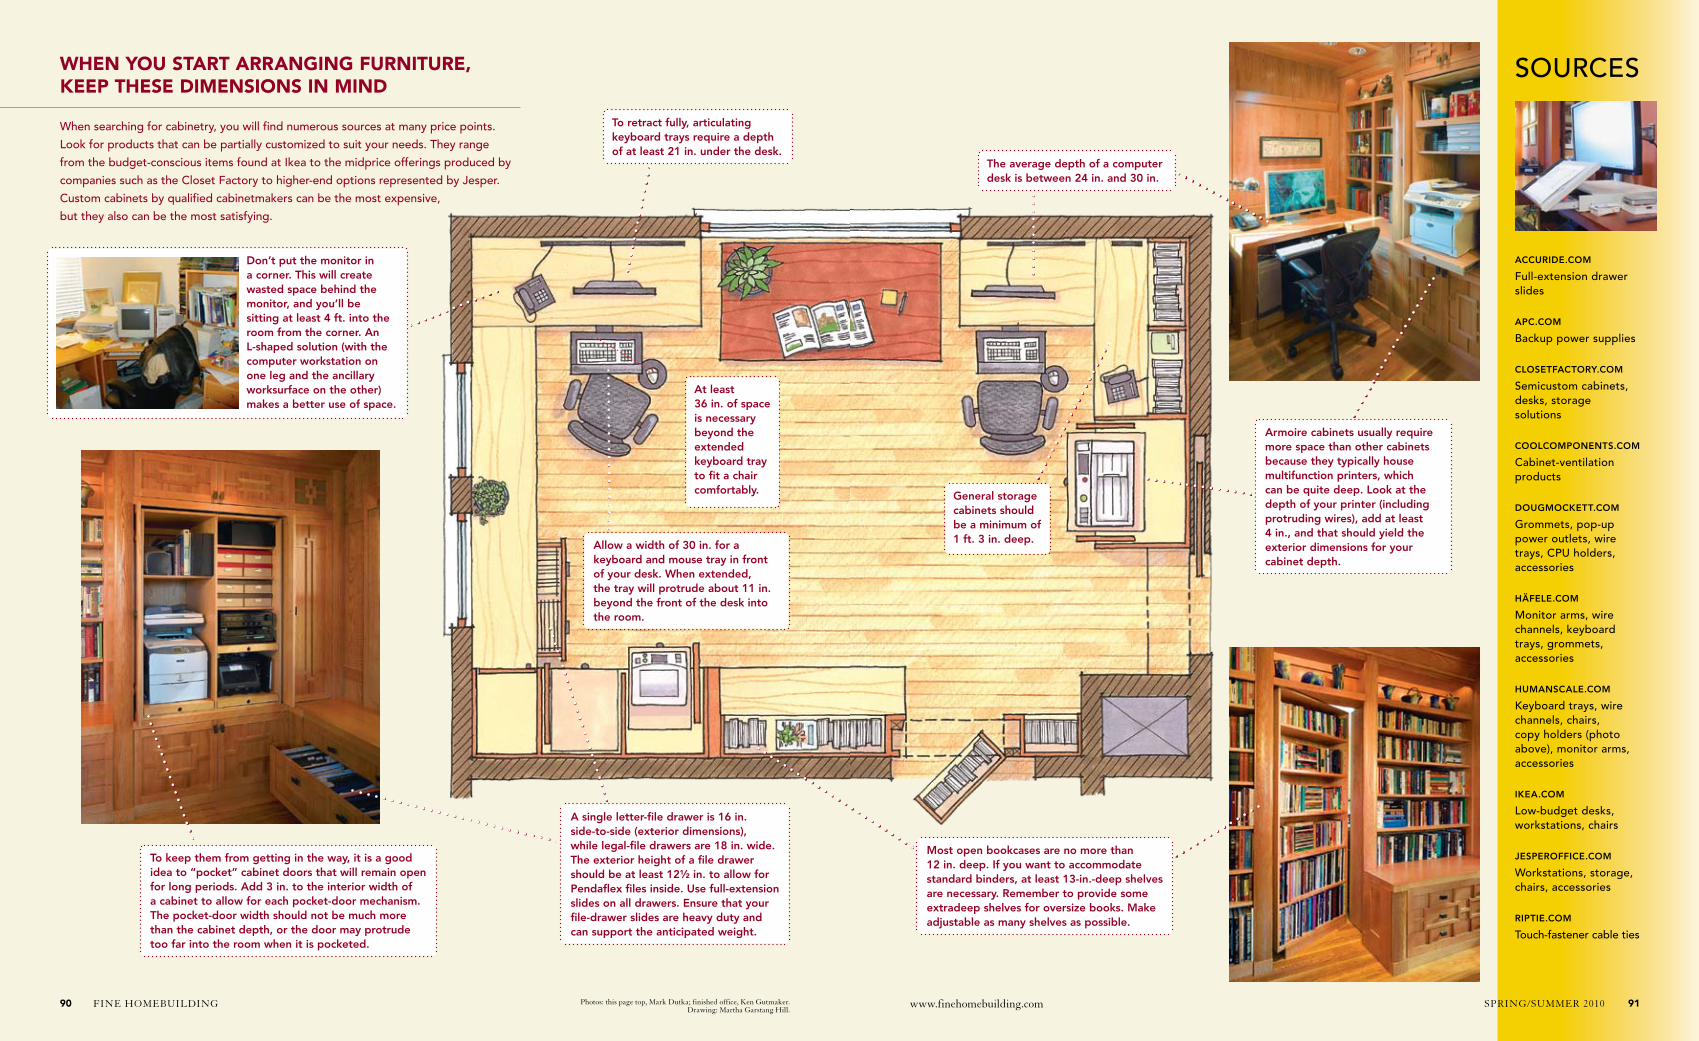
when YoU start arrangIng fUrnItUre, keeP these DImensIons In mInD
to retract fully, articulating keyboard trays require a depth of at least 21 in. under the desk.
At least 36 in. of space is necessary beyond the extended keyboard tray to fit a chair comfortably. General storage
cabinets should be a minimum of 1 ft. 3 in. deep.Allow a width of 30 in. for a
keyboard and mouse tray in front of your desk. When extended, the tray will protrude about 11 in. beyond the front of the desk into the room.
Armoire cabinets usually require more space than other cabinets because they typically house multifunction printers, which can be quite deep. Look at the depth of your printer (including protruding wires), add at least 4 in., and that should yield the exterior dimensions for your cabinet depth.
Most open bookcases are no more than 12 in. deep. If you want to accommodate standard binders, at least 13-in.-deep shelves are necessary. remember to provide some extradeep shelves for oversize books. Make adjustable as many shelves as possible.
Don’t put the monitor in a corner. this will create wasted space behind the monitor, and you’ll be sitting at least 4 ft. into the room from the corner. An L-shaped solution (with the computer workstation on one leg and the ancillary worksurface on the other) makes a better use of space.
to keep them from getting in the way, it is a good idea to “pocket” cabinet doors that will remain open for long periods. Add 3 in. to the interior width of a cabinet to allow for each pocket-door mechanism. the pocket-door width should not be much more than the cabinet depth, or the door may protrude too far into the room when it is pocketed.
When searching for cabinetry, you will find numerous sources at many price points.
Look for products that can be partially customized to suit your needs. They range
from the budget-conscious items found at Ikea to the midprice offerings produced by
companies such as the Closet Factory to higher-end options represented by Jesper.
Custom cabinets by qualified cabinetmakers can be the most expensive,
but they also can be the most satisfying.
A single letter-file drawer is 16 in. side-to-side (exterior dimensions), while legal-file drawers are 18 in. wide. the exterior height of a file drawer should be at least 121⁄2 in. to allow for Pendaflex files inside. use full-extension slides on all drawers. Ensure that your file-drawer slides are heavy duty and can support the anticipated weight.
SOUrCES
the average depth of a computer desk is between 24 in. and 30 in.
ACCurIDE.CoM
Full-extension drawer slides
APC.CoM
Backup power supplies
CLosEtfACtory.CoM
Semicustom cabinets, desks, storage solutions
CooLCoMPonEnts.CoM
Cabinet-ventilation products
DouGMoCkEtt.CoM
Grommets, pop-up power outlets, wire trays, CPU holders, accessories
HÄfELE.CoM
Monitor arms, wire channels, keyboard trays, grommets, accessories
HuMAnsCALE.CoM
Keyboard trays, wire channels, chairs, copy holders (photo above), monitor arms, accessories
IkEA.CoM
Low-budget desks, workstations, chairs
JEsPEroffICE.CoM
Workstations, storage, chairs, accessories
rIPtIE.CoM
Touch-fastener cable ties
FINE HOMEBUILDING90 www.finehomebuilding.com SPrING/SUMMEr 2010 91Photos: this page top, Mark Dutka; finished office, Ken Gutmaker. Drawing: Martha Garstang Hill.
FINE HOMEBUILDING92
gallery
www.finehomebuilding.comDrawing: Vince Babak. “Before” photo: Mark Dutka. All other photos: Ken Gutmaker.
sprING/sUMMEr 2010 93
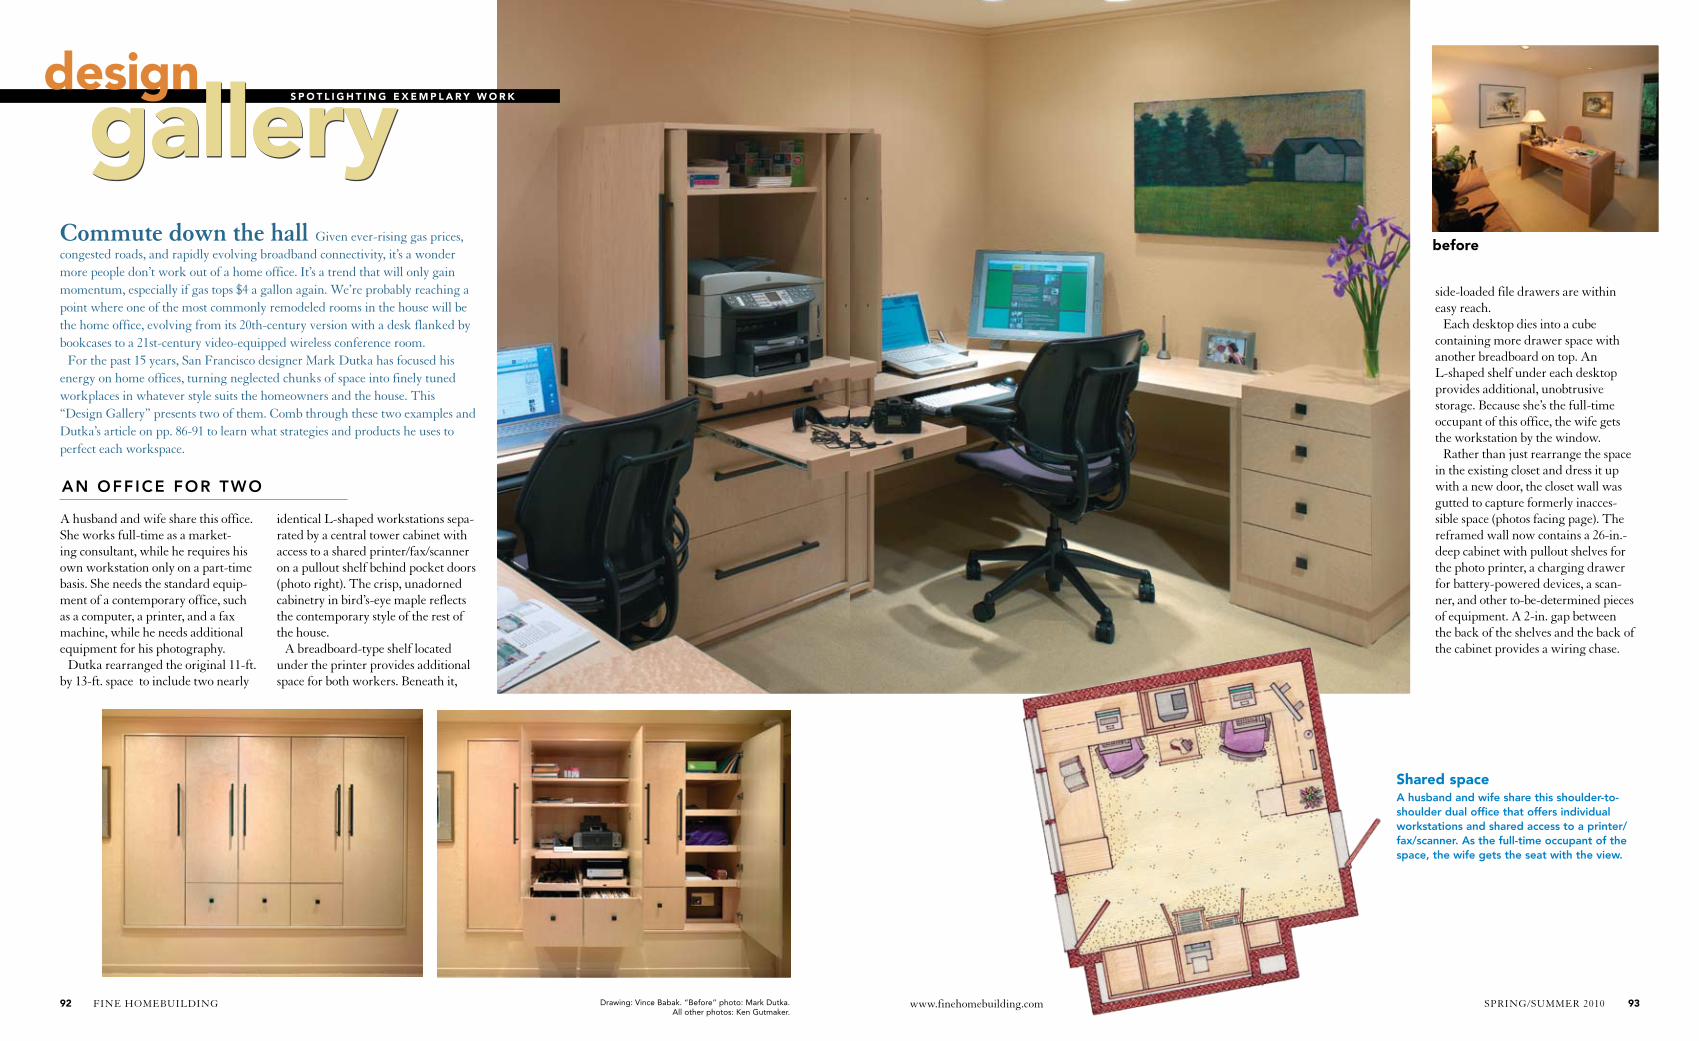
A husband and wife share this office. she works full-time as a market-ing consultant, while he requires his own workstation only on a part-time basis. she needs the standard equip-ment of a contemporary office, such as a computer, a printer, and a fax machine, while he needs additional equipment for his photography.
Dutka rearranged the original 11-ft. by 13-ft. space to include two nearly
identical L-shaped workstations sepa-rated by a central tower cabinet with access to a shared printer/fax/scanner on a pullout shelf behind pocket doors (photo right). The crisp, unadorned cabinetry in bird’s-eye maple reflects the contemporary style of the rest of the house.
A breadboard-type shelf located under the printer provides additional space for both workers. Beneath it,
Commute down the hall Given ever-rising gas prices, congested roads, and rapidly evolving broadband connectivity, it’s a wonder more people don’t work out of a home office. It’s a trend that will only gain momentum, especially if gas tops $4 a gallon again. We’re probably reaching a point where one of the most commonly remodeled rooms in the house will be the home office, evolving from its 20th-century version with a desk flanked by bookcases to a 21st-century video-equipped wireless conference room.
For the past 15 years, san Francisco designer Mark Dutka has focused his energy on home offices, turning neglected chunks of space into finely tuned workplaces in whatever style suits the homeowners and the house. This “Design Gallery” presents two of them. Comb through these two examples and Dutka’s article on pp. 86-91 to learn what strategies and products he uses to perfect each workspace.
An office for two
before
Shared spaceA husband and wife share this shoulder-to-shoulder dual office that offers individual workstations and shared access to a printer/fax/scanner. As the full-time occupant of the space, the wife gets the seat with the view.
S p o t l i g h t i n g e x e m p l a r y w o r kgallerydesign
side-loaded file drawers are within easy reach.
Each desktop dies into a cube containing more drawer space with another breadboard on top. An L-shaped shelf under each desktop provides additional, unobtrusive storage. Because she’s the full-time occupant of this office, the wife gets the workstation by the window.
rather than just rearrange the space in the existing closet and dress it up with a new door, the closet wall was gutted to capture formerly inacces-sible space (photos facing page). The reframed wall now contains a 26-in.-deep cabinet with pullout shelves for the photo printer, a charging drawer for battery-powered devices, a scan-ner, and other to-be-determined pieces of equipment. A 2-in. gap between the back of the shelves and the back of the cabinet provides a wiring chase.
gallery
sprING/sUMMEr 2010 95
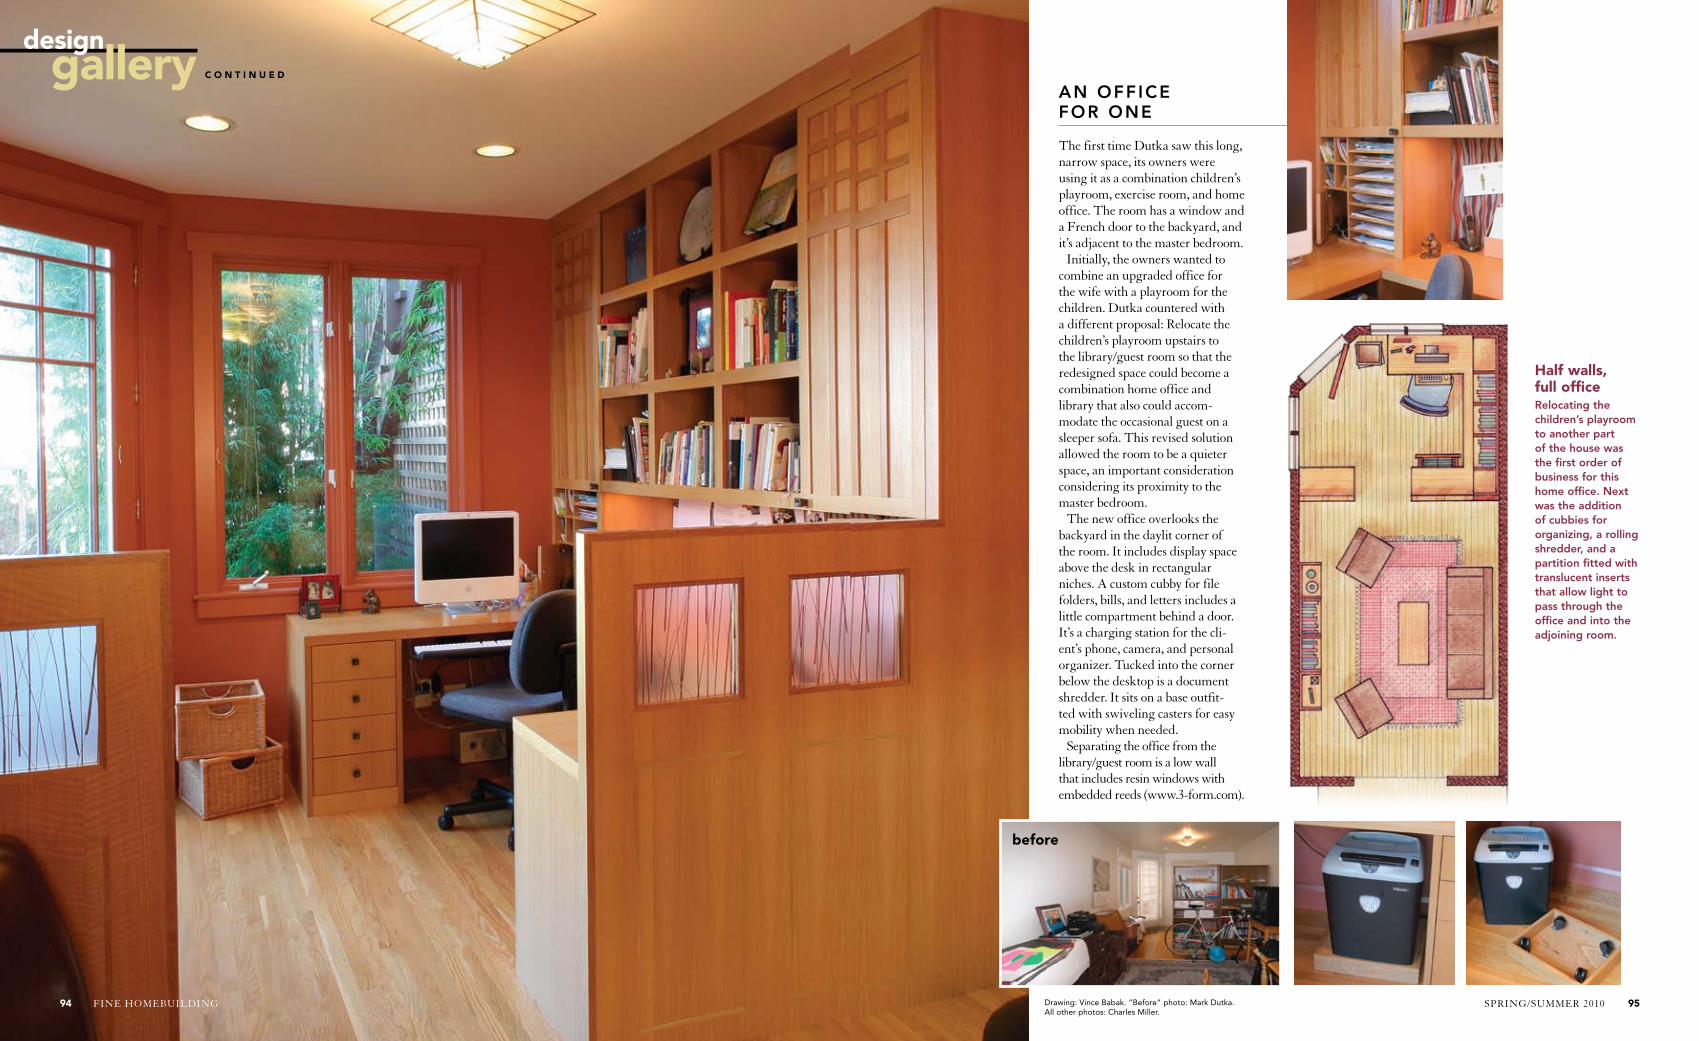
The first time Dutka saw this long, narrow space, its owners were using it as a combination children’s playroom, exercise room, and home office. The room has a window and a French door to the backyard, and it’s adjacent to the master bedroom.
Initially, the owners wanted to combine an upgraded office for the wife with a playroom for the children. Dutka countered with a different proposal: relocate the children’s playroom upstairs to the library/guest room so that the redesigned space could become a combination home office and library that also could accom-modate the occasional guest on a sleeper sofa. This revised solution allowed the room to be a quieter space, an important consideration considering its proximity to the master bedroom.
The new office overlooks the backyard in the daylit corner of the room. It includes display space above the desk in rectangular niches. A custom cubby for file folders, bills, and letters includes a little compartment behind a door. It’s a charging station for the cli-ent’s phone, camera, and personal organizer. Tucked into the corner below the desktop is a document shredder. It sits on a base outfit-ted with swiveling casters for easy mobility when needed.
separating the office from the library/guest room is a low wall that includes resin windows with embedded reeds (www.3-form.com).
before
designgallery
An office for one
half walls, full officerelocating the children’s playroom to another part of the house was the first order of business for this home office. next was the addition of cubbies for organizing, a rolling shredder, and a partition fitted with translucent inserts that allow light to pass through the office and into the adjoining room.
c o n t i n u e d
Drawing: Vince Babak. “Before” photo: Mark Dutka. All other photos: Charles Miller.
FINE HOMEBUILDING94