Embed Size (px)
Citation preview

ZENworks® Reporting 6.2.1ZENworks Reporting Appliance
Deployment and Administration Reference
July 2017

Legal Notices
For information about legal notices, trademarks, disclaimers, warranties, export and other use restrictions, U.S. Government rights, patent policy, and FIPS compliance, see http://www.microfocus.com/company/legal/.
Copyright © 2017 Micro Focus Software, Inc. All Rights Reserved.
Contents
About This Guide 5
1 Overview 7
2 System Requirements 9
3 Appliance Deployment 13
3.1 Deploying the Appliance. . . . . . . . . . . . . . . . . . . . . . . . . . . . . . . . . . . . . . . . . . . . . . . . . . . . . . . . . . . 133.2 Configuring the Appliance Settings . . . . . . . . . . . . . . . . . . . . . . . . . . . . . . . . . . . . . . . . . . . . . . . . . . 13
4 ZENworks Reporting Configuration 15
4.1 Configuring ZENworks Reporting. . . . . . . . . . . . . . . . . . . . . . . . . . . . . . . . . . . . . . . . . . . . . . . . . . . . 154.2 Reconfiguring ZENworks Reporting. . . . . . . . . . . . . . . . . . . . . . . . . . . . . . . . . . . . . . . . . . . . . . . . . . 21
5 Appliance Management 29
5.1 Ganglia Configuration . . . . . . . . . . . . . . . . . . . . . . . . . . . . . . . . . . . . . . . . . . . . . . . . . . . . . . . . . . . . 305.2 Ganglia Monitoring . . . . . . . . . . . . . . . . . . . . . . . . . . . . . . . . . . . . . . . . . . . . . . . . . . . . . . . . . . . . . . . 305.3 Network . . . . . . . . . . . . . . . . . . . . . . . . . . . . . . . . . . . . . . . . . . . . . . . . . . . . . . . . . . . . . . . . . . . . . . . 305.4 Time . . . . . . . . . . . . . . . . . . . . . . . . . . . . . . . . . . . . . . . . . . . . . . . . . . . . . . . . . . . . . . . . . . . . . . . . . . 315.5 Storage. . . . . . . . . . . . . . . . . . . . . . . . . . . . . . . . . . . . . . . . . . . . . . . . . . . . . . . . . . . . . . . . . . . . . . . . 315.6 System Services . . . . . . . . . . . . . . . . . . . . . . . . . . . . . . . . . . . . . . . . . . . . . . . . . . . . . . . . . . . . . . . . 31
5.6.1 Starting, Stopping, or Restarting System Services . . . . . . . . . . . . . . . . . . . . . . . . . . . . . . . 325.6.2 Setting System Services to Automatic or Manual . . . . . . . . . . . . . . . . . . . . . . . . . . . . . . . . 32
5.7 Firewall . . . . . . . . . . . . . . . . . . . . . . . . . . . . . . . . . . . . . . . . . . . . . . . . . . . . . . . . . . . . . . . . . . . . . . . . 325.8 Administrative Passwords . . . . . . . . . . . . . . . . . . . . . . . . . . . . . . . . . . . . . . . . . . . . . . . . . . . . . . . . . 325.9 Field Patch . . . . . . . . . . . . . . . . . . . . . . . . . . . . . . . . . . . . . . . . . . . . . . . . . . . . . . . . . . . . . . . . . . . . . 335.10 Online Update . . . . . . . . . . . . . . . . . . . . . . . . . . . . . . . . . . . . . . . . . . . . . . . . . . . . . . . . . . . . . . . . . . 335.11 Shutting Down and Restarting ZENworks Reporting Appliance. . . . . . . . . . . . . . . . . . . . . . . . . . . . . 34
6 ZENworks Reporting System Management 35
6.1 ZENworks Reporting Configuration . . . . . . . . . . . . . . . . . . . . . . . . . . . . . . . . . . . . . . . . . . . . . . . . . . 366.2 Terminal and File Explorer . . . . . . . . . . . . . . . . . . . . . . . . . . . . . . . . . . . . . . . . . . . . . . . . . . . . . . . . . 38
6.2.1 Terminal . . . . . . . . . . . . . . . . . . . . . . . . . . . . . . . . . . . . . . . . . . . . . . . . . . . . . . . . . . . . . . . . 386.2.2 File Explorer. . . . . . . . . . . . . . . . . . . . . . . . . . . . . . . . . . . . . . . . . . . . . . . . . . . . . . . . . . . . . 39
6.3 Logs . . . . . . . . . . . . . . . . . . . . . . . . . . . . . . . . . . . . . . . . . . . . . . . . . . . . . . . . . . . . . . . . . . . . . . . . . . 406.4 ZENworks Reporting Backup . . . . . . . . . . . . . . . . . . . . . . . . . . . . . . . . . . . . . . . . . . . . . . . . . . . . . . . 42
7 ZENworks Reporting Migration 43
7.1 Backing up the ZENworks Reporting 5.6.1 Data . . . . . . . . . . . . . . . . . . . . . . . . . . . . . . . . . . . . . . . . 437.2 Deploying, Configuring and Migrating to the ZENworks Reporting 6.2.1 Appliance . . . . . . . . . . . . . 44
Contents 3

4 Con
8 Jaspersoft Studio 45
8.1 Installing Jaspersoft Studio 6.2.1 . . . . . . . . . . . . . . . . . . . . . . . . . . . . . . . . . . . . . . . . . . . . . . . . . . . . 458.2 Connecting Jaspersoft Studio 6.2.1 to ZENworks Reporting . . . . . . . . . . . . . . . . . . . . . . . . . . . . . . . 46
8.2.1 Copying the ZENworks Reporting Certificate . . . . . . . . . . . . . . . . . . . . . . . . . . . . . . . . . . . 47
A Troubleshooting 49
tents
About This Guide
This Micro Focus ZENworks Reporting Virtual Appliance Deployment and Administration Reference helps you to deploy and configure ZENworks Reporting Appliance to the ZENworks Reporting supported virtual infrastructure.
The information in this guide is organized as follows:
Chapter 1, “Overview,” on page 7
Chapter 2, “System Requirements,” on page 9
Chapter 3, “Appliance Deployment,” on page 13
Chapter 4, “ZENworks Reporting Configuration,” on page 15
Chapter 5, “Appliance Management,” on page 29
Chapter 6, “ZENworks Reporting System Management,” on page 35
Chapter 7, “ZENworks Reporting Migration,” on page 43
Chapter 8, “Jaspersoft Studio,” on page 45
Appendix A, “Troubleshooting,” on page 49
Audience
This guide is intended for ZENworks Reporting administrators.
Feedback
We want to hear your comments and suggestions about this manual and the other documentation included with this product. Please use the User Comments feature at the bottom of each page of the online documentation.
Additional Documentation
ZENworks Reporting is supported by other documentation (in both PDF and HTML formats) that you can use to learn about and implement the product. For additional documentation, see the ZENworks 2017 documentation Web site (https://www.novell.com/documentation/zenworks2017/).
About This Guide 5

6 About This Guide
1 1Overview
ZENworks Reporting 6.2.1 is available as a virtual appliance that can be deployed to a supported virtual infrastructure. ZENworks Reporting Appliance is built on a customized SUSE Linux Enterprise Server (SLES), and comes pre-installed with ZENworks Reporting 6.2.1 and thus helps save on operating system license costs.
After deployment, ZENworks Reporting can be re-configured by using an easy to use web based console. Also, the same console can be used to maintain ZENworks Reporting Appliance and perform basic tasks such as executing commands, starting and stopping services, viewing logs, uploading, and downloading files. You can also tweak basic server settings and monitor the server performance.
Appliance supports root and zenadmin users. The root user has all privileges on the Appliance and ZENworks Reporting. The zenadmin user has privileges only on ZENworks Reporting.
The root user has the following privileges:
On Appliance
Ganglia Configuration
Ganglia Monitoring
Network
Time
Storage
System Services
Firewall
Administrative Passwords
Field Patch
Online Update
Shutting Down and Restarting ZENworks Reporting Appliance
On ZENworks Reporting
ZENworks Reporting Configuration
Terminal and File Explorer
Logs
ZENworks Reporting Backup
The zenadmin user has the following privileges:
On Appliance
Ganglia Configuration
Ganglia Monitoring
System Services
Administrative Passwords
Field Patch
Overview 7

Online Update
Shutting Down and Restarting ZENworks Reporting Appliance
On ZENworks Reporting
ZENworks Reporting Configuration
Terminal and File Explorer
Logs
ZENworks Reporting Backup
8 Overview
2 2System Requirements
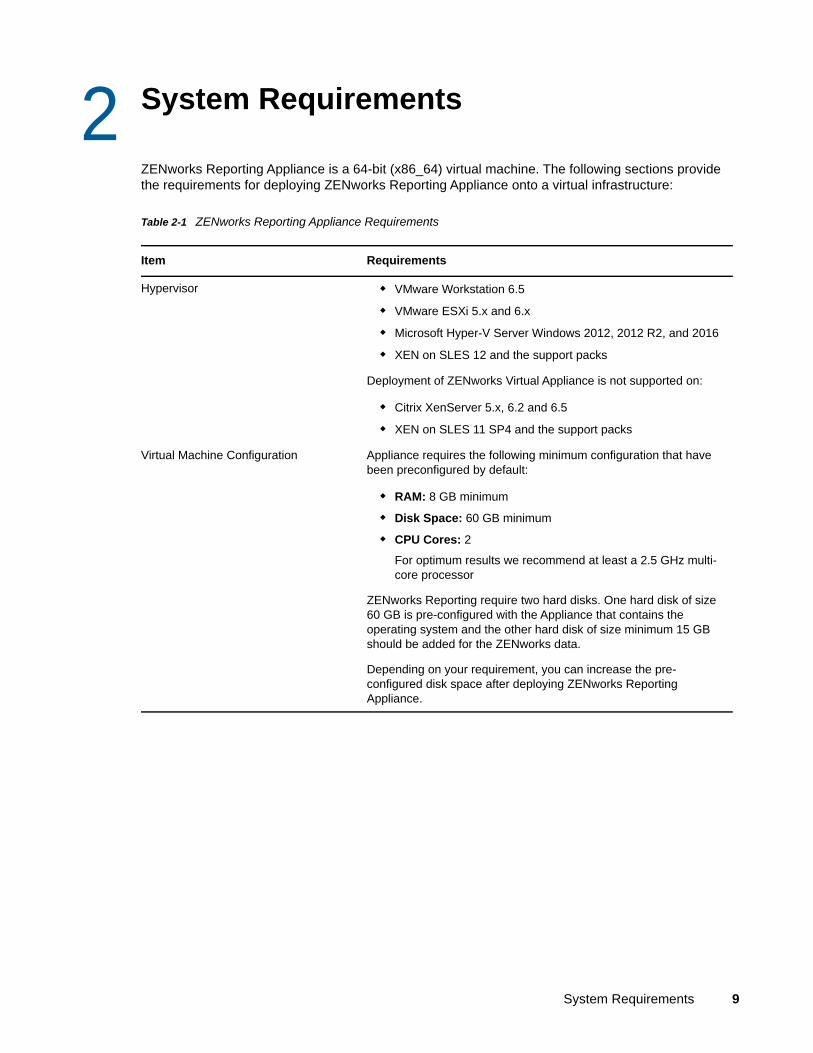
ZENworks Reporting Appliance is a 64-bit (x86_64) virtual machine. The following sections provide the requirements for deploying ZENworks Reporting Appliance onto a virtual infrastructure:
Table 2-1 ZENworks Reporting Appliance Requirements
Item Requirements
Hypervisor VMware Workstation 6.5
VMware ESXi 5.x and 6.x
Microsoft Hyper-V Server Windows 2012, 2012 R2, and 2016
XEN on SLES 12 and the support packs
Deployment of ZENworks Virtual Appliance is not supported on:
Citrix XenServer 5.x, 6.2 and 6.5
XEN on SLES 11 SP4 and the support packs
Virtual Machine Configuration Appliance requires the following minimum configuration that have been preconfigured by default:
RAM: 8 GB minimum
Disk Space: 60 GB minimum
CPU Cores: 2
For optimum results we recommend at least a 2.5 GHz multi-core processor
ZENworks Reporting require two hard disks. One hard disk of size 60 GB is pre-configured with the Appliance that contains the operating system and the other hard disk of size minimum 15 GB should be added for the ZENworks data.
Depending on your requirement, you can increase the pre-configured disk space after deploying ZENworks Reporting Appliance.
System Requirements 9

User Source ZENworks Reporting can be configured to use Microsoft Active Directory or Novell e-Directory user source.
User with LDAP credentials can log in to ZENworks Reporting. User management is not possible through the ZENworks Reporting server.
Supported Authoritative User Sources
Novell eDirectory 8.7.3 or 8.8
Microsoft Active Directory (as shipped with Windows 2000 SP4 or later)
LDAP user access: ZENworks Reporting requires user with minimum Read-only access to the LDAP directory
LDAP Authentication: Simple bind authenticates the user, and allows user to access the application.
Simple bind is where an application provides a Distinguished Name (DN) and password for that DN. To use a simple bind, the client must supply the DN of an existing LDAP entry and a password that matches the user password attribute for that entry.
IP Address The server must have a static IPv4 address or a permanently leased DHCP address.
Ports The following ports are required for Primary Server communication:
Database ports of Microsoft SQL, Oracle, and Sybase
Primary Server: 443
LDAP: 389 or 636
SMTP: 25 for email
NTP: 123 for time sync
SSH: 22
Appliance: 8443
Appliance administration console: 9443
Database The following are the supported databases:
Microsoft SQL Server 2008 R2, 2008 SP2, 2012, 2014, and 2016
Oracle 11.2.0.4 Standard and Enterprise Edition, 11.2.0.4 RAC, 12c (12.1.0.1 and 12.1.0.2), and 12c RAC
Sybase SQL Anywhere 17
For more information, see Database Requirements in the System Requirements.
Item Requirements
10 System Requirements

Web Browser The following are supported web browsers for the Appliance console:
Internet Explorer version 11
Firefox ESR version 38.5 and 45.5
Firefox version 50 onwards (including any patches)
Supported Languages These are the supported languages for the Appliance console:
English - en
French - fr
German - de
Italian - it
Japanese - ja
Portuguese (Brazilian)
Simplified Chinese - zh_CN
Traditional Chinese - zh_TW
Spanish - es
Item Requirements
System Requirements 11

12 System Requirements
3 3Appliance Deployment
To deploy ZENworks Reporting Appliance, perform the tasks in the following sections:
Section 3.1, “Deploying the Appliance,” on page 13
Section 3.2, “Configuring the Appliance Settings,” on page 13
3.1 Deploying the ApplianceTo deploy ZENworks Reporting Appliance, perform the following:
1 Ensure that the hypervisor to which you want to deploy ZENworks Reporting Appliance meet the requirements listed in Chapter 2, “System Requirements,” on page 9.
2 Download the ZENworks Reporting Appliance file from the Micro Focus Download website.
Based on your hypervisor, download any of the following files:
VMware ESXi: Download the .ova file.
Microsoft Hyper-V: Download the .vhd file.
XenServer on SLES 12: Download the xen.tar.gz file.
3 Deploy the ZENworks Reporting Appliance to a hypervisor by using the downloaded (.ova, .vhd, or xen.tar.gz) file.
By default, the VMware tools are installed at the first boot of ZENworks Reporting Virtual Appliance. If the internet connection is not available during the first boot, then whenever the internet connection is available execute the install_vmware_tools script located at /opt/novell/va_install.
4 (Optional) Take a snapshot of the virtual machine that you created.
To save the state and data of a virtual machine at a specific point in time.
5 After deploying ZENworks Reporting Appliance, you must add a hard disk before you power on the Virtual Machine.
IMPORTANT: To migrate from ZENworks Reporting 5.6.1 to ZENworks Reporting 6.2.1 do not configure the appliance, continue with Chapter 7, “ZENworks Reporting Migration,” on page 43.
6 To configure the appliance, continue with the Section 3.2, “Configuring the Appliance Settings,” on page 13.
3.2 Configuring the Appliance SettingsTo configure the appliance settings, perform the following:
1 On the License Agreement page, select the required License Language and Keyboard Language, then click Accept.
2 On the Passwords and Time Zone page, specify the following information:
Root Password and Confirmation: The root password for ZENworks Reporting Appliance.
Appliance Deployment 13
zenadmin Password and Confirmation: The zenadmin password for ZENworks Reporting Appliance.
NTP Server: The IP address or DNS name of the external Network Time Protocol (NTP) server.
Optional NTP Server: The IP address or DNS name of the external Network Time Protocol (NTP) server.
Region: The local region.
Time Zone: The local time zone.
3 Click Next.
4 On the Network Settings page, specify the following information:
Hostname: The Fully Qualified Domain Name (FQDN) associated with the appliance IP address. For example, server.domain.com.
The hostname must be resolveable, or some features in ZENworks Reporting do not work properly. Server names must support the DNS requirements, or the ZENworks Reporting login fails. Acceptable characters are the letters a-z (uppercase and lowercase), numbers, and the hyphen (-).
Obtain IP Address using DHCP: Select this option to get the IP Address using DHCP address. If you select this option IP Address and Networks Mask will be disabled.
IP Address: The server must have a static IP address or a permanently leased
DHCP address.
Network Mask: The network mask associated with the appliance IP address.
Gateway: The IP address of the gateway on the subnet where ZENworks Reporting Appliance is located.
DNS Server: The IP address of a primary DNS server for your network.
Optional DNS Server: The IP address of a primary DNS server for your network.
Domain Search: By default, domain that you specified in the Hostname field is displayed.
Optional Domain Search: The alternate domain.
5 Click Next.
If you have not added a hard disk after deployment, then a warning message is displayed. In this scenario, you need to power off the virtual machine, add a hard disk, power on, and then continue with Step 2.
6 On the Data Store Location page, verify the new hard disk that you added.
7 Click Configure.
After configuration, URL is displayed in the console. Use the URL (https://<FQDN>:9443) for administering the appliance and configuring ZENworks Reporting.
8 Continue with the next task, Chapter 4, “ZENworks Reporting Configuration,” on page 15.
14 Appliance Deployment

4 4ZENworks Reporting Configuration
The following sections provide the configuration and reconfiguration flow:
Section 4.1, “Configuring ZENworks Reporting,” on page 15
Section 4.2, “Reconfiguring ZENworks Reporting,” on page 21
4.1 Configuring ZENworks ReportingAfter deploying the ZENworks Reporting Appliance to a hypervisor, perform the following steps to configure ZENworks Reporting:
1 Launch the URL on a supported web browser.
The URL (https://<FQDN>:9443 or https://<ipaddress>:9443) is displayed on the Appliance console.
2 Choose the required language. If the web browser supports the selected language, then it displays in that language, else it displays in English.
For information, see Supported Languages in the Chapter 2, “System Requirements,” on page 9.
3 Log in to ZENworks Reporting with the root or zenadmin credentials that were specified in Step 2, under Section 3.2, “Configuring the Appliance Settings,” on page 13.
When you log in for the first time, you are prompted to configure ZENworks Reporting.
4 Verify the prerequisites on the Configure ZENworks Reporting page. You should be prepared with the required information to complete the configuration.
Domain specific to your reporting needs
Certificate Authority configuration
The ZENworks Reporting server requires a certificate to communicate securely. ZENworks Reporting supports internal and external certificates. If you want to use an internal certificate, it will be automatically generated by ZENworks Reporting. If you want to use an external certificate, you can generate a Certificate Signed Request (CSR) using ZENworks Reporting or by using your organization-specific methods, and then get the signed certificates.
A CSR is encrypted text, provided by a user to the Certificate Authority (CA), through a Secure Sockets Layer (SSL) digital certificate application. The CSR is validated by the CA and a signed certificate is issued.
5 Choose If this is a new ZENworks Reporting server.
6 If you want ZENworks Reporting to generate a CSR, click Generate CSR.
If you generate the CSR from this page, the Private Key will be stored on the server.
ZENworks Reporting Configuration 15
While configuring ZENworks Reporting, you need to have a signed server certificate, private key, and a CA certificate. To get the signed server certificate, you need to generate a CSR and validate by the CA.
6a Specify the following information.
Common Name (CN): The Fully Qualified Domain Name of the ZENworks Reporting server. This name should match the server name in the URL, in order for browsers to accept the certificate for SSL communication. For example, mail.novell.com.
Organization (O): Organization name.
Organizational Unit (OU): Organizational unit name, such as a department or division.
City or Locality (L)
State or Province (ST)
Country or Region: Two-letter country code or region. For example, US.
Key length: The required key length can be 1024 or 2048.
6b Click Generate and download the CSR.
7 Click Configure new ZENworks Reporting server.
8 Specify the following to create an administrator account:
Username: The user name can have a maximum length of 50 characters. It can contain alphanumeric characters and special characters (underscore _ and hyphen -).
Password: The administrator password is used for logging in to ZENworks Reporting. The password must contain a minimum of six characters.
Confirm Password: Use this field to confirm a correct password. If there is a mismatch, an error message is displayed after you click Next. You must re-enter the correct passwords.
This user will have administrator rights. This administrator account can be used to log into ZENworks Reporting independent of user sources and is given higher priority over any similar user existing in configured user sources.
9 Click Next.
16 ZENworks Reporting Configuration

10 Specify one or more domains that you want to use for ZENworks Reporting. You can add domains from ZENworks Management Zone or import domain resource files.
10a Click Add.
10b On the Add Domain page, select how you want to add the domain and configure a datasource.
ZENworks Reporting Configuration 17

Choose Add domains from ZENworks Management Zone, then specify the following:
Server address: A valid IP address or a Fully Qualified Domain Name (FQDN) of the ZENworks Primary Server in the Management Zone. This Primary Server will be referenced to download the domain resource file and the required database information to configure the datasource for that domain.
Port: The port used by the Primary Server in the Management Zone. The default port is 443.
Username: The Management Zone's administrator username for logging in to ZENworks Control Center.
Password: The password for the Management Zone's administrator user specified in the Username field.
Domains to add: Select the domains that you want to add.
Bundle domain is not supported for versions that are prior to ZENworks 2017. In the Domain to add field, clear ZENworks Bundle Domain (ZENworks 2017 or later).
or
18 ZENworks Reporting Configuration

You can add domains from the ZENworks Management Zone or upload domain resource files for other Micro Focus products.
Choose Add domain using resource file.
Resource file (*.zip): Drag and drop the domain resource file that had been downloaded and is locally available.
Datasource: Select the datasource for the uploaded domain.
If the datasource is a database server, specify the following:
Server Address: A valid IP address or a Fully Qualified Domain Name (FQDN) of the database server.
Port: The port used by the database server.
Database Name: The name of the database.
Username: The username that has read and write permissions to access the database.
Password: A valid password to access the database.
ZENworks Reporting Configuration 19

If your database server is Microsoft SQL Server, then specify the following:
Instance name: Specify the name of the Microsoft SQL server instance that is hosting the database.
Authentication type: Select the authentication type.
Domain: This field is enabled if you select Windows Authentication. Specify the Fully Qualified Domain Name (FQDN) or hostname.
If the datasource is a ZENworks Management Zone, specify the following:
Server address: A valid IP address or a Fully Qualified Domain Name (FQDN) of the ZENworks Primary Server in the Management Zone. This Primary Server will be referenced to download the domain resource file and the required database information to configure the datasource for that domain.
Port: The port used by the Primary Server in the Management Zone. The default port is 443.
Username: The Management Zone's administrator username for logging in to ZENworks Control Center.
Password: The password for the Management Zone's administrator user specified in the Username field.
10c Click Test to check whether the connection to the ZENworks Primary Server is established, then click Add.
11 (Optional) Click Domain hyperlink to edit a configured domain.
12 Choose the type of Certificate Authority (CA) for the Management Zone.
Internal CA: The certificate is automatically generated.
External CA: Choose Secure certificate (.p12, or .pfx), Root certificate and Server certificate with Private key, or Root certificate and Server certificate.
12a Based on the required certificate, specify the details:
Secure certificate (.p12 or .pfx)
Secure certificate: This certificate stores the server certificate, any intermediate certificate chains, and the private key in a encrypted file, which is password-protected. It supports the .p12 or .pfx file format.
Password: Password for the secured certificate file.
Root certificate and Server certificate with Private Key
Root certificate: The top-level certificate in the certificate tree issued by the CA that signed the Server certificate and any intermediate certificate chains. It supports the .pem, .crt, .cer, .der, .p7b, or.p7c file format.
Server certificate: It is a signed certificate that is used for the ZENworks server. It supports the .pem, .crt, .cer, .der, .p7b, or .p7c file format.
Private key: The private key file that is associated with the signed server certificate. It supports the .der file format.
Root certificate and Server certificate
To use Root certificate and Server certificate, you must have generated a CSR by using the Generate CSR link.
Root certificate: The top-level certificate in the certificate tree issued by the CA that signed the Server certificate and any intermediate certificate chains. It supports the .pem, .crt, .cer, .der, .p7b, or.p7c file format.
Server certificate: It is a signed certificate that is used for the ZENworks server. It supports the.pem, .crt, .cer, .der, .p7b, or .p7c file format.
20 ZENworks Reporting Configuration
12b Click Finish.
ZENworks Reporting configuration starts and it might take several minutes. The configuration process will continue in the background even if you close the browser or the browser times out.
After ZENworks Reporting is configured, from the Summary page you can use the ZENworks Reporting Console to access the ZENworks Reporting capabilities.
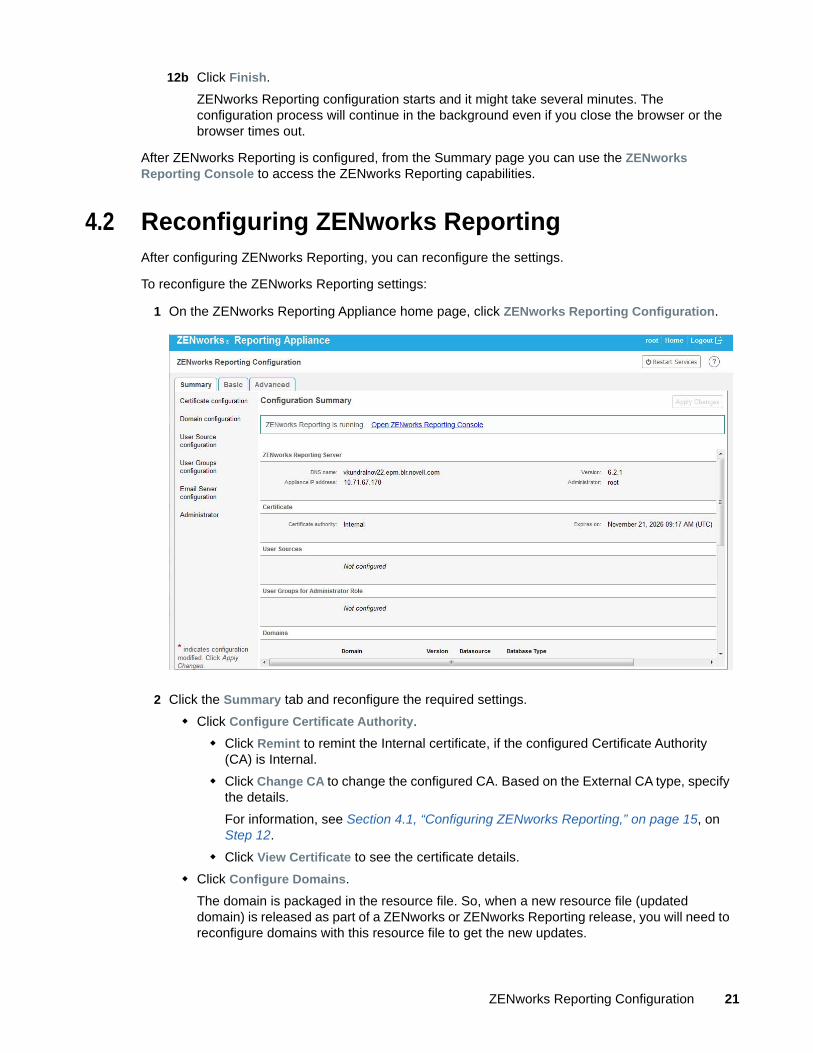
4.2 Reconfiguring ZENworks ReportingAfter configuring ZENworks Reporting, you can reconfigure the settings.
To reconfigure the ZENworks Reporting settings:
1 On the ZENworks Reporting Appliance home page, click ZENworks Reporting Configuration.
2 Click the Summary tab and reconfigure the required settings.
Click Configure Certificate Authority.
Click Remint to remint the Internal certificate, if the configured Certificate Authority (CA) is Internal.
Click Change CA to change the configured CA. Based on the External CA type, specify the details.
For information, see Section 4.1, “Configuring ZENworks Reporting,” on page 15, on Step 12.
Click View Certificate to see the certificate details.
Click Configure Domains.
The domain is packaged in the resource file. So, when a new resource file (updated domain) is released as part of a ZENworks or ZENworks Reporting release, you will need to reconfigure domains with this resource file to get the new updates.
ZENworks Reporting Configuration 21

This page enables you to add or edit domains. To edit a configured domain, click on the name. You can choose the latest version or the earlier version of the domain or change the datasource details for that domain.
NOTE
If you reconfigure a domain with the new ZENworks resource file, the existing custom reports, custom datasource, and custom domain will not be changed. Only predefined reports will be updated.
Before reconfiguring ZENworks Reporting, back up the ZENworks Reporting resources (reports, views and so on) as follows:
1. Log in to the ZENworks Reporting server console (https://<ip>:8443) as an administrator.
2. Go to Manage > Server Settings > Export.
3. Save the export.zip file to your local machine.
For reconfiguring domains, see Section 4.1, “Configuring ZENworks Reporting,” on page 15, on Step 10.
Click User Source Configuration.
To add or edit multiple user sources.
22 ZENworks Reporting Configuration

Click Add to add a user source, specify the following details:
ZENworks Reporting Configuration 23
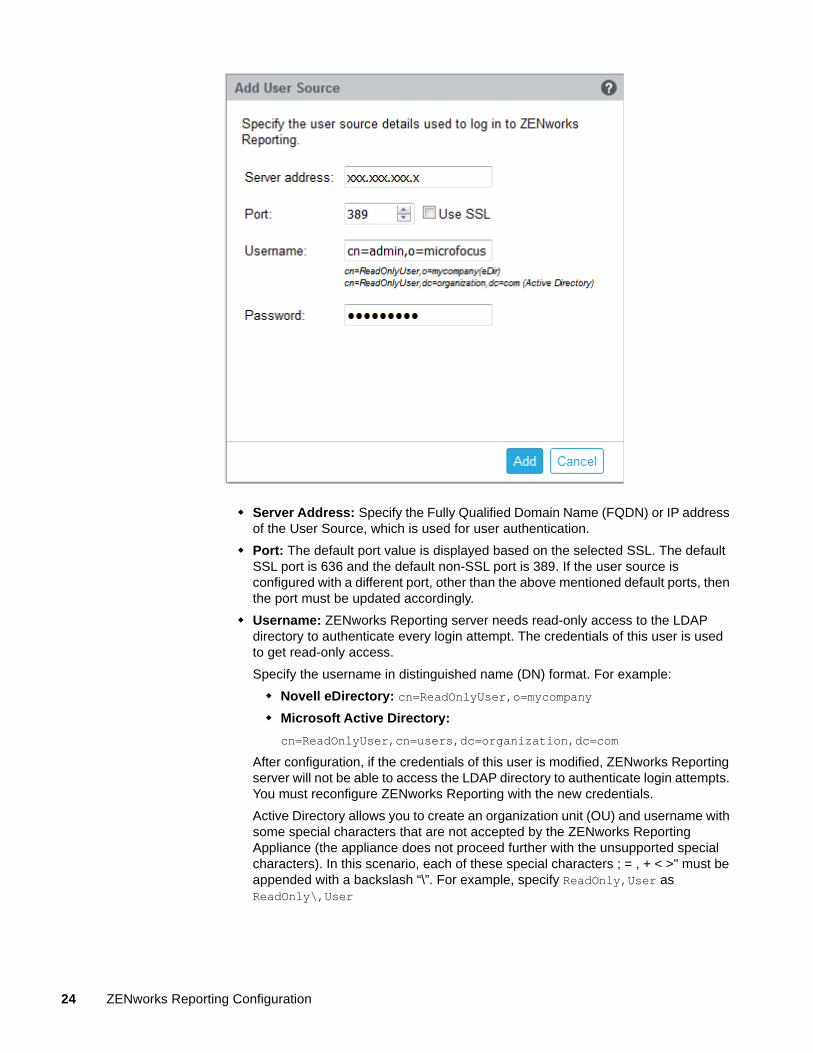
Server Address: Specify the Fully Qualified Domain Name (FQDN) or IP address of the User Source, which is used for user authentication.
Port: The default port value is displayed based on the selected SSL. The default SSL port is 636 and the default non-SSL port is 389. If the user source is configured with a different port, other than the above mentioned default ports, then the port must be updated accordingly.
Username: ZENworks Reporting server needs read-only access to the LDAP directory to authenticate every login attempt. The credentials of this user is used to get read-only access.
Specify the username in distinguished name (DN) format. For example:
Novell eDirectory: cn=ReadOnlyUser,o=mycompany
Microsoft Active Directory:
cn=ReadOnlyUser,cn=users,dc=organization,dc=com
After configuration, if the credentials of this user is modified, ZENworks Reporting server will not be able to access the LDAP directory to authenticate login attempts. You must reconfigure ZENworks Reporting with the new credentials.
Active Directory allows you to create an organization unit (OU) and username with some special characters that are not accepted by the ZENworks Reporting Appliance (the appliance does not proceed further with the unsupported special characters). In this scenario, each of these special characters ; = , + < >" must be appended with a backslash “\”. For example, specify ReadOnly,User as ReadOnly\,User
24 ZENworks Reporting Configuration

Password: Specify the password of the first authentication user.
Click Test to check whether the connection to the user source is established, then click Add.
Delete: Select the user source that you want to remove and click Delete. If a user source is deleted, the users from that user sources cannot have access to ZENworks Reporting.
Move up: Select the user source that you want to step up in the list. This ensures that the user authentication for this user source is attempted with higher priority than those listed below.
Move down: Select the user source that you want to step down in the list. This ensures that the user authentication for this user source is attempted with lower priority than those listed above.
Click User Groups Configuration.
To add user groups from the configured user sources so as to get ZENworks Reporting administrator rights for the members of the those groups.
ZENworks Reporting Configuration 25

Click Add and specify the following to add a LDAP group:
26 ZENworks Reporting Configuration
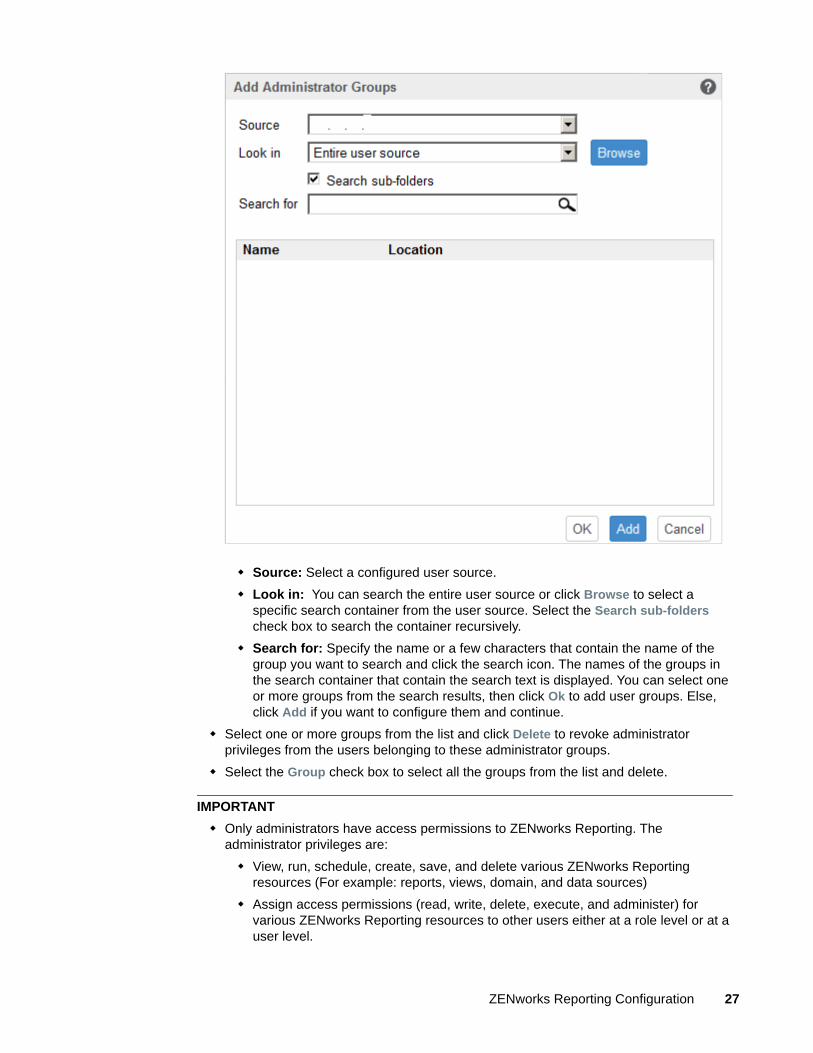
Source: Select a configured user source.
Look in: You can search the entire user source or click Browse to select a specific search container from the user source. Select the Search sub-folders check box to search the container recursively.
Search for: Specify the name or a few characters that contain the name of the group you want to search and click the search icon. The names of the groups in the search container that contain the search text is displayed. You can select one or more groups from the search results, then click Ok to add user groups. Else, click Add if you want to configure them and continue.
Select one or more groups from the list and click Delete to revoke administrator privileges from the users belonging to these administrator groups.
Select the Group check box to select all the groups from the list and delete.
IMPORTANT
Only administrators have access permissions to ZENworks Reporting. The administrator privileges are:
View, run, schedule, create, save, and delete various ZENworks Reporting resources (For example: reports, views, domain, and data sources)
Assign access permissions (read, write, delete, execute, and administer) for various ZENworks Reporting resources to other users either at a role level or at a user level.
ZENworks Reporting Configuration 27
Manage ZENworks Reporting server settings
Delete users or roles
If you have selected a parent group (a group containing other sub-groups), note the following:
For Active Directory: Users in those sub-groups will not have administrator privileges. To assign these users administrator privileges, configure them individually.
For eDirectory: All the sub-groups will also have administrator privileges.
Click Email Server Configuration.
Configure the outbound email server settings to send email notifications and reports.
To configure the outbound email server, specify the following:
Outbound email server: Specify the FQDN or IP address of the SMTP server. The SMTP server is used for mailing scheduled reports.
Port: Specify the port number on which the SMTP server is listening. The default port number is 25.
Use SSL/TLS: Select this option if the SMTP server is running on SSL or TLS.
Sender email address: Specify the sender email address from which all scheduled reports will be sent.
Requires Password: Clear the check box to configure the Outbound email server without authentication. Select the check box if you want the sender to use a password for authentication.
Password: Specify the sender's password.
Click Ok.
Click Administrator.
To change password for ZENworks Reporting administrator.
The asterisk (*) indicates configuration modified.
3 Click Apply Changes.
For more information about the ZENworks Reporting Configuration page, see Section 6.1,
“ZENworks Reporting Configuration,” on page 36.
28 ZENworks Reporting Configuration
5 5Appliance Management
In ZENworks Reporting Appliance, a web based interface is provided to manage the appliance. The user interface helps you to configure and perform operations on a ZENworks Reporting server. Based on the login user the tiles are displayed.
To manage ZENworks Reporting, see Chapter 5, “Appliance Management,” on page 29.
ZENworks Reporting Appliance enables you to reconfigure settings of the appliance, such as administrative passwords, network settings, and certificate settings.
ZENworks Reporting Appliance supports root and zenadmin users. You must use the root user if you want to perform any operations on ZENworks Reporting Appliance. Since, root user has all privileges on the ZENworks Reporting Appliance and ZENworks Reporting.
To manage ZENworks Reporting Appliance:
1 On a supported web browser, launch the URL to access the Management Console.
The URL (https://<FQDN>:9443 or https://<ipaddress>:9443) that is displayed on the Appliance console.
2 Specify the login credentials, then click Log in.
The following options are displayed under Appliance Configuration:
Section 5.1, “Ganglia Configuration,” on page 30
Section 5.2, “Ganglia Monitoring,” on page 30
Section 5.3, “Network,” on page 30
Section 5.4, “Time,” on page 31
Section 5.5, “Storage,” on page 31
Section 5.6, “System Services,” on page 31
Section 5.7, “Firewall,” on page 32
Section 5.8, “Administrative Passwords,” on page 32
Section 5.9, “Field Patch,” on page 33
Section 5.10, “Online Update,” on page 33
Section 5.11, “Shutting Down and Restarting ZENworks Reporting Appliance,” on page 34
Appliance Management 29
5.1 Ganglia ConfigurationGanglia is a scalable, distributed monitoring system that allows you to gather information about the ZENworks Reporting Appliance system. The default metrics that you can monitor are CPU, disk, load, memory, network, and process.
1 On the ZENworks Reporting Appliance home page, under Appliance Configuration, click Ganglia Configuration.
2 You can change the following configuration options:
Enable Full Monitoring Services: Select this option to receive and store metrics from other appliances, and to allow the Ganglia Web Interface to run on the same device as the ZENworks Reporting Appliance.
You can disable Ganglia monitoring by clearing this option. You can perform this only if you have a monitoring system that you want to use for ZENworks Reporting Appliance, or if you want to configure a dedicated appliance for viewing monitoring information. (You can do this by selecting Unicast below; then specify the FQDN or IP address of the appliance where monitoring information is stored.)
Enable monitoring on this appliance: Select this option to enable Ganglia monitoring on this appliance.
Multicast: Select this option to send monitoring information to other appliances on the network.
Unicast: Select this option to send monitoring information to a single destination.
Publish to: Specify the URL where Ganglia sends monitoring information while it is running in Unicast mode.
Monitoring Tool Options: Select this option to enable the monitoring tool to access this server through http port 9080 using a URL similar to http://:9080/gweb/.
3 (Optional) Click Reset Database to remove all existing Ganglia metrics from this appliance.
This option is not applicable to the ZENworks Reporting database.
4 Click OK.
For more information about how to use Ganglia monitoring with ZENworks Reporting Appliance, see Section 5.2, “Ganglia Monitoring,” on page 30.
5.2 Ganglia MonitoringGanglia is a scalable, distributed monitoring system that allows you to gather information about the ZENworks Reporting Appliance system. The default metrics that you can monitor are CPU, disk, load, memory, network, and process. For more information, see Ganglia.
5.3 Network1 On the ZENworks Reporting Appliance home page, under Appliance Configuration, click
Network.
2 Below DNS Configuration, you can modify the name servers, search domains, and gateway settings for the ZENworks Reporting Appliance network.
3 Below NIC Configuration, click the ID to modify the IP address, hostname, and network mask of any Network Interface Controller (NIC) associated with the appliance. (If multiple NICs are configured for ZENworks Reporting Appliance, you can configure the additional NICs.)
30 Appliance Management

4 Click OK, then restart the appliance to reflect the changes.
5 (Optional) In the Appliance Administration UI (port 9443) Access Restrictions, specify the IP address of any networks for which you want to allow access to the ZENworks Reporting Appliance. Leave this blank to allow any network to access the ZENworks Reporting.
6 Click OK.
5.4 Time1 On the ZENworks Reporting Appliance home page, under Appliance Configuration, click Time.
2 Change the required time configuration options:
NTP Server: Specify the NTP server that you want to use for time synchronization. Multiple servers can be specified by providing spaces.
Region: Select the region where ZENworks Reporting Appliance is located.
Time Zone: Select the time zone on which ZENworks Reporting Appliance is located.
Hardware Clock Set to UTC
3 Click OK.
5.5 StorageIf you have created hard disk partitions (/vastorage and /var), ZENworks Reporting Appliance provides tools that allow you to expand the storage space for the /vastorage and /var partitions.
1 On the ZENworks Reporting Appliance home page, under Appliance Configuration, click Storage.
2 Use the tools provided by your virtualization platform vendor to expand the virtual disks that contain the partitions your are expanding.
3 In the Appliance Disks Containing Unallocated Free Space, select the partitions to be expanded.
4 Click Expand partitions.
Appliance services are stopped, the selected partitions are expanded to the size of their respective disks, and appliance services are restarted.
5 Restart the appliance so that the operating system detect the disks that are expanded.
5.6 System ServicesThis is the SSH service that is running on the ZENworks Reporting Appliance. The following system services are available:
SSH
Proxy DHCP
In the System Services page, you can perform the following actions:
Section 5.6.1, “Starting, Stopping, or Restarting System Services,” on page 32
Section 5.6.2, “Setting System Services to Automatic or Manual,” on page 32
Appliance Management 31

5.6.1 Starting, Stopping, or Restarting System Services
1 In the System Services page, select the service that you want to start, stop, or restart.
2 Click Action, then click Start, Stop, or Restart.
5.6.2 Setting System Services to Automatic or Manual
1 On the System Services page, select the service that you want to make automatic or manual.
2 Click Options, then click Set as Automatic, or Set as Manual.
If you choose Set as Automatic, the SSH services will start automatically when you run the appliance.
If you choose Set as Manual, you need to start or stop the SSH services manually after you run the appliance.
5.7 FirewallDuring the configuration a few ports on appliance are open. You can view the current firewall configuration from the ZENworks Reporting Appliance.
1 On the ZENworks Reporting Appliance home page, under Appliance Configuration, click Firewall.
Port numbers are displayed with the current status.
If you have a firewall, you must allow the listed port numbers to ensure that you have a seamless experience with ZENworks Reporting Appliance. As a best practice, do not change any port numbers from the default ports.
5.8 Administrative Passwords1 On the ZENworks Reporting Appliance home page, under Appliance Configuration, click
Administrative Passwords.
2 Specify the new passwords for the root and zenadmin administrators.
If you are changing the root password, you must first specify the current root password.
3 (Optional) Select or clear Allow root access to SSH. When this option is selected, the root user is able to SSH to the appliance. If this option is not selected, only the zenadmin user can SSH to the appliance.
4 Click OK.
32 Appliance Management

5.9 Field PatchThe Field Patch page, enables you to manage field test patches for the ZENworks Reporting Appliance. You can install new patches that has fix for issues, view currently installed patches, and uninstalled patches.
1 On the ZENworks Reporting Appliance home page, under Appliance Configuration, click Field Patch.
2 (Optional) Install a Downloaded Patch:
2a Download the patch from the Micro Focus Download site on to your device.
2b On the Field Test Patch page, click Browse to select the downloaded patch.
2c Click Install.
3 (Optional) Manage Installed Patches:
3a Below the Manage Installed Patches, on the Patch Name column, select the patch that you want to uninstall.
3b Click Uninstall Latest Patch.
5.10 Online UpdateOnline Update enables you to update the Appliance.
1 On the ZENworks Reporting Appliance home page, under Appliance Configuration, click Online Update.
You can perform the following actions:
Register: Enables you to register with Micro Focus Customer Center server or a Local Subscription Management Tool (SMT) server from where you can download software updates and install automatically to update the product.
To register online update service:
1. Click the Register tab.
2. Choose the type of service Local SMT (Subscription Management Tool) or Novell Customer Center (NCC).
Based on the service type, specify the following:
Local SMT
Hostname: The hostname of the server from where you want to download.
SSL Cert URL (optional): The SSL certificate to communicate with the server.
Namespace path (optional): The name space of the file or directory.
Novell Customer
Email: The email address to receive the updates on the appliance.
Activation key: The activation key for the server base license.
Allow data send: choose how you want to receive the data Hardware Profile or Optional information.
3. Click Register.
Update Now: After registration, click Update Now to trigger downloaded updates.
Appliance Management 33

Schedule: After registration, you can configure type of updates to download and whether to automatically agree with the licenses.
To schedule online update:
1. Click the Schedule tab.
2. Select a schedule for download updates (Manual, Daily, Weekly, Monthly).
View Info: Displays the list of installed and downloaded software updates.
Refresh: Refreshes the status of updates on the Appliance.
5.11 Shutting Down and Restarting ZENworks Reporting Appliance
1 On the ZENworks Reporting Appliance home page, under Appliance Configuration, click Reboot or Shutdown.
This restarts or shuts down ZENworks Reporting Appliance.
34 Appliance Management
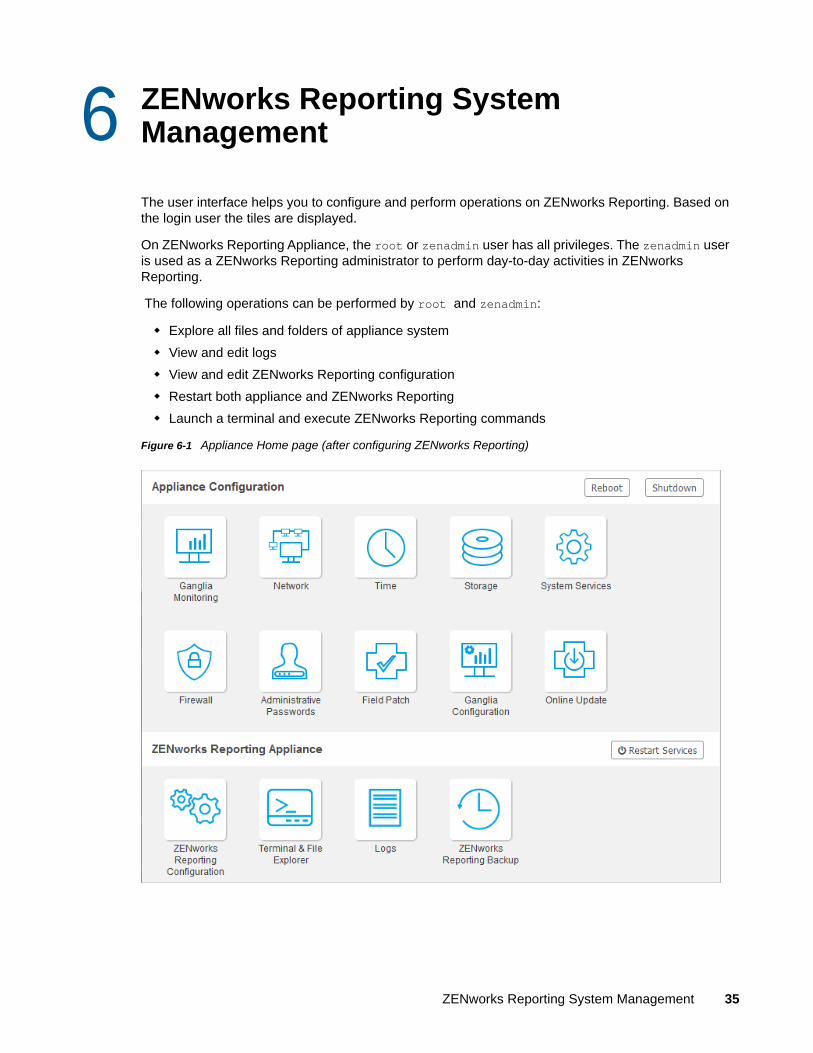
6 6ZENworks Reporting System Management
The user interface helps you to configure and perform operations on ZENworks Reporting. Based on the login user the tiles are displayed.
On ZENworks Reporting Appliance, the root or zenadmin user has all privileges. The zenadmin user is used as a ZENworks Reporting administrator to perform day-to-day activities in ZENworks Reporting.
The following operations can be performed by root and zenadmin:
Explore all files and folders of appliance system
View and edit logs
View and edit ZENworks Reporting configuration
Restart both appliance and ZENworks Reporting
Launch a terminal and execute ZENworks Reporting commands
Figure 6-1 Appliance Home page (after configuring ZENworks Reporting)
ZENworks Reporting System Management 35

To manage ZENworks Reporting:
1 Launch the URL on a supported web browser.
For example: https://<FQDN>:9443 or https://<ipaddress>:9443
2 Specify the login credentials, then click Log in.
The following options are displayed under ZENworks Reporting Appliance:
Section 6.1, “ZENworks Reporting Configuration,” on page 36
Section 6.2, “Terminal and File Explorer,” on page 38
Section 6.3, “Logs,” on page 40
Section 6.4, “ZENworks Reporting Backup,” on page 42
6.1 ZENworks Reporting Configuration The ZENworks Reporting Configuration page is enabled only after ZENworks Reporting is successfully configured.
1 On the ZENworks Reporting Appliance home page, under ZENworks Reporting Appliance, click ZENworks Reporting Configuration.
The ZENworks Reporting Configuration page has the Summary, Basic, and Advanced views. The Basic view displays frequently used server configuration settings. In the Advanced view, you can edit any relevant server configuration file online. To reflect modified changes, some services might need to restart.
The Summary view enables you to view and reconfigure the ZENworks Reporting settings, such as Certificate, Domain, User Source, User Group, Email Server configuration, change Administrator password, and Appliance details, such as type of hypervisor used, operating system, RAM and file system and HDD details.
Click Open ZENworks Reporting Console to use ZENworks Reporting.
To reconfigure ZENworks Reporting settings, see Section 4.2, “Reconfiguring ZENworks Reporting,” on page 21.
The Appliance comes with the built-in 43 GB of rootfs file system that is mounted on root directory. Additional hard disk that is added will be attached to the /dev/sdb1 and mounted on /vastorage. All ZENworks Reporting related configurations, log files, backup files, certificates, and binaries are stored in additional hard disk.
Figure 6-2 ZENworks Configuration Views
36 ZENworks Reporting System Management

The Basic view displays frequently used server configuration settings as an individual configuration value. You can edit frequently used ZENworks Reporting related settings such as Min Heap Size, Max Heap Size, Min Permanent Generation size, Max Permanent Generation size, and Thread Stack size.
For example, you can configure Thread Stack size (in MB) by changing the default value, save, and then restart the pending service that is available in Restart Service page.
Basic view has the following options:
Save: Saves the modified settings.
Refresh: Refreshes all the ZENworks Reporting configurations.
Reset all values to default: Reverts the settings to its original state after configuration. This is the last applied or migrated ZENworks Reporting.
Restart Services: Enables you to select the services that need to be restarted for configuration changes and to reflect the changes.
When there is any changes in the configuration file that is associated with the ZENworks Reporting process, then the system determines automatically and process get listed in the Restart Services page.
The Advanced view enables you to view, configure, or edit any server configuration file that is related to ZENworks Reporting, such as Tomcat and ZENworks Reporting.
In the Advance tab the jvmsettings.properties file for minimum and maximum values has no validation functionality. Ensure that you use the values within the range. We recommend you to configure the size using the Basic tab.
Figure 6-3 Tool Bar
By default the file will be in Read-Only mode. To edit a file, toggle the Edit Mode, change the required content of the file, and then Save. Whenever there is any changes to the file, then corresponding process has to be restarted by clicking Restart Services.
The Advanced view has the following options:
Download: Downloads the server configuration files.
Edit Mode: Enables you to toggle or edit a server configuration file in an editor.
Reload: Loads the server configuration file from the file system. Any unsaved changes made in the browser editor will be lost.
Reset all values to default: Reverts the file to its original state after configuration. This is the last applied ZENworks Reporting System update.
Download all Files: Downloads all the server configuration folders that are displayed in the left pane. The appliance creates a compressed archive of the files to be downloaded.
Save: Saves a server configuration file to file system.
Restart Services: Enables you to select the services that need to be restarted for configuration changes (in Basic or Advanced view) and to reflect the changes.
When there is any change in the configuration file that is associated with the ZENworks Reporting process, then the system determines automatically and process the list of changes in the Restart Services page.
Select Path: Click the select path icon to copy the physical path of the configuration file.
ZENworks Reporting System Management 37
Refresh: Refreshes all the ZENworks Reporting configurations.
6.2 Terminal and File ExplorerThis tile launches an integrated view for File System Explorer and Terminal.
Section 6.2.1, “Terminal,” on page 38
Section 6.2.2, “File Explorer,” on page 39
6.2.1 Terminal
SSH service needs to be running for the terminal to work. SSH service is not started by default for security reasons.
1 On the ZENworks Reporting Appliance home page, under Appliance Configuration, click the System Services icon.
2 Select the SSH service on the System Services page.
3 Click Action, then click Start.
Set the SSH service to Automatic, if you want to restart the SSH service automatically after you reboot the device.
4 On the ZENworks Reporting Appliance home page, under ZENworks Reporting Appliance, click Terminal & File Explorer
A new browser window launches two frames that display a File Explorer (for performing file operations) and a Terminal. Whenever you close the Terminal browser or tab, then a confirmation message is displayed.
Figure 6-4 Terminal
You can perform file operations by using an embedded File Explorer that enables you to transfer content between the local and the remote file systems. You can also open new terminals rooted at any folder in the remote file system.
38 ZENworks Reporting System Management
You can launch more than one terminal by clicking New Terminal. By default, a maximum of five terminals can be launched.
To configure with any other value than the default value of the terminal:
1 Go to /etc/opt/novell/base
2 Open the terminal_config.properties file.
3 Change the maxTerminalsPerBrowser value with the required value, then save the file.
To select a theme (foreground and background color) for the terminals:
1 Click the Settings icon, then select the required terminal theme.
To create a theme:
1 Go to /etc/opt/novell/base
2 Open the terminal-themes.xml file.
3 Add your own theme, then save the file. For example:
<theme> <name>example</name> <background-color>#000000</background-color> <foreground-color>yellow</foreground-color></theme>
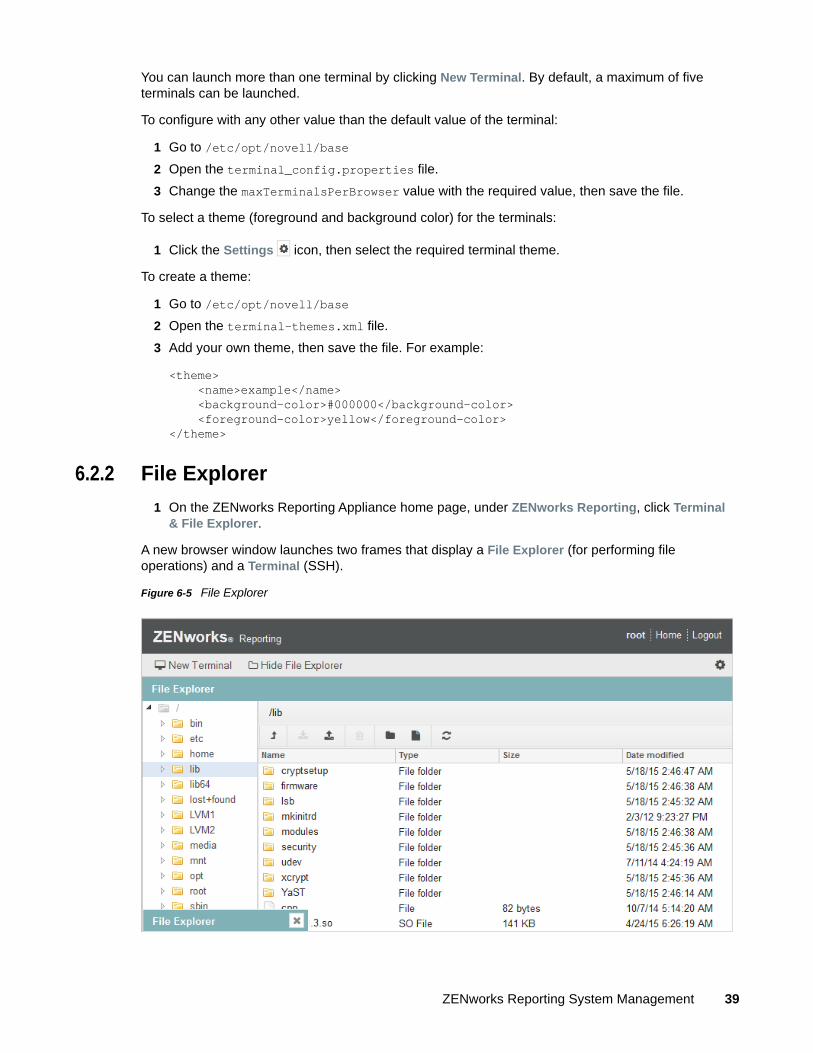
6.2.2 File Explorer
1 On the ZENworks Reporting Appliance home page, under ZENworks Reporting, click Terminal & File Explorer.
A new browser window launches two frames that display a File Explorer (for performing file operations) and a Terminal (SSH).
Figure 6-5 File Explorer
ZENworks Reporting System Management 39

This enables you to perform operations on files and folders.
The file operations are based on user privileges (POSIX file permissions).
If you log in as zenadmin, all file operations are executed as zenworks user.
If you log in as root, all file operations are executed as root user.
In the tabular view, a context menu is available with these options: Open Terminal, Refresh, Upload, New Folder, and New File.
The Tree View for appliance file system displays the Appliance file system as a tree. Only folders are displayed in the tree view. The following options are available New folder, Delete, Rename, Open Terminal, Refresh, Cut, Copy, Paste, Upload, and Download.
File explorer enables you to explore the Appliance’s (SLES -Unix) file system, breadcrumb navigation, upload, download, refresh, rename, create, delete, or, CCP operations (cut, copy, and paste).
Below the file path, a toolbar is displayed and you can perform the following:
6.3 LogsAll log files that are monitored on ZENworks Reporting Appliance are organized in a virtual tree structure and path of the particular file or folder is displayed. Log files can be viewed in the Tail mode or View From Start mode.
In the Tail mode, a log file is displayed from the end of log file.
Icon Name Description
Terminal Settings To change the terminal theme display settings.
Select Path To select file path that is displayed on the breadcrumb.
Settings To configure which file settings to show or hide.
/ Breadcrumb Displays the path for selected file or folder.
Parent Directory Display the contents of the parent folder in the tabular view.
Download To download files and folders under a specified folder.
Upload Supports multiple file upload; folder upload is not supported.
New folder Creates a folder in the current folder.
New file Creates a new file in the current folder.
Refresh Updates the tabular view with the latest contents from the appliance.
Delete Enables you to delete multiple files and folders under a specified folder.
40 ZENworks Reporting System Management
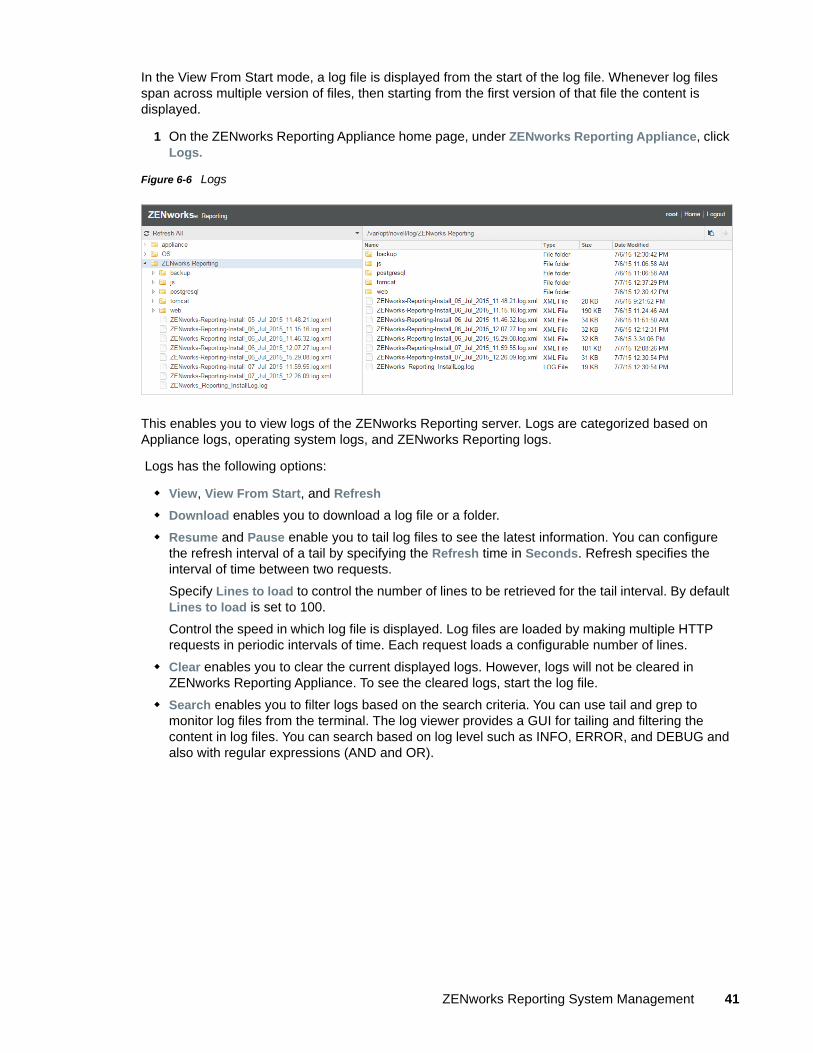
In the View From Start mode, a log file is displayed from the start of the log file. Whenever log files span across multiple version of files, then starting from the first version of that file the content is displayed.
1 On the ZENworks Reporting Appliance home page, under ZENworks Reporting Appliance, click Logs.
Figure 6-6 Logs
This enables you to view logs of the ZENworks Reporting server. Logs are categorized based on Appliance logs, operating system logs, and ZENworks Reporting logs.
Logs has the following options:
View, View From Start, and Refresh
Download enables you to download a log file or a folder.
Resume and Pause enable you to tail log files to see the latest information. You can configure the refresh interval of a tail by specifying the Refresh time in Seconds. Refresh specifies the interval of time between two requests.
Specify Lines to load to control the number of lines to be retrieved for the tail interval. By default Lines to load is set to 100.
Control the speed in which log file is displayed. Log files are loaded by making multiple HTTP requests in periodic intervals of time. Each request loads a configurable number of lines.
Clear enables you to clear the current displayed logs. However, logs will not be cleared in ZENworks Reporting Appliance. To see the cleared logs, start the log file.
Search enables you to filter logs based on the search criteria. You can use tail and grep to monitor log files from the terminal. The log viewer provides a GUI for tailing and filtering the content in log files. You can search based on log level such as INFO, ERROR, and DEBUG and also with regular expressions (AND and OR).
ZENworks Reporting System Management 41
6.4 ZENworks Reporting BackupZENworks Reporting Backup enables you to back up the ZENworks Reporting related files such as ZENworks Reporting server configuration, properties, domains, certificates, customized reports, and schedules. Backup is used to restore all the backed up configuration files on a new appliance while migrating.
To back up the ZENworks Reporting files:
1 On the ZENworks Reporting Appliance home page, under ZENworks Reporting Appliance, click ZENworks Reporting Backup.
2 Click Start Backup.
The backed up files will be stored at /vastorage/backup location.
42 ZENworks Reporting System Management
7 7ZENworks Reporting Migration
This chapter includes information to help you migrate from ZENworks Reporting 5.6.1 to ZENworks Reporting 6.2.1.
If you are migrating from ZENworks Reporting 5.0, first migrate to 5.6.1 and then migrate to ZENworks Reporting 6.2.1.
For information about migrating from ZENworks Reporting 5.0 to 5.6.1, see ZENworks Reporting Migration.
The following sections provide instructions for migration:
Section 7.1, “Backing up the ZENworks Reporting 5.6.1 Data,” on page 43
Section 7.2, “Deploying, Configuring and Migrating to the ZENworks Reporting 6.2.1 Appliance,” on page 44
7.1 Backing up the ZENworks Reporting 5.6.1 DataTo back up the ZENworks Reporting 5.6.1 data:
1 In the ZENworks Reporting Home page, under ZENworks Reporting Appliance click ZENworks Reporting Backup (https://<FQDN>:9443 or https://<ipaddress>:9443).
ZENworks Reporting backup is stored in the /vastorage/backup folder in the file system.
2 Download the ZENworks_Reporting_62_Migration_Utility.zip file, from the Download website.
3 Extract the ZENworks_Reporting_62_Migration_Utility.zip file.
You will get the zrs-migration-prereq-0.1-1.noarch.rpm file.
4 Back up the security configuration of the ZENworks Reporting Appliance:
4a Copy the zrs-migration-prereq-0.1-1.noarch.rpm file to any folder.
4b Log into the ZENworks Reporting server through SSH.
If SSH is disabled, then run the service sshd start command on the console.
4c Go to the zrs-migration-prereq-0.1-1.noarch.rpm location and execute the rpm –ivh zrs-migration-prereq-0.1-1.noarch.rpm command.
5 Note the location of the second hard disk and then copy the hard disk to an accessible location.
For example, if you are using VMware ESX, right-click on the machine, Edit settings, note down where the hard disk is located. Go to the location and copy the hard disk file. The file format will be in <machinename> vmdk
It is recommended to back up the /vastorage/backup directory to another location on the 5.6.1 appliance.
6 Power off the ZENworks Reporting 5.6.1 Appliance.
7 Continue with the next task, see Deploying, Configuring and Migrating to the ZENworks Reporting 6.2.1 Appliance.
ZENworks Reporting Migration 43

IMPORTANT: After backing up ZENworks Reporting, if you make any changes in the ZENworks Reporting server they might not be available post migration.
7.2 Deploying, Configuring and Migrating to the ZENworks Reporting 6.2.1 ApplianceYou need to deploy the ZENworks Reporting 6.2.1 Appliance to migrate the existing ZENworks Reporting 5.6.1, and then configure the appliance with the network settings.
1 Deploy the appliance as instructed in Section 3.1, “Deploying the Appliance,” on page 13.
2 Add the second hard disk (vastorage) to the ZENworks 6.2.1 Appliance and point to the copied hard disk Step 5 under Section 7.1, “Backing up the ZENworks Reporting 5.6.1 Data,” on page 43.
3 Boot the ZENworks Reporting 6.2.1 Appliance and specify the new password for zenadmin and root users.
After the process is completed, on Appliance login console the URL is displayed, which is used for configuring the appliance. For configuration, see Chapter 4, “ZENworks Reporting Configuration,” on page 15.
4 Specify the ZENworks Reporting Administrator password:
Password: The administrator password is used for logging in to ZENworks Reporting. The password must contain a minimum of six characters.
Confirm Password: Use this field to confirm a correct password. If there is a mismatch, an error message is displayed after you click Next. You must re-enter the correct password.
5 Click Validate Domain.
If ZENworks Server is upgraded to ZENworks 2017, a message is displayed that the domain updates are available.
The new bundle domain is only available if ZENworks Server is upgraded to ZENworks 2017.
6 Click OK to reconfigure the domains so that the new bundle domain is available. Else, click Skip to proceed with the existing domains.
7 Click Finish to complete the migration process.
IMPORTANT
The migration completes only if the certificates are valid that is when the hostname of the appliance is the same as the certificate hostname.
After migration it is recommended to validate configurations under Summary: LDAP, Certificates, Domain, SMTP and so on.
44 ZENworks Reporting Migration

8 8Jaspersoft Studio
Jaspersoft Studio 6.2.1 is an Eclipse-based report designer for ZENworks Reporting. It is a full rewrite of iReport. Jaspersoft Studio allows you to create sophisticated layouts containing charts, images, sub-reports, crosstabs, and more. You can access your data through various sources including JDBC, TableModels, JavaBeans, XML, Hibernate, Big Data (such as Hive), CSV, XML, as well as custom sources. Then you can publish reports as PDF, RTF, XML, XLS, CSV, HTML, XHTML, text, DOCX, or Open Office.
Updating your workspace to Jaspersoft Studio 6.2 and later version, see Updating Your Workspace to Jaspersoft Studio 6.2 and Higher.
IMPORTANT: Jaspersoft Studio 6.2.1 supports only Windows.
To install Jaspersoft Studio 6.2.1 and connect to ZENworks Reporting, perform the following tasks:
Section 8.1, “Installing Jaspersoft Studio 6.2.1,” on page 45
Section 8.2, “Connecting Jaspersoft Studio 6.2.1 to ZENworks Reporting,” on page 46
8.1 Installing Jaspersoft Studio 6.2.1To install Jaspersoft Studio 6.2:
1 Download the Jaspersoft_Studio_6.2.iso file from the Micro Focus Download site.
2 Mount the Jaspersoft_Studio_6.2.iso file.
3 Browse to the Jaspersoft_Studio_6.2.iso directory.
4 Double-click the setup.exe file.
5 Select the required language, then click Continue.
6 Accept the agreement in the License Agreement page, then click Next.
7 Choose the installation directory, then click Next.
8 Review the Summary page. To change previous settings, click Previous; otherwise, click Install, then click Done.
9 Go to Start > Jaspersoft > Jaspersoft Studio Professional-6.2 final, then click Jaspersoft Studio Professional-6.2 final.
10 If the Workspace Selection page appears, specify the Workspace Root Path, then click OK.
11 If you want to create the workspace directory, click OK.
12 In Jaspersoft Studio, choose Help, then click License Manager.
13 In the License Manager page, click Install new license.
14 Browse to the jasperserver.license file location. For example, C:\jsstudio\js-studio-pro-6.2.
15 Click Open to install the new license for Jaspersoft Studio.
In the License Manager page, the License Type will be changed from Evaluation to Commercial.
16 Click Close to close the License Manager page.
Jaspersoft Studio 45

8.2 Connecting Jaspersoft Studio 6.2.1 to ZENworks ReportingTo connect Jaspersoft Studio 6.2.1 to ZENworks Reporting:
1 Install the ZENworks Reporting certificate:
1a Administrators provide the ZENworks Reporting certificate. To get the ZENworks Reporting certificate, see Section 8.2.1, “Copying the ZENworks Reporting Certificate,” on page 47.
1b Copy the ZENworks Reporting certificate (server.cert) on the device on which Jaspersoft Studio 6.2.1 is installed.
1c Open the command prompt, then execute the following command:
cd <studio install path>\js-studio-pro-6.2.1\features\jre.win32.win32.x86_64.feature_1.8.0.u74\jre\bin
<studio install path> is the location where Jaspersoft Studio 6.2.1 is installed. For example, "C:\Program Files\Jaspersoft"
1d Execute the following command:
keytool -import -keystore <studio install path>\js-studio-pro-6.2.1\features\jre.win32.win32.x86_64.feature_1.8.0.u74\jre\lib\security\cacerts -file <certificate path>\<certificate name> -storepass changeit
<studio install path> is the location where Jaspersoft Studio 6.2.1 is installed. For example, C:\Program Files\Jaspersoft
<certificate path> is the location where the ZENworks Reporting certificate that is copied onto the device where Jaspersoft Studio 6.2 is installed. For example "C:\Program Files\Certificate"
<certificate name> is the name of the ZENworks Reporting certificate. For example, server.cert
If <studio install path> or <certificate name> contains a space, then include quotation (“) mark as shown:
"C:\Program Files\Certificate"
2 Start Jaspersoft Studio 6.2.
3 In Jaspersoft Studio 6.2, choose Window > Show View, then click Other.
4 In the Show View page, below the Jaspersoft Studio view, select Repository Explorer, then click OK.
5 In the Repository view, right-click Servers, then click Create JasperReports Server Connection.
6 In the Server profile wizard, specify the following:
Name: Name of the connection.
URL: The ZENworks Reporting URL (https://<hostname>:<port number>/jasperserver-pro/).
Do not use the ZENworks Reporting server IP address.
Organization: Name of the organization.
User: A valid ZENworks Reporting user name.
Password: The relevant password for the user name specified in the previous field.
7 Click Test Connection. After a successful connection is established, the ZENworks Reporting content appears.
46 Jaspersoft Studio
8 Click Finish to save the connection.
For more information about how to use Jaspersoft Studio 6.2, see Jaspersoft Studio 6.2.
8.2.1 Copying the ZENworks Reporting Certificate
To copy the ZENworks Reporting Certificate:
Linux:
1 Log into ZENworks Reporting as a root user.
2 Go to /opt/novell/zenworks-reporting/conf/security.
3 Copy the server.cert file.
Jaspersoft Studio 47

48 Jaspersoft Studio

A ATroubleshooting
The following sections provides solutions to the problems you might encounter while deploying and Configuring ZENworks Reporting Appliance:
java.lang.IllegalStateException: Form too large error message is displayed
Source: ZENworks Reporting.
Explanation: If the size of a file that is displayed in the Advanced Configuration tab exceeds the default value of 400000 Bytes (~ 400KB), the following error message is displayed:
java.lang.IllegalStateException:Form too large
Action: Increase the form content size parameter in the start.ini file:
1 Go to /opt/novell/jetty8
2 Open the start.ini file.
3 Search for the Dorg.eclipse.jetty.server.Request.maxFormContentSize parameter and increase the value.
4 Stop the jetty server using the rcnovell-jetty stop command.
5 Start the jetty server using the rcnovell-jetty start command.
Changing ZENworks Reporting Session Time out
Source: ZENworks Reporting.
Explanation: Default ZENworks Reporting session time out is set to 30 minutes.
Action: You can change ZENworks Reporting session time out by using the web.xml file.
To change the ZENworks Reporting session time out:
1. Backup the web.xml file.
For Windows: %ZRS_HOME%\js\apache-tomcat\webapps\jasperserver-pro\WEB-INF\web.xml
For linux: /opt/novell/zenworks-reporting/js/apache-tomcat/webapps/jasperserver-pro/WEB-INF/web.xml
2. Open the web.xml file.
3. Go to <session-timeout>
4. Change the existing time out (30) to the required time out in <session-timeout>30</session-timeout>
5. Manually restart the ZENworks Reporting services.
Troubleshooting 49

50 Troubleshooting