APM Connect
© 2020 General Electric Company
Contents
Chapter 1: Overview 1About APM Connect 2
About Time Zone Data 2
Support for Multiple Source Systems 3
Support for Multiple Culture Settings from a Single Source System 4
Chapter 2: Deployment 5About the APM Connect Installation Package 7
Upgrade the APM Connect Base to V2.0.0 7
Deploy the APM Connect Base for the First Time 8
Run the APM Connect Installer 8
Encrypt Parameters 12
Access the APM Connect Administration Center 13
Change and Encrypt the APM Connect Service User Names and Passwords 16
Install and Start the APM Runtime Container 17
Install the Meridium Integration Services 20
Enable Internet Explorer for APM Connect 20
Update PostgreSQL Networking Configuration 21
Change the PostgreSQL Passwords 21
Configure SSL 22
Configure the Karaf Server for SSL 25
Configure Multiple Source Systems or Multiple Plants 27
Enable Multiple Cultures From a Single Source System 28
Access the APM Connect Administration Center 28
Change the APM Connect Administration Center User Password 31
Create a Service Account User 32
Uninstall APM Connect 33
Chapter 3: Troubleshooting Deployment 35Validate the APM Connect Administration Center License 36
ii APM Connect
Set Java Environment Variables 38
Enable Test Connection 39
Change H2 Console Password 39
Create APM Service User 41
Import Adapter Jobs 41
Chapter 4: Administer 43Access the APM Connect Administration Center 44
Configure the APM Connect Administration Center 46
Set User Permissions 47
Authorize Users for Projects 49
Configure Logging 50
Configure Source System Custom Field Mappings or Default Values 51
Deploy Data Loaders or Adapters 52
Access APM Connect EAM Jobs 53
Access the Details of an EAM Job 53
Delete a Job 54
Chapter 5: Data Loaders 56General Information 57
APM Family Data Loader 58
Taxonomy Data Loader 67
Work History Data Loader 75
Unified Asset Ingestion Data Loader 90
Automatic Data Loader 125
Deploy the Automatic Data Loader Job 126
Chapter 6: Reference 131APM Connect System Requirements 132
Predix Essentials Attribute to Reserved Predix Attribute Mappings 134
Predix Essentials Attribute to Predix Attribute Mappings 134
Required Server Ports 137
The Automatic Data Loader Directories 137
iii

Chapter 7: Release Notes 138Third Quarter of 2019 139
Second Quarter of 2019 139
First Quarter of 2019 140
iv APM Connect

Copyright GE Digital
GE, the GE Monogram, and Predix are either registered trademarks or trademarks of All other trademarksare the property of their respective owners.
This document may contain Confidential/Proprietary information of and/or its suppliers or vendors.Distribution or reproduction is prohibited without permission.
THIS DOCUMENT AND ITS CONTENTS ARE PROVIDED "AS IS," WITH NO REPRESENTATION ORWARRANTIES OF ANY KIND, WHETHER EXPRESS OR IMPLIED, INCLUDING BUT NOT LIMITED TOWARRANTIES OF DESIGN, MERCHANTABILITY, OR FITNESS FOR A PARTICULAR PURPOSE. ALL OTHERLIABILITY ARISING FROM RELIANCE UPON ANY INFORMATION CONTAINED HEREIN IS EXPRESSLYDISCLAIMED.
Access to and use of the software described in this document is conditioned on acceptance of the EndUser License Agreement and compliance with its terms.
v© 2020 General Electric Company
© 2020 General Electric Company.


Chapter
1OverviewTopics:
• About APM Connect• About Time Zone Data• Support for Multiple Source
Systems• Support for Multiple Culture
Settings from a Single SourceSystem
1© 2020 General Electric Company
About APM ConnectThe APM Connect system provides the means to load data from the Industrial Internet of Things (IIOT)into Predix Essentials.
The system uses data loaders and adapters to establish a data flow between Predix Essentials and EAMsystems, Field Service Management systems, and other assets. The APM Connect context file defines thecommunication path between the IIOT and Predix Essentials.
About Time Zone DataPredix Essentials stores the dates and times of transactions in Universal Coordinated Time (UTC) format.This enables the data to flow through the system in a single time zone format. APM Connect supports thetime zones defined in https://docs.microsoft.com/en-us/previous-versions/windows/embedded/gg154758(v=winembedded.80).
To provide information with the time stamp relevant to your operations, the system converts UTC to yourtime zone by using the time zone information configured in your user definition.
Important: If you change the time zone information configured in your user definition, all the records willreflect the new time zone.
The following sections contain the time zone considerations relevant to specific systems.
Maximo
Predix Essentials stores the time stamp associated with the data extracted from Maximo in UTC anddisplays the time stamp based on your configured time zone.
SAP
SAP provides a set of baseline time zone codes, which contain most of the standard time zones across theworld. SAP also provides the ability for administrators to define their own custom time zone, as needed.Before you use a customized time zone, you must configure the timezone_control table in APM Connect toinclude the customized time zone.
SAP defines two types of time zones:
• System: This time zone is based on SAP Application Server Operating System and is derived from thecontext file. You cannot modify this type of time zone.
• User: This time zone is based on the user who created the SAP record. You can modify and store thistype of time zone in the SAP user interface.
Predix Essentials stores the time stamp associated with the data extracted from SAP in UTC and displaysthe time stamp based on the time zone configured for the user who created the SAP record.
Note: If the data extracted from SAP contains only the date, then Predix Essentials will assign the time00:00:00 and adjust the assigned time with the SAP system or user time zone. This may lead to a datemismatch when you choose to display the data in Predix Essentials. To prevent this, Predix Essentialsstores the assigned reference time stamp as a string within the data, which is hidden by default. If youneed this information, you can configure Predix Essentials to display the data.
2 © 2020 General Electric Company
ServiceMax
Predix Essentials stores the time stamp associated with the data extracted from ServiceMax in UTC anddisplays the time stamp based on your configured time zone.
Support for Multiple Source SystemsWhether in a cloud environment or an on-premise installation, APM Connect enables you to connectmultiple source systems to a single Predix Essentials system.
There are occasions when you need to connect multiple source systems to a single Predix Essentialssystem. For example, when your company acquires another company, rather than immediatelyattempting to merge two systems together, you need to keep the systems running separately but want toimplement strategies centrally. The two systems might be the same type or of different types. You canconfigure APM Connect to handle either scenario.
The steps to configure these scenarios is similar to configuring a single system; you repeat the steps thatdefine the EAM system records and, after creating the intermediate repository for the first system, run ajob that adds the other systems to the intermediate repository with any required extraction filters.
Multiple Source Systems of the Same Type
This scenario is most useful when you all systems you need to support are the same type. The context fileconfiguration for each source system will look the same for the target Predix Essentials and APM Connectsystem for all the source systems. The unique parts of the context file are those that describe theparticulars of the source system, for example, the system ID and filters used.
Multiple Source Systems of Different Types
Use this scenario if you need to support multiple disparate systems, for example, an SAP and a Maximosystem. In this case, you will need to configure context files for each different type of source system, eachpointing to the same target Predix Essentials and APM Connect system. This does not preclude havingmultiple systems of a specific type (for example, one SAP, one ServiceMax, and two Maximo).
Considerations
There are some things to consider when connecting multiple source systems to a single Predix Essentialswith APM Connect:
• You must make sure that each source system has a unique system ID.• The logs will contain the messages from all of the source systems. Each message will identify the
source system using the system ID.• Some source system types have unique requirements that must be performed for each source system.
For example, you must run the Static Data job for all SAP systems.• Each source system in a cloud environment will need an intermediate repository, even though they are
communicating with a single tenant.• Do not schedule running the same adapter job types (for example, functional location extractions)
simultaneously from different source systems.
3© 2020 General Electric Company

Support for Multiple Culture Settings from a Single SourceSystem
APM Connect enables you to send data to Predix Essentials from a single source system that supportsplants using different language or extraction requirements.
Important: This feature is not supported for Technical Characteristics, Work Management, AssetCriticality Analysis, Asset Strategy Management, or Asset Strategy Implementation.
Globalization has increased the need to improve management of assets in different culture settings. Yoursolution may involve including these new plants in a single source system that communicates with PredixEssentials but requires the data to be presented to the user in their native language. You can accomplishthis by configuring APM Connect so that the plants that require specific languages or extractions appearto be different source systems, one for each language or extraction requirement. This capability provides abetter user experience for all users of Predix Essentials regardless of their location.
A key advantage of this support is that you can combine your source systems and then configure APMConnect to extract the data correctly.
Considerations
• The user defined in the source system that communicates with Predix Essentials must use the samedecimal notation.
• You must have unique system IDs and the correct language parameter value or extractionrequirements for each plant.
• You must configure filters to make sure that the data is routed correctly to the specific location.
4 © 2020 General Electric Company
Chapter
2DeploymentTopics:
• About the APM ConnectInstallation Package
• Upgrade the APM Connect Baseto V2.0.0
• Deploy the APM Connect Basefor the First Time
• Run the APM Connect Installer• Encrypt Parameters• Access the APM Connect
Administration Center• Change and Encrypt the APM
Connect Service User Namesand Passwords
• Install and Start the APMRuntime Container
• Install the Meridium IntegrationServices
• Enable Internet Explorer forAPM Connect
• Update PostgreSQL NetworkingConfiguration
• Change the PostgreSQLPasswords
• Configure SSL• Configure the Karaf Server for
SSL• Configure Multiple Source
Systems or Multiple Plants• Enable Multiple Cultures From a
Single Source System• Access the APM Connect
Administration Center
5© 2020 General Electric Company

• Change the APM ConnectAdministration Center UserPassword
• Create a Service Account User• Uninstall APM Connect
6 © 2020 General Electric Company
About the APM Connect Installation PackagePredix Essentials creates and delivers an installation package that provides the files and folders neededfor a successful implementation of APM Connect. This topic describes what may be contained in yourinstallation package based on your requirements.
Important: To prevent processing failures, you must upgrade your on-premises, client-side jobs withintwo months of a Predix Essentials release to the most current version of the APM Connect client jobs.
Contents of the Installation Package
The installation package contains the following folder:
APM Connect Base:This folder contains the APM Connect installer.
The following folder contains a configuration folder, a jobs package folder, a third-party software folder,and a compressed file to help you install the third-party software. It also contains the ABAP package andinstallation documentation for that package.
Unified - SAP cloud client:This folder contains the SAP cloud client.
Upgrade the APM Connect Base to V2.0.0
About This Task
The following table outlines the steps that you must complete to upgrade this module to V2.0.0.
These tasks may be completed by multiple people in your organization. However, we recommend that thetasks be completed in the order in which they are listed.
Note: As of the version of APM Connect released in the first quarter of 2019, you must keep theseconsiderations in mind:
• Because of changes to the Check Connection function, the CMMS_ID and the System Name in the EAMSystem record must be the same. Before upgrading, make sure you update the EAM System record sothese values match.
• If you are using multiple cultures from a single source system, existing data must be updated beforeyou upgrade.
Procedure
Upgrade from any version V1.0.0 through V1.0.31. Uninstall APM Connect.2. Complete the steps to deploy the APM Connect Base for the first time.
7© 2020 General Electric Company

Deploy the APM Connect Base for the First TimeThe topics outline the steps that you must complete to deploy and configure this module for the first time.These instructions assume that you have completed the steps for deploying the basic Predix Essentialssystem architecture.
About This Task
These tasks may be completed by multiple people in your organization. We recommend, however, that thetasks be completed in the order in which they are listed.
Next Steps
After deploying the APM Connect Base, deploy any adapters you need.
Run the APM Connect Installer
Before You begin
Before you can run the APM Connect Installer, you must:
• Ensure that your system meets the APM Connect system requirements.• Access the APM Connect installation package.• For SAP integrations, download the SAP Java Connector Files (SAP JCO) from the SAP marketplace.
Procedure
1. On your APM Connect server, access the APM Connect installation package, navigate the Installerfolder, and then open the package.
2. Double-click the file APMConnect-Base.exe.3. On the message that asks if you want the installer to make changes to your machine, select Yes.4. In the Setup - APM Connect window, select Next.5. In the Select Destination Location window, select the destination to which you want to save the
software by doing one of the following:
• To select the default location (C:\APMConnect), just select Next.• To use a different location, navigate to the folder you want to use, select OK, and then select Next.
6. In the Select Components window, select the components to you want to install, and then selectNext.
• Install Oracle Java JDK 1.8 (uncheck if java already installed): If Java JDK 1.8 is alreadyinstalled on your machine, clear the check box.
• Install PostgreSQL (required unless using external database): If you are using an externaldatabase configuration, clear the check box.
• Install APM Connect Container (required unless already installed): If you have previouslyinstalled the APM Connect Container, clear the check box.
7. Select Next.
The screen appears.
8 © 2020 General Electric Company
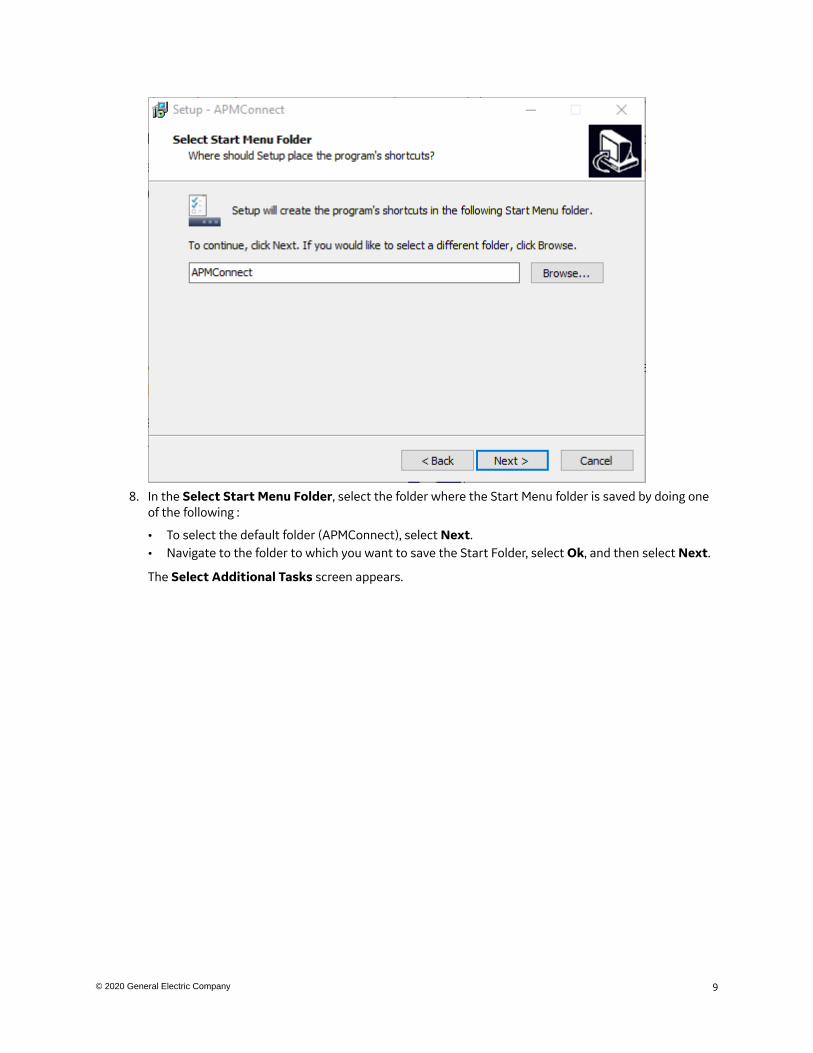
8. In the Select Start Menu Folder, select the folder where the Start Menu folder is saved by doing oneof the following :
• To select the default folder (APMConnect), select Next.• Navigate to the folder to which you want to save the Start Folder, select Ok, and then select Next.
The Select Additional Tasks screen appears.
9© 2020 General Electric Company
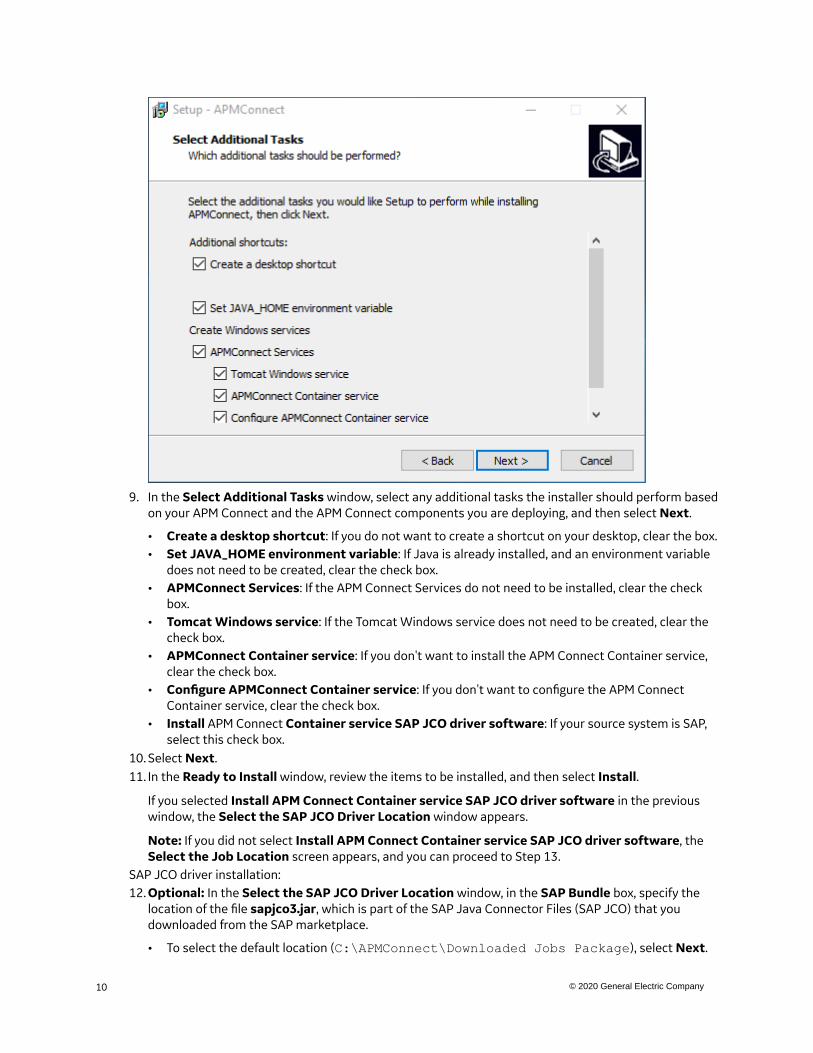
9. In the Select Additional Tasks window, select any additional tasks the installer should perform basedon your APM Connect and the APM Connect components you are deploying, and then select Next.
• Create a desktop shortcut: If you do not want to create a shortcut on your desktop, clear the box.• Set JAVA_HOME environment variable: If Java is already installed, and an environment variable
does not need to be created, clear the check box.• APMConnect Services: If the APM Connect Services do not need to be installed, clear the check
box.• Tomcat Windows service: If the Tomcat Windows service does not need to be created, clear the
check box.• APMConnect Container service: If you don't want to install the APM Connect Container service,
clear the check box.• Configure APMConnect Container service: If you don't want to configure the APM Connect
Container service, clear the check box.• Install APM Connect Container service SAP JCO driver software: If your source system is SAP,
select this check box.10. Select Next.11. In the Ready to Install window, review the items to be installed, and then select Install.
If you selected Install APM Connect Container service SAP JCO driver software in the previouswindow, the Select the SAP JCO Driver Location window appears.
Note: If you did not select Install APM Connect Container service SAP JCO driver software, theSelect the Job Location screen appears, and you can proceed to Step 13.
SAP JCO driver installation:12. Optional: In the Select the SAP JCO Driver Location window, in the SAP Bundle box, specify the
location of the file sapjco3.jar, which is part of the SAP Java Connector Files (SAP JCO) that youdownloaded from the SAP marketplace.
• To select the default location (C:\APMConnect\Downloaded Jobs Package), select Next.
10 © 2020 General Electric Company
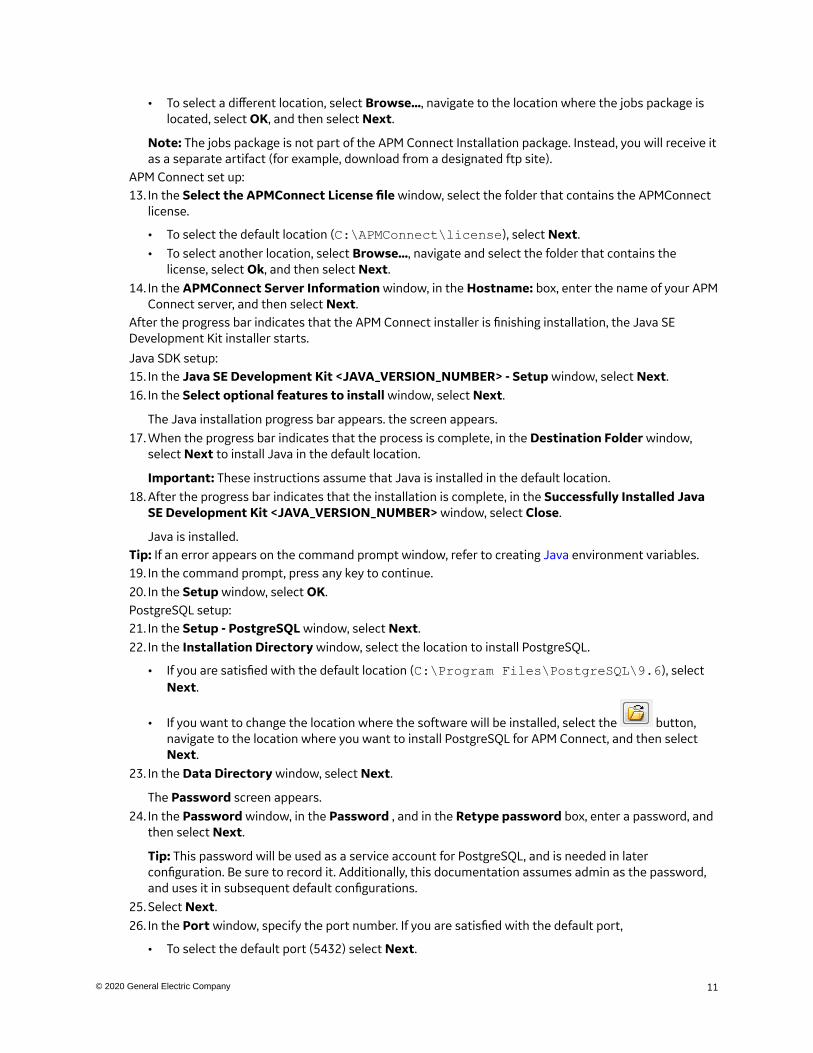
• To select a different location, select Browse..., navigate to the location where the jobs package islocated, select OK, and then select Next.
Note: The jobs package is not part of the APM Connect Installation package. Instead, you will receive itas a separate artifact (for example, download from a designated ftp site).
APM Connect set up:13. In the Select the APMConnect License file window, select the folder that contains the APMConnect
license.
• To select the default location (C:\APMConnect\license), select Next.• To select another location, select Browse..., navigate and select the folder that contains the
license, select Ok, and then select Next.14. In the APMConnect Server Information window, in the Hostname: box, enter the name of your APM
Connect server, and then select Next.After the progress bar indicates that the APM Connect installer is finishing installation, the Java SEDevelopment Kit installer starts.
Java SDK setup:15. In the Java SE Development Kit <JAVA_VERSION_NUMBER> - Setup window, select Next.16. In the Select optional features to install window, select Next.
The Java installation progress bar appears. the screen appears.17. When the progress bar indicates that the process is complete, in the Destination Folder window,
select Next to install Java in the default location.
Important: These instructions assume that Java is installed in the default location.18. After the progress bar indicates that the installation is complete, in the Successfully Installed Java
SE Development Kit <JAVA_VERSION_NUMBER> window, select Close.
Java is installed.Tip: If an error appears on the command prompt window, refer to creating Java environment variables.19. In the command prompt, press any key to continue.20. In the Setup window, select OK.PostgreSQL setup:21. In the Setup - PostgreSQL window, select Next.22. In the Installation Directory window, select the location to install PostgreSQL.
• If you are satisfied with the default location (C:\Program Files\PostgreSQL\9.6), selectNext.
• If you want to change the location where the software will be installed, select the button,navigate to the location where you want to install PostgreSQL for APM Connect, and then selectNext.
23. In the Data Directory window, select Next.
The Password screen appears.24. In the Password window, in the Password , and in the Retype password box, enter a password, and
then select Next.
Tip: This password will be used as a service account for PostgreSQL, and is needed in laterconfiguration. Be sure to record it. Additionally, this documentation assumes admin as the password,and uses it in subsequent default configurations.
25. Select Next.26. In the Port window, specify the port number. If you are satisfied with the default port,
• To select the default port (5432) select Next.
11© 2020 General Electric Company
• In the Port box, enter the port on which you prefer the server to listen, and then select Next.
Tip: The port number is needed in later configuration. Be sure to record it. Additionally, theseinstructions and all subsequent instructions assume that the default port 5432 is used.
27. In the Advanced Options window, select Next.28. In the Ready to Install window, Select Next.
An installation progress bar appears. screen appears.29. After the installation bar indicates that the installation is complete, in the Completing the
PostgreSQL Setup Wizard window, clear the Stack Builder may be used to download and installadditional tools, drivers and applications to complement your PostgreSQL installation checkbox, and then select Finish.
Complete setup:
Note: If you have selected the installation of APM Connect Container service or the SAPJCO driversoftware , the Administrator: Windows Power Shell and Administrator: Karaf windows appear.Installation progress may not be visible on the screen for 2-3 minutes. During this time, do not press anykey or close the windows.30. In the Completing the APM Connect Setup Wizard window, make sure Yes, restart the computer
now is selected, and then select Finish.
The APM Connect installer has completed its operations, and the machine should restartautomatically.
31. Optional: If the machine does not do so automatically, restart your machine.
Encrypt ParametersParameters in the context file are not encrypted by default, which results in values being transmitted inclear text over the network. However, you can manually encrypt any parameter manually.
Procedure
1. On the machine on which you installed APM Connect, access the file apmpasswd.zip, and unzip it.2. Open the EncryptString folder, and then run apmpasswd_run.bat.
Command prompt opens, and then the Talend Open Studio window appears.3. Enter the parameter value you want to encrypt in the Enter the text to be encrypted: box, and then
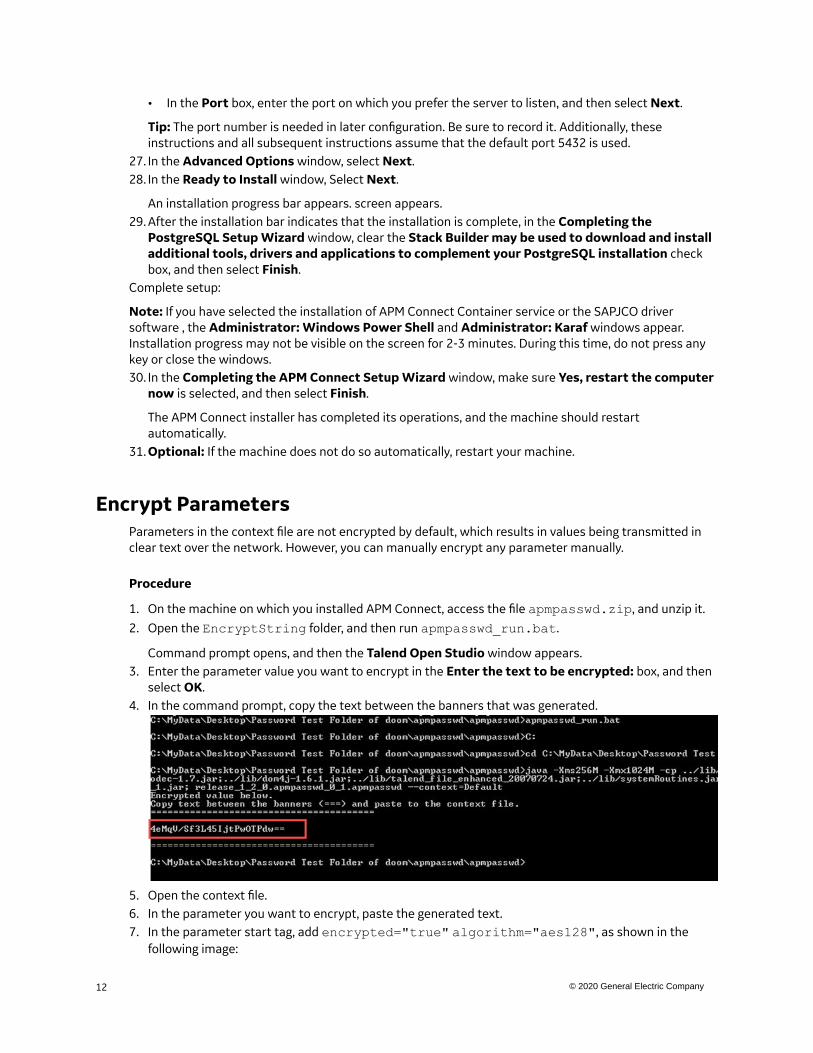
select OK.4. In the command prompt, copy the text between the banners that was generated.
5. Open the context file.6. In the parameter you want to encrypt, paste the generated text.7. In the parameter start tag, add encrypted="true" algorithm="aes128", as shown in the
following image:
12 © 2020 General Electric Company
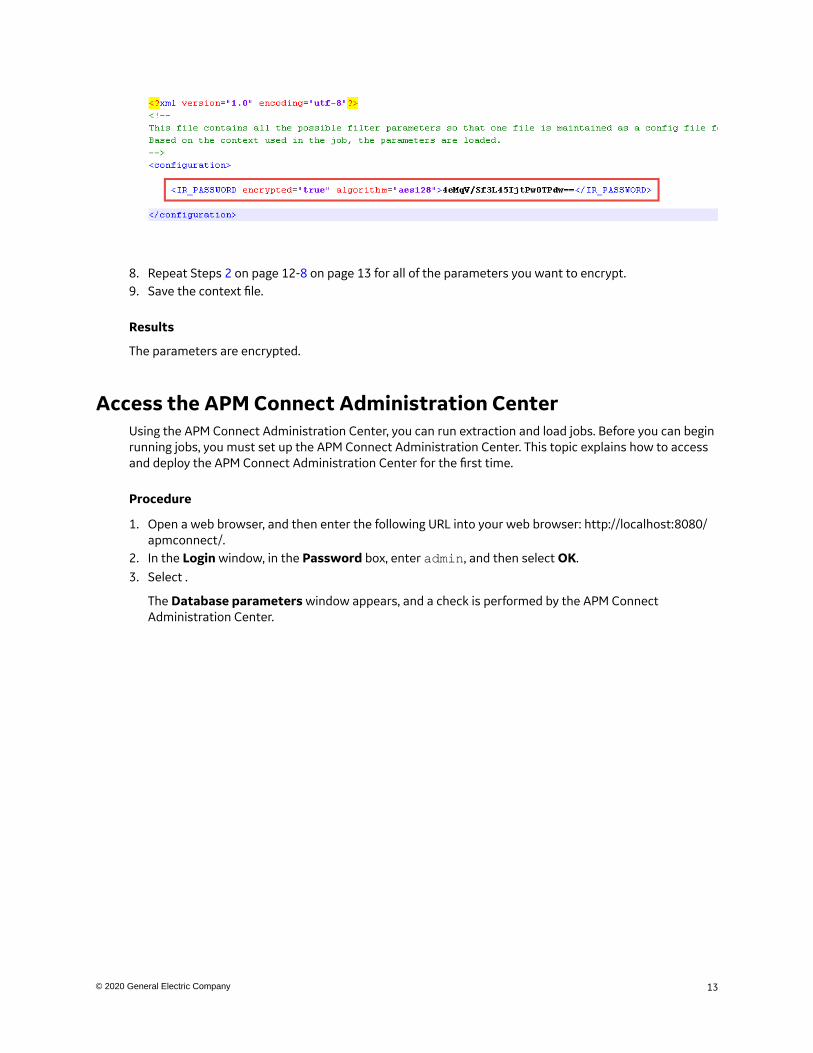
8. Repeat Steps 2 on page 12-8 on page 13 for all of the parameters you want to encrypt.9. Save the context file.
Results
The parameters are encrypted.
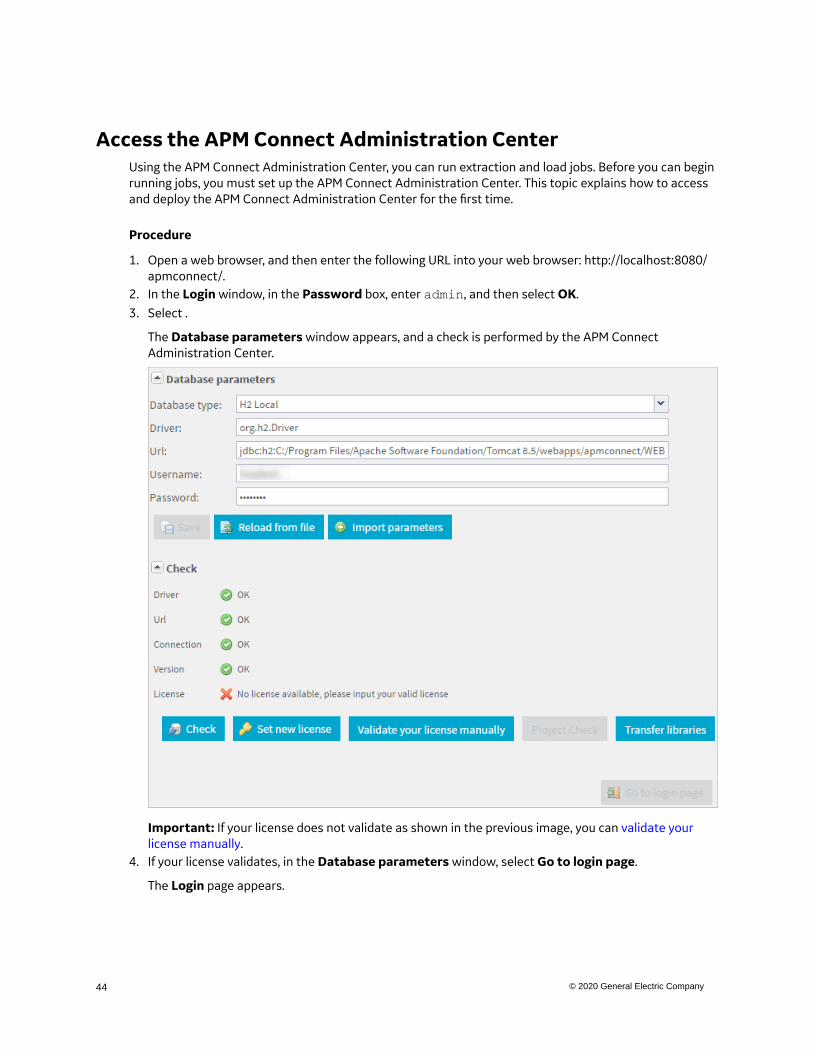
Access the APM Connect Administration CenterUsing the APM Connect Administration Center, you can run extraction and load jobs. Before you can beginrunning jobs, you must set up the APM Connect Administration Center. This topic explains how to accessand deploy the APM Connect Administration Center for the first time.
Procedure
1. Open a web browser, and then enter the following URL into your web browser: http://localhost:8080/apmconnect/.
2. In the Login window, in the Password box, enter admin, and then select OK.3. Select .
The Database parameters window appears, and a check is performed by the APM ConnectAdministration Center.
13© 2020 General Electric Company
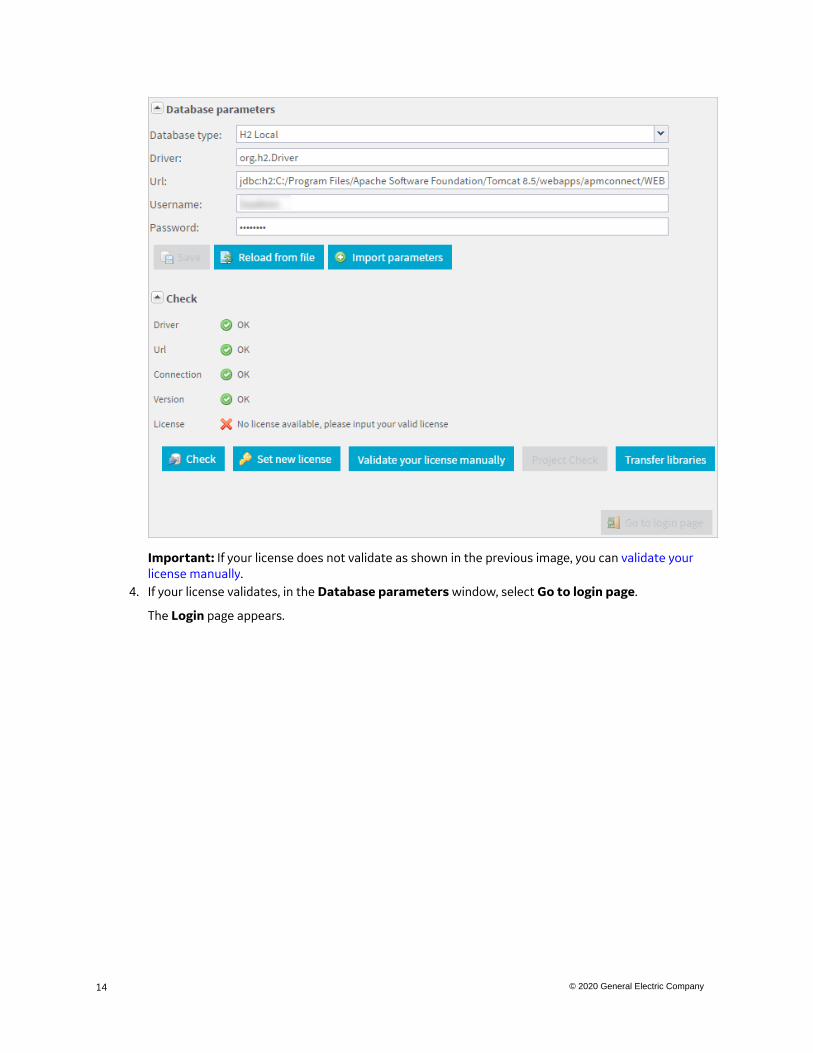
Important: If your license does not validate as shown in the previous image, you can validate yourlicense manually.
4. If your license validates, in the Database parameters window, select Go to login page.
The Login page appears.
14 © 2020 General Electric Company

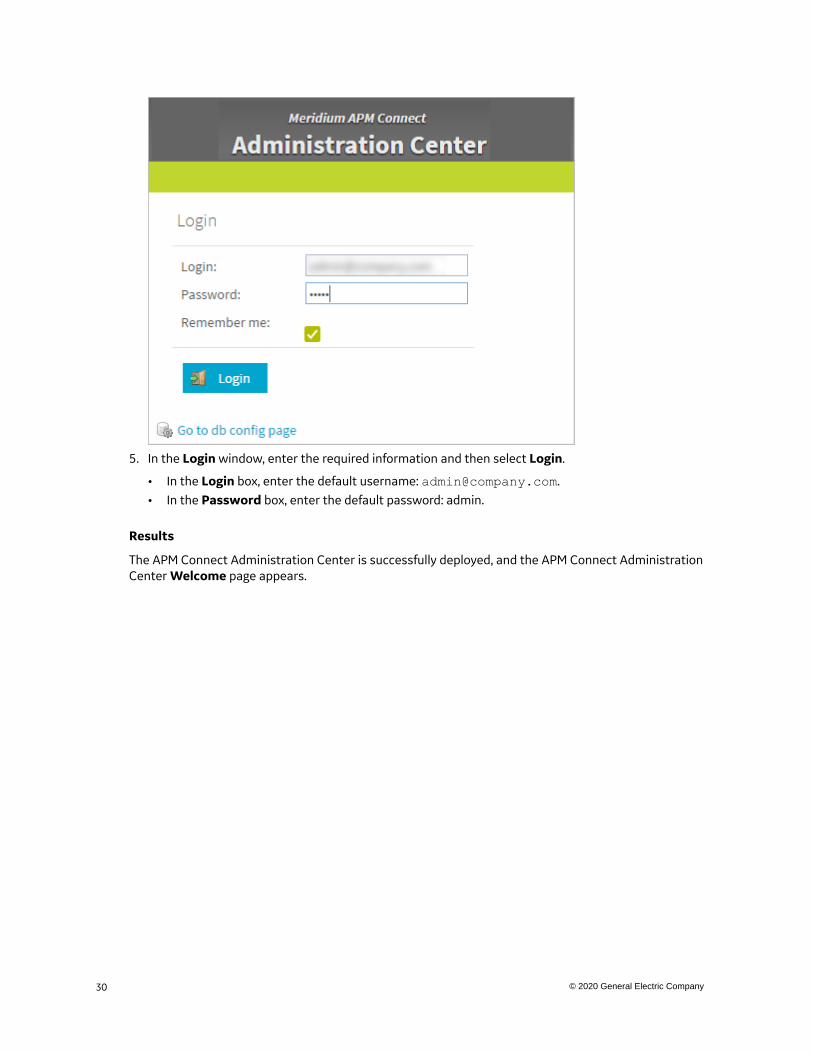
5. In the Login window, enter the required information and then select Login.
• In the Login box, enter the default username: [email protected].• In the Password box, enter the default password: admin.
Results
The APM Connect Administration Center is successfully deployed, and the APM Connect AdministrationCenter Welcome page appears.
15© 2020 General Electric Company
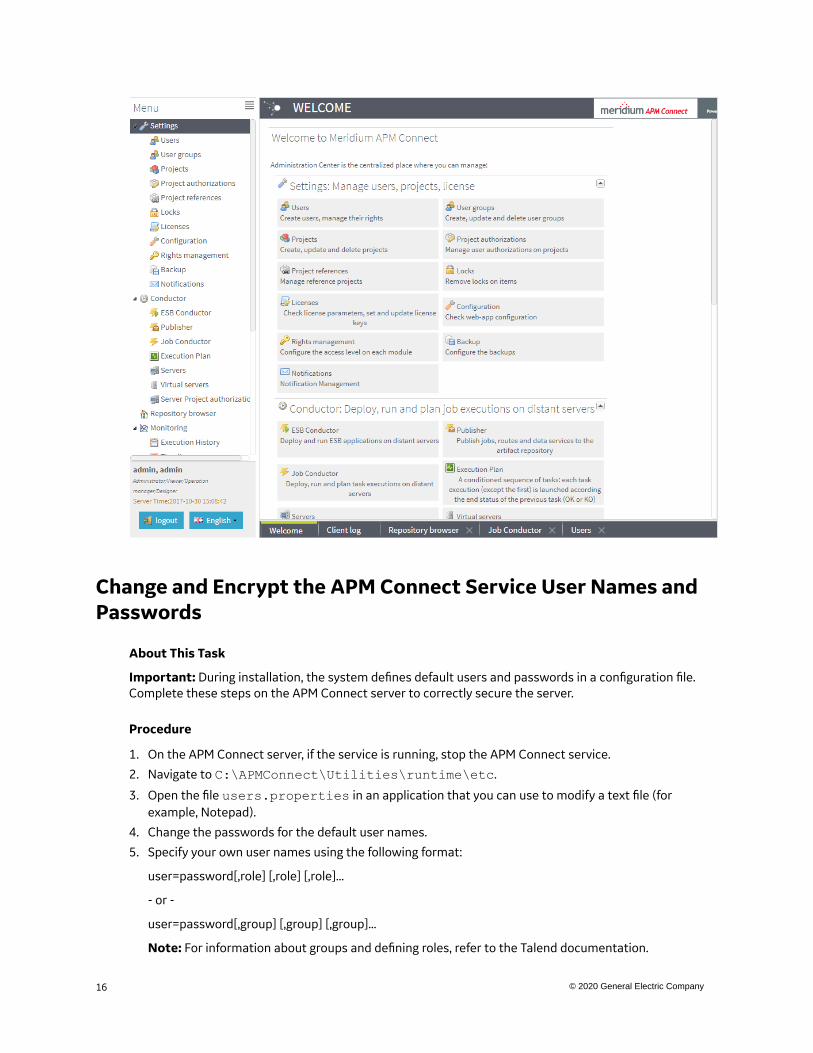
Change and Encrypt the APM Connect Service User Names andPasswords
About This Task
Important: During installation, the system defines default users and passwords in a configuration file.Complete these steps on the APM Connect server to correctly secure the server.
Procedure
1. On the APM Connect server, if the service is running, stop the APM Connect service.
2. Navigate to C:\APMConnect\Utilities\runtime\etc.
3. Open the file users.properties in an application that you can use to modify a text file (forexample, Notepad).
4. Change the passwords for the default user names.
5. Specify your own user names using the following format:
user=password[,role] [,role] [,role]...
- or -
user=password[,group] [,group] [,group]...
Note: For information about groups and defining roles, refer to the Talend documentation.
16 © 2020 General Electric Company

6. Save and close the file.7. To specify authorizations for the jobserver, open the file users.csv.8. Add the authorized user names and passwords in the following format:
username,password
Note: For information about jobserver requirements, refer to the Talend documentation.9. Save and close the file.10. To enable password encryption, open the file system.properties.11. Add the following statements at the end of the file:
# edit config config:edit org.apache.karaf.jaas config:property-set encryption.enabled true config:update # force a restart bundle:restart
12. Save and close the file.13. Start the APM Connect service.
Install and Start the APM Runtime Container
Procedure
1. On the APM Connect server, locate Command Prompt2. Right-click on Command Prompt, and then select Run as administrator.
17© 2020 General Electric Company
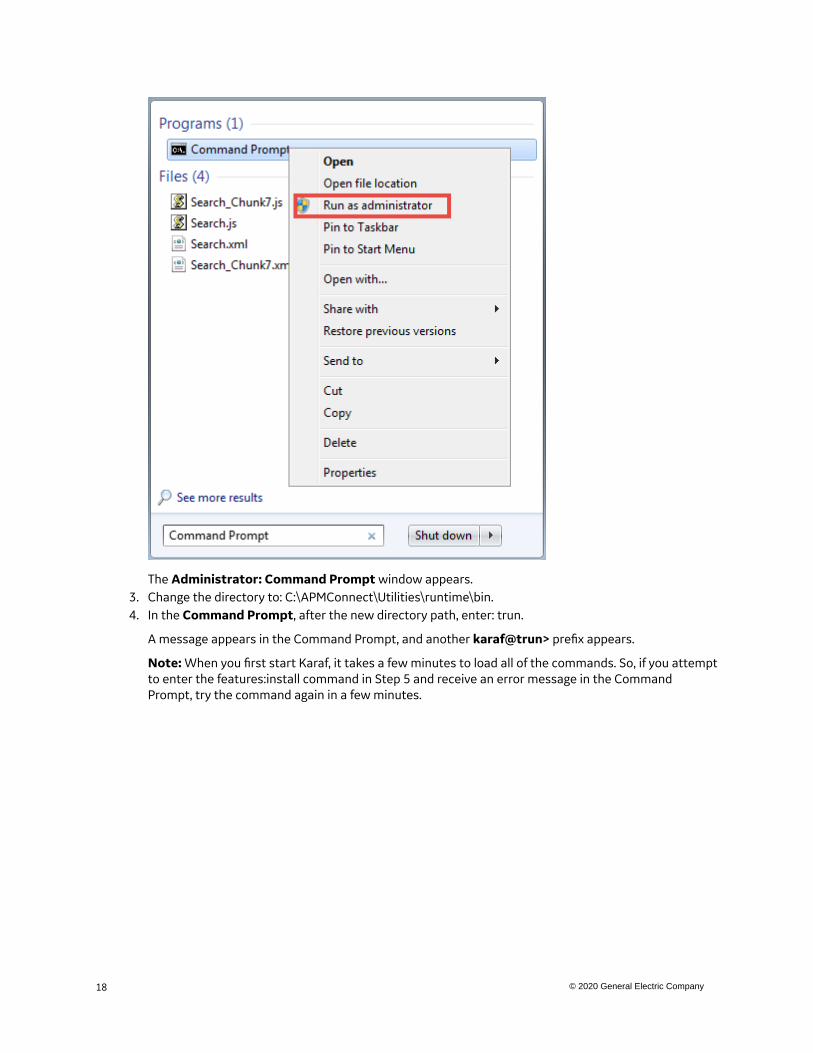
The Administrator: Command Prompt window appears.3. Change the directory to: C:\APMConnect\Utilities\runtime\bin.4. In the Command Prompt, after the new directory path, enter: trun.
A message appears in the Command Prompt, and another karaf@trun> prefix appears.
Note: When you first start Karaf, it takes a few minutes to load all of the commands. So, if you attemptto enter the features:install command in Step 5 and receive an error message in the CommandPrompt, try the command again in a few minutes.
18 © 2020 General Electric Company
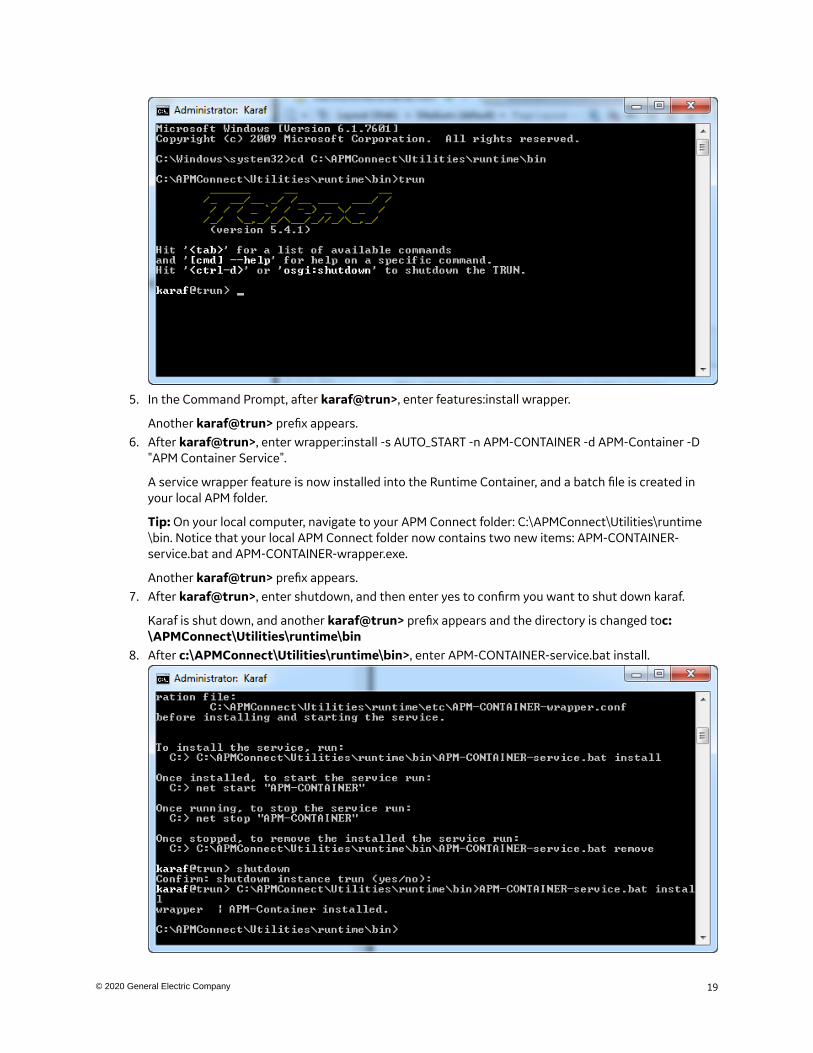
5. In the Command Prompt, after karaf@trun>, enter features:install wrapper.
Another karaf@trun> prefix appears.6. After karaf@trun>, enter wrapper:install -s AUTO_START -n APM-CONTAINER -d APM-Container -D
"APM Container Service".
A service wrapper feature is now installed into the Runtime Container, and a batch file is created inyour local APM folder.
Tip: On your local computer, navigate to your APM Connect folder: C:\APMConnect\Utilities\runtime\bin. Notice that your local APM Connect folder now contains two new items: APM-CONTAINER-service.bat and APM-CONTAINER-wrapper.exe.
Another karaf@trun> prefix appears.7. After karaf@trun>, enter shutdown, and then enter yes to confirm you want to shut down karaf.
Karaf is shut down, and another karaf@trun> prefix appears and the directory is changed toc:\APMConnect\Utilities\runtime\bin
8. After c:\APMConnect\Utilities\runtime\bin>, enter APM-CONTAINER-service.bat install.
19© 2020 General Electric Company
The APM Container is installed, and a message appears indicating as such.9. To start the APM Container, restart your machine.
Install the Meridium Integration Services
About This Task
Depending on your system architecture, you can perform this procedure on the APM Connect server orthe Predix Essentials server.
Procedure
1. On the server, access the Predix Essentials distribution package, navigate to the folder \\Setup\Meridium APM Server and Add-ons, and then double-click the file Setup.exe.
2. Double-click the file .3. In the Welcome window, select Next.4. In the License Agreement window, read the License Agreement and, if you agree, select the I accept
the terms of the license agreement check box, and then select Next.
The screen appears.5. In the Select Installation Location window, select Next to accept the default location.6. In the Select the features you want to install window, select the Meridium Integration Services
option, and then select Next.
Note: While additional options are available for selection, these options are not meant to be installedon this server. These instructions assume that you want to install only Meridium Integration Services.
7. Select Next.8. In the Websites window, select Next.9. In the Complete the Installation window, select Install.
The Setup Status window appears, displaying a progress bar.10. In the Installation is complete screen window, select Finish.
The Meridium Integration Services installation is complete.
Enable Internet Explorer for APM Connect
About This Task
Important: This step is required only if you are using Internet Explorer to access the APM ConnectAdministration Center. If you are not using Internet Explorer, you can skip this procedure, and proceed tothe next step, in the APM Connect Base First-Time Deployment Workflow.
Procedure
1. On the APM Connect server, access Control Panel\Network and Internet, and then select InternetOptions.
The Internet Properties screen appears2. Select the Security tab, then, in the Select a zone to view or change security settings section,
select Local intranet, and then select Custom level....
The Security Settings -Intranet Zone screen appears.
20 © 2020 General Electric Company
3. In the Settings section, access the Include local directory path when uploading files to a server,and select Disable.
4. Select OK.
The Security Settings -Intranet Zone screen closes.5. On the Internet Properties screen, select Apply.
Internet Explorer is configured accommodate APM Connect.
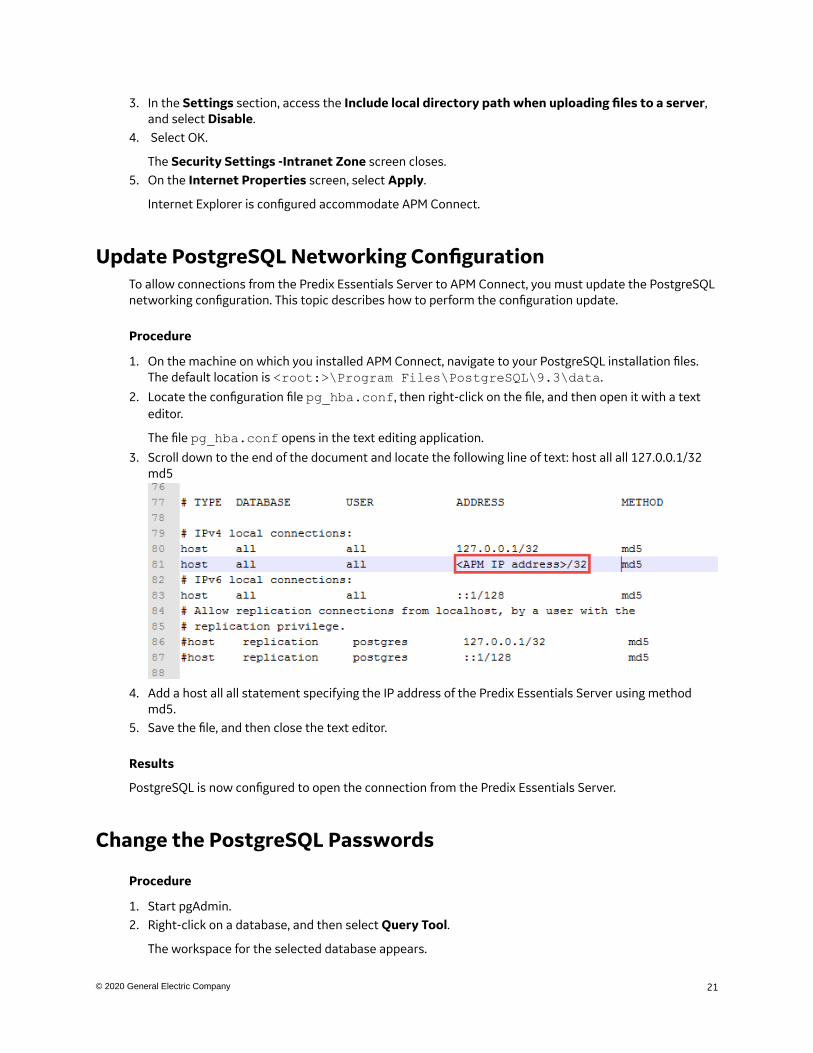
Update PostgreSQL Networking ConfigurationTo allow connections from the Predix Essentials Server to APM Connect, you must update the PostgreSQLnetworking configuration. This topic describes how to perform the configuration update.
Procedure
1. On the machine on which you installed APM Connect, navigate to your PostgreSQL installation files.The default location is <root:>\Program Files\PostgreSQL\9.3\data.
2. Locate the configuration file pg_hba.conf, then right-click on the file, and then open it with a texteditor.
The file pg_hba.conf opens in the text editing application.3. Scroll down to the end of the document and locate the following line of text: host all all 127.0.0.1/32
md5
4. Add a host all all statement specifying the IP address of the Predix Essentials Server using methodmd5.
5. Save the file, and then close the text editor.
Results
PostgreSQL is now configured to open the connection from the Predix Essentials Server.
Change the PostgreSQL Passwords
Procedure
1. Start pgAdmin.2. Right-click on a database, and then select Query Tool.
The workspace for the selected database appears.
21© 2020 General Electric Company
3. In the workspace, enter ALTER statements for each role to be changed using the following format:
ALTER ROLE username SET PASSWORD TO 'newpassword'
4. At the top of the workspace, select .
The query runs and the password is changed.
Note: For more information about the PostgreSQL roles, see the PostgreSQL documentation.
Configure SSLIf you want to use SSL for connections from APM Connect, this step is required.
About This Task
If you want to use SSL when moving data through the system, you must import security certificates fromthe secured application into a truststore file accessible to APM Connect. This procedure describes theprocess for a single application. You can import multiple certificates into a single truststore file byrepeating this procedure for each application requiring SSL.
Important: When copying the certificates, make sure that you only log in to the application requiringSSL access to APM Connect.
Note: If you want to use SSL with Predix Essentials web services, contact GE Global Support.
Procedure
1. Log in to your application, and then access the certificate information from your browser.
Note: Typically, you can access certificate information by selecting the lock icon in the address bar.
The Certificate window appears.2. Select Details, and then select Copy to File....
The Certificate Export Wizard window appears.
22 © 2020 General Electric Company
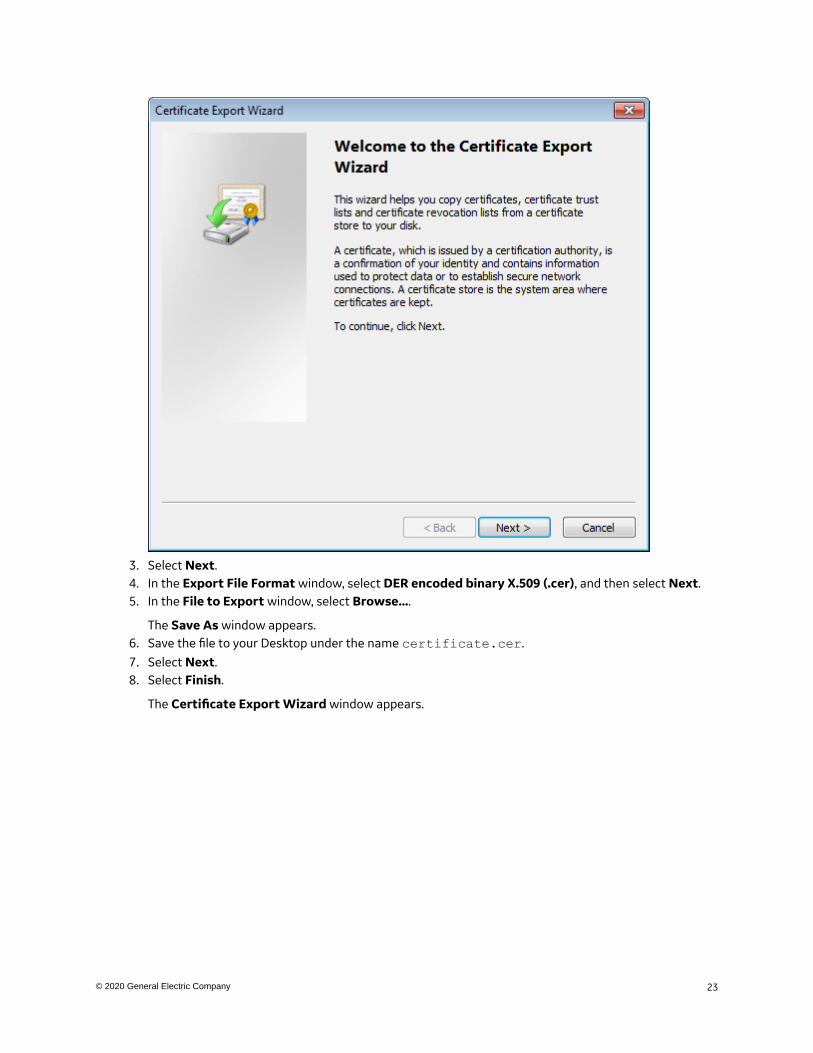
3. Select Next.4. In the Export File Format window, select DER encoded binary X.509 (.cer), and then select Next.5. In the File to Export window, select Browse….
The Save As window appears.6. Save the file to your Desktop under the name certificate.cer.7. Select Next.8. Select Finish.
The Certificate Export Wizard window appears.
23© 2020 General Electric Company
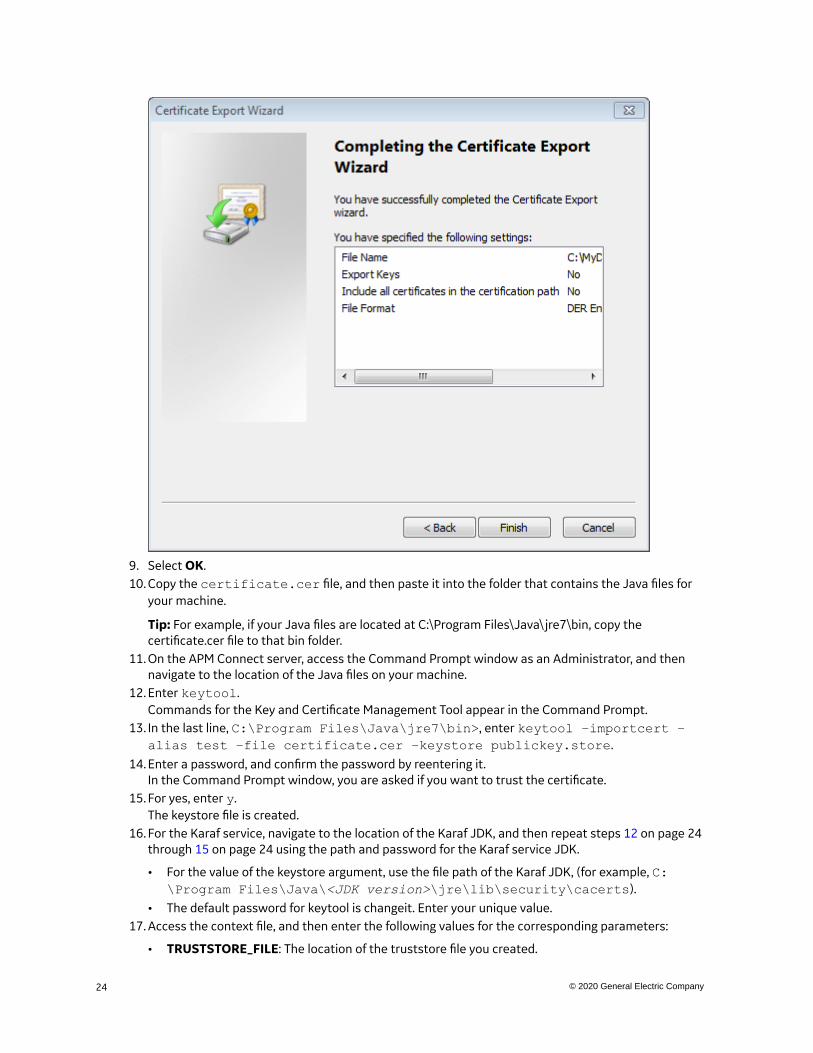
9. Select OK.10. Copy the certificate.cer file, and then paste it into the folder that contains the Java files for
your machine.
Tip: For example, if your Java files are located at C:\Program Files\Java\jre7\bin, copy thecertificate.cer file to that bin folder.
11. On the APM Connect server, access the Command Prompt window as an Administrator, and thennavigate to the location of the Java files on your machine.
12. Enter keytool.Commands for the Key and Certificate Management Tool appear in the Command Prompt.
13. In the last line, C:\Program Files\Java\jre7\bin>, enter keytool –importcert –alias test –file certificate.cer –keystore publickey.store.
14. Enter a password, and confirm the password by reentering it.In the Command Prompt window, you are asked if you want to trust the certificate.
15. For yes, enter y.The keystore file is created.
16. For the Karaf service, navigate to the location of the Karaf JDK, and then repeat steps 12 on page 24through 15 on page 24 using the path and password for the Karaf service JDK.
• For the value of the keystore argument, use the file path of the Karaf JDK, (for example, C:\Program Files\Java\<JDK version>\jre\lib\security\cacerts).
• The default password for keytool is changeit. Enter your unique value.17. Access the context file, and then enter the following values for the corresponding parameters:
• TRUSTSTORE_FILE: The location of the truststore file you created.
24 © 2020 General Electric Company
• TRUSTSTORE_PASSWORD: The password you entered in the Command Prompt window whenyou installed the certificate.
• USE_SSL: true.• APM_API_USE_SSL: true, if you are using SSL on the Predix Essentials Server.
Results
SSL is now enabled for the applications for which you imported the certificates.
Configure the Karaf Server for SSLTo ensure proper communications between Predix Essentials and APM Connect, you must configure theserver to use SSL.
About This Task
To provide a more secure data flow, you must make sure that the connection that provides the path fromthe APM Connect system to Predix Essentials is protected. You can provide additional security to the dataflow by configuring the APM Connect server, which processes the jobs that send and receive databetween the endpoints, to use SSL.
Procedure
1. Edit the file etc/org.ops4j.pax.web.cfg so that the HTTP feature uses SSL.
When you are done, the file should look similar to this example, with your_password replaced with thepasswords you will use.
org.osgi.service.http.port=8040org.osgi.service.http.port.secure=9001org.osgi.service.http.secure.enabled=trueorg.ops4j.pax.web.ssl.keystore=${karaf.base}/etc/keystores/keystor.jksorg.ops4j.pax.web.ssl.password=your_passwordorg.ops4j.pax.web.ssl.keypassword=your_password#org.ops4j.pax.web.config.file=${karaf.base}/etc/jetty.xml
2. Enable HTTP client support in APM Connect.
a) Navigate to C:\APMConnect\Utilities\runtime, and then enter bin/trun.b) At the prompt, enter feature:install http.
3. From a certificate authority, obtain two certificates: one for the server and one for the client.
Important: Make sure you import the client certificate you receive into your application server.4. In the APM Connect server, at the command prompt, import the server certificate into the server
keystore.
The command will resemble the following example.
keytool -import -trustcacerts -keystore keystore.jks -storepass keystore_password -alias serverkey -file server.cer
5. In the APM Connect server, at the command prompt, import the client certificate into the serverkeystore.
25© 2020 General Electric Company

The command will resemble the following example.
keytool -import -trustcacerts -keystore keystore.jks -storepass keystore_password -alias clientkey -file client.cer
6. In the APM Connect server, at the command prompt, verify that the client certificate is imported.
a) In the APM Connect server, at the command prompt, enter keytool -list -v -keystorekeystore.jks.
b) At the password prompt, enter the keystore password.The system responds similarly to the following example.
Keystore type: JKSKeystore provider: SUNYour keystore contains 2 entries................Alias name: serverkeyCreation date: Jun 1, 2018Entry type: PrivateKeyEntry...............Alias name: clientkeyCreation date: Jun 1, 2018Entry type: trustedCertEntry.............................
7. Test the APM Connect server configuration.
a) Start the Karaf service.bin/client
b) Install the WebConsole feature.karaf@trun> feature:install webconsole
c) In a browser, enter https://localhost:9001/system/console.You should get an error message similar to the following:
An error occurred during a connection to localhost:9001.
SSL peer cannot verify your certificate.
(Error code: ssl_error_bad_cert_alert)d) Import the client certificate from step 3 on page 25 into your browser using the process for
managing certificates for that browser.e) Repeat step 7.c on page 26 to verify that the certificate imported successfully and you can access
the APM Connect server.
Results
The APM Connect server is configured to require SSL.
Next Steps
Import any additional client application certificates for your installation.
26 © 2020 General Electric Company
Configure Multiple Source Systems or Multiple PlantsWhether you have multiple source systems or multiple plants connected to Predix Essentials, theconfiguration process is similar.
Before You begin
• Identify the target APM Connect system and all required information, such as userids, passwords, IPaddresses, and ports.
• Identify the source systems you need. These can be any type of source system or plants that haveunique language or extraction requirements.
• Review the information about creating EAM system records.• Review the information about configuring the context file for the types of source systems involved.• Make sure that the language and decimal notation values for the source system System User and
Predix Essentials match.• Make sure Predix Essentials is deployed.
About This Task
You need to follow these steps if you have multiple source systems using APM Connect performingExtractions and RFC/Notification Management for a single Predix Essentials system or for a single PredixEssentials Tenant in a cloud environment. The scenarios include:
• Multiple source systems of the same EAM type. This situation has multiple SAP, Maximo, or ServiceMaxSystems connected to a single Predix Essentials system.
• Multiple source systems with a mixture of EAM types. This situation has multiple SAP, Maximo, andServiceMax systems connected to a single Predix Essentials system.
• A single source system that has plants that need different languages or extractions.• An asset can only be accessed by a single CMMS-ID.
You use similar steps to configure APM Connect to support either multiple source systems or multipleplants from a single source system. The main differences are addressing of the sources, any applicablefiltering of data, and the contents of the context file for each source. The following steps outline whatneeds to be done in both an on-premise environment or a cloud environment.
This topic assumes familiarity with the process of deploying APM Connect for a single source system andthat you have already configured Predix Essentials for the first source system.
Procedure
1. For each source system or plant, create an EAM System Record.
Each source system or plant must have a unique system ID (CMMS-ID).
Note: If you are configuring multiple plants from a single source system, the IP addresses, user IDs,and other addressing information will be the same as the first EAM System Record you defined for thesource system.
2. Run the job addSourceSystem to add configurations to the existing Intermediate Repository databasewith a different system ID for each source system or plant and the appropriate system type (SAP,Maximo, or ServiceMax).
3. Configure context files for each of the source systems or plants so they have separate jobs for theExtractions.
Important: Do not schedule the same interface job simultaneously from different source systems.
27© 2020 General Electric Company
4. Set up RFC and Notifications from Predix Essentials to the source systems for either on-premise orcloud environments.
Environment Action
On-premises Deploy connectServices.jar service for the outbound interface to all the source systemsfrom Predix Essentials.
Cloud Import the connectServicesCloudClient job for each source system using the samecontext file used for the Extraction.
Note: You should use Intermediate Repositories on each EAM system clients to senddata to a single Predix Essentials tenant. The tenant will have separateconnectServicesCloudClient for each extraction context.
5. Optional: For each SAP system, run the Static Data job to extract data for each SAP system.
Enable Multiple Cultures From a Single Source SystemTo enable data flow when there are multiple cultures configured for a single source system, you mustcomplete the following steps.
Procedure
1. Create a context file for each culture originating from a specific source system.
a) Assign a CMMS_ID and TARGET_CMMS_ID that indicates the culture.For example, consider a source system that supports both French and Spanish. Your CMMS_ID andTARGET_CMMS_ID for the two systems could resemble SRC1_client_FR andSRC1_client_ES.
2. Create the Intermediate Repository database for the first CMMS_ID you define.3. For each additional CMMS_ID defined in Step 1.a on page 28, run the addSourceSystem job.4. For each CMMS_ID defined in Step 1.a on page 28, create an EAM system record, using the CMMS_ID in
the System Name field.5. Select Test Connection for each EAM System record you created.
Results
You have configured APM Connect to support multiple cultures from a single source system.
Access the APM Connect Administration CenterUsing the APM Connect Administration Center, you can run extraction and load jobs. Before you can beginrunning jobs, you must set up the APM Connect Administration Center. This topic explains how to accessand deploy the APM Connect Administration Center for the first time.
Procedure
1. Open a web browser, and then enter the following URL into your web browser: http://localhost:8080/apmconnect/.
2. In the Login window, in the Password box, enter admin, and then select OK.3. Select .
The Database parameters window appears, and a check is performed by the APM ConnectAdministration Center.
28 © 2020 General Electric Company
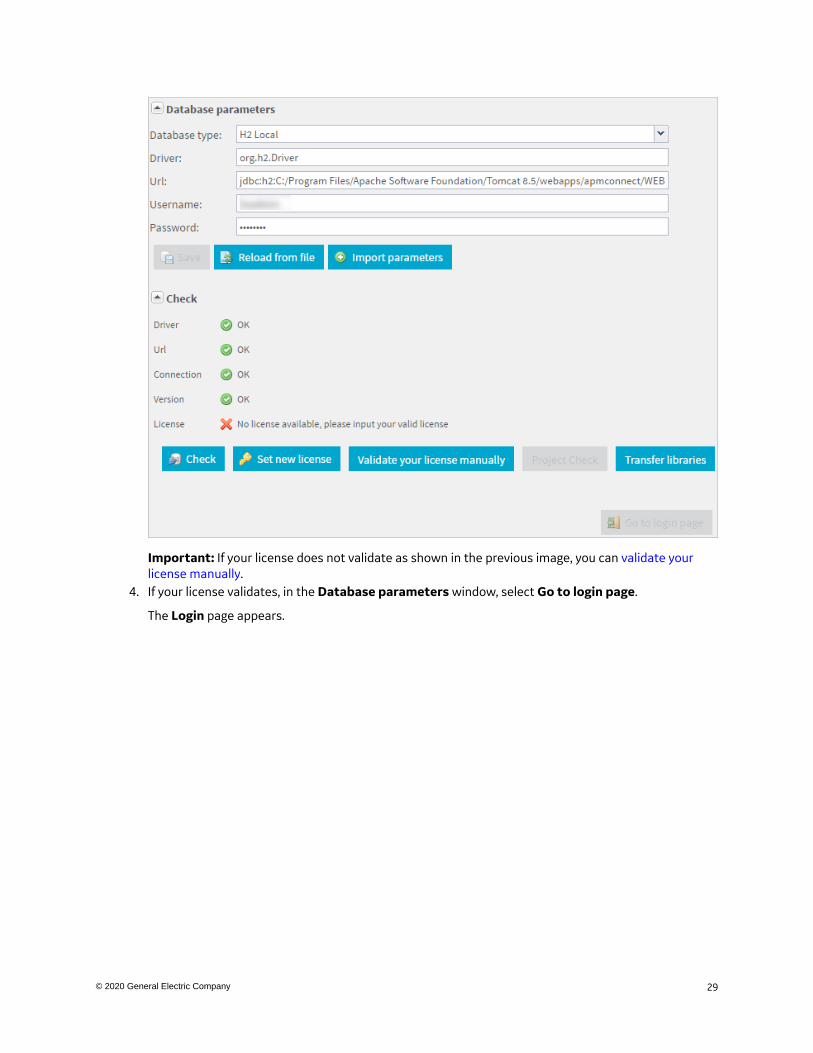
Important: If your license does not validate as shown in the previous image, you can validate yourlicense manually.
4. If your license validates, in the Database parameters window, select Go to login page.
The Login page appears.
29© 2020 General Electric Company
5. In the Login window, enter the required information and then select Login.
• In the Login box, enter the default username: [email protected].• In the Password box, enter the default password: admin.
Results
The APM Connect Administration Center is successfully deployed, and the APM Connect AdministrationCenter Welcome page appears.
30 © 2020 General Electric Company
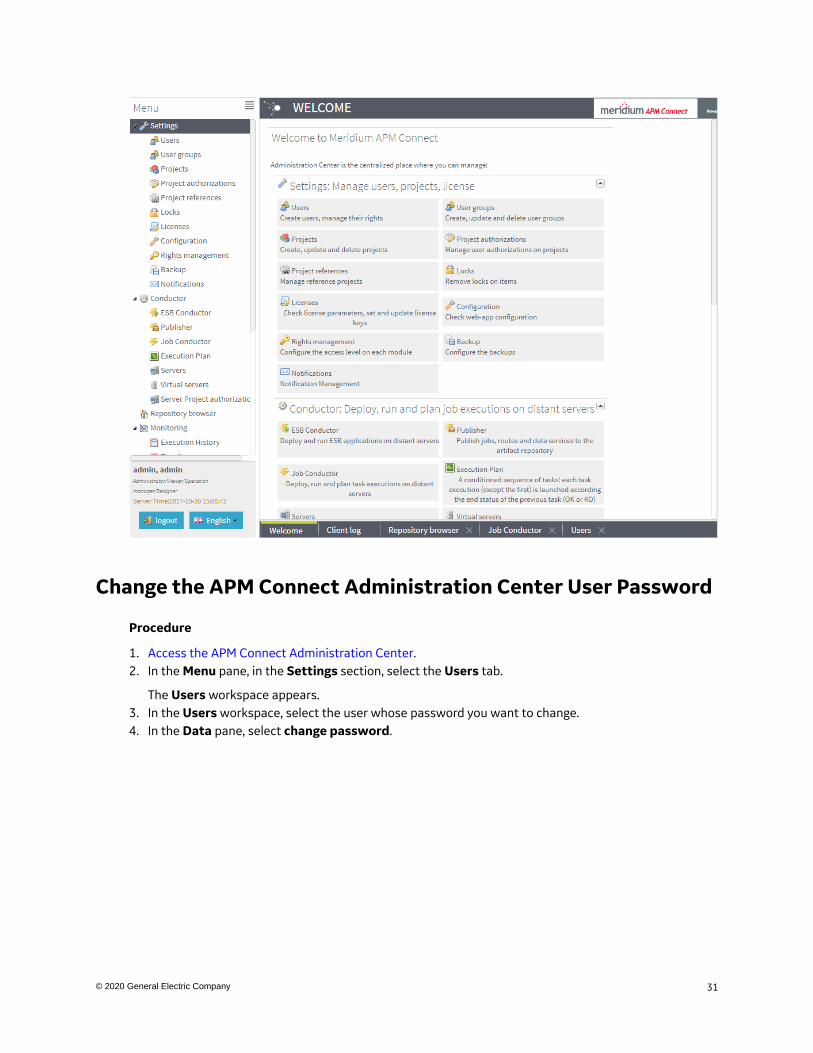
Change the APM Connect Administration Center User Password
Procedure
1. Access the APM Connect Administration Center.2. In the Menu pane, in the Settings section, select the Users tab.
The Users workspace appears.3. In the Users workspace, select the user whose password you want to change.4. In the Data pane, select change password.
31© 2020 General Electric Company
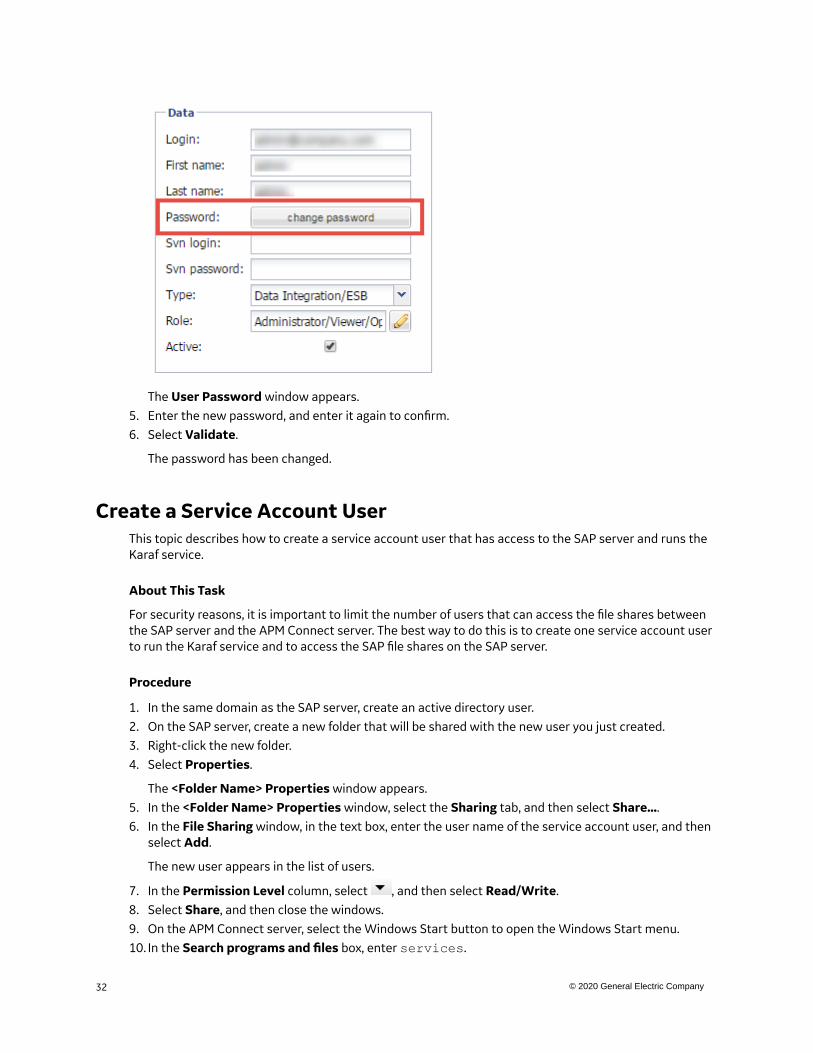
The User Password window appears.5. Enter the new password, and enter it again to confirm.6. Select Validate.
The password has been changed.
Create a Service Account UserThis topic describes how to create a service account user that has access to the SAP server and runs theKaraf service.
About This Task
For security reasons, it is important to limit the number of users that can access the file shares betweenthe SAP server and the APM Connect server. The best way to do this is to create one service account userto run the Karaf service and to access the SAP file shares on the SAP server.
Procedure
1. In the same domain as the SAP server, create an active directory user.2. On the SAP server, create a new folder that will be shared with the new user you just created.3. Right-click the new folder.4. Select Properties.
The <Folder Name> Properties window appears.5. In the <Folder Name> Properties window, select the Sharing tab, and then select Share....6. In the File Sharing window, in the text box, enter the user name of the service account user, and then
select Add.
The new user appears in the list of users.
7. In the Permission Level column, select , and then select Read/Write.8. Select Share, and then close the windows.9. On the APM Connect server, select the Windows Start button to open the Windows Start menu.10. In the Search programs and files box, enter services.
32 © 2020 General Electric Company
Services appears in the Programs list.
11. Select Services.
12. In the Services window, right-click the APM-CONTAINER service.
13. Select Properties.
The APM-CONTAINER Properties (Local Computer) window appears.
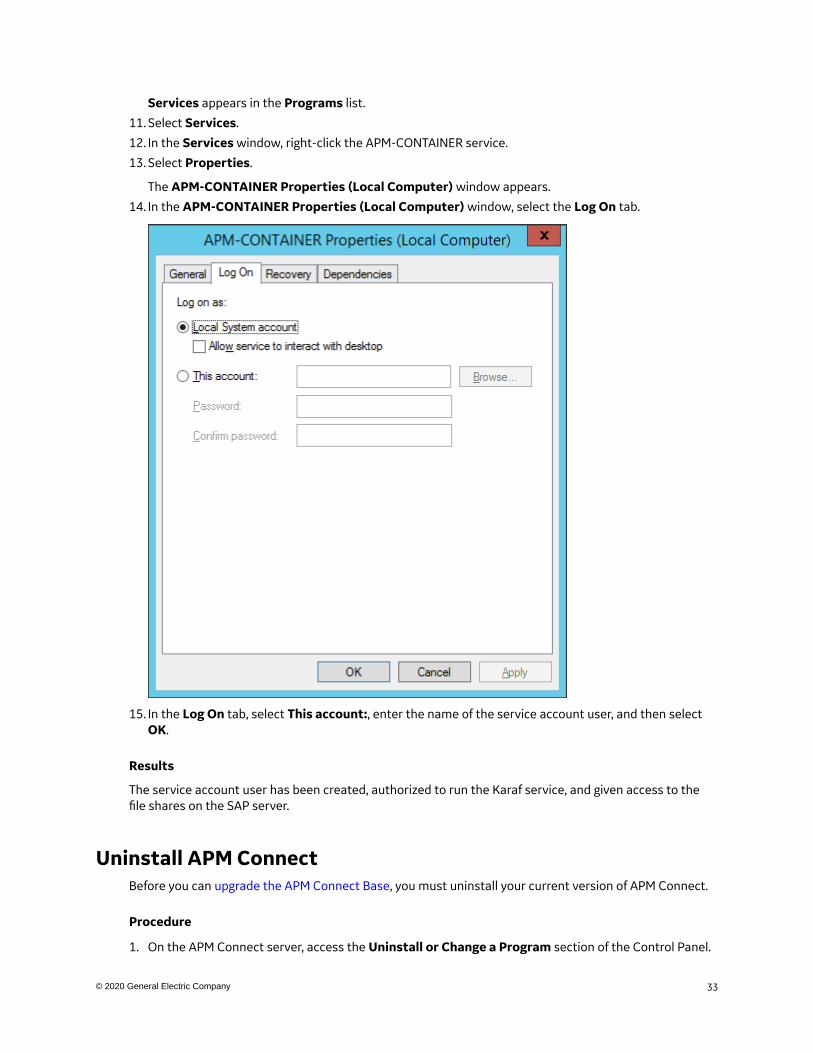
14. In the APM-CONTAINER Properties (Local Computer) window, select the Log On tab.
15. In the Log On tab, select This account:, enter the name of the service account user, and then selectOK.
Results
The service account user has been created, authorized to run the Karaf service, and given access to thefile shares on the SAP server.
Uninstall APM ConnectBefore you can upgrade the APM Connect Base, you must uninstall your current version of APM Connect.
Procedure
1. On the APM Connect server, access the Uninstall or Change a Program section of the Control Panel.
33© 2020 General Electric Company

2. Select APMConnect <version>, right-click, and then select Uninstall.3. Access the Services section of the Control Panel (in the Administrative Tools section of System
and Security) and stop the following services:
• APM-CONTAINER• 7.0.57 APMConnect_Tomcat
4. Access the Uninstall or Change a Program section of the Control Panel again, select the Javaprograms (for example, Java 1.7.71 and Java SE Development Kit 1.7.71), right-click, and then selectUninstall.
5. On the APM Connect server, locate the folder C:\APMConnect, and then delete it.
Tip: If files are locked and prevent you from deleting this folder, you may need to restart the APMConnect server machine.
6. Access the Command Prompt window, and run the following commands:
• SC DELETE APM-CONTAINER• SC DELETE APMConnect_Tomcat
7. Restart the APM Connect server machine.
APM Connect is uninstalled.
34 © 2020 General Electric Company
Chapter
3Troubleshooting DeploymentTopics:
• Validate the APM ConnectAdministration Center License
• Set Java Environment Variables• Enable Test Connection• Change H2 Console Password• Create APM Service User• Import Adapter Jobs
35© 2020 General Electric Company
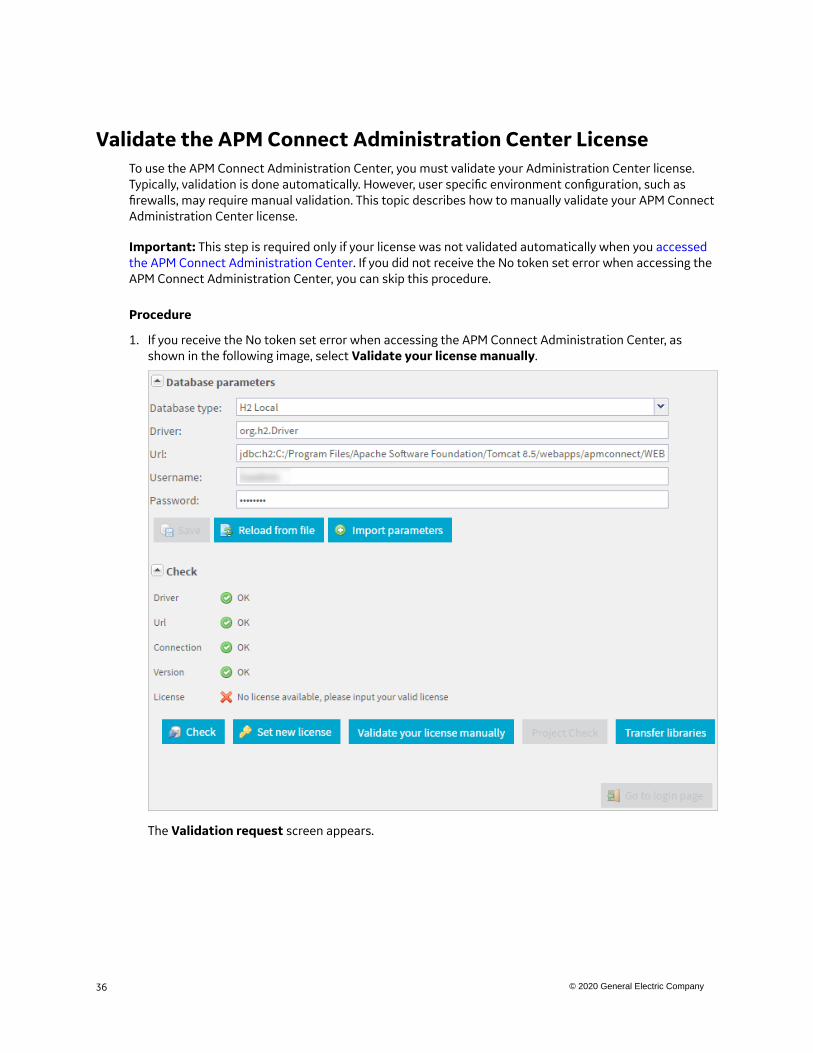
Validate the APM Connect Administration Center LicenseTo use the APM Connect Administration Center, you must validate your Administration Center license.Typically, validation is done automatically. However, user specific environment configuration, such asfirewalls, may require manual validation. This topic describes how to manually validate your APM ConnectAdministration Center license.
Important: This step is required only if your license was not validated automatically when you accessedthe APM Connect Administration Center. If you did not receive the No token set error when accessing theAPM Connect Administration Center, you can skip this procedure.
Procedure
1. If you receive the No token set error when accessing the APM Connect Administration Center, asshown in the following image, select Validate your license manually.
The Validation request screen appears.
36 © 2020 General Electric Company
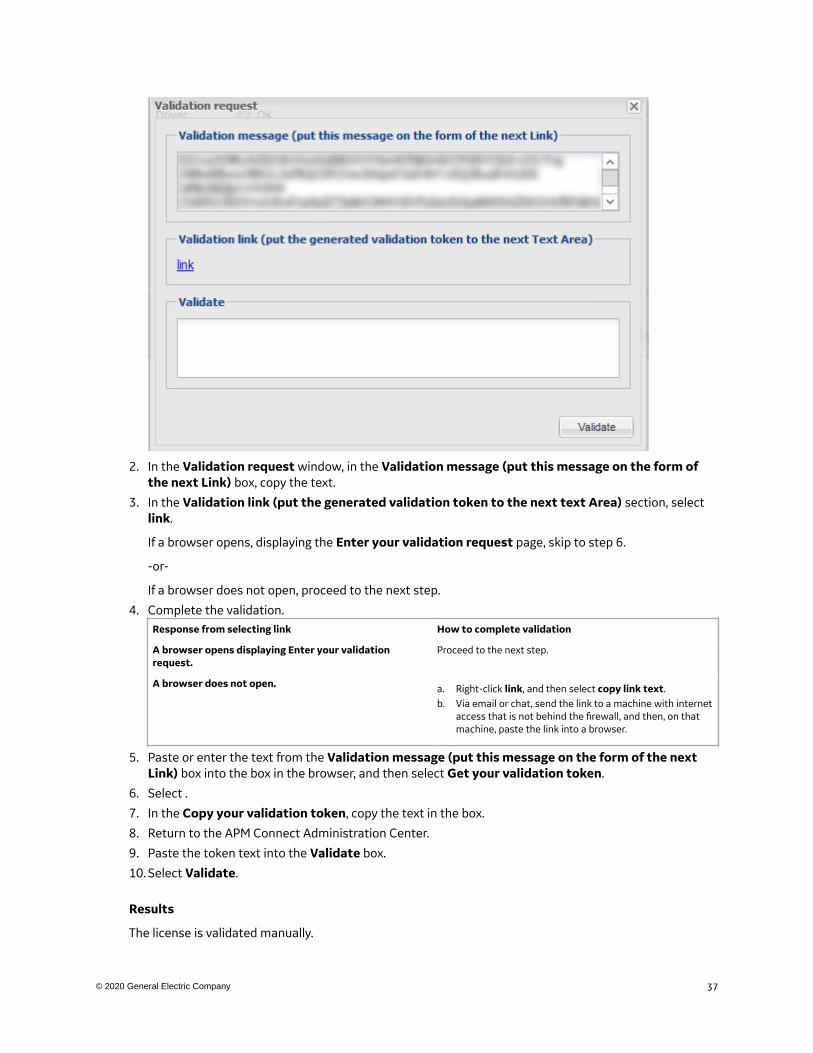
2. In the Validation request window, in the Validation message (put this message on the form ofthe next Link) box, copy the text.
3. In the Validation link (put the generated validation token to the next text Area) section, selectlink.
If a browser opens, displaying the Enter your validation request page, skip to step 6.
-or-
If a browser does not open, proceed to the next step.
4. Complete the validation.Response from selecting link How to complete validation
A browser opens displaying Enter your validationrequest.
Proceed to the next step.
A browser does not open. a. Right-click link, and then select copy link text.b. Via email or chat, send the link to a machine with internet
access that is not behind the firewall, and then, on thatmachine, paste the link into a browser.
5. Paste or enter the text from the Validation message (put this message on the form of the nextLink) box into the box in the browser, and then select Get your validation token.
6. Select .
7. In the Copy your validation token, copy the text in the box.
8. Return to the APM Connect Administration Center.
9. Paste the token text into the Validate box.
10. Select Validate.
Results
The license is validated manually.
37© 2020 General Electric Company
Set Java Environment Variables
About This Task
The Java Environment variables are set automatically when you run the APM Connect installer. However,if you need to update or reinstall Java without reinstalling APM Connect, complete these steps toconfigure Java on your APM Connect server.
Procedure
1. On the APM Connect server, navigate to Control Panel\System and Security\System toopen system properties for the Windows machine.
The View basic information about your computer screen appears.2. In the Control Panel Home pane, select Advanced systems settings.
The System Properties window appears, displaying the Advanced tab.3. Select Environment Variables....
The Environment Variables window appears.4. In the System variables section, select New....
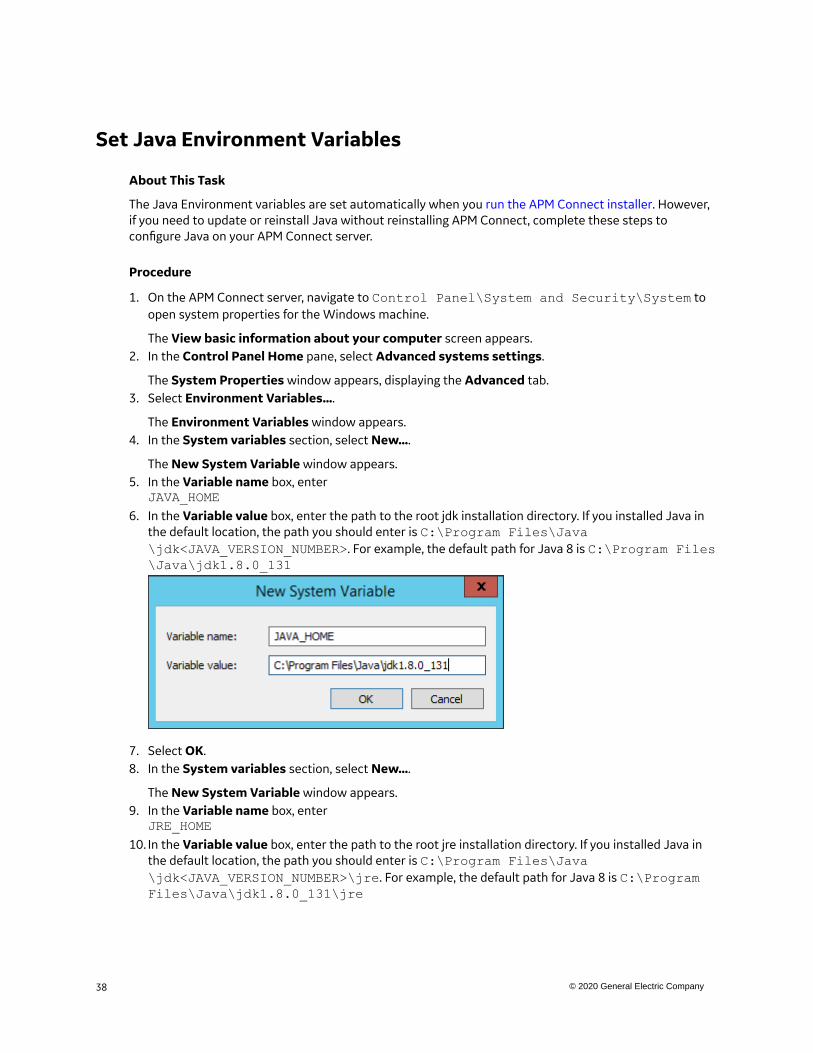
The New System Variable window appears.5. In the Variable name box, enter
JAVA_HOME6. In the Variable value box, enter the path to the root jdk installation directory. If you installed Java in
the default location, the path you should enter is C:\Program Files\Java\jdk<JAVA_VERSION_NUMBER>. For example, the default path for Java 8 is C:\Program Files\Java\jdk1.8.0_131
7. Select OK.8. In the System variables section, select New....
The New System Variable window appears.9. In the Variable name box, enter
JRE_HOME10. In the Variable value box, enter the path to the root jre installation directory. If you installed Java in
the default location, the path you should enter is C:\Program Files\Java\jdk<JAVA_VERSION_NUMBER>\jre. For example, the default path for Java 8 is C:\ProgramFiles\Java\jdk1.8.0_131\jre
38 © 2020 General Electric Company
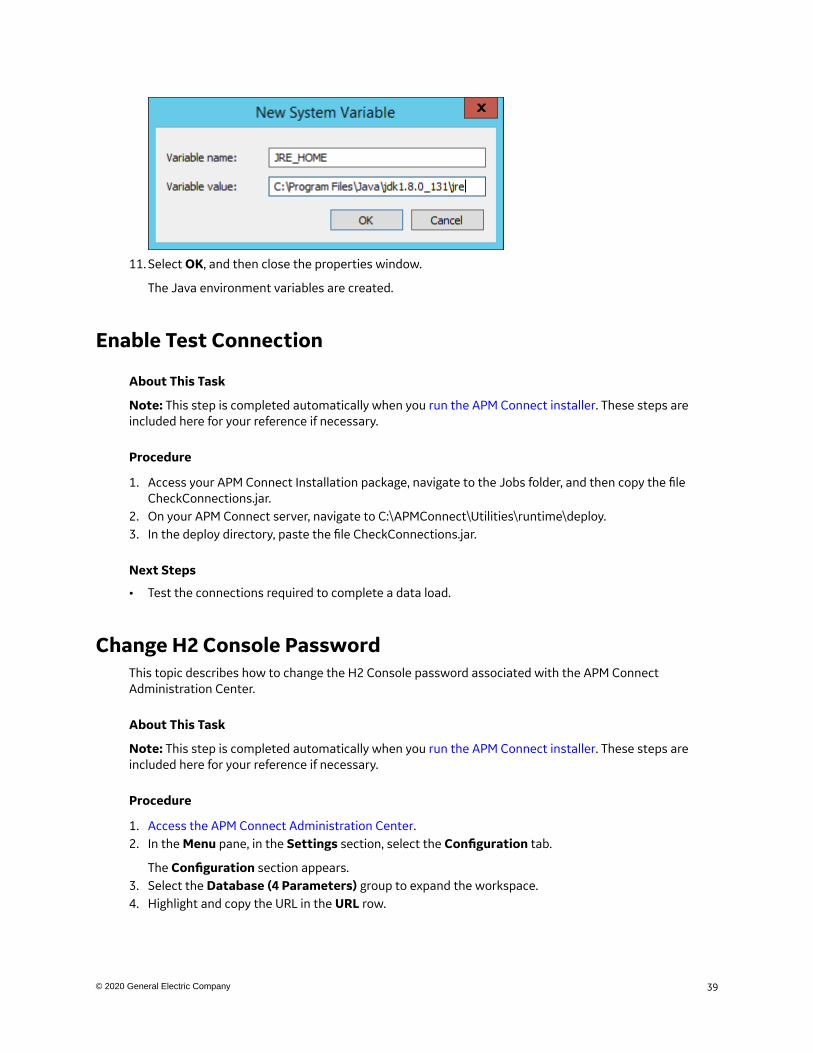
11. Select OK, and then close the properties window.
The Java environment variables are created.
Enable Test Connection
About This Task
Note: This step is completed automatically when you run the APM Connect installer. These steps areincluded here for your reference if necessary.
Procedure
1. Access your APM Connect Installation package, navigate to the Jobs folder, and then copy the fileCheckConnections.jar.
2. On your APM Connect server, navigate to C:\APMConnect\Utilities\runtime\deploy.3. In the deploy directory, paste the file CheckConnections.jar.
Next Steps
• Test the connections required to complete a data load.
Change H2 Console PasswordThis topic describes how to change the H2 Console password associated with the APM ConnectAdministration Center.
About This Task
Note: This step is completed automatically when you run the APM Connect installer. These steps areincluded here for your reference if necessary.
Procedure
1. Access the APM Connect Administration Center.2. In the Menu pane, in the Settings section, select the Configuration tab.
The Configuration section appears.3. Select the Database (4 Parameters) group to expand the workspace.4. Highlight and copy the URL in the URL row.
39© 2020 General Electric Company
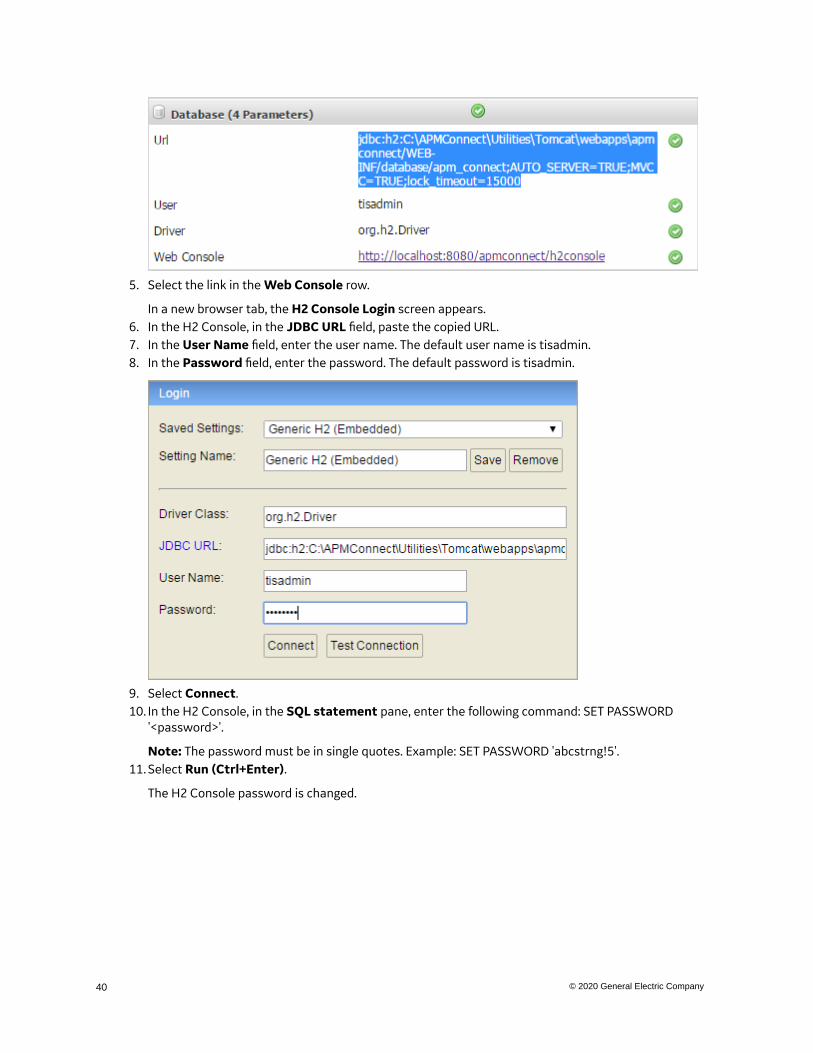
5. Select the link in the Web Console row.
In a new browser tab, the H2 Console Login screen appears.6. In the H2 Console, in the JDBC URL field, paste the copied URL.7. In the User Name field, enter the user name. The default user name is tisadmin.8. In the Password field, enter the password. The default password is tisadmin.
9. Select Connect.10. In the H2 Console, in the SQL statement pane, enter the following command: SET PASSWORD
'<password>'.
Note: The password must be in single quotes. Example: SET PASSWORD 'abcstrng!5'.11. Select Run (Ctrl+Enter).
The H2 Console password is changed.
40 © 2020 General Electric Company
Create APM Service UserJobs in the APM Connect Administration Center are run by users. The apmService user is required tofacilitate communication between APM Connect and Predix Essentials.
About This Task
Note: This step is completed automatically when you run the APM Connect installer. These steps areincluded here for your reference if necessary.
Procedure
1. In the APM Connect Administration Center, from the Menu pane, in the Settings section, select theUsers tab, and then select Add.
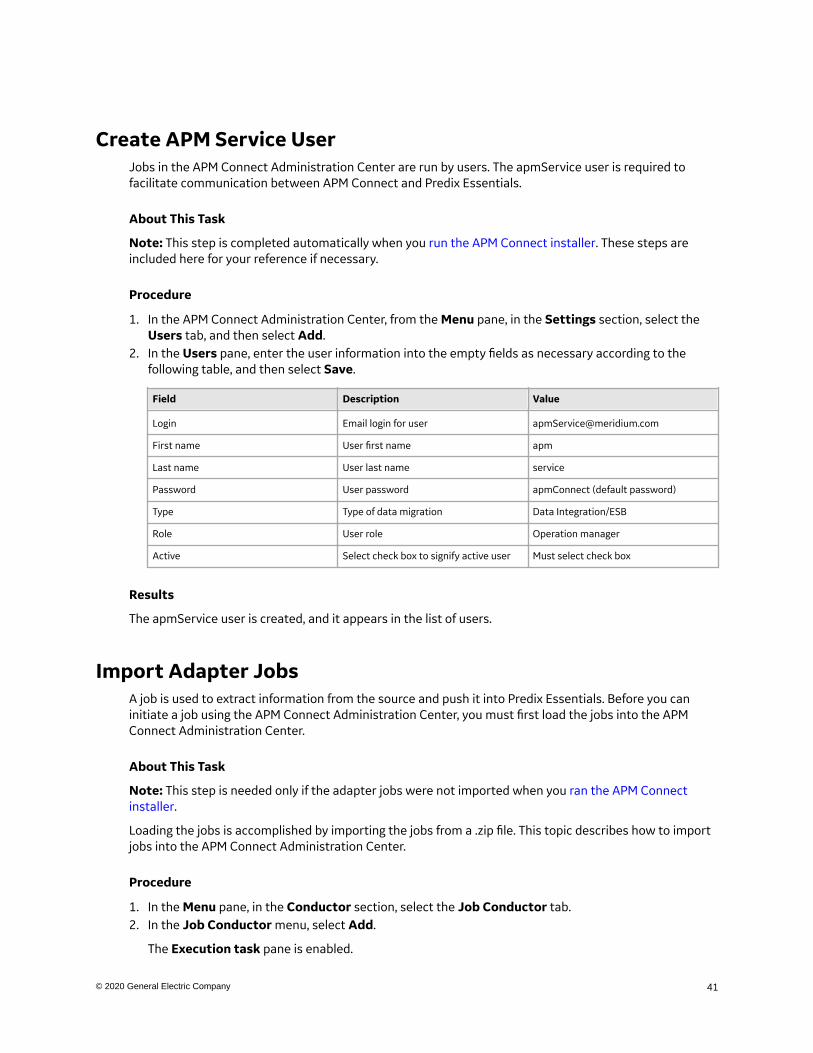
2. In the Users pane, enter the user information into the empty fields as necessary according to thefollowing table, and then select Save.
Field Description Value
Login Email login for user [email protected]
First name User first name apm
Last name User last name service
Password User password apmConnect (default password)
Type Type of data migration Data Integration/ESB
Role User role Operation manager
Active Select check box to signify active user Must select check box
Results
The apmService user is created, and it appears in the list of users.
Import Adapter JobsA job is used to extract information from the source and push it into Predix Essentials. Before you caninitiate a job using the APM Connect Administration Center, you must first load the jobs into the APMConnect Administration Center.
About This Task
Note: This step is needed only if the adapter jobs were not imported when you ran the APM Connectinstaller.
Loading the jobs is accomplished by importing the jobs from a .zip file. This topic describes how to importjobs into the APM Connect Administration Center.
Procedure
1. In the Menu pane, in the Conductor section, select the Job Conductor tab.2. In the Job Conductor menu, select Add.
The Execution task pane is enabled.
41© 2020 General Electric Company

3. In the Execution task pane, in the Label box, enter a label for the job.4. In the Description box, enter a description for the Job.5. Select the Active check box.
6. In the Job section, select .7. In the Import generated code window, select Browse, and then navigate to the folder containing the
updated jobs package.8. Depending on the type of deployment, select the file that contains the job based on the following
tables.
Note: You must import every job, or run the respective wrapper job, in the table for the respectivedeployment.
Job Name Description
CreateIntermediateRepository_Client.zip Creates the IR database.
Extraction_Wrapper_Maximo.zip Wrapper job for all Maximo Adapters allowing easyconfiguration of multiple Maximo Adapters jobs.
connectServicesCloudClient.zip Enables the cloud client services.
Figure 1: Maximo Adapter Jobs
Job Name Description
CreateIntermediateRepository_Client.zip Creates Intermediate Repository database.
Email_notifcation.zip Allows for an email notification to be sent when a job orextraction fails. This report, the Failure Details report,provides the reason for why a record did not load.
EncryptString.zip Used to encrypt passwords.
Extraction_Wrapper.zip Wrapper job for all SAP Adapters allowing easy configurationof multiple SAP jobs.
Note: This job can be used to run all of the Adapter jobs. It isrecommended to use this job solely. Additionally, if you areusing multiple SAP systems, you must use this job.
connectServicesCloudClient.zip Enables the cloud client services.
Figure 2: SAP and SAP PI Cloud Adapter Jobs9. On the Import generated code window, select Launch upload.
The Project, Branch, Name, Version, and Context boxes are automatically populated withappropriate values.
10. In the Execution Server list, select the server on which the task should be run.11. Select Save.
The Adapter Job is imported into the APM Connect Administration Center.12. Repeat steps 2 on page 41 through 11 on page 42 for every job.
Results
Each Job is automatically categorized into the correct project.
42 © 2020 General Electric Company
Chapter
4AdministerTopics:
• Access the APM ConnectAdministration Center
• Configure the APM ConnectAdministration Center
• Set User Permissions• Authorize Users for Projects• Configure Logging• Configure Source System
Custom Field Mappings orDefault Values
• Deploy Data Loaders orAdapters
• Access APM Connect EAM Jobs• Access the Details of an EAM
Job• Delete a Job
43© 2020 General Electric Company
Access the APM Connect Administration CenterUsing the APM Connect Administration Center, you can run extraction and load jobs. Before you can beginrunning jobs, you must set up the APM Connect Administration Center. This topic explains how to accessand deploy the APM Connect Administration Center for the first time.
Procedure
1. Open a web browser, and then enter the following URL into your web browser: http://localhost:8080/apmconnect/.
2. In the Login window, in the Password box, enter admin, and then select OK.3. Select .
The Database parameters window appears, and a check is performed by the APM ConnectAdministration Center.
Important: If your license does not validate as shown in the previous image, you can validate yourlicense manually.
4. If your license validates, in the Database parameters window, select Go to login page.
The Login page appears.
44 © 2020 General Electric Company

5. In the Login window, enter the required information and then select Login.
• In the Login box, enter the default username: [email protected].• In the Password box, enter the default password: admin.
Results
The APM Connect Administration Center is successfully deployed, and the APM Connect AdministrationCenter Welcome page appears.
45© 2020 General Electric Company
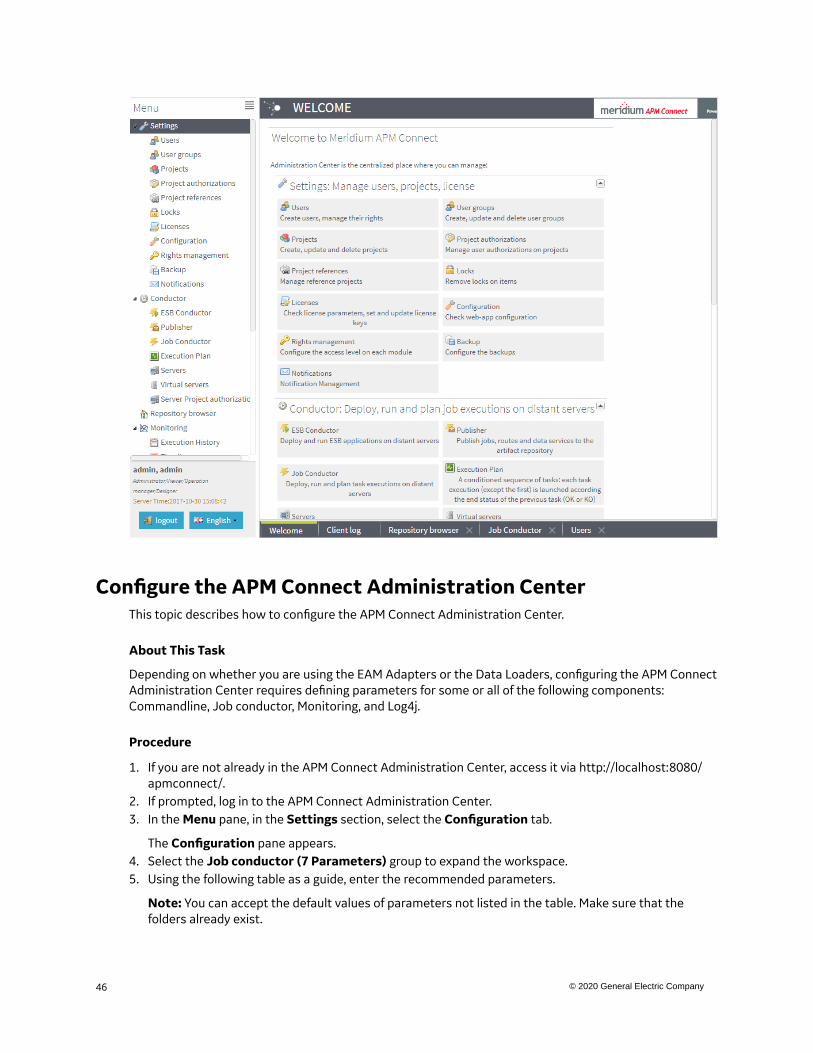
Configure the APM Connect Administration CenterThis topic describes how to configure the APM Connect Administration Center.
About This Task
Depending on whether you are using the EAM Adapters or the Data Loaders, configuring the APM ConnectAdministration Center requires defining parameters for some or all of the following components:Commandline, Job conductor, Monitoring, and Log4j.
Procedure
1. If you are not already in the APM Connect Administration Center, access it via http://localhost:8080/apmconnect/.
2. If prompted, log in to the APM Connect Administration Center.3. In the Menu pane, in the Settings section, select the Configuration tab.
The Configuration pane appears.4. Select the Job conductor (7 Parameters) group to expand the workspace.5. Using the following table as a guide, enter the recommended parameters.
Note: You can accept the default values of parameters not listed in the table. Make sure that thefolders already exist.
46 © 2020 General Electric Company
Parameter Description Recommended or Default Value
Generated jobsfolder
The path to the folder with the Jobexecution archives.
C:\APMConnect\Logs\generated_jobs
Tasks logs folder The path to the folder with the Jobexecution logs.
C:\APMConnect\Logs\execution_logs
6. Select the Servers group to expand the workspace.
7. In the workspace, select Add, and then select Add Server.
8. In the Execution server section, configure the server.
a) Enter the name of the administrator host in the Label:, Description:, and Host: boxes.b) Select the Meridium Runtime check box.c) Select Save.
The server configuration is saved.d) Select the server you just added to verify the configuration.
All of the server indicators should be green.
9. Select the Monitoring (2 Parameters) group to expand the workspace.
Note: Configuring this parameter is optional.
10. Select the Log4j (4 Parameters) group to expand the workspace.
11. Using the following table as a guide, enter the necessary parameters.
Parameter Description Recommended or Default Value
Technical fileappender
The path to the technical log file of theAPM Connect Administration Center.
C:/APMConnect/Utilities/Tomcat/logs/technical.log
Technical logthreshold
The level of logs you want to append. WARN
Business log filepath
The path to the business log file of theAPM Connect Administration Center.
C:/APMConnect/Utilities/Tomcat/logs/business.log
Technical logstashappender
The host and port corresponding to theLogstash instance.
localhost:8050
Results
The APM Connect Administration Center parameters are configured.
Set User PermissionsTo begin using the APM Connect Administration Center to run data extractions, or Jobs, you must firstgive the admin user all the user roles.
Before You begin
A user must be authorized for a project before they can view or change sections associated with a project.
Procedure
1. In the Menu pane, in the Settings section, select the Users tab.
2. Select the user that you want to be the administrator.
The Data section is activated.
47© 2020 General Electric Company
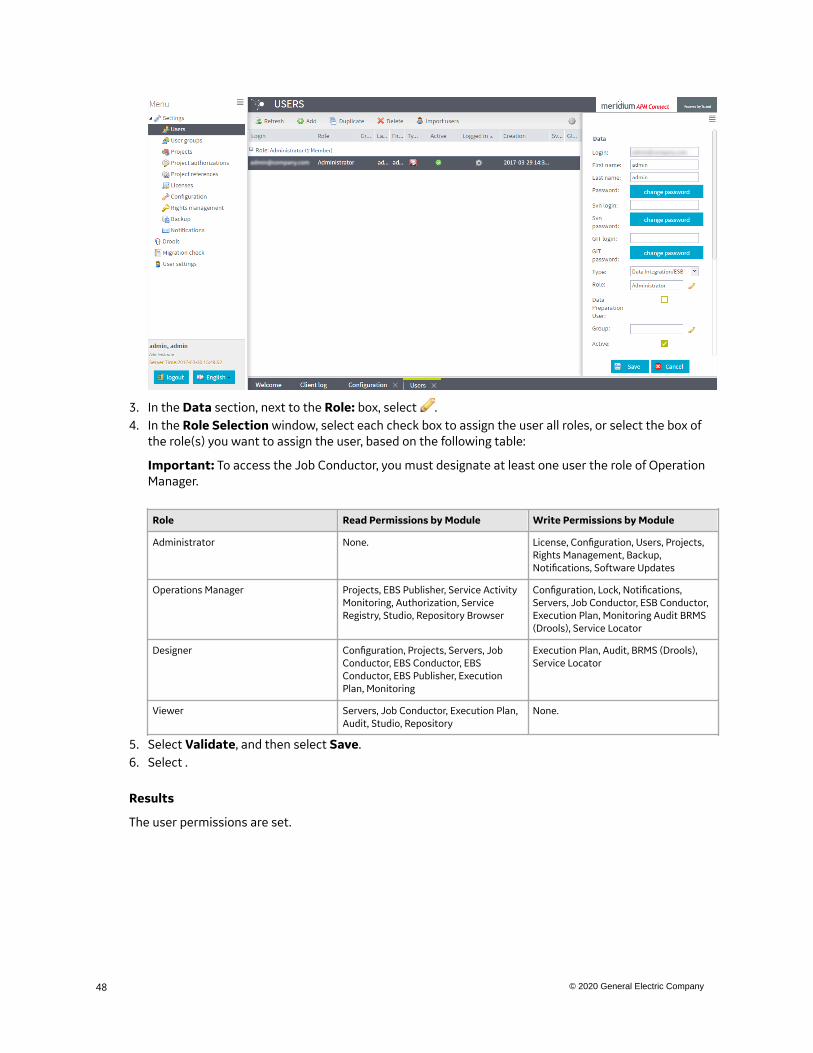
3. In the Data section, next to the Role: box, select .4. In the Role Selection window, select each check box to assign the user all roles, or select the box of
the role(s) you want to assign the user, based on the following table:
Important: To access the Job Conductor, you must designate at least one user the role of OperationManager.
Role Read Permissions by Module Write Permissions by Module
Administrator None. License, Configuration, Users, Projects,Rights Management, Backup,Notifications, Software Updates
Operations Manager Projects, EBS Publisher, Service ActivityMonitoring, Authorization, ServiceRegistry, Studio, Repository Browser
Configuration, Lock, Notifications,Servers, Job Conductor, ESB Conductor,Execution Plan, Monitoring Audit BRMS(Drools), Service Locator
Designer Configuration, Projects, Servers, JobConductor, EBS Conductor, EBSConductor, EBS Publisher, ExecutionPlan, Monitoring
Execution Plan, Audit, BRMS (Drools),Service Locator
Viewer Servers, Job Conductor, Execution Plan,Audit, Studio, Repository
None.
5. Select Validate, and then select Save.6. Select .
Results
The user permissions are set.
48 © 2020 General Electric Company
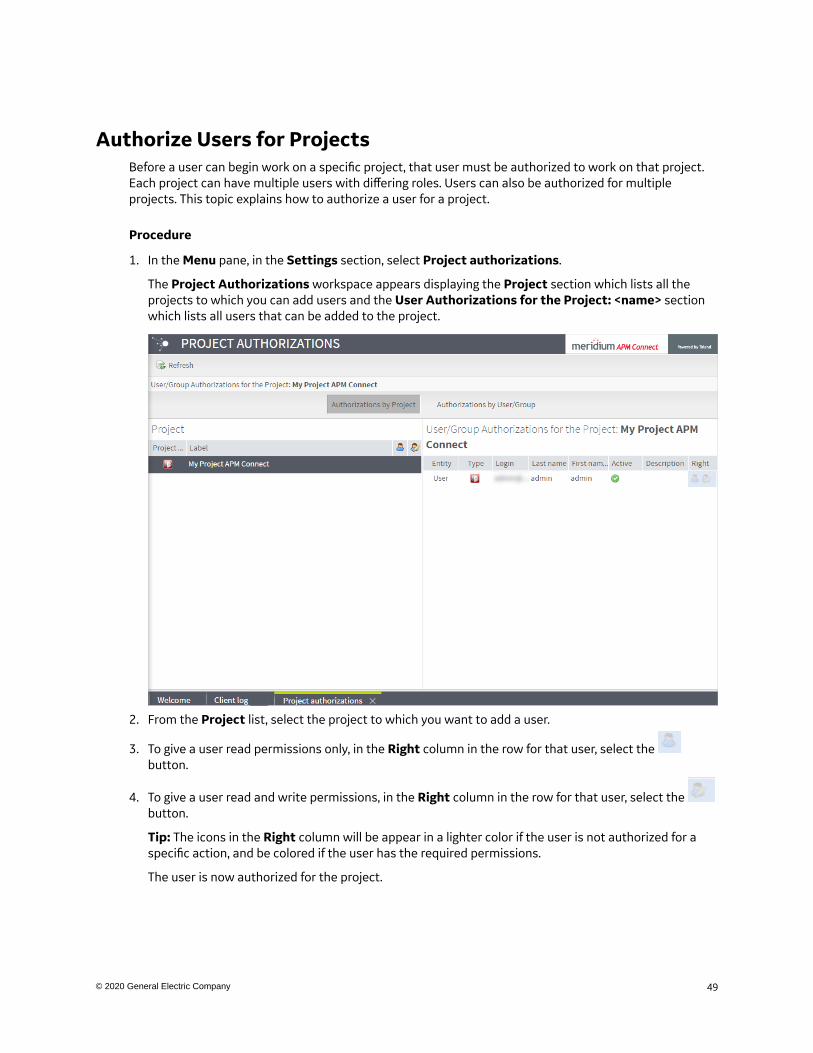
Authorize Users for ProjectsBefore a user can begin work on a specific project, that user must be authorized to work on that project.Each project can have multiple users with differing roles. Users can also be authorized for multipleprojects. This topic explains how to authorize a user for a project.
Procedure
1. In the Menu pane, in the Settings section, select Project authorizations.
The Project Authorizations workspace appears displaying the Project section which lists all theprojects to which you can add users and the User Authorizations for the Project: <name> sectionwhich lists all users that can be added to the project.
2. From the Project list, select the project to which you want to add a user.
3. To give a user read permissions only, in the Right column in the row for that user, select the button.
4. To give a user read and write permissions, in the Right column in the row for that user, select the button.
Tip: The icons in the Right column will be appear in a lighter color if the user is not authorized for aspecific action, and be colored if the user has the required permissions.
The user is now authorized for the project.
49© 2020 General Electric Company
Configure LoggingAPM Connect uses log4j version 1.2 to log events and provides a default configuration for logging events.These steps describe how to modify this default configuration.
Procedure
1. On the APM Connect Server, navigate to the folder C:\APMConnect\Config.
2. Open the file log4j.properties in an application that you can use to modify a text file (forexample, Notepad).
3. Modify the log4j.rootLogger statement to select the correct severity level and appender. Consider thefollowing example of a modified statement:
log4j.rootLogger=ERROR, fileout
...where the first value is the severity level and the second value is the appender to use. You can enterany of the following values as the severity level:
• TRACE• DEBUG• INFO• WARN• ERROR• FATAL• OFF
The severity level that you configure controls the messages written to the log. Each severity causesthe system to filter messages above that type in the preceding list.
Note: The appender value must be either fileout or consoleout.
Important: To collect the most complete information, do not change the conversion pattern on anyappender you use.
4. Modify the log4j.logger.org.apache.cd statement to log the Web Service request and responsemessages. The format is similar to that previously shown for log4j.rootlogger.
5. Modify the log4j.logger.org.apache.activemq statement to enable the logging levels for ActiveMQmessages. The format is similar to to that previously shown for log4j.rootlogger.
6. If you use the console appender, uncomment all statements containing consoleout and comment thestatements containing fileout. Consider the following example:
# consoleout is set to be a ConsoleAppender.log4j.appender.consoleout=org.apache.log4j.ConsoleAppenderlog4j.appender.consoleout.Threshold=DEBUGlog4j.appender.consoleout.layout=org.apache.log4j.PatternLayoutlog4j.appender.consoleout.layout.ConversionPattern=[%-5p][%d{dd MMM yyyy HH:mm:ss}][%t][%c][%M] %x - %m%n#fileout uses fileAppender#log4j.appender.fileout=org.apache.log4j.RollingFileAppender#log4j.appender.fileout.Threshold=debug#log4j.appender.fileout.MaxFileSize=1MB#log4j.appender.fileout.MaxBackupIndex=2#log4j.appender.fileout.File=${LOG}/${LOG_FILE}#log4j.appender.fileout.Append=true#log4j.appender.fileout.layout=org.apache.log4j.PatternLayout
50 © 2020 General Electric Company
#log4j.appender.fileout.layout.ConversionPattern=[%-5p][%d{dd MMM yyyy HH:mm:ss}][%t][%c][%M] %x - %m%n
7. If you use the file rolling appender:
a. Modify the log4j.appender.fileout.MaxFileSize value to the appropriate size for your installation.b. Modify the log4j.appender.fileout.MaxBackupIndex value to the number of log files you want to
keep.8. Save the file.
Event logging has been configured.
Configure Source System Custom Field Mappings or DefaultValues
There may be times when you need to either map values from Predix Essentials to your source system oradd a default value for a field in your source system from Predix Essentials. This topic describes how toachieve this goal.
Before You begin
To successfully perform this task, you must have the following:
• Administrative rights to the APM Connect database from which you are retrieving the field values orsetting the default values.
• A database tool, such as DBeaver or DBVisualizer.
About This Task
There are times when you need to have information that is stored in Predix Essentials displayed in yoursource system database. To achieve this goal, you need to modify tables used by Predix Essentials to senddata to your source system.
The following procedure describes how to either configure a mapping between Predix Essentials and yoursource system or to set a default in your source system from Predix Essentials.
The following image is an example of the southbound_mapping_control table as displayed by a databasetool.
51© 2020 General Electric Company
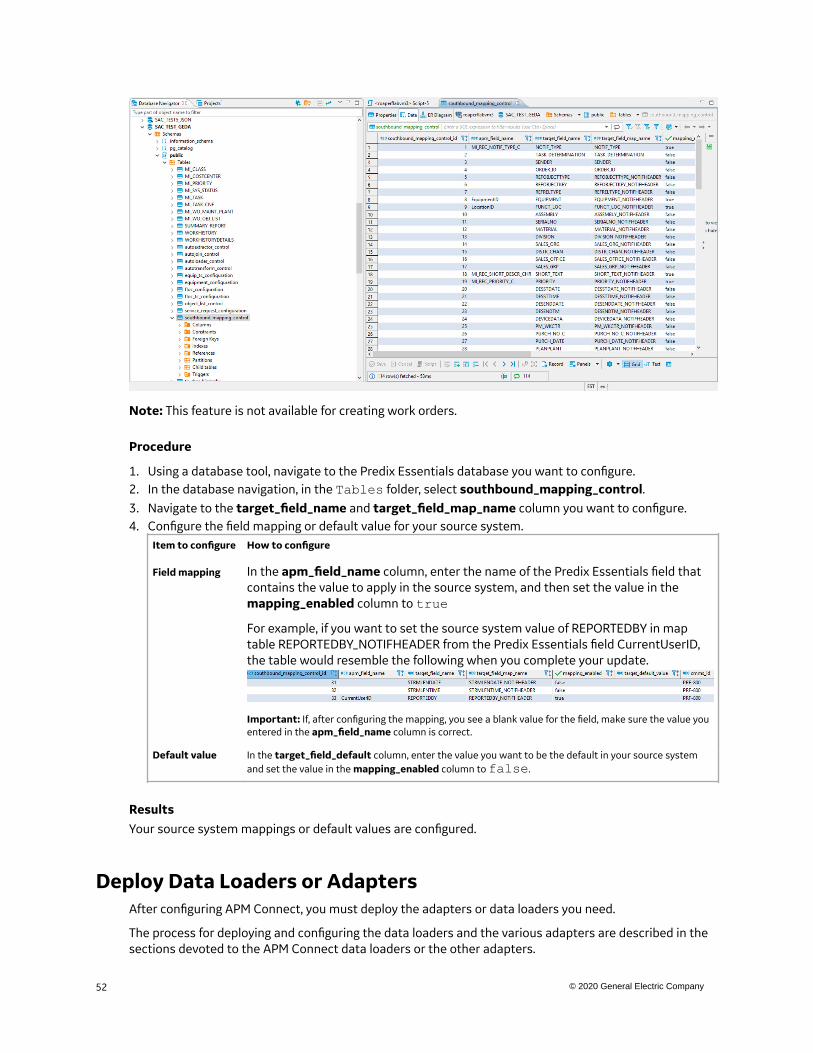
Note: This feature is not available for creating work orders.
Procedure
1. Using a database tool, navigate to the Predix Essentials database you want to configure.2. In the database navigation, in the Tables folder, select southbound_mapping_control.3. Navigate to the target_field_name and target_field_map_name column you want to configure.4. Configure the field mapping or default value for your source system.
Item to configure How to configure
Field mapping In the apm_field_name column, enter the name of the Predix Essentials field thatcontains the value to apply in the source system, and then set the value in themapping_enabled column to trueFor example, if you want to set the source system value of REPORTEDBY in maptable REPORTEDBY_NOTIFHEADER from the Predix Essentials field CurrentUserID,the table would resemble the following when you complete your update.
Important: If, after configuring the mapping, you see a blank value for the field, make sure the value youentered in the apm_field_name column is correct.
Default value In the target_field_default column, enter the value you want to be the default in your source systemand set the value in the mapping_enabled column to false.
ResultsYour source system mappings or default values are configured.
Deploy Data Loaders or AdaptersAfter configuring APM Connect, you must deploy the adapters or data loaders you need.
The process for deploying and configuring the data loaders and the various adapters are described in thesections devoted to the APM Connect data loaders or the other adapters.
52 © 2020 General Electric Company
Access APM Connect EAM Jobs
Procedure
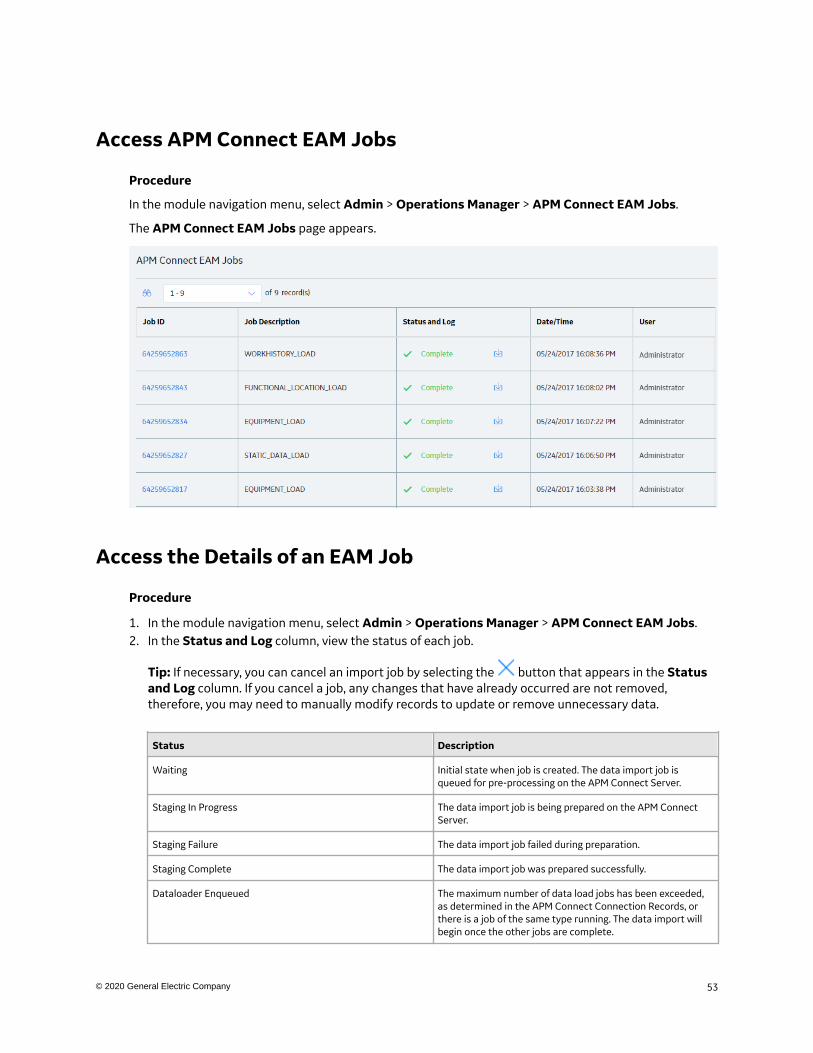
In the module navigation menu, select Admin > Operations Manager > APM Connect EAM Jobs.
The APM Connect EAM Jobs page appears.
Access the Details of an EAM Job
Procedure
1. In the module navigation menu, select Admin > Operations Manager > APM Connect EAM Jobs.2. In the Status and Log column, view the status of each job.
Tip: If necessary, you can cancel an import job by selecting the button that appears in the Statusand Log column. If you cancel a job, any changes that have already occurred are not removed,therefore, you may need to manually modify records to update or remove unnecessary data.
Status Description
Waiting Initial state when job is created. The data import job isqueued for pre-processing on the APM Connect Server.
Staging In Progress The data import job is being prepared on the APM ConnectServer.
Staging Failure The data import job failed during preparation.
Staging Complete The data import job was prepared successfully.
Dataloader Enqueued The maximum number of data load jobs has been exceeded,as determined in the APM Connect Connection Records, orthere is a job of the same type running. The data import willbegin once the other jobs are complete.
53© 2020 General Electric Company
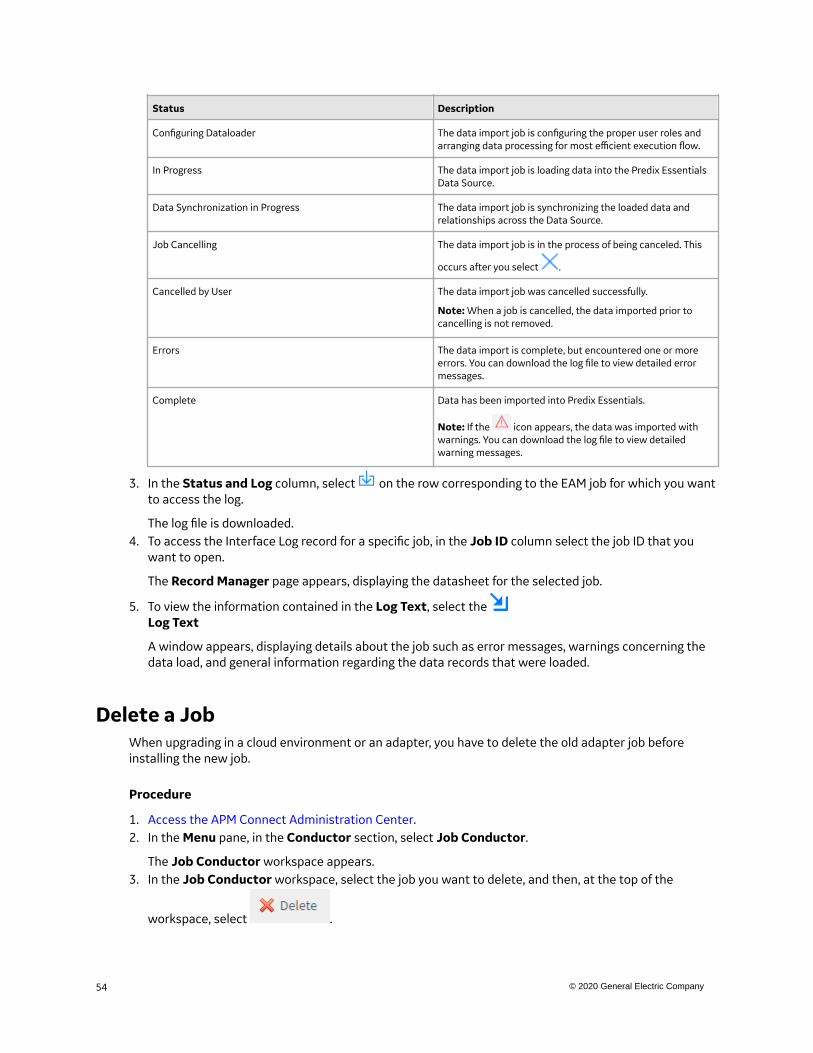
Status Description
Configuring Dataloader The data import job is configuring the proper user roles andarranging data processing for most efficient execution flow.
In Progress The data import job is loading data into the Predix EssentialsData Source.
Data Synchronization in Progress The data import job is synchronizing the loaded data andrelationships across the Data Source.
Job Cancelling The data import job is in the process of being canceled. This
occurs after you select .
Cancelled by User The data import job was cancelled successfully.
Note: When a job is cancelled, the data imported prior tocancelling is not removed.
Errors The data import is complete, but encountered one or moreerrors. You can download the log file to view detailed errormessages.
Complete Data has been imported into Predix Essentials.
Note: If the icon appears, the data was imported withwarnings. You can download the log file to view detailedwarning messages.
3. In the Status and Log column, select on the row corresponding to the EAM job for which you wantto access the log.
The log file is downloaded.4. To access the Interface Log record for a specific job, in the Job ID column select the job ID that you
want to open.
The Record Manager page appears, displaying the datasheet for the selected job.
5. To view the information contained in the Log Text, select the Log Text
A window appears, displaying details about the job such as error messages, warnings concerning thedata load, and general information regarding the data records that were loaded.
Delete a JobWhen upgrading in a cloud environment or an adapter, you have to delete the old adapter job beforeinstalling the new job.
Procedure
1. Access the APM Connect Administration Center.2. In the Menu pane, in the Conductor section, select Job Conductor.
The Job Conductor workspace appears.3. In the Job Conductor workspace, select the job you want to delete, and then, at the top of the
workspace, select .
54 © 2020 General Electric Company

Results
The job is deleted.
55© 2020 General Electric Company
Chapter
5Data LoadersTopics:
• General Information• APM Family Data Loader• Taxonomy Data Loader• Work History Data Loader• Unified Asset Ingestion Data
Loader• Automatic Data Loader• Deploy the Automatic Data
Loader Job
56 © 2020 General Electric Company
General Information
Requirements for APM Connect Data LoadersAll APM Connect Data Loaders have the same mapping and security settings requirements.
Security Settings
The Security User performing the data load operation must be associated with either the MI Data LoaderUser or MI Data Loader Admin Security Role.
Mapping
The Data Loaders map the datasheet columns in the Excel workbook to fields in Predix Essentials familiesby field ID. The captions may be changed as needed, but do not change the field IDs.
About Populating Site Reference DataThe APM Family Data Loader can be used to populate the Site Reference on Equipment and FunctionalLocation records in Predix Essentials.
About This Task
Important: In a cloud environment, before populating site reference data for the first time, you must runthe Unified Asset Ingestion Data Loader to load the enterprise and site data.
The APM Family Data Loader populates the ENTY_KEY system field and the MI_SITE_KEY system fieldassociated with the Site Reference value to be populated. On asset records, the Site Reference is stored inthe MI_SITE_KEY field, a system field in Predix Essentials. The APM Data Loader uses the Site Name(MI_SITE_NAME) to translate the value to the corresponding Site Key and populate the MI_SITE_KEYfield; therefore, you do not need to know the key to be able to populate the site reference. Thisfunctionality is important because this value can change from one database to another.
Procedure
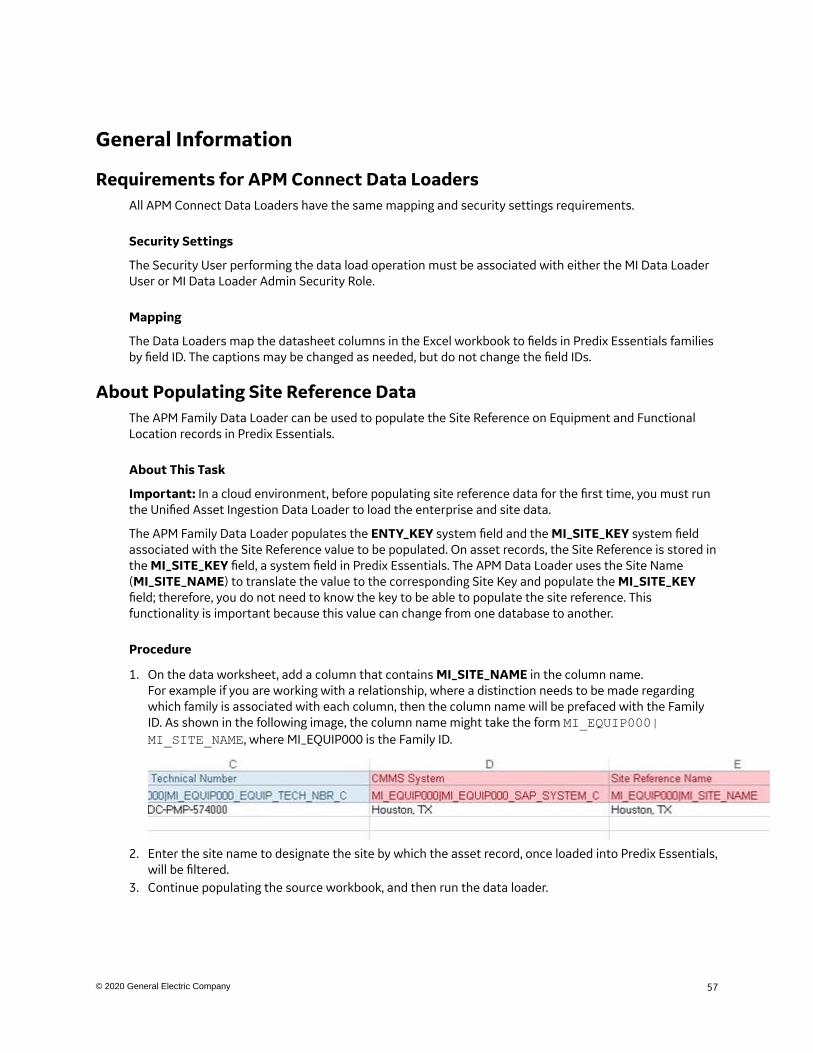
1. On the data worksheet, add a column that contains MI_SITE_NAME in the column name.For example if you are working with a relationship, where a distinction needs to be made regardingwhich family is associated with each column, then the column name will be prefaced with the FamilyID. As shown in the following image, the column name might take the form MI_EQUIP000|MI_SITE_NAME, where MI_EQUIP000 is the Family ID.
2. Enter the site name to designate the site by which the asset record, once loaded into Predix Essentials,will be filtered.
3. Continue populating the source workbook, and then run the data loader.
57© 2020 General Electric Company
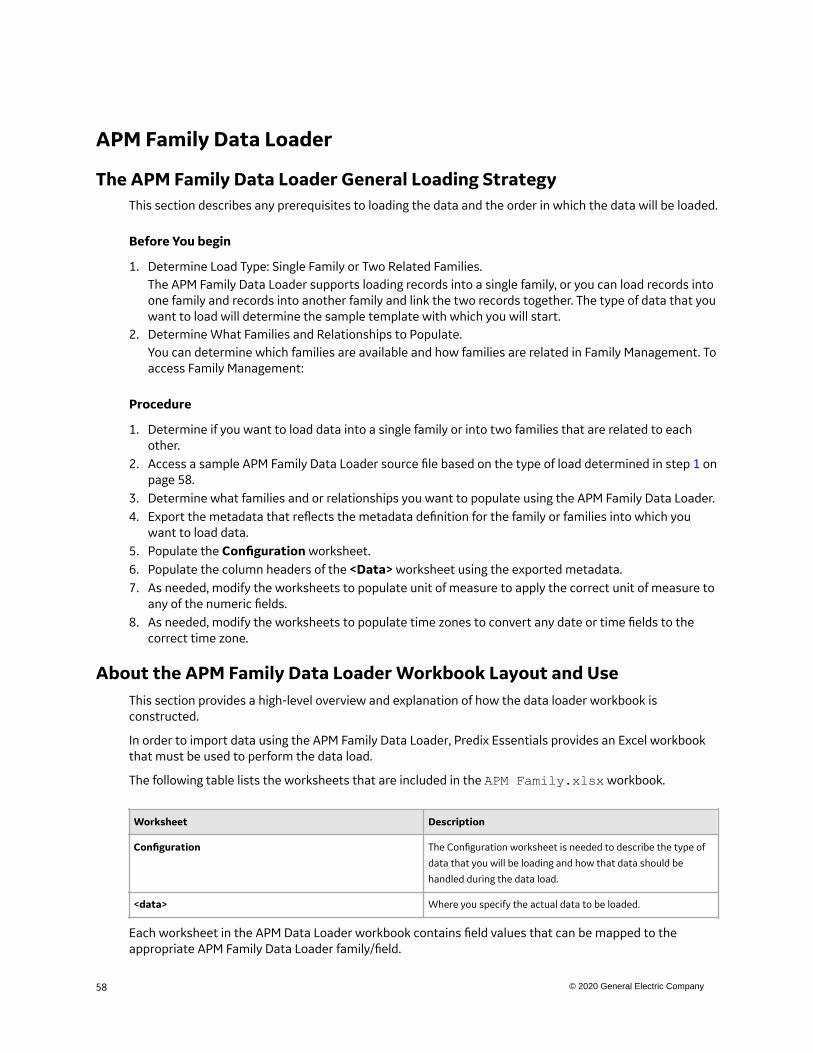
APM Family Data Loader
The APM Family Data Loader General Loading StrategyThis section describes any prerequisites to loading the data and the order in which the data will be loaded.
Before You begin
1. Determine Load Type: Single Family or Two Related Families.The APM Family Data Loader supports loading records into a single family, or you can load records intoone family and records into another family and link the two records together. The type of data that youwant to load will determine the sample template with which you will start.
2. Determine What Families and Relationships to Populate.You can determine which families are available and how families are related in Family Management. Toaccess Family Management:
Procedure
1. Determine if you want to load data into a single family or into two families that are related to eachother.
2. Access a sample APM Family Data Loader source file based on the type of load determined in step 1 onpage 58.
3. Determine what families and or relationships you want to populate using the APM Family Data Loader.4. Export the metadata that reflects the metadata definition for the family or families into which you
want to load data.5. Populate the Configuration worksheet.6. Populate the column headers of the <Data> worksheet using the exported metadata.7. As needed, modify the worksheets to populate unit of measure to apply the correct unit of measure to
any of the numeric fields.8. As needed, modify the worksheets to populate time zones to convert any date or time fields to the
correct time zone.
About the APM Family Data Loader Workbook Layout and UseThis section provides a high-level overview and explanation of how the data loader workbook isconstructed.
In order to import data using the APM Family Data Loader, Predix Essentials provides an Excel workbookthat must be used to perform the data load.
The following table lists the worksheets that are included in the APM Family.xlsx workbook.
Worksheet Description
Configuration The Configuration worksheet is needed to describe the type of
data that you will be loading and how that data should be
handled during the data load.
<data> Where you specify the actual data to be loaded.
Each worksheet in the APM Data Loader workbook contains field values that can be mapped to theappropriate APM Family Data Loader family/field.
58 © 2020 General Electric Company
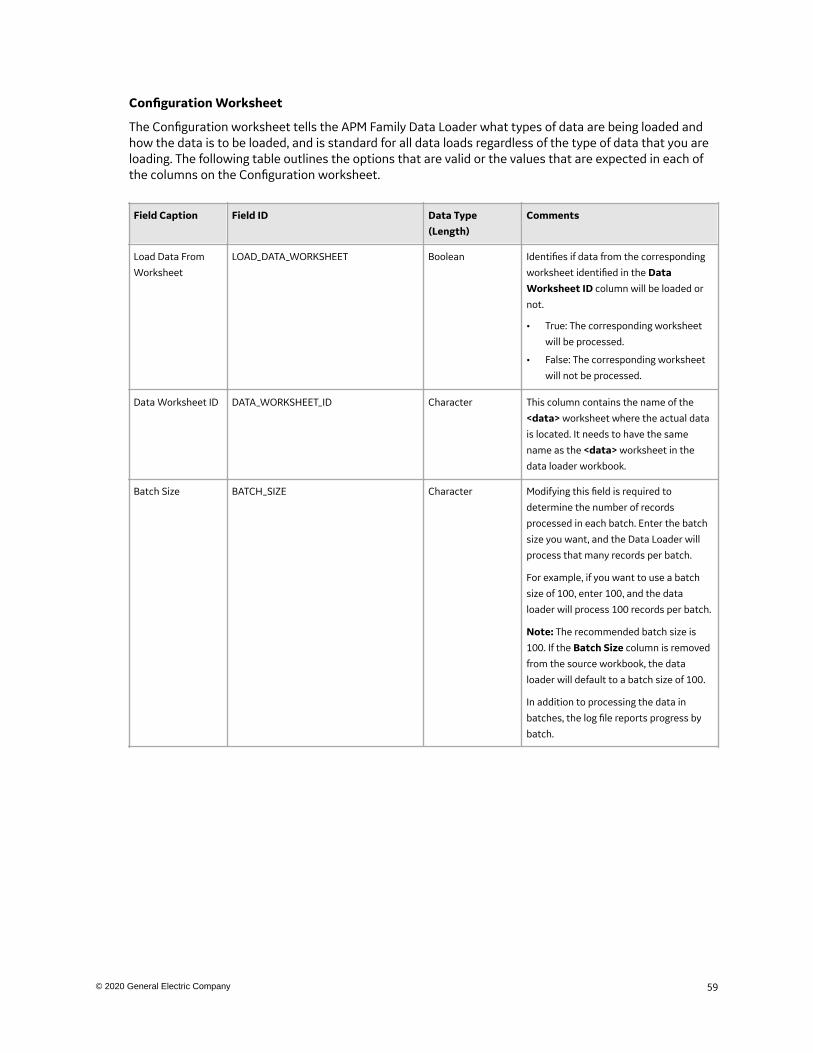
Configuration Worksheet
The Configuration worksheet tells the APM Family Data Loader what types of data are being loaded andhow the data is to be loaded, and is standard for all data loads regardless of the type of data that you areloading. The following table outlines the options that are valid or the values that are expected in each ofthe columns on the Configuration worksheet.
Field Caption Field ID Data Type(Length)
Comments
Load Data From
Worksheet
LOAD_DATA_WORKSHEET Boolean Identifies if data from the corresponding
worksheet identified in the DataWorksheet ID column will be loaded or
not.
• True: The corresponding worksheet
will be processed.
• False: The corresponding worksheet
will not be processed.
Data Worksheet ID DATA_WORKSHEET_ID Character This column contains the name of the
<data> worksheet where the actual data
is located. It needs to have the same
name as the <data> worksheet in the
data loader workbook.
Batch Size BATCH_SIZE Character Modifying this field is required to
determine the number of records
processed in each batch. Enter the batch
size you want, and the Data Loader will
process that many records per batch.
For example, if you want to use a batch
size of 100, enter 100, and the data
loader will process 100 records per batch.
Note: The recommended batch size is
100. If the Batch Size column is removed
from the source workbook, the data
loader will default to a batch size of 100.
In addition to processing the data in
batches, the log file reports progress by
batch.
59© 2020 General Electric Company
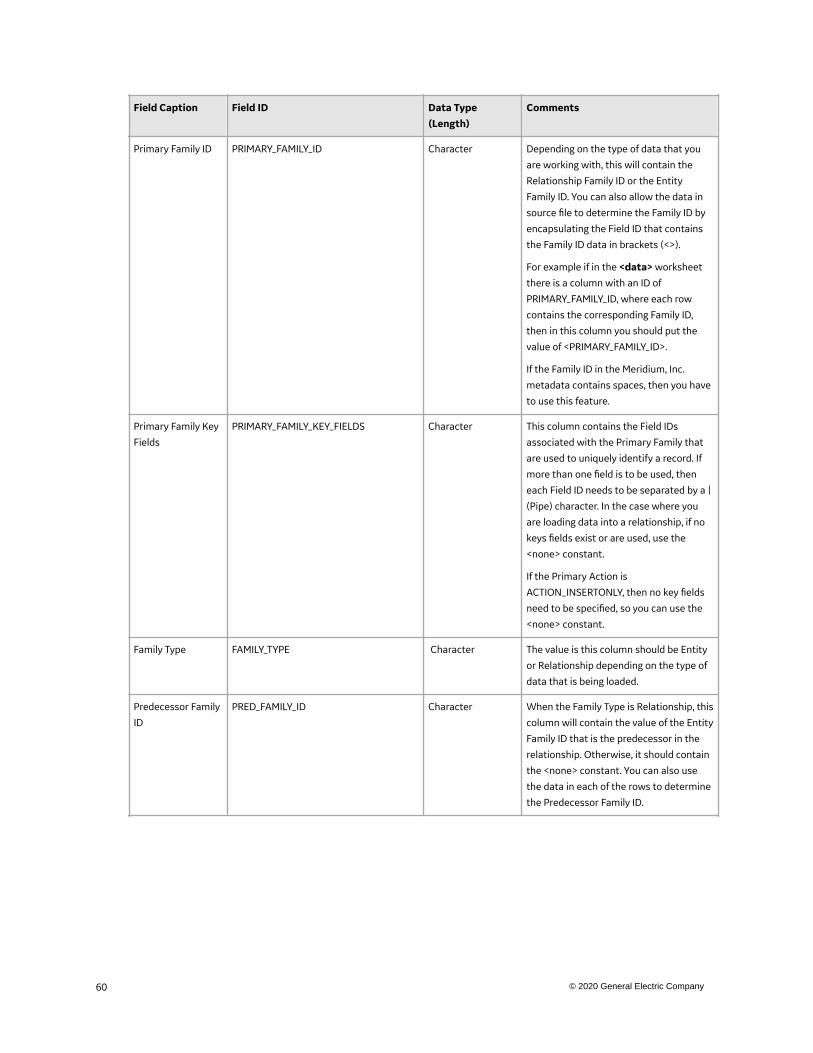
Field Caption Field ID Data Type(Length)
Comments
Primary Family ID PRIMARY_FAMILY_ID Character Depending on the type of data that you
are working with, this will contain the
Relationship Family ID or the Entity
Family ID. You can also allow the data in
source file to determine the Family ID by
encapsulating the Field ID that contains
the Family ID data in brackets (<>).
For example if in the <data> worksheet
there is a column with an ID of
PRIMARY_FAMILY_ID, where each row
contains the corresponding Family ID,
then in this column you should put the
value of <PRIMARY_FAMILY_ID>.
If the Family ID in the Meridium, Inc.
metadata contains spaces, then you have
to use this feature.
Primary Family Key
Fields
PRIMARY_FAMILY_KEY_FIELDS Character This column contains the Field IDs
associated with the Primary Family that
are used to uniquely identify a record. If
more than one field is to be used, then
each Field ID needs to be separated by a |
(Pipe) character. In the case where you
are loading data into a relationship, if no
keys fields exist or are used, use the
<none> constant.
If the Primary Action is
ACTION_INSERTONLY, then no key fields
need to be specified, so you can use the
<none> constant.
Family Type FAMILY_TYPE Character The value is this column should be Entity
or Relationship depending on the type of
data that is being loaded.
Predecessor Family
ID
PRED_FAMILY_ID Character When the Family Type is Relationship, this
column will contain the value of the Entity
Family ID that is the predecessor in the
relationship. Otherwise, it should contain
the <none> constant. You can also use
the data in each of the rows to determine
the Predecessor Family ID.
60 © 2020 General Electric Company
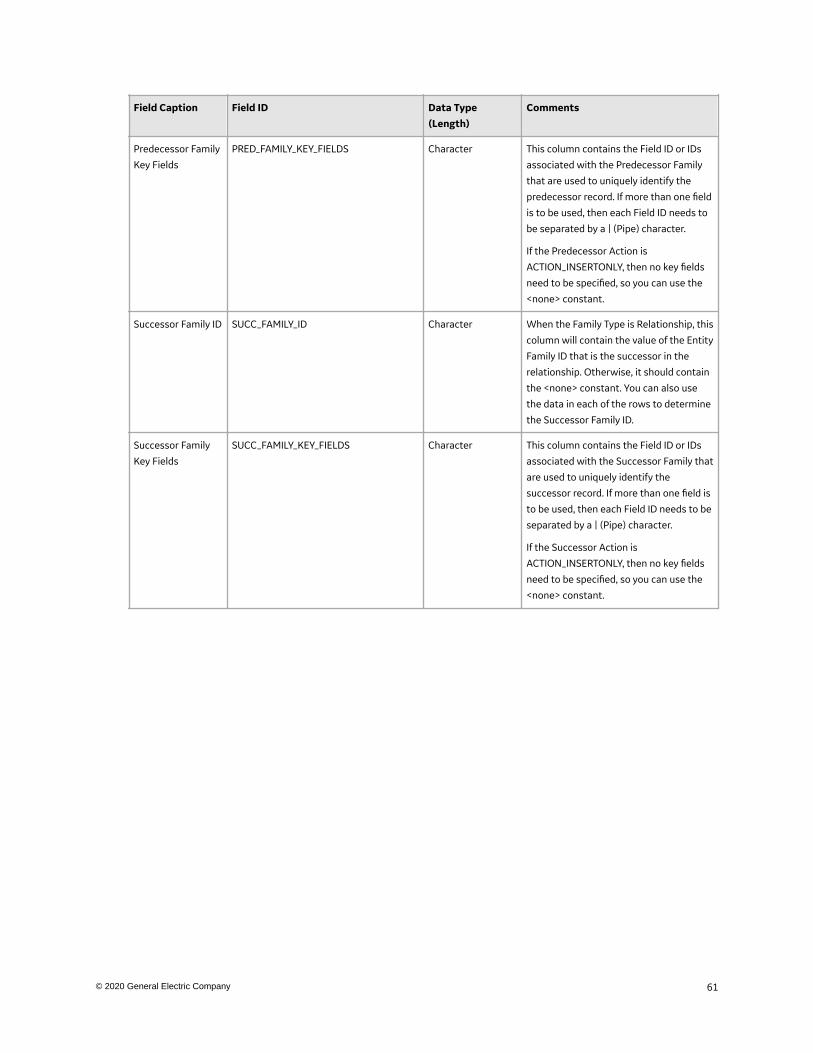
Field Caption Field ID Data Type(Length)
Comments
Predecessor Family
Key Fields
PRED_FAMILY_KEY_FIELDS Character This column contains the Field ID or IDs
associated with the Predecessor Family
that are used to uniquely identify the
predecessor record. If more than one field
is to be used, then each Field ID needs to
be separated by a | (Pipe) character.
If the Predecessor Action is
ACTION_INSERTONLY, then no key fields
need to be specified, so you can use the
<none> constant.
Successor Family ID SUCC_FAMILY_ID Character When the Family Type is Relationship, this
column will contain the value of the Entity
Family ID that is the successor in the
relationship. Otherwise, it should contain
the <none> constant. You can also use
the data in each of the rows to determine
the Successor Family ID.
Successor Family
Key Fields
SUCC_FAMILY_KEY_FIELDS Character This column contains the Field ID or IDs
associated with the Successor Family that
are used to uniquely identify the
successor record. If more than one field is
to be used, then each Field ID needs to be
separated by a | (Pipe) character.
If the Successor Action is
ACTION_INSERTONLY, then no key fields
need to be specified, so you can use the
<none> constant.
61© 2020 General Electric Company
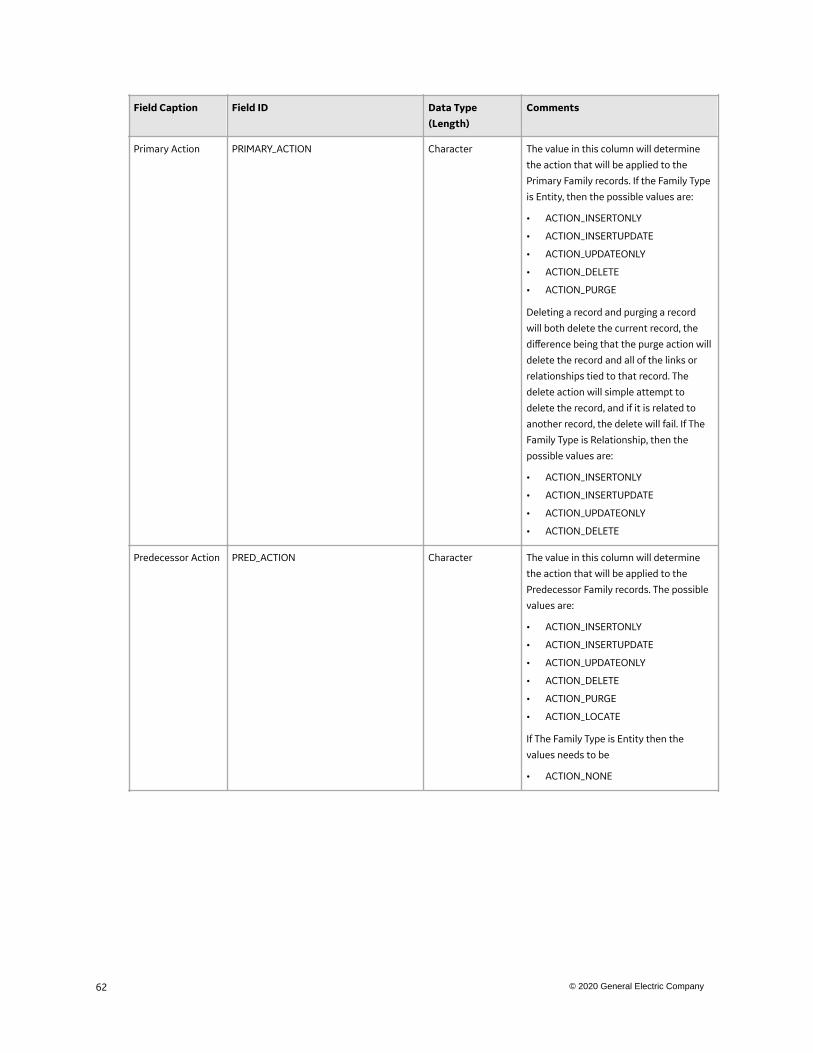
Field Caption Field ID Data Type(Length)
Comments
Primary Action PRIMARY_ACTION Character The value in this column will determine
the action that will be applied to the
Primary Family records. If the Family Type
is Entity, then the possible values are:
• ACTION_INSERTONLY
• ACTION_INSERTUPDATE
• ACTION_UPDATEONLY
• ACTION_DELETE
• ACTION_PURGE
Deleting a record and purging a record
will both delete the current record, the
difference being that the purge action will
delete the record and all of the links or
relationships tied to that record. The
delete action will simple attempt to
delete the record, and if it is related to
another record, the delete will fail. If The
Family Type is Relationship, then the
possible values are:
• ACTION_INSERTONLY
• ACTION_INSERTUPDATE
• ACTION_UPDATEONLY
• ACTION_DELETE
Predecessor Action PRED_ACTION Character The value in this column will determine
the action that will be applied to the
Predecessor Family records. The possible
values are:
• ACTION_INSERTONLY
• ACTION_INSERTUPDATE
• ACTION_UPDATEONLY
• ACTION_DELETE
• ACTION_PURGE
• ACTION_LOCATE
If The Family Type is Entity then the
values needs to be
• ACTION_NONE
62 © 2020 General Electric Company
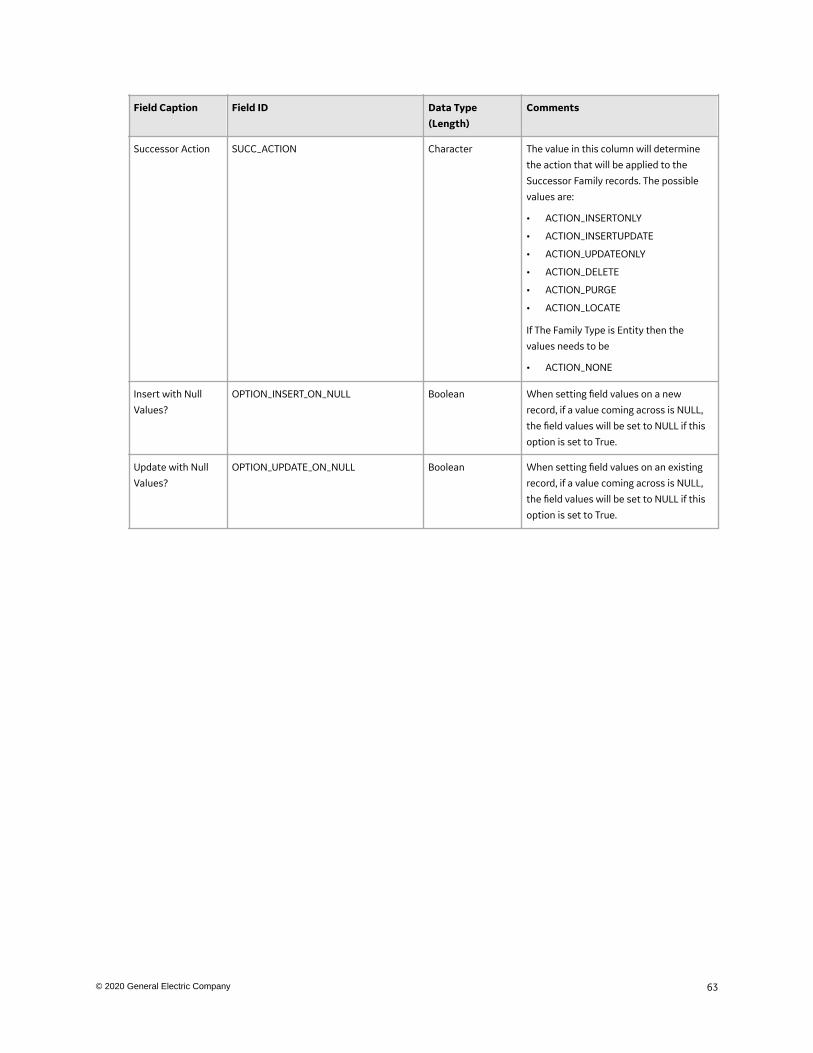
Field Caption Field ID Data Type(Length)
Comments
Successor Action SUCC_ACTION Character The value in this column will determine
the action that will be applied to the
Successor Family records. The possible
values are:
• ACTION_INSERTONLY
• ACTION_INSERTUPDATE
• ACTION_UPDATEONLY
• ACTION_DELETE
• ACTION_PURGE
• ACTION_LOCATE
If The Family Type is Entity then the
values needs to be
• ACTION_NONE
Insert with Null
Values?
OPTION_INSERT_ON_NULL Boolean When setting field values on a new
record, if a value coming across is NULL,
the field values will be set to NULL if this
option is set to True.
Update with Null
Values?
OPTION_UPDATE_ON_NULL Boolean When setting field values on an existing
record, if a value coming across is NULL,
the field values will be set to NULL if this
option is set to True.
63© 2020 General Electric Company
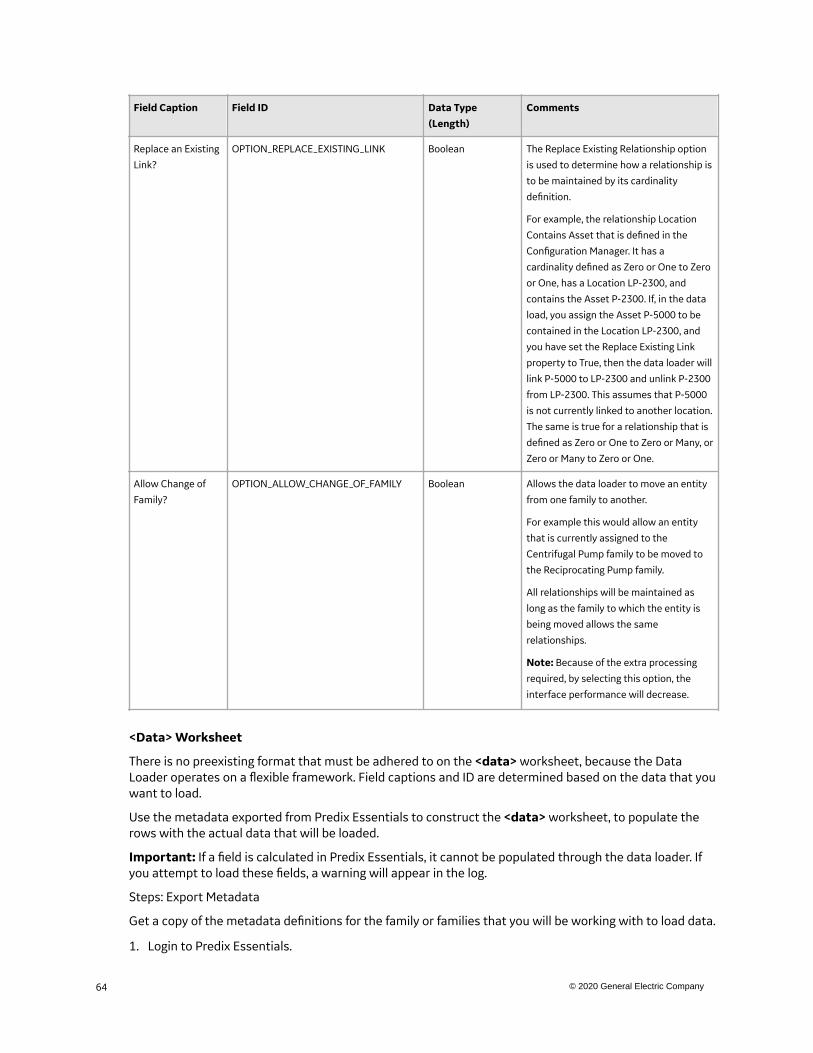
Field Caption Field ID Data Type(Length)
Comments
Replace an Existing
Link?
OPTION_REPLACE_EXISTING_LINK Boolean The Replace Existing Relationship option
is used to determine how a relationship is
to be maintained by its cardinality
definition.
For example, the relationship Location
Contains Asset that is defined in the
Configuration Manager. It has a
cardinality defined as Zero or One to Zero
or One, has a Location LP-2300, and
contains the Asset P-2300. If, in the data
load, you assign the Asset P-5000 to be
contained in the Location LP-2300, and
you have set the Replace Existing Link
property to True, then the data loader will
link P-5000 to LP-2300 and unlink P-2300
from LP-2300. This assumes that P-5000
is not currently linked to another location.
The same is true for a relationship that is
defined as Zero or One to Zero or Many, or
Zero or Many to Zero or One.
Allow Change of
Family?
OPTION_ALLOW_CHANGE_OF_FAMILY Boolean Allows the data loader to move an entity
from one family to another.
For example this would allow an entity
that is currently assigned to the
Centrifugal Pump family to be moved to
the Reciprocating Pump family.
All relationships will be maintained as
long as the family to which the entity is
being moved allows the same
relationships.
Note: Because of the extra processing
required, by selecting this option, the
interface performance will decrease.
<Data> Worksheet
There is no preexisting format that must be adhered to on the <data> worksheet, because the DataLoader operates on a flexible framework. Field captions and ID are determined based on the data that youwant to load.
Use the metadata exported from Predix Essentials to construct the <data> worksheet, to populate therows with the actual data that will be loaded.
Important: If a field is calculated in Predix Essentials, it cannot be populated through the data loader. Ifyou attempt to load these fields, a warning will appear in the log.
Steps: Export Metadata
Get a copy of the metadata definitions for the family or families that you will be working with to load data.
1. Login to Predix Essentials.
64 © 2020 General Electric Company
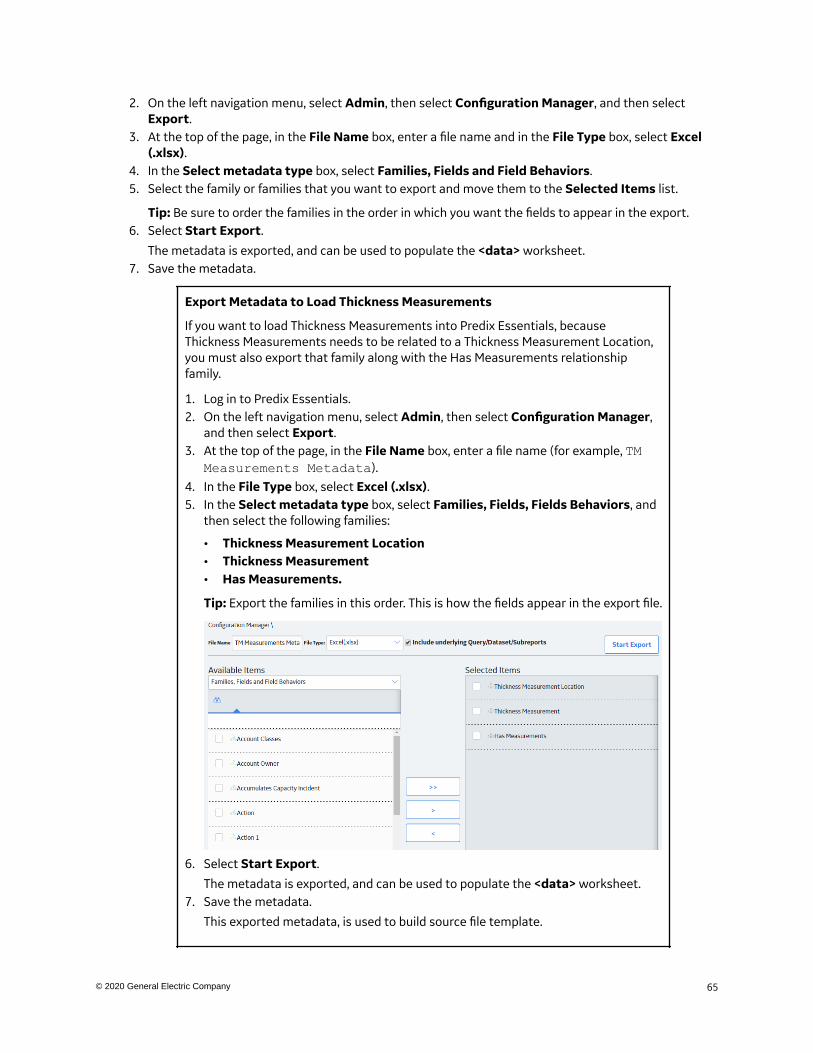
2. On the left navigation menu, select Admin, then select Configuration Manager, and then selectExport.
3. At the top of the page, in the File Name box, enter a file name and in the File Type box, select Excel(.xlsx).
4. In the Select metadata type box, select Families, Fields and Field Behaviors.5. Select the family or families that you want to export and move them to the Selected Items list.
Tip: Be sure to order the families in the order in which you want the fields to appear in the export.6. Select Start Export.
The metadata is exported, and can be used to populate the <data> worksheet.7. Save the metadata.
Export Metadata to Load Thickness Measurements
If you want to load Thickness Measurements into Predix Essentials, becauseThickness Measurements needs to be related to a Thickness Measurement Location,you must also export that family along with the Has Measurements relationshipfamily.
1. Log in to Predix Essentials.2. On the left navigation menu, select Admin, then select Configuration Manager,
and then select Export.3. At the top of the page, in the File Name box, enter a file name (for example, TM
Measurements Metadata).4. In the File Type box, select Excel (.xlsx).5. In the Select metadata type box, select Families, Fields, Fields Behaviors, and
then select the following families:
• Thickness Measurement Location• Thickness Measurement• Has Measurements.
Tip: Export the families in this order. This is how the fields appear in the export file.
6. Select Start Export.
The metadata is exported, and can be used to populate the <data> worksheet.7. Save the metadata.
This exported metadata, is used to build source file template.
65© 2020 General Electric Company

Configure the Data Loader Source File to Use Units of Measure
Sometimes the data that is being loaded, is in a different unit of measure than the one associated withthe corresponding field in Predix Essentials. When this is the case, the APM Family Data Loader allows foryou to specify the unit of measure that is tied to a specific row and column. This is done by copying thecolumn to which the unit of measure is tied, and then adding the suffix |UOM to the end of the Column ID.Then, in the data, specify the unit of measure ID for the data being loaded. This unit of measure ID needsto be a valid unit of measure as defined Predix Essentials, and a valid conversion needs to be specified forthe unit of measure specified and the field’s unit of measure. Please note that if a unit of measure is notspecified, then it will use the field’s unit of measure, as defined inPredix Essentials.
Configure the Data Loader Source File to use Time Zones
Sometimes date and time data that is being loaded was collected in a different time zone than the timezone associated with the current user. When this is the case, the APM Family Data Loader allows you tospecify the time zone that is tied to a specific row and column. This is done by copying the column towhich the time zone is tied, and then adding the suffix |TZ to the end of the Column ID. Then, in the data,specify the time zone for the data being loaded. Please note that if a time zone is not specified, then it willuse the time zone defined for the current user.
Example APM Family WorkbooksIn addition to the APM Family Data Loader workbook, you can access an example workbookFoundation_APM_Data_Loader-Health Indicators and Readings example.xlsx. This example workbookillustrates how you can use the APM Family Data Loader to load records into a defined PredixEssentials family and link records in one family to another. You can use the information in this example asa model to configure or define templates for loading data into any baseline or custom family.
The data loader in this example creates Health Indicator records in Predix Essentials, links the HealthIndicator records to Equipment records, and then links the Health Indicator records to Health IndicatorMapping records. Finally, the data loader loads Readings for one of the Health Indicators. In addition, theexample spreadsheet includes how you can use a reference worksheet to store list values and otherreference information that users can use when populating the data loader template with data.
Populate the Configuration Worksheet
The Configuration Worksheet tells the APM Family Data Loader what types of data are being loaded andhow the data is to be loaded.
Populate the HealthIndicators Worksheet
The HealthIndicators worksheet is populated with the actual Health Indicator records you want to loadinto Predix Essentials.
Populate the HealthIndicatorsEquipment Worksheet
The HealthIndicatorsEquipment worksheet is populated with the key field values for the Equipmentrecords to which the Health Indicators on the HealthIndicators worksheet will be linked once loaded intoPredix Essentials.
Populate the HealthIndicatorMappings Worksheet
The HealthIndicatorMappings worksheet is populated with the Health Indicator Mappings to load intoPredix Essentials.
66 © 2020 General Electric Company
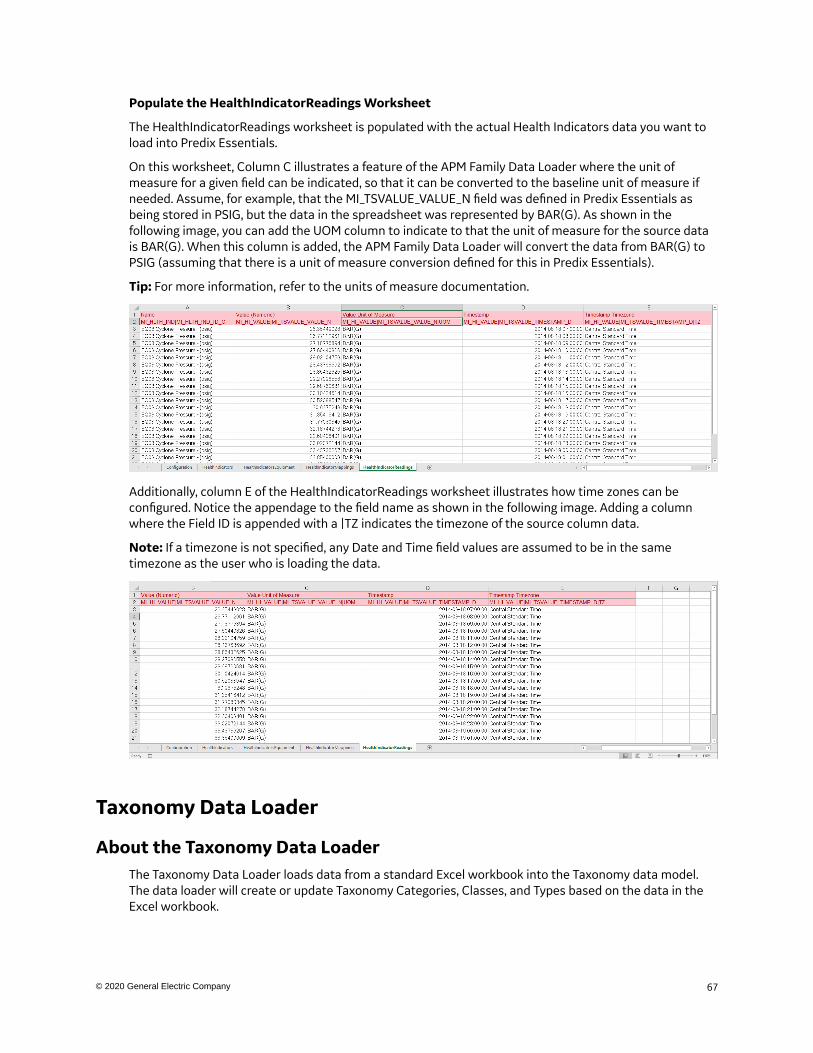
Populate the HealthIndicatorReadings Worksheet
The HealthIndicatorReadings worksheet is populated with the actual Health Indicators data you want toload into Predix Essentials.
On this worksheet, Column C illustrates a feature of the APM Family Data Loader where the unit ofmeasure for a given field can be indicated, so that it can be converted to the baseline unit of measure ifneeded. Assume, for example, that the MI_TSVALUE_VALUE_N field was defined in Predix Essentials asbeing stored in PSIG, but the data in the spreadsheet was represented by BAR(G). As shown in thefollowing image, you can add the UOM column to indicate to that the unit of measure for the source datais BAR(G). When this column is added, the APM Family Data Loader will convert the data from BAR(G) toPSIG (assuming that there is a unit of measure conversion defined for this in Predix Essentials).
Tip: For more information, refer to the units of measure documentation.
Additionally, column E of the HealthIndicatorReadings worksheet illustrates how time zones can beconfigured. Notice the appendage to the field name as shown in the following image. Adding a columnwhere the Field ID is appended with a |TZ indicates the timezone of the source column data.
Note: If a timezone is not specified, any Date and Time field values are assumed to be in the sametimezone as the user who is loading the data.
Taxonomy Data Loader
About the Taxonomy Data LoaderThe Taxonomy Data Loader loads data from a standard Excel workbook into the Taxonomy data model.The data loader will create or update Taxonomy Categories, Classes, and Types based on the data in theExcel workbook.
67© 2020 General Electric Company
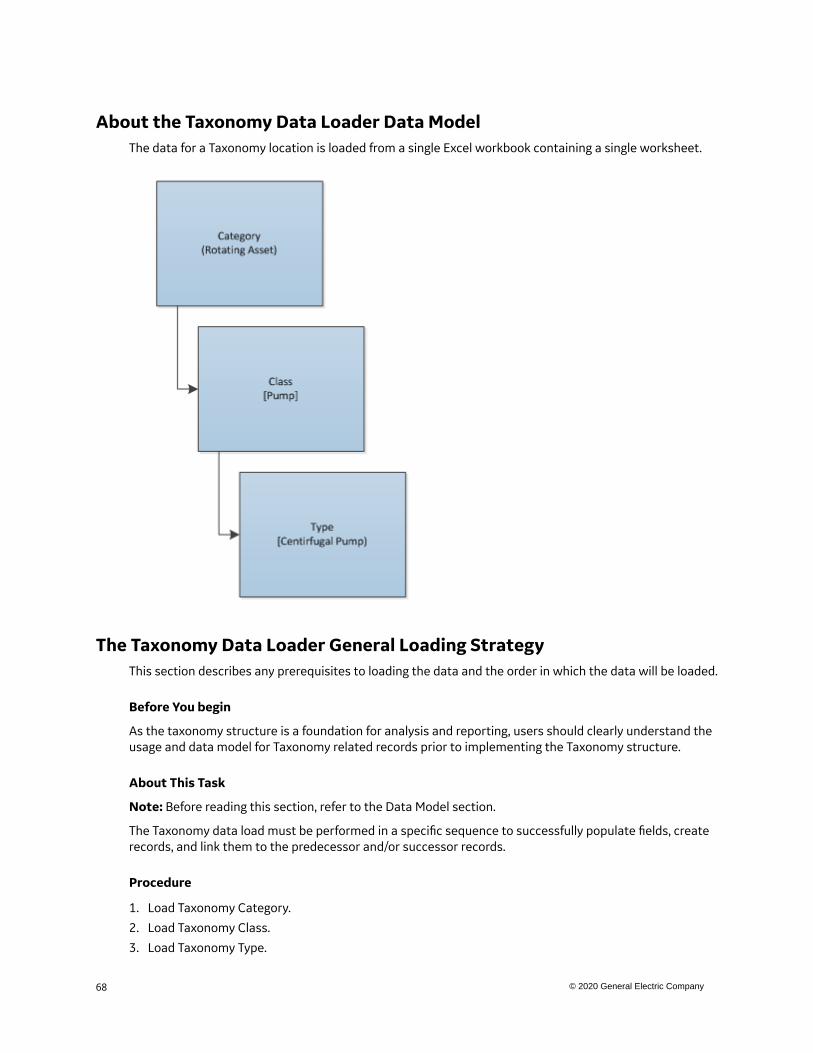
About the Taxonomy Data Loader Data ModelThe data for a Taxonomy location is loaded from a single Excel workbook containing a single worksheet.
The Taxonomy Data Loader General Loading StrategyThis section describes any prerequisites to loading the data and the order in which the data will be loaded.
Before You begin
As the taxonomy structure is a foundation for analysis and reporting, users should clearly understand theusage and data model for Taxonomy related records prior to implementing the Taxonomy structure.
About This Task
Note: Before reading this section, refer to the Data Model section.
The Taxonomy data load must be performed in a specific sequence to successfully populate fields, createrecords, and link them to the predecessor and/or successor records.
Procedure
1. Load Taxonomy Category.
2. Load Taxonomy Class.
3. Load Taxonomy Type.
68 © 2020 General Electric Company
4. Load Taxonomy Mapping Values.
About the Taxonomy Data Loader Workbook Layout and UseThis section provides a high-level overview and explanation of how the data loader workbook isconstructed.
In order to import data using the Taxonomy Data Loader, GE Digital provides an Excel workbook,Taxonomy.xlsx, which supports baseline data loading of Taxonomy in Predix Essentials. This workbookmust be used to perform the data load. On the Taxonomy worksheets, you will enter the information toload a taxonomy structure that will be assigned to assets within Predix Essentials.
The baseline file is organized such that each row is capable of creating one node in the data model whenall columns contain the appropriate values.
The following table lists the worksheets that are included in the Taxonomy Data Loader workbook.
Note: Worksheets in the workbook not being used may be left blank, but should not be deleted from theworkbook.
Worksheet Description
Configuration The Configuration worksheet is needed to describe the type of
data that you will be loading and how that data should be
handled during the data load.
TaxonomyCategory This worksheet is used to link Taxonomy Category data and
Taxonomy Class data.
TaxonomyClass This worksheet is used to link Taxonomy Class data and
Taxonomy Type data.
TaxonomyMapping This worksheet is used to link Taxonomy Type data and
Taxonomy Mapping data.
Configuration Worksheet
The Configuration worksheet tells the data loader what types of data are being loaded and how the datais to be loaded, and is standard for all data loads regardless of the type of data that you are loading. Thefollowing table outlines the options that are valid or the values that are expected in each of the columnson the Configuration worksheet.
69© 2020 General Electric Company
Field Caption Field ID Data Type(Length)
Comments
Load Data
From
Worksheet
LOAD_DATA_WORKSHEET Boolean Identifies if data from the corresponding
worksheet identified in the Data WorksheetID column will be loaded or not.
• True: The corresponding worksheet will be
processed.
• False: The corresponding worksheet will
not be processed.
Data
Worksheet ID
DATA_WORKSHEET_ID Character This column contains the name of the
<data>worksheet where the actual data is
located. It needs to have the same name as the
<data> worksheet in the data loader
workbook.
Batch Size BATCH_SIZE Character Modifying this field is required to determine the
number of records processed in each batch.
Enter the batch size you want, and the Data
Loader will process that many records per
batch.
For example, if you want to use a batch size of
100, enter 100, and the data loader will process
100 records per batch.
Note: The recommended batch size is 100. If
the Batch Size column is removed from the
source workbook, the data loader will default
to a batch size of 100.
In addition to processing the data in batches,
the log file reports progress by batch.
Primary
Family ID
PRIMARY_FAMILY_ID Character Depending on the type of data that you are
working with, this will contain the Relationship
Family ID or the Entity Family ID. You can also
allow the data in source file to determine the
Family ID by encapsulating the Field ID that
contains the Family ID data in brackets (<>).
For example if in the <data> worksheet there is
a column with an ID of PRIMARY_FAMILY_ID,
where each row contains the corresponding
Family ID, then in this column you should put
the value of <PRIMARY_FAMILY_ID>.
If the Family ID in the Meridium, Inc. metadata
contains spaces, then you have to use this
feature.
70 © 2020 General Electric Company
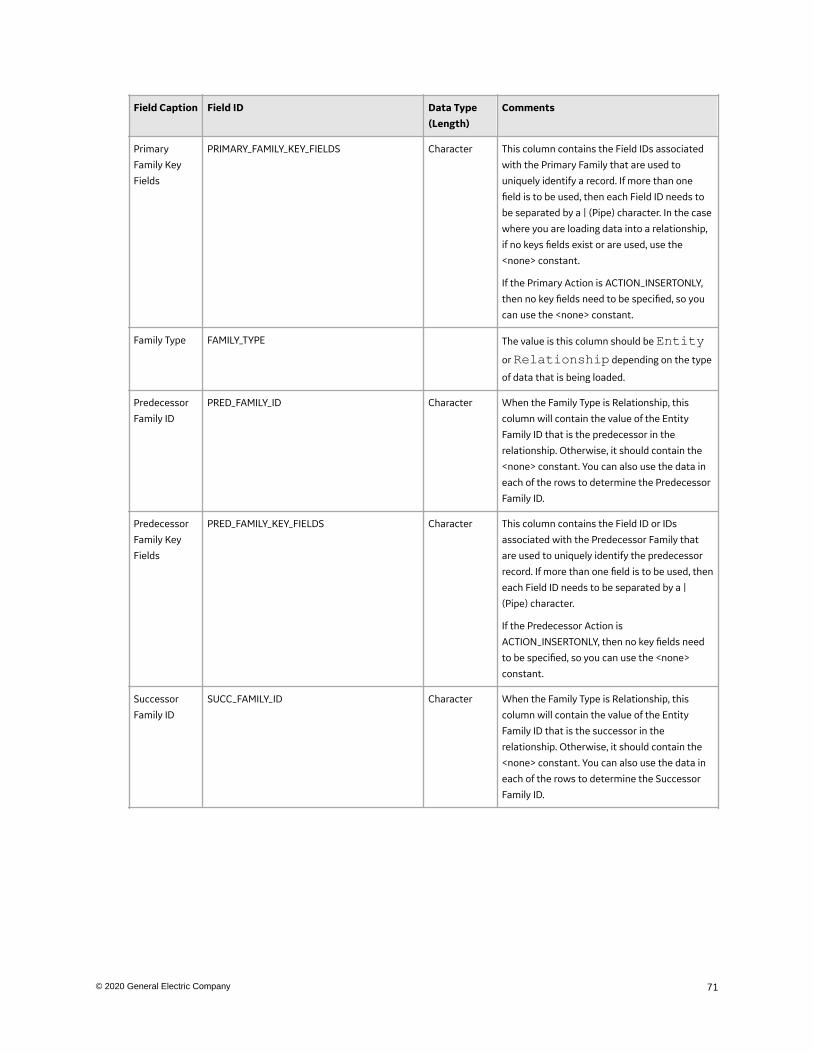
Field Caption Field ID Data Type(Length)
Comments
Primary
Family Key
Fields
PRIMARY_FAMILY_KEY_FIELDS Character This column contains the Field IDs associated
with the Primary Family that are used to
uniquely identify a record. If more than one
field is to be used, then each Field ID needs to
be separated by a | (Pipe) character. In the case
where you are loading data into a relationship,
if no keys fields exist or are used, use the
<none> constant.
If the Primary Action is ACTION_INSERTONLY,
then no key fields need to be specified, so you
can use the <none> constant.
Family Type FAMILY_TYPE The value is this column should be Entityor Relationship depending on the type
of data that is being loaded.
Predecessor
Family ID
PRED_FAMILY_ID Character When the Family Type is Relationship, this
column will contain the value of the Entity
Family ID that is the predecessor in the
relationship. Otherwise, it should contain the
<none> constant. You can also use the data in
each of the rows to determine the Predecessor
Family ID.
Predecessor
Family Key
Fields
PRED_FAMILY_KEY_FIELDS Character This column contains the Field ID or IDs
associated with the Predecessor Family that
are used to uniquely identify the predecessor
record. If more than one field is to be used, then
each Field ID needs to be separated by a |
(Pipe) character.
If the Predecessor Action is
ACTION_INSERTONLY, then no key fields need
to be specified, so you can use the <none>
constant.
Successor
Family ID
SUCC_FAMILY_ID Character When the Family Type is Relationship, this
column will contain the value of the Entity
Family ID that is the successor in the
relationship. Otherwise, it should contain the
<none> constant. You can also use the data in
each of the rows to determine the Successor
Family ID.
71© 2020 General Electric Company
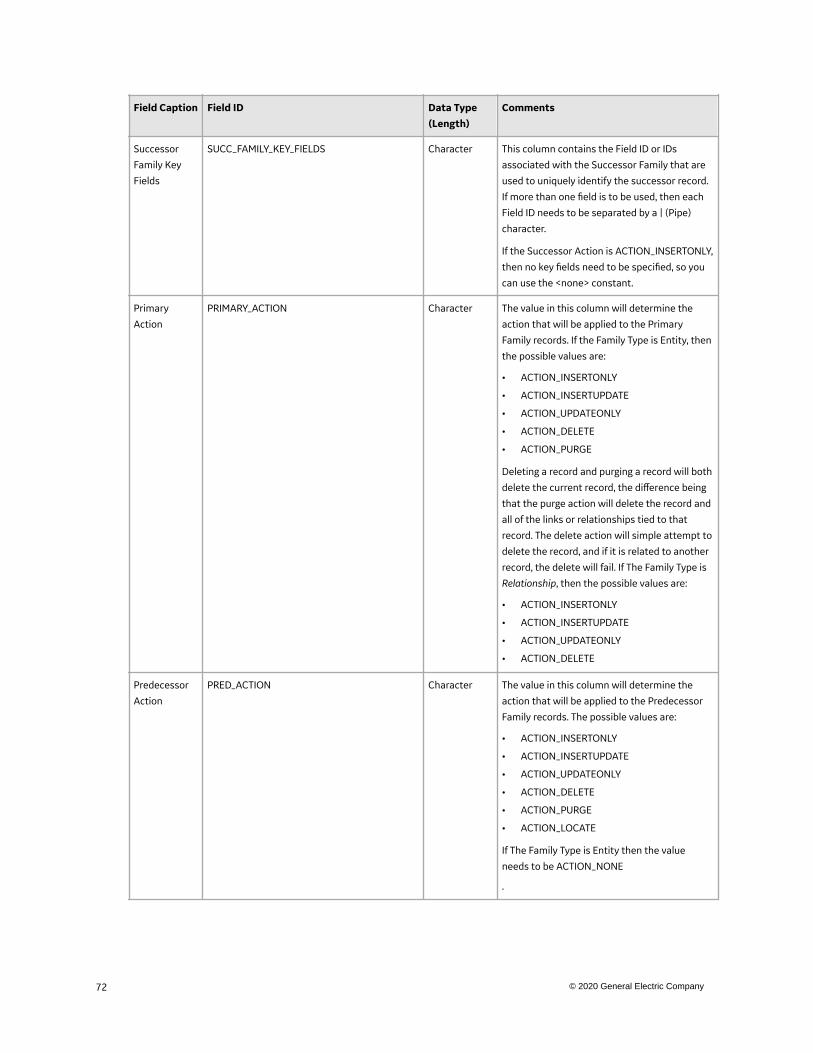
Field Caption Field ID Data Type(Length)
Comments
Successor
Family Key
Fields
SUCC_FAMILY_KEY_FIELDS Character This column contains the Field ID or IDs
associated with the Successor Family that are
used to uniquely identify the successor record.
If more than one field is to be used, then each
Field ID needs to be separated by a | (Pipe)
character.
If the Successor Action is ACTION_INSERTONLY,
then no key fields need to be specified, so you
can use the <none> constant.
Primary
Action
PRIMARY_ACTION Character The value in this column will determine the
action that will be applied to the Primary
Family records. If the Family Type is Entity, then
the possible values are:
• ACTION_INSERTONLY
• ACTION_INSERTUPDATE
• ACTION_UPDATEONLY
• ACTION_DELETE
• ACTION_PURGE
Deleting a record and purging a record will both
delete the current record, the difference being
that the purge action will delete the record and
all of the links or relationships tied to that
record. The delete action will simple attempt to
delete the record, and if it is related to another
record, the delete will fail. If The Family Type is
Relationship, then the possible values are:
• ACTION_INSERTONLY
• ACTION_INSERTUPDATE
• ACTION_UPDATEONLY
• ACTION_DELETE
Predecessor
Action
PRED_ACTION Character The value in this column will determine the
action that will be applied to the Predecessor
Family records. The possible values are:
• ACTION_INSERTONLY
• ACTION_INSERTUPDATE
• ACTION_UPDATEONLY
• ACTION_DELETE
• ACTION_PURGE
• ACTION_LOCATE
If The Family Type is Entity then the value
needs to be ACTION_NONE
.
72 © 2020 General Electric Company
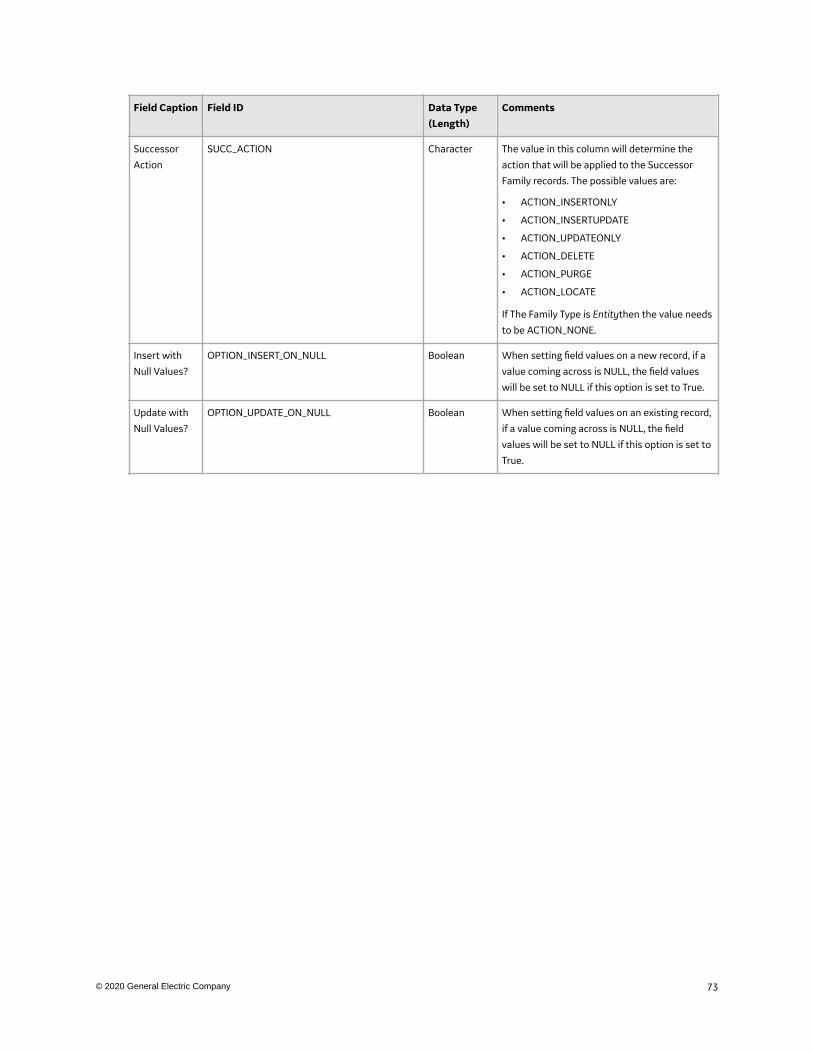
Field Caption Field ID Data Type(Length)
Comments
Successor
Action
SUCC_ACTION Character The value in this column will determine the
action that will be applied to the Successor
Family records. The possible values are:
• ACTION_INSERTONLY
• ACTION_INSERTUPDATE
• ACTION_UPDATEONLY
• ACTION_DELETE
• ACTION_PURGE
• ACTION_LOCATE
If The Family Type is Entitythen the value needs
to be ACTION_NONE.
Insert with
Null Values?
OPTION_INSERT_ON_NULL Boolean When setting field values on a new record, if a
value coming across is NULL, the field values
will be set to NULL if this option is set to True.
Update with
Null Values?
OPTION_UPDATE_ON_NULL Boolean When setting field values on an existing record,
if a value coming across is NULL, the field
values will be set to NULL if this option is set to
True.
73© 2020 General Electric Company
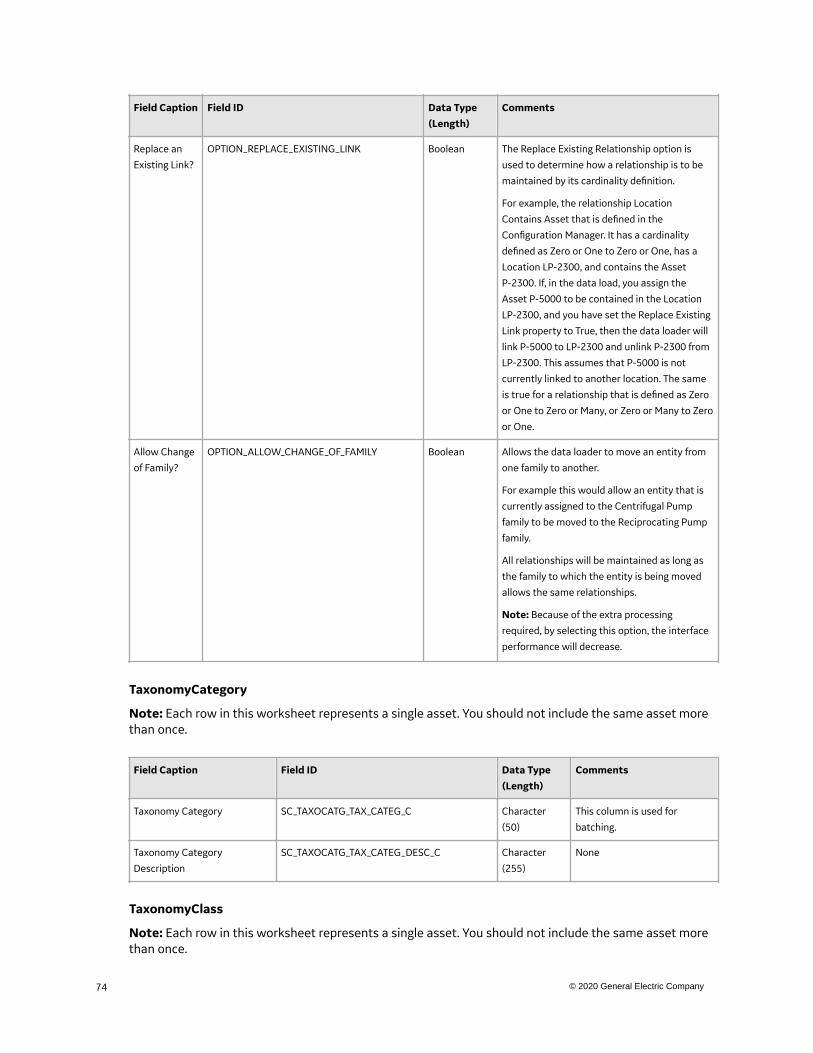
Field Caption Field ID Data Type(Length)
Comments
Replace an
Existing Link?
OPTION_REPLACE_EXISTING_LINK Boolean The Replace Existing Relationship option is
used to determine how a relationship is to be
maintained by its cardinality definition.
For example, the relationship Location
Contains Asset that is defined in the
Configuration Manager. It has a cardinality
defined as Zero or One to Zero or One, has a
Location LP-2300, and contains the Asset
P-2300. If, in the data load, you assign the
Asset P-5000 to be contained in the Location
LP-2300, and you have set the Replace Existing
Link property to True, then the data loader will
link P-5000 to LP-2300 and unlink P-2300 from
LP-2300. This assumes that P-5000 is not
currently linked to another location. The same
is true for a relationship that is defined as Zero
or One to Zero or Many, or Zero or Many to Zero
or One.
Allow Change
of Family?
OPTION_ALLOW_CHANGE_OF_FAMILY Boolean Allows the data loader to move an entity from
one family to another.
For example this would allow an entity that is
currently assigned to the Centrifugal Pump
family to be moved to the Reciprocating Pump
family.
All relationships will be maintained as long as
the family to which the entity is being moved
allows the same relationships.
Note: Because of the extra processing
required, by selecting this option, the interface
performance will decrease.
TaxonomyCategory
Note: Each row in this worksheet represents a single asset. You should not include the same asset morethan once.
Field Caption Field ID Data Type(Length)
Comments
Taxonomy Category SC_TAXOCATG_TAX_CATEG_C Character
(50)
This column is used for
batching.
Taxonomy Category
Description
SC_TAXOCATG_TAX_CATEG_DESC_C Character
(255)
None
TaxonomyClass
Note: Each row in this worksheet represents a single asset. You should not include the same asset morethan once.
74 © 2020 General Electric Company
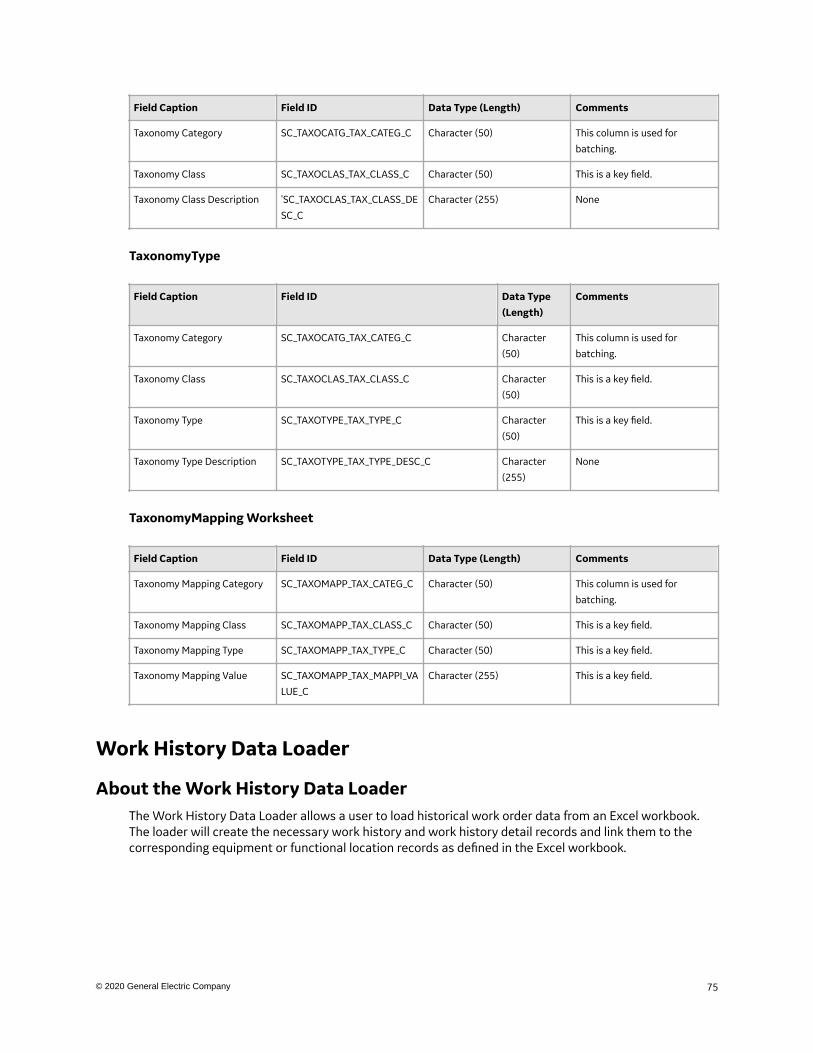
Field Caption Field ID Data Type (Length) Comments
Taxonomy Category SC_TAXOCATG_TAX_CATEG_C Character (50) This column is used for
batching.
Taxonomy Class SC_TAXOCLAS_TAX_CLASS_C Character (50) This is a key field.
Taxonomy Class Description 'SC_TAXOCLAS_TAX_CLASS_DE
SC_C
Character (255) None
TaxonomyType
Field Caption Field ID Data Type(Length)
Comments
Taxonomy Category SC_TAXOCATG_TAX_CATEG_C Character
(50)
This column is used for
batching.
Taxonomy Class SC_TAXOCLAS_TAX_CLASS_C Character
(50)
This is a key field.
Taxonomy Type SC_TAXOTYPE_TAX_TYPE_C Character
(50)
This is a key field.
Taxonomy Type Description SC_TAXOTYPE_TAX_TYPE_DESC_C Character
(255)
None
TaxonomyMapping Worksheet
Field Caption Field ID Data Type (Length) Comments
Taxonomy Mapping Category SC_TAXOMAPP_TAX_CATEG_C Character (50) This column is used for
batching.
Taxonomy Mapping Class SC_TAXOMAPP_TAX_CLASS_C Character (50) This is a key field.
Taxonomy Mapping Type SC_TAXOMAPP_TAX_TYPE_C Character (50) This is a key field.
Taxonomy Mapping Value SC_TAXOMAPP_TAX_MAPPI_VA
LUE_C
Character (255) This is a key field.
Work History Data Loader
About the Work History Data LoaderThe Work History Data Loader allows a user to load historical work order data from an Excel workbook.The loader will create the necessary work history and work history detail records and link them to thecorresponding equipment or functional location records as defined in the Excel workbook.
75© 2020 General Electric Company
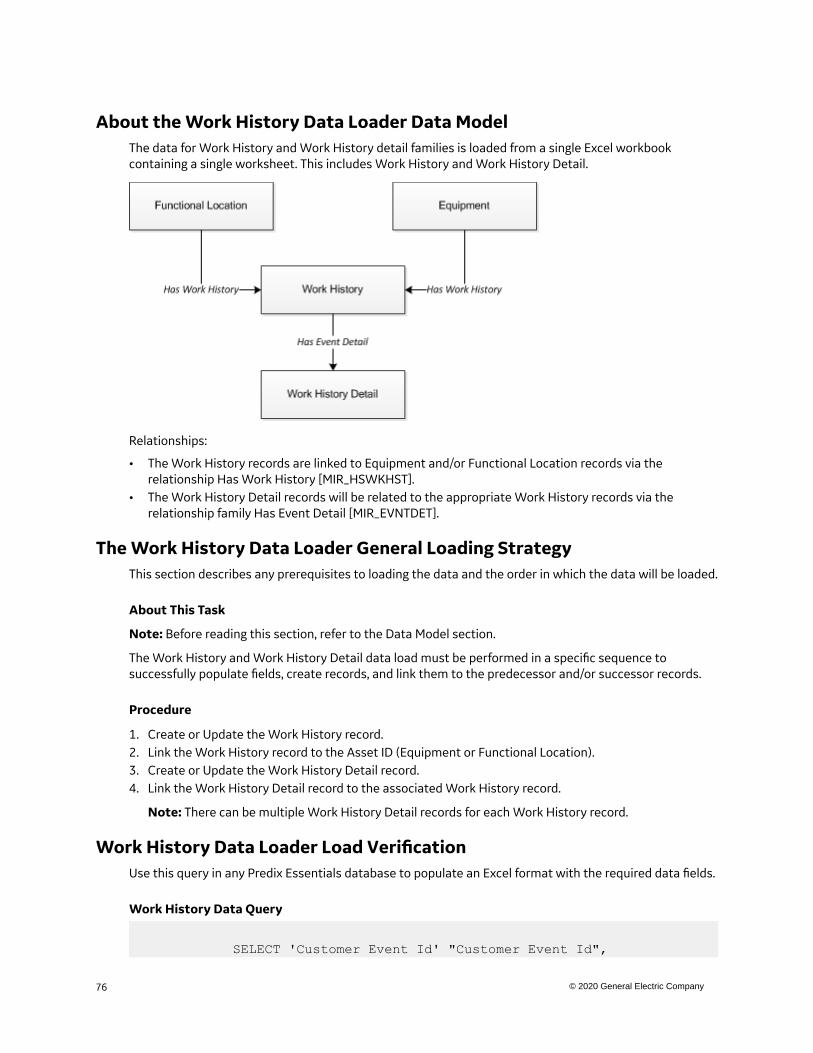
About the Work History Data Loader Data ModelThe data for Work History and Work History detail families is loaded from a single Excel workbookcontaining a single worksheet. This includes Work History and Work History Detail.
Relationships:
• The Work History records are linked to Equipment and/or Functional Location records via therelationship Has Work History [MIR_HSWKHST].
• The Work History Detail records will be related to the appropriate Work History records via therelationship family Has Event Detail [MIR_EVNTDET].
The Work History Data Loader General Loading StrategyThis section describes any prerequisites to loading the data and the order in which the data will be loaded.
About This Task
Note: Before reading this section, refer to the Data Model section.
The Work History and Work History Detail data load must be performed in a specific sequence tosuccessfully populate fields, create records, and link them to the predecessor and/or successor records.
Procedure
1. Create or Update the Work History record.2. Link the Work History record to the Asset ID (Equipment or Functional Location).3. Create or Update the Work History Detail record.4. Link the Work History Detail record to the associated Work History record.
Note: There can be multiple Work History Detail records for each Work History record.
Work History Data Loader Load VerificationUse this query in any Predix Essentials database to populate an Excel format with the required data fields.
Work History Data Query
SELECT 'Customer Event Id' "Customer Event Id",
76 © 2020 General Electric Company
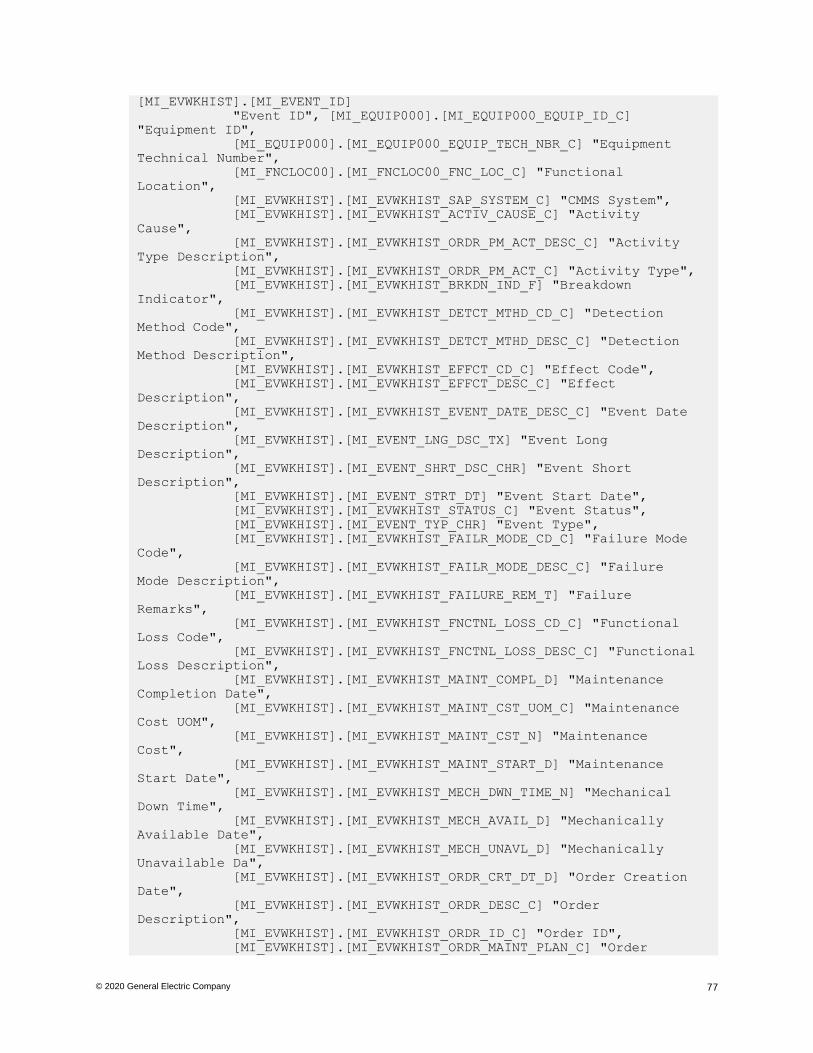
[MI_EVWKHIST].[MI_EVENT_ID] "Event ID", [MI_EQUIP000].[MI_EQUIP000_EQUIP_ID_C] "Equipment ID", [MI_EQUIP000].[MI_EQUIP000_EQUIP_TECH_NBR_C] "Equipment Technical Number", [MI_FNCLOC00].[MI_FNCLOC00_FNC_LOC_C] "Functional Location", [MI_EVWKHIST].[MI_EVWKHIST_SAP_SYSTEM_C] "CMMS System", [MI_EVWKHIST].[MI_EVWKHIST_ACTIV_CAUSE_C] "Activity Cause", [MI_EVWKHIST].[MI_EVWKHIST_ORDR_PM_ACT_DESC_C] "Activity Type Description", [MI_EVWKHIST].[MI_EVWKHIST_ORDR_PM_ACT_C] "Activity Type", [MI_EVWKHIST].[MI_EVWKHIST_BRKDN_IND_F] "Breakdown Indicator", [MI_EVWKHIST].[MI_EVWKHIST_DETCT_MTHD_CD_C] "Detection Method Code", [MI_EVWKHIST].[MI_EVWKHIST_DETCT_MTHD_DESC_C] "Detection Method Description", [MI_EVWKHIST].[MI_EVWKHIST_EFFCT_CD_C] "Effect Code", [MI_EVWKHIST].[MI_EVWKHIST_EFFCT_DESC_C] "Effect Description", [MI_EVWKHIST].[MI_EVWKHIST_EVENT_DATE_DESC_C] "Event Date Description", [MI_EVWKHIST].[MI_EVENT_LNG_DSC_TX] "Event Long Description", [MI_EVWKHIST].[MI_EVENT_SHRT_DSC_CHR] "Event Short Description", [MI_EVWKHIST].[MI_EVENT_STRT_DT] "Event Start Date", [MI_EVWKHIST].[MI_EVWKHIST_STATUS_C] "Event Status", [MI_EVWKHIST].[MI_EVENT_TYP_CHR] "Event Type", [MI_EVWKHIST].[MI_EVWKHIST_FAILR_MODE_CD_C] "Failure Mode Code", [MI_EVWKHIST].[MI_EVWKHIST_FAILR_MODE_DESC_C] "Failure Mode Description", [MI_EVWKHIST].[MI_EVWKHIST_FAILURE_REM_T] "Failure Remarks", [MI_EVWKHIST].[MI_EVWKHIST_FNCTNL_LOSS_CD_C] "Functional Loss Code", [MI_EVWKHIST].[MI_EVWKHIST_FNCTNL_LOSS_DESC_C] "Functional Loss Description", [MI_EVWKHIST].[MI_EVWKHIST_MAINT_COMPL_D] "Maintenance Completion Date", [MI_EVWKHIST].[MI_EVWKHIST_MAINT_CST_UOM_C] "Maintenance Cost UOM", [MI_EVWKHIST].[MI_EVWKHIST_MAINT_CST_N] "Maintenance Cost", [MI_EVWKHIST].[MI_EVWKHIST_MAINT_START_D] "Maintenance Start Date", [MI_EVWKHIST].[MI_EVWKHIST_MECH_DWN_TIME_N] "Mechanical Down Time", [MI_EVWKHIST].[MI_EVWKHIST_MECH_AVAIL_D] "Mechanically Available Date", [MI_EVWKHIST].[MI_EVWKHIST_MECH_UNAVL_D] "Mechanically Unavailable Da", [MI_EVWKHIST].[MI_EVWKHIST_ORDR_CRT_DT_D] "Order Creation Date", [MI_EVWKHIST].[MI_EVWKHIST_ORDR_DESC_C] "Order Description", [MI_EVWKHIST].[MI_EVWKHIST_ORDR_ID_C] "Order ID", [MI_EVWKHIST].[MI_EVWKHIST_ORDR_MAINT_PLAN_C] "Order
77© 2020 General Electric Company

Maintenance Plan", [MI_EVWKHIST].[MI_EVWKHIST_ORDR_PRTY_DESC_C] "Order Priority Description", [MI_EVWKHIST].[MI_EVWKHIST_ORDR_PRTY_C] "Order Priority", [MI_EVWKHIST].[MI_EVWKHIST_ORDR_REF_DT_D] "Order Reference Date", [MI_EVWKHIST].[MI_EVWKHIST_ORDR_SYS_CND_DES_C] "Order System Condition Desc", [MI_EVWKHIST].[MI_EVWKHIST_ORDR_SYS_COND_C] "Order System Condition", [MI_EVWKHIST].[MI_EVWKHIST_ORDR_SYS_STAT_C] "Order System Status", [MI_EVWKHIST].[MI_EVWKHIST_ORDR_TYP_CD_C] "Order Type Code", [MI_EVWKHIST].[MI_EVWKHIST_ORDR_TYP_DESC_C] "Order Type Description", [MI_EVWKHIST].[MI_EVWKHIST_ORDR_USER_STAT_C] "Order User Status", [MI_EVWKHIST].[MI_EVWKHIST_PM_NBR_C] "PM Number", [MI_EVWKHIST].[MI_EVWKHIST_PRDN_CST_N] "Production Cost", [MI_EVWKHIST].[MI_EVWKHIST_RQST_ID_C] "Request ID", [MI_EVWKHIST].[MI_EVWKHIST_RQST_CRT_DT_D] "Request Creation Date", [MI_EVWKHIST].[MI_EVWKHIST_RQST_DESC_C] "Request Description", [MI_EVWKHIST].[MI_EVWKHIST_RQST_PRTY_DESC_C] "Request Priority Descriptio", [MI_EVWKHIST].[MI_EVWKHIST_RQST_PRTY_C] "Request Priority", [MI_EVWKHIST].[MI_EVWKHIST_RQST_SYS_STAT_C] "Request System Status", [MI_EVWKHIST].[MI_EVWKHIST_RQST_TYP_CD_C] "Request Type Code", [MI_EVWKHIST].[MI_EVWKHIST_RQST_TYP_DESC_C] "Request Type Description", [MI_EVWKHIST].[MI_EVWKHIST_RQST_USER_STAT_C] "Request User Status", [MI_EVWKHIST].[MI_EVWKHIST_SCHED_COMPL_D] "Scheduled Completion Date", [MI_EVWKHIST].[MI_EVWKHIST_SCHED_START_D] "Scheduled Start Date", [MI_EVWKHIST].[MI_EVWKHIST_TARGET_COMPL_D] "Target Completion Date", [MI_EVWKHIST].[MI_EVWKHIST_TARGET_START_D] "Target Start Date", [MI_EVWKHIST].[MI_EVWKHIST_TIME_TO_REPR_N] "Time To Repair (TTR)", [MI_EVWKHIST].[MI_EVWKHIST_TOTL_CST_N] "Total Cost", [MI_EVWKHIST].[MI_EVWKHIST_WORK_HIST_TYPE_C] "Work History Type", [MI_EVWKHIST].[MI_EVWKHIST_WO_PRIORTY_N] "Work Order Priority", 'WHD_Customer WHD ID' "WHD_Customer WHD ID", [MI_DTWKHIST].[MI_DTWKHIST_EVNT_DTL_ID_C] "WHD_Work History Detail ID", [MI_DTWKHIST].[MI_DTWKHIST_EVNT_DTL_DESC_C] "WHD_Work Hist Detail Desc", [MI_DTWKHIST].[MI_DTWKHIST_ORDR_ID_C] "WHD_Order ID", [MI_DTWKHIST].[MI_DTWKHIST_RQST_ID_C] "WHD_Request ID", [MI_DTWKHIST].[MI_DTWKHIST_CAUSE_CD_C] "WHD_Cause Code",
78 © 2020 General Electric Company
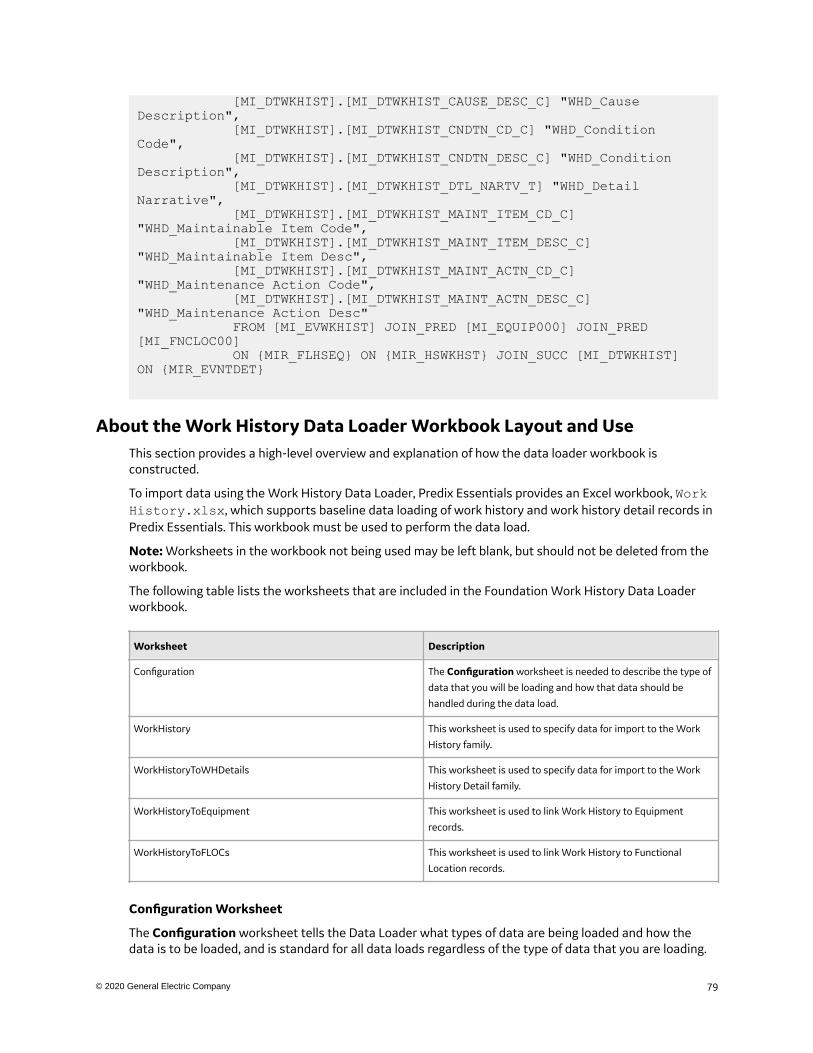
[MI_DTWKHIST].[MI_DTWKHIST_CAUSE_DESC_C] "WHD_Cause Description", [MI_DTWKHIST].[MI_DTWKHIST_CNDTN_CD_C] "WHD_Condition Code", [MI_DTWKHIST].[MI_DTWKHIST_CNDTN_DESC_C] "WHD_Condition Description", [MI_DTWKHIST].[MI_DTWKHIST_DTL_NARTV_T] "WHD_Detail Narrative", [MI_DTWKHIST].[MI_DTWKHIST_MAINT_ITEM_CD_C] "WHD_Maintainable Item Code", [MI_DTWKHIST].[MI_DTWKHIST_MAINT_ITEM_DESC_C] "WHD_Maintainable Item Desc", [MI_DTWKHIST].[MI_DTWKHIST_MAINT_ACTN_CD_C] "WHD_Maintenance Action Code", [MI_DTWKHIST].[MI_DTWKHIST_MAINT_ACTN_DESC_C] "WHD_Maintenance Action Desc" FROM [MI_EVWKHIST] JOIN_PRED [MI_EQUIP000] JOIN_PRED [MI_FNCLOC00] ON {MIR_FLHSEQ} ON {MIR_HSWKHST} JOIN_SUCC [MI_DTWKHIST] ON {MIR_EVNTDET}
About the Work History Data Loader Workbook Layout and UseThis section provides a high-level overview and explanation of how the data loader workbook isconstructed.
To import data using the Work History Data Loader, Predix Essentials provides an Excel workbook, WorkHistory.xlsx, which supports baseline data loading of work history and work history detail records inPredix Essentials. This workbook must be used to perform the data load.
Note: Worksheets in the workbook not being used may be left blank, but should not be deleted from theworkbook.
The following table lists the worksheets that are included in the Foundation Work History Data Loaderworkbook.
Worksheet Description
Configuration The Configuration worksheet is needed to describe the type of
data that you will be loading and how that data should be
handled during the data load.
WorkHistory This worksheet is used to specify data for import to the Work
History family.
WorkHistoryToWHDetails This worksheet is used to specify data for import to the Work
History Detail family.
WorkHistoryToEquipment This worksheet is used to link Work History to Equipment
records.
WorkHistoryToFLOCs This worksheet is used to link Work History to Functional
Location records.
Configuration Worksheet
The Configuration worksheet tells the Data Loader what types of data are being loaded and how thedata is to be loaded, and is standard for all data loads regardless of the type of data that you are loading.
79© 2020 General Electric Company
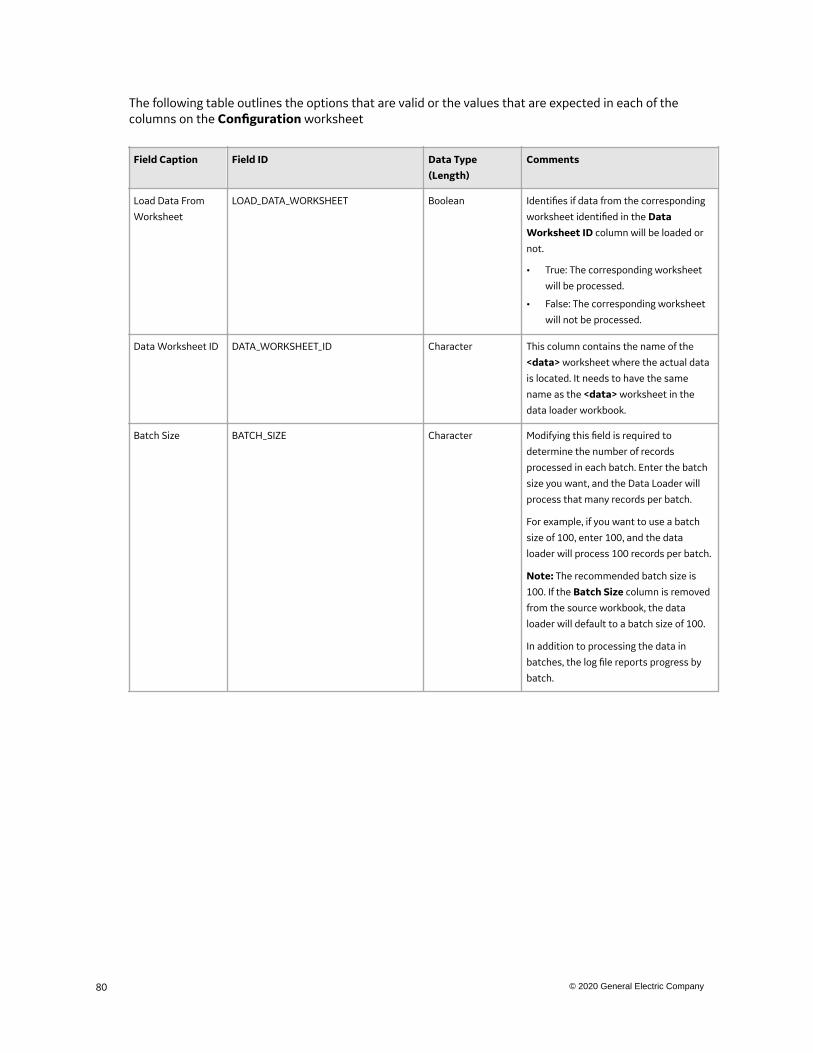
The following table outlines the options that are valid or the values that are expected in each of thecolumns on the Configuration worksheet
Field Caption Field ID Data Type(Length)
Comments
Load Data From
Worksheet
LOAD_DATA_WORKSHEET Boolean Identifies if data from the corresponding
worksheet identified in the DataWorksheet ID column will be loaded or
not.
• True: The corresponding worksheet
will be processed.
• False: The corresponding worksheet
will not be processed.
Data Worksheet ID DATA_WORKSHEET_ID Character This column contains the name of the
<data> worksheet where the actual data
is located. It needs to have the same
name as the <data> worksheet in the
data loader workbook.
Batch Size BATCH_SIZE Character Modifying this field is required to
determine the number of records
processed in each batch. Enter the batch
size you want, and the Data Loader will
process that many records per batch.
For example, if you want to use a batch
size of 100, enter 100, and the data
loader will process 100 records per batch.
Note: The recommended batch size is
100. If the Batch Size column is removed
from the source workbook, the data
loader will default to a batch size of 100.
In addition to processing the data in
batches, the log file reports progress by
batch.
80 © 2020 General Electric Company
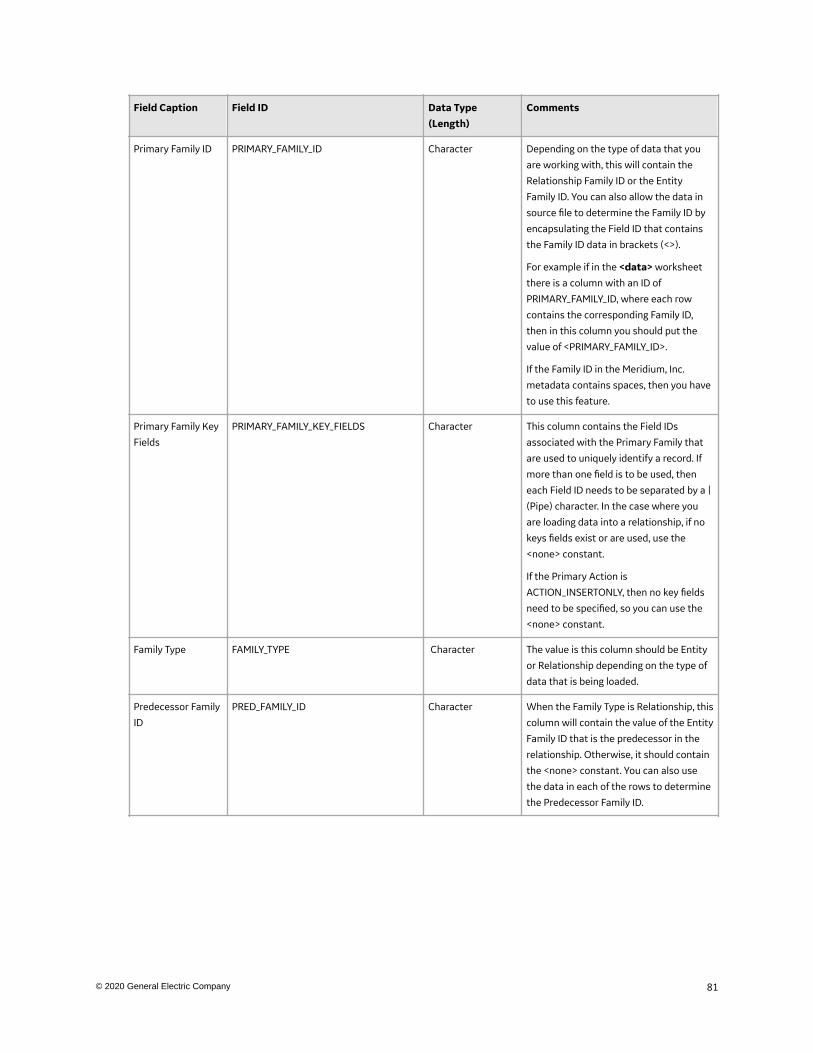
Field Caption Field ID Data Type(Length)
Comments
Primary Family ID PRIMARY_FAMILY_ID Character Depending on the type of data that you
are working with, this will contain the
Relationship Family ID or the Entity
Family ID. You can also allow the data in
source file to determine the Family ID by
encapsulating the Field ID that contains
the Family ID data in brackets (<>).
For example if in the <data> worksheet
there is a column with an ID of
PRIMARY_FAMILY_ID, where each row
contains the corresponding Family ID,
then in this column you should put the
value of <PRIMARY_FAMILY_ID>.
If the Family ID in the Meridium, Inc.
metadata contains spaces, then you have
to use this feature.
Primary Family Key
Fields
PRIMARY_FAMILY_KEY_FIELDS Character This column contains the Field IDs
associated with the Primary Family that
are used to uniquely identify a record. If
more than one field is to be used, then
each Field ID needs to be separated by a |
(Pipe) character. In the case where you
are loading data into a relationship, if no
keys fields exist or are used, use the
<none> constant.
If the Primary Action is
ACTION_INSERTONLY, then no key fields
need to be specified, so you can use the
<none> constant.
Family Type FAMILY_TYPE Character The value is this column should be Entity
or Relationship depending on the type of
data that is being loaded.
Predecessor Family
ID
PRED_FAMILY_ID Character When the Family Type is Relationship, this
column will contain the value of the Entity
Family ID that is the predecessor in the
relationship. Otherwise, it should contain
the <none> constant. You can also use
the data in each of the rows to determine
the Predecessor Family ID.
81© 2020 General Electric Company

Field Caption Field ID Data Type(Length)
Comments
Predecessor Family
Key Fields
PRED_FAMILY_KEY_FIELDS Character This column contains the Field ID or IDs
associated with the Predecessor Family
that are used to uniquely identify the
predecessor record. If more than one field
is to be used, then each Field ID needs to
be separated by a | (Pipe) character.
If the Predecessor Action is
ACTION_INSERTONLY, then no key fields
need to be specified, so you can use the
<none> constant.
Successor Family ID SUCC_FAMILY_ID Character When the Family Type is Relationship, this
column will contain the value of the Entity
Family ID that is the successor in the
relationship. Otherwise, it should contain
the <none> constant. You can also use
the data in each of the rows to determine
the Successor Family ID.
Successor Family
Key Fields
SUCC_FAMILY_KEY_FIELDS Character This column contains the Field ID or IDs
associated with the Successor Family that
are used to uniquely identify the
successor record. If more than one field is
to be used, then each Field ID needs to be
separated by a | (Pipe) character.
If the Successor Action is
ACTION_INSERTONLY, then no key fields
need to be specified, so you can use the
<none> constant.
82 © 2020 General Electric Company
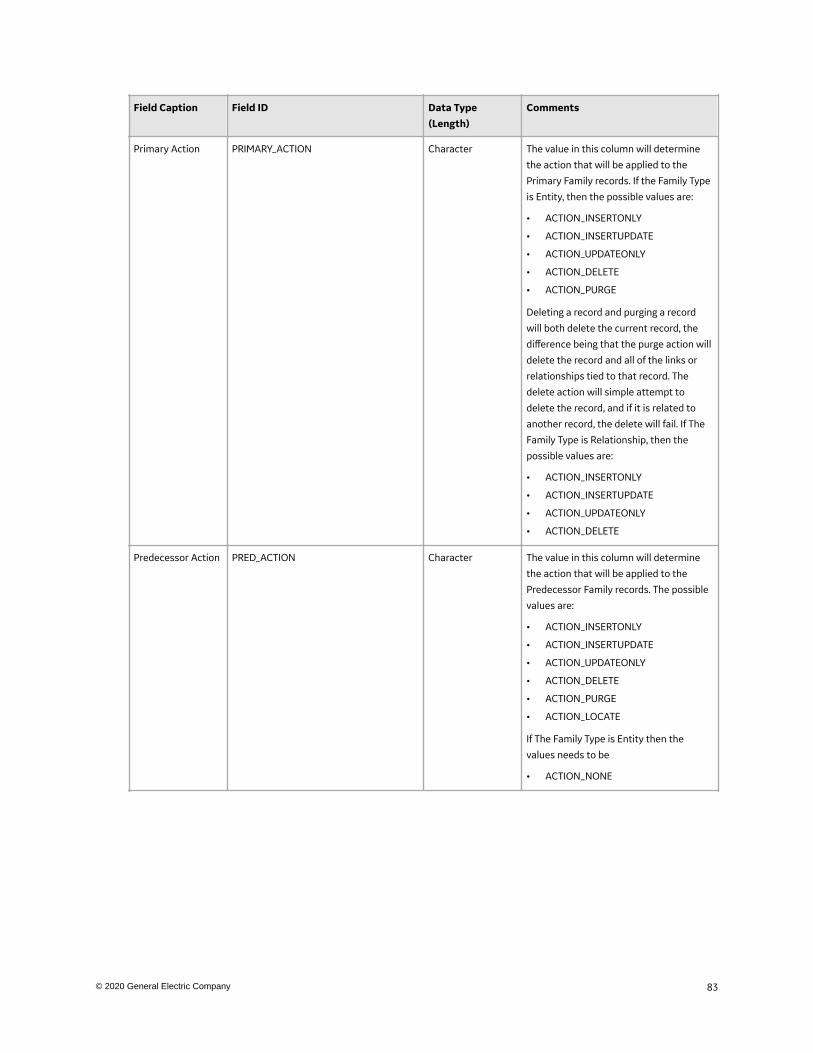
Field Caption Field ID Data Type(Length)
Comments
Primary Action PRIMARY_ACTION Character The value in this column will determine
the action that will be applied to the
Primary Family records. If the Family Type
is Entity, then the possible values are:
• ACTION_INSERTONLY
• ACTION_INSERTUPDATE
• ACTION_UPDATEONLY
• ACTION_DELETE
• ACTION_PURGE
Deleting a record and purging a record
will both delete the current record, the
difference being that the purge action will
delete the record and all of the links or
relationships tied to that record. The
delete action will simple attempt to
delete the record, and if it is related to
another record, the delete will fail. If The
Family Type is Relationship, then the
possible values are:
• ACTION_INSERTONLY
• ACTION_INSERTUPDATE
• ACTION_UPDATEONLY
• ACTION_DELETE
Predecessor Action PRED_ACTION Character The value in this column will determine
the action that will be applied to the
Predecessor Family records. The possible
values are:
• ACTION_INSERTONLY
• ACTION_INSERTUPDATE
• ACTION_UPDATEONLY
• ACTION_DELETE
• ACTION_PURGE
• ACTION_LOCATE
If The Family Type is Entity then the
values needs to be
• ACTION_NONE
83© 2020 General Electric Company

Field Caption Field ID Data Type(Length)
Comments
Successor Action SUCC_ACTION Character The value in this column will determine
the action that will be applied to the
Successor Family records. The possible
values are:
• ACTION_INSERTONLY
• ACTION_INSERTUPDATE
• ACTION_UPDATEONLY
• ACTION_DELETE
• ACTION_PURGE
• ACTION_LOCATE
If The Family Type is Entity then the
values needs to be
• ACTION_NONE
Insert with Null
Values?
OPTION_INSERT_ON_NULL Boolean When setting field values on a new
record, if a value coming across is NULL,
the field values will be set to NULL if this
option is set to True.
Update with Null
Values?
OPTION_UPDATE_ON_NULL Boolean When setting field values on an existing
record, if a value coming across is NULL,
the field values will be set to NULL if this
option is set to True.
84 © 2020 General Electric Company
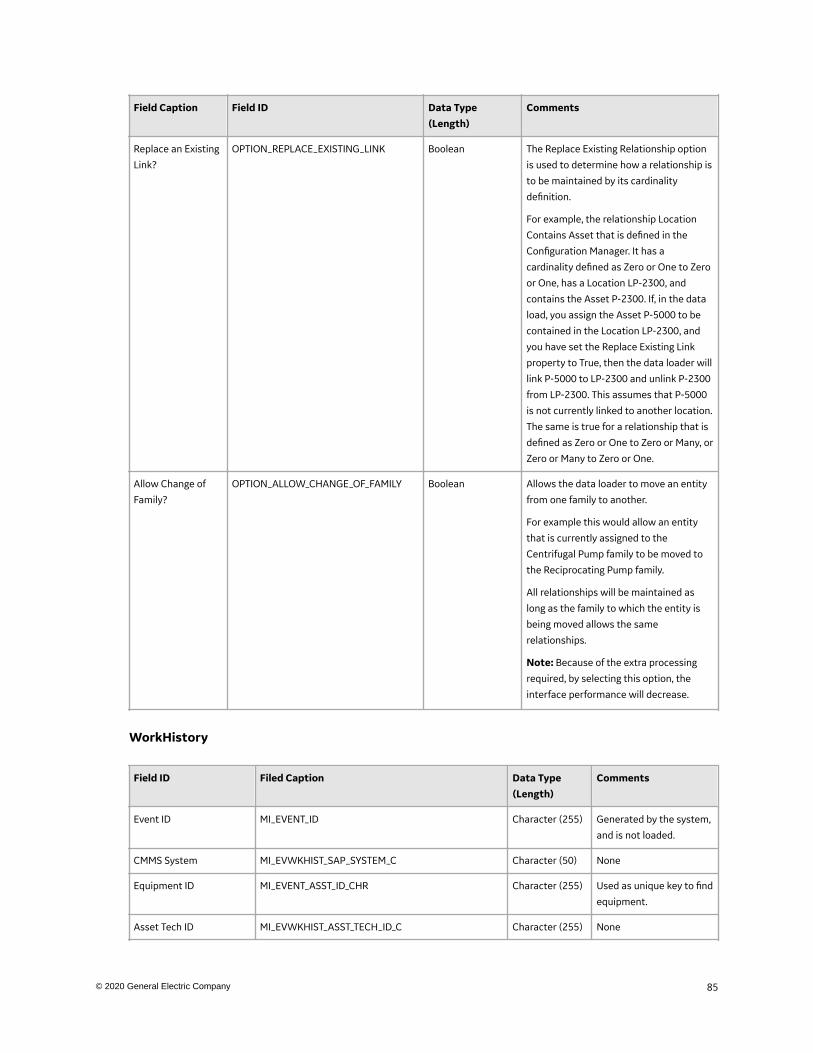
Field Caption Field ID Data Type(Length)
Comments
Replace an Existing
Link?
OPTION_REPLACE_EXISTING_LINK Boolean The Replace Existing Relationship option
is used to determine how a relationship is
to be maintained by its cardinality
definition.
For example, the relationship Location
Contains Asset that is defined in the
Configuration Manager. It has a
cardinality defined as Zero or One to Zero
or One, has a Location LP-2300, and
contains the Asset P-2300. If, in the data
load, you assign the Asset P-5000 to be
contained in the Location LP-2300, and
you have set the Replace Existing Link
property to True, then the data loader will
link P-5000 to LP-2300 and unlink P-2300
from LP-2300. This assumes that P-5000
is not currently linked to another location.
The same is true for a relationship that is
defined as Zero or One to Zero or Many, or
Zero or Many to Zero or One.
Allow Change of
Family?
OPTION_ALLOW_CHANGE_OF_FAMILY Boolean Allows the data loader to move an entity
from one family to another.
For example this would allow an entity
that is currently assigned to the
Centrifugal Pump family to be moved to
the Reciprocating Pump family.
All relationships will be maintained as
long as the family to which the entity is
being moved allows the same
relationships.
Note: Because of the extra processing
required, by selecting this option, the
interface performance will decrease.
WorkHistory
Field ID Filed Caption Data Type(Length)
Comments
Event ID MI_EVENT_ID Character (255) Generated by the system,
and is not loaded.
CMMS System MI_EVWKHIST_SAP_SYSTEM_C Character (50) None
Equipment ID MI_EVENT_ASST_ID_CHR Character (255) Used as unique key to find
equipment.
Asset Tech ID MI_EVWKHIST_ASST_TECH_ID_C Character (255) None
85© 2020 General Electric Company
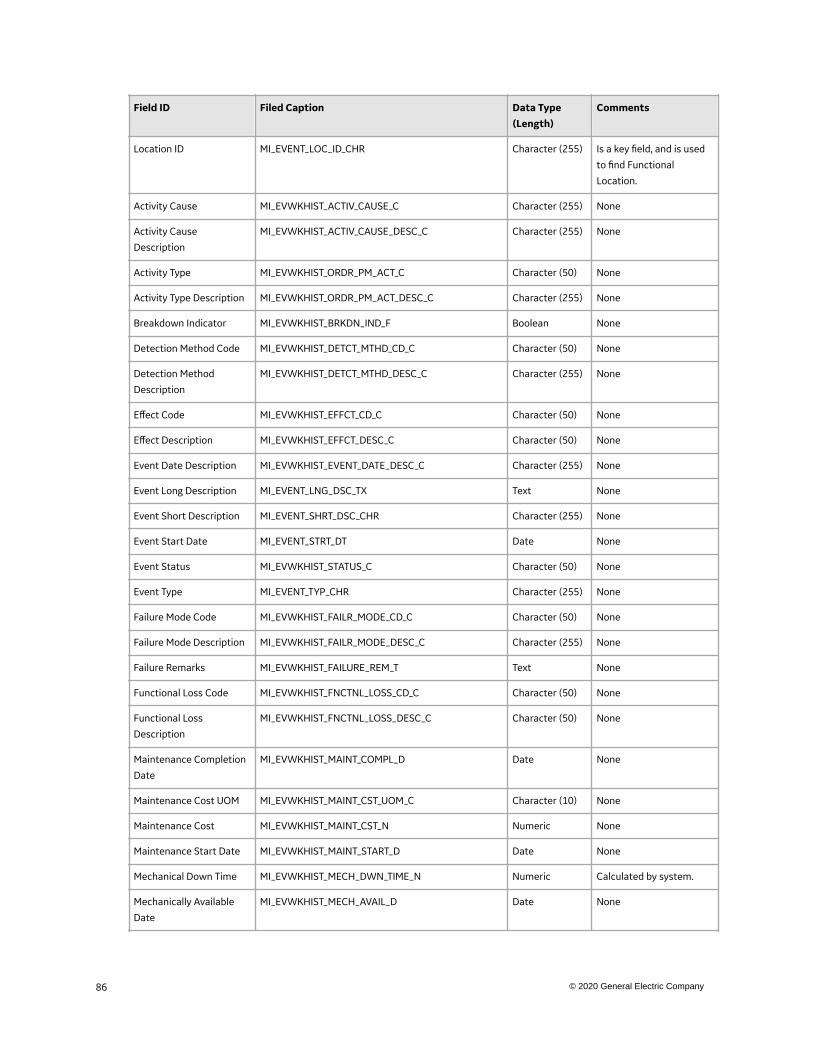
Field ID Filed Caption Data Type(Length)
Comments
Location ID MI_EVENT_LOC_ID_CHR Character (255) Is a key field, and is used
to find Functional
Location.
Activity Cause MI_EVWKHIST_ACTIV_CAUSE_C Character (255) None
Activity Cause
Description
MI_EVWKHIST_ACTIV_CAUSE_DESC_C Character (255) None
Activity Type MI_EVWKHIST_ORDR_PM_ACT_C Character (50) None
Activity Type Description MI_EVWKHIST_ORDR_PM_ACT_DESC_C Character (255) None
Breakdown Indicator MI_EVWKHIST_BRKDN_IND_F Boolean None
Detection Method Code MI_EVWKHIST_DETCT_MTHD_CD_C Character (50) None
Detection Method
Description
MI_EVWKHIST_DETCT_MTHD_DESC_C Character (255) None
Effect Code MI_EVWKHIST_EFFCT_CD_C Character (50) None
Effect Description MI_EVWKHIST_EFFCT_DESC_C Character (50) None
Event Date Description MI_EVWKHIST_EVENT_DATE_DESC_C Character (255) None
Event Long Description MI_EVENT_LNG_DSC_TX Text None
Event Short Description MI_EVENT_SHRT_DSC_CHR Character (255) None
Event Start Date MI_EVENT_STRT_DT Date None
Event Status MI_EVWKHIST_STATUS_C Character (50) None
Event Type MI_EVENT_TYP_CHR Character (255) None
Failure Mode Code MI_EVWKHIST_FAILR_MODE_CD_C Character (50) None
Failure Mode Description MI_EVWKHIST_FAILR_MODE_DESC_C Character (255) None
Failure Remarks MI_EVWKHIST_FAILURE_REM_T Text None
Functional Loss Code MI_EVWKHIST_FNCTNL_LOSS_CD_C Character (50) None
Functional Loss
Description
MI_EVWKHIST_FNCTNL_LOSS_DESC_C Character (50) None
Maintenance Completion
Date
MI_EVWKHIST_MAINT_COMPL_D Date None
Maintenance Cost UOM MI_EVWKHIST_MAINT_CST_UOM_C Character (10) None
Maintenance Cost MI_EVWKHIST_MAINT_CST_N Numeric None
Maintenance Start Date MI_EVWKHIST_MAINT_START_D Date None
Mechanical Down Time MI_EVWKHIST_MECH_DWN_TIME_N Numeric Calculated by system.
Mechanically Available
Date
MI_EVWKHIST_MECH_AVAIL_D Date None
86 © 2020 General Electric Company
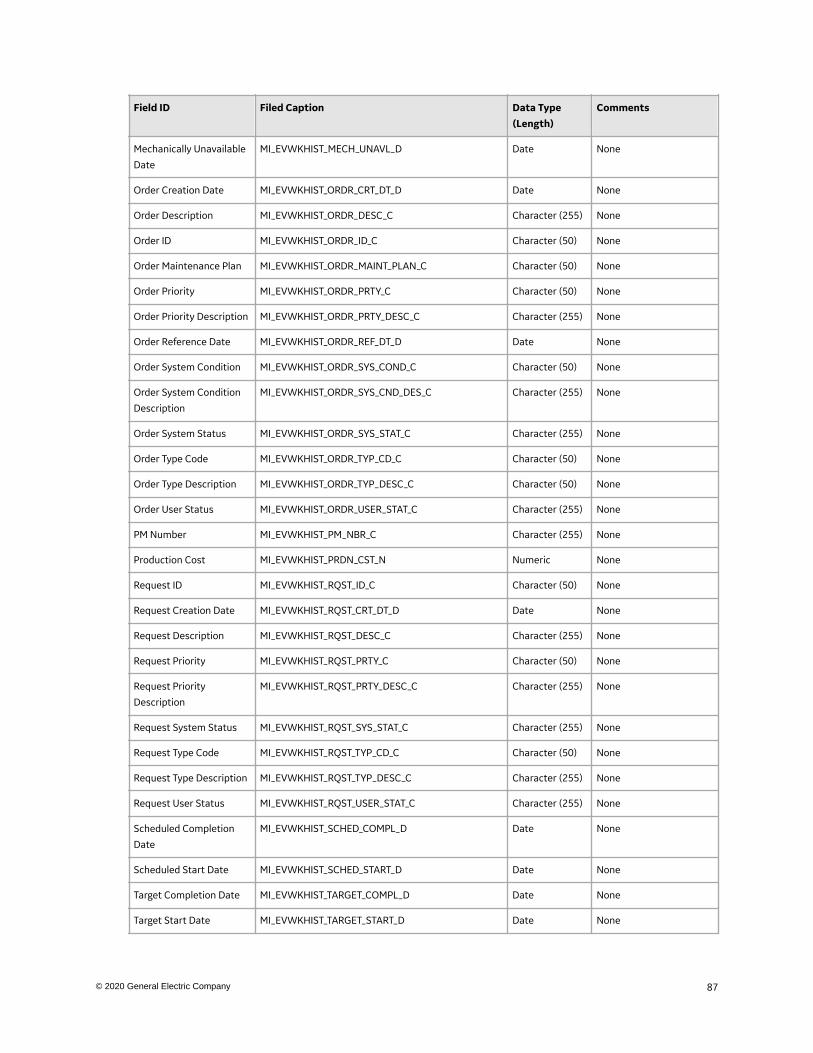
Field ID Filed Caption Data Type(Length)
Comments
Mechanically Unavailable
Date
MI_EVWKHIST_MECH_UNAVL_D Date None
Order Creation Date MI_EVWKHIST_ORDR_CRT_DT_D Date None
Order Description MI_EVWKHIST_ORDR_DESC_C Character (255) None
Order ID MI_EVWKHIST_ORDR_ID_C Character (50) None
Order Maintenance Plan MI_EVWKHIST_ORDR_MAINT_PLAN_C Character (50) None
Order Priority MI_EVWKHIST_ORDR_PRTY_C Character (50) None
Order Priority Description MI_EVWKHIST_ORDR_PRTY_DESC_C Character (255) None
Order Reference Date MI_EVWKHIST_ORDR_REF_DT_D Date None
Order System Condition MI_EVWKHIST_ORDR_SYS_COND_C Character (50) None
Order System Condition
Description
MI_EVWKHIST_ORDR_SYS_CND_DES_C Character (255) None
Order System Status MI_EVWKHIST_ORDR_SYS_STAT_C Character (255) None
Order Type Code MI_EVWKHIST_ORDR_TYP_CD_C Character (50) None
Order Type Description MI_EVWKHIST_ORDR_TYP_DESC_C Character (50) None
Order User Status MI_EVWKHIST_ORDR_USER_STAT_C Character (255) None
PM Number MI_EVWKHIST_PM_NBR_C Character (255) None
Production Cost MI_EVWKHIST_PRDN_CST_N Numeric None
Request ID MI_EVWKHIST_RQST_ID_C Character (50) None
Request Creation Date MI_EVWKHIST_RQST_CRT_DT_D Date None
Request Description MI_EVWKHIST_RQST_DESC_C Character (255) None
Request Priority MI_EVWKHIST_RQST_PRTY_C Character (50) None
Request Priority
Description
MI_EVWKHIST_RQST_PRTY_DESC_C Character (255) None
Request System Status MI_EVWKHIST_RQST_SYS_STAT_C Character (255) None
Request Type Code MI_EVWKHIST_RQST_TYP_CD_C Character (50) None
Request Type Description MI_EVWKHIST_RQST_TYP_DESC_C Character (255) None
Request User Status MI_EVWKHIST_RQST_USER_STAT_C Character (255) None
Scheduled Completion
Date
MI_EVWKHIST_SCHED_COMPL_D Date None
Scheduled Start Date MI_EVWKHIST_SCHED_START_D Date None
Target Completion Date MI_EVWKHIST_TARGET_COMPL_D Date None
Target Start Date MI_EVWKHIST_TARGET_START_D Date None
87© 2020 General Electric Company
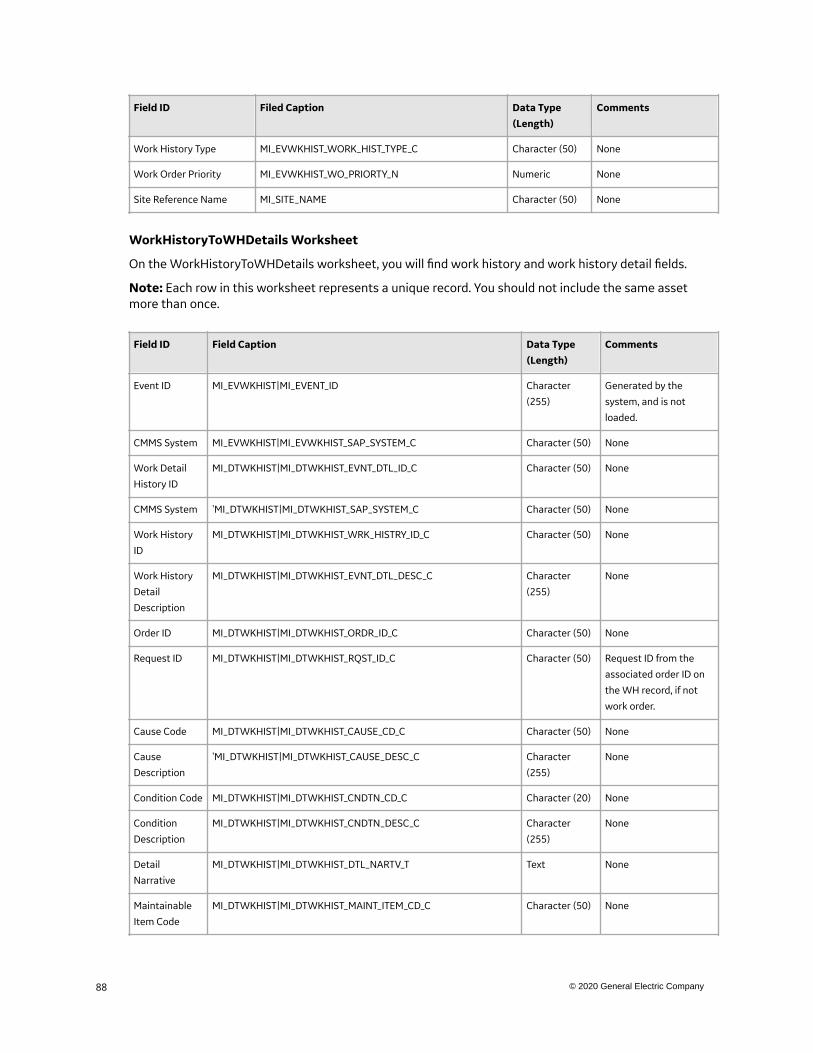
Field ID Filed Caption Data Type(Length)
Comments
Work History Type MI_EVWKHIST_WORK_HIST_TYPE_C Character (50) None
Work Order Priority MI_EVWKHIST_WO_PRIORTY_N Numeric None
Site Reference Name MI_SITE_NAME Character (50) None
WorkHistoryToWHDetails Worksheet
On the WorkHistoryToWHDetails worksheet, you will find work history and work history detail fields.
Note: Each row in this worksheet represents a unique record. You should not include the same assetmore than once.
Field ID Field Caption Data Type(Length)
Comments
Event ID MI_EVWKHIST|MI_EVENT_ID Character
(255)
Generated by the
system, and is not
loaded.
CMMS System MI_EVWKHIST|MI_EVWKHIST_SAP_SYSTEM_C Character (50) None
Work Detail
History ID
MI_DTWKHIST|MI_DTWKHIST_EVNT_DTL_ID_C Character (50) None
CMMS System 'MI_DTWKHIST|MI_DTWKHIST_SAP_SYSTEM_C Character (50) None
Work History
ID
MI_DTWKHIST|MI_DTWKHIST_WRK_HISTRY_ID_C Character (50) None
Work History
Detail
Description
MI_DTWKHIST|MI_DTWKHIST_EVNT_DTL_DESC_C Character
(255)
None
Order ID MI_DTWKHIST|MI_DTWKHIST_ORDR_ID_C Character (50) None
Request ID MI_DTWKHIST|MI_DTWKHIST_RQST_ID_C Character (50) Request ID from the
associated order ID on
the WH record, if not
work order.
Cause Code MI_DTWKHIST|MI_DTWKHIST_CAUSE_CD_C Character (50) None
Cause
Description
'MI_DTWKHIST|MI_DTWKHIST_CAUSE_DESC_C Character
(255)
None
Condition Code MI_DTWKHIST|MI_DTWKHIST_CNDTN_CD_C Character (20) None
Condition
Description
MI_DTWKHIST|MI_DTWKHIST_CNDTN_DESC_C Character
(255)
None
Detail
Narrative
MI_DTWKHIST|MI_DTWKHIST_DTL_NARTV_T Text None
Maintainable
Item Code
MI_DTWKHIST|MI_DTWKHIST_MAINT_ITEM_CD_C Character (50) None
88 © 2020 General Electric Company
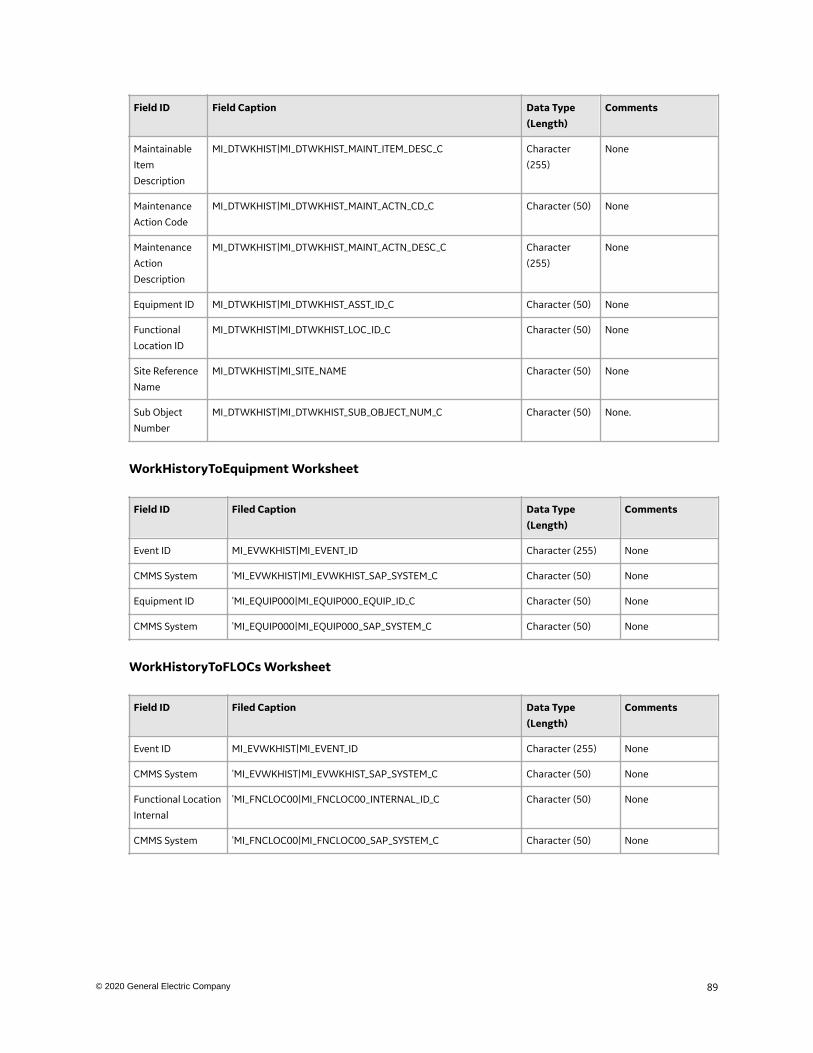
Field ID Field Caption Data Type(Length)
Comments
Maintainable
Item
Description
MI_DTWKHIST|MI_DTWKHIST_MAINT_ITEM_DESC_C Character
(255)
None
Maintenance
Action Code
MI_DTWKHIST|MI_DTWKHIST_MAINT_ACTN_CD_C Character (50) None
Maintenance
Action
Description
MI_DTWKHIST|MI_DTWKHIST_MAINT_ACTN_DESC_C Character
(255)
None
Equipment ID MI_DTWKHIST|MI_DTWKHIST_ASST_ID_C Character (50) None
Functional
Location ID
MI_DTWKHIST|MI_DTWKHIST_LOC_ID_C Character (50) None
Site Reference
Name
MI_DTWKHIST|MI_SITE_NAME Character (50) None
Sub Object
Number
MI_DTWKHIST|MI_DTWKHIST_SUB_OBJECT_NUM_C Character (50) None.
WorkHistoryToEquipment Worksheet
Field ID Filed Caption Data Type(Length)
Comments
Event ID MI_EVWKHIST|MI_EVENT_ID Character (255) None
CMMS System 'MI_EVWKHIST|MI_EVWKHIST_SAP_SYSTEM_C Character (50) None
Equipment ID 'MI_EQUIP000|MI_EQUIP000_EQUIP_ID_C Character (50) None
CMMS System 'MI_EQUIP000|MI_EQUIP000_SAP_SYSTEM_C Character (50) None
WorkHistoryToFLOCs Worksheet
Field ID Filed Caption Data Type(Length)
Comments
Event ID MI_EVWKHIST|MI_EVENT_ID Character (255) None
CMMS System 'MI_EVWKHIST|MI_EVWKHIST_SAP_SYSTEM_C Character (50) None
Functional Location
Internal
'MI_FNCLOC00|MI_FNCLOC00_INTERNAL_ID_C Character (50) None
CMMS System 'MI_FNCLOC00|MI_FNCLOC00_SAP_SYSTEM_C Character (50) None
89© 2020 General Electric Company
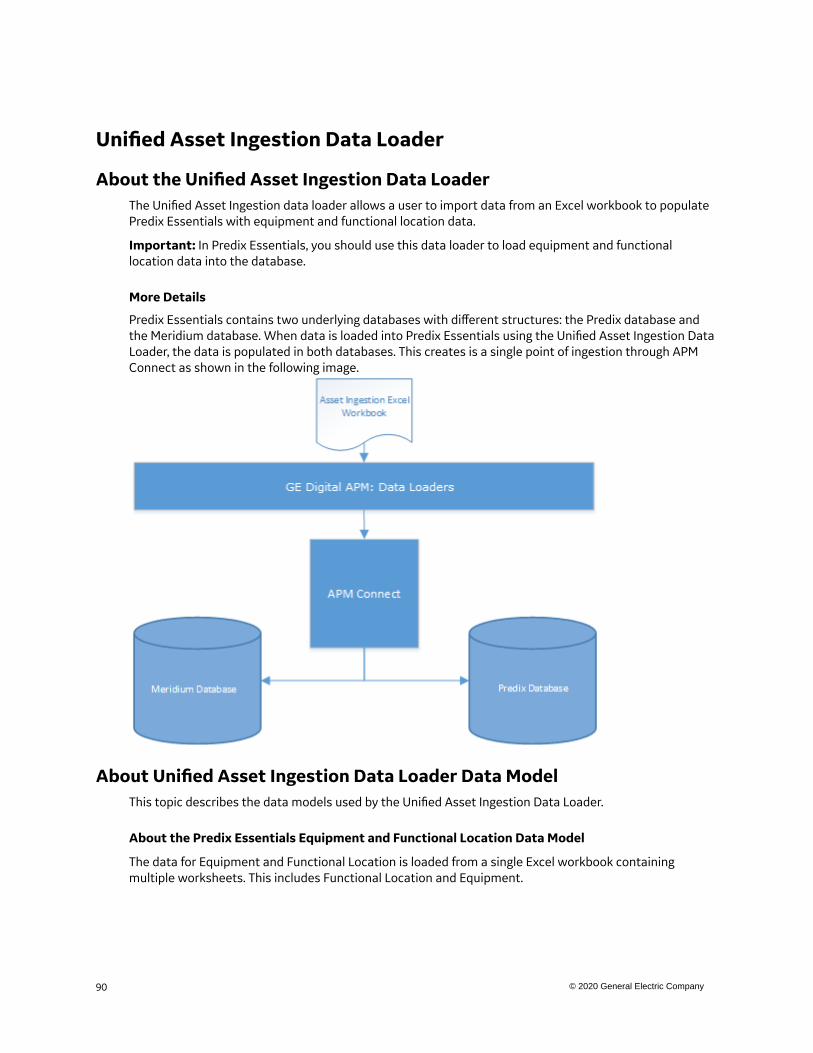
Unified Asset Ingestion Data Loader
About the Unified Asset Ingestion Data LoaderThe Unified Asset Ingestion data loader allows a user to import data from an Excel workbook to populatePredix Essentials with equipment and functional location data.
Important: In Predix Essentials, you should use this data loader to load equipment and functionallocation data into the database.
More Details
Predix Essentials contains two underlying databases with different structures: the Predix database andthe Meridium database. When data is loaded into Predix Essentials using the Unified Asset Ingestion DataLoader, the data is populated in both databases. This creates is a single point of ingestion through APMConnect as shown in the following image.
About Unified Asset Ingestion Data Loader Data ModelThis topic describes the data models used by the Unified Asset Ingestion Data Loader.
About the Predix Essentials Equipment and Functional Location Data Model
The data for Equipment and Functional Location is loaded from a single Excel workbook containingmultiple worksheets. This includes Functional Location and Equipment.
90 © 2020 General Electric Company

The Functional Location can be linked to a parent Functional Location using the relationship FunctionalLocation Has Functional Location(s).
About the Predix Asset Data Model
Predix uses four ccomClass to create the Asset Hierarchy Enterprise, Site, Segment, and Asset.
• Enterprise• Site• Segment• Asset
The following image is an example Asset Hierarchy in Predix.
91© 2020 General Electric Company
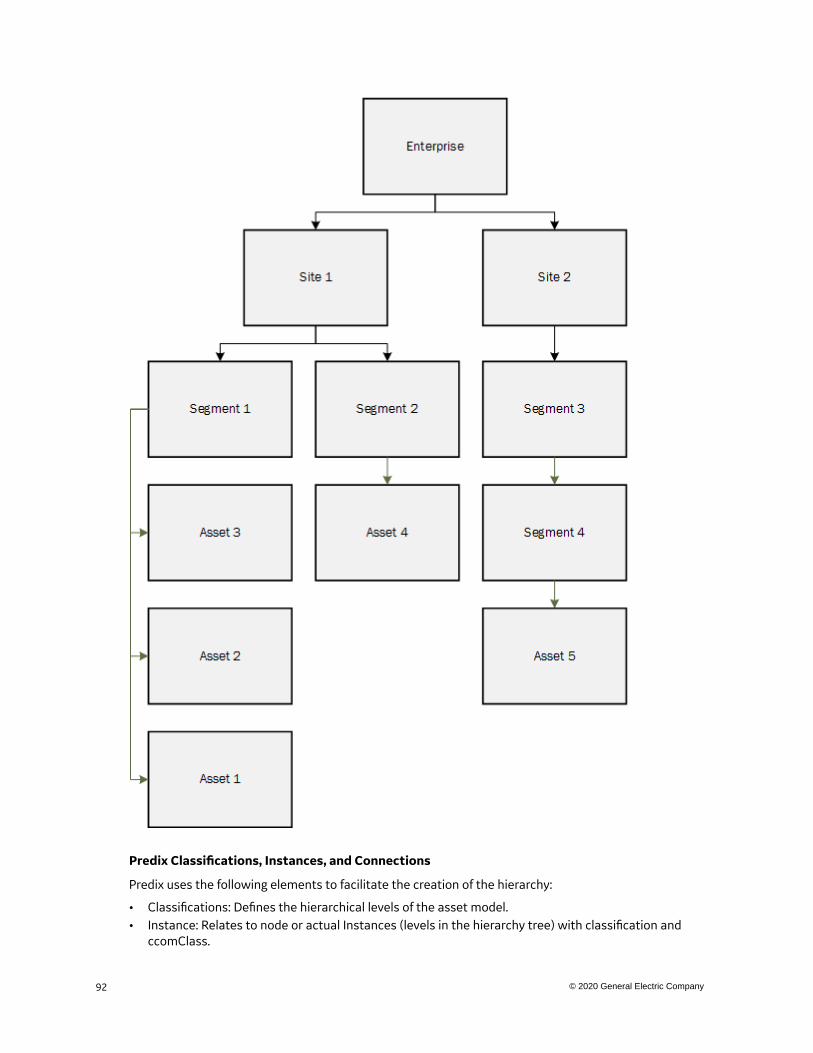
Predix Classifications, Instances, and Connections
Predix uses the following elements to facilitate the creation of the hierarchy:
• Classifications: Defines the hierarchical levels of the asset model.• Instance: Relates to node or actual Instances (levels in the hierarchy tree) with classification and
ccomClass.
92 © 2020 General Electric Company
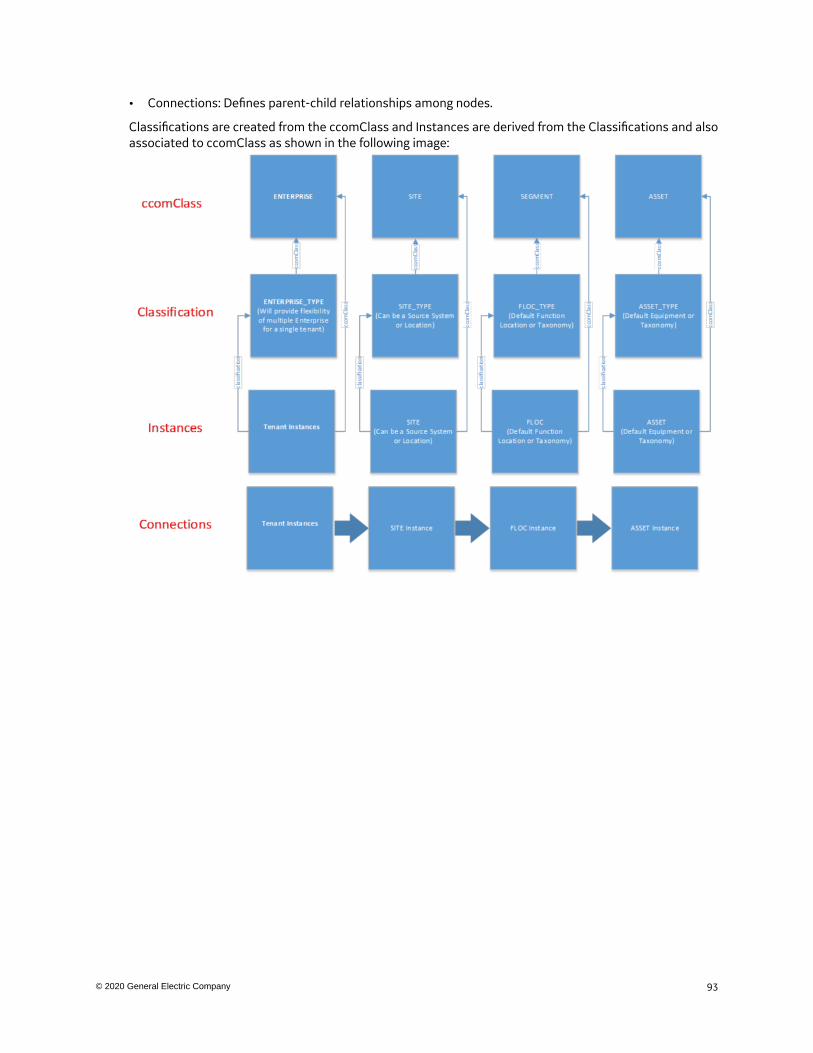
• Connections: Defines parent-child relationships among nodes.
Classifications are created from the ccomClass and Instances are derived from the Classifications and alsoassociated to ccomClass as shown in the following image:
93© 2020 General Electric Company
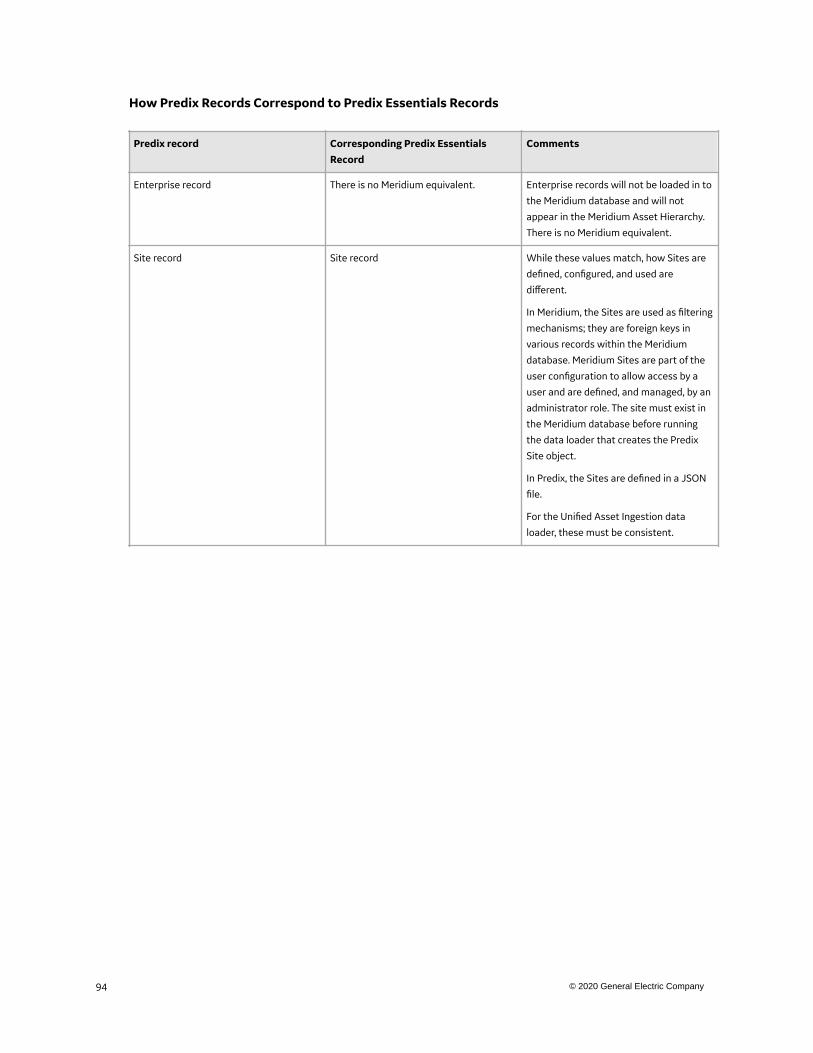
How Predix Records Correspond to Predix Essentials Records
Predix record Corresponding Predix EssentialsRecord
Comments
Enterprise record There is no Meridium equivalent. Enterprise records will not be loaded in to
the Meridium database and will not
appear in the Meridium Asset Hierarchy.
There is no Meridium equivalent.
Site record Site record While these values match, how Sites are
defined, configured, and used are
different.
In Meridium, the Sites are used as filtering
mechanisms; they are foreign keys in
various records within the Meridium
database. Meridium Sites are part of the
user configuration to allow access by a
user and are defined, and managed, by an
administrator role. The site must exist in
the Meridium database before running
the data loader that creates the Predix
Site object.
In Predix, the Sites are defined in a JSON
file.
For the Unified Asset Ingestion data
loader, these must be consistent.
94 © 2020 General Electric Company
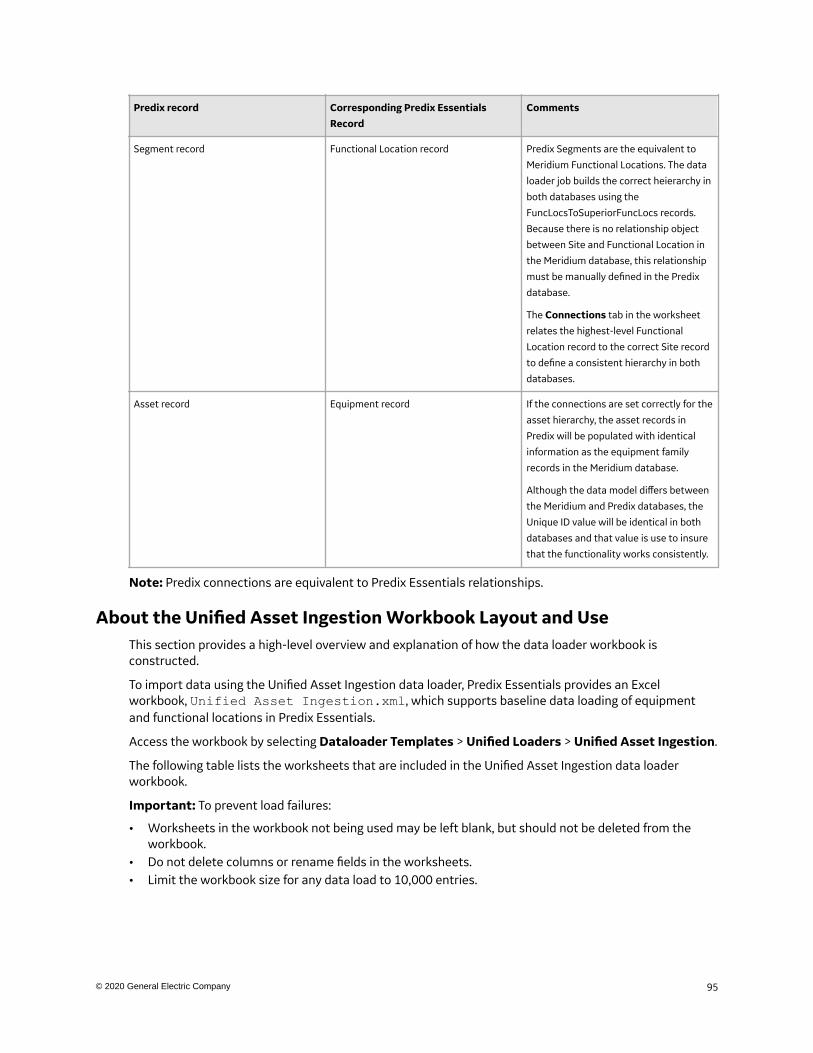
Predix record Corresponding Predix EssentialsRecord
Comments
Segment record Functional Location record Predix Segments are the equivalent to
Meridium Functional Locations. The data
loader job builds the correct heierarchy in
both databases using the
FuncLocsToSuperiorFuncLocs records.
Because there is no relationship object
between Site and Functional Location in
the Meridium database, this relationship
must be manually defined in the Predix
database.
The Connections tab in the worksheet
relates the highest-level Functional
Location record to the correct Site record
to define a consistent hierarchy in both
databases.
Asset record Equipment record If the connections are set correctly for the
asset hierarchy, the asset records in
Predix will be populated with identical
information as the equipment family
records in the Meridium database.
Although the data model differs between
the Meridium and Predix databases, the
Unique ID value will be identical in both
databases and that value is use to insure
that the functionality works consistently.
Note: Predix connections are equivalent to Predix Essentials relationships.
About the Unified Asset Ingestion Workbook Layout and UseThis section provides a high-level overview and explanation of how the data loader workbook isconstructed.
To import data using the Unified Asset Ingestion data loader, Predix Essentials provides an Excelworkbook, Unified Asset Ingestion.xml, which supports baseline data loading of equipmentand functional locations in Predix Essentials.
Access the workbook by selecting Dataloader Templates > Unified Loaders > Unified Asset Ingestion.
The following table lists the worksheets that are included in the Unified Asset Ingestion data loaderworkbook.
Important: To prevent load failures:
• Worksheets in the workbook not being used may be left blank, but should not be deleted from theworkbook.
• Do not delete columns or rename fields in the worksheets.• Limit the workbook size for any data load to 10,000 entries.
95© 2020 General Electric Company

Worksheet Description
Configuration The Configuration worksheet is needed to describe the type of data that you
will be loading and how that data should be handled during the data load. It
also sets the rules of the data loading with regards to the inserts, updates,
deletes, key fields, locating existing records, etc.
Equipment This worksheet is used to specify data for import to the Equipment family. It
also generates the corresponding asset nodes in the Predix database.
FunctionalLocations This worksheet is used to specify data for import to the Functional Location
family. It also generates the corresponding segment nodes in the Predix
database.
FuncLocsToSuperiorFuncLocs This worksheet is used to link Functional Locations to Superior Functional
Locations. It will also generate connections in the Predix database.
EquipmentToSuperiorEquipment This worksheet is used to link Equipment to Superior Equipment records. It
will also generate connections in the Predix database.
FuncLocsToEquipment This worksheet is used to link Functional Location records to Equipment
records. It will generate connections in the Predix database.
Predix Database Worksheets
Worksheet Description
Enterprise This worksheet is used to define the Enterprise classifications in
the Meridium and Predix databases.
Site This worksheet is used to define the Site classifications in the
Meridium and Predix databases.
Taxonomy This worksheet is used to define the classifications of the
Assets and Segments in the Predix database.
Important: Use the Taxonomy data loader to load the
taxonomy into the database. Do not change the values on this
worksheet.
Connections This worksheet is used to define the hierarchy or connections
for the Predix database for Enterprise, Site, and top-level
Segment.
Create connections for these hierarchies:
• Enterprise to Enterprise
• Site to Enterprise
• Site to Site
• Top-level Segment (Functional Location in the Meridium
database) to Site
Configuration Worksheet
The Configuration worksheet tells the Data Loader what types of data are being loaded and how the datais to be loaded. The following table outlines the options that are valid or the values that are expected ineach of the columns on the Configuration worksheet.
96 © 2020 General Electric Company
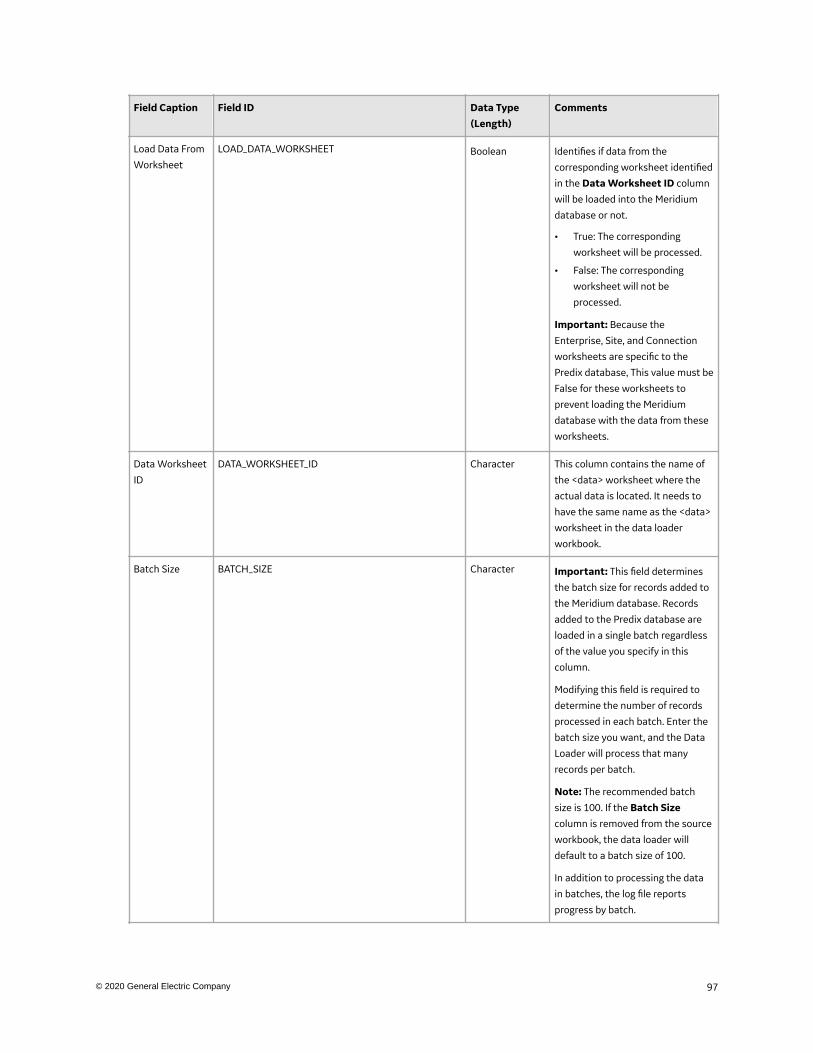
Field Caption Field ID Data Type(Length)
Comments
Load Data From
Worksheet
LOAD_DATA_WORKSHEET Boolean Identifies if data from the
corresponding worksheet identified
in the Data Worksheet ID column
will be loaded into the Meridium
database or not.
• True: The corresponding
worksheet will be processed.
• False: The corresponding
worksheet will not be
processed.
Important: Because the
Enterprise, Site, and Connection
worksheets are specific to the
Predix database, This value must be
False for these worksheets to
prevent loading the Meridium
database with the data from these
worksheets.
Data Worksheet
ID
DATA_WORKSHEET_ID Character This column contains the name of
the <data> worksheet where the
actual data is located. It needs to
have the same name as the <data>
worksheet in the data loader
workbook.
Batch Size BATCH_SIZE Character Important: This field determines
the batch size for records added to
the Meridium database. Records
added to the Predix database are
loaded in a single batch regardless
of the value you specify in this
column.
Modifying this field is required to
determine the number of records
processed in each batch. Enter the
batch size you want, and the Data
Loader will process that many
records per batch.
Note: The recommended batch
size is 100. If the Batch Sizecolumn is removed from the source
workbook, the data loader will
default to a batch size of 100.
In addition to processing the data
in batches, the log file reports
progress by batch.
97© 2020 General Electric Company
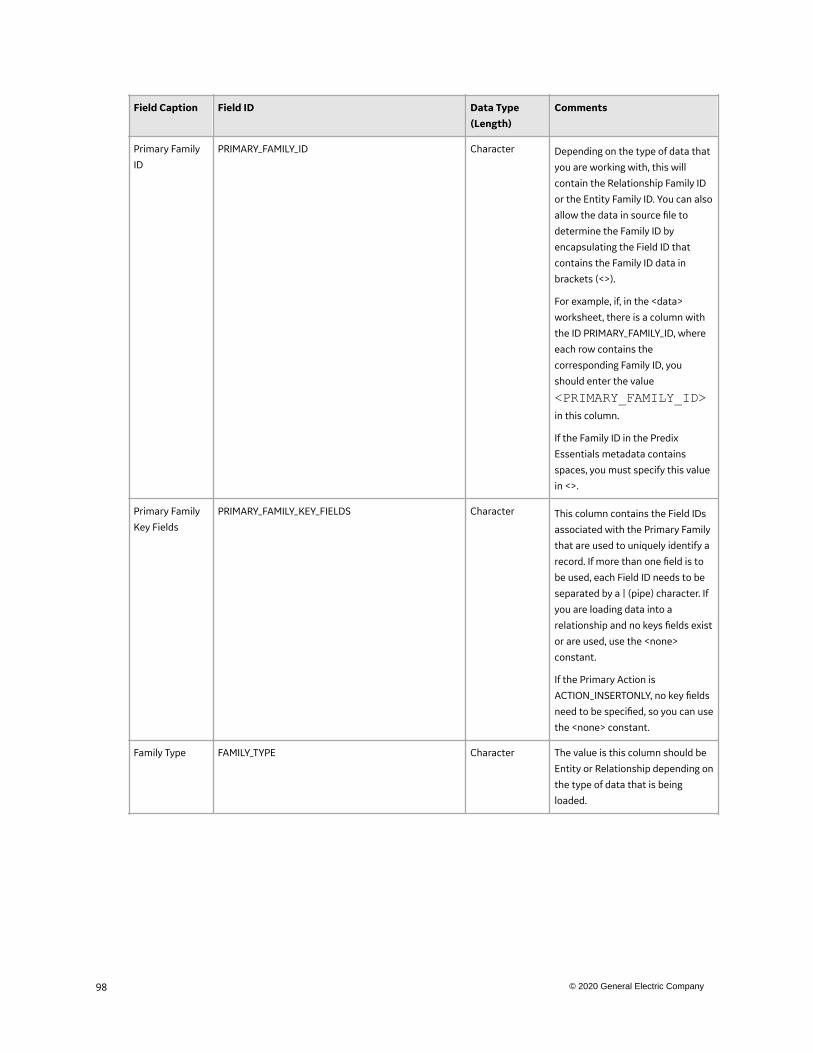
Field Caption Field ID Data Type(Length)
Comments
Primary Family
ID
PRIMARY_FAMILY_ID Character Depending on the type of data that
you are working with, this will
contain the Relationship Family ID
or the Entity Family ID. You can also
allow the data in source file to
determine the Family ID by
encapsulating the Field ID that
contains the Family ID data in
brackets (<>).
For example, if, in the <data>
worksheet, there is a column with
the ID PRIMARY_FAMILY_ID, where
each row contains the
corresponding Family ID, you
should enter the value
<PRIMARY_FAMILY_ID>in this column.
If the Family ID in the Predix
Essentials metadata contains
spaces, you must specify this value
in <>.
Primary Family
Key Fields
PRIMARY_FAMILY_KEY_FIELDS Character This column contains the Field IDs
associated with the Primary Family
that are used to uniquely identify a
record. If more than one field is to
be used, each Field ID needs to be
separated by a | (pipe) character. If
you are loading data into a
relationship and no keys fields exist
or are used, use the <none>
constant.
If the Primary Action is
ACTION_INSERTONLY, no key fields
need to be specified, so you can use
the <none> constant.
Family Type FAMILY_TYPE Character The value is this column should be
Entity or Relationship depending on
the type of data that is being
loaded.
98 © 2020 General Electric Company
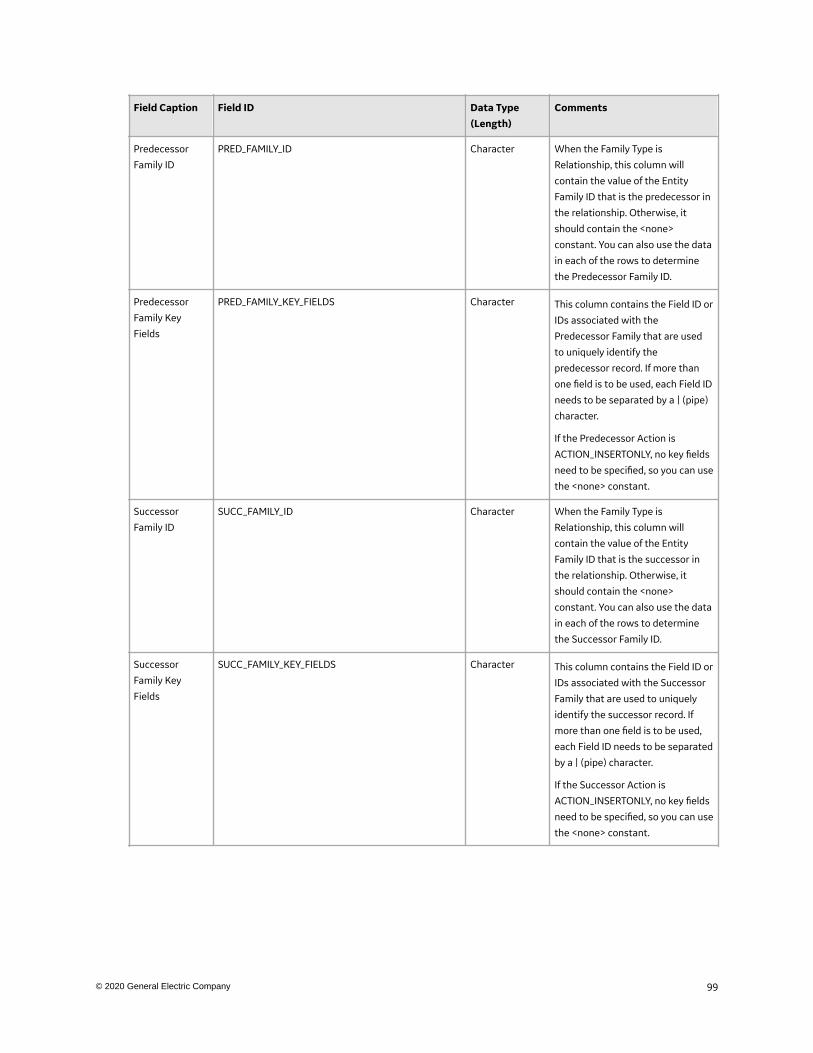
Field Caption Field ID Data Type(Length)
Comments
Predecessor
Family ID
PRED_FAMILY_ID Character When the Family Type is
Relationship, this column will
contain the value of the Entity
Family ID that is the predecessor in
the relationship. Otherwise, it
should contain the <none>
constant. You can also use the data
in each of the rows to determine
the Predecessor Family ID.
Predecessor
Family Key
Fields
PRED_FAMILY_KEY_FIELDS Character This column contains the Field ID or
IDs associated with the
Predecessor Family that are used
to uniquely identify the
predecessor record. If more than
one field is to be used, each Field ID
needs to be separated by a | (pipe)
character.
If the Predecessor Action is
ACTION_INSERTONLY, no key fields
need to be specified, so you can use
the <none> constant.
Successor
Family ID
SUCC_FAMILY_ID Character When the Family Type is
Relationship, this column will
contain the value of the Entity
Family ID that is the successor in
the relationship. Otherwise, it
should contain the <none>
constant. You can also use the data
in each of the rows to determine
the Successor Family ID.
Successor
Family Key
Fields
SUCC_FAMILY_KEY_FIELDS Character This column contains the Field ID or
IDs associated with the Successor
Family that are used to uniquely
identify the successor record. If
more than one field is to be used,
each Field ID needs to be separated
by a | (pipe) character.
If the Successor Action is
ACTION_INSERTONLY, no key fields
need to be specified, so you can use
the <none> constant.
99© 2020 General Electric Company
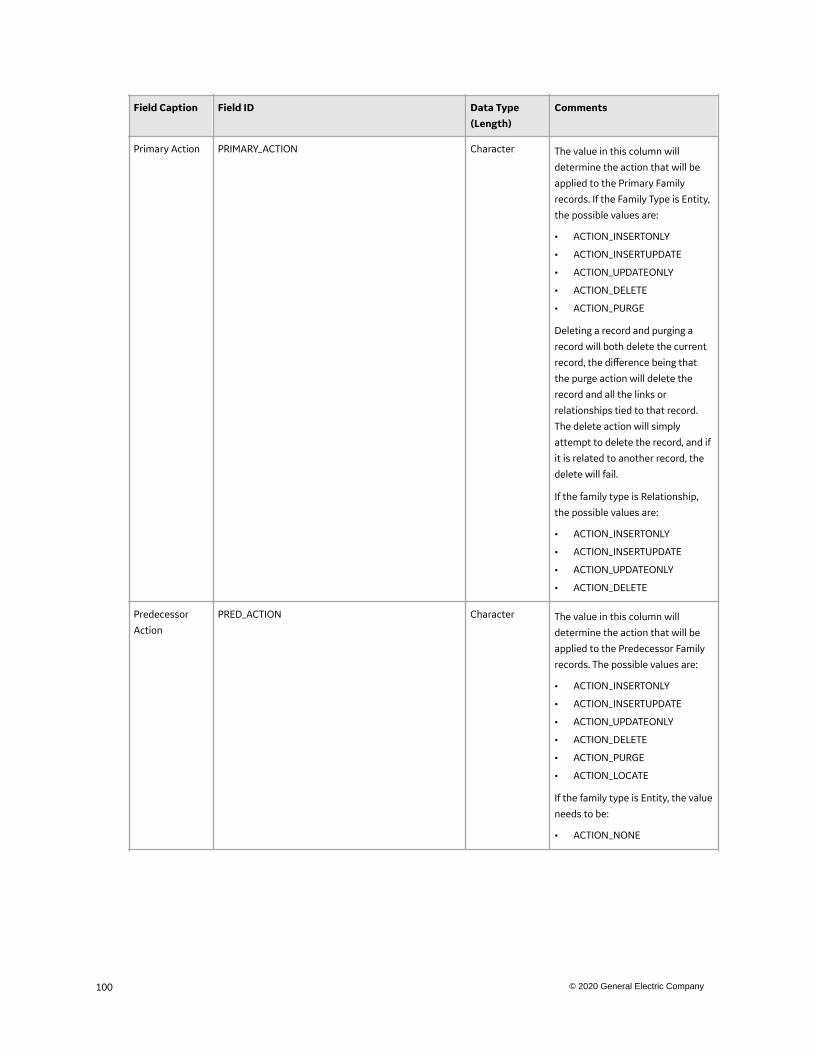
Field Caption Field ID Data Type(Length)
Comments
Primary Action PRIMARY_ACTION Character The value in this column will
determine the action that will be
applied to the Primary Family
records. If the Family Type is Entity,
the possible values are:
• ACTION_INSERTONLY
• ACTION_INSERTUPDATE
• ACTION_UPDATEONLY
• ACTION_DELETE
• ACTION_PURGE
Deleting a record and purging a
record will both delete the current
record, the difference being that
the purge action will delete the
record and all the links or
relationships tied to that record.
The delete action will simply
attempt to delete the record, and if
it is related to another record, the
delete will fail.
If the family type is Relationship,
the possible values are:
• ACTION_INSERTONLY
• ACTION_INSERTUPDATE
• ACTION_UPDATEONLY
• ACTION_DELETE
Predecessor
Action
PRED_ACTION Character The value in this column will
determine the action that will be
applied to the Predecessor Family
records. The possible values are:
• ACTION_INSERTONLY
• ACTION_INSERTUPDATE
• ACTION_UPDATEONLY
• ACTION_DELETE
• ACTION_PURGE
• ACTION_LOCATE
If the family type is Entity, the value
needs to be:
• ACTION_NONE
100 © 2020 General Electric Company
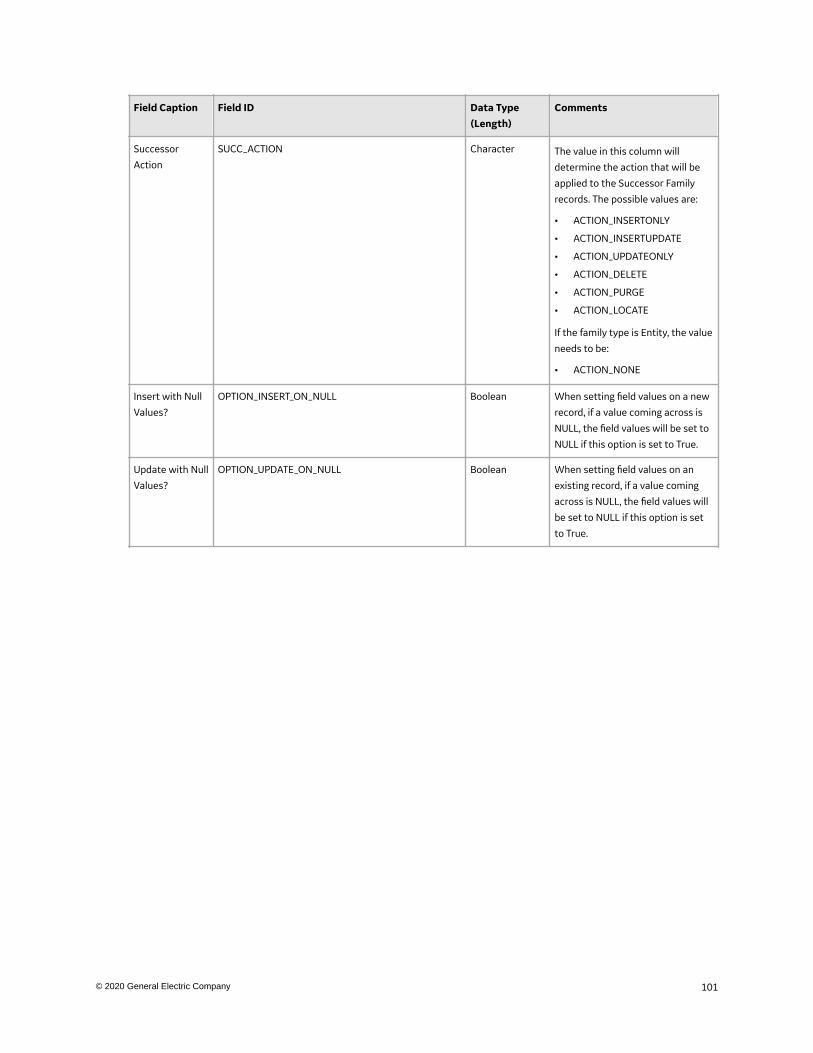
Field Caption Field ID Data Type(Length)
Comments
Successor
Action
SUCC_ACTION Character The value in this column will
determine the action that will be
applied to the Successor Family
records. The possible values are:
• ACTION_INSERTONLY
• ACTION_INSERTUPDATE
• ACTION_UPDATEONLY
• ACTION_DELETE
• ACTION_PURGE
• ACTION_LOCATE
If the family type is Entity, the value
needs to be:
• ACTION_NONE
Insert with Null
Values?
OPTION_INSERT_ON_NULL Boolean When setting field values on a new
record, if a value coming across is
NULL, the field values will be set to
NULL if this option is set to True.
Update with Null
Values?
OPTION_UPDATE_ON_NULL Boolean When setting field values on an
existing record, if a value coming
across is NULL, the field values will
be set to NULL if this option is set
to True.
101© 2020 General Electric Company
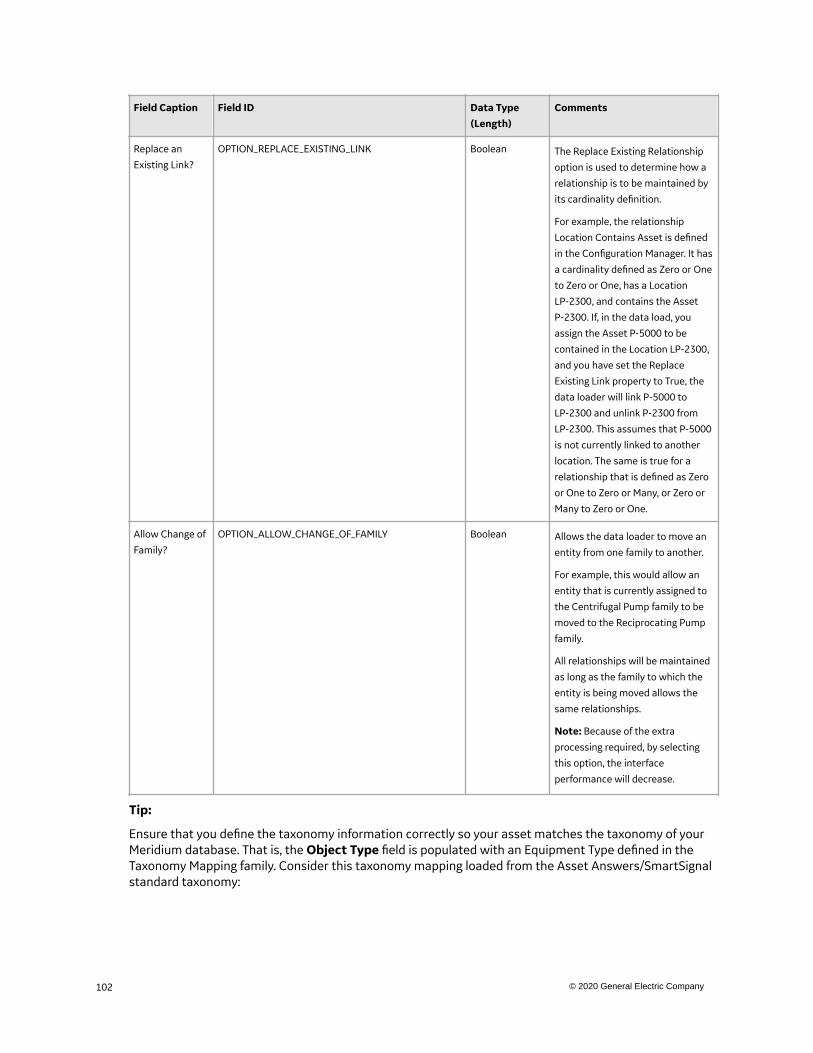
Field Caption Field ID Data Type(Length)
Comments
Replace an
Existing Link?
OPTION_REPLACE_EXISTING_LINK Boolean The Replace Existing Relationship
option is used to determine how a
relationship is to be maintained by
its cardinality definition.
For example, the relationship
Location Contains Asset is defined
in the Configuration Manager. It has
a cardinality defined as Zero or One
to Zero or One, has a Location
LP-2300, and contains the Asset
P-2300. If, in the data load, you
assign the Asset P-5000 to be
contained in the Location LP-2300,
and you have set the Replace
Existing Link property to True, the
data loader will link P-5000 to
LP-2300 and unlink P-2300 from
LP-2300. This assumes that P-5000
is not currently linked to another
location. The same is true for a
relationship that is defined as Zero
or One to Zero or Many, or Zero or
Many to Zero or One.
Allow Change of
Family?
OPTION_ALLOW_CHANGE_OF_FAMILY Boolean Allows the data loader to move an
entity from one family to another.
For example, this would allow an
entity that is currently assigned to
the Centrifugal Pump family to be
moved to the Reciprocating Pump
family.
All relationships will be maintained
as long as the family to which the
entity is being moved allows the
same relationships.
Note: Because of the extra
processing required, by selecting
this option, the interface
performance will decrease.
Tip:
Ensure that you define the taxonomy information correctly so your asset matches the taxonomy of yourMeridium database. That is, the Object Type field is populated with an Equipment Type defined in theTaxonomy Mapping family. Consider this taxonomy mapping loaded from the Asset Answers/SmartSignalstandard taxonomy:
102 © 2020 General Electric Company
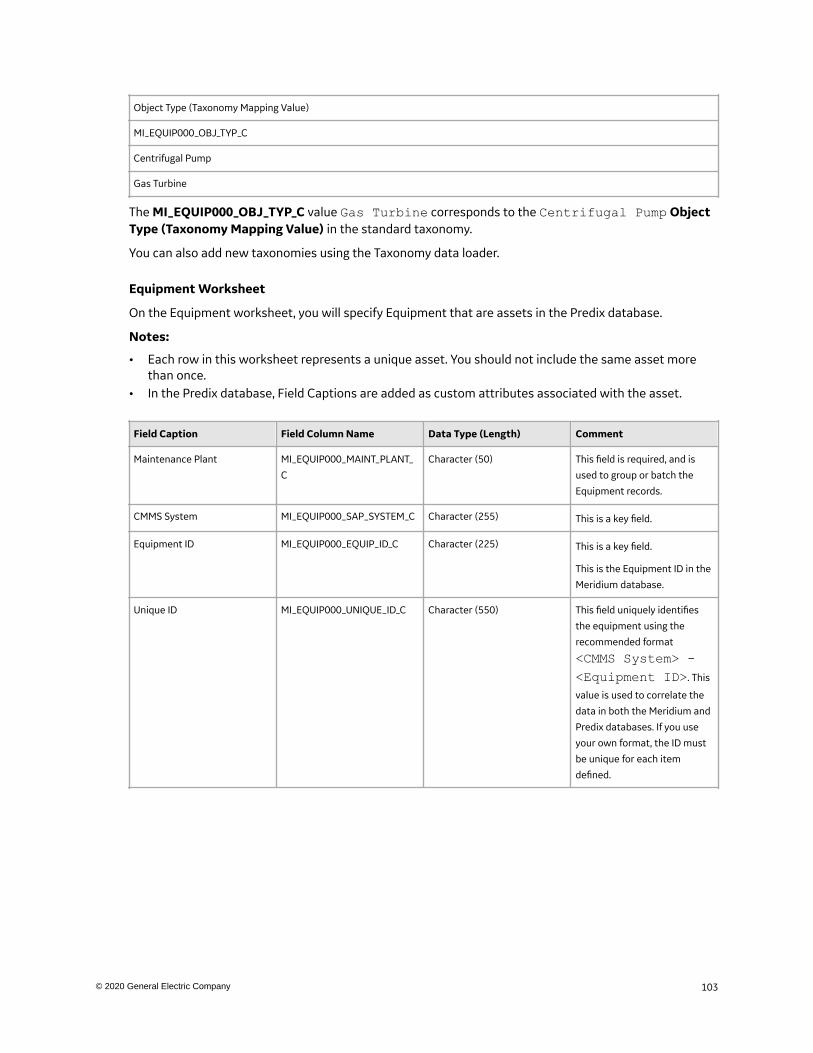
Object Type (Taxonomy Mapping Value)
MI_EQUIP000_OBJ_TYP_C
Centrifugal Pump
Gas Turbine
The MI_EQUIP000_OBJ_TYP_C value Gas Turbine corresponds to the Centrifugal Pump ObjectType (Taxonomy Mapping Value) in the standard taxonomy.
You can also add new taxonomies using the Taxonomy data loader.
Equipment Worksheet
On the Equipment worksheet, you will specify Equipment that are assets in the Predix database.
Notes:
• Each row in this worksheet represents a unique asset. You should not include the same asset morethan once.
• In the Predix database, Field Captions are added as custom attributes associated with the asset.
Field Caption Field Column Name Data Type (Length) Comment
Maintenance Plant MI_EQUIP000_MAINT_PLANT_
C
Character (50) This field is required, and is
used to group or batch the
Equipment records.
CMMS System MI_EQUIP000_SAP_SYSTEM_C Character (255) This is a key field.
Equipment ID MI_EQUIP000_EQUIP_ID_C Character (225) This is a key field.
This is the Equipment ID in the
Meridium database.
Unique ID MI_EQUIP000_UNIQUE_ID_C Character (550) This field uniquely identifies
the equipment using the
recommended format
<CMMS System> -<Equipment ID>. This
value is used to correlate the
data in both the Meridium and
Predix databases. If you use
your own format, the ID must
be unique for each item
defined.
103© 2020 General Electric Company
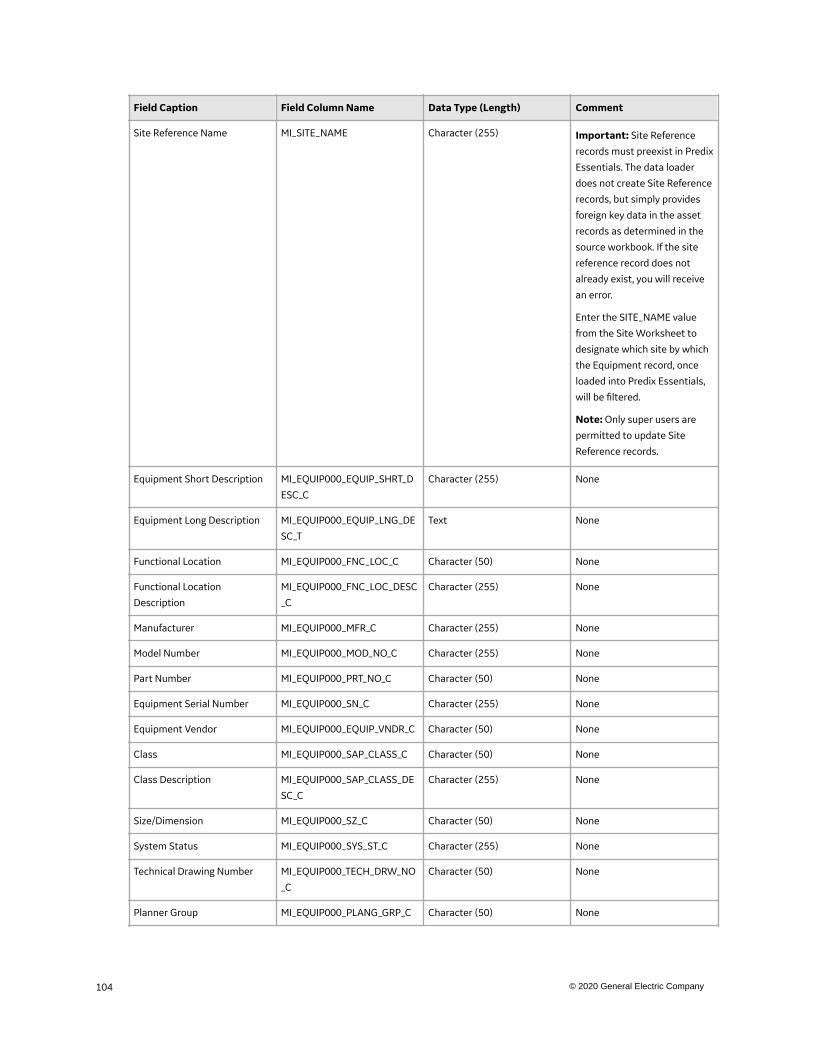
Field Caption Field Column Name Data Type (Length) Comment
Site Reference Name MI_SITE_NAME Character (255) Important: Site Reference
records must preexist in Predix
Essentials. The data loader
does not create Site Reference
records, but simply provides
foreign key data in the asset
records as determined in the
source workbook. If the site
reference record does not
already exist, you will receive
an error.
Enter the SITE_NAME value
from the Site Worksheet to
designate which site by which
the Equipment record, once
loaded into Predix Essentials,
will be filtered.
Note: Only super users are
permitted to update Site
Reference records.
Equipment Short Description MI_EQUIP000_EQUIP_SHRT_D
ESC_C
Character (255) None
Equipment Long Description MI_EQUIP000_EQUIP_LNG_DE
SC_T
Text None
Functional Location MI_EQUIP000_FNC_LOC_C Character (50) None
Functional Location
Description
MI_EQUIP000_FNC_LOC_DESC
_C
Character (255) None
Manufacturer MI_EQUIP000_MFR_C Character (255) None
Model Number MI_EQUIP000_MOD_NO_C Character (255) None
Part Number MI_EQUIP000_PRT_NO_C Character (50) None
Equipment Serial Number MI_EQUIP000_SN_C Character (255) None
Equipment Vendor MI_EQUIP000_EQUIP_VNDR_C Character (50) None
Class MI_EQUIP000_SAP_CLASS_C Character (50) None
Class Description MI_EQUIP000_SAP_CLASS_DE
SC_C
Character (255) None
Size/Dimension MI_EQUIP000_SZ_C Character (50) None
System Status MI_EQUIP000_SYS_ST_C Character (255) None
Technical Drawing Number MI_EQUIP000_TECH_DRW_NO
_C
Character (50) None
Planner Group MI_EQUIP000_PLANG_GRP_C Character (50) None
104 © 2020 General Electric Company
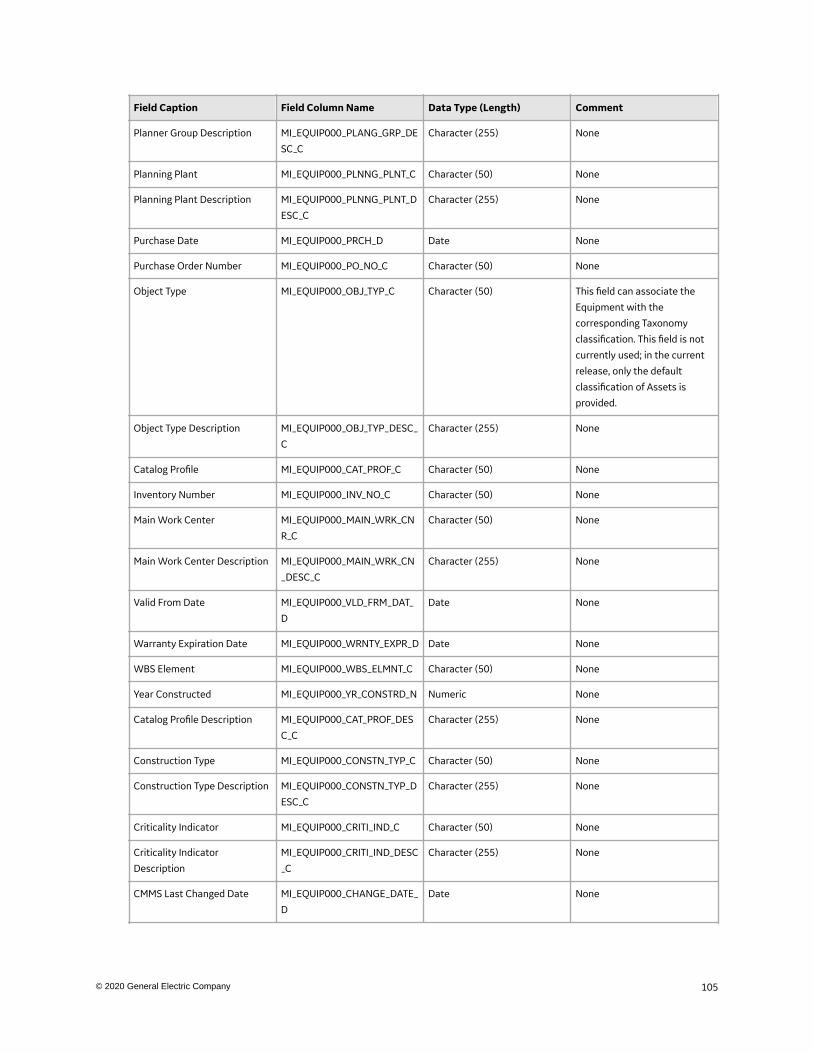
Field Caption Field Column Name Data Type (Length) Comment
Planner Group Description MI_EQUIP000_PLANG_GRP_DE
SC_C
Character (255) None
Planning Plant MI_EQUIP000_PLNNG_PLNT_C Character (50) None
Planning Plant Description MI_EQUIP000_PLNNG_PLNT_D
ESC_C
Character (255) None
Purchase Date MI_EQUIP000_PRCH_D Date None
Purchase Order Number MI_EQUIP000_PO_NO_C Character (50) None
Object Type MI_EQUIP000_OBJ_TYP_C Character (50) This field can associate the
Equipment with the
corresponding Taxonomy
classification. This field is not
currently used; in the current
release, only the default
classification of Assets is
provided.
Object Type Description MI_EQUIP000_OBJ_TYP_DESC_
C
Character (255) None
Catalog Profile MI_EQUIP000_CAT_PROF_C Character (50) None
Inventory Number MI_EQUIP000_INV_NO_C Character (50) None
Main Work Center MI_EQUIP000_MAIN_WRK_CN
R_C
Character (50) None
Main Work Center Description MI_EQUIP000_MAIN_WRK_CN
_DESC_C
Character (255) None
Valid From Date MI_EQUIP000_VLD_FRM_DAT_
D
Date None
Warranty Expiration Date MI_EQUIP000_WRNTY_EXPR_D Date None
WBS Element MI_EQUIP000_WBS_ELMNT_C Character (50) None
Year Constructed MI_EQUIP000_YR_CONSTRD_N Numeric None
Catalog Profile Description MI_EQUIP000_CAT_PROF_DES
C_C
Character (255) None
Construction Type MI_EQUIP000_CONSTN_TYP_C Character (50) None
Construction Type Description MI_EQUIP000_CONSTN_TYP_D
ESC_C
Character (255) None
Criticality Indicator MI_EQUIP000_CRITI_IND_C Character (50) None
Criticality Indicator
Description
MI_EQUIP000_CRITI_IND_DESC
_C
Character (255) None
CMMS Last Changed Date MI_EQUIP000_CHANGE_DATE_
D
Date None
105© 2020 General Electric Company
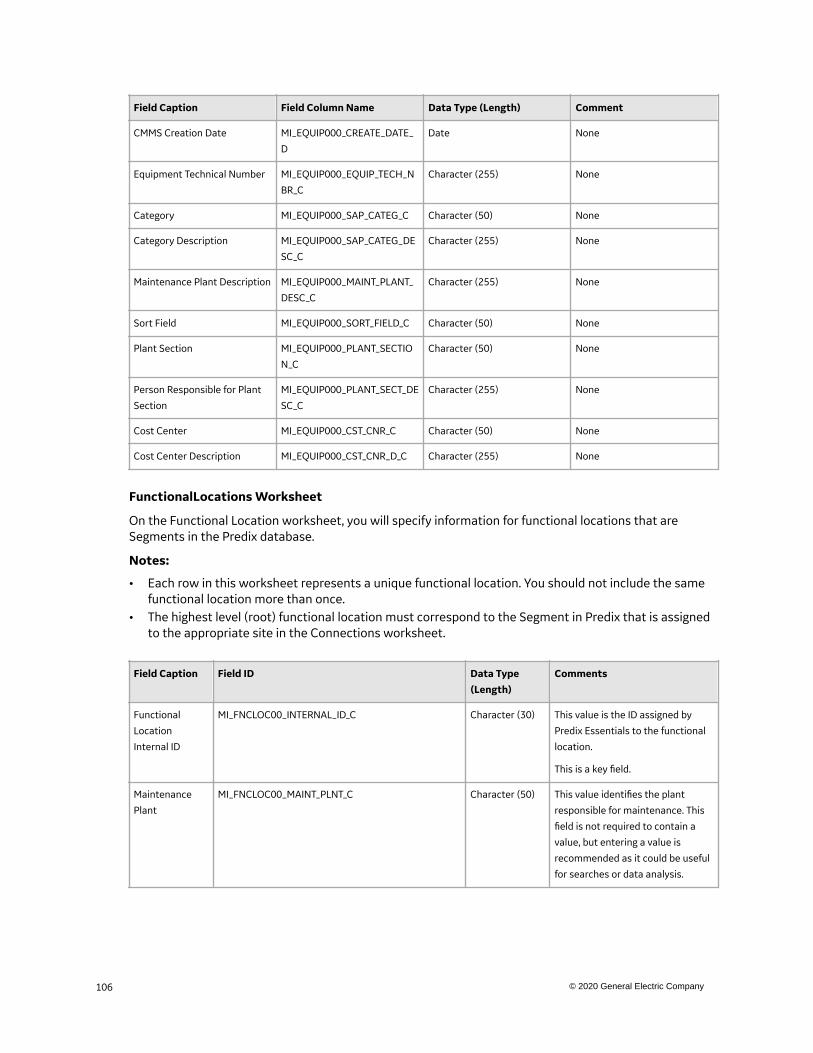
Field Caption Field Column Name Data Type (Length) Comment
CMMS Creation Date MI_EQUIP000_CREATE_DATE_
D
Date None
Equipment Technical Number MI_EQUIP000_EQUIP_TECH_N
BR_C
Character (255) None
Category MI_EQUIP000_SAP_CATEG_C Character (50) None
Category Description MI_EQUIP000_SAP_CATEG_DE
SC_C
Character (255) None
Maintenance Plant Description MI_EQUIP000_MAINT_PLANT_
DESC_C
Character (255) None
Sort Field MI_EQUIP000_SORT_FIELD_C Character (50) None
Plant Section MI_EQUIP000_PLANT_SECTIO
N_C
Character (50) None
Person Responsible for Plant
Section
MI_EQUIP000_PLANT_SECT_DE
SC_C
Character (255) None
Cost Center MI_EQUIP000_CST_CNR_C Character (50) None
Cost Center Description MI_EQUIP000_CST_CNR_D_C Character (255) None
FunctionalLocations Worksheet
On the Functional Location worksheet, you will specify information for functional locations that areSegments in the Predix database.
Notes:
• Each row in this worksheet represents a unique functional location. You should not include the samefunctional location more than once.
• The highest level (root) functional location must correspond to the Segment in Predix that is assignedto the appropriate site in the Connections worksheet.
Field Caption Field ID Data Type(Length)
Comments
Functional
Location
Internal ID
MI_FNCLOC00_INTERNAL_ID_C Character (30) This value is the ID assigned by
Predix Essentials to the functional
location.
This is a key field.
Maintenance
Plant
MI_FNCLOC00_MAINT_PLNT_C Character (50) This value identifies the plant
responsible for maintenance. This
field is not required to contain a
value, but entering a value is
recommended as it could be useful
for searches or data analysis.
106 © 2020 General Electric Company
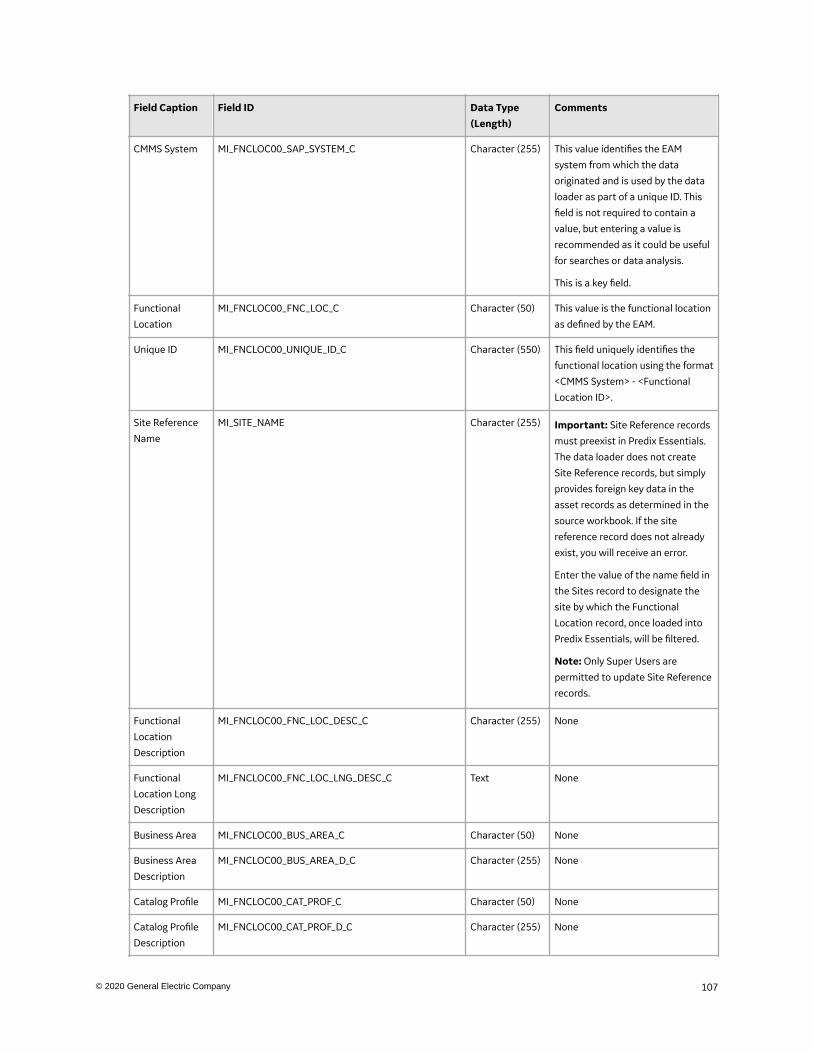
Field Caption Field ID Data Type(Length)
Comments
CMMS System MI_FNCLOC00_SAP_SYSTEM_C Character (255) This value identifies the EAM
system from which the data
originated and is used by the data
loader as part of a unique ID. This
field is not required to contain a
value, but entering a value is
recommended as it could be useful
for searches or data analysis.
This is a key field.
Functional
Location
MI_FNCLOC00_FNC_LOC_C Character (50) This value is the functional location
as defined by the EAM.
Unique ID MI_FNCLOC00_UNIQUE_ID_C Character (550) This field uniquely identifies the
functional location using the format
<CMMS System> - <Functional
Location ID>.
Site Reference
Name
MI_SITE_NAME Character (255) Important: Site Reference records
must preexist in Predix Essentials.
The data loader does not create
Site Reference records, but simply
provides foreign key data in the
asset records as determined in the
source workbook. If the site
reference record does not already
exist, you will receive an error.
Enter the value of the name field in
the Sites record to designate the
site by which the Functional
Location record, once loaded into
Predix Essentials, will be filtered.
Note: Only Super Users are
permitted to update Site Reference
records.
Functional
Location
Description
MI_FNCLOC00_FNC_LOC_DESC_C Character (255) None
Functional
Location Long
Description
MI_FNCLOC00_FNC_LOC_LNG_DESC_C Text None
Business Area MI_FNCLOC00_BUS_AREA_C Character (50) None
Business Area
Description
MI_FNCLOC00_BUS_AREA_D_C Character (255) None
Catalog Profile MI_FNCLOC00_CAT_PROF_C Character (50) None
Catalog Profile
Description
MI_FNCLOC00_CAT_PROF_D_C Character (255) None
107© 2020 General Electric Company
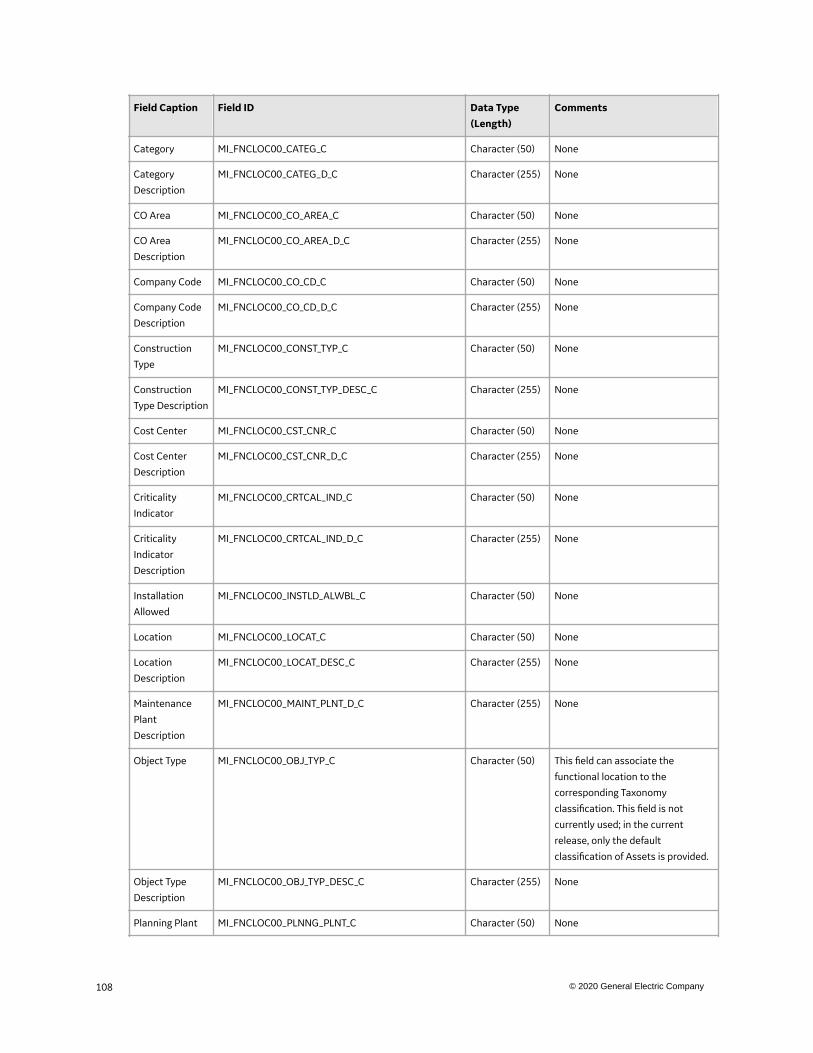
Field Caption Field ID Data Type(Length)
Comments
Category MI_FNCLOC00_CATEG_C Character (50) None
Category
Description
MI_FNCLOC00_CATEG_D_C Character (255) None
CO Area MI_FNCLOC00_CO_AREA_C Character (50) None
CO Area
Description
MI_FNCLOC00_CO_AREA_D_C Character (255) None
Company Code MI_FNCLOC00_CO_CD_C Character (50) None
Company Code
Description
MI_FNCLOC00_CO_CD_D_C Character (255) None
Construction
Type
MI_FNCLOC00_CONST_TYP_C Character (50) None
Construction
Type Description
MI_FNCLOC00_CONST_TYP_DESC_C Character (255) None
Cost Center MI_FNCLOC00_CST_CNR_C Character (50) None
Cost Center
Description
MI_FNCLOC00_CST_CNR_D_C Character (255) None
Criticality
Indicator
MI_FNCLOC00_CRTCAL_IND_C Character (50) None
Criticality
Indicator
Description
MI_FNCLOC00_CRTCAL_IND_D_C Character (255) None
Installation
Allowed
MI_FNCLOC00_INSTLD_ALWBL_C Character (50) None
Location MI_FNCLOC00_LOCAT_C Character (50) None
Location
Description
MI_FNCLOC00_LOCAT_DESC_C Character (255) None
Maintenance
Plant
Description
MI_FNCLOC00_MAINT_PLNT_D_C Character (255) None
Object Type MI_FNCLOC00_OBJ_TYP_C Character (50) This field can associate the
functional location to the
corresponding Taxonomy
classification. This field is not
currently used; in the current
release, only the default
classification of Assets is provided.
Object Type
Description
MI_FNCLOC00_OBJ_TYP_DESC_C Character (255) None
Planning Plant MI_FNCLOC00_PLNNG_PLNT_C Character (50) None
108 © 2020 General Electric Company
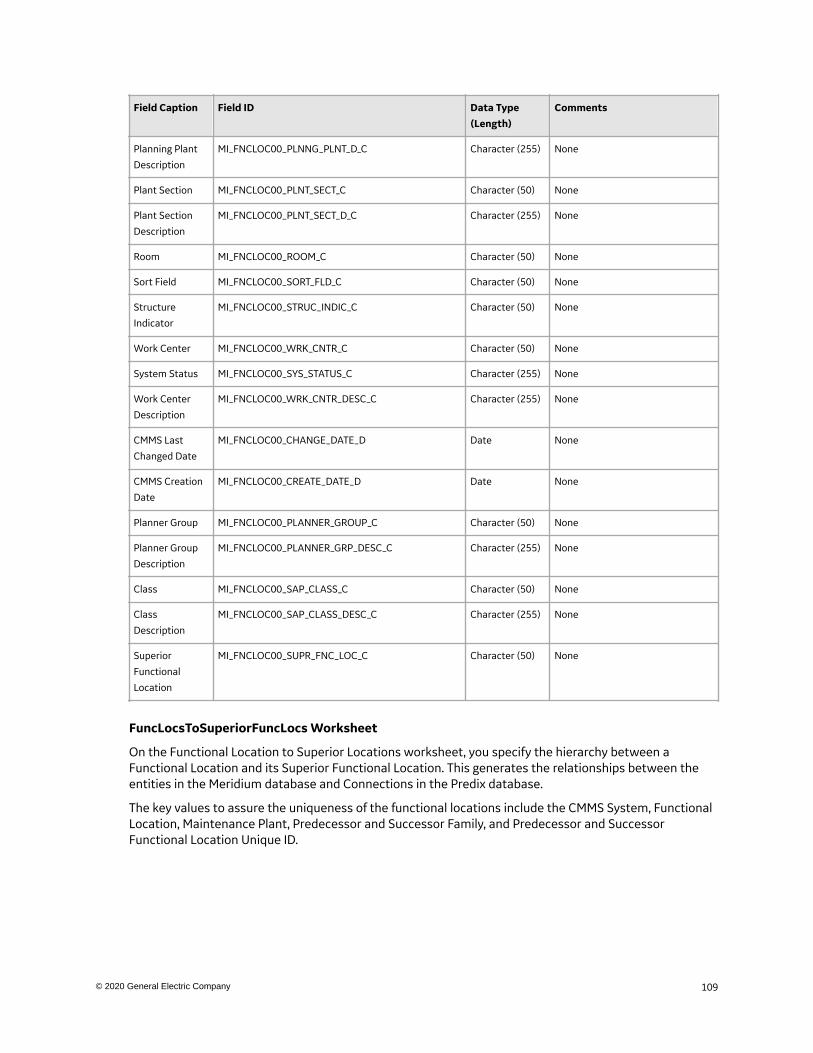
Field Caption Field ID Data Type(Length)
Comments
Planning Plant
Description
MI_FNCLOC00_PLNNG_PLNT_D_C Character (255) None
Plant Section MI_FNCLOC00_PLNT_SECT_C Character (50) None
Plant Section
Description
MI_FNCLOC00_PLNT_SECT_D_C Character (255) None
Room MI_FNCLOC00_ROOM_C Character (50) None
Sort Field MI_FNCLOC00_SORT_FLD_C Character (50) None
Structure
Indicator
MI_FNCLOC00_STRUC_INDIC_C Character (50) None
Work Center MI_FNCLOC00_WRK_CNTR_C Character (50) None
System Status MI_FNCLOC00_SYS_STATUS_C Character (255) None
Work Center
Description
MI_FNCLOC00_WRK_CNTR_DESC_C Character (255) None
CMMS Last
Changed Date
MI_FNCLOC00_CHANGE_DATE_D Date None
CMMS Creation
Date
MI_FNCLOC00_CREATE_DATE_D Date None
Planner Group MI_FNCLOC00_PLANNER_GROUP_C Character (50) None
Planner Group
Description
MI_FNCLOC00_PLANNER_GRP_DESC_C Character (255) None
Class MI_FNCLOC00_SAP_CLASS_C Character (50) None
Class
Description
MI_FNCLOC00_SAP_CLASS_DESC_C Character (255) None
Superior
Functional
Location
MI_FNCLOC00_SUPR_FNC_LOC_C Character (50) None
FuncLocsToSuperiorFuncLocs Worksheet
On the Functional Location to Superior Locations worksheet, you specify the hierarchy between aFunctional Location and its Superior Functional Location. This generates the relationships between theentities in the Meridium database and Connections in the Predix database.
The key values to assure the uniqueness of the functional locations include the CMMS System, FunctionalLocation, Maintenance Plant, Predecessor and Successor Family, and Predecessor and SuccessorFunctional Location Unique ID.
109© 2020 General Electric Company
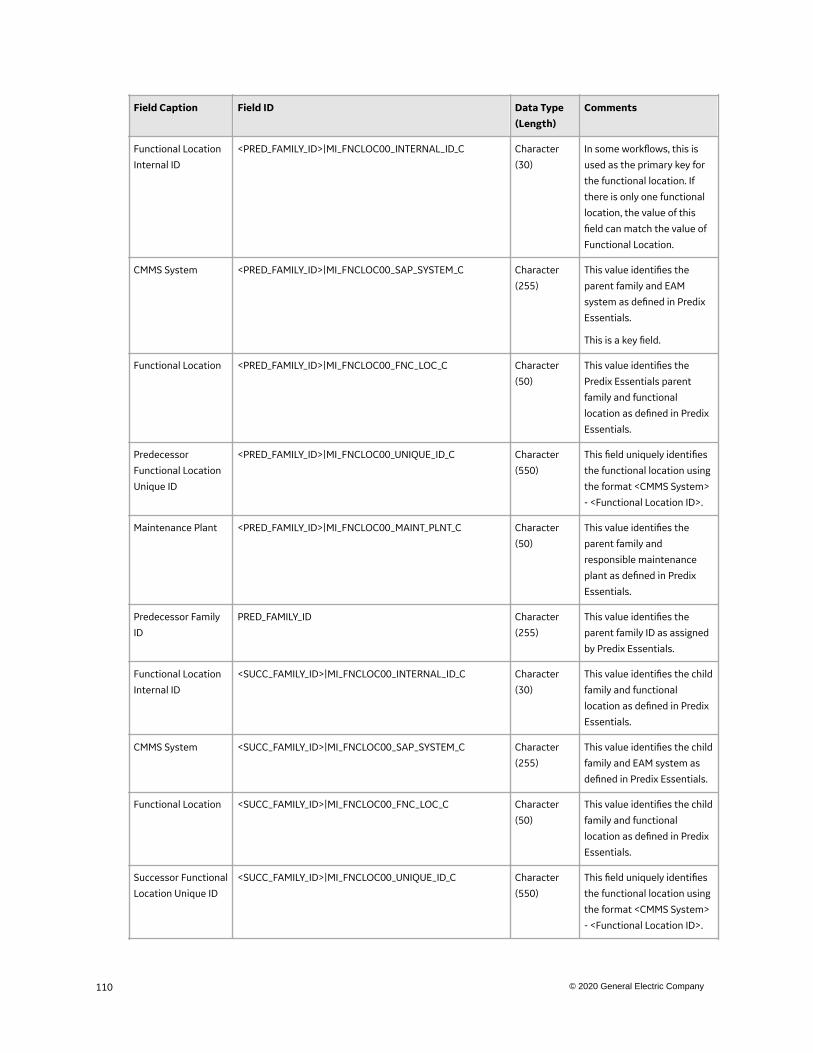
Field Caption Field ID Data Type(Length)
Comments
Functional Location
Internal ID
<PRED_FAMILY_ID>|MI_FNCLOC00_INTERNAL_ID_C Character
(30)
In some workflows, this is
used as the primary key for
the functional location. If
there is only one functional
location, the value of this
field can match the value of
Functional Location.
CMMS System <PRED_FAMILY_ID>|MI_FNCLOC00_SAP_SYSTEM_C Character
(255)
This value identifies the
parent family and EAM
system as defined in Predix
Essentials.
This is a key field.
Functional Location <PRED_FAMILY_ID>|MI_FNCLOC00_FNC_LOC_C Character
(50)
This value identifies the
Predix Essentials parent
family and functional
location as defined in Predix
Essentials.
Predecessor
Functional Location
Unique ID
<PRED_FAMILY_ID>|MI_FNCLOC00_UNIQUE_ID_C Character
(550)
This field uniquely identifies
the functional location using
the format <CMMS System>
- <Functional Location ID>.
Maintenance Plant <PRED_FAMILY_ID>|MI_FNCLOC00_MAINT_PLNT_C Character
(50)
This value identifies the
parent family and
responsible maintenance
plant as defined in Predix
Essentials.
Predecessor Family
ID
PRED_FAMILY_ID Character
(255)
This value identifies the
parent family ID as assigned
by Predix Essentials.
Functional Location
Internal ID
<SUCC_FAMILY_ID>|MI_FNCLOC00_INTERNAL_ID_C Character
(30)
This value identifies the child
family and functional
location as defined in Predix
Essentials.
CMMS System <SUCC_FAMILY_ID>|MI_FNCLOC00_SAP_SYSTEM_C Character
(255)
This value identifies the child
family and EAM system as
defined in Predix Essentials.
Functional Location <SUCC_FAMILY_ID>|MI_FNCLOC00_FNC_LOC_C Character
(50)
This value identifies the child
family and functional
location as defined in Predix
Essentials.
Successor Functional
Location Unique ID
<SUCC_FAMILY_ID>|MI_FNCLOC00_UNIQUE_ID_C Character
(550)
This field uniquely identifies
the functional location using
the format <CMMS System>
- <Functional Location ID>.
110 © 2020 General Electric Company
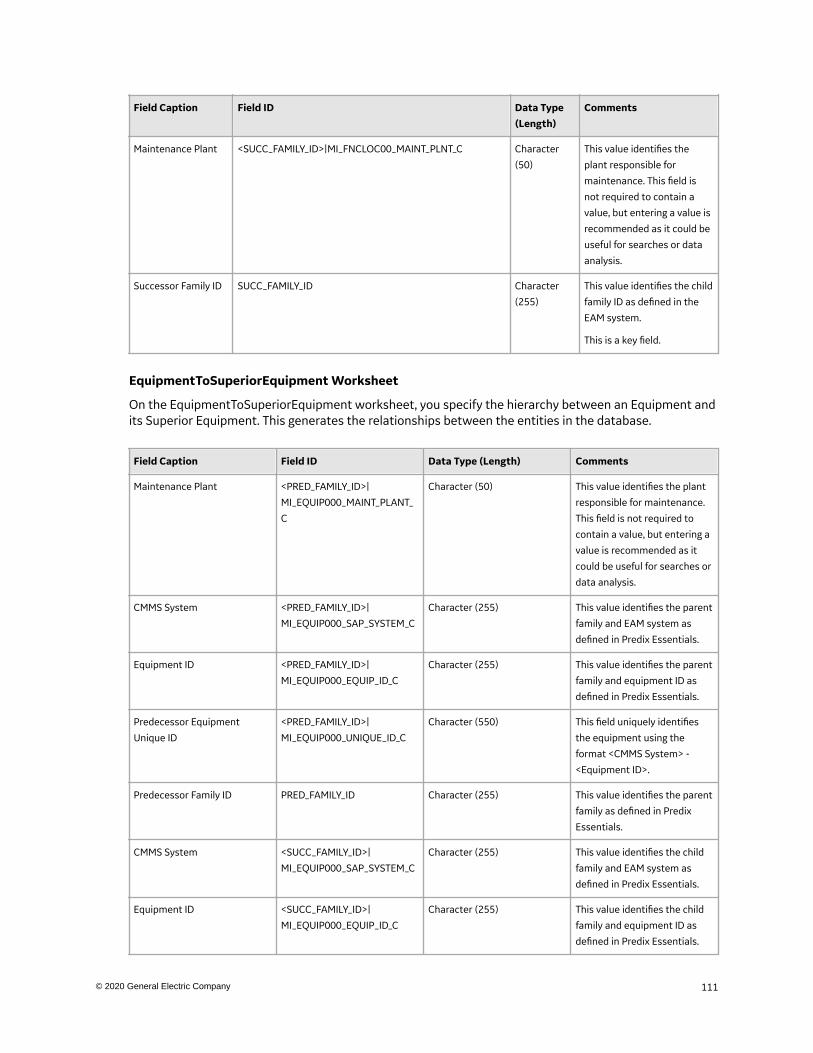
Field Caption Field ID Data Type(Length)
Comments
Maintenance Plant <SUCC_FAMILY_ID>|MI_FNCLOC00_MAINT_PLNT_C Character
(50)
This value identifies the
plant responsible for
maintenance. This field is
not required to contain a
value, but entering a value is
recommended as it could be
useful for searches or data
analysis.
Successor Family ID SUCC_FAMILY_ID Character
(255)
This value identifies the child
family ID as defined in the
EAM system.
This is a key field.
EquipmentToSuperiorEquipment Worksheet
On the EquipmentToSuperiorEquipment worksheet, you specify the hierarchy between an Equipment andits Superior Equipment. This generates the relationships between the entities in the database.
Field Caption Field ID Data Type (Length) Comments
Maintenance Plant <PRED_FAMILY_ID>|
MI_EQUIP000_MAINT_PLANT_
C
Character (50) This value identifies the plant
responsible for maintenance.
This field is not required to
contain a value, but entering a
value is recommended as it
could be useful for searches or
data analysis.
CMMS System <PRED_FAMILY_ID>|
MI_EQUIP000_SAP_SYSTEM_C
Character (255) This value identifies the parent
family and EAM system as
defined in Predix Essentials.
Equipment ID <PRED_FAMILY_ID>|
MI_EQUIP000_EQUIP_ID_C
Character (255) This value identifies the parent
family and equipment ID as
defined in Predix Essentials.
Predecessor Equipment
Unique ID
<PRED_FAMILY_ID>|
MI_EQUIP000_UNIQUE_ID_C
Character (550) This field uniquely identifies
the equipment using the
format <CMMS System> -
<Equipment ID>.
Predecessor Family ID PRED_FAMILY_ID Character (255) This value identifies the parent
family as defined in Predix
Essentials.
CMMS System <SUCC_FAMILY_ID>|
MI_EQUIP000_SAP_SYSTEM_C
Character (255) This value identifies the child
family and EAM system as
defined in Predix Essentials.
Equipment ID <SUCC_FAMILY_ID>|
MI_EQUIP000_EQUIP_ID_C
Character (255) This value identifies the child
family and equipment ID as
defined in Predix Essentials.
111© 2020 General Electric Company
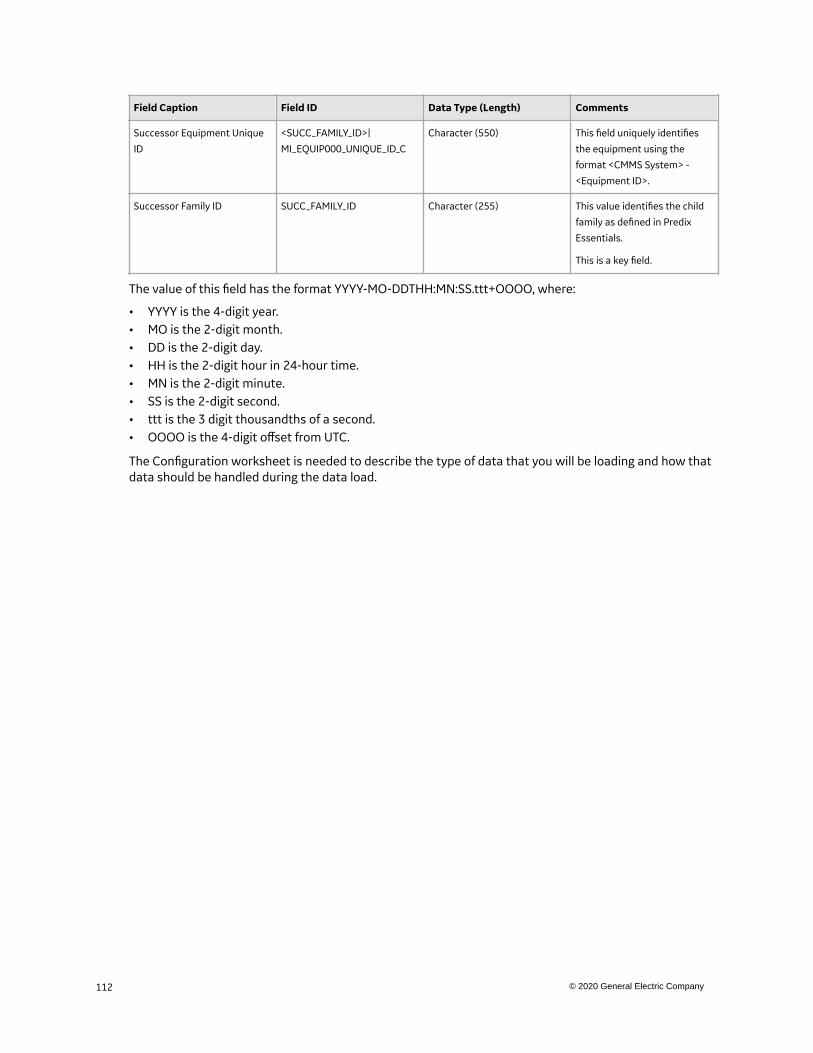
Field Caption Field ID Data Type (Length) Comments
Successor Equipment Unique
ID
<SUCC_FAMILY_ID>|
MI_EQUIP000_UNIQUE_ID_C
Character (550) This field uniquely identifies
the equipment using the
format <CMMS System> -
<Equipment ID>.
Successor Family ID SUCC_FAMILY_ID Character (255) This value identifies the child
family as defined in Predix
Essentials.
This is a key field.
The value of this field has the format YYYY-MO-DDTHH:MN:SS.ttt+OOOO, where:
• YYYY is the 4-digit year.• MO is the 2-digit month.• DD is the 2-digit day.• HH is the 2-digit hour in 24-hour time.• MN is the 2-digit minute.• SS is the 2-digit second.• ttt is the 3 digit thousandths of a second.• OOOO is the 4-digit offset from UTC.
The Configuration worksheet is needed to describe the type of data that you will be loading and how thatdata should be handled during the data load.
112 © 2020 General Electric Company
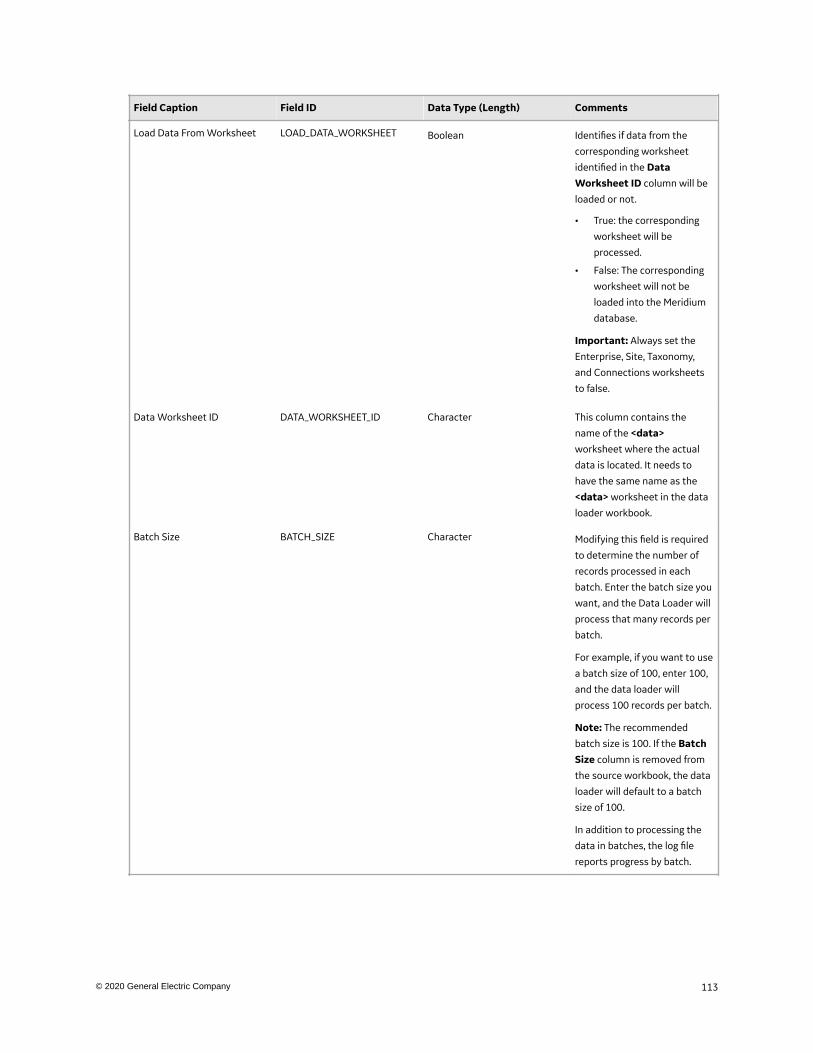
Field Caption Field ID Data Type (Length) Comments
Load Data From Worksheet LOAD_DATA_WORKSHEET Boolean Identifies if data from the
corresponding worksheet
identified in the DataWorksheet ID column will be
loaded or not.
• True: the corresponding
worksheet will be
processed.
• False: The corresponding
worksheet will not be
loaded into the Meridium
database.
Important: Always set the
Enterprise, Site, Taxonomy,
and Connections worksheets
to false.
Data Worksheet ID DATA_WORKSHEET_ID Character This column contains the
name of the <data>worksheet where the actual
data is located. It needs to
have the same name as the
<data> worksheet in the data
loader workbook.
Batch Size BATCH_SIZE Character Modifying this field is required
to determine the number of
records processed in each
batch. Enter the batch size you
want, and the Data Loader will
process that many records per
batch.
For example, if you want to use
a batch size of 100, enter 100,
and the data loader will
process 100 records per batch.
Note: The recommended
batch size is 100. If the BatchSize column is removed from
the source workbook, the data
loader will default to a batch
size of 100.
In addition to processing the
data in batches, the log file
reports progress by batch.
113© 2020 General Electric Company
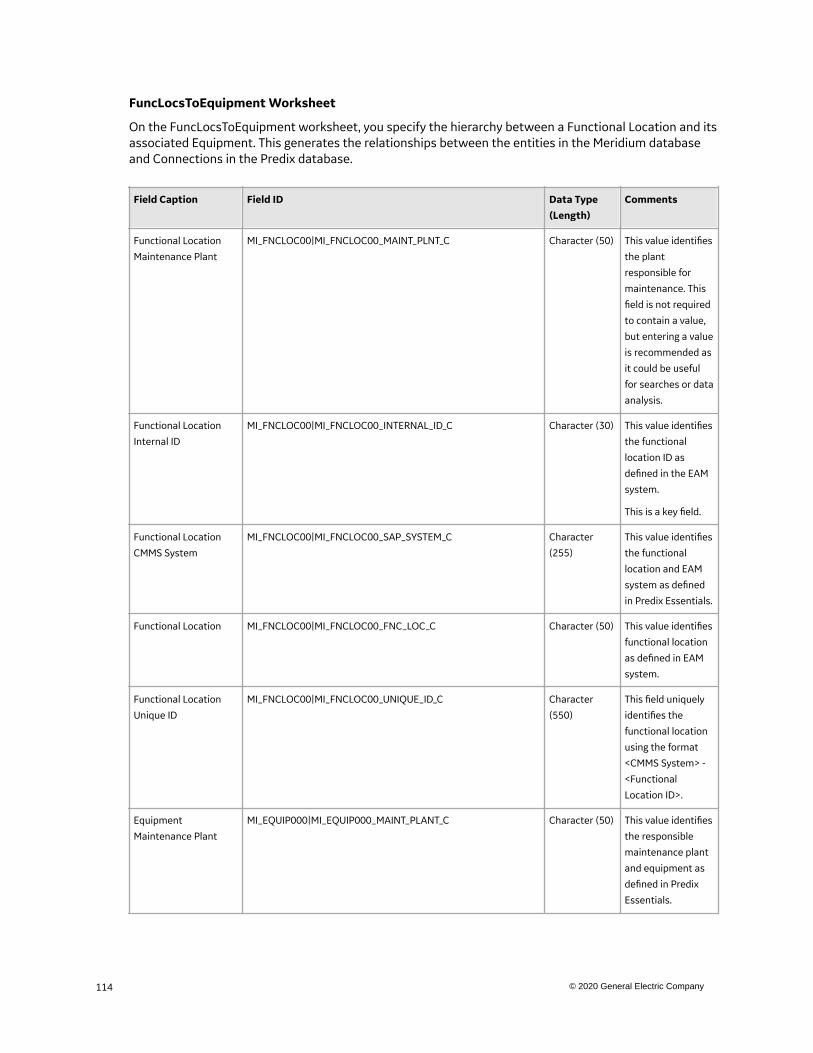
FuncLocsToEquipment Worksheet
On the FuncLocsToEquipment worksheet, you specify the hierarchy between a Functional Location and itsassociated Equipment. This generates the relationships between the entities in the Meridium databaseand Connections in the Predix database.
Field Caption Field ID Data Type(Length)
Comments
Functional Location
Maintenance Plant
MI_FNCLOC00|MI_FNCLOC00_MAINT_PLNT_C Character (50) This value identifies
the plant
responsible for
maintenance. This
field is not required
to contain a value,
but entering a value
is recommended as
it could be useful
for searches or data
analysis.
Functional Location
Internal ID
MI_FNCLOC00|MI_FNCLOC00_INTERNAL_ID_C Character (30) This value identifies
the functional
location ID as
defined in the EAM
system.
This is a key field.
Functional Location
CMMS System
MI_FNCLOC00|MI_FNCLOC00_SAP_SYSTEM_C Character
(255)
This value identifies
the functional
location and EAM
system as defined
in Predix Essentials.
Functional Location MI_FNCLOC00|MI_FNCLOC00_FNC_LOC_C Character (50) This value identifies
functional location
as defined in EAM
system.
Functional Location
Unique ID
MI_FNCLOC00|MI_FNCLOC00_UNIQUE_ID_C Character
(550)
This field uniquely
identifies the
functional location
using the format
<CMMS System> -
<Functional
Location ID>.
Equipment
Maintenance Plant
MI_EQUIP000|MI_EQUIP000_MAINT_PLANT_C Character (50) This value identifies
the responsible
maintenance plant
and equipment as
defined in Predix
Essentials.
114 © 2020 General Electric Company
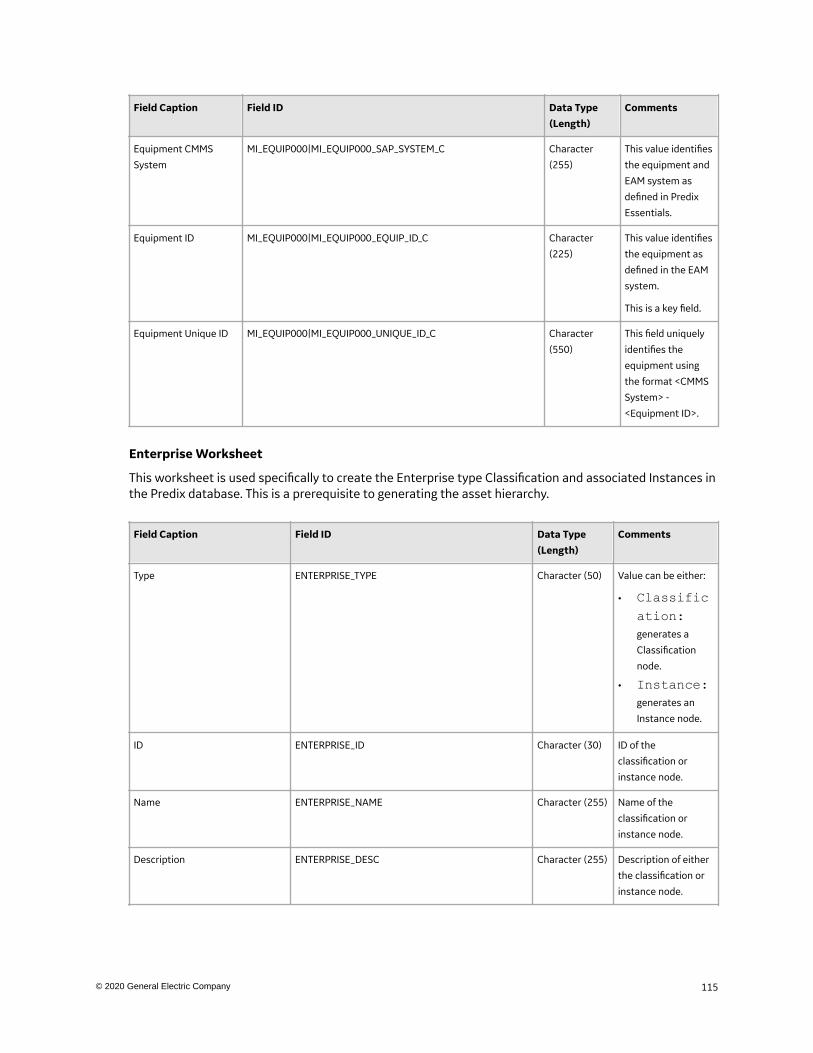
Field Caption Field ID Data Type(Length)
Comments
Equipment CMMS
System
MI_EQUIP000|MI_EQUIP000_SAP_SYSTEM_C Character
(255)
This value identifies
the equipment and
EAM system as
defined in Predix
Essentials.
Equipment ID MI_EQUIP000|MI_EQUIP000_EQUIP_ID_C Character
(225)
This value identifies
the equipment as
defined in the EAM
system.
This is a key field.
Equipment Unique ID MI_EQUIP000|MI_EQUIP000_UNIQUE_ID_C Character
(550)
This field uniquely
identifies the
equipment using
the format <CMMS
System> -
<Equipment ID>.
Enterprise Worksheet
This worksheet is used specifically to create the Enterprise type Classification and associated Instances inthe Predix database. This is a prerequisite to generating the asset hierarchy.
Field Caption Field ID Data Type(Length)
Comments
Type ENTERPRISE_TYPE Character (50) Value can be either:
• Classification:generates a
Classification
node.
• Instance:generates an
Instance node.
ID ENTERPRISE_ID Character (30) ID of the
classification or
instance node.
Name ENTERPRISE_NAME Character (255) Name of the
classification or
instance node.
Description ENTERPRISE_DESC Character (255) Description of either
the classification or
instance node.
115© 2020 General Electric Company
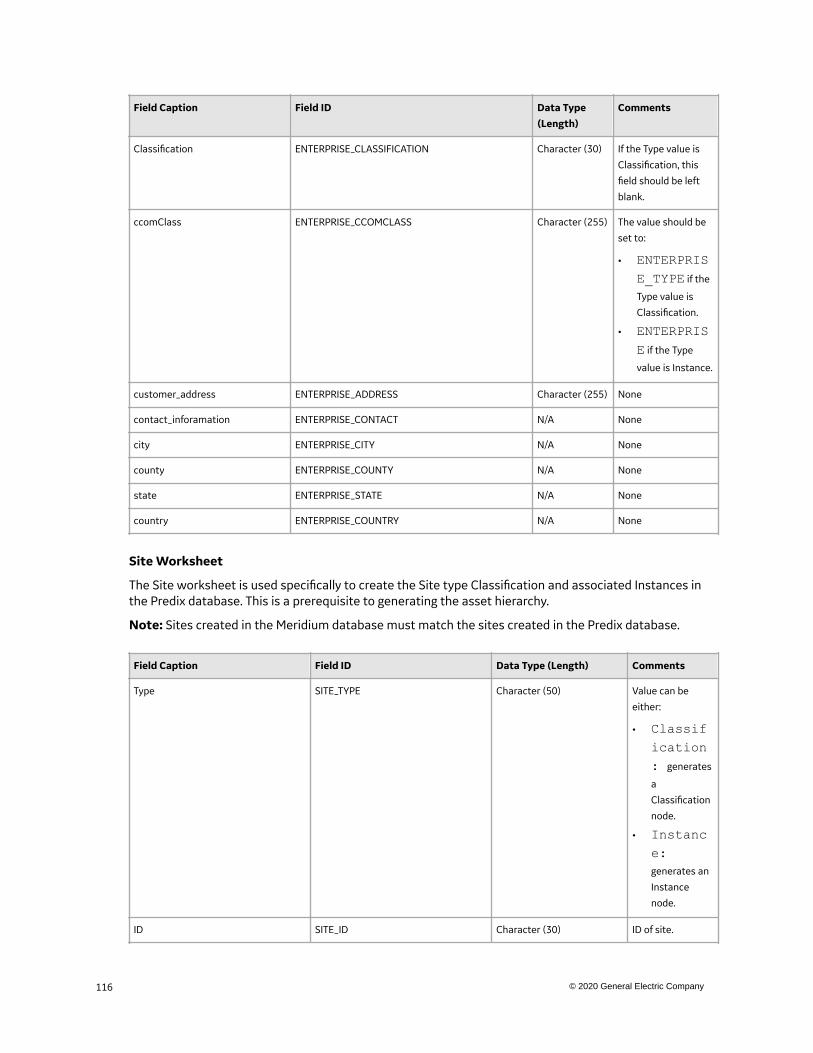
Field Caption Field ID Data Type(Length)
Comments
Classification ENTERPRISE_CLASSIFICATION Character (30) If the Type value is
Classification, this
field should be left
blank.
ccomClass ENTERPRISE_CCOMCLASS Character (255) The value should be
set to:
• ENTERPRISE_TYPE if the
Type value is
Classification.
• ENTERPRISE if the Type
value is Instance.
customer_address ENTERPRISE_ADDRESS Character (255) None
contact_inforamation ENTERPRISE_CONTACT N/A None
city ENTERPRISE_CITY N/A None
county ENTERPRISE_COUNTY N/A None
state ENTERPRISE_STATE N/A None
country ENTERPRISE_COUNTRY N/A None
Site Worksheet
The Site worksheet is used specifically to create the Site type Classification and associated Instances inthe Predix database. This is a prerequisite to generating the asset hierarchy.
Note: Sites created in the Meridium database must match the sites created in the Predix database.
Field Caption Field ID Data Type (Length) Comments
Type SITE_TYPE Character (50) Value can be
either:
• Classification: generates
a
Classification
node.
• Instance:generates an
Instance
node.
ID SITE_ID Character (30) ID of site.
116 © 2020 General Electric Company
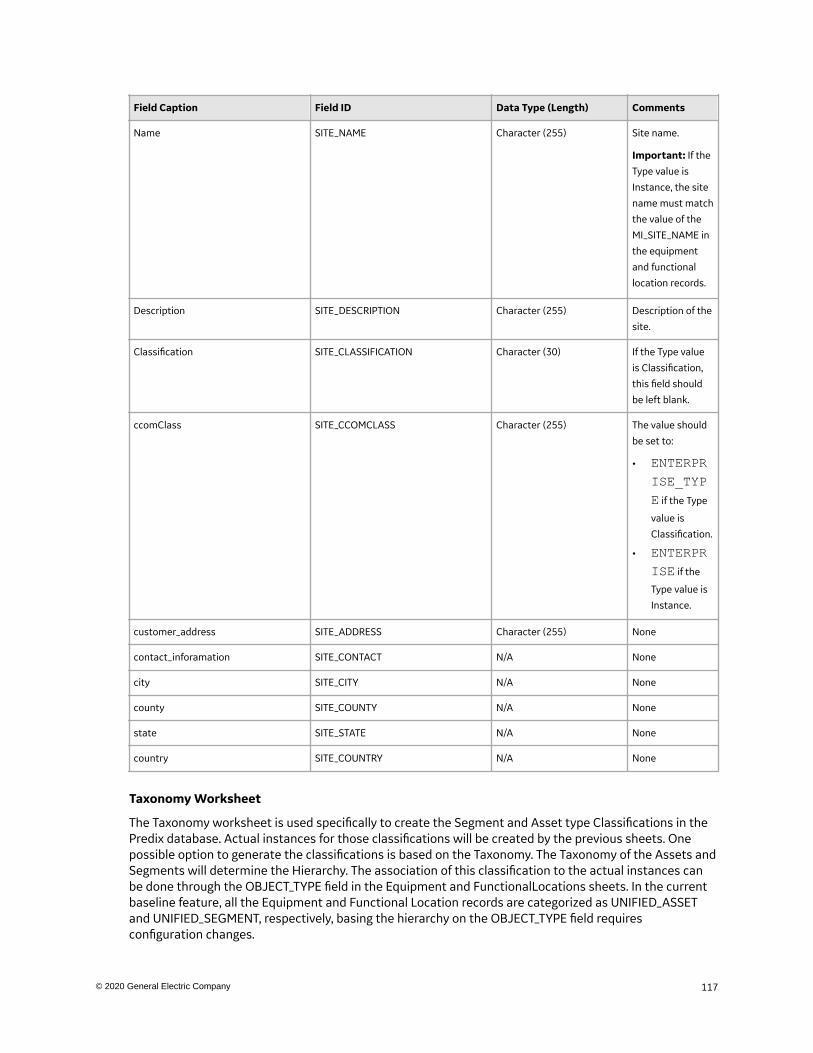
Field Caption Field ID Data Type (Length) Comments
Name SITE_NAME Character (255) Site name.
Important: If the
Type value is
Instance, the site
name must match
the value of the
MI_SITE_NAME in
the equipment
and functional
location records.
Description SITE_DESCRIPTION Character (255) Description of the
site.
Classification SITE_CLASSIFICATION Character (30) If the Type value
is Classification,
this field should
be left blank.
ccomClass SITE_CCOMCLASS Character (255) The value should
be set to:
• ENTERPRISE_TYPE if the Type
value is
Classification.
• ENTERPRISE if the
Type value is
Instance.
customer_address SITE_ADDRESS Character (255) None
contact_inforamation SITE_CONTACT N/A None
city SITE_CITY N/A None
county SITE_COUNTY N/A None
state SITE_STATE N/A None
country SITE_COUNTRY N/A None
Taxonomy Worksheet
The Taxonomy worksheet is used specifically to create the Segment and Asset type Classifications in thePredix database. Actual instances for those classifications will be created by the previous sheets. Onepossible option to generate the classifications is based on the Taxonomy. The Taxonomy of the Assets andSegments will determine the Hierarchy. The association of this classification to the actual instances canbe done through the OBJECT_TYPE field in the Equipment and FunctionalLocations sheets. In the currentbaseline feature, all the Equipment and Functional Location records are categorized as UNIFIED_ASSETand UNIFIED_SEGMENT, respectively, basing the hierarchy on the OBJECT_TYPE field requiresconfiguration changes.
117© 2020 General Electric Company
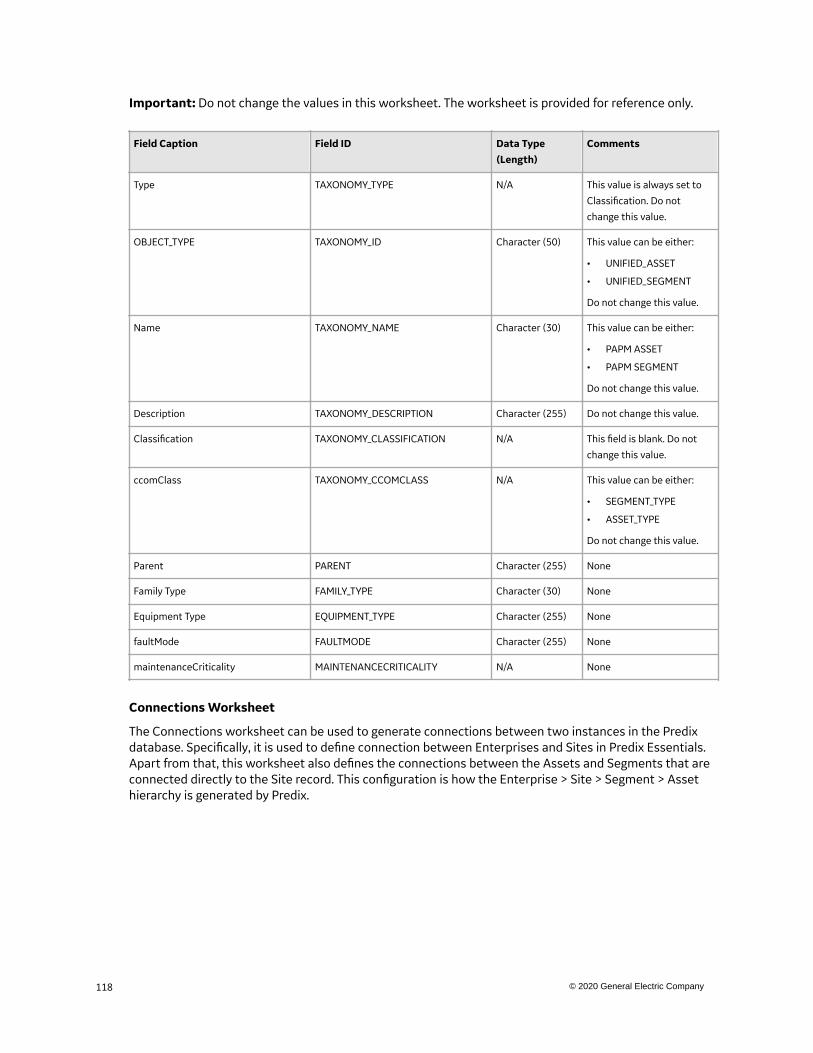
Important: Do not change the values in this worksheet. The worksheet is provided for reference only.
Field Caption Field ID Data Type(Length)
Comments
Type TAXONOMY_TYPE N/A This value is always set to
Classification. Do not
change this value.
OBJECT_TYPE TAXONOMY_ID Character (50) This value can be either:
• UNIFIED_ASSET
• UNIFIED_SEGMENT
Do not change this value.
Name TAXONOMY_NAME Character (30) This value can be either:
• PAPM ASSET
• PAPM SEGMENT
Do not change this value.
Description TAXONOMY_DESCRIPTION Character (255) Do not change this value.
Classification TAXONOMY_CLASSIFICATION N/A This field is blank. Do not
change this value.
ccomClass TAXONOMY_CCOMCLASS N/A This value can be either:
• SEGMENT_TYPE
• ASSET_TYPE
Do not change this value.
Parent PARENT Character (255) None
Family Type FAMILY_TYPE Character (30) None
Equipment Type EQUIPMENT_TYPE Character (255) None
faultMode FAULTMODE Character (255) None
maintenanceCriticality MAINTENANCECRITICALITY N/A None
Connections Worksheet
The Connections worksheet can be used to generate connections between two instances in the Predixdatabase. Specifically, it is used to define connection between Enterprises and Sites in Predix Essentials.Apart from that, this worksheet also defines the connections between the Assets and Segments that areconnected directly to the Site record. This configuration is how the Enterprise > Site > Segment > Assethierarchy is generated by Predix.
118 © 2020 General Electric Company
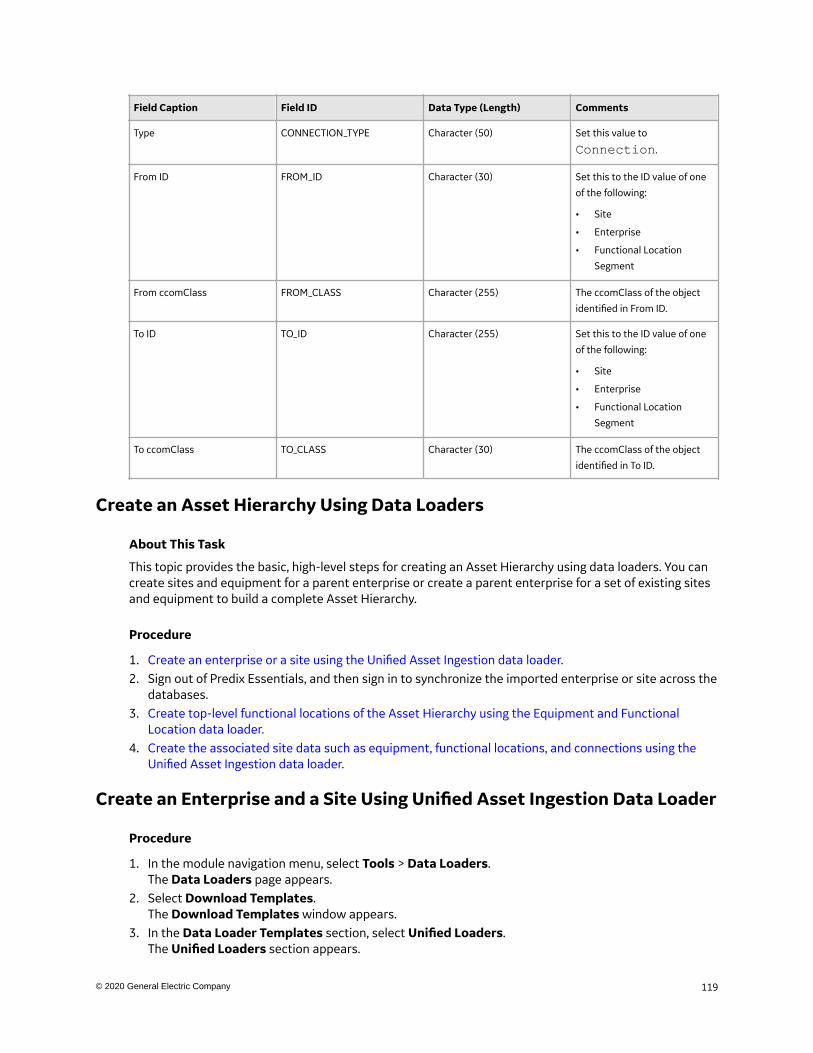
Field Caption Field ID Data Type (Length) Comments
Type CONNECTION_TYPE Character (50) Set this value to
Connection.
From ID FROM_ID Character (30) Set this to the ID value of one
of the following:
• Site
• Enterprise
• Functional Location
Segment
From ccomClass FROM_CLASS Character (255) The ccomClass of the object
identified in From ID.
To ID TO_ID Character (255) Set this to the ID value of one
of the following:
• Site
• Enterprise
• Functional Location
Segment
To ccomClass TO_CLASS Character (30) The ccomClass of the object
identified in To ID.
Create an Asset Hierarchy Using Data Loaders
About This Task
This topic provides the basic, high-level steps for creating an Asset Hierarchy using data loaders. You cancreate sites and equipment for a parent enterprise or create a parent enterprise for a set of existing sitesand equipment to build a complete Asset Hierarchy.
Procedure
1. Create an enterprise or a site using the Unified Asset Ingestion data loader.2. Sign out of Predix Essentials, and then sign in to synchronize the imported enterprise or site across the
databases.3. Create top-level functional locations of the Asset Hierarchy using the Equipment and Functional
Location data loader.4. Create the associated site data such as equipment, functional locations, and connections using the
Unified Asset Ingestion data loader.
Create an Enterprise and a Site Using Unified Asset Ingestion Data Loader
Procedure
1. In the module navigation menu, select Tools > Data Loaders.The Data Loaders page appears.
2. Select Download Templates.The Download Templates window appears.
3. In the Data Loader Templates section, select Unified Loaders.The Unified Loaders section appears.
119© 2020 General Electric Company
4. Select .The Unified Asset Ingestion data loader template is downloaded.
5. Open the Unified Asset Ingestion data loader workbook, and then perform the following operations:
a) In the Enterprise and Site worksheets, specify the enterprises and sites, respectively.
Note: If the enterprise that you want to associate with the site is available in Predix Essentials,specify the enterprise data in the Enterprise worksheet.
Important: You must only specify data in the Enterprise, Site, and Connections worksheets.Additionally, ensure that only the appropriate enterprise, site, and connections data are available inthe Enterprise, Site, and Connections worksheets, respectively.
b) In the Connections worksheet, provide the following details:
• In the From ID column, specify the sites.• In the To ID column, specify the enterprises.
c) In the Configuration worksheet, in the Load Data from Worksheet column, enter FALSE next toeach Data worksheet ID, and then save the workbook.
6. Select Import New.The Import Data window appears.
7. In the Select Data Loader section, select Unified Loaders, and then select Asset Ingestion Loader.8. In the File for Import section:
a. Select Choose File, and then access the folder where you saved the Unified Asset Ingestion dataloader workbook.
b. Select the workbook, and then select Open.9. Select Import.
A job is scheduled, and the status of the job appears in the Status and Log column. When the statusis displayed as Complete, the enterprises and the sites that you specified in the workbook are created,and the relationships between the enterprises and the sites are established in Predix Essentials.
Note: If an error occurs while importing the Unified Asset Ingestion data loader workbook, resolve theissues in the workbook, and then import the workbook.
Create Top-Level Functional Locations of an Asset Hierarchy
About This Task
You must use the Equipment and Functional Location data loader to create the top-level functionallocations of the Asset Hierarchy in the Meridium database. The top-level functional locations are createdin the Meridium and Predix databases using different data loaders, and are based on the levels of thefunctional locations that you want to create.
• If you want to create an Enterprise, you must import the first three levels of functional locations to theMeridium database using the Equipment and Functional Location data loader.
• If you want to create a child Site for an Enterprise that is available in Predix Essentials, you mustimport the second and third levels of functional locations to the Meridium database using theEquipment and Functional Location data loader.
Important: You must use the Equipment and Functional Location data loaders to import the top-levelfunctional locations. If you use the Unified Asset Ingestion data loader to import the functional locations,inconsistent Asset Hierarchies will be created in both the Meridium and Predix databases.
Procedure
1. In the module navigation menu, select Tools > Data Loaders.
120 © 2020 General Electric Company
The Data Loaders page appears.2. Select Download Templates.
The Download Templates window appears.3. In the Data Loader Templates section, select APM Connect.
The APM Connect section appears.
4. In the Templates column, select next to the Equipment and Functional Location data loader.The Equipment and Functional Location data loader template is downloaded.
5. Open the Equipment and Functional Location data loader workbook, and then perform the followingoperations:
a) In the FunctionalLocations and FuncLocsToSuperiorFuncLocs worksheets, specify the functionallocations that will create the first three levels of assets in the hierarchy.
Note: You must populate data only in the FunctionalLocations and FuncLocsToSuperiorFuncLocsworksheets.
b) Save the Equipment and Functional Location data loader workbook.6. Select Import New.
The Import Data window appears.7. In the Select Data Loader section, select APM Connect, and then select Equipment and Functional
Location.8. In the File for Import section:
a. Select Choose File, and then access the folder where you saved the Equipment and FunctionalLocation data loader workbook.
b. Select the workbook, and then select Open.9. Select Import.
A job is scheduled, and the status of the job appears in the Status and Log column. When the statusis displayed as Complete, the functional locations that you specified in the workbook are created inPredix Essentials.
Note: If an error occurs while importing the Equipment and Functional Location data loader workbook,resolve the issues in the workbook, and then import the workbook.
Create Equipment and Functional Locations for an Asset Hierarchy
About This Task
This topic describes how to import the associated site data such as equipment, functional locations, andconnections to Predix Essentials using the Unified Asset Ingestion data loader.
Procedure
1. In the module navigation menu, select Tools > Data Loaders.The Data Loaders page appears.
2. Select Download Templates.The Download Templates window appears.
3. In the Data Loader Templates section, select Unified Loaders.The Unified Loaders section appears.
4. Select .The Unified Asset Ingestion data loader template is downloaded.
5. Open the Unified Asset Ingestion data loader workbook, and then perform the following operations:
a) Provide data in the following worksheets:
121© 2020 General Electric Company
• Equipment• FunctionalLocations• FuncLocsToSuperiorFuncLocs• EquipmentToSupEquipment• FuncLocsToEquipment
b) In the Connections worksheet, provide the following details:
• In the From ID column, specify the segments.• In the To ID column, specify the sites.
c) In the Enterprise and Site worksheets, specify the enterprises and sites, respectively, and then savethe workbook.
6. Select Import New.The Import Data window appears.
7. In the Select Data Loader section, select Unified Loaders, and then select Asset Ingestion Loader.8. In the File for Import section:
a. Select Choose File, and then access the folder where you saved the Unified Asset Ingestion dataloader workbook.
b. Select the workbook, and then select Open.9. Select Import.
A job is scheduled, and the status of the job appears in the Status and Log column. When the statusis displayed as Complete, the equipment and functional locations that you specified in the workbookare created, and the relationships between the equipment and the functional locations are establishedin Predix Essentials.
Note: If an error occurs while importing the Unified Asset Ingestion data loader workbook, resolve theissues in the workbook, and then import the workbook.
Create a Child-Level Equipment for a Functional Location
Procedure
1. In the module navigation menu, select Tools > Data Loaders.The Data Loaders page appears.
2. Select Download Templates.The Download Templates window appears.
3. In the Data Loader Templates section, select Unified Loaders.The Unified Loaders section appears.
4. Select .The Unified Asset Ingestion data loader template is downloaded.
5. Open the Unified Asset Ingestion data loader workbook, and then perform the following operations:
a) Provide data in the following worksheets:
• Equipment• FuncLocsToEquipment
b) In the Enterprise and Site worksheets, specify the enterprises and sites, respectively, and then savethe workbook.
6. Select Import New.The Import Data window appears.
7. In the Select Data Loader section, select Unified Loaders, and then select Asset Ingestion Loader.8. In the File for Import section:
122 © 2020 General Electric Company
a. Select Choose File, and then access the folder where you saved the Unified Asset Ingestion dataloader workbook.
b. Select the workbook, and then select Open.9. Select Import.
A job is scheduled, and the status of the job appears in the Status and Log column. When the statusis displayed as Complete, the equipment that you specified in the workbook are created, and therelationships between the equipment and the functional locations are established in Predix Essentials.
Note: If an error occurs while importing the Unified Asset Ingestion data loader workbook, resolve theissues in the workbook, and then import the workbook.
Create a Child-Level Functional Location for a Functional Location
Procedure
1. In the module navigation menu, select Tools > Data Loaders.The Data Loaders page appears.
2. Select Download Templates.The Download Templates window appears.
3. In the Data Loader Templates section, select Unified Loaders.The Unified Loaders section appears.
4. Select .The Unified Asset Ingestion data loader template is downloaded.
5. Open the Unified Asset Ingestion data loader workbook, and then perform the following operations:
a) Provide data in the following worksheets:
• FunctionalLocations• FuncLocsToSuperiorFuncLocs
Important: You must specify data only in the FunctionalLocations andFuncLocsToSuperiorFuncLocs worksheets.
b) In the Enterprise and Site worksheets, specify the enterprises and sites, respectively, and then savethe workbook.
6. Select Import New.The Import Data window appears.
7. In the Select Data Loader section, select Unified Loaders, and then select Asset Ingestion Loader.8. In the File for Import section:
a. Select Choose File, and then access the folder where you saved the Unified Asset Ingestion dataloader workbook.
b. Select the workbook, and then select Open.9. Select Import.
A job is scheduled, and the status of the job appears in the Status and Log column. When the statusis displayed as Complete, the functional locations that you specified in the workbook are created, andthe relationships between the functional locations and the parent-level functional locations areestablished in Predix Essentials.
Note: If an error occurs while importing the Unified Asset Ingestion data loader workbook, resolve theissues in the workbook, and then import the workbook.
123© 2020 General Electric Company
Create a Child-Level Equipment for an Equipment
Procedure
1. In the module navigation menu, select Tools > Data Loaders.The Data Loaders page appears.
2. Select Download Templates.The Download Templates window appears.
3. In the Data Loader Templates section, select Unified Loaders.The Unified Loaders section appears.
4. Select .The Unified Asset Ingestion data loader template is downloaded.
5. Open the Unified Asset Ingestion data loader workbook, and then perform the following operations:
a) Provide data in the following worksheets:
• Equipment• EquipmentToSupEquipment
Important: You must specify data only in the Equipment and EquipmentToSupEquipmentworksheets.
b) In the Enterprise and Site worksheets, specify the enterprises and sites, respectively, and then savethe workbook.
6. Select Import New.The Import Data window appears.
7. In the Select Data Loader section, select Unified Loaders, and then select Asset Ingestion Loader.
8. In the File for Import section:
a. Select Choose File, and then access the folder where you saved the Unified Asset Ingestion dataloader workbook.
b. Select the workbook, and then select Open.
9. Select Import.A job is scheduled, and the status of the job appears in the Status and Log column. When the statusis displayed as Complete, the equipment that you specified in the workbook are created, and therelationships between the equipment and the parent-level equipment are established in PredixEssentials.
Note: If an error occurs while importing the Unified Asset Ingestion data loader workbook, resolve theissues in the workbook, and then import the workbook.
The Unified Asset Ingestion Data Loader General Loading StrategyThis section describes any prerequisites to loading the data and the order in which the data will be loaded.
Before You begin
Notes:
• Before reading this section, refer to the Data Model section.• Use this data loader only for Predix APM applications.
Equipment Taxonomy data and Site Reference data must be present prior to loading Equipment andFunctional Location data into the database.
124 © 2020 General Electric Company
About This Task
You must use the Unified Asset Ingestion data loader is used to load enterprise, site, and asset data intothe databases.
Considerations
• The top-level parent node is not automatically designated by the data loader; you must explicitlydefine this node in the Excel source workbook.
• The Functional Location hierarchy is constructed in the loader by assigning the ID of the parentFunctional Location (superseding Functional Location) to the child Functional Location record asthe value of the Predecessor Functional Location Unique ID field in the record.
• An asset record can have only one parent. For example, an Equipment record cannot have a parentEquipment record and a parent Functional Location record; it must have one or the other.Therefore, to avoid unexpected results, you should ensure that each record is related to only oneparent when you configure the Unified Asset Ingestion data loader workbook.
• CMMS-ID is a required field that is intended to identify the original source of the data and part ofthe key value.
• After loading Equipment records into Predix Essentials with a specific site reference, you cannotupdate the Equipment records to have global site references by reimporting the workbook withthe site reference column updated to global on the Equipment worksheet.In Predix Essentials, records inherit their site references from their predecessor records.Additionally, when the Unified Asset Ingestion data loader is run, it loads Equipment records first,and then loads Functional Location records.
How Instances Are Assigned to ClassificationsFor the Enterprise and Site, both the Classifications and Instances are created through thecorresponding sheets in the template. All segment and asset records (UNIFIED_ASSET andUNIFIED_SEGMENT) will be assigned a single, generic classification that is defined in the auto_joinqueries.
You must use multiple steps to define an asset hierarchy in the database, for example, Site > Area > Unit >Asset.
Procedure
1. Assign sites to Predix Essentials.2. Use the Taxonomy data loader to load the taxonomy into the databases.3. In the workbook, define the Unit as the only Functional Location.4. In the workbook, define the link between the Unit and the asset.
The Unit then corresponds to a Segment in the Predix database.5. Use the data loader to load more Functional Locations.
You can define the hierarchy in the Meridium database at this time or later. Use the Record Manager todefine the hierarchy.
6. Use the data loader to add the Equipment and Functional Locations to the defined asset hierarchy.
Automatic Data Loader
About the Automatic Data Loader JobThe Automatic Data Loader can load Excel workbooks or .zip files into the system from an on-premisesinstallation of APM Connect.
APM Connect must be installed on premises.
125© 2020 General Electric Company
Predix Essentials provides a method to automatically load data into the system from correctly formattedExcel workbooks or a .zip file containing correctly formatted .csv files. You must place your dataloader workbook in the correct directory for a successful data load.
The job monitors a configured load directory for the presence of a file in a subdirectory and stages thecontents of the file into the system. Multiple files moved into the directory are processed in descendingorder according to the last modified time stamp on each file. The order that the directories are processedis defined in the .csv file, AutomaticDataLoaderOrder.csv.
The system logs the staging progress and archives files it has successfully staged in an archive directory. Ifdata fails to stage, a message is written to the log indicating the reason for failure, and the source filesremain in the scan directory.
A service then retrieves the staged workbooks, and, using an administrative account, the service invokesthe appropriate data loader to load the data contained in the workbooks.
Note: For cloud deployment, the archiving of files occurs before staging the data for upload to the cloudserver.
Deploy the Automatic Data Loader Job
Set up the Automatic Data Loader Job
Before You begin
APM Connect must be installed on premises.
You must make sure port 443 is open for the job to use for file transfers in a cloud environment.
Procedure
1. Access the APM Connect Administration Center.2. In the Menu pane, in the Conductor section, select Job Conductor.3. In the Job Conductor toolbar, select Add.
The Execution task pane is enabled.4. In the Execution task pane, in the Label box, enter a label for the job.5. In the Description box, enter a description for the job.6. Select the Active check box.
7. In the Job section, select .
The Import generated code window appears.8. Select Browse..., and then navigate to the folder containing the updated jobs package.9. Select the job dinokeeper.zip, and then select Launch upload.
The job is imported into the Job Conductor.10. Configure the context file to identify the location of the load directory, the archive directory, and the
log file.11. Modify the <Context_File_PATH> value in the job conductor context parameters to point to the
context file for the job.12. Optional: If needed, edit the file AutomaticDataLoaderOrder.csv to change the directory
processing order.13. Run the job.
126 © 2020 General Electric Company
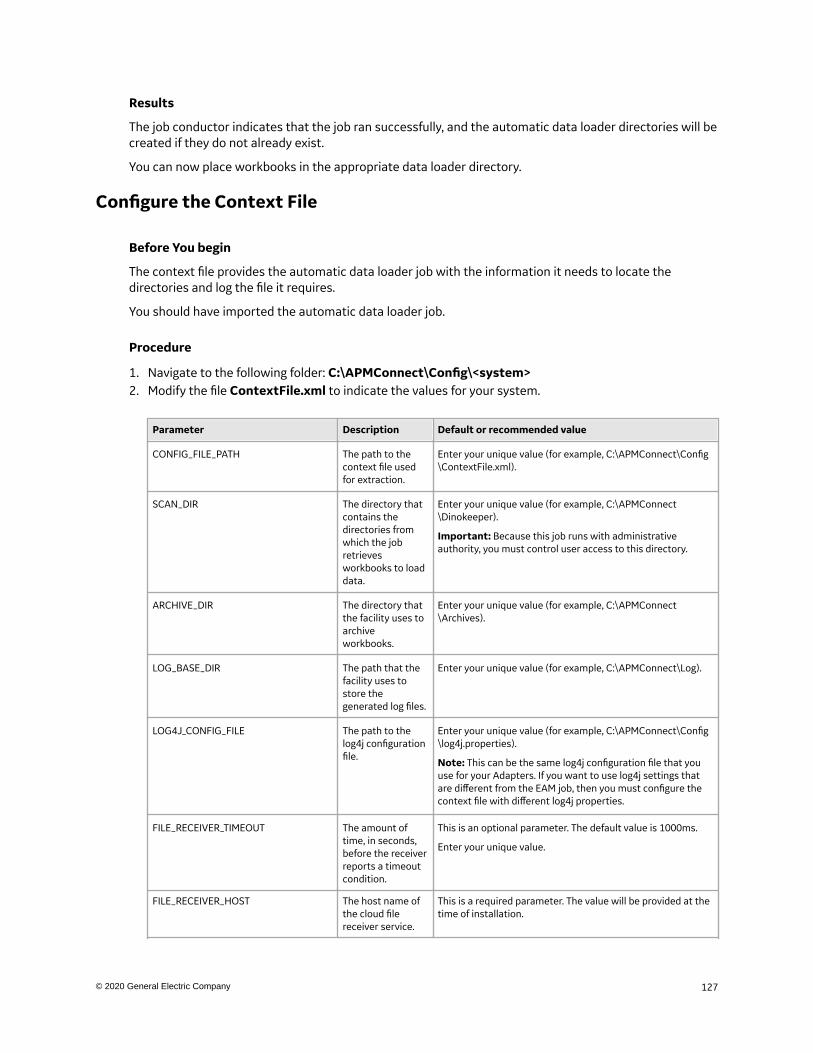
Results
The job conductor indicates that the job ran successfully, and the automatic data loader directories will becreated if they do not already exist.
You can now place workbooks in the appropriate data loader directory.
Configure the Context File
Before You begin
The context file provides the automatic data loader job with the information it needs to locate thedirectories and log the file it requires.
You should have imported the automatic data loader job.
Procedure
1. Navigate to the following folder: C:\APMConnect\Config\<system>2. Modify the file ContextFile.xml to indicate the values for your system.
Parameter Description Default or recommended value
CONFIG_FILE_PATH The path to thecontext file usedfor extraction.
Enter your unique value (for example, C:\APMConnect\Config\ContextFile.xml).
SCAN_DIR The directory thatcontains thedirectories fromwhich the jobretrievesworkbooks to loaddata.
Enter your unique value (for example, C:\APMConnect\Dinokeeper).
Important: Because this job runs with administrativeauthority, you must control user access to this directory.
ARCHIVE_DIR The directory thatthe facility uses toarchiveworkbooks.
Enter your unique value (for example, C:\APMConnect\Archives).
LOG_BASE_DIR The path that thefacility uses tostore thegenerated log files.
Enter your unique value (for example, C:\APMConnect\Log).
LOG4J_CONFIG_FILE The path to thelog4j configurationfile.
Enter your unique value (for example, C:\APMConnect\Config\log4j.properties).
Note: This can be the same log4j configuration file that youuse for your Adapters. If you want to use log4j settings thatare different from the EAM job, then you must configure thecontext file with different log4j properties.
FILE_RECEIVER_TIMEOUT The amount oftime, in seconds,before the receiverreports a timeoutcondition.
This is an optional parameter. The default value is 1000ms.
Enter your unique value.
FILE_RECEIVER_HOST The host name ofthe cloud filereceiver service.
This is a required parameter. The value will be provided at thetime of installation.
127© 2020 General Electric Company
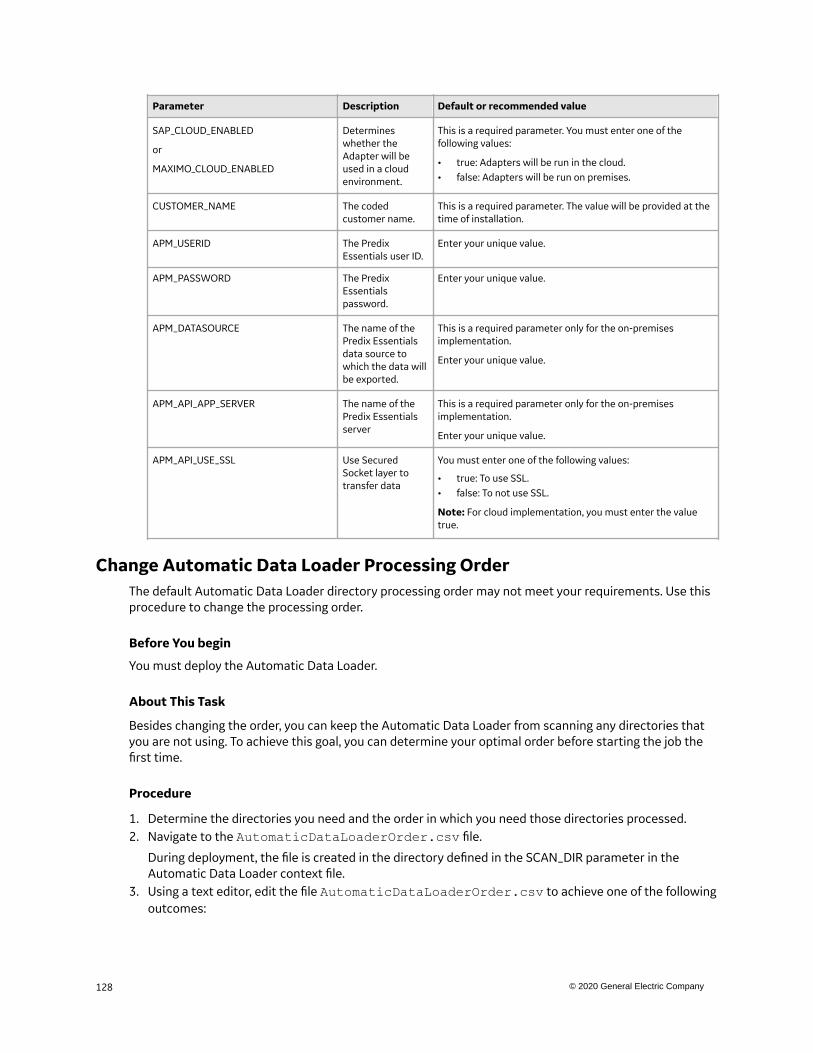
Parameter Description Default or recommended value
SAP_CLOUD_ENABLED
or
MAXIMO_CLOUD_ENABLED
Determineswhether theAdapter will beused in a cloudenvironment.
This is a required parameter. You must enter one of thefollowing values:
• true: Adapters will be run in the cloud.• false: Adapters will be run on premises.
CUSTOMER_NAME The codedcustomer name.
This is a required parameter. The value will be provided at thetime of installation.
APM_USERID The PredixEssentials user ID.
Enter your unique value.
APM_PASSWORD The PredixEssentialspassword.
Enter your unique value.
APM_DATASOURCE The name of thePredix Essentialsdata source towhich the data willbe exported.
This is a required parameter only for the on-premisesimplementation.
Enter your unique value.
APM_API_APP_SERVER The name of thePredix Essentialsserver
This is a required parameter only for the on-premisesimplementation.
Enter your unique value.
APM_API_USE_SSL Use SecuredSocket layer totransfer data
You must enter one of the following values:
• true: To use SSL.• false: To not use SSL.
Note: For cloud implementation, you must enter the valuetrue.
Change Automatic Data Loader Processing OrderThe default Automatic Data Loader directory processing order may not meet your requirements. Use thisprocedure to change the processing order.
Before You begin
You must deploy the Automatic Data Loader.
About This Task
Besides changing the order, you can keep the Automatic Data Loader from scanning any directories thatyou are not using. To achieve this goal, you can determine your optimal order before starting the job thefirst time.
Procedure
1. Determine the directories you need and the order in which you need those directories processed.2. Navigate to the AutomaticDataLoaderOrder.csv file.
During deployment, the file is created in the directory defined in the SCAN_DIR parameter in theAutomatic Data Loader context file.
3. Using a text editor, edit the file AutomaticDataLoaderOrder.csv to achieve one of the followingoutcomes:
128 © 2020 General Electric Company
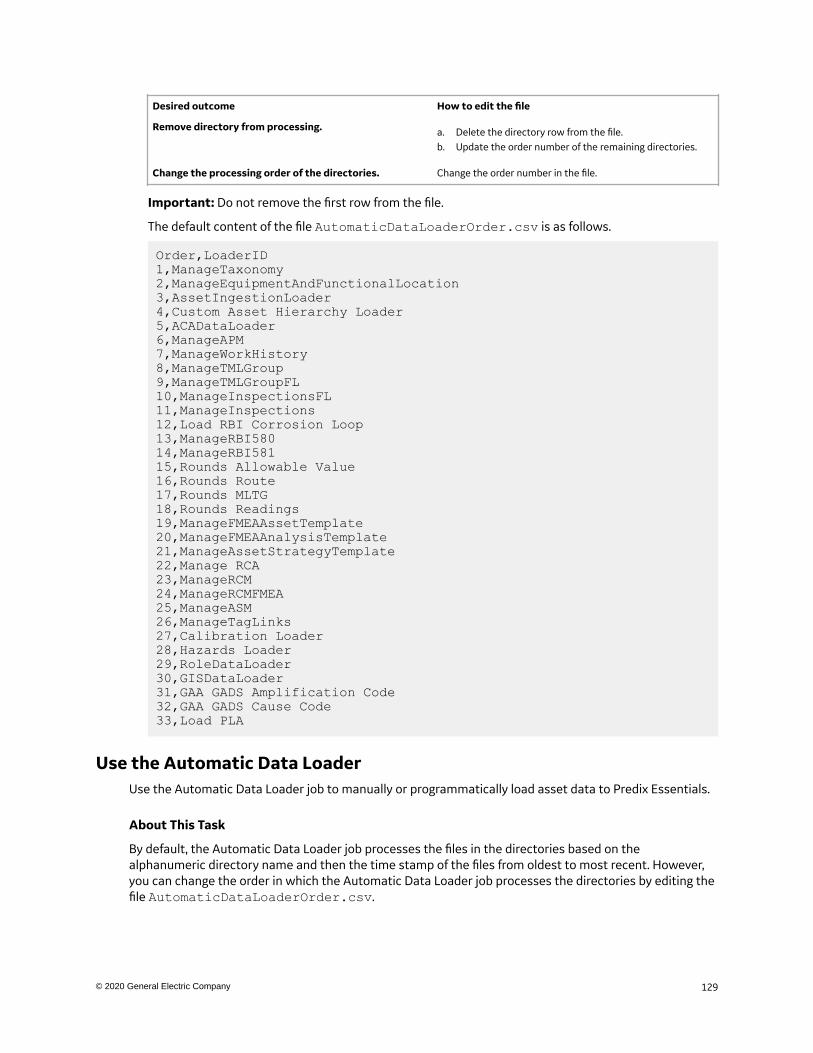
Desired outcome How to edit the file
Remove directory from processing. a. Delete the directory row from the file.b. Update the order number of the remaining directories.
Change the processing order of the directories. Change the order number in the file.
Important: Do not remove the first row from the file.
The default content of the file AutomaticDataLoaderOrder.csv is as follows.
Order,LoaderID1,ManageTaxonomy2,ManageEquipmentAndFunctionalLocation3,AssetIngestionLoader4,Custom Asset Hierarchy Loader5,ACADataLoader6,ManageAPM7,ManageWorkHistory8,ManageTMLGroup9,ManageTMLGroupFL10,ManageInspectionsFL11,ManageInspections12,Load RBI Corrosion Loop13,ManageRBI58014,ManageRBI58115,Rounds Allowable Value16,Rounds Route17,Rounds MLTG18,Rounds Readings19,ManageFMEAAssetTemplate20,ManageFMEAAnalysisTemplate21,ManageAssetStrategyTemplate22,Manage RCA23,ManageRCM24,ManageRCMFMEA25,ManageASM26,ManageTagLinks27,Calibration Loader28,Hazards Loader29,RoleDataLoader30,GISDataLoader31,GAA GADS Amplification Code32,GAA GADS Cause Code33,Load PLA
Use the Automatic Data LoaderUse the Automatic Data Loader job to manually or programmatically load asset data to Predix Essentials.
About This Task
By default, the Automatic Data Loader job processes the files in the directories based on thealphanumeric directory name and then the time stamp of the files from oldest to most recent. However,you can change the order in which the Automatic Data Loader job processes the directories by editing thefile AutomaticDataLoaderOrder.csv.
129© 2020 General Electric Company

Procedure
1. Identify the directory that corresponds to the data loader you are using.2. Move the data loader files (either a correctly formatted Excel workbook or a .zip file that contains
correctly formatted .csv files) into the identified directory.
130 © 2020 General Electric Company
Chapter
6ReferenceTopics:
• APM Connect SystemRequirements
• Predix Essentials Attribute toReserved Predix AttributeMappings
• Predix Essentials Attribute toPredix Attribute Mappings
• Required Server Ports• The Automatic Data Loader
Directories
131© 2020 General Electric Company

APM Connect System Requirements
License Requirements
APM Connect has a two-tier license system that enables the APM Connect Framework. One of thefollowing license types is required to take advantage of the APM Connect functionality:
• APM Connect Basic• APM Connect Plus
Additional Licensing
The following additional licenses are required to take advantage of the SAP Adapters:
SAP Integration Interfaces:Enables the SAP Equipment, Functional Location, Work History, and Notification Creation Adapters.
SAP Technical Characteristics:Enables the SAP Technical Characteristics Adapter.
SAP Work Management:Enables the SAP Work Management Adapter.
The following additional license is required to take advantage of the Maximo Adapters:
Maximo Interfaces:Enables the Maximo Equipment, Functional Location, Work History, Service Request, and Work OrderGeneration Adapters.
The following additional license is required to take advantage of the ServiceMax Adapters:
ServiceMax Enterprise License:Enables ServiceMax Installed Product and Service Request Generation Adapters.
Note: There is no additional license required to take advantage of the APM Connect Data Loaderfunctionality.
UDLP Versions
Beginning with the Sept. 21, 2018 release, Predix Essentials will maintain compatibility with the APMConnect client-side jobs one version prior to the newly released version.
To prevent processing failures, you must upgrade your on-premises, client-side jobs within two months ofa Predix Essentials release to the most current version of the APM Connect client jobs. For example, if thePredix Essentials tenant has installed the Dec. 14, 2018 release, you must upgrade the on-premises,client-side jobs to UDLP V2.5.0 or V2.5.1 by Feb. 14, 2019, otherwise the next release of the PredixEssentials tenant may not process your data correctly.
The following UDLP versions are currently supported in Predix Essentials:
• V2.7.0• V2.6.0 and V2.6.1
Additional Components Required
In addition to the basic Predix Essentials system architecture, your system must also contain the followingcomponents:
132 © 2020 General Electric Company
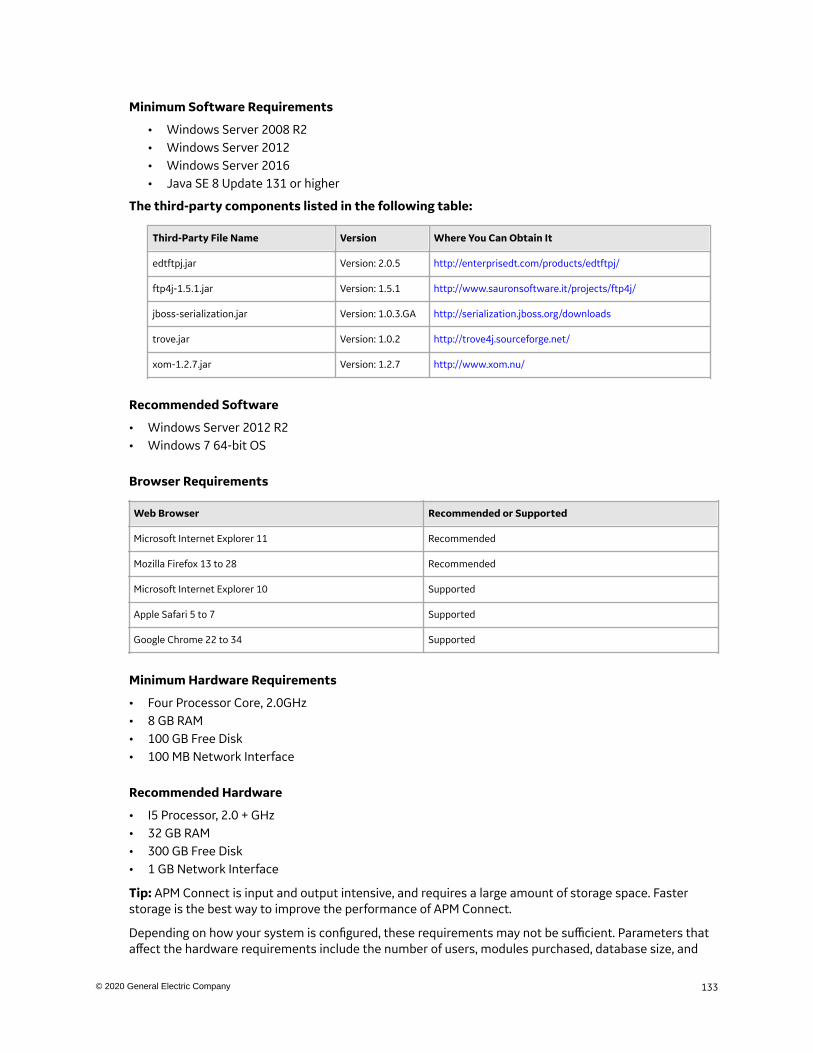
Minimum Software Requirements
• Windows Server 2008 R2• Windows Server 2012• Windows Server 2016• Java SE 8 Update 131 or higher
The third-party components listed in the following table:
Third-Party File Name Version Where You Can Obtain It
edtftpj.jar Version: 2.0.5 http://enterprisedt.com/products/edtftpj/
ftp4j-1.5.1.jar Version: 1.5.1 http://www.sauronsoftware.it/projects/ftp4j/
jboss-serialization.jar Version: 1.0.3.GA http://serialization.jboss.org/downloads
trove.jar Version: 1.0.2 http://trove4j.sourceforge.net/
xom-1.2.7.jar Version: 1.2.7 http://www.xom.nu/
Recommended Software
• Windows Server 2012 R2• Windows 7 64-bit OS
Browser Requirements
Web Browser Recommended or Supported
Microsoft Internet Explorer 11 Recommended
Mozilla Firefox 13 to 28 Recommended
Microsoft Internet Explorer 10 Supported
Apple Safari 5 to 7 Supported
Google Chrome 22 to 34 Supported
Minimum Hardware Requirements
• Four Processor Core, 2.0GHz• 8 GB RAM• 100 GB Free Disk• 100 MB Network Interface
Recommended Hardware
• I5 Processor, 2.0 + GHz• 32 GB RAM• 300 GB Free Disk• 1 GB Network Interface
Tip: APM Connect is input and output intensive, and requires a large amount of storage space. Fasterstorage is the best way to improve the performance of APM Connect.
Depending on how your system is configured, these requirements may not be sufficient. Parameters thataffect the hardware requirements include the number of users, modules purchased, database size, and
133© 2020 General Electric Company
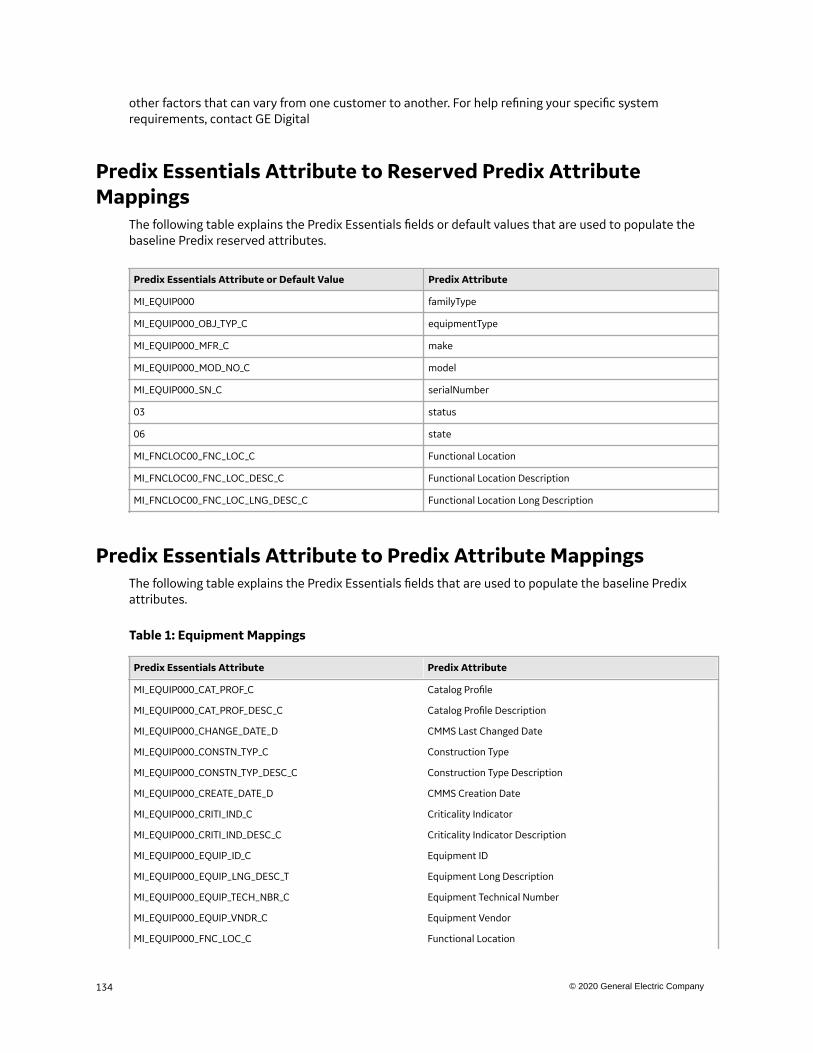
other factors that can vary from one customer to another. For help refining your specific systemrequirements, contact GE Digital
Predix Essentials Attribute to Reserved Predix AttributeMappings
The following table explains the Predix Essentials fields or default values that are used to populate thebaseline Predix reserved attributes.
Predix Essentials Attribute or Default Value Predix Attribute
MI_EQUIP000 familyType
MI_EQUIP000_OBJ_TYP_C equipmentType
MI_EQUIP000_MFR_C make
MI_EQUIP000_MOD_NO_C model
MI_EQUIP000_SN_C serialNumber
03 status
06 state
MI_FNCLOC00_FNC_LOC_C Functional Location
MI_FNCLOC00_FNC_LOC_DESC_C Functional Location Description
MI_FNCLOC00_FNC_LOC_LNG_DESC_C Functional Location Long Description
Predix Essentials Attribute to Predix Attribute MappingsThe following table explains the Predix Essentials fields that are used to populate the baseline Predixattributes.
Table 1: Equipment Mappings
Predix Essentials Attribute Predix Attribute
MI_EQUIP000_CAT_PROF_C Catalog Profile
MI_EQUIP000_CAT_PROF_DESC_C Catalog Profile Description
MI_EQUIP000_CHANGE_DATE_D CMMS Last Changed Date
MI_EQUIP000_CONSTN_TYP_C Construction Type
MI_EQUIP000_CONSTN_TYP_DESC_C Construction Type Description
MI_EQUIP000_CREATE_DATE_D CMMS Creation Date
MI_EQUIP000_CRITI_IND_C Criticality Indicator
MI_EQUIP000_CRITI_IND_DESC_C Criticality Indicator Description
MI_EQUIP000_EQUIP_ID_C Equipment ID
MI_EQUIP000_EQUIP_LNG_DESC_T Equipment Long Description
MI_EQUIP000_EQUIP_TECH_NBR_C Equipment Technical Number
MI_EQUIP000_EQUIP_VNDR_C Equipment Vendor
MI_EQUIP000_FNC_LOC_C Functional Location
134 © 2020 General Electric Company
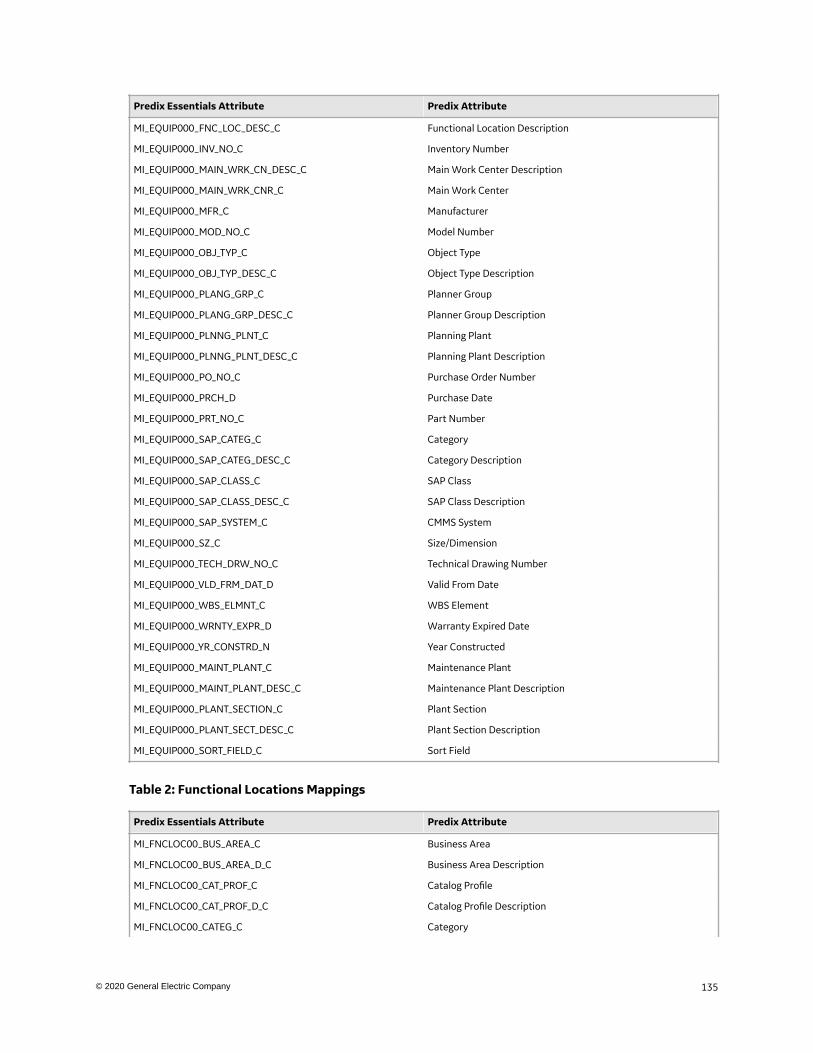
Predix Essentials Attribute Predix Attribute
MI_EQUIP000_FNC_LOC_DESC_C Functional Location Description
MI_EQUIP000_INV_NO_C Inventory Number
MI_EQUIP000_MAIN_WRK_CN_DESC_C Main Work Center Description
MI_EQUIP000_MAIN_WRK_CNR_C Main Work Center
MI_EQUIP000_MFR_C Manufacturer
MI_EQUIP000_MOD_NO_C Model Number
MI_EQUIP000_OBJ_TYP_C Object Type
MI_EQUIP000_OBJ_TYP_DESC_C Object Type Description
MI_EQUIP000_PLANG_GRP_C Planner Group
MI_EQUIP000_PLANG_GRP_DESC_C Planner Group Description
MI_EQUIP000_PLNNG_PLNT_C Planning Plant
MI_EQUIP000_PLNNG_PLNT_DESC_C Planning Plant Description
MI_EQUIP000_PO_NO_C Purchase Order Number
MI_EQUIP000_PRCH_D Purchase Date
MI_EQUIP000_PRT_NO_C Part Number
MI_EQUIP000_SAP_CATEG_C Category
MI_EQUIP000_SAP_CATEG_DESC_C Category Description
MI_EQUIP000_SAP_CLASS_C SAP Class
MI_EQUIP000_SAP_CLASS_DESC_C SAP Class Description
MI_EQUIP000_SAP_SYSTEM_C CMMS System
MI_EQUIP000_SZ_C Size/Dimension
MI_EQUIP000_TECH_DRW_NO_C Technical Drawing Number
MI_EQUIP000_VLD_FRM_DAT_D Valid From Date
MI_EQUIP000_WBS_ELMNT_C WBS Element
MI_EQUIP000_WRNTY_EXPR_D Warranty Expired Date
MI_EQUIP000_YR_CONSTRD_N Year Constructed
MI_EQUIP000_MAINT_PLANT_C Maintenance Plant
MI_EQUIP000_MAINT_PLANT_DESC_C Maintenance Plant Description
MI_EQUIP000_PLANT_SECTION_C Plant Section
MI_EQUIP000_PLANT_SECT_DESC_C Plant Section Description
MI_EQUIP000_SORT_FIELD_C Sort Field
Table 2: Functional Locations Mappings
Predix Essentials Attribute Predix Attribute
MI_FNCLOC00_BUS_AREA_C Business Area
MI_FNCLOC00_BUS_AREA_D_C Business Area Description
MI_FNCLOC00_CAT_PROF_C Catalog Profile
MI_FNCLOC00_CAT_PROF_D_C Catalog Profile Description
MI_FNCLOC00_CATEG_C Category
135© 2020 General Electric Company
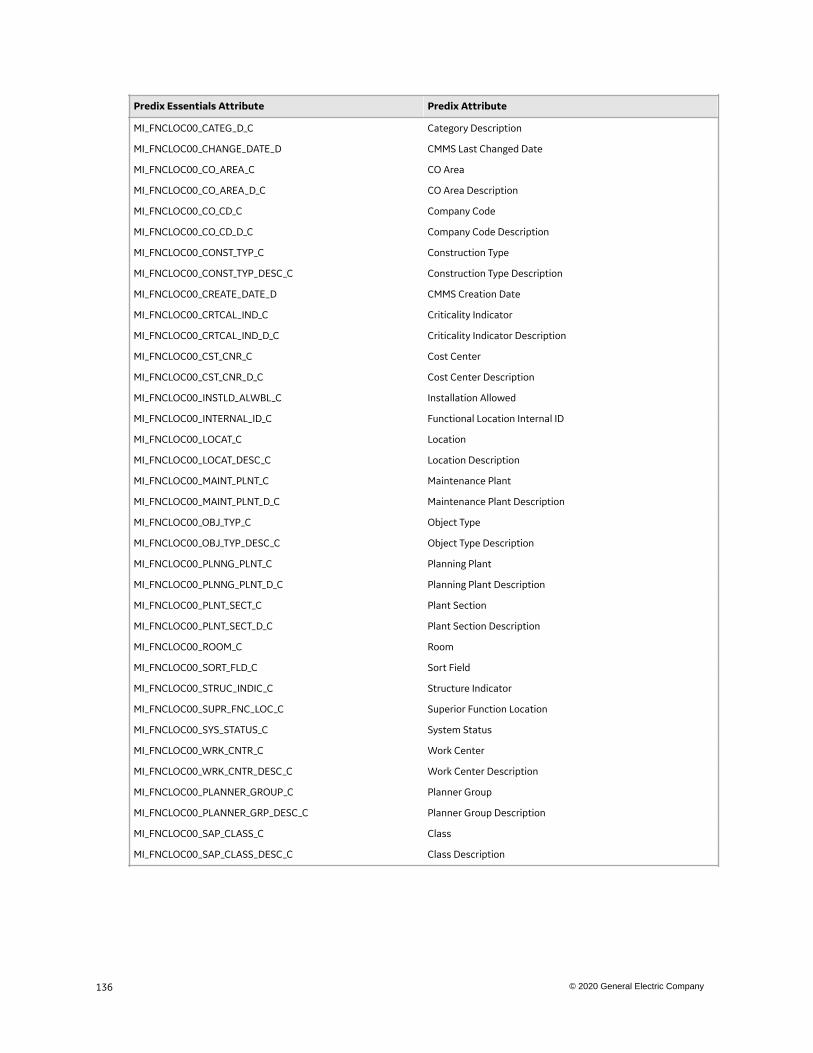
Predix Essentials Attribute Predix Attribute
MI_FNCLOC00_CATEG_D_C Category Description
MI_FNCLOC00_CHANGE_DATE_D CMMS Last Changed Date
MI_FNCLOC00_CO_AREA_C CO Area
MI_FNCLOC00_CO_AREA_D_C CO Area Description
MI_FNCLOC00_CO_CD_C Company Code
MI_FNCLOC00_CO_CD_D_C Company Code Description
MI_FNCLOC00_CONST_TYP_C Construction Type
MI_FNCLOC00_CONST_TYP_DESC_C Construction Type Description
MI_FNCLOC00_CREATE_DATE_D CMMS Creation Date
MI_FNCLOC00_CRTCAL_IND_C Criticality Indicator
MI_FNCLOC00_CRTCAL_IND_D_C Criticality Indicator Description
MI_FNCLOC00_CST_CNR_C Cost Center
MI_FNCLOC00_CST_CNR_D_C Cost Center Description
MI_FNCLOC00_INSTLD_ALWBL_C Installation Allowed
MI_FNCLOC00_INTERNAL_ID_C Functional Location Internal ID
MI_FNCLOC00_LOCAT_C Location
MI_FNCLOC00_LOCAT_DESC_C Location Description
MI_FNCLOC00_MAINT_PLNT_C Maintenance Plant
MI_FNCLOC00_MAINT_PLNT_D_C Maintenance Plant Description
MI_FNCLOC00_OBJ_TYP_C Object Type
MI_FNCLOC00_OBJ_TYP_DESC_C Object Type Description
MI_FNCLOC00_PLNNG_PLNT_C Planning Plant
MI_FNCLOC00_PLNNG_PLNT_D_C Planning Plant Description
MI_FNCLOC00_PLNT_SECT_C Plant Section
MI_FNCLOC00_PLNT_SECT_D_C Plant Section Description
MI_FNCLOC00_ROOM_C Room
MI_FNCLOC00_SORT_FLD_C Sort Field
MI_FNCLOC00_STRUC_INDIC_C Structure Indicator
MI_FNCLOC00_SUPR_FNC_LOC_C Superior Function Location
MI_FNCLOC00_SYS_STATUS_C System Status
MI_FNCLOC00_WRK_CNTR_C Work Center
MI_FNCLOC00_WRK_CNTR_DESC_C Work Center Description
MI_FNCLOC00_PLANNER_GROUP_C Planner Group
MI_FNCLOC00_PLANNER_GRP_DESC_C Planner Group Description
MI_FNCLOC00_SAP_CLASS_C Class
MI_FNCLOC00_SAP_CLASS_DESC_C Class Description
136 © 2020 General Electric Company
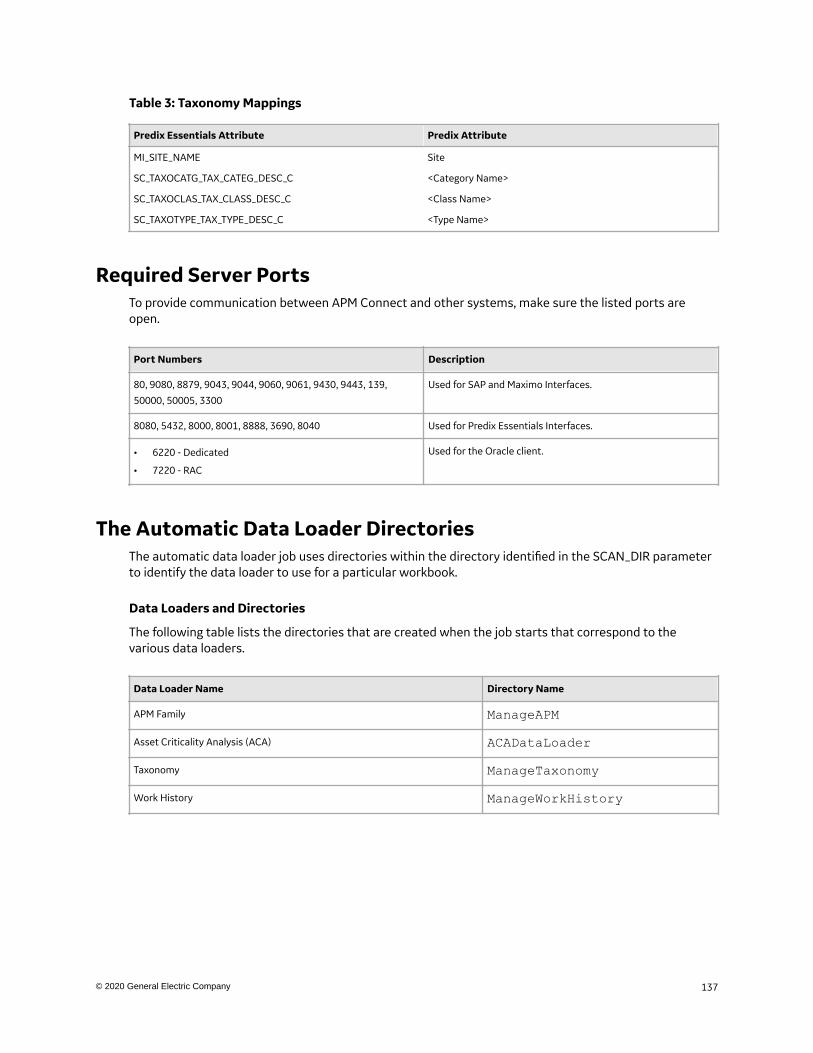
Table 3: Taxonomy Mappings
Predix Essentials Attribute Predix Attribute
MI_SITE_NAME Site
SC_TAXOCATG_TAX_CATEG_DESC_C <Category Name>
SC_TAXOCLAS_TAX_CLASS_DESC_C <Class Name>
SC_TAXOTYPE_TAX_TYPE_DESC_C <Type Name>
Required Server PortsTo provide communication between APM Connect and other systems, make sure the listed ports areopen.
Port Numbers Description
80, 9080, 8879, 9043, 9044, 9060, 9061, 9430, 9443, 139,
50000, 50005, 3300
Used for SAP and Maximo Interfaces.
8080, 5432, 8000, 8001, 8888, 3690, 8040 Used for Predix Essentials Interfaces.
• 6220 - Dedicated
• 7220 - RAC
Used for the Oracle client.
The Automatic Data Loader DirectoriesThe automatic data loader job uses directories within the directory identified in the SCAN_DIR parameterto identify the data loader to use for a particular workbook.
Data Loaders and Directories
The following table lists the directories that are created when the job starts that correspond to thevarious data loaders.
Data Loader Name Directory Name
APM Family ManageAPMAsset Criticality Analysis (ACA) ACADataLoaderTaxonomy ManageTaxonomyWork History ManageWorkHistory
137© 2020 General Electric Company

Chapter
7Release NotesTopics:
• Third Quarter of 2019• Second Quarter of 2019• First Quarter of 2019
138 © 2020 General Electric Company
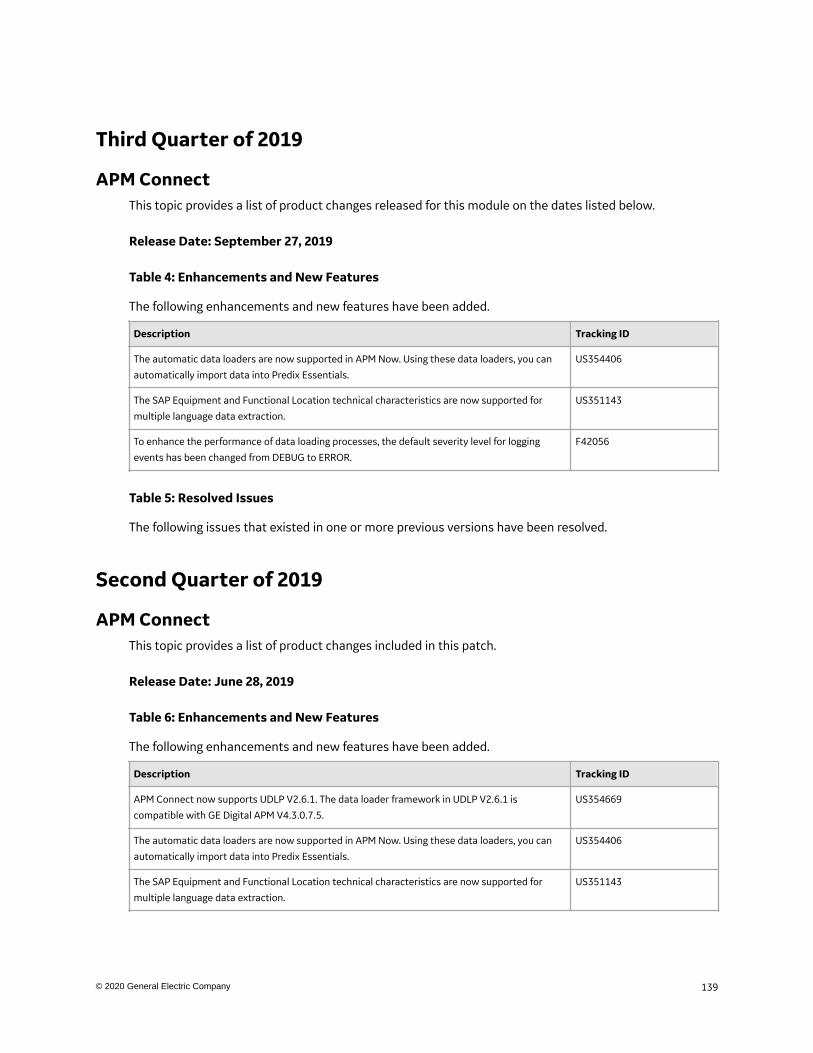
Third Quarter of 2019
APM ConnectThis topic provides a list of product changes released for this module on the dates listed below.
Release Date: September 27, 2019
Table 4: Enhancements and New Features
The following enhancements and new features have been added.
Description Tracking ID
The automatic data loaders are now supported in APM Now. Using these data loaders, you can
automatically import data into Predix Essentials.
US354406
The SAP Equipment and Functional Location technical characteristics are now supported for
multiple language data extraction.
US351143
To enhance the performance of data loading processes, the default severity level for logging
events has been changed from DEBUG to ERROR.
F42056
Table 5: Resolved Issues
The following issues that existed in one or more previous versions have been resolved.
Second Quarter of 2019
APM ConnectThis topic provides a list of product changes included in this patch.
Release Date: June 28, 2019
Table 6: Enhancements and New Features
The following enhancements and new features have been added.
Description Tracking ID
APM Connect now supports UDLP V2.6.1. The data loader framework in UDLP V2.6.1 is
compatible with GE Digital APM V4.3.0.7.5.
US354669
The automatic data loaders are now supported in APM Now. Using these data loaders, you can
automatically import data into Predix Essentials.
US354406
The SAP Equipment and Functional Location technical characteristics are now supported for
multiple language data extraction.
US351143
139© 2020 General Electric Company
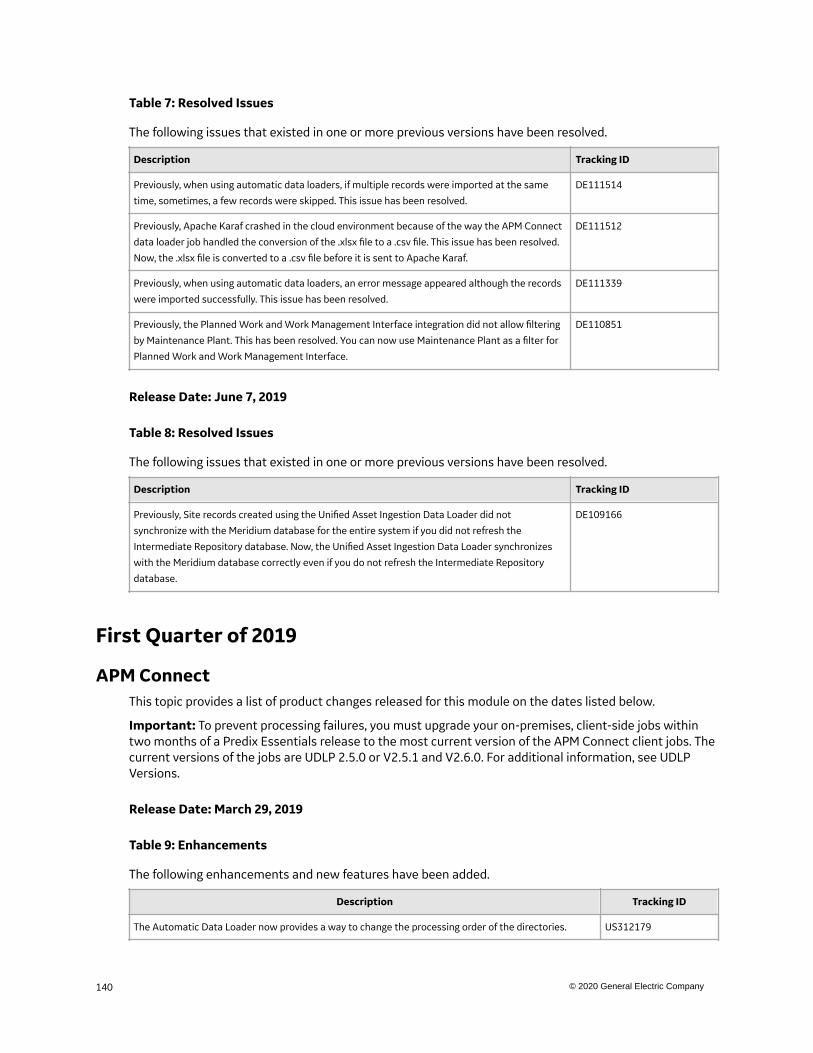
Table 7: Resolved Issues
The following issues that existed in one or more previous versions have been resolved.
Description Tracking ID
Previously, when using automatic data loaders, if multiple records were imported at the same
time, sometimes, a few records were skipped. This issue has been resolved.
DE111514
Previously, Apache Karaf crashed in the cloud environment because of the way the APM Connect
data loader job handled the conversion of the .xlsx file to a .csv file. This issue has been resolved.
Now, the .xlsx file is converted to a .csv file before it is sent to Apache Karaf.
DE111512
Previously, when using automatic data loaders, an error message appeared although the records
were imported successfully. This issue has been resolved.
DE111339
Previously, the Planned Work and Work Management Interface integration did not allow filtering
by Maintenance Plant. This has been resolved. You can now use Maintenance Plant as a filter for
Planned Work and Work Management Interface.
DE110851
Release Date: June 7, 2019
Table 8: Resolved Issues
The following issues that existed in one or more previous versions have been resolved.
Description Tracking ID
Previously, Site records created using the Unified Asset Ingestion Data Loader did not
synchronize with the Meridium database for the entire system if you did not refresh the
Intermediate Repository database. Now, the Unified Asset Ingestion Data Loader synchronizes
with the Meridium database correctly even if you do not refresh the Intermediate Repository
database.
DE109166
First Quarter of 2019
APM ConnectThis topic provides a list of product changes released for this module on the dates listed below.
Important: To prevent processing failures, you must upgrade your on-premises, client-side jobs withintwo months of a Predix Essentials release to the most current version of the APM Connect client jobs. Thecurrent versions of the jobs are UDLP 2.5.0 or V2.5.1 and V2.6.0. For additional information, see UDLPVersions.
Release Date: March 29, 2019
Table 9: Enhancements
The following enhancements and new features have been added.
Description Tracking ID
The Automatic Data Loader now provides a way to change the processing order of the directories. US312179
140 © 2020 General Electric Company

Table 10: Resolved Issues
The following issues that existed in one or more previous versions have been resolved.
Description Tracking ID
Previously, EAM or data loader jobs would occasionally end without updating the status correctly. This
issue has been resolved.• DE97417
• US318351
141© 2020 General Electric Company
Recommended