Designed for use with Bison Pedestals, the Bison Paver Tray offers a simple and lightweight paver backing to enhance the impact resistance and provide additional strength to paver surface materials for outdoor areas. The Bison Paver Tray meets ASTM E136 Non-Combustible Surface testing requirements* and is manufactured in the USA from weather resistant galvanized steel. The Bison Paver Tray can be adhered to the desired surface pavers on site before installation.
Recommended for use with Bison Pedestals ranging from 0.50” to 36” in height, the Bison Paver Tray attaches to Bison Pedestals using the Bison FS-12 Fastening Spline. The standard 595 x 595 mm Bison Paver Tray is compatible with square pavers measuring 595-602 mm x 595-602 mm. Special order and custom size Paver Trays are available for your specific design requirements.
Bison Paver Tray Installation Details
Fastening System
PAV
ER
TR
AY
Inst
alla
tion
Det
ails
Dec
emb
er 2
019
©2018-2019 United Construction Products, Inc. All Rights Reserved. *Bison Paver Tray and 2CM Paver System (not tested for use with other thickness of pavers or other surface materials). Covered by one or more patents or pending patents.
PAVER
ADHESIVE
GALVANIZED STEEL TRAY
TRAY CHANNEL
RELEASE PAPER
The FS-12 Spline secures Bison Paver Trays to Bison Pedestals ranging from 0.50” to 36” in height. The FS-12 can slide along the paver tray channels to release individual pavers after installation.
When installing an FS-12, use the long screw for adjustable pedestals or the short screw for HD50 and HD75 fixed height pedestals. Using the wrong screw could cause damage to the roofing membrane. Use the spline posts to slide FS-12 splines into the channel between two adjacent paver tray assemblies. Drive the screw through the center of the screw slot and into the center of the pedestal top. Tighten until the screw head base is flush with the top of the spline rib. Remove spline posts with pliers, taking care not to damage the pavers. DO NOT ATTEMPT TO HAMMER THE SPLINE POSTS. Use a small screwdriver to manipulate the spline if the posts have been prematurely removed.
FS-12 Spline
When using fastening components, Bison requires 3/16” spacer tabs on pedestals.
SPLINE POST SCREW SLOT
LONG SCREW SHORT SCREW
SPLINE RIB
Bison Innovative Products | 701 Osage Street, Unit 120, Denver CO 80204 USA | 800-333-4234 | www.bisonip.com

Adhering Paver Tray Assemblies
Remove the release paper from the adhesive on the tray, and run a bead of the provided 3M adhesive down the middle of the tray, being careful to keep the adhesive free of moisture, dust, and debris. The 3M adhesive must be placed only on the steel for proper paver bond. One 10.1oz tube of 3M should provide a 1/4” diameter bead for 14-15 paver trays.
2.) Release Paper and 3M Adhesive1.) Assembly Guide
Place the finish surface of a paver face-down onto four assembly guides, and ensure a snug fit before screwing each assembly guide into the work surface (plywood, wood frame, pallet, etc.) with provided screws, being careful to not damage the roof below.
3.) Tray Edge Alignment
Place the tray adhesive-side down onto the upside-down paver in the assembly guides as shown, and slowly lower the tray onto the paver, being sure to keep the edges properly aligned. Firmly press the tray onto the paver prior to stacking.
4.) Paver Tray Assembly Stacking
Carefully stack the paver tray assemblies on top of each other face-down with provided PS1 shims broken and folded in half in between each paver as shown. Make sure to keep the stack stable and balanced, no more than ten (10) paver tray assemblies high. Store stacks overnight out of direct sunlight in a dry area and/or cover with a tarp until 3M adhesive has cured completely.
Cutting Paver Tray Assemblies
When adhering Paver Trays to pavers, take note of the paver face orientation in relation to the Paver Tray channel direction. When installing Paver Tray Assemblies, the channels must all run continuously in the same direction. Pull pavers from different pallets and/or boxes in order to achieve an even color distribution. Prior to installation and during assembly, limit exposure to moisture, direct sunlight, and temperatures outside of 50°F to 100°F (10°C to 37°C). The release paper can be difficult to remove from the adhesive in warmer temperatures.
• Use an appropriate wet tile saw and a new saw blade (such as Rubi Viper or Dewalt) designed for use with porcelain tiles.
• To minimize the possibility of chipping the paver, Bison recommends cutting paver tray assemblies paver tray side up.
• Once cut to desired dimensions, use a metal file to smooth any sharp edges or burrs created along the cut line. DO NOT run your fingers along the cut line or any visible burrs.
• Use a cleaner such as Goof Off to remove any adhesive residue from the pavers or saw blade. Spray a small amount of cleaner on the adhesive and rub until clean. Wash with a clean rag and mild soap to remove any slippery residue.
• Cut edges need to be painted with primer or cold galvanizing spray to re-administer galvanizing layer removed by cutting (heat, grinding, exposure to water) to prevent rusting damage.
Bison recommends cutting pavers after adhering them to the Bison Paver Tray.
Bison Innovative Products | 701 Osage Street, Unit 120, Denver CO 80204 USA | 800-333-4234 | www.bisonip.com
Trimmed Perimeter Paver Tray Assemblies
Cut perimeter pavers must be properly supported by pedestals. In the case of small cut paver tray assemblies around the perimeter, it may be necessary to provide support in the void created by the remaining paver tray channel. In this case, B11 and PS1 shims may be torn in half and placed in combination with one another on top of a pedestal in order to keep the paver surface level. Adhere shims to each other and to the pedestal top with construction adhesive if necessary. Pedestals may also be inverted to provide support in some circumstances. NOTE: See Bison Pedestal Installation Details for additional information.
Paver Tray to Wood Tile Transitions
Bison Pedestals can support a variety of surface materials, including 2cm porcelain, concrete pavers, wood tiles, composite materials, fiberglass grating, or conventional joist and plank systems to create unique custom looks. Transitions between surface materials must be properly supported. Be sure to maintain a tight installation and limit space between surfaces.
CONSTRUCTIONADHESIVE
P:\B
ison
Det
ails
\1-D
WG
-201
7\Ve
rsad
just
\V-0
22-P
S1Pl
astic
Shim
.dw
g, L
ayou
t2, 3
/12/
2018
9:3
5:11
AM
, WH
eim
buch
, 1:0
.329
598,
CO
PYRI
GH
T 20
08 U
NIT
ED C
ON
STRU
CTIO
N P
ROD
UCT
S, I
NC.
ALL
RIG
HTS
RES
ERVE
D
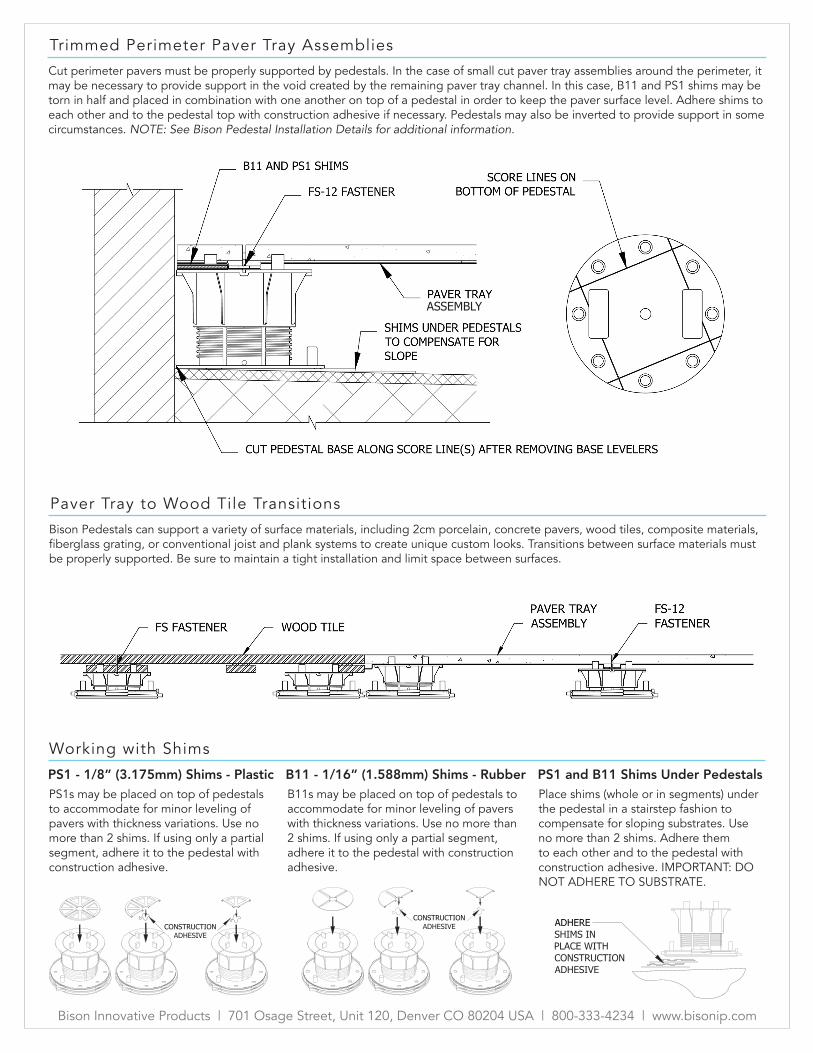
Working with Shims
B11s may be placed on top of pedestals to accommodate for minor leveling of pavers with thickness variations. Use no more than 2 shims. If using only a partial segment, adhere it to the pedestal with construction adhesive.
PS1 - 1/8” (3.175mm) Shims - Plastic B11 - 1/16” (1.588mm) Shims - Rubber PS1 and B11 Shims Under PedestalsPS1s may be placed on top of pedestals to accommodate for minor leveling of pavers with thickness variations. Use no more than 2 shims. If using only a partial segment, adhere it to the pedestal with construction adhesive.
CONSTRUCTIONADHESIVE
P:\B
ison
Det
ails
\1-D
WG
-201
7\Ve
rsad
just
\V-0
21-B
11Ru
bber
Shim
.dw
g, L
ayou
t2, 3
/12/
2018
9:3
3:50
AM
, WH
eim
buch
, 1:0
.327
301,
CO
PYRI
GH
T 20
08 U
NIT
ED C
ON
STRU
CTIO
N P
ROD
UCT
S, I
NC.
ALL
RIG
HTS
RES
ERVE
D
Bison Innovative Products | 701 Osage Street, Unit 120, Denver CO 80204 USA | 800-333-4234 | www.bisonip.com
ASSEMBLY
ADHERESHIMS INPLACE WITHCONSTRUCTIONADHESIVE
P:\B
ison
Det
ails
\1-D
WG
-201
7\Ve
rsad
just
\V-0
21-B
11Ru
bber
Shim
.dw
g, L
ayou
t2, 3
/12/
2018
9:3
4:30
AM
, WH
eim
buch
, 1:0
.327
301,
CO
PYRI
GH
T 20
08 U
NIT
ED C
ON
STRU
CTIO
N P
ROD
UCT
S, I
NC.
ALL
RIG
HTS
RES
ERVE
D
Place shims (whole or in segments) under the pedestal in a stairstep fashion to compensate for sloping substrates. Use no more than 2 shims. Adhere them to each other and to the pedestal with construction adhesive. IMPORTANT: DO NOT ADHERE TO SUBSTRATE.

Maintenance Recommendations
Important
Routine maintenance of your paver deck system will enhance the beauty, reduce major repairs, and prolong the life of your deck. Below is a list of maintenance guidelines that should be performed on a regular basis:
1. Check for pavers that rock. If you notice pavers rocking back and forth while walking on the deck, simply lift the paver up and shim one or more corners until the paver is level on all four corners. Bison 1/16” (1.588 mm) B11 Shims or 1/8” (3.175 mm) PS1 Shims can be used for this purpose.
2. Depending on substrate materials, some settling may occur. Remove the paver and adjust the pedestal until a level height is achieved. You may need to do this to more than one pedestal to level out an area.
3. Clean drains and scuppers on a regular basis. Water should completely drain off the roof deck within 48 hours after rainfall under ambient drying conditions. Standing or pooling water can be detrimental to some waterproofing systems.
4. Periodically check the spacer tabs between pavers, and replace broken spacer tabs immediately. Loss of spacer tabs could create unsafe deck movement.
5. There should be no more than a 3/16” (4.5 mm) gap between pavers or at any perimeter edge, and the deck should not exhibit any lateral movement which could create an unsafe condition.
6. Follow the paver manufacturer’s suggestions for upkeep and maintenance of the pavers.
7. Retain extra Bison Paver Trays and pavers in a convenient location for future replacements.
The Bison Paver Tray was designed to provide a simple and lightweight paver backing to enhance the collapse resistance, strength, and wind uplift performance of paver surface materials for outdoor areas. Wind Uplift Systems must be installed in accordance with separate Wind Uplift Engineering documents not included herein.
The Bison Paver Tray will not prevent any surface material from cracking, chipping, or breaking. When using Bison Paver Trays with customer supplied surface materials, including but not limited to concrete, stone, porcelain, and/or ceramic pavers not sold by Bison, the customer must independently verify surface material product strength, span rating, weight bearing capacity, material compatibility, and suitability for the intended use. In the event of surface material cracks, chips, or breaks, the Bison Paver Tray is designed to prevent an individual from falling through the paver surface to the subsurface below. The Bison Paver Tray is intended to support the surface material after absorbing impact for a limited time. To avoid further damage or injury, the customer MUST REPLACE any cracked, chipped, or broken surface materials and the accompanying Bison Paver Tray as soon as possible. The Bison Paver Tray is not intended to be a reusable product, and must be replaced with the surface paver.
Bison Innovative Products | 701 Osage Street, Unit 120, Denver CO 80204 USA | 800-333-4234 | www.bisonip.com
Recommended