BOYO VTR7G
FHD Vehicle Camera Recorder
with built-in GPS
User’s Guide
(Note : Together with the drive recorder , you’ll be provided with a CD ,which include the
media player “GPSplayer” both for Windows and Mac OS .)

Table of Contents

Introduction
The VTR7G Vehicle Camera Recorder is an easy-to-use high-definition (1080P Full HD) Vehicle
camera recorder with a 2.0” LCD display and built-in GPS. It records both audio and video with time
& date stamp which can be used to pinpoint exactly when an event occurred. The events are
recorded to a Micro SD card which can be used as evidence for auto insurance company if there
are any legal complications during an insurance claim. The VTR7G Vehicle Camera Recorder is
perfect for all motorists, lets you capture 1080p or 720p footage with time and location data, so you
can easily keep track of incidents that happen in and around your vehicle.
Features
• HD video quality and real time recording (30fps)
• Built-in GPS provides information regarding latitude, longitude, date, time, speed and direction of
travel for thorough tracking
• Auto recording, video motion detection recording and manual recording (video or snapshot)
modes
• Smart impact sensing recording (G sensor) with non-over writable video will lock up current and
post impact sending video clips
• Records up to 3 1/2 hours (at 1080FHD) on a 32GB micro SD (8GB Micro SD card included)
• Auto overwrite when SD is full
• Built-in microphone and speaker
• 150 degree Wide angle lens
• Records 1-min, 3-min or 5-min of continuous video clips
Important
This guide provides important information on the use and operation of your VTR7G Vehicle
Camera Recorder and the images/features shown throughout the manual are subject to change
without notice due to system and firmware upgrades. Please read all the information carefully prior
to using the product for the best performance and to prevent any damage/injuries or misuse of the
device(s). Customers are entitled to have read through this complete user’s manual before using
the VTR7G Vehicle Camera Recorder. Any unapproved changes or modifications will void your
warranty. Please ensure to have a complete understanding of the following restrictions.
NOTE: Please check the state laws and regulations to determine if windshield mounting is legal at your local
state laws.
-1-

Restrictions
When using this product, the safety precautions below must be taken to avoid possible legal lia-
bilities and damages. Retain and follow all product safety and operating instructions. Observe all
warnings in the product operating instructions. To reduce the risk of bodily injury, electric shock, fire
and damage to the equipment, observe the following precautions.
PLEASE NOTE that under certain circumstances, audio/video recording may be PROHIBITED by
law.
• DO NOT use this product near water, for example, near a bathtub, washbowl, kitchen sink, or
laundry tub, in a wet basement, or near a swimming pool .
• DO NOT place this product on an unstable cart, stand, or table. The product may fall, causing
serious damage to the product.
• DO NOT disassemble this product. Opening or removing covers may expose you to dangerous
voltages or other risks. Incorrect reassembly can cause electric shock during subsequent use.
• DO NOT use this product to infringe on one’s privacy, spying intercepting and related activities are
illegal and punishable by law. Monitoring one’s private activities without consent is illegal and this
product is not designed or manufactured for these purposes.
• DO NOT use this product to carry out any illegal activities such as sneak preview, etc.
The Seller and Manufacturer of the product shall not be responsible for any consequences of
illegal conducts made by users.
• DO NOT put the plastic packaging bags in reach of children or babies. Plastic bags can create a
suffocation hazard when placed over the nose and mouth.
• DO NOT plug the AC adapter into the outlet in improper situations.
• Plugging in an AC adapter with wet hands might cause electric shock.
• Plugging in the AC adapter unsteadily might cause fire or electric shock.
• DO NOT cover the AC adapter when it is connected to an outlet, place the adapter near heaters, or
put it on the floor which is equipped with a heater. The above mentioned operation might cause
fire or incidents.
-2-

Disclaimers
• Please make sure that you are following the regulations and laws set by your Country and State
DMV(Department of Motor Vehicles) prior to mounting your camera. This manual does not intent
to provide any specific legal advice.
• Please check the feature of VTR7G Vehicle Camera Recorder periodically to ensure that it is
operating as required.
• Please use the VTR7G Vehicle Camera Recorder as a tool while driving and use driver’s safety
while driving.
• The Seller and Manufacturer of VTR7G Vehicle Camera Recorder shall not be held responsible
for any traffic violations related to the positioning or improper use of our product.
• Avoid mounting the camera outside of an airbag deployment zone.
• Knowing most vehicles runs off 12VDC power supply from the battery, please double check our
cigarette power adapter’s output rating before attempting to run power directly from the car
battery.
Conditions
Please read the following messages to make sure your working environment is suitable.
• If your vehicle does not cut off power to your cigarette lighter port, then you may have to
manually turn off or unplug the charger to prevent it from overheating.
• The temperature should be kept between –10˚C and 50˚C (14˚F to 122˚F). The relative humidity
should be kept between 20% and 80%.
• Avoid putting the product in places where temperature or humidity may change rapidly.
• Keep it dry, dustless and avoid lens exposure in direct sunlight.
• Keep product away from heat sources such as electric heaters.
• Do not use the camera near harmful chemicals.
• Do not place product near any strong magnetic objects
• It might influence the normal operation of the product if used at the fringe range of normal
temperature. Please turn off the power when not in use.
• Do not disassemble the product.
• Do not shake or strike the product.
• Please obey the local government’s environment protection policy.
-3-
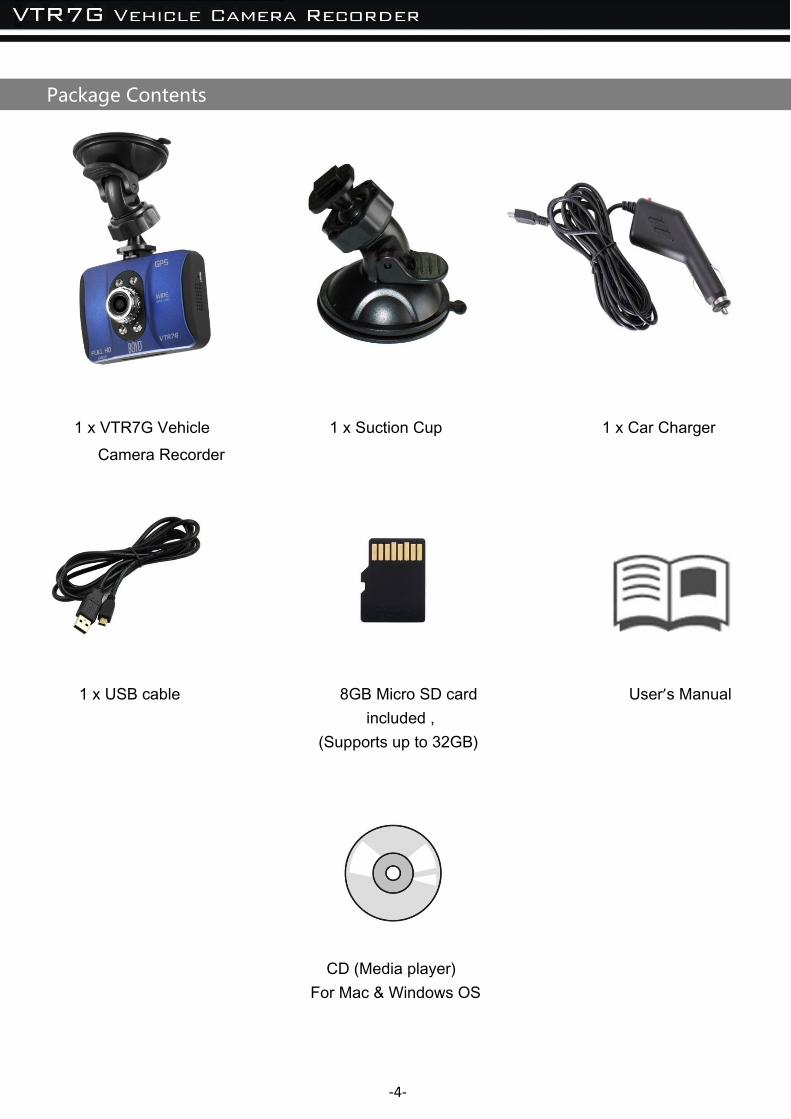
Package Contents
1 x VTR7G Vehicle 1 x Suction Cup 1 x Car Charger
Camera Recorder
1 x USB cable 8GB Micro SD card User’s Manual
included ,
(Supports up to 32GB)
CD (Media player)
For Mac & Windows OS
-4-

Product Basics
-5-
Diagram 1
Diagram 2

Main Interface
MAIN INTERFACE
Note : this instruction for reference only and it may vary from actual product.)
Live View Video/Photo
1 Battery 7 Recording
2 G-Sensor Lock 8 Video/Camera Mode
3 GPS connection sign 9 Date
4 IR Sensor on 10 Time
5 Memory Card 11 Video Resolution
6 Microphone on 12 Recording Time
-6-
Note:
#12, Recording time will show the total length of the recording time, it does not related to the looping
recording minutes that you set.
#4, in order to turn ON/OFF the Infrared Sensor, you may long press #3 button shown in diagram 1.
#8, It can show a Camera sign by pressing the Mode/PLAYBACK button shown in diagram 1.

Quick Start
MOUNTING THE CAMERA
Please make sure that you are following the regulations and laws set by your Country or states
DMV (Department of Motor Vehicles) prior to mounting your camera. This will avoid any accidents
and traffic violations that can occur if the camera is mounted in a location that is prohibited by law.
NOTE: The Seller or Manufacturer of VTR7G Vehicle Camera Recorder shall not be held
responsible for any traffic violations related to the positioning or improper use of our product.
Determine where you will be mounting the camera. The following diagram depicts mounting
locations on a vehicle based in the state of California (U.S.) and its restrictions.
NOTE: Please check with your states DMV regulation for the location of windshield mounting
Special notes: Inside the VTR7G has a small rechargeable battery which allow you to check on
video once you did not plug into AC outlet. The battery must be fully charged before first use. This
will keep the duration of the battery. When not used for a long time, the battery should be charged
at least every 2 months.
-7-

2. Using the suction cup and rotating bracket, mount the VTR7G Vehicle Camera Recorder to the
inside of your vehicles windshield (use the adjustment knob to loosen and tighten the VTR7G as
needed).
NOTE: The VTR7G can also be used to record both exterior and interior (front and rear) of your
vehicle. For interior recording, simply follow the steps above and rotate the camera so that the lens
is facing the inside of your vehicle.
INSERT THE SD CARD
Insert your micro SD card into the VTR7G Vehicle Camera Recorder’s micro SD slot. Make sure
that you insert the in the correct direction as shown. The SD card will make a clicking sound,
indicating it has been locked into the VTR7G.
-8-
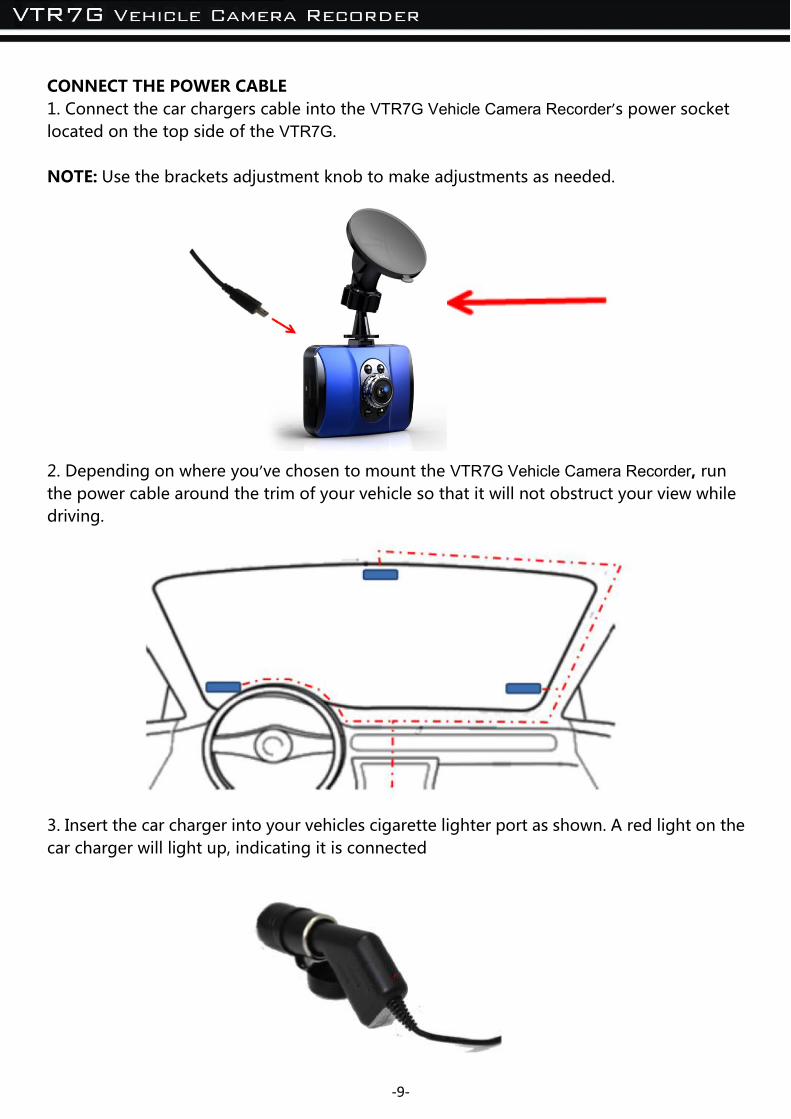
CONNECT THE POWER CABLE
1. Connect the car chargers cable into the VTR7G Vehicle Camera Recorder’s power socket
located on the top side of the VTR7G.
NOTE: Use the brackets adjustment knob to make adjustments as needed.
2. Depending on where you’ve chosen to mount the VTR7G Vehicle Camera Recorder, run
the power cable around the trim of your vehicle so that it will not obstruct your view while
driving.
3. Insert the car charger into your vehicles cigarette lighter port as shown. A red light on the
car charger will light up, indicating it is connected
-9-

TURNING THE CAMERA ON
There is two ways to turn on your VTR7G Vehicle Camera Recorder.
1) Start your vehicle and the VTR7G will automatically turn on and
begin recording.
2) Long press the power button manually to turn on the VTR7G
NOTE: The VTR7G will automatically turn on/off whenever your vehicle turns on/ off, respectively.
.
LIGHT INDICATORS
-10-
BASIC OPERATIONS
SET DATE & TIME
1. Turn on your VTR7G
• Press and hold the Power button until the “Welcome” screen appears
2. Press the Menu button ONCE to get to “Setup” menu
•If there is a SD card already inserted, press the Menu button until the “SYSTEM”
settings appears on the screen
•If there is no SD card, wait for the “Please Insert SD Card” message to disappear,
and then press the Menu button until the “SYSTEM” Settings appears
3. Select the Date/Time
• Press the “Down” button until Date/Time option is highlighted
• Press the “OK” button
4. Change the Date/Time
• Use the “Up” and “Down” buttons to change the date and the time
• Use the “Mode” button to go to next , and use the “OK” to confirm the change .
FORMAT YOUR SD CARD
1. Turn on your VTR7G
• Press and hold the Power button until the “Welcome” screen appears
2. Press the Menu button
• If there is a SD card already inserted, press the Menu button until the “Setup”
settings appears on the screen
• If there is no SD card, wait for the “Please Insert SD Card” message to disappear,
and then press the Menu button until the “Setup” Settings appears
3. Select the Format option
• Press the “Down” button until “Format” option is highlighted
4. Confirm Formatting
• Press “OK” to confirm your SD Card to be formatted
CHANGE TO DEFAULT SETTINGS
1. Turn on your VTR7G
• Press and hold the Power button until the “Welcome” screen appears
2. Press the Menu button
• If there is a SD card already inserted, press the Menu button until the “Setup”
settings appears on the screen
• If there is no SD card, wait for the “Please Insert SD Card” message to disappear,
and then press the Menu button until the “Setup” Settings appears
3. Select the “Default Setting” option
• Press the “Down” button until “Default Setting” option is highlighted
4. Confirm “Default Setting”
• Press “OK” to confirm your VTR7G will switch back to its default settings
-11-

BUTTONS & SETTINGS
BUTTONS
POWER
The POWER button is used to manually turn the VTR7G on or off when needed (long press), but in
most cases the VTR7G will automatically turn itself on and off whenever the vehicle does.
REC/OK
The REC/OK button is used to start and stop manual recording while in Video mode. It is also used
to take pictures while in Photo mode. It can be used to make setting changes and select which
event to view during playback.
DOWN / VOLUME DOWN / DELETE
The DOWN / VOLUME DOWN button is used to navigate through out the menu and make setting
selections. It can also Volume down the sound while in video or photo mode. Long press this
button , the single file can be deleted in playback mode.
UP / VOLUME UP / INFRARED SENSOR
The UP/VOLUME UP / INFRARED SENSOR button is used to navigate through out the menu and
make setting selections. It can also Volume up the sound while in video or photo mode. Long press
this button, the INFRARED sensor will be switched on / off .
MENU / BACK
The MENU / BACK button allows access your VTR7G menu settings. Pressing the Menu button
again will bring you to Video & Photo or System settings. While in Video mode, you may access the
GPS information by long pressing this button.
-12-

MODE / PLAYBACK
The MODE button is used to switch between Video mode and Photo mode. This button is also used
to switch to Playback and view the video and photos been recorded.
SETTINGS
The VTR7G’s settings are divided into 3 categories: Video Mode, Photo Mode, and Setup settings.
NOTE: The “Setup” settings can be accessed by pressing “Menu/Back” button until open up the
Setup configuration menu.
SYSTEM SETTINGS
The System menu configures the VTR7G’s system settings such as date and time, language,
default settings, etc. It can be accessed from the Video Mode, Photo Mode. Press the Menu button
Once to access the System menu.
SETUP SETTINGS
The Setup settings consist of the following configuration options. Press the Menu Button once.
• Auto Power Off – Auto System Shut Off configuration.
• Date/Time – Date and Time configuration.
• Date Stamp - Enables/Disables date stamp on recorded events.
• Auto Video Record – Enables /Disables video recording automatically when the car turn on.
• Loop Recording – Overwrite configuration.
• Motion Detection – Enables/Disables motion detection recording.
• Video Record Mode – Select Video & Audio recording mode .
• G-Sensor Sensivity – G-force sensor configuration .
• Language – Language settings.
• Beep Sound – Enables/Disables button sound.
• Format– Formats your SD card.
• Screensaver – Backlight/screensaver duration configuration.
• Frequency – Light frequency configuration.
-13-

• System Version– Displays Firmware information.
• Default Settings– Restores the VTR7G to its factory default settings.
AUTO POWER OFF
The auto power off option is an auto shut-down feature which, after a set time frame of inactivity
(not recording) or standby, the VTR7G shuts off. The auto power off feature consists of the
following options:
• Off
• 6 SECONDS (default)
• 30 SECONDS
• 1 MINUTE
DATE/TIME
The date/time option is used to set and configure the VTR7G’s current date and time format. The
button configurations are listed and described below :
• UP/DOWN – Use these to scroll through each selection
• MODE – This button scrolls through the date and time (i.e. Month to Day to Year, etc.)
• REC/OK – Press this button to accept and save your date/time.
DATE STAMP
The date stamp option is used to enable/disable the date & time stamp from being displayed on
playback videos. The date stamp feature consists of the following options:
• Off/Disable
• On/Enable (default)- It shows 'DATE TIME" on the firmware
AUTO VIDEO RECORD
The auto video record option is used to enable/disable the Video recording automatically when the
ignition is turned on and stop when engine is turned off (with Car cigarette lighter cable connected).
The auto video record feature consists of the following options:
• No/Disable
• Yes/Enable (default)
LOOP RECORDING
The loop recording option serves as two features: “Overwrite”&“Segment Length”. The
overwrite feature allows the DVR to delete previously recorded events in increments when
the SD card becomes full. The segment length feature is the length each recorded event
can be before generating a new file. Use the UP/DOWN keys to scroll through the options.
-14-

Press the REC/OK button to select your desired settings. The available options include:
• 1 Minutes- Enables the DVR to record/overwrite in 1 minute increments
• 3 Minutes (default)- Enables the DVR to record/overwrite in 3 minute increments
• 5 Minutes – Enables the DVR to record/overwrite in 5 minute increments
NOTE: The recording time shows by the upper right corner of screen (when recording) indicate the
current total recording time, not the segment length.
MOTION DETECTION
The motion detection option is used to enable/disable motion detection recording. While the
VTR7G is on, and the VTR7G is on standby, any movement in front of it will trigger a recording.
The Motion Detection feature consists of the following options:
• Off/Disable(default)
• On/Enable
NOTE: Make sure the “Auto Power Off” function is set to “Off” to let the VTR7G stay on during
standby mode. When motion detection is active or turned ON, the G sensing will be deactivated.
Please make sure motion detection is turned OFF for G-sensor to function properly.
VIDEO RECORD MODE
The video record mode option is used to enable / disable the audio recording along with video
recording. The Video Record Mode feature consists of the following options:
• Video + Audio / Enable (default)
• Video /Disable
NOTE: The Audio recording can be switched on / off manually by pressing “Menu” button during
recording.
G-SENSOR SENSIVITY
The G-Sensor option is used to enable/disable the VTR7G’s G-force/impact sensor which will lock
the previous and current file from being deleted by the overwrite feature. The G-force acts as a
sensor for the VTR7G to secure any video files recorded in the event that the vehicle gets hit. Any
force that is acted upon the vehicle will result in locking the current recording video file.
NOTE: Formatting the SD card will result in erasing all files, including the locked video files.
The G-Sensor feature consists of the following options:
-15-
• Off/Disable
• Low(default)- Represents 39.24m/s2 of force
• Medium- Represents 19.62m/s2 of force
• High- Represents 9.81m/s2 of force
LANGUAGE
The language option lets you change the language of the VTR7G. The language feature consists of
the following options:
• English (default)
BEEP SOUND
The Beep sound enables/disables the button sound.
• Off
• On (default)
FORMAT
The format setting option is used to erase all files inside your SD card, including protected files. The
format feature consists of the following options:
• NO
• YES
SCREENSAVER
The backlight option controls the time you want your screen to stay on before the screen turns off
during video recording. For safety purposes, it is recommended for the screen of the VTR7G which
do not stay on while the vehicle is in motion. The backlight feature consists of the following option:
• Off
• 30 Seconds (default)
• 1 Minute
FREQUENCY
The frequency option switches between the two most commonly used refresh rates “60Hz” and
“50Hz”. By default the VTR7G is set to 60Hz which is standard for United Sates and Japan. The
frequency feature consists of the following options:
•50Hz – Standard for Europe and China.
•60Hz (default) – Standard for United Sates and Japan.
SYSTEM VERSION
-16-
This feature is to indicate VTR7G's system version.
DEFAULT SETTING
The default setting option is used apply the VTR7G’s manufacturer default settings. The default
setting feature consists of the following options:
• NO
• YES
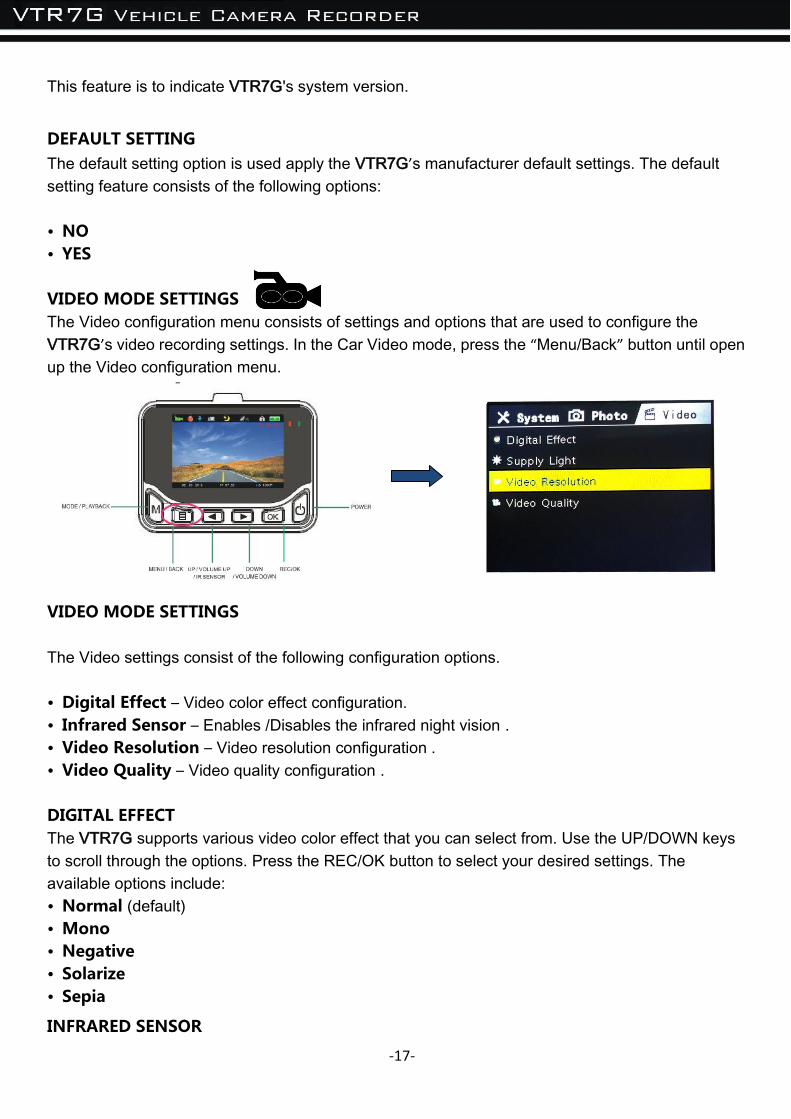
VIDEO MODE SETTINGS
The Video configuration menu consists of settings and options that are used to configure the
VTR7G’s video recording settings. In the Car Video mode, press the “Menu/Back” button until open
up the Video configuration menu.
VIDEO MODE SETTINGS
The Video settings consist of the following configuration options.
• Digital Effect – Video color effect configuration.
• Infrared Sensor – Enables /Disables the infrared night vision .
• Video Resolution – Video resolution configuration .
• Video Quality – Video quality configuration .
DIGITAL EFFECT
The VTR7G supports various video color effect that you can select from. Use the UP/DOWN keys
to scroll through the options. Press the REC/OK button to select your desired settings. The
available options include:
• Normal (default)
• Mono
• Negative
• Solarize
• Sepia
INFRARED SENSOR
-17-

The INFRARED Sensor enables/disables the IR night vision sensor.
• Off(default)
• On
VIDEO RESOLUTION
The VTR7G supports various video resolutions that you can select from. The higher the resolution,
the better your video quality and the bigger the video size will be.
Use the UP/DOWN keys to scroll through the options. Press the REC/OK button to select your
desired settings. The available options include:
• 1080HD (1920x1080) (default)
• 720P (1280x720)
VIDEO QUALITY
The VTR7G supports various video quality that you can select from. The higher the quality, the
better your video quality will be.
Use the UP/DOWN keys to scroll through the options. Press the REC/OK button to select your
desired settings. The available options include:
• Super Fine (default)
• Fine
• Normal
PHOTO MODE SETTINGS
The Camera configures the VTR7G’s photo snapshot settings. In the Video/Photo mode, press the
“Menu” button twice until the “Photo” Settings appears
PHOTO MODE SETTINGS
-18-

The Camera settings consist of the following configuration options.
• Exposure – Image exposure adjustment.
• Contrast – Image Contrast adjustment.
• White Balance – White balance configuration.
• Resolution – Photo resolution configuration.
• Photo Quality - Photo quality configuration
EXPOSURE
The exposure option lets you select the numeric exposure value for your snap shots. The exposure
feature consists of the following options:
• -3
• -2
• -1
• 0 (default)
• 1
• 2
• 3
CONTRAST
The contrast option lets you select the numeric contrast value for your snap shots. The contrast
feature consists of the following options:
• -3
• -2
• -1
• 0 (default)
• 1
• 2
• 3
WHITE BALANCE
The white balance option lets you remove unrealistic color casts, so that objects which appear
white in person are rendered white in your photo. The white balance feature consists of the
following options:
• Fluorescent
• Incandescent
• Cloudy
• Sunny
• Auto (default)
RESOLUTION
-19-
The VTR7G supports various “Mega Pixel” resolutions that you can select from. The resolution
feature consists of the following options:
• 12MP (default)
• 20MP
Photo Quality
The VTR7G supports various photo quality that you can select from. The higher the quality, the
better your photo quality will be.
Use the UP/DOWN keys to scroll through the options. Press the REC/OK button to select your
desired settings. The available options include:
• Super Fine (default)
• Fine
• Normal
PLAYBACK Video & GPS logging
-20-

PLAYING BACK VIDEOS & GPS logging
You can play back recorded events using two methods; directly from the VTR7G or on a computer.
VTR7G Vehicle Camera Recorder
To play back events directly from the VTR7G navigate to the playback screen using the MODE /
Playback button. Please press MODE / Playback until the Video / Image files appears. Then the
screen we shown below. If you press MODE/Playback with video icon on the left upper corner of
the screen, the page will not show as below. You can use the following buttons to play back and
delete the recorded events:
NOTE: Playing back from VTR7G , you’ll not be able to see the GPS logging .
BUTTON ACTION DESCRIPTION
REC/OK Press once (when not playing back video)
-Selects the highlighted event to play back/view -Confirm on option when promoted
Press once (during video play back )
-Pause the video
Menu Press once -Back to video list
Up Press once (during video play back)
- Used to navigate through the recorded events.
Down Press once (during video play back)
-Used to navigate through the recorded events.
Note: In order to delete the recorded events, press the MODE/PLAYBACK button to enter to the
files that were saved. You may select the file that you want to delete and press the #4 button in
diagram 1 to delete the file. You may only delete file one at the time either video or picture file.
COMPUTER
-21-

-22-
To playback recorded video on a PC or Mac:
1. Remove the Micro-SD card from the camera by gently pushing on the SD card allowing it to pop
out from its slot.
2. Insert the Micro-SD card into a Micro-SD card reader (not included) connected to your PC (your
PC should load the SD card as a new Removable Drive).
3. When prompted, select the “Open folder to view files” option to view its contents (you should
see a folder labeled DCIM).
4. Open the DCIM folder to view two folders , all photos that recorded by this device will be saved
in the folder “Capture” and all videos that recorded by this device will be saved in the folder
“Movie” .
5. Locked files (by G-Sensor ) will be saved in the folder “ EMG” .
For Windows OS User :
1. Please double-click the application “eplay.exe “ in the same Removable Drive .

2. Clicking the and choosing the folder in the memory card where the video placed, in this
way the system will recognize the files and load it into its list automatically .If you want delete the
file from the list just click the . If you want to delete the file from the computer at the same
time, please make the deleting choice in the dialog box and confirm it. The could help you
to change the graphics driver mode. If the file cannot be played due to the driver mode issue,
we’d like to suggest you select the right driver by clicking . If you have other enquiries, the
may do some help and you could feel free to contact us also. The interface of the player
can show the date, the time, the speed that you were driving according to the current location
which will show up on the Google map .The playing bar is available for consumer to fast forward
and backward. If you want to take a screenshot of the video, please click the . The
makes it possible for consumer to transfer the video’s format to .AVI which is available for most
media player (NOTE: transfer processing may cause lose of the GPS information).The other
buttons like , , , , just share the same function as the popular media player on
your computer except that the or the cannot realize the backward or forward function
by keeping clicking them.
3. The GPS location can be visualized on the map. The on the map indicate the initial
location when you open your GPS recorder.The on the map shows your current location and
the indicate the final location when the recorder stops working.
For Mac OS User :
Together with the drive recorder, you’ll be provided with a CD, which include the media player both
for Windows and Mac OS.
Please run the .dmg in the CD and refer to the Media player procedure for Windows OS above .
Note : You’ll find the media player on the Micro SD card which has been created by the device
system automatically.
-23-

Specifications
LCD Size 2.0” TFT LCD
Image Sensor Digital HD color CMOS
Viewing angle 150°A+ grade high-resolution ultra wide-angle
Language for options English
Video resolution 1920x1080(FHD), 1280x720(720p),
Video/Photo formats .sci /JPEG
Recording video format M-JPEG
Photo pixels 12M /20M Pixels
SD slot Micro SD card (supports up to 32GB, class 4 or above)
Overwrite Yes
Microphone Built-in (Menu: On/Off)
Speaker Built-in
Recording frame rate 30fps
GPS Built-in
Video recording mode
*Auto record when the ignition is turned on and stop when engine is turned
off (with car cigarette lighter cable connected)
*Manual record by pressing REC button
*Video Motion Detection record
Frequency 60Hz/50Hz
TV standard NTSC/PAL
USB port USB 2.0
PC mode (via USB) Mass Storage or PC Camera
Power supply Input: DC12V-24V, Output: 5VDC / 1.0A
Rechargeable battery
3.7V / 240 mAh (Charging time: 120-Minutes. Recording time: 30-Minutes.
Standby Time: 45-Minutes)
Camera size (L*W*H) 3.1”x2.2”x1.3”(without bracket)
Operating temperature -10°C to 50°C (14°F~122°F)
Non-Operating temperature -20°C to 65°C (-4°F~149°F)
Operating humidity ≤85% RH
-24-

System Requirements
To download photos and videos to your Windows or Apple computer, requirements are as followed below:
-25-
Recommended