1. Find the pupil and focus the image in the iris viewport.
Adjust table height.
Place patient’s chin in the left chin cup (marked blue) to scan the right eye or the right chin cup (marked white) to scan the left eye. Patient’s forehead should make contact with the headrest. Adjust the chinrest height to align the canthus marker with the patient’s eye.
Adjust the patient position to find the iris and pupil. Use the chinrest controls or click on the pupil in the iris viewport. Instruct the patient to move with the chinrest. The patient should not hold on to instrument. Click within the center of the pupil for final alignment.
Use to obtain a clear focus on the iris. This helps the system set the position for the OCT scan.
This guide is an overview. See the Instructions for Use for safe and effective operation.
Advanced Tips• Clickonthe icontoadjustthebrightness,contrast,andillumination.Loweringtheilluminationmayincreasepupilsize.
• Themousescrollwheelcanbeusedtomakefinechangestotheirisimagein/outadjustment.
• Duringsubsequentsteps,monitor:1)thepatient’sheadtoensuretheymaintaincontactwiththeheadrestand,2)thepositionoftheredscancircleinthepupiltoensureitremainswithinthepupil.
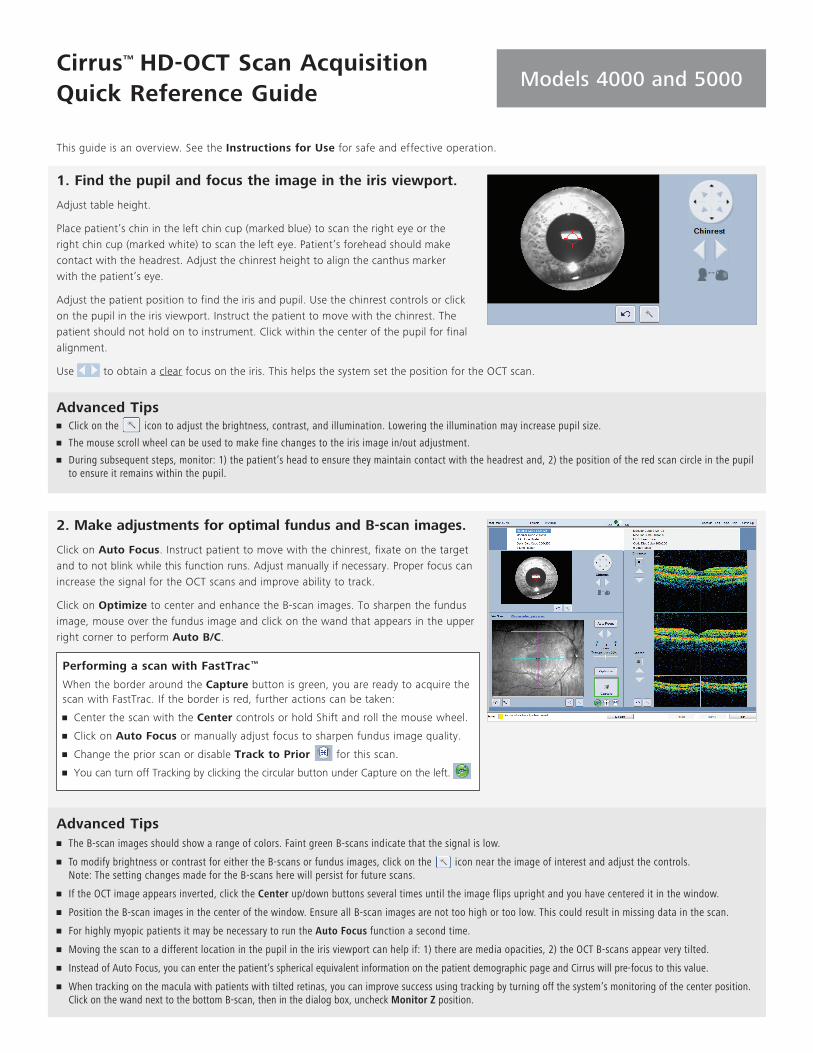
2. Make adjustments for optimal fundus and B-scan images.
Click on Auto Focus. Instruct patient to move with the chinrest, fixate on the target and to not blink while this function runs. Adjust manually if necessary. Proper focus can increase the signal for the OCT scans and improve ability to track.
Click on Optimize to center and enhance the B-scan images. To sharpen the fundus image, mouse over the fundus image and click on the wand that appears in the upper right corner to perform Auto B/C.
Performing a scan with FastTrac™
When the border around the Capture button is green, you are ready to acquire the scan with FastTrac. If the border is red, further actions can be taken:
• CenterthescanwiththeCenter controls or hold Shift and roll the mouse wheel.
• Click on Auto Focus or manually adjust focus to sharpen fundus image quality.
• Change the prior scan or disable Track to Prior for this scan.
• YoucanturnoffTrackingbyclickingthecircularbuttonunderCaptureontheleft.
Advanced Tips• TheB-scanimagesshouldshowarangeofcolors.FaintgreenB-scansindicatethatthesignalislow.
• TomodifybrightnessorcontrastforeithertheB-scansorfundusimages,clickonthe iconneartheimageofinterestandadjustthecontrols.Note:ThesettingchangesmadefortheB-scansherewillpersistforfuturescans.
• IftheOCTimageappearsinverted,clicktheCenterup/downbuttonsseveraltimesuntiltheimageflipsuprightandyouhavecentereditinthewindow.
• PositiontheB-scanimagesinthecenterofthewindow.EnsureallB-scanimagesarenottoohighortoolow.Thiscouldresultinmissingdatainthescan.
• ForhighlymyopicpatientsitmaybenecessarytoruntheAuto Focusfunctionasecondtime.
• Movingthescantoadifferentlocationinthepupilintheirisviewportcanhelpif:1)therearemediaopacities,2)theOCTB-scansappearverytilted.
• InsteadofAutoFocus,youcanenterthepatient’ssphericalequivalentinformationonthepatientdemographicpageandCirruswillpre-focustothisvalue.
• Whentrackingonthemaculawithpatientswithtiltedretinas,youcanimprovesuccessusingtrackingbyturningoffthesystem’smonitoringofthecenterposition.ClickonthewandnexttothebottomB-scan,theninthedialogbox,uncheckMonitor Zposition.
Cirrus™ HD-OCT Scan AcquisitionQuick Reference Guide
Models 4000 and 5000

CIR
.45
87
Rev
B
© 2
012
by C
arl Z
eiss
Med
itec,
Inc.
All
copy
right
s re
serv
ed.
Cirr
us is
a t
rade
mar
k of
Car
l Zei
ss M
edite
c,
Inc.
in t
he U
nite
d St
ates
and
/or
othe
r co
untr
ies.
Spe
cifi
catio
ns s
ubje
ct t
o ch
ange
with
out
notic
e. P
rinte
d in
U.S
.A.
4. Review the captured scan, then save or try again.
On the Review screen, evaluate the B-scan quality and the Signal Strength (should be 6 or greater, if possible). Check that the OCT B-scans are approximately centered in the windows without missing data.
If scan quality, position, or eye movements are unacceptable, click Try Again to retake the scan.
Adjust brightness and contrast by right clicking on the fundus or OCT image. The B/C values set on the review screen are saved and used for analysis for this scan only.
Click on Save.
If you will perform another scan on the same eye, the patient can stay positioned. Otherwise, the patient should sit back.
Advanced Tips
• Examinethehighdefinitionenfacescancloselyforanysubtleeyemovement.AlsoslidetheTransparencycontrolbackandforthtocomparetheimages.Ifnoteworthymovementisdetected,clickTry Again.
• Ifthenextscanwillbeontheothereye,choosethescanpatternforthateyebeforethepatientreturnstheirheadtotheappropriatechincupandheadrest.Thiscanhelpavoidcontactwiththepatient’snose.
• Signalstrengthandimagequalitycanbesignificantlyreducedwhenthelensisdirtyorsmudged.SeeUserManualforcleaninginstructions.
• DuringthecourseofascanwithFastTrac,theindividualB-Scansinacubemaybeacquiredatslightlydifferentpositions.Asaresult,theOCTFunduscanshowhorizontallinesorbands.Aslongastherearenosaccades,ascanwithbandsintheOCTFundusshouldbeacceptableforanalysisandtheoperatorisadvisedtosavethescan.BelowareexamplesofanOCTFunduswithasaccadeandwithbanding.
Carl Zeiss Meditec, Inc.5160HaciendaDriveDublin,CA94568USAwww.meditec.zeiss.com
Carl Zeiss Meditec AGGoeschwitzerStr.51-5207745JenaGermanywww.meditec.zeiss.com
0297
2660021148935 A
3. Capture the fundus image and high-density scan.When the fundus image and B-scans are optimized, tell the patient to blink once or twice. Then tell the patient to open wide and maintain focus on the center of the green fixation target.
Click on Capture.
Avoid a patient blink right at the moment you intend to click on Capture.
If tracking is on, you can tell the patient to blink naturally during the scan.
If tracking is off, remind the patient to avoid blinking and to focus on the target until the capture is completed.
FastTrac Scan in Progress Screen
When FastTrac is interrupted, the information box indicators turn red and the progress bar stops. Adjustments may be necessary to the center position, the focus of the fundus image or the iris image.
The user can stop the scan for any reason from this screen by clicking on Cancel one time. This returns the user to the Acquire Screen, from which you can turn off FastTrac to take a non-tracked scan.
Example:Saccades(vesselmismatch)
Example:Fundusimagebanding(novesselmismatch)
Recommended