Multi-Device Hybrid Apps for Visual Studio 1
We love feedback! Twitter StackOverflow Email
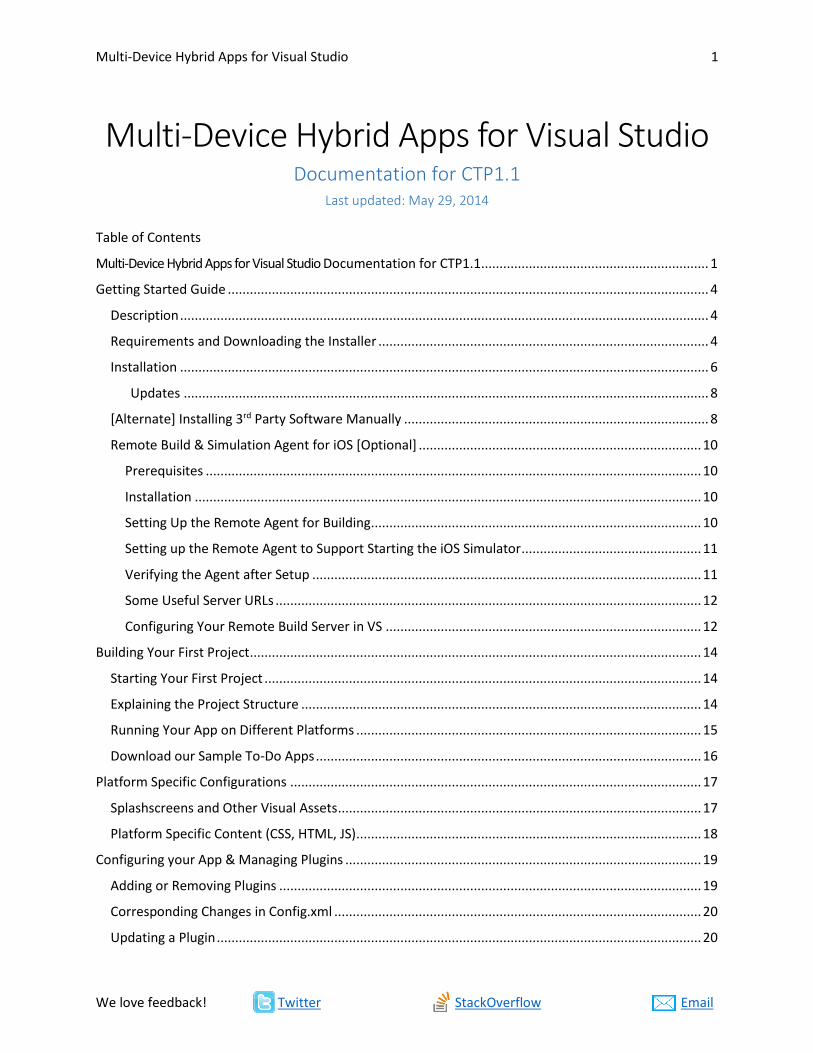
Multi-Device Hybrid Apps for Visual Studio Documentation for CTP1.1
Last updated: May 29, 2014
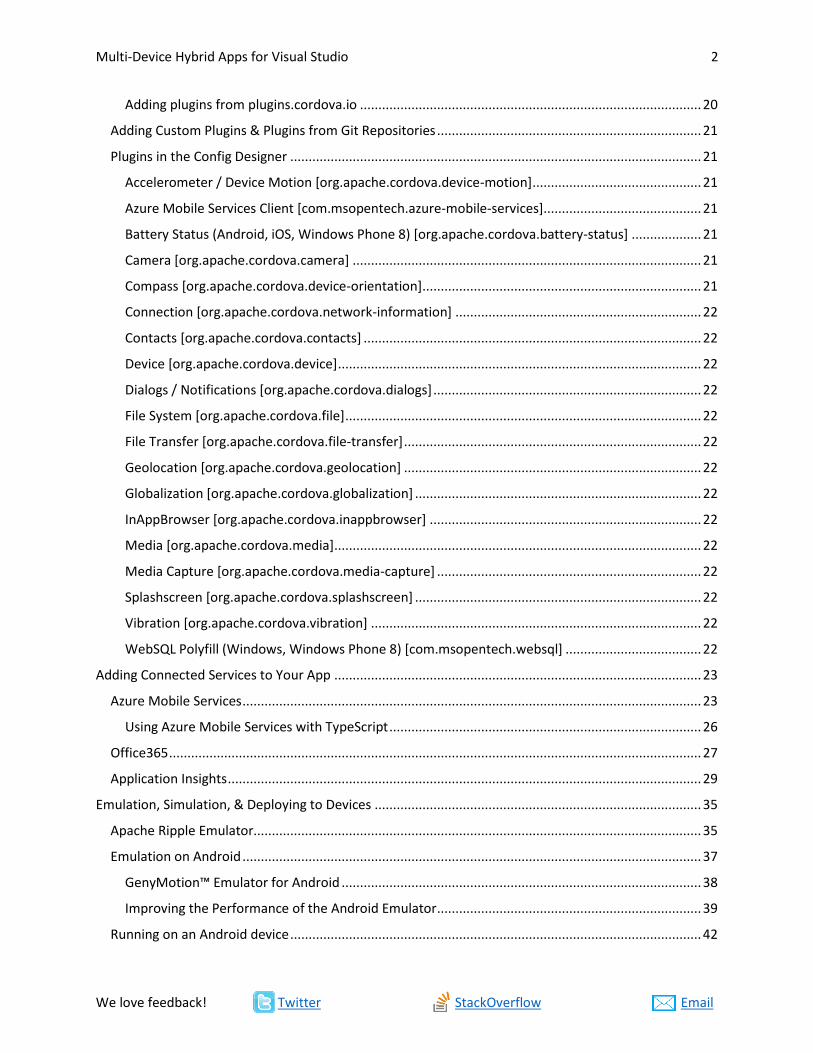
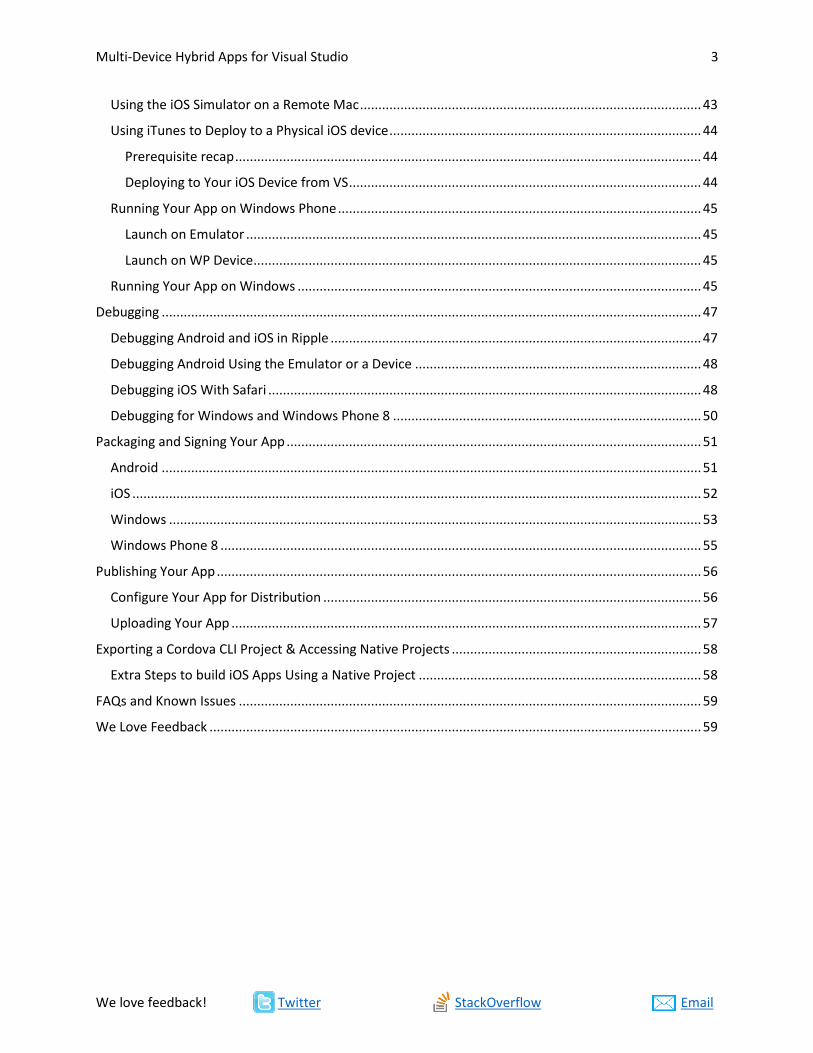
Table of Contents
Multi-Device Hybrid Apps for Visual Studio Documentation for CTP1.1 .............................................................. 1
Getting Started Guide ................................................................................................................................... 4
Description ................................................................................................................................................ 4
Requirements and Downloading the Installer .......................................................................................... 4
Installation ................................................................................................................................................ 6
Updates ............................................................................................................................................... 8
[Alternate] Installing 3rd Party Software Manually ................................................................................... 8
Remote Build & Simulation Agent for iOS [Optional] ............................................................................. 10
Prerequisites ....................................................................................................................................... 10
Installation .......................................................................................................................................... 10
Setting Up the Remote Agent for Building.......................................................................................... 10
Setting up the Remote Agent to Support Starting the iOS Simulator ................................................. 11
Verifying the Agent after Setup .......................................................................................................... 11
Some Useful Server URLs .................................................................................................................... 12
Configuring Your Remote Build Server in VS ...................................................................................... 12
Building Your First Project ........................................................................................................................... 14
Starting Your First Project ....................................................................................................................... 14
Explaining the Project Structure ............................................................................................................. 14
Running Your App on Different Platforms .............................................................................................. 15
Download our Sample To-Do Apps ......................................................................................................... 16
Platform Specific Configurations ................................................................................................................ 17
Splashscreens and Other Visual Assets ................................................................................................... 17
Platform Specific Content (CSS, HTML, JS) .............................................................................................. 18
Configuring your App & Managing Plugins ................................................................................................. 19
Adding or Removing Plugins ................................................................................................................... 19
Corresponding Changes in Config.xml .................................................................................................... 20
Updating a Plugin .................................................................................................................................... 20
Multi-Device Hybrid Apps for Visual Studio 2
We love feedback! Twitter StackOverflow Email
Adding plugins from plugins.cordova.io ............................................................................................. 20
Adding Custom Plugins & Plugins from Git Repositories ........................................................................ 21
Plugins in the Config Designer ................................................................................................................ 21
Accelerometer / Device Motion [org.apache.cordova.device-motion] .............................................. 21
Azure Mobile Services Client [com.msopentech.azure-mobile-services] ........................................... 21
Battery Status (Android, iOS, Windows Phone 8) [org.apache.cordova.battery-status] ................... 21
Camera [org.apache.cordova.camera] ............................................................................................... 21
Compass [org.apache.cordova.device-orientation] ............................................................................ 21
Connection [org.apache.cordova.network-information] ................................................................... 22
Contacts [org.apache.cordova.contacts] ............................................................................................ 22
Device [org.apache.cordova.device] ................................................................................................... 22
Dialogs / Notifications [org.apache.cordova.dialogs] ......................................................................... 22
File System [org.apache.cordova.file] ................................................................................................. 22
File Transfer [org.apache.cordova.file-transfer] ................................................................................. 22
Geolocation [org.apache.cordova.geolocation] ................................................................................. 22
Globalization [org.apache.cordova.globalization] .............................................................................. 22
InAppBrowser [org.apache.cordova.inappbrowser] .......................................................................... 22
Media [org.apache.cordova.media] .................................................................................................... 22
Media Capture [org.apache.cordova.media-capture] ........................................................................ 22
Splashscreen [org.apache.cordova.splashscreen] .............................................................................. 22
Vibration [org.apache.cordova.vibration] .......................................................................................... 22
WebSQL Polyfill (Windows, Windows Phone 8) [com.msopentech.websql] ..................................... 22
Adding Connected Services to Your App .................................................................................................... 23
Azure Mobile Services ............................................................................................................................. 23
Using Azure Mobile Services with TypeScript ..................................................................................... 26
Office365 ................................................................................................................................................. 27
Application Insights ................................................................................................................................. 29
Emulation, Simulation, & Deploying to Devices ......................................................................................... 35
Apache Ripple Emulator.......................................................................................................................... 35
Emulation on Android ............................................................................................................................. 37
GenyMotion™ Emulator for Android .................................................................................................. 38
Improving the Performance of the Android Emulator ........................................................................ 39
Running on an Android device ................................................................................................................ 42
Multi-Device Hybrid Apps for Visual Studio 3
We love feedback! Twitter StackOverflow Email
Using the iOS Simulator on a Remote Mac ............................................................................................. 43
Using iTunes to Deploy to a Physical iOS device ..................................................................................... 44
Prerequisite recap ............................................................................................................................... 44
Deploying to Your iOS Device from VS ................................................................................................ 44
Running Your App on Windows Phone ................................................................................................... 45
Launch on Emulator ............................................................................................................................ 45
Launch on WP Device .......................................................................................................................... 45
Running Your App on Windows .............................................................................................................. 45
Debugging ................................................................................................................................................... 47
Debugging Android and iOS in Ripple ..................................................................................................... 47
Debugging Android Using the Emulator or a Device .............................................................................. 48
Debugging iOS With Safari ...................................................................................................................... 48
Debugging for Windows and Windows Phone 8 .................................................................................... 50
Packaging and Signing Your App ................................................................................................................. 51
Android ................................................................................................................................................... 51
iOS ........................................................................................................................................................... 52
Windows ................................................................................................................................................. 53
Windows Phone 8 ................................................................................................................................... 55
Publishing Your App .................................................................................................................................... 56
Configure Your App for Distribution ....................................................................................................... 56
Uploading Your App ................................................................................................................................ 57
Exporting a Cordova CLI Project & Accessing Native Projects .................................................................... 58
Extra Steps to build iOS Apps Using a Native Project ............................................................................. 58
FAQs and Known Issues .............................................................................................................................. 59
We Love Feedback ...................................................................................................................................... 59
Multi-Device Hybrid Apps for Visual Studio 4
We love feedback! Twitter StackOverflow Email
Getting Started Guide
Description Visual Studio has always been about helping you create great apps. Whether you are building an app for
the web, a Windows device, or the desktop, Visual Studio has you covered with great functionality ranging
from full code editor support to a highly integrated debugging and diagnostics experience to best-in-class
tools for authoring UI.
With our Multi-Device Hybrid Apps release, we are taking what you love about Visual Studio further. We
are giving you the ability to build hybrid apps in HTML, CSS, and JavaScript that work beautifully on
Android, iOS, Windows Phone, and Windows Store. Best of all, all of this is done inside Visual Studio itself.
This document will walk you through everything the Multi-Device Hybrid Apps release provides, and how
you can quickly start using it to create great apps. We’ll start by looking at the Apache Cordova™ and finish
with previewing your app in a variety of ways involving simulators, emulators, and tethered devices.
Let’s get started!
One thing to note is that this release of the tools is a very early preview. This version is not feature
complete, and occasionally things might not work as expected.
This release supports building apps for the following device targets:
Android 4+ (4.4 providing the optimal developer experience)
iOS 6 & 7
Windows 8.0 (Store)
Windows Phone 8.0
Note: Windows and Windows Phone 8.0 applications are fully compatible to run on 8.1 devices.
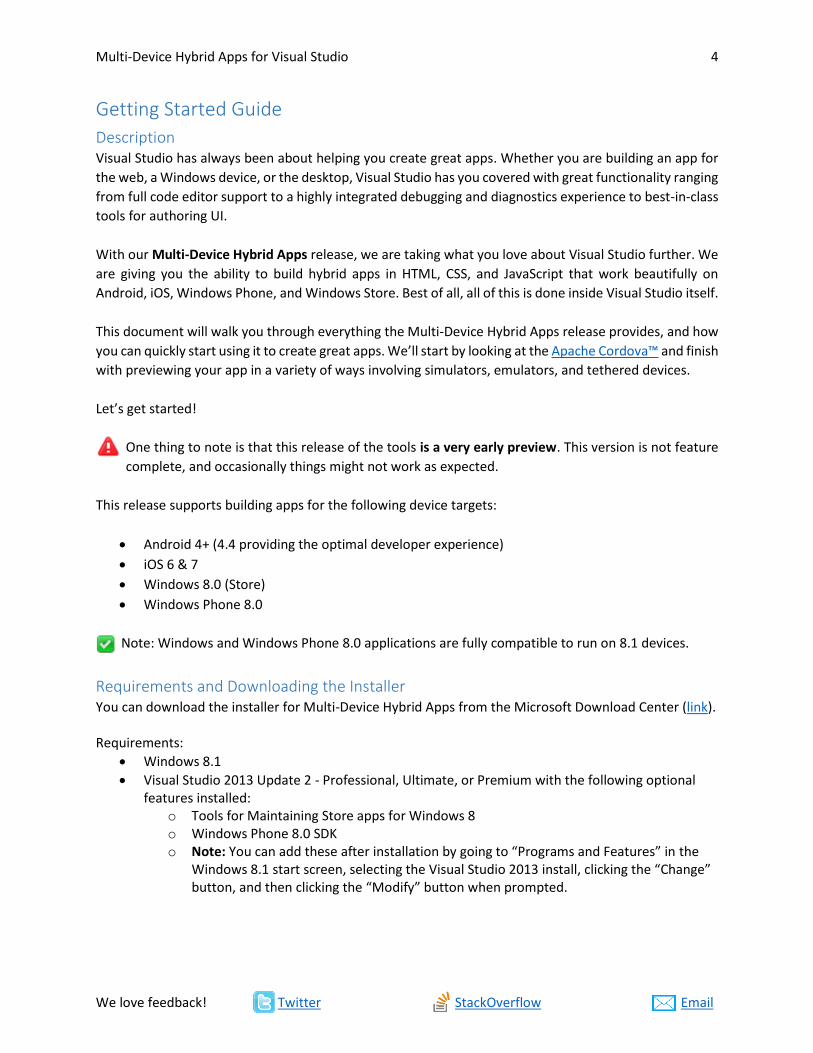
Requirements and Downloading the Installer You can download the installer for Multi-Device Hybrid Apps from the Microsoft Download Center (link). Requirements:
Windows 8.1
Visual Studio 2013 Update 2 - Professional, Ultimate, or Premium with the following optional features installed:
o Tools for Maintaining Store apps for Windows 8 o Windows Phone 8.0 SDK o Note: You can add these after installation by going to “Programs and Features” in the
Windows 8.1 start screen, selecting the Visual Studio 2013 install, clicking the “Change” button, and then clicking the “Modify” button when prompted.
Multi-Device Hybrid Apps for Visual Studio 5
We love feedback! Twitter StackOverflow Email
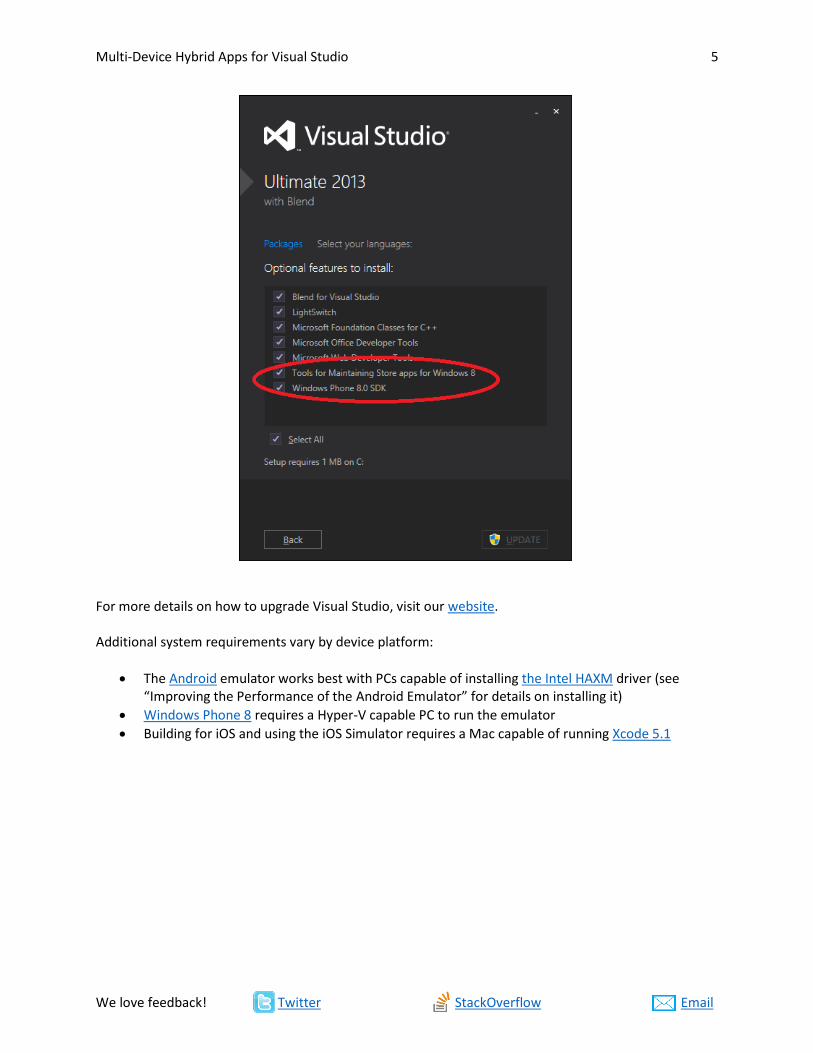
For more details on how to upgrade Visual Studio, visit our website. Additional system requirements vary by device platform:
The Android emulator works best with PCs capable of installing the Intel HAXM driver (see “Improving the Performance of the Android Emulator” for details on installing it)
Windows Phone 8 requires a Hyper-V capable PC to run the emulator
Building for iOS and using the iOS Simulator requires a Mac capable of running Xcode 5.1
Multi-Device Hybrid Apps for Visual Studio 6
We love feedback! Twitter StackOverflow Email
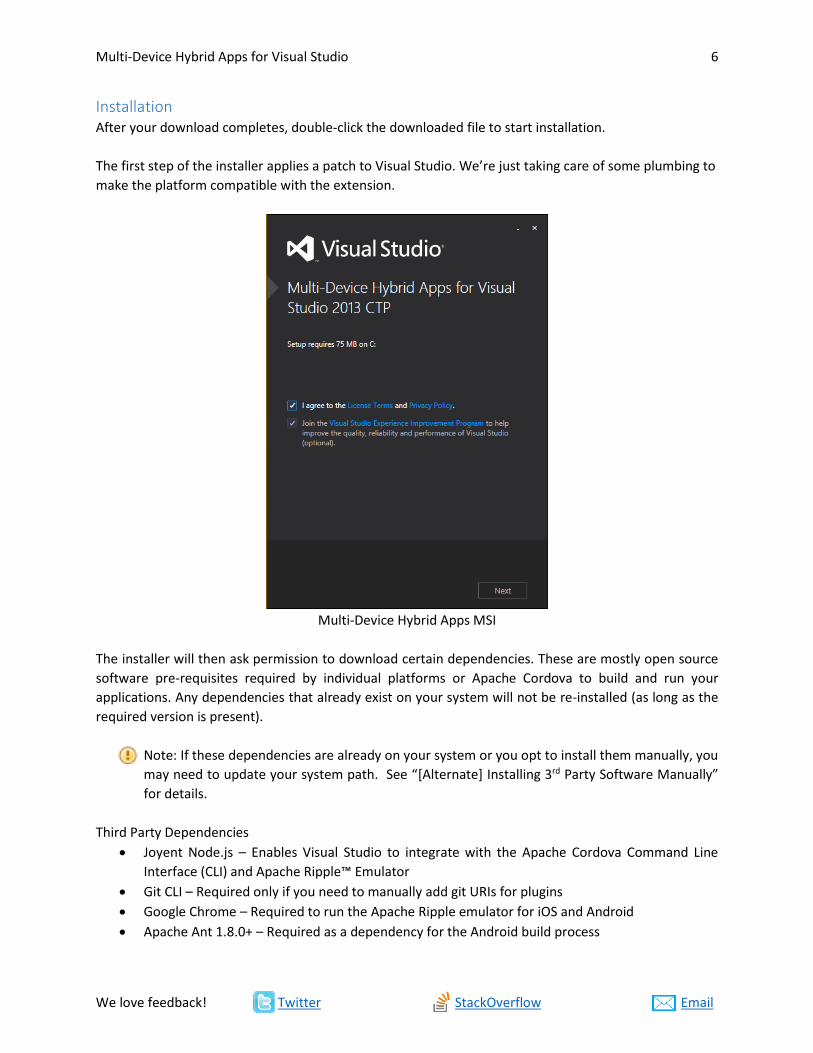
Installation After your download completes, double-click the downloaded file to start installation.
The first step of the installer applies a patch to Visual Studio. We’re just taking care of some plumbing to
make the platform compatible with the extension.
Multi-Device Hybrid Apps MSI
The installer will then ask permission to download certain dependencies. These are mostly open source
software pre-requisites required by individual platforms or Apache Cordova to build and run your
applications. Any dependencies that already exist on your system will not be re-installed (as long as the
required version is present).
Note: If these dependencies are already on your system or you opt to install them manually, you
may need to update your system path. See “[Alternate] Installing 3rd Party Software Manually”
for details.
Third Party Dependencies
Joyent Node.js – Enables Visual Studio to integrate with the Apache Cordova Command Line
Interface (CLI) and Apache Ripple™ Emulator
Git CLI – Required only if you need to manually add git URIs for plugins
Google Chrome – Required to run the Apache Ripple emulator for iOS and Android
Apache Ant 1.8.0+ – Required as a dependency for the Android build process
Multi-Device Hybrid Apps for Visual Studio 7
We love feedback! Twitter StackOverflow Email
Oracle Java JDK 7 – Required as a dependency for the Android build process
Android SDK – Required as a dependency for the Android build process and Ripple
SQLLite for Windows Runtime – required to add SQL connectivity to Windows apps (for the
WebSQL Polyfill plugin)
Apple iTunes – Required for deploying an app to an iOS device connected to your Windows PC
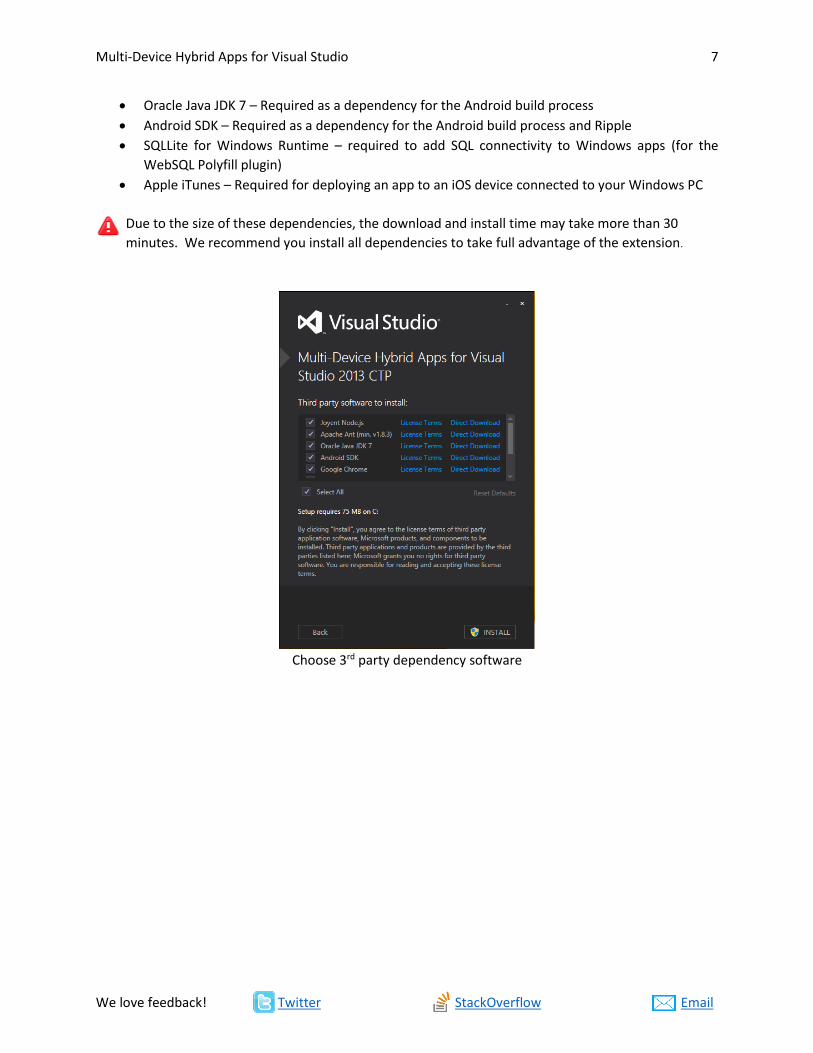
Due to the size of these dependencies, the download and install time may take more than 30
minutes. We recommend you install all dependencies to take full advantage of the extension.
Choose 3rd party dependency software
Multi-Device Hybrid Apps for Visual Studio 8
We love feedback! Twitter StackOverflow Email
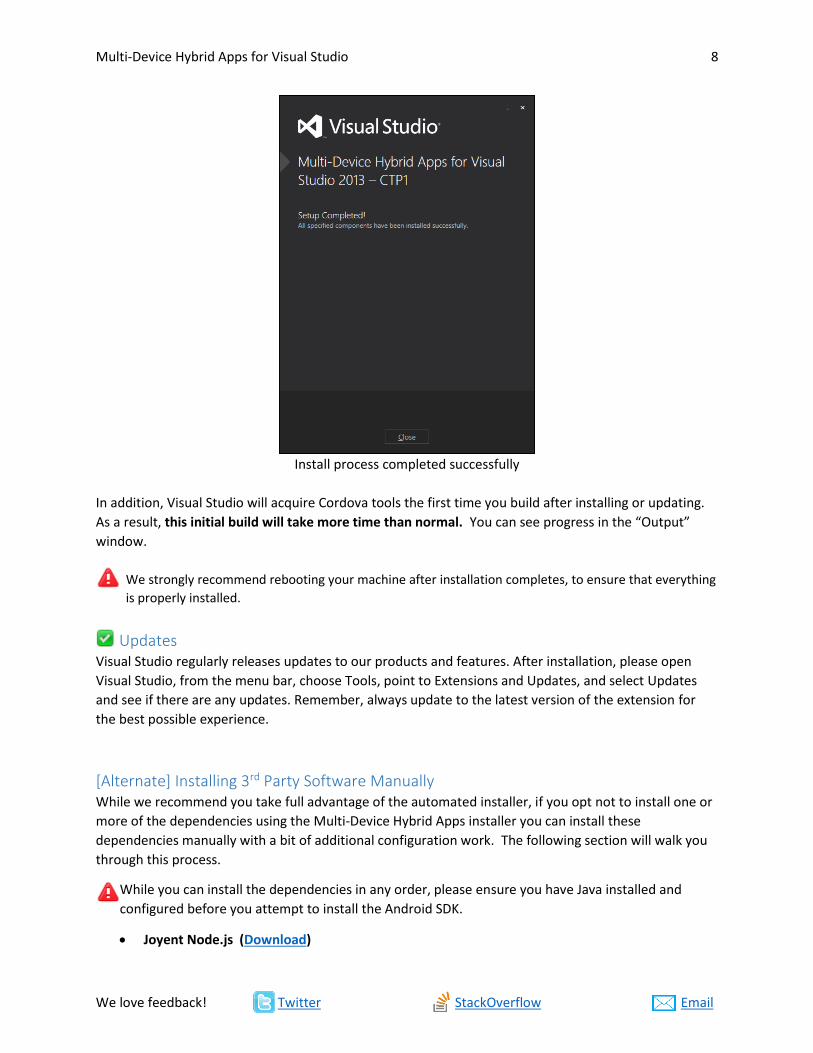
Install process completed successfully
In addition, Visual Studio will acquire Cordova tools the first time you build after installing or updating.
As a result, this initial build will take more time than normal. You can see progress in the “Output”
window.
We strongly recommend rebooting your machine after installation completes, to ensure that everything
is properly installed.
Updates Visual Studio regularly releases updates to our products and features. After installation, please open
Visual Studio, from the menu bar, choose Tools, point to Extensions and Updates, and select Updates
and see if there are any updates. Remember, always update to the latest version of the extension for
the best possible experience.
[Alternate] Installing 3rd Party Software Manually While we recommend you take full advantage of the automated installer, if you opt not to install one or
more of the dependencies using the Multi-Device Hybrid Apps installer you can install these
dependencies manually with a bit of additional configuration work. The following section will walk you
through this process.
While you can install the dependencies in any order, please ensure you have Java installed and
configured before you attempt to install the Android SDK.
Joyent Node.js (Download)
Multi-Device Hybrid Apps for Visual Studio 9
We love feedback! Twitter StackOverflow Email
o We suggest installing the 64-bit version
Google Chrome (Download)
Git Command Line Tools (Download)
o Please ensure you select the option that adds git to your command prompt path
Apache Ant (Download)
o Download and extract Ant to a location like C:/ant-1.x.x/
o Set the ANT_HOME environment to point to the above location.
o Add to System Path: %ANT_HOME%\bin
Oracle Java 7 (Download)
Android only supports the x86 version of Java
o Set the JAVA_HOME environment variable to C:/Program Files/Java/jdk1.7.0_55
o Add to System Path: %JAVA_HOME%\bin
Android SDK (Download)
The default install location for the Android SDK on Windows can be hard to find. Choosing
to install globally for all users places it in “Program Files (x86),” otherwise it is located here:
%localappdata%\Android\android-sdk (C:\Users\<user>\AppData\Local\Android\android-
sdk)
o Download and install the SDK
o Update the APIs as per the default suggestion. Be sure the SDK for Android 4.4.x (API
level 19) is installed.
o Set the ADT_HOME environment variable to the SDK install location
o Add to System Path: %ADT_HOME%\tools;%ADT_HOME%\platform-tools
Apple iTunes (x86, x64)
SQLite (Download)
Multi-Device Hybrid Apps for Visual Studio 10
We love feedback! Twitter StackOverflow Email
Remote Build & Simulation Agent for iOS [Optional] Currently iOS apps cannot be built on Windows and the iOS Simulator is also Mac only. Fortunately, we
have provided an agent that can be setup on a remote Mac (or local if you are using a virtualization
technology to host Windows) to support these scenarios.
The agent will queue up builds, so it can be used in a shared environment. It can also be configured as a
personal server that can launch the iOS Simulator.
This step is only required if you would like to build and deploy the app for iOS right from Visual
Studio. Information on alternative ways to build and simulate iOS are covered later in this
document.
This section will cover how to set up and configure a remote build agent on a Mac and how to configure
Visual Studio to use this agent to build iOS apps.
Prerequisites Mac OS X Mavericks
Xcode 5.1 and Xcode command line tools
An active iOS Developer Program account with Apple, with iOS provisioning profile and signing
identity configured in Xcode
Node.js installed on the Mac
Installation Run the following command from the Terminal app on your Mac:
sudo npm install -g vs-mda-remote
Global installation is recommended but not strictly required.
By default, the agent is geared towards being placed on a shared build server. If you wish to configure
the build agent to support launching the iOS Simulator, the ios-sim node module must be installed
globally on the Mac. (Additional instructions on configuring the agent to run in this configuration can be
found later in this document.)
sudo npm install -g ios-sim
Setting Up the Remote Agent for Building To start up the agent, run the following command:
vs-mda-remote --buildDir <server-build-directory>
In the above command, <server-build-directory> should be replaced with the location of a folder on
your machine. Builds will be organized by build number subdirectories in this location.
This will start the agent in build server mode. An additional command line parameter is required to start
up the agent for personal use with the iOS Simulator that will be covered later.
Multi-Device Hybrid Apps for Visual Studio 11
We love feedback! Twitter StackOverflow Email
Other options include the port number to listen on, the maximum number of builds to retain on the file
system (defaults to 10 and they are cleared on shutdown). For help:
vs-mda-remote --help
It is good practice to capture stdout and stderr to a file and run as a background process, the server.log
would assist in troubleshooting if necessary:
vs-mda-remote --buildDir ~/builds > server.log 2>&1 &
You can also run with a configuration file instead of using command line parameters:
vs-mda-remote --config path-to-config-file
The config file should be a JSON format file with the startup options and their values without dashes in
the name. An example config file is vs-mda-remote/examples/exampleConfig.json.
Setting up the Remote Agent to Support Starting the iOS Simulator If you are using the remote agent on a personal Mac (vs a shared Mac build server), you can configure
the agent to support launching the iOS Simulator on your Mac from Visual Studio.
As mentioned previously, the ios-sim node module is required globally to enable starting up the iOS
Simulator from Visual Studio. Run the following command to install it:
sudo npm install -g ios-sim
The build server should then be started with the command line option --allowsEmulate=true:
vs-mda-remote --buildDir <server-build-directory> --allowsEmulate=true
When these requirements are met, the app can be deployed from Visual Studio to the simulator on the
Mac running the agent.
Verifying the Agent after Setup You can verify your config by running the following command (make sure you have the agent running
from the steps above):
vs-mda-remote test
The output from should show the build number and other information about the example build that was
submitted, and the progress of the build until it is complete.
Open http://localhost:3000/build/tasks in a browser - it should display information about the build and
after some time its status should be complete.

Multi-Device Hybrid Apps for Visual Studio 12
We love feedback! Twitter StackOverflow Email
Open http://localhost:3000/files in a browser - browse to the build number directory and verify that you
can see directory contents.
If you started server on a port other than 3000, run the following command instead:
vs-mda-remote test http://localhost:<portNumber>
You can verify that Developer signing identity is set up correctly for Device builds (for the Debug and
Release configurations from Visual Studio) by running the following command:
vs-mda-remote test --device
You can verify that Distribution signing identity is set up correctly for Device builds (for the Distribution
configuration from Visual Studio) by running the following command:
vs-mda-remote test --device --cfg distribution
See the section on “Packaging and Signing Your App” for details on setting up provisioning and signing
identities.
Some Useful Server URLs
Web based directory and file access to builds and their files: http://localhost:3000/files
Build tasks submitted to the build server: http://localhost:3000/build/tasks
Build status information for a particular build (identified by a buildNumber such as 1234):
http://localhost:3000/build/buildNumber
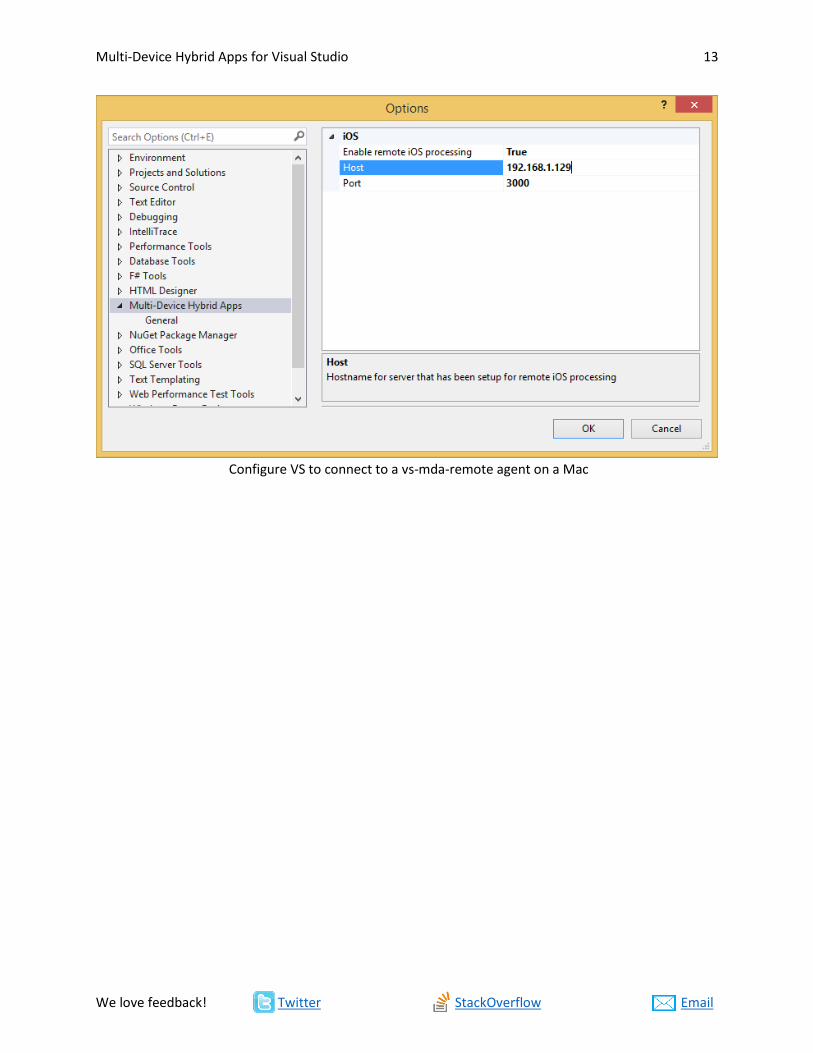
Configuring Your Remote Build Server in VS (On Mac) ifconfig to figure out the IP address of your Mac.
(In Visual Studio) Add that IP address and port 3000 in Options > Multi-Device Hybrid Apps >
General. Set Enable remote iOS processing to True.
Multi-Device Hybrid Apps for Visual Studio 13
We love feedback! Twitter StackOverflow Email
Configure VS to connect to a vs-mda-remote agent on a Mac
Multi-Device Hybrid Apps for Visual Studio 14
We love feedback! Twitter StackOverflow Email
Building Your First Project
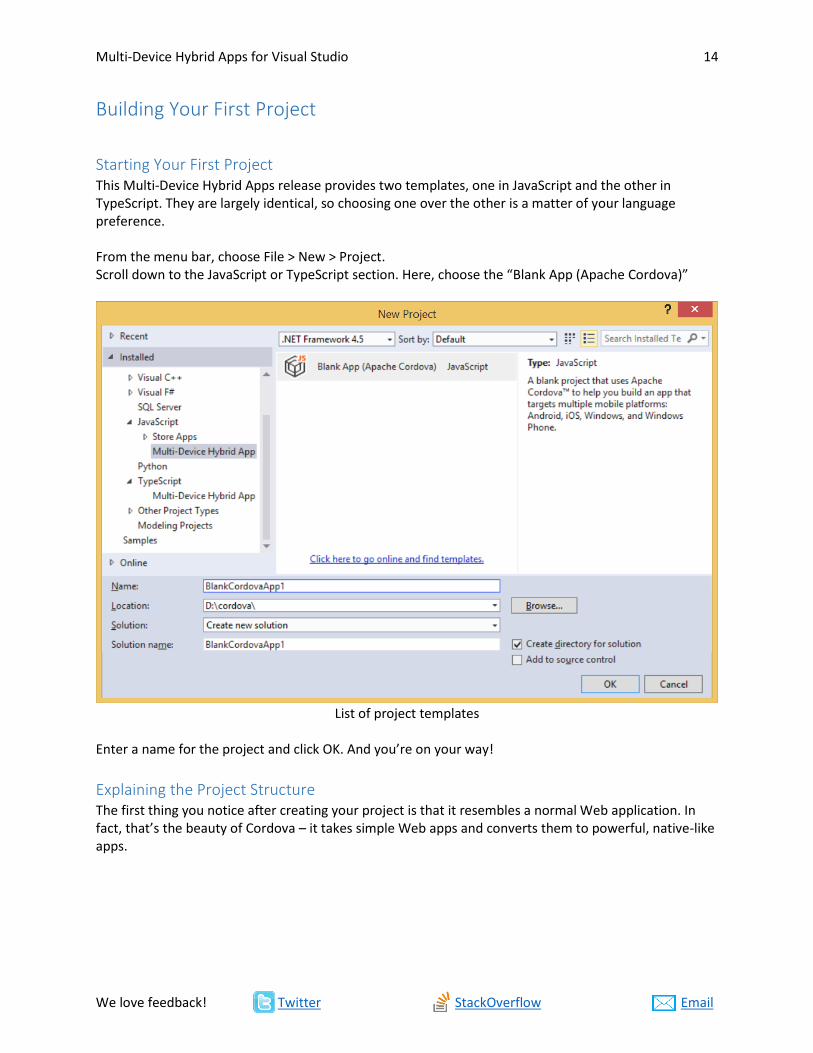
Starting Your First Project This Multi-Device Hybrid Apps release provides two templates, one in JavaScript and the other in TypeScript. They are largely identical, so choosing one over the other is a matter of your language preference. From the menu bar, choose File > New > Project. Scroll down to the JavaScript or TypeScript section. Here, choose the “Blank App (Apache Cordova)”
List of project templates
Enter a name for the project and click OK. And you’re on your way!
Explaining the Project Structure The first thing you notice after creating your project is that it resembles a normal Web application. In fact, that’s the beauty of Cordova – it takes simple Web apps and converts them to powerful, native-like apps.
Multi-Device Hybrid Apps for Visual Studio 15
We love feedback! Twitter StackOverflow Email
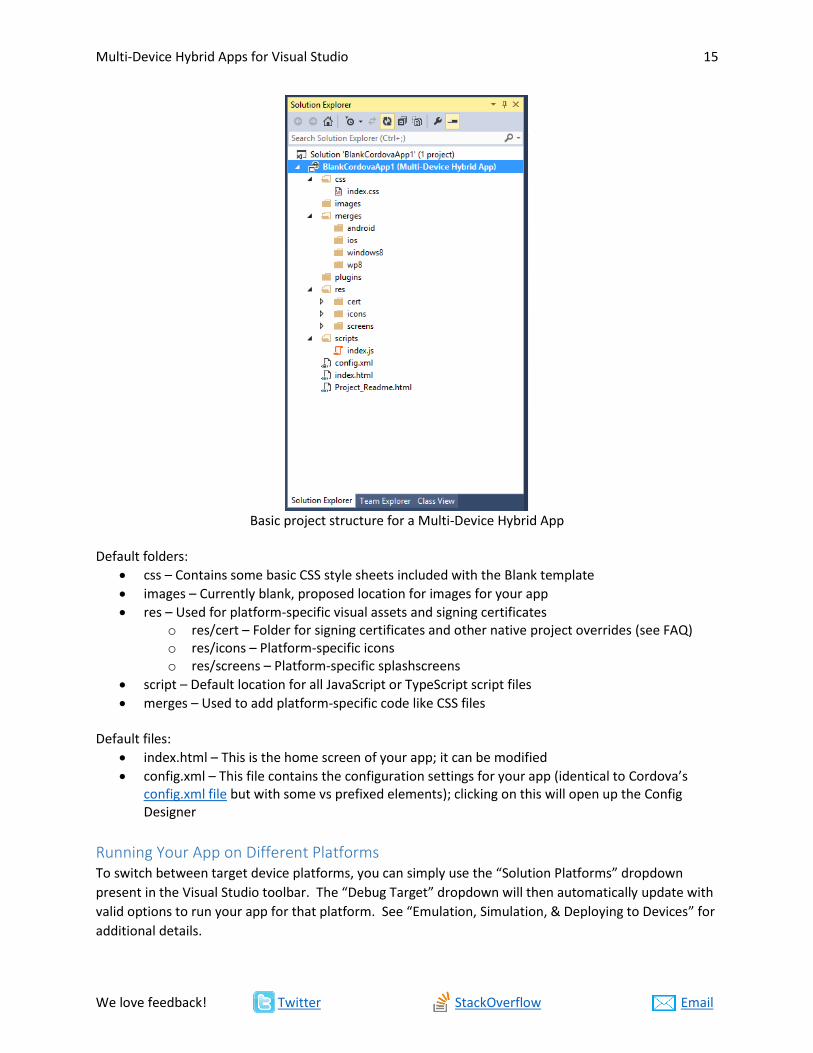
Basic project structure for a Multi-Device Hybrid App
Default folders:
css – Contains some basic CSS style sheets included with the Blank template
images – Currently blank, proposed location for images for your app
res – Used for platform-specific visual assets and signing certificates o res/cert – Folder for signing certificates and other native project overrides (see FAQ) o res/icons – Platform-specific icons o res/screens – Platform-specific splashscreens
script – Default location for all JavaScript or TypeScript script files
merges – Used to add platform-specific code like CSS files Default files:
index.html – This is the home screen of your app; it can be modified
config.xml – This file contains the configuration settings for your app (identical to Cordova’s config.xml file but with some vs prefixed elements); clicking on this will open up the Config Designer
Running Your App on Different Platforms To switch between target device platforms, you can simply use the “Solution Platforms” dropdown
present in the Visual Studio toolbar. The “Debug Target” dropdown will then automatically update with
valid options to run your app for that platform. See “Emulation, Simulation, & Deploying to Devices” for
additional details.
Multi-Device Hybrid Apps for Visual Studio 16
We love feedback! Twitter StackOverflow Email
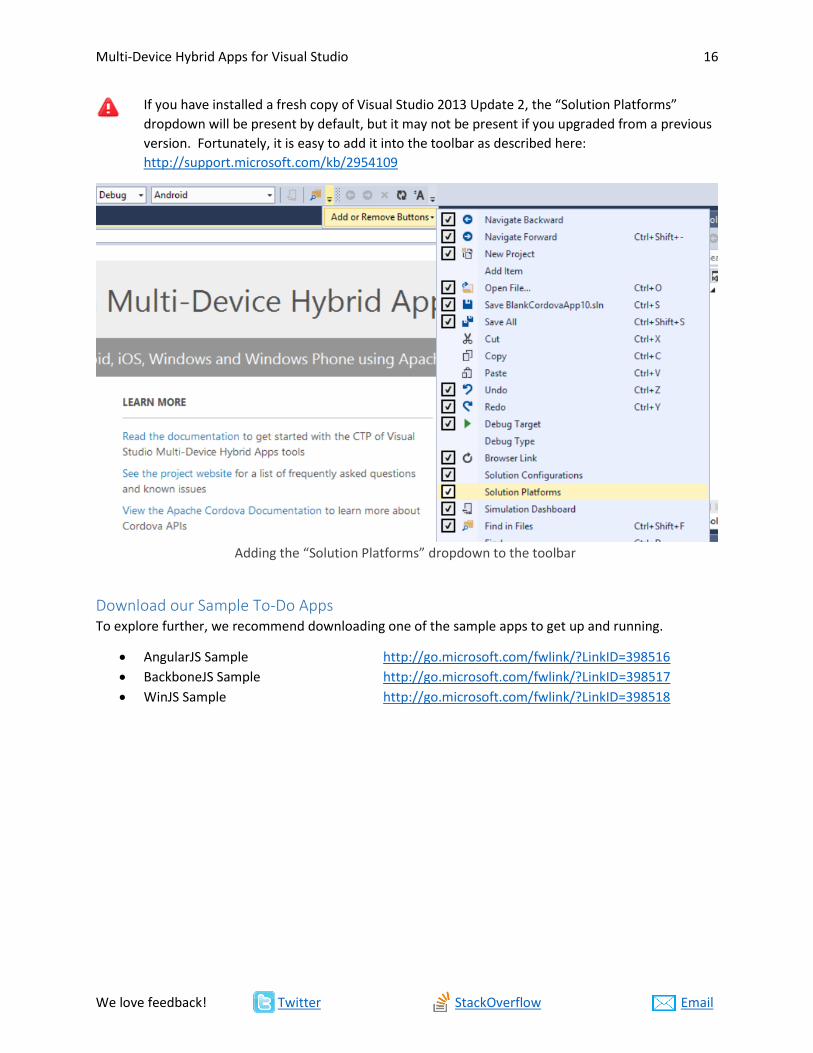
If you have installed a fresh copy of Visual Studio 2013 Update 2, the “Solution Platforms”
dropdown will be present by default, but it may not be present if you upgraded from a previous
version. Fortunately, it is easy to add it into the toolbar as described here:
http://support.microsoft.com/kb/2954109
Adding the “Solution Platforms” dropdown to the toolbar
Download our Sample To-Do Apps To explore further, we recommend downloading one of the sample apps to get up and running.
AngularJS Sample http://go.microsoft.com/fwlink/?LinkID=398516
BackboneJS Sample http://go.microsoft.com/fwlink/?LinkID=398517
WinJS Sample http://go.microsoft.com/fwlink/?LinkID=398518
Multi-Device Hybrid Apps for Visual Studio 17
We love feedback! Twitter StackOverflow Email
Platform Specific Configurations There are a few ways in which the project can be configured to add device platform specific functionality
and styling. This feature is optional and if no specific overrides are added, the defaults provided by our
extension will be used.
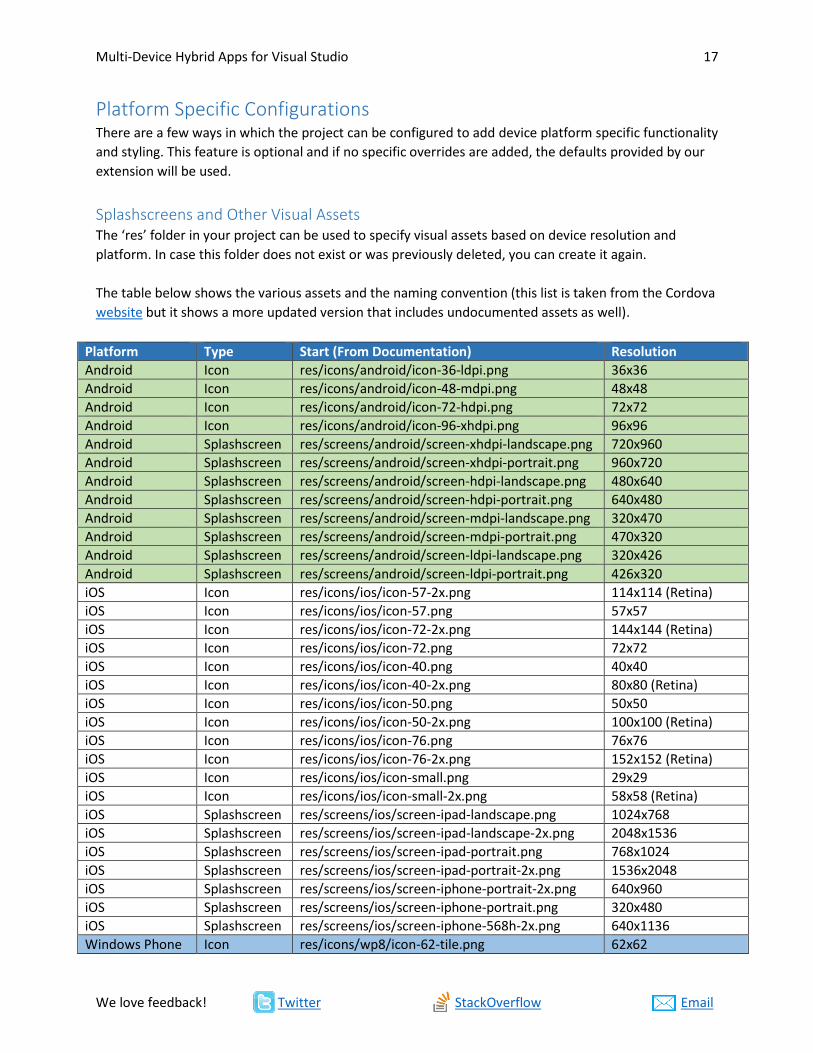
Splashscreens and Other Visual Assets The ‘res’ folder in your project can be used to specify visual assets based on device resolution and
platform. In case this folder does not exist or was previously deleted, you can create it again.
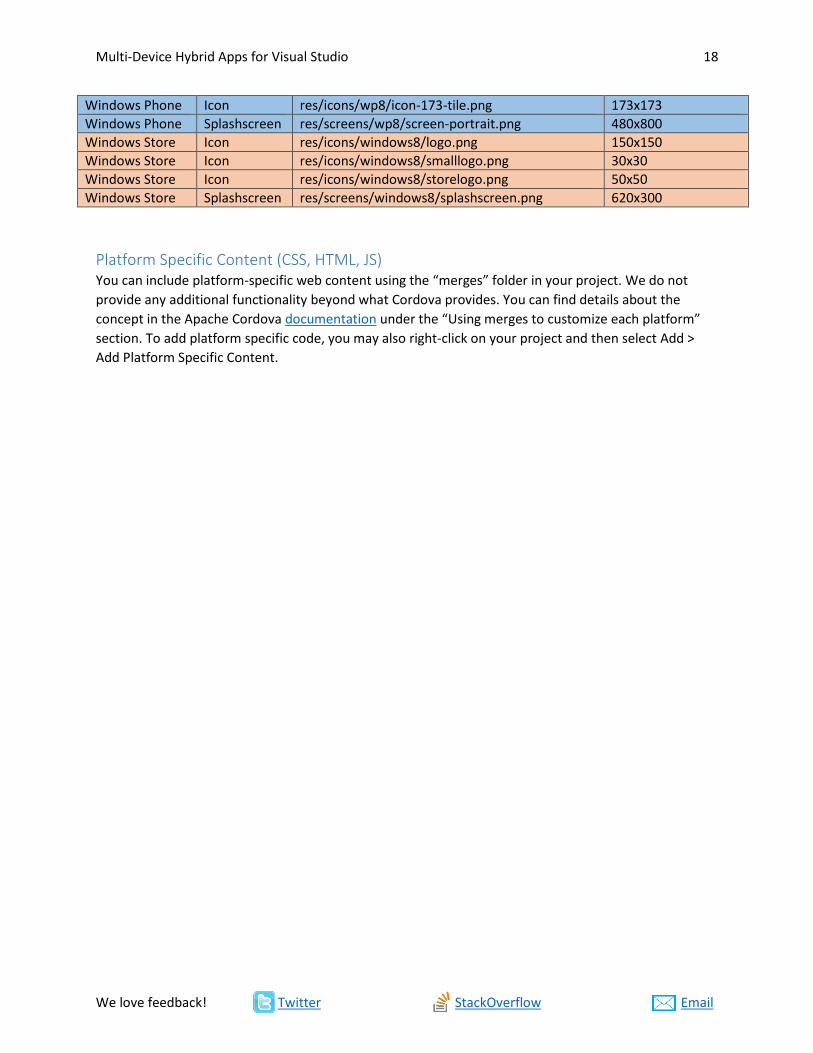
The table below shows the various assets and the naming convention (this list is taken from the Cordova
website but it shows a more updated version that includes undocumented assets as well).
Platform Type Start (From Documentation) Resolution
Android Icon res/icons/android/icon-36-ldpi.png 36x36
Android Icon res/icons/android/icon-48-mdpi.png 48x48
Android Icon res/icons/android/icon-72-hdpi.png 72x72
Android Icon res/icons/android/icon-96-xhdpi.png 96x96
Android Splashscreen res/screens/android/screen-xhdpi-landscape.png 720x960
Android Splashscreen res/screens/android/screen-xhdpi-portrait.png 960x720
Android Splashscreen res/screens/android/screen-hdpi-landscape.png 480x640
Android Splashscreen res/screens/android/screen-hdpi-portrait.png 640x480
Android Splashscreen res/screens/android/screen-mdpi-landscape.png 320x470
Android Splashscreen res/screens/android/screen-mdpi-portrait.png 470x320
Android Splashscreen res/screens/android/screen-ldpi-landscape.png 320x426
Android Splashscreen res/screens/android/screen-ldpi-portrait.png 426x320
iOS Icon res/icons/ios/icon-57-2x.png 114x114 (Retina)
iOS Icon res/icons/ios/icon-57.png 57x57
iOS Icon res/icons/ios/icon-72-2x.png 144x144 (Retina)
iOS Icon res/icons/ios/icon-72.png 72x72
iOS Icon res/icons/ios/icon-40.png 40x40
iOS Icon res/icons/ios/icon-40-2x.png 80x80 (Retina)
iOS Icon res/icons/ios/icon-50.png 50x50
iOS Icon res/icons/ios/icon-50-2x.png 100x100 (Retina)
iOS Icon res/icons/ios/icon-76.png 76x76
iOS Icon res/icons/ios/icon-76-2x.png 152x152 (Retina)
iOS Icon res/icons/ios/icon-small.png 29x29
iOS Icon res/icons/ios/icon-small-2x.png 58x58 (Retina)
iOS Splashscreen res/screens/ios/screen-ipad-landscape.png 1024x768
iOS Splashscreen res/screens/ios/screen-ipad-landscape-2x.png 2048x1536
iOS Splashscreen res/screens/ios/screen-ipad-portrait.png 768x1024
iOS Splashscreen res/screens/ios/screen-ipad-portrait-2x.png 1536x2048
iOS Splashscreen res/screens/ios/screen-iphone-portrait-2x.png 640x960
iOS Splashscreen res/screens/ios/screen-iphone-portrait.png 320x480
iOS Splashscreen res/screens/ios/screen-iphone-568h-2x.png 640x1136
Windows Phone Icon res/icons/wp8/icon-62-tile.png 62x62
Multi-Device Hybrid Apps for Visual Studio 18
We love feedback! Twitter StackOverflow Email
Windows Phone Icon res/icons/wp8/icon-173-tile.png 173x173
Windows Phone Splashscreen res/screens/wp8/screen-portrait.png 480x800
Windows Store Icon res/icons/windows8/logo.png 150x150
Windows Store Icon res/icons/windows8/smalllogo.png 30x30
Windows Store Icon res/icons/windows8/storelogo.png 50x50
Windows Store Splashscreen res/screens/windows8/splashscreen.png 620x300
Platform Specific Content (CSS, HTML, JS) You can include platform-specific web content using the “merges” folder in your project. We do not
provide any additional functionality beyond what Cordova provides. You can find details about the
concept in the Apache Cordova documentation under the “Using merges to customize each platform”
section. To add platform specific code, you may also right-click on your project and then select Add >
Add Platform Specific Content.
Multi-Device Hybrid Apps for Visual Studio 19
We love feedback! Twitter StackOverflow Email
Configuring your App & Managing Plugins The majority of your app configuration is done through the config.xml file. Opening config.xml will present
you with a Config Designer, but it is worth noting that you can also add valid “preference” configuration
elements described in the config.xml documentation for Cordova by editing the config.xml code directly.
One of the advantages of using Apache Cordova is that it provides access to native device capabilities not
available to simple web apps via “plugins.” The concept of a plugin is in many ways similar to a cross-
platform library. They provide JavaScript APIs that can access native code and device capabilities on
multiple platforms. They also take care of updating platform manifest settings to enable device
capabilities where necessary. It is worth noting, however, that not all plugins are supported or needed
on all device platforms.
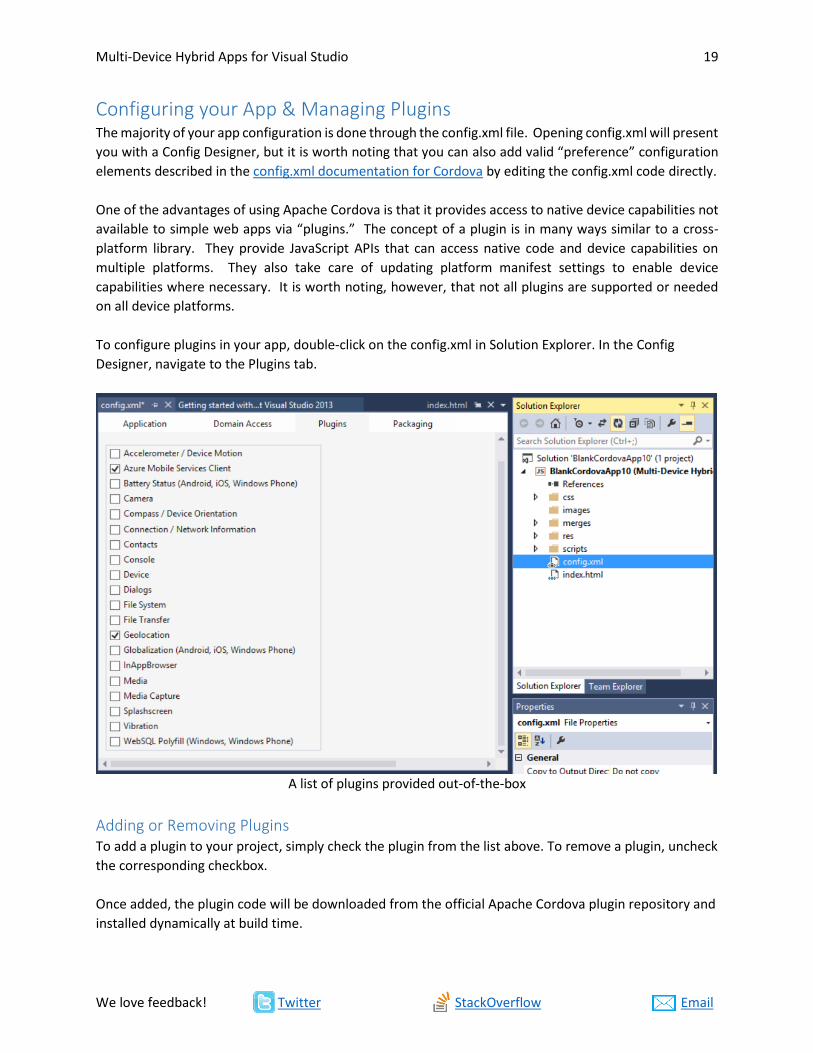
To configure plugins in your app, double-click on the config.xml in Solution Explorer. In the Config
Designer, navigate to the Plugins tab.
A list of plugins provided out-of-the-box
Adding or Removing Plugins To add a plugin to your project, simply check the plugin from the list above. To remove a plugin, uncheck
the corresponding checkbox.
Once added, the plugin code will be downloaded from the official Apache Cordova plugin repository and
installed dynamically at build time.
Multi-Device Hybrid Apps for Visual Studio 20
We love feedback! Twitter StackOverflow Email
Corresponding Changes in Config.xml To examine changes performed in the Config Designer, right-click on the config.xml file in Solution
Explorer, then choose View Code. This opens up the code view of the config file. Here you can see other
settings that you setup in your Manifest Designer, including a list of plugins you’ve added.
Avoid making manual changes to the config.xml code view directly, unless you are certain of what
you’re doing. Incorrect changes can cause errors during the build process.
Updating a Plugin The designer adds specific versions of plugins to your project to avoid unexpected API changes that may
occur when the plugins are updated. However, you may also update to the latest version (or an older
one) by changing the version number in the code view of the config.xml file.
Example: To update the “Camera” plugin from version 0.2.5, simply change the value <vs:feature>[email protected]</vs:feature>
…to… <vs:feature>[email protected]</vs:feature>
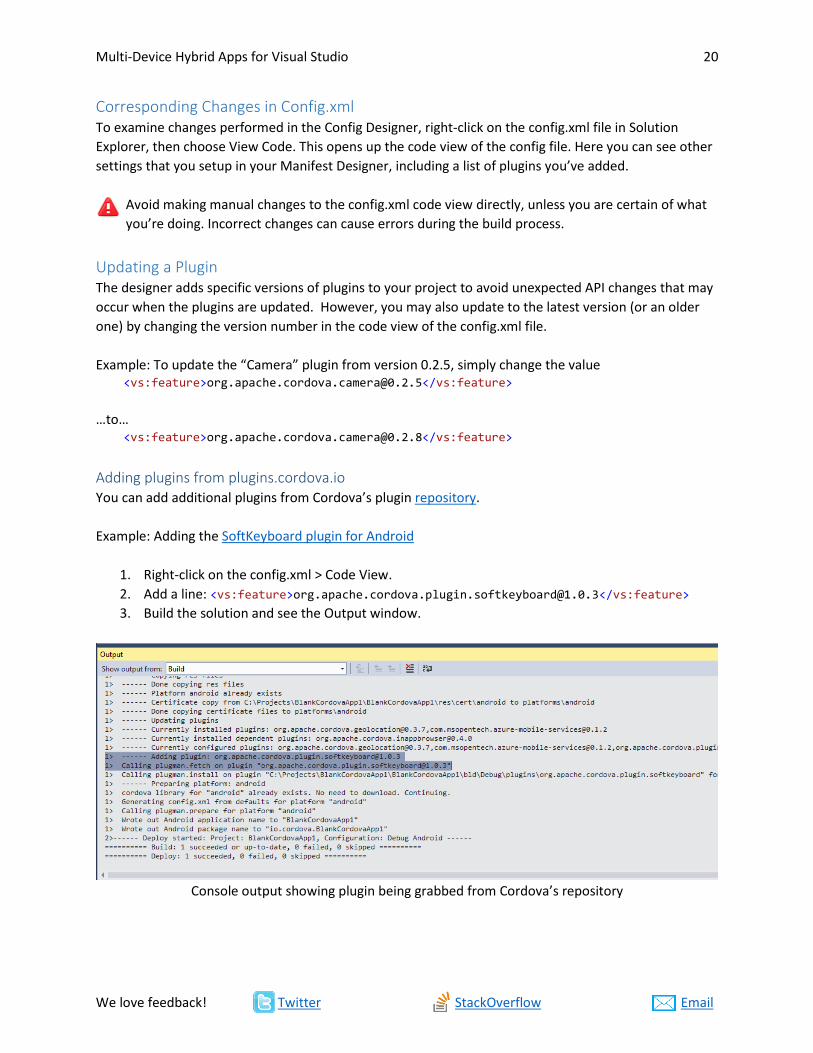
Adding plugins from plugins.cordova.io You can add additional plugins from Cordova’s plugin repository.
Example: Adding the SoftKeyboard plugin for Android
1. Right-click on the config.xml > Code View.
2. Add a line: <vs:feature>[email protected]</vs:feature>
3. Build the solution and see the Output window.
Console output showing plugin being grabbed from Cordova’s repository
Multi-Device Hybrid Apps for Visual Studio 21
We love feedback! Twitter StackOverflow Email
Adding Custom Plugins & Plugins from Git Repositories Pre-packaged plugins are extremely useful. However, in case you need to offload computationally
expensive functions to native code, expose new device capabilities to your app, or apply a fix that you
would prefer not to release publicly, you may want to create your own plugins. You can find more
information about creating your own plugins in the Cordova documentation.
To add your own plugin using Visual Studio, simply create a “plugins” folder in your project root and add
your plugin code structure in a sub-folder. The plugin will automatically be added to your app the next
time you build the project. To aid in the development of new plugins, all of the contents of the plugins
folder are editable. This allows you to make changes and check them into source control with the rest of
your project.
It’s also worth noting that this same capability can be used to add plugins not found in the
plugins.cordova.io repository. While you are technically able to pull plugins directly from Git
repositories by specifying a Git URI in config.xml, this will always fetch get the “edge” version of a plugin.
A better approach is to download the plugin from Github (download as zip) and place an extracted copy
in this same “plugins” folder in your project.
Plugins in the Config Designer Here’s a list of plugins that that are listed in the config designer out-of-the-box. When using the config
designer, the plugins will be locked to a specific version to reduce the chances of unexpected problems.
However, if there is a fix you need in a more recent version of a plugin, you can manually update to the
latest version as described above.
Accelerometer / Device Motion [org.apache.cordova.device-motion] Provides access to a motion sensor that detects changes in movement relative to the devices
orientation. Read More
Azure Mobile Services Client [com.msopentech.azure-mobile-services] Adds the appropriate Azure Mobile Services client library to your app for each platform and enables
your app to synchronize content with an Azure Mobile Services instance. Read More
Battery Status (Android, iOS, Windows Phone 8) [org.apache.cordova.battery-status] Enables your app to handle an event that is raised when the charge that is available in the battery
increases or decreases by at least 1 percent, or when the device is connected or disconnected from a
power outlet. Read More
Camera [org.apache.cordova.camera] Enables your app to take pictures by using the default camera application of the device. Read More
Compass [org.apache.cordova.device-orientation] Provides access to a sensor that detects the direction or heading of the device based on which way the
device is pointed. Read More
Multi-Device Hybrid Apps for Visual Studio 22
We love feedback! Twitter StackOverflow Email
Connection [org.apache.cordova.network-information] Enables your app to determine the network connection state of the device, and the types of networks
the device is connected to. Read More
Contacts [org.apache.cordova.contacts] Provides access to the device’s Contacts database. Your app can find, add, or remove contacts. Read
More
Device [org.apache.cordova.device] Provides access to information about the hardware and software of the device. For example, this could
be the model number or platform of the device. Read More
Dialogs / Notifications [org.apache.cordova.dialogs] Enables your app to display dialog boxes. Read More
File System [org.apache.cordova.file] Enables your app to read, write, and navigate the file system of the device. Read More
File Transfer [org.apache.cordova.file-transfer] Enables your app to upload or download files to and from a server. Read More
Geolocation [org.apache.cordova.geolocation] Provides information about the device's location such as latitude and longitude. Read More
Globalization [org.apache.cordova.globalization] Enables your app to obtain information about the user’s locale and time zone, and then perform
operations that are specific to that locale and time zone. Read More
InAppBrowser [org.apache.cordova.inappbrowser] Enables your app to host a Web browser, and then perform actions in response to browser-related
events such as inserting CSS into the browser window when a page loads. Read More
Media [org.apache.cordova.media] Enables your app to play and record audio files by using the device’s default application. Read More
Media Capture [org.apache.cordova.media-capture] Provides access to the device’s audio, image, and video capture capabilities. Read More
Splashscreen [org.apache.cordova.splashscreen] Enables your app to show and hide the application’s splash screen. Read More
Vibration [org.apache.cordova.vibration] Enables your app to vibrate the device. Read More
WebSQL Polyfill (Windows, Windows Phone 8) [com.msopentech.websql] Enables WebSQL on all platforms by adding WebSQL functionality to your app on Windows and
Windows Phone 8. Read More
Multi-Device Hybrid Apps for Visual Studio 23
We love feedback! Twitter StackOverflow Email
Adding Connected Services to Your App The Connected Service Manager allows developers to integrate Microsoft services like Office365, Azure
Mobile, Application Insights, and others into their projects. It’s a simple way to add these services
without ever leaving Visual Studio.
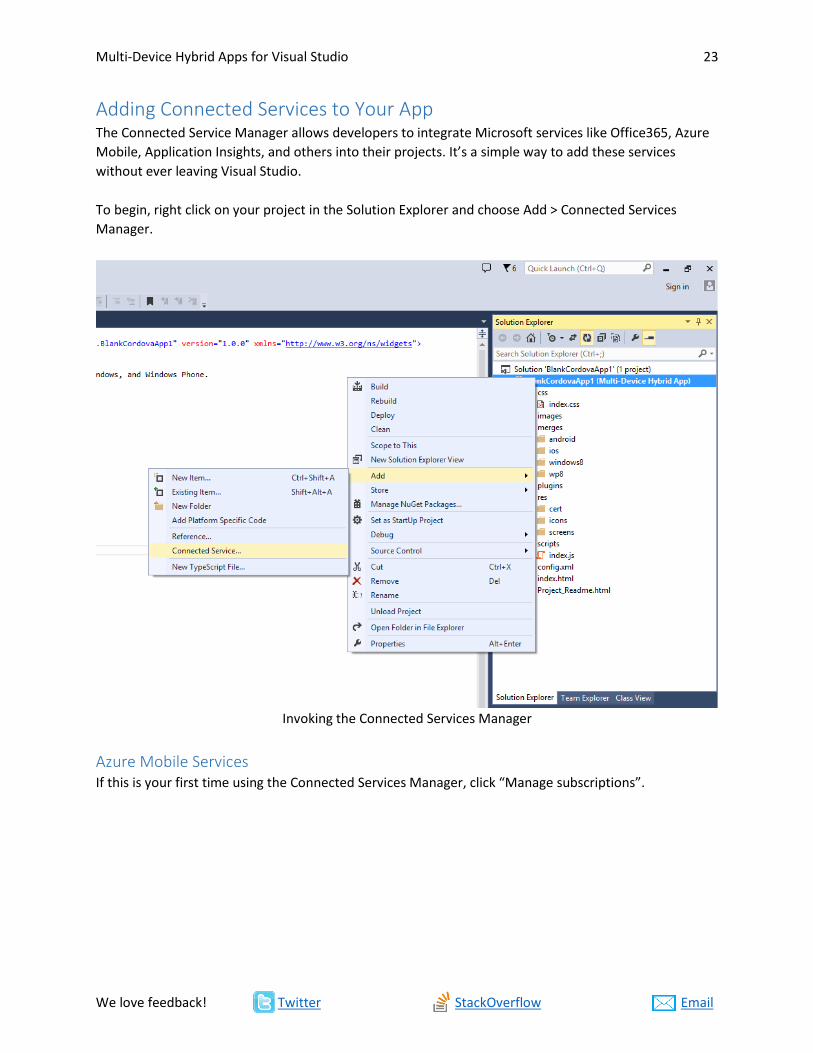
To begin, right click on your project in the Solution Explorer and choose Add > Connected Services
Manager.
Invoking the Connected Services Manager
Azure Mobile Services If this is your first time using the Connected Services Manager, click “Manage subscriptions”.

Multi-Device Hybrid Apps for Visual Studio 24
We love feedback! Twitter StackOverflow Email
Manage subscription page
If you don’t have a Microsoft Azure account yet, you can create one from the Microsoft Azure
portal.
Now, login with your Microsoft account to see current subscriptions associated with your account. Once
done, click “OK”.
Multi-Device Hybrid Apps for Visual Studio 25
We love feedback! Twitter StackOverflow Email
Current account subscriptions
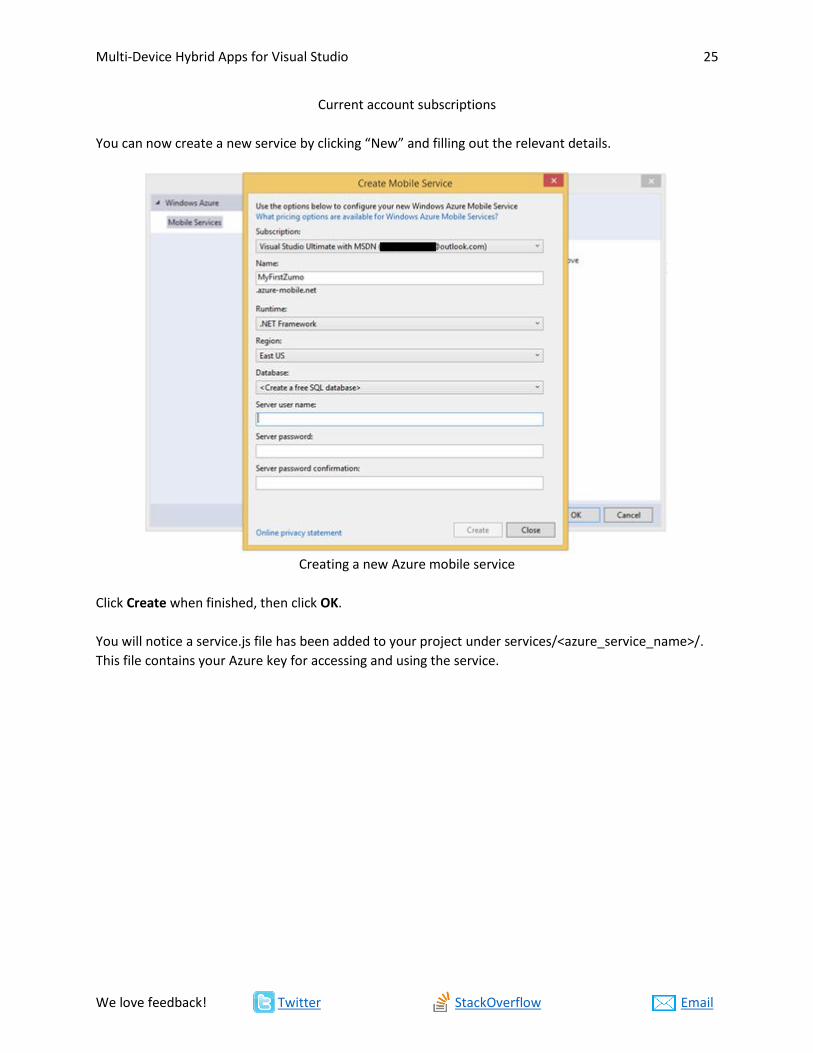
You can now create a new service by clicking “New” and filling out the relevant details.
Creating a new Azure mobile service
Click Create when finished, then click OK.
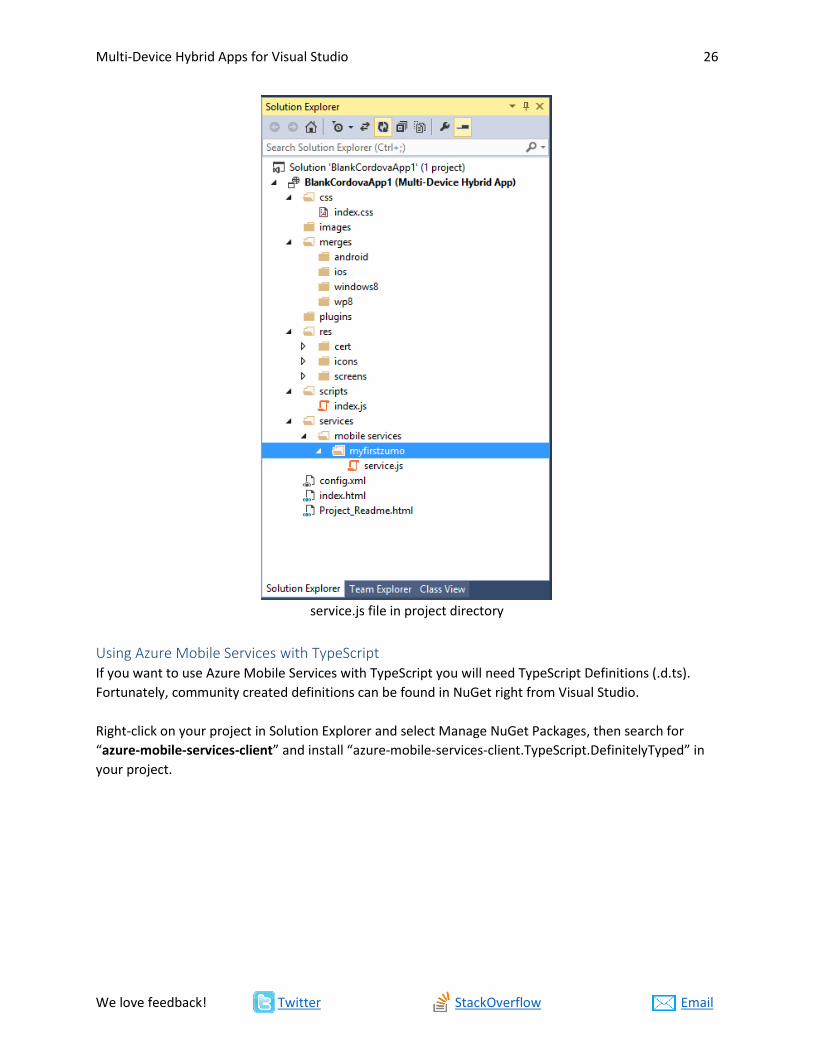
You will notice a service.js file has been added to your project under services/<azure_service_name>/.
This file contains your Azure key for accessing and using the service.
Multi-Device Hybrid Apps for Visual Studio 26
We love feedback! Twitter StackOverflow Email
service.js file in project directory
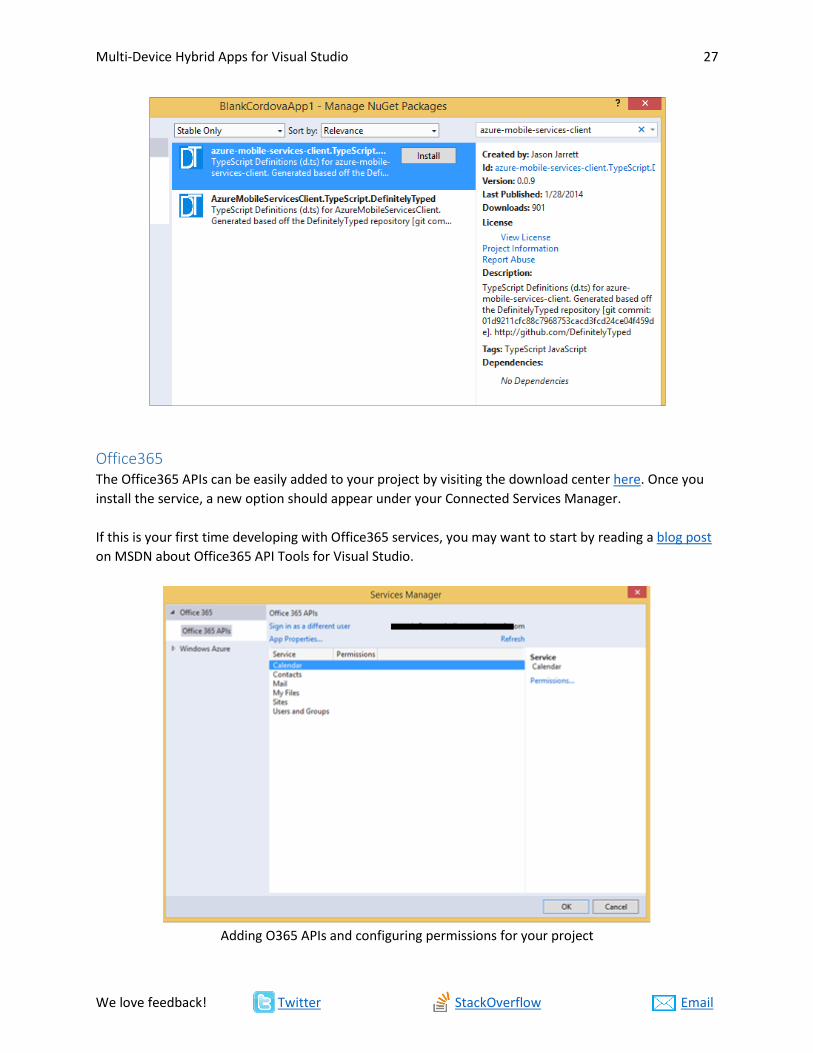
Using Azure Mobile Services with TypeScript If you want to use Azure Mobile Services with TypeScript you will need TypeScript Definitions (.d.ts).
Fortunately, community created definitions can be found in NuGet right from Visual Studio.
Right-click on your project in Solution Explorer and select Manage NuGet Packages, then search for
“azure-mobile-services-client” and install “azure-mobile-services-client.TypeScript.DefinitelyTyped” in
your project.
Multi-Device Hybrid Apps for Visual Studio 27
We love feedback! Twitter StackOverflow Email
Office365 The Office365 APIs can be easily added to your project by visiting the download center here. Once you
install the service, a new option should appear under your Connected Services Manager.
If this is your first time developing with Office365 services, you may want to start by reading a blog post
on MSDN about Office365 API Tools for Visual Studio.
Adding O365 APIs and configuring permissions for your project
Multi-Device Hybrid Apps for Visual Studio 28
We love feedback! Twitter StackOverflow Email
Note: You might be asked to login to your Office365 developer account if this is the first time adding
the service inside Visual Studio.
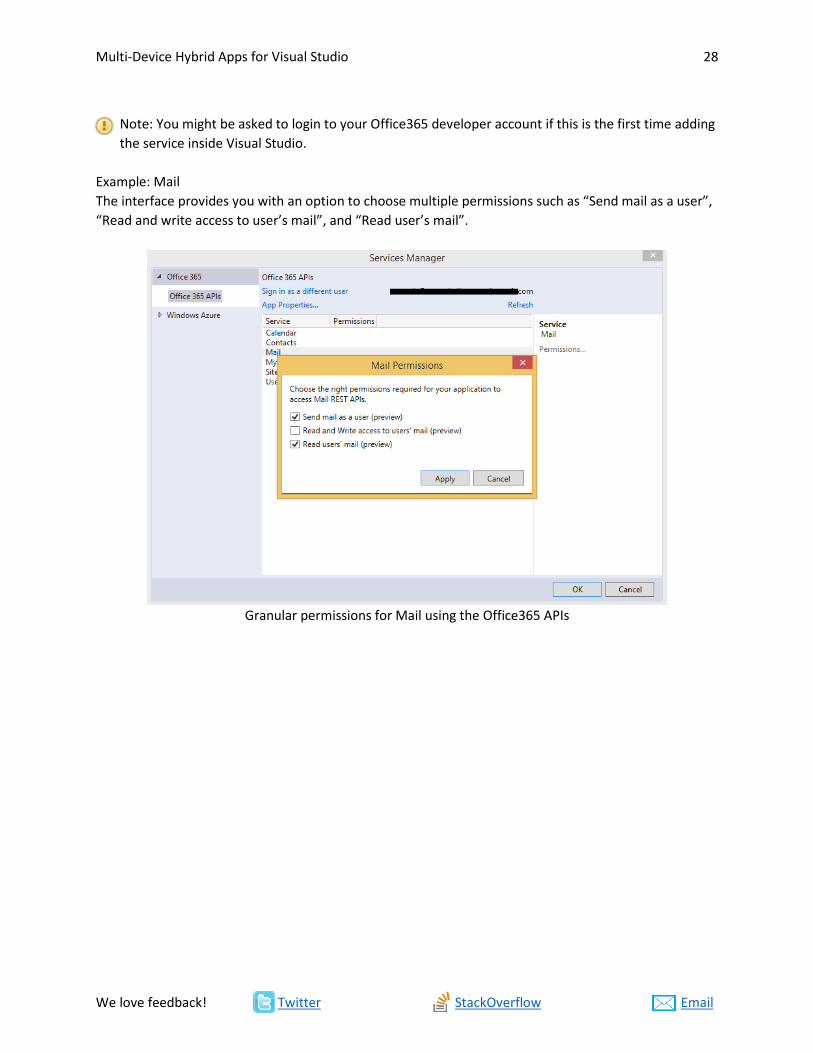
Example: Mail
The interface provides you with an option to choose multiple permissions such as “Send mail as a user”,
“Read and write access to user’s mail”, and “Read user’s mail”.
Granular permissions for Mail using the Office365 APIs
Multi-Device Hybrid Apps for Visual Studio 29
We love feedback! Twitter StackOverflow Email
Application Insights
Application Insights provides telemetry data for your application to ensure it is available, performing,
and improving. It also provides other usage metrics such as operating systems, location, unique users,
and the ability to add custom events to create your own statistics.
Modifying your app to report telemetry via Application Insights requires a few steps that are described
below. Integration with Application Insights is performed through the simple addition of a NuGet
package that will add the Application Insights SDK to your project.
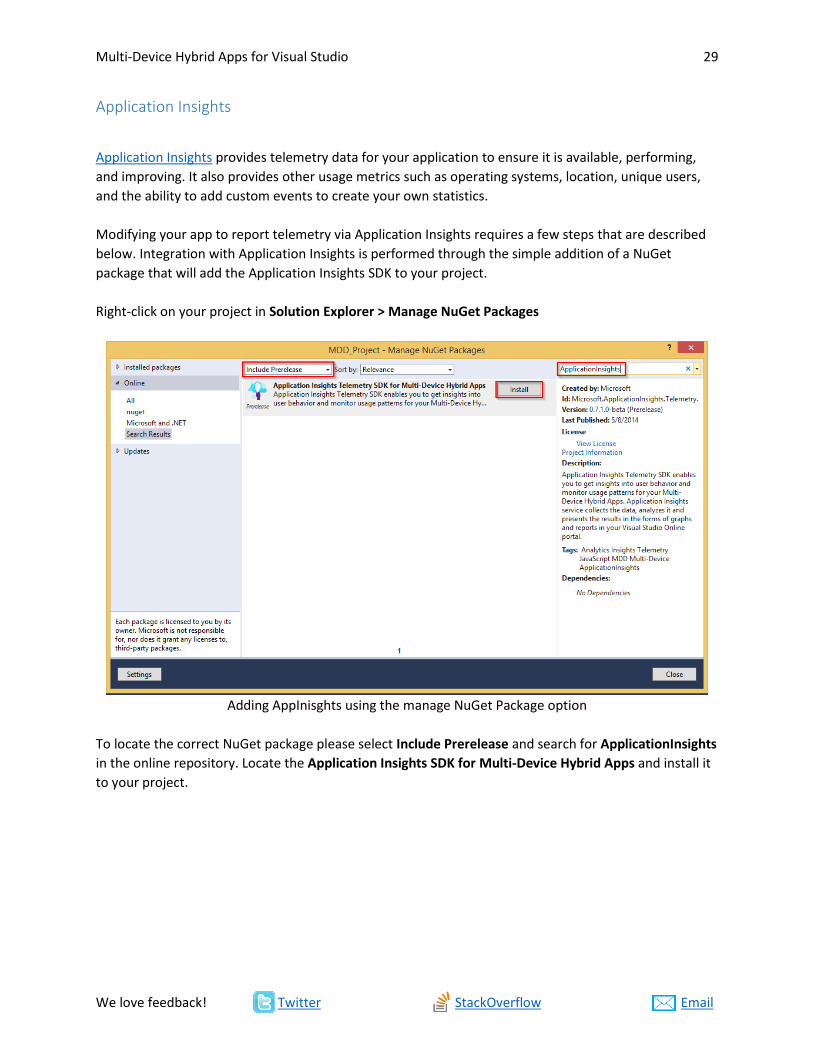
Right-click on your project in Solution Explorer > Manage NuGet Packages
Adding AppInisghts using the manage NuGet Package option
To locate the correct NuGet package please select Include Prerelease and search for ApplicationInsights
in the online repository. Locate the Application Insights SDK for Multi-Device Hybrid Apps and install it
to your project.
Multi-Device Hybrid Apps for Visual Studio 30
We love feedback! Twitter StackOverflow Email
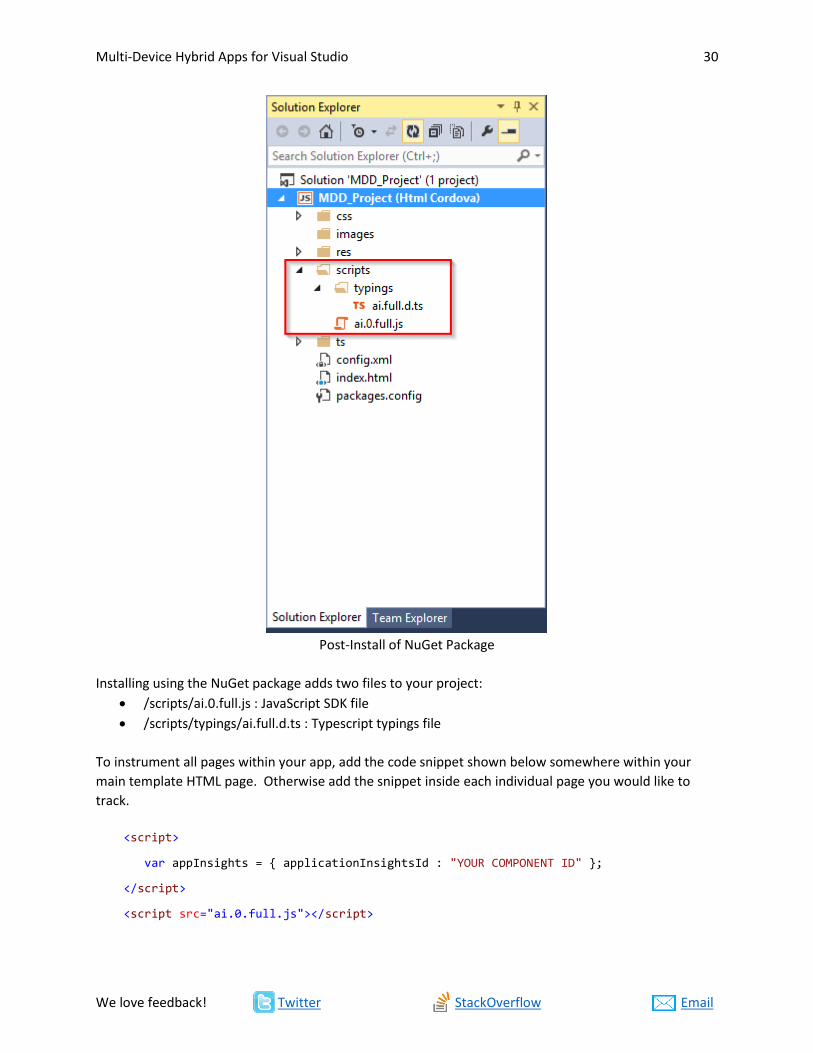
Post-Install of NuGet Package
Installing using the NuGet package adds two files to your project:
/scripts/ai.0.full.js : JavaScript SDK file
/scripts/typings/ai.full.d.ts : Typescript typings file
To instrument all pages within your app, add the code snippet shown below somewhere within your
main template HTML page. Otherwise add the snippet inside each individual page you would like to
track.
<script>
var appInsights = { applicationInsightsId : "YOUR COMPONENT ID" };
</script>
<script src="ai.0.full.js"></script>
Multi-Device Hybrid Apps for Visual Studio 31
We love feedback! Twitter StackOverflow Email
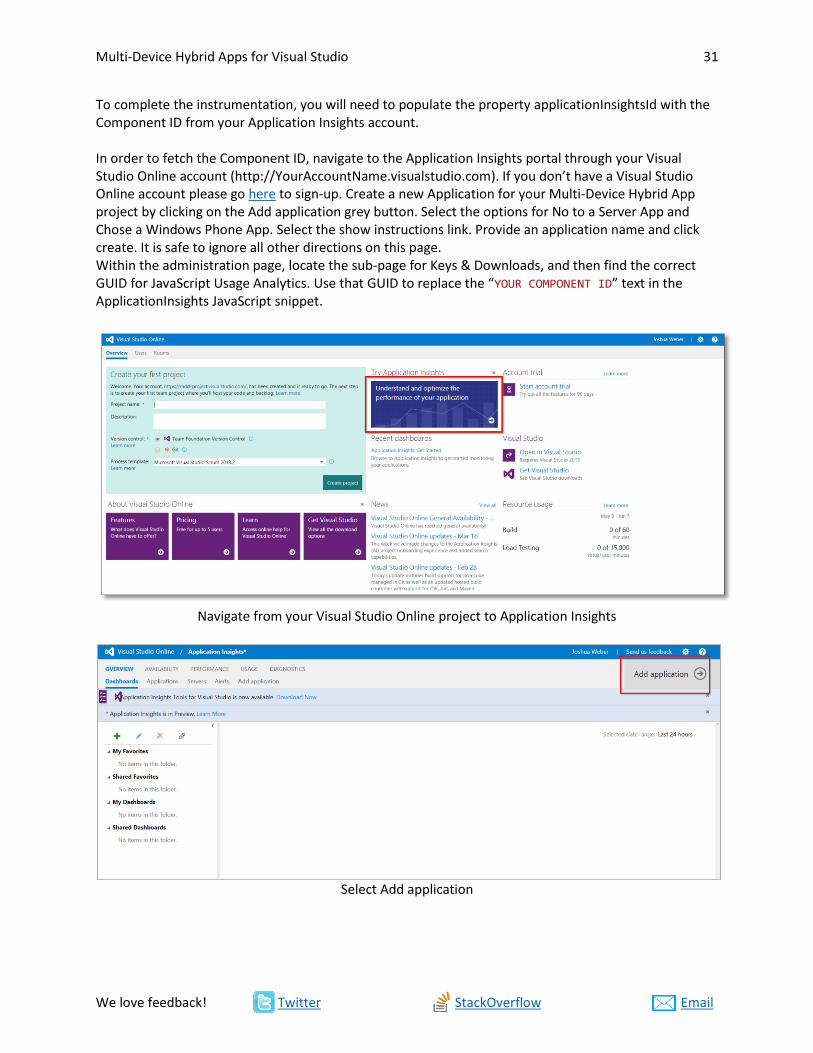
To complete the instrumentation, you will need to populate the property applicationInsightsId with the Component ID from your Application Insights account. In order to fetch the Component ID, navigate to the Application Insights portal through your Visual Studio Online account (http://YourAccountName.visualstudio.com). If you don’t have a Visual Studio Online account please go here to sign-up. Create a new Application for your Multi-Device Hybrid App project by clicking on the Add application grey button. Select the options for No to a Server App and Chose a Windows Phone App. Select the show instructions link. Provide an application name and click create. It is safe to ignore all other directions on this page. Within the administration page, locate the sub-page for Keys & Downloads, and then find the correct GUID for JavaScript Usage Analytics. Use that GUID to replace the “YOUR COMPONENT ID” text in the ApplicationInsights JavaScript snippet.
Navigate from your Visual Studio Online project to Application Insights
Select Add application
Multi-Device Hybrid Apps for Visual Studio 32
We love feedback! Twitter StackOverflow Email
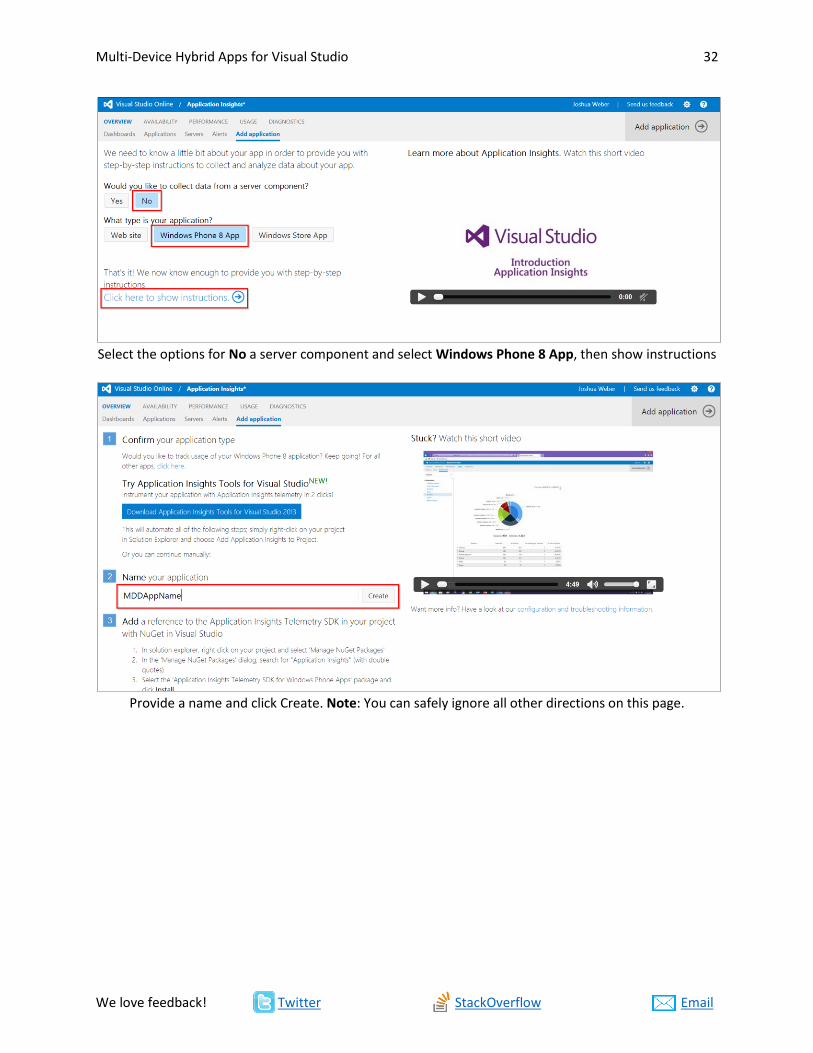
Select the options for No a server component and select Windows Phone 8 App, then show instructions
Provide a name and click Create. Note: You can safely ignore all other directions on this page.
Multi-Device Hybrid Apps for Visual Studio 33
We love feedback! Twitter StackOverflow Email
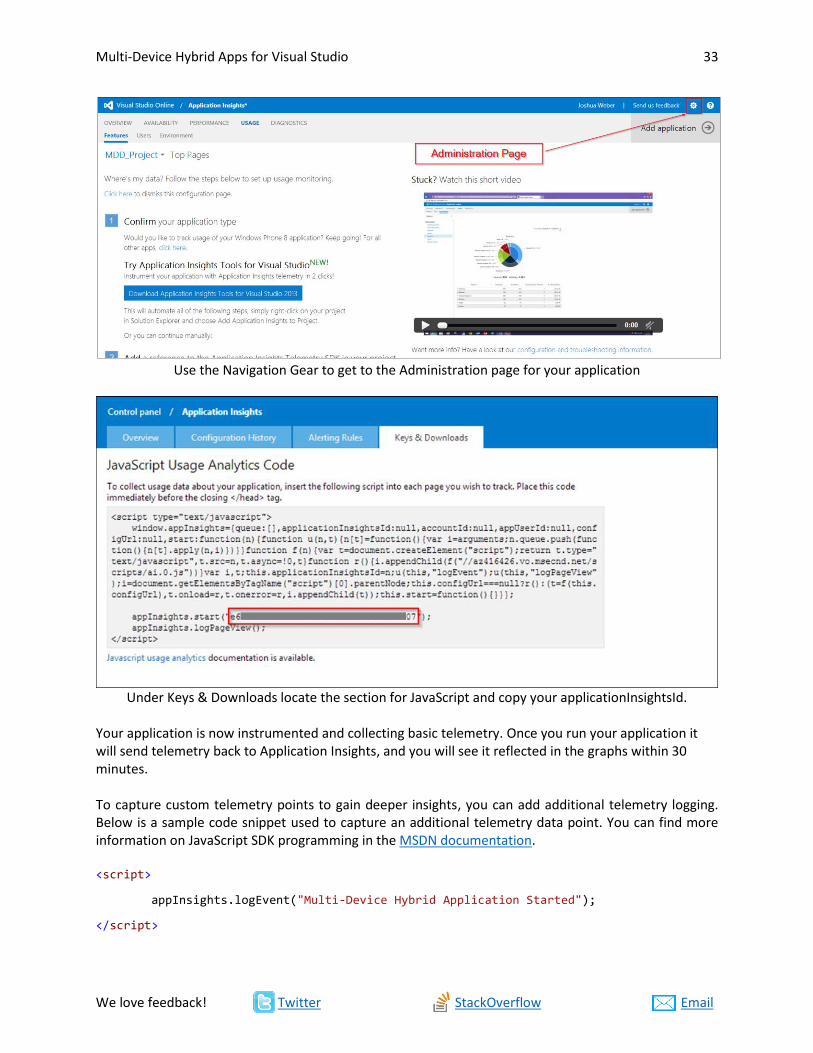
Use the Navigation Gear to get to the Administration page for your application
Under Keys & Downloads locate the section for JavaScript and copy your applicationInsightsId. Your application is now instrumented and collecting basic telemetry. Once you run your application it will send telemetry back to Application Insights, and you will see it reflected in the graphs within 30 minutes. To capture custom telemetry points to gain deeper insights, you can add additional telemetry logging. Below is a sample code snippet used to capture an additional telemetry data point. You can find more information on JavaScript SDK programming in the MSDN documentation. <script>
appInsights.logEvent("Multi-Device Hybrid Application Started");
</script>
Multi-Device Hybrid Apps for Visual Studio 34
We love feedback! Twitter StackOverflow Email
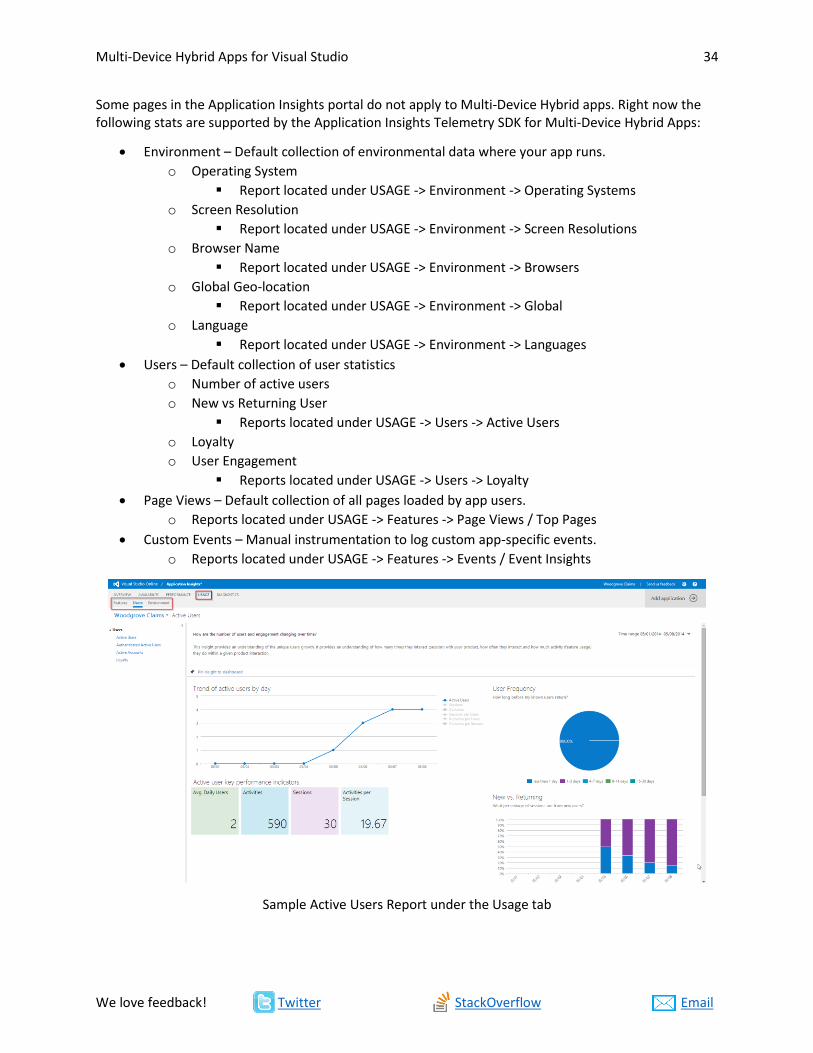
Some pages in the Application Insights portal do not apply to Multi-Device Hybrid apps. Right now the following stats are supported by the Application Insights Telemetry SDK for Multi-Device Hybrid Apps:
Environment – Default collection of environmental data where your app runs.
o Operating System
Report located under USAGE -> Environment -> Operating Systems
o Screen Resolution
Report located under USAGE -> Environment -> Screen Resolutions
o Browser Name
Report located under USAGE -> Environment -> Browsers
o Global Geo-location
Report located under USAGE -> Environment -> Global
o Language
Report located under USAGE -> Environment -> Languages
Users – Default collection of user statistics
o Number of active users
o New vs Returning User
Reports located under USAGE -> Users -> Active Users
o Loyalty
o User Engagement
Reports located under USAGE -> Users -> Loyalty
Page Views – Default collection of all pages loaded by app users.
o Reports located under USAGE -> Features -> Page Views / Top Pages
Custom Events – Manual instrumentation to log custom app-specific events.
o Reports located under USAGE -> Features -> Events / Event Insights
Sample Active Users Report under the Usage tab
Multi-Device Hybrid Apps for Visual Studio 35
We love feedback! Twitter StackOverflow Email
Emulation, Simulation, & Deploying to Devices Visual Studio provides a host of emulation, simulation, and device deployment options, from running
the app in a browser using Apache Ripple to native emulators and physical devices.
To switch between target device platforms, you will need to use the “Solution Platforms”
dropdown present in the VS toolbar. If you have installed a fresh copy of Visual Studio 2013
Update 2, it will be there by default, but it may not be present if you upgraded from a previous
version. Fortunately, it is easy to add it into the toolbar as described here:
http://support.microsoft.com/kb/2954109
Apache Ripple Emulator The Apache Ripple Emulator runs as a Web application inside a WebKit-based browser like Chrome. In
Cordova, it can be used to simulate your app on a number of devices and platforms and provides basic
support for some core Cordova plugins like Geolocation and Device Orientation.
Apache Ripple provides a quick and easy first step in authoring and validating your app (particularly
triaging CSS issues) for Android and iOS, where running it as a Windows app would not provide the needed
fidelity.
However, it’s important to note that, like the iOS Simulator, Ripple is by no means complete in its
emulation of Cordova APIs or native device capabilities, nor does it fully emulate the specific versions of
the browser used by your app on a given device platform. It is complementary to, but does not replace,
native emulator and device testing.
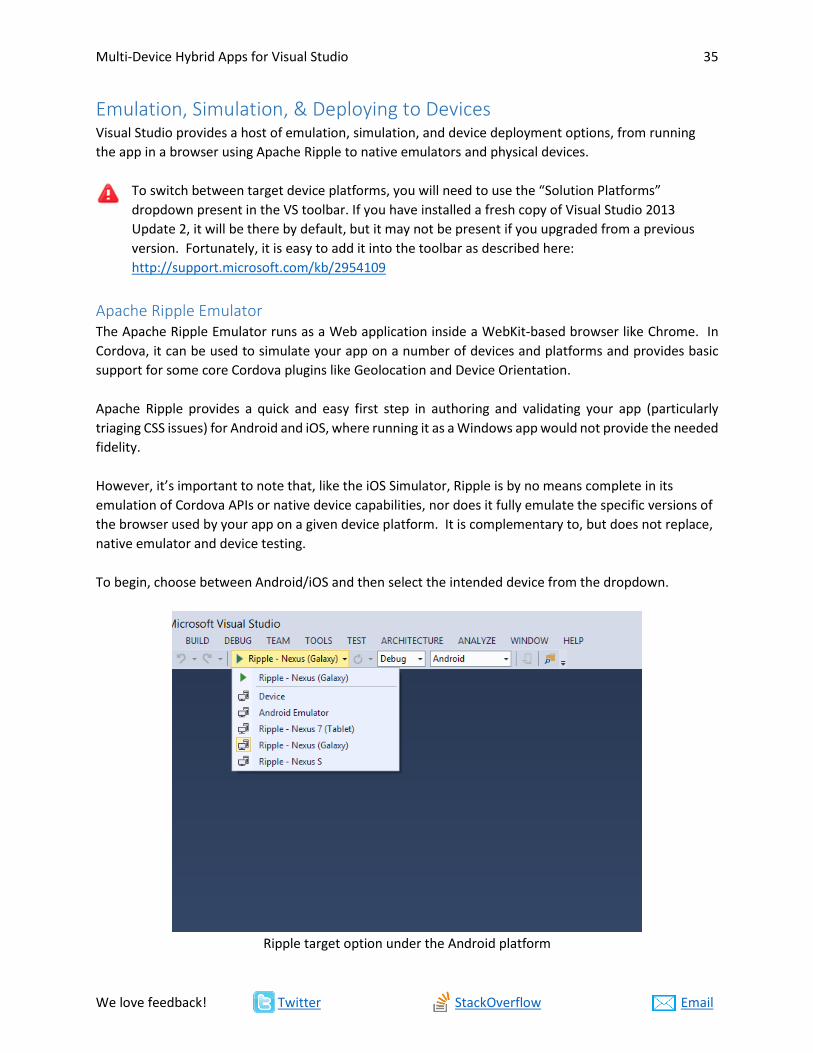
To begin, choose between Android/iOS and then select the intended device from the dropdown.
Ripple target option under the Android platform
Multi-Device Hybrid Apps for Visual Studio 36
We love feedback! Twitter StackOverflow Email
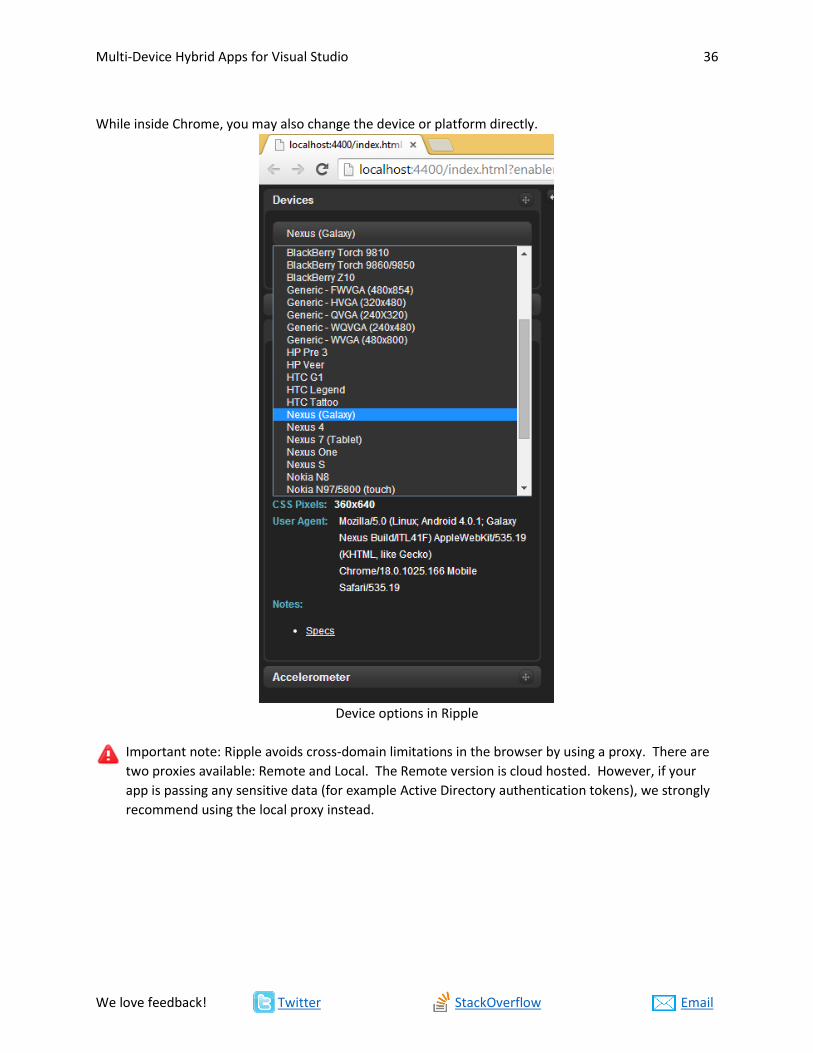
While inside Chrome, you may also change the device or platform directly.
Device options in Ripple
Important note: Ripple avoids cross-domain limitations in the browser by using a proxy. There are
two proxies available: Remote and Local. The Remote version is cloud hosted. However, if your
app is passing any sensitive data (for example Active Directory authentication tokens), we strongly
recommend using the local proxy instead.
Multi-Device Hybrid Apps for Visual Studio 37
We love feedback! Twitter StackOverflow Email
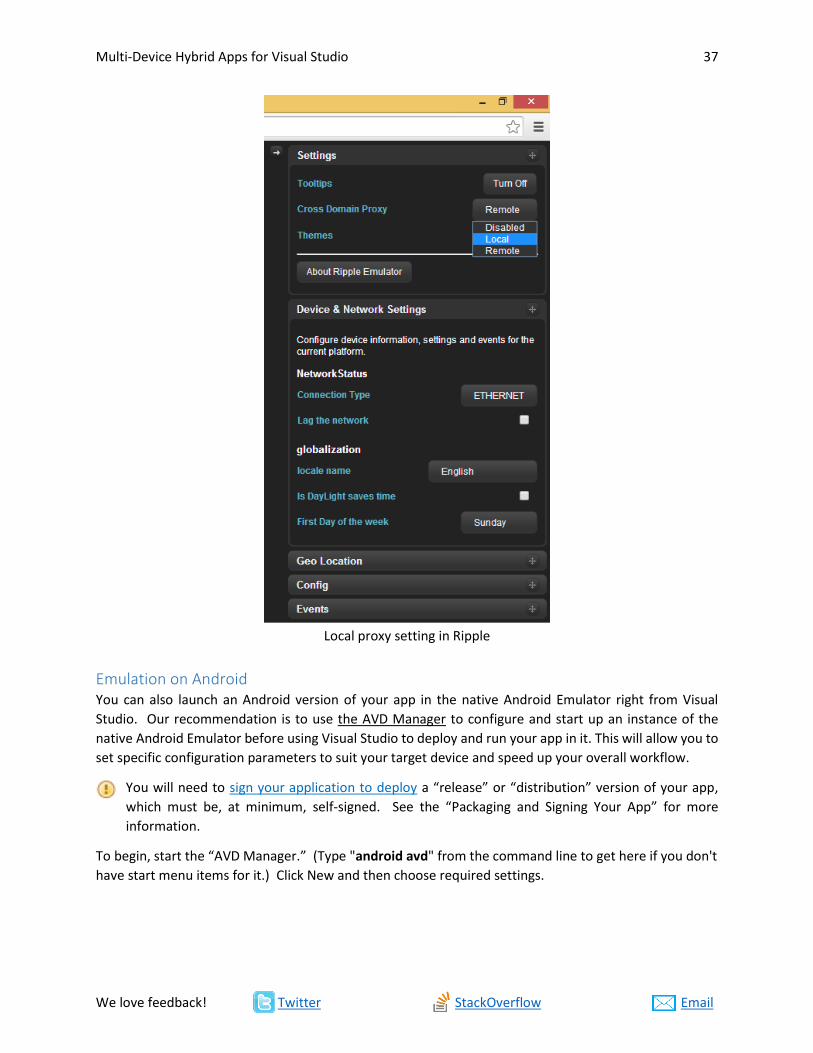
Local proxy setting in Ripple
Emulation on Android You can also launch an Android version of your app in the native Android Emulator right from Visual
Studio. Our recommendation is to use the AVD Manager to configure and start up an instance of the
native Android Emulator before using Visual Studio to deploy and run your app in it. This will allow you to
set specific configuration parameters to suit your target device and speed up your overall workflow.
You will need to sign your application to deploy a “release” or “distribution” version of your app,
which must be, at minimum, self-signed. See the “Packaging and Signing Your App” for more
information.
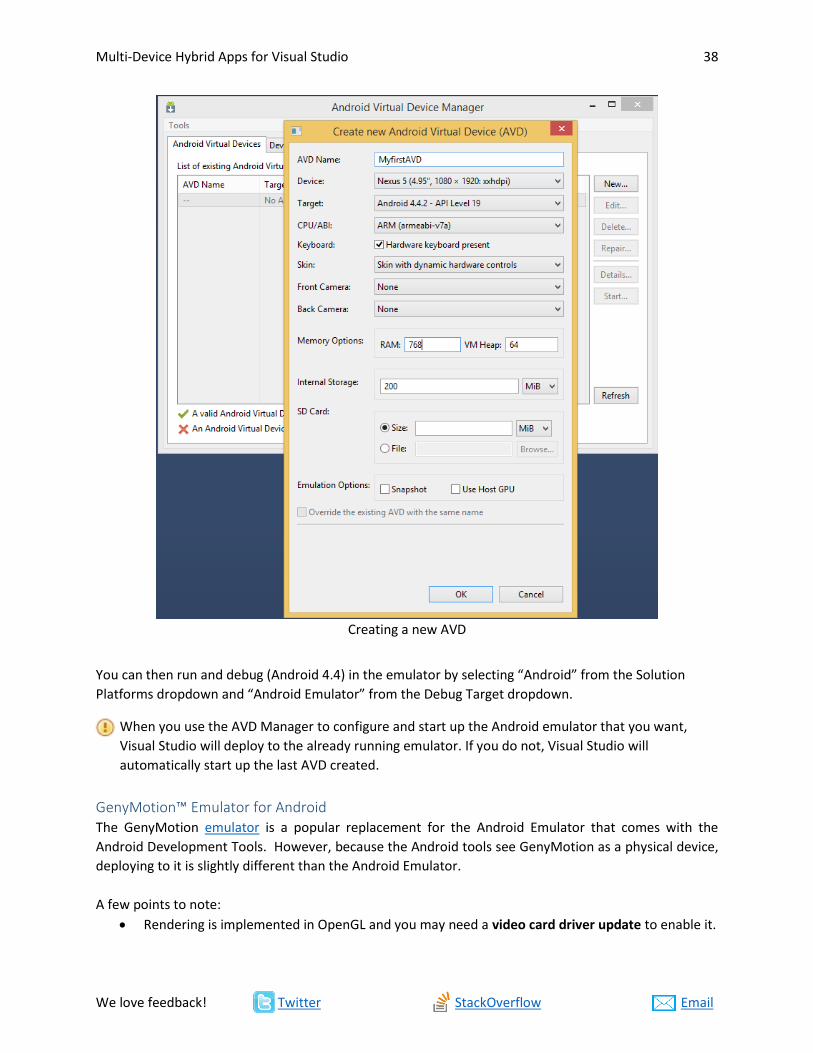
To begin, start the “AVD Manager.” (Type "android avd" from the command line to get here if you don't
have start menu items for it.) Click New and then choose required settings.
Multi-Device Hybrid Apps for Visual Studio 38
We love feedback! Twitter StackOverflow Email
Creating a new AVD
You can then run and debug (Android 4.4) in the emulator by selecting “Android” from the Solution
Platforms dropdown and “Android Emulator” from the Debug Target dropdown.
When you use the AVD Manager to configure and start up the Android emulator that you want,
Visual Studio will deploy to the already running emulator. If you do not, Visual Studio will
automatically start up the last AVD created.
GenyMotion™ Emulator for Android The GenyMotion emulator is a popular replacement for the Android Emulator that comes with the
Android Development Tools. However, because the Android tools see GenyMotion as a physical device,
deploying to it is slightly different than the Android Emulator.
A few points to note:
Rendering is implemented in OpenGL and you may need a video card driver update to enable it.
Multi-Device Hybrid Apps for Visual Studio 39
We love feedback! Twitter StackOverflow Email
Because of the OpenGL requirement, the Genymotion emulator may not start if you are
connected remotely
Using GenyMotion from Visual Studio
Start the GenyMotion emulator.
Select “Device” as the deployment target from the dropdown in the Visual Studio.
Now press F5 or click on the Debug toolbar button (with the Device option). This will start the app
in the GenyMotion emulator and connect the debugger (for Android 4.4).
Note that if you later want to deploy your app to a physical Android device, you will need to shut
down GenyMotion first.
Improving the Performance of the Android Emulator
To improve the performance of the emulators included in the Android SDK and GenyMotion, you must
disable Hyper-V and configure the emulator to use hardware acceleration. Note that disabling Hyper-V
will prevent you from using the Windows Phone emulator. You can still deploy to a Windows Phone
device.
Disable Hyper-V
Hyper-V must be fully disabled so it does not start at boot time. Shutting down VMs or stopping the
Hyper-V server is not sufficient. Note that disabling Hyper-V will prevent you from using the Windows
Phone emulator, but you can still deploy to Windows Phone devices.
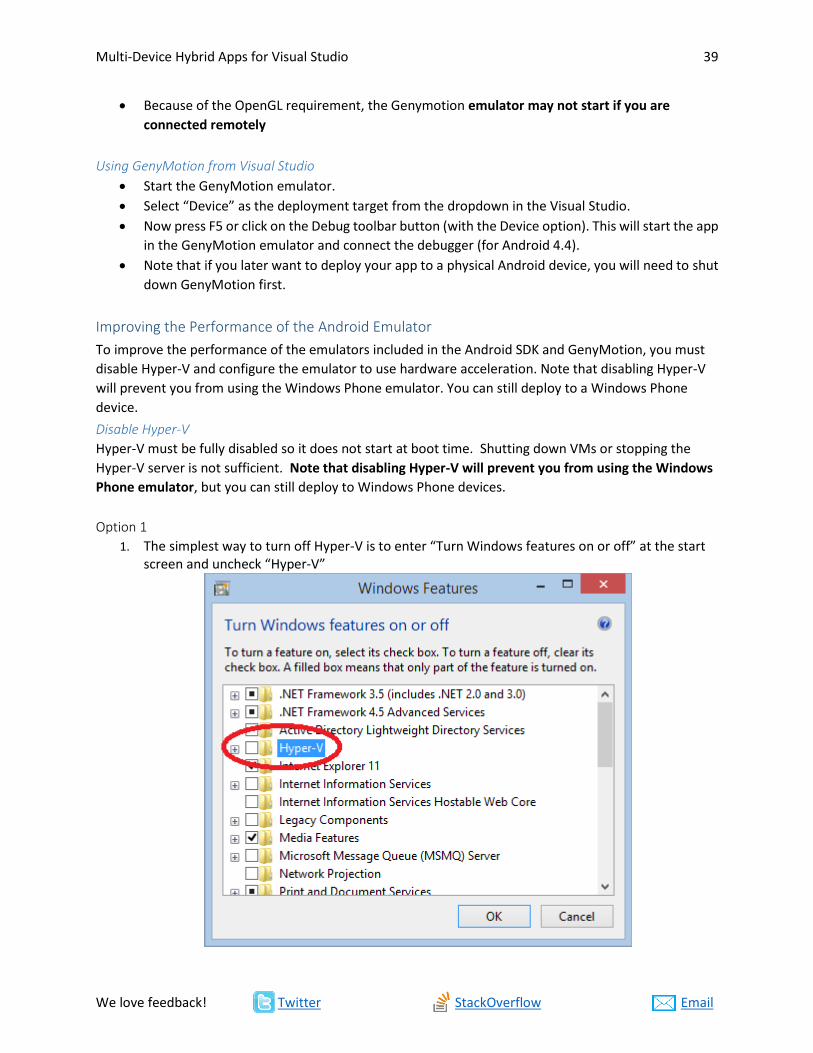
Option 1
1. The simplest way to turn off Hyper-V is to enter “Turn Windows features on or off” at the start screen and uncheck “Hyper-V”
Multi-Device Hybrid Apps for Visual Studio 40
We love feedback! Twitter StackOverflow Email
2. Hyper-V will no longer be active after clicking “OK” and Rebooting
Option 2
An alternate method is to configure Windows to start with Hyper-V enabled or disabled via the command prompt.
Warning: Running the following commands can prevent your system from booting if not executed correctly. Exercise caution when using bcdedit commands.
1. From an elevated command prompt (Run as Administrator) run this command:
bcdedit /set hypervisorlaunchtype off
2. Reboot
You can create a simple shell script to automate this as follows: bcdedit /set hypervisorlaunchtype off
shutdown /r
You can turn Hyper-V on again later by executing this command and rebooting:
bcdedit /set hypervisorlaunchtype auto
If you are using the GenyMotion emulator, stop here. For additional steps that show how to set up the native Android Emulator, keep reading.
Improving Android Emulator Performance After Hyper-V is Disabled
Now that Hyper-V is disabled, you can install the Intel HAXM Driver and configure your Android AVD to take advantage of hardware acceleration if your computer has an Intel processor.
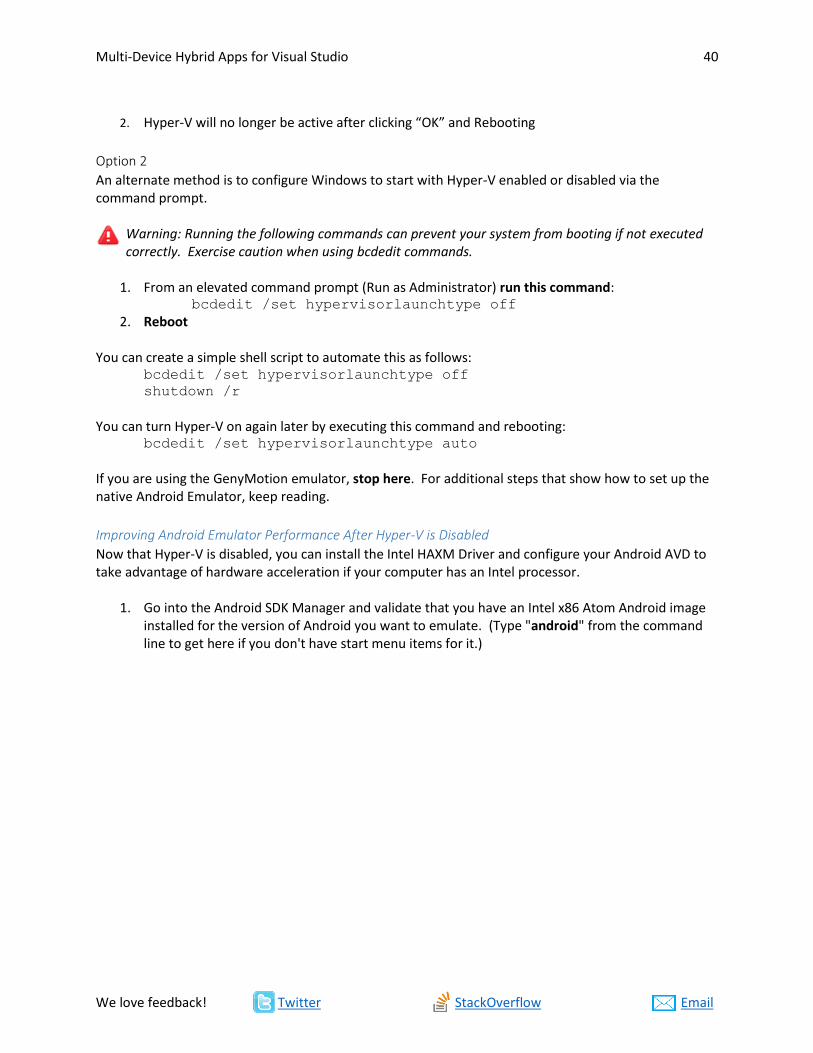
1. Go into the Android SDK Manager and validate that you have an Intel x86 Atom Android image installed for the version of Android you want to emulate. (Type "android" from the command line to get here if you don't have start menu items for it.)
Multi-Device Hybrid Apps for Visual Studio 41
We love feedback! Twitter StackOverflow Email
2. Install the Intel x86 Emulator Accelerator (HAXM) driver (Read more) a. You can get the Intel x86 Emulator Accelerator (HAXM) driver by checking it under
"Extras" in the Android SDK Manager (above). b. NOTE: This step only downloads the drivers
3. Once downloaded, go to where you installed the Android SDK and run the installer at:
extras\intel\Hardware_Accelerated_Execution_Manager a. Note that this install will fail if Hyper-V is not disabled. In this scenario, an error will
incorrectly state that your PC does not have Intel virtualization technology. b. If you still are running into problems after disabling Hyper-V, you need to validate
that virtualization hardware acceleration is enabled in your BIOS and that your processor is supported.
Note: The default install location for the Android SDK on Windows can be hard to find. It is located here: %localappdata%\Android\android-sdk (Ex: C:\Users\<user>\AppData\Local\Android\android-sdk)
4. Next, go into the AVD Manager and create a new image. (Type "android avd" from the command line to get here if you don't have a Start menu item.)
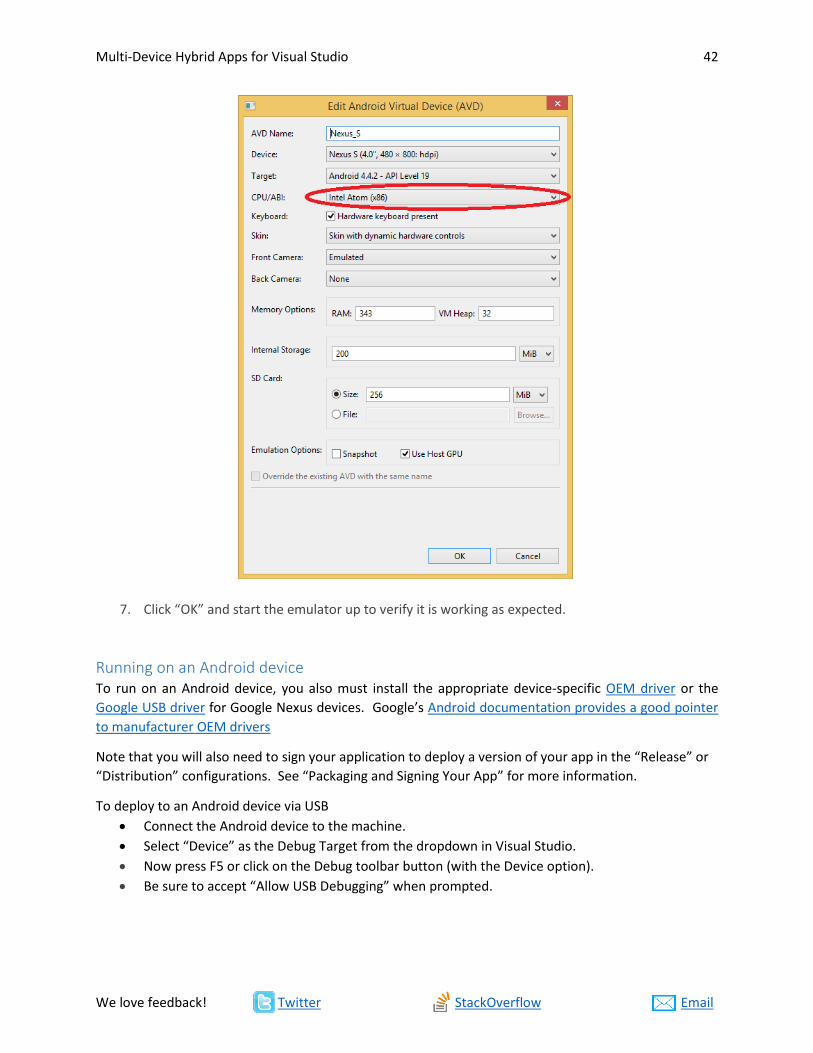
5. Select the Intel Atom (x86) CPU/ABI option. 6. Using Android 4.4.x (API Level 19) or higher will allow you to use the Visual Studio debugger as
well
Multi-Device Hybrid Apps for Visual Studio 42
We love feedback! Twitter StackOverflow Email
7. Click “OK” and start the emulator up to verify it is working as expected.
Running on an Android device To run on an Android device, you also must install the appropriate device-specific OEM driver or the
Google USB driver for Google Nexus devices. Google’s Android documentation provides a good pointer
to manufacturer OEM drivers
Note that you will also need to sign your application to deploy a version of your app in the “Release” or
“Distribution” configurations. See “Packaging and Signing Your App” for more information.
To deploy to an Android device via USB
Connect the Android device to the machine.
Select “Device” as the Debug Target from the dropdown in Visual Studio.
Now press F5 or click on the Debug toolbar button (with the Device option).
Be sure to accept “Allow USB Debugging” when prompted.
Multi-Device Hybrid Apps for Visual Studio 43
We love feedback! Twitter StackOverflow Email
Using the iOS Simulator on a Remote Mac Before you can start your app on the iOS Simulator, you need to set up the vs-cordova-remote agent as
mentioned in the “Remote Build and Simulation Agent” section. Make sure that you have the emulation
enabled in the agent as described previously.
Visual Studio will start up the iOS Simulator on the Mac, not your PC. Its use is recommended when
you have a personal Mac device or are using virtualization technology like Parallels.
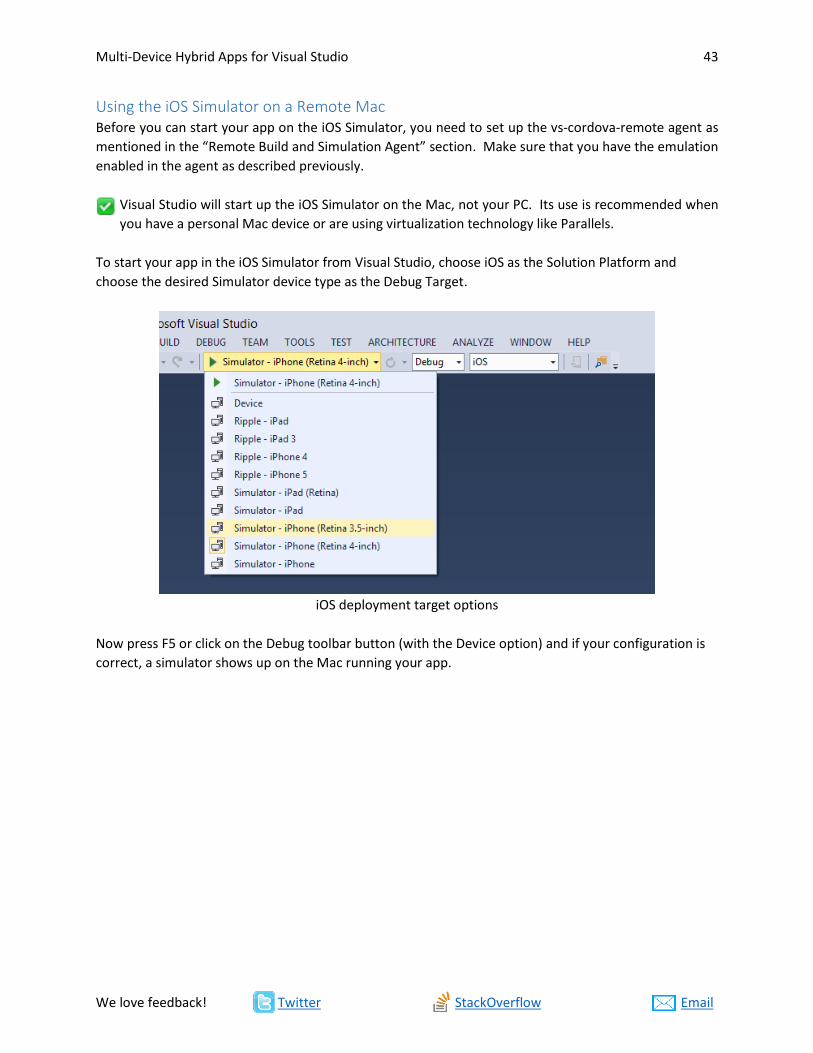
To start your app in the iOS Simulator from Visual Studio, choose iOS as the Solution Platform and
choose the desired Simulator device type as the Debug Target.
iOS deployment target options
Now press F5 or click on the Debug toolbar button (with the Device option) and if your configuration is
correct, a simulator shows up on the Mac running your app.

Multi-Device Hybrid Apps for Visual Studio 44
We love feedback! Twitter StackOverflow Email
Simulator running on a Mac OS
Using iTunes to Deploy to a Physical iOS device While Visual Studio does not currently support debugging your app on iOS, we have taken steps to make
deploying your iOS app to your iOS device easier when using the vs-mda-remote agent for to build your
app.
Prerequisite recap
Install iTunes, if you did not install it with the Multi-Device Hybrid Apps extension.
Configure the vs-mda-remote build agent on a Mac as described previously.
Ensure that the iOS device you will be deploying to been provisioned with the same provisioning
profile as the remote Mac build server you have configured. (See the instructions under the
“Packaging and Signing Your App” to learn more about provisioning.)
Deploying to Your iOS Device from VS In Visual Studio, choose iOS in the Solution Platform dropdown and then choose “Device” as the Debug
target.
Press F5 or click on the Debug toolbar button (with the Device option). If your configuration is correct,
iTunes will start and the built iOS app will automatically be added to (or replaced in) your library. You
can then install/update the app on a connected iOS device as you would any other app.
Multi-Device Hybrid Apps for Visual Studio 45
We love feedback! Twitter StackOverflow Email
Running Your App on Windows Phone The Windows Phone options are similar to Android and iOS, except for Ripple emulation.
With this release, each time you launch (F5) your app against a Windows Phone 8.0 emulator or
device target, the app deployment will appear not to complete in VS even though the app does
successfully deploy and run in the emulator or on the device. The result is that you will need to
shut down the Windows Phone emulator, disconnect the device, or cancel the build when you
are done testing your app.
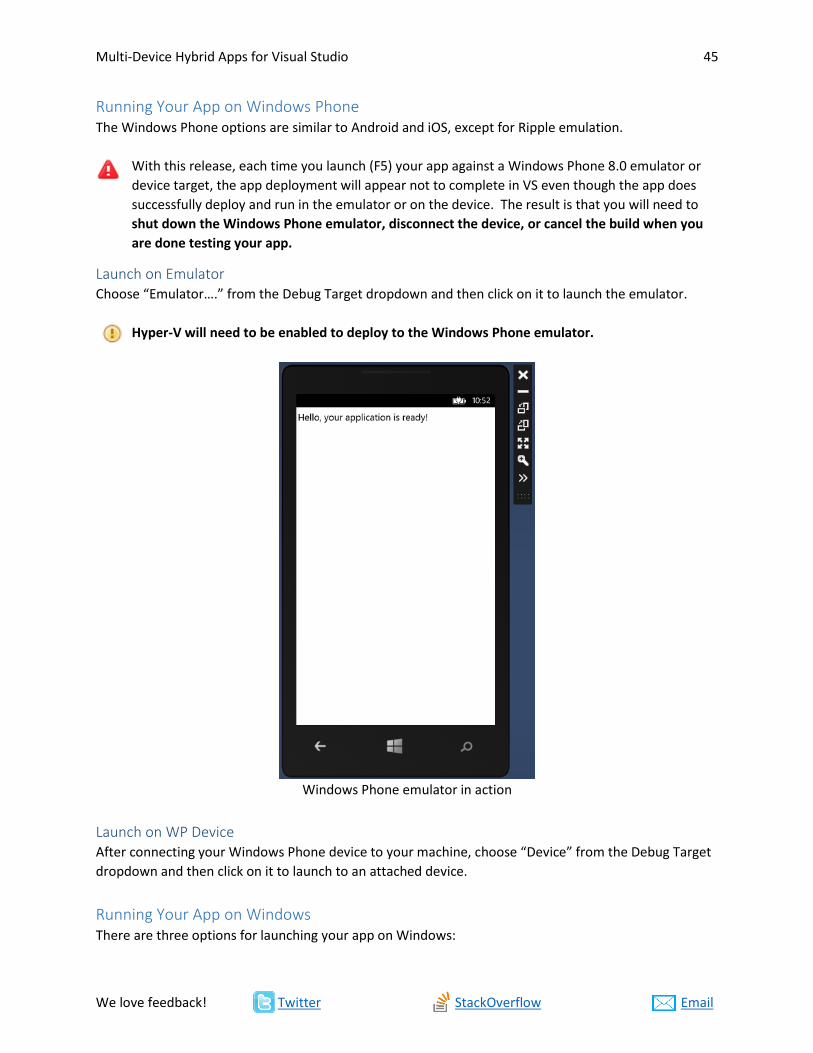
Launch on Emulator Choose “Emulator….” from the Debug Target dropdown and then click on it to launch the emulator.
Hyper-V will need to be enabled to deploy to the Windows Phone emulator.
Windows Phone emulator in action
Launch on WP Device After connecting your Windows Phone device to your machine, choose “Device” from the Debug Target
dropdown and then click on it to launch to an attached device.
Running Your App on Windows There are three options for launching your app on Windows:
Multi-Device Hybrid Apps for Visual Studio 46
We love feedback! Twitter StackOverflow Email
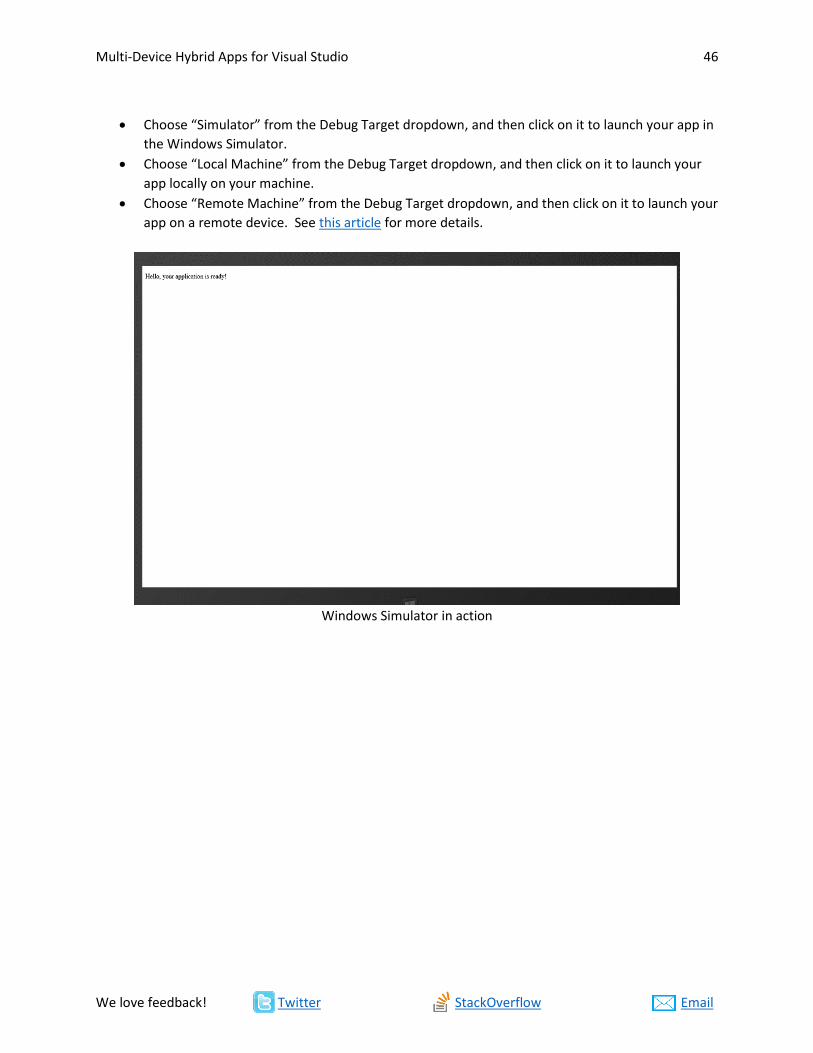
Choose “Simulator” from the Debug Target dropdown, and then click on it to launch your app in
the Windows Simulator.
Choose “Local Machine” from the Debug Target dropdown, and then click on it to launch your
app locally on your machine.
Choose “Remote Machine” from the Debug Target dropdown, and then click on it to launch your
app on a remote device. See this article for more details.
Windows Simulator in action
Multi-Device Hybrid Apps for Visual Studio 47
We love feedback! Twitter StackOverflow Email
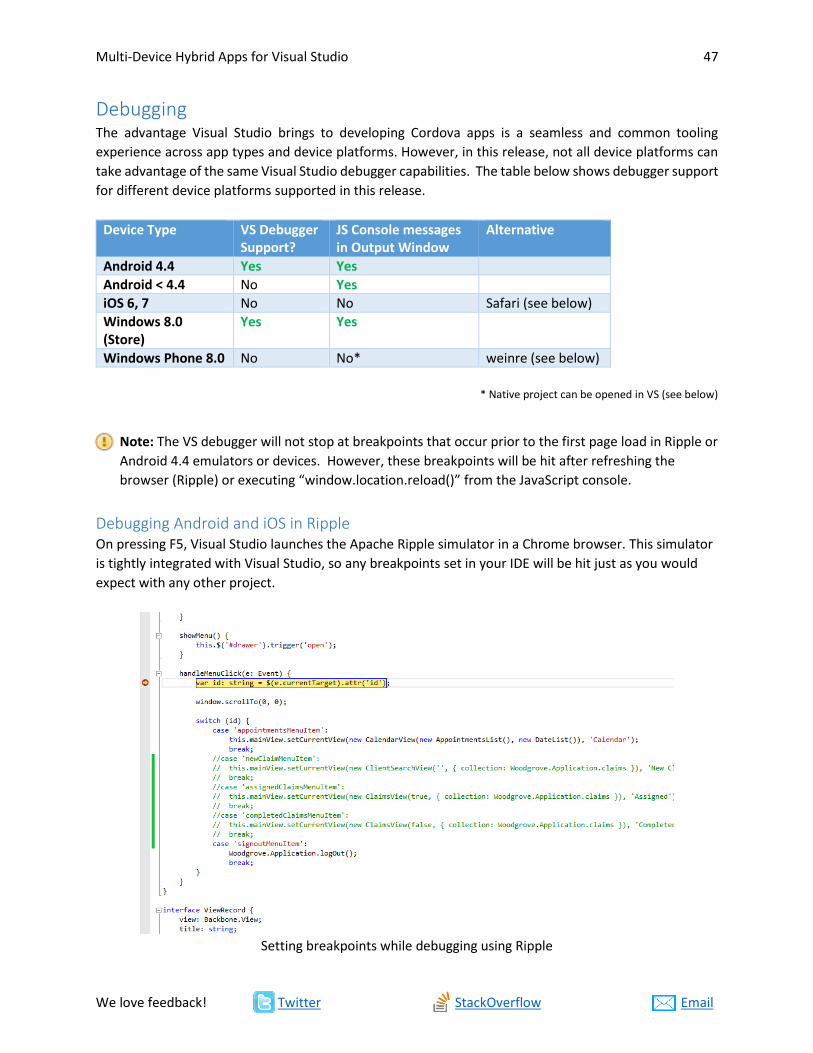
Debugging The advantage Visual Studio brings to developing Cordova apps is a seamless and common tooling
experience across app types and device platforms. However, in this release, not all device platforms can
take advantage of the same Visual Studio debugger capabilities. The table below shows debugger support
for different device platforms supported in this release.
Device Type VS Debugger Support?
JS Console messages in Output Window
Alternative
Android 4.4 Yes Yes
Android < 4.4 No Yes
iOS 6, 7 No No Safari (see below)
Windows 8.0 (Store)
Yes Yes
Windows Phone 8.0 No No* weinre (see below)
* Native project can be opened in VS (see below)
Note: The VS debugger will not stop at breakpoints that occur prior to the first page load in Ripple or
Android 4.4 emulators or devices. However, these breakpoints will be hit after refreshing the
browser (Ripple) or executing “window.location.reload()” from the JavaScript console.
Debugging Android and iOS in Ripple On pressing F5, Visual Studio launches the Apache Ripple simulator in a Chrome browser. This simulator
is tightly integrated with Visual Studio, so any breakpoints set in your IDE will be hit just as you would
expect with any other project.
Setting breakpoints while debugging using Ripple
Multi-Device Hybrid Apps for Visual Studio 48
We love feedback! Twitter StackOverflow Email
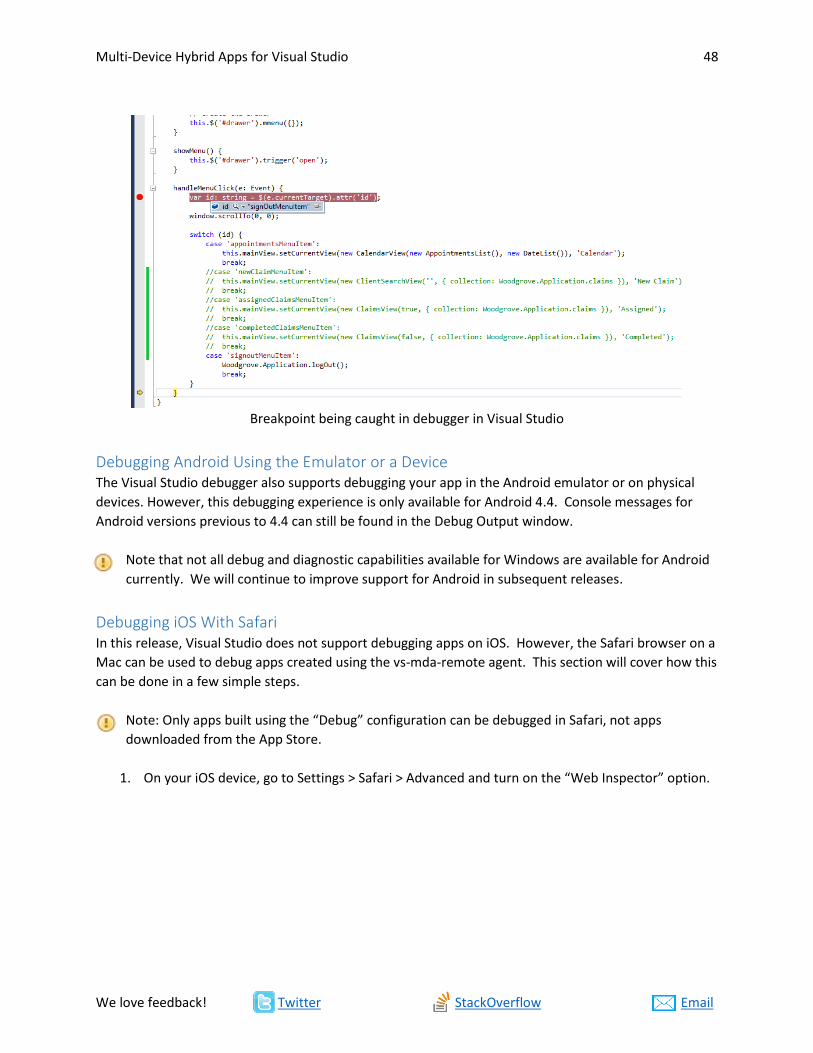
Breakpoint being caught in debugger in Visual Studio
Debugging Android Using the Emulator or a Device The Visual Studio debugger also supports debugging your app in the Android emulator or on physical
devices. However, this debugging experience is only available for Android 4.4. Console messages for
Android versions previous to 4.4 can still be found in the Debug Output window.
Note that not all debug and diagnostic capabilities available for Windows are available for Android
currently. We will continue to improve support for Android in subsequent releases.
Debugging iOS With Safari In this release, Visual Studio does not support debugging apps on iOS. However, the Safari browser on a
Mac can be used to debug apps created using the vs-mda-remote agent. This section will cover how this
can be done in a few simple steps.
Note: Only apps built using the “Debug” configuration can be debugged in Safari, not apps
downloaded from the App Store.
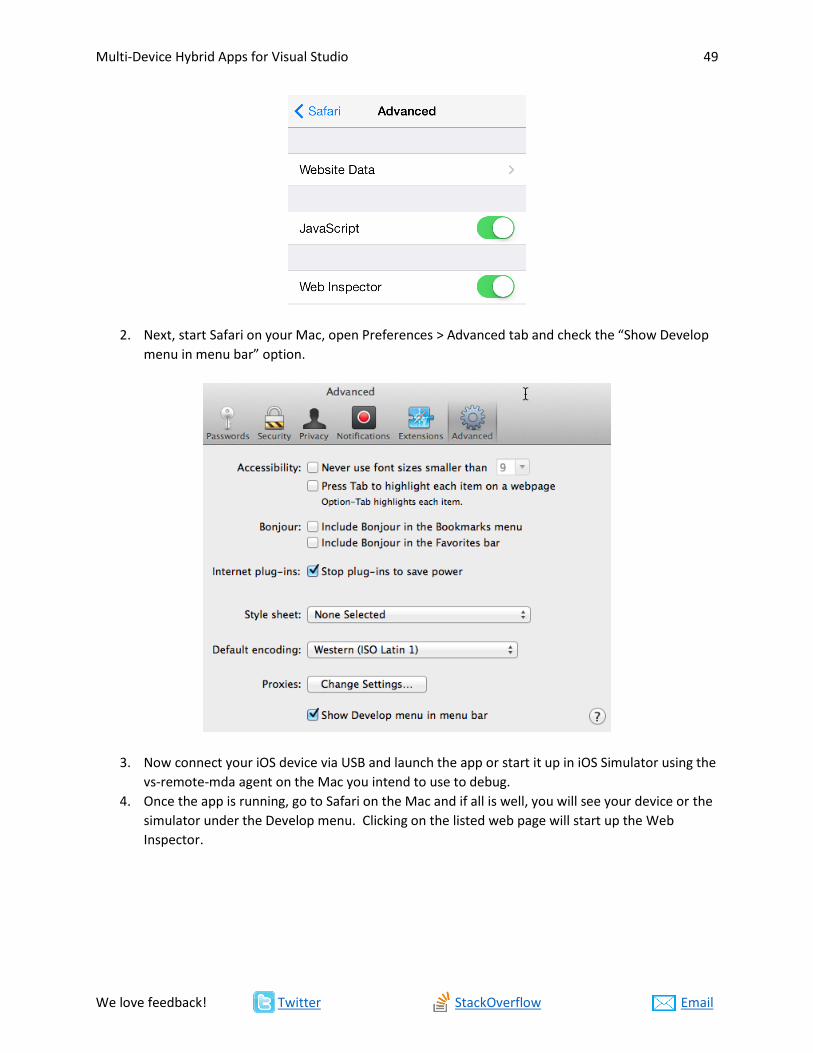
1. On your iOS device, go to Settings > Safari > Advanced and turn on the “Web Inspector” option.
Multi-Device Hybrid Apps for Visual Studio 49
We love feedback! Twitter StackOverflow Email
2. Next, start Safari on your Mac, open Preferences > Advanced tab and check the “Show Develop
menu in menu bar” option.
3. Now connect your iOS device via USB and launch the app or start it up in iOS Simulator using the
vs-remote-mda agent on the Mac you intend to use to debug.
4. Once the app is running, go to Safari on the Mac and if all is well, you will see your device or the
simulator under the Develop menu. Clicking on the listed web page will start up the Web
Inspector.

Multi-Device Hybrid Apps for Visual Studio 50
We love feedback! Twitter StackOverflow Email
Debugging for Windows and Windows Phone 8 For Windows applications, you can use the same tooling as you would for any WWA application. Please
refer to the documentation here.
For Windows Phone 8 applications, you can use the weinre (Web Inspector Remote) project as described
in this blog post from MS OpenTech. Unfortunately, in this early release, the Visual Studio debugger
cannot attach to Windows Phone apps.
As an alternative to weinre, you can opt to use the Console plugin along with the generated native
Windows Phone 8 project to see console output in the Output Window and to triage native code issues.
See below for details on accessing the underlying Windows Phone 8 project.
Multi-Device Hybrid Apps for Visual Studio 51
We love feedback! Twitter StackOverflow Email
Packaging and Signing Your App
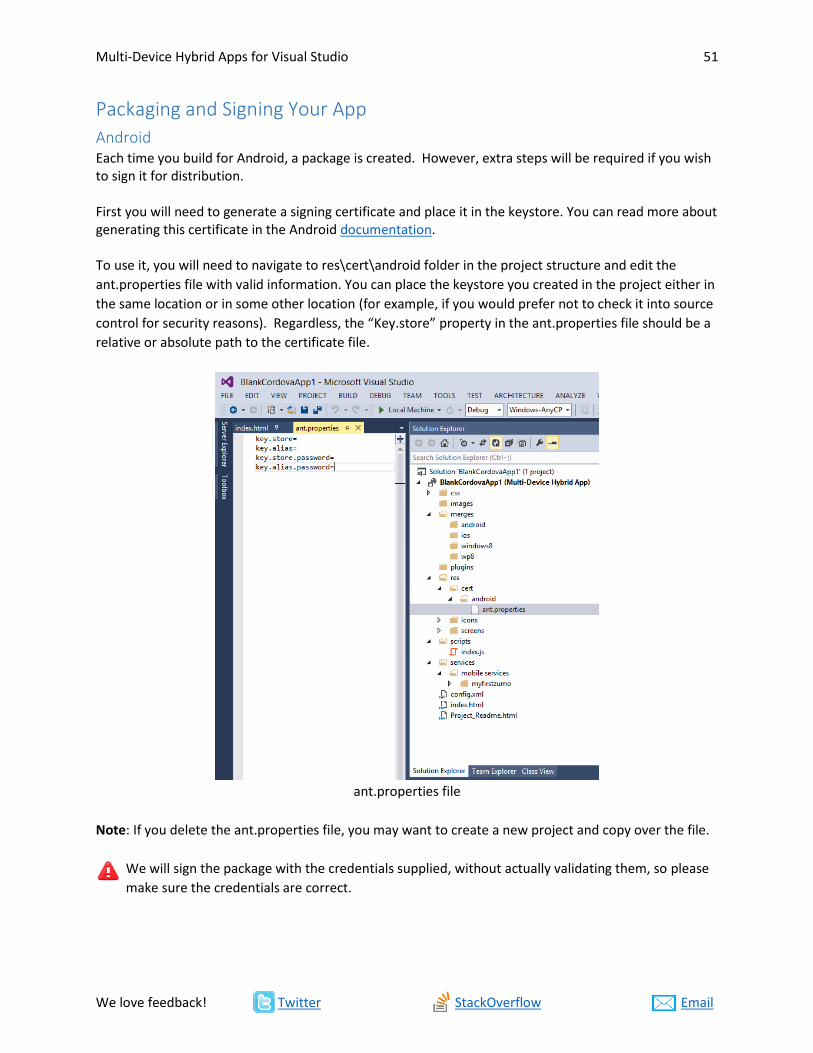
Android Each time you build for Android, a package is created. However, extra steps will be required if you wish to sign it for distribution. First you will need to generate a signing certificate and place it in the keystore. You can read more about generating this certificate in the Android documentation. To use it, you will need to navigate to res\cert\android folder in the project structure and edit the
ant.properties file with valid information. You can place the keystore you created in the project either in
the same location or in some other location (for example, if you would prefer not to check it into source
control for security reasons). Regardless, the “Key.store” property in the ant.properties file should be a
relative or absolute path to the certificate file.
ant.properties file
Note: If you delete the ant.properties file, you may want to create a new project and copy over the file.
We will sign the package with the credentials supplied, without actually validating them, so please
make sure the credentials are correct.
Multi-Device Hybrid Apps for Visual Studio 52
We love feedback! Twitter StackOverflow Email
iOS To generate a package that can be used on an iOS device, you will first need to sign it using a valid Apple
iOS Developer account and a Mac with Xcode. These steps are described below.
Follow these steps to create a new provisioning profile and signing identity:
1. Download a provisioning profile from here. 2. Install the provisioning profile on your build machine. 3. In Xcode’s “Accounts” preferences, view the details of your Apple ID (set it up if you haven’t). 4. Click the ‘+’ button to create a new “iOS Development” signing identify for the selected
provisioning profile. If no provisioning profile shows up, go back to step 2 (or step 1).
When building for “Debug” or “Release” configurations using the iOS remote agent from Visual Studio,
the agent will select the first valid “iOS Development” signing identity installed on your system.
The agent will match the first “iOS Distribution” signing identity when building for “Distribution.” You
can follow the same instructions above to generate a distribution cert by selecting that option during
step 4 above.
“Valid” in this case means the provisioning profile identifier matches your App ID. For example, a
provisioning profile with id “com.foo.bar.*” would match the App ID “com.foo.bar.fizzbuzz”. In many
cases, developers will have a wildcard provisioning profile that matches all App IDs, in which case this
isn’t a problem.
Read the official documentation on setting up the provisioning profile and signing identities is here.
Multi-Device Hybrid Apps for Visual Studio 53
We love feedback! Twitter StackOverflow Email
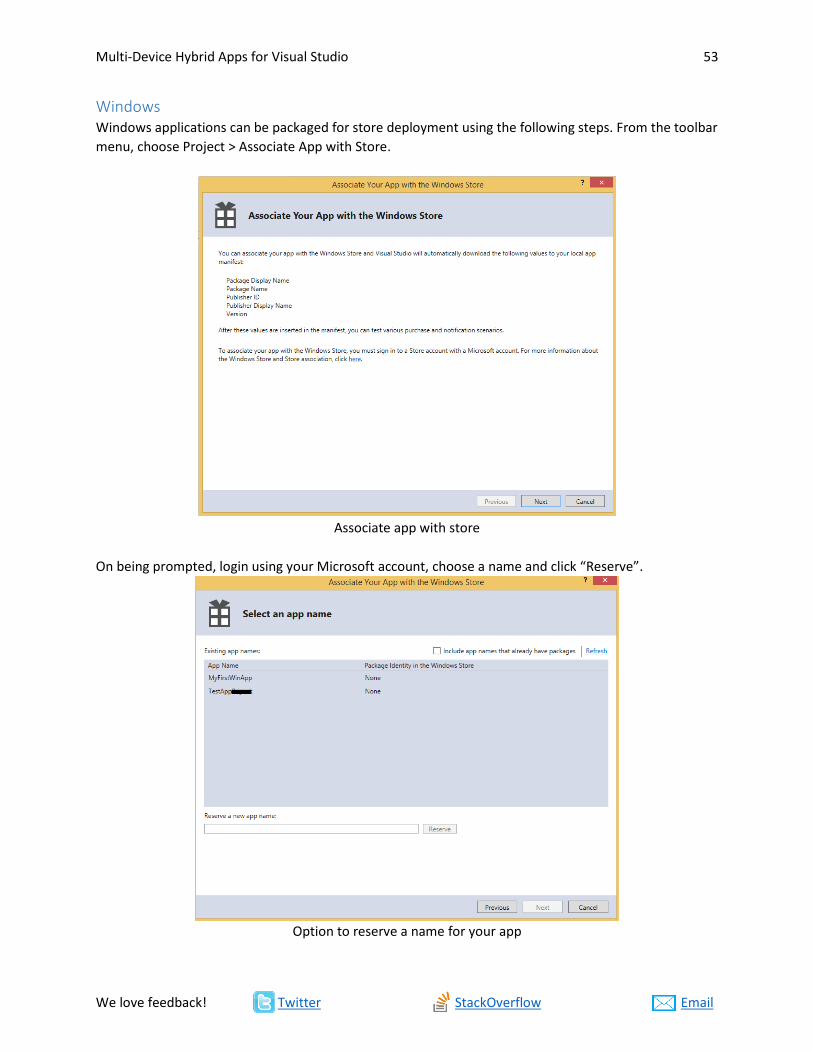
Windows Windows applications can be packaged for store deployment using the following steps. From the toolbar
menu, choose Project > Associate App with Store.
Associate app with store
On being prompted, login using your Microsoft account, choose a name and click “Reserve”.
Option to reserve a name for your app
Multi-Device Hybrid Apps for Visual Studio 54
We love feedback! Twitter StackOverflow Email
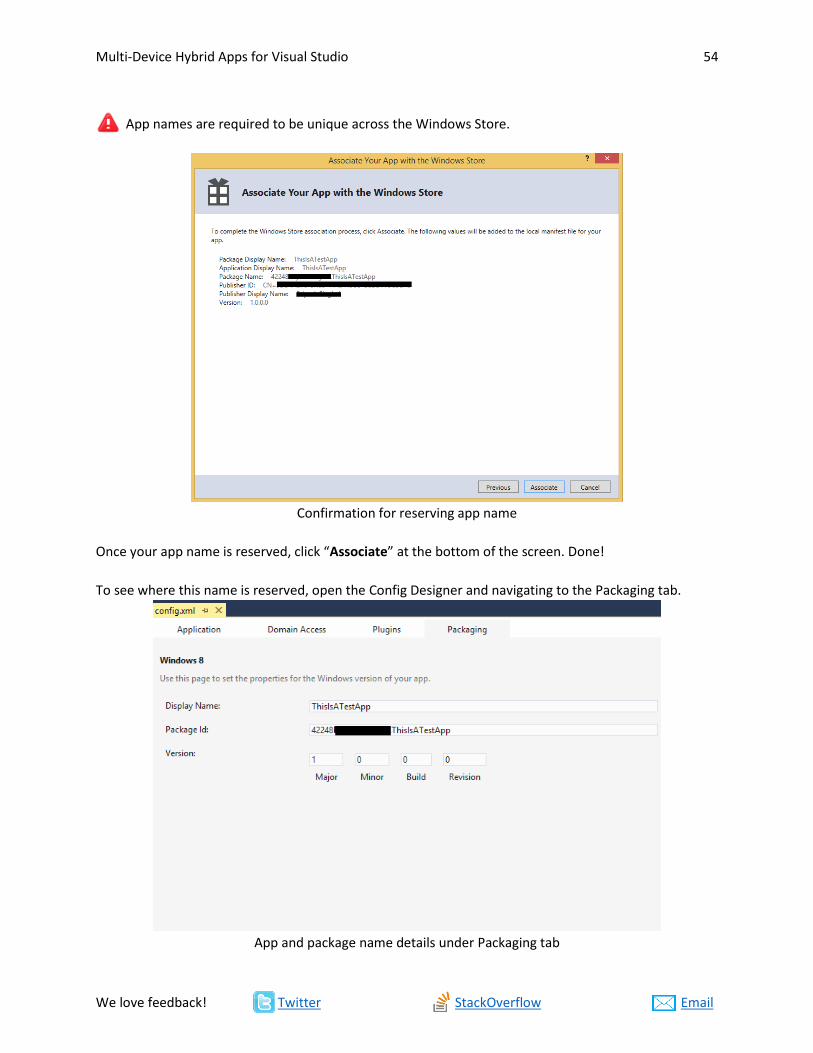
App names are required to be unique across the Windows Store.
Confirmation for reserving app name
Once your app name is reserved, click “Associate” at the bottom of the screen. Done!
To see where this name is reserved, open the Config Designer and navigating to the Packaging tab.
App and package name details under Packaging tab
Multi-Device Hybrid Apps for Visual Studio 55
We love feedback! Twitter StackOverflow Email
You will see that the name and associated package ID has been updated.
Changing the app name under the “Application” tab will not affect the Windows Store app name or
vice-versa. To update the Windows Store app name, please repeat the steps above.
Windows Phone 8 Windows Phone 8 apps are automatically packaged and do not need to be signed at build time. You can
then submit the generated XAP as described in this article.
Multi-Device Hybrid Apps for Visual Studio 56
We love feedback! Twitter StackOverflow Email
Publishing Your App
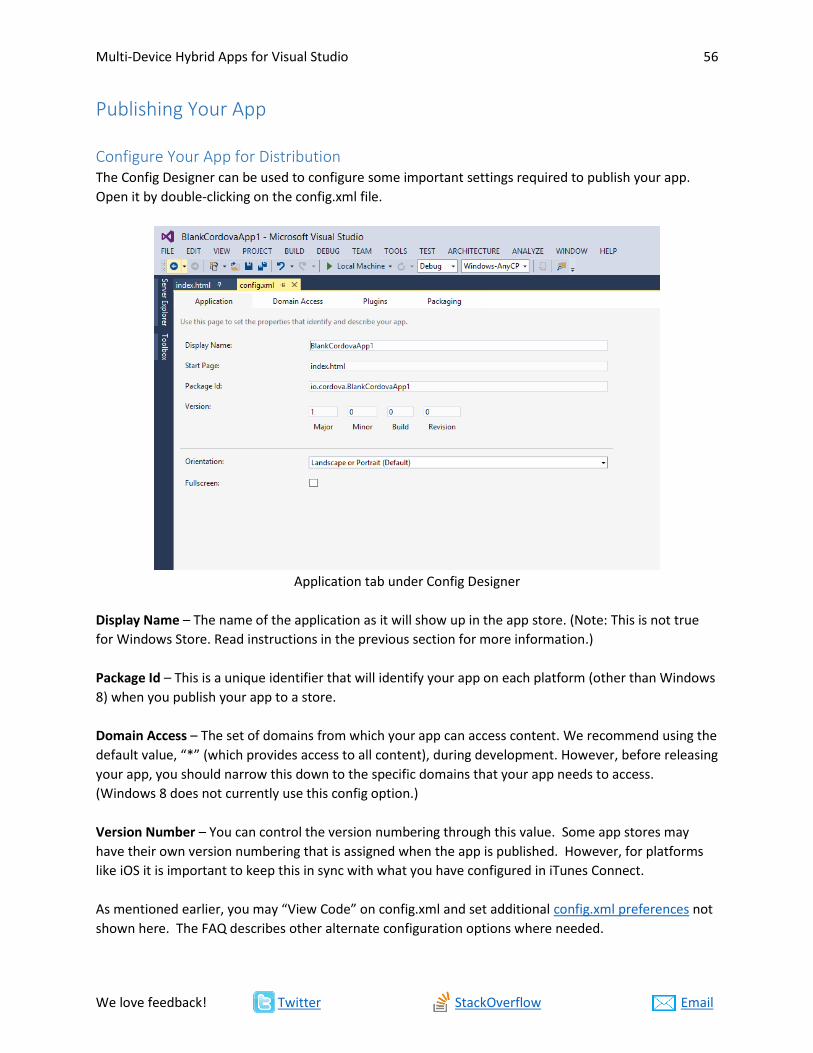
Configure Your App for Distribution The Config Designer can be used to configure some important settings required to publish your app.
Open it by double-clicking on the config.xml file.
Application tab under Config Designer
Display Name – The name of the application as it will show up in the app store. (Note: This is not true
for Windows Store. Read instructions in the previous section for more information.)
Package Id – This is a unique identifier that will identify your app on each platform (other than Windows
8) when you publish your app to a store.
Domain Access – The set of domains from which your app can access content. We recommend using the
default value, “*” (which provides access to all content), during development. However, before releasing
your app, you should narrow this down to the specific domains that your app needs to access.
(Windows 8 does not currently use this config option.)
Version Number – You can control the version numbering through this value. Some app stores may
have their own version numbering that is assigned when the app is published. However, for platforms
like iOS it is important to keep this in sync with what you have configured in iTunes Connect.
As mentioned earlier, you may “View Code” on config.xml and set additional config.xml preferences not
shown here. The FAQ describes other alternate configuration options where needed.
Multi-Device Hybrid Apps for Visual Studio 57
We love feedback! Twitter StackOverflow Email
Uploading Your App You can access the packages you built from the “bin” folder under the project directory. When built
using the Distribution configuration, you may then upload the packages to the app stores for the
respective platform as required.
The process of uploading your app to a store varies by store type and platform.
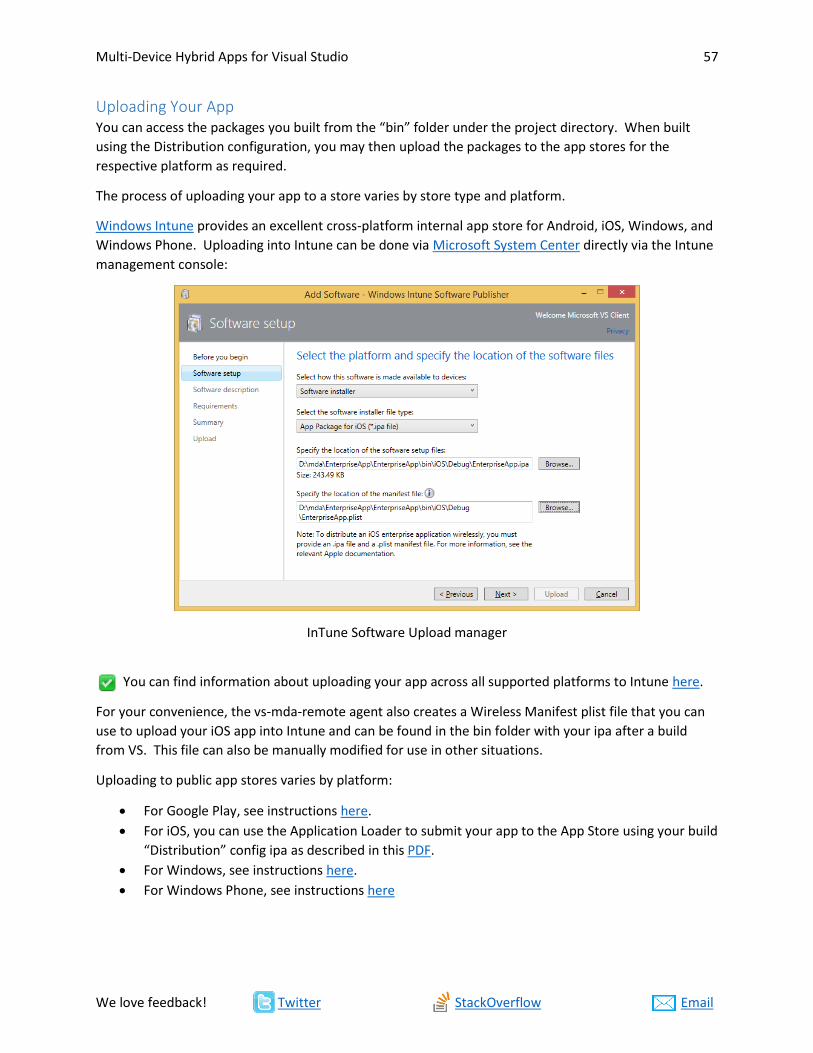
Windows Intune provides an excellent cross-platform internal app store for Android, iOS, Windows, and
Windows Phone. Uploading into Intune can be done via Microsoft System Center directly via the Intune
management console:
InTune Software Upload manager
You can find information about uploading your app across all supported platforms to Intune here.
For your convenience, the vs-mda-remote agent also creates a Wireless Manifest plist file that you can
use to upload your iOS app into Intune and can be found in the bin folder with your ipa after a build
from VS. This file can also be manually modified for use in other situations.
Uploading to public app stores varies by platform:
For Google Play, see instructions here.
For iOS, you can use the Application Loader to submit your app to the App Store using your build
“Distribution” config ipa as described in this PDF.
For Windows, see instructions here.
For Windows Phone, see instructions here
Multi-Device Hybrid Apps for Visual Studio 58
We love feedback! Twitter StackOverflow Email
Exporting a Cordova CLI Project & Accessing Native Projects When building against device or emulator targets, Visual Studio invokes the Apache Cordova Command
Line Interface (CLI) to build for the specified device platform. The resulting packages can be accessed
from the “bin” folder inside the project folder on the local file system.
If you install the Cordova CLI, you can execute any CLI command against the contents of the
“bld/<config>” (ex: bld/Debug) folder in your Visual Studio project. You can install the Cordova CLI by
executing the following command from the Developer Command Prompt:
npm install -g [email protected]
There may be situations in which access to a native platform project is required. With the exception of
iOS, the native project can be found under the “bld/<config>/platforms/<platform>” folder in your
Visual Studio project (Ex: bld/Debug/platforms/android).
Note that edits made here will not be reflected in your Visual Studio project and the contents of this
folder will be removed by a “Clean” operation in Visual Studio.
In this release there is not a supported way to use the Adobe PhoneGap™ Developer app from VS. However, the Cordova CLI supports the same “serve” command used by this app. Execute the following command from the project’s “bld/<config>” folder to start it up:
cordova serve
In this release, you will need to rebuild to update content but intend to accelerate this and the
Apache Ripple workflow in the future.
Extra Steps to build iOS Apps Using a Native Project Given that iOS apps cannot be built on Windows, accessing the native project or using the Cordova CLI
requires extra steps, described here.
Install node.js on your Mac.
Install the Cordova CLI on your Mac:
sudo npm install -g [email protected]
Copy the contents of the bld/Debug, bld/Release, or bld/Distribution folder to your Mac.
Go to the folder where you copied the contents to from the command line using the Terminal
app.
Execute the command:
cordova platform add ios
You can then use any Cordova CLI command. For example:
cordova build ios … or … cordova emulate ios
Multi-Device Hybrid Apps for Visual Studio 59
We love feedback! Twitter StackOverflow Email
In addition, inside the platforms/ios folder will be a native Xcode project
FAQs and Known Issues Find answers to common questions on our FAQ page.
Find the updated list of bugs and fixes on our Known Issues page.
We Love Feedback Talk to us on Twitter: @VSClientTools
File bugs on StackOverflow: #multi-device-hybrid-apps
Email us: [email protected]
Recommended