EN 13241
EN 12453
EN 12445
Electromechanical operators for heavy industrial sliding gates
• Fibo 300 - 1,5 HP maximum gate weight 2.500 kg
• Fibo 400 - 3,0 HP maximum gate weight 4.000 kg
1 - 12GB Instructions manual pages
FIBO 300 - FIBO 400
FIBO 300 - 1,5 HP FIBO 400 - 3,0 HP
the gate opener

2
Fibo 300Fibo 400
En
gli
shThree-phase electromechanical geared motor
for sliding gates
GENERAL WARNINGS FOR PEOPLE SAFETY
INTRODUCTION This operator is designed for a speci!c scope of applications as indicated in this manual, including safety, control and signaling accessories as minimum required with FADINI equipment. □ Any applications not explicitly included in this manual may cause operation problems or damages to properties and people. □ Meccanica Fadini snc is not liable for damages caused by the incorrect use of the equipment, or for applications not included in this manual or for malfunctioning resulting from the use of materials or accessories not recommended by the manufacturer. □ The manufacturer reserves the right to make changes to its products without prior notice. □ All that is not explicitly indicated in this manualis to be considered not allowed.
BEFORE INSTALLATIONBefore commencing operator installation assess the suitability of the access, its general condition and the structure. □ Make sure that there is no risk of impact, crushing, shearing, conveying, cutting, entangling and lifting situations, which may prejudice people safety. □ Do not install near any source of heat and avoid contacts with "ammable substances. □ Keep all the accessories able to turn on the operator (transmitters, proximity readers, key-switches, etc) out of the reach of the children. □ Transit through the access only with stationary operator. □ Do not allow children and/or people to stand in the proximity of a working operator. □ To ensure safety in the whole movement area of a gate it is advisable to install photocells, sensitive edges, magnetic loops and detectors. □ Use yellow-black strips or proper signals to identify dangerous spots. □ Before cleaning and maintenance operations, disconnect the appliance from the mains by switching o# the master switch. □ If removing the actuator, do not cut the electric wires, but disconnect them from the terminal box byloosening the screws inside the junction box.
INSTALLATIONAll installation operations must be performed by a quali!ed technician, in observance of the Machinery Directive 2006/42/CE and safety regulations EN 12453 - EN 12445. □
Verify the presence of a thermal-magnetic circuit breaker0,03 A - 230 V - 50 Hz upstream the installation. □ Use appropriate objects to test the correct functionality of the safety accessories, such as photocells, sensitive edges, etc. □ Carry out a risk analysis by means of appropriate instruments measuring the crushing and impact force of the main opening and closing edge in compliance with EN 12445. □ Identify the appropriate solution necessary to eliminate and reduce suchrisks. □ In case where the gate to automate is equipped with a pedestrian entrance, it is appropriate to prepare the system in such a way to prohibit the operation of the engine when the pedestrian entrance is used. □ Apply safety nameplates with CE marking on the gate warning about the presence of an automated installation. □ The installer must inform and instruct the end user about the proper use of the system by releasing him a technical dossier, including: layout and components of the installation, risk analysis, veri!cation of safety accessories, veri!cation of impact forces and reporting of residual risks.
INFORMATION FOR END-USERSThe end-user is required to read carefully and to receive information concerning only the operation of the installation so that he becomes himself responsible for the correct use of it. □ The end-user shall establish a written maintenance contract with the installer/maintenance technician (on -call). □ Any maintenance operation must be done by quali!ed technicians. □ Keep these instructions carefully.
WARNINGS FOR THE CORRECT OPERATION OF THE INSTALLATION For optimum performance of system over time according to safety regulations, it is necessary to perform proper maintenance and monitoring of the entire installation: the automation, the electronic equipment and the cables connected to these. □ The entire installation must be carried out by quali!ed technical personnel, !lling in the Maintenance Manual indicated in the Safety Regulation Book (to be requested or downloaded from the site www.fadini.net/supporto/downloads). □ Operator: maintenance inspection at least every 6 months, while for the electronic equipment and safety systems an inspection at least once every month is required. □ The manufacturer, Meccanica Fadini snc, is not responsible for non-observance of good installation practice and incorrect maintenance of the installation.
DISPOSAL OF MATERIALSDispose properly of the packaging materials such as cardboard, nylon, polystyrene etc. through specializing companies (after veri!cation of the regulations in force at the place of installation in the !eld of waste disposal). Disposal of electrical and electronic materials: to remove and dispose through specializing companies, as per Directive 2012/19/UE. Disposal of substances hazardous for the environment isprohibited.
Meccanica Fadini s.n.c.
Director in charge
CE DECLARATION OF CONFORMITY of the manufacturer:Meccanica Fadini snc (Via Mantova, 177/A - 37053 Cerea - VR - Italy) declares under own responsibility that: Fibo 300 -Fibo 400 comply with the 2006/42/CE Machinery Directive, and also that they are sold to be installed in an “automatic system”, along with original accessories and components as indicated by the manufacturing company. An automatic gate operator is, by law, a “machinery” and therefore the installer must !t the equipment with all of the applicable safety norms. The installer is also required to issue the installer’s Declaration of Conformity. The manufacturer is not liable for possible incorrect use of the product. The product complies with the following speci!c norms: analysis of the risks and subsequent action to cure them as per EN 12445 and EN 12453, Low Voltage Directive 2014/35/UE, Electromagnetic Compatibility 2014/30/UE. In order to certify the product, the manufacturer declares under own responsibility the compliance with the EN 13241-1 PRODUCT NORMS.

3
INSTRUCTIONS FOR THE INSTALLATION OF THE GEARED MOTORS FIBO 300 - FIBO 400 ON SLIDING GATES.
FOR A PERFECT APPLICATION AND IN ORDER TO ACHIEVE A RELIABLE PERFORMANCE OF FIBO 300 - FIBO 400 IT IS RECOMMENDED
THAT THE FOLLOWING STEPS BE CARRIED OUT AND DRAWINGS BE KEPT TO.
FIBO 300 and FIBO 400 are electromechanical operators designed to open and close heavy industrial sliding gates, up to 2.500 kg
(Fibo 300 -1,5 HP) max. and 4.000 kg (Fibo 400 - 3,0 HP) max. gate weights respectively; the motor comes enclosed in a metallic
casing (protection cover) and access to it is by a customized key. The worm and crown gear coupling is made of steel and bronze,
suitable to withstand high stress conditions and heavy duty applications where signi!cant loads are involved.They are controlled by an electronic unit Elpro 37 HP with power contactors, to which complementary accessories can be connected
such as remote controls, photocells, mechanical safety edges, "ashers and other safety devices.
The whole lot of them represents a perfect safety system in support to the installation.
The manual override, disengaging the motor from the gate and allowing manual operations, is by an hexagonal box spanner
whose action is directly on the motor shaft, that is located inside the protection cover.
GATE INSPECTION
Make sure that the gate sliding track be !rmly set into the ground foundation to prevent it from moving or setting at a later stage,
which might eventually lead into the gate going o# the rail during its opening/closing travels.
NOTE WELL:
• make sure that proper gate stops be !xed to ground in open and closed gate positions, to prevent the gate
from overrunning the upper track;
• make sure the gate be !tted with a safety system to prevent it from falling over;
• prevent the gate from crashing into the gate posts or gate stops.
MAIN COMPONENTS TO AUTOMATE A HEAVY SLIDING GATE
The gate must be !tted with upper and lower rails for it to safely slide along them and be prevented from falling over independetly
from its travel position. In addition to this and as extra safety, provide one or two gate stops to be !xed to the ground both in
opening and closing positions to prevent the gate from overrunning the rails.
Close to the gate, in the position as indicated in Pic. 1, provide an accessible pit for the electrical junctions of the safety and command
accessories, whose cables are to be laid underground through suitable conduits to be set up as indicated in Pic. 13.
En
gli
sh
Pic. 1
!
Three-phase electromechanical geared motorfor sliding gates
Miri 4 "asher withBirio A8 aerial
Mechanical safety edge
VIEW OF THE INSTALLATION FROM INSIDE
Fibo 300Fibo 400
Opening direction
Installation positionFibo 300 or Fibo 400
Arpo 58 transmitter
Upper slidingbracket
Chis 37 keyswitchrecess mount
Fit 55 inner photocell unitpost mount
Gate stops in closed position
Gear rack
Junction pit,near Fibo 300 orFibo 400, for the undergroundconnections of all theaccessories
Arpo 58 receiver
Mechanical safety edge
Lowersliding rail
Gate stops in openposition
Fit 55 inner photocell unitpost mount

4
En
gli
sh
Pic. 2
Pic. 3
Fibo 300Fibo 400
Three-phase electromechanical geared motorfor sliding gates
FIBO 300 MAIN COMPONENTS
FIBO 400 MAIN COMPONENTS
Elpro 37 HPcontrol boxto be fastened to the bracketby screws, washers and nuts
Bracket !xing screwswith nuts and washers
Control box bracket support base plate
Clean contactmicroswitch forvoltage cuto"
Cover !xing screwswith washers
Metal protectioncover
Cover !xingscrews withwashers
Command limit switchFibo 300
Fibo 400
Gear box
Pre-boredoperator !xingbase plate
Electric motor
Release box spannerE 23-27
Drive gear
Metal protectioncover
Cover !xingscrews withwashers
Command limit switch
Gear box
Pre-boredoperator !xingbase plate
Electric motor
Release box spannerE 30-32
Drive gear
Control box!xing bracket
Door with access customized key
Clean contactmicroswitch forvoltage cuto"
Cover !xing screwswith washers
Door with access customizedkey
BACK VIEW
BACK VIEW
Elpro 37 HPcontrol boxto be fastened to the bracketby screws, washers and nuts
Bracket !xing screwswith nuts and washers
Control box!xing bracket
Base plate !xingscrews with washers
Control box bracketsupport base plate
Base plate !xingscrews with washers

Pic. 6Pic. 5
Pic. 4
5
En
gli
sh
INSTALLING FIBO 300 AND FIBO 400
Removing the cover - Fibo 300 and Fibo 400:
The !rst installation step is to bare the motor operator. To do this, undo the four
lateral screws and pull the cover upwards (Pic. 4).
Next step. Undo the !xing screws of all the components indicated in Pic. 2 and in
Pic. 3, then proceed with the installation.
Positioning the base plate - Fibo 300 and Fibo 400:
Once satis!ed with the correct position where Fibo 300 or Fibo 400 should be
installed next to the gate, respect the installation distances as in Pic. 5 and Pic. 6.
Mark the paving in correspondence with the four holes in the base plate, remove
Fibo 300 or Fibo 400, drill and insert the anchoring expanding bolts.
Fibo 300Fibo 400
Three-phase electromechanical geared motorfor sliding gates
!NOTE WELL: in doing this operation the door is no longer supported
by the cover and might fall down: remove it from its seat along with
the cover.
!IMPORTANT: to achieve "rm anchoring of the Fibo 300 or Fibo 400
assess the ground "rst and make sure it is adaquate to provide a "rm
anchoring for the motor so it can properly operate a heavy gate.
Basa plate
Cover !xingscrews with washers
Protectioncover
!
!
Wall
65 mm
Ø 16
50
0 m
m
80 mm5
00
mm
Ø 50 hole forcable inlet
Drill and !t theexpanding bolts(not included)
Ø 16
Ø 50 hole forcable inlet
Drill and !t theexpanding bolts(not included)
Gate
Fibo 300
Base plateFibo 300
Wall Gate
Fibo 400
Base plateFibo 400
Make sure soil is adequate to provide a "rm
anchoring for the Fibo 300
NOTE WELL: the holes in the base
plate are factory-made
!
!
Make sure soil is adequate to provide a "rm
anchoring for the Fibo 400
NOTE WELL: the holes in the base
plate are factory-made
350290 430
280

Pic. 8
Pic. 10Pic. 9
Pic. 7
6
En
gli
shFibo 300Fibo 400
Three-phase electromechanical geared motorfor sliding gates
FIXING THE ANCHORING BASE PLATE OF FIBO 300 AND FIBO 400
Before !xing the operator base plate, it is advisable that a tube be laid under the ground from an accessible junction pit (to be
provided nearby) through the Ø 50 hole into the base plate (Pic. 8). Fit the four expanding bolts (not included with the equipment)
into the holes in the foundation as previously drilled, in respect of the distance between the holes in the base plate, while depth
is to follow the rules of good installation technique and soil nature (Pic. 7).
MANUAL RELEASING FIBO 300 AND FIBO 400
In order to properly install the gear rack all along the gate, it is !rst necessary to disengage the gate from the Fibo 300 or Fibo 400
motors, once these have been installed. Overriding for manual operations is by the spanner supplied with the equipment and the
release system is positioned in the front side of Fibo 300 or Fibo 400 on the drive gear shaft: unlock the M18 (for Fibo 300) or M22
(for Fibo 400) nuts by a few turns to release.
!IMPORTANT: Make sure Fibo 300 or Fibo 400 be perfectly aligned by means of a spirit level (Pic. 8), then tighten
the four nuts and washers to the four bolts.
INSERTING AND FASTENING THE BOLTS
M16
Ø 16
70
mm
After drilling the 4 holes, making sure distances are correct, insert the bolts and let them protrude 70 mm
70
mm
Tighten the nut very hard and letthe bolt protrude 70 mm
1
2
M16 anchoringbolts into thefoundation or pavement
Spirit level
Junction pit
Fibo 300 - 65 mmFibo 400 - 80 mm
Corrugated tube to be laidunder the ground for cableleading
Tighten the four nuts and washersvery hard
Base plate
Spiritlevel
Fibo 300
M18 self locking nut
UNLOCK TORELEASE
LOCK
Release box spannerE 23-27
Fibo 400
M22 self locking nut
UNLOCK TORELEASE
LOCK
Release box spannerE 30-32

Pic. 12
Pic. 11
7
En
gli
sh
FITTING THE GEAR RACK TO THE GATE
With heavy gates, the standard gear rack is to be double mounted and only the steel version 22x22 mm per bar is recommended.
It is to be !tted using support angles (not included) which are to be !rmly welded to the gate following these instructions:
• Weld the single bars into compact double modules as indicated in Pic. 11.
• The total length of the gear rack must be equal to the gate travel, including the parts taken by the limit switch striking plates,
which are to be fastened on the rack itself.
• Provide a temporary setup for the gear rack on the gate and make sure there is a tip clearance of about 2 mm between the drive
gear and the teeth of the bar.
• Make sure the gear rack is perfectly aligned all along the gate travel before welding it !rmly: test the correct alignment by manually
running the gate full track, Fibo 300 or Fibo 400 in disengaged mode, and make sure the drive gear turns smoothly without any
friction or jerking.
• Once satis!ed with the outcome of the !rst running test, !rmly weld the gear rack as indicated.
INSTALLING THE LIMIT SWITCH STRIKING PLATES
Gate stop, ie. stop of the drive gear, occurs when either striking plate meets the respective limit switches. Therefore the striking
plates are to be installed on the gear rack once the open/closed positions of the gate have been precisely assessed, ie. when the
gate is at the end/limit of the open and close cycles as required: it is recommended that the limit switches be activated a few
seconds earlier than the gate reaches the end of the travel where a complete stop is required (Pic.12).
Fibo 300Fibo 400
Three-phase electromechanical geared motorfor sliding gates
2,0 m
50x50x6 angle bracketfor gear rack !xing
(not included)
When joining the gear rack barsmake sure the pitch is respectedby using a “counter-gear rack”
2 mm tip clearance betweendrive gear and gear rack
Single, galvanized22x22 mm, m4 bars welded into one double module
Leave a clearance of
about 10 mm
Limit switch
50x50x6 angle bracketfor gear rack !xing
(not included)
22x22 zinc-coateddouble rack
Drive gear
Gear rack !ttedto the gate
Gear rack
"Counter-gear rack" Zinc-coated 22x22double gear rack
Drive gear
22
2 mm
22
22
Command limit switchmounted onFibo 300 or Fibo 400
Striking platefastening screw
The striking plate is toengage the limit switchfeeler
Limit switch feeler
Command limit switchmounted onFibo 300 or Fibo 400
Limit switch striking plate
LATERAL VIEW

Pic. 13
8
En
gli
shFibo 300Fibo 400
Three-phase electromechanical geared motorfor sliding gates
LAYOUT OF THE INSTALLATION - WIRING DIAGRAM AND ACCESSORIES
Before installing Fibo 300 or Fibo 400 prepare all the command and safety accessories as required.
General layout: merely indicative, it is the installer’s care and responsibility to properly lay the tubes for the electrical connections.
2
3
45
6
7
8
9
10
11
1213
15
8
3
141
11 9
10
4230 V 50 Hz ±10%
n° 2x1
n° 2x1
n° 4x1
n° 4x1n°
2x1
RG
58
n°
4x1
n°
4x1,
5
1 - Miri 4 #asher - code 4612L with Birio A8 aerial - code 4601L2 - Arpo 58 transmitter - code 5802L3 - Mechanical cable-operated safety edge - code 2077L4 - Fit 55 recess photocell projector - code 551L5 - Chis 37 recess key-switch - code 371L6 - 230 V - 50 Hz - 0,03 A magneto-thermal di$erential circuit breaker (not supplied with the equipment) (beyond 100 m increase cable section to 2,5 mm²)7 - Junction box (not supplied with the equipment)8 - Fit 55 recess photocell receiver - code 551L
9 - 0,5 m post - code 555L10 - Post *xing base plate and cover - code 554L11 - Gate stop (mandatory, not supplied with the equipment)12 - Gear rack code 2039L13 - Fibo 300 or Fibo 400 with Elpro 37 HP electronic controller - code 7185L and VIX 53/2 R plug-in receiver - code 5311L14 - Arpo 58 receiver - code 5801L15 - VIX 53/4 TR transmitter - code 5313GL
IMPORTANT: all the electrical equipment must be properly grounded.!

Pic. 15Pic. 14
9
ADJUSTING THE MECHANICAL CLUTCH
It is possible to adjust power with Fibo 300 and Fibo 400 by a mechanical clutch (factory pre-set).In order to adjust the mechanical clutch, ie. the operator torque to the gate weight, turn the self-locking nut positioned on the operator base: screw the nut harder to increase torque, unscrew to decrease torque (Pic. 14 and Pic. 15).
Eng
lish
Fibo 300Fibo 400
Three-phase electromechanical geared motorfor sliding gates
M18 hexagonal nut
E 23-27 boxspanner
M22 hexagonal nut
E 30-32 boxspanner
- power
+ power
- power
+ power
Fibo 300 Fibo 400

10
Eng
lish
Three-phase electromechanical geared motorfor sliding gates
FIBO 300 TECHNICAL DATA
ELECTRIC MOTORPower output 1,1 kW (1,5 HP)Absorbed power 1.500 WThree-phase supply voltage 230/400 VacFrequency 50/60 HzAbsorbed current 5,1/3 AMotor rotation speed 1.400 rpm (50 Hz) - 1.700 rpm (60 Hz)Intermittent service S3 - 75%Cooling by fan
ELECTROMECHANICAL GEARED OPERATORRatio 1:40Output revolutions 35 rpm (50 Hz) - 42,5 rpm (60 Hz)Drive gear Z 24Module 4,0Nominal torque 300 Nm (50 Hz) - 247 Nm (60 Hz)Transfer speed (1.400 rpm - 50 Hz) 10,5 m/1'Transfer speed (1.700 rpm - 60 Hz) 12,8 m/1'Hydraulic oil type Oil Fadini - art. 706LWorking temperature -25 °C +80 °CFibo 300 weight 65 kgMaximum gate weight 2.500 kgProtection standard IP 55 (inside the enclosure)Limit switch mechanical
FIBO 300 OVERALL DIMENSIONS
PERFORMANCEFrequency of use very intensiveService cycle 25 s opening - 30 s dwell - 25 s closing - 30 s dwellComplete cycle time 110 sComplete opening - dwell - closing - dwell cycles No. 33/hourAnnual cycles (with 8 hours of use per day) No. 96.000
Fibo 300
Pic. 16
400
630
580
50
138 23
2
190
138
236
420 mm
184
Ø 104 - Z24 - m4
70
370
42
54 400
454 320
FIBO 400 TECHNICAL DATA
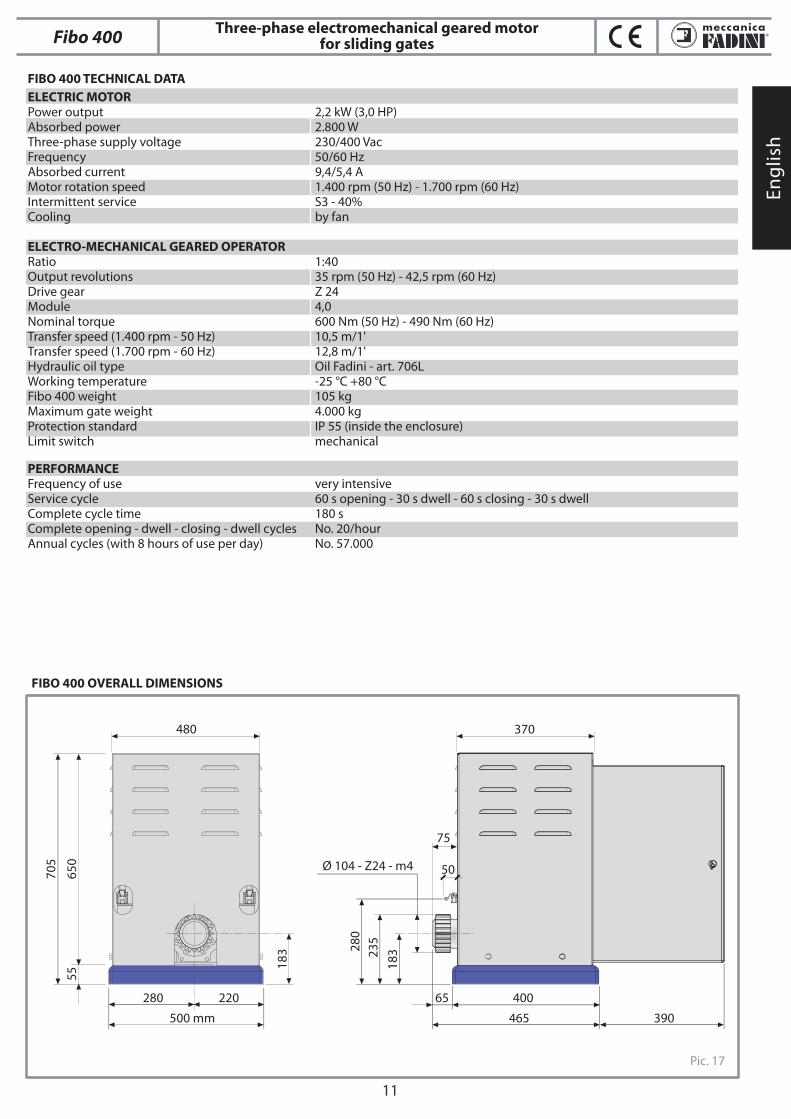
ELECTRIC MOTORPower output 2,2 kW (3,0 HP)Absorbed power 2.800 WThree-phase supply voltage 230/400 VacFrequency 50/60 HzAbsorbed current 9,4/5,4 AMotor rotation speed 1.400 rpm (50 Hz) - 1.700 rpm (60 Hz)Intermittent service S3 - 40%Cooling by fan
ELECTRO-MECHANICAL GEARED OPERATORRatio 1:40Output revolutions 35 rpm (50 Hz) - 42,5 rpm (60 Hz)Drive gear Z 24Module 4,0Nominal torque 600 Nm (50 Hz) - 490 Nm (60 Hz)Transfer speed (1.400 rpm - 50 Hz) 10,5 m/1'Transfer speed (1.700 rpm - 60 Hz) 12,8 m/1'Hydraulic oil type Oil Fadini - art. 706LWorking temperature -25 °C +80 °CFibo 400 weight 105 kgMaximum gate weight 4.000 kgProtection standard IP 55 (inside the enclosure)Limit switch mechanical
PERFORMANCEFrequency of use very intensiveService cycle 60 s opening - 30 s dwell - 60 s closing - 30 s dwellComplete cycle time 180 sComplete opening - dwell - closing - dwell cycles No. 20/hourAnnual cycles (with 8 hours of use per day) No. 57.000
11
Eng
lish
Three-phase electromechanical geared motorfor sliding gates
Pic. 17
FIBO 400 OVERALL DIMENSIONS
Fibo 400
480
705
650
55
183 28
0
235
183
280
500 mm
220
Ø 104 - Z24 - m4
75
370
50
65 400
465 390
Eng
lish
Fibo 300Fibo 400
Three-phase electromechanical geared motorfor sliding gates
2018/04
Via Mantova, 177/A - 37053 Cerea (VR) Italy Ph. +39 0442 330422 Fax +39 0442 [email protected] - www.fadini.net
GB2012/19/UE DirectiveRe. disposal of electric
and electronic waste
DISPOSE PROPERLY OF MATERIALSARMFUL TO THE ENVIRONMENT
Recommended