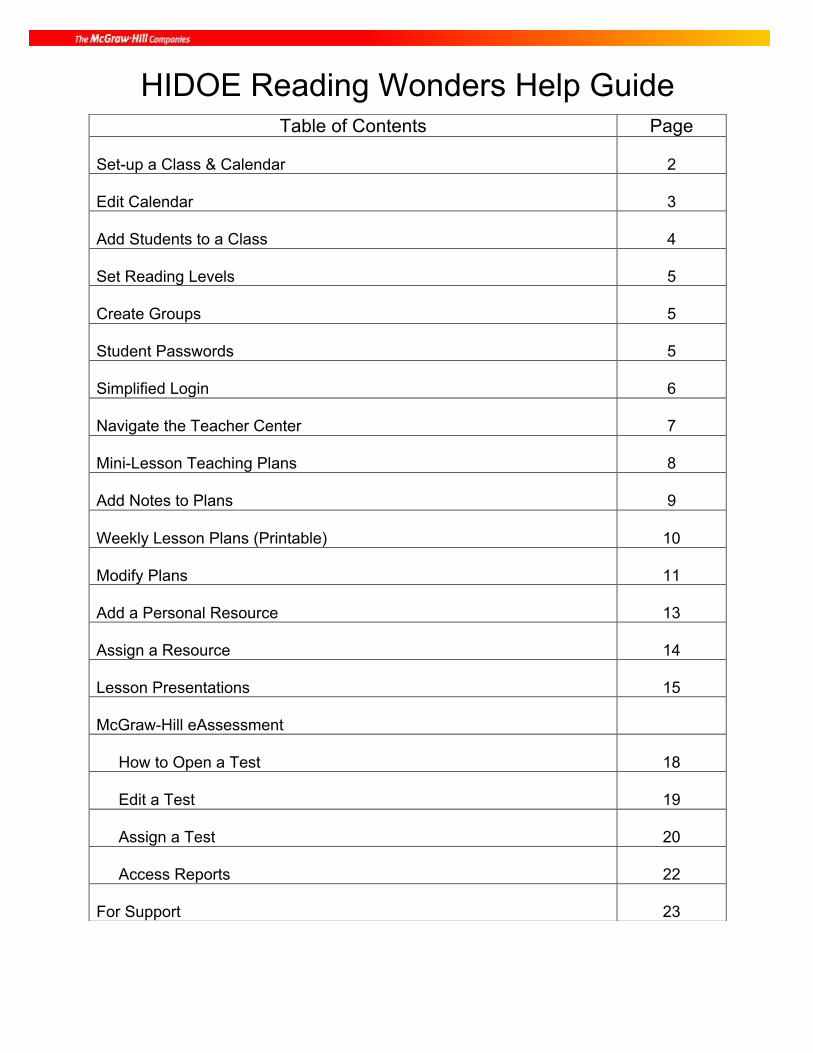
HIDOE Reading Wonders Help Guide
Table of Contents Page Set-up a Class & Calendar
2
Edit Calendar
3
Add Students to a Class
4
Set Reading Levels
5
Create Groups
5
Student Passwords
5
Simplified Login
6
Navigate the Teacher Center
7
Mini-Lesson Teaching Plans
8
Add Notes to Plans
9
Weekly Lesson Plans (Printable)
10
Modify Plans
11
Add a Personal Resource
13
Assign a Resource
14
Lesson Presentations
15
McGraw-Hill eAssessment
How to Open a Test
18
Edit a Test
19
Assign a Test
20
Access Reports
22
For Support
23
March 2015 Page 2
PLEASE NOTE: There may be slight differences to the content loaded on your screen.
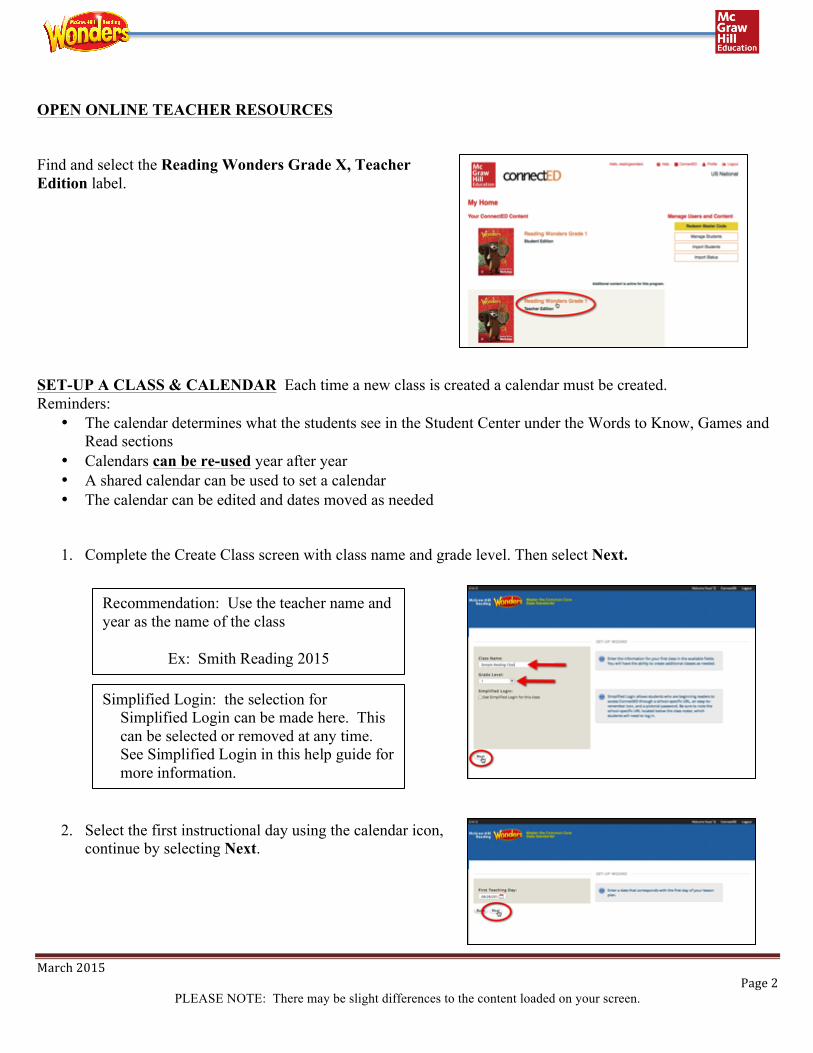
OPEN ONLINE TEACHER RESOURCES Find and select the Reading Wonders Grade X, Teacher Edition label. SET-UP A CLASS & CALENDAR Each time a new class is created a calendar must be created. Reminders:
• The calendar determines what the students see in the Student Center under the Words to Know, Games and Read sections
• Calendars can be re-used year after year • A shared calendar can be used to set a calendar • The calendar can be edited and dates moved as needed
1. Complete the Create Class screen with class name and grade level. Then select Next.
2. Select the first instructional day using the calendar icon, continue by selecting Next.
Recommendation: Use the teacher name and year as the name of the class
Ex: Smith Reading 2015
Simplified Login: the selection for Simplified Login can be made here. This can be selected or removed at any time. See Simplified Login in this help guide for more information.
March 2015 Page 3
PLEASE NOTE: There may be slight differences to the content loaded on your screen.
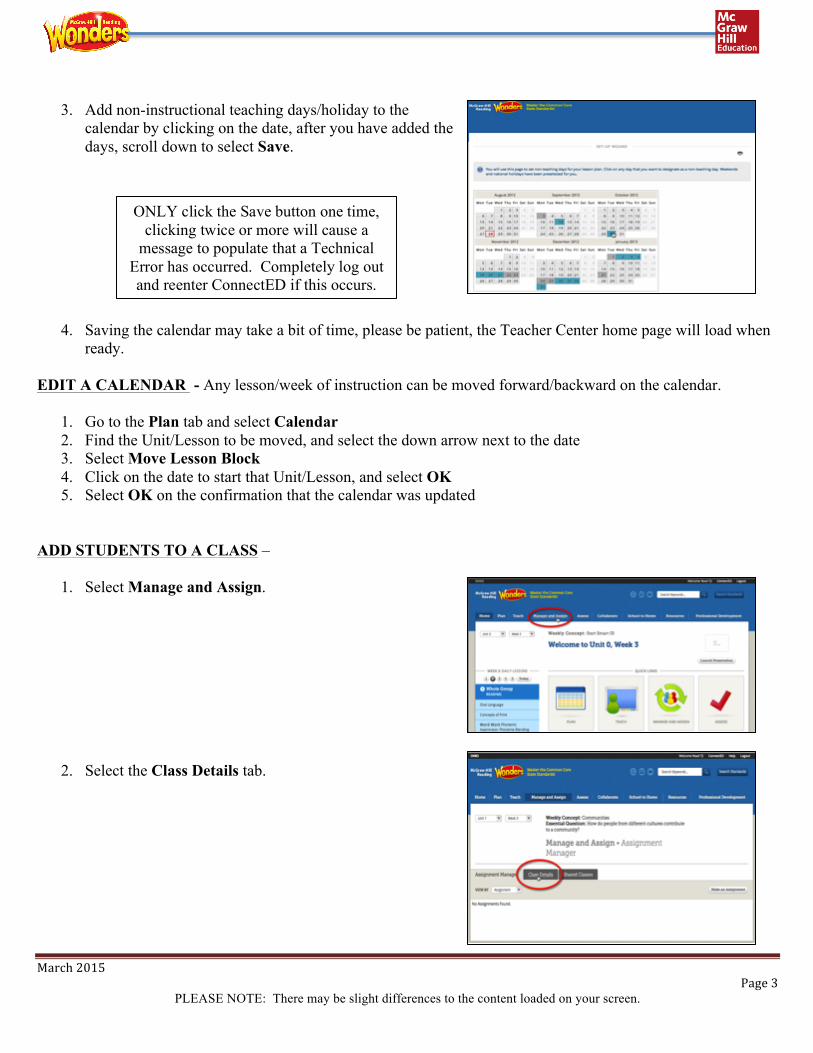
3. Add non-instructional teaching days/holiday to the
calendar by clicking on the date, after you have added the days, scroll down to select Save.
4. Saving the calendar may take a bit of time, please be patient, the Teacher Center home page will load when ready.
EDIT A CALENDAR - Any lesson/week of instruction can be moved forward/backward on the calendar.
1. Go to the Plan tab and select Calendar 2. Find the Unit/Lesson to be moved, and select the down arrow next to the date 3. Select Move Lesson Block 4. Click on the date to start that Unit/Lesson, and select OK 5. Select OK on the confirmation that the calendar was updated
ADD STUDENTS TO A CLASS –
1. Select Manage and Assign.
2. Select the Class Details tab.
ONLY click the Save button one time, clicking twice or more will cause a
message to populate that a Technical Error has occurred. Completely log out and reenter ConnectED if this occurs.
March 2015 Page 4
PLEASE NOTE: There may be slight differences to the content loaded on your screen.
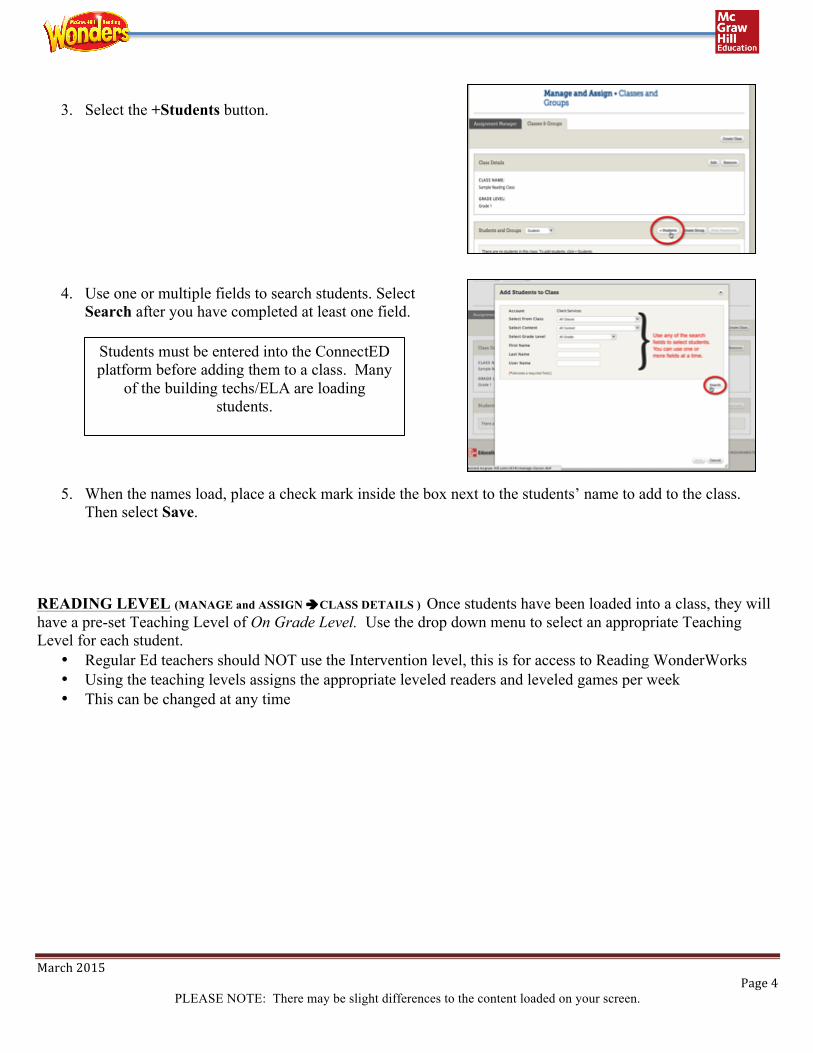
3. Select the +Students button.
4. Use one or multiple fields to search students. Select Search after you have completed at least one field.
5. When the names load, place a check mark inside the box next to the students’ name to add to the class. Then select Save.
READING LEVEL (MANAGE and ASSIGN èCLASS DETAILS ) Once students have been loaded into a class, they will have a pre-set Teaching Level of On Grade Level. Use the drop down menu to select an appropriate Teaching Level for each student.
• Regular Ed teachers should NOT use the Intervention level, this is for access to Reading WonderWorks • Using the teaching levels assigns the appropriate leveled readers and leveled games per week • This can be changed at any time
Students must be entered into the ConnectED platform before adding them to a class. Many
of the building techs/ELA are loading students.
March 2015 Page 5
PLEASE NOTE: There may be slight differences to the content loaded on your screen.
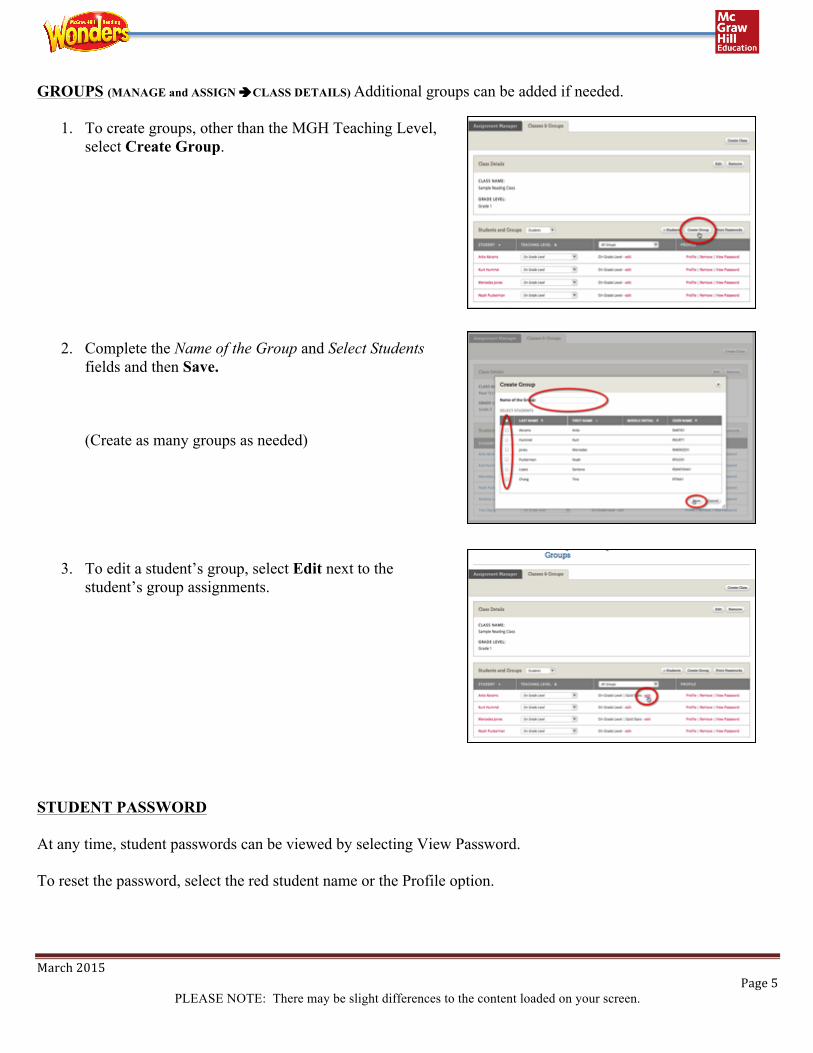
GROUPS (MANAGE and ASSIGN èCLASS DETAILS) Additional groups can be added if needed.
1. To create groups, other than the MGH Teaching Level, select Create Group.
2. Complete the Name of the Group and Select Students fields and then Save. (Create as many groups as needed)
3. To edit a student’s group, select Edit next to the student’s group assignments.
STUDENT PASSWORD At any time, student passwords can be viewed by selecting View Password. To reset the password, select the red student name or the Profile option.
March 2015 Page 6
PLEASE NOTE: There may be slight differences to the content loaded on your screen.
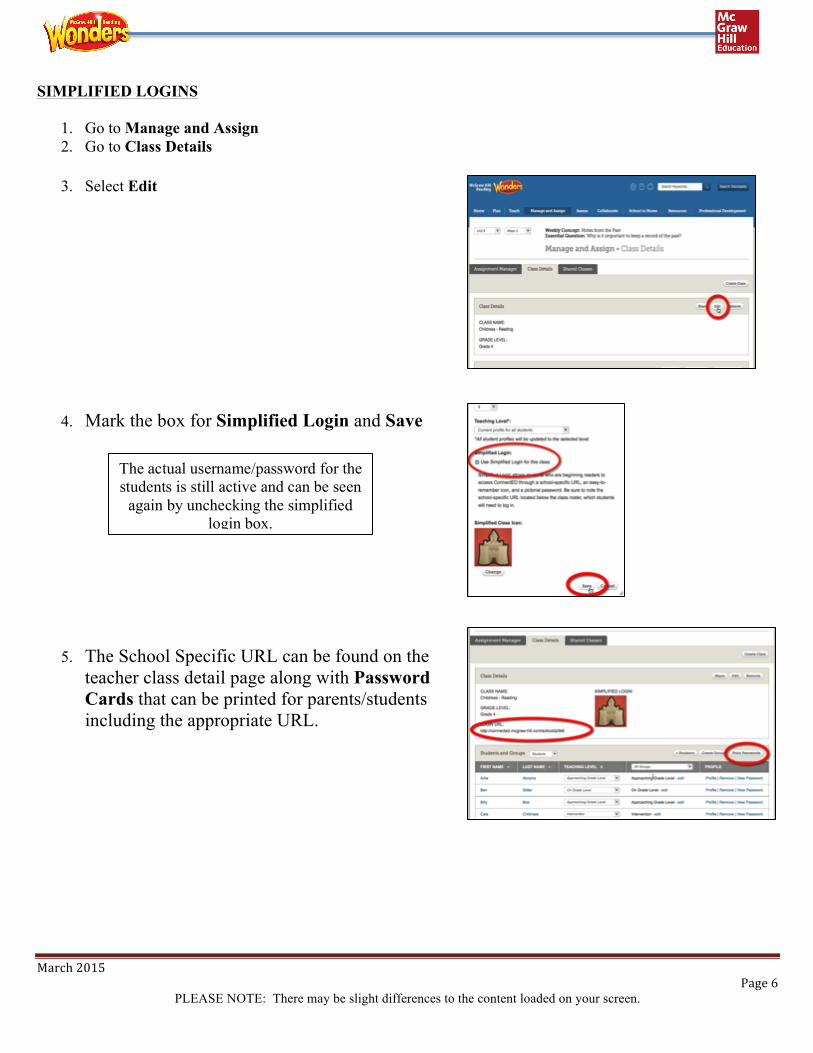
SIMPLIFIED LOGINS
1. Go to Manage and Assign 2. Go to Class Details
3. Select Edit
4. Mark the box for Simplified Login and Save
5. The School Specific URL can be found on the teacher class detail page along with Password Cards that can be printed for parents/students including the appropriate URL.
The actual username/password for the students is still active and can be seen
again by unchecking the simplified login box.
March 2015 Page 7
PLEASE NOTE: There may be slight differences to the content loaded on your screen.
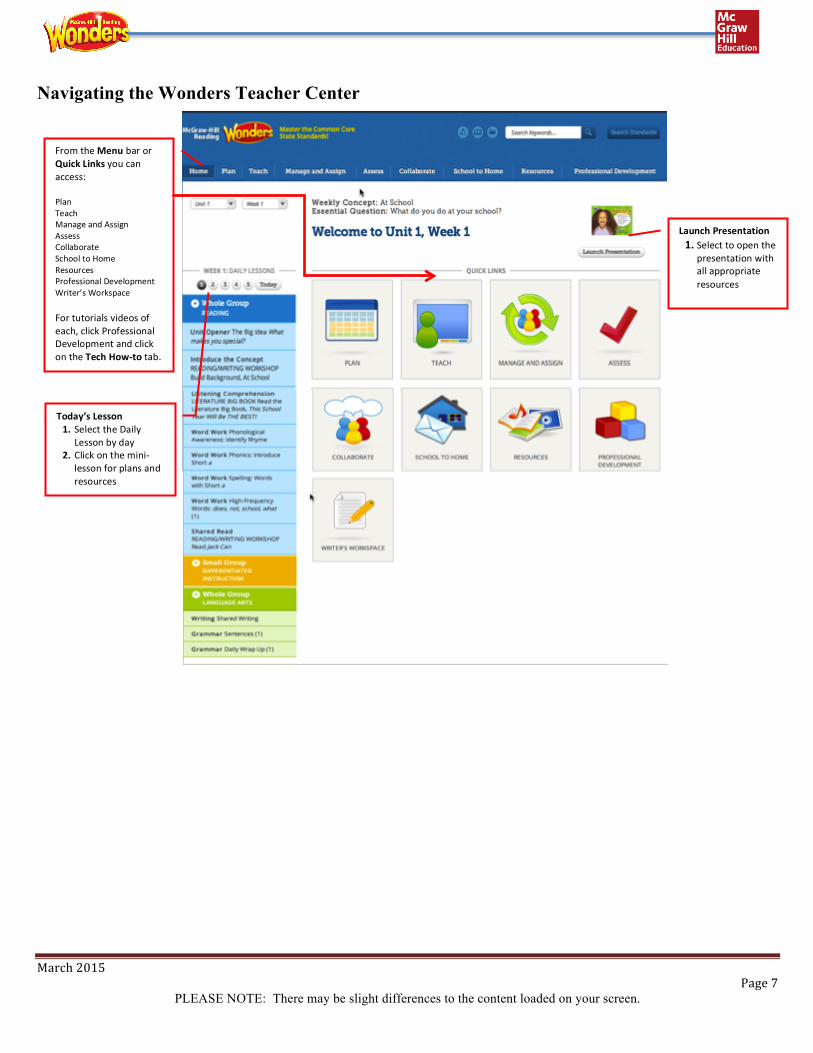
Navigating the Wonders Teacher Center
Launch Presentation 1. Select to open the
presentation with all appropriate resources
From the Menu bar or Quick Links you can access: Plan Teach Manage and Assign Assess Collaborate School to Home Resources Professional Development Writer’s Workspace For tutorials videos of each, click Professional Development and click on the Tech How-‐to tab.
Today’s Lesson 1. Select the Daily
Lesson by day 2. Click on the mini-‐
lesson for plans and resources

March 2015 Page 8
PLEASE NOTE: There may be slight differences to the content loaded on your screen.
MINI-LESSON TEACHING PLANS (by mini-lesson) (There are several ways to access lesson plans, these instructions will be starting from the Teacher Center home page)\
1. Select one of the options on the left side of the screen under Daily Lesson.
Lessons are color-coded: Blue: Whole Group Reading Gold: Small Group Differentiated Instruction Green: Whole Group Language Arts
2. Resources are shown in the center of the screen. If the resource is already in the lesson presentation, there is a “screen” icon.
To Launch: double-click on the resource, or use the cog icon and select Open this resource To Remove from Lesson Presentation: select the cog icon and choose Remove this resource from presentation To Reorder the resource in the presentation: drag/drop the resource To Add a resource to the presentation (w/o a screen icon): select the cog icon and choose Add this resource to the presentation
3. The instructions for the lesson plan are listed below the resources. On the right side of the screen teachers have additional Lesson Support for topics such as Standards and Professional Development.
March 2015 Page 9
PLEASE NOTE: There may be slight differences to the content loaded on your screen.
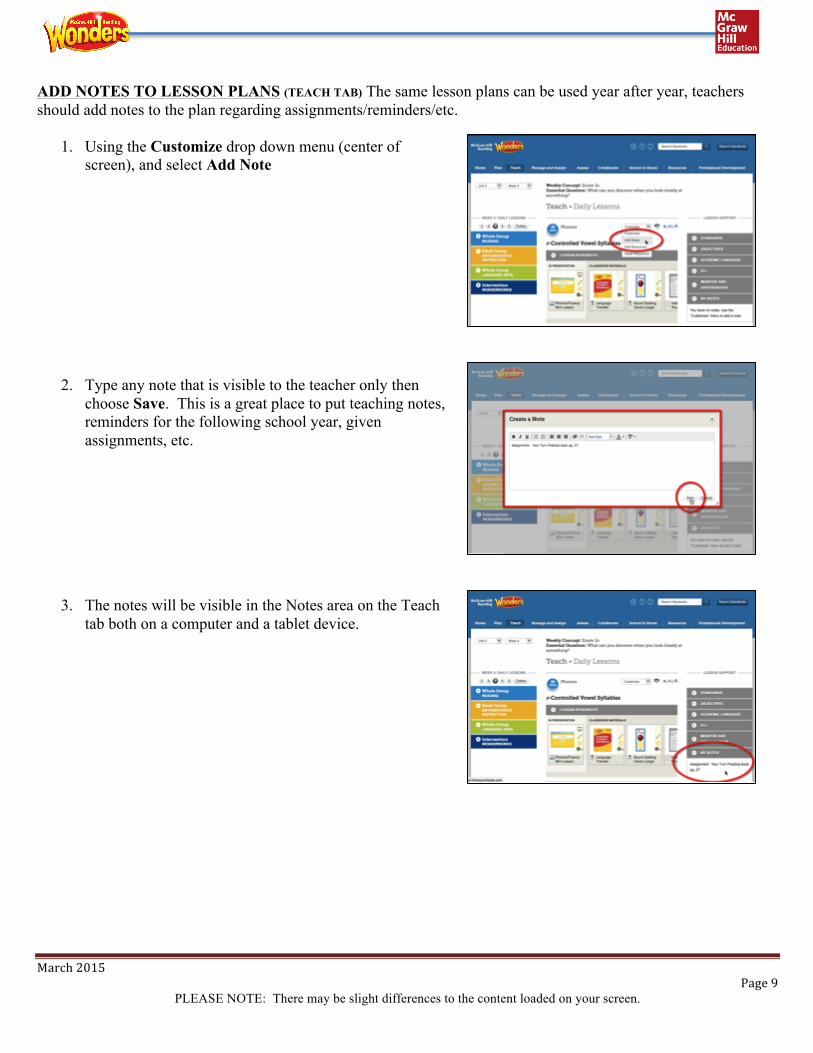
ADD NOTES TO LESSON PLANS (TEACH TAB) The same lesson plans can be used year after year, teachers should add notes to the plan regarding assignments/reminders/etc.
1. Using the Customize drop down menu (center of screen), and select Add Note
2. Type any note that is visible to the teacher only then choose Save. This is a great place to put teaching notes, reminders for the following school year, given assignments, etc.
3. The notes will be visible in the Notes area on the Teach tab both on a computer and a tablet device.
March 2015 Page 10
PLEASE NOTE: There may be slight differences to the content loaded on your screen.
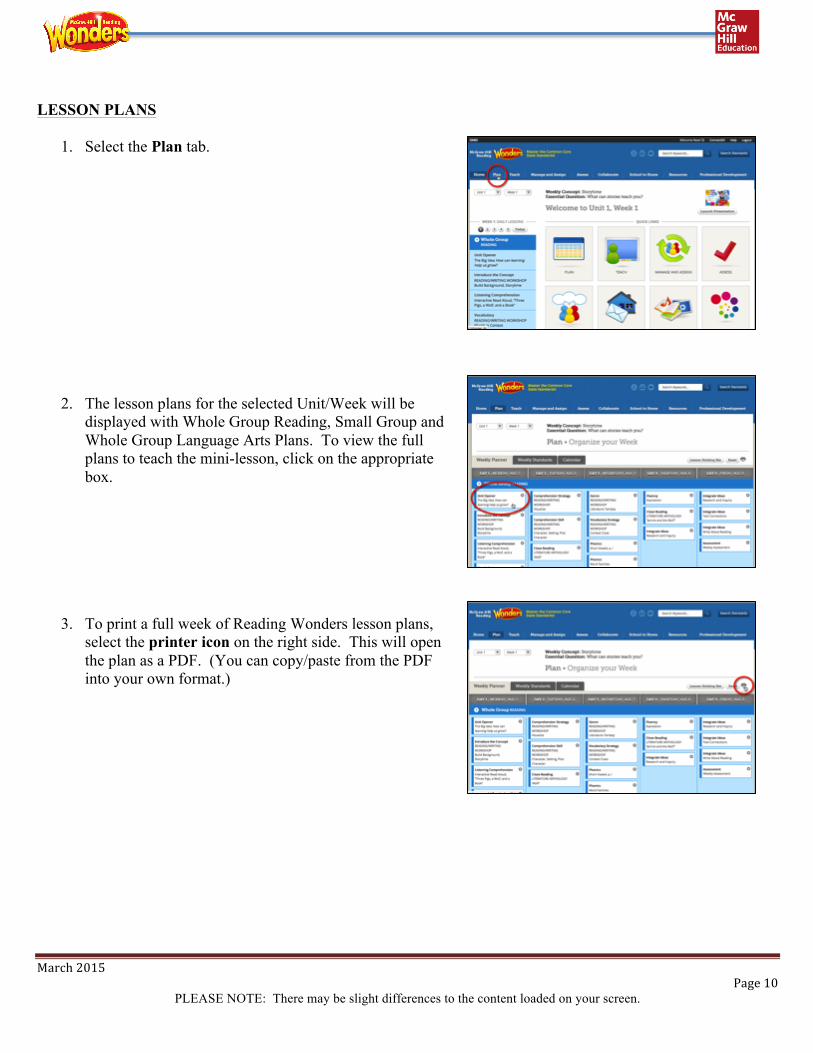
LESSON PLANS
1. Select the Plan tab.
2. The lesson plans for the selected Unit/Week will be displayed with Whole Group Reading, Small Group and Whole Group Language Arts Plans. To view the full plans to teach the mini-lesson, click on the appropriate box.
3. To print a full week of Reading Wonders lesson plans, select the printer icon on the right side. This will open the plan as a PDF. (You can copy/paste from the PDF into your own format.)
March 2015 Page 11
PLEASE NOTE: There may be slight differences to the content loaded on your screen.
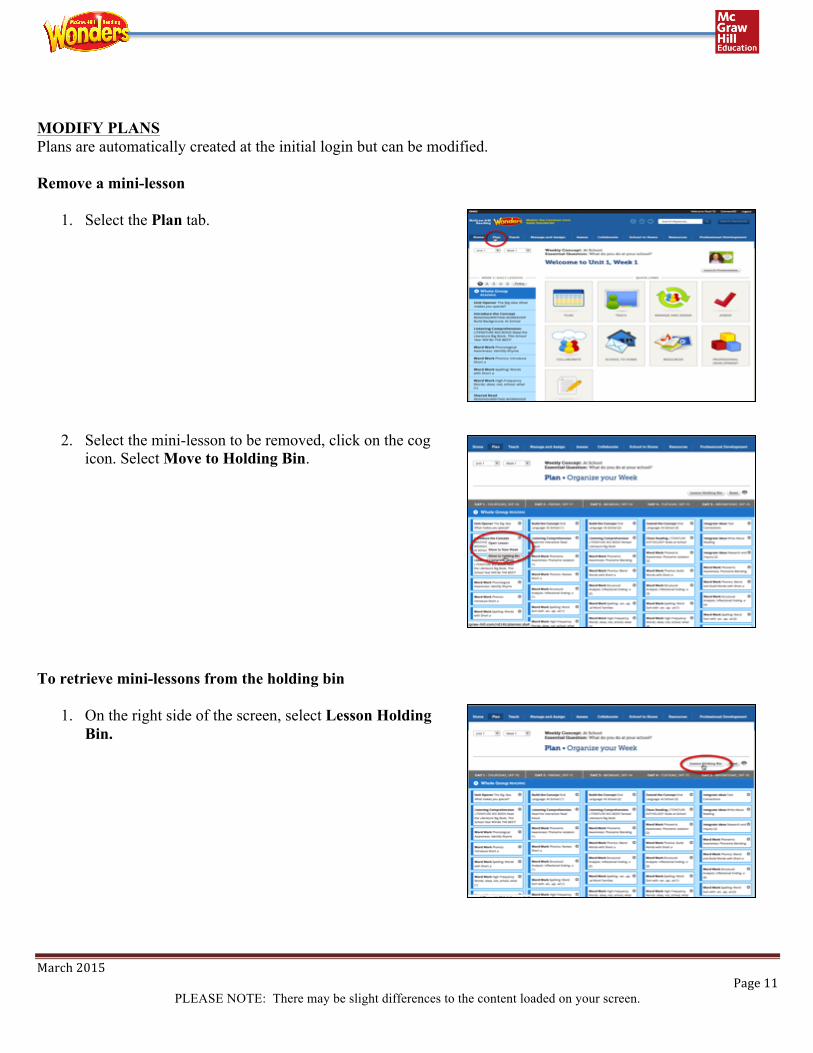
MODIFY PLANS Plans are automatically created at the initial login but can be modified. Remove a mini-lesson
1. Select the Plan tab.
2. Select the mini-lesson to be removed, click on the cog icon. Select Move to Holding Bin.
To retrieve mini-lessons from the holding bin
1. On the right side of the screen, select Lesson Holding Bin.
March 2015 Page 12
PLEASE NOTE: There may be slight differences to the content loaded on your screen.
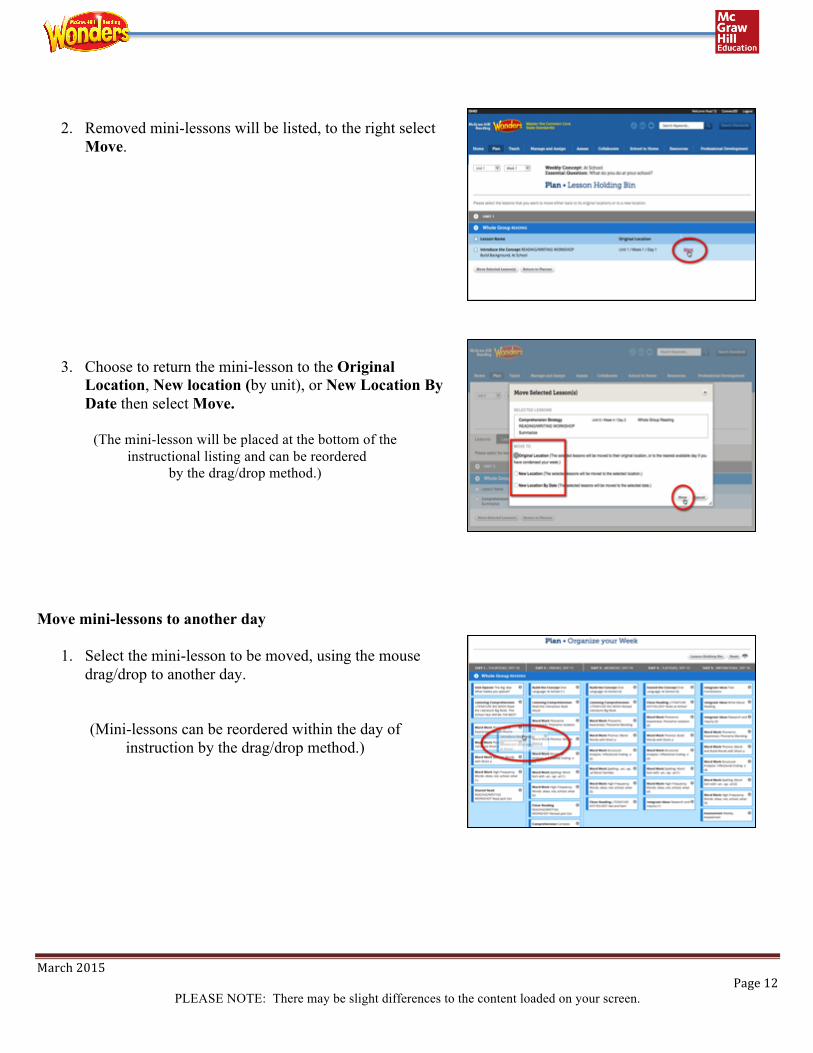
2. Removed mini-lessons will be listed, to the right select Move.
3. Choose to return the mini-lesson to the Original Location, New location (by unit), or New Location By Date then select Move.
(The mini-lesson will be placed at the bottom of the
instructional listing and can be reordered by the drag/drop method.)
Move mini-lessons to another day
1. Select the mini-lesson to be moved, using the mouse drag/drop to another day.
(Mini-lessons can be reordered within the day of instruction by the drag/drop method.)
March 2015 Page 13
PLEASE NOTE: There may be slight differences to the content loaded on your screen.
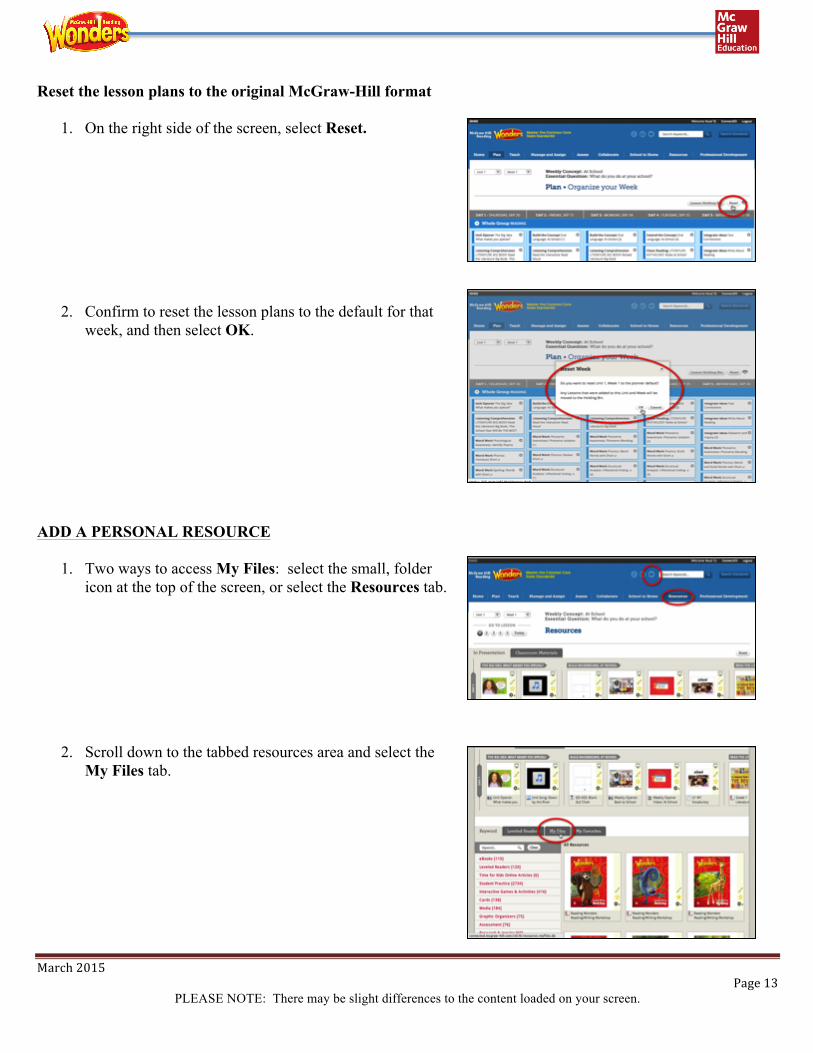
Reset the lesson plans to the original McGraw-Hill format
1. On the right side of the screen, select Reset.
2. Confirm to reset the lesson plans to the default for that week, and then select OK.
ADD A PERSONAL RESOURCE
1. Two ways to access My Files: select the small, folder icon at the top of the screen, or select the Resources tab.
2. Scroll down to the tabbed resources area and select the My Files tab.
March 2015 Page 14
PLEASE NOTE: There may be slight differences to the content loaded on your screen.
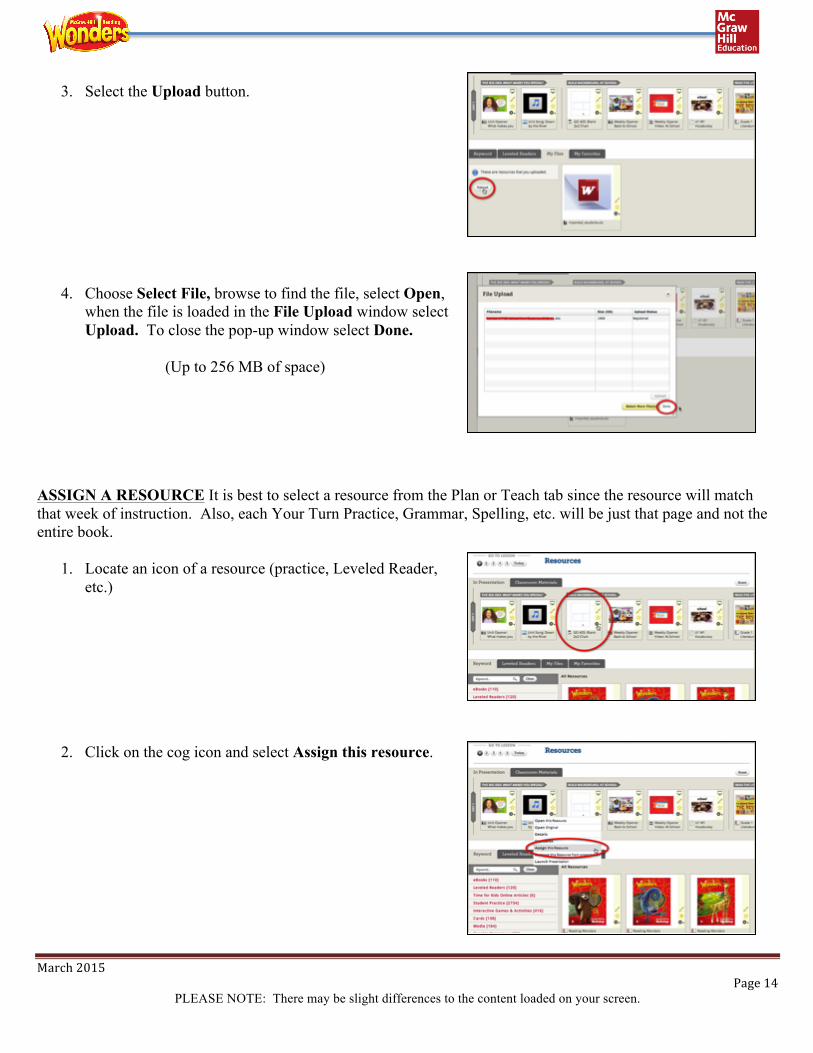
3. Select the Upload button.
4. Choose Select File, browse to find the file, select Open, when the file is loaded in the File Upload window select Upload. To close the pop-up window select Done.
(Up to 256 MB of space)
ASSIGN A RESOURCE It is best to select a resource from the Plan or Teach tab since the resource will match that week of instruction. Also, each Your Turn Practice, Grammar, Spelling, etc. will be just that page and not the entire book.
1. Locate an icon of a resource (practice, Leveled Reader, etc.)
2. Click on the cog icon and select Assign this resource.
March 2015 Page 15
PLEASE NOTE: There may be slight differences to the content loaded on your screen.
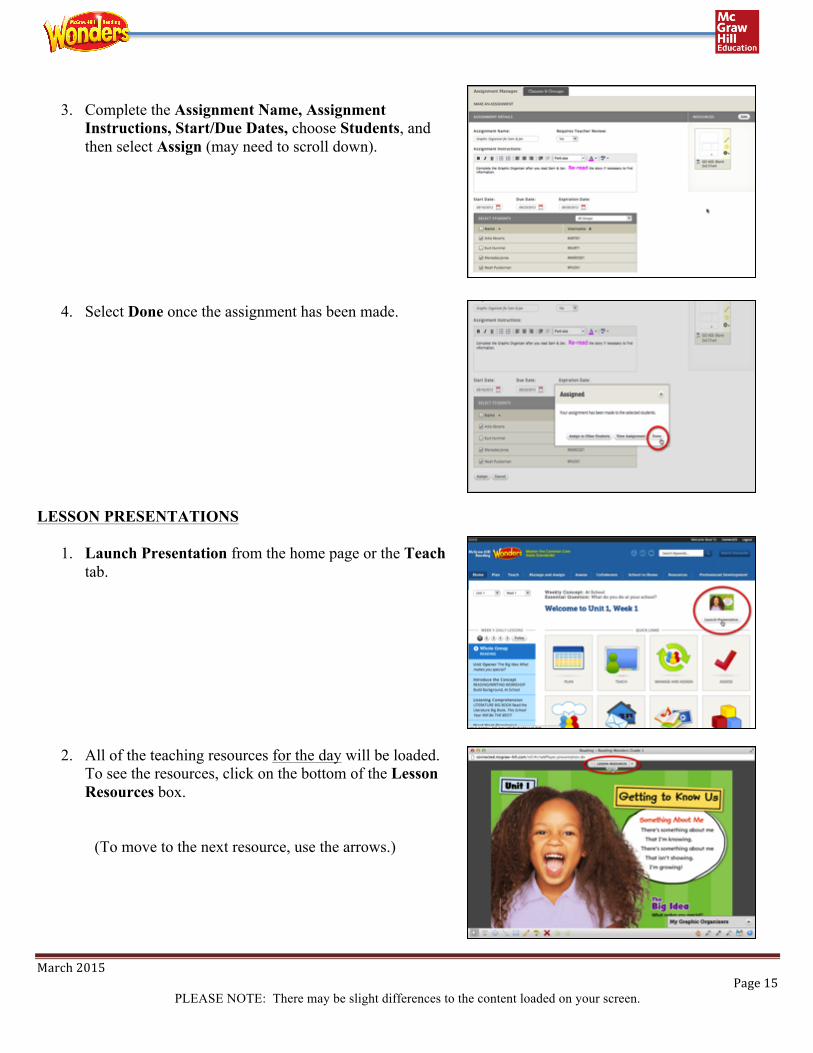
3. Complete the Assignment Name, Assignment
Instructions, Start/Due Dates, choose Students, and then select Assign (may need to scroll down).
4. Select Done once the assignment has been made. LESSON PRESENTATIONS
1. Launch Presentation from the home page or the Teach tab.
2. All of the teaching resources for the day will be loaded. To see the resources, click on the bottom of the Lesson Resources box.
(To move to the next resource, use the arrows.)
March 2015 Page 16
PLEASE NOTE: There may be slight differences to the content loaded on your screen.
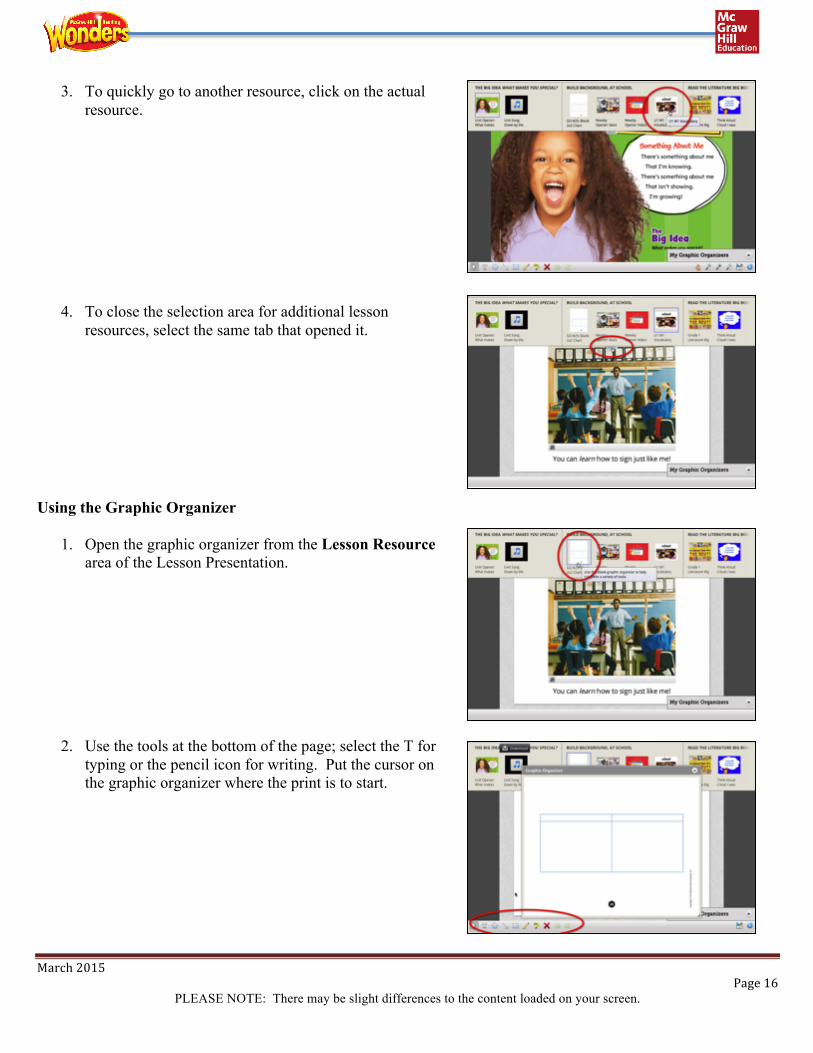
3. To quickly go to another resource, click on the actual resource.
4. To close the selection area for additional lesson resources, select the same tab that opened it.
Using the Graphic Organizer
1. Open the graphic organizer from the Lesson Resource area of the Lesson Presentation.
2. Use the tools at the bottom of the page; select the T for typing or the pencil icon for writing. Put the cursor on the graphic organizer where the print is to start.
March 2015 Page 17
PLEASE NOTE: There may be slight differences to the content loaded on your screen.
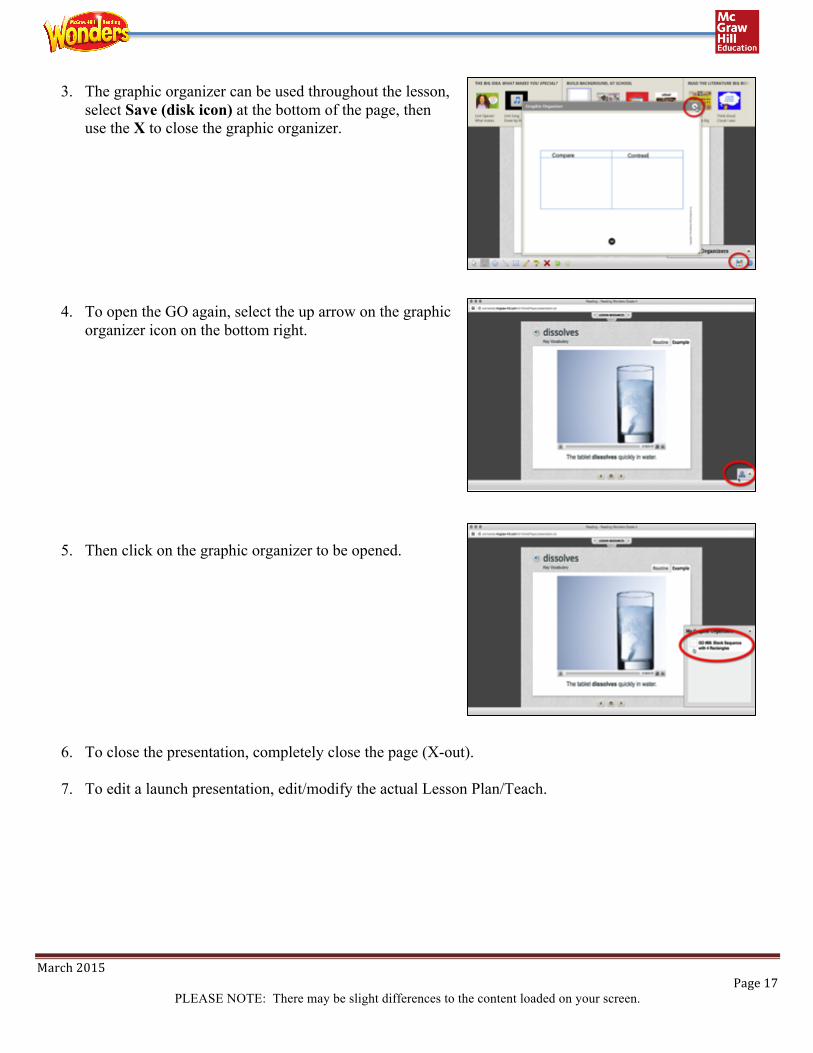
3. The graphic organizer can be used throughout the lesson, select Save (disk icon) at the bottom of the page, then use the X to close the graphic organizer.
4. To open the GO again, select the up arrow on the graphic organizer icon on the bottom right.
5. Then click on the graphic organizer to be opened.
6. To close the presentation, completely close the page (X-out).
7. To edit a launch presentation, edit/modify the actual Lesson Plan/Teach.
March 2015 Page 18
PLEASE NOTE: There may be slight differences to the content loaded on your screen.
MGH eASSESSMENT HOW TO OPEN A TEST
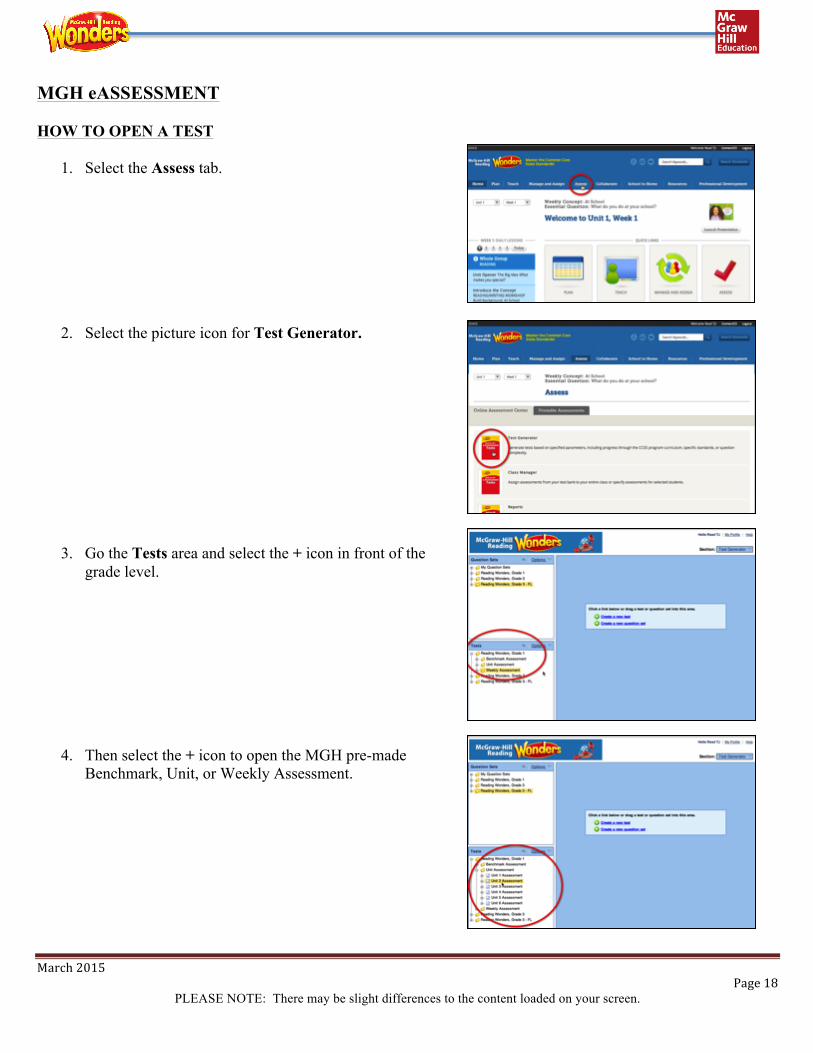
1. Select the Assess tab.
2. Select the picture icon for Test Generator.
3. Go the Tests area and select the + icon in front of the grade level.
4. Then select the + icon to open the MGH pre-made Benchmark, Unit, or Weekly Assessment.
March 2015 Page 19
PLEASE NOTE: There may be slight differences to the content loaded on your screen.
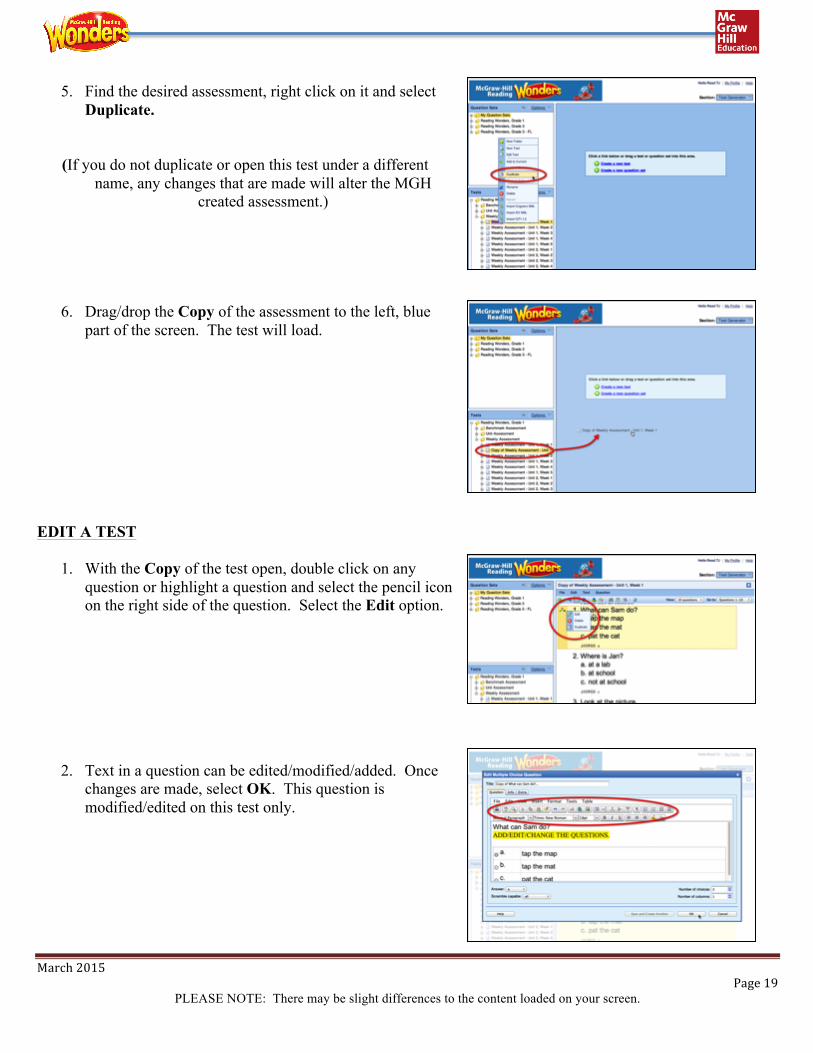
5. Find the desired assessment, right click on it and select Duplicate.
(If you do not duplicate or open this test under a different name, any changes that are made will alter the MGH
created assessment.)
6. Drag/drop the Copy of the assessment to the left, blue part of the screen. The test will load.
EDIT A TEST
1. With the Copy of the test open, double click on any question or highlight a question and select the pencil icon on the right side of the question. Select the Edit option.
2. Text in a question can be edited/modified/added. Once changes are made, select OK. This question is modified/edited on this test only.
March 2015 Page 20
PLEASE NOTE: There may be slight differences to the content loaded on your screen.
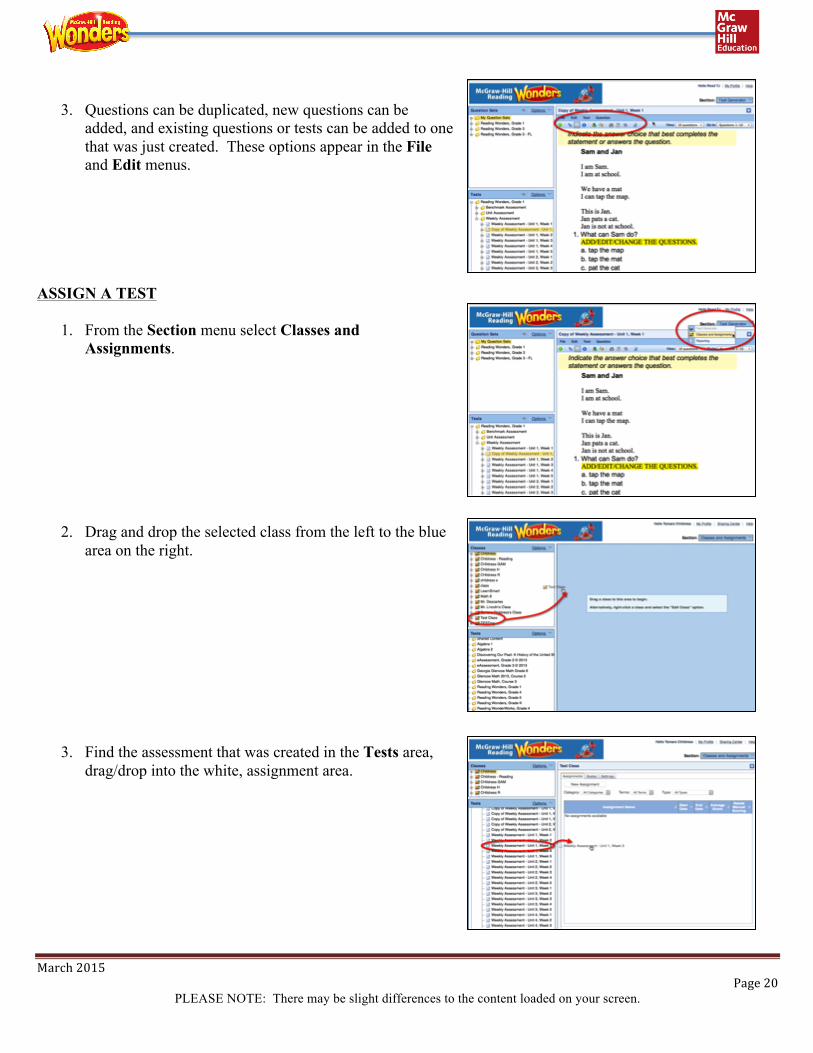
3. Questions can be duplicated, new questions can be
added, and existing questions or tests can be added to one that was just created. These options appear in the File and Edit menus.
ASSIGN A TEST
1. From the Section menu select Classes and Assignments.
2. Drag and drop the selected class from the left to the blue area on the right.
3. Find the assessment that was created in the Tests area, drag/drop into the white, assignment area.
March 2015 Page 21
PLEASE NOTE: There may be slight differences to the content loaded on your screen.
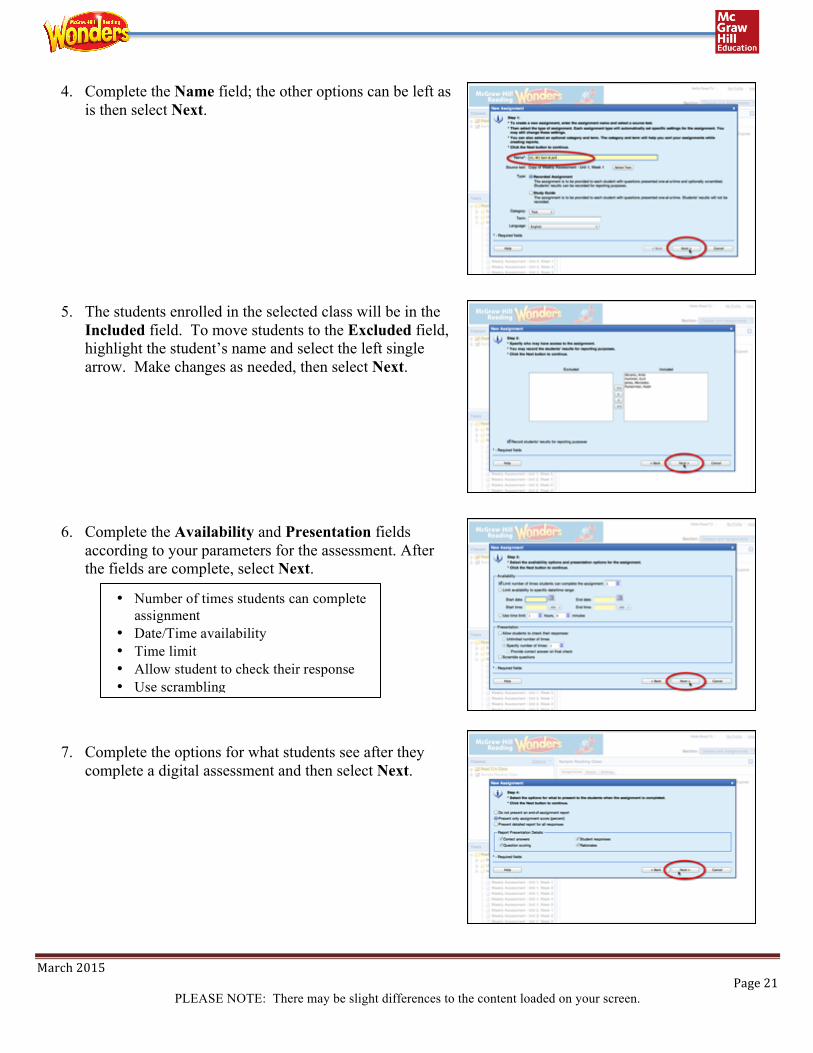
4. Complete the Name field; the other options can be left as is then select Next.
5. The students enrolled in the selected class will be in the Included field. To move students to the Excluded field, highlight the student’s name and select the left single arrow. Make changes as needed, then select Next.
6. Complete the Availability and Presentation fields according to your parameters for the assessment. After the fields are complete, select Next.
7. Complete the options for what students see after they complete a digital assessment and then select Next.
• Number of times students can complete assignment
• Date/Time availability • Time limit • Allow student to check their response • Use scrambling
March 2015 Page 22
PLEASE NOTE: There may be slight differences to the content loaded on your screen.
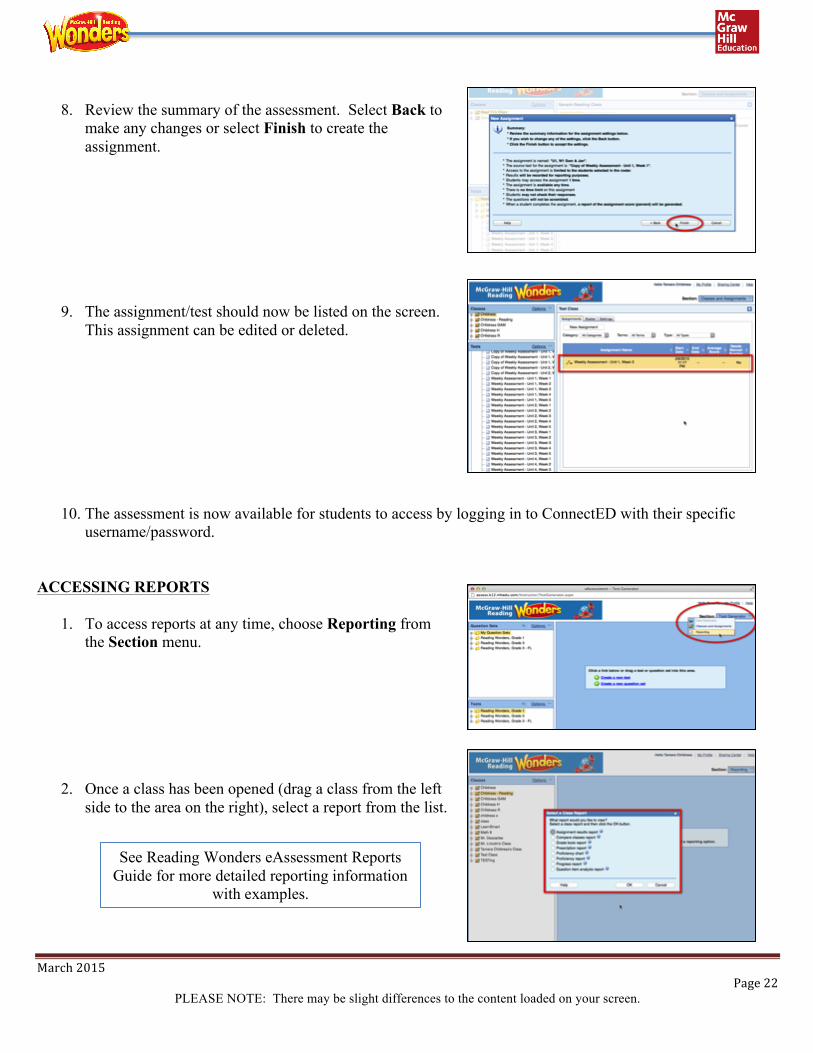
8. Review the summary of the assessment. Select Back to
make any changes or select Finish to create the assignment.
9. The assignment/test should now be listed on the screen. This assignment can be edited or deleted.
10. The assessment is now available for students to access by logging in to ConnectED with their specific username/password.
ACCESSING REPORTS
1. To access reports at any time, choose Reporting from the Section menu.
2. Once a class has been opened (drag a class from the left side to the area on the right), select a report from the list.
See Reading Wonders eAssessment Reports Guide for more detailed reporting information
with examples.
March 2015 Page 23
PLEASE NOTE: There may be slight differences to the content loaded on your screen.
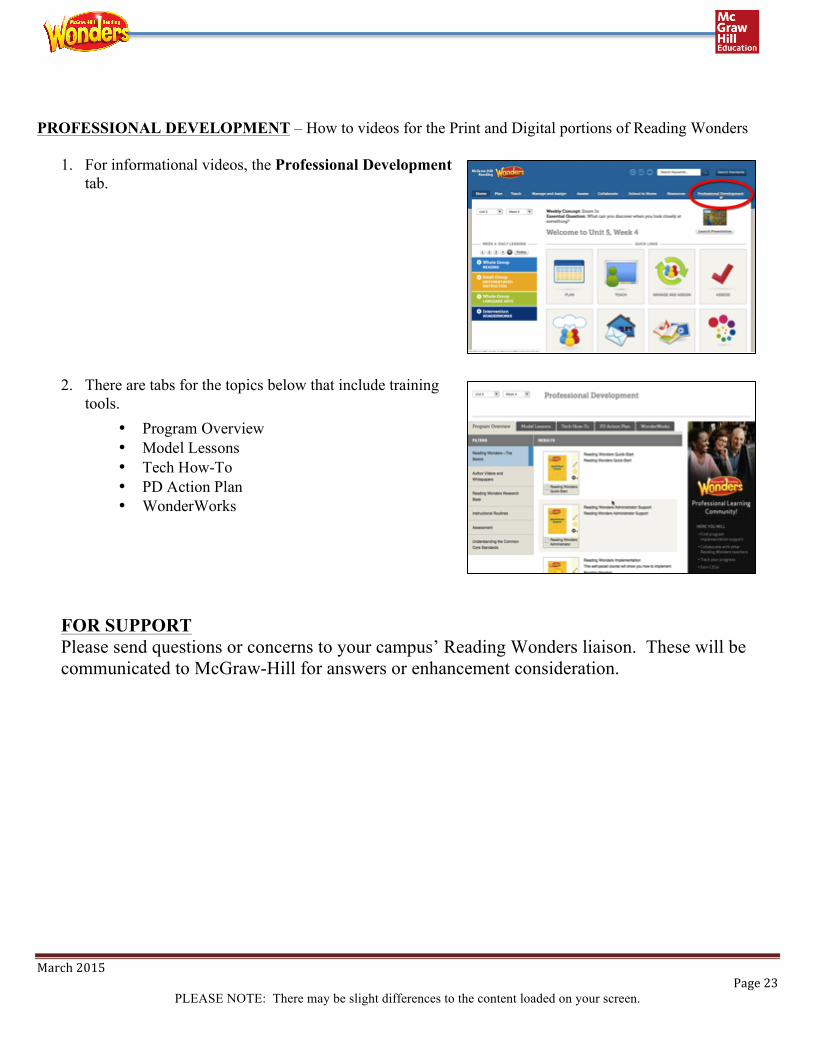
PROFESSIONAL DEVELOPMENT – How to videos for the Print and Digital portions of Reading Wonders
1. For informational videos, the Professional Development tab.
2. There are tabs for the topics below that include training tools.
FOR SUPPORT Please send questions or concerns to your campus’ Reading Wonders liaison. These will be communicated to McGraw-Hill for answers or enhancement consideration.
• Program Overview • Model Lessons • Tech How-To • PD Action Plan • WonderWorks
Recommended