Operating Instructions
www.boeckmann.com
Horse Trailer Livestock Trailer
www.boeckmann.com

Operating Instructions
04/13

Horse Trailer, Livestock Trailer
04/13
Copyright
BÖCKMANN Fahrzeugwerke GmbH retains all rights to these operating instructions as well as translations of these operating instructions. The technical information contained therein may not be reproduced in whole or in part in any form whatsoever (including print-out, photocopy, microfilm or data transfer) without the written permission of BÖCKMANN Fahrzeugwerke GmbH. Storage, processing, duplication and distribution by electronic means and circulation to third parties are prohibited.
Your vehicle data
Vehicle model:
Chassis no.:
Total weight rating:
Year of construction:
Tyre size/manufacturer:
Overrun device typePro-ducer / test mark:
Drawbar / tow barManufacturer / test symbol:
Axle typeManufacturer / test symbol:
Wheel brake typeManufacturer / test symbol:
Ball coupling typeManufacturer / test symbol:
Key no. for lockable cou-pling:

Operating Instructions
04/13
Table of contents
Horse Trailer, Livestock Trailer
1 Important Information . . . . . . . . . . . . . . . . . . . . . . . . . . . . . . . . . . . . . . 11.1 Operating Instructions . . . . . . . . . . . . . . . . . . . . . . . . . . . . . . . . . . . . . . . . . . . . . 1
1.2 Representation Conventions . . . . . . . . . . . . . . . . . . . . . . . . . . . . . . . . . . . . . . . . 1
1.3 Trailer Versions and Accessories . . . . . . . . . . . . . . . . . . . . . . . . . . . . . . . . . . . . 2
1.4 Third-Party Documentation . . . . . . . . . . . . . . . . . . . . . . . . . . . . . . . . . . . . . . . . . 2
1.5 Trailer Approval . . . . . . . . . . . . . . . . . . . . . . . . . . . . . . . . . . . . . . . . . . . . . . . . . . 2
1.6 Driving Licence . . . . . . . . . . . . . . . . . . . . . . . . . . . . . . . . . . . . . . . . . . . . . . . . . . 2
2 Safety . . . . . . . . . . . . . . . . . . . . . . . . . . . . . . . . . . . . . . . . . . . . . . . . . . . 32.1 Intended Use . . . . . . . . . . . . . . . . . . . . . . . . . . . . . . . . . . . . . . . . . . . . . . . . . . . . 3
2.2 Basic Safety Instructions . . . . . . . . . . . . . . . . . . . . . . . . . . . . . . . . . . . . . . . . . . . 3
2.3 Labels . . . . . . . . . . . . . . . . . . . . . . . . . . . . . . . . . . . . . . . . . . . . . . . . . . . . . . . . . 4
2.4 Disposal . . . . . . . . . . . . . . . . . . . . . . . . . . . . . . . . . . . . . . . . . . . . . . . . . . . . . . . . 6
3 Technical Data . . . . . . . . . . . . . . . . . . . . . . . . . . . . . . . . . . . . . . . . . . . . 73.1 Rating plate . . . . . . . . . . . . . . . . . . . . . . . . . . . . . . . . . . . . . . . . . . . . . . . . . . . . . 7
4 Trailer Features . . . . . . . . . . . . . . . . . . . . . . . . . . . . . . . . . . . . . . . . . . . 84.1 Electrical Connections . . . . . . . . . . . . . . . . . . . . . . . . . . . . . . . . . . . . . . . . . . . . . 8
4.2 Towing Devices . . . . . . . . . . . . . . . . . . . . . . . . . . . . . . . . . . . . . . . . . . . . . . . . . . 9
4.3 Coupling. . . . . . . . . . . . . . . . . . . . . . . . . . . . . . . . . . . . . . . . . . . . . . . . . . . . . . . 10
4.4 Breakaway Cable for Overrun Brake . . . . . . . . . . . . . . . . . . . . . . . . . . . . . . . . . 11
4.5 Jockey wheel . . . . . . . . . . . . . . . . . . . . . . . . . . . . . . . . . . . . . . . . . . . . . . . . . . . 11
4.6 Parking brake and wheel chocks . . . . . . . . . . . . . . . . . . . . . . . . . . . . . . . . . . . . 12
4.7 Support leg. . . . . . . . . . . . . . . . . . . . . . . . . . . . . . . . . . . . . . . . . . . . . . . . . . . . . 14
4.8 Rear Ramp Top Canvas Cover . . . . . . . . . . . . . . . . . . . . . . . . . . . . . . . . . . . . . 14
4.9 Rear ramp/1-section door combination . . . . . . . . . . . . . . . . . . . . . . . . . . . . . . . 15
4.10 Safety Stall Bar System . . . . . . . . . . . . . . . . . . . . . . . . . . . . . . . . . . . . . . . . . . . 16
4.11 Breech bars . . . . . . . . . . . . . . . . . . . . . . . . . . . . . . . . . . . . . . . . . . . . . . . . . . . . 16
5 Coupling . . . . . . . . . . . . . . . . . . . . . . . . . . . . . . . . . . . . . . . . . . . . . . . . 175.1 Nose Weight . . . . . . . . . . . . . . . . . . . . . . . . . . . . . . . . . . . . . . . . . . . . . . . . . . . 17
5.2 Coupling. . . . . . . . . . . . . . . . . . . . . . . . . . . . . . . . . . . . . . . . . . . . . . . . . . . . . . . 17
5.3 Parking the Trailer . . . . . . . . . . . . . . . . . . . . . . . . . . . . . . . . . . . . . . . . . . . . . . . 18
04/13

Table of contents
Operating Instructions
6 Loading . . . . . . . . . . . . . . . . . . . . . . . . . . . . . . . . . . . . . . . . . . . . . . . . 196.1 Loading and Unloading the Trailer . . . . . . . . . . . . . . . . . . . . . . . . . . . . . . . . . . . 19
6.2 Preparations. . . . . . . . . . . . . . . . . . . . . . . . . . . . . . . . . . . . . . . . . . . . . . . . . . . . 19
6.3 Weight Distribution . . . . . . . . . . . . . . . . . . . . . . . . . . . . . . . . . . . . . . . . . . . . . . . 19
6.4 Securing Animals for Transport . . . . . . . . . . . . . . . . . . . . . . . . . . . . . . . . . . . . . 20
6.5 Loading Animals Safely . . . . . . . . . . . . . . . . . . . . . . . . . . . . . . . . . . . . . . . . . . . 21
7 Driving . . . . . . . . . . . . . . . . . . . . . . . . . . . . . . . . . . . . . . . . . . . . . . . . . 237.1 Pre-drive Checklist . . . . . . . . . . . . . . . . . . . . . . . . . . . . . . . . . . . . . . . . . . . . . . . 23
7.2 Driving Precautions . . . . . . . . . . . . . . . . . . . . . . . . . . . . . . . . . . . . . . . . . . . . . . 24
7.3 Brakes . . . . . . . . . . . . . . . . . . . . . . . . . . . . . . . . . . . . . . . . . . . . . . . . . . . . . . . . 25
7.4 Reversing . . . . . . . . . . . . . . . . . . . . . . . . . . . . . . . . . . . . . . . . . . . . . . . . . . . . . . 26
7.5 Manoeuvring . . . . . . . . . . . . . . . . . . . . . . . . . . . . . . . . . . . . . . . . . . . . . . . . . . . 26
8 Cleaning, Maintenance and Inspection. . . . . . . . . . . . . . . . . . . . . . . 278.1 Care and Cleaning . . . . . . . . . . . . . . . . . . . . . . . . . . . . . . . . . . . . . . . . . . . . . . . 27
8.2 Maintenance. . . . . . . . . . . . . . . . . . . . . . . . . . . . . . . . . . . . . . . . . . . . . . . . . . . . 28
8.3 Tyres and Changing Wheels . . . . . . . . . . . . . . . . . . . . . . . . . . . . . . . . . . . . . . . 29
8.4 Inspection. . . . . . . . . . . . . . . . . . . . . . . . . . . . . . . . . . . . . . . . . . . . . . . . . . . . . . 30
9 Troubleshooting . . . . . . . . . . . . . . . . . . . . . . . . . . . . . . . . . . . . . . . . . 37
10 Service . . . . . . . . . . . . . . . . . . . . . . . . . . . . . . . . . . . . . . . . . . . . . . . . . 3810.1 Information on Quality . . . . . . . . . . . . . . . . . . . . . . . . . . . . . . . . . . . . . . . . . . . . 38
10.2 Ordering Spare Parts and Accessories . . . . . . . . . . . . . . . . . . . . . . . . . . . . . . . 39
04/13

1 Important Information
Horse Trailer, Livestock Trailer
1 Important Information
Dear Customer,
These operating instructions are intend-ed to help you use your "First-Class Trailer" optimally. Following these in-structions will ensure that you can use your trailer safely for a long time.
This trailer has been developed and de-signed to the latest state-of-the-art and has been thoroughly tested to ensure perfect functioning prior to despatch.
1.1 Operating Instructions
– Please retain these operating instruc-tions for future reference. If you sell or lend your trailer to a third party please always give the operating instructions to the new user.
– Please read the operating instruc-tions completely before using the trailer for the first time.
– Disregard of these operating instruc-tions may lead to injuries or damage to the trailer.
– BÖCKMANN accepts no liability for damage resulting from disregard of these operating instructions.
1.2 Representation Conventions
1.2.1 Safety Notices and Warnings
In these operating instructions a three-level system is used to indicate different hazard severities.
Indicates that death or serious bodily injury will probably occur if the spec-ified precautionary measures are not taken.
Indicates that minor to moderate bodily injury will occur if the speci-fied precautionary measures are not taken.
Indicates that material damage will occur if the specified precautionary measures are not taken.
The following markings are also used:
NOTE
Points out particularly important informa-tion about the trailer, handling of the ve-hicle or the respective part of the operating instructions.
TIP
Indicates a user tip.
04/13 11

Important Information 1
Operating Instructions
1.2.2 Text Distinctions
The following text markings are used in these operating instructions:
A Version variants are indicated by the respective capital letters.
1.3 Trailer Versions and Acces-sories
All trailers are available in different ver-sions. You can also retrofit your trailer with additional accessories (see "Spare Parts and Accessories").
Due to the large number of versions and accessory parts, not all trailer versions are described.
Familiarise yourself with the version, op-tions and accessories of your trailer to identify the corresponding version vari-ants in these operating instructions that apply to your trailer.
1.4 Third-Party Documentation
If the trailer is fitted with purchased parts the corresponding operating instructions from the third-party manufacturers are supplied with the trailer documents.
Please heed the information regarding operation, maintenance and care of the purchased part in the corresponding op-erating instructions.
1.5 Trailer Approval
Trailer approval is country-specific. Please find out how and where you can obtain approval for your trailer.
The following applies in Germany:
You must insure your trailer and obtain approval for road driving before you can drive on the roads.
1.5.1 Speed Limit of 100
The maximum allowable speed for tow-ing the trailer is 80 kph. If certain require-ments are met the speed limit can be raised to 100 kph by the approval author-ity.
NOTE
For detailed information on the require-ments please see "Böckmann Info" on the website www.boeckmann.com.
1.5.2 Vehicle Inspection
The regulations for vehicle inspections are country-specific. Please find out
– when a vehicle inspection is required and
– where a vehicle inspection can be carried out for your vehicle.
1.6 Driving Licence
Depending on the country, a specific driving licence may be needed for towing a trailer. Please find out about the re-quirements in your country.
04/132
2 Safety
Horse Trailer, Livestock Trailer
2 Safety
2.1 Intended Use
The trailer is designed to transport ani-mals and packaged goods in the range of the corresponding gross weight rating (see "Technical Data").
Any other use is considered to be im-proper use. BÖCKMANN accepts no lia-bility for damage resulting from improper use.
The following uses are prohibited:
– transport of people
– transport of dry bulk goods.
2.2 Basic Safety Instructions
2.2.1 Inspections
– Inspections may only be carried out at BÖCKMANN-approved authorised shops. For further information please go to www.boeckmann.com.
– The delivery inspection must be car-ried out by the dealer and recorded in the inspection schedule (see "Clean-ing, Maintenance and Inspection").
– The wheel bolts must be inspected after the first 50 km using a torque wrench (see "Cleaning, Maintenance and Inspection").
– All further inspections must be carried out in accordance with the inspection schedule (see "Cleaning, Mainte-nance and Inspection").
2.2.2 People
– Trailers are not toys. Do not allow children to play unattended in the vi-cinity of a trailer. They may injure themselves when playing with the trailer.
– People working with or driving the trailer must have read and under-stood these operating instructions.
2.2.3 Trailer
– Never use a defective trailer. Defec-tive trailers conceal unforeseeable risks.
– The rear lights of the trailer must be visible at all times. If the rear lights are covered by a protruding load, open ramps or dirt please mount an easily visible rear lighting unit to mark the end of the trailer.
2.2.4 Load
– Do not exceed the total weight rating (see "Loading").
– The trailer must be loaded carefully and correctly. Incorrectly loaded trail-ers can easily start skidding. See "Loading" to find out how to load the trailer correctly.
04/13 33
Safety 2
Operating Instructions
2.2.5 Transport of Coaches
The following legal requirements apply to transport of coaches:
– You may only transport a coach if the trailer is loaded. Ensure that the max-imum allowable nose weight is not exceeded by the additional weight of the coach.
– If you use the trailer without transport-ing a coach the nose weight must be at least 25 kg.
– Before driving on public roads you must adequately secure the loaded coach. Cover all protruding parts and sharp edges.
2.2.6 Driving
– Before starting a journey you must complete the pre-drive checklist (see "Driving").
– Familiarise yourself with the driving and braking characteristics (see "Driving") of the trailer in difficult road and weather conditions, for example inclines, rough roads, storms, side wind and snow.
– Your driving behaviour and speed must always be adapted to the given road and weather conditions.
– At all times during the journey you must be able to see the road behind you through the two exterior mirrors.
2.2.7 Repair
Please note the following for repairs:
– Repairs may only be carried out at BÖCKMANN-approved authorised shops.
– Only genuine BÖCKMANN spare parts may be used for repair.
– Vehicle modifications and extensions are subject to the approval of BÖCK-MANN.
2.2.8 Environmental Conditions
– Protect the trailer and accessories as well as possible from adverse weath-er conditions such as rain, snow and hail.
– Ensure adequate lighting when work-ing on the trailer at dusk or in the dark.
2.3 Labels
The following labels are affixed to the trailer:
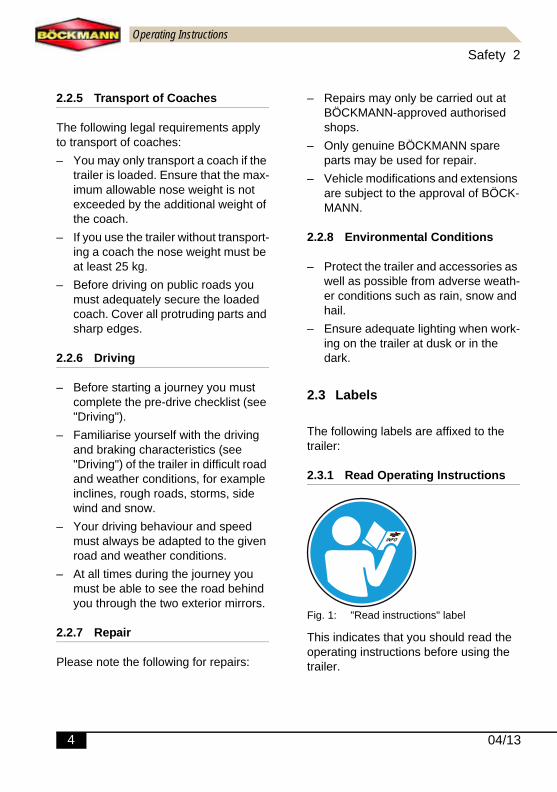
2.3.1 Read Operating Instructions
Fig. 1: "Read instructions" label
This indicates that you should read the operating instructions before using the trailer.
04/134

2 Safety
Horse Trailer, Livestock Trailer
2.3.2 Replace Spring Clip
Fig. 2: "Lock using spring clip" label
This indicates that you may only use locks with spring clips.
If a spring clip is missing from a lock you must immediately replace the spring clip.
2.3.3 Lubrication Points on the Cou-pling
Fig. 3: "Lubrication points on coupling" la-bel
This indicates the places where you must lubricate the coupling.
2.3.4 Removing the safety bar
Fig. 4: "Removing the safety bar" label
Indicates how to remove the safety bar system in case of an emergency.
PANIC SYSTEM
04/13 55

Safety 2
Operating Instructions
2.4 Disposal
The trailer owner must dispose of the trailer and all associated components in accordance with national disposal regu-lations.
Waste electrical and electronic equip-ment
Devices marked with this sym-bol are subject to the Europe-an Directive 2002/96/EG. All old electronic and electric de-vices must be disposed of
separately from normal house waste. Ask your local authority how to properly dispose of old devices.
Batteries
Batteries may contact toxic heavy metals and must be treated as hazardous waste. Dispose of old batteries at the
appropriate collection point.
Hydraulic oil
Hydraulic oil must be disposed of proper-ly. Please observe local regulations.
Old tyres
Dispose of old tyres in accordance with local regulations.
04/136
04/13
3 Technical Data
7
Horse Trailer, Livestock Trailer
7
3 Technical Data
The technical data for your trailer can be found in the following places:
– in the vehicle documents for your trailer
– on the trailer's rating plate
– in the type identification information for the trailer.
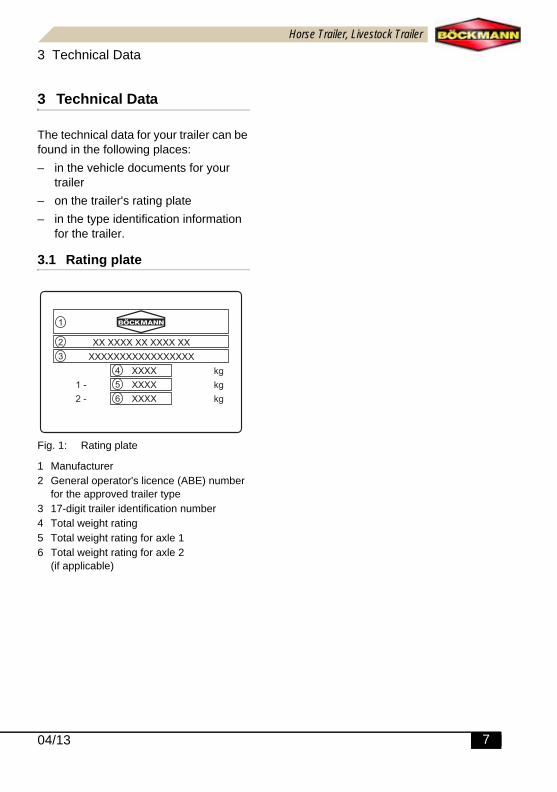
3.1 Rating plate
Fig. 1: Rating plate
1 Manufacturer2 General operator's licence (ABE) number
for the approved trailer type3 17-digit trailer identification number4 Total weight rating5 Total weight rating for axle 16 Total weight rating for axle 2
(if applicable)
XX XXXX XX XXXX XXXXXXXXXXXXXXXXXXX
XXXX kgXXXX kgXXXX
1 -2 - kg
1
23
456
Trailer Features 4
Operating Instructions
4 Trailer Features
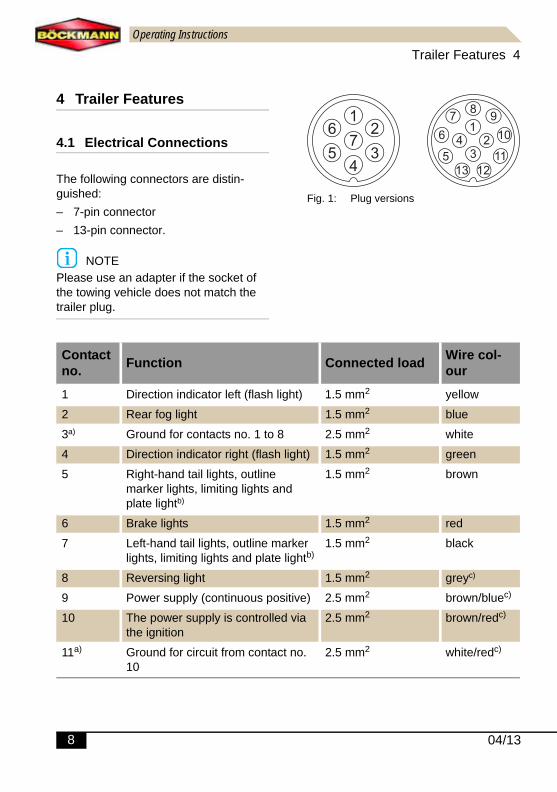
4.1 Electrical Connections
The following connectors are distin-guished:
– 7-pin connector
– 13-pin connector.
NOTE
Please use an adapter if the socket of the towing vehicle does not match the trailer plug.
Fig. 1: Plug versions
Contact no.
Function Connected loadWire col-our
1 Direction indicator left (flash light) 1.5 mm2 yellow
2 Rear fog light 1.5 mm2 blue
3a) Ground for contacts no. 1 to 8 2.5 mm2 white
4 Direction indicator right (flash light) 1.5 mm2 green
5 Right-hand tail lights, outline marker lights, limiting lights and plate lightb)
1.5 mm2 brown
6 Brake lights 1.5 mm2 red
7 Left-hand tail lights, outline marker lights, limiting lights and plate lightb)
1.5 mm2 black
8 Reversing light 1.5 mm2 greyc)
9 Power supply (continuous positive) 2.5 mm2 brown/bluec)
10 The power supply is controlled via the ignition
2.5 mm2 brown/redc)
11a) Ground for circuit from contact no. 10
2.5 mm2 white/redc)
04/138
4 Trailer Features
Horse Trailer, Livestock Trailer
4.2 Towing Devices
The following towing devices are distin-guished:
– Standard drawbar (A),
– Height-adjustable drawbar (B),
– Drawbar for coach (C).
A Standard drawbar
This version is standard equipment.
B Height-adjustable drawbar
NOTE
See additional operating instructions and / or third-party documentation.
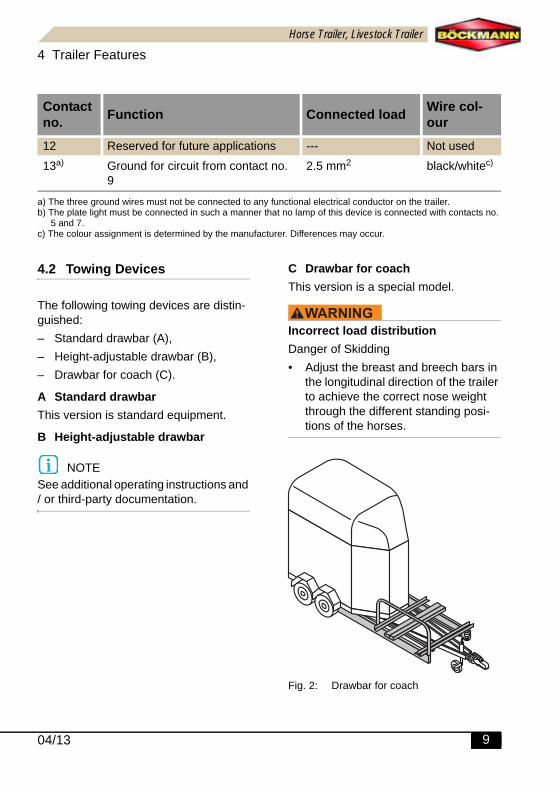
C Drawbar for coach
This version is a special model.
Incorrect load distribution
Danger of Skidding
• Adjust the breast and breech bars in the longitudinal direction of the trailer to achieve the correct nose weight through the different standing posi-tions of the horses.
Fig. 2: Drawbar for coach
12 Reserved for future applications --- Not used
13a) Ground for circuit from contact no. 9
2.5 mm2 black/whitec)
a) The three ground wires must not be connected to any functional electrical conductor on the trailer.b) The plate light must be connected in such a manner that no lamp of this device is connected with contacts no.
5 and 7.c) The colour assignment is determined by the manufacturer. Differences may occur.
Contact no.
Function Connected loadWire col-our
04/13 99
Trailer Features 4
Operating Instructions
NOTE
Coaches may only be transported on the drawbar if certain conditions are met (see "Safety").
4.3 Coupling
The following couplings are distin-guished:
– standard coupling version (A),
– anti-sway coupling (B) [accessory].
A Standard coupling version (also available lockable, A2)
Fig. 3: Standard coupling version A1
B Anti-sway coupling
NOTE
See additional operating instructions and / or third-party documentation.
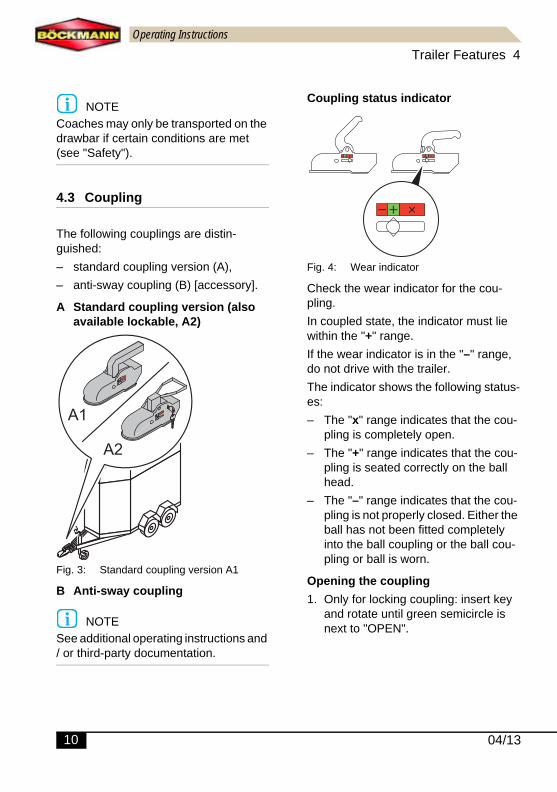
Coupling status indicator
Fig. 4: Wear indicator
Check the wear indicator for the cou-pling.
In coupled state, the indicator must lie within the "+" range.
If the wear indicator is in the "–" range, do not drive with the trailer.
The indicator shows the following status-es:
– The "x" range indicates that the cou-pling is completely open.
– The "+" range indicates that the cou-pling is seated correctly on the ball head.
– The "–" range indicates that the cou-pling is not properly closed. Either the ball has not been fitted completely into the ball coupling or the ball cou-pling or ball is worn.
Opening the coupling
1. Only for locking coupling: insert key and rotate until green semicircle is next to "OPEN".
A1
A2
04/1310
4 Trailer Features
Horse Trailer, Livestock Trailer
Fig. 5: Opened and closed coupling
2. Press and hold down the release but-ton on the safety catch.
3. Pull the handle forward.
Closing the coupling
1. Push the handle down.
2. Only for locking coupling: insert key and rotate until red semicircle is next to "OPEN".
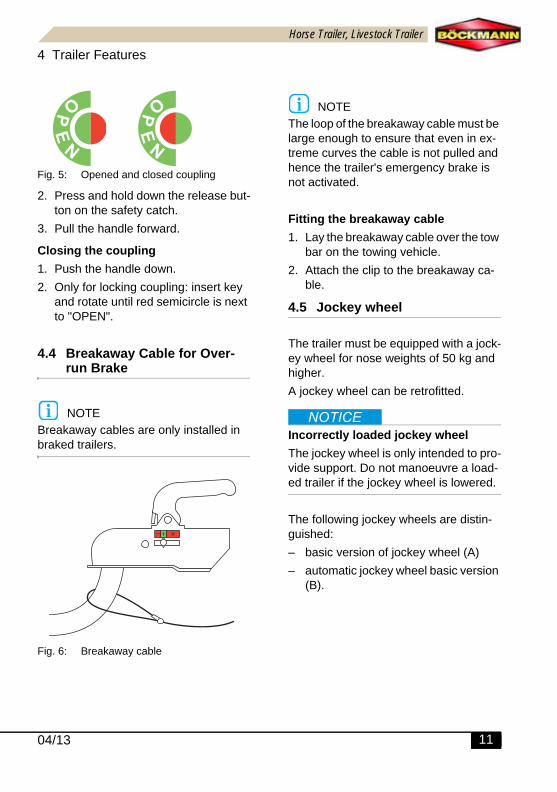
4.4 Breakaway Cable for Over-run Brake
NOTE
Breakaway cables are only installed in braked trailers.
Fig. 6: Breakaway cable
NOTE
The loop of the breakaway cable must be large enough to ensure that even in ex-treme curves the cable is not pulled and hence the trailer's emergency brake is not activated.
Fitting the breakaway cable
1. Lay the breakaway cable over the tow bar on the towing vehicle.
2. Attach the clip to the breakaway ca-ble.
4.5 Jockey wheel
The trailer must be equipped with a jock-ey wheel for nose weights of 50 kg and higher.
A jockey wheel can be retrofitted.
Incorrectly loaded jockey wheel
The jockey wheel is only intended to pro-vide support. Do not manoeuvre a load-ed trailer if the jockey wheel is lowered.
The following jockey wheels are distin-guished:
– basic version of jockey wheel (A)
– automatic jockey wheel basic version (B).
04/13 1111

Trailer Features 4
Operating Instructions
A Basic version of jockey wheel
Fig. 7: Basic version of jockey wheel
B Automatic jockey wheel basic ver-sion
Fig. 8: Automatic jockey wheel
Extending the jockey wheel
1. Only for the basic jockey wheel ver-sion: loosen the tommy screw and lower the jockey wheel.
2. Lower the jockey wheel using the hand crank.
Retracting the jockey wheel
1. Raise the jockey wheel as far as pos-sible using the hand crank.
2. Only for the basic jockey wheel ver-sion: slide the jockey wheel up as far as possible and tighten the tommy screw.
4.6 Parking brake and wheel chocks
NOTE
Parking brakes and wheel chocks can only be found on braked trailers.
The following parking brakes are distin-guished:
– parking brake with spring energy ac-cumulator (A)
– parking brake with button and toothed segment (B).
Sticking and frozen brake pads
Personal injury through delayed braking action
• The trailer should not be secured by means of the parking brake in frost conditions or when not in use for long periods.
04/1312

4 Trailer Features
Horse Trailer, Livestock Trailer
• Secure the trailer using wheel chocks.
Fig. 9: Positions of the wheel chocks
A Parking brake with spring energy accumulator
Fig. 10: Parking brake with spring energy ac-cumulator
Delayed braking action with the spring energy accumulator
Pinching of body parts, material damage
When the parking brake is applied, the trailer is secured against rolling. After ap-plying the parking brake, the trailer can still be moved backwards approx. 25 cm. Only then does the full braking effect come into play. The forwards braking ef-fect is immediately effective.
• Ensure that the full braking power is applied.
Applying the parking brake
• Pull the hand lever up until the brak-ing action is applied.
Releasing the parking brake
• Push the hand lever down.
B Parking brake with button and toothed segment
Fig. 11: Parking brake with button and toothed segment
04/13 1313

Trailer Features 4
Operating Instructions
Applying the parking brake
• Pull the hand lever up until the brak-ing action is applied.
Releasing the parking brake
• Pull the hand lever up a bit further while simultaneously pressing the button to enable the hand lever to be lowered towards the front.
4.7 Support leg
Fig. 12: Support leg
Incorrectly used support leg
Pinching of body parts, material damage
• Only use the support leg to stabilise the trailer when parked.
• Do not use as a car jack.
• The tyres must always be loaded.
Extending the support leg
1. Attach the hand crank to the support leg and crank until the leg is firmly touching the ground.
2. Detach the hand crank and store safely.
Retracting the support leg
1. Attach the hand crank to the support leg and crank until the leg is com-pletely retracted.
2. Detach the hand crank and store safely.
4.8 Rear Ramp Top Canvas Cover
Fig. 13: Canvas cover (roll-up)
• Ensure optimum ventilation in the trailer in transit.
• Close the canvas cover in wet or cold conditions to protect the horses from rain and draughts.
04/1314

4 Trailer Features
Horse Trailer, Livestock Trailer
4.9 Rear ramp/1-section door combination
NOTE
This version is a special model for horse trailers.
Horse trailers are each fitted with a com-bination door. This door can be used in two ways:
– ramp (A) and
– 1-section door (B).
A Ramp
Fig. 14: Ramp
This should be used to load and unload horses.
B 1-section door
Fig. 15: 1-section door
Fully unlocked rear ramp/1-section door
Death by crushing, pinching of body parts
• Never release all latches at the same time.
• Open either the lever for the rear ramp or the 1-section door.
Fig. 16: Incorrectly unlocked rear ramp/1-section door
04/13 1515

Trailer Features 4
Operating Instructions
• Make sure there are only ever two latches open at the same time.
4.10 Safety Stall Bar System
Fig. 17: Safety Stall Bar System
If horses panic they may step over the breast bar in the trailer with their front legs.
In such a case the breast bar can be re-leased from the outside:
• Unscrew the eye bolt on the outside.
The bracket is released on the inside and swings down along with the breast bar.
4.11 Breech bars
Fig. 18: Breech bars
• Secure the breech bars with the split pins prior to transport.
04/1316

5 Coupling
Horse Trailer, Livestock Trailer
5 Coupling
5.1 Nose Weight
The nose weight is defined as the weight on the towing device of the towing vehi-cle when a trailer is coupled.
• Ensure that:
– the nose weight is at least 4% of the actual laden weight of the trail-er. However, it need not be more than 25 kg.
– the maximum nose weight for the towing vehicle is not exceeded.
The nose weight specifications are locat-ed with the towing vehicle:
– on a label in the rear area,
– in field 13 of part I (vehicle registra-tion certificate) of the approval certifi-cate.
Danger of Skidding
Bodily injury or material damage
• Do not overload the trailer at the rear.
• The load at the front of the trailer should be slightly higher than at the rear.
5.2 Coupling
Coupling must be done in a safe and well-lit location.
The ground or support surface must be firm, strong and level.
Traffic must not be restricted. Drivers and other people must not be hindered or endangered.
Before hitching or unhitching secure the towing vehicle to prevent it rolling away.
5.2.1 Hitching the Trailer
1. Open the coupling completely.
2. Hitch the trailer.
3. Check that the coupling is firmly seat-ed.
The coupling's firm seating is indicat-ed by the coupling statuses. Green or a "+" symbol indicate that the cou-pling is firmly seated.
The colour red or a "-" symbol indi-cate that the coupling is not correctly engaged and secured. Coupling must be repeated.
Correct seating must also be checked by pulling forcefully on the coupling.
4. Plug the trailer connector into the socket of the towing vehicle.
5. Attach the breakaway cable.
6. Retract the jockey wheel.
04/13 1717
Coupling 5
Operating Instructions
5.2.2 Unhitching the Trailer
1. Pull up the parking brake to prevent the trailer rolling away.
2. Remove the breakaway cable from the tow bar of the towing vehicle.
3. Lower the jockey wheel to unload the coupling.
4. Pull the plug out of the socket.
5. Open the coupling.
6. Lift the coupling up off the tow bar of the towing vehicle.
5.3 Parking the Trailer
NOTE
For the trailer to be stable the ground or support surface should be firm, level and flat.
To park the trailer stably you must do the following (depending on the model):
– lower the jockey wheel after unhitch-ing,
– place the wheel chocks under the tyres,
– place the rear prop stands (if sup-plied) in position.
04/1318
6 Loading
Horse Trailer, Livestock Trailer
6 Loading
6.1 Loading and Unloading the Trailer
For loading and unloading, the trailer must be coupled to a towing vehicle.
The ground or support surface must be firm, strong and level. Loading must be done in a safe and well-lit location.
Traffic must not be restricted. Drivers and other people must not be hindered or endangered.
Additionally secure the trailer to prevent it rolling away:
1. Pull up the parking brake.
2. Place wheel chocks (if supplied) in front of the tyres.
6.2 Preparations
1. Completely mount all required attach-ment parts before loading the trailer. Install parts which divide the load area (e.g. mesh partitions and similar parts) such that the load can be posi-tioned in the middle near the axis.
2. Make sure all ramps, mesh partitions etc. are completely mounted and se-cured.
6.3 Weight Distribution
6.3.1 Correct Load Distribution
• The load must be uniformly distribut-ed and form-fitting.
• The weight must be concentrated at the axle(s).
• Load the cargo in such a way that the centre of gravity is as low as possible.
• The load must not protrude over the side wall.
• Loose parts must be secured to pre-vent them slipping (see "Securing the Load").
• The minimum and maximum nose weight specifications must be com-plied with (see "Coupling").
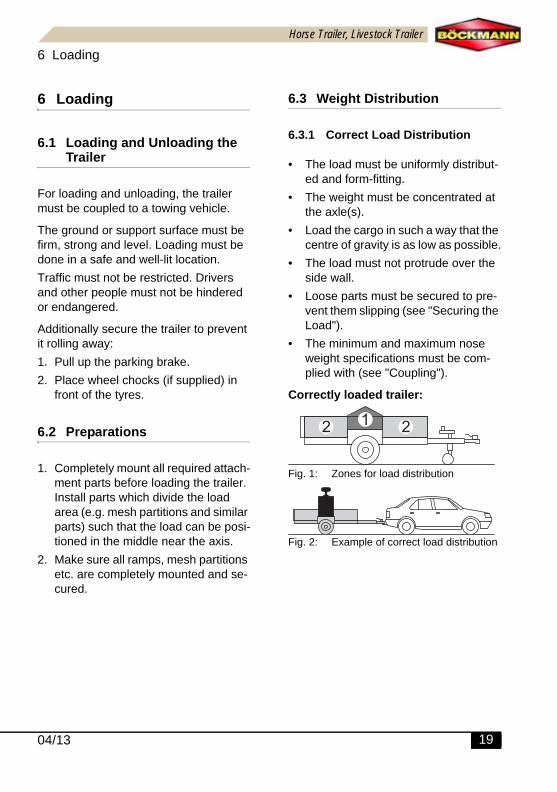
Correctly loaded trailer:
Fig. 1: Zones for load distribution
Fig. 2: Example of correct load distribution
12 2
04/13 1919

Loading 6
Operating Instructions
6.3.2 Incorrect Load Distribution
Incorrect load distribution
Material damage
• For measures for distributing the load correctly please see "Correct Load Distribution".
Incorrectly loaded trailer:
Fig. 3: Incorrect load distribution example A
In example A the weight of the load is not on the axle.
Fig. 4: Incorrect load distribution example B
In example B the load is concentrated at the front of the trailer, making the nose weight on the tow bar of the towing vehicle too high. The rear of the towing vehicle is pulled down.
Fig. 5: Incorrect load distribution example C
In example C the load is concentrated at the rear of the trailer, making the leverage force on the tow bar of the towing vehicle too high. The rear of the towing vehicle is pulled up. The nose weight is too low.
6.4 Securing Animals for Trans-port
Unsecured loose parts
Injury to animals
• There must not be any loose parts, straps or slings in the load area.
Draughts
Colds or conjunctivitis
• Before starting a journey close all doors and window openings.
• Secure the animals such that they will not be able to lose their balance or in-jure themselves even in extreme driv-ing situations (full braking, swerving or similar actions).
• Always tie large animals such as hors-es and cows on both sides.
• Close, lock and secure all ramps, doors and sliding windows.
• Completely fasten and secure safety bars, divider walls and mesh parti-tions.
Tip
Use bandages to protect horses from bumps and injuries.
04/1320
6 Loading
Horse Trailer, Livestock Trailer
6.5 Loading Animals Safely
NOTE
Please observe the following instructions for loading animals safely:
– Switch on the interior light and open the front jockey door to light up the in-terior of the trailer as much as possi-ble.
– Make sure the rear ramp is positioned firmly and stably.
– Adapt the safety breast bar to the height of the respective animal.
– Swing the partition to the side to ex-pand the horse area for anxious hors-es (see "Expanding the Load Area").
– The calmer the person leading the animal is, the more reassured the an-imal is.
– For livestock trailers install the mesh partitions such that the animals are positioned in the middle of the trailer.
6.5.1 Expanding the Load Area
Swivelling the partition
1. Lift the partition out of the recess at the rear and swing to the right (when in the driving direction).
2. Load the trailer.
3. Swing the partition back into its origi-nal position and secure.
NOTE
An additional partition floor bracket [ac-cessory] is required for driving with the partition in swung-out position.
BÖCKMANN recommends use of a full-width stall bar [accessory] for a swivelled partition.
Removing the partition
1. Swivel the partition at the rear to the left (when in the driving direction).
2. Lift the partition at the front out of the mount.
6.5.2 Loading the Horse
1. Open the rear ramp and lower com-pletely to the ground or support sur-face.
2. One person must be standing on the open side facing the trailer to steady the horse during loading.
3. Lead the horse on the rope straight and without hesitation on to the trail-er.
4. Attach the stall bar and secure with the split pin.
Stall bars with Multi Safe System (MSS) lock automatically after attach-ing.
5. Tie the rope to the tie ring at the front using a safety knot.
NOTE
BÖCKMANN recommends tying the horse on both sides.
04/13 2121

Loading 6
Operating Instructions
6. Close the rear ramp and secure both latches.
6.5.3 Unloading the Horse
1. Open the rear ramp from the side. The person involved must be stand-ing beside the trailer.
2. Untie the rope.
3. Release the stall bar and swing down.
4. One person must be standing on the open side facing the trailer to steady the horse during unloading.
5. Back the horse slowly straight out of the trailer.
6.5.4 Loading Livestock
1. Open the rear ramp and lower com-pletely to the ground or support sur-face.
2. One person must be standing on the open side facing the trailer to steady the livestock during loading.
3. Loading livestock:
A Large livestock
• Lead the animal on the rope straight and without hesitation on to the trailer.
• Close and latch the mesh partition of the rear ramp.
• Tie the rope to the tie ring at the front using a safety knot.
B Small livestock
• Drive the animals on to the trailer.
• For large herds separate the ani-mals into smaller groups using mesh partitions.
• Close and latch the mesh partition of the rear ramp.
4. Close and latch the rear ramp.
6.5.5 Unloading Livestock
1. Open the rear ramp and lower com-pletely to the ground or support sur-face.
2. Unloading livestock:
A Large livestock
• Untie the rope.
• Release and open the mesh parti-tion.
• One person must be standing on the open side facing the trailer to steady the animal during unload-ing.
• Back the animal slowly straight out of the trailer.
B Small livestock
• Open the inner mesh partitions (if used).
• One person must be standing on the open side facing the trailer to steady the animals during unload-ing.
• Release and open the mesh parti-tion to let the animals out of the trailer.
04/1322

7 Driving
Horse Trailer, Livestock Trailer
7 Driving
7.1 Pre-drive Checklist
Component Check
Windows and rear canvas cover
Adjusted according to weather conditions?
Tack room All objects secured against slipping?
Doors and ramps Closed and secured?
Animals Tied securely?
Partition Fully engaged?
Ball coupling Correctly engaged and secured?
Breakaway cable Positioned over tow bar of towing vehicle?
Parking brake Released?
Connector Firmly connected and secured?
Jockey wheel Fully raised and secured?
Wheel chocks Removed and stored safely?
Tyres Filled with the correct air pressure?
Support legs Raised and secured? Crank removed and stored safely?
Stall bars Attached and locked?
Lighting system Undamaged and working?
04/13 2323

Driving 7
Operating Instructions
7.2 Driving Precautions
Please read the following information carefully so that you are prepared for dif-ferent driving conditions.
7.2.1 General Driving Precautions
– The stability of the vehicle-trailer combination decreases with increas-ing speed. Adapt your speed to the given road and weather conditions to ensure that you can stop the vehicle and trailer without problems at any time.
– Slow down while driving a loaded trailer on an incline to ensure that you can stop the vehicle and trailer with-out problems at any time.
– Note that the turning radius of long trailers is unusually large.
– Note that long trailers follow the vehi-cle in a smaller radius when turning.
– If protruding or overhanging loads cover the lights you must attach an additional easily visible lighting unit.
– Trailer snaking may result if the tyre pressure is too low. Before making a trip check the air pressure in all tyres on the trailer. If necessary, adapt the tyre pressure to the weight of the load.
7.2.2 Tips for Driving in Rain, Frost and Snow
– Note that on icy and slippery roads the driving and braking characteris-
tics are poorer because the tyres have less traction.
– Before making a trip remove any wa-ter, snow or ice from the roof of the trailer to avoid endangering other drivers.
7.2.3 Tips for Driving in Side Wind
– Side wind can cause the trailer to snake or tip over.
Side wind gusts often occur suddenly and unexpectedly, e.g. on rough ter-rain or bridges, when you are chang-ing lanes or passing etc.
Slow down immediately if you notice a side wind.
7.2.4 Tips for Handling Snaking
– If the vehicle-trailer combination starts snaking carefully take your foot off the gas pedal and counter-steer gently. Do not speed up.
Do not make any hectic or abrupt steering motions.
04/1324
7 Driving
Horse Trailer, Livestock Trailer
7.3 Brakes
Non-functioning brake system
Bodily injury or material damage
A poorly functioning or non-functioning brake system cannot promptly stop the trailer.
• Before each journey a brake test must be carried out with the trailer.
• Brake early.
Braking distance too short
Bodily injury or material damage
The braking distance of the trailer in-creases with increasing load.
• Note that the ABS system of the tow-ing vehicle does not control the over-run mechanism of the trailer.
• The driver of the towing vehicle must initiate braking early.
NOTE
For trailers with overrun brakes full brak-ing may cause the overrun brake to block the wheels. brake the trailer first brake gently to avoid blocking the wheels. Then brake hard.
TIP
Inexperienced drivers should first prac-tise braking without horses on suitable terrain.
7.3.1 Checking the Brake System
The trailer's brake system must be checked regularly.
• Check whether:
– the guides, Bowden cables or yokes are damaged or corroded,
– other components are restricting the Bowden cables,
– the joints on the yokes and the rods are free-moving, but secure,
– the exteriors of the dust seals or gaskets are damaged.
• Ensure that any defects are repaired promptly.
NOTE
If the brake pads need to be replaced make sure the wheel bearings are also checked for wear and damage.
04/13 2525
Driving 7
Operating Instructions
7.4 Reversing
Blind spot
Running over people or objects
• Have an experienced person teach you how to reverse safely to ensure you will not endanger other drivers.
• Make sure no one is between the towing vehicle and the trailer while re-versing.
• Instructors must maintain a safe dis-tance to the trailer and must always be visible in the exterior mirrors when the trailer is being reversed.
7.5 Manoeuvring
NOTE
The trailer can be more easily manoeu-vred if the air pressure in the tyres is not too low. If the trailer is difficult to ma-noeuvre check the tyre pressure (see "Tyre inflation pressure" table).
04/1326

8 Cleaning, Maintenance and Inspection
Horse Trailer, Livestock Trailer
8 Cleaning, Maintenance and Inspection
Cleaning, maintenance and inspection of the trailer are essential for driving safety as well as retention of the value of your trailer and the validity of your warranty.
NOTE
Late or skipped inspections or mainte-nance and cleaning work may result in damage to the trailer and consequent in-jury. This also voids the warranty.
8.1 Care and Cleaning
You may carry out cleaning work your-self.
NOTE
All parts and surfaces must be checked for dirt and, if necessary, cleaned before and after use.
This especially applies to transport of an-imals to ensure the hygiene and safety of the animals. Also, long-term dirt accu-mulation significantly affects driving safety and value retention.
Salt and acids
Avoid contact with salt, acids and caustic agents. After driving in road salt condi-tions or after transporting fertilisers or other acid-containing substances imme-diately clean the trailer inside and out with water.
White rust
White rust forms on zinc surfaces which are corroded by prolonged wetness or exposed to chlorides such as those found in road salt. White rust is not a gal-vanisation quality defect. A thin surface layer of white rust does not damage the galvanised layer.
Brush off areas with heavy white rust for-mation using a nylon or wire brush and, if necessary, galvanise again.
Damage to galvanised layer
Immediately galvanise again with a standard commercial zinc spray.
Interiors of animal transporters
Animal urine and excrement can attack the floor, rear ramp and seals and lead to corrosion. Hence take appropriate hy-giene measures and thoroughly clean all dirty surfaces, seals between walls and the floor, anti-slip fittings, straps etc. after transport.
Rubber floor
The rubber floor is glued on and sealed around the edges along the side walls with a sealant. Protruding horseshoe nails and screwed-in or welded horse-shoe studs can damage the rubber floor. Check the sealant regularly for damage and renew if damaged. The rubber floor can be protected with a scuff mat [acces-sory].
Canvas covers
Canvases are easy-care products. Clean with soap and water.
04/13 2727
Cleaning, Maintenance and Inspection 8
Operating Instructions
Rear lights and lighting elements
Rear lights and lighting elements must always be intact, unobstructed and clean. Wash or clean regularly.
Rims, wheel guards and mudflaps
Clean regularly.
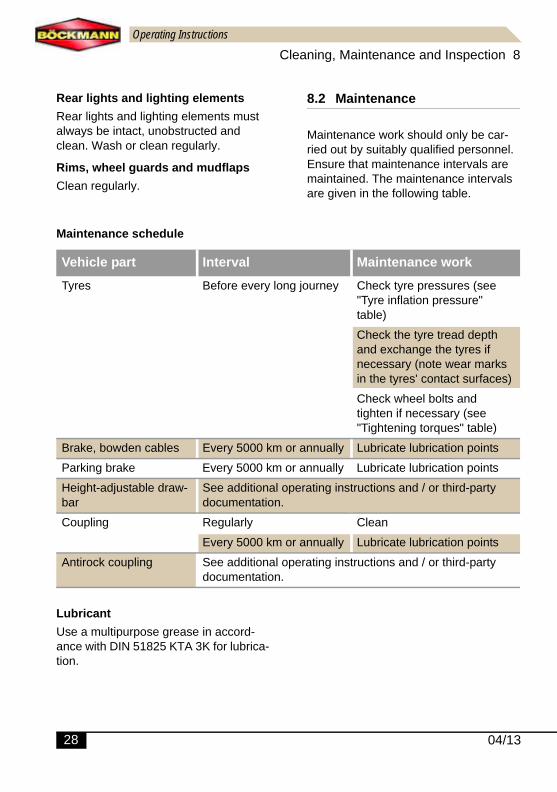
8.2 Maintenance
Maintenance work should only be car-ried out by suitably qualified personnel. Ensure that maintenance intervals are maintained. The maintenance intervals are given in the following table.
Maintenance schedule
Lubricant
Use a multipurpose grease in accord-ance with DIN 51825 KTA 3K for lubrica-tion.
Vehicle part Interval Maintenance work
Tyres Before every long journey Check tyre pressures (see "Tyre inflation pressure" table)
Check the tyre tread depth and exchange the tyres if necessary (note wear marks in the tyres' contact surfaces)
Check wheel bolts and tighten if necessary (see "Tightening torques" table)
Brake, bowden cables Every 5000 km or annually Lubricate lubrication points
Parking brake Every 5000 km or annually Lubricate lubrication points
Height-adjustable draw-bar
See additional operating instructions and / or third-party documentation.
Coupling Regularly Clean
Every 5000 km or annually Lubricate lubrication points
Antirock coupling See additional operating instructions and / or third-party documentation.
04/1328

8 Cleaning, Maintenance and Inspection
Horse Trailer, Livestock Trailer
8.3 Tyres and Changing Wheels
Incorrectly repaired tyres
Bodily injury or material damage
• Only trained and qualified personnel may repair the tyres.
• Do not repair tyres yourself.
8.3.1 Tread Depth
According to the German Road Traffic Li-censing Regulations (StVZO) the tread depth of the tyres must not be less than 1.6 mm.
8.3.2 Wheel Bearings
The wheel bearings are maintenance-free. In severe loading conditions the wheel bearings must be checked for play.
8.3.3 Changing Wheels
Rapidly lowering bed
Death by crushing, serious bodily injury
• Do not stand under the raised trailer.
Wheel changing must be done in a safe and well-lit location. Traffic must not be restricted. Drivers and other people must not be hindered or endangered.
The trailer must be secured with wheel chocks or similar aids to prevent it rolling away.
• After changing wheels tighten wheel nuts to the correct torque (see "Tight-ening torques" table).
8.3.4 Wheel Bolts
The tightness of the wheel bolts must be checked after the first 50 km. Also after a wheel change the wheel bolts must be checked after 50 km. The tightening tor-ques for the wheel bolts are given in the following table.
Tightening torques
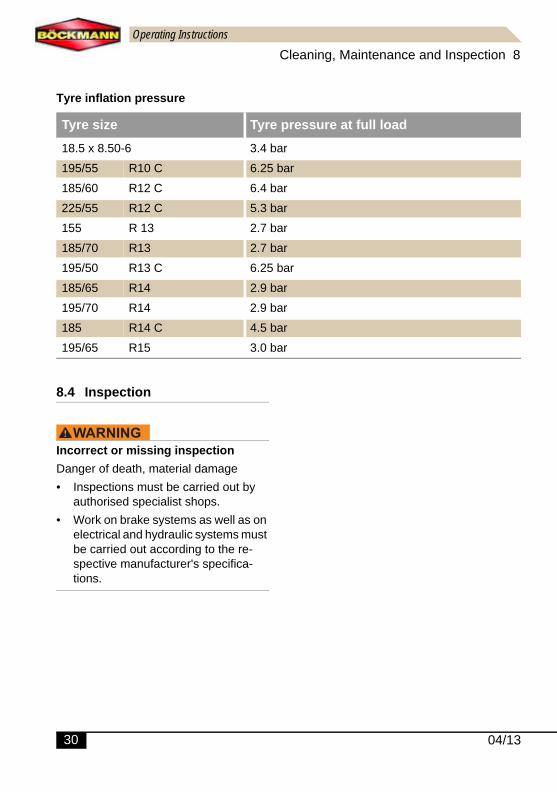
8.3.5 Tyre pressure
If the tyre pressure is too low or too high it will have a negative effect on the han-dling of the vehicle-trailer combination, the fuel consumption and the life of the tyres.
Regularly check the tyre pressure. The tyre inflation pressures are given in the following table.
Rim typeTightening torque
Steel 90 Nm to 100 Nm
Aluminium 110 Nm
04/13 2929
Cleaning, Maintenance and Inspection 8
Operating Instructions
Tyre inflation pressure
8.4 Inspection
Incorrect or missing inspection
Danger of death, material damage
• Inspections must be carried out by authorised specialist shops.
• Work on brake systems as well as on electrical and hydraulic systems must be carried out according to the re-spective manufacturer's specifica-tions.
Tyre size Tyre pressure at full load
18.5 x 8.50-6 3.4 bar
195/55 R10 C 6.25 bar
185/60 R12 C 6.4 bar
225/55 R12 C 5.3 bar
155 R 13 2.7 bar
185/70 R13 2.7 bar
195/50 R13 C 6.25 bar
185/65 R14 2.9 bar
195/70 R14 2.9 bar
185 R14 C 4.5 bar
195/65 R15 3.0 bar
04/1330
8 Cleaning, Maintenance and Inspection
Horse Trailer, Livestock Trailer
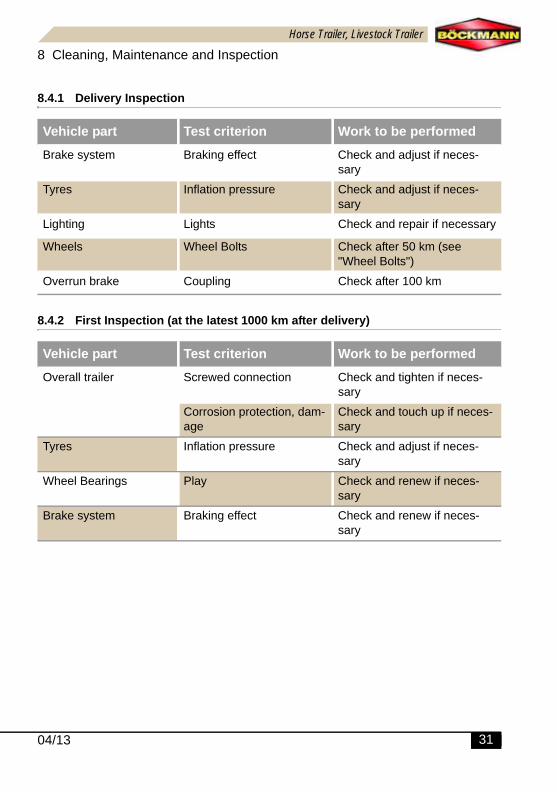
8.4.1 Delivery Inspection
8.4.2 First Inspection (at the latest 1000 km after delivery)
Vehicle part Test criterion Work to be performed
Brake system Braking effect Check and adjust if neces-sary
Tyres Inflation pressure Check and adjust if neces-sary
Lighting Lights Check and repair if necessary
Wheels Wheel Bolts Check after 50 km (see "Wheel Bolts")
Overrun brake Coupling Check after 100 km
Vehicle part Test criterion Work to be performed
Overall trailer Screwed connection Check and tighten if neces-sary
Corrosion protection, dam-age
Check and touch up if neces-sary
Tyres Inflation pressure Check and adjust if neces-sary
Wheel Bearings Play Check and renew if neces-sary
Brake system Braking effect Check and renew if neces-sary
04/13 3131

Cleaning, Maintenance and Inspection 8
Operating Instructions
8.4.3 Inspection Schedule
Vehicle part Test criterion Work to be performed
Brake system Brake pads Check and renew if necessary
Brake mechanism Check and repair if necessary
Friction points of the brake mechanism
Grease
Overrun mechanism Lubricate, check brake fluid
Brake Adjust
Wheel Bearings Seals check and replace bearing if nec-essary
Play check and replace bearing if nec-essary
Axle Damage Carry out visual inspection and repair if necessary
Mount Check and repair if necessary
Rims Damage Check and renew if necessary
Tyres Damage Check and renew if necessary
Excessive ageing Check and renew if necessary
Tread Check and renew if necessary
Run-out Check and balance if necessary
Inflation pressure Check and correct if necessary
Drawbar / overrun mechanism
Screwed connections Check and replace if necessary
Lighting Connectors, cables, lights Check and repair if necessary
Reflectors and rear lights Check and renew if necessary
Floor Damage Check and renew if necessary
Rubber floor Sealing Check and renew if necessary
Information signs Completeness and legibil-ity
Check and renew if necessary
Accessories Connections Check and repair/renew if neces-sary
04/1332

8 Cleaning, Maintenance and Inspection
Horse Trailer, Livestock Trailer
8.4.4 Inspection Verification
Stamp Date Signature
Delivery Inspection
1000 km inspection(max. ½ year after delivery)
5000 km inspection(max. ½ year after last inspection)
10,000 km inspection(max. ½ year after last inspection)
15,000 km inspection(max. ½ year after last inspection)
20,000 km inspection(max. ½ year after last inspection)
04/13 3333

Cleaning, Maintenance and Inspection 8
Operating Instructions
25,000 km inspection(max. ½ year after last inspection)
30,000 km inspection(max. ½ year after last inspection)
35,000 km inspection(max. ½ year after last inspection)
40,000 km inspection(max. ½ year after last inspection)
45,000 km inspection(max. ½ year after last inspection)
50,000 km inspection(max. ½ year after last inspection)
Stamp Date Signature
04/1334

8 Cleaning, Maintenance and Inspection
Horse Trailer, Livestock Trailer
55,000 km inspection(max. ½ year after last inspection)
60,000 km inspection(max. ½ year after last inspection)
65,000 km inspection(max. ½ year after last inspection)
70,000 km inspection(max. ½ year after last inspection)
75,000 km inspection(max. ½ year after last inspection)
80,000 km inspection(max. ½ year after last inspection)
Stamp Date Signature
04/13 3535

Cleaning, Maintenance and Inspection 8
Operating Instructions
85,000 km inspection(max. ½ year after last inspection)
90,000 km inspection(max. ½ year after last inspection)
95,000 km inspection(max. ½ year after last inspection)
100,000 km inspection(max. ½ year after last inspection)
Stamp Date Signature
04/1336

04/13
9 Troubleshooting
37
Horse Trailer, Livestock Trailer
37
9 Troubleshooting
Failure Possible cause Remedy
Lighting does not work Connector not properly inserted into socket of tow-ing vehicle
Insert the plug all the way into the socket of the towing vehi-cle. Twist the 13-pin connec-tor.
Lamp defective Replace lamp.
Cable defective Replace cable.
Connector defective Replace connector.
Side wall or rear ramp cannot be closed
Object blocking side wall or rear ramp
Open side wall or rear ramp, remove object and clean gap.
Side wall or rear ramp warped
Please contact your dealer or BÖCKMANN directly (see "Service").
Service 10
Operating Instructions
10 Service
10.1 Information on Quality
The following are not defects:
– Moisture, humidity
– Water ingress,
– Minor scratches
– Varying surface appearance.
Moisture, humidity
The trailer is not thermally insulated. Condensation may therefore form under tarpaulin covers or polyester and alumin-ium roofs.
Water ingress
Water may penetrate into the trailer through openings such as doors, ramps or windows.
NOTE
If your trailer is closed and parked for a long period make sure to ventilate the in-terior every now and again to prevent mildew from forming.
Minor scratches
In the manufacture of BÖCKMANN trail-ers care is taken to ensure that surfaces are not scratched. However, because the trailers are hand-built minor scratch-es can arise on the surfaces during as-sembly. These scratches do not affect the function or safety of the trailer and are not quality defects.
Polyester components
The polyester components are not 100% colour-fast; bleaching and/or colour changes may therefore occur. The indi-vidual components of a polyester con-struction may differ in colour and lustre. Fissures may also occur due to punctual strain on the components, e.g. hoof beats or sliding loads banging against the wall. Fissures are optical damages to the components. They do not affect the functioning or the safety of the vehicle.
10.1.1 Varying surface appearance
Wood surfaces
All wood surfaces used are coated with phenolic resin or plastic. Both phenolic resin and plastic react to changing weather conditions. The colours may fade.
Plywood walls and floors expand and contract minimally according to the rela-tive humidity and temperature of the sur-rounding air due to the natural properties of the material. This may cause warpage in wood parts. Wood grains and unevenness may appear on the surface.
Aluminium surfaces
Aluminium extrusions are anodised. The colours of individual extrusions may vary slightly. This colouring is a characteristic of the material and does not affect the use or safety of the trailer.
Rubber surfaces
Due to their material properties rubber surfaces may shrink slightly over time.
04/1338

10 Service
Horse Trailer, Livestock Trailer
Galvanised metal surfaces
Before galvanised metal surfaces can provide effective protection against cor-rosion they must oxide. This oxidation process may take some months. As long as the metal surface is still shiny silver the oxidation process is not yet complet-ed.
Galvanised parts are not resistant to cer-tain aggressive chemical substances such as acids. Galvanised metal surfac-es in contact with aggressive chemical substances (e.g. road salt in winter or fertiliser) must be rinsed thoroughly with clean water immediately after the jour-ney.
10.2 Ordering Spare Parts and Accessories
There are two methods for ordering spare parts or accessories for your trail-er:
– You can contact the BÖCKMANN dealer in your region. Please see "Our Dealers" on the website www.boeckmann.com to find out where your nearest dealer is.
– If there is no dealer in your area you can contact BÖCKMANN directly:
BÖCKMANN Fahrzeugwerke GmbH
Siehefeld 5
49688 LASTRUP
GERMANY
Tel: + 49 4472 895-210 or -680
Fax: +49 4472 895-470
Email: [email protected]
10.2.1 Reordering Keys
You can reorder keys for the following components:
– lockable coupling
– jockey door
– tack room door
– storage compartment door.
When ordering please specify the en-graved key number.
The number is engraved on the key and the lock.
XXXX
04/13 3939

Operating Instructions
04/13

Horse Trailer, Livestock Trailer
04/13

www.boeckmann.com
Böckmann Fahrzeugwerke GmbH
Siehefeld 5
49688 LASTRUP
GERMANY
Phone: + 49 4472 895-0
Fax: +49 4472 895-550
Email: [email protected]
Art. no.: 1084223
Recommended