FENCING INSTALLATION: EVOLVER 1EVOLVER ALUMINUM FRAMED COMPOSITE FENCING
INSTALLATION INSTRUCTIONS
2 FENCING INSTALLATION: EVOLVER
TABLE OF CONTENTS
English Introduction.........................................................................3 FenceLayout........................................................................5 PostInstallation....................................................................7 NotEmbedded.........................................................7 Embedded................................................................9 Rail&FenceBoardInstallation..........................................11 45oDegreeConverterInstallation......................................14 Care&Maintenance..........................................................16 Warranty............................................................................17
AboutCaliforniaProposition65:https://fortressbp.com/about/californiaproposition65

FENCING INSTALLATION: EVOLVER 3
INTRODUCTION
READ INSTRUCTIONS COMPLETELY BEFORE STARTING INSTALLATION It is the responsibility of the installer to meet all code and safety requirements, and to obtain all required building permits.Thefenceinstallershoulddetermineand implementappropriateinstallationtechniquesforeach installationsituation.FortressBuildingProductsandits distributors shall not be held liable for improper or unsafeinstallations.
Before You Begin Contact your local Building Code Department for required permitsandlawsregardingyourfenceproject. Ifapplicable,alsocontactyourHomeOwnersAssociation forrulesandregulationsregardingfenceinstallationsin yourneighborhood. Call811beforeyoudigpostholestolocateandidentify anyburiedutilities.
Components
Locking Clip
Side Rail Support
Fastener Post Slide Cover
TopRailPost BottomRail
Intermediate Rail
45o Converter 70-7/8”
[1800mm]
Post BasePost CapFence Board 70-1/2”
[1791mm]

4 FENCING INSTALLATION: EVOLVER
Customizable Panel Styles
Privacy
Semi-Privacy Reinforced Decorative
Standard Panel Style
Portal
Required Tools
Goggles
Drill
TapeMeasurer
LevelTool
Speed Square
Spray Paint
Miter or Circular Saw
#2PhillipsHead Bit
Bit Extender
Socket Set
Pencil
Rubber Mallet
Safety Gloves
StringGround Stakes
Post Hole Digger
Spade Shovel
Concrete/Gravel
Wheelbarrow
Pliers
DrillBits:1/16”[2mm]
Hand saw

FENCING INSTALLATION: EVOLVER 5
FENCE LAYOUT
Step 1: Sketch Layout of Fence Perimeter 1. Identifythepropertylineanddeterminetheperimeterof
yourfenceproject. 2. Using a tape measure, determine the length of each fencerun. 3. EvolverFenceiseasiesttoinstallwhenstartingfroma corner.Ifnogatesareused,onlyoneboardineachline
shouldneedtobecut. 4. Usethegraphonpage6tosketchoutyourfenceproject.
Fig.1
Corner Post
Corner Post
LinePost
TOP VIEW
HOUSE End Post

6 FENCING INSTALLATION: EVOLVER
FENCING INSTALLATION: EVOLVER 7
POST INSTALLATION: NOT EMBEDDED (EXISTING FOUNDATION)
Required Components: • Post Base (Not Embedded) • Post • Fastener Note: • Components can ONLY be purchased separately, not as
partofafullkit.
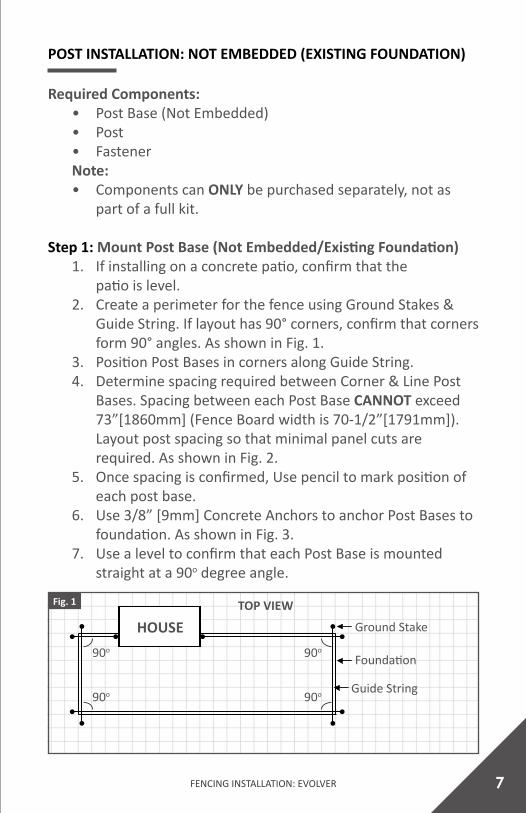
Step 1: MountPostBase(NotEmbedded/ExistingFoundation) 1. Ifinstallingonaconcretepatio,confirmthatthe patioislevel. 2. CreateaperimeterforthefenceusingGroundStakes& GuideString.Iflayouthas90°corners,confirmthatcorners form90°angles.AsshowninFig.1. 3. PositionPostBasesincornersalongGuide String. 4. DeterminespacingrequiredbetweenCorner&LinePost
Bases.Spacing between each Post Base CANNOT exceed 73”[1860mm](FenceBoardwidthis70-1/2”[1791mm]). Layout post spacing so that minimal panel cuts are required.AsshowninFig.2. 5. Oncespacingisconfirmed,Usepenciltomarkpositionof
eachpostbase. 6. Use3/8”[9mm]ConcreteAnchorstoanchorPostBasesto
foundation.AsshowninFig.3. 7. UsealeveltoconfirmthateachPostBaseismounted
straightata90odegreeangle.
Fig.1
90o
90o
90o
90o
HOUSE Ground Stake
Foundation
Guide String
TOP VIEW
8 FENCING INSTALLATION: EVOLVER
sewerage lines, that may run across them. You may wish to check that you are not digging into them.
STEP 2.1 Slide your post over the mount.
STEP 2.2. Use a screw to fasten your post to your mount.
Installation Guide - 2017 4
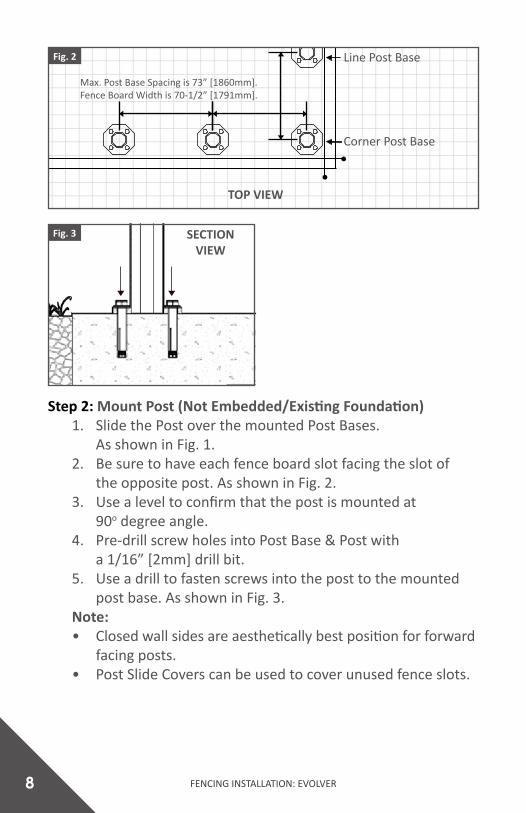
Fig.2
Fig.3 SECTIONVIEW
TOP VIEW
Line Post Base
Corner Post Base
Step2:Mount Post (NotEmbedded/ExistingFoundation) 1. SlidethePostoverthemountedPostBases. AsshowninFig.1. 2. Be sure to have each fence board slot facing the slot of
theoppositepost.AsshowninFig.2. 3. Usealeveltoconfirmthatthepostismountedat 90odegreeangle. 4. Pre-drillscrewholesintoPostBase&Postwith a1/16”[2mm]drillbit. 5. Useadrilltofastenscrews into the post to the mounted
postbase.AsshowninFig.3. Note: • Closedwallsidesareaestheticallybestpositionforforward
facingposts. • PostSlideCoverscanbeusedtocoverunusedfenceslots.
Max.Post Base Spacing is 73”[1860mm].Fence Board Width is 70-1/2”[1791mm].
FENCING INSTALLATION: EVOLVER 9
When slotting the post over the post mount. Make certain that your rail slots are facing in the correct direction for your fence boards.
Installation Guide - 2017 5
When slotting the post over the post mount. Make certain that your rail slots are facing in the correct direction for your fence boards.
Installation Guide - 2017 5
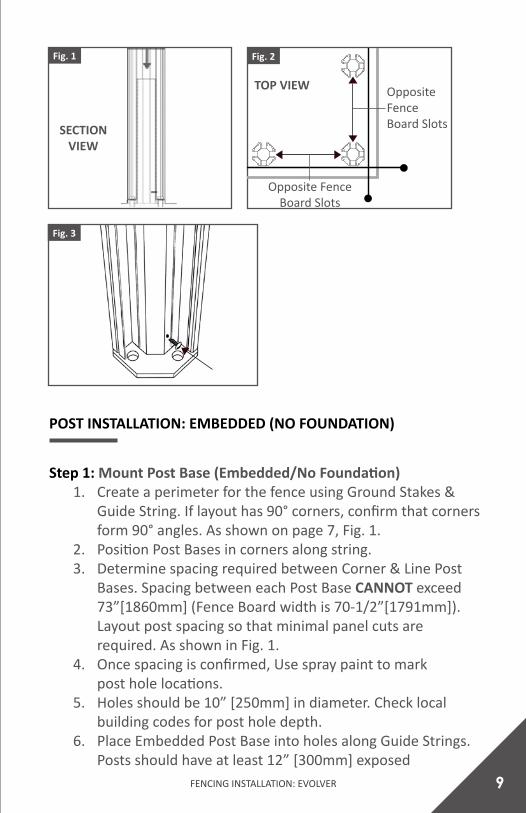
Fig.1 Fig.2
Fig.3
Opposite Fence Board Slots
Opposite Fence Board Slots
TOP VIEW
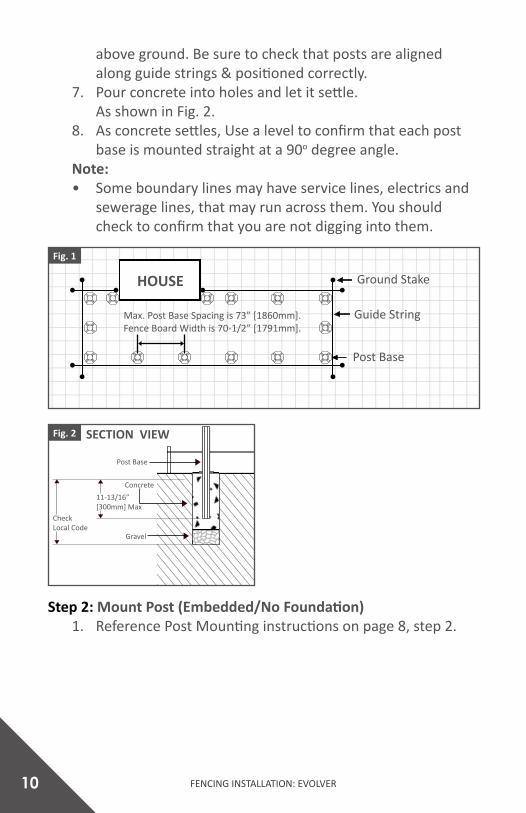
Step 1: Mount Post Base (Embedded/NoFoundation) 1. Create a perimeter for the fence using Ground Stakes & GuideString.Iflayouthas90°corners,confirmthatcorners form90°angles.Asshownonpage7,Fig.1. 2. PositionPostBasesincornersalongstring. 3. Determine spacing required between Corner & Line Post
Bases.Spacing between each Post Base CANNOT exceed 73”[1860mm](FenceBoardwidthis70-1/2”[1791mm]). Layout post spacing so that minimal panel cuts are required. AsshowninFig.1. 4. Oncespacingisconfirmed,Usespraypainttomark postholelocations. 5. Holesshouldbe10”[250mm]indiameter.Checklocal
buildingcodesforpostholedepth. 6. PlaceEmbeddedPostBaseintoholesalongGuideStrings.
Postsshouldhaveatleast12”[300mm]exposed
POST INSTALLATION: EMBEDDED (NO FOUNDATION)
SECTIONVIEW
10 FENCING INSTALLATION: EVOLVER
Fig.2
Gravel
Concrete
Post Base
SECTION VIEW
11-13/16”[300mm]Max
Check Local Code
aboveground.Besuretocheckthatpostsarealigned alongguidestrings&positionedcorrectly.
7. Pourconcreteintoholesandletitsettle. AsshowninFig.2. 8. Asconcretesettles,Usealeveltoconfirmthateachpost
baseismountedstraightata90odegreeangle. Note: • Some boundary lines may have service lines, electrics and
seweragelines,thatmayrunacrossthem.Youshould checktoconfirmthatyouarenotdiggingintothem.
Fig.1
Max.Post Base Spacing is 73”[1860mm].Fence Board Width is 70-1/2”[1791mm].
Ground Stake
Guide String
Post Base
Step2:Mount Post (Embedded/NoFoundation) 1. ReferencePostMountinginstructionsonpage8,step2.
HOUSE
FENCING INSTALLATION: EVOLVER 11
STEP 3. Slide rail supports into place.
Rail supports are supplied in several lengths, that can be cut to size to accommodate the changing levels in your terrain, and can even be stacked on top of each other. No other fastening is needed for these, as the weight of the boards will hold them in place
Installation Guide - 2017 6
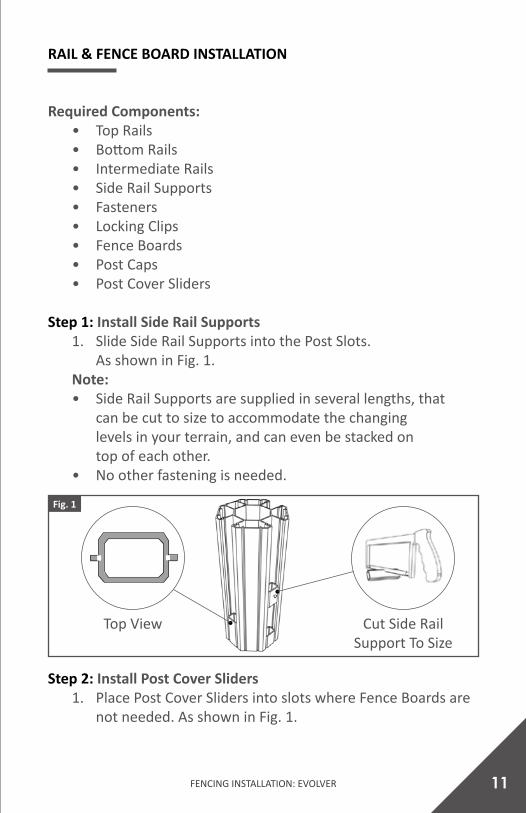
RAIL & FENCE BOARD INSTALLATION
Required Components: • TopRails • BottomRails • Intermediate Rails • Side Rail Supports • Fasteners • Locking Clips • Fence Boards • Post Caps • Post Cover Sliders
Step 1: Install Side Rail Supports 1. SlideSideRailSupportsintothePostSlots. AsshowninFig.1. Note: • Side Rail Supports are supplied in several lengths, that
can be cut to size to accommodate the changing levels in your terrain, and can even be stacked on topofeachother.
• Nootherfasteningisneeded.
Fig.1
Step2:Install Post Cover Sliders 1. PlacePostCoverSliders into slots where Fence Boards are
notneeded.AsshowninFig.1.
Cut Side Rail SupportToSize
TopView
12 FENCING INSTALLATION: EVOLVER
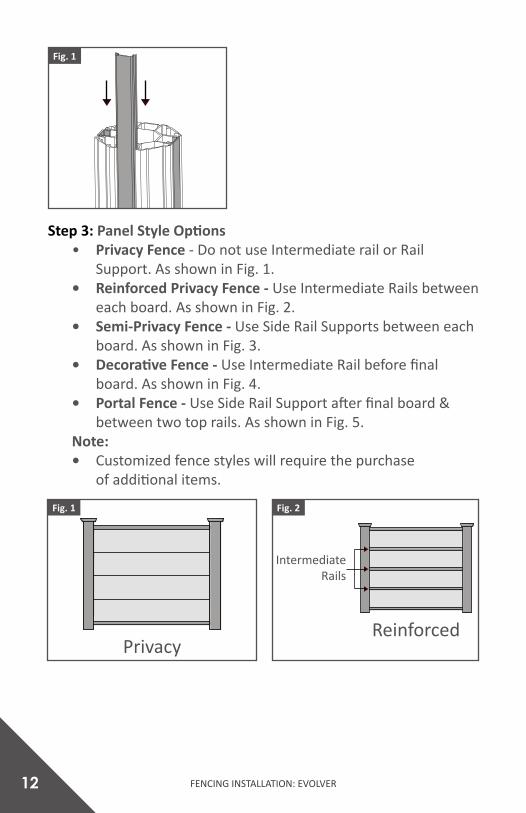
Step3:PanelStyleOptions • Privacy Fence-DonotuseIntermediaterailorRail Support.AsshowninFig.1. • Reinforced Privacy Fence - Use Intermediate Rails between eachboard.AsshowninFig.2. • Semi-Privacy Fence - Use Side Rail Supports between each board.AsshowninFig.3. • DecorativeFence-UseIntermediateRailbeforefinal
board.AsshowninFig.4. • Portal Fence - UseSideRailSupportafterfinalboard&
betweentwotoprails.AsshowninFig.5. Note: • Customized fence styles will require the purchase
ofadditionalitems.
Fig.1
Fig.1 Fig.2
ReinforcedPrivacy
IntermediateRails

FENCING INSTALLATION: EVOLVER 13
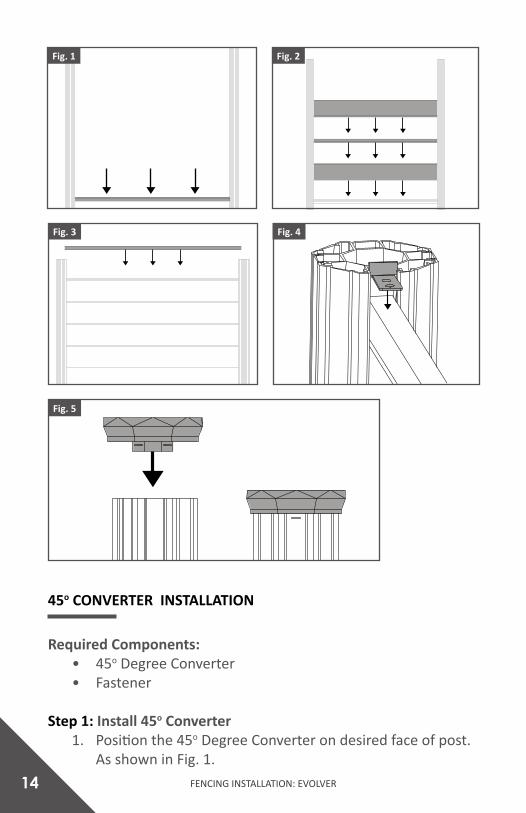
Step 4: Install Rail & Fence Board 1. SlideBottomRailinto the Post Slots.AsshowninFig.1. 2. SlideFenceBoardsand/orIntermediateRailoneafterthe
other.AsshowninFig.2. 3. SlidedownTopRail.AsshowninFig.3. 4. SlideLockingClipintoplacewithsuppliedscrewsand fasten.AsshowninFig.4. 5. SlidePostCapintoplace.AsshowninFig.5. Note: • Rubber Mallet can be used to seat Fence Boards, Top/Bottom/Intermediate Rails & gently knock Post Caps
downintoplacedown,ifnecessary.
Fig.3 Fig.4
Fig.5
Semi-Privacy Decorative
Portal
Spaces Created
With Side Rail Supports
IntermediateRail
Space Created
With Side Rail Support
14 FENCING INSTALLATION: EVOLVER
45o CONVERTER INSTALLATION
Required Components: • 45o Degree Converter • Fastener
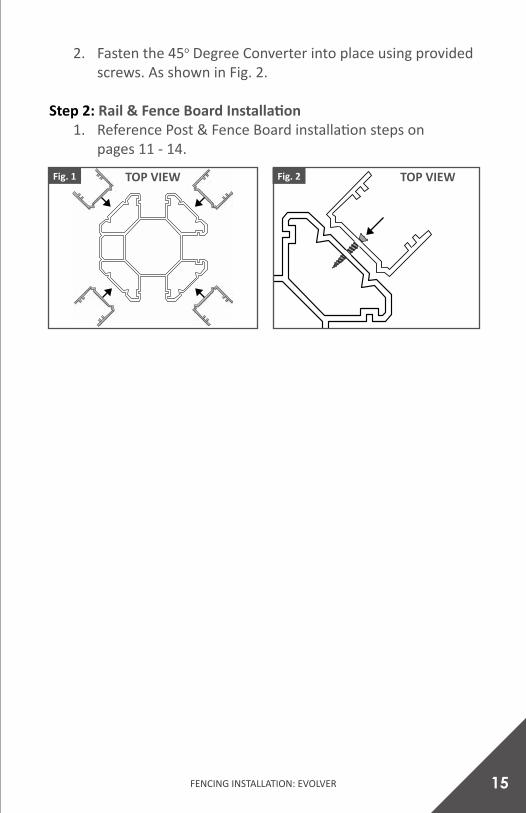
Step 1: Install45o Converter 1. Positionthe45oDegreeConverterondesiredfaceofpost.
AsshowninFig.1.
Fig.3 Fig.4
Fig.5
Fig.1 Fig.2
FENCING INSTALLATION: EVOLVER 15
Fig.1 Fig.2TOP VIEW TOP VIEW
2. Fasten the45o Degree Converter into place using provided screws.AsshowninFig.2.
Step2:Rail&FenceBoardInstallation 1. ReferencePost&FenceBoardinstallationstepson pages11-14.
16 FENCING INSTALLATION: EVOLVER
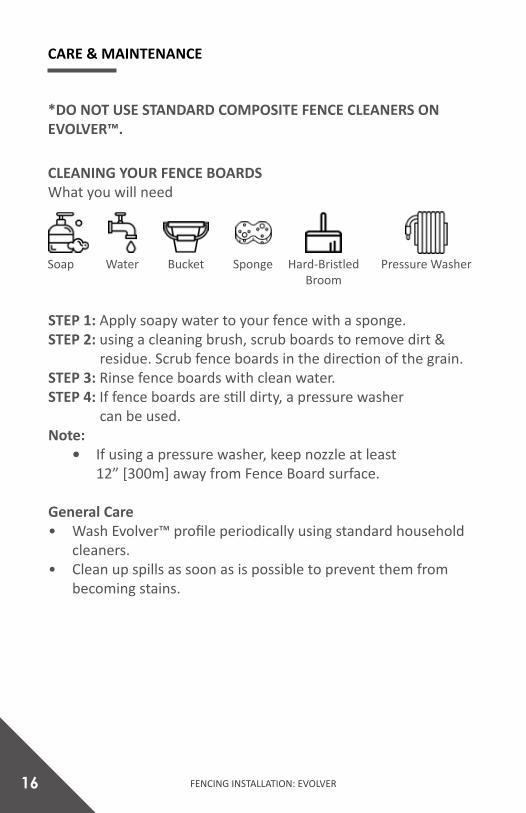
CARE & MAINTENANCE
CLEANING YOUR FENCE BOARDSWhat you will need
Soap Water Bucket Sponge Pressure WasherHard-BristledBroom
STEP 1:Applysoapywatertoyourfencewithasponge.STEP2: using a cleaning brush, scrub boards to remove dirt & residue.Scrubfenceboardsinthedirectionofthegrain.STEP3:Rinsefenceboardswithcleanwater.STEP 4:Iffenceboardsarestilldirty,apressurewasher canbeused.Note: • If using a pressure washer, keep nozzle at least 12”[300m]awayfromFenceBoardsurface.
General Care • Wash Evolver™profileperiodicallyusingstandardhousehold
cleaners.• Clean up spills as soon as is possible to prevent them from
becomingstains.
*DO NOT USE STANDARD COMPOSITE FENCE CLEANERS ON EVOLVER™.

FENCING INSTALLATION: EVOLVER 17
WARRANTY
FortressBuildingProducts(“Fortress”)warrantstotheoriginalresidentialpurchaser(“Purchaser”,“you”or“your”)that,foraperiodoftwentyfive(25)yearsfromthedateoforiginalpurchase,undernormalresidentialuseandserviceconditions,EvolverCompositeFencing(“Evolver®”)shallbefreefrommaterialdefectsin workmanship and materials, and shall not split, splinter, rot, or sufferstructuraldamageresultingfromtermitesorfungaldecay.
Forpurposesofthiswarranty,a“residentialpurchaser”referstoanindividualresidentialhomeowner.
ThiswarrantydoesnotcovercostsincurredwithremovalofdefectiveEvolver®productsortheinstallationofreplacementmaterials,includingbutnotlimitedtolaborandfreight.
Fortress does not warrant against and is not responsible for any conditionattributableto:(1)improperinstallationofEvolver®and/orfailuretoabidebyFortressinstallationguidelines,includingbutnotlimitedtoimpropergapping;(2)useofEvolver® beyond normalandproperuse,orinanapplicationnotrecommendedbyFortressguidelinesandlocalbuildingcodes;(3)movement,distortion,collapseorsettlingofthegroundorthesupportingstructure on which Evolver® is installed; (4) any act of God (such as flooding,hurricane,earthquake,lightning,etc.),environmentalcondition(suchasairpollution,mold,mildew,etc.),stainingfromforeignsubstances(suchasdirt,grease,oil,etc.),ornormalweathering(exposuretosunlight,weatherandatmosphere which will cause any colored surface to gradually fade,chalk,oraccumulatedirtorstains);(5)improperhandling,storage, abuse or neglect by Purchaser, the transferee or third parties;or(6)ordinarywearandtear.
TheoriginalresidentialpurchasermustcontactFortressBuildingProductscustomerservicedirectlyviaphoneat(866)323-4766or

18 FENCING INSTALLATION: EVOLVER
[email protected] claimformsandofficialclaimprocess.ORIGINALPROOFOFPURCHASEMUSTACCOMPANYALLWARRANTYCLAIMS.TheoriginalresidentialpurchaserwillbenotifiedbyFortressastowhetherthewarrantyclaimisapprovedordenied.
ConditionsAndExclusionsOfThisWarranty
THISWARRANTYMUSTBEREGISTEREDWITHIN30DAYSOFINSTALLATIONWITHFORTRESSBUILDINGPRODUCTS.
THISWARRANTYISNOTTRANSFERABLE.THEAMOUNTOFYOURRESTITUTIONWILLNOTINCLUDELABORTOREMOVEEXISTINGCOMPONENTSORINSTALLTHEREPLACEMENTCOMPONENTS,SHIPPINGCHARGES,SALESTAXORANYOTHERCHARGES,NORISFORTRESSFENCEPRODUCTSREQUIREDTOPROVIDESUCHLABORORSERVICE.
THISLIMITEDWARRANTYISINLIEUOFALLOTHEREXPRESSWARRANTIES.FORTRESSFENCEPRODUCTSMAKESNOOTHEREXPRESSWARRANTIESANDDOESNOTAUTHORIZEANYOTHERPERSONORAGENTTOMAKEANYOTHEREXPRESSWARRANTIES.FORTRESSBUILDINGPRODUCTSNEITHERASSUMESNORAUTHORIZESANYOTHERLIABILITYOROBLIGATIONINWARRANTY,INCLUDINGWITHOUTLIMITATION,THEIMPLIEDWARRANTIESOFMERCHANTABILITYANDFITNESSFORAPARTICULARPURPOSEWITHRESPECTTOTHISPRODUCT,ISLIMITEDINDURATIONTOTHETWENTY(20)YEARTERMOFTHISLIMITEDWARRANTY.INNOEVENTSHALLFORTRESSFENCEPRODUCTSBELIABLEFORANYCONSEQUENTIAL,SPECIAL,ORINCIDENTALDAMAGESARISINGOUTOFORCONNECTEDWITHTHEPURCHASEORUSEOFTHISPRODUCTORFORANYBREACHOFWARRANTY.
MAYHAVEOTHERRIGHTSTHATVARYFROMSTATETOSTATE.THISWARRANTYISAPPLICABLEONLYTOSYSTEMSINSTALLEDWITHINTHECONTINENTALUNITEDSTATESANDCANADA.
FENCING INSTALLATION: EVOLVER 19
ThisAgreementshallbegovernedbyandconstruedinaccordancewiththelawsoftheStateofTexas,withoutregardtoitsconflictoflaws.AnylegalactionarisingoutofthisAgreementshallbelitigatedandenforcedunderthelawsoftheStateofTexas.Inaddition,youagreetosubmittothejurisdictionofthecourtsoftheStateofTexas,andthatanylegalactionpursuedbyyoushallbewithintheexclusivejurisdictionofthecourtsintheStateofTexas,U.S.A.
SOMESTATESDONOTALLOWLIMITATIONSONHOWLONGANIMPLIEDWARRANTYLASTS,ORTHEEXCLUSIONORLIMITATIONOFINCIDENTALORCONSEQUENTIALDAMAGES,SOTHEABOVELIMITATIONSOREXCLUSIONMAYNOTAPPLYTOYOU.THISWARRANTYGIVESYOUSPECIFICLEGALRIGHTS,ANDYOUMAYHAVEOTHERRIGHTSTHATVARYFROMSTATETOSTATE.THISWARRANTYISAPPLICABLEONLYTOSYSTEMSINSTALLEDWITHINTHECONTINENTALUNITEDSTATESANDCANADA.

20 FENCING INSTALLATION: EVOLVER
JOIN THE REVOLUTION.FortressBP.com | 866.323.4766
Unless otherwise noted, all proprietary names are trademarks of Fortress Iron, LP. All rights reserved.
08/2020
© 2020 Fortress Building Products.
Recommended