Version: May 2011
Grading
structural
softwoods
Learner
Guide
Supporting:
FPICOT2216A:
Visually stress
grade softwood


Developed by Workspace Training – adapted from the ‘Timber Plus Toolbox’ e-learning resource
Acknowledgements, copyright and disclaimer
Acknowledgements
This learner guide was developed by McElvenny Ware Pty Ltd, trading as Workspace
Training. It is a print-based adaptation of the Grading structural softwoods e-learning unit
developed by McElvenny Ware for the Australian Flexible Learning Framework in 2010.
The Grading structural softwood e-learning unit is available in two formats:
as a free ‘learning object’ download from the Flexible Learning Toolbox Repository at:
http://toolboxes.flexiblelearning.net.au/repository/index.htm
as part of the Timber Plus Toolbox, a website resource covering nine units from the
Forest and Forest Products Training Package (FPI05), available for purchase on a CD
through Australian Training Products at: http://www.atpl.net.au/
For more information about the Timber Plus Toolbox, and other e-learning resources
developed by McElvenny Ware, go to the Workspace Training website at:
http://www.workspacetraining.com.au/
Copyright
The Timber Plus Toolbox was produced on behalf of the national training system and funded
under the 2010 Australian Flexible Learning Framework, administered by the department of
Education, Employment and Workspace Relations. Copyright is owned by the
Commonwealth of Australia.
The views expressed in the Timber Plus Toolbox do not necessarily represent the views of the
Commonwealth of Australia. The work is copyright and licensed under the AEShareNet
Share and Return Licence (AEShareNetS Licence).
Conditions for the licence can be found at: http://www.aesharenet.com.au/S4/.
Disclaimer
The content of this learner guide is provided for educational purposes only. No claim is made
as to the accuracy or authenticity of the content.
The Commonwealth, through the Department of Education, Employment & Workplace
Relations, does not accept any liability to any person for the information or advice (or the use
of such information or advice) which is provided in this material or incorporated into it by
reference. The information is provided on the basis that all persons accessing this material
undertake responsibility for assessing the relevance and accuracy of its content. No liability is
accepted for any information or services which may appear in any other format. No
responsibility is taken for any information or services which may appear on any linked
websites.

Developed by Workspace Training – adapted from the ‘Timber Plus Toolbox’ e-learning resource

Developed by Workspace Training – adapted from the ‘Timber Plus Toolbox’ e-learning resource
Table of contents
Introduction ..........................................................................................................................1
Section 1: Principles of stress grading .................................................................................2
Your job .............................................................................................................................2
Types of stresses .................................................................................................................3
Strength groups...................................................................................................................6
Structural grades and stress grades ......................................................................................8
F grading with a machine .................................................................................................. 12
MGP grading with a machine............................................................................................ 14
Visual over-rides for MSG softwoods ............................................................................... 16
Task for Section 1: Principles of stress grading ................................................................. 19
Section 2: Assessing characteristics ................................................................................... 20
Your job ........................................................................................................................... 20
Looking at the piece ......................................................................................................... 22
Knots ................................................................................................................................ 24
Resin, bark and overgrowths ............................................................................................. 30
Slope of grain ................................................................................................................... 32
Other characteristics ......................................................................................................... 34
Combinations of characteristics ........................................................................................ 38
Task for Section 2: Assessing characteristics .................................................................... 41

Developed by Workspace Training – adapted from the ‘Timber Plus Toolbox’ e-learning resource

Grading structural softwoods - Learner guide 1
Developed by Workspace Training – adapted from the ‘Timber Plus Toolbox’ e-learning resource
This house uses radiata pine wall frames and roof trusses. All of the pieces that perform a structural function have been stress graded in the sawmill – either visually or mechanically.
Stress grading allows the builder and home owner to have confidence in the structural integrity of the building.
Introduction
When timber is used in a structure, it needs have
reliable strength properties. The strength of a
structural member is what allows it to withstand
the stresses that act on it. These stresses come
from things like wind gusts that blow from
different directions, people or heavy objects
inside, and of course, the dead weight of the
structure itself.
Stress grading is all about taking into account the
things that affect the strength of a piece of timber,
and then giving it a grade that matches its ability
to withstand stresses.
When the grading is done by a person who
physically looks for the strength-reducing
characteristics, it’s called visual stress grading.
When it is done by a machine, it’s called
mechanical stress grading.
In this unit, we’ll be concentrating on the
background knowledge needed to visually stress
grade softwoods, although we will also briefly
look at the principles of mechanical stress grading.
Background knowledge you should already have
Visual stress grading is very much a practical application of wood technology concepts. It
will be very helpful for you to complete the Learner Guide Selecting timber before
undertaking this grading unit, so that you have a good understanding of how certain growth
characteristics in trees affect the properties of wood.
You should also get a copy of the Australian Standard covering the visual stress grading of
softwood. This is called: AS 2858-2008: Timber – Softwood – Visually stress graded for
structural purposes. Each time the Standard is revised, the year is updated – so you can see
that the last update was made in 2008. If your company doesn’t have a copy that you can have
to study, you can buy your own copy via the SAI Global website, at:
http://www.saiglobal.com/

Grading structural softwoods - Learner guide 2
Developed by Workspace Training – adapted from the ‘Timber Plus Toolbox’ e-learning resource
Section 1: Principles of stress grading
Your job
Stress grading involves assessing the characteristics
in a piece of timber that have an effect on its
strength, and deciding on a grade that reflects its
ability to withstand particular stresses.
In this section, we’ll examine the types of stresses
timber is subjected to in a structure, and then discuss
the general principles of stress grading. Although the
main focus of this unit is on visual assessment using
AS 2858, there are a range of ‘visual over-rides’ that
apply to timber that has been graded by a machine.
So we’ll briefly look at the process of mechanical
stress grading as well.
Note that the visual over-rides used for mechanically
stress graded timber aren’t actually part of AS 2858,
so if you’re involved in this aspect of softwood
grading, you will need to consult another Australian
Standard: AS/NZS1748:2006 – Timber –
Mechanically stress-graded for structural purposes.
Here's your job
1. Have a look at the Task for this section to preview the questions
you'll need to answer at the end.
2. Work through each of the lessons for more detailed information
on the concepts covered, and complete the learning activity at
the end of each topic.
3. Complete the Task.
This timber grader is working on-line in a softwood mill. He is using a crayon to mark the points where the boards need to be docked to remove large defects.
An ‘optimising docking saw’ will scan the piece to look for the crayon marks and dock the piece accordingly. The remaining length will then make the
grade allocated to it.

Grading structural softwoods - Learner guide 3
Developed by Workspace Training – adapted from the ‘Timber Plus Toolbox’ e-learning resource
Post
Compressive stress
Load
Beam
Tensile stress
Load
Ceiling joist
Load
Rafter Rafter
Bending stress
Load
Types of stresses
Structural timber needs to withstand four basic types of stresses.
These are:
Compression
A load which tends to shorten or crush a member produces
compressive stresses.
This particularly applies to supporting members, such as a
post supporting a beam.
Tension
A load which tends to stretch a member produces tensile
stresses.
This happens to members designed to stop a pulling-apart
action, such as a ceiling joist fixed to the foot of two
rafters, resisting their tendency to spread apart under the
roof load.
Shear
A load which tends to slide one part of a member over
an adjacent part produces shear stresses.
This can occur in places where a defect in the member
might weaken the wood fibres and cause them to split
along the grain, such as in the top plate of a wall frame.
Bending
When a load is applied to the middle of a beam
supported at both ends, it tends to bend the piece,
producing bending stresses.
But when you look more closely at it, bending is
really a combination of compressive, tensile and shear
stresses.
This is because:
the top part of the beam tends to shorten, producing compressive stresses
the bottom tends to lengthen, producing tensile stresses
the interaction of compressive and tensile stresses produce shear, as the different layers try to slide over each other.
Load
Rafter
Stud
Top plate
Shear stress

Grading structural softwoods - Learner guide 4
Developed by Workspace Training – adapted from the ‘Timber Plus Toolbox’ e-learning resource
Learning activity
Below are four examples of structural members under stress. For each one,
identify the type of stress that the member is being subjected to.
Example 1 This collar tie is fixed between two rafters in a roof. When the tiles go on the roof, the rafters will tend to spread, with the ridge (where they join together at the top) acting like a hinge. What stress is the collar tie under?
Example 2 This is a close up view of the fixing point at one end of the collar tie. When the rafter tries to spread outwards, it will pull against the bolt, because the collar tie is pulling back in the other direction. What stress is the grain being subjected to in the end of this collar tie?
Example 3 This stud is in a wall frame. When the rafters sit on top of the wall frame, it will be bearing the weight of the roof. What stress will the stud be under when the roof goes on?
Stud
Collar tie
Collar tie
Rafters
Rafter

Grading structural softwoods - Learner guide 5
Developed by Workspace Training – adapted from the ‘Timber Plus Toolbox’ e-learning resource
Example 4 This floor joist is supported by bearers (shown in end section), which are sitting on brick piers. There is an internal wall frame sitting on top of the floor, in between the two bearers. What stress is the floor joist under in between its supports?
Floor joist

Grading structural softwoods - Learner guide 6
Developed by Workspace Training – adapted from the ‘Timber Plus Toolbox’ e-learning resource
Strength groups
All timber species graded for structural
purposes are classified into strength groups.
Because most species become stronger when
they are seasoned, there are two sets of
strength groups – one for green timbers,
ranging from S1 (the strongest) to S7; and one
for dry timbers, ranging from SD1 (S for
strength, D for dry) to SD8.
You can see from the list below of typical
species in the different strength groups that the
density of the timber has a big influence on its
strength. This is because density is closely
related to the thickness of the cell walls in the
wood fibres.
The right hand column shows the density,
either green (GD) or air dried (ADD)
measured at an average of 12% moisture
content. For more information on these two
methods of recording density, see the chapter
Density in the unit: Selecting timber.
Strength groups and typical species
Species Strength
group (unseasoned)
Green density
(GD)
Strength group
(seasoned)
Air dried density (ADD)
Grey ironbark (Eucalyptus paniculata) S1 1250 SD1 1100
Blackbutt (Eucalyptus pilularis) S2 1150 SD2 900
Messmate (Eucalyptus oblique) S3 1100 SD3 750
Jarrah (Eucalyptus marginata) S4 1100 SD4 800
Douglas fir (oregon) (Pseudotsuga menziesii) S5 710 SD5 550
Radiata pine (Pinus radiata) S6 800 SD6 550
Light-red meranti (Shorea spp.) S6 - SD7 400
Western red cedar (Thuja plicata) S7 - SD8 350
Density is the single biggest factor influencing the strength of a piece of timber. Even within a species, the denser a board is the stronger it will be, all other things being equal.
These radiata pine boards have differing densities – you can tell by looking at how close together the growth rings are. The pieces with close growth rings are slower growing and denser; in general they’ll produce higher grades.
The density value given to a species is based
on the average density of the wood produced.

Grading structural softwoods - Learner guide 7
Developed by Workspace Training – adapted from the ‘Timber Plus Toolbox’ e-learning resource
Learning activity
Did you know that on a strength to weight ratio, some species of timber are
stronger than steel? Douglas fir is one example, which is why it has
traditionally been used in many critical applications, including boat masts and
aeroplane frames. Sitka spruce is another, and for a long time was the preferred
species for aircraft manufacture, including in the largest plane ever built –
Howard Hughes’s ‘Spruce Goose’.
There are many other examples of timber being used in particular applications that require
high performance characteristics, especially in relation to strength. Modern mass production
methods have meant that a lot of these traditional uses have disappeared into history – but not
always because the replacement materials, such as steel, aluminium and plastics, performed
better. Often it was simply due to the cost effectiveness and the reduced availability of high
grade timber. However, there are still instances where timber is used in engineering
applications, because it is the best material for the job.
How many examples can you think of – either historical or current – of timber being used in
engineering applications? Do you know which species are specified for those end uses?

Grading structural softwoods - Learner guide 8
Developed by Workspace Training – adapted from the ‘Timber Plus Toolbox’ e-learning resource
Structural grades and stress grades
Strength groups are a good starting point for working
out how much stress a piece of timber can withstand,
but their problem is that they only give you the
average strength for the species. And even then, the
strength group allocation is based on the testing of
small clear samples of the timber without any
imperfections. In practice, individual pieces contain a
variety of defects, such as knots, splits and resin
pockets.
Because the size and occurrence of these defects can
have a serious effect on strength, each piece needs to
be assessed according to its structural grade. For
softwoods there are five grades – Structural grade No.
1 is the strongest, and each lower grade represents a
25% reduction in strength.
Each structural grade also has an F rating. F stands for force in megapascals (MPa). This is
the amount of force a piece of timber can withstand without bending beyond an acceptable
limit. A piece graded to F11, for example, will have a safe working stress in bending of 11
MPa. This is also called the stress grade of the piece.
The reason for having structural grades and as well as stress grades is that it allows a single
set of grading rules to be used for a wide range of species – the structural grades categorise
the allowable size and number of particular defects, and the stress grades (i.e. F grades) tell
you how strong the piece is after allowance is made for those defects in a piece of timber from
that particular strength group.
An example
To understand this idea more clearly, have a look at the table below. This shows a comparison
in stress grades between two softwoods. Notice that the slash pine is denser than western red
cedar, and comparatively stronger. So when the defects in a piece of slash allow it to be given
a Structural grade 1, its stress grade will be F14 – that is, it can take a load of 14 megapascals
without bending too much. But a piece of cedar with exactly the same sized defects, and
therefore still given a Structural grade 1, will only make a stress grade of F8, because the
wood itself is naturally weaker.
We’ll look more closely at the different types of defects and other strength-reducing
characteristics in Section 2: Assessing characteristics, but for now, the important thing is that
you understand the relationship between strength groups, structural grades and stress grades.
A grader visually assesses slash pine and stamps each piece with the stress
grade as he goes.

Grading structural softwoods - Learner guide 9
Developed by Workspace Training – adapted from the ‘Timber Plus Toolbox’ e-learning resource
Standard trade name
Air dried density
(12% MC)
Strength group
Stress grade (F grade)
Structural grade number
1 2 3 4 5
Slash pine 470 SD5 F14 F14 F11 F8 F7
Western red cedar (USA)
360 SD8 F8 F7 F5 F4 -
In-grade testing
Although the traditional F grading system we’ve just described has been used successfully for
many years, it was originally developed for hardwoods, which tend to have a lot less knots
than the softwoods. When the test results of small clear samples of hardwood are generalised
to full length pieces in that species, the estimations of how they will perform under a load are
reasonably accurate.
But in the case of the some of the softwoods, it has turned out that full length pieces don’t
always perform the way the testing of small clear samples predicted they would. For this
reason, there have been various revisions made to the F grade allocations of particular
softwood species, based on ‘in-grade’ tests of full length pieces.
So you need to remember whenever you’re looking at a general table of strength groups,
structural grades and stress grades that for certain species of softwood there are now revised
F grades that over-rule these generalised grade allocations.
The tables below show the F grades for some commonly used softwood species. These
include the updates made to particular species as a result of in-grade testing.
Stress grades for unseasoned softwoods
Standard trade name Strength
group
Stress grade (F grade)
Structural grade number
1 2 3 4 5
Caribbean Pine S6 F8 F7 F5 F4 -
D. fir (oregon) (North America) S5 F11 F8 F7 F5 F4
D. fir (oregon) (Elsewhere) S6 F8 F7 F5 F4 -
Radiata pine (Aust) S6 F8 F7 F5 F4 -
Radiata pine (NZ) S6 F8 F7 F5 F4 -
Slash pine S5 F11 F8 F7 F5 F4
Western hemlock S6 F8 F7 F5 F4 -
Western red cedar (Canada) S7 F5 F4 - - -
Western red cedar (USA) S7 F7 F5 F4 - -

Grading structural softwoods - Learner guide 10
Developed by Workspace Training – adapted from the ‘Timber Plus Toolbox’ e-learning resource
Note that cypress and hoop are listed separately in AS 2858, and have their own grade
descriptions. These are as follows.
Standard trade name
Strength group
Stress grade (F grade)
Cypress pine S5 F7 F5 F4
Hoop pine S6 F7 F5 F4
Stress grades for seasoned softwoods
Standard trade name Strength
group
Stress grade (F grade)
Structural grade number
1 2 3 4 5
Caribbean Pine SD6 F11 F11 F8 F7 F5
D. fir (oregon) (North America) SD5 F11 F11 F8 F7 F5
D. fir (oregon) (Elsewhere) SD6 F11 F11 F8 F7 F5
Radiata pine SD6 F8 F8 F7 F5 F4
Slash pine SD5 F14 F14 F11 F8 F7
Western hemlock SD6 F11 F11 F8 F7 F5
Western red cedar SD8 F8 F7 F5 F4 -
Note that cypress and hoop are listed separately in AS 2858, and have their own grade
descriptions. These are as follows.
Standard trade name
Strength group
Stress grade (F grade)
Cypress pine SD6 F7 F5 F4
Hoop pine SD5 F8 F7 F5

Grading structural softwoods - Learner guide 11
Developed by Workspace Training – adapted from the ‘Timber Plus Toolbox’ e-learning resource
Learning activity
Below are four boards that have been given a structural grade, based on the size
and location of the defects. See if you can give each board its correct F grade.
You will need to look up the two stress grade tables shown above to match up
the species, seasoned/unseasoned condition, and structural grade with the
appropriate stress grade.
When you have decided on your answer, write the appropriate F grade on the end of the
board.
Species Green/ Dry
Structural Grade
Radiata pine Dry 1
Slash pine Dry 1
NZ oregon Green 3
American oregon Green 3
Write the grade here

Grading structural softwoods - Learner guide 12
Developed by Workspace Training – adapted from the ‘Timber Plus Toolbox’ e-learning resource
Load roller
Rotation Direction of board
Deflection
F grading with a machine
In mechanical stress grading, the stick of
timber is bent in a machine and measured in
terms of its resistance to deflection. This is then
converted to a stress grade via the machine’s
computer. Traditionally, mechanical stress
grading machines always used F grades.
However, the plantation pines are now
generally stress graded using the MGP
(machine graded pine) system. The process of
physically bending the piece
In order to understand how a machine stress
grader calculates F grades, it’s important to
know the difference between bending strength
and bending stiffness.
Bending strength
The bending strength of a piece is derived
from the point at which the piece breaks under
a load, called the Modulus of Rupture (MOR),
since this is the pressure required to actually
rupture the fibres. The F grade of the piece is
based on the MOR divided by a safety factor.
This is why the F grade is called the safe working stress in bending.
That is: F grade = safe working stress in bending
= modulus of rupture (MOR)
safety factor
Bending stiffness
By contrast, the bending stiffness of a piece is a measure of its Modulus of Elasticity (MOE).
The higher the MOE, the less elastic it will be – so the more resistant it is to deflection under
a load.
That is: Stiffness = modulus of elasticity (MOE)
= resistance to deflection
Fortunately, there is a close relationship between MOR and MOE. If there wasn’t, the
machine would have to break every piece to find its actual point of rupture before it could
derive an F grade. But because the stiffness of the board is a good indication of how much
This diagram of a machine stress grader shows how the machine measures the stiffness of a board.
The load roller applies a force to the board, and bends it between two support rollers. The blue dotted line represents the deflection that occurs.
As the rollers rotate, the board moves through the machine, so that the deflection can be measured very quickly right along the length of the board.

Grading structural softwoods - Learner guide 13
Developed by Workspace Training – adapted from the ‘Timber Plus Toolbox’ e-learning resource
stress it can take before the fibres rupture, the machine can measure the MOE by running the
timber across two rollers spaced apart, and use a formula to work out the MOR and then the F
grade.
In most boards, the grade will vary along the length, depending on the size and positioning of
knots and other defects. So the machine sprays bursts of paint along the piece to mark the
different grades, and uses the lowest one as the overall grade. This is generally shown on the
end of the board in a long stripe of colour.
The colour codes used for the most common softwood F grades are:
F4: red
F5: black
F7: blue
F8: green
Fll: purple
Learning activity
Below are several boards that have just come through a machine stress grader.
There are spray bursts indicating the varying strengths along the length of each
board as the different defects and other characteristics pass under the load
roller.
The overall grade for each piece has not yet been decided on. Your job is to
look at the paint colours sprayed by the machine and write the correct grade on
the end of the board.
Write the grade here

Grading structural softwoods - Learner guide 14
Developed by Workspace Training – adapted from the ‘Timber Plus Toolbox’ e-learning resource
MGP grading with a machine
We talked about in-grade testing in the earlier
lesson: Structural grades and stress grades.
These tests found that the F grading system
was not as accurate for some of the pines as it
was for most other timbers, especially
hardwoods. In order to overcome this
problem, a new set of MGP (machine graded
pine) grades was developed, specifically
designed to describe the properties of pine.
The MGP system is based directly on the
‘modulus of elasticity’ (MOE) of the timber.
You’ll recall that we said in the last lesson –
F-grading with a machine – that MOE is a
measurement of stiffness, and the higher the
MOE, the stiffer (in other words, less
‘elastic’) the timber is. So the MGP grade
designations given to the boards tested by a
machine stress grader are simply an
abbreviated form of the MOE category that the timber falls into.
For example:
MGP 10 has an MOE of 10,000 megapascals (MPa)
MGP 12 has an MOE of 12,700 MPa
MGP 15 has an MOE of 15,200 MPa
Using MGP timber in place of F graded timber
Remember that when a piece of timber is machine stress graded under the F grading system,
its basic bending strength is calculated from the MOE value. Because this isn’t a direct
measurement of its bending strength (which is based on the modulus of rupture, divided by a
safety factor), there needs to be a greater allowance for error.
By contrast, the properties of MGP graded timber are measured more accurately, allowing
pieces to be used closer to their design limitations, with less margin for error. This is why
some end users of structural pine say that the defects in MGP pine sometimes look bigger
than they do in the F grades equivalents.
Nonetheless, the properties attributed to MGP pine are all greater than those of the F grades
they can be substituted for. Below are the three main MGP grades and the F grades they can
replace.
MGP 10 can replace F5
MGP 12 can replace F8
MGP 15 can replace F11
This machine stress grader bends the timber as it runs through the rollers, and measures its resistance to deflection, or ‘modulus of elasticity’. The MOE value then becomes the basis for the MGP grade, which is marked along the board with
colour-coded paint.

Grading structural softwoods - Learner guide 15
Developed by Workspace Training – adapted from the ‘Timber Plus Toolbox’ e-learning resource
When you’re reading span tables or specifying grades, it’s important to note that MGP grades
and F grades can’t simply be used interchangeably. MGP material may be substituted for F
graded material, as shown above. But F graded material must not be used where MGP
material has been specified. This is because of the differences in design properties between
the two systems.
Learning activity
The following questions draw on information covered in this lesson as well as
the previous lesson: F grading with a machine. If you have trouble answering
these questions correctly, make sure you go back over the topics to check your
understanding of the concepts.
Answer True or False to the following questions.
1. Modulus of elasticity (MOE) is a measure of stiffness, so a board with a high MOE
will have less deflection when it’s put under a load than a board with a low MOE.
2. A person can learn to visually stress grade timber using both the F grade system and
the MGP system.
3. If a plan specifies F5 for a particular member, you can use a piece of MGP 10 in its
place.
4. If a plan specifies MGP12 for a particular member, you can use a piece of F8 in its
place.

Grading structural softwoods - Learner guide 16
Developed by Workspace Training – adapted from the ‘Timber Plus Toolbox’ e-learning resource
Visual over-rides for MSG softwoods
Although timber graded with a mechanical stress
grader (MSG) is physically bent by the machine
to measure its stiffness, a person still needs to
visually check each piece for defects that the
machine might have missed before the piece is
given a grade. For example, defects that affect
shear strength, such as sloping grain, resin and
bark pockets, and fractures are very difficult for
machine stress graders to recognise. The same
goes for things that affect straightness, such as
bow, spring and twist.
It’s a good idea for everyone who handles MGP
timber to have a general understanding of the
visual over-rides that apply, because there may be
times when a piece will get through the quality
control process that isn’t up to grade. There are
also various problems that can appear or get
worse after the timber has been graded and left
the sawmill – in particular those defects that are
affected by changes in moisture content.
If you come across pieces that clearly don’t make the standard required, you shouldn’t use
them, even if they are stamped with that grade. This particularly applies to timber going into
wall frames, roof trusses or other structural applications. You might think at the time that it’s
too much effort to cut the out-of-grade defects out of the piece, or put the whole piece to one
side, but in the long run it could save you a lot of trouble.
If you find that a lot of pieces in a pack are not making the grade they’re stamped with, you
should contact the mill that supplied the timber and ask them to send out a rep to discuss the
problem.
On the following page is a table of visual over-rides that apply to all machine stress graded
softwoods that are kiln dried and planer gauged or dressed. The species you’re most likely to
use this with are radiata and slash pine. For definitions of the characteristics listed in this
table, and methods of measurement, see the next section: Assessing characteristics.
This mill grader is visually assessing the timber that has come through a machine stress grader, and putting a sticker on pieces that make the grade. The pieces that don’t make a specified grade are sent
back to be re-worked.

Grading structural softwoods - Learner guide 17
Developed by Workspace Training – adapted from the ‘Timber Plus Toolbox’ e-learning resource
Visual over-rides for machine stress graded softwoods AS/NZS 1748:2006
Note: This is a summary only of the visual over-rides that apply to K/D P/G MSG softwoods under AS/NZS1748:2006. For a full description of all grade requirements, consult the Standard.
Characteristic Limitation
Cross shakes and splits other than end splits
Not permitted
Cupping 1 mm per 50 mm of width
End splits Maximum individual length: ½ width of piece; Aggregate length at each end: lesser of 2 times width or 200 mm
Finished dressed size +2 mm, -0 mm on specified width and thickness
Heart shakes Maximum width: 3 mm; Not one surface to the opposite surface
Knots To the limits allowed to meet the specified strength and MOE
Machine skip Maximum -0.5 mm when extending for full length of the piece
Moisture Content 15% maximum for at least 90% of pieces
Resin streaks, resin pockets, bark pockets
Not one surface to the opposite surface if longer than the width of the piece
Squareness +0.5 degree from a right angle (equivalent to less than 1 mm per 100 mm)
Want and wane Maximum 1/2 face and 1/3 edge
Length
(m)
Bow (mm)
Spring (nom. width mm) Twist (nom. width mm)
Up to 125 150 & up Up to 100 101– 150 151-200 201-300
Up to 2.4 20 6 6 5 7 10 15
3.0 30 9 9 7 10 14 20
3.6 40 18 14 8 13 18 25
4.2 50 22 18 9 15 21 29
4.8 60 29 24 10 16 23 33
5.4 65 36 30 11 18 26 37
6.0 & over 70 44 36 12 20 28 40

Grading structural softwoods - Learner guide 18
Developed by Workspace Training – adapted from the ‘Timber Plus Toolbox’ e-learning resource
Learning activity
When you look at the summary table above, you’ll see that there are a lot of
abbreviations used to help condense the information into a small space. Most of
these abbreviations are in common usage throughout various industries,
particularly those relating to manufacturing or building.
We won’t go into the definition and measurement of the defects listed in the
table, because that will be covered in the next section of this unit. But for now,
see if you can pick the correct answer for each of the questions below on the
meanings of the common abbreviations used.
1. AS/NZS stands for:
(a) All Services under the New Zealand System
(b) Australian Standard / New Zealand Standard
2. K/D stands for ‘kiln dried’, which means that the timber has been:
(a) dried in a kiln to a moisture content of 15% maximum (unless specified
otherwise)
(b) dried in a kiln until the timber loses its surface moisture
3. P/G stands for ‘planer gauged’, which means that the timber has:
(a) a planed surface on all four sides, gauged to a specific size, so that the piece has
reliable width and thickness dimensions
(b) a groove running down the centre of the board which is gouged out with a planer.
4. If a piece of 90 x 35 has a size tolerance of +2 mm, -0 mm, it means:
(a) the piece can be up to 92 mm wide and up to 37 mm thick, and still be within the
specification, but it can’t be any less than 90 mm x 35 mm.
(b) the end of the piece can be cut up to 2 mm out of square.
5. If the squareness tolerance of a piece is +0.5 mm, it means
(a) the angle between the face and edge can vary slightly from a perfect right angle,
as long as it is no more than half a millimetre out of square.
(b) the length of the piece must be no more than half a millimetre longer or shorter
than the length specified.

Grading structural softwoods - Learner guide 19
Developed by Workspace Training – adapted from the ‘Timber Plus Toolbox’ e-learning resource
Task for Section 1: Principles of stress grading
The purpose of this Task is to prepare you for the practical grading demonstration you will
need to perform for Section 2 of this unit: Assessing characteristics. You will need to speak to
your trainer or supervisor about the species you’ll be using in your hands-on grading
demonstration, and then answer the questions set out below.
Most of the information you’ll need will be in the lessons for this section. However, you may
also need to look up some of the tables in the Learner Guide: Selecting timber.
1. Description of species
Nominate the common name, botanical name, country of origin, strength group
(unseasoned), and strength group (seasoned) for the timber.
2. F grades
Specify whether the timber you will be grading is seasoned or unseasoned, and then fill in
the appropriate F grades that will apply.
3. Structural uses and stresses
Think about the types of structures this timber is typically used in. List three different
types of stresses that the timber would need to be able to withstand, and for each one,
give at least one example of a structural member that would be subjected to that stress.

Grading structural softwoods - Learner guide 20
Developed by Workspace Training – adapted from the ‘Timber Plus Toolbox’ e-learning resource
Section 2: Assessing characteristics
Your job
There are lots of characteristics in timber that can
influence strength. Some characteristics, such as
fractures, are serious defects and therefore not
allowed in any grade. Others, such as knots and
resin pockets, have a relative effect on strength,
depending on how big they are and where they
occur in the piece.
In this section, we’ll look at the main
characteristics you need to be able to identify and
measure when you’re visually stress grading
softwood. We’ll concentrate on the general grade
descriptions listed in Part 2 of AS 2858-2008.
However, you’ll notice that Part 3 of the
Standard deals specifically with cypress pine,
and Part 4 covers hoop pine. These two timbers
have been given their own subsets of grading
rules, because they tend to behave a bit
differently from the other softwoods due to their
knot configurations and grain structure.
Learning the process
To learn to become a good grader, you’ll need
plenty of practice under the guidance of a face-to-face trainer or supervisor, because there will
be many times when you’ll question whether a particular imperfection falls into one category
or another, or whether a borderline measurement should put a piece into a lower grade or a
higher grade. The ability to make good quality grading decisions will come with practice, and
a sound knowledge of the particular species you are working with.
So it is not the intention of this section to give you everything you need to know in order to
identify and assess characteristics accurately. But the lessons in this section will help you to
develop an understanding of how to evaluate the most common characteristics described in
AS 2858. From there you will simply need to keep practicing your skills and gradually learn
from experience to apply these principles correctly to the many variations you will be
presented with when you’re grading at work.
A supervisor works with a trainee grader, showing her how to evaluate characteristics and decide on the correct grade.
He doesn’t mind the fact that progress is slow at first, because he knows that the best graders are the ones who have taken the time to really ‘get it’ – they ask lots of questions, study the grading rules closely, and learn all the fundamentals before starting to pick up the pace to normal production speed.

Grading structural softwoods - Learner guide 21
Developed by Workspace Training – adapted from the ‘Timber Plus Toolbox’ e-learning resource
Here's your job
1. Have a look at the Task for this section to preview the
questions you'll need to answer at the end.
2. Work through each of the lessons for more detailed information
on the concepts covered, and complete the learning activity at
the end of each topic.
3. Complete the Task.

Grading structural softwoods - Learner guide 22
Developed by Workspace Training – adapted from the ‘Timber Plus Toolbox’ e-learning resource
This grader quickly turns the piece while looking up and down the board, and uses a crayon to mark the characteristics that need to be docked out.
Looking at the piece
There are two main types of characteristics that
you need to look for when you visually grade
structural timber:
1. characteristics that have a strength-
reducing effect on the piece, such as
knots, resin pockets, and sloping grain
2. characteristics that affect straightness,
and therefore usability, such as bow,
spring and twist.
The only way to be sure that you don’t miss
anything important is to inspect all four sides
and both end of every piece. If you’re working
on a production line and need to grade pieces
quickly, it’s best to have an offsider checking
the far ends for you as they come down the line.
It’s not easy working quickly without sacrificing accuracy, but that’s part of the skill of being
a good grader. Fortunately, you don’t need to study every defect in the piece – you only need
to assess the worst characteristic, because that will be the one that determines the grade. So
the trick is to roll the piece while you look up and down all surfaces, find the feature or
combination of features that will give you the lowest grade, and then make your assessment.
If you’re reworking the pieces and cutting out bad defects, you need to make the judgement as
you go about whether it’s best to leave the piece long at a lower grade, or dock the piece to a
shorter length and get a higher grade. You may also be re-sawing the width of the boards, in
which case you have to decide whether a large imperfection on a wide board is better than a
smaller one on a narrower board. Obviously, if the defect you’re looking at is bad enough to
reject the piece completely, then re-working it will be your only option.

Grading structural softwoods - Learner guide 23
Developed by Workspace Training – adapted from the ‘Timber Plus Toolbox’ e-learning resource
Learning activity
Terms like ‘face’, ‘edge’, ‘width’ and ‘size’ have strict meanings when
referring to timber. This exercise is designed to reinforce the correct meaning
of each term.
1. Write the correct term for each of these surfaces, and the line where the
surfaces meet.
This piece of 140 x 45 oregon is 2.4. metres long. Therefore:
The of the board is 140 mm
The of the board is 45 mm
So the is 140 x 45 and the is 2.4 metres.
2. Another two terms that you will come across in visual stress grading are backsawn and
quartersawn – which refer to the way the board is cut from the log. The general
definition is:
If the growth rings are less than 45 degrees to the face, the board is backsawn
If the growth rings are more than 45 degrees to the face, the board is quartersawn.
Match up the correct term to each of the boards below by writing boxes provided.

Grading structural softwoods - Learner guide 24
Developed by Workspace Training – adapted from the ‘Timber Plus Toolbox’ e-learning resource
Knots
When you’re grading softwood, the characteristic you’ll
spend most of your time looking at will be knots. It takes a
while to get the hang of visually assessing knots, but the
more you practice, the faster and more accurate you’ll
become.
Note that for this discussion on knots, we’re not including
cypress pine or hoop pine, because they have their own
variations to the normal rules set out in AS 2858. However,
the principles are the same, so if you’re grading cypress or
hoop, you simply need to look up the specific differences
that apply.
What is a knot?
A knot is a section of the branch of the tree, cut through in
section when the timber has been re-sawn. For the purposes
of grading structural softwoods, it doesn’t matter whether
the knot is tight (firmly trapped in the grain), loose (liable
to fall out), bark encased, or even a knot hole.
Because it is assumed that a knot contributes no strength to
the timber, all of these variations are classified as knots.
Types of knots
There are three basic types of knots in softwoods:
Face knots, which are fully contained within the ‘central face region’ of the piece
Edge knots, which are fully contained within the ‘central edge region’ of the piece
Other knots, comprising all knots that don’t fall into the above categories.
Central region of the face and edge
The central region of the face and edge varies, depending on the grade. In Structural grades 1
and 2 it represents 1/2 of the surface width, and in grades 3 to 5 it represents 3/4 of the
surface. See the diagrams on the following page to see how you would visualise these regions
on the face and edge of a board.
Face knot
Other knot
The three basic types of knots used in softwood grading – face knot, edge knot and other knot.
The dotted line represents the ‘central region’ of the face or edge.
Edge knot

Grading structural softwoods - Learner guide 25
Developed by Workspace Training – adapted from the ‘Timber Plus Toolbox’ e-learning resource
Central region for Structural grades 1 and 2
Central region for Structural grades 3, 4 and 5
Fraction of surface: 1/4 1/2 1/4 1/4 1/2 1/4
Measurements for 90 x 45: 22 45 22 11 23 11 (approx. mm)
Measurements for 70 x 35: 17 35 17 9 17 9 (approx. mm)
Central 50% of the width of the face
Central 50% of the width
of the edge
Central 75% of the width of the face
Central 75% of the width of the edge
Fraction of surface: 1/8 3/4 1/8 1/8 3/4 1/8
Measurements for 90 x 45: 11 68 11 6 33 6 (approx. mm)
Measurements for 70 x 35: 9 52 9 4 26 4 (approx. mm)

Grading structural softwoods - Learner guide 26
Developed by Workspace Training – adapted from the ‘Timber Plus Toolbox’ e-learning resource
Assessing the size of knots
The size of a knot is measured in terms of its Knot Area Ratio (KAR). This is the area that the
knot takes up inside the piece, expressed as a percentage of the end section of the piece.
The end section is the simply the end of the piece viewed front on, so its area is 100%. To
find the KAR of the knot, you need to mentally cut through it at its widest point, look at the
area it takes up on the end section you’ve just created, and estimate the area as a percentage.
Have a close look at these three examples:
KAR of 50%
This other knot comes halfway
across the piece (shown by the
dotted line).
Dock through the knot at its widest
point across the face.
Because the knot is the same size
on the top and bottom faces, it will
take up exactly half of the cross
section of the piece.
Therefore, it has a KAR of 50%.
KAR of 25%
This other knot comes halfway
across the face of the piece, like the
previous one. But when you turn
the piece over, you discover that
the knot doesn’t appear at all on the
other face, because it runs off
diagonally through the piece.
50% 50%
50% 50%

Grading structural softwoods - Learner guide 27
Developed by Workspace Training – adapted from the ‘Timber Plus Toolbox’ e-learning resource
Now the knot only takes up a
quarter of the end section.
Therefore, it has a KAR of 25%.
If you wanted to calculate it
mathematically, you could say:
50% (top) + 0% (bottom) = 25%
2
KAR of 30%
This face knot is right in the centre of
the piece.
But typical of softwood knots, it has
a taper, so it’s smaller on the other
face.
On the top face, the knot takes up
40% of the width. On the bottom
face, it takes up 20%.
Therefore, the knot has a KAR of
30%, which is half way in between.
Mathematically, the KAR is:
40% (top) + 20% (bottom) = 30%
2
Measuring the width of a knot
When you assess the surface width of the knot, take the
measurement at its widest point, at right angles to the arris
of the piece. Make sure you include any bark or voids
associated with the knot.
50% 50%
Knot takes up 0%, because the wood fibres cover 100%
30% 40% 30%
40% 20% 40%
Width
Arris

Grading structural softwoods - Learner guide 28
Developed by Workspace Training – adapted from the ‘Timber Plus Toolbox’ e-learning resource
Learning activity
Set out below is a summary of the KAR limitations for unseasoned ‘west coast’
(American) oregon, also called Douglas fir. Use this table to work out the grade
of each of the knots shown below. Once you’ve decided on the grade, write the
correct answer in the box for that question.
Remember that you’ll need to work out what type of knot it is first, on the basis
of its position, and then decide on the appropriate F grade.
Unseasoned North American oregon (D. fir) Maximum KAR
Structural Grade No 1
Structural Grade No 2
Structural Grade No 3
Structural Grade No 4
Structural Grade No 5
F11 F8 F7 F5 F4
Face knots Central 1/2 of face
KAR 25%
Central 1/2 of face
KAR 40%
Central 3/4 of face
KAR 50%
Central 3/4 of face
KAR 60%
Central 3/4 of face
KAR 70%
Edge knots Central 1/2 of edge
KAR 25%
Central 1/2 of edge
KAR 40%
Central 3/4 of edge
KAR 50%
Central 3/4 of edge
KAR 60%
Central 3/4 of edge
KAR 70%
Other knots KAR 15% KAR 25% KAR 30% KAR 40% KAR 45%
Knot 1
This knot takes up 20% of the width of the top face and 30% of the bottom face. What grade is it?
20%
30%

Grading structural softwoods - Learner guide 29
Developed by Workspace Training – adapted from the ‘Timber Plus Toolbox’ e-learning resource
Knot 3
This knot takes up 55% of the top face width and its boundaries are within the central 3/4 of the face. On the bottom it takes up 45%. What grade is it?
Knot 4
This knot takes up 40% of the top face, but it’s just outside the central 3/4 of the face. On the bottom it takes up 20%. What grade is it?
Knot 2
This knot takes up 30% of the width of the top face and is just within the central half of the face. It takes up 10% of the bottom face. What grade is it?
55%
45%
40%
20%
30%
10%

Grading structural softwoods - Learner guide 30
Developed by Workspace Training – adapted from the ‘Timber Plus Toolbox’ e-learning resource
Resin, bark and overgrowths
Resin pockets, bark pockets and overgrowths of injury
are put into the same category in structural grading,
because they all have the same effect on the strength of
a piece, and are all measured in the same way.
Resin pockets are formed in the growing tree
as a result of damage.
Bark pockets are patches of bark that have
been encased in wood tissue.
Overgrowths of injury are areas of dead or
damaged wood that have been overgrown by
new wood, and are often combined with resin.
Assessing their size
The width of a resin pocket, bark pocket or
overgrowth is measured radially – that is, towards the
centre of the tree. The length is measured parallel to
the length of the piece.
These two resin pockets show how the direction of the width measurement changes, depending on the orientation of the growth rings.
Because the width is measured radially (at right angles to the growth rings), the closer the board is to being fully backsawn, the more it becomes an up-and-down – or ‘depth’ – measurement.
On the other hand, the closer the board is to being fully quartersawn, the more it becomes a sideways measurement
across the face.

Grading structural softwoods - Learner guide 31
Developed by Workspace Training – adapted from the ‘Timber Plus Toolbox’ e-learning resource
Learning activity
In seasoned radiata pine, resin pockets, bark pockets and overgrowths of injury
are permitted in all grades (F8, F7, F5, F4) as long as the characteristic doesn’t
exceed the dimensions specified. For pockets and overgrowths that only appear
on one surface, the dimensions are as follows.
Resin pockets, bark pockets and overgrowths of injury appearing on one surface only
Maximum length 300 mm or 3 times the width of the surface (whichever is the lesser)
Maximum width 20 mm or 1/3 the width of the surface (whichever is the lesser)
A characteristic that is no bigger than these dimensions will therefore make an F8 grade, so if
it was the worst defect in the board, the final grade for the piece would be F8. However, if the
characteristic is larger than either of these dimensions, the board would need to be rejected
from all grades. The only way to save the board would be to cut the defect out and re-grade
the two shorter lengths.
For each of the resin pockets described below, decide whether the board is ‘in grade’ (i.e. F8)
or ‘out of grade’ (i.e. reject).
1. On a 90 mm wide face, the resin pocket is 280 mm long and 15 mm wide.
2. On a 70 mm wide face, the resin pocket is 200 mm long and 10 mm wide.
3. On a 45 mm wide face, the resin pocket is 100 mm long and 12 mm wide.
4. On a 190 mm wide face, the resin pocket is 380 mm long and 22 mm wide.

Grading structural softwoods - Learner guide 32
Developed by Workspace Training – adapted from the ‘Timber Plus Toolbox’ e-learning resource
The piece of radiata pine in the middle (with the green stress-grader paint) shows a large other knot, and grain that swirls around it. This is ‘local deviation’ of the grain, and so is not classed as ‘sloping grain’.
Slope of grain
Timber is strongest when the grain is straight and runs
parallel to the length of the board. The more it deviates
from straight and parallel, the weaker it becomes. This
is why you need to look out for sloping grain when
you’re grading structural timber.
In softwoods, it’s common for the grain to deviate
around knots. As long as this is limited to local
deviation, it doesn’t need to be separately assessed,
because the KAR calculations on the knots make
allowance for it. The same thing applies to variations in
the grain as it curves along a piece – if the deviation is
no more than half the width of the piece, you can call it
‘localised’.
But where there is a general slope of grain it needs to be
considered as a separate characteristic, because it will
have a strength-reducing effect on the piece.
Detecting slope of grain
Sloping grain can sometimes be tricky to detect by eye, because the growth rings often run
down the length of the board and make you think that the grain is doing the same thing. But
remember, growth rings are the alternation of early wood and late wood, and they form
different patterns on the face of a board depending on the way it’s been cut from the log. The
grain, on the other hand, is the direction of the wood fibres, and it may or may not run in line
with the growth rings.
If you’re in doubt about what the grain is doing in a particular area of the board, you can find
out using one of the following methods:
Look for surface checks – these always follow the grain, because they’re caused by
the fibres pulling away from each other as the timber dries
Split a small portion of wood off the board, or prise a slither away from the surface –
again, you will be separating the fibres, so you will know exactly where the grain is
going
Use a scribe – this is also called a ‘sloping grain detector, and it is basically a
gramophone needle on the end of a rod that tracks along the grain as you pull the
detector down the board.
Grading structural softwoods - Learner guide 33
Developed by Workspace Training – adapted from the ‘Timber Plus Toolbox’ e-learning resource
Measuring slope of grain
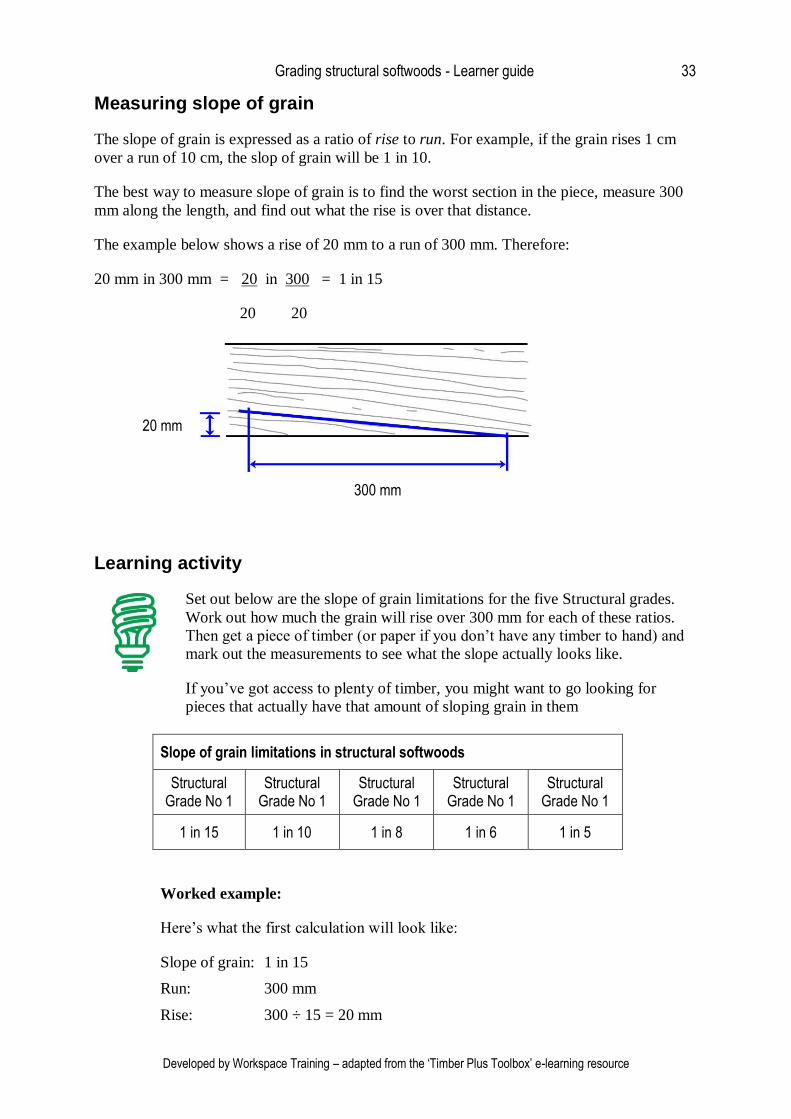
The slope of grain is expressed as a ratio of rise to run. For example, if the grain rises 1 cm
over a run of 10 cm, the slop of grain will be 1 in 10.
The best way to measure slope of grain is to find the worst section in the piece, measure 300
mm along the length, and find out what the rise is over that distance.
The example below shows a rise of 20 mm to a run of 300 mm. Therefore:
20 mm in 300 mm = 20 in 300 = 1 in 15
20 20
Learning activity
Set out below are the slope of grain limitations for the five Structural grades.
Work out how much the grain will rise over 300 mm for each of these ratios.
Then get a piece of timber (or paper if you don’t have any timber to hand) and
mark out the measurements to see what the slope actually looks like.
If you’ve got access to plenty of timber, you might want to go looking for
pieces that actually have that amount of sloping grain in them
Slope of grain limitations in structural softwoods
Structural Grade No 1
Structural Grade No 1
Structural Grade No 1
Structural Grade No 1
Structural Grade No 1
1 in 15 1 in 10 1 in 8 1 in 6 1 in 5
Worked example:
Here’s what the first calculation will look like:
Slope of grain: 1 in 15
Run: 300 mm
Rise: 300 ÷ 15 = 20 mm
300 mm
20 mm

Grading structural softwoods - Learner guide 34
Developed by Workspace Training – adapted from the ‘Timber Plus Toolbox’ e-learning resource
Other characteristics
There are many other characteristics covered in AS 2858
that haven’t been described in detail in this unit. Below are
some more of the commonly occurring characteristics that
you need to look out for.
Want and wane
Want and wane are caused by different things, but because
they have the same effect they’re both measured in the
same way.
Wane is the appearance of the underbark surface of the
log, which causes some of the arris to be missing on the
piece. Sometimes the surface is smooth, but other times
there is still bark attached.
Want is the absence of wood from the surface or arris
when it’s caused by anything other than wane. For
example, forklift damage or abrasions from chains can
break off the edge of a piece and result in want.
Width of growth rings
During the early development of a tree, while it’s still a
sapling and growing quickly, the wood fibres tend to
have a lower density than in later growth in the more
mature tree. For this reason, the first 50 mm radius from
the centre of the tree needs to be visually assessed, to
make sure that you’re not allowing low strength material
to get through in a board
The wider the growths rings are apart, the lower the
density is likely to be. There are certain restrictions in AS 2858 on the maximum distance
between grown rings, depending on the grade. For more general information about growth
rings, and the method for determining how close they are to the pith, when the pith is not
visible in the piece, go to the chapter ‘Growth rings’ from the Learner Guide Selecting timber.
Checks, splits and shakes
There are various forces that can cause wood fibres to separate and show up as cracks in a
board. Sometimes they occur in the growing tree, other times they develop while the timber is
drying, and they can also happen due to mishandling.
The most common types of cracks or fissures in the grain are checks, splits and shakes.
Because they have different effects on the strength of timber, they are treated differently in
the grading rules.
Want and wane are measured in terms of how much of the face or edge of the piece is missing.
Width of growth rings is measured radially, that is, towards the pith. Measure from the start of one latewood band to the start of the next latewood band.
Note that you only need to check the width of the growth rings if the piece has been cut from the central 100 mm diameter, or 50 mm
radius, of the tree.

Grading structural softwoods - Learner guide 35
Developed by Workspace Training – adapted from the ‘Timber Plus Toolbox’ e-learning resource
Checks
Checks generally form as the result of drying
stresses, where the wood fibres pull away from
each other because different areas are shrinking
at different rates. They always run lengthwise
with the grain, and their depth is radial to the
growth rings – that is, towards the centre of the
tree.
The width of a check is measured at right angles to the direction its length is going in. The
length of a check is measured parallel to the length of the board. It’s important to remember
that a check does not go from one surface to another. When this happens, it is called a split.
Splits
A split is a lengthwise separation of fibres that runs
from one surface to another surface. It sometimes
occurs when a drying check gets so bad that it goes
right through the piece, and is particularly common
on the ends of a board.
Note that where a separation of fibres begins as a
split and then disappears on one surface, it
becomes a check from that point on. In the diagram at right, the dotted line indicates where
the split stops on the underside. This is marked by the green arrow on the top face, so from
that point the crack turns back into a surface check.
Splits in the body of the piece are not permitted at all. On the ends they are called ‘end splits’,
and are only permitted within strict limitations in the lower grades.
Shakes
There are several types of shakes, such as heart
shakes, ring shakes and cross shakes. What they
all have in common is that they are not caused
by drying problems, but are the result of internal
stresses in the standing tree or in the log during
felling or conversion to sawn timber.
Like splits, they have a serious effect on the
strength of a piece, and in most instances are not
permitted in any grade.
The diagram above shows a heart shake, which radiates from the heart of the tree, often in the
form of a star pattern. Heart shakes are permitted in the lower grades if they’re no worse than
an equivalent sized check or end split.
Grading structural softwoods - Learner guide 36
Developed by Workspace Training – adapted from the ‘Timber Plus Toolbox’ e-learning resource
Distortions in the board
It’s not uncommon for there to be a small amount of distortion in a board, especially if it dries
unevenly or has a grain direction that moves around along its length. Small amounts of
deviation from straightness and flatness can be pulled out of a board when it’s fixed into
position in the structure. But the worse the deviation is, the harder it is to work with.
There are tables in AS 2858 specifying the maximum amount of bow, spring, twist and cup
that are allowed in a board. Once the distortion exceeds that level, it is rejected from the
grade.
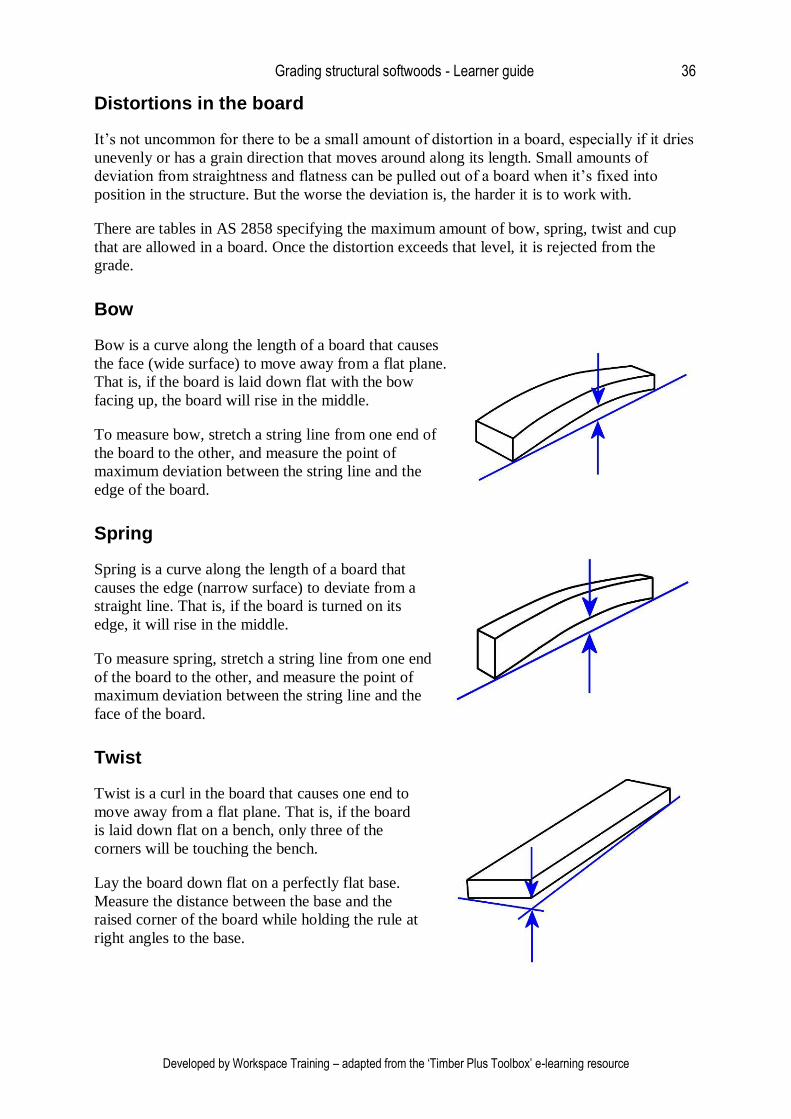
Bow
Bow is a curve along the length of a board that causes
the face (wide surface) to move away from a flat plane.
That is, if the board is laid down flat with the bow
facing up, the board will rise in the middle.
To measure bow, stretch a string line from one end of
the board to the other, and measure the point of
maximum deviation between the string line and the
edge of the board.
Spring
Spring is a curve along the length of a board that
causes the edge (narrow surface) to deviate from a
straight line. That is, if the board is turned on its
edge, it will rise in the middle.
To measure spring, stretch a string line from one end
of the board to the other, and measure the point of
maximum deviation between the string line and the
face of the board.
Twist
Twist is a curl in the board that causes one end to
move away from a flat plane. That is, if the board
is laid down flat on a bench, only three of the
corners will be touching the bench.
Lay the board down flat on a perfectly flat base.
Measure the distance between the base and the
raised corner of the board while holding the rule at
right angles to the base.

Grading structural softwoods - Learner guide 37
Developed by Workspace Training – adapted from the ‘Timber Plus Toolbox’ e-learning resource
Note that a concrete floor is generally not flat enough to take an accurate measurement. In
workplaces where there are no steel bench tops or other reliably flat surfaces, the only way to
assess twist is to sight along the board and estimate the deviation.
Cup
Cup is a curve across the face of a board. That is,
if the board is laid flat with the cup facing up, the
board will rock from side to side.
Hold a straight edge across the concave face of the
board, and measure the distance between the
straight edge and the face at its worst point.
Learning activity
You’re likely to find examples of most of the characteristics described in this
lesson in your own timber racks or elsewhere on-site. Depending on the species
you’re working with, you may find examples of them all. Go outside and have a
look for each of the characteristics listed below. If you’ve got a digital camera
(such as in your mobile phone), take a close-up photo of each one. If you don’t
have access to a camera, note down the size, species and other details of the
piece for each of the examples that you come across.
Characteristics:
Want
Wane
Wide growth rings within 50 mm radius of the pith
Surface check
Split (either within the body of the piece or on the end of the board)
Shake
Bow
Spring
Twist
Cup

Grading structural softwoods - Learner guide 38
Developed by Workspace Training – adapted from the ‘Timber Plus Toolbox’ e-learning resource
Combinations of characteristics
When particular defects occur close to each other, their
combined effect on the strength of the board tends to be
worse than their individual effects. For this reason, there
is a rule in AS 2858 regarding combinations of
characteristics.
The combination rule is that if two characteristics occur
within 150 mm of each other, or twice the width of the
board – whichever is the lesser – then their strength-
reducing effects have to be added together.
If you’re grading a 70 mm wide board, you’ll use the
‘twice the width’ calculation, because 2 x 70 = 140 mm,
which is less than 150 mm. But for boards 90 mm wide
and greater, you need to assess any characteristics
within 150 mm of each other in combination.
Remember that characteristics can appear on any
surface, so you have to turn each piece while you’re
grading to see which ones fall within the combination
rule.
The most common combinations you’re likely to come across are knots. However, any
strength-reducing characteristics occurring within the 150 mm or twice the width need to be
assessed in combination, including resin pockets, sloping grain, checks, splits and shakes. The
only characteristics that aren’t considered in combination are distortions in the board – that is:
bow, spring, twist and cup. These need to be assessed separately.
Adding sizes together
Example of two similar characteristics
If two characteristics are of the same type, you can simply
add their sizes together.
For example, if two face knots are in combination, and their
KARs are 20% and 25%, then their total KAR as a
combination is 20% + 25% = 45%.
The distance between two characteristics is measured by finding the points that are closest to each other, and measuring between them, parallel to the length of the piece.
If we assume that the piece of timber above is 90 x 45, these two knots must be considered in combination if the distance between them is
150 mm or less.
Face knot 1: KAR 20%
Face knot 2: KAR 25%
Combination of face knots:
KAR 45%.

Grading structural softwoods - Learner guide 39
Developed by Workspace Training – adapted from the ‘Timber Plus Toolbox’ e-learning resource
Example of two characteristics of different types
If the characteristics are of different types – such as a face
knot and an other knot, or an other knot and a resin pocket
– then you should work out each characteristic’s
proportionate size as a percentage of the maximum allowed
for that type and the stress grade you are considering, and
add the two proportions together.
For example, if the other knot is 40% of the maximum
allowed for an other knot, and the resin pocket is 50% of
the maximum allowed for a resin pocket, then the
combination would be: 40% + 50% = 90%. This
combination would therefore be assessed as ‘in grade’.
Learning activity
Set out below is a summary of the KAR limitations for seasoned radiata pine.
Use this table to work out the grade of each of the knots shown below. Once
you’ve decided on the grade, write your answer in the box provided.
If you need to revise the definitions for the different types of knots, or the
methods for assessing KAR, go back to the earlier chapter in this section on
Knots.
Seasoned radiata pine:
maximum KAR
Structural Grade No 1
Structural Grade No 2
Structural Grade No 3
Structural Grade No 4
Structural Grade No 5
F8 F8 F7 F5 F4
Face knots Central 1/2 of face
KAR 25%
Central 1/2 of face
KAR 40%
Central 3/4 of face
KAR 50%
Central 3/4 of face
KAR 60%
Central 3/4 of face
KAR 70%
Edge knots Central 1/2 of edge
KAR 25%
Central 1/2 of edge
KAR 40%
Central 3/4 of edge
KAR 50%
Central 3/4 of edge
KAR 60%
Central 3/4 of edge
KAR 70%
Other knots KAR 15% KAR 25% KAR 30% KAR 40% KAR 45%
Other knot: 40% of maximum allowed for the grade
Resin pocket: 50% of maximum allowed for the grade
Combination: 90% of maximum allowed for the grade

Grading structural softwoods - Learner guide 40
Developed by Workspace Training – adapted from the ‘Timber Plus Toolbox’ e-learning resource
Combination 1
These two knots are both within the central face region for Structural grades 3, 4 and 5. Their KARs are 25% and 30%. What grade will the combination be?
Combination 2
These two knots have KARs of 25% and 10%. What grade will the combination be?
Combination 3
These three knots have KARs of 15%, 35% and 10%. What grade will the combination be?
Combination 4
These two knots are both within the central edge region for Structural grades 1 and 2. Because they meet in the middle, you can treat them as one knot and call the total KAR 25%. What grade will the combination be?
KAR25%
KAR30%
KAR15%
KAR10%
KAR25%
KAR10%
KAR 25%
KAR35%

Grading structural softwoods - Learner guide 41
Developed by Workspace Training – adapted from the ‘Timber Plus Toolbox’ e-learning resource
Task for Section 2: Assessing characteristics
Your task is to demonstrate your ability to apply the theory of visual stress grading to the
practice of actually doing the job. You will be required to grade 100 pieces of timber while
being observed by your assessor.
You may grade to one of the following Australian Standards:
AS 2858 – if you plan to carry out a full visual stress grade of the timber under the F
grade system
AS 1748 – if you plan to apply visual over-rides to timber that has already been graded
by a machine stress grader.
See your trainer or supervisor about organising the area and materials required for this
assessment. You may either carry out the process on the production line, or alternatively
grade the pieces one by one in an area set aside for the assessment.
Complete the grading sheet as you grade the 100 pieces. If you are working on-line at normal
production speed, your assessor may fill in the sheet for you.
State whether you will be carrying out a full visual stress-grade of the timber or whether you
be applying visual over-rides to the timber.
Recommended