Linton Village College STEM Deep Learning Day
1
Linton Village College
Deep Learning Day
A whole day STEM-based activity for all pupils in year 7.
The pupils did two of the six activities and did each activity for 2 hours.
This set of activities have been developed using the Bloodhound materials. They can be
further developed for all KS3 pupils and potentially into KS4/KS5.
PDF processed with CutePDF evaluation edition www.CutePDF.com

Linton Village College STEM Deep Learning Day
2
Contents
Overview of the day 3
Science lesson plan 6
Geography pupil worksheet 8
Maths lesson plan 12
Food lesson plan 14
DT lesson plan 15
Point of sale lesson plan 16
Linton Village College STEM Deep Learning Day
3
STEM Deep Learning Day
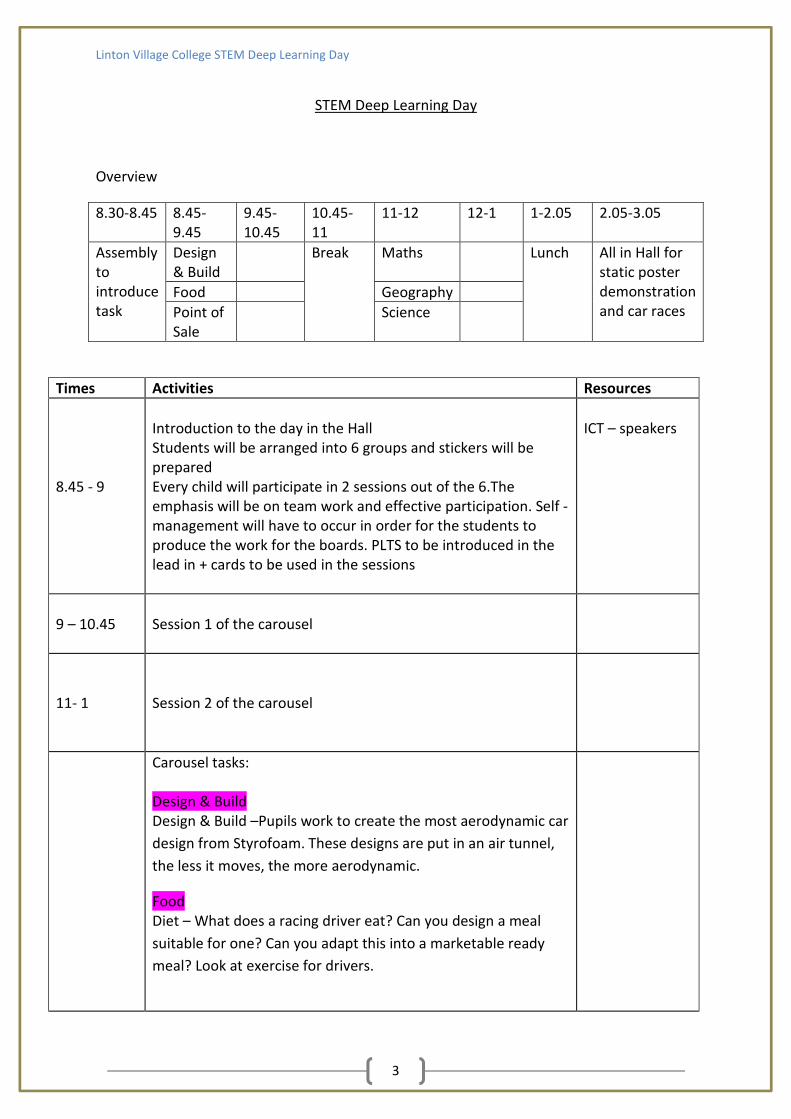
Overview
8.30-8.45 8.45-
9.45
9.45-
10.45
10.45-
11
11-12 12-1 1-2.05 2.05-3.05
Assembly
to
introduce
task
Design
& Build
Break Maths Lunch All in Hall for
static poster
demonstration
and car races
Food Geography
Point of
Sale
Science
Times Activities Resources
8.45 - 9
Introduction to the day in the Hall
Students will be arranged into 6 groups and stickers will be
prepared
Every child will participate in 2 sessions out of the 6.The
emphasis will be on team work and effective participation. Self -
management will have to occur in order for the students to
produce the work for the boards. PLTS to be introduced in the
lead in + cards to be used in the sessions
ICT – speakers
9 – 10.45
Session 1 of the carousel
11- 1
Session 2 of the carousel
Carousel tasks:
Design & Build
Design & Build –Pupils work to create the most aerodynamic car
design from Styrofoam. These designs are put in an air tunnel,
the less it moves, the more aerodynamic.
Food
Diet – What does a racing driver eat? Can you design a meal
suitable for one? Can you adapt this into a marketable ready
meal? Look at exercise for drivers.
Linton Village College STEM Deep Learning Day
4
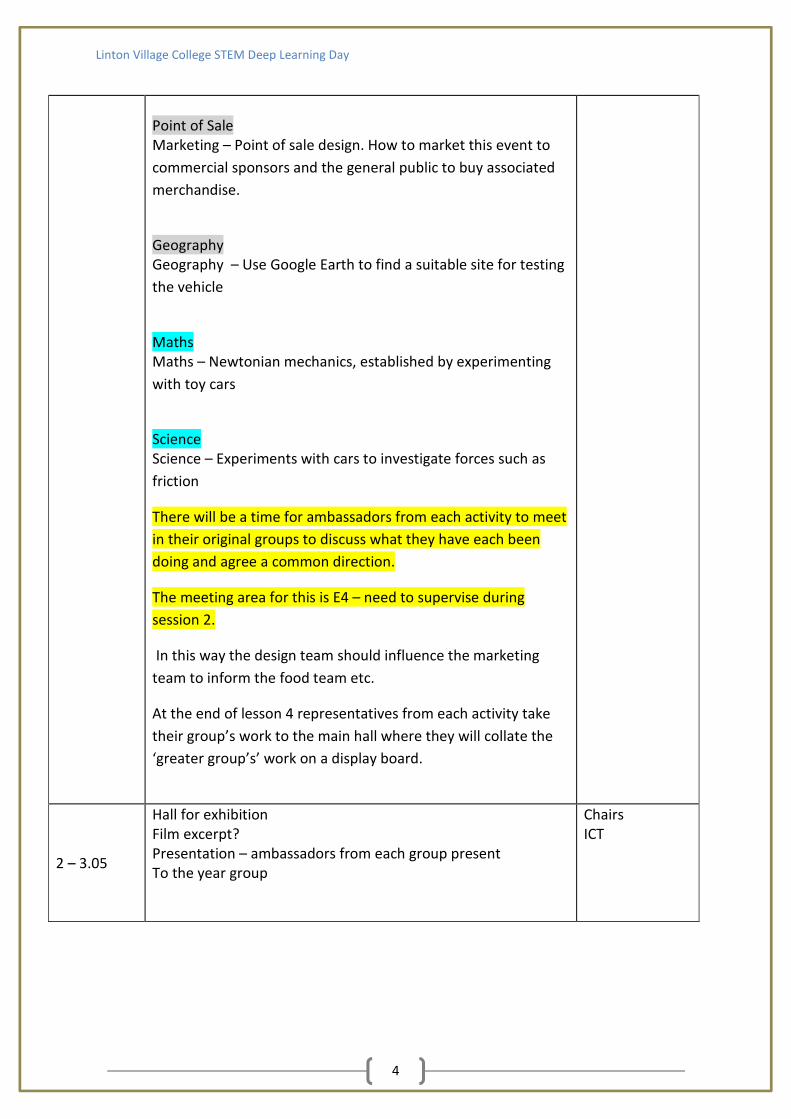
Point of Sale
Marketing – Point of sale design. How to market this event to
commercial sponsors and the general public to buy associated
merchandise.
Geography
Geography – Use Google Earth to find a suitable site for testing
the vehicle
Maths
Maths – Newtonian mechanics, established by experimenting
with toy cars
Science
Science – Experiments with cars to investigate forces such as
friction
There will be a time for ambassadors from each activity to meet
in their original groups to discuss what they have each been
doing and agree a common direction.
The meeting area for this is E4 – need to supervise during
session 2.
In this way the design team should influence the marketing
team to inform the food team etc.
At the end of lesson 4 representatives from each activity take
their group’s work to the main hall where they will collate the
‘greater group’s’ work on a display board.
2 – 3.05
Hall for exhibition
Film excerpt?
Presentation – ambassadors from each group present
To the year group
Chairs
ICT

Linton Village College STEM Deep Learning Day
5
Schedule for Friday 10th
February 2012
Everyone will start in the Hall for a brief introduction from X before moving to their rooms
for session 1.
D&B Geog POSale Science Food Maths
PERIODS 1 & 2 A B C D E F
PERIODS 3 & 4 B A D C F E
ACTIVITY STAFF ROOM
Design & Build
Food
Point of Sale
Geography
Maths
Science
Student experts - Nominated and selected by delivery
staff
Area
Design &
Build
Geography
Science
Point of
Sale
Maths
Food
Linton Village College STEM Deep Learning Day
6
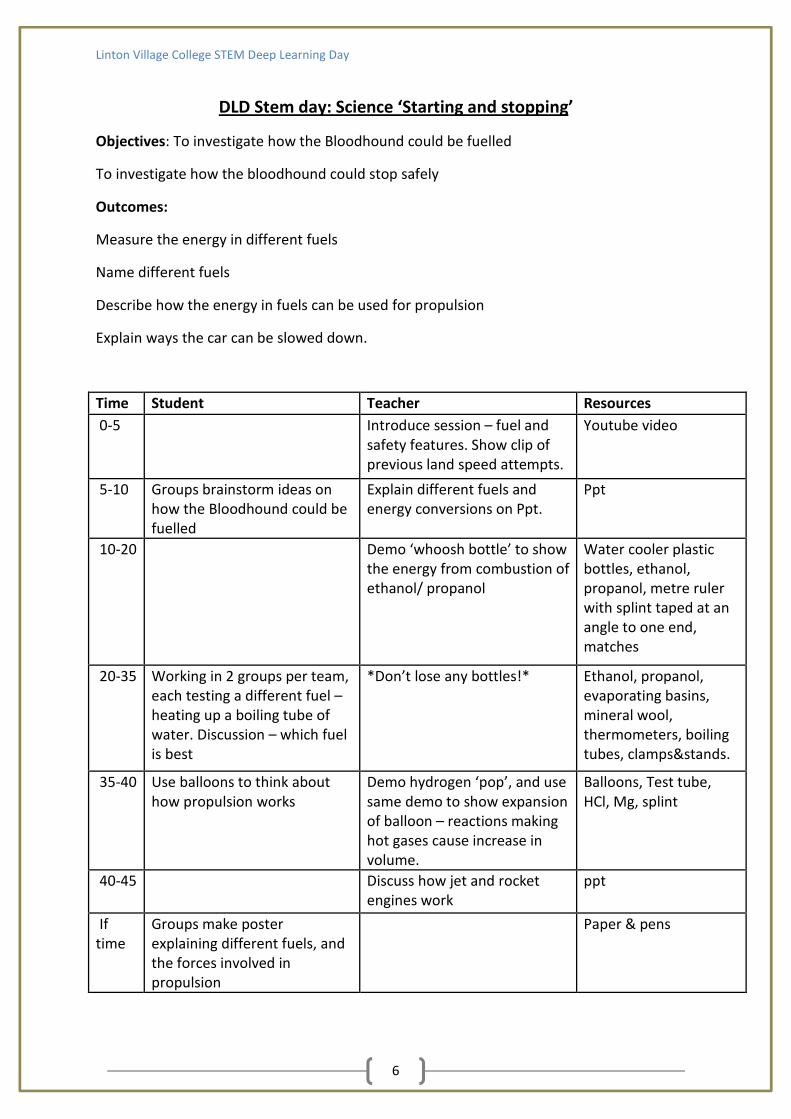
DLD Stem day: Science ‘Starting and stopping’
Objectives: To investigate how the Bloodhound could be fuelled
To investigate how the bloodhound could stop safely
Outcomes:
Measure the energy in different fuels
Name different fuels
Describe how the energy in fuels can be used for propulsion
Explain ways the car can be slowed down.
Time Student Teacher Resources
0-5 Introduce session – fuel and
safety features. Show clip of
previous land speed attempts.
Youtube video
5-10 Groups brainstorm ideas on
how the Bloodhound could be
fuelled
Explain different fuels and
energy conversions on Ppt.
Ppt
10-20 Demo ‘whoosh bottle’ to show
the energy from combustion of
ethanol/ propanol
Water cooler plastic
bottles, ethanol,
propanol, metre ruler
with splint taped at an
angle to one end,
matches
20-35 Working in 2 groups per team,
each testing a different fuel –
heating up a boiling tube of
water. Discussion – which fuel
is best
*Don’t lose any bottles!* Ethanol, propanol,
evaporating basins,
mineral wool,
thermometers, boiling
tubes, clamps&stands.
35-40 Use balloons to think about
how propulsion works
Demo hydrogen ‘pop’, and use
same demo to show expansion
of balloon – reactions making
hot gases cause increase in
volume.
Balloons, Test tube,
HCl, Mg, splint
40-45 Discuss how jet and rocket
engines work
ppt
If
time
Groups make poster
explaining different fuels, and
the forces involved in
propulsion
Paper & pens
Linton Village College STEM Deep Learning Day
7
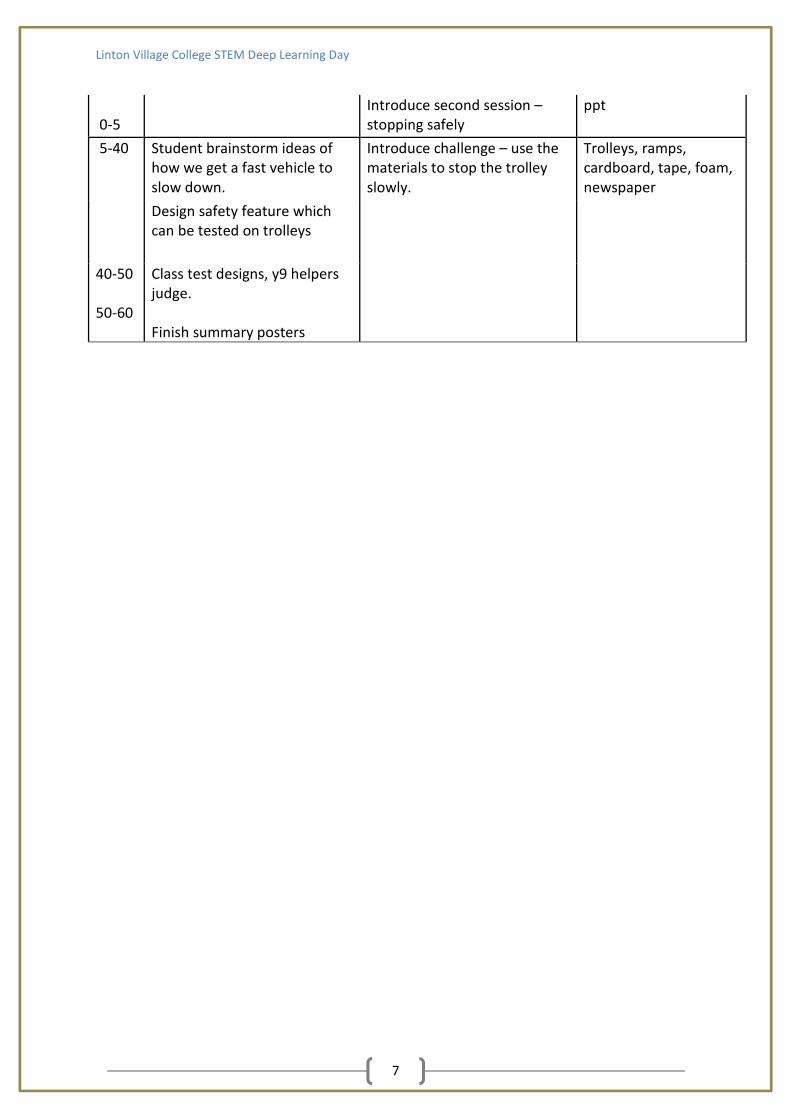
0-5
Introduce second session –
stopping safely
ppt
5-40 Student brainstorm ideas of
how we get a fast vehicle to
slow down.
Introduce challenge – use the
materials to stop the trolley
slowly.
Trolleys, ramps,
cardboard, tape, foam,
newspaper
Design safety feature which
can be tested on trolleys
40-50
50-60
Class test designs, y9 helpers
judge.
Finish summary posters
12/03/2012
1
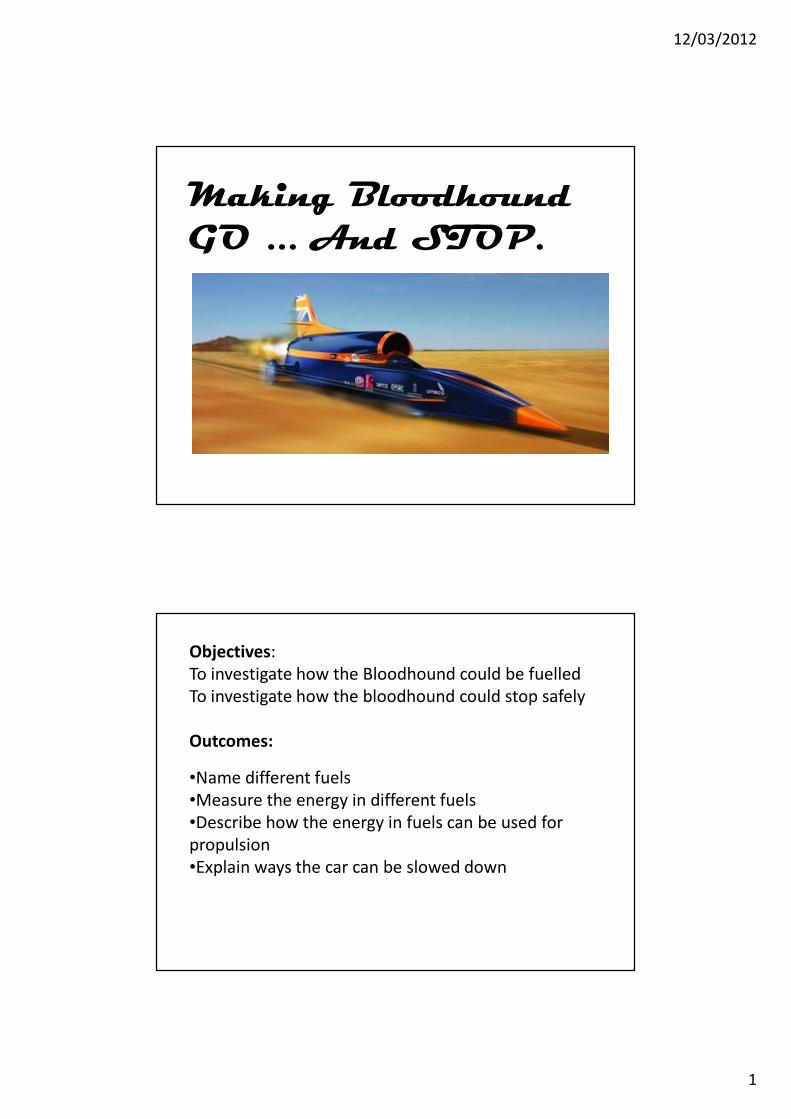
Making Bloodhound GO ... And STOP.
Objectives:
To investigate how the Bloodhound could be fuelled
To investigate how the bloodhound could stop safely
Outcomes:
•Name different fuels
•Measure the energy in different fuels
•Describe how the energy in fuels can be used for
propulsion
•Explain ways the car can be slowed down
12/03/2012
2
http://www.youtube.com/watch?v=fmbH1ApU
G8M
What makes it go?
12/03/2012
3
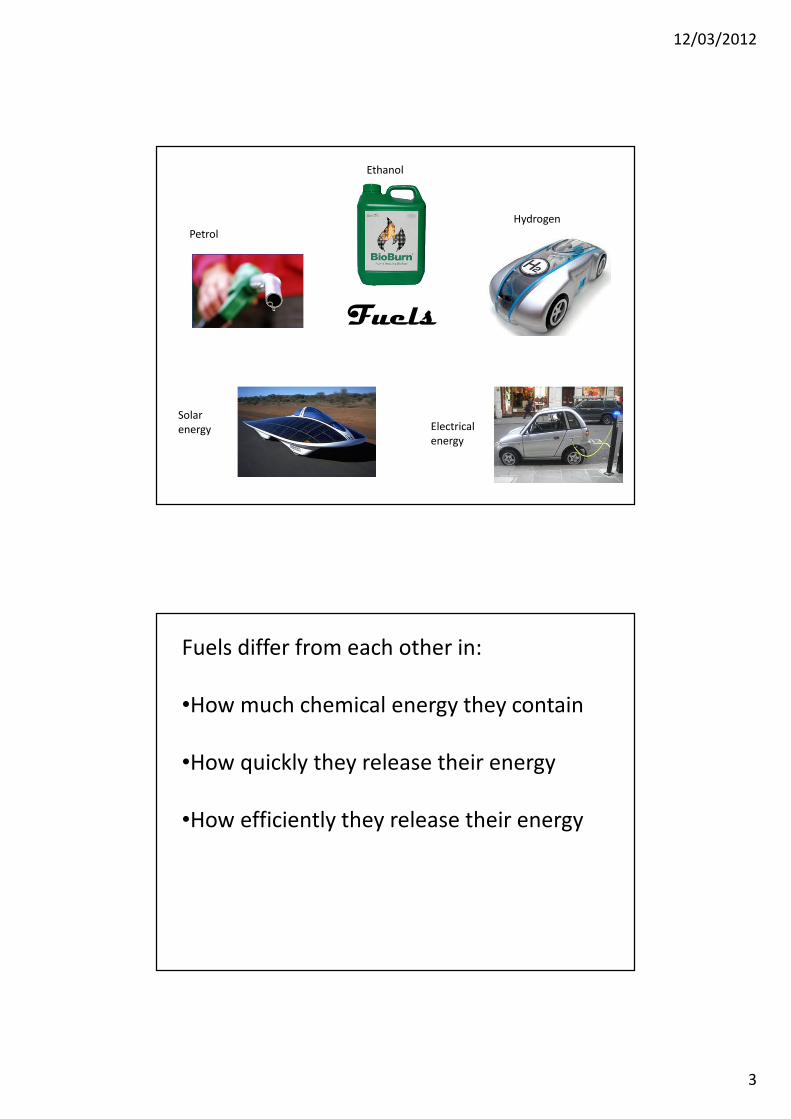
Fuels
Hydrogen
Petrol
Electrical
energy
Solar
energy
Ethanol
Fuels differ from each other in:
•How much chemical energy they contain
•How quickly they release their energy
•How efficiently they release their energy
12/03/2012
4
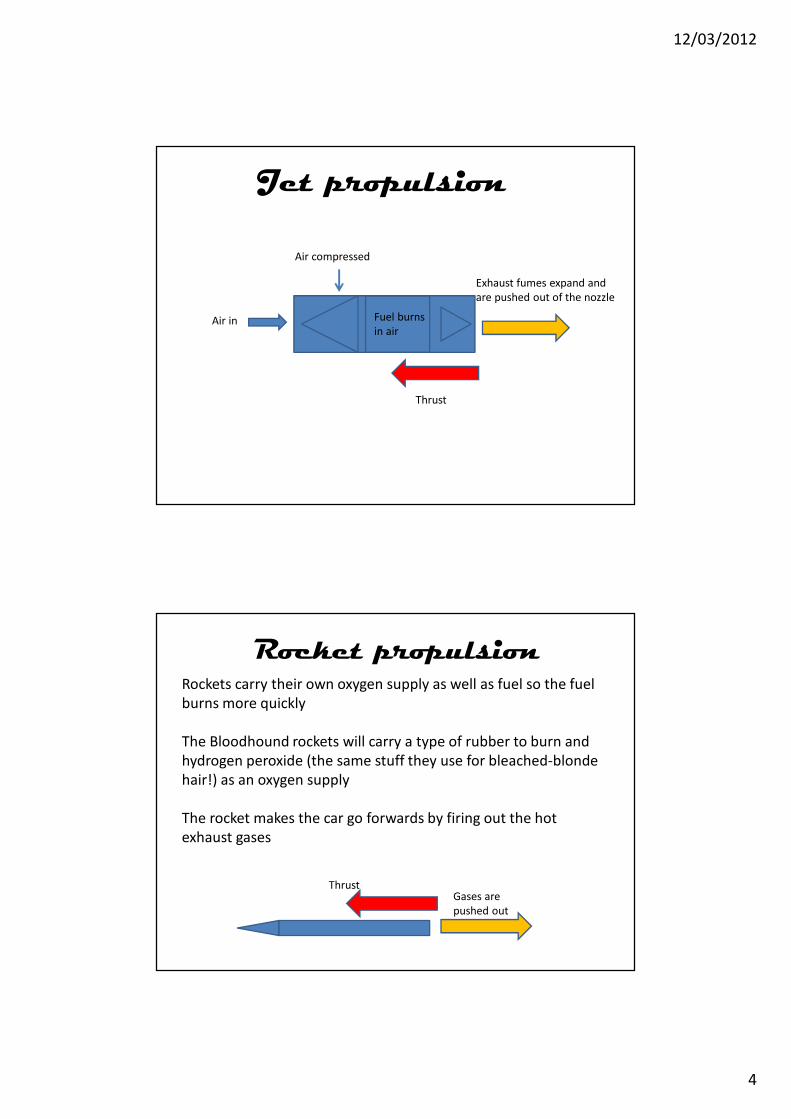
Jet propulsion
Air in
Air compressed
Fuel burns
in air
Exhaust fumes expand and
are pushed out of the nozzle
Thrust
Rocket propulsionRockets carry their own oxygen supply as well as fuel so the fuel
burns more quickly
The Bloodhound rockets will carry a type of rubber to burn and
hydrogen peroxide (the same stuff they use for bleached-blonde
hair!) as an oxygen supply
The rocket makes the car go forwards by firing out the hot
exhaust gases
Gases are
pushed out
Thrust
12/03/2012
5
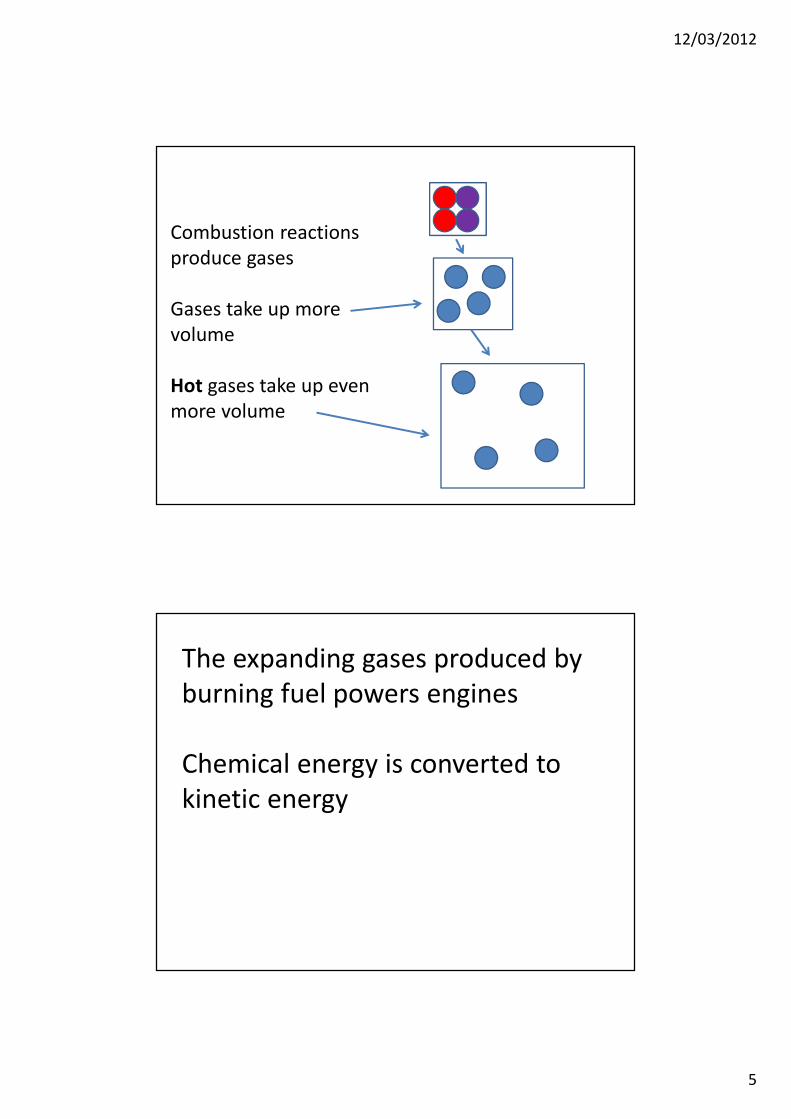
Combustion reactions
produce gases
Gases take up more
volume
Hot gases take up even
more volume
The expanding gases produced by
burning fuel powers engines
Chemical energy is converted to
kinetic energy
12/03/2012
6
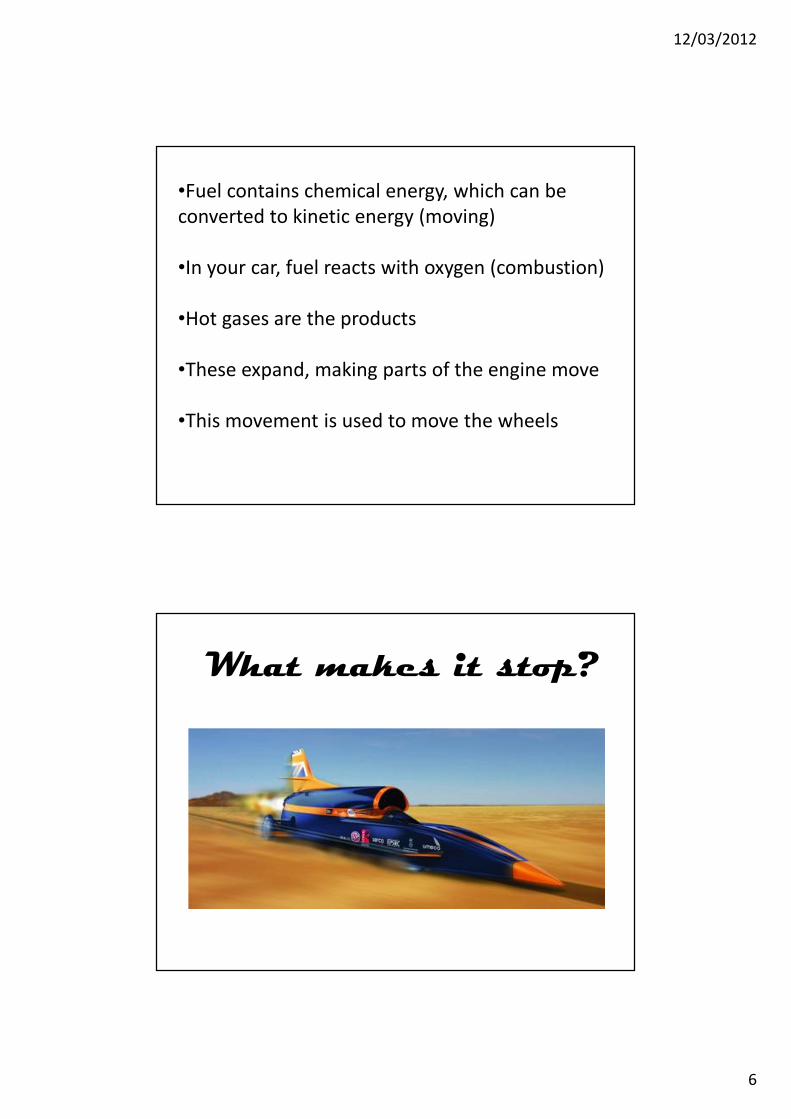
•Fuel contains chemical energy, which can be
converted to kinetic energy (moving)
•In your car, fuel reacts with oxygen (combustion)
•Hot gases are the products
•These expand, making parts of the engine move
•This movement is used to move the wheels
What makes it stop?
12/03/2012
7
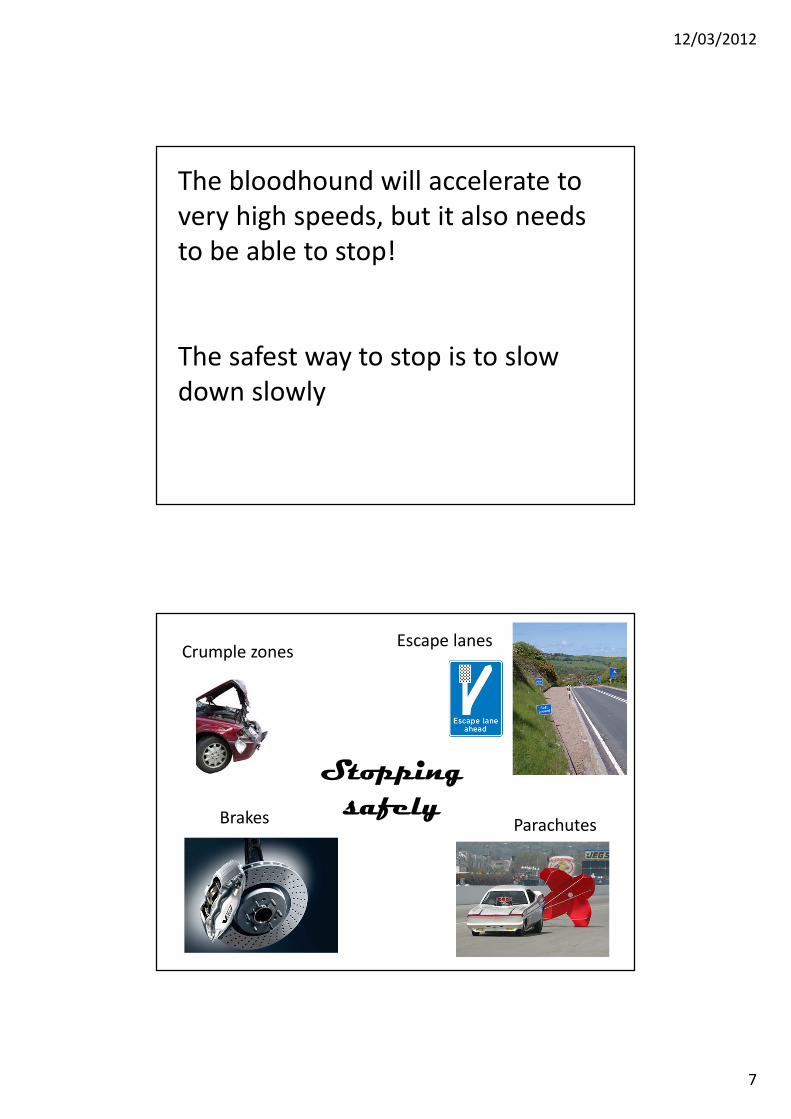
The bloodhound will accelerate to
very high speeds, but it also needs
to be able to stop!
The safest way to stop is to slow
down slowly
Stopping safely
Crumple zonesEscape lanes
ParachutesBrakes

12/03/2012
8
Safety challengeIn your teams, design and build a safety device for your car that slows it down
slowly
Use the ideas from crumple zones, escape lanes, brakes and parachutes to
inspire you design
You may use any of the materials you like, but must share them fairly with other
teams
At the end of the session, your design will be tested using the ‘trolley’ cars.
The winning design will be judged on these criteria:
Does the car stop?
Did it ‘slow down slowly’? – the car should come to a gentle stop, and not
bounce / fall over/ bang into things!
Objectives:
To investigate how the Bloodhound could be fuelled
To investigate how the bloodhound could stop safely
Outcomes:
•Name different fuels
•Measure the energy in different fuels
•Describe how the energy in fuels can be used for
propulsion
•Explain ways the car can be slowed down

Linton Village College STEM Deep Learning Day
8
Desert Selection Programme - Geography
Problem:
The Black Rock Desert in Nevada, site of the previous world land speed record, has
deteriorated in recent years. BLOODHOUND requires a flat, smooth surface long and wide
enough to safely reach, and slow down from, its target speed of 1000 mph.
Activity
Use Google Maps (click on satellite view) and identify the dry desert area at Black Rock City, Nevada. How big is the area? Is there a 12 mile straight for testing BLOODHOUND? There is a scale in the bottom left corner of the screen.
Finding a new test site:
The Desert Search program, led by Andy Green, defined a list of priorities:
1. Flat ground (insignificant surface slopes)
2. Smooth surface (at the level of centimetres)
3. Large area (12 miles by 3 miles minimum)
4. Reliable surface dry-out period (may be different time of year for different climate regimes)
5. Access from road network (heavy loads)
6. Security (political and non-political)
7. Potential for publicity and constructive competition
Linton Village College STEM Deep Learning Day
9
Question 1
Question 2
Why is the width of the test area important?
Use Google Maps and identify the road network to Black Rock Nevada.
Where is the nearest Motorway (I roads in USA)? Where does it lead?
Where is the nearest major airport? Seaport? Where is the nearest town
where the Bloodhound crew could stay?

Linton Village College STEM Deep Learning Day
10
A semi-automated search for candidate test sites was devised:
1. Split the globe into 7
map regions
2. In each region seek
flat areas of a
minimum size in a
digital elevation
model of spatial
resolution 100 m
acquired by the Space
Shuttle in 2000
3. Reject areas known to be vegetated from a
satellite image classification of land cover
4. Create maps of suitability from the
combination of flatness and lack of vegetation
5. Use further high spatial resolution satellite
data and Google Earth to refine the search to
desert lake beds which potentially have the
required smoothness
6. Make further refinements based on access, meteorology, political sensitivity and site
visits
Thirty-six potential sites were identified in this way, nine of which are already known as land
speed trial sites, and thirteen of which need further investigation:
Linton Village College STEM Deep Learning Day
11
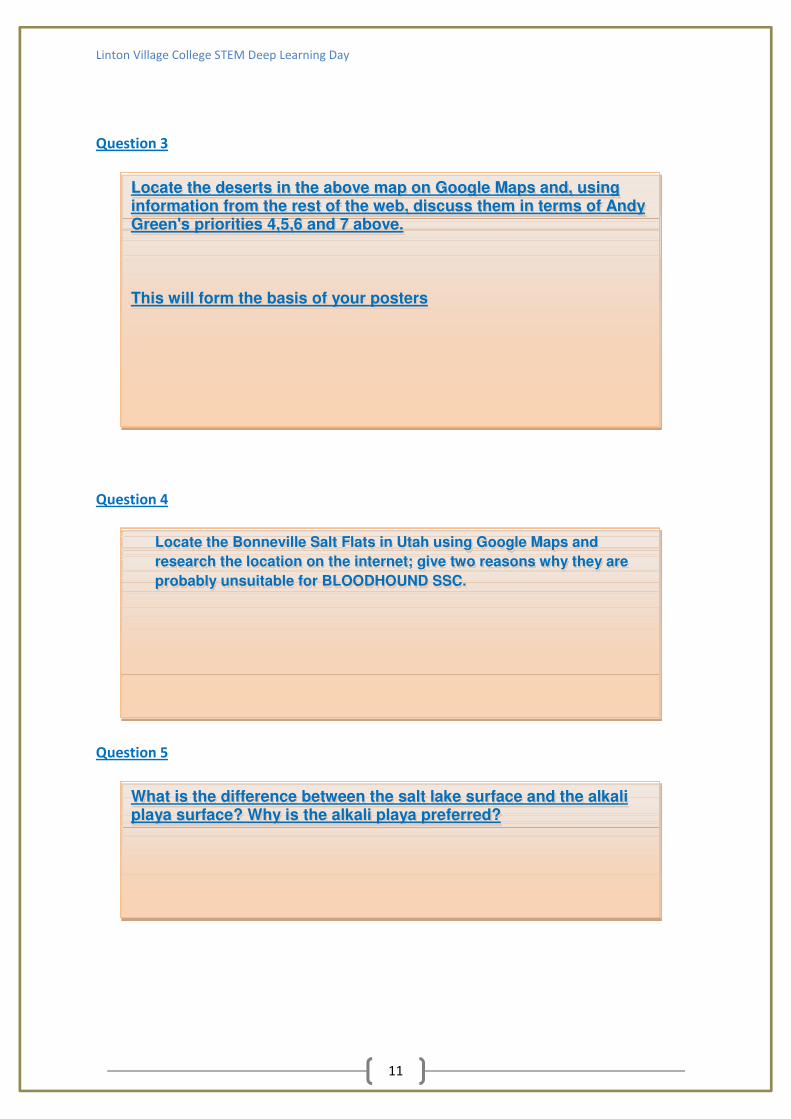
Question 3
Question 4
Question 5
Locate the deserts in the above map on Google Maps and, using information from the rest of the web, discuss them in terms of Andy Green's priorities 4,5,6 and 7 above.
This will form the basis of your posters
Locate the Bonneville Salt Flats in Utah using Google Maps and
research the location on the internet; give two reasons why they are
probably unsuitable for BLOODHOUND SSC.
What is the difference between the salt lake surface and the alkali playa surface? Why is the alkali playa preferred?
Linton Village College STEM Deep Learning Day
12
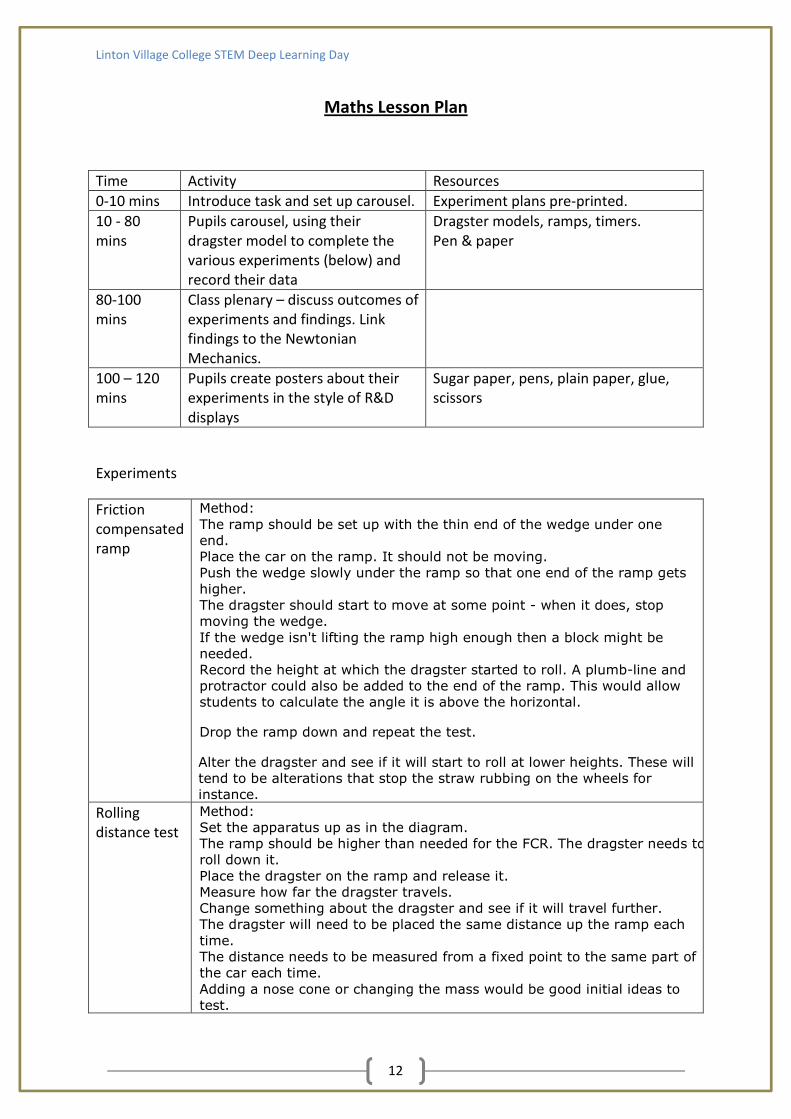
Maths Lesson Plan
Time Activity Resources
0-10 mins Introduce task and set up carousel. Experiment plans pre-printed.
10 - 80
mins
Pupils carousel, using their
dragster model to complete the
various experiments (below) and
record their data
Dragster models, ramps, timers.
Pen & paper
80-100
mins
Class plenary – discuss outcomes of
experiments and findings. Link
findings to the Newtonian
Mechanics.
100 – 120
mins
Pupils create posters about their
experiments in the style of R&D
displays
Sugar paper, pens, plain paper, glue,
scissors
Experiments
Friction
compensated
ramp
Method:
The ramp should be set up with the thin end of the wedge under one
end.
Place the car on the ramp. It should not be moving.
Push the wedge slowly under the ramp so that one end of the ramp gets
higher.
The dragster should start to move at some point - when it does, stop
moving the wedge.
If the wedge isn't lifting the ramp high enough then a block might be
needed.
Record the height at which the dragster started to roll. A plumb-line and
protractor could also be added to the end of the ramp. This would allow
students to calculate the angle it is above the horizontal.
Drop the ramp down and repeat the test.
Alter the dragster and see if it will start to roll at lower heights. These will
tend to be alterations that stop the straw rubbing on the wheels for
instance.
Rolling
distance test
Method:
Set the apparatus up as in the diagram.
The ramp should be higher than needed for the FCR. The dragster needs to
roll down it.
Place the dragster on the ramp and release it.
Measure how far the dragster travels.
Change something about the dragster and see if it will travel further.
The dragster will need to be placed the same distance up the ramp each
time.
The distance needs to be measured from a fixed point to the same part of
the car each time.
Adding a nose cone or changing the mass would be good initial ideas to
test.
Linton Village College STEM Deep Learning Day
13
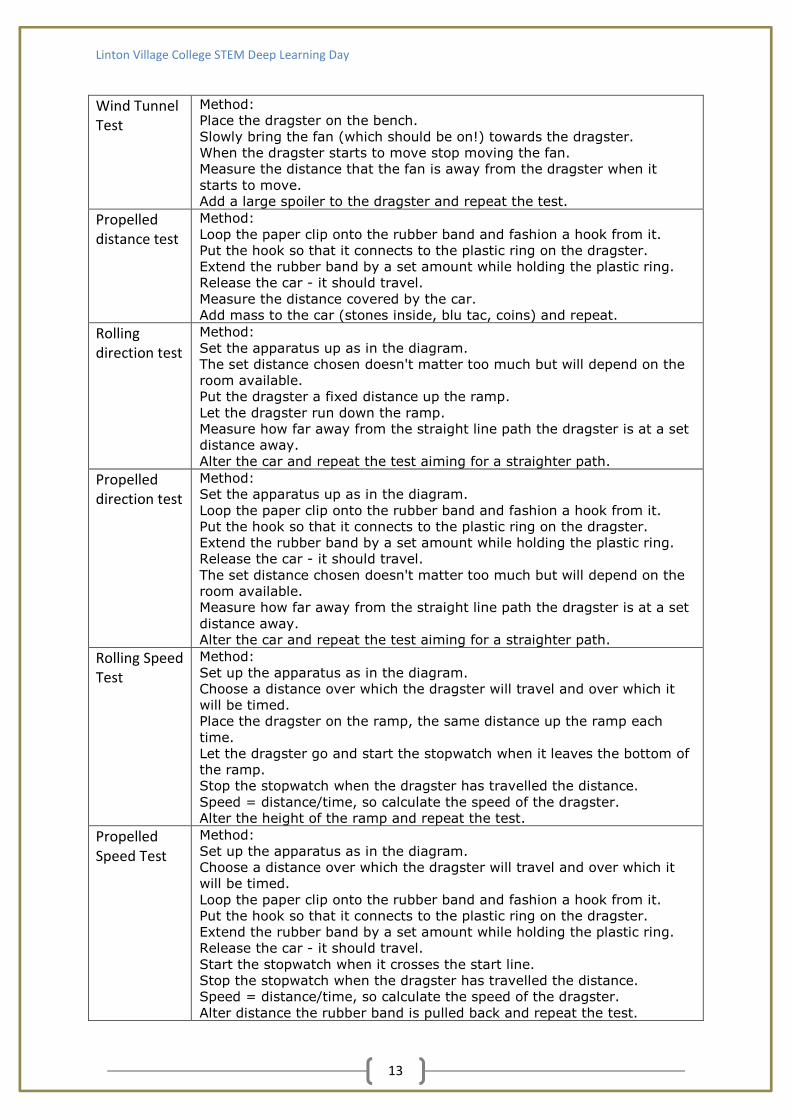
Wind Tunnel
Test
Method:
Place the dragster on the bench.
Slowly bring the fan (which should be on!) towards the dragster.
When the dragster starts to move stop moving the fan.
Measure the distance that the fan is away from the dragster when it
starts to move.
Add a large spoiler to the dragster and repeat the test.
Propelled
distance test
Method:
Loop the paper clip onto the rubber band and fashion a hook from it.
Put the hook so that it connects to the plastic ring on the dragster.
Extend the rubber band by a set amount while holding the plastic ring.
Release the car - it should travel.
Measure the distance covered by the car.
Add mass to the car (stones inside, blu tac, coins) and repeat.
Rolling
direction test
Method:
Set the apparatus up as in the diagram.
The set distance chosen doesn't matter too much but will depend on the
room available.
Put the dragster a fixed distance up the ramp.
Let the dragster run down the ramp.
Measure how far away from the straight line path the dragster is at a set
distance away.
Alter the car and repeat the test aiming for a straighter path.
Propelled
direction test
Method:
Set the apparatus up as in the diagram.
Loop the paper clip onto the rubber band and fashion a hook from it.
Put the hook so that it connects to the plastic ring on the dragster.
Extend the rubber band by a set amount while holding the plastic ring.
Release the car - it should travel.
The set distance chosen doesn't matter too much but will depend on the
room available.
Measure how far away from the straight line path the dragster is at a set
distance away.
Alter the car and repeat the test aiming for a straighter path.
Rolling Speed
Test
Method:
Set up the apparatus as in the diagram.
Choose a distance over which the dragster will travel and over which it
will be timed.
Place the dragster on the ramp, the same distance up the ramp each
time.
Let the dragster go and start the stopwatch when it leaves the bottom of
the ramp.
Stop the stopwatch when the dragster has travelled the distance.
Speed = distance/time, so calculate the speed of the dragster.
Alter the height of the ramp and repeat the test.
Propelled
Speed Test
Method:
Set up the apparatus as in the diagram.
Choose a distance over which the dragster will travel and over which it
will be timed.
Loop the paper clip onto the rubber band and fashion a hook from it.
Put the hook so that it connects to the plastic ring on the dragster.
Extend the rubber band by a set amount while holding the plastic ring.
Release the car - it should travel.
Start the stopwatch when it crosses the start line.
Stop the stopwatch when the dragster has travelled the distance.
Speed = distance/time, so calculate the speed of the dragster.
Alter distance the rubber band is pulled back and repeat the test.

Linton Village College STEM Deep Learning Day
14
Diet and Ready Meal for a racing driver – Food technology
Aim: The class will develop marketing skills and recognise what the main ingredients are to form the
basis of a healthy ready meal for a Racing Driver.
Starter Activity: Students must know that food choices affect how they feel (mood) and how their
bodies develop. Read out several menus from local restaurants in Cambridge. Begin asking the
students whether the meals sound healthy or not. Show the power point. Teacher will INTRODUCE
with the class the food pyramid and healthy eating concept. Teacher will discuss with the class some
ideas of food they think would be suitable for a racing driver.
Main body of the session: Teacher will divide the class into pairs. Students will design a ready meal
for a racing car driver that contains good food choices from each of the areas of the Food Pyramid.
You must present your ideas in the form of a poster. This will be presented to the rest of the class.
Success Criteria
• 1. Have a main heading
• 2. Use pictures and colour to ensure your poster is attractive
• 3. Make sure your ready meal is for a Racing Car driver
• 4. Think about how your meal will attract customers.
They will need to include a cover and prices for the food items. Pairs will present their ready meal
plan to the class. They will exchange plans with other pairs and use peer assessment against the
success criteria.
Students will then form small groups and select a popular ready meal to market via a dramatized TV
advert. What makes an effective TV advert?
• Persuasive language
• Offer
• Jingle
• Humour
• Any more???
Extensions: 1.) Students could create their own restaurant menus for athletes. 2.) They could
suggest ideas for their own school lunch. 3.) They could keep a food journal for a week.
Plenary: Evaluate the reasons for the increase in ready meals consumption in the UK.
Resources:
Pencils, coloured pens, A5 paper, restaurant menus (online).

12/03/2012
1
DIET
FOOD A proper diet is vitally important to all competitive athletes. Racers have to be even more disciplined with their diets in order to achieve peak performance inside the race car. Driving a race car requires a tremendous amount of energy, and a driver must be properly nourished and hydrated beforehand.
DRINK Hydration is even more important to racers because they often lose several pounds of body weight through perspiration during any given race. Becoming dehydrated during a race leads to many problems such as fatigue, diminished mental alertness, slower reactions, and driving errors. Normally though, most
racers make sure to drink lots of water or sports beverages before, during, and after a race.
STEM DLD DAYSTEM DLD DAYSTEM DLD DAYSTEM DLD DAY
What does a racing driver eat?
Fuel for a race event
Water
Pasta (stored ENERGY)
Energy bars
Banana
French fries
Scrambled eggs
Chicken (high in
carbohydrates and protein).

12/03/2012
2
DESIGN BRIEF
There has been a large increase in sales
for ready meals. A Racing car company
wish to expand their range of ready meals
for their drivers. You have been asked to
produce a ready meal for their new range.

12/03/2012
3
POSTER DESIGNDesign a ready meal for a racing car driver. You must present your ideas in the form of a poster. This will be presented to the rest of the class.
Success Criteria
• 1. Have a main heading
• 2. Use pictures and colour to ensure your poster is attractive
• 3. Make sure your ready meal is for a Racing Car driver
• 4. Think about how your meal will attract customers.
Good Luck!
TV ADVERT
Market your plans via the creation of a TV advert
What makes an effective TV advert?
• Persuasive language
• Offer
• Jingle
• Humour
• Any more???
Linton Village College STEM Deep Learning Day
15
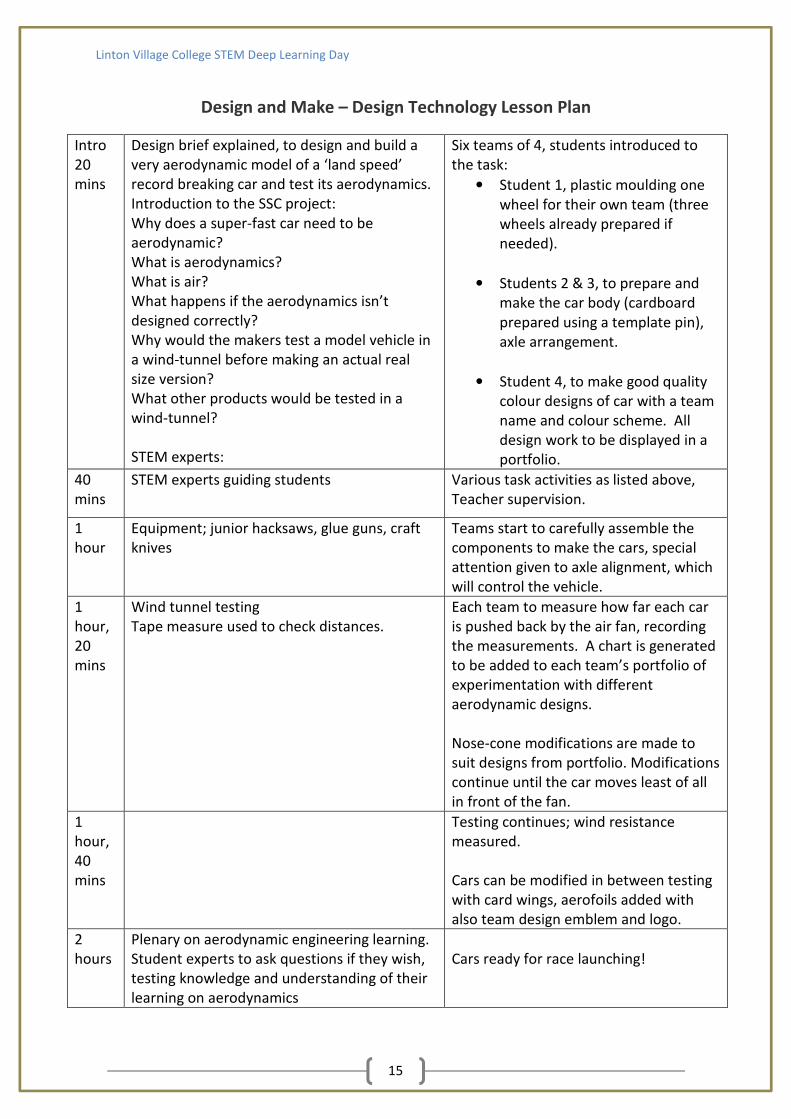
Design and Make – Design Technology Lesson Plan
Intro
20
mins
Design brief explained, to design and build a
very aerodynamic model of a ‘land speed’
record breaking car and test its aerodynamics.
Introduction to the SSC project:
Why does a super-fast car need to be
aerodynamic?
What is aerodynamics?
What is air?
What happens if the aerodynamics isn’t
designed correctly?
Why would the makers test a model vehicle in
a wind-tunnel before making an actual real
size version?
What other products would be tested in a
wind-tunnel?
STEM experts:
Six teams of 4, students introduced to
the task:
• Student 1, plastic moulding one
wheel for their own team (three
wheels already prepared if
needed).
• Students 2 & 3, to prepare and
make the car body (cardboard
prepared using a template pin),
axle arrangement.
• Student 4, to make good quality
colour designs of car with a team
name and colour scheme. All
design work to be displayed in a
portfolio.
40
mins
STEM experts guiding students Various task activities as listed above,
Teacher supervision.
1
hour
Equipment; junior hacksaws, glue guns, craft
knives
Teams start to carefully assemble the
components to make the cars, special
attention given to axle alignment, which
will control the vehicle.
1
hour,
20
mins
Wind tunnel testing
Tape measure used to check distances.
Each team to measure how far each car
is pushed back by the air fan, recording
the measurements. A chart is generated
to be added to each team’s portfolio of
experimentation with different
aerodynamic designs.
Nose-cone modifications are made to
suit designs from portfolio. Modifications
continue until the car moves least of all
in front of the fan.
1
hour,
40
mins
Testing continues; wind resistance
measured.
Cars can be modified in between testing
with card wings, aerofoils added with
also team design emblem and logo.
2
hours
Plenary on aerodynamic engineering learning.
Student experts to ask questions if they wish,
testing knowledge and understanding of their
learning on aerodynamics
Cars ready for race launching!
12/03/2012
1
ENGINEERING ADVENTURE www.BLOODHOUNDSSC.com
Dragsters
How to make the basic car
ENGINEERING ADVENTURE www.BLOODHOUNDSSC.com
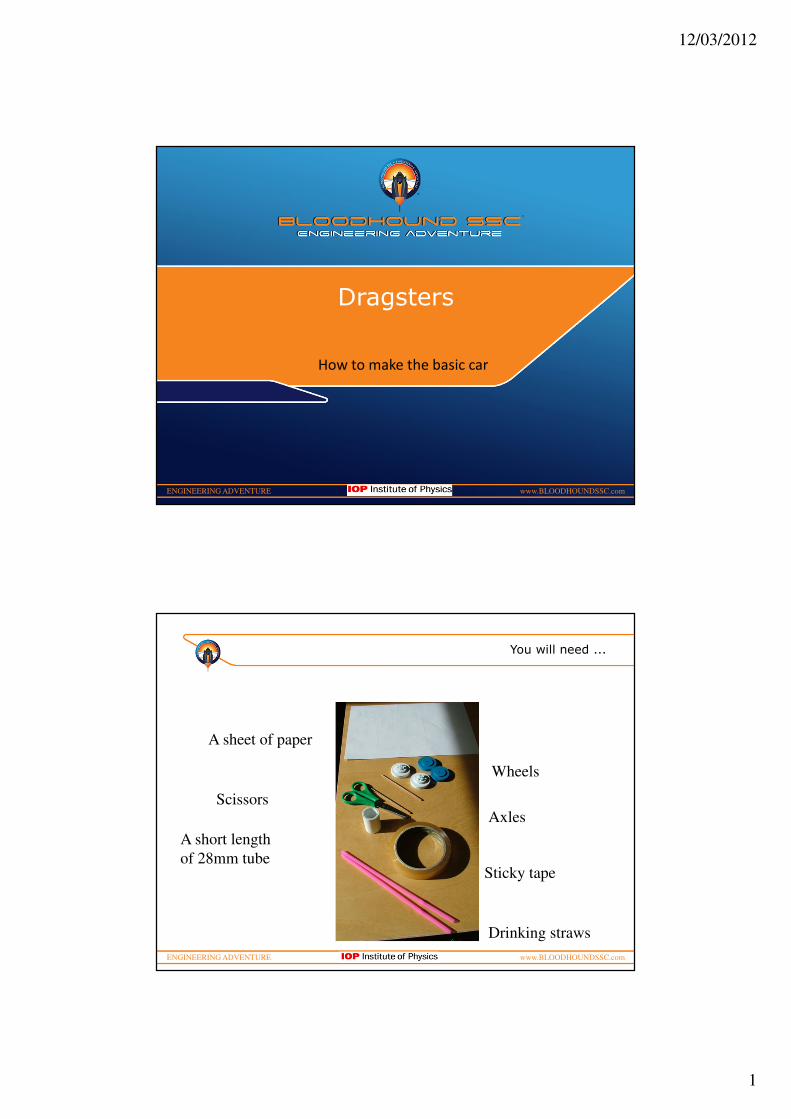
You will need ...
A sheet of paper
Wheels
Scissors
Sticky tape
A short length
of 28mm tube
Drinking straws
Axles

12/03/2012
2
ENGINEERING ADVENTURE www.BLOODHOUNDSSC.com
Roll the paper into a cylinder around the short length of tube
ENGINEERING ADVENTURE www.BLOODHOUNDSSC.com
Tape the end firmly to the tube

12/03/2012
3
ENGINEERING ADVENTURE www.BLOODHOUNDSSC.com
Put tape along the edge of the paper
ENGINEERING ADVENTURE www.BLOODHOUNDSSC.com
Put tape over the top to make the one end of the cylinder air tight

12/03/2012
4
ENGINEERING ADVENTURE www.BLOODHOUNDSSC.com
Next cut the drinking straws so they are slightly shorter than the axles
ENGINEERING ADVENTURE www.BLOODHOUNDSSC.com
Put the axles inside the straws
12/03/2012
5
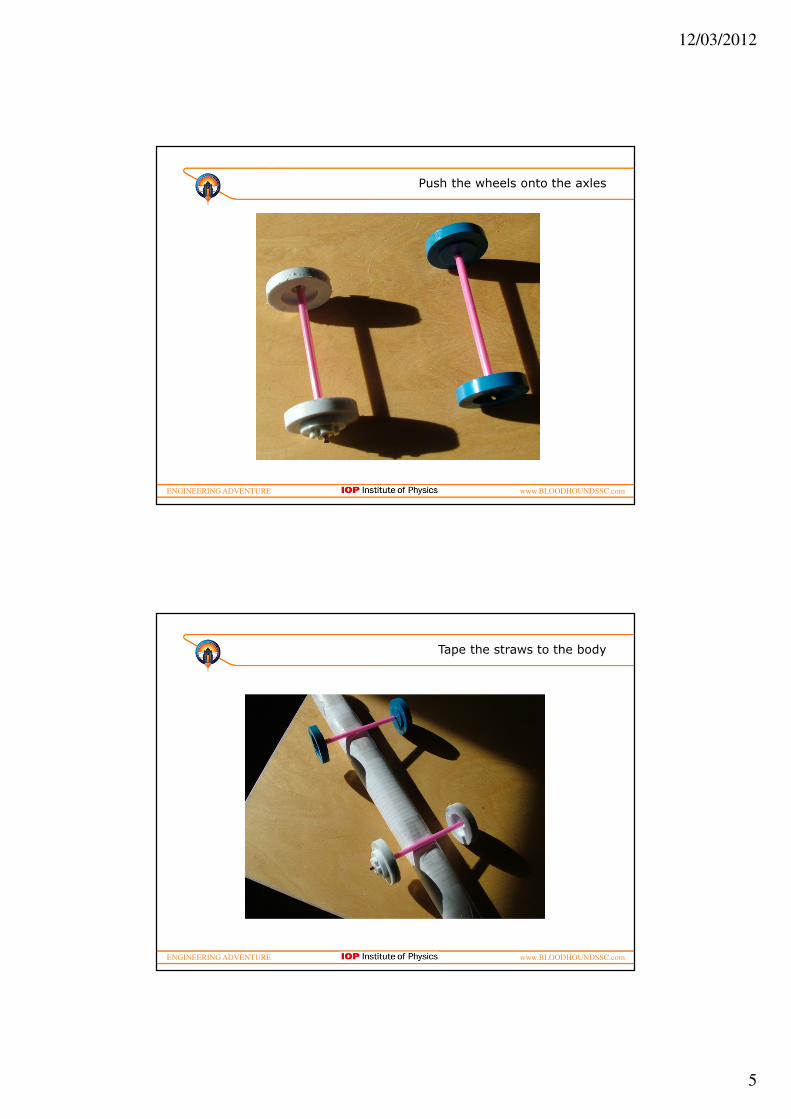
ENGINEERING ADVENTURE www.BLOODHOUNDSSC.com
Push the wheels onto the axles
ENGINEERING ADVENTURE www.BLOODHOUNDSSC.com
Tape the straws to the body
12/03/2012
6
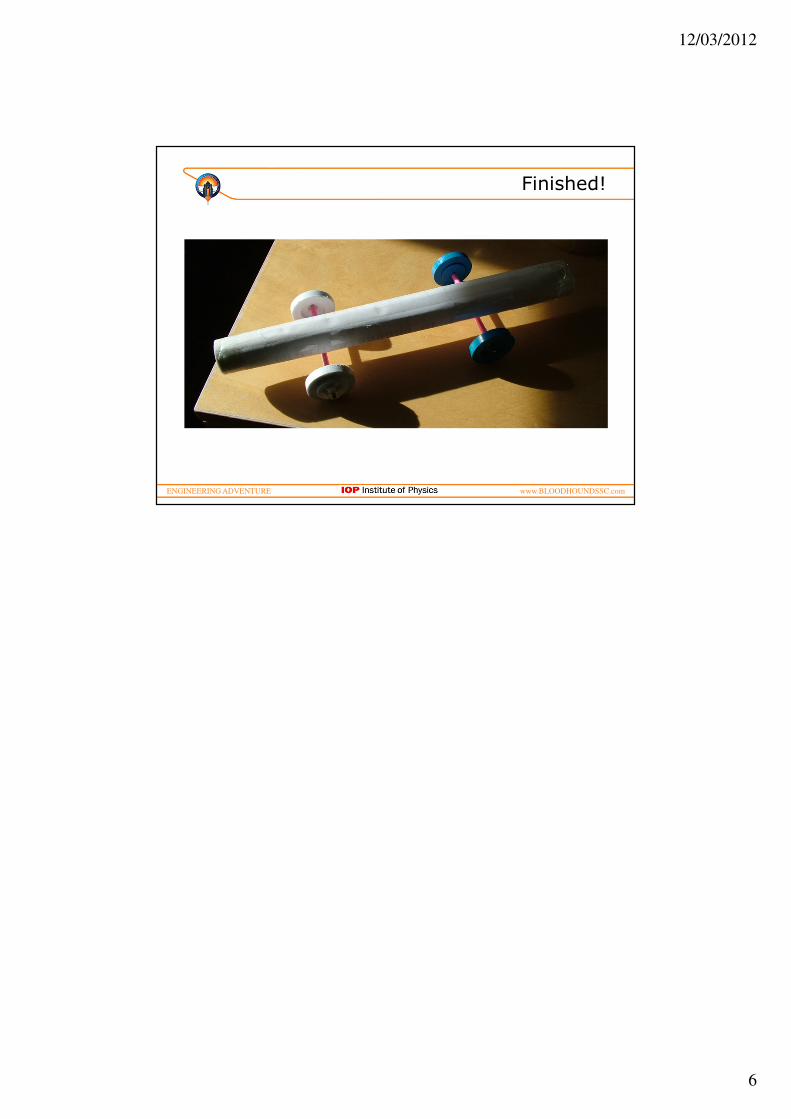
ENGINEERING ADVENTURE www.BLOODHOUNDSSC.com
Finished!

Linton Village College STEM Deep Learning Day
16
Point of Sale Lesson Plan – Design Technology - Graphics
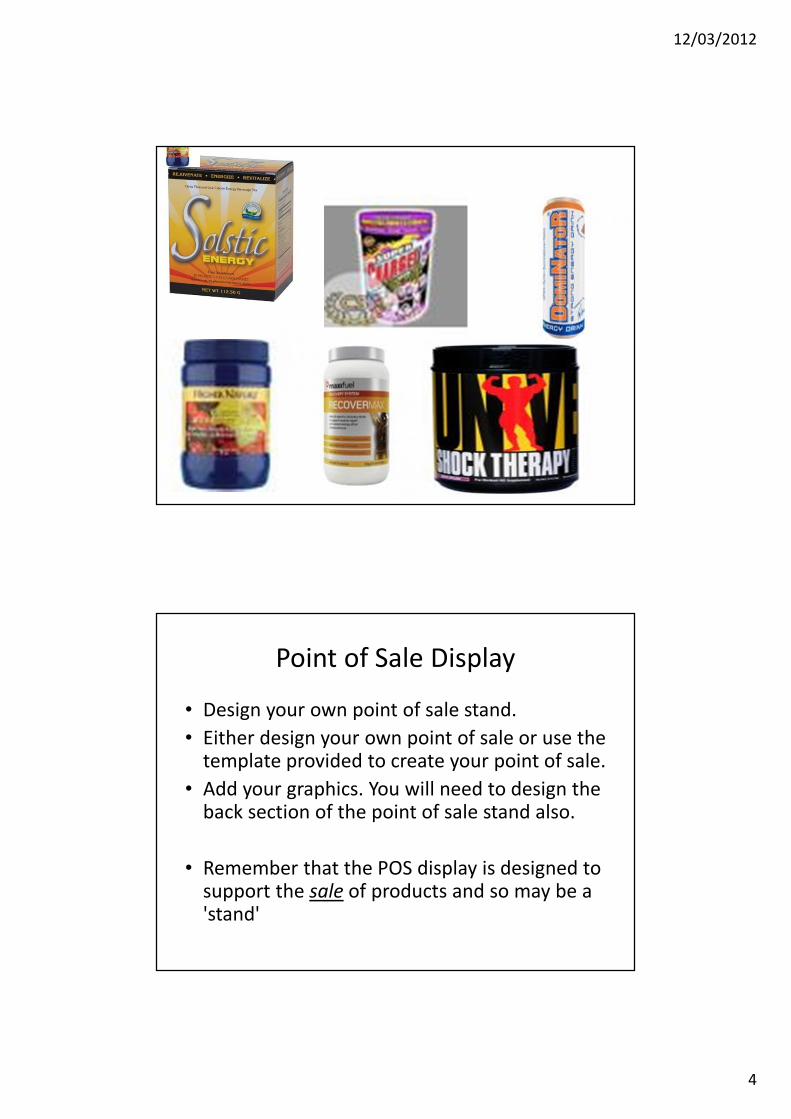
Starter:
Introduce task. Show images of point of sale stands to familiarise pupils. Discuss audience
and use of colour, language, font, etc.
Main:
Pupils complete the task below:
• Design your own point of sale stand.
• Either design your own point of sale or use the template provided to create your
point of sale.
• Add your graphics. You will need to design the back section of the point of sale stand
also.
• Remember that the POS display is designed to support the sale of products and so
may be a 'stand'
Pupils are provided with modelling card to physically construct their point of sale boards
Plenary:
Pupils compare their point of sale displays and make a short presentation on why theirs will
appeal to customers

12/03/2012
1
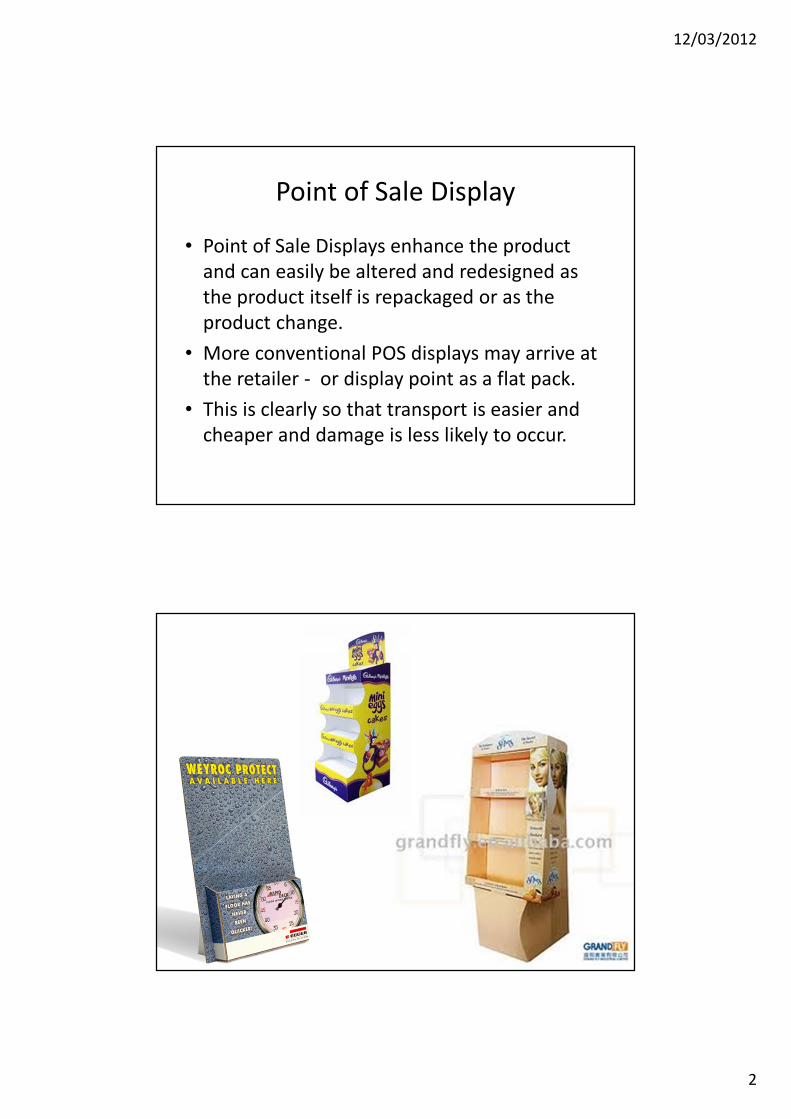
Point of Sale Display
Point of Sale Display
• Point of Sale Displays are usually made from
card (generally cheaper) or from moulded
plastic.
• The main principle being that they are
disposable, have a deliberately limited life and
are easy to manufacture and assemble.
• They may also be used as cheap display
shelving for fairly light (weight) products.
12/03/2012
2
Point of Sale Display
• Point of Sale Displays enhance the product
and can easily be altered and redesigned as
the product itself is repackaged or as the
product change.
• More conventional POS displays may arrive at
the retailer - or display point as a flat pack.
• This is clearly so that transport is easier and
cheaper and damage is less likely to occur.

12/03/2012
3
12/03/2012
4
Point of Sale Display
• Design your own point of sale stand.
• Either design your own point of sale or use the template provided to create your point of sale.
• Add your graphics. You will need to design the back section of the point of sale stand also.
• Remember that the POS display is designed to support the sale of products and so may be a 'stand'
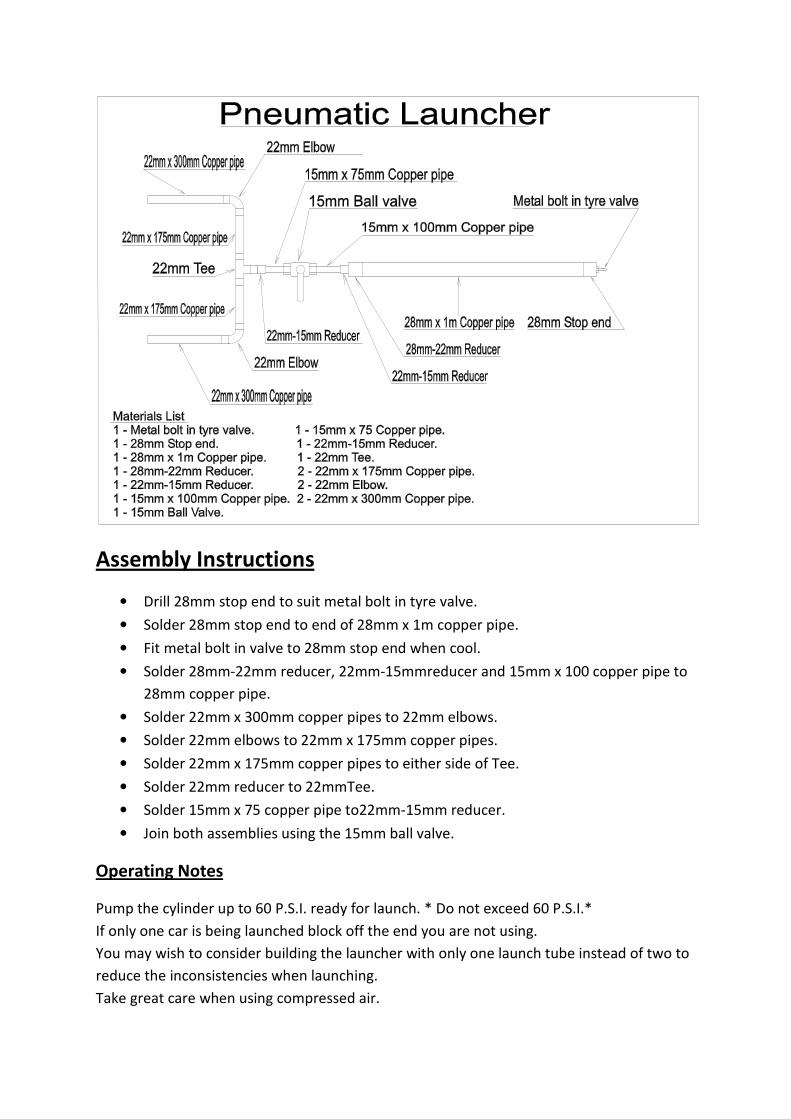
Assembly Instructions
• Drill 28mm stop end to suit metal bolt in tyre valve.
• Solder 28mm stop end to end of 28mm x 1m copper pipe.
• Fit metal bolt in valve to 28mm stop end when cool.
• Solder 28mm-22mm reducer, 22mm-15mmreducer and 15mm x 100 copper pipe to
28mm copper pipe.
• Solder 22mm x 300mm copper pipes to 22mm elbows.
• Solder 22mm elbows to 22mm x 175mm copper pipes.
• Solder 22mm x 175mm copper pipes to either side of Tee.
• Solder 22mm reducer to 22mmTee.
• Solder 15mm x 75 copper pipe to22mm-15mm reducer.
• Join both assemblies using the 15mm ball valve.
Operating Notes
Pump the cylinder up to 60 P.S.I. ready for launch. * Do not exceed 60 P.S.I.*
If only one car is being launched block off the end you are not using.
You may wish to consider building the launcher with only one launch tube instead of two to
reduce the inconsistencies when launching.
Take great care when using compressed air.
Recommended