Saskatchewan
Learning
Machining 10, 20, 30
Curriculum Guide
A Practical and Applied Art
Saskatchewan Learning
2003
ISBN: 1-894116-88-7
ii
Acknowledgements
Saskatchewan Learning acknowledges the contributions of the Practical and Applied Arts (PAA) Reference
Committee formed in 1996. Current members are:
Jerry Cherneski, Instructor
SIAST Palliser Campus
Hazel Lorenz, Consultant
Landswest S.D. #123
Saskatchewan Teachers’ Federation (STF)
Saskatchewan Career/Work Education Association
(SCWEA)
Dean Lucyk, Teacher
Regina RCSSD #81
Saskatchewan Teachers’ Federation
Saskatchewan Industrial Education Association
(SIEA)
Barbara McKinnon, Teacher
Moose Jaw S.D. #1
Saskatchewan Teachers’ Federation
Saskatchewan Business Teachers’ Association (SBTA)
Lance Moen, Dean
Associated Studies
SIAST Kelsey Campus
Rose Olson
Saskatchewan School Trustees Association (SSTA)
Dr. Len Proctor
Professor, College of Education
University of Saskatchewan
Ron Provali, Teacher
Potashville S.D. #80
Saskatchewan Teachers’ Federation
Saskatchewan Association for Computers in Education
(SACE)
Dr. Kevin Quinlan
Professor, Faculty of Education
University of Regina
Doug Robertson
Lloydminster RCSSD #89
League of Educational Administrators, Directors and
Superintendents (LEADS)
Gayleen Turner, Teacher
Swift Current Comprehensive High School Board
Saskatchewan Teachers’ Federation
Saskatchewan Home Economics Teachers’ Association
(SHETA)
Previous Members:
Susan Buck, SIAST
Laurent Fournier, SSTA
Morris Smith, LEADS
Dave Spencer, LEADS
Ron Wallace, SCWEA
Debbie Ward, SSTA
Saskatchewan Learning wishes to thank many others who contributed to the development of these guidelines:
Kevin Reiter, contracted developer/writer, Estevan S.D.
Bill Wright, contracted developer/writer, Moosomin S.D.
the PAA Program Team
field test/pilot teachers
other field personnel and consultants.
This document was completed under the direction of the Science and Technology Unit, Curriculum and
Instruction Branch, Saskatchewan Learning.
iii
Table of Contents
Introduction ........................................................................................................................................................... 1
Philosophy and Rationale .................................................................................................................................. 1
Aim, Goals and Foundational Objectives ....................................................................................................... 1
Course Components and Considerations ....................................................................................................... 3
Work Study Components .................................................................................................................................... 3
Creating Partnerships for Work Study ....................................................................................................................3
Portfolios ................................................................................................................................................................ 4
Extended Study Modules ..........................................................................................................................................5
Career Development .................................................................................................................................................5
Resources ...................................................................................................................................................................6
Assessment and Evaluation .....................................................................................................................................6
Module Overview .................................................................................................................................................. 8
Suggested Course Configurations .................................................................................................................. 10
Core and Optional Modules ............................................................................................................................. 12
Module 1: Introduction to Machining (Core) ....................................................................................................... 12
Module 2A, B, C: Safety (Core) ............................................................................................................................. 14
Module 3: Using Technical Drawings (Core) ....................................................................................................... 16
Module 4A: Simple Measurement (Core) ............................................................................................................. 18
Module 4B: Adjustable Measurement Tools (Core) ............................................................................................ 19
Module 4C: Measuring with Gauges (Core) ........................................................................................................ 20
Module 5: Layout Work (Core) ............................................................................................................................. 21
Module 6: Hand Tools (Core) ................................................................................................................................ 22
Module 7: Fasteners (Core) ................................................................................................................................... 23
Module 8: Jigs and Fixtures (Optional) ............................................................................................................... 24
Module 9: Cutting Fluids (Optional) .................................................................................................................... 25
Module 10: Drills and Drilling Machines (Core) ................................................................................................. 26
Module 11: Offhand Grinding (Core) ................................................................................................................... 29
Module 12: Saws and Cutoff Machines (Core) .................................................................................................... 31
Module 13: Metal Characteristics (Optional) ...................................................................................................... 32
Module 14: Heat Treatment of Metals (Core) ..................................................................................................... 34
Module 15: Metal Finishing (Optional) ............................................................................................................... 36
Module 16: Career Opportunities (Core) ............................................................................................................. 37
Module 17A: The Lathe, Introduction (Core) ..................................................................................................... 39
Module 17B: Lathe Cutting Tools (Core) ............................................................................................................. 40
Module 17C: Cutting Speeds and Feeds on the Lathe (Core) ............................................................................ 42
Module 17D: Mounting Work Between Centres on the Lathe (Optional) ......................................................... 43
Module 17E: Turning Between Centres on the Lathe (Core) ............................................................................. 44
Module 17F: Lathe Chucks (Optional) ................................................................................................................. 45
Module 18: Cutting Tapers on the Lathe (Optional) .......................................................................................... 46
Module 19: Cutting Screw Threads on the Lathe (Core) .................................................................................... 47
Module 20: Additional Lathe Operations (Optional) .......................................................................................... 49
Module 21: Band Machining (Core) ..................................................................................................................... 52
Module 22: Broaching Operations (Core) ............................................................................................................ 54
Module 23A: Introduction to the Milling Machine (Core) .................................................................................. 55
Module 23B: Milling Machine Cutters (Optional) .............................................................................................. 56
Module 23C: Setting a Milling Machine (Optional) ............................................................................................ 57
Module 24: Operating a Vertical Milling Machine (Core) .................................................................................. 59
Module 25: Operating a Horizontal Milling Machine (Optional) ....................................................................... 60
Module 26: Gear Cutting Operations (Optional) ................................................................................................. 62
Module 27: Precision Grinding (Core) .................................................................................................................. 64
iv
Module 28: Work Holding Devices and Surface Grinding (Optional) ................................................................ 66
Module 29: Additional Grinding Techniques (Optional) .................................................................................... 67
Module 30: Numerical Control (Optional) ........................................................................................................... 69
Module 31: Automated Multi-machine Manufacturing (Optional) .................................................................... 70
Module 32: Quality Control (Optional) ................................................................................................................ 71
Module 33: Electro-machining Processes (Optional) .......................................................................................... 72
Module 34: Non-traditional Machining Techniques (Optional) ......................................................................... 73
Module 35: Other Machining Processes (Optional) ............................................................................................ 75
Module 36A, B, C: Machining Project Options (Optional) .................................................................................. 77
Module 37A, B, C: Work Study Preparation and Follow-up Activities (Optional) ........................................... 79
Module 38A, B, C: Work Study (Optional) .......................................................................................................... 82
Module 88: Apprenticeship in Saskatchewan (Optional) ................................................................................... 83
Module 99A, B, C: Extended Study (Optional) .................................................................................................... 85
References ............................................................................................................................................................ 86
Appendix A: Determining a Trade Pathway for Students ...................................................................... 87
Appendix B: Recordkeeping Charts for Suggested Courses................................................................... 92
Machining 10 .......................................................................................................................................................... 92
Machining 20 .......................................................................................................................................................... 93
Machining 30 .......................................................................................................................................................... 94
Appendix C: Sample Training Plan Checklists .......................................................................................... 95
Machining 10 .......................................................................................................................................................... 95
Machining 20 .......................................................................................................................................................... 96
Machining 30 .......................................................................................................................................................... 98
Appendix D: Career Research Interview Questions ............................................................................... 100
Appendix E: Project Plans ............................................................................................................................. 101


1
Introduction
Within Core Curriculum, the Practical and Applied Arts (PAA) is a major area of study that incorporates five
traditional areas of Business Education, Work Experience Education/Career Education, Computer
Education, Home Economics Education and Industrial Arts Education. Saskatchewan Learning, its
educational partners, and other stakeholders have collaborated to complete the PAA curriculum renewal.
Some PAA curriculum guides have been updated by integrating, adapting, or deleting some components;
some Locally Developed Courses have been elevated to provincial status; and some new guides have been
developed. A companion document, Practical and Applied Arts Handbook, provides background on Core
Curriculum philosophy, perspectives, and initiatives. The Handbook provides a renewed set of goals for
PAA. It presents additional information about the PAA area of study, including guidelines about work study
and related transition-to-work dimensions. A Practical and Applied Arts Information Bulletin provides
direction for administrators and others. Lists of recommended resources from all guides are compiled into a
PAA bibliography with periodic updates.
Philosophy and Rationale
A study of the development of technology shows that industry has progressed from the time when everything
was made by hand to the present fully automated manufacturing of products. Machining skills have played
an essential role in all technological advances. The renewed Machining Curriculum is designed to facilitate
and promote the development of the machining skills needed to operate today’s advanced machine tools.
The Machining 10, 20, 30 Curriculum Guide is designed to enable students to acquire an appreciation of
machining. Opportunities are explored for a variety of applications of design through the use of different
materials, processes, and finishing. A strong foundation is built by a firm emphasis on the manipulation
and application of hand tools, equipment, and materials in a variety of fabricating situations. This course
provides relevant, practical applications for students to develop machining and business skills, as well as
gain practical employment skills.
Aim, Goals and Foundational Objectives
Aim
To provide students with opportunities to acquire knowledge and develop skills in machining.
It is highly recommended that students have the opportunity to develop skills with hand tools and manual-
controlled machine tools. This is an essential beginning before automatic and computer-controlled
machining.
Goals
Health and Safety: To obtain the knowledge and skill required to safely perform bench work and machine
tool operations.
Awareness: To gain an understanding of practical uses for skills from other subject areas.
Career and Employment: To help students make informed career decisions based on their experiences.
Personal Development: To enhance self-esteem through success with equipment, materials and
techniques used.
Independent Learning: To learn independent work practices.
Communication: To learn to communicate effectively in a non-traditional classroom environment.
2
Foundational Objectives
Foundational objectives are the major, general statements that guide what each student is expected to
achieve for the modules of the Practical and Applied Arts curriculum guidelines. Foundational objectives
indicate the most important knowledge, skills, attitudes/values, and abilities for a student to learn in a
subject. Both the Foundational Objectives for Machining 10, 20 and 30 and the Common Essential
Learnings (CELs) Foundational Objectives to be emphasized are stated in this document. Some of these
statements may be repeated or enhanced in different modules for emphasis. The Foundational Objectives of
the Core Modules of the Machining curriculum include:
To develop proficiency in the safe use of hand and machine tools.
To read, observe, and understand all of the information provided on drawings.
To be able to select and safely use the proper tool for the job.
To identify and explain health and safety hazards in the workplace so that the potential for personal
injury and damage to the equipment and the environment are minimized.
To understand the properties and uses of different materials used in machining.
To be able to use and understand the terminology related to machining in context.
To be able to produce parts to meet given specifications.
To increase self-esteem from success with the equipment, materials, and techniques used.
To become aware of the variety of jobs and career opportunities in the machining trades.
To create an awareness of apprenticeship programs and opportunities in Saskatchewan.
To handle, use, and dispose of materials safely.
To be knowledgeable about the impact of new technologies in the machining industry.
To learn about the evolution of machine tools.
To gain an overview of the different machining processes.
To understand the evolving role of a machinist.
All of the subject and CELs Foundational Objectives are stated at the beginning of each module.
Common Essential Learnings (CELs)
The incorporation of the Common Essential Learnings (CELs) into the instruction and assessment of the
Practical and Applied Arts curriculum offers many opportunities to develop students’ knowledge, skills, and
abilities. The purpose of the CELs is to assist students with learning concepts, skills and attitudes
necessary to make transitions to career, work, and adult life.
The CELs establish a link between the transition-to-work dimensions and Practical and Applied Arts
curriculum content. The transition-to-work dimensions included in the Practical and Applied Arts curricula
are: apprenticeship, career exploration/development, community project(s), employability skills,
entrepreneurial skills, occupational skills, personal accountability, processing of information, teamwork and
work study/experience. Throughout the Practical and Applied Arts curricula, the CELs objectives are stated
explicitly at the beginning of each module and are coded in this document, as follows:
COM = Communication
NUM = Numeracy
CCT = Critical and Creative Thinking
TL = Technological Literacy
PSVS = Personal and Social Values and Skills
IL = Independent Learning
Selected learning objectives for the CELs are included throughout the modules. It is anticipated that
teachers will find additional ways to incorporate the CELs into their classroom instruction.

3
Course Components and Considerations
The Machining 10, 20, 30 Curriculum Guide offers three courses of 100 hours each of module development.
The introductory course outlined at the 10 level incorporates a number of core modules that provide the
foundation for the suggested themes at the 20 and 30 levels. There is a graduated level of tool and
equipment development throughout the courses, with most of the hand tools being used at the 10 level and
power tools being introduced at the 20 and 30 levels.
It is important to remember that when a student has successfully completed a module, credit cannot be
given for that module again. The suggested configurations of courses will help create flexibility and meet
the needs of the student or community. Many of the machining course modules have been identified as
intermediate level. These modules may be used at all grade levels to facilitate greater flexibility. Teachers
are encouraged to pursue the variety of options through community partnerships that will enable the use of
speakers, mentorships, and business sites for work study.
The Machining Curriculum is intended to be flexible to allow for the different variations in facilities,
materials, equipment, and the time available to teach machining. The introductory level modules are
developed for students who have no previous metal working experience. The intermediate and advance
modules build on competencies developed at the introductory level.
Work Study Components
This module permits the student to apply school-based learning to workplace settings in the community.
Students are provided with an opportunity to experience the optional work study component through
appropriate placements. If time credit in the workplace is desired, it is required that the student work with
a journeyperson in the trade. For more information regarding time credit, consult High School to
Apprenticeship: Link to the Future (2003). Module 37: Work Study Preparation and Follow-up Activities
must be covered prior to and following the work study module. The Practical and Applied Arts Handbook
has detailed information in the “Work Study Guidelines”. Students who have previously taken a work study
module may cover content developed by Saskatchewan Labour found in the Career and Work Exploration10,
20, A30, B30 Curriculum Guide and the Practical and Applied Arts Handbook. These content references
include:
Labour Standards
Occupational Health and Safety Act and
Workplace Hazardous Materials Information System (WHMIS).
Creating Partnerships for Work Study
Partnerships are important to the success of the work study component. The three distinct partners that
play an important role are industry/business, the school, and the student.
Personal contact is the best approach to building partnerships. One should begin by making a presentation
to colleagues within the school, to the student body, to school board members, to parents, and to local
businesses. It is important to outline the curriculum and the benefits and responsibilities for each of the
partners.
See the modules outlined in the curriculum and the “Work Study Guidelines” in the Practical and Applied
Arts Handbook for further information on work study.

4
Portfolios
A personal career portfolio is a valuable organizer of student projects and assignments. It encourages
students to collect examples of their work as they progress through the various activities, labs, and projects.
Selecting particular items to include in a portfolio encourages students to reflect on what they have learned
or accomplished and what they have yet to learn. Portfolio items may include: journal notes, drafts,
photographs, audio or video tapes, computer discs, sketches, drawings, etc. Portfolios may be used for peer,
teacher, and self-assessment and as a format to present selected works to parents, post-secondary
institutions, or potential employers. In addition, the portfolio can demonstrate the link between home,
school, and community in the student’s education. Each student should have a portfolio representing his or
her work during the course.
The portfolio helps students:
reflect on personal growth and accomplishment
see links between home, school, and community education and activities
collect materials to prepare applications for post-secondary education and scholarship program entrance
collect materials to prepare for employment applications
focus on career planning.
The portfolio helps teachers:
provide a framework for independent learning strategies for the student
communicate student learning from one school year to another in a specific area of study
identify career planning needs for students
assess and evaluate the student’s progress and achievement in a course of study.
The portfolio helps post-secondary institutions:
determine suitable candidates for awards and scholarships
evaluate candidates for program entrance
evaluate prior learning for program placement.
The portfolio helps the community:
reflect on the involvement in a student’s education and the support offered to learners
demonstrate the link between the home, school, and community in education.
The portfolio helps potential employers:
identify employable skills desired in future employees
provide evidence of knowledge and skill development of potential employees.
Working Portfolio
Students collect work over time in a working folder. Each student should also keep a journal of
observations, critiques, ideas, and reflections as part of his or her working portfolio. Items in this portfolio
may be used for the purpose of reflection, for ongoing and summative evaluations, for peer, teacher and self-
evaluations, and for documenting skill development and mastery.
Working portfolios may be used for purposes of conferencing between student and teacher, teacher and
parent, teacher and teacher, or student and student. When a teacher examines a student’s portfolio in order
to make a decision regarding student progress, the information it contains may become documented evidence
for the evaluation.
A daily journal may also become a part of a working portfolio as a means of tracking the student’s use of
time and to record progress on ideas that are being developed. This will provide the student with a focus for
self-directed or independent learning, as well as an anecdotal record for part of the course evaluation.
5
Presentation Portfolio
To compile a presentation portfolio, students should select items from their working portfolio. The
presentation portfolio should cover the range of students’ experiences and should display their best efforts.
The preparation of a presentation portfolio can be an assessment strategy. It is strongly suggested that
students at the 30 level prepare a presentation portfolio suitable for submission to potential employers or
post-secondary institutions.
Through collecting, selecting and reflecting, students are able to compile presentation portfolios that display
their best collection of work.
Extended Study Modules
The extended study module is designed to provide schools with an opportunity to meet current and future
demands that are not addressed by current modules in the renewed PAA curriculum.
The flexibility of this module allows a school/school division to design one new module per credit to
complement or extend the study of existing pure core modules and optional modules. The extended study
module is designed to extend the content of the pure courses and to offer survey course modules beyond the
scope of the selection of PAA modules.
The list of possibilities for topics of study or projects for the extended study module approach is as varied as
the imagination of those involved in using the module. These optional extended study module guidelines,
found in the Practical and Applied Arts Handbook, should be used to strengthen the knowledge, skills, and
processes advocated in the PAA curriculum in which the extended study module is used.
It is recommended that a summary of any extended study module be sent to the Regional Superintendent of
Curriculum and Instruction to establish a resource bank of module topics.
For more information on the extended study module, refer to the Practical and Applied Arts Handbook.
Career Development
Saskatchewan Learning is committed to the infusion of career development competencies across curricula as
part of a broad career development strategy for Saskatchewan. Saskatchewan students will be better
equipped to achieve fulfillment in personal, social, and work roles through exposure to a career building
process.
In 2001, the Department adopted the Blueprint for Life/Work Designs as the scope and sequence for the
integration of career development competencies into Core Curriculum. The Blueprint outlines the skills,
knowledge and attitudes that are essential tools for effectively managing life/work development. This
framework, which describes career development competencies from early childhood through adulthood, was
developed through the collaboration of representatives of Canadian provinces and territories and is
published by the National Life/Work Centre, a not-for-profit organization that supports career development.
The cornerstone of the Blueprint is the matrix of eleven competencies grouped into three sections: personal
management, learning and work exploration, and life/work building.
The career development framework includes the continuous development of the following competencies:
A. Personal Management:
1. Building and maintaining a positive self-image
2. Interacting positively and effectively with others
3. Changing and growing throughout one’s life

6
B. Learning and Work Exploration:
4. Participating in life-long learning supportive of life/work goals
5. Locating and effectively using life/work information
6. Understanding the relationship between work and society/economy
C. Life/Work Building:
7. Securing, creating, and maintaining work
8. Making life/work enhancing decisions
9. Maintaining balanced life and work goals
10. Understanding the changing nature of life/work roles
11. Understanding, engaging in, and managing one’s own life/work building processes
Each of the eleven competencies has been further categorized into four developmental levels roughly
corresponding to Elementary Level, Middle Level, Secondary Level, and Adult Level. Within each level of a
competency are a number of general learning objectives, referred to in the Blueprint as indicators. These
objectives are grouped within learning stages of acquisition, application, personalization, and actualization.
A comprehensive description of all of the eleven career development competencies may be found at
www.blueprint4life.ca.
This curriculum guide reflects the career development competencies within the curriculum objectives,
instructional activities, and suggested student assessment processes.
Resources
To support the principle of Resource-based Learning, a variety of instructional resources have been
evaluated and recommended. See the Machining section of Practical and Applied Arts: A Bibliography
(2003) for a list of annotated resources. Teachers should also consult the Practical and Applied Arts
Resources website at www.sasked.gov.sk.ca/curr_inst/iru/paares.html for access to the online bibliographies,
updates, websites, journals, videos and discussion areas.
The on-line version of this guide is accessible at www.sasked.gov.sk.ca/docs/paa.html. It will be
“Evergreened”, as appropriate.
Assessment and Evaluation
Student assessment and evaluation is an important part of teaching as it allows the teacher to plan and
adapt instruction to meet the specific needs of each student. It also allows the teacher to discuss the current
successes and challenges with students and report progress to the parent or guardian. It is important that
teachers use a variety of assessment and evaluation strategies to evaluate student progress. Additional
information on evaluation of student achievement can be found in the Saskatchewan Education documents
Student Evaluation: A Teacher Handbook (1991) and Curriculum Evaluation in Saskatchewan (1991).
Assessment and evaluation throughout the Machining 10, 20, 30 courses should be based on the learning
objectives that are outlined in the curriculum. It is important to use a variety of assessment techniques to
ensure accurate student evaluation. The design of an evaluation matrix/scheme should reflect the amount of
time devoted to each of the modules taught in the course.
Here is a sample evaluation scheme:
Portfolios 20%
Tests (written) 10%
Project work 25%
Homework and Assignments 10%
Classroom Presentations 10%
Work Study 25%

7
If work study was not offered, some time could be used for project development involving larger projects that
might include the optional extended study module available in this guide.
For more information about student evaluation refer to the Practical and Applied Arts Handbook or Student
Evaluation: A Staff Development Handbook (Saskatchewan Professional Development Unit, 1999).
For information about program evaluation refer to the Saskatchewan School-Based Program Evaluation
Resource Book (1989).
For information about curriculum evaluation refer to Curriculum Evaluation in Saskatchewan
(Saskatchewan Education, 1991).
8
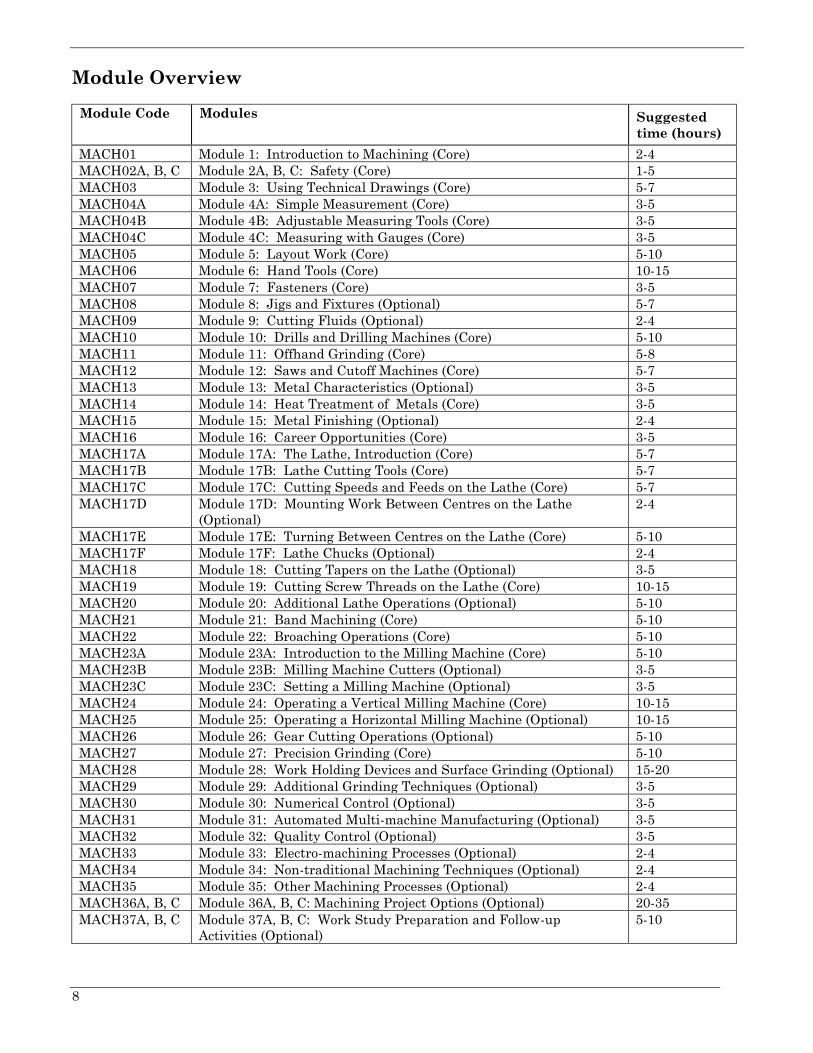
Module Overview
Module Code Modules Suggested
time (hours)
MACH01 Module 1: Introduction to Machining (Core) 2-4
MACH02A, B, C Module 2A, B, C: Safety (Core) 1-5
MACH03 Module 3: Using Technical Drawings (Core) 5-7
MACH04A Module 4A: Simple Measurement (Core) 3-5
MACH04B Module 4B: Adjustable Measuring Tools (Core) 3-5
MACH04C Module 4C: Measuring with Gauges (Core) 3-5
MACH05 Module 5: Layout Work (Core) 5-10
MACH06 Module 6: Hand Tools (Core) 10-15
MACH07 Module 7: Fasteners (Core) 3-5
MACH08 Module 8: Jigs and Fixtures (Optional) 5-7
MACH09 Module 9: Cutting Fluids (Optional) 2-4
MACH10 Module 10: Drills and Drilling Machines (Core) 5-10
MACH11 Module 11: Offhand Grinding (Core) 5-8
MACH12 Module 12: Saws and Cutoff Machines (Core) 5-7
MACH13 Module 13: Metal Characteristics (Optional) 3-5
MACH14 Module 14: Heat Treatment of Metals (Core) 3-5
MACH15 Module 15: Metal Finishing (Optional) 2-4
MACH16 Module 16: Career Opportunities (Core) 3-5
MACH17A Module 17A: The Lathe, Introduction (Core) 5-7
MACH17B Module 17B: Lathe Cutting Tools (Core) 5-7
MACH17C Module 17C: Cutting Speeds and Feeds on the Lathe (Core) 5-7
MACH17D Module 17D: Mounting Work Between Centres on the Lathe
(Optional)
2-4
MACH17E Module 17E: Turning Between Centres on the Lathe (Core) 5-10
MACH17F Module 17F: Lathe Chucks (Optional) 2-4
MACH18 Module 18: Cutting Tapers on the Lathe (Optional) 3-5
MACH19 Module 19: Cutting Screw Threads on the Lathe (Core) 10-15
MACH20 Module 20: Additional Lathe Operations (Optional) 5-10
MACH21 Module 21: Band Machining (Core) 5-10
MACH22 Module 22: Broaching Operations (Core) 5-10
MACH23A Module 23A: Introduction to the Milling Machine (Core) 5-10
MACH23B Module 23B: Milling Machine Cutters (Optional) 3-5
MACH23C Module 23C: Setting a Milling Machine (Optional) 3-5
MACH24 Module 24: Operating a Vertical Milling Machine (Core) 10-15
MACH25 Module 25: Operating a Horizontal Milling Machine (Optional) 10-15
MACH26 Module 26: Gear Cutting Operations (Optional) 5-10
MACH27 Module 27: Precision Grinding (Core) 5-10
MACH28 Module 28: Work Holding Devices and Surface Grinding (Optional) 15-20
MACH29 Module 29: Additional Grinding Techniques (Optional) 3-5
MACH30 Module 30: Numerical Control (Optional) 3-5
MACH31 Module 31: Automated Multi-machine Manufacturing (Optional) 3-5
MACH32 Module 32: Quality Control (Optional) 3-5
MACH33 Module 33: Electro-machining Processes (Optional) 2-4
MACH34 Module 34: Non-traditional Machining Techniques (Optional) 2-4
MACH35 Module 35: Other Machining Processes (Optional) 2-4
MACH36A, B, C Module 36A, B, C: Machining Project Options (Optional) 20-35
MACH37A, B, C Module 37A, B, C: Work Study Preparation and Follow-up
Activities (Optional)
5-10

9
MACH38A, B, C Module 38A, B, C: Work Study (Optional) 25-50
MACH88 Module 88: Apprenticeship in Saskatchewan (Optional) 2-5
MACH99A, B, C Module 99A, B, C: Extended Study (Optional) 5-20
10
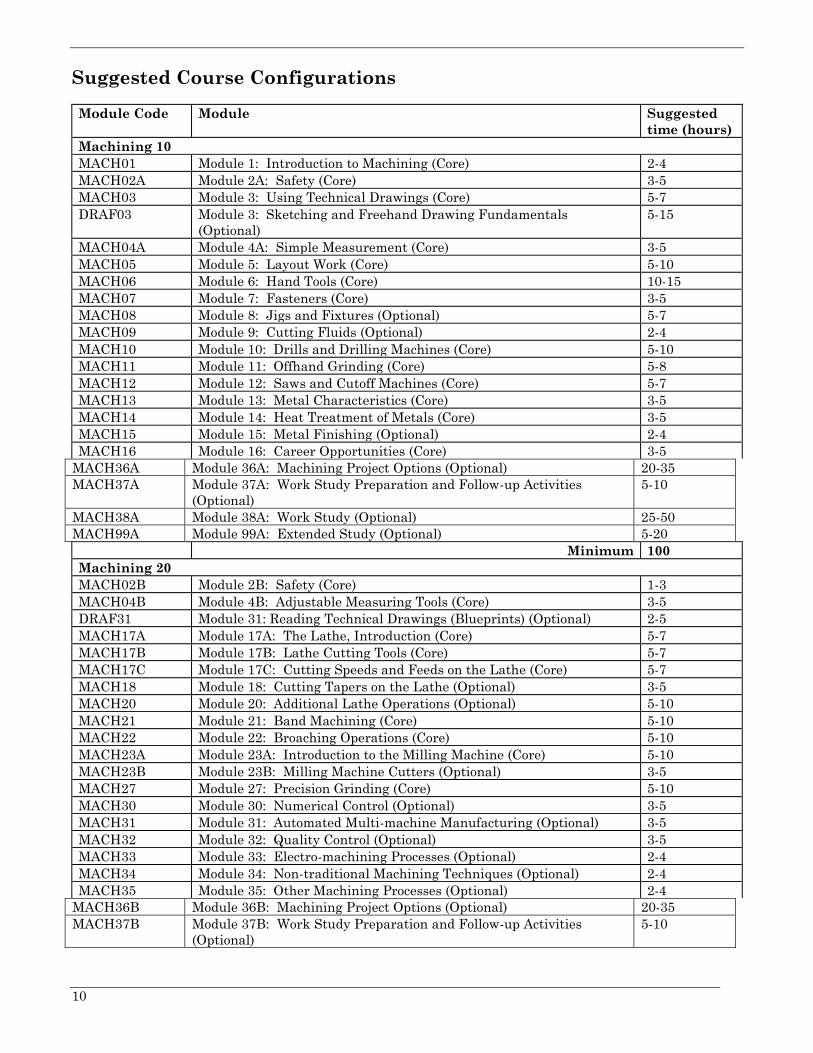
Suggested Course Configurations
Module Code Module Suggested
time (hours)
Machining 10
MACH01 Module 1: Introduction to Machining (Core) 2-4
MACH02A Module 2A: Safety (Core) 3-5
MACH03 Module 3: Using Technical Drawings (Core) 5-7
DRAF03 Module 3: Sketching and Freehand Drawing Fundamentals
(Optional)
5-15
MACH04A Module 4A: Simple Measurement (Core) 3-5
MACH05 Module 5: Layout Work (Core) 5-10
MACH06 Module 6: Hand Tools (Core) 10-15
MACH07 Module 7: Fasteners (Core) 3-5
MACH08 Module 8: Jigs and Fixtures (Optional) 5-7
MACH09 Module 9: Cutting Fluids (Optional) 2-4
MACH10 Module 10: Drills and Drilling Machines (Core) 5-10
MACH11 Module 11: Offhand Grinding (Core) 5-8
MACH12 Module 12: Saws and Cutoff Machines (Core) 5-7
MACH13 Module 13: Metal Characteristics (Core) 3-5
MACH14 Module 14: Heat Treatment of Metals (Core) 3-5
MACH15 Module 15: Metal Finishing (Optional) 2-4
MACH16 Module 16: Career Opportunities (Core) 3-5
MACH36A Module 36A: Machining Project Options (Optional) 20-35
MACH37A Module 37A: Work Study Preparation and Follow-up Activities
(Optional)
5-10
MACH38A Module 38A: Work Study (Optional) 25-50
MACH99A Module 99A: Extended Study (Optional) 5-20
Minimum 100
Machining 20
MACH02B Module 2B: Safety (Core) 1-3
MACH04B Module 4B: Adjustable Measuring Tools (Core) 3-5
DRAF31 Module 31: Reading Technical Drawings (Blueprints) (Optional) 2-5
MACH17A Module 17A: The Lathe, Introduction (Core) 5-7
MACH17B Module 17B: Lathe Cutting Tools (Core) 5-7
MACH17C Module 17C: Cutting Speeds and Feeds on the Lathe (Core) 5-7
MACH18 Module 18: Cutting Tapers on the Lathe (Optional) 3-5
MACH20 Module 20: Additional Lathe Operations (Optional) 5-10
MACH21 Module 21: Band Machining (Core) 5-10
MACH22 Module 22: Broaching Operations (Core) 5-10
MACH23A Module 23A: Introduction to the Milling Machine (Core) 5-10
MACH23B Module 23B: Milling Machine Cutters (Optional) 3-5
MACH27 Module 27: Precision Grinding (Core) 5-10
MACH30 Module 30: Numerical Control (Optional) 3-5
MACH31 Module 31: Automated Multi-machine Manufacturing (Optional) 3-5
MACH32 Module 32: Quality Control (Optional) 3-5
MACH33 Module 33: Electro-machining Processes (Optional) 2-4
MACH34 Module 34: Non-traditional Machining Techniques (Optional) 2-4
MACH35 Module 35: Other Machining Processes (Optional) 2-4
MACH36B Module 36B: Machining Project Options (Optional) 20-35
MACH37B Module 37B: Work Study Preparation and Follow-up Activities
(Optional)
5-10

11
MACH38B Module 38B: Work Study (Optional) 25-50
MACH99B Module 99B: Extended Study (Optional) 5-20
Minimum 100
Machining 30
MACH02C Module 2C: Safety (Core) 1-3
MACH04C Module 4C: Measuring with Gauges (Core) 3-5
MACH17D Module 17D: Mounting Work Between Centres on the Lathe
(Optional)
2-4
MACH17E Module 17E: Turning Between Centres on the Lathe (Core) 5-10
MACH17F Module 17F: Lathe Chucks (Optional) 2-4
MACH19 Module 19: Cutting Screw Threads on the Lathe (Core) 10-15
MACH20 Module 20: Additional Lathe Operations (Optional) 5-10
MACH22 Module 22: Broaching Operations (Core) 5-10
MACH23C Module 23C: Setting a Milling Machine (Optional) 3-5
MACH24 Module 24: Operating a Vertical Milling Machine (Core) 10-15
MACH25 Module 25: Operating a Horizontal Milling Machine (Optional) 10-15
MACH26 Module 26: Gear Cutting Operations (Optional) 5-10
MACH28 Module 28: Work Holding Devices and Surface Grinding (Optional) 15-20
MACH29 Module 29: Additional Grinding Techniques (Optional) 3-5
MACH36C Module 36C: Machining Project Options (Optional) 20-35
MACH37C Module 37C: Work Study Preparation and Follow-up Activities
(Optional)
5-10
MACH38C Module 38C: Work Study (Optional) 25-50
MACH88 Module 88: Apprenticeship in Saskatchewan (Optional) 2-5
MACH99C Module 99C: Extended Study (Optional) 5-20
Minimum 100

12
Core and Optional Modules
Module 1: Introduction to Machining (Core)
Suggested time: 2-4 hours Level: Introductory
Prerequisite: None
Foundational Objectives
To learn about the evolution of machine tools.
To gain an overview of the different machining processes.
To understand the evolving role of a machinist.
To be able to use and understand the terminology related to machining in context.
Common Essential Learnings Foundational Objectives
To explore the evolution of technological innovation within machining with a focus on the social forces
that spawned the innovations and the steps involved in the development. (TL)
To understand the essential role machinists play in the development of all technological advances.
(PSVS)
To recognize the inevitability of profound change due to advancements in technology and be prepared to
influence change by continuing to learn on an ongoing basis. (IL)
Learning Objectives Notes
1.1 To understand how machine
tools evolved.
Review the evolution of machining from the first metal work to the
present machining processes.
Have the students discuss how machine tools might be created
when there were no machine tools to make the new machines.
Review the different types of hand and machine tool operations.
1.2 To describe the operation of the
basic machine tools. (COM)
Have the students collect pictorial examples of basic machine
tools including:
lathes
drills
grinders
mills
saws
broaches.
1.3 To describe the application of
non-traditional machining
processes.
These processes include a variety of electrical and chemical
processes used to machine materials. The most commonly used in
industry today are:
Laser machining with the use of an intense light beam to cut
or drill surfaces.
Hydrodynamic machining when water forced through a jet at
very high pressure is used as the cutter.
Electrochemical processes where electricity passes through a
chemical medium and removes material in a precise manner.
1.4 To understand how machining
processes became automated.
The development of fully automated machining processes includes
the numerical control system for programming machining
operations. Have the students discuss how this system of
operations, now directed by a computer (computer numerical
control, CNC) has changed the manufacturing industry.

13
Learning Objectives Notes
1.5 To explore the role machining
has in all types of
manufacturing. (CCT)
Have students name different products to discover if that product
does not require the skill of a machinist somewhere in its
manufacture or production.

14
Module 2A, B, C: Safety (Core)
Module 2A: Safety (Core)
Suggested time: 3-5 hours Level: Introductory
Prerequisite: None
Foundational Objectives
To be able to use and understand the terminology related to machining in context.
To identify and explain health and safety hazards in the workplace so that the potential for personal
injury and damage to the equipment and the environment are minimized.
To develop proficiency in the safe use of hand and machine tools.
Common Essential Learnings Foundational Objectives
To use imaging in order to enhance their learning. (CCT)
To develop skills in the use of equipment and materials common to the machining industry. (IL)
To develop workplace skills, knowledge, and attitudes that may lead to successful employment. (PSVS)
Learning Objectives Notes
2.1 To recognize and apply safe
working practices in the
working area. (CCT)
Use lecture and discussion methods. Students should be required
to make notes based on these discussions. In the work areas,
demonstrate and identify the items with which students must be
familiar. Be sure to indicate the location of necessary safety and
first-aid equipment.
Topics to discuss should include: eye protection, protective clothing
and footwear, health hazards, safe handling and storage of
chemicals, ventilation, reporting accidents, safety procedures,
cleanup, tool use, equipment maintenance, and material storage.
Follow workplace procedures and emphasize risk control
concerning:
cleanliness
tool and material handling
slips and falls
proper electrical safety
harassment and violence.
General information regarding the Labour Standards Act,
Occupational Health and Safety and Workplace Hazardous
Materials Information System (WHMIS) is found in the Practical
and Applied Arts Handbook and the Career and Work Exploration
10, 20, A30, B30 Curriculum Guidelines. Specific information
about hazards is available from Saskatchewan Labour or is found
in the bibliography of recommended resources.
15
Learning Objectives
Notes
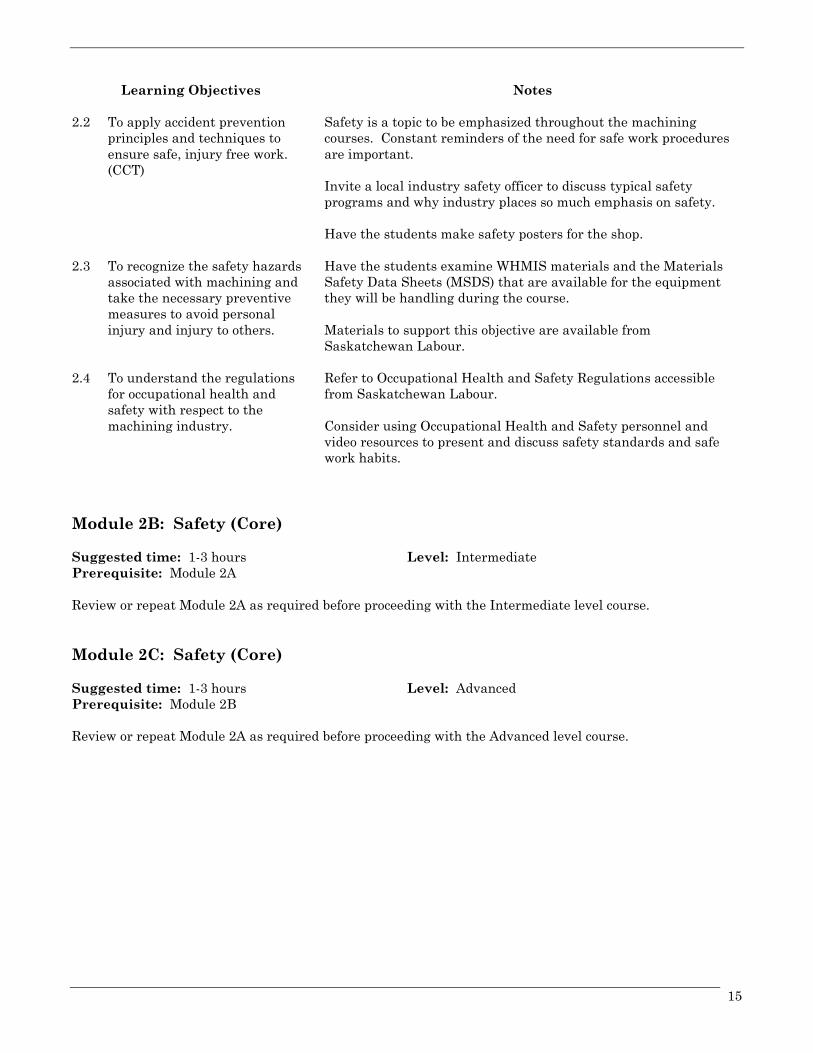
2.2 To apply accident prevention
principles and techniques to
ensure safe, injury free work.
(CCT)
Safety is a topic to be emphasized throughout the machining
courses. Constant reminders of the need for safe work procedures
are important.
Invite a local industry safety officer to discuss typical safety
programs and why industry places so much emphasis on safety.
Have the students make safety posters for the shop.
2.3 To recognize the safety hazards
associated with machining and
take the necessary preventive
measures to avoid personal
injury and injury to others.
Have the students examine WHMIS materials and the Materials
Safety Data Sheets (MSDS) that are available for the equipment
they will be handling during the course.
Materials to support this objective are available from
Saskatchewan Labour.
2.4 To understand the regulations
for occupational health and
safety with respect to the
machining industry.
Refer to Occupational Health and Safety Regulations accessible
from Saskatchewan Labour.
Consider using Occupational Health and Safety personnel and
video resources to present and discuss safety standards and safe
work habits.
Module 2B: Safety (Core)
Suggested time: 1-3 hours Level: Intermediate
Prerequisite: Module 2A
Review or repeat Module 2A as required before proceeding with the Intermediate level course.
Module 2C: Safety (Core)
Suggested time: 1-3 hours Level: Advanced
Prerequisite: Module 2B
Review or repeat Module 2A as required before proceeding with the Advanced level course.
16
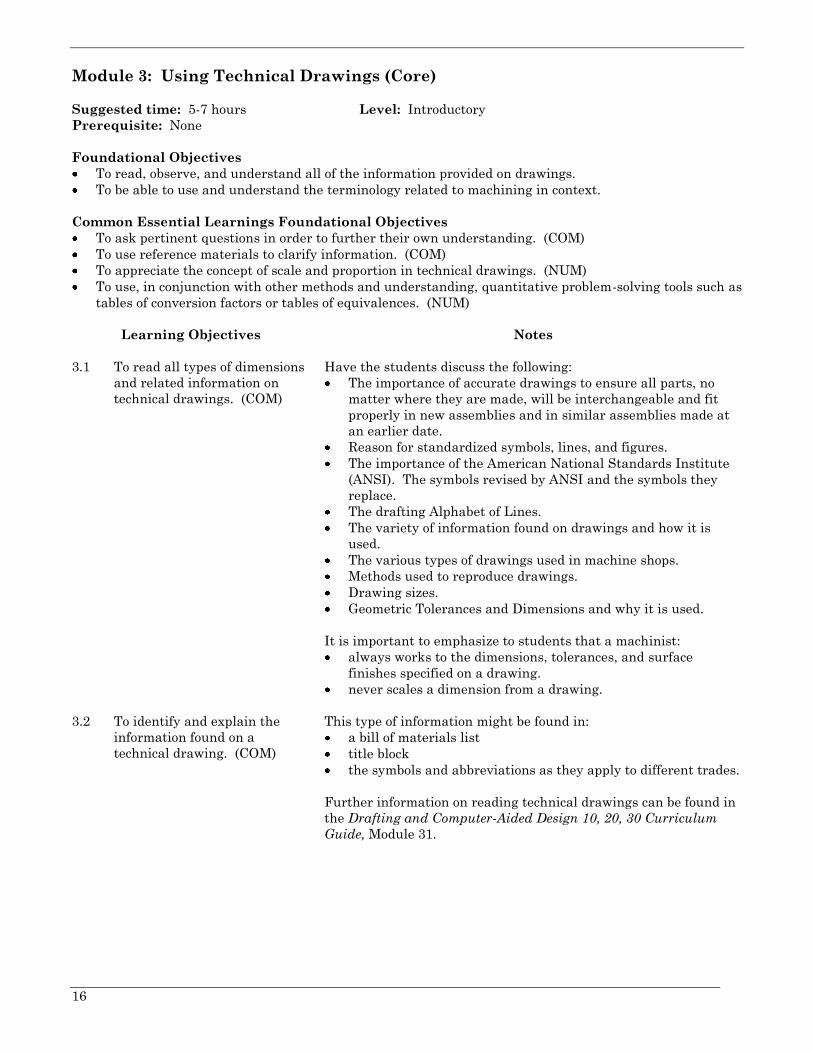
Module 3: Using Technical Drawings (Core)
Suggested time: 5-7 hours Level: Introductory
Prerequisite: None
Foundational Objectives
To read, observe, and understand all of the information provided on drawings.
To be able to use and understand the terminology related to machining in context.
Common Essential Learnings Foundational Objectives
To ask pertinent questions in order to further their own understanding. (COM)
To use reference materials to clarify information. (COM)
To appreciate the concept of scale and proportion in technical drawings. (NUM)
To use, in conjunction with other methods and understanding, quantitative problem-solving tools such as
tables of conversion factors or tables of equivalences. (NUM)
Learning Objectives
Notes
3.1 To read all types of dimensions
and related information on
technical drawings. (COM)
Have the students discuss the following:
The importance of accurate drawings to ensure all parts, no
matter where they are made, will be interchangeable and fit
properly in new assemblies and in similar assemblies made at
an earlier date.
Reason for standardized symbols, lines, and figures.
The importance of the American National Standards Institute
(ANSI). The symbols revised by ANSI and the symbols they
replace.
The drafting Alphabet of Lines.
The variety of information found on drawings and how it is
used.
The various types of drawings used in machine shops.
Methods used to reproduce drawings.
Drawing sizes.
Geometric Tolerances and Dimensions and why it is used.
It is important to emphasize to students that a machinist:
always works to the dimensions, tolerances, and surface
finishes specified on a drawing.
never scales a dimension from a drawing.
3.2 To identify and explain the
information found on a
technical drawing. (COM)
This type of information might be found in:
a bill of materials list
title block
the symbols and abbreviations as they apply to different trades.
Further information on reading technical drawings can be found in
the Drafting and Computer-Aided Design 10, 20, 30 Curriculum
Guide, Module 31.
17
Learning Objectives
Notes
3.3 To list and describe the various
types of drawings common to
machine work.
Have the students prepare or collect a variety of drawings
including detail, assembly, subassembly and exploded view and
explain the possible uses for each type.
Show prints of a simple assembly drawing of a project that will be
made by the class. Show a completed sample of the object shown on
the print.
3.4 To explain the basics of
geometric dimensioning and
tolerancing.
Have the students prepare a list of terms and their uses that are
used for dimensioning and tolerancing in machining.

18
Module 4A: Simple Measurement (Core)
Suggested time: 3-5 hours Level: Introductory
Prerequisite: None
Foundational Objectives
To be able to use and understand the terminology related to machining in context.
To be able to produce parts to meet given specifications.
Common Essential Learnings Foundational Objectives
To use fractions and decimals in order to better understand machining. (NUM)
To read commonly used dials, meters, and scales and understand how to interpret these readings.
(NUM)
To understand the meaning of precision and determine the most appropriate degree of precision for a
particular task. (NUM)
Learning Objectives
Notes
4.1 To measure accurately with a
steel rule to 1/64” (0.5 mm).
Demonstrate how to use rules and discuss:
the various types of rules
how to read and use the various types of rules
how to handle and care for rules so they will retain their
accuracy.
Have the students measure a number of samples to practice their
skill.
4.2 To measure angles accurately
using a protractor. (NUM)
Have the students layout a variety of angles -- acute, right, obtuse,
straight and reflex.
4.3 To use measurements in
calculations that would be
common in machining.
Students will need to be able to perform basic calculations (adding,
subtracting, multiplying, dividing, percentage) with both decimals
and fractions, including mixed and improper fractions. Examples
in the context of machining should be provided and opportunity to
demonstrate and further develop those skills should be provided
when necessary.

19
Module 4B: Adjustable Measurement Tools (Core)
Suggested time: 3-5 hours Level: Intermediate
Prerequisite: Module 4A
Review or repeat Module 4A as required before proceeding with the Intermediate level course.
Learning Objectives
Notes
4.4 To measure accurately with a
micrometer caliper. (NUM)
Discuss the importance of proper care and cleaning of the
micrometer.
Demonstrate the use of micrometers for the students and discuss:
the various types of micrometers
how to read both the thousandths of an inch-based and metric-
based micrometers
the correct way to use micrometers
the proper way to store micrometers so they will retain their
accuracy
that students should be expected to be able to measure to an
accuracy of 0.001” (0.002 mm).
4.5 To use Vernier measuring tools
to make accurate
measurements. (NUM)
Demonstrate for the students how to use a Vernier scale and
discuss:
the various types of measuring tools that use a Vernier scale
how to read inch- and metric-based Vernier scales
the correct way to handle a Vernier scaled tool
the proper way to care for Vernier so they will retain their
accuracy
that students should be expected to be able to measure to an
accuracy of 0.001” (0.002 mm).
4.6 To measure angles accurately
using a universal Vernier
bevel.
Demonstrate how to use Vernier Measuring Tools and discuss:
the various types of Vernier calipers
how to read dial calipers
how to read the universal bevel protractor
the correct way to use Vernier and dial calipers
the proper way to care for Vernier measuring tools so they will
retain their accuracy
students should be expected to be able to measure to an
accuracy of 0º5'.
4.7 To calculate and use degree of
precision, absolute error, and
relative error.
Students should recognize that with any measuring device there is
a margin of error, as no measuring instrument is infinitely precise.
Students should be able to calculate the maximum possible error
for any measuring device they use, and calculate the absolute error
and relative error for any measurement they make.
The relationship between absolute error and tolerance should be
discussed, and implications for the manufacturing process should
be examined.
20
Module 4C: Measuring with Gauges (Core)
Suggested time: 3-5 hours Level: Advanced
Prerequisite: Module 4B
Review or repeat Module 4B as required before proceeding with the Advanced level course.
Learning Objectives
Notes
4.8 To identify and describe the
types of gauges used in
machining. (COM)
Demonstrate and discuss how gauges and dial indicators are used
and cared for. It is important that students understand the care
and maintenance requirements of these types of measuring tools.
4.9 To measure using dial indicator
gauges. (TL)
Have the students demonstrate the correct method used to take
measurements using a dial indicator.
4.10 To use helper measuring tools
used in a machine shop.
Have the students practice measuring on sample project parts that
they will be making.
If some types of tools are not available, contact a tool manufacturer
to demonstrate the tools for the students.
21
Module 5: Layout Work (Core)
Suggested time: 5-10 hours Level: Introductory
Prerequisite: Modules 3 and 4
Foundational Objectives
To develop proficiency in the safe use of hand and machine tools.
To identify and explain health and safety hazards in the workplace so that the potential for personal
injury and damage to the equipment and the environment are minimized.
Common Essential Learnings Foundational Objectives
To ask pertinent question in order to further their own understanding. (COM)
To sequence a series of instructions so the process progresses constructively. (COM)
Learning Objectives
Notes
5.1 To understand the need to do
layout work. (TL)
Have the students list the reasons for doing the layout procedure.
5.2 To understand the purpose of
each layout tool.
Have the students gather the following material and equipment:
layout dye, scriber, hermaphrodite caliper, divider, surface gage,
squares, combination set, hammer, and punches.
Review the safe handling and use of layout tools and the need to
protect layout equipment from becoming damaged.
5.3 To demonstrate the safe use of
layout tools. (PSVS)
For a demonstration on precision layout work, have the following
equipment available:
Vernier height gage
right angle plate
parallels
V-blocks
straight edge
Vernier bevel
protractor
surface plate.
5.4 To follow a basic procedure for
basic layout. (IL)
Have the students demonstrate the layout tools they will be using.
This should include:
safe handling of layout tools
preparing metal for layout with layout dye
procedural steps for making a simple layout
laying out angles
the use of parallels, V-blocks and angle plate in layout work
the proper way to use and care for measuring tools
care of the surface plate.
5.5 To follow a machining sequence
using hand tools. (IL)
Have the students complete a small project that requires the use of
layout and hand tools to complete.
A drill-grinding gauge or a right angle square are useful projects at
the Introductory level.
22
Module 6: Hand Tools (Core)
Suggested time: 10-15 hours Level: Introductory
Prerequisite: Module 2
Foundational Objectives
To develop proficiency in the safe use of hand and machine tools.
To identify and explain health and safety hazards in the workplace so that the potential for personal
injury and damage to the equipment and the environment are minimized.
To be able to select and safely use the proper tool for the job.
Common Essential Learnings Foundational Objectives
To use text aids such as diagrams to learn technical terms associated with the hand tools used in
machining. (COM, TL)
To equip the student with the knowledge needed to recognize and correct unsafe working conditions.
(CCT)
Learning Objectives
Notes
6.1 To identify common machine
shop hand tools. (TL)
Emphasize the need for proper storage of tools to prevent damage or
loss.
6.2 To use the appropriate hand
tool for the job being done.
(TL)
Review the risks involved in using the wrong tool for the job.
Selecting the proper size of hammer or a hacksaw blade with the
proper number of teeth per inch are examples that might be used to
illustrate this point.
Have students work in pairs and present demonstrations and
explanations on proper care and use for the hand tools used in
machining.
6.3 To recognize tools in need of
repair. (IL)
Review the health and safety risks that might result from using a
damaged tool. Have students inspect tools and identify those that
are need of repair.
Tools will need to be sharpened or replaced from time to time. Have
the students learn to recognize when a tool needs maintenance and
to report its condition.
Note: Students will learn to sharpen tools in the modules where the
tool is used. At the Introductory level identifying any problems is
sufficient.
6.4 To properly clean hand tools
and the work area.
Have the students recognize the importance of keeping tools clean
and the work area well organized. For example, it will be necessary
to clean files as they are used to remove waste that will lodge in the
teeth of the file.
Refer the Students to The Occupational Health and Safety Act, 1993
as well as the Regulations for further information regarding the
need for maintaining a clean work area.
23
Module 7: Fasteners (Core)
Suggested time: 3-5 hours Level: Introductory
Prerequisite: None
Foundational Objectives
To demonstrate knowledge of different materials and their applications in the machining industry.
Common Essential Learnings Foundational Objective(s)
To be knowledgeable about the impact of new technologies in the machining industry. (TL)
Learning Objectives
Notes
7.1 To identify the different kinds
of fasteners a machinist might
use.
The following items will aid in teaching this module:
A selection of fastener styles and types for examination.
A selection of adhesives suitable for bonding metal.
7.2 To describe situations where
these fasteners are used.
(COM)
Have students identify a variety of nut and bolt styles that
illustrate permanent and non-permanent applications for a variety
of Unified National Coarse (UNC) and Unified National Fine (UNF)
threaded fasteners and give an example of a typical application.
Compare these fasteners with thread forming and thread cutting
screws.
Have the students identify different types and styles of fasteners
that are not threaded. Include a variety of pins, rivets, and keys
identifying applications for each type of fastener.
7.3 To select the proper fastening
device for a specific job. (CCT)
Have the students discuss the following:
Why there are so many types of fasteners.
How threaded fasteners are measured.
How to identify metric fasteners.
How to identify National Coarse Series fasteners.
Thread nomenclature.
The various fasteners available in the shop.
What problems are encountered when inch-based and metric-
based fasteners are used on the same product.
The use of stainless steel fasteners.
Why aircraft application fasteners are so expensive.
Where adhesives are used to join metal parts.
7.4 To describe how parts are
joined using chemical fastening
techniques. (COM)
Have the students describe situations where adhesives would be
used and where their use would not be suitable. Bond samples of
metal using different adhesives and then test the strength of the
bond by conducting a destructive test.
Review the need for the safe, proper handling of adhesives and the
use of proper safety equipment with the students.
24
Module 8: Jigs and Fixtures (Optional)
Suggested time: 5-7 hours Level: Introductory
Prerequisite: Module 1
Foundational Objectives
To increase self-esteem from success with the equipment, materials, and techniques used.
To gain an overview of the different machining processes.
Common Essential Learnings Foundational Objective(s)
To explore the technical implications of present technology and of impending technological developments
as they arise in the field of machining. (TL)
Learning Objectives
Notes
8.1 To understand the advantages
of using jigs and fixtures.
(CCT)
Have the students discuss the following:
Describe how a jig differs from a fixture.
The purposes for jigs and fixtures.
The various types of jigs and fixtures.
It is important to realize that jigs are developed to save time when
an action is repeated many times. A jig is created to be a time
saving tool where a large number of repetitions of the same
operation are required. The need for precise duplication of a task is
the reason for this type of tool.
8.2 To list different types of jigs.
(TL)
Have students find examples of different types of jigs and explain
their use in a production process.
Have students design and build a simple template jig for a project
they will be making. This could be as simple as making a jig to
guide a drill bit to create a hole to hang up a tool.
8.3 To give examples of fixtures
and explain their purpose.
(COM)
Have the student find examples of different types of fixtures and
explain their use in a production process. A common example of a
fixture is a drill press vise. The fixture holds the workpiece while
operations are performed on it.
Have students design and build a simple fixture to be used with a
project on a lathe, grinder, or drill press.
8.4 To be able to identify the
different types of jigs and
fixtures.
Have students research and collect examples of jigs and fixtures.
If possible arrange a tour of a local manufacturing company that
uses jigs and fixtures.
25
Module 9: Cutting Fluids (Optional)
Suggested time: 2-4 hours Level: Introductory
Prerequisite: Module 1
Foundational Objectives
To identify and explain health and safety hazards in the workplace so that the potential for personal
injury and damage to the equipment and the environment are minimized.
To gain an overview of the different machining processes.
To understand the properties and uses of different materials used in machining.
Common Essential Learnings Foundational Objectives
To handle, use, and dispose of materials safely. (TL)
To interpret and report results of learning experiences. (IL)
Learning Objectives
Notes
9.1 To understand the purpose of
cutting fluids. (IL)
Have students collect literature on cutting fluids from different
manufacturers.
Have the students list the functions served by cutting fluid.
9.2 To describe the properties of
different types of cutting fluids.
(COM)
Have the students research the properties of a variety of cutting
fluids to discover that different fluids are used for different
applications.
Collect samples of as many different cutting fluids as possible for
comparison.
9.3 To describe different methods
of application for each type of
cutting fluid.
Have the students do research to find when each type of cutting
fluid is used and when certain types of cutting fluids should not be
used.
9.4 To describe the safe use,
storage, and disposal of each
type of cutting fluid. (COM)
Stress safety concerns with the different types of cutting fluids and
the application of cutting fluids.
If mist or vapour is present as a result of the cutting process, a
respirator is necessary in addition to eye protection.
Proper safety equipment must be worn when working with or
handling cutting fluids.
Discuss with the students the proper method to dispose of oil in an
environmentally responsible fashion. Many communities have an
oil collection site where used oil is stockpiled for recycling.
26
Module 10: Drills and Drilling Machines (Core)
Suggested time: 5-10 hours Level: Introductory
Prerequisite: Modules 1 and 2
Foundational Objectives
To develop proficiency in the safe use of hand and machine tools.
To learn about the evolution of machine tools.
To increase self-esteem from success with the equipment, materials, and techniques used.
Common Essential Learnings Foundational Objective(s)
To learn technical terms associated with the subject area. (COM, TL)
Learning Objectives
Notes
10.1 To understand the operation of
a drilling machine. (TL)
Have the students list the styles and types of drilling machines,
work-holding devices, jigs, and setups as well as the variety of drill
press machining operations.
Have the students identify the parts of the drill press and how a
drill press is sized.
10.2 To name the parts of a twist
drill. (COM)
Have students research the manufacturing process for twist drills
and identify the parts of a twist drill as part of an exercise to
describe how a drill cuts a hole.
10.3 To understand the procedures
that will ensure safe drilling
operations. (PSVS)
Have students prepare a poster of safety rules, including personal
safety equipment, that should be followed when using drills or drill
presses.
Have students demonstrate the safe use of various types of hold
down devices.
Have students do demonstrations of safe tool operations.
An example of what can happen when a loose sleeve comes in
contact with a drill bit can be demonstrated with a scrap of fabric
laid on a piece of wood and touched by the rotating drill bit.
10.4 To understand the use of
cutting speed and feed tables.
(NUM)
Have students demonstrate the use of speed and feed tables by
adjusting drill press speed to determine proper settings for drilling
in a variety of metals.

27
Learning Objectives
Notes
10.5 To operate drilling equipment
used in machining operations.
(PSVS)
Have the students demonstrate the setup sequence and operation
of a drill press and portable drills. The use of a centre finder or a
punch to mark the hole location to guide the drill is recommended.
Remind students of the need to wear the proper safety equipment
for the operation they are doing.
Select projects like a drill gauge plate as an exercise to develop skill
with drills and the drilling operations. This project could then be
used to determine drill size when the stamped size on the shank
has become illegible.
Students should practice using the drill press on flat and round
stock with a number of different types of material.
Review the purpose and use of cutting fluid.
10.6 To describe and compare the
various drill series that are
available.
Have the students determine the common drill series available in
sets from tool dealers. There are also different levels of quality
available in drill bits that students might experiment with to
determine the cost effectiveness of buying cheaper or more
expensive drill bits.
Have students find examples of other types of drills and drill sizes
that would be useful in machining operations.
10.7 To sharpen a twist drill bit.
The three factors for students to remember when sharpening a
twist drill are:
maintaining the dead centre
lip clearance
length and angle of the lip
Have students practice drill bit sharpening using old or dull bits. It
is important that students do not allow the bit to overheat as it will
lose its temper. Allow hot bits to cool in the air, not in water. The
rapid change in temperature resulting from dipping in water will
make the metal in the bit brittle.
A poster assignment of drill bit sharpening problems might be
useful to help students recognize any problems they encounter
during their sharpening practice.
A project to consider for the students is a drill point gauge that
helps to check and maintain the dead centre and lip angle when a
drill bit is sharpened. A purchased gauge might act as a template
for the project.
10.8 To perform countersinking
operations on a drill press. (IL)
The students could demonstrate the purpose of countersinking by
flush mounting a flat head fastener.
It might be possible to find high speed steel (HSS) drills that have a
countersink built into the drill rod.
28
Learning Objectives
Notes
10.9 To perform counterboring and
spotfacing operations on a drill
press.
These operations both provide a flat surface against which to
tighten a fastener.
Have students demonstrate the counterbore procedure by
preparing the drilled hole for a fastener that is set below a flat
work surface.
Have students demonstrate the spotfacing procedure by preparing
a hole for a fastener that is set on a rough or irregular work
surface.
10.10 To demonstrate the use of a
drill press to assist tapping a
drilled hole.
The drill press can be used as a steady rest for the tap to keep the
tap aligned vertically during the tapping procedure. The drill press
has a dead centre clamped in the drill chuck and positioned on the
top of the tap. As the tap is turned by hand, the drill press
handwheel or lever moves the quill down as the tap moves through
the drilled hole.
Remember the drill press is used as a guide and is not
turned on during this operation. A tap is not designed to be
used in a drill chuck (without a tapping attachment to reduce drill
press speed) and to do so would shatter the tap.
10.11 To demonstrate the use of a
reamer.
Have students select the appropriate reamer and ream a pre-drilled
hole to produce a smooth surface.
A reamer will also provide a hole that is round. Some drills and
drill presses can cut distorted out-of-round holes. The reamer is
the tool to use to insure the hole produced is round.

29
Module 11: Offhand Grinding (Core)
Suggested time: 5-8 hours Level: Introductory
Prerequisite: Modules 1 and 2
Foundational Objectives
To develop proficiency in the safe use of hand and machine tools.
To gain an overview of the different machining processes.
To be knowledgeable about the impact of new technologies in the machining industry.
Common Essential Learnings Foundational Objectives
To equip the student with the knowledge needed to recognize and correct unsafe working conditions.
(CCT)
To be aware of safety issues and to value the importance of safe work practices. (PSVS)
Learning Objectives
Notes
11.1 To identify and describe the use
of each of the different types of
offhand grinders.
Have the students identify different types of offhand grinders and
the situations when each is best suited.
Have the students compare when it is best to use a dry-type grinder
or a wet-type grinder.
11.2 To identify structural
characteristics of grinding
wheels.
Have students identify and list the characteristics of different types
of abrasives that are used for grinding wheels. The list should
include synthetic materials as well.
11.3 To identify operating
characteristics of grinding
wheels. (TL)
Have the students list the characteristics that should be considered
when a grinding wheel is selected. They might consider size,
shape, thickness, abrasive size and type, bonding agent, hardness,
and operating speed limitations.
11.4 To dress and true a grinding
wheel.
Have the students dress and true a grinding wheel. This is an
operation that will create a lot of debris and dust. Make certain the
students are wearing appropriate safety equipment and a dust
mask.
11.5 To prepare a grinder for safe
operation. (PSVS)
Review the inspection procedure for the grinder and have the
students:
determine if the selected grinding wheel is appropriate for the
task
check grinding wheels for any defects that would make them
unsafe to use (chips and cracks)
properly adjusted tool rest and the possible need for adjustment
during the grinding procedure
correctly place all guards and spark deflectors
use of required personal safety protective equipment
11.6 To describe and demonstrate
procedures to perform offhand
grinding safely.
The students could make posters for use in the shop that contain
the safety information necessary for correct selection of grinding
tools, maintenance, and safe machine tool operation.

30
Learning Objectives
Notes
Students can practice offhand grinding skills using various
thicknesses of scrap steel. Skill building with grinding operations
should be done with smaller machines to allow students to gain
confidence in their abilities.
Choose a variety of scrap steel samples that have different
properties. The properties can be identified by the patterns of the
sparks they emit.
Students need to understand what metals can or cannot be ground
on shop grinding machines.
When demonstrating offhand grinding techniques, be sure that:
equipment is properly adjusted with all guards and safety
devices in place
students are wearing approved eye protection
grinding wheels are solid, dressed, and running true.
31
Module 12: Saws and Cutoff Machines (Core)
Suggested time: 5-7 hours Level: Introductory
Prerequisite: Modules 1 and 2
Foundational Objectives
To develop proficiency in the safe use of hand and machine tools.
To gain an overview of the different machining processes.
Common Essential Learnings Foundational Objective(s)
To distinguish between quantitative situations where precision is required and those where
approximations are acceptable. (NUM)
Learning Objectives
Notes
12.1 To identify the types of saws
and cutoff machines commonly
found in machine shops.
Have the students collect pictures as examples of different types of
cutting tools used in the machining trade and describe how they
operate.
Have the students draw and label the features of the different types
of power saws.
12.2 To use correct criteria for
selecting the correct cutting
blade for various tasks. (CCT)
Have the students select the correct blade for cutting different types
of metals. The hardness and the shape of the metal (rounds, flats,
pipe, and angles) being cut will also have a bearing on the saw blade
selected.
12.3 To install a blade and ready
the machine for use. (TL)
Have the students carefully read the instruction manuals that come
with the saws to learn how to properly install and tension the blade.
The students should review the safety rules required when handling
saw blades as they are sharp. New saw blades will be coiled. When
releasing the coil, caution is urged as the coil will spring free.
12.4 To be able to position the
material to prepare for cutting
safely.
Have students demonstrate the proper way to prepare, mount and
secure material in preparation for cutting.
Different types of material will require different cutting speeds or
the feed pressure to cut properly. Students could prepare a chart to
show various materials and their individual requirements.
12.5 To be able to safely use the
sawing and cutoff machines.
Students could prepare a safety video on the safety precautions to be
observed when power sawing.
12.6 To be able to diagnose sawing
problems. (CCT)
Have the students review samples of material that illustrate cutting
problems Have the students troubleshoot the problems and solve
them.
32
Module 13: Metal Characteristics (Optional)
Suggested time: 3-5 hours Level: Introductory
Prerequisite: None
Foundational Objectives
To understand the properties and uses of different materials used in machining.
To use correct machining methods for different types of materials.
To safely machine different types of material.
Common Essential Learnings Foundational Objectives
To use and understand the terminology related to machining in context. (COM)
To use reference material to enhance learning. (COM)
Learning Objectives
Notes
13.1 To explain different metal
classifications.
Have the students determine whether a metal is a ferrous or a
nonferrous metal and create a list of metals and their properties.
The properties to examine include:
base metal or an alloy
ferrous metals include cast iron, steel, alloy steel, sintered, steel
and stainless steel
non-ferrous metals do not contain iron as a basic ingredient.
13.2 To describe the characteristics
of types of steel.
Have the students prepare a chart of alloying elements that could
be added to steel and the effect the element produces to enhance
the steel’s properties.
Students could also collect samples of different steels and
experiment with them to see how they differ. Things to examine
might include:
Hardness: Does the sample mark easily when scratched?
Flexibility: Can the sample be bent?
Colouration: Is the sample shiny or dull?
Have the students prepare samples of mild steel and, using a range
of temperatures and an ordinary oven, create samples that show
the colouration that occurs when ferrous metals are heat treated.
The students can then describe the colour’s characteristics.
The students could do a spark test with a grinding wheel to
determine the grade of steel and put their observations on a chart
or poster.
33
Learning Objectives
Notes
13.3 To identify the characteristics
of non-ferrous metals.
Have students prepare a list of non-ferrous metals and their
characteristics. List the advantages that these metals have when
compared to ferrous metals.
The common non-ferrous metals students could review include:
aluminum
magnesium
titanium.
13.4 To identify other types and
classifications of metals that
may be machined.
The other types of metals the students could collect examples of or
research include:
Copper based alloys: copper, brass, bronze, and beryllium
copper
High temperature metals: nickel alloys, molybdenum,
tantalum, and tungsten
Rare metals: scandium, yttrium, cerium, euporium,
langthanum, and holmium.
13.5 To handle and store metal
safely. (PSVS)
Review with the students the safety requirements to be observed
when moving heavy materials. It is important for the students to
recognize the potential for injury that heavy metal bars and plates
can create as their weight is not always related to their size.
13.6 To identify metal products
using standardized codes.
(TL)
Have the students identify a number of samples by using the
appropriate code and/or the colour coding system established by the
Society of Automotive Engineers (SAE), the Aluminum Association
Designation System, and the American Iron and Steel Institute
(AISI).
34
Module 14: Heat Treatment of Metals (Core)
Suggested time: 3-5 hours Level: Introductory
Prerequisite: Module 2
Foundational Objectives
To understand the properties and uses of different materials used in machining.
To gain an overview of the different machining processes.
Common Essential Learnings Foundational Objectives
To be able to use and understand the terminology related to machining in context. (COM)
To handle materials in a safe and efficient way. (IL, PSVS)
Learning Objectives
Notes
14.1 To understand the reasons for
heat treating metals. (TL)
Everyday items must be heat treated to fulfill their function. Have
the students list reasons why metals might be heat treated and
provide examples of those applications.
14.2 To list the properties and
characteristics of metals that
can be heat treated.
Most metals that are heat treated are ferrous metals. Have the
students explain why some metals can be heat treated and others
cannot. Make a list of nonferrous metals that may be heat treated.
14.3 To describe different ways
that metals are heat-treated.
Have the students list and describe the various methods of heat
treating metals and the results which are obtained for each
method. Include the following heat treatment methods:
stress-relieving
annealing
normalizing
hardening
surface hardening
case hardening
tempering (drawing).
The hardening process can be accomplished in a variety of ways
usually requiring additional heat treatment.
14.4 To describe different methods
of heating and quenching
metals.
Have the students discuss methods of heating metals. List the
procedures and methods used to quench metals that are being heat
treated.
A colour chart of temperatures would help the students to identify
the temperature range for ferrous materials that the students are
heating for tempering.
14.5 To harden and temper carbon
steel samples. (IL)
Have students heat samples of carbon steels to a variety of
predetermined temperatures and record the colours of the steel as
the temperature of the furnace or oven they are using is raised. An
ordinary kitchen convection oven will provide an opportunity for
students to experiment with colours and heat treating. The colours
obtained at lower temperatures will tend toward the bluer end of
the colour spectrum.

35
Learning Objectives
Notes
14.6 To describe hardness testing
techniques and methods.
The students might collect information on the different types of
hardness testing equipment that are available and the purpose that
this type of testing is used for in the machining industry.
If possible have the students temper a carbon steel sample and
compare its characteristics with a sample of the same material that
has not been tempered in order to see the effects of this process.
14.7 To describe and demonstrate
the safety precautions that
must be taken when heat-
treating metals. (PSVS)
Review with the students the safety precautions needed when they
are handling hot metals. There are also ventilating precautions to
be observed when hot metals are quenched.
36
Module 15: Metal Finishing (Optional)
Suggested time: 2-4 hours Level: Introductory
Prerequisite: Module 1
Foundational Objectives
To gain an overview of the different machining processes.
To be able to produce parts to meet given specifications.
Common Essential Learnings Foundational Objectives
To be able to use and understand the terminology related to machining in context. (COM)
To understand the terms and symbols used to determine surface roughness. (COM)
Learning Objectives
Notes
15.1 To describe how the finish of a
machined surface is
designated. (COM)
Have the students use diagrams and correct terms to explain how
and why a standard for metal finishing is required.
15.2 To explain the relationship
between the quality of a
machined surface and
production costs.
The students might examine the tradeoffs that finishing and cost
have to offer in terms of cost input and economic return
15.3 To identify the set of numbers
and symbols indicating
surface roughness.
Have the students prepare a chart of the texture symbols and
roughness values that are part of the standardized system that
describes degrees of surface roughness.
If possible, have the students compare samples that have different
surface roughness. This would help to develop an appreciation for
the requirements that some machining operations require.
15.4 To describe the purposes of
metal finishing. (COM)
There are many reasons and methods used to finish metal. Have
the students list the different ways that metal can be finished and
the reasons for that method.
15.5 To demonstrate finishing
techniques. (IL)
The students can apply finishing techniques that are appropriate
for the metal projects they have selected in other modules.
15.6 To demonstrate the
application of an organic
coating. (IL)
The students will be familiar with the process of applying organic
coatings in woodworking. The students could apply a paint coat to
their project in a number of different ways, as a demonstration of
organic finishing. Discuss the following processes with students:
Inorganic coatings and the application processes and materials
involved.
Why the chemical blackening process is used.
Mechanical finishes and their processes of application.
15.7 To list the types of inorganic
coatings used in industry.
The inorganic coating methods of anodizing, electro-brightening,
and porcelain (vitreous coating) are the common types of inorganic
coatings.
Another inorganic coating method is to use chemical blackening, a
black oxide coating, to enhance machined surfaces and increase
wear resistance.
37
Module 16: Career Opportunities (Core)
Suggested time: 3-5 hours Level: Introductory
Prerequisite: None
Foundational Objectives
To become aware of the variety of jobs and career opportunities in the machining trades.
To create an awareness of apprenticeship programs and opportunities in Saskatchewan.
Common Essential Learnings Foundational Objectives
To develop students’ abilities to access knowledge. (IL)
To promote both intuitive, imaginative thought and the ability to evaluate ideas, processes, experiences, and
objects in meaningful contexts. (CCT)
To recognize that learning is continuous from birth to death. (IL)
Learning 0bjectives
Notes
16.1 To explore the designated
trades.
Students will define apprenticeship. Generate a list with students of
apprenticeship trades and a definition of an apprentice. Outline the
advantages and disadvantages of apprenticeship.
16.2 To explore how the
Secondary Level curriculum
articulates with Level I of
the trade. (COM)
Show students the training plan. Explain how completing all the
objectives and covering the appropriate modules can prepare them to
challenge the Level One exam.
16.3 To generate a list of career
opportunities related to the
machining industry. (COM)
Students will create a list of different career opportunities in the
upholstery industry. Encourage students to use a variety of sources for
information: guidance counsellors, libraries, community resources,
career software packages, personal interviews, government resources,
websites, etc.
16.4 To identify personal skills
and interests that may lead
to career exploration. (CCT)
Ask each student to create an inventory of personal interests and skills.
Have each student examine his or her list to determine how these
interests and skills may be combined with career opportunities in the
upholstery industry in the community.
Websites that will be of interest when conducting research can be found
in the bibliography.
16.5 To determine skills and
interests that enhance
career decisions. (CCT)
From the list created, ask the students to select two choices of possible
occupations for further research. Investigate the choices including:
description of work duties
what personal qualities individuals should possess
how personal interests and skills correspond to choice
process to become certified within the trade/career
length of education and training
school locations
cost of education and upgrading
trends within the business or career
the best and worst parts of the job
beginning salary
opportunities for advancement.

38
Learning Objectives Notes
If a student engages in work study, he or she may investigate career
links within the community for possible work study placements. The
student may conduct an interview of the professional/tradesperson as
part of his or her experience. Refer to Appendix D, Career Research
Interview Questions.
39
Module 17A: The Lathe, Introduction (Core)
Suggested time: 5-7 hours Level: Intermediate
Prerequisite: Modules 1 and 2
Foundational Objectives
To be able to produce parts to meet given specifications.
To increase self-esteem from success with the equipment, materials, and techniques used.
Common Essential Learnings Foundational Objectives
To be able to use and understand the terminology related to machining in context. (COM)
To use the correct terms to describe the various cutting operations preformed on a lathe. (TL)
Learning Objectives
Notes
17.1 To identify and describe the
function of the various parts of
a machinist’s lathe.
Have students draw and label a diagram of a lathe and describe the
operating characteristics of the various components. Some lathes
have a large number of parts and accessories important to the
operation of the machine. This may be an opportunity to divide
students into groups to report on major components of a lathe.
17.2 To describe how a machinist’s
lathe operates. (COM)
The lathe is a versatile tool and capable of many single and
compound operations. Have the students describe the various
operations that can be performed on the lathe and how the lathe
size is determined.
Arrange a tour of a machine shop, if possible, to look at the
machinist’s lathe tools.
17.3 To understand the precautions
necessary when preparing to
operate a lathe.
The students could make a checklist to help prepare a lathe for
operation. The students should establish a routine to follow before
turning on the lathe that includes regular maintenance and
lubrication requirement items.
The lathe will need to be cleaned each time it is used to remove
waste and other contaminants that might cause corrosion to the
lathe. This should be the last operation done on a lathe every time
it is used.
17.4 To list the precautions and
personal safety equipment
needed to operate a lathe.
(COM)
Students need to be reminded of the importance of wearing proper
clothing that is in good repair and appropriate for the task they are
undertaking.
The use of eye protection and other safety equipment will be
required for different operations with the lathe.

40
Module 17B: Lathe Cutting Tools (Core)
Suggested time: 5-7 hours Level: Intermediate
Prerequisite: Modules 1, 2, and 17A
Learning Objectives
Notes
17.5 To describe the different styles
and types of lathe tool cutters.
(COM)
Have students prepare a chart of various types of cutters and the
type of work that each cutter style performs.
The most common cutters that students use will be made from high
speed steel (HSS). Other types of cutters have inserts or carbide
tips and can be run at much higher cutting speeds. These are
specialized tools and are costly but should be reviewed as they are
widely used in industry.
Have students make a tool board with the nine basic categories of
cutting tools.
17.6 To sharpen HSS lathe cutting
tools. (IL)
Have students begin by preparing a step by step guide to follow
when making a cutting tip with tool steel. Begin with the easier to
shape profiles to give the student confidence and a tool that will
accomplish a beginning task such as, a roughing out tool.
It may be easier for the students to follow if a sample pattern for
them to copy is available as they follow the grinding sequence for
their version of the tool.
Have students examine other HSS cutting tools and how they are
shaped for different types of turning.
Demonstrate the purpose of a chipbreaker incorporated with the
cutting tip to prevent long continuous chips that may become
tangled in the lathe as the work is turned.
17.7 To safely and correctly use
American and Turret tool
holders.
Lathes may have different styles of tool holders and students will
need to be aware of how to correctly secure the cutter into the
holder they will be working with as well as to make the correct
adjustments.

41
Learning Objectives
Notes
17.8 To safely set up and operate a
lathe using cutting tools. (IL,
TL)
After completing a demonstration of all the necessary steps to
follow to setup the lathe, have the students set up a simple project
to operate the lathe. Students will be doing only very simple
operations to demonstrate their ability to start and operate the
lathe.
17.9 To sharpen a cutting tool.
(TL)
It will also be necessary to sharpen cutting tools from time to time.
Therefore, students will need to know how to tell when the cutter
they are using has become dull. Students should learn how to
handle sharpened cutting tools to prevent injury and premature
cutting tool wear.
42
Module 17C: Cutting Speeds and Feeds on the Lathe (Core)
Suggested time: 5-7 hours Level: Intermediate
Prerequisite: Modules 1, 2, and 17B
Learning Objectives
Notes
17.10 To read a cutting speed and
feed chart to determine the
correct cutting speed for the
material being machined.
Have the students list the factors that affect cutting speeds and
feeds.
The students could do a video or a class presentation on how lathe
speed and carriage feed is set for different materials.
Review the cutting operation with the students and have them give
reasons for making different types of cuts. The students also need
to know how the depth of cut is determined on lathes.
Demonstrate the difference between roughing cuts and finishing
cuts. Ensure that all students are wearing approved eye protection
during all machining operations.
17.11 To calculate correct speed and
feed based on the material
used, the size of the part being
machined, and the cutter
being used.
The students should do calculations to determine cutting speeds
and feeds for a variety of materials.
Have students demonstrate the use of the formula:
4(CS)=R.P.M.
D
Students will need some time working on project problems to
become confident at calculating the speed they should run their
lathe for different applications. Give them a project assignment
where they need to calculate several problems related to lathe
speeds and feeds.
43
Module 17D: Mounting Work Between Centres on the Lathe (Optional)
Suggested time: 2-4 hours Level: Advanced
Prerequisite: Modules 1, 2, and 17C
Learning Objectives
Notes
17.12 To identify various work
holding attachments. (TL)
Have the students identify the various work holding devices that
can be used on a lathe. Discuss and demonstrate the various work
holding attachments set up on the lathe.
Have the students select the proper holding device and
demonstrate its use.
Review the safety precautions that must be observed when
mounting the attachments on the lathe and when the attachments
are being used.
17.13 To select and use a centre
drill. (TL)
Have the students prepare stock material for turning between
centres. They will need to locate and centre-punch the centre of the
stock and select the correct centre drill to prepare both ends of the
material for securing in the lathe.
17.14 To check for centre alignment.
(TL)
Have the students demonstrate how to check a lathe to be certain
the headstock and tailstock centres are aligned. Turning a shaft of
consistent diameter and flipping it end for end would prove the
centre alignment of the lathe.
Students could also demonstrate the adjustment methods that can
be used on the lathe to true the alignment.
17.15 To correctly position the tool
holder and cutting tool. (TL)
Most lathes that students will use have a round tool post and hold
a single tool holder. Have the students identify the different styles
and the correct application for each type of tool holder.
Have the students demonstrate the correct method of fastening the
cutting tools to the tool holder and positioning the tool holder in the
tool post.
17.16 To safely mount and prepare
material for turning between
centres. (IL)
Have the students review the following and then demonstrate the
turning between centres operations:
Set up a lathe for turning between centres.
Properly drill center holes.
Check for center alignment.
Select the proper size lathe dog.
Properly mount work between centres.
Emphasize the safety precautions that must be observed when
turning between centres.
Turn to a shoulder.
Perform grooving or necking operations.
Safely perform parting operations.

44
Module 17E: Turning Between Centres on the Lathe (Core)
Suggested time: 5-10 hours Level: Advanced
Prerequisite: Modules 1, 2, and 17D
Learning Objectives
Notes
17.17 To face material mounted on
the lathe. (IL)
Have the students face the material and list the purpose for this
operation.
17.18 To describe the rough turning
and finishing sequence on a
plain turned surface. (COM)
Have students discuss and demonstrate on a mild steel sample
rough turning to a specified size and then finish turning a smooth
surface to the final size requirement.
17.19 To demonstrate the cutting
characteristics of a variety of
cutting toolbits. (TL)
The students can prepare a single piece of stock to use as a
reference using a variety of different cutting toolbits. If a variety of
toolbits are not available students could prepare a chart of the
different types and their uses.
17.20 To demonstrate shoulder
turning.
There are three common shoulder turning operations. Have the
students demonstrate the procedures needed to complete the three
types of shoulder cuts.
17.21 To describe the procedure for
filing and polishing. (COM)
If cutting tools are kept sharp, the need for these procedures is
minimized. It should be mentioned that these procedures are not a
substitute for a properly sharpened cutting toolbit.

45
Module 17F: Lathe Chucks (Optional)
Suggested time: 2-4 hours Level: Advanced
Prerequisite: Modules 1, 2, and 17A
Learning Objectives
Notes
17.22 To describe various types of
chucks used on a machinist’s
lathe. (COM)
Have students compare the different styles of chucks and the types
of jobs each is best suited to perform.
Demonstrate the use of the Jacobs chuck for small turning
applications in the tailstock and headstock.
17.23 To safely turn work mounted
in a chuck.
Have the students demonstrate how the various types of chucks are
used. Have students report on the following:
The advantages and disadvantages of the 3-jaw universal
chuck.
The installation of jaws in the universal chuck.
The advantages and disadvantages of the 4-jaw independent
chuck. The 4-jaw independent chuck is very important in
machine shops today and students need to have this chuck
demonstrated to them completely.
How to centre work in an independent chuck.
How to mount and remove chucks safely. Emphasize the safety
precautions that must be observed when turning work mounted
in a chuck. Caution students to never leave the chuck
wrench in the lathe chuck. The only time the wrench
should be in the chuck is while the student’s hand is on
it and he or she is adjusting the chuck.
Facing stock in a chuck will demonstrate whether the cutting
tool is above or below center.
17.24 To face material mounted in a
chuck on the lathe. (IL)
Have the students face the material and list the reasons for this
operation.
46
Module 18: Cutting Tapers on the Lathe (Optional)
Suggested time: 3-5 hours Level: Intermediate
Prerequisite: Module 17C
Foundational Objectives
To gain an overview of the different machining processes.
To be able to use and understand the terminology related to machining in context.
Common Essential Learnings Foundational Objectives
To increase self-esteem from success with the equipment, materials, and techniques used. (PSVS)
To be able to use and understand the terminology related to machining in context. (COM)
To be able to calculate the amount of taper using the various formulae. (NUM)
Learning Objectives
Notes
18.1 To describe how to turn a
taper on a lathe. (COM)
Have the students set up the lathe and demonstrate the various
ways tapers can be cut. Discuss the advantages and disadvantages
of the various methods used to cut tapers.
18.2 To calculate tailstock setover
needed to turn a taper.
(NUM)
Have the students solve problems for projects that require:
how to calculate tailstock setover using mathematical formulae
whether taper per inch (TPI), taper per foot (TPF), or taper
dimensions are known
the mechanical methods used to setover the tailstock
types of taper attachments and how to set them
how to measure tapers.
18.3 To calculate taper when using
a taper attachment. (NUM)
This is a guide that can be attached to most lathes and is the
preferred method used to cut tapers.
Have students examine both the plain and telescoping taper
attachments.
18.4 To safely set up a lathe and
turn a taper.
Emphasize the safety precautions that must be observed when
cutting tapers.
Have students measure the tapers they have created using a taper
plug gauge and also a micrometer.

47
Module 19: Cutting Screw Threads on the Lathe (Core)
Suggested time: 10-15 hours Level: Advanced
Prerequisite: Module 17C
Foundational Objectives
To gain an overview of the different machining processes.
To be able to use and understand the terminology related to machining in context.
Common Essential Learnings Foundational Objectives
To learn and use the language and terms of the machining trade. (COM)
Learning Objectives
Notes
19.1 To describe various
applications for screw threads.
(COM)
The students could research the different ways that screw threads
have been used. This need not be limited to fasteners but might
also include ideas like moving grain with an auger or water using
an Archimede’s screw. Students could build models of different
applications for screw threads.
19.2 To identify the terms related
to screw threads.
Have the students review thread nomenclature and prepare labeled
diagrams of different screw thread forms.
19.3 To describe the various forms
of screw threads.
Have the students collect examples of different screw thread forms
and give examples of their application.
Emphasize safety precautions to be observed when cutting threads
on a lathe.
19.4 To cut external screw threads
on a lathe. (IL)
Have the students develop a checklist to follow before they begin
this procedure. Explain the procedure and demonstrate cutting
external threads. Points to include:
How to sharpen lathe threading tools.
Setting up a lathe to cut 60 degrees threads.
Using the thread dial.
Threading tool cutting action.
Using cutting fluid.
Ending the thread cut.
19.5 To demonstrate the cutting of
different kinds of threads on
the lathe. (IL)
Student projects could demonstrate cutting the following thread
types:
right hand threads
left hand threads
square threads
acme threads.
48
Learning Objectives
Notes
19.6 To cut internal threads on a
lathe. (IL)
Have the students explain the procedure and then demonstrate the
procedure for cutting internal threads.
This procedure is more difficult as the thread cutting is blind to the
operator and is optional.
19.7 To measure threads. (NUM) There are different methods used to measure threads. The
simplest way to measure threads when close tolerances are not
specified is to use a screw pitch gage or trial fitting with a fastener.
Have students use “the three wire method” and if possible use a
thread micrometer if one is available.
49
Module 20: Additional Lathe Operations (Optional)
Suggested time: 5-10 hours Level: Advanced
Prerequisite: Module 17C
Foundational Objectives
To operate a lathe to do boring, drilling, reaming, filing, polishing, and knurling operations.
To be able to produce parts to meet given specifications.
Common Essential Learnings Foundational Objectives
To be able to use and understand the terminology related to machining in context. (COM)
To learn and use the language and terms of the machining trade. (COM)
To increase self-esteem from success with the equipment, materials, and techniques used. (PSVS)
Learning Objectives
Notes
20.1 To identify various work
holding devices. (COM)
Have the students identify and describe the function of different
types of work holding devices, in addition to lathe chucks.
20.2 To set up steady and follower
rests properly. (TL)
Have the students set up and demonstrate the use of both rests on
a project that requires additional support as it is worked.
20.3 To machine an internal
surface by boring. (IL)
Have students identify the differences between internal (boring)
and external (conventional) cutting operations on the lathe.
When demonstrating the operation, discuss selection and
positioning of the boring bar and the precautions that cutting by
“feel” require.
20.4 To perform drilling operations
on the lathe. (IL)
Have students set up and demonstrate the procedure for drilling
with a stationary drill with drill sizes less than one-half inch held
in a Jacob’s chuck. As well, for drills creating holes larger than
one-half inch, it is necessary to use taper shank drills. If the taper
does not fit in the tailstock, it will be necessary to use a lathe dog to
hold the drill while the handwheel is used to move the bit into the
work.
Have students use a centre drill to ensure accuracy. Holes that are
over one-half inch in diameter will require a pilot hole.
Be certain to use a cutting fluid during this drilling operation.
Review the safety procedures that need to be followed when
drilling.
50
Learning Objectives
Notes
20.5 To demonstrate the use of a
reamer on the lathe.
Have students select the appropriate reamer and ream a pre-drilled
hole to produce a smooth inner surface.
A reamer will also provide a hole that is accurate and round. Some
drills can cut distorted out-of-round or off-centre holes. The reamer
is the tool to use to ensure that the hole produced is round.
Do not use a hand reamer with a lathe that will be under power.
Machine reamers are used for the operation that is carried out
under power on the lathe. The cutting speed for a reamer is
generally about two-thirds the speed used to cut the hole being
reamed.
20.6 To select and install a
mandrel.
The students can install a manufactured hardened steel or
machined mandrel made from mild steel to fit the requirements for
the assigned turning task.
20.7 To perform grinding
operations on a lathe.
It is possible to attach a tool post grinder to do various operations
that include sharpening tools or truing lathe centres.
Internal and external grinding attachments are also available to do
finish work.
Care needs to be taken to cover exposed areas of the lathe when
grinding to prevent dust and grit from falling on moving parts and
creating excessive wear. Discuss with students:
reasons that filing and polishing on the lathe should be kept to
a minimum
a safe way to file.
20.8 To perform milling operations
on a lathe.
Have students demonstrate the milling procedure if possible.
There are limited horizontal milling operations that can be done on
the lathe.
20.9 To discuss the possible
industrial applications of the
lathe.
Have students research and report on the variety of industrial
applications for which a lathe can be used.
Students could report on large industrial or computer numerical
control (CNC) lathes used in manufacturing to machine repetitive
turnings or the smaller manually operated lathes for limited
production or custom work (as the lathes used in schools).
20.10 To use a lathe file. Have the students identify the differences between a mill file and a
long angled lathe file.
Have the students demonstrate the proper safety precautions to
use when filing and why it is better to file left-handed than right
handed.
51
Learning Objectives
Notes
20.11 To describe the procedure for
knurling. (COM)
Have the students discuss and demonstrate the following:
reasons for knurling work
different types of knurls
different styles of knurling tools
lathe speeds and feeds to use for knurling
how to set up the lathe for knurling.
20.12 To perform knurling on a
lathe. (IL)
The procedure will produce a gripping surface on the stock
material. A handle for a project is an example of an opportunity for
students to practice their skill with the knurling tool.
20.13 To polish on the lathe. The quality of the finish will depend on the coarseness of the
abrasive cloth that is being used to polish the surface. Aluminum
oxide is used for ferrous metals and silicon carbide for non-ferrous
metals.
Have students finish all assignments with a finishing polish to
provide the cleanest surface. A few drops of oil during the final
passes will help to prevent oxidization of the surface.
Alternatively, if the product is to be used as a display, it could be
coated with a permanent finish.
52
Module 21: Band Machining (Core)
Suggested time: 5-10 hours Level: Intermediate
Prerequisite: Modules 1, 2, 9, and 12
Foundational Objectives
To develop proficiency in the safe use of hand and machine tools.
To gain an overview of the different machining processes.
To prepare and carry out band machining operations.
To handle, use, and dispose of materials safely.
Common Essential Learnings Foundational Objective(s)
To use the technical terminology specific to the machining trade. (COM)
Learning Objectives
Notes
21.1 To describe the operation and
function of a band machine.
(COM)
Have students prepare a sketch of a band machine and a
description of the operating features.
21.2 To describe the advantages of
band machining. (COM)
The students could look for similar machines that use a continuous
blade system to cut material and describe the advantages that the
vertical band machine holds as compared to the other saws. The
students could collect samples or drawings of the different types of
work that each type of saw is capable of producing.
21.3 To choose the appropriate
blade for the task. (CCT)
Have students list the different types and characteristics (different
widths, sets, and tooth forms) of the saw blades used in band
machines.
Students need to know blade terminology and how to select a blade
to match the job or material requirements. (COM)
21.4 To install a blade on a band
machine. (TL)
Caution students about handling saw blades. Care needs to be
taken when pre-welded blades are uncoiled as they will open up
like a spring. Heavy gloves should be worn to work with blades to
avoid injury. Have the students practice handling and mounting
different sizes and types of blades.
Make certain the teeth are running in the downward direction
through the table and that correct tension has been applied to the
blade. The blade guides and tracking will need to be adjusted for
different sizes of blades.

53
Learning Objectives
Notes
21.5 To operate a band machine
safely. (PSVS)
The students could do demonstrations to prove that they can safely
follow the set-up and operate the saw. The demonstration should
include:
correct procedure to follow when changing blades
to handle, use and dispose of materials safely
possible band machining problems and how to correct them
determining and setting the proper cutting speed
setting the cutting speed
selecting and adjusting cooling fluids
straight sawing
contour sawing
using power feed (if available).
21.6 To describe other operations
which are done on banding
machines. (COM)
The additional operations for students to describe include:
band filing
band polishing
friction sawing
types of specialty blades and their applications.
21.7 To prepare and weld a blade
and mount it on the band
machine.
Have the students demonstrate the procedures to prepare a blade
for welding. Most band machines have a built-in blade shear,
grinder, welder, and annealer designed for the welding operation.
The procedure should include the following steps:
Shear the blade to square the ends.
Determine the amount of material consumed by the welding
process.
Remove teeth from the blade to maintain correct tooth spacing
and set.
Set-up and weld the blade according to the manufacturer’s
instructions.
Anneal the blade to remove the brittleness created by the
welding process.
Grind the band weld, avoiding the teeth.
Mount the blade on the tool as indicated in 17.4.
Students could also prepare a set of welded blade sections
illustrating different welding problems that might occur when
welding blades and steps to correct them. In addition, a set of scrap
blade sections could be used to illustrate the steps needed to weld a
blade.
54
Module 22: Broaching Operations (Core)
Suggested time: 5-10 hours Level: Advanced
Prerequisite: Modules 1 and 2
Foundational Objectives
To develop proficiency in the safe use of hand and machine tools.
To gain an overview of the different machining processes.
Common Essential Learnings Foundational Objectives
To learn and use the language and terms of the machining trade. (COM)
To be able to use and understand the terminology related to machining in context. (COM)
Learning Objectives
Notes
22.1 To describe purpose,
procedure, and advantages of
the broaching operation.
Have students identify the types of broaching operations and the
need for this type of tool.
The students can prepare a labeled diagram of the sections of a
broaching tool and explain the different cutting operations
performed by each section on the tool.
The students could prepare a list of the advantages or reasons for
broaching.
22.2 To broach a keyway. (IL)
Have students set up and cut a keyway using a keyway broach and
an arbor press. If this is not possible to do in the classroom, it may
be possible to arrange a tour of a machine shop to see the operation
performed.
Save scrap pieces of aluminum and have students begin broaching
on aluminum because it is softer. Encourage students to bring old
pulleys from home to broach keyways into.

55
Module 23A: Introduction to the Milling Machine (Core)
Suggested time: 5-10 hours Level: Intermediate
Prerequisite: Modules 1 and 2
Foundational Objectives
To be able to use and understand the terminology related to machining in context.
To develop proficiency in the safe use of hand and machine tools.
Common Essential Learnings Foundational Objectives
To learn and use the language and terms of the machining trade as they apply to milling machines.
(COM)
To learn the skills necessary to do milling safely. (TL)
Learning Objectives Notes
23.1 To distinguish between the
various types of milling
machines. (COM)
Have the students collect data on different types of milling
machines and the operations that they can perform.
23.2 To describe the operation of
milling machines. (COM)
This should be a detailed description of the different operations
that are possible for a variety of mill types. The students might
also research the four methods of control that include manual,
semi-automatic, automatic, and CNC milling machines. The last
two being the types of mills found in industry when large scale
project production is done.
23.3 To list the safety
considerations for milling
machines.
In addition to the standard safety practices that are to be followed
for all machining operations, have the students add other safety
considerations that could apply to the milling procedure.
23.4 To list the main components of
milling machines and their
operating relationship.
The different types of milling machines have similar components
assembled in different configurations. Have the students describe
the similarities and differences and their effect on the tool’s
operation.
56
Module 23B: Milling Machine Cutters (Optional)
Suggested time: 3-5 hours Level: Intermediate
Prerequisite: Module 23A
Learning Objectives
Notes
23.5 To describe various types of
milling cutters. (COM)
Have students identify the two main types of cutters and how
cutters are classified. It is important that students learn the
terminology for the various styles of cutters for the two types.
23.6 To select the proper cutter for
the job to be done. (CCT)
The selection of the cutter will depend on the material being cut
and the type of milling operation that is being carried out, as well
as the type of milling machine that is used for the work operation.
The following should be considered when a cutter is being selected:
face milling and peripheral milling
solid or insert tooth cutter
milling cutter classification
milling cutter material
end, face or arbor mill cutters
miscellaneous milling cutters
care of milling cutters
methods of milling
safe handling and storage of milling cutters.
23.7 To list the rules and formulas
used to determine cutter
speeds and feeds. (NUM)
Students will need to apply a variety of formulas in order to
correctly set up the milling machine for the various types of
material that they may be working with to complete their
assignments.
Have the students prepare a table of the information they will need
and then laminate it to keep it clean, legible, and close at hand
when they are working.
23.8 To calculate cutting speeds
and feeds. (NUM)
Have the students list the points to consider when selecting a feed
and cutting speed for different materials, and draw conclusions
from their research.
The students will need to be reminded about the importance of the
calculations that are necessary to do this type of operation
successfully.
23.9 To identify milling methods.
(CCT)
Have the students list the advantages and disadvantages of each
milling method, conventional (up-milling) and climb (down-milling).

57
Module 23C: Setting a Milling Machine (Optional)
Suggested time: 3-5 hours Level: Advanced
Prerequisite: Module 19B
Learning Objectives
Notes
23.10 To install a variety of cutters
appropriate for different types
of milling machines. (IL)
Have the students identify the three main types of arbor styles
used and their characteristics. The students can demonstrate how
to mount cutters on different arbors and locate the cutter on the
arbor by the use of spacing collars.
Remind students of the need to keep the work area clean as a
maintenance procedure and to prevent damage to equipment. It is
also important to remember to protect the cutter and the operator’s
hands when installing and removing cutters and holding devices
from the machines.
Students should establish a routine for storage and care of cutters
and driving devices.
23.11 To demonstrate the use of
collets.
The students can do end milling operations using spring collets and
a collet chuck (if needed).
23.12 To understand the need for
different cutting speeds and
feeds. (CCT)
The students could collect a sample of different metals and rank
them to determine which materials are soft and which are harder,
and then decide on a slow or fast cutting speed.
23.13 To calculate cutting speeds
and feed rates for a variety of
materials. (NUM)
It is important for students to recognize the need for careful
calculations when they are doing machine tool operations. The type
of cutter will have a bearing on the cutter speed and the feed rate
for a particular operation such as, a rough cut or a finishing cut.
There are a variety of calculations and formulas that students will
need to be familiar with to determine correct feeds and speeds.
58
Learning Objectives
Notes
23.14 To select a cutting fluid
appropriate for different
cutting operations. (TL)
The material being worked determines the choice of cutting fluid.
Have students list the reasons for using cutting fluid and prepare a
chart or a poster of the fluids needed for cutting different materials.
(COM)
23.15 To understand the application
of different work-holding
attachments. (CCT)
Have the students collect examples of different work holding
devices, both manually and automatically controlled. Examples
should include:
flanged vise
swivel vise
universal vise
rotary table
dividing head (set-up and use)
indexing table
magnetic chuck.
Have the students list the advantages and disadvantages of the
various types of work-holding devices. Review cutting speeds and
feeds and safety procedures to be followed when handling heavy
work-holding attachments.
59
Module 24: Operating a Vertical Milling Machine (Core)
Suggested time: 10-15 hours Level: Advanced
Prerequisite: Module 23C
Foundational Objectives
To understand the properties and uses of different materials used in machining.
To be able to use and understand the terminology related to machining in context.
To be able to produce parts to meet given specifications.
To develop proficiency in the safe use of hand and machine tools.
Common Essential Learnings Foundational Objectives
To use the technical terminology specific to the machining trade. (COM)
To work in a safe and careful manner. (PSVS)
Learning Objectives
Notes
24.1 To describe how a vertical
milling machine operates.
(COM)
Have students identify and/or demonstrate the following:
Name the various parts and operations of the vertical milling
machine.
Explain the different types cutters used with vertical milling
machines.
Describe the maintenance and care of a milling machine.
24.2 To point out safety
precautions that must be
observed when operating a
milling machine. (COM)
The students can identify areas on the mill where safety concerns
need to be recognized.
24.3 To set up and safely operate a
vertical milling machine. (TL)
The students could do demonstrations in pairs. One student
demonstrates while the other marks a checklist of important points
that need to learned about the vertical milling machine operation.
Then have the students reverse their roles.
Points to include in the checklist include:
methods employed to mount cutters
methods used to align a vise
how to align a vise with a dial indicator
mounting the project work in a vise.
24.4 To perform various operations
on a vertical milling machine.
(IL)
The selected project for the students should include the following
operations:
squaring stock with a vertical milling machine
machining angular surfaces
positioning a cutter to mill a keyway or slot
how to position a cutter using a paper strip
how to position a side cutter to mill a slot in flat stock
how to position a side cutter to mill a slot or keyway in
round stock.
Have the students demonstrate the following:
how to use a wiggler
how to use an edge finder
boring with a vertical milling machine.

60
Module 25: Operating a Horizontal Milling Machine (Optional)
Suggested time: 10-15 hours Level: Advanced
Prerequisite: Module 23C
Foundational Objectives
To develop proficiency in the safe use of hand and machine tools.
To gain an overview of the different machining processes.
To be able to produce parts to meet given specifications.
To increase self-esteem from success with the equipment, materials, and techniques used.
Common Essential Learnings Foundational Objectives
To use the technical terminology specific to the machining trade. (COM)
To work in a safe and careful manner. (PSVS)
Learning Objectives
Notes
25.1 To describe how a horizontal
milling machine operates.
(COM)
Have students identify and/or demonstrate the following:
Name the various parts and operations of the horizontal milling
machine.
Identify different types of cutters used with horizontal milling
machines and their applications.
Mainten and care for a milling machine.
25.2 To point out safety
precautions that must be
observed when operating a
milling machine. (COM)
The students should identify areas on the mill where safety
concerns need to be recognized and describe methods to ensure safe
operations.
25.3 To select milling cutters
appropriate for the required
cut. (TL)
Have the students prepare a chart of the various cutters and the
type of cut that they will perform on a horizontal mill. The list of
cutters could include the following common types:
plain (slab)
side milling
angle
metal slitting
formed
concave
convex
corner rounding
gear.
25.4 To set up and safely operate a
horizontal milling machine.
(TL)
Have the students discuss and demonstrate the sequence of steps
used to prepare for horizontal milling operations including:
milling flat surfaces using plain (straight tooth cutters) and
slab (helical tooth cutters) cutting mills
how to position a side cutter to mill a slot in flat stock
how to position a side cutter to mill a slot or keyway in round
stock
selecting cutting speeds and feeds.

61
Learning Objectives
Notes
25.5 To perform various milling
operations on a horizontal
milling machine. (IL)
The students should select a project that involves as many of the
following operations as can be incorporated:
flat milling
face and side milling
straddle and gang milling
slitting and slotting operations.
Have the students review methods to determine cutting speeds and
feeds.
25.6 To perform drilling operations
on a horizontal milling
machine. (IL)
Have the students demonstrate drilling on a horizontal milling
machine using different drill holding attachments.
25.7 To perform boring operations
on a horizontal milling
machine. (IL)
Have the students correctly align an existing drilled hole using a
dial indicator gauge and a boring bar.
If possible, arrange a tour of an automotive engine re-building
business to see a practical application for boring operations.

62
Module 26: Gear Cutting Operations (Optional)
Suggested time: 5-10 hours Level: Advanced
Prerequisite: Module 23C
Foundational Objectives
To develop proficiency in the safe use of hand and machine tools.
To handle, use and dispose of materials safely.
To be able to use and understand the terminology related to machining in context.
To be able to produce parts to meet given specifications.
Common Essential Learnings Foundational Objectives
To learn the terminology necessary to identify the parts of spur and bevel gears. (COM)
To apply mathematical formulas to do required calculations to determine how to cut spur and bevel
gears. (NUM)
To work in a safe and careful manner. (PSVS)
Learning Objectives
Notes
26.1 To use the terms for gear
nomenclature in context.
(COM)
Have the students identify to collect different types of gears and
give examples of typical applications for each type.
In order for students to do the calculations needed to create toothed
gears, they need to learn the terminology that applies to the parts
of the gear. (COM, NUM)
26.2 To make calculations and
measurements for spur gears.
(NUM)
Have the students discuss and demonstrate the following:
calculating the information necessary to cut a spur gear
how gear teeth measurement is checked.
As an additional exercise, provide students with samples of spur
gears and have them determine the calculations that were
necessary in order to make the gear.
26.3 To cut a spur gear using the
dividing head on a horizontal
mill. (IL)
Before the students do the cutting operation, they should:
determine the correct gear cutter
center the gear cutter over the work
prepare the dividing head to cut the required number of teeth
and review cutter alignment
perform the cutting and finishing operations.
26.4 To make calculations and
measurements for a bevel
gear. (NUM)
Discuss and demonstrate the following with the students before
they undertake cutting their own bevel gear:
the difference between bevel and spur gears
the complexity of cutting a bevel gear with accuracy.
Have the students discuss and demonstrate:
calculating the information necessary to cut a spur gear
how gear teeth measurement is checked.
As an additional exercise, provide students with samples of spur
gears and have them determine the calculations that were
necessary in order to make the gear.
63
Learning Objectives
Notes
26.5 To cut a bevel gear using the
dividing head on a horizontal
mill. (IL)
Before the students do the cutting operation, they should:
determine the correct gear cutter
center the gear cutter over the work
prepare the dividing head to cut the required number of teeth
and review cutter alignment
perform the cutting and finishing operations.
26.6 To review safety precautions
that must be observed when
operating a milling machine.
(PSVS)
Have the students demonstrate the necessary safety procedures to
operate a milling machine before they proceed with the cutting
procedure.
64
Module 27: Precision Grinding (Core)
Suggested time: 5-10 hours Level: Intermediate
Prerequisite: Modules 1, 2, and 11
Foundational Objectives
To develop proficiency in the safe use of hand and machine tools.
To identify and explain health and safety hazards in the workplace so that the potential for personal
injury and damage to the equipment and the environment are minimized.
To understand the properties and uses of different materials used in machining.
Common Essential Learnings Foundational Objectives
To use the technical terminology specific to the machining trade. (COM)
To work in a safe and careful manner. (PSVS)
Learning Objectives
Notes
27.1 To explain the function of
precision grinders.
The students might sketch and identify the general operating
characteristics a precision grinder.
Other topics to explore include:
the principles of precision grinding and why it is done
how different types (I, II, III) of surface grinders operate
how cylindrical grinders operate including centre, roll,
centreless, internal cylinder, and tool and cutter types.
27.2 To use the grinding
terminology in context.
(COM)
Have students list the terms and definitions that apply to the
grinder operations.
27.3 To identify and describe the
various types of precision
grinding machines. (TL)
Have the students identify the different operating characteristics of
planer and rotary surface grinders.
27.4 To identify and select grinding
wheels. (CCT)
Students will need to be able to identify grinding wheels by the
specification numbers printed on them. Have students prepare a
chart of the numbering system that illustrates what the numbers
and symbols stand for on any grinding wheel.
Have the students prepare a chart of various types, shapes, and
applications for grinding wheels.
27.5 To inspect grinding wheels for
safe operation. (TL)
Demonstrate to students the procedure for inspecting grinding
wheels for possible defects or the need for dressing. Students might
list the defects that they locate in various supplied samples of older
grinding wheels that are no longer suitable for use.
65
Learning Objectives
Notes
27.6 To prepare a grinder for
operation. (IL)
Have the students select the proper grinding wheel for a particular
application and follow the correct mounting procedure to put the
grinder into service. Review how to check the soundness of the
grinding wheel with the “ring test” before mounting it on the
surface grinder.
Have the students demonstrate the operating sequence for starting
and stopping a surface grinder.
27.7 To dress and true a grinding
wheel. (IL)
Have students prepare an instruction sheet to dress a grinding
wheel, to true the surface, and to unload the abrasive or de-glaze
the surface. This operation will be revisited as a student activity in
the next module.
27.8 To recognize the safety
hazards that precision
grinding presents. (IL)
Students must be aware of the danger of material being projected
out of the magnetic chuck, and, therefore, the importance of
removing only small amounts of material with each pass of the
surface grinder.
The students should understand the danger of the grind wheel
becoming jammed in the work and the possibility of the stone
exploding.
27.9 To identify and select cutting
fluids.
Have students identify:
why cutting fluids are required for most grinding operations
types of cutting fluids and their application method
how cutting fluids are applied
how swarf is removed from cutting fluid.
66
Module 28: Work Holding Devices and Surface Grinding (Optional)
Suggested time: 15-20 hours Level: Advanced
Prerequisite: Modules 1, 2, and 11
Foundational Objectives
To develop proficiency in the safe use of hand and machine tools.
To identify and explain health and safety hazards in the workplace so that the potential for personal
injury and damage to the equipment and the environment are minimized.
To be able to use and understand the terminology related to machining in context.
Common Essential Learnings Foundational Objectives
To use the technical terminology specific to the machining trade. (COM)
To work in a safe and careful manner. (PSVS)
Learning Objectives
Notes
28.1 To identify various work-
holding devices used for
surface grinding. (TL)
Types of work-holding devices students could identify and describe
used for surface grinding include:
magnetic chucks
electromagnetic chucks (demagnitizers)
universal vise
indexing head and clamps.
The students might also list the advantages and disadvantages of
each type of holder.
28.2 To select a work-holding
device and safely operate a
surface grinder. (PSVS)
Have the students select a work-holding device and justify their
choice. Points for discussion with the students could include:
why a magnetic chuck is “ground-in”
why a piece of oiled paper is placed between the work and the
magnetic chuck
how to use a paper strip to position the grinding wheel
grinding edges square and parallel with face sides
the proper way to clean the surface grinder.
28.3 To dress, balance, and true a
grinding wheel. (IL)
Have students mount, balance, and dress a grinding wheel to true
the surface or to unload the abrasive or de-glaze the surface.
28.4 To list safety rules related to
precision grinding.
Have students produce a checklist to review before they begin to
use the surface grinder. Laminate the checklist to keep it clean.
28.5 To perform a surface grinding
sequence. (IL)
Students will need to practice the set-up procedure to ensure that
they are working for the accuracy that surface grinding is intended
to produce and not the removal of large amounts of material.
The students could prepare a worksheet that sequences the method
they intend to follow to carry out the surface grinding procedure.

67
Module 29: Additional Grinding Techniques (Optional)
Suggested time: 3-5 hours Level: Advanced
Prerequisites: Modules 1, 2, and 11
Foundational Objectives
To gain an overview of the different machining processes.
To be able to produce parts to meet given specifications.
To be knowledgeable about the impact of new technologies in the machining industry.
Common Essential Learnings Foundational Objectives
To operate machine tools in a safe manner. (PSVS)
To use the technical terminology specific to the machining trade. (COM)
Learning Objectives
Notes
29.1 To explain how tool and cutter
grinders operate. (COM)
Have the students identify the uses for a tool and cutter grinder
and describe how milling cutters are sharpened with a tool and
cutter grinder. The students could discuss the following topics:
use of the tool and cutter grinder
selecting the proper wheel for the sharpening operation
using and adjusting tooth rest
sequence for grinding plain milling cutters
sequence for grinding cutters with helical teeth
how to grind end mills
how to grind form cutters
sharpening taps and reamers.
29.2 To safely operate a tool and
cutter grinder.
Remind students that carbide tool steel and high speed steel (HSS)
do not produce showers of sparks when they are being dressed.
This can lead to the false assumption that too light a cut is being
made. It is far better for the equipment to make several light cuts
than to be too aggressive.
29.3 To explain how to operate a
cylindrical grinder. (COM)
Have students review the following:
the principles of cylindrical grinding
the differences between traverse and plunge grinding
methods of holding and driving the work
machining procedure, setting cutting speeds and feeds, table
movement and runoff.
29.4 To explain how internal
grinding is done. (COM)
Demonstrate:
the principles of internal grinding
holding and driving the work
machining procedure; setting cutting speeds and feeds, grinder
movement and runoff.
29.5 To perform cylindrical and
internal grinding operations.
(IL)
The project selected by the student could employ both cylindrical
and internal grinding operations. A plan of how the grinding will
be sequenced could be used to reinforce the necessity to be properly
prepared before beginning work.

68
Learning Objectives
Notes
29.6 To describe centreless
grinding operations. (COM)
Have the students prepare sketches of the various centreless
grinding operations including:
through feed grinding
infeed grinding
endfeed grinding
internal grinding.
Tours might be arranged for students as the more specialized
grinding machine operations may only be available through
visitations to manufacturers.
29.7 To describe other methods of
grinding. (COM)
Have students research additional types of grinding that are used
in industry. These might include Computer Numerical Control
(CNC), electrolytic, and belt grinding.
69
Module 30: Numerical Control (Optional)
Suggested time: 3-5 hours Level: Intermediate
Prerequisite: Module 1
Foundational Objectives
To be knowledgeable about the impact of new technologies in the machining industry.
To become aware of the variety of jobs and career opportunities in the machining trades.
To gain an overview of the different machining processes.
Common Essential Learnings Foundational Objectives
To understand the impact of technology on the area of machining and on society in general. (TL)
To explore the evolution of technological innovations within areas of study with a focus on the benefits
and limitations of the innovation itself. (TL)
Learning Objectives
Notes
30.1 To describe numerical control.
(COM)
Have the students discuss and understand with the following
terminology:
Numerical Control (NC) and Computer Numerical Control
(CNC)
The differences between Direct and Distributed Numerical
Control
The Cartesian Coordinate System: Spindle motion of the
machine tool determines which axis will be the z-axis. (NUM)
30.2 To distinguish between
incremental and absolute
positioning methods. (COM)
Have the students review the operations performed by each method
and decide which is the preferred system of use and why.
30.3 To describe the actions of the
three movement systems.
(COM)
Have the students decide which three NC movement systems is
best suited to NC machine operations and provide examples of each
of the following:
point-to-point
straight-cut
contour (continuous path)
circular interpolation
mirror imaging.
30.4 To list the advantages of using
numerical control (NC) tools.
(CCT)
Have the students brainstorm ideas where NC would be used in
industry. They might also predict what might be possible in the
future using this technology. (TL)
Have students explain the uses and reasons for having adaptive
control (AC) on CNC machines.
30.5 To differentiate between
programming systems for
automated control of machine
tools.
Have students decide whether a manual program or computer-
aided program would be the best choice for a variety of NC
operations. Then have students prepare a list of operations that
might be performed for a given object or component from the rough-
out to finish operations.
30.6 To understand programming
terminology and language.
(TL)
Have students collect information on the programming languages
used by machine tool onboard computers for CNC work.
70
Module 31: Automated Multi-machine Manufacturing (Optional)
Suggested time: 3-5 hours Level: Intermediate
Prerequisite: Modules 13A and 19A
Foundational Objectives
To be knowledgeable about the impact of new technologies in the machining industry.
To learn about the evolution of machine tools.
Common Essential Learnings Foundational Objective(s)
To be knowledgeable about the impact of new technologies in the machining industry. (CCT, TL)
Learning Objectives
Notes
31.1 To explain what automation
means in the machining
industry.
Have students define what the term automation means. List the
advantages of using an automated manufacturing system.
Ask students if an assembly line operation is a good example of
automation and to give reasons or examples to justify their
answers.
31.2 To describe several situations
that would utilize automated
production systems.
The students might brainstorm possible applications for flexible
manufacturing systems (FMS) using computer numerical control
and robotics to minimize the necessity for human involvement.
31.3 To explain how industrial
robots are used.
Have the students define the functions performed by an industrial
robot and describe some of the operations performed by industrial
robots.
31.4 To explain how robotics are
used in automated production
systems.
Robotic applications are becoming more common and sophisticated.
Have students brainstorm for applications where robots carry out
tasks which may be unsafe for a human.
If possible, visit an industrial site that uses robots as part of their
manufacturing system.
It may also be possible to build a robot from a kit to perform simple
tasks as an example of possible applications that parallel the work
of industrial robots.
71
Module 32: Quality Control (Optional)
Suggested time: 3-5 hours Level: Intermediate
Prerequisite: None
Foundational Objectives
To be knowledgeable about the impact of new technologies in the machining industry.
To learn about the evolution of machine tools.
Common Essential Learnings Foundational Objective(s)
To be aware of the motives, interests, knowledge base, and justification for their own position and that of
others. (CCT)
Learning Objectives
Notes
32.1 To explain why quality control
is such an important issue in
the manufacturing process.
(COM)
Have the students discuss quality control as a preventive measure
in the manufacturing process.
Discuss:
measuring techniques
the coordinated measuring machine and its capability
other quality control techniques.
32.2 To identify the difference
between destructive and non-
destructive testing. (CCT)
The two basic types of quality control are destructive and non-
destructive testing. The students could identify situations where
each method of testing is used to evaluate a product.
32.3 To describe some methods of
performing non-destructive
tests.
Common methods of non-destructive testing include visual
inspection, accurate measurement, and weighing. Have students
identify specialized tools used to assist these inspection methods.
Other types of inspections might include the following inspection
methods:
radiographic (X-ray)
magnetic particle
fluorescent penetrant
ultrasonic
laser measurement
electrical eddy-current.
32.4 To demonstrate methods of
destructive testing.
Have the students demonstrate different methods of destructive
testing and discuss what the results demonstrate about the quality
of the product.
The students could also list situations where destructive testing is
used extensively in industry. The most evident is in the automotive
industry when vehicles are crashed to verify safety features.

72
Module 33: Electro-machining Processes (Optional)
Suggested time: 2-4 hours Level: Intermediate
Prerequisite: None
Foundational Objectives
To gain an overview of the different machining processes.
To be knowledgeable about the impact of new technologies in the machining industry.
Common Essential Learnings Foundational Objective(s)
To understand the evolving role of a machinist. (TL)
Learning Objectives
Notes
33.1 To explain the advantages and
disadvantages of the electro-
machining processes.
Have the students identify the components of an electrical
discharge machine.
Have students describe the operating process of electro-machining
and list the advantages of electro-machining compared to
traditional machining.
33.2 To describe the types of
electrical discharge machining
(EDM). (COM)
Have the students prepare a diagram, label it and explain the
process and operation of the components of the two types of EDMs.
Have students provide examples of EDM applications.
33.3 To describe electrical
discharge wire cutting. (COM)
Have the students compare the wire cutting (EDWC) process to
band machining. An illustrative example of the process could be to
use a wire saw to cut through a thin piece of wood or styrofoam.
33.4 To describe the process of
forming parts using
electrochemical machining
(ECM).
Have the students describe the process of electrochemical
machining (ECM) and then list the advantages of ECM.
73
Module 34: Non-traditional Machining Techniques (Optional)
Suggested time: 2-4 hours Level: Intermediate
Prerequisite: None
Foundational Objectives
To be knowledgeable about the impact of new technologies in the machining industry.
To be able to use and understand the terminology related to machining in context.
Common Essential Learnings Foundational Objectives
To acquire knowledge about non-traditional machining methods. (TL)
To develop independence regarding planning, monitoring, and evaluating of learning experiences. (IL)
Learning Objectives
Notes
34.1 To differentiate between non-
traditional machining
techniques and traditional
machining methods. (CCT)
Have the students research both methods of machining. They could
prepare a list, and compare the advantages and disadvantages of
each method.
34.2 To describe the processes
common to non-traditional
machining. (COM)
The four major groups of non-traditional machining include:
mechanical energy machining
electrical energy machining
thermal energy machining
chemical energy machining.
Have the students list the different processes that are members of
each of the above major groups. Many of these processes are known
by acronyms. Have the students list the acronyms that apply to
each group and identify them.
Have students collect other examples of new processes that have
not yet reached wide industry acceptance.
34.3 To understand electrical
energy machining processes.
Have the students collect examples of industrial situations that use
this machining technique. Each process will do some operations
better than another process. Provide examples of the benefits that
the electrical energy machining process has over the other three
major types.
This process includes the following electrochemical (EC) operations:
ECD – deburring
ECG – grinding
ECM – machining
ECH – honing
ECP – polishing
ECT – turning.
For additional information, refer to Module 32.

74
Learning Objectives
Notes
34.4 To describe other non-
traditional methods of
machining. (COM)
Have the students work in groups each researching a different type
of machining process. Include the following types:
hydrodynamic machining – water-jet cutting
ultrasonic machining
electron Beam (EBM) machining
laser Beam – cutting.
If possible, arrange tours of facilities which use these techniques.
75
Module 35: Other Machining Processes (Optional)
Suggested time: 2-4 hours Level: Intermediate
Prerequisite: Modules 1 to 20
Foundational Objectives
To understand the properties and uses of different materials used in machining.
To be knowledgeable about the impact of new technologies in the machining industry.
Common Essential Learnings Foundational Objectives
To acquire knowledge about non-traditional machining methods. (TL)
To develop independence regarding planning, monitoring, and evaluating of learning experiences. (IL)
Learning Objectives
Notes
35.1 To discuss characteristics of
various plastics that must be
considered before machining.
Have the students discuss the various types of plastics and their
machining characteristics. Have the students discuss why some
plastics but not others must be annealed.
35.2 To describe the safety issues
that must be considered before
machining plastics.
Have students brainstorm a list of the possible hazards associated
with machining plastics.
When machining plastics, the build up of heat is a concern. Have
the students discuss methods to prevent heat build up when
machining plastics.
35.3 To sharpen cutting tools to
machine plastics.
Sharpening cutting tools used for machining plastics is different
than the procedures used for machining metals. Have students
compare the two materials and the sharpening characteristics of
tools for different types of plastics and metals.
Have students prepare a display of tools sharpened for metal
cutting compared to others sharpened for plastic cutting.
35.4 To describe various forms of
chipless machining operations.
(COM)
Have the students describe the five basic operations required for
the cold heading technique and how it is put to use for making
bolts, nuts, screws, and other fasteners.
Have students explain how the Intraform® process differs from
other chipless machining techniques.
35.5 To describe the powder
metallurgy (P/M) process.
The students could prepare a poster showing the steps involved in
the P/M process used to create objects. Process terms including
briquetting, sintering, forging and coining should be included.
Have students collect examples of parts or components
manufactured using the powder metallurgy process.
76
Learning Objectives
Notes
35.6 To describe high-energy-rate
forming (HERF).
Have the students explain the differences between HERF and
conventional metal forming techniques.
35.7 To describe various types of
HERF.
Have the students describe the actions of:
explosive forming – stand-off and contact operations
electromagnetic forming
electrohydraulic forming
pneumatic-mechanical forming.
Then have students compare the advantages and disadvantages of
various HERF techniques.
35.8 To explain how the science of
cryogenics is playing a role in
the machining industry.
Have students list uses for cyrogenics in machining. Develop an
experiment to illustrate the effect of using cold to fit parts together
that would not fit if cold was not used.
77
Module 36A, B, C: Machining Project Options (Optional)
Suggested time: 20-35 hours Level: Introductory/Intermediate/Advanced
Prerequisite: Modules 1, 3, and 4
Foundational Objectives
To increase self-esteem from success with the equipment, materials, and techniques used.
To develop proficiency in the safe use of hand and machine tools.
To gain an overview of the different machining processes.
Common Essential Learnings Foundational Objectives
To measure, cut and assemble materials as required by instructions. (TL, NUM)
To work on in-depth processes of their choice. (PSVS)
To take pride in the completed project. (PSVS)
Learning Objectives
Notes
36.1 To read and understand
technical drawings. (CCT,
NUM)
Have students explain what the plan they are working from tells
them to do in a sequence that will produce the desired product.
For additional information about reading technical drawings, see
Module 3. More information is also available in the Drafting and
Computer-Aided Design 10, 20, 30 Curriculum Guide.
36.2 To measure and cut selected
metal material. (NUM)
Students need to be familiar with imperial and metric
measurements. Students should measure twice and cut once. (TL)
Review the necessary math skills from the Geometry-Measurement
strand of the Mathematics curriculum, grades 6-9, (perimeter, area,
volume, and circumference) available at the Saskatchewan
Learning website.
36.3 To use hand tools and
machine tools in a safe and
productive manner. (TL)
The project(s) at the introductory level should focus on the use of
hand tools to complete the project.
Continually monitor student work habits emphasizing safe, careful
work. Ensure that students wear protective safety equipment
when working in the shop.
As a means to evaluate knowledge of large machine operation, have
students do presentations on the proper and safe use of machine
tools for other members in the class who are to provide feedback
(which would also be evaluated). If each student is required to
make a presentation, the importance of careful use of large
machines like lathes, saws, and milling machines will be reinforced.
There is a selection of projects in Appendix E suited to student use
with access to a lathe.
78
Learning Objectives
Notes
36.4 To take pride in completed
project(s). (IL, PSVS)
Have students check their work frequently and give attention to
detail such as being square, proper fit and finish, etc. before
assembly.
Provide assistance as necessary to ensure a satisfactory product.
Do not allow students to take an inferior product home. Work with
the student to bring the work up to an acceptable standard
Display student projects in school display cases whenever possible.
Ask students to evaluate their project(s) and state what they would
change if they were to make the project again.
Module 36B: Metal Projects (Optional)
Suggested time: 20-35 hours Level: Intermediate
Prerequisite: Module 36A
Review or repeat objectives from Module 36A as required before proceeding with the Intermediate level
project work.
Module 36C: Metal Projects (Optional)
Suggested time: 20-35 hours Level: Advanced
Prerequisite: Module 36B
Review or repeat objectives from Module 36A as required before proceeding with the Advanced level project
work.

79
Module 37A, B, C: Work Study Preparation and Follow-up Activities (Optional)
Note: Module 37 Work Study Preparation and Follow-up Activities is 5 - 10 hours. If students have
participated in a work study module in a previous Practical and Applied Arts course, a review of this module
is still required but less time may be needed.
Suggested time: 5-10 hours Level: Introductory/Intermediate/Advanced
Prerequisite: None
Module Overview
Students will prepare for work study in the community. Expectations for the student, the teacher, and the
employer should be discussed. During follow-up, students will reflect on work study experiences.
Foundational Objectives
To develop workplace skills, knowledge, and attitudes in the machining industry that may lead to
successful employment.
To understand how skills acquired in school may transfer to the workplace.
Common Essential Learnings Foundational Objective(s)
To demonstrate skills and attitudes that contribute to the development of positive human relationships.
(IL, PSVS)
Learning Objectives
Notes
37.1 To be aware of the
expectations of each of the
partners in the work study
component.
In order to establish a successful working relationship with all of
the partners involved in the workplace, it is important to define the
expectations of each partner. For a list of roles and responsibilities
of the business, personnel, manager, teacher monitor, school,
parent, and student, see the Work Study Guidelines for the
Practical and Applied Arts included in the Practical and Applied
Arts Handbook.
37.2 To determine the factors
that may affect the student’s
contribution in the
workplace. (CCT)
Brainstorm a list of factors that may affect the student’s
contribution in the workplace, then verify through experience. The
list may include previous work experience, volunteer work,
teamwork activities and extra-curricular participation within the
school.
37.3 To build good
communication skills for the
workplace. (COM, PSVS)
Discuss verbal and non-verbal communication. List some ways in
which negative and positive non-verbal communication may be
displayed. Encourage students to role play ways of demonstrating
effective techniques of verbal communication on the job when
giving or receiving instructions and resolving conflict. Use case
studies and divide the students into groups to role play how
effective communication may be used to resolve conflict on the job.
Emphasize the Employability Skills (from the Conference Board of
Canada) and compare them to the Common Essential Learnings of
Saskatchewan’s Core Curriculum. Make the direct link between
skill development in this course and the needs of employers.
Development of skills and documentation of the skills leads to
employment using those skills.
80
Learning Objectives Notes
37.4 To develop a résumé that
may be forwarded to a
potential employer.
The student will develop a résumé using the correct format. (IL)
The résumé may be used to introduce the student to the employer
of a workplace site prior to an interview. Teachers are
encouraged to work with other staff members to ensure résumé
preparation is taught. Résumé writing is covered in English
Language Arts 20 and A30, Information Processing 10, 20, 30 and
Career and Work Exploration 10, 20, A30, B30 curriculum guides.
Students should save the résumé and update it as changes need
to be made and references are added. Skills that have been
developed can also be added to the updated résumé.
Students should develop their résumés and update them during
the course, as work placement references are accumulated. A
discussion with students about the benefits of a portfolio of
sample work is appropriate at this time.
A personal website that highlights the student’s skills and
training might be created and referred to in the résumé.
If students have already completed a résumé and cover letter in
another course, the teacher may do a review and encourage
students to update their information. Each student should
submit a résumé for teacher approval prior to going to an
interview or directly to the workplace.
37.5 To create a student guide
in preparation for an
interview.
Through a classroom discussion or in groups, students should
compile a “guide” for job interviews. After the students formulate
their guide, the teacher may prompt them for missing items.
Outline and describe the three stages of an interview. Point out
to the students at what stage of the interview each of the
guidelines previously discussed will be used.
The greeting involves an introduction between the student and
employer. Discuss or demonstrate how this should be done.
The exchange is the longest part of the interview where the
employer asks a series of questions and engages in a dialogue
with the student about information on the résumé and other
matters relating to the job. A student’s portfolio may be
examined by the employer as part of the exchange.
The parting provides closure to the interview and may be just as
important as the greeting. Explain how this may be done.
Provide the students with a list of questions frequently asked by
employers or ask students to make a list. Students may role play
the stages of the interview.
81
Learning Objectives Notes
37.6 To discuss the post
interview.
After the student has completed the interview with the employer,
do a follow-up activity. Review the interview with the student
using the three stages above as points for discussion.
37.7 To develop a procedural
guide for the work site.
Discuss the following work site items with students:
transportation
hours of work
absence and tardiness
procedures for conflict resolution
role of the student, teacher, and workplace supervisor
dress code
job description
school and employer expectations.
37.8 To relate feedback from the
work placement.
Students provide feedback about work placement including:
location, type of business, duties, most rewarding experience, and
most difficult situation and how they handled it.
It is recommended that each student send a thank-you note or
card to the employer upon the completion of each work
placement. If more than one placement has been made in the
course, follow-up activities must be completed after each
placement.
Ensure that students understand these guidelines by asking
students to describe each of these items.
Look for opportunities to introduce and reinforce ideas about
Labour Standards, Occupational Health and Safety, and WHMIS.
Use the Career and Work Exploration 10, 20, A30, B30
Curriculum Guide, the Practical and Applied Arts Handbook, the
Saskatchewan Labour website, and other recommended resources
in the accompanying bibliography.
82
Module 38A, B, C: Work Study (Optional)
Suggested time: 25-50 hours Level: Introductory/Intermediate/Advanced
Prerequisite: Module 32
Foundational Objectives
To provide students with experience in the machining industry that will enable them to make informed
career decisions.
To integrate classroom learning with work-based learning.
Common Essential Learnings Foundational Objectives
To engage in a work study experience and develop entry level workplace skills that may lead to
sustainable employment. (PSVS)
To expand career research beyond the classroom setting. (IL)
For more information about implementing work study in schools, see the Work Study Guidelines for the
Practical and Applied Arts included in the Practical and Applied Arts Handbook. Teachers need to use or
design appropriate learning objectives for this module (e.g., to demonstrate ability to follow a “Training
Plan”). The training plan for the student should be designed to relate to the objectives of the course modules
chosen in collaboration with the cooperating employer.
Consult Saskatchewan Labour for content about Labour Standards, Occupational Health and Safety, and
WHMIS.
83
Module 88: Apprenticeship in Saskatchewan (Optional)
Suggested time: 2-5 hours Level: Introductory
Prerequisite: None
Module Overview
Students will be introduced to the apprenticeship and trade certification process and the role of the
Saskatchewan Apprenticeship and Trade Certification Commission. Students will also explore a variety of
opportunities that apprenticeship offers, and the relationship between Secondary Level and apprenticeship
training.
This module is available for all Practical and Applied Arts curricula related to a designated trade, but should
be taught from the perspective of the specific trade involved. In this case, the perspective reflects the trade
of machining.
Foundational Objective
To create an awareness of apprenticeship programs and opportunities in Saskatchewan.
Common Essential Learnings Foundational Objectives
To broaden students’ understanding of the apprenticeship program and the role it plays in the trade
industries. (CCT)
To examine particular trade opportunities that are appropriate for themselves. (IL, PSVS)
Learning Objectives
Notes
88.1 To understand and describe the
process and benefits of
apprenticeship.
Students should recognize that apprenticeship is a process of training
and certifying workers in specific trades.
Students could perform research to determine which trades are
designated in Saskatchewan and how those compare to those in other
provinces.
Students should brainstorm reasons why a person would become an
apprentice. Alternatively, they could interview journeypersons or
apprentices to find out what they feel the advantages of the
apprenticeship program were for them.
Students should be able to describe the difference between a provincial
certification and the Interprovincial Standards “Red Seal” program.
88.2 To understand and use the
appropriate terminology
related to apprenticeship.
Students should be able to use a wide variety of terms appropriately
including, but not limited to, the following:
journeyperson
indenture
joint training committee
pre-employment training
designated trade and sub-trade
advanced standing.

84
Learning Objectives
Notes
88.3 To determine the steps
involved in becoming an
apprentice.
Students need to be aware that the applicant must be working in the
trade, must sign a formal contract with the employer and the
Saskatchewan Apprenticeship and Trade Certification Commission,
and must be prepared to attend technical training, typically once per
year.
Students could interview a journeyperson or an apprentice to learn
about their experience.
88.4 To determine the relationship
between the ATCC and the
various trade boards.
Students should be aware of how a trade board becomes established
and how a trade becomes designated in Saskatchewan.
Each student could contact a trade board and find out the role it plays
in the apprenticeship process. They should also determine the
relationship between the trade board and the ATCC. Students could
share and compare their findings with other students in the class.
88.5 To develop an understanding of
the programs available to help
make the transition from
Secondary Level to
apprenticeship.
Students should be aware of the recognition of time that is available.
Students should also be aware of the opportunity for challenging the
Level I examination in a given trade, providing certain conditions are
met.
88.6 To determine the length of
apprenticeship and the annual
training required in a
particular trade that may be of
interest to the student.
Students should explore the requirements of one or more specific
trades including years and hours required, location of annual training,
and the duration of annual training. Students could also explore
employability and expected wages for those trades. They could share
their findings with the rest of the class.
88.7 To explore the qualities of a
successful apprentice.
Students could interview employers to determine personal
characteristics that will help make an apprentice in a particular trade
successful. Students could also brainstorm a list of qualities and
discuss them. With these qualities in mind, the students could
perform a peer or self-assessment to gauge their own suitability for a
career in that trade.

85
Module 99A, B, C: Extended Study (Optional)
Note: The extended study module may be used only once in each 100 hour course. It is important to record
the title of the extended study module on the recordkeeping chart. Record 99A for the first extended study
module offered in the course series, 99B for the second offering, and 99C for the third.
Suggested time: 5-20 hours Level: Introductory/Intermediate/Advanced
Prerequisite: None
Evolving societal and personal needs of society, advances in technology and demands to solve current
problems require a flexible curriculum that can accommodate new ways and means to support learning in
the future. The extended study module is designed to provide schools with an opportunity to meet current
and future demands that are not provided within current modules in the renewed PAA curriculum.
The flexibility of this module allows a school/school division to design one new module per credit to
complement or extend the study of pure, core and optional modules configured to meet the specific
needs of students or the community. The extended study module is designed to extend the content of the
pure courses and to offer survey course modules beyond the scope of the available selection of PAA modules.
The list of possibilities for topics of study or projects for the extended study module approach is as varied as
the imagination of those involved in using the module. These optional extended study module guidelines
should be used to strengthen the knowledge, skills, and processes advocated in the PAA curriculum and to
address particular student needs and interests.
For more information on the guidelines for the Extended Study module see the Practical and Applied Arts
Handbook.
86
References
Note: A complete list of resources providing annotations and ordering information is available in the
bibliography.
Apprenticeship and Trade Certification Commission. (2003). High school to apprenticeship: Linking to the
future. A handbook for high school administrators and student counsellors. Regina, SK: Author.
Hache, L., Redekopp, D. E., and Jarvis, P. S. (1998). Blueprint for life/work designs. National Life/Work
Centre.
Kibbe, R., Neely, J., Meyer, R., and White, W. (1999). Machine tool practices. (6th Ed.). Columbus, OH:
Prentice Hall.
Krar, S., Rapisarda, M. and Check, A. (1998). Machine tool and manufacturing technology. Albany, NY:
Delmar Publishers.
Saskatchewan Education. (1988). Understanding the common essential learnings: A handbook for teachers.
Regina, SK: Author.
Saskatchewan Education. (1991). Instructional approaches: A framework for professional practice. Regina,
SK: Author.
Saskatchewan Education. (1991). Student evaluation: A teacher handbook. Regina, SK: Author.
Saskatchewan Education. (2000). Drafting and computer-aided designing 10, 20, 30 curriculum guide. A
practical and applied art. Regina, SK: Author.
Saskatchewan Labour. (1993). Occupational health and safety act. Regina, SK: Author
Saskatchewan Learning. (2003). Career and work exploration 10, 20, A30, B30 curriculum guide. A
practical and applied art. Regina, SK: Author.
Saskatchewan Learning. (2003). Practical and applied arts handbook. Regina, SK: Author.
Walker, John R. (2000). Machining fundamentals. Tinley Park, IL: Goodheart-Wilcox Co.
87
Appendix A: Determining a Trade Pathway for Students
During the renewal of the Practical and Applied Arts (PAA), Saskatchewan Learning has signed an
articulation agreement for Machining with the Apprenticeship and Trade Certification Commission (ATCC),
and the Saskatchewan Institute of Applied Science and Technology (SIAST).
School divisions should be aware that although Machining content requires a certain level of maturity, some
modules are recommended for Middle Level grades 7-9. These modules are listed in the Practical and
Applied Arts Handbook.
Pure courses, one hundred hours long, are available beginning at the grade 10 level. Students may take
Machining with no intent to pursue the Machining apprenticeship route.
Articulation
Saskatchewan Learning, in consultation with the PAA Reference Committee, has agreed to develop
adequate hours of provincial curriculum in the designated trade areas, that, combined with limited practical
experience, will meet the Level I requirements (or their equivalent), as outlined by the Apprenticeship and
Trade Certification Commission (ATCC). Articulation agreements have been established to accommodate
students who have met the Level I requirements and who have followed the procedures specified by the
ATCC’s High School to Apprenticeship: A Link to the Future (2003). Such students may challenge the Level
I trade exam and, if successful, receive Level I technical training credit and verifiable time credit in
Apprenticeship. Verifiable time credit refers to: time accrued under the supervision of a journeyperson, a
course taught by a teacher holding a journey status in the designated trade, or a course taught by a teacher
who has taken an approved certification course.
Training plans included in Appendix C have been designed to provide direction for Level I skill development
in the classroom and in the workplace.
School divisions or schools seeking to register students who wish to challenge the Machining
Level I exam, must meet the following criteria:
Review and understand procedures outlined in High School to Apprenticeship: A Link to the Future
(2003). (Apprenticeship Work Placement Program, Apprenticeship Recognition for Practical and Applied
Arts Courses, Additional Practical and Applied Arts Courses in the Designated Trades)
The Level I theory identified below as required modules in Machining must be covered thoroughly by the
journey status or certified teacher and students.
Practical experiences must be offered in the school setting or through the optional work study modules
used in partnership with local businesses and journeypersons.
Only a teacher who is a journeyperson or who has completed an approved certification course in
the designated trade may recommend students for a Level I challenge exam. This will ensure that the
teacher has the necessary background skills to evaluate Level I theory and practice in the school.
Time credit is granted when time is accrued under a journeyperson or when the course is taught by a
teacher who either holds journey status in the designated trade or who has taken an approved
certification course in the designated trade.
Accreditation courses, approved by the ATCC and Saskatchewan Learning, are delivered by
SIAST through the STF Summer Short Course mechanism.
88
Only those students who have successfully completed the Level I content in the Secondary Level courses
and whose marks have been submitted to Saskatchewan Learning student records may challenge the
Level I exam. Students without aspirations of pursuing further training in the trade should not consider
this route. To be successful, students challenging the Level I apprenticeship theory exam must attain a
mark of 70%. The Level I exam may not replace any portion of the evaluation for Secondary Level
credit.
Certified teachers are responsible for assigning a mark for submission to Student Records for Secondary
Level students.
The students must successfully complete all the courses in the series before challenging the Level I exam
and should be nearing completion of the last course in the series when they indicate their intent to
challenge the Level I exam.
The school division or school must notify ATCC at least two months prior to the writing of the Level I
exam, stating their intention to recommend a student or students. Verification of the marks for the
completed course (official transcript), a statement of preliminary marks for courses underway if
applicable, and the examination fee must be submitted for each student eligible to write. Registration
for the Level I exam is managed by ATCC.
The ATCC will administer the Level I exams to Secondary Level students during the January and June
Departmental Examination writing sessions. ATCC will evaluate the exams, record the results and
notify the student(s) of results at school. The dates for the writing sessions are established annually and
published in the Registrar’s Handbook for School Administrators that is distributed to the schools.
(Available from Student Records at Saskatchewan Learning).
Saskatchewan Learning will distribute information to inform schools of changes to the Level I
apprenticeship requirements in the trade.
Successful students will receive Level I technical training credit and verifiable time credit in
Apprenticeship.
Advanced standing in the Machining program at SIAST will be awarded to students who are successful
in the challenge of the Level I exam and/or who have completed verifiable time credit for Level I in the
designated trade.
Upon registration in the trade, a Secondary Level student who was unsuccessful in the Level I challenge
will not receive credit for Level I theory, but will receive time credit recognition for time spent in
practical experience under the supervision of a journeyperson. This must be documented in a letter (on a
Form 6) signed by the supervising journeyperson.
For more information about trade articulation, see the High School to Apprenticeship: A Link to the Future
(2003) document distributed by ATCC.

89
The following Saskatchewan Learning PAA Machining modules must be successfully completed in order
to meet the Level I requirements in the trade:
MODULE TITLE
MACH01 Introduction to Machining (Core)
MACH2A,B,C Safety (Core)
MACH03 Using Technical Drawings (Core)
MACH04A Simple Measurement (Core)
MACH04B Adjustable Measurement Tools (Core)
MACH04C Measuring with Gauges (Core)
MACH05 Layout Work (Core)
MACH06 Hand Tools (Core)
MACH07 Fasteners (Core)
MACH09 Cutting Fluids (Optional)
MACH10 Drills and Drilling Machines (Core)
MACH11 Offhand Grinding (Core)
MACH12 Saws and Cutoff Machines (Core)
MACH13 Metal Characteristics (Optional)
MACH17A The Lathe, Introduction (Core)
MACH17B Lathe Cutting Tools (Core)
MACH17C Cutting Speeds and Feeds on the Lathe (Core)
MACH17D Mounting Work Between Centres on the Lathe (Optional)
MACH17E Turning Between Centres on the Lathe (Optional)
MACH17F Lathe Chucks (Optional)
MACH18 Cutting Tapers on the Lathe (Optional)
MACH19 Cutting Screw Threads on the Lathe (Core)
MACH20 Additional Lathe Operations (Optional)
MACH23A Introduction to the Milling Machine (Core)
MACH23B Milling Machine Cutters (Optional)
MACH23C Setting a Milling Machine (Optional)
MACH24 Operating a Vertical Milling Machine (Core)
DRAF03 Sketching and Freehand Drawing Fundamentals (Optional)
DRAF31 Reading Technical Drawings (Blueprints) (Optional)
The modules above in the Machining curriculum have been identified as core modules required for a Level I
exam challenge. The content in these modules is similar enough to be considered as equal with the SIAST
modules that follow:
MACH-190 Lathe
TOOL-192 Benchwork/Measure
MACH-192 Cutoff Saws, Material ID, Pedestal Grinder, Cutting Fluids
MACH-193 Drilling Machines
DRFT-188 Technical Drawing and Blueprint Reading
ME-181 Safety and Basic Shop Mechanics
MACH-189 Milling
MATH-290 Mathematics

90
SAMPLE FORM – Obtain full document from address below
Social Insurance Number Please check one of the following: New Apprenticeship Contract (must be accompanied by Form 1)
Placement on Apprenticeship File (updating hours)
Examination (must be accompanied by Form 2)
Request for Journeyperson Certificate (must be accompanied by Form 3)
Entry into Upgrading Course (must be accompanied by Form 4)
Trade
Name of Apprentice/Tradesperson (last/first)
Address
City/Town
Postal Code Telephone
Name of Company (Employer) for Which Trade Experience is Being Verified
Address Telephone
City/Town Postal Code
Period of Employment From to D/M/Y D/M/Y
Please refer to Period of Employment instructions on reverse.
Work Performed At City/Town
Document only the time spent actually working the trade, using the tools of the trade. Please refer to Trade Experience instructions on reverse.
Description of Work Performed Trade Experience in Hours
Total Hours
FOR COMMISSION USE ONLY Time Assessed Hours Date Assessed by
If the work was supervised by a Journeyperson:
Name of Journeyperson Certificate # Trade
Signed this day of 200__ Signature of Witness* Signature of Appropriate Person*
Name of Witness (Please Print) Name of Appropriate Person (Please Print) Address Position Telephone Address *The witness may not be the subject (apprentice or Telephone tradesperson applying) of this letter.
*An Appropriate Person: employer, employer’s representative or journeyperson supervising the work
Form 6 Verification of Trade Experience Letter This letter is to verify the type of work a person performs in a
specific trade.
*Use one verification letter per employer.
Saskatchewan
Apprenticeship and
Trade Certification Commission
2140 Hamilton Street
Regina, Saskatchewan
S4P 3V7
Tel (306) 787-2444
Fax (306) 787-5105
Company Stamp
If Available

91
Instructions a) Period of Employment: When you submit the first Form 6, the period of employment starts with the day you
started with the employer and ends with the day you fill out the form. The period of employment on the second,
Form 6 you submit starts the day after the day listed on the first Form 6 and ends the day you fill out
the form.
Example: First Form 6: 15/01/99 to 15/06/00
Second Form 6: 16/06/00 to 30/12/00
b) Trade Experience in Hours:
Refers to the number of hours you worked in the period of employment.
Example:
Description of Work Performed Trade Experience in
Hours
Gears Transmissions
40 hours 75 hours
Total Hours 115 hours
Affidavit for Verification of Trade Time An Affidavit is to be used only when confirming trade time in the following instances:
a) a business is no longer in existence; b) self-employment. (Attach copy of business license or letter from: town clerk, municipal secretary, or person in authority in the
community acknowledging that during the period in question, the tradesperson was known to be an owner/operator of a business.)
Before proceeding, please ensure that the reverse side of this form is fully completed. Canada Province of Saskatchewan To Wit: In the matter of the verification of trade time in the
trade, I of Address/ Postal Code do solemnly declare that said verification of trade time as stated on the reverse side of this document is accurate and I make this solemn declaration conscientiously believing it to be true and knowing that it is of the same force and effect as if made under oath and by virtue of the Canada Evidence Act. Declared before me at the of City/Town in the Province of Saskatchewan this day of A.D., 200_.
Signature of Tradesperson
Commissioner of Oaths in and For the Province of Saskatchewan My Commission expires:
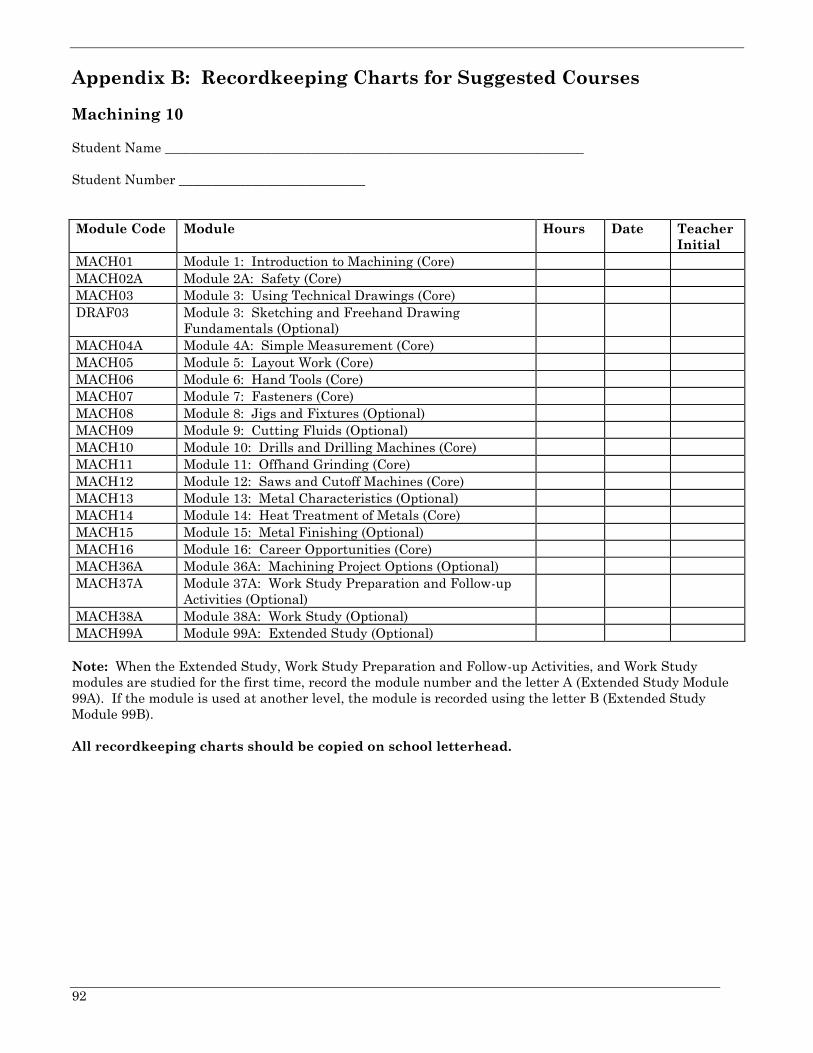
92
Appendix B: Recordkeeping Charts for Suggested Courses
Machining 10
Student Name _______________________________________________________________
Student Number ____________________________
Module Code Module Hours Date Teacher
Initial
MACH01 Module 1: Introduction to Machining (Core)
MACH02A Module 2A: Safety (Core)
MACH03 Module 3: Using Technical Drawings (Core)
DRAF03 Module 3: Sketching and Freehand Drawing
Fundamentals (Optional)
MACH04A Module 4A: Simple Measurement (Core)
MACH05 Module 5: Layout Work (Core)
MACH06 Module 6: Hand Tools (Core)
MACH07 Module 7: Fasteners (Core)
MACH08 Module 8: Jigs and Fixtures (Optional)
MACH09 Module 9: Cutting Fluids (Optional)
MACH10 Module 10: Drills and Drilling Machines (Core)
MACH11 Module 11: Offhand Grinding (Core)
MACH12 Module 12: Saws and Cutoff Machines (Core)
MACH13 Module 13: Metal Characteristics (Optional)
MACH14 Module 14: Heat Treatment of Metals (Core)
MACH15 Module 15: Metal Finishing (Optional)
MACH16 Module 16: Career Opportunities (Core)
MACH36A Module 36A: Machining Project Options (Optional)
MACH37A Module 37A: Work Study Preparation and Follow-up
Activities (Optional)
MACH38A Module 38A: Work Study (Optional)
MACH99A Module 99A: Extended Study (Optional)
Note: When the Extended Study, Work Study Preparation and Follow-up Activities, and Work Study
modules are studied for the first time, record the module number and the letter A (Extended Study Module
99A). If the module is used at another level, the module is recorded using the letter B (Extended Study
Module 99B).
All recordkeeping charts should be copied on school letterhead.

93
Machining 20
Student Name _______________________________________________________________
Student Number ____________________________
Module Code Module Hours Date Teacher
Initial
MACH02B Module 2B: Safety (Core)
MACH04B Module 4B: Adjustable Measuring Tools (Core)
MACH17A Module 17A: The Lathe, Introduction (Core)
MACH17B Module 17B: Lathe Cutting Tools (Core)
MACH17C Module 17C: Cutting Speeds and Feeds on the Lathe
(Core)
MACH18 Module 18: Cutting Tapers on the Lathe (Optional)
MACH20 Module 20: Additional Lathe Operations (Optional)
MACH21 Module 21: Band Machining (Core)
MACH22 Module 22: Broaching Operations (Core)
MACH23A Module 23A: Introduction to the Milling Machine
(Core)
MACH23B Module 23B: Milling Machine Cutters (Optional)
MACH27 Module 27: Precision Grinding (Core)
MACH30 Module 30: Numerical Control (Optional)
MACH31 Module 31: Automated Multi-machine Manufacturing
(Optional)
MACH32 Module 32: Quality Control (Optional)
MACH33 Module 33: Electro-machining Processes (Optional)
MACH34 Module 34: Non-traditional Machining Techniques
(Optional)
MACH35 Module 35: Other Machining Processes (Optional)
MACH36B Module 36B: Machining Project Options (Optional)
MACH37B Module 37B: Work Study Preparation and Follow-up
Activities (Optional)
MACH38B Module 38B: Work Study (Optional)
MACH99B Module 99B: Extended Study (Optional)
Note: When the Extended Study, Work Study Preparation and Follow-up Activities and Work Study
modules are studied for the first time, record the module number and the letter A (Extended Study Module
99A). If the module is used at another level, the module is recorded using the letter B (Extended Study
Module 99B).
All recordkeeping charts should be copied on school letterhead.

94
Machining 30
Student Name _______________________________________________________________
Student Number ____________________________
Module Code Module Hours Date Teacher
Initial
MACH02C Module 2C: Safety ( Core)
MACH04C Module 4C: Measuring with Gauges (Core)
MACH17D Module 17D: Mounting Work Between Centres on the
Lathe (Optional)
MACH17E Module 17E: Turning Between Centres on the Lathe
(Core)
MACH17F Module 17F: Lathe Chucks (Optional)
MACH19 Module 19: Cutting Screw Threads on the Lathe (Core)
MACH20 Module 20: Additional Lathe Operations (Optional)
MACH22 Module 22: Broaching Operations (Core)
MACH23C Module 23C: Setting a Milling Machine (Optional)
MACH24 Module 24: Operating a Vertical Milling Machine
(Core)
MACH25 Module 25: Operating a Horizontal Milling Machine
(Optional)
MACH26 Module 26: Gear Cutting Operations (Optional)
MACH28 Module 28: Work Holding Devices and Surface
Grinding (Optional)
MACH29 Module 29: Additional Grinding Techniques (Optional)
MACH36C Module 36C: Machining Project Options (Optional)
MACH37C Module 37C: Work Study Preparation and Follow-up
Activities (Optional)
MACH38C Module 38C: Work Study (Optional)
MACH88 Module 88: Apprenticeship in Saskatchewan
(Optional)
MACH99C Module 99C: Extended Study (Optional)
Note: When the Extended Study, Work Study Preparation and Follow-up Activities, and Work Study
modules are studied for the first time, record the module number and the letter A (Extended Study Module
99A). If the module is used at another level, the module is recorded using the letter B (Extended Study
Module 99B).
All recordkeeping charts should be copied on school letterhead.
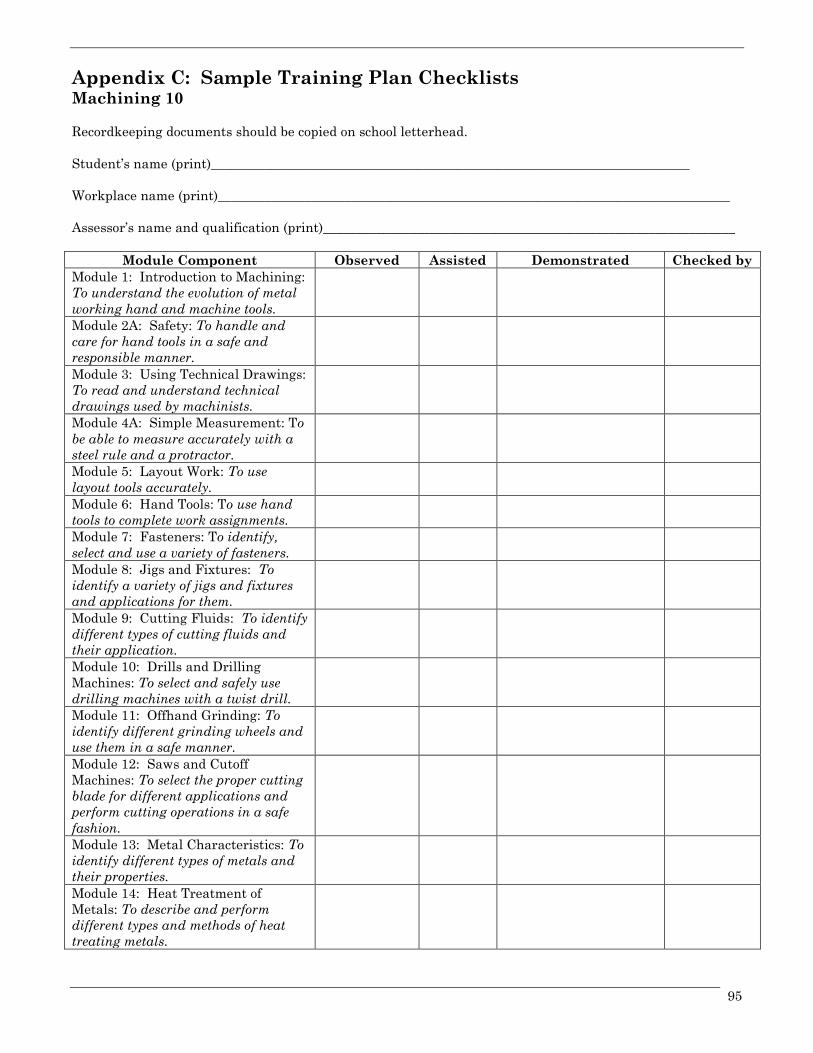
95
Appendix C: Sample Training Plan Checklists Machining 10
Recordkeeping documents should be copied on school letterhead.
Student’s name (print)________________________________________________________________________
Workplace name (print)_____________________________________________________________________________
Assessor’s name and qualification (print)______________________________________________________________
Module Component Observed Assisted Demonstrated Checked by
Module 1: Introduction to Machining:
To understand the evolution of metal
working hand and machine tools.
Module 2A: Safety: To handle and
care for hand tools in a safe and
responsible manner.
Module 3: Using Technical Drawings:
To read and understand technical
drawings used by machinists.
Module 4A: Simple Measurement: To
be able to measure accurately with a
steel rule and a protractor.
Module 5: Layout Work: To use
layout tools accurately.
Module 6: Hand Tools: To use hand
tools to complete work assignments.
Module 7: Fasteners: To identify,
select and use a variety of fasteners.
Module 8: Jigs and Fixtures: To
identify a variety of jigs and fixtures
and applications for them.
Module 9: Cutting Fluids: To identify
different types of cutting fluids and
their application.
Module 10: Drills and Drilling
Machines: To select and safely use
drilling machines with a twist drill.
Module 11: Offhand Grinding: To
identify different grinding wheels and
use them in a safe manner.
Module 12: Saws and Cutoff
Machines: To select the proper cutting
blade for different applications and
perform cutting operations in a safe
fashion.
Module 13: Metal Characteristics: To
identify different types of metals and
their properties.
Module 14: Heat Treatment of
Metals: To describe and perform
different types and methods of heat
treating metals.
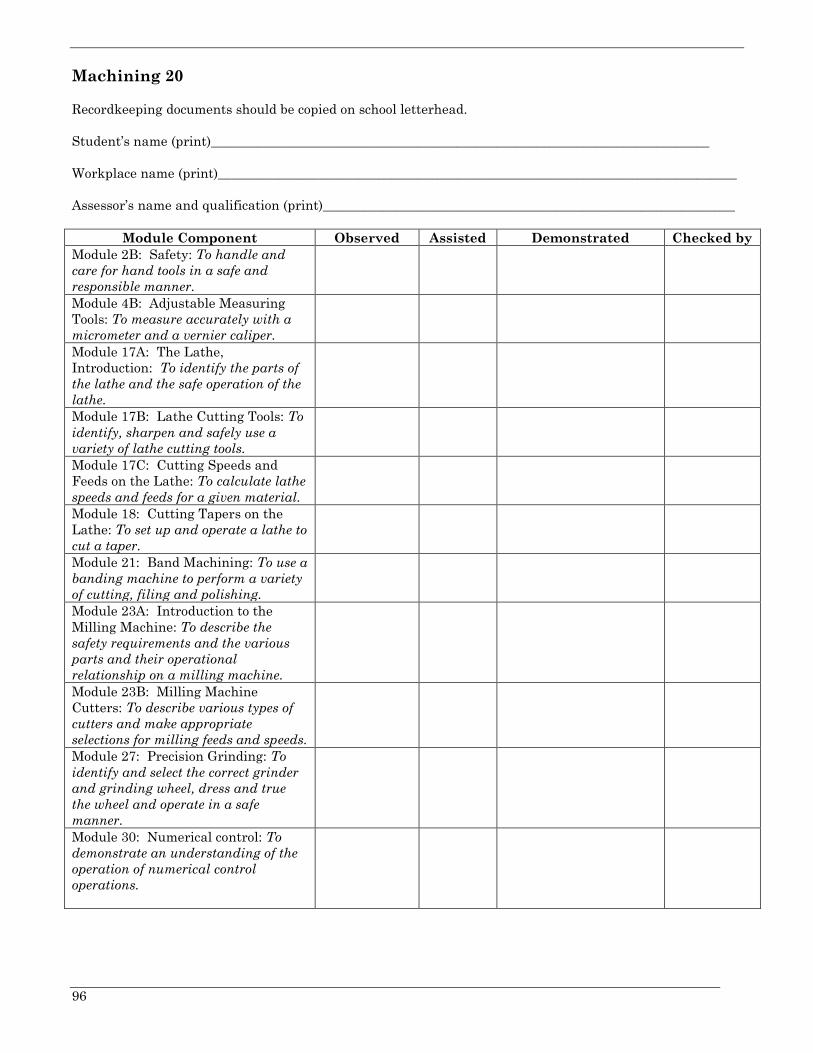
96
Machining 20
Recordkeeping documents should be copied on school letterhead.
Student’s name (print)___________________________________________________________________________
Workplace name (print)______________________________________________________________________________
Assessor’s name and qualification (print)______________________________________________________________
Module Component Observed Assisted Demonstrated Checked by
Module 2B: Safety: To handle and
care for hand tools in a safe and
responsible manner.
Module 4B: Adjustable Measuring
Tools: To measure accurately with a
micrometer and a vernier caliper.
Module 17A: The Lathe,
Introduction: To identify the parts of
the lathe and the safe operation of the
lathe.
Module 17B: Lathe Cutting Tools: To
identify, sharpen and safely use a
variety of lathe cutting tools.
Module 17C: Cutting Speeds and
Feeds on the Lathe: To calculate lathe
speeds and feeds for a given material.
Module 18: Cutting Tapers on the
Lathe: To set up and operate a lathe to
cut a taper.
Module 21: Band Machining: To use a
banding machine to perform a variety
of cutting, filing and polishing.
Module 23A: Introduction to the
Milling Machine: To describe the
safety requirements and the various
parts and their operational
relationship on a milling machine.
Module 23B: Milling Machine
Cutters: To describe various types of
cutters and make appropriate
selections for milling feeds and speeds.
Module 27: Precision Grinding: To
identify and select the correct grinder
and grinding wheel, dress and true
the wheel and operate in a safe
manner.
Module 30: Numerical control: To
demonstrate an understanding of the
operation of numerical control
operations.
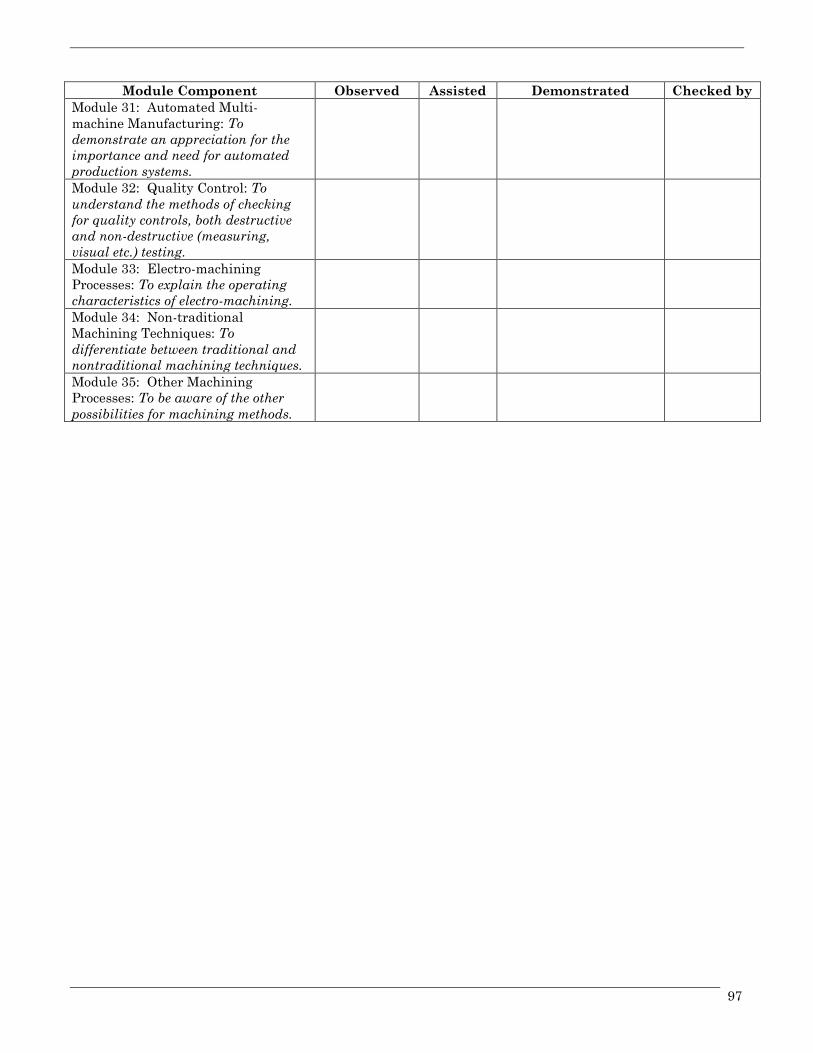
97
Module Component Observed Assisted Demonstrated Checked by
Module 31: Automated Multi-
machine Manufacturing: To
demonstrate an appreciation for the
importance and need for automated
production systems.
Module 32: Quality Control: To
understand the methods of checking
for quality controls, both destructive
and non-destructive (measuring,
visual etc.) testing.
Module 33: Electro-machining
Processes: To explain the operating
characteristics of electro-machining.
Module 34: Non-traditional
Machining Techniques: To
differentiate between traditional and
nontraditional machining techniques.
Module 35: Other Machining
Processes: To be aware of the other
possibilities for machining methods.

98
Machining 30
Recordkeeping documents should be copied on school letterhead.
Student’s name (print)________________________________________________________________________
Workplace name (print)_____________________________________________________________________________
Assessor’s name and qualification (print)______________________________________________________________
Module Component Observed Assisted Demonstrated Checked by
Module 2C: Safety: To handle and
care for hand tools in a safe and
responsible manner.
Module 4C: Measuring with Gauges:
To be able to use dial indicator
measuring gauges.
Module 17D: Mounting Work
Between Centres on the Lathe: To
safely and correctly mount work to be
turned between centres on a lathe.
Module 17E: Turning Between
Centres on the Lathe: To rough and
finish turn materials between centres
on the lathes to plan specifications.
Module 17F: Lathe Chucks: To select
and mount different types of turning
chucks on the lathe
Module 19: Cutting Screw Threads
on the Lathe: To differentiate among
different screw thread styles and
demonstrate the method used to cut
screw threads internally and
externally.
Module 20: Additional Lathe
Operations: To perform a variety of
lathe operations including: setup and
use of work holding devices, drilling,
reaming, and grinding.
Module 22: Broaching Operations: To
demonstrate and explain how to
broach a keyway.
Module 23C: Setting a Milling
Machine: To select the proper cutter
and determine cutting speeds and
feed,s and the use of work holding
devices.
Module 24: Operating a Vertical
Milling Machine: To demonstrate the
safe use of a vertical milling machine.
Module 25: Operating a Horizontal
Milling Machine: To demonstrate the
safe use of a vertical milling machine.

99
Module Component Observed Assisted Demonstrated Checked by
Module 28: Work Holding Devices
and Surface Grinding: To safely
perform the grinding operations using
work holding devices.
Module 29: Additional Grinding
Techniques: To safely operate a
grinder to perform internal and
cylindrical grinding.
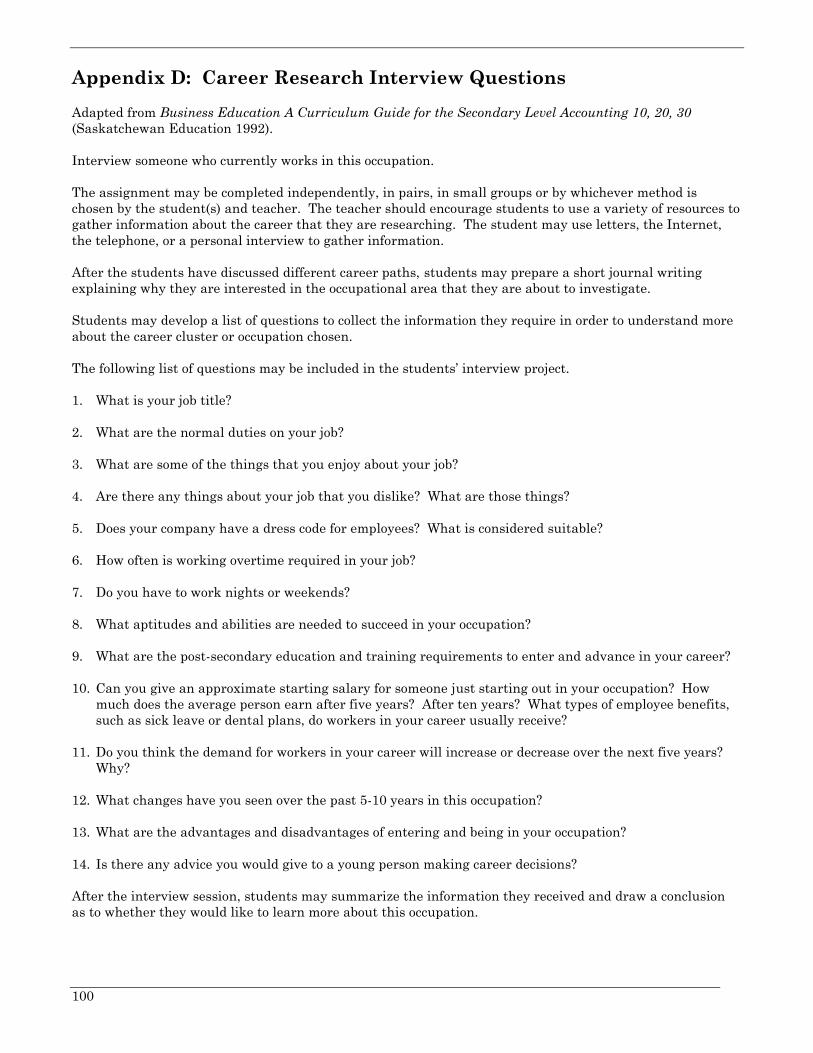
100
Appendix D: Career Research Interview Questions
Adapted from Business Education A Curriculum Guide for the Secondary Level Accounting 10, 20, 30
(Saskatchewan Education 1992).
Interview someone who currently works in this occupation.
The assignment may be completed independently, in pairs, in small groups or by whichever method is
chosen by the student(s) and teacher. The teacher should encourage students to use a variety of resources to
gather information about the career that they are researching. The student may use letters, the Internet,
the telephone, or a personal interview to gather information.
After the students have discussed different career paths, students may prepare a short journal writing
explaining why they are interested in the occupational area that they are about to investigate.
Students may develop a list of questions to collect the information they require in order to understand more
about the career cluster or occupation chosen.
The following list of questions may be included in the students’ interview project.
1. What is your job title?
2. What are the normal duties on your job?
3. What are some of the things that you enjoy about your job?
4. Are there any things about your job that you dislike? What are those things?
5. Does your company have a dress code for employees? What is considered suitable?
6. How often is working overtime required in your job?
7. Do you have to work nights or weekends?
8. What aptitudes and abilities are needed to succeed in your occupation?
9. What are the post-secondary education and training requirements to enter and advance in your career?
10. Can you give an approximate starting salary for someone just starting out in your occupation? How
much does the average person earn after five years? After ten years? What types of employee benefits,
such as sick leave or dental plans, do workers in your career usually receive?
11. Do you think the demand for workers in your career will increase or decrease over the next five years?
Why?
12. What changes have you seen over the past 5-10 years in this occupation?
13. What are the advantages and disadvantages of entering and being in your occupation?
14. Is there any advice you would give to a young person making career decisions?
After the interview session, students may summarize the information they received and draw a conclusion
as to whether they would like to learn more about this occupation.
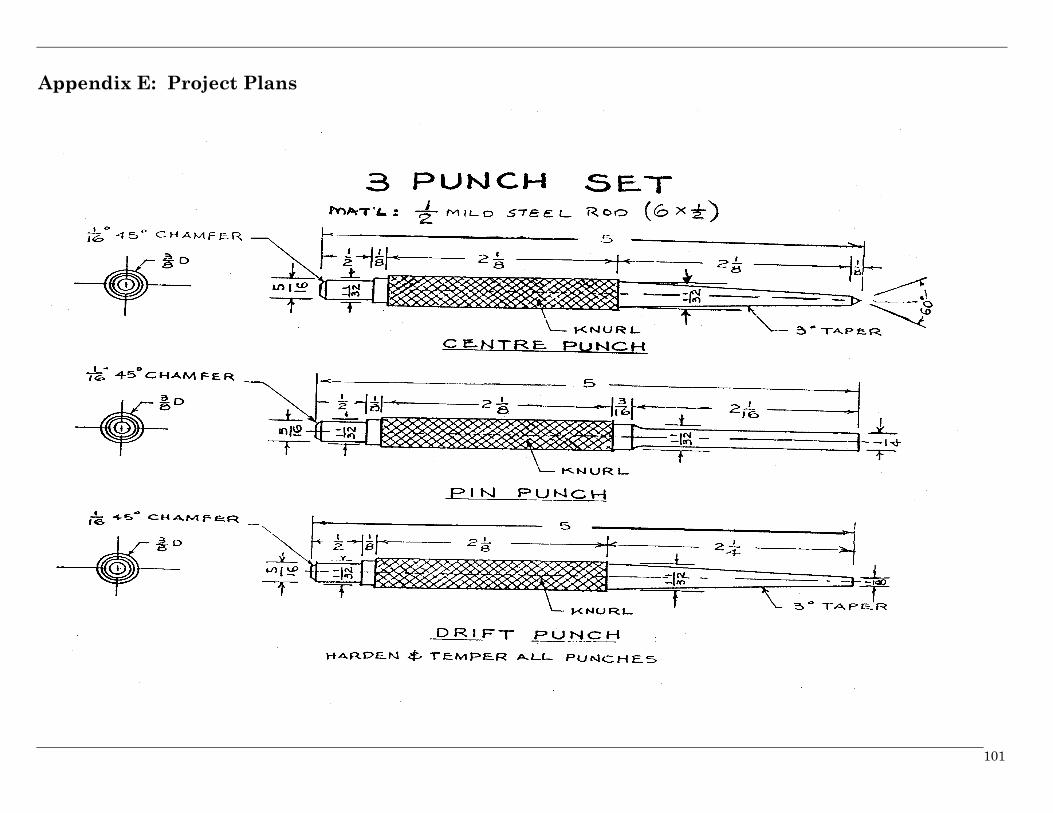
101
Appendix E: Project Plans

102
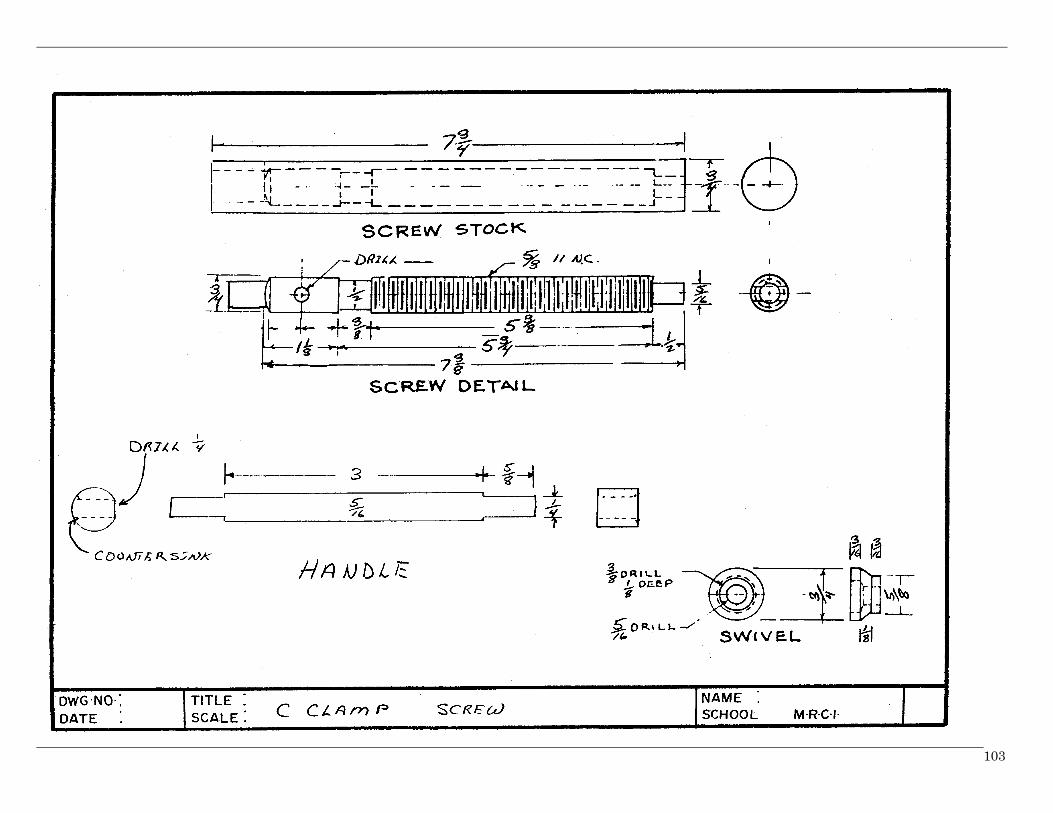
103

104
Recommended