User GuideDigital Interface and System Controller for DTV+
1241234-5-B
Table of Contents
Interface and Controller Anatomy . . . . . . . . . . . . . . . . . . . . . . . . . . . . . . . . . . . . . . . . . . . . . . . . . . . . . 4System Layout . . . . . . . . . . . . . . . . . . . . . . . . . . . . . . . . . . . . . . . . . . . . . . . . . . . . . . . . . . . . . . . . . . . 5Download/Install Software . . . . . . . . . . . . . . . . . . . . . . . . . . . . . . . . . . . . . . . . . . . . . . . . . . . . . . . . . . 6Initial System Setup . . . . . . . . . . . . . . . . . . . . . . . . . . . . . . . . . . . . . . . . . . . . . . . . . . . . . . . . . . . . . . . 7Software Updates . . . . . . . . . . . . . . . . . . . . . . . . . . . . . . . . . . . . . . . . . . . . . . . . . . . . . . . . . . . . . . . . 8Shower Configurations – Overview . . . . . . . . . . . . . . . . . . . . . . . . . . . . . . . . . . . . . . . . . . . . . . . . . . . . 9Shower Configuration A – Plumbing Layout 1 . . . . . . . . . . . . . . . . . . . . . . . . . . . . . . . . . . . . . . . . . . . 11Shower Configuration A – Plumbing Layout 2 . . . . . . . . . . . . . . . . . . . . . . . . . . . . . . . . . . . . . . . . . . . 12Shower Configuration B – Plumbing Layout 1 . . . . . . . . . . . . . . . . . . . . . . . . . . . . . . . . . . . . . . . . . . . 13Shower Configuration B – Plumbing Layout 2 . . . . . . . . . . . . . . . . . . . . . . . . . . . . . . . . . . . . . . . . . . . 14Shower Configuration B – Plumbing Layout 3 . . . . . . . . . . . . . . . . . . . . . . . . . . . . . . . . . . . . . . . . . . . 15Shower Configuration C – Plumbing Layout 1 . . . . . . . . . . . . . . . . . . . . . . . . . . . . . . . . . . . . . . . . . . . 16Shower Configuration D – Plumbing Layout 1 . . . . . . . . . . . . . . . . . . . . . . . . . . . . . . . . . . . . . . . . . . . 17Shower Configuration D – Plumbing Layout 2 . . . . . . . . . . . . . . . . . . . . . . . . . . . . . . . . . . . . . . . . . . . 18Shower Configuration – Custom . . . . . . . . . . . . . . . . . . . . . . . . . . . . . . . . . . . . . . . . . . . . . . . . . . . . . 19Settings Overview . . . . . . . . . . . . . . . . . . . . . . . . . . . . . . . . . . . . . . . . . . . . . . . . . . . . . . . . . . . . . . . 20Web Settings – System . . . . . . . . . . . . . . . . . . . . . . . . . . . . . . . . . . . . . . . . . . . . . . . . . . . . . . . . . . . 21Web Settings – Users . . . . . . . . . . . . . . . . . . . . . . . . . . . . . . . . . . . . . . . . . . . . . . . . . . . . . . . . . . . . 23Web Settings – Valve . . . . . . . . . . . . . . . . . . . . . . . . . . . . . . . . . . . . . . . . . . . . . . . . . . . . . . . . . . . . . 24Web Settings – Water Outlet Options . . . . . . . . . . . . . . . . . . . . . . . . . . . . . . . . . . . . . . . . . . . . . . . . . 26Web Settings – Default and Maximum Temperature . . . . . . . . . . . . . . . . . . . . . . . . . . . . . . . . . . . . . . . 27Web Settings – Cold Water . . . . . . . . . . . . . . . . . . . . . . . . . . . . . . . . . . . . . . . . . . . . . . . . . . . . . . . . 28Web Settings – Auto Purge . . . . . . . . . . . . . . . . . . . . . . . . . . . . . . . . . . . . . . . . . . . . . . . . . . . . . . . . 29Web Settings – Massage . . . . . . . . . . . . . . . . . . . . . . . . . . . . . . . . . . . . . . . . . . . . . . . . . . . . . . . . . . 30Web Settings – Interface . . . . . . . . . . . . . . . . . . . . . . . . . . . . . . . . . . . . . . . . . . . . . . . . . . . . . . . . . . 32Web Settings – Music . . . . . . . . . . . . . . . . . . . . . . . . . . . . . . . . . . . . . . . . . . . . . . . . . . . . . . . . . . . . 33Web Settings – Room Lighting . . . . . . . . . . . . . . . . . . . . . . . . . . . . . . . . . . . . . . . . . . . . . . . . . . . . . . 34Web Settings – Rain Panel Lighting . . . . . . . . . . . . . . . . . . . . . . . . . . . . . . . . . . . . . . . . . . . . . . . . . . 36Web Settings – Steam . . . . . . . . . . . . . . . . . . . . . . . . . . . . . . . . . . . . . . . . . . . . . . . . . . . . . . . . . . . . 37Web Settings – About . . . . . . . . . . . . . . . . . . . . . . . . . . . . . . . . . . . . . . . . . . . . . . . . . . . . . . . . . . . . . 38Web Service – Diagnostics . . . . . . . . . . . . . . . . . . . . . . . . . . . . . . . . . . . . . . . . . . . . . . . . . . . . . . . . . 39Web Service – Updates . . . . . . . . . . . . . . . . . . . . . . . . . . . . . . . . . . . . . . . . . . . . . . . . . . . . . . . . . . . 40Interface – Power System On/Off . . . . . . . . . . . . . . . . . . . . . . . . . . . . . . . . . . . . . . . . . . . . . . . . . . . . 41Interface – Turn Features Off . . . . . . . . . . . . . . . . . . . . . . . . . . . . . . . . . . . . . . . . . . . . . . . . . . . . . . . 42Interface Settings – Overview . . . . . . . . . . . . . . . . . . . . . . . . . . . . . . . . . . . . . . . . . . . . . . . . . . . . . . . 43Interface Settings – Display . . . . . . . . . . . . . . . . . . . . . . . . . . . . . . . . . . . . . . . . . . . . . . . . . . . . . . . . 44Interface Settings – Auto Return . . . . . . . . . . . . . . . . . . . . . . . . . . . . . . . . . . . . . . . . . . . . . . . . . . . . . 45Interface Settings – Start Up . . . . . . . . . . . . . . . . . . . . . . . . . . . . . . . . . . . . . . . . . . . . . . . . . . . . . . . 46Interface Settings – Clean (Lock) . . . . . . . . . . . . . . . . . . . . . . . . . . . . . . . . . . . . . . . . . . . . . . . . . . . . 47Interface Settings – Beep . . . . . . . . . . . . . . . . . . . . . . . . . . . . . . . . . . . . . . . . . . . . . . . . . . . . . . . . . . 49System Settings – Overview . . . . . . . . . . . . . . . . . . . . . . . . . . . . . . . . . . . . . . . . . . . . . . . . . . . . . . . . 50System Settings – About . . . . . . . . . . . . . . . . . . . . . . . . . . . . . . . . . . . . . . . . . . . . . . . . . . . . . . . . . . 51System Settings – Update . . . . . . . . . . . . . . . . . . . . . . . . . . . . . . . . . . . . . . . . . . . . . . . . . . . . . . . . . 52System Settings – Date & Time . . . . . . . . . . . . . . . . . . . . . . . . . . . . . . . . . . . . . . . . . . . . . . . . . . . . . 53System Settings – Temperature Unit . . . . . . . . . . . . . . . . . . . . . . . . . . . . . . . . . . . . . . . . . . . . . . . . . . 54System Settings – Language . . . . . . . . . . . . . . . . . . . . . . . . . . . . . . . . . . . . . . . . . . . . . . . . . . . . . . . 55Shower – Start . . . . . . . . . . . . . . . . . . . . . . . . . . . . . . . . . . . . . . . . . . . . . . . . . . . . . . . . . . . . . . . . . . 56Shower – Valve Zones . . . . . . . . . . . . . . . . . . . . . . . . . . . . . . . . . . . . . . . . . . . . . . . . . . . . . . . . . . . . 57Shower – Auto Purge . . . . . . . . . . . . . . . . . . . . . . . . . . . . . . . . . . . . . . . . . . . . . . . . . . . . . . . . . . . . . 58Shower – Adjust Temperature . . . . . . . . . . . . . . . . . . . . . . . . . . . . . . . . . . . . . . . . . . . . . . . . . . . . . . . 59Shower – Dual Temperature (Multiple Valves Only) . . . . . . . . . . . . . . . . . . . . . . . . . . . . . . . . . . . . . . . 60Shower – Maximum Cold . . . . . . . . . . . . . . . . . . . . . . . . . . . . . . . . . . . . . . . . . . . . . . . . . . . . . . . . . . 61Shower – Massage Setup . . . . . . . . . . . . . . . . . . . . . . . . . . . . . . . . . . . . . . . . . . . . . . . . . . . . . . . . . 62Shower – Massage Run . . . . . . . . . . . . . . . . . . . . . . . . . . . . . . . . . . . . . . . . . . . . . . . . . . . . . . . . . . . 64Users – Setting Preferences . . . . . . . . . . . . . . . . . . . . . . . . . . . . . . . . . . . . . . . . . . . . . . . . . . . . . . . . 65Steam – Setup . . . . . . . . . . . . . . . . . . . . . . . . . . . . . . . . . . . . . . . . . . . . . . . . . . . . . . . . . . . . . . . . . . 66Steam – Run . . . . . . . . . . . . . . . . . . . . . . . . . . . . . . . . . . . . . . . . . . . . . . . . . . . . . . . . . . . . . . . . . . . 67Steam – Deluge . . . . . . . . . . . . . . . . . . . . . . . . . . . . . . . . . . . . . . . . . . . . . . . . . . . . . . . . . . . . . . . . . 68Steam – Power Clean . . . . . . . . . . . . . . . . . . . . . . . . . . . . . . . . . . . . . . . . . . . . . . . . . . . . . . . . . . . . 69
1241234-5-B 2 Kohler Co.
Lighting – Room . . . . . . . . . . . . . . . . . . . . . . . . . . . . . . . . . . . . . . . . . . . . . . . . . . . . . . . . . . . . . . . . 70Lighting – Ambient Rain Effects . . . . . . . . . . . . . . . . . . . . . . . . . . . . . . . . . . . . . . . . . . . . . . . . . . . . . 72Lighting – Ambient Rain Color . . . . . . . . . . . . . . . . . . . . . . . . . . . . . . . . . . . . . . . . . . . . . . . . . . . . . . 73Lighting – Ambient Rain Options . . . . . . . . . . . . . . . . . . . . . . . . . . . . . . . . . . . . . . . . . . . . . . . . . . . . . 75Music – Controls . . . . . . . . . . . . . . . . . . . . . . . . . . . . . . . . . . . . . . . . . . . . . . . . . . . . . . . . . . . . . . . . 76Music – Bluetooth Input . . . . . . . . . . . . . . . . . . . . . . . . . . . . . . . . . . . . . . . . . . . . . . . . . . . . . . . . . . . 77Music – Line-In Input . . . . . . . . . . . . . . . . . . . . . . . . . . . . . . . . . . . . . . . . . . . . . . . . . . . . . . . . . . . . . 78Spa – Setup . . . . . . . . . . . . . . . . . . . . . . . . . . . . . . . . . . . . . . . . . . . . . . . . . . . . . . . . . . . . . . . . . . . 79Spa – Start . . . . . . . . . . . . . . . . . . . . . . . . . . . . . . . . . . . . . . . . . . . . . . . . . . . . . . . . . . . . . . . . . . . . 80Spa – Adjust Script . . . . . . . . . . . . . . . . . . . . . . . . . . . . . . . . . . . . . . . . . . . . . . . . . . . . . . . . . . . . . . 82Time – Minute Timer . . . . . . . . . . . . . . . . . . . . . . . . . . . . . . . . . . . . . . . . . . . . . . . . . . . . . . . . . . . . . 84Time – Alarm Clock . . . . . . . . . . . . . . . . . . . . . . . . . . . . . . . . . . . . . . . . . . . . . . . . . . . . . . . . . . . . . . 86Time – Tub Fill . . . . . . . . . . . . . . . . . . . . . . . . . . . . . . . . . . . . . . . . . . . . . . . . . . . . . . . . . . . . . . . . . . 87User Interface Software . . . . . . . . . . . . . . . . . . . . . . . . . . . . . . . . . . . . . . . . . . . . . . . . . . . . . . . . . . . 88Compliance . . . . . . . . . . . . . . . . . . . . . . . . . . . . . . . . . . . . . . . . . . . . . . . . . . . . . . . . . . . . . . . . . . . . 89
Kohler Co. 3 1241234-5-B
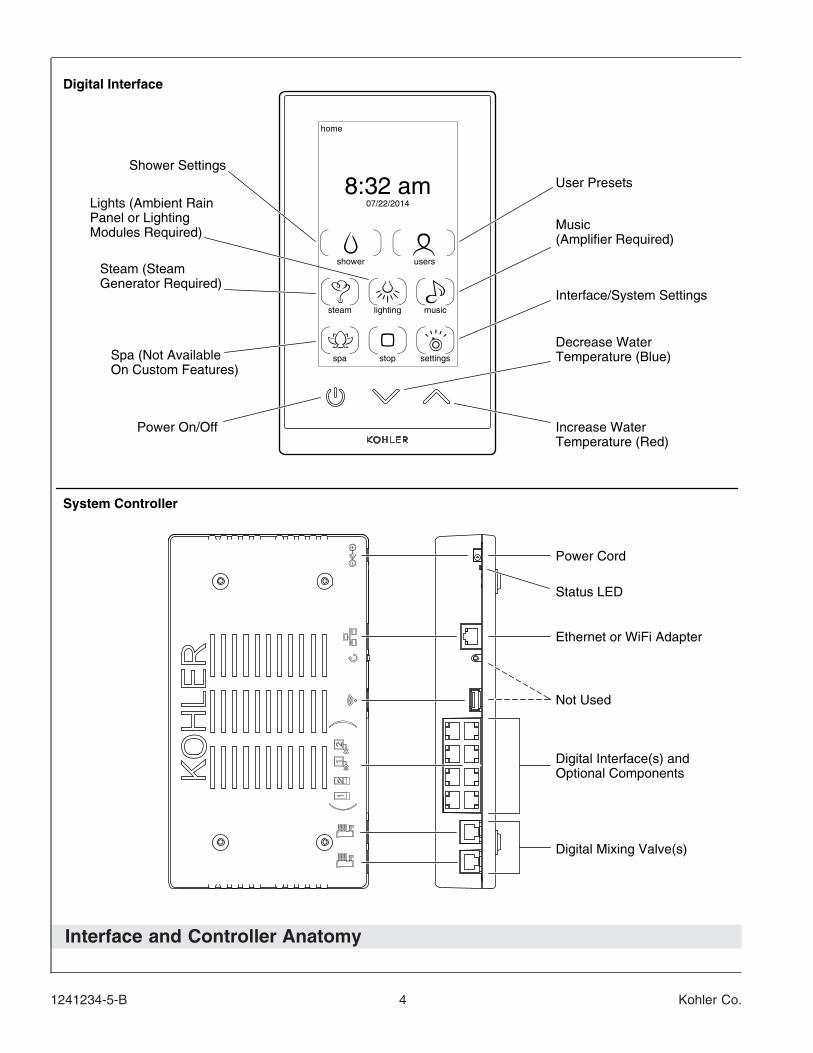
Interface and Controller Anatomy
Digital Mixing Valve(s)
Ethernet or WiFi Adapter
Not Used
Status LED
Digital Interface(s) andOptional Components
Interface/System Settings
Digital Interface
System Controller
Decrease WaterTemperature (Blue)
Increase WaterTemperature (Red)
Power On/Off
User Presets
Power Cord
Music(Amplifier Required)
Steam (SteamGenerator Required)
Spa (Not AvailableOn Custom Features)
Lights (Ambient RainPanel or LightingModules Required)
Shower Settings
stop
lighting musicsteam
shower users
settingsspa
07/22/2014
home
8:32 am
1241234-5-B 4 Kohler Co.
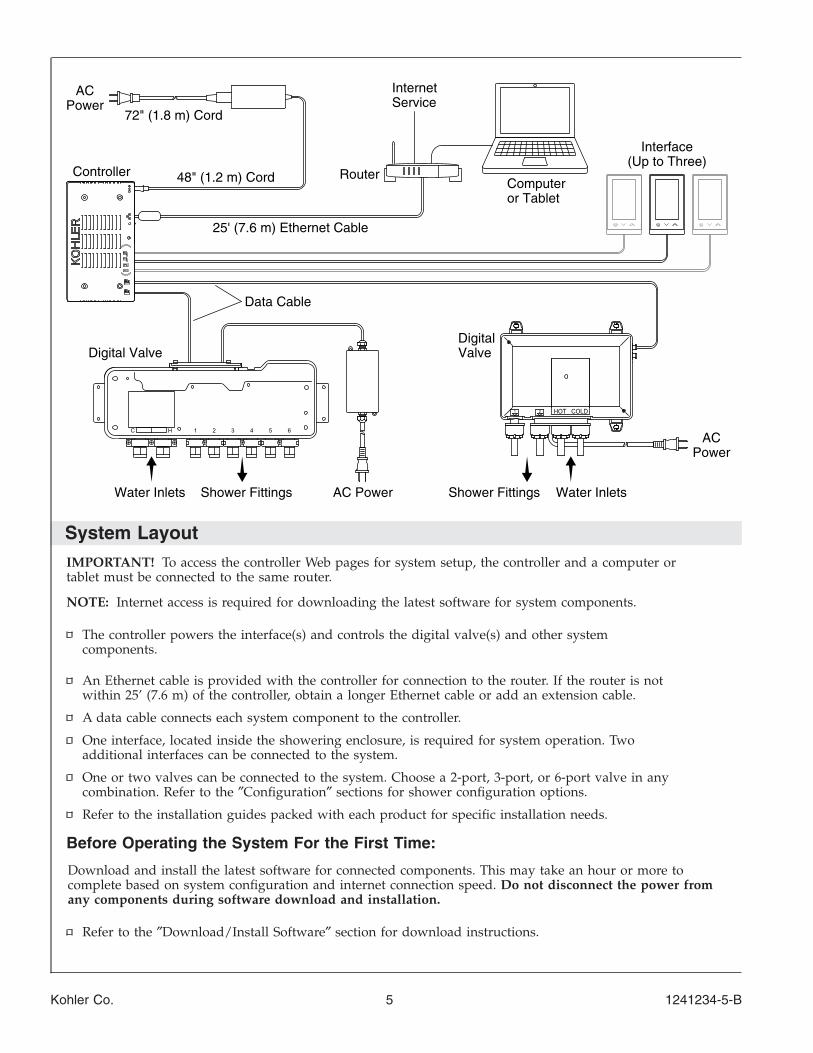
System LayoutIMPORTANT! To access the controller Web pages for system setup, the controller and a computer ortablet must be connected to the same router.
NOTE: Internet access is required for downloading the latest software for system components.
The controller powers the interface(s) and controls the digital valve(s) and other systemcomponents.
An Ethernet cable is provided with the controller for connection to the router. If the router is notwithin 25’ (7.6 m) of the controller, obtain a longer Ethernet cable or add an extension cable.
A data cable connects each system component to the controller.
One interface, located inside the showering enclosure, is required for system operation. Twoadditional interfaces can be connected to the system.
One or two valves can be connected to the system. Choose a 2-port, 3-port, or 6-port valve in anycombination. Refer to the ″Configuration″ sections for shower configuration options.
Refer to the installation guides packed with each product for specific installation needs.
Before Operating the System For the First Time:
Download and install the latest software for connected components. This may take an hour or more tocomplete based on system configuration and internet connection speed. Do not disconnect the power fromany components during software download and installation.
Refer to the ″Download/Install Software″ section for download instructions.
DigitalValve
ACPower
Shower Fittings Water Inlets
Computeror Tablet
InternetService
Router
25' (7.6 m) Ethernet Cable
48" (1.2 m) CordController
ACPower
Interface(Up to Three)
Data Cable
AC PowerShower FittingsWater Inlets
Digital Valve
72" (1.8 m) Cord
Kohler Co. 5 1241234-5-B
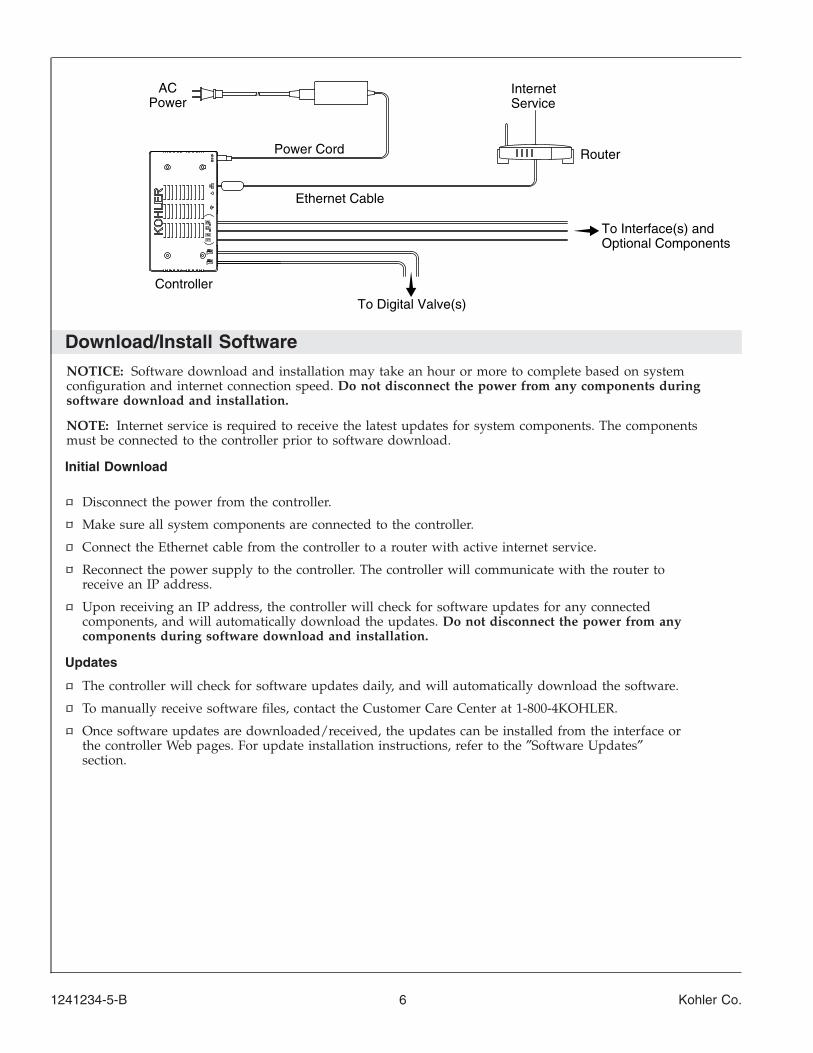
Download/Install SoftwareNOTICE: Software download and installation may take an hour or more to complete based on systemconfiguration and internet connection speed. Do not disconnect the power from any components duringsoftware download and installation.
NOTE: Internet service is required to receive the latest updates for system components. The componentsmust be connected to the controller prior to software download.
Initial Download
Disconnect the power from the controller.
Make sure all system components are connected to the controller.
Connect the Ethernet cable from the controller to a router with active internet service.
Reconnect the power supply to the controller. The controller will communicate with the router toreceive an IP address.
Upon receiving an IP address, the controller will check for software updates for any connectedcomponents, and will automatically download the updates. Do not disconnect the power from anycomponents during software download and installation.
Updates
The controller will check for software updates daily, and will automatically download the software.
To manually receive software files, contact the Customer Care Center at 1-800-4KOHLER.
Once software updates are downloaded/received, the updates can be installed from the interface orthe controller Web pages. For update installation instructions, refer to the ″Software Updates″section.
InternetService
Router
Ethernet Cable
Controller
ACPower
Power Cord
To Digital Valve(s)
To Interface(s) andOptional Components
1241234-5-B 6 Kohler Co.
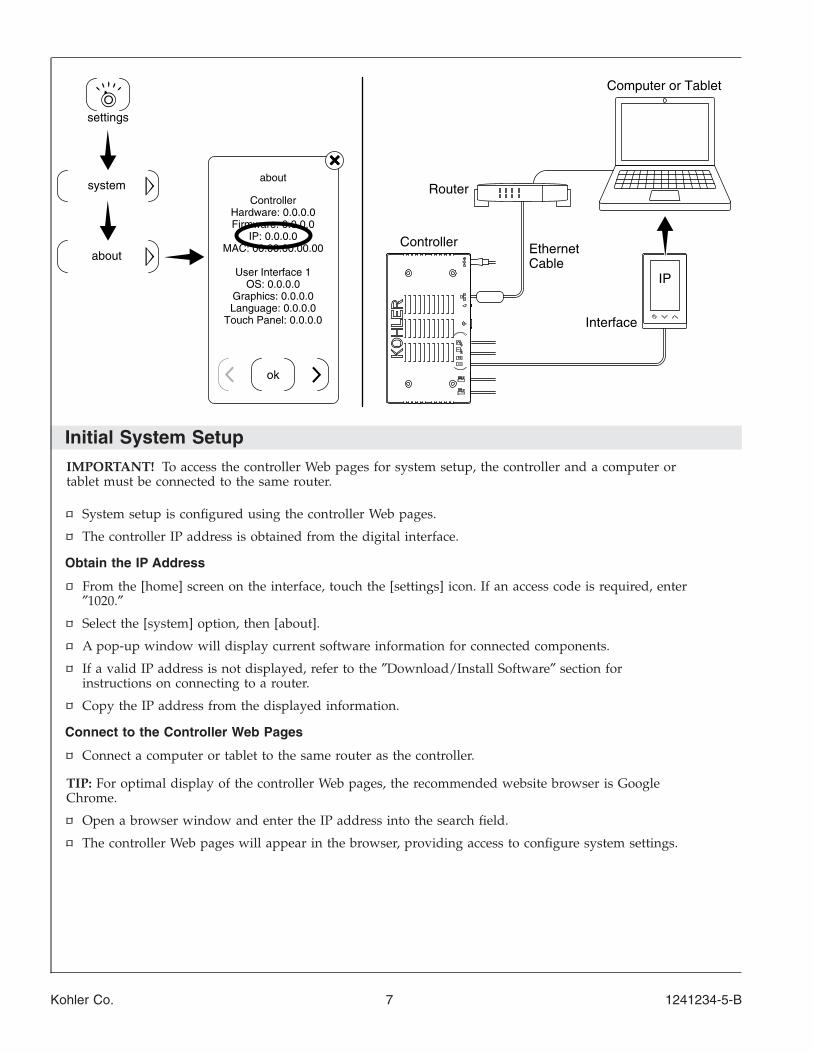
Initial System SetupIMPORTANT! To access the controller Web pages for system setup, the controller and a computer ortablet must be connected to the same router.
System setup is configured using the controller Web pages.
The controller IP address is obtained from the digital interface.
Obtain the IP Address
From the [home] screen on the interface, touch the [settings] icon. If an access code is required, enter″1020.″
Select the [system] option, then [about].
A pop-up window will display current software information for connected components.
If a valid IP address is not displayed, refer to the ″Download/Install Software″ section forinstructions on connecting to a router.
Copy the IP address from the displayed information.
Connect to the Controller Web Pages
Connect a computer or tablet to the same router as the controller.
TIP: For optimal display of the controller Web pages, the recommended website browser is GoogleChrome.
Open a browser window and enter the IP address into the search field.
The controller Web pages will appear in the browser, providing access to configure system settings.
ControllerHardware: 0.0.0.0Firmware: 0.0.0.0
IP: 0.0.0.0MAC: 00.00.00.00.00
User Interface 1OS: 0.0.0.0
Graphics: 0.0.0.0Language: 0.0.0.0
Touch Panel: 0.0.0.0
about
ok
settings
system
about
Interface
IP
Controller
Router
Computer or Tablet
EthernetCable
Kohler Co. 7 1241234-5-B
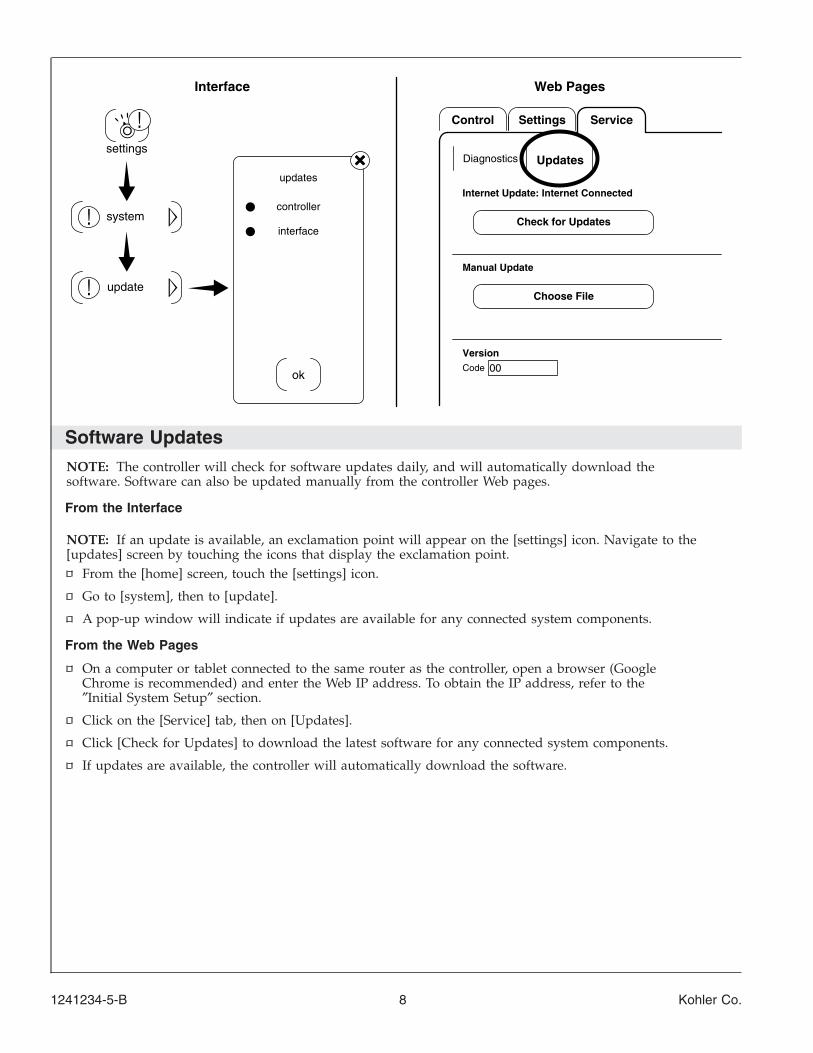
Software UpdatesNOTE: The controller will check for software updates daily, and will automatically download thesoftware. Software can also be updated manually from the controller Web pages.
From the Interface
NOTE: If an update is available, an exclamation point will appear on the [settings] icon. Navigate to the[updates] screen by touching the icons that display the exclamation point.
From the [home] screen, touch the [settings] icon.
Go to [system], then to [update].
A pop-up window will indicate if updates are available for any connected system components.
From the Web Pages
On a computer or tablet connected to the same router as the controller, open a browser (GoogleChrome is recommended) and enter the Web IP address. To obtain the IP address, refer to the″Initial System Setup″ section.
Click on the [Service] tab, then on [Updates].
Click [Check for Updates] to download the latest software for any connected system components.
If updates are available, the controller will automatically download the software.
Settings Service
Interface Web Pages
Diagnostics Updates
Check for Updatescontroller
ok
settings
system
update
interface
updates
Control
Internet Update: Internet Connected
Manual Update
Choose File
Version
00Code
1241234-5-B 8 Kohler Co.
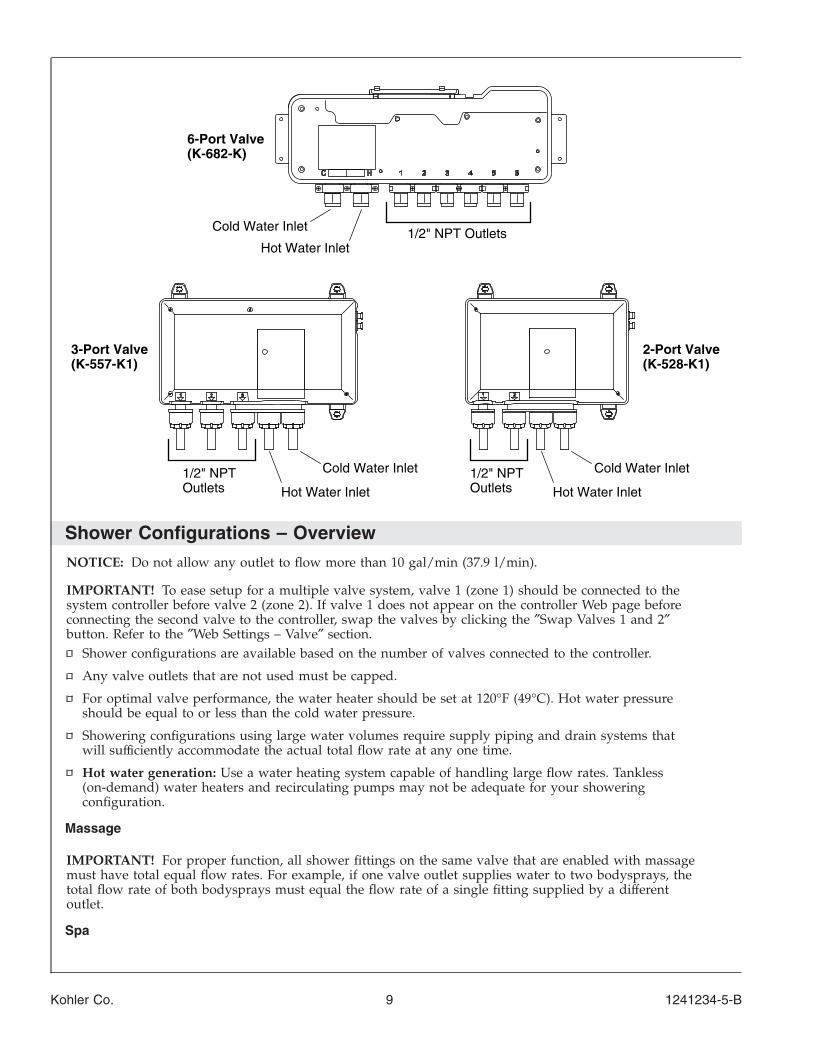
Shower Configurations – OverviewNOTICE: Do not allow any outlet to flow more than 10 gal/min (37.9 l/min).
IMPORTANT! To ease setup for a multiple valve system, valve 1 (zone 1) should be connected to thesystem controller before valve 2 (zone 2). If valve 1 does not appear on the controller Web page beforeconnecting the second valve to the controller, swap the valves by clicking the ″Swap Valves 1 and 2″button. Refer to the ″Web Settings – Valve″ section.
Shower configurations are available based on the number of valves connected to the controller.
Any valve outlets that are not used must be capped.
For optimal valve performance, the water heater should be set at 120°F (49°C). Hot water pressureshould be equal to or less than the cold water pressure.
Showering configurations using large water volumes require supply piping and drain systems thatwill sufficiently accommodate the actual total flow rate at any one time.
Hot water generation: Use a water heating system capable of handling large flow rates. Tankless(on-demand) water heaters and recirculating pumps may not be adequate for your showeringconfiguration.
Massage
IMPORTANT! For proper function, all shower fittings on the same valve that are enabled with massagemust have total equal flow rates. For example, if one valve outlet supplies water to two bodysprays, thetotal flow rate of both bodysprays must equal the flow rate of a single fitting supplied by a differentoutlet.
Spa
Hot Water Inlet
Cold Water Inlet
Hot Water Inlet
Cold Water Inlet1/2" NPTOutlets
1/2" NPTOutlets
(K-557-K1)3-Port Valve
(K-528-K1)2-Port Valve
Hot Water Inlet1/2" NPT OutletsCold Water Inlet
(K-682-K)6-Port Valve
Kohler Co. 9 1241234-5-B
Shower Configurations – Overview (cont.)
NOTICE: Custom shower configurations may not allow certain system features to be enabled.For the [spa] icon to be displayed on the interface home screen, spa must be enabled on thecontroller Web pages. To enable the spa feature, refer to the ″Web Settings – System″ section.
Use of configurations other than the preprogrammed options will LIMIT preprogrammed spa andmassage features.
1241234-5-B 10 Kohler Co.
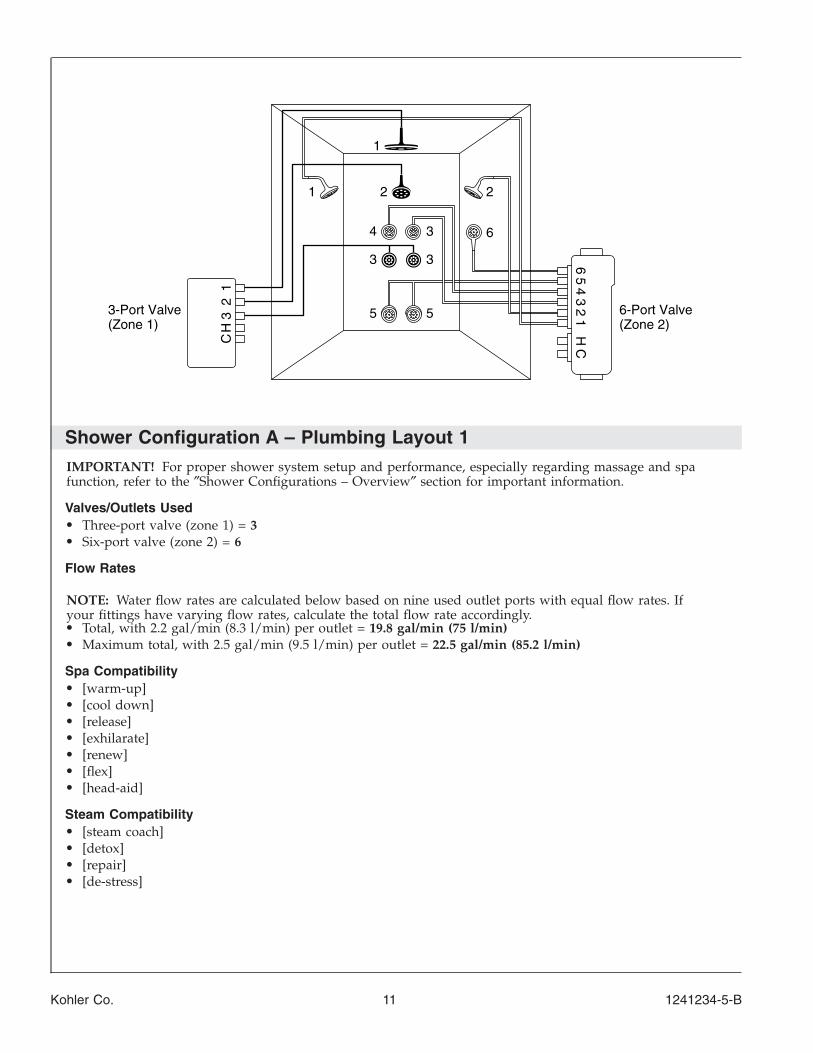
Shower Configuration A – Plumbing Layout 1IMPORTANT! For proper shower system setup and performance, especially regarding massage and spafunction, refer to the ″Shower Configurations – Overview″ section for important information.
Valves/Outlets Used• Three-port valve (zone 1) = 3• Six-port valve (zone 2) = 6
Flow Rates
NOTE: Water flow rates are calculated below based on nine used outlet ports with equal flow rates. Ifyour fittings have varying flow rates, calculate the total flow rate accordingly.• Total, with 2.2 gal/min (8.3 l/min) per outlet = 19.8 gal/min (75 l/min)• Maximum total, with 2.5 gal/min (9.5 l/min) per outlet = 22.5 gal/min (85.2 l/min)
Spa Compatibility• [warm-up]• [cool down]• [release]• [exhilarate]• [renew]• [flex]• [head-aid]
Steam Compatibility• [steam coach]• [detox]• [repair]• [de-stress]
CHC
H4 3
(Zone 1)3-Port Valve 3
21
21
3
2
5
1
3
5(Zone 2)6-Port Valve
65
43
21
6
Kohler Co. 11 1241234-5-B
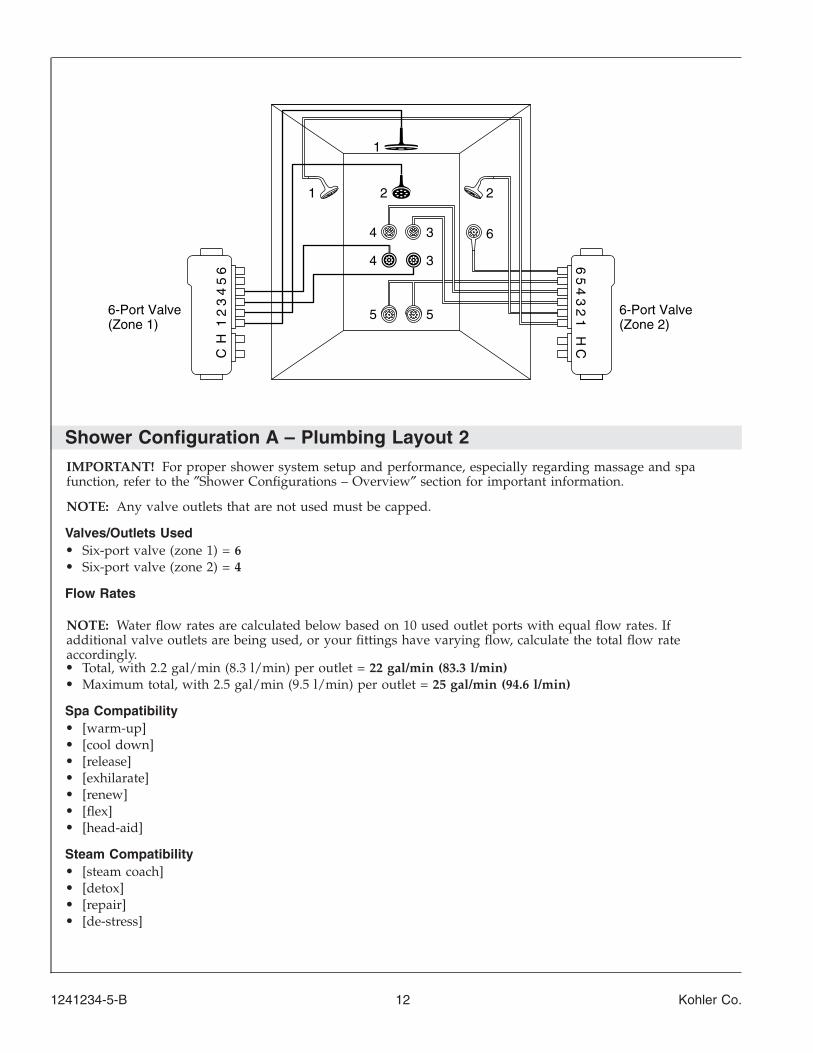
Shower Configuration A – Plumbing Layout 2IMPORTANT! For proper shower system setup and performance, especially regarding massage and spafunction, refer to the ″Shower Configurations – Overview″ section for important information.
NOTE: Any valve outlets that are not used must be capped.
Valves/Outlets Used• Six-port valve (zone 1) = 6• Six-port valve (zone 2) = 4
Flow Rates
NOTE: Water flow rates are calculated below based on 10 used outlet ports with equal flow rates. Ifadditional valve outlets are being used, or your fittings have varying flow, calculate the total flow rateaccordingly.• Total, with 2.2 gal/min (8.3 l/min) per outlet = 22 gal/min (83.3 l/min)• Maximum total, with 2.5 gal/min (9.5 l/min) per outlet = 25 gal/min (94.6 l/min)
Spa Compatibility• [warm-up]• [cool down]• [release]• [exhilarate]• [renew]• [flex]• [head-aid]
Steam Compatibility• [steam coach]• [detox]• [repair]• [de-stress]
65
43
21
6
5
3
1
5
4
1 2
34
2
12
34
56
6-Port Valve(Zone 2)
6-Port Valve(Zone 1) H
CHC
1241234-5-B 12 Kohler Co.
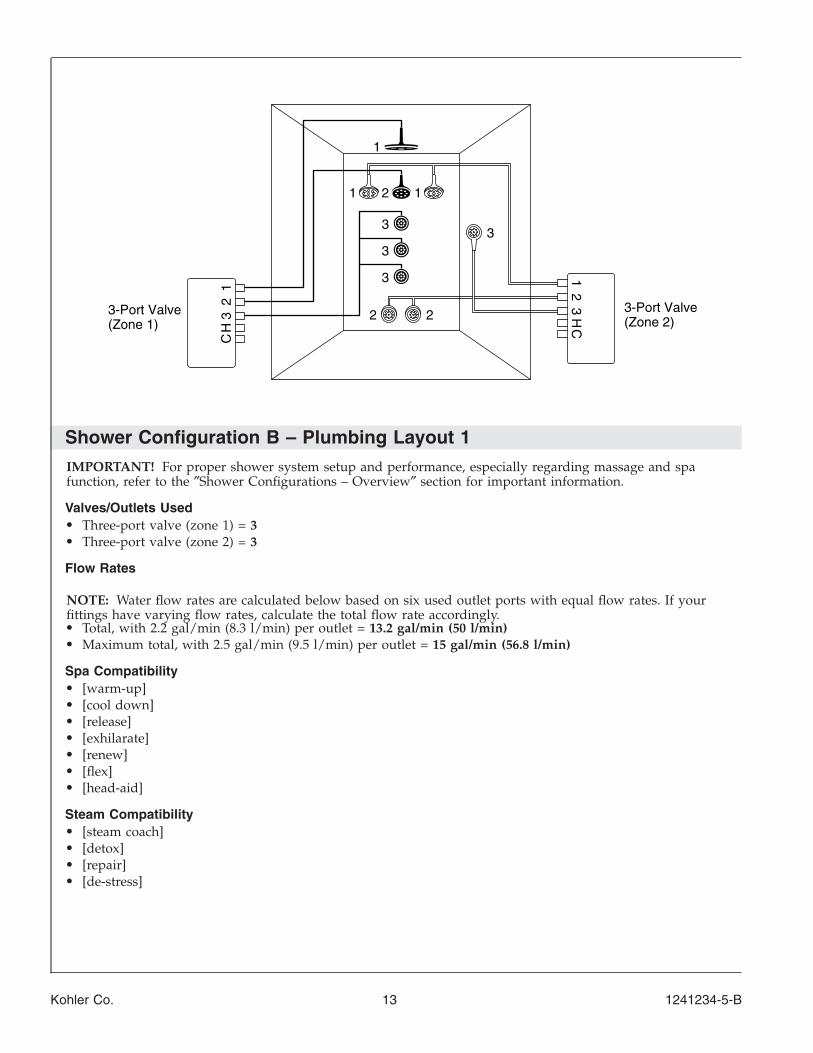
Shower Configuration B – Plumbing Layout 1IMPORTANT! For proper shower system setup and performance, especially regarding massage and spafunction, refer to the ″Shower Configurations – Overview″ section for important information.
Valves/Outlets Used• Three-port valve (zone 1) = 3• Three-port valve (zone 2) = 3
Flow Rates
NOTE: Water flow rates are calculated below based on six used outlet ports with equal flow rates. If yourfittings have varying flow rates, calculate the total flow rate accordingly.• Total, with 2.2 gal/min (8.3 l/min) per outlet = 13.2 gal/min (50 l/min)• Maximum total, with 2.5 gal/min (9.5 l/min) per outlet = 15 gal/min (56.8 l/min)
Spa Compatibility• [warm-up]• [cool down]• [release]• [exhilarate]• [renew]• [flex]• [head-aid]
Steam Compatibility• [steam coach]• [detox]• [repair]• [de-stress]
CH
CH(Zone 1)
3-Port Valve 32
1
(Zone 2)3-Port Valve3
213
3
3
11 2
3
2
1
2
Kohler Co. 13 1241234-5-B
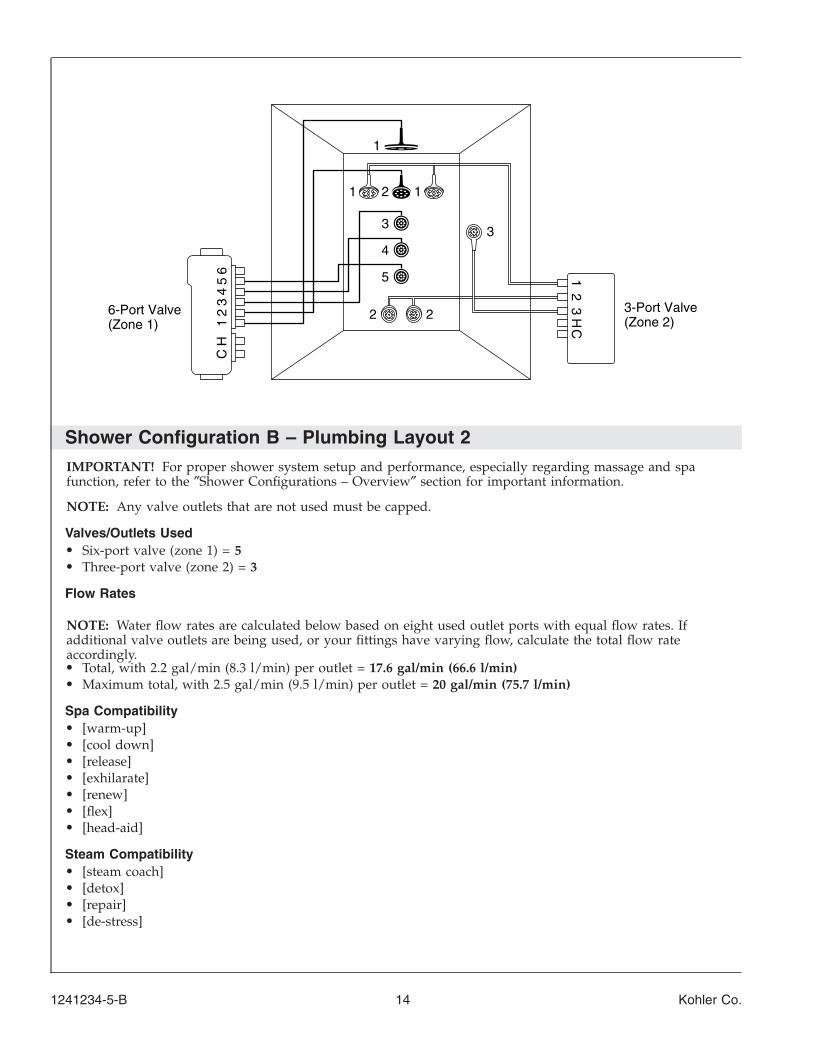
Shower Configuration B – Plumbing Layout 2IMPORTANT! For proper shower system setup and performance, especially regarding massage and spafunction, refer to the ″Shower Configurations – Overview″ section for important information.
NOTE: Any valve outlets that are not used must be capped.
Valves/Outlets Used• Six-port valve (zone 1) = 5• Three-port valve (zone 2) = 3
Flow Rates
NOTE: Water flow rates are calculated below based on eight used outlet ports with equal flow rates. Ifadditional valve outlets are being used, or your fittings have varying flow, calculate the total flow rateaccordingly.• Total, with 2.2 gal/min (8.3 l/min) per outlet = 17.6 gal/min (66.6 l/min)• Maximum total, with 2.5 gal/min (9.5 l/min) per outlet = 20 gal/min (75.7 l/min)
Spa Compatibility• [warm-up]• [cool down]• [release]• [exhilarate]• [renew]• [flex]• [head-aid]
Steam Compatibility• [steam coach]• [detox]• [repair]• [de-stress]
CH
CH
3
(Zone 2)3-Port Valve
(Zone 1)6-Port Valve
5
4
3
11 2
2
65
43
21
1
2
32
1
1241234-5-B 14 Kohler Co.
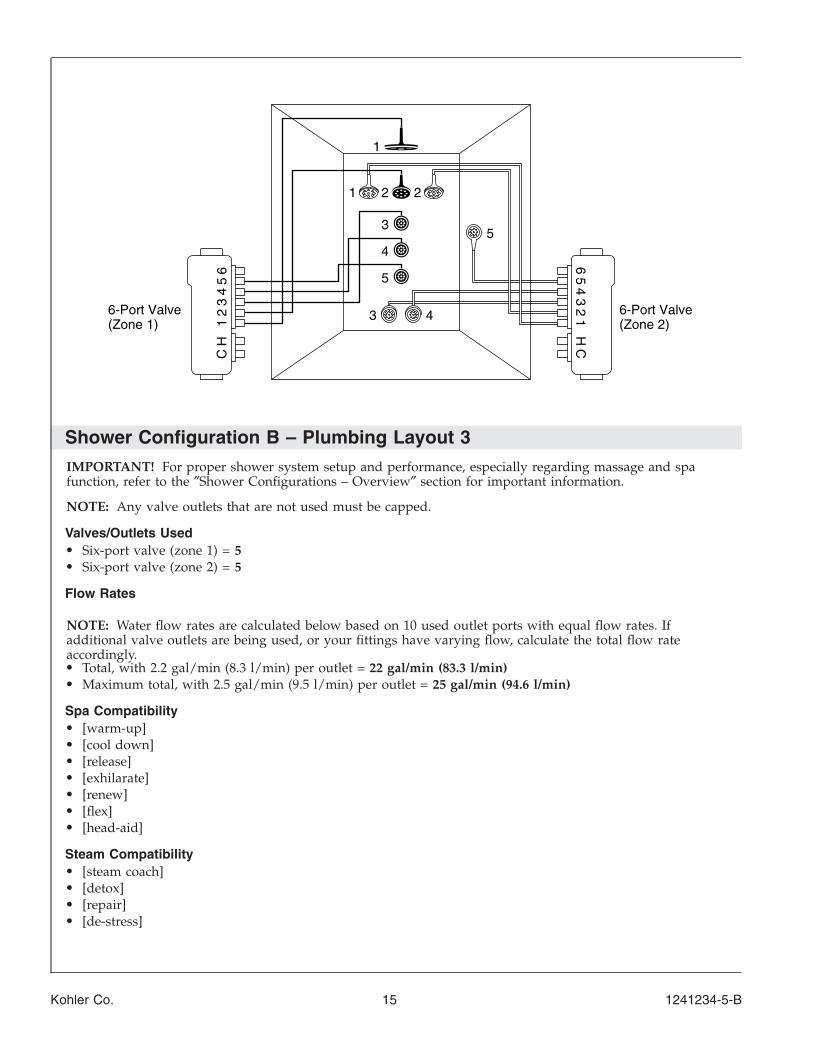
Shower Configuration B – Plumbing Layout 3IMPORTANT! For proper shower system setup and performance, especially regarding massage and spafunction, refer to the ″Shower Configurations – Overview″ section for important information.
NOTE: Any valve outlets that are not used must be capped.
Valves/Outlets Used• Six-port valve (zone 1) = 5• Six-port valve (zone 2) = 5
Flow Rates
NOTE: Water flow rates are calculated below based on 10 used outlet ports with equal flow rates. Ifadditional valve outlets are being used, or your fittings have varying flow, calculate the total flow rateaccordingly.• Total, with 2.2 gal/min (8.3 l/min) per outlet = 22 gal/min (83.3 l/min)• Maximum total, with 2.5 gal/min (9.5 l/min) per outlet = 25 gal/min (94.6 l/min)
Spa Compatibility• [warm-up]• [cool down]• [release]• [exhilarate]• [renew]• [flex]• [head-aid]
Steam Compatibility• [steam coach]• [detox]• [repair]• [de-stress]
CH C
H (Zone 2)6-Port Valve
65
43
21
5
4
3
21 2
5
4
1
3(Zone 1)6-Port Valve
65
43
21
Kohler Co. 15 1241234-5-B
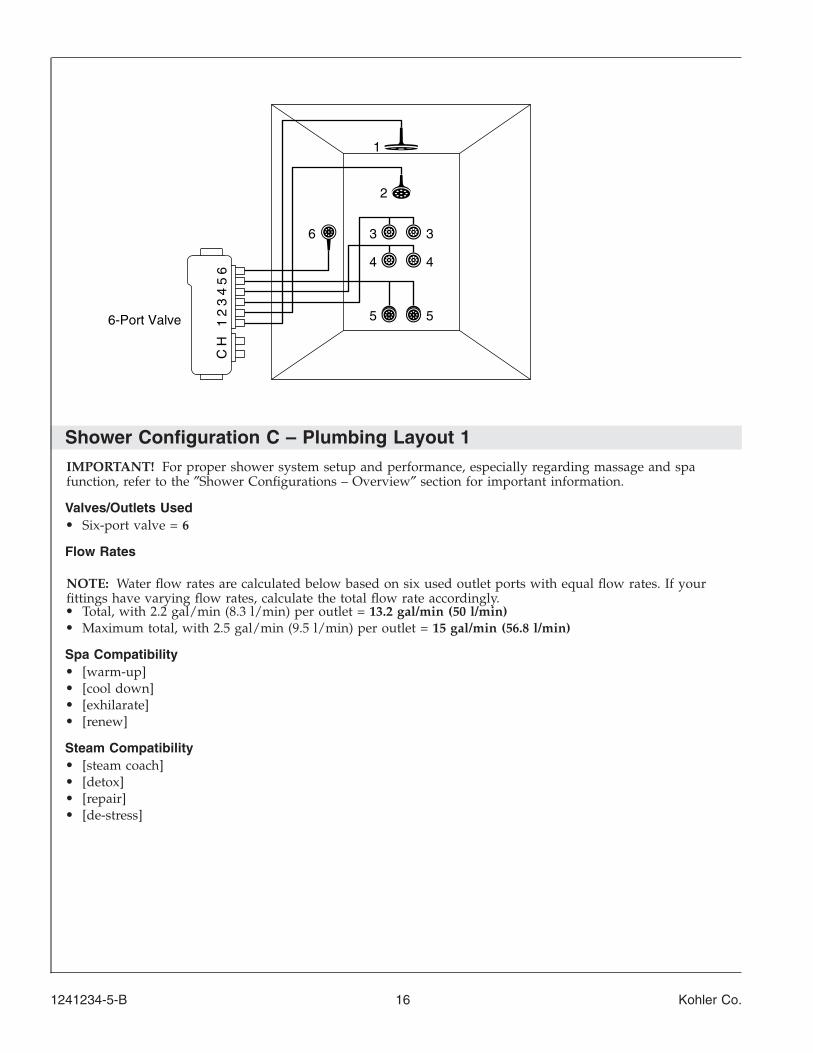
Shower Configuration C – Plumbing Layout 1IMPORTANT! For proper shower system setup and performance, especially regarding massage and spafunction, refer to the ″Shower Configurations – Overview″ section for important information.
Valves/Outlets Used• Six-port valve = 6
Flow Rates
NOTE: Water flow rates are calculated below based on six used outlet ports with equal flow rates. If yourfittings have varying flow rates, calculate the total flow rate accordingly.• Total, with 2.2 gal/min (8.3 l/min) per outlet = 13.2 gal/min (50 l/min)• Maximum total, with 2.5 gal/min (9.5 l/min) per outlet = 15 gal/min (56.8 l/min)
Spa Compatibility• [warm-up]• [cool down]• [exhilarate]• [renew]
Steam Compatibility• [steam coach]• [detox]• [repair]• [de-stress]
CH
6-Port Valve
4
2
6
5
65
43
21
1
3
4
5
3
1241234-5-B 16 Kohler Co.
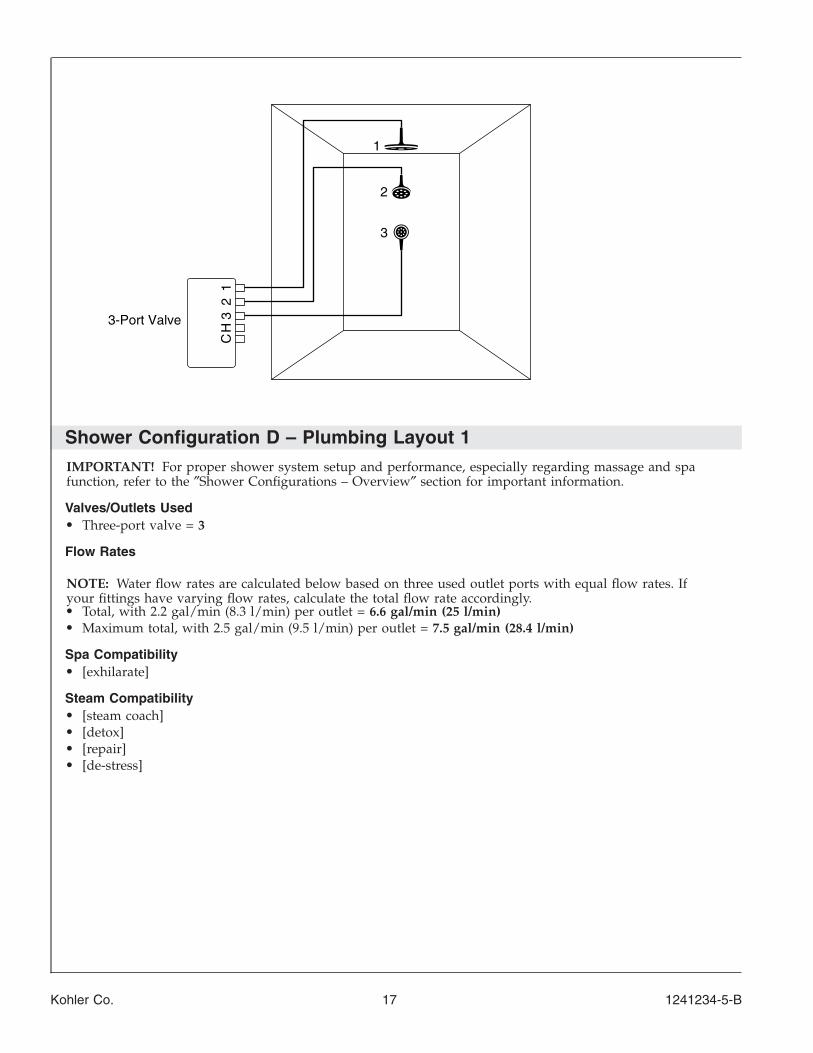
Shower Configuration D – Plumbing Layout 1IMPORTANT! For proper shower system setup and performance, especially regarding massage and spafunction, refer to the ″Shower Configurations – Overview″ section for important information.
Valves/Outlets Used• Three-port valve = 3
Flow Rates
NOTE: Water flow rates are calculated below based on three used outlet ports with equal flow rates. Ifyour fittings have varying flow rates, calculate the total flow rate accordingly.• Total, with 2.2 gal/min (8.3 l/min) per outlet = 6.6 gal/min (25 l/min)• Maximum total, with 2.5 gal/min (9.5 l/min) per outlet = 7.5 gal/min (28.4 l/min)
Spa Compatibility• [exhilarate]
Steam Compatibility• [steam coach]• [detox]• [repair]• [de-stress]
1
2
31
233-Port Valve
HC
Kohler Co. 17 1241234-5-B
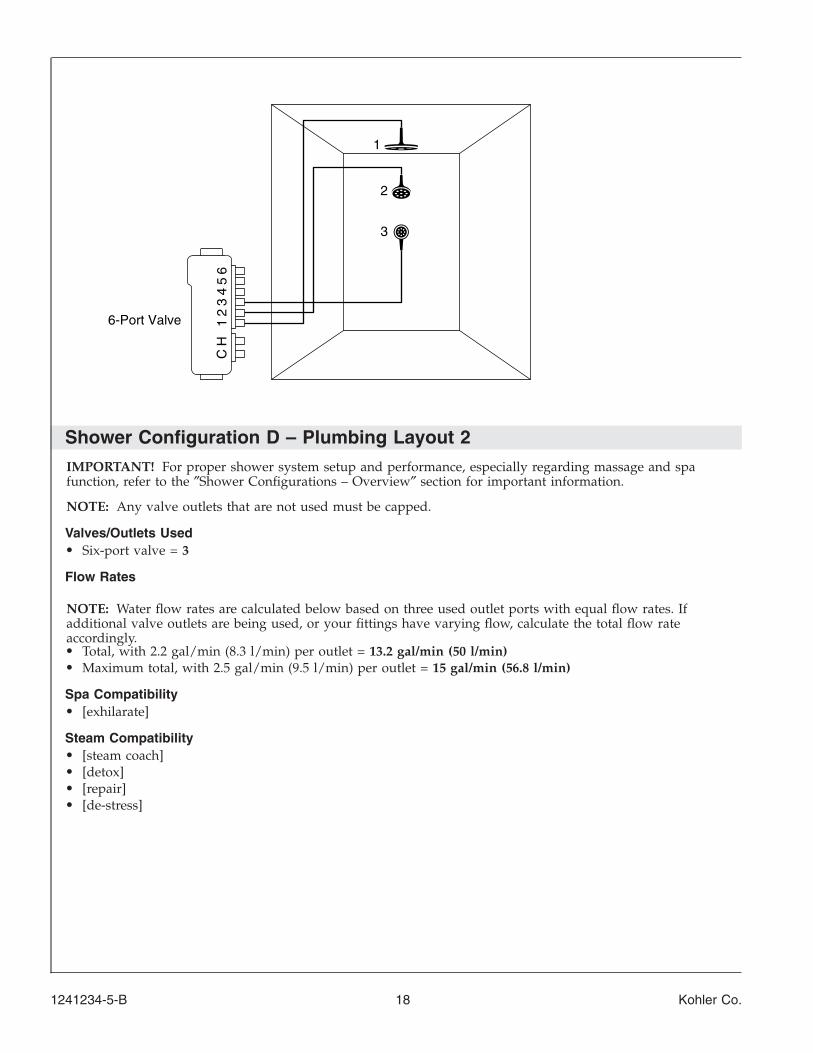
Shower Configuration D – Plumbing Layout 2IMPORTANT! For proper shower system setup and performance, especially regarding massage and spafunction, refer to the ″Shower Configurations – Overview″ section for important information.
NOTE: Any valve outlets that are not used must be capped.
Valves/Outlets Used• Six-port valve = 3
Flow Rates
NOTE: Water flow rates are calculated below based on three used outlet ports with equal flow rates. Ifadditional valve outlets are being used, or your fittings have varying flow, calculate the total flow rateaccordingly.• Total, with 2.2 gal/min (8.3 l/min) per outlet = 13.2 gal/min (50 l/min)• Maximum total, with 2.5 gal/min (9.5 l/min) per outlet = 15 gal/min (56.8 l/min)
Spa Compatibility• [exhilarate]
Steam Compatibility• [steam coach]• [detox]• [repair]• [de-stress]
CH
6-Port Valve
3
2
65
43
21
1
1241234-5-B 18 Kohler Co.
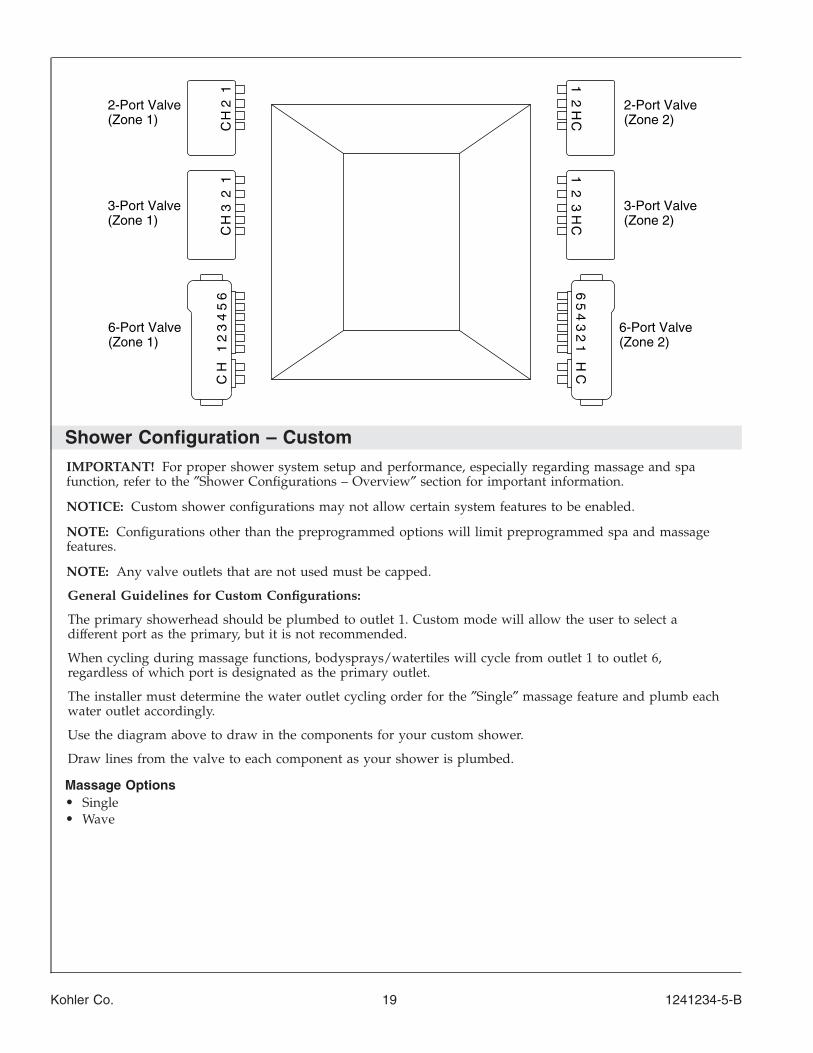
Shower Configuration – CustomIMPORTANT! For proper shower system setup and performance, especially regarding massage and spafunction, refer to the ″Shower Configurations – Overview″ section for important information.
NOTICE: Custom shower configurations may not allow certain system features to be enabled.
NOTE: Configurations other than the preprogrammed options will limit preprogrammed spa and massagefeatures.
NOTE: Any valve outlets that are not used must be capped.
General Guidelines for Custom Configurations:
The primary showerhead should be plumbed to outlet 1. Custom mode will allow the user to select adifferent port as the primary, but it is not recommended.
When cycling during massage functions, bodysprays/watertiles will cycle from outlet 1 to outlet 6,regardless of which port is designated as the primary outlet.
The installer must determine the water outlet cycling order for the ″Single″ massage feature and plumb eachwater outlet accordingly.
Use the diagram above to draw in the components for your custom shower.
Draw lines from the valve to each component as your shower is plumbed.
Massage Options• Single• Wave
12
34
56
12
34
56
HCH
C1
23
HC
12
3H
C1
22-Port Valve(Zone 1) H
C1
2H
C
3-Port Valve(Zone 1)
6-Port Valve(Zone 1)
2-Port Valve(Zone 2)
3-Port Valve(Zone 2)
6-Port Valve(Zone 2)
Kohler Co. 19 1241234-5-B
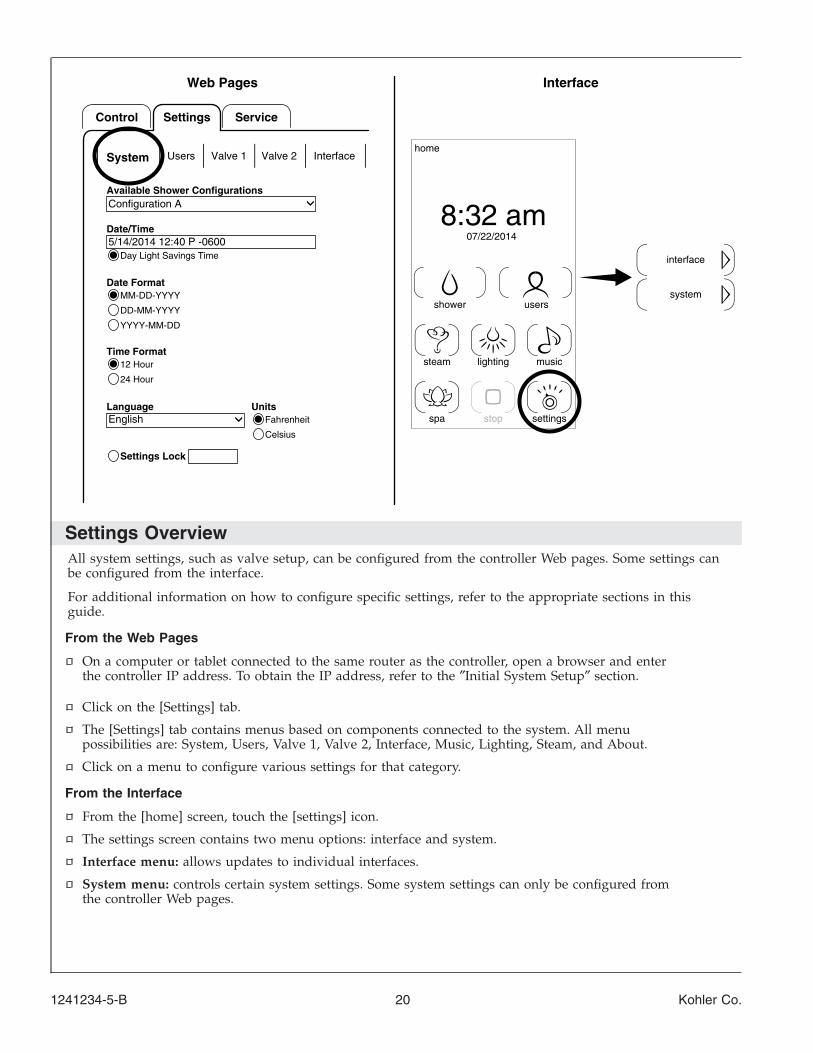
Settings OverviewAll system settings, such as valve setup, can be configured from the controller Web pages. Some settings canbe configured from the interface.
For additional information on how to configure specific settings, refer to the appropriate sections in thisguide.
From the Web Pages
On a computer or tablet connected to the same router as the controller, open a browser and enterthe controller IP address. To obtain the IP address, refer to the ″Initial System Setup″ section.
Click on the [Settings] tab.
The [Settings] tab contains menus based on components connected to the system. All menupossibilities are: System, Users, Valve 1, Valve 2, Interface, Music, Lighting, Steam, and About.
Click on a menu to configure various settings for that category.
From the Interface
From the [home] screen, touch the [settings] icon.
The settings screen contains two menu options: interface and system.
Interface menu: allows updates to individual interfaces.
System menu: controls certain system settings. Some system settings can only be configured fromthe controller Web pages.
stop
lighting musicsteam
shower users
settingsspa
07/22/2014
homeInterfaceValve 2
Settings Lock
5/14/2014 12:40 P -0600
EnglishCelsius
FahrenheitUnitsLanguage
24 Hour
12 HourTime Format
YYYY-MM-DD
DD-MM-YYYY
Day Light Savings Time
MM-DD-YYYYDate Format
Date/Time
Available Shower Configurations
Valve 1
Configuration A
System Users
Web Pages
interface
system
Interface
8:32 am
ServiceSettingsControl
1241234-5-B 20 Kohler Co.
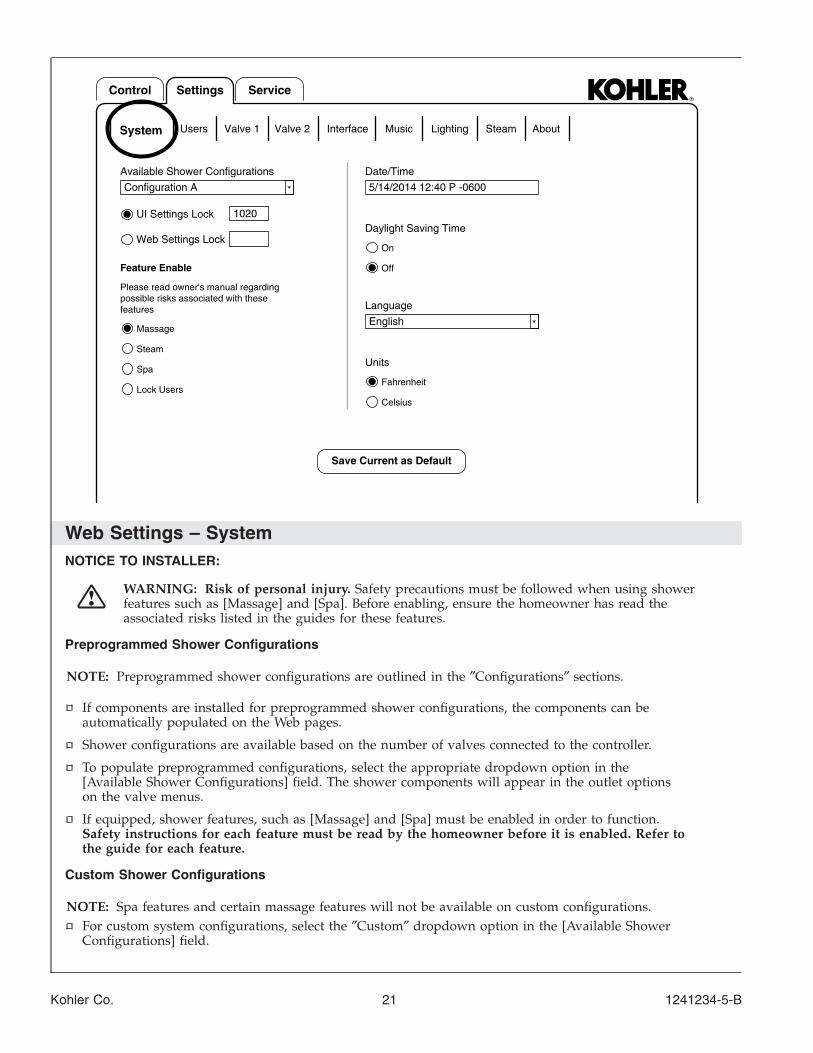
Web Settings – SystemNOTICE TO INSTALLER:
WARNING: Risk of personal injury. Safety precautions must be followed when using showerfeatures such as [Massage] and [Spa]. Before enabling, ensure the homeowner has read theassociated risks listed in the guides for these features.
Preprogrammed Shower Configurations
NOTE: Preprogrammed shower configurations are outlined in the ″Configurations″ sections.
If components are installed for preprogrammed shower configurations, the components can beautomatically populated on the Web pages.
Shower configurations are available based on the number of valves connected to the controller.
To populate preprogrammed configurations, select the appropriate dropdown option in the[Available Shower Configurations] field. The shower components will appear in the outlet optionson the valve menus.
If equipped, shower features, such as [Massage] and [Spa] must be enabled in order to function.Safety instructions for each feature must be read by the homeowner before it is enabled. Refer tothe guide for each feature.
Custom Shower Configurations
NOTE: Spa features and certain massage features will not be available on custom configurations.For custom system configurations, select the ″Custom″ dropdown option in the [Available ShowerConfigurations] field.
Feature Enable
featurespossible risks associated with these
Celsius
Fahrenheit
Units
English
Off
On
1020
Language
Daylight Saving Time
5/14/2014 12:40 P -0600
Date/Time
Configuration A
AboutSteamLightingMusicUsers Valve 2Valve 1 Interface
Available Shower Configurations
Save Current as Default
Spa
Steam
UI Settings Lock
Massage
System
ServiceSettingsControl
Lock Users
Please read owner's manual regarding
Web Settings Lock
Kohler Co. 21 1241234-5-B
Web Settings – System (cont.)
To check or configure custom valve settings, go to the [Valve 1] or [Valve 2] menus. Refer to the″Web Settings – Valve″ section.
1241234-5-B 22 Kohler Co.
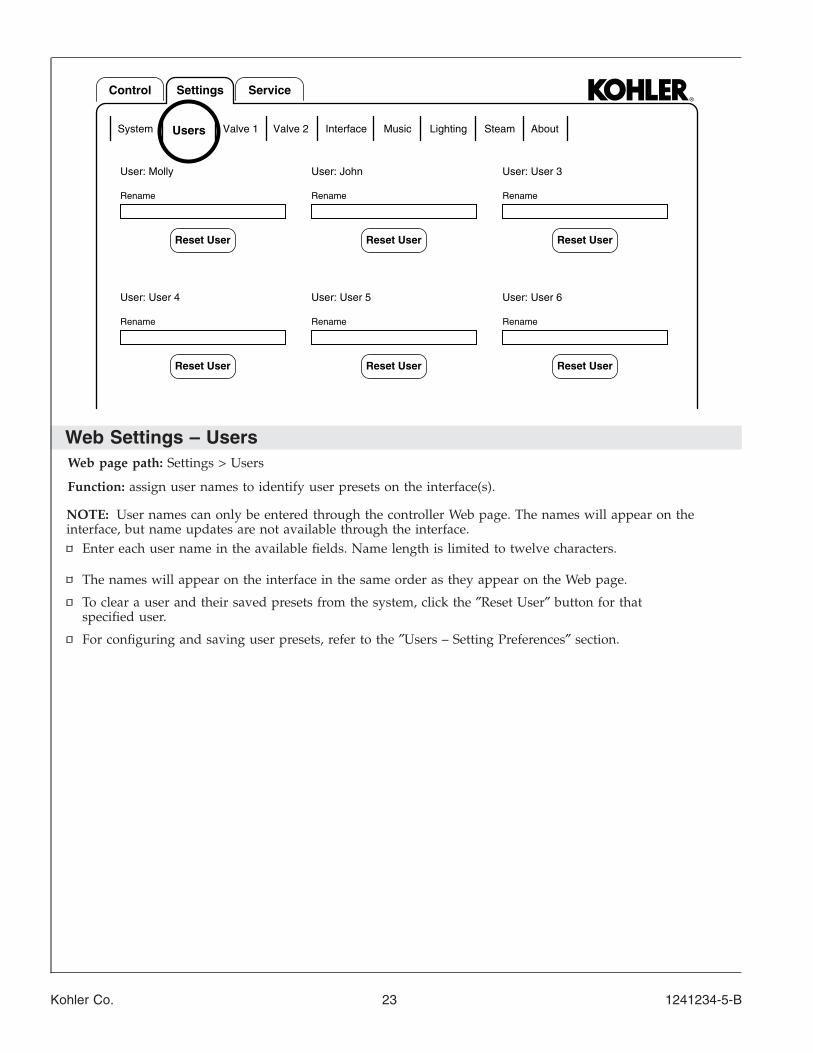
Web Settings – UsersWeb page path: Settings > Users
Function: assign user names to identify user presets on the interface(s).
NOTE: User names can only be entered through the controller Web page. The names will appear on theinterface, but name updates are not available through the interface.
Enter each user name in the available fields. Name length is limited to twelve characters.
The names will appear on the interface in the same order as they appear on the Web page.
To clear a user and their saved presets from the system, click the ″Reset User″ button for thatspecified user.
For configuring and saving user presets, refer to the ″Users – Setting Preferences″ section.
AboutSteamLightingMusicValve 2Valve 1 Interface
User: User 6
Rename
User: User 3
Rename
User: User 5
Rename
User: John
Rename
User: User 4
Rename
User: Molly
Rename
System Users
ServiceSettingsControl
Reset User Reset User Reset User
Reset User Reset User Reset User
Kohler Co. 23 1241234-5-B

Web Settings – ValveWeb page path: Settings > Valve 1 (or Valve 2)
IMPORTANT! To ease setup for a multiple valve system, valve 1 (zone 1) should be connected to thesystem controller before valve 2 (zone 2). If valve 1 does not appear on the controller Web page beforeconnecting the second valve to the controller, swap the valves by clicking the ″Swap Valves 1 and 2″button.
Valve Configuration – Custom Options
For preprogrammed configurations, refer to the ″Configurations″ sections.
Function: sets the outlet icons of your custom configuration to match your shower installation.
IMPORTANT! The fitting shown in the outlet window on the Web page should be the fitting that isphysically plumbed to that valve outlet.
Click the icon window to scroll through the list of available water outlet options for your showerconfiguration (see ″Water Outlet Options″ section).
Select Default Outlet
Function: sets the water outlet that will turn on if the user makes no shower selections beforetouching the [start] icon on the interface.
Determine the primary outlet by clicking the radio button next to ″Default.″ Only one default outletcan be selected per system.
Add/Remove Outlets from Massage Cycling Pattern
Function: sets the water outlets that will cycle when the massage feature is activated.
7 SecondsAuto Purge
Cold Water 5 Minutes
113
100
Max Temperature
Default Temperature
AboutSteamLightingValve 2 Interface Music
Auto Purge
Massage
Default
Outlet 6
Auto Purge
Massage
Default
Outlet 5
Auto Purge
Massage
Default
Outlet 4
Temperature
Auto Purge
Massage
Default
Outlet 3
Auto Purge
Massage
Default
Outlet 2
Auto Purge
Massage
Default
Outlet 1
System Users Valve 1
(example: 1,3,2,4,6,5)
ServiceSettingsControl
Custom Massage Order 1
(example: 1,3,2,4,6,5)Custom Massage Order 2
Max Run Time
Steam Deluge Steam Deluge Steam Deluge
Steam Deluge Steam DelugeSteam Deluge
1241234-5-B 24 Kohler Co.
Web Settings – Valve (cont.)
Add or remove outlets by clicking the radio button next to ″Massage.″
Kohler Co. 25 1241234-5-B
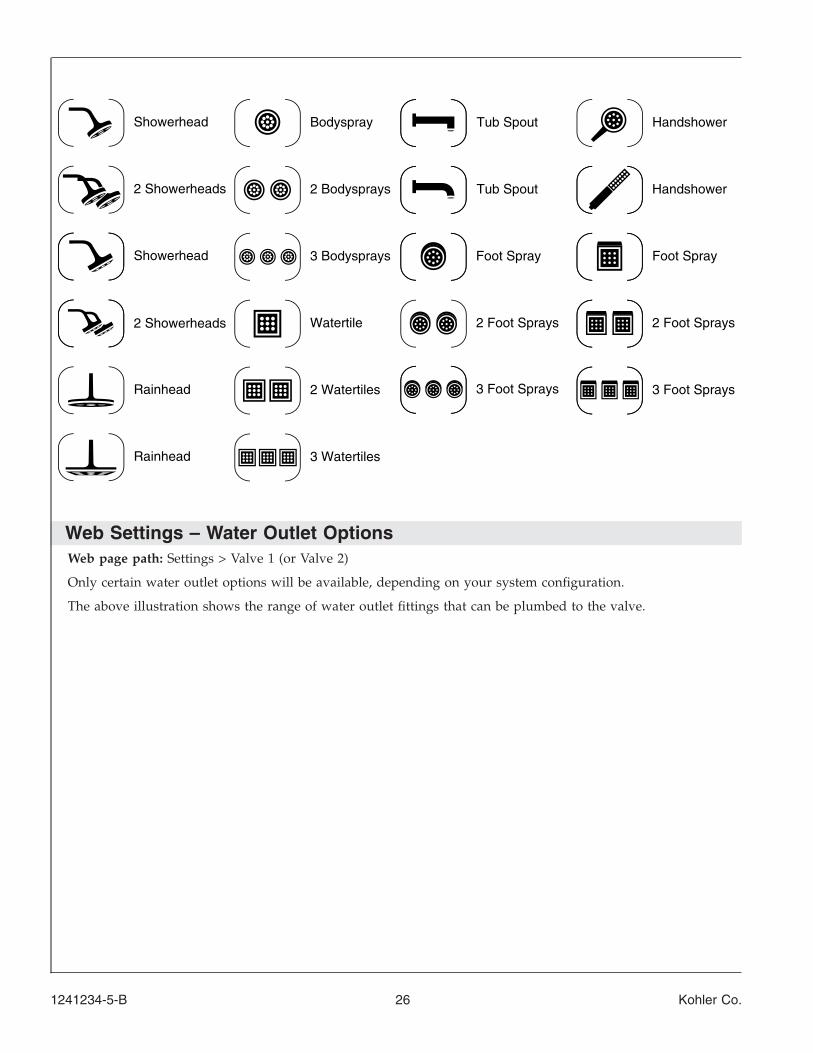
Web Settings – Water Outlet OptionsWeb page path: Settings > Valve 1 (or Valve 2)
Only certain water outlet options will be available, depending on your system configuration.
The above illustration shows the range of water outlet fittings that can be plumbed to the valve.
2 Foot Sprays
Rainhead
3 Watertiles
2 Watertiles
Watertile
Tub Spout2 Bodysprays
Bodyspray
2 Showerheads
Showerhead Handshower
Foot Spray
3 Foot Sprays
Showerhead
2 Showerheads
3 Bodysprays
Tub Spout
Handshower
Foot Spray
2 Foot Sprays
3 Foot Sprays
Rainhead
1241234-5-B 26 Kohler Co.
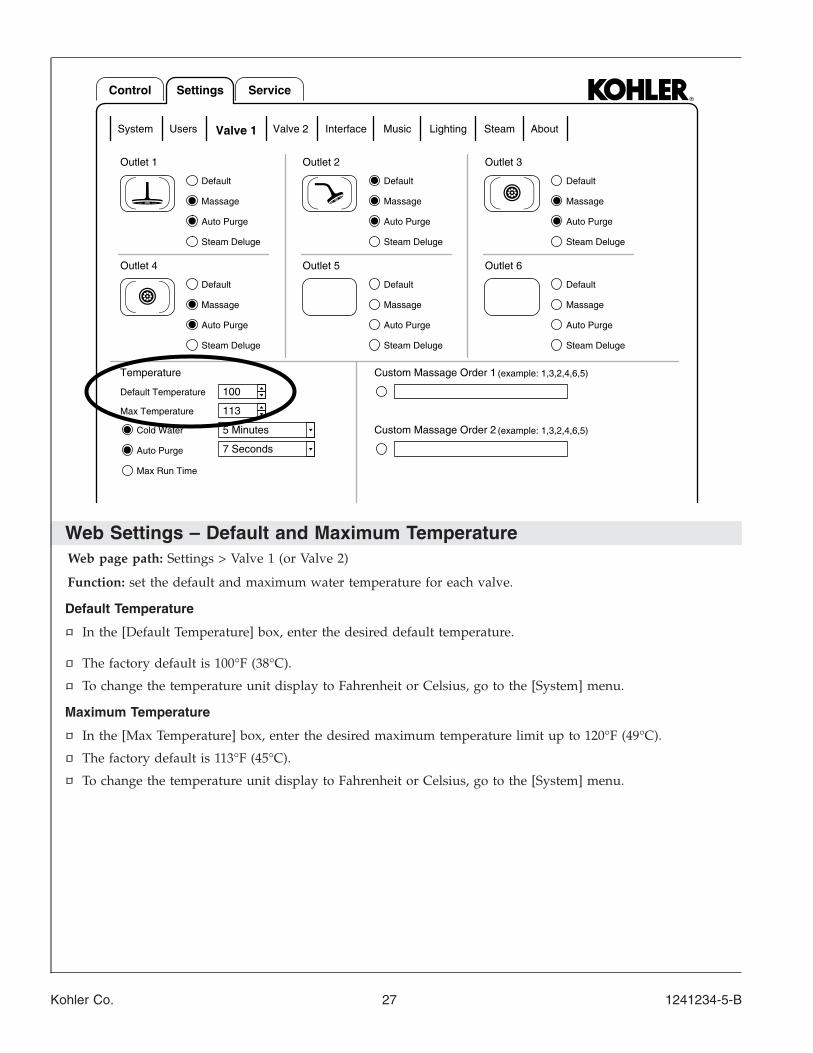
Web Settings – Default and Maximum TemperatureWeb page path: Settings > Valve 1 (or Valve 2)
Function: set the default and maximum water temperature for each valve.
Default Temperature
In the [Default Temperature] box, enter the desired default temperature.
The factory default is 100°F (38°C).
To change the temperature unit display to Fahrenheit or Celsius, go to the [System] menu.
Maximum Temperature
In the [Max Temperature] box, enter the desired maximum temperature limit up to 120°F (49°C).
The factory default is 113°F (45°C).
To change the temperature unit display to Fahrenheit or Celsius, go to the [System] menu.
7 SecondsAuto Purge
Cold Water 5 Minutes
113
100
Max Temperature
Default Temperature
AboutSteamLightingValve 2 Interface Music
Auto Purge
Massage
Default
Outlet 6
Auto Purge
Massage
Default
Outlet 5
Auto Purge
Massage
Default
Outlet 4
Temperature
Auto Purge
Massage
Default
Outlet 3
Auto Purge
Massage
Default
Outlet 2
Auto Purge
Massage
Default
Outlet 1
System Users Valve 1
(example: 1,3,2,4,6,5)
ServiceSettingsControl
Custom Massage Order 1
(example: 1,3,2,4,6,5)Custom Massage Order 2
Max Run Time
Steam Deluge Steam Deluge Steam Deluge
Steam Deluge Steam DelugeSteam Deluge
Kohler Co. 27 1241234-5-B
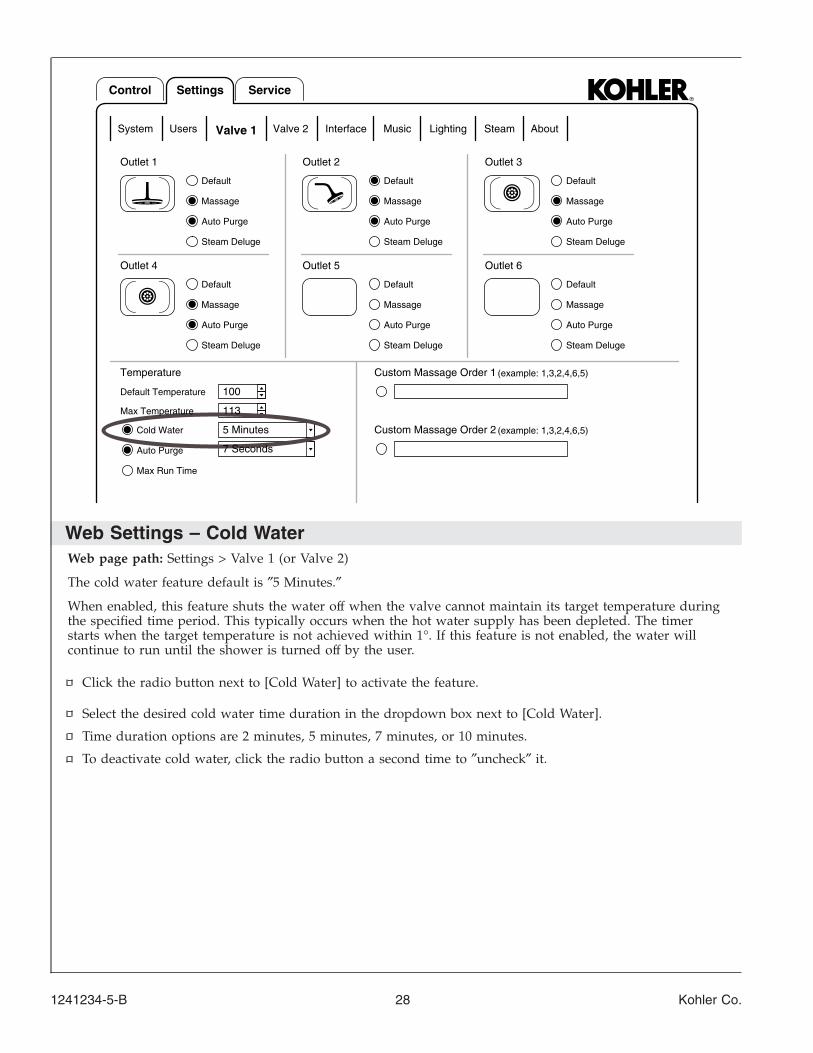
Web Settings – Cold WaterWeb page path: Settings > Valve 1 (or Valve 2)
The cold water feature default is ″5 Minutes.″
When enabled, this feature shuts the water off when the valve cannot maintain its target temperature duringthe specified time period. This typically occurs when the hot water supply has been depleted. The timerstarts when the target temperature is not achieved within 1°. If this feature is not enabled, the water willcontinue to run until the shower is turned off by the user.
Click the radio button next to [Cold Water] to activate the feature.
Select the desired cold water time duration in the dropdown box next to [Cold Water].
Time duration options are 2 minutes, 5 minutes, 7 minutes, or 10 minutes.
To deactivate cold water, click the radio button a second time to ″uncheck″ it.
7 SecondsAuto Purge
Cold Water 5 Minutes
113
100
Max Temperature
Default Temperature
AboutSteamLightingValve 2 Interface Music
Auto Purge
Massage
Default
Outlet 6
Auto Purge
Massage
Default
Outlet 5
Auto Purge
Massage
Default
Outlet 4
Temperature
Auto Purge
Massage
Default
Outlet 3
Auto Purge
Massage
Default
Outlet 2
Auto Purge
Massage
Default
Outlet 1
System Users Valve 1
(example: 1,3,2,4,6,5)
ServiceSettingsControl
Custom Massage Order 1
(example: 1,3,2,4,6,5)Custom Massage Order 2
Max Run Time
Steam Deluge Steam Deluge Steam Deluge
Steam Deluge Steam DelugeSteam Deluge
1241234-5-B 28 Kohler Co.
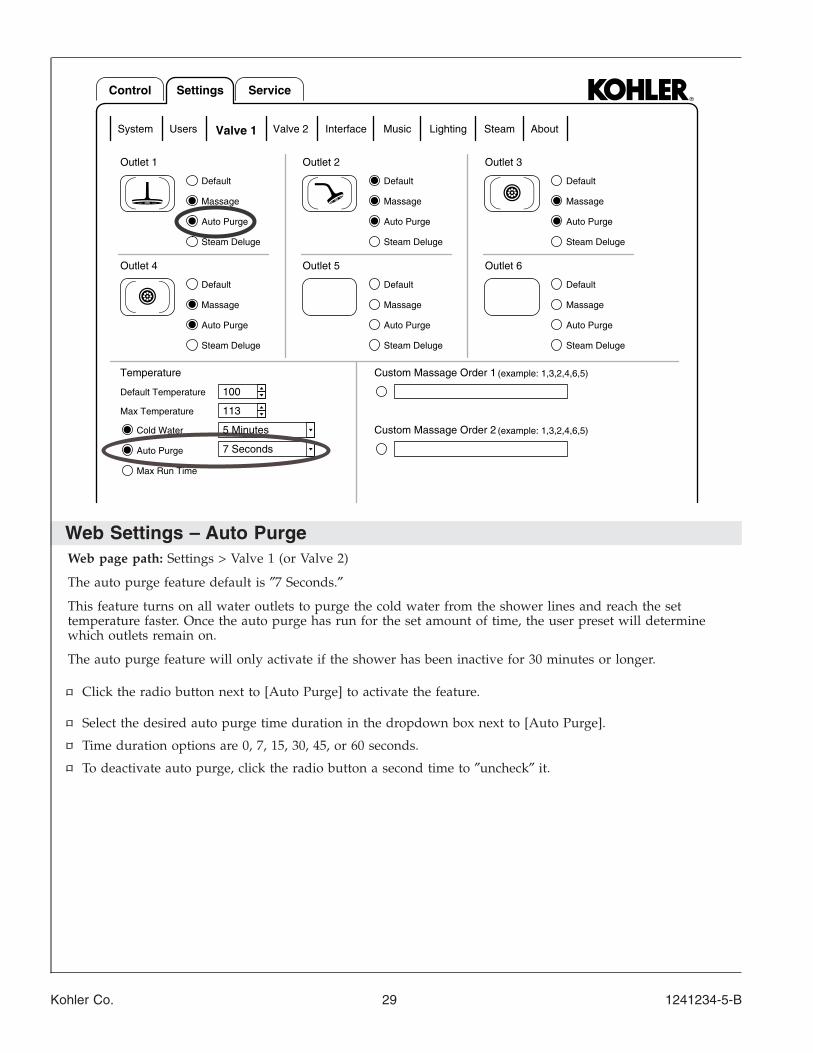
Web Settings – Auto PurgeWeb page path: Settings > Valve 1 (or Valve 2)
The auto purge feature default is ″7 Seconds.″
This feature turns on all water outlets to purge the cold water from the shower lines and reach the settemperature faster. Once the auto purge has run for the set amount of time, the user preset will determinewhich outlets remain on.
The auto purge feature will only activate if the shower has been inactive for 30 minutes or longer.
Click the radio button next to [Auto Purge] to activate the feature.
Select the desired auto purge time duration in the dropdown box next to [Auto Purge].
Time duration options are 0, 7, 15, 30, 45, or 60 seconds.
To deactivate auto purge, click the radio button a second time to ″uncheck″ it.
7 SecondsAuto Purge
Cold Water 5 Minutes
113
100
Max Temperature
Default Temperature
AboutSteamLightingValve 2 Interface Music
Auto Purge
Massage
Default
Outlet 6
Auto Purge
Massage
Default
Outlet 5
Auto Purge
Massage
Default
Outlet 4
Temperature
Auto Purge
Massage
Default
Outlet 3
Auto Purge
Massage
Default
Outlet 2
Auto Purge
Massage
Default
Outlet 1
System Users Valve 1
(example: 1,3,2,4,6,5)
ServiceSettingsControl
Custom Massage Order 1
(example: 1,3,2,4,6,5)Custom Massage Order 2
Max Run Time
Steam Deluge Steam Deluge Steam Deluge
Steam Deluge Steam DelugeSteam Deluge
Kohler Co. 29 1241234-5-B
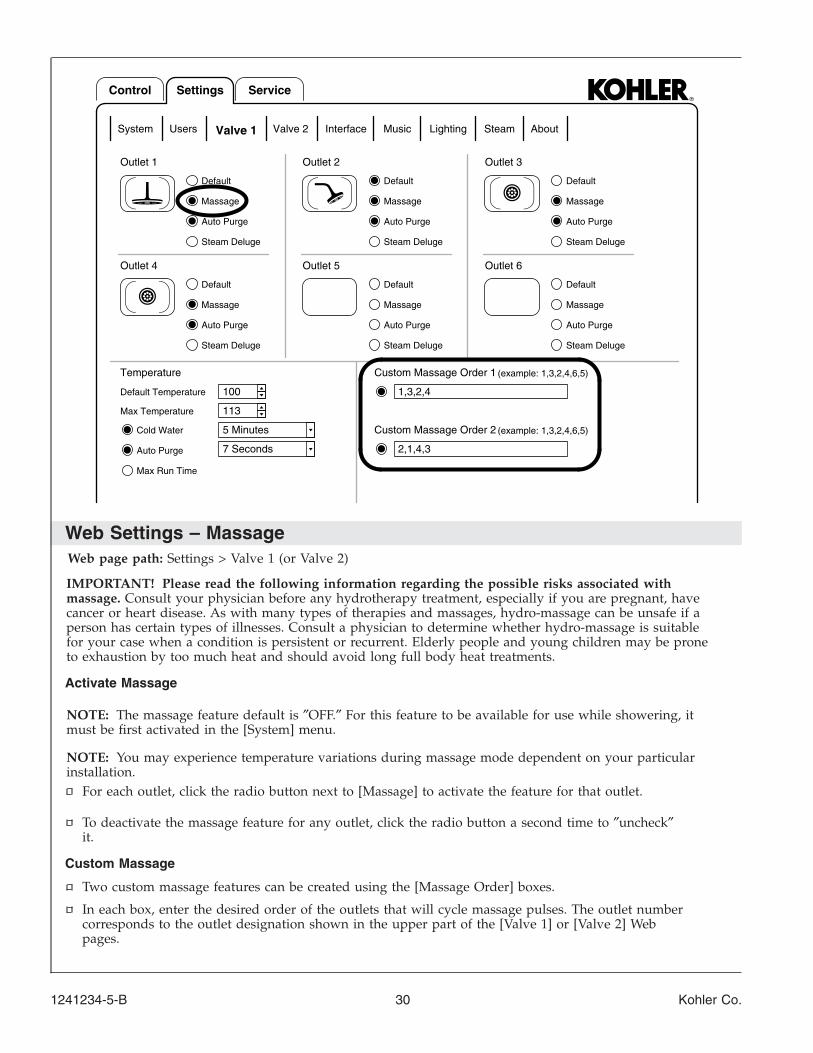
Web Settings – MassageWeb page path: Settings > Valve 1 (or Valve 2)
IMPORTANT! Please read the following information regarding the possible risks associated withmassage. Consult your physician before any hydrotherapy treatment, especially if you are pregnant, havecancer or heart disease. As with many types of therapies and massages, hydro-massage can be unsafe if aperson has certain types of illnesses. Consult a physician to determine whether hydro-massage is suitablefor your case when a condition is persistent or recurrent. Elderly people and young children may be proneto exhaustion by too much heat and should avoid long full body heat treatments.
Activate Massage
NOTE: The massage feature default is ″OFF.″ For this feature to be available for use while showering, itmust be first activated in the [System] menu.
NOTE: You may experience temperature variations during massage mode dependent on your particularinstallation.
For each outlet, click the radio button next to [Massage] to activate the feature for that outlet.
To deactivate the massage feature for any outlet, click the radio button a second time to ″uncheck″it.
Custom Massage
Two custom massage features can be created using the [Massage Order] boxes.
In each box, enter the desired order of the outlets that will cycle massage pulses. The outlet numbercorresponds to the outlet designation shown in the upper part of the [Valve 1] or [Valve 2] Webpages.
7 SecondsAuto Purge
Cold Water 5 Minutes
113
100
Max Temperature
Default Temperature
AboutSteamLightingValve 2 Interface Music
Auto Purge
Massage
Default
Outlet 6
Auto Purge
Massage
Default
Outlet 5
Auto Purge
Massage
Default
Outlet 4
Temperature
Auto Purge
Massage
Default
Outlet 3
Auto Purge
Massage
Default
Outlet 2
Auto Purge
Massage
Default
Outlet 1
System Users Valve 1
(example: 1,3,2,4,6,5)
ServiceSettingsControl
Custom Massage Order 1
(example: 1,3,2,4,6,5)Custom Massage Order 2
Max Run Time
Steam Deluge Steam Deluge Steam Deluge
Steam Deluge Steam DelugeSteam Deluge
1,3,2,4
2,1,4,3
1241234-5-B 30 Kohler Co.
Web Settings – Massage (cont.)
Enter the outlets according to number, separated by commas (example: 1,3,2,4).
Any sequence of numbers that is not separated by a comma will cycle those outlets at the same time(example: 1,23,4,6,5 – outlets 2 and 3 will cycle massage pulses at the same time).
Once activated/deactivated, press the [Back Icon] until you return to the settings menu.
Kohler Co. 31 1241234-5-B
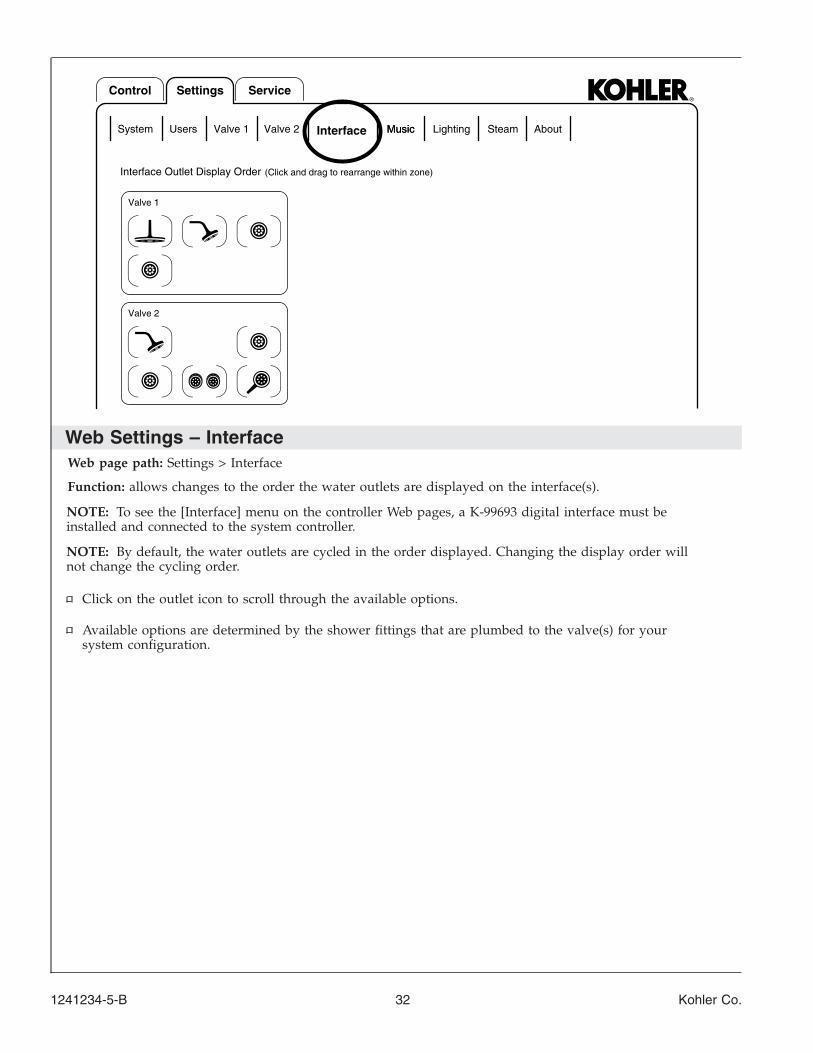
Web Settings – InterfaceWeb page path: Settings > Interface
Function: allows changes to the order the water outlets are displayed on the interface(s).
NOTE: To see the [Interface] menu on the controller Web pages, a K-99693 digital interface must beinstalled and connected to the system controller.
NOTE: By default, the water outlets are cycled in the order displayed. Changing the display order willnot change the cycling order.
Click on the outlet icon to scroll through the available options.
Available options are determined by the shower fittings that are plumbed to the valve(s) for yoursystem configuration.
AboutSteamLightingMusicValve 2Valve 1System Users
Valve 2
Interface Music
(Click and drag to rearrange within zone)
Valve 1
Interface Outlet Display Order
ServiceSettingsControl
1241234-5-B 32 Kohler Co.
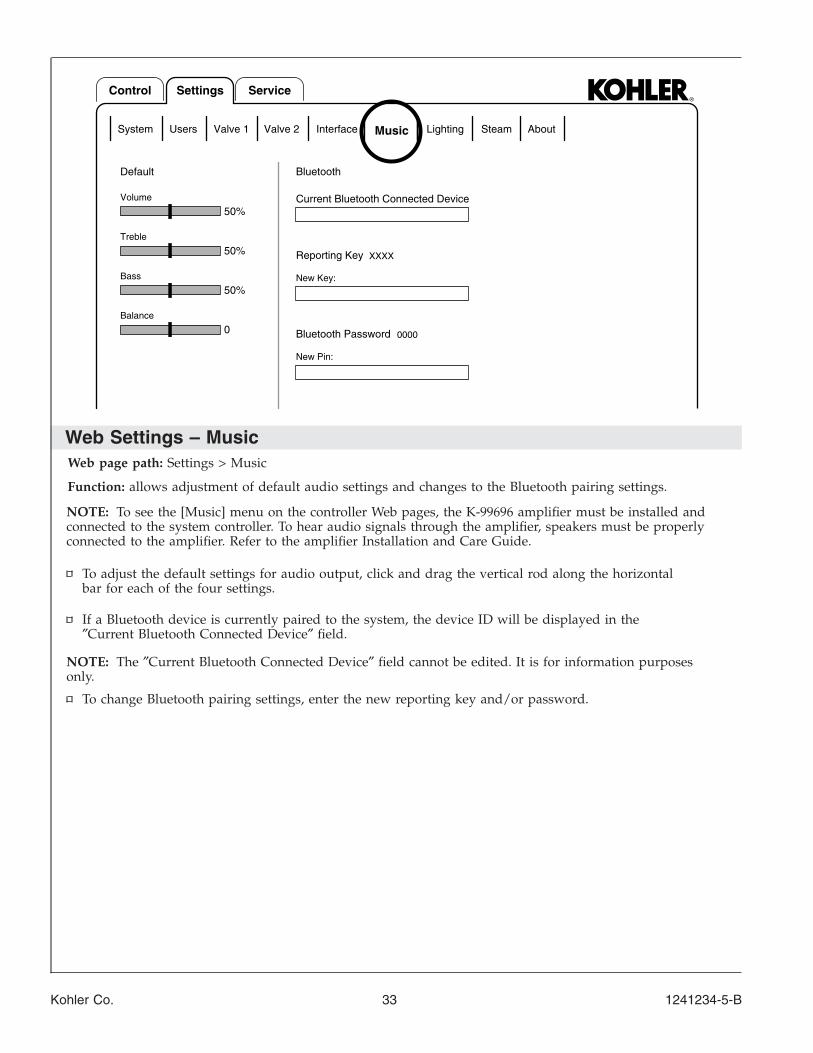
Web Settings – MusicWeb page path: Settings > Music
Function: allows adjustment of default audio settings and changes to the Bluetooth pairing settings.
NOTE: To see the [Music] menu on the controller Web pages, the K-99696 amplifier must be installed andconnected to the system controller. To hear audio signals through the amplifier, speakers must be properlyconnected to the amplifier. Refer to the amplifier Installation and Care Guide.
To adjust the default settings for audio output, click and drag the vertical rod along the horizontalbar for each of the four settings.
If a Bluetooth device is currently paired to the system, the device ID will be displayed in the″Current Bluetooth Connected Device″ field.
NOTE: The ″Current Bluetooth Connected Device″ field cannot be edited. It is for information purposesonly.
To change Bluetooth pairing settings, enter the new reporting key and/or password.
AboutSteamLighting
0000Bluetooth Password
New Pin:
XXXXReporting Key
New Key:
Bluetooth
Current Bluetooth Connected Device
50%
0Balance
Bass
50%
50%Treble
Volume
Default
Valve 2Valve 1System Users Interface Music
ServiceSettingsControl
Kohler Co. 33 1241234-5-B
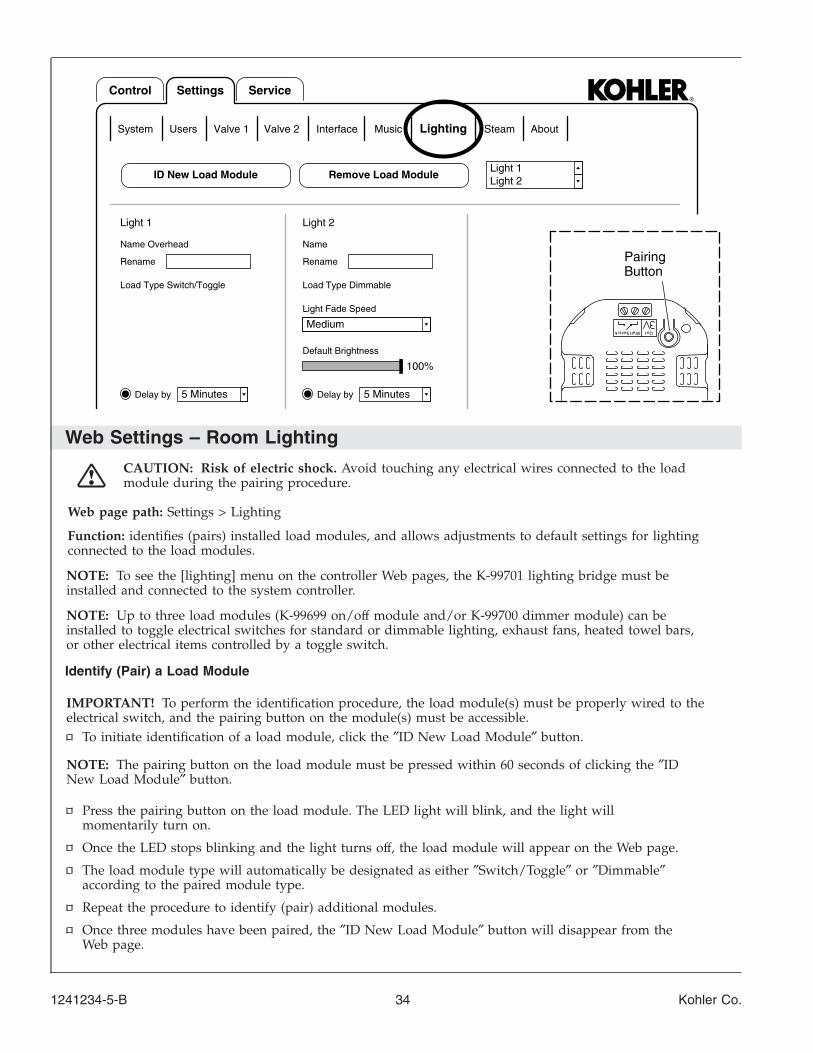
Web Settings – Room Lighting
CAUTION: Risk of electric shock. Avoid touching any electrical wires connected to the loadmodule during the pairing procedure.
Web page path: Settings > Lighting
Function: identifies (pairs) installed load modules, and allows adjustments to default settings for lightingconnected to the load modules.
NOTE: To see the [lighting] menu on the controller Web pages, the K-99701 lighting bridge must beinstalled and connected to the system controller.
NOTE: Up to three load modules (K-99699 on/off module and/or K-99700 dimmer module) can beinstalled to toggle electrical switches for standard or dimmable lighting, exhaust fans, heated towel bars,or other electrical items controlled by a toggle switch.
Identify (Pair) a Load Module
IMPORTANT! To perform the identification procedure, the load module(s) must be properly wired to theelectrical switch, and the pairing button on the module(s) must be accessible.
To initiate identification of a load module, click the ″ID New Load Module″ button.
NOTE: The pairing button on the load module must be pressed within 60 seconds of clicking the ″IDNew Load Module″ button.
Press the pairing button on the load module. The LED light will blink, and the light willmomentarily turn on.
Once the LED stops blinking and the light turns off, the load module will appear on the Web page.
The load module type will automatically be designated as either ″Switch/Toggle″ or ″Dimmable″according to the paired module type.
Repeat the procedure to identify (pair) additional modules.
Once three modules have been paired, the ″ID New Load Module″ button will disappear from theWeb page.
PairingButton
ServiceSettingsControl
100%
Default Brightness
Medium
Light Fade Speed
Load Type Dimmable
5 Minutes
Name
Light 2
Rename
Delay by
Name Overhead
Light 2Light 1
Remove Load Module
Light 1
Rename
Load Type Switch/Toggle
5 Minutes
ID New Load Module
Valve 2Valve 1System Users Interface Music AboutSteamLighting
Delay by
1241234-5-B 34 Kohler Co.
Web Settings – Room Lighting (cont.)
Remove a Load Module
IMPORTANT! To perform the removal procedure, the load module must be selected in the menu beforeclicking the ″Remove Load Module″ button.
To disconnect a load module from the lighting bridge, select the module in the menu next to the″Remove Load Module″ button.
Once a module is selected, click the ″Remove Load Module″ button.
A pop-up window will appear, stating removal is in progress.
When removal is complete, the selected load module will disappear from the Web page.
Adjust Settings
NOTE: Lighting names must be entered through the controller Web page to appear on the interface.To rename a load module, enter the desired name in the ″Rename″ field, then hit ″Enter″ on thekeyboard or click outside the ″Rename″ field.
For dimmable lighting, to change the default light fade speed, choose the desired option in thedropdown box under [Light Fade Speed].
For dimmable lighting, to adjust the default brightness, click and drag the vertical rod along thehorizontal brightness bar.
Adjust Delay Time
Lighting that is connected to the DTV+ system will be turned off when the user presses the powerbutton on the interface. Lighting can be delayed for certain period of time after the system is turnedoff. The delay time is designated on the controller Web Pages.
NOTE: Delay time is linked between load modules. Changing the time for one module will update allmodules to the same time.
To delay the time when a light turns off after the system is turned off, click the radio button next to[Delay by].
To adjust the delay time interval when the light(s) turn off, choose the desired option in thedropdown box next to [Delay by].
Kohler Co. 35 1241234-5-B
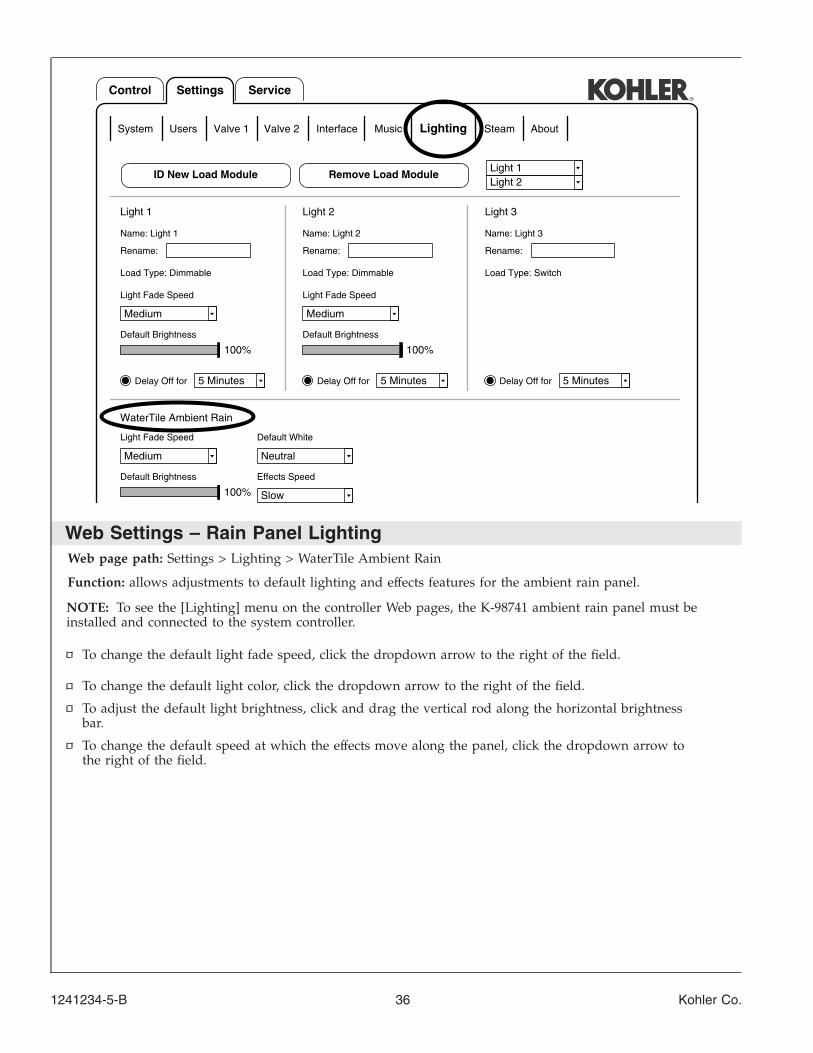
Web Settings – Rain Panel LightingWeb page path: Settings > Lighting > WaterTile Ambient Rain
Function: allows adjustments to default lighting and effects features for the ambient rain panel.
NOTE: To see the [Lighting] menu on the controller Web pages, the K-98741 ambient rain panel must beinstalled and connected to the system controller.
To change the default light fade speed, click the dropdown arrow to the right of the field.
To change the default light color, click the dropdown arrow to the right of the field.
To adjust the default light brightness, click and drag the vertical rod along the horizontal brightnessbar.
To change the default speed at which the effects move along the panel, click the dropdown arrow tothe right of the field.
Name: Light 3
Light 3
Rename:
Load Type: Switch
5 MinutesDelay Off for
Name: Light 2
Light 2
Rename:
Load Type: Dimmable
Medium
Light Fade Speed
5 MinutesDelay Off for
Name: Light 1
Light 2Light 1
Remove Load Module
Light 1
Rename:
Load Type: Dimmable
Default Brightness
Medium
Light Fade Speed
5 Minutes
Effects Speed
Slow
Neutral
Default White
ID New Load Module
Valve 2Valve 1System Users Interface Music
Medium
Light Fade Speed
AboutSteamLighting
Delay Off for
WaterTile Ambient Rain
ServiceSettingsControl
100%
Default Brightness
100%
Default Brightness
100%
1241234-5-B 36 Kohler Co.
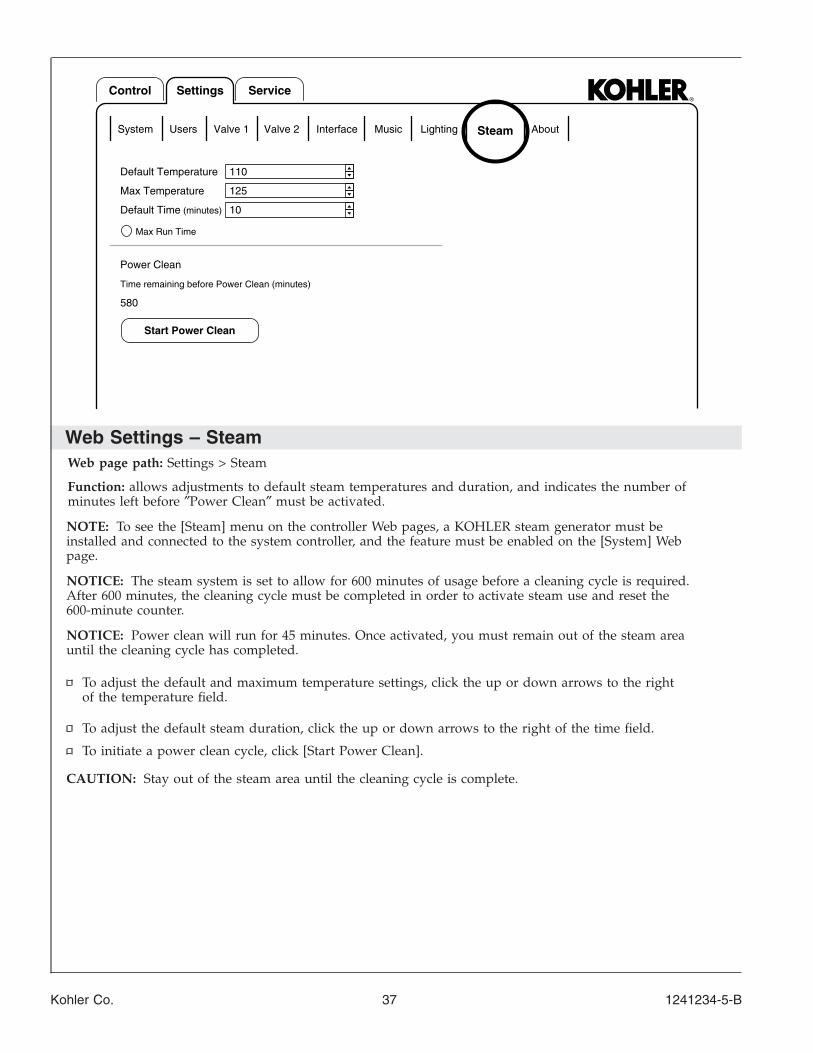
Web Settings – SteamWeb page path: Settings > Steam
Function: allows adjustments to default steam temperatures and duration, and indicates the number ofminutes left before ″Power Clean″ must be activated.
NOTE: To see the [Steam] menu on the controller Web pages, a KOHLER steam generator must beinstalled and connected to the system controller, and the feature must be enabled on the [System] Webpage.
NOTICE: The steam system is set to allow for 600 minutes of usage before a cleaning cycle is required.After 600 minutes, the cleaning cycle must be completed in order to activate steam use and reset the600-minute counter.
NOTICE: Power clean will run for 45 minutes. Once activated, you must remain out of the steam areauntil the cleaning cycle has completed.
To adjust the default and maximum temperature settings, click the up or down arrows to the rightof the temperature field.
To adjust the default steam duration, click the up or down arrows to the right of the time field.
To initiate a power clean cycle, click [Start Power Clean].
CAUTION: Stay out of the steam area until the cleaning cycle is complete.
Start Power Clean
580
10
125
110
Power Clean
Default Temperature
LightingValve 2Valve 1System Users Interface Music
Time remaining before Power Clean (minutes)
(minutes)Default Time
Max Temperature
Steam About
ServiceSettingsControl
Max Run Time
Kohler Co. 37 1241234-5-B
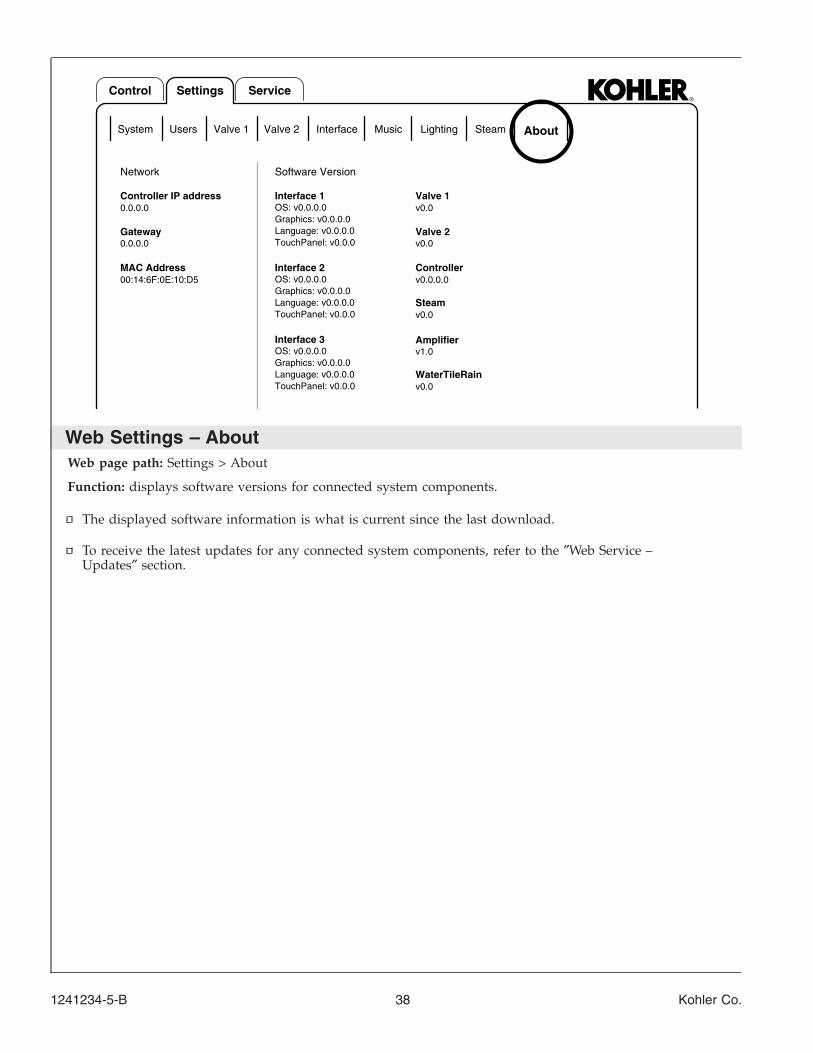
Web Settings – AboutWeb page path: Settings > About
Function: displays software versions for connected system components.
The displayed software information is what is current since the last download.
To receive the latest updates for any connected system components, refer to the ″Web Service –Updates″ section.
Software VersionNetwork
v0.0WaterTileRain
v1.0Amplifier
TouchPanel: v0.0.0
Graphics: v0.0.0.0Language: v0.0.0.0
OS: v0.0.0.0Interface 3
TouchPanel: v0.0.0
Graphics: v0.0.0.0Language: v0.0.0.0
OS: v0.0.0.0Interface 2
v0.0Steam
v0.0.0.0Controller
v0.0Valve 2
v0.0Valve 1
SteamLightingValve 2Valve 1System Users Interface Music
TouchPanel: v0.0.0
Graphics: v0.0.0.0Language: v0.0.0.0
OS: v0.0.0.0Interface 1
00:14:6F:0E:10:D5MAC Address
0.0.0.0Gateway
0.0.0.0Controller IP address
About
ServiceSettingsControl
1241234-5-B 38 Kohler Co.
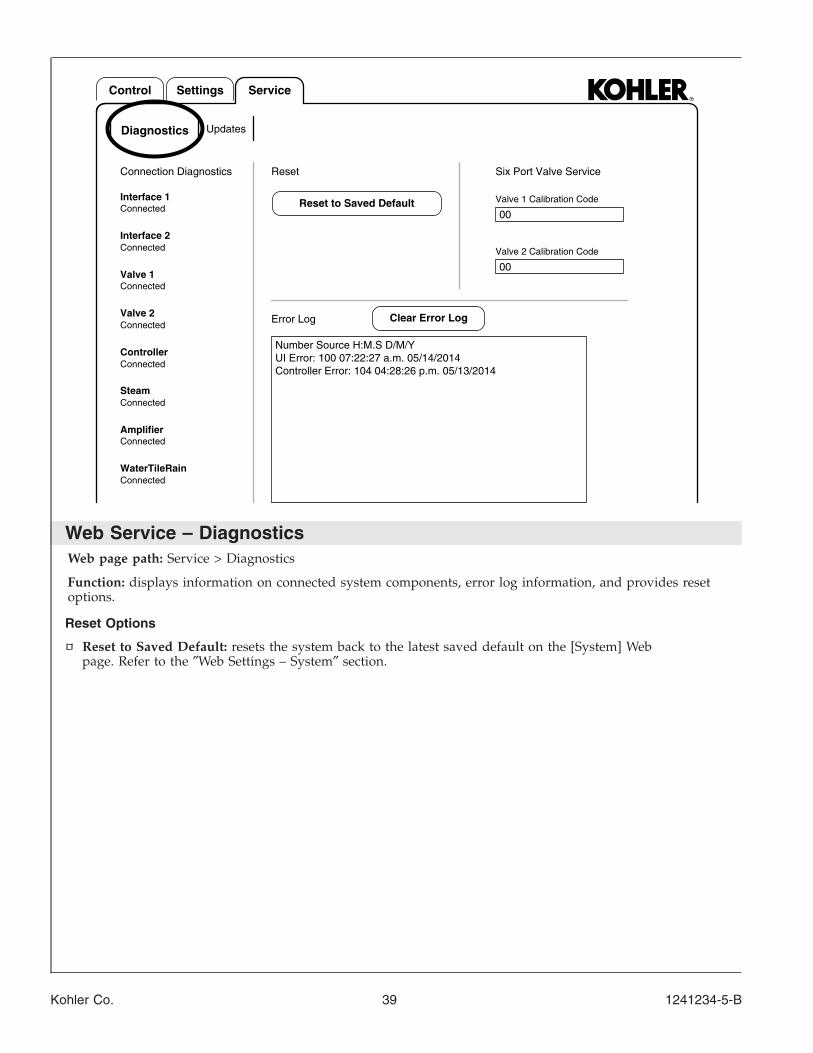
Web Service – DiagnosticsWeb page path: Service > Diagnostics
Function: displays information on connected system components, error log information, and provides resetoptions.
Reset Options
Reset to Saved Default: resets the system back to the latest saved default on the [System] Webpage. Refer to the ″Web Settings – System″ section.
00
00
Reset
Reset to Saved Default
Connection Diagnostics
Valve 2 Calibration Code
Six Port Valve Service
ConnectedWaterTileRain
ConnectedAmplifier
ConnectedSteam
Controller Error: 104 04:28:26 p.m. 05/13/2014UI Error: 100 07:22:27 a.m. 05/14/2014Number Source H:M.S D/M/Y
Error Log
Valve 1 Calibration Code
UpdatesDiagnostics
ConnectedController
ConnectedValve 2
ConnectedValve 1
ConnectedInterface 2
ConnectedInterface 1
ServiceControl Settings
Clear Error Log
Kohler Co. 39 1241234-5-B
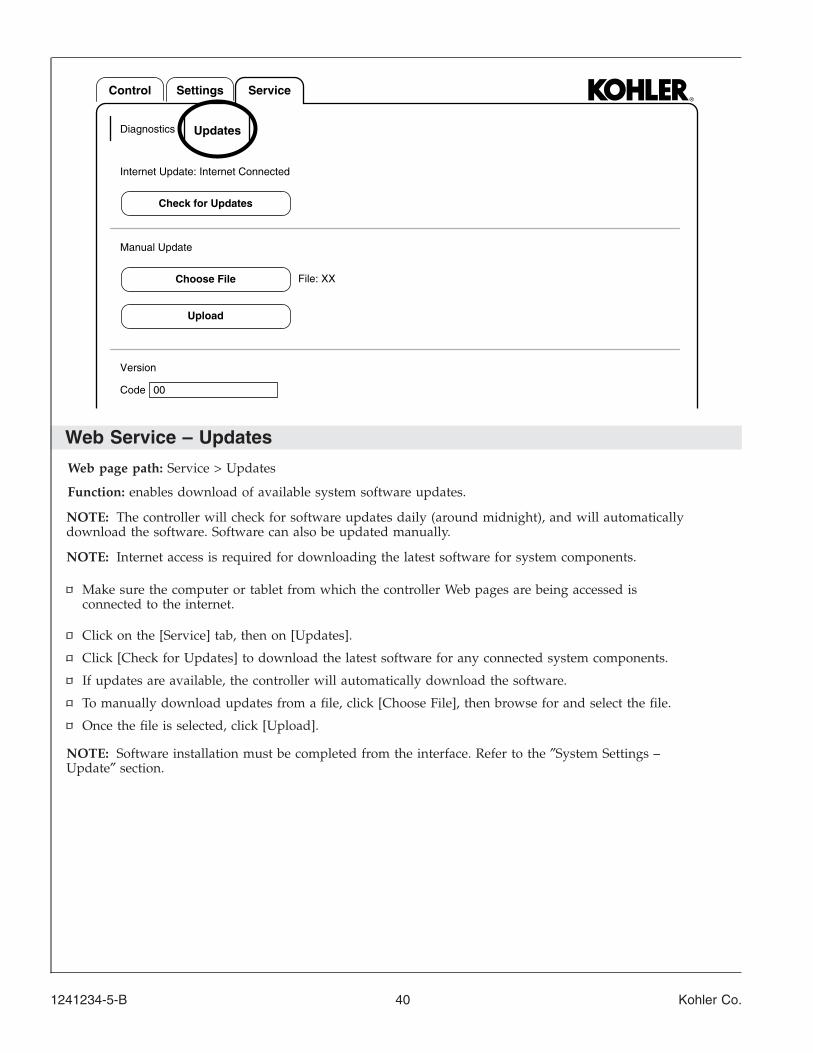
Web Service – Updates
Web page path: Service > Updates
Function: enables download of available system software updates.
NOTE: The controller will check for software updates daily (around midnight), and will automaticallydownload the software. Software can also be updated manually.
NOTE: Internet access is required for downloading the latest software for system components.
Make sure the computer or tablet from which the controller Web pages are being accessed isconnected to the internet.
Click on the [Service] tab, then on [Updates].
Click [Check for Updates] to download the latest software for any connected system components.
If updates are available, the controller will automatically download the software.
To manually download updates from a file, click [Choose File], then browse for and select the file.
Once the file is selected, click [Upload].
NOTE: Software installation must be completed from the interface. Refer to the ″System Settings –Update″ section.
00
File: XXChoose File
Upload
Internet Update: Internet Connected
Check for Updates
Manual Update
Version
Code
UpdatesDiagnostics
ServiceControl Settings
1241234-5-B 40 Kohler Co.
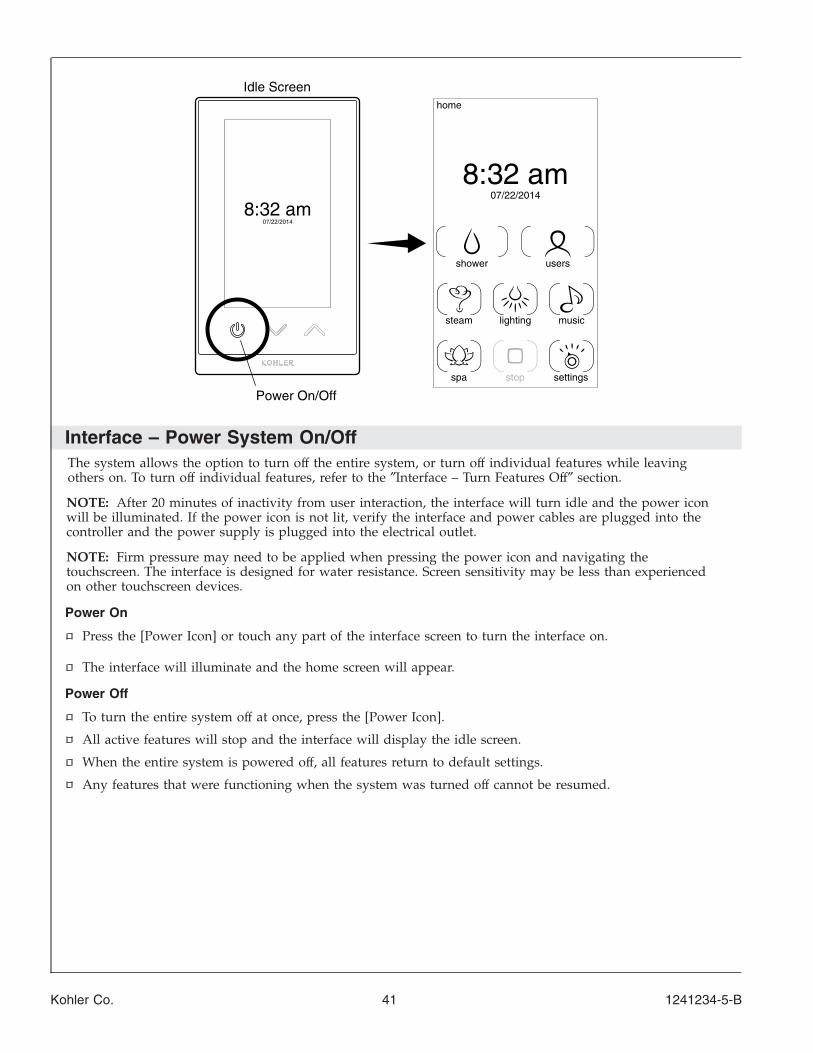
Interface – Power System On/OffThe system allows the option to turn off the entire system, or turn off individual features while leavingothers on. To turn off individual features, refer to the ″Interface – Turn Features Off″ section.
NOTE: After 20 minutes of inactivity from user interaction, the interface will turn idle and the power iconwill be illuminated. If the power icon is not lit, verify the interface and power cables are plugged into thecontroller and the power supply is plugged into the electrical outlet.
NOTE: Firm pressure may need to be applied when pressing the power icon and navigating thetouchscreen. The interface is designed for water resistance. Screen sensitivity may be less than experiencedon other touchscreen devices.
Power On
Press the [Power Icon] or touch any part of the interface screen to turn the interface on.
The interface will illuminate and the home screen will appear.
Power Off
To turn the entire system off at once, press the [Power Icon].
All active features will stop and the interface will display the idle screen.
When the entire system is powered off, all features return to default settings.
Any features that were functioning when the system was turned off cannot be resumed.
Idle Screen
Power On/Off
8:32 am07/22/2014
stop
lighting musicsteam
shower users
settingsspa
home
07/22/2014
8:32 am
Kohler Co. 41 1241234-5-B
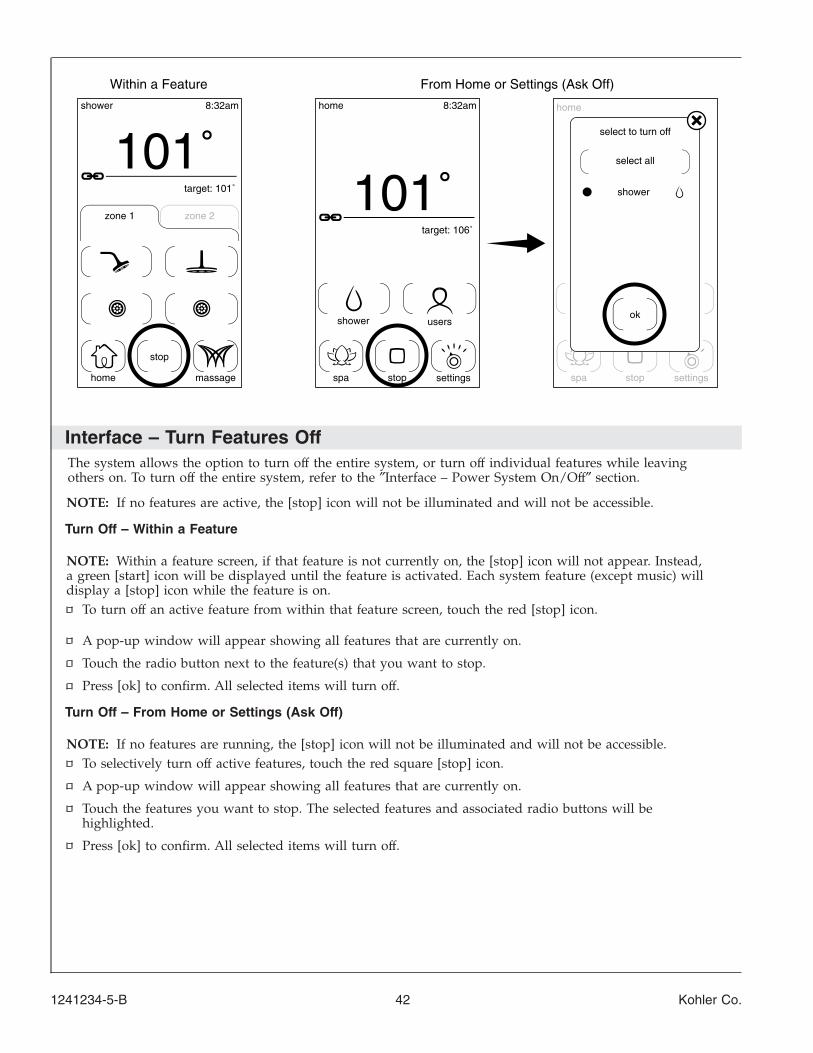
Interface – Turn Features OffThe system allows the option to turn off the entire system, or turn off individual features while leavingothers on. To turn off the entire system, refer to the ″Interface – Power System On/Off″ section.
NOTE: If no features are active, the [stop] icon will not be illuminated and will not be accessible.
Turn Off – Within a Feature
NOTE: Within a feature screen, if that feature is not currently on, the [stop] icon will not appear. Instead,a green [start] icon will be displayed until the feature is activated. Each system feature (except music) willdisplay a [stop] icon while the feature is on.
To turn off an active feature from within that feature screen, touch the red [stop] icon.
A pop-up window will appear showing all features that are currently on.
Touch the radio button next to the feature(s) that you want to stop.
Press [ok] to confirm. All selected items will turn off.
Turn Off – From Home or Settings (Ask Off)
NOTE: If no features are running, the [stop] icon will not be illuminated and will not be accessible.To selectively turn off active features, touch the red square [stop] icon.
A pop-up window will appear showing all features that are currently on.
Touch the features you want to stop. The selected features and associated radio buttons will behighlighted.
Press [ok] to confirm. All selected items will turn off.
Within a Feature
101˚target: 106˚
stop settingsspa
shower users
home
ok
select all
select to turn off
shower
home
zone 2zone 1
101˚target: 101˚
stop
massagehome
shower
From Home or Settings (Ask Off)
stop settingsspa
8:32am 8:32am
1241234-5-B 42 Kohler Co.

Interface Settings – OverviewPath: settings > interface
Function: allows customization of interface settings. The customization is specific to the individual interface.If a system has multiple interfaces, modifications to one interface will not appear automatically on the otherinterface. For example, the interface inside the shower can be set to a higher or lower brightness than theinterface outside the shower.
NOTE: The settings menu is not accessible when water is running or steam is on. A ″not available″pop-up window will appear if the user touches the [settings] icon while any shower or steam feature isactivated.
The interface settings menu consists of five categories:
• Display – adjusts screen brightness and dim settings• Auto Return – returns the interface to the highest active feature screen after 30 seconds of inactivity• Start Up – sets the screen that appears at start up• Clean – locks the interface for 30 seconds so the screen can be cleaned• Beep – adjusts the volume of the interface beeps
From the home screen, touch the [settings] icon.
Touch the [interface] option.
Select a category to view/adjust interface options as desired.
NOTE: The [back] icon appears on all settings screens. Touch the [back] icon to return to the previousscreen.
Touch the [home] or [back] icon to exit the interface settings menu.
07/22/2014
8:32 am
8:32am 8:32am
stop
lighting musicsteam
shower users
settingsspa backstophome
beep
display
clean
start up
auto return
home
home
interface
system
settings interface
stop
Kohler Co. 43 1241234-5-B
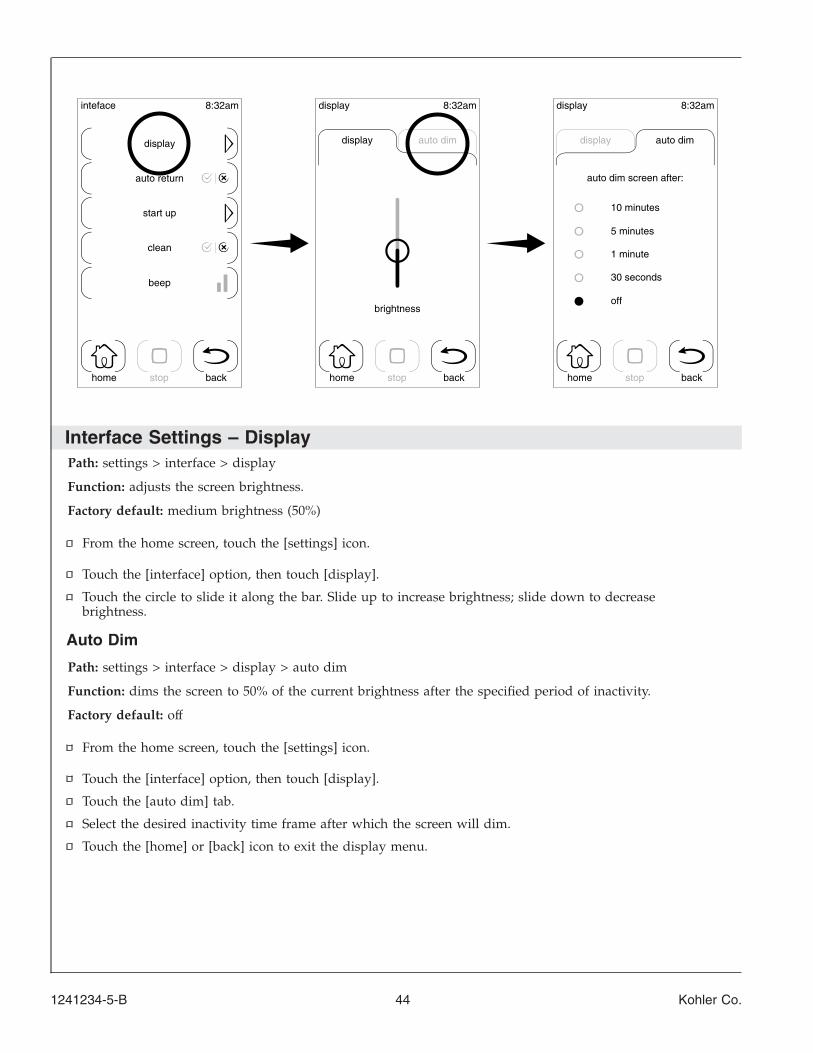
Interface Settings – DisplayPath: settings > interface > display
Function: adjusts the screen brightness.
Factory default: medium brightness (50%)
From the home screen, touch the [settings] icon.
Touch the [interface] option, then touch [display].
Touch the circle to slide it along the bar. Slide up to increase brightness; slide down to decreasebrightness.
Auto Dim
Path: settings > interface > display > auto dim
Function: dims the screen to 50% of the current brightness after the specified period of inactivity.
Factory default: off
From the home screen, touch the [settings] icon.
Touch the [interface] option, then touch [display].
Touch the [auto dim] tab.
Select the desired inactivity time frame after which the screen will dim.
Touch the [home] or [back] icon to exit the display menu.
off
10 minutes
5 minutes
1 minute
30 seconds
auto dim screen after:
auto dimdisplayauto dimdisplay
brightness
backstophome
beep
display
clean
start up
auto return
backstophome backstophome
8:32am8:32am 8:32aminteface display display
1241234-5-B 44 Kohler Co.
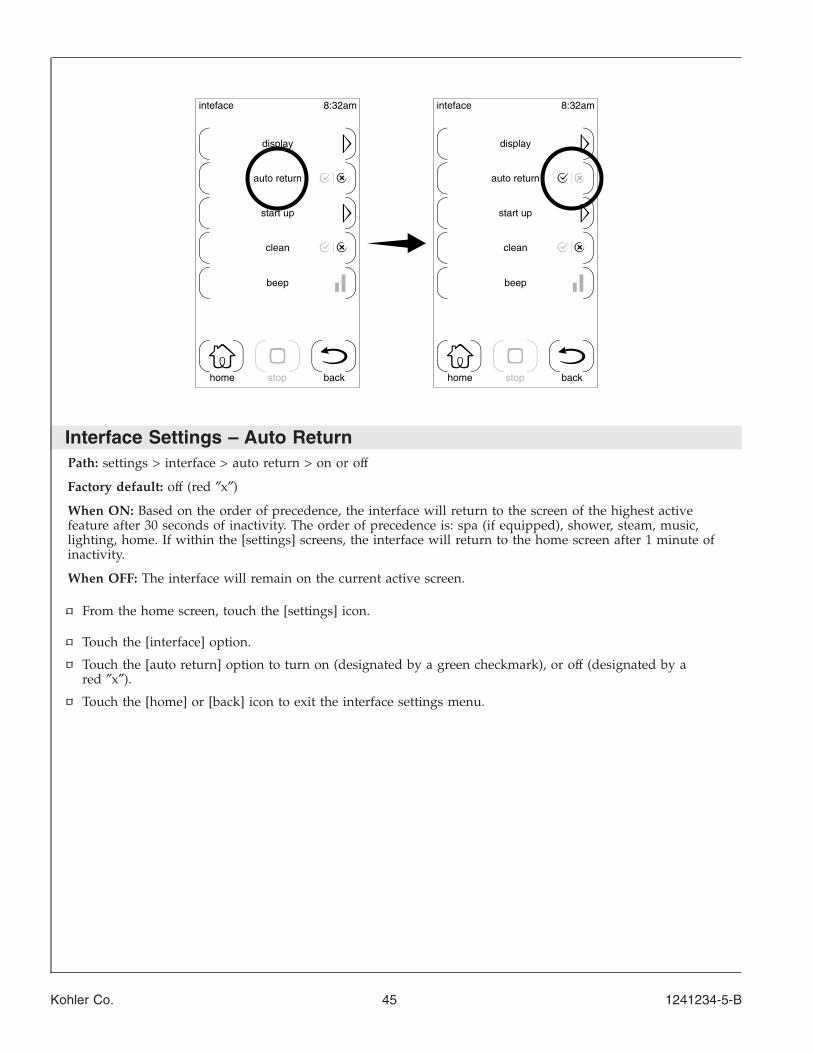
Interface Settings – Auto ReturnPath: settings > interface > auto return > on or off
Factory default: off (red ″x″)
When ON: Based on the order of precedence, the interface will return to the screen of the highest activefeature after 30 seconds of inactivity. The order of precedence is: spa (if equipped), shower, steam, music,lighting, home. If within the [settings] screens, the interface will return to the home screen after 1 minute ofinactivity.
When OFF: The interface will remain on the current active screen.
From the home screen, touch the [settings] icon.
Touch the [interface] option.
Touch the [auto return] option to turn on (designated by a green checkmark), or off (designated by ared ″x″).
Touch the [home] or [back] icon to exit the interface settings menu.
backstophome
beep
display
clean
start up
auto return
8:32aminteface
backstophome
beep
display
clean
start up
auto return
8:32aminteface
Kohler Co. 45 1241234-5-B
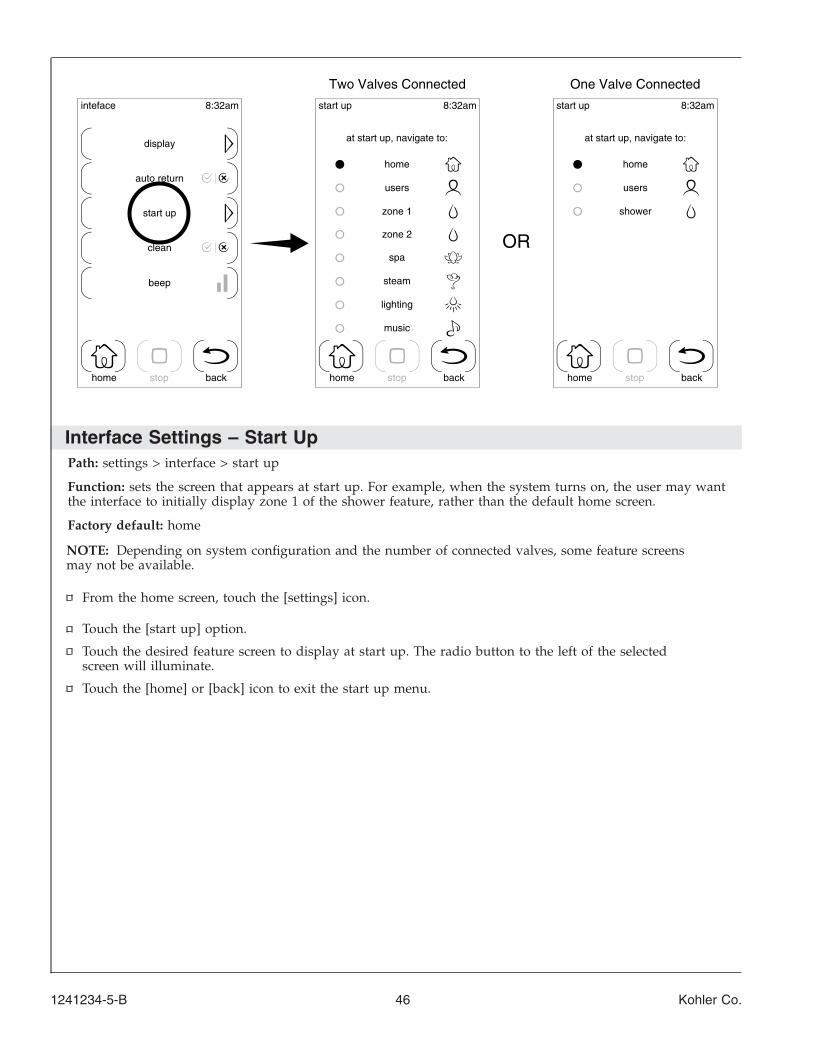
Interface Settings – Start UpPath: settings > interface > start up
Function: sets the screen that appears at start up. For example, when the system turns on, the user may wantthe interface to initially display zone 1 of the shower feature, rather than the default home screen.
Factory default: home
NOTE: Depending on system configuration and the number of connected valves, some feature screensmay not be available.
From the home screen, touch the [settings] icon.
Touch the [start up] option.
Touch the desired feature screen to display at start up. The radio button to the left of the selectedscreen will illuminate.
Touch the [home] or [back] icon to exit the start up menu.
One Valve ConnectedTwo Valves Connected
at start up, navigate to:
home
users
shower
music
lighting
steam
OR
at start up, navigate to:
home
users
zone 1
zone 2
spa
backstophome
beep
display
clean
start up
auto return
8:32aminteface
backstophome backstophome
8:32amstart up 8:32amstart up
1241234-5-B 46 Kohler Co.
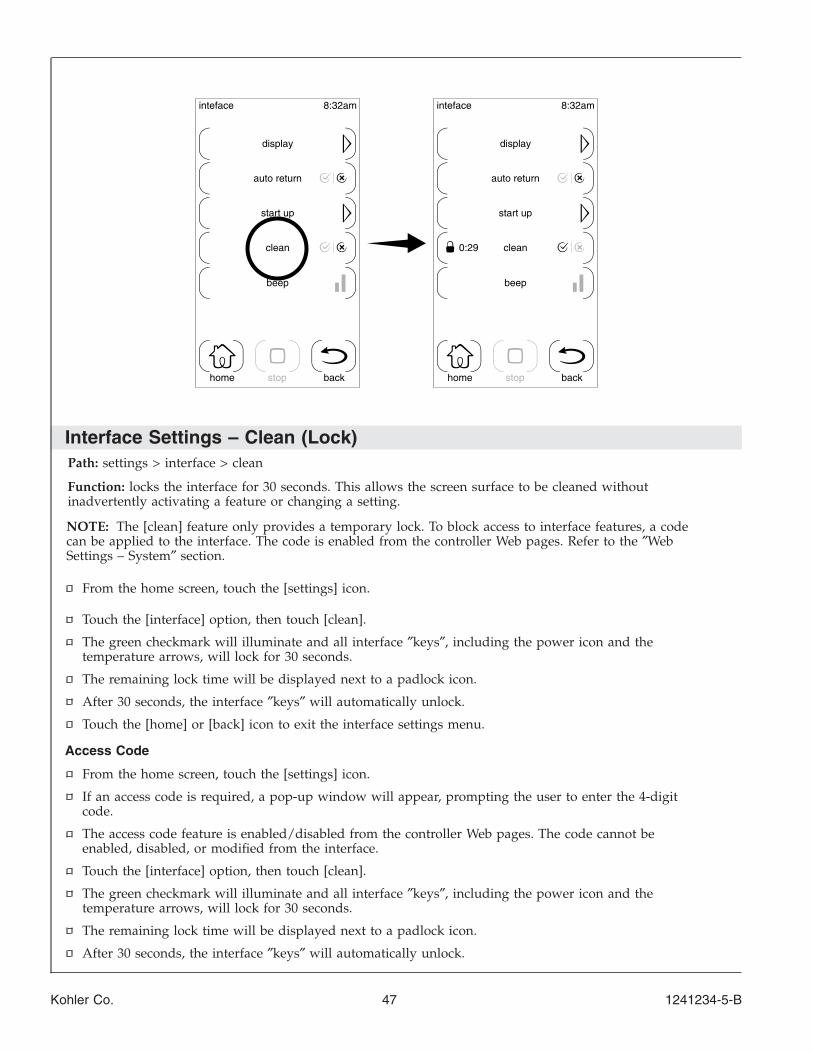
Interface Settings – Clean (Lock)Path: settings > interface > clean
Function: locks the interface for 30 seconds. This allows the screen surface to be cleaned withoutinadvertently activating a feature or changing a setting.
NOTE: The [clean] feature only provides a temporary lock. To block access to interface features, a codecan be applied to the interface. The code is enabled from the controller Web pages. Refer to the ″WebSettings – System″ section.
From the home screen, touch the [settings] icon.
Touch the [interface] option, then touch [clean].
The green checkmark will illuminate and all interface ″keys″, including the power icon and thetemperature arrows, will lock for 30 seconds.
The remaining lock time will be displayed next to a padlock icon.
After 30 seconds, the interface ″keys″ will automatically unlock.
Touch the [home] or [back] icon to exit the interface settings menu.
Access Code
From the home screen, touch the [settings] icon.
If an access code is required, a pop-up window will appear, prompting the user to enter the 4-digitcode.
The access code feature is enabled/disabled from the controller Web pages. The code cannot beenabled, disabled, or modified from the interface.
Touch the [interface] option, then touch [clean].
The green checkmark will illuminate and all interface ″keys″, including the power icon and thetemperature arrows, will lock for 30 seconds.
The remaining lock time will be displayed next to a padlock icon.
After 30 seconds, the interface ″keys″ will automatically unlock.
0:29
backstophome
beep
display
clean
start up
auto return
8:32aminteface
backstophome
beep
display
clean
start up
auto return
8:32aminteface
Kohler Co. 47 1241234-5-B
Interface Settings – Clean (Lock) (cont.)
Touch the [home] or [back] icon to exit the interface settings menu.
1241234-5-B 48 Kohler Co.
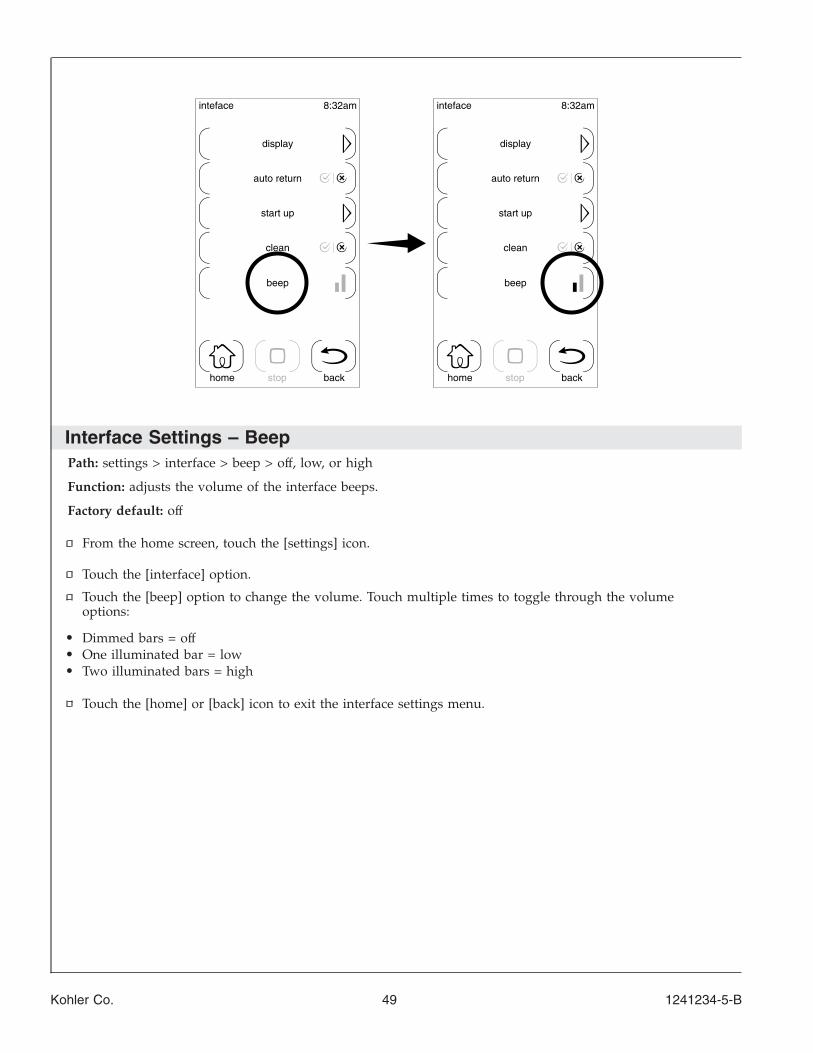
Interface Settings – BeepPath: settings > interface > beep > off, low, or high
Function: adjusts the volume of the interface beeps.
Factory default: off
From the home screen, touch the [settings] icon.
Touch the [interface] option.
Touch the [beep] option to change the volume. Touch multiple times to toggle through the volumeoptions:
• Dimmed bars = off• One illuminated bar = low• Two illuminated bars = high
Touch the [home] or [back] icon to exit the interface settings menu.
backstophome
beep
display
clean
start up
auto return
8:32aminteface
backstophome
beep
display
clean
start up
auto return
8:32aminteface
Kohler Co. 49 1241234-5-B
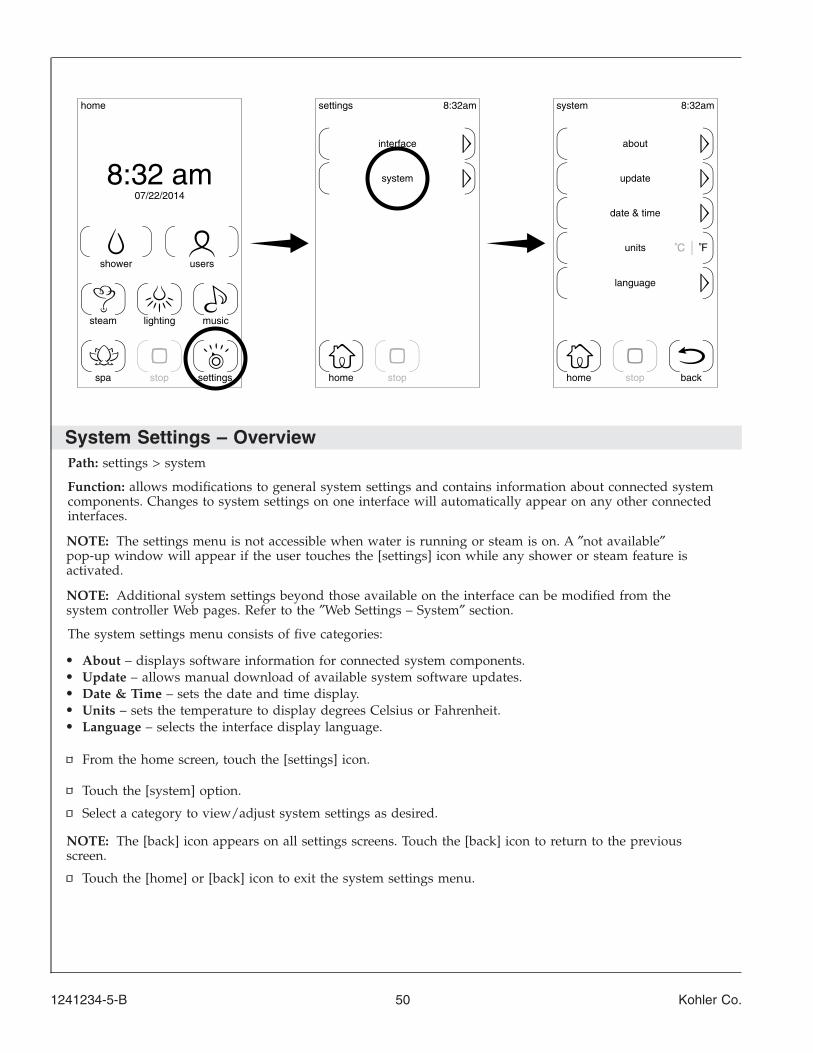
System Settings – OverviewPath: settings > system
Function: allows modifications to general system settings and contains information about connected systemcomponents. Changes to system settings on one interface will automatically appear on any other connectedinterfaces.
NOTE: The settings menu is not accessible when water is running or steam is on. A ″not available″pop-up window will appear if the user touches the [settings] icon while any shower or steam feature isactivated.
NOTE: Additional system settings beyond those available on the interface can be modified from thesystem controller Web pages. Refer to the ″Web Settings – System″ section.
The system settings menu consists of five categories:
• About – displays software information for connected system components.• Update – allows manual download of available system software updates.• Date & Time – sets the date and time display.• Units – sets the temperature to display degrees Celsius or Fahrenheit.• Language – selects the interface display language.
From the home screen, touch the [settings] icon.
Touch the [system] option.
Select a category to view/adjust system settings as desired.
NOTE: The [back] icon appears on all settings screens. Touch the [back] icon to return to the previousscreen.
Touch the [home] or [back] icon to exit the system settings menu.
language
about
units
date & time
update
07/22/2014
8:32 am
8:32am 8:32am
stop
lighting musicsteam
shower users
settingsspa backstophome
home
home
interface
system
settings system
stop
1241234-5-B 50 Kohler Co.
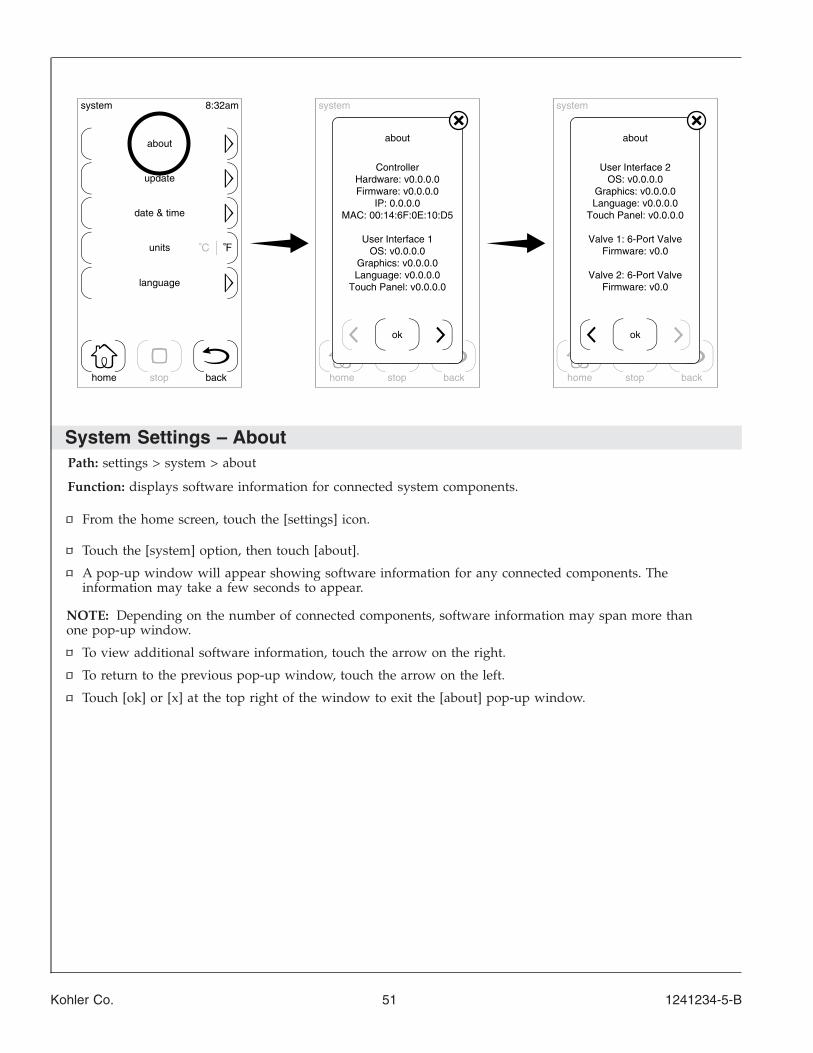
System Settings – AboutPath: settings > system > about
Function: displays software information for connected system components.
From the home screen, touch the [settings] icon.
Touch the [system] option, then touch [about].
A pop-up window will appear showing software information for any connected components. Theinformation may take a few seconds to appear.
NOTE: Depending on the number of connected components, software information may span more thanone pop-up window.
To view additional software information, touch the arrow on the right.
To return to the previous pop-up window, touch the arrow on the left.
Touch [ok] or [x] at the top right of the window to exit the [about] pop-up window.
backstophome backstophome backstophome
language
about
units
date & time
update
8:32amsystem system system
ok
Touch Panel: v0.0.0.0Language: v0.0.0.0Graphics: v0.0.0.0
OS: v0.0.0.0User Interface 1
MAC: 00:14:6F:0E:10:D5IP: 0.0.0.0
Firmware: v0.0.0.0Hardware: v0.0.0.0
Controller
about
ok
Firmware: v0.0Valve 2: 6-Port Valve
Firmware: v0.0Valve 1: 6-Port Valve
Touch Panel: v0.0.0.0Language: v0.0.0.0Graphics: v0.0.0.0
OS: v0.0.0.0User Interface 2
about
Kohler Co. 51 1241234-5-B
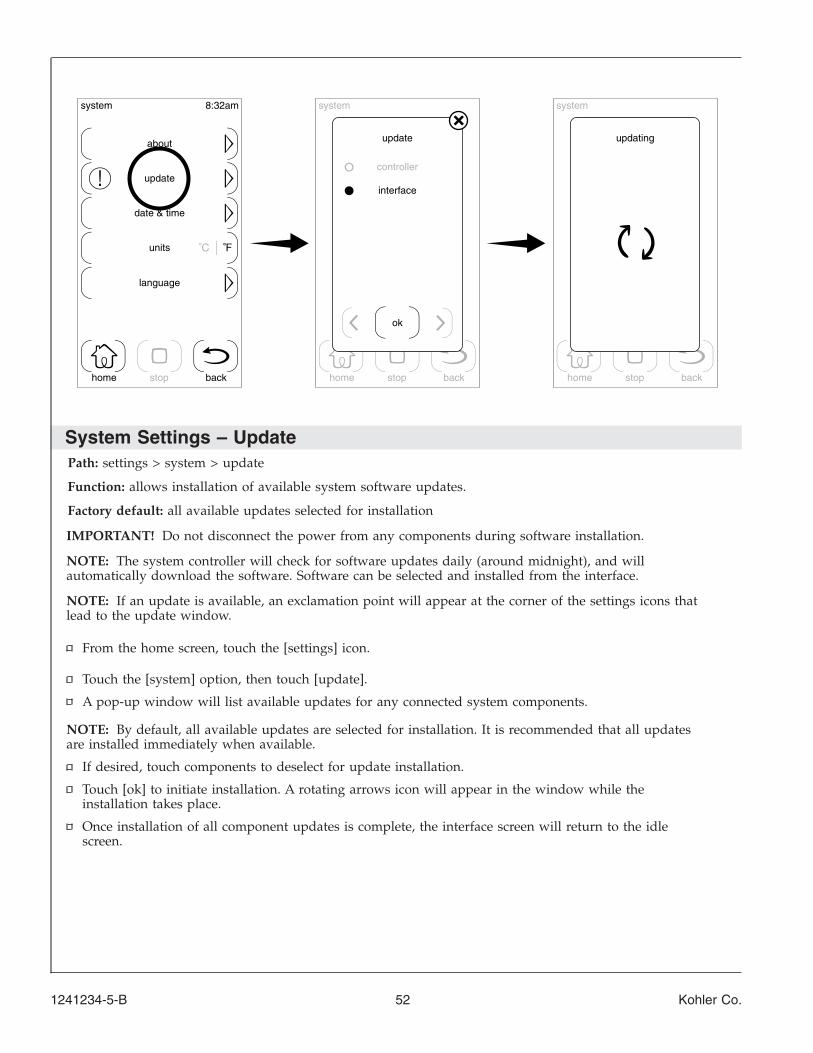
System Settings – UpdatePath: settings > system > update
Function: allows installation of available system software updates.
Factory default: all available updates selected for installation
IMPORTANT! Do not disconnect the power from any components during software installation.
NOTE: The system controller will check for software updates daily (around midnight), and willautomatically download the software. Software can be selected and installed from the interface.
NOTE: If an update is available, an exclamation point will appear at the corner of the settings icons thatlead to the update window.
From the home screen, touch the [settings] icon.
Touch the [system] option, then touch [update].
A pop-up window will list available updates for any connected system components.
NOTE: By default, all available updates are selected for installation. It is recommended that all updatesare installed immediately when available.
If desired, touch components to deselect for update installation.
Touch [ok] to initiate installation. A rotating arrows icon will appear in the window while theinstallation takes place.
Once installation of all component updates is complete, the interface screen will return to the idlescreen.
updating
interface
controller
ok
update
backstophome backstophome backstophome
language
about
units
date & time
update
8:32amsystem system system
1241234-5-B 52 Kohler Co.
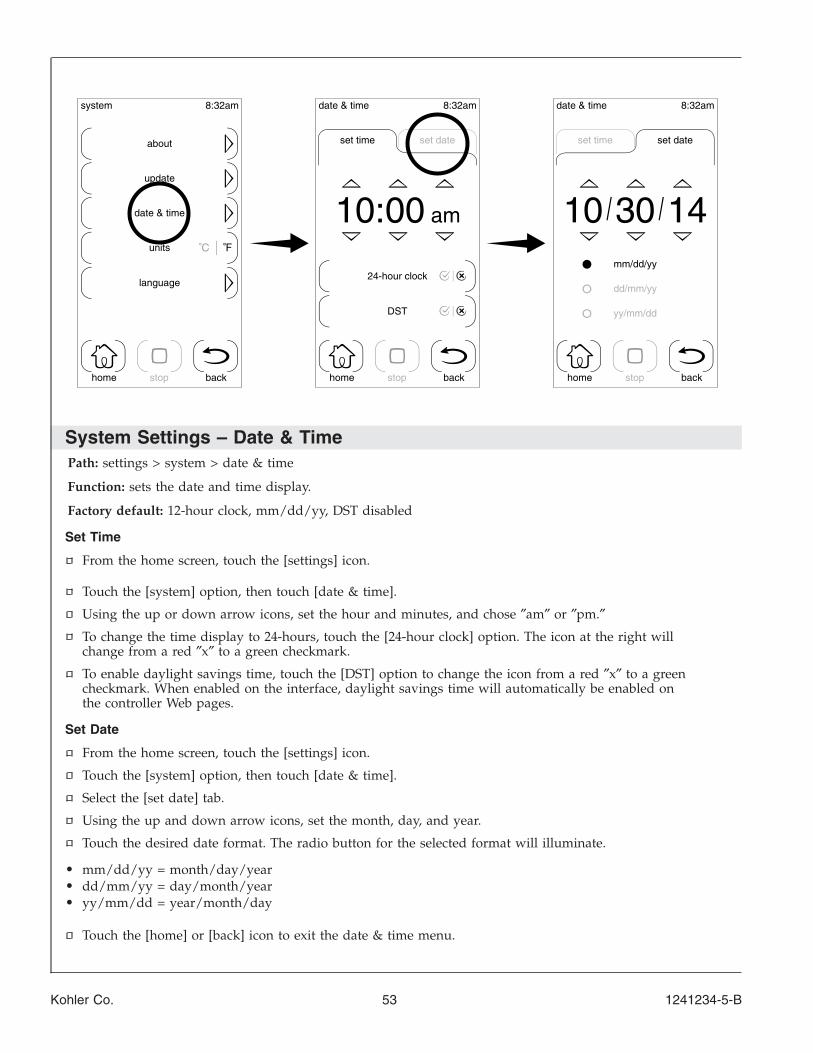
System Settings – Date & TimePath: settings > system > date & time
Function: sets the date and time display.
Factory default: 12-hour clock, mm/dd/yy, DST disabled
Set Time
From the home screen, touch the [settings] icon.
Touch the [system] option, then touch [date & time].
Using the up or down arrow icons, set the hour and minutes, and chose ″am″ or ″pm.″
To change the time display to 24-hours, touch the [24-hour clock] option. The icon at the right willchange from a red ″x″ to a green checkmark.
To enable daylight savings time, touch the [DST] option to change the icon from a red ″x″ to a greencheckmark. When enabled on the interface, daylight savings time will automatically be enabled onthe controller Web pages.
Set Date
From the home screen, touch the [settings] icon.
Touch the [system] option, then touch [date & time].
Select the [set date] tab.
Using the up and down arrow icons, set the month, day, and year.
Touch the desired date format. The radio button for the selected format will illuminate.
• mm/dd/yy = month/day/year• dd/mm/yy = day/month/year• yy/mm/dd = year/month/day
Touch the [home] or [back] icon to exit the date & time menu.
yy/mm/dd
dd/mm/yy
set timeset date
DST
24-hour clock
10 1430
set date
mm/dd/yy
am10:00
set time
backstophome backstophome backstophome
language
about
units
date & time
update
8:32amsystem date & time date & time8:32am 8:32am
Kohler Co. 53 1241234-5-B
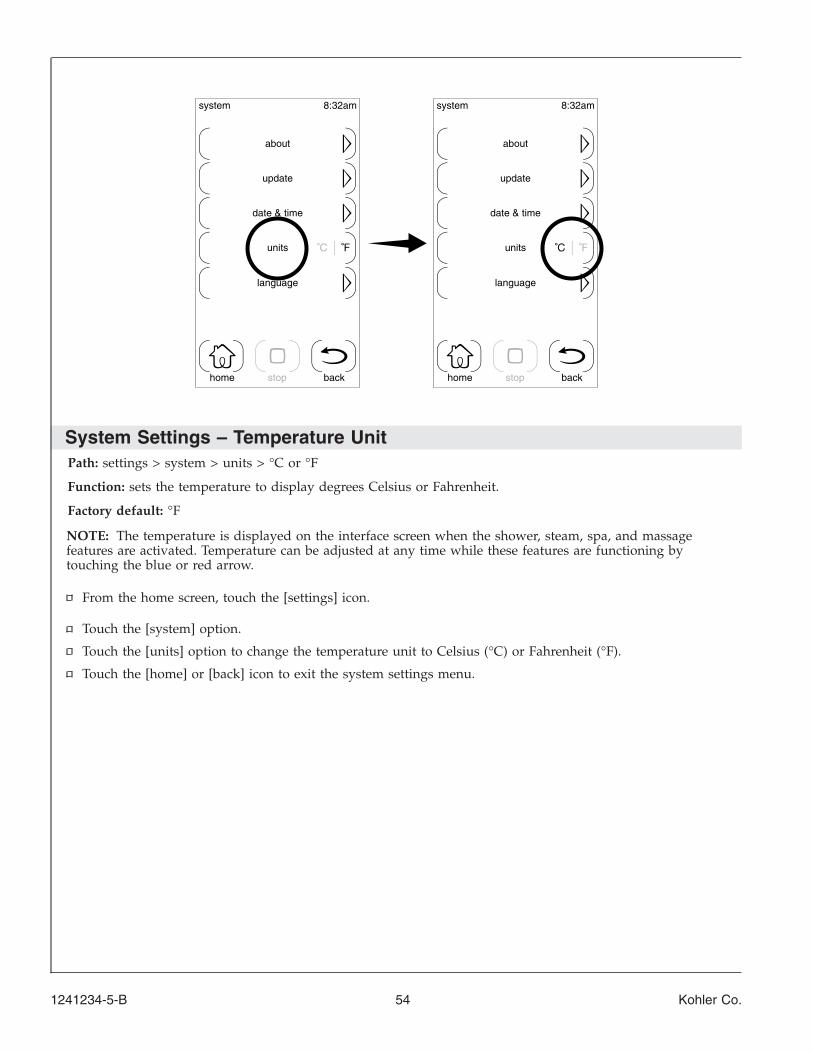
System Settings – Temperature UnitPath: settings > system > units > °C or °F
Function: sets the temperature to display degrees Celsius or Fahrenheit.
Factory default: °F
NOTE: The temperature is displayed on the interface screen when the shower, steam, spa, and massagefeatures are activated. Temperature can be adjusted at any time while these features are functioning bytouching the blue or red arrow.
From the home screen, touch the [settings] icon.
Touch the [system] option.
Touch the [units] option to change the temperature unit to Celsius (°C) or Fahrenheit (°F).
Touch the [home] or [back] icon to exit the system settings menu.
backstophome
language
about
units
date & time
update
8:32amsystem
backstophome
language
about
units
date & time
update
8:32amsystem
1241234-5-B 54 Kohler Co.
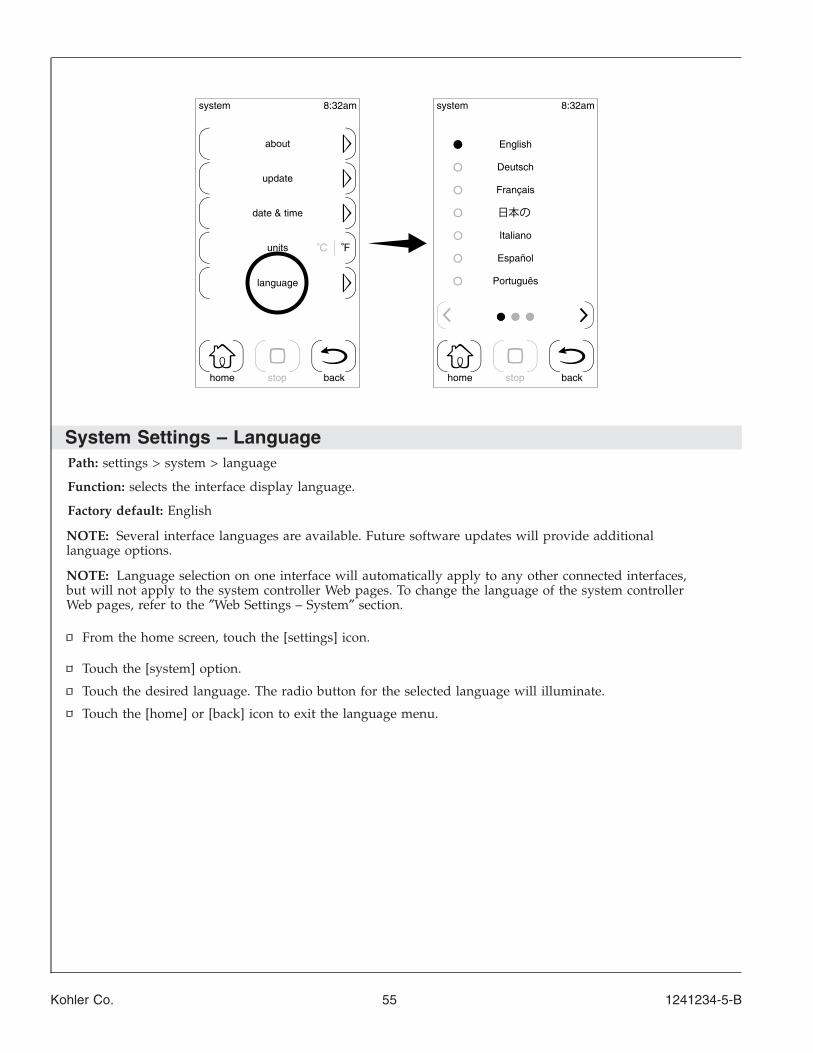
System Settings – LanguagePath: settings > system > language
Function: selects the interface display language.
Factory default: English
NOTE: Several interface languages are available. Future software updates will provide additionallanguage options.
NOTE: Language selection on one interface will automatically apply to any other connected interfaces,but will not apply to the system controller Web pages. To change the language of the system controllerWeb pages, refer to the ″Web Settings – System″ section.
From the home screen, touch the [settings] icon.
Touch the [system] option.
Touch the desired language. The radio button for the selected language will illuminate.
Touch the [home] or [back] icon to exit the language menu.
Deutsch
Português
Español
Italiano
Français
English
backstophome
language
about
units
date & time
update
8:32amsystem
backstophome
8:32amsystem
Kohler Co. 55 1241234-5-B
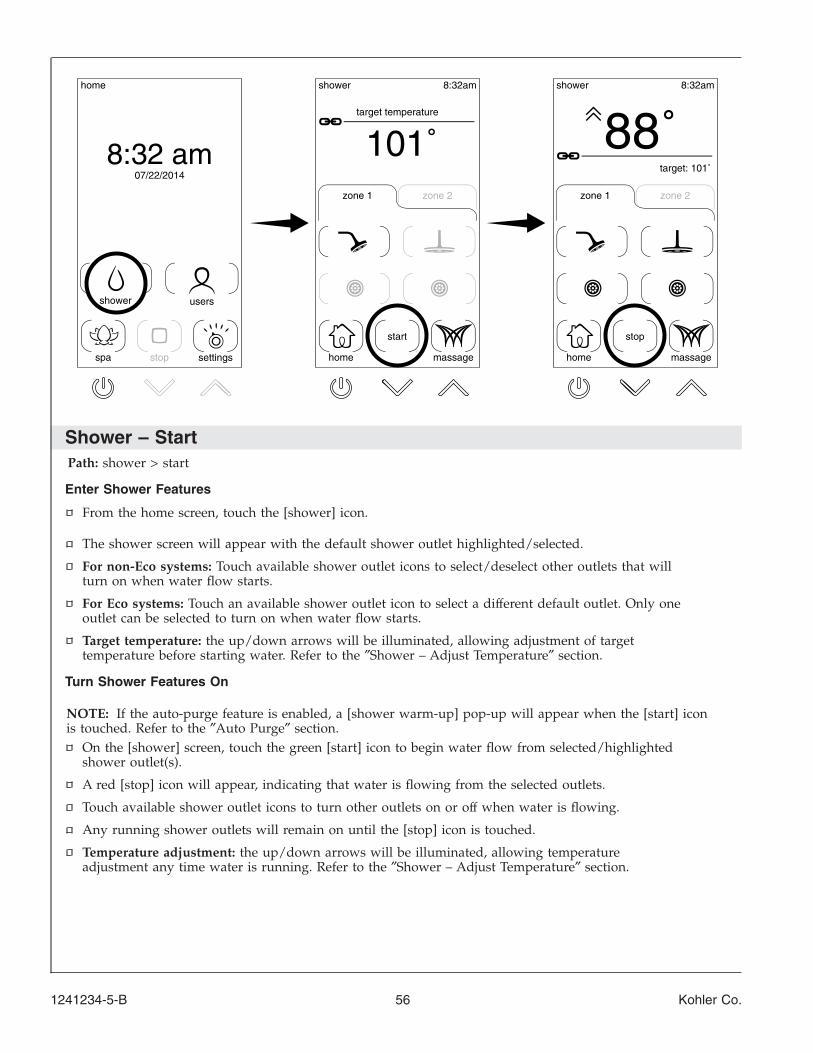
Shower – StartPath: shower > start
Enter Shower Features
From the home screen, touch the [shower] icon.
The shower screen will appear with the default shower outlet highlighted/selected.
For non-Eco systems: Touch available shower outlet icons to select/deselect other outlets that willturn on when water flow starts.
For Eco systems: Touch an available shower outlet icon to select a different default outlet. Only oneoutlet can be selected to turn on when water flow starts.
Target temperature: the up/down arrows will be illuminated, allowing adjustment of targettemperature before starting water. Refer to the ″Shower – Adjust Temperature″ section.
Turn Shower Features On
NOTE: If the auto-purge feature is enabled, a [shower warm-up] pop-up will appear when the [start] iconis touched. Refer to the ″Auto Purge″ section.
On the [shower] screen, touch the green [start] icon to begin water flow from selected/highlightedshower outlet(s).
A red [stop] icon will appear, indicating that water is flowing from the selected outlets.
Touch available shower outlet icons to turn other outlets on or off when water is flowing.
Any running shower outlets will remain on until the [stop] icon is touched.
Temperature adjustment: the up/down arrows will be illuminated, allowing temperatureadjustment any time water is running. Refer to the ″Shower – Adjust Temperature″ section.
home shower shower8:32am 8:32am
07/22/2014
8:32 amzone 2zone 1
start
massagehome
zone 2zone 1
target: 101˚
stop
massagehome
target temperature
stop settingsspa
shower users
101˚ 88˚
1241234-5-B 56 Kohler Co.
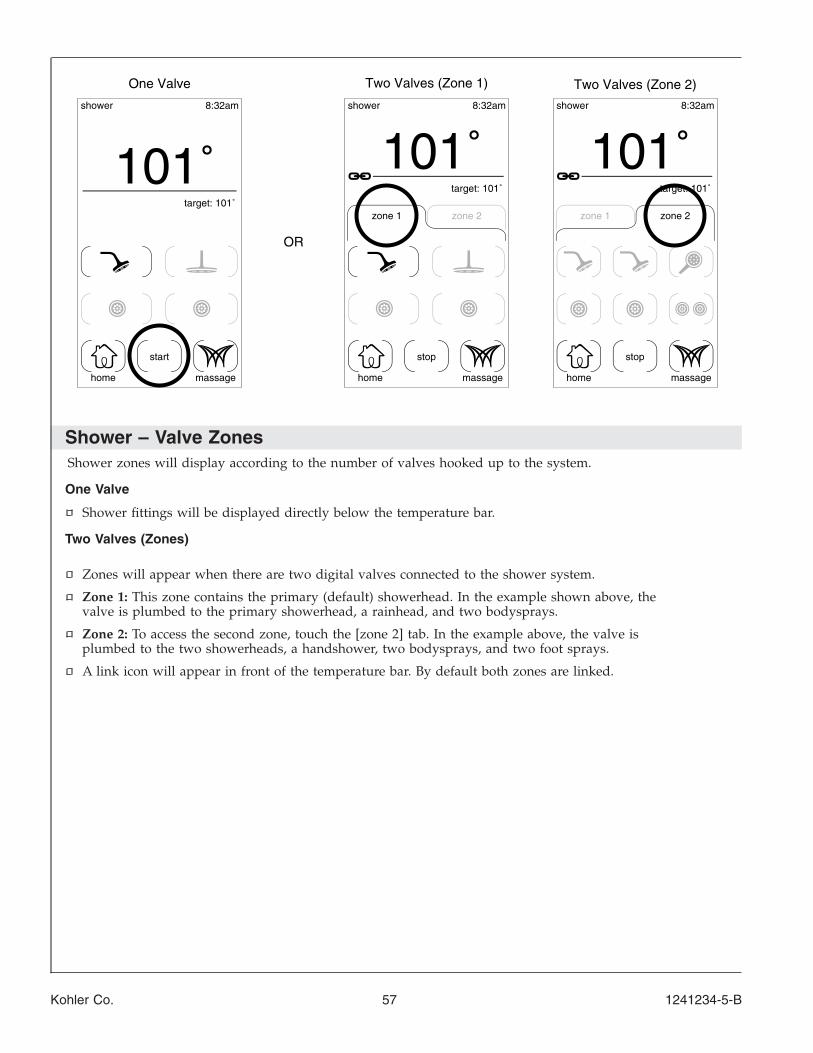
Shower – Valve ZonesShower zones will display according to the number of valves hooked up to the system.
One Valve
Shower fittings will be displayed directly below the temperature bar.
Two Valves (Zones)
Zones will appear when there are two digital valves connected to the shower system.
Zone 1: This zone contains the primary (default) showerhead. In the example shown above, thevalve is plumbed to the primary showerhead, a rainhead, and two bodysprays.
Zone 2: To access the second zone, touch the [zone 2] tab. In the example above, the valve isplumbed to the two showerheads, a handshower, two bodysprays, and two foot sprays.
A link icon will appear in front of the temperature bar. By default both zones are linked.
101˚
Two Valves (Zone 2)Two Valves (Zone 1)One Valve
101˚101˚OR
shower 8:32am
zone 2zone 1
target: 101˚
stop
massagehome
shower 8:32am
zone 2zone 1
target: 101˚
stop
massagehome
shower 8:32am
start
massagehome
target: 101˚
Kohler Co. 57 1241234-5-B
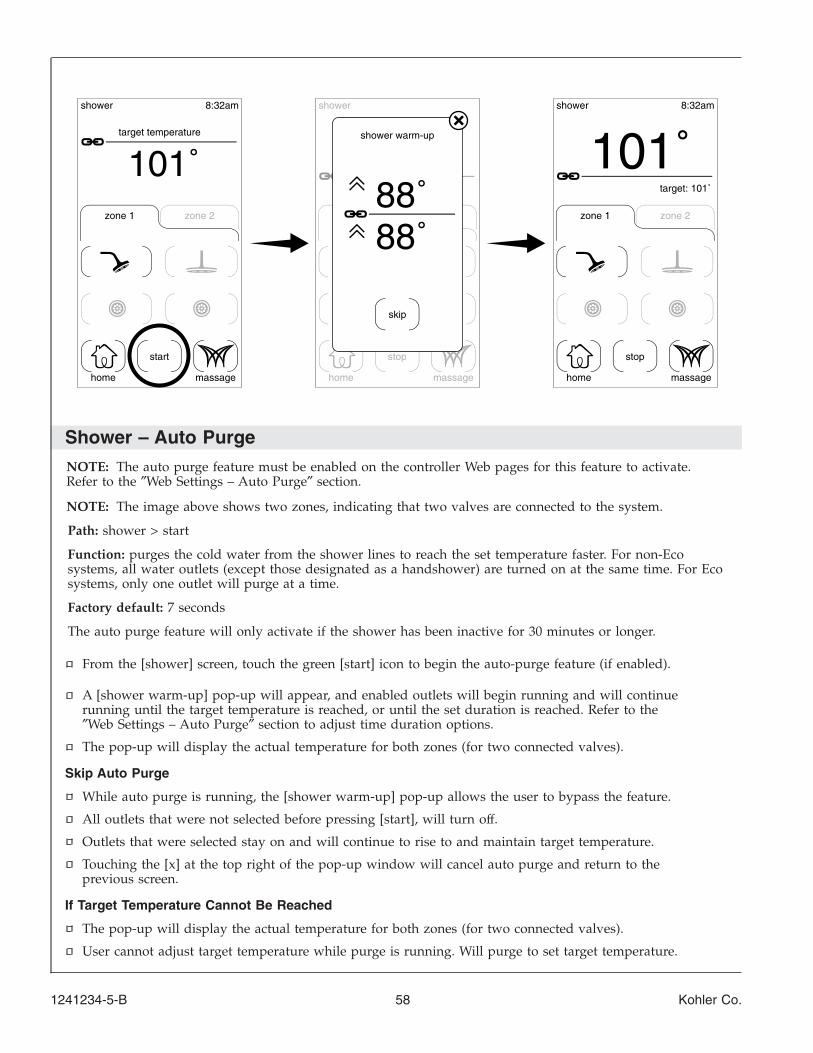
Shower – Auto PurgeNOTE: The auto purge feature must be enabled on the controller Web pages for this feature to activate.Refer to the ″Web Settings – Auto Purge″ section.
NOTE: The image above shows two zones, indicating that two valves are connected to the system.
Path: shower > start
Function: purges the cold water from the shower lines to reach the set temperature faster. For non-Ecosystems, all water outlets (except those designated as a handshower) are turned on at the same time. For Ecosystems, only one outlet will purge at a time.
Factory default: 7 seconds
The auto purge feature will only activate if the shower has been inactive for 30 minutes or longer.
From the [shower] screen, touch the green [start] icon to begin the auto-purge feature (if enabled).
A [shower warm-up] pop-up will appear, and enabled outlets will begin running and will continuerunning until the target temperature is reached, or until the set duration is reached. Refer to the″Web Settings – Auto Purge″ section to adjust time duration options.
The pop-up will display the actual temperature for both zones (for two connected valves).
Skip Auto Purge
While auto purge is running, the [shower warm-up] pop-up allows the user to bypass the feature.
All outlets that were not selected before pressing [start], will turn off.
Outlets that were selected stay on and will continue to rise to and maintain target temperature.
Touching the [x] at the top right of the pop-up window will cancel auto purge and return to theprevious screen.
If Target Temperature Cannot Be Reached
The pop-up will display the actual temperature for both zones (for two connected valves).
User cannot adjust target temperature while purge is running. Will purge to set target temperature.
101˚88˚88˚
101˚
shower 8:32am
zone 2zone 1
start
massagehome
target temperature
shower
stop
massagehome
shower warm-up
skip
shower 8:32am
zone 2zone 1
stop
massagehome
target: 101˚
1241234-5-B 58 Kohler Co.
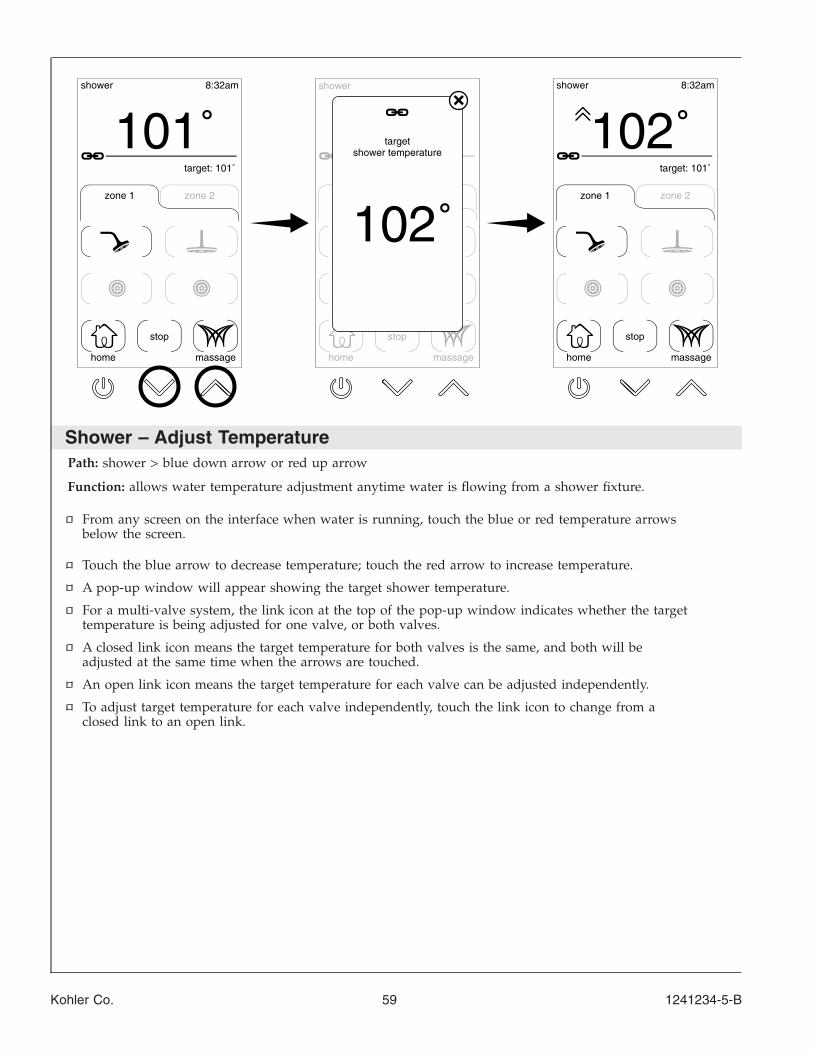
Shower – Adjust TemperaturePath: shower > blue down arrow or red up arrow
Function: allows water temperature adjustment anytime water is flowing from a shower fixture.
From any screen on the interface when water is running, touch the blue or red temperature arrowsbelow the screen.
Touch the blue arrow to decrease temperature; touch the red arrow to increase temperature.
A pop-up window will appear showing the target shower temperature.
For a multi-valve system, the link icon at the top of the pop-up window indicates whether the targettemperature is being adjusted for one valve, or both valves.
A closed link icon means the target temperature for both valves is the same, and both will beadjusted at the same time when the arrows are touched.
An open link icon means the target temperature for each valve can be adjusted independently.
To adjust target temperature for each valve independently, touch the link icon to change from aclosed link to an open link.
101˚shower 8:32am
zone 2zone 1
target: 101˚
stop
massagehome
shower
stop
massagehome
shower
stop
massagehome
8:32am
zone 2zone 1
target: 101˚
102˚
102˚
targetshower temperature
Kohler Co. 59 1241234-5-B
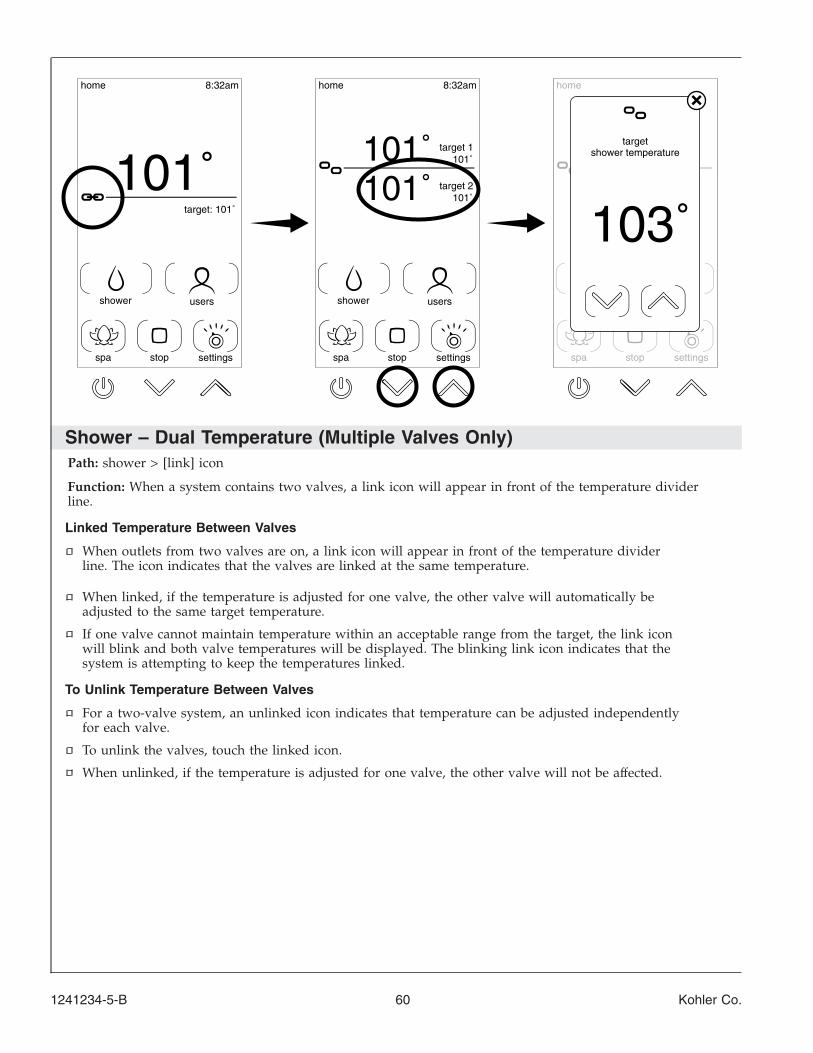
Shower – Dual Temperature (Multiple Valves Only)Path: shower > [link] icon
Function: When a system contains two valves, a link icon will appear in front of the temperature dividerline.
Linked Temperature Between Valves
When outlets from two valves are on, a link icon will appear in front of the temperature dividerline. The icon indicates that the valves are linked at the same temperature.
When linked, if the temperature is adjusted for one valve, the other valve will automatically beadjusted to the same target temperature.
If one valve cannot maintain temperature within an acceptable range from the target, the link iconwill blink and both valve temperatures will be displayed. The blinking link icon indicates that thesystem is attempting to keep the temperatures linked.
To Unlink Temperature Between Valves
For a two-valve system, an unlinked icon indicates that temperature can be adjusted independentlyfor each valve.
To unlink the valves, touch the linked icon.
When unlinked, if the temperature is adjusted for one valve, the other valve will not be affected.
homehome 8:32amhome 8:32am
101˚target: 101˚
stop settingsspa
shower users
stop settingsspa
shower users
stop settingsspa
103˚
targetshower temperature
101˚101˚ 101˚
101˚
target 1
target 2
1241234-5-B 60 Kohler Co.
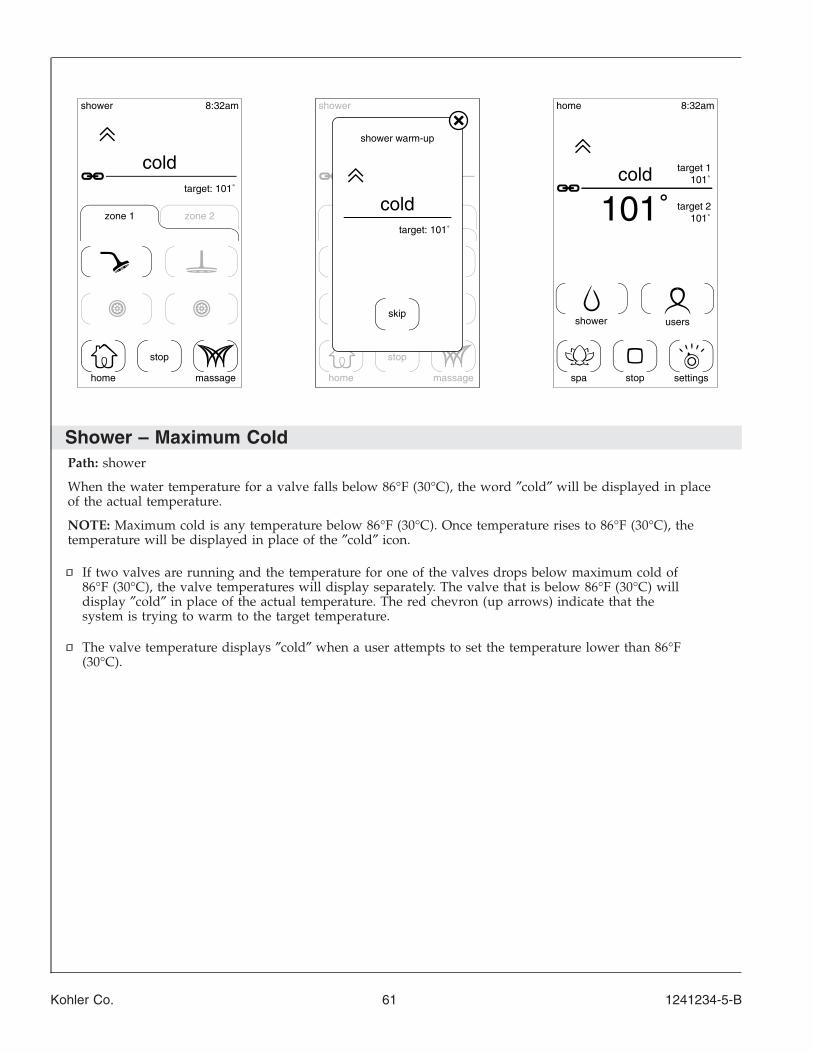
Shower – Maximum ColdPath: shower
When the water temperature for a valve falls below 86°F (30°C), the word ″cold″ will be displayed in placeof the actual temperature.
NOTE: Maximum cold is any temperature below 86°F (30°C). Once temperature rises to 86°F (30°C), thetemperature will be displayed in place of the ″cold″ icon.
If two valves are running and the temperature for one of the valves drops below maximum cold of86°F (30°C), the valve temperatures will display separately. The valve that is below 86°F (30°C) willdisplay ″cold″ in place of the actual temperature. The red chevron (up arrows) indicate that thesystem is trying to warm to the target temperature.
The valve temperature displays ″cold″ when a user attempts to set the temperature lower than 86°F(30°C).
cold
shower 8:32am
zone 2zone 1
target: 101˚
stop
massagehome
shower
stop
massagehome
skip
cold
shower warm-up
target: 101˚
home 8:32am
stop settingsspa
shower users
101˚101˚
101˚
target 1
target 2
cold
Kohler Co. 61 1241234-5-B
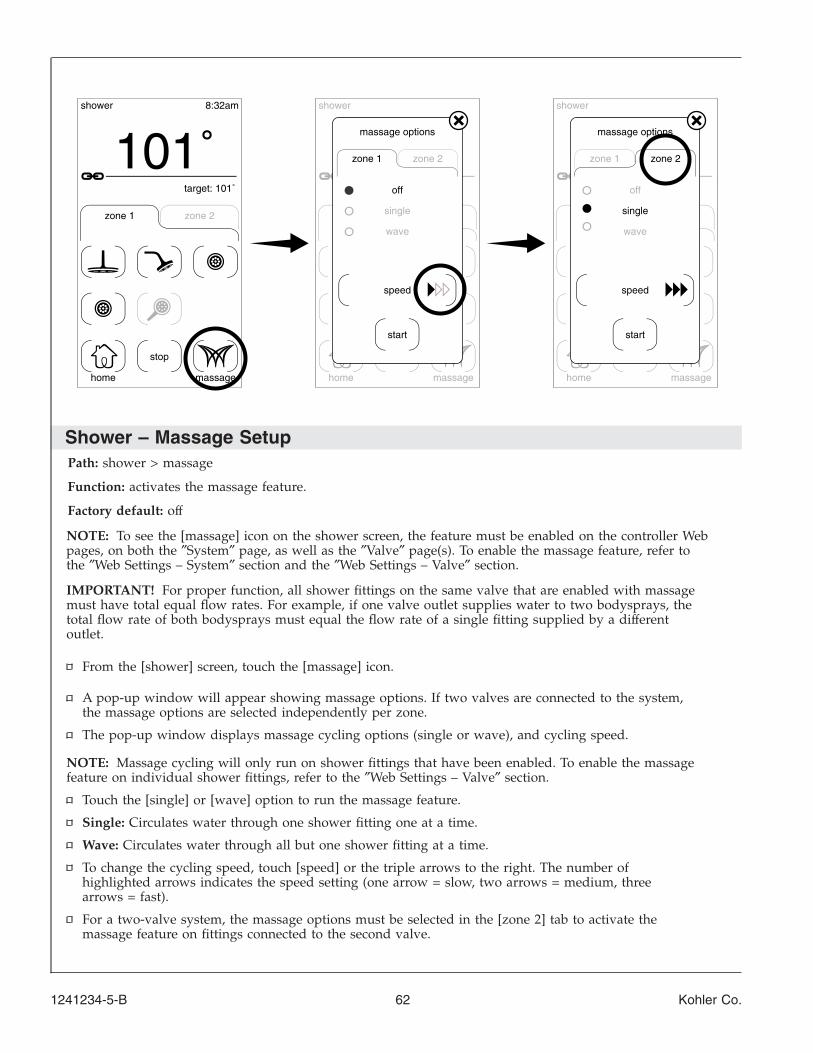
Shower – Massage SetupPath: shower > massage
Function: activates the massage feature.
Factory default: off
NOTE: To see the [massage] icon on the shower screen, the feature must be enabled on the controller Webpages, on both the ″System″ page, as well as the ″Valve″ page(s). To enable the massage feature, refer tothe ″Web Settings – System″ section and the ″Web Settings – Valve″ section.
IMPORTANT! For proper function, all shower fittings on the same valve that are enabled with massagemust have total equal flow rates. For example, if one valve outlet supplies water to two bodysprays, thetotal flow rate of both bodysprays must equal the flow rate of a single fitting supplied by a differentoutlet.
From the [shower] screen, touch the [massage] icon.
A pop-up window will appear showing massage options. If two valves are connected to the system,the massage options are selected independently per zone.
The pop-up window displays massage cycling options (single or wave), and cycling speed.
NOTE: Massage cycling will only run on shower fittings that have been enabled. To enable the massagefeature on individual shower fittings, refer to the ″Web Settings – Valve″ section.
Touch the [single] or [wave] option to run the massage feature.
Single: Circulates water through one shower fitting one at a time.
Wave: Circulates water through all but one shower fitting at a time.
To change the cycling speed, touch [speed] or the triple arrows to the right. The number ofhighlighted arrows indicates the speed setting (one arrow = slow, two arrows = medium, threearrows = fast).
For a two-valve system, the massage options must be selected in the [zone 2] tab to activate themassage feature on fittings connected to the second valve.
shower 8:32am
zone 2zone 1
target: 101˚
stop
massagehome
101˚shower
massagehome
speed
start
off
wave
single
zone 2zone 1
massage options
shower
massagehome
speed
start
off
wave
single
zone 2zone 1
massage options
1241234-5-B 62 Kohler Co.

Shower – Massage Setup (cont.)
NOTE: The massage cycling feature runs independently on each valve. For example, the [single] optioncan be run on zone 1 while the [wave] option is run on zone 2. The cycling feature will not span acrossboth zones.
Kohler Co. 63 1241234-5-B
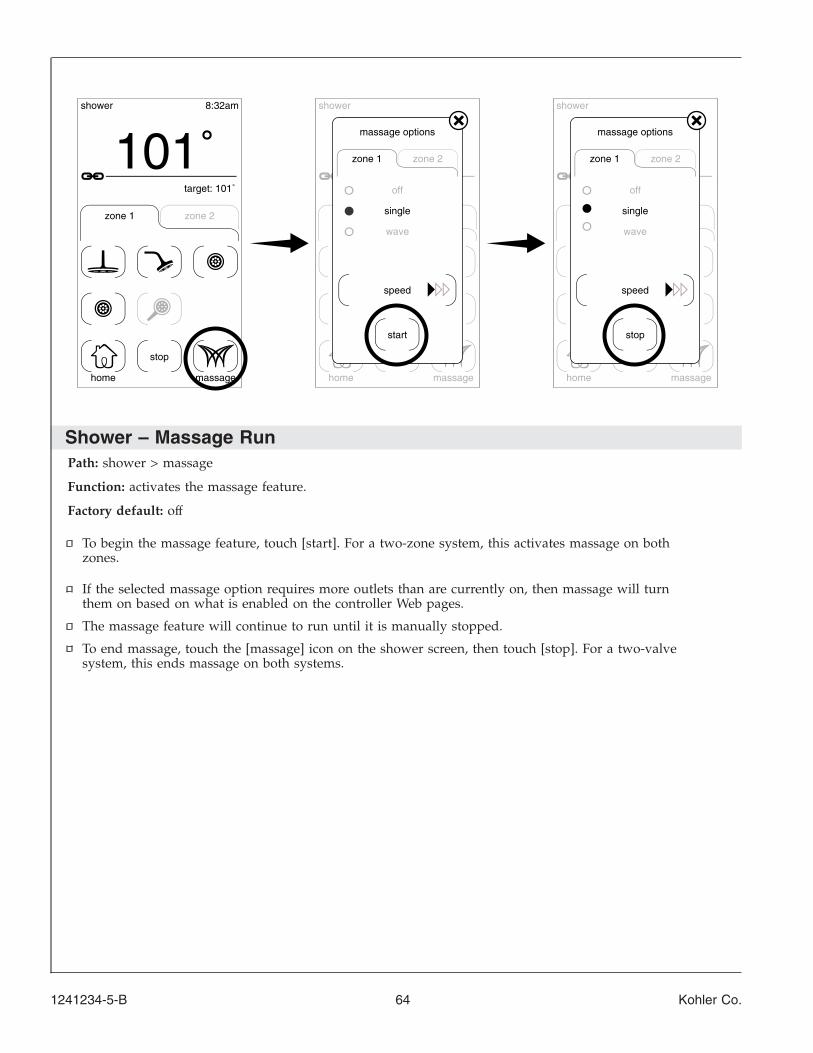
Shower – Massage RunPath: shower > massage
Function: activates the massage feature.
Factory default: off
To begin the massage feature, touch [start]. For a two-zone system, this activates massage on bothzones.
If the selected massage option requires more outlets than are currently on, then massage will turnthem on based on what is enabled on the controller Web pages.
The massage feature will continue to run until it is manually stopped.
To end massage, touch the [massage] icon on the shower screen, then touch [stop]. For a two-valvesystem, this ends massage on both systems.
shower 8:32am
zone 2zone 1
target: 101˚
stop
massagehome
101˚shower
massagehome
speed
start
off
wave
single
zone 2zone 1
massage options
shower
massagehome
speed
stop
off
wave
single
zone 2zone 1
massage options
1241234-5-B 64 Kohler Co.
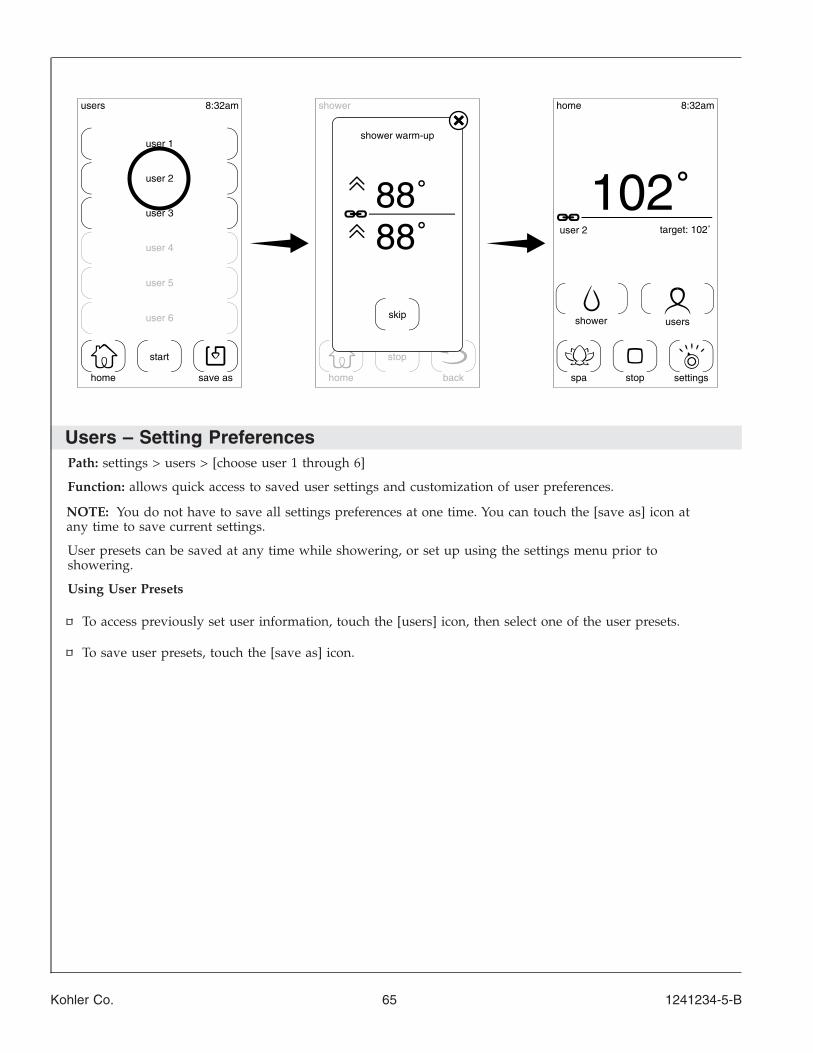
Users – Setting PreferencesPath: settings > users > [choose user 1 through 6]
Function: allows quick access to saved user settings and customization of user preferences.
NOTE: You do not have to save all settings preferences at one time. You can touch the [save as] icon atany time to save current settings.
User presets can be saved at any time while showering, or set up using the settings menu prior toshowering.
Using User Presets
To access previously set user information, touch the [users] icon, then select one of the user presets.
To save user presets, touch the [save as] icon.
users 8:32am
start
save ashome
shower
stop
backhome
home 8:32am
stop settingsspa
shower usersuser 6
user 5
user 4
user 1
user 3
user 2
user 2
88˚88˚
shower warm-up
skip
102˚target: 102˚
Kohler Co. 65 1241234-5-B
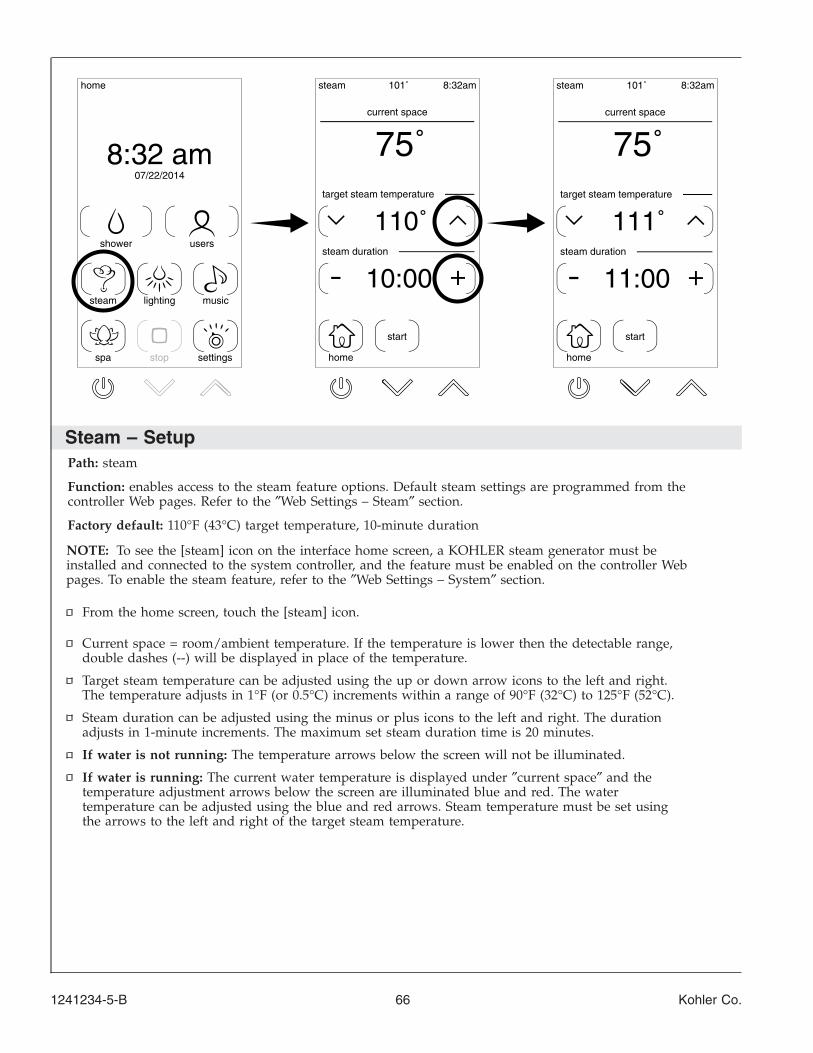
Steam – SetupPath: steam
Function: enables access to the steam feature options. Default steam settings are programmed from thecontroller Web pages. Refer to the ″Web Settings – Steam″ section.
Factory default: 110°F (43°C) target temperature, 10-minute duration
NOTE: To see the [steam] icon on the interface home screen, a KOHLER steam generator must beinstalled and connected to the system controller, and the feature must be enabled on the controller Webpages. To enable the steam feature, refer to the ″Web Settings – System″ section.
From the home screen, touch the [steam] icon.
Current space = room/ambient temperature. If the temperature is lower then the detectable range,double dashes (--) will be displayed in place of the temperature.
Target steam temperature can be adjusted using the up or down arrow icons to the left and right.The temperature adjusts in 1°F (or 0.5°C) increments within a range of 90°F (32°C) to 125°F (52°C).
Steam duration can be adjusted using the minus or plus icons to the left and right. The durationadjusts in 1-minute increments. The maximum set steam duration time is 20 minutes.
If water is not running: The temperature arrows below the screen will not be illuminated.
If water is running: The current water temperature is displayed under ″current space″ and thetemperature adjustment arrows below the screen are illuminated blue and red. The watertemperature can be adjusted using the blue and red arrows. Steam temperature must be set usingthe arrows to the left and right of the target steam temperature.
stop
lighting musicsteam
shower users
settingsspa
home
07/22/2014
8:32 am
steam 8:32am
start
home
steam 8:32am
start
home
10:00
110˚
current space
steam duration
target steam temperature
75˚
11:00
111˚
current space
steam duration
target steam temperature
75˚
101˚ 101˚
1241234-5-B 66 Kohler Co.
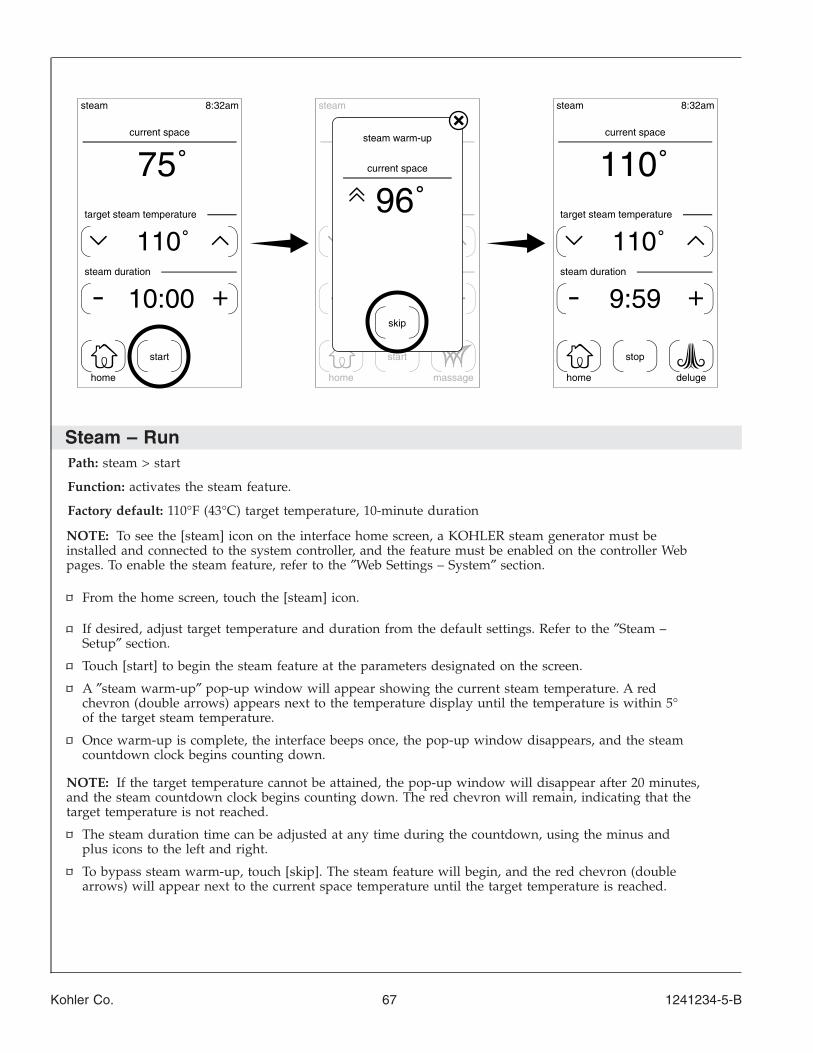
Steam – RunPath: steam > start
Function: activates the steam feature.
Factory default: 110°F (43°C) target temperature, 10-minute duration
NOTE: To see the [steam] icon on the interface home screen, a KOHLER steam generator must beinstalled and connected to the system controller, and the feature must be enabled on the controller Webpages. To enable the steam feature, refer to the ″Web Settings – System″ section.
From the home screen, touch the [steam] icon.
If desired, adjust target temperature and duration from the default settings. Refer to the ″Steam –Setup″ section.
Touch [start] to begin the steam feature at the parameters designated on the screen.
A ″steam warm-up″ pop-up window will appear showing the current steam temperature. A redchevron (double arrows) appears next to the temperature display until the temperature is within 5°of the target steam temperature.
Once warm-up is complete, the interface beeps once, the pop-up window disappears, and the steamcountdown clock begins counting down.
NOTE: If the target temperature cannot be attained, the pop-up window will disappear after 20 minutes,and the steam countdown clock begins counting down. The red chevron will remain, indicating that thetarget temperature is not reached.
The steam duration time can be adjusted at any time during the countdown, using the minus andplus icons to the left and right.
To bypass steam warm-up, touch [skip]. The steam feature will begin, and the red chevron (doublearrows) will appear next to the current space temperature until the target temperature is reached.
steam 8:32am
start
home
10:00
110˚
current space
steam duration
target steam temperature
75˚96˚
steam warm-up
current space
steam
start
home
skip
massage
steam 8:32am
stop
home
9:59
110˚
current space
steam duration
target steam temperature
110˚
deluge
Kohler Co. 67 1241234-5-B
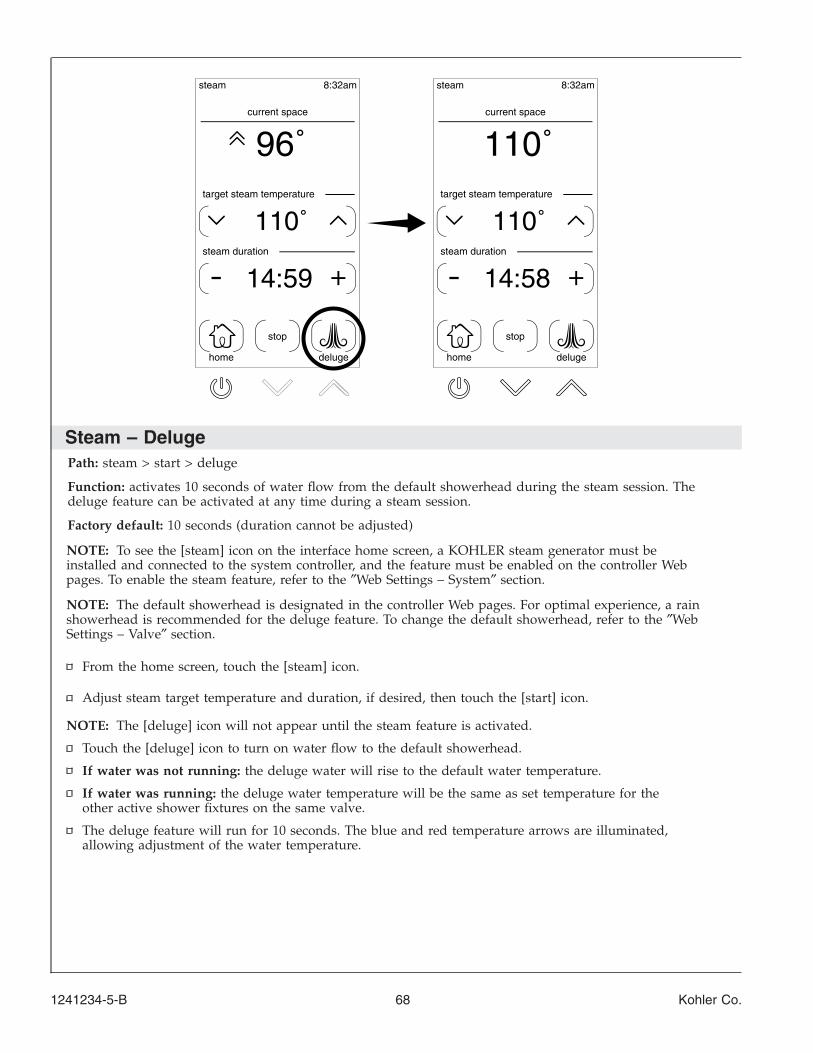
Steam – DelugePath: steam > start > deluge
Function: activates 10 seconds of water flow from the default showerhead during the steam session. Thedeluge feature can be activated at any time during a steam session.
Factory default: 10 seconds (duration cannot be adjusted)
NOTE: To see the [steam] icon on the interface home screen, a KOHLER steam generator must beinstalled and connected to the system controller, and the feature must be enabled on the controller Webpages. To enable the steam feature, refer to the ″Web Settings – System″ section.
NOTE: The default showerhead is designated in the controller Web pages. For optimal experience, a rainshowerhead is recommended for the deluge feature. To change the default showerhead, refer to the ″WebSettings – Valve″ section.
From the home screen, touch the [steam] icon.
Adjust steam target temperature and duration, if desired, then touch the [start] icon.
NOTE: The [deluge] icon will not appear until the steam feature is activated.
Touch the [deluge] icon to turn on water flow to the default showerhead.
If water was not running: the deluge water will rise to the default water temperature.
If water was running: the deluge water temperature will be the same as set temperature for theother active shower fixtures on the same valve.
The deluge feature will run for 10 seconds. The blue and red temperature arrows are illuminated,allowing adjustment of the water temperature.
steam 8:32am
stop
home
current space
steam duration
target steam temperature
deluge
110˚
14:59
110˚
14:58
96˚ 110˚
steam 8:32am
stop
home
current space
steam duration
target steam temperature
deluge
1241234-5-B 68 Kohler Co.
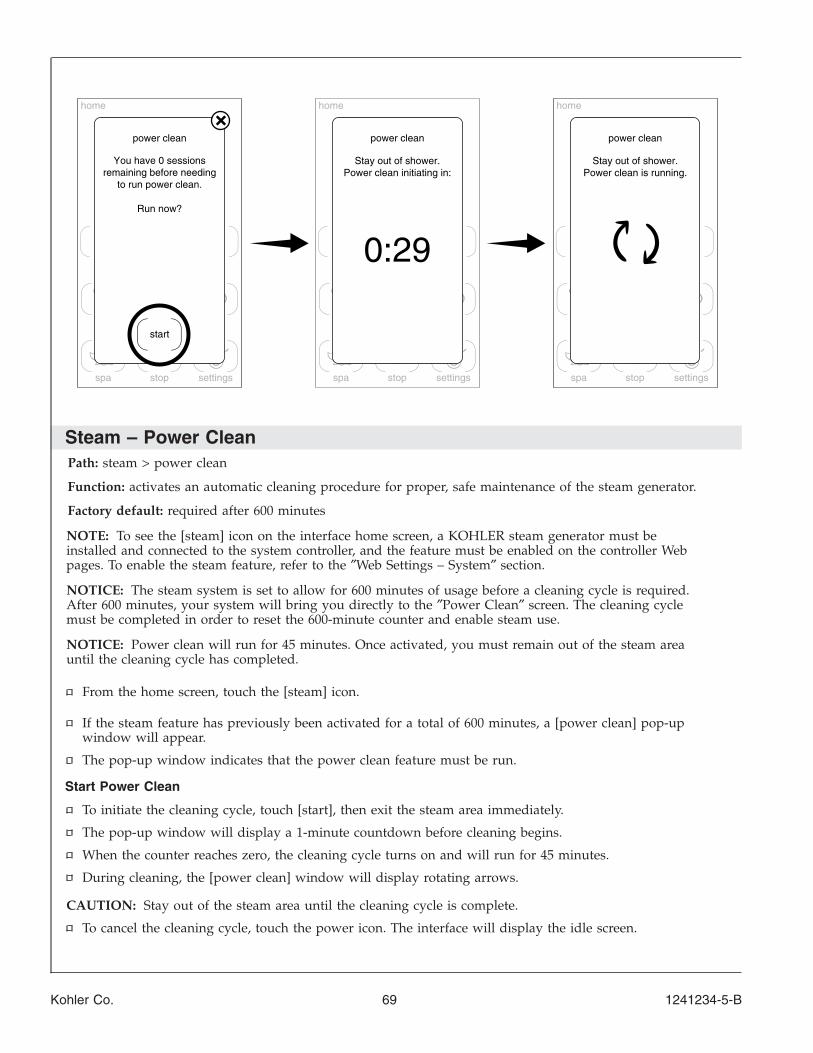
Steam – Power CleanPath: steam > power clean
Function: activates an automatic cleaning procedure for proper, safe maintenance of the steam generator.
Factory default: required after 600 minutes
NOTE: To see the [steam] icon on the interface home screen, a KOHLER steam generator must beinstalled and connected to the system controller, and the feature must be enabled on the controller Webpages. To enable the steam feature, refer to the ″Web Settings – System″ section.
NOTICE: The steam system is set to allow for 600 minutes of usage before a cleaning cycle is required.After 600 minutes, your system will bring you directly to the ″Power Clean″ screen. The cleaning cyclemust be completed in order to reset the 600-minute counter and enable steam use.
NOTICE: Power clean will run for 45 minutes. Once activated, you must remain out of the steam areauntil the cleaning cycle has completed.
From the home screen, touch the [steam] icon.
If the steam feature has previously been activated for a total of 600 minutes, a [power clean] pop-upwindow will appear.
The pop-up window indicates that the power clean feature must be run.
Start Power Clean
To initiate the cleaning cycle, touch [start], then exit the steam area immediately.
The pop-up window will display a 1-minute countdown before cleaning begins.
When the counter reaches zero, the cleaning cycle turns on and will run for 45 minutes.
During cleaning, the [power clean] window will display rotating arrows.
CAUTION: Stay out of the steam area until the cleaning cycle is complete.
To cancel the cleaning cycle, touch the power icon. The interface will display the idle screen.
You have 0 sessionsremaining before needing
to run power clean.
power clean
Stay out of shower.Power clean is running.
power clean
Run now?
power clean
Stay out of shower.Power clean initiating in:
0:29
stop settingsspa
home
start
stop settingsspa
home
stop settingsspa
home
Kohler Co. 69 1241234-5-B
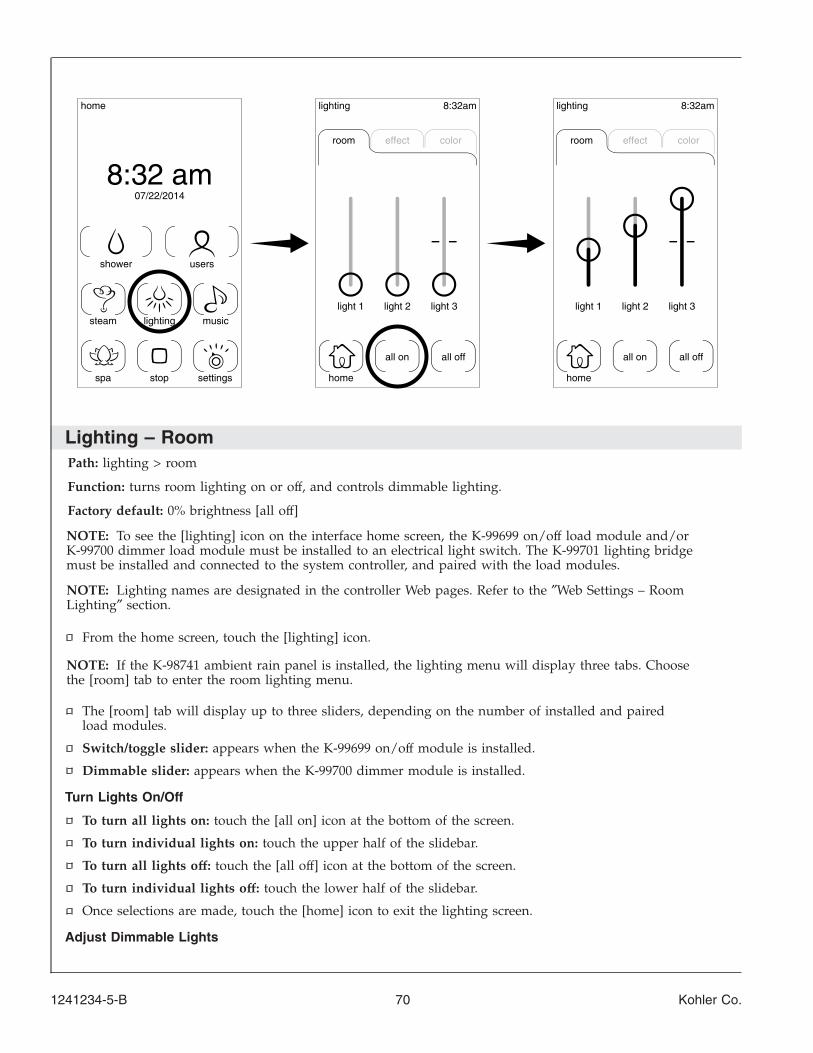
Lighting – RoomPath: lighting > room
Function: turns room lighting on or off, and controls dimmable lighting.
Factory default: 0% brightness [all off]
NOTE: To see the [lighting] icon on the interface home screen, the K-99699 on/off load module and/orK-99700 dimmer load module must be installed to an electrical light switch. The K-99701 lighting bridgemust be installed and connected to the system controller, and paired with the load modules.
NOTE: Lighting names are designated in the controller Web pages. Refer to the ″Web Settings – RoomLighting″ section.
From the home screen, touch the [lighting] icon.
NOTE: If the K-98741 ambient rain panel is installed, the lighting menu will display three tabs. Choosethe [room] tab to enter the room lighting menu.
The [room] tab will display up to three sliders, depending on the number of installed and pairedload modules.
Switch/toggle slider: appears when the K-99699 on/off module is installed.
Dimmable slider: appears when the K-99700 dimmer module is installed.
Turn Lights On/Off
To turn all lights on: touch the [all on] icon at the bottom of the screen.
To turn individual lights on: touch the upper half of the slidebar.
To turn all lights off: touch the [all off] icon at the bottom of the screen.
To turn individual lights off: touch the lower half of the slidebar.
Once selections are made, touch the [home] icon to exit the lighting screen.
Adjust Dimmable Lights
stop
lighting musicsteam
shower users
settingsspa
home
07/22/2014
8:32 am
lighting 8:32am
all on
home
all off
room coloreffect
light 1 light 3light 2
lighting 8:32am
all on
home
all off
room coloreffect
light 1 light 3light 2
1241234-5-B 70 Kohler Co.
Lighting – Room (cont.)
To adjust dimmable light: touch the circle to slide it along the slidebar. Slide up to increasebrightness; slide down to decrease brightness.
Once selections are made, touch the [home] icon to exit the lighting screen.
Kohler Co. 71 1241234-5-B

Lighting – Ambient Rain EffectsPath: lighting > effect
Function: scripted light sequences are preprogrammed to the ambient rain panel. The user can choose fromeight different light (mood) options. Available effects are: color cycle, sunrise, sunset, sunny clouds,thunderstorm, water reflections, warm energy, and cool calm.
Factory default: color cycle
NOTE: To see the [lighting] icon on the interface home screen, lighting components must be installed andconnected to the system controller.
From the home screen, touch the [lighting] icon.
The effects tab displays the light effects options. To view additional effects, touch the right arrow.
To return to the previous effects options, touch the left arrow.
Touch the desired light effect. The radio button for the selected effect will illuminate.
Touch [start] to turn on the rain panel light and begin the sequence.
The green [start] icon will change to a red [stop] icon and the lighting sequence will continue toloop.
NOTE: A different light effect can be selected at any time while the current effect is running.
To change to a different light sequence, selected the desired effect, then touch [start]. The lightsequence will immediately change to the new effect.
stop
lighting musicsteam
shower users
settingsspa
home
07/22/2014
8:32 am
lighting 8:32am
home
start
options
sunny clouds
thunderstorm
sunset
sunrise
color cycle
cool calm
warm energy
water reflections
lighting 8:32am
home
start
options
room coloreffect room coloreffect
1241234-5-B 72 Kohler Co.
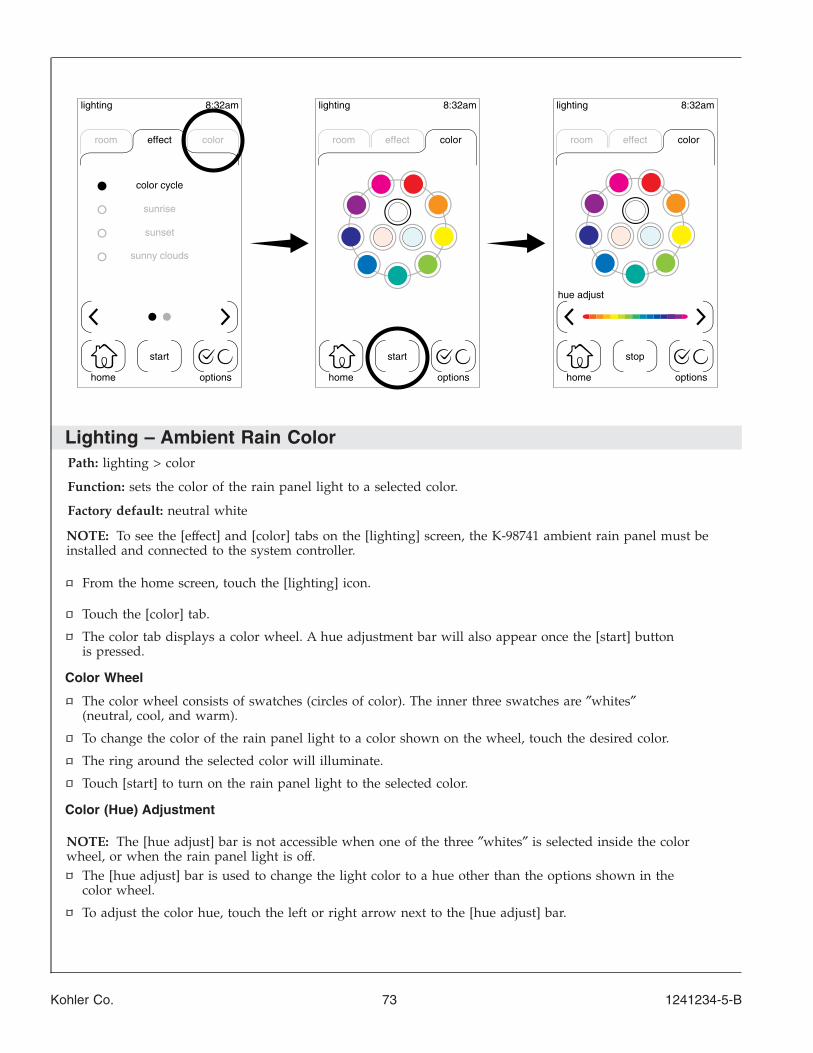
Lighting – Ambient Rain ColorPath: lighting > color
Function: sets the color of the rain panel light to a selected color.
Factory default: neutral white
NOTE: To see the [effect] and [color] tabs on the [lighting] screen, the K-98741 ambient rain panel must beinstalled and connected to the system controller.
From the home screen, touch the [lighting] icon.
Touch the [color] tab.
The color tab displays a color wheel. A hue adjustment bar will also appear once the [start] buttonis pressed.
Color Wheel
The color wheel consists of swatches (circles of color). The inner three swatches are ″whites″(neutral, cool, and warm).
To change the color of the rain panel light to a color shown on the wheel, touch the desired color.
The ring around the selected color will illuminate.
Touch [start] to turn on the rain panel light to the selected color.
Color (Hue) Adjustment
NOTE: The [hue adjust] bar is not accessible when one of the three ″whites″ is selected inside the colorwheel, or when the rain panel light is off.
The [hue adjust] bar is used to change the light color to a hue other than the options shown in thecolor wheel.
To adjust the color hue, touch the left or right arrow next to the [hue adjust] bar.
lighting 8:32am
home
start
options
sunny clouds
sunset
sunrise
color cycle
lighting 8:32am
home
start
options
lighting 8:32am
home
stop
options
hue adjust
room coloreffect room coloreffectroom coloreffect
Kohler Co. 73 1241234-5-B
Lighting – Ambient Rain Color (cont.)
The color shifts in 5° increments based on the color wheel. The left arrow shifts the colorcounterclockwise along the wheel. The right arrow shifts the color clockwise. For example, if thegreen swatch was initially selected, one touch of the left arrow will shift the color toward the yellowswatch by 5°.
The new color changes immediately as the hue is adjusted.
1241234-5-B 74 Kohler Co.
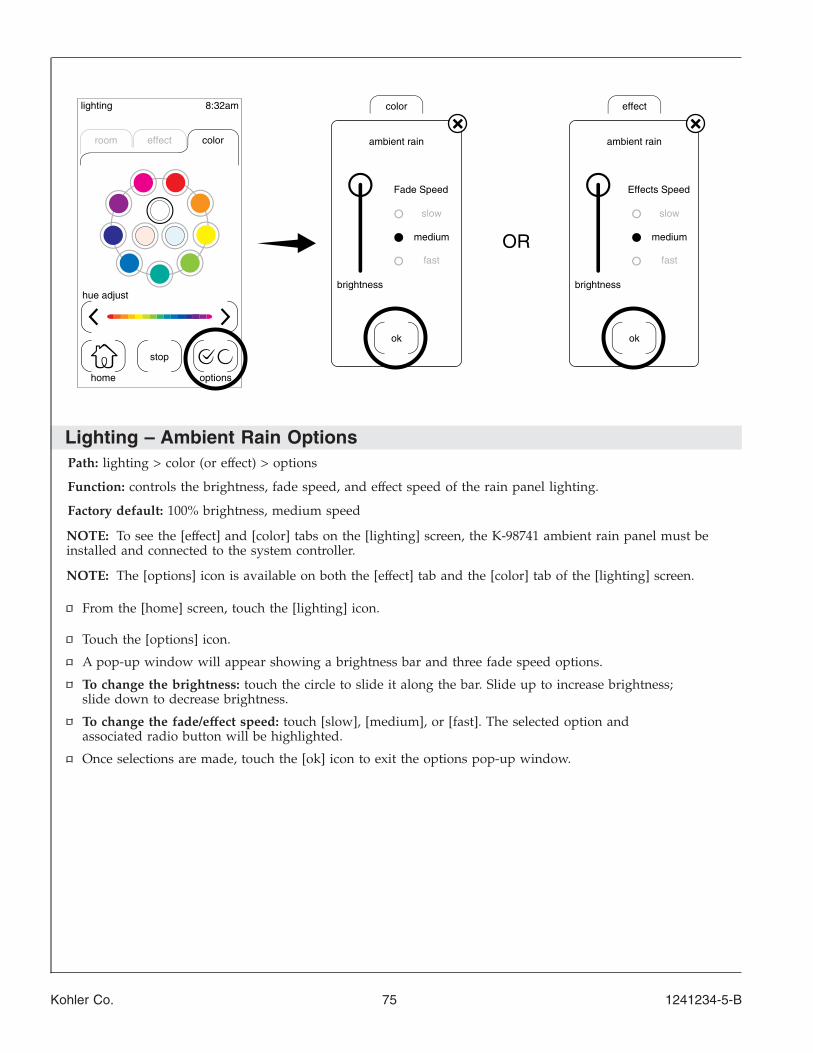
Lighting – Ambient Rain OptionsPath: lighting > color (or effect) > options
Function: controls the brightness, fade speed, and effect speed of the rain panel lighting.
Factory default: 100% brightness, medium speed
NOTE: To see the [effect] and [color] tabs on the [lighting] screen, the K-98741 ambient rain panel must beinstalled and connected to the system controller.
NOTE: The [options] icon is available on both the [effect] tab and the [color] tab of the [lighting] screen.
From the [home] screen, touch the [lighting] icon.
Touch the [options] icon.
A pop-up window will appear showing a brightness bar and three fade speed options.
To change the brightness: touch the circle to slide it along the bar. Slide up to increase brightness;slide down to decrease brightness.
To change the fade/effect speed: touch [slow], [medium], or [fast]. The selected option andassociated radio button will be highlighted.
Once selections are made, touch the [ok] icon to exit the options pop-up window.
lighting 8:32am
home
stop
options
hue adjust
ambient rain
ok
brightness
fast
medium
slow
Fade Speed
ambient rain
ok
brightness
fast
medium
slow
Effects Speed
room coloreffect
color effect
OR
Kohler Co. 75 1241234-5-B
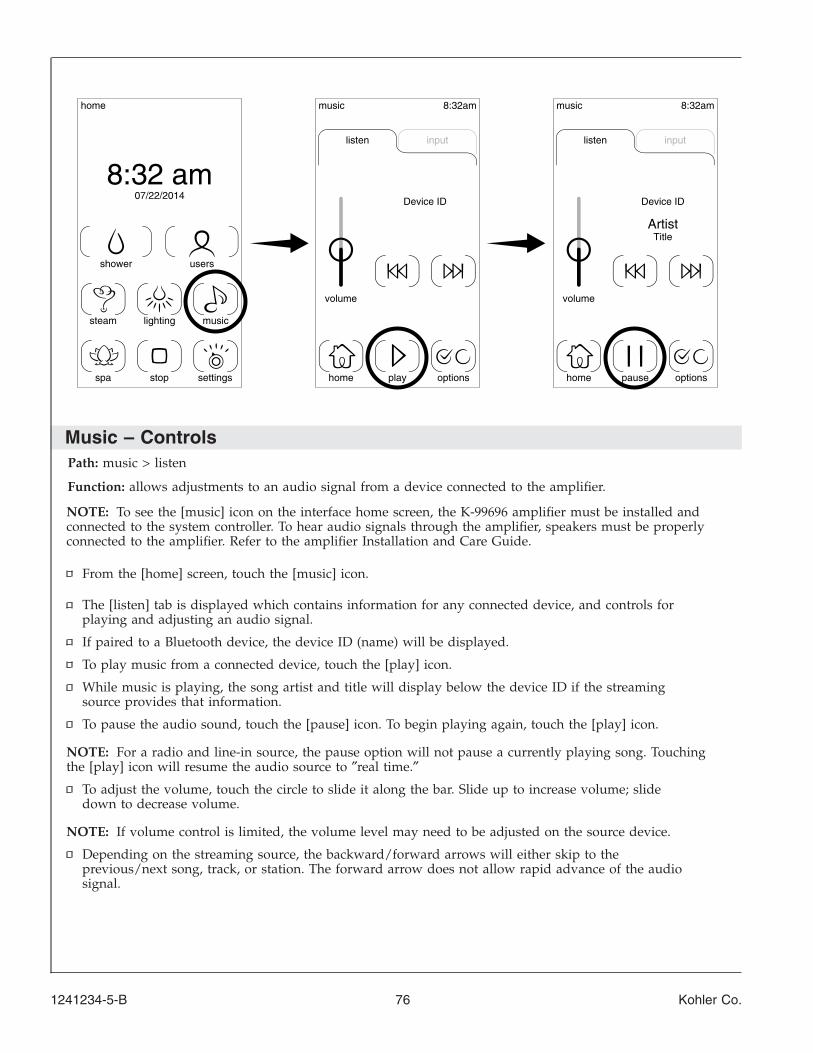
Music – ControlsPath: music > listen
Function: allows adjustments to an audio signal from a device connected to the amplifier.
NOTE: To see the [music] icon on the interface home screen, the K-99696 amplifier must be installed andconnected to the system controller. To hear audio signals through the amplifier, speakers must be properlyconnected to the amplifier. Refer to the amplifier Installation and Care Guide.
From the [home] screen, touch the [music] icon.
The [listen] tab is displayed which contains information for any connected device, and controls forplaying and adjusting an audio signal.
If paired to a Bluetooth device, the device ID (name) will be displayed.
To play music from a connected device, touch the [play] icon.
While music is playing, the song artist and title will display below the device ID if the streamingsource provides that information.
To pause the audio sound, touch the [pause] icon. To begin playing again, touch the [play] icon.
NOTE: For a radio and line-in source, the pause option will not pause a currently playing song. Touchingthe [play] icon will resume the audio source to ″real time.″
To adjust the volume, touch the circle to slide it along the bar. Slide up to increase volume; slidedown to decrease volume.
NOTE: If volume control is limited, the volume level may need to be adjusted on the source device.
Depending on the streaming source, the backward/forward arrows will either skip to theprevious/next song, track, or station. The forward arrow does not allow rapid advance of the audiosignal.
stop
lighting musicsteam
shower users
settingsspa
home
07/22/2014
8:32 am
music 8:32am
home
inputlisten
optionsplay
volume
Device ID
music 8:32am
home
inputlisten
optionspause
volume
Device ID
ArtistTitle
1241234-5-B 76 Kohler Co.
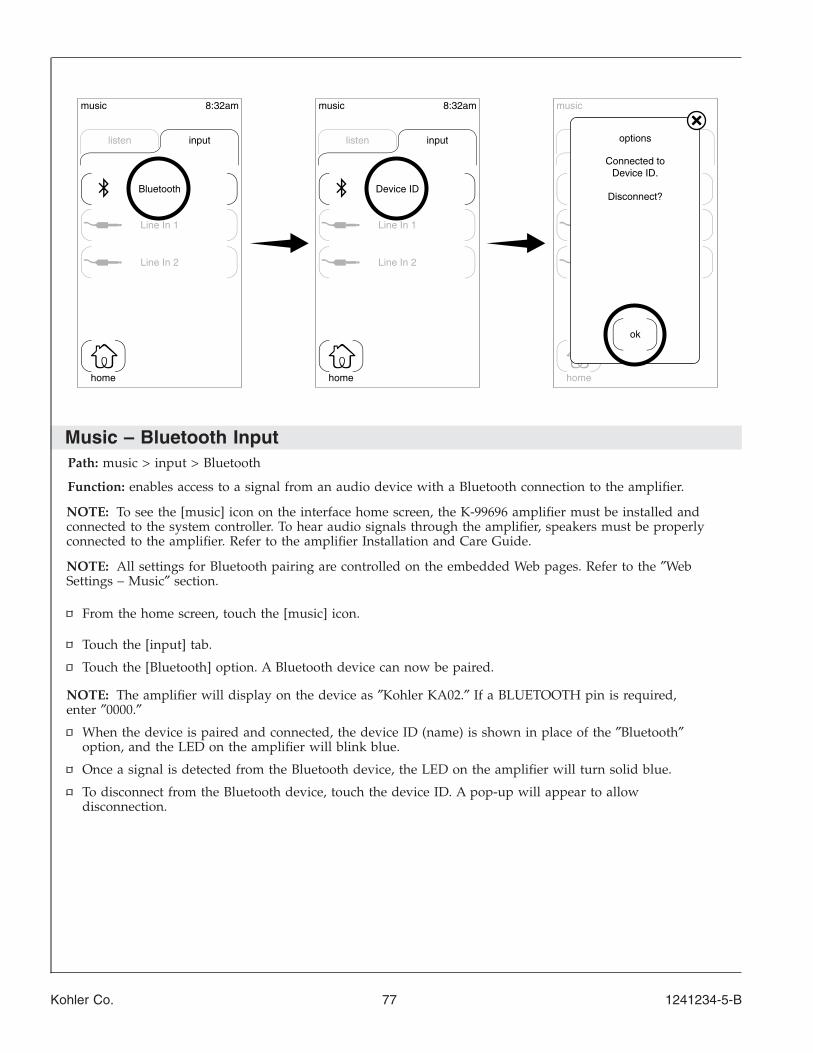
Music – Bluetooth InputPath: music > input > Bluetooth
Function: enables access to a signal from an audio device with a Bluetooth connection to the amplifier.
NOTE: To see the [music] icon on the interface home screen, the K-99696 amplifier must be installed andconnected to the system controller. To hear audio signals through the amplifier, speakers must be properlyconnected to the amplifier. Refer to the amplifier Installation and Care Guide.
NOTE: All settings for Bluetooth pairing are controlled on the embedded Web pages. Refer to the ″WebSettings – Music″ section.
From the home screen, touch the [music] icon.
Touch the [input] tab.
Touch the [Bluetooth] option. A Bluetooth device can now be paired.
NOTE: The amplifier will display on the device as ″Kohler KA02.″ If a BLUETOOTH pin is required,enter ″0000.″
When the device is paired and connected, the device ID (name) is shown in place of the ″Bluetooth″option, and the LED on the amplifier will blink blue.
Once a signal is detected from the Bluetooth device, the LED on the amplifier will turn solid blue.
To disconnect from the Bluetooth device, touch the device ID. A pop-up will appear to allowdisconnection.
music 8:32am
home
inputlisten
Line In 1
Line In 2
Bluetooth
music 8:32am
home
inputlisten
Line In 1
Line In 2
Device ID
music
home
Connected toDevice ID.
options
Disconnect?
ok
Kohler Co. 77 1241234-5-B
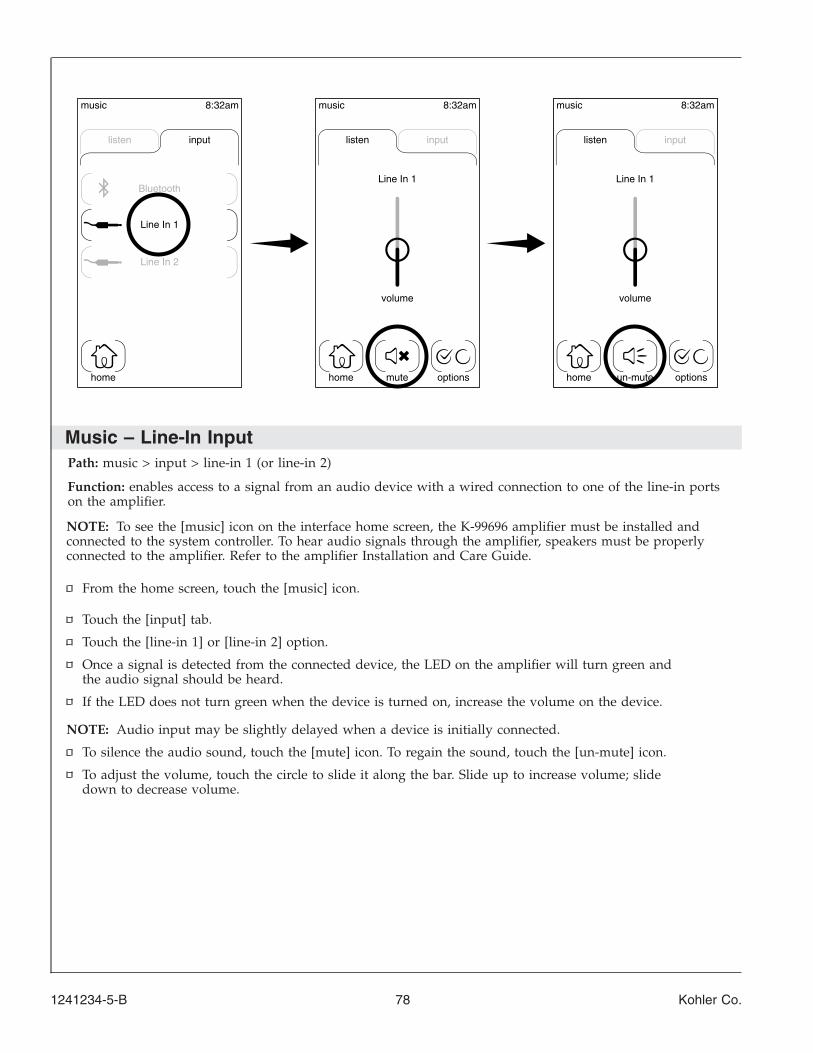
Music – Line-In InputPath: music > input > line-in 1 (or line-in 2)
Function: enables access to a signal from an audio device with a wired connection to one of the line-in portson the amplifier.
NOTE: To see the [music] icon on the interface home screen, the K-99696 amplifier must be installed andconnected to the system controller. To hear audio signals through the amplifier, speakers must be properlyconnected to the amplifier. Refer to the amplifier Installation and Care Guide.
From the home screen, touch the [music] icon.
Touch the [input] tab.
Touch the [line-in 1] or [line-in 2] option.
Once a signal is detected from the connected device, the LED on the amplifier will turn green andthe audio signal should be heard.
If the LED does not turn green when the device is turned on, increase the volume on the device.
NOTE: Audio input may be slightly delayed when a device is initially connected.
To silence the audio sound, touch the [mute] icon. To regain the sound, touch the [un-mute] icon.
To adjust the volume, touch the circle to slide it along the bar. Slide up to increase volume; slidedown to decrease volume.
music 8:32am
home
inputlisten
Line In 1
Line In 2
Bluetooth
music 8:32am
home
inputlisten
volume
Line In 1
mute options
music 8:32am
home
inputlisten
volume
Line In 1
optionsun-mute
1241234-5-B 78 Kohler Co.
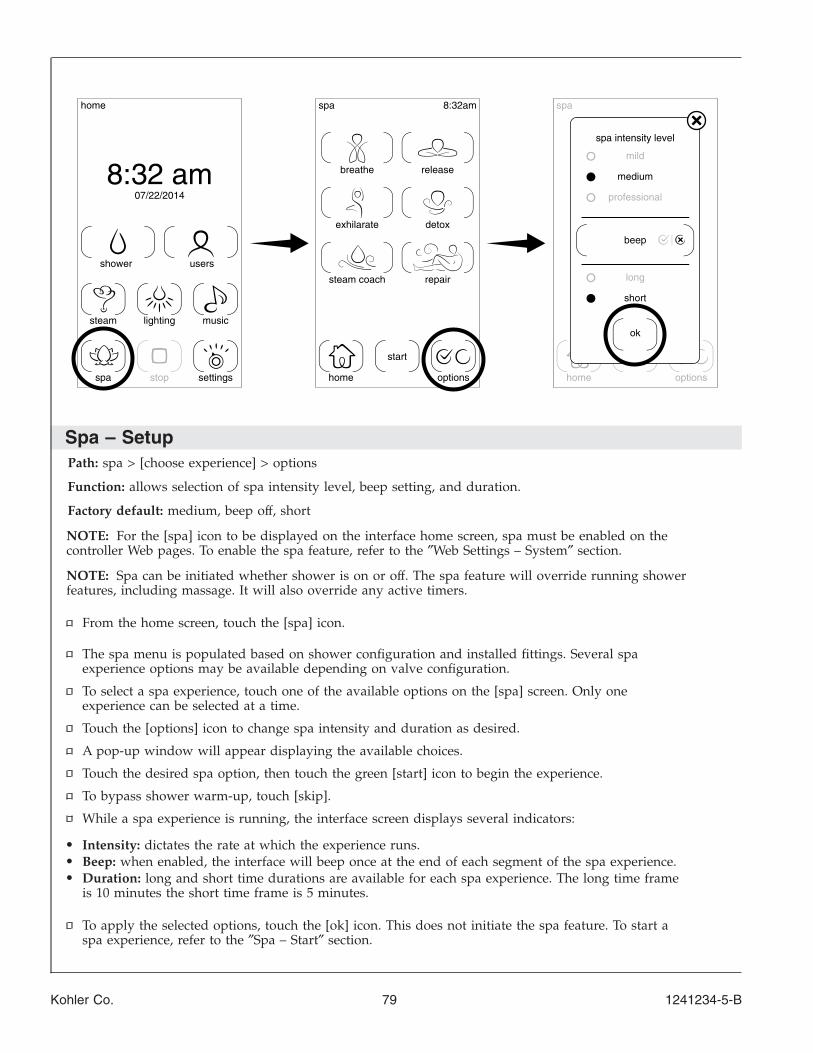
Spa – SetupPath: spa > [choose experience] > options
Function: allows selection of spa intensity level, beep setting, and duration.
Factory default: medium, beep off, short
NOTE: For the [spa] icon to be displayed on the interface home screen, spa must be enabled on thecontroller Web pages. To enable the spa feature, refer to the ″Web Settings – System″ section.
NOTE: Spa can be initiated whether shower is on or off. The spa feature will override running showerfeatures, including massage. It will also override any active timers.
From the home screen, touch the [spa] icon.
The spa menu is populated based on shower configuration and installed fittings. Several spaexperience options may be available depending on valve configuration.
To select a spa experience, touch one of the available options on the [spa] screen. Only oneexperience can be selected at a time.
Touch the [options] icon to change spa intensity and duration as desired.
A pop-up window will appear displaying the available choices.
Touch the desired spa option, then touch the green [start] icon to begin the experience.
To bypass shower warm-up, touch [skip].
While a spa experience is running, the interface screen displays several indicators:
• Intensity: dictates the rate at which the experience runs.• Beep: when enabled, the interface will beep once at the end of each segment of the spa experience.• Duration: long and short time durations are available for each spa experience. The long time frame
is 10 minutes the short time frame is 5 minutes.
To apply the selected options, touch the [ok] icon. This does not initiate the spa feature. To start aspa experience, refer to the ″Spa – Start″ section.
stop
lighting musicsteam
shower users
settingsspa
home
07/22/2014
8:32 am
spa spa8:32am
start
home options
release
exhilarate detox
steam coach repair
home options
spa intensity level
medium
professional
mild
long
short
ok
beep
breathe
Kohler Co. 79 1241234-5-B
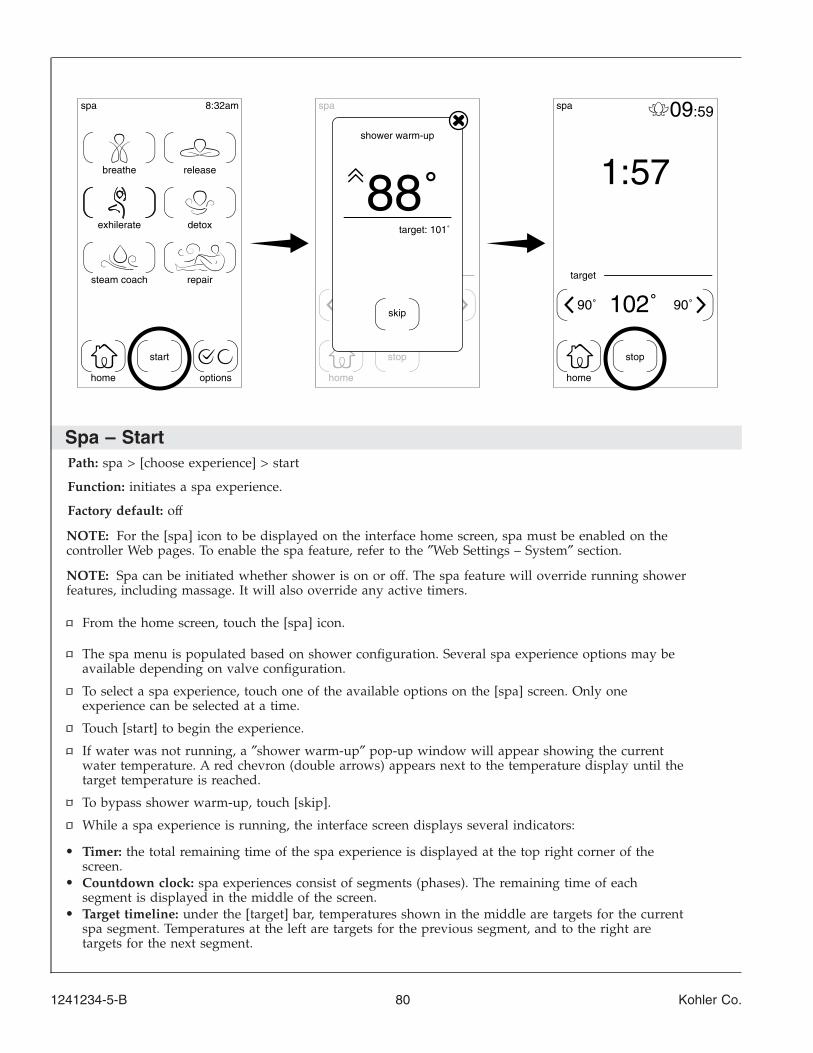
Spa – StartPath: spa > [choose experience] > start
Function: initiates a spa experience.
Factory default: off
NOTE: For the [spa] icon to be displayed on the interface home screen, spa must be enabled on thecontroller Web pages. To enable the spa feature, refer to the ″Web Settings – System″ section.
NOTE: Spa can be initiated whether shower is on or off. The spa feature will override running showerfeatures, including massage. It will also override any active timers.
From the home screen, touch the [spa] icon.
The spa menu is populated based on shower configuration. Several spa experience options may beavailable depending on valve configuration.
To select a spa experience, touch one of the available options on the [spa] screen. Only oneexperience can be selected at a time.
Touch [start] to begin the experience.
If water was not running, a ″shower warm-up″ pop-up window will appear showing the currentwater temperature. A red chevron (double arrows) appears next to the temperature display until thetarget temperature is reached.
To bypass shower warm-up, touch [skip].
While a spa experience is running, the interface screen displays several indicators:
• Timer: the total remaining time of the spa experience is displayed at the top right corner of thescreen.
• Countdown clock: spa experiences consist of segments (phases). The remaining time of eachsegment is displayed in the middle of the screen.
• Target timeline: under the [target] bar, temperatures shown in the middle are targets for the currentspa segment. Temperatures at the left are targets for the previous segment, and to the right aretargets for the next segment.
spa 8:32am
start
home options
release
exhilerate detox
steam coach repair
breathe
stop
home
skip
spa
shower warm-up
88˚target: 101˚
1:57
:5909
stop
home
spa
90˚
target
102˚90˚
1241234-5-B 80 Kohler Co.
Spa – Start (cont.)
To end a spa experience before the time duration is reached, touch the [stop] icon. All water will beturned off.
Kohler Co. 81 1241234-5-B
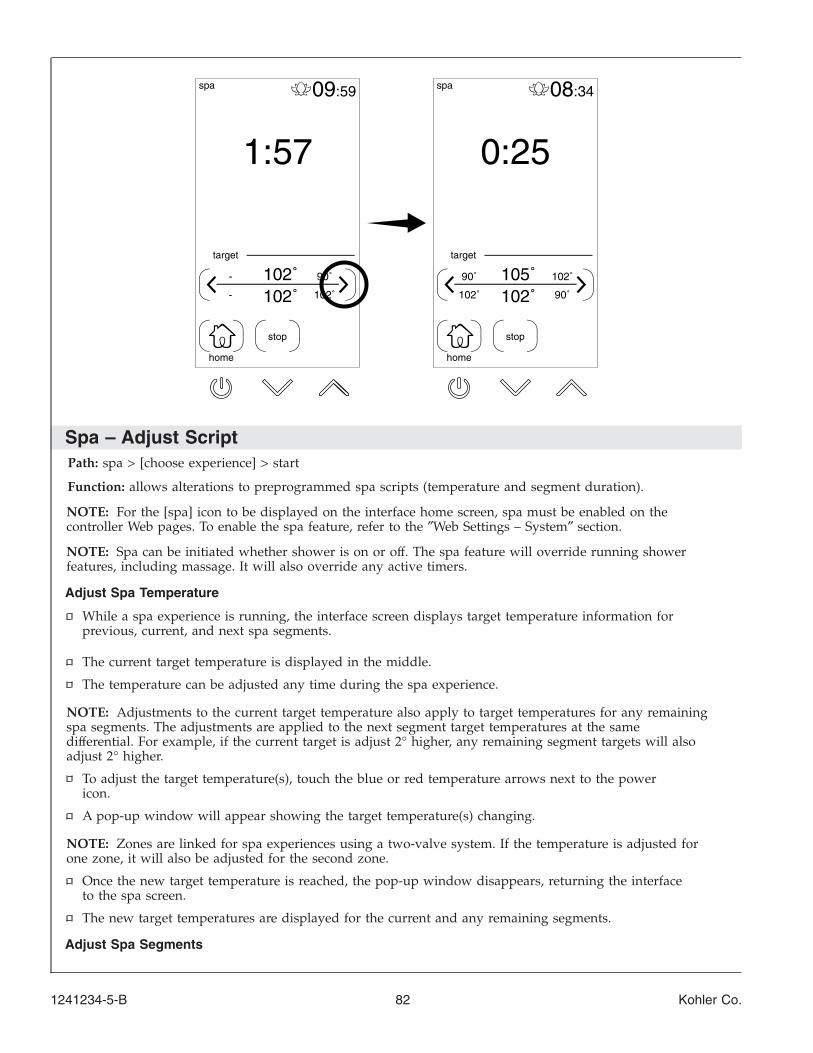
Spa – Adjust ScriptPath: spa > [choose experience] > start
Function: allows alterations to preprogrammed spa scripts (temperature and segment duration).
NOTE: For the [spa] icon to be displayed on the interface home screen, spa must be enabled on thecontroller Web pages. To enable the spa feature, refer to the ″Web Settings – System″ section.
NOTE: Spa can be initiated whether shower is on or off. The spa feature will override running showerfeatures, including massage. It will also override any active timers.
Adjust Spa Temperature
While a spa experience is running, the interface screen displays target temperature information forprevious, current, and next spa segments.
The current target temperature is displayed in the middle.
The temperature can be adjusted any time during the spa experience.
NOTE: Adjustments to the current target temperature also apply to target temperatures for any remainingspa segments. The adjustments are applied to the next segment target temperatures at the samedifferential. For example, if the current target is adjust 2° higher, any remaining segment targets will alsoadjust 2° higher.
To adjust the target temperature(s), touch the blue or red temperature arrows next to the powericon.
A pop-up window will appear showing the target temperature(s) changing.
NOTE: Zones are linked for spa experiences using a two-valve system. If the temperature is adjusted forone zone, it will also be adjusted for the second zone.
Once the new target temperature is reached, the pop-up window disappears, returning the interfaceto the spa screen.
The new target temperatures are displayed for the current and any remaining segments.
Adjust Spa Segments
stop
home
spa
target
0:25
08:34
105˚102˚
102˚
90˚
90˚
102˚
102˚
1:57
09:59
102˚90˚
102˚
-
-
stop
home
spa
target
1241234-5-B 82 Kohler Co.
Spa – Adjust Script (cont.)
While a spa experience is running, the target timeline displays backward and forward arrows. Thesearrows allow jumping to previous or next steps.
Touch the back arrow to restart the current spa segment (if active for less than 5 seconds), or jumpto the previous segment (if active for more than 5 seconds).
Touch the forward arrow to jump to the next segment.
Whether a segment is restarted or jumped to, the countdown clock for that segment restarts, thetemperature adjusts to the segment targets, and any associated outlets for that segment areactivated/deactivated.
Kohler Co. 83 1241234-5-B
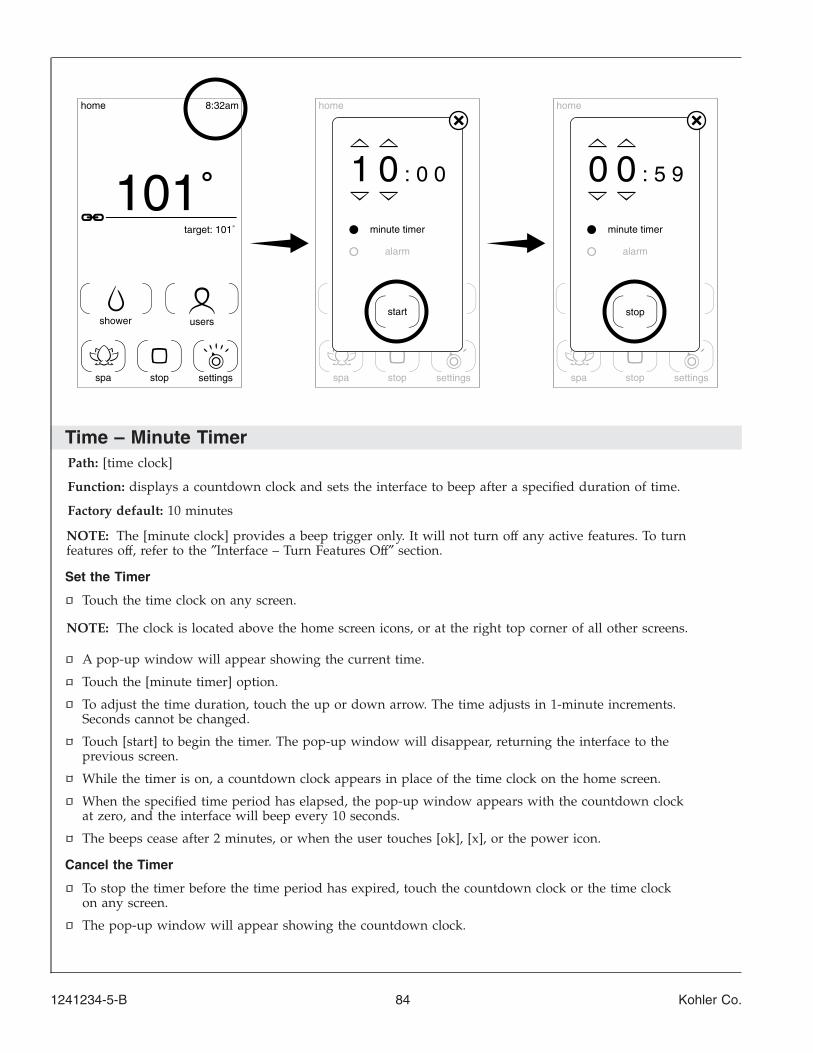
Time – Minute TimerPath: [time clock]
Function: displays a countdown clock and sets the interface to beep after a specified duration of time.
Factory default: 10 minutes
NOTE: The [minute clock] provides a beep trigger only. It will not turn off any active features. To turnfeatures off, refer to the ″Interface – Turn Features Off″ section.
Set the Timer
Touch the time clock on any screen.
NOTE: The clock is located above the home screen icons, or at the right top corner of all other screens.
A pop-up window will appear showing the current time.
Touch the [minute timer] option.
To adjust the time duration, touch the up or down arrow. The time adjusts in 1-minute increments.Seconds cannot be changed.
Touch [start] to begin the timer. The pop-up window will disappear, returning the interface to theprevious screen.
While the timer is on, a countdown clock appears in place of the time clock on the home screen.
When the specified time period has elapsed, the pop-up window appears with the countdown clockat zero, and the interface will beep every 10 seconds.
The beeps cease after 2 minutes, or when the user touches [ok], [x], or the power icon.
Cancel the Timer
To stop the timer before the time period has expired, touch the countdown clock or the time clockon any screen.
The pop-up window will appear showing the countdown clock.
1 0 : 0 0 0 0 : 5 9
home 8:32am
stop settingsspa
shower users
target: 101˚
101˚
home
stop settingsspa
home
stop settingsspa
start
minute timer
alarm
minute timer
alarm
stop
1241234-5-B 84 Kohler Co.
Time – Minute Timer (cont.)
Touch [stop] to cancel the minute timer. The pop-up window will disappear, returning the interfaceto the previous screen.
Kohler Co. 85 1241234-5-B
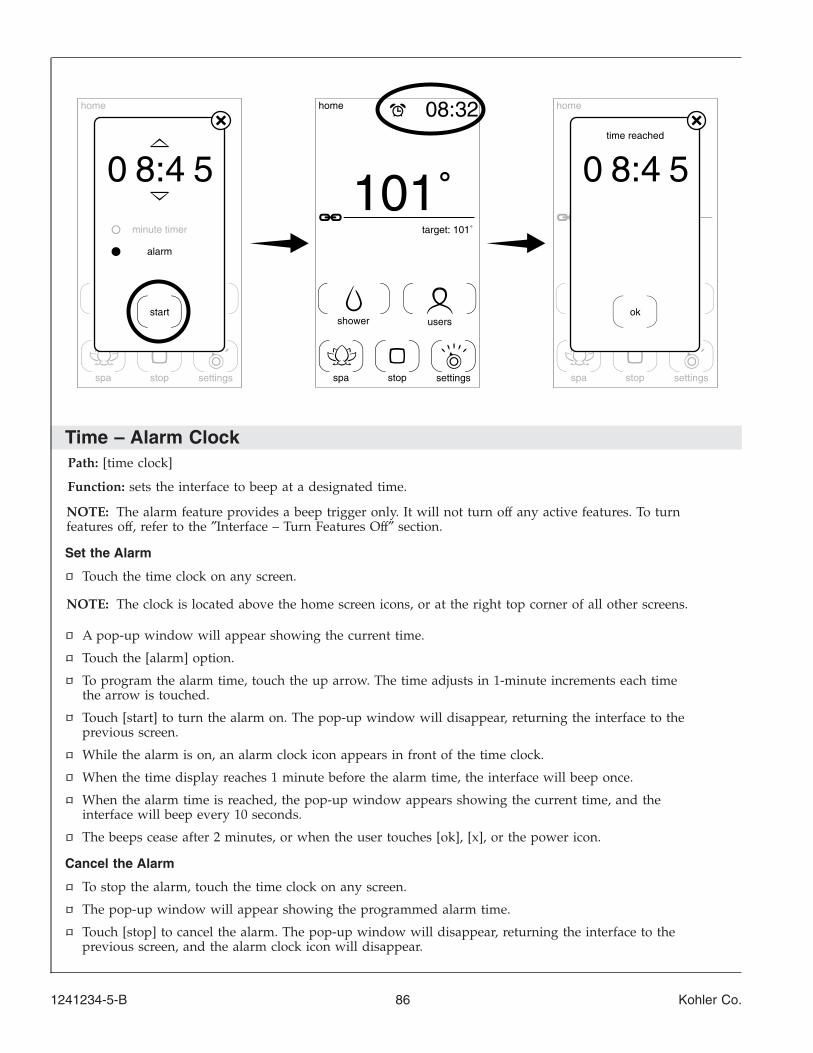
Time – Alarm ClockPath: [time clock]
Function: sets the interface to beep at a designated time.
NOTE: The alarm feature provides a beep trigger only. It will not turn off any active features. To turnfeatures off, refer to the ″Interface – Turn Features Off″ section.
Set the Alarm
Touch the time clock on any screen.
NOTE: The clock is located above the home screen icons, or at the right top corner of all other screens.
A pop-up window will appear showing the current time.
Touch the [alarm] option.
To program the alarm time, touch the up arrow. The time adjusts in 1-minute increments each timethe arrow is touched.
Touch [start] to turn the alarm on. The pop-up window will disappear, returning the interface to theprevious screen.
While the alarm is on, an alarm clock icon appears in front of the time clock.
When the time display reaches 1 minute before the alarm time, the interface will beep once.
When the alarm time is reached, the pop-up window appears showing the current time, and theinterface will beep every 10 seconds.
The beeps cease after 2 minutes, or when the user touches [ok], [x], or the power icon.
Cancel the Alarm
To stop the alarm, touch the time clock on any screen.
The pop-up window will appear showing the programmed alarm time.
Touch [stop] to cancel the alarm. The pop-up window will disappear, returning the interface to theprevious screen, and the alarm clock icon will disappear.
08:32home
stop settingsspa
shower users
target: 101˚
101˚0 8:4 5 0 8:4 5
home
stop settingsspa
home
stop settingsspa
minute timer
alarm
start ok
time reached
1241234-5-B 86 Kohler Co.
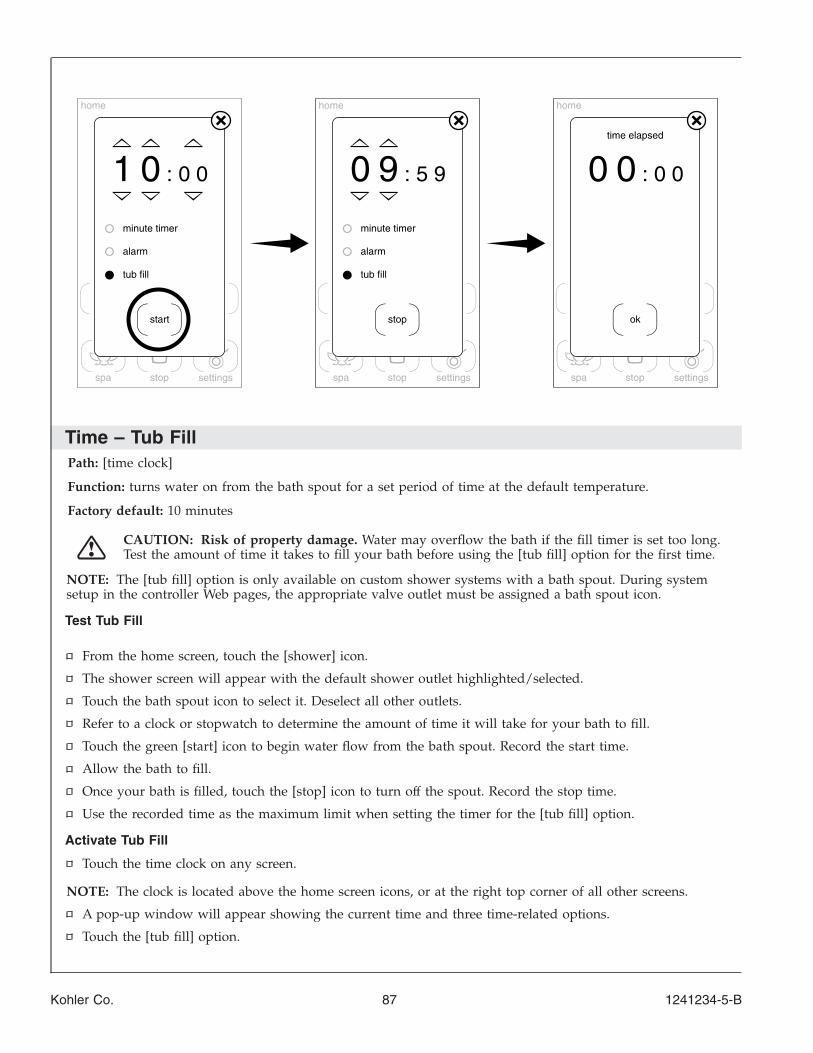
Time – Tub FillPath: [time clock]
Function: turns water on from the bath spout for a set period of time at the default temperature.
Factory default: 10 minutes
CAUTION: Risk of property damage. Water may overflow the bath if the fill timer is set too long.Test the amount of time it takes to fill your bath before using the [tub fill] option for the first time.
NOTE: The [tub fill] option is only available on custom shower systems with a bath spout. During systemsetup in the controller Web pages, the appropriate valve outlet must be assigned a bath spout icon.
Test Tub Fill
From the home screen, touch the [shower] icon.
The shower screen will appear with the default shower outlet highlighted/selected.
Touch the bath spout icon to select it. Deselect all other outlets.
Refer to a clock or stopwatch to determine the amount of time it will take for your bath to fill.
Touch the green [start] icon to begin water flow from the bath spout. Record the start time.
Allow the bath to fill.
Once your bath is filled, touch the [stop] icon to turn off the spout. Record the stop time.
Use the recorded time as the maximum limit when setting the timer for the [tub fill] option.
Activate Tub Fill
Touch the time clock on any screen.
NOTE: The clock is located above the home screen icons, or at the right top corner of all other screens.
A pop-up window will appear showing the current time and three time-related options.
Touch the [tub fill] option.
0 9 : 5 91 0 : 0 0 0 0 : 0 0
home
stop settingsspa
home
stop settingsspa
home
stop settingsspa
tub fill
alarm
minute timer
tub fill
alarm
minute timer
time elapsed
stopstart ok
Kohler Co. 87 1241234-5-B
Time – Tub Fill (cont.)
To adjust the time duration, touch the up or down arrows. Minutes adjust sequentially. Secondsadjust in 15-second increments.
Touch [start] to begin water flow from the bath spout.
If water was running from other fixtures: when [tub fill] is activated, the system shuts the otheroutlets off. Water will flow only from the bath spout at the designated default temperature.
If water was not running from other fixtures: when [tub fill] is activated, water flows from the bathspout, rising to the designated default temperature.
While [tub fill] is activated, a countdown clock appears in place of the time clock on all screens.
When the specified time period has elapsed, the pop-up window appears with the countdown clockat zero, and the interface will beep every 10 seconds.
The beeps cease after 2 minutes, or when the user touches [ok], [x], or the power icon.
Cancel Tub Fill
To stop water flow from the bath spout before the fill time as elapsed, touch [stop].
Water flow will cease, and the pop-up window will disappear, returning the interface to theprevious screen.
User Interface SoftwareThe user interface includes several open source packages under different open source licenses as listed below.Source code for the GPL and LGPL packages are available directly from Kohler Company. Contact KohlerCo. at 1-800-4KOHLER for more information or to obtain a copy.
Linux kernel, cross_scripts, cramfs, fakeroot, intltool, mtd-utils, pkgconfig, uboot, busybox,e2fsprogs, lzo, tslib, util-linux, dtc, freetype are licensed under the GPLv2:http://www.gnu.org/licenses/gpl-2.0.html
binutils, gcc, gdb, ccache, gdbserver, freefont-ttf are licensed under the GPLv3https://www.gnu.org/licenses/gpl-3.0.html
glibc and glib2 are licensed under the LGPLv2.1: http://www.gnu.org/licenses/lgpl-2.1.html
gmp is licensed under the LGPLv3.0: https://www.gnu.org/licenses/lgpl-3.0.html
openssh is licensed under http://cvsweb.openbsd.org/cgi-bin/cvsweb/~checkout~/src/usr.bin/ssh/LICENCE?rev=1.19&content-type=text/plain
zlib is licensed under the zlib license: http://zlib.net/zlib_license.html
pcre is licensed under http://www.pcre.org/licence.txt
libffi is licensed under https://raw.github.com/atgreen/libffi/master/LICENSE
Dhcp, expat, freetype are licensed under the BSD licnese:https://www.freebsd.org/copyright/freebsd-license.html
openssl is licensed under the OpenSSL license: http://www.openssl.org/source/license.html
Fontconfig, ncurses, libxml2 are licensed under the MIT license:http://www.opensource.org/licenses/mit-license.html
Open Source Packages Used
S. No. Package Name Version License1 Linux kernel 3.14 GPLv22 binutils 2.24 GPLv33 gcc 4.8.4 GPLv3
1241234-5-B 88 Kohler Co.
User Interface Software (cont.)
S. No. Package Name Version License4 glibc 2.18 LGPL5 gdb 7.7 GPLv36 cross_scripts NA GPLv27 cramfs 1.1 GPLv28 fakeroot 1.14.4 GPLv29 intltool 0.50.2 GPLv210 mtd-utils 1.5.0 GPLv211 pkgconfig 0.28 GPLv212 ccache 3.1.9 GPLv213 dtc 1.4.1 GPL14 uboot 2014.07 GPLv215 busybox 1.23.1 GPLv316 fontconfig 2.11.1 MIT17 dhcp 3.1-ESV-R3 BSD18 e2fsprogs 1.42.8 GPLv219 gdbserver 7.7 GPLv320 lzo 2.06 GPLv221 tslib 1 GPLv222 util-linux 2.21.2 GPLv223 zlib 1.2.8 BSD24 expat 2.1.0 BSD25 freefont-ttf 20100919 GPLv326 freetype 2.4.10 BSD/GPL dual license27 glib2 2.41.2 LGPL28 gmp 6.0.0 LGPLv329 libffi 3.0.13 BSD30 ncurses 5.9 MIT31 pcre 8.31 BSD32 openssh 6.7p1 BSD33 libxml2 2.8.0 MIT34 openssl 1.0.1k OpenSSL
ComplianceFCC Interference Statement
This device complies with Part 15 of the FCC Rules. Operation is subject to the following two conditions:
1. This device may not cause harmful interference, and
2. This device must accept any interference received, including interference that may cause undesiredoperation.
Changes or modifications not expressly approved by the party responsible for compliance could void theuser’s authority to operate the equipment.
This equipment has been tested and found to comply with the limits for a Class B digital device, pursuant toPart 15 of the FCC Rules. These limits are designed to provide reasonable protection against harmfulinterference in a residential installation. This equipment generates, uses, and can radiate radio frequencyenergy and, if not installed and used in accordance with the instructions, may cause harmful interference toradio communications. However, there is no guarantee that interference will not occur in a particular
Kohler Co. 89 1241234-5-B
Compliance (cont.)
installation. If this equipment does cause harmful interference to radio or television reception, which can bedetermined by turning the equipment off and on, the user is encouraged to try to correct the interference byone or more of the following measures:
• Reorient or relocate the receiving antenna.• Increase the separation between the equipment and receiver.• Connect the equipment into an outlet on a circuit different from that to which the receiver is
connected.• Consult the dealer or an experienced radio/TV technician for help.
Industry Canada Statement
This device complies with Industry Canada licence-exempt RSS standard(s). Operation is subject to thefollowing two conditions:
1. This device may not cause interference, and
2. This device must accept any interference, including interference that may cause undesired operation of thedevice.
CAN ICES-3(B)/NMB-3(B)
1241234-5-B 90 Kohler Co.

1241234-5-B

USA/Canada: 1-800-4KOHLER
México: 001-800-456-4537
kohler.com
©2017 Kohler Co.
1241234-5-B
Recommended