Open Impress.OpenOffice.orgpresentations David Megías Jiménez (coordinador)Jordi Mas (coordinador)Ana-Elena Guerrero Roldán (coordinadora)Jesús Corrius i Llavina PID_00148477

GNUFDL • PID_00148477 Open Impress. OpenOffice.org presentations
© 2009, FUOC. Se garantiza permiso para copiar, distribuir y modificar este documento según los términos de la GNU FreeDocumentation License, Version 1.2 o cualquiera posterior publicada por la Free Software Foundation, sin secciones invariantes nitextos de cubierta delantera o trasera. Se dispone de una copia de la licencia en el apartado "GNU Free Documentation License" deeste documento.
GNUFDL • PID_00148477 Open Impress. OpenOffice.org presentations
Index
Introduction............................................................................................... 5
1. Basic use of the program................................................................. 7
1.1. The working environment .......................................................... 7
1.2. Creating a sample presentation using AutoPilot ........................ 8
1.2.1. Creating the presentation ............................................. 8
1.2.2. Modifying the presentation ........................................... 12
1.2.3. Displaying the presentation .......................................... 16
2. Adding content to the presentation............................................. 17
2.1. Adding items of text ................................................................... 17
2.1.1. Defining editing options ............................................... 17
2.1.2. Creating a text frame .................................................... 18
2.1.3. Modifying text frame options ....................................... 19
2.1.4. Writing the text ............................................................. 21
2.2. Inserting graphics ........................................................................ 22
Summary...................................................................................................... 23

GNUFDL • PID_00148477 5 Open Impress. OpenOffice.org presentations
Introduction
OpenOffice.org comes with a component for presentations called Open Im-
press, which can be used to create professional presentations in the style of
Microsoft PowerPoint. Impress has the same drawing features as the Open
Draw component, which we will see in the next unit. Before getting down to
work with the program, we will run through some of its key features:
• Creating�presentations�from�other�sources. With the Open Impress Au-
toPilot, we can collect attributes, introduction pages, formats, presenta-
tion backgrounds and more from templates and examples.
• Different� formats. OpenOffice.org can import different document for-
mats such as PowerPoint and export presentations created in many others,
such as Macromedia Flash.
• Exporting�to�HTML�or�WebCast. The program can export presentations
and drawings created in HTML format, with or without frames. The ex-
ported documents can be run automatically or they can be used in web-
casts.
• Special�effects. Objects and animated texts, sounds and custom transi-
tions can be inserted in documents to enhance their appearance.
• Text�format. Impress offers the same text formatting capabilities as Writer.
The FontWork tool can also be used for the creation and advanced han-
dling of text effects.
• Custom�presentations. You can save different versions of a presentation
in a single document without losing or modifying the existing slides.
Notes can even be added to each one.
• Inserting�other�documents. One of the top features of Impress is the pos-
sibility of inserting other documents into a presentation. We can insert a
range of documents, from spreadsheets to graphics such as OLE objects,
which means that we can edit their contents even after they have been
embedded. We can also add a graphic either by inserting it or by using the
drawing functions of Open Draw, available in Open Impress.
The main aims of this unit are:
1) to explain how to use the AutoPilot feature to create presentations and
slides quickly with templates from the program, and

GNUFDL • PID_00148477 6 Open Impress. OpenOffice.org presentations
2) to study the process of inserting graphics and texts in presentations to add
content.
GNUFDL • PID_00148477 7 Open Impress. OpenOffice.org presentations
1. Basic use of the program
Open Impress can be launched from any OpenOffice.org application by se-
lecting the File > New > Presentation menu option.
Tips can be very useful for learning about the different features of the program.
Tips are displayed for each of the labels and buttons on the screen. You can
enable or disable this option using the Help > Tips menu option.
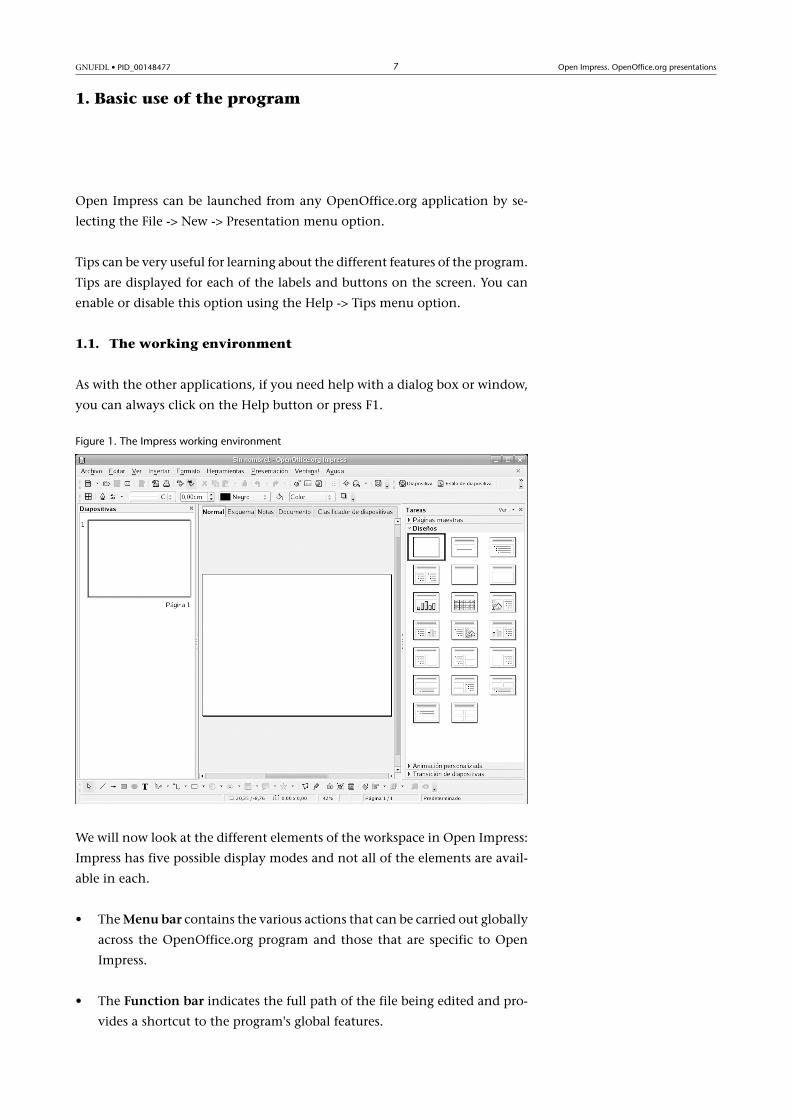
1.1. The working environment
As with the other applications, if you need help with a dialog box or window,
you can always click on the Help button or press F1.
Figure 1. The Impress working environment
We will now look at the different elements of the workspace in Open Impress:
Impress has five possible display modes and not all of the elements are avail-
able in each.
• The Menu�bar contains the various actions that can be carried out globally
across the OpenOffice.org program and those that are specific to Open
Impress.
• The Function�bar indicates the full path of the file being edited and pro-
vides a shortcut to the program's global features.
GNUFDL • PID_00148477 8 Open Impress. OpenOffice.org presentations
• The Object�bar is used to apply formatting to the objects you are working
with at a given time. In Impress, it is almost identical to Open Draw and
gives the user access to the drawing functions.
• The workspace�view�buttons are located in the top right of the window,
just above the scroll bar, and are used to select the different modes avail-
able in Open Impress.
• The Presentation�menu is used to move through, edit and insert new
slides. To display this window, select the View > Toolbars > Presentation
main menu option.
• The Main�toolbar, positioned vertically down the left-hand side of the
document, gives quick access to the most common drawing functions and
3D and animation effects.
• The Status�bar, located at the bottom of the screen has a number of func-
tions, which include displaying the number of the slide being viewed and
the total number of slides in the presentation, applying page styles (by
right-clicking on Standard), changing the zoompercentage and changing
the default type of text selection.
• The tabs can be used for easy scrolling through the slides of a presentation.
• The Stylist is used to apply automatic styles and effects to program objects.
To show or hide the Stylist, press F11 or use the Format > Stylist menu
option.
• The Navigator is used to switch from one slide to another, insert new
slides etc. To display the Navigator, press F5 or click on the Navigator but-
ton in the Function bar.
1.2. Creating a sample presentation using AutoPilot
In this section, we will look at how to create presentations using the AutoPilot
Presentation tool. To do this, we will use a fictitious presentation to help us
to try and understand the basics of Open Impress.
1.2.1. Creating the presentation
In this section, we will discover the features of the AutoPilot tool by creating
a sample presentation. The selected options will determine whether the pro-
gram displays all of the dialog boxes described.
GNUFDL • PID_00148477 9 Open Impress. OpenOffice.org presentations
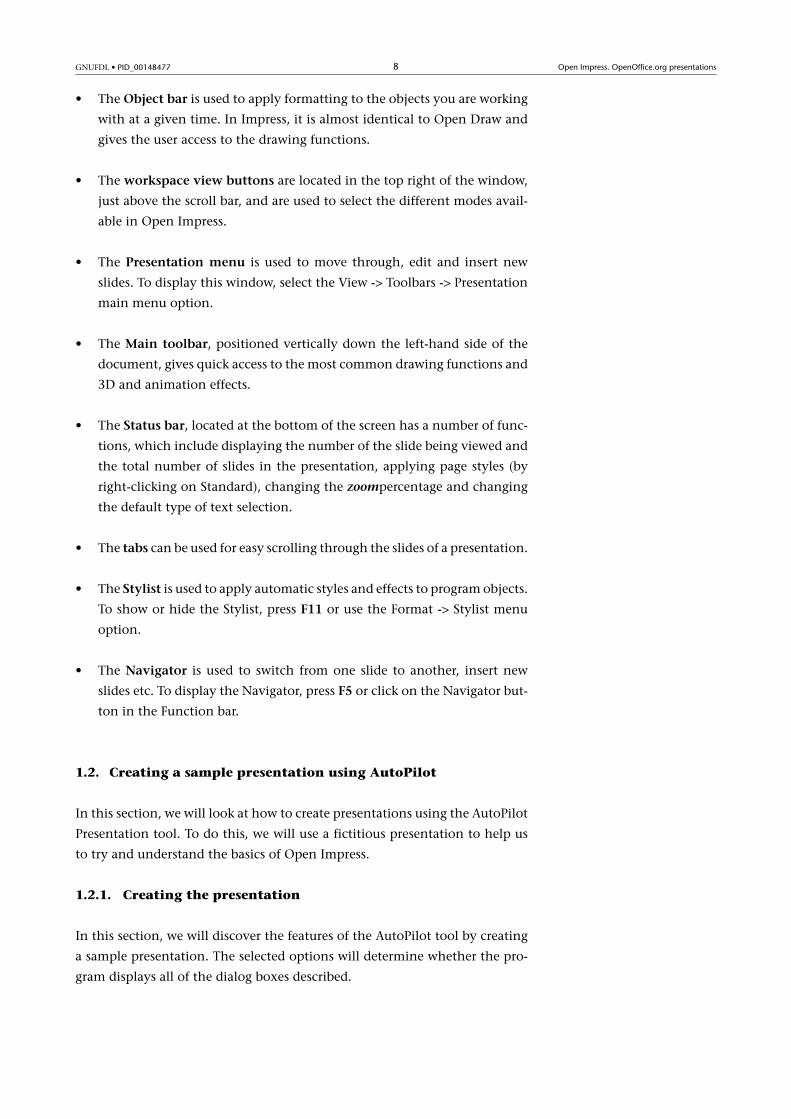
1) In the OpenOffice.org main menu, select the File > AutoPilot > Presenta-
tion option, which will bring up the first AutoPilot dialog box.
Figure 2. First AutoPilot dialog box
In this dialog box, we can choose whether to create a blank presentation for a
presentation of our own or to create a presentation from a template. The third
option simply allows the user to open an existing presentation. If you select
the Template option, you will need to select a category followed by a name.
It is important to keep the Preview option checked to see how the template
we are creating is going to look.
2) For our example, we will select the Template option and Introducing a New
Product from the list of presentations. Click on Next.
In the second AutoPilot dialog box, we select a style for our presentation back-
ground. If using a template, we can select <Original> to use the template's
default background.
We can also tell the system how we are going to display the presentation. If
we are going to use a computer for this, we will need to select Screen. If we are
using a template, we can use the default option by checking Original. Howev-
er, in the more recent versions of OpenOffice.org, these settings generally do
not have a major impact on the presentation.
GNUFDL • PID_00148477 10 Open Impress. OpenOffice.org presentations
Figure 3. Second AutoPilot dialog box
3) Select one of the options from the Select a slide design field. This will be
the background for your presentation. Click on Next.
Figure 4. Third AutoPilot dialog box
Unless we are advanced users of this program, it is very important in this
screen to mark the Preview option to view a live demo of the effects that we
can select from the Effect field. You can try them all out until you find an
effect you like although the descriptions are clear enough.
You can change slides manually but you can tell the program to do it for you
after a specified time interval.
4) From this list of effects, select Fly in From Left and in type of presentation,
select automatic with a 5-second duration of page. Once you have made your
selection, click on Next.
GNUFDL • PID_00148477 11 Open Impress. OpenOffice.org presentations
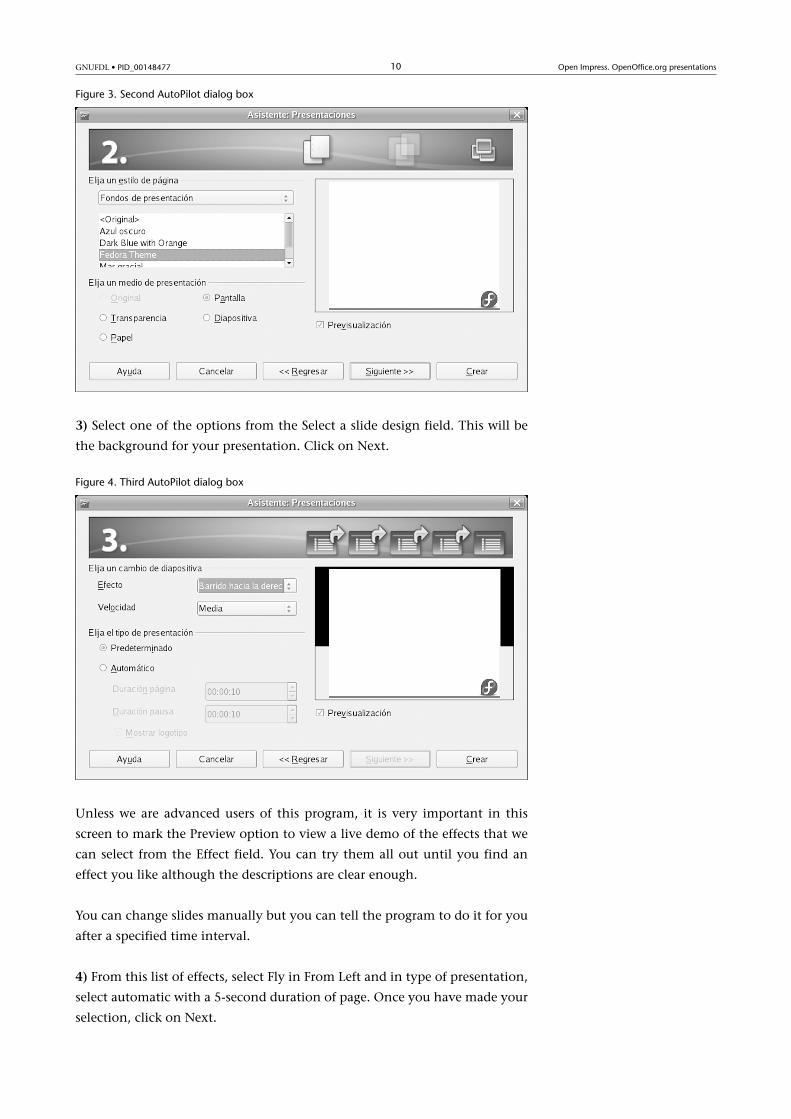
Figure 5. Fourth AutoPilot dialog box
In the fourth window, we need to enter a description of the presentation. The
What is your name or the name of your company field will be positioned
below the main title of the presentation, which will be the text entered in the
What is the subject of your presentation? field.
In the Further ideas to be presented? field, you can type in the text that will
be used as a secondary point, below the presentation title.
5) Type in your name and the following product presentation. "Open Calcu-
lation Tutorial". In the Further ideas to be presented? field, type "Learning to
use AutoPilot to create presentations". Click on Next to continue.
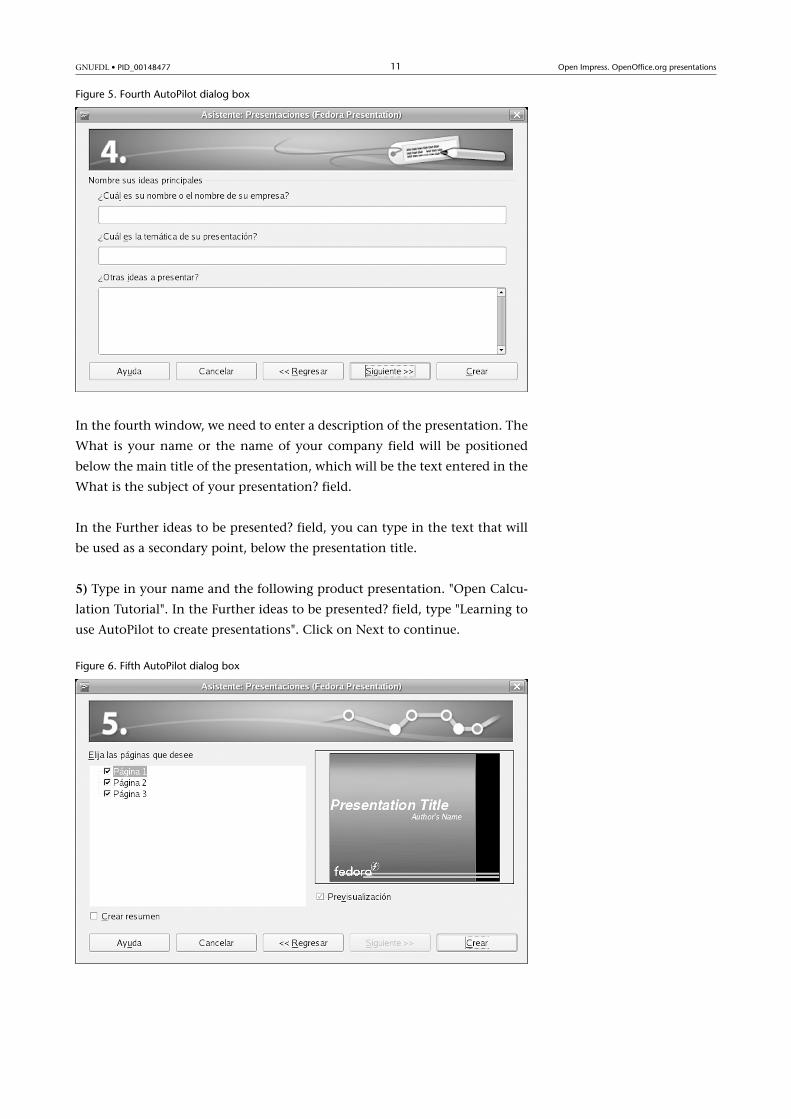
Figure 6. Fifth AutoPilot dialog box

GNUFDL • PID_00148477 12 Open Impress. OpenOffice.org presentations
Each template contains predefined slides. In this screen, you select the ones
you wish to use. If you are not sure at this point, you can come back to this
step later, since the program allows slides to be added or deleted at any time.
The result with the text entered in the previous screen is displayed on the
right-hand side of the window, so long as the Preview option is enabled.
If you do not want to use any of the predefined slides, simply unmark the list.
The text in each slide is displayed when it is collapsed using the arrow to the
left of its name.
You can automatically create a table of contents at the end of the presentation
by marking the Create summary option.
6) For our presentation, unmark the Customer Wishes slide and mark the Cre-
ate summary option. Then click on the Create button to display the presen-
tation.
1.2.2. Modifying the presentation
In this section, we will modify the presentation we created automatically in
the previous section, which only described the process of creating presenta-
tions. The steps that we will take to do this are:
1) Press the F5 key to open the Navigator and select the Next Steps of Action
slide. If the Navigator gets in your way when you are working, you can hide
it again by pressing the same key.
Figure 7. Navigator window
2) In the Next Steps of Action slide, type: "Study a lot", "Write up my notes"
and "Cram for my exam". Each of these texts needs to go on a different line.
Select the second and third lines and click on the Demote button in the Object
bar. You will see that the Object bar has changed now that you are inside an
item of text.
GNUFDL • PID_00148477 13 Open Impress. OpenOffice.org presentations
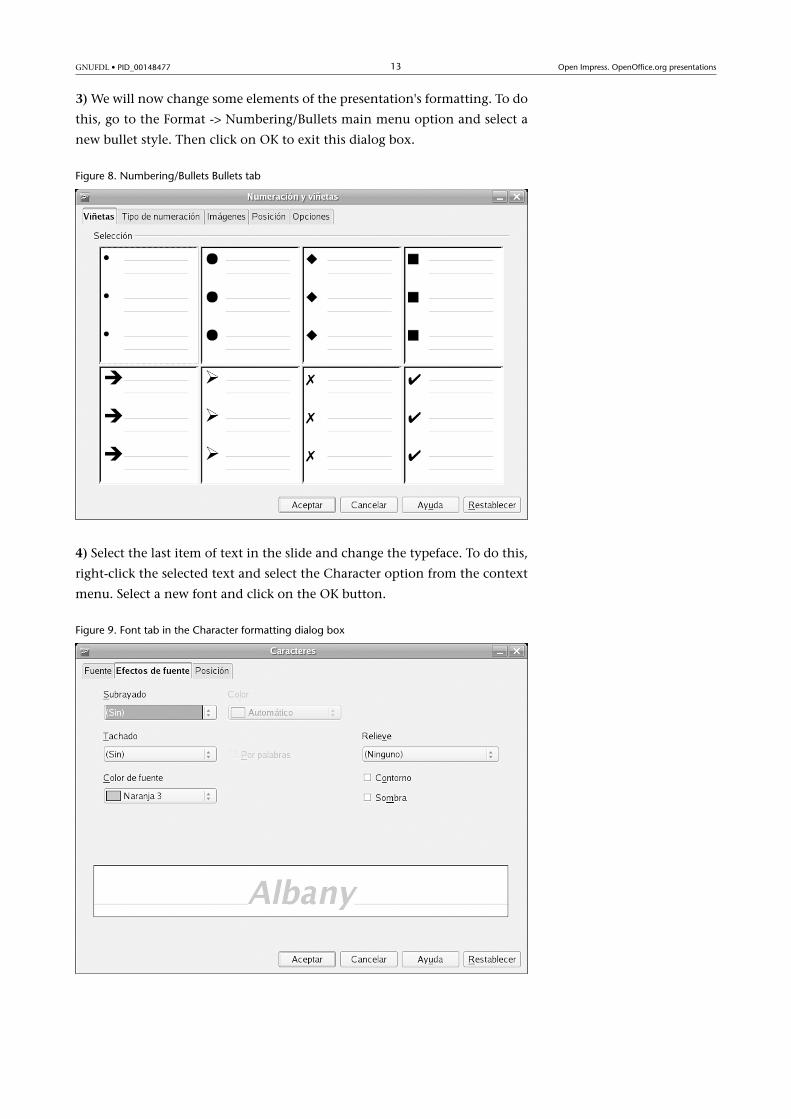
3) We will now change some elements of the presentation's formatting. To do
this, go to the Format > Numbering/Bullets main menu option and select a
new bullet style. Then click on OK to exit this dialog box.
Figure 8. Numbering/Bullets Bullets tab
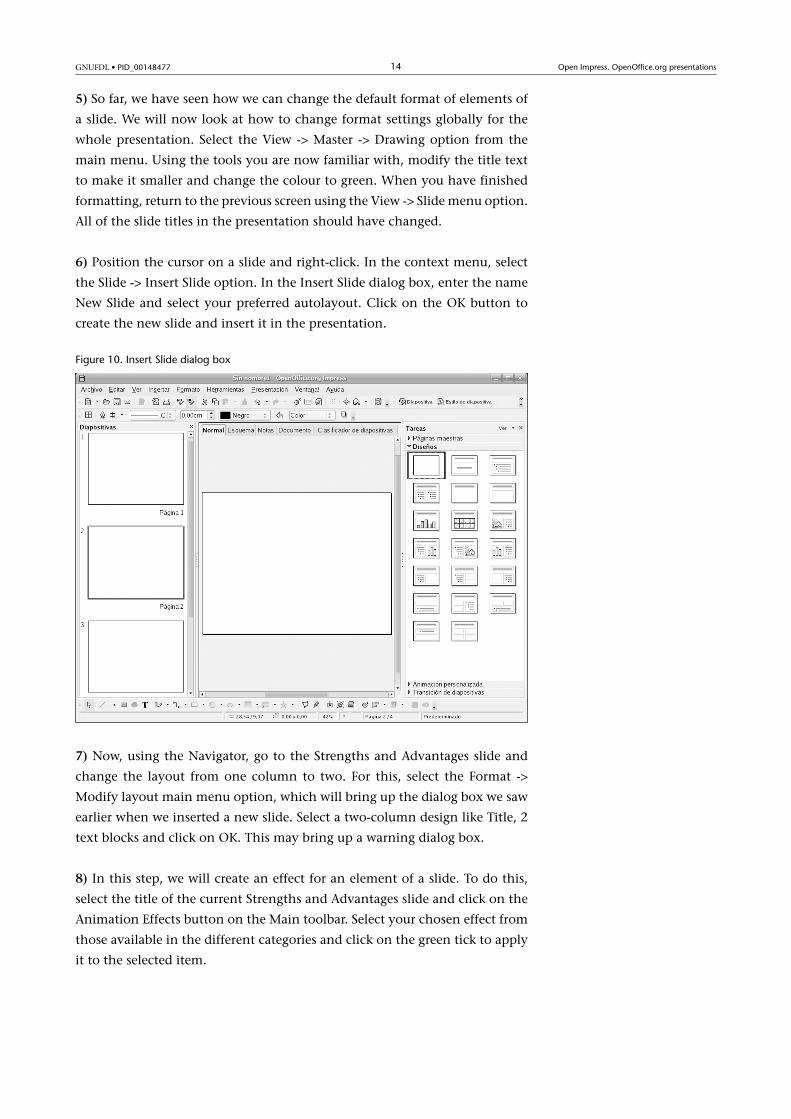
4) Select the last item of text in the slide and change the typeface. To do this,
right-click the selected text and select the Character option from the context
menu. Select a new font and click on the OK button.
Figure 9. Font tab in the Character formatting dialog box
GNUFDL • PID_00148477 14 Open Impress. OpenOffice.org presentations
5) So far, we have seen how we can change the default format of elements of
a slide. We will now look at how to change format settings globally for the
whole presentation. Select the View > Master > Drawing option from the
main menu. Using the tools you are now familiar with, modify the title text
to make it smaller and change the colour to green. When you have finished
formatting, return to the previous screen using the View -> Slide menu option.
All of the slide titles in the presentation should have changed.
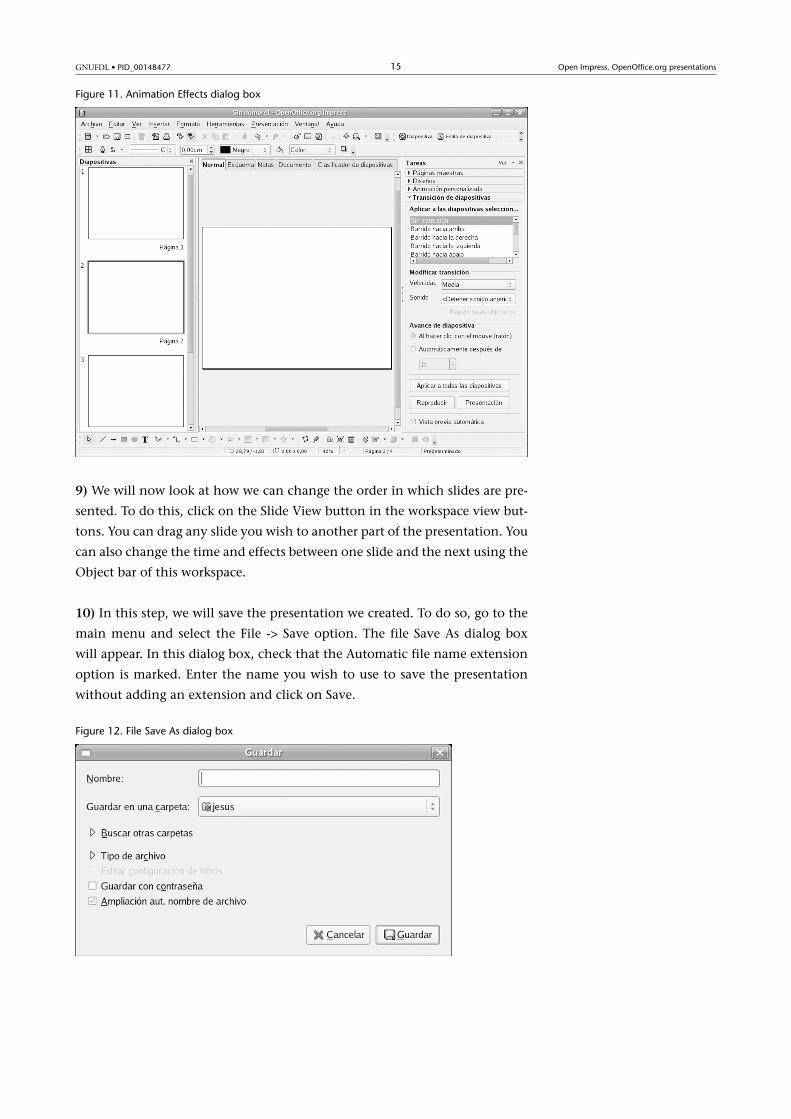
6) Position the cursor on a slide and right-click. In the context menu, select
the Slide > Insert Slide option. In the Insert Slide dialog box, enter the name
New Slide and select your preferred autolayout. Click on the OK button to
create the new slide and insert it in the presentation.
Figure 10. Insert Slide dialog box
7) Now, using the Navigator, go to the Strengths and Advantages slide and
change the layout from one column to two. For this, select the Format >
Modify layout main menu option, which will bring up the dialog box we saw
earlier when we inserted a new slide. Select a two-column design like Title, 2
text blocks and click on OK. This may bring up a warning dialog box.
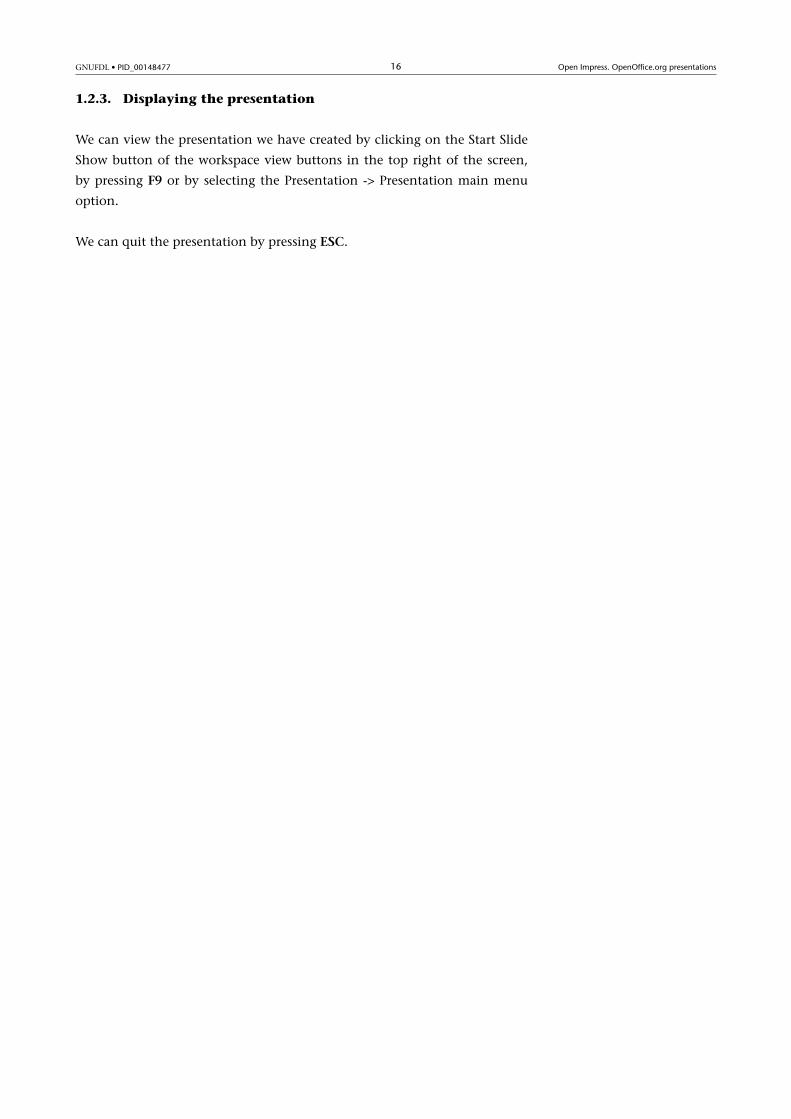
8) In this step, we will create an effect for an element of a slide. To do this,
select the title of the current Strengths and Advantages slide and click on the
Animation Effects button on the Main toolbar. Select your chosen effect from
those available in the different categories and click on the green tick to apply
it to the selected item.
GNUFDL • PID_00148477 15 Open Impress. OpenOffice.org presentations
Figure 11. Animation Effects dialog box
9) We will now look at how we can change the order in which slides are pre-
sented. To do this, click on the Slide View button in the workspace view but-
tons. You can drag any slide you wish to another part of the presentation. You
can also change the time and effects between one slide and the next using the
Object bar of this workspace.
10) In this step, we will save the presentation we created. To do so, go to the
main menu and select the File > Save option. The file Save As dialog box
will appear. In this dialog box, check that the Automatic file name extension
option is marked. Enter the name you wish to use to save the presentation
without adding an extension and click on Save.
Figure 12. File Save As dialog box
GNUFDL • PID_00148477 16 Open Impress. OpenOffice.org presentations
1.2.3. Displaying the presentation
We can view the presentation we have created by clicking on the Start Slide
Show button of the workspace view buttons in the top right of the screen,
by pressing F9 or by selecting the Presentation > Presentation main menu
option.
We can quit the presentation by pressing ESC.
GNUFDL • PID_00148477 17 Open Impress. OpenOffice.org presentations
2. Adding content to the presentation
One of the keys to working with presentations is the correct use of text, as
these are the items that will allow us to explain concepts and express our ideas
to our target audience.
2.1. Adding items of text
To add text to presentations created from scratch, the required steps are: to
define the editing options, create a text frame (if necessary) and, lastly, to write
the text.
2.1.1. Defining editing options
To define the editing options, go to the program's Option bar. To enable the
Option bar, select the View > Toolbars > Option Bar menu option. An option
is turned on if the corresponding button is recessed.
When you use Open Impress and Open Draw, you will probably find that
the best option is to mark only the option Double-click to edit text to avoid
confusion when working with other items.
The available options are as follows:
• The Allow�Quick�Editing option is used to edit a text simply by clicking
once on it. This option can make it difficult to interact with the other
elements of the slide. One of the things it does, for example, is that it
makes it much harder to select text frames.
• Select�Text�Area�Only is an option that, when enabled, tells the program
that we cannot click on a text to select the entire text frame and move
or delete it. To select a frame, we must first switch to text editing mode
by clicking or double-clicking on the text frame. It is best not to use this
option unless you very rarely use text frames.
• Double-click�to�edit�Text allows us to edit texts quickly by double-click-
ing on them with the mouse. With this option, we will never accidentally
select text when we actually wanted to work on other elements of the slide.
Now that we have seen all of the options available in the program, we need
to set our editing options. To make life easier, we generally recommend only
selecting the last option and turning the other two off.

GNUFDL • PID_00148477 18 Open Impress. OpenOffice.org presentations
2.1.2. Creating a text frame
Text frames are the spaces in which the slide text is inserted and which let
us know its position inside the composition. OpenOffice.org can create hori-
zontal and vertical text frames. To turn on vertical text, choose the Tools >
Options > Language Settings > Language main menu option and check the
Enabled option in the Asian languages support section.
Figure 13. Language settings dialog box
We do not generally recommend creating your own text frames for presenta-
tions because the slides or templates you use already come with their own text
frames. There is a very simple reason for this. It is much quicker and easier
to create professional presentations using predefined text frames than it is to
create text frames with the program's tools.
This is because the templates and slides contain a wide range of formatting
options that would take a long time to reproduce. Another feature of templates
is that the text frames are visible even when they have no text inside, which
is not the case when we create new text frames with the text tools.
The items needed to work with text frames are located in the Text button of
the Main toolbar, to the left of the workspace. When you click and hold the
left mouse button on the text button, the Text items bar will appear.
Figure 14. Text items bar
The three buttons on the text items bar are as follows:
GNUFDL • PID_00148477 19 Open Impress. OpenOffice.org presentations
• The Text button creates a text frame, which is very useful when we want
to control text wrapping in the frame, such as when we want to define a
specific line size. This will generally be the tool to use for creating most
text frames in presentation slides.
• The Fit�Text� to�Frame tool can be useful in small text frames or if we
want to quickly and roughly define the size of the text in a frame. The text
adapts more or less to the size of the frame we draw. However, the lines
of text do not adjust to the frame. The text begins in the centre of the
frame and extends both left and right as you type, even spilling outside
the borders of the workspace.
• The Callouts button draws a line and a text frame at the same time. To use
this feature, click on the spot where you would like the line to begin and
drag it to the area where you want to enter the text. You can adjust the size
of the frame and double-click inside it to enter the text. By default, the
lines of text do not wrap to the frame but this can be changed by right-
clicking the text and selecting Text from the context menu, followed by
Fit width to text in the Text tab. We shall see this dialog box in a moment.
If you have enabled Asian languages support, these buttons will be duplicated
for horizontal and vertical text.
2.1.3. Modifying text frame options
The following procedure can be used to modify the options for any text frame,
regardless of whether you created it yourself or it came from a presentation or
slide template. These options also apply if you have inserted text in an object
by double-clicking on it. The steps required to modify these options are as
follows:
1) Go to Drawing View by clicking on the Drawing View button in the
workspace view buttons.
2) Select the text frame or object you wish to customise and choose the Format
> Text option from the application's main menu. This will bring up the Text
frame properties dialog box. After making the necessary changes, click on OK
and close the window.
GNUFDL • PID_00148477 20 Open Impress. OpenOffice.org presentations
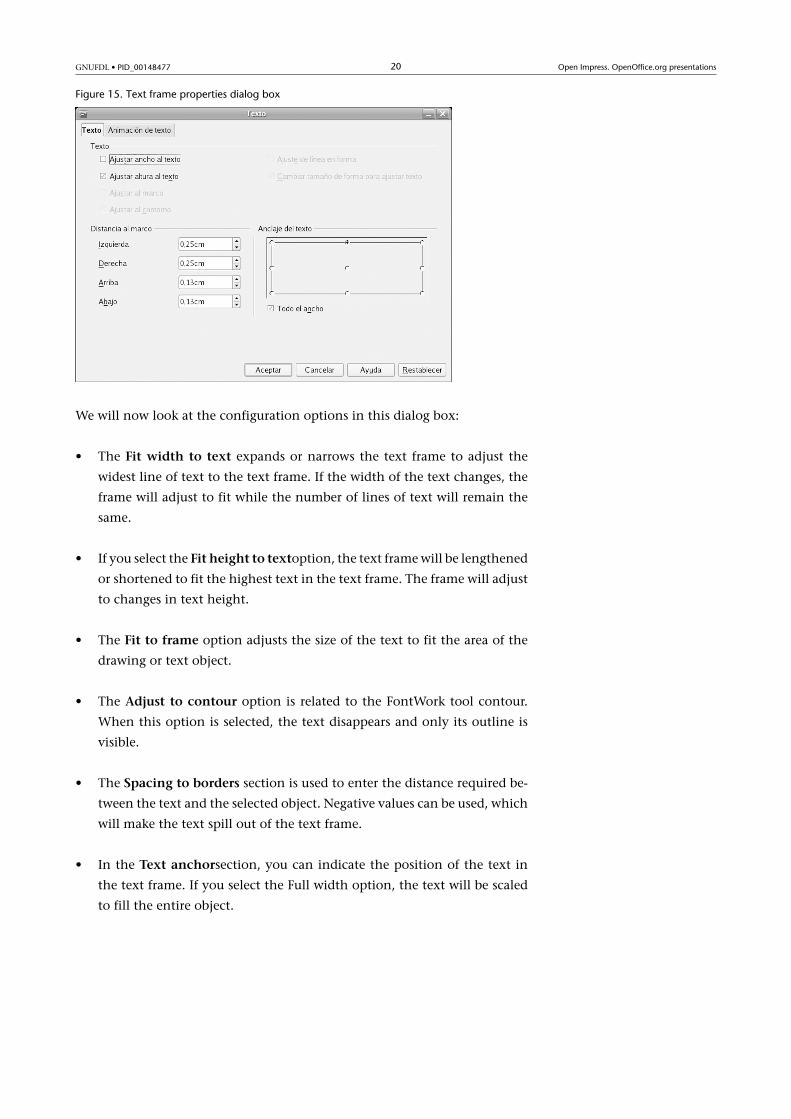
Figure 15. Text frame properties dialog box
We will now look at the configuration options in this dialog box:
• The Fit�width�to�text expands or narrows the text frame to adjust the
widest line of text to the text frame. If the width of the text changes, the
frame will adjust to fit while the number of lines of text will remain the
same.
• If you select the Fit�height�to�textoption, the text frame will be lengthened
or shortened to fit the highest text in the text frame. The frame will adjust
to changes in text height.
• The Fit�to�frame option adjusts the size of the text to fit the area of the
drawing or text object.
• The Adjust�to�contour option is related to the FontWork tool contour.
When this option is selected, the text disappears and only its outline is
visible.
• The Spacing�to�borders section is used to enter the distance required be-
tween the text and the selected object. Negative values can be used, which
will make the text spill out of the text frame.
• In the Text�anchorsection, you can indicate the position of the text in
the text frame. If you select the Full width option, the text will be scaled
to fill the entire object.
GNUFDL • PID_00148477 21 Open Impress. OpenOffice.org presentations
2.1.4. Writing the text
This is clearly the most important part of creating the presentation because
this is where we write the ideas we want to get across. There are several ways
of entering text in OpenOffice.org, which we shall now look at in turn.
• The first is the most obvious option: we can type the text inside a text
frame by double-clicking on the frame to enter the contents of our pre-
sentation. Remember that the way we access the text inside the frame may
vary according to the editing options we defined.
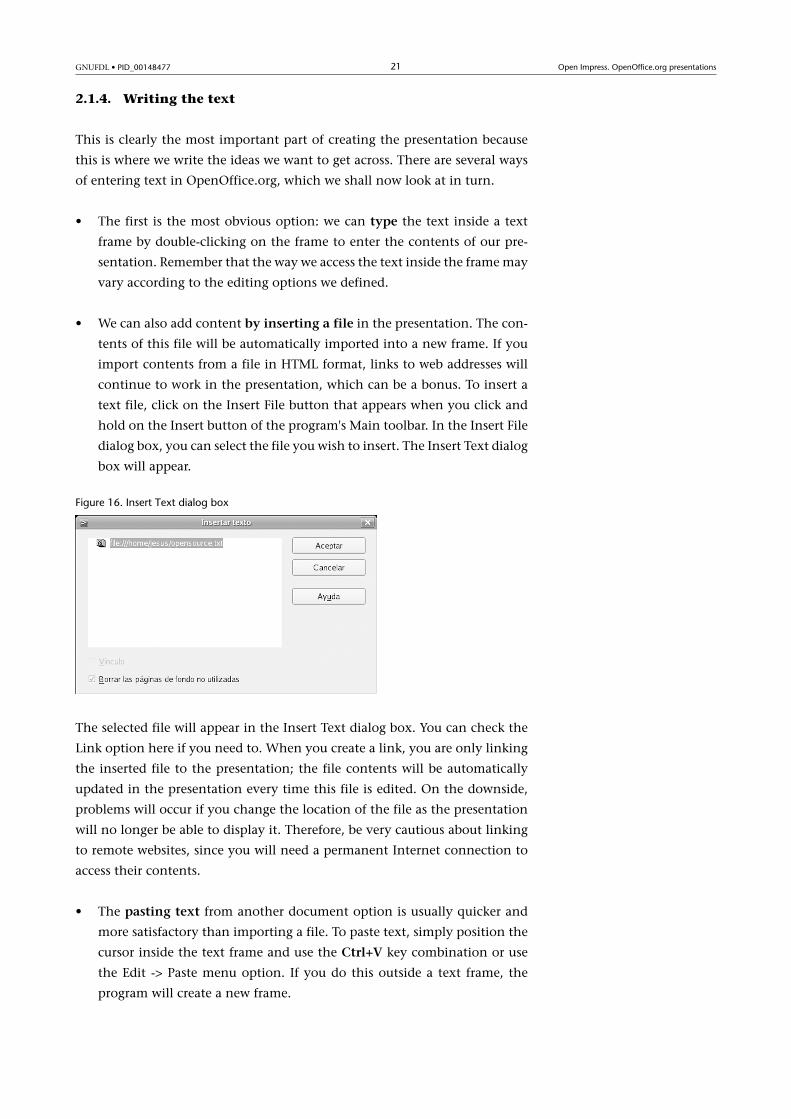
• We can also add content by�inserting�a�file in the presentation. The con-
tents of this file will be automatically imported into a new frame. If you
import contents from a file in HTML format, links to web addresses will
continue to work in the presentation, which can be a bonus. To insert a
text file, click on the Insert File button that appears when you click and
hold on the Insert button of the program's Main toolbar. In the Insert File
dialog box, you can select the file you wish to insert. The Insert Text dialog
box will appear.
Figure 16. Insert Text dialog box
The selected file will appear in the Insert Text dialog box. You can check the
Link option here if you need to. When you create a link, you are only linking
the inserted file to the presentation; the file contents will be automatically
updated in the presentation every time this file is edited. On the downside,
problems will occur if you change the location of the file as the presentation
will no longer be able to display it. Therefore, be very cautious about linking
to remote websites, since you will need a permanent Internet connection to
access their contents.
• The pasting�text from another document option is usually quicker and
more satisfactory than importing a file. To paste text, simply position the
cursor inside the text frame and use the�Ctrl+V key combination or use
the Edit > Paste menu option. If you do this outside a text frame, the
program will create a new frame.
GNUFDL • PID_00148477 22 Open Impress. OpenOffice.org presentations
• A less orthodox option is to write�text�inside�an�object.. Simply double-
click and start writing. The text will spill outside the borders of the object,
so you need to keep an eye on the size of the font. You can also right-click
the text and select the Text > Fit to frame option we looked at earlier.
2.2. Inserting graphics
We can insert empty graphics frames in presentation slides, which we can then
manually edit, or we can insert existing graphics files, which is the method
that we will describe here. The steps for inserting graphics from files are as
follows:
1) Click on the Insert Graphics button from the toolbar displayed when you
click and hold the Insert button of the program's Main toolbar. You can
also use the Insert > Graphics main menu option.
2) Select the file you wish to insert and click on Open.
If, on the other hand, you would like to insert a drawing in the current slide,
the steps are as follows:
1) Go to Drawing View by clicking on the Drawing View button in the
workspace view buttons.
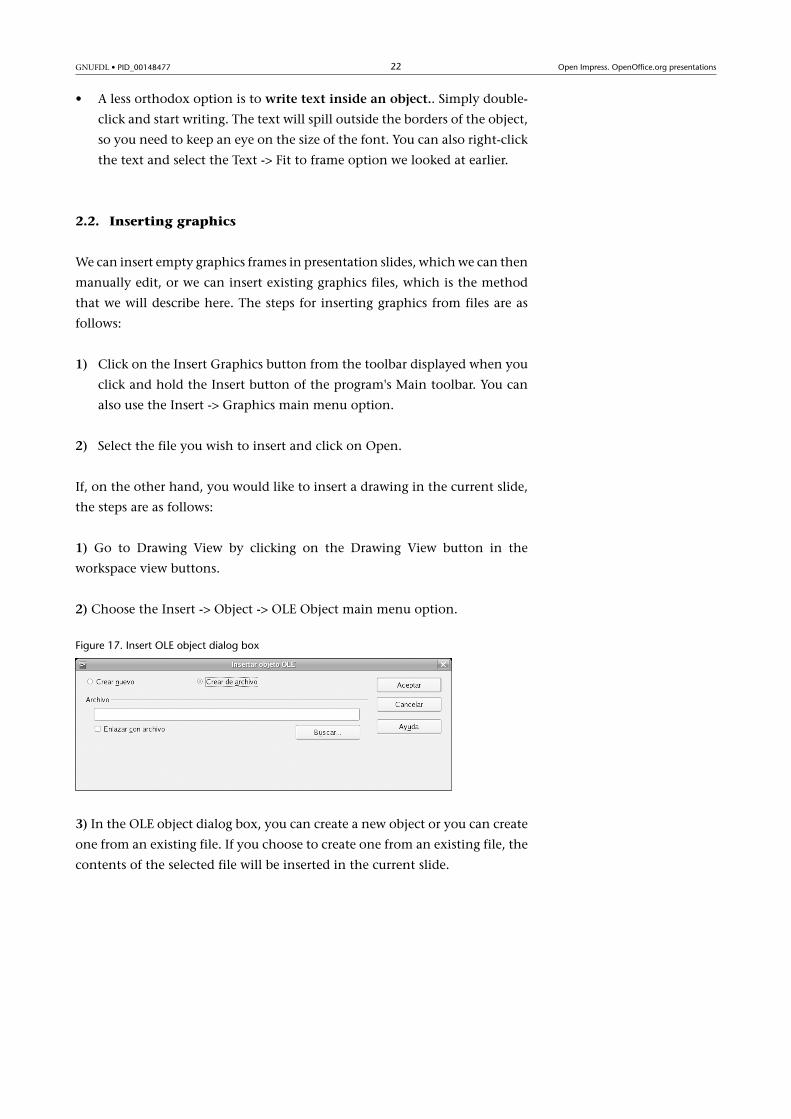
2) Choose the Insert > Object > OLE Object main menu option.
Figure 17. Insert OLE object dialog box
3) In the OLE object dialog box, you can create a new object or you can create
one from an existing file. If you choose to create one from an existing file, the
contents of the selected file will be inserted in the current slide.
GNUFDL • PID_00148477 23 Open Impress. OpenOffice.org presentations
Summary
In this introduction to Open Impress, we have seen how to create slides and
presentations quickly and easily using OpenOffice.org's program for the cre-
ation of presentations. We now know that these are available on the Internet
and that we can create our own.
We have also seen the procedure for adding content to presentations created
automatically. With what we have learnt in this unit, although merely an
introduction, we should now have a solid basis for creating a whole range of
presentations with this program.

Recommended