Portico VT
User GuideFOR HEARTLAND MERCHANT USERS
DECEMBER 2015
V2.11
Portico VT Online User GuidePeripheral GuideTransition Guide, v2.11—December 2015
NoticeTHE INFORMATION CONTAINED HEREIN IS PROVIDED TO RECIPIENT "AS IS" WITHOUT WARRANTY OF ANY KIND, EXPRESS OR IMPLIED, INCLUDING BUT NOT LIMITED TO, THE IMPLIED WARRANTIES OF MERCHANTABILITY AND FITNESS FOR A PARTICULAR PURPOSE, OR WARRANTY OF TITLE OR NON-INFRINGEMENT. ALL SUCH WARRANTIES ARE EXPRESSLY DISCLAIMED. HEARTLAND PAYMENT SYSTEMS SHALL NOT BE LIABLE FOR ANY DIRECT, INDIRECT, SPECIAL, INCIDENTAL, OR CONSEQUENTIAL DAMAGES RESULTING FROM THE USE OF ANY INFORMATION CONTAINED HEREIN, WHETHER RESULTING FROM BREACH OF CONTRACT, BREACH OF WARRANTY, NEGLIGENCE, OR OTHERWISE, EVEN IF HEARTLAND PAYMENT SYSTEMS HAS BEEN ADVISED OF THE POSSIBILITY OF SUCH DAMAGES. HEARTLAND PAYMENT SYSTEMS RESERVES THE RIGHT TO MAKE CHANGES TO THE INFORMATION CONTAINED HEREIN AT ANY TIME WITHOUT NOTICE. THIS DOCUMENT AND ALL INFORMATION CONTAINED HEREIN IS PROPRIETARY HEARTLAND PAYMENT SYSTEMS INFORMATION. UNDER ANY CIRCUMSTANCES, RECIPIENT SHALL NOT DISCLOSE THIS DOCUMENT OR THE SYSTEM DESCRIBED HEREIN TO ANY THIRD PARTY WITHOUT PRIOR WRITTEN CONSENT OF A DULY AUTHORIZED REPRESENTATIVE OF HEARTLAND PAYMENT SYSTEMS. IN ORDER TO PROTECT THE CONFIDENTIAL NATURE OF THIS PROPRIETARY INFORMATION, RECIPIENT AGREES:
A. TO IMPOSE IN WRITING SIMILAR OBLIGATIONS OF CONFIDENTIALITY AND NONDISCLOSURE AS CONTAINED HEREIN ON RECIPIENT’S EMPLOYEES AND AUTHORIZED THIRD PARTIES TO WHOM RECIPIENT DISCLOSES THIS INFORMATION (SUCH DISCLOSURE TO BE MADE ON A STRICTLY NEED-TO-KNOW BASIS) PRIOR TO SHARING THIS DOCUMENT AND
B. TO BE RESPONSIBLE FOR ANY BREACH OF CONFIDENTIALITY BY THOSE EMPLOYEES AND THIRD PARTIES TO WHOM RECIPIENT DISCLOSES THIS INFORMATION.
RECIPIENT ACKNOWLEDGES AND AGREES THAT USE OF THE INFORMATION CONTAINED HEREIN SIGNIFIES ACKNOWLEDGEMENT AND ACCEPTANCE OF THESE TERMS. ANY SUCH USE IS CONDITIONED UPON THE TERMS, CONDITIONS AND OBLIGATIONS CONTAINED WITHIN THIS NOTICE. THE TRADEMARKS AND SERVICE MARKS RELATING TO PRODUCTS OR SERVICES OF HEARTLAND PAYMENT SYSTEMS OR OF THIRD PARTIES ARE OWNED BY HEARTLAND PAYMENT SYSTEMS OR THE RESPECTIVE THIRD PARTY OWNERS OF THOSE MARKS, AS THE CASE MAY BE, AND NO LICENSE WITH RESPECT TO ANY SUCH MARK IS EITHER GRANTED OR IMPLIED. TO VERIFY EXISTING CONTENT OR TO OBTAIN ADDITIONAL INFORMATION, PLEASE CALL OR EMAIL YOUR ASSIGNED HEARTLAND PAYMENT SYSTEMS CONTACT.
©2015 Heartland Payment Systems, Inc., All Rights Reserved i
Portico VT Online User GuidePeripheral GuideTransition Guide, v2.11—December 2015
Table of Contents
1 Overview 11.1 Document purpose 41.2 Audience 41.3 System requirements (desktop) 41.4 System requirements (online) 41.5 Supported peripherals (desktop and online) 5
2 Procedures 62.1 General tasks 6
2.1.1 Log in 62.1.2 Change your password 6
2.1.2.1 Password requirements 62.1.3 Reset a forgotten password 72.1.4 Enter card data 82.1.5 EMV transactions 8
2.1.5.1 EMV prompts 82.1.6 AVS and CVV actions 82.1.7 Print a receipt 92.1.8 Email a receipt 92.1.9 Switch merchant sites 92.1.10 Switch terminal devices 10
2.2 Credit card transactions 112.2.1 Process a card present sale 11
2.2.1.1 Credit card present sale transaction fields 112.2.1.2 Credit card transaction results and receipt fields 132.2.1.3 Card security code information 14
2.2.2 Process a MOTO/E-Commerce sale 142.2.3 Process a credit card authorization 152.2.4 Process a credit card return 152.2.5 Process a credit card void 162.2.6 Verify a credit card account 172.2.7 Process a credit card offline sale 172.2.8 Process a credit card offline authorization 182.2.9 Add a transaction to a batch 182.2.10 Add a tip 18
2.3 Debit card transactions 192.3.1 Process a debit card sale 20
2.3.1.1 Debit card transaction fields 202.3.1.2 Debit card transaction results and receipt fields 21
2.3.2 Process a debit card return 212.3.3 Process a debit card void 22
©2015 Heartland Payment Systems, Inc., All Rights Reserved ii

Portico VT Online User GuidePeripheral GuideTransition Guide, v2.11—December 2015
2.4 Check transactions 232.4.1 Check sale 232.4.2 Check verify 232.4.3 One-time ACH 232.4.4 Process a check void 24
2.5 PayPlan transactions 242.5.1 Add a customer 24
2.5.1.1 Field sizes for PayPlan add/edit customer 252.5.2 Find a customer 252.5.3 Edit a customer 262.5.4 Delete a customer 262.5.5 Add a payment method 26
2.5.5.1 For credit cards 272.5.5.2 For ACH 28
2.5.6 Find a payment method 282.5.7 Edit a payment method 292.5.8 Delete a payment method 292.5.9 Add a scheduled payment 30
2.5.9.1 Field sizes for PayPlan add/edit schedules 302.5.9.2 Schedule frequency definitions 31
2.5.10 Find a schedule 312.5.11 Edit a schedule 322.5.12 Delete a schedule 332.5.13 View agreement 332.5.14 View the failed schedules detail list 342.5.15 Process a stored payment, one-time charge 34
2.5.15.1 Charge Now 342.5.15.2 Detailed Charge 342.5.15.3 Debt Repayment 35
2.6 HMS transactions 352.6.1 Redeem an HMS gift card 352.6.2 Load an HMS gift card 352.6.3 Make an HMS gift card balance inquiry 362.6.4 Transfer funds 362.6.5 Add an alias 362.6.6 Remove an alias 36
2.7 PrePaid transactions 382.7.1 Process a PrePaid card sale 382.7.2 Add value 382.7.3 Make a balance inquiry 38
2.8 EBT transactions 402.8.1 Process a food stamp sale 40
©2015 Heartland Payment Systems, Inc., All Rights Reserved iii
Portico VT Online User GuidePeripheral GuideTransition Guide, v2.11—December 2015
2.8.2 Process food stamp voucher sale 402.8.3 Process a cash benefit sale 412.8.4 Process a food stamp return 412.8.5 Make a food stamp balance inquiry 41
2.9 Reports 432.9.1 Run a current batch summary report 432.9.2 Run a current batch details report 432.9.3 Run a find transactions summary report 432.9.4 Run a find transactions details report 442.9.5 Run an open authorizations report 452.9.6 Run a fraud decline details report 46
2.9.6.1 Override a fraud decline 462.9.7 Run an historical batch report 472.9.8 Run an HMS details report 472.9.9 Run a check details report 482.9.10 Open the InfoCentral reporting site 48
2.10 Administrative tasks 492.10.1 Close a batch 492.10.2 Settings 49
2.10.2.1 Add or edit the receipt footer 492.10.2.2 Configure the input hardware 502.10.2.3 Name a terminal device 502.10.2.4 Update hardware drivers 50
2.10.3 Create new user 502.10.3.1 Permissions by role 522.10.3.2 Customize access 532.10.3.3 Add a custom role 53
2.10.4 Send error report 543 Contact support 554 Appendices 56
Appendix A: Issuer decline codes 56Appendix B: Healthcare MCCs 57Appendix C: Revision description 58
©2015 Heartland Payment Systems, Inc., All Rights Reserved iv
Portico VT Online User GuidePeripheral GuideTransition Guide, v2.11—December 2015 1 Overview
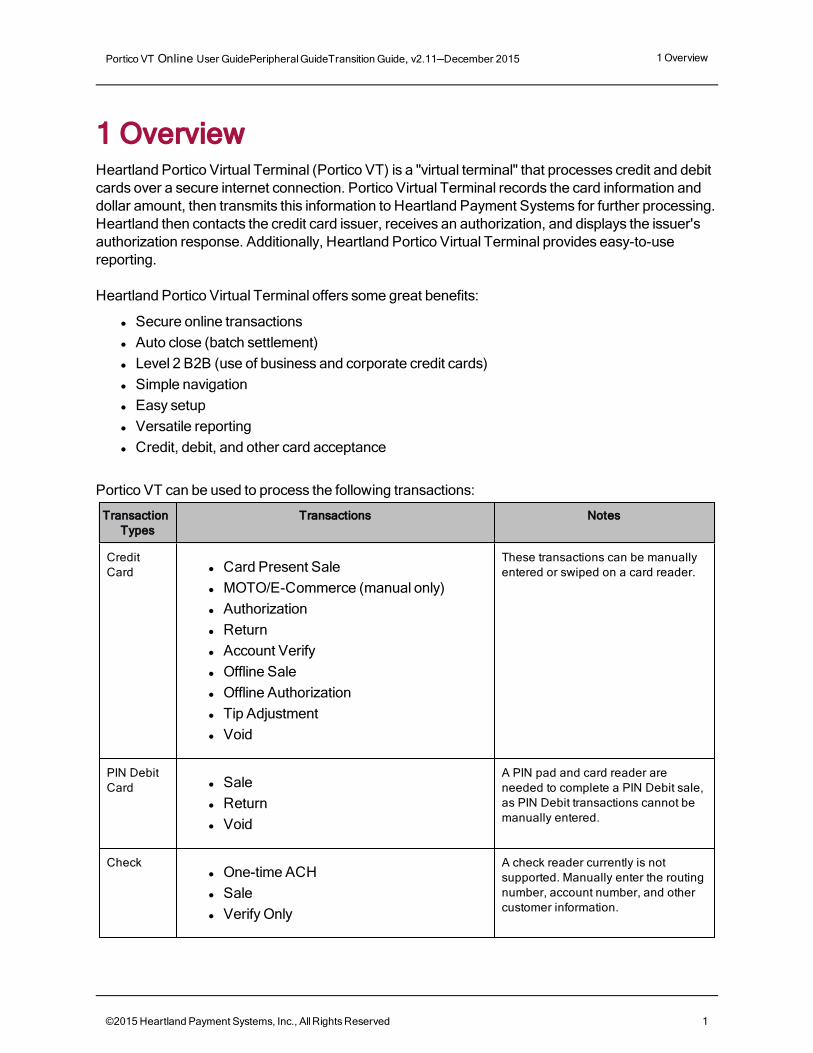
1 OverviewHeartland Portico Virtual Terminal (Portico VT) is a "virtual terminal" that processes credit and debit cards over a secure internet connection. Portico Virtual Terminal records the card information and dollar amount, then transmits this information to Heartland Payment Systems for further processing. Heartland then contacts the credit card issuer, receives an authorization, and displays the issuer's authorization response. Additionally, Heartland Portico Virtual Terminal provides easy-to-use reporting. Heartland Portico Virtual Terminal offers some great benefits:
l Secure online transactions l Auto close (batch settlement) l Level 2 B2B (use of business and corporate credit cards) l Simple navigation l Easy setup l Versatile reporting l Credit, debit, and other card acceptance
Portico VT can be used to process the following transactions:
Transaction Types
Transactions Notes
Credit Card l Card Present Sale
l MOTO/E-Commerce (manual only) l Authorization l Return l Account Verify l Offline Sale l Offline Authorization l Tip Adjustment l Void
These transactions can be manually entered or swiped on a card reader.
PIN Debit Card l Sale
l Return l Void
A PIN pad and card reader are needed to complete a PIN Debit sale, as PIN Debit transactions cannot be manually entered.
Check l One-time ACH l Sale l Verify Only
A check reader currently is not supported. Manually enter the routing number, account number, and other customer information.
©2015 Heartland Payment Systems, Inc., All Rights Reserved 1
Portico VT Online User GuidePeripheral GuideTransition Guide, v2.11—December 2015 1 Overview
Transaction Types
Transactions Notes
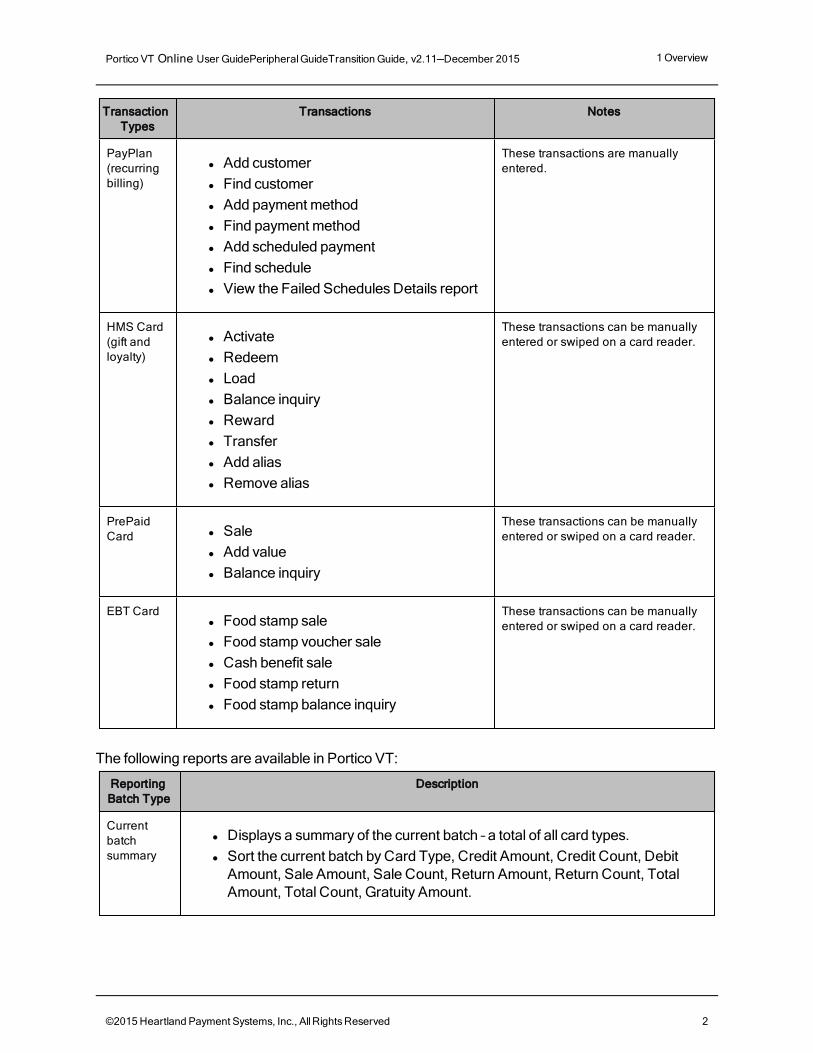
PayPlan (recurring billing)
l Add customer l Find customer l Add payment method l Find payment method l Add scheduled payment l Find schedule l View the Failed Schedules Details report
These transactions are manually entered.
HMS Card (gift and loyalty)
l Activate l Redeem l Load l Balance inquiry l Reward l Transfer l Add alias l Remove alias
These transactions can be manually entered or swiped on a card reader.
PrePaid Card l Sale
l Add value l Balance inquiry
These transactions can be manually entered or swiped on a card reader.
EBT Card l Food stamp sale l Food stamp voucher sale l Cash benefit sale l Food stamp return l Food stamp balance inquiry
These transactions can be manually entered or swiped on a card reader.
The following reports are available in Portico VT:
Reporting Batch Type
Description
Current batch summary
l Displays a summary of the current batch – a total of all card types. l Sort the current batch by Card Type, Credit Amount, Credit Count, Debit
Amount, Sale Amount, Sale Count, Return Amount, Return Count, Total Amount, Total Count, Gratuity Amount.
©2015 Heartland Payment Systems, Inc., All Rights Reserved 2
Portico VT Online User GuidePeripheral GuideTransition Guide, v2.11—December 2015 1 Overview
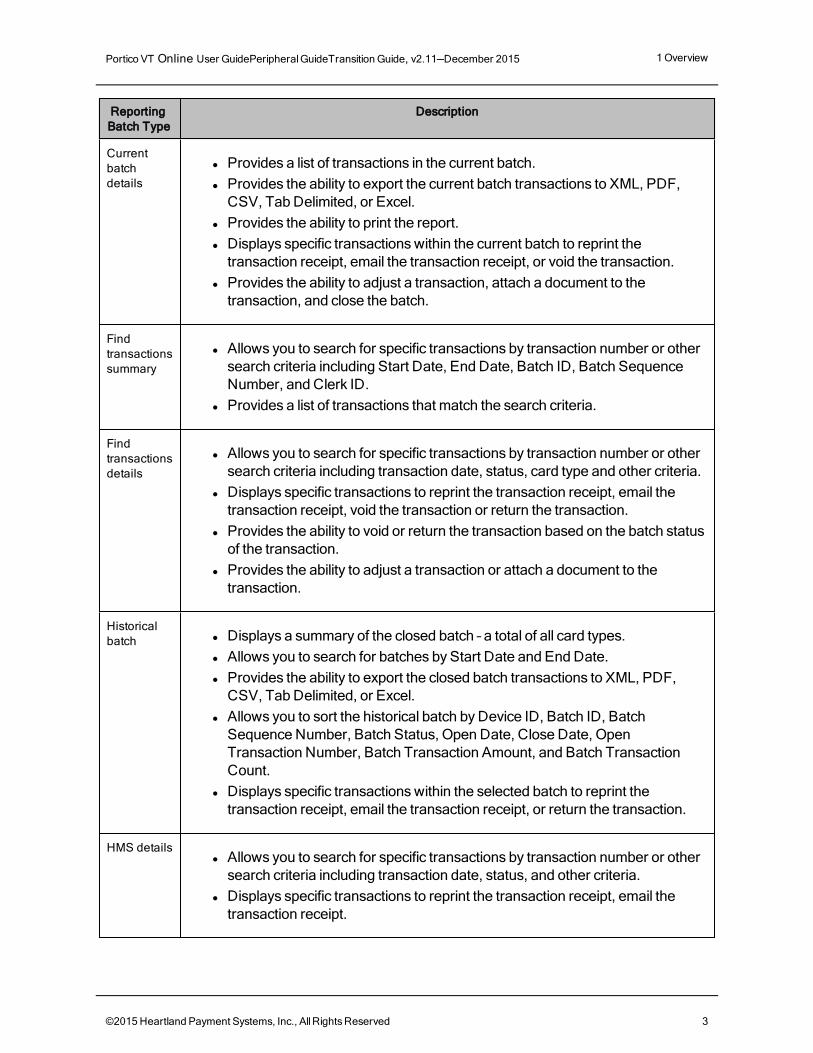
Reporting Batch Type
Description
Current batch details
l Provides a list of transactions in the current batch. l Provides the ability to export the current batch transactions to XML, PDF,
CSV, Tab Delimited, or Excel. l Provides the ability to print the report. l Displays specific transactions within the current batch to reprint the
transaction receipt, email the transaction receipt, or void the transaction. l Provides the ability to adjust a transaction, attach a document to the
transaction, and close the batch.
Find transactions summary
l Allows you to search for specific transactions by transaction number or other search criteria including Start Date, End Date, Batch ID, Batch Sequence Number, and Clerk ID.
l Provides a list of transactions that match the search criteria.
Find transactions details
l Allows you to search for specific transactions by transaction number or other search criteria including transaction date, status, card type and other criteria.
l Displays specific transactions to reprint the transaction receipt, email the transaction receipt, void the transaction or return the transaction.
l Provides the ability to void or return the transaction based on the batch status of the transaction.
l Provides the ability to adjust a transaction or attach a document to the transaction.
Historical batch l Displays a summary of the closed batch – a total of all card types.
l Allows you to search for batches by Start Date and End Date. l Provides the ability to export the closed batch transactions to XML, PDF,
CSV, Tab Delimited, or Excel. l Allows you to sort the historical batch by Device ID, Batch ID, Batch
Sequence Number, Batch Status, Open Date, Close Date, Open Transaction Number, Batch Transaction Amount, and Batch Transaction Count.
l Displays specific transactions within the selected batch to reprint the transaction receipt, email the transaction receipt, or return the transaction.
HMS details l Allows you to search for specific transactions by transaction number or other
search criteria including transaction date, status, and other criteria. l Displays specific transactions to reprint the transaction receipt, email the
transaction receipt.
©2015 Heartland Payment Systems, Inc., All Rights Reserved 3
Portico VT Online User GuidePeripheral GuideTransition Guide, v2.11—December 2015 1 Overview
Reporting Batch Type
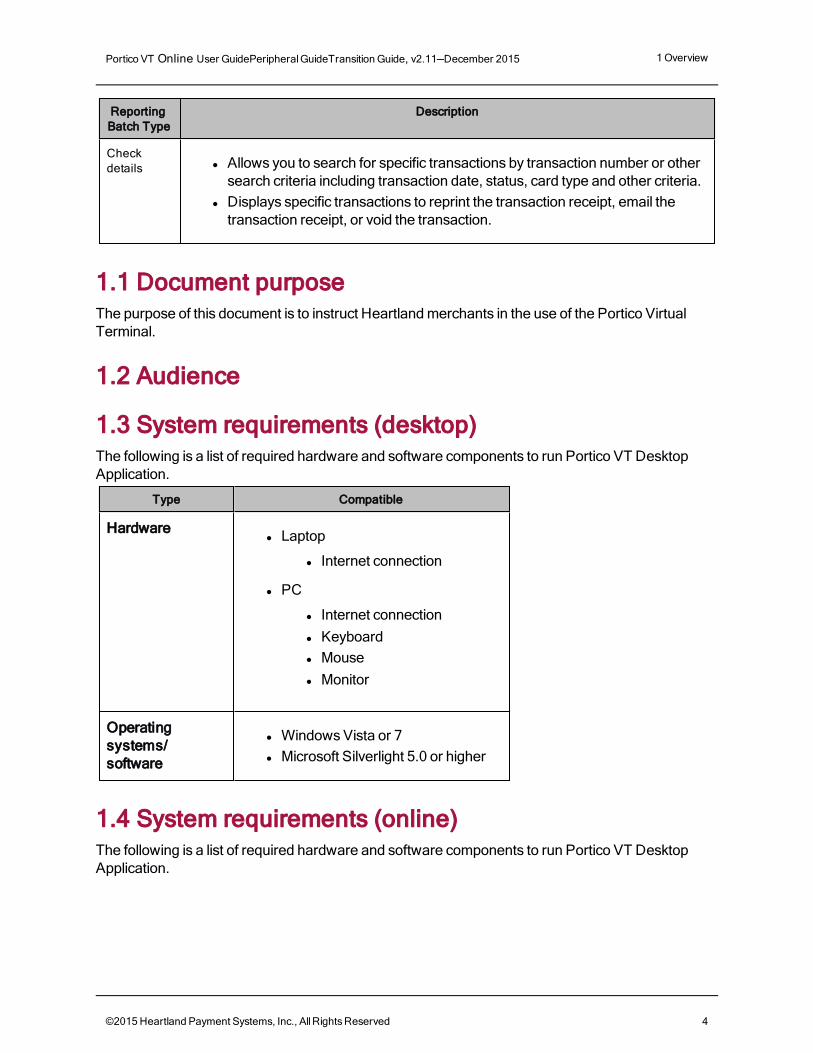
Description
Check details l Allows you to search for specific transactions by transaction number or other
search criteria including transaction date, status, card type and other criteria. l Displays specific transactions to reprint the transaction receipt, email the
transaction receipt, or void the transaction.
1.1 Document purposeThe purpose of this document is to instruct Heartland merchants in the use of the Portico Virtual Terminal.
1.2 Audience
1.3 System requirements (desktop)The following is a list of required hardware and software components to run Portico VT Desktop Application.
Type Compatible
Hardware l Laptop
l Internet connection
l PC
l Internet connection l Keyboard l Mouse l Monitor
Operating systems/software
l Windows Vista or 7 l Microsoft Silverlight 5.0 or higher
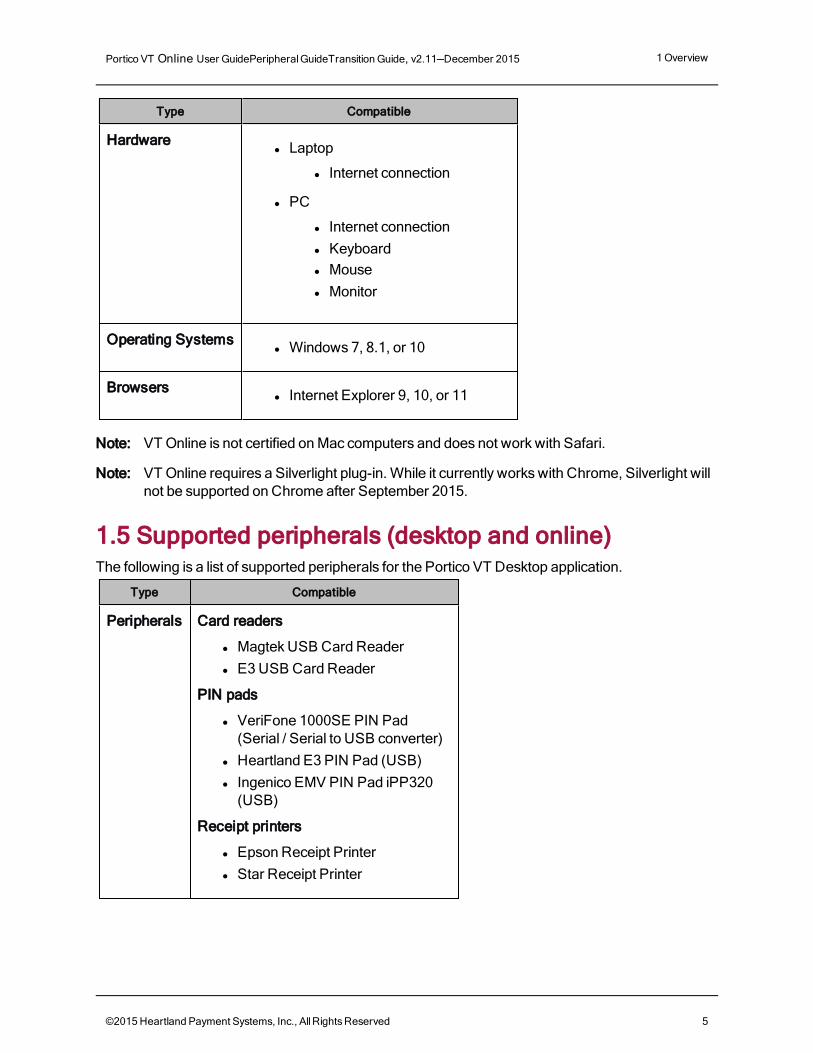
1.4 System requirements (online)The following is a list of required hardware and software components to run Portico VT Desktop Application.
©2015 Heartland Payment Systems, Inc., All Rights Reserved 4
Portico VT Online User GuidePeripheral GuideTransition Guide, v2.11—December 2015 1 Overview
Type Compatible
Hardware l Laptop
l Internet connection
l PC
l Internet connection l Keyboard l Mouse l Monitor
Operating Systems l Windows 7, 8.1, or 10
Browsers l Internet Explorer 9, 10, or 11
Note: VT Online is not certified on Mac computers and does not work with Safari.
Note: VT Online requires a Silverlight plug-in. While it currently works with Chrome, Silverlight will not be supported on Chrome after September 2015.
1.5 Supported peripherals (desktop and online)The following is a list of supported peripherals for the Portico VT Desktop application.
Type Compatible
Peripherals Card readers
l Magtek USB Card Reader l E3 USB Card Reader
PIN pads
l VeriFone 1000SE PIN Pad (Serial / Serial to USB converter)
l Heartland E3 PIN Pad (USB) l Ingenico EMV PIN Pad iPP320
(USB)
Receipt printers
l Epson Receipt Printer l Star Receipt Printer
©2015 Heartland Payment Systems, Inc., All Rights Reserved 5
Portico VT Online User GuidePeripheral GuideTransition Guide, v2.11—December 2015 2 Procedures
2 Procedures
2.1 General tasksOnce you have access to Portico VT per the Welcome email and/or Peripheral Guide, you will be able to log in and begin using the service.
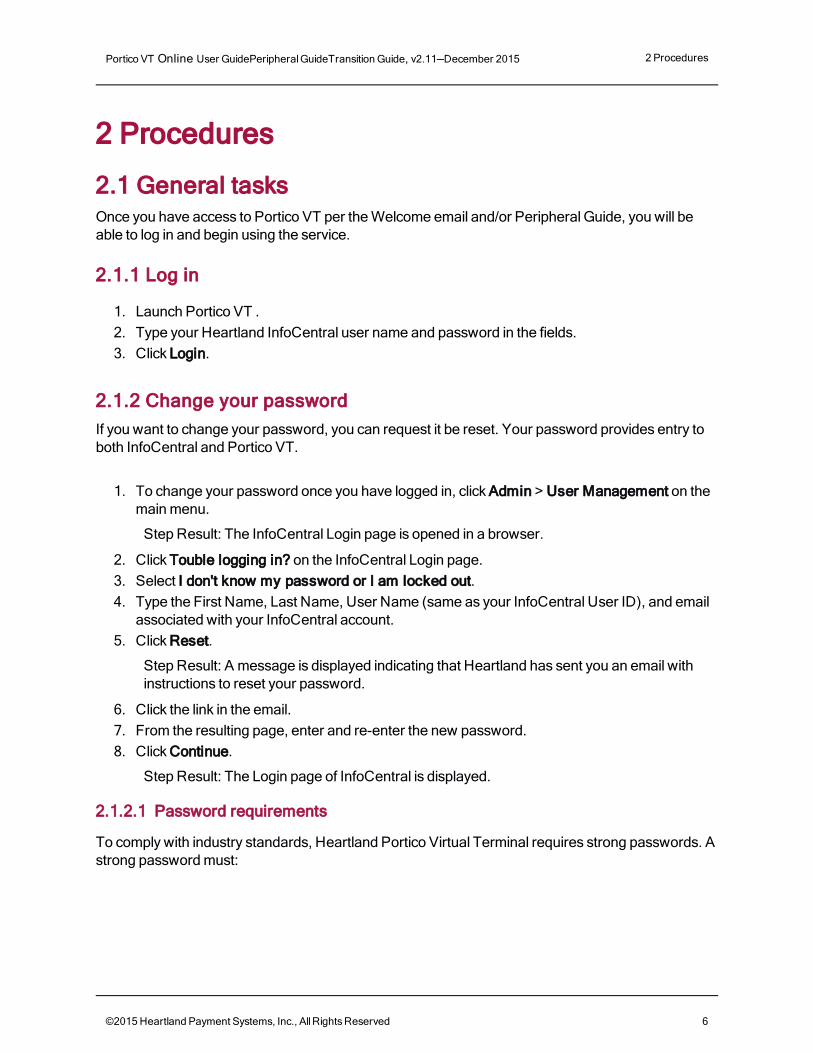
2.1.1 Log in
1. Launch Portico VT . 2. Type your Heartland InfoCentral user name and password in the fields. 3. Click Login.
2.1.2 Change your passwordIf you want to change your password, you can request it be reset. Your password provides entry to both InfoCentral and Portico VT.
1. To change your password once you have logged in, click Admin > User Management on the main menu.
Step Result: The InfoCentral Login page is opened in a browser.
2. Click Touble logging in? on the InfoCentral Login page. 3. Select I don't know my password or I am locked out. 4. Type the First Name, Last Name, User Name (same as your InfoCentral User ID), and email
associated with your InfoCentral account. 5. Click Reset.
Step Result: A message is displayed indicating that Heartland has sent you an email with instructions to reset your password.
6. Click the link in the email. 7. From the resulting page, enter and re-enter the new password. 8. Click Continue.
Step Result: The Login page of InfoCentral is displayed.
2.1.2.1 Password requirements
To comply with industry standards, Heartland Portico Virtual Terminal requires strong passwords. A strong password must:
©2015 Heartland Payment Systems, Inc., All Rights Reserved 6

Portico VT Online User GuidePeripheral GuideTransition Guide, v2.11—December 2015 2 Procedures
l Be minimum of eight characters long l Contain at least one number l Contain at least one letter l Contain at least one special character (!@#$%^&*) l Be different than your InfoCentral username or email l Not be a recently used password (not one of the last 10 passwords used)
2.1.3 Reset a forgotten passwordIf you forgot your password, you can ask to have it reset, The password provides entry to both InfoCentral and Portico VT.
Note: If you try to use the incorrect password five times, you will be locked out. You will have to go through this same process to reset your password.
1. To request to have your password reset from the Portico VT Login page, click Forgot Password?.
Step Result: The InfoCentral Login page is opened in a browser.
2. Click Trouble logging in? on the InfoCentral Login page. 3. Type the First Name, Last Name, User Name (same as the InfoCentral User ID), and the
email associated with you account. 4. Click Reset.
Step Result: A message is displayed indicating that Heartland has sent you an email with instructions to reset your password.
©2015 Heartland Payment Systems, Inc., All Rights Reserved 7
Portico VT Online User GuidePeripheral GuideTransition Guide, v2.11—December 2015 2 Procedures
5. Click the link in the email. 6. From the resulting page, enter and re-enter the new password. 7. Click Continue.
Step Result: The Login page of InfoCentral is displayed.
2.1.4 Enter card dataThroughout the VT user documentation, the step "Enter card data" can mean one of these things, depending on the procedure:
l Enter card data manually. For Credit, Prepaid, and PayPlan, manual entry can be done via a keyboard or the EMV or E3 PIN Pad keypad.
l Swipe the card l Insert the EMV card into the EMV reader slot
Note: If an EMV device is connected, the cardholder will be prompted whether to insert or swipe the card. Some transaction types will only prompt for card swipe at this time.
2.1.5 EMV transactionsEMV chip cards contain a computer chip that is activated and read when inserted in the chip card reader. When the EMV card is inserted, it must not be removed during the transaction. The device will tell the consumer when to insert and remove their card. If an EMV device is used with the Portico Virtual Terminal and a chip card is inserted, the chip may prompt the cardholder for additional information. Since chip cards may contain multiple payment applications, a customer may be prompted to confirm the application in order to send the card data to the Virtual Terminal. A chip card may decline a transaction without sending it to the Issuer. If this occurs, an "advice" message is sent to Portico to capture the decline and the appropriate EMV tags.
2.1.5.1 EMV prompts
After the clerk clicks Process for a VT transaction, a chip card customer may be prompted as to:
l Confirm amount (required) l Enter PIN (optional, depends on chip and device settings)
If the customer is prompted for a PIN, they may not need to sign the receipt. If the chip validated the PIN, the printed receipt will indicate PIN VERIFIED instead of printing the signature line.
Note: EMV transactions may take slightly longer to process than magnetic stripe transactions.
2.1.6 AVS and CVV actionsWhen the Issuer Response is received for a transaction, the AVS and CVV result values are evaluated by Portico. The action taken is determined by the options selected at boarding for the various AVS and CVV results that can be returned by card issuers.
©2015 Heartland Payment Systems, Inc., All Rights Reserved 8
Portico VT Online User GuidePeripheral GuideTransition Guide, v2.11—December 2015 2 Procedures
If any AVS or CVV response code is set at boarding to DECLINE, then the transaction will be declined and the user will receive the message: " DO NOT HONOR DUE TO AVS/CVV SETTINGS" If any AVS response code is set at boarding to PROMPT, then a pop up prompt displays asking whether the user wants to accept or decline the transaction. For PayPlan Add Credit Card, the user will be prompted whether they want to save the card. If saved, future one time transactions will continue to prompt due to AVS mismatch. If the user clicks Accept, the transaction result pop up will display indicating the approval. If the user clicks Decline, a reversal message will be sent. If the reversal is successful, the transaction result popup will display indicating declined or reversed. If the reversal fails for any reason (this is unlikely), the user will see an error message. Click OK. The transaction approval will display; the void icon will be enabled at the top of the screen. The transaction will need to be voided.
2.1.7 Print a receiptWhen you process any type of transaction you are shown a transaction result page. This is the receipt for the transaction.
1. To print the receipt, click the print preview button in the top right-hand corner of the transaction result page.
2. To print customer and merchant copies (default setting), click Print.
Step Result: Your computer's print dialog is displayed.
3. Follow your computer's prompts for printing.
2.1.8 Email a receiptWhen you process any type of transaction, you are shown a transaction result page.
1. To email the receipt, click the email button in the top right-hand corner of the transaction result page.
Step Result: An Email Receipt dialog is displayed with the email address associated with the transaction in the To: line (if one was added).
2. To add an email address, type it in the text box. To add another email address, press the Enter key and type it in the additional text box.
3. Click Send.
2.1.9 Switch merchant sitesMerchants with more than one location can establish more than one site with Heartland.
©2015 Heartland Payment Systems, Inc., All Rights Reserved 9

Portico VT Online User GuidePeripheral GuideTransition Guide, v2.11—December 2015 2 Procedures
1. To switch merchant sites, click the arrow for the Site drop-down list located the top right of the screen.
2. Select the desired site. 3. Click Apply.
2.1.10 Switch terminal devicesMerchants with more than one terminal can register multiple devices for each site with Heartland. This provides more control and better reporting.
1. To switch devices, click the arrow for the Device drop-down list located the top right of the screen.
2. Select the desired device. 3. Click Apply.
©2015 Heartland Payment Systems, Inc., All Rights Reserved 10
Portico VT Online User GuidePeripheral GuideTransition Guide, v2.11—December 2015 2 Procedures
2.2 Credit card transactionsUse the Heartland Portico Virtual Terminal to process credit card transactions. It supports a card reader attached to the PC or manually keying the account number.
Note: Merchants with Healthcare MCCs (see Appendix B Healthcare MCCs) may only enter a max of eight digits in the Customer ID, Invoice Number, and PO Number fields.
2.2.1 Process a card present saleUse the card present sale when a customer uses a credit card as payment for goods or services.
1. To process a sale, click Credit > Card Present Sale on the main menu. 2. If an EMV device is detected, a prompt is displayed. Type the Amount in the prompt box click
OK.
Step Result: The Card Present Sale page displays.
3. Enter card data. If using an EMV insert, the customer may be prompted to confirm the application (see EMV transactions).
4. Type the transaction information in the remaining fields. The fields displayed may vary depending on the merchant setup.
5. To process an authorization for the same card and amount, check Force Duplicate. Without this indication, the current transaction would be rejected.
6. To process an authorization for a sale that should not include tax, check Tax Exempt (if available).
7. Click Process.
Step Result: If this is an EMV transaction, the cardholder may be prompted for additional information (see EMV prompts).For all transactions, the transaction result page displays the issuer authorization response (for example, Approved) with the current total amount displayed.
8. To prepare to add a tip to the authorized amount, click the print preview icon on the top right-hand corner of the transaction result page.
Step Result: The receipt print preview is displayed.
9. Click Print. 10. Present the printed receipt to the customer to add a tip, total, and sign (if available). 11. Follow the steps in Add a tip.
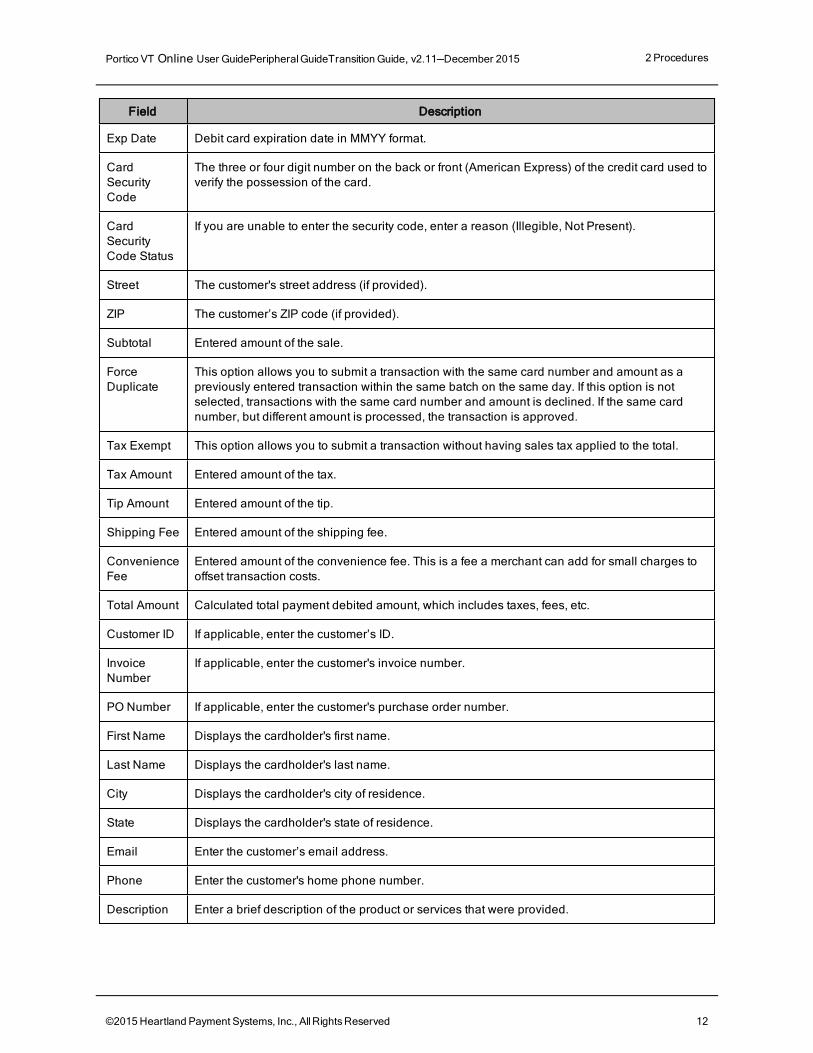
2.2.1.1 Credit card present sale transaction fields
Field Description
Card Number
Card number obtained when the user inputs card data (see Enter card data).
©2015 Heartland Payment Systems, Inc., All Rights Reserved 11
Portico VT Online User GuidePeripheral GuideTransition Guide, v2.11—December 2015 2 Procedures
Field Description
Exp Date Debit card expiration date in MMYY format.
Card Security Code
The three or four digit number on the back or front (American Express) of the credit card used to verify the possession of the card.
Card Security Code Status
If you are unable to enter the security code, enter a reason (Illegible, Not Present).
Street The customer's street address (if provided).
ZIP The customer’s ZIP code (if provided).
Subtotal Entered amount of the sale.
Force Duplicate
This option allows you to submit a transaction with the same card number and amount as a previously entered transaction within the same batch on the same day. If this option is not selected, transactions with the same card number and amount is declined. If the same card number, but different amount is processed, the transaction is approved.
Tax Exempt This option allows you to submit a transaction without having sales tax applied to the total.
Tax Amount Entered amount of the tax.
Tip Amount Entered amount of the tip.
Shipping Fee Entered amount of the shipping fee.
Convenience Fee
Entered amount of the convenience fee. This is a fee a merchant can add for small charges to offset transaction costs.
Total Amount Calculated total payment debited amount, which includes taxes, fees, etc.
Customer ID If applicable, enter the customer’s ID.
Invoice Number
If applicable, enter the customer's invoice number.
PO Number If applicable, enter the customer's purchase order number.
First Name Displays the cardholder's first name.
Last Name Displays the cardholder's last name.
City Displays the cardholder's city of residence.
State Displays the cardholder's state of residence.
Email Enter the customer’s email address.
Phone Enter the customer's home phone number.
Description Enter a brief description of the product or services that were provided.
©2015 Heartland Payment Systems, Inc., All Rights Reserved 12
Portico VT Online User GuidePeripheral GuideTransition Guide, v2.11—December 2015 2 Procedures
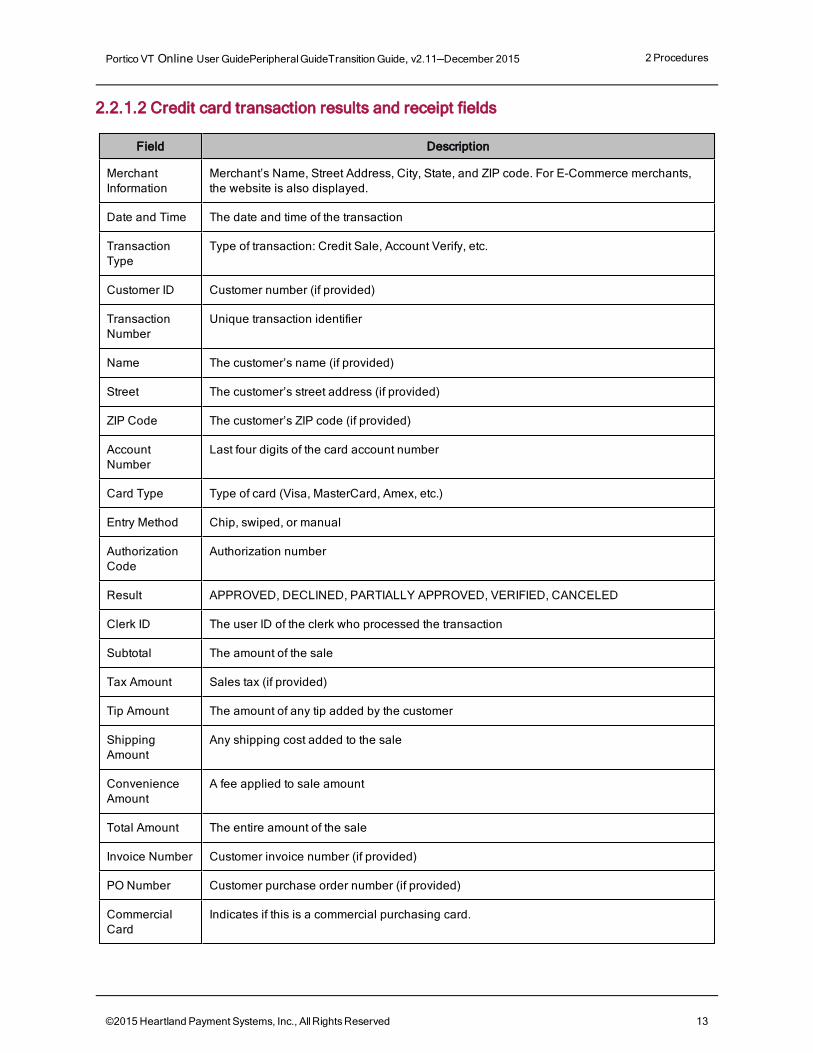
2.2.1.2 Credit card transaction results and receipt fields
Field Description
Merchant Information
Merchant’s Name, Street Address, City, State, and ZIP code. For E-Commerce merchants, the website is also displayed.
Date and Time The date and time of the transaction
Transaction Type
Type of transaction: Credit Sale, Account Verify, etc.
Customer ID Customer number (if provided)
Transaction Number
Unique transaction identifier
Name The customer’s name (if provided)
Street The customer’s street address (if provided)
ZIP Code The customer’s ZIP code (if provided)
Account Number
Last four digits of the card account number
Card Type Type of card (Visa, MasterCard, Amex, etc.)
Entry Method Chip, swiped, or manual
Authorization Code
Authorization number
Result APPROVED, DECLINED, PARTIALLY APPROVED, VERIFIED, CANCELED
Clerk ID The user ID of the clerk who processed the transaction
Subtotal The amount of the sale
Tax Amount Sales tax (if provided)
Tip Amount The amount of any tip added by the customer
Shipping Amount
Any shipping cost added to the sale
Convenience Amount
A fee applied to sale amount
Total Amount The entire amount of the sale
Invoice Number Customer invoice number (if provided)
PO Number Customer purchase order number (if provided)
Commercial Card
Indicates if this is a commercial purchasing card.
©2015 Heartland Payment Systems, Inc., All Rights Reserved 13
Portico VT Online User GuidePeripheral GuideTransition Guide, v2.11—December 2015 2 Procedures
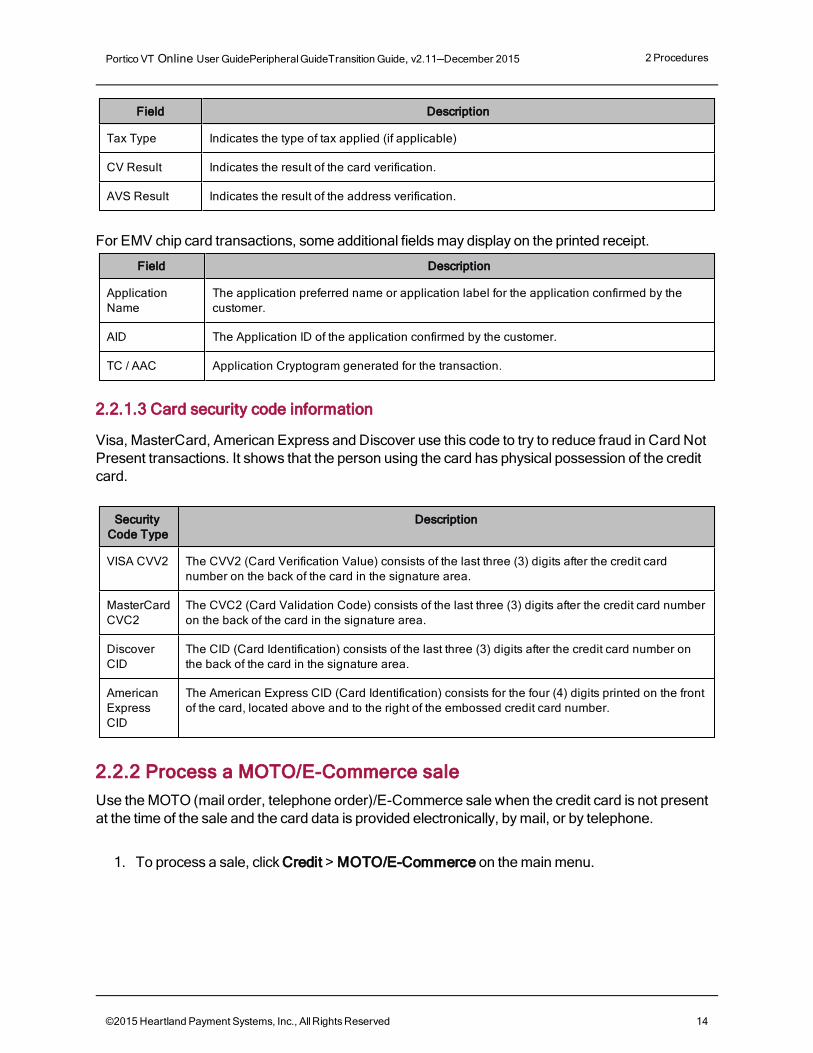
Field Description
Tax Type Indicates the type of tax applied (if applicable)
CV Result Indicates the result of the card verification.
AVS Result Indicates the result of the address verification.
For EMV chip card transactions, some additional fields may display on the printed receipt.
Field Description
Application Name
The application preferred name or application label for the application confirmed by the customer.
AID The Application ID of the application confirmed by the customer.
TC / AAC Application Cryptogram generated for the transaction.
2.2.1.3 Card security code information
Visa, MasterCard, American Express and Discover use this code to try to reduce fraud in Card Not Present transactions. It shows that the person using the card has physical possession of the credit card.
Security Code Type
Description
VISA CVV2 The CVV2 (Card Verification Value) consists of the last three (3) digits after the credit card number on the back of the card in the signature area.
MasterCard CVC2
The CVC2 (Card Validation Code) consists of the last three (3) digits after the credit card number on the back of the card in the signature area.
Discover CID
The CID (Card Identification) consists of the last three (3) digits after the credit card number on the back of the card in the signature area.
American Express CID
The American Express CID (Card Identification) consists for the four (4) digits printed on the front of the card, located above and to the right of the embossed credit card number.
2.2.2 Process a MOTO/E-Commerce saleUse the MOTO (mail order, telephone order)/E-Commerce sale when the credit card is not present at the time of the sale and the card data is provided electronically, by mail, or by telephone.
1. To process a sale, click Credit > MOTO/E-Commerce on the main menu.
©2015 Heartland Payment Systems, Inc., All Rights Reserved 14
Portico VT Online User GuidePeripheral GuideTransition Guide, v2.11—December 2015 2 Procedures
2. To indicate the type of sale, click MOTO or E-Commerce. 3. Type the card and transaction information into the fields. The fields displayed may vary
depending on the merchant setup. 4. Click Process.
Step Result: The transaction result page displays the issuer authorization response (for example, Approved).
2.2.3 Process a credit card authorizationAuthorization reserves funds by placing a hold on a credit card. This ensures sufficient funds will be available when the authorization is completed. Use Authorization for transactions that will be modified later (for example, adding a tip). This transaction type does not settle automatically.
Note: The authorization transaction must be added to a batch prior to making a tip adjustment or a settlement.
1. To process a credit card authorization, click Credit > Authorization Only on the main menu. 2. Enter card data. If using an EMV insert, the customer may be prompted to confirm the
application (see EMV transactions). 3. Type the transaction information in the remaining fields. The fields displayed may vary
depending on the merchant setup. 4. To process an authorization for the same card and amount, check Force Duplicate. Without
this indication, the current transaction would be rejected. 5. To process an authorization for a sale that should not include tax, check Tax Exempt (if
available). 6. Click Process.
Step Result: If this is an EMV transaction, the cardholder may be prompted for additional information (see EMV prompts).For all transactions, the transaction result page displays the issuer authorization response (for example, Approved) with the current total amount displayed.
7. To prepare to add a tip to the authorized amount, click the print preview icon on the top right-hand corner of the transaction result page.
Step Result: The receipt print preview is displayed.
8. Click Print. 9. Take the printed receipt to the customer to add a tip, total, and sign.
10. Follow the steps in Add a tip, if applicable.
2.2.4 Process a credit card returnUse a return to refund money to the customer’s credit card for returned items from a previously closed batch.
Note: The original transaction must be located before it can be returned. See Find transactions details for more information on locating transactions.
©2015 Heartland Payment Systems, Inc., All Rights Reserved 15
Portico VT Online User GuidePeripheral GuideTransition Guide, v2.11—December 2015 2 Procedures
1. To process a return, click Credit > Return on the main menu. 2. Enter card data. 3. Type the transaction information in the remaining fields. The fields displayed may vary
depending on the merchant setup. 4. To indicate that the card used in the original transaction is present, check Card Present. 5. To indicate that the card reader used in the original transaction is present, check Card Reader
Present. 6. To process a return for the same card and amount, check Force Duplicate. Without this
indication, the current transaction would be rejected. 7. Click Process.
Step Result: The transaction result page displays the issuer authorization response (for example, Approved).
Alternatively, you can process a return from the transaction details page accessed by the Find Transaction Details report.
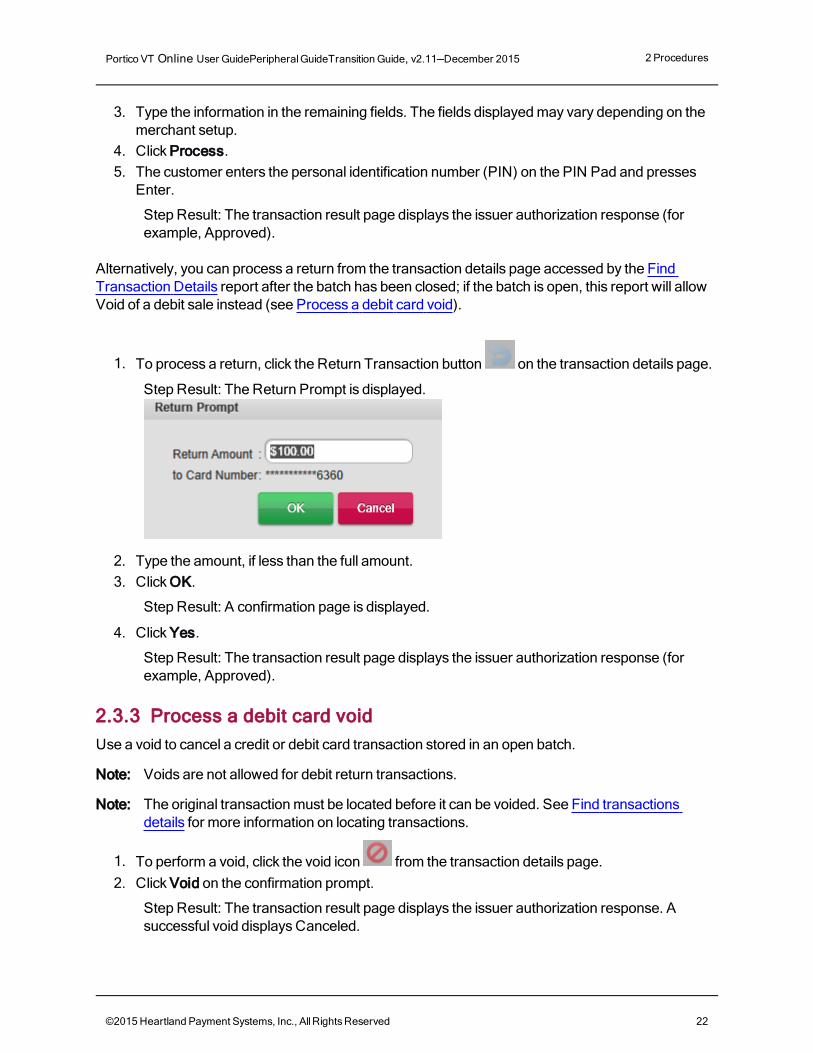
1. To process a return, click the Return Transaction button on the transaction details page.
Step Result: The return prompt is displayed.
2. Type the amount, if less than the full amount. 3. Click OK.
Step Result: A confirmation page is displayed.
4. Click Yes.
Step Result: The transaction result page displays the issuer authorization response (for example, Approved).
2.2.5 Process a credit card voidUse a void to cancel a credit or debit card transaction stored in an open batch.
Note: The original transaction must be located before it can be voided. See Find transactions details for more information on locating transactions.
1. To perform a void, click the void icon from the transaction details page. 2. Click Void on the confirmation prompt.
Step Result: The transaction result page displays the issuer authorization response. A successful void displays Canceled.
Note: Voiding a transaction removes it from the batch and updates the settlement amount to $0.00.
©2015 Heartland Payment Systems, Inc., All Rights Reserved 16
Portico VT Online User GuidePeripheral GuideTransition Guide, v2.11—December 2015 2 Procedures
2.2.6 Verify a credit card accountThe Account Verify feature allows a merchant to determine if a customer’s Visa, MasterCard, or Discover account is in good standing prior to processing a sale without affecting the cardholder’s account. The Account Verify feature does not, however, protect you from chargebacks. The Account Verify feature is not an Authorization and is not meant to provide information to you or the issuer about the amount or type of the transaction. An Authorization is still required and supersedes the Verification response for the same transaction. The Account Verify feature can be used for AMEX as well for validating the customer’s ZIP Code.
1. To process an Account Verify transaction, click Credit > Account Verify on the main menu. 2. Enter card data.
a. If you enter the number manually, also enter the expiration data, card holder name, and ZIP Code (required for American Express).
3. Type the credit card and transaction information into the fields. 4. Click Process.
Step Result: The transaction result page displays the issuer authorization response (for example, Approved).
2.2.7 Process a credit card offline saleUse the credit card offline sale when a customer uses a credit card as payment for goods or services and you have a voice authorization. The offline sale is usually used when you do not have an Internet connection.
1. To process an offline sale, click Credit > Offline Sale on the main menu. 2. Call the appropriate voice authorization center and type the authorization code. 3. Enter card data. 4. Type the transaction information in the remaining fields. The fields displayed may vary
depending on the merchant setup. 5. To indicate that the card used in the original transaction is present, check Card Present. 6. To indicate that the card reader used in the original transaction is present, check Card Reader
Present. 7. To process an authorization for the same card and amount, check Force Duplicate. Without
this indication, the current transaction would be rejected. 8. To process an authorization for a sale that should not include tax, check Tax Exempt (if
available). 9. Click Process.
Step Result: The transaction result page displays the issuer authorization response (for example, Approved).
10. To manually add the offline sale to the batch, follow the steps in Add a transaction to a batch once you are connected to the Internet and logged in to Portico VT.
©2015 Heartland Payment Systems, Inc., All Rights Reserved 17
Portico VT Online User GuidePeripheral GuideTransition Guide, v2.11—December 2015 2 Procedures
2.2.8 Process a credit card offline authorizationUse an authorization to open a credit card transaction that will be modified later (usually a tip) by calling for a voice authorization. The offline authorization is usually used when you do not have an Internet connection.
1. To process a credit card offline authorization, click Credit > Offline Authorization Only on the main menu.
2. Call the appropriate voice authorization center and type the authorization code. 3. Enter card data. 4. Type the transaction information in the remaining fields. The fields displayed may vary
depending on the merchant setup. 5. To process an authorization for the same card and amount, check Force Duplicate. Without
this indication, the current transaction would be rejected. 6. To process an authorization for a sale that should not include tax, check Tax Exempt (if
available). 7. Click Process.
Step Result: The transaction result page displays the issuer authorization response (for example, Approved).
8. To manually add the offline authorization to the batch, follow the steps in Add a transaction to a batch once you are connected to the Internet and logged in to Portico VT.
2.2.9 Add a transaction to a batchWhen you process an online or offline authorization, you need to add it to a batch for it to settle. You add the transaction from the transaction details page. You can access the transaction details page from Find Transaction Details report.
1. To add an authorization to a batch, click the Add to Batch icon on the transaction details page .
Step Result: The Add to Batch dialog is displayed.
2. Click OK. 3. If you need to add a tip, you can do that from the transaction details page once the transaction
is added to a batch.
2.2.10 Add a tipUse Tip Adjustment to add a tip to a previously processed credit card payment.
Note: If a transaction is partially approved, a tip cannot be added or changed.
©2015 Heartland Payment Systems, Inc., All Rights Reserved 18
Portico VT Online User GuidePeripheral GuideTransition Guide, v2.11—December 2015 2 Procedures
Note: Authorizations must be added to the batch to enable Tip Adjustment. You need to have the transaction number to add a tip to a payment. Get the transaction number from the receipt printout or use the Current Batch Details report to find the transaction number.
1. To add a tip, click Credit > Tip Adjustment from the main menu. 2. Type the transaction number. It is on the printed receipt. 3. Click Search.
a. If you have not added the transaction to the batch, a message displays asking if you would like to add it. Click Yes.
Step Result: An Add To Batch prompt displays.
b. Verify or update the amount and click OK.
Step Result: A Notification displays saying the transaction has been added to the current batch.
c. Click OK.
Step Result: The Tip Adjustment page displays.
4. Type the tip in the Tip Amount field. 5. Click Process.
Step Result: The transaction result page displays the issuer response (for example, Approved) with the subtotal, tip, and total amount displayed.
Alternatively, you can add a tip to a transaction from the transaction details page accessed by the Find Transaction Details report.
1. To add a tip to a transaction, click the Adjust button on the transaction details page.
Step Result: The Tip Adjustment dialog is displayed.
2. Type the tip in the Tip Amount field. 3. Click Process.
Step Result: A confirmation page is displayed.
4. Click Yes.
Step Result: The transaction result page displays the issuer response (for example, Approved) with the subtotal, tip, and total amount displayed.
2.3 Debit card transactionsUse the Heartland Portico Virtual Terminal to process debit card transactions. For debit card transactions, the merchant must have a card reader and a PIN Pad attached to the PC.
Note: Debit card transactions cannot be manually entered.
©2015 Heartland Payment Systems, Inc., All Rights Reserved 19
Portico VT Online User GuidePeripheral GuideTransition Guide, v2.11—December 2015 2 Procedures
2.3.1 Process a debit card saleUse the debit card sale when a customer uses a debit card as payment for goods or services.
1. To process a debit card sale, click Debit > Sale on the main menu. 2. Enter card data.
Step Result: The Card Number, Expiration Date, and Name fields are filled in.
3. Type the transaction information in the remaining fields. 4. To process a sale for the same card and amount as a previous transaction, check Force
Duplicate. Without this indication, the current transaction would be rejected. 5. Click Process. 6. The customer enters the personal identification number (PIN) on the PIN Pad and presses
Enter.
Step Result: The transaction result page displays the issuer authorization response (for example, Approved).
2.3.1.1 Debit card transaction fields
Field Description
Card Number
Card number obtained when the cardholder swipes a debit card
Exp Date Debit card expiration date in MMYY format
Subtotal Enter the amount of the sale
Force Duplicate
This option allows you to submit a transaction with the same card number and amount as a previously entered transaction within the same batch on the same day. If this option is not selected, transactions with the same card number and amount is declined. If the same card number, but different amount is processed, the transaction is approved.
Cashback Amount
If applicable, the customer can request cash back amount.
Total Amount
Calculated total payment debited amount, which includes taxes, cash back, etc.
Customer ID
If applicable, enter the customer’s ID.
Invoice Number
If applicable, enter the customer's invoice number
First Name Displays the cardholder's first name
Last Name Displays the cardholder's last name
Email Enter the customer’s email address.
Description Enter a brief description of the product or services that were provided.
©2015 Heartland Payment Systems, Inc., All Rights Reserved 20

Portico VT Online User GuidePeripheral GuideTransition Guide, v2.11—December 2015 2 Procedures
2.3.1.2 Debit card transaction results and receipt fields
Field Description
Merchant Information Merchant’s Name, Street Address, City, State, and ZIP code
Date and Time The date and time of the transaction
Transaction Type Type of transaction performed
Customer ID Customer number (if provided)
Transaction Number Unique transaction identifier
Name The customer’s name
Account number Last four digits of the card account number
Card Type DEBIT
Entry Method Swiped
Authorization Code Authorization number assigned by the cardholder's issuing bank
Result Displays whether the transaction was APPROVED or DECLINED
Clerk ID The user ID of the clerk who processed the question
Subtotal The amount of the sale
Cashback Amount The cash back amount for the transaction
Total Amount The entire amount of the sale
Available Balance The amount of available money in the debit account.
Invoice Number Customer invoice number (if provided)
Commercial Card Indicates if this is a commercial purchasing card.
Tax Type Indicates the type of tax applied (if applicable)
CV Result Indicates the result of the card verification.
AVS Result Indicates the result of the address verification.
2.3.2 Process a debit card returnUse a return to refund money to the customer’s debit card for returned items.
1. To process a return, click Debit > Return on the main menu. 2. Enter card data.
Step Result: The Card Number, Expiration Date, and Name fields are filled in.
©2015 Heartland Payment Systems, Inc., All Rights Reserved 21
Portico VT Online User GuidePeripheral GuideTransition Guide, v2.11—December 2015 2 Procedures
3. Type the information in the remaining fields. The fields displayed may vary depending on the merchant setup.
4. Click Process. 5. The customer enters the personal identification number (PIN) on the PIN Pad and presses
Enter.
Step Result: The transaction result page displays the issuer authorization response (for example, Approved).
Alternatively, you can process a return from the transaction details page accessed by the Find Transaction Details report after the batch has been closed; if the batch is open, this report will allow Void of a debit sale instead (see Process a debit card void).
1. To process a return, click the Return Transaction button on the transaction details page.
Step Result: The Return Prompt is displayed.
2. Type the amount, if less than the full amount. 3. Click OK.
Step Result: A confirmation page is displayed.
4. Click Yes.
Step Result: The transaction result page displays the issuer authorization response (for example, Approved).
2.3.3 Process a debit card voidUse a void to cancel a credit or debit card transaction stored in an open batch.
Note: Voids are not allowed for debit return transactions.
Note: The original transaction must be located before it can be voided. See Find transactions details for more information on locating transactions.
1. To perform a void, click the void icon from the transaction details page. 2. Click Void on the confirmation prompt.
Step Result: The transaction result page displays the issuer authorization response. A successful void displays Canceled.
©2015 Heartland Payment Systems, Inc., All Rights Reserved 22
Portico VT Online User GuidePeripheral GuideTransition Guide, v2.11—December 2015 2 Procedures
2.4 Check transactionsUse the Heartland Portico Virtual Terminal to process check transactions. The check menu options that display are based on the programs allowed by your Check Processor.
Note: Merchants with Healthcare MCCs (see Appendix B Healthcare MCCs) may only enter a max of eight digits in the Customer ID, Invoice Number, and PO Number fields.
2.4.1 Check saleUse check sale when a customer uses a check as payment for goods or services.
Note: You must retain and deposit the physical check to receive payment.
1. To process a check sale, click Check > Sale on the main menu. 2. To select the account type, click Personal or Business under Check Details; click Savings or
Checking under Transaction Details. 3. Type the check and transaction information into the fields. 4. Click Process.
Step Result: The transaction result page displays the authorization response (for example, Approved).
2.4.2 Check verifyUse check verify only to make sure the checking account has sufficient funds prior to accepting a customer's check as payment for goods or services.
Note: You must retain and deposit the physical check to receive payment.
1. To verify a check, click Check > Verify Only on the main menu. 2. To select the account type, click Personal or Business under Check Details; click Savings or
Checking under Transaction Details. 3. Type the check and transaction information into the fields. 4. Click Process.
Step Result: The transaction result page displays the authorization response.
2.4.3 One-time ACHUse the one-time Automated Clearing House (ACH) when a customer uses their check account numbers as payment for goods or services.
Note: Once you convert the check information into an ACH payment, you must destroy the physical check. It should not be deposited or kept.
©2015 Heartland Payment Systems, Inc., All Rights Reserved 23
Portico VT Online User GuidePeripheral GuideTransition Guide, v2.11—December 2015 2 Procedures
1. To process a one-time ACH transaction, click Check > One-Time ACH on the main menu.
2. To select the account type, click Personal or Business under Check Details; click Savings or Checking under Transaction Details.
3. Type the check and transaction information into the fields. 4. Click Process.
Step Result: The transaction result page displays the authorization response (for example, Approved).
2.4.4 Process a check voidUse a void to cancel a check transaction according to the rules of your Check Processor.
Note: The original transaction must be located before it can be voided. See Check details for more information on locating transactions.
1. To perform a void, click the void icon from the transaction details page. 2. Click Void on the confirmation prompt.
Step Result: The transaction result page displays the Check Processor authorization response. A successful void displays Canceled.
2.5 PayPlan transactionsUse the Heartland Portico Virtual Terminal to set up and process PayPlan recurring payment transactions.
Note: If PayPlan is not enabled on your device, you will not see PayPlan in the main menu.
Note: PayPlan does not allow quotation marks in any text field.
2.5.1 Add a customerUse add customer to register a new PayPlan recurring payment customer.
1. To add a PayPlan customer, click PayPlan > Add Customer on the main menu . 2. Type the Customer ID, name, address, and contact information into the fields 3. Click Process.
Step Result: A result message is displayed (for example, Customer successfully added).
4. Click OK.
Step Result: The View Customer page displays the information for the new customer and provides options to Edit Customer, Add Payment Method, and Add Schedule.
©2015 Heartland Payment Systems, Inc., All Rights Reserved 24
Portico VT Online User GuidePeripheral GuideTransition Guide, v2.11—December 2015 2 Procedures
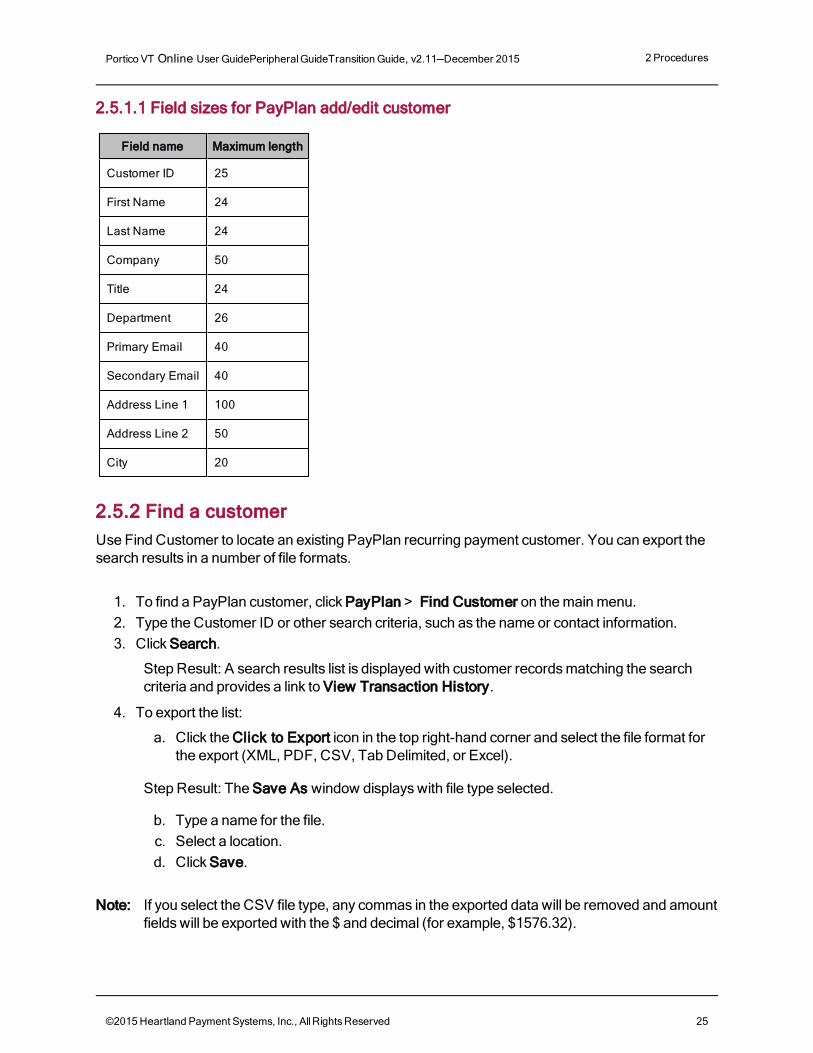
2.5.1.1 Field sizes for PayPlan add/edit customer
Field name Maximum length
Customer ID 25
First Name 24
Last Name 24
Company 50
Title 24
Department 26
Primary Email 40
Secondary Email 40
Address Line 1 100
Address Line 2 50
City 20
2.5.2 Find a customerUse Find Customer to locate an existing PayPlan recurring payment customer. You can export the search results in a number of file formats.
1. To find a PayPlan customer, click PayPlan > Find Customer on the main menu. 2. Type the Customer ID or other search criteria, such as the name or contact information. 3. Click Search.
Step Result: A search results list is displayed with customer records matching the search criteria and provides a link to View Transaction History.
4. To export the list:
a. Click the Click to Export icon in the top right-hand corner and select the file format for the export (XML, PDF, CSV, Tab Delimited, or Excel).
Step Result: The Save As window displays with file type selected.
b. Type a name for the file. c. Select a location. d. Click Save.
Note: If you select the CSV file type, any commas in the exported data will be removed and amount fields will be exported with the $ and decimal (for example, $1576.32).
©2015 Heartland Payment Systems, Inc., All Rights Reserved 25
Portico VT Online User GuidePeripheral GuideTransition Guide, v2.11—December 2015 2 Procedures
5. To see details about the customer, click the Customer ID number.
Step Result: The View Customer page displays the information for the new customer and provides options to View Transaction History, Edit Customer, Add Payment Method, and Add Schedule.
2.5.3 Edit a customerUse Edit Customer to modify the information of an existing PayPlan recurring payment customer. The option to edit a customer is found on the View Customer page. To get to that page, follow the steps to Find a customer.
1. To edit a PayPlan customer, click Edit Customer from the View Customer page.
Note: The Edit Customer page also has a link to View Transaction History and allows a user to update data.
2. Type any updates to the name, address, and contact information into the fields. 3. Click Update.
Step Result: A result message is displayed (for example, Customer successfully added).
4. Click OK.
Step Result: The View Customer page displays the updated information for the customer.
2.5.4 Delete a customerUse the Delete option to delete a PayPlan recurring payment customer.
Note: The option to delete a customer is reached from the Edit Customer page. To get to that page, follow the steps to Find a customer.
1. To delete a PayPlan customer, click Edit Customer from the View Customer page. 2. Click Delete.
Step Result: A Delete Confirmation message asks if you are sure you want to delete the customer. This cannot be undone.
3. Click Yes.
Step Result: A status message is displayed. If the customer has active schedules, you will be informed that deleting the customer will also delete all their payment methods and schedules.
2.5.5 Add a payment methodUse Add Payment Method or View Customer to associate a new payment method to an existing PayPlan customer.
Note: To add a payment method, you need to have the Customer ID number. If you don't know the Customer ID, use Find a customer. You are able to add a new payment method from the View Customer page as a part of the find process.
©2015 Heartland Payment Systems, Inc., All Rights Reserved 26
Portico VT Online User GuidePeripheral GuideTransition Guide, v2.11—December 2015 2 Procedures
1. To add a payment method to a PayPlan customer, click PayPlan > Add Payment Method on the main menu.
2. Type the Customer ID. 3. Click Select. 4. To select a payment type, click Credit Card or ACH.
2.5.5.1 For credit cards
1. Enter card data.
Note: PayPlan supports adding a credit card by swipe and by keying the card number from an E3 or EMV PIN Pad keypad.
2. If not swiped, type the expiration month and year. 3. If not swiped, or swipe did not populate the name field, type the name on the card (maximum
50 character limit number). 4. To make this card the default payment, check the Preferred Payment Method box. 5. To autofill the customer's address, click Copy Customer Address or type in the information.
Note: Billing ZIP/Postal code is required for AMEX cards.
6. To save the payment without processing an immediate payment, click Later User Only. 7. To process an immediate payment, select Charge Now and add the payment amount. 8. Click Save.
Step Result: A result message is displayed. If you processed a payment, a transaction result page displays the issuer authorization response (for example, Approved). If the AVS or CVV setting is set to decline, you will not be able to save the payment method. If there is an AVS mismatch set to PROMPT, the user will be prompted whether they want to save the card. If saved, future one-time transactions will continue to prompt due to AVS mismatch. Please note that if the payment method is saved, then attached to a schedule, the AVS action of PROMPT will be ignored during schedule processing.
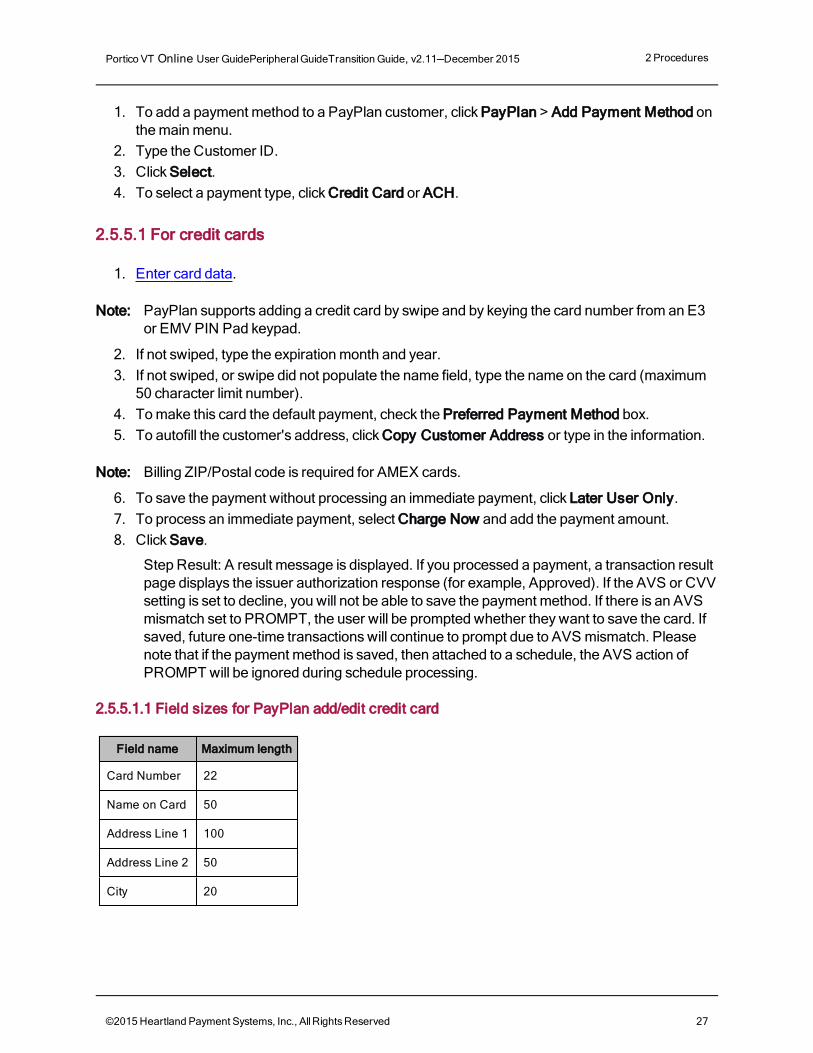
2.5.5.1.1 Field sizes for PayPlan add/edit credit card
Field name Maximum length
Card Number 22
Name on Card 50
Address Line 1 100
Address Line 2 50
City 20
©2015 Heartland Payment Systems, Inc., All Rights Reserved 27
Portico VT Online User GuidePeripheral GuideTransition Guide, v2.11—December 2015 2 Procedures
2.5.5.2 For ACH
Note: If your device does not have "Allow Check" set to "True" the option to add an ACH payment method does not display.
1. Type the Bank Routing / Transit Number (maximum 9 character limit number). 2. Type the Account Number (maximum 18 character limit number). 3. Select the Account Type (Personal or Business). 4. Select the ACH Type (Checking or Savings). 5. Type the First Name and Last Name. 6. To autofill the customer's address, click Copy Customer Address or type in the information. 7. Type the Social Security Number Last 4 (optional). 8. Type the Account Holder Year of Birth (optional). 9. Select the Drivers License State (optional).
10. Type the Drivers License Number (optional). 11. To save the payment without processing an immediate payment, click Later User Only. 12. To process an immediate payment, select Charge Now and add the payment amount. 13. Click Save.
Step Result: A result message is displayed. If you processed a payment, a transaction result page displays the issuer authorization response (for example, Approved).
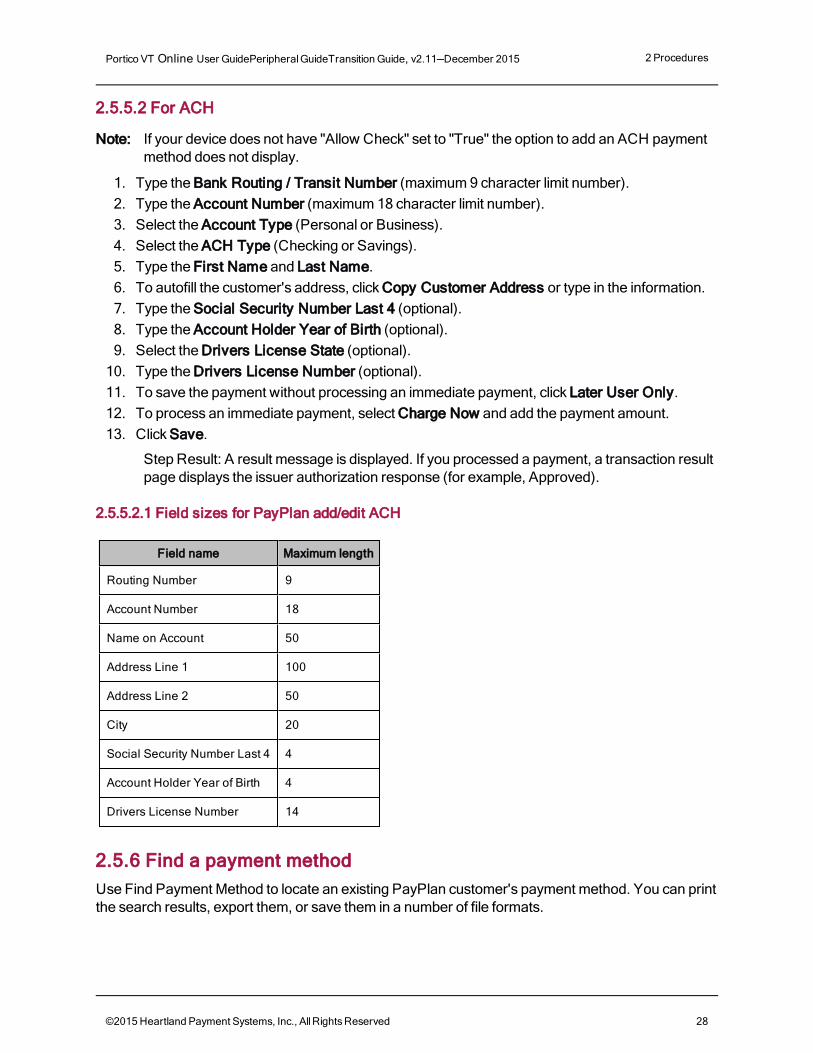
2.5.5.2.1 Field sizes for PayPlan add/edit ACH
Field name Maximum length
Routing Number 9
Account Number 18
Name on Account 50
Address Line 1 100
Address Line 2 50
City 20
Social Security Number Last 4 4
Account Holder Year of Birth 4
Drivers License Number 14
2.5.6 Find a payment methodUse Find Payment Method to locate an existing PayPlan customer's payment method. You can print the search results, export them, or save them in a number of file formats.
©2015 Heartland Payment Systems, Inc., All Rights Reserved 28
Portico VT Online User GuidePeripheral GuideTransition Guide, v2.11—December 2015 2 Procedures
1. To find a PayPlan customer's payment method, click PayPlan > Find Payment Method on the main menu.
2. Type the Customer ID or other search criteria, such as the card type, the first six digits of a card number, expiration information, or schedule attachment.
3. Click Search.
Step Result: A search results list is displayed with payment method records matching the search criteria.
4. To view payment schedules that use a payment method, click View under View Linked Schedules.
Step Result: The View Linked Schedules page is displayed.
5. To export the list:
a. Click the Click to Export icon in the top right-hand corner and select the file format for the export (XML, PDF, CSV, Tab Delimited, or Excel).
Step Result: The Save As window displays with file type selected.
b. Type a name for the file. c. Select a location. d. Click Save.
2.5.7 Edit a payment methodUse Edit Payment Method to edit an existing payment method of an existing PayPlan customer.
Note: The option to edit a payment method is reached from the View Customer page. To get to that page, follow the steps to find a customer.
1. To edit a customer's payment method, open the View Customer page.
2. Click the in the row of the desired payment method. 3. Edit the payment status, expiration date, name on card, or billing address information on the
Edit Payment Method page. The editable information fields change depending on the selected payment type.
4. Click Update.
Step Result: A result message is displayed.
2.5.8 Delete a payment methodUse the Delete option to remove a payment method from a PayPlan customer.
Note: The option to delete a payment method is reached from the View Customer page. To get to that page, follow the steps to find a customer.
©2015 Heartland Payment Systems, Inc., All Rights Reserved 29

Portico VT Online User GuidePeripheral GuideTransition Guide, v2.11—December 2015 2 Procedures
1. To delete a customer's payment method, open the View Customer page.
2. Click the in the row of the desired payment method.
Step Result: A Delete Confirmation message asks if you are sure you want to delete the payment method. This action cannot be undone.
3. Click Yes.
Step Result: The payment method is deleted.
Note: If the payment method is attached to active schedules, it will not be deleted. Instead, an error message will be displayed.
2.5.9 Add a scheduled paymentUse Add Scheduled Payment to create a new payment schedule for an existing PayPlan customer.
1. To add a scheduled payment to a PayPlan customer, click PayPlan > Add Scheduled Payment on the main menu.
2. Type the Customer ID. 3. Click Select. 4. Type a new Schedule ID (it must be a unique, maximum 30 character limit number) and
Schedule Name. 5. Select a Schedule Status (default is Active). 6. Select a payment method account to use for the schedule. 7. To add a new payment method, click Add New Payment Method. Type the payment method
information. 8. Type the payment information, frequency, reprocess attempt number, and notification
options. See 2.5.9.2 for information on schedule frequency.
Step Result: When the frequency is selected, payment timing and duration options are displayed.
Note: The start date must be the current date or later. If the end date option is used, the end date must be greater than the last processing date.
9. Schedules now include optional fields for Invoice Number and Description. The values in these fields are sent in the transaction request on the Next Bill Date.
10. Click Save.
Step Result: A result message is displayed (for example, Schedule successfully added).
2.5.9.1 Field sizes for PayPlan add/edit schedules
Field name Maximum length
Schedule ID 40
Schedule Name 40
©2015 Heartland Payment Systems, Inc., All Rights Reserved 30
Portico VT Online User GuidePeripheral GuideTransition Guide, v2.11—December 2015 2 Procedures
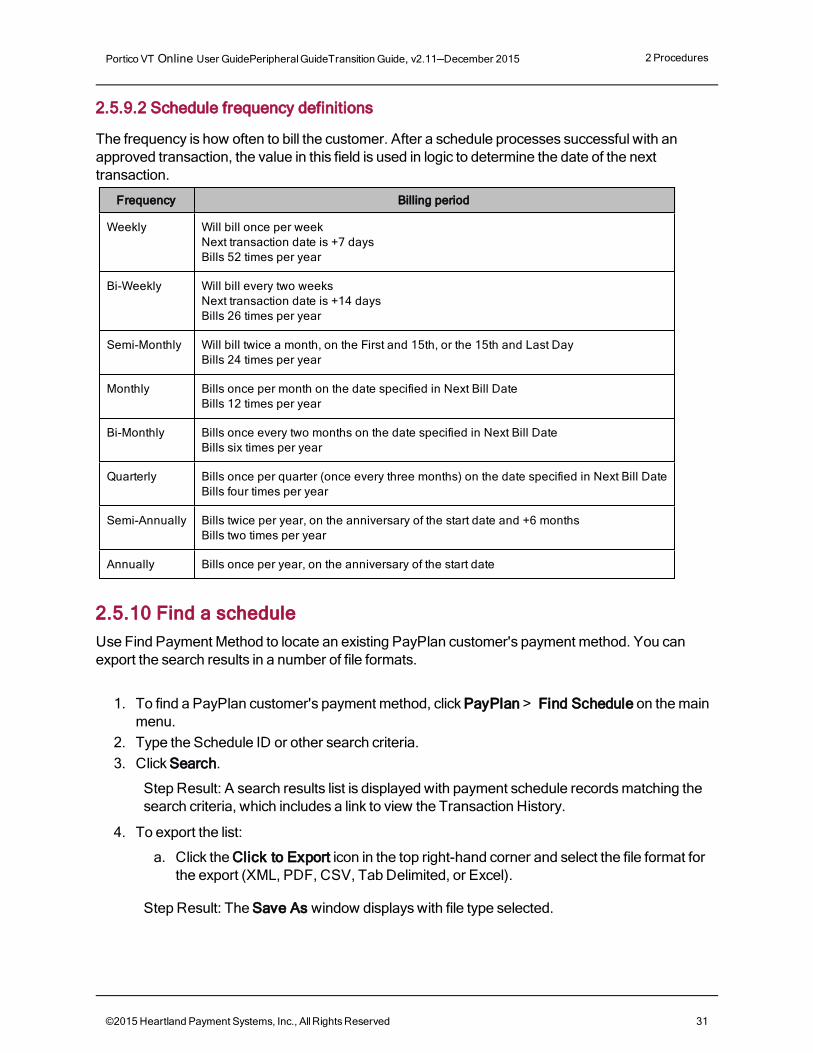
2.5.9.2 Schedule frequency definitions
The frequency is how often to bill the customer. After a schedule processes successful with an approved transaction, the value in this field is used in logic to determine the date of the next transaction.
Frequency Billing period
Weekly Will bill once per weekNext transaction date is +7 daysBills 52 times per year
Bi-Weekly Will bill every two weeks Next transaction date is +14 daysBills 26 times per year
Semi-Monthly Will bill twice a month, on the First and 15th, or the 15th and Last DayBills 24 times per year
Monthly Bills once per month on the date specified in Next Bill DateBills 12 times per year
Bi-Monthly Bills once every two months on the date specified in Next Bill Date Bills six times per year
Quarterly Bills once per quarter (once every three months) on the date specified in Next Bill DateBills four times per year
Semi-Annually Bills twice per year, on the anniversary of the start date and +6 monthsBills two times per year
Annually Bills once per year, on the anniversary of the start date
2.5.10 Find a scheduleUse Find Payment Method to locate an existing PayPlan customer's payment method. You can export the search results in a number of file formats.
1. To find a PayPlan customer's payment method, click PayPlan > Find Schedule on the main menu.
2. Type the Schedule ID or other search criteria. 3. Click Search.
Step Result: A search results list is displayed with payment schedule records matching the search criteria, which includes a link to view the Transaction History.
4. To export the list:
a. Click the Click to Export icon in the top right-hand corner and select the file format for the export (XML, PDF, CSV, Tab Delimited, or Excel).
Step Result: The Save As window displays with file type selected.
©2015 Heartland Payment Systems, Inc., All Rights Reserved 31
Portico VT Online User GuidePeripheral GuideTransition Guide, v2.11—December 2015 2 Procedures
b. Type a name for the file. c. Select a location. d. Click Save.
Note: If you select the CSV file type, any commas in the exported data will be removed and amount fields will be exported with the $ and decimal (for example, $1576.32).
5. To view payment schedules details, click the Schedule ID.
Step Result: The Edit Payment Schedule page is displayed.
2.5.11 Edit a scheduleUse Edit Payment Schedule to modify the information of an existing PayPlan recurring payment schedule.
Note: The option to edit a schedule is reached from the View Linked Schedules page. To get to that page, follow the steps to find a schedule. You can also reach it from the View Customer page, Scheduled Payments section. To get to that page, follow the steps to find a customer.
1. To edit a payment schedule:
l From the View Linked Schedules page, click the Schedule ID number of the desired schedule.
l From the View Customer page, click the in the row of the desired payment schedule.
Note: The Edit Payment Schedule page also has a link to View Payment History. Note that a void of a scheduled payment does not adjust the number of payments remaining on the schedule.
2. Edit any of the available fields (grayed-out fields are not editable).
l If the schedule has not yet started processing, start date is editable. If the schedule has started processing, next bill date is editable.
l If modifying any date field, the new date must be greater than the current date. The end date and cancellation date must also be greater than the next bill date.
l The status change date displays the timestamp of the most recent update to the Schedule Status. It is displayed in the local timezone set up for the Device. If it is not correct, contact Heartland.
l To cancel a schedule immediately, set the Schedule Status to Inactive. l If the Duration is assigned to be End Date, the End Date may be updated. It must be
greater than the next bill date. l If the Duration is assigned to be Limited Number, the number of payments remaining
may be updated to any number greater than 0. l If the Duration is assigned to be Ongoing, a Cancellation Date may be set that is greater
than the next bill date.
©2015 Heartland Payment Systems, Inc., All Rights Reserved 32
Portico VT Online User GuidePeripheral GuideTransition Guide, v2.11—December 2015 2 Procedures
3. Select options for payment notifications to the customer. 4. Click Update.
Step Result: A result message is displayed. If the Next Bill Date was modified, a prompt message asks if it is a one-time or ongoing change.
5. To verify a processing date change, select the desired option and click Continue. 6. Click OK.
Step Result: The View Linked Schedules page displays the updated information for the schedule.
2.5.12 Delete a scheduleUse the Delete schedule option to delete an existing PayPlan recurring payment schedule.
Note: The option to delete a schedule is reached from the View Linked Schedules page. To get to that page, follow the steps to Find a schedule. You can also reach it from the View Customer page, Scheduled Payments section. To get to that page, follow the steps to find a customer.
1. To delete a payment schedule:
l From the View Linked Schedules page, click the Schedule ID number of the desired schedule. Click Delete.
l From the View Customer page, click the in the row of the desired payment schedule.
Step Result: A confirmation message is displayed asking if you want to delete this schedule.
2. Click OK.
Step Result: The View Linked Schedules or View Customers page displays the updated schedule list.
2.5.13 View agreementUse the View Agreement link to see the agreement the customer made to allow the merchant to store the customer's payment information.
1. To access the View agreement link, click PayPlan > Find Schedule on the main menu. 2. Type the Schedule ID or other search criteria. 3. Click Search.
Step Result: A search results list is displayed with payment schedule records matching the search criteria.
4. To view the customer agreement, click the Schedule ID.
Step Result: The Edit Payment Schedule page is displayed.
5. Click View Agreement.
Step Result: A disclaimer page is displayed.
©2015 Heartland Payment Systems, Inc., All Rights Reserved 33

Portico VT Online User GuidePeripheral GuideTransition Guide, v2.11—December 2015 2 Procedures
6. Click OK.
Step Result: The customer agreement is displayed.
7. Click Print or Cancel.
2.5.14 View the failed schedules detail listUse Failed Schedules Detail to view a list of failed schedules.
1. To view the Failed Schedules Detail list, click PayPlan > Failed Schedules Detail on the main menu.
2. Type any combination of search criteria.
Note: Leave the fields blank to retrieve a general list of all transactions.
3. Click Search.
Step Result: A list of failed schedules meeting the search criteria is displayed.
2.5.15 Process a stored payment, one-time chargeYou can use a card on file of an existing PayPlan customer to process a one-time charge. This is done from the View Customer page (use Find Customer to get to View Customer page).
Note: Partial approvals for one-time charges are not supported. You have the option to make a immediate (Charge Now) or a Detailed Charge.
2.5.15.1 Charge Now
1. To make an immediate charge, type the amount to be charged in the field next to the payment method you want to use.
2. Click Charge Now.
Step Result: The transaction result page displays the issuer authorization response (for example, Approved).
2.5.15.2 Detailed Charge
1. To make a detailed charge, click Detailed Charge.
Step Result: The One Time Payment page displays.
2. Type the amount. 3. Optionally, type the invoice number and a description. Credit card stored payments also have
the option to enter tax amount and PO Number. 4. Click Process.
Step Result: The transaction result page displays the issuer authorization response (for example, Approved).
©2015 Heartland Payment Systems, Inc., All Rights Reserved 34
Portico VT Online User GuidePeripheral GuideTransition Guide, v2.11—December 2015 2 Procedures
2.5.15.3 Debt Repayment
For merchants with MCCs of 6012 or 6051, there is an option to flag a transaction as a Debt Repayment. Ticking this box sends the debt_obligation indicator if the merchant is enrolled in Visa's MVV program. It is the merchant's responsibility to conform to the rules of that program. It is only eligible for Visa debit or prepaid cards. The debt repayment option is available under Add Credit Card > Charge Now option, View Customer > Charge Now, and Detailed Charge. Debt Repayment can also be flagged on a schedule. If the payment method for a schedule changes, it is up to the merchant to uncheck the Debt Repayment option if it no longer applies.
2.6 HMS transactionsUse the Heartland Portico Virtual Terminal to process Heartland Marketing Solutions (HMS) gift and loyalty card transactions. It supports a card reader attached to the PC or manually keying the account number.
Note: If loyalty transactions are not enabled on your device, you will not see the Reward option under HMS in the main menu.
2.6.1 Redeem an HMS gift cardUse Redeem when a customer uses an HMS gift card as payment for goods or services.
1. To process a gift card sale, click HMS > Redeem on the main menu.
Note: If loyalty transactions are not enabled on your device, you will not see the Loyalty button.
2. Enter card data or type the phone alias.
3. Type the subtotal and tip amount. 4. Click Process.
Step Result: The transaction result page displays the issuer authorization response (for example, Approved).
2.6.2 Load an HMS gift cardUse Load when a customer wants to add funds to an HMS gift card.
1. To process a gift card load, click HMS > Load on the main menu. 2. Enter card data or type the phone alias.
©2015 Heartland Payment Systems, Inc., All Rights Reserved 35
Portico VT Online User GuidePeripheral GuideTransition Guide, v2.11—December 2015 2 Procedures
3. Type the amount to load onto the gift card. 4. Click Process.
Step Result: The transaction result page is displayed.
2.6.3 Make an HMS gift card balance inquiryUse Balance Inquiry to find out how much a customer has left on an HMS gift card.
1. To make a gift card balance inquiry, click HMS > Balance Inquiry on the main menu. 2. Enter card data or type the phone alias.
3. Click Process.
Step Result: The transaction result page displays the balance amount and other card information.
2.6.4 Transfer fundsUse Transfer to move money from one HMS gift card to another.
1. To process a gift card transfer, click HMS > Transfer on the main menu. 2. Type the original card number and the new card number.
3. Click Process.
Step Result: Any amount on the old card is transferred to the new card. The old card is deactivated.
2.6.5 Add an aliasAliases are phone numbers that can be added to an HMS card to be used to identify the card's owner.
1. To add an alias to an HMS card, click HMS > Add Alias on the main menu. 2. Type the card number and the alias phone number.
3. Click Process.
Step Result: The phone number can now be used as the gift card number.
2.6.6 Remove an aliasUse Remove Alias to remove an alias from an HMS gift card an alias.
1. To remove an alias from an HMS card, click HMS > Remove Alias on the main menu. 2. Type the card number and the alias phone number.
©2015 Heartland Payment Systems, Inc., All Rights Reserved 36
Portico VT Online User GuidePeripheral GuideTransition Guide, v2.11—December 2015 2 Procedures
3. Click Process.
Step Result: The phone number now cannot be used as the gift card number.
©2015 Heartland Payment Systems, Inc., All Rights Reserved 37

Portico VT Online User GuidePeripheral GuideTransition Guide, v2.11—December 2015 2 Procedures
2.7 PrePaid transactionsUse the Heartland Portico Virtual Terminal to process PrePaid card transactions.
2.7.1 Process a PrePaid card saleUse the PrePaid Sale when a customer uses a PrePaid card as payment for goods or services.
1. To process a PrePaid card sale, click PrePaid > Sale on the main menu. 2. Enter card data.
Step Result: The Card Number andExpiration Date fields are filled in.
3. Type the information in the remaining fields. The fields displayed may vary depending on the merchant setup.
4. To process a sale for the same card and amount as a previous sale, check Force Duplicate. Without this indication, the current transaction would be rejected.
5. Click Process.
Step Result: The transaction result page displays the issuer authorization response (for example, Approved).
2.7.2 Add valueUse Add Value to add money to a PrePaid card.
1. To add money to a PrePaid card, click PrePaid > Add Value on the main menu. 2. Enter card data.
Step Result: The Card Number andExpiration Date fields are filled in.
3. Type the information in the remaining fields. The fields displayed may vary depending on the merchant setup.
4. To process a sale for the same card and amount as a previous sale, check Force Duplicate. Without this indication, the current transaction would be rejected.
5. Click Process.
Step Result: The transaction result page displays the issuer authorization response (for example, Approved).
2.7.3 Make a balance inquiryUse Balance Inquiry to find out how much a customer has left on a PrePaid card.
1. To make a PrePaid card balance inquiry, click PrePaid > Balance Inquiry on the main menu. 2. Enter card data. 3. Type the information in the remaining fields.
©2015 Heartland Payment Systems, Inc., All Rights Reserved 38
Portico VT Online User GuidePeripheral GuideTransition Guide, v2.11—December 2015 2 Procedures
4. Click Process.
Step Result: The transaction result page displays the balance amount and other card information.
©2015 Heartland Payment Systems, Inc., All Rights Reserved 39

Portico VT Online User GuidePeripheral GuideTransition Guide, v2.11—December 2015 2 Procedures
2.8 EBT transactionsUse the Heartland Portico Virtual Terminal to process EBT transactions.
2.8.1 Process a food stamp saleUse the Food Stamp Sale when a customer uses an EBT card as a food stamp payment for food.
1. To process a food stamp sale, click EBT > Food Stamp Sale on the main menu . 2. Enter card data.
Step Result: If the card is swiped, the Card Number, Expiration Date, and Name fields are filled in.
3. Type the information in the remaining fields. 4. To process a sale for the same card and amount, check Force Duplicate. Without this
indication, the current transaction would be rejected. 5. Click Process. 6. The customer enters the personal identification number (PIN) on the PIN Pad and presses
Enter.
Step Result: The transaction result page displays the issuer authorization response (for example, Approved).
2.8.2 Process food stamp voucher saleUse the Food Stamp Voucher sale when a customer uses an EBT card as payment for food and you have a voice authorization. The voucher is usually used when you do not have an Internet connection.
Note: Food Stamp Voucher is only available to merchants who were processing EBT prior to March 2014.
1. To process a food stamp voucher sale, click EBT > Food Stamp Voucher on the main menu. 2. Enter card data. 3. Call the appropriate voice authorization center and type the authorization code. 4. Type the Voucher Number. 5. Type information into the remaining fields. 6. Click Process.
Step Result: The transaction result page displays the issuer authorization response (for example, Approved).
©2015 Heartland Payment Systems, Inc., All Rights Reserved 40
Portico VT Online User GuidePeripheral GuideTransition Guide, v2.11—December 2015 2 Procedures
2.8.3 Process a cash benefit saleUse the Cash Benefit Sale when a customer uses an EBT card as a cash benefit payment.
1. To process a cash benefit sale, click EBT > Cash Benefit Sale on the main menu . 2. Enter card data.
Step Result: If the card is swiped, the Card Number, Expiration Date, and Name fields are filled in.
3. Type the cashback amount, if desired. 4. Type the information in the remaining fields. 5. To process a sale for the same card and amount as a previous transaction, check Force
Duplicate. Without this indication, the current transaction would be rejected. 6. Click Process. 7. The customer enters the personal identification number (PIN) on the PIN Pad and presses
Enter.
Step Result: The transaction result page displays the issuer authorization response (for example, Approved).
2.8.4 Process a food stamp returnUse the Food Stamp Return when a customer returns merchandise from an EBT card food stamp transaction.
1. To process a food stamp return, click EBT > Food Stamp Return on the main menu. 2. Enter card data.
Step Result: If the card is swiped, the Card Number, Expiration Date, and Name fields are filled in.
3. Type the information in the remaining fields. 4. To process a return for the same card and amount, check Force Duplicate. Without this
indication, the current transaction would be rejected. 5. Click Process. 6. The customer enters the personal identification number (PIN) on the PIN Pad and presses
Enter.
Step Result: The transaction result page displays the issuer authorization response (for example, Approved).
2.8.5 Make a food stamp balance inquiryUse Food Stamp Balance Inquiry to find out how much a customer has left on an EBT card.
©2015 Heartland Payment Systems, Inc., All Rights Reserved 41

Portico VT Online User GuidePeripheral GuideTransition Guide, v2.11—December 2015 2 Procedures
1. To make a food stamp card balance inquiry, click EBT > Food Stamp Balance Inquiry on the main menu.
2. Enter card data.
3. Click Process.
Step Result: The transaction result page displays the balance amount and other card information.
©2015 Heartland Payment Systems, Inc., All Rights Reserved 42
Portico VT Online User GuidePeripheral GuideTransition Guide, v2.11—December 2015 2 Procedures
2.9 ReportsUse the reports to see summary and detailed information about current and past batches. You can print the reports, export them, or save them in a number of file formats.
Note: Reports can take up to two minutes to generate and print. Do not click Print again or try to close the print dialog, as this can cause errors.
You can perform the following actions in Reports:
2.9.1 Run a current batch summary reportUse the current batch summary report to get general information about your batch in progress.
1. To run the current batch summary report, click Reporting > Current Batch Summary on the main menu.
Step Result: The batch summary report is displayed.
Note: The Results per page defaults to 25, but can be adjusted manually to increase the results to 50, 75, or 100. If you have multiple pages on the report, use the paging functionality in the lower right-hand corner. You can click the arrow or manually enter the page number to go directly to that page.
2.9.2 Run a current batch details reportUse the current batch details report to get detailed information about your batch in progress.
1. To run the current batch summary report, click Reporting > Current Batch Details on the main menu.
Step Result: The batch details report is displayed.
Note: The Results per page defaults to 25, but can be adjusted manually to increase the results to 50, 75, or 100. If you have multiple pages on the report, use the paging functionality in the lower right-hand corner. You can click the arrow or manually enter the page number to go directly to that page.
2. To close the current batch, click Close Batch. See Close a batch for more information.
Note: When printing this report, some data is truncated. All data is displayed and exported.
2.9.3 Run a find transactions summary reportUse the find transactions summary report to find transactions based on a small set of search criteria.
©2015 Heartland Payment Systems, Inc., All Rights Reserved 43
Portico VT Online User GuidePeripheral GuideTransition Guide, v2.11—December 2015 2 Procedures
1. To run the find transactions summary report, click Reporting > Find Transactions Summary on the main menu.
2. Type any combination of search criteria. Leave the fields blank to see all transactions. 3. Click Search.
Step Result: A summary of transactions meeting the search criteria is displayed.
Note: The Results per page defaults to 25, but can be adjusted manually to increase the results to 50, 75, or 100. If you have multiple pages on the report, use the paging functionality in the lower right-hand corner. You can click the arrow or manually enter the page number to go directly to that page.
2.9.4 Run a find transactions details reportUse the find transactions details report to locate transaction records. This is the preliminary process for processing a return or void. Depending on the type of information that you have, you may either key the Transaction Number or narrow your search criteria based on the numerous fields.
1. To run a find transactions details report, click Reporting > Find Transactions Details on the main menu.
2. Type the Transaction Number or any combination of search criteria.
Note: Leave the fields blank and set the Status to "All Approval" or "All Statuses" to retrieve a general list of transactions.
3. To see voids in the list, check Include Voided Transactions. 4. Click Search.
Step Result: A list of transactions meeting the search criteria is displayed.
5. To export the list:
a. Click the Click to Export icon in the top right-hand corner and select the file format for the export (XML, PDF, CSV, Tab Delimited, or Excel).
Step Result: The Save As window displays with file type selected.
b. Type a name for the file. c. Select a location. d. Click Save.
Note: If you select the CSV file type, any commas in the exported data will be removed and amount fields will be exported with the $ and decimal (for example, $1576.32).
6. Click on the transaction number of the desired transaction.
©2015 Heartland Payment Systems, Inc., All Rights Reserved 44
Portico VT Online User GuidePeripheral GuideTransition Guide, v2.11—December 2015 2 Procedures
Note: The Results per page defaults to 25, but can be adjusted manually to increase the results to 50, 75, or 100. If you have multiple pages on the report, use the paging functionality in the lower right-hand corner. You can click the arrow or manually enter the page number to go directly to that page.
Note: PayPlan customers have additional search criteria and see additional information in the report results. They can search on Schedule ID. In the report results, a column for the Schedule ID displays. PayPlan users can click on the Schedule ID to display the View/Edit Schedule page. PayPlan users can also click on the Customer ID to display the the View Customer page.
2.9.5 Run an open authorizations reportUse the open authorizations report to locate authorizations that have not been closed.
1. To run a find transactions details report, click Reporting > Open Authorizations on the main menu.
2. Type the Transaction Number or any combination of search criteria.
Note: Leave the fields blank and set the Transaction Type to "All" to retrieve all open authorizations.
3. Click Search.
Step Result: A list of open authorizations meeting the search criteria is displayed.
4. To export the list:
a. Click the Click to Export icon in the top right-hand corner and select the file format for the export (XML, PDF, CSV, Tab Delimited, or Excel).
Step Result: The Save As window displays with file type selected.
b. Type a name for the file. c. Select a location. d. Click Save.
Note: If you select the CSV file type, any commas in the exported data will be removed and amount fields will be exported with the $ and decimal (for example, $1576.32).
6. Click on the transaction number of the desired transaction.
Note: The Results per page defaults to 25, but can be adjusted manually to increase the results to 50, 75, or 100. If you have multiple pages on the report, use the paging functionality in the lower right-hand corner. You can click the arrow or manually enter the page number to go directly to that page.
©2015 Heartland Payment Systems, Inc., All Rights Reserved 45
Portico VT Online User GuidePeripheral GuideTransition Guide, v2.11—December 2015 2 Procedures
2.9.6 Run a fraud decline details reportUse the fraud decline details report to review eCommerce transactions that were declined by Heartland’s Advanced Fraud Screening (AFS) service.
Note: This report option only displays when the following conditions are all true:
l Device is configured for eCommerce l Merchant is enrolled in AFS service l User has a Merchant Manager or Merchant Admin role
1. To run a fraud decline details report, click Reporting > Fraud Decline Details on the main menu.
2. Type the Transaction Number or any combination of search criteria.
Note: Leave the fields blank and set the Transaction Type to "All" to retrieve all transactions declined by the AFS service for the current date.
3. Click Search.
Step Result: A list of transactions meeting the search criteria is displayed.
4. To export the list:
a. Click the Click to export icon in the top right-hand corner and select the file format for the export (XML, PDF, CSV, Tab Delimited, or Excel).
Step Result: The Save As window displays with file type selected. b. Type a name for the file. c. Select a location. d. Click Save.
Note: If you select the CSV file type, any commas in the exported data will be removed and amount fields will be exported with the $ and decimal (for example, $1576.32).
5. To see transaction details, click the transaction number of the desired transaction.
Note: The Results per page defaults to 25, but can be adjusted manually to increase the results to 50, 75, or 100. If you have multiple pages on the report, use the paging functionality in the lower right-hand corner. You can click the arrow or manually enter the page number to go directly to that page.
2.9.6.1 Override a fraud decline
Use the Override action to initiate an identical request that will by-pass the AFS service. Override is allowed if the following conditions are true:
l Transaction date must be within three calendar days l Transaction has not already been overridden l Card Brand is Visa, MasterCard, or American Express
©2015 Heartland Payment Systems, Inc., All Rights Reserved 46
Portico VT Online User GuidePeripheral GuideTransition Guide, v2.11—December 2015 2 Procedures
The far right column of the report has an Action column. If override is allowed, the override text displays in red. If either of the above conditions is false, the override text displays in black. The Override option is also available from the Detailed results page (action icon at the top of the screen). Click the transaction number to open the Details results page. If an override is allowed, the override transaction icon will display at the top of the page.
2.9.7 Run an historical batch reportUse the historical batch report to find information on previously closed batches.
1. To run the historical batch report, click Reporting > Historical Batch on the main menu.
2. Type or select the Start and End Date search criteria.
Note: Leave the fields blank to see all transactions.
3. Click Search.
Step Result: A list of batch summary records meeting the search criteria is displayed.
4. Click Summary for a batch to see a summary report. 5. Click the Batch ID number to see the batch details.
Note: The Results per page defaults to 25, but can be adjusted manually to increase the results to 50, 75, or 100. If you have multiple pages on the report, use the paging functionality in the lower right-hand corner. You can click the arrow or manually enter the page number to go directly to that page.
2.9.8 Run an HMS details reportUse the HMS details report to locate gift and loyalty transaction records.
1. To run an HMS details report, click Reporting > HMS Details on the main menu. 2. Type the Transaction Number or any combination of search criteria.
Note: Leave the fields blank and set the Status to "All Approval" or "All Statuses" to retrieve a general list of transactions.
3. To see voids in the list, check Include Voided Transactions. 4. Click Search.
Step Result: A list of transactions meeting the search criteria is displayed.
5. Click on the transaction number of the desired transaction.
Note: The Results per page defaults to 25, but can be adjusted manually to increase the results to 50, 75, or 100. If you have multiple pages on the report, use the paging functionality in the lower right-hand corner. You can click the arrow or manually enter the page number to go directly to that page.
©2015 Heartland Payment Systems, Inc., All Rights Reserved 47

Portico VT Online User GuidePeripheral GuideTransition Guide, v2.11—December 2015 2 Procedures
2.9.9 Run a check details reportUse the check details report to locate check transaction records.
1. To run a check details report, click Reporting > Check Details on the main menu. 2. Type the Transaction Number or any combination of search criteria.
Note: Leave the fields blank and set the Status to "All Approval" or "All Statuses" to retrieve a general list of transactions.
3. To see voids in the list, check Include Voided Transactions. 4. Click Search.
Step Result: A list of transactions meeting the search criteria is displayed.
5. Click on the transaction number of the desired transaction.
Note: The Results per page defaults to 25, but can be adjusted manually to increase the results to 50, 75, or 100. If you have multiple pages on the report, use the paging functionality in the lower right-hand corner. You can click the arrow or manually enter the page number to go directly to that page.
2.9.10 Open the InfoCentral reporting siteUse the InfoCentral reporting option to sign in to the InfoCentral reporting site. If you are not a current Heartland customer or have not been set up with an InfoCentral account, contact Heartland.
1. To open the InfoCentral reporting site, from the main menu click Reporting > InfoCentral Reporting.
2. Type the user name and password in the appropriate fields. 3. Click Login.
Step Result: Your InfoCentral reporting site is displayed.
©2015 Heartland Payment Systems, Inc., All Rights Reserved 48
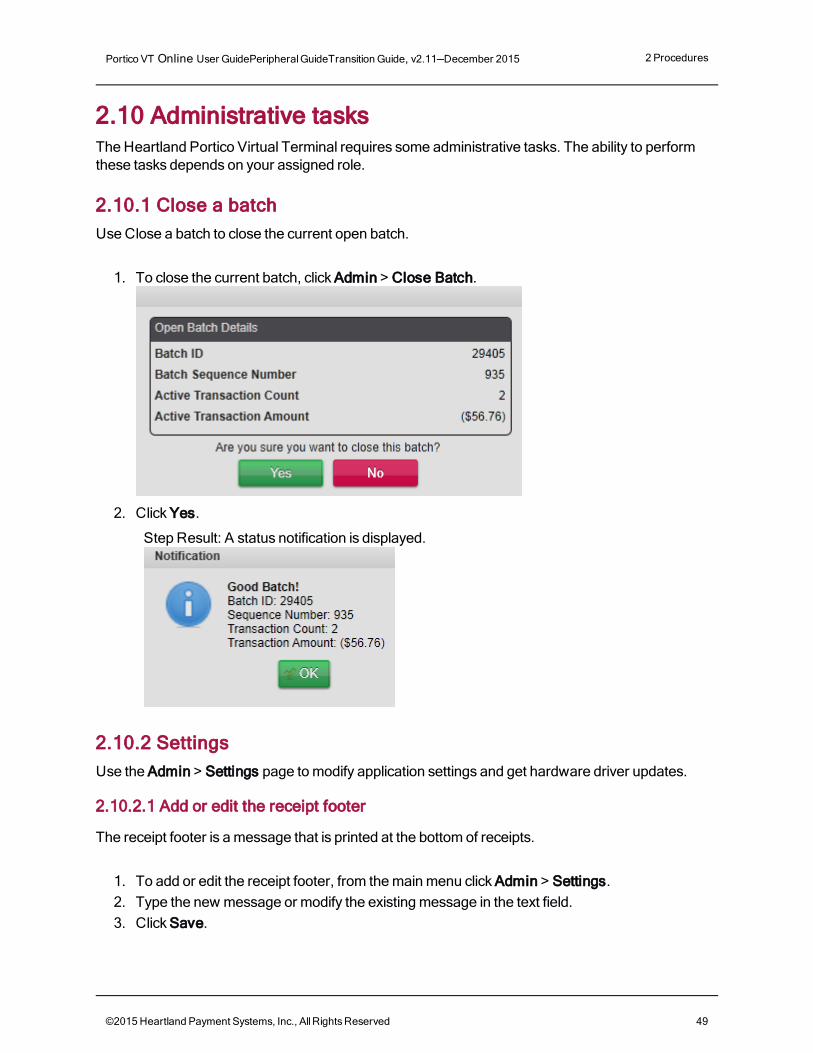
Portico VT Online User GuidePeripheral GuideTransition Guide, v2.11—December 2015 2 Procedures
2.10 Administrative tasksThe Heartland Portico Virtual Terminal requires some administrative tasks. The ability to perform these tasks depends on your assigned role.
2.10.1 Close a batchUse Close a batch to close the current open batch.
1. To close the current batch, click Admin > Close Batch.
2. Click Yes.
Step Result: A status notification is displayed.
2.10.2 SettingsUse the Admin > Settings page to modify application settings and get hardware driver updates.
2.10.2.1 Add or edit the receipt footer
The receipt footer is a message that is printed at the bottom of receipts.
1. To add or edit the receipt footer, from the main menu click Admin > Settings. 2. Type the new message or modify the existing message in the text field. 3. Click Save.
©2015 Heartland Payment Systems, Inc., All Rights Reserved 49
Portico VT Online User GuidePeripheral GuideTransition Guide, v2.11—December 2015 2 Procedures
2.10.2.2 Configure the input hardware
Use the Hardware tab in Settings to configure your input devices. Refer to the Peripheral Guide for details on configuring your device(s).
2.10.2.3 Name a terminal device
Use the Device tab in Settings to name to your terminal devices.
1. To name your input devices, from the main menu click Admin > Settings > Device. 2. Select a terminal device number. 3. Type a name for the device. 4. Click Save.
2.10.2.4 Update hardware drivers
Use the Hardware Drivers tab in Settings to update the driver software for your supported peripheral devices.
Note: Some drivers are specific to the operating system. Verify your computer's operating system prior to updating any drivers.
1. To update your hardware drivers, click Admin > Settings > Hardware Drivers on the main menu.
2. Click the applicable operating system link for the peripheral device. 3. Follow the prompts. 4. Click Save.
2.10.3 Create new userAn Administrator has the ability to create new users and assign specific roles to them.
1. To create a new user, click Admin > User Management.
Step Result: The InfoCentral login page opens in a browser.
2. Type the user's information in the appropriate fields. 3. Click Login.
Step Result: The merchant InfoCentral start page is displayed.
4. Click Access > Manage Users.
Step Result: The Manage Users page displays with your user information.
©2015 Heartland Payment Systems, Inc., All Rights Reserved 50
Portico VT Online User GuidePeripheral GuideTransition Guide, v2.11—December 2015 2 Procedures
5. Click New +. 6. Type the user's information in the appropriate fields and select the access level from the Job
Level drop-down list. 7. Click Next. 8. To set access for the InfoCentral reporting, verify the correct access level is selected and click
Assign.
Step Result: The assigned access populates in the grid.
9. To set access for the Portico Virtual Terminal application, click Grant Custom Access.
Step Result: A Search option displays, and below that, a list of the user's current locations.
10. To search for another location, type the merchant information in the applicable fields and click Search.Note: To go back to the original list of locations, leave the fields blank and click Search.
11. Check the boxes of the location(s) for which the user will need VT permissions.
Step Result: A list of pre-designated custom roles populates in the box to the right.
12. Find the Portico Virtual Terminal role appropriate for the user (see Permissions by role chart) and click Assign.
Step Result: The selected role populates in the Assigned Access grid above (you may need to scroll up to see this).
13. Assign any additional roles.Note: Most users will have only one HIC access level and one VT access level.
14. To customize access, see Customize access.
15. Click Next.
Step Result: The Summary page displays. The Default Device is blank. You must select a default device, or the user will not be able to log in.
16. Next to Portico Virtual Terminal, click Edit.
Step Result: The Portico Virtual Terminal pop up displays.
17. Select a default device from the drop-down list. 18. Click OK. 19. Click Create User.
Step Result: The new user is created. An email is sent to complete user setup, allowing the user to set up their user name and password.
20. Click OK.
©2015 Heartland Payment Systems, Inc., All Rights Reserved 51
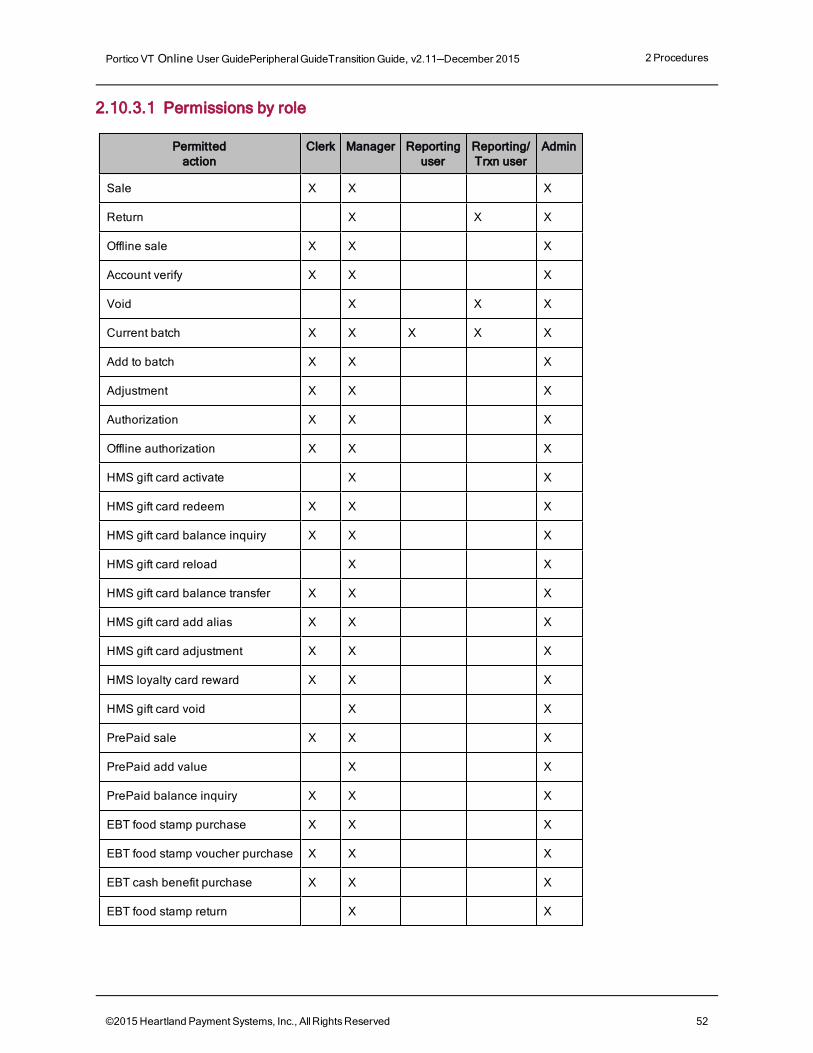
Portico VT Online User GuidePeripheral GuideTransition Guide, v2.11—December 2015 2 Procedures
2.10.3.1 Permissions by role
Permittedaction
Clerk Manager Reportinguser
Reporting/Trxn user
Admin
Sale X X X
Return X X X
Offline sale X X X
Account verify X X X
Void X X X
Current batch X X X X X
Add to batch X X X
Adjustment X X X
Authorization X X X
Offline authorization X X X
HMS gift card activate X X
HMS gift card redeem X X X
HMS gift card balance inquiry X X X
HMS gift card reload X X
HMS gift card balance transfer X X X
HMS gift card add alias X X X
HMS gift card adjustment X X X
HMS loyalty card reward X X X
HMS gift card void X X
PrePaid sale X X X
PrePaid add value X X
PrePaid balance inquiry X X X
EBT food stamp purchase X X X
EBT food stamp voucher purchase X X X
EBT cash benefit purchase X X X
EBT food stamp return X X
©2015 Heartland Payment Systems, Inc., All Rights Reserved 52
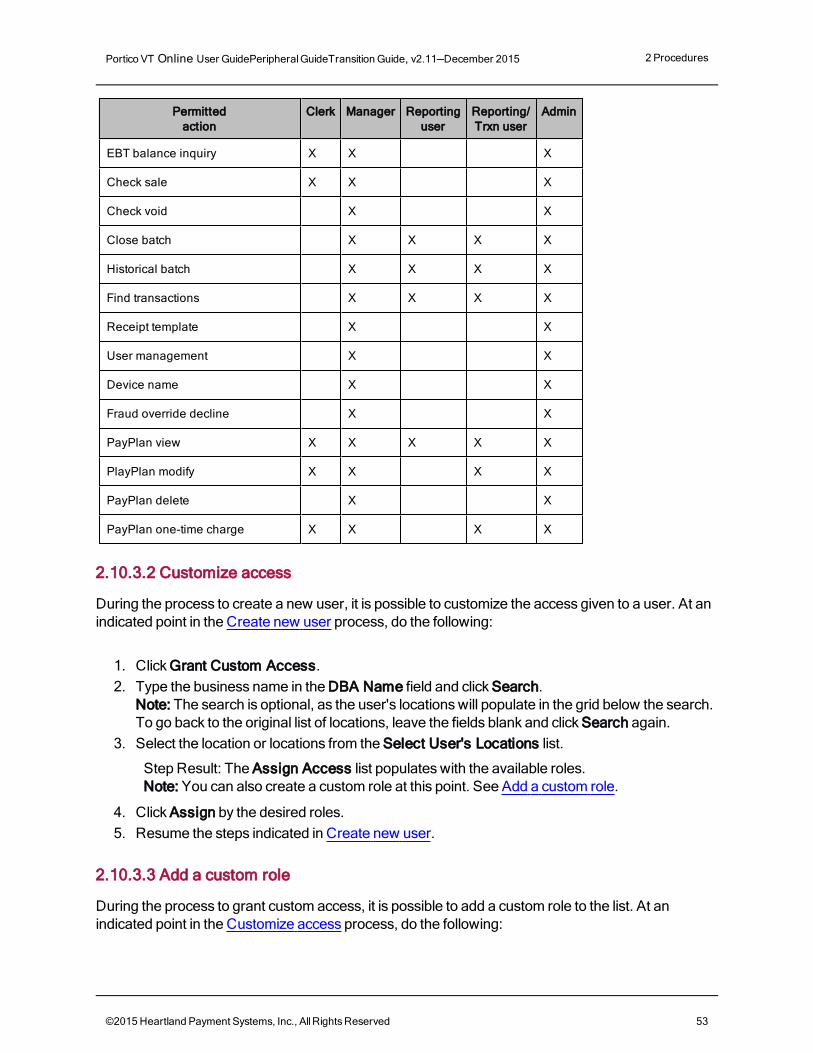
Portico VT Online User GuidePeripheral GuideTransition Guide, v2.11—December 2015 2 Procedures
Permittedaction
Clerk Manager Reportinguser
Reporting/Trxn user
Admin
EBT balance inquiry X X X
Check sale X X X
Check void X X
Close batch X X X X
Historical batch X X X X
Find transactions X X X X
Receipt template X X
User management X X
Device name X X
Fraud override decline X X
PayPlan view X X X X X
PlayPlan modify X X X X
PayPlan delete X X
PayPlan one-time charge X X X X
2.10.3.2 Customize access
During the process to create a new user, it is possible to customize the access given to a user. At an indicated point in the Create new user process, do the following:
1. Click Grant Custom Access. 2. Type the business name in the DBA Name field and click Search.
Note: The search is optional, as the user's locations will populate in the grid below the search. To go back to the original list of locations, leave the fields blank and click Search again.
3. Select the location or locations from the Select User's Locations list.
Step Result: The Assign Access list populates with the available roles.Note: You can also create a custom role at this point. See Add a custom role.
4. Click Assign by the desired roles. 5. Resume the steps indicated in Create new user.
2.10.3.3 Add a custom role
During the process to grant custom access, it is possible to add a custom role to the list. At an indicated point in the Customize access process, do the following:
©2015 Heartland Payment Systems, Inc., All Rights Reserved 53
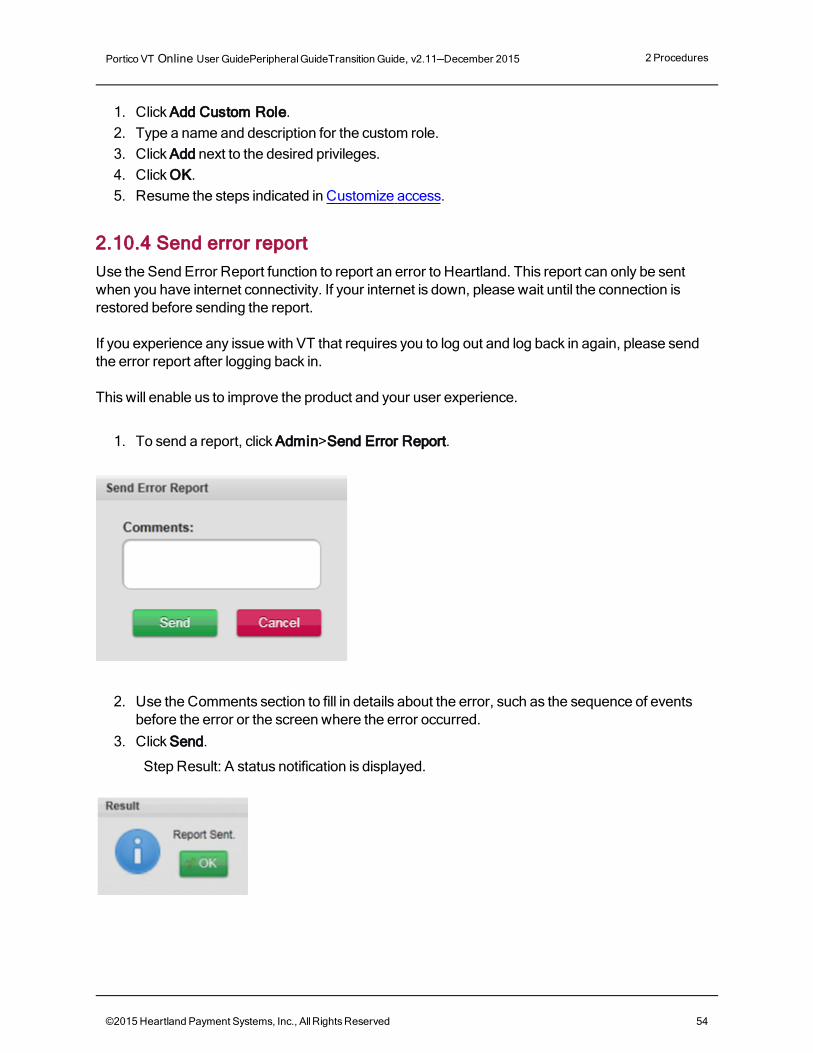
Portico VT Online User GuidePeripheral GuideTransition Guide, v2.11—December 2015 2 Procedures
1. Click Add Custom Role. 2. Type a name and description for the custom role. 3. Click Add next to the desired privileges. 4. Click OK. 5. Resume the steps indicated in Customize access.
2.10.4 Send error reportUse the Send Error Report function to report an error to Heartland. This report can only be sent when you have internet connectivity. If your internet is down, please wait until the connection is restored before sending the report. If you experience any issue with VT that requires you to log out and log back in again, please send the error report after logging back in. This will enable us to improve the product and your user experience.
1. To send a report, click Admin>Send Error Report.
2. Use the Comments section to fill in details about the error, such as the sequence of events before the error or the screen where the error occurred.
3. Click Send.
Step Result: A status notification is displayed.
©2015 Heartland Payment Systems, Inc., All Rights Reserved 54
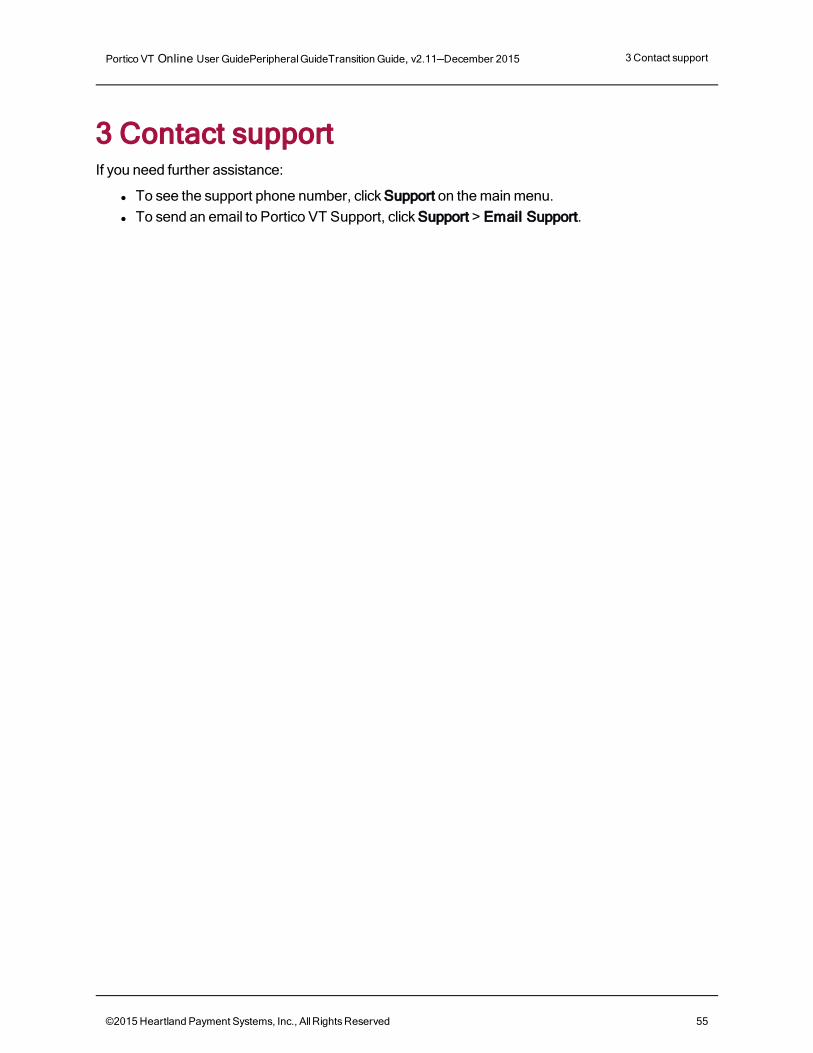
Portico VT Online User GuidePeripheral GuideTransition Guide, v2.11—December 2015 3 Contact support
3 Contact supportIf you need further assistance:
l To see the support phone number, click Support on the main menu. l To send an email to Portico VT Support, click Support > Email Support.
©2015 Heartland Payment Systems, Inc., All Rights Reserved 55
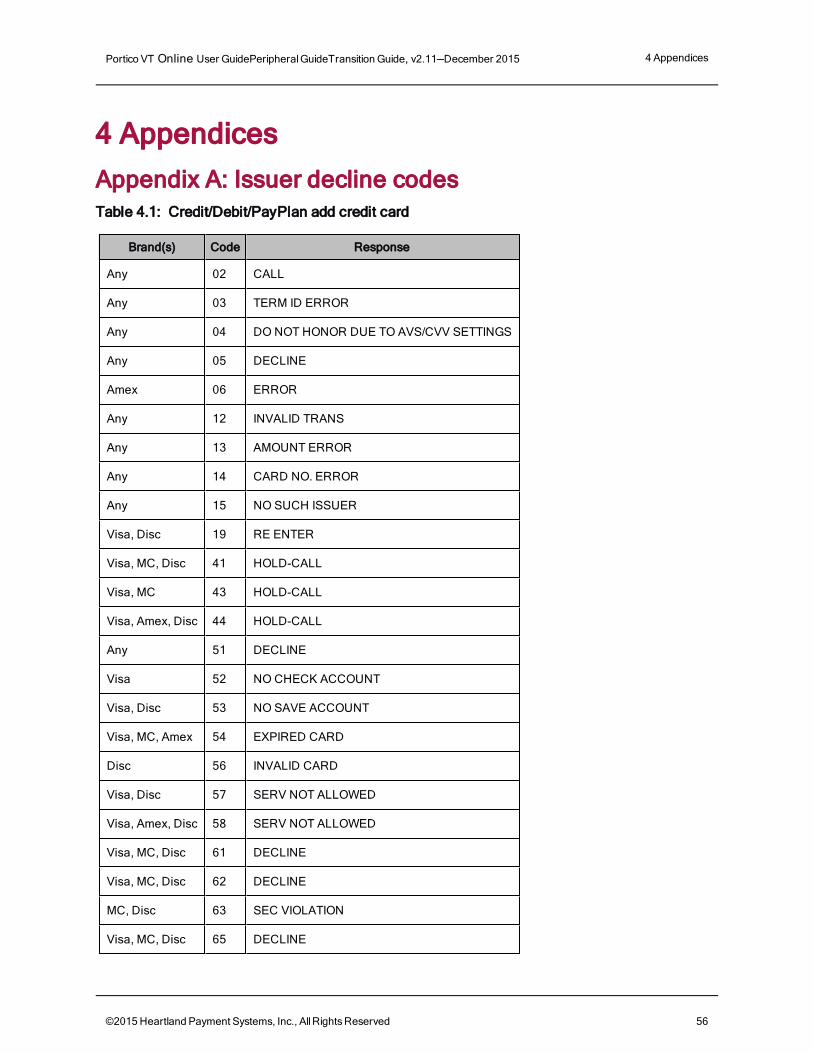
Portico VT Online User GuidePeripheral GuideTransition Guide, v2.11—December 2015 4 Appendices
4 AppendicesAppendix A: Issuer decline codesTable 4.1: Credit/Debit/PayPlan add credit card
Brand(s) Code Response
Any 02 CALL
Any 03 TERM ID ERROR
Any 04 DO NOT HONOR DUE TO AVS/CVV SETTINGS
Any 05 DECLINE
Amex 06 ERROR
Any 12 INVALID TRANS
Any 13 AMOUNT ERROR
Any 14 CARD NO. ERROR
Any 15 NO SUCH ISSUER
Visa, Disc 19 RE ENTER
Visa, MC, Disc 41 HOLD-CALL
Visa, MC 43 HOLD-CALL
Visa, Amex, Disc 44 HOLD-CALL
Any 51 DECLINE
Visa 52 NO CHECK ACCOUNT
Visa, Disc 53 NO SAVE ACCOUNT
Visa, MC, Amex 54 EXPIRED CARD
Disc 56 INVALID CARD
Visa, Disc 57 SERV NOT ALLOWED
Visa, Amex, Disc 58 SERV NOT ALLOWED
Visa, MC, Disc 61 DECLINE
Visa, MC, Disc 62 DECLINE
MC, Disc 63 SEC VIOLATION
Visa, MC, Disc 65 DECLINE
©2015 Heartland Payment Systems, Inc., All Rights Reserved 56
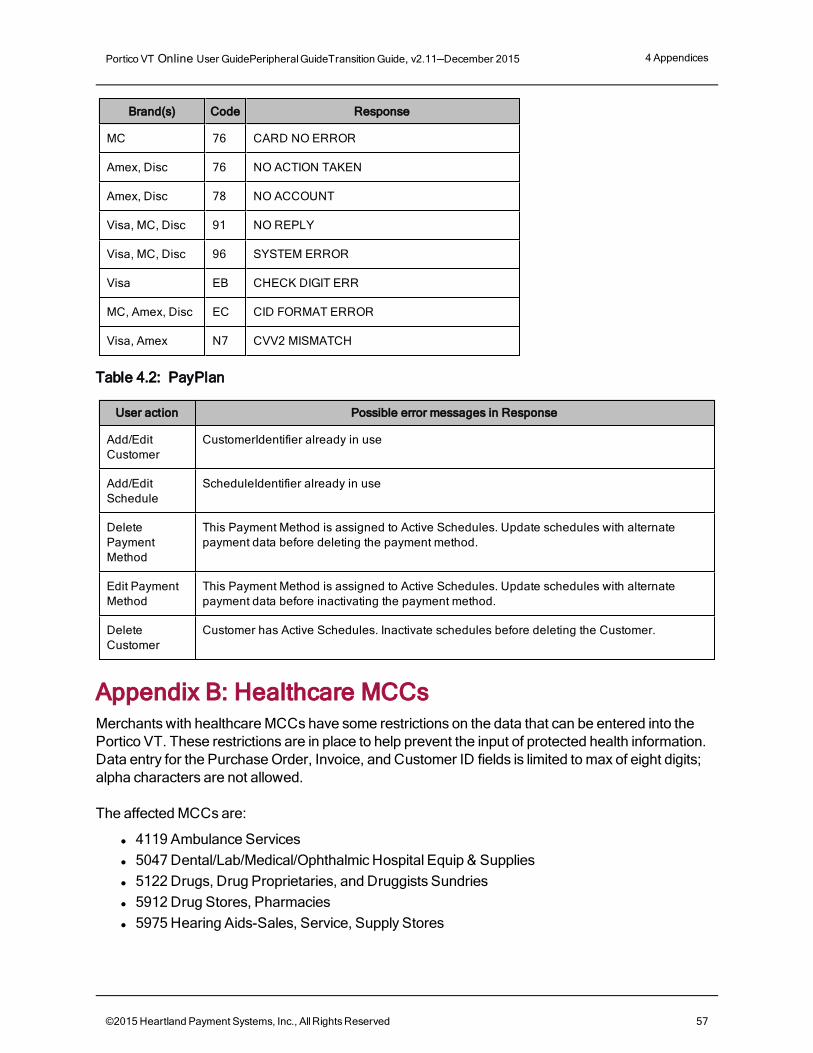
Portico VT Online User GuidePeripheral GuideTransition Guide, v2.11—December 2015 4 Appendices
Brand(s) Code Response
MC 76 CARD NO ERROR
Amex, Disc 76 NO ACTION TAKEN
Amex, Disc 78 NO ACCOUNT
Visa, MC, Disc 91 NO REPLY
Visa, MC, Disc 96 SYSTEM ERROR
Visa EB CHECK DIGIT ERR
MC, Amex, Disc EC CID FORMAT ERROR
Visa, Amex N7 CVV2 MISMATCH
Table 4.2: PayPlan
User action Possible error messages in Response
Add/Edit Customer
CustomerIdentifier already in use
Add/Edit Schedule
ScheduleIdentifier already in use
Delete Payment Method
This Payment Method is assigned to Active Schedules. Update schedules with alternate payment data before deleting the payment method.
Edit Payment Method
This Payment Method is assigned to Active Schedules. Update schedules with alternate payment data before inactivating the payment method.
Delete Customer
Customer has Active Schedules. Inactivate schedules before deleting the Customer.
Appendix B: Healthcare MCCsMerchants with healthcare MCCs have some restrictions on the data that can be entered into the Portico VT. These restrictions are in place to help prevent the input of protected health information. Data entry for the Purchase Order, Invoice, and Customer ID fields is limited to max of eight digits; alpha characters are not allowed. The affected MCCs are:
l 4119 Ambulance Services l 5047 Dental/Lab/Medical/Ophthalmic Hospital Equip & Supplies l 5122 Drugs, Drug Proprietaries, and Druggists Sundries l 5912 Drug Stores, Pharmacies l 5975 Hearing Aids-Sales, Service, Supply Stores
©2015 Heartland Payment Systems, Inc., All Rights Reserved 57
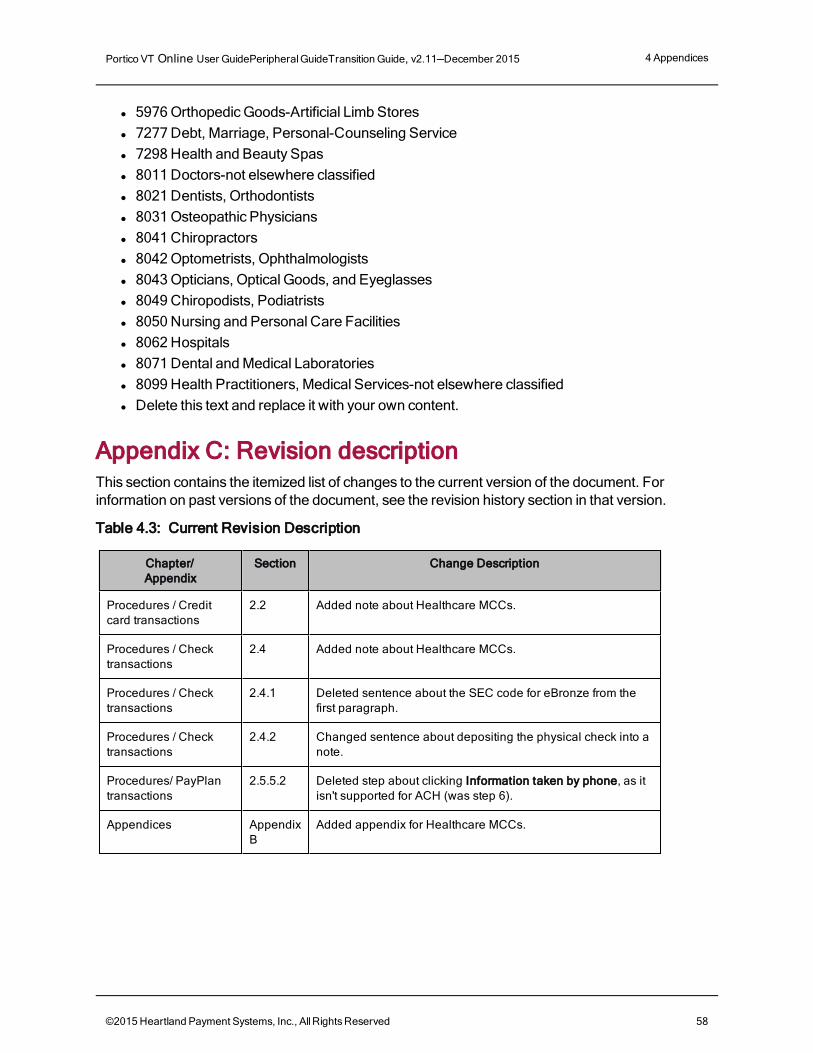
Portico VT Online User GuidePeripheral GuideTransition Guide, v2.11—December 2015 4 Appendices
l 5976 Orthopedic Goods-Artificial Limb Stores l 7277 Debt, Marriage, Personal-Counseling Service l 7298 Health and Beauty Spas l 8011 Doctors-not elsewhere classified l 8021 Dentists, Orthodontists l 8031 Osteopathic Physicians l 8041 Chiropractors l 8042 Optometrists, Ophthalmologists l 8043 Opticians, Optical Goods, and Eyeglasses l 8049 Chiropodists, Podiatrists l 8050 Nursing and Personal Care Facilities l 8062 Hospitals l 8071 Dental and Medical Laboratories l 8099 Health Practitioners, Medical Services-not elsewhere classified l Delete this text and replace it with your own content.
Appendix C: Revision descriptionThis section contains the itemized list of changes to the current version of the document. For information on past versions of the document, see the revision history section in that version.
Table 4.3: Current Revision Description
Chapter/Appendix
Section Change Description
Procedures / Credit card transactions
2.2 Added note about Healthcare MCCs.
Procedures / Check transactions
2.4 Added note about Healthcare MCCs.
Procedures / Check transactions
2.4.1 Deleted sentence about the SEC code for eBronze from the first paragraph.
Procedures / Check transactions
2.4.2 Changed sentence about depositing the physical check into a note.
Procedures/ PayPlan transactions
2.5.5.2 Deleted step about clicking Information taken by phone, as it isn't supported for ACH (was step 6).
Appendices Appendix B
Added appendix for Healthcare MCCs.
©2015 Heartland Payment Systems, Inc., All Rights Reserved 58
Recommended