Page 1 of 45 “Rational Support Whitepaper”
Rational Rhapsody with Workbench
Integrate, Design and Debug
Manish Kumar
June 18, 2010
Page 2 of 45 “Rational Support Whitepaper”
INTRODUCTION .................................................................................................................................. 3
OVERVIEW OF THE INTEGRATION .............................................................................................. 4
BENEFITS OF USING THE INTEGRATION ................................................................................. 4
ENABLING RHAPSODY AND WORKBENCH TO WORK TOGETHER #1 ...................................................... 5
SETTING UP WORKBENCH ...................................................................................................................... 5
CONFIGURING HOST NETWORK...................................................................................................... 7
CONFIGURING TARGET .................................................................................................................... 7
RHAPSODY INSTALLATION .................................................................................................................. 18
RUNNING THE MODEL #2 ....................................................................................................................... 20
CREATING A RHAPSODY DEMO MODEL……………………………………………………………...….
BUILD AND EXECUTE.……………………………………………………………...……………………
DEBUGGING #3 .................................................................................................................................. 28
TRACK THE TASKS AND CONTEXTS USING SYSTEM VIEWER ......................................................... 32
SOURCE LEVEL DEBUGGING…………………………………………………………………………..
ENABLING EXECUTION VIA WEB #4 ...................................................................................................... 40
FAQ’S #5 ............................................................................................................................................... 42
REFERENCES ..................................................................................................................................... 44
Page 3 of 45 “Rational Support Whitepaper”
Introduction
The purpose of this document is to describe the integration between Rhapsody
and Workbench.
This document explains how Windriver Workbench installation can be configured
to enable communication with the host system.
The host system here refers to the system where the application binary is built.
You will use Rhapsody to model and build the binary.
The document also describes the changes made to the Rhapsody configuration to
enable it to be built using VxWorks compiler.
Further the document describes how the binary ported on to the target and the
kernel itself can be configured to allow tracking of the current running context
and the events that cause the context switch.
Continuing with the debugging, the document touches up on enabling and
performing source level debugging.
Finally, this document describes enabling web and generating events from a web
interface.
Page 4 of 45 “Rational Support Whitepaper”
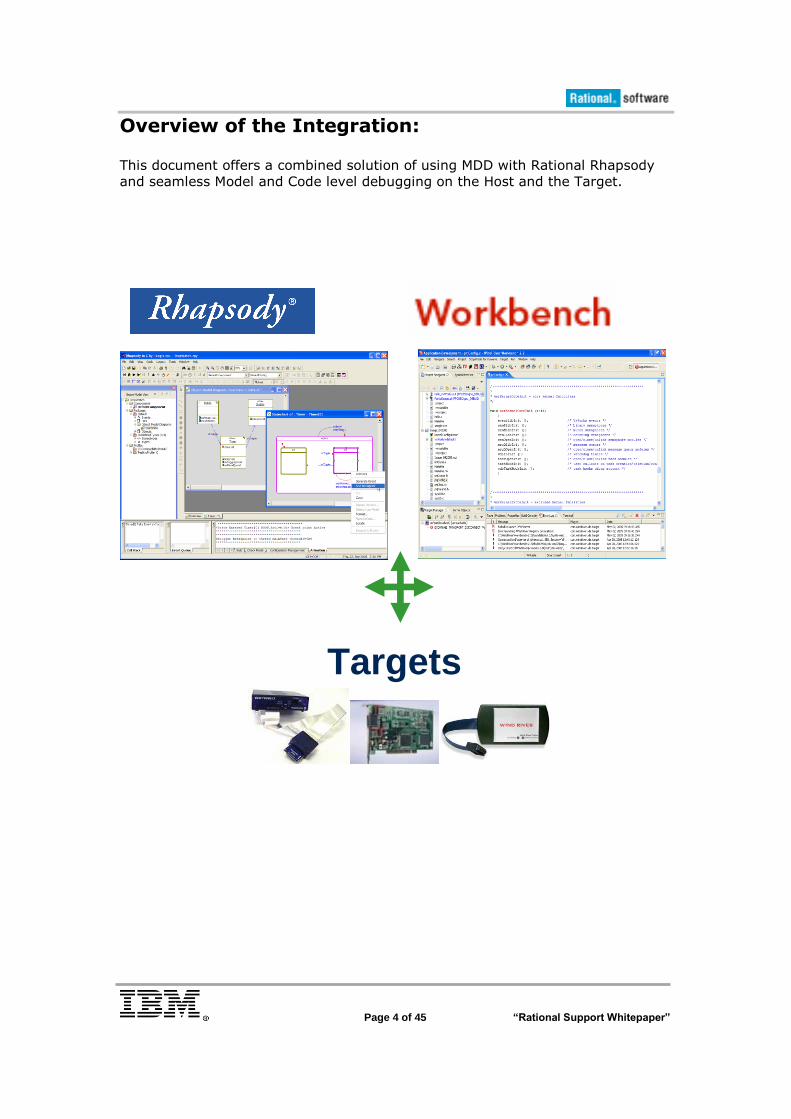
Overview of the Integration:
This document offers a combined solution of using MDD with Rational Rhapsody
and seamless Model and Code level debugging on the Host and the Target.
Targets
Page 5 of 45 “Rational Support Whitepaper”
Benefits of using the Integration
New Capabilities:
- Development at a higher level of abstraction
- Modeling tightly integrated with IDE and RTOS
- Seamless Model and Code level debugging on the Host and the Target
- Development integrated with testing
- Modular integrated tool chain covering entire development process
(requirements to deployment)
Impact:
- Higher developer productivity
- Shorter time to market
- Lower project risk
- Lower cost of development
- Lower cost of quality
- Higher legacy software and software component reuse
- Higher resource deployment flexibility
- Rapid response product development process
Page 6 of 45 “Rational Support Whitepaper”
Enabling Rhapsody and Workbench to work with each other
Includes setting up workbench features like installing the WRTAP, Creating a
VxWorks Image file of SIMNT type. This will be helpful for users who do not have
a real target, thus you can use the Simulator. Later you will see installation of
Rhapsody to take VxWorks into account as a compiler.
1. Setting Up Workbench
Workbench installation provides you with the following environment:
– Wind River® Workbench 3.0
– VxWorks® 6.6
– VxWorks 6.6 BSP‟s SIMNT / PENTIUM®
– Wind River Compiler (Aka Diab Compiler)
– WindRiver Scope Tools and System Viewer
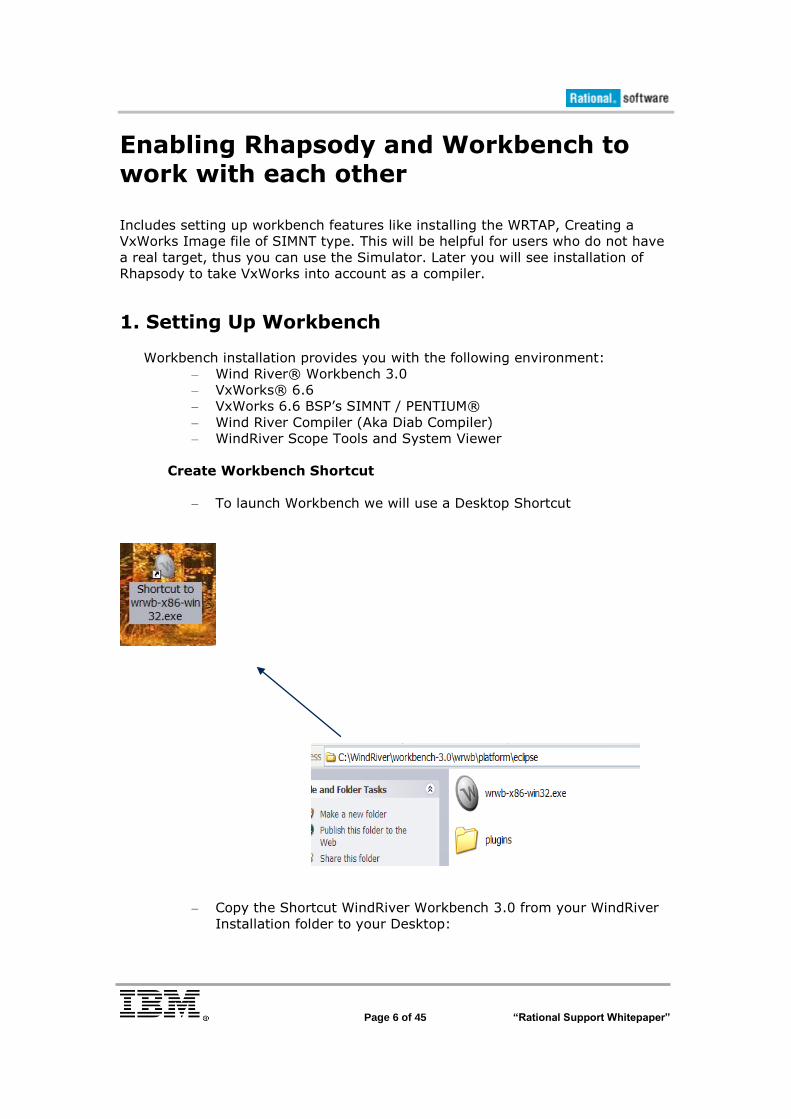
Create Workbench Shortcut
– To launch Workbench we will use a Desktop Shortcut
– Copy the Shortcut WindRiver Workbench 3.0 from your WindRiver
Installation folder to your Desktop:

Page 7 of 45 “Rational Support Whitepaper”
Updating the Path
The following must be added to the path in order to use the Rhapsody IDE
connection later on:
C:\WindRiver\workbench-3.0\wrwb\platform\eclipse;
Page 8 of 45 “Rational Support Whitepaper”
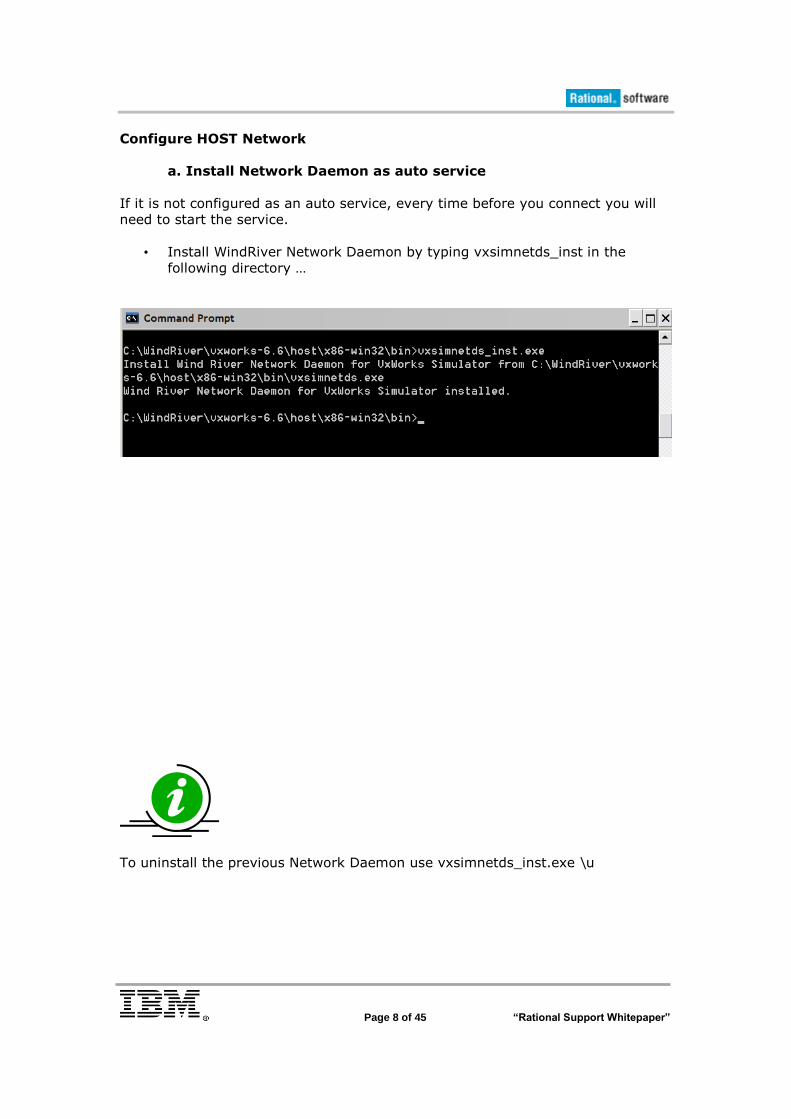
Configure HOST Network
a. Install Network Daemon as auto service
If it is not configured as an auto service, every time before you connect you will
need to start the service.
• Install WindRiver Network Daemon by typing vxsimnetds_inst in the
following directory …
To uninstall the previous Network Daemon use vxsimnetds_inst.exe \u
Page 9 of 45 “Rational Support Whitepaper”
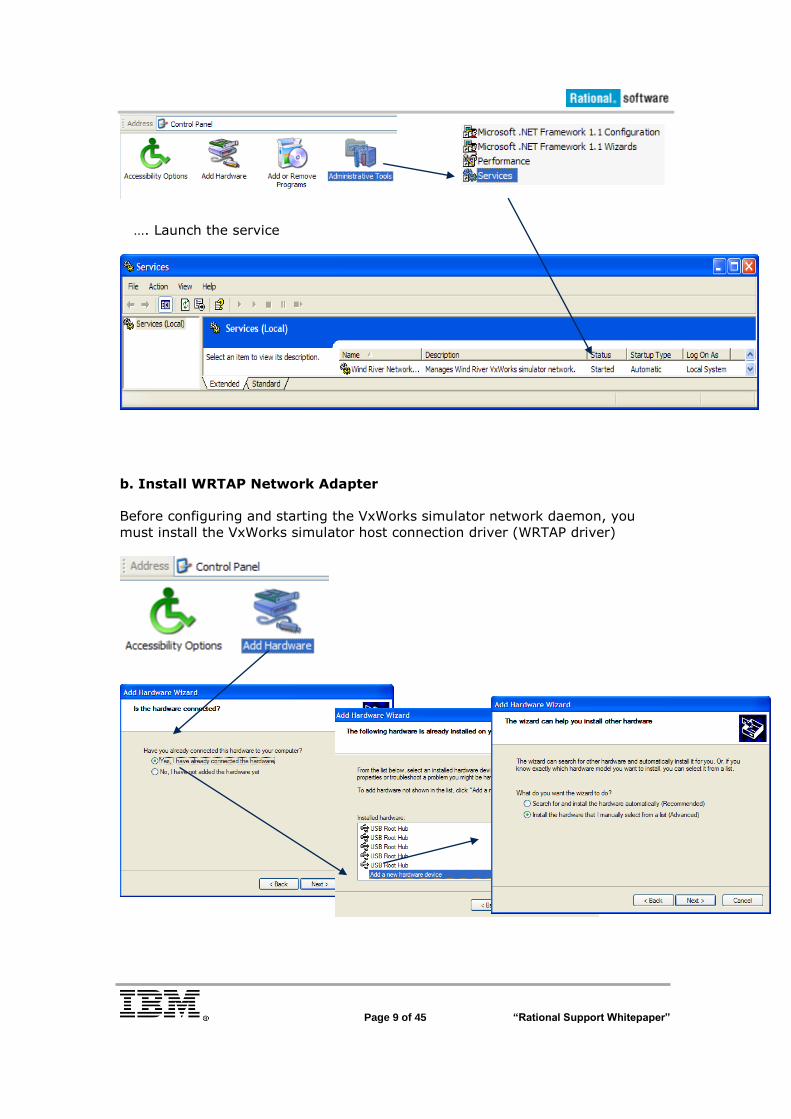
…. Launch the service
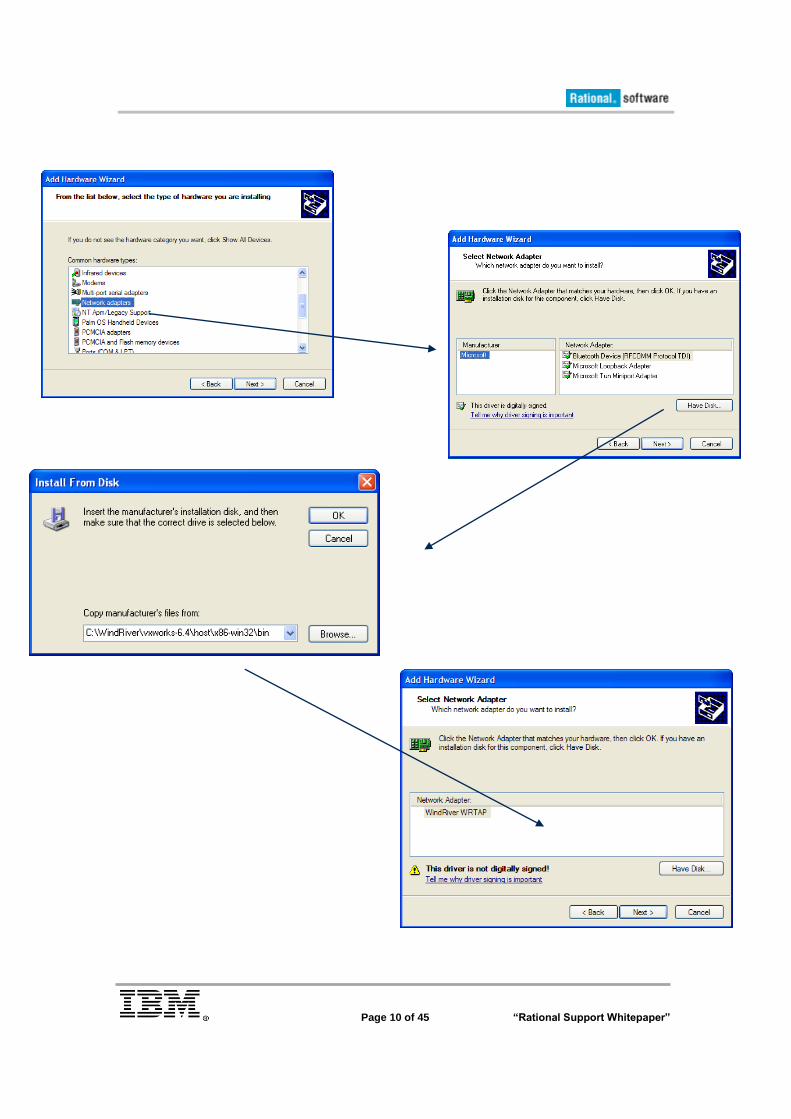
b. Install WRTAP Network Adapter
Before configuring and starting the VxWorks simulator network daemon, you
must install the VxWorks simulator host connection driver (WRTAP driver)
Page 10 of 45 “Rational Support Whitepaper”
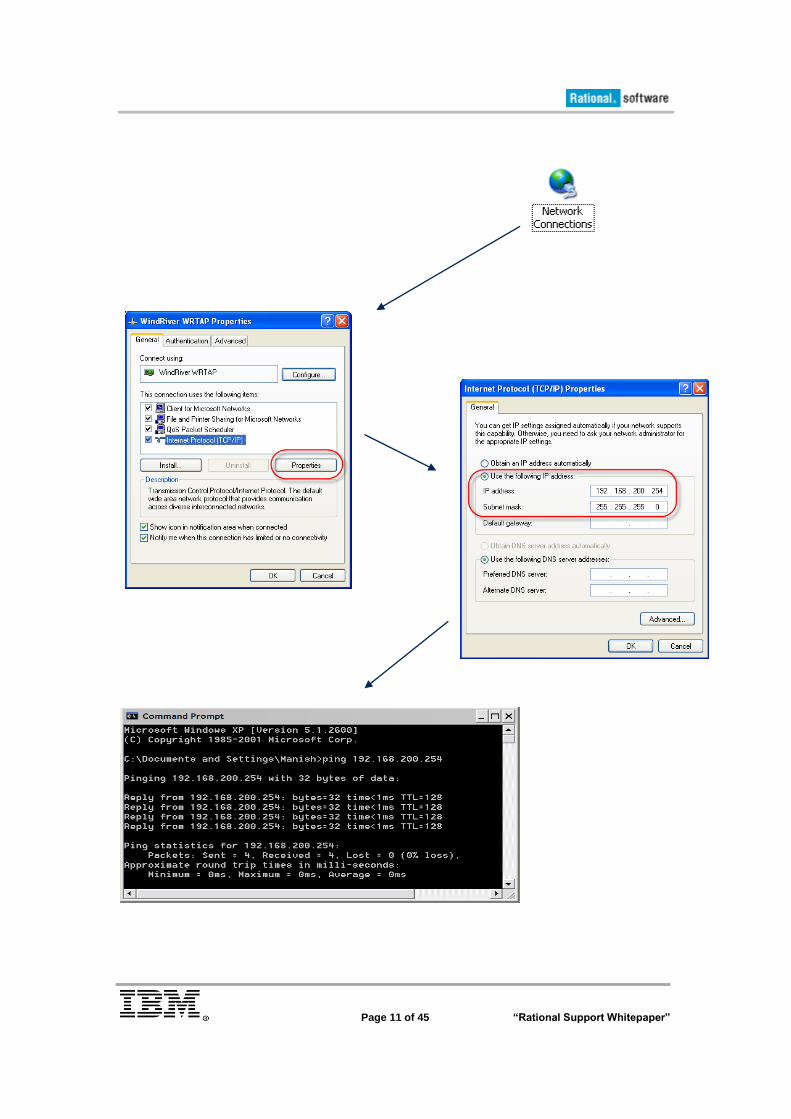
c. Checking WRTAP
Page 11 of 45 “Rational Support Whitepaper”

Page 12 of 45 “Rational Support Whitepaper”
Configuring the TARGET
• We will use the VxWorks Simulator as Target system.
• This requires the following steps:
– Creating a Vx-Simulator Image
– Configure the Vx-Sim connection
– Validate the connection
a. Creating Vx-Simulator Image
If users do not have a physical target, they can use Vx-Simulator.
• Launch Workbench
• Right click in the Project Navigator and select “New->VxWorks Image
Project”
Page 13 of 45 “Rational Support Whitepaper”
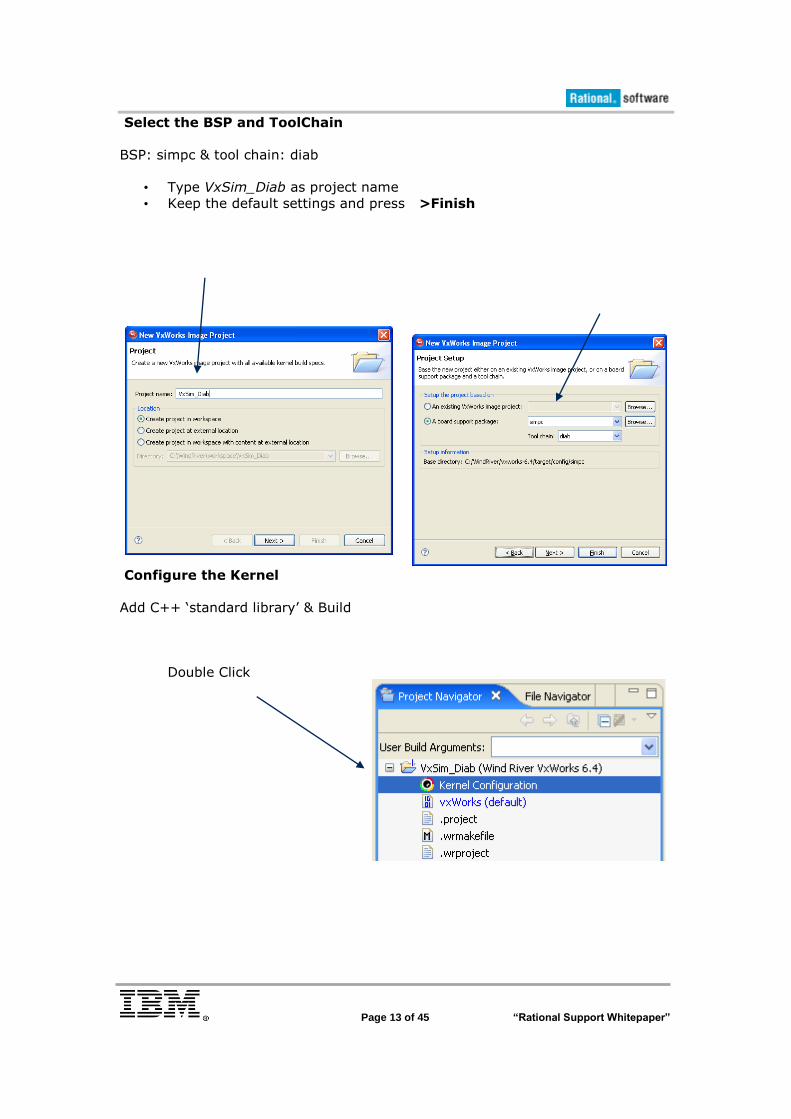
Select the BSP and ToolChain
BSP: simpc & tool chain: diab
• Type VxSim_Diab as project name
• Keep the default settings and press >Finish
Configure the Kernel
Add C++ „standard library‟ & Build
Double Click
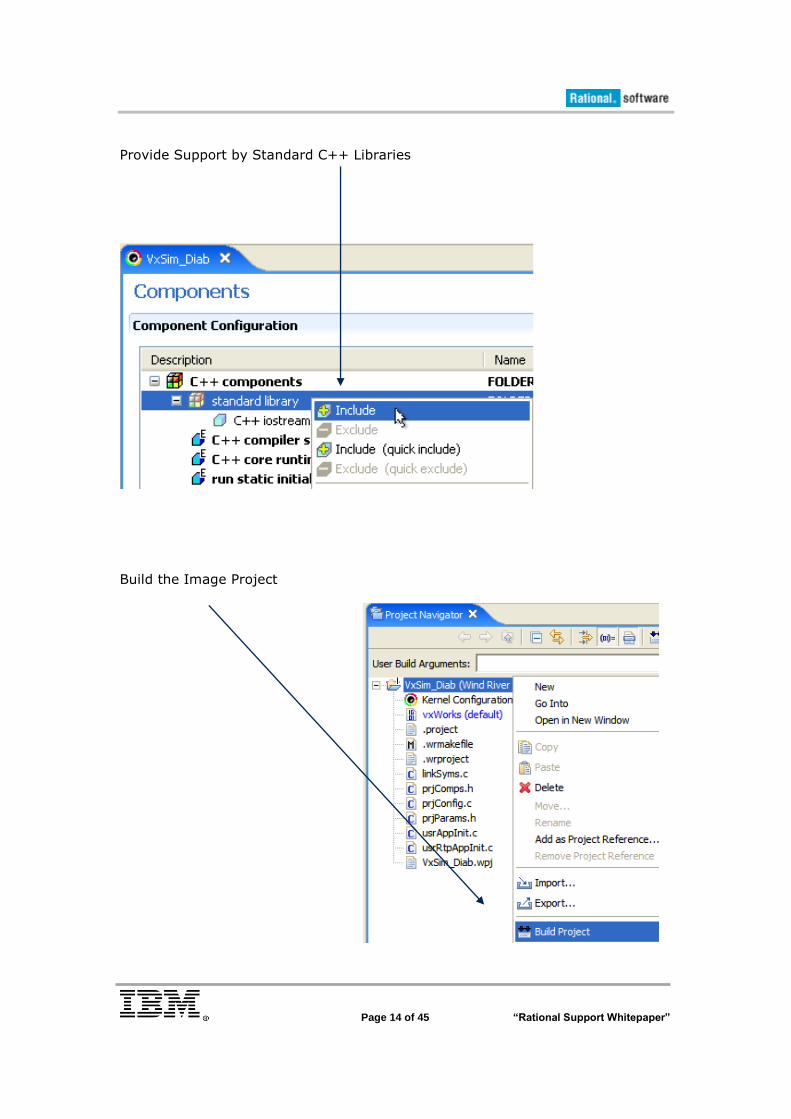
Page 14 of 45 “Rational Support Whitepaper”
Provide Support by Standard C++ Libraries
Build the Image Project
Page 15 of 45 “Rational Support Whitepaper”
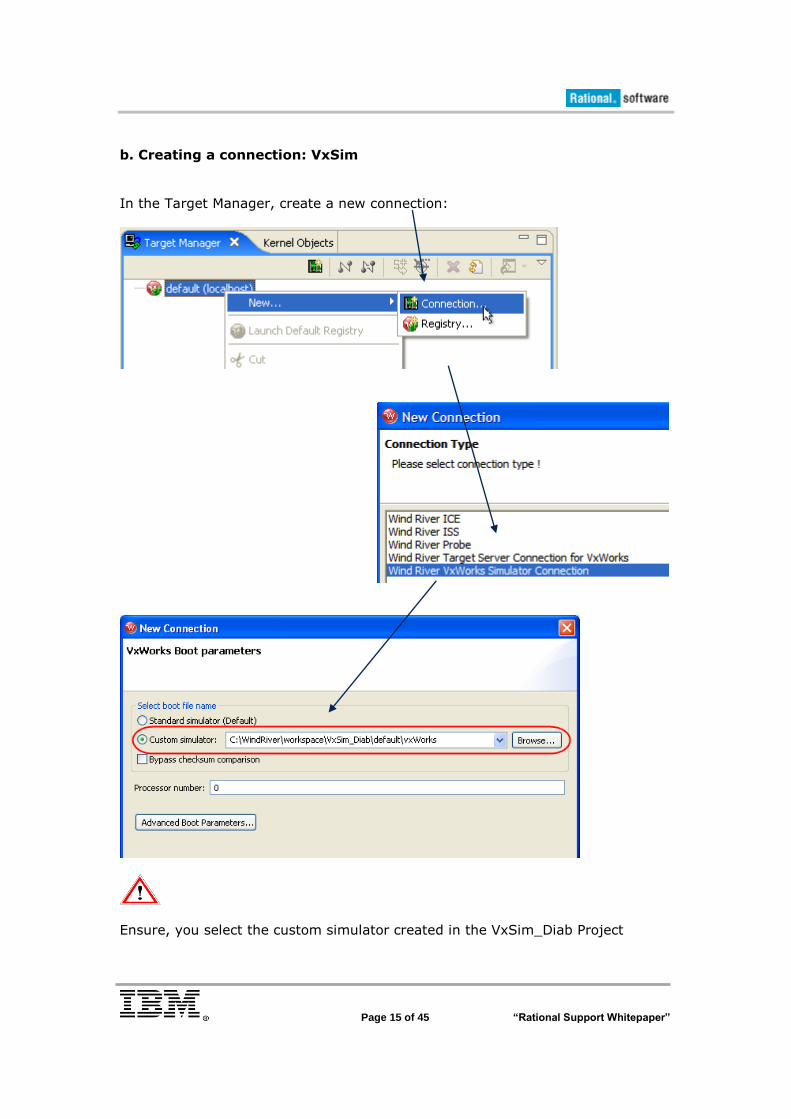
b. Creating a connection: VxSim
In the Target Manager, create a new connection:
Ensure, you select the custom simulator created in the VxSim_Diab Project
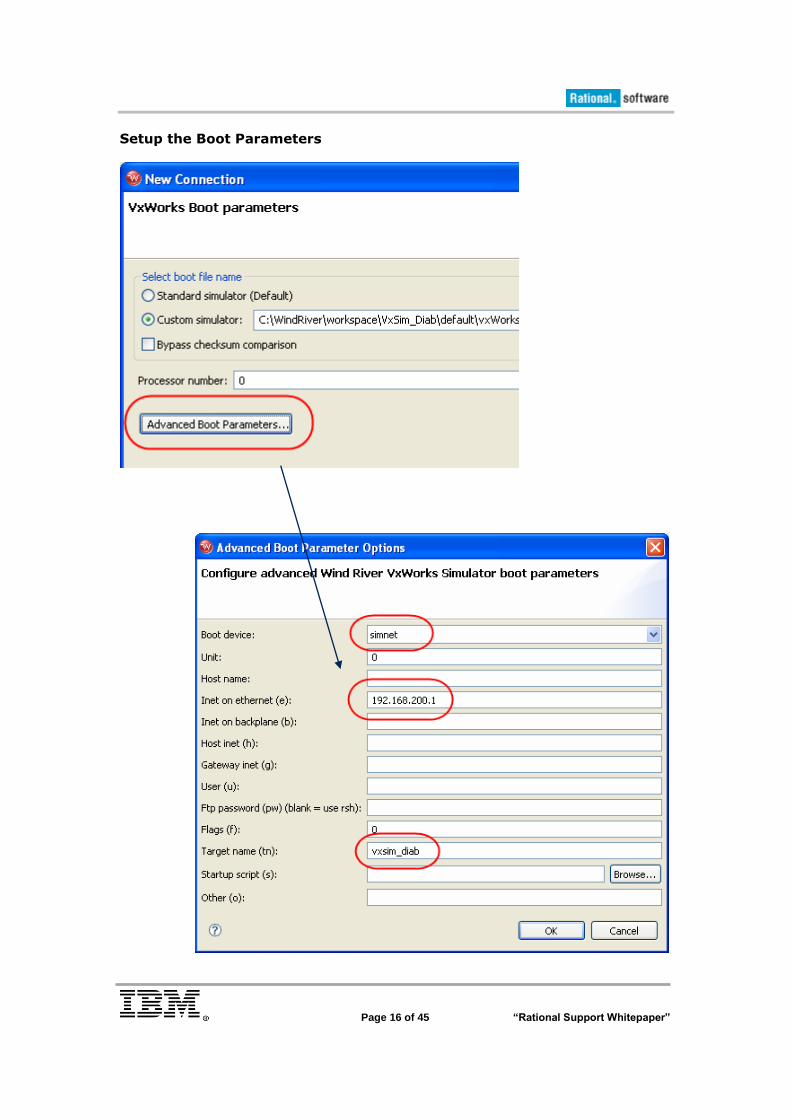
Page 16 of 45 “Rational Support Whitepaper”
Setup the Boot Parameters
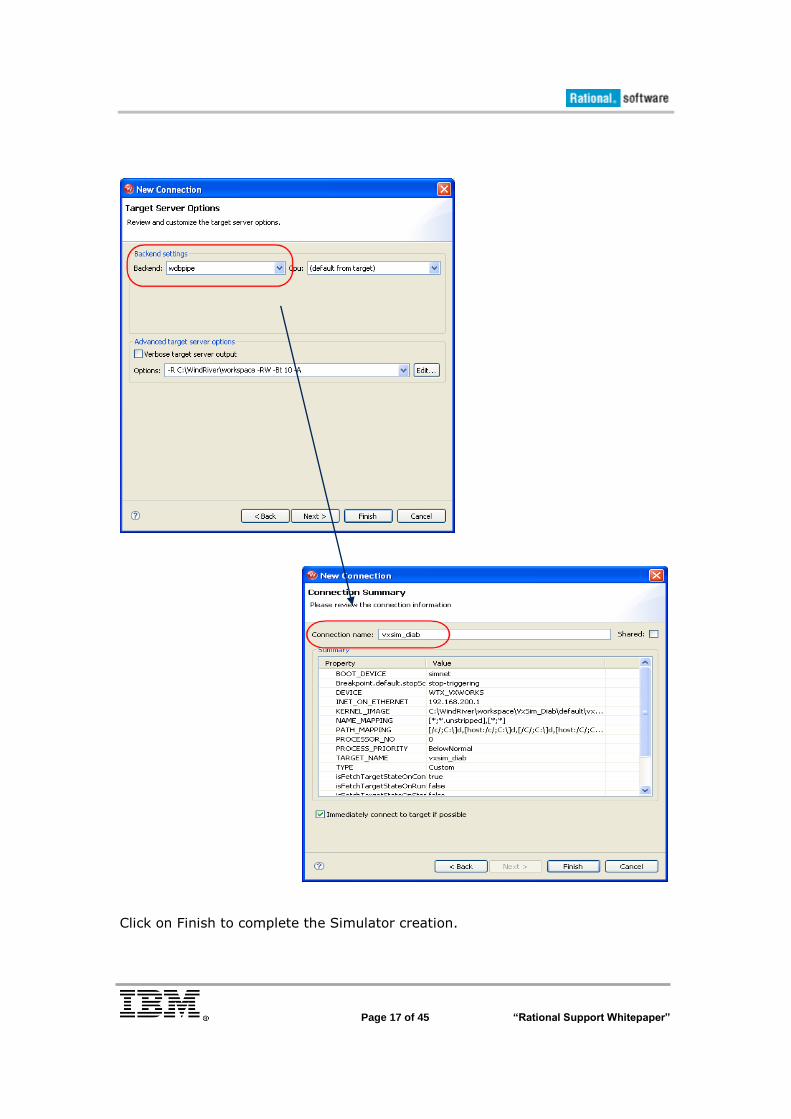
Page 17 of 45 “Rational Support Whitepaper”
Click on Finish to complete the Simulator creation.
Page 18 of 45 “Rational Support Whitepaper”
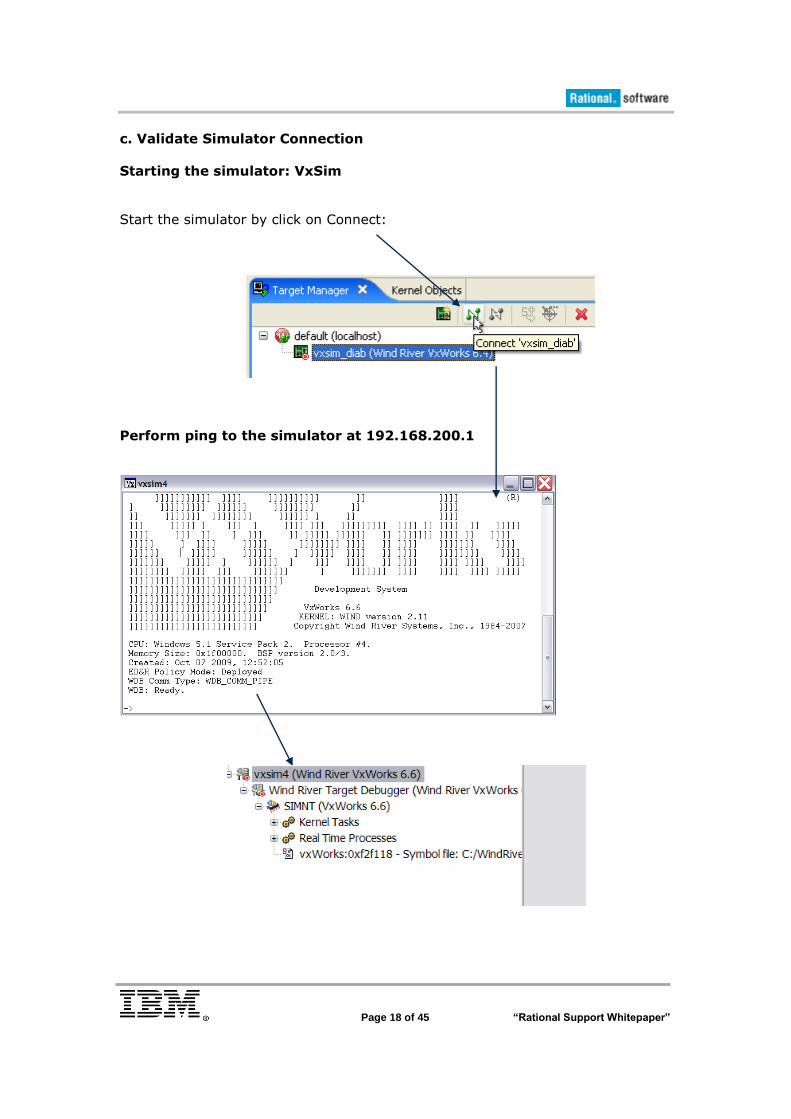
c. Validate Simulator Connection
Starting the simulator: VxSim
Start the simulator by click on Connect:
Perform ping to the simulator at 192.168.200.1
Page 19 of 45 “Rational Support Whitepaper”
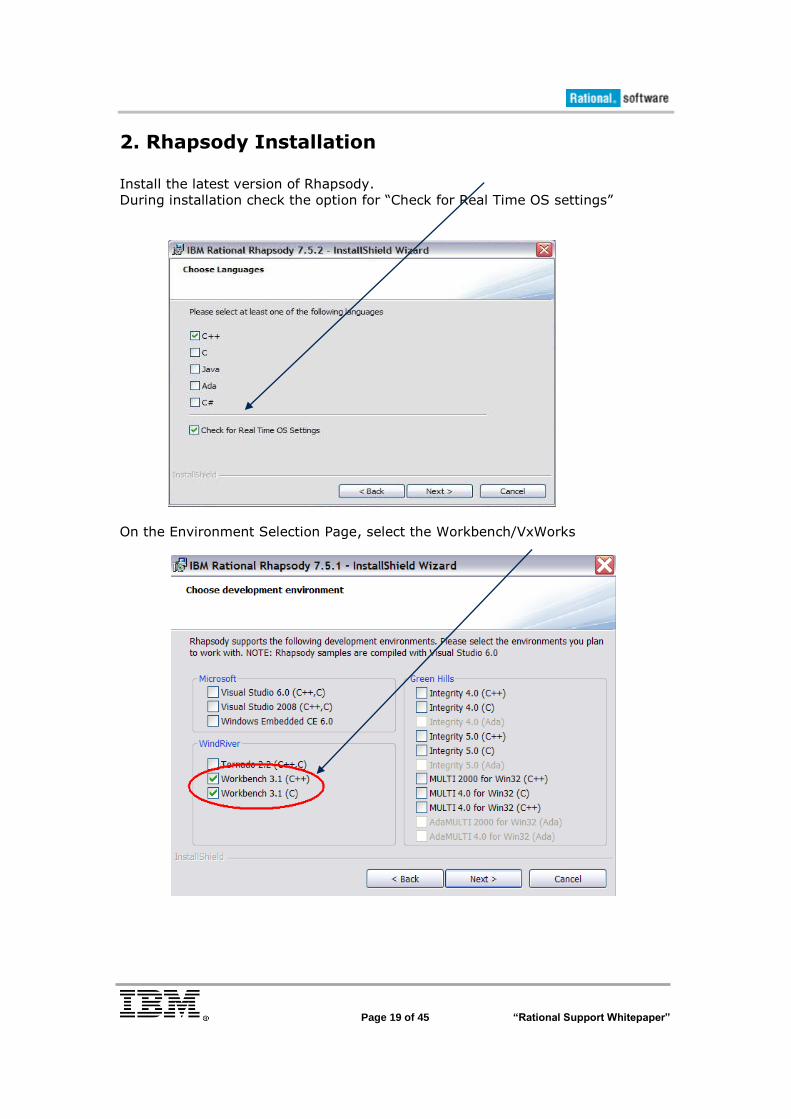
2. Rhapsody Installation Install the latest version of Rhapsody.
During installation check the option for “Check for Real Time OS settings”
On the Environment Selection Page, select the Workbench/VxWorks

Page 20 of 45 “Rational Support Whitepaper”
Browse to Windriver Installation Path and complete the installation for Rhapsody.
Eclipse Path
Modify Rhapsody.ini file located in Rhapsody installation directory to include the
path for wrwb-x86-win32.exe
Page 21 of 45 “Rational Support Whitepaper”
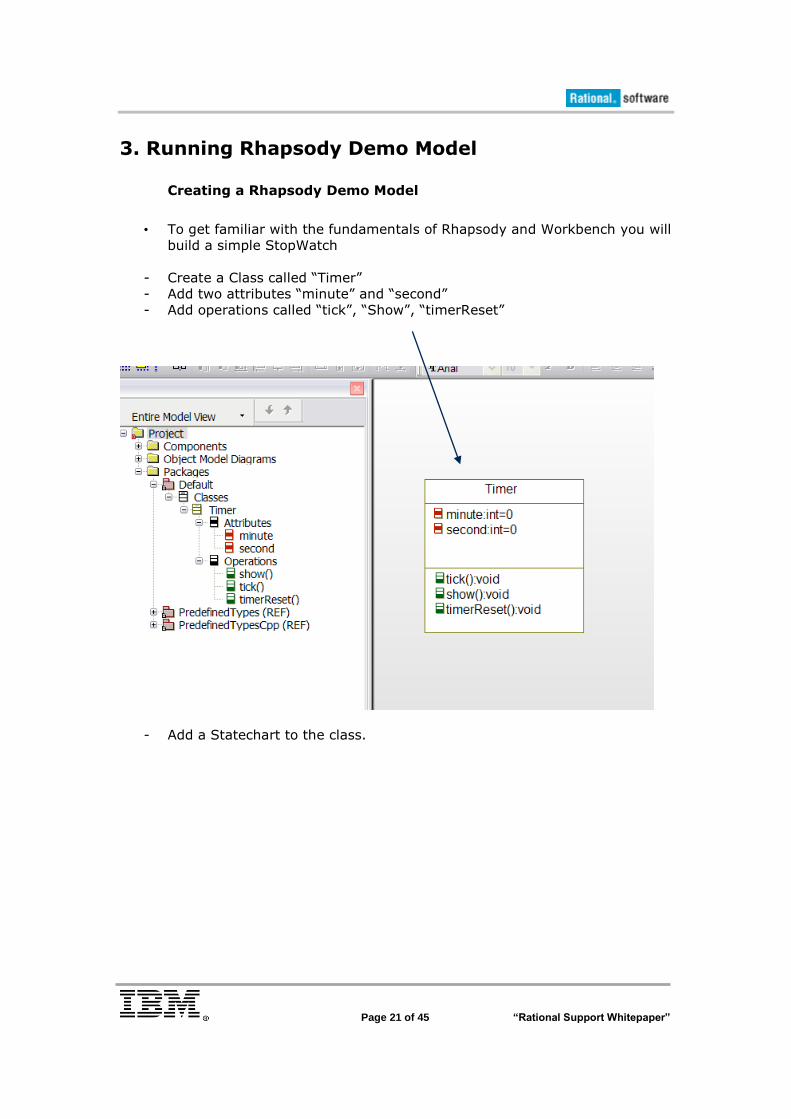
3. Running Rhapsody Demo Model Creating a Rhapsody Demo Model
• To get familiar with the fundamentals of Rhapsody and Workbench you will
build a simple StopWatch
- Create a Class called “Timer”
- Add two attributes “minute” and “second”
- Add operations called “tick”, “Show”, “timerReset”
- Add a Statechart to the class.
Page 22 of 45 “Rational Support Whitepaper”
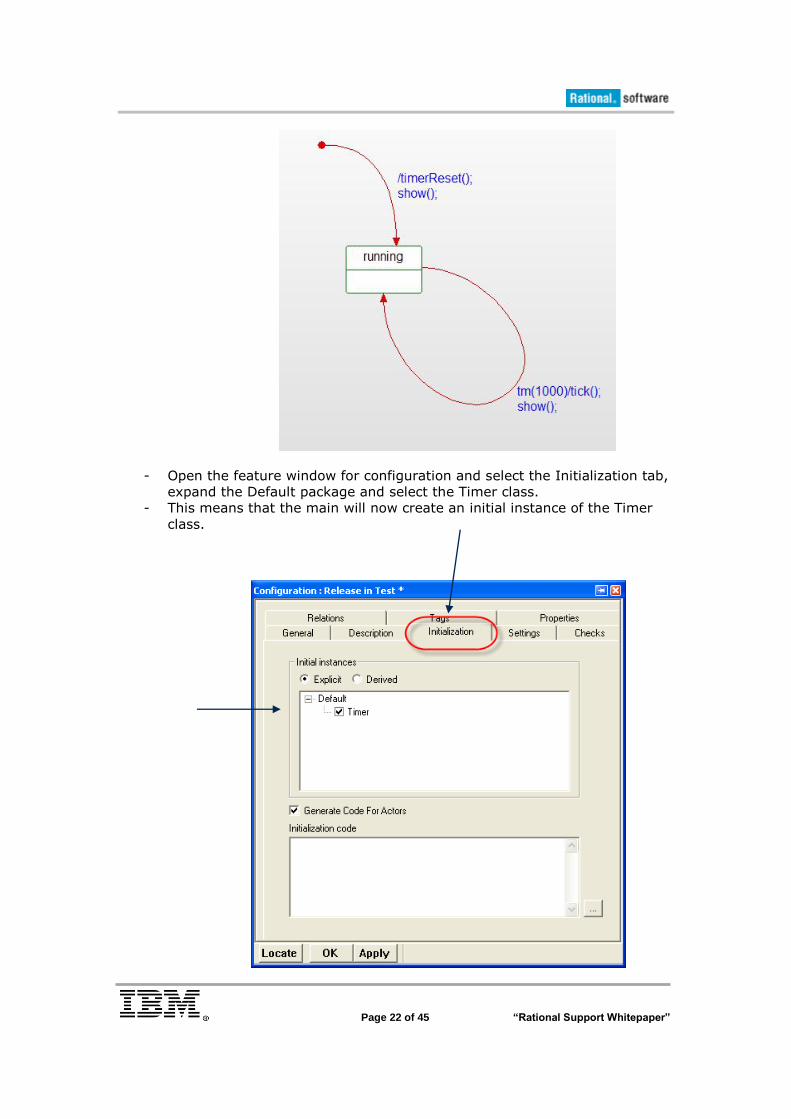
- Open the feature window for configuration and select the Initialization tab,
expand the Default package and select the Timer class.
- This means that the main will now create an initial instance of the Timer
class.
Page 23 of 45 “Rational Support Whitepaper”
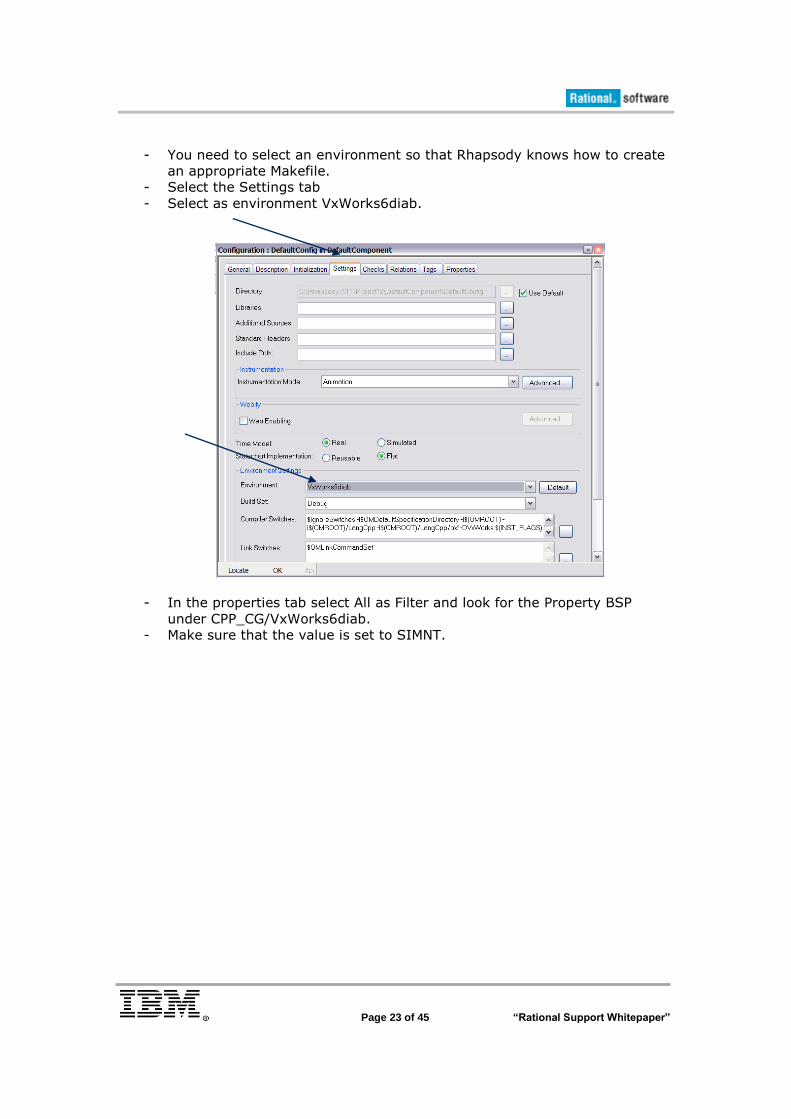
- You need to select an environment so that Rhapsody knows how to create
an appropriate Makefile.
- Select the Settings tab
- Select as environment VxWorks6diab.
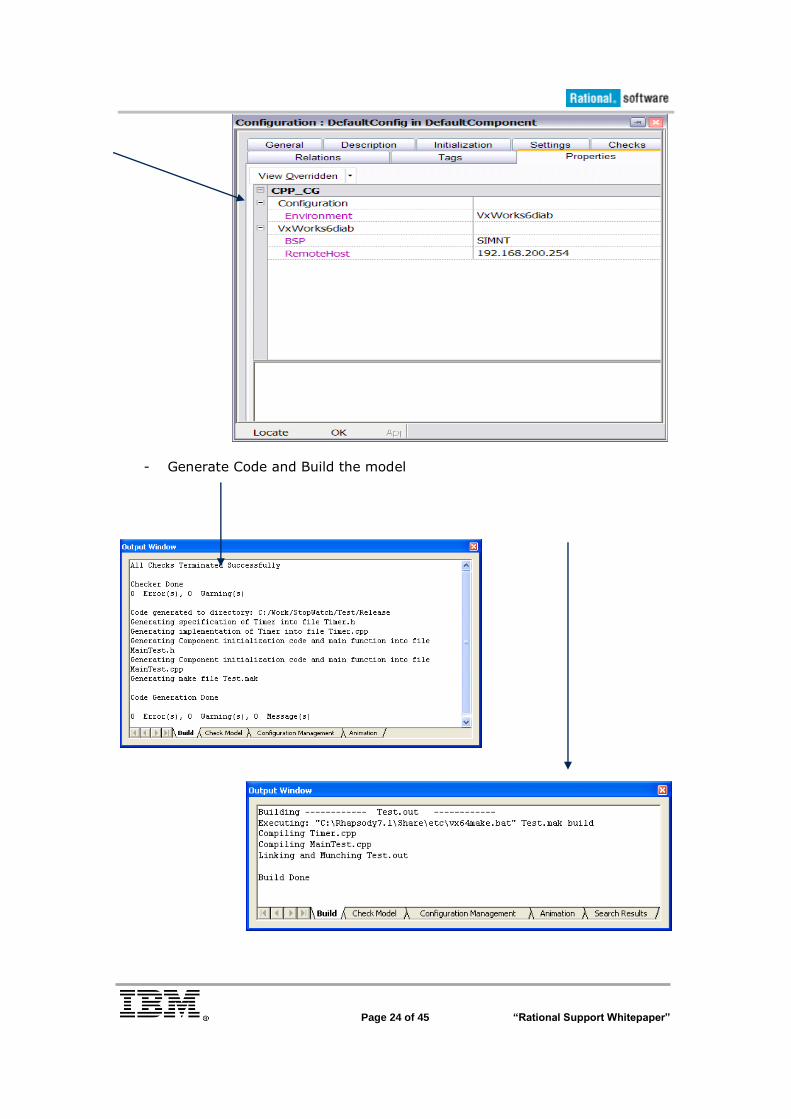
- In the properties tab select All as Filter and look for the Property BSP
under CPP_CG/VxWorks6diab.
- Make sure that the value is set to SIMNT.
Page 24 of 45 “Rational Support Whitepaper”
- Generate Code and Build the model
Page 25 of 45 “Rational Support Whitepaper”
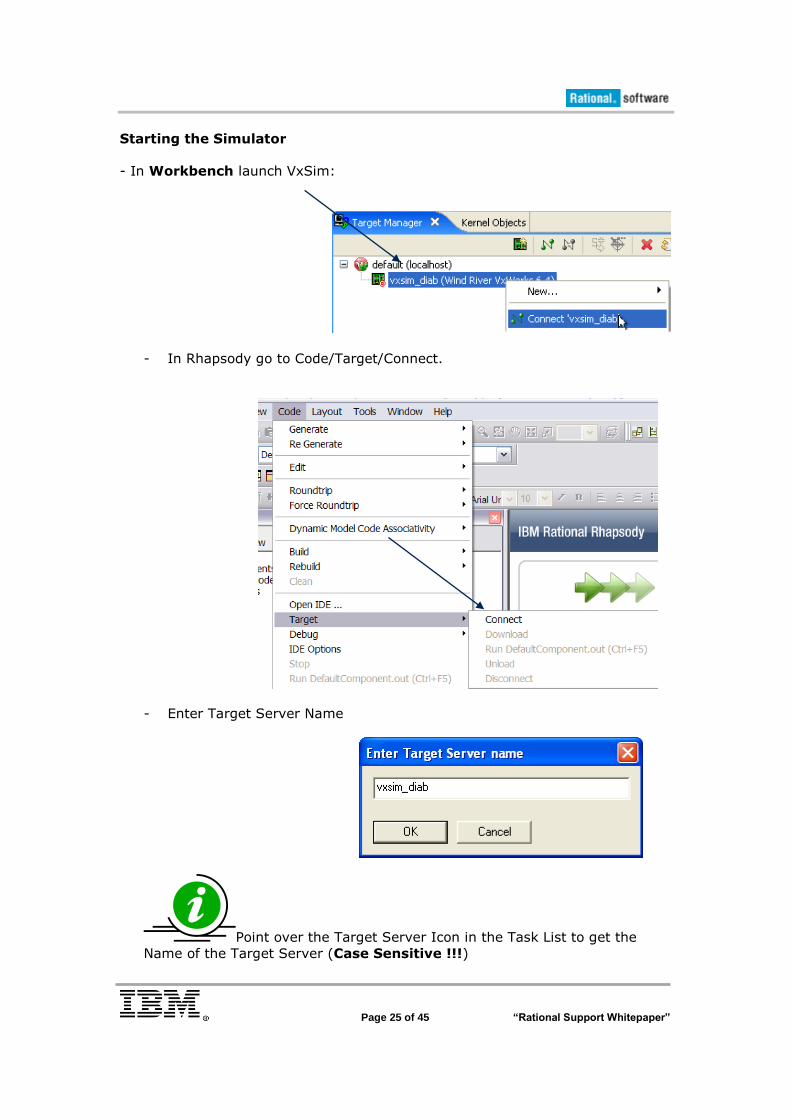
Starting the Simulator
- In Workbench launch VxSim:
- In Rhapsody go to Code/Target/Connect.
- Enter Target Server Name
Point over the Target Server Icon in the Task List to get the
Name of the Target Server (Case Sensitive !!!)
Page 26 of 45 “Rational Support Whitepaper”
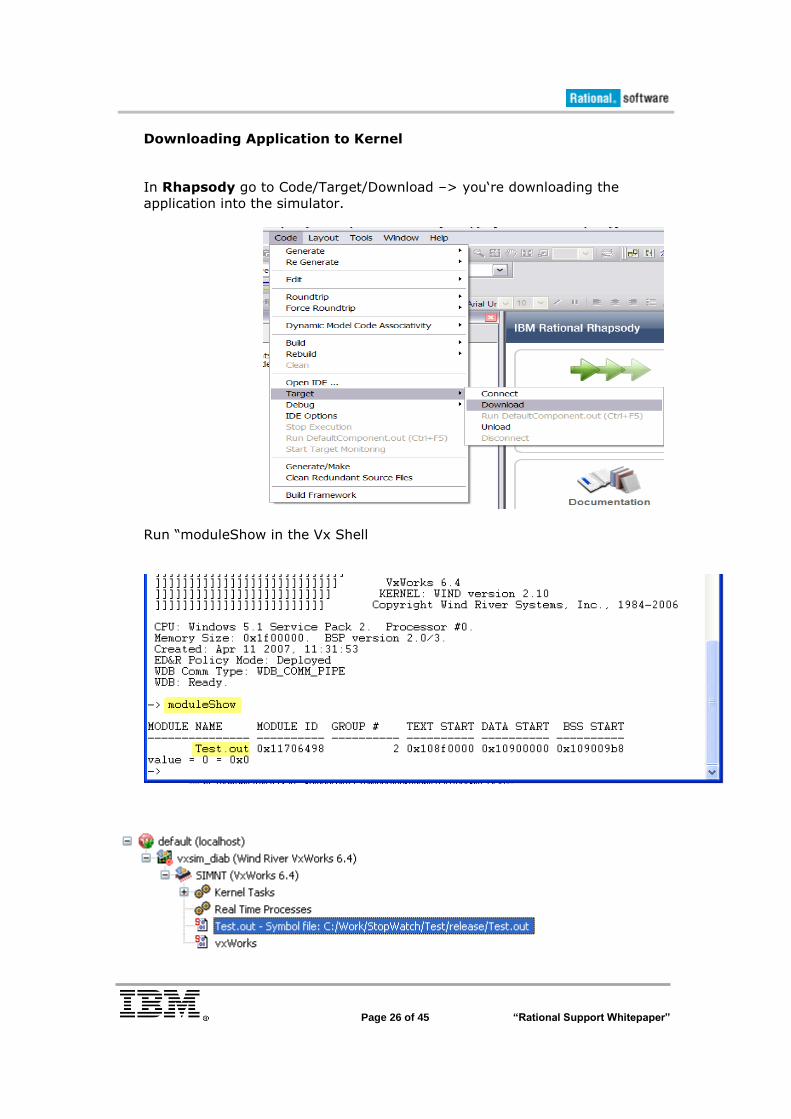
Downloading Application to Kernel
In Rhapsody go to Code/Target/Download –> you„re downloading the
application into the simulator.
Run “moduleShow in the Vx Shell
Page 27 of 45 “Rational Support Whitepaper”
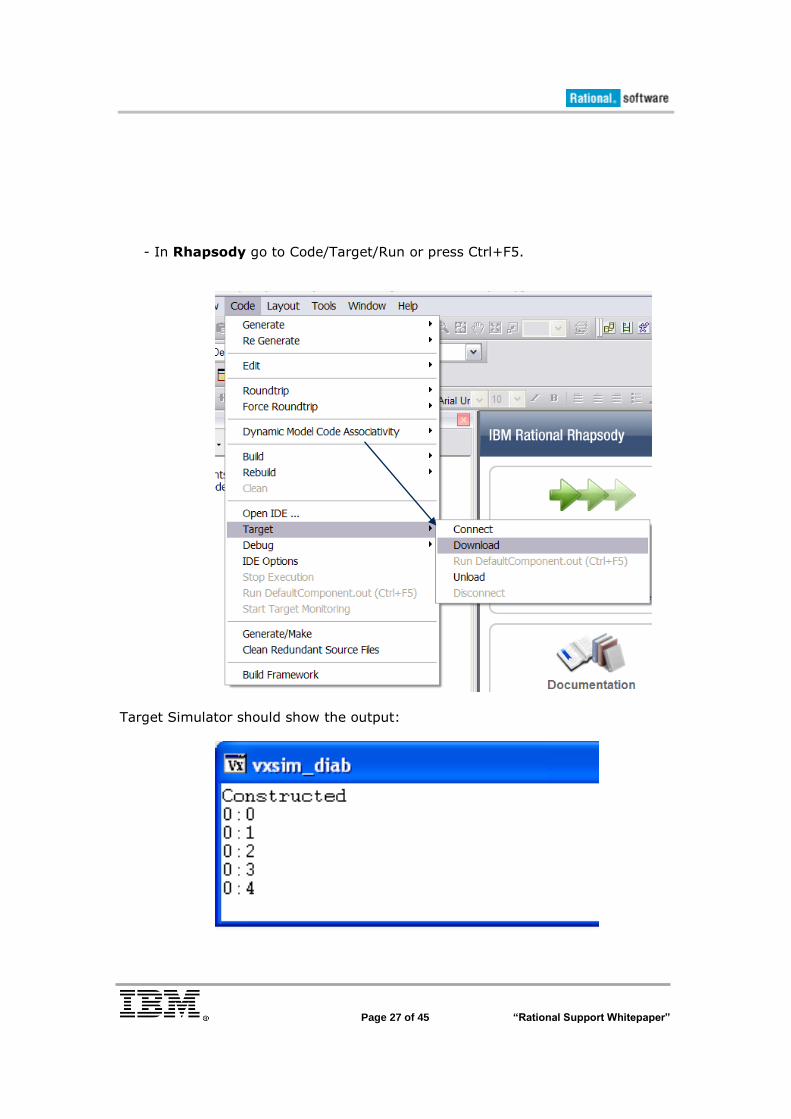
- In Rhapsody go to Code/Target/Run or press Ctrl+F5.
Target Simulator should show the output:
Page 28 of 45 “Rational Support Whitepaper”
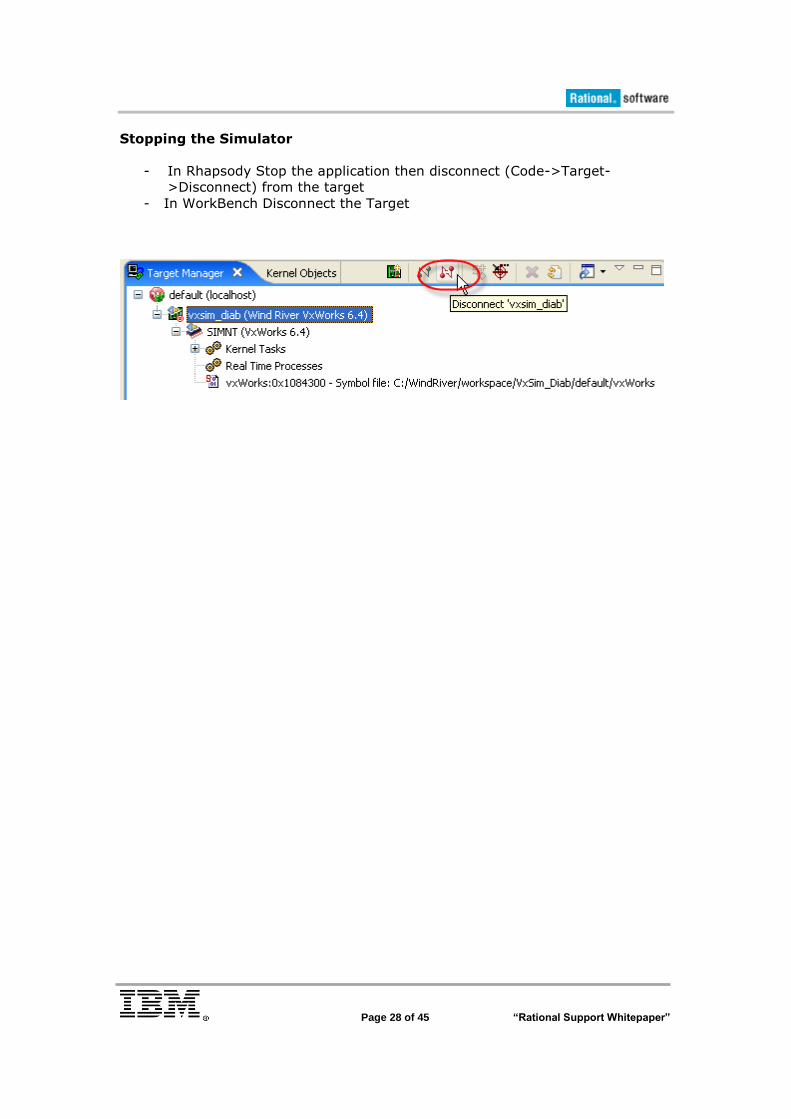
Stopping the Simulator
- In Rhapsody Stop the application then disconnect (Code->Target-
>Disconnect) from the target
- In WorkBench Disconnect the Target
Page 29 of 45 “Rational Support Whitepaper”
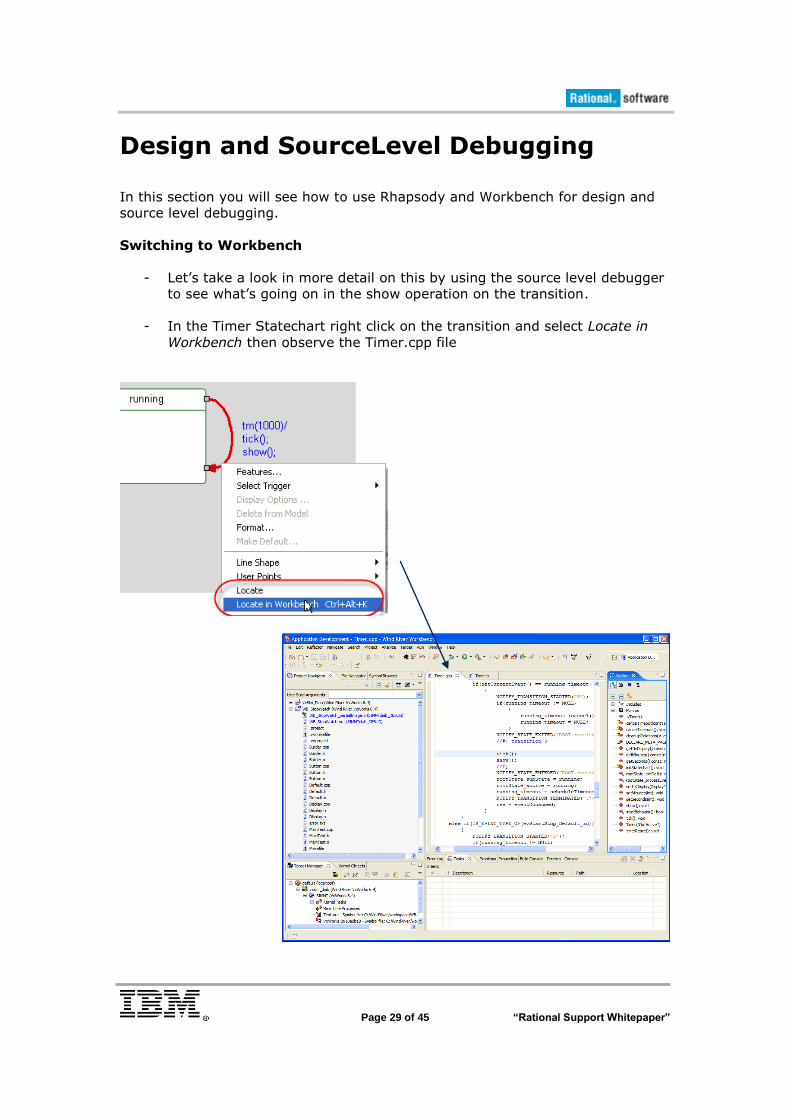
Design and SourceLevel Debugging In this section you will see how to use Rhapsody and Workbench for design and
source level debugging.
Switching to Workbench
- Let‟s take a look in more detail on this by using the source level debugger
to see what‟s going on in the show operation on the transition.
- In the Timer Statechart right click on the transition and select Locate in
Workbench then observe the Timer.cpp file
Page 30 of 45 “Rational Support Whitepaper”
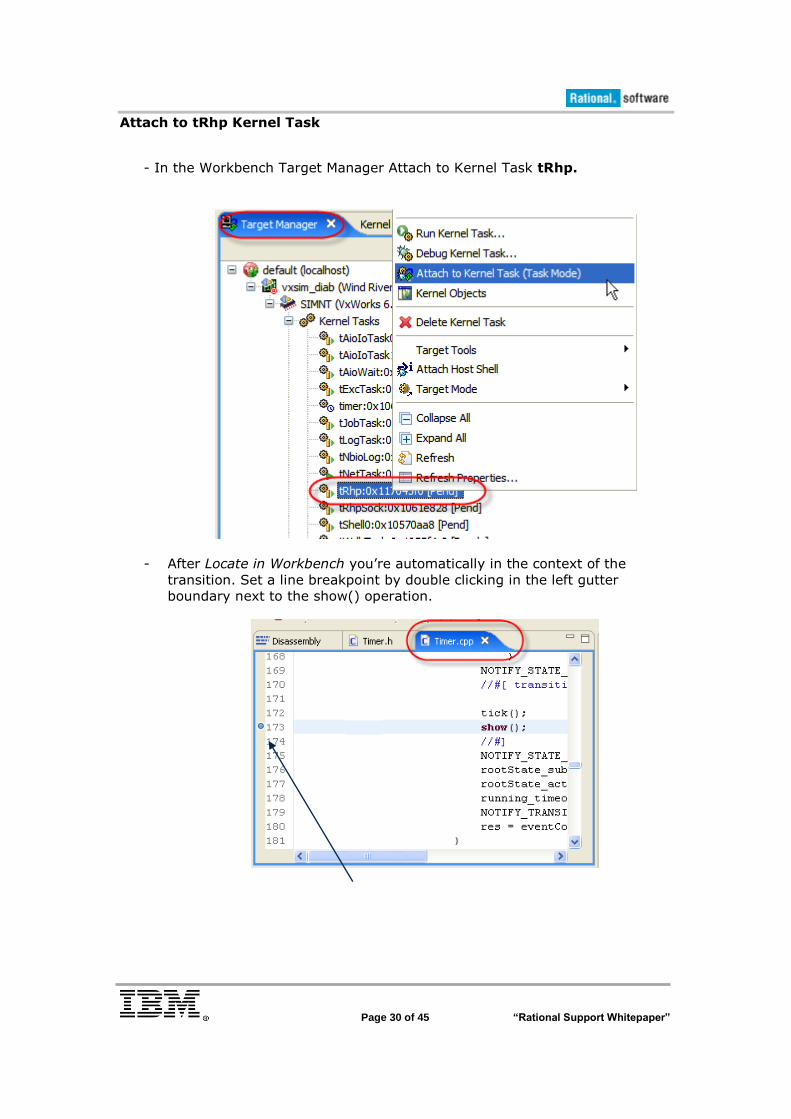
Attach to tRhp Kernel Task
- In the Workbench Target Manager Attach to Kernel Task tRhp.
- After Locate in Workbench you‟re automatically in the context of the
transition. Set a line breakpoint by double clicking in the left gutter
boundary next to the show() operation.
Page 31 of 45 “Rational Support Whitepaper”
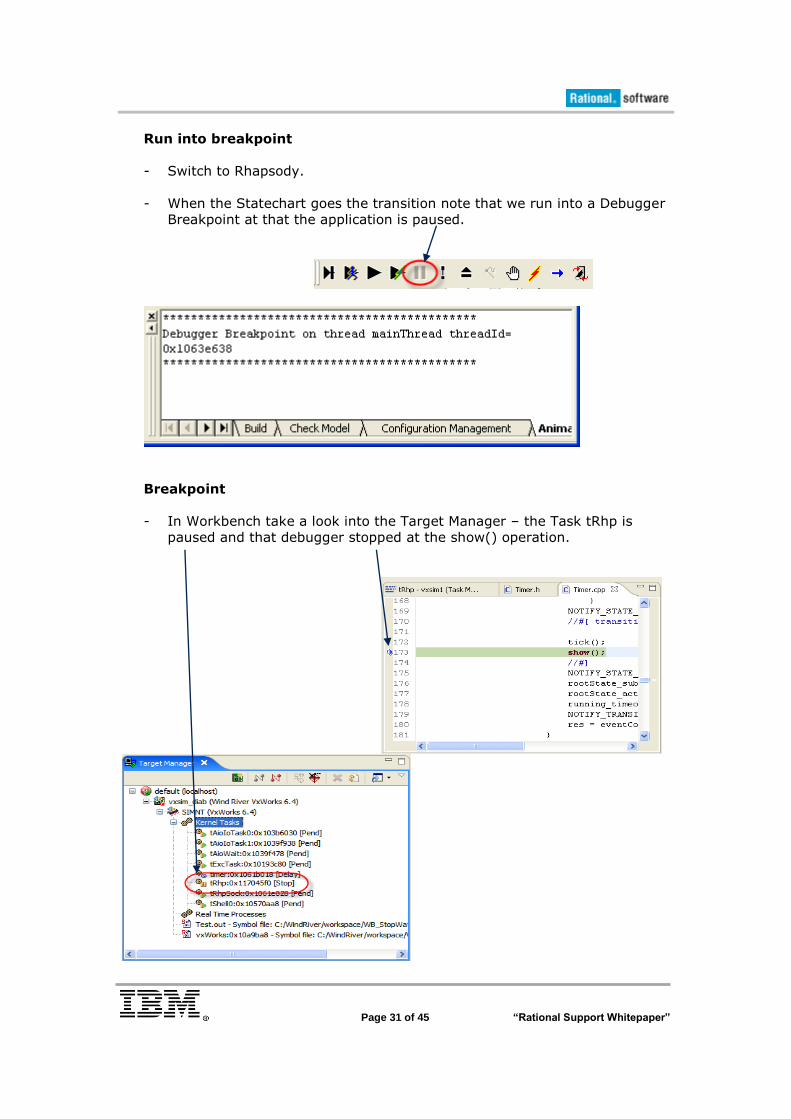
Run into breakpoint
- Switch to Rhapsody.
- When the Statechart goes the transition note that we run into a Debugger
Breakpoint at that the application is paused.
Breakpoint
- In Workbench take a look into the Target Manager – the Task tRhp is
paused and that debugger stopped at the show() operation.

Page 32 of 45 “Rational Support Whitepaper”
Obviously Collaboration
- Step into the operation show().
- You are just performing a simple cout.
Page 33 of 45 “Rational Support Whitepaper”
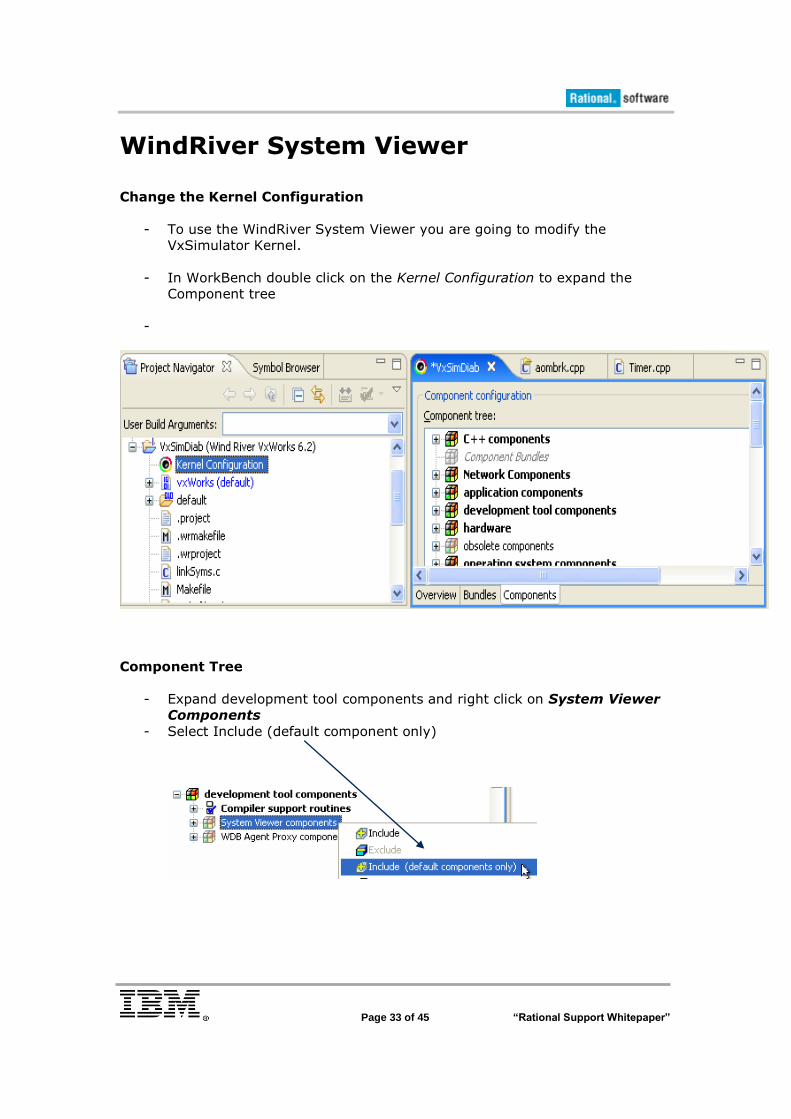
WindRiver System Viewer Change the Kernel Configuration
- To use the WindRiver System Viewer you are going to modify the
VxSimulator Kernel.
- In WorkBench double click on the Kernel Configuration to expand the
Component tree
-
Component Tree
- Expand development tool components and right click on System Viewer
Components
- Select Include (default component only)
Page 34 of 45 “Rational Support Whitepaper”
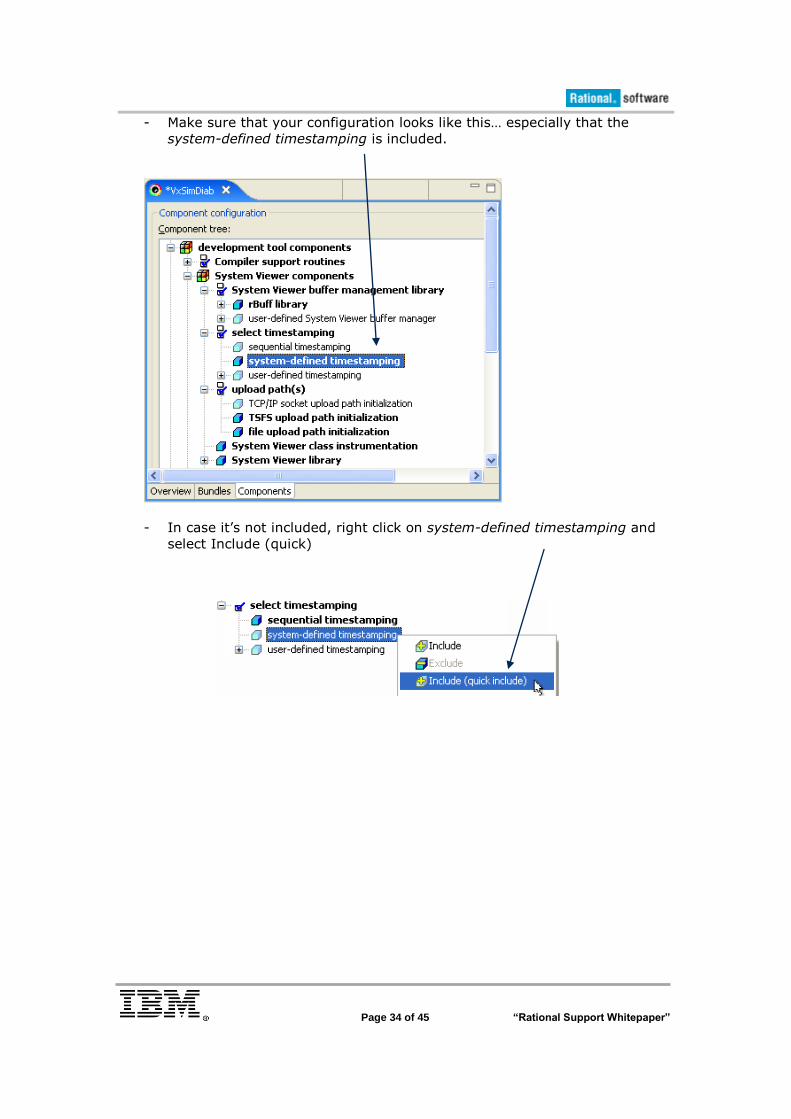
- Make sure that your configuration looks like this… especially that the
system-defined timestamping is included.
- In case it‟s not included, right click on system-defined timestamping and
select Include (quick)
Page 35 of 45 “Rational Support Whitepaper”
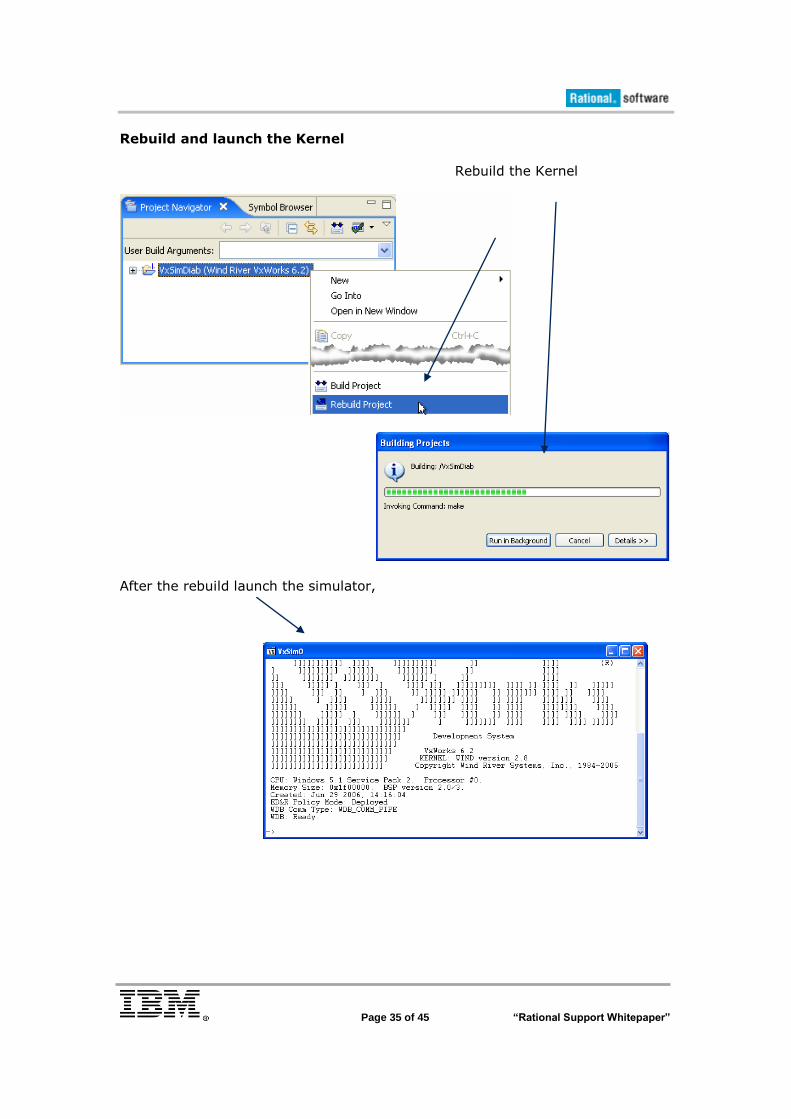
Rebuild and launch the Kernel
Rebuild the Kernel
After the rebuild launch the simulator,
Page 36 of 45 “Rational Support Whitepaper”
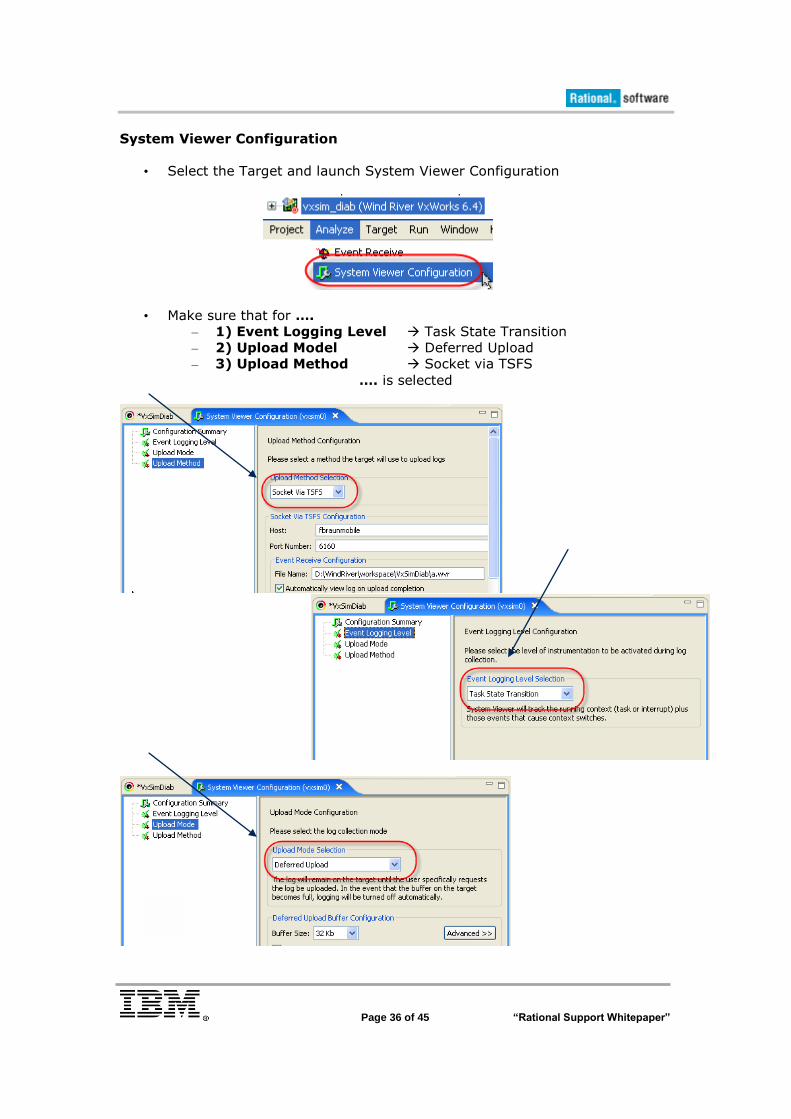
System Viewer Configuration
• Select the Target and launch System Viewer Configuration
• Make sure that for ….
– 1) Event Logging Level Task State Transition
– 2) Upload Model Deferred Upload
– 3) Upload Method Socket via TSFS
…. is selected
Page 37 of 45 “Rational Support Whitepaper”
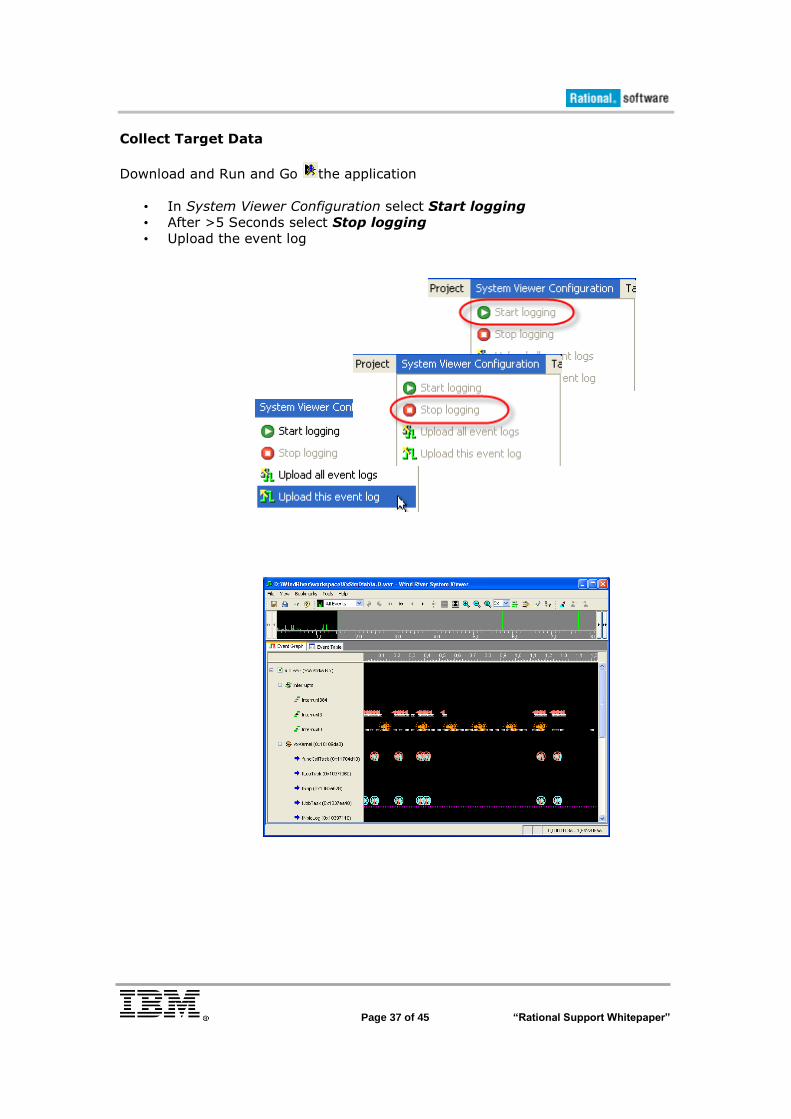
Collect Target Data
Download and Run and Go the application
• In System Viewer Configuration select Start logging
• After >5 Seconds select Stop logging
• Upload the event log
Page 38 of 45 “Rational Support Whitepaper”
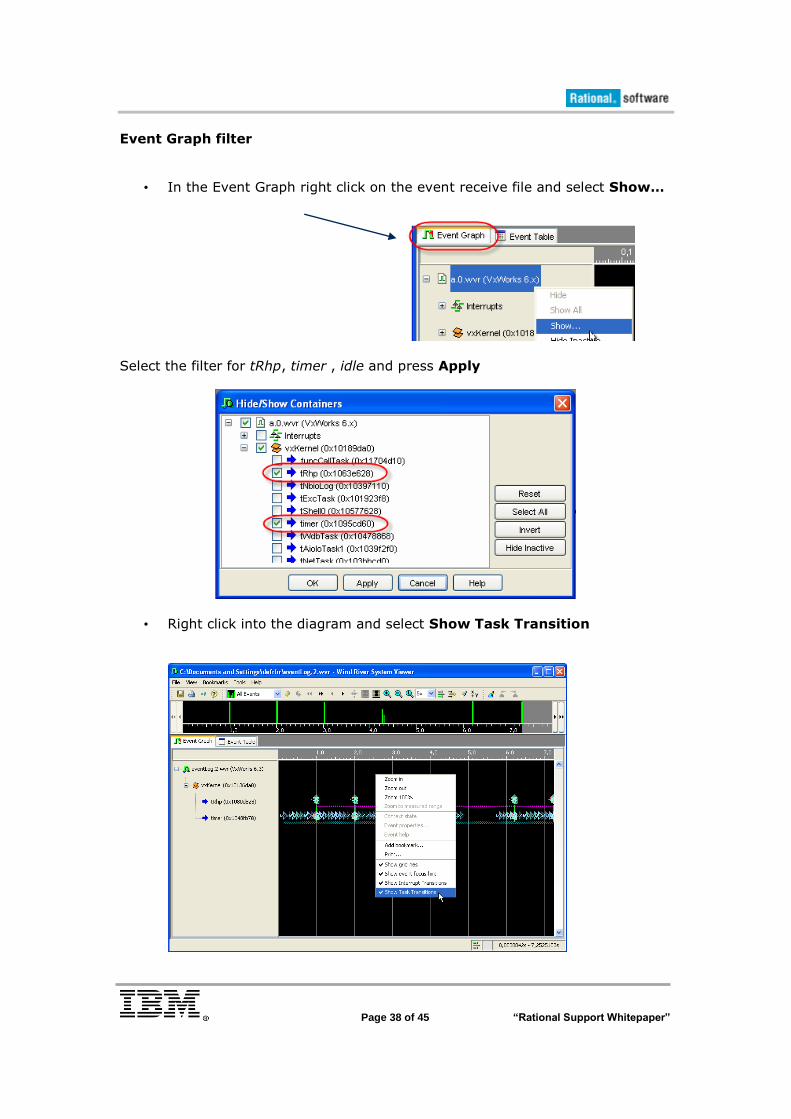
Event Graph filter
• In the Event Graph right click on the event receive file and select Show…
Select the filter for tRhp, timer , idle and press Apply
• Right click into the diagram and select Show Task Transition
Page 39 of 45 “Rational Support Whitepaper”
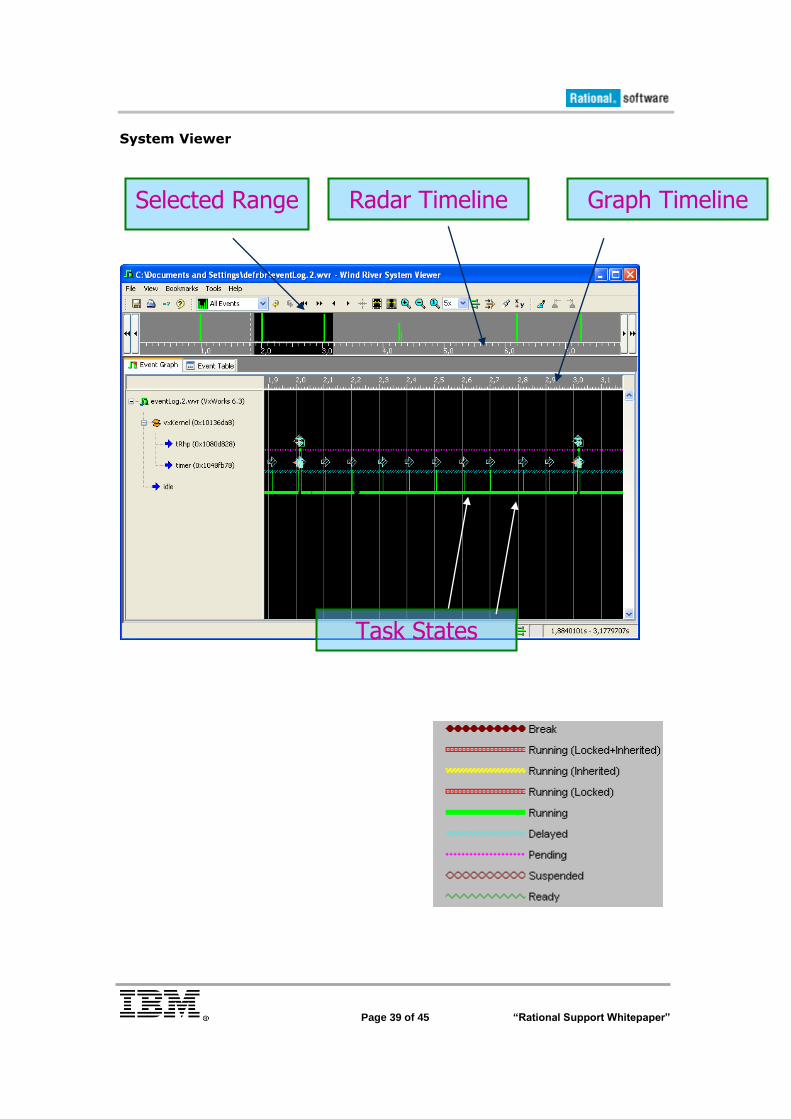
System Viewer
Selected Range Radar Timeline Graph Timeline
Task States
Page 40 of 45 “Rational Support Whitepaper”
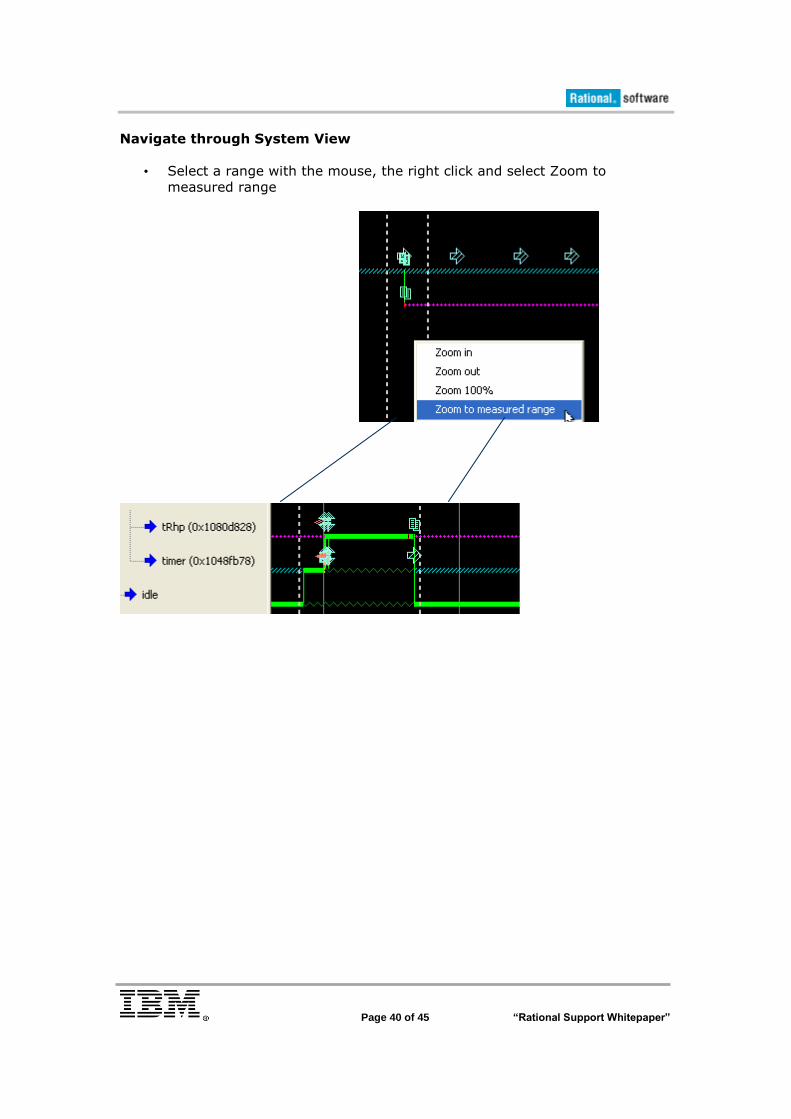
Navigate through System View
• Select a range with the mouse, the right click and select Zoom to
measured range
Page 41 of 45 “Rational Support Whitepaper”
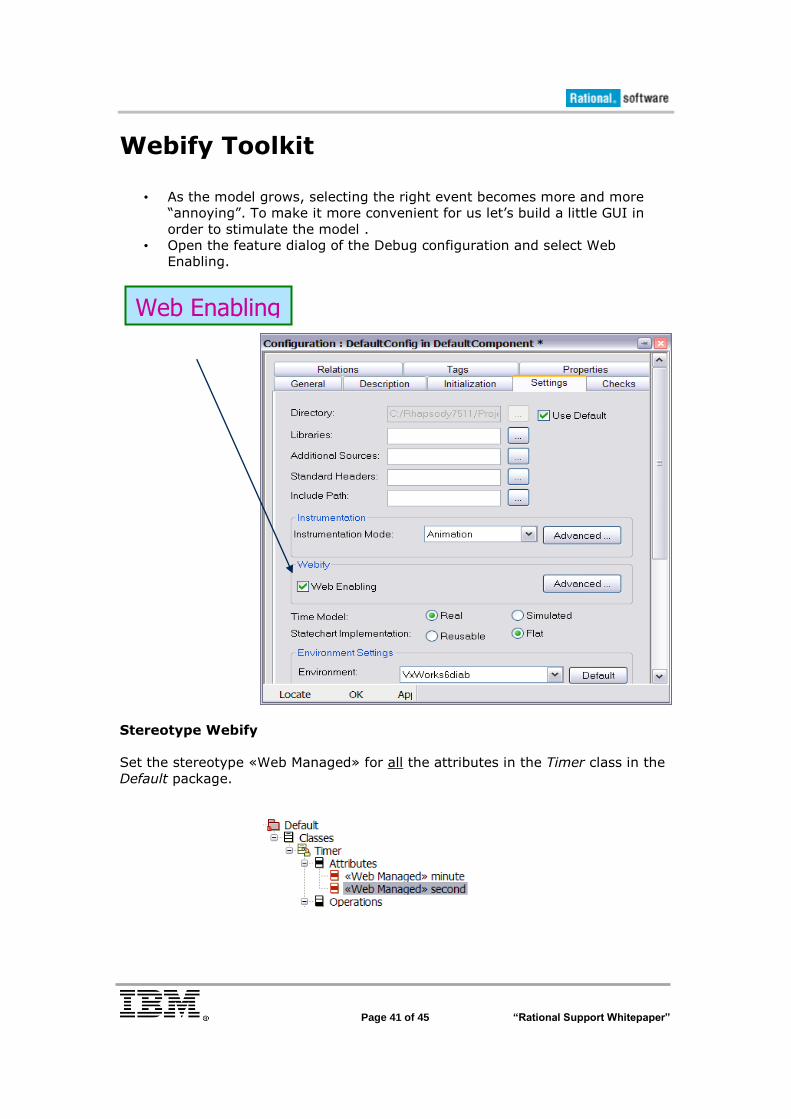
Webify Toolkit
• As the model grows, selecting the right event becomes more and more
“annoying”. To make it more convenient for us let‟s build a little GUI in
order to stimulate the model .
• Open the feature dialog of the Debug configuration and select Web
Enabling.
Stereotype Webify
Set the stereotype «Web Managed» for all the attributes in the Timer class in the
Default package.
Web Enabling
Page 42 of 45 “Rational Support Whitepaper”
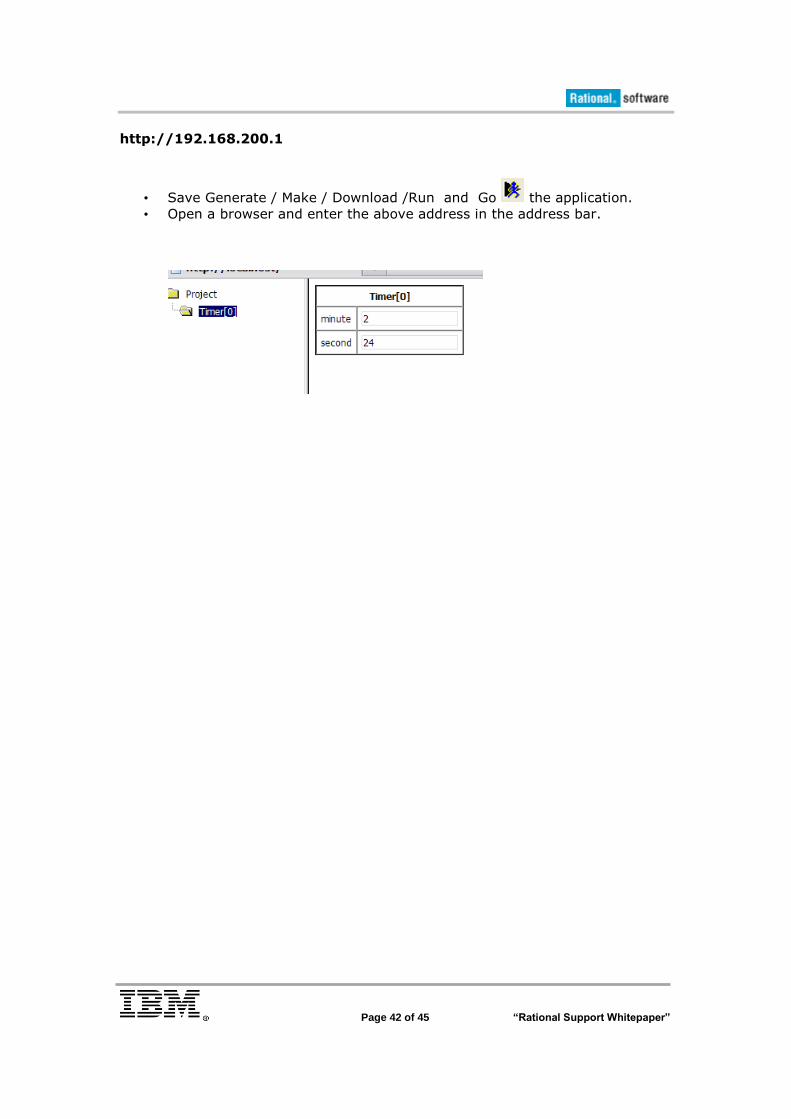
http://192.168.200.1
• Save Generate / Make / Download /Run and Go the application.
• Open a browser and enter the above address in the address bar.
Page 43 of 45 “Rational Support Whitepaper”
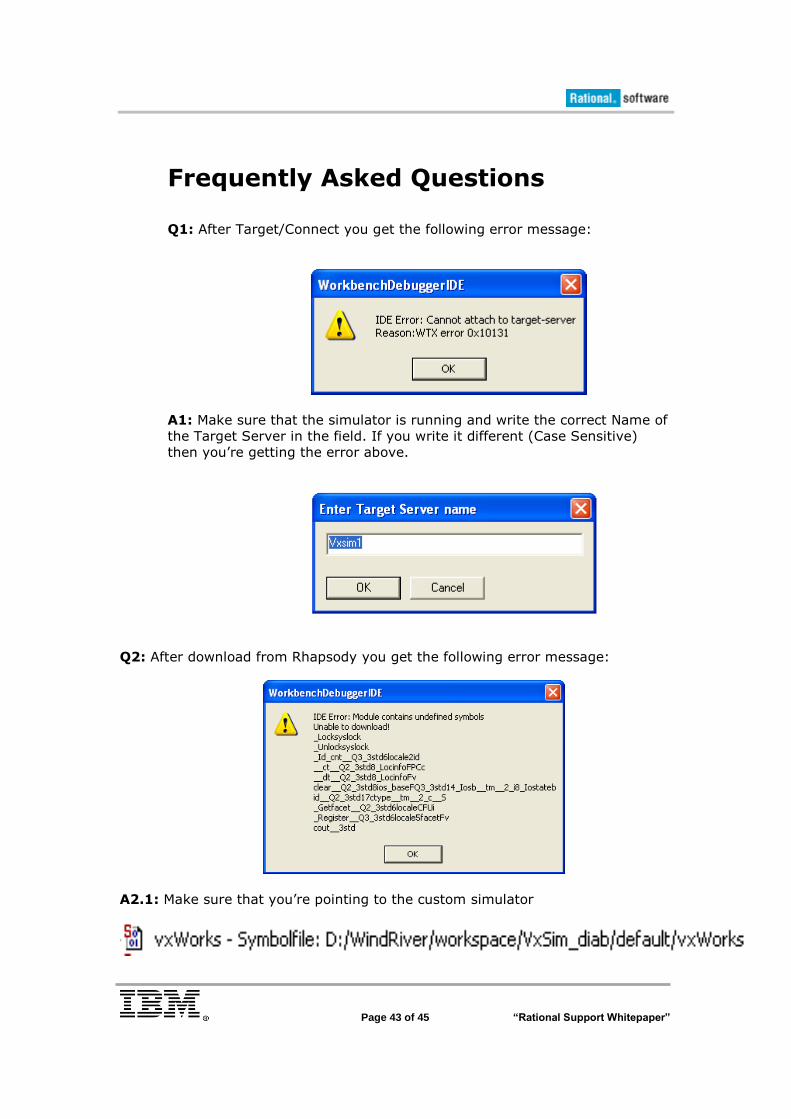
Frequently Asked Questions Q1: After Target/Connect you get the following error message:
A1: Make sure that the simulator is running and write the correct Name of
the Target Server in the field. If you write it different (Case Sensitive)
then you‟re getting the error above.
Q2: After download from Rhapsody you get the following error message:
A2.1: Make sure that you‟re pointing to the custom simulator
Page 44 of 45 “Rational Support Whitepaper”
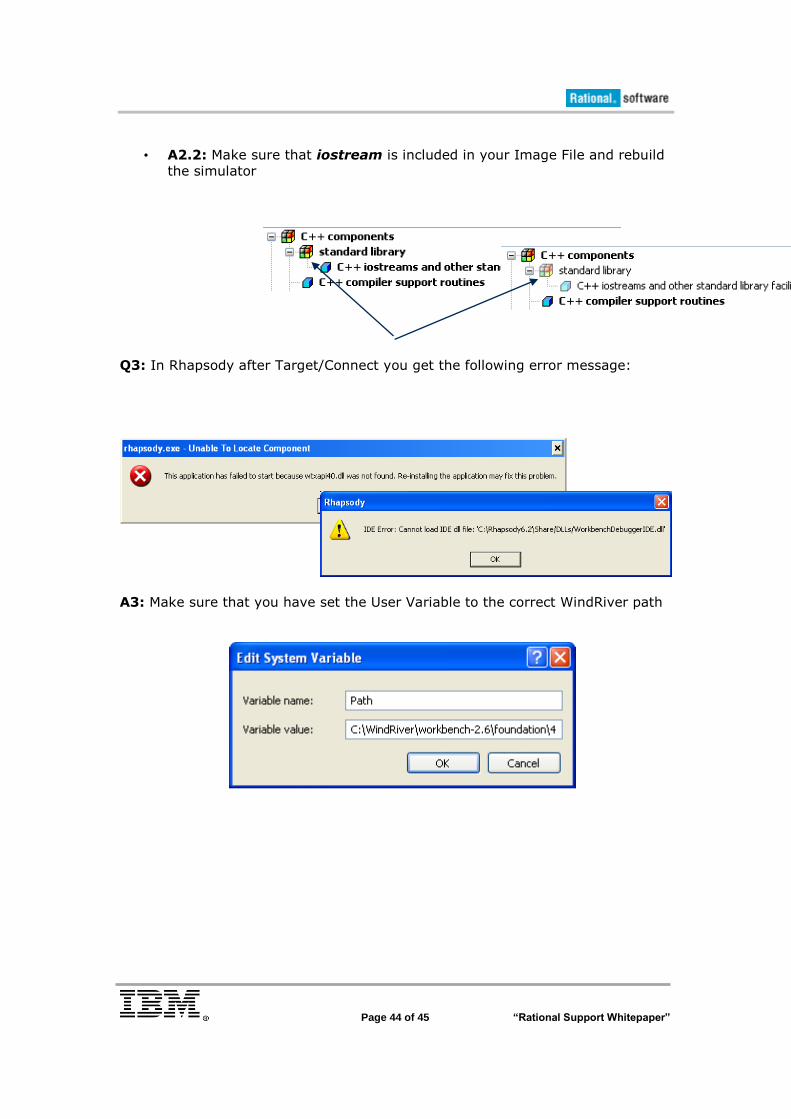
• A2.2: Make sure that iostream is included in your Image File and rebuild
the simulator
Q3: In Rhapsody after Target/Connect you get the following error message:
A3: Make sure that you have set the User Variable to the correct WindRiver path
Page 45 of 45 “Rational Support Whitepaper”
References: http://www.windriver.com/developers/workbench/index.html
http://www.cadfamily.com/downinfo/298888.html
http://www-
947.ibm.com/support/entry/portal/Overview/Software/Rational/Rational_Rhapsod
y?S_CMP=rnav
Web Enabli
Recommended