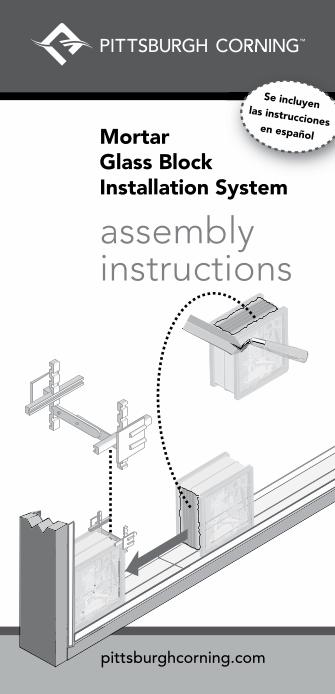
Mortar Glass Block Installation System
assembly instructions
Se incluyen las instrucciones en español
pittsburghcorning.com

1 2
Pittsburgh CorningMortar Glass Block Installation SystemAssembly Instructions
Introduction:The Mortar I System utilizes Pittsburgh Corning perimeter channels on all four sides. You will also use Universal Mortar Spacers and glass block mortar to produce clean, consistent 1/4" joints and a traditional grid look.The Mortar II System does not use the Pittsburgh Corning perimeter channels but instead utilizes expansion strips, panel reinforcing and panel anchors. You will also use Universal Mortar Spacers and glass block mortar to produce clean, consistent 1/4" joints and a traditional grid look.
Here is additional information about each method.
Mortar I: (page 3)• This method is designed for use with Pittsburgh Corning Premiere (4" thick) and Thinline® (3" thick) Series Glass Block. • The installation recommendations are for small
residential panels of 25 sq. ft. or less.• Not for use in constructing curved glass block walls.• Interior and exterior panels must be framed on all four
sides.
Note: This instruction is not to be used in constructing curved glass block applications. All glass block panels are non-load bearing, so adequate provisions must be made for support of construction around the panel.
Mortar II: (page 14)
• This method is designed for use with Pittsburgh Corning Premiere (4" thick) and Thinline® (3" thick) Series Glass Block.
• The installation recommendations are for interior or exterior residential panels larger than 25 sq. ft.
• This method may be used to install projects framed on two, three, or four sides.
• Premiere Series - Panel size limitations - Interior (250 sq. ft. max) and *Exterior (144 sq. ft. max.).
• Thinline® Series - Panel size limitations - Interior (150 sq. ft. max.) and *Exterior (85 sq. ft. max.).
* Exterior panel size limitations are based on a 20 PSF. For higher windloads consult local building codes or call Pittsburgh Corning Corporation at 1-800-624-2120.
Note: All glass block panels are non-load bearing, so adequate provisions must be made for support of construction around the panel.
The joints of the Mortar I and Mortar II Systems utilize a traditional installation method using a mortar finish for the classic “grid” look. Glass block sealant should be used to seal the perimeter on both sides of the panel.
Before you begin installing your glass blocks, decide which installation method is right for your project.
The materials required for Mortar System glass block installation are:
1. Pittsburgh Corning Premiere Series or Thinline® Series Glass Block
2. Universal Mortar Spacers
3. Perimeter Channels - Premiere (4") or Thinline® (3") (Mortar I System)
4. Expansion Strips
5. #6 x 1" zinc-plated flat head screws (approx. three per lineal foot of perimeter channel) (Mortar I System)
6. Panel reinforcing (Mortar II System)
7. Panel anchors (Mortar II System)
8. #12 x 1" zinc-plated pan head screws (Mortar II System)
9. Glass Block white premixed mortar
10. Pittsburgh Corning Glass Block Sealant
11. White touch up paint (Mortar I System)
12. Latex paint, Weldbond® adhesive, or asphalt emulsion depending upon application.


7
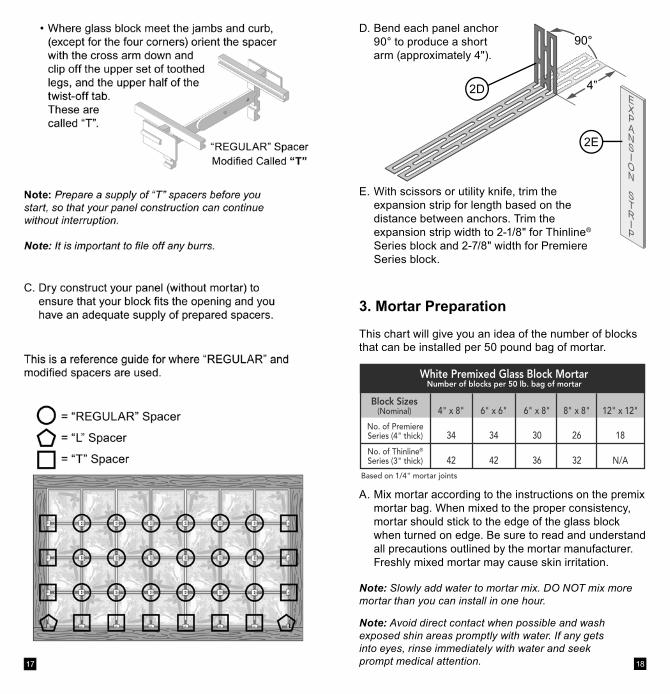
This is a reference guide for where “REGULAR” and modifi ed spacers are used.
= “REGULAR” Spacer
= “FLAT” Spacer
= “H” Spacer
4. Mortar Preparation
The following gives an idea of the number of blocks that can be installed per 50 pound bag of mortar.
A. Mix mortar according to the instructions on the premix mortar bag. When mixed to the proper consistency, mortar should stick to the edge of the glass block when turned on edge. Be sure to read and understand all precautions outlined by the
mortar manufacturer. Freshly mixed mortar may cause skin irritation.
Note: Slowly add water to mortar mix. DO NOT mix more mortar than you can install in one hour.
Note: Avoid direct contact when possible and wash exposed skin areas promptly with water. If any gets into eyes, rinse immediately with water and seek prompt medical attention.
White Premixed Glass Block Mortar
Block Sizes(Nominal) 4" x 8" 6" x 6" 6" x 8" 8" x 8" 12" x 12"
No. of PremiereSeries (4" thick)
Based on 1/4" mortar joints
34 34 30 26 18
No. of Thinline®
Series (3" thick) 42 42 36 32 N/A
Number of blocks per 50 lb. bag of mortar


13
D. Use a soft, dry cloth to remove the excess fi lm. A common household plastic scouring pad can also
be used.
E. Cut the expansion strip to a 1-1/2" width and insert it between the top of the blocks and the frame.
F. Apply sealant to the back of the half-section of channel and install it between the expansion strip
and frame.
G. Apply glass block sealant around the perimeter to seal the glass block and channel. Also seal the top channel to the frame at the head.
Note: For exterior panels or wet areas, also seal where the channels meet the framing.
TOP HALF CHANNEL
7E
7F
7G

18
E. With scissors or utility knife, trim the expansion strip for length based on the distance between anchors. Trim the expansion strip width to 2-1/8" for Thinline® Series block and 2-7/8" width for Premiere Series block.
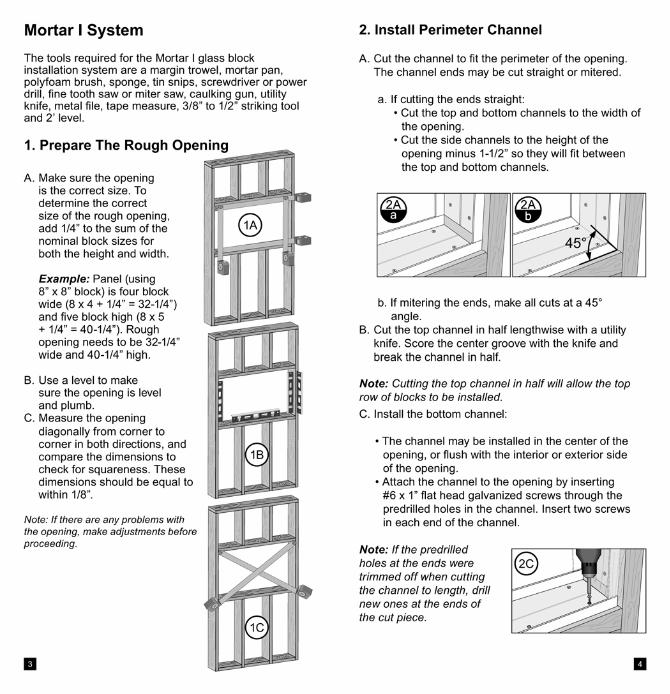
3. Mortar Preparation
This chart will give you an idea of the number of blocks that can be installed per 50 pound bag of mortar.
A. Mix mortar according to the instructions on the premix mortar bag. When mixed to the proper consistency, mortar should stick to the edge of the glass block when turned on edge. Be sure to read and understand all precautions outlined by the mortar manufacturer. Freshly mixed mortar may cause skin irritation.
Note: Slowly add water to mortar mix. DO NOT mix more mortar than you can install in one hour.
Note: Avoid direct contact when possible and wash exposed shin areas promptly with water. If any gets into eyes, rinse immediately with water and seek prompt medical attention.
4”
90°
2DEXPANSION
STRIP
2E
White Premixed Glass Block Mortar
Block Sizes(Nominal) 4" x 8" 6" x 6" 6" x 8" 8" x 8" 12" x 12"
No. of PremiereSeries (4" thick)
Based on 1/4" mortar joints
34 34 30 26 18
No. of Thinline®
Series (3" thick) 42 42 36 32 N/A
Number of blocks per 50 lb. bag of mortar
D. Bend each panel anchor 90° to produce a short
arm (approximately 4").


22
S. Install a vertical panel anchor after the second block and screw the short leg of the anchor to the curb. All panel anchors should be attached using #12 x 1" zinc-plated head screws. Use two screws per anchor. Note: If attaching the panel anchors to tile or masonry, plastic screw anchors should be used.
T. Apply mortar so that the long leg of the anchor is embedded in the vertical joint.
4S
4T
U. Follow this procedure for the rest of the blocks in the fi rst row, installing a panel anchor after every
2 blocks.
V. Check periodically to ensure that the glass blocks are straight, level and plumb.
Note: If you fi nd a problem, adjust the block into place with a rubber mallet before proceeding.
W. Using a polyfoam brush, remove excess mortar and fi ll any voids on both sides of your panel.
4W
24
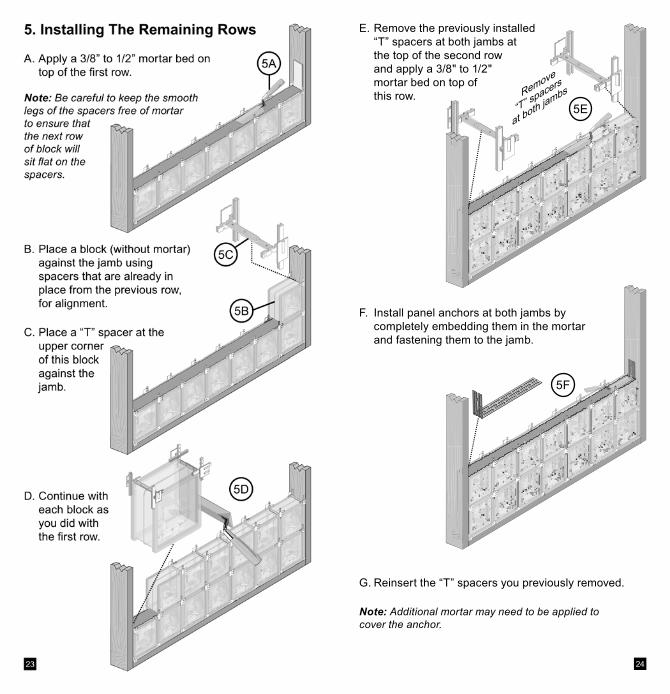
G. Reinsert the “T” spacers you previously removed.
Note: Additional mortar may need to be applied to cover the anchor.
F. Install panel anchors at both jambs by completely embedding them in the mortar and fastening them to the jamb.
E. Remove the previously installed “T” spacers at both jambs at the top of the second row and apply a 3/8" to 1/2" mortar bed on top of this row. Remove
“T” spacers
at both jambs
5E
5F

27
6. Finishing
Note: Allow the mortar to set up for about one hour before proceeding.
Note: To prevent scratching of the glass DO NOT use abrasive materials for this cleanup.
A. Twist off the spacer tabs on both sides of the panel.
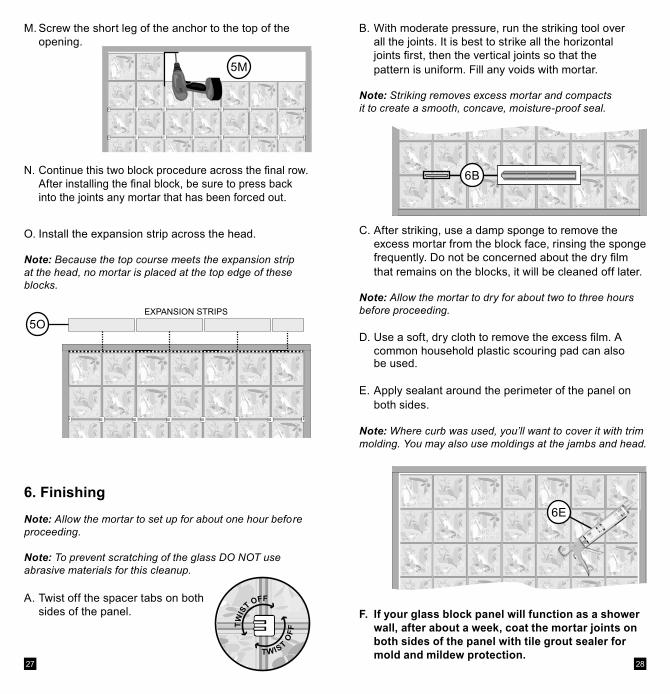
M. Screw the short leg of the anchor to the top of the opening.
N. Continue this two block procedure across the fi nal row. After installing the fi nal block, be sure to press back into the joints any mortar that has been forced out.
O. Install the expansion strip across the head.
Note: Because the top course meets the expansion strip at the head, no mortar is placed at the top edge of these blocks.
5M
EXPANSION STRIPS
5O
28
B. With moderate pressure, run the striking tool over all the joints. It is best to strike all the horizontal joints fi rst, then the vertical joints so that the pattern is uniform. Fill any voids with mortar. Note: Striking removes excess mortar and compacts it to create a smooth, concave, moisture-proof seal.
C. After striking, use a damp sponge to remove the excess mortar from the block face, rinsing the sponge frequently. Do not be concerned about the dry fi lm that remains on the blocks, it will be cleaned off later.
Note: Allow the mortar to dry for about two to three hours before proceeding.
D. Use a soft, dry cloth to remove the excess fi lm. A common household plastic scouring pad can also
be used.
E. Apply sealant around the perimeter of the panel on both sides.
Note: Where curb was used, you’ll want to cover it with trim molding. You may also use moldings at the jambs and head.
6B
6E
F. If your glass block panel will function as a shower wall, after about a week, coat the mortar joints on both sides of the panel with tile grout sealer for mold and mildew protection.

29 30
MaintenanceAn important part of the functional beauty of
Pittsburgh Corning Glass Block products is that they
are virtually maintenance free! There’s nothing to rot,
rust, peel or paint. All that is needed is an occasional
wiping with a damp, soft cloth on interior panels or
a hosing on exterior panels, With minimal attention,
your Pittsburgh Corning Glass Block will remain
sparkling and beautiful for years!
If you need assistance
We hope these instructions are clear and answer
your questions about the installation of Pittsburgh
Corning Premiere Series Glass Blocks and Finishing
Units with the ProVantage® Glass Block Installation
System. For additional information on Pittsburgh
Corning Glass Block visit our website at
pittsburghcorning.com
or call 1-800-624-2120.
The information contained herein is accurate
and reliable to the best of our knowledge. But,
because Pittsburgh Corning has no control over
installation, workmanship, accessory materials, or
conditions of application NO REPRESENTATION
OR WARRANTY, EXPRESSED OR IMPLIED,
EITHER AS TO MERCHANTABILITY OR FITNESS
FOR A PARTICULAR PURPOSE, IS MADE as
to the performance or results of an installation
containing the products which extends beyond the
description on the face hereof and ANY AND ALL
LIABILITY FOR NEGLIGENCE, STRICT LIABILITY
OR ANY OTHER THEORY OF TORT LIABILITY IS
EXPRESSLY DISCLAIMED.
If the products otherwise fail to conform to the
representations made herein, through no fault of
the buyer, buyer’s exclusive remedy at Pittsburgh
Corning’s option, is the repair or replacement, of the
nonconforming products or return of the purchase
price paid by purchaser. If replacement is elected,
Pittsburgh Corning will not be responsible for
installation or labor costs. In no event shall Pittsburgh
Corning be responsible or liable for any incidental,
special, consequential or punitive damages which
might result from product failure, regardless of the
theory of liability upon which any such damages are
claimed.
Pittsburgh Corning Corporation provides written
warranties for many of its products, and such
warranties take precedence over the statements
contained herein. You may obtain a copy of the
warranty for this product by contacting Pittsburgh
Corning.

Weldbond® is a registered trademark of F. T. Ross Ltd. All other trademarks and registered trademarks in this brochure are owned
and protected by Pittsburgh Corning Corporation, Pittsburgh, PA 15239-2724.
© 2011 Pittsburgh Corning Corporation GB-243 50M Rev. 11/11
Printed in U.S.A. (Replaces Rev. 5/07)
Pittsburgh Corning Corporation800 Presque Isle DrivePittsburgh, PA 15239-2724
1-800-624-2120pittsburghcorning.com
Recommended