Version 1.0 Tim Koehler 2012-10-09
“snom UC edition” Version 8.8.x.x
Overall documentation of new features
Version 1.0 Tim Koehler 2012-10-09
Welcome to the new Lync optimized Build for the “snom UC edition”
The new version includes a whole host of key new features, including:
Native software update
Software updates to snom phones can now be managed directly from the Lync server, the
same as any other endpoints in a Lync 2010 deployment. As this is a new feature, not
supported by prior software you need to upgrade to 8.8.1.1 first to test it.
To test the different stages we provide the same software with different versioning. All
three builds (8.8.1.1, 8.8.1.2 and 8.8.1.3) are identical. We provide the different versions,
so that you have the chance to familiarize yourself with the software update process of
snom phones.
Easy sign in with extension and PIN
With extension/PIN authentication, the requirement to enter full NTLM credentials on the
phone has become history! The phone can be setup easily by the user via the phone
keyboard. You can even sign in multiple accounts via a hotdesking option quick and easy!
Call parking
Calls can be sent into parking orbits whilst the phone keeps track of the calls and informs the
user about who picks up the call from the parking queue. (Please configure a key to “Park
Orbit”).
SBA - Survivability Branch Appliance
In the unexpected case of a WAN outage, your snom phones will continue to work on a SBA.
On top of the general features, with the Apollo build we introduce some very exclusive features:
Music on hold (local)
In case you need music on hold in your Lync installation, the snom phones generate the
music for the caller on hold.
Boss/Admin scenarios
This new feature provides a host of useful possibilities to simplify the flow of calls to, from
and between Boss and Admin. For example, the Admin can make calls on behalf of the Boss,
Boss and Admin can monitor each other’s line status and also intercept incoming calls.
Easy assign presence to button
Now users can assign their favorite contacts to buttons directly from the contact list and see
their live presence status instantly.
Asian language support:
The snom 821 will now support many more Asian languages including Korean, Japanese,
Chinese, etc.

Version 1.0 Tim Koehler 2012-10-09
snom native software update via Lync Server 2010 feature: Starting with Version 8.8.1.1 snom introduces the new feature “native software update via Lync
Server 2010”. Software updates to snom devices can now be directly managed by Lync Server 2010
via Lync Control Panel and/or Lync PowerShell. This means that snom now provides firmware cabinet
(.CAB) files in your personal firmware portal.
There are two states from which the phone can perform an update:
“not registered”:
In this state the device uses the static DNS A record
ucupdates-r2.<DNSDomainNameProvidedByDHCP> as described in TechNet “Updating
Devices” under: http://technet.microsoft.com/en-us/library/gg412864.aspx.
“registered”:
If the device is registered, the update information will be received in the inband provisioning
after successful registration and re-registration.
Notes and limitations: As this feature is new to 8.8.1.1 the update won’t work in previous versions. This means that at least
8.8.1.1 firmware needs to be installed initially with snom mechanisms. Once 8.8.1.1 or higher is
installed, the phone will work with the software update service from Lync Server 2010.
Limitations in this version:
- The snom 3xx series cannot download the firmware via an https URL, which is the default
case for the Updates Server External URL. Updating snom 3xx internally is not affected (URL
is http per default).
- A test device can only be added to the “Lync Control Panel – Test Device page” in conjunction
with a snom device MAC address. The serial number is not a valid unique identifier for snom
phones.
- The firmware update file cannot be downloaded in the background.
Configuration
Prerequisites
As mentioned previously, the DNS A record
ucupdates-r2.<DNSDomainNameProvidedByDHCP> should be configured in the internal DNS
zone to enable device update “Out of Box”.
Review the values provided in inband provisioning and ensure that the URLs are accessible
from the network location at which the snom device resides.
Hint: In the local Lync PC client log file of a Lync Client use the same account used on the
snom device file to perform a search in the Snooper tool and for the settings:
updatesServerInternalUrl, updatesServerExternalUrl and updatesServerEnabled.
Details about the Snooper tool are available in Microsoft Lync Server 2010 Resource
Kit Tool: Snooper.

Version 1.0 Tim Koehler 2012-10-09
Uploading the cabinet files
The snom firmware cabinet files can be uploaded by using the Lync PowerShell command Import-
CSDeviceUpdate described in TechNet: http://technet.microsoft.com/en-us/library/gg398861.aspx
Hint: To ensure that all update files from the current folder (in CSPowerShell) are uploaded to all
your Lync Update Device Webservices, run this command.
foreach ($file in Get-ChildItem) {Get-CsService -WebServer | select PoolFQDN | foreach
{Import-CsDeviceUpdate -Identity ('WebServer:' + $_.PoolFQDN) -FileName $file}}
This command can also be executed in single server installations (Standard Edition, Enterprise
Edition), where there is typically only one Device Update Web Service.
Example: If the snom 8.8.1.1 release for the snom 300, 370 and 821 is placed in the folder
“C:\snom_UC_Edition”,
the following command would import all files to all services:

Version 1.0 Tim Koehler 2012-10-09
In the Lync Control Panel – on the Device Update page, the uploaded version is listed under pending
version.
Managing firmware updates in Lync Server 2010
With the cabinet file successfully uploaded, the following tasks can be performed
Rollout pending firmware to test devices (only MAC can be the unique identifier)
Approve, Restore and Delete updates in Device Updates Web service
via Lync Control Panel or Lync Powershell
Please review the TechNet article “Managing Device Updates” under
http://technet.microsoft.com/en-us/library/gg425953.aspx for further information.
User experience The device side update experience for the user is similar to Windows operating systems. The user can
check for updates, postpone updates (whereby activity on the update will be delayed automatically),
or opt to execute updates instantly.
The time required for the update to be completed is visible as a countdown to the user.
Update check
The snom phone will check for the latest available software on the following occasions:
each boot-up, regardless of whether or not it is registered,
each re-registration (typically every 8 hours),
on demand via the device user interface (example snom 821), irrespective of registration
status:
Menu Maintenance Check SW-Update

Version 1.0 Tim Koehler 2012-10-09
(Option Check SW-Update is available in Administrator and User Mode per default)
Indication of software update in the user interface
An indication of upcoming software updates is provided to the user as countdown of 5 minutes
(300sec). The countdown will be reset by any user activity on the device to prevent an update while
the phone is in use.
Forcing or postponing a software update
Instant execution or postponing of an update can be performed via the status info screen accessible
using Menu Status info.
Select the status message about “SW-Update in XXXs” by pressing the virtual key with the “i”.
By confirming the “Execute?” question the update is performed instantly. By canceling the
“Execute?” dialogue, the update is postponed until the next software update check is performed (as
stated earlier).

Version 1.0 Tim Koehler 2012-10-09
(The option to confirm or cancel is available in Administrator and User Mode.)
Version 1.0 Tim Koehler 2012-10-09
Troubleshooting Besides the information provided in the TechNet article “Updating Devices”
(http://technet.microsoft.com/en-us/library/gg412864.aspx) reviewing the snom device side log can
be useful for troubleshooting. To access this, open the log.htm (https only per default) of the device
in a browser by entering the device’s ip-address followed by /log.htm.
Example: https://192.168.1.42/log.htm (available as default in Administrator and User Mode).
By switching the Log Level to 6 and clicking “Apply”, the system log will include the correspondence
with Device Update Web service. Performing a Software Update Check via the phone user interface
results in the response from the device update web service being logged.
Please search and review everything that includes
UcSendFirmwareUpdateAvailableRequest
UcFirmwareUpdateAvailableResponseReceived NumOfFiles
UcFirmwareUpdateAvailableResponseReceived URL
in your browser.
Version 1.0 Tim Koehler 2012-10-09
snom Extension and PIN sign in support with Lync Server 2010: Starting with Version 8.8.1.1 snom introduces the new feature “Extension and PIN sign in support
with Microsoft Lync Server 2010”. This feature is based on the same mechanisms used to sign in
phones running the Lync Phone Edition 2010 available from other vendors. In an environment set up
to support these devices, snom phones are able to sign in with extension and PIN automatically.
As an alternative to authentication via NTLM (full AD – Active Directory credentials,
Domain\Username and Password), snom UC edition devices can now authenticate via TLS-DSK (TLS
with Derived Session Key) in SIP and HTTP(S). This kind of client certificate is provisioned by the Lync
Server 2010 web service when a valid combination of a user’s extension (optional: complete phone
number) and PIN is provided. Using a Derived Session Key the snom devices operate independently
of any Active Directory password changes, or even changes to the telephone number, extension or
PIN.
Notes and limitations:
Easy Hot-Desking
With the support of Extension and PIN sign in, snom devices introduce “easy Hot-Desking”. Signing in
and out multiple user accounts1 on one device using extension and PIN becomes a quick and intuitive
task. For details please refer to the section “Easy Hot-Desking in configuration”.
TLS-DSK and SBA support
With Version 8.8.1.1 and beyond, snom UC edition devices will use TLS-DSK as the primary
authentication mechanism for SIP and HTTP(S), regardless of whether or not the new extension &
PIN or NTLM authentication is used. This is a basic requirement in Survivable Branch Appliance (SBA)
scenarios, which are also now natively supported by the snom UC edition (min. 8.8.1.1). This includes
user interface notifications during an outage and the underlying failover mechanism related to
primary and backup registrars in Lync infrastructures.
1 Currently, this feature is officially supported for up to two user identities – additional identities are not
recommended but can be added.

Version 1.0 Tim Koehler 2012-10-09
Signing in with Extension and PIN: If the snom device detects (via DHCP responses – covered in detail later in this document) it will
provide users with the option to login with extension and PIN (visible in the top line of the user
interface). If the phone continues to ask for NTLM credentials (SIP-URI) because it could not detect
the prerequisites for this sign in method, please refer to the prerequisites section of this document.
When an Extension and PIN
is provided by the user the device will contact Lync’s certificate provisioning web service by using the
URL received via the DHCP server’s response (if configured - not per default - the DHCP response can
also be sent by Lync Registrar via the built-in stripped down DHCP server – more details in the section
about configuration prerequisites). By design, the login process with extension and PIN takes more
time than the login with NTLM credentials. As long as the process is running, the device will indicate
this on the user interface.
If the login fails, for example because of an invalid or non-existent extension, a request will be made
for a valid extension and PIN combination, with a note (not registered: signing in…).
If the sign-in fails completely, the device will display a corresponding message.

Version 1.0 Tim Koehler 2012-10-09
By returning to the “Welcome!” screen
the device now returns to the authentication message for NTLM (full credentials: SIP-address,
Domain\Username and Password).
Please note: Every time a login is canceled (phone returns to the “Welcome!...”-screen), the
phone will toggle between Extension & PIN sign in and NTLM..
A successful extension and PIN sign-in finishes with the same idle screen when performing NTLM
authentication.
Version 1.0 Tim Koehler 2012-10-09
Configuration The possibility to sign in devices with extension and PIN is not available by default after Lync Server
2010 is deployed. Please follow Microsoft’s guidelines on how to setup extension and PIN sign-in.
Consequently, snom recommends carefully reviewing related TechNet articles, blog posts and
whitepapers.
Prerequisites
Please verify that extension and PIN authentication is enabled on the Lync Server as
described in TechNet:
Setting Up (PIN) Authentication on the New IP Phones
http://technet.microsoft.com/en-us/library/gg412902
Please also verifiy that Certificate Authentication (TLS-DSK) is enabled via the Lync
PowerShell command:
Get-CsWebServiceConfiguration | select usecertificateauth | fl
More details are available in TechNet
Get-CsWebServiceConfiguration: http://technet.microsoft.com/en-us/library/gg425751
Set-CsWebServiceConfiguration: http://technet.microsoft.com/en-us/library/gg398396
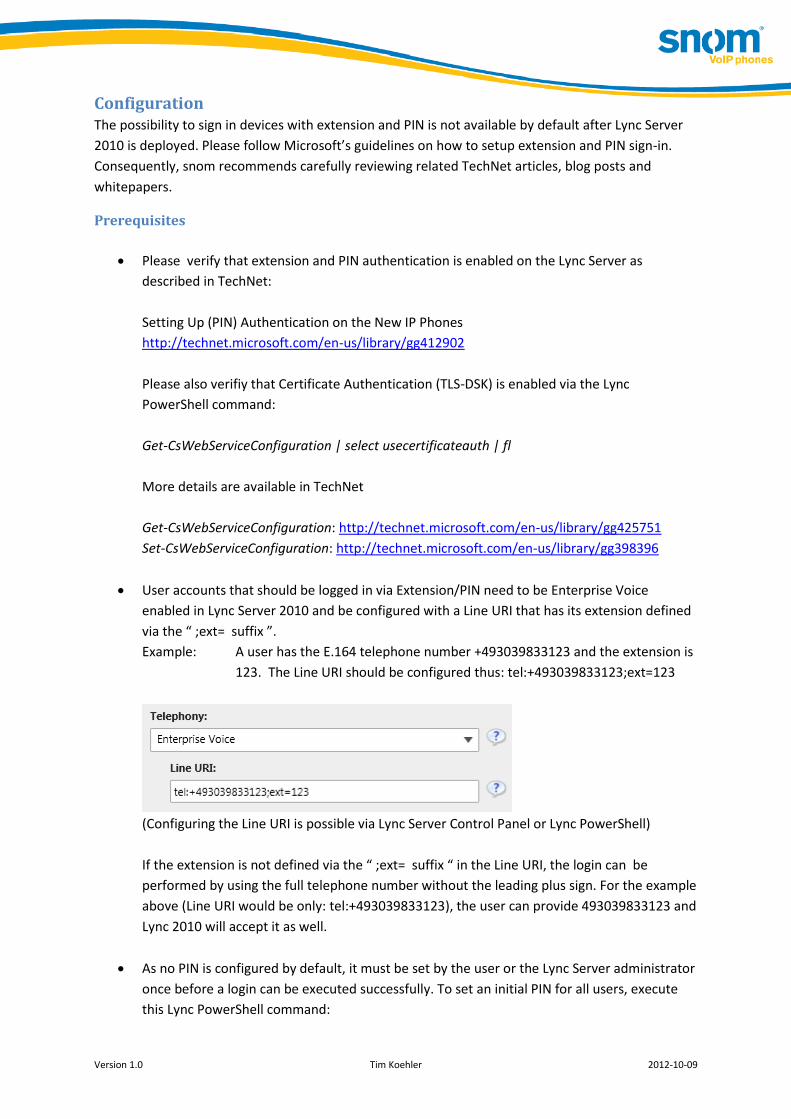
User accounts that should be logged in via Extension/PIN need to be Enterprise Voice
enabled in Lync Server 2010 and be configured with a Line URI that has its extension defined
via the “ ;ext= suffix ”.
Example: A user has the E.164 telephone number +493039833123 and the extension is
123. The Line URI should be configured thus: tel:+493039833123;ext=123
(Configuring the Line URI is possible via Lync Server Control Panel or Lync PowerShell)
If the extension is not defined via the “ ;ext= suffix “ in the Line URI, the login can be
performed by using the full telephone number without the leading plus sign. For the example
above (Line URI would be only: tel:+493039833123), the user can provide 493039833123 and
Lync 2010 will accept it as well.
As no PIN is configured by default, it must be set by the user or the Lync Server administrator
once before a login can be executed successfully. To set an initial PIN for all users, execute
this Lync PowerShell command:

Version 1.0 Tim Koehler 2012-10-09
Get-CsUser | Set-CsClientPin -Pin 12345
This will set the same PIN for all users found in the Lync infrastructure and may conflict
with your security policies!
For more details and background information about the Lync PIN, lock and unlock a PIN, and
the options on how to set or reset it as an administrator or a user please carefully review the
following online information:
o From the CS PowerShell team - CSCP Haiku 095:
http://blogs.technet.com/b/csps/archive/2011/04/22/haiku095.aspx
o Office Online Help Topic - Join a meeting or conference call by phone – section “Set
my dial-in conferencing PIN”:
http://office.microsoft.com/en-us/communicator-help/join-a-meeting-or-
conference-call-by-phone-HA102041504.aspx
The DHCP server that operates the network segment where the devices will be used needs to
be configured with a set of vendor specific options. With the URL information provided by
the DHCP server, snom devices will be able to locate the Lync Server certificate provisioning
service (extension/PIN sign-in required).
o For Windows based DHCP servers a pair of handy tools called DHCPutil.exe and
DHCPConfigScript.bat is available, typically stored in common files of the Lync Server
installation folder: …\Program Files\Common Files\Microsoft Lync Server 2010
This TechNet article will guide through the steps to configure Windows based DHCP
servers with by using these tools:
Using DHCPUtil: http://technet.microsoft.com/en-us/library/gg412988.aspx
o For DHCP servers other than Windows DHCP server please refer to these TechNet
articles:
Configuring DHCP Options on DHCP Servers other than Windows DHCP Server
http://technet.microsoft.com/en-us/library/gg412828.aspx
A whitepaper that compliments the previous article on how to configure DHCP
servers from the following manufacturers: BlueCat, Cisco, Linux, Infoblox, and QIP:
Configuring DHCP Options to Enable Sign-in for IP Phones
http://www.microsoft.com/en-us/download/details.aspx?id=27138

Version 1.0 Tim Koehler 2012-10-09
o For network segments without a DHCP solution that supports the necessary vendor
specific options (e.g. a router device) using the built in Lync Server DHCP component
(a stripped down DHCP server provided with the Registrar) might be an option.
To enable the built in Lync Server DHCP component, which is disabled per default
this Lync PowerShell command needs to be executed:
set-CsRegistrarConfiguration -EnableDHCPServer $true
More details: http://technet.microsoft.com/en-us/library/gg398764.aspx
Please note that this DHCP component will not lease IP addresses. It just listens to
the device’s DHCP broadcasts and responds with the appropriate DHCP INFORM
packets containing the URL to Lync certificate provisioning web service.
For more information about configuring DHCP servers, the Lync Server DHCP component, and
parallel usage please refer to the TechNet article:
Setting Up DHCP for Devices
http://technet.microsoft.com/en-us/library/gg398369.aspx
Easy Hot-Desking Signing in multiple accounts within a Lync infrastructure on a single snom device now becomes an
easy and quite straight forward task.
Please note: Depending on account activity, the amount of usable accounts on a phone can be
limited, snom supports up to 2 Identities on one phone. Additional Identities can be
added but are not recommended
The following example, on a snom 821, explains the major steps required.
On a snom device already signed in to Lync with one or more accounts, the user can enter
the settings menu, via the menu button. Selecting and confirming the optional identity
will lead to the Identity submenu.

Version 1.0 Tim Koehler 2012-10-09
By selecting and confirming ‘Edit User’ the Hotdesking option is displayed.
Inside Hotdesking menu a new option called PIN is available.
When PIN is selected and confirmed all phone accounts (maximum is 12 in case of snom 821)
not in use are displayed.
For the selected account the device will request the user’s extension and PIN in the same
way it does when the Welcome! Screen is passed.

Version 1.0 Tim Koehler 2012-10-09
Once the sign-in starts, the display will return to the idle screen indicating the process.
After successfully signing in, the additional account is ready for use with the same feature set
as the first account: Presence, contact list, voicemail, etc.
The menus for presence, contact list, etc. will dynamically switch their context according to
the current active identity selected (highlighted) via the Navigation button on the device.
Please note: The device is able to receive all incoming calls for the accounts logged in.
Outgoing calls will be performed with the active identity.
Logging off one or all users can be performed via the Identity submenu by choosing the
option Logoff User or Logoff All.

Version 1.0 Tim Koehler 2012-10-09
Troubleshooting The key information the devices need to have, to start offering the Extension and PIN sign in dialog is
the URL for the Lync Server certificate provisioning web service. This information should be provided
within a vendor specific DHCP inform response.
For troubleshooting, it is essential to review the network infrastructure and components in use, while
considering the nature of DHCP protocol and transport layer. Please verify if it is in general possible
for the snom device to successfully send out a DHCP inform request to a desired DHCP server (or the
DHCP component in a Lync Registrar if enabled). In addition, the response from the DHCP server or
component must reach the device in the opposite direction. Besides Firewall rules, DHCP - Denial of
Service protection in use might be another obstacle blocking the DHCP packets.
How to verify if the device detected the URL to Lync Certificate provisioning web service
If the devices successfully obtain a URL, it is stored under the setting called
“cert_provisioning_service”. For example:
cert_provisioning_service!: https://ls.contoso.com:443/CertProv/CertProvisioningService.svc
The setting and its value can be found on the device “/settings.htm” page. This page can be
reviewed by logging into the device web server with administrative access that unlocks the
advanced settings and submenus. For example, if a device has the IP address 10.10.10.42
then “settings.htm” can be accessed under https://10.10.10.42/settings.htm
For details about logging in to the device web server and accessing advanced mode, please
refer to the appendix: How to login to the device web server – Automatic device web server
protection
Setting cert_provisioning_service is empty
If the value of the setting “cert_provisioning_service” is empty the device did not receive the
DHCP inform response or did not parse it successfully for the Lync Certificate provisioning
web service URL. In case the setting has no value, the login dialog screen for Extension and
PIN authentication will not offered by the device. Please analyze your DHCP configuration.
Setting cert_provisioning_service is set
If the value is set to a valid URL to a Lync Certificate provisioning web service but login with
Version 1.0 Tim Koehler 2012-10-09
extension and PIN fails, it is recommended to carefully review the prerequisite steps under
section configuration. Ensure communication between the device and the web service is not
blocked by any network protection, such as a firewall, and also check that DNS is working in
the network location of the device. Try to request the URL from a web browser in the same
network segment – the browser should ask for credentials (this would indicate that
communication is possible).
Manually setting the Certificate Provisioning Service:
When troubleshooting it can be helpful to set the value for “cert_provisioning_service”
manually on the phone by accessing the device web server in Admin mode. This can be
performed by using a web browser to open the so called “/dummy.htm” and providing the
URL with a command such as in this example:
o The IP address of the device is: 10.10.10.42
o The Lync Certificate provisioning web service is available under the URL:
https://ls.contoso.com:443/CertProv/CertProvisioningService.svc
This URL needs to be opened in a browser if the device web server is already
accessed in Admin mode:
https:// 10.10.10.42/dummy.htm?settings=save&cert_provisioning_service=https://
ls.contoso.com:443/CertProv/CertProvisioningService.svc
o After setting the value manually it is recommended to review the “/settings.htm”
page again (refresh it in browser) to see if it’s configured correctly.
o A subsequent reboot (not just power off/on) performed via the phone’s user
interface using Menu Maintenance Reboot is recommended.
o When rebooted the device should start offering the login dialog for Extension and
PIN authentication if the Welcome! Screen is passed. If not, please refer to the
section “Setting cert_provisioning_service is set”
Version 1.0 Tim Koehler 2012-10-09
Appendix:
How to login to the device web server – Automatic device web server protection
In the UC edition firmware, snom’s built in web server is enabled to only be accessible via HTTPS by
default. The device IP address can be obtained whilst booting..
As access to the web server is restricted to HTTPS you need to open a web browser and enter the
device IP address in the address bar prefixed with https (not just http).
Please note: most browsers will display a warning message regarding the certificate presented by the
snom device web server. The warning can be safely ignored.
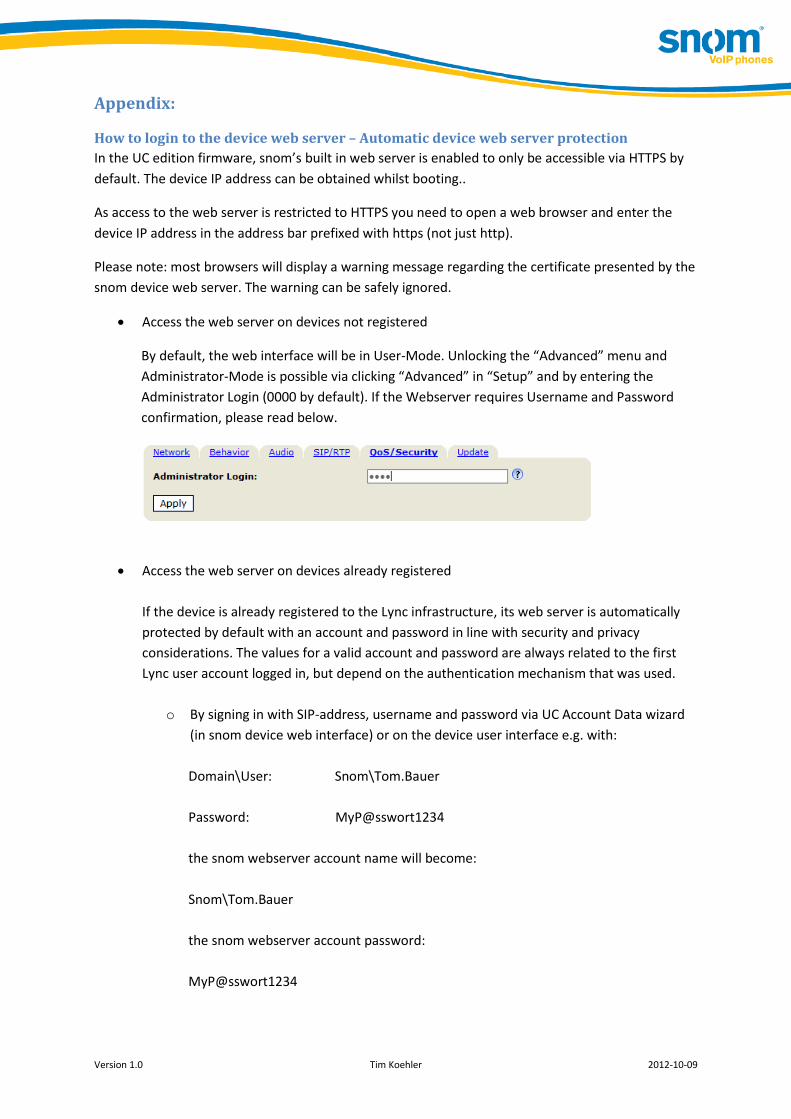
Access the web server on devices not registered
By default, the web interface will be in User-Mode. Unlocking the “Advanced” menu and
Administrator-Mode is possible via clicking “Advanced” in “Setup” and by entering the
Administrator Login (0000 by default). If the Webserver requires Username and Password
confirmation, please read below.
Access the web server on devices already registered
If the device is already registered to the Lync infrastructure, its web server is automatically
protected by default with an account and password in line with security and privacy
considerations. The values for a valid account and password are always related to the first
Lync user account logged in, but depend on the authentication mechanism that was used.
o By signing in with SIP-address, username and password via UC Account Data wizard
(in snom device web interface) or on the device user interface e.g. with:
Domain\User: Snom\Tom.Bauer
Password: MyP@sswort1234
the snom webserver account name will become:
Snom\Tom.Bauer
the snom webserver account password:
MyP@sswort1234

Version 1.0 Tim Koehler 2012-10-09
Sum:
1. The domain and \ becomes part of the account name value.
2. Both account name and password are CASE sensitive!
It is necessary to enter the exact values to gain access to the snom web server again.
o By signing in with extension and PIN on the phone e.g. with:
Extension: 5678
PIN: 12345
the snom webserver admin account name will become:
5678
The snom webserver admin password:
12345
Unlocking the Advanced menu and Administrator-Mode can be performed the same way as
described in “Access the web server on devices not registered”
By signing out the first user, the web interface can be unlocked.

Version 1.0 Tim Koehler 2012-10-09
snom Call Park support with Lync Server 2010: Starting with Version 8.8.1.1 snom supports the Call Park service in Lync Server 2010. Established
calls can be parked to a server side lot. The device will display the retrieval number, provided by the
Call Park service. Calls can be retrieved at any other endpoint with that “lot-number” or on the
parker device by using the parked call list. The device which parked will provide information about
events, like when and by whom the call was retrieved.
Notes and limitations: Please note Call Park support is not enabled per default in Lync Server 2010. It has to be enabled and
configured via Lync Control Panel and/or Lync PowerShell.
Details available in TechNet: Configuring Call Park http://technet.microsoft.com/en-
us/library/gg399014.aspx
Limitations in this version:
- It is necessary to configure one of the programmable keys (Fkeys) with the function
Park+Orbit via the phone user interface (optional via snom’s built-in webserver).
- During the assignment process of an Fkey with Park+Orbit phone user interface is asking to
provide a value for Orbit, which is not needed in Lync Server 2010. User just confirms the
dialog without entering any value.
- Calls on hold cannot be parked. User needs to un-hold the call to park it.
Configuration
Prerequisites
Call Park Service has to be enabled and configured in Lync Server 2010.
Assigning an Fkey with the Park+Orbit function
Fkey’s can be assigned with the Park+Orbit function by selecting the Menu button on the device to
enter Settings.
By selecting preferences the Fkeys submenu option is displayed.

Version 1.0 Tim Koehler 2012-10-09
Inside Fkeys menu the desired Fkey for Park+Orbit can be selected. (Line is the default function for all
Fkeys)
After the selection is confirmed the Park+Orbit can be assigned to the Fkey from the choice of
functions. The choice of functions depends on Admin or User mode, but Park+Orbit is available in
both.
When Park+Orbit is confirmed a dialog is displayed requesting a value to be entered (for an Orbit).

Version 1.0 Tim Koehler 2012-10-09
This dialog can be confirmed with the OK key as no value is needed when used with Lync Server
2010. The display will return to the Fkeys submenu to continue with assigning more keys showing the
Orbit value as: <sip:_Y_@your-sip-domain>
Returning to the main screen can be achieved by pressing the Cancel key twice.
Using the Call Park feature
Pressing the desired Fkey assigned will park one or more established calls. The display will present
the retrieval number for the one that was parked.
In addition, the Call History menu displays a submenu listing parked calls.
From here the option to un-park calls is provided.

Version 1.0 Tim Koehler 2012-10-09
The list of the calls parked in the orbit.
Version 1.0 Tim Koehler 2012-10-09
snom music on hold feature: Starting with Version 8.8.1.1 snom introduces the new feature “local music on hold” (MoH). This
means that the phone itself will play music to a caller placed on hold. This is very useful in
environments without a music on hold service.
Notes and limitations: Due to resource handling the phone will playback a local media file in G711 CoDec.
Limitations in this version:
- Replacing the media file on the device with a custom file is not possible
- Music on hold will always stream in G711ulaw (no other CoDec supported)
- If enabled, the phone will always be the music on hold source
- The music on hold generated by the phone does not necessarily follow call admission
control. This means that when a low-bandwidth codec is enforced due to network policy and
the call is put on hold by a snom phone, the MoH will always stream in G711 – thus
contravening the usage of a low-bandwidth codec.
- Media file is only 5 sec long (and repeats itself) on snom 3xx
Configuration By default, the MoH feature is deactivated in snom devices and in Lync Server 2010. The snom
devices are conforming with the CSClientPolicy – EnableClientMusicOnHold configuration. The policy
is received in inband provisioning as part of a provisionGroup named “endpointConfiguration" during
registration or reregistration:
<property name="DisableMusicOnHold" >false</property> (possible values: true or false)
Due to this process, please keep in mind that policy changes will not be reflected to Lync endpoints
instantly.
To centrally manage the MoH feature via Lync PowerShell simply run the following commands:
Set-CsClientPolicy -EnableClientMusicOnHold $True
Set-CsClientPolicy -EnableClientMusicOnHold $False
Please note that if an identity value for Set-CsClientPolicy is not provided, you will change the default
Global CSClientPolicy. This means that all endpoints in the deployment are affected! In addition,
ensure that CSClientPolicy changes are granted to the snom device user account.
More details about Set-CSClientPolicy: http://technet.microsoft.com/en-us/library/gg398300.aspx
Hint:
If you intend to activate the feature on a single device via snom’s built in webserver you need to
change the setting under: Advanced Audio Play music during hold = on (and click on Apply &
Save). Please keep in mind that this will only turn on MoH temporarily (until next reregistration), if
the value for "DisableMusicOnHold" in Lync Server inband provisioning is set to “true”.

Version 1.0 Tim Koehler 2012-10-09
snom boss-admin feature description
Starting with version 8.8.1.1 snom supports extended boss-admin scenarios on Microsoft Lync 2010.
The new boss-admin is designed to improve telephony efficiency between the boss and admin
(secretary). The feature enables the admin to see the in-call status of the boss and vice versa so that
calls can be picked up calls and put on hold by any party.
Notes and limitations:
Currently, only snom phones have implemented this feature on the client side. This means for the
scenario to work, both admin and boss need to have a snom phone (currently supported on snom
370 and snom 821).
On the server side, for these extended scenarios, a new container is used. This container needs to be
created/allowed in Lync 2010.
Lync Server 2010 allows for applications to publish Enhanced Presence categories as detailed on
MSDN. Microsoft, in collaboration with IP Phone Partners, has tentatively defined a publication
category for purpose of sharing line state of boss identities and call retrieval in a boss/delegate
configuration.
In order to enable boss shared line state and call retrieval, Lync administrators must execute the
following at the command line at each backend where the capabilities are to be enabled –
sqlcmd -E -S se.fabrikam.com\RTC -Q “use rtc;exec RtcRegisterCategoryDef N’dialogInfo’”
(where ‘se.fabrikam.com\RTC’ is the URI of the presence back end)
More information from Microsoft will be available at a later date. Questions specific to the
enablement of this feature in Lync Server 2010 should be directed to [email protected].
Supported scenario overview: - Monitor line state
The boss’ line (either being used by an admin “on-behalf-of” or by the boss himself) is visible
to the boss and all of the associated admins. When a person is in a call (either the boss or an
admin in an “on-behalf-of” call) the LED of the assigned function key is on. When a call is held
by any party the LED will blink.
- Call Pickup
If the LED on the assigned button is blinking, this means a call is held. This call can be picked
up by the boss or any associated admin. If multiple calls are on hold, the boss or admin can
choose which one to pick up.
- Make a call on-behalf-of
The secretary is able to make a call “on-behalf-of” the boss. By making calls on the boss’
behalf, the boss can see the line activity on his phone (associated delegate button). The boss
can later on pick up a held call.
Version 1.0 Tim Koehler 2012-10-09
- Safe transfer
The admin and the boss have the option to perform a “safe transfer” meaning these
transferred calls are not sent to voicemail or forwarded. They home back to the initiator after
timeout.
- Join conference call
The admin is able to join a conference “on-behalf-of” the boss and transfer the call.
- N to n relation
An admin can have multiple bosses, a boss can have multiple admins and an admin can be
the boss of another admin.
Functionality overview:
Boss’ phone:
- Assign buttons to admin
The boss is able to select an admin from the group delegates in his contact list and assign this
delegate to a function key. He can have multiple admins on multiple buttons (1 admin per
button)
o The corresponding LED will be on constantly if:
The associated delegate is in a call “on-behalf” of the boss
The boss is in a call on his own (as his “line” is busy)
o The corresponding LED will blink if:
The boss puts the call on hold
The secretary puts a call on hold
o The hold state will always overwrite the “in-a-call” state, meaning that if there is a
call held by any party, the LED will blink (even though someone might be in an active
call)
- Pick up calls which are held
If a call (made on the boss’-behalf) is held by the Admin, the boss can pick up the call. If there
are multiple calls on hold, the boss can choose which call to pick up.
- Do a safe transfer
The boss can do a safe transfer (meaning the call will not go to voicemail and home back to
him if it remains unanswered).
- Easy transfer
The boss can do a transfer to admins by pressing transfer and the corresponding button.
- Quick access
The button assigned to the admin, gives quick access to the admin’s contact details and
presence state (once pressed).

Version 1.0 Tim Koehler 2012-10-09
Admin’s phone
- Assign buttons to admin
The admin can assign multiple boss’ to multiple function keys (one boss per function key).
This gives the admin direct access to presence and contact options of the boss. The
associated LED then indicates the boss’ line status.
o ON means the boss or another admin (making a call “on-behalf-of”) is “in-a-call”.
o BLINKING means that the boss or another admin has put a call on hold. (Irrelevant if
someone is “in-a-call” or not)
- Pickup of held calls
If calls are held by any party (boss or other admin), the admin can pick up this call, or choose
which call to pick up if multiple calls are held (irrelevant of the user is holding the call).
- Make a call on-behalf-of
The admin can make calls “on-behalf-of” the boss. In this case, the boss can see the “in-a-
call” LED lit on his phone.
- Dial into a conference and transfer to boss
The admin can join a conference “on-behalf-of” a boss and transfer it to the boss.
- Do a safe transfer
The admin can do a safe transfer (meaning the call will not go to Voicemail and home back to
the admin if it remains unanswered).
- Quick access
The button assigned to the admin, gives quick access to the admin’s contact details and
presence state (once pressed).
Configuration: To enable the boss-admin functionality, a delegation needs to be set up in the Lync Client of the boss.
This brings up the groups “Delegates” (for boss’) and the group “People I Manage Calls For” in the
contact list (press left/right on the silver navigation key, to browse through groups).
By pressing the “i” Button, more information is available:

Version 1.0 Tim Koehler 2012-10-09
Then Select Fkeys.
Select the key to which the Boss/Admin should be assigned to
(the text behind the number shows the current
configuration).
Select Boss/Admin
The button is now configured
Recommended