FOR ALL SEASONS*fe.

snowflakesFOR ALL SEASONS
72EASY-TO-MAKESNOWFLAKE PATTERNS
BY CINDY HIGHAM
»PGibbs Smith, Publisher
Salt Lake City

contentsGetting Started
New Year's
Toast to the New Year
New Year's Hour Glass
Valentine's Day
Hearts
Hearts with Arrows
Hearts in Hearts
Burst of Hearts
Hearts and Curves
Cupid
Love and Kisses
President's Day
Lincoln and Washington
St. Patrick's Day
Shamrocks
Shamrocks-a-Plenty
Pot-o'-Gold
Spring
Butterflies
Tulip Garden
Love Birds
Flying Kites
7
9
10
11
12
13
14
15
16
17
18
19
20
21
Easter
Bunnies
Lilies and Baby Chicks
Summer
Ring around the Rosies
Giant Cactus and Coyotes
Sunshine, Clouds, and Lightning
Swinging in a Tree
Fourth of July
Firecrackers and Liberty Bells
Freedom Stars
Statue of Liberty
Autumn
Pumpkins and Autumn Leaves
Autumn Leaves
Halloween
Black Cats and ]ack-o-lanterns
Big Bats
Mean Ghosts
Spiders Everywhere
Jack-o-lanterns
Owls and Black Cats
Frankenstein
Spiderweb
26
27
28
29
30
31
32
33
34
35
36
37
38
39
40
41
42
43
44

Thanksgiving
Turkey Time 45
Thanks to the Pilgrims 46
Christmas
Toy Soldiers 47
Nutcracker Ballerina 48
Christmas Trees 49
Candy Canes 50
Christmas Bells 51
Candlelight 52
WINTER
Let's Make a Snowman 53
Powerline 54
Winter Bloom ^jLJs^T fjjk55
Jack Frost
Winter Star«rki 56
m 57
Geometric 58
Round Point 59
Pinecone 60
Crosshatch 61
Empty Heart
Pinecone Lace
Poinsettia
Thistle
Pine Bough
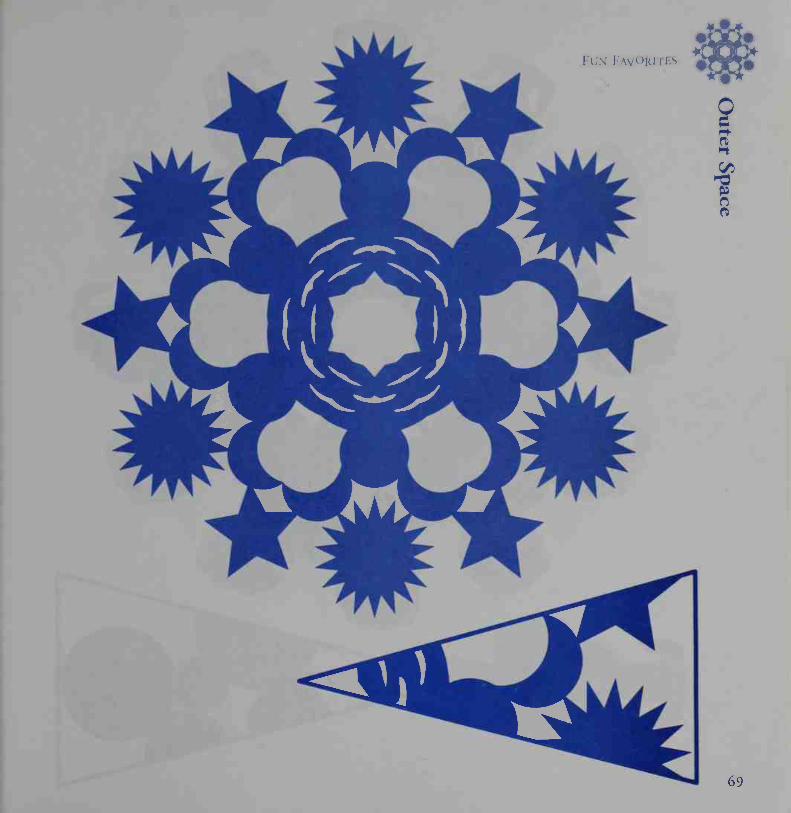
Fun Favorites
Pioneer Wagons
Teddy Bears
Outer Space
Have a Ball
Dog
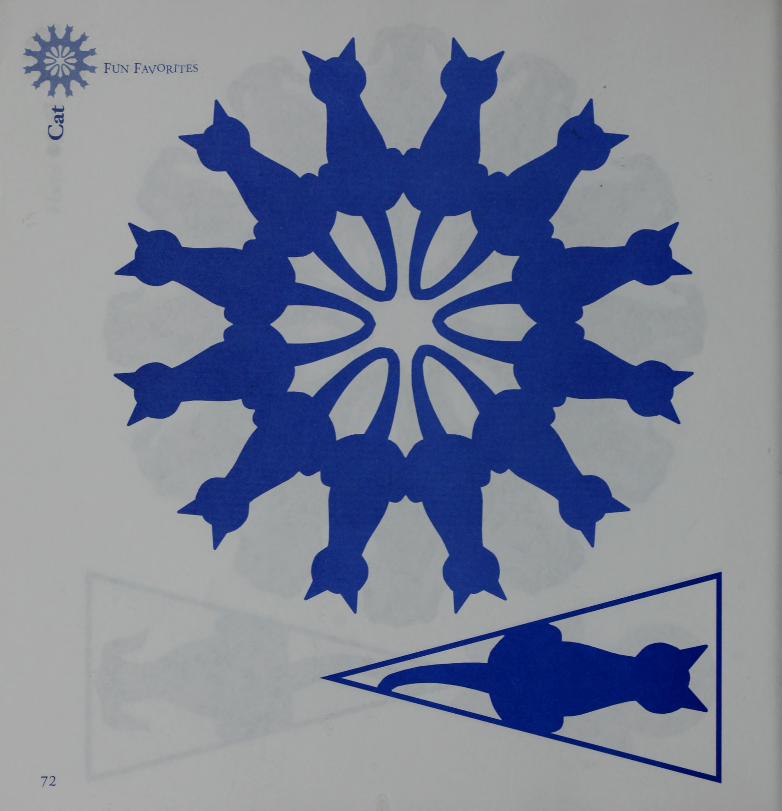
Cat
Jacks
Venus Flytrap
Jets in Formation
Aliens
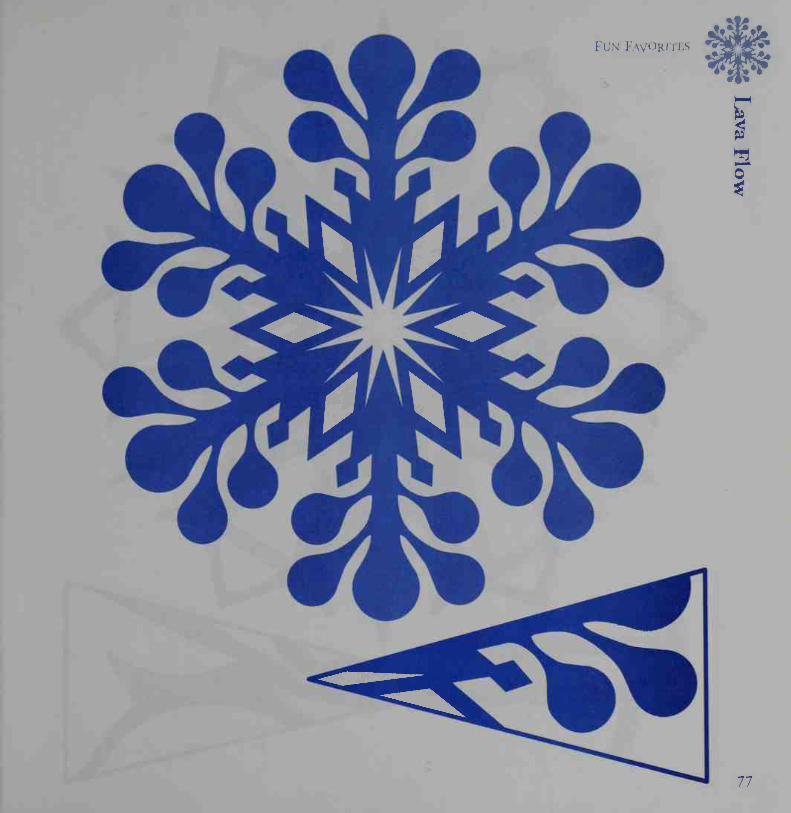
Lava Flow
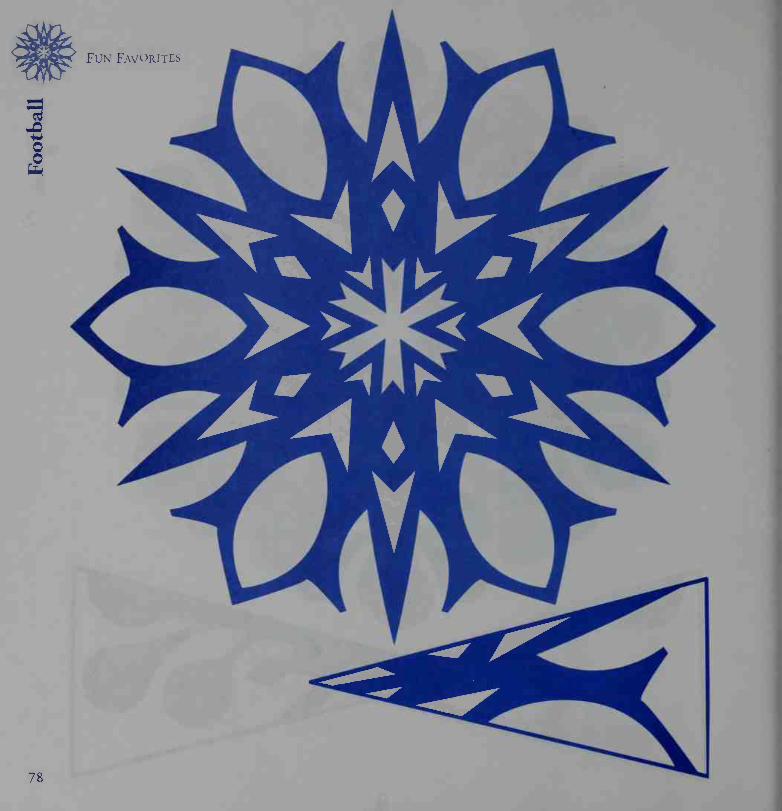
Football
Ferris Wheel
Pinwheel
62
63
64
65
66
67
68
69
70
71
72
73
74
75
76
77
78
79
80

getting startedIT'S OFTEN SAID that no two snowflakes
are alike. That's also true with paper snowflakes!
The slightest change in the paper folding or the
slightest cut difference and you can have a new
and exciting snowflake.
Use the patterns in this book to learn the tech-
niques, and then start experimenting on your own.
Snowflakes could be the least expensive decora-
tion you can make. Any 8 Y> x 11 sheet of paper will
do. There are many different paper styles and col-
ors available for choosing. Find some paper and a
pair of sharp scissors and you are ready to start.
Use the diagrams on page 8 to learn how to
fold your paper. Then pick the pattern you want to
try first.
You can use the same patterns many times.
Photocopy or trace the patterns rather than cutting
them out so you can use them many times.
You can also photocopy your patterns smaller
or larger so you have a variety of snowflake sizes
for decorating. Cut a piece of paper to the size you
want your snowflake. Fold the paper, as per the
instructions, then enlarge or reduce the pattern to
fit your snowflake triangle.
Hints
Put a small piece of tape on the sides of your
pattern and tape it to your folded paper. Cut the
small sections out first and work your way up to the
large cuts. This will give you more paper to hold
onto for a longer amount of time.
You can tape the finished snowflakes to your
windows or hang them from the ceiling with
thread. Watch the room transform into a magical
place.
If your snowflakes aren't flat, you can press
them into a book for a few days or you can take a
slightly warm iron and press out the folds.
If you want to make your snowflakes sparkle,
you can buy glue sticks with glitter in them or glue
glitter pens that are fun to decorate your snowflakes
with.
Use colored paper that coordinates with the
holiday you are celebrating.
Fun Uses for Snowflakes
Bows for packages
Scrapbook fillers
Picture frames
Bulletin board borders
Window displays
Cards
Valentines
Invitations
Holiday tree decorations
Placemats

Folding Instructions
If your paper is a rectangle, fold the top right cor-
ner down to left side of paper so that the top edge
aligns with left edge. Cut off the paper that extends past
the bottom of the triangle. Now you have a square.
Diagram 1
Fold corner A down to B. (After each fold, run
your fingernail along the fold to press it down tight.)
Fold corner C down to D.
You should have a triangle that looks like the
shaded area on the diagram.
Diagram 2
Fold the bottom left corner partially to the right,
so that the corner sticks out past the bottom edge of
the triangle.
Diagram 3
Now fold in the opposite third. Fold A to A,
B to B, and C to C. The more perfect the paper is
folded the more perfect the snowflake will be.
Diagram 4
Your paper should now look like this. On one side
of the folded paper you will see a straight line, where
the dotted line is shown in the diagram. Cut off the
paper along this line. You now have your snowflake
triangle and are ready to choose a pattern to make.
Choose a pattern to cut out.

vr's
3-ft

New Year's
3
o1-1
IIn
4
10

Vai i
11

Valentine's Day
I
12

Vai i Day
13

Valentine's Day
CO
14

Valentine's Day
i
15

*M#
•w*
Valentine's Day
1
16

Vai I - Day
17

President's Day


St. Patrick's Day
20


SPRIXG
8
CO
22

Spring
23

,«jftiu
T<7^r r
SpRl.VG
i
j
24

Spring
25

3
co
26

Easter
8
*V.V»

Summer
28

Summer
29

Summer
G
V5
30

3P
ft
ft
31

> \^J t\FOURTH OF JUI V
-
S2
V
32

rHO] )
*1nft
ft
P
33

fourth of July
o
I
34

Ao i
73
EB
i
1
35

Autumn
I
I
36

Hallowi
03
PC
n
o
5ftft>n
0S
37

HALLOVTEEX
Vi4-
PQ
PQ
38

H \i
39

Halloween
40

n \i
8
o
n
41

42


Halloween
J2
C/5
44

Thanksgiving
45

THA-\'KSGIVINTG
au
46

Chris
i
ft
47

CHRISTMAS
48

CHRISTMAS
49

Christmas
50

CHRISTMAS
nT3.(A
5P
C/J
51

CHRISTMAS
4
1
52

Winter
!
3
53

Winter
54

WlN'-I IK
ft
03
55

Winter
1
1
56

\X'l\"lhR
57

58

59

WINTER
CU
G
60

WIN' I I.
K
61

Winter
62

Winter
Oft
ft
oDft
n
63

\rINTER
.2
G
64

Winter
65

WINTER
66


Fux Favorites
68
RJTES
www
1ft
69

FUN Favorites
i
70

i r . 'RITES
71
FUN Favorites
72

I I•.' 'Klll>
73

FUN Favorites
74

[UTES
&
75

FUN Favorites
76
I . I /vvorites
r
f
11
Fun Favorites
I
78

RJTES
•n
79

FUN Favorites
80

y\M/
/
</0
nowfiakesFOR ALL SEASONS
No two snowflakes are alike—even paper ones! The
slightest change in the paper folding or cut can open up
a whole new storm of possibilities. By following these
all-season patterns, you can learn your own techniques
and create your own designs. Perfect for decorating
packages, scrapbook pages, greeting cards, bulletin-
board displays, or windows, the snowflakes in this book
will have you shoveling through hours of creative fun!
www. allseasonsnowflakes@yahoo,com
Recommended