SOLAR ECLIPSE™
Sun Control System
INSTALLATION MANUAL
BuildingEnvelope®
August 2021Phone: 1-866-OLDCASTLE (653-2278)
Web: www.obe.com

TABLE OF CONTENTS
GENERAL INFORMATION
Product Use.....................................................................................................................................Page 3
Protection and Storage....................................................................................................................Page 3
Check Material................................................................................................................................Page 3
Field Conditions...............................................................................................................................Page 3
Cleaning Materials...........................................................................................................................Page 3
SOLAR ECLIPSE
Section 1 Reliance Curtain Wall
1.1 Reliance Fabrication.........................................................................................Page 4
1.2 Reliance Assembly...........................................................................................Page 5
1.3 Reliance Glazing...............................................................................................Page 6
Section 2 Reliance SSG Curtain Wall
2.1 Reliance SSG Fabrication.................................................................................Page 7
2.2 Reliance SSG Assembly...................................................................................Page 8
2.3 Reliance SSG Anchor Install Captured Adaptor...............................................Page 9
Section 7 SOLAR ECLIPSE SUNSHADE
7.1 Eclipse Fabrication.............................................................................................Page 24
7.2 Eclipse Assembly...............................................................................................Page 25
Solar Eclipse Parts List.............................................................................................Page 26-27
2.4 Reliance SSG SSG to Captured Transition......................................................Page 10
2.5 Reliance SSG Glazing.......................................................................................Page 11
Section 3 Reliance-LT Curtain Wall
3.1 Reliance-LT Fabrication.................................................................................Page 12
3.2 Reliance-LT Assembly...................................................................................Page 13
3.3 Reliance-LT Glazing.......................................................................................Page 14
Section 5 3000 & 6000 Multiplane Storefront
5.1 3000 & 6000 Multiplane Fabrication.................................................................Page 17
5.2 3000 & 6000 Multiplane Assembly...................................................................Page 18 - 19
Section 4 Reliance-IGSS Curtain Wall
4.1 Reliance-IGSS Fabrication...............................................................................Page 15
4.2 Reliance-IGSS Assembly..................................................................................Page 16
Section 6 Reliance-TC
6.1 Reliance-TC Type I Assembly............................................................................Page 20
6.2 Reliance-TC Type I Seal and Cap Install...........................................................Page 21
6.3 Reliance-TC Type II Assembly...........................................................................Page 22
6.4 Reliance-TC Type II Seal and Cap Install..........................................................Page 23
August 2021Phone: 1-866-OLDCASTLE (653-2278)
Web: www.obe.com
2
SOLAR ECLIPSE™ SUNSHADE INSTALLATION MANUAL
GENERAL INFORMATION
PRODUCT USE
Variations from the details shown are not the responsibility of Oldcastle BuildingEnvelope when
drawn by others. Oldcastle BuildingEnvelope strongly encourages its customers to utilize Oldcastle
BuildingEnvelope supplied calculations and shop drawings. Sun Control products must be reviewed
by an engineer for each project to ensure proper application.
Oldcastle BuildingEnvelope does not control the application or selection of its product configurations,
sealant or glazing material and assumes no responsibility thereof. It is the responsibility of the owner,
architect and installer to make these selections in strict compliance with applicable laws and building
codes.
Consult sealant manufacturer for review and recommendation of sealant application. Follow sealant
manufacturer's recommendations and literature for proper installation.
PROTECTION AND STORAGE
Handle all material carefully. Do not drop from the truck. Stack with adequate separation so materials
do not rub together. Store material off the ground, protecting against the elements and other
construction hazards by using a well ventilated covering. Remove material from package if wet or
located in a damp area. For further guidelines consult AAMA publication " Care and Handling of
Architectural Aluminum from Shop to Site".
CHECK MATERIAL
Check all material upon arrival at job site for quality and to determine any shipping damage.
Using the contract documents, completely check the surrounding conditions that will receive your
material. Notify the general contractor by letter of any discrepancies before proceeding with the work.
Failure to do so constitutes acceptance of work by other trades.
Check shop drawings, installation instructions, architectural drawings and shipping list to become
familiar with the project. The shop drawings take precedence and include specific details for the
project. The installation instructions are of a general nature and cover the common conditions. Due to
varying job conditions all sealant used must be approved by the sealant manufacturer to insure it will
perform per the conditions shown on the instructions and shop drawings. The sealant must be
compatible with all surfaces in which adhesion is required, including other sealant surfaces. Use
primers where directed by sealant manufacturer. Properly store sealant at the recommended
temperatures and check sealant for remainder of shelf life before using.
FIELD CONDITIONS
All materials to be installed must be plumb, level and true. Aluminum to be placed in direct contact with
masonry or incompatible material should be isolated with a heavy coat of zinc chromate, bituminous
paint or non-metallic material.
CLEANING MATERIALS
Cement, plaster terrazzo, alkaline and acid based materials used to clean masonry is very harmful to
finishes. Any residue should be removed with water and mild soap immediately or permanent staining
will occur. A spot test is recommended before cleaning agent is used. Refer to Architectural Finish
Guide in the Detail Catalog.
®
®
®
®
The SOLAR ECLIPSE™ sun control system is intended for installation by glazing
professionals with appropriate experience. Subcontractors without experience should employ a
qualified person to provide field instructions and project management.
August 2021Phone: 1-866-OLDCASTLE (653-2278)
Web: www.obe.com
3
SOLAR ECLIPSE™ SUNSHADE INSTALLATION MANUAL

1
4
"
6
1
2
"
R
1
8
"
1
5
16
"
15
16
"
1
5
16
"
15
16
" 5
8
"
Drill 7/16" dia. holes
(4) places
FIGURE 2
Notch top of lower caps
and bottom of upper caps
as shown.
2
1
2
"
1
3
32
"
5
16
"
3
1
4
"
Front
View
Side
View
1) Locate the centerline of each sunshade anchor. A 1/4" wide x 6-1/2" long cutout must be
milled into face of mullion tongue as shown in upper detail of FIGURE 1. The standard
sunshade anchor (WW-107-01) for Reliance Curtain Wall will require (4) four 7/16" clear
holes for attachment. See FIGURE 1 for hole locations. ( Size, locations and quantity of bolts
may vary based on project requirements, consult engineer for specific applications.)
2) Face caps must be notched to clear anchor. Face caps are cut at centerline of sunshade,
notched on ends. Notch per FIGURE 2.
SOLAR ECLIPSE™ Reliance
Installation Notes:
1) Face cap will be notched above and
below anchor. See FIGURE 2.
2) Slide cap over anchor and snap into
position.
3) Butt splice cap at centerline of
anchor.
Note: WW-110 face cap shown, notch
similar for custom applications.
FIGURE 1
Mill center of mullion tongue
for shade anchor
Centerline of
Sunshade Anchor
Centerline of
Sunshade Anchor
1.1 Fabrication
August 2021
Phone: 1-866-OLDCASTLE (653-2278) Web: www.obe.com
4
SOLAR ECLIPSE™ SUNSHADE INSTALLATION MANUAL

WW-107-01
WW-162-02
Install WW-107-01 anchor with
(4) 3/8"-16" 7/8" S.S. button
socket head bolts. Prior to
installing glass.
FIGURE 3
3/8" hex jamb nuts
& washers
FS-325
(#12 x 1-11/32" hwh
drill-flex)
1.2 Assembly
3) Hardware required for attachment of standard anchor (WW-107-01) will be contained in the
hardware package, (part. no. 12854). This package contains (1) one WW-162-02 cover plate,
(4) four 3/8"- 16 x 7/8" stainless steel button socket head bolts, nuts and washers and (4) four
3/8"-16 x1-1/4" stainless steel hex head bolts, nuts and washers. (Size and quantity of bolts
may vary based on project requirements, consult engineer for specific job applications).
4) Attach anchor to mullion by first inserting anchor into cutout in face of mullion tongue. Attach
anchor using the 3/8"-16 x 7/8" S.S. button socket head bolts, washers and securing using
the 3/8"-16 S.S. jamb nuts. Repeat for each of the 4 bolts. See FIGURE 3 (Size and
quantity of bolts may vary based on project requirements, consult engineer for specific job
applications).
5) Once system is glazed. Install section of GP-103 gasket onto WW-162-02 cover plate and
install plate over anchor attaching to mullion using (2) two FS-325 (#12-14 x 1-1/2" HWH
Drill-Flex fasteners).
Note: Due to reduced clearance for attachment of anchors, special care must be taken when
installing glass.
SOLAR ECLIPSE™ Reliance
Notes:
1) Hardware package part no. 12854 required.
2) Anchor must be installed prior to glazing.
3) Glass clearance at anchor is reduced to 3/16",
so care should be exercised during installation
of glass.
August 2021
Phone: 1-866-OLDCASTLE (653-2278) Web: www.obe.com
5
SOLAR ECLIPSE™ SUNSHADE INSTALLATION MANUAL

Seal gap between cover plate
and pressure plates.
Seal gap between anchor
and cover plate
FIGURE 4
Install WW-162-02 cover plate
after glass is installed.
attach with (2) FS-325 fasteners
1/8"gap
1.3 Glazing
6) Clean all surfaces to be sealed using isopropyl alcohol. Then seal cover plate to anchor to
prevent any water infiltration. See FIGURE 4.
7) Pressure plates should be located above and below the cover plate allowing 1/8" joint. This
joint should be cleaned and sealed. See FIGURE 4.
SOLAR ECLIPSE™ Reliance
Note:
1) Typical pressure plates will be installed above and
below cover plate.
2) See FIGURE 2 page 4 for face cap fabrication.
August 2021Phone: 1-866-OLDCASTLE (653-2278)
Web: www.obe.com
6
SOLAR ECLIPSE™ SUNSHADE INSTALLATION MANUAL

3/4" 2 1/4" 2 1/4"
3/4"
6"
1"24" O.C.
1"24" O.C.
1-1/8"
Drill #11 (.191Ø)
@ 24" On Center
Drill #11 (.191Ø)
@ 24" On Center
& Countersink for
#10 flat head
WW-286
WW-287 WW-289
FIGURE 5
FIGURE 6
1) Fabrication for typical WW-285-01 SSG sunshade anchor shown below. The length and number of
fasteners may vary based on project conditions. All sunshade anchors must be reviewed by an
Engineer to determine proper size and attachment. See FIGURE 5.
2) FIGURE 6 shows the fabrication of the WW-286 SSG glazing adaptor and optional captured
glazing adaptors; WW-287 and WW-289. Cut length of WW-286 adaptors will be cut to leave 1/8"
joint above and below sunshade anchor. See FIGURE 5. WW-287 and WW-289 adaptor will run
between SSG bridges.
Drill "H" (.266Ø) holes and
countersink for 1/4" Flat head
fasteners.
2.1 Fabrication
1
4
"
9
16
"
1
2
"
1
8
"
SOLAR ECLIPSE™ Reliance SSG
August 2021Phone: 1-866-OLDCASTLE (653-2278)
Web: www.obe.com
7
SOLAR ECLIPSE™ SUNSHADE INSTALLATION MANUAL
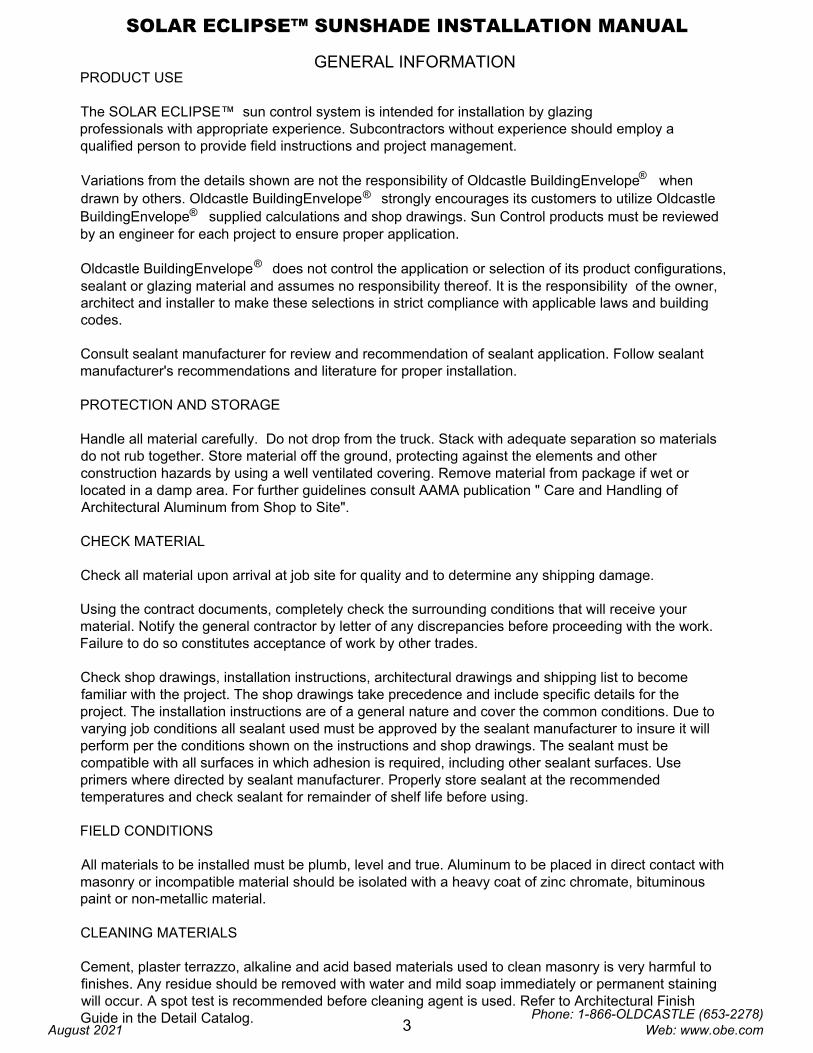
3) Reliance-SSG will use the WW-563 (7-1/4") mullion for sunshade applications. Note that it is
recommended to build the mullion assemblies in the shop by sliding each glazing adaptor and
sunshade anchor into place, attaching and sealing.
4) After the WW-285 anchor is in its proper location, match drill mullion for anchor using a #11 (.191Ø)
drill. Inject sealant into holes prior to installing fasteners. Attach with (6) FS-260 (1/4"-20 x 1" Flat
Head Type F) fasteners. Cap seal all fasteners. See FIGURE 7 & 8.
(Length of anchor and number of fasteners may vary based on Engineer's review.)
5) The WW-286 SSG glazing adaptor will run continuous except where it crosses the sunshade anchor.
Slide the WW-286 onto the mullion between the sunshade anchors. Cut the WW-286 so there is a
1/8" joint above and below sunshade anchors. Attach with FS-7 (#10 x 3/4" flat head) at 1" from each
end and 24"on center or based on Engineer's review. Match drill mullion using #25 (.149"Ø) drill bit.
Fill holes with sealant and install fasteners. Once fastener is installed cap seal. See FIGURE 8
1"
FIGURE 7
WW-286
WW-285-01
WW-463 (6")
WW-563 (7-1/4")
WW-863 (10-1/8")
FS-7
Cap Seal
FS-260
FIGURE 8
2.2 Assembly
Match drill holes through anchor
using #11 (.191Ø) drill bit. Fill hole
with sealant and install FS-260 fasteners.
Notes:
1) Hardware Package # 36526 required
2) Anchor and glazing adaptors to be installed
prior to installation of system.
SOLAR ECLIPSE™ Reliance SSG
August 2021Phone: 1-866-OLDCASTLE (653-2278)
Web: www.obe.com
8
SOLAR ECLIPSE™ SUNSHADE INSTALLATION MANUAL

2.3 Captured Adaptor Anchor Installation
1"
1"
WW-287
FS-7
Cap Seal
Fasteners
FIGURE 9
6) Optional captured adaptors are also available. WW-287 will be the standard captured glazing
adaptor and WW-289 may be used for thermal composite applications. Attach captured adaptors
using the FS-7 fasteners at each side of adaptor at 24" on center and 1" from each end.
See FIGURE 9 & 10. Figures below show installation of a captured glazing adaptor above and
below a sunshade anchor. An 1/8" joint should be held above and below anchor. Slide adaptors onto
mullion as required for project starting at bottom of mullion and working to top. Attach anchor as
shown on page 8, FIGURE 7 & 8.
WW-289
TC Adaptor
WW-287
FIGURE 10
SOLAR ECLIPSE™ Reliance SSG
August 2021Phone: 1-866-OLDCASTLE (653-2278)
Web: www.obe.com
9
SOLAR ECLIPSE™ SUNSHADE INSTALLATION MANUAL

7) The WW-563 mullion can be used for installation of captured to SSG transitions. Installation of typical SSG
adaptors would apply where applicable as shown in previous pages. Transitions to captured are shown in
figures below. Captured adaptor will be cut to run day light opening plus 5/8" at top and bottom of the
WW-287 (WW-289). See FIGURE 11 & 12.
8) The WW-287 SSG adaptor will be cut day light opening plus1-3/4" so that it extends above and/or below the
horizontal stem as needed. See FIGURE 11 & 12. This will allow the installation and sealing of the WW-300
zone bridge Top of SSG adaptor must be sealed and married to seals at bridge. See FIGURE 13.
2.4 SSG to Captured Transition
FIGURE 13
1 3
/4
"
5/8
"
Seal WW-300 SSG Bridge and
top of WW-286 SSG glazing adaptor
FIGURE 11
FIGURE 12
WW-287
(WW-289)
WW-286
1/8" joint between
adaptors
WW-286 extends
above and below
horizontal tongue.
Seal per FIGURE 14
1/8
"
FIGURE 14
SOLAR ECLIPSE™ Reliance SSG
August 2021
Phone: 1-866-OLDCASTLE (653-2278) Web: www.obe.com
10
SOLAR ECLIPSE™ SUNSHADE INSTALLATION MANUAL

FIGURE 15
Notch ears from
GP-105 at fasteners
for sunshade anchor
GP-105 Spacer Gasket
Structural Silicone
Seal around sunshade anchor
marrying with glass seals above
and below.
3/4"
6) Use GP-105 spacer gasket at SSG verticals and sunshade anchor. See FIGURE 15. Gasket will run
continuous across anchor. Ear of spacer gasket must be trimmed to clear flat head fasteners used to
attach sunshade anchor to mullion. See FIGURE 16.
7) WW-287 and WW-289 captured adaptors will use either GP-1050 gasket on interior or GP-106 spacer
gasket with cap bead of silicone. Both will use the GP-103 gasket on WW-162 pressure plate.
See FIGURE 17.
8) Clean all surfaces to be sealed using isopropyl alcohol. Seal around sunshade anchor marrying seal
with glass seal above and below. Note: glass spacer must be 3/4" when sunshade anchors are used with
SSG mullions to provide 1/4" sealant joint on either side of anchor. See FIGURE 15 & 17.
9) Glass bite varies based on glazing configuration. Typical SSG installation will have 1/2" sealant joint with 1"
glass bite. SSG where a sunshade anchor is required will have a 3/4" sealant joint with 7/8" glass bite. When
captured glazing adaptors are used glass bite will be 1/2" per standard Reliance glazing. See FIGURE 17.
NOTE: Due to reduced glazing clearance at sunshade anchors. Special care must be taken when installing glass.
3/4"
2.5 Glazing
1/2"
7/8"
FIGURE 17
FIGURE 16
GP-103
GP-105
1/2"
GP-1050
GP-106
1"
SOLAR ECLIPSE™ Reliance SSG
August 2021
Phone: 1-866-OLDCASTLE (653-2278) Web: www.obe.com
11
SOLAR ECLIPSE™ SUNSHADE INSTALLATION MANUAL

3/16"
6
1
2
"
R3/32"
1
5
16
"
15
16
"
1
5
16
"
15
16
" 5
8
"
Drill 7/16" dia. holes
(4) places
FIGURE 20
Notch top of lower caps
and bottom of upper caps
as shown.
2"
27
32
"
5
16
"
3
1
4
"
Front
View
Side
View
1) Locate the centerline of each sunshade anchor. A 1/4" wide x 6-1/2" long cutout must be
milled into face of mullion tongue as shown in upper detail of FIGURE 19.The standard
sunshade anchor (RL-107-01) for Reliance-LT Curtain Wall will require (4) four 7/16" clear
holes for attachment. See FIGURE 19 for hole locations. ( Size, locations and quantity of bolts
may vary based on project requirements, consult engineer for specific applications.)
2) Face caps must be notched to clear anchor. Face caps are cut at centerline of sunshade,
notched on ends. Notch per FIGURE 20.
SOLAR ECLIPSE™ Reliance-LT
Installation Notes:
1) Face cap will be notched above and
below anchor. See FIGURE 20.
2) Slide cap over anchor and snap into
position.
3) Butt splice cap at centerline of
anchor.
Note: RL-110 face cap shown, notch
similar for custom applications.
FIGURE 19
Mill center of mullion tongue
for shade anchor
Centerline of
Sunshade Anchor
Centerline of
Sunshade Anchor
3.1 Fabrication
August 2021
Phone: 1-866-OLDCASTLE (653-2278) Web: www.obe.com
12
SOLAR ECLIPSE™ SUNSHADE INSTALLATION MANUAL

RL-107-01
RL-162-02
Install RL-107-01 anchor
with (4) FS-86 (3/8"-16"
x 1/2" set screw w/
Loctite patch) prior to
installing glass.
FIGURE 21
FS-325
(#12 x 1-11/32" hwh
drill-flex)
3.2 Assembly
SOLAR ECLIPSE™ Reliance-LT
Notes:
1) Hardware package part no. 36525 required.
2) Anchor must be installed prior to glazing.
August 2021
Phone: 1-866-OLDCASTLE (653-2278) Web: www.obe.com
13
SOLAR ECLIPSE™ SUNSHADE INSTALLATION MANUAL

Seal gap between cover plate
and pressure plates.
Seal gap between anchor
and cover plate
FIGURE 22
Install RL-162-02 cover plate
after glass is installed.
attach with (2) FS-325 fasteners
1/8"gap
3.3 Glazing
6) Clean all surfaces to be sealed using isopropyl alcohol. Then seal cover plate to anchor to
prevent any water infiltration. See FIGURE 22.
7) Pressure plates should be located above and below the cover plate allowing 1/8" joint. This
joint should be cleaned and sealed. See FIGURE 22.
SOLAR ECLIPSE™ Reliance-LT
Note:
1) Typical pressure plates will be installed above and
below cover plate.
2) See FIGURE 20 page 12 for face cap fabrication.
August 2021Phone: 1-866-OLDCASTLE (653-2278)
Web: www.obe.com
14
SOLAR ECLIPSE™ SUNSHADE INSTALLATION MANUAL

1 Mill cutouts from stem of mullion at location of each anchor bolt, 4 bolts shown are for standard
application and your project may require additional fasteners based on engineers review. Cutouts will
be 1-1/2" wide by 1" deep and must be flush with back of mullion face. Location will vary depending on
project requirements, pattern shown is for standard anchor only. SEE FIGURE 23
2 Drill face of mullion with 7/16" Ø holes for 3/8" anchor bolts. SEE FIGURE 23
3 Debur bolt holes on exterior and interior face of mullion to insure proper fit of anchor and bolts.
4 A bead of sealant must be applied around each hole in face of mullion prior to attaching anchor.
SEE FIGURE 45
5 Attach anchor to face of mullion with 3/8"-16 x 1" hex head bolt, nut, flat and lock washers.
Cap seal bolts once installed. SEE FIGURE 24, page 16.
6 ICW-111 face cap required for projects with sunshade installation. Face cap will be notched at each
anchor. SEE FIGURE 23
NOTE: All sunshade installations must be reviewed by a structural engineer for anchor design and
attachment.
ICW-111
Face cap
1 1/2"
1"
Notch mullion stem at
each attachment bolt
1 1/4"
2"
1 1/4"
2"
1'-4"
6"
IW-107-01 Anchor
3/8"-16 X 1" stainless
steel hex head bolt,
nut and washers
Notch flush
with back of face
Drill 7/16" dia. hole
at center line of
mullion face
1 1/4"
FIGURE 23
Sunshade Fabrication
4 1/4"
4 1/4"
C
L of anchor
1 9
/1
6" R
EF
.
4.1 Fabrication
4.2 Installation
SOLAR ECLIPSE™ Reliance-IGSS
August 2021Phone: 1-866-OLDCASTLE (653-2278)
Web: www.obe.com
15
SOLAR ECLIPSE™ SUNSHADE INSTALLATION MANUAL

FIGURE 24
Sunshade Anchor
Assembly
Apply sealant around
each anchor bolt
60207
3/8"-16 x 1" hex head bolt
IW107-01
Sunshade anchor
Cap seal
fasteners
12839
3/8" flat washer
12840
3/8"-16 lock Nut
Notes:
1) Hardware Package part # 36527
required
2) Bolt size and quantity to be reviewed
by project engineer to insure proper
size and application.
3) Anchor must be installed prior to
glazing.
12839
3/8" flat washer
SOLAR ECLIPSE™ Reliance-IGSS
August 2021Phone: 1-866-OLDCASTLE (653-2278)
Web: www.obe.com
16
SOLAR ECLIPSE™ SUNSHADE INSTALLATION MANUAL
1
4
"
29
32
"
Mill face of mullion
anchor length minus
3
8
" x
1
4
" wide
FG-3621 3000 MP Center Set (shown)
FG-3623 3000XT
FG-6621 6000 MP Center Set
FG-6623 6000XT
FG-3622 3000 MP Front Set (shown)
FG-6622 6000 MP Front Set
1
4
"
1-3/16"
Mill face of mullion
anchor length minus
3
8
" x
1
4
" wide
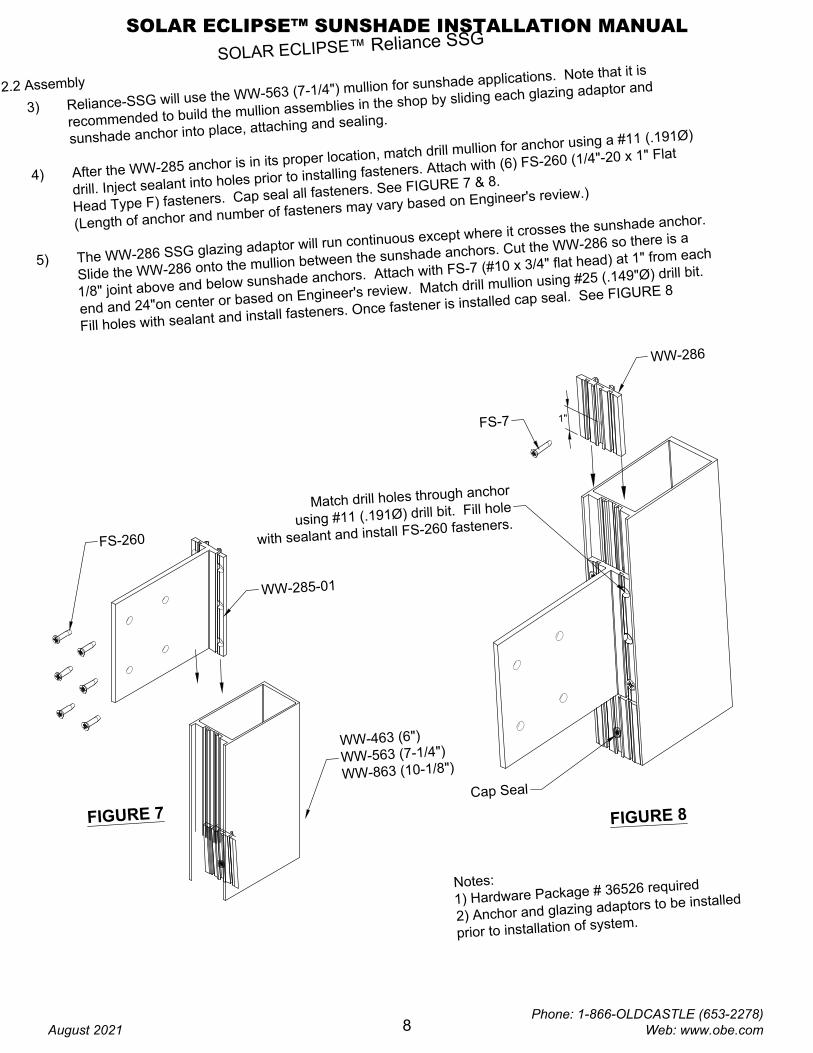
5.1) Storefront Sunshade Anchor Fabrication
1) Mill face of mullion to clear SS-200 (Center Set) or SS-201 (Front Set) sunshade anchor. Mill cut will
be anchor length minus
3
8
" x
1
4
" wide. See parts list for available standard anchors. All anchors should
be sized based on Engineer's review for project loads.
FIGURE 25
SOLAR ECLIPSE™ Series 3000/6000 Multiplane / XT
August 2021
Phone: 1-866-OLDCASTLE (653-2278) Web: www.obe.com
17
SOLAR ECLIPSE™ SUNSHADE INSTALLATION MANUAL

5.2) Storefront Sunshade Anchor Installation
2) Run bead of sealant around slot in face of mullion.
3) Insert sunshade anchor through slot in face of mullion. Clean any excess sealant from around
anchor once installation is complete. SS200-01 (6") and SS201-01 (6") anchors shown. SS-200-02 (9"),
SS-200-03 (12"), SS-201-02 (9") and SS-201-03 (12") are available. Size of anchor will be
determined by Engineer's review.
SS201-01
SS200-01
FIGURE 26
Apply Sealant around
anchor cut out
Apply Sealant
around anchor
cut out
SOLAR ECLIPSE™ Series 3000/6000 Multiplane / XT
August 2021
Phone: 1-866-OLDCASTLE (653-2278) Web: www.obe.com
18
SOLAR ECLIPSE™ SUNSHADE INSTALLATION MANUAL

4) Match drill mullion for 1/4"-20 fasteners using 7/32" (.218 Ø) drill. Center set storefront will use a 1/4"-20 x
3/4" Phillips Flat Head Type F fastener. Front Set uses a 1/4"-20 x 1/2" Phillips flat head machine screw,
so will require holes to be tapped for the 1/4"-20 after match drill. Number of fasteners must be reviewed
by Engineer per project requirements.
FS-147 (1/4"-20 x 3/4" PFH Type F TCS St. Steel)
FS-146 (1/4" -20 x 1/2"
PFH MS St. Steel)
Match Drill holes in mullion with
7/32" (.218Ø) drill. The holes for
Front Set mullion must be tapped
for
1
4
"-20 fasteners.
FIGURE 27
Match Drill holes in mullion
with 7/32" (.218Ø) drill.
Notes:
1) Hardware Package part # 36530
for Center Set & XT
2) Hardware Package part# 36531
for Front Set
3) Anchors must be installed prior
to glazing
SOLAR ECLIPSE™ Series 3000/6000 Multiplane / XT
August 2021
Phone: 1-866-OLDCASTLE (653-2278) Web: www.obe.com
19
SOLAR ECLIPSE™ SUNSHADE INSTALLATION MANUAL

FIGURE 28
SS-203-01
SOLAR ECLIPSE™ Reliance TC Type I
FS-306
(1/4"-20 x 3" HWH
#5 pt Bi-Flex)
6.1 Assembly
1) Sunshades on the Reliance TC Type I system requires the use of the WW-566 mullion. This
mullion is designed with heavy wall at base of stem to accept the Bi-Flex fastener.
2) The SS-203-01 sunshade anchor will be attached using the FS-306 (1/4"-20 x 3" HWH #5 pt
Bi-Flex) fasteners. Final sunshade anchor and attachment must be determined by Engineer's
review.
3) Use sunshade anchor to mark face of mullion to locate holes in face. Drill pressure plate of the
WW-566 mullion using 13/32" drill bit. Insert 3/8" o.d. x 1" long pipe sleeve inside of thermal struts.
The Bi-Flex fastener will be used to drill into the tubular section of the mullion.
4) Bed anchor in sealant.
WW-566
Notes:
1) Hardware Package part # 36528
required.
2) Anchor may be installed before
or after glazing.
August 2021
Phone: 1-866-OLDCASTLE (653-2278) Web: www.obe.com
20
SOLAR ECLIPSE™ SUNSHADE INSTALLATION MANUAL
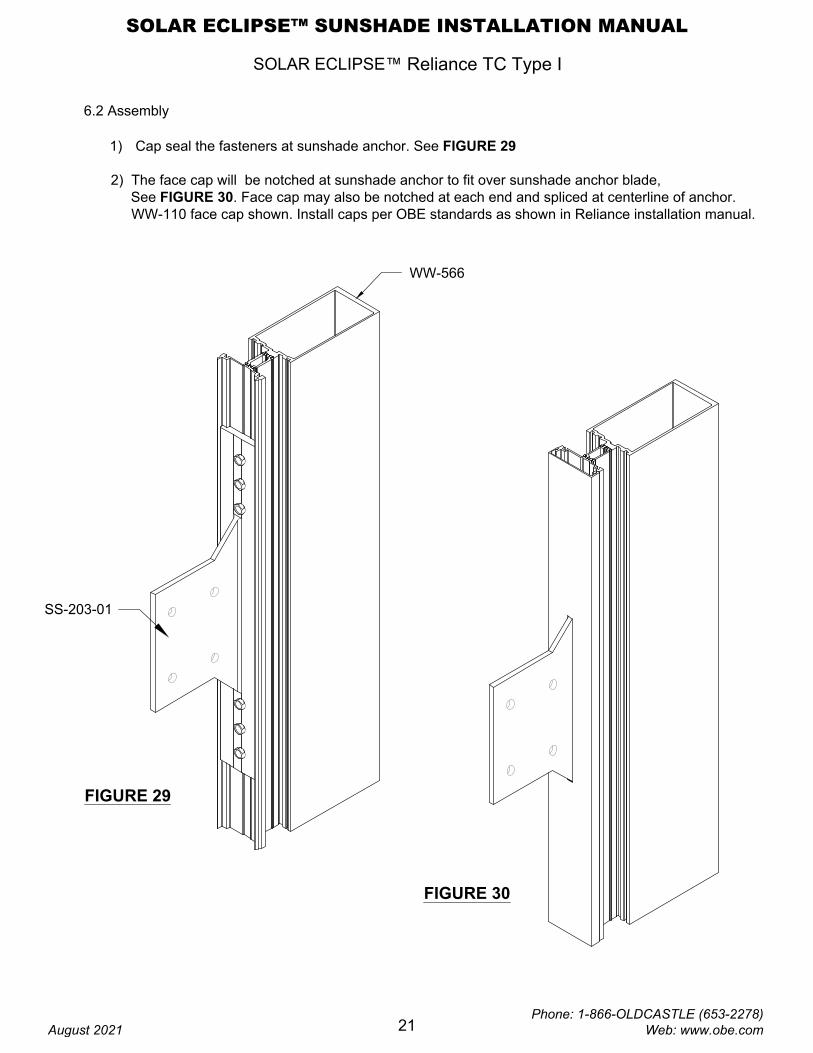
FIGURE 29
SOLAR ECLIPSE™ Reliance TC Type I
6.2 Assembly
1) Cap seal the fasteners at sunshade anchor. See FIGURE 29
2) The face cap will be notched at sunshade anchor to fit over sunshade anchor blade,
See FIGURE 30. Face cap may also be notched at each end and spliced at centerline of anchor.
WW-110 face cap shown. Install caps per OBE standards as shown in Reliance installation manual.
WW-566
SS-203-01
FIGURE 30
August 2021
Phone: 1-866-OLDCASTLE (653-2278) Web: www.obe.com
21
SOLAR ECLIPSE™ SUNSHADE INSTALLATION MANUAL

FIGURE 31
SS-202-01
SOLAR ECLIPSE™ Reliance TC Type II
FS-306
(1/4"-20 x 3 "
HWH #5 pt Bi-Flex)
6.3 Assembly
1) Sunshades on the Reliance TC Type II system requires the use of the AW-530 mullion. This
mullion is designed with heavy wall at base of stem to accept the Bi Flex fastener.
2) The SS-202-01 sunshade anchor will be attached using the FS-306 (
1
4
"-20 x 3" HWH #5 pt
Bi Flex) fastener. Final sunshade anchor and attachment must be determined by Engineer's
review.
3) Use the sunshade anchor to mark the pressure plate. Match drill the WW-162 pressure plate using
"H" (.266") drill bit. Drill the tongue of the mullion using a 13/32" drill bit and insert a 3/8" x 1" long
pipe sleeve inside of the thermal struts. The Bi Flex fastener will be used to drill into the tubular
section of the mullion.
4) Bed anchor in sealant.
WW-162
Pressure Plate
GP-108 Isolator
GP-198
Rigid Isolator
GP-108 Isolator
AW-530
Bed anchor in
sealant
Notes:
1) Hardware Package part # 36528
required.
2) Anchor may be installed before
or after glazing.
August 2021Phone: 1-866-OLDCASTLE (653-2278)
Web: www.obe.com
22
SOLAR ECLIPSE™ SUNSHADE INSTALLATION MANUAL
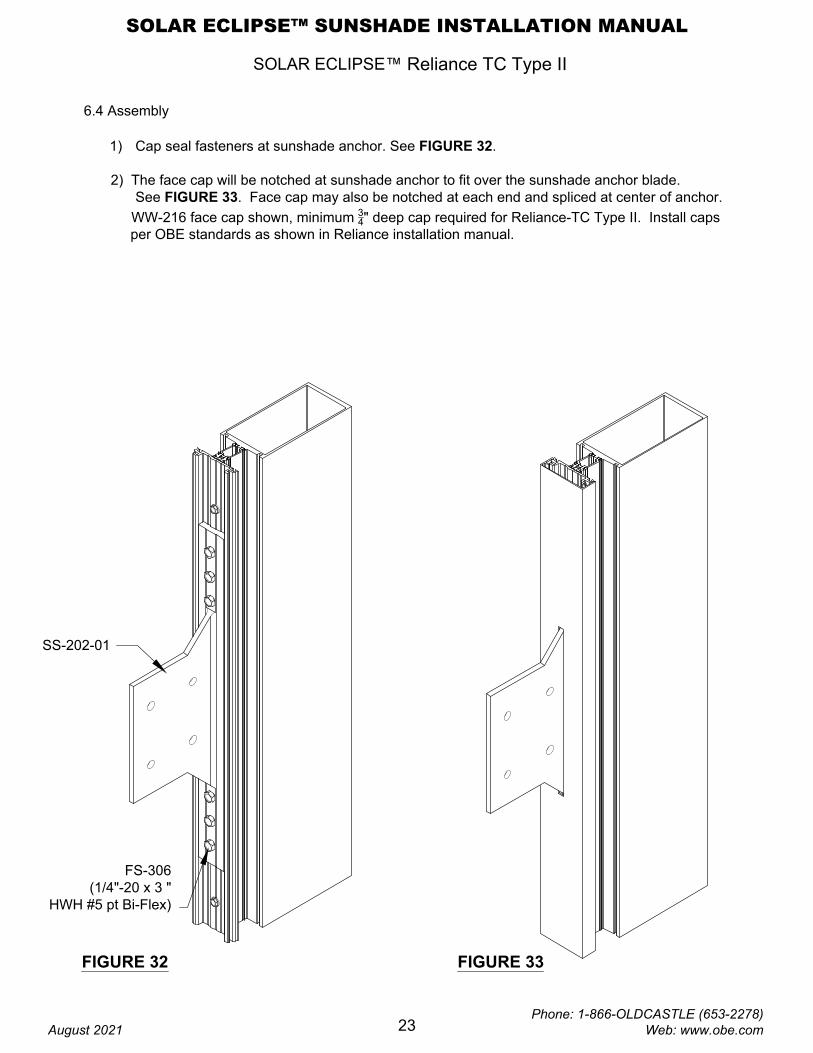
FIGURE 32
SS-202-01
SOLAR ECLIPSE™ Reliance TC Type II
FS-306
(1/4"-20 x 3 "
HWH #5 pt Bi-Flex)
6.4 Assembly
1) Cap seal fasteners at sunshade anchor. See FIGURE 32.
2) The face cap will be notched at sunshade anchor to fit over the sunshade anchor blade.
See FIGURE 33. Face cap may also be notched at each end and spliced at center of anchor.
WW-216 face cap shown, minimum
3
4
" deep cap required for Reliance-TC Type II. Install caps
per OBE standards as shown in Reliance installation manual.
FIGURE 33
August 2021Phone: 1-866-OLDCASTLE (653-2278)
Web: www.obe.com
23
SOLAR ECLIPSE™ SUNSHADE INSTALLATION MANUAL

Louver
Cut Length
FIGURE 34
Outriggers
FS-20 (#10 X 3/4" S.S. button socket head B pt)
fastener. (4) required typical per louver.
Custom designs may vary.
7.1 Fabrication
1) All standard sunshade outriggers are factory drilled for attachment to shade louvers
2) Cut louvers to fit between outriggers per formulas shown on FIGURE 34.
Fabrication Notes:
1) Louver Cut Length = Mull centerline minus 11/16" or mull
centerline minus anchor (1/4" std.) minus 3/8" (thickness of two
standard outriggers) minus 1/16" clearance.
2) Each louver attached to outriggers with (4) FS-20 fasteners.
Custom louvers may require additional fasteners.
3) Note: Number of louvers will vary based on sunshade depth
and project requirements.
SOLAR ECLIPSE™ Outrigger Assembly
August 2021
Phone: 1-866-OLDCASTLE (653-2278) Web: www.obe.com
24
SOLAR ECLIPSE™ SUNSHADE INSTALLATION MANUAL

FS-20
(#10 X 3/4" S.S.
button socket head)
(4) per louver
FIGURE 35
FIGURE 36
Outriggers
7.2 Assembly
3) Attach outriggers to louvers using FS-20 (#10 x 3/4" stainless steel button socket head).
Quantity of fasteners will vary based on sunshade depth. See FIGURE 35.
4) Attach sunshades to anchors using (4) four 3/8"-16 x 1" stainless steel hex head head bolts.
See FIGURE 36. (Size and quantity of bolts may vary based on project requirements, consult
engineer for specific job applications.)
Attach outrigger to anchor using
(4) 3/8"-16 x 1" hex head stainless steel bolts,
washers and lock nuts. Bolt size matches
load capacity of standard Reliance anchors
All connections must be verified
by an Engineer.
Note: See system installation
pages or parts list for hardware
packages used for each product.
SOLAR ECLIPSE™ Outrigger Assembly
August 2021
Phone: 1-866-OLDCASTLE (653-2278) Web: www.obe.com
25
SOLAR ECLIPSE™ SUNSHADE INSTALLATION MANUAL

Reliance SSG
6" Depth
Sunshade Extrusions
DESCRIPTIONITEM
WW-463
FG-3621
Series 3000
Multiplane
Center Set
Reliance, Reliance-IGSS and Reliance-LT use standard system mullions based on project load
requirements. Mullions shown above are specific to sunshade applications for systems shown.
FG-3622
FG-3624
Parts List
4" Diamond
Sunshade Extrusions
DESCRIPTIONITEM
SS-100
SS-101
5" Rectangle
SS-102
4" Square
SS-103
5" Zee
SS-104
4" Round
SS-105
5" Round
SS-106
5" Bullnose
SS-107
6" Half Airfoil
6" Airfoil
SS-108
SS-109
4" Airfoil
Reliance SSG
7-1/4" Depth
Reliance SSG
10-1/8" Depth
Series 3000
Multiplane
Front Set
Series 3000XT
Series 6000
Multiplane
Center Set
Series 6000
Multiplane
Front Set
Series 6000XT
FG-6621
FG-6622
FG-6624
WW-563
WW-863
Reliance-TC
Type I / TC IG
Mullion 7-1/4" DepthWW-566
FG-3634-01
Center Set Storefront
I.S. 90 Corner Anchor
Reinforcement
Reliance-TC
Type I / TC IG
Mullion 6" Depth
WW-466
Reliance-TC Type II
Mullion 6" Depth
AW-430
Reliance-TC Type II
Mullion 7-1/4" Depth
AW-530
August 2021Phone: 1-866-OLDCASTLE (653-2278)
Web: www.obe.com
26
SOLAR ECLIPSE™ SUNSHADE INSTALLATION MANUAL

WW-107-01
Sunshade Anchors
Reliance Anchor
Reliance SSG Anchor
WW-285-01
IW-107-01
Reliance-IGSS
Anchor
SS-200-01
Series 3000 / 6000
Multiplane Center Set /
XT Anchor
SS-201-01
DESCRIPTIONITEM
Series 3000 / 6000
Multiplane Front Set
Anchor
1/4"-20 x 1" Phillips
Flat Head Type F
Thread Cutting Screw
#10 X 3/4" Phillips
Flat Head
FS-7
FS-260
FASTENERS
#12-24 x 1-11/32" H.W.H.
Self Drilling Fastener
FS-325
Sunshade blades shown above are standard profiles. Custom shapes and sizes may be
created to fit your design and application. Outriggers are custom ordered for each project
and not shown above. Please contact your nearest OBE facility for additional information.
DESCRIPTIONITEM
Parts List
#10 X 3/4" S.S. Button
Socket Head
FS-20
1/4"-20 x 1/2" Phillips Flat
Head Stainless Machine
Screw
FS-146
SS-202-01
SS-203-01
1/4"-20 x 3" H.W.H.
Bi-Flex Self Drilling
Fastener
Hardware Packages:
System Part No.
Reliance 12854
Reliance SSG 36526
Reliance-LT 36525
Reliance Cassette 36529
Reliance-IGSS 36527
Reliance-TC Type I & II 36528
Reliance-TCIG 36528
3000XT 36530
3000 & 6000 Multiplane Center Set 36530
3000 & 6000 Multiplane Front Set 36531
WW-2266-01
Reliance Cassette
Anchor
Reliance-TC
Type II
Anchor
Reliance-TC
Type I / TC IG
Anchor
3/8" O.D. x 1" Lg
Pipesleeve
60657-01
FS-306
1/4"-20 x 3/4" PFH Type
F Stainless Thread
Cutting Screw
FS-147
3/8"-16 X 1/2" Set
screw w/ Loctite Patch
FS-86
August 2021Phone: 1-866-OLDCASTLE (653-2278)
Web: www.obe.com
27
SOLAR ECLIPSE™ SUNSHADE INSTALLATION MANUAL
Recommended