Date: October 11th, 2017
SpiraTeam® | Build Server Integration Guide
Inflectra Corporation
Page 1 of 30 © Copyright 2006-2017, Inflectra Corporation This document contains Inflectra proprietary information
Contents
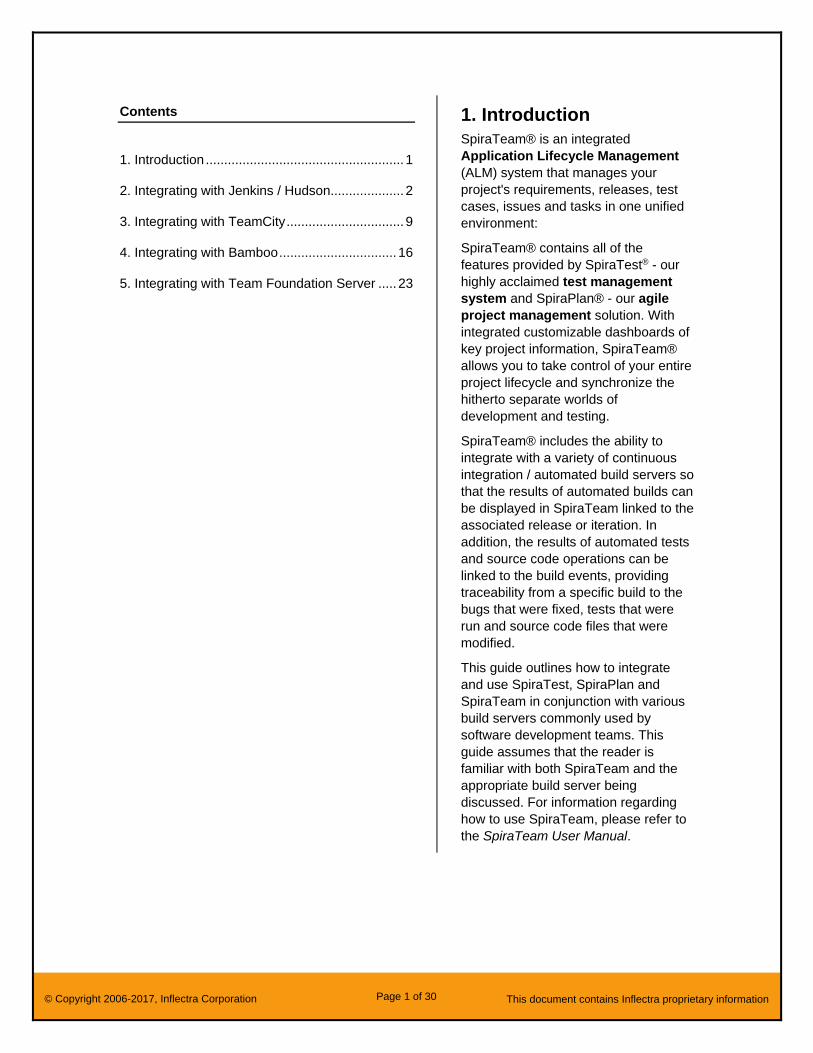
1. Introduction ...................................................... 1
2. Integrating with Jenkins / Hudson.................... 2
3. Integrating with TeamCity ................................ 9
4. Integrating with Bamboo ................................ 16
5. Integrating with Team Foundation Server ..... 23
1. Introduction
SpiraTeam® is an integrated
Application Lifecycle Management
(ALM) system that manages your
project's requirements, releases, test
cases, issues and tasks in one unified
environment:
SpiraTeam® contains all of the
features provided by SpiraTest® - our
highly acclaimed test management
system and SpiraPlan® - our agile
project management solution. With
integrated customizable dashboards of
key project information, SpiraTeam®
allows you to take control of your entire
project lifecycle and synchronize the
hitherto separate worlds of
development and testing.
SpiraTeam® includes the ability to
integrate with a variety of continuous
integration / automated build servers so
that the results of automated builds can
be displayed in SpiraTeam linked to the
associated release or iteration. In
addition, the results of automated tests
and source code operations can be
linked to the build events, providing
traceability from a specific build to the
bugs that were fixed, tests that were
run and source code files that were
modified.
This guide outlines how to integrate
and use SpiraTest, SpiraPlan and
SpiraTeam in conjunction with various
build servers commonly used by
software development teams. This
guide assumes that the reader is
familiar with both SpiraTeam and the
appropriate build server being
discussed. For information regarding
how to use SpiraTeam, please refer to
the SpiraTeam User Manual.
Page 2 of 30 © Copyright 2006-2017, Inflectra Corporation This document contains Inflectra proprietary information
2. Integrating with Jenkins / Hudson
This section outlines how to use SpiraTest, SpiraPlan or SpiraTeam (hereafter referred to as SpiraTeam)
in conjunction with either the Jenkins or Hudson (hereafter referred to as Jenkins) continuous integration
build servers. It assumes that you already have a working installation of SpiraTest, SpiraPlan or
SpiraTeam v3.2 or later and a working installation of Jenkins/Hudson v1.405 or later. If you have an
earlier version of SpiraTeam, you will need to upgrade to at least v3.2.
2.1. Overview
Jenkins provides continuous integration services for software development, primarily in the Java
programming language. It is a server-based system running in a servlet container such as Apache
Tomcat. It supports SCM tools including CVS, Subversion, Git, Mercurial, Perforce and Clearcase, and
can execute Apache Ant and Apache Maven based projects as well as arbitrary shell scripts and
Windows batch commands.
When you use the SpiraTeam plugin for Jenkins, it will allow you to associate each Jenkins project with a
corresponding project and release in SpiraTeam. Then, each time Jenkins creates a new build, a new
build artifact will be created in SpiraTeam. Each build in SpiraTeam will be automatically linked to the
incidents fixed, source code revisions committed, and any SpiraTeam tokens in the Jenkins changelog
will be parsed and turned into SpiraTeam artifact hyperlinks.
2.2. Installing the SpiraTeam Plug-in for Jenkins
Go to the Inflectra website and open up the page that lists the various downloads available for SpiraTeam
(http://www.inflectra.com/SpiraTeam/Downloads.aspx). Listed on this page will be the SpiraTeam Plug-In
for Jenkins. Right-click on this link and save the Zip compressed folder to a temporary location. Open up
the compressed folder and extract the spira-plugin.hpi file contained inside.
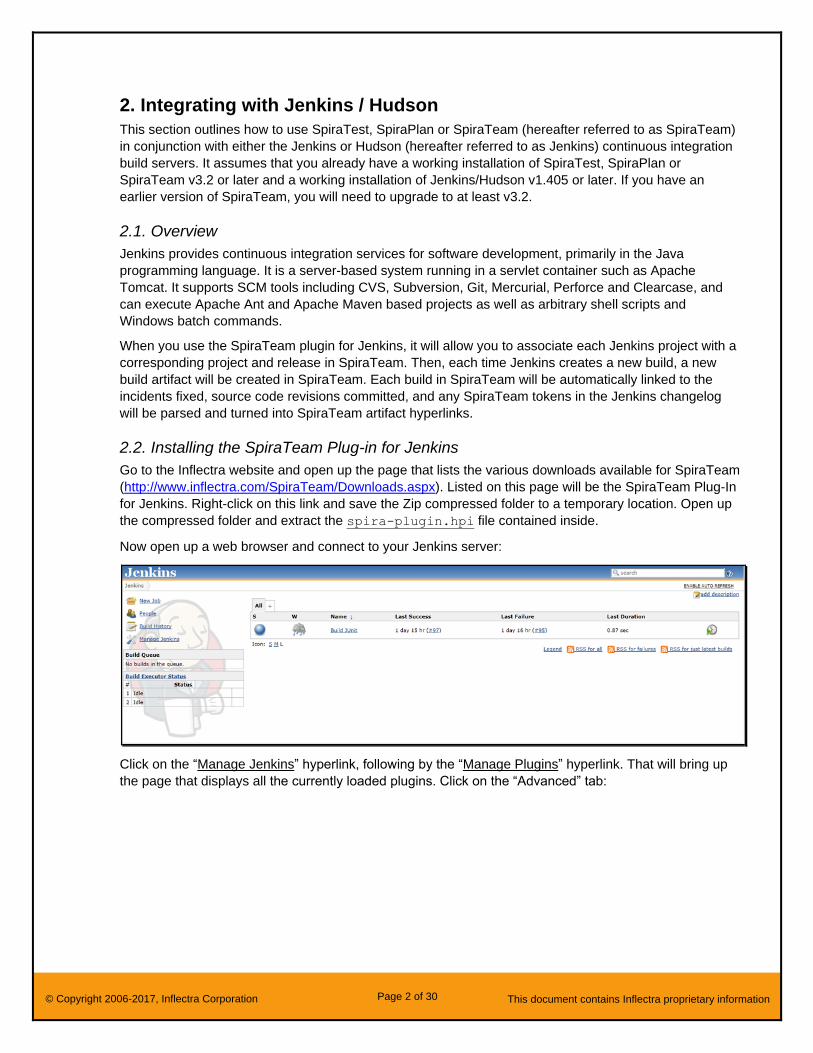
Now open up a web browser and connect to your Jenkins server:
Click on the “Manage Jenkins” hyperlink, following by the “Manage Plugins” hyperlink. That will bring up
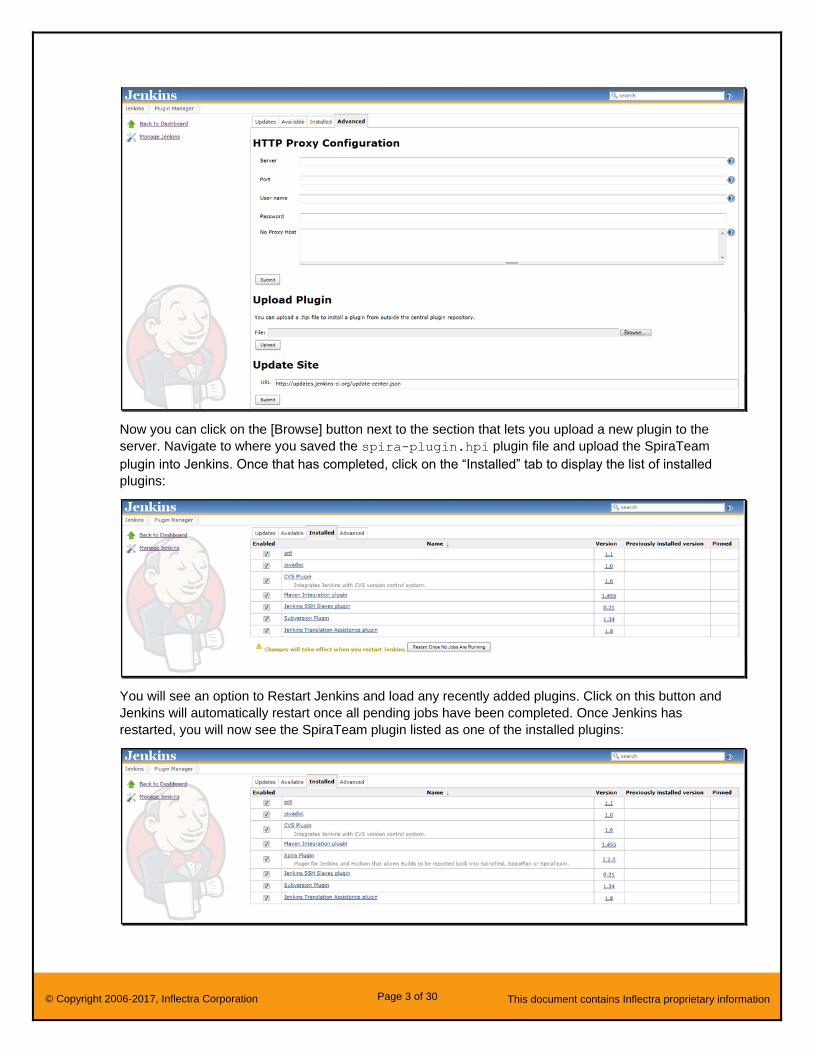
the page that displays all the currently loaded plugins. Click on the “Advanced” tab:
Page 3 of 30 © Copyright 2006-2017, Inflectra Corporation This document contains Inflectra proprietary information
Now you can click on the [Browse] button next to the section that lets you upload a new plugin to the
server. Navigate to where you saved the spira-plugin.hpi plugin file and upload the SpiraTeam
plugin into Jenkins. Once that has completed, click on the “Installed” tab to display the list of installed
plugins:
You will see an option to Restart Jenkins and load any recently added plugins. Click on this button and
Jenkins will automatically restart once all pending jobs have been completed. Once Jenkins has
restarted, you will now see the SpiraTeam plugin listed as one of the installed plugins:
Page 4 of 30 © Copyright 2006-2017, Inflectra Corporation This document contains Inflectra proprietary information
2.3. Setting-Up the SpiraTeam Jenkins Plug-in
Now that the plugin has been installed, you need to go back to the Jenkins homepage and click on the
“Manage Jenkins” hyperlink followed by the “Configure System” hyperlink. This will bring up the main
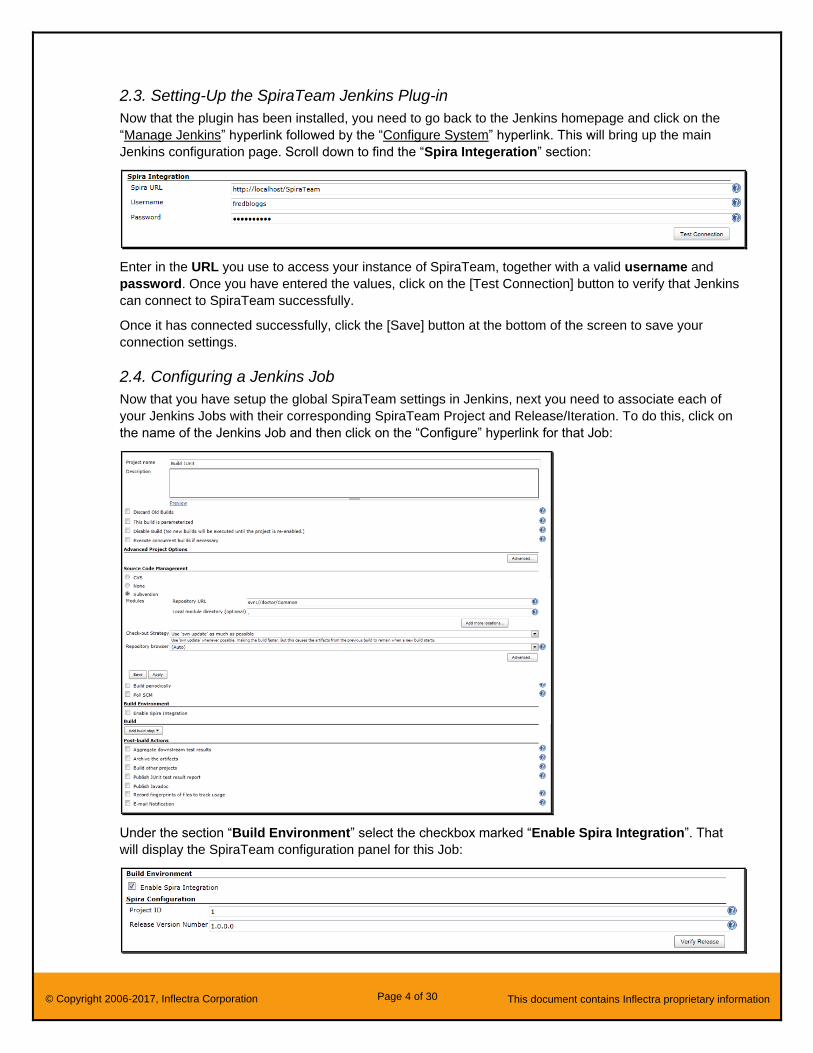
Jenkins configuration page. Scroll down to find the “Spira Integeration” section:
Enter in the URL you use to access your instance of SpiraTeam, together with a valid username and
password. Once you have entered the values, click on the [Test Connection] button to verify that Jenkins
can connect to SpiraTeam successfully.
Once it has connected successfully, click the [Save] button at the bottom of the screen to save your
connection settings.
2.4. Configuring a Jenkins Job
Now that you have setup the global SpiraTeam settings in Jenkins, next you need to associate each of
your Jenkins Jobs with their corresponding SpiraTeam Project and Release/Iteration. To do this, click on
the name of the Jenkins Job and then click on the “Configure” hyperlink for that Job:
Under the section “Build Environment” select the checkbox marked “Enable Spira Integration”. That
will display the SpiraTeam configuration panel for this Job:
Page 5 of 30 © Copyright 2006-2017, Inflectra Corporation This document contains Inflectra proprietary information
Now you need to enter the following values:
• Project ID – The numeric ID of the SpiraTeam Project that the Build belongs to. (e.g. for Project
PR00001 just enter 1)
• Release Version Number – The version number of the SpiraTeam Release/Iteration that the
Build belongs to. (e.g. for Release RL0004 with version number 1.0.0.0 you'd enter just 1.0.0.0)
Once you have entered in the Project ID and Release version number, click the [Verify Release] button
and the plugin will connect to SpiraTeam and verify that the project exists, that the current user can
connect to that project, and that the specified release/iteration exists in the project.
Once it has verified successfully, click the [Save] button at the bottom of the screen to save your Job
configuration settings. You are now ready to use Jenkins with SpiraTeam.
2.5. Viewing the Build Results in SpiraTeam
Now that you have associated your Jenkins job with a specific SpiraTeam project and release/iteration,
you can now use Jenkins to manage your software builds and have the results of the build be reported
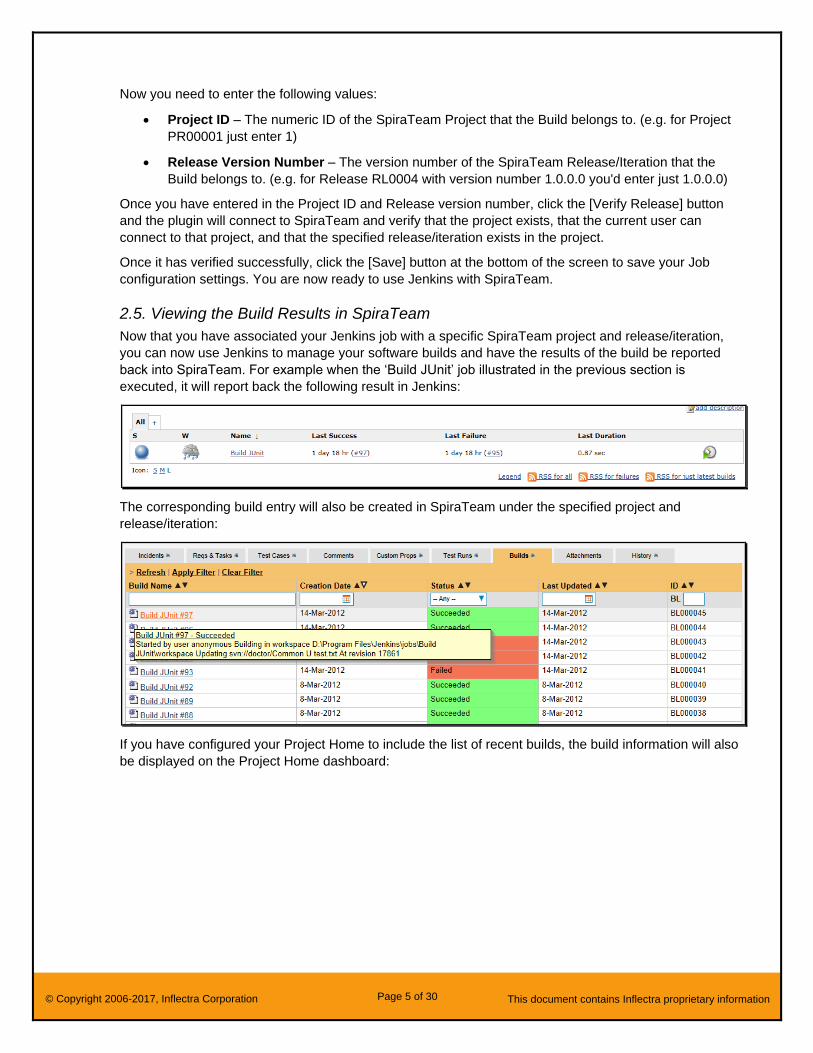
back into SpiraTeam. For example when the ‘Build JUnit’ job illustrated in the previous section is
executed, it will report back the following result in Jenkins:
The corresponding build entry will also be created in SpiraTeam under the specified project and
release/iteration:
If you have configured your Project Home to include the list of recent builds, the build information will also
be displayed on the Project Home dashboard:

Page 6 of 30 © Copyright 2006-2017, Inflectra Corporation This document contains Inflectra proprietary information
Clicking on either of the hyperlinks will allow you to navigate to the Build details page inside SpiraTeam:
This page will display the status (success / failure) and details of the build (from the Jenkins Console
Output) together with a list of the associated incidents, test runs and source code revisions. The following
section will explain how to use your Source Code Management (SCM) system to take advantage of the
SpiraTeam plugin and automatically link incidents and source code revisions to the build information.
2.6. Working with Source Code Changesets
When your developers commit changes to your application’s source into the SCM repository, they should
make sure to link the commit to the appropriate artifacts in SpiraTeam. For example they may want to
record that the revision fixes a specific incident or implements a specific feature (requirement).
Linking an artifact is very simple. All the developer needs to do is enter the artifact token in the following
format:
[PREFIX:ID]
The first half, the Artifact Identifier, is a two-letter code that is used throughout SpiraTeam, and is visible
on almost every page in the application. For example, a requirement’s identifier is “RQ”. Incidents are
“IN”, and tasks are “TK”. The artifact ID is the number of the artifact. So by creating a commit message
that reads:
Page 7 of 30 © Copyright 2006-2017, Inflectra Corporation This document contains Inflectra proprietary information
SpiraTeam will automatically detect the tokens and will include links to them under the Associations tab
for each revision detail in SpiraTeam.
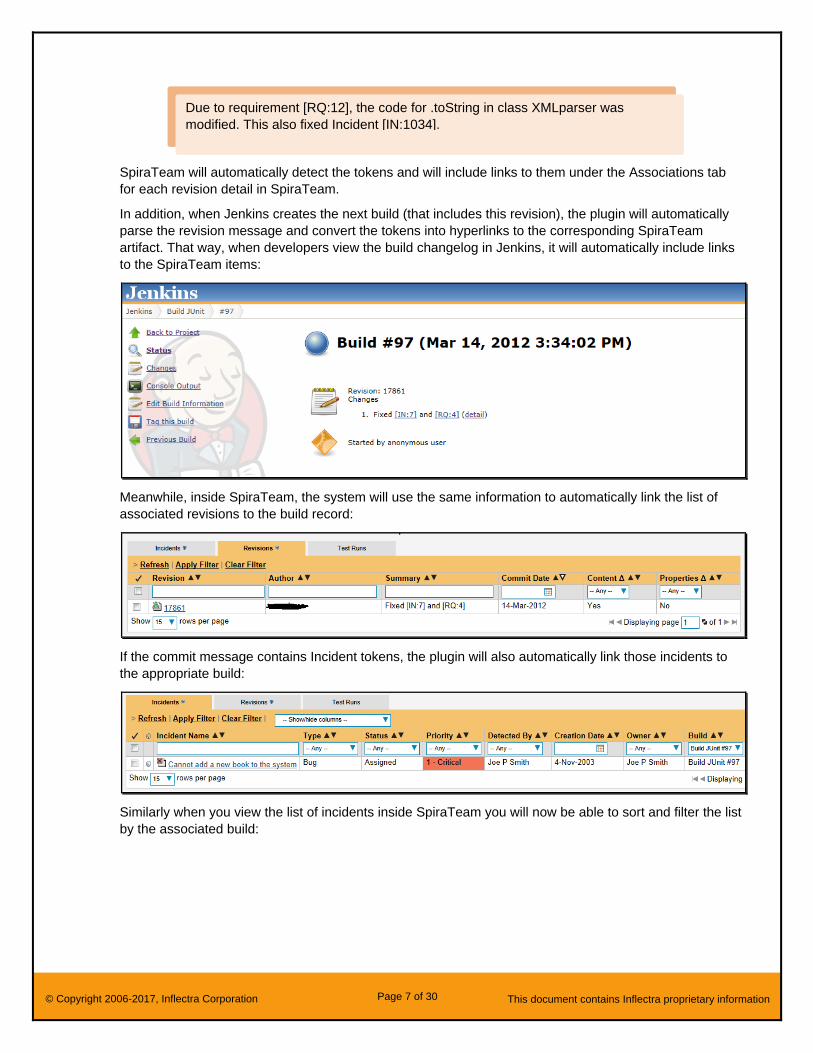
In addition, when Jenkins creates the next build (that includes this revision), the plugin will automatically
parse the revision message and convert the tokens into hyperlinks to the corresponding SpiraTeam
artifact. That way, when developers view the build changelog in Jenkins, it will automatically include links
to the SpiraTeam items:
Meanwhile, inside SpiraTeam, the system will use the same information to automatically link the list of
associated revisions to the build record:
If the commit message contains Incident tokens, the plugin will also automatically link those incidents to
the appropriate build:
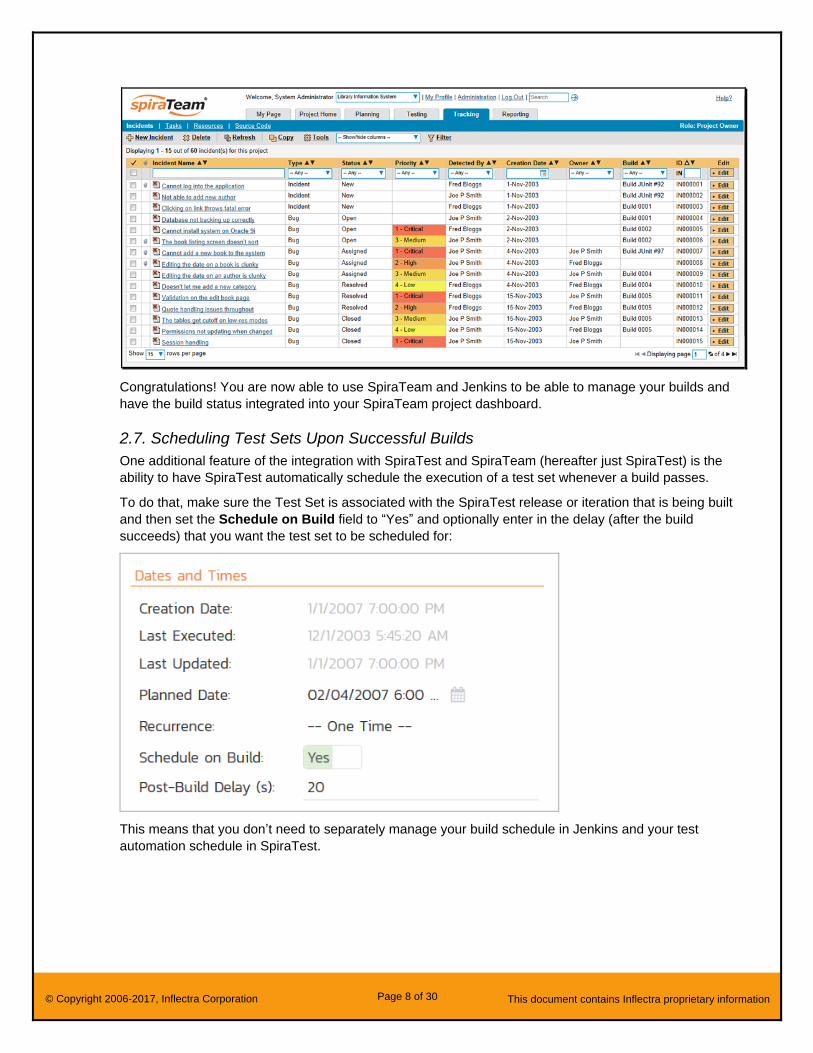
Similarly when you view the list of incidents inside SpiraTeam you will now be able to sort and filter the list
by the associated build:
Due to requirement [RQ:12], the code for .toString in class XMLparser was
modified. This also fixed Incident [IN:1034].
Page 8 of 30 © Copyright 2006-2017, Inflectra Corporation This document contains Inflectra proprietary information
Congratulations! You are now able to use SpiraTeam and Jenkins to be able to manage your builds and
have the build status integrated into your SpiraTeam project dashboard.
2.7. Scheduling Test Sets Upon Successful Builds
One additional feature of the integration with SpiraTest and SpiraTeam (hereafter just SpiraTest) is the
ability to have SpiraTest automatically schedule the execution of a test set whenever a build passes.
To do that, make sure the Test Set is associated with the SpiraTest release or iteration that is being built
and then set the Schedule on Build field to “Yes” and optionally enter in the delay (after the build
succeeds) that you want the test set to be scheduled for:
This means that you don’t need to separately manage your build schedule in Jenkins and your test
automation schedule in SpiraTest.
Page 9 of 30 © Copyright 2006-2017, Inflectra Corporation This document contains Inflectra proprietary information
3. Integrating with TeamCity
This section outlines how to use SpiraTest, SpiraPlan or SpiraTeam (hereafter referred to as SpiraTeam)
in conjunction with the JetBrains’ TeamCity continuous integration build servers. It assumes that you
already have a working installation of SpiraTest, SpiraPlan or SpiraTeam v4.0 or later and a working
installation of TeamCity v9.0.4 or later. If you have an earlier version of SpiraTeam, you will need to
upgrade to at least v4.0.
3.1. Overview
TeamCity provides continuous integration services for software development, primarily in the Java
programming language. It is a server-based system running that supports a variety of different version
control systems and build runners. It supports SCM tools including CVS, Subversion, Git, Mercurial,
Perforce and Borland StarTeam, and can execute Apache Ant and Apache Maven based projects as well
as arbitrary shell scripts and Windows batch commands.
When you use the SpiraTeam Plug-In for TeamCity, it will allow you to associate each TeamCity project
with a corresponding project and release in SpiraTeam. Then, each time TeamCity creates a new build, a
new build artifact will be created in SpiraTeam. Each build in SpiraTeam will be automatically linked to the
incidents fixed, tasks implemented, requirements developed and source code revisions committed.
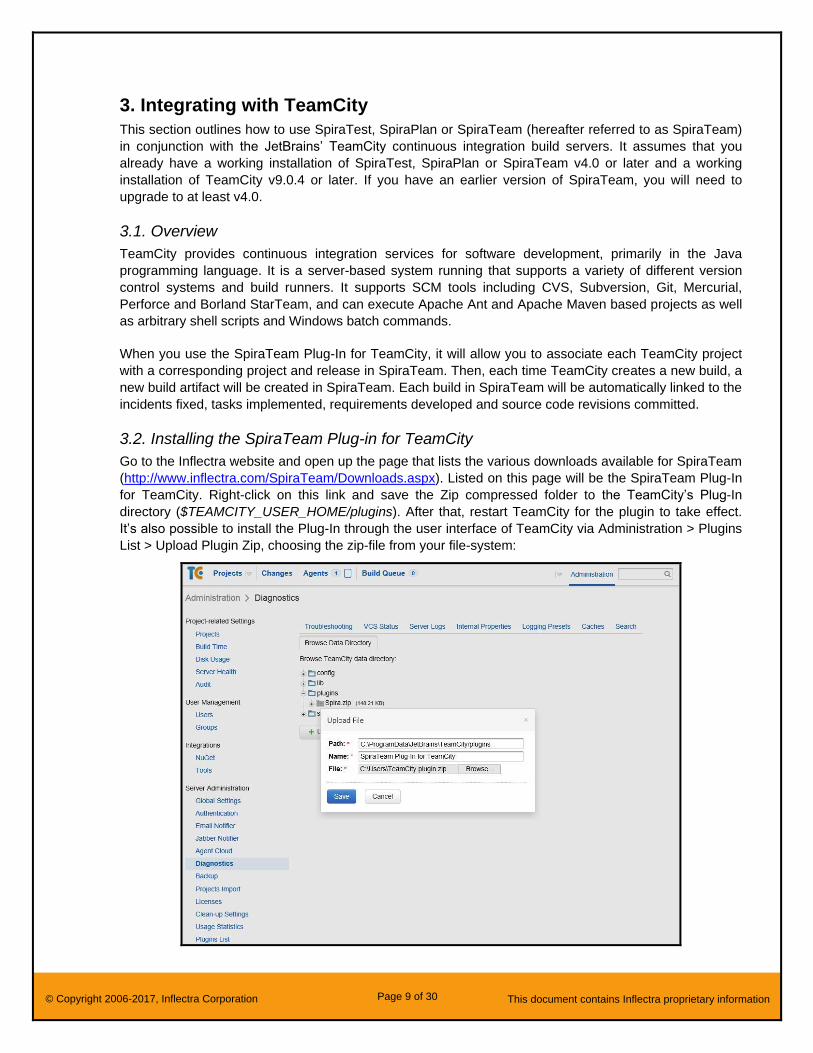
3.2. Installing the SpiraTeam Plug-in for TeamCity
Go to the Inflectra website and open up the page that lists the various downloads available for SpiraTeam
(http://www.inflectra.com/SpiraTeam/Downloads.aspx). Listed on this page will be the SpiraTeam Plug-In
for TeamCity. Right-click on this link and save the Zip compressed folder to the TeamCity’s Plug-In
directory ($TEAMCITY_USER_HOME/plugins). After that, restart TeamCity for the plugin to take effect.
It’s also possible to install the Plug-In through the user interface of TeamCity via Administration > Plugins
List > Upload Plugin Zip, choosing the zip-file from your file-system:
Page 10 of 30 © Copyright 2006-2017, Inflectra Corporation This document contains Inflectra proprietary information
Do not forget to restart TeamCity for the plugin to take effect.
Once TeamCity has restarted, you can see the SpiraTeam Plug-In listed as one of the installed plugins:
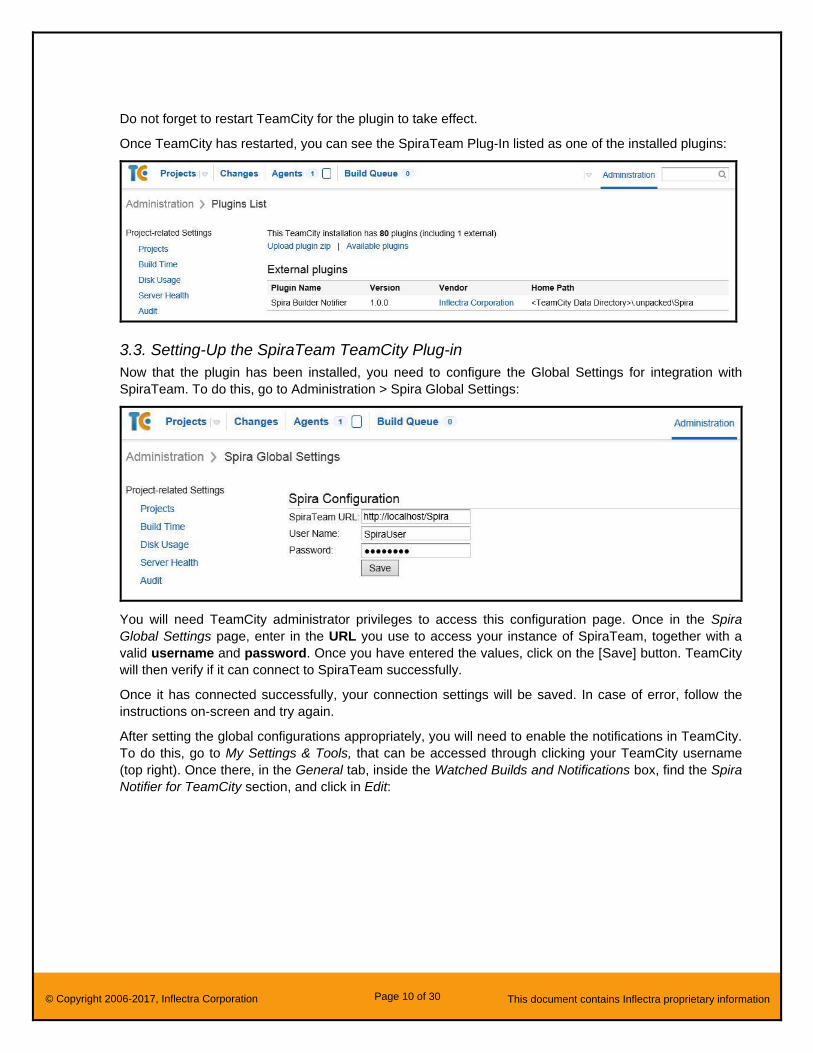
3.3. Setting-Up the SpiraTeam TeamCity Plug-in
Now that the plugin has been installed, you need to configure the Global Settings for integration with
SpiraTeam. To do this, go to Administration > Spira Global Settings:
You will need TeamCity administrator privileges to access this configuration page. Once in the Spira
Global Settings page, enter in the URL you use to access your instance of SpiraTeam, together with a
valid username and password. Once you have entered the values, click on the [Save] button. TeamCity
will then verify if it can connect to SpiraTeam successfully.
Once it has connected successfully, your connection settings will be saved. In case of error, follow the
instructions on-screen and try again.
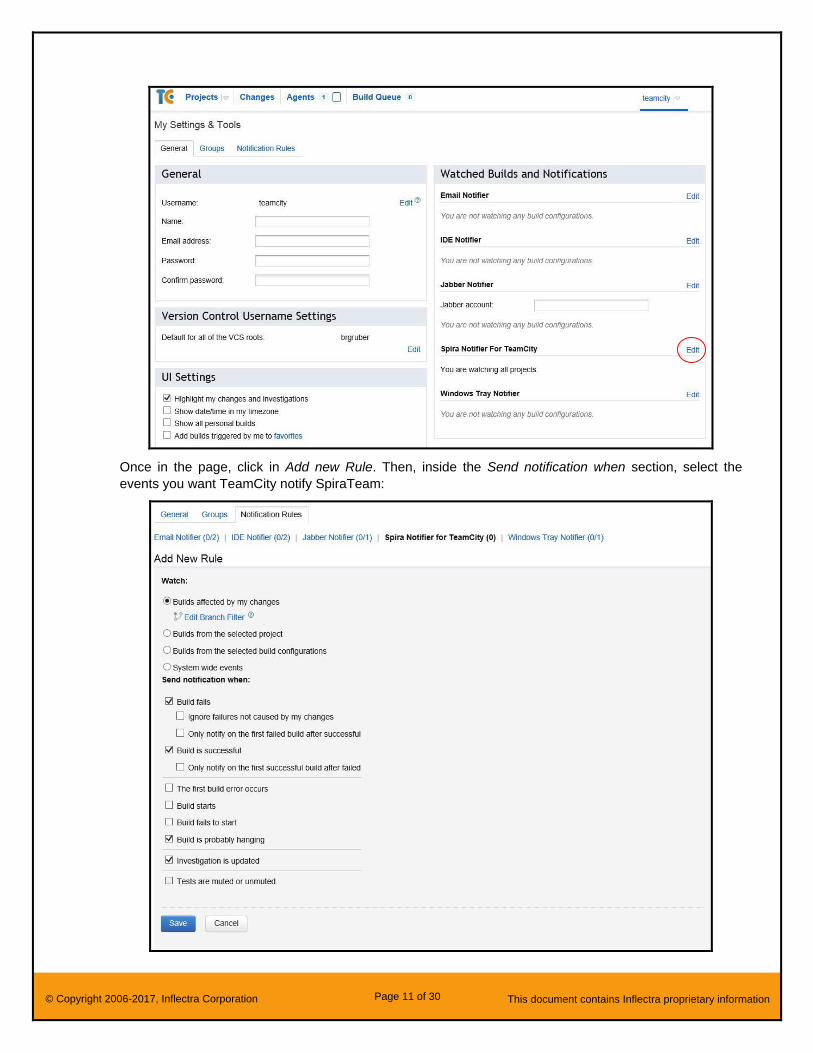
After setting the global configurations appropriately, you will need to enable the notifications in TeamCity.
To do this, go to My Settings & Tools, that can be accessed through clicking your TeamCity username
(top right). Once there, in the General tab, inside the Watched Builds and Notifications box, find the Spira
Notifier for TeamCity section, and click in Edit:
Page 11 of 30 © Copyright 2006-2017, Inflectra Corporation This document contains Inflectra proprietary information
Once in the page, click in Add new Rule. Then, inside the Send notification when section, select the
events you want TeamCity notify SpiraTeam:
Page 12 of 30 © Copyright 2006-2017, Inflectra Corporation This document contains Inflectra proprietary information
After selecting your preferences, click in the Save button.
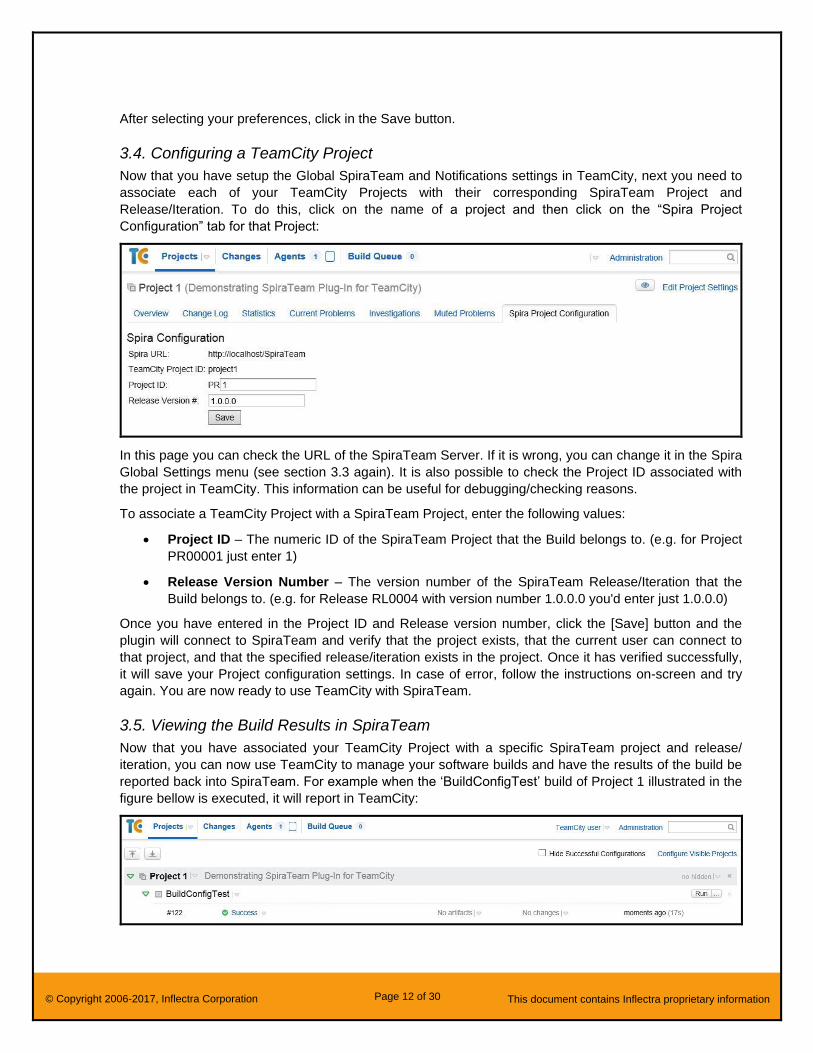
3.4. Configuring a TeamCity Project
Now that you have setup the Global SpiraTeam and Notifications settings in TeamCity, next you need to
associate each of your TeamCity Projects with their corresponding SpiraTeam Project and
Release/Iteration. To do this, click on the name of a project and then click on the “Spira Project
Configuration” tab for that Project:
In this page you can check the URL of the SpiraTeam Server. If it is wrong, you can change it in the Spira
Global Settings menu (see section 3.3 again). It is also possible to check the Project ID associated with
the project in TeamCity. This information can be useful for debugging/checking reasons.
To associate a TeamCity Project with a SpiraTeam Project, enter the following values:
• Project ID – The numeric ID of the SpiraTeam Project that the Build belongs to. (e.g. for Project
PR00001 just enter 1)
• Release Version Number – The version number of the SpiraTeam Release/Iteration that the
Build belongs to. (e.g. for Release RL0004 with version number 1.0.0.0 you'd enter just 1.0.0.0)
Once you have entered in the Project ID and Release version number, click the [Save] button and the
plugin will connect to SpiraTeam and verify that the project exists, that the current user can connect to
that project, and that the specified release/iteration exists in the project. Once it has verified successfully,
it will save your Project configuration settings. In case of error, follow the instructions on-screen and try
again. You are now ready to use TeamCity with SpiraTeam.
3.5. Viewing the Build Results in SpiraTeam
Now that you have associated your TeamCity Project with a specific SpiraTeam project and release/
iteration, you can now use TeamCity to manage your software builds and have the results of the build be
reported back into SpiraTeam. For example when the ‘BuildConfigTest’ build of Project 1 illustrated in the
figure bellow is executed, it will report in TeamCity:
Page 13 of 30 © Copyright 2006-2017, Inflectra Corporation This document contains Inflectra proprietary information
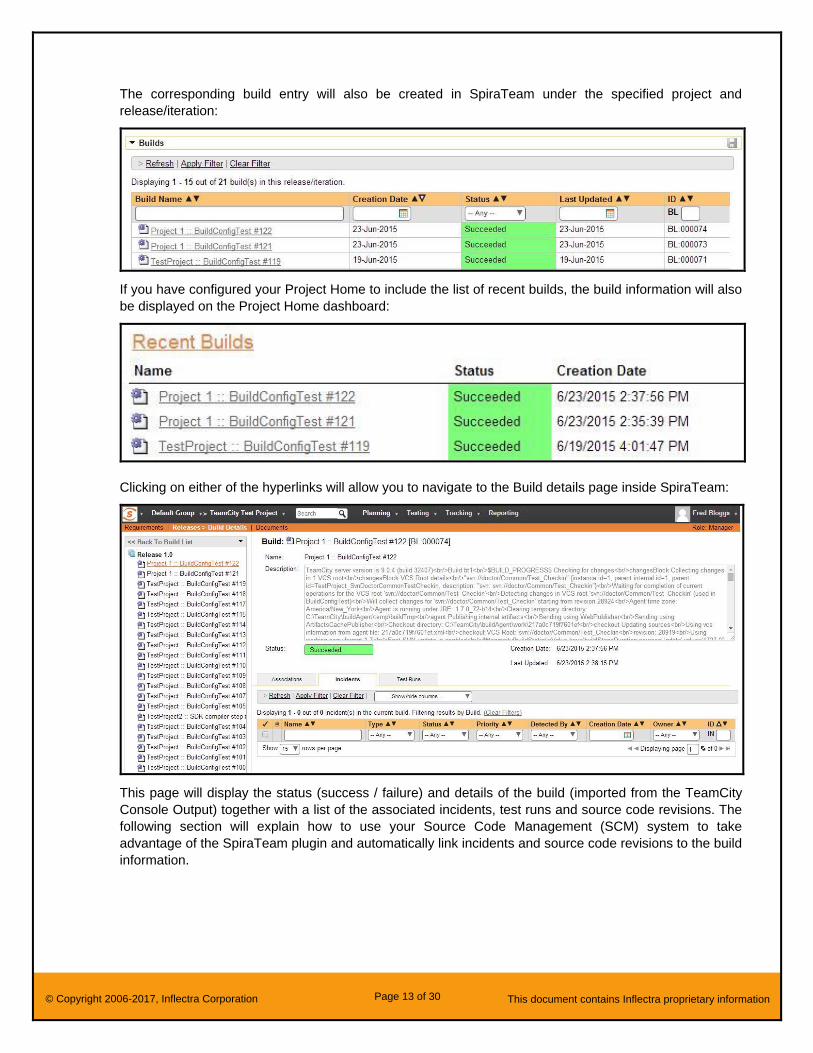
The corresponding build entry will also be created in SpiraTeam under the specified project and
release/iteration:
If you have configured your Project Home to include the list of recent builds, the build information will also
be displayed on the Project Home dashboard:
Clicking on either of the hyperlinks will allow you to navigate to the Build details page inside SpiraTeam:
This page will display the status (success / failure) and details of the build (imported from the TeamCity
Console Output) together with a list of the associated incidents, test runs and source code revisions. The
following section will explain how to use your Source Code Management (SCM) system to take
advantage of the SpiraTeam plugin and automatically link incidents and source code revisions to the build
information.
Page 14 of 30 © Copyright 2006-2017, Inflectra Corporation This document contains Inflectra proprietary information
3.6. Working with Source Code Changesets
When your developers commit changes to your application’s source into the SCM repository, they should
make sure to link the commit to the appropriate artifacts in SpiraTeam. For example they may want to
record that the revision fixes a specific incident or implements a specific feature (requirement).
Linking an artifact is very simple. All the developer needs to do is enter the artifact token in the following
format:
[PREFIX:ID]
The first half, the Artifact Identifier, is a two-letter code that is used throughout SpiraTeam, and is visible
on almost every page in the application. For example, a requirement’s identifier is “RQ”. Incidents are
“IN”, and tasks are “TK”. The artifact ID is the number of the artifact. So by creating a commit message
that reads:
SpiraTeam will automatically detect the tokens and will include links to them under the Associations tab
for each revision detail in SpiraTeam.
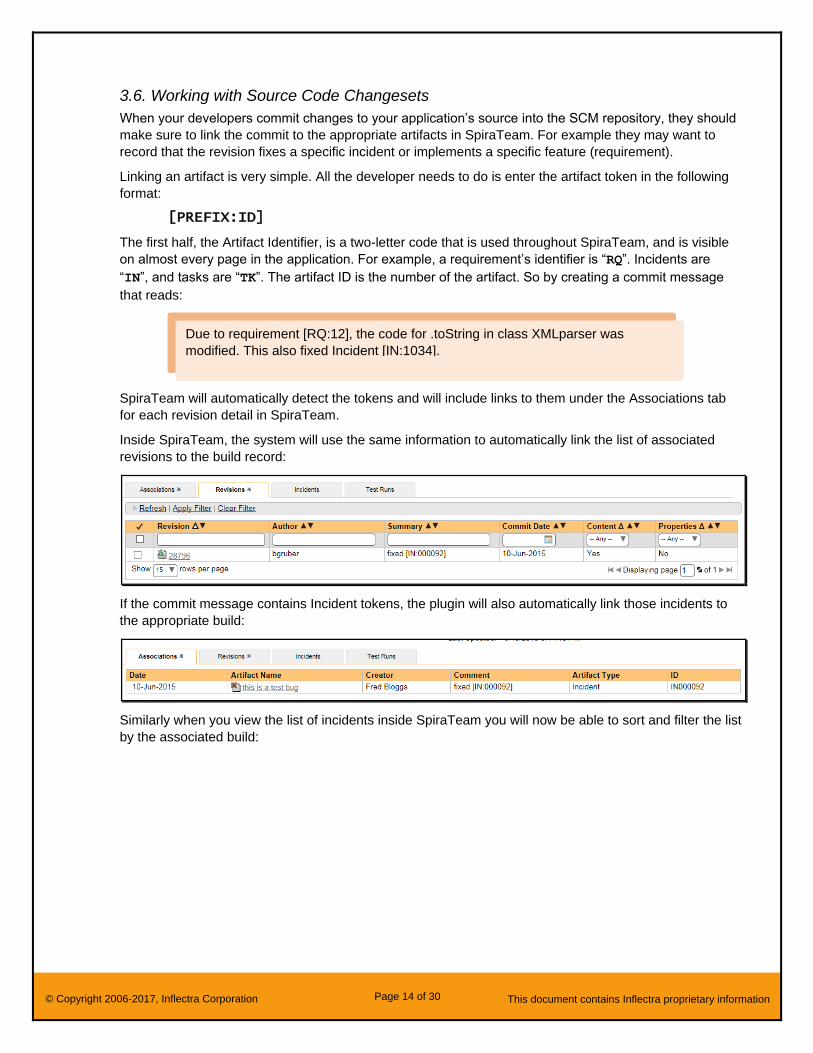
Inside SpiraTeam, the system will use the same information to automatically link the list of associated
revisions to the build record:
If the commit message contains Incident tokens, the plugin will also automatically link those incidents to
the appropriate build:
Similarly when you view the list of incidents inside SpiraTeam you will now be able to sort and filter the list
by the associated build:
Due to requirement [RQ:12], the code for .toString in class XMLparser was
modified. This also fixed Incident [IN:1034].
Page 15 of 30 © Copyright 2006-2017, Inflectra Corporation This document contains Inflectra proprietary information
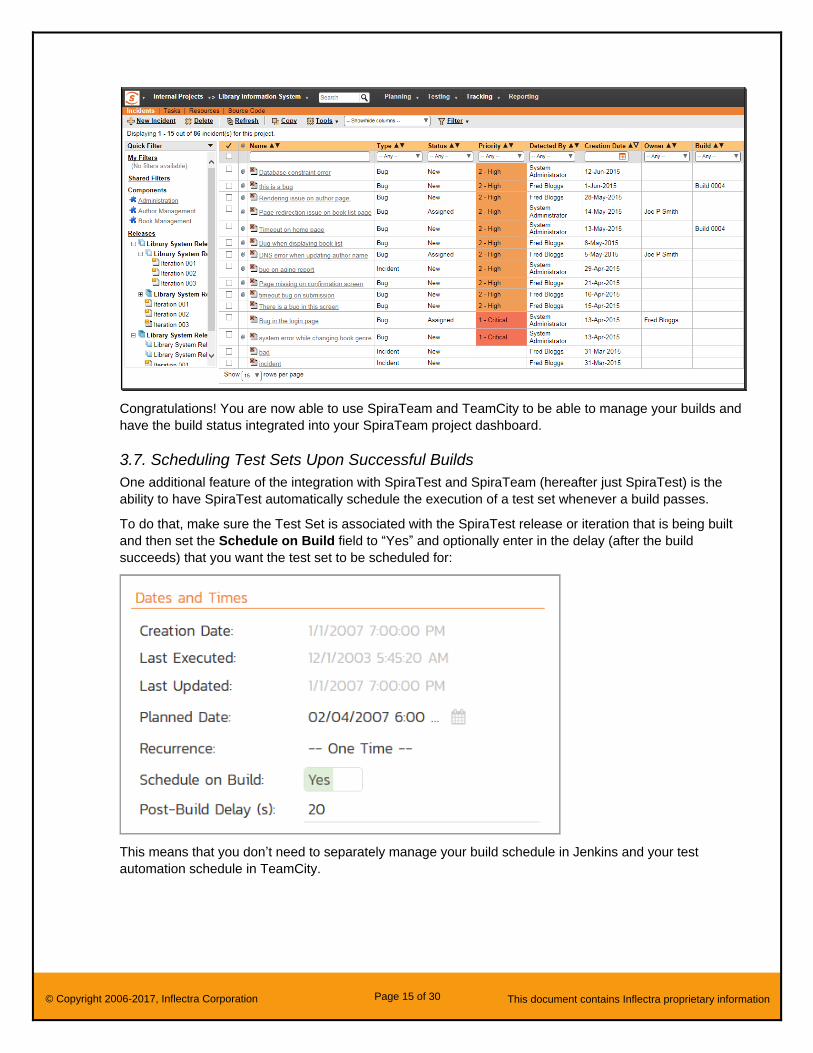
Congratulations! You are now able to use SpiraTeam and TeamCity to be able to manage your builds and
have the build status integrated into your SpiraTeam project dashboard.
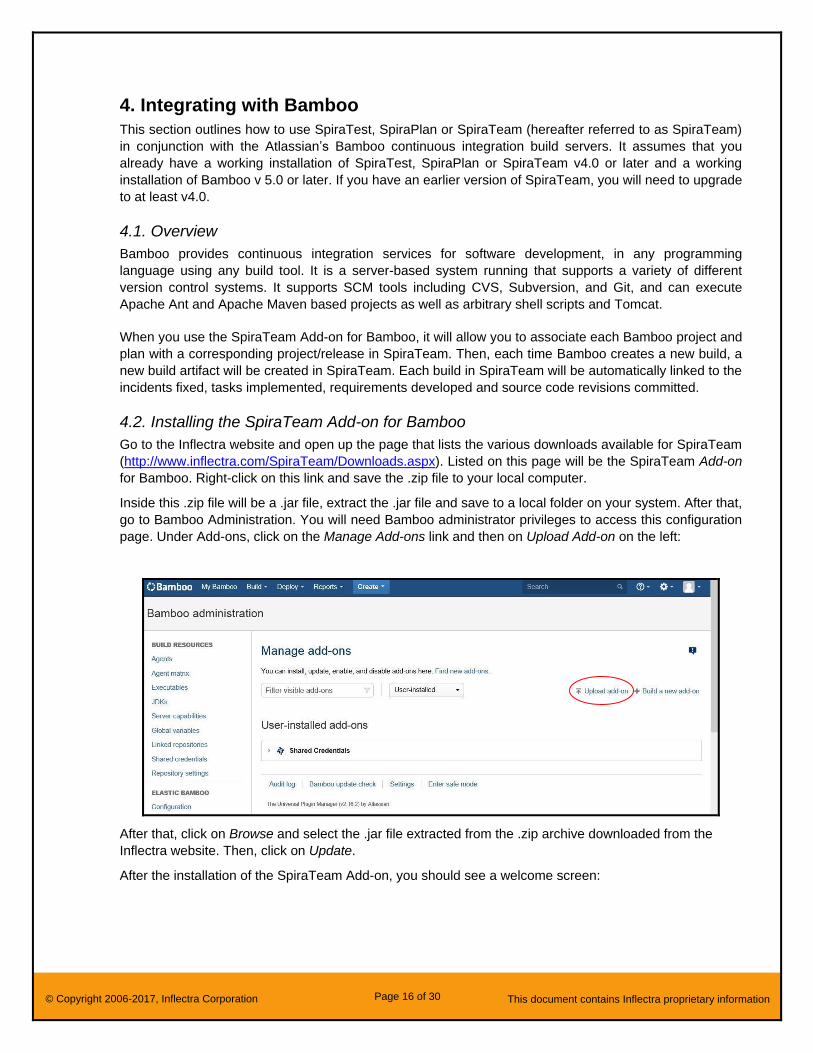
3.7. Scheduling Test Sets Upon Successful Builds
One additional feature of the integration with SpiraTest and SpiraTeam (hereafter just SpiraTest) is the
ability to have SpiraTest automatically schedule the execution of a test set whenever a build passes.
To do that, make sure the Test Set is associated with the SpiraTest release or iteration that is being built
and then set the Schedule on Build field to “Yes” and optionally enter in the delay (after the build
succeeds) that you want the test set to be scheduled for:
This means that you don’t need to separately manage your build schedule in Jenkins and your test
automation schedule in TeamCity.
Page 16 of 30 © Copyright 2006-2017, Inflectra Corporation This document contains Inflectra proprietary information
4. Integrating with Bamboo
This section outlines how to use SpiraTest, SpiraPlan or SpiraTeam (hereafter referred to as SpiraTeam)
in conjunction with the Atlassian’s Bamboo continuous integration build servers. It assumes that you
already have a working installation of SpiraTest, SpiraPlan or SpiraTeam v4.0 or later and a working
installation of Bamboo v 5.0 or later. If you have an earlier version of SpiraTeam, you will need to upgrade
to at least v4.0.
4.1. Overview
Bamboo provides continuous integration services for software development, in any programming
language using any build tool. It is a server-based system running that supports a variety of different
version control systems. It supports SCM tools including CVS, Subversion, and Git, and can execute
Apache Ant and Apache Maven based projects as well as arbitrary shell scripts and Tomcat.
When you use the SpiraTeam Add-on for Bamboo, it will allow you to associate each Bamboo project and
plan with a corresponding project/release in SpiraTeam. Then, each time Bamboo creates a new build, a
new build artifact will be created in SpiraTeam. Each build in SpiraTeam will be automatically linked to the
incidents fixed, tasks implemented, requirements developed and source code revisions committed.
4.2. Installing the SpiraTeam Add-on for Bamboo
Go to the Inflectra website and open up the page that lists the various downloads available for SpiraTeam
(http://www.inflectra.com/SpiraTeam/Downloads.aspx). Listed on this page will be the SpiraTeam Add-on
for Bamboo. Right-click on this link and save the .zip file to your local computer.
Inside this .zip file will be a .jar file, extract the .jar file and save to a local folder on your system. After that,
go to Bamboo Administration. You will need Bamboo administrator privileges to access this configuration
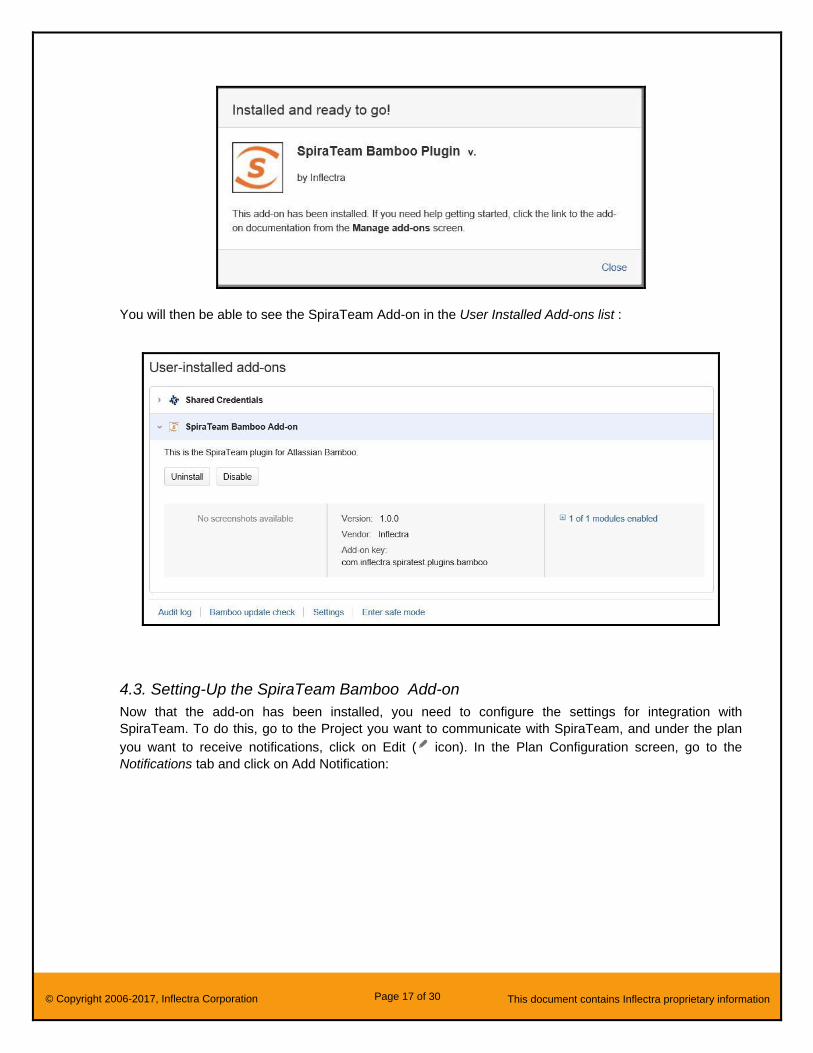
page. Under Add-ons, click on the Manage Add-ons link and then on Upload Add-on on the left:
After that, click on Browse and select the .jar file extracted from the .zip archive downloaded from the
Inflectra website. Then, click on Update.
After the installation of the SpiraTeam Add-on, you should see a welcome screen:
Page 17 of 30 © Copyright 2006-2017, Inflectra Corporation This document contains Inflectra proprietary information
You will then be able to see the SpiraTeam Add-on in the User Installed Add-ons list :
4.3. Setting-Up the SpiraTeam Bamboo Add-on
Now that the add-on has been installed, you need to configure the settings for integration with
SpiraTeam. To do this, go to the Project you want to communicate with SpiraTeam, and under the plan
you want to receive notifications, click on Edit ( icon). In the Plan Configuration screen, go to the
Notifications tab and click on Add Notification:
Page 18 of 30 © Copyright 2006-2017, Inflectra Corporation This document contains Inflectra proprietary information
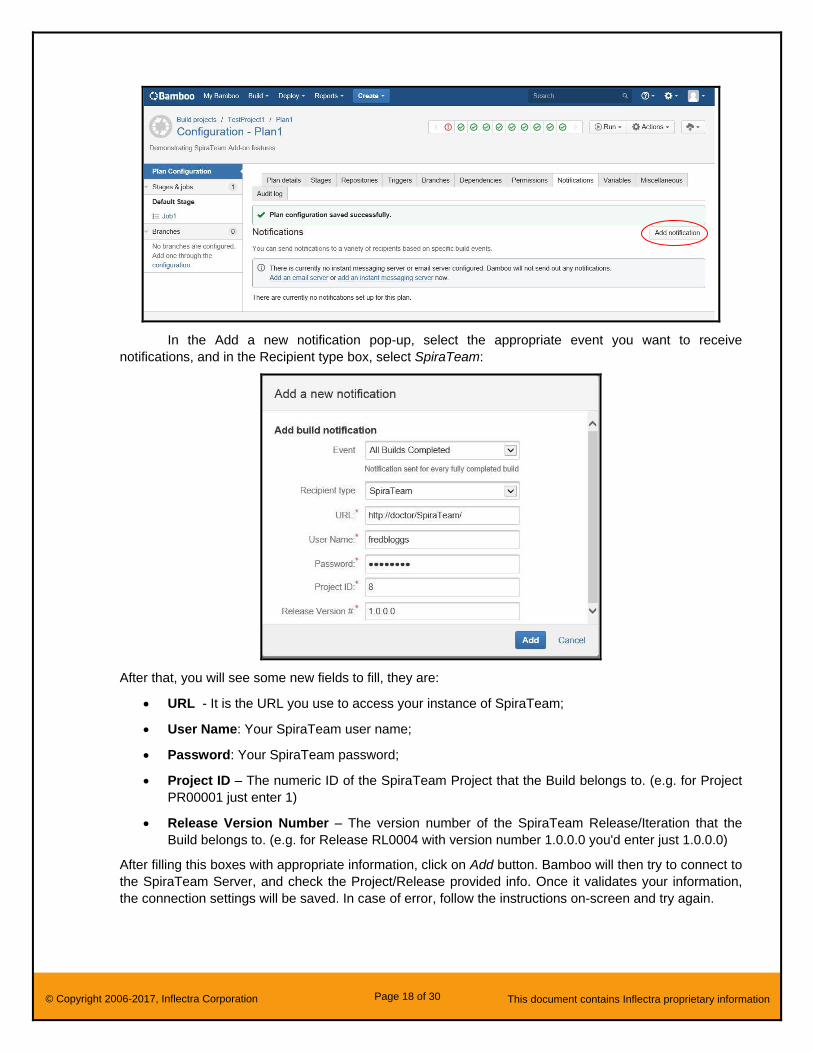
In the Add a new notification pop-up, select the appropriate event you want to receive
notifications, and in the Recipient type box, select SpiraTeam:
After that, you will see some new fields to fill, they are:
• URL - It is the URL you use to access your instance of SpiraTeam;
• User Name: Your SpiraTeam user name;
• Password: Your SpiraTeam password;
• Project ID – The numeric ID of the SpiraTeam Project that the Build belongs to. (e.g. for Project
PR00001 just enter 1)
• Release Version Number – The version number of the SpiraTeam Release/Iteration that the
Build belongs to. (e.g. for Release RL0004 with version number 1.0.0.0 you'd enter just 1.0.0.0)
After filling this boxes with appropriate information, click on Add button. Bamboo will then try to connect to
the SpiraTeam Server, and check the Project/Release provided info. Once it validates your information,
the connection settings will be saved. In case of error, follow the instructions on-screen and try again.
Page 19 of 30 © Copyright 2006-2017, Inflectra Corporation This document contains Inflectra proprietary information
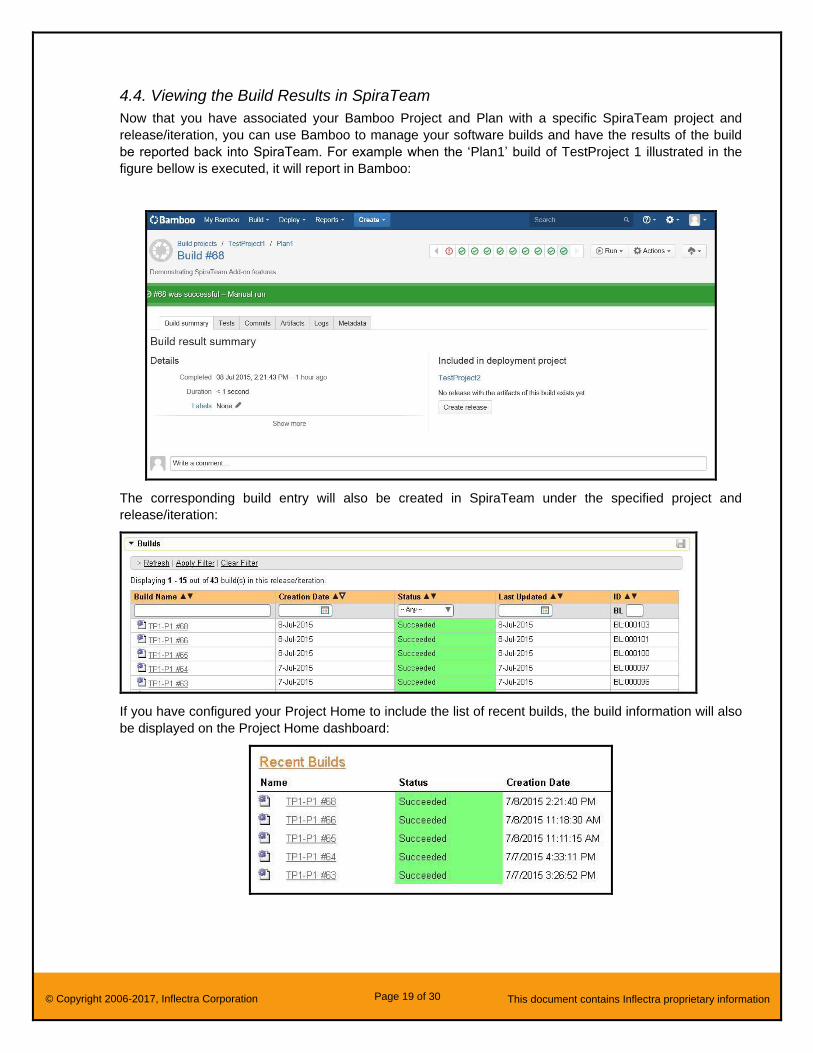
4.4. Viewing the Build Results in SpiraTeam
Now that you have associated your Bamboo Project and Plan with a specific SpiraTeam project and
release/iteration, you can use Bamboo to manage your software builds and have the results of the build
be reported back into SpiraTeam. For example when the ‘Plan1’ build of TestProject 1 illustrated in the
figure bellow is executed, it will report in Bamboo:
The corresponding build entry will also be created in SpiraTeam under the specified project and
release/iteration:
If you have configured your Project Home to include the list of recent builds, the build information will also
be displayed on the Project Home dashboard:
Page 20 of 30 © Copyright 2006-2017, Inflectra Corporation This document contains Inflectra proprietary information
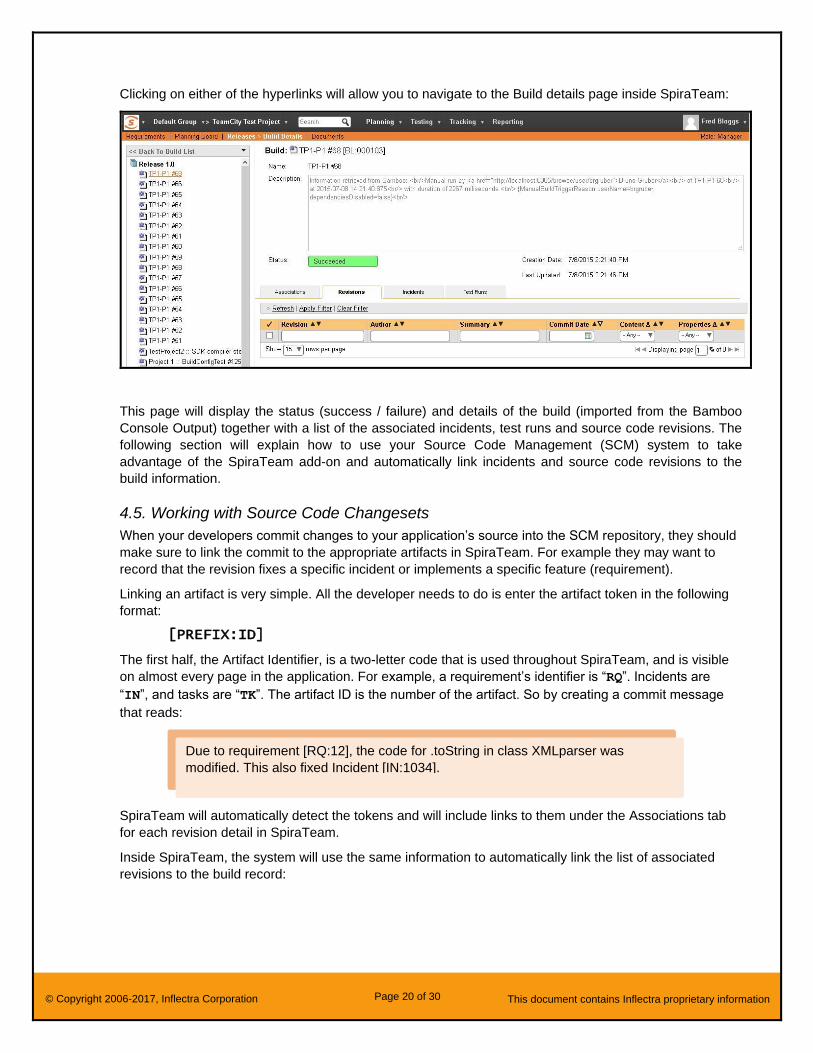
Clicking on either of the hyperlinks will allow you to navigate to the Build details page inside SpiraTeam:
This page will display the status (success / failure) and details of the build (imported from the Bamboo
Console Output) together with a list of the associated incidents, test runs and source code revisions. The
following section will explain how to use your Source Code Management (SCM) system to take
advantage of the SpiraTeam add-on and automatically link incidents and source code revisions to the
build information.
4.5. Working with Source Code Changesets
When your developers commit changes to your application’s source into the SCM repository, they should
make sure to link the commit to the appropriate artifacts in SpiraTeam. For example they may want to
record that the revision fixes a specific incident or implements a specific feature (requirement).
Linking an artifact is very simple. All the developer needs to do is enter the artifact token in the following
format:
[PREFIX:ID]
The first half, the Artifact Identifier, is a two-letter code that is used throughout SpiraTeam, and is visible
on almost every page in the application. For example, a requirement’s identifier is “RQ”. Incidents are
“IN”, and tasks are “TK”. The artifact ID is the number of the artifact. So by creating a commit message
that reads:
SpiraTeam will automatically detect the tokens and will include links to them under the Associations tab
for each revision detail in SpiraTeam.
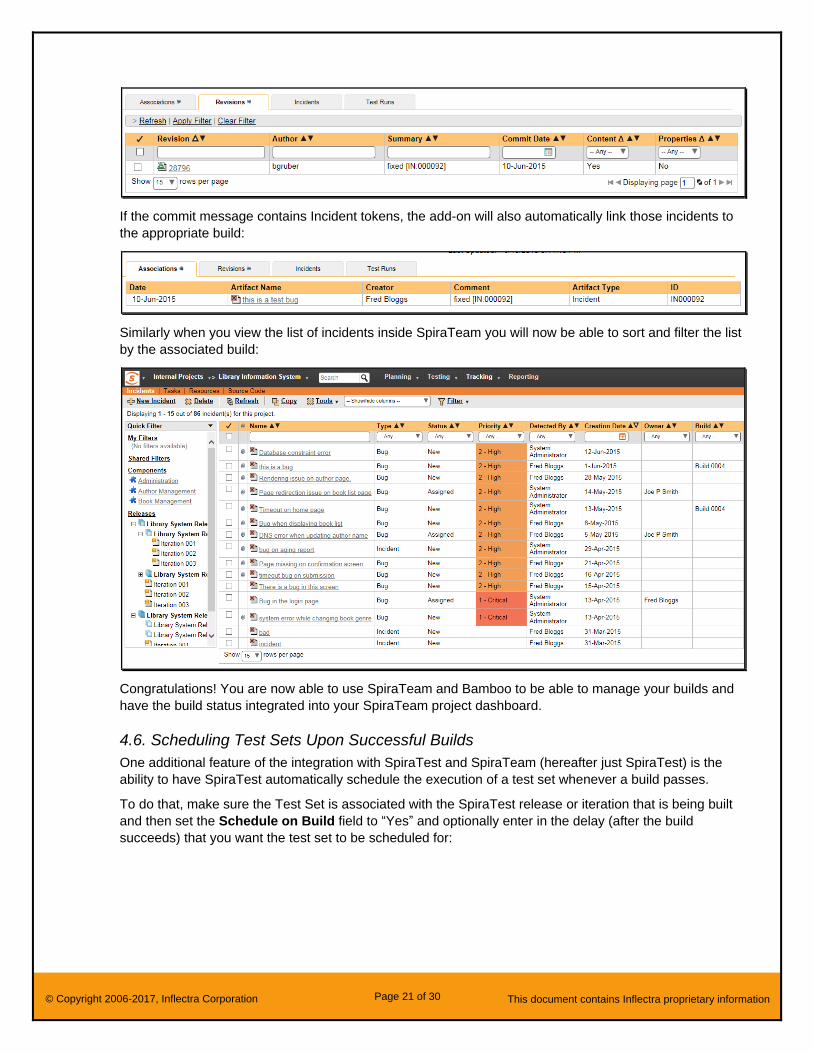
Inside SpiraTeam, the system will use the same information to automatically link the list of associated
revisions to the build record:
Due to requirement [RQ:12], the code for .toString in class XMLparser was
modified. This also fixed Incident [IN:1034].
Page 21 of 30 © Copyright 2006-2017, Inflectra Corporation This document contains Inflectra proprietary information
If the commit message contains Incident tokens, the add-on will also automatically link those incidents to
the appropriate build:
Similarly when you view the list of incidents inside SpiraTeam you will now be able to sort and filter the list
by the associated build:
Congratulations! You are now able to use SpiraTeam and Bamboo to be able to manage your builds and
have the build status integrated into your SpiraTeam project dashboard.
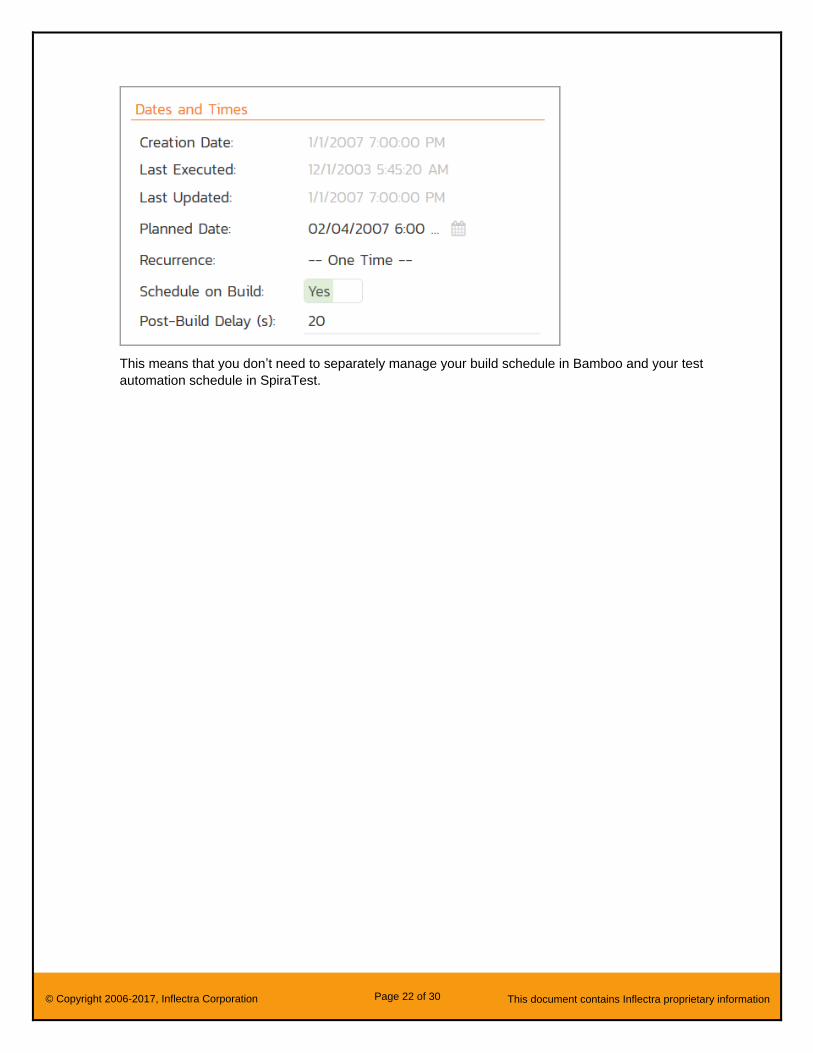
4.6. Scheduling Test Sets Upon Successful Builds
One additional feature of the integration with SpiraTest and SpiraTeam (hereafter just SpiraTest) is the
ability to have SpiraTest automatically schedule the execution of a test set whenever a build passes.
To do that, make sure the Test Set is associated with the SpiraTest release or iteration that is being built
and then set the Schedule on Build field to “Yes” and optionally enter in the delay (after the build
succeeds) that you want the test set to be scheduled for:
Page 22 of 30 © Copyright 2006-2017, Inflectra Corporation This document contains Inflectra proprietary information
This means that you don’t need to separately manage your build schedule in Bamboo and your test
automation schedule in SpiraTest.
Page 23 of 30 © Copyright 2006-2017, Inflectra Corporation This document contains Inflectra proprietary information
5. Integrating with Team Foundation Server
This section outlines how to use SpiraTest, SpiraPlan or SpiraTeam (hereafter referred to as SpiraTeam)
in conjunction with Microsoft’s Team Foundation Server (hereafter referred to as TFS) continuous
integration build server module. It assumes that you already have a working installation of SpiraTest,
SpiraPlan or SpiraTeam v4.0 or later and a working installation of TFS 2013 or later. If you have an
earlier version of SpiraTeam, you will need to upgrade to at least v4.0.
5.1. Overview
TFS provides tools for managing the entire application lifecycle, including source code management,
reporting, automated builds, testing and release capabilities, for example. It supports version control
using either its native TFS source code management system or Git. SpiraTeam has version control
plugins for both TFS native and TFS with Git source code management options.
When you use the SpiraTeam Build Server Plug-In for TFS, it will allow you to associate different TFS
projects with a corresponding project and release in SpiraTeam. Then, each time TFS creates a new
build, a new build artifact will be created in SpiraTeam. Each build in SpiraTeam will be automatically
linked to the incidents fixed, tasks implemented, requirements developed and source code revisions
committed.
5.2. Installing the SpiraTeam Build Plug-in for TFS
Go to the Inflectra website and open up the page that lists the various downloads available for SpiraTeam
(http://www.inflectra.com/SpiraTeam/Downloads.aspx). Listed on this page will be the SpiraTeam Build
Plug-In for TFS. Right-click on this link and save the .zip file in your system. You will need to extract the
folder and copy all the files to the TFS Plugins Directory, which is usually:
C:\Program Files\Microsoft Team Foundation Server x.x\Application Tier\Web
Services\bin\Plugins
After that, TFS will automatically restart and run the SpiraTeam Build Plug-In.
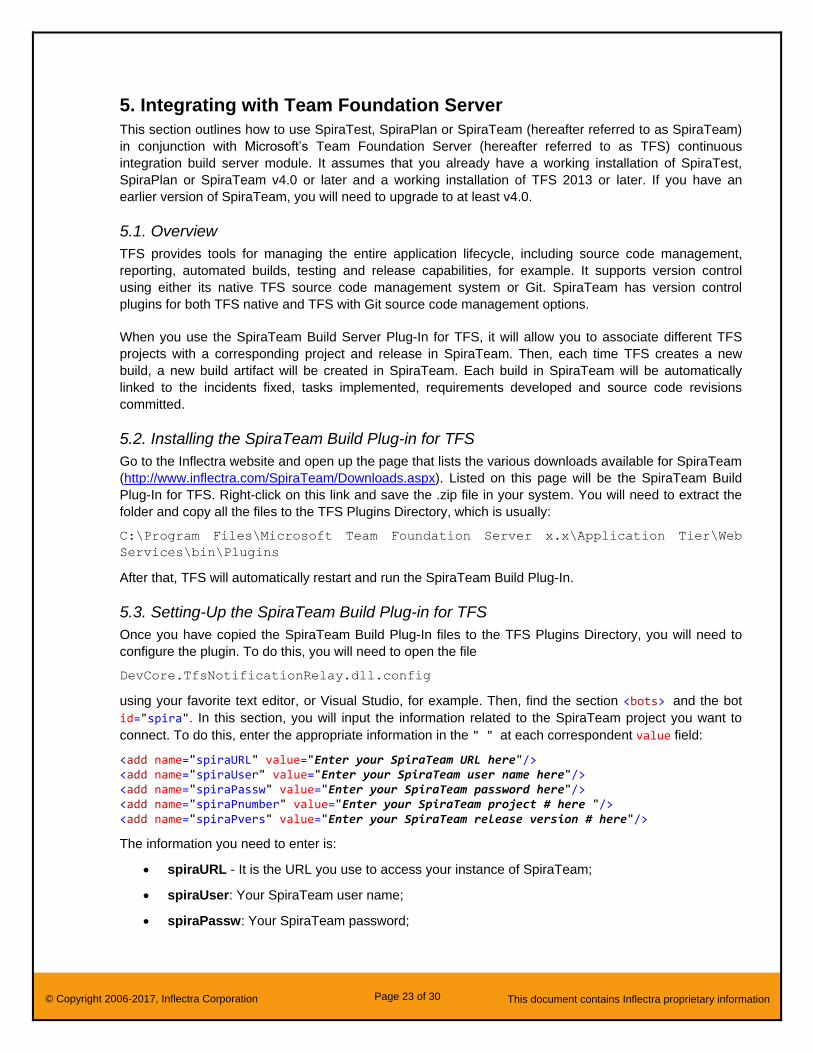
5.3. Setting-Up the SpiraTeam Build Plug-in for TFS
Once you have copied the SpiraTeam Build Plug-In files to the TFS Plugins Directory, you will need to
configure the plugin. To do this, you will need to open the file
DevCore.TfsNotificationRelay.dll.config
using your favorite text editor, or Visual Studio, for example. Then, find the section <bots> and the bot
id="spira". In this section, you will input the information related to the SpiraTeam project you want to
connect. To do this, enter the appropriate information in the " " at each correspondent value field:
<add name="spiraURL" value="Enter your SpiraTeam URL here"/> <add name="spiraUser" value="Enter your SpiraTeam user name here"/> <add name="spiraPassw" value="Enter your SpiraTeam password here"/> <add name="spiraPnumber" value="Enter your SpiraTeam project # here "/> <add name="spiraPvers" value="Enter your SpiraTeam release version # here"/>
The information you need to enter is:
• spiraURL - It is the URL you use to access your instance of SpiraTeam;
• spiraUser: Your SpiraTeam user name;
• spiraPassw: Your SpiraTeam password;
Page 24 of 30 © Copyright 2006-2017, Inflectra Corporation This document contains Inflectra proprietary information
• spiraPnumber – The numeric ID of the SpiraTeam Project that the Build belongs to. (e.g. for
Project PR00001 just enter 1)
• spiraPvers – The version number of the SpiraTeam Release/Iteration that the Build belongs to.
(e.g. for Release RL0004 with version number 1.0.0.0 you'd enter just 1.0.0.0)
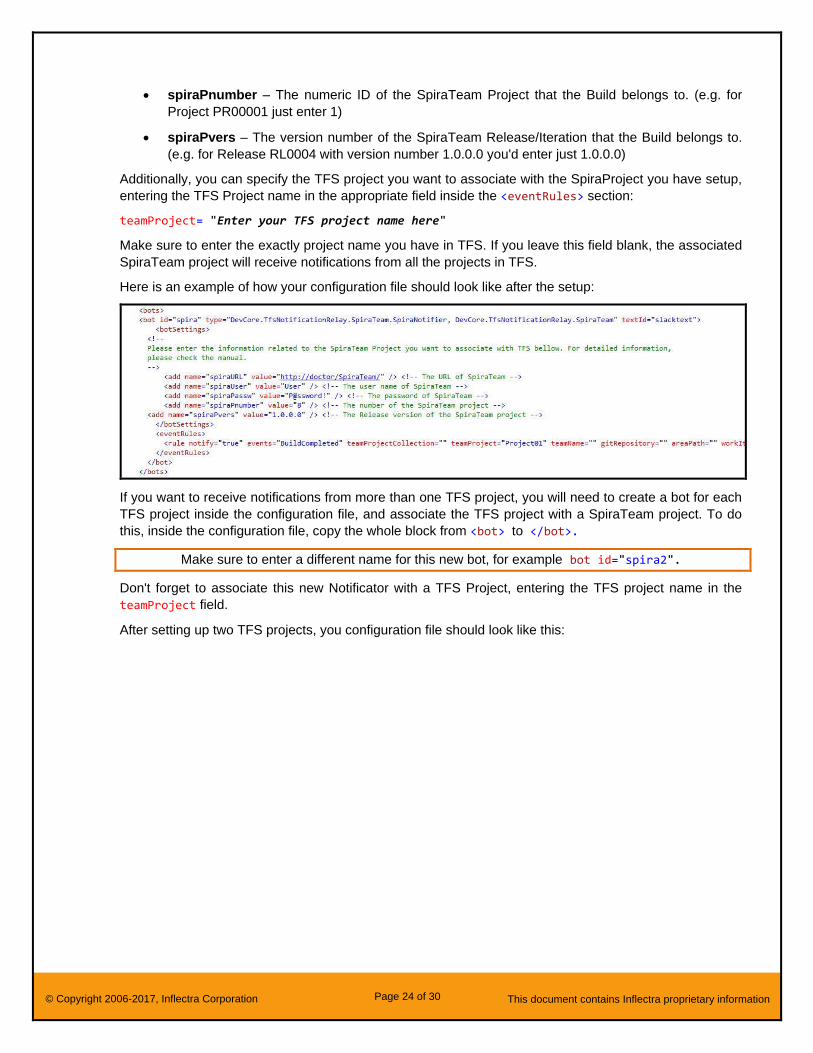
Additionally, you can specify the TFS project you want to associate with the SpiraProject you have setup,
entering the TFS Project name in the appropriate field inside the <eventRules> section:
teamProject= "Enter your TFS project name here"
Make sure to enter the exactly project name you have in TFS. If you leave this field blank, the associated
SpiraTeam project will receive notifications from all the projects in TFS.
Here is an example of how your configuration file should look like after the setup:
If you want to receive notifications from more than one TFS project, you will need to create a bot for each
TFS project inside the configuration file, and associate the TFS project with a SpiraTeam project. To do
this, inside the configuration file, copy the whole block from <bot> to </bot>.
Make sure to enter a different name for this new bot, for example bot id="spira2".
Don't forget to associate this new Notificator with a TFS Project, entering the TFS project name in the
teamProject field.
After setting up two TFS projects, you configuration file should look like this:
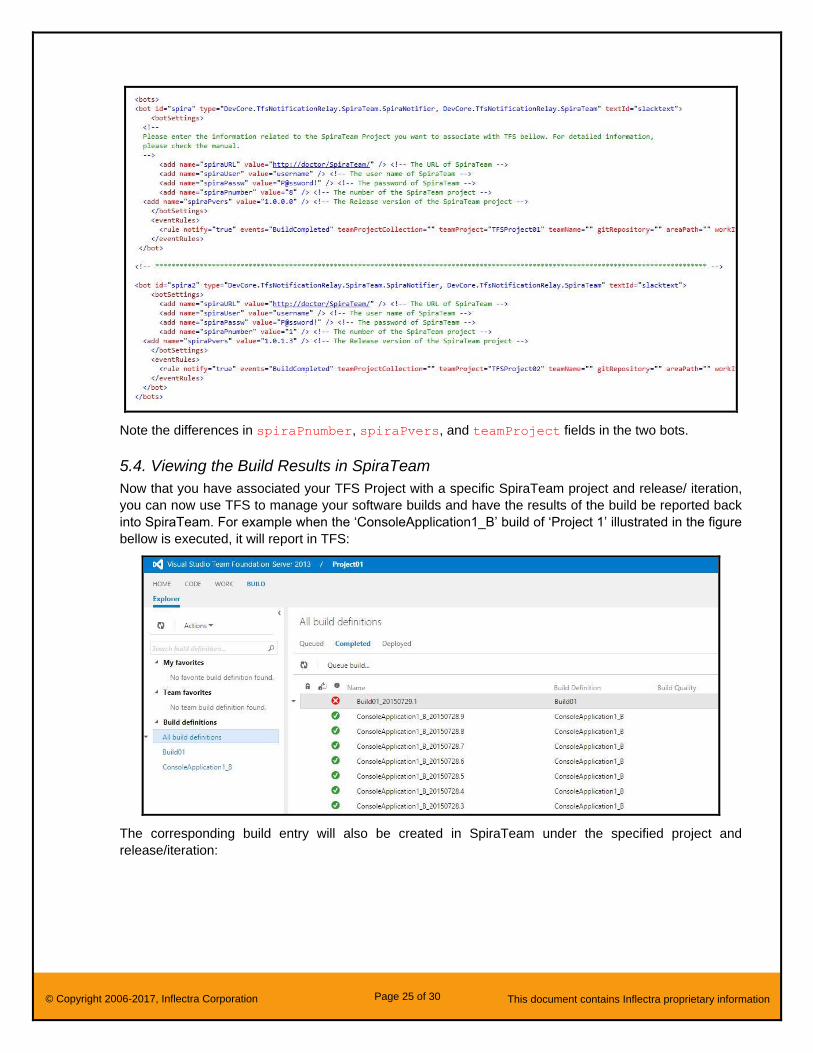
Page 25 of 30 © Copyright 2006-2017, Inflectra Corporation This document contains Inflectra proprietary information
Note the differences in spiraPnumber, spiraPvers, and teamProject fields in the two bots.
5.4. Viewing the Build Results in SpiraTeam
Now that you have associated your TFS Project with a specific SpiraTeam project and release/ iteration,
you can now use TFS to manage your software builds and have the results of the build be reported back
into SpiraTeam. For example when the ‘ConsoleApplication1_B’ build of ‘Project 1’ illustrated in the figure
bellow is executed, it will report in TFS:
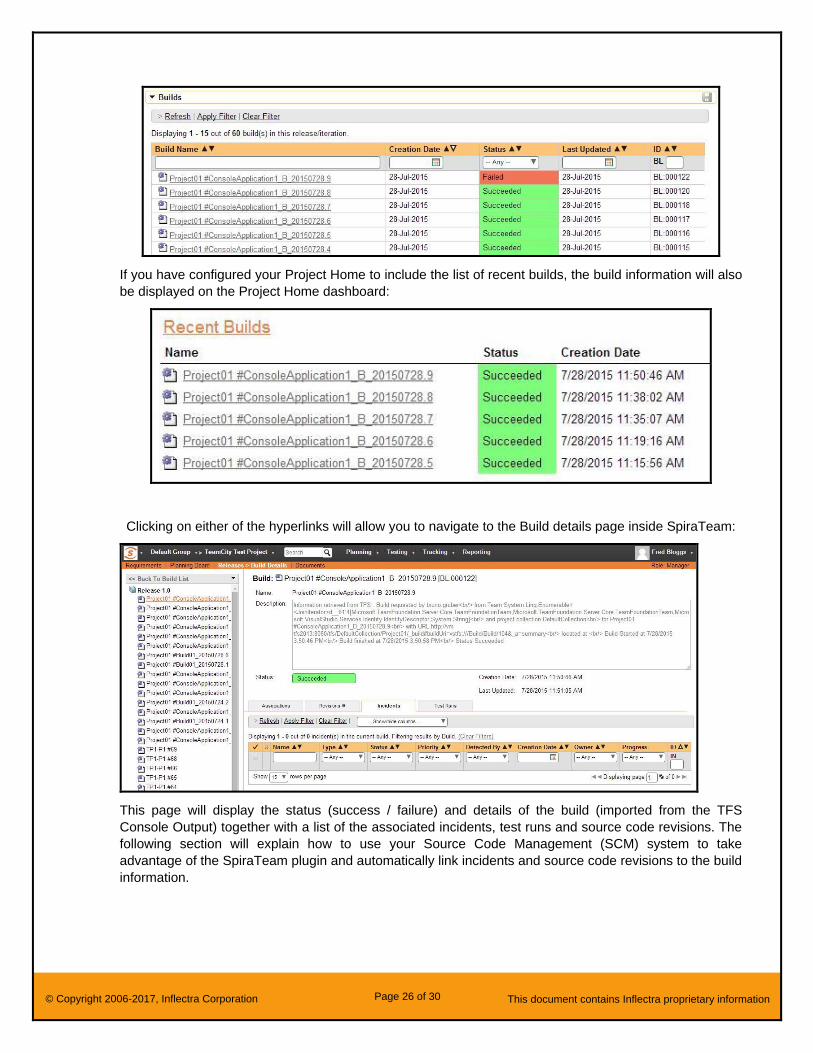
The corresponding build entry will also be created in SpiraTeam under the specified project and
release/iteration:
Page 26 of 30 © Copyright 2006-2017, Inflectra Corporation This document contains Inflectra proprietary information
If you have configured your Project Home to include the list of recent builds, the build information will also
be displayed on the Project Home dashboard:
Clicking on either of the hyperlinks will allow you to navigate to the Build details page inside SpiraTeam:
This page will display the status (success / failure) and details of the build (imported from the TFS
Console Output) together with a list of the associated incidents, test runs and source code revisions. The
following section will explain how to use your Source Code Management (SCM) system to take
advantage of the SpiraTeam plugin and automatically link incidents and source code revisions to the build
information.
Page 27 of 30 © Copyright 2006-2017, Inflectra Corporation This document contains Inflectra proprietary information
5.6. Working with Source Code Changesets
When your developers commit changes to your application’s source into the SCM repository, they should
make sure to link the commit to the appropriate artifacts in SpiraTeam. For example they may want to
record that the revision fixes a specific incident or implements a specific feature (requirement).
Linking an artifact is very simple. All the developer needs to do is enter the artifact token in the following
format:
[PREFIX:ID]
The first half, the Artifact Identifier, is a two-letter code that is used throughout SpiraTeam, and is visible
on almost every page in the application. For example, a requirement’s identifier is “RQ”. Incidents are
“IN”, and tasks are “TK”. The artifact ID is the number of the artifact. So by creating a commit message
that reads:
SpiraTeam will automatically detect the tokens and will include links to them under the Associations tab
for each revision detail in SpiraTeam.
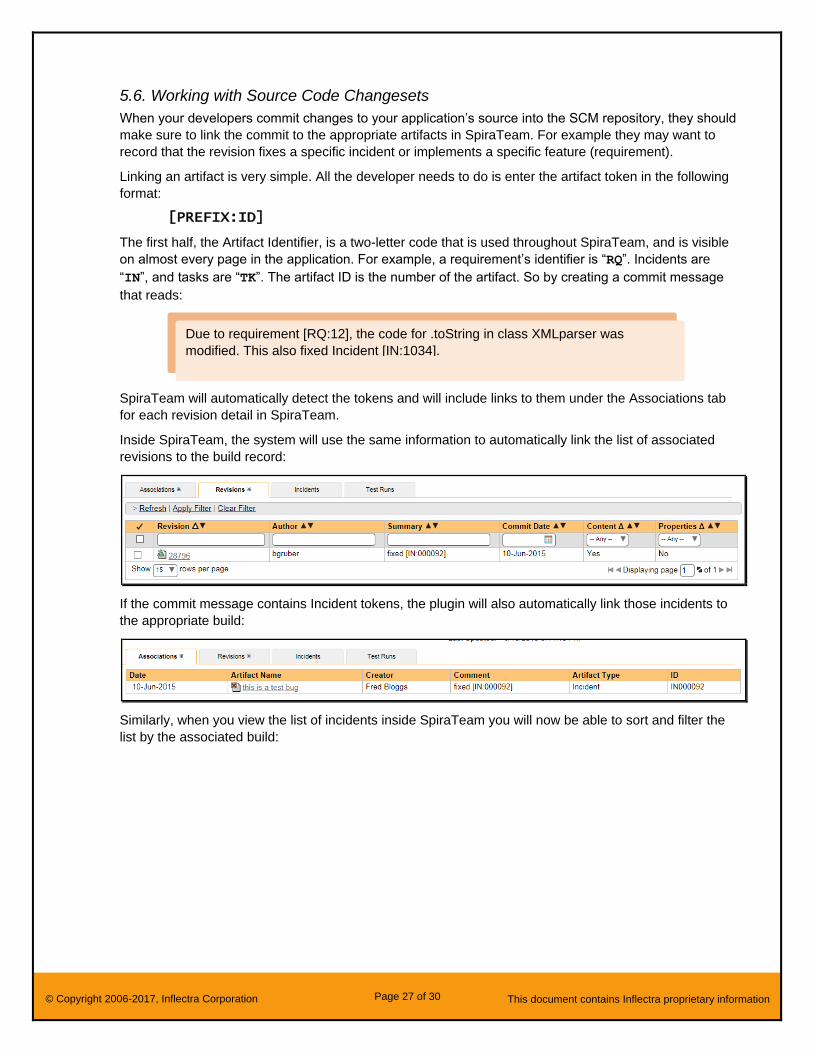
Inside SpiraTeam, the system will use the same information to automatically link the list of associated
revisions to the build record:
If the commit message contains Incident tokens, the plugin will also automatically link those incidents to
the appropriate build:
Similarly, when you view the list of incidents inside SpiraTeam you will now be able to sort and filter the
list by the associated build:
Due to requirement [RQ:12], the code for .toString in class XMLparser was
modified. This also fixed Incident [IN:1034].
Page 28 of 30 © Copyright 2006-2017, Inflectra Corporation This document contains Inflectra proprietary information
Congratulations! You are now able to use SpiraTeam and TFS to be able to manage your builds and
have the build status integrated into your SpiraTeam project dashboard.
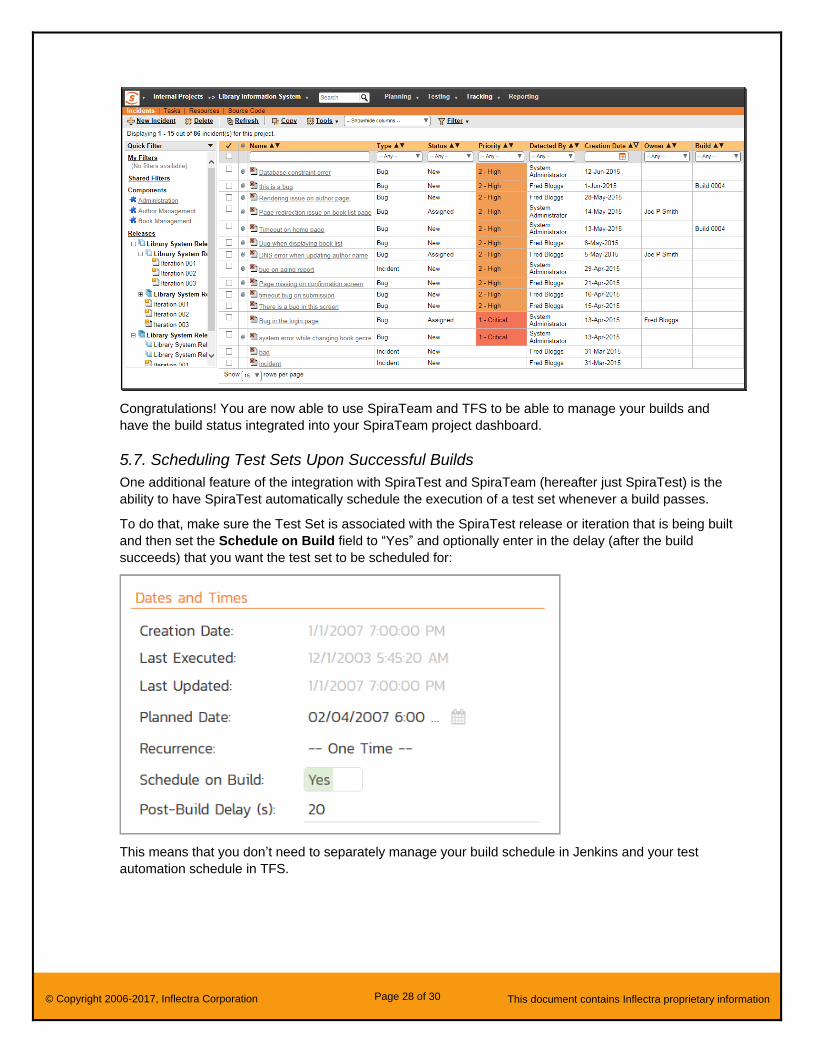
5.7. Scheduling Test Sets Upon Successful Builds
One additional feature of the integration with SpiraTest and SpiraTeam (hereafter just SpiraTest) is the
ability to have SpiraTest automatically schedule the execution of a test set whenever a build passes.
To do that, make sure the Test Set is associated with the SpiraTest release or iteration that is being built
and then set the Schedule on Build field to “Yes” and optionally enter in the delay (after the build
succeeds) that you want the test set to be scheduled for:
This means that you don’t need to separately manage your build schedule in Jenkins and your test
automation schedule in TFS.

Page 29 of 30 © Copyright 2006-2017, Inflectra Corporation This document contains Inflectra proprietary information
Legal Notices
This publication is provided as is without warranty of any kind, either express or implied, including, but not
limited to, the implied warranties of merchantability, fitness for a particular purpose, or non-infringement.
This publication could include technical inaccuracies or typographical errors. Changes are periodically
added to the information contained herein; these changes will be incorporated in new editions of the
publication. Inflectra Corporation may make improvements and/or changes in the product(s) and/or
program(s) and/or service(s) described in this publication at any time.
The sections in this guide that discuss internet web security are provided as suggestions and guidelines.
Internet security is constantly evolving field, and our suggestions are no substitute for an up-to-date
understanding of the vulnerabilities inherent in deploying internet or web applications, and Inflectra cannot
be held liable for any losses due to breaches of security, compromise of data or other cyber-attacks that
may result from following our recommendations.
SpiraTest®, SpiraPlan®, SpiraTeam® and Inflectra® are registered trademarks of Inflectra Corporation in
the United States of America and other countries. Microsoft®, Windows®, Explorer® and Microsoft Project®
are registered trademarks of Microsoft Corporation. All other trademarks and product names are property
of their respective holders.
Please send comments and questions to:
Technical Publications
Inflectra Corporation
8121 Georgia Ave, Suite 504
Silver Spring, MD 20910-4957
U.S.A.
Recommended