Testing the fracture behaviour of chocolate
Testing the fracture behaviour of chocolate
L B Parsons and R Goodall
Department of Materials Science and Engineering, the University of Sheffield, Sir Robert
Hadfield Building, Mappin St, Sheffield, S1 3JD UK
E-mail: [email protected]
Abstract
In teaching the materials science aspects of physics, mechanical behaviour is important due to its
relevance to many practical applications. This article presents a method to experimentally examine
the toughness of chocolate, including a design for a simple test rig, and a number of experiments that
can be performed in the classroom. Typical data for some of these experiments is given, along with
reflection on the activity.
1. Introduction
The mechanical properties of materials are very important in most engineering situations, from the
construction of a nuclear reactor to an artificial hip joint or the hard disc inside a computer. It is very
important therefore that students of physics meet these concepts in ways that will engage them and be
memorable. In this article we present a simple method to demonstrate the toughness of materials using
chocolate.
1.1 The Difference between Stiffness, Strength and Toughness
When considering the mechanical properties of materials, it is important to note the distinction between
materials that are stiff (i.e. resistant to elastic, recoverable deformation), strong (i.e. hard to permanently
deform) and tough (i.e. resistant to fracture). Figure 1 ranks some materials for each of these properties; note
that some materials, such as glass, can be good in certain properties but poor in others. The experiment that
is discussed here examines the toughness only, by looking at the energy required to break a sample of
material. If a lot of energy is required, as would be the case for a material that tears apart, then it has a high
toughness. If little energy is needed, which would be the case for a material that snaps with a single crack, it
has a low toughness (it shows brittle behaviour).
Testing the fracture behaviour of chocolate
Figure 1 – Approximate ranking of different common materials for stiffness (Young’s modulus,
E), strength (yield or fracture stress, σf) and toughness (Critical strain energy release rate, GC)
Adapted from [1].
2. Chocolate
Chocolate is, like a lot of materials, made by combining different substances together. Typically, chocolate
will include cocoa mass, extracted cocoa butter, sugar and vegetable oil, with milk added to make milk
chocolate. Up to 5% vegetable fat is added, and this, along with the fat in the cocoa butter, controls the
melting point, responsible for the apparent texture of the chocolate [2]. Another similarity that chocolate has
with engineering materials is the effect on the final properties of how it is processed. When blending
together the ingredients, it is important to get a fine particle size (typically <36 µm) so that the resulting
texture is not gritty [3]. The fat present coats the particles, lubricating their movement past each other, and so
finer particles also result in better flow properties for the chocolate in the liquid state. Mixing, reducing the
particle size and coating the particles with fat are achieved in a process known as conching [2]. A conching
machine will consist of two or three linked containers with a rotating arm in each section. The arms spread
molten chocolate onto the temperature-controlled wall of the container, and it is then scraped off (breaking
up the particles) and thrown through the air, enabling the unwanted chemical compounds to escape [2].
Chocolate is a polymorphic material with a complex structure. This is due to the cocoa butter having 6
different ways of packing together in its crystalline form, giving rise to 6 different forms of chocolate
(chemically identical, but structurally different), known as polymorphs I-VI [4]. Form I has the lowest
stability, with a melting point of ~17ºC, and stability increases through each polymorph with forms V and VI
being the most widely used by commercial manufacturers. A transition between these forms over long times
is responsible for the whitish “fat-bloom” on the surface of old chocolate, as different amounts of fat are
stable in different forms [3, 4]. Getting the correct form, and therefore the correct melting temperature
(controlling it to “melt in your mouth, not in your hand”) is another challenge, which has similarities to the
industrial processing of materials. The solutions used are the same, sometimes adding “seed” crystals of the
correct type, to promote growth of this form, sometimes a carefully-designed series of heat treatments, to
encourage the desirable structures to form and remove the undesirable [2].
For our purposes chocolate is a highly suitable material, sharing many aspects with real engineering
materials, being sufficiently weak that we can test it without advanced equipment, and being non toxic and
readily available. In addition, it is obviously an attractive material to work with, and has been previously
used for activities involving students for this reason [5].

Testing the fracture behaviour of chocolate
3. Fracture Test Rig
The test we will perform is based on an actual materials test procedure known as Charpy impact testing [6],
where a sample is broken by a pendulum. It is a quick test to perform which measures the energy required to
break a sample. In practice, this test is often applied as a rapid test for quality assurance on materials such as
steels.
Figure 2 – a) Schematic diagram of a suitable test rig, with suggested suitable dimensions. b) A
diagram of the test procedure, showing the energy present in the system at each stage. c) one
suggested mechanism for recording the maximum swing in each test.
3.1 Principle of Operation
Figure 2b shows a simple schematic of the energy present in the system. In the start position, when the
pendulum is held horizontally, there is a certain amount of potential energy. When the pendulum is released,
this is converted to kinetic energy, and the pendulum is at its fastest when it is vertical. Past this point, the
kinetic energy converts back to potential energy, and for a system with no sample and no friction we would
expect the pendulum to reach horizontal on the other side. However, some energy will be absorbed by

Testing the fracture behaviour of chocolate
breaking the sample, and so the pendulum will not go so high up on the swing through. By measuring how
far it does swing we can determine how much energy was used up.
These energies can be calculated simply in the case where the weight of the pendulum is low and the added
weights dominate. In this case the weight added can be used with the equation for potential energy (E =
mgh), and the difference in height between the initial horizontal position and the final highest swing on the
other side to calculate the energy absorbed by breaking the sample. In the rig we made (shown in Figure 3a),
the pendulum arm needed no additional weight, so we simply measured the percentage of the initial energy
absorbed.
3.2 Test Rig Design
The basic design of the test rig is shown schematically in Figure 2a, with typical suitable dimensions
indicated (these can be varied). Our rig was made out of aluminium, Figure 3a, but any material robust
enough to stand up to the test may be used (for example wood, Meccano, etc). The key parts are:
Base and Supports – The base must be relatively heavy, and at least as wide along the swing direction as
the pendulum is long for stability. Fixed firmly to the base should be 2 sturdy vertical supports that will hold
the pivot, and hold the sample directly beneath the pivot point near the base on small shelves cut into both
supports.
Pivot – The pivot for the pendulum should be as low friction as possible. We used a system with bearings,
but a metal rod passing through a hole in the pendulum or a simple dowel rod loosely fitting through a hole
in the supports would be suitable.
Pendulum – The pendulum should be strong enough to resist the impact. The length, in combination with
the weight, will determine the energy available to break the sample. A suitable pendulum would be made of
1 cm diameter wood and be about 30cm long, though the length may need to be reduced if heavier or bulkier
material is used.
Weights – It may be that the pendulum is not heavy enough to cause fracture, and in this case weights can be
added as shown in Figure 2a. Critically, the weight should not be low enough that no harm will come if
someone accidentally puts their finger in the machine during a test. In practice, some experimentation
will be needed to find the right weights for a particular set of samples.
Dial and Pointer – In order to make measurements, it is important to be able to record how high the
pendulum gets once it has broken the specimen. On a simple level, this could be done by fixing a thin wire
on the opposite side of the pivot to the pendulum, and visually comparing this against a scale, although this
can be difficult to do with accuracy. One possible improvement is shown in Figure 2c. If the dial is made of
steel, then magnets can be used to mark the position of maximum swing, using the pointer wire to push them
into place. In our rig we used a similar system, but with a second mobile pointer that was held in place with
a magnet. Many alternative ideas are possible, such as placing a sheet of paper on the dial, and having a pen
attached to the pointer, or by placing some plasticene on the dial front, and arranging the pointer to scribe a
line along it. In each case these can of course be reset between tests.
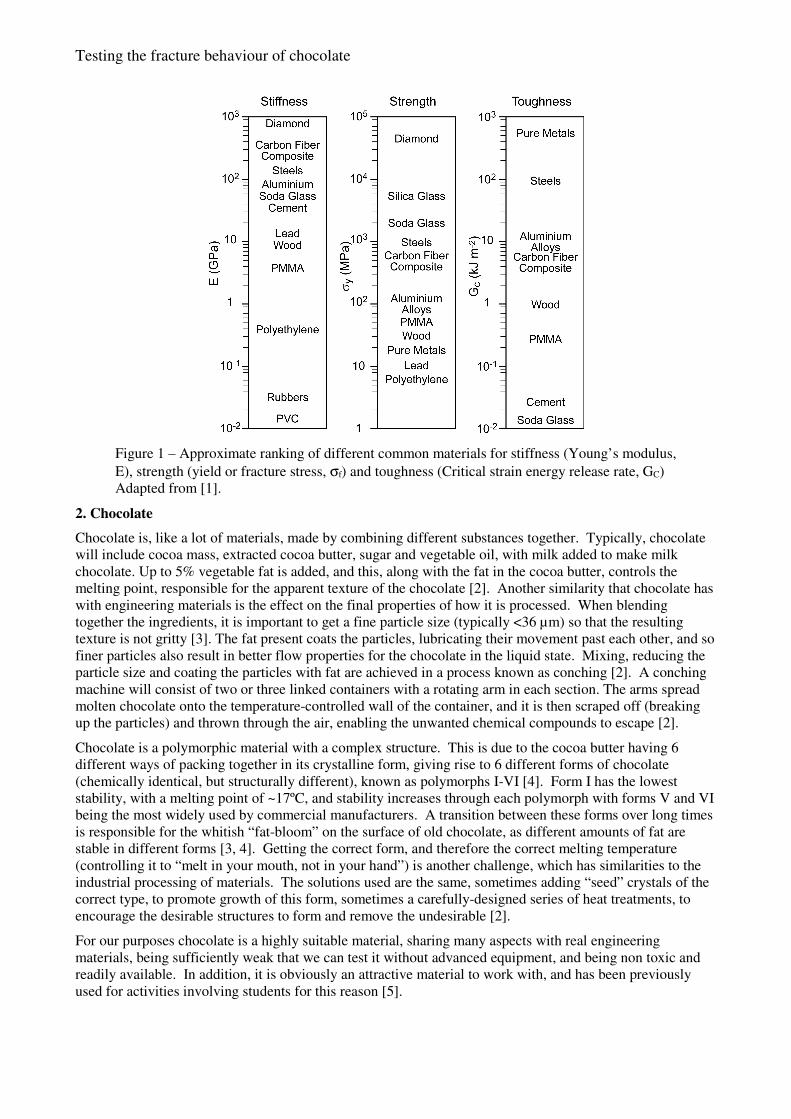
Sample – The sample should be a bar of chocolate, with a notch in the centre part, opposite where the
pendulum will strike, to ensure that fracture happens at this point (this is necessary for a valid test, and is
done in Charpy testing of engineering materials). Such samples can be cast into a mould, but in practice it
can be easily achieved using segmented bars of chocolate, broken into strips. If there is a join between two
segments in the centre of a sample bar (as shown in the samples in Figure 3b; it does not matter how many
segments there are across the whole sample), then this will be enough to ensure it breaks in the middle. Any
particular chocolate can be used, but to make comparisons all samples should be the same shape and size;
some supermarket own brands of chocolate are available in many types in the same shape bars.
Testing the fracture behaviour of chocolate
Figure 3 – a) Image of the rig produced for this work, with a sample in the test position (the rig
pendulum is 30 cm long). b) Suitable segments of chocolate bars that can be used as specimens
(milk, white and fruit and nut chocolate respectively). c) The same samples after testing,
positioned to show their fracture surfaces (energy absorbed in these tests were: milk 77%, white
85% and fruit and nut 55%).
3.3 Test Procedure
A standard test procedure might be as follows:
i) Place the device on a flat surface, check the pendulum is swinging freely, and carry out one test without
any sample inside, in order to determine the amount of energy lost to friction, air resistance, etc.
ii) Zero the dial and place a sample on the supports. Raise the pendulum to horizontal.
iii) When sure no one has their hand in the machine, release the pendulum so it falls and breaks the sample.
iv) Record the reading, remove the broken sample and reset the dial for the next test.
4. Typical Experiments and Results
A wide range of experiments are possible with such a device. Some of these are outlined below.
4.1 Comparison of Different Materials
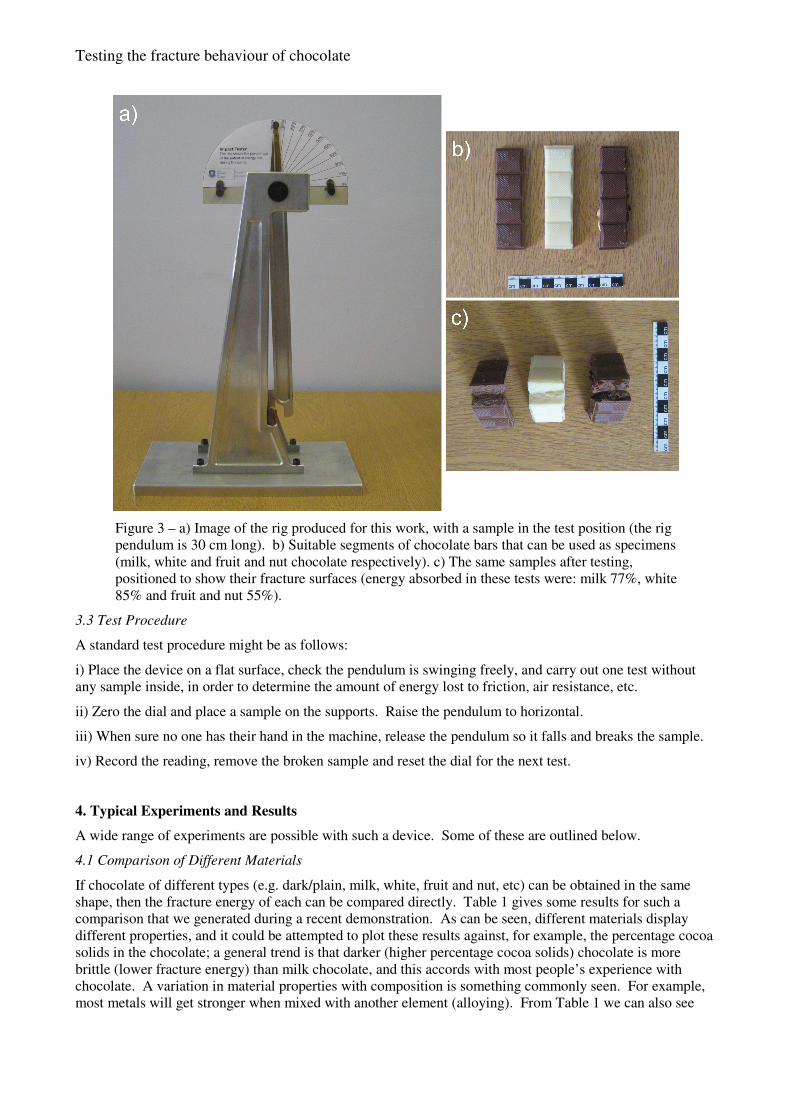
If chocolate of different types (e.g. dark/plain, milk, white, fruit and nut, etc) can be obtained in the same
shape, then the fracture energy of each can be compared directly. Table 1 gives some results for such a
comparison that we generated during a recent demonstration. As can be seen, different materials display
different properties, and it could be attempted to plot these results against, for example, the percentage cocoa
solids in the chocolate; a general trend is that darker (higher percentage cocoa solids) chocolate is more
brittle (lower fracture energy) than milk chocolate, and this accords with most people’s experience with
chocolate. A variation in material properties with composition is something commonly seen. For example,
most metals will get stronger when mixed with another element (alloying). From Table 1 we can also see
Testing the fracture behaviour of chocolate
that fruit and nut was toughest, likely to be due to the crack being held up by the added materials, which is
very similar to the processes occurring in composite materials. We also see that these samples had a higher
standard deviation, which is related to the random locations of the reinforcements in the chocolate;
sometimes they are in the right places to be effective, sometimes not.
Table 1 – Results obtained using the rig for to test different types of chocolate. In each case at
least 10 samples were tested.
Chocolate Energy absorbed on fracture (%)
Average Standard Deviation
Milk 69.6 7.1
Plain 64.4 5.3
White 77.6 9.1
Fruit & Nut 83.1 10.4
Taking this further, experiments could also be performed comparing different types of chocolate bar to see
which is the toughest. This could include bars with soft layers or bars with bubbles (comparable to foamed
materials). In comparing these, some attention would have to be given to the different size of the bars. By
taking the energy measured and dividing it by the cross sectional area of the fracture surface, the fracture
energy per unit area can be calculated.
An additional activity would be to get students to design, make and test their own materials. The low
melting point of chocolate means that students could manufacture their own composites, including different
amounts of such additions as nuts, raisins, spaghetti, etc in different amounts, and carry out tests to see what
the most effective addition is and determine the effect of the amount added.
4.2 Effect of Temperature
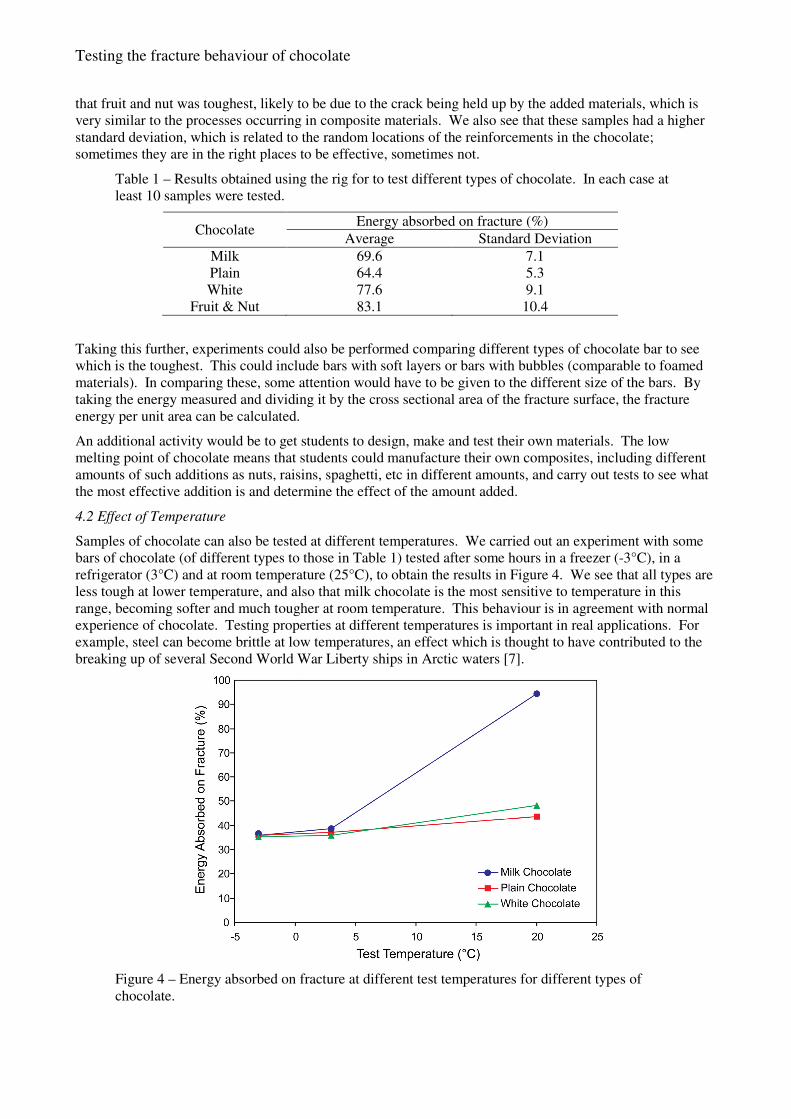
Samples of chocolate can also be tested at different temperatures. We carried out an experiment with some
bars of chocolate (of different types to those in Table 1) tested after some hours in a freezer (-3°C), in a
refrigerator (3°C) and at room temperature (25°C), to obtain the results in Figure 4. We see that all types are
less tough at lower temperature, and also that milk chocolate is the most sensitive to temperature in this
range, becoming softer and much tougher at room temperature. This behaviour is in agreement with normal
experience of chocolate. Testing properties at different temperatures is important in real applications. For
example, steel can become brittle at low temperatures, an effect which is thought to have contributed to the
breaking up of several Second World War Liberty ships in Arctic waters [7].
Figure 4 – Energy absorbed on fracture at different test temperatures for different types of
chocolate.
Testing the fracture behaviour of chocolate
4.3 Examination of Fracture Surface
After testing, it can be very instructive to examine the broken surfaces (as in Figure 3c) to see whether it is
smooth (generally corresponding to brittle materials with low fracture energy) or rough (generally ductile
materials with high fracture energy). Also, it may be possible to identify features, such as air bubbles or
second phases (e.g. the nuts in fruit and nut) that may have contributed to failure by providing a weakness. In
testing of engineering materials, and the investigation of failures, examination of the broken surface often
provides critical clues to how the fracture process has occurred.
4.4 Experimental Error and Variation
Finally, if a large number of tests are carried out, there will be some scatter, due to slight variations in the
test conditions, in material properties or sample dimensions. These can be used to introduce to students the
need to treat results statistically; in testing engineering materials a large number of repeats will be used.
5. Evaluation and Conclusions
In this paper we have described a test rig that we have developed, and given some general guidelines on how
similar equipment could be produced. We have used this rig in a number of different demonstrations to
different students, at both GCSE and AS-level, in schools as the basis of hour long lessons to physics classes
and for shorter demonstrations to students visiting the University. In each case we have allowed the students
to carry out experiments, and then made the link between what they have observed and the properties and
behaviours of materials more generally, as explained throughout this article. In all of these situations we
have obtained excellent feedback from students, frequently, it has to be said, making reference to the use of
chocolate. Nevertheless, with some effort to show the students the issues beyond this, we have found it a
very engaging way to introduce concepts relating to mechanical properties of materials.
References
[1]. Ashby M F and Jones D R H, 1996, Engineering Materials 1: An Introduction to their Properties and
Applications, Butterworth-Heinemann, Oxford, 2nd Ed.
[2]. Beckett S T, 2004 The Science of Chocolate, The Royal Society of Chemistry, Cambridge
[3]. Beckett S T, 1999, Industrial Chocolate Manufacture and Use, 3rd Ed, Blackwell Science, Oxford
[4]. Schenk H and Peschar R, 2004 Understanding the structure of chocolate, Radiation Physics and
Chemistry 71, 829-835
[5]. Diak B J, 2006, Strength by chocolate, Int. J. Engng Ed. 22 925-936
[6]. Dowling N E, 1999 Mechanical Behaviour of Materials, 2nd Ed, Prentice-Hall, New York pp. 102-137
[7]. Callister W D, 2007 Materials Science and Engineering; An Introduction, Wiley, New York
Brief Biographies
Lucy Parsons studied Material Science & Engineering at the University of Sheffield, and undertook a final
year project that focussed on the study of the fracture properties of chocolate and the conveyance of the
engineering principles behind the study to wider audiences.
Russell Goodall is a Lecturer in Metallurgy at the Department of Materials Science & Engineering, the
University of Sheffield, where he coordinates the Outreach and Schools activities. His research is focussed
on the processing and mechanical properties of metallic materials, in particular metal foams and sponges.

Testing the fracture behaviour of chocolate
Recommended

![Fracture behaviour of single crystal silicon microstructures · Fracture mechanics analysis The fracture mechanics analysis is based on Griffith's theory [16]. Griffith's energy balance](https://img.pdfslide.net/doc/110x75/5ed24ab31ff0452a594e202e/fracture-behaviour-of-single-crystal-silicon-microstructures-fracture-mechanics.jpg)