Two-Second Adv
TIBCO Runtime Agent™
Scripting Deployment User’s GuideSoftware Release 5.11July 2018
antage®

Important Information
SOME TIBCO SOFTWARE EMBEDS OR BUNDLES OTHER TIBCO SOFTWARE. USE OF SUCH EMBEDDED OR BUNDLED TIBCO SOFTWARE IS SOLELY TO ENABLE THE FUNCTIONALITY (OR PROVIDE LIMITED ADD-ON FUNCTIONALITY) OF THE LICENSED TIBCO SOFTWARE. THE EMBEDDED OR BUNDLED SOFTWARE IS NOT LICENSED TO BE USED OR ACCESSED BY ANY OTHER TIBCO SOFTWARE OR FOR ANY OTHER PURPOSE.USE OF TIBCO SOFTWARE AND THIS DOCUMENT IS SUBJECT TO THE TERMS AND CONDITIONS OF A LICENSE AGREEMENT FOUND IN EITHER A SEPARATELY EXECUTED SOFTWARE LICENSE AGREEMENT, OR, IF THERE IS NO SUCH SEPARATE AGREEMENT, THE CLICKWRAP END USER LICENSE AGREEMENT WHICH IS DISPLAYED DURING DOWNLOAD OR INSTALLATION OF THE SOFTWARE (AND WHICH IS DUPLICATED IN THE LICENSE FILE) OR IF THERE IS NO SUCH SOFTWARE LICENSE AGREEMENT OR CLICKWRAP END USER LICENSE AGREEMENT, THE LICENSE(S) LOCATED IN THE “LICENSE” FILE(S) OF THE SOFTWARE. USE OF THIS DOCUMENT IS SUBJECT TO THOSE TERMS AND CONDITIONS, AND YOUR USE HEREOF SHALL CONSTITUTE ACCEPTANCE OF AND AN AGREEMENT TO BE BOUND BY THE SAME.ANY SOFTWARE ITEM IDENTIFIED AS THIRD PARTY LIBRARY IS AVAILABLE UNDER SEPARATE SOFTWARE LICENSE TERMS AND IS NOT PART OF A TIBCO PRODUCT. AS SUCH, THESE SOFTWARE ITEMS ARE NOT COVERED BY THE TERMS OF YOUR AGREEMENT WITH TIBCO, INCLUDING ANY TERMS CONCERNING SUPPORT, MAINTENANCE, WARRANTIES, AND INDEMNITIES. DOWNLOAD AND USE THESE ITEMS IS SOLELY AT YOUR OWN DISCRETION AND SUBJECT TO THE LICENSE TERMS APPLICABLE TO THEM. BY PROCEEDING TO DOWNLOAD, INSTALL OR USE ANY OF THESE ITEMS, YOU ACKNOWLEDGE THE FOREGOING DISTINCTIONS BETWEEN THESE ITEMS AND TIBCO PRODUCTS.This document contains confidential information that is subject to U.S. and international copyright laws and treaties. No part of this document may be reproduced in any form without the written authorization of TIBCO Software Inc.TIBCO, Two-Second Advantage, TIBCO Hawk, TIBCO Rendezvous, TIBCO Runtime Agent, TIBCO ActiveMatrix BusinessWorks, TIBCO Administrator, TIBCO Designer, TIBCO ActiveMatrix Service Gateway, TIBCO BusinessEvents, TIBCO BusinessConnect, and TIBCO BusinessConnect Trading Community Management are either registered trademarks or trademarks of TIBCO Software Inc. in the United States and/or other countries.Enterprise Java Beans (EJB), Java Platform Enterprise Edition (Java EE), Java 2 Platform Enterprise Edition (J2EE), and all Java-based trademarks and logos are trademarks or registered trademarks of Oracle Corporation in the U.S. and other countries.All other product and company names and marks mentioned in this document are the property of their respective owners and are mentioned for identification purposes only.THIS SOFTWARE MAY BE AVAILABLE ON MULTIPLE OPERATING SYSTEMS. HOWEVER, NOT ALL OPERATING SYSTEM PLATFORMS FOR A SPECIFIC SOFTWARE VERSION ARE RELEASED AT THE SAME TIME. SEE THE README FILE FOR THE AVAILABILITY OF THIS SOFTWARE VERSION ON A SPECIFIC OPERATING SYSTEM PLATFORM.THIS DOCUMENT IS PROVIDED “AS IS” WITHOUT WARRANTY OF ANY KIND, EITHER EXPRESS OR IMPLIED, INCLUDING, BUT NOT LIMITED TO, THE IMPLIED WARRANTIES OF MERCHANTABILITY, FITNESS FOR A PARTICULAR PURPOSE, OR NON-INFRINGEMENT.THIS DOCUMENT COULD INCLUDE TECHNICAL INACCURACIES OR TYPOGRAPHICAL ERRORS. CHANGES ARE PERIODICALLY ADDED TO THE INFORMATION HEREIN; THESE CHANGES WILL BE INCORPORATED IN NEW EDITIONS OF THIS DOCUMENT. TIBCO SOFTWARE INC. MAY MAKE IMPROVEMENTS AND/OR CHANGES IN THE PRODUCT(S) AND/OR THE PROGRAM(S) DESCRIBED IN THIS DOCUMENT AT ANY TIME.THE CONTENTS OF THIS DOCUMENT MAY BE MODIFIED AND/OR QUALIFIED, DIRECTLY OR INDIRECTLY, BY OTHER DOCUMENTATION WHICH ACCOMPANIES THIS SOFTWARE, INCLUDING BUT NOT LIMITED TO ANY RELEASE NOTES AND "READ ME" FILES.

This Product is covered by U.S. Patent No. 6,970,981.Copyright © 1998-2018 TIBCO Software Inc. ALL RIGHTS RESERVED.


| v
Contents
Figures . . . . . . . . . . . . . . . . . . . . . . . . . . . . . . . . . . . . . . . . . . . . . . . . . . . . . . . . . . . . . . . . . . . . . . . . ix
Tables . . . . . . . . . . . . . . . . . . . . . . . . . . . . . . . . . . . . . . . . . . . . . . . . . . . . . . . . . . . . . . . . . . . . . . . . . xi
Preface . . . . . . . . . . . . . . . . . . . . . . . . . . . . . . . . . . . . . . . . . . . . . . . . . . . . . . . . . . . . . . . . . . . . . . . xiii
Changes from the previous Release of this Guide . . . . . . . . . . . . . . . . . . . . . . . . . . . . . . . . . . . . . . . . . . . . . . . .xiv
Related Documentation . . . . . . . . . . . . . . . . . . . . . . . . . . . . . . . . . . . . . . . . . . . . . . . . . . . . . . . . . . . . . . . . . . . . . xvTIBCO Runtime Agent Documentation. . . . . . . . . . . . . . . . . . . . . . . . . . . . . . . . . . . . . . . . . . . . . . . . . . . . . . xvOther TIBCO Product Documentation . . . . . . . . . . . . . . . . . . . . . . . . . . . . . . . . . . . . . . . . . . . . . . . . . . . . . . xv
Typographical Conventions . . . . . . . . . . . . . . . . . . . . . . . . . . . . . . . . . . . . . . . . . . . . . . . . . . . . . . . . . . . . . . . . . xvii
TIBCO Product Documentation and Support Services . . . . . . . . . . . . . . . . . . . . . . . . . . . . . . . . . . . . . . . . . . . . . xxHow to Access TIBCO Documentation. . . . . . . . . . . . . . . . . . . . . . . . . . . . . . . . . . . . . . . . . . . . . . . . . . . . . . xxHow to Contact TIBCO Support . . . . . . . . . . . . . . . . . . . . . . . . . . . . . . . . . . . . . . . . . . . . . . . . . . . . . . . . . . . xxHow to Join TIBCO Community . . . . . . . . . . . . . . . . . . . . . . . . . . . . . . . . . . . . . . . . . . . . . . . . . . . . . . . . . . . xx
Chapter 1 Scripting Deployment . . . . . . . . . . . . . . . . . . . . . . . . . . . . . . . . . . . . . . . . . . . . . . . . . . .1
Overview . . . . . . . . . . . . . . . . . . . . . . . . . . . . . . . . . . . . . . . . . . . . . . . . . . . . . . . . . . . . . . . . . . . . . . . . . . . . . . . . . 2
buildear Utility . . . . . . . . . . . . . . . . . . . . . . . . . . . . . . . . . . . . . . . . . . . . . . . . . . . . . . . . . . . . . . . . . . . . . . . . . . . . . 3
AppManage Utility . . . . . . . . . . . . . . . . . . . . . . . . . . . . . . . . . . . . . . . . . . . . . . . . . . . . . . . . . . . . . . . . . . . . . . . . . . 4
Credential File . . . . . . . . . . . . . . . . . . . . . . . . . . . . . . . . . . . . . . . . . . . . . . . . . . . . . . . . . . . . . . . . . . . . . . . . . 4
Installed Files. . . . . . . . . . . . . . . . . . . . . . . . . . . . . . . . . . . . . . . . . . . . . . . . . . . . . . . . . . . . . . . . . . . . . . . . . . . . . . 6
Starting the Scripting Utilities. . . . . . . . . . . . . . . . . . . . . . . . . . . . . . . . . . . . . . . . . . . . . . . . . . . . . . . . . . . . . . . . . . 7
Accessing Online Help for Commands . . . . . . . . . . . . . . . . . . . . . . . . . . . . . . . . . . . . . . . . . . . . . . . . . . . . . . . . . . 8Specifying Application Names . . . . . . . . . . . . . . . . . . . . . . . . . . . . . . . . . . . . . . . . . . . . . . . . . . . . . . . . . . . . . 9
Working with Passwords . . . . . . . . . . . . . . . . . . . . . . . . . . . . . . . . . . . . . . . . . . . . . . . . . . . . . . . . . . . . . . . . . . . . 11
Protecting Sensitive Data. . . . . . . . . . . . . . . . . . . . . . . . . . . . . . . . . . . . . . . . . . . . . . . . . . . . . . . . . . . . . . . . . . . . 12
Log Files . . . . . . . . . . . . . . . . . . . . . . . . . . . . . . . . . . . . . . . . . . . . . . . . . . . . . . . . . . . . . . . . . . . . . . . . . . . . . . . . 13AppManage Log Files. . . . . . . . . . . . . . . . . . . . . . . . . . . . . . . . . . . . . . . . . . . . . . . . . . . . . . . . . . . . . . . . . . . 13buildear Log File . . . . . . . . . . . . . . . . . . . . . . . . . . . . . . . . . . . . . . . . . . . . . . . . . . . . . . . . . . . . . . . . . . . . . . . 13
Chapter 2 Getting Started . . . . . . . . . . . . . . . . . . . . . . . . . . . . . . . . . . . . . . . . . . . . . . . . . . . . . . . .15
Simple Application Deployment . . . . . . . . . . . . . . . . . . . . . . . . . . . . . . . . . . . . . . . . . . . . . . . . . . . . . . . . . . . . . . . 16
Complex Application Deployment . . . . . . . . . . . . . . . . . . . . . . . . . . . . . . . . . . . . . . . . . . . . . . . . . . . . . . . . . . . . . 18
TIBCO Runtime Agent Scripting Deployment User’s Guide

vi | Contents
Redeploying an Application. . . . . . . . . . . . . . . . . . . . . . . . . . . . . . . . . . . . . . . . . . . . . . . . . . . . . . . . . . . . . . . . . . 20Changes Made to EAR file Only . . . . . . . . . . . . . . . . . . . . . . . . . . . . . . . . . . . . . . . . . . . . . . . . . . . . . . . . . . 20Changes Made to Deployment File Only . . . . . . . . . . . . . . . . . . . . . . . . . . . . . . . . . . . . . . . . . . . . . . . . . . . . 20Changes Made to EAR and Deployment Files . . . . . . . . . . . . . . . . . . . . . . . . . . . . . . . . . . . . . . . . . . . . . . . 21
Exporting an Application . . . . . . . . . . . . . . . . . . . . . . . . . . . . . . . . . . . . . . . . . . . . . . . . . . . . . . . . . . . . . . . . . . . . 23
Other Options . . . . . . . . . . . . . . . . . . . . . . . . . . . . . . . . . . . . . . . . . . . . . . . . . . . . . . . . . . . . . . . . . . . . . . . . . . . . 24-upload Option . . . . . . . . . . . . . . . . . . . . . . . . . . . . . . . . . . . . . . . . . . . . . . . . . . . . . . . . . . . . . . . . . . . . . . . . 25-config Option . . . . . . . . . . . . . . . . . . . . . . . . . . . . . . . . . . . . . . . . . . . . . . . . . . . . . . . . . . . . . . . . . . . . . . . . 25-undeploy Option . . . . . . . . . . . . . . . . . . . . . . . . . . . . . . . . . . . . . . . . . . . . . . . . . . . . . . . . . . . . . . . . . . . . . . 25-delete Option . . . . . . . . . . . . . . . . . . . . . . . . . . . . . . . . . . . . . . . . . . . . . . . . . . . . . . . . . . . . . . . . . . . . . . . . 25-start Option . . . . . . . . . . . . . . . . . . . . . . . . . . . . . . . . . . . . . . . . . . . . . . . . . . . . . . . . . . . . . . . . . . . . . . . . . . 25-stop Option . . . . . . . . . . . . . . . . . . . . . . . . . . . . . . . . . . . . . . . . . . . . . . . . . . . . . . . . . . . . . . . . . . . . . . . . . . 26-breaklock Option. . . . . . . . . . . . . . . . . . . . . . . . . . . . . . . . . . . . . . . . . . . . . . . . . . . . . . . . . . . . . . . . . . . . . . 26–override Option . . . . . . . . . . . . . . . . . . . . . . . . . . . . . . . . . . . . . . . . . . . . . . . . . . . . . . . . . . . . . . . . . . . . . . 26-min Option . . . . . . . . . . . . . . . . . . . . . . . . . . . . . . . . . . . . . . . . . . . . . . . . . . . . . . . . . . . . . . . . . . . . . . . . . . 27-max Option . . . . . . . . . . . . . . . . . . . . . . . . . . . . . . . . . . . . . . . . . . . . . . . . . . . . . . . . . . . . . . . . . . . . . . . . . . 27-template Option . . . . . . . . . . . . . . . . . . . . . . . . . . . . . . . . . . . . . . . . . . . . . . . . . . . . . . . . . . . . . . . . . . . . . . 27-password Option. . . . . . . . . . . . . . . . . . . . . . . . . . . . . . . . . . . . . . . . . . . . . . . . . . . . . . . . . . . . . . . . . . . . . . 27-passwordFile Option . . . . . . . . . . . . . . . . . . . . . . . . . . . . . . . . . . . . . . . . . . . . . . . . . . . . . . . . . . . . . . . . . . . 28-moveAppData Option . . . . . . . . . . . . . . . . . . . . . . . . . . . . . . . . . . . . . . . . . . . . . . . . . . . . . . . . . . . . . . . . . . 28-truncate Option . . . . . . . . . . . . . . . . . . . . . . . . . . . . . . . . . . . . . . . . . . . . . . . . . . . . . . . . . . . . . . . . . . . . . . . 28-serialize Option. . . . . . . . . . . . . . . . . . . . . . . . . . . . . . . . . . . . . . . . . . . . . . . . . . . . . . . . . . . . . . . . . . . . . . . 29-exportDeployed Option . . . . . . . . . . . . . . . . . . . . . . . . . . . . . . . . . . . . . . . . . . . . . . . . . . . . . . . . . . . . . . . . . 29
Monitoring Events and Rulebases . . . . . . . . . . . . . . . . . . . . . . . . . . . . . . . . . . . . . . . . . . . . . . . . . . . . . . . . . . . . 30Event Element . . . . . . . . . . . . . . . . . . . . . . . . . . . . . . . . . . . . . . . . . . . . . . . . . . . . . . . . . . . . . . . . . . . . . . . . 30Rulebase . . . . . . . . . . . . . . . . . . . . . . . . . . . . . . . . . . . . . . . . . . . . . . . . . . . . . . . . . . . . . . . . . . . . . . . . . . . . 32
Setting Service Instance Runtime Variables . . . . . . . . . . . . . . . . . . . . . . . . . . . . . . . . . . . . . . . . . . . . . . . . . . . . . 34
Chapter 3 Using AppManage in Batch Mode . . . . . . . . . . . . . . . . . . . . . . . . . . . . . . . . . . . . . . . . 37
Overview . . . . . . . . . . . . . . . . . . . . . . . . . . . . . . . . . . . . . . . . . . . . . . . . . . . . . . . . . . . . . . . . . . . . . . . . . . . . . . . . 38
Creating the AppManage.batch File by Exporting Applications . . . . . . . . . . . . . . . . . . . . . . . . . . . . . . . . . . . . . . 39
Deploying Applications in Batch Mode . . . . . . . . . . . . . . . . . . . . . . . . . . . . . . . . . . . . . . . . . . . . . . . . . . . . . . . . . 40Undeploying Applications in Batch Mode. . . . . . . . . . . . . . . . . . . . . . . . . . . . . . . . . . . . . . . . . . . . . . . . . . . . 40
Starting Applications in Batch Mode . . . . . . . . . . . . . . . . . . . . . . . . . . . . . . . . . . . . . . . . . . . . . . . . . . . . . . . . . . . 41Stopping Applications in Batch Mode . . . . . . . . . . . . . . . . . . . . . . . . . . . . . . . . . . . . . . . . . . . . . . . . . . . . . . 41
Deleting Applications in Batch Mode. . . . . . . . . . . . . . . . . . . . . . . . . . . . . . . . . . . . . . . . . . . . . . . . . . . . . . . . . . . 42Killing Applications in Batch Mode. . . . . . . . . . . . . . . . . . . . . . . . . . . . . . . . . . . . . . . . . . . . . . . . . . . . . . . . . 42
Changing the Transport for Applications . . . . . . . . . . . . . . . . . . . . . . . . . . . . . . . . . . . . . . . . . . . . . . . . . . . . . . . . 43
Appendix A Deployment Configuration File Reference . . . . . . . . . . . . . . . . . . . . . . . . . . . . . . . 45
Overview . . . . . . . . . . . . . . . . . . . . . . . . . . . . . . . . . . . . . . . . . . . . . . . . . . . . . . . . . . . . . . . . . . . . . . . . . . . . . . . . 46
TIBCO Runtime Agent Scripting Deployment User’s Guide

Contents | vii
AppManage XSD Files . . . . . . . . . . . . . . . . . . . . . . . . . . . . . . . . . . . . . . . . . . . . . . . . . . . . . . . . . . . . . . . . . . 46Icons Used in the Diagrams . . . . . . . . . . . . . . . . . . . . . . . . . . . . . . . . . . . . . . . . . . . . . . . . . . . . . . . . . . . . . . 46
Application Element . . . . . . . . . . . . . . . . . . . . . . . . . . . . . . . . . . . . . . . . . . . . . . . . . . . . . . . . . . . . . . . . . . . . . . . . 48NVPairs Element . . . . . . . . . . . . . . . . . . . . . . . . . . . . . . . . . . . . . . . . . . . . . . . . . . . . . . . . . . . . . . . . . . . . . . 49RepoInstances Element . . . . . . . . . . . . . . . . . . . . . . . . . . . . . . . . . . . . . . . . . . . . . . . . . . . . . . . . . . . . . . . . . 52services Element . . . . . . . . . . . . . . . . . . . . . . . . . . . . . . . . . . . . . . . . . . . . . . . . . . . . . . . . . . . . . . . . . . . . . . 53httpRepoInstance Element . . . . . . . . . . . . . . . . . . . . . . . . . . . . . . . . . . . . . . . . . . . . . . . . . . . . . . . . . . . . . . . 54rvRepoInstance . . . . . . . . . . . . . . . . . . . . . . . . . . . . . . . . . . . . . . . . . . . . . . . . . . . . . . . . . . . . . . . . . . . . . . . 55bindings Element . . . . . . . . . . . . . . . . . . . . . . . . . . . . . . . . . . . . . . . . . . . . . . . . . . . . . . . . . . . . . . . . . . . . . . 57monitor Element . . . . . . . . . . . . . . . . . . . . . . . . . . . . . . . . . . . . . . . . . . . . . . . . . . . . . . . . . . . . . . . . . . . . . . . 59product Element . . . . . . . . . . . . . . . . . . . . . . . . . . . . . . . . . . . . . . . . . . . . . . . . . . . . . . . . . . . . . . . . . . . . . . . 59setting Element . . . . . . . . . . . . . . . . . . . . . . . . . . . . . . . . . . . . . . . . . . . . . . . . . . . . . . . . . . . . . . . . . . . . . . . . 60shutdown Element . . . . . . . . . . . . . . . . . . . . . . . . . . . . . . . . . . . . . . . . . . . . . . . . . . . . . . . . . . . . . . . . . . . . . 60NTService Element. . . . . . . . . . . . . . . . . . . . . . . . . . . . . . . . . . . . . . . . . . . . . . . . . . . . . . . . . . . . . . . . . . . . . 61java Element . . . . . . . . . . . . . . . . . . . . . . . . . . . . . . . . . . . . . . . . . . . . . . . . . . . . . . . . . . . . . . . . . . . . . . . . . . 62rulebases Element . . . . . . . . . . . . . . . . . . . . . . . . . . . . . . . . . . . . . . . . . . . . . . . . . . . . . . . . . . . . . . . . . . . . . 63events Element . . . . . . . . . . . . . . . . . . . . . . . . . . . . . . . . . . . . . . . . . . . . . . . . . . . . . . . . . . . . . . . . . . . . . . . . 64failureEvent Element. . . . . . . . . . . . . . . . . . . . . . . . . . . . . . . . . . . . . . . . . . . . . . . . . . . . . . . . . . . . . . . . . . . . 64suspendProcessEvent Element . . . . . . . . . . . . . . . . . . . . . . . . . . . . . . . . . . . . . . . . . . . . . . . . . . . . . . . . . . . 65logEvent Element . . . . . . . . . . . . . . . . . . . . . . . . . . . . . . . . . . . . . . . . . . . . . . . . . . . . . . . . . . . . . . . . . . . . . . 66alertAction Element . . . . . . . . . . . . . . . . . . . . . . . . . . . . . . . . . . . . . . . . . . . . . . . . . . . . . . . . . . . . . . . . . . . . 66emailAction Element . . . . . . . . . . . . . . . . . . . . . . . . . . . . . . . . . . . . . . . . . . . . . . . . . . . . . . . . . . . . . . . . . . . . 67customAction Element . . . . . . . . . . . . . . . . . . . . . . . . . . . . . . . . . . . . . . . . . . . . . . . . . . . . . . . . . . . . . . . . . . 69
bw Element . . . . . . . . . . . . . . . . . . . . . . . . . . . . . . . . . . . . . . . . . . . . . . . . . . . . . . . . . . . . . . . . . . . . . . . . . . . . . . 71bwprocesses Element . . . . . . . . . . . . . . . . . . . . . . . . . . . . . . . . . . . . . . . . . . . . . . . . . . . . . . . . . . . . . . . . . . 72checkpoints Element. . . . . . . . . . . . . . . . . . . . . . . . . . . . . . . . . . . . . . . . . . . . . . . . . . . . . . . . . . . . . . . . . . . . 73faultTolerant Element . . . . . . . . . . . . . . . . . . . . . . . . . . . . . . . . . . . . . . . . . . . . . . . . . . . . . . . . . . . . . . . . . . . 74
adapter Element . . . . . . . . . . . . . . . . . . . . . . . . . . . . . . . . . . . . . . . . . . . . . . . . . . . . . . . . . . . . . . . . . . . . . . . . . . 77
formFlow Element . . . . . . . . . . . . . . . . . . . . . . . . . . . . . . . . . . . . . . . . . . . . . . . . . . . . . . . . . . . . . . . . . . . . . . . . . 79authentications Element . . . . . . . . . . . . . . . . . . . . . . . . . . . . . . . . . . . . . . . . . . . . . . . . . . . . . . . . . . . . . . . . . 80
Requires Authentication. . . . . . . . . . . . . . . . . . . . . . . . . . . . . . . . . . . . . . . . . . . . . . . . . . . . . . . . . . . . . . . . . . . . . 82CookieAuthenticationConfiguration Element . . . . . . . . . . . . . . . . . . . . . . . . . . . . . . . . . . . . . . . . . . . . . . . . . 82HttpSessionAuthenticationConfiguration Element . . . . . . . . . . . . . . . . . . . . . . . . . . . . . . . . . . . . . . . . . . . . . 83WebServerAuthenticationConfiguration Element . . . . . . . . . . . . . . . . . . . . . . . . . . . . . . . . . . . . . . . . . . . . . . 84ExternalAuthenticationConfiguration Element . . . . . . . . . . . . . . . . . . . . . . . . . . . . . . . . . . . . . . . . . . . . . . . . 85
Appendix B Failure Code List . . . . . . . . . . . . . . . . . . . . . . . . . . . . . . . . . . . . . . . . . . . . . . . . . . . .87
Index . . . . . . . . . . . . . . . . . . . . . . . . . . . . . . . . . . . . . . . . . . . . . . . . . . . . . . . . . . . . . . . . . . . . . . . . . .95
TIBCO Runtime Agent Scripting Deployment User’s Guide

viii | Contents
TIBCO Runtime Agent Scripting Deployment User’s Guide

Figures | ix
Figures
Figure 1 TIBCO Administrator GUI. . . . . . . . . . . . . . . . . . . . . . . . . . . . . . . . . . . . . . . . . . . . . . . . . . . . . . . . . . 9
Figure 2 Partial Element Diagram . . . . . . . . . . . . . . . . . . . . . . . . . . . . . . . . . . . . . . . . . . . . . . . . . . . . . . . . . 47
Figure 3 Application Element Diagram. . . . . . . . . . . . . . . . . . . . . . . . . . . . . . . . . . . . . . . . . . . . . . . . . . . . . . 48
Figure 4 NVPairs Element Diagram . . . . . . . . . . . . . . . . . . . . . . . . . . . . . . . . . . . . . . . . . . . . . . . . . . . . . . . . 50
Figure 5 RepoInstances Element . . . . . . . . . . . . . . . . . . . . . . . . . . . . . . . . . . . . . . . . . . . . . . . . . . . . . . . . . . 52
Figure 6 services Element Diagram . . . . . . . . . . . . . . . . . . . . . . . . . . . . . . . . . . . . . . . . . . . . . . . . . . . . . . . . 53
Figure 7 httpRepoInstance Element Diagram . . . . . . . . . . . . . . . . . . . . . . . . . . . . . . . . . . . . . . . . . . . . . . . . 55
Figure 8 rvRepoInstance Element Diagram . . . . . . . . . . . . . . . . . . . . . . . . . . . . . . . . . . . . . . . . . . . . . . . . . . 56
Figure 9 bindings Element Diagram . . . . . . . . . . . . . . . . . . . . . . . . . . . . . . . . . . . . . . . . . . . . . . . . . . . . . . . . 58
Figure 10 monitor Element Diagram . . . . . . . . . . . . . . . . . . . . . . . . . . . . . . . . . . . . . . . . . . . . . . . . . . . . . . . . 59
Figure 11 product Element Diagram . . . . . . . . . . . . . . . . . . . . . . . . . . . . . . . . . . . . . . . . . . . . . . . . . . . . . . . . 59
Figure 12 setting Element Diagram . . . . . . . . . . . . . . . . . . . . . . . . . . . . . . . . . . . . . . . . . . . . . . . . . . . . . . . . . 60
Figure 13 shutdown Element Diagram . . . . . . . . . . . . . . . . . . . . . . . . . . . . . . . . . . . . . . . . . . . . . . . . . . . . . . . 61
Figure 14 NTService Element Diagram . . . . . . . . . . . . . . . . . . . . . . . . . . . . . . . . . . . . . . . . . . . . . . . . . . . . . . 61
Figure 15 java Element Diagram . . . . . . . . . . . . . . . . . . . . . . . . . . . . . . . . . . . . . . . . . . . . . . . . . . . . . . . . . . . 62
Figure 16 rulebases Element Diagram. . . . . . . . . . . . . . . . . . . . . . . . . . . . . . . . . . . . . . . . . . . . . . . . . . . . . . . 63
Figure 17 events Element Diagram . . . . . . . . . . . . . . . . . . . . . . . . . . . . . . . . . . . . . . . . . . . . . . . . . . . . . . . . . 64
Figure 18 failureEvent Element Diagram . . . . . . . . . . . . . . . . . . . . . . . . . . . . . . . . . . . . . . . . . . . . . . . . . . . . . 64
Figure 19 suspendProcess Event Element Diagram . . . . . . . . . . . . . . . . . . . . . . . . . . . . . . . . . . . . . . . . . . . . 65
Figure 20 logEvent Element Diagram . . . . . . . . . . . . . . . . . . . . . . . . . . . . . . . . . . . . . . . . . . . . . . . . . . . . . . . 66
Figure 21 alertAction Element Diagram . . . . . . . . . . . . . . . . . . . . . . . . . . . . . . . . . . . . . . . . . . . . . . . . . . . . . . 67
Figure 22 emailAction Element Diagram . . . . . . . . . . . . . . . . . . . . . . . . . . . . . . . . . . . . . . . . . . . . . . . . . . . . . 68
Figure 23 customAction Element Diagram. . . . . . . . . . . . . . . . . . . . . . . . . . . . . . . . . . . . . . . . . . . . . . . . . . . . 69
Figure 24 bw Element Diagram . . . . . . . . . . . . . . . . . . . . . . . . . . . . . . . . . . . . . . . . . . . . . . . . . . . . . . . . . . . . 71
Figure 25 bwprocesses Element Diagram . . . . . . . . . . . . . . . . . . . . . . . . . . . . . . . . . . . . . . . . . . . . . . . . . . . . 73
Figure 26 checkpoints Element Diagram . . . . . . . . . . . . . . . . . . . . . . . . . . . . . . . . . . . . . . . . . . . . . . . . . . . . . 74
Figure 27 faultTolerant Element Diagram . . . . . . . . . . . . . . . . . . . . . . . . . . . . . . . . . . . . . . . . . . . . . . . . . . . . 74
Figure 28 adapter Element Diagram . . . . . . . . . . . . . . . . . . . . . . . . . . . . . . . . . . . . . . . . . . . . . . . . . . . . . . . . 77
TIBCO Runtime Agent Scripting Deployment User’s Guide

x | Figures
Figure 29 formFlow Element Diagram. . . . . . . . . . . . . . . . . . . . . . . . . . . . . . . . . . . . . . . . . . . . . . . . . . . . . . . 79
Figure 30 authentications Element Diagram . . . . . . . . . . . . . . . . . . . . . . . . . . . . . . . . . . . . . . . . . . . . . . . . . . 81
Figure 31 RequiresAuthentication Element Diagram. . . . . . . . . . . . . . . . . . . . . . . . . . . . . . . . . . . . . . . . . . . . 82
Figure 32 CookieAuthenticationConfiguration Element Diagram . . . . . . . . . . . . . . . . . . . . . . . . . . . . . . . . . . 83
Figure 33 HttpSessionAuthenticationConfiguration Element Diagram . . . . . . . . . . . . . . . . . . . . . . . . . . . . . . 84
Figure 34 WebServerAuthenticationConfiguration Element Diagram . . . . . . . . . . . . . . . . . . . . . . . . . . . . . . . 85
Figure 35 ExternalAuthenticationConfiguration Element Diagram . . . . . . . . . . . . . . . . . . . . . . . . . . . . . . . . . 86
TIBCO Runtime Agent Scripting Deployment User’s Guide
Tables | xi
Tables
Table 1 General Typographical Conventions . . . . . . . . . . . . . . . . . . . . . . . . . . . . . . . . . . . . . . . . . . . . . . . xvii
Table 2 Syntax Typographical Conventions . . . . . . . . . . . . . . . . . . . . . . . . . . . . . . . . . . . . . . . . . . . . . . . xviii
Table 3 Application Element Description . . . . . . . . . . . . . . . . . . . . . . . . . . . . . . . . . . . . . . . . . . . . . . . . . . 49
Table 4 NVPairs Element Description. . . . . . . . . . . . . . . . . . . . . . . . . . . . . . . . . . . . . . . . . . . . . . . . . . . . . 50
Table 5 RepoInstances Element Description . . . . . . . . . . . . . . . . . . . . . . . . . . . . . . . . . . . . . . . . . . . . . . . 52
Table 6 services Element Description. . . . . . . . . . . . . . . . . . . . . . . . . . . . . . . . . . . . . . . . . . . . . . . . . . . . . 54
Table 7 httpRepoInstance Element Description . . . . . . . . . . . . . . . . . . . . . . . . . . . . . . . . . . . . . . . . . . . . . 55
Table 8 rvRepoInstance Element Description. . . . . . . . . . . . . . . . . . . . . . . . . . . . . . . . . . . . . . . . . . . . . . . 56
Table 9 bindings Element Description. . . . . . . . . . . . . . . . . . . . . . . . . . . . . . . . . . . . . . . . . . . . . . . . . . . . . 58
Table 10 monitor Element Description . . . . . . . . . . . . . . . . . . . . . . . . . . . . . . . . . . . . . . . . . . . . . . . . . . . . . 59
Table 11 product Element Description . . . . . . . . . . . . . . . . . . . . . . . . . . . . . . . . . . . . . . . . . . . . . . . . . . . . . 59
Table 12 setting Element Description . . . . . . . . . . . . . . . . . . . . . . . . . . . . . . . . . . . . . . . . . . . . . . . . . . . . . . 60
Table 13 shutdown Element Description. . . . . . . . . . . . . . . . . . . . . . . . . . . . . . . . . . . . . . . . . . . . . . . . . . . . 61
Table 14 NTService Element Description . . . . . . . . . . . . . . . . . . . . . . . . . . . . . . . . . . . . . . . . . . . . . . . . . . . 62
Table 15 java Element Description . . . . . . . . . . . . . . . . . . . . . . . . . . . . . . . . . . . . . . . . . . . . . . . . . . . . . . . . 63
Table 16 rulebases Element Description . . . . . . . . . . . . . . . . . . . . . . . . . . . . . . . . . . . . . . . . . . . . . . . . . . . 63
Table 17 events Element Description . . . . . . . . . . . . . . . . . . . . . . . . . . . . . . . . . . . . . . . . . . . . . . . . . . . . . . 64
Table 18 failureEvent Element Description . . . . . . . . . . . . . . . . . . . . . . . . . . . . . . . . . . . . . . . . . . . . . . . . . . 64
Table 19 suspendProcess Event Element Description . . . . . . . . . . . . . . . . . . . . . . . . . . . . . . . . . . . . . . . . . 65
Table 20 logEvent Element Description . . . . . . . . . . . . . . . . . . . . . . . . . . . . . . . . . . . . . . . . . . . . . . . . . . . . 66
Table 21 alertAction Element Description . . . . . . . . . . . . . . . . . . . . . . . . . . . . . . . . . . . . . . . . . . . . . . . . . . . 67
Table 22 emailAction Element Description . . . . . . . . . . . . . . . . . . . . . . . . . . . . . . . . . . . . . . . . . . . . . . . . . . 68
Table 23 customAction Element Description. . . . . . . . . . . . . . . . . . . . . . . . . . . . . . . . . . . . . . . . . . . . . . . . . 69
Table 24 bw Element Description . . . . . . . . . . . . . . . . . . . . . . . . . . . . . . . . . . . . . . . . . . . . . . . . . . . . . . . . . 71
Table 25 bwprocesses Element Description . . . . . . . . . . . . . . . . . . . . . . . . . . . . . . . . . . . . . . . . . . . . . . . . . 73
Table 26 checkpoints Element Description . . . . . . . . . . . . . . . . . . . . . . . . . . . . . . . . . . . . . . . . . . . . . . . . . . 74
Table 27 faultTolerant Element Description . . . . . . . . . . . . . . . . . . . . . . . . . . . . . . . . . . . . . . . . . . . . . . . . . 75
Table 28 adapter Element Description . . . . . . . . . . . . . . . . . . . . . . . . . . . . . . . . . . . . . . . . . . . . . . . . . . . . . 77
TIBCO Runtime Agent Scripting Deployment User’s Guide

xii | Tables
Table 29 formFlow Element Description. . . . . . . . . . . . . . . . . . . . . . . . . . . . . . . . . . . . . . . . . . . . . . . . . . . . . 79
Table 30 authentications Element Description . . . . . . . . . . . . . . . . . . . . . . . . . . . . . . . . . . . . . . . . . . . . . . . . 81
Table 31 RequiresAuthetication Element Description . . . . . . . . . . . . . . . . . . . . . . . . . . . . . . . . . . . . . . . . . . 82
Table 32 CookieAuthenticationConfiguration Element Description . . . . . . . . . . . . . . . . . . . . . . . . . . . . . . . . 83
Table 33 HttpSessionAuthenticationConfiguration Element Description . . . . . . . . . . . . . . . . . . . . . . . . . . . . 84
Table 34 WebServerAuthenticationConfiguration Element Description . . . . . . . . . . . . . . . . . . . . . . . . . . . . . 85
Table 35 ExternalAuthenticationConfiguration Element Description . . . . . . . . . . . . . . . . . . . . . . . . . . . . . . . 86
Table 36 Failure Code List . . . . . . . . . . . . . . . . . . . . . . . . . . . . . . . . . . . . . . . . . . . . . . . . . . . . . . . . . . . . . . . 87
TIBCO Runtime Agent Scripting Deployment User’s Guide
| xiii
Preface
This document details the command line utility AppManage, by which you can automate and customize application deployment tasks using shell scripts.
Topics
• Changes from the previous Release of this Guide, page xiv
• Related Documentation, page xv
• Typographical Conventions, page xvii
• TIBCO Product Documentation and Support Services, page xx
TIBCO Runtime Agent Scripting Deployment User’s Guide
xiv | Changes from the previous Release of this Guide
Changes from the previous Release of this Guide
All the screenshots have been updated with new TIBCO logo.
TIBCO Runtime Agent Scripting Deployment User’s Guide

Preface | xv
Related Documentation
This section lists documentation resources you may find useful.
TIBCO Runtime Agent DocumentationThe TIBCO Runtime Agent™ software suite is a prerequisite for other TIBCO software products. In addition to Runtime Agent components, the software suite includes the third-party libraries used by other TIBCO products, TIBCO Designer™, Java Runtime Environment (JRE), TIBCO Rendezvous®, and TIBCO Hawk®.
The following documents form the TIBCO Runtime Agent™ documentation set:
• TIBCO Runtime Agent™ Installation Read this manual for instructions on site preparation and installation.
• TIBCO Runtime Agent™ Installing Into a Cluster Read this manual for instructions on installing TIBCO applications into a cluster environment.
• TIBCO Runtime Agent™ Upgrading to Release 5.11.0 Read this manual for instructions on upgrading from release 5.x to release 5.11.0.
• TIBCO Runtime Agent™ Domain Utility User’s Guide Read this manual for instructions on using TIBCO Domain Utility to create and manage administration domains.
• TIBCO Runtime Agent™ Scripting Deployment User’s Guide Read this manual for instructions on using the AppManage scripting utility to deploy applications.
• TIBCO Runtime Agent™ Authentication API User's Guide Read this manual for instructions on using Authentication API.
• TIBCO Runtime Agent™ Release Notes Read the release notes for a list of new and changed features. This document also contains lists of known issues and closed issues for this release.
Other TIBCO Product DocumentationYou may find it useful to read the documentation for the following TIBCO products:
• TIBCO Administrator™ : TIBCO Administrator allows you to manage users, machines and applications defined in a TIBCO administration domain. The TIBCO Administrator graphical user interface enables users to deploy, monitor, and start and stop TIBCO applications.
TIBCO Runtime Agent Scripting Deployment User’s Guide
xvi | Related Documentation
• TIBCO Designer™: This graphical user interface is used for designing and creating integration project configurations and building an Enterprise Archive (EAR) for the project. The EAR can then be used by TIBCO Administrator for deploying and running the application.
• TIBCO Hawk®: This is a tool for monitoring and managing distributed applications and operating systems.
• TIBCO Rendezvous®: Rendezvous enables programs running on many different kinds of computers on a network to communicate seamlessly. It includes two main components: the Rendezvous application programming interface (API) in several languages, and the Rendezvous daemon.
• TIBCO Enterprise Message Service™: This software lets application programs send and receive messages using the Java Message Service (JMS) protocol. It also integrates with TIBCO Rendezvous and TIBCO SmartSockets® messaging products.
• TIBCO ActiveMatrix BusinessWorks™: ActiveMatrix BusinessWorks is a scalable, extensible, and easy to use integration platform that allows you to develop integration projects. ActiveMatrix BusinessWorks includes a GUI for defining business processes and an engine that executes the process.
• TIBCO® Adapter software: TIBCO Runtime Agent is a prerequisite for TIBCO Adapter products. You will therefore find TIBCO Adapter product documentation useful.
TIBCO Runtime Agent Scripting Deployment User’s Guide

Preface | xvii
Typographical Conventions
The following typographical conventions are used in this manual.
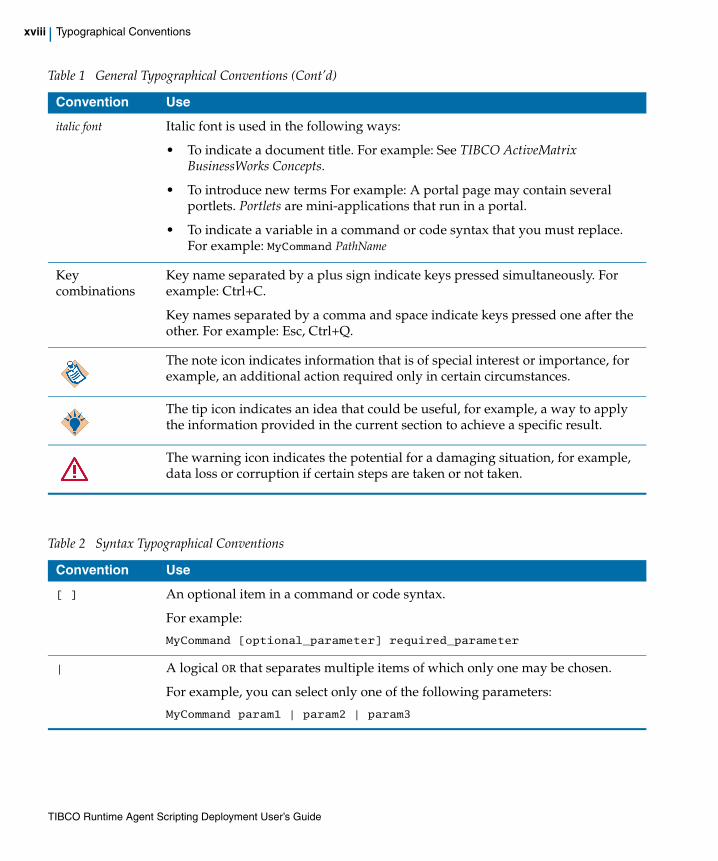
Table 1 General Typographical Conventions
Convention Use
ENV_NAME
TIBCO_HOME
TRA_HOME
TIBCO products are installed into an installation environment. A product installed into an installation environment does not access components in other installation environments. Incompatible products and multiple instances of the same product must be installed into different installation environments.
An installation environment consists of the following properties:
• Name Identifies the installation environment. This name is referenced in documentation as ENV_NAME. On Microsoft Windows, the name is appended to the name of Windows services created by the installer and is a component of the path to the product shortcut in the Windows Start > All Programs menu.
• Path The folder into which the product is installed. This folder is referenced in documentation as TIBCO_HOME.
TIBCO Runtume Agent installs into a directory within a TIBCO_HOME. This directory is referenced in documentation as <ProductAcronym>_HOME. The default value of <ProductAcronym>_HOME depends on the operating system. For example on Windows systems, the default value is C:\tibco\<ProductAcronym>\<ReleaseNumber>.
code font Code font identifies commands, code examples, filenames, pathnames, and output displayed in a command window. For example:
Use MyCommand to start the foo process.
bold code
font Bold code font is used in the following ways:
• In procedures, to indicate what a user types. For example: Type admin.
• In large code samples, to indicate the parts of the sample that are of particular interest.
• In command syntax, to indicate the default parameter for a command. For example, if no parameter is specified, MyCommand is enabled: MyCommand [enable | disable]
TIBCO Runtime Agent Scripting Deployment User’s Guide
xviii | Typographical Conventions
italic font Italic font is used in the following ways:
• To indicate a document title. For example: See TIBCO ActiveMatrix BusinessWorks Concepts.
• To introduce new terms For example: A portal page may contain several portlets. Portlets are mini-applications that run in a portal.
• To indicate a variable in a command or code syntax that you must replace. For example: MyCommand PathName
Key combinations
Key name separated by a plus sign indicate keys pressed simultaneously. For example: Ctrl+C.
Key names separated by a comma and space indicate keys pressed one after the other. For example: Esc, Ctrl+Q.
The note icon indicates information that is of special interest or importance, for example, an additional action required only in certain circumstances.
The tip icon indicates an idea that could be useful, for example, a way to apply the information provided in the current section to achieve a specific result.
The warning icon indicates the potential for a damaging situation, for example, data loss or corruption if certain steps are taken or not taken.
Table 1 General Typographical Conventions (Cont’d)
Convention Use
Table 2 Syntax Typographical Conventions
Convention Use
[ ] An optional item in a command or code syntax.
For example:
MyCommand [optional_parameter] required_parameter
| A logical OR that separates multiple items of which only one may be chosen.
For example, you can select only one of the following parameters:
MyCommand param1 | param2 | param3
TIBCO Runtime Agent Scripting Deployment User’s Guide

Preface | xix
{ } A logical group of items in a command. Other syntax notations may appear within each logical group.
For example, the following command requires two parameters, which can be either the pair param1 and param2, or the pair param3 and param4.
MyCommand {param1 param2} | {param3 param4}
In the next example, the command requires two parameters. The first parameter can be either param1 or param2 and the second can be either param3 or param4:
MyCommand {param1 | param2} {param3 | param4}
In the next example, the command can accept either two or three parameters. The first parameter must be param1. You can optionally include param2 as the second parameter. And the last parameter is either param3 or param4.
MyCommand param1 [param2] {param3 | param4}
Table 2 Syntax Typographical Conventions (Cont’d)
Convention Use
TIBCO Runtime Agent Scripting Deployment User’s Guide

xx | TIBCO Product Documentation and Support Services
TIBCO Product Documentation and Support Services
For information about this product, you can read the documentation, contact TIBCO Support, or join TIBCO Community.
How to Access TIBCO DocumentationDocumentation for TIBCO products is available on the TIBCO Product Documentation website mainly in the HTML and PDF formats.
The TIBCO Product Documentation website is updated frequently and is more current than any other documentation included with the product. To access the latest documentation, visit https://docs.tibco.com.
Documentation for TIBCO Runtime Agent™ is available on the https://docs.tibco.com/products/tibco-runtime-agent
How to Contact TIBCO SupportYou can contact TIBCO Support in the following ways:
• For an overview of TIBCO Support, visit https://www.tibco.com/services/support.
• For accessing the Support Knowledge Base and getting personalized content about products you are interested in, visit the TIBCO Support portal at https://support.tibco.com.
• For creating a Support case, you must have a valid maintenance or support contract with TIBCO. You also need a user name and password to log in to https://support.tibco.com. If you do not have a user name, you can request one by clicking Register on the website.
How to Join TIBCO CommunityTIBCO Community is the official channel for TIBCO customers, partners, and employee subject matter experts to share and access their collective experience. TIBCO Community offers access to Q&A forums, product wikis, and best practices. It also offers access to extensions, adapters, solution accelerators, and tools that extend and enable customers to gain full value from TIBCO products. In addition, users can submit and vote on feature requests from within the TIBCO Ideas Portal. For a free registration, go to https://community.tibco.com.
TIBCO Runtime Agent Scripting Deployment User’s Guide
Scripting Deployment | 1
Chapter 1 Scripting Deployment
This chapter introduces the TIBCO Runtime Agent™ scripting utilities that are used to upload, configure and deploy applications in administration domains.
Topics
• Overview, page 2
• buildear Utility, page 3
• AppManage Utility, page 4
• Installed Files, page 6
• Starting the Scripting Utilities, page 7
• Accessing Online Help for Commands, page 8
• Working with Passwords, page 11
• Log Files, page 13
TIBCO Runtime Agent Scripting Deployment User’s Guide

2 | Chapter 1 Scripting Deployment
Overview
The scripting tools allow you to build an EAR file for an application configured in TIBCO Designer, then load the application into one or more TIBCO Administrator administration domains. Deployment options can be specified in a deployment configuration file that is created using the AppManage utility.
• If your application is not complex and needs only machine bindings defined for each domain, you can use the AppManage utility to create the deployment configuration file from information in the EAR file, then edit the configuration file with the machine names where the applications will be deployed. In this scenario, the TIBCO Administrator GUI is not used.
• If your application is complex and needs more then machine bindings defined, you can import an EAR file into the TIBCO Administrator GUI and specify deployment configuration options for the application. This method is preferred if your application includes complex mappings, such as fault tolerance, runtime variables, alerts and so on.
In this scenario, the TIBCO Administrator GUI is used to initially set the application’s deployment configuration options. After the options are set, the TIBCO Administrator GUI is no longer used. The AppManage utility updates the deployment configuration file from the application configured in the TIBCO Administrator GUI. The file is edited for each administration domain by changing machine bindings and so on, then deployed into each administration domain.
TIBCO Runtime Agent Scripting Deployment User’s Guide
buildear Utility | 3
buildear Utility
The buildear utility builds an EAR file based on the Enterprise Archive resource that is defined in a TIBCO Designer project. The project directories and files must be writable so that buildear can save the file. When saving, buildear increments the archive build number and saves it to the project.
An EAR file size can be very large. You should ensure that the machine on which the EAR file is loaded and deployed has sufficient disk space. See Enterprise Archive File Size in TIBCO Designer User’s Guide for details.
It is recommended that you configure the components that are included in the archive and build the archive in TIBCO Designer. After the archive is built you can use buildear to send the archive to multiple machines.
On UNIX platform, the builder utility requires configuration of X Server Manager (X11) or XVFB (X Virtual FrameBuffer). The builder utility fails when X server or XVFB does not run or when the DISPLAY environment variable is not set properly.
TIBCO Runtime Agent Scripting Deployment User’s Guide
4 | Chapter 1 Scripting Deployment
AppManage Utility
The AppManage utility creates an XML based deployment configuration file in which deployment options can be defined. The utility also uploads the deployment file and EAR file into a TIBCO Administrator administration domain. The AppManage utility can be used to:
• Create a deployment configuration file based on information in an EAR file , or from an application already configured in the TIBCO Administrator GUI.
• Upload an EAR file to an administration domain without specifying deployment configuration options. After the file is imported, it is ready to be configured with deployment options and deployed using the TIBCO Administrator GUI.
• Upload an EAR file and a deployment configuration file into an administration domain in one operation. The application is uploaded with its deployment options set, but is not deployed.
• Upload an EAR file and a deployment configuration file and deploy the application in one operation. Using this method, you can quickly deploy your applications in multiple domains.
• Export all application archives and deployment configuration files within a domain, so they can be batch deleted, started, stopped, undeployed, or deployed in another domain. For TIBCO Rendezvous administration domains, you can change the transport set for application to administration server communication, from rv (Rendezvous) to local, or the reverse.
• Undeploy a deployed application.
• Delete an application from an administration domain.
• Start a service instance of an application.
• Stop a successfully deployed service instance of an application.
Credential FileA credential file contains the administration domain user’s name and encrypted password.
The -cred option takes the name and location of a property file containing username and encrypted password. If the -cred option is used, the -user and-pw options should not be used.
TIBCO Runtime Agent Scripting Deployment User’s Guide
AppManage Utility | 5
When invoking an AppManage option, use the -cred option to specify the name and location of the property file.AppManage -upload -ear <ear_name> -cred <file-path\cred123.txt> -domain <domain_name>
To Create a Sample Credential File:
1. Create a text file with the username and password entries only as shown next. Add the prefix #! to the password.user=admin
pw=#!ax86n0ty
2. Save the file and invoke the utility giving the file as input.
In some cases, message "Specify userID and password" is generated even after providing the credential file because of incorrect credential file or it doesn't contain the required two field in proper format : - user pw
Sample Credential file:user=username-1
pw=#!password-1
user=username-2
pw=#!password-2
. . . . .
. . . . .
. . . . . user=username-N
pw=#!password-N
TIBCO Runtime Agent Scripting Deployment User’s Guide

6 | Chapter 1 Scripting Deployment
Installed Files
The installation log file is written to the TIBCO_HOME/log directory.
AppManage Utility
The AppManage utility and the AppManage.tra file are installed in the TIBCO_HOME/tra/version/bin directory. The AppManage.jar file is installed in the TIBCO_HOME/tra/version/lib directory.
Buildear Utility
The buildear utility and the buildear.tra file are installed in the TIBCO_HOME/tra/version/bin directory.
TIBCO Runtime Agent Scripting Deployment User’s Guide

Starting the Scripting Utilities | 7
Starting the Scripting Utilities
This section explains how to start the AppManage and buildear utilities.
Starting AppManage
To start the AppManage utility, change directory to TIBCO_HOME/tra/version/bin and type AppManage -action. See the next section for information about using online help for information about the actions available.
Starting Buildear
To start the buildear utility, change directory to TIBCO_HOME/tra/version/bin and type buildear -options. See the next section for information about using online help.
You should verify your project by loading it into TIBCO Designer before you use the project with the buildear utility. If the project doesn't load correctly in TIBCO Designer, the buildear utility doesn't support it.
The AppManage utility must be run on a machine that is part of the administration domain you are updating.
The user account used to run the AppManage utility must have Write permissions set in the TIBCO Administrator GUI for the application, domain repository and application repository that is being updated.
TIBCO Runtime Agent Scripting Deployment User’s Guide
8 | Chapter 1 Scripting Deployment
Accessing Online Help for Commands
Online help is available for the AppManage and buildear utilities.
AppManage Help
The AppManage online help shows the command line syntax, describes each command option and provides command line examples. For example, typing AppManage on the command line produces the following help.C:\tibco\tra\<version>\bin>appmanageUsage: AppManage [options] [args...] (to execute a task) or AppManage -? [options] (to print detailed message of each option)where options include:
-export export a deployment configuration file-upload upload an archive-config configure an application
If -ear is specified, upload the archive first-deploy deploy an application
If -ear is specified, upload the archive firstIf -deployConfig is specified, configure the application first
-undeploy undeploy an application-delete delete an application
If -force is specified, undeploy theapplication first.
-start start successfully deployed service instancesof an application
-stop gracefully shutdown successfully deployedservice instances of an application
-kill immediately kill successfully deployed service instances of an application
-moveAppData Redeploy application with new location for Application Data
-truncate Truncate the application deployment revision-batchExport To export deployment configuration files for
all the archives under a directory-batchUpload Uplaod all applications specified in
AppManage.batch-batchConfig Config all applications specified in
AppManage.batch-batchDeploy Deploy all applications specified in
AppManage.batch-batchUndeploy Undeploy all applications specified in
AppManage.batch-batchDelete Delete all applications specified in
AppManage.batch-batchstart Start all applications specified in
AppManage.batch-batchstop Stop all applications specified in
AppManage.batch-batchkill Kill all applications specified in
TIBCO Runtime Agent Scripting Deployment User’s Guide
Accessing Online Help for Commands | 9
AppManage.batch-batchMoveAppData Move Application Data to or from local for
all applications specified in AppManage.batch
To display help about a command line option, type:
AppManage -? command line option
Buildear Help
The buildear utility help can be displayed by typing:
buildear -h
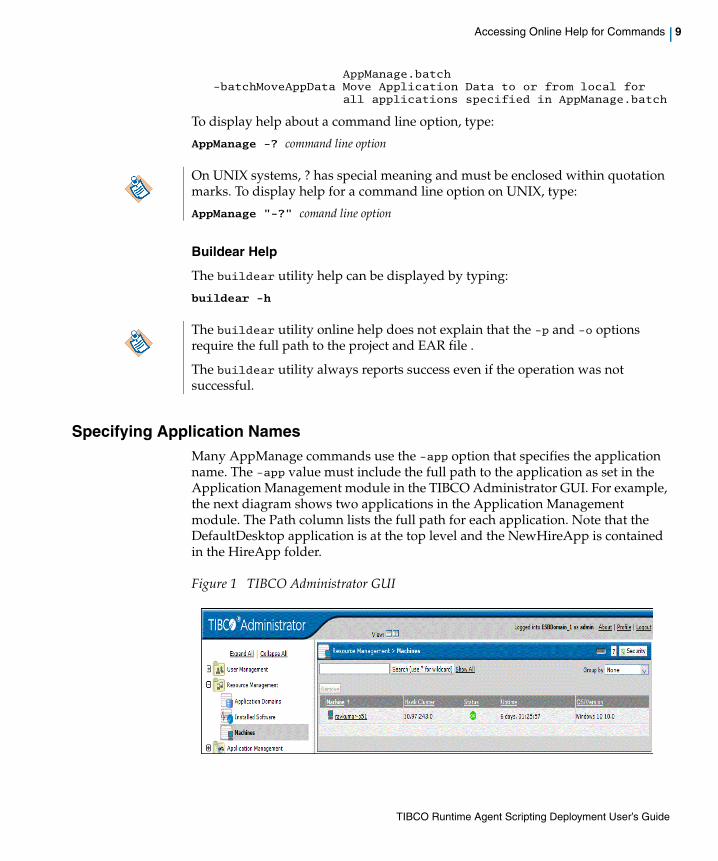
Specifying Application NamesMany AppManage commands use the -app option that specifies the application name. The -app value must include the full path to the application as set in the Application Management module in the TIBCO Administrator GUI. For example, the next diagram shows two applications in the Application Management module. The Path column lists the full path for each application. Note that the DefaultDesktop application is at the top level and the NewHireApp is contained in the HireApp folder.
Figure 1 TIBCO Administrator GUI
On UNIX systems, ? has special meaning and must be enclosed within quotation marks. To display help for a command line option on UNIX, type:
AppManage "-?" comand line option
The buildear utility online help does not explain that the -p and -o options require the full path to the project and EAR file .
The buildear utility always reports success even if the operation was not successful.
TIBCO Runtime Agent Scripting Deployment User’s Guide

10 | Chapter 1 Scripting Deployment
When running a command option such as -undeploy against the top level DefaultDesktop application, the following syntax must be used for the -app option:
AppManage -undeploy -app DefaultDesktop -user a -pw a -domain test
When running the same command against the NewHireApp application that is contained in the HireApp folder, the following syntax must be used for the -app option. A forward slash separates the folder and application name.
AppManage -undeploy -app HireApp/NewHireApp -user a -pw a -domain test
TIBCO Runtime Agent Scripting Deployment User’s Guide

Working with Passwords | 11
Working with Passwords
Each action specified using the AppManage utility requires a password to access the administration domain where the action will be executed. You can specify the password using clear text or an encrypted key. The -pw option always takes a clear text password. The -cred option takes the name and location of a property file containing username and encrypted password. If the -cred option is used, the -user and-pw options should not be used.
A credentials file contains an administration domain user’s name and encrypted password. The obfuscate utility is used to create the encrypted password. For example, a credentials text file containing the user name john and encrypted password jH86n0ty is created as follows.
1. Create a text file with the username and password entries only as shown next. Add the prefix #! to the password.user=john
pw=#!jH86n0ty
2. Save the file and invoke the obfuscate utility giving the file as input. The utility is in TIBCO_HOME/tra/version/bin. (Refer to TIBCO Runtime Agent Installation for more information about Obfuscate Utility.)
3. When invoking an AppManage option, use the -cred option to specify the name and location of the property file.
AppManage -upload -ear c:\ears\timer_wait.ear -cred c:\ears\psswd\tp001Psw.txt -domain tp001
Passwords in the generated deployment configuration file are always encrypted.
TIBCO Runtime Agent Scripting Deployment User’s Guide

12 | Chapter 1 Scripting Deployment
Protecting Sensitive Data
When you export an application, sensitive data in the EAR file is encrypted using either a static key or dynamically generated symmetric key, depending on whether you choose to use dynamic symmetric key at the time of deployment. Likewise, sensitive data in the deployment configuration file is encrypted using a static key when it is exported. However, you can generate a custom key for better security by specifying an encryption password. If you do so, you will also be required to provide the same password when you upload or deploy with the deployment configuration file.
See Other Options on page 24 for descriptions and example usage of the -password and -passwordFile options.
TIBCO Runtime Agent Scripting Deployment User’s Guide

Log Files | 13
Log Files
Both the AppManage and buildear utilities write information to a log file.
AppManage Log FilesThe AppManage utility writes information to a log file. The log file location depends on whether you are accessing an administration domain or not.
• If you are not accessing an administration domain, the log is written to the TIBCO_HOME/tra/version/logs/ApplicationManagement.log file.
• If you are accessing an administration domain, the log is written to the TIBCO_HOME/tra/domain/domain/logs/ApplicationManagement.log file.
A comparison log file is generated if you export from an EAR file without specifying an administration domain. This information can help you decide whether you need to change the deployment configuration file after an EAR file changes.
For example, using the following command line, the AppManage utility compares the oldconfiguration.xml file with the given EAR file. If any service, global variables, or both have been added, removed, or updated, a log file is created in the same directory where the oldconfiguration.xml file resides, using the file name, oldconfiguration.xml.log.
AppManage -export -ear c:\ears\timer_wait.ear -deployConfig oldconfiguration.xml -out newconfiguration.xml
buildear Log FileThe buildear utility writes information to the designer.log file. By default, on Windows, the log is located in the C:\Documents and Settings\user-name\.TIBCO\logs directory.
Note that the default log location can be changed in TIBCO Designer.
TIBCO Runtime Agent Scripting Deployment User’s Guide

14 | Chapter 1 Scripting Deployment
TIBCO Runtime Agent Scripting Deployment User’s Guide

| 15
Chapter 2 Getting Started
This chapter explains how to use the AppManage utility for simple and complex deployments.
Topics
• Simple Application Deployment, page 16
• Complex Application Deployment, page 18
• Redeploying an Application, page 20
• Exporting an Application, page 23
• Other Options, page 24
• Monitoring Events and Rulebases, page 30
• Setting Service Instance Runtime Variables, page 34
TIBCO Runtime Agent Scripting Deployment User’s Guide

16 | Chapter 2 Getting Started
Simple Application Deployment
In this scenario, a file notification project has been modified using TIBCO BusinessWorks. The buildear utility builds an EAR file for deployment. Based on the EAR file, the AppManage utility creates a deployment configuration file which includes XML tags for each deployment option. Using a text editor, the machine binding tags are edited. The AppManage utility is then used to deploy the application.
1. Build the EAR file.
The project is configured using TIBCO Designer. After all components in an archive resource are configured, the buildear utility can be used to build the EAR file.
The command line to build the EAR file is listed next. The -s option is saves the archive as another version in the project.
You can have multiple archive resources defined in a project. The -ear option allows you to provide the location of the archive resource that contains the changed components. You can get the archive resource URI in TIBCO Designer by selecting the archive and clicking Resource > Inspect Resource. The Resource Inspector dialog shows the URI next to the icon.
The -o option identifies the location and name of the output EAR file. The EAR file name must use the .ear suffix. If not specified, the EAR file location for the Enterprise Archive is used.
The -p option provides the location of the TIBCO Designer project where the archive has been created.
buildear -s -ear /filenotify.archive -o c:\ears\deployment\filenotify.ear -p c:\tibco\projects\filenotify
2. Create the deployment configuration file.
The deployment configuration file is created by the AppManage utility based on information in the EAR file. The -out option provides the name and location of the deployment configuration file. The file is created with XML tags for all required schema and substitution variables for each machine binding tag.
AppManage -export -ear c:\ears\deployment\filenotify.ear -out c:\ears\deployments\filenotify.xml
3. Edit the deployment configuration file.
Before editing the file, copy it and name it based on the application and administration domain into which the application will be deployed. Open the
TIBCO Runtime Agent Scripting Deployment User’s Guide

Simple Application Deployment | 17
new file and change the substitution variables defined by the AppManage utility for the processes. In this example the <machine> XML tags are modified with the name of the machine on which the processes run.
The generated file includes substitution variables for the machine element value. The variables use the syntax, %%<archive-type>-machine%% (a combination of percent symbols, archive type and computer name). During deployment you must configure an element that uses such a variable by replacing the substitution value with the actual value, without the percent symbols.
<services><bw name="Process Archive.par">
<enabled>true</enabled><bindings>
<binding name=""><machine>%%Process Archive.par-machine%%</machine>
.
.
.<bindings>
<binding name=""><machine>%%deuxiemeprocess.par-machine%%</machine>
.
.
.
4. Deploy the application.
The following command line uploads the EAR file and the deployment configuration file into the tp001 domain. The -deploy action indicates that the application is to be uploaded and deployed in one operation. The -ear option specifies the EAR file to load and the -deployconfig option specifies the name of the deployment configuration file. The -app option provides the application name. The admin account is used in this example. If you are using a normal user account, it must have the Administer permission set for the application. Note that the application name and administration domain name are case sensitive.
AppManage -deploy -ear c:\ears\deployment\filenotify.ear -deployconfig c:\ears\deployment\filenotify_tp001.xml -app filenotify -domain tp001 -user admin -pw admin
TIBCO Runtime Agent Scripting Deployment User’s Guide

18 | Chapter 2 Getting Started
Complex Application Deployment
In a more complex scenario an application may require fault tolerant options, alerts, TIBCO Hawk rulebases, and so on defined. While you could define these options in the deployment configuration file that is generated by the AppManage utility, it is recommended you configure the options in TIBCO Administrator and use AppManage to generate the deployment configuration file from the application itself.
1. Build the EAR file.
buildear -ear /dbtrigger.archive -o c:\ears\deployment\dbtrigger.ear -p c:\tibco\projects\dbtrigger
2. Import and configure the EAR file in TIBCO Administrator.
Start the TIBCO Administrator GUI and import the EAR file, then configure the application with deployment options. See the TIBCO Administrator User’s Guide for information. Exit TIBCO Administrator after the deployment options are set.
3. Create the deployment configuration file.
The AppManage utility creates the deployment configuration file based on information in the application you configured in the TIBCO Administrator GUI. The -out option provides the name and location of the deployment configuration file that will be generated by the AppManage utility. The -app option identifies the application in the given administration domain to use. The -template option is used so that substitution variables are created for each machine tag.
AppManage -export -out c:\ears\deployment\dbtrigger.xml -app dbtrigger -domain tp001 -user admin -pw admin -template
4. Edit the deployment configuration file.
Before editing the file, copy it and name it based on the application and domain into which the application will be deployed. Open the new file and change the <machine> XML tags to the name of the machine on which the processes run. For example:
<services><bw name="Process Archive.par">
<enabled>true</enabled><bindings>
<binding name=""><machine>%%Process Archive.par-machine%%</machine>
.
.
.
TIBCO Runtime Agent Scripting Deployment User’s Guide

Complex Application Deployment | 19
<bindings><binding name="">
<machine>%%deuxiemeprocess.par-machine%%</machine>...
5. Deploy the application.
After you have set the machine bindings, you can upload and deploy the application in one operation. The following command uploads the EAR file and the deployment configuration file into the tp003 domain. The -deploy option specifies that the application should be deployed. The -ear option specifies the EAR file to load and the -deployConfig option specifies the name and location of the deployment configuration file to use. The -app option provides the application name. Note that the application name and domain names are case sensitive.
AppManage -deploy -ear c:\ears\deployment\dbtrigger.ear -deployconfig c:\ears\deployments\dbtrigger_tp003.xml -app dbtrigger -domain tp003 -user admin -pw admin
TIBCO Runtime Agent Scripting Deployment User’s Guide

20 | Chapter 2 Getting Started
Redeploying an Application
You can use the scripting utilities to redeploy an already deployed application. The AppManage utility does not include a redeploy command; the -deploy command is used to redeploy an application. The options to use with the -deploy command vary depending on where changes were made. The -force option provided for AppManage is equivalent to the Force redeployment of all services in the TIBCO Adminitrator GUI. This section shows these options.
Changes Made to EAR file OnlyIf you have only changed the application’s configuration in TIBCO Designer, you must upload the changed EAR file into the affected administration domains. For example, you might modify a TIBCO Designer project by:
• changing an existing adapter service or form flow service
• changing an existing process within a process service by adding or deleting new activities or changing existing activities
• adding, deleting or changing existing sub-processes
• adding, deleting or changing shared resources
In scenarios where just the application’s project has changed, build the new EAR file using the buildear utility and use AppManage -deploy with the -ear option to redeploy the application.
For example, the following command lines build an EAR file and redeploy the filenotify application with the changed filenotify.ear archive file.
buildear -s -ear /filenotify.archive -o c:\ears\deployment\filenotify.ear -p c:\tibco\projects\filenotify
AppManage -deploy -ear c:\ears\deployment\filenotify.ear -app filenotify -domain tp003 -user admin -pw admim
Changes Made to Deployment File OnlyIf you have only changed the deployment file, you must upload the changed deployment file. For example, you might modify the deployment file by:
• changing deployment level or service level variables
• adding or removing machines to which services are bound
• adding, deleting or changing service monitoring configurations
TIBCO Runtime Agent Scripting Deployment User’s Guide

Redeploying an Application | 21
• changing fault-tolerance settings for process services deployed in fault-tolerant mode
• changing checkpoint storage from JDBC to File, or from File to JDBC ,or JDBC to JDBC, where the new JDBC resource exists in the original shared archive
• changing process settings such as Active or Inactive State, MaxJobs, or Activation Limit
• changing service instance configuration settings such as NT Service, Java parameters, or log files
• changing deployment transport settings such as to Rendezvous, HTTP, HTTPS or related parameters
In scenarios where just the deployment configuration file has changed, use AppManage -deploy with the -deployconfig option to redeploy the application.
For example, the following command redeploys the filenotify application with the changed filenotify_tp003.xml file.
AppManage -deploy -deployconfig c:\ears\deployment\filenotify_tp003.xml -app filenotify -domain tp003 -user admin -pw admin
Changes Made to EAR and Deployment FilesIf you change both the TIBCO Designer project and the deployment configuration file, you must upload both when redeploying. For example, you may want to make the following changes:
• add new services or delete existing services (adapter, process or form flow archives)
• add or remove deployment level or service level variables (including Adapter SDK properties)
• change checkpoint storage from File to JDBC or JDBC to JDBC, where the new JDBC Shared Resource was not part of the Shared Archive in the original EAR file
If you have changed both the TIBCO Designer project and the deployment configuration file, complete the following steps to redeploy the changed application:
1. Build an EAR file using the buildear utility. For example:
buildear -s -ear /filenotify.archive -o c:\ears\deployment\filenotify.ear -p c:\tibco\projects\filenotify
TIBCO Runtime Agent Scripting Deployment User’s Guide

22 | Chapter 2 Getting Started
2. Generate a new deployment configuration file using the EAR file created in the previous step, the deployment configuration file used when previously deploying the application and specify a new deployment configuration file.
For example, when the following command is run, a log file is generated in the same folder where the new deployment configuration file is created. The log file lists all changes that were made to the deployment configuration file, as a result of changes to the EAR file.
AppManage -export -ear c:\ears\deployment\filenotify.ear -deployconfig c:\ears\deployments\filenotify.xml -out c:\ears\deployments\filenotify-changed.xml
The new deployment configuration file may need to be further modified, for example, by replacing machine binding substitution variables with actual machine names for new services, modifying deployment or service level variable values, picking up the right checkpoint repository from the list of checkpoint repositories, and so.
3. After you have made the changes to your deployment configuration file, you are ready to deploy the application. For example:
AppManage -deploy -ear c:\ears\deployment\filenotify.ear -deployconfig c:\ears\deployment\filenotify-changed.xml -app filenotify -domain tp003 -user admin -pw admin
TIBCO Runtime Agent Scripting Deployment User’s Guide

Exporting an Application | 23
Exporting an Application
You can use the appManage -export option to create and export an application’s deployment configuration file and archive (EAR) file. You can also use the appManage -batchExport option to create and export the deployment configuration files and EAR files for all applications in an administration domain.
Exporting an EAR File and Configuring for an Application
The next command exports the deployment configuration file and creates an EAR file for an application named myApp. The deployment configuration file and EAR file are created in the c:\test folder. The application is embedded in folder1/folder2/, which is relative to the Application Management root in the TIBCO Administrator GUI. See Specifying Application Names on page 9 for more information.
AppManage -export -out c:\test\myApp.xml -genEar -ear c:\test\myApp.ear -app folder1/folder2/myApp -user user1 -pw user1 -domain test
Exporting EAR Files and Configuring for all Applications
You can export all applications in an administration domain using the appManage -batchExport option. For example, the next command exports a deployment configuration file and EAR file for each application found in the test domain.
AppManage -batchExport -user user1 -pw user1 -domain test -dir c:\temp\test
When performing batch jobs with AppManage in a database-based domain, make sure that your database server is configured with a sufficiently large connection pool so that you do not run out of JDBC connections. For more information, see Configuring Connection Pool Size for the Database Server in TIBCO Administrator Server Configuration Guide.
TIBCO Runtime Agent Scripting Deployment User’s Guide

24 | Chapter 2 Getting Started
Other Options
In addition to the -export and -deploy options, the AppManage utility allows you to use:
• -upload to upload an application into an administration domain without configuring the application’s deployment options.
• -config to upload an application along with its deployment configuration file, which defines the application’s configuration options, but not deploy the application.
• -undeploy to undeploy an application.
• -delete to remove an application from an administration domain.
• -start or -stop to start or stop a service or process configured under an application.
• -override to use global variable values defined in the EAR file, instead of those defined in the original deployment configuration file when redeploying.
• -min to generate only XML tags for options you have changed.
• -max to export a template deployment configuration file with every possible setting included.
• -template to generate a deployment configuration file in template format.
• -password to prompt for a password that is used to encrypt or decrypt sensitive data in the deployment configuration file.
• -passwordFile to use a password file to encrypt or decrypt sensitive data in the deployment configuration file.
• -MoveAppData to change the transport setting for a given application.
• -truncate to truncate the application deployment revision.
• -desc to specify a description for the deployed application.
• -serialize to deploy service instances one at a time instead of in parallel.
• -exportDeployed to export the configuration for the last successful deployment rather than what is currently being modified and will be used for the next deployment.
TIBCO Runtime Agent Scripting Deployment User’s Guide

Other Options | 25
-upload OptionYou can use the AppManage utility to upload an EAR file into an administration domain. Specifying the -upload option is identical to importing an EAR in the TIBCO Administrator GUI. The application is loaded, but no deployment options are specified and the application is not deployed.
AppManage -upload -ear c:\ears\timer_wait.ear -user admin -pw admin -domain tp002
-config OptionYou can upload an EAR file and a deployment configuration file into an administration domain and not deploy the application. The -config option uploads the EAR file and the deployment configuration file, but does not deploy the application. You can omit the -ear option if the EAR file is already loaded in the domain.
AppManage -config -ear c:\ears\timer_wait.ear -deployConfig c:\ears\deployments\timer_wait.xml -app timer_wait -user admin -pw admin -domain tp002
-undeploy OptionYou can undeploy an application using a command line similar to the following. The application will remain in the domain, but in an undeployed state.
AppManage -undeploy -app timer_wait -domain tp001 -user admin -pw admin
-delete OptionYou can remove an application from an administration domain. If the application is deployed, you can undeploy and delete the application in one operation using the -force option. An error is returned if you attempt to delete a deployed application without specifying the -force option.
AppManage -delete -app timer_wait -user admin -pw admin -domain tp001 -force
-start OptionYou can use the AppManage utility to start an application and all its associated processes, or use the utility to start just one service. The -service tag takes the name of a service. Each service contains a name. For example, if there is a TIBCO BusinessWorks service element <bw name="BW Processes.par"> in a deployment configuration file, -service takes the value "BW Processes.par".
TIBCO Runtime Agent Scripting Deployment User’s Guide

26 | Chapter 2 Getting Started
AppManage -start -app myApp -user a -pw a -domain test
AppManage -start -app myApp -service "BW Processes.par" -user a -pw a -domain test"
In the case where -binding is provided without -service, all services in the application are started.
AppManage -start -app myApp -binding ActiveDatabaseAdapterConfiguration -user a -pw a -domain test
-stop OptionYou can use the AppManage utility to stop an application and all its associated processes, or use the utility to stop just one service. The -binding tag takes the name of a binding. Each binding contains a name. For example, if there is a binding element <binding name="BW Processes"> in a deployment configuration file, -binding takes the value "BW Processes".
AppManage -stop -app myApp -user a -pw a -domain test
AppManage -stop -app myApp -serviceActiveDatabaseAdapterConfiguration.aar -user a -pw a -domain test
AppManage -stop -app myApp -service "BW Processes.par" -binding "BW Processes" -user a -pw a -domain test
-breaklock OptionYou can use the AppManage utility to break the lock held on the application by other users. This will result in loosing uncommitted changes by the other users.
–override OptionThis option is only applicable when a deployment configuration file already exists. That is, you are redeploying with a changed archive file.
By default, a newly generated deployment configuration file preserves the value in the original deployment config file. Use this option with the -export option to create a deployment configuration file that uses the values defined for global variables in the archive file, rather than the values defined for global variables in the original deployment configuration file.
AppManage -export -ear c:\ears\deployment\filenotify.ear -deployconfig c:\ears\deployments\filenotify.xml-out c:\ears\deployments\filenotify-changed.xml -override
TIBCO Runtime Agent Scripting Deployment User’s Guide
Other Options | 27
-min OptionUse this option with the -export and -ear options to create a small deployment configuration file that only includes XML tags for options you have changed in the EAR file. XML tags are not generated for default options that have values, which have not been changed from their defaults. Options for which XML tags are not generated will use default values.
-max OptionUse this option with the -export option to create a deployment configuration file that includes all possible XML tags. For example:
appmanage -export -app SendMsg -domain tp041 -user admin -pw admin -out c:\temp\sendmsg.xml -max
-template OptionUse this option with the -export option to create a deployment configuration file that includes XML tags for all options. Certain options, such as machine tags will include values defined within percent (%%) characters that can be searched for and replaced. For example:
<bindings><binding name="">
<machine>%%demo2sub.aar-machine%%</machine><product>
<type>adb</type><version/><location/>
</product><description/><contact/>
</binding></bindings>
-password OptionUse this option with the -export option to encrypt sensitive data in the exported deployment configuration file. You will be prompted to enter an encryption password. For example:
AppManage -export -out c:\ears\deployments\timer_wait.xml -app timer_wait -user admin -pw admin -domain tp002 -password
Also use this option with the -deploy or -config option to upload a deployment configuration file whose sensitive data is encrypted with your custom password. You will be prompted to enter the encryption password that you specified when generating the deployment configuration file. For example:
TIBCO Runtime Agent Scripting Deployment User’s Guide
28 | Chapter 2 Getting Started
AppManage -config -ear c:\ears\timer_wait.ear -deployConfig c:\ears\deployments\timer_wait.xml -app timer_wait -user admin -pw admin -domain tp002 -password
-passwordFile OptionUse this option with the -export option to encrypt sensitive data in the exported deployment configuration file using a properties file. The properties file contains the password encrypted using the obfuscate utility (Refer to TIBCO Runtime Agent Installation for more information about Obfuscate Utility). For example:
AppManage -export -out c:\ears\deployments\timer_wait.xml -app timer_wait -user admin -pw admin -domain tp002 -passwordFile c:\my_password.txt
Also use this option with the -deploy or -config option to upload a deployment configuration file whose sensitive data is encrypted with your custom password. To use this option, you must provide a properties file which contains the password encrypted using the obfuscate utility when generating the deployment configuration file. For example:
AppManage -config -ear c:\ears\timer_wait.ear -deployConfig c:\ears\deployments\timer_wait.xml -app timer_wait -user admin -pw
admin -domain tp002 -passwordFile c:\my_password.txt
-moveAppData OptionThis option allows you to change the transport setting for a given application. It is similar to the -batchMoveAppData option, but operates against a single application. If the application is within a directory, use a forward slash (/) to separate it from the application name. For an overview of this option, see , Changing the Transport for Applications, on page 43.
The -deployconfig option can be used to configure the application with a given XML file.
The following example shows how to change the transport setting for an application from rv (Rendezvous) to local.
AppManage -moveAppData -app SendMsg -user admin -pw admin -domain tp041 -local
-truncate OptionWith this option you can remove unwanted revisions of an application. Note that this option does not change the value of Max Deployment Revision for your application. The following example truncates the application’s revision history.
TIBCO Runtime Agent Scripting Deployment User’s Guide
Other Options | 29
AppManage -truncate -app <app> -domain <domain> -user <user> -pw <password>] [-cred <cred>]
-serialize OptionIf this option is used, then deployment will be done to one machine at a time. Without this, deployment is done simultaneously to all machines with service instances for the application being deployed.
When deployment is being done to multiple machines and there are contention issues, the use of this flag can alleviate them and greatly speedup the overall deployment process.
Contention issues can be identified by deployment taking many minutes, but not using significant amounts of CPU time on the admin server or target machines.
The following example shows how to use this option in a domain.
AppManage -deploy -app myApp -user user1 -pw user1 -domain test -serialize
-exportDeployed OptionThis option is to be used with -export or -batchExport option. If -exportDeployed is specified, the active deployed configuration is exported. If not, then the current configuration changes that would be picked up by the next deployment are what is exported. If the application is in undeployed status, but was deployed earlier, the last deployed configuration is exported. If the application has never been deployed, the current configuration is exported just as if the flag was not specified.
When used with -export:
AppManage -export -app <app> -domain <domain> -out <uri> [-user <user> -pw <password>] [-cred <cred>] [-template] [-min] [-genEar] [-ear <archive>] [-exportDeployed]
When used with -batchExport:
AppManage -batchExport -domain <domain> -user <userName> -pw <password> [-cred <cred>] -dir <dir> [-template] [-min] [-noear] [-exportDeployed]
TIBCO Runtime Agent Scripting Deployment User’s Guide
30 | Chapter 2 Getting Started
Monitoring Events and Rulebases
A deployment configuration file can contain specifications for event elements and TIBCO Hawk rulebases. This section provides examples about how to configure these elements. For an introduction to monitoring events and rulebases, see the TIBCO Administrator User’s Guide.
Event ElementWhen defining an event in the TIBCO Administrator GUI, the Add Event panel displays the General, Alert, Email and Command sections. The General section defines how events defined in the alert, email and command sections are handled. Events are defined in the deployment configuration file in a similar way. Similar to the General section, the failureEvent element describes how an event is handled. The Alert, Email and Command sections correspond to the alertAction, emailAction and customAction elements.
Alert
The following XML fragment shows the definition of a monitoring alert section. The restart element is set to true and the failure element is set to FIRST. This means when the alert is triggered, only for the first failure occurrence, TIBCO Administrator will attempt to restart the service instance. For all subsequent failure occurrences, the service instance is not restarted. If the failure element was set to Subsequent, each time a failure occurred, the TIBCO Administrator would attempt to restart the failed service.
An alertAction is enabled and set to medium level. The alert is enabled for only for the first failure occurrence. To generate an alert for each failure occurrence, the performPolicy element must be set to Always.
The emailAction and customAction sections are not enabled.
<monitor><events>
<failureEvent><restart>true</restart><description>Restart on first failure</description><actions>
<alertAction><performPolicy>Once</performPolicy><enabled>true</enabled><level>Medium</level><message>Component failed!</message>
</alertAction><emailAction>
<performPolicy>Once</performPolicy>
TIBCO Runtime Agent Scripting Deployment User’s Guide

Monitoring Events and Rulebases | 31
<enabled>false</enabled></emailAction><customAction>
<performPolicy>Once</performPolicy><enabled>false</enabled>
</customAction></actions><failure>FIRST</failure>
</failureEvent></events>
</monitor>
The following XML fragment shows the definition for a monitoring email event. The restart element is set to true, so when an enabled action evaluates to true, the service instance is restarted. The failure element is set to ANY, which means that any failure will trigger the restart.
Only the emailAction element is enabled. The alertAction and customAction elements are disabled. The performPolicy element for email is defined as Always and the enabled element is defined as true. This means that the email alert action will be performed each time a failure event occurs for the application.
<monitor><events>
<failureEvent><restart>true</restart><description>Restart service instance.</description><actions>
<alertAction><performPolicy>Once</performPolicy><enabled>false</enabled><level>Low</level>
</alertAction><emailAction>
<performPolicy>Always</performPolicy><enabled>true</enabled><message>MyMessage</message><to>SentTo</to><cc>CCTo</cc><subject>MySubject</subject><sMTPServer>my.mail.server</sMTPServer>
</emailAction><customAction>
<performPolicy>Once</performPolicy><enabled>false</enabled>
</customAction></actions><failure>ANY</failure>
</failureEvent></events>
</monitor>
TIBCO Runtime Agent Scripting Deployment User’s Guide

32 | Chapter 2 Getting Started
Command
The following XML fragment shows the definition for a monitor command event.
The restart element is set to false, so the service instance is not restarted upon failure. The alertAction and emailAction elements are disabled.
The customAction element is enabled such that the command is executed only once. The command element lists the batch file to execute upon failure.
<monitor><events>
<suspendProcessEvent><restart>false</restart><description>Execute command upon failure.</description><actions>
<alertAction><performPolicy>Once</performPolicy><enabled>false</enabled><level>Low</level>
</alertAction><emailAction>
<performPolicy>Once</performPolicy><enabled>false</enabled>
</emailAction><customAction>
<performPolicy>Once</performPolicy><enabled>true</enabled><command>c:\commands\bin\mycommand.bat</command>
</customAction></actions>
</suspendProcessEvent></events>
</monitor>
RulebaseIn a scenario where a TIBCO Hawk rulebase file is used to monitor a TIBCO BusinessWorks process or an adapter service, when configuring deployment options using the TIBCO Administrator GUI, the rulebase file is picked up by browsing the file system or by specifying the full path to the file in the file system. When the rulebase file is loaded, path information is lost and only the file name and the contents are stored within Administrator.
If a deployment that makes use of this feature is exported into a deployment configuration file, using the AppManage -export command, the XML file has a section similar to:
<monitor><rulebases>
<rulebase><uri>myrulebase.hrb</uri><data>Hawk Rulebase file in Binary format</data>
TIBCO Runtime Agent Scripting Deployment User’s Guide

Monitoring Events and Rulebases | 33
</rulebase></rulebases>
</monitor>
When using this deployment configuration file to redeploy, you must change the uri to the absolute uri of the new Hawk rulebase file. For example:
<monitor><rulebases>
<rulebase><uri>c:\tibco\hkrulebases\myrulebase.hrb</uri><data>Hawk Rulebase file in Binary format</data>
</rulebase></rulebases>
</monitor>
Note that:
• If the uri is a path to a valid Hawk rulebase file, it will be used in the deployment, even if the contents of the rulebase file do not match the content within the data tag <data></data>.
• If the uri is not a valid path to a Hawk rulebase file, the binary content within the <data> tag will be used to create the Hawk rulebase file and the name given to the rulebase file will be the Filename portion of the uri.
• If the uri is invalid and a Hawk rulebase cannot be created out of the content within the data tag, an exception will be thrown.
TIBCO Runtime Agent Scripting Deployment User’s Guide

34 | Chapter 2 Getting Started
Setting Service Instance Runtime Variables
You can set a service instance runtime variable by exporting an application’s deployment configuration file and adding a runtime variable to the NVPairs element section to the file as shown in this section. After adding the section, use AppManage to deploy the application.
Each service instance can use the same runtime variable and assign a different value to it. The instance runtime variable can be any runtime variable that was defined for the service at configuration time and set to be included when the Include all service level global variables option is selected when building the enterprise archive file
Variable values can be set at the application level, service level and service instance level. A variable value set at the service instance level overrides the same variable value set at the service level. Similarly, a variable value set at the service level overrides the same variable set at the application level.
You can use the -template and -max options to create an XML file that shows all the service instance runtime variables defined for your application. See , -max Option, on page 27.
The following XML fragment shows the services section for a TIBCO BusinessWorks project that includes a sender process instance deployed on one machine and a receiver process instance deployed on two machines. The bold sections show that an instance runtime variable has been added to each process instance deployment in the NVPairs section, under each service instance binding section. This allows you to set values separately for each process instance deployment. The NVPairs name must be "INSTANCE_RUNTIME_VARIABLES".
<?xml version="1.0" encoding="UTF-8"?>
<application xmlns="http://www.tibco.com/xmlns/ApplicationManagement" name="RVCM_Project"> <description></description> <contact></contact> <NVPairs name="Global Variables"> <NameValuePair> <name>DirLedger</name> <value>.</value> </NameValuePair>...
<NameValuePairInteger> <name>RVCM/Worker_Tasks</name> <value>0</value> </NameValuePairInteger> <NameValuePairInteger>
TIBCO Runtime Agent Scripting Deployment User’s Guide
Setting Service Instance Runtime Variables | 35
<name>RVCM/Scheduler_Weight</name> <value>0</value> </NameValuePairInteger> <NameValuePairInteger> <name>RVCM/Worker_Weight</name> <value>0</value> </NameValuePairInteger>
</NVPairs>...
<services> <bw name="RVCM-Sender.par"> <enabled>true</enabled> <bindings> <binding name=""> <machine>SENDER-MACHINE</machine>... <NVPairs name="INSTANCE_RUNTIME_VARIABLES"> <NameValuePairInteger> <name>RVCM/Worker_Tasks</name> <value>0</value> </NameValuePairInteger> <NameValuePairInteger> <name>RVCM/Scheduler_Weight</name> <value>0</value> </NameValuePairInteger> <NameValuePairInteger> <name>RVCM/Worker_Weight</name> <value>0</value> </NameValuePairInteger> </NVPairs> </binding> </bindings>... </bw> <bw name="RVCMQ-Receiver.par"> <enabled>true</enabled> <bindings> <binding name=""> <machine>RECEIVER-MACHINE1</machine>... <NVPairs name="INSTANCE_RUNTIME_VARIABLES"> <NameValuePairInteger> <name>RVCM/Worker_Tasks</name> <value>0</value> </NameValuePairInteger> <NameValuePairInteger> <name>RVCM/Scheduler_Weight</name> <value>0</value> </NameValuePairInteger>
TIBCO Runtime Agent Scripting Deployment User’s Guide

36 | Chapter 2 Getting Started
<NameValuePairInteger> <name>RVCM/Worker_Weight</name> <value>0</value> </NameValuePairInteger> </NVPairs> </binding> <binding name=""> <machine>RECEIVER-MACHINE2</machine>... <NVPairs name="INSTANCE_RUNTIME_VARIABLES"> <NameValuePairInteger> <name>RVCM/Worker_Tasks</name> <value>0</value> </NameValuePairInteger> <NameValuePairInteger> <name>RVCM/Scheduler_Weight</name> <value>0</value> </NameValuePairInteger> <NameValuePairInteger> <name>RVCM/Worker_Weight</name> <value>0</value> </NameValuePairInteger> </NVPairs> </binding> </bindings>... </bw> </services></application>
TIBCO Runtime Agent Scripting Deployment User’s Guide

| 37
Chapter 3 Using AppManage in Batch Mode
This chapter explains the AppManage utility batch commands.
Topics
• Overview, page 38
• Creating the AppManage.batch File by Exporting Applications, page 39
• Deploying Applications in Batch Mode, page 40
• Starting Applications in Batch Mode, page 41
• Deleting Applications in Batch Mode, page 42
TIBCO Runtime Agent Scripting Deployment User’s Guide
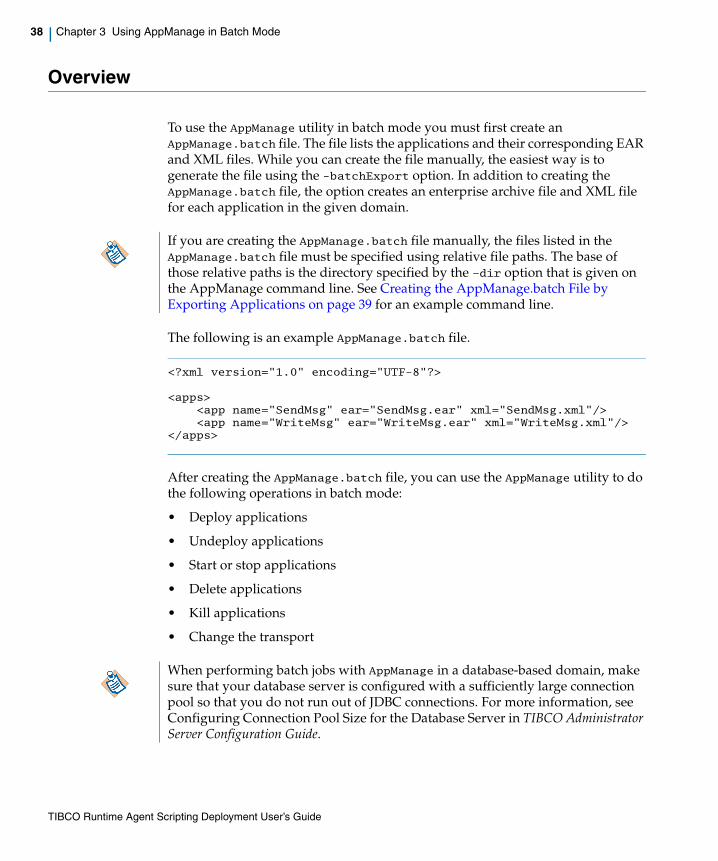
38 | Chapter 3 Using AppManage in Batch Mode
Overview
To use the AppManage utility in batch mode you must first create an AppManage.batch file. The file lists the applications and their corresponding EAR and XML files. While you can create the file manually, the easiest way is to generate the file using the -batchExport option. In addition to creating the AppManage.batch file, the option creates an enterprise archive file and XML file for each application in the given domain.
The following is an example AppManage.batch file.
<?xml version="1.0" encoding="UTF-8"?>
<apps> <app name="SendMsg" ear="SendMsg.ear" xml="SendMsg.xml"/> <app name="WriteMsg" ear="WriteMsg.ear" xml="WriteMsg.xml"/></apps>
After creating the AppManage.batch file, you can use the AppManage utility to do the following operations in batch mode:
• Deploy applications
• Undeploy applications
• Start or stop applications
• Delete applications
• Kill applications
• Change the transport
If you are creating the AppManage.batch file manually, the files listed in the AppManage.batch file must be specified using relative file paths. The base of those relative paths is the directory specified by the –dir option that is given on the AppManage command line. See Creating the AppManage.batch File by Exporting Applications on page 39 for an example command line.
When performing batch jobs with AppManage in a database-based domain, make sure that your database server is configured with a sufficiently large connection pool so that you do not run out of JDBC connections. For more information, see Configuring Connection Pool Size for the Database Server in TIBCO Administrator Server Configuration Guide.
TIBCO Runtime Agent Scripting Deployment User’s Guide

Creating the AppManage.batch File by Exporting Applications | 39
Creating the AppManage.batch File by Exporting Applications
The next command shows how to automatically create the AppManage.batch file.
To use an encrypted password, do not use the -user and -pw options. Instead create a credentials file and encrypt the password, then provide the file location and name to the -cred option. See Working with Passwords on page 11 for details.
The -dir option specifies the location where the AppManage.batch file will be written. The directory specified for the option is created, if it does not exist. The AppManage.batch file cannot be written directly under the file system root drive. That is, specifying c:\AppManage.batch for the –dir option is not allowed.
AppManage -batchExport -domain mydomain -user admin -pw admin -dir c:\adminbatch\mybatch\
The -batchExport option also takes these options:
• -template — export a deployment configuration file in template format.
• -min — export a deployment configuration file with default settings omitted.
• -noear — do not export enterprise archive files.
TIBCO Runtime Agent Scripting Deployment User’s Guide

40 | Chapter 3 Using AppManage in Batch Mode
Deploying Applications in Batch Mode
The following command deploys all applications specified in the AppManage.batch file that is located in the directory specified for the -dir option. The directory must have been created earlier using the -batchExport option. See Creating the AppManage.batch File by Exporting Applications on page 39 for details.
Because the -nostart option is given, the applications are not started. If the -nostart option is not given, the applications are started after deployment.
AppManage -batchDeploy -domain mydomain -user admin -pw admin -dir c:\adminbatch\mybatch\ -nostart
Undeploying Applications in Batch ModeThe following command undeploys all applications specified in the AppManage.batch file that is located in the directory specified for the -dir option.
AppManage -batchUnDeploy -domain mydomain -user admin -pw admin -dir c:\adminbatch\mybatch\
TIBCO Runtime Agent Scripting Deployment User’s Guide

Starting Applications in Batch Mode | 41
Starting Applications in Batch Mode
The following command starts all applications specified in the AppManage.batch file that is located in the directory specified for the -dir option. The directory must have been created earlier using the -batchExport option. See Creating the AppManage.batch File by Exporting Applications on page 39 for details.
AppManage -batchstart -domain mydomain -user admin -pw admin -dir c:\adminbatch\mybatch\
Stopping Applications in Batch ModeThe following command stops all applications specified in the AppManage.batch file that is located in the directory specified for the -dir option.
AppManage -batchstop -domain mydomain -user admin -pw admin -dir c:\adminbatch\mybatch\
TIBCO Runtime Agent Scripting Deployment User’s Guide
42 | Chapter 3 Using AppManage in Batch Mode
Deleting Applications in Batch Mode
The following command deletes all applications specified in the AppManage.batch file that is located in the directory specified for the -dir option. The directory must have been created earlier using the -batchExport option. See Creating the AppManage.batch File by Exporting Applications on page 39 for details.
If the application is deployed, you can undeploy and delete the application in one operation using the -force option. An error is returned if you attempt to delete a deployed application without specifying the -force option.
AppManage -batchDelete -domain mydomain -user admin -pw admin -dir c:\adminbatch\mybatch\ -force
Killing Applications in Batch ModeThis command forces an immediate shutdown of each service instance or process engine listed in the AppManage.batch file. If checkpoints or other graceful shutdown options are defined for a process engine, the options are ignored. Current jobs are terminated before given a chance to complete.
The following command kills all applications specified in the AppManage.batch file that is located in the directory specified for the -dir option.
AppManage -batchkill -domain mydomain -user admin -pw admin -dir c:\adminbatch\mybatch\
TIBCO Runtime Agent Scripting Deployment User’s Guide

Changing the Transport for Applications | 43
Changing the Transport for Applications
When configuring an administration domain, you set the default for how the administration server interacts with application repositories stored as files. When TIBCO Rendezvous is configured as the transport for the administration domain, it can be configured to use local application data or server-based application data as the default.
While the choice you use can be changed in TIBCO Administrator by undeploying the application, changing the transport setting, and redeploying the application, you can use the AppManage -batchMoveAppData option to change the transport setting in batch mode.
When using the option, AppManage redeploys the application with the changed transport setting. You can change values and redeploy without undeploying the application.
The -batchMoveAppData option updates all applications specified in the -dir directory. You can also change the default transport setting for an administration domain by including the -setDefault option, where all subsequent deployments in the domain will use the given transport.
The user account must have write permission for the specified applications. Only the local or rv (Rendezvous) transports can be set.
For example, the following command changes the transport from rv to local for the applications specified in the directory given for the -dir option. The directory must have been populated earlier using the -batchExport option. See Creating the AppManage.batch File by Exporting Applications on page 39 for details.
C:\tibco\tra\<version>\bin>appmanage -batchMoveAppData -domain tp041 -user admin -pw admin -dir c:\adminbatch\mybatch -localChecking if master server is responding ...Finished checkingInitializing ...Finished initializationRedeploying application SendMsg with new Application data location local ...Loading archive ...Finished loading archiveConfiguring application ...Finished configuring applicationDeploying application ...Instance SendMsg created succesfullyFinished deploying application[ SendMsg ]: Finished successfully in 19 seconds
TIBCO Runtime Agent Scripting Deployment User’s Guide

44 | Chapter 3 Using AppManage in Batch Mode
TIBCO Runtime Agent Scripting Deployment User’s Guide

| 45
Appendix A Deployment Configuration File Reference
This chapter explains the values you can set for elements in the generated deployment configuration XML file.
Topics
• Application Element, page 48
• bw Element, page 71
• adapter Element, page 77
• formFlow Element, page 79
• Requires Authentication, page 82
TIBCO Runtime Agent Scripting Deployment User’s Guide

46 | Appendix A Deployment Configuration File Reference
Overview
This chapter explains the values you can set for elements in an XML file for an application. The XML file is typically generated using the AppManage -export option against an application’s EAR file. For example:
AppManage -export -out c:\test\myApp.xml -ear myApp.ear
Typically, you then edit the XML file, and then deploy the application. See Simple Application Deployment on page 16 for details about deploying an application after editing its deployment configuration file.
AppManage XSD FilesIf you are using an XML editor such as that available in TIBCO Designer (using Project > Import Resources from File, Folder, URL), you can load the XSD files that are included in the AppManage.jar and the Deployment.jar files. Doing so allows you to get more information about the elements in the deployment configuration file. The jar files are located in the TIBCO_HOME/tra/version/lib directory.
The main XML schema for deployment configuration is in ApplicationManagement.xsd, which is included in the AppManage.jar. The bw.xsd file is also in the AppManage.jar file. There are two imported schemas, RequiresAuthentication.xsd and DeploymentDescriptorArchive.xsd referenced. The two XSDs are in the Deployment.jar file.
To get the XSD files, use winzip or another utility to unpack the jar files. The XSD files are located as follows in the jar files:• AppManage.jar:
com\tibco\administrator\command\resource\ApplicationManagement.xsd
• AppManage.jar: com\tibco\administrator\command\resource\bw\bw.xsd
• Deployment.jar: \com\tibco\dd\authentication\RequiresAuthentication.xsd
Icons Used in the DiagramsEach element in this appendix is explained using the diagrams that display in TIBCO Designer. The following shows a partial element diagram. In the diagram below, the name attribute is mandatory and the repoInstanceName element is optional.
TIBCO Runtime Agent Scripting Deployment User’s Guide

Overview | 47
Figure 2 Partial Element Diagram
• The icon indicates the object is an attribute.
• The icon indicates the object is an element.
• The allowed data type is listed in the grey box.
• The icon indicates the attribute or element is optional.
• If a icon does not appear, the attribute or element is mandatory.
• The icon (not shown in the diagram) indicates a one to many relationship exists for an element.
Indicates allowed"?" indicates optional data type
TIBCO Runtime Agent Scripting Deployment User’s Guide
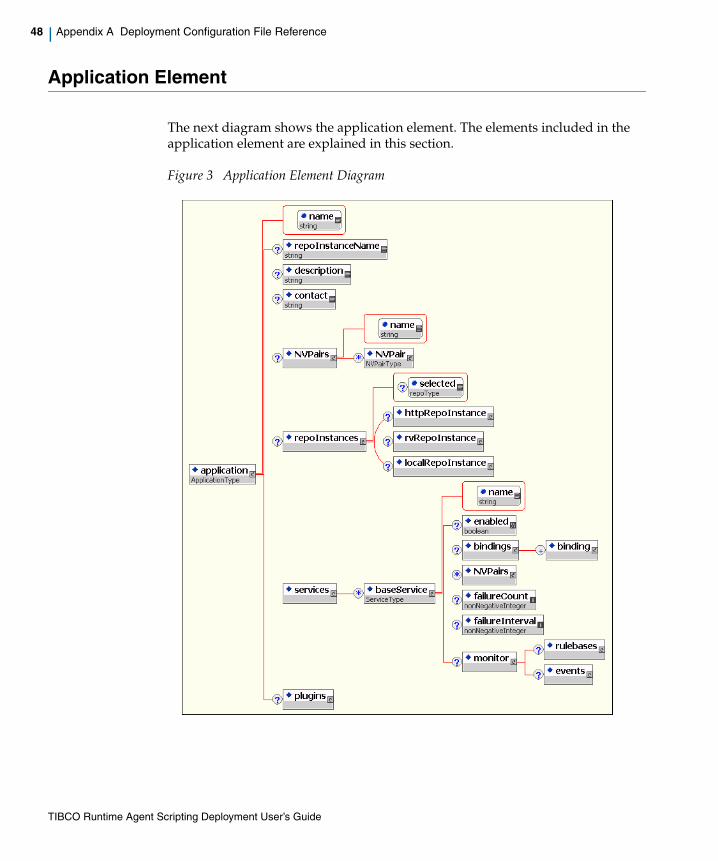
48 | Appendix A Deployment Configuration File Reference
Application Element
The next diagram shows the application element. The elements included in the application element are explained in this section.
Figure 3 Application Element Diagram
TIBCO Runtime Agent Scripting Deployment User’s Guide

Application Element | 49
NVPairs ElementThe next diagram shows the element.
Table 3 Application Element Description
Attribute or Element Description
name The name assigned to the application in TIBCO Designer.
repoInstanceName This element corresponds to the Deployment Name field that is displayed in the Edit Application Configuration panel in the TIBCO Administrator GUI. The element’s value is the <administration-domain>-<application> name.
description Information about the application that is stored in this file.
contact Name of the person responsible for this application.
NVPairs See NVPairs Element on page 49.
repoInstances See RepoInstances Element on page 52.
services See services Element on page 53.
plugins Currently not used.
TIBCO Runtime Agent Scripting Deployment User’s Guide
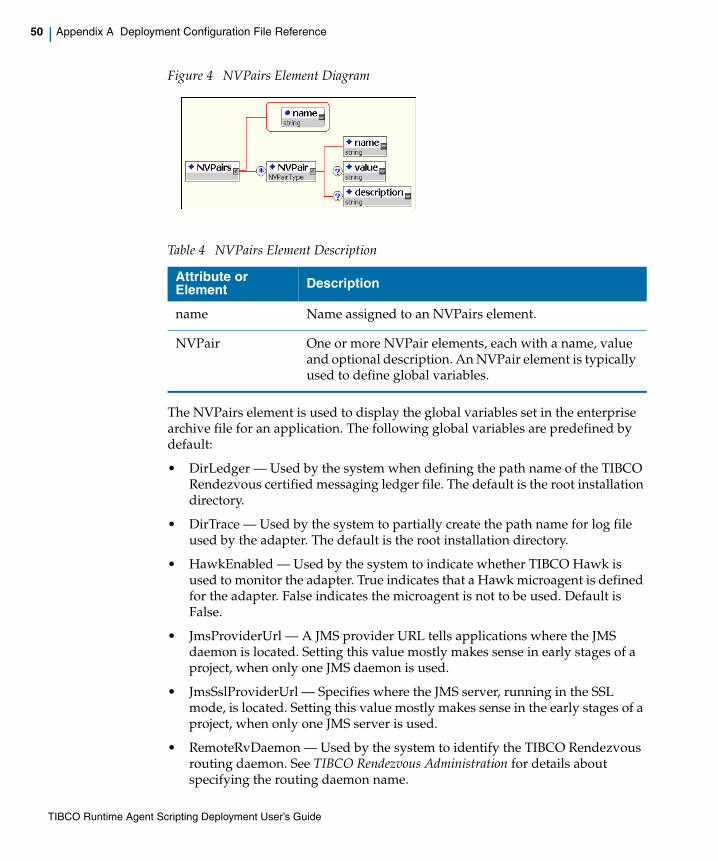
50 | Appendix A Deployment Configuration File Reference
Figure 4 NVPairs Element Diagram
The NVPairs element is used to display the global variables set in the enterprise archive file for an application. The following global variables are predefined by default:
• DirLedger — Used by the system when defining the path name of the TIBCO Rendezvous certified messaging ledger file. The default is the root installation directory.
• DirTrace — Used by the system to partially create the path name for log file used by the adapter. The default is the root installation directory.
• HawkEnabled — Used by the system to indicate whether TIBCO Hawk is used to monitor the adapter. True indicates that a Hawk microagent is defined for the adapter. False indicates the microagent is not to be used. Default is False.
• JmsProviderUrl — A JMS provider URL tells applications where the JMS daemon is located. Setting this value mostly makes sense in early stages of a project, when only one JMS daemon is used.
• JmsSslProviderUrl — Specifies where the JMS server, running in the SSL mode, is located. Setting this value mostly makes sense in the early stages of a project, when only one JMS server is used.
• RemoteRvDaemon — Used by the system to identify the TIBCO Rendezvous routing daemon. See TIBCO Rendezvous Administration for details about specifying the routing daemon name.
Table 4 NVPairs Element Description
Attribute or Element Description
name Name assigned to an NVPairs element.
NVPair One or more NVPair elements, each with a name, value and optional description. An NVPair element is typically used to define global variables.
TIBCO Runtime Agent Scripting Deployment User’s Guide
Application Element | 51
• RvDaemon — Used by the system to identify the TIBCO Rendezvous daemon parameter. The parameter instructs the transport object about how and where to find the Rendezvous daemon and establish communication. The default value is 7500, which is the default value used by the Rendezvous daemon. See TIBCO Rendezvous Concepts for details about specifying the daemon parameter.
• RvNetwork — Used by the system to identify the TIBCO Rendezvous network parameter. Every network transport communicates with other transports over a single network interface. On computers with more than one network interface, the network parameter instructs the TIBCO Rendezvous daemon to use a particular network for all outbound messages from this transport. See TIBCO Rendezvous Concepts for details about specifying the network parameter.
• RvService — Used by the system to identify the TIBCO Rendezvous service parameter. The Rendezvous daemon divides the network into logical partitions. Each transport communicates on a single service; a transport can communicate only with other transports on the same service. See TIBCO Rendezvous Concepts for details about specifying the service parameter. Default is 7500
• RvaHost — Used by the system to identify the computer on which the TIBCO Rendezvous agent runs. See TIBCO Rendezvous Administration for details about specifying the rva parameters.
• RvaPort — Used by the system to identify the TIBCO Rendezvous agent TCP port where the agent listens for client connection requests. See TIBCO Rendezvous Administration for details about specifying the rva parameters. Default is to 7501.
• TIBHawkDaemon — Used by the system to identify the TIBCO Hawk daemon parameter. See the TIBCO Hawk Installation and Configuration manual for details about this parameter. Default is the value that was set during domain creation (7474 by default).
• TIBHawkNetwork — Used by the system to identify the TIBCO Hawk network parameter. See the TIBCO Hawk Installation and Configuration manual for details about this parameter. Default is an empty string.
• TIBHawkService — Used by the system to identify the TIBCO service parameter. See the TIBCO Hawk Installation and Configuration manual for details about this parameter. Default is 7474.
• MessageEncoding — The message encoding set for the application. The default value is ISO8859-1, which only supports English and other western European languages that belong to ISO Latin-1 character set. After the project is deployed in an administration domain, the messaging encoding set at design time is overridden by the domain's encoding property. All the TIBCO
TIBCO Runtime Agent Scripting Deployment User’s Guide
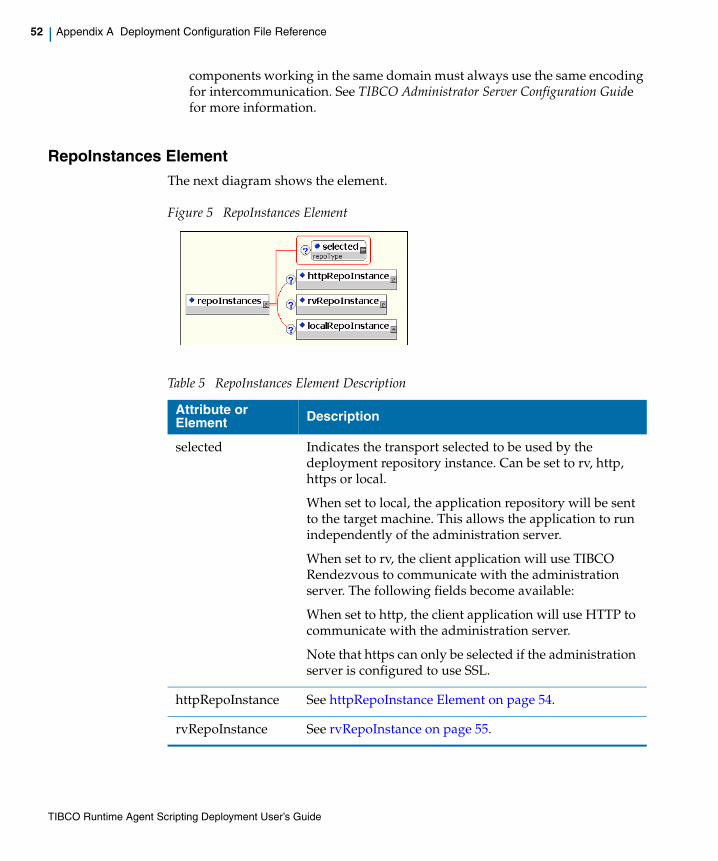
52 | Appendix A Deployment Configuration File Reference
components working in the same domain must always use the same encoding for intercommunication. See TIBCO Administrator Server Configuration Guide for more information.
RepoInstances ElementThe next diagram shows the element.
Figure 5 RepoInstances Element
Table 5 RepoInstances Element Description
Attribute or Element Description
selected Indicates the transport selected to be used by the deployment repository instance. Can be set to rv, http, https or local.
When set to local, the application repository will be sent to the target machine. This allows the application to run independently of the administration server.
When set to rv, the client application will use TIBCO Rendezvous to communicate with the administration server. The following fields become available:
When set to http, the client application will use HTTP to communicate with the administration server.
Note that https can only be selected if the administration server is configured to use SSL.
httpRepoInstance See httpRepoInstance Element on page 54.
rvRepoInstance See rvRepoInstance on page 55.
TIBCO Runtime Agent Scripting Deployment User’s Guide

Application Element | 53
services ElementThe next diagram shows the element.
Figure 6 services Element Diagram
localRepoInstance Indicates a local file (or directory of files) is used as the deployment repository instance. Depending on the type of services deployed to a machine, the local repository may be a .dat file or a multi-file project (such as is used in Designer). If there is an adapter service and a BW service you will have both types of instances installed on your local machine.
The localRepoInstance element contains the encoding element. If this element is not specified, then the encoding for the admin server is used. If the admin server is not available, then the default for this element is ISO8859-1.
Table 5 RepoInstances Element Description
Attribute or Element Description
TIBCO Runtime Agent Scripting Deployment User’s Guide
54 | Appendix A Deployment Configuration File Reference
httpRepoInstance ElementThe next diagram shows the element.
Table 6 services Element Description
Attribute or Element Description
name The name assigned to the application’s service or process. Names ending in .par indicate the application is a TIBCO BusinessWorks process. Names ending in .sar indicate the application is a service, such as a TIBCO adapter.
enabled true or false. Only enabled services are deployed. Disabling a service, effectively undeploys just that service while letting all other services in the application run as normal. For example, this can be useful when you wish to deploy an application that includes a service for which you don't have the required software.
bindings See bindings Element on page 57.
NVPairs See NVPairs Element on page 49.
failureCount The value in this field defines how many restarts should be attempted before resetting the error counter to 0. See the TIBCO Administrator User’s Guide for more information about this element.
failureInterval The value in this field defines how much time should expire before resetting the error counter to 0.
monitor See monitor Element on page 59.
TIBCO Runtime Agent Scripting Deployment User’s Guide
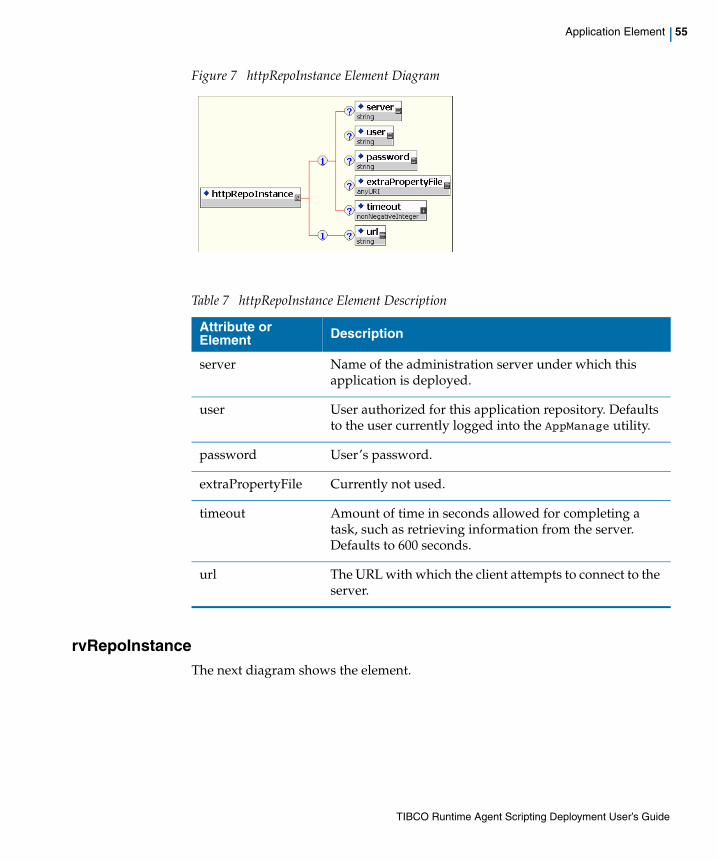
Application Element | 55
Figure 7 httpRepoInstance Element Diagram
rvRepoInstanceThe next diagram shows the element.
Table 7 httpRepoInstance Element Description
Attribute or Element Description
server Name of the administration server under which this application is deployed.
user User authorized for this application repository. Defaults to the user currently logged into the AppManage utility.
password User’s password.
extraPropertyFile Currently not used.
timeout Amount of time in seconds allowed for completing a task, such as retrieving information from the server. Defaults to 600 seconds.
url The URL with which the client attempts to connect to the server.
TIBCO Runtime Agent Scripting Deployment User’s Guide
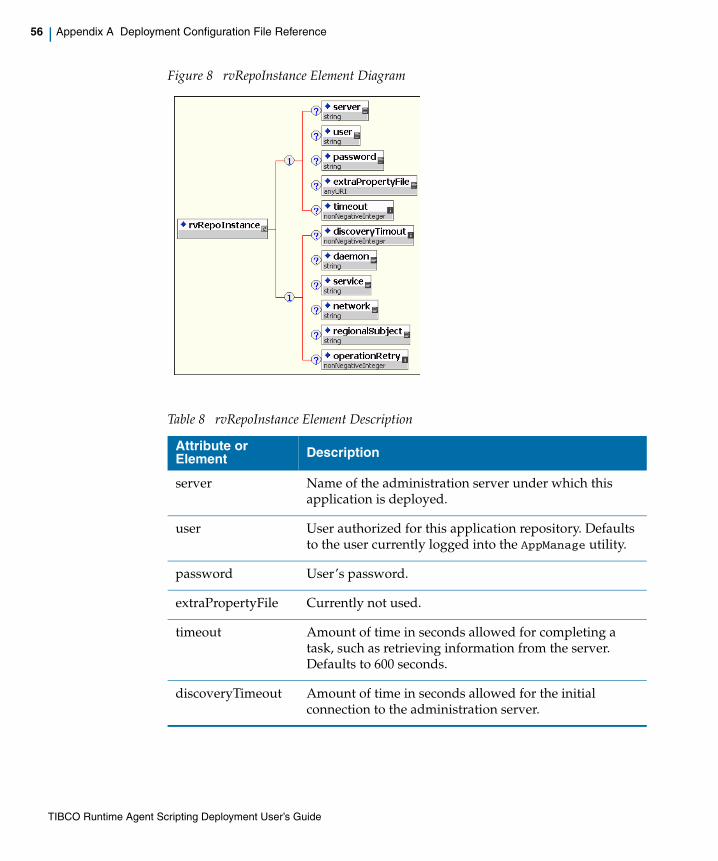
56 | Appendix A Deployment Configuration File Reference
Figure 8 rvRepoInstance Element Diagram
Table 8 rvRepoInstance Element Description
Attribute or Element Description
server Name of the administration server under which this application is deployed.
user User authorized for this application repository. Defaults to the user currently logged into the AppManage utility.
password User’s password.
extraPropertyFile Currently not used.
timeout Amount of time in seconds allowed for completing a task, such as retrieving information from the server. Defaults to 600 seconds.
discoveryTimeout Amount of time in seconds allowed for the initial connection to the administration server.
TIBCO Runtime Agent Scripting Deployment User’s Guide
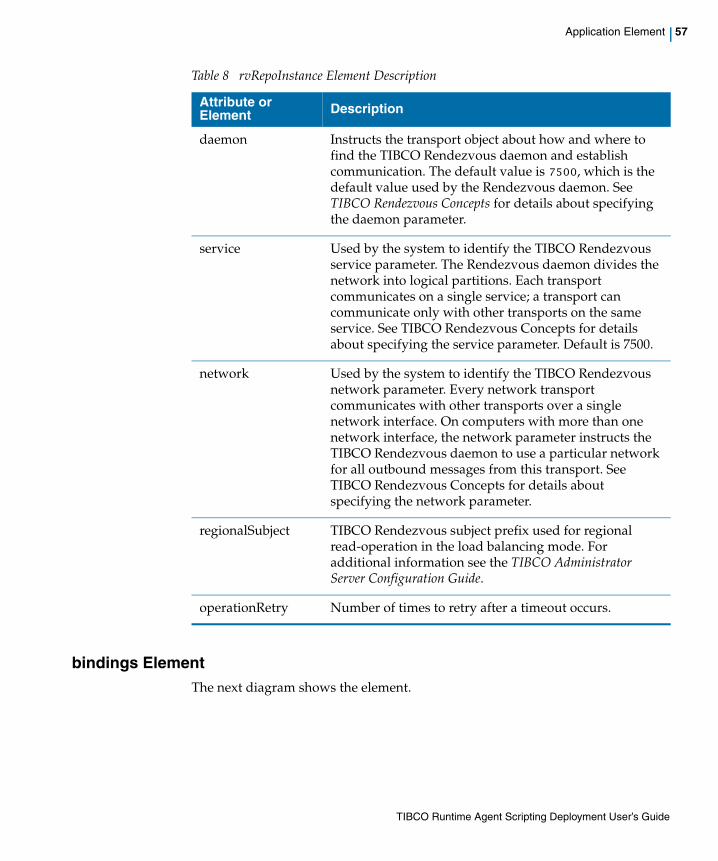
Application Element | 57
bindings ElementThe next diagram shows the element.
daemon Instructs the transport object about how and where to find the TIBCO Rendezvous daemon and establish communication. The default value is 7500, which is the default value used by the Rendezvous daemon. See TIBCO Rendezvous Concepts for details about specifying the daemon parameter.
service Used by the system to identify the TIBCO Rendezvous service parameter. The Rendezvous daemon divides the network into logical partitions. Each transport communicates on a single service; a transport can communicate only with other transports on the same service. See TIBCO Rendezvous Concepts for details about specifying the service parameter. Default is 7500.
network Used by the system to identify the TIBCO Rendezvous network parameter. Every network transport communicates with other transports over a single network interface. On computers with more than one network interface, the network parameter instructs the TIBCO Rendezvous daemon to use a particular network for all outbound messages from this transport. See TIBCO Rendezvous Concepts for details about specifying the network parameter.
regionalSubject TIBCO Rendezvous subject prefix used for regional read-operation in the load balancing mode. For additional information see the TIBCO Administrator Server Configuration Guide.
operationRetry Number of times to retry after a timeout occurs.
Table 8 rvRepoInstance Element Description
Attribute or Element Description
TIBCO Runtime Agent Scripting Deployment User’s Guide
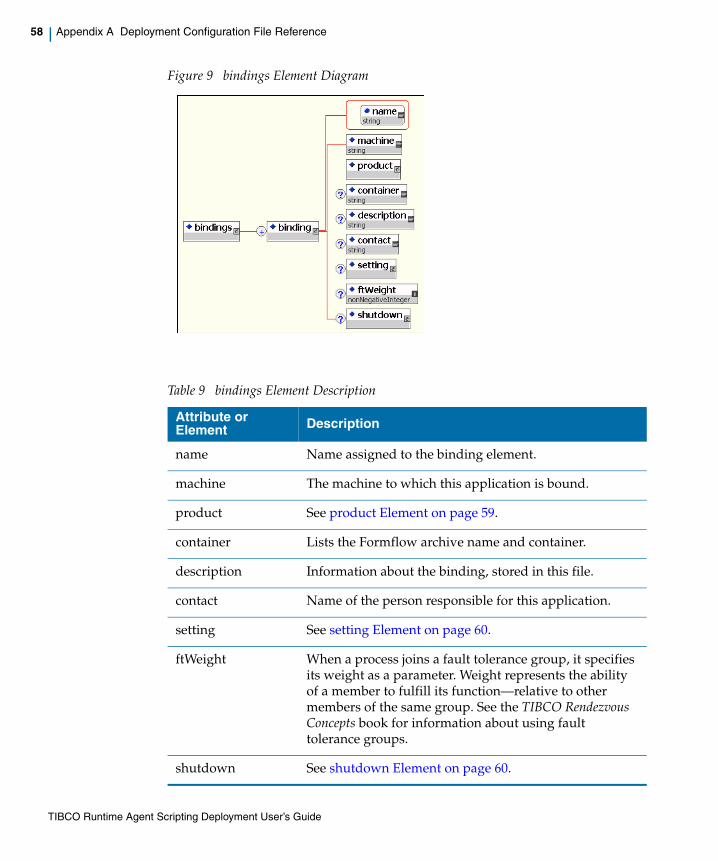
58 | Appendix A Deployment Configuration File Reference
Figure 9 bindings Element Diagram
Table 9 bindings Element Description
Attribute or Element Description
name Name assigned to the binding element.
machine The machine to which this application is bound.
product See product Element on page 59.
container Lists the Formflow archive name and container.
description Information about the binding, stored in this file.
contact Name of the person responsible for this application.
setting See setting Element on page 60.
ftWeight When a process joins a fault tolerance group, it specifies its weight as a parameter. Weight represents the ability of a member to fulfill its function—relative to other members of the same group. See the TIBCO Rendezvous Concepts book for information about using fault tolerance groups.
shutdown See shutdown Element on page 60.
TIBCO Runtime Agent Scripting Deployment User’s Guide

Application Element | 59
monitor ElementThe next diagram shows the element.
Figure 10 monitor Element Diagram
product ElementThe next diagram shows the element.
Figure 11 product Element Diagram
Table 10 monitor Element Description
Attribute or Element Description
rulebases See rulebases Element on page 63.
events See events Element on page 64.
Table 11 product Element Description
Attribute or Element Description
type The product type. Do not change.
version The product version installed.
location The product’s directory location.
TIBCO Runtime Agent Scripting Deployment User’s Guide

60 | Appendix A Deployment Configuration File Reference
setting ElementThe next diagram shows the element.
Figure 12 setting Element Diagram
shutdown ElementThe next diagram shows the element.
Table 12 setting Element Description
Attribute or Element Description
startOnBoot Specifies that the service instance should be started whenever its machine restarts.
enableVerbose Enables verbose tracing.
maxLogFileSize Specifies the maximum size (in Kilobytes) a log file can reach before the engine switches to the next log file.
threadCount Number of threads assigned. Default is 8.
NTService See NTService Element on page 61.
java See java Element on page 62.
TIBCO Runtime Agent Scripting Deployment User’s Guide

Application Element | 61
Figure 13 shutdown Element Diagram
NTService ElementThe next diagram shows the element.
Figure 14 NTService Element Diagram
Table 13 shutdown Element Description
Attribute or Element Description
checkpoint When true, the process engine waits for all jobs to finish (up to the maximum timeout) before shutting down the engine, rather than removing jobs at their next checkpoint.
timeout The maximum timeout in seconds the process engine will wait for jobs to finish before shutting down the engine. A zero (0) value means 0 seconds, which effectively turns the graceful shutdown into an immediate shutdown.
TIBCO Runtime Agent Scripting Deployment User’s Guide

62 | Appendix A Deployment Configuration File Reference
java ElementThe next diagram shows the element.
Figure 15 java Element Diagram
Table 14 NTService Element Description
Attribute or Element Description
runAsNT true or false. When true, the service is run as a Microsoft Windows Service. You can then manage the engine as you would any other service, and you can specify that it starts automatically when the machine reboots.
startupType Set to one of the service startup types, Automatic, Manual, or Disabled.
loginAs The login account for the service, if any. The domain name must be specified. If the login account is defined on the local machine, the domain is ".". For example, user jeff on the local machine would be specified as .\jeff.
password Password for the login account.
TIBCO Runtime Agent Scripting Deployment User’s Guide
Application Element | 63
rulebases ElementThe next diagram shows the element.
Figure 16 rulebases Element Diagram
Table 15 java Element Description
Attribute or Element Description
prepandClassPath The items you provide here are prepended to your CLASSPATH environment variable. You can specify a Java code editor, or the jar file from a JNDI provider if you wish to use TIBCO BusinessWorks to receive and process JMS messages.
appendClassPath The items you provide here are appended to your CLASSPATH environment variable. You can specify a Java code editor, or the jar file from a JNDI provider if you wish to use TIBCO BusinessWorks to receive and process JMS messages.
initHeapSize Initial size for the JVM used for the process engine. Default is 32 MB.
maxHeapSize Maximum size for the JVM used for the process engine. Default is 128 MB.
threadStackSize Size for the thread stack. Default is 128 KB.
Table 16 rulebases Element Description
Attribute or Element Description
uri Location of the rulebase file.
TIBCO Runtime Agent Scripting Deployment User’s Guide
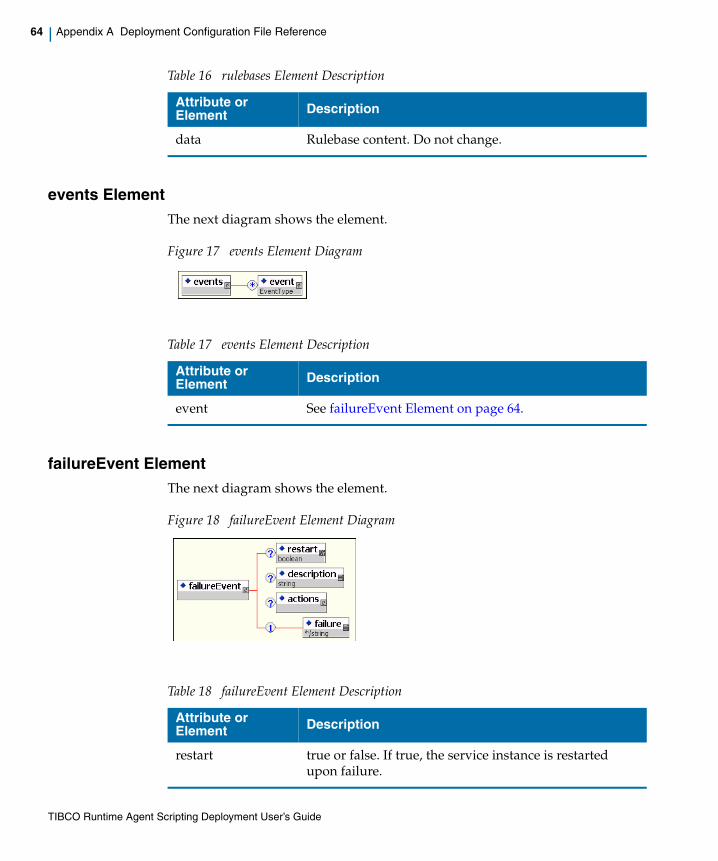
64 | Appendix A Deployment Configuration File Reference
events ElementThe next diagram shows the element.
Figure 17 events Element Diagram
failureEvent ElementThe next diagram shows the element.
Figure 18 failureEvent Element Diagram
data Rulebase content. Do not change.
Table 16 rulebases Element Description
Attribute or Element Description
Table 17 events Element Description
Attribute or Element Description
event See failureEvent Element on page 64.
Table 18 failureEvent Element Description
Attribute or Element Description
restart true or false. If true, the service instance is restarted upon failure.
TIBCO Runtime Agent Scripting Deployment User’s Guide

Application Element | 65
suspendProcessEvent ElementThe next diagram shows the element.
Figure 19 suspendProcess Event Element Diagram
description Information that describes this operation.
actions One of the following actions defined for a failure event:
• alertAction Element on page 66
• emailAction Element on page 67
• customAction Element on page 69
failure The failure element defines when the alert action should be enabled after a service instance failure. One of the following can be defined:
• ANY—Any failure
• FIRST—First component failure.
• SECOND—Second component failure.
• Subsequent—Subsequent component failures.
Table 18 failureEvent Element Description
Attribute or Element Description
Table 19 suspendProcess Event Element Description
Attribute or Element Description
restart true or false. If true, the service instance is restarted upon failure.
TIBCO Runtime Agent Scripting Deployment User’s Guide

66 | Appendix A Deployment Configuration File Reference
logEvent ElementThe next diagram shows the element.
Figure 20 logEvent Element Diagram
alertAction ElementThe next diagram shows the element.
description Information that describes this operation.
actions The action to perform when the policy is suspended.
Table 19 suspendProcess Event Element Description
Attribute or Element Description
Table 20 logEvent Element Description
Attribute or Element Description
restart true or false. If true, the service instance is restarted upon failure.
description Information that describes this operation.
actions The action to perform.
match The string in the log file to match.
TIBCO Runtime Agent Scripting Deployment User’s Guide
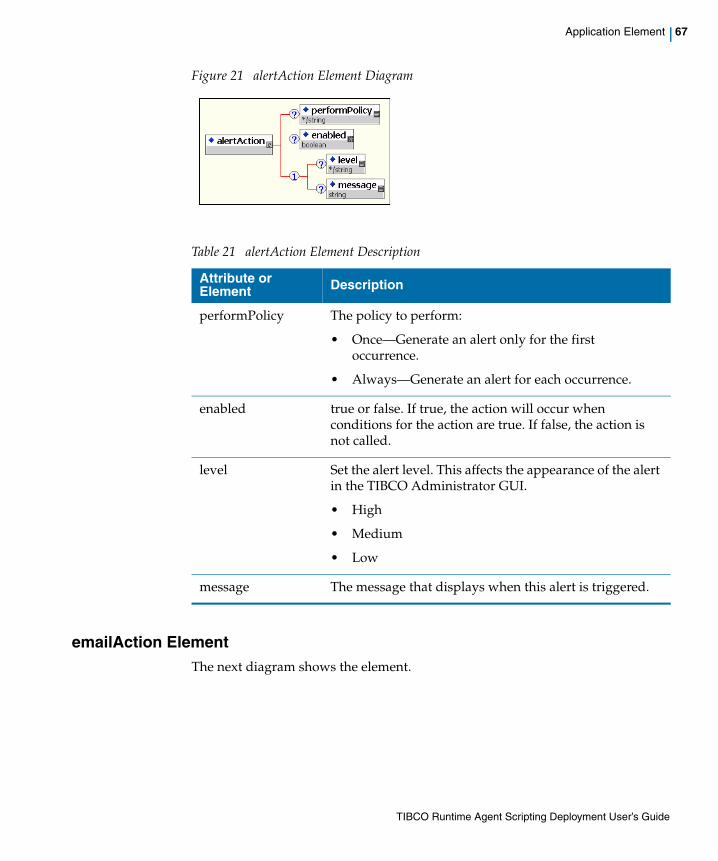
Application Element | 67
Figure 21 alertAction Element Diagram
emailAction ElementThe next diagram shows the element.
Table 21 alertAction Element Description
Attribute or Element Description
performPolicy The policy to perform:
• Once—Generate an alert only for the first occurrence.
• Always—Generate an alert for each occurrence.
enabled true or false. If true, the action will occur when conditions for the action are true. If false, the action is not called.
level Set the alert level. This affects the appearance of the alert in the TIBCO Administrator GUI.
• High
• Medium
• Low
message The message that displays when this alert is triggered.
TIBCO Runtime Agent Scripting Deployment User’s Guide
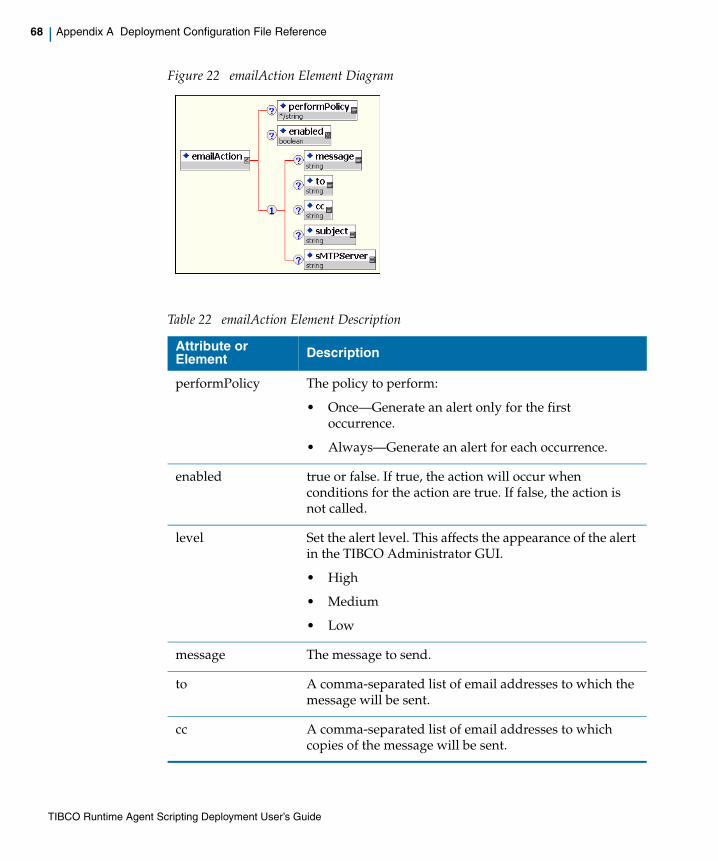
68 | Appendix A Deployment Configuration File Reference
Figure 22 emailAction Element Diagram
Table 22 emailAction Element Description
Attribute or Element Description
performPolicy The policy to perform:
• Once—Generate an alert only for the first occurrence.
• Always—Generate an alert for each occurrence.
enabled true or false. If true, the action will occur when conditions for the action are true. If false, the action is not called.
level Set the alert level. This affects the appearance of the alert in the TIBCO Administrator GUI.
• High
• Medium
• Low
message The message to send.
to A comma-separated list of email addresses to which the message will be sent.
cc A comma-separated list of email addresses to which copies of the message will be sent.
TIBCO Runtime Agent Scripting Deployment User’s Guide
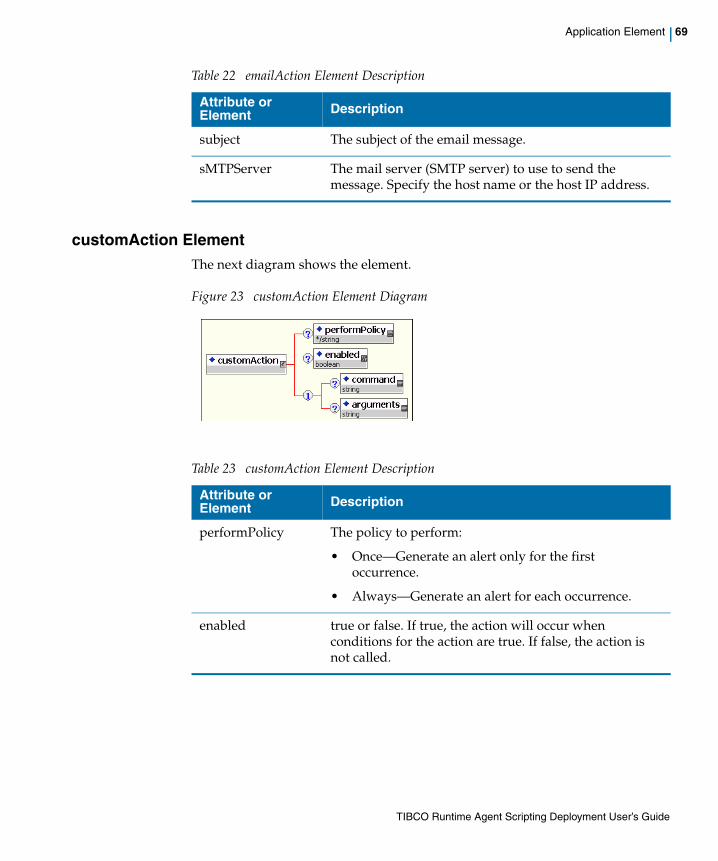
Application Element | 69
customAction ElementThe next diagram shows the element.
Figure 23 customAction Element Diagram
subject The subject of the email message.
sMTPServer The mail server (SMTP server) to use to send the message. Specify the host name or the host IP address.
Table 22 emailAction Element Description
Attribute or Element Description
Table 23 customAction Element Description
Attribute or Element Description
performPolicy The policy to perform:
• Once—Generate an alert only for the first occurrence.
• Always—Generate an alert for each occurrence.
enabled true or false. If true, the action will occur when conditions for the action are true. If false, the action is not called.
TIBCO Runtime Agent Scripting Deployment User’s Guide

70 | Appendix A Deployment Configuration File Reference
command Specify the script to execute. Script files are highly recommended.
Commands are possible but are limited because the command line arguments cannot accept redirection (|), multiple command (;) or append characters(> and >>). Redirection is allowed in a script.
On Windows:
• Use a .bat file that begins with the line @echo off to prevent the shell from exiting prematurely.
• Always give the full path with "\" as the path separator.
• If you use a command instead of a script, you must prefix it with cmd \c.
On UNIX:
• Make sure the script is executable (chmod +x).
• Always give the full path with / as the path separator.
If you purchased the full TIBCO Hawk product, see the TIBCO Hawk Administrator’s Guide for more information.
arguments The list of arguments for the command.
Table 23 customAction Element Description
Attribute or Element Description
TIBCO Runtime Agent Scripting Deployment User’s Guide

bw Element | 71
bw Element
The bw element is used by a TIBCO BusinessWorks process. The next diagram shows the element.
Figure 24 bw Element Diagram
Table 24 bw Element Description
Attribute or Element Description
name Name assigned to this process instance.
TIBCO Runtime Agent Scripting Deployment User’s Guide
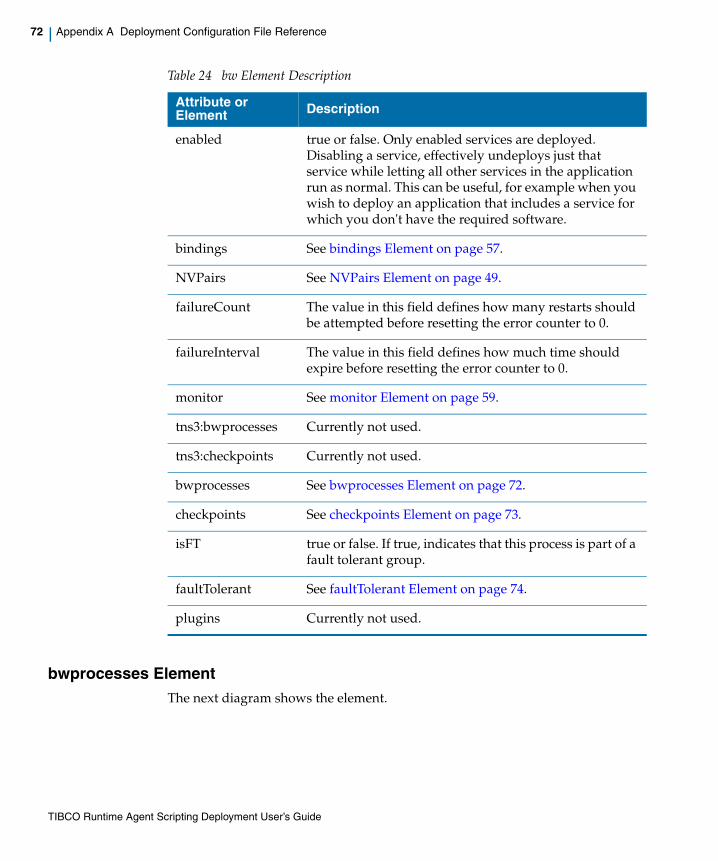
72 | Appendix A Deployment Configuration File Reference
bwprocesses ElementThe next diagram shows the element.
enabled true or false. Only enabled services are deployed. Disabling a service, effectively undeploys just that service while letting all other services in the application run as normal. This can be useful, for example when you wish to deploy an application that includes a service for which you don't have the required software.
bindings See bindings Element on page 57.
NVPairs See NVPairs Element on page 49.
failureCount The value in this field defines how many restarts should be attempted before resetting the error counter to 0.
failureInterval The value in this field defines how much time should expire before resetting the error counter to 0.
monitor See monitor Element on page 59.
tns3:bwprocesses Currently not used.
tns3:checkpoints Currently not used.
bwprocesses See bwprocesses Element on page 72.
checkpoints See checkpoints Element on page 73.
isFT true or false. If true, indicates that this process is part of a fault tolerant group.
faultTolerant See faultTolerant Element on page 74.
plugins Currently not used.
Table 24 bw Element Description
Attribute or Element Description
TIBCO Runtime Agent Scripting Deployment User’s Guide

bw Element | 73
Figure 25 bwprocesses Element Diagram
checkpoints ElementThe next diagram shows the element.
Table 25 bwprocesses Element Description
Attribute or Element Description
name Name for this element.
starter Name of the process starter.
enabled true or false. Only enabled processes are deployed. Disabling a process, effectively undeploys just that process while letting all other processes in the application run as normal. This can be useful, for example when you wish to deploy an application that includes a process for which you don't have the required software.
maxjob Specifies the maximum number of process instances that can concurrently be loaded into memory.
flowlimit Specifies the maximum number of currently running process instance to start before suspending the process starter.
TIBCO Runtime Agent Scripting Deployment User’s Guide

74 | Appendix A Deployment Configuration File Reference
Figure 26 checkpoints Element Diagram
faultTolerant ElementThe next diagram shows the element.
Figure 27 faultTolerant Element Diagram
Table 26 checkpoints Element Description
Attribute or Element Description
selected The selected checkpoint (from checkpoint element).
checkpoint A list of possible checkpoints.
tablePrefix When you specify a database for TIBCO BusinessWorks storage, tables are created in your database. The administration domain name and deployment ID (assigned by TIBCO BusinessWorks) are used to name the tables to ensure uniqueness of the tables for each domain and each deployment. This element lists the table prefix.
TIBCO Runtime Agent Scripting Deployment User’s Guide

bw Element | 75
Table 27 faultTolerant Element Description
Attribute or Element Description
hbInterval Heartbeat Interval. The master engine of a fault-tolerant group broadcasts heartbeat messages to inform the other group members that it is still active. The heartbeat interval determines the time (in milliseconds) between heartbeat messages. In the event if one process engine fails, another engine detects the stop in the master’s heartbeat and resumes operation in place of the other engine. All process starters are restarted on the secondary, and services are restarted to the state of their last checkpoint.
activationInterval Activation Interval (ms) — A standard TIBCO Rendezvous fault tolerant parameter, documented in the TIBCO Rendezvous Concepts chapter 15, Developing Fault Tolerant Programs.
Secondary process engines track heartbeat messages sent from the master engine. This field specifies the amount of time to expire since the last heartbeat from the master before the secondary restarts the process starters and process engines.
The Heartbeat Interval should be smaller than the Preparation Interval, which should be smaller than the Activation interval. It is recommended that Activation Interval be slightly over 2 heartbeats.
TIBCO Runtime Agent Scripting Deployment User’s Guide
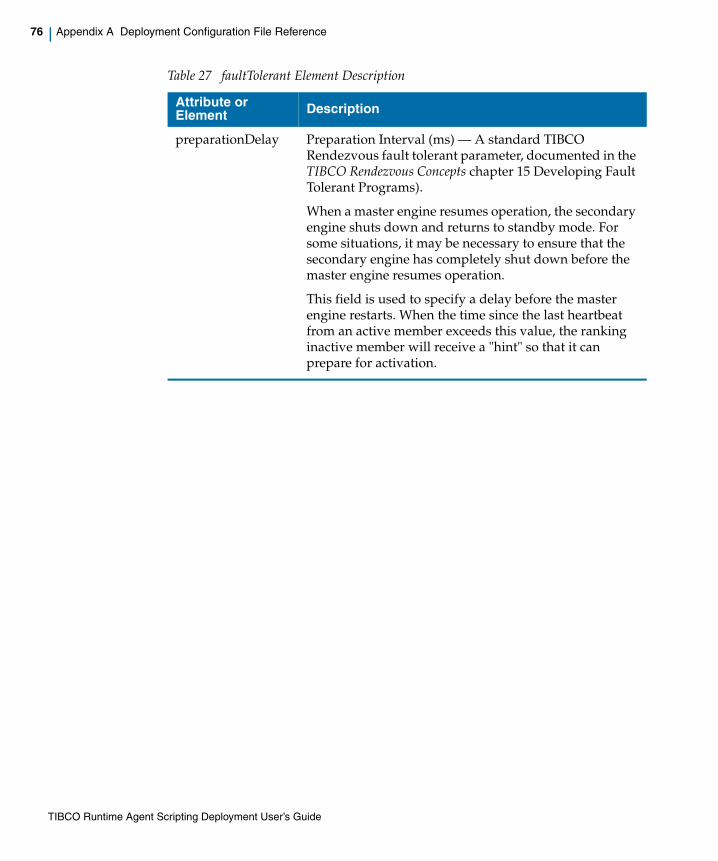
76 | Appendix A Deployment Configuration File Reference
preparationDelay Preparation Interval (ms) — A standard TIBCO Rendezvous fault tolerant parameter, documented in the TIBCO Rendezvous Concepts chapter 15 Developing Fault Tolerant Programs).
When a master engine resumes operation, the secondary engine shuts down and returns to standby mode. For some situations, it may be necessary to ensure that the secondary engine has completely shut down before the master engine resumes operation.
This field is used to specify a delay before the master engine restarts. When the time since the last heartbeat from an active member exceeds this value, the ranking inactive member will receive a "hint" so that it can prepare for activation.
Table 27 faultTolerant Element Description
Attribute or Element Description
TIBCO Runtime Agent Scripting Deployment User’s Guide

adapter Element | 77
adapter Element
The adapter element is used by a TIBCO Adapter service. The next diagram shows the element.
Figure 28 adapter Element Diagram
Table 28 adapter Element Description
Attribute or Element Description
name Name assigned to this application.
enabled true or false. Only enabled services are deployed. Disabling a service, effectively undeploys just that service while letting all other services in the application run as normal. This can be useful, for example when you wish to deploy an application that includes a service for which you don't have the required software.
bindings See bindings Element on page 57.
NVPairs See NVPairs Element on page 49.
failureCount The value in this field defines how many restarts should be attempted before resetting the error counter to 0.
failureInterval The value in this field defines how much time should expire before resetting the error counter to 0.
TIBCO Runtime Agent Scripting Deployment User’s Guide
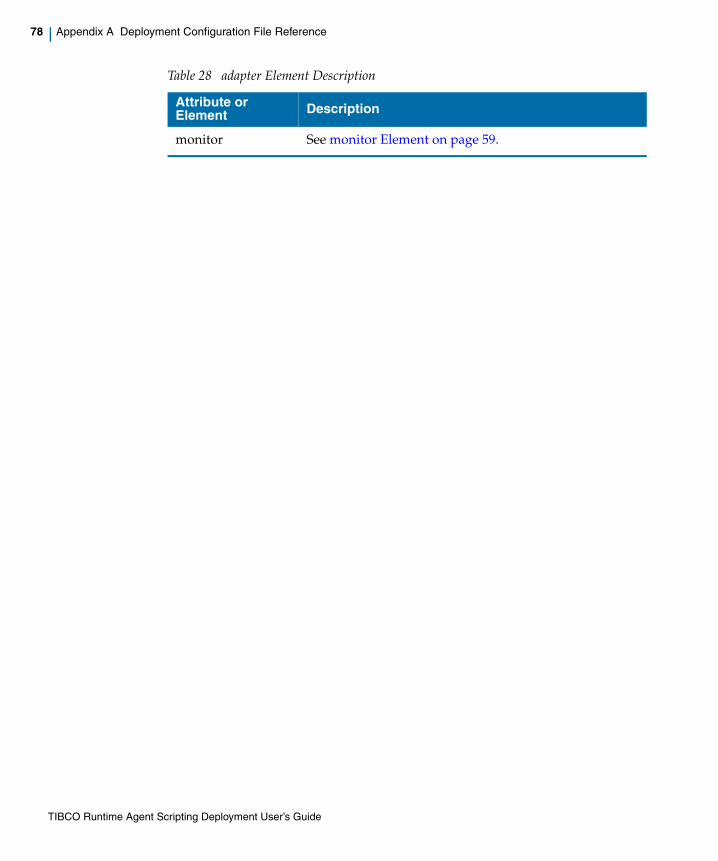
78 | Appendix A Deployment Configuration File Reference
monitor See monitor Element on page 59.
Table 28 adapter Element Description
Attribute or Element Description
TIBCO Runtime Agent Scripting Deployment User’s Guide

formFlow Element | 79
formFlow Element
The formflow element is used by a TIBCO BusinessWorks Workflow process. The next diagram shows the formflow element.
Figure 29 formFlow Element Diagram
Table 29 formFlow Element Description
Attribute or Element Description
name Name assigned to this application.
TIBCO Runtime Agent Scripting Deployment User’s Guide
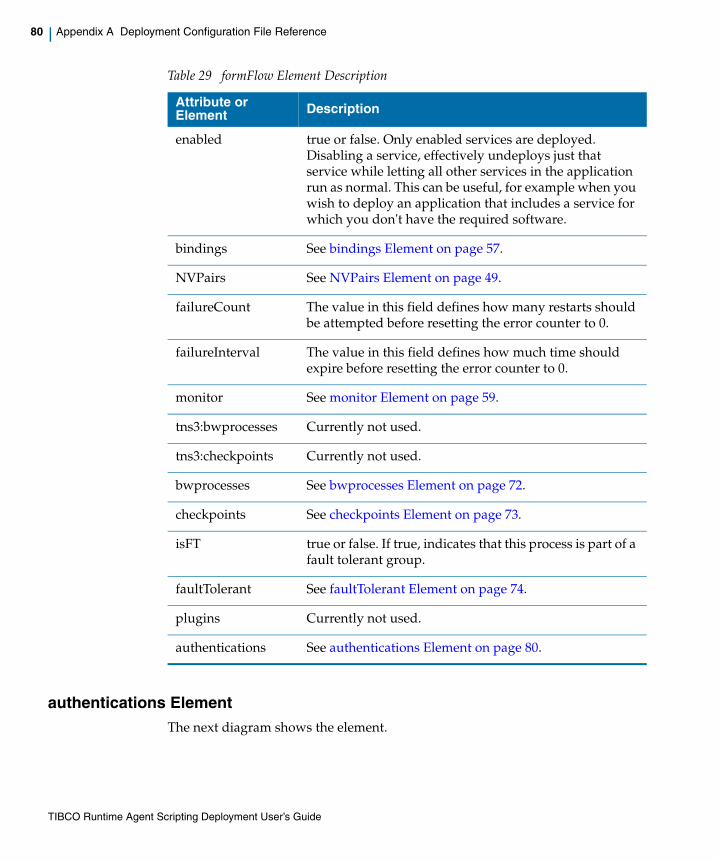
80 | Appendix A Deployment Configuration File Reference
authentications ElementThe next diagram shows the element.
enabled true or false. Only enabled services are deployed. Disabling a service, effectively undeploys just that service while letting all other services in the application run as normal. This can be useful, for example when you wish to deploy an application that includes a service for which you don't have the required software.
bindings See bindings Element on page 57.
NVPairs See NVPairs Element on page 49.
failureCount The value in this field defines how many restarts should be attempted before resetting the error counter to 0.
failureInterval The value in this field defines how much time should expire before resetting the error counter to 0.
monitor See monitor Element on page 59.
tns3:bwprocesses Currently not used.
tns3:checkpoints Currently not used.
bwprocesses See bwprocesses Element on page 72.
checkpoints See checkpoints Element on page 73.
isFT true or false. If true, indicates that this process is part of a fault tolerant group.
faultTolerant See faultTolerant Element on page 74.
plugins Currently not used.
authentications See authentications Element on page 80.
Table 29 formFlow Element Description
Attribute or Element Description
TIBCO Runtime Agent Scripting Deployment User’s Guide
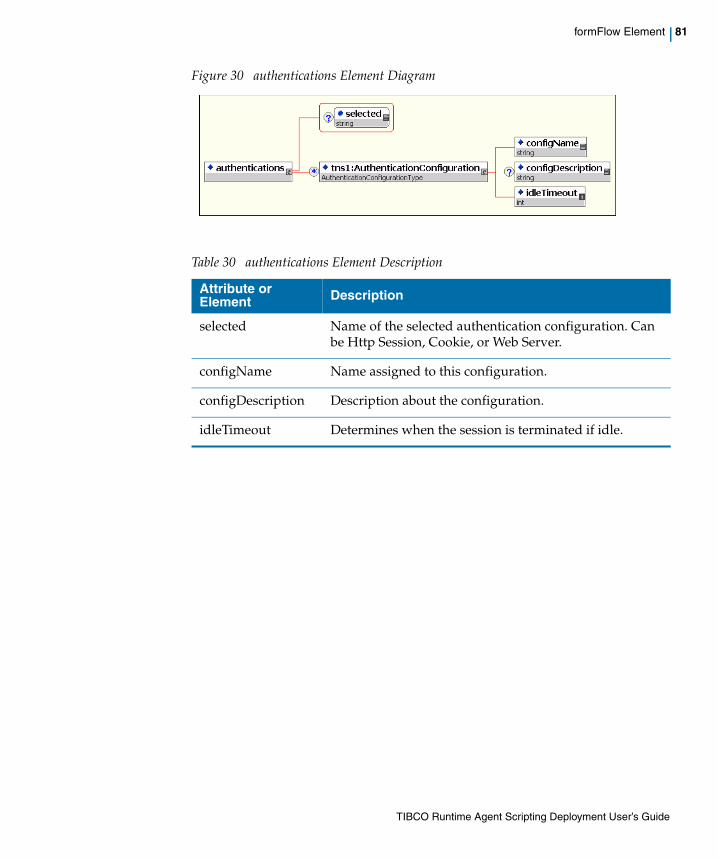
formFlow Element | 81
Figure 30 authentications Element Diagram
Table 30 authentications Element Description
Attribute or Element Description
selected Name of the selected authentication configuration. Can be Http Session, Cookie, or Web Server.
configName Name assigned to this configuration.
configDescription Description about the configuration.
idleTimeout Determines when the session is terminated if idle.
TIBCO Runtime Agent Scripting Deployment User’s Guide
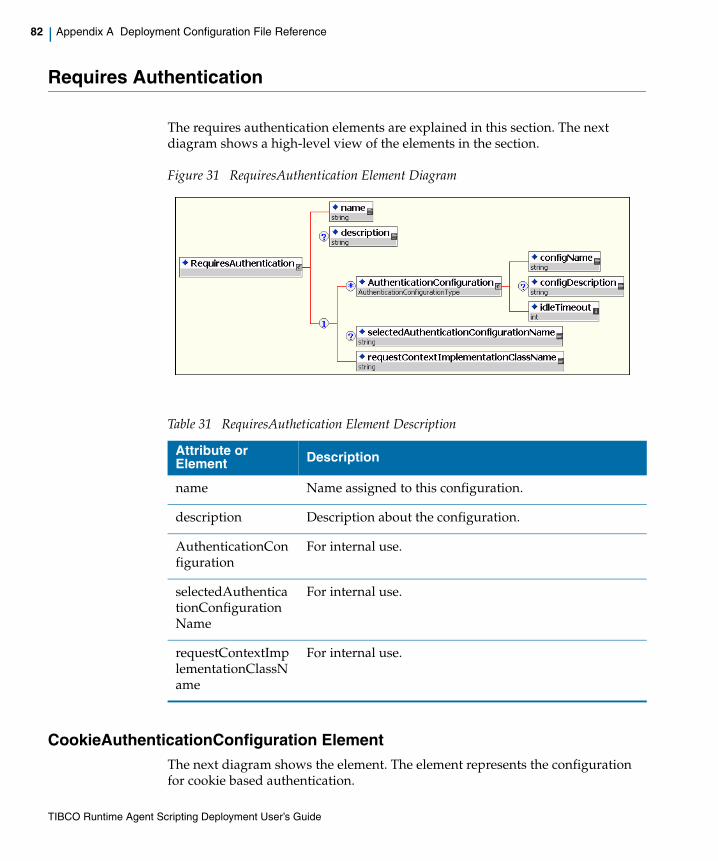
82 | Appendix A Deployment Configuration File Reference
Requires Authentication
The requires authentication elements are explained in this section. The next diagram shows a high-level view of the elements in the section.
Figure 31 RequiresAuthentication Element Diagram
CookieAuthenticationConfiguration ElementThe next diagram shows the element. The element represents the configuration for cookie based authentication.
Table 31 RequiresAuthetication Element Description
Attribute or Element Description
name Name assigned to this configuration.
description Description about the configuration.
AuthenticationConfiguration
For internal use.
selectedAuthenticationConfigurationName
For internal use.
requestContextImplementationClassName
For internal use.
TIBCO Runtime Agent Scripting Deployment User’s Guide

Requires Authentication | 83
Figure 32 CookieAuthenticationConfiguration Element Diagram
HttpSessionAuthenticationConfiguration ElementThe next diagram shows the element.
Table 32 CookieAuthenticationConfiguration Element Description
Attribute or Element Description
configName Name assigned to this configuration.
configDescription Description about the configuration.
idleTimeout Determines when the session is terminated if idle.
requiresPasswordInCleartext
For internal use.
cookieDomain The domain to which the tracking cookie applies. The domain string must begin with a dot and must include at least one embedded dot.
cookieKeepExpire Number of days that the cookie is kept, after which the cookie will expire.
signaturePassword Password used to protect the logged in identity from being changed in a client’s cookie file.
TIBCO Runtime Agent Scripting Deployment User’s Guide
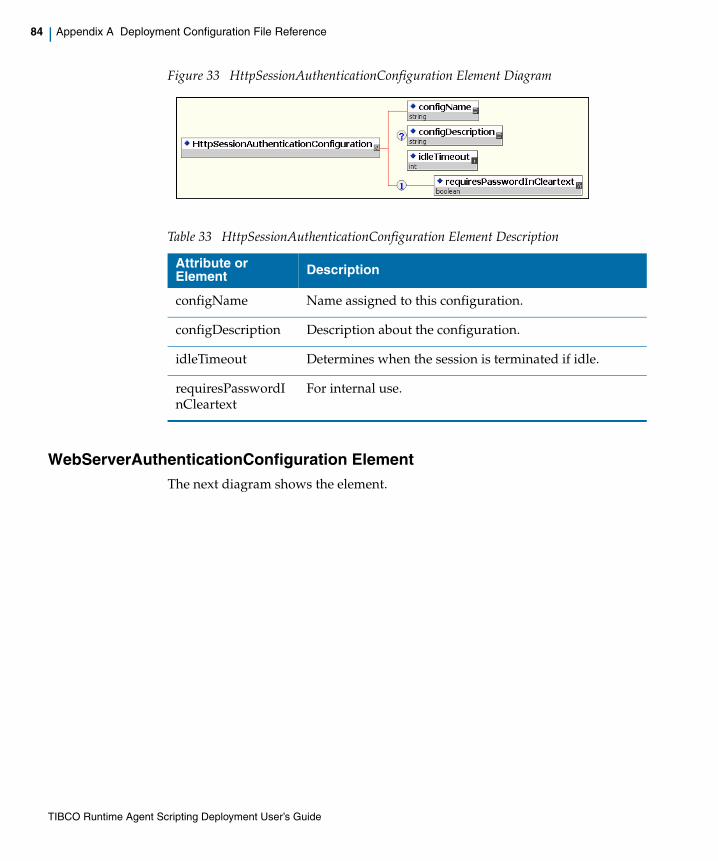
84 | Appendix A Deployment Configuration File Reference
Figure 33 HttpSessionAuthenticationConfiguration Element Diagram
WebServerAuthenticationConfiguration ElementThe next diagram shows the element.
Table 33 HttpSessionAuthenticationConfiguration Element Description
Attribute or Element Description
configName Name assigned to this configuration.
configDescription Description about the configuration.
idleTimeout Determines when the session is terminated if idle.
requiresPasswordInCleartext
For internal use.
TIBCO Runtime Agent Scripting Deployment User’s Guide

Requires Authentication | 85
Figure 34 WebServerAuthenticationConfiguration Element Diagram
ExternalAuthenticationConfiguration ElementThe next diagram shows the element.
Table 34 WebServerAuthenticationConfiguration Element Description
Attribute or Element Description
configName Name assigned to this configuration.
configDescription Description about the configuration.
idleTimeout Determines when the session is terminated if idle.
requiresPasswordInCleartext
For internal use.
cookieDomain The domain to which the tracking cookie applies. The domain string must begin with a dot and must include at least one embedded dot.
cookiePath Path where the cookie will be stored.
requireNewSessionForVerify
Allows users to specify that a new browser session is required for login.
TIBCO Runtime Agent Scripting Deployment User’s Guide

86 | Appendix A Deployment Configuration File Reference
Figure 35 ExternalAuthenticationConfiguration Element Diagram
Table 35 ExternalAuthenticationConfiguration Element Description
Attribute or Element Description
configName Name assigned to this configuration.
configDescription Description about the configuration.
idleTimeout Determines when the session is terminated if idle.
className Authentication Handler Class Name. Class name in servlet path or in the enterprise archive file.
TIBCO Runtime Agent Scripting Deployment User’s Guide

| 87
Appendix B Failure Code List
The following table lists and explains failure codes.
Table 36 Failure Code List
Exit Code Description Action Numeric Value
FAILURE_USAGE_ERROR
A command line arguments parsing error occurred.
Usage error. Correct the usage error.
-1
FAILURE_APPLICATION_NOT_EXIST
The specified application does not exist in the administration domain.
Usage error. Correct the usage error.
-2
FAILURE_SERVICE_NOT_EXIST
The specified service does not exist in the administration domain.
Usage error. Correct the usage error.
-5
FAILURE_UNEXPECTED_EXCEPTION
An unexpected application level or Java exception occurred, such as a locking exception or a JDBC connection exception.
Runtime error. Check the log, correct the error and retry.
-3
FAILURE_UNEXPECTED_THROWABLE
An abnormal Java error occurred, such as a thread error or out of memory error.
The error is not revocable. Retry the action.
-4
FAILURE_BINDING_NOT_EXIST
The specified service container binding does not exist in the administration domain.
Usage error. Correct the usage error.
-6
FAILURE_HAWK_MICROAGENT
The TIBCO Hawk microagent is not running or a Hawk microagent exception has been thrown.
Runtime error. Check if the server is running.
-7
FAILURE_HAWK_CONSOLE
A TIBCO Hawk console exception occurred.
Runtime error. Check the TIBCO Hawk console for errors.
-8
TIBCO Runtime Agent Scripting Deployment User’s Guide
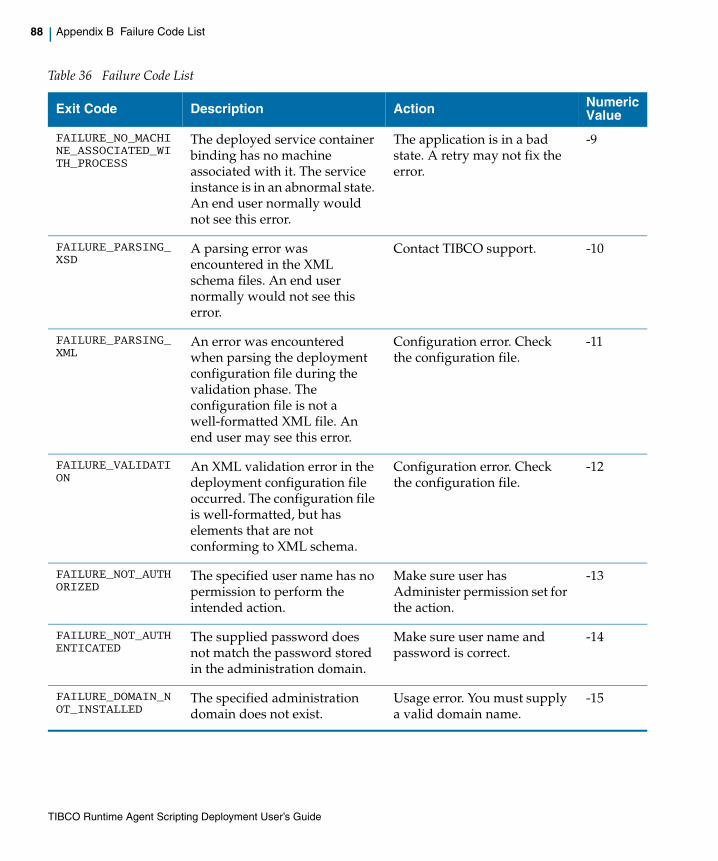
88 | Appendix B Failure Code List
FAILURE_NO_MACHINE_ASSOCIATED_WITH_PROCESS
The deployed service container binding has no machine associated with it. The service instance is in an abnormal state. An end user normally would not see this error.
The application is in a bad state. A retry may not fix the error.
-9
FAILURE_PARSING_XSD
A parsing error was encountered in the XML schema files. An end user normally would not see this error.
Contact TIBCO support. -10
FAILURE_PARSING_XML
An error was encountered when parsing the deployment configuration file during the validation phase. The configuration file is not a well-formatted XML file. An end user may see this error.
Configuration error. Check the configuration file.
-11
FAILURE_VALIDATION
An XML validation error in the deployment configuration file occurred. The configuration file is well-formatted, but has elements that are not conforming to XML schema.
Configuration error. Check the configuration file.
-12
FAILURE_NOT_AUTHORIZED
The specified user name has no permission to perform the intended action.
Make sure user has Administer permission set for the action.
-13
FAILURE_NOT_AUTHENTICATED
The supplied password does not match the password stored in the administration domain.
Make sure user name and password is correct.
-14
FAILURE_DOMAIN_NOT_INSTALLED
The specified administration domain does not exist.
Usage error. You must supply a valid domain name.
-15
Table 36 Failure Code List
Exit Code Description Action Numeric Value
TIBCO Runtime Agent Scripting Deployment User’s Guide

Failure Code List | 89
FAILURE_DOMAIN_MASTER_SERVER_DOWN
The master server is down or not responding within the discovery timeout limit as specified in the administration domain's property file, AdministrationDomain.prop
erties.
Make sure master server is running.
-16
FAILURE_GET_ARCHIVE
Failed to retrieve the enterprise archive file from the administration domain or from the file system URI.
Make sure the enterprise archive file exists in the file system.
-17
FAILURE_BATCH One or more exceptions occurred during batch mode operations.
Runtime error. Check the log file, make corrections and retry.
-18
FAILURE_UPLOAD_GENRAL
Various unexpected exceptions occurred during archive uploading, but not the following:FAILURE_UPLOAD_COMMIT
FAILURE_UPLOAD_APPLICATION_ARCHIVE
FAILURE_UPLOAD_APPLICATION_ARCHIVE
Runtime error. Check the log file, make corrections and retry.
-20
FAILURE_UPLOAD_COMMIT
A commit exception occurred when uploading the archive.
Runtime error. Check the log file, make corrections and retry.
-21
FAILURE_UPLOAD_APPLICATION_ARCHIVE
An exception occurred when adding archive into application deployment configuration object.
Runtime error. Check the log file, make corrections and retry.
-22
FAILURE_ERROR_EXECUTING_EAR_PLUGIN
An exception occurred when supplying default deployment settings.
Runtime error. Check log file, Retry
-24
Table 36 Failure Code List
Exit Code Description Action Numeric Value
TIBCO Runtime Agent Scripting Deployment User’s Guide
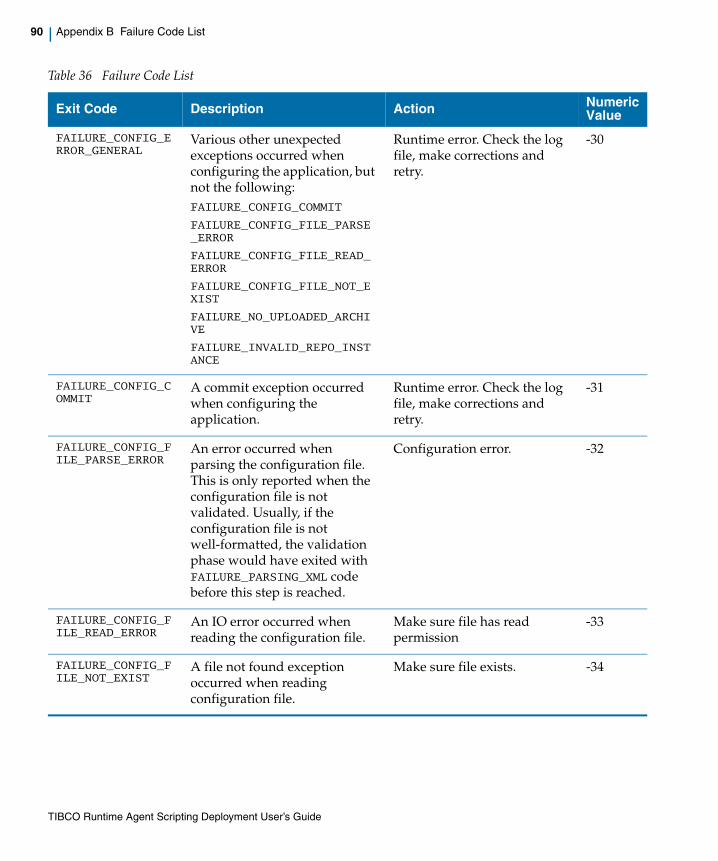
90 | Appendix B Failure Code List
FAILURE_CONFIG_ERROR_GENERAL
Various other unexpected exceptions occurred when configuring the application, but not the following:FAILURE_CONFIG_COMMIT
FAILURE_CONFIG_FILE_PARSE_ERROR
FAILURE_CONFIG_FILE_READ_ERROR
FAILURE_CONFIG_FILE_NOT_EXIST
FAILURE_NO_UPLOADED_ARCHIVE
FAILURE_INVALID_REPO_INSTANCE
Runtime error. Check the log file, make corrections and retry.
-30
FAILURE_CONFIG_COMMIT
A commit exception occurred when configuring the application.
Runtime error. Check the log file, make corrections and retry.
-31
FAILURE_CONFIG_FILE_PARSE_ERROR
An error occurred when parsing the configuration file. This is only reported when the configuration file is not validated. Usually, if the configuration file is not well-formatted, the validation phase would have exited with FAILURE_PARSING_XML code before this step is reached.
Configuration error. -32
FAILURE_CONFIG_FILE_READ_ERROR
An IO error occurred when reading the configuration file.
Make sure file has read permission
-33
FAILURE_CONFIG_FILE_NOT_EXIST
A file not found exception occurred when reading configuration file.
Make sure file exists. -34
Table 36 Failure Code List
Exit Code Description Action Numeric Value
TIBCO Runtime Agent Scripting Deployment User’s Guide
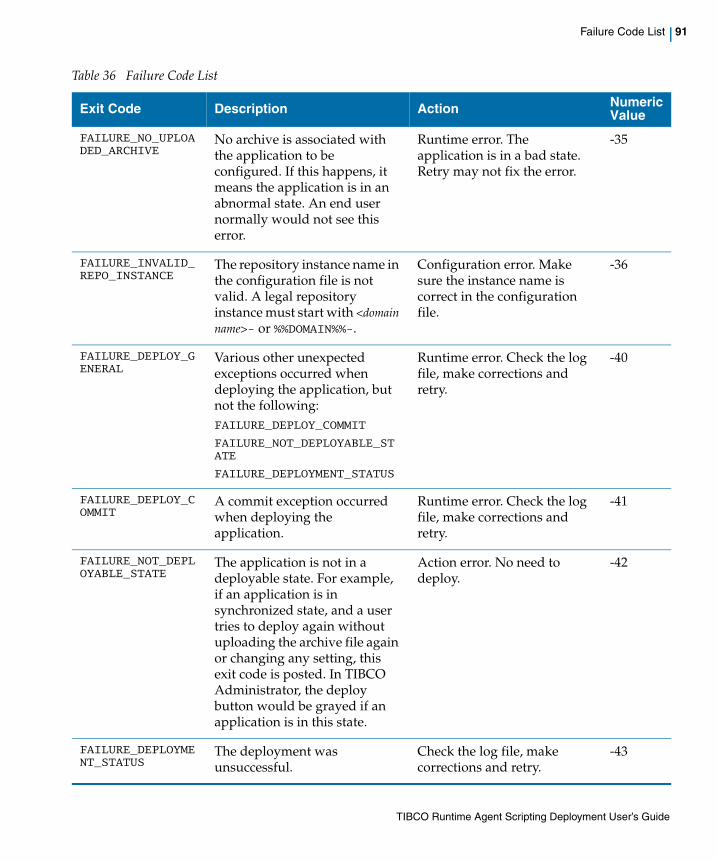
Failure Code List | 91
FAILURE_NO_UPLOADED_ARCHIVE
No archive is associated with the application to be configured. If this happens, it means the application is in an abnormal state. An end user normally would not see this error.
Runtime error. The application is in a bad state. Retry may not fix the error.
-35
FAILURE_INVALID_REPO_INSTANCE
The repository instance name in the configuration file is not valid. A legal repository instance must start with <domain name>- or %%DOMAIN%%-.
Configuration error. Make sure the instance name is correct in the configuration file.
-36
FAILURE_DEPLOY_GENERAL
Various other unexpected exceptions occurred when deploying the application, but not the following:FAILURE_DEPLOY_COMMIT
FAILURE_NOT_DEPLOYABLE_STATE
FAILURE_DEPLOYMENT_STATUS
Runtime error. Check the log file, make corrections and retry.
-40
FAILURE_DEPLOY_COMMIT
A commit exception occurred when deploying the application.
Runtime error. Check the log file, make corrections and retry.
-41
FAILURE_NOT_DEPLOYABLE_STATE
The application is not in a deployable state. For example, if an application is in synchronized state, and a user tries to deploy again without uploading the archive file again or changing any setting, this exit code is posted. In TIBCO Administrator, the deploy button would be grayed if an application is in this state.
Action error. No need to deploy.
-42
FAILURE_DEPLOYMENT_STATUS
The deployment was unsuccessful.
Check the log file, make corrections and retry.
-43
Table 36 Failure Code List
Exit Code Description Action Numeric Value
TIBCO Runtime Agent Scripting Deployment User’s Guide

92 | Appendix B Failure Code List
FAILURE_UNDEPLOY_GENERAL
Various other unexpected exceptions occurred when undeploying the application, but not including the following:FAILURE_UNDEPLOY_COMMIT
Runtime error. Check the log file, make corrections and retry.
-50
FAILURE_UNDEPLOY_COMMIT
A commit exception occurred when undeploying the application.
Runtime error. Check the log file, make corrections and retry.
-51
FAILURE_DELETE_GENERAL
Various other unexpected exception occurred when deleting the application, but not including the following:FAILURE_DELETE_COMMIT
FAILURE_DEPLOYED_STATE
Runtime error. Check the log file, make corrections and retry.
-60
FAILURE_DELETE_COMMIT
A commit exception occurred when deleting the application.
Runtime error. Check the log file, make corrections and retry.
-61
FAILURE_DEPLOYED_STATE
The application cannot be deleted as it is not yet undeployed.
Action error. Undeploy the application first or use the -force option.
-62
FAILURE_EXPORT_GENERAL
Various other unexpected exception occurred when exporting the application configuration, but not including the following:FAILURE_XML_SERIALIZE
FAILURE_EXPORT_FILE_NAME_ERROR
FAILURE_MERGE_ERROR
Runtime error. Check the log file, make corrections and retry.
-70
FAILURE_XML_SERIALIZE
An IO error occurred when writing the configuration file.
Make sure the file or directory is writable.
-71
Table 36 Failure Code List
Exit Code Description Action Numeric Value
TIBCO Runtime Agent Scripting Deployment User’s Guide

Failure Code List | 93
FAILURE_EXPORT_FILE_NAME_ERROR
The given export file name is invalid. A valid export file name must end with a dot suffix.
Usage error. Correct the file name.
-72
FAILURE_MERGE_ERROR
An error occurred when merging an old configuration with a new archive.
Runtime error. Check the log file, make corrections and retry.
-73
FAILURE_START_GENERAL
Various other unexpected exceptions occurred when starting the application, but not the following: FAILURE_BINDING_NOT_EXIST
FAILURE_HAWK_MICROAGENT
FAILURE_HAWK_CONSOLE
Runtime error. Check the log file, make corrections and retry.
-80
FAILURE_STOP_GENERAL
Various other unexpected exceptions occurred when stopping the application, but not the following: FAILURE_BINDING_NOT_EXIST
FAILURE_HAWK_MICROAGENT
FAILURE_HAWK_CONSOLE
Runtime error. Check the log file, make corrections and retry.
-90
FAILURE_STOP_NOT_IN_STOPPABLE_STATE
The application is not in stoppable state.
Action error. Make sure the service instance is in a stoppable state.
-91
FAILURE_KILL_GENERAL
Various other unexpected exceptions occurred when killing application, but not the following: FAILURE_BINDING_NOT_EXIST
FAILURE_HAWK_MICROAGENT
FAILURE_HAWK_CONSOLE
Runtime error. Check the log file, make corrections and retry.
-100
Table 36 Failure Code List
Exit Code Description Action Numeric Value
TIBCO Runtime Agent Scripting Deployment User’s Guide

94 | Appendix B Failure Code List
TIBCO Runtime Agent Scripting Deployment User’s Guide
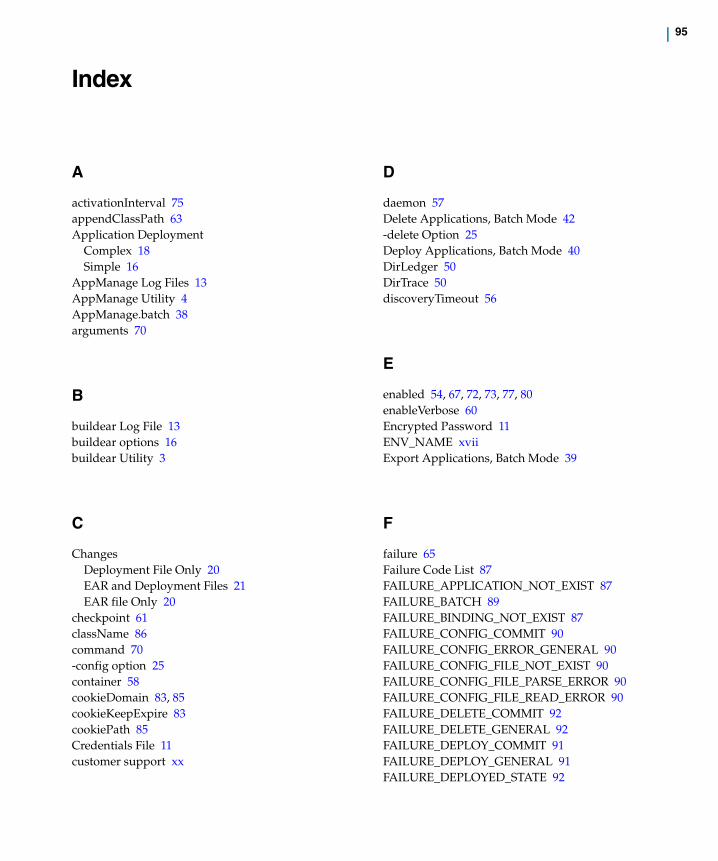
| 95
Index
A
activationInterval 75appendClassPath 63Application Deployment
Complex 18Simple 16
AppManage Log Files 13AppManage Utility 4AppManage.batch 38arguments 70
B
buildear Log File 13buildear options 16buildear Utility 3
C
ChangesDeployment File Only 20EAR and Deployment Files 21EAR file Only 20
checkpoint 61className 86command 70-config option 25container 58cookieDomain 83, 85cookieKeepExpire 83cookiePath 85Credentials File 11customer support xx
D
daemon 57Delete Applications, Batch Mode 42-delete Option 25Deploy Applications, Batch Mode 40DirLedger 50DirTrace 50discoveryTimeout 56
E
enabled 54, 67, 72, 73, 77, 80enableVerbose 60Encrypted Password 11ENV_NAME xviiExport Applications, Batch Mode 39
F
failure 65Failure Code List 87FAILURE_APPLICATION_NOT_EXIST 87FAILURE_BATCH 89FAILURE_BINDING_NOT_EXIST 87FAILURE_CONFIG_COMMIT 90FAILURE_CONFIG_ERROR_GENERAL 90FAILURE_CONFIG_FILE_NOT_EXIST 90FAILURE_CONFIG_FILE_PARSE_ERROR 90FAILURE_CONFIG_FILE_READ_ERROR 90FAILURE_DELETE_COMMIT 92FAILURE_DELETE_GENERAL 92FAILURE_DEPLOY_COMMIT 91FAILURE_DEPLOY_GENERAL 91FAILURE_DEPLOYED_STATE 92

96 | Index
FAILURE_DEPLOYMENT_STATUS 91FAILURE_DOMAIN_MASTER_SERVER_DOWN 89FAILURE_DOMAIN_NOT_INSTALLED 88FAILURE_ERROR_EXECUTING_EAR_PLUGIN 89FAILURE_EXPORT_FILE_NAME_ERROR 93FAILURE_EXPORT_GENERAL 92FAILURE_GET_ARCHIVE 89FAILURE_HAWK_CONSOLE 87FAILURE_HAWK_MICROAGENT 87FAILURE_INVALID_REPO_INSTANCE 91FAILURE_KILL_GENERAL 93FAILURE_MERGE_ERROR 93FAILURE_NO_MACHINE_ASSOCIATED_WITH_PR
OCESS 88FAILURE_NO_UPLOADED_ARCHIVE 91FAILURE_NOT_AUTHENTICATED 88FAILURE_NOT_AUTHORIZED 88FAILURE_NOT_DEPLOYABLE_STATE 91FAILURE_PARSING_XML 88FAILURE_PARSING_XSD 88FAILURE_SERVICE_NOT_EXIST 87FAILURE_START_GENERAL 93FAILURE_STOP_GENERAL 93FAILURE_STOP_NOT_IN_STOPPABLE_STATE 93FAILURE_UNDEPLOY_COMMIT 92FAILURE_UNDEPLOY_GENERAL 92FAILURE_UNEXPECTED_EXCEPTION 87FAILURE_UNEXPECTED_THROWABLE 87FAILURE_UPLOAD_APPLICATION_ARCHIVE 89FAILURE_UPLOAD_COMMIT 89FAILURE_UPLOAD_GENRAL 89FAILURE_USAGE_ERROR 87FAILURE_VALIDATION 88FAILURE_XML_SERIALIZE 92failureCount 54, 72, 77, 80failureInterval 54, 72, 77, 80flowlimit 73ftWeight 58
H
HawkEnabled 50hbInterval 75
Help 8
I
idleTimeout 86initHeapSize 63
J
JmsProviderUrl 50JmsSslProviderUrl 50
L
level 67localRepoInstance 53location 59Log Files, AppManage 13loginAs 62
M
machine 58maxHeapSize 63maxjob 73maxLogFileSize 60MessageEncoding 51-min Option 27-moveAppData Option 28
N
network 57NVPair 50

Index | 97
O
obfuscate utility 11Online Help 8operationRetry 57options, buildear 16
P
-passwordfile Option 28Passwords 11performPolicy 67, 68prepandClassPath 63preparationDelay 76-prompt Option 27Protecting Sensitive Data 12
R
Redeployingan Application 20
regionalSubject 57relative file paths 38RemoteRvDaemon 50repoInstanceName 49requireNewSessionForVerify 85restart 64, 65, 66runAsNT 62Running Scripting Utilities 7RvaHost 51RvaPort 51RvDaemon 51RvNetwork 51RvService 51
S
selected 52server 55, 56
service 57signaturePassword 83sMTPServer 69-start Option 25startOnBoot 60startupType 62-stop Option 26support, contacting xx
T
tablePrefix 74technical support xx-template Option 27threadCount 60threadStackSize 63TIBCO support
TIBCOmmunity xxTIBCO_HOME xviiTIBHawkDaemon 51TIBHawkNetwork 51TIBHawkService 51timeout 55, 56, 61-truncate Option 28type 59
U
Undeploy Applications, Batch Mode 40-undeploy Option 25-upload option 25url 55Using Online Help 8
W
Working with Passwords 11
98 | Index
X
XSD files 46
Z
?verride Option 26
Recommended