8/8/2019 Volatility Linux Installv1
http://slidepdf.com/reader/full/volatility-linux-installv1 1/9
Volatility Page 1
Installing Volatility in Ubuntu 9.04
Table of ContentsAbstract. .................................................................................................................................................. 2
Python ..................................................................................................................................................... 2
Installing Volatility................................................................................................................................... 2
Extracting the tarball........................................................................................................................... 3
First steps to setting up Volatility ....................................................................................................... 3
Editing the main volatility file ............................................................................................................. 5
Changing the permissions ................................................................................................................... 5
Basic walkthrough ............................................................................................................................... 7
Installing Plugins ..................................................................................................................................... 8
Installing malfind and malfind2 ...................................................................................................... 8
Installing volrip and volreg .............................................................................................................. 8
Installing Volatility Subversion ................................................................................................................ 9
8/8/2019 Volatility Linux Installv1
http://slidepdf.com/reader/full/volatility-linux-installv1 2/9
Volatility Page 2
Abstract.
Volatility is an open source python based extensible framework that assists investigators whether
they be forensic examiners or malware analysts. The frameworks assists them in the examination of
physical memory dumps, crash dumps and hibernation files. Volatility currently has support for
Windows XP memory images.
This guide will assist examiners in setting up Volatility on Ubuntu Linux. This guide may also be used
to assist in the setup on other Linux variants.
Python
The Volatility framework is developed using python, which on the majority of distributions issupplied by default. Using python also means that it can be utilised on other Operating Systems
including Microsoft Windows, or Apple's MAC OSX. For Microsoft Windows please refer to Gleeda's
guide on setup1. You can check the current version available by starting a terminal and typing
python -V.
Figure 1: Displaying python version
Volatility provides support for "plugins" which further enhance the frameworks capabilities. Some
of these plugins are dependent on other packages, such as perl. This guide will also assist examiners
in providing the necessary dependencies required by such plugins.
Installing VolatilityAt the time of writing this guide the latest version available was Volatility-1.3_Beta. Volatility is
available from https://www.volatilesystems.com/default/volatility/ If you wish to install the cutting
edge version refer to the Installing Volatility Subversion section.
From the terminal you can fetch this version by using the following;
wget https://www.volatilesystems.com/volatility/1.3/Volatility-1.3_Beta.tar.gz
1Windows install guide, http://volatility.googlecode.com/files/install.pdf

8/8/2019 Volatility Linux Installv1
http://slidepdf.com/reader/full/volatility-linux-installv1 3/9
Volatility Page 3
Download links are also provided for md5,sha1 and public key encryption signed files. To verify the
.tar.gz (tarball) file using md5 download https://www.volatilesystems.com/volatility/1.3/md5sum-
1.3 We can view the contents from the terminal using the cat command and compare the md5
value using md5sum.
Figure 2: Using md5sum to confirm file integrity
AAron Walters' public key is also available together with a signed digest for each of the packages,
you can use these to verify the integrity and authenticity of the packages using the gpg command.
First import AAron Walter's public key to your keyring so that it can be used to verify the
authenticity of the tarball or other files. gpg --import awalters.asc. We can then use the gpg -
-verify option to verify the files we have downloaded.
Figure 3: Verifying package files authenticity
Extracting the tarball.
Before you extract the tarball archive first view its contents, we can do this using the tar command
tar ztvf Volatility-1.3_Beta.tar.gz
By default this Volatility package creates its own directory called Volatility-1.3_Beta containing
directories and other files required for its operation.
Now we use tar zxvf Volatility-1.3_Beta.tar.gz to extract the archive. If you have followed
the guide without deviation the directory Volatility-1.3_Beta will be created in your users home
directory, if you are unsure which directory you are currently at use the pwd command to print the
current working directory.
First steps to setting up Volatility
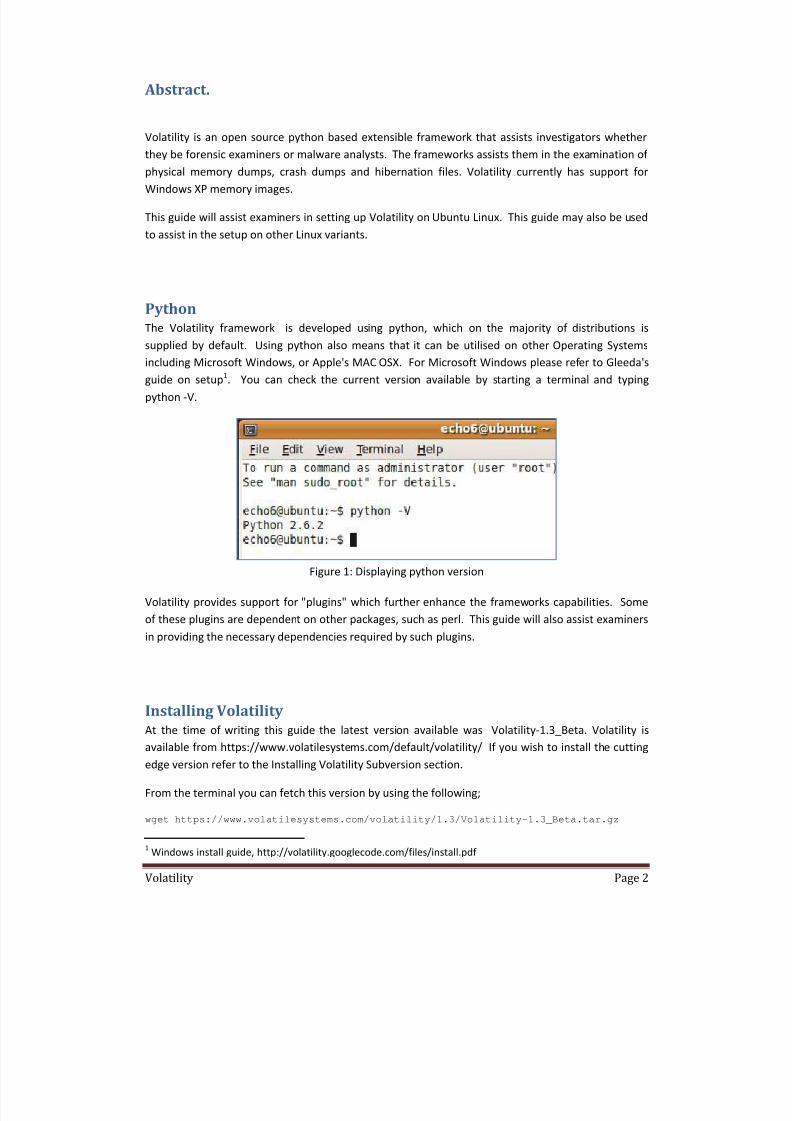
We can now configure volatility for our environment. From the terminal change directory so that we
are within the Volatility-1.3_Beta directory, cd Volatility-1.3_Beta. After entering ls -l you
should see a listing of the directories and files as shown in figure 4.
8/8/2019 Volatility Linux Installv1
http://slidepdf.com/reader/full/volatility-linux-installv1 4/9
Volatility Page 4
Figure 4: Listing Volatility files and directories
By default we can use the following to execute our newly installed volatility python application, i.e.
python volatility. However we can also change it so that we simply need to supply
./volatility to execute whilst within the Volatility-1.3_Beta directory, which is the way I prefer tohave it setup.
To do this we need to edit the first line of the volatility python script, then change the permissions of
the file to an executable. From the output of ls -l we can see that volatility has no execute
permissions e.g. -rw-r--r-- unlike the 'vtypes.py' file.

8/8/2019 Volatility Linux Installv1
http://slidepdf.com/reader/full/volatility-linux-installv1 5/9
Volatility Page 5
Editing the main volatility file
To edit the file we can either use Gedit GUI editor or the terminal editor nano.
The Gedit text editor is available within Gnome from Application->Accessories->Text Editor.
Figure 5: Accessing Gedit from Gnome
Edit the first line '#!c:\python\python.exe' to read '#!/usr/bin/env python'. Note there is a space
between env and python. As you can see the default setup is Windows centric, but we are using a
far more versatile Operating System. There are some plugins which will only work under Linux, as
we shall see later ;-) After editing the file save the changes. The change allows our Linux
environment to identify the correct path to where python is installed. This should also allow other
Linux environments to work with volatility and python.
Changing the permissionsTo change the permissions of the volatility file, we use the command chmod +x volatility, we
can confirm the permissions have been applied correctly using the ls -l volatility command.
Figure 6: Checking volatility file permissions
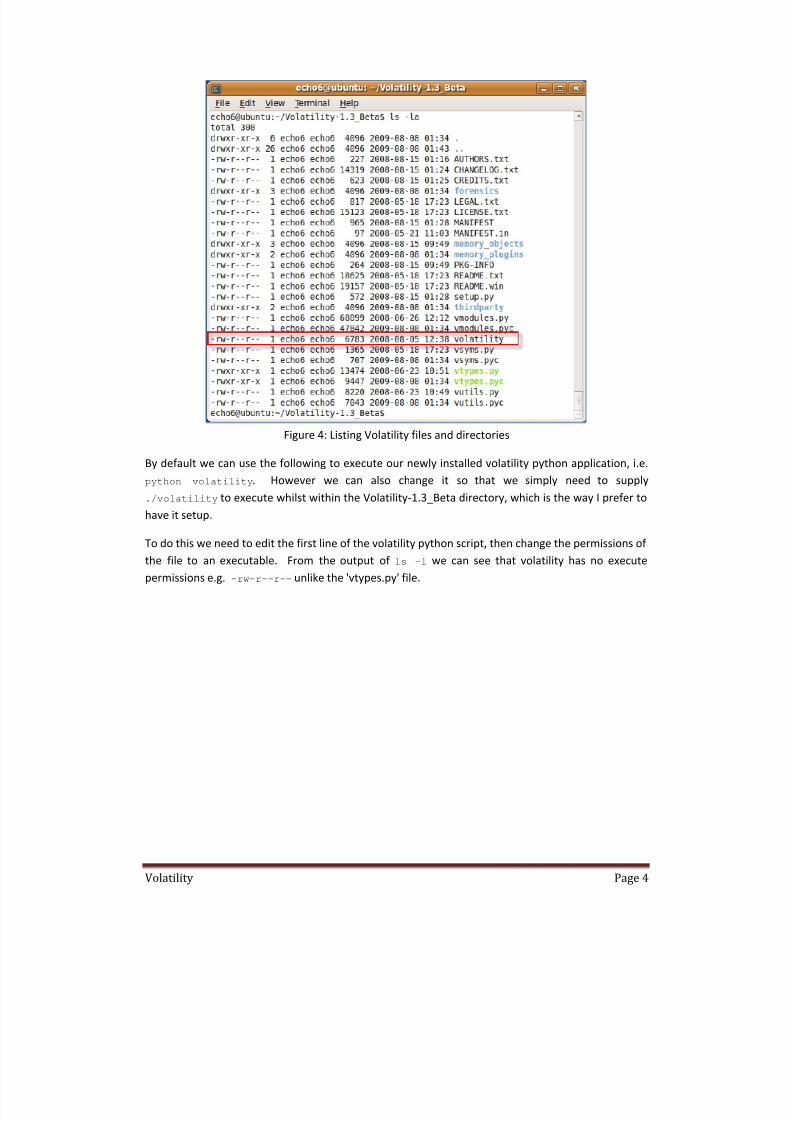
Now when you do ./volatility you should see the help output displayed in your terminal, as in Figure
7.
8/8/2019 Volatility Linux Installv1
http://slidepdf.com/reader/full/volatility-linux-installv1 6/9
Volatility Page 6
Figure 7: Help displayed in terminal output from ./volatility
The DeprecationWarning can be ignored, it will not affect volatility. If you wish to fix this you canedit the file forensics/win32/crashdump.py and edit line 31 to comment out the import that is no
longer required using # at the start of that line. Hint: with nano if you use the key combination 'ctrl'
+ ' alt' +'_ ' together it will prompt for the line number.
Figure 8: Commenting out import sha module
8/8/2019 Volatility Linux Installv1
http://slidepdf.com/reader/full/volatility-linux-installv1 7/9
Volatility Page 7
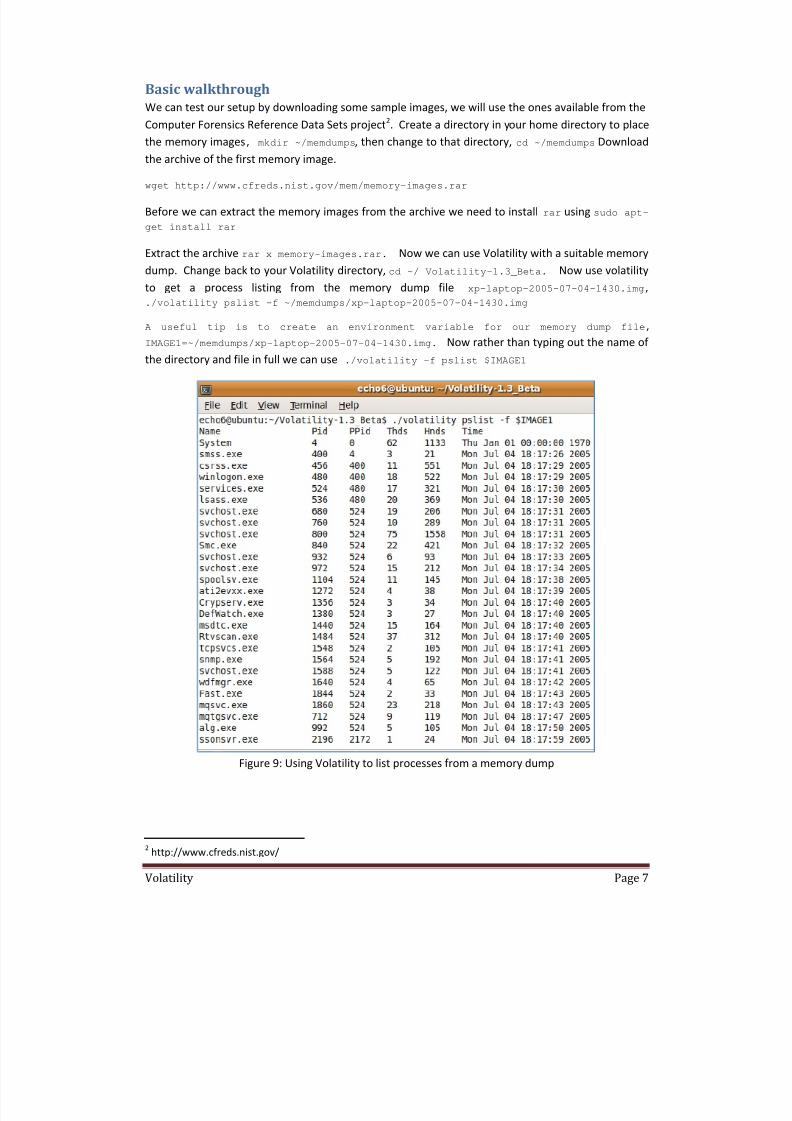
Basic walkthrough
We can test our setup by downloading some sample images, we will use the ones available from the
Computer Forensics Reference Data Sets project2. Create a directory in your home directory to place
the memory images, mkdir ~/memdumps, then change to that directory, cd ~/memdumps Download
the archive of the first memory image.
wget http://www.cfreds.nist.gov/mem/memory-images.rar
Before we can extract the memory images from the archive we need to install rar using sudo apt-
get install rar
Extract the archive rar x memory-images.rar. Now we can use Volatility with a suitable memory
dump. Change back to your Volatility directory, cd ~/ Volatility-1.3_Beta. Now use volatility
to get a process listing from the memory dump file xp-laptop-2005-07-04-1430.img,
./volatility pslist -f ~/memdumps/xp-laptop-2005-07-04-1430.img
A useful tip is to create an environment variable for our memory dump file,IMAGE1=~/memdumps/xp-laptop-2005-07-04-1430.img. Now rather than typing out the name of
the directory and file in full we can use ./volatility -f pslist $IMAGE1
Figure 9: Using Volatility to list processes from a memory dump
2http://www.cfreds.nist.gov/
8/8/2019 Volatility Linux Installv1
http://slidepdf.com/reader/full/volatility-linux-installv1 8/9
Volatility Page 8
Installing PluginsA list of plugins is maintained at the Forensicwiki
3. The majority of these can simply be downloaded,
unpacked if required, and placed into the Volatility-1.3_Beta directory or the Volatility-1.3_Beta
/memory_plugins directory. Each time you add a plugin they should appear in the help output
under "Supported Plugin Commands". You can get some additional help from each plugin, e.g../volatility malfind2 --help
Installing malfind and malfind2
These plugins were written by Michael Hale Ligh available from his blog http://mnin.blogspot.com.
We can download these two plugins directly into the memory_plugins directory.
cd ~Volatility-1.3_Beta/memory_plugins
wget http://mhl-malware-scripts.googlecode.com/files/malfind.py
wget http://mhl-malware-scripts.googlecode.com/files/malfind2.py
Before we can use them we have to install some dependencies. They rely on pydasm4 which is a
python interface to libdasm5
a x86 disassembling library. It also relies on pefile6
which is a pythonmodule which reads and works with Portable Executable PE files.
Download and install
Fortunately pydasm is included with libdasm. An open source fork is available which is more up to
date. This is the version we will install. This will require the use of the subversion tool. To install
subversion use sudo apt-get install subversion. Now change to your home directory cd ~ and
use the following to download the latest code;
svn checkout http://libdasm.googlecode.com/svn/trunk/ svn/libdasm-read-only
Now enter the following series of commands;
cd svn/libdasm-read-only/
make
sudo make install
cd pydasm
sudo apt-get install python2.6-dev
python setup.py build_ext
sudo python setup.py install
pefile is easier to install because Ubuntu already has a package for it, sudo apt-get install
python-pefile
Installing volrip and volreg
The packages volreg and volrip were written by Moyix (Brendan Dolvan-Gavitt), they utilise Harlan
Carvey's excellent RegRipper7
tool to recover registry artifacts from a memory dump file. They
provide the following plugins, hivescan, hivelist, printkey, hashdump, lsadump and cachedump8. A
depenency is PyCrypto. This is installed using sudo apt-get install python-crypto.
3ForensicWiki http://www.forensicswiki.org/wiki/List_of_Volatility_Plugins
4pydasm, http://dkbza.org/pydasm.html
5libdasm http://www.nologin.org/main.pl?action=codeView&codeId=49
6
pefile. http://code.google.com/p/pefile/7RegRipper http://www.regripper.net/
8Registry plugins http://moyix.blogspot.com/2009/01/memory-registry-tools.html

8/8/2019 Volatility Linux Installv1
http://slidepdf.com/reader/full/volatility-linux-installv1 9/9
Volatility Page 9
Create a directory for your plugins, download the files to that directory and extract the tarballs to
your Volatility directory. Use the following;
wget http://www.cc.gatech.edu/%7Ebrendan/volatility/dl/volreg-0.6.tar.gz
wget http://www.cc.gatech.edu/%7Ebrendan/volatility/dl/volrip-0.1.tar.gz
tar zcvf volreg-0.6.tar.gz -C ~/Volatility-1.3_Beta
tar zcvf volrip-0.1.tar.gz -C ~/Volatility-1.3_Beta
Installing Volatility SubversionSee Gleeda's guide
9, which includes directions to installing the latest Volatility code under Linux.
Under Ubuntu the steps are straightforward though.
cd ~
sudo apt-get install subversion
svn checkout http://volatility.googlecode.com/svn/trunk svn
This will result in a directory being created in your home folder called svn which will contain a
further directory called Volatility which will contain the latest code. Repeat the previous steps to
edit the main volatility file, change execution permissions and add additional plugins.
9Windows SVN install, http://volatility.googlecode.com/files/VolatilitySVN.pdf
Recommended