Embed Size (px)
Citation preview

Brenda Hoddinott X-01 ADVANCED: FANTASY & FUN
Meet Dudley – a former figment of my imagination, now the subject of this
drawing project! You use a grid format to establish proportions and then outline
the highly detailed dragon and his nest with thin neat lines. Suggestions are
offered for more adventurous artists who choose to add color to their drawings.
Suggested drawing supplies include good quality white drawing paper, graphite pencils, kneaded and vinyl erasers, and a pencil sharpener.
This project is divided into the following seven sections:
GLOSSARY OF ART TERMS INTRODUCTION: Dudley the dragon became a realistic entity when he hatched from an
egg in my painting about self-discovery titled “Serendipity”. This project brings a baby dragon beyond paint on a canvas into the new world of a line drawing.
SKETCHING PROPER PROPORTIONS: Setting up accurate proportions is the foundation of drawing. You first set up an intricate grid to help you sketch the dragon, nest, and the egg in their correct places.
OUTLINING WITH A FINE-TIP MARKER: You use a sharp eye, a very steady hand, lots of patience, and a fine tip marker to outline this cartoon.
ADDING FINAL TOUCHES: The options for completing this drawing are limited only by human imagination!
19 PAGES – 20 ILLUSTRATIONS This advanced project is recommended for artists with good drawing skills, from age 12 to adult,
as well as home schooling, academic and recreational fine art educators.
Published by Hoddinott Fine Art Publishers, Halifax, NS, Canada – March, 2005
Copyright to all articles, images, text, projects, lessons and exercises within this drawing class belong to Brenda Hoddinott and may not be reproduced or used for any commercial purposes whatsoever without the written permission of Brenda Hoddinott.
E-mail [email protected] Web site http://www.finearteducation.com or http://www.drawspace.com
- 2 -
GLOSSARY OF ART TERMS Contour drawing: is a drawing comprised of lines that follow the contours of the edges of various components of a drawing subject and define the outlines of its forms.
Contour lines: are lines that are formed when the shared edges of spaces and/or objects meet.
Curved lines: are created when a straight line curves (or bends). Curved lines can be drawn thick or thin.
Drawing space (sometimes called a drawing format): refers to the area of a drawing surface within a specific perimeter, outlined by a shape of any size, such as a square, rectangle or circle.
Grid: is a precise arrangement of a specific number of squares, of exact sizes, proportionately drawn on both a photo and drawing surface. Grids help artists with numerous challenges, such as rendering precise proportions and correct perspective.
Highlight: refers to the brightest area of a form where light bounces off its surface and is usually the section closest to the light source.
Iris of an eye: is the colored circular section of the eyeball surrounding the pupil.
Proportion: is the relationship in size of one component of a drawing to another or others.
Pupil of an eye: is the darkest circular shape within the iris, which adjusts its size under different lighting conditions.
Rough sketch: refers to a quickly rendered drawing that illustrates the important elements of your drawing subject with very few details.
Sketching: refers to the method used for creating a quick, rough representation or outline of a planned drawing subject. A sketch can also be a completed work of art.
Shape: refers to the outward outline of a form. Basic shapes include circles, squares and triangles.
INTRODUCTION Dudley the dragon was born of my imagination and became a realistic entity when he hatched from an egg in my painting about self-discovery titled “Serendipity”.
This project brings a baby dragon beyond paint on a canvas, into the new world of a line drawing. You use a grid format to establish proportions and then outline the highly detailed dragon and his nest with thin neat lines.
I have included an image of the painting of Dudley as a reference for artists who would prefer to add color after the initial sketch is completed, rather than render a detailed contour drawing outlined in ink. If you are skilled in working with colored pencils (or other color media), may I suggest that you complete the entire drawing very lightly in pencil and then add colors of your choice to complete your artwork. Naturally, the final drawing will not look identical to my painted image, but depending on your skill level, can easily become an outstanding drawing. Refer to Illustrations 01-01, 01-02, and 01-03 to compare a color image to a line drawing.
Copyright to all articles, images, text, projects, lessons and exercises within this drawing class belong to Brenda Hoddinott and may not be reproduced or used for any commercial purposes whatsoever without the written permission of Brenda Hoddinott.
E-mail [email protected] Web site http://www.finearteducation.com or http://www.drawspace.com
- 3 -
The following was written by a friend and speaks well of the philosophy of my painting: “As children, we entered into a world with the utmost of innocence, curiosity, trust and unconditional love. We walked our first steps in the journey of self-discovery, through many challenges, hardships and triumphs.
Each day that we strive to become the person we are meant to be – we become a role model, who has the ability to assist with the self-discovery of others.”
ILLUSTRATION 01-01
The above text is used with the permission of © Robert A. Roughley B.A., B.Ed., B.AEd. M.Ed., MC, CCC .
ILLUSTRATION 01-02 ILLUSTRATION 01-03
Copyright to all articles, images, text, projects, lessons and exercises within this drawing class belong to Brenda Hoddinott and may not be reproduced or used for any commercial purposes whatsoever without the written permission of Brenda Hoddinott.
E-mail [email protected] Web site http://www.finearteducation.com or http://www.drawspace.com
- 4 -
SKETCHING PROPER PROPORTIONS Setting up accurate proportions is the foundation of drawing. In this project, you first set up a grid to help you sketch the dragon, nest, and the egg in their correct places.
1. Use a ruler to draw a square and divide it into 49 smaller squares. Keep your lines very light! Suggested sizes include: 7 by 7 inches (with 1 inch squares), 11.5 or 11.5 (with 1.5 inch squares), or 14 by 14 (with 2 inch squares).
2. Letter each square along the top and bottom (A to G) and number each square down each side (1 to 7)) to help you keep track of where you are working.
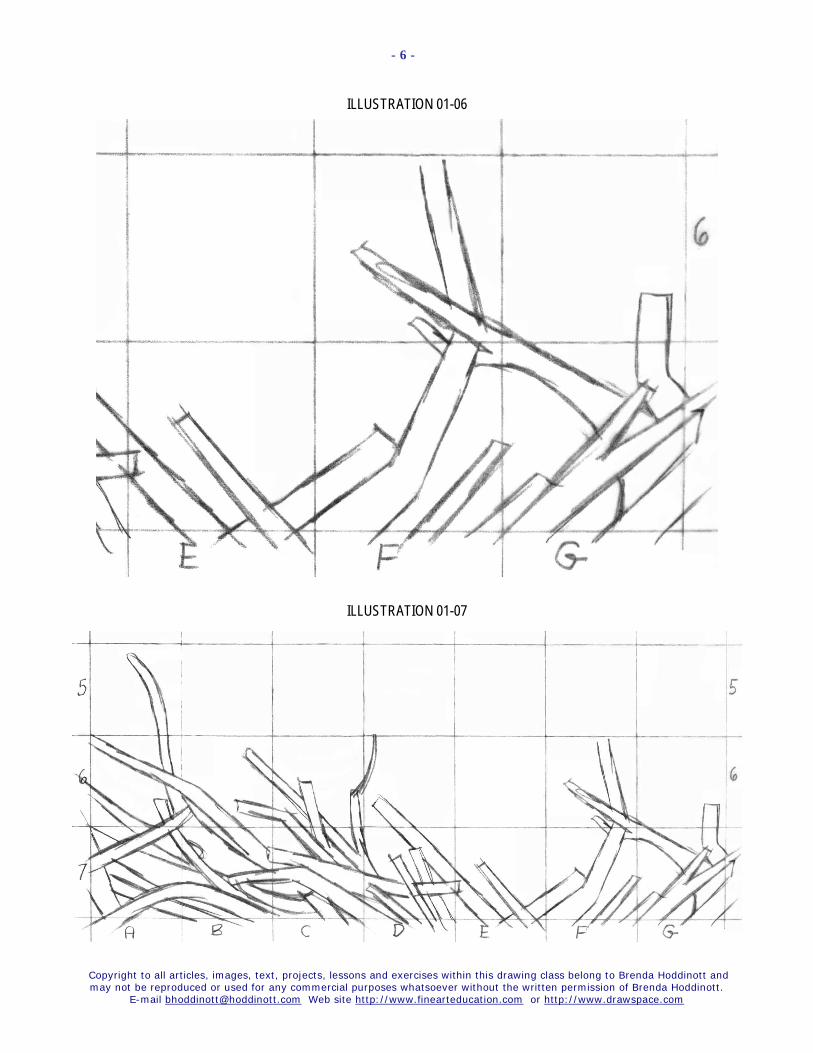
3. Lightly sketch what you see inside each of the lower three rows of squares. Refer to Illustration 01-04 and the close-ups of these sections on the next two pages (Illustrations 01-05 to 01-07). Use the numbers and letters along the sides of the grid to keep track of where you are drawing, especially in the close-up images.
ILLUSTRATION 01-04
Keep your sketch lines very light!
In this illustration the lines look dark.
However, in fact they are so light that I can barely see them. I have made them look darker in a computer program so you can see them.
Copyright to all articles, images, text, projects, lessons and exercises within this drawing class belong to Brenda Hoddinott and may not be reproduced or used for any commercial purposes whatsoever without the written permission of Brenda Hoddinott.
E-mail [email protected] Web site http://www.finearteducation.com or http://www.drawspace.com
- 5 -
Draw your outlines slowly and carefully! Pay close attention to the grid lines to make sure you draw the various lines in their proper places. Double check the proportions of each section of your sketch by visually measuring the shapes of the positive and negative spaces.
ILLUSTRATION 01-05
Remember; don’t press too hard with your pencils. Not only do these areas become impossible to erase or touch up, but they also leave dents in your paper. All the lines you draw now will either need to be completely erased or made lighter in the next sections.
Copyright to all articles, images, text, projects, lessons and exercises within this drawing class belong to Brenda Hoddinott and may not be reproduced or used for any commercial purposes whatsoever without the written permission of Brenda Hoddinott.
E-mail [email protected] Web site http://www.finearteducation.com or http://www.drawspace.com
- 6 -
ILLUSTRATION 01-06
ILLUSTRATION 01-07
Copyright to all articles, images, text, projects, lessons and exercises within this drawing class belong to Brenda Hoddinott and may not be reproduced or used for any commercial purposes whatsoever without the written permission of Brenda Hoddinott.
E-mail [email protected] Web site http://www.finearteducation.com or http://www.drawspace.com
- 7 -
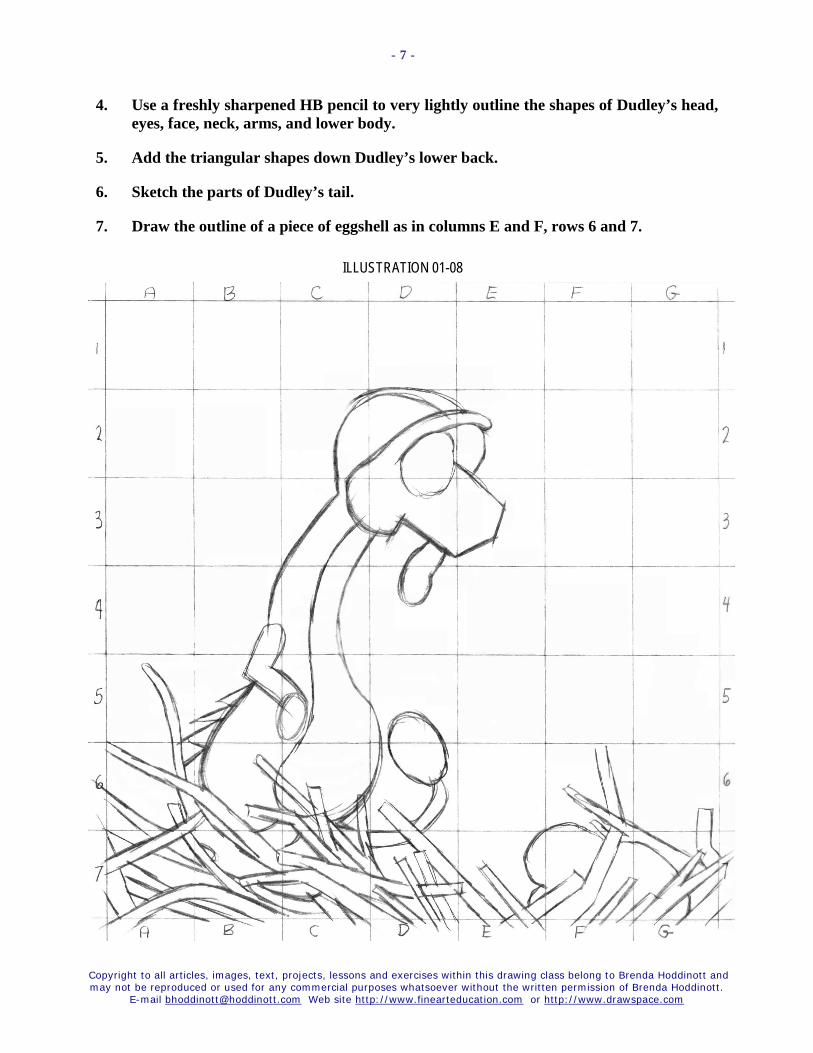
4. Use a freshly sharpened HB pencil to very lightly outline the shapes of Dudley’s head, eyes, face, neck, arms, and lower body.
5. Add the triangular shapes down Dudley’s lower back.
6. Sketch the parts of Dudley’s tail.
7. Draw the outline of a piece of eggshell as in columns E and F, rows 6 and 7.
ILLUSTRATION 01-08
Copyright to all articles, images, text, projects, lessons and exercises within this drawing class belong to Brenda Hoddinott and may not be reproduced or used for any commercial purposes whatsoever without the written permission of Brenda Hoddinott.
E-mail [email protected] Web site http://www.finearteducation.com or http://www.drawspace.com
- 8 -
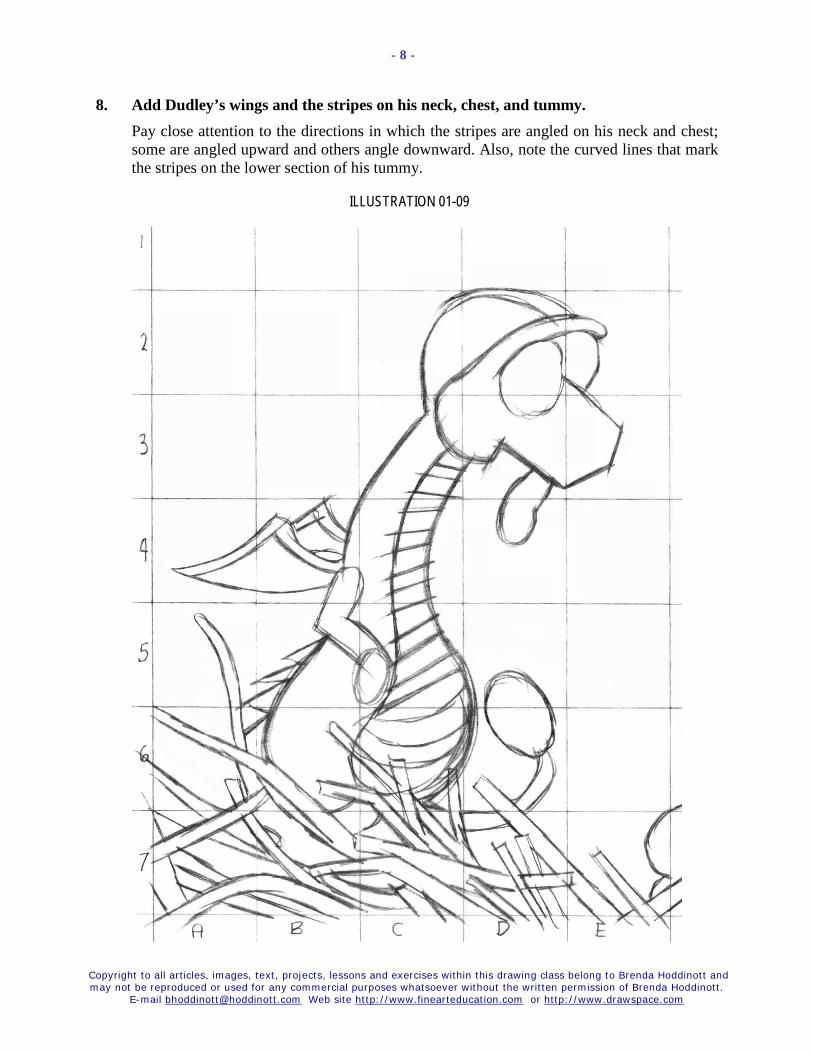
8. Add Dudley’s wings and the stripes on his neck, chest, and tummy. Pay close attention to the directions in which the stripes are angled on his neck and chest; some are angled upward and others angle downward. Also, note the curved lines that mark the stripes on the lower section of his tummy.
ILLUSTRATION 01-09
Copyright to all articles, images, text, projects, lessons and exercises within this drawing class belong to Brenda Hoddinott and may not be reproduced or used for any commercial purposes whatsoever without the written permission of Brenda Hoddinott.
E-mail [email protected] Web site http://www.finearteducation.com or http://www.drawspace.com
- 9 -
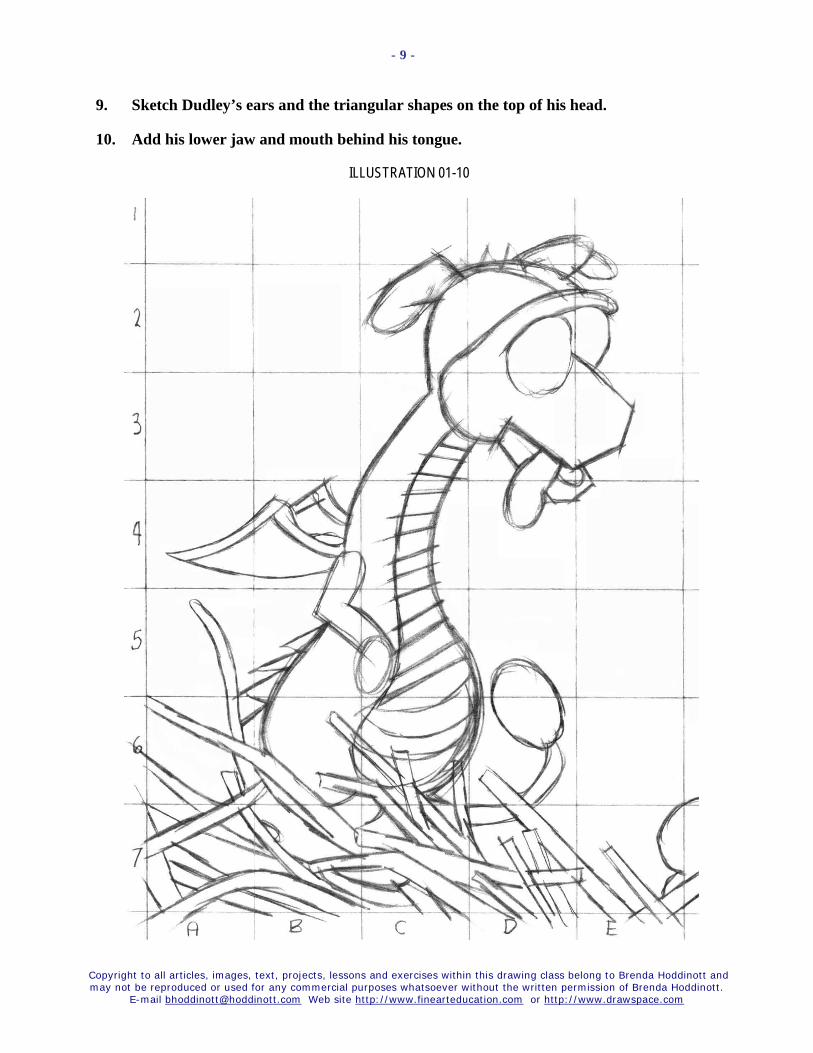
9. Sketch Dudley’s ears and the triangular shapes on the top of his head.
10. Add his lower jaw and mouth behind his tongue.
ILLUSTRATION 01-10
Copyright to all articles, images, text, projects, lessons and exercises within this drawing class belong to Brenda Hoddinott and may not be reproduced or used for any commercial purposes whatsoever without the written permission of Brenda Hoddinott.
E-mail [email protected] Web site http://www.finearteducation.com or http://www.drawspace.com
- 10 -
ILLUSTRATION 01-11
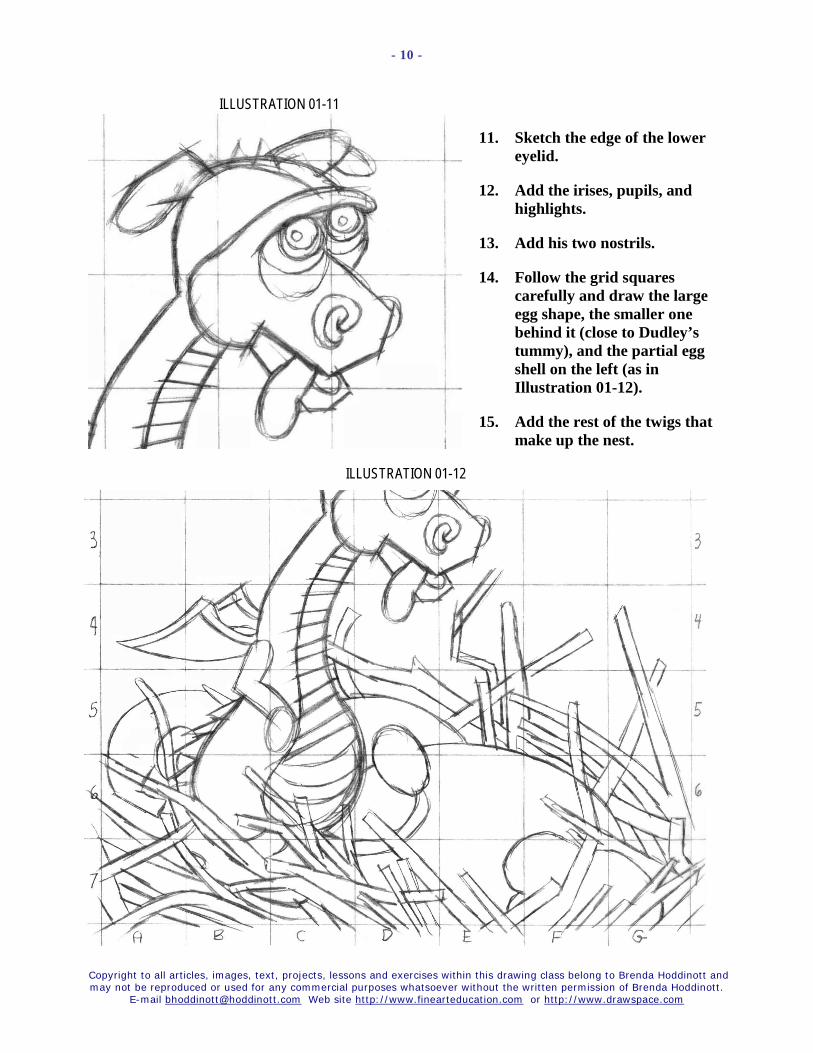
11. Sketch the edge of the lower eyelid.
12. Add the irises, pupils, and highlights.
13. Add his two nostrils.
14. Follow the grid squares carefully and draw the large egg shape, the smaller one behind it (close to Dudley’s tummy), and the partial egg shell on the left (as in Illustration 01-12).
15. Add the rest of the twigs that make up the nest.
ILLUSTRATION 01-12
Copyright to all articles, images, text, projects, lessons and exercises within this drawing class belong to Brenda Hoddinott and may not be reproduced or used for any commercial purposes whatsoever without the written permission of Brenda Hoddinott.
E-mail [email protected] Web site http://www.finearteducation.com or http://www.drawspace.com
- 11 -
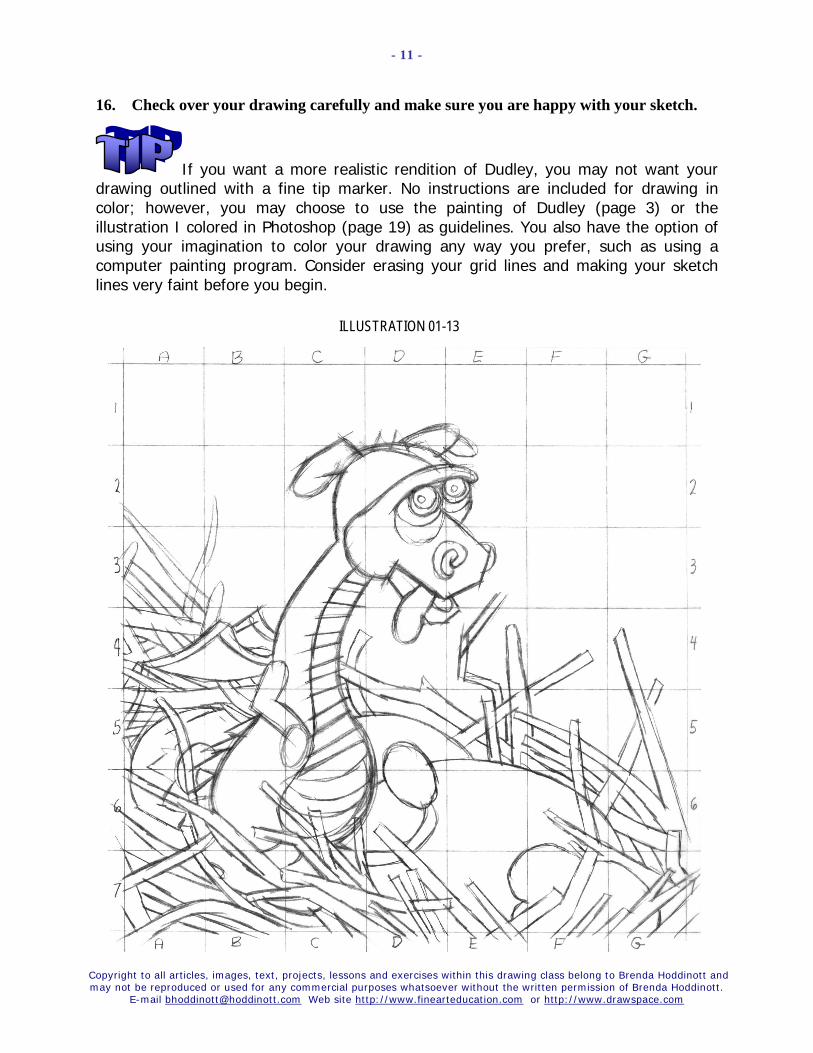
16. Check over your drawing carefully and make sure you are happy with your sketch.
If you want a more realistic rendition of Dudley, you may not want your drawing outlined with a fine tip marker. No instructions are included for drawing in color; however, you may choose to use the painting of Dudley (page 3) or the illustration I colored in Photoshop (page 19) as guidelines. You also have the option of using your imagination to color your drawing any way you prefer, such as using a computer painting program. Consider erasing your grid lines and making your sketch lines very faint before you begin.
ILLUSTRATION 01-13
Copyright to all articles, images, text, projects, lessons and exercises within this drawing class belong to Brenda Hoddinott and may not be reproduced or used for any commercial purposes whatsoever without the written permission of Brenda Hoddinott.
E-mail [email protected] Web site http://www.finearteducation.com or http://www.drawspace.com
- 12 -
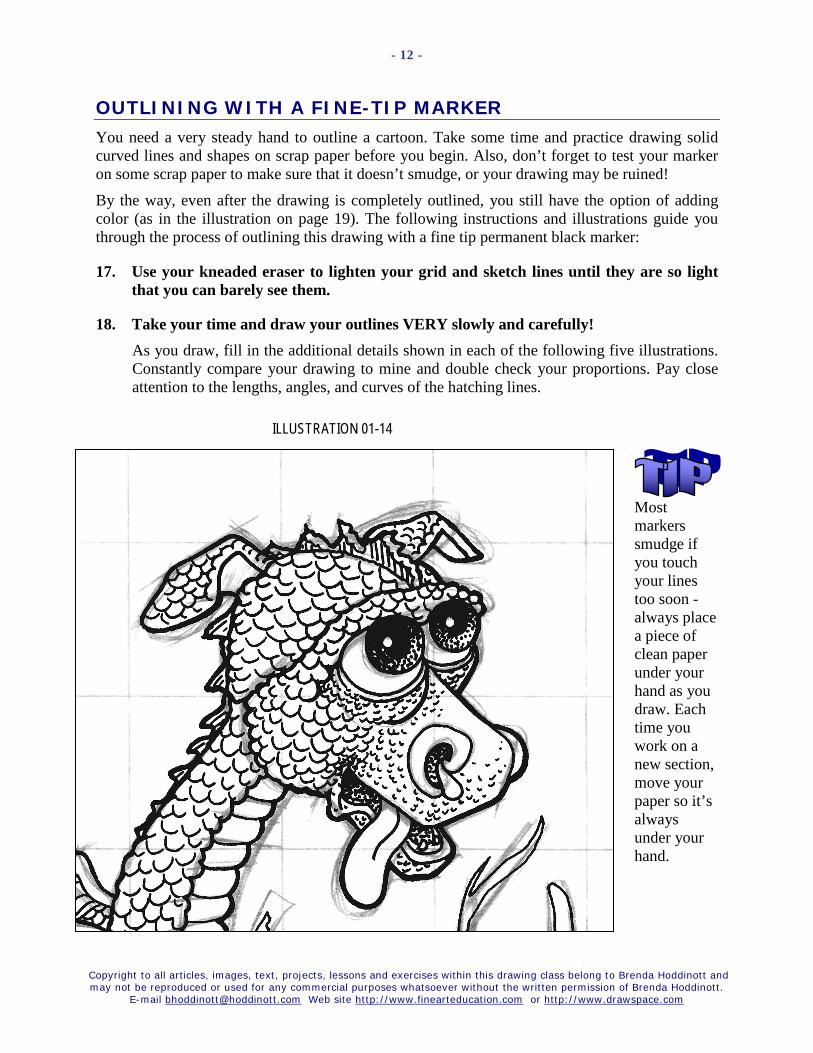
OUTLINING WITH A FINE-TIP MARKER You need a very steady hand to outline a cartoon. Take some time and practice drawing solid curved lines and shapes on scrap paper before you begin. Also, don’t forget to test your marker on some scrap paper to make sure that it doesn’t smudge, or your drawing may be ruined!
By the way, even after the drawing is completely outlined, you still have the option of adding color (as in the illustration on page 19). The following instructions and illustrations guide you through the process of outlining this drawing with a fine tip permanent black marker:
17. Use your kneaded eraser to lighten your grid and sketch lines until they are so light that you can barely see them.
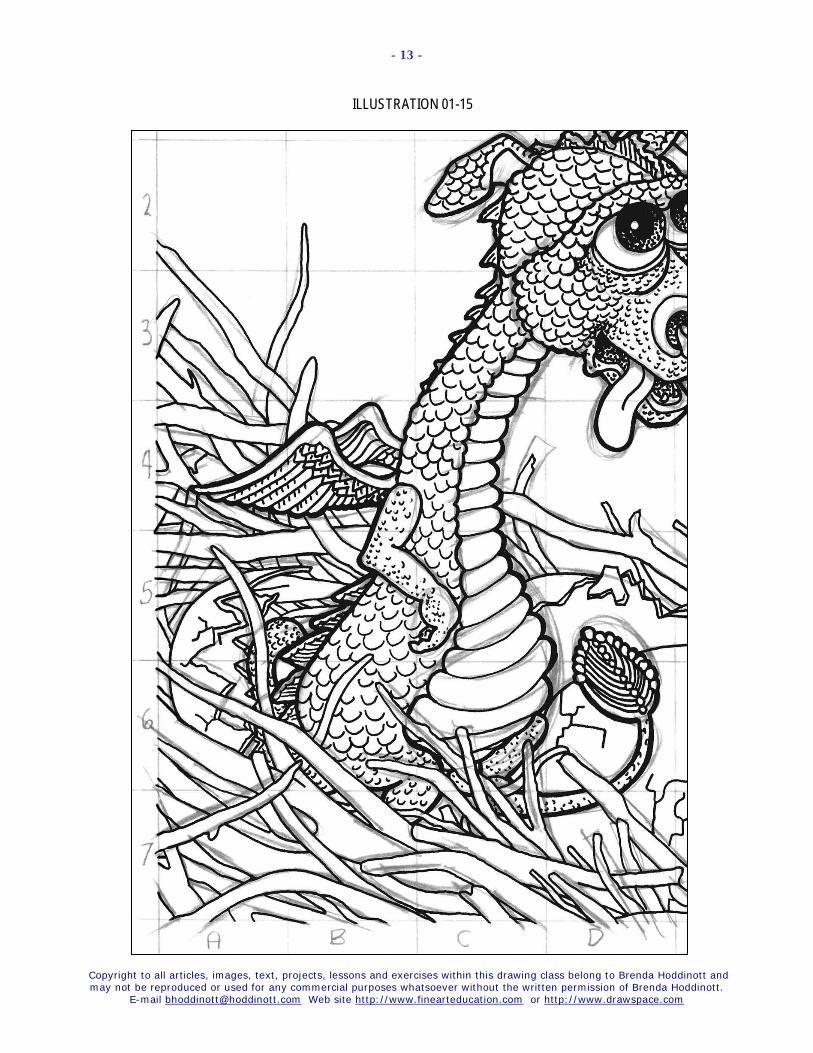
18. Take your time and draw your outlines VERY slowly and carefully! As you draw, fill in the additional details shown in each of the following five illustrations. Constantly compare your drawing to mine and double check your proportions. Pay close attention to the lengths, angles, and curves of the hatching lines.
ILLUSTRATION 01-14
Most markers smudge if you touch your lines too soon - always place a piece of clean paper under your hand as you draw. Each time you work on a new section, move your paper so it’s always under your hand.
Copyright to all articles, images, text, projects, lessons and exercises within this drawing class belong to Brenda Hoddinott and may not be reproduced or used for any commercial purposes whatsoever without the written permission of Brenda Hoddinott.
E-mail [email protected] Web site http://www.finearteducation.com or http://www.drawspace.com
- 13 -
ILLUSTRATION 01-15

Copyright to all articles, images, text, projects, lessons and exercises within this drawing class belong to Brenda Hoddinott and may not be reproduced or used for any commercial purposes whatsoever without the written permission of Brenda Hoddinott.
E-mail [email protected] Web site http://www.finearteducation.com or http://www.drawspace.com
- 14 -
ILLUSTRATION 01-16
Copyright to all articles, images, text, projects, lessons and exercises within this drawing class belong to Brenda Hoddinott and may not be reproduced or used for any commercial purposes whatsoever without the written permission of Brenda Hoddinott.
E-mail [email protected] Web site http://www.finearteducation.com or http://www.drawspace.com
- 15 -
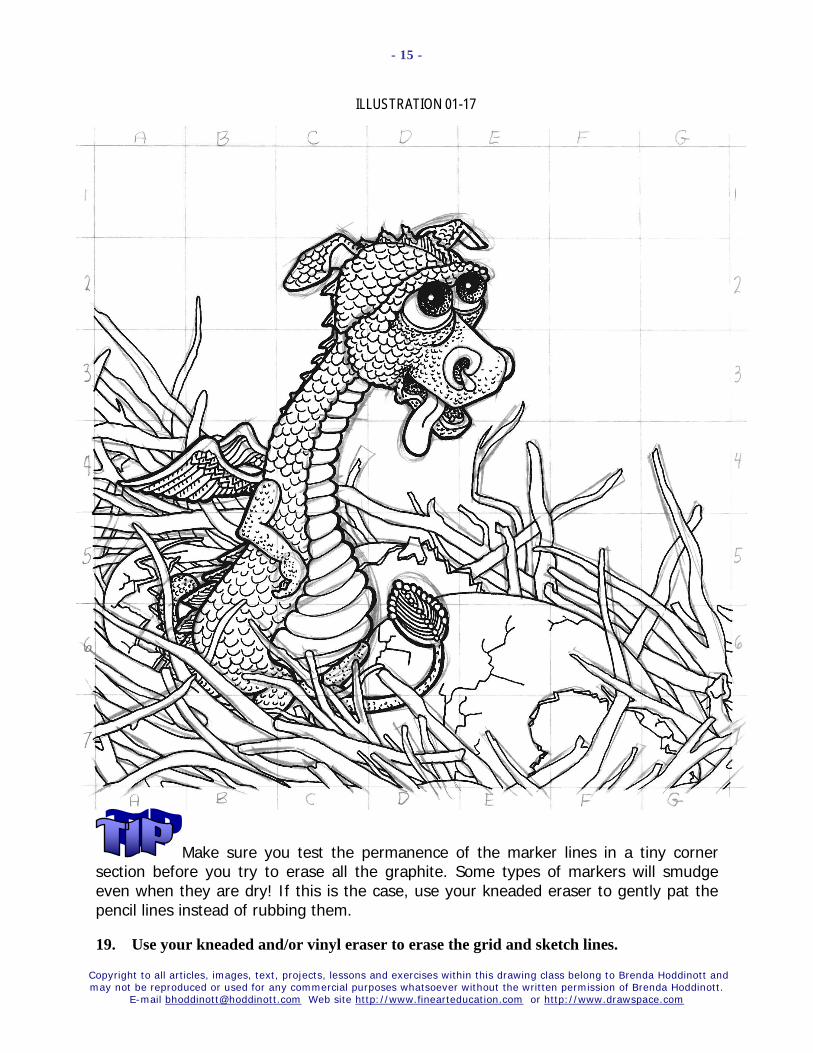
ILLUSTRATION 01-17
Make sure you test the permanence of the marker lines in a tiny corner section before you try to erase all the graphite. Some types of markers will smudge even when they are dry! If this is the case, use your kneaded eraser to gently pat the pencil lines instead of rubbing them.
19. Use your kneaded and/or vinyl eraser to erase the grid and sketch lines.
Copyright to all articles, images, text, projects, lessons and exercises within this drawing class belong to Brenda Hoddinott and may not be reproduced or used for any commercial purposes whatsoever without the written permission of Brenda Hoddinott.
E-mail [email protected] Web site http://www.finearteducation.com or http://www.drawspace.com
- 16 -
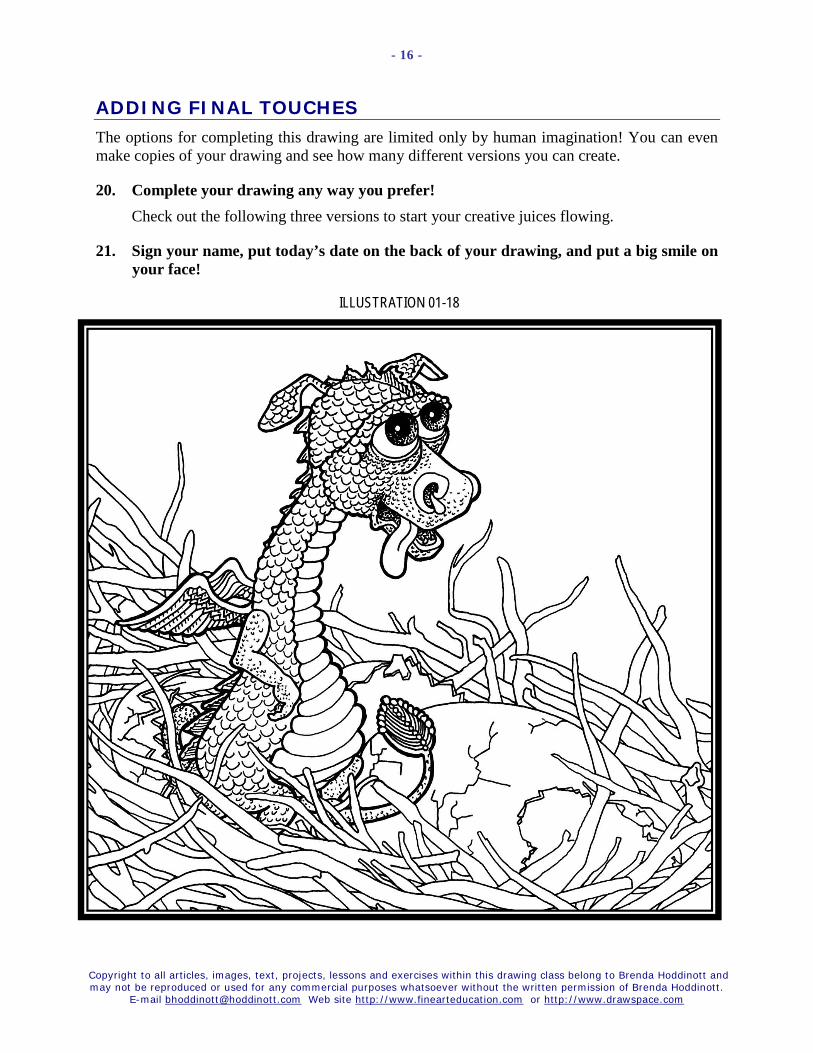
ADDING FINAL TOUCHES The options for completing this drawing are limited only by human imagination! You can even make copies of your drawing and see how many different versions you can create.
20. Complete your drawing any way you prefer! Check out the following three versions to start your creative juices flowing.
21. Sign your name, put today’s date on the back of your drawing, and put a big smile on your face!
ILLUSTRATION 01-18
Copyright to all articles, images, text, projects, lessons and exercises within this drawing class belong to Brenda Hoddinott and may not be reproduced or used for any commercial purposes whatsoever without the written permission of Brenda Hoddinott.
E-mail [email protected] Web site http://www.finearteducation.com or http://www.drawspace.com
- 17 -
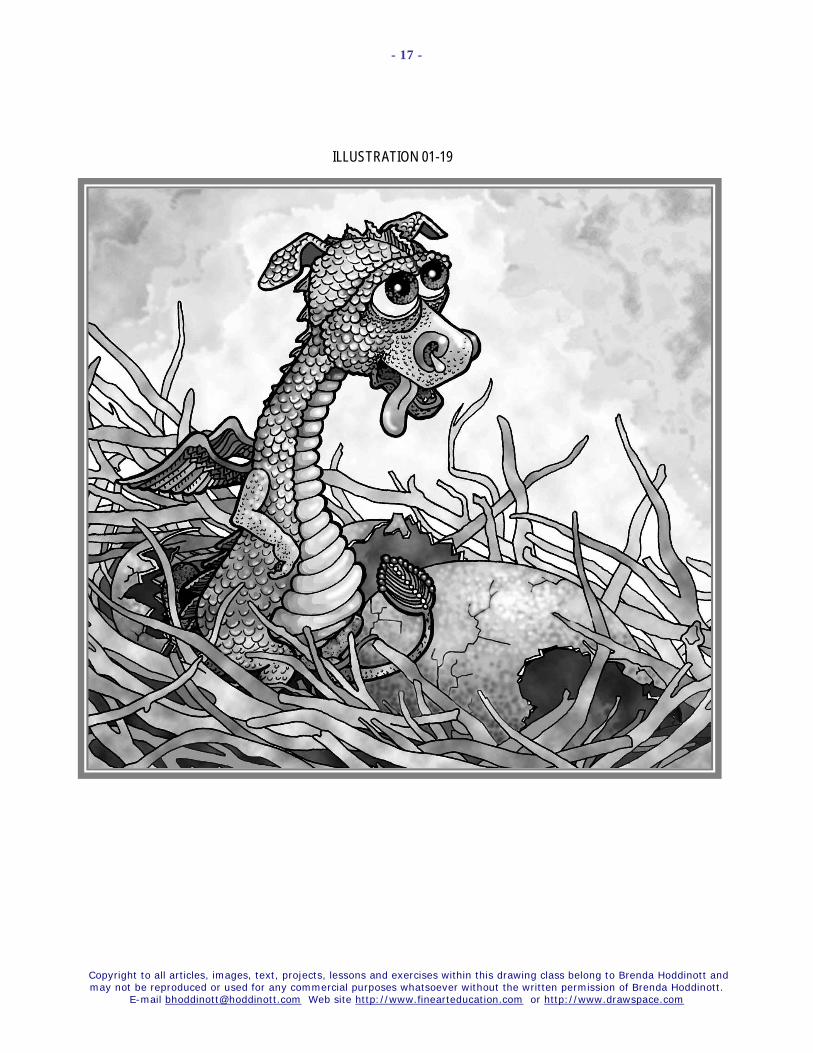
ILLUSTRATION 01-19

Copyright to all articles, images, text, projects, lessons and exercises within this drawing class belong to Brenda Hoddinott and may not be reproduced or used for any commercial purposes whatsoever without the written permission of Brenda Hoddinott.
E-mail [email protected] Web site http://www.finearteducation.com or http://www.drawspace.com
- 18 -
ILLUSTRATION 01-20
Copyright to all articles, images, text, projects, lessons and exercises within this drawing class belong to Brenda Hoddinott and may not be reproduced or used for any commercial purposes whatsoever without the written permission of Brenda Hoddinott.
E-mail [email protected] Web site http://www.finearteducation.com or http://www.drawspace.com
- 19 -
BRENDA HODDINOTT - BIOGRAPHY As a self-educated teacher, visual artist, portraitist, forensic artist, and illustrator, Brenda Hoddinott utilizes diverse art media including graphite, technical pen, colored pencil, chalk pastel, charcoal, conté crayon, and oil paints.
My philosophy on teaching art is to focus primarily on the enjoyment aspects while gently introducing
the technical and academic. Hence, in creating a passion for the subject matter, the quest for
knowledge also becomes enjoyable. >Brenda Hoddinott<
Born in St. John’s, Newfoundland, Brenda grew up in the small town of Corner Brook. She developed strong technical competencies with a personal commitment to self directed learning, and the aid of assorted “Learn to Draw” books. During Brenda’s twenty-five year career as a self-educated civilian forensic artist, numerous criminal investigation departments have employed Brenda’s skills, including Royal Canadian Mounted Police and municipal police departments. In 1992, Brenda was honored with a commendation from the Royal Canadian Mounted Police, and in 1994, she was awarded a Certificate of Membership from “Forensic Artists International”.
Her home-based art career included graphic design, and teaching recreational drawing and painting classes. As supervisor of her community’s recreational art department, Brenda hired and trained teachers, and designed curriculum for several children’s art programs. In 1998, Brenda chose to end her eighteen-year career as an art educator in order to devote more time to writing, drawing, painting, and developing her websites.
Drawspace http://www.drawspace.com incorporates her unique style and innovative approach to curriculum development. This site offers downloadable and printable drawing classes for students of all abilities from the age of eight through adult. Students of all ages, levels and abilities have praised the simple step-by-step instructional approach. This site is respected as a resource for fine art educators, home schooling programs, and educational facilities throughout the world.
LEARN-TO-DRAW BOOKS BY BRENDA HODDINOTT Drawing for Dummies (2003): Wiley Publishing, Inc., New, York, NY, this 336 page book
is available on various websites and in major bookstores internationally.
The Complete Idiot’s Guide to Drawing People (2004): Winner of the Alpha-Penguin Book of the Year Award 2004, Alpha - Pearson Education – Macmillan, Indianapolis, IN, this 360 page book is available on various websites and in major bookstores internationally.
Brenda Hoddinott
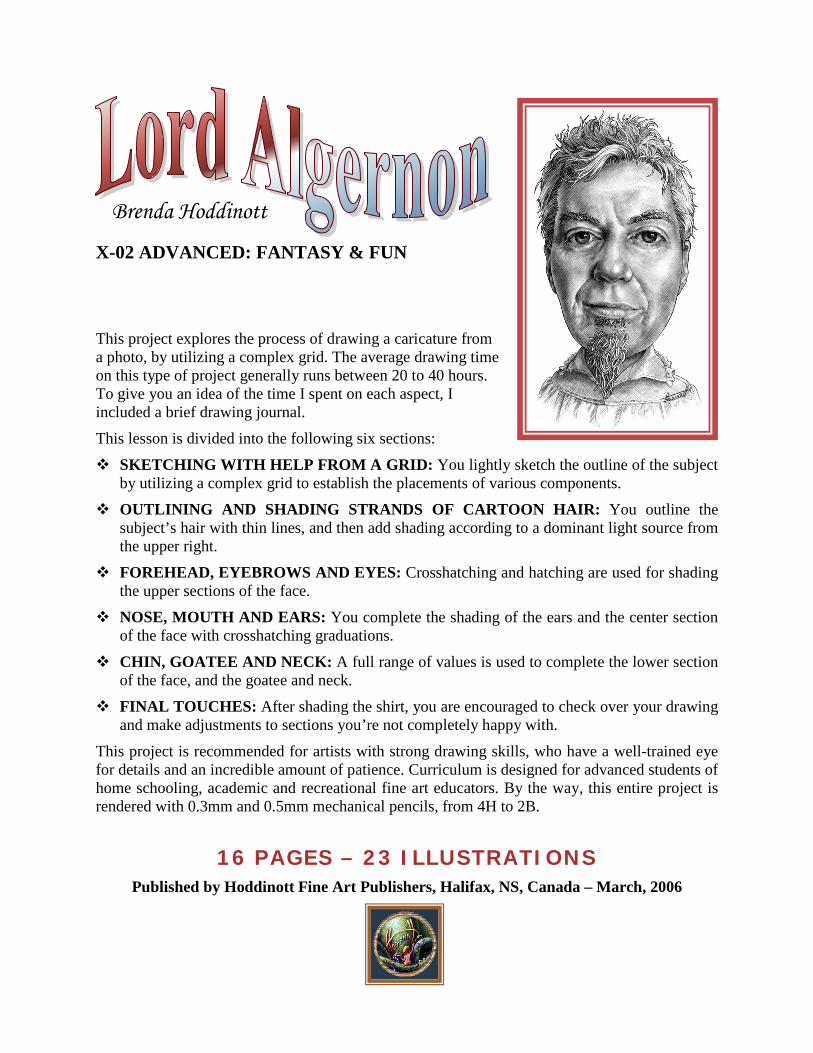
X-02 ADVANCED: FANTASY & FUN This project explores the process of drawing a caricature from a photo, by utilizing a complex grid. The average drawing time on this type of project generally runs between 20 to 40 hours. To give you an idea of the time I spent on each aspect, I included a brief drawing journal.
This lesson is divided into the following six sections:
SKETCHING WITH HELP FROM A GRID: You lightly sketch the outline of the subject by utilizing a complex grid to establish the placements of various components.
OUTLINING AND SHADING STRANDS OF CARTOON HAIR: You outline the subject’s hair with thin lines, and then add shading according to a dominant light source from the upper right.
FOREHEAD, EYEBROWS AND EYES: Crosshatching and hatching are used for shading the upper sections of the face.
NOSE, MOUTH AND EARS: You complete the shading of the ears and the center section of the face with crosshatching graduations.
CHIN, GOATEE AND NECK: A full range of values is used to complete the lower section of the face, and the goatee and neck.
FINAL TOUCHES: After shading the shirt, you are encouraged to check over your drawing and make adjustments to sections you’re not completely happy with.
This project is recommended for artists with strong drawing skills, who have a well-trained eye for details and an incredible amount of patience. Curriculum is designed for advanced students of home schooling, academic and recreational fine art educators. By the way, this entire project is rendered with 0.3mm and 0.5mm mechanical pencils, from 4H to 2B.
16 PAGES – 23 ILLUSTRATIONS Published by Hoddinott Fine Art Publishers, Halifax, NS, Canada – March, 2006
Copyright to all articles, images, text, projects, lessons and exercises within this drawing class belong to Brenda Hoddinott and may not be reproduced or used for any commercial purposes whatsoever without the written permission of Brenda Hoddinott.
E-mail [email protected] Web sites http://www.finearteducation.com and http://www.drawspace.com
2
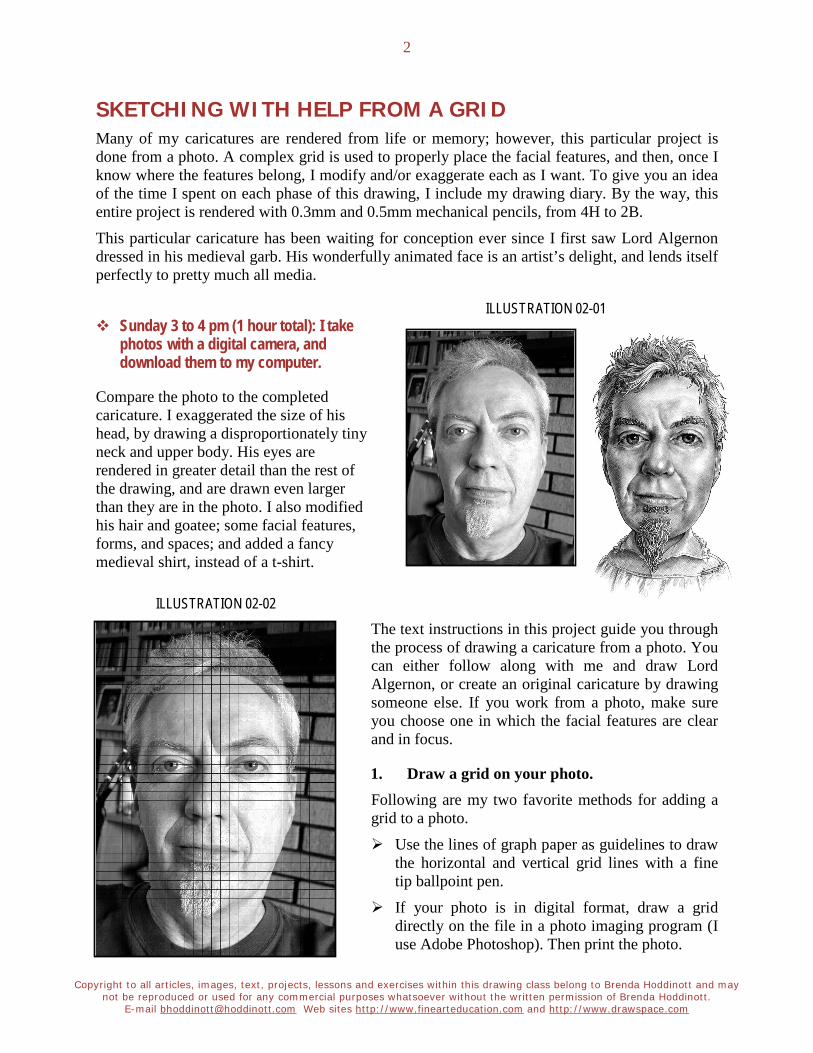
SKETCHING WITH HELP FROM A GRID Many of my caricatures are rendered from life or memory; however, this particular project is done from a photo. A complex grid is used to properly place the facial features, and then, once I know where the features belong, I modify and/or exaggerate each as I want. To give you an idea of the time I spent on each phase of this drawing, I include my drawing diary. By the way, this entire project is rendered with 0.3mm and 0.5mm mechanical pencils, from 4H to 2B.
This particular caricature has been waiting for conception ever since I first saw Lord Algernon dressed in his medieval garb. His wonderfully animated face is an artist’s delight, and lends itself perfectly to pretty much all media.
ILLUSTRATION 02-01 Sunday 3 to 4 pm (1 hour total): I take
photos with a digital camera, and download them to my computer.
Compare the photo to the completed caricature. I exaggerated the size of his head, by drawing a disproportionately tiny neck and upper body. His eyes are rendered in greater detail than the rest of the drawing, and are drawn even larger than they are in the photo. I also modified his hair and goatee; some facial features, forms, and spaces; and added a fancy medieval shirt, instead of a t-shirt.
ILLUSTRATION 02-02 The text instructions in this project guide you through the process of drawing a caricature from a photo. You can either follow along with me and draw Lord Algernon, or create an original caricature by drawing someone else. If you work from a photo, make sure you choose one in which the facial features are clear and in focus.
1. Draw a grid on your photo. Following are my two favorite methods for adding a grid to a photo.
Use the lines of graph paper as guidelines to draw the horizontal and vertical grid lines with a fine tip ballpoint pen.
If your photo is in digital format, draw a grid directly on the file in a photo imaging program (I use Adobe Photoshop). Then print the photo.
Copyright to all articles, images, text, projects, lessons and exercises within this drawing class belong to Brenda Hoddinott and may not be reproduced or used for any commercial purposes whatsoever without the written permission of Brenda Hoddinott.
E-mail [email protected] Web sites http://www.finearteducation.com and http://www.drawspace.com
3
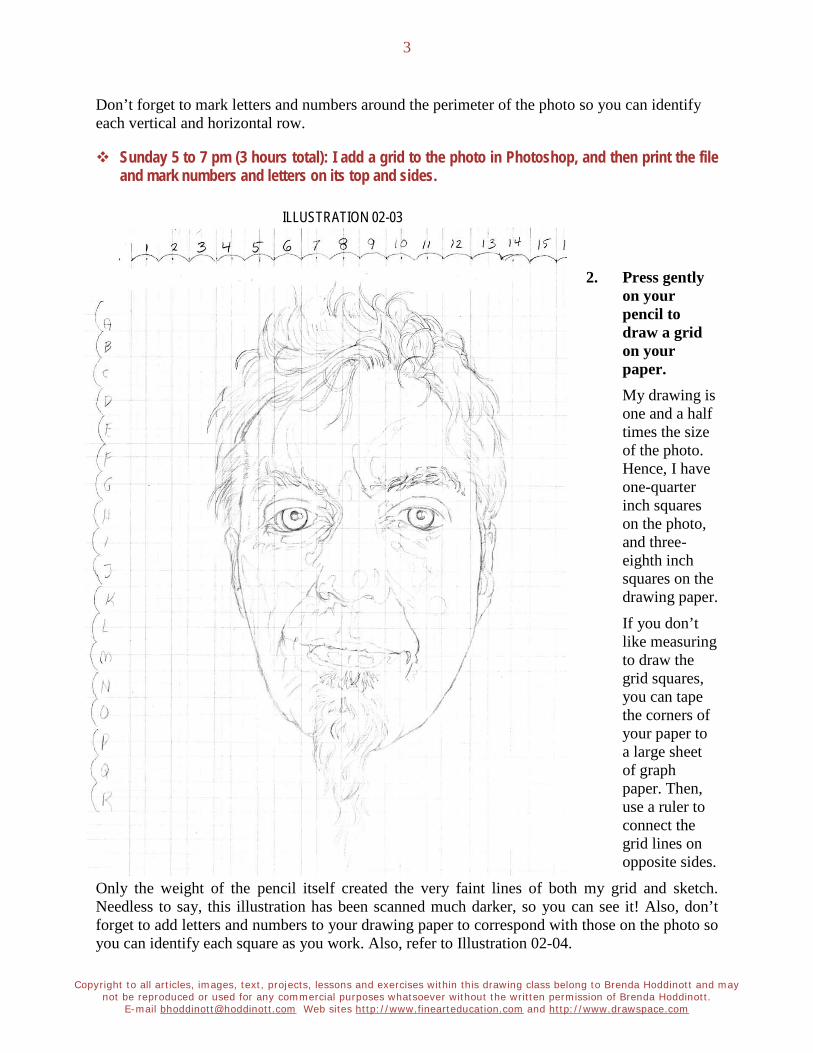
Don’t forget to mark letters and numbers around the perimeter of the photo so you can identify each vertical and horizontal row.
Sunday 5 to 7 pm (3 hours total): I add a grid to the photo in Photoshop, and then print the file and mark numbers and letters on its top and sides.
ILLUSTRATION 02-03
2. Press gently on your pencil to draw a grid on your paper. My drawing is one and a half times the size of the photo. Hence, I have one-quarter inch squares on the photo, and three-eighth inch squares on the drawing paper.
If you don’t like measuring to draw the grid squares, you can tape the corners of your paper to a large sheet of graph paper. Then, use a ruler to connect the grid lines on opposite sides.
Only the weight of the pencil itself created the very faint lines of both my grid and sketch. Needless to say, this illustration has been scanned much darker, so you can see it! Also, don’t forget to add letters and numbers to your drawing paper to correspond with those on the photo so you can identify each square as you work. Also, refer to Illustration 02-04.
Copyright to all articles, images, text, projects, lessons and exercises within this drawing class belong to Brenda Hoddinott and may not be reproduced or used for any commercial purposes whatsoever without the written permission of Brenda Hoddinott.
E-mail [email protected] Web sites http://www.finearteducation.com and http://www.drawspace.com
4
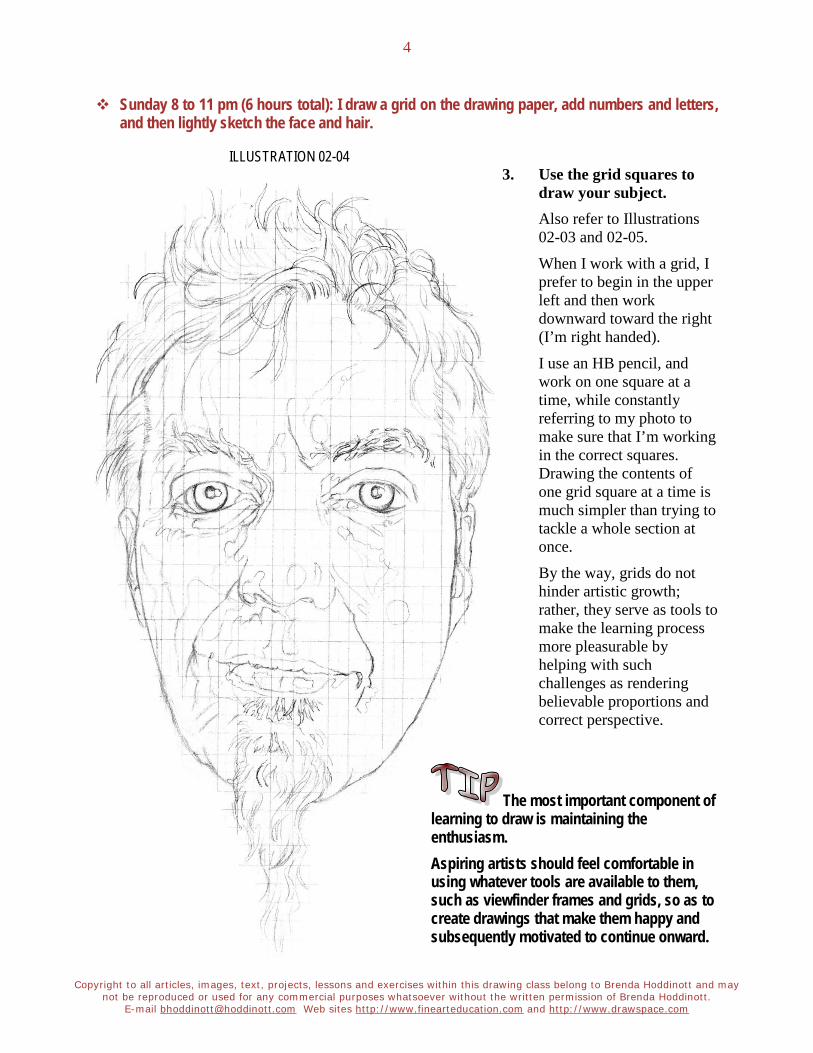
Sunday 8 to 11 pm (6 hours total): I draw a grid on the drawing paper, add numbers and letters, and then lightly sketch the face and hair.
ILLUSTRATION 02-04 3. Use the grid squares to
draw your subject. Also refer to Illustrations 02-03 and 02-05.
When I work with a grid, I prefer to begin in the upper left and then work downward toward the right (I’m right handed).
I use an HB pencil, and work on one square at a time, while constantly referring to my photo to make sure that I’m working in the correct squares. Drawing the contents of one grid square at a time is much simpler than trying to tackle a whole section at once.
By the way, grids do not hinder artistic growth; rather, they serve as tools to make the learning process more pleasurable by helping with such challenges as rendering believable proportions and correct perspective.
The most important component of learning to draw is maintaining the enthusiasm. Aspiring artists should feel comfortable in using whatever tools are available to them, such as viewfinder frames and grids, so as to create drawings that make them happy and subsequently motivated to continue onward.
Copyright to all articles, images, text, projects, lessons and exercises within this drawing class belong to Brenda Hoddinott and may not be reproduced or used for any commercial purposes whatsoever without the written permission of Brenda Hoddinott.
E-mail [email protected] Web sites http://www.finearteducation.com and http://www.drawspace.com
5
ILLUSTRATION 02-05
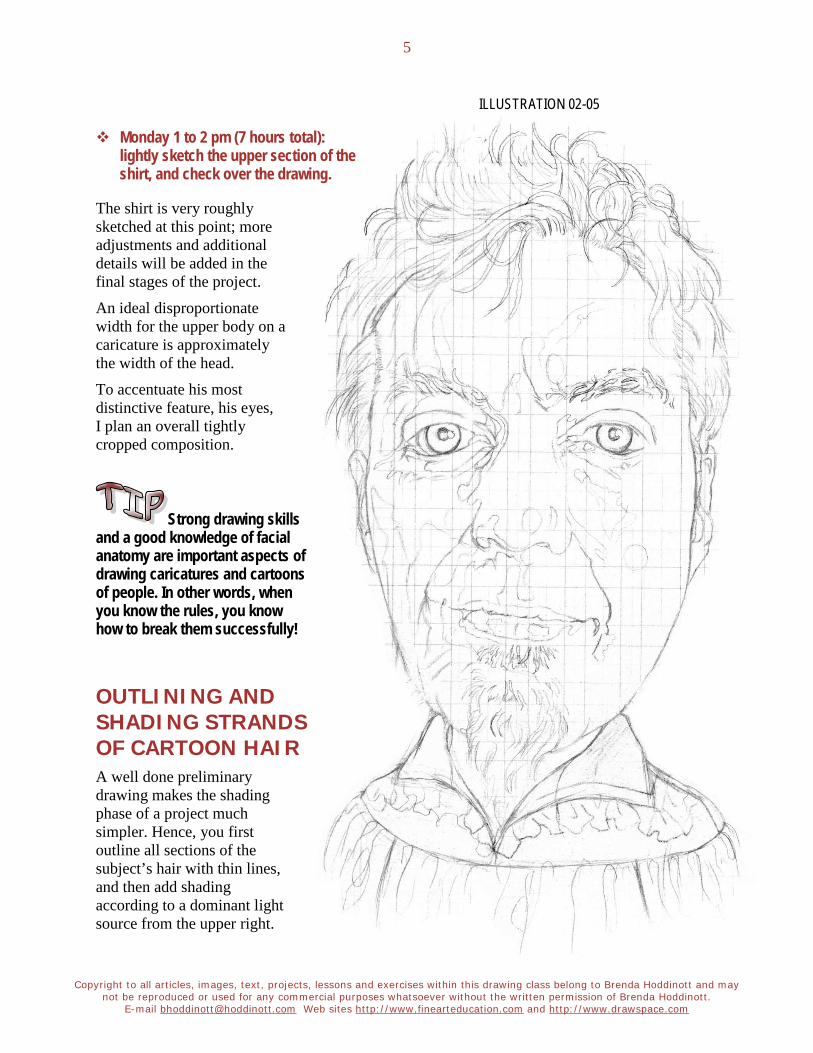
Monday 1 to 2 pm (7 hours total): lightly sketch the upper section of the shirt, and check over the drawing.
The shirt is very roughly sketched at this point; more adjustments and additional details will be added in the final stages of the project.
An ideal disproportionate width for the upper body on a caricature is approximately the width of the head.
To accentuate his most distinctive feature, his eyes, I plan an overall tightly cropped composition.
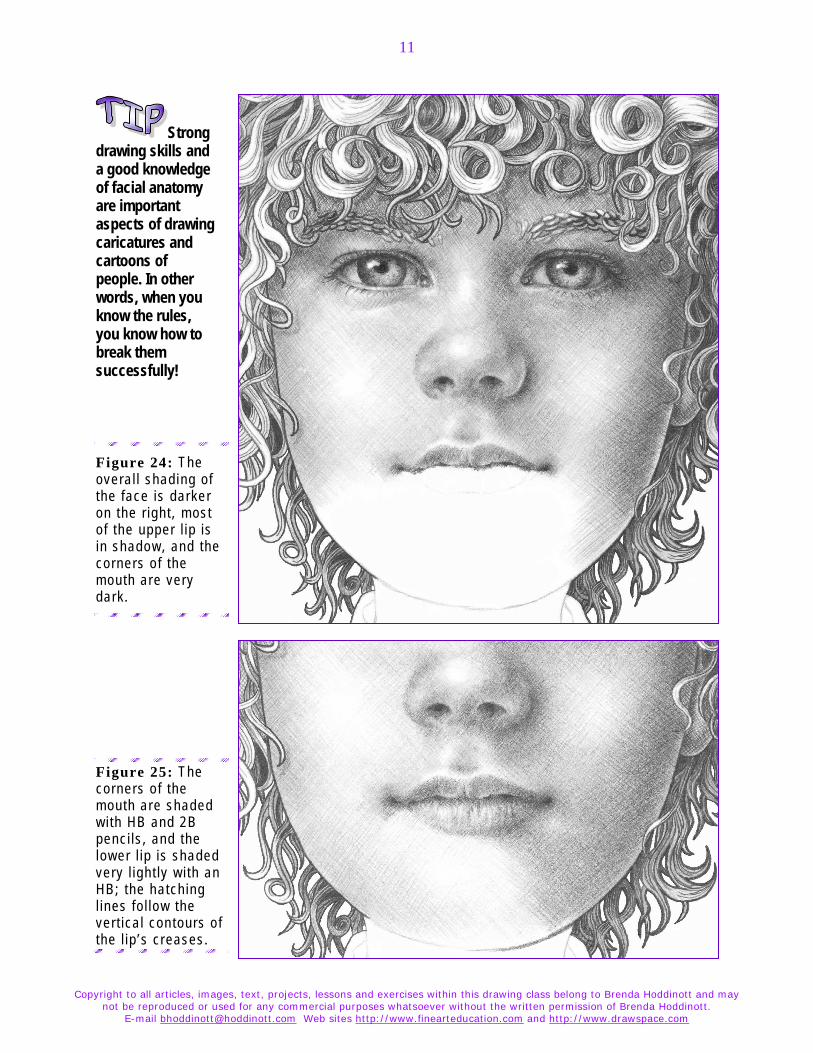
Strong drawing skills and a good knowledge of facial anatomy are important aspects of drawing caricatures and cartoons of people. In other words, when you know the rules, you know how to break them successfully!
OUTLINING AND SHADING STRANDS OF CARTOON HAIR A well done preliminary drawing makes the shading phase of a project much simpler. Hence, you first outline all sections of the subject’s hair with thin lines, and then add shading according to a dominant light source from the upper right.
Copyright to all articles, images, text, projects, lessons and exercises within this drawing class belong to Brenda Hoddinott and may not be reproduced or used for any commercial purposes whatsoever without the written permission of Brenda Hoddinott.
E-mail [email protected] Web sites http://www.finearteducation.com and http://www.drawspace.com
6
ILLUSTRATION 02-06
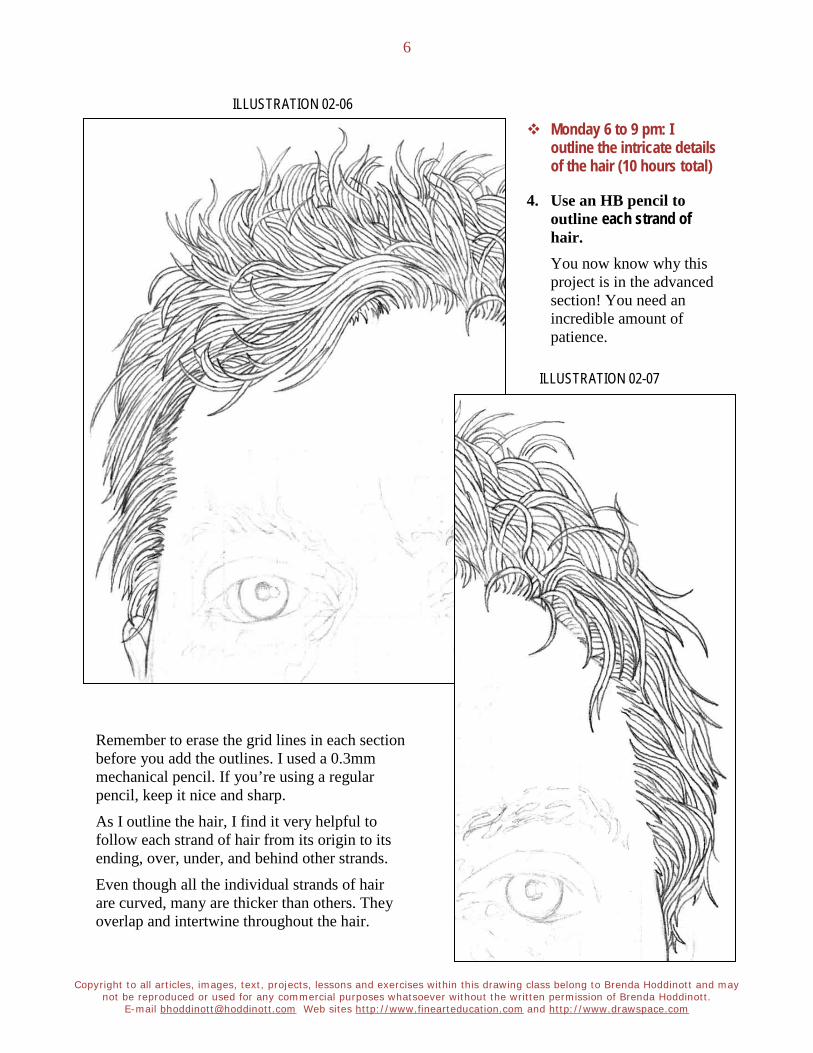
Monday 6 to 9 pm: I outline the intricate details of the hair (10 hours total)
4. Use an HB pencil to outline each strand of hair. You now know why this project is in the advanced section! You need an incredible amount of patience.
ILLUSTRATION 02-07
Remember to erase the grid lines in each section before you add the outlines. I used a 0.3mm mechanical pencil. If you’re using a regular pencil, keep it nice and sharp.
As I outline the hair, I find it very helpful to follow each strand of hair from its origin to its ending, over, under, and behind other strands.
Even though all the individual strands of hair are curved, many are thicker than others. They overlap and intertwine throughout the hair.
Copyright to all articles, images, text, projects, lessons and exercises within this drawing class belong to Brenda Hoddinott and may not be reproduced or used for any commercial purposes whatsoever without the written permission of Brenda Hoddinott.
E-mail [email protected] Web sites http://www.finearteducation.com and http://www.drawspace.com
7
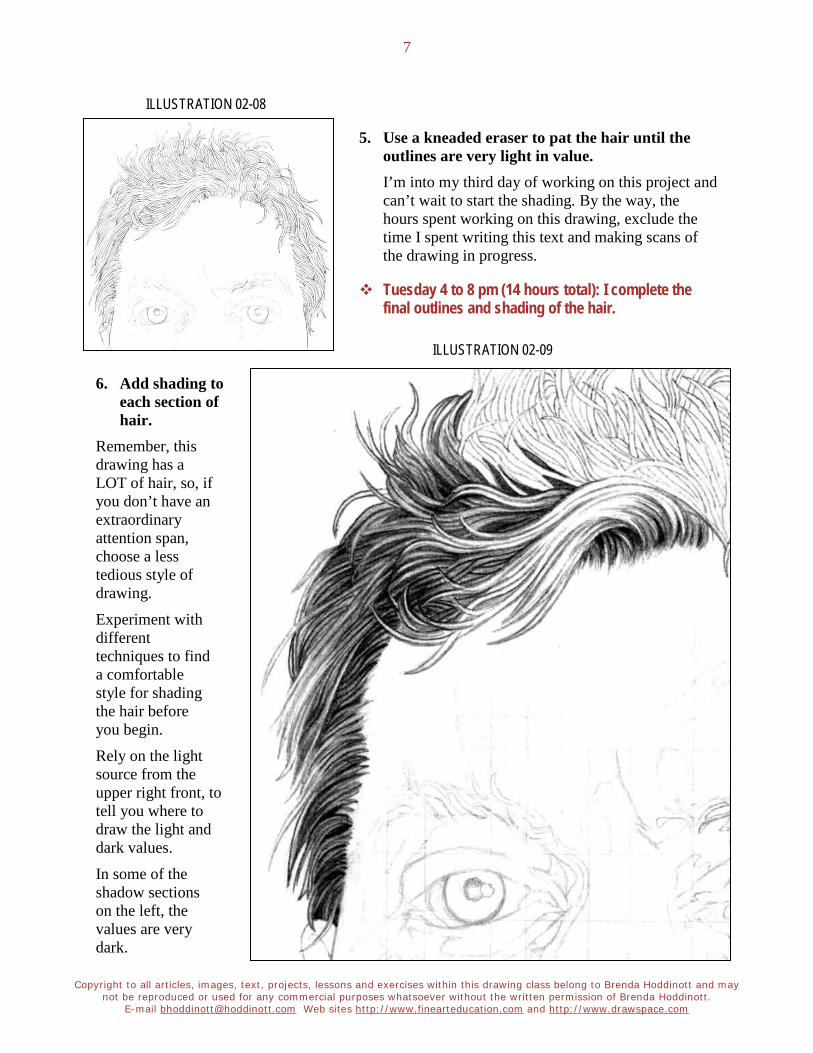
ILLUSTRATION 02-08
5. Use a kneaded eraser to pat the hair until the outlines are very light in value. I’m into my third day of working on this project and can’t wait to start the shading. By the way, the hours spent working on this drawing, exclude the time I spent writing this text and making scans of the drawing in progress.
Tuesday 4 to 8 pm (14 hours total): I complete the final outlines and shading of the hair.
ILLUSTRATION 02-09
6. Add shading to each section of hair.
Remember, this drawing has a LOT of hair, so, if you don’t have an extraordinary attention span, choose a less tedious style of drawing.
Experiment with different techniques to find a comfortable style for shading the hair before you begin.
Rely on the light source from the upper right front, to tell you where to draw the light and dark values.
In some of the shadow sections on the left, the values are very dark.
Copyright to all articles, images, text, projects, lessons and exercises within this drawing class belong to Brenda Hoddinott and may not be reproduced or used for any commercial purposes whatsoever without the written permission of Brenda Hoddinott.
E-mail [email protected] Web sites http://www.finearteducation.com and http://www.drawspace.com
8
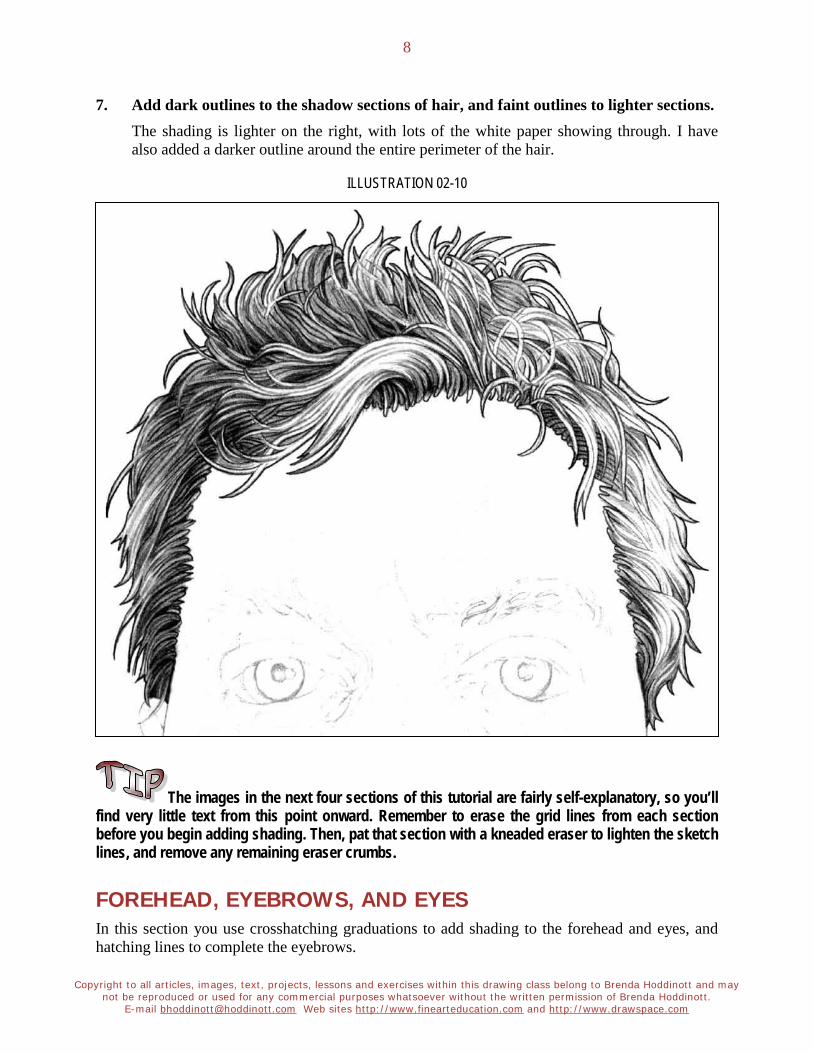
7. Add dark outlines to the shadow sections of hair, and faint outlines to lighter sections. The shading is lighter on the right, with lots of the white paper showing through. I have also added a darker outline around the entire perimeter of the hair.
ILLUSTRATION 02-10
The images in the next four sections of this tutorial are fairly self-explanatory, so you’ll find very little text from this point onward. Remember to erase the grid lines from each section before you begin adding shading. Then, pat that section with a kneaded eraser to lighten the sketch lines, and remove any remaining eraser crumbs.
FOREHEAD, EYEBROWS, AND EYES In this section you use crosshatching graduations to add shading to the forehead and eyes, and hatching lines to complete the eyebrows.
Copyright to all articles, images, text, projects, lessons and exercises within this drawing class belong to Brenda Hoddinott and may not be reproduced or used for any commercial purposes whatsoever without the written permission of Brenda Hoddinott.
E-mail [email protected] Web sites http://www.finearteducation.com and http://www.drawspace.com
9
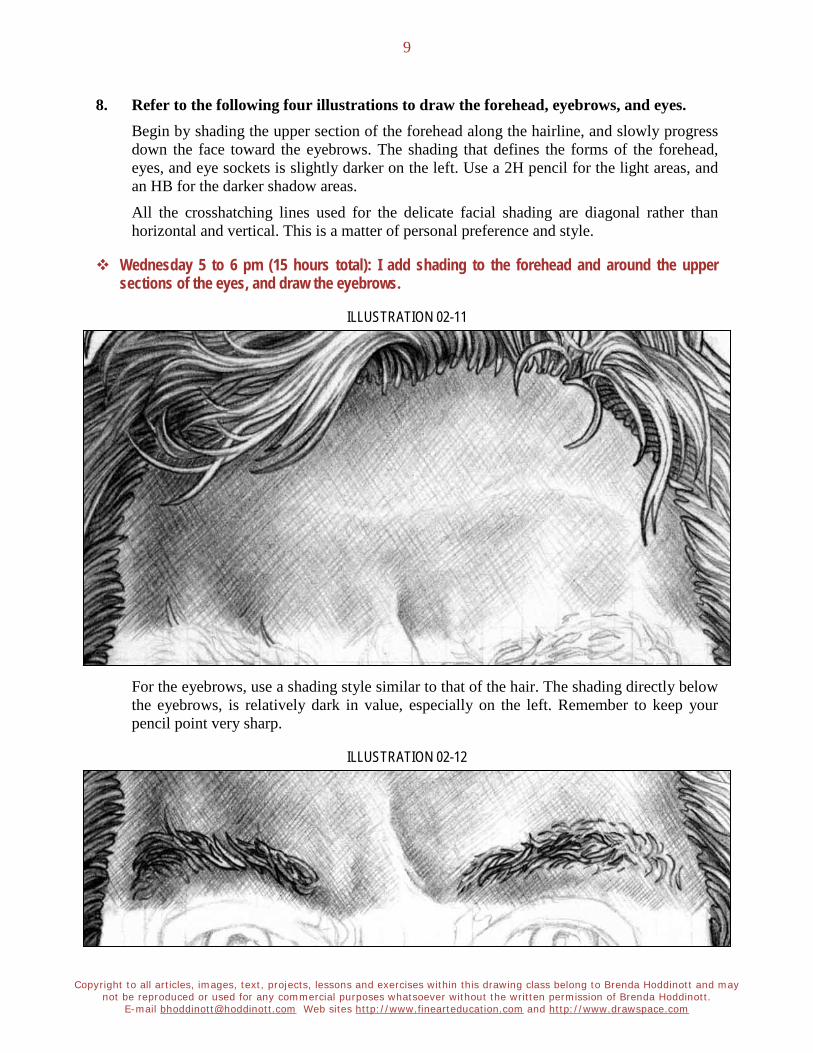
8. Refer to the following four illustrations to draw the forehead, eyebrows, and eyes. Begin by shading the upper section of the forehead along the hairline, and slowly progress down the face toward the eyebrows. The shading that defines the forms of the forehead, eyes, and eye sockets is slightly darker on the left. Use a 2H pencil for the light areas, and an HB for the darker shadow areas.
All the crosshatching lines used for the delicate facial shading are diagonal rather than horizontal and vertical. This is a matter of personal preference and style.
Wednesday 5 to 6 pm (15 hours total): I add shading to the forehead and around the upper sections of the eyes, and draw the eyebrows.
ILLUSTRATION 02-11
For the eyebrows, use a shading style similar to that of the hair. The shading directly below the eyebrows, is relatively dark in value, especially on the left. Remember to keep your pencil point very sharp.
ILLUSTRATION 02-12
Copyright to all articles, images, text, projects, lessons and exercises within this drawing class belong to Brenda Hoddinott and may not be reproduced or used for any commercial purposes whatsoever without the written permission of Brenda Hoddinott.
E-mail [email protected] Web sites http://www.finearteducation.com and http://www.drawspace.com
10
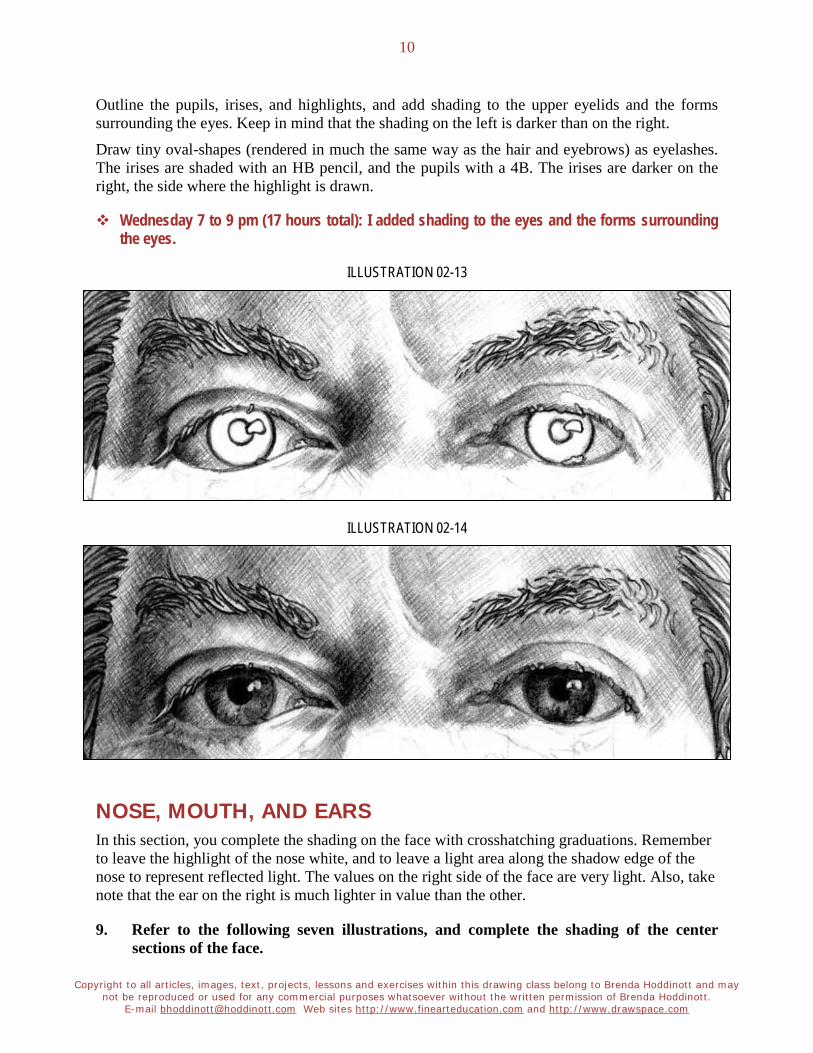
Outline the pupils, irises, and highlights, and add shading to the upper eyelids and the forms surrounding the eyes. Keep in mind that the shading on the left is darker than on the right.
Draw tiny oval-shapes (rendered in much the same way as the hair and eyebrows) as eyelashes. The irises are shaded with an HB pencil, and the pupils with a 4B. The irises are darker on the right, the side where the highlight is drawn.
Wednesday 7 to 9 pm (17 hours total): I added shading to the eyes and the forms surrounding the eyes.
ILLUSTRATION 02-13
ILLUSTRATION 02-14
NOSE, MOUTH, AND EARS In this section, you complete the shading on the face with crosshatching graduations. Remember to leave the highlight of the nose white, and to leave a light area along the shadow edge of the nose to represent reflected light. The values on the right side of the face are very light. Also, take note that the ear on the right is much lighter in value than the other.
9. Refer to the following seven illustrations, and complete the shading of the center sections of the face.

Copyright to all articles, images, text, projects, lessons and exercises within this drawing class belong to Brenda Hoddinott and may not be reproduced or used for any commercial purposes whatsoever without the written permission of Brenda Hoddinott.
E-mail [email protected] Web sites http://www.finearteducation.com and http://www.drawspace.com
11
ILLUSTRATION 02-15 ILLUSTRATION 02-16
Thursday 6 to 8 pm (19 hours total): I add shading to the shadow sections of the face on the left, and complete the shading of the nose.
ILLUSTRATION 02-17
Friday 1 to 2:00 pm (20 hours total): I add shading to the section of the face directly below the eye on the right.
Copyright to all articles, images, text, projects, lessons and exercises within this drawing class belong to Brenda Hoddinott and may not be reproduced or used for any commercial purposes whatsoever without the written permission of Brenda Hoddinott.
E-mail [email protected] Web sites http://www.finearteducation.com and http://www.drawspace.com
12
ILLUSTRATION 02-18
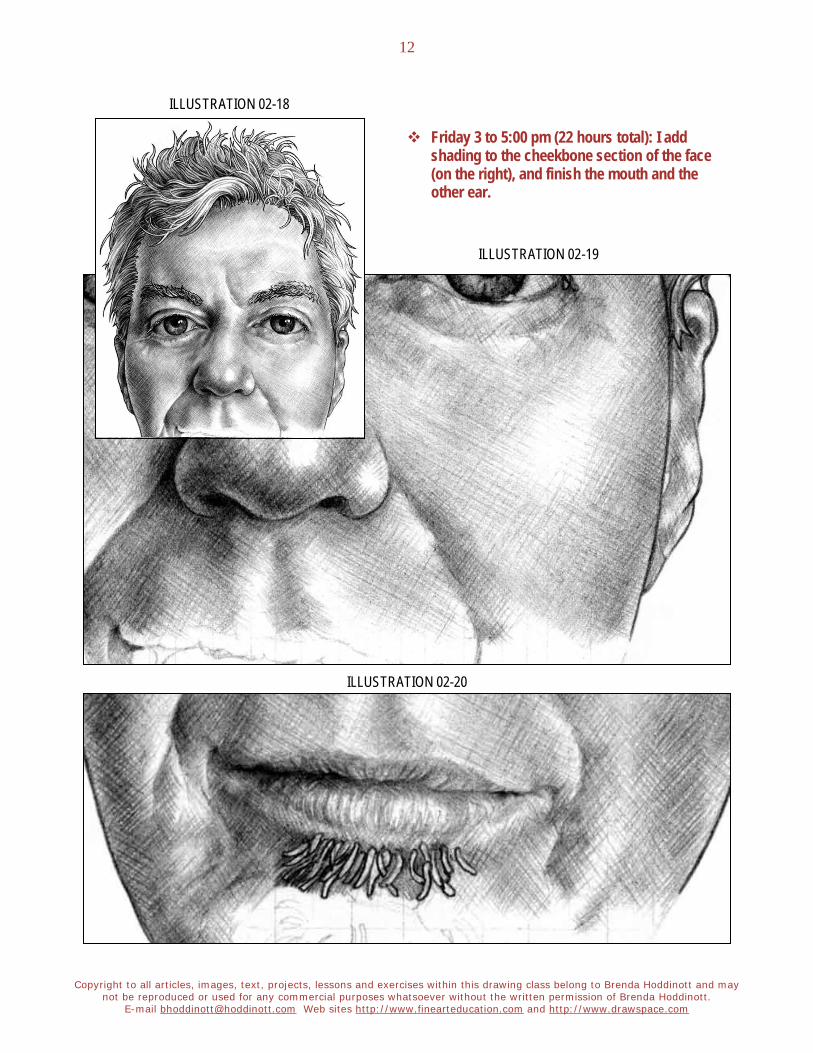
Friday 3 to 5:00 pm (22 hours total): I add shading to the cheekbone section of the face (on the right), and finish the mouth and the other ear.
ILLUSTRATION 02-19
ILLUSTRATION 02-20
Copyright to all articles, images, text, projects, lessons and exercises within this drawing class belong to Brenda Hoddinott and may not be reproduced or used for any commercial purposes whatsoever without the written permission of Brenda Hoddinott.
E-mail [email protected] Web sites http://www.finearteducation.com and http://www.drawspace.com
13
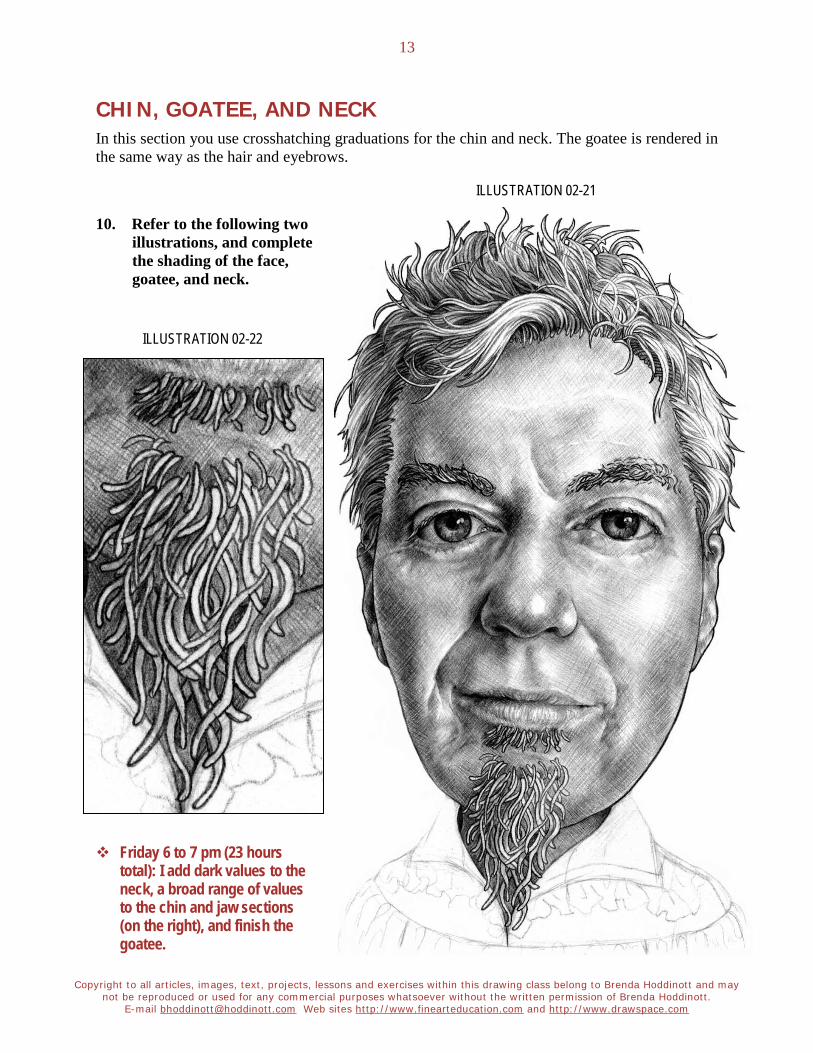
CHIN, GOATEE, AND NECK In this section you use crosshatching graduations for the chin and neck. The goatee is rendered in the same way as the hair and eyebrows.
ILLUSTRATION 02-21
10. Refer to the following two illustrations, and complete the shading of the face, goatee, and neck.
ILLUSTRATION 02-22
Friday 6 to 7 pm (23 hours total): I add dark values to the neck, a broad range of values to the chin and jaw sections (on the right), and finish the goatee.
Copyright to all articles, images, text, projects, lessons and exercises within this drawing class belong to Brenda Hoddinott and may not be reproduced or used for any commercial purposes whatsoever without the written permission of Brenda Hoddinott.
E-mail [email protected] Web sites http://www.finearteducation.com and http://www.drawspace.com
14
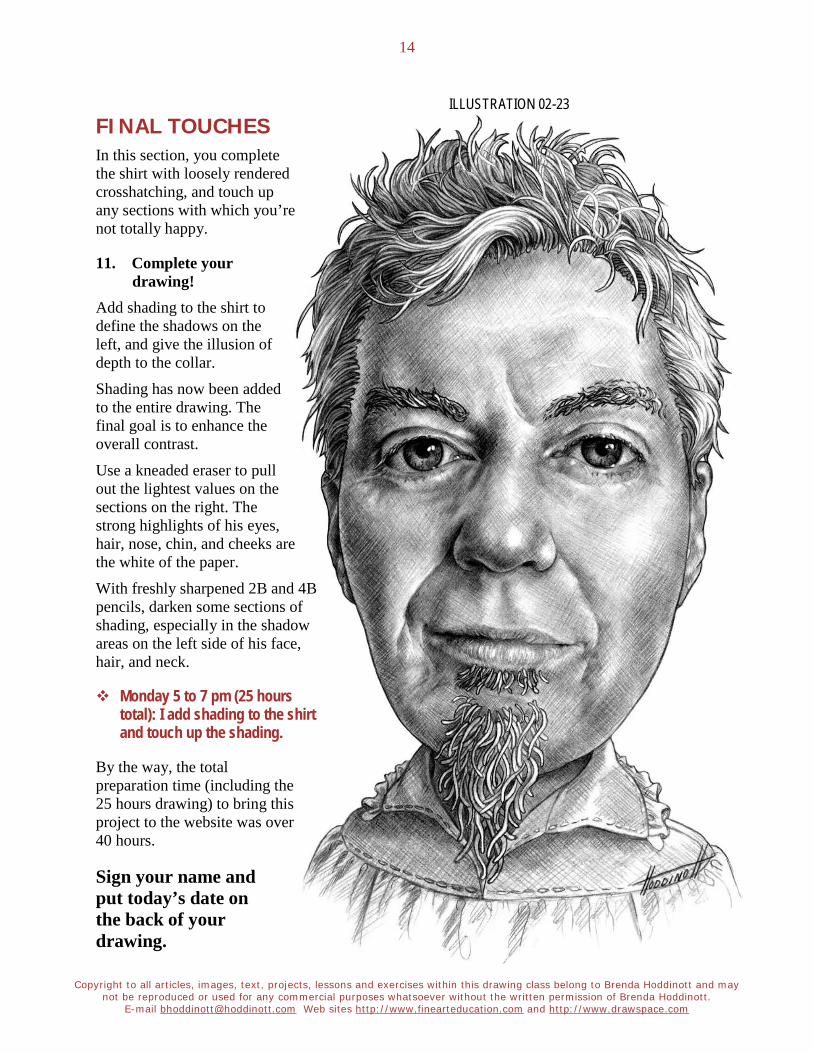
ILLUSTRATION 02-23 FINAL TOUCHES In this section, you complete the shirt with loosely rendered crosshatching, and touch up any sections with which you’re not totally happy.
11. Complete your drawing!
Add shading to the shirt to define the shadows on the left, and give the illusion of depth to the collar.
Shading has now been added to the entire drawing. The final goal is to enhance the overall contrast.
Use a kneaded eraser to pull out the lightest values on the sections on the right. The strong highlights of his eyes, hair, nose, chin, and cheeks are the white of the paper.
With freshly sharpened 2B and 4B pencils, darken some sections of shading, especially in the shadow areas on the left side of his face, hair, and neck.
Monday 5 to 7 pm (25 hours total): I add shading to the shirt and touch up the shading.
By the way, the total preparation time (including the 25 hours drawing) to bring this project to the website was over 40 hours.
Sign your name and put today’s date on the back of your drawing.
Copyright to all articles, images, text, projects, lessons and exercises within this drawing class belong to Brenda Hoddinott and may not be reproduced or used for any commercial purposes whatsoever without the written permission of Brenda Hoddinott.
E-mail [email protected] Web sites http://www.finearteducation.com and http://www.drawspace.com
15
BRENDA HODDINOTT - BIOGRAPHY As a self-educated teacher, visual artist, portraitist, forensic artist, and illustrator, Brenda Hoddinott utilizes diverse art media including graphite, technical pen, colored pencil, chalk pastel, charcoal, conté crayon, and oil paints.
My philosophy on teaching art is to focus primarily on the enjoyment aspects while gently introducing the technical and academic. Hence, in creating a passion for the subject matter,
the quest for knowledge also becomes enjoyable. >Brenda Hoddinott<
Born in St. John’s, Newfoundland, Brenda grew up in the small town of Corner Brook. She developed strong technical competencies with a personal commitment to self directed learning, and the aid of assorted “Learn to Draw” books. During Brenda’s twenty-five year career as a self-educated civilian forensic artist, numerous criminal investigation departments have employed Brenda’s skills, including Royal Canadian Mounted Police and municipal police departments. In 1992, Brenda was honored with a commendation from the Royal Canadian Mounted Police, and in 1994, she was awarded a Certificate of Membership from “Forensic Artists International”.
Her home-based art career included graphic design, and teaching recreational drawing and painting classes. As supervisor of her community’s recreational art department, Brenda hired and trained teachers, and designed curriculum for several children’s art programs. In 1998, Brenda chose to end her eighteen-year career as an art educator in order to devote more time to writing, drawing, painting, and developing her websites.
Drawspace http://www.drawspace.com incorporates her unique style and innovative approach to curriculum development. This site offers downloadable and printable drawing classes for students of all abilities from the age of eight through adult. Students of all ages, levels and abilities have praised the simple step-by-step instructional approach. These sites are respected as a resource for fine art educators, home schooling programs, and educational facilities throughout the world.
LEARN-TO-DRAW BOOKS BY BRENDA HODDINOTT Drawing for Dummies: Wiley Publishing, Inc., New, York, NY, this 336 page book is available on various websites and in major bookstores internationally.
The Complete Idiot’s Guide to Drawing People: Winner of the Alpha-Penguin Book of the Year Award 2004, Alpha - Pearson Education – Macmillan, Indianapolis, IN, this 360 page book is available on various websites and in major bookstores internationally.
Brenda Hoddinott
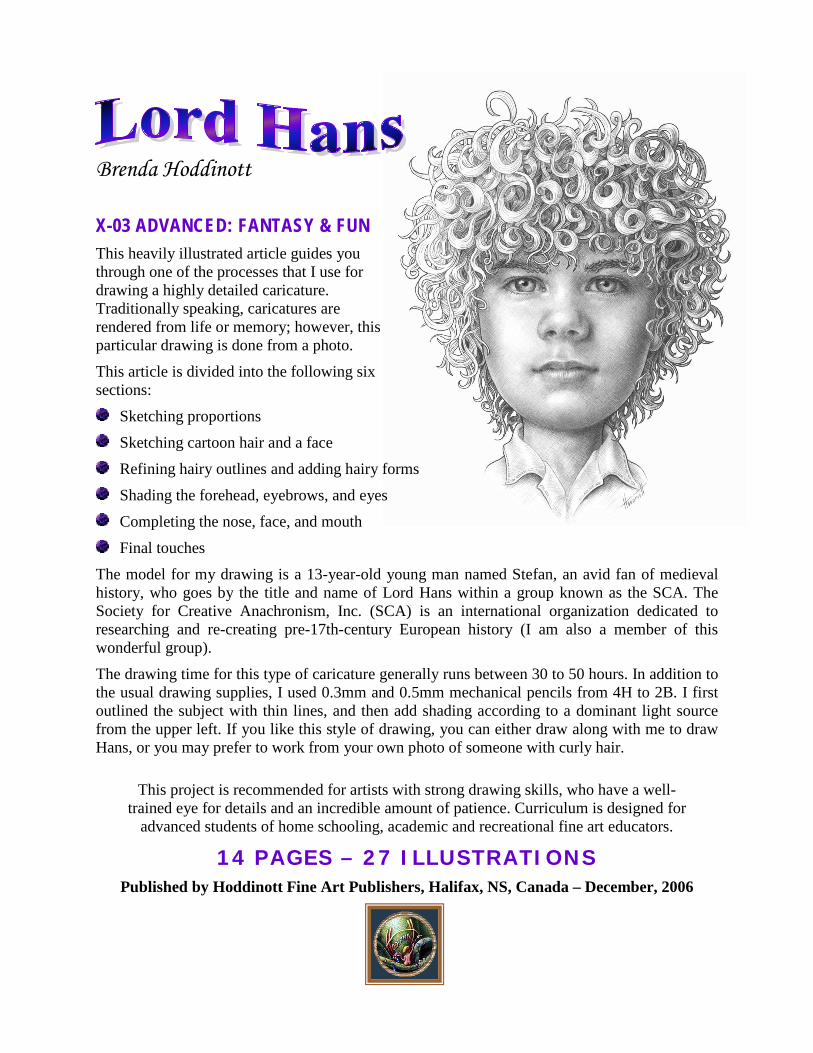
X-03 ADVANCED: FANTASY & FUN This heavily illustrated article guides you through one of the processes that I use for drawing a highly detailed caricature. Traditionally speaking, caricatures are rendered from life or memory; however, this particular drawing is done from a photo.
This article is divided into the following six sections:
Sketching proportions
Sketching cartoon hair and a face
Refining hairy outlines and adding hairy forms
Shading the forehead, eyebrows, and eyes
Completing the nose, face, and mouth
Final touches
The model for my drawing is a 13-year-old young man named Stefan, an avid fan of medieval history, who goes by the title and name of Lord Hans within a group known as the SCA. The Society for Creative Anachronism, Inc. (SCA) is an international organization dedicated to researching and re-creating pre-17th-century European history (I am also a member of this wonderful group).
The drawing time for this type of caricature generally runs between 30 to 50 hours. In addition to the usual drawing supplies, I used 0.3mm and 0.5mm mechanical pencils from 4H to 2B. I first outlined the subject with thin lines, and then add shading according to a dominant light source from the upper left. If you like this style of drawing, you can either draw along with me to draw Hans, or you may prefer to work from your own photo of someone with curly hair.
This project is recommended for artists with strong drawing skills, who have a well-trained eye for details and an incredible amount of patience. Curriculum is designed for
advanced students of home schooling, academic and recreational fine art educators.
14 PAGES – 27 ILLUSTRATIONS Published by Hoddinott Fine Art Publishers, Halifax, NS, Canada – December, 2006
Copyright to all articles, images, text, projects, lessons and exercises within this drawing class belong to Brenda Hoddinott and may not be reproduced or used for any commercial purposes whatsoever without the written permission of Brenda Hoddinott.
E-mail [email protected] Web sites http://www.finearteducation.com and http://www.drawspace.com
2
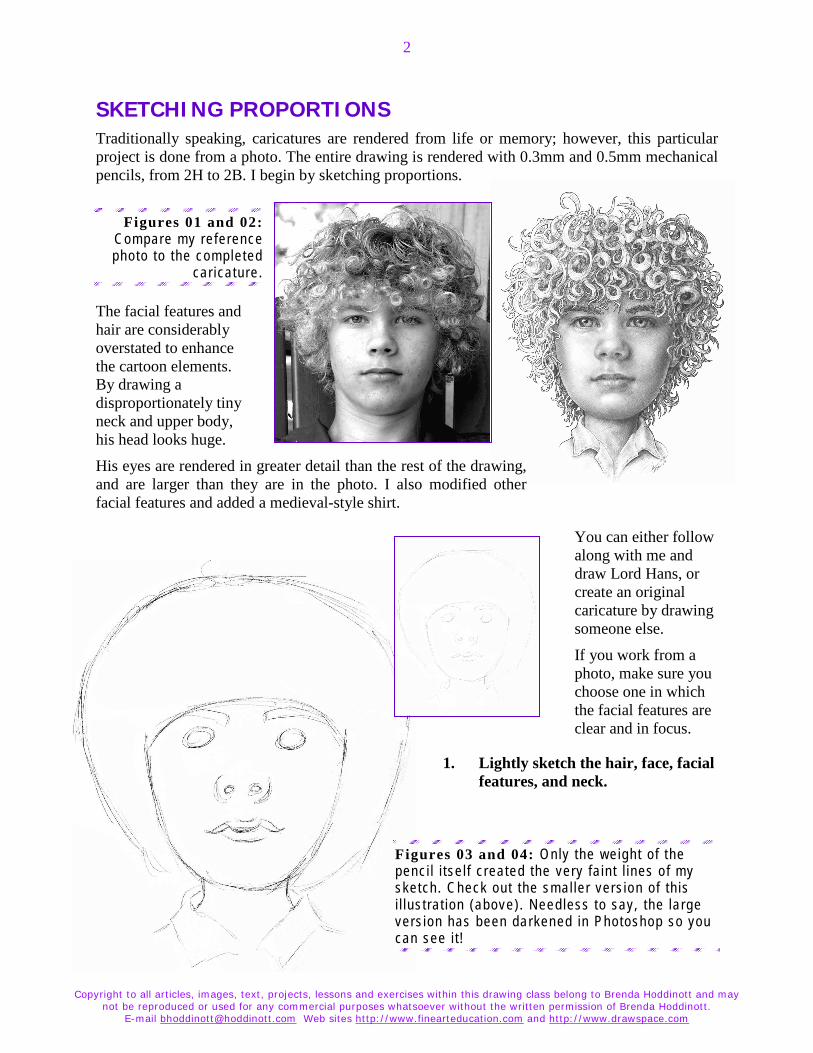
SKETCHING PROPORTIONS Traditionally speaking, caricatures are rendered from life or memory; however, this particular project is done from a photo. The entire drawing is rendered with 0.3mm and 0.5mm mechanical pencils, from 2H to 2B. I begin by sketching proportions.
Figures 01 and 02: Compare my re ference photo to the completed
car icature .
The facial features and hair are considerably overstated to enhance the cartoon elements. By drawing a disproportionately tiny neck and upper body, his head looks huge.
His eyes are rendered in greater detail than the rest of the drawing, and are larger than they are in the photo. I also modified other facial features and added a medieval-style shirt.
You can either follow along with me and draw Lord Hans, or create an original caricature by drawing someone else.
If you work from a photo, make sure you choose one in which the facial features are clear and in focus.
1. Lightly sketch the hair, face, facial features, and neck.
Figures 03 and 04: Only the weight of the penci l i tse l f c reated the very fa int l ines o f my sketch. Check out the smal ler vers ion of th is i l lus t rat ion (above). Needless to say, the la rge vers ion has been darkened in Photoshop so you can see i t !
Copyright to all articles, images, text, projects, lessons and exercises within this drawing class belong to Brenda Hoddinott and may not be reproduced or used for any commercial purposes whatsoever without the written permission of Brenda Hoddinott.
E-mail [email protected] Web sites http://www.finearteducation.com and http://www.drawspace.com
3
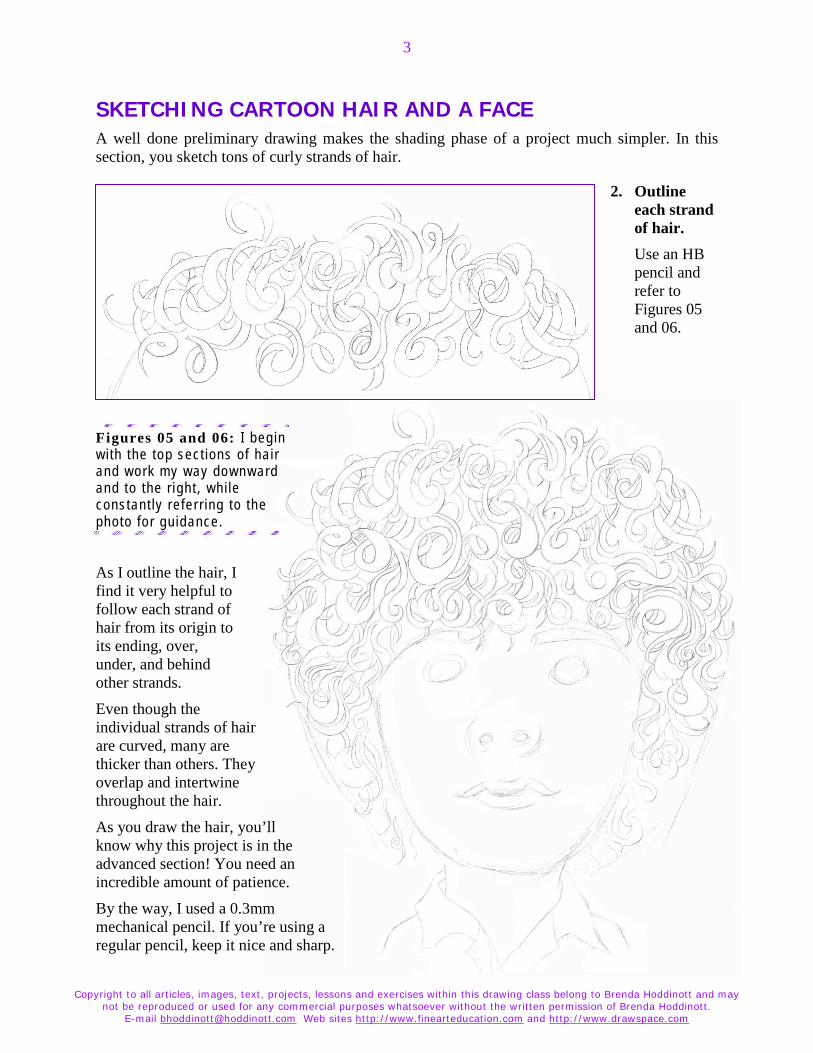
SKETCHING CARTOON HAIR AND A FACE A well done preliminary drawing makes the shading phase of a project much simpler. In this section, you sketch tons of curly strands of hair.
2. Outline each strand of hair. Use an HB pencil and refer to Figures 05 and 06.
Figures 05 and 06: I begin wi th the top sect ions of hai r and work my way downward and to the r ight , whi le constant ly refer r ing to the photo fo r guidance.
As I outline the hair, I find it very helpful to follow each strand of hair from its origin to its ending, over, under, and behind other strands.
Even though the individual strands of hair are curved, many are thicker than others. They overlap and intertwine throughout the hair.
As you draw the hair, you’ll know why this project is in the advanced section! You need an incredible amount of patience.
By the way, I used a 0.3mm mechanical pencil. If you’re using a regular pencil, keep it nice and sharp.
Copyright to all articles, images, text, projects, lessons and exercises within this drawing class belong to Brenda Hoddinott and may not be reproduced or used for any commercial purposes whatsoever without the written permission of Brenda Hoddinott.
E-mail [email protected] Web sites http://www.finearteducation.com and http://www.drawspace.com
4
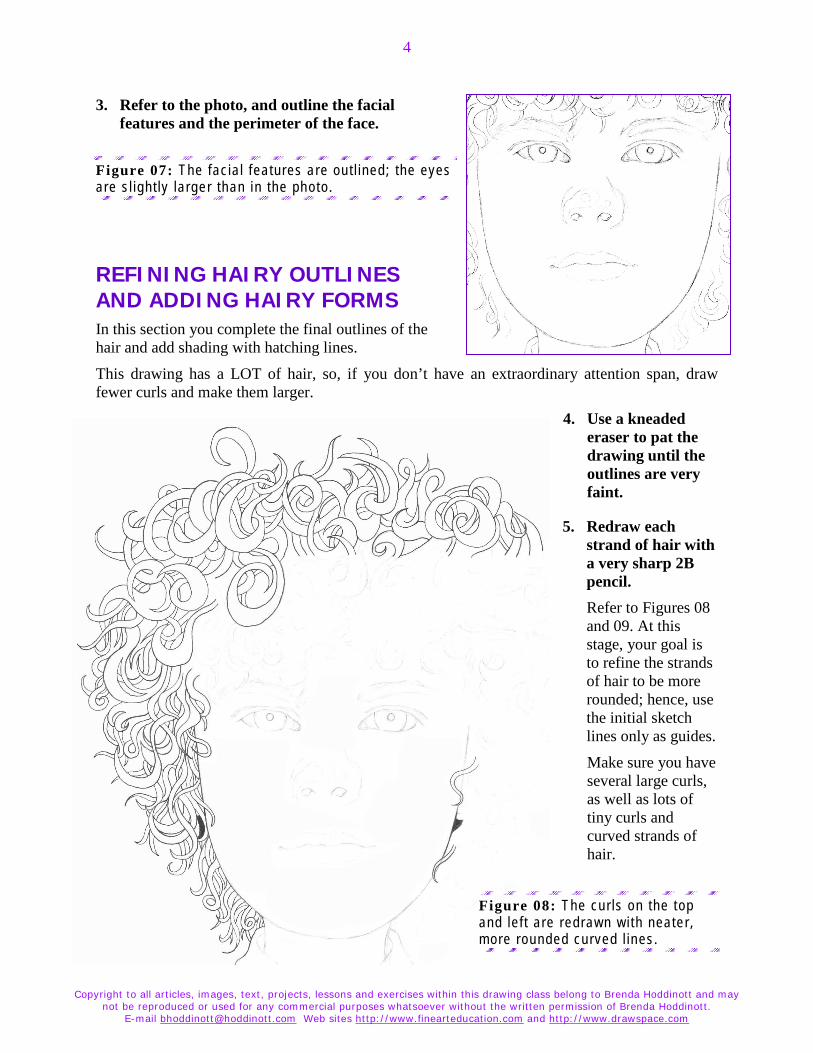
3. Refer to the photo, and outline the facial features and the perimeter of the face.
Figure 07: The fac ia l features are ou t l ined; the eyes are s l ight ly larger than in the photo.
REFINING HAIRY OUTLINES AND ADDING HAIRY FORMS In this section you complete the final outlines of the hair and add shading with hatching lines.
This drawing has a LOT of hair, so, if you don’t have an extraordinary attention span, draw fewer curls and make them larger.
4. Use a kneaded eraser to pat the drawing until the outlines are very faint.
5. Redraw each strand of hair with a very sharp 2B pencil. Refer to Figures 08 and 09. At this stage, your goal is to refine the strands of hair to be more rounded; hence, use the initial sketch lines only as guides.
Make sure you have several large curls, as well as lots of tiny curls and curved strands of hair.
Figure 08: The cur ls on the top and lef t are redrawn wi th neater , more rounded curved l ines.
Copyright to all articles, images, text, projects, lessons and exercises within this drawing class belong to Brenda Hoddinott and may not be reproduced or used for any commercial purposes whatsoever without the written permission of Brenda Hoddinott.
E-mail [email protected] Web sites http://www.finearteducation.com and http://www.drawspace.com
5
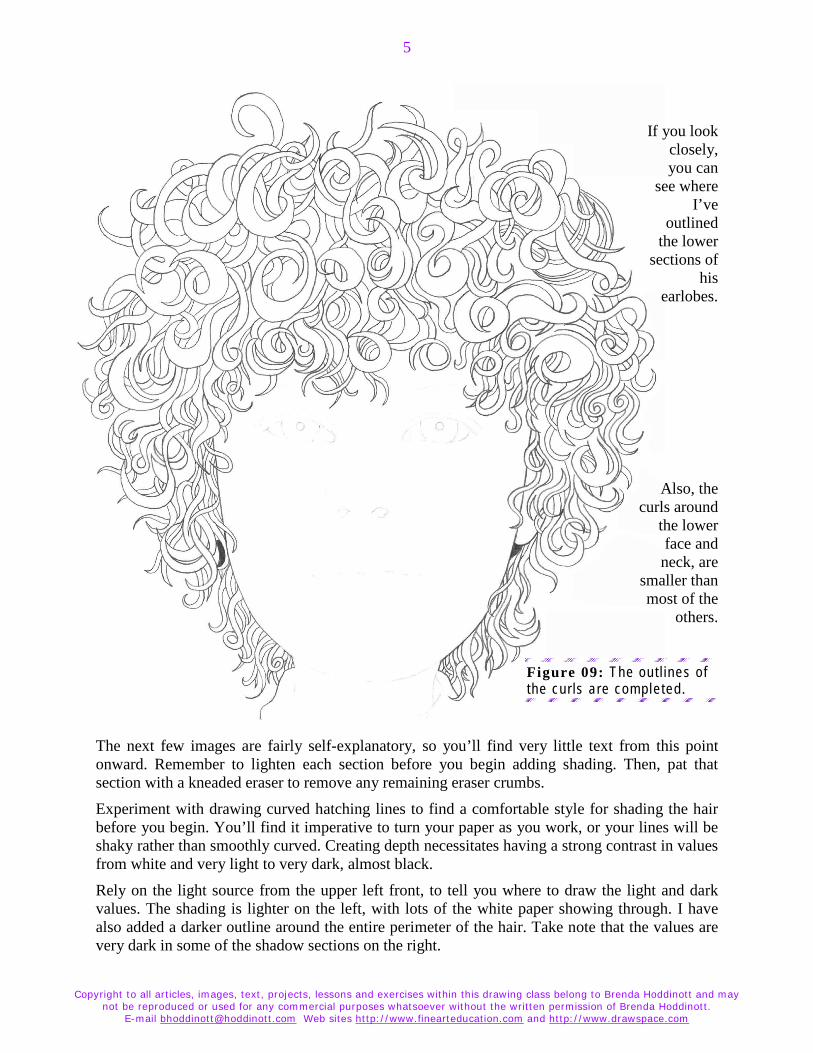
If you look closely, you can
see where I’ve
outlined the lower
sections of his
earlobes.
Also, the curls around
the lower face and neck, are
smaller than most of the
others.
Figure 09: The out l ines of the cur ls are completed.
The next few images are fairly self-explanatory, so you’ll find very little text from this point onward. Remember to lighten each section before you begin adding shading. Then, pat that section with a kneaded eraser to remove any remaining eraser crumbs.
Experiment with drawing curved hatching lines to find a comfortable style for shading the hair before you begin. You’ll find it imperative to turn your paper as you work, or your lines will be shaky rather than smoothly curved. Creating depth necessitates having a strong contrast in values from white and very light to very dark, almost black.
Rely on the light source from the upper left front, to tell you where to draw the light and dark values. The shading is lighter on the left, with lots of the white paper showing through. I have also added a darker outline around the entire perimeter of the hair. Take note that the values are very dark in some of the shadow sections on the right.
Copyright to all articles, images, text, projects, lessons and exercises within this drawing class belong to Brenda Hoddinott and may not be reproduced or used for any commercial purposes whatsoever without the written permission of Brenda Hoddinott.
E-mail [email protected] Web sites http://www.finearteducation.com and http://www.drawspace.com
6
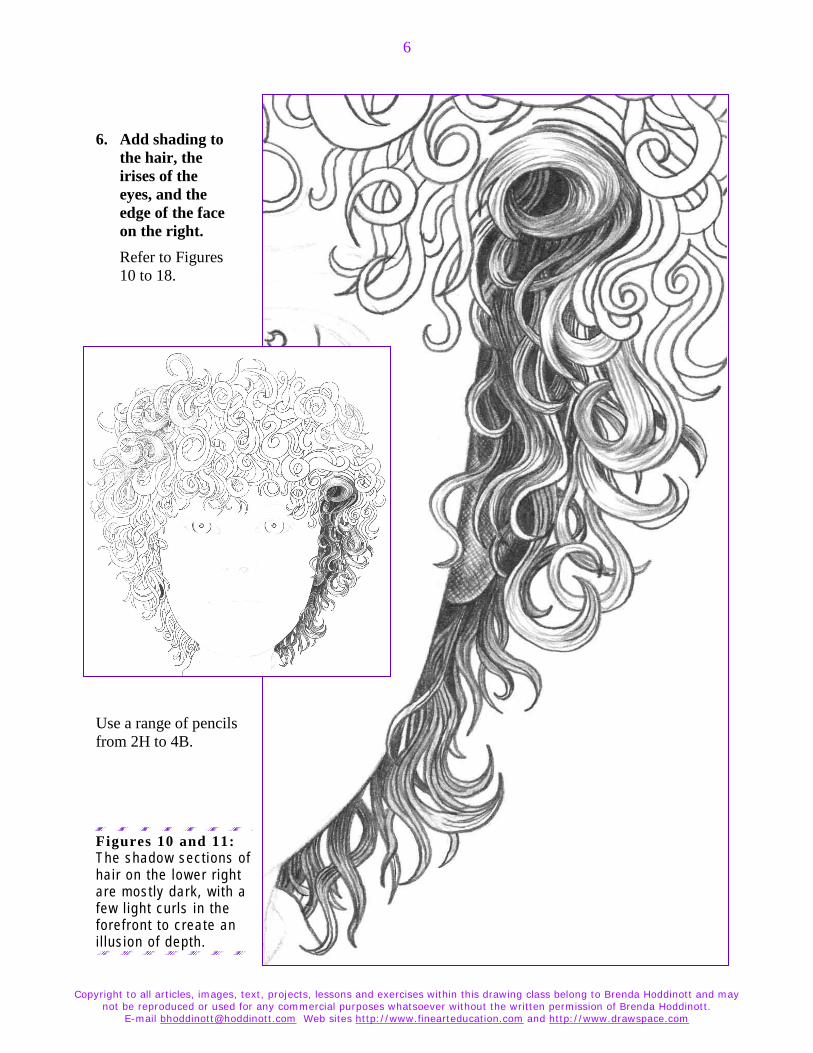
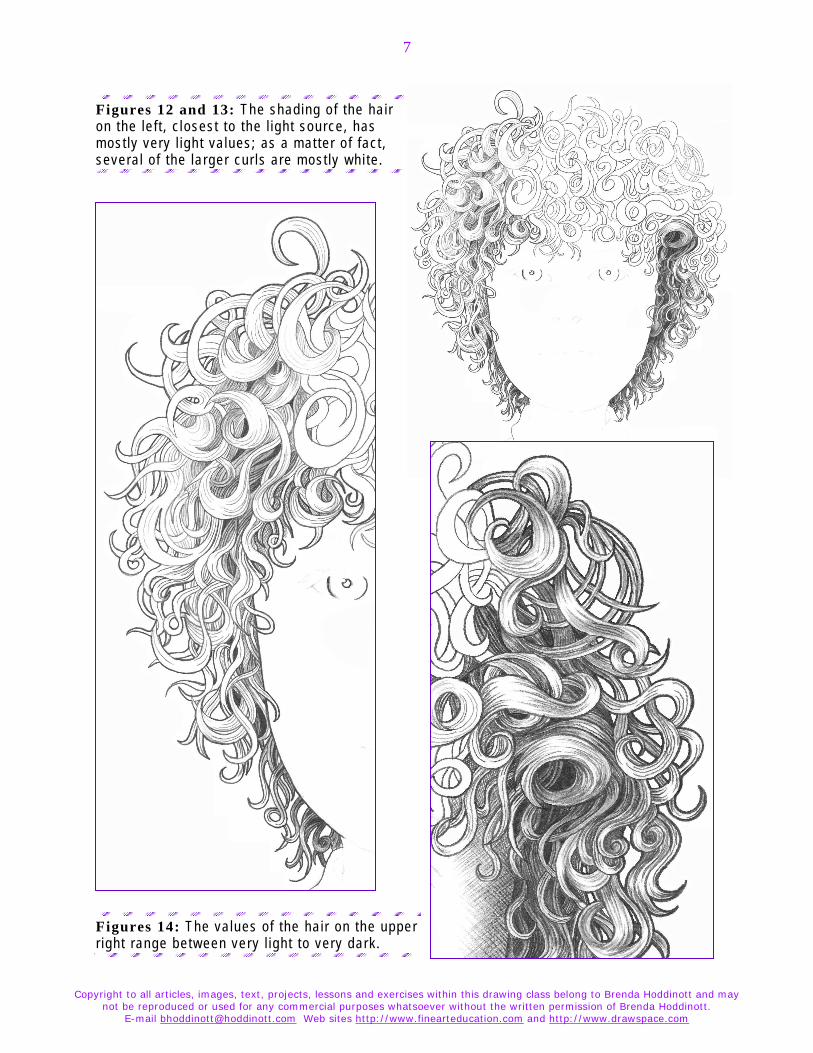
6. Add shading to the hair, the irises of the eyes, and the edge of the face on the right. Refer to Figures 10 to 18.
Use a range of pencils from 2H to 4B.
Figures 10 and 11: The shadow sect ions of hai r on the lower r igh t are most ly dark , wi th a few l ight cur ls in the forefront to crea te an i l lus ion of depth.
Copyright to all articles, images, text, projects, lessons and exercises within this drawing class belong to Brenda Hoddinott and may not be reproduced or used for any commercial purposes whatsoever without the written permission of Brenda Hoddinott.
E-mail [email protected] Web sites http://www.finearteducation.com and http://www.drawspace.com
7
Figures 12 and 13: The shading o f the hai r on the le f t , c losest to the l ight source, has most ly very l igh t va lues; as a mat ter o f fact , several of the la rger cur l s are most ly whi te.
Figures 14: The values of the hai r on the upper r ight range between very l ight to very dark.
Copyright to all articles, images, text, projects, lessons and exercises within this drawing class belong to Brenda Hoddinott and may not be reproduced or used for any commercial purposes whatsoever without the written permission of Brenda Hoddinott.
E-mail [email protected] Web sites http://www.finearteducation.com and http://www.drawspace.com
8
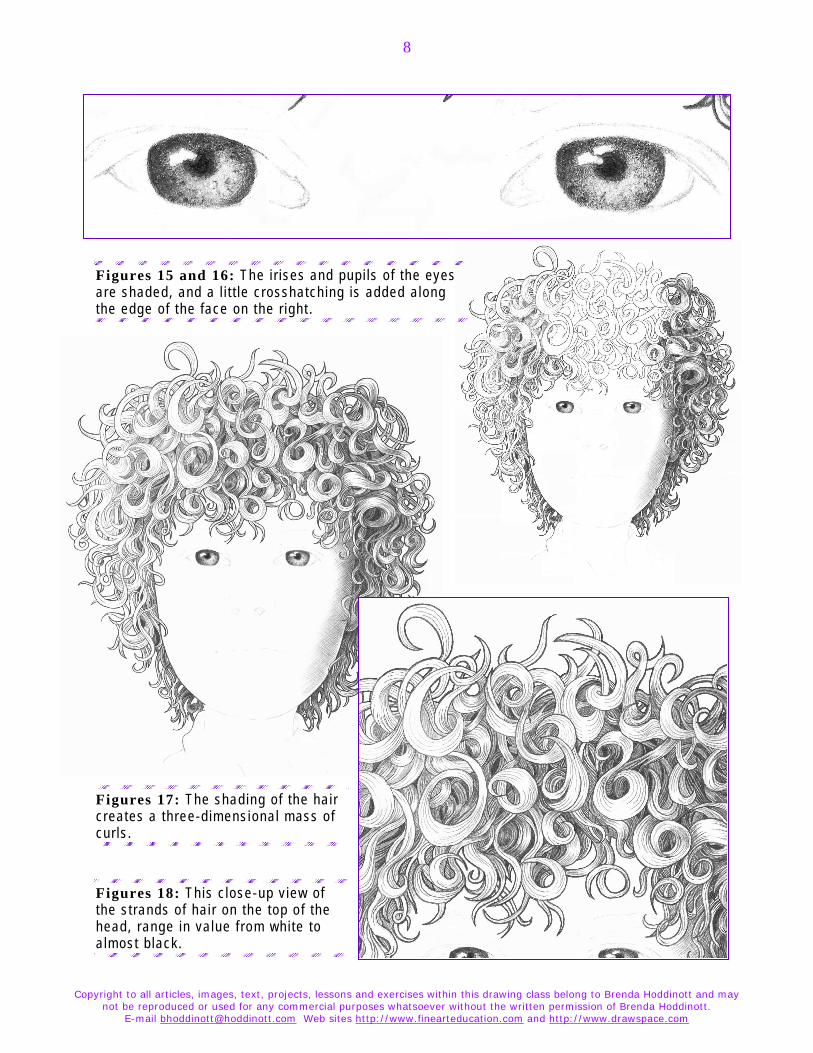
Figures 15 and 16: The i r ises and pupi ls of the eyes are shaded, and a l i t t le crosshatching is added a long the edge of the face on the r ight .
Figures 17: The shading of the hai r creates a three-dimensional mass of cur ls .
Figures 18: This c lose-up v iew of the s t rands of hai r on the top o f the head, range in value f rom whi te to a lmost b lack.
Copyright to all articles, images, text, projects, lessons and exercises within this drawing class belong to Brenda Hoddinott and may not be reproduced or used for any commercial purposes whatsoever without the written permission of Brenda Hoddinott.
E-mail [email protected] Web sites http://www.finearteducation.com and http://www.drawspace.com
9
SHADING THE FOREHEAD, EYEBROWS, AND EYES In this section you use crosshatching graduations to add shading to the forehead and eyes, and draw several tiny oval-shapes as eyebrows.
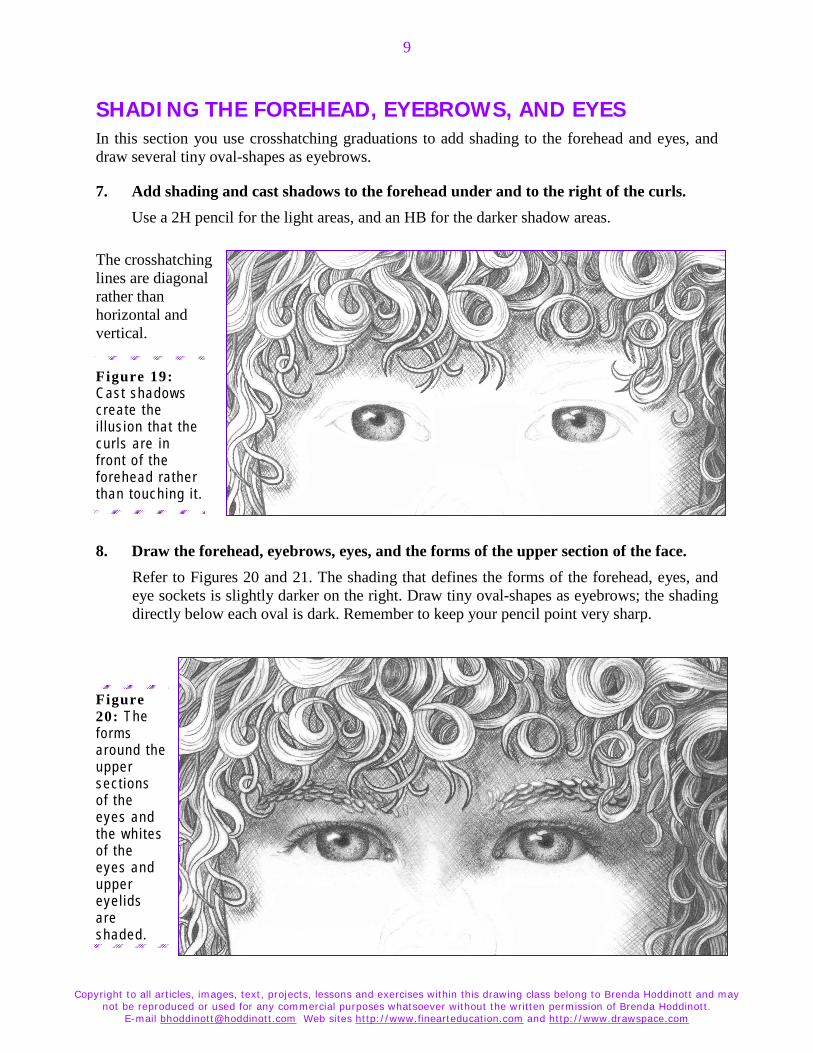
7. Add shading and cast shadows to the forehead under and to the right of the curls. Use a 2H pencil for the light areas, and an HB for the darker shadow areas.
The crosshatching lines are diagonal rather than horizontal and vertical.
Figure 19: Cast shadows create the i l lus ion that the cur ls are in f ront o f the forehead rather than touching i t .
8. Draw the forehead, eyebrows, eyes, and the forms of the upper section of the face.
Refer to Figures 20 and 21. The shading that defines the forms of the forehead, eyes, and eye sockets is slightly darker on the right. Draw tiny oval-shapes as eyebrows; the shading directly below each oval is dark. Remember to keep your pencil point very sharp.
Figure 20: The forms around the upper sect ions of the eyes and the wh i tes of the eyes and upper eyel ids are shaded.
Copyright to all articles, images, text, projects, lessons and exercises within this drawing class belong to Brenda Hoddinott and may not be reproduced or used for any commercial purposes whatsoever without the written permission of Brenda Hoddinott.
E-mail [email protected] Web sites http://www.finearteducation.com and http://www.drawspace.com
10
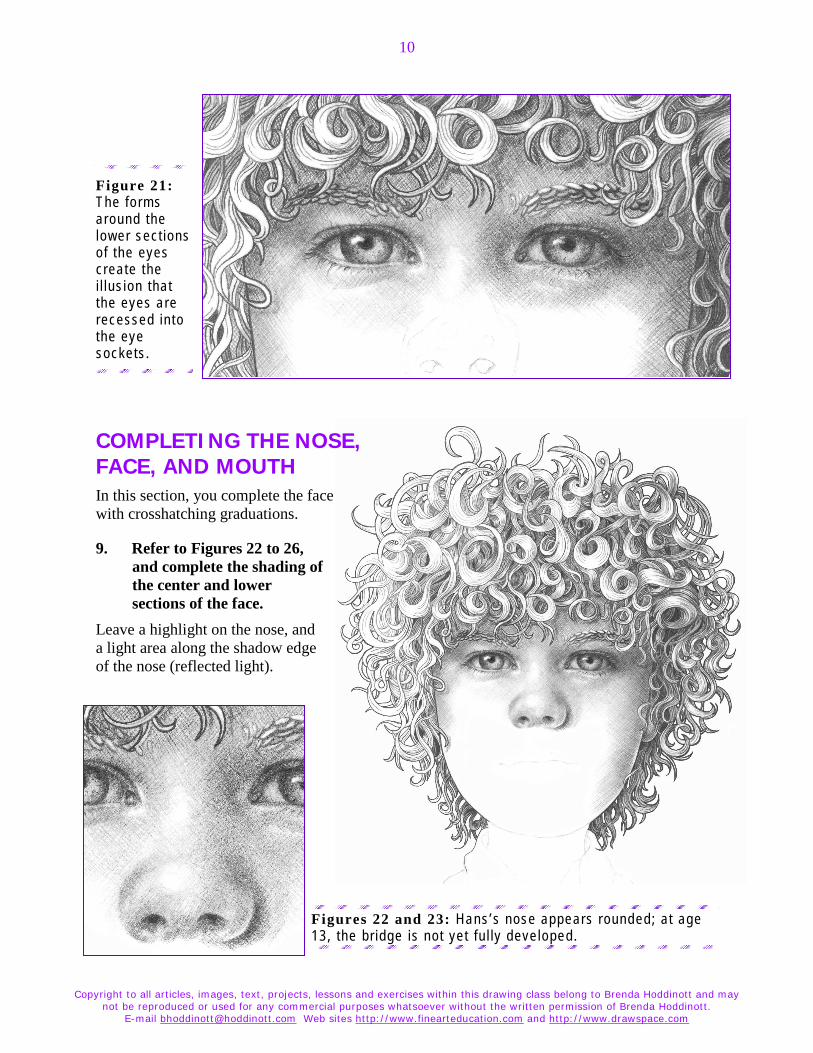
Figure 21: The fo rms around the lower sect ions of the eyes create the i l lus ion that the eyes are recessed into the eye sockets .
COMPLETING THE NOSE, FACE, AND MOUTH In this section, you complete the face with crosshatching graduations.
9. Refer to Figures 22 to 26, and complete the shading of the center and lower sections of the face.
Leave a highlight on the nose, and a light area along the shadow edge of the nose (reflected light).
Figures 22 and 23: Hans’s nose appears rounded; at age 13, the br idge is not yet fu l ly developed.
Copyright to all articles, images, text, projects, lessons and exercises within this drawing class belong to Brenda Hoddinott and may not be reproduced or used for any commercial purposes whatsoever without the written permission of Brenda Hoddinott.
E-mail [email protected] Web sites http://www.finearteducation.com and http://www.drawspace.com
11
Strong drawing skills and a good knowledge of facial anatomy are important aspects of drawing caricatures and cartoons of people. In other words, when you know the rules, you know how to break them successfully!
Figure 24: The overal l shading of the face is darker on the r ight , most of the upper l ip is in shadow, and the corners o f the mouth are very dark .
Figure 25: The corners o f the mouth are shaded wi th HB and 2B penci ls , and the lower l ip is shaded very l ight ly wi th an HB; the hatching l ines fo l low the ver t ica l contours o f the l ip ’s creases.
Copyright to all articles, images, text, projects, lessons and exercises within this drawing class belong to Brenda Hoddinott and may not be reproduced or used for any commercial purposes whatsoever without the written permission of Brenda Hoddinott.
E-mail [email protected] Web sites http://www.finearteducation.com and http://www.drawspace.com
12
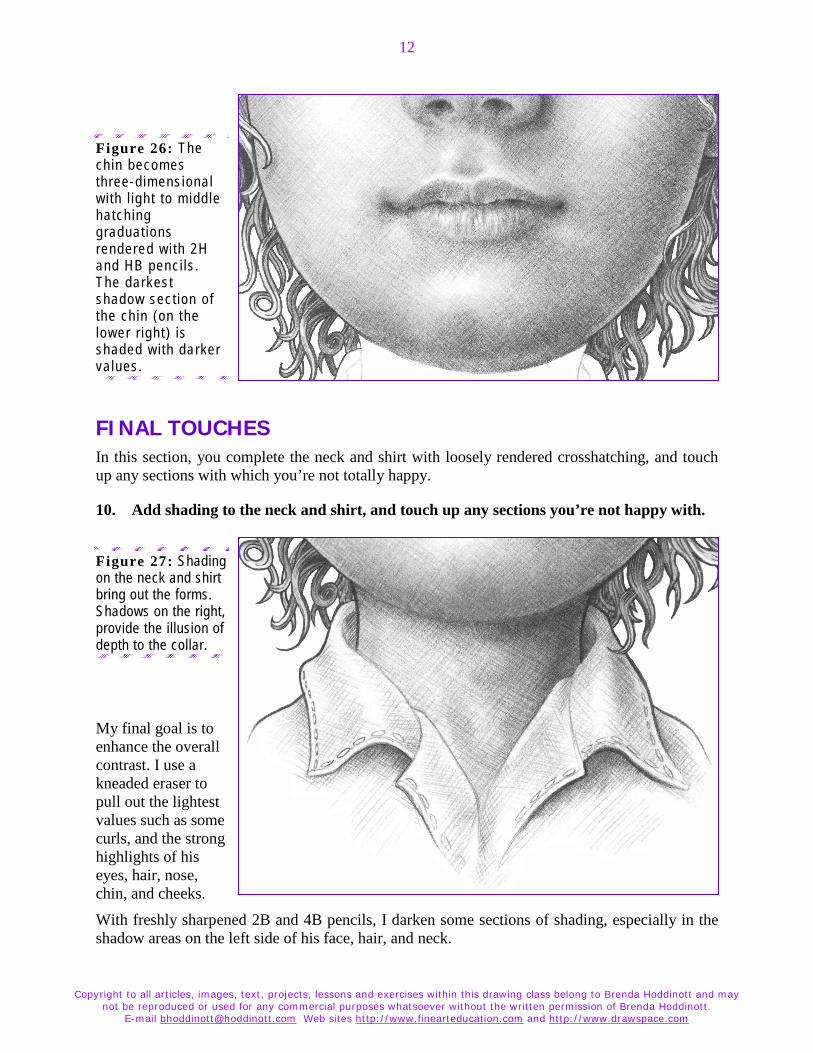
Figure 26: The chin becomes three-dimensional wi th l ight to middle hatching graduat ions rendered wi th 2H and HB penci ls . The darkest shadow sec t ion o f the chin (on the lower r ight ) is shaded wi th darker values.
FINAL TOUCHES In this section, you complete the neck and shirt with loosely rendered crosshatching, and touch up any sections with which you’re not totally happy.
10. Add shading to the neck and shirt, and touch up any sections you’re not happy with.
Figure 27: Shading on the neck and shirt bring out the forms. Shadows on the right, provide the illusion of depth to the collar.
My final goal is to enhance the overall contrast. I use a kneaded eraser to pull out the lightest values such as some curls, and the strong highlights of his eyes, hair, nose, chin, and cheeks.
With freshly sharpened 2B and 4B pencils, I darken some sections of shading, especially in the shadow areas on the left side of his face, hair, and neck.
Copyright to all articles, images, text, projects, lessons and exercises within this drawing class belong to Brenda Hoddinott and may not be reproduced or used for any commercial purposes whatsoever without the written permission of Brenda Hoddinott.
E-mail [email protected] Web sites http://www.finearteducation.com and http://www.drawspace.com
13
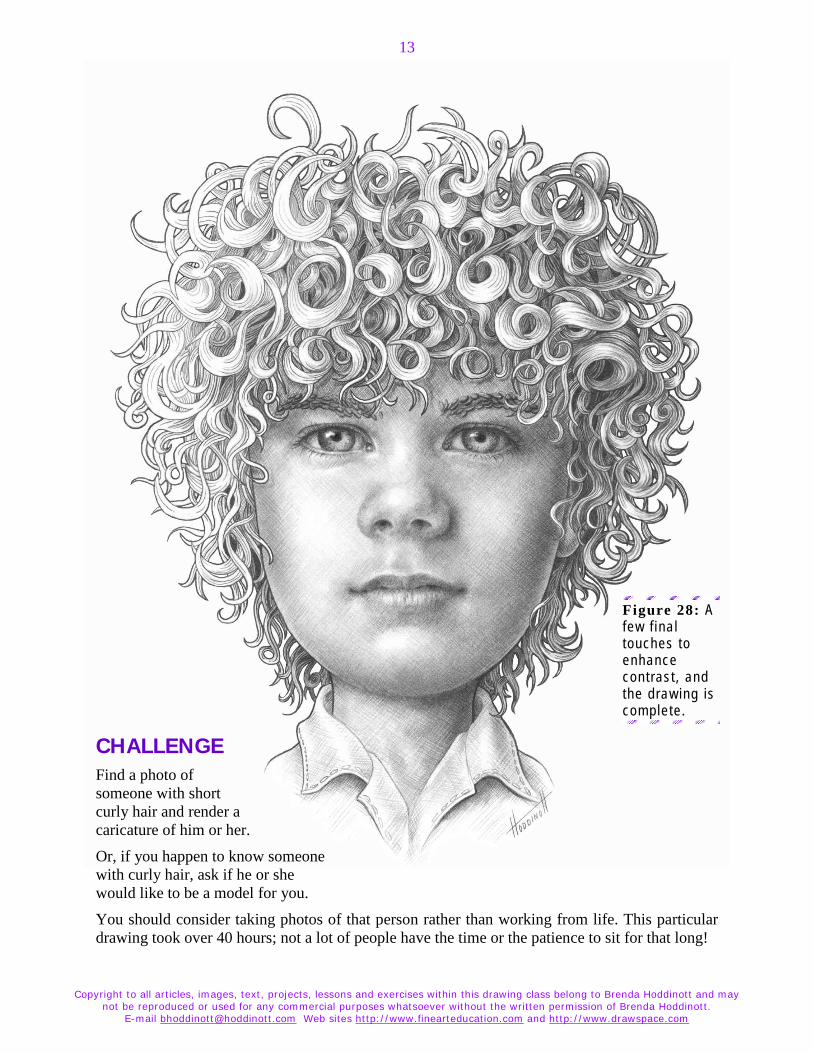
Figure 28: A few f inal touches to enhance contrast , and the drawing is complete.
CHALLENGE Find a photo of someone with short curly hair and render a caricature of him or her.
Or, if you happen to know someone with curly hair, ask if he or she would like to be a model for you.
You should consider taking photos of that person rather than working from life. This particular drawing took over 40 hours; not a lot of people have the time or the patience to sit for that long!
Copyright to all articles, images, text, projects, lessons and exercises within this drawing class belong to Brenda Hoddinott and may not be reproduced or used for any commercial purposes whatsoever without the written permission of Brenda Hoddinott.
E-mail [email protected] Web sites http://www.finearteducation.com and http://www.drawspace.com
14
BRENDA HODDINOTT - BIOGRAPHY As a self-educated teacher, visual artist, portraitist, forensic artist, and illustrator, Brenda Hoddinott utilizes diverse art media including graphite, technical pen, colored pencil, chalk pastel, charcoal, conté crayon, and oil paints.
My philosophy on teaching art is to focus primarily on the enjoyment aspects while gently introducing the technical and academic. Hence, in creating a passion for the subject matter,
the quest for knowledge also becomes enjoyable. >Brenda Hoddinott<
Born in St. John’s, Newfoundland, Brenda grew up in the small town of Corner Brook. She developed strong technical competencies with a personal commitment to self directed learning, and the aid of assorted “Learn to Draw” books. During Brenda’s twenty-five year career as a self-educated civilian forensic artist, numerous criminal investigation departments have employed Brenda’s skills, including Royal Canadian Mounted Police and municipal police departments. In 1992, Brenda was honored with a commendation from the Royal Canadian Mounted Police, and in 1994, she was awarded a Certificate of Membership from “Forensic Artists International”.
Her home-based art career included graphic design, and teaching recreational drawing and painting classes. As supervisor of her community’s recreational art department, Brenda hired and trained teachers, and designed curriculum for several children’s art programs. In 1998, Brenda chose to end her eighteen-year career as an art educator in order to devote more time to writing, drawing, painting, and developing her websites.
Drawspace http://www.drawspace.com incorporates her unique style and innovative approach to curriculum development. This site offers downloadable and printable drawing classes for students of all abilities from the age of eight through adult. Students of all ages, levels and abilities have praised the simple step-by-step instructional approach. These sites are respected as a resource for fine art educators, home schooling programs, and educational facilities throughout the world.
LEARN-TO-DRAW BOOKS BY BRENDA HODDINOTT Drawing for Dummies: Wiley Publishing, Inc., New, York, NY, this 336 page book is available on various websites and in major bookstores internationally.
The Complete Idiot’s Guide to Drawing People: Winner of the Alpha-Penguin Book of the Year Award 2004, Alpha - Pearson Education – Macmillan, Indianapolis, IN, this 360 page book is available on various websites and in major bookstores internationally.