Embed Size (px)
Citation preview
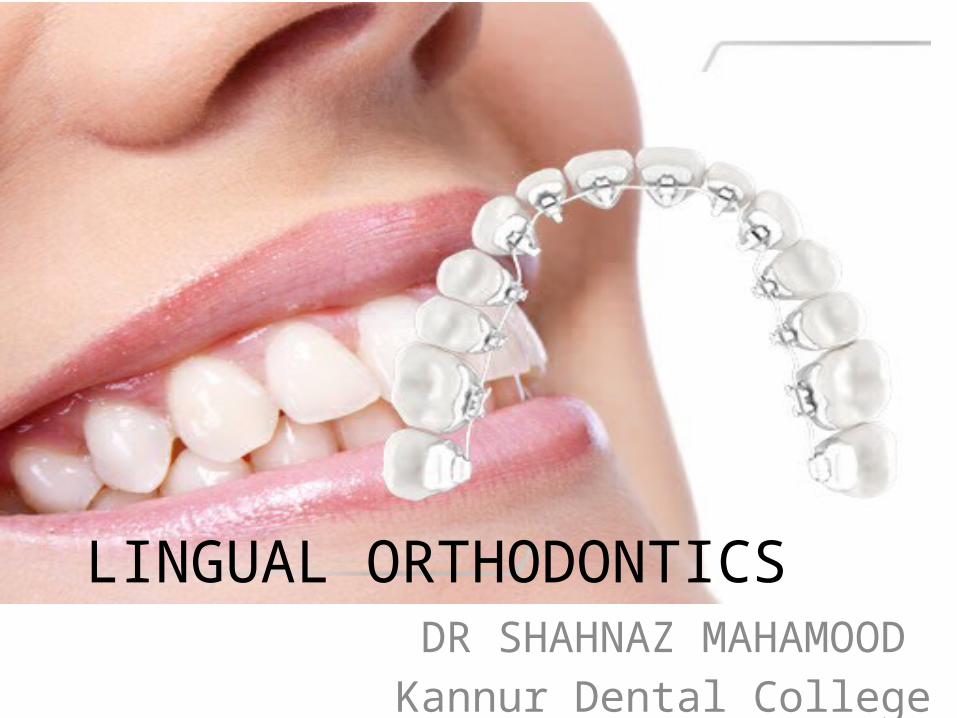
LINGUAL ORTHODONTICSDR SHAHNAZ MAHAMOOD
Kannur Dental College
WHY LINGUAL ORTHODONTICS?
• The only solution that does not impair the patient from an esthetic point of view.
• Importance to appearance for social or work reasons would refuse traditional orthodontic treatment.
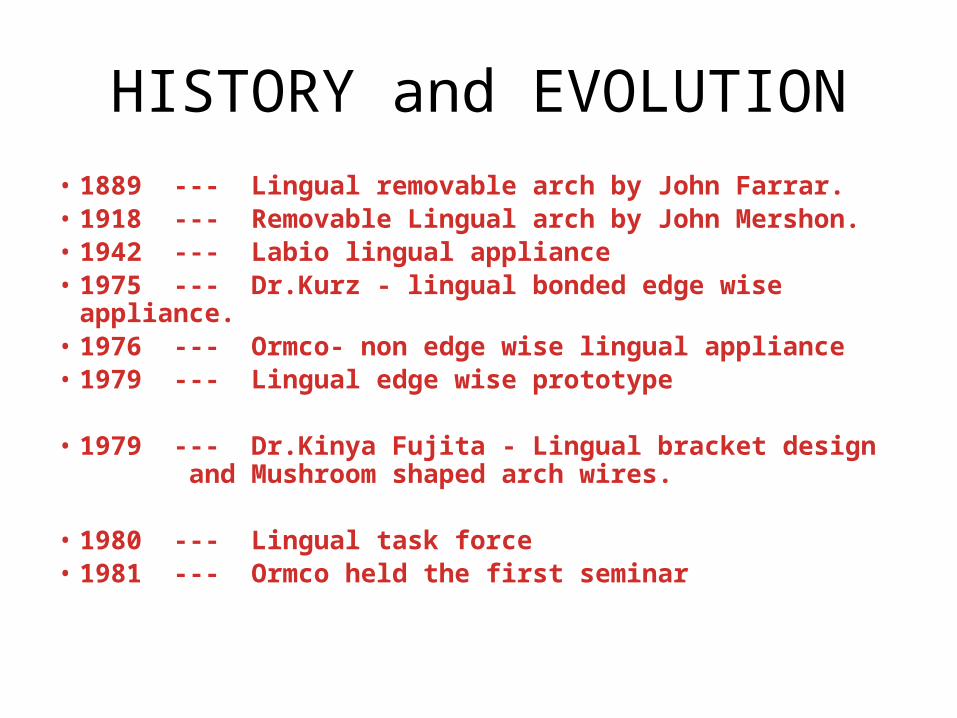
HISTORY and EVOLUTION• 1889 --- Lingual removable arch by John Farrar.• 1918 --- Removable Lingual arch by John Mershon.• 1942 --- Labio lingual appliance• 1975 --- Dr.Kurz - lingual bonded edge wise
appliance.• 1976 --- Ormco- non edge wise lingual appliance• 1979 --- Lingual edge wise prototype
• 1979 --- Dr.Kinya Fujita - Lingual bracket design and Mushroom shaped arch wires.
• 1980 --- Lingual task force • 1981 --- Ormco held the first seminar
• In December 1980, Ormco decided to put together a team of orthodontists (the Task Force ) to study the appliance further and make suggestions regarding improvements
• The Task Force was initially charged with the responsibilities of evaluating the appliance design over a two-year period.
• Their specific objectives were:1. To help refine bracket design (dimensions,
torques, angulations, thickness, etc.).
2. To develop mechanotherapy techniques.3. To create archwire designs.4. To discuss treatment sequences. 5. To determine case selection criteria.
The Lingual Appliance
• In 1976, the Ist generation of lingual brackets were produced by Ormco.
• The Ist generation brackets or First Kurz Appliance had an .018" slot size for conservation of incisal-gingival bracket dimension and for compatibility with existing archwires.
Development by Kurz & co-workers
• The incisal wing of the maxillary incisor brackets incorporated a bite plane (flat occlusal plane) which served the dual purpose of assisting in opening deep bites and redirecting the forces of occlusion to prevent shearing of the bond.
• As a result, bond failure was dramatically lower than before.
• The brackets were bonded according to reciprocal tip and torque values to Andrew’s published values.
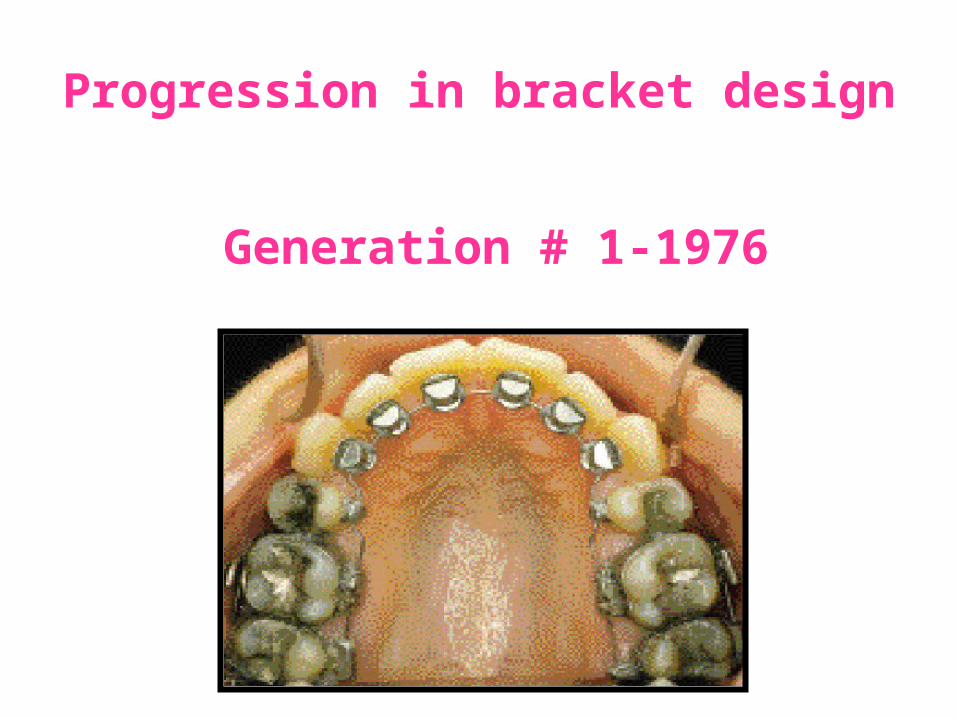
Progression in bracket design
Generation # 1-1976
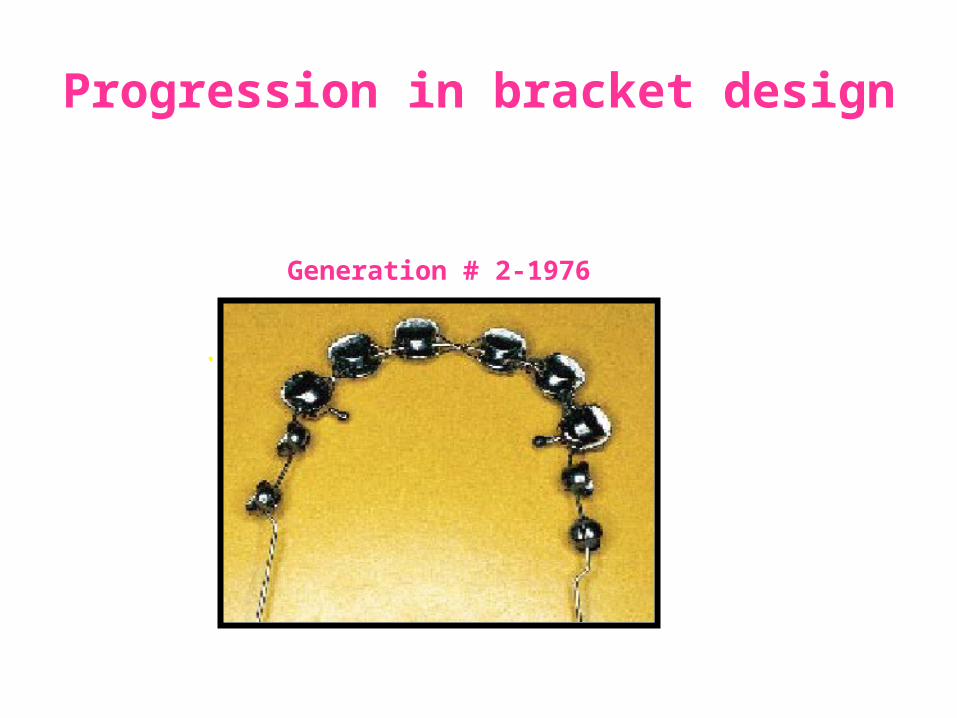
Progression in bracket design
Generation # 2-1976
.
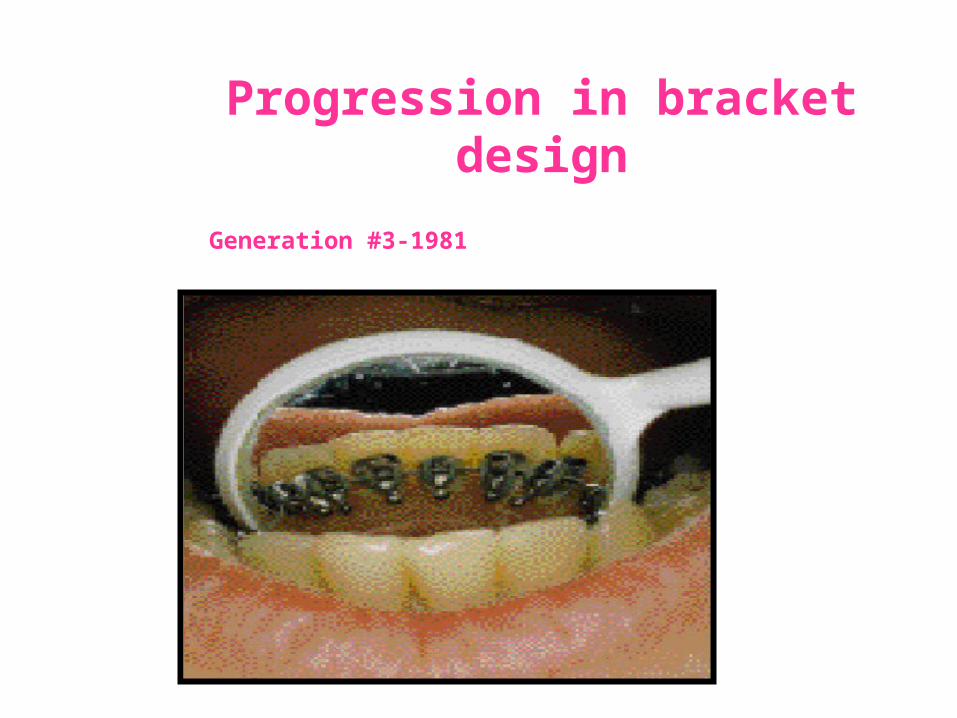
Progression in bracket design
Generation #3-1981
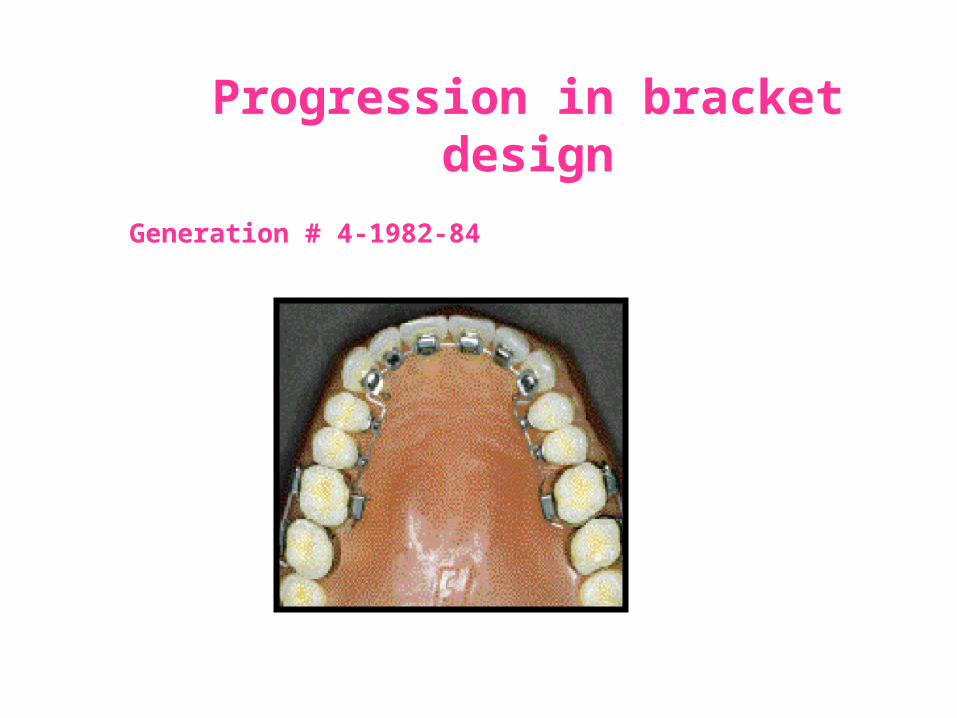
Progression in bracket design
Generation # 4-1982-84

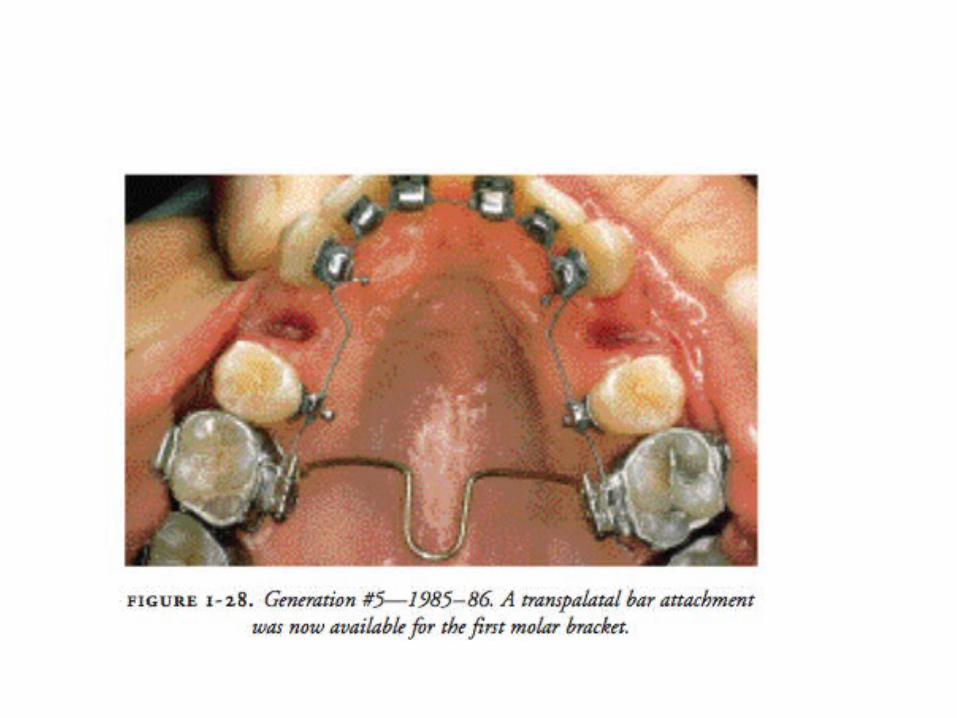
Progression in bracket design
Generation # 5-1985-86
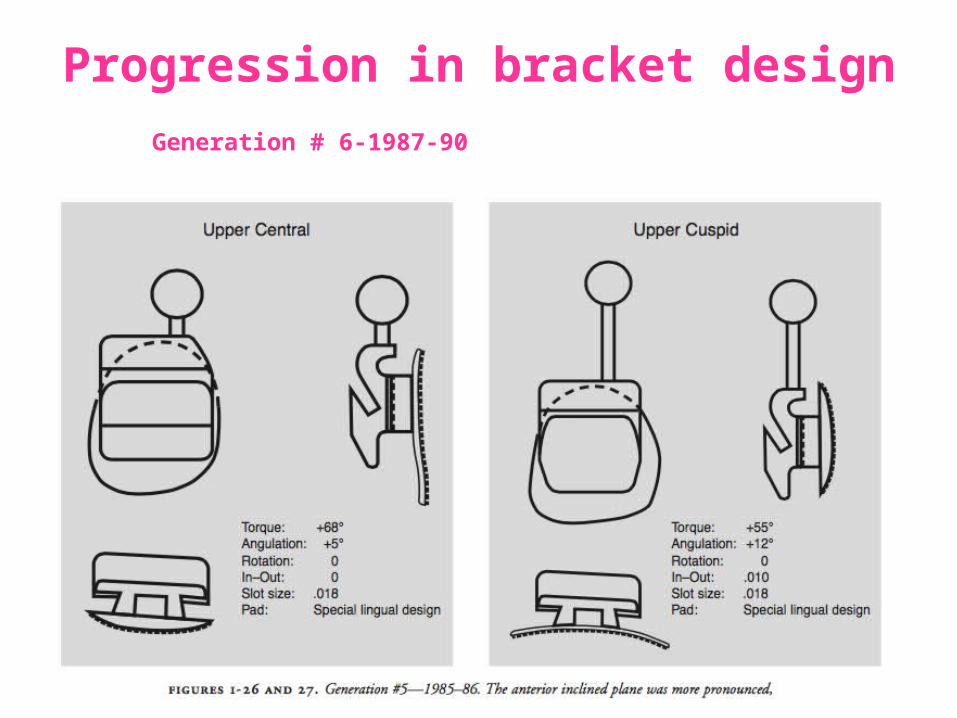
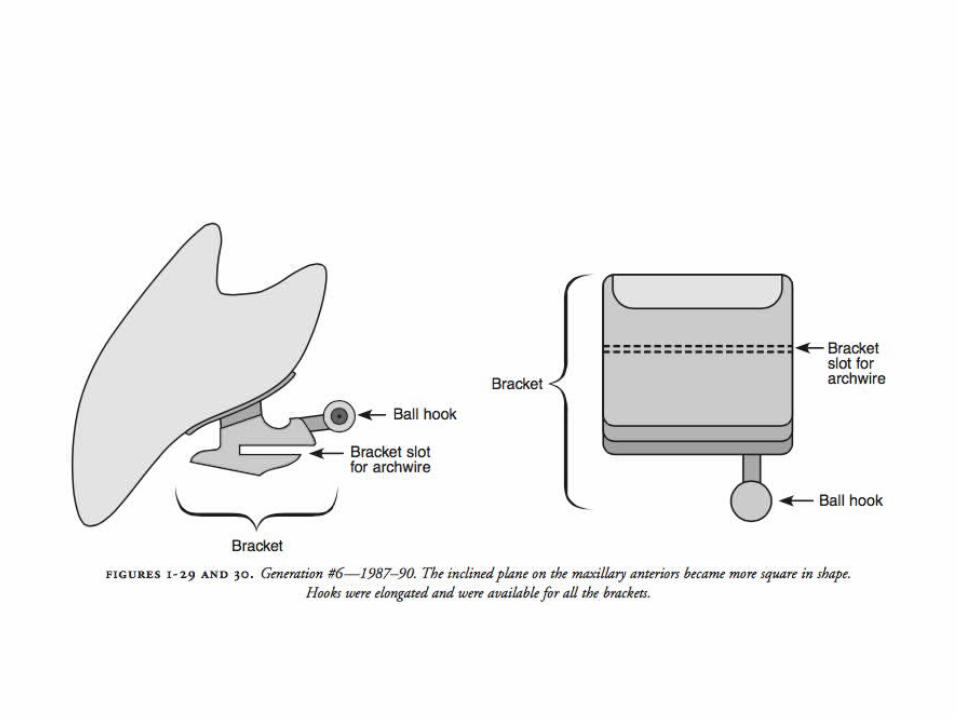
Progression in bracket design Generation # 6-1987-90
Progression in bracket design
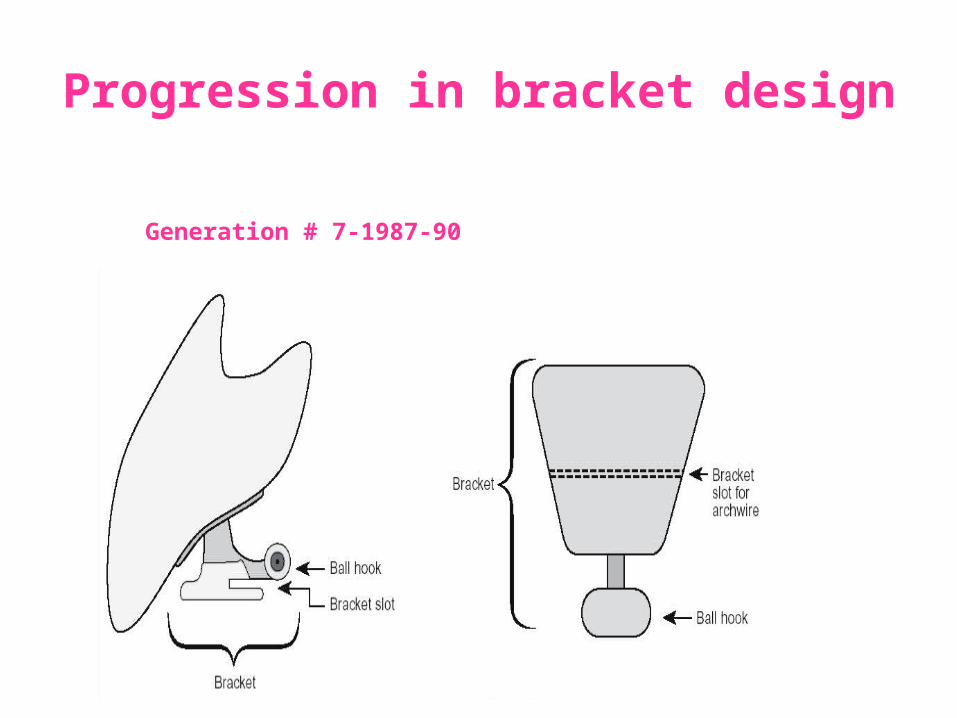
Generation # 7-1987-90
The lingual appliance most widely used today is the generation VII appliance, developed in 1990 by Ormco Corp.
CHARACTERISTICS:• The VIIth generation brackets are much refined, low
profile, patient friendly brackets.
• They have a horizontal slot, for easier torque control, and are offered in either an 0.018" or 0.022" slot size.
• The premolar brackets have increased width to allow better angulation and rotation control.

Modifications in lingual bracket design.
• Multiple molar attachments are available, including a tube, a twin bracket with a mesial ball hook and a hinge cap molar tube for easier wire insertion or terminal sheath (a convertible bracket that can function as a tube or a self-ligating slot).
• All brackets have a gingival ball hook which facilitates elastic ligature placement, rotation control and placement of intra- and inter-maxillary elastics.
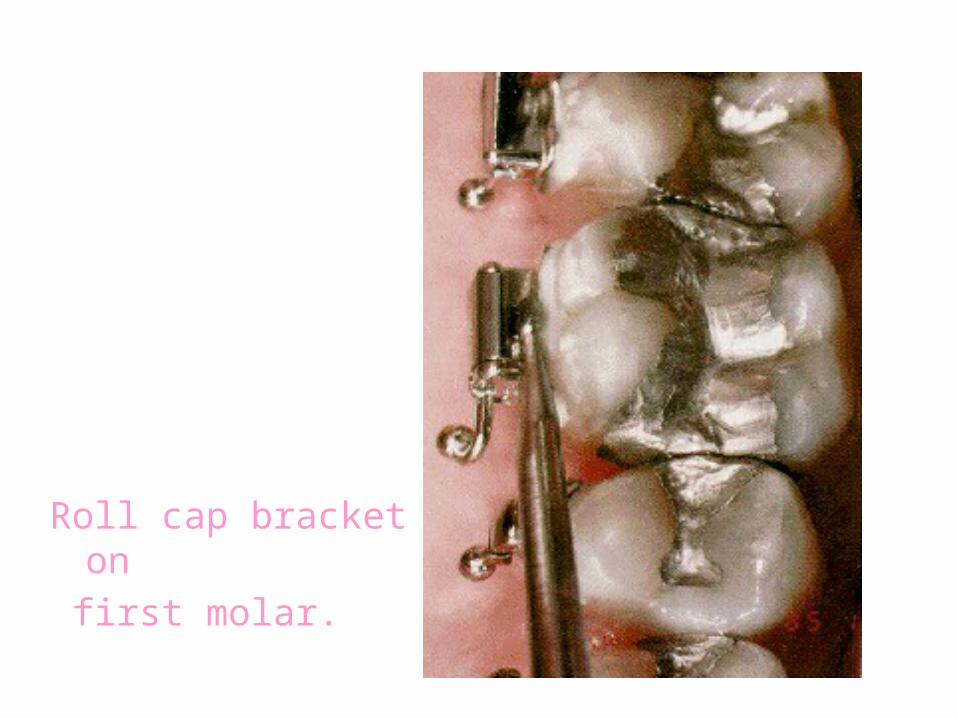
Roll cap bracket on first molar.
• The bite plane on the maxillary anterior brackets is heart-shaped. It is parallel to the archwire and occlusal plane.
Significance: The bite plane allows placement of all brackets during initial bonding even in cases with severe deep bites. The patient’s occlusion is located on the bite planes of the anterior brackets.
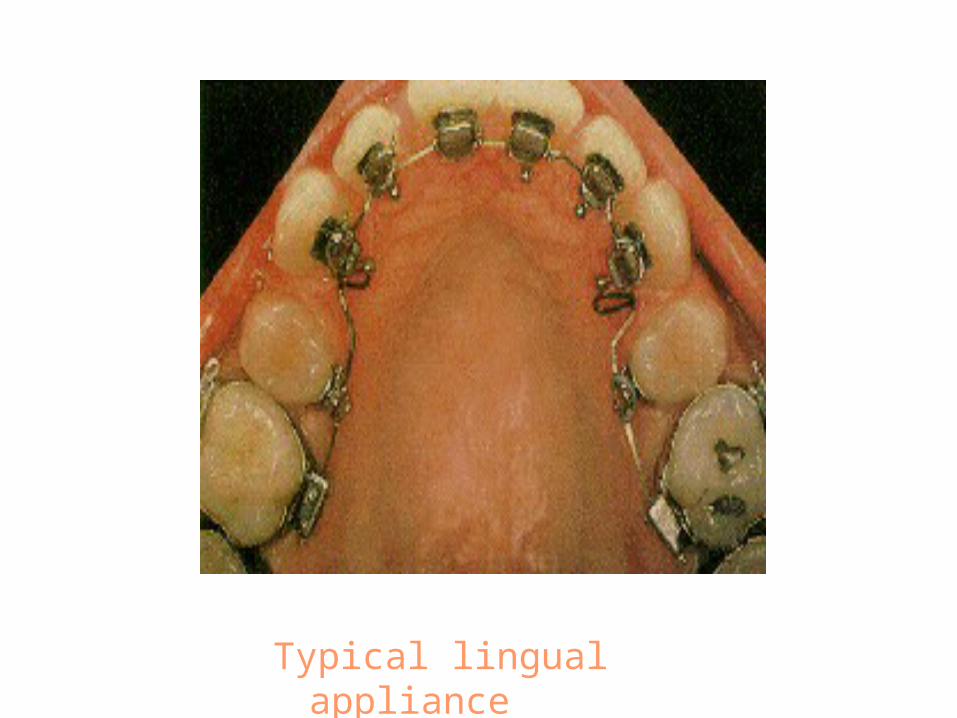
Typical lingual appliance
The bite planes cause immediate disclusion of the
posterior teeth, removing the forces of occlusion from the biomechanical formula. Thus, the correction of crossbites, deepbites, rotations and space closure can be achieved at an accelerated pace without the interference of occlusion.
At the same time, anchorage loss, bowing of the buccal segment, loss of arch coordination and extrusion of molars are made easier without the controlling effect of the forces of occlusion.
• Interbracket distances are reversed with the lingual appliance.
There is less interbracket distance in the anterior, but in the posterior region, the interbracket distances are increased mesio-distally.
This can hinder full bracket engagement in the anterior and reduces the relative stiffness of the archwire in the posterior segment.
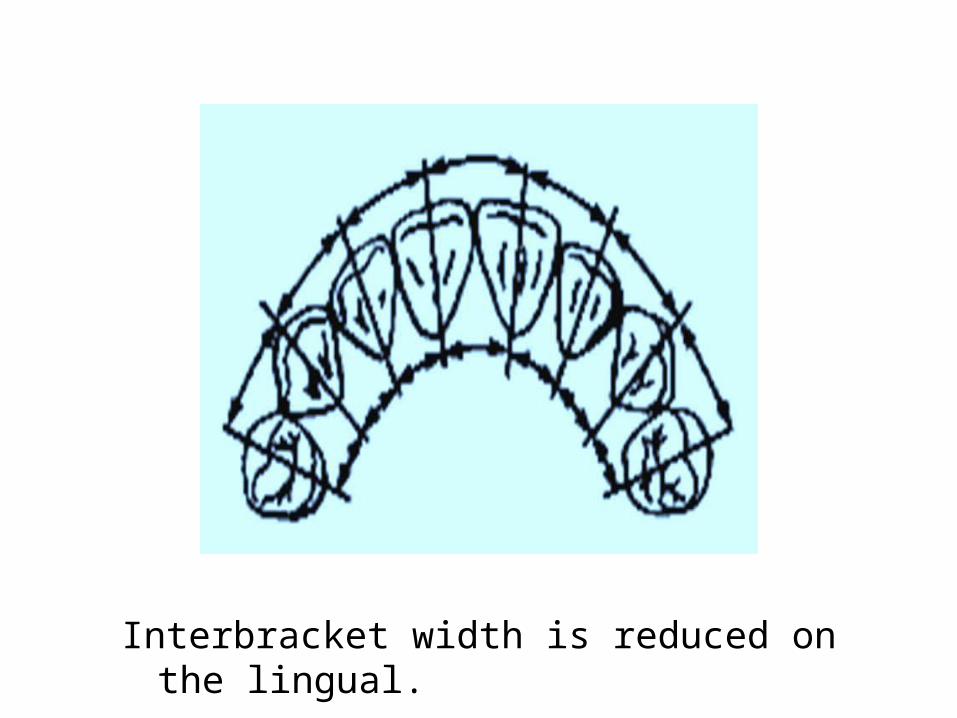
Interbracket width is reduced on the lingual.
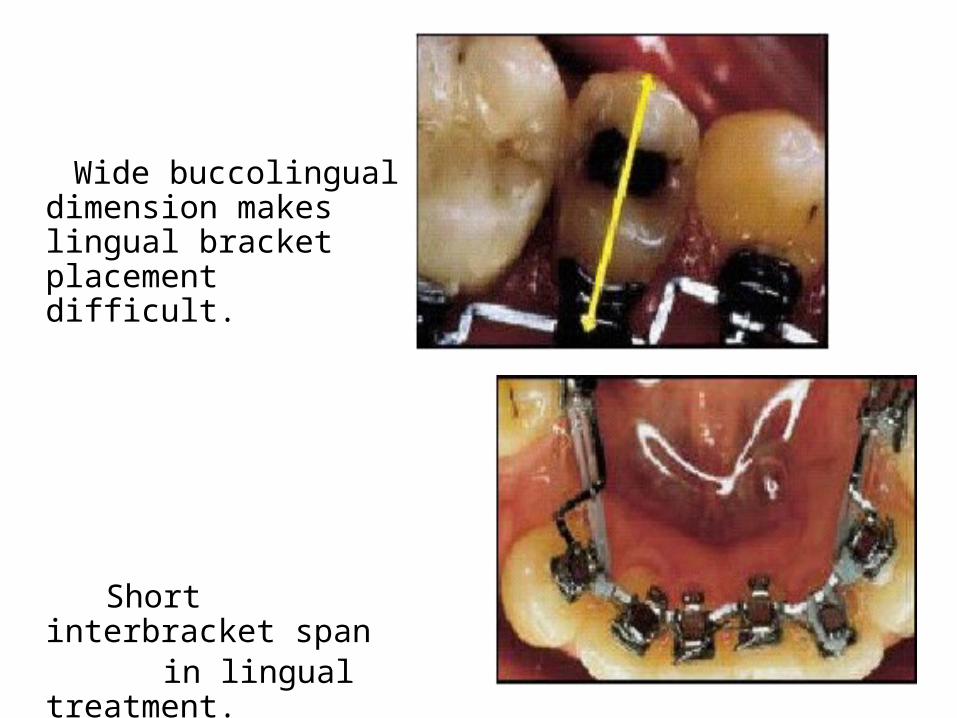
Wide buccolingual dimension makes lingual bracket placement difficult.
Short interbracket span in lingual treatment.
• The brackets have a custom pad that is fabricated in the laboratory. This ensures proper bracket placement and maximizes bond strength by minimizing the space between bracket and tooth.
This pad makes each lingual bracket unique and gives the orthodontist the ability to prescribe specific tooth movement for each patient.
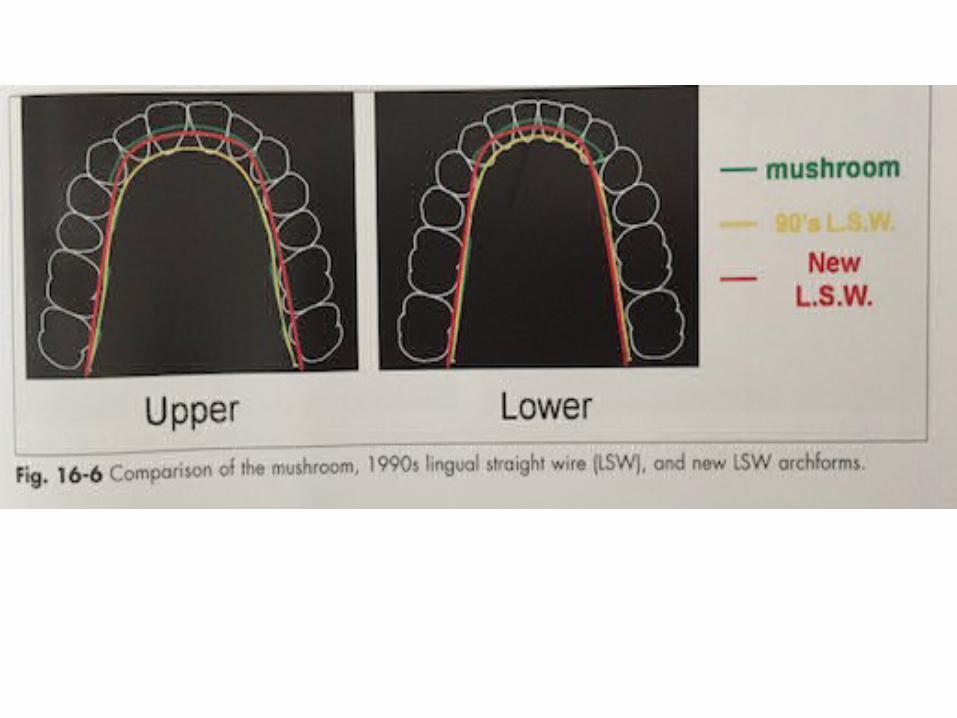
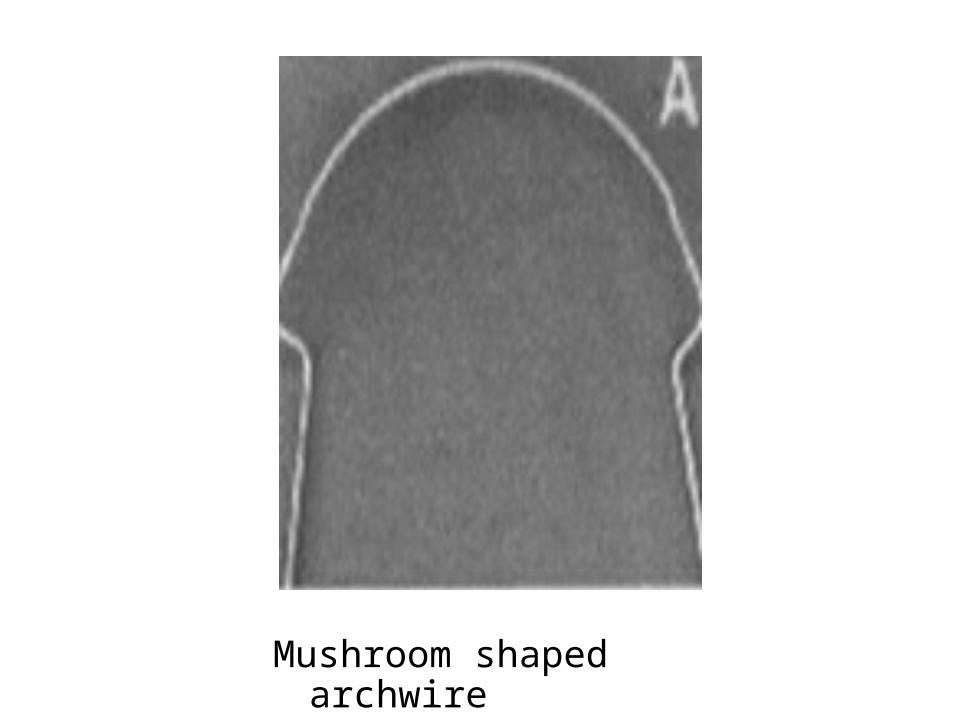
• The ideal archwire has a mushroom shape.• This is due to the large constriction in arch width
that occurs as one proceeds distally from the lingual surface of the canine to the bicuspid.
• Since the brackets are designed to minimize bracket profiles, it is necessary to place compensating first order bends interproximally at the cuspid-bicuspid and bicuspid-molar locations.

Mushroom shaped archwire
• In cases with short clinical crowns, or if there is a problem with incisal clearance, a second order bend, or step-down, may also be needed between cuspids and bicuspids.

Newer bracket designs:Lingual Orthodontics – Its Renaissance JCO 1989,Thomas Creekmore, 120 – 137.In this article, the author has described a newer bracket
design with occlusal slots instead of lingual. There is also modification in the design of the molar tube. The first 1mm of molar tube opens to the occlusal aspect, providing direct guidance for the insertion of arch wire.
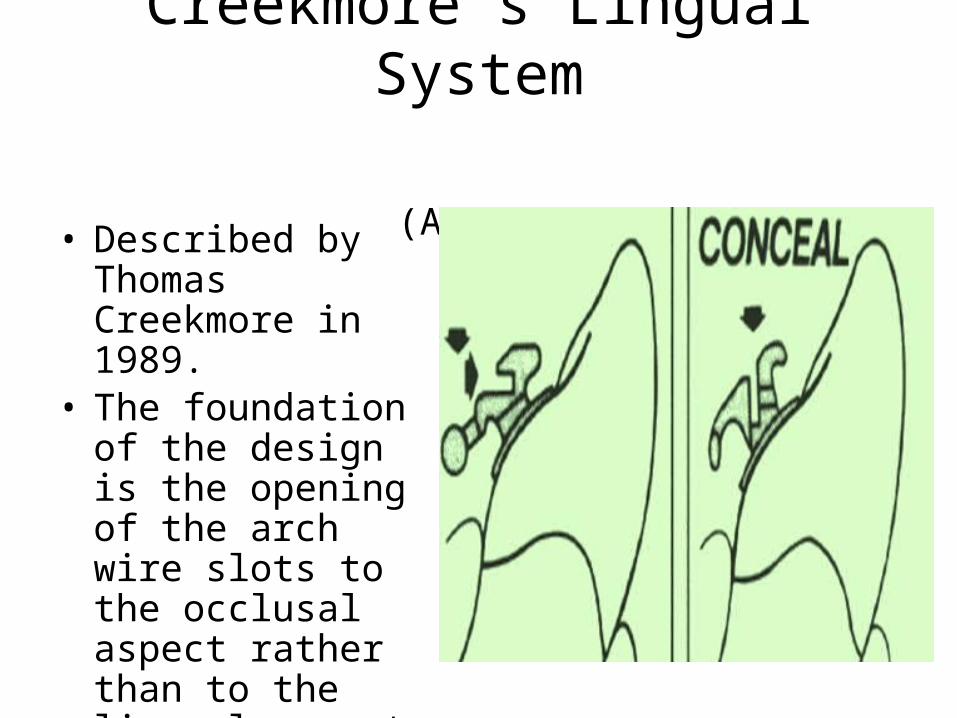
Creekmore’s Lingual System (AJODO 1989)
• Described by Thomas Creekmore in 1989.
• The foundation of the design is the opening of the arch wire slots to the occlusal aspect rather than to the lingual aspect.
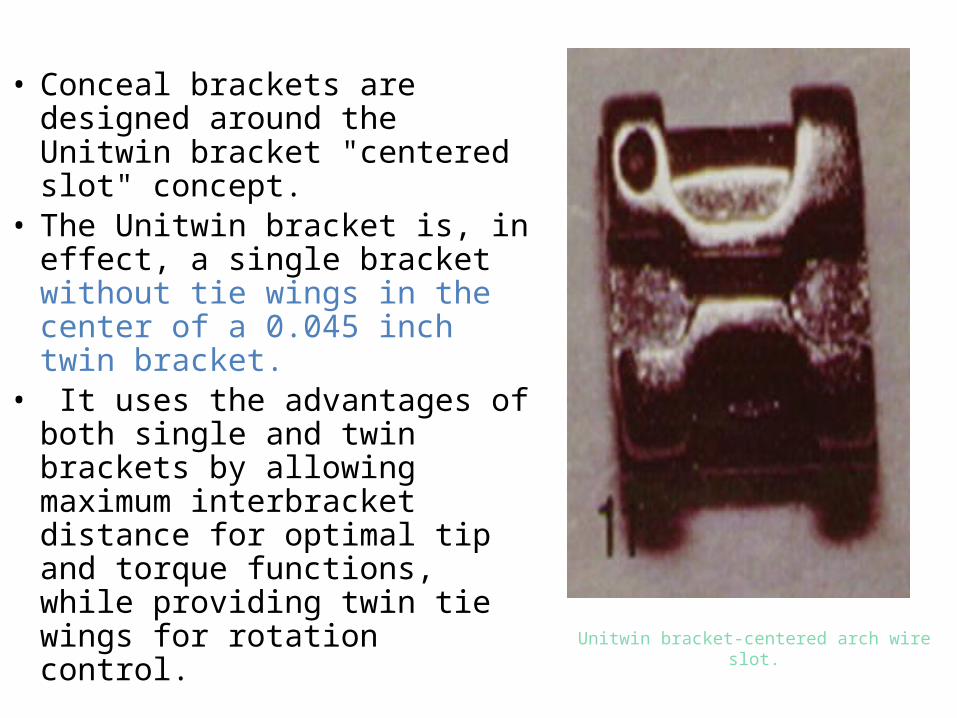
Unitwin bracket-centered arch wire slot.
• Conceal brackets are designed around the Unitwin bracket "centered slot" concept.
• The Unitwin bracket is, in effect, a single bracket without tie wings in the center of a 0.045 inch twin bracket.
• It uses the advantages of both single and twin brackets by allowing maximum interbracket distance for optimal tip and torque functions, while providing twin tie wings for rotation control.
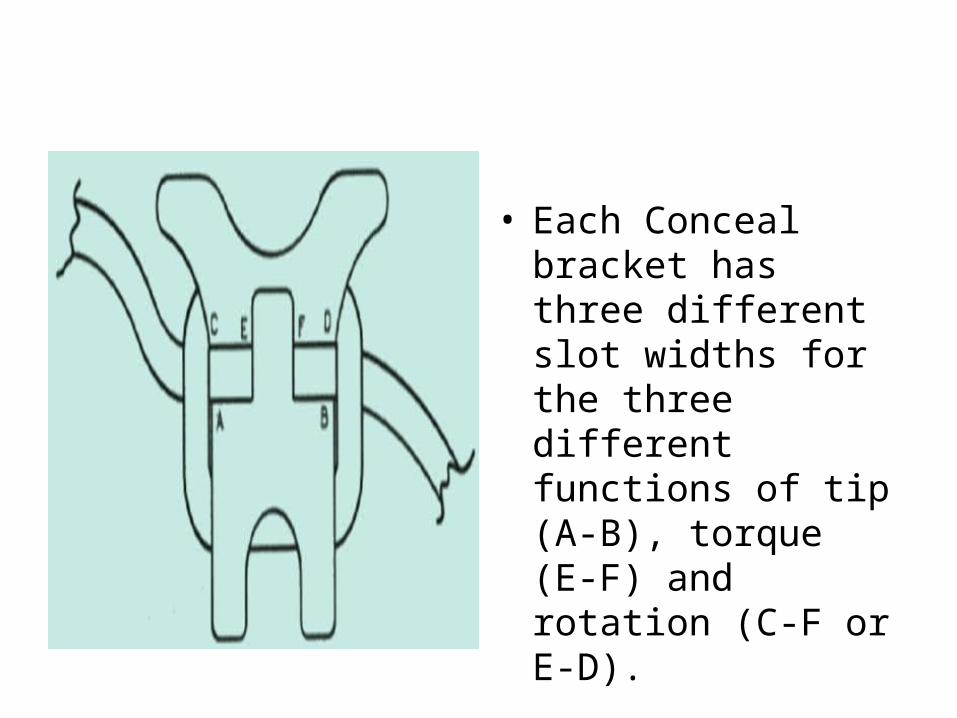
• Each Conceal bracket has three different slot widths for the three different functions of tip (A-B), torque (E-F) and rotation (C-F or E-D).
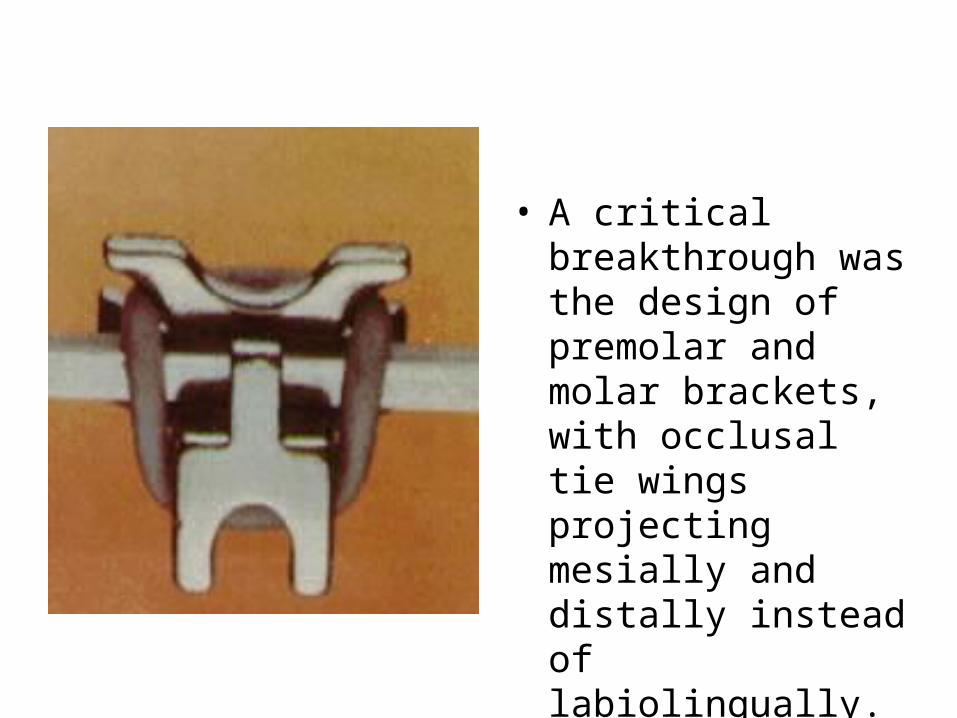
• A critical breakthrough was the design of premolar and molar brackets, with occlusal tie wings projecting mesially and distally instead of labiolingually.
Fujita’s lingual bracket system (AJO 1979)
Kinya Fujita’s purpose for lingual bracket system, apart from aesthetics, was to prevent injury with labial brackets during sports.
• The first Fujita lingual bracket was introduced in 1979.
• It featured a slot that opened toward the occlusal. The occlusal approach makes arch wire insertion, seating, and removal easier than arch wire insertion with lingually opening slots.

A. Lingual insertion. B. Occlusal insertion.
• A lock pin was inserted mesiodistally into a groove in the slot to secure the archwire, in conjunction with a conventional elastomeric or steel ligature.
• Auxiliary groove was set in the occluso-gingival direction to facilitate correction of the mesio-distal tipping of the teeth.
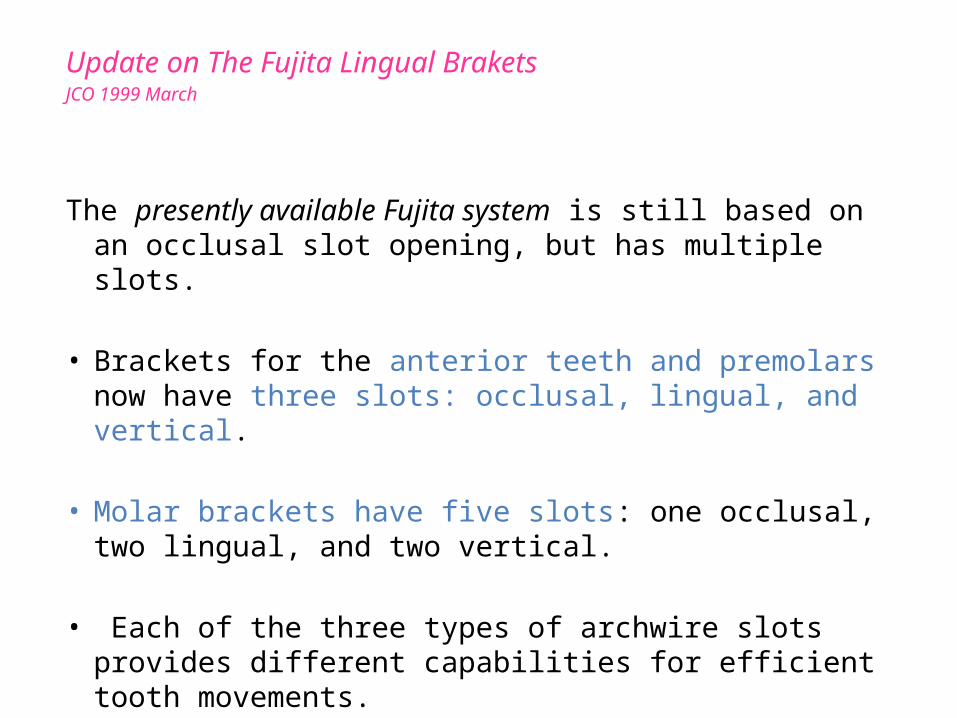
Update on The Fujita Lingual BraketsJCO 1999 March
The presently available Fujita system is still based on an occlusal slot opening, but has multiple slots.
• Brackets for the anterior teeth and premolars now have three slots: occlusal, lingual, and vertical.
• Molar brackets have five slots: one occlusal, two lingual, and two vertical.
• Each of the three types of archwire slots provides different capabilities for efficient tooth movements.
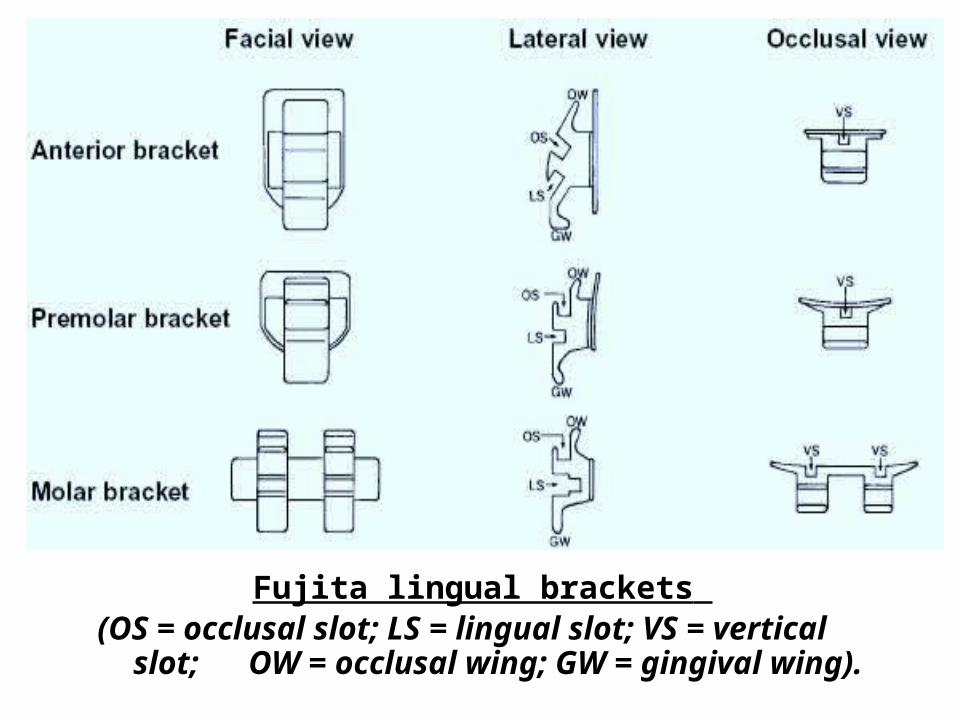
Fujita lingual brackets (OS = occlusal slot; LS = lingual slot; VS = vertical slot;
OW = occlusal wing; GW = gingival wing).
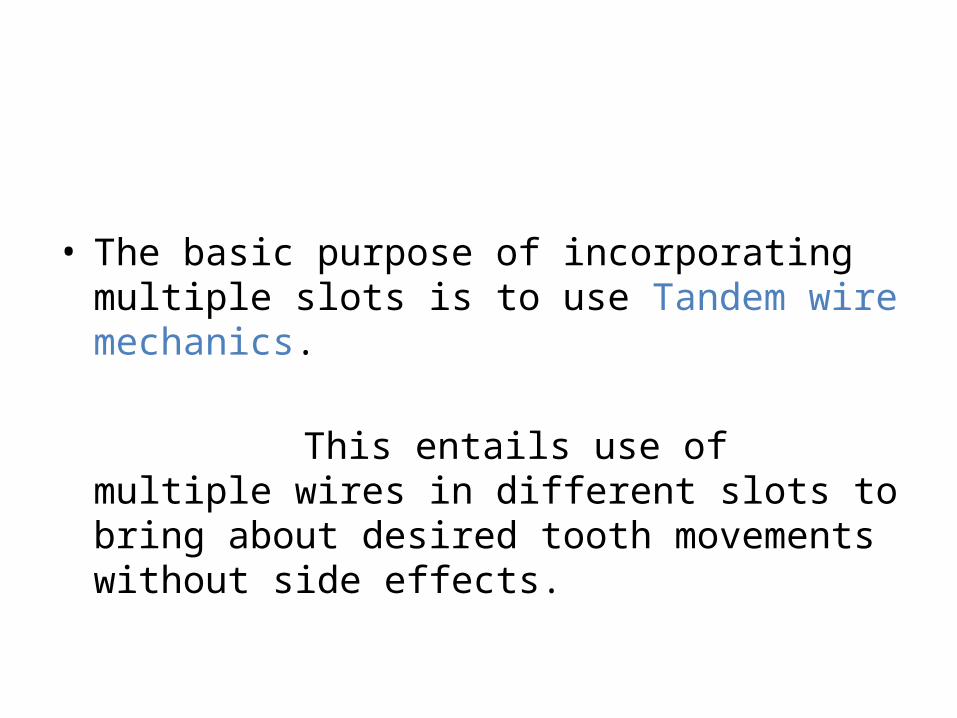
• The basic purpose of incorporating multiple slots is to use Tandem wire mechanics.
This entails use of multiple wires in different
slots to bring about desired tooth movements without side effects.
• The Fujita system is advantageous:
i. In cases in which esthetic considerations are important.
ii. In cases in which the patient is engaged in sports activities (less trauma to the lips).
iii. In undertaking minor tooth movement as a preliminary to prosthodontic treatment.
iv. For orthodontic treatment and fixation as treatment for periodontal disease.
v. Because it makes use of the lingual-bracket and mushroom-arch appliance in lieu of a retaining appliance.
• STB light lingual philosophy is based on 3 fundamental points:
1. Less lab procedures: does not need a lab set up in non-extraction cases. The reduced bracket dimension enables initial full bonding, even on overcrowded cases, with less bracket interference.
this can reduce time,work and costs.
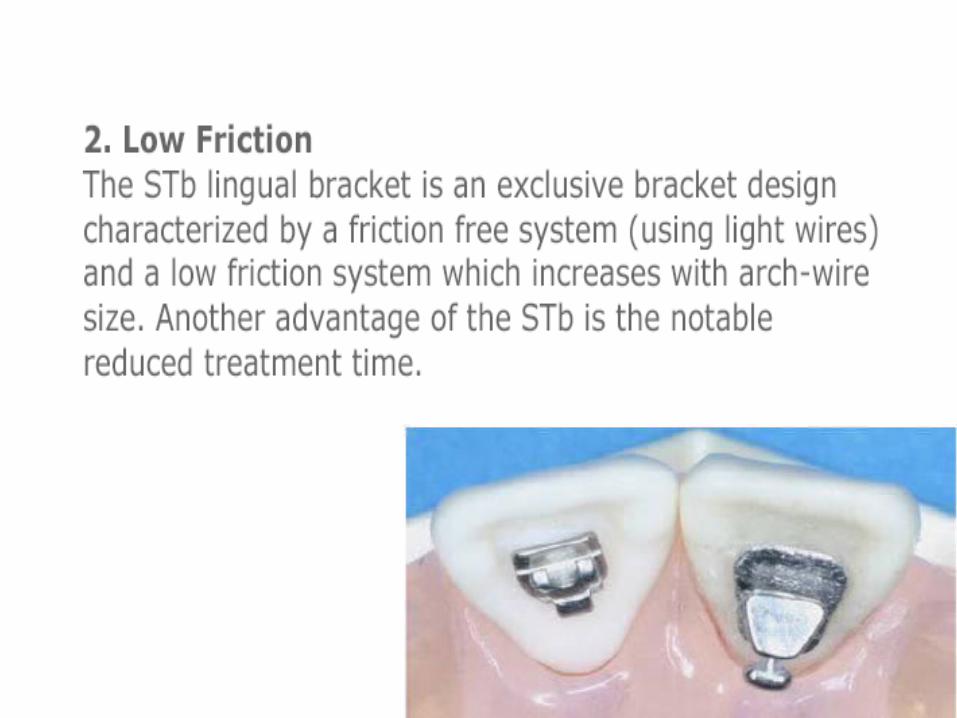
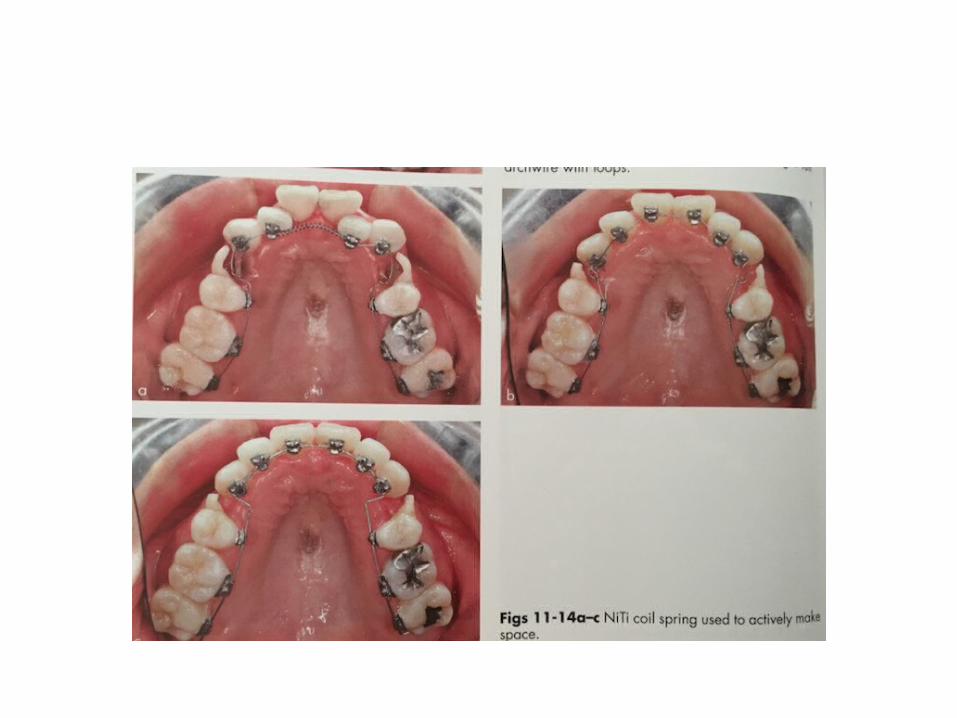
3. Low forces: the use of very light arch wires (0.010/.012 niti), which expresses biological forces absolutely compatible with the neuromuscular system, fast tooth movt, enhance patient comfort.
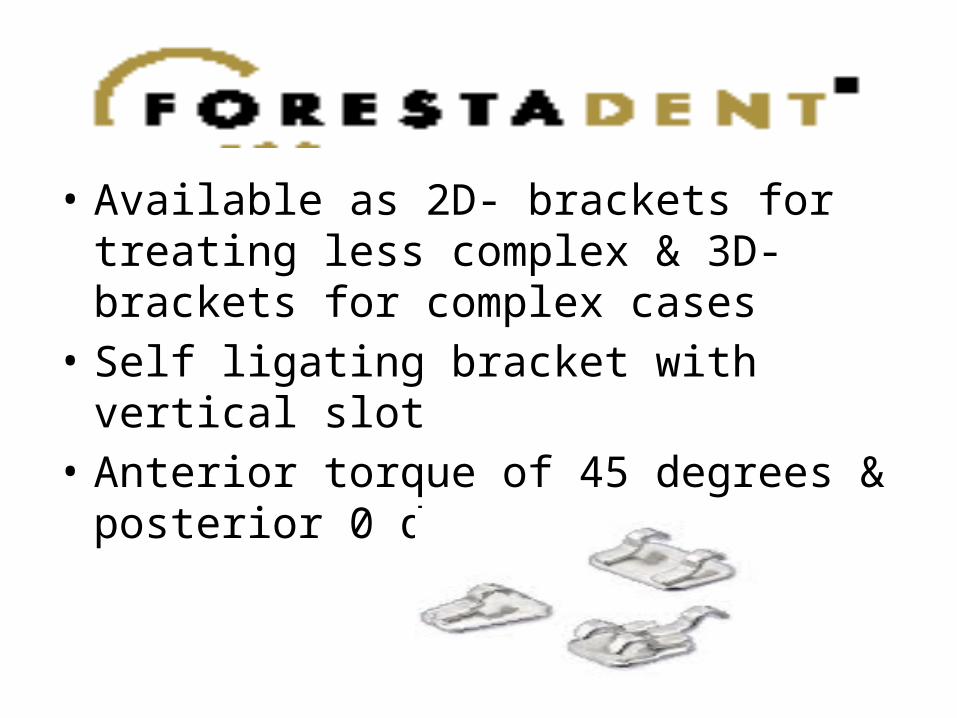
• Available as 2D- brackets for treating less complex & 3D- brackets for complex cases
• Self ligating bracket with vertical slot• Anterior torque of 45 degrees & posterior 0
degrees
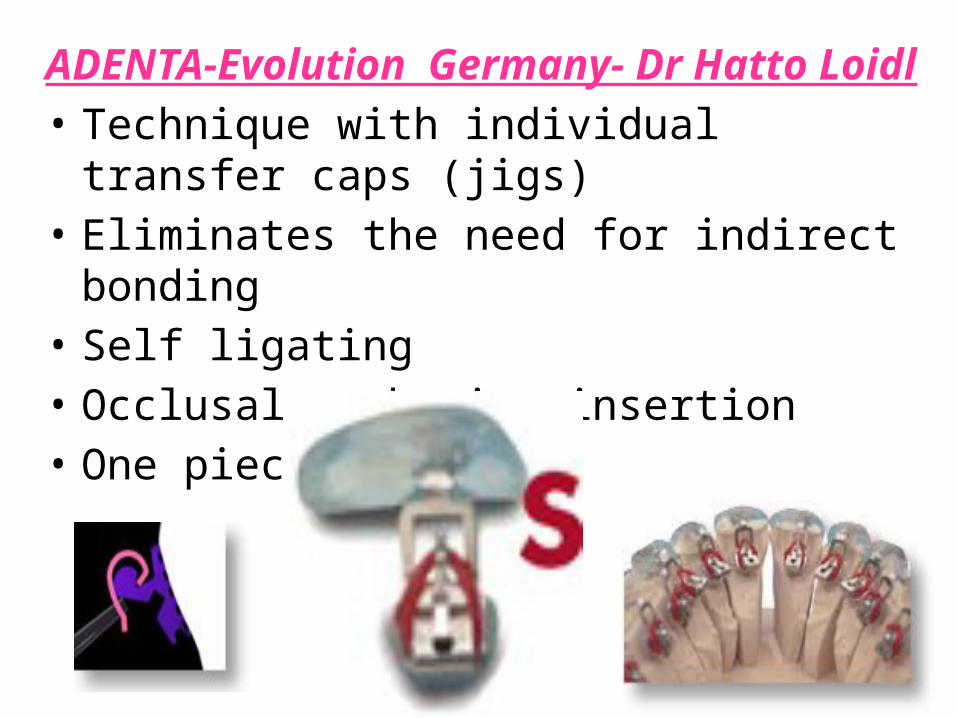
ADENTA-Evolution Germany- Dr Hatto Loidl• Technique with individual transfer caps (jigs)• Eliminates the need for indirect bonding• Self ligating• Occlusal arch wire insertion• One piece design
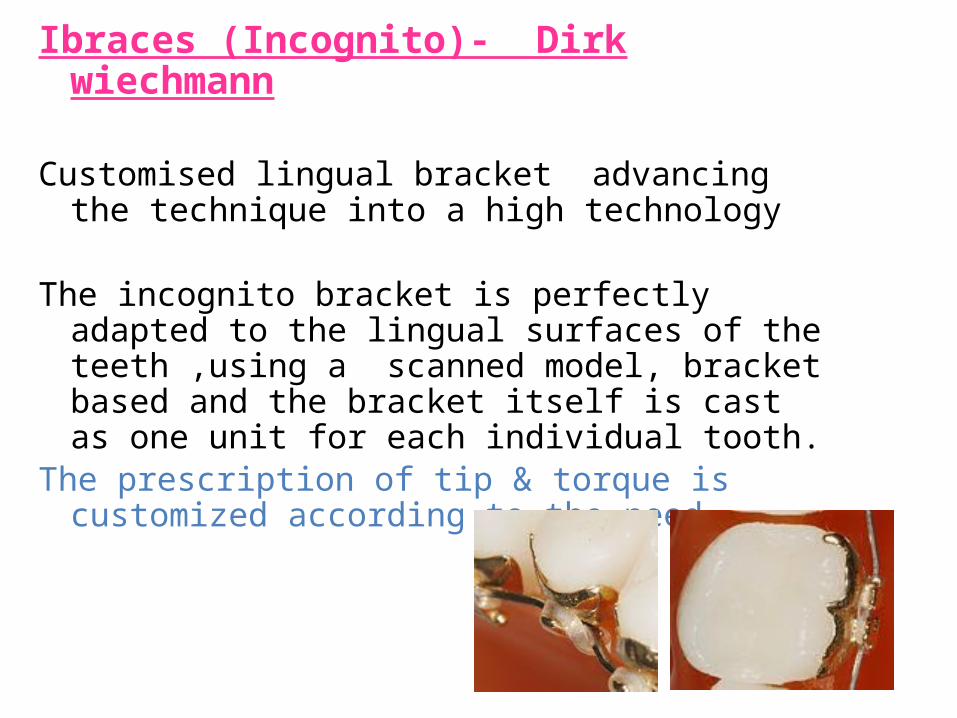
Ibraces (Incognito)- Dirk wiechmann
Customised lingual bracket advancing the technique into a high technology
The incognito bracket is perfectly adapted to the lingual surfaces of the teeth ,using a scanned model, bracket based and the bracket itself is cast as one unit for each individual tooth.
The prescription of tip & torque is customized according to the need.
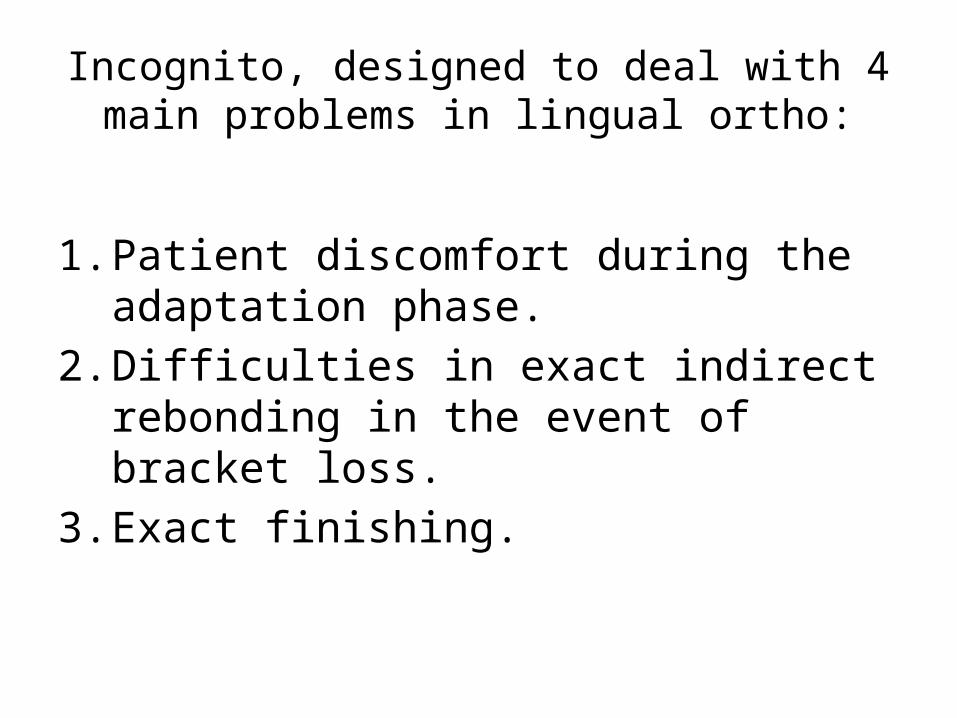
Incognito, designed to deal with 4 main problems in lingual ortho:
1. Patient discomfort during the adaptation phase.
2. Difficulties in exact indirect rebonding in the event of bracket loss.
3. Exact finishing.
Begg’s lingual brackets (JCO1982)
• Dr. Stephen Paige introduced the Lingual Light Wire technique in 1982.
• Initially, he used the Begg’s TP 256-500 labial brackets.
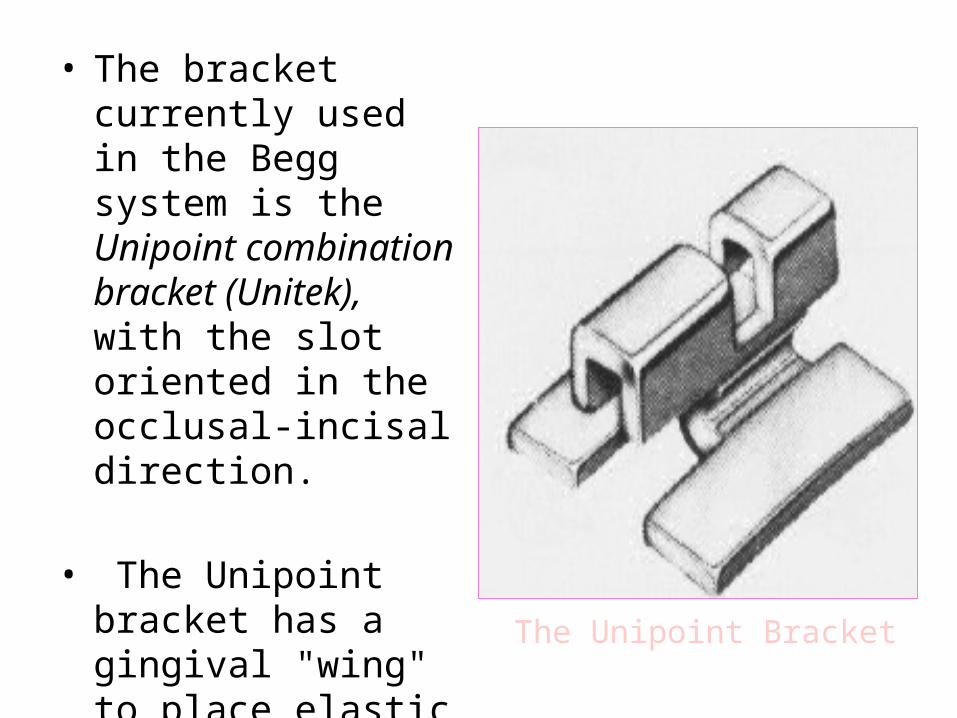
• The bracket currently used in the Begg system is the Unipoint combination bracket (Unitek), with the slot oriented in the occlusal-incisal direction.
• The Unipoint bracket has a gingival "wing" to place elastic modules on continuous elastic chains. The Unipoint Bracket
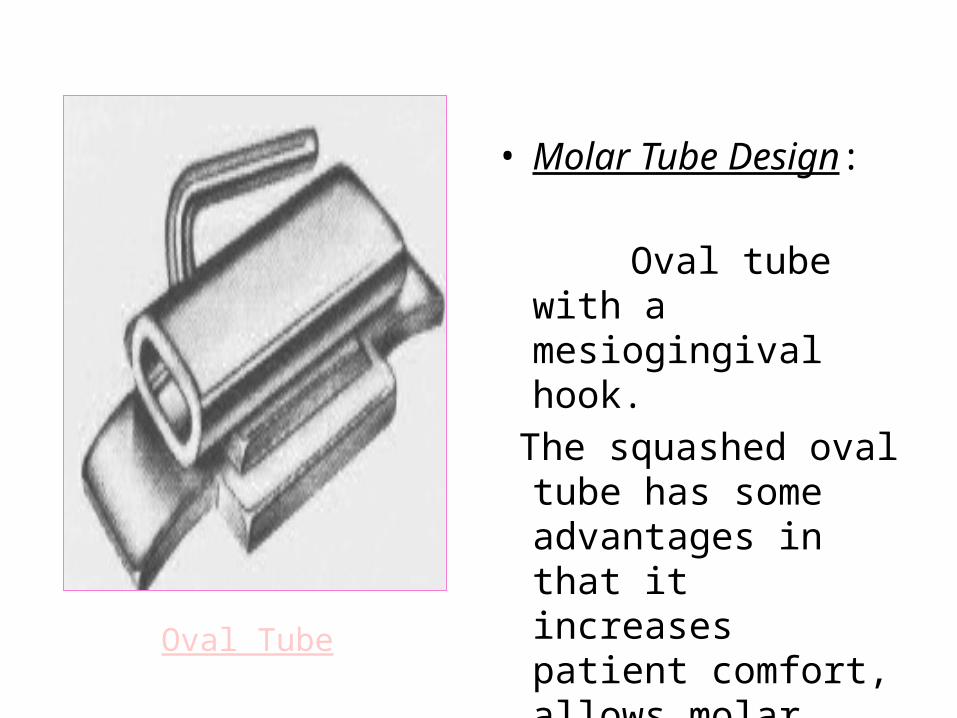
• Molar Tube Design: Oval tube with a
mesiogingival hook. The squashed oval
tube has some advantages in that it increases patient comfort, allows molar control, and will accept a ribbon arch. Oval Tube
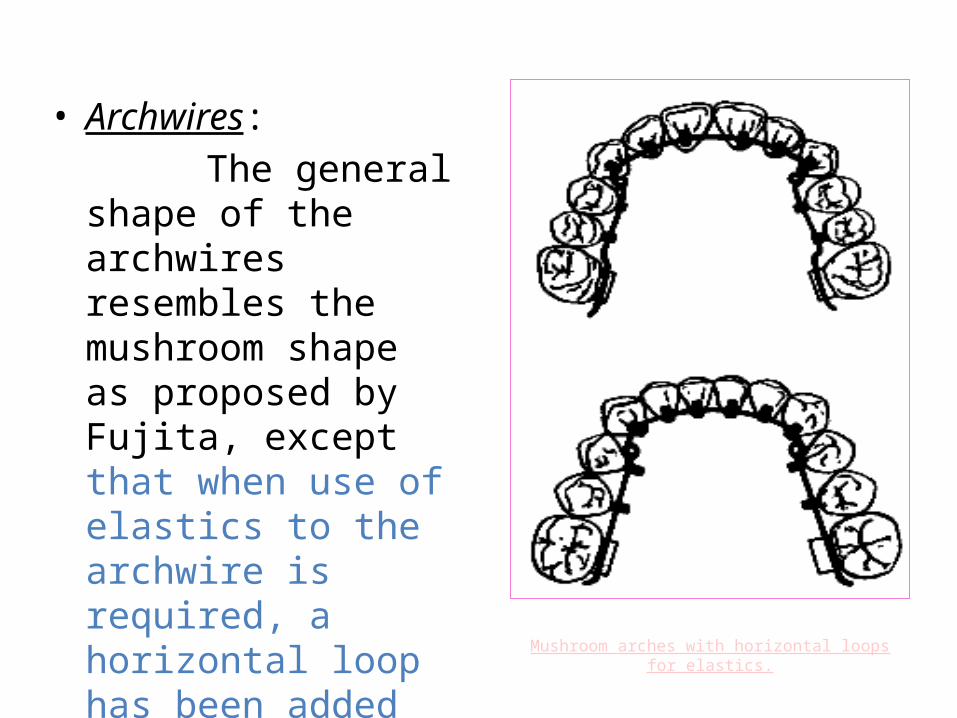
Mushroom arches with horizontal loops for elastics.
• Archwires: The general shape of
the archwires resembles the mushroom shape as proposed by Fujita, except that when use of elastics to the archwire is required, a horizontal loop has been added distal to the cuspids.
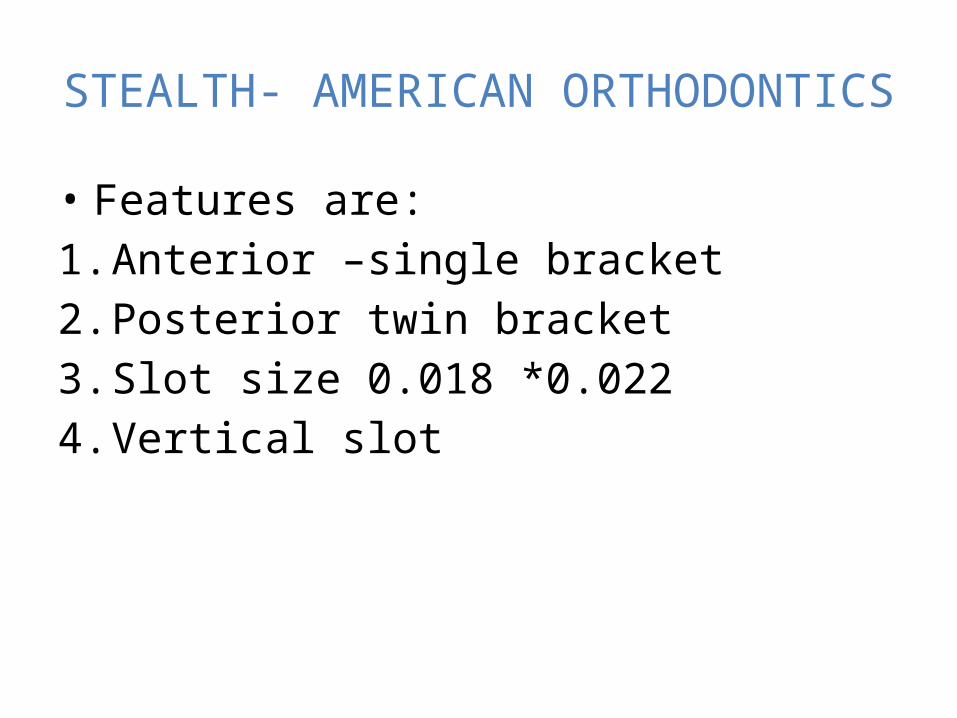
STEALTH- AMERICAN ORTHODONTICS
• Features are:1. Anterior –single bracket2. Posterior twin bracket3. Slot size 0.018 *0.0224. Vertical slot
• Manufactures claim following advantages:1. Compact size& smooth contour2. Full wire control with reduced friction3. Reduced m-d dimension which increase
interbracket distance4. Integrated vertical slot from anteriors through
molars to expand option for mechanics5. Generous base pad size for increase bond
strength
• KELLY BRACKET (UNITEK):• Horizontal insertion bracket The best in
controlling rotation s since it is twin with two actual contact points between the bracket and wire. It is a labial Unitek bracket adapted as a lingual one and not related to any special technique.
Phatom lingual attachments” The Ortendahl lingual system”
• Self-ligating esthetic bonding system• Utilize set of transfer jigs.• Direct bonding with built-in placement jig• Passive initially and active in later stage.• Tubes on premolars to avoid speech impediment.
brackets also available for pm if molars to be bonded.
• Quick and easy application• esthetic
Straight Wire Lingual Brackets
(JCO 2001)• Takemoto and Scuzzo in 2001 found that the
bucco-lingual distances at the gingival margins do not vary substantially. This led them to conclude that straight archwires could be used in lingual orthodontics if they were placed as close to the gingival margin as possible.
• Compared to other lingual brackets, archwire insertion in this design is from the top instead of the bottom.
• Advantages:- Flossing is easier as the archwire is farther from the
lingual surface and incisal edge.- Mesio-distal with of the bracket is smaller, allowing
adequate inter-bracket distances.- Less composite is needed to raise the bite, since the
brackets are placed more gingivally.- Rotations can be more easily accomplished as the
archwire can be tied tightly to the bottom of bracket slots.
- Torque control is improved.- Rebonding is easier as the archwire does not have to
be removed.- Pre-formed archwires can be used with a few
additional bends, reducing chairtime and allowing the use of sliding mechanics.
Self-ligating Lingual Brackets (JCO 2002)
• First described by Macchi et al in 2002, the Philippe Self Ligating Lingual Brackets (Forestadent, St. Louis, MO) can be bonded directly to the lingual tooth surfaces.
• Since they do not have slots, only first- and second-order movements are possible.
• Four types of Philippe brackets are available:
- Standard medium twin bracket (most commonly used).
- Narrow single-wing bracket for lower incisors.- Large twin bracket.- Three- wing bracket for attachmentof intermaxillary
elastics and application of simple third-order movements.
• Clinical applications:
- Post – treatment retention.- Closure of minor spaces.- Limited intrusion.- Correction of simple tooth malalignments and mild
crowding, especially in the mandibular arch.
Customised brackets & archwires for lingual orthodontic treatment
(AJODO 2003)
• Developed by Weichmann et al in 2003.• In this technique, the processes of bracket fabrication
and optimized positioning of the fabricated brackets on the tooth are fused into one unit.
• Each tooth has its own customized bracket, made with state-of-the-art CAD/CAM software coupled with high-end, rapid prototyping techniques.
Advantages of lingual on labial
1. Facial surfaces of the teeth are not damaged 2. Facial gingival tissues are not adversely
affected. 3. The position of the teeth can be more
precisely seen 4. Lip position is normal5. Tongue thrust habits are easily managed6. intrusion of anterior teeth7. maxillary arch expansion8. mandibular reposition therapy9. distalization of maxillary molars
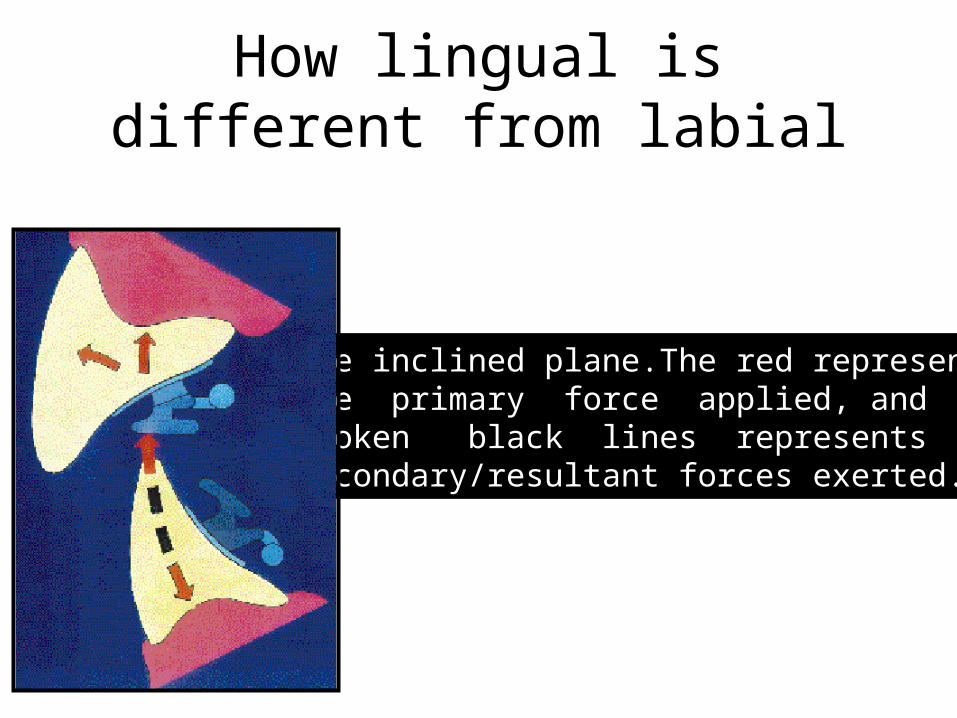
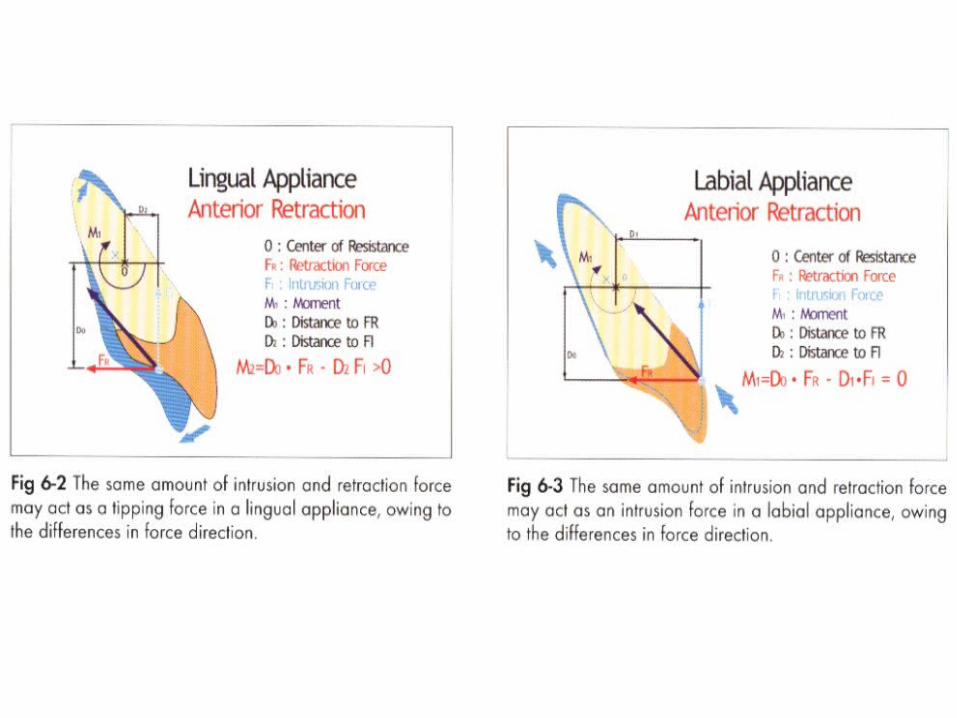
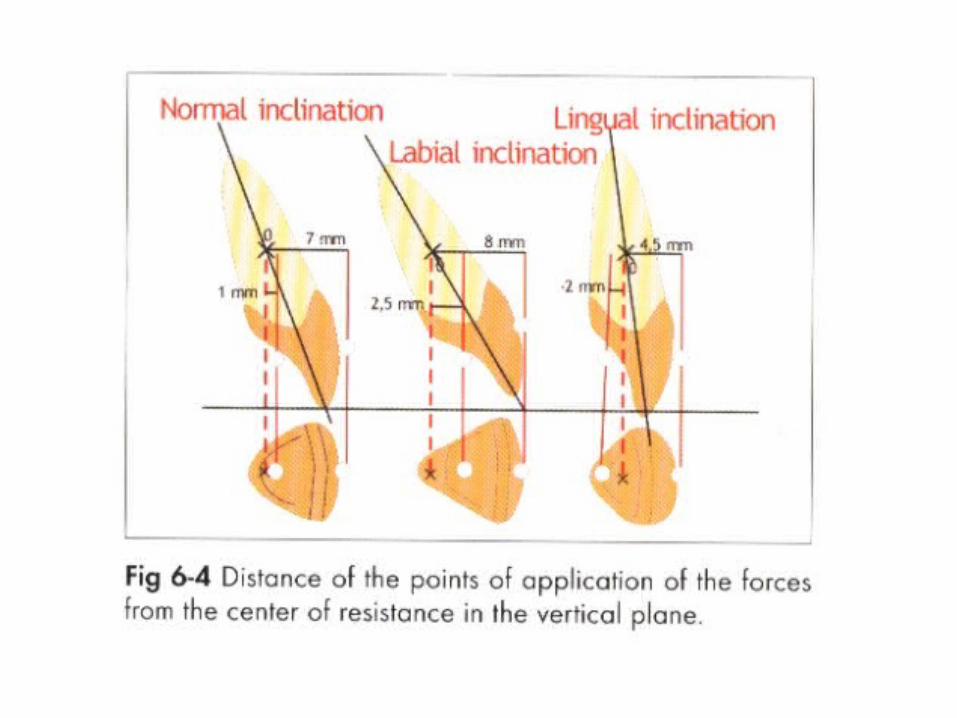
The inclined plane.The red representthe primary force applied, and the broken black lines represents the secondary/resultant forces exerted.
How lingual is different from labial
Need for accurate bracket positioning, mostly customised to individual teeth
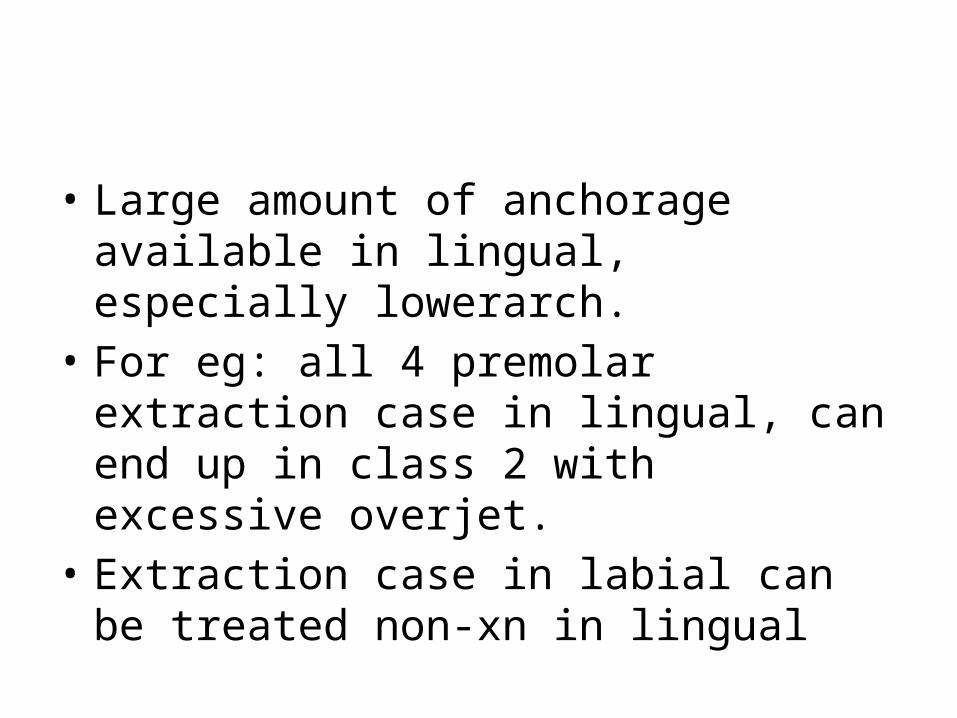
• Large amount of anchorage available in lingual, especially lowerarch.
• For eg: all 4 premolar extraction case in lingual, can end up in class 2 with excessive overjet.
• Extraction case in labial can be treated non-xn in lingual
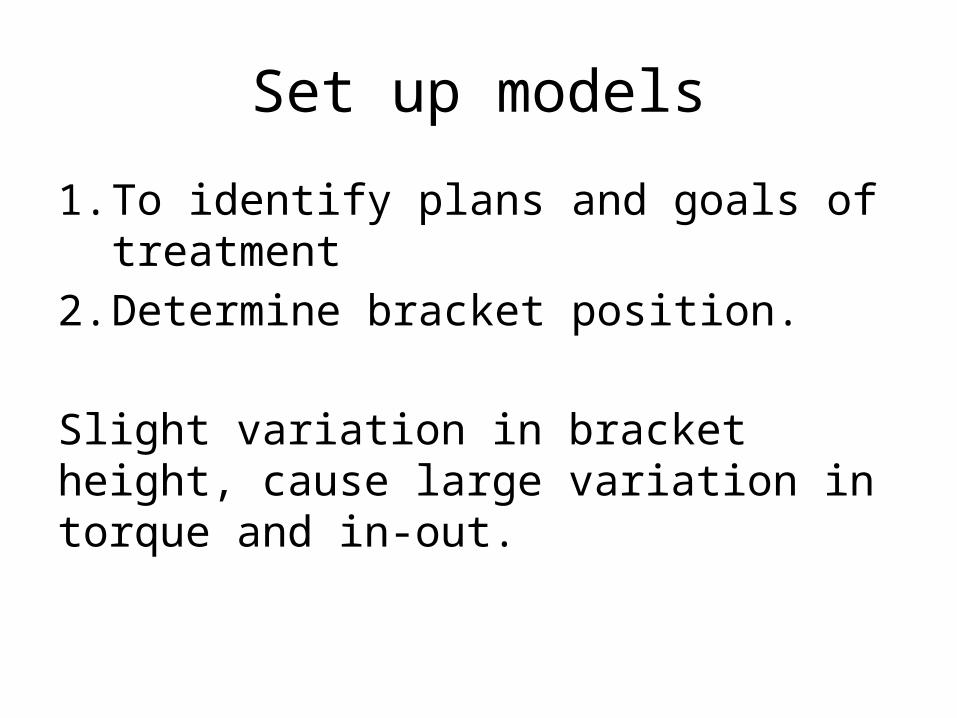
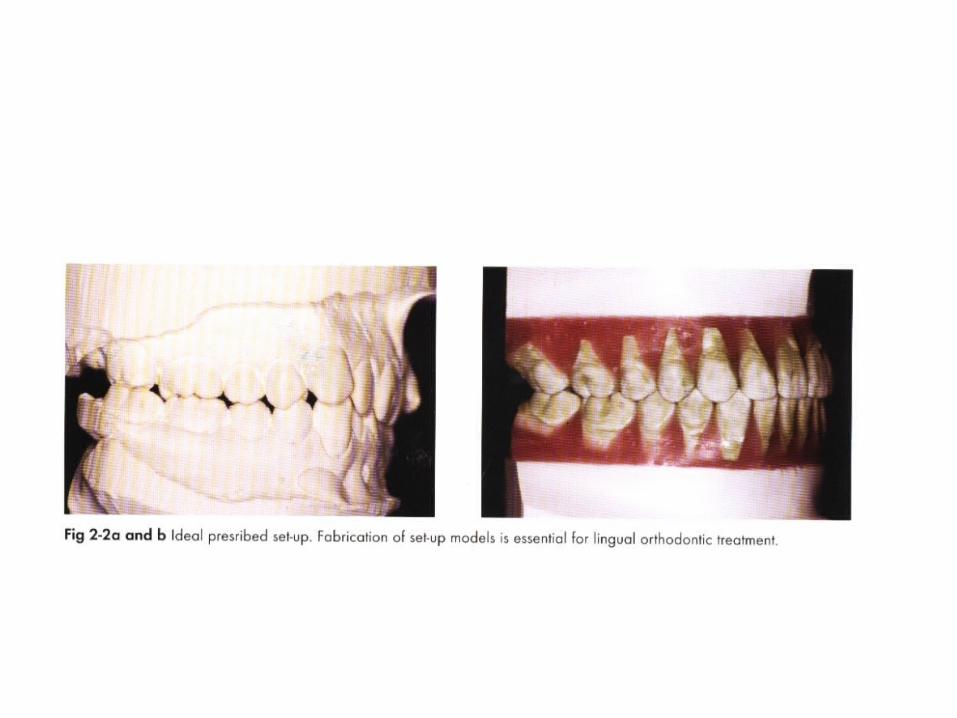
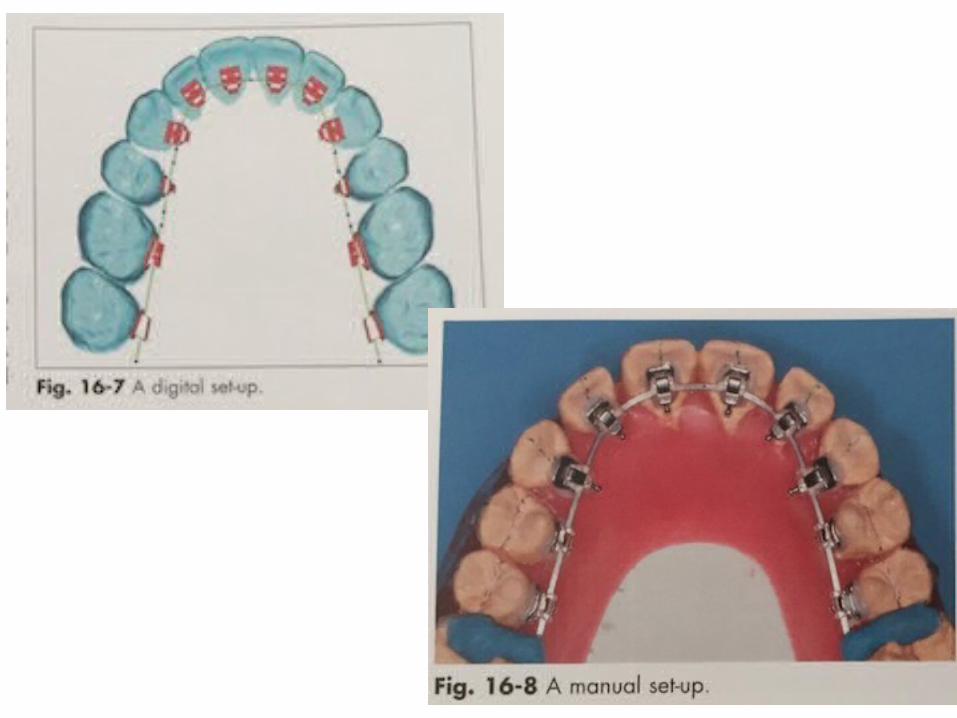
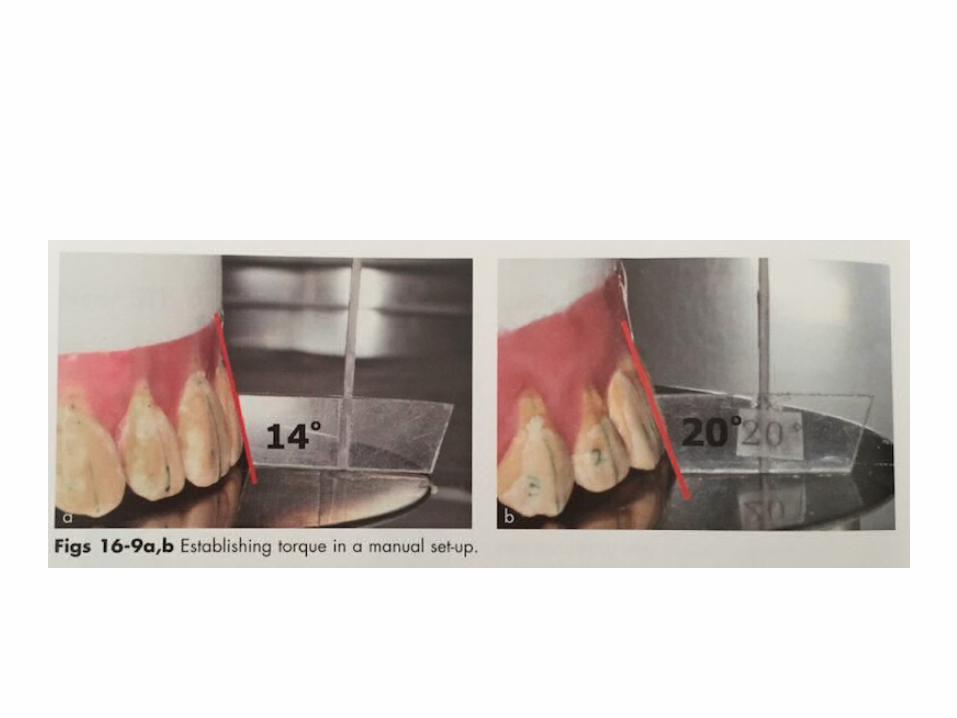
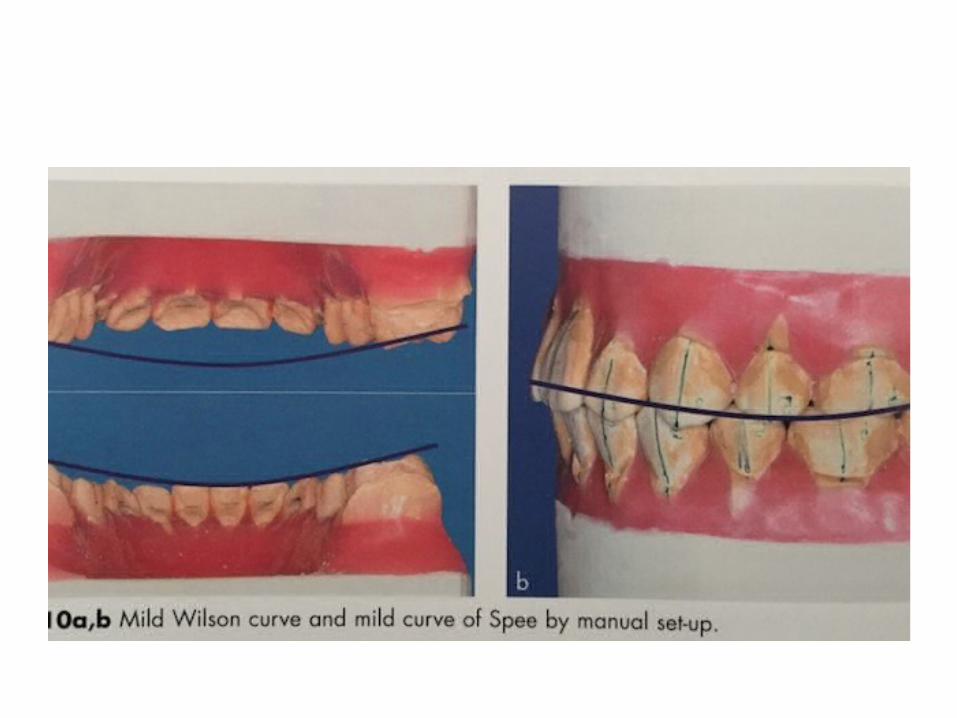
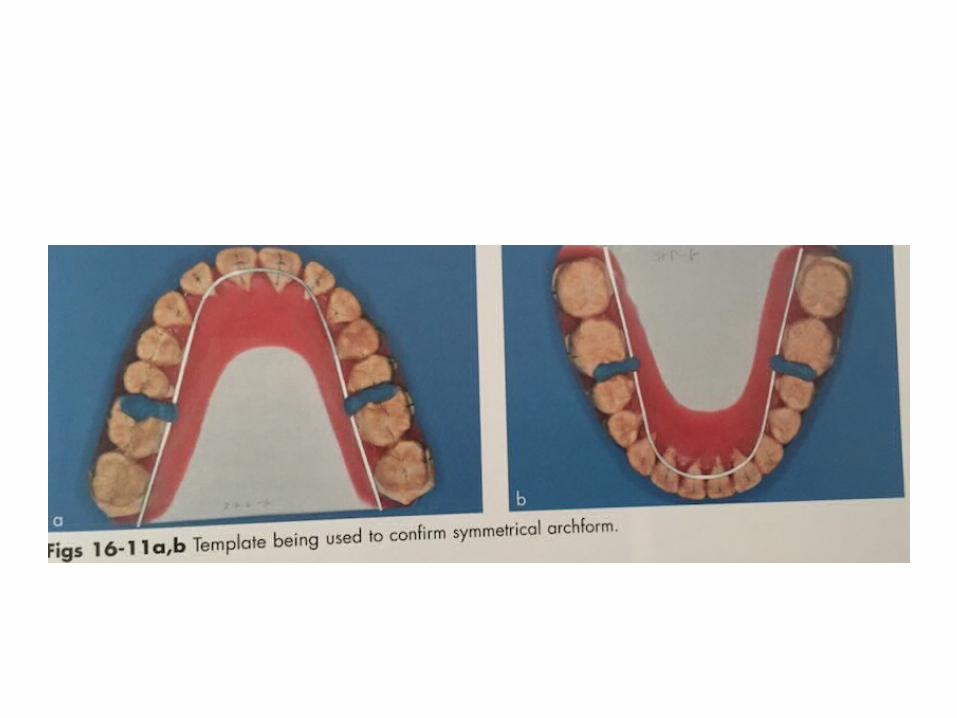
Set up models
1. To identify plans and goals of treatment2. Determine bracket position.
Slight variation in bracket height, cause large variation in torque and in-out.
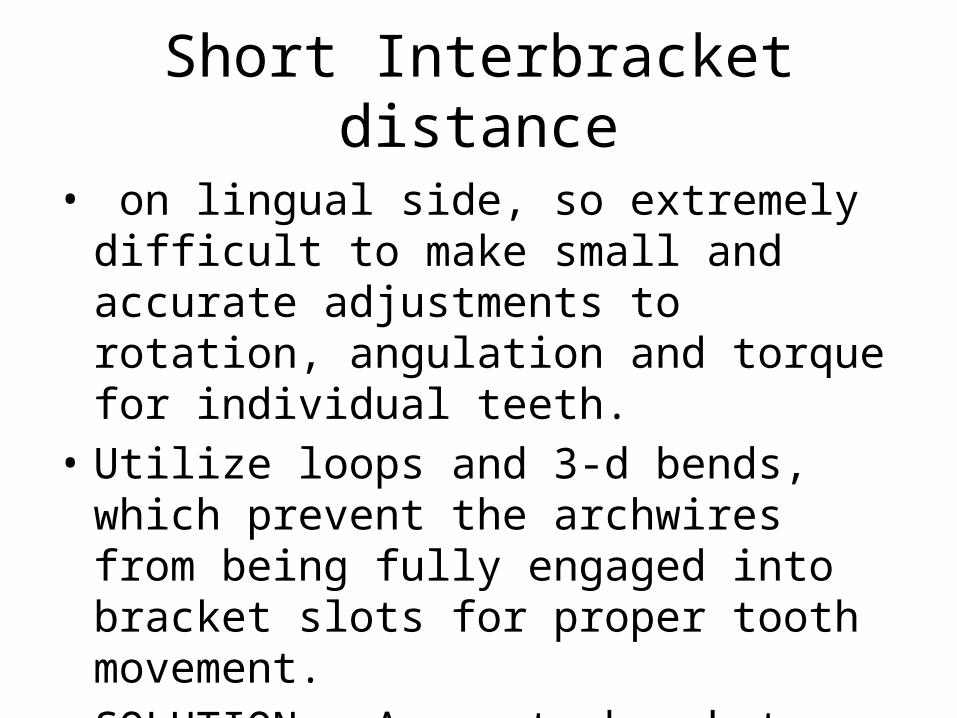
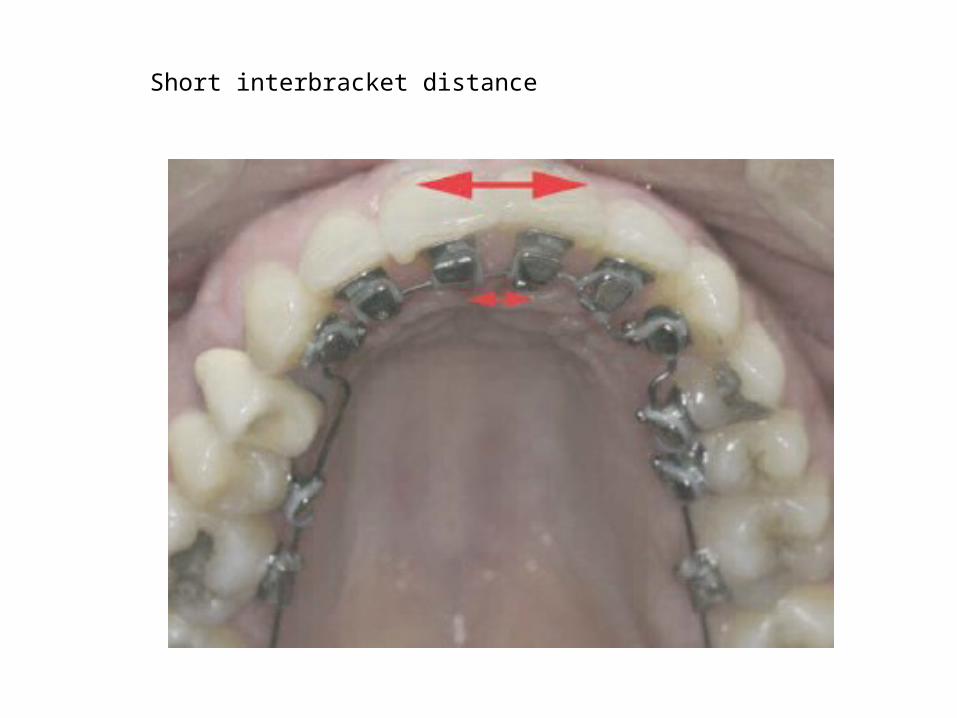
Short Interbracket distance
• on lingual side, so extremely difficult to make small and accurate adjustments to rotation, angulation and torque for individual teeth.
• Utilize loops and 3-d bends, which prevent the archwires from being fully engaged into bracket slots for proper tooth movement.
• SOLUTION : Accurate bracket position with the use of set up models.
Mushroom shaped archwire
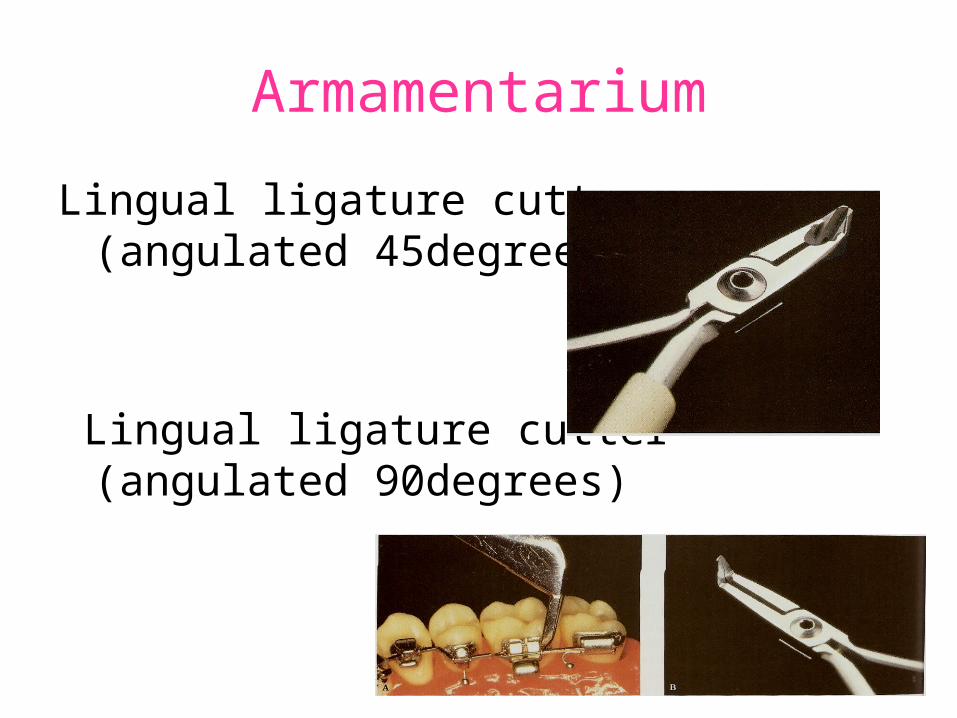
Armamentarium
Lingual ligature cutter (angulated 45degrees)
Lingual ligature cutter (angulated 90degrees)
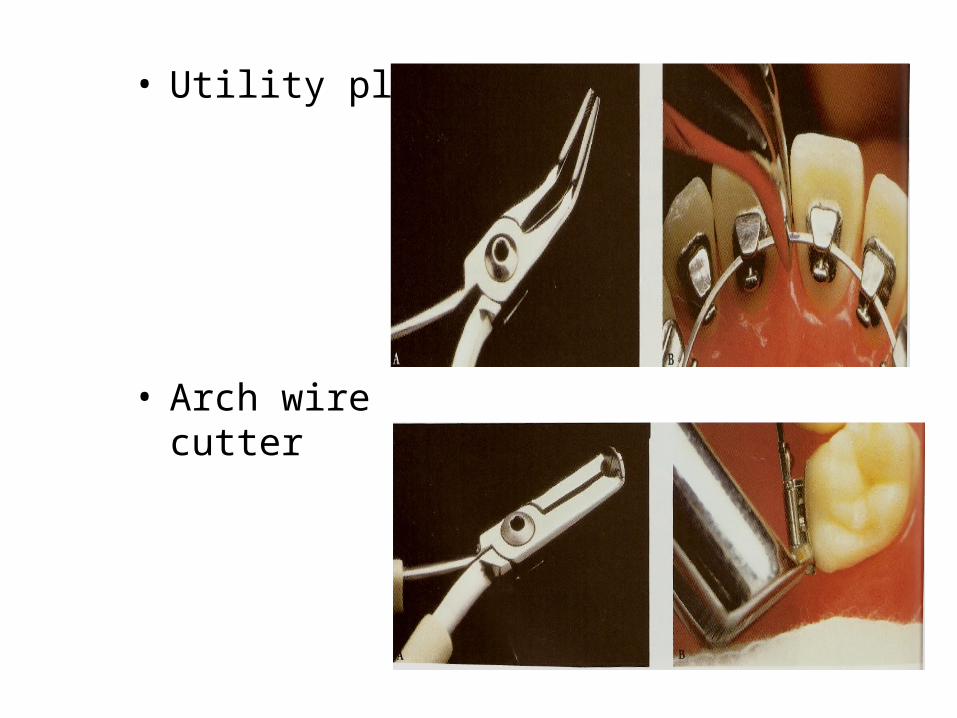
• Utility plier
• Arch wire cutter
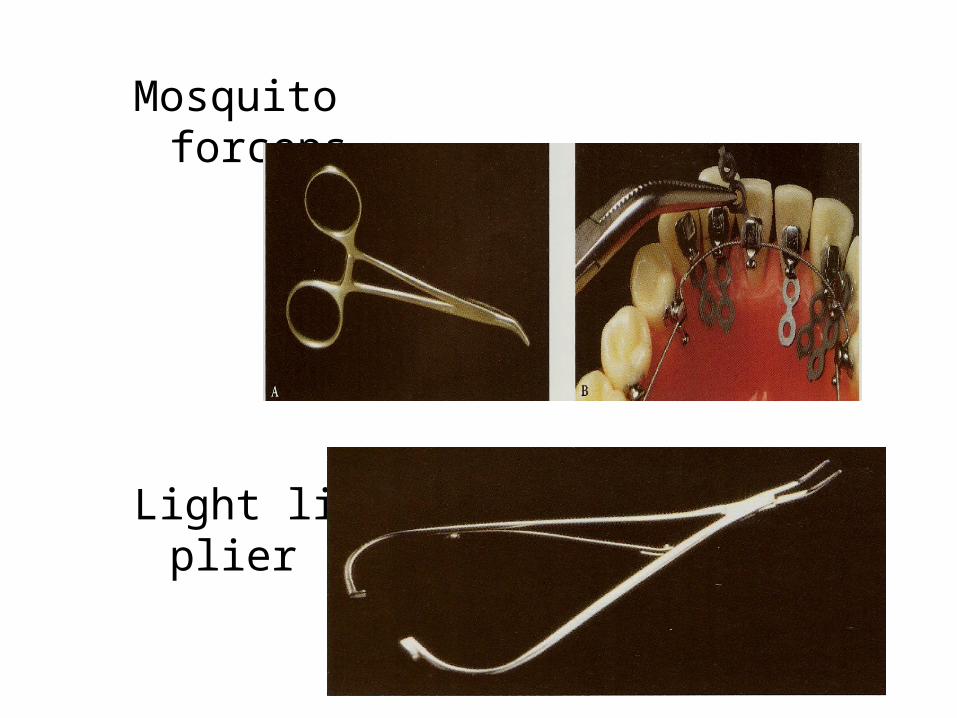
Mosquito forceps
Light ligature plier
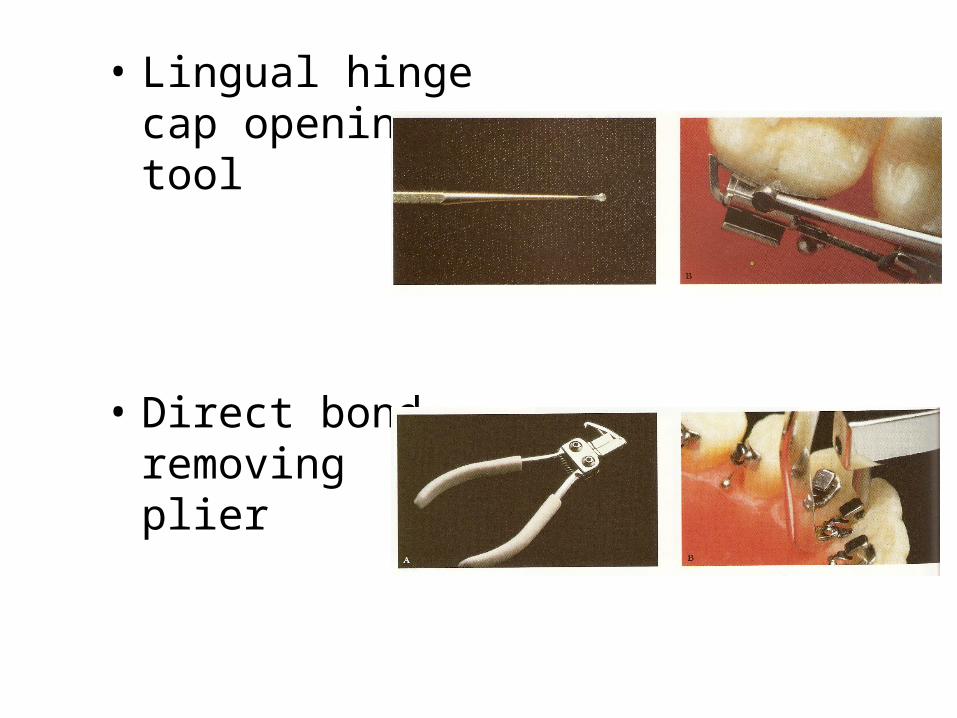
• Lingual hinge cap opening tool
• Direct bond removing plier
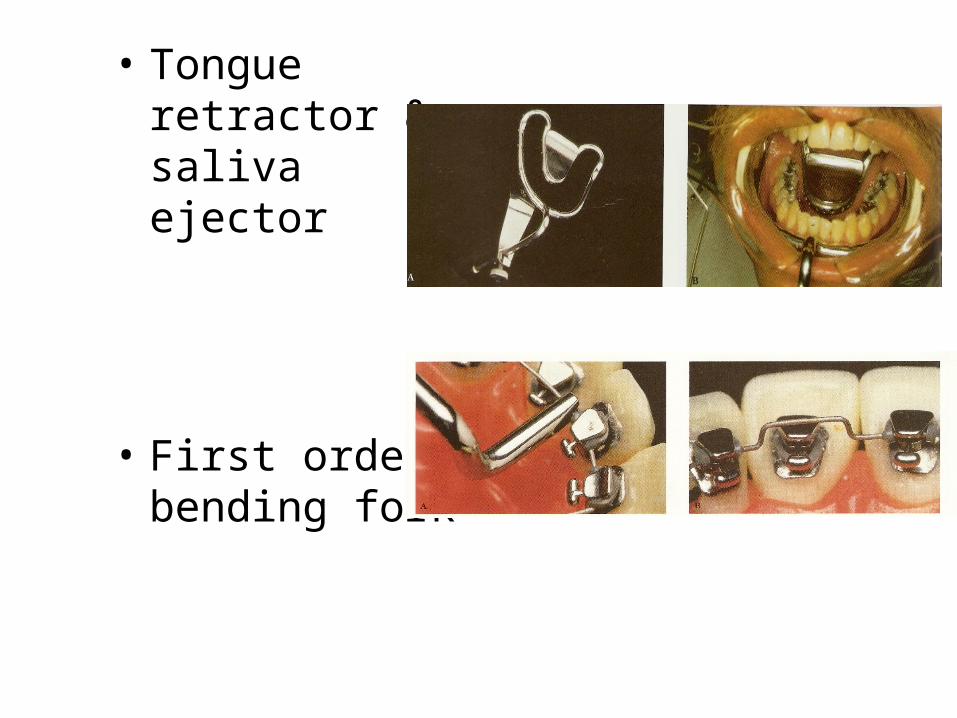
• Tongue retractor & saliva ejector
• First order bending fork
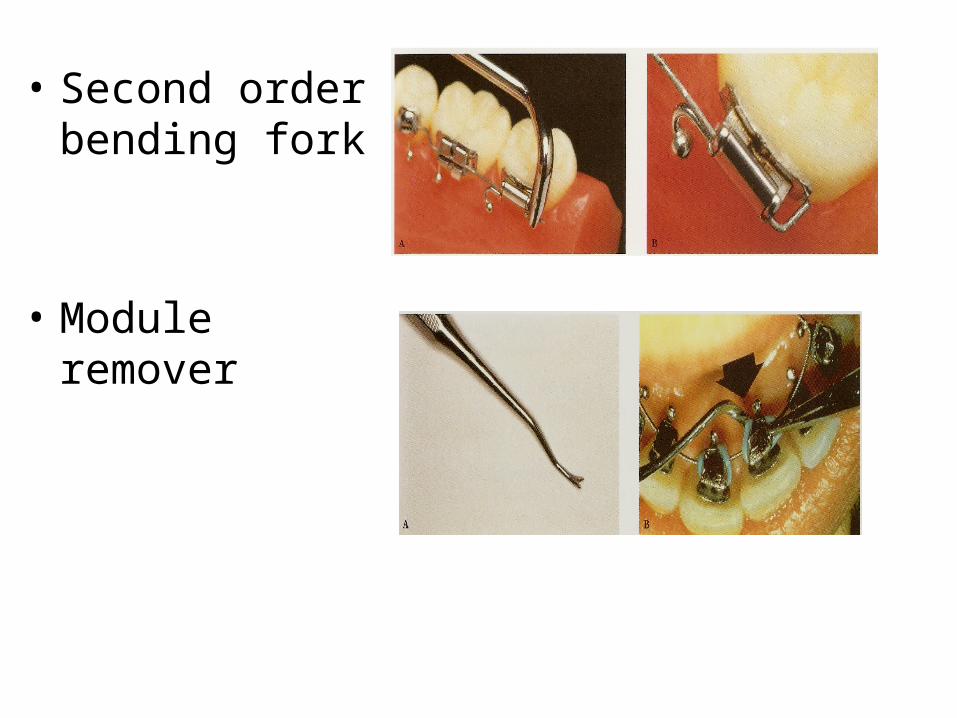
• Second order bending fork
• Module remover
What are the diagnostic and therapeutic considerations?
1. Soft tissue and histological considerations2. Anterior bite plane effect3. Speech and hygiene considerations
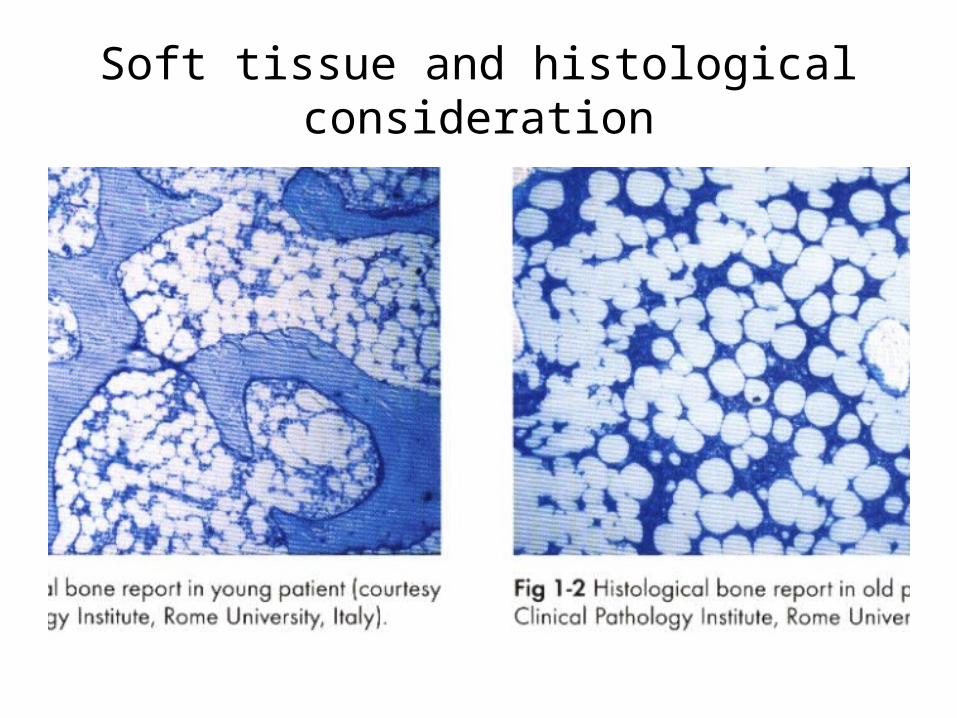
Soft tissue and histological consideration
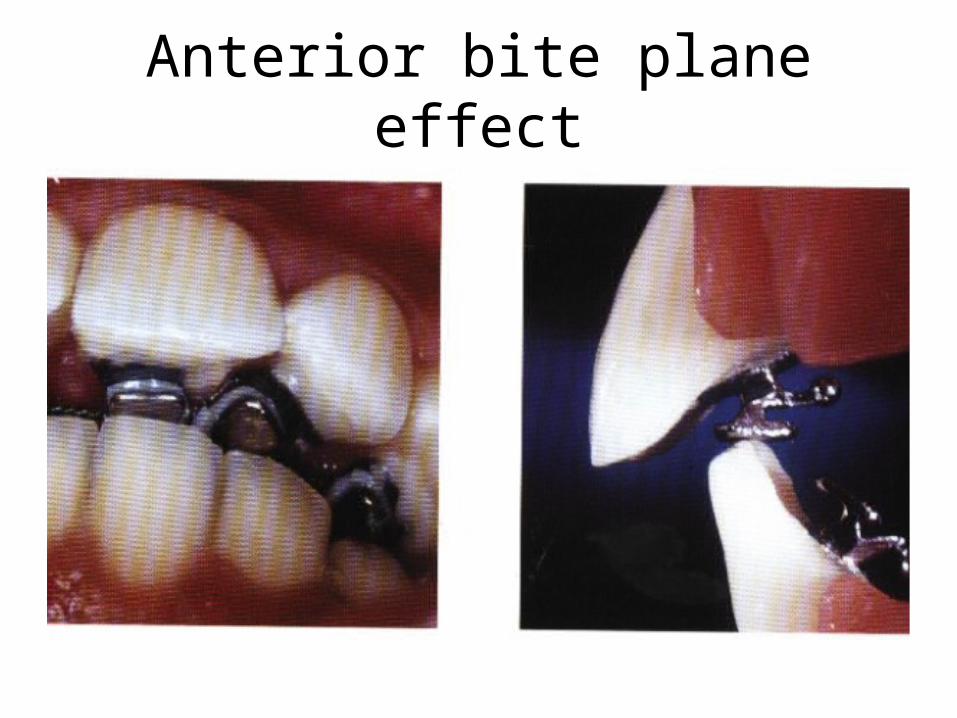
Anterior bite plane effect
Anterior bite plane effect
• It is important to anticipate problems from this:1. Excessive deep bite or very big overjet case,
hinderance in antero-posterior correction of malocclusion.
2. The upper incisor cannot be retracted or the lower advanced as a negative anterior anchorage effect would result in the risk of closure of extraction space for mesialization of the posteriors.
3. Class 2 non xtraction case: chance of increase in class 2 for mandibular clockwise rotation.
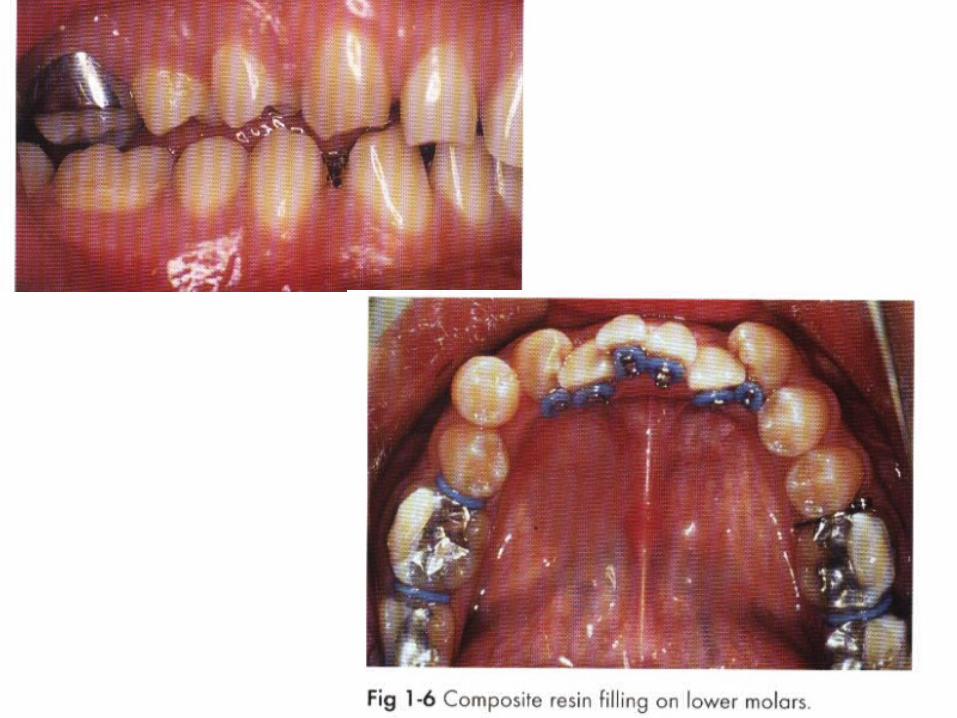
4. Difficulty in mastication, as posterior open bite exists.
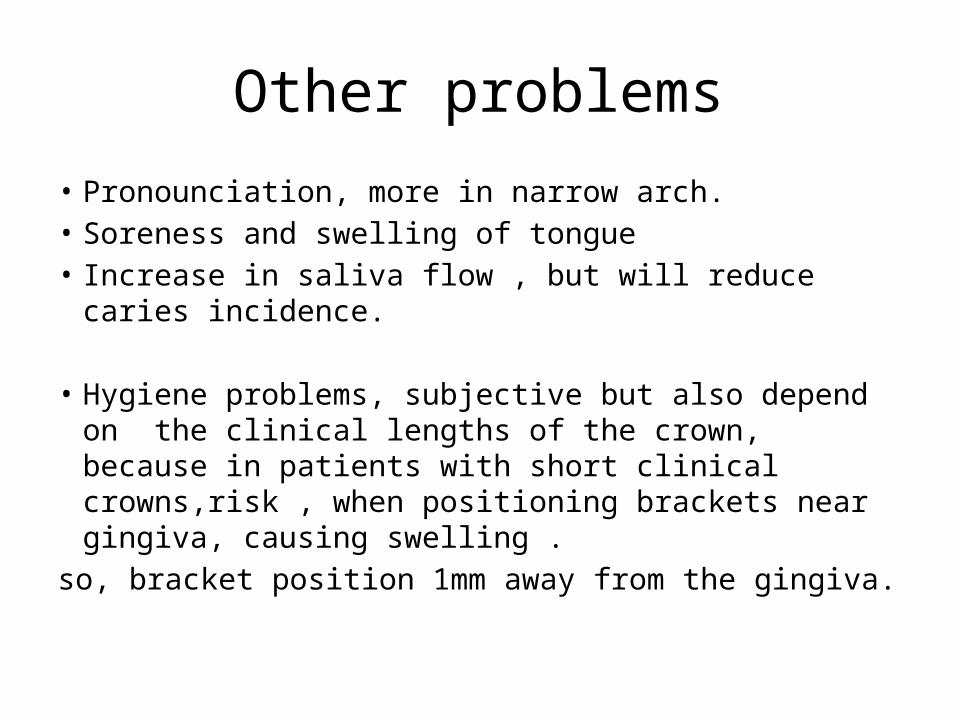
Other problems
• Pronounciation, more in narrow arch.• Soreness and swelling of tongue• Increase in saliva flow , but will reduce caries incidence.
• Hygiene problems, subjective but also depend on the clinical lengths of the crown, because in patients with short clinical crowns,risk , when positioning brackets near gingiva, causing swelling .
so, bracket position 1mm away from the gingiva.
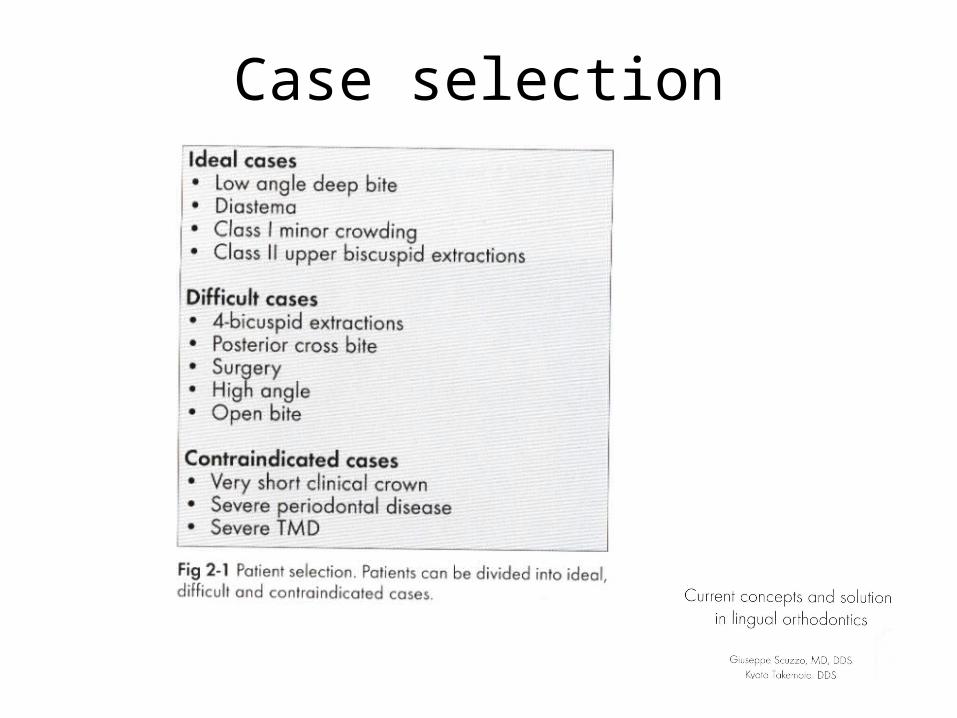
Case selection
Favourable casesNon–extraction cases- Deep bite, class l with mild crowding, good
facial pattern- Deep bite, class l with spacing or diastema,
good facial pattern- Deep bite, mild class ll, good facial pattern- Class ll div2 with retruded mandible
LINGUAL ORTHODONTICS
RAFI ROMANO, DMD, MSc
Exraction cases-Class ll upper 1PM & lower 2PM-Class ll upper 1PM extractions-Mild bimaxillary protrusion with 4 PM
extraction-class lll tendency with deep bite
LINGUAL ORTHODONTICS
RAFI ROMANO, DMD, MSc
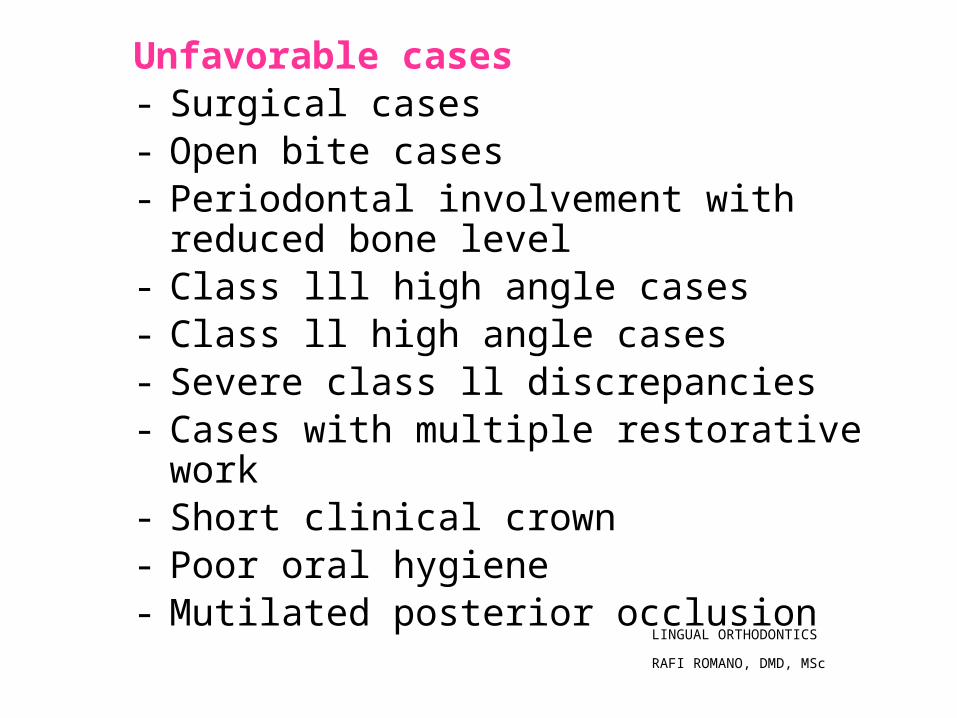
Unfavorable cases- Surgical cases- Open bite cases - Periodontal involvement with reduced bone level- Class lll high angle cases- Class ll high angle cases- Severe class ll discrepancies- Cases with multiple restorative work- Short clinical crown- Poor oral hygiene- Mutilated posterior occlusion
LINGUAL ORTHODONTICS
RAFI ROMANO, DMD, MSc
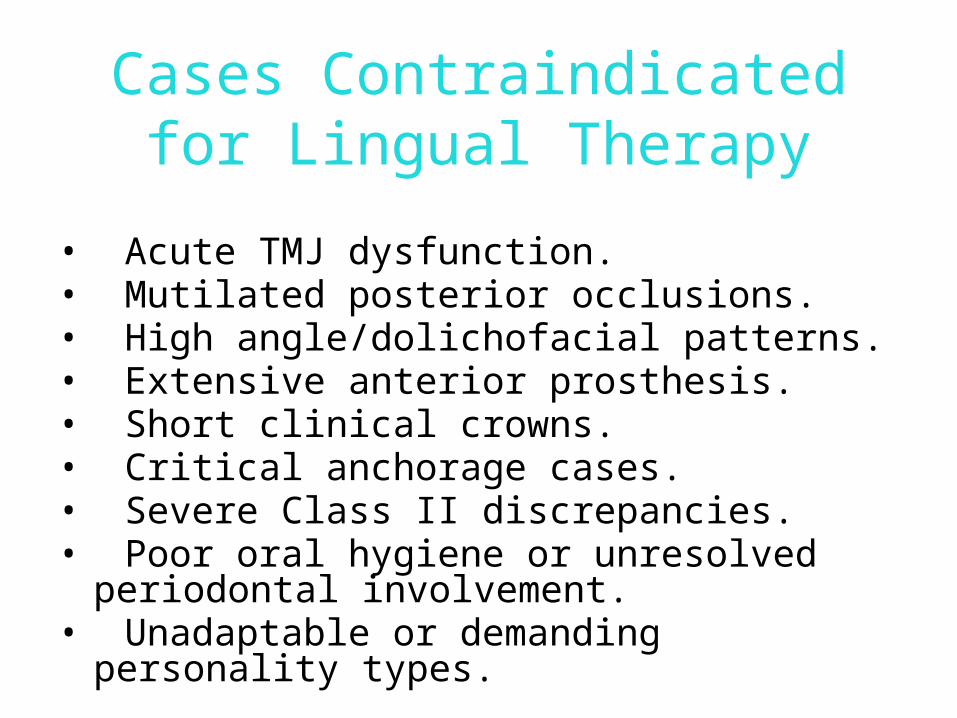
• Acute TMJ dysfunction.• Mutilated posterior occlusions.• High angle/dolichofacial patterns.• Extensive anterior prosthesis.• Short clinical crowns.• Critical anchorage cases.• Severe Class II discrepancies.• Poor oral hygiene or unresolved periodontal
involvement.• Unadaptable or demanding personality types.
Cases Contraindicated for Lingual Therapy
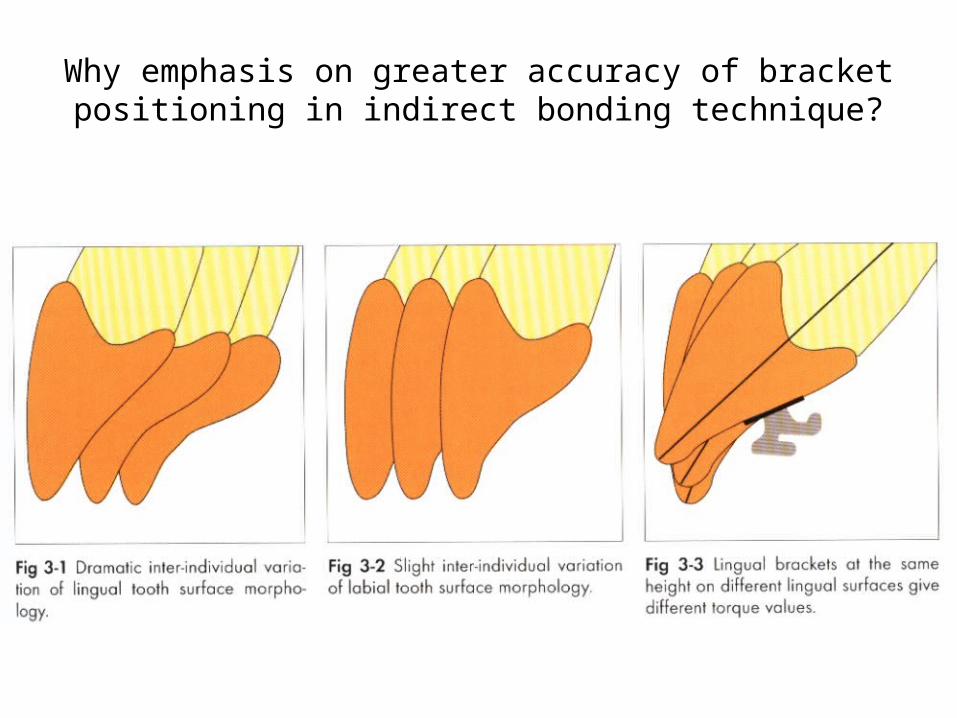
Why emphasis on greater accuracy of bracket positioning in indirect bonding technique?
Lingual Bracket Placement
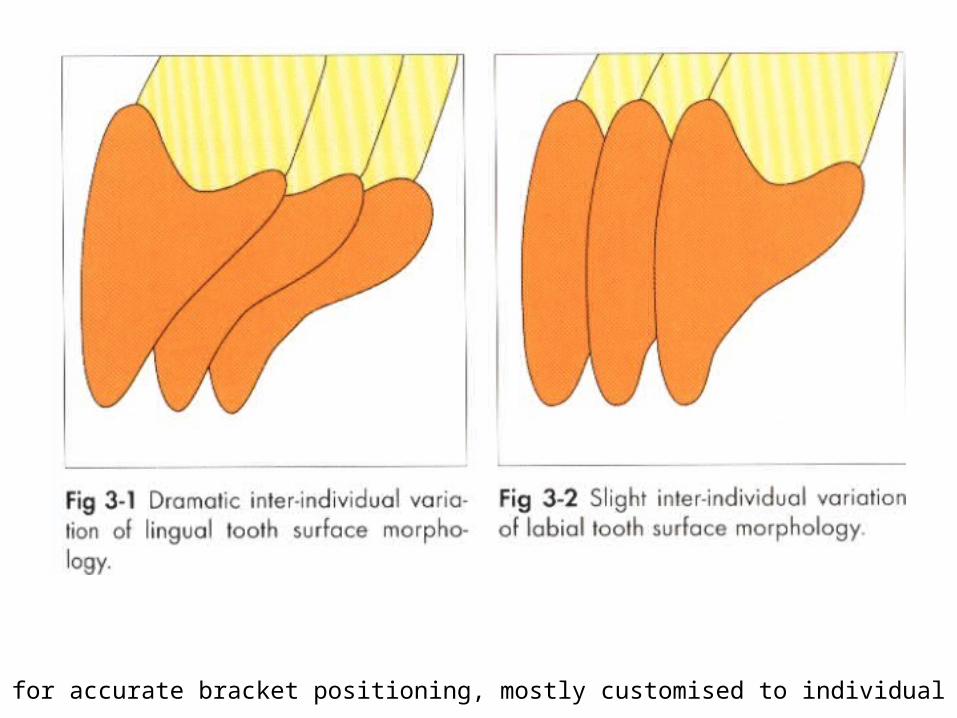
• Considering the difficulty of access, irregularity and variability of lingual tooth morphology, it is difficult to locate exact bracket positions, even on plaster casts.
• Michael Diamond (J Clin Orthod, 1983) described the critical aspects of lingual bracket placement as follows:
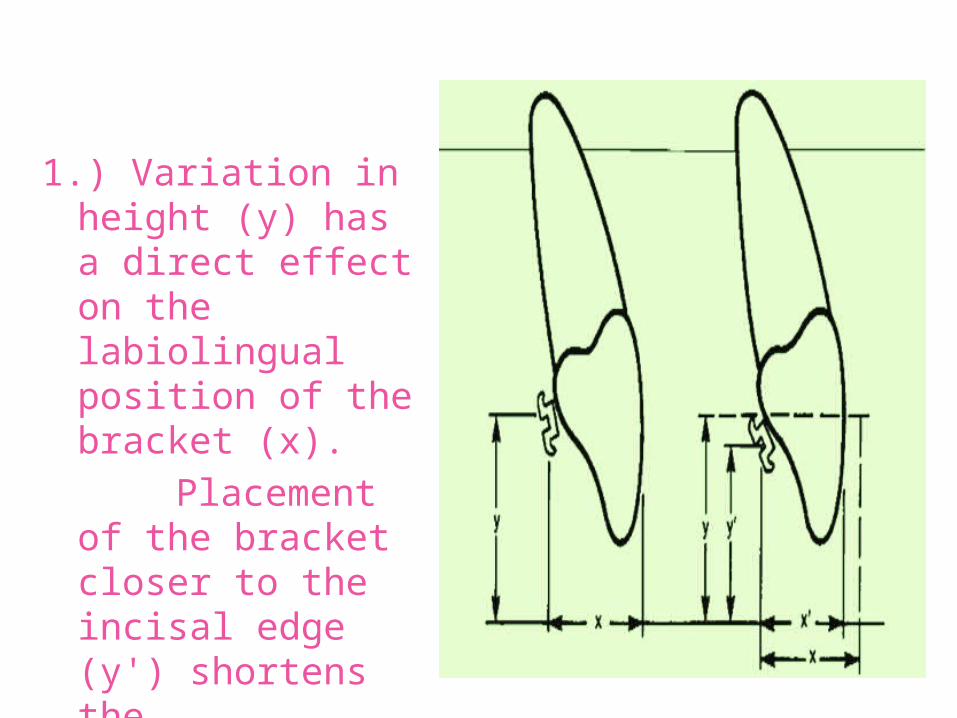
1.) Variation in height (y) has a direct effect on the labiolingual position of the bracket (x).
Placement of the bracket closer to the incisal edge (y') shortens the labiolingual distance (x').
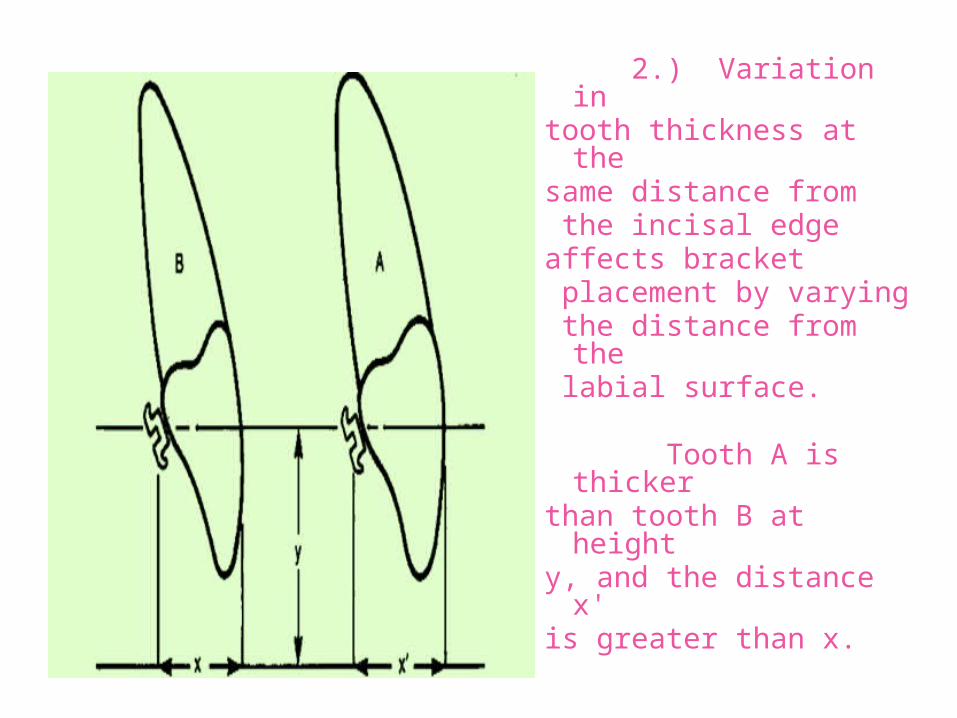
2.) Variation in tooth thickness at the same distance from the incisal edge affects bracket placement by varying the distance from the labial surface.
Tooth A is thicker than tooth B at height y, and the distance x' is greater than x.
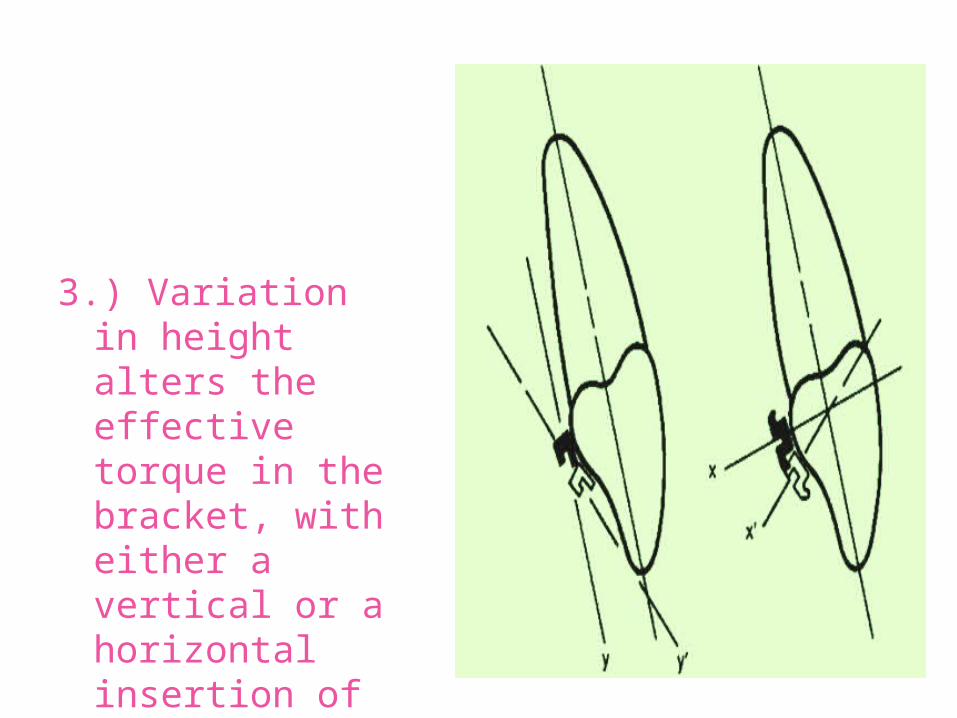
3.) Variation in height alters the effective torque in the bracket, with either a vertical or a horizontal insertion of the archwire.
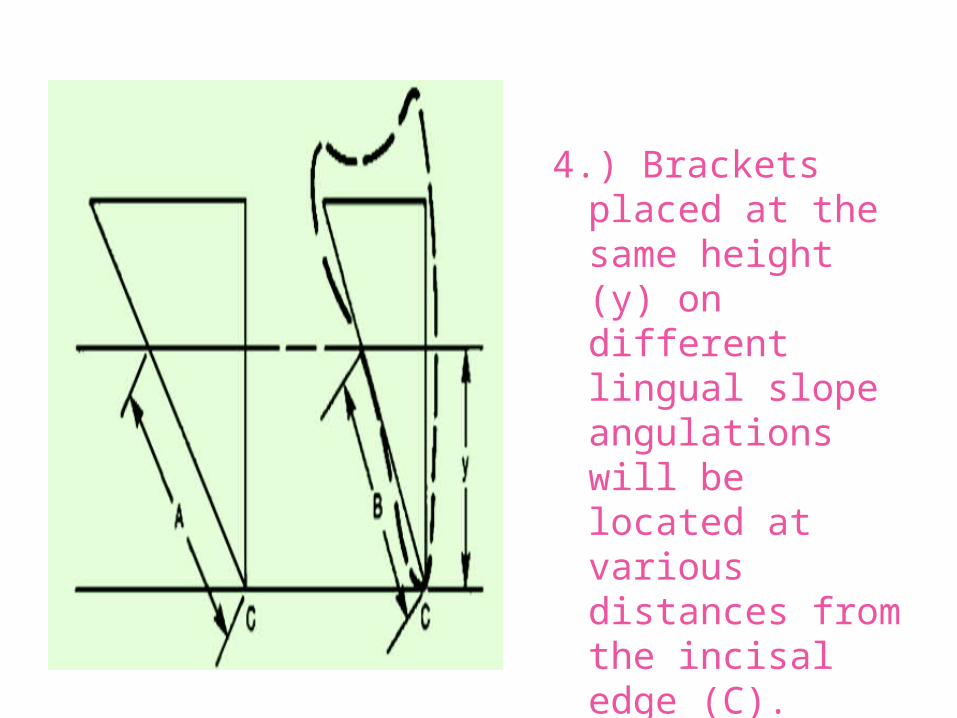
4.) Brackets placed at the same height (y) on different lingual slope angulations will be located at various distances from the incisal edge (C).
A is greater than B.
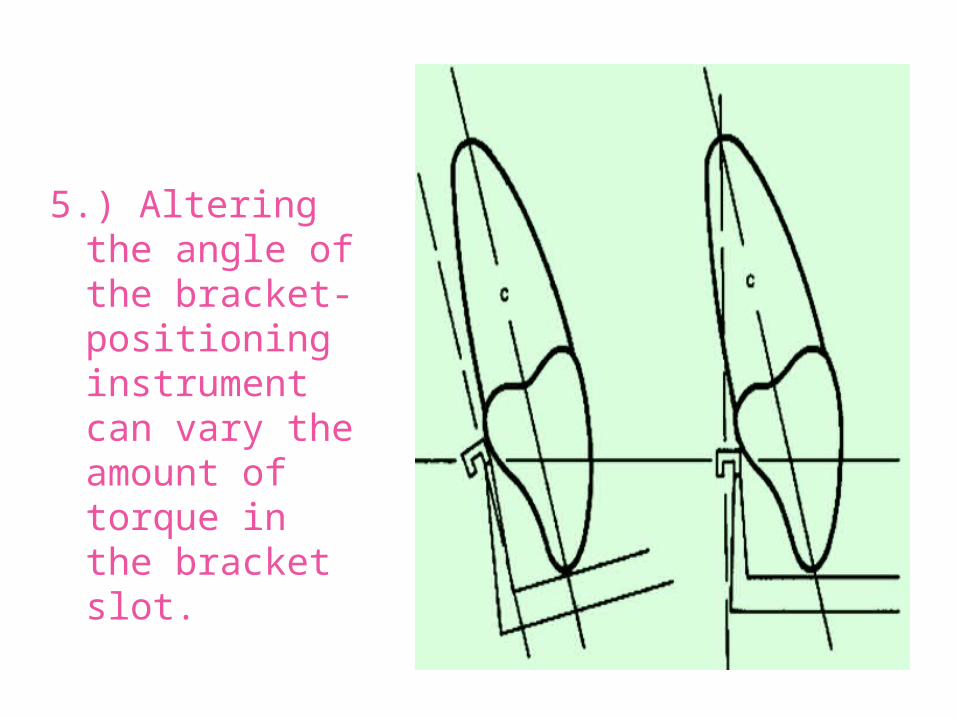
5.) Altering the angle of the bracket-positioning instrument can vary the amount of torque in the bracket slot.
Bonding techniques for
Lingual Orthodontics
- Direct bonding- Indirect bonding
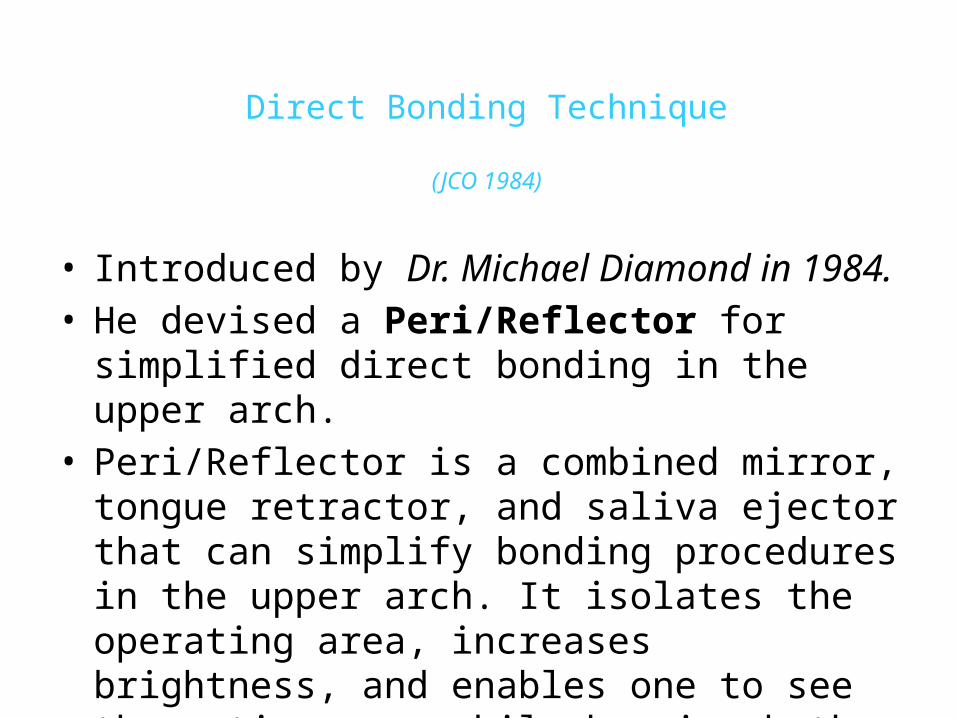
• Introduced by Dr. Michael Diamond in 1984.• He devised a Peri/Reflector for simplified direct
bonding in the upper arch.• Peri/Reflector is a combined mirror, tongue retractor,
and saliva ejector that can simplify bonding procedures in the upper arch. It isolates the operating area, increases brightness, and enables one to see the entire area while keeping both hands free.
Direct Bonding Technique (JCO 1984)
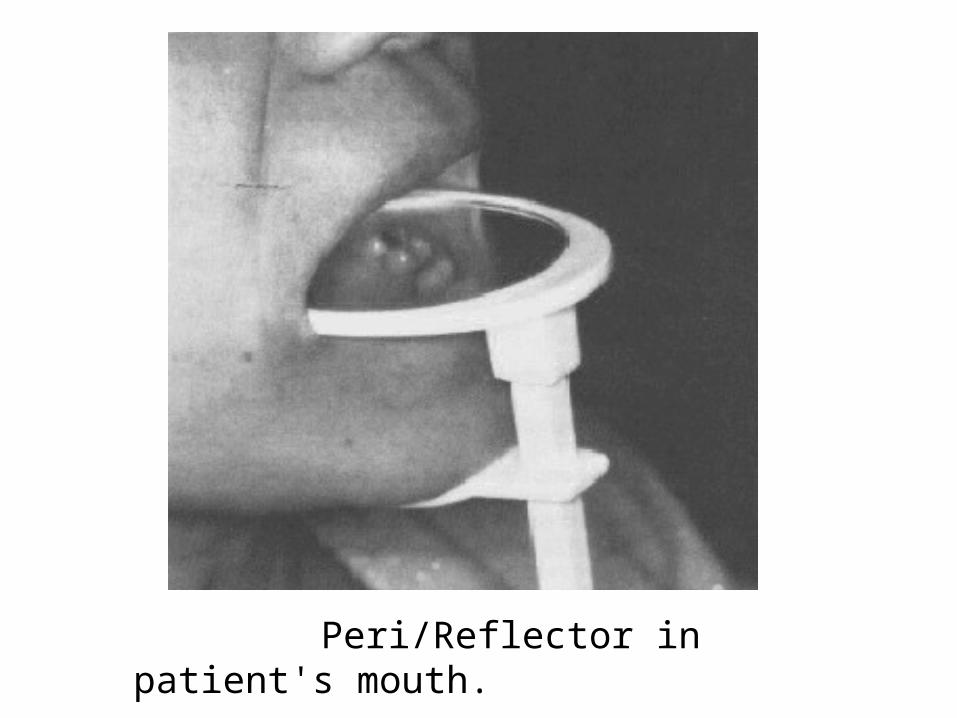
Peri/Reflector in patient's mouth.
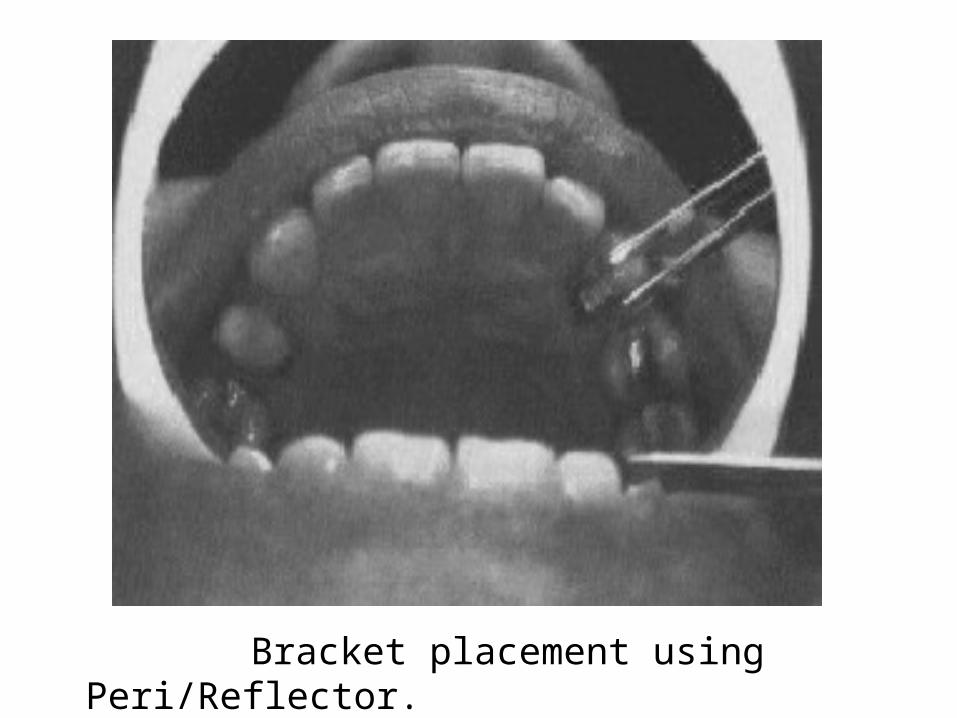
Bracket placement using Peri/Reflector.
INDIRECT BONDING• A key factor for successful correction of a malocclusion
with lingual orthodontics is precise and accurate bracket positioning.
• The importance of bracket positioning is due to: difficulty of direct vision, variation in morphology of lingual surfaces of teeth, wide range of labiolingualnthickness, transfer of labial and buccal torque on to lingual surface, and smaller inter bracket distances.
Indirect Bonding Techniques• Indirect bonding is the preferred technique for
lingual bracket placement Because of the irregular morphology of the lingual tooth surfaces and the difficulty of access Research on lingual indirect bonding started with the work of the Lingual Task Force.
• They used indirect bonding with Two Component Mix systems like ENDUR, Concise and No Mix systems like SYSTEM 1, Insta-Bond.
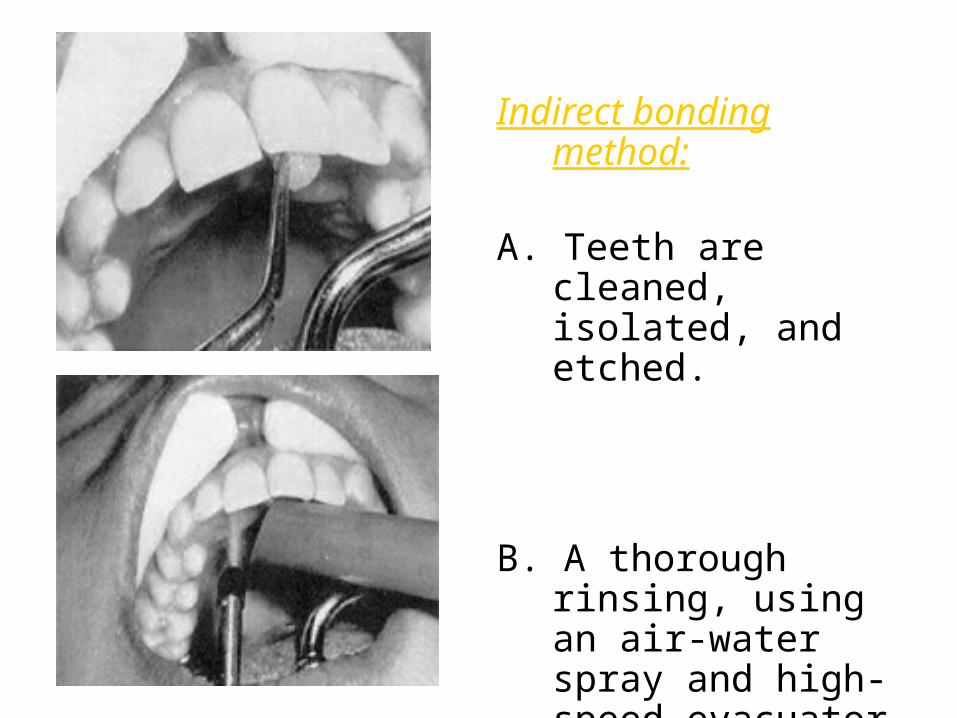
Indirect bonding method:
A. Teeth are cleaned, isolated, and etched.
B. A thorough rinsing, using an air-water spray and high-speed evacuator, is essential.
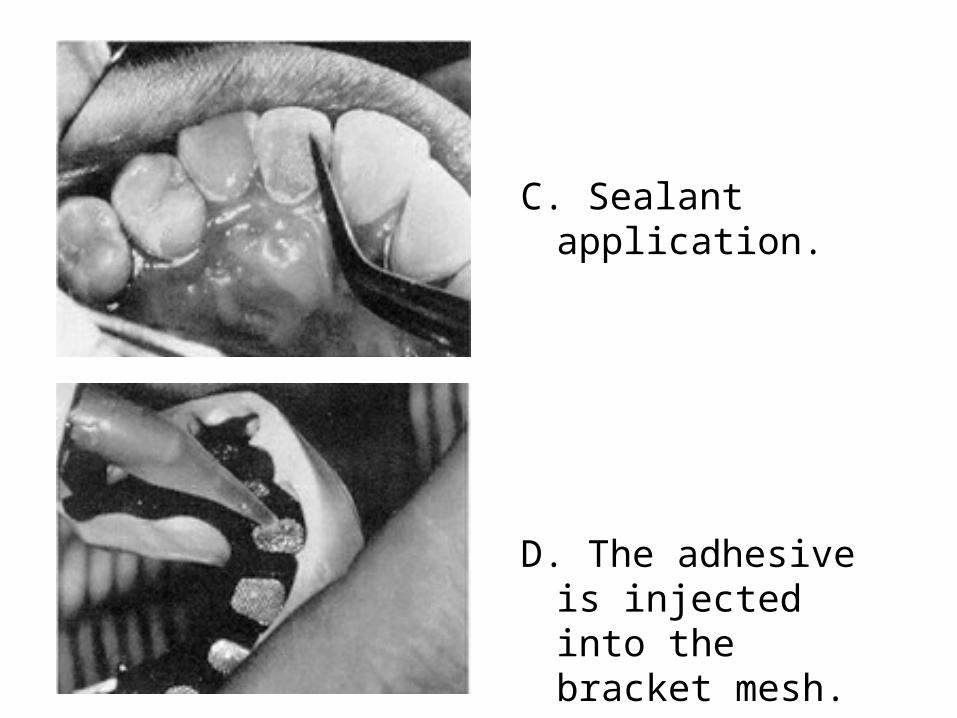
C. Sealant application.
D. The adhesive is injected into the bracket mesh.
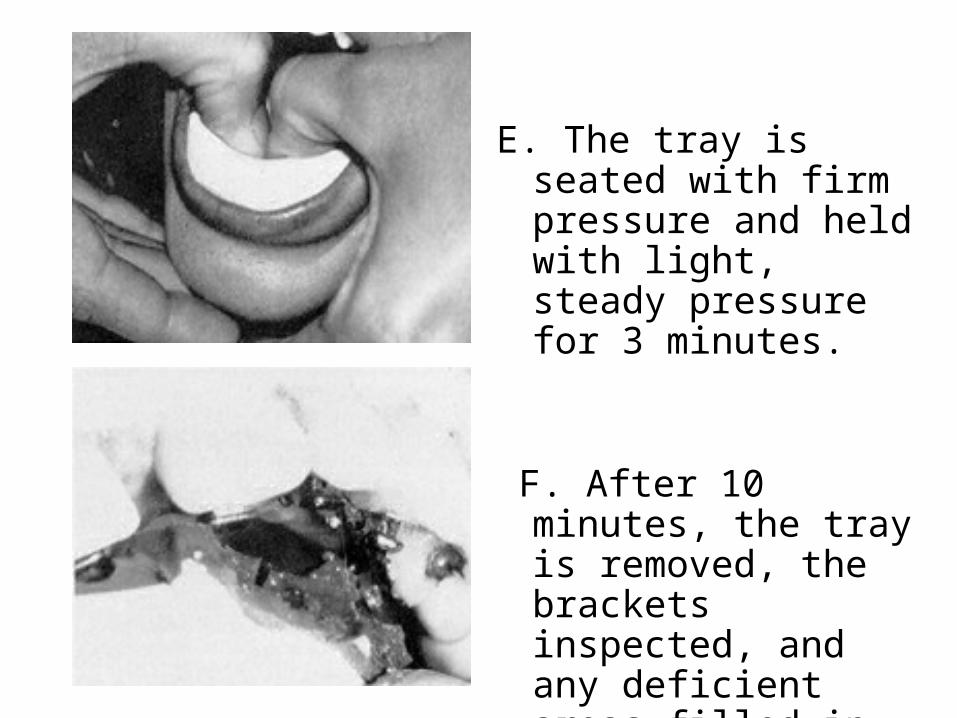
E. The tray is seated with firm pressure and held with light, steady pressure for 3 minutes.
F. After 10 minutes, the tray is removed, the brackets inspected, and any deficient areas filled in with a thin mix of bonding adhesive.
Indirect Bonding procedures
for Lingual Orthodontics
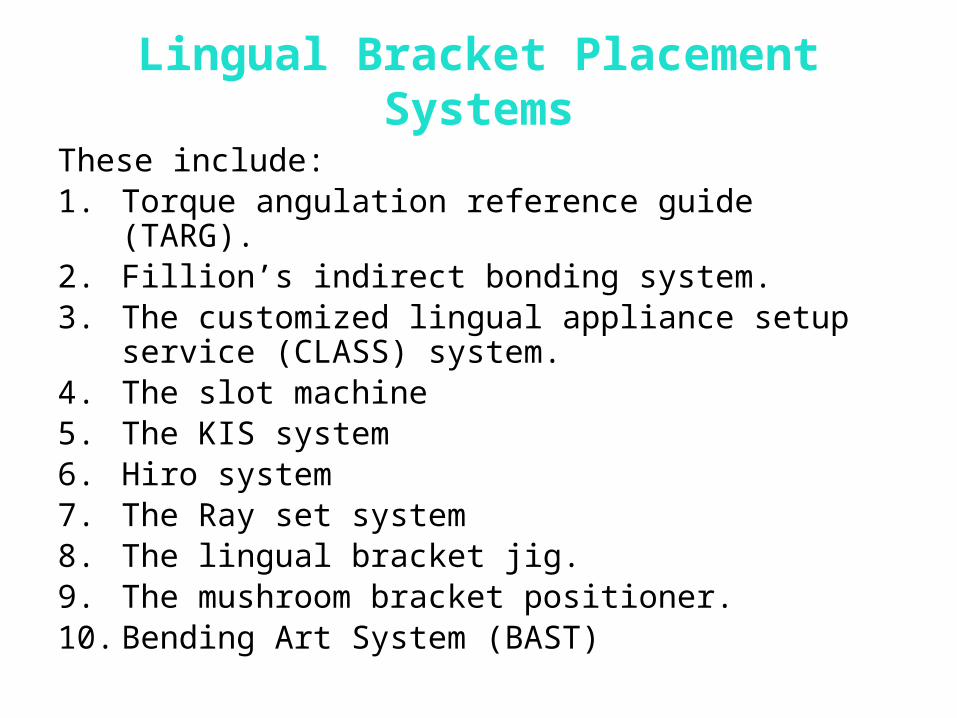
Lingual Bracket Placement Systems
These include:1. Torque angulation reference guide (TARG).2. Fillion’s indirect bonding system.3. The customized lingual appliance setup service
(CLASS) system.4. The slot machine5. The KIS system6. Hiro system7. The Ray set system8. The lingual bracket jig.9. The mushroom bracket positioner.10. Bending Art System (BAST)
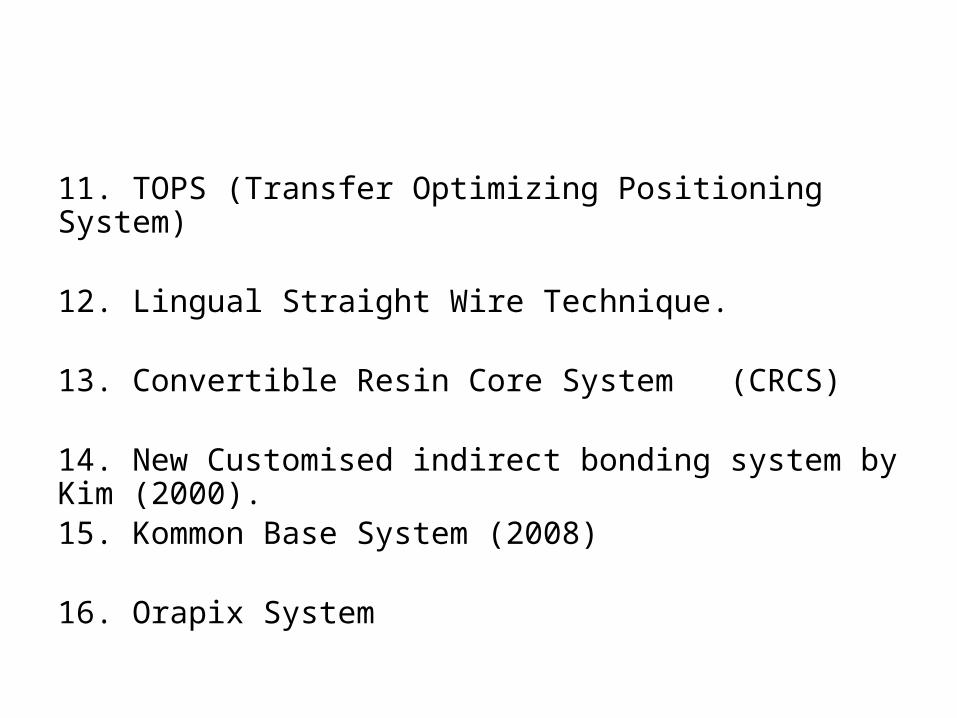
11. TOPS (Transfer Optimizing Positioning System)
12. Lingual Straight Wire Technique.
13. Convertible Resin Core System (CRCS)
14. New Customised indirect bonding system by Kim (2000).15. Kommon Base System (2008)
16. Orapix System
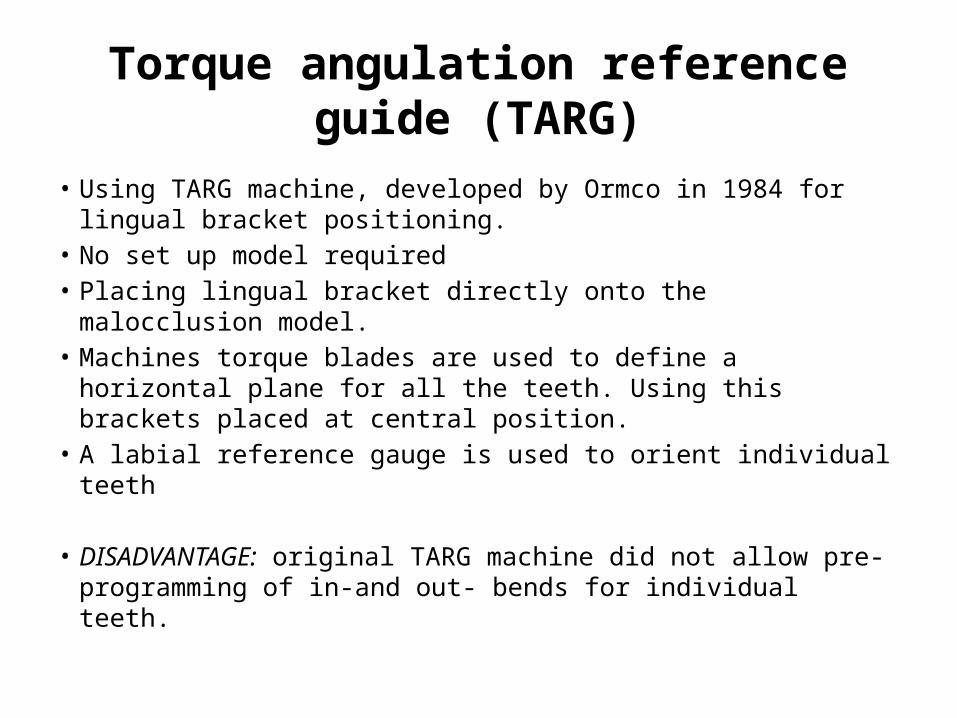
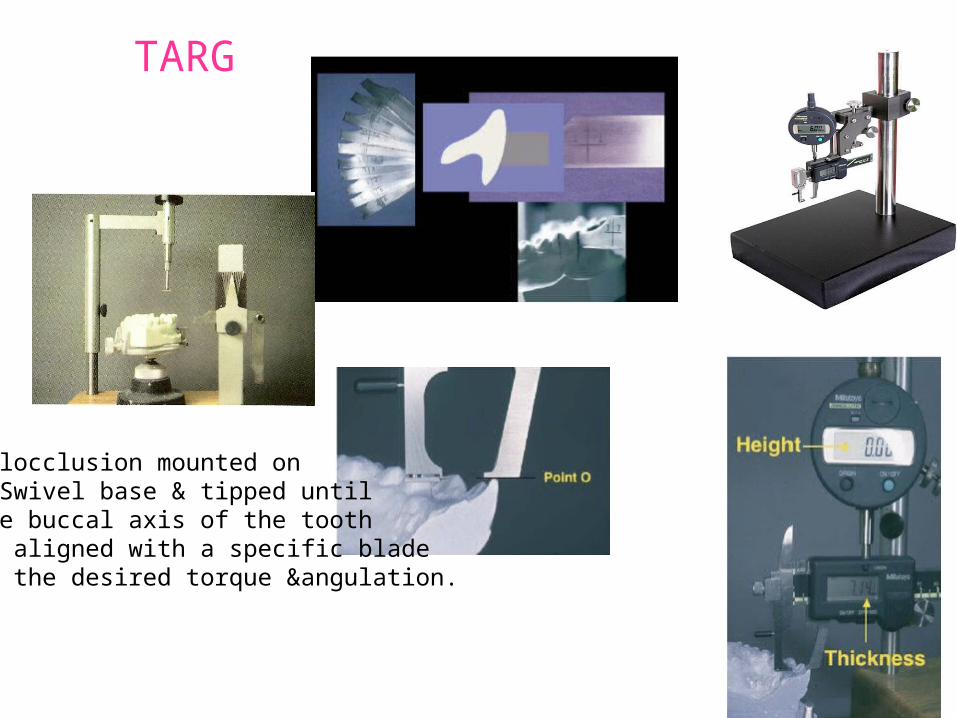
Torque angulation reference guide (TARG)
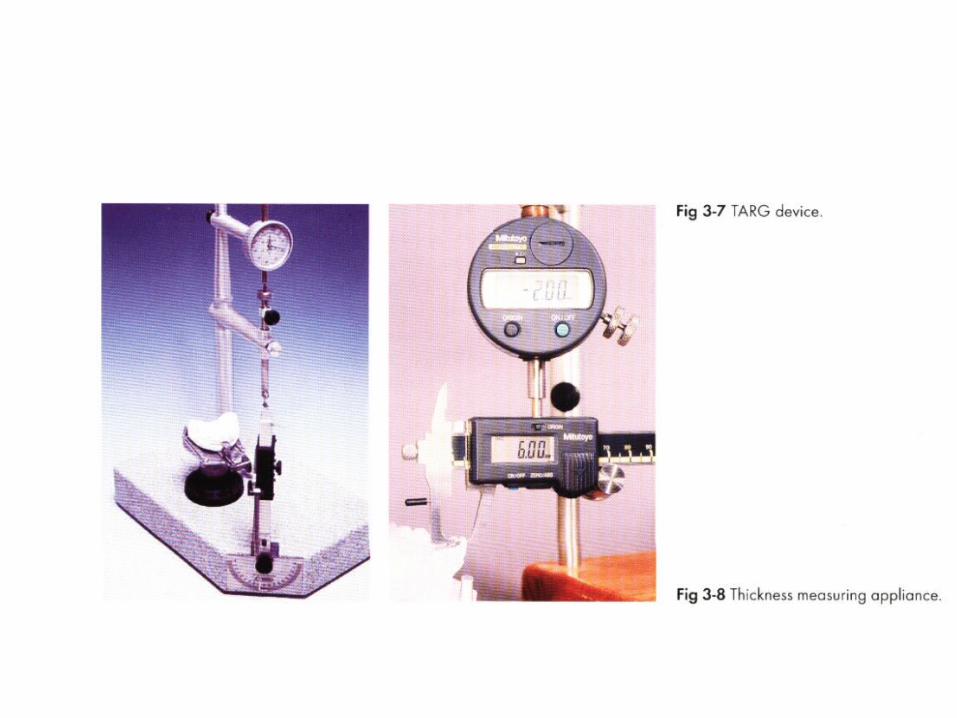
• Using TARG machine, developed by Ormco in 1984 for lingual bracket positioning.
• No set up model required• Placing lingual bracket directly onto the malocclusion model.• Machines torque blades are used to define a horizontal plane
for all the teeth. Using this brackets placed at central position.• A labial reference gauge is used to orient individual teeth
• DISADVANTAGE: original TARG machine did not allow pre-programming of in-and out- bends for individual teeth.
TARG
Malocclusion mounted onA Swivel base & tipped untilThe buccal axis of the tooth Is aligned with a specific bladeTo the desired torque &angulation.

• Didier Fillion improved this method in 1987 by adding an electronic device to the TARG machine with the purpose of measuring tooth labial-lingual thickness. (Electronic TARG)
• This reduced the number of first order bends in the wire, compensating for different tooth thickness and making the distance from the slot to the labial surface uniform.
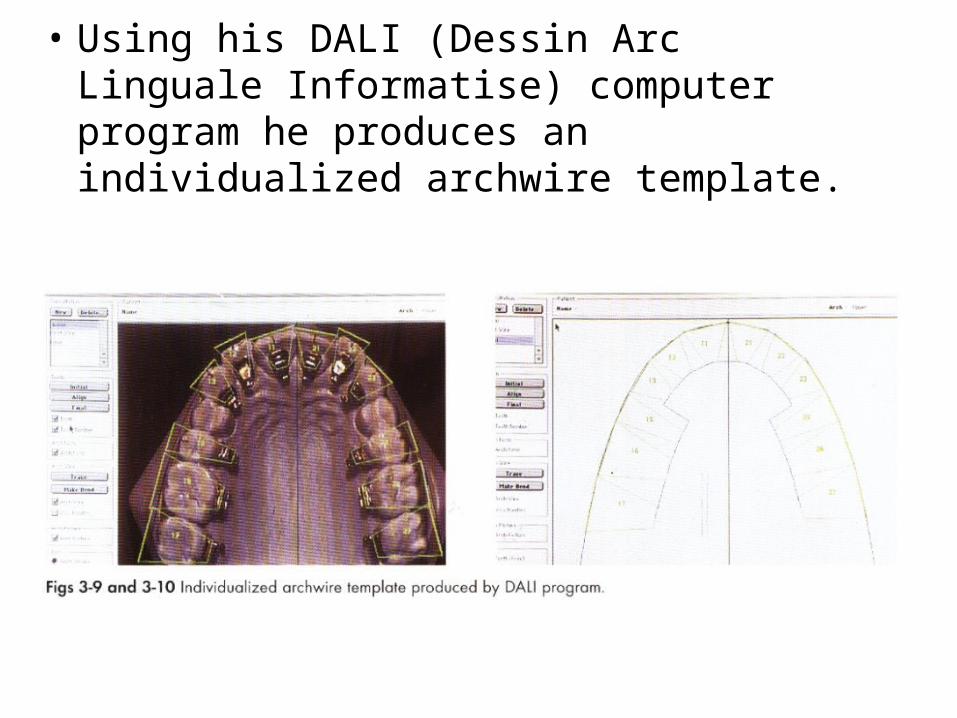
• Using his DALI (Dessin Arc Linguale Informatise) computer program he produces an individualized archwire template.
• Advantages:- It is an accurate and quantified two-dimensional system.- Allows accurate placement of the brackets on the cast
without need to cut out the teeth and place in wax.- Allows indefinite prescription possibilities
• Disadvantages:- The system does not take into account the labio-lingual
thickness of teeth.(original TARG)- The distance of the bracket base and the labial surface
varies according to the level of bonding.
The Customized Lingual Appliance Setup Service (CLASS) system
• Described by Scott Huge, this technique involves an integrated method of lingual bracket placement and indirect bonding.
• Ormco & Specialty Appliances lab developed.
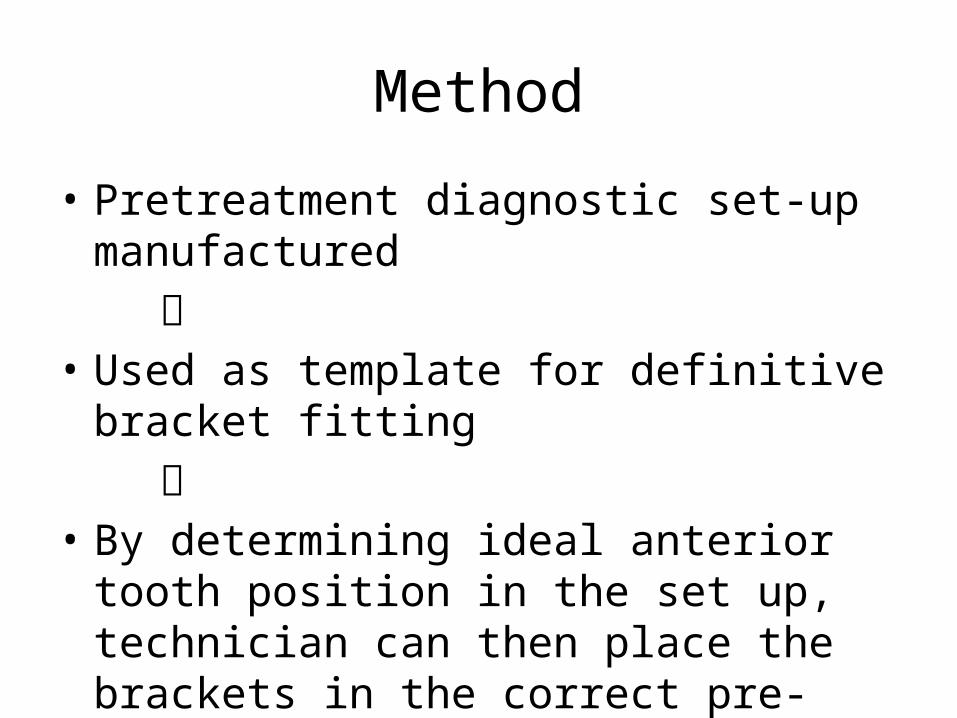
Method
• Pretreatment diagnostic set-up manufactured • Used as template for definitive bracket fitting • By determining ideal anterior tooth position in
the set up, technician can then place the brackets in the correct pre-programmed position.
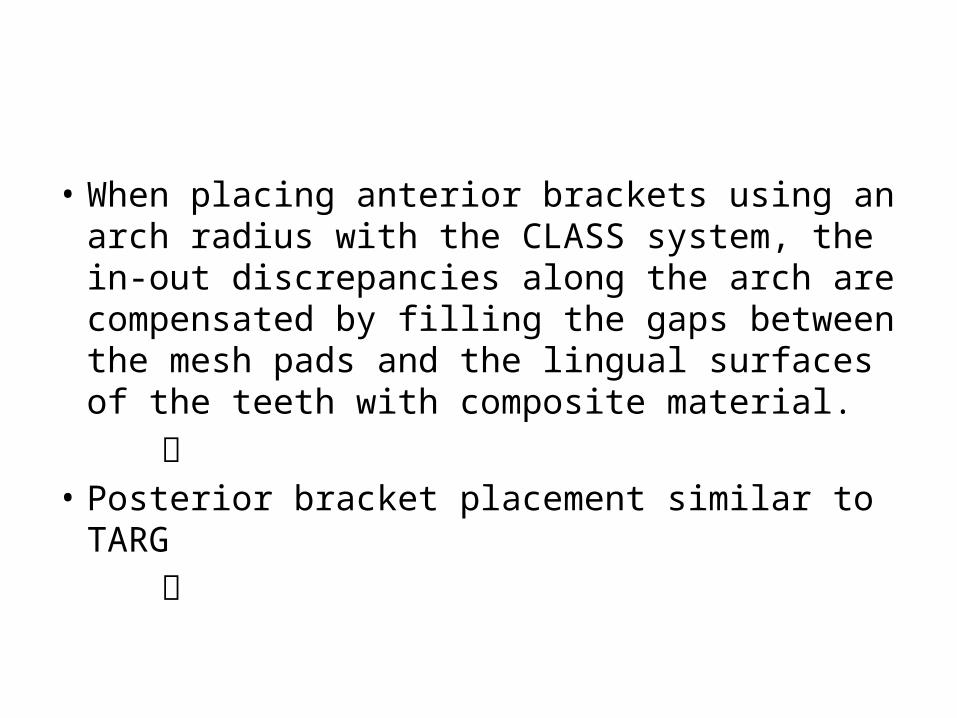
• When placing anterior brackets using an arch radius with the CLASS system, the in-out discrepancies along the arch are compensated by filling the gaps between the mesh pads and the lingual surfaces of the teeth with composite material.
• Posterior bracket placement similar to TARG
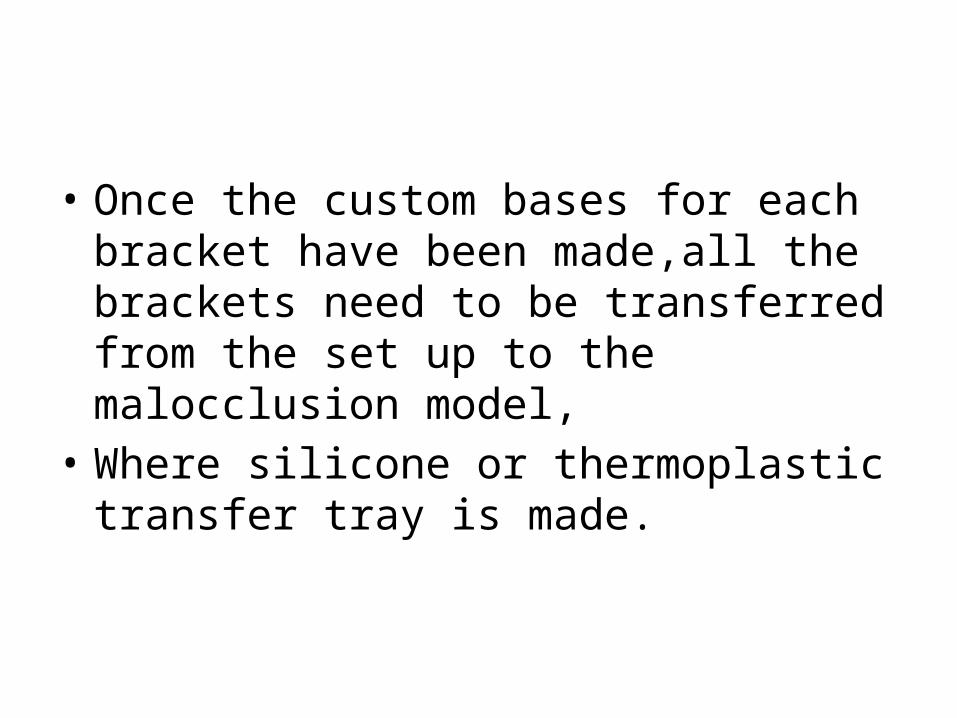
• Once the custom bases for each bracket have been made,all the brackets need to be transferred from the set up to the malocclusion model,
• Where silicone or thermoplastic transfer tray is made.
Disadvantages
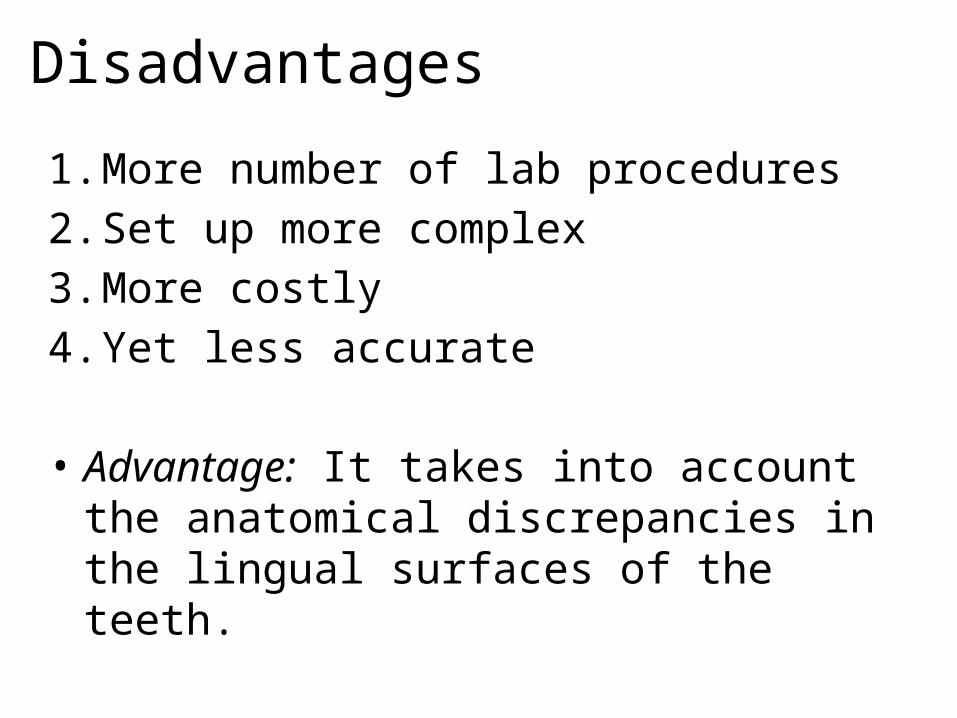
1. More number of lab procedures2. Set up more complex3. More costly4. Yet less accurate
• Advantage: It takes into account the anatomical discrepancies in the lingual surfaces of the teeth.
BASS
• An evolution of the CLASS method is the BASS(Basetta Alveolare Sistema set-up), which allows more precise transfer from the set-up to the malocclusion models.
• Introduced by Hiro and later improved by Takemoto and Scuzzo.
• Modified CLASS system.• No TARG device used.• Set up is different from the usual diagnostic set
up• Full sized ideal archwire (.018×.025 SS) as
transfer tool, all over-correction have to be pre-programmed in the set up.
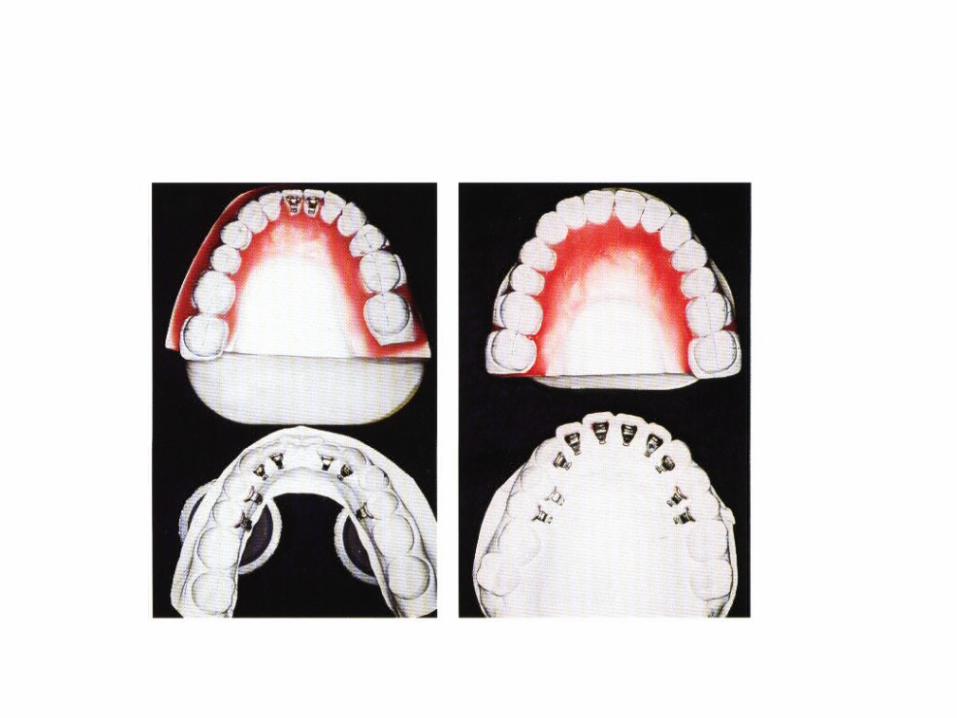
Hiro system
• Method:- An ideal archwire is made on the setup using a
full size rectangular archwire.- The lingual brackets are transferred onto this
wire and secured with elastic ligatures.- Single rigid transfer trays are fabricated for each
tooth.
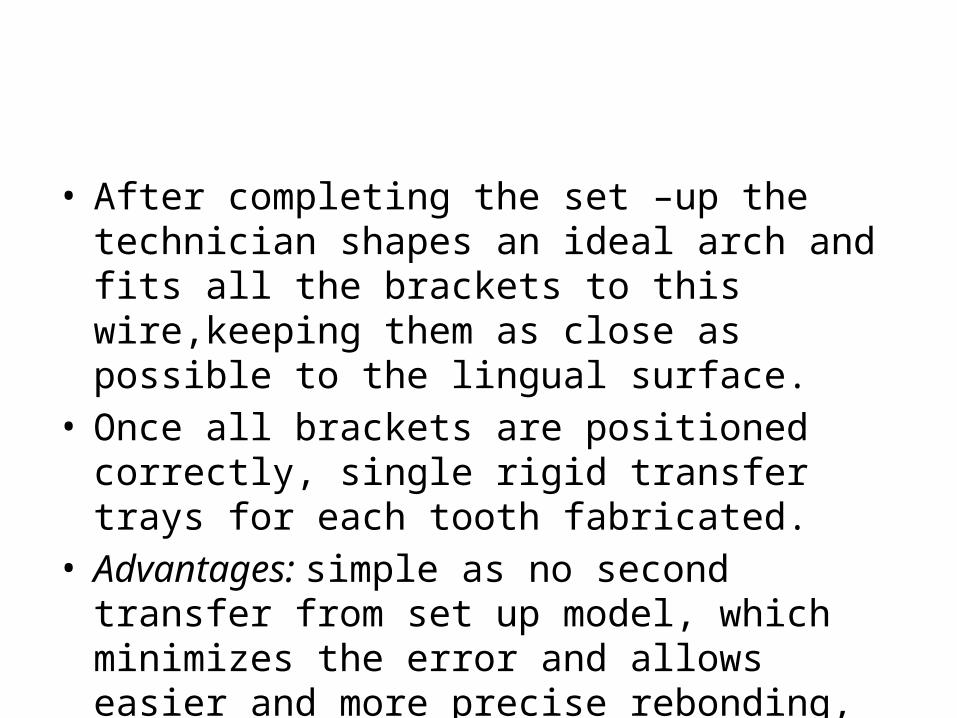
• After completing the set –up the technician shapes an ideal arch and fits all the brackets to this wire,keeping them as close as possible to the lingual surface.
• Once all brackets are positioned correctly, single rigid transfer trays for each tooth fabricated.
• Advantages: simple as no second transfer from set up model, which minimizes the error and allows easier and more precise rebonding, Bonding of one tooth is not affected by position of other teeth .
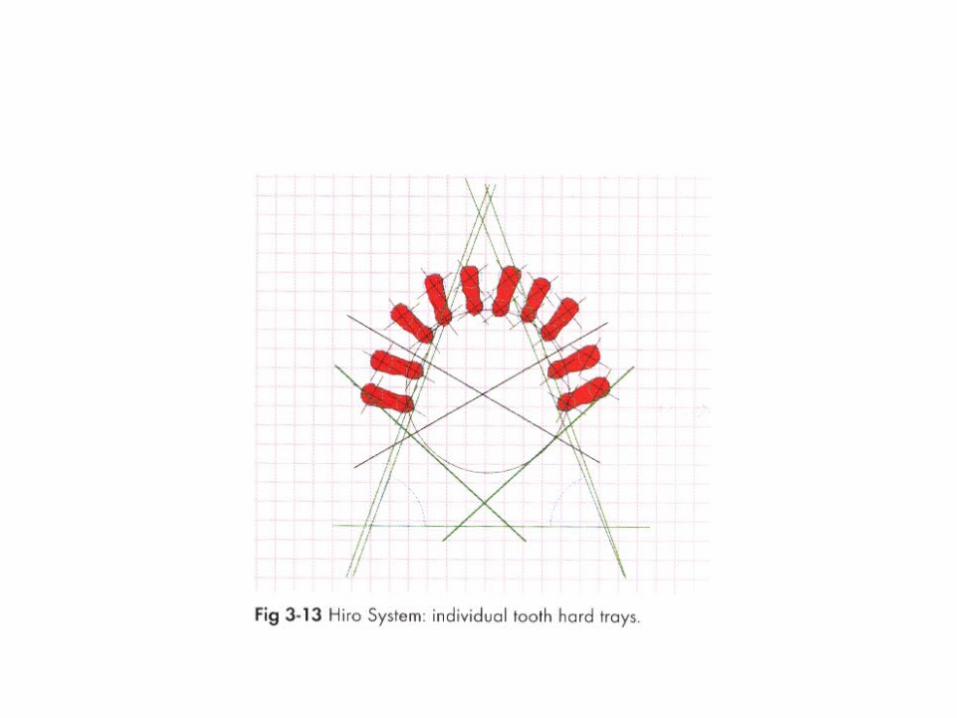
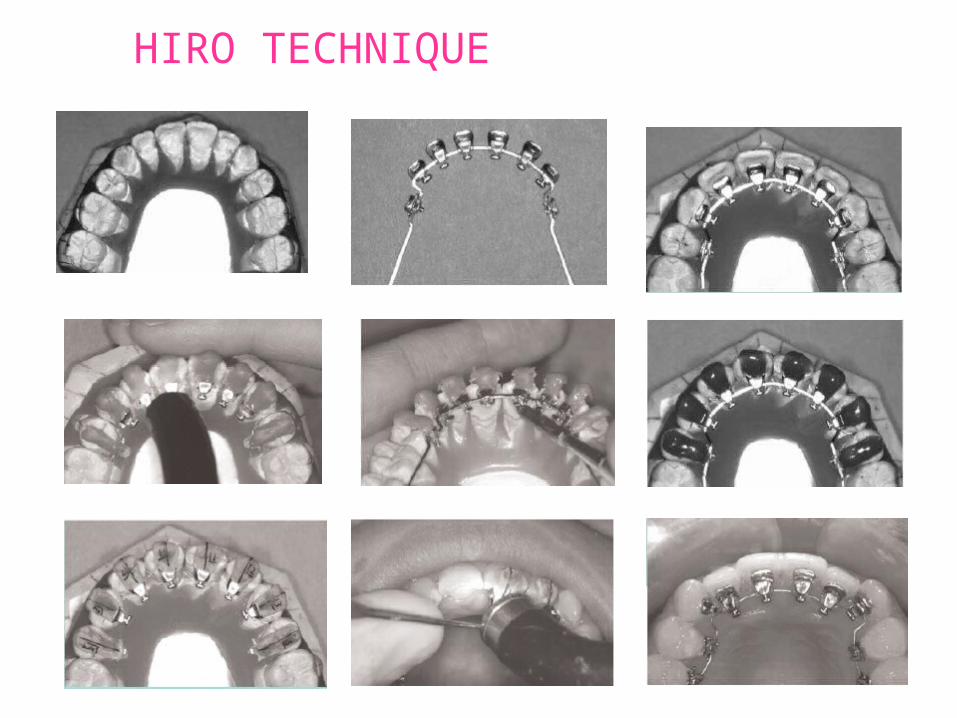
HIRO TECHNIQUE
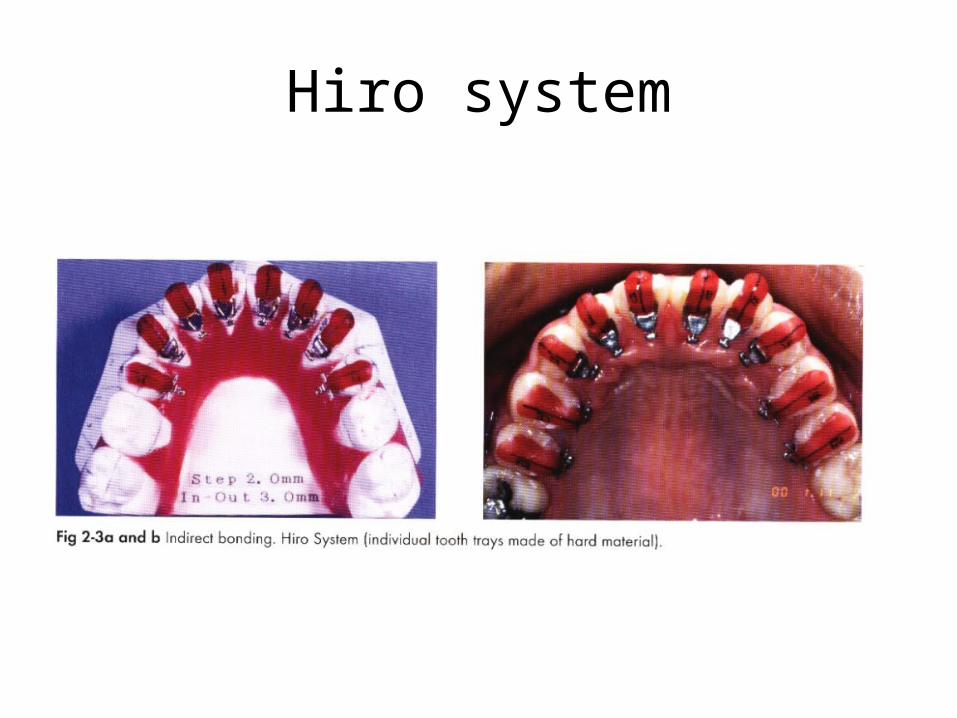
Hiro system
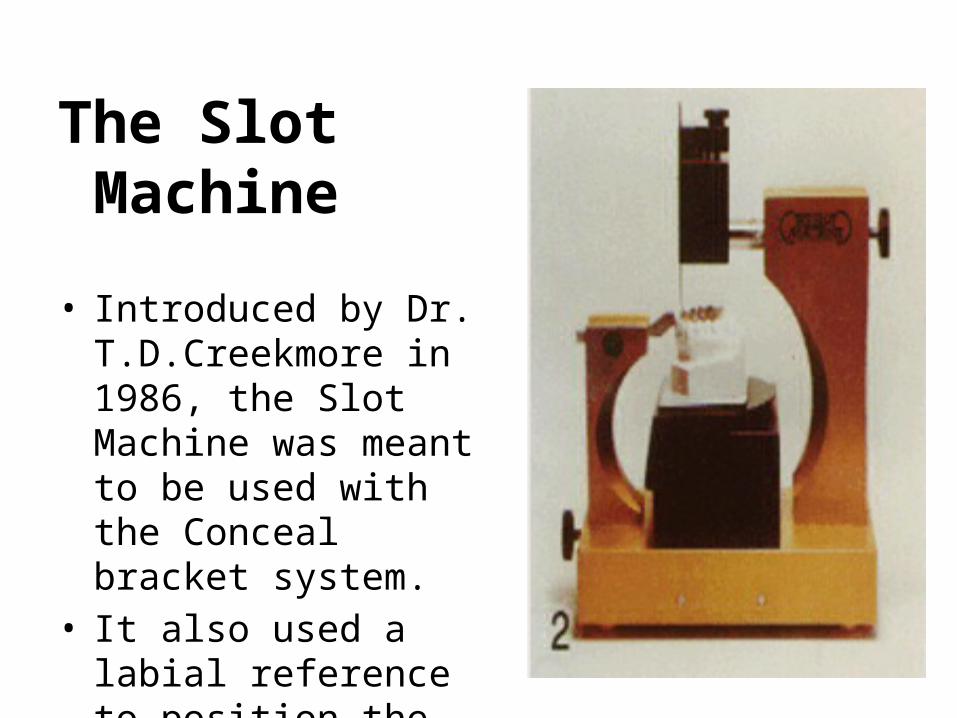
The Slot Machine
• Introduced by Dr. T.D.Creekmore in 1986, the Slot Machine was meant to be used with the Conceal bracket system.
• It also used a labial reference to position the brackets like the TARG machine.
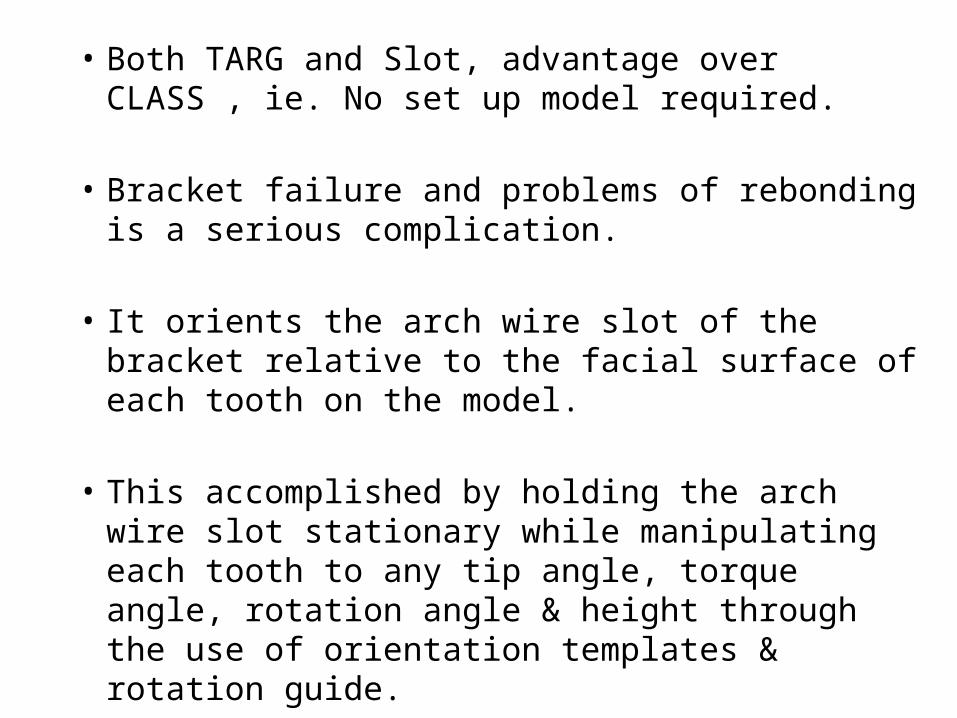
• Both TARG and Slot, advantage over CLASS , ie. No set up model required.
• Bracket failure and problems of rebonding is a serious complication.
• It orients the arch wire slot of the bracket relative to the facial surface of each tooth on the model.
• This accomplished by holding the arch wire slot stationary while manipulating each tooth to any tip angle, torque angle, rotation angle & height through the use of orientation templates & rotation guide.
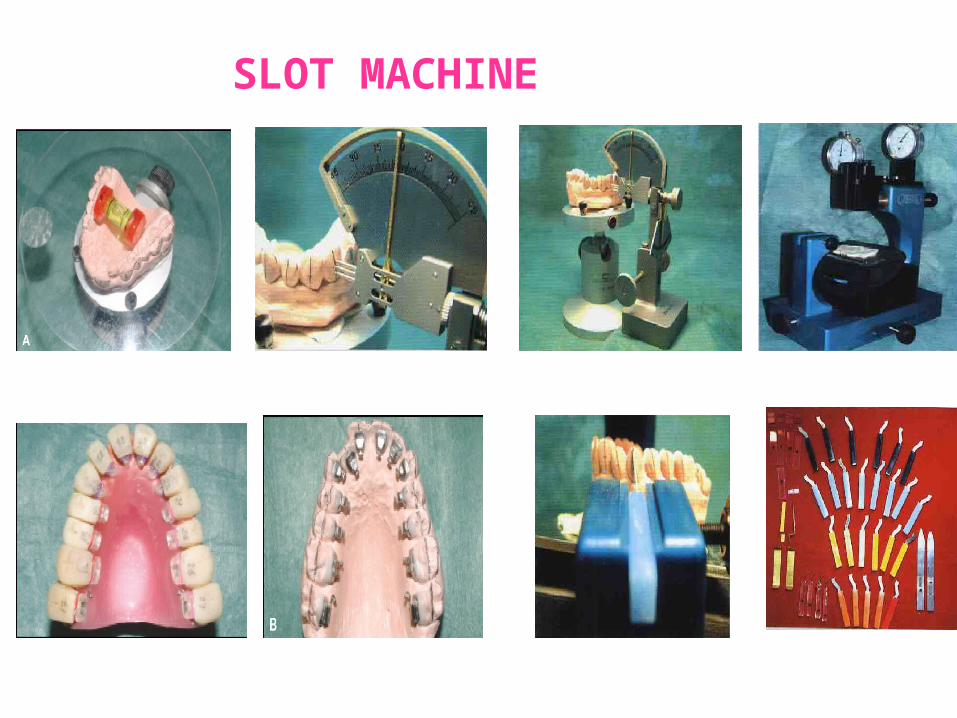
SLOT MACHINE
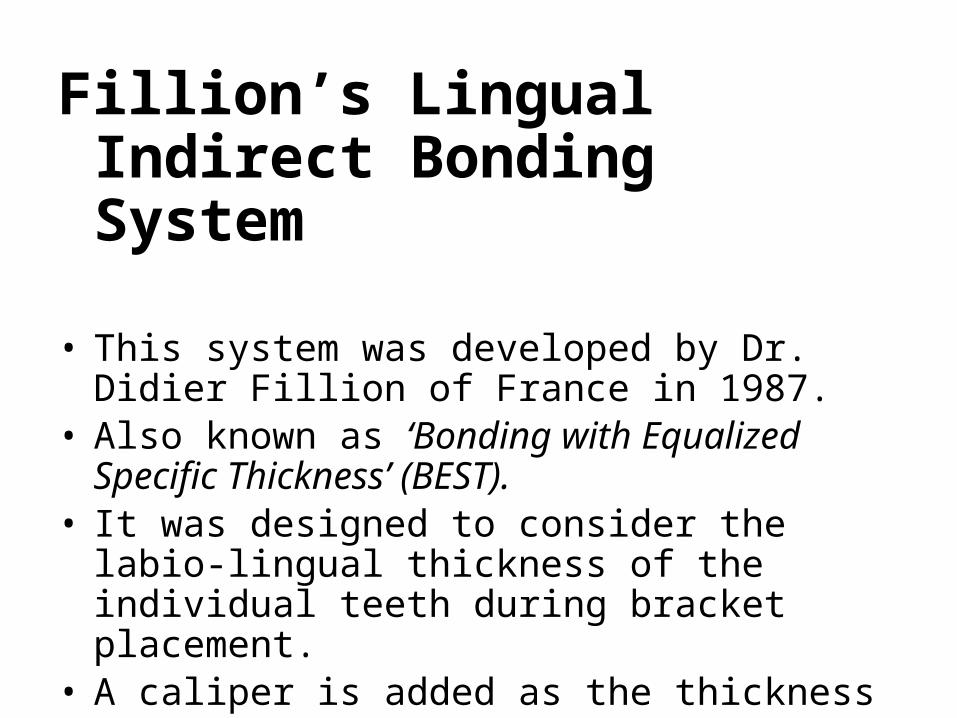
Fillion’s Lingual Indirect Bonding System
• This system was developed by Dr. Didier Fillion of France in 1987.
• Also known as ‘Bonding with Equalized Specific Thickness’ (BEST).
• It was designed to consider the labio-lingual thickness of the individual teeth during bracket placement.
• A caliper is added as the thickness measurement system.
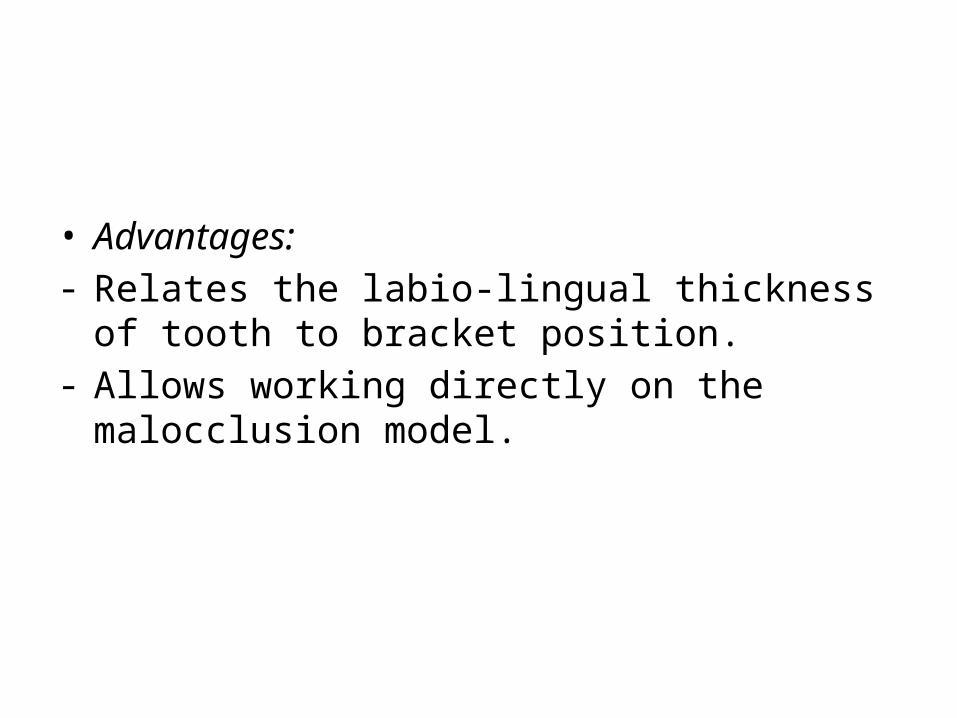
• Advantages:- Relates the labio-lingual thickness of tooth to
bracket position.- Allows working directly on the malocclusion
model.
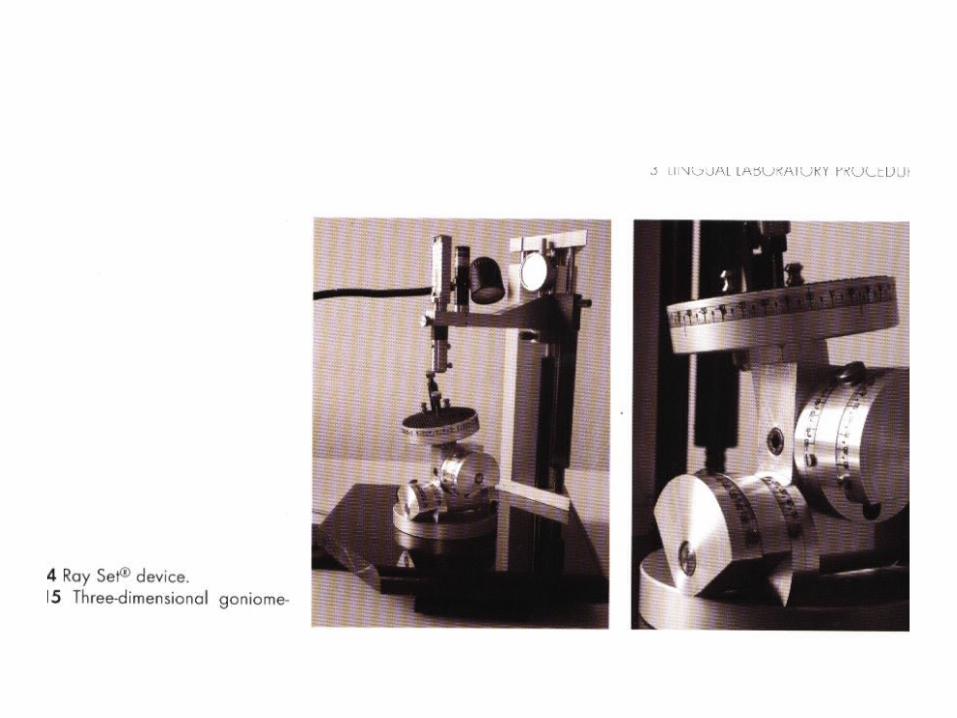
The Ray Set system
• Its stated mission is to take each tooth as an individual unit, virtually to isolate it from the arch and place it at the center of a 3-D control system in which its respective first-, second-,and third –order values are determined.
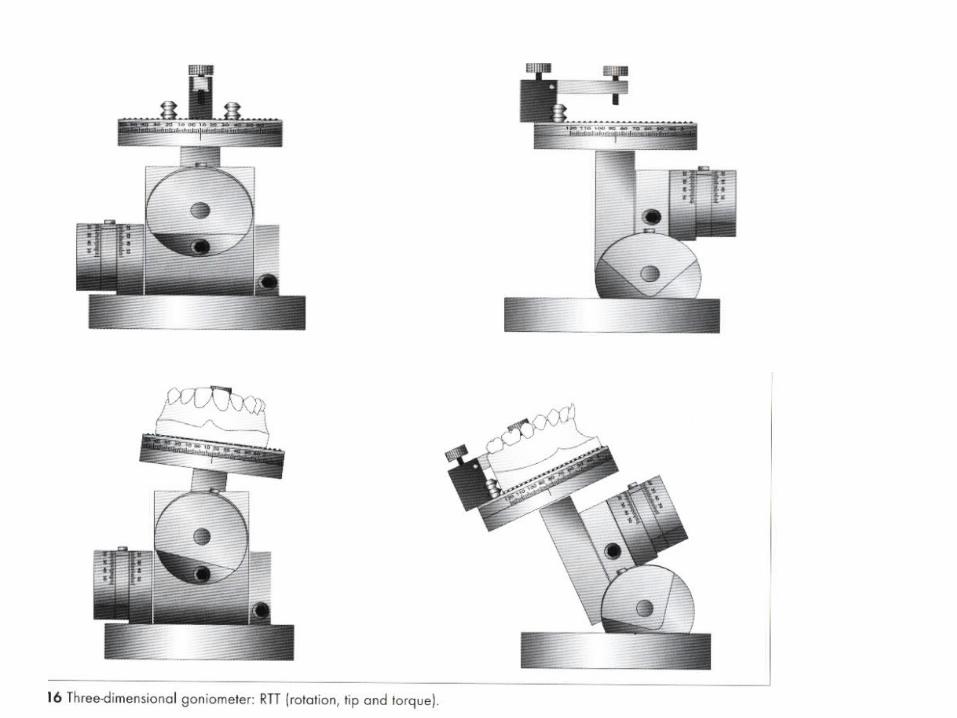
The Ray Set system• This system utilizes a 3-dimensional goniometer for
analysis of the first-, second-, and third-order values of each individual tooth.
• Both pre- and post-setup values of individual teeth are evaluated and the amount of orthodontic tooth movement for each tooth on the setup model is calculated.
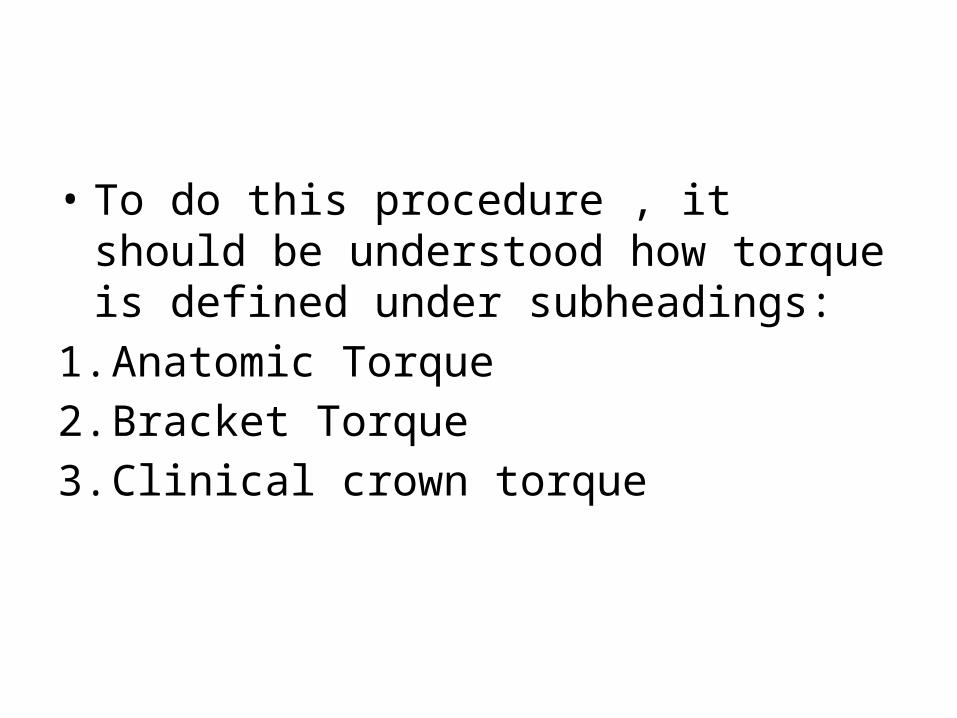
• To do this procedure , it should be understood how torque is defined under subheadings:
1. Anatomic Torque2. Bracket Torque3. Clinical crown torque
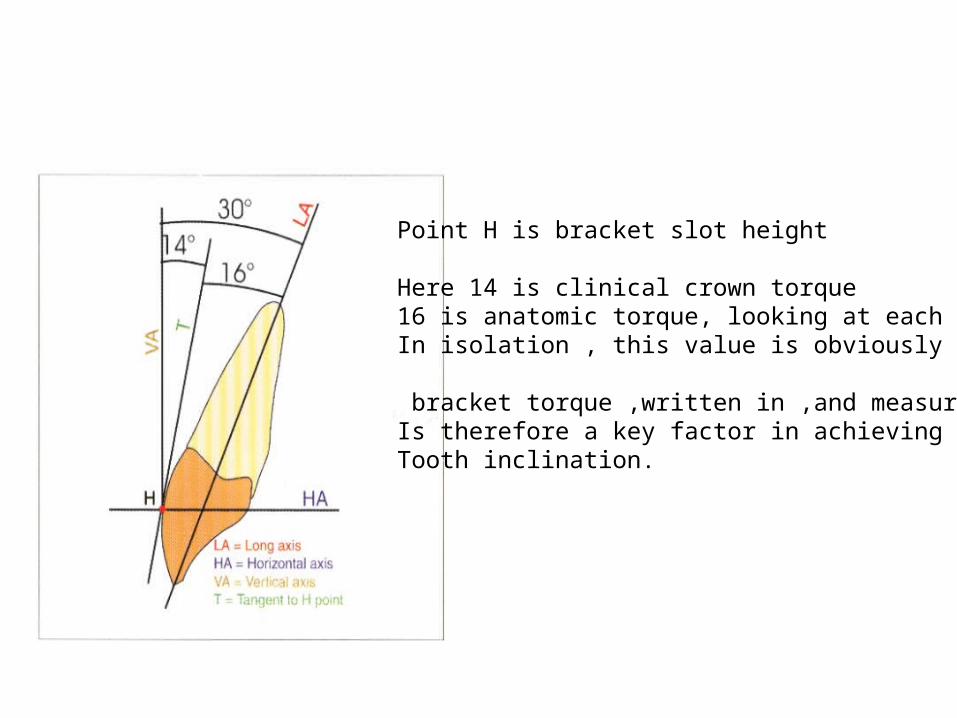
Point H is bracket slot height
Here 14 is clinical crown torque16 is anatomic torque, looking at each toothIn isolation , this value is obviously constant.
bracket torque ,written in ,and measurable,Is therefore a key factor in achieving correctTooth inclination.
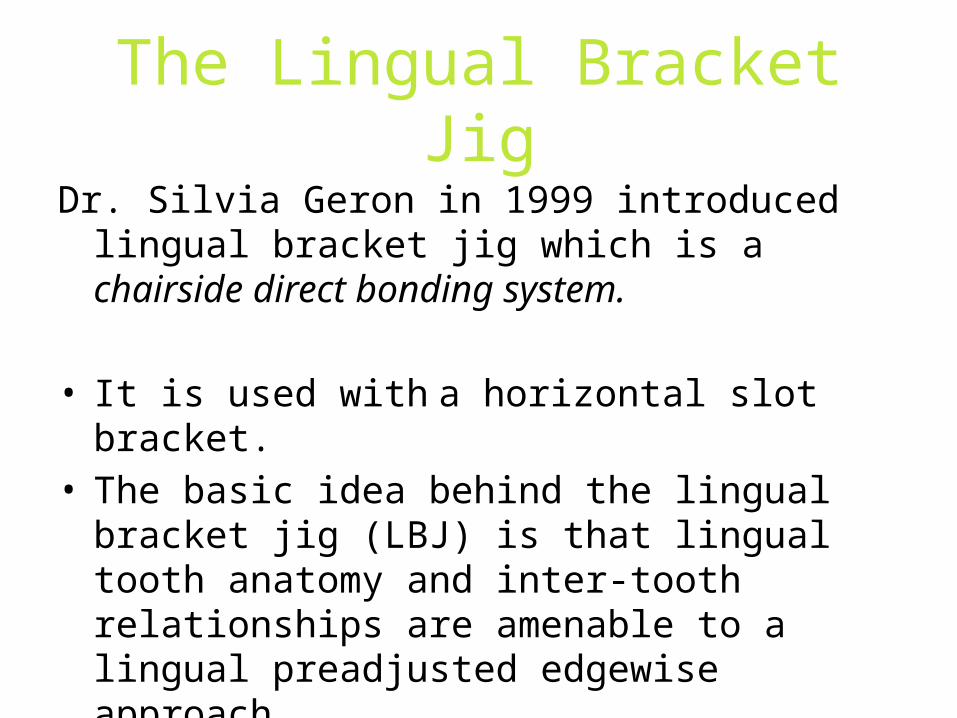
The Lingual Bracket JigDr. Silvia Geron in 1999 introduced lingual
bracket jig which is a chairside direct bonding system.
• It is used with a horizontal slot bracket.• The basic idea behind the lingual bracket jig
(LBJ) is that lingual tooth anatomy and inter-tooth relationships are amenable to a lingual preadjusted edgewise approach.
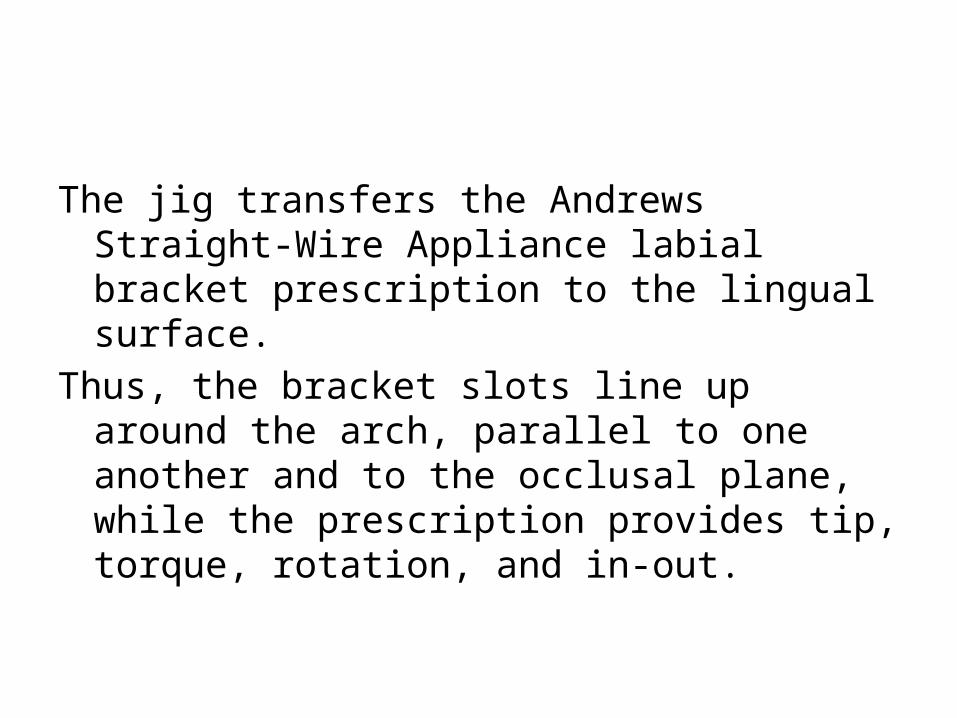
The jig transfers the Andrews Straight-Wire Appliance labial bracket prescription to the lingual surface.
Thus, the bracket slots line up around the arch, parallel to one another and to the occlusal plane, while the prescription provides tip, torque, rotation, and in-out.
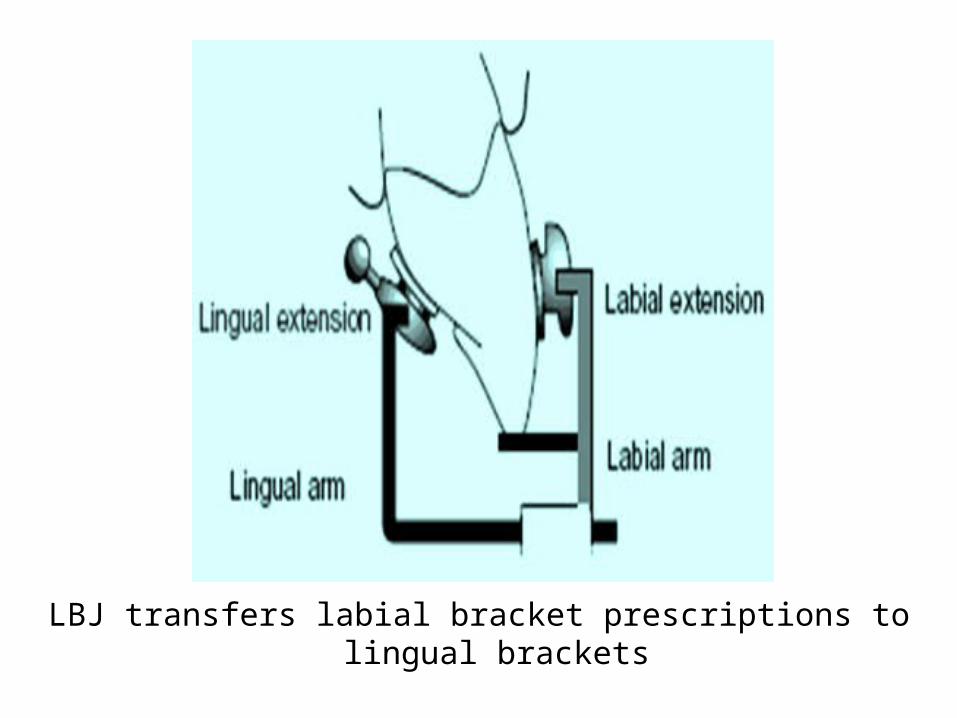
LBJ transfers labial bracket prescriptions to lingual brackets
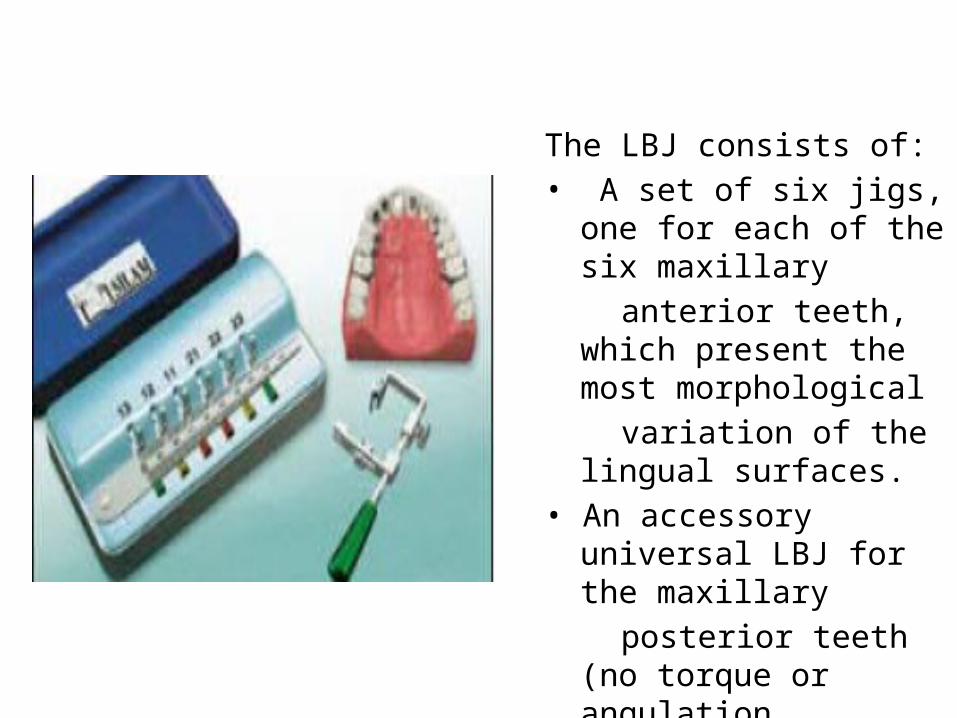
The LBJ consists of:• A set of six jigs, one for
each of the six maxillary anterior teeth, which
present the most morphological
variation of the lingual surfaces.
• An accessory universal LBJ for the maxillary
posterior teeth (no torque or angulation prescribed).
• Each jig has a labial arm and a lingual arm.
• The tip of the labial arm incorporates a prescription, similar to that of a preadjusted labial bracket.
• The lingual arm, which holds the lingual bracket, slides into the labial arm.
• When the lingual bracket is mounted on the LBJ, the lingual bracket slot is parallel to the labial slot. When the labial arm is positioned correctly, the lingual bracket is automatically placed in its correct position.
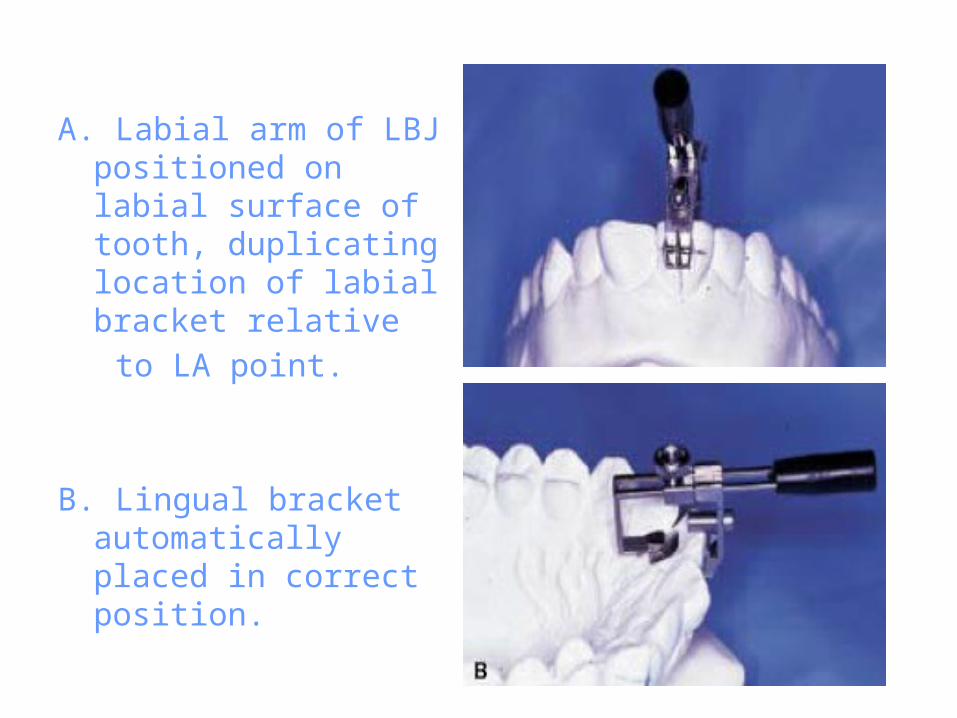
A. Labial arm of LBJ positioned on labial surface of tooth, duplicating location of labial bracket relative
to LA point.
B. Lingual bracket automatically placed in correct position.
• Advantages:
- Lingual bracket positioning with the LBJ is simple and quick, and requires no special
training.- The LBJ automatically incorporates the Straight-Wire labial prescription into the bonded lingual brackets in all dimensions. - This allows the orthodontist to perform direct as
well as indirect bonding as in-office procedures.
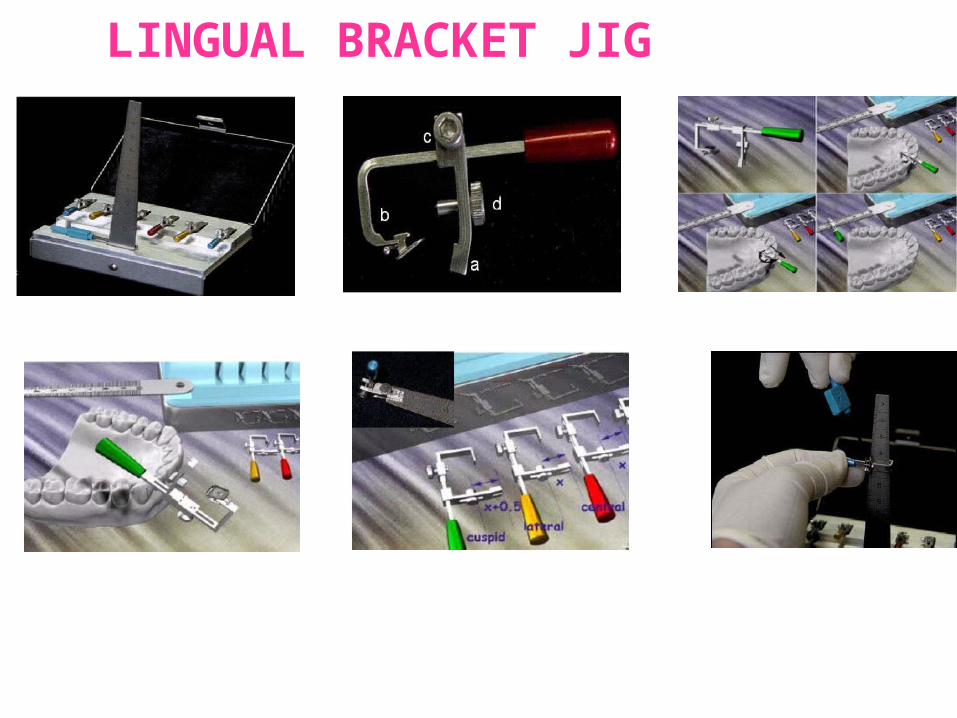
LINGUAL BRACKET JIG
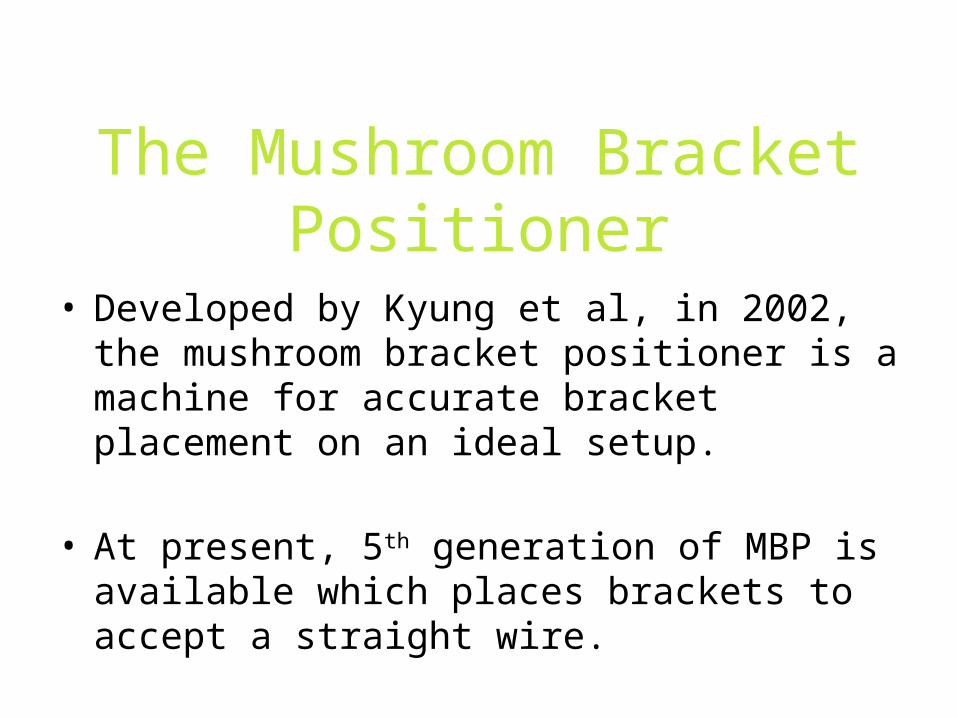
The Mushroom Bracket Positioner
• Developed by Kyung et al, in 2002, the mushroom bracket positioner is a machine for accurate bracket placement on an ideal setup.
• At present, 5th generation of MBP is available which places brackets to accept a straight wire.
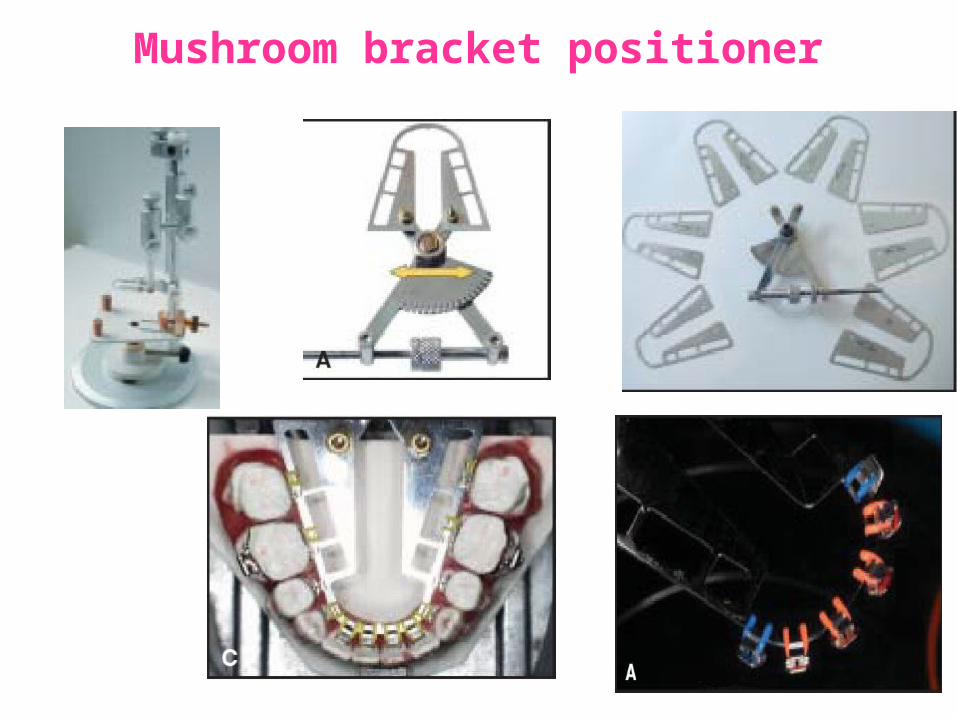
Mushroom bracket positioner
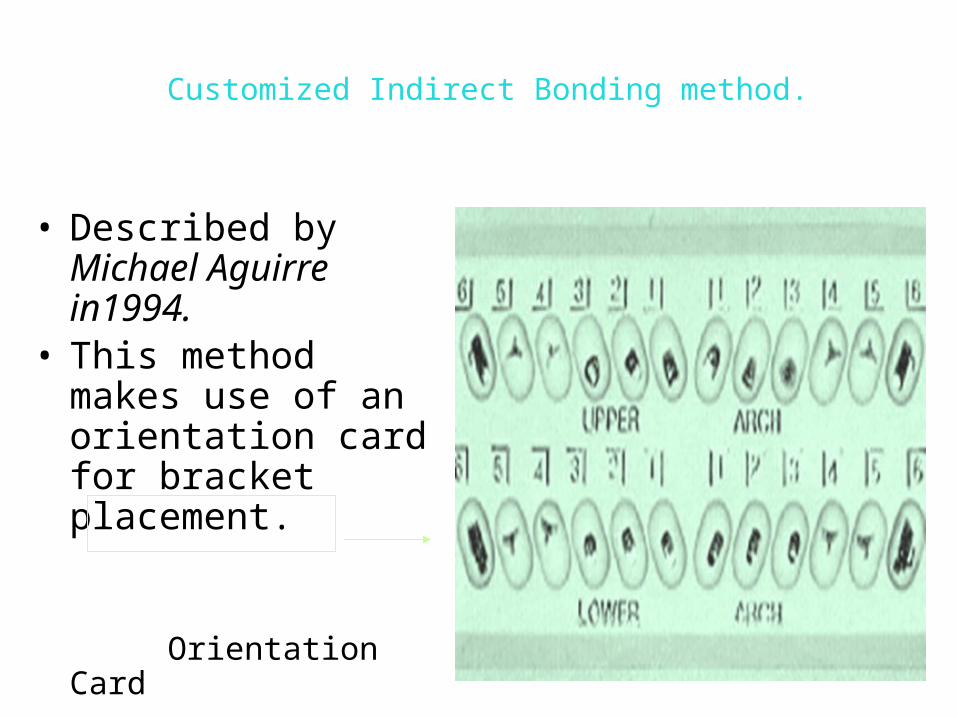
Customized Indirect Bonding method.
• Described by Michael Aguirre in1994.
• This method makes use of an orientation card for bracket placement.
Orientation Card
Korean Indirec t Bonding Set-up (KIS) System
• The KIS system was developed by members of the Korean Society of Lingual Orthodontics (KSLO) and uses a bracket-positioning machine that allows the positioning of all brackets at once.
• Once again it is necessary to create a set-up model; however, the set-up is created with the help of a special set-up model gauge for increased precision.
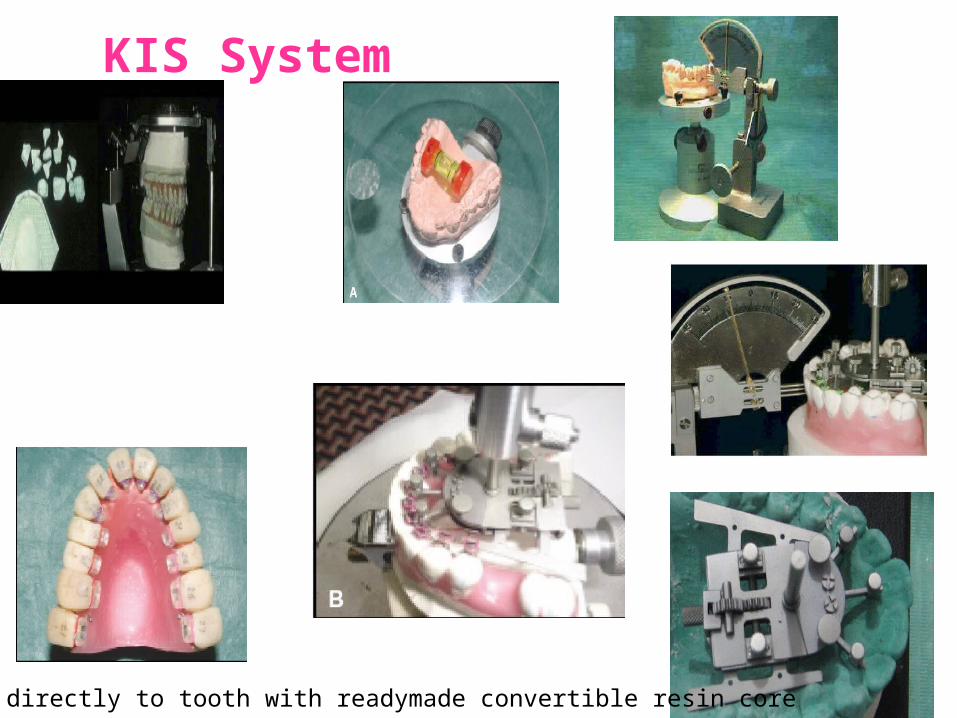
KIS System
Transferd directly to tooth with readymade convertible resin core
Convertible Resin Core System • The Convertible Resin Core system uses hard resin to
prepare the individual transfer trays and an elastomeric ligature to hold the tray and bracket together.
• This allows accurate repositioning of the bracket within the resin core and the trays can be reused in cases of bracket failure.
• The use of unitary trays makes the initial bonding session longer and the technique still relies on a set-up model to position the brackets.

Convertible Resin Core system (CRCS).• Developed by Hong et al in 2000.• They incorporated stainless steel wires into the
transfer trays.
New Customized Indirect Bonding Method.• Introduced by Kim et al in 2000.• They incorporated elastomeric ligatures into the
transfer trays during the indirect bonding procedure.
Hybrid Core System.
• This is not so much a bracket-positioning system but rather a bracket-transfer system.
• The Hybrid Core system developed by Matsuno
• combines the favorable properties of silicone and composite resin in the construction of its indirect transfer tray.
• Silicone covers the bracket and this in turn is covered by composite resin.
• This combination allows for stable positioning of the transfer tray within the mouth, followed by easy removal of the silicone component from the bonded bracket.
BENDING ART SYSTEM (BAST)
• Fabricate customized lingual archwires with a computer controlled bending robot.
• Ideal set up of patients model is required as a first step.
• Next brackets are bonded& position of the brackets slots is determined with the BAS, using stainless steel measuring plates, inserted into the brackets slot & a stereoscopic camera.
• The robot designs an archwire that fits passively into the brackets & brackets are transferred one by one to the working models using individual templates.
• Then transfer tray for indirect bonding produced
• Unlike other tec, there is no need for thick resin bases as wire bending can compensate for width differences.
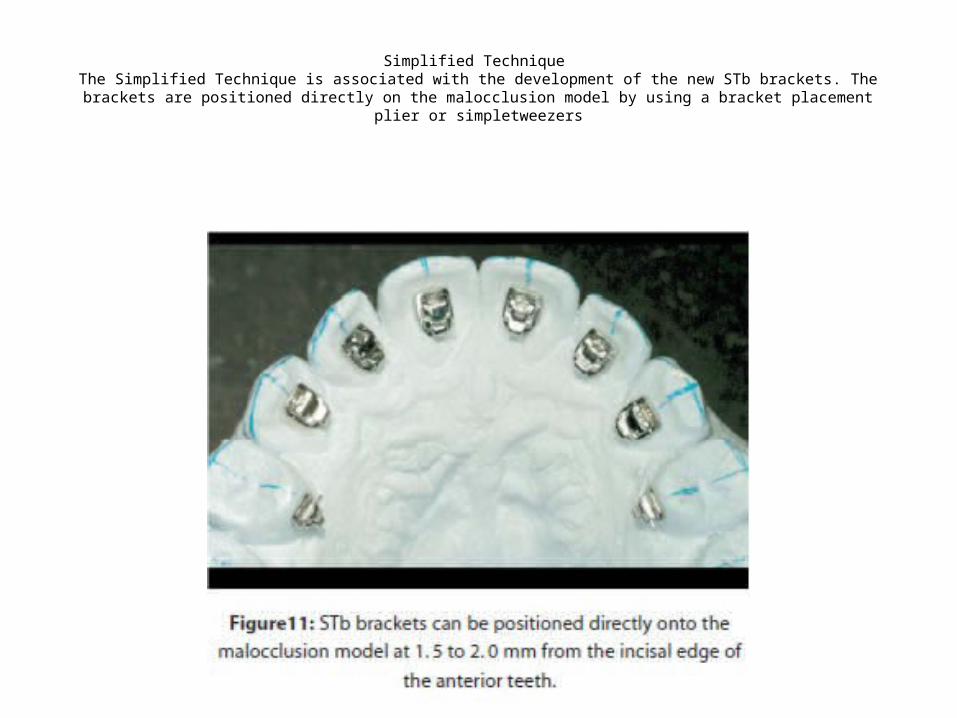
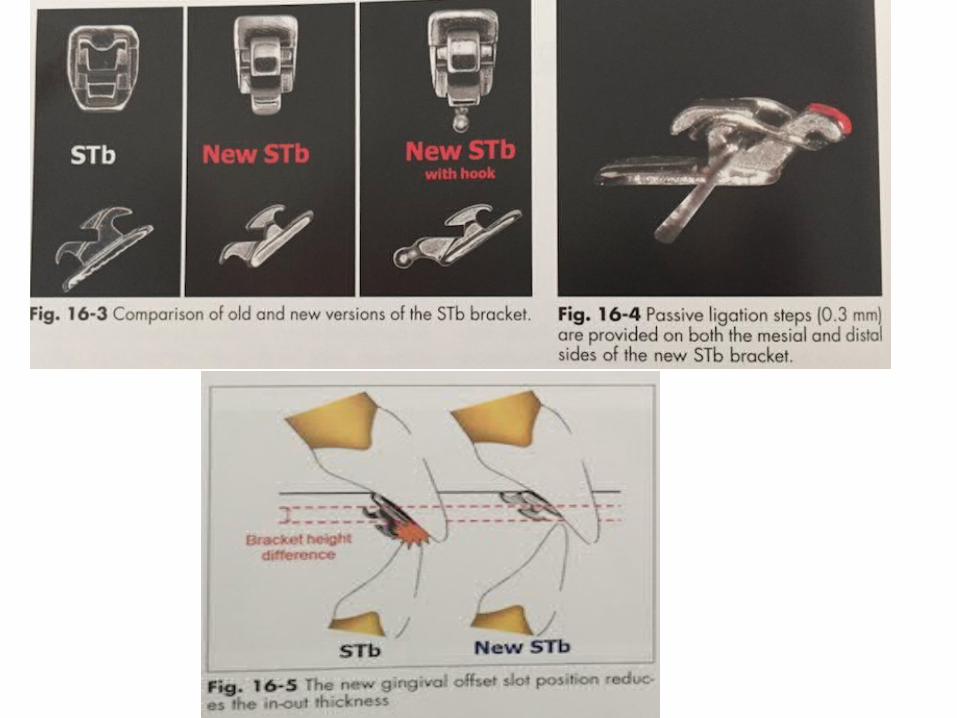
Simplified Technique The Simplified Technique is associated with the development of the new STb brackets. The brackets are positioned
directly on the malocclusion model by using a bracket placement plier or simpletweezers
Transfer Optimized Positioning System
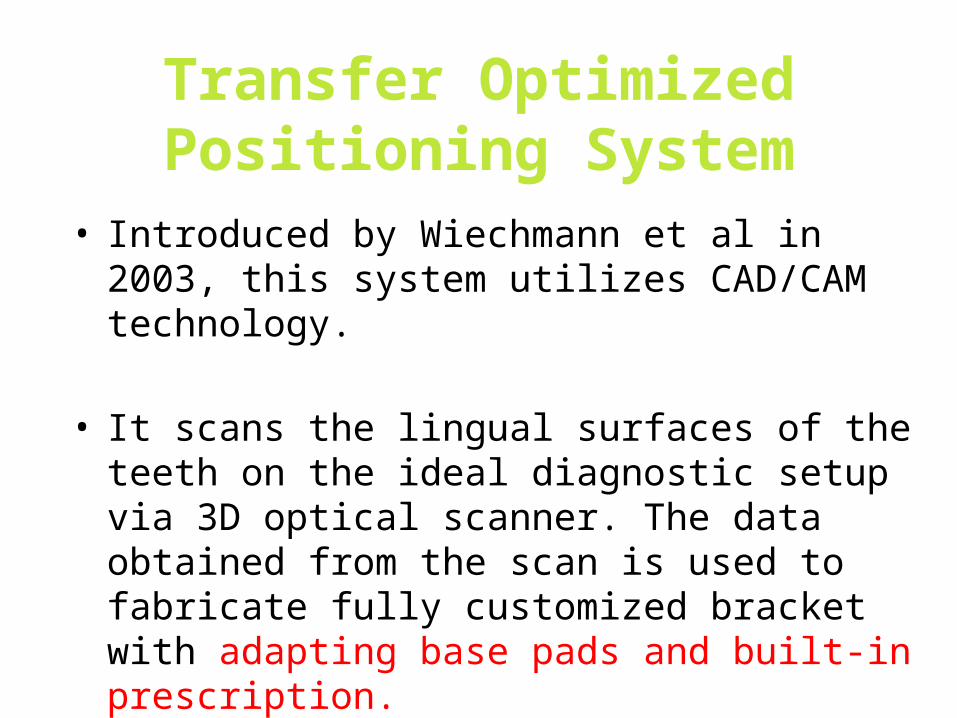
• Introduced by Wiechmann et al in 2003, this system utilizes CAD/CAM technology.
• It scans the lingual surfaces of the teeth on the ideal diagnostic setup via 3D optical scanner. The data obtained from the scan is used to fabricate fully customized bracket with adapting base pads and built-in prescription.
Lingual Straight Wire Technique
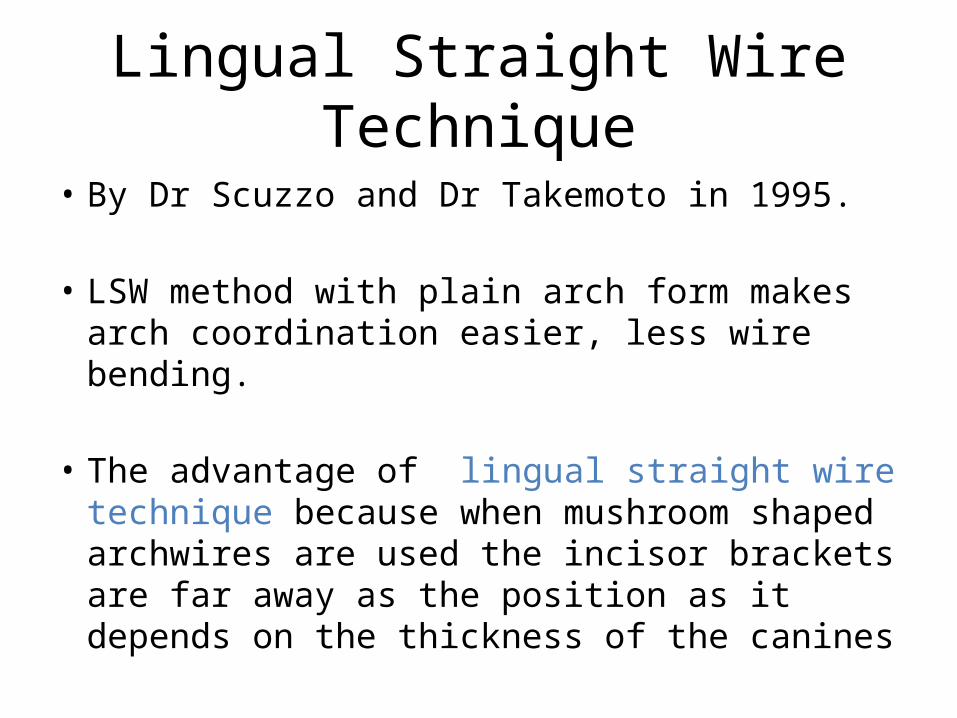
• By Dr Scuzzo and Dr Takemoto in 1995.
• LSW method with plain arch form makes arch coordination easier, less wire bending.
• The advantage of lingual straight wire technique because when mushroom shaped archwires are used the incisor brackets are far away as the position as it depends on the thickness of the canines
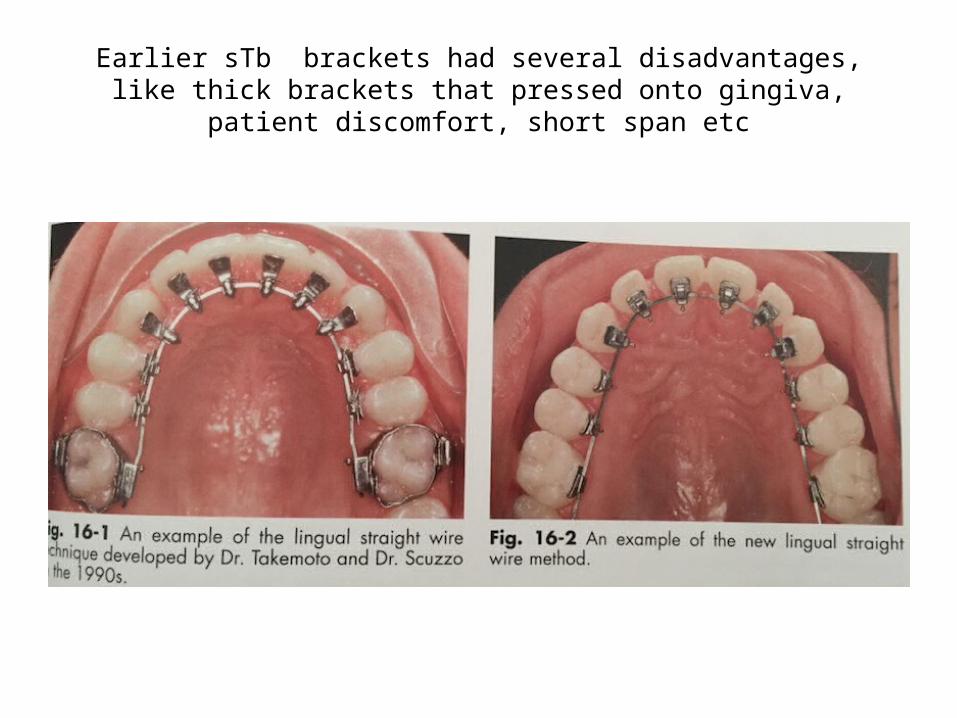
Earlier sTb brackets had several disadvantages, like thick brackets that pressed onto gingiva, patient discomfort, short span etc
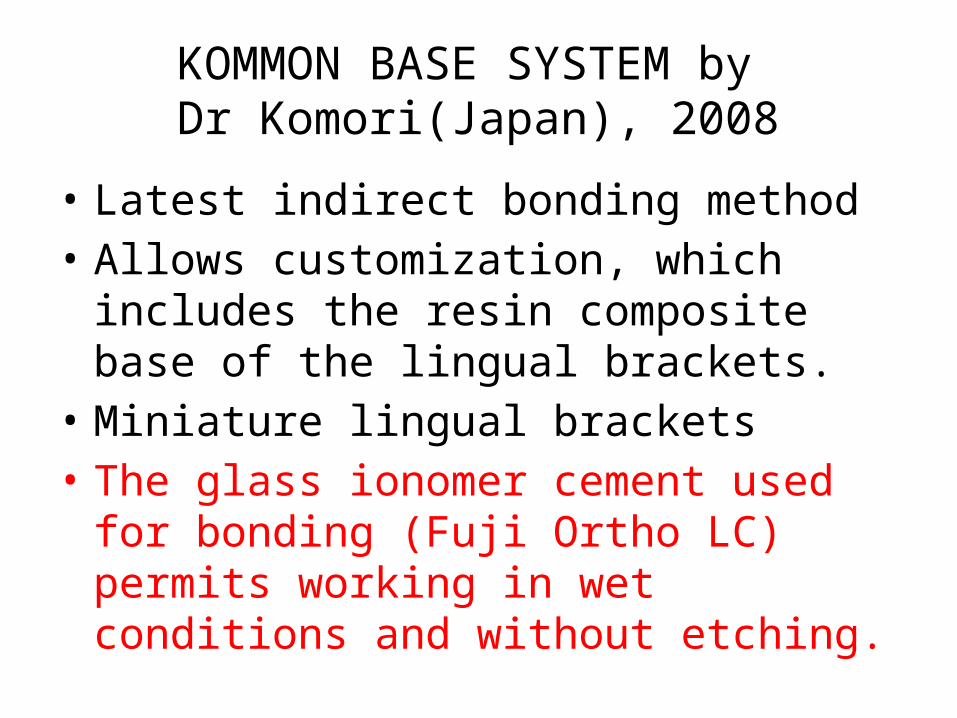
KOMMON BASE SYSTEM by Dr Komori(Japan), 2008
• Latest indirect bonding method• Allows customization, which includes the resin
composite base of the lingual brackets.• Miniature lingual brackets• The glass ionomer cement used for bonding
(Fuji Ortho LC) permits working in wet conditions and without etching.
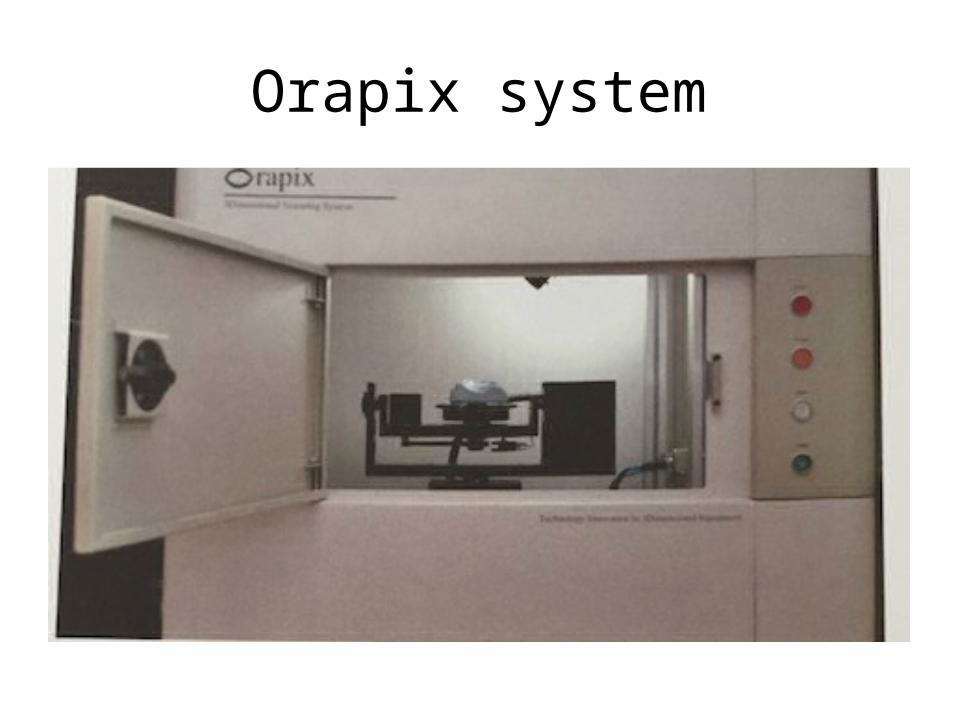
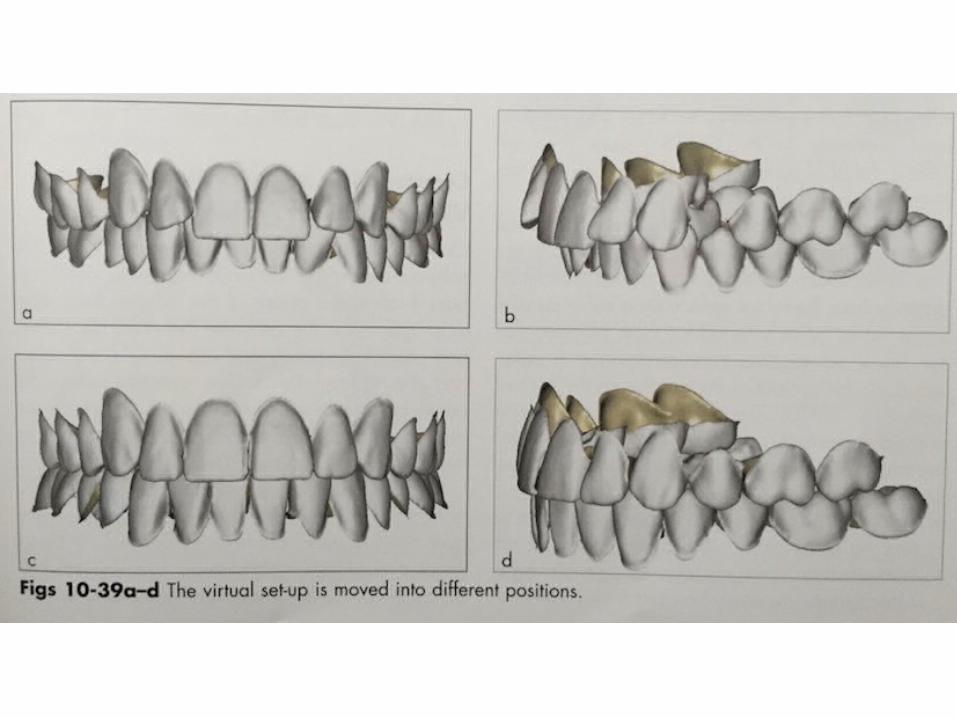
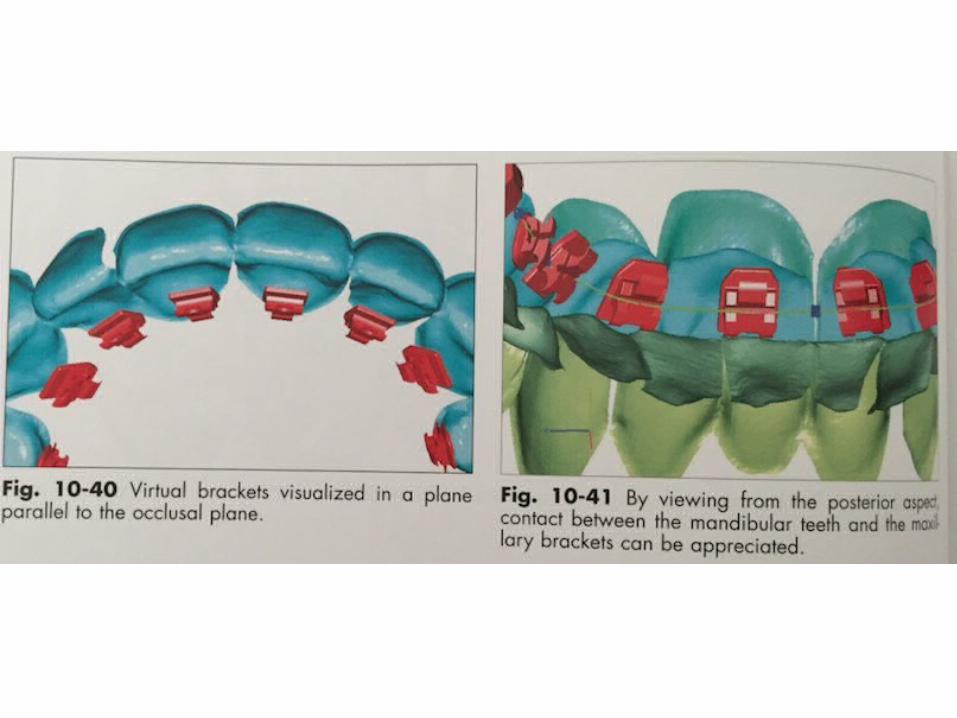
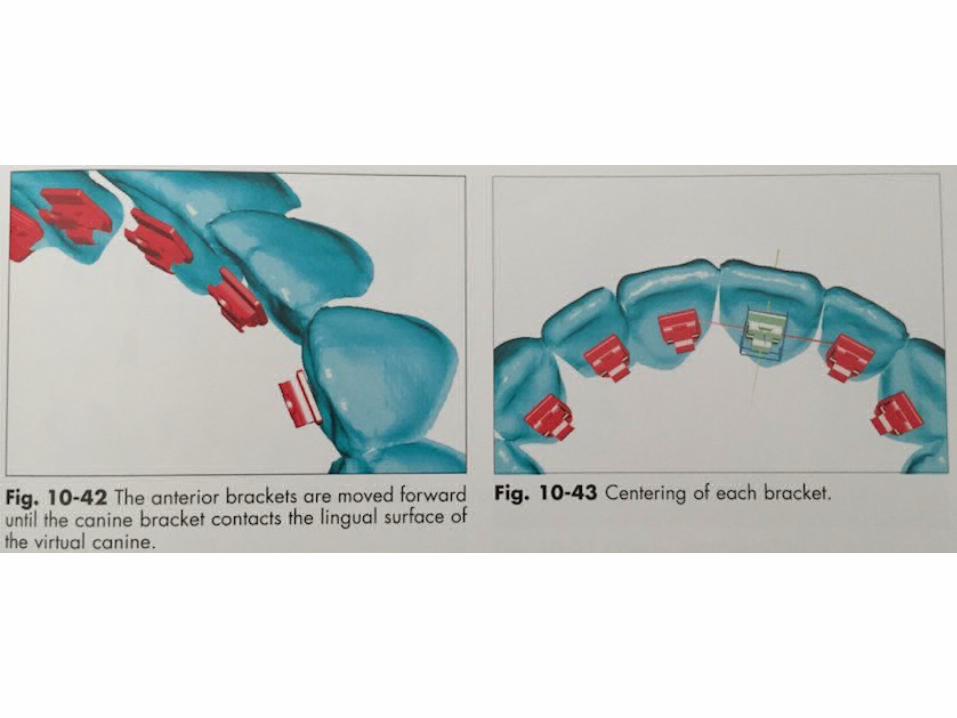
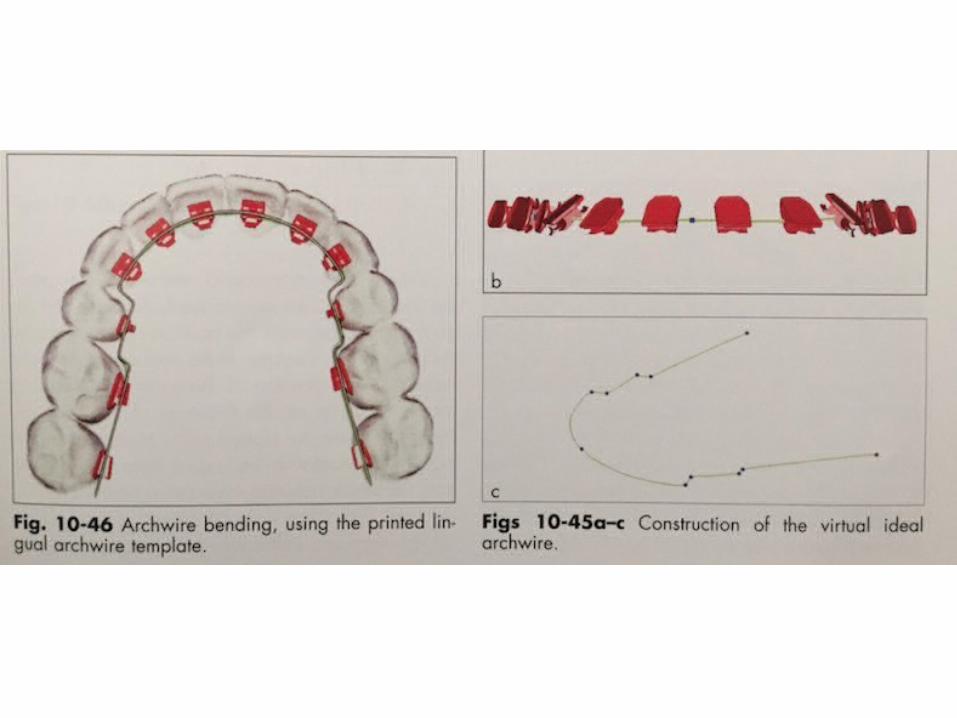
Orapix system
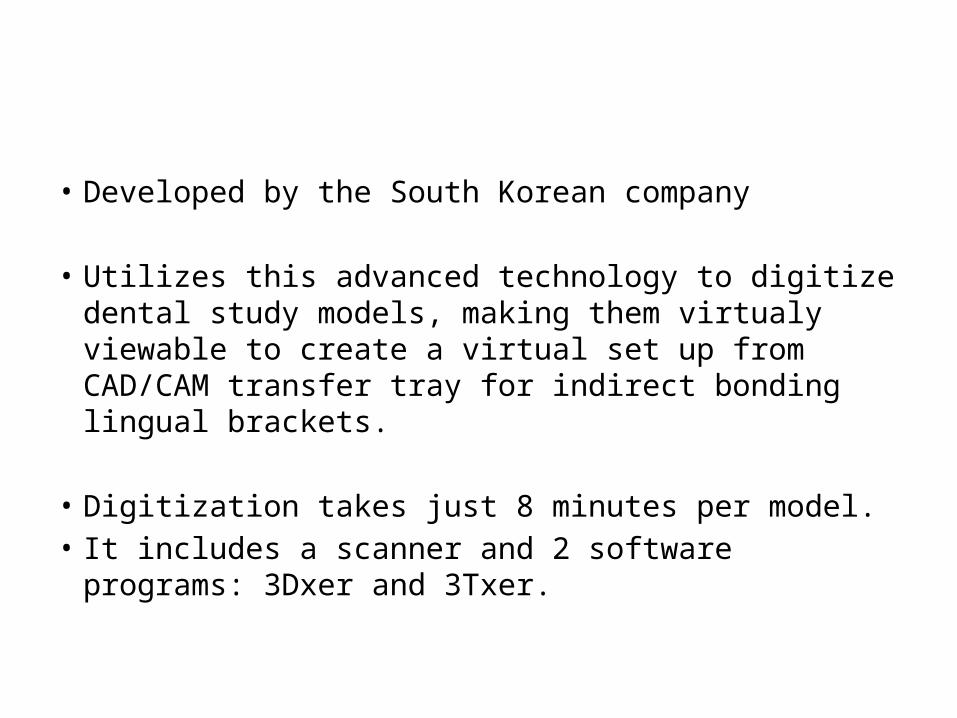
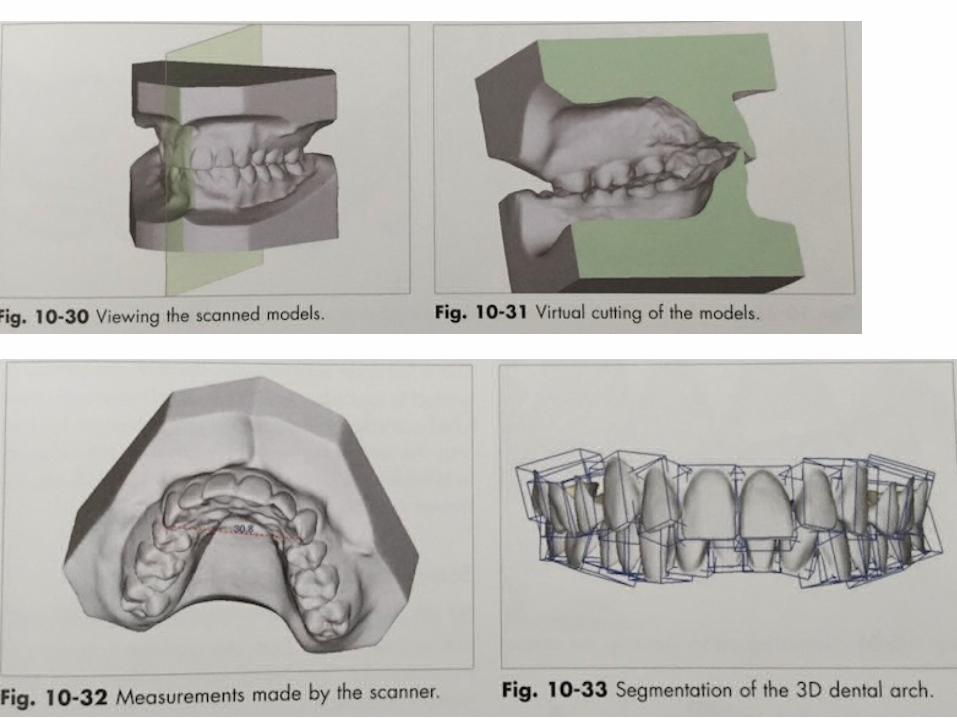
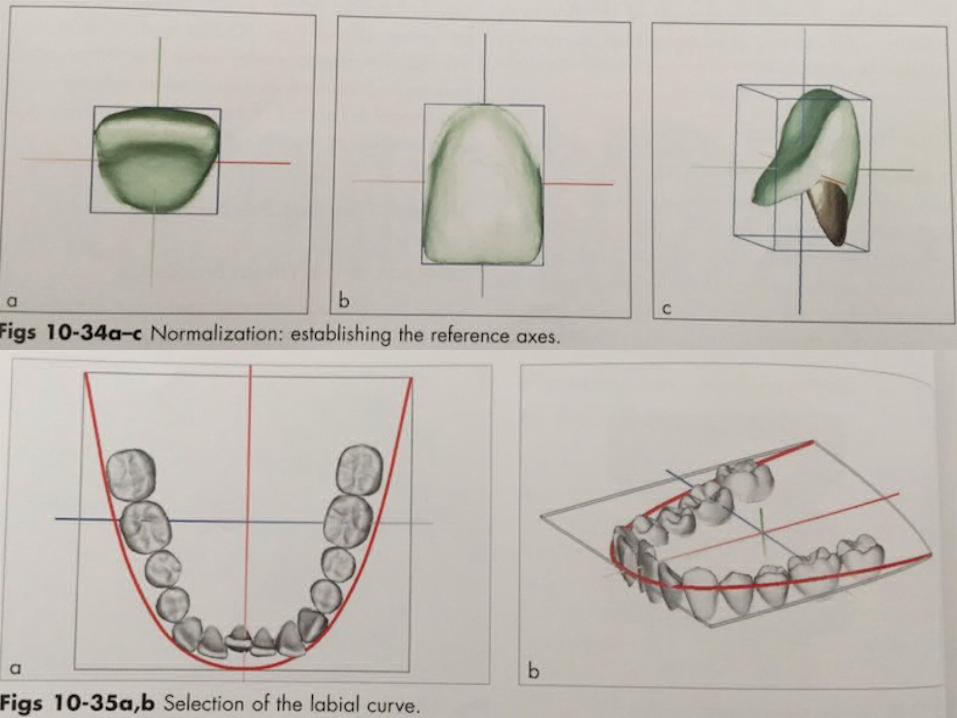
• Developed by the South Korean company
• Utilizes this advanced technology to digitize dental study models, making them virtualy viewable to create a virtual set up from CAD/CAM transfer tray for indirect bonding lingual brackets.
• Digitization takes just 8 minutes per model.• It includes a scanner and 2 software programs: 3Dxer
and 3Txer.

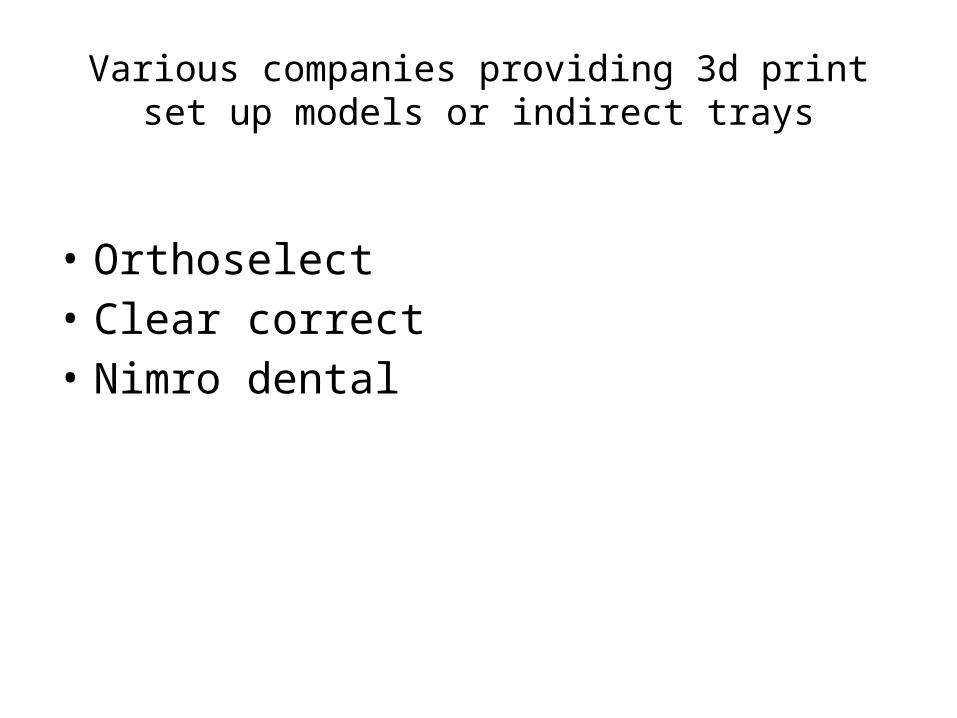
Various companies providing 3d print set up models or indirect trays
• Orthoselect• Clear correct• Nimro dental
Rebonding can be done in 2 ways:
1. By using the initial trays again. Individual tooth regions can be sectioned and positioned.
2. By redoing an individual bonding tray using the same protocol.
Conclusive of various techniq• Basically all procedures are based on same principles:1. The labial surface of teeth are aligned to the desired final
position & the lingual brackets are bonded according to that.
2. In all systems, customised bracket bases are fabricated according to the desired torque, angulation & in-out position.
3. In all system except BAST, customised bases are fabricated accordingly,
But in BAST, the in-out differences are disregarded &the wire is bent according to the final desired position.
4. All the tech, are very sensitive & accuracy is the main concern. A small mistake in bracket position on lingual is much more expressed in lingual.
Difficulties with lingual tech:
1. Overlap of the teeth at the beginning of treatment, which does not allow correct bracket positioning.
2. Brackets fail during the treatment & inaccurate rebonding. Therefore most of the techniques require wire bending at finishing stage.
Lingual Mechanotherapy
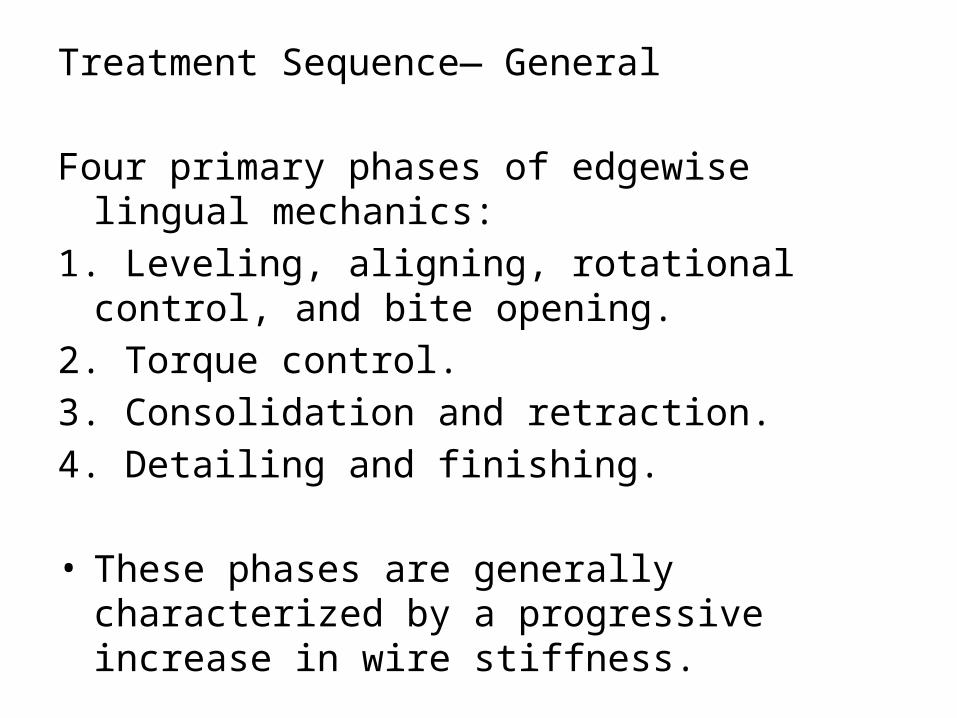
Treatment Sequence— General
Four primary phases of edgewise lingual mechanics:1. Leveling, aligning, rotational control, and bite
opening.2. Torque control.3. Consolidation and retraction.4. Detailing and finishing.
• These phases are generally characterized by a progressive increase in wire stiffness.

Lingual archwires.
• Typically mushroom-shaped.• Compensating bends are made.
• First order bends between cuspids and bicuspids are made at right angles, with a generous step to allow for the differences in labiolingual thickness between cuspids and premolars.
• First order bends contacting the mesiolingual of bicuspids or first molars can also act as archwire stops. These can provide an advancing or expansive force to the arch.
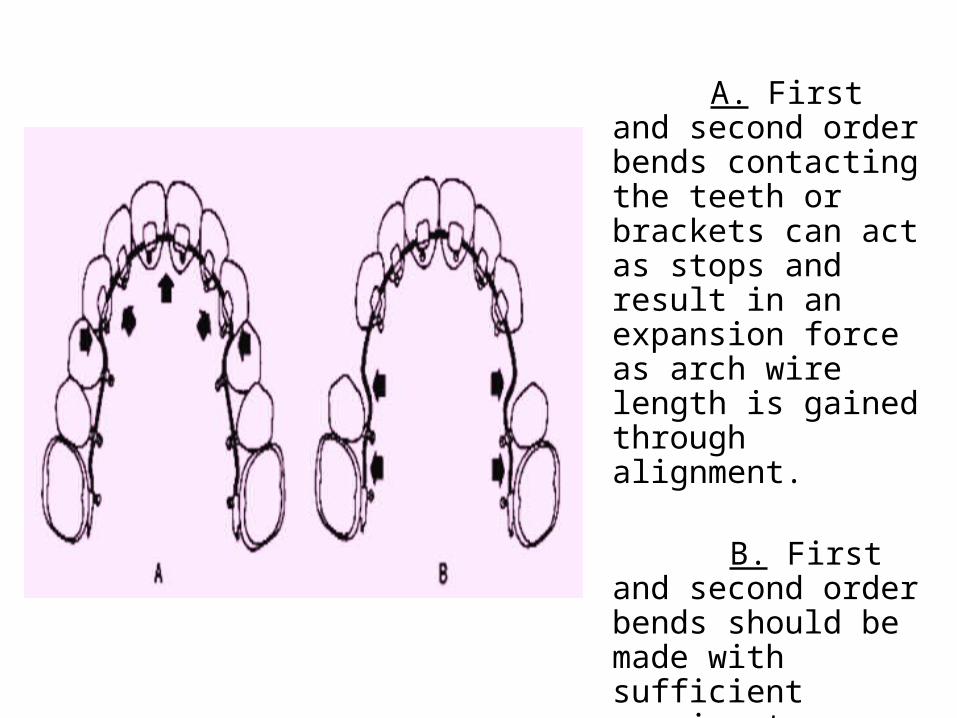
A. First and second order bends contacting the teeth or brackets can act as stops and result in an expansion force as arch wire length is gained through alignment.
B. First and second order bends should be made with sufficient spacing to prevent anterior advancement or to provide for retraction mechanics.
TREATMENT SEQUENCE
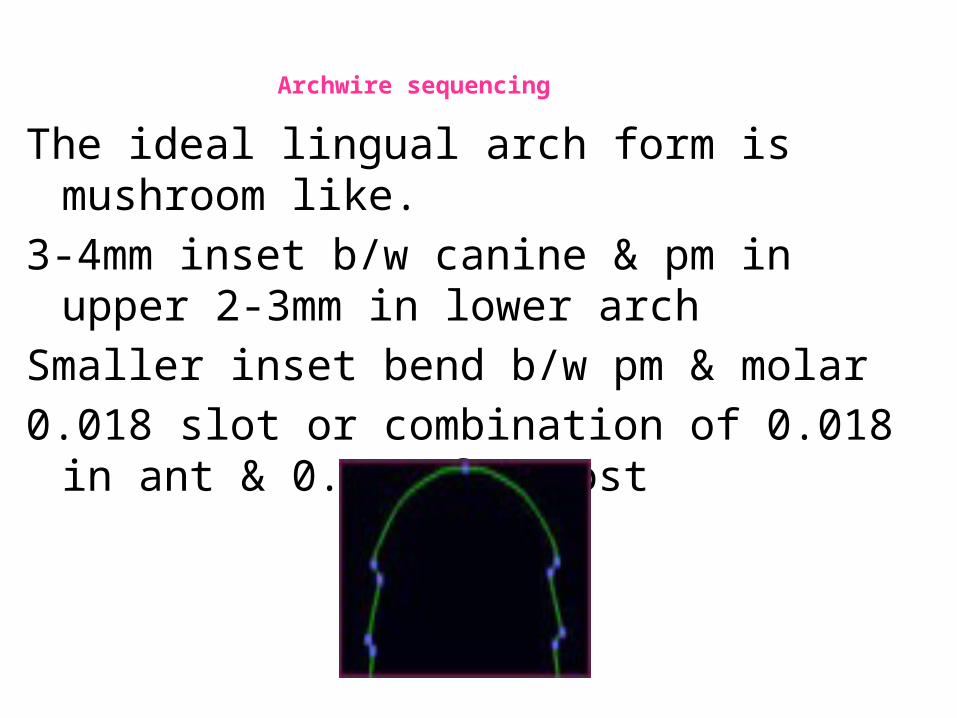
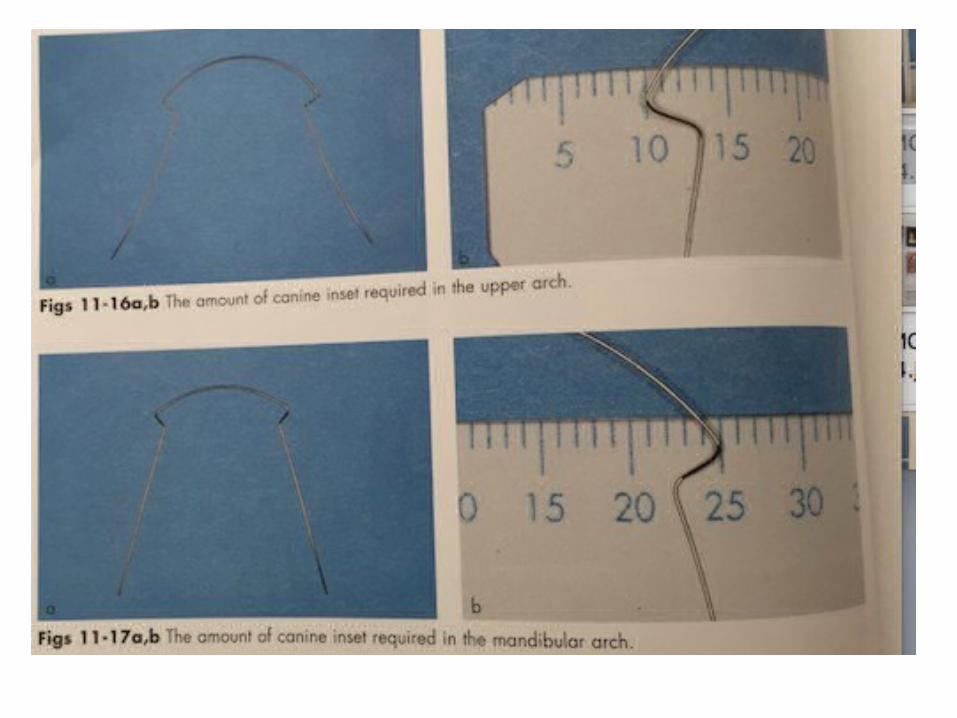
Archwire sequencing
The ideal lingual arch form is mushroom like.3-4mm inset b/w canine & pm in upper 2-3mm in
lower archSmaller inset bend b/w pm & molar0.018 slot or combination of 0.018 in ant & 0.022
for post
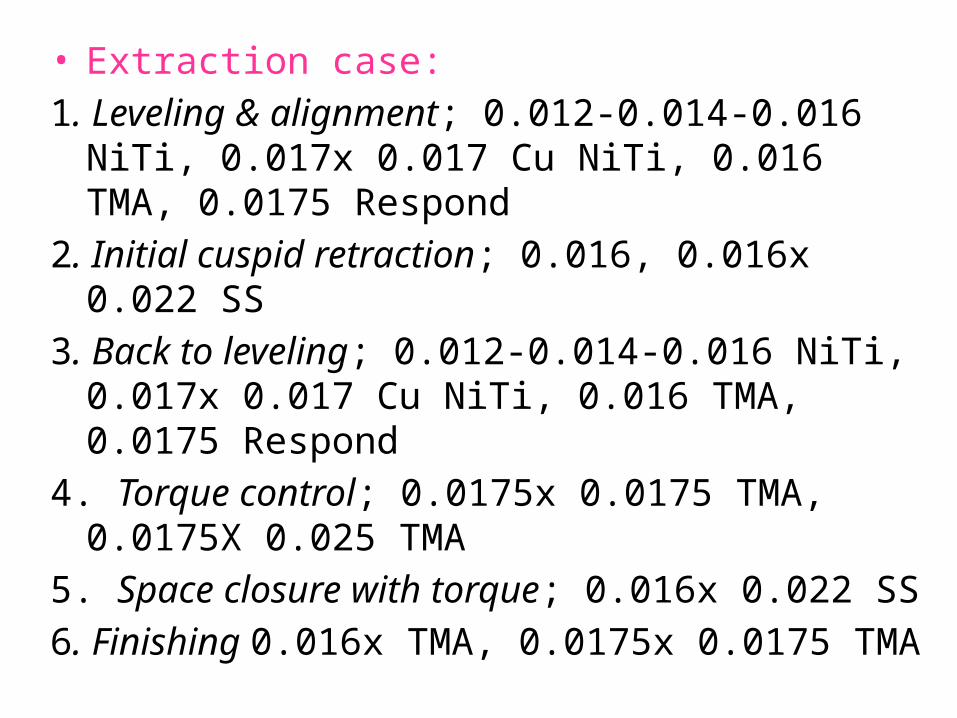
• Extraction case:1. Leveling & alignment; 0.012-0.014-0.016 NiTi, 0.017x
0.017 Cu NiTi, 0.016 TMA, 0.0175 Respond2. Initial cuspid retraction; 0.016, 0.016x 0.022 SS3. Back to leveling; 0.012-0.014-0.016 NiTi, 0.017x 0.017
Cu NiTi, 0.016 TMA, 0.0175 Respond4. Torque control; 0.0175x 0.0175 TMA, 0.0175X 0.025
TMA5. Space closure with torque; 0.016x 0.022 SS6. Finishing 0.016x TMA, 0.0175x 0.0175 TMA

Non extraction1. Leveling & alignment; 0.012-0.014-0.016
NiTi, 0.017x 0.017 Cu NiTi, 0.016 TMA, 0.0175 Respond
2. Torque control; 0.0175x 0.0175 TMA, 0.0175X 0.025 TMA
3. Consolidation; 0.016x 0.022 SS4. Finishing; 0.016 TMA, 0.0175 TMA
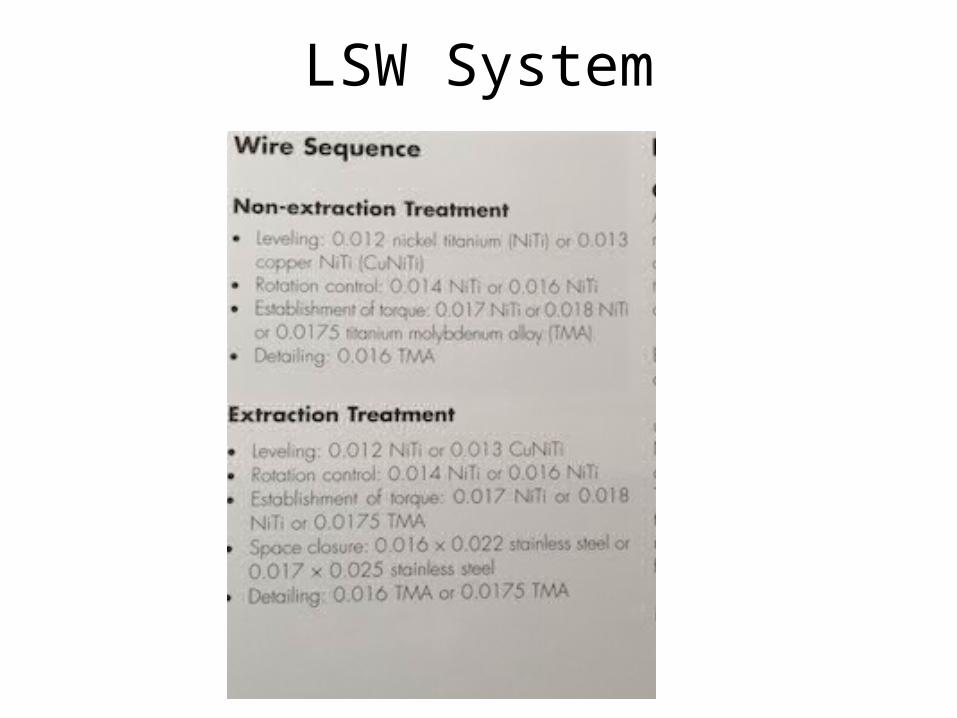
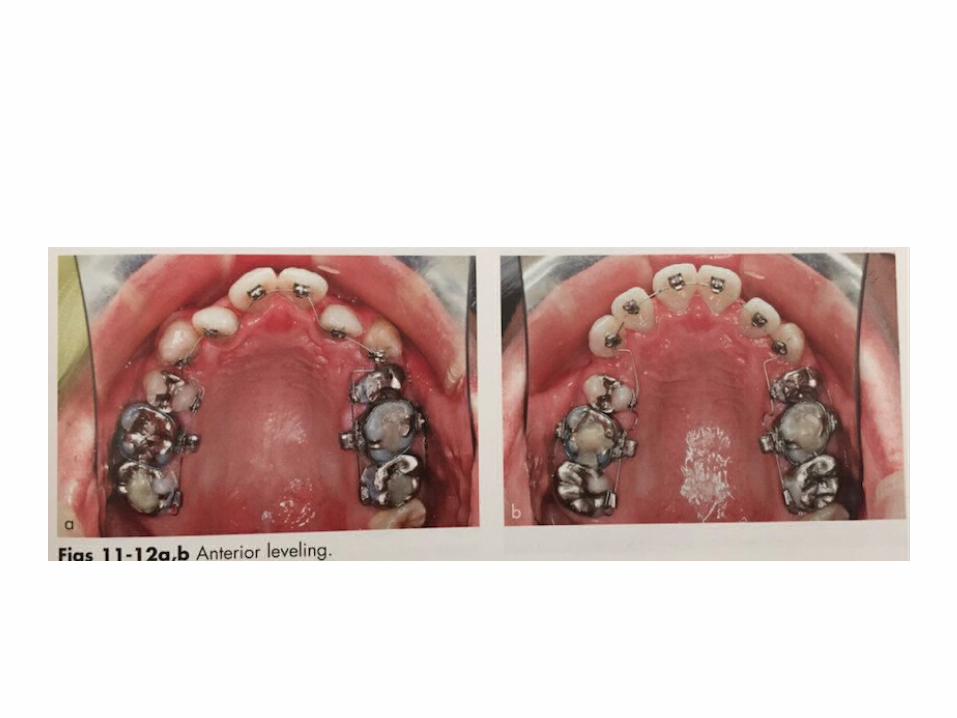
LSW System
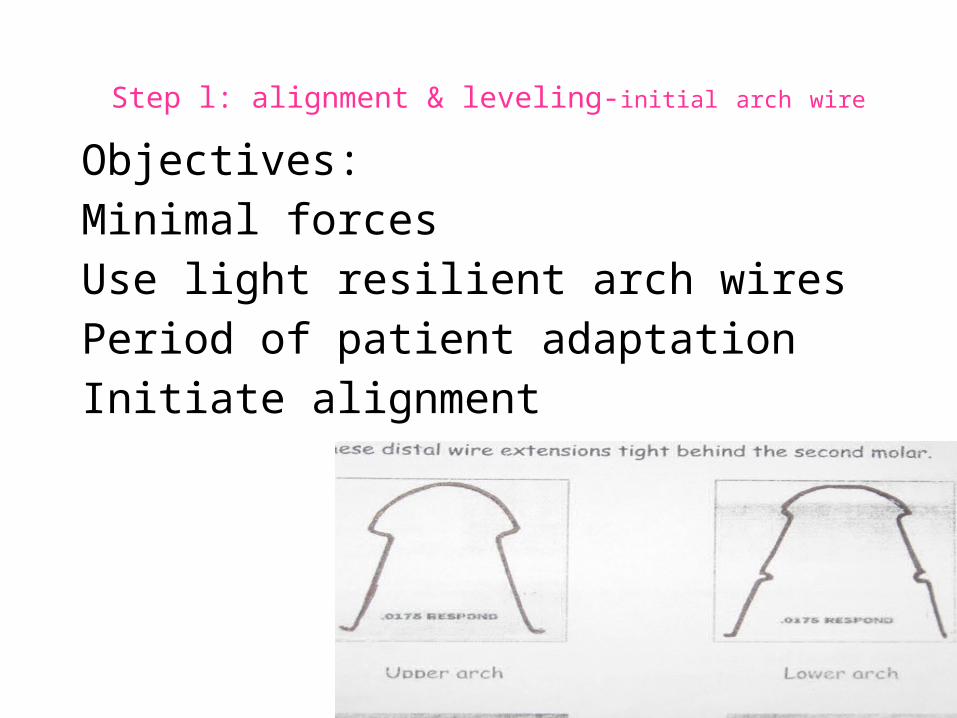
Step l: alignment & leveling-initial arch wire
Objectives:Minimal forcesUse light resilient arch wiresPeriod of patient adaptationInitiate alignment
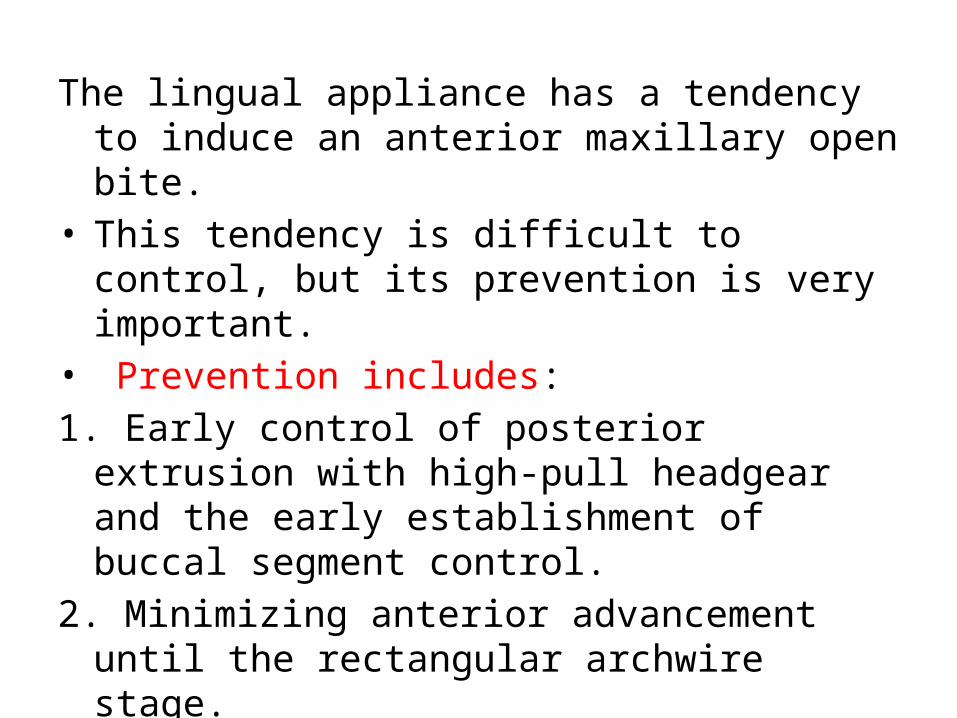
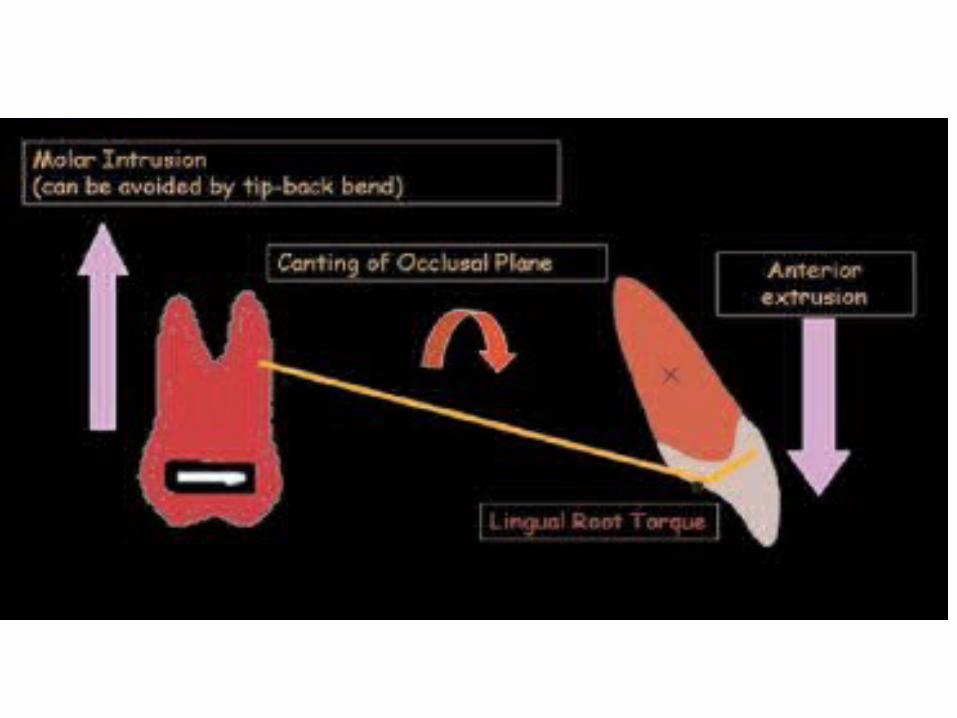
The lingual appliance has a tendency to induce an anterior maxillary open bite.
• This tendency is difficult to control, but its prevention is very important.
• Prevention includes:1. Early control of posterior extrusion with high-pull
headgear and the early establishment of buccal segment control.
2. Minimizing anterior advancement until the rectangular archwire stage.
3. Patient education on tongue positioning.
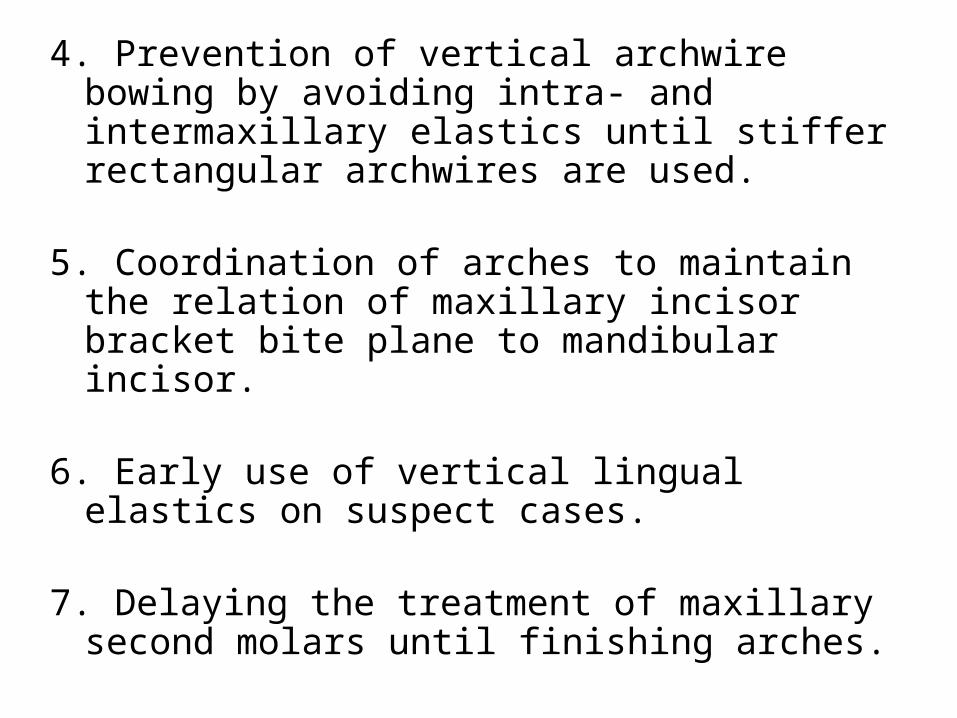
4. Prevention of vertical archwire bowing by avoiding intra- and intermaxillary elastics until stiffer rectangular archwires are used.
5. Coordination of arches to maintain the relation of maxillary incisor bracket bite plane to mandibular incisor.
6. Early use of vertical lingual elastics on suspect cases.
7. Delaying the treatment of maxillary second molars until finishing arches.
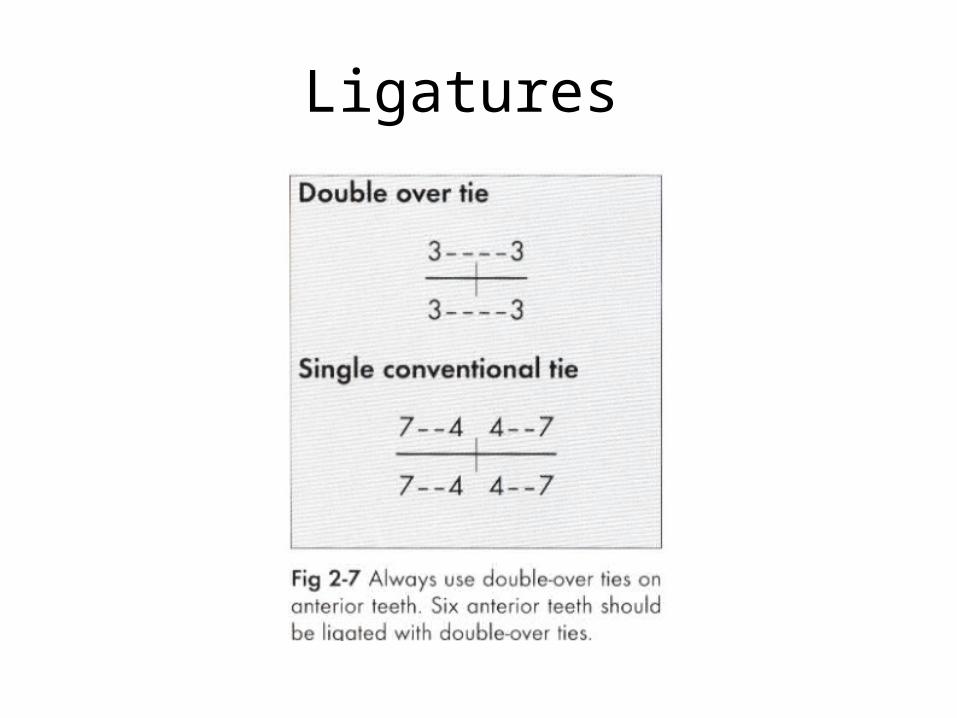
Ligatures
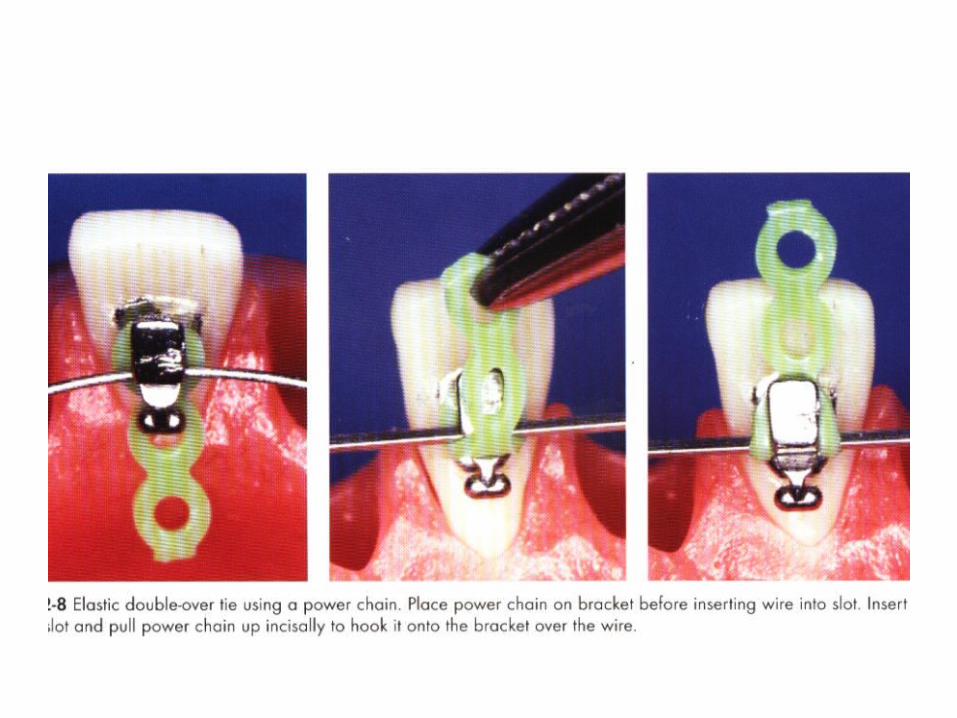
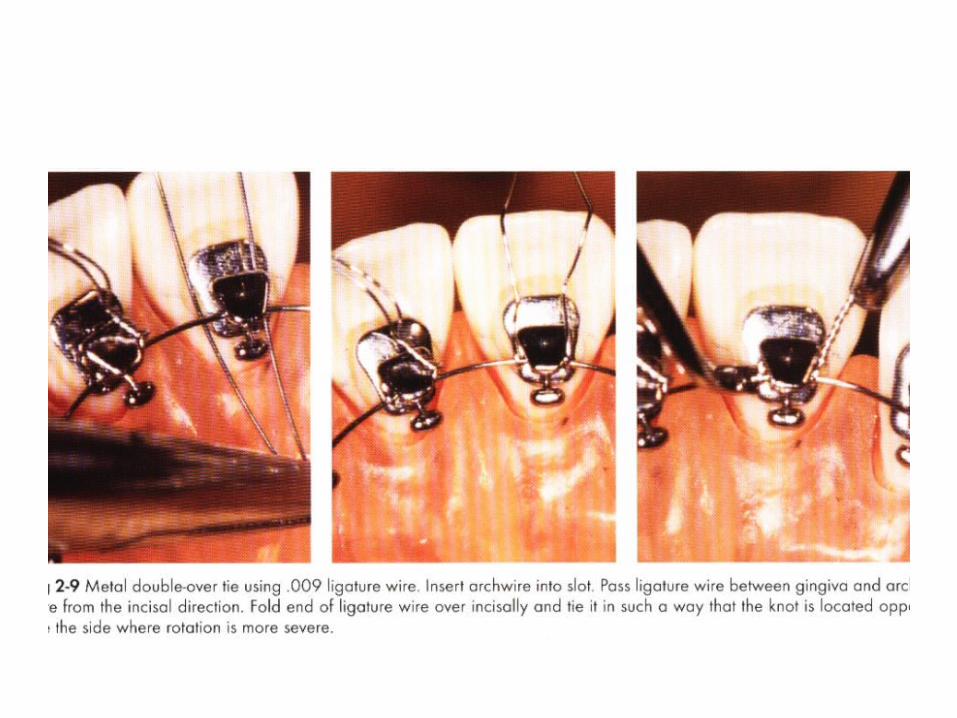
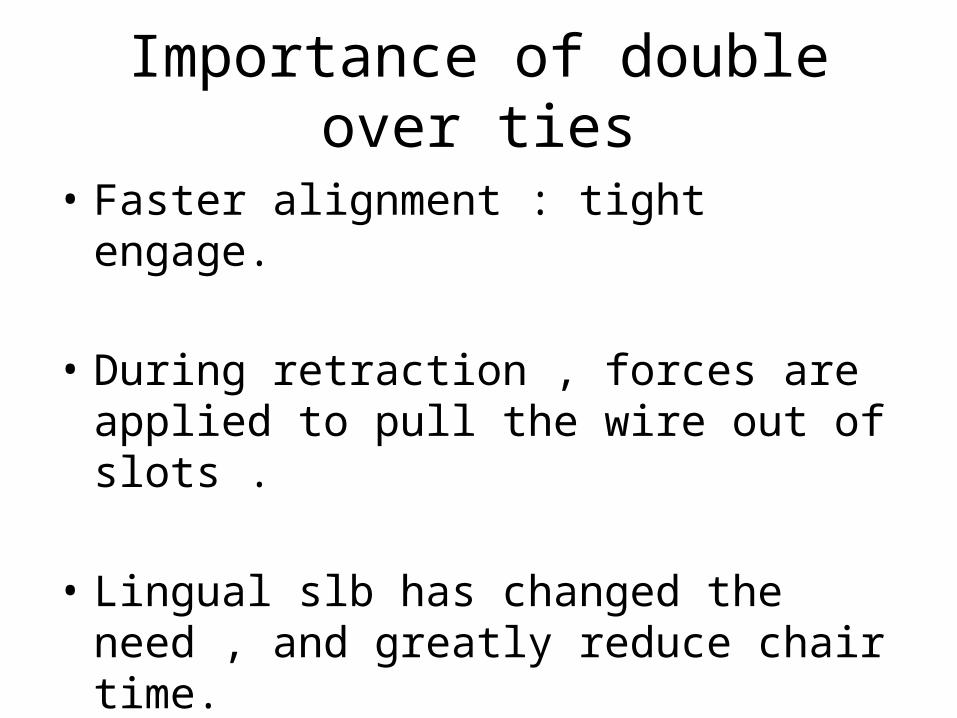
Importance of double over ties
• Faster alignment : tight engage.
• During retraction , forces are applied to pull the wire out of slots .
• Lingual slb has changed the need , and greatly reduce chair time.
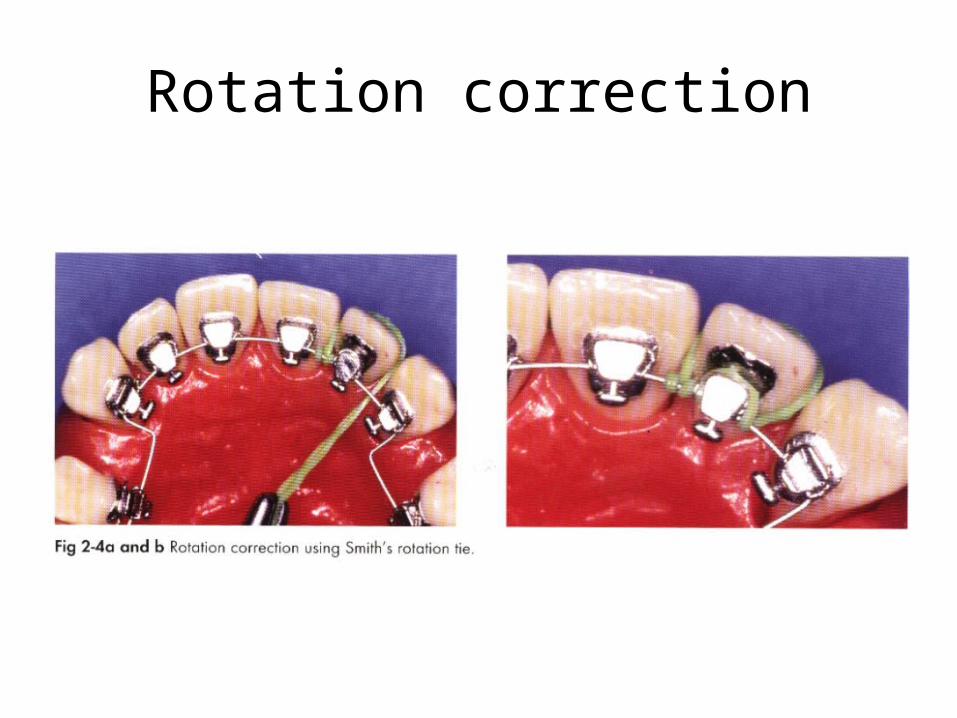
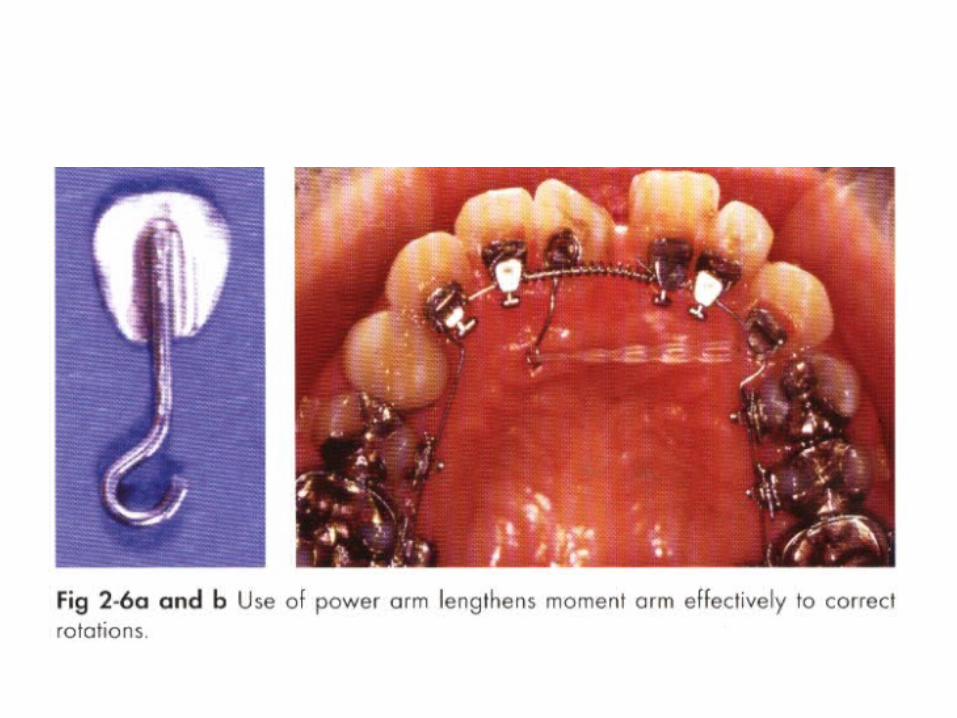
Rotation correction
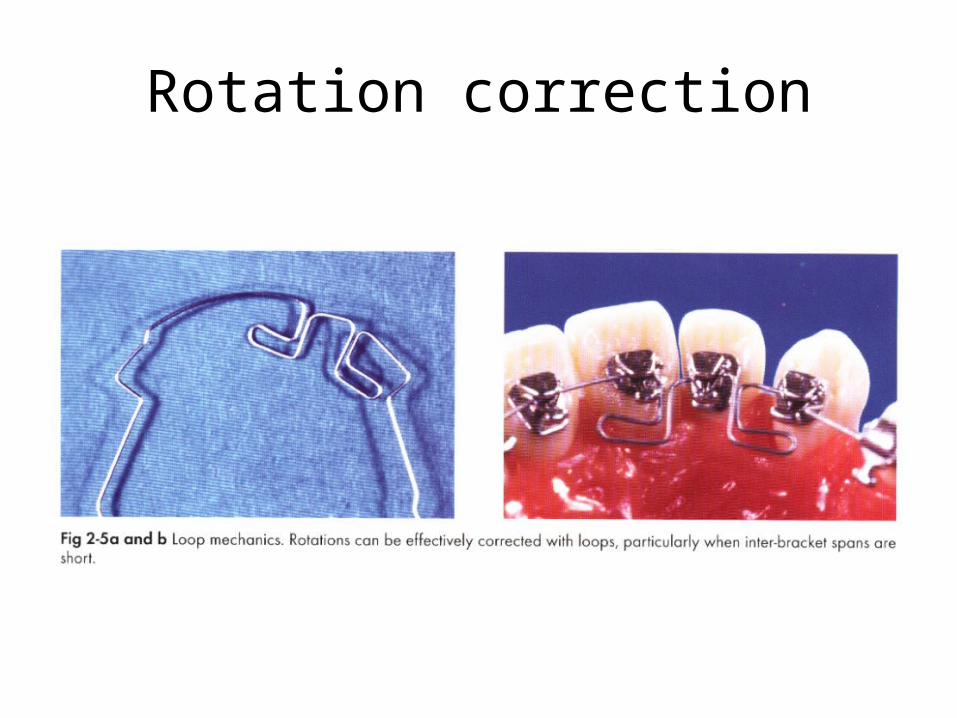
Rotation correction
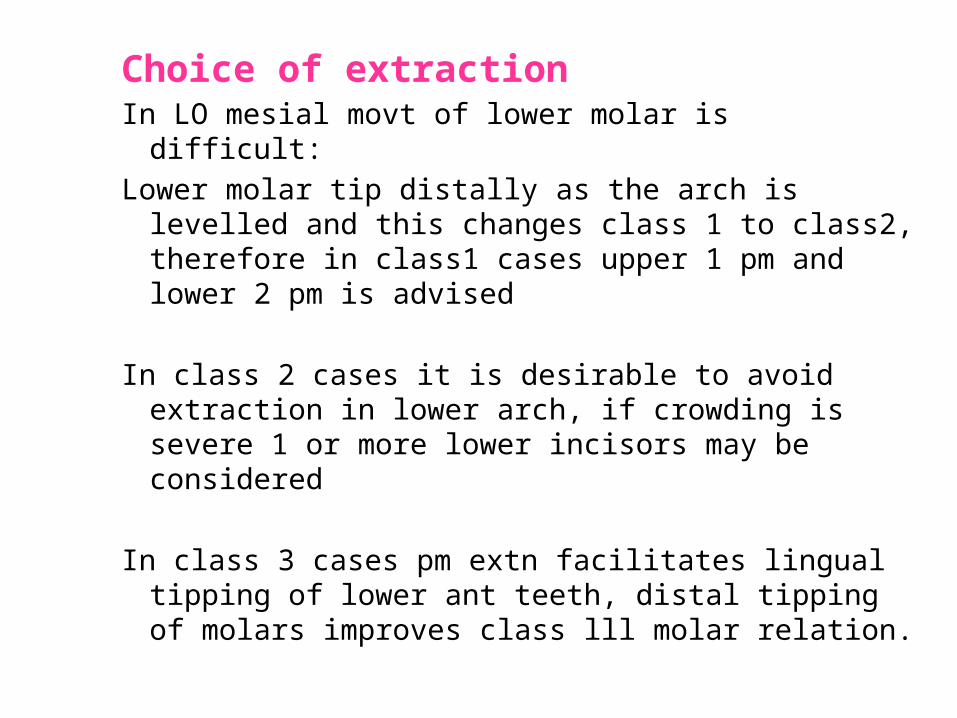
Choice of extractionIn LO mesial movt of lower molar is difficult:Lower molar tip distally as the arch is levelled and
this changes class 1 to class2, therefore in class1 cases upper 1 pm and lower 2 pm is advised
In class 2 cases it is desirable to avoid extraction in lower arch, if crowding is severe 1 or more lower incisors may be considered
In class 3 cases pm extn facilitates lingual tipping of lower ant teeth, distal tipping of molars improves class lll molar relation.

Step 2; Initial cuspid retraction
• Increase arch perimeter• Correct rotations• Achieve alignment• Establish arch form• Obtain complete wire engagement
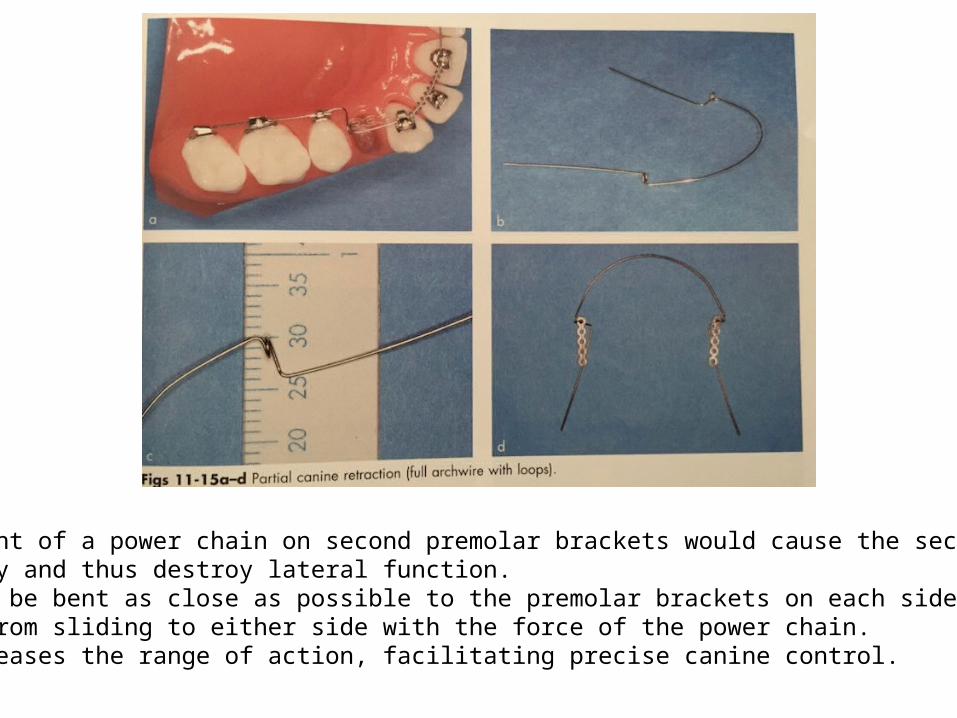
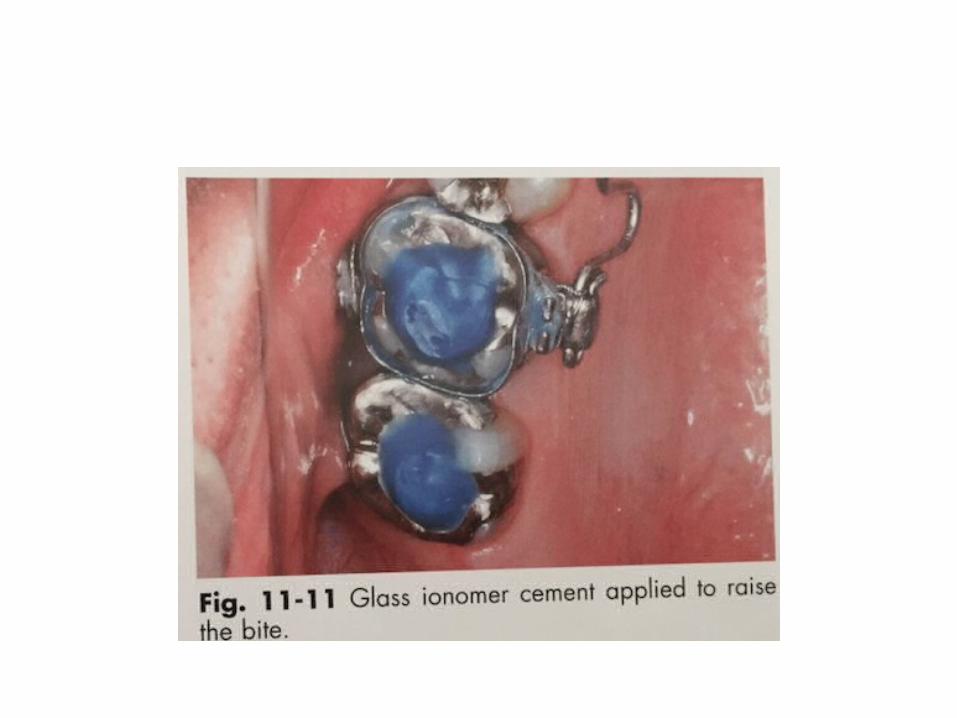
Direct placement of a power chain on second premolar brackets would cause the second pmTo tip mesially and thus destroy lateral function.Inserts should be bent as close as possible to the premolar brackets on each side,which preventsThe archwire from sliding to either side with the force of the power chain.This also increases the range of action, facilitating precise canine control.
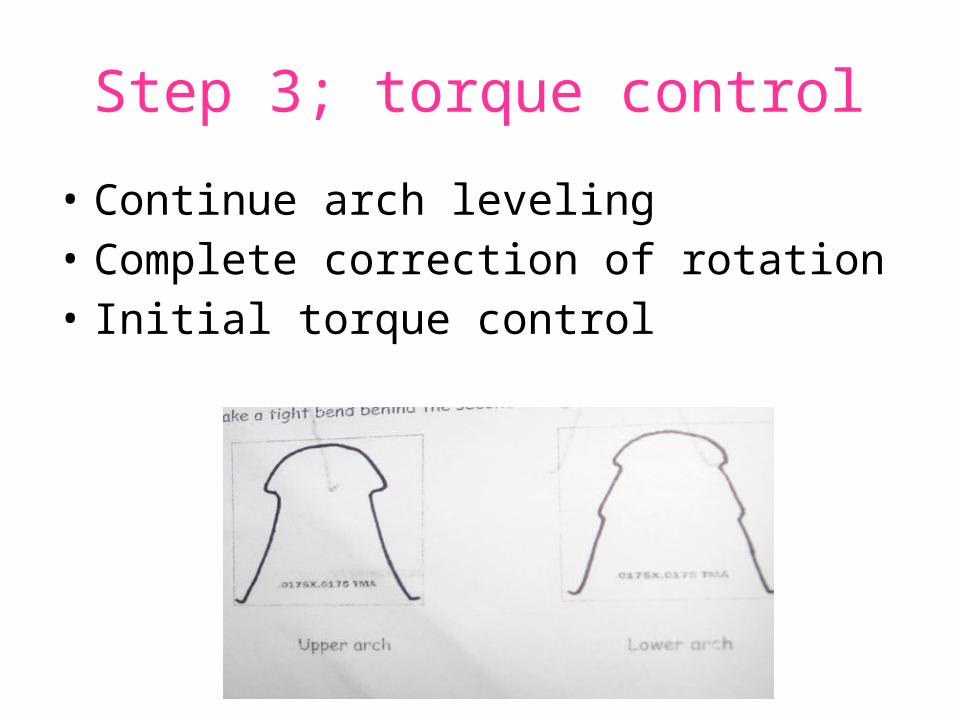
Step 3; torque control
• Continue arch leveling• Complete correction of rotation• Initial torque control
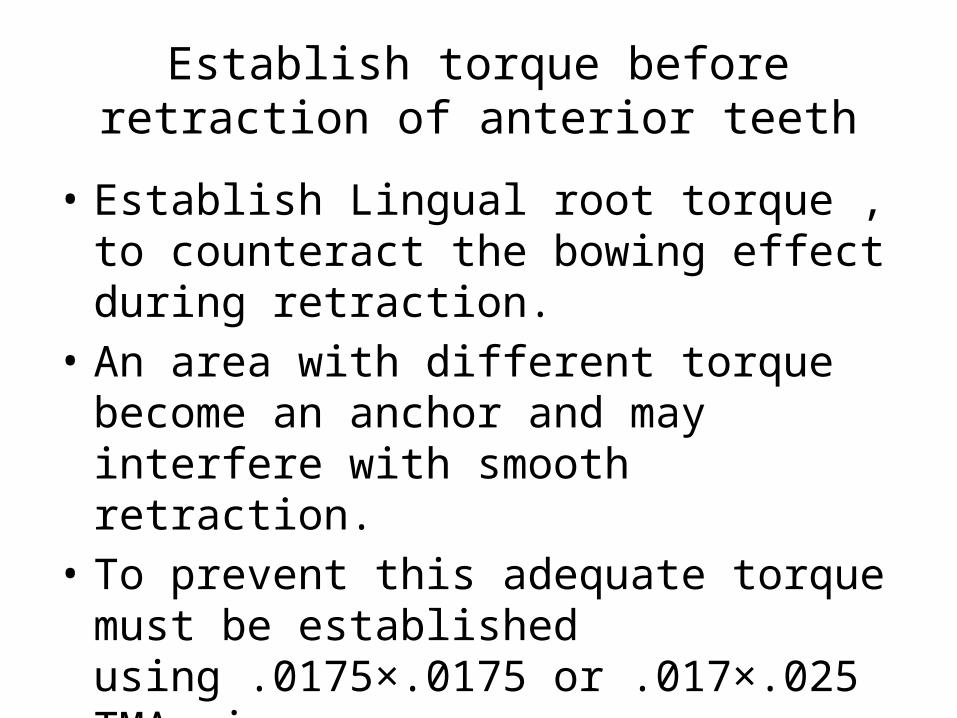
Establish torque before retraction of anterior teeth
• Establish Lingual root torque , to counteract the bowing effect during retraction.
• An area with different torque become an anchor and may interfere with smooth retraction.
• To prevent this adequate torque must be established using .0175×.0175 or .017×.025 TMA wire.
Do not use round wire for anterior retraction
• As round wire retraction causes only the crowns of anterior teeth to tip lingually producing vertical bowing effect.
• To prevent this use rectangular wire of sufficient rigidity.
Retraction and space closure
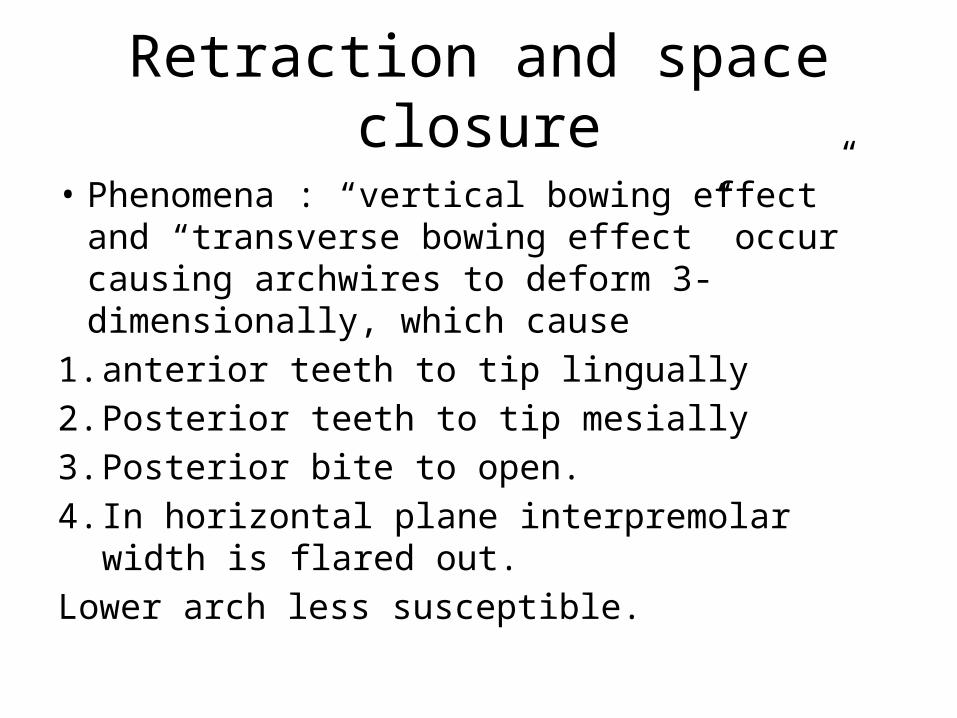
• Phenomena : “vertical bowing effect” and “transverse bowing effect” occur causing archwires to deform 3-dimensionally, which cause
1. anterior teeth to tip lingually2. Posterior teeth to tip mesially3. Posterior bite to open.4. In horizontal plane interpremolar width is flared
out.Lower arch less susceptible.
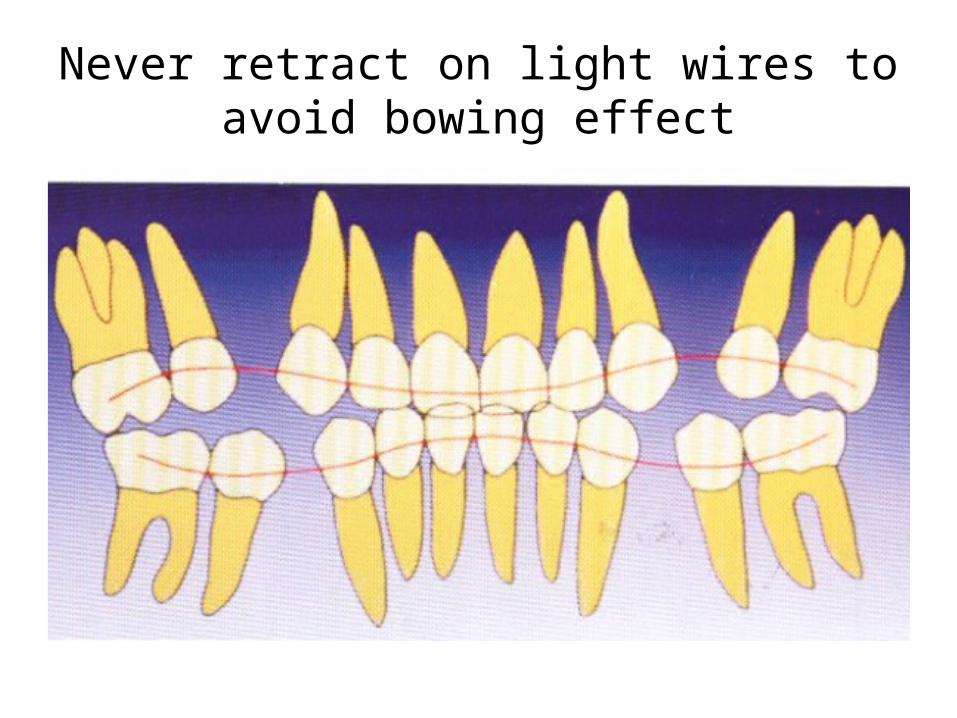
Never retract on light wires to avoid bowing effect

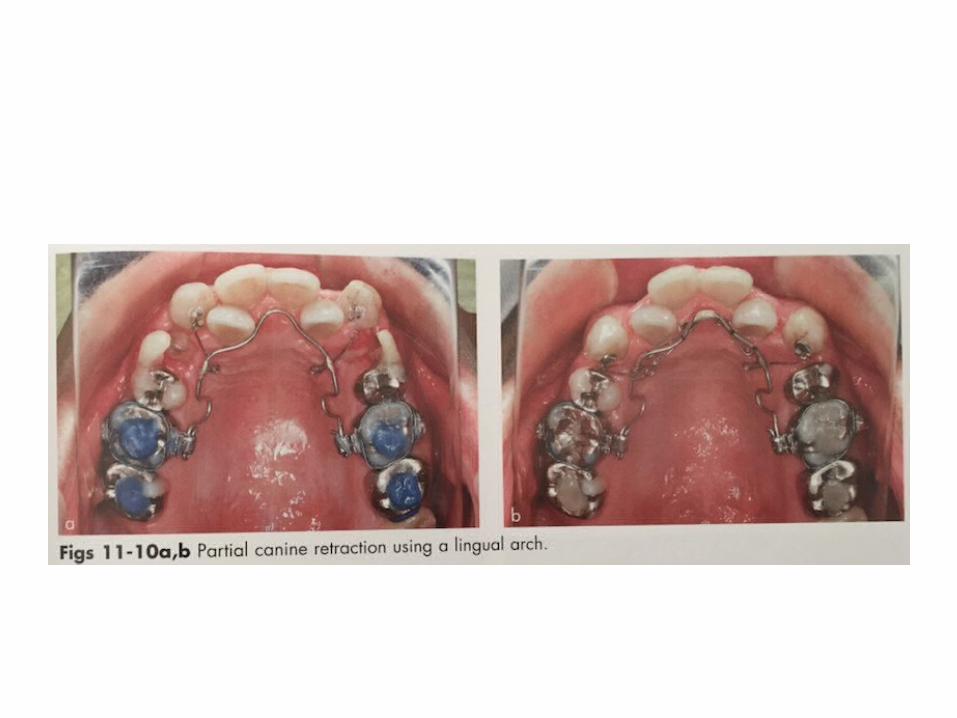
Two types• 1.Canines and incisors separately• 2.Enmasse retraction
Retraction mechanics
Utilize en masse retraction
• Method of retraction more esthetically acceptable, since space does not open between laterals and canine.
• Also, when space available distal to canine, inset in archwire do not get into the way during retraction.
Retraction mechanics can be divided into
1. Sliding mechanics 2. Loop mechanics
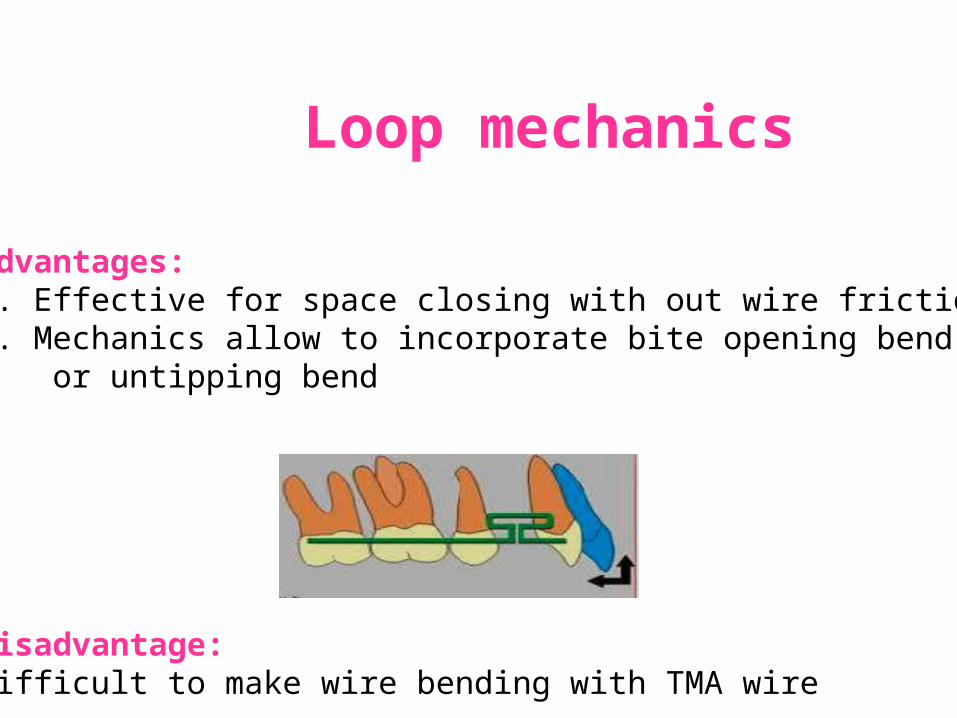
Loop mechanics
Advantages:1. Effective for space closing with out wire friction2. Mechanics allow to incorporate bite opening bend or untipping bend
Disadvantage:Difficult to make wire bending with TMA wire

Sliding mechanics
Teeth are moved with the brackets sliding along the arch wire. Advantages:Simple and effectiveDisadvantages:Wire friction and uncontrolled retraction force
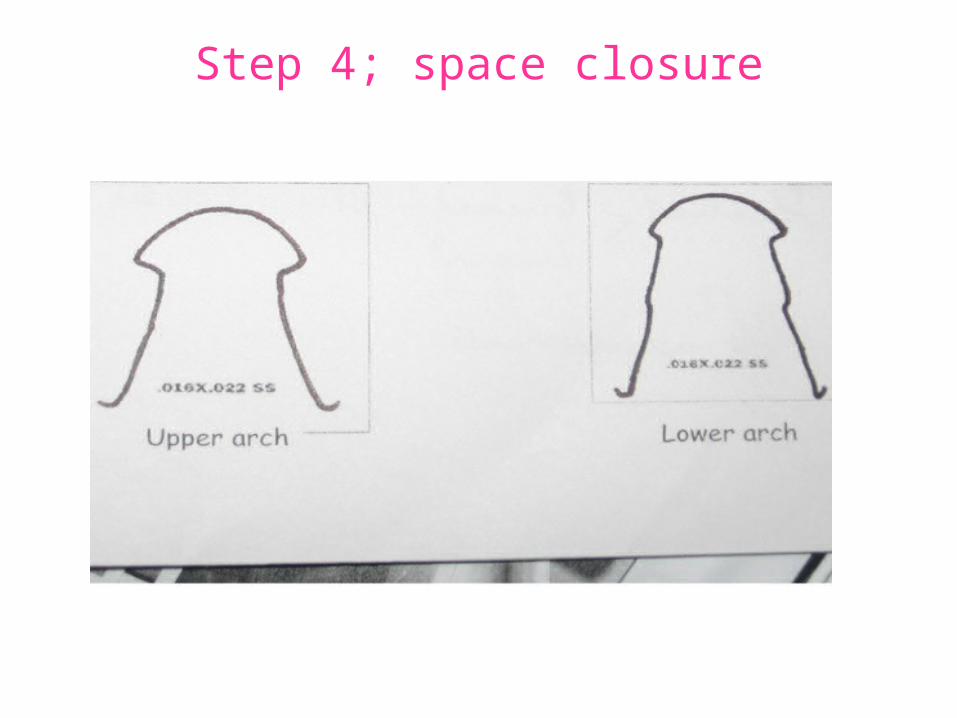
Step 4; space closure
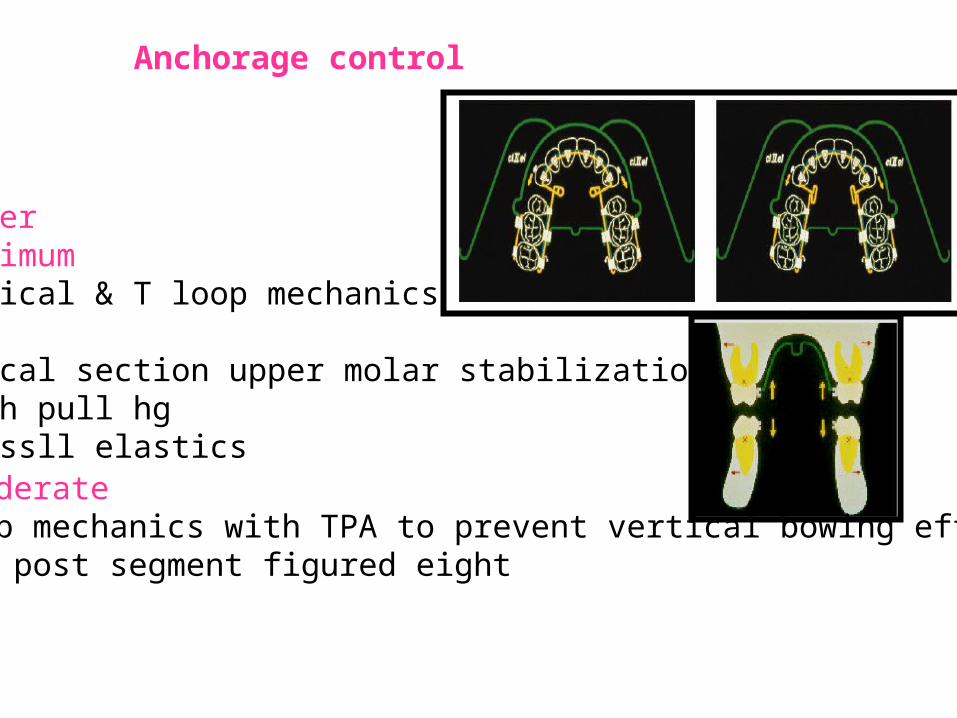
Anchorage control
Moderate L loop mechanics with TPA to prevent vertical bowing effectAnt & post segment figured eight
UpperMaximumHelical & T loop mechanicsTPABuccal section upper molar stabilizationHigh pull hgClassll elastics
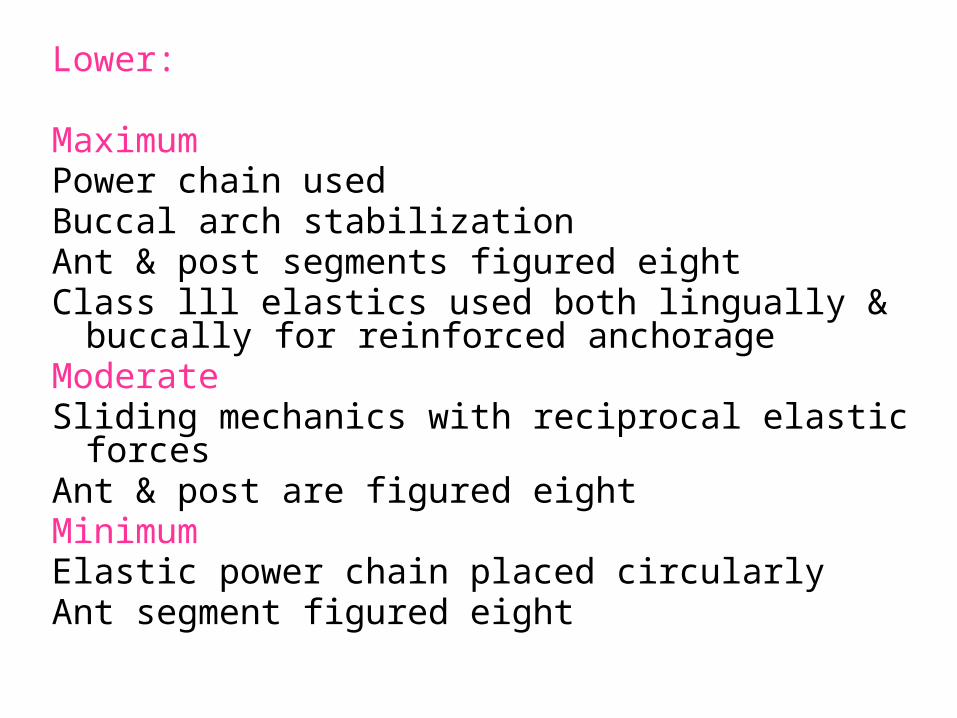
Lower:
Maximum Power chain usedBuccal arch stabilizationAnt & post segments figured eightClass lll elastics used both lingually & buccally for
reinforced anchorageModerateSliding mechanics with reciprocal elastic forcesAnt & post are figured eightMinimumElastic power chain placed circularlyAnt segment figured eight
Six anchorage keys1. Incorporate extra root torque, molar tubes
mesially off-centered2. Bidimensional arch wire3. Posterior bite stops to open the bite4. Light class l, ll, lll forces for retraction or
space closure5. Incorporation of the 2nd molars in
anchorage unit6. Incorporation of an exaggerated curve of
spee

Auxilliaries used
1. Overlay expanders2. Hugo lingual torquing auxilliary3. Modified root torquing auxilliary , by Ziegfried J Weber4. Hugo de torquing bar
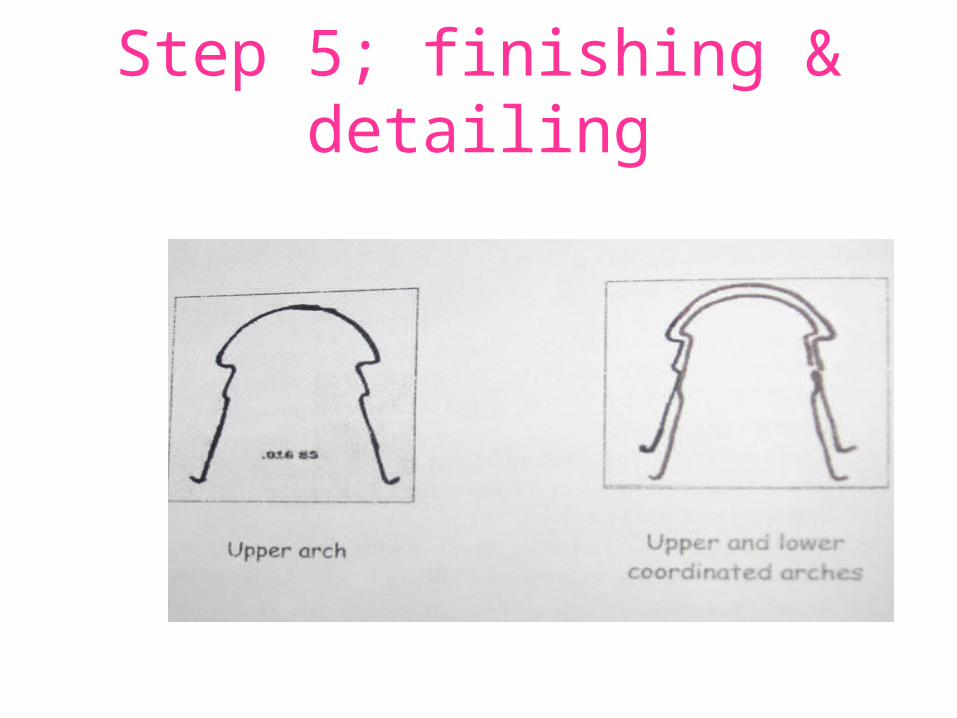
Step 5; finishing & detailing
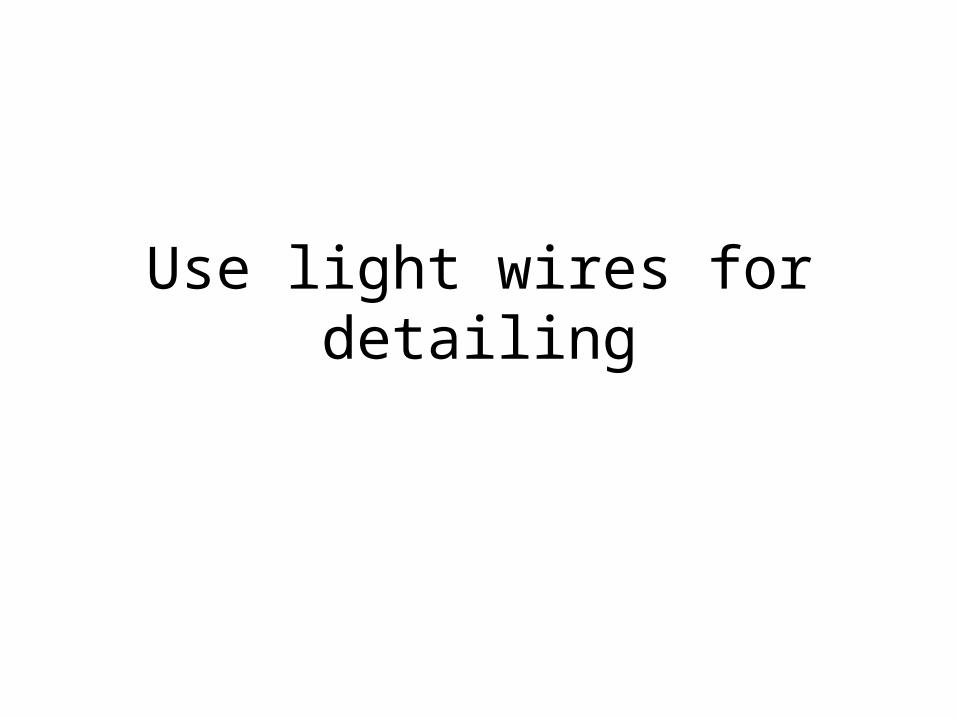
Use light wires for detailing
Retention
• Ideally started on the day of debonding.• As most lingual patients are adults, retention in
adults have following characteristics:1. Esthetically more demanding and do no like visible
retainers.2. Many adults have dental problems like ging
recession, occlusal wear, poor restoration, missing teeth, requiring dental procedures during retention.
3. Limited time of wear due to social restrictions.
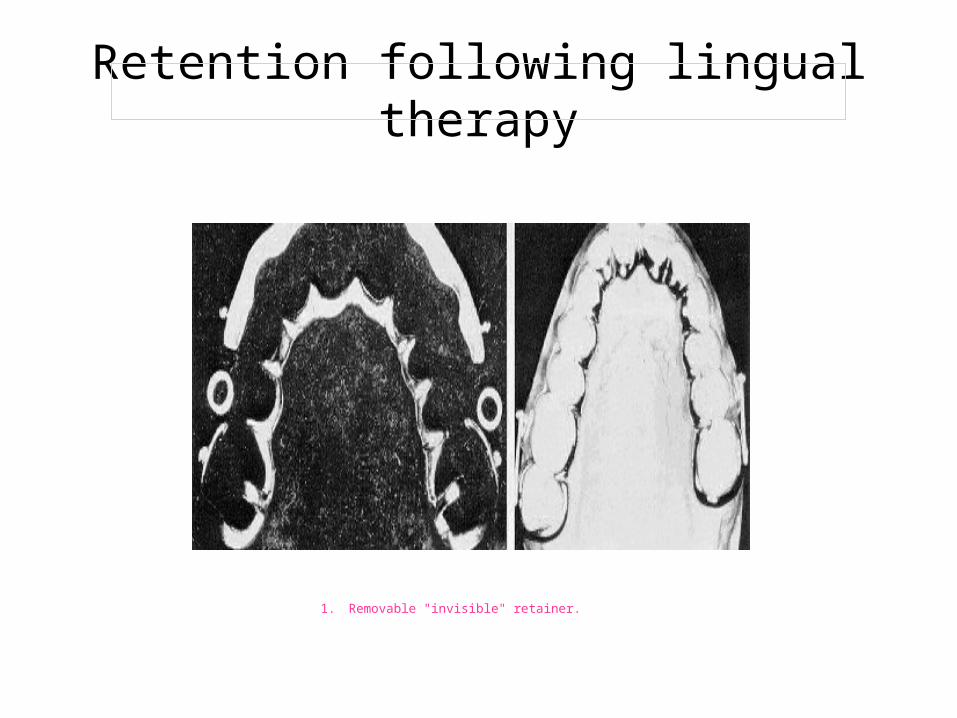
Retention following lingual therapy
1. Removable "invisible" retainer.
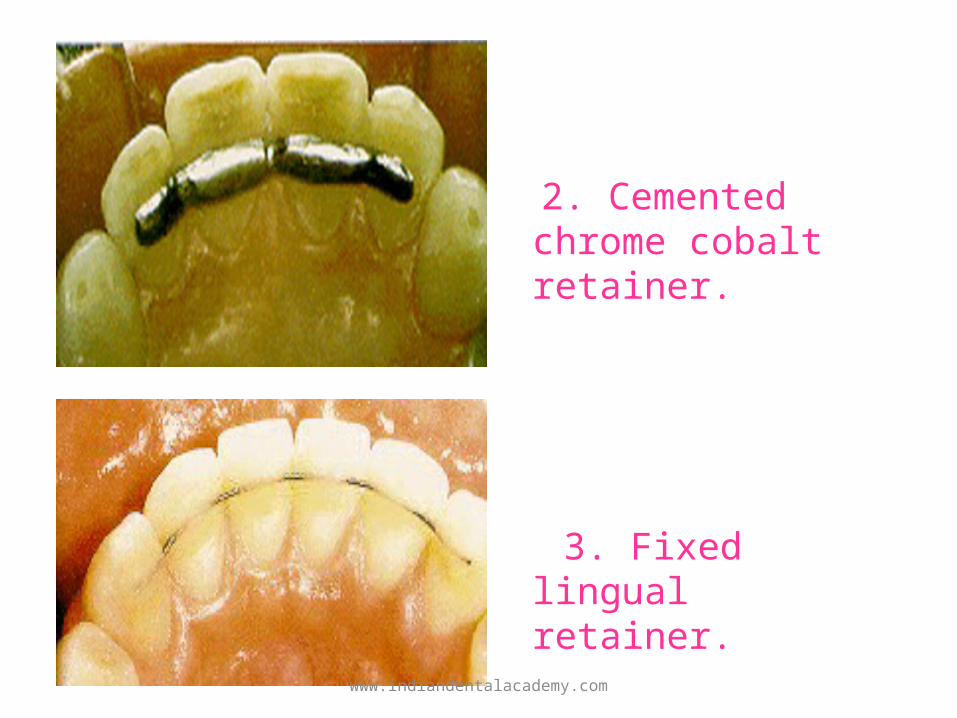
2. Cemented chrome cobalt retainer.
3. Fixed lingual retainer.
www.indiandentalacademy.com

Biomechanics
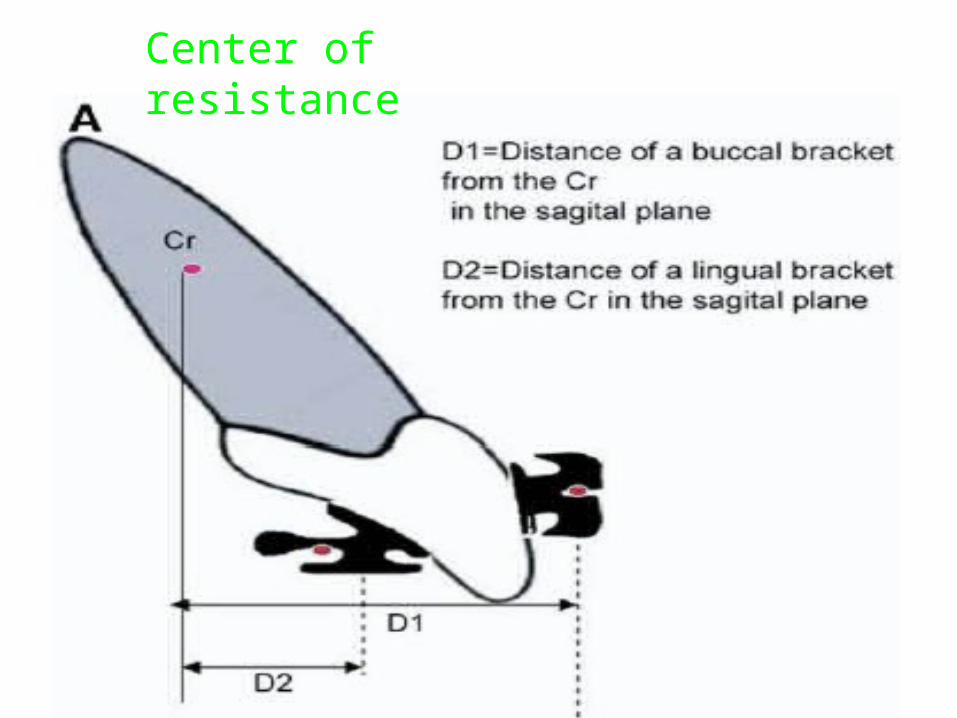
Center of resistance
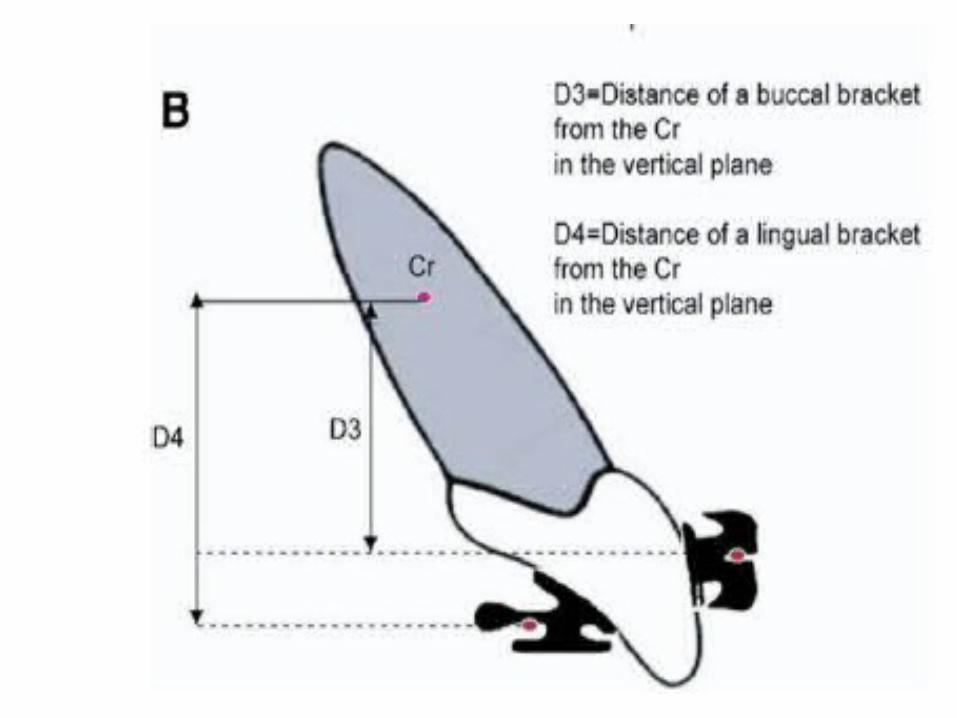
Short interbracket distance
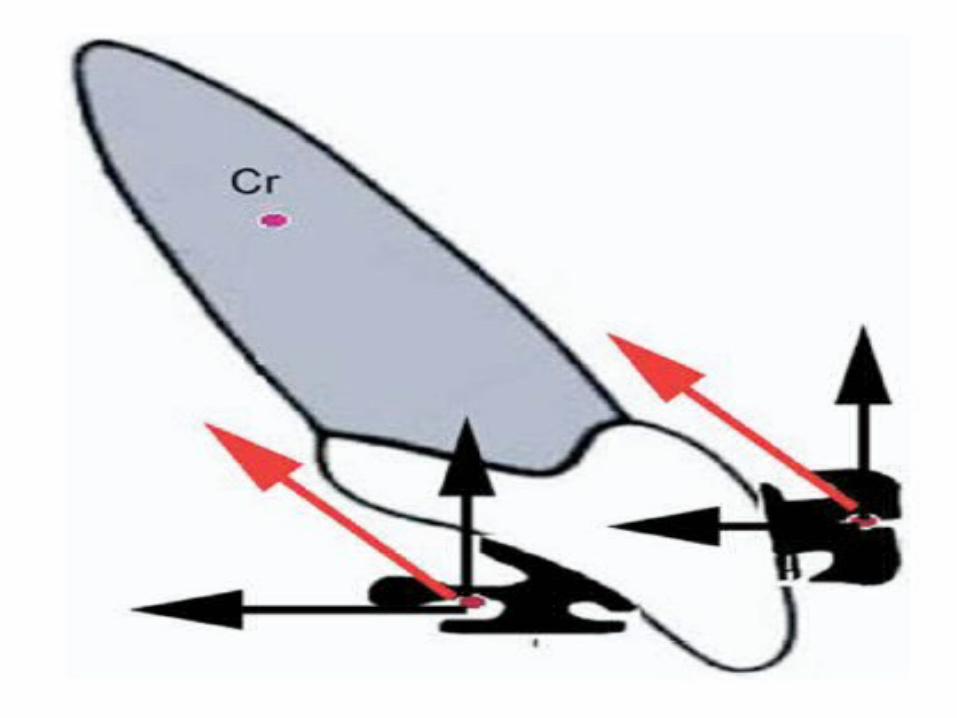
Force system
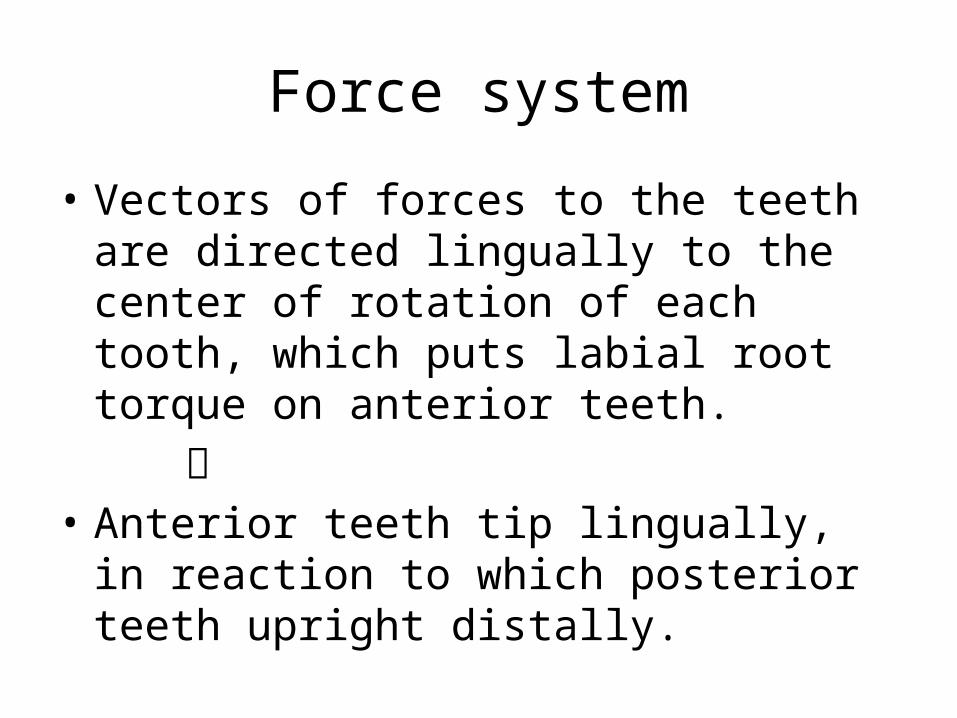
• Vectors of forces to the teeth are directed lingually to the center of rotation of each tooth, which puts labial root torque on anterior teeth.
• Anterior teeth tip lingually, in reaction to
which posterior teeth upright distally.
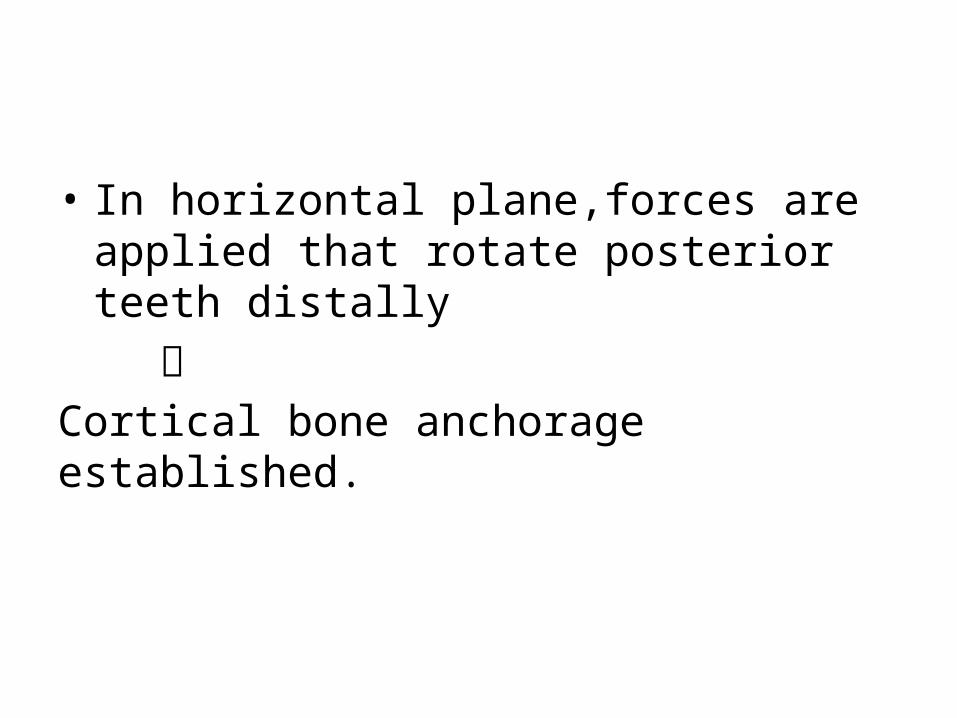
• In horizontal plane,forces are applied that rotate posterior teeth distally
Cortical bone anchorage established.
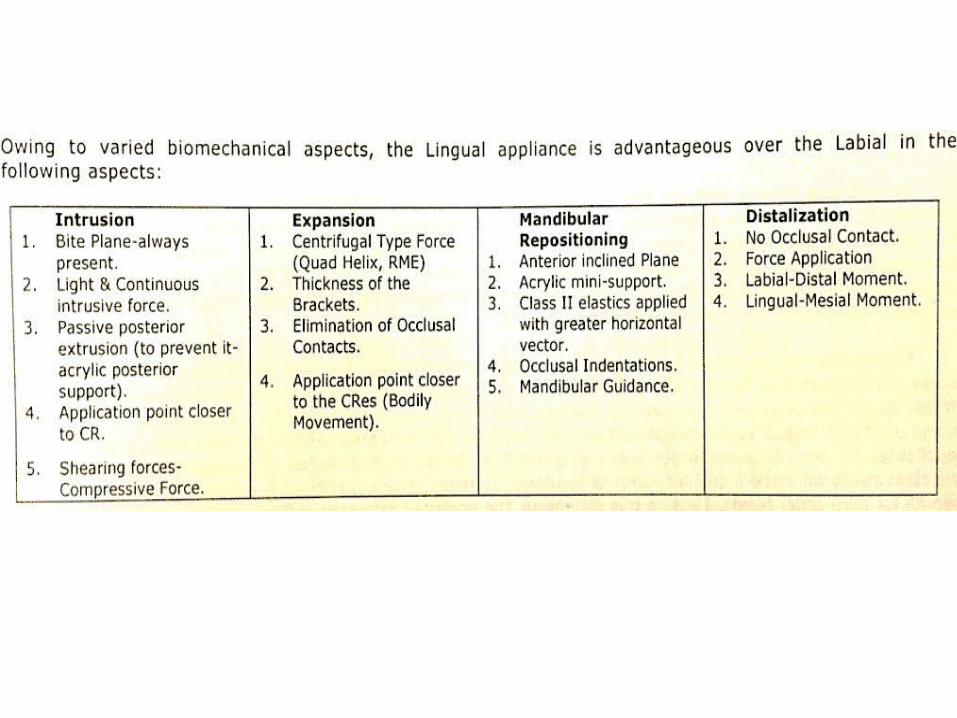
BIOMECHANICS AND COMPARATIVE BIOMECHANICS

Keys to Success in Lingual Therapy
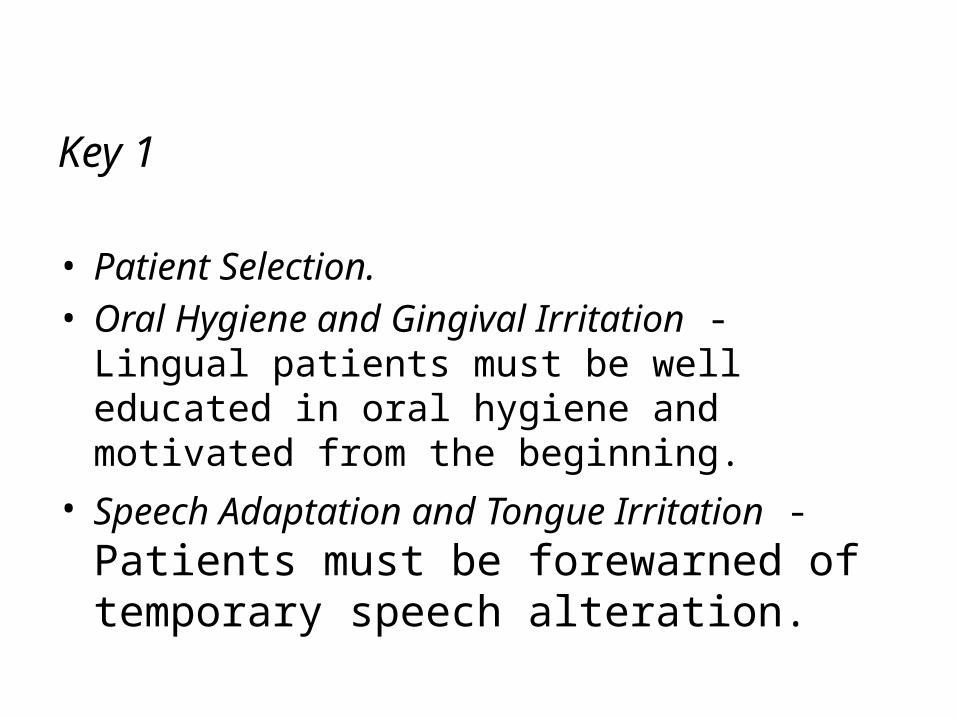
Key 1
• Patient Selection.• Oral Hygiene and Gingival Irritation - Lingual
patients must be well educated in oral hygiene and motivated from the beginning.
• Speech Adaptation and Tongue Irritation - Patients must be forewarned of temporary speech alteration.
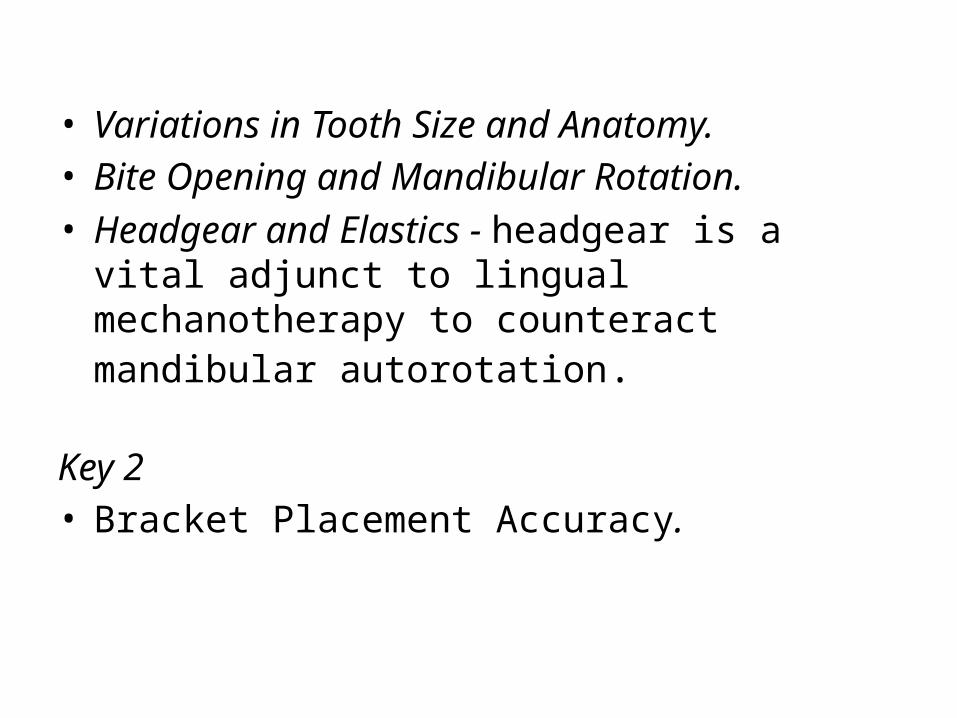
• Variations in Tooth Size and Anatomy.• Bite Opening and Mandibular Rotation.• Headgear and Elastics - headgear is a vital
adjunct to lingual mechanotherapy to counteract mandibular autorotation.
Key 2• Bracket Placement Accuracy.
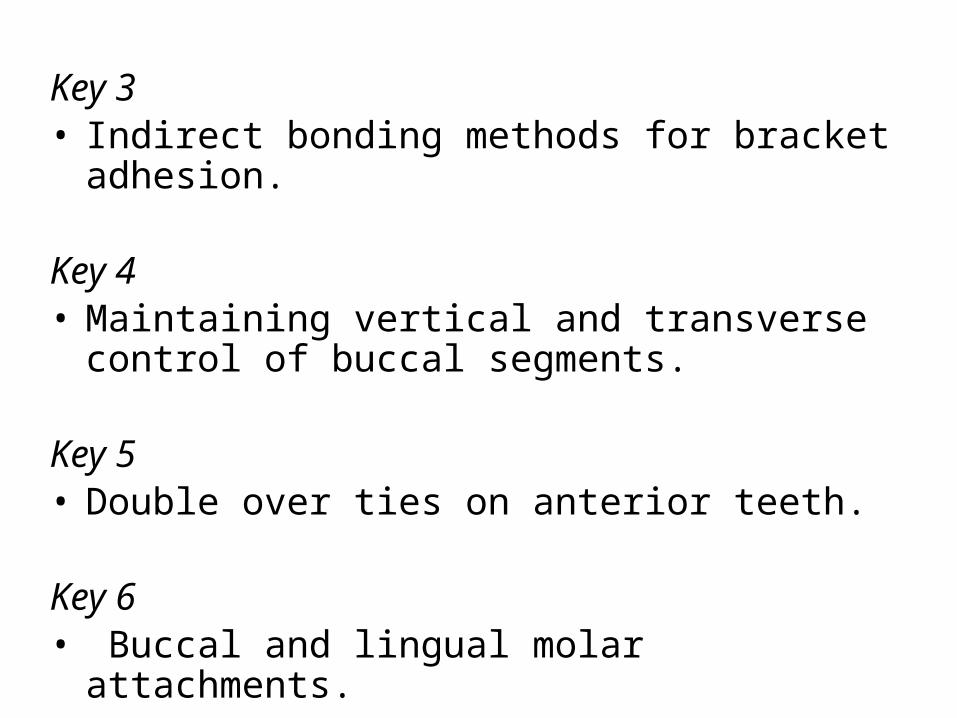
Key 3• Indirect bonding methods for bracket adhesion.
Key 4 • Maintaining vertical and transverse control of
buccal segments.
Key 5• Double over ties on anterior teeth.
Key 6• Buccal and lingual molar attachments.
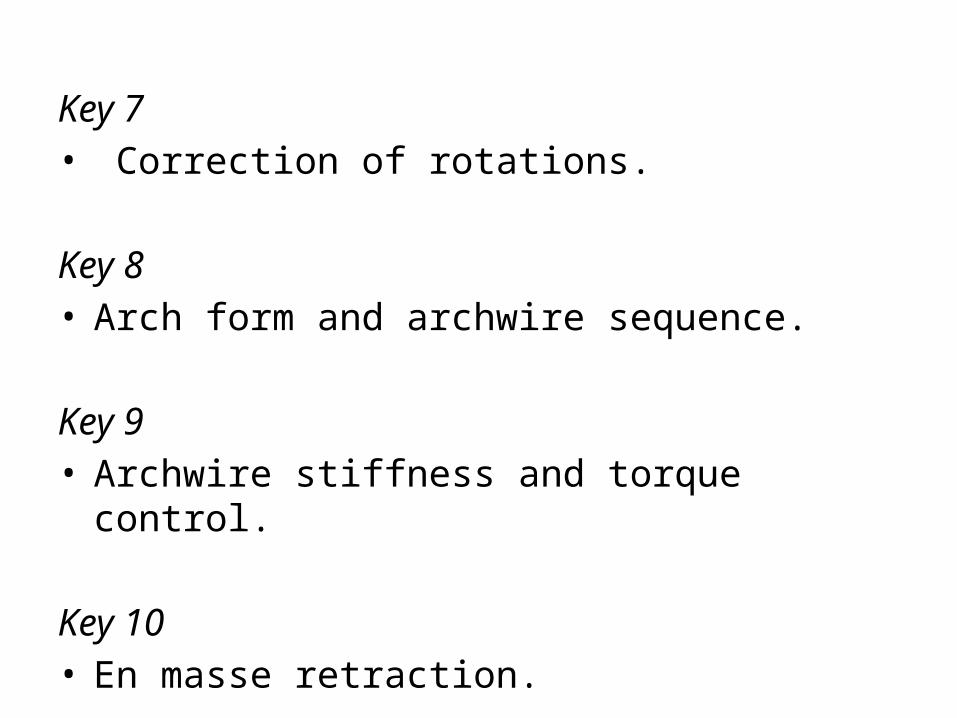
Key 7• Correction of rotations.
Key 8• Arch form and archwire sequence.
Key 9• Archwire stiffness and torque control.
Key 10• En masse retraction.
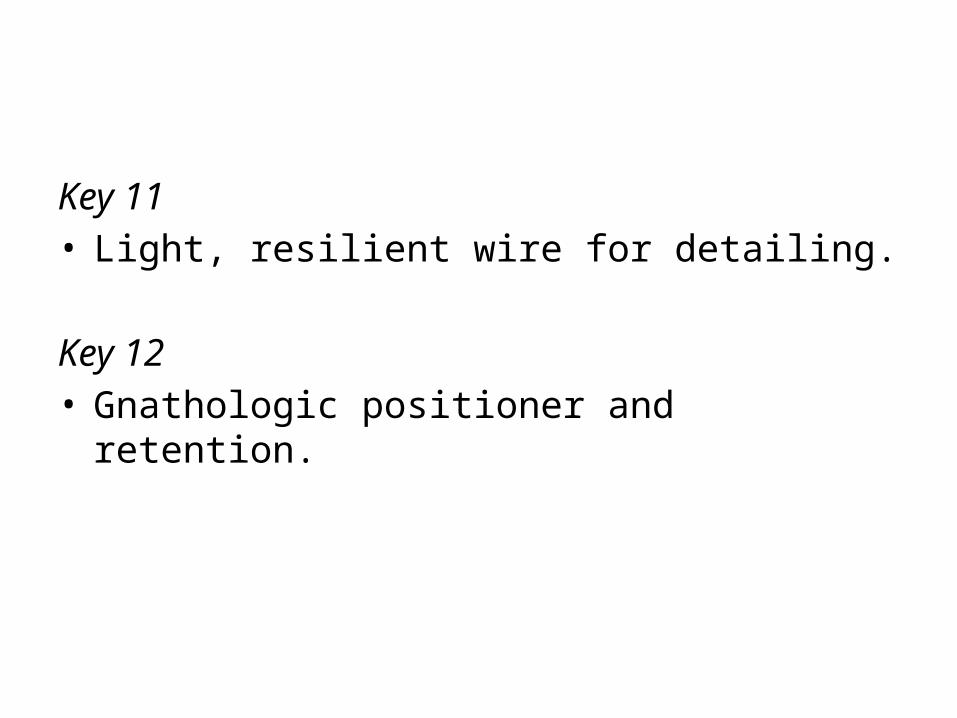
Key 11• Light, resilient wire for detailing.
Key 12• Gnathologic positioner and retention.

Improving Patient Comfort
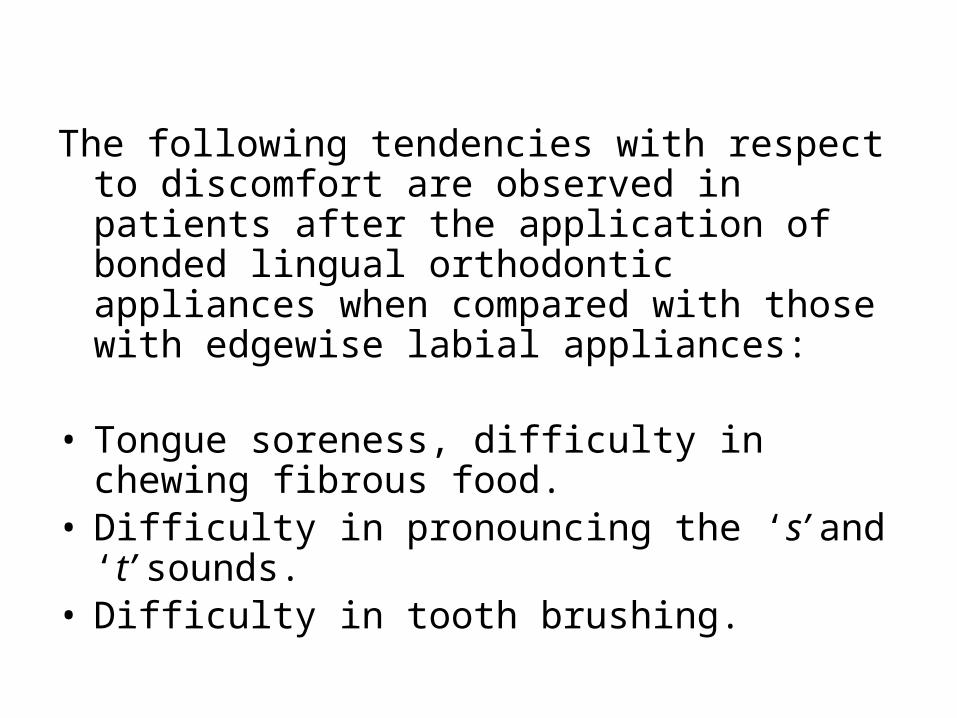
The following tendencies with respect to discomfort are observed in patients after the application of bonded lingual orthodontic appliances when compared with those with edgewise labial appliances:
• Tongue soreness, difficulty in chewing fibrous food.• Difficulty in pronouncing the ‘s’ and ‘t’ sounds.• Difficulty in tooth brushing.
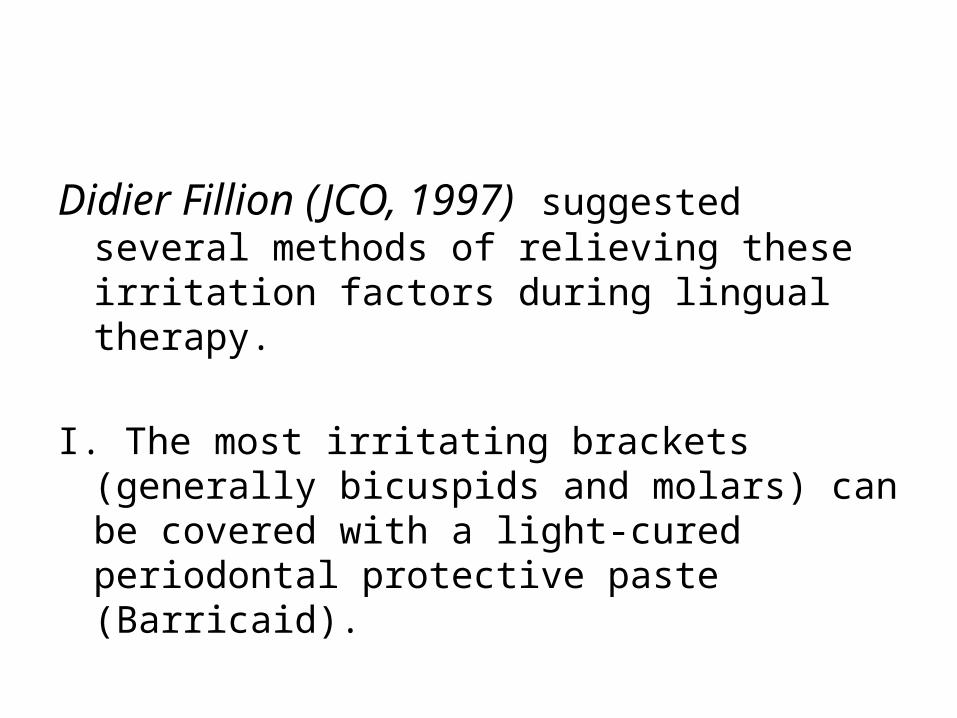
Didier Fillion (JCO, 1997) suggested several methods of relieving these irritation factors during lingual therapy.
I. The most irritating brackets (generally bicuspids and molars) can be covered with a light-cured periodontal protective paste (Barricaid).
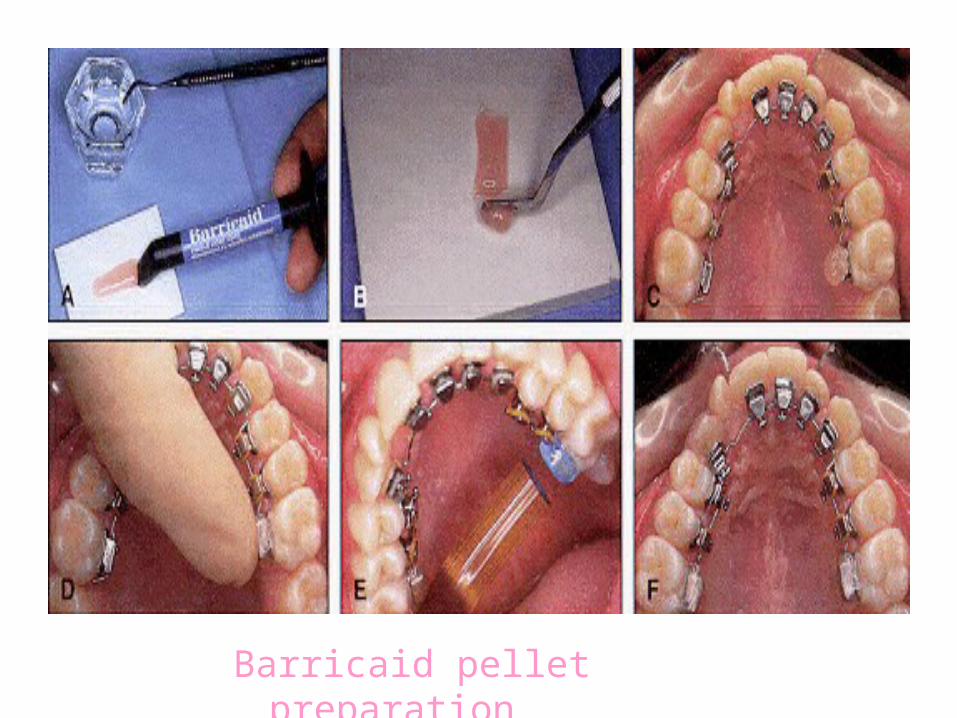
Barricaid pellet preparation
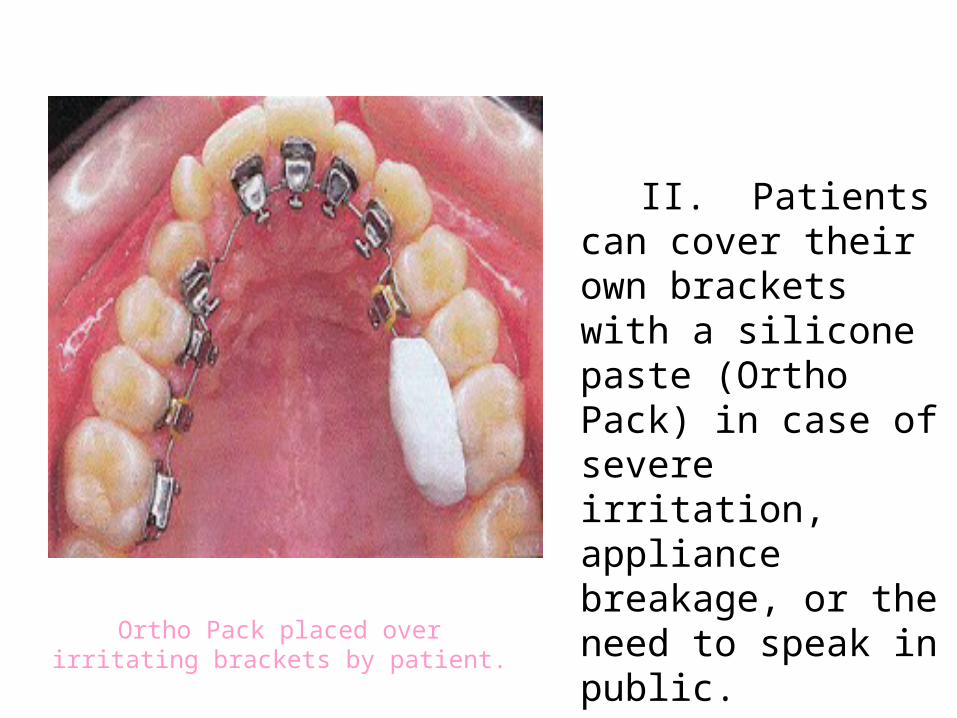
II. Patients can cover their own brackets with a silicone paste (Ortho Pack) in case of severe irritation, appliance breakage, or the need to speak in public.
Ortho Pack placed over irritating brackets by patient.
III. Patients with strong tongue-thrust habits and large tongues have more trouble adapting to lingual appliances. In such cases, a soft splint made from a 1.5mm-thick silicone material may be prescribed.
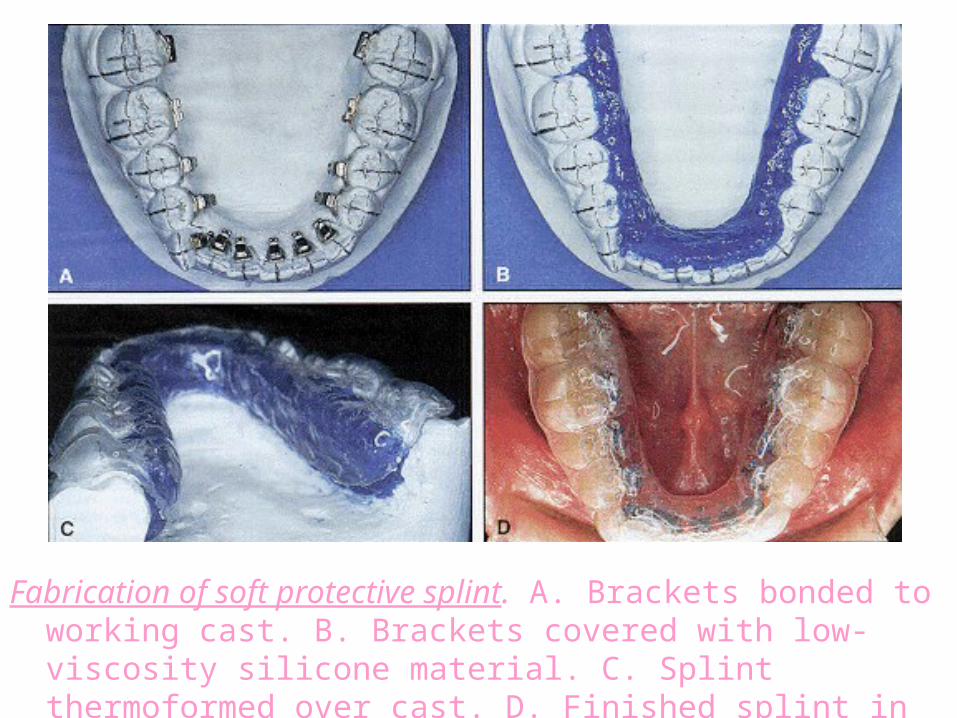
Fabrication of soft protective splint. A. Brackets bonded to working cast. B. Brackets covered with low-viscosity silicone material. C. Splint thermoformed over cast. D. Finished splint in place.
Plastic tubing placed over archwire
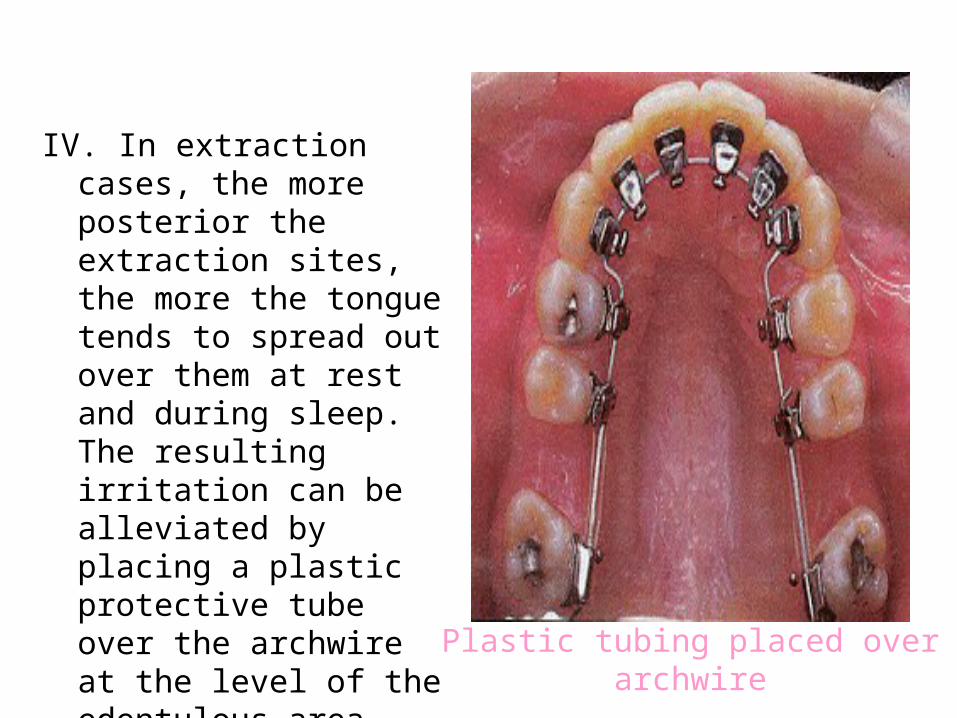
IV. In extraction cases, the more posterior the extraction sites, the more the tongue tends to spread out over them at rest and during sleep. The resulting irritation can be alleviated by placing a plastic protective tube over the archwire at the level of the edentulous area.
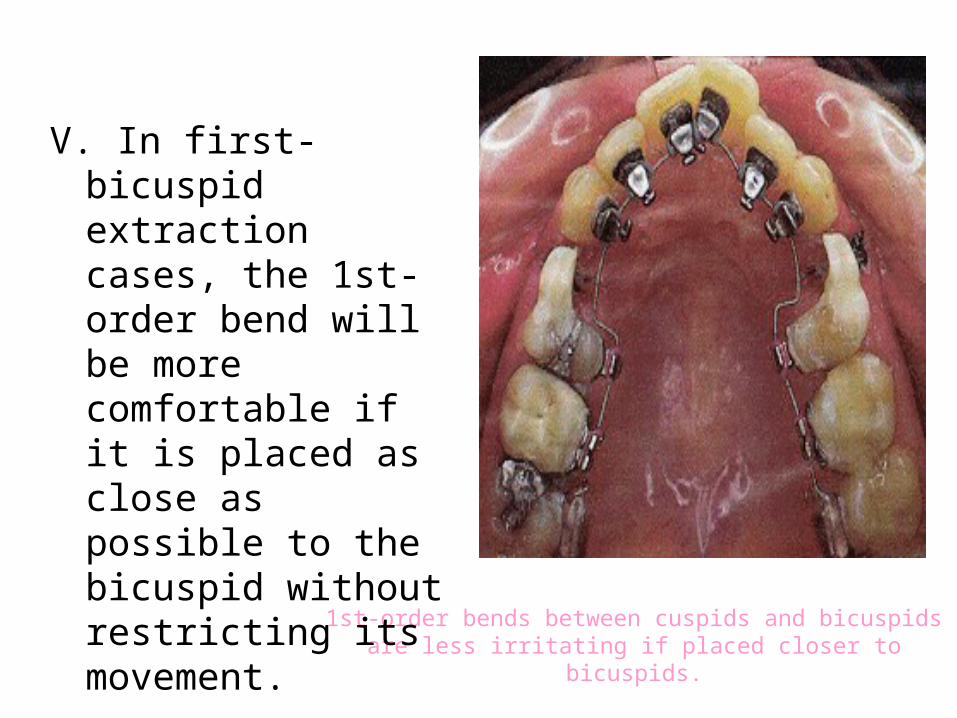
1st-order bends between cuspids and bicuspids are less irritating if placed closer to bicuspids.
V. In first-bicuspid extraction cases, the 1st-order bend will be more comfortable if it is placed as close as possible to the bicuspid without restricting its movement.
Advantages of Lingual Orthodontics
• Facial surfaces of the teeth are not damaged from bonding, debonding, adhesive removal, or decalcification from plaque retained around labial appliances.
• Facial gingival tissues are not adversely affected.
• The position of the teeth can be more precisely seen when their surfaces are not obstructed by brackets and arch wires.
• Facial contours are truly visualized since the contour and drape of the lips are not distorted by protruding labial appliances.
• Most adult and many young patients would prefer "invisible" lingual appliances if costs, treatment times, and results were comparable to those of labial appliance treatment. Given these advantages for patients, the perfection of lingual treatment seems worthwhile.
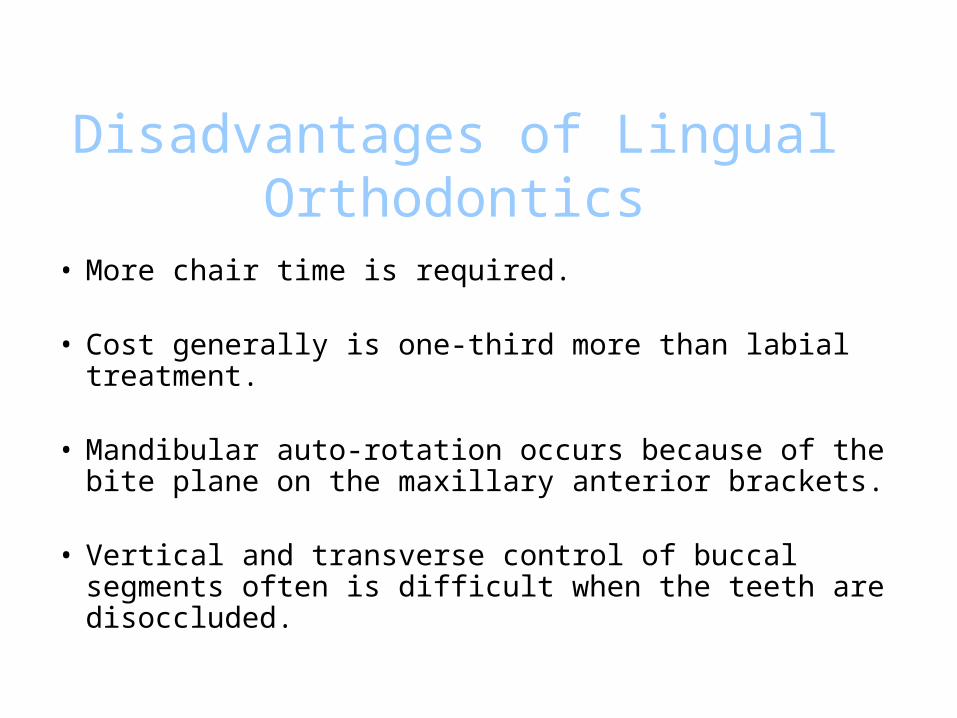
Disadvantages of Lingual Orthodontics
• More chair time is required.
• Cost generally is one-third more than labial treatment.
• Mandibular auto-rotation occurs because of the bite plane on the maxillary anterior brackets.
• Vertical and transverse control of buccal segments often is difficult when the teeth are disoccluded.
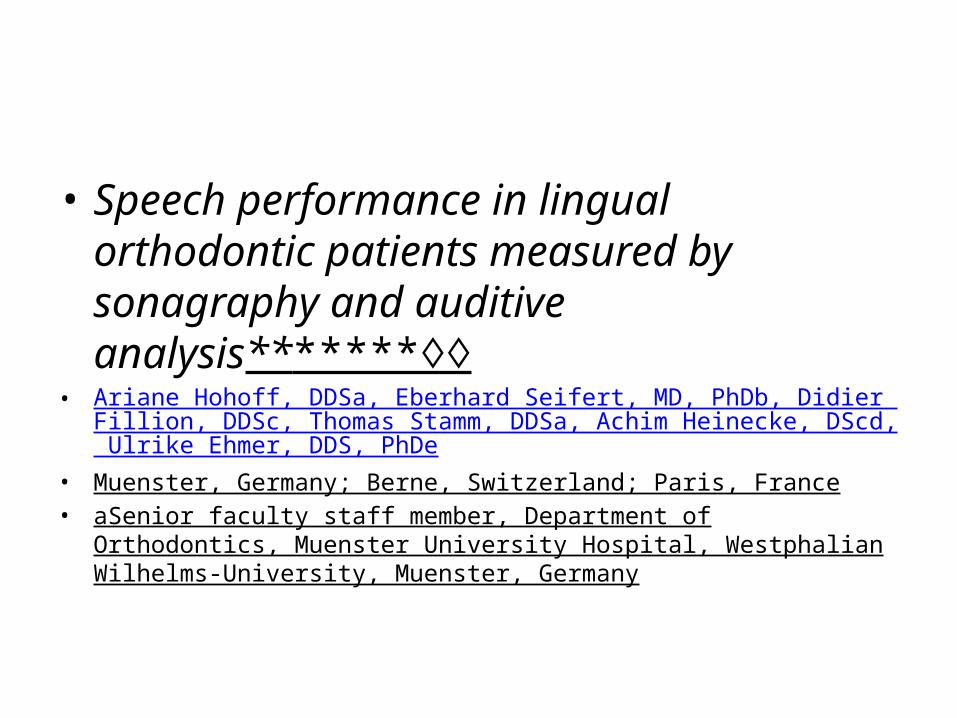
• Speech performance in lingual orthodontic patients measured by sonagraphy and auditive analysis*******♢♢
• Ariane Hohoff, DDSa, Eberhard Seifert, MD, PhDb, Didier Fillion, DDSc, Thomas Stamm, DDSa, Achim Heinecke, DScd, Ulrike Ehmer, DDS, PhDe
• Muenster, Germany; Berne, Switzerland; Paris, France• aSenior faculty staff member, Department of Orthodontics, Muenster University
Hospital, Westphalian Wilhelms-University, Muenster, Germany
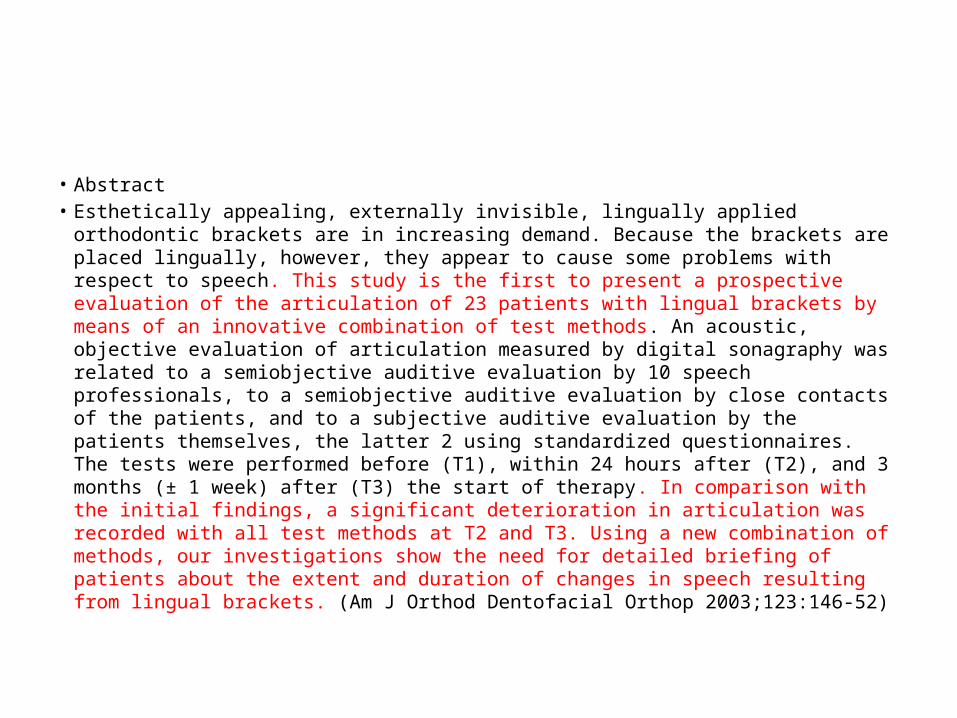
• Abstract• Esthetically appealing, externally invisible, lingually applied orthodontic brackets are in
increasing demand. Because the brackets are placed lingually, however, they appear to cause some problems with respect to speech. This study is the first to present a prospective evaluation of the articulation of 23 patients with lingual brackets by means of an innovative combination of test methods. An acoustic, objective evaluation of articulation measured by digital sonagraphy was related to a semiobjective auditive evaluation by 10 speech professionals, to a semiobjective auditive evaluation by close contacts of the patients, and to a subjective auditive evaluation by the patients themselves, the latter 2 using standardized questionnaires. The tests were performed before (T1), within 24 hours after (T2), and 3 months (± 1 week) after (T3) the start of therapy. In comparison with the initial findings, a significant deterioration in articulation was recorded with all test methods at T2 and T3. Using a new combination of methods, our investigations show the need for detailed briefing of patients about the extent and duration of changes in speech resulting from lingual brackets. (Am J Orthod Dentofacial Orthop 2003;123:146-52)
References1. Creekmore T. Lingual orthodontics – Its
renaissance. Am J Orthod Dentofac Orthop 1989; 95: 514-520.
2. Alexander CM, Alexander RG, Gorman JC et al. Lingual orthodontics: A status report. J Clin Orthod. 1982; 16(4): 255-262.
3. Kurz C, Swartz ML, Andreiko C. Lingual Orthodontics: A Status Report Part 2 Research and Development. J Clin Orthod. 1982; 16(11): 735-740.
4. Alexander CM, Alexander RG, Gorman JC et al. Lingual orthodontics: A status report Part 5 – Lingual Mechanotherapy. J Clin Orthod 1983; 17(2): 99-115.
5. Valiathan A, Sivakumar A. Lingual mechanics turning orthodontics outside in: an update. J Intl Coll Dentists. 2003.
6. Paige SF. A Lingual Light-Wire Technique. J. Clin Orthod 1982 Aug534 – 544.
7. Kinya Fujita. New orthodontic treatment with lingual bracket mushroom arch wire appliance. Am J Orthod. 1979; 76(6); 657.
8. Kinya Fujita. Multilingual bracket and mushroom arch wire technique: a clinical report. Am J Orthod Dentofac Orthop. 1982; 82(2): 120-140.
9. Hong K. Update on the Fujita Lingual Bracket. J Clin Orthod 1999; 33(3): 136-142.
10. Yen PKJ. A lingual Begg light wire technique. J Clin Orthod. 1986; 20(11): 786-791.
11. JCO interviews. Dr. Vincent M. Kelly on Lingual Orthodontics. J Clin Orthod. 1982; 16(7): 461-476.
12. Takemoto K, Scuzzo G. The Straight Wire concept in Lingual Orthodontics. J Clin Orthod. 2001; 35(1): 46-52.
13. Macchi A, Tagliabue A, Levrini L, Trezzi G. Philippe Self-Ligating Lingual Brackets. J Clin Orthod. 2002; 36(1): 42-45.
14. Wiechmann D, Rummel V, Thalheim A, Simon JS, Weichmann L. Customized brackets and archwires for lingual orthodontic treatment. Am J Orthod Dentofac Orthop. 2003; 124: 593-599.
15. Diamond M. Critical aspects of lingual bracket placement. J Clin Orthod. 1983; 17(10): 688-691.
16. Smith JR, Gorman JC, Kurz C, Dunn RM. Keys to success in Lingual Therapy: Part I. J Clin Orthod. 1986; 20(4): 252-261.
17. Smith JR, Gorman JC, Kurz C, Dunn RM. Keys to success in Lingual Therapy: Part II. J Clin Orthod. 1986; 20(5): 330-340.
18. Sachdeva RCL, Weichmann D, Rummel V. Precision finishing in Lingual Orthodontics. J Clin Orthod. 1999; 33(2): 101-113.
19. Gorman JC, Hilgers JJ, Smith JR. Lingual Orthodontics: a status report: Part 4-Diagnosis and Treatment Planning. J Clin Ortho 1983; 17(1): 26-35.
20. Gorman JC. Treatment of adults with Lingual Orthodontic Appliances. Dent Clin N Amer. 1988; 32(3): 589-620.
21. Hohoff A, Fillion D, Stamm T. Speech performance in lingual orthodontic patients measured by sonography and auditive analysis. Am J Orthod Dentfac Orthop. 2003; 123: 146- 152.
22. Chaconas SJ, Caputo AA, Ademir RB. Force transmission characteristics of lingual appliances. J Clin Orthod 1990; 24: 26-43.
23. Miyawaki S, Yasuhara M, Koh Y, Discomfort caused by bonded lingual orthodontic appliances in adult patients as examined by retrospective questionnaire. Am J Orthod Dentofac Orthop. 1999; 115(1): 83-88.
24. Geron S. the Lingual Bracket Jig. J Clin Orthod. 1984; 33(8): 814-815.
25. Kyung HM. The Mushoom Braket Positioner for Lingual Orthodontics. J Clin Orthod. 2002; 36(6): 320-328.
26. Diamond M. Improved vision and isolation for direct lingual bonding of the upper arch. J Clin Orthod. 1984; 18(11): 814-815.
27. Scholz RP, Swartz M. Lingual Orthodontics: a status report: Part 3- Indirect Bonding – laboratory and clinical procedures. J Clin Orthod. 1982; 16(12): 812-820.
28. Hong RK. Customized indirect bonding method for Lingual Orthodontics. J Clin Orthod 1996; 30(11): 650-652.
29. Hong RK. A new Customized Lingual indirect bonding system. J Clin Orthod. 2000; 34(8): 456-460.
30. Kim TW. New indirect bonding method for Lingual Orthodontics. J Clin Orthod 2000; 33(6):348-350.

31. Aguirre M. Indirect bonding for lingual cases. J Clin Orthod 1984; 18(8): 565-569.
THANK YOU