Embed Size (px)
Citation preview
Chapter 81
SAP NetWeaver Fiori
The following is an overview of the steps required to configure the SAP NetWeaver Fiori Web application for single sign-on (SSO) via SAML. SAP NetWeaver Fiori offers both IdP-initiated SAML SSO (for SSO access through the Admin Portal) and SP-initiated SAML SSO (for SSO access directly through the SAP NetWeaver Fiori web application). You can configure SAP NetWeaver Fiori for either or both types of SSO. Enabling both methods ensures that users can log in to SAP NetWeaver Fiori in different situations such as clicking through a notification email.
Note This document is written with SAP NetWeaver 7.4 with SAP ERP 6.0. If you are not using the same versions, your interface may differ from the illustrations.
1 Prepare SAP NetWeaver Fiori for single sign-on (see Preparing for Configuration).
2 Complete the prerequisites for Fiori to be a service provider.
For details, see:
Assigning roles to users to configure SAML
Activating SAML2 configuration UI services
3 Add and begin to configure the SAP NetWeaver Fiori application in Admin Portal.
For details, see Configuring SAP NetWeaver Fiori in Admin Portal (Part 1).
4 Enable SAML and create a local provider.
For more information, see Enabling SAML and creating a local provider in SAP NetWeaver’s SAML 2.0 Configuration
5 Create and Enable a Trusted Provider for Centrify.
For more information, see Creating and enabling a trusted provider for Centrify.
6 Finish configuring SAP NetWeaver Fiori application for single sign-on.
For details, Configuring SAP NetWeaver Fiori in Admin Portal (Part 2).
After you have finished configuring the application settings in the Admin Portal and the SAP NetWeaver Fiori application, users are ready to launch the application from the Centrify user portal.
1
Preparing for Configuration
Preparing for Configuration
SAP NetWeaver Fiori requirements for SSO
Before you configure the SAP NetWeaver Fiori web application for SSO, you need the following:
SAP NetWeaver Fiori.
An active SAP NetWeaver Fiori account with administrator rights for your organization.
Setting up the certificates for SSO
To establish a trusted connection between the web application and the Centrify Directory Service, you need to have the same signing certificate in both the application and the application settings in Admin Portal.
If you use your own certificate, you upload the signing certificate and its private key in a .pfx or .p12 file to the application settings in Admin Portal. You also upload the public key certificate in a .cer or .pem file to the web application.
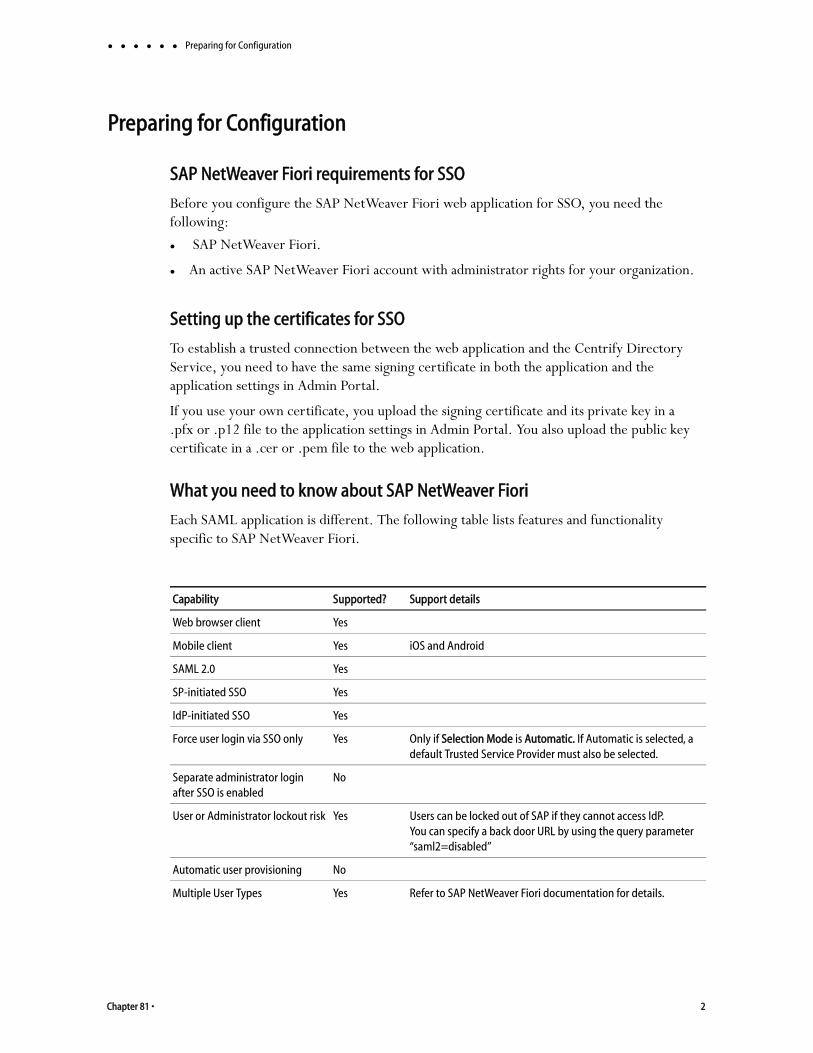
What you need to know about SAP NetWeaver Fiori
Each SAML application is different. The following table lists features and functionality specific to SAP NetWeaver Fiori.
Capability Supported? Support details
Web browser client Yes
Mobile client Yes iOS and Android
SAML 2.0 Yes
SP-initiated SSO Yes
IdP-initiated SSO Yes
Force user login via SSO only Yes Only if Selection Mode is Automatic. If Automatic is selected, a default Trusted Service Provider must also be selected.
Separate administrator login after SSO is enabled
No
User or Administrator lockout risk Yes Users can be locked out of SAP if they cannot access IdP. You can specify a back door URL by using the query parameter “saml2=disabled”
Automatic user provisioning No
Multiple User Types Yes Refer to SAP NetWeaver Fiori documentation for details.
Chapter 81 • 2

Completing prerequisites for Fiori service providers
Completing prerequisites for Fiori service providersIn order for Fiori to be fully configured as a service provider, it must have a supported cryptographic library installed, users with administrative privileges, and activated SAML2 configuration UI services.
Assigning roles to users to configure SAML
If you have users without administrative privileges who you want to give the ability to configure SAML, assign them the role SAP_SAML2_CFG_ADM. There is also a read-only role, SAP_SAML2_CFG_DISPLAY.
Activating SAML2 configuration UI services
To access SAP Fiori's SAML 2.0 Configuration page, you must first activate SAML2 Configuration UI Services and other related services. A series of services must be activated. Follow the steps below in To activate a service for each of the service paths in this list:
/sap/bc/saml2/CDC_EXT_SERVICE
/sap/bc/webdynpro/sap/SAML2
/sap/public/bc/icf/logoff
/sap/public/bc/icons
/sap/public/bc/icons_rtl
/sap/public/bc/pictograms
/sap/public/bc/sec/SAML2
/sap/public/bc/webdynpro/adobeChallenge
/sap/public/bc/webdynpro/mimes
/sap/public/bc/webdynpro/ssr
/sap/public/bc/webdynpro/ViewDesigner
/sap/public/bc/webicons
/sap/public/myssocntl
Self-service password Yes Users can reset their own passwords. Note that administrators cannot reset a user’s password.
Access restriction using a corporate IP range
Yes You can specify an IP Range in the Admin Portal Policy page to restrict access to the application.
Capability Supported? Support details
Admin Portal user’s guide 3

Changing the logon data procedure of Fiori UI services
To activate a service
1 Call transaction SICF.
2 On the Maintain Services page, enter one of the service paths from the list above in the Service Path field.
3 Click Execute.
4 Repeat Step 2 and Step 3 for each of the services listed above.
5 Right-click the service in the tree view and if the option is offered, select Activate Service.
If the Activate Service option is not available, that means the service is already activated.
6 When prompted to activate the service, click Yes with tree:
7 Call transaction SAML2.
Note The Enable SAML 2.0 Support button should be visible. However, if the SAML 2.0 configuration UI shows an error, you will not be able to move ahead until you find the source of the error. The most common error is due to not activating all of the services listed above. Double-check to make sure that all the services listed above are activated.
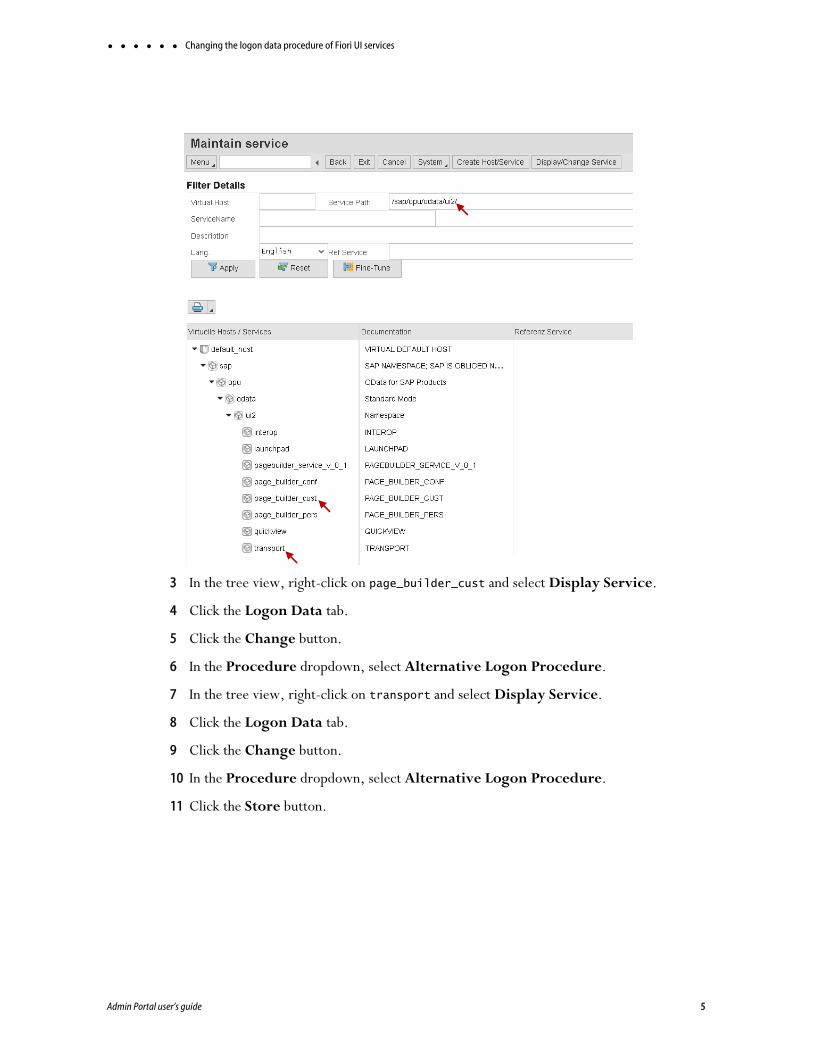
Changing the logon data procedure of Fiori UI services
To change the logon data procedure of Fiori UI services:
1 Call transaction SICF.
2 Search for Service Path /sap/opu/odata/ui2.
Chapter 81 • 4
Changing the logon data procedure of Fiori UI services
3 In the tree view, right-click on page_builder_cust and select Display Service.
4 Click the Logon Data tab.
5 Click the Change button.
6 In the Procedure dropdown, select Alternative Logon Procedure.
7 In the tree view, right-click on transport and select Display Service.
8 Click the Logon Data tab.
9 Click the Change button.
10 In the Procedure dropdown, select Alternative Logon Procedure.
11 Click the Store button.
Admin Portal user’s guide 5

Configuring SAP NetWeaver Fiori in Admin Portal (Part 1)
Configuring SAP NetWeaver Fiori in Admin Portal (Part 1)
To add and configure the SAP NetWeaver Fiori application in Admin Portal:
1 In Admin Portal, click Apps, then click Add Web Apps.
The Add Web Apps screen appears.
2 On the Search tab, enter the partial or full application name in the Search field and click the search icon.
3 Next to the application, click Add.
4 In the Add Web App screen, click Yes to confirm.
Admin Portal adds the application.
5 Click Close to exit the Application Catalog.
The application that you just added opens to the Application Settings page.
6 Click Download Identity Provider Metadata File.
This downloads an XML file onto your computer that you will need in the next section, Creating and enabling a trusted provider for Centrify.
7 (Optional) On the Application Settings page, click Enable Derived Credentials for this app on enrolled devices (opens in built-in browser) to use derived credentials on enrolled mobile devices to authenticate with this application.
Chapter 81 • 6

Configuring SAP NetWeaver Fiori in Admin Portal (Part 1)
For more information, see Derived Credentials.
8 On the Application Settings page, expand the Additional Options section and specify the following settings:
Option Description
Application ID Configure this field if you are deploying a mobile application that uses the Centrify mobile SDK, for example mobile applications that are deployed into a Samsung KNOX version 1 container. The Centrify Directory Service uses the Application ID to provide single sign-on to mobile applications. Note the following:
• The Application ID has to be the same as the text string that is specified as the target in the code of the mobile application written using the mobile SDK. If you change the name of the web application that corresponds to the mobile application, you need to enter the original application name in the Application ID field.
• There can only be one SAML application deployed with the name used by the mobile application.
The Application ID is case-sensitive and can be any combination of letters, numbers, spaces, and special characters up to 256 characters.
Show in User app list Select Show in User app list to display this web application in the user portal. (This option is selected by default.)
If this web application is added only to provide SAML for a corresponding mobile app, deselect this option so the web application won’t display for users in the user portal.
Security Certificate These settings specify the signing certificate used for secure SSO authentication between the Centrify Directory Service and the web application. Just be sure to use a matching certificate both in the application settings in the Admin Portal and in the application itself. Select an option to change the signing certificate.
• Use existing certificate
When selected the certificate currently in use is displayed. It’s not necessary to select this option—it’s present to display the current certificate in use.
• Use the default tenant signing certificate
Select this option to use the Centrify Directory Service standard certificate. This is the default setting.
• Use a certificate with a private key (pfx file) from your local storage
Select this option to use your organization’s own certificate. To use your own certificate, you must click Browse to upload an archive file (.p12 or .pfx extension) that contains the certificate along with its private key. If the file has a password, you must enter it when prompted.
Upload the certificate from your local storage prior to downloading the IdP metadata or the Signing Certificate from the Applications Settings page. If the IdP metadata is available from a URL, be sure to upload the certificate prior to providing the URL to your service provider.
Admin Portal user’s guide 7
Configuring SAP NetWeaver Fiori in Admin Portal (Part 1)
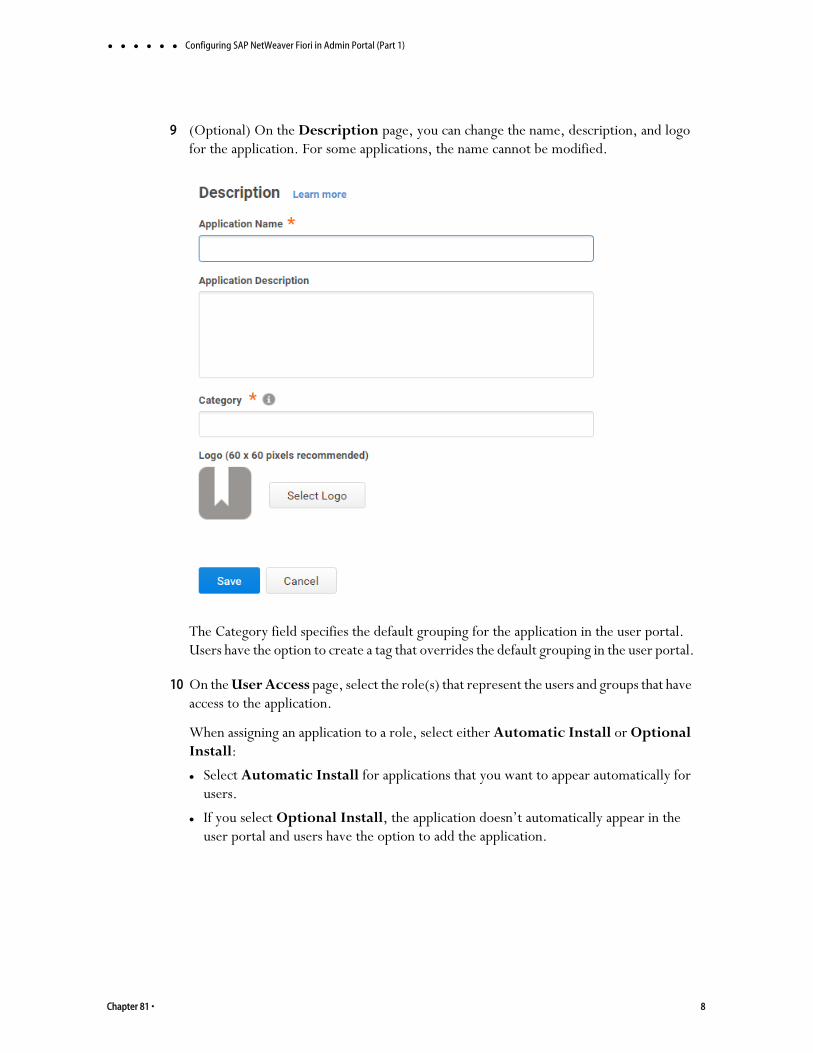
9 (Optional) On the Description page, you can change the name, description, and logo for the application. For some applications, the name cannot be modified.
The Category field specifies the default grouping for the application in the user portal. Users have the option to create a tag that overrides the default grouping in the user portal.
10 On the User Access page, select the role(s) that represent the users and groups that have access to the application.
When assigning an application to a role, select either Automatic Install or Optional Install:
Select Automatic Install for applications that you want to appear automatically for users.
If you select Optional Install, the application doesn’t automatically appear in the user portal and users have the option to add the application.
Chapter 81 • 8
Configuring SAP NetWeaver Fiori in Admin Portal (Part 1)
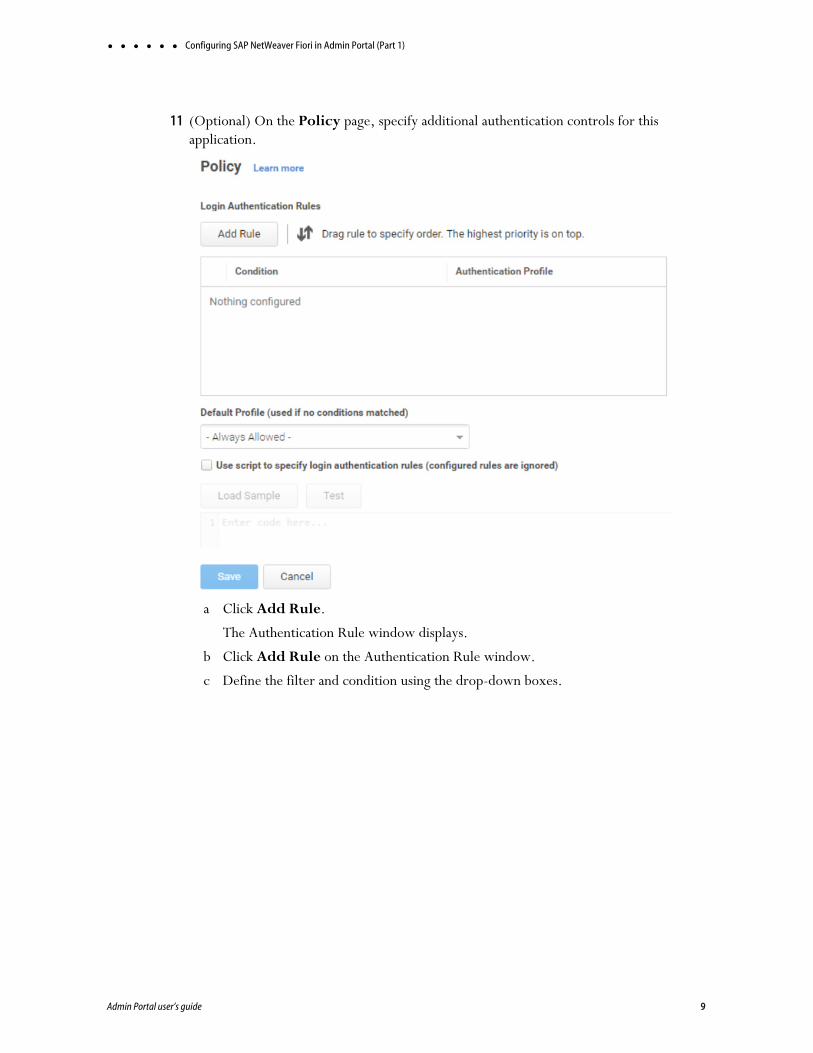
11 (Optional) On the Policy page, specify additional authentication controls for this application.
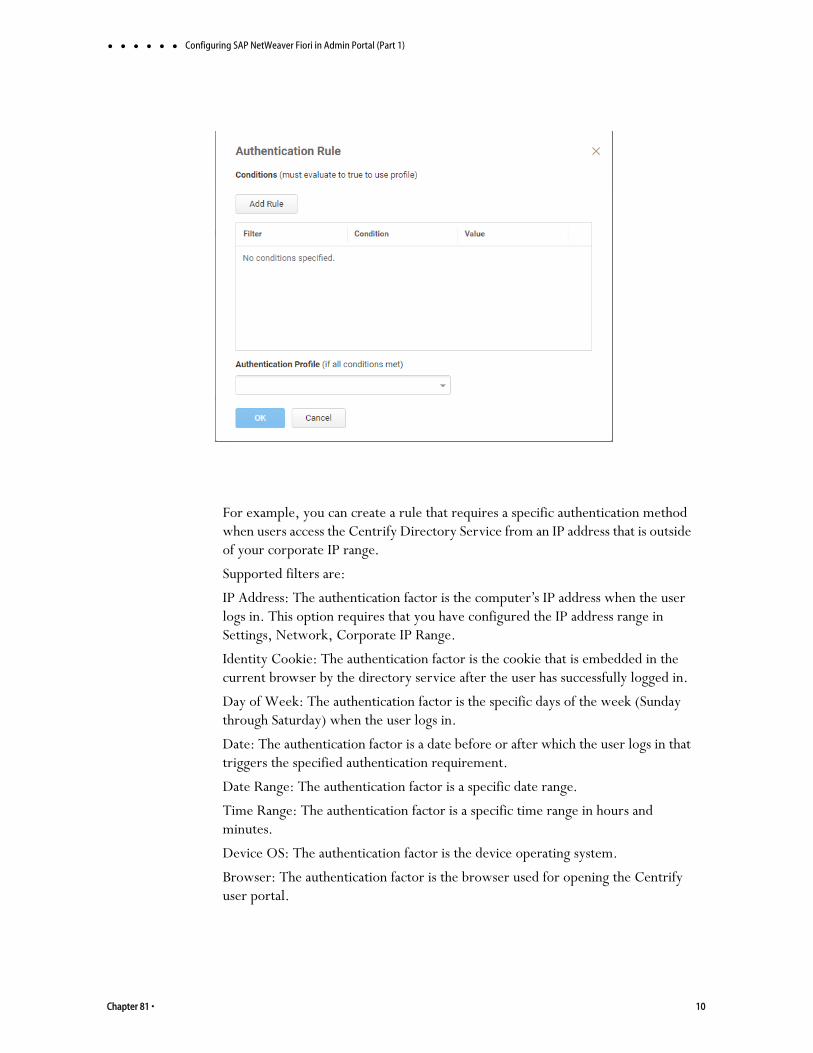
a Click Add Rule.
The Authentication Rule window displays.
b Click Add Rule on the Authentication Rule window.
c Define the filter and condition using the drop-down boxes.
Admin Portal user’s guide 9
Configuring SAP NetWeaver Fiori in Admin Portal (Part 1)
For example, you can create a rule that requires a specific authentication method when users access the Centrify Directory Service from an IP address that is outside of your corporate IP range.
Supported filters are:
IP Address: The authentication factor is the computer’s IP address when the user logs in. This option requires that you have configured the IP address range in Settings, Network, Corporate IP Range.
Identity Cookie: The authentication factor is the cookie that is embedded in the current browser by the directory service after the user has successfully logged in.
Day of Week: The authentication factor is the specific days of the week (Sunday through Saturday) when the user logs in.
Date: The authentication factor is a date before or after which the user logs in that triggers the specified authentication requirement.
Date Range: The authentication factor is a specific date range.
Time Range: The authentication factor is a specific time range in hours and minutes.
Device OS: The authentication factor is the device operating system.
Browser: The authentication factor is the browser used for opening the Centrify user portal.
Chapter 81 • 10
Configuring SAP NetWeaver Fiori in Admin Portal (Part 1)
Country: The authentication factor is the country based on the IP address of the user computer.
For the Day/Date/Time related conditions, you can choose between the user’s local time and Universal Time Coordinated (UTC) time.
d Click the Add button associated with the filter and condition.
e Select the profile you want applied if all filters/conditions are met in the Authentication Profile drop-down.
The authentication profile is where you define the authentication methods. If you have not created the necessary authentication profile, select the Add New Profile option. See Creating authentication profiles.
f Click OK.
g (Optional) In the Default Profile (used if no conditions matched) drop-down, you can select a default profile to be applied if a user does not match any of the configured conditions.
If you have no authentication rules configured and you select Not Allowed in the Default Profile dropdown, users will not be able to log in to the service.
h Click Save.
If you have more than one authentication rule, you can prioritize them on the Policy page.
You can also include JavaScript code to identify specific circumstances when you want to block an application or you want to require additional authentication methods. For details, see Application access policies with JavaScript.
Note If you left the Apps section of Admin Portal to specify additional authentication control, you will need to return to the Apps section before continuing by clicking Apps at the top of the page in Admin Portal.
Admin Portal user’s guide 11
Configuring SAP NetWeaver Fiori in Admin Portal (Part 1)
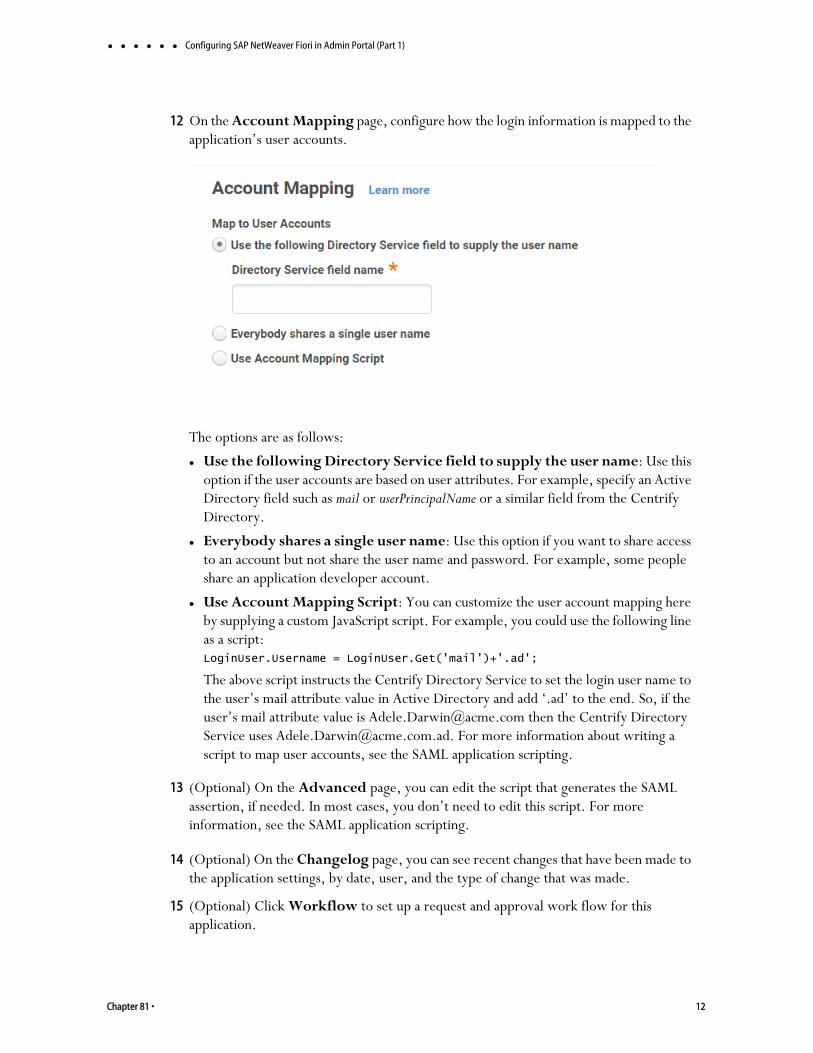
12 On the Account Mapping page, configure how the login information is mapped to the application’s user accounts.
The options are as follows:
Use the following Directory Service field to supply the user name: Use this option if the user accounts are based on user attributes. For example, specify an Active Directory field such as mail or userPrincipalName or a similar field from the Centrify Directory.
Everybody shares a single user name: Use this option if you want to share access to an account but not share the user name and password. For example, some people share an application developer account.
Use Account Mapping Script: You can customize the user account mapping here by supplying a custom JavaScript script. For example, you could use the following line as a script:LoginUser.Username = LoginUser.Get('mail')+'.ad';
The above script instructs the Centrify Directory Service to set the login user name to the user’s mail attribute value in Active Directory and add ‘.ad’ to the end. So, if the user’s mail attribute value is [email protected] then the Centrify Directory Service uses [email protected]. For more information about writing a script to map user accounts, see the SAML application scripting.
13 (Optional) On the Advanced page, you can edit the script that generates the SAML assertion, if needed. In most cases, you don’t need to edit this script. For more information, see the SAML application scripting.
14 (Optional) On the Changelog page, you can see recent changes that have been made to the application settings, by date, user, and the type of change that was made.
15 (Optional) Click Workflow to set up a request and approval work flow for this application.
Chapter 81 • 12
Enabling SAML and creating a local provider in SAP NetWeaver’s SAML 2.0 Configuration
The Workflow feature is a premium feature and is available only in the Centrify Identity Service App+ Edition. See Configuring Workflow for more information.
16 Click Save.
17 Leave the browser tab open to the Admin Portal. You will use it again in Configuring SAP NetWeaver Fiori in Admin Portal (Part 2).
Enabling SAML and creating a local provider in SAP NetWeaver’s SAML 2.0 Configuration
To enable and configure SAML 2.0:
1 Log in to the SAP as an administrator.
Note If you choose the Web GUI, the URL resembles: http(s)://<sap-fiori-hostname-and-port-number>/sap/bc/gui/sap/its/webgui
Note If you have pop-ups blocked in your browser, you need to unblock them before the next step, or add an exception for this URL.
2 Call transaction SAML2.
A browser window opens to load the SAML 2.0 Configuration UI. If you have not enabled SAML 2.0 before, you will see the message, “Client is not configured to support SAML 2.0” and the button Enable SAML 2.0 Support. If you do not see this message and button, SAML 2.0 is already enabled and you can skip to Step 4.
3 If visible, click Enable SAML 2.0 Support and select Create SAML 2.0 Local Provider.
4 At Step 1, in Provider Name, enter CentrifySAML and click Next.
Note If you enter a different provider name here, you must also enter it in the Local Provider Name field in Application Settings of your SAML application. See Configuring SAP NetWeaver Fiori in Admin Portal (Part 2) for details.
5 At Step 2, click Next.
6 At Step 3, click Finish to create a Local Provider.
The SAML 2.0 Configuration of Fiori System page appears showing the Local Provider you just created.
7 Click the Service Provider Settings tab.
8 Click Edit.
9 Click Add under Relay State Mapping.
Admin Portal user’s guide 13
Creating and enabling a trusted provider for Centrify
10 In the SAML 2.0 Configuration pop-up, enter fiori as the RelayState and your Fiori UI landing page as the Path. For example, /sap/bc/ui5_ui5/sap/arsrvc_upb_admn
Note Make sure the Path does not have a trailing slash.
11 Click OK.
12 Click Save at the top of the page.
13 Under Assertion Consumer Service, copy your EndPoint Path and save it to use in Configuring SAP NetWeaver Fiori in Admin Portal (Part 2).
14 Continue to Creating and enabling a trusted provider for Centrify.
Creating and enabling a trusted provider for CentrifyNote This procedure continues from Enabling SAML and creating a local provider in SAP NetWeaver’s SAML 2.0 Configuration.
1 Click Trusted Providers.
2 Select Add > Uploading Metadata File.
3 In the SAML 2.0 Configuration pop-up window, click Browse and select the metadata file you downloaded in Configuring SAP NetWeaver Fiori in Admin Portal (Part 1).
4 Click Next.
5 Enter Centrify SSO to Fiori as the Alias.
If entered, SAP will show the name of the alias on the IdP selection screen; if not entered the selection screen will show the IdP’s Entity ID that was provided in the IdP Metadata.
6 Click Next.
7 On the screen that appears, leave all the default values unchanged and click Next again until you reach the step Single-Sign-On Endpoints.
8 Select HTTP POST and click Next.
9 On the screen that appears, leave all the default values unchanged and click Next again.
10 Continue to click Next until you see the Finish button.
11 Click Finish.
12 Select the trusted provider you just created under the List of Trusted Providers.
13 Click Edit.
14 Select the trusted provider you just added.
15 Click Identity Federation under Details of trusted provider.
Chapter 81 • 14

Configuring SAP NetWeaver Fiori in Admin Portal (Part 2)
16 Click Add.
17 Select Unspecified as the Supported NameID Format and click OK.
18 Click Save.
19 Click Enable.
20 Click OK to confirm.
The Active icon changes from a gray diamond to a green square.
Configuring SAP NetWeaver Fiori in Admin Portal (Part 2)
To finish configuring the SAP NetWeaver Fiori application in Admin Portal:
1 Return to the browser tab you were using to work in the Admin Portal in Configuring SAP NetWeaver Fiori in Admin Portal (Part 1) and navigate to the Application Settings screen of your SAP NetWeaver Fiori app.
2 Configure the following:
3 Click Save.
Field Set it to What you do
Assertion Consumer Service Endpoint URL
Your custom endpoint URL Replace YOUR-SAP-FIORI-FQDN-AND-PORT with your actual SAP FIORI FQDN and port number. For example, if your Fiori UI is hosted at: http://acme:8000/sap/bc/ui5_ui5/sap/
arsrvc_upb_admn/, your SAP FIORI FQDN AND PORT is acme:8000.
Replace ENDPOINT-PATH with the SAML Endpoint path that you saved from the Enabling SAML and creating a local provider in SAP NetWeaver’s SAML 2.0 Configuration.
The result should look something like this: http://acme:8000/sap/saml2/sp/acs/001
Local Provider Name The name of your local provider; either CentrifySAML or the name saved from Enabling SAML and creating a local provider in SAP NetWeaver’s SAML 2.0 Configuration
Enter the local provider name you provided in Step 4 of Enabling SAML and creating a local provider in SAP NetWeaver’s SAML 2.0 Configuration
Admin Portal user’s guide 15
Using Single Sign-On from SAP Fiori Client on Android and iOS
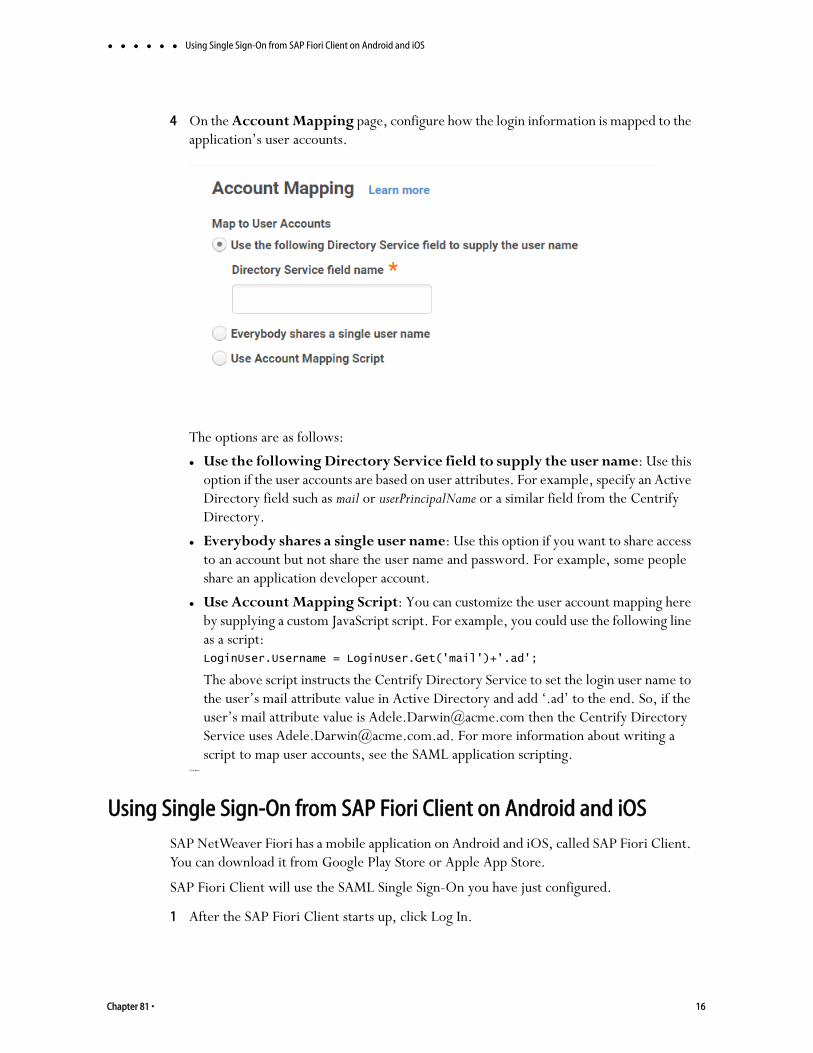
4 On the Account Mapping page, configure how the login information is mapped to the application’s user accounts.
The options are as follows:
Use the following Directory Service field to supply the user name: Use this option if the user accounts are based on user attributes. For example, specify an Active Directory field such as mail or userPrincipalName or a similar field from the Centrify Directory.
Everybody shares a single user name: Use this option if you want to share access to an account but not share the user name and password. For example, some people share an application developer account.
Use Account Mapping Script: You can customize the user account mapping here by supplying a custom JavaScript script. For example, you could use the following line as a script:LoginUser.Username = LoginUser.Get('mail')+'.ad';
The above script instructs the Centrify Directory Service to set the login user name to the user’s mail attribute value in Active Directory and add ‘.ad’ to the end. So, if the user’s mail attribute value is [email protected] then the Centrify Directory Service uses [email protected]. For more information about writing a script to map user accounts, see the SAML application scripting.
Click Save.
Using Single Sign-On from SAP Fiori Client on Android and iOSSAP NetWeaver Fiori has a mobile application on Android and iOS, called SAP Fiori Client. You can download it from Google Play Store or Apple App Store.
SAP Fiori Client will use the SAML Single Sign-On you have just configured.
1 After the SAP Fiori Client starts up, click Log In.
Chapter 81 • 16
For more information about SAP NetWeaver Fiori
2 Enter your SAP Fiori URL, such as: http://acme:8000/sap/bc/ui5_ui5/
3 Choose whether or not to set a passcode.
4 On the identity provider selection screen, select Centrify SSO to Fiori to be redirected to Centrify.
Note If your SAP SAML has been configured to always use Centrify as the default identity provider, you will be redirected to Centrify immediately without being shown the identity provider selection screen.
5 On Centrify login screen, log in to Centrify.
6 You will be redirected back to SAP Fiori Client and logged in.
For more information about SAP NetWeaver FioriContact SAP for more information about configuring SAP NetWeaver Fiori for SSO.
Admin Portal user’s guide 17