Embed Size (px)
Citation preview
ADMINISTRATION GUIDEP/N 300-011-622
REV A05
EMC CORPORATION
CORPORATE HEADQUARTERS:HOPKINTON, MA 01748-9103
1-508-435-1000WWW.EMC.COM
EMC® AVAMAR®
6.0
EMC AVAMAR 6.0 • ADMINISTRATION GUIDE 2
Copyright and Trademark Notices
Copyright © 2002 - 2011 EMC Corporation. All rights reserved.
Published September, 2011
EMC believes the information in this publication is accurate as of its publication date. The information is subject to change without notice.
THE INFORMATION IN THIS PUBLICATION IS PROVIDED “AS IS.” EMC CORPORATION MAKES NO REPRESENTATIONS OR WARRANTIES OF ANY KIND WITH RESPECT TO THE INFORMATION IN THIS PUBLICATION, AND SPECIFICALLY DISCLAIMS IMPLIED WARRANTIES OF MERCHANTABILITY OR FITNESS FOR A PARTICULAR PURPOSE.
Use, copying, and distribution of any EMC software described in this publication requires an applicable software license.
For the most up-to-date regulatory document for your product line, go to the Technical Documentation and Advisories section on EMC Powerlink.
For the most up-to-date listing of EMC product names, see EMC Corporation Trademarks on EMC.com.
All other trademarks used herein are the property of their respective owners.

TABLE OF CONTENTS
Revision history . . . . . . . . . . . . . . . . . . . . . . . . . . . . . . . . . . . . . . . . . . . . .15
Preface . . . . . . . . . . . . . . . . . . . . . . . . . . . . . . . . . . . . . . . . . . . . . . . . . . . . .17Scope and intended audience. . . . . . . . . . . . . . . . . . . . . . . . . . . . . . . . . . . . . . . . . . . . . 17Product information . . . . . . . . . . . . . . . . . . . . . . . . . . . . . . . . . . . . . . . . . . . . . . . . . . . . . 17Avamar Support . . . . . . . . . . . . . . . . . . . . . . . . . . . . . . . . . . . . . . . . . . . . . . . . . . . . . . . 17Your comments . . . . . . . . . . . . . . . . . . . . . . . . . . . . . . . . . . . . . . . . . . . . . . . . . . . . . . . . 18Typographic conventions . . . . . . . . . . . . . . . . . . . . . . . . . . . . . . . . . . . . . . . . . . . . . . . . 18Safety admonitions and notices . . . . . . . . . . . . . . . . . . . . . . . . . . . . . . . . . . . . . . . . . . . 19
Introduction . . . . . . . . . . . . . . . . . . . . . . . . . . . . . . . . . . . . . . . . . . . . . . . . .20Important terms and concepts. . . . . . . . . . . . . . . . . . . . . . . . . . . . . . . . . . . . . . . . . . . . . 21Functional overview . . . . . . . . . . . . . . . . . . . . . . . . . . . . . . . . . . . . . . . . . . . . . . . . . . . . 23
Avamar servers. . . . . . . . . . . . . . . . . . . . . . . . . . . . . . . . . . . . . . . . . . . . . . . . . . . . . 23Avamar clients . . . . . . . . . . . . . . . . . . . . . . . . . . . . . . . . . . . . . . . . . . . . . . . . . . . . . 24Avamar Administrator . . . . . . . . . . . . . . . . . . . . . . . . . . . . . . . . . . . . . . . . . . . . . . . . 25Encryption. . . . . . . . . . . . . . . . . . . . . . . . . . . . . . . . . . . . . . . . . . . . . . . . . . . . . . . . . 25
Avamar Administrator . . . . . . . . . . . . . . . . . . . . . . . . . . . . . . . . . . . . . . . . .26Installing Avamar Administrator on Microsoft Windows . . . . . . . . . . . . . . . . . . . . . . . . . 26Uninstalling and upgrading Avamar Administrator on Microsoft Windows . . . . . . . . . . . 27Installing Avamar Administrator on Linux . . . . . . . . . . . . . . . . . . . . . . . . . . . . . . . . . . . . 28
Downloading the install package . . . . . . . . . . . . . . . . . . . . . . . . . . . . . . . . . . . . . . . 28Installing Avamar Administrator software . . . . . . . . . . . . . . . . . . . . . . . . . . . . . . . . . 29
Uninstalling Avamar Administrator on Linux . . . . . . . . . . . . . . . . . . . . . . . . . . . . . . . . . . 30Upgrading Avamar Administrator on Linux . . . . . . . . . . . . . . . . . . . . . . . . . . . . . . . . . . . 30Starting Avamar Administrator . . . . . . . . . . . . . . . . . . . . . . . . . . . . . . . . . . . . . . . . . . . . 31Special features . . . . . . . . . . . . . . . . . . . . . . . . . . . . . . . . . . . . . . . . . . . . . . . . . . . . . . . 33
Status bar . . . . . . . . . . . . . . . . . . . . . . . . . . . . . . . . . . . . . . . . . . . . . . . . . . . . . . . . . 33Launcher shortcuts . . . . . . . . . . . . . . . . . . . . . . . . . . . . . . . . . . . . . . . . . . . . . . . . . . 33Status messages . . . . . . . . . . . . . . . . . . . . . . . . . . . . . . . . . . . . . . . . . . . . . . . . . . . 34Mouse shortcuts . . . . . . . . . . . . . . . . . . . . . . . . . . . . . . . . . . . . . . . . . . . . . . . . . . . . 37
EMC AVAMAR 6.0 • ADMINISTRATION GUIDE 3

TABLE OF CONTENTS
Domains, Clients, and Users . . . . . . . . . . . . . . . . . . . . . . . . . . . . . . . . . . . 38Domains and subdomains . . . . . . . . . . . . . . . . . . . . . . . . . . . . . . . . . . . . . . . . . . . . . . . . 38Creating a domain . . . . . . . . . . . . . . . . . . . . . . . . . . . . . . . . . . . . . . . . . . . . . . . . . . . . . . 40Editing domain information. . . . . . . . . . . . . . . . . . . . . . . . . . . . . . . . . . . . . . . . . . . . . . . . 42Deleting a domain . . . . . . . . . . . . . . . . . . . . . . . . . . . . . . . . . . . . . . . . . . . . . . . . . . . . . . 43Clients . . . . . . . . . . . . . . . . . . . . . . . . . . . . . . . . . . . . . . . . . . . . . . . . . . . . . . . . . . . . . . . 44
Registration . . . . . . . . . . . . . . . . . . . . . . . . . . . . . . . . . . . . . . . . . . . . . . . . . . . . . . . . 44Activation . . . . . . . . . . . . . . . . . . . . . . . . . . . . . . . . . . . . . . . . . . . . . . . . . . . . . . . . . . 45Important information about client names . . . . . . . . . . . . . . . . . . . . . . . . . . . . . . . . . 45
Adding a client . . . . . . . . . . . . . . . . . . . . . . . . . . . . . . . . . . . . . . . . . . . . . . . . . . . . . . . . . 46Activating a client . . . . . . . . . . . . . . . . . . . . . . . . . . . . . . . . . . . . . . . . . . . . . . . . . . . . . . . 48Editing client information . . . . . . . . . . . . . . . . . . . . . . . . . . . . . . . . . . . . . . . . . . . . . . . . . 49Viewing client properties . . . . . . . . . . . . . . . . . . . . . . . . . . . . . . . . . . . . . . . . . . . . . . . . . 51Enabling and disabling a client. . . . . . . . . . . . . . . . . . . . . . . . . . . . . . . . . . . . . . . . . . . . . 53Retiring a client. . . . . . . . . . . . . . . . . . . . . . . . . . . . . . . . . . . . . . . . . . . . . . . . . . . . . . . . . 54Moving a client to a new domain . . . . . . . . . . . . . . . . . . . . . . . . . . . . . . . . . . . . . . . . . . . 56Deleting a client . . . . . . . . . . . . . . . . . . . . . . . . . . . . . . . . . . . . . . . . . . . . . . . . . . . . . . . . 57Editing client paging settings . . . . . . . . . . . . . . . . . . . . . . . . . . . . . . . . . . . . . . . . . . . . . . 58Batch client registration . . . . . . . . . . . . . . . . . . . . . . . . . . . . . . . . . . . . . . . . . . . . . . . . . . 61
Creating a clients definition file . . . . . . . . . . . . . . . . . . . . . . . . . . . . . . . . . . . . . . . . . 61Validate and import clients definition file . . . . . . . . . . . . . . . . . . . . . . . . . . . . . . . . . . 63
Users and roles . . . . . . . . . . . . . . . . . . . . . . . . . . . . . . . . . . . . . . . . . . . . . . . . . . . . . . . . 65Users . . . . . . . . . . . . . . . . . . . . . . . . . . . . . . . . . . . . . . . . . . . . . . . . . . . . . . . . . . . . . 65Roles . . . . . . . . . . . . . . . . . . . . . . . . . . . . . . . . . . . . . . . . . . . . . . . . . . . . . . . . . . . . . 66
Adding a user to a client. . . . . . . . . . . . . . . . . . . . . . . . . . . . . . . . . . . . . . . . . . . . . . . . . . 72Adding a user to a domain . . . . . . . . . . . . . . . . . . . . . . . . . . . . . . . . . . . . . . . . . . . . . . . . 74Editing user information . . . . . . . . . . . . . . . . . . . . . . . . . . . . . . . . . . . . . . . . . . . . . . . . . . 76Deleting a user . . . . . . . . . . . . . . . . . . . . . . . . . . . . . . . . . . . . . . . . . . . . . . . . . . . . . . . . . 77
Backup, Restore, and Backup Management . . . . . . . . . . . . . . . . . . . . . . 78Performing an on-demand client backup . . . . . . . . . . . . . . . . . . . . . . . . . . . . . . . . . . . . . 80Monitoring backup, restore, and validation activities . . . . . . . . . . . . . . . . . . . . . . . . . . . . 82Select for restore overview. . . . . . . . . . . . . . . . . . . . . . . . . . . . . . . . . . . . . . . . . . . . . . . . 89
Finding a backup by calendar date . . . . . . . . . . . . . . . . . . . . . . . . . . . . . . . . . . . . . . 89Finding a backup by content . . . . . . . . . . . . . . . . . . . . . . . . . . . . . . . . . . . . . . . . . . . 90
Performing a restore. . . . . . . . . . . . . . . . . . . . . . . . . . . . . . . . . . . . . . . . . . . . . . . . . . . . . 91Backup Management window overview . . . . . . . . . . . . . . . . . . . . . . . . . . . . . . . . . . . . . . 94
Finding backups by calendar date . . . . . . . . . . . . . . . . . . . . . . . . . . . . . . . . . . . . . . . 94Finding backups by date range . . . . . . . . . . . . . . . . . . . . . . . . . . . . . . . . . . . . . . . . . 94Finding backups by retention type . . . . . . . . . . . . . . . . . . . . . . . . . . . . . . . . . . . . . . . 95
Changing a backup expiration date . . . . . . . . . . . . . . . . . . . . . . . . . . . . . . . . . . . . . . . . . 95Changing backup retention types. . . . . . . . . . . . . . . . . . . . . . . . . . . . . . . . . . . . . . . . . . . 97Validating a backup . . . . . . . . . . . . . . . . . . . . . . . . . . . . . . . . . . . . . . . . . . . . . . . . . . . . . 99Backup statistics. . . . . . . . . . . . . . . . . . . . . . . . . . . . . . . . . . . . . . . . . . . . . . . . . . . . . . . 101
Viewing backup statistics from the Backup Management window. . . . . . . . . . . . . . 101Viewing backup statistics from the Activity window . . . . . . . . . . . . . . . . . . . . . . . . . 103
Deleting a backup. . . . . . . . . . . . . . . . . . . . . . . . . . . . . . . . . . . . . . . . . . . . . . . . . . . . . . 104Canceling an activity . . . . . . . . . . . . . . . . . . . . . . . . . . . . . . . . . . . . . . . . . . . . . . . . . . . 105
EMC AVAMAR 6.0 • ADMINISTRATION GUIDE 4

TABLE OF CONTENTS
Datasets, Schedules, and Retention Policies . . . . . . . . . . . . . . . . . . . . 106Datasets . . . . . . . . . . . . . . . . . . . . . . . . . . . . . . . . . . . . . . . . . . . . . . . . . . . . . . . . . . . . . 106
Dataset properties . . . . . . . . . . . . . . . . . . . . . . . . . . . . . . . . . . . . . . . . . . . . . . . . . . 106Dataset catalog . . . . . . . . . . . . . . . . . . . . . . . . . . . . . . . . . . . . . . . . . . . . . . . . . . . . 108
Creating a dataset . . . . . . . . . . . . . . . . . . . . . . . . . . . . . . . . . . . . . . . . . . . . . . . . . . . . . 110Editing a dataset. . . . . . . . . . . . . . . . . . . . . . . . . . . . . . . . . . . . . . . . . . . . . . . . . . . . . . . 114Copying a dataset . . . . . . . . . . . . . . . . . . . . . . . . . . . . . . . . . . . . . . . . . . . . . . . . . . . . . 115Deleting a dataset . . . . . . . . . . . . . . . . . . . . . . . . . . . . . . . . . . . . . . . . . . . . . . . . . . . . . 115Schedules. . . . . . . . . . . . . . . . . . . . . . . . . . . . . . . . . . . . . . . . . . . . . . . . . . . . . . . . . . . . 116
Important terms and concepts . . . . . . . . . . . . . . . . . . . . . . . . . . . . . . . . . . . . . . . . . 116Schedule properties. . . . . . . . . . . . . . . . . . . . . . . . . . . . . . . . . . . . . . . . . . . . . . . . . 118Schedule catalog . . . . . . . . . . . . . . . . . . . . . . . . . . . . . . . . . . . . . . . . . . . . . . . . . . . 120
Creating a schedule . . . . . . . . . . . . . . . . . . . . . . . . . . . . . . . . . . . . . . . . . . . . . . . . . . . . 121Editing a schedule . . . . . . . . . . . . . . . . . . . . . . . . . . . . . . . . . . . . . . . . . . . . . . . . . . . . . 123Copying a schedule . . . . . . . . . . . . . . . . . . . . . . . . . . . . . . . . . . . . . . . . . . . . . . . . . . . . 124Deleting a schedule . . . . . . . . . . . . . . . . . . . . . . . . . . . . . . . . . . . . . . . . . . . . . . . . . . . . 124Running a schedule now . . . . . . . . . . . . . . . . . . . . . . . . . . . . . . . . . . . . . . . . . . . . . . . . 125Retention policies . . . . . . . . . . . . . . . . . . . . . . . . . . . . . . . . . . . . . . . . . . . . . . . . . . . . . . 126
Basic retention settings . . . . . . . . . . . . . . . . . . . . . . . . . . . . . . . . . . . . . . . . . . . . . . 126Advanced retention settings . . . . . . . . . . . . . . . . . . . . . . . . . . . . . . . . . . . . . . . . . . 127Minimal retention . . . . . . . . . . . . . . . . . . . . . . . . . . . . . . . . . . . . . . . . . . . . . . . . . . . 127Retention policy catalog. . . . . . . . . . . . . . . . . . . . . . . . . . . . . . . . . . . . . . . . . . . . . . 128
Creating a retention policy . . . . . . . . . . . . . . . . . . . . . . . . . . . . . . . . . . . . . . . . . . . . . . . 129Editing a retention policy . . . . . . . . . . . . . . . . . . . . . . . . . . . . . . . . . . . . . . . . . . . . . . . . 131Copying a retention policy . . . . . . . . . . . . . . . . . . . . . . . . . . . . . . . . . . . . . . . . . . . . . . . 132Deleting a retention policy . . . . . . . . . . . . . . . . . . . . . . . . . . . . . . . . . . . . . . . . . . . . . . . 132Disabling the Minimal Retention policy. . . . . . . . . . . . . . . . . . . . . . . . . . . . . . . . . . . . . . 133Enabling the Minimal Retention policy . . . . . . . . . . . . . . . . . . . . . . . . . . . . . . . . . . . . . . 134
Groups and Group Policies . . . . . . . . . . . . . . . . . . . . . . . . . . . . . . . . . . . 135Policy window overview . . . . . . . . . . . . . . . . . . . . . . . . . . . . . . . . . . . . . . . . . . . . . . . . . 137Creating a group. . . . . . . . . . . . . . . . . . . . . . . . . . . . . . . . . . . . . . . . . . . . . . . . . . . . . . . 139Editing group properties . . . . . . . . . . . . . . . . . . . . . . . . . . . . . . . . . . . . . . . . . . . . . . . . . 144
Editing a single group . . . . . . . . . . . . . . . . . . . . . . . . . . . . . . . . . . . . . . . . . . . . . . . 144Editing multiple groups . . . . . . . . . . . . . . . . . . . . . . . . . . . . . . . . . . . . . . . . . . . . . . 146
Copying a group . . . . . . . . . . . . . . . . . . . . . . . . . . . . . . . . . . . . . . . . . . . . . . . . . . . . . . . 147Enabling and disabling a group . . . . . . . . . . . . . . . . . . . . . . . . . . . . . . . . . . . . . . . . . . . 148Deleting a group . . . . . . . . . . . . . . . . . . . . . . . . . . . . . . . . . . . . . . . . . . . . . . . . . . . . . . . 149Viewing the Group Summary Reports . . . . . . . . . . . . . . . . . . . . . . . . . . . . . . . . . . . . . . 150Viewing the Group Status Summary . . . . . . . . . . . . . . . . . . . . . . . . . . . . . . . . . . . . . . . 151Managing group membership. . . . . . . . . . . . . . . . . . . . . . . . . . . . . . . . . . . . . . . . . . . . . 152
Adding and removing clients for a group . . . . . . . . . . . . . . . . . . . . . . . . . . . . . . . . . 152Adding and removing groups for a client . . . . . . . . . . . . . . . . . . . . . . . . . . . . . . . . . 153
Overriding group policy settings . . . . . . . . . . . . . . . . . . . . . . . . . . . . . . . . . . . . . . . . . . . 154Assigning a different dataset to a client . . . . . . . . . . . . . . . . . . . . . . . . . . . . . . . . . . 154Assigning a different retention policy to a client. . . . . . . . . . . . . . . . . . . . . . . . . . . . 156Changing the client encryption method . . . . . . . . . . . . . . . . . . . . . . . . . . . . . . . . . . 157Allowing scheduled backups to run overtime. . . . . . . . . . . . . . . . . . . . . . . . . . . . . . 159Allowing users to initiate backups . . . . . . . . . . . . . . . . . . . . . . . . . . . . . . . . . . . . . . 161
Initiating on-demand group backups . . . . . . . . . . . . . . . . . . . . . . . . . . . . . . . . . . . . . . . 164
EMC AVAMAR 6.0 • ADMINISTRATION GUIDE 5

TABLE OF CONTENTS
Events, Notifications, and Profiles . . . . . . . . . . . . . . . . . . . . . . . . . . . . . 165Important terms and concepts . . . . . . . . . . . . . . . . . . . . . . . . . . . . . . . . . . . . . . . . . . . . 165
Events . . . . . . . . . . . . . . . . . . . . . . . . . . . . . . . . . . . . . . . . . . . . . . . . . . . . . . . . . . . 165Audit logging . . . . . . . . . . . . . . . . . . . . . . . . . . . . . . . . . . . . . . . . . . . . . . . . . . . . . . 166Customizing error events . . . . . . . . . . . . . . . . . . . . . . . . . . . . . . . . . . . . . . . . . . . . . 166Notifications . . . . . . . . . . . . . . . . . . . . . . . . . . . . . . . . . . . . . . . . . . . . . . . . . . . . . . . 166Profiles. . . . . . . . . . . . . . . . . . . . . . . . . . . . . . . . . . . . . . . . . . . . . . . . . . . . . . . . . . . 168Profile catalog . . . . . . . . . . . . . . . . . . . . . . . . . . . . . . . . . . . . . . . . . . . . . . . . . . . . . 168
Editing System event profile properties . . . . . . . . . . . . . . . . . . . . . . . . . . . . . . . . . . . . . 169Creating a custom event profile . . . . . . . . . . . . . . . . . . . . . . . . . . . . . . . . . . . . . . . . . . . 170Editing custom event profile properties . . . . . . . . . . . . . . . . . . . . . . . . . . . . . . . . . . . . . 177Copying a custom event profile . . . . . . . . . . . . . . . . . . . . . . . . . . . . . . . . . . . . . . . . . . . 178Testing custom event profile notifications . . . . . . . . . . . . . . . . . . . . . . . . . . . . . . . . . . . 179Enabling and disabling a custom event profile . . . . . . . . . . . . . . . . . . . . . . . . . . . . . . . . 180Deleting a custom event profile . . . . . . . . . . . . . . . . . . . . . . . . . . . . . . . . . . . . . . . . . . . 180Modifying “Email Home” configuration . . . . . . . . . . . . . . . . . . . . . . . . . . . . . . . . . . . . . . 181
Modify mcserver.xml Email Home settings . . . . . . . . . . . . . . . . . . . . . . . . . . . . . . . 182Monitoring the Avamar server using syslog . . . . . . . . . . . . . . . . . . . . . . . . . . . . . . . . . . 183
Configure a custom event profile . . . . . . . . . . . . . . . . . . . . . . . . . . . . . . . . . . . . . . . 184Configure syslogd . . . . . . . . . . . . . . . . . . . . . . . . . . . . . . . . . . . . . . . . . . . . . . . . . . 185
Monitoring the Avamar server using SNMP . . . . . . . . . . . . . . . . . . . . . . . . . . . . . . . . . . 186Configuring the Net-SNMP agent . . . . . . . . . . . . . . . . . . . . . . . . . . . . . . . . . . . . . . 188Configure a custom event profile . . . . . . . . . . . . . . . . . . . . . . . . . . . . . . . . . . . . . . . 190
Managing ConnectEMC . . . . . . . . . . . . . . . . . . . . . . . . . . . . . . . . . . . . . . . . . . . . . . . . . 192Enabling and disabling ConnectEMC. . . . . . . . . . . . . . . . . . . . . . . . . . . . . . . . . . . . . . . 192Stopping and starting ConnectEMC. . . . . . . . . . . . . . . . . . . . . . . . . . . . . . . . . . . . . . . . 193Editing Primary and Failover transports . . . . . . . . . . . . . . . . . . . . . . . . . . . . . . . . . . . . . 193Editing the Notification transport . . . . . . . . . . . . . . . . . . . . . . . . . . . . . . . . . . . . . . . . . . 197Testing transports. . . . . . . . . . . . . . . . . . . . . . . . . . . . . . . . . . . . . . . . . . . . . . . . . . . . . . 200
Reporting . . . . . . . . . . . . . . . . . . . . . . . . . . . . . . . . . . . . . . . . . . . . . . . . . . 201Avamar reports. . . . . . . . . . . . . . . . . . . . . . . . . . . . . . . . . . . . . . . . . . . . . . . . . . . . . . . . 202Creating a report . . . . . . . . . . . . . . . . . . . . . . . . . . . . . . . . . . . . . . . . . . . . . . . . . . . . . . 205Editing a report . . . . . . . . . . . . . . . . . . . . . . . . . . . . . . . . . . . . . . . . . . . . . . . . . . . . . . . . 208Running a report. . . . . . . . . . . . . . . . . . . . . . . . . . . . . . . . . . . . . . . . . . . . . . . . . . . . . . . 209Deleting a report. . . . . . . . . . . . . . . . . . . . . . . . . . . . . . . . . . . . . . . . . . . . . . . . . . . . . . . 210Viewing the Client Summary Report . . . . . . . . . . . . . . . . . . . . . . . . . . . . . . . . . . . . . . . 211Viewing the Activity Report. . . . . . . . . . . . . . . . . . . . . . . . . . . . . . . . . . . . . . . . . . . . . . . 215Viewing the Replication Report . . . . . . . . . . . . . . . . . . . . . . . . . . . . . . . . . . . . . . . . . . . 220Exporting displayed tabular data as CSV files . . . . . . . . . . . . . . . . . . . . . . . . . . . . . . . . 223
Activity Report . . . . . . . . . . . . . . . . . . . . . . . . . . . . . . . . . . . . . . . . . . . . . . . . . . . . . 223Replication Report . . . . . . . . . . . . . . . . . . . . . . . . . . . . . . . . . . . . . . . . . . . . . . . . . . 223Client Summary Report . . . . . . . . . . . . . . . . . . . . . . . . . . . . . . . . . . . . . . . . . . . . . . 223Event Management . . . . . . . . . . . . . . . . . . . . . . . . . . . . . . . . . . . . . . . . . . . . . . . . . 224Session Monitor . . . . . . . . . . . . . . . . . . . . . . . . . . . . . . . . . . . . . . . . . . . . . . . . . . . . 224
Support for third-party reporting tools. . . . . . . . . . . . . . . . . . . . . . . . . . . . . . . . . . . . . . . 225Setting up the PostgreSQL ODBC driver . . . . . . . . . . . . . . . . . . . . . . . . . . . . . . . . . . . . 225Crystal Reports templates . . . . . . . . . . . . . . . . . . . . . . . . . . . . . . . . . . . . . . . . . . . . . . . 228Other third-party support . . . . . . . . . . . . . . . . . . . . . . . . . . . . . . . . . . . . . . . . . . . . . . . . 229
EMC AVAMAR 6.0 • ADMINISTRATION GUIDE 6

TABLE OF CONTENTS
Avamar Client Agent and Plug-in Management . . . . . . . . . . . . . . . . . . . 230Agents Summary view . . . . . . . . . . . . . . . . . . . . . . . . . . . . . . . . . . . . . . . . . . . . . . . . . . 231Plug-ins Summary view . . . . . . . . . . . . . . . . . . . . . . . . . . . . . . . . . . . . . . . . . . . . . . . . . 232Adding a build record . . . . . . . . . . . . . . . . . . . . . . . . . . . . . . . . . . . . . . . . . . . . . . . . . . . 234Editing version or build record settings . . . . . . . . . . . . . . . . . . . . . . . . . . . . . . . . . . . . . 235Deleting a build record . . . . . . . . . . . . . . . . . . . . . . . . . . . . . . . . . . . . . . . . . . . . . . . . . . 236Enabling and disabling all client initiated activations . . . . . . . . . . . . . . . . . . . . . . . . . . . 237Enabling and disabling all client initiated backups . . . . . . . . . . . . . . . . . . . . . . . . . . . . . 238
Server Monitoring . . . . . . . . . . . . . . . . . . . . . . . . . . . . . . . . . . . . . . . . . . . 239Recommended daily server monitoring . . . . . . . . . . . . . . . . . . . . . . . . . . . . . . . . . . . . . 239Monitoring the server . . . . . . . . . . . . . . . . . . . . . . . . . . . . . . . . . . . . . . . . . . . . . . . . . . . 240Verifying system integrity . . . . . . . . . . . . . . . . . . . . . . . . . . . . . . . . . . . . . . . . . . . . . . . . 260Viewing system events. . . . . . . . . . . . . . . . . . . . . . . . . . . . . . . . . . . . . . . . . . . . . . . . . . 261Filtering the Event Monitor Display. . . . . . . . . . . . . . . . . . . . . . . . . . . . . . . . . . . . . . . . . 263Viewing the Audit Log. . . . . . . . . . . . . . . . . . . . . . . . . . . . . . . . . . . . . . . . . . . . . . . . . . . 267Filtering the Audit Log display . . . . . . . . . . . . . . . . . . . . . . . . . . . . . . . . . . . . . . . . . . . . 269Viewing services information . . . . . . . . . . . . . . . . . . . . . . . . . . . . . . . . . . . . . . . . . . . . . 272Viewing a detailed client session log . . . . . . . . . . . . . . . . . . . . . . . . . . . . . . . . . . . . . . . 274Collecting and viewing log files . . . . . . . . . . . . . . . . . . . . . . . . . . . . . . . . . . . . . . . . . . . 275
Basic Server Administration . . . . . . . . . . . . . . . . . . . . . . . . . . . . . . . . . . 276Avamar server functional block diagram . . . . . . . . . . . . . . . . . . . . . . . . . . . . . . . . . . . . 276
Data server . . . . . . . . . . . . . . . . . . . . . . . . . . . . . . . . . . . . . . . . . . . . . . . . . . . . . . . 276Management Console Server (MCS). . . . . . . . . . . . . . . . . . . . . . . . . . . . . . . . . . . . 277Enterprise Manager Server (EMS) . . . . . . . . . . . . . . . . . . . . . . . . . . . . . . . . . . . . . 277
Avamar server maintenance activities and backup/maintenance windows . . . . . . . . . . 278Maintenance activities . . . . . . . . . . . . . . . . . . . . . . . . . . . . . . . . . . . . . . . . . . . . . . . 278Backup/maintenance windows . . . . . . . . . . . . . . . . . . . . . . . . . . . . . . . . . . . . . . . . 278Best practices . . . . . . . . . . . . . . . . . . . . . . . . . . . . . . . . . . . . . . . . . . . . . . . . . . . . . 280
Acknowledging system events . . . . . . . . . . . . . . . . . . . . . . . . . . . . . . . . . . . . . . . . . . . . 281Suspending and resuming backups and restores . . . . . . . . . . . . . . . . . . . . . . . . . . . . . 282Suspending and resuming scheduled operations . . . . . . . . . . . . . . . . . . . . . . . . . . . . . 283Enabling and disabling scheduled group backups . . . . . . . . . . . . . . . . . . . . . . . . . . . . . 283Suspending and resuming maintenance activities . . . . . . . . . . . . . . . . . . . . . . . . . . . . . 284Changing backup/maintenance window settings . . . . . . . . . . . . . . . . . . . . . . . . . . . . . . 285Managing services . . . . . . . . . . . . . . . . . . . . . . . . . . . . . . . . . . . . . . . . . . . . . . . . . . . . . 286Canceling a client session . . . . . . . . . . . . . . . . . . . . . . . . . . . . . . . . . . . . . . . . . . . . . . . 287Resetting a client . . . . . . . . . . . . . . . . . . . . . . . . . . . . . . . . . . . . . . . . . . . . . . . . . . . . . . 288
Server Shutdown and Restart . . . . . . . . . . . . . . . . . . . . . . . . . . . . . . . . . 289Shutting down the server . . . . . . . . . . . . . . . . . . . . . . . . . . . . . . . . . . . . . . . . . . . . . . . . 289Restarting the server . . . . . . . . . . . . . . . . . . . . . . . . . . . . . . . . . . . . . . . . . . . . . . . . . . . 291Stopping the MCS . . . . . . . . . . . . . . . . . . . . . . . . . . . . . . . . . . . . . . . . . . . . . . . . . . . . . 292Starting the MCS . . . . . . . . . . . . . . . . . . . . . . . . . . . . . . . . . . . . . . . . . . . . . . . . . . . . . . 292Getting MCS Status . . . . . . . . . . . . . . . . . . . . . . . . . . . . . . . . . . . . . . . . . . . . . . . . . . . . 293
EMC AVAMAR 6.0 • ADMINISTRATION GUIDE 7

TABLE OF CONTENTS
Avamar Enterprise Manager . . . . . . . . . . . . . . . . . . . . . . . . . . . . . . . . . . 294Capabilities and limitations. . . . . . . . . . . . . . . . . . . . . . . . . . . . . . . . . . . . . . . . . . . . . . . 294Shutting down the EMS . . . . . . . . . . . . . . . . . . . . . . . . . . . . . . . . . . . . . . . . . . . . . . . . . 296Restarting the EMS . . . . . . . . . . . . . . . . . . . . . . . . . . . . . . . . . . . . . . . . . . . . . . . . . . . . 296Logging in to Avamar Enterprise Manager. . . . . . . . . . . . . . . . . . . . . . . . . . . . . . . . . . . 297Dashboard . . . . . . . . . . . . . . . . . . . . . . . . . . . . . . . . . . . . . . . . . . . . . . . . . . . . . . . . . . . 298System . . . . . . . . . . . . . . . . . . . . . . . . . . . . . . . . . . . . . . . . . . . . . . . . . . . . . . . . . . . . . . 303
Individual system information page . . . . . . . . . . . . . . . . . . . . . . . . . . . . . . . . . . . . . 303All servers information (detailed dashboard) page . . . . . . . . . . . . . . . . . . . . . . . . . 315
Capacity . . . . . . . . . . . . . . . . . . . . . . . . . . . . . . . . . . . . . . . . . . . . . . . . . . . . . . . . . . . . . 317Policy . . . . . . . . . . . . . . . . . . . . . . . . . . . . . . . . . . . . . . . . . . . . . . . . . . . . . . . . . . . . . . . 317Reports. . . . . . . . . . . . . . . . . . . . . . . . . . . . . . . . . . . . . . . . . . . . . . . . . . . . . . . . . . . . . . 318
Running a report . . . . . . . . . . . . . . . . . . . . . . . . . . . . . . . . . . . . . . . . . . . . . . . . . . . 319Exporting a report as a CSV File . . . . . . . . . . . . . . . . . . . . . . . . . . . . . . . . . . . . . . . 319
Replicator . . . . . . . . . . . . . . . . . . . . . . . . . . . . . . . . . . . . . . . . . . . . . . . . . . . . . . . . . . . . 320Configure . . . . . . . . . . . . . . . . . . . . . . . . . . . . . . . . . . . . . . . . . . . . . . . . . . . . . . . . . . . . 320Client Manager . . . . . . . . . . . . . . . . . . . . . . . . . . . . . . . . . . . . . . . . . . . . . . . . . . . . . . . . 321System Maintenance . . . . . . . . . . . . . . . . . . . . . . . . . . . . . . . . . . . . . . . . . . . . . . . . . . . 321Monitoring other systems . . . . . . . . . . . . . . . . . . . . . . . . . . . . . . . . . . . . . . . . . . . . . . . . 322Suspending and resuming system monitoring . . . . . . . . . . . . . . . . . . . . . . . . . . . . . . . . 324Removing a system from the systems list . . . . . . . . . . . . . . . . . . . . . . . . . . . . . . . . . . . 325Monitoring Avamar 4.1.x and 5.x systems . . . . . . . . . . . . . . . . . . . . . . . . . . . . . . . . . . . 326
Obtain and install the server hotifx . . . . . . . . . . . . . . . . . . . . . . . . . . . . . . . . . . . . . 326Configure MCS web services . . . . . . . . . . . . . . . . . . . . . . . . . . . . . . . . . . . . . . . . . 326Add the system to Avamar Enterprise Manager . . . . . . . . . . . . . . . . . . . . . . . . . . . 327
Launching Avamar Administrator from Avamar Enterprise Manager . . . . . . . . . . . . . . . 328
Capacity Management . . . . . . . . . . . . . . . . . . . . . . . . . . . . . . . . . . . . . . . 331Limits and thresholds . . . . . . . . . . . . . . . . . . . . . . . . . . . . . . . . . . . . . . . . . . . . . . . . . . . 331Obtaining basic utilization information . . . . . . . . . . . . . . . . . . . . . . . . . . . . . . . . . . . . . . 332Capacity forecasting. . . . . . . . . . . . . . . . . . . . . . . . . . . . . . . . . . . . . . . . . . . . . . . . . . . . 334Detailed utilization and forecasting. . . . . . . . . . . . . . . . . . . . . . . . . . . . . . . . . . . . . . . . . 335Customizing capacity limits and behavior . . . . . . . . . . . . . . . . . . . . . . . . . . . . . . . . . . . 336
Avamar Administrator settings. . . . . . . . . . . . . . . . . . . . . . . . . . . . . . . . . . . . . . . . . 336Avamar Enterprise Manager settings . . . . . . . . . . . . . . . . . . . . . . . . . . . . . . . . . . . 337Updating Avamar application preference files . . . . . . . . . . . . . . . . . . . . . . . . . . . . . 338
Server and client average daily change rates . . . . . . . . . . . . . . . . . . . . . . . . . . . . . . . . 339Server data . . . . . . . . . . . . . . . . . . . . . . . . . . . . . . . . . . . . . . . . . . . . . . . . . . . . . . . 339Client data . . . . . . . . . . . . . . . . . . . . . . . . . . . . . . . . . . . . . . . . . . . . . . . . . . . . . . . . 340
Replication . . . . . . . . . . . . . . . . . . . . . . . . . . . . . . . . . . . . . . . . . . . . . . . . 341Important terms and concepts . . . . . . . . . . . . . . . . . . . . . . . . . . . . . . . . . . . . . . . . . . . . 342Capabilities and limitations. . . . . . . . . . . . . . . . . . . . . . . . . . . . . . . . . . . . . . . . . . . . . . . 343Best practices. . . . . . . . . . . . . . . . . . . . . . . . . . . . . . . . . . . . . . . . . . . . . . . . . . . . . . . . . 344Managing replication with Avamar Administrator . . . . . . . . . . . . . . . . . . . . . . . . . . . . . . 345Viewing replication statistics with Avamar Administrator . . . . . . . . . . . . . . . . . . . . . . . . 348Managing replication with Avamar Enterprise Manager. . . . . . . . . . . . . . . . . . . . . . . . . 349
Replicator setup page . . . . . . . . . . . . . . . . . . . . . . . . . . . . . . . . . . . . . . . . . . . . . . . 350Replicator status page . . . . . . . . . . . . . . . . . . . . . . . . . . . . . . . . . . . . . . . . . . . . . . . 351Configuring or modifying replication settings . . . . . . . . . . . . . . . . . . . . . . . . . . . . . . 352Getting replication status . . . . . . . . . . . . . . . . . . . . . . . . . . . . . . . . . . . . . . . . . . . . . 355Starting and stopping daily replications . . . . . . . . . . . . . . . . . . . . . . . . . . . . . . . . . . 356
EMC AVAMAR 6.0 • ADMINISTRATION GUIDE 8

TABLE OF CONTENTS
Advanced Server Administration and Maintenance . . . . . . . . . . . . . . . 357Checkpoints . . . . . . . . . . . . . . . . . . . . . . . . . . . . . . . . . . . . . . . . . . . . . . . . . . . . . . . . . . 357Creating a checkpoint. . . . . . . . . . . . . . . . . . . . . . . . . . . . . . . . . . . . . . . . . . . . . . . . . . . 358Validating a checkpoint . . . . . . . . . . . . . . . . . . . . . . . . . . . . . . . . . . . . . . . . . . . . . . . . . 359Deleting a checkpoint . . . . . . . . . . . . . . . . . . . . . . . . . . . . . . . . . . . . . . . . . . . . . . . . . . . 360Rolling back to a checkpoint. . . . . . . . . . . . . . . . . . . . . . . . . . . . . . . . . . . . . . . . . . . . . . 361MCS configuration settings . . . . . . . . . . . . . . . . . . . . . . . . . . . . . . . . . . . . . . . . . . . . . . 362Backing up MCS data. . . . . . . . . . . . . . . . . . . . . . . . . . . . . . . . . . . . . . . . . . . . . . . . . . . 363Performing an on-demand MCS flush . . . . . . . . . . . . . . . . . . . . . . . . . . . . . . . . . . . . . . 363Finding MCS backups in the system . . . . . . . . . . . . . . . . . . . . . . . . . . . . . . . . . . . . . . . 364Restoring MCS data . . . . . . . . . . . . . . . . . . . . . . . . . . . . . . . . . . . . . . . . . . . . . . . . . . . . 365Reverting to default MCS preference settings . . . . . . . . . . . . . . . . . . . . . . . . . . . . . . . . 366Manually changing Avamar Administrator client preferences . . . . . . . . . . . . . . . . . . . . 367Updating server licensing . . . . . . . . . . . . . . . . . . . . . . . . . . . . . . . . . . . . . . . . . . . . . . . . 367
Installing the software without a license key . . . . . . . . . . . . . . . . . . . . . . . . . . . . . . 368Generating and installing the license. . . . . . . . . . . . . . . . . . . . . . . . . . . . . . . . . . . . 368
Changing Avamar passwords . . . . . . . . . . . . . . . . . . . . . . . . . . . . . . . . . . . . . . . . . . . . 374Run change-passwords . . . . . . . . . . . . . . . . . . . . . . . . . . . . . . . . . . . . . . . . . . . . . . 375Manually update EMS settings . . . . . . . . . . . . . . . . . . . . . . . . . . . . . . . . . . . . . . . . 382
Changing single-node server network settings . . . . . . . . . . . . . . . . . . . . . . . . . . . . . . . 384Adding a custom security notification to web login pages . . . . . . . . . . . . . . . . . . . . . . . 388Manually updating the plug-in catalog . . . . . . . . . . . . . . . . . . . . . . . . . . . . . . . . . . . . . . 389Configuring Avamar to use network address translation . . . . . . . . . . . . . . . . . . . . . . . . 390
Resolving NAT connection and configuration problems . . . . . . . . . . . . . . . . . . . . . 392
Server Updates and Hotfixes . . . . . . . . . . . . . . . . . . . . . . . . . . . . . . . . . . 393Important terms . . . . . . . . . . . . . . . . . . . . . . . . . . . . . . . . . . . . . . . . . . . . . . . . . . . . . . . 393Functional overview . . . . . . . . . . . . . . . . . . . . . . . . . . . . . . . . . . . . . . . . . . . . . . . . . . . . 394
File distribution. . . . . . . . . . . . . . . . . . . . . . . . . . . . . . . . . . . . . . . . . . . . . . . . . . . . . 395Avamar Downloader Service security . . . . . . . . . . . . . . . . . . . . . . . . . . . . . . . . . . . 395Avamar Downloader Service components. . . . . . . . . . . . . . . . . . . . . . . . . . . . . . . . 395
Avamar Downloader Service installation requirements . . . . . . . . . . . . . . . . . . . . . . . . . 396Installing the Avamar Downloader Service. . . . . . . . . . . . . . . . . . . . . . . . . . . . . . . . . . . 397
Downloading the software . . . . . . . . . . . . . . . . . . . . . . . . . . . . . . . . . . . . . . . . . . . . 397Installing the software . . . . . . . . . . . . . . . . . . . . . . . . . . . . . . . . . . . . . . . . . . . . . . . 397Defining an inbound rule for Microsoft Windows 7 hosts . . . . . . . . . . . . . . . . . . . . . 399
Configuring the Avamar Downloader Service . . . . . . . . . . . . . . . . . . . . . . . . . . . . . . . . 400Using the Avamar Downloader Service . . . . . . . . . . . . . . . . . . . . . . . . . . . . . . . . . . . . . 402
Starting the Avamar Downloader Service configuration application . . . . . . . . . . . . 402Monitoring Avamar Downloader Service status . . . . . . . . . . . . . . . . . . . . . . . . . . . . 402Checking the EMC repository . . . . . . . . . . . . . . . . . . . . . . . . . . . . . . . . . . . . . . . . . 404Modifying the username or password . . . . . . . . . . . . . . . . . . . . . . . . . . . . . . . . . . . 404Removing an Avamar system from the Known Systems list . . . . . . . . . . . . . . . . . . 405
Troubleshooting Avamar Downloader Service issues . . . . . . . . . . . . . . . . . . . . . . . . . . 405Installing the Avamar Downloader Service fails. . . . . . . . . . . . . . . . . . . . . . . . . . . . 405Not receiving files from the Avamar FTP site. . . . . . . . . . . . . . . . . . . . . . . . . . . . . . 406Downloading a package fails . . . . . . . . . . . . . . . . . . . . . . . . . . . . . . . . . . . . . . . . . . 406
Uninstalling the Avamar Downloader Service . . . . . . . . . . . . . . . . . . . . . . . . . . . . . . . . 406Installing patches and hotfixes from the System Maintenance page . . . . . . . . . . . . . . . 407
Microsoft Windows browser requirements . . . . . . . . . . . . . . . . . . . . . . . . . . . . . . . . 407EMC Customer Support account . . . . . . . . . . . . . . . . . . . . . . . . . . . . . . . . . . . . . . . 407SW Updates page . . . . . . . . . . . . . . . . . . . . . . . . . . . . . . . . . . . . . . . . . . . . . . . . . . 408Installing packages . . . . . . . . . . . . . . . . . . . . . . . . . . . . . . . . . . . . . . . . . . . . . . . . . 409Deleting packages . . . . . . . . . . . . . . . . . . . . . . . . . . . . . . . . . . . . . . . . . . . . . . . . . . 412
Viewing installation history information . . . . . . . . . . . . . . . . . . . . . . . . . . . . . . . . . . . . . 413
EMC AVAMAR 6.0 • ADMINISTRATION GUIDE 9

TABLE OF CONTENTS
Client System Recovery . . . . . . . . . . . . . . . . . . . . . . . . . . . . . . . . . . . . . . 418Windows client system recovery . . . . . . . . . . . . . . . . . . . . . . . . . . . . . . . . . . . . . . . . . . 418Red Hat Linux system recovery . . . . . . . . . . . . . . . . . . . . . . . . . . . . . . . . . . . . . . . . . . . 419
Prerequisites . . . . . . . . . . . . . . . . . . . . . . . . . . . . . . . . . . . . . . . . . . . . . . . . . . . . . . 419Procedure . . . . . . . . . . . . . . . . . . . . . . . . . . . . . . . . . . . . . . . . . . . . . . . . . . . . . . . . 419
Sun Solaris system recovery . . . . . . . . . . . . . . . . . . . . . . . . . . . . . . . . . . . . . . . . . . . . . 423Prerequisites . . . . . . . . . . . . . . . . . . . . . . . . . . . . . . . . . . . . . . . . . . . . . . . . . . . . . . 423Procedure . . . . . . . . . . . . . . . . . . . . . . . . . . . . . . . . . . . . . . . . . . . . . . . . . . . . . . . . 425
Avamar System Migration . . . . . . . . . . . . . . . . . . . . . . . . . . . . . . . . . . . . 429Important terms and concepts . . . . . . . . . . . . . . . . . . . . . . . . . . . . . . . . . . . . . . . . . . . . 429Capabilities and limitations. . . . . . . . . . . . . . . . . . . . . . . . . . . . . . . . . . . . . . . . . . . . . . . 430Migrating an Avamar server . . . . . . . . . . . . . . . . . . . . . . . . . . . . . . . . . . . . . . . . . . . . . . 431
Replicating the source server . . . . . . . . . . . . . . . . . . . . . . . . . . . . . . . . . . . . . . . . . 432Restoring data on the destination server . . . . . . . . . . . . . . . . . . . . . . . . . . . . . . . . . 433
Manually migrating backup clients to a new server . . . . . . . . . . . . . . . . . . . . . . . . . . . . 435Migrating pageable clients . . . . . . . . . . . . . . . . . . . . . . . . . . . . . . . . . . . . . . . . . . . . 435Migrating non-pageable clients . . . . . . . . . . . . . . . . . . . . . . . . . . . . . . . . . . . . . . . . 435
Avamar Client Manager . . . . . . . . . . . . . . . . . . . . . . . . . . . . . . . . . . . . . . 436Capabilities. . . . . . . . . . . . . . . . . . . . . . . . . . . . . . . . . . . . . . . . . . . . . . . . . . . . . . . . . . . 436Starting Avamar Client Manager . . . . . . . . . . . . . . . . . . . . . . . . . . . . . . . . . . . . . . . . . . 437
Connection security . . . . . . . . . . . . . . . . . . . . . . . . . . . . . . . . . . . . . . . . . . . . . . . . . 437Apache web server authentication. . . . . . . . . . . . . . . . . . . . . . . . . . . . . . . . . . . . . . 438Editing the session timeout period. . . . . . . . . . . . . . . . . . . . . . . . . . . . . . . . . . . . . . 438Increasing the JavaScript timeout period. . . . . . . . . . . . . . . . . . . . . . . . . . . . . . . . . 439Showing and hiding tooltips . . . . . . . . . . . . . . . . . . . . . . . . . . . . . . . . . . . . . . . . . . . 440Refreshing the window . . . . . . . . . . . . . . . . . . . . . . . . . . . . . . . . . . . . . . . . . . . . . . 440Support for version 4 and 5 servers. . . . . . . . . . . . . . . . . . . . . . . . . . . . . . . . . . . . . 440
Managing clients . . . . . . . . . . . . . . . . . . . . . . . . . . . . . . . . . . . . . . . . . . . . . . . . . . . . . . 443Moving clients to a new server . . . . . . . . . . . . . . . . . . . . . . . . . . . . . . . . . . . . . . . . 443Moving clients to a new domain. . . . . . . . . . . . . . . . . . . . . . . . . . . . . . . . . . . . . . . . 446Retiring clients . . . . . . . . . . . . . . . . . . . . . . . . . . . . . . . . . . . . . . . . . . . . . . . . . . . . . 447Deleting clients . . . . . . . . . . . . . . . . . . . . . . . . . . . . . . . . . . . . . . . . . . . . . . . . . . . . 448Adding and removing groups for a client . . . . . . . . . . . . . . . . . . . . . . . . . . . . . . . . . 449Adding and removing clients in a group. . . . . . . . . . . . . . . . . . . . . . . . . . . . . . . . . . 450Process viewer . . . . . . . . . . . . . . . . . . . . . . . . . . . . . . . . . . . . . . . . . . . . . . . . . . . . 451Management and activation logs . . . . . . . . . . . . . . . . . . . . . . . . . . . . . . . . . . . . . . . 452
Analyzing client activity . . . . . . . . . . . . . . . . . . . . . . . . . . . . . . . . . . . . . . . . . . . . . . . . . 454Server Summary report . . . . . . . . . . . . . . . . . . . . . . . . . . . . . . . . . . . . . . . . . . . . . . 455Successful Clients report . . . . . . . . . . . . . . . . . . . . . . . . . . . . . . . . . . . . . . . . . . . . . 457Backup/Restore Summary by Client report . . . . . . . . . . . . . . . . . . . . . . . . . . . . . . . 458Successful Backups report . . . . . . . . . . . . . . . . . . . . . . . . . . . . . . . . . . . . . . . . . . . 460Failed Clients report. . . . . . . . . . . . . . . . . . . . . . . . . . . . . . . . . . . . . . . . . . . . . . . . . 461Failed Backups report . . . . . . . . . . . . . . . . . . . . . . . . . . . . . . . . . . . . . . . . . . . . . . . 462Idle Clients report. . . . . . . . . . . . . . . . . . . . . . . . . . . . . . . . . . . . . . . . . . . . . . . . . . . 463Clients with Restore Activity report . . . . . . . . . . . . . . . . . . . . . . . . . . . . . . . . . . . . . 464Restore Activities report. . . . . . . . . . . . . . . . . . . . . . . . . . . . . . . . . . . . . . . . . . . . . . 465Saving reports . . . . . . . . . . . . . . . . . . . . . . . . . . . . . . . . . . . . . . . . . . . . . . . . . . . . . 466
Upgrading Avamar clients . . . . . . . . . . . . . . . . . . . . . . . . . . . . . . . . . . . . . . . . . . . . . . . 467Requirements . . . . . . . . . . . . . . . . . . . . . . . . . . . . . . . . . . . . . . . . . . . . . . . . . . . . . 467Obtaining client packages . . . . . . . . . . . . . . . . . . . . . . . . . . . . . . . . . . . . . . . . . . . . 467Upgrading Avamar client software. . . . . . . . . . . . . . . . . . . . . . . . . . . . . . . . . . . . . . 468Downloading a client package to all servers . . . . . . . . . . . . . . . . . . . . . . . . . . . . . . 470Downloading a client package to selected servers . . . . . . . . . . . . . . . . . . . . . . . . . 470
EMC AVAMAR 6.0 • ADMINISTRATION GUIDE 10

TABLE OF CONTENTS
Removing a client package . . . . . . . . . . . . . . . . . . . . . . . . . . . . . . . . . . . . . . . . . . . 471Client Upgrade Status report . . . . . . . . . . . . . . . . . . . . . . . . . . . . . . . . . . . . . . . . . . 472
Activating clients. . . . . . . . . . . . . . . . . . . . . . . . . . . . . . . . . . . . . . . . . . . . . . . . . . . . . . . 474Loading the list of clients for activation . . . . . . . . . . . . . . . . . . . . . . . . . . . . . . . . . . 474Searching for computers to activate . . . . . . . . . . . . . . . . . . . . . . . . . . . . . . . . . . . . 477Activating selected computers . . . . . . . . . . . . . . . . . . . . . . . . . . . . . . . . . . . . . . . . . 478Activating computers by organizational unit . . . . . . . . . . . . . . . . . . . . . . . . . . . . . . 479Activation queue . . . . . . . . . . . . . . . . . . . . . . . . . . . . . . . . . . . . . . . . . . . . . . . . . . . 481Creating a domain . . . . . . . . . . . . . . . . . . . . . . . . . . . . . . . . . . . . . . . . . . . . . . . . . . 482Creating a group . . . . . . . . . . . . . . . . . . . . . . . . . . . . . . . . . . . . . . . . . . . . . . . . . . . 482Viewing group information for a domain . . . . . . . . . . . . . . . . . . . . . . . . . . . . . . . . . 483Viewing clients for a domain . . . . . . . . . . . . . . . . . . . . . . . . . . . . . . . . . . . . . . . . . . 483Searching for clients . . . . . . . . . . . . . . . . . . . . . . . . . . . . . . . . . . . . . . . . . . . . . . . . 484
Remote push install of the client software . . . . . . . . . . . . . . . . . . . . . . . . . . . . . . . . . . . 485Supported systems management tools . . . . . . . . . . . . . . . . . . . . . . . . . . . . . . . . . . 485Push install on Windows computers . . . . . . . . . . . . . . . . . . . . . . . . . . . . . . . . . . . . 485Push Install on Macintosh computers . . . . . . . . . . . . . . . . . . . . . . . . . . . . . . . . . . . 487Uninstalling the Avamar client software. . . . . . . . . . . . . . . . . . . . . . . . . . . . . . . . . . 488
Avamar Desktop/Laptop . . . . . . . . . . . . . . . . . . . . . . . . . . . . . . . . . . . . . 489Environment requirements . . . . . . . . . . . . . . . . . . . . . . . . . . . . . . . . . . . . . . . . . . . . . . . 490
Computers . . . . . . . . . . . . . . . . . . . . . . . . . . . . . . . . . . . . . . . . . . . . . . . . . . . . . . . . 490Network . . . . . . . . . . . . . . . . . . . . . . . . . . . . . . . . . . . . . . . . . . . . . . . . . . . . . . . . . . 492LDAP authentication . . . . . . . . . . . . . . . . . . . . . . . . . . . . . . . . . . . . . . . . . . . . . . . . 492Avamar authentication . . . . . . . . . . . . . . . . . . . . . . . . . . . . . . . . . . . . . . . . . . . . . . . 493NIS authentication . . . . . . . . . . . . . . . . . . . . . . . . . . . . . . . . . . . . . . . . . . . . . . . . . . 493Avamar system . . . . . . . . . . . . . . . . . . . . . . . . . . . . . . . . . . . . . . . . . . . . . . . . . . . . 493
User authentication . . . . . . . . . . . . . . . . . . . . . . . . . . . . . . . . . . . . . . . . . . . . . . . . . . . . 494LDAP . . . . . . . . . . . . . . . . . . . . . . . . . . . . . . . . . . . . . . . . . . . . . . . . . . . . . . . . . . . . 494Avamar . . . . . . . . . . . . . . . . . . . . . . . . . . . . . . . . . . . . . . . . . . . . . . . . . . . . . . . . . . 496Mixed . . . . . . . . . . . . . . . . . . . . . . . . . . . . . . . . . . . . . . . . . . . . . . . . . . . . . . . . . . . . 497
Configuring authentication . . . . . . . . . . . . . . . . . . . . . . . . . . . . . . . . . . . . . . . . . . . . . . . 498Authentication domain information . . . . . . . . . . . . . . . . . . . . . . . . . . . . . . . . . . . . . 498Authentication methods . . . . . . . . . . . . . . . . . . . . . . . . . . . . . . . . . . . . . . . . . . . . . . 501Enable local users . . . . . . . . . . . . . . . . . . . . . . . . . . . . . . . . . . . . . . . . . . . . . . . . . . 507Authentication configuration tool . . . . . . . . . . . . . . . . . . . . . . . . . . . . . . . . . . . . . . . 508
Apache web server authentication . . . . . . . . . . . . . . . . . . . . . . . . . . . . . . . . . . . . . . . . . 512Rebranding the Web UI . . . . . . . . . . . . . . . . . . . . . . . . . . . . . . . . . . . . . . . . . . . . . . . . . 512Checking the status of Avamar Desktop/Laptop server . . . . . . . . . . . . . . . . . . . . . . . . . 513Stopping and starting Avamar Desktop/Laptop server. . . . . . . . . . . . . . . . . . . . . . . . . . 513User selectable backup schedules. . . . . . . . . . . . . . . . . . . . . . . . . . . . . . . . . . . . . . . . . 514
Enabling selectable backup schedules . . . . . . . . . . . . . . . . . . . . . . . . . . . . . . . . . . 515Configure selectable backup schedules . . . . . . . . . . . . . . . . . . . . . . . . . . . . . . . . . 515
On-demand backups . . . . . . . . . . . . . . . . . . . . . . . . . . . . . . . . . . . . . . . . . . . . . . . . . . . 517Retention policy . . . . . . . . . . . . . . . . . . . . . . . . . . . . . . . . . . . . . . . . . . . . . . . . . . . . 517Disabling on-demand backups . . . . . . . . . . . . . . . . . . . . . . . . . . . . . . . . . . . . . . . . 518
Selectable backup sets . . . . . . . . . . . . . . . . . . . . . . . . . . . . . . . . . . . . . . . . . . . . . . . . . 518Enabling selectable backup sets . . . . . . . . . . . . . . . . . . . . . . . . . . . . . . . . . . . . . . . 519Enabling selectable backup sets for individual clients . . . . . . . . . . . . . . . . . . . . . . . 519
Restore from an alternate computer. . . . . . . . . . . . . . . . . . . . . . . . . . . . . . . . . . . . . . . . 520Restoring from an alternate computer . . . . . . . . . . . . . . . . . . . . . . . . . . . . . . . . . . . 520Viewing history for an alternate computer . . . . . . . . . . . . . . . . . . . . . . . . . . . . . . . . 521
Server-class clients . . . . . . . . . . . . . . . . . . . . . . . . . . . . . . . . . . . . . . . . . . . . . . . . . . . . 521Back up now dataset . . . . . . . . . . . . . . . . . . . . . . . . . . . . . . . . . . . . . . . . . . . . . . . . 521Backup of large number of files . . . . . . . . . . . . . . . . . . . . . . . . . . . . . . . . . . . . . . . . 522
EMC AVAMAR 6.0 • ADMINISTRATION GUIDE 11

TABLE OF CONTENTS
Backup on battery power . . . . . . . . . . . . . . . . . . . . . . . . . . . . . . . . . . . . . . . . . . . . . 522Disable restores. . . . . . . . . . . . . . . . . . . . . . . . . . . . . . . . . . . . . . . . . . . . . . . . . . . . 522
Restore data size limit . . . . . . . . . . . . . . . . . . . . . . . . . . . . . . . . . . . . . . . . . . . . . . . . . . 524Downloads link . . . . . . . . . . . . . . . . . . . . . . . . . . . . . . . . . . . . . . . . . . . . . . . . . . . . . . . . 525Client installation using systems management tools . . . . . . . . . . . . . . . . . . . . . . . . . . . 526Local installation of the client . . . . . . . . . . . . . . . . . . . . . . . . . . . . . . . . . . . . . . . . . . . . . 526Windows and Mac client log locations . . . . . . . . . . . . . . . . . . . . . . . . . . . . . . . . . . . . . . 527Macintosh clients with Entourage. . . . . . . . . . . . . . . . . . . . . . . . . . . . . . . . . . . . . . . . . . 528
Creating the dataset . . . . . . . . . . . . . . . . . . . . . . . . . . . . . . . . . . . . . . . . . . . . . . . . 528Client backup message . . . . . . . . . . . . . . . . . . . . . . . . . . . . . . . . . . . . . . . . . . . . . . 529
Using Avamar with Data Domain . . . . . . . . . . . . . . . . . . . . . . . . . . . . . . 530How Avamar and Data Domain work together . . . . . . . . . . . . . . . . . . . . . . . . . . . . . . . . 530
Architecture of Avamar with Data Domain. . . . . . . . . . . . . . . . . . . . . . . . . . . . . . . . 531Supported backup types . . . . . . . . . . . . . . . . . . . . . . . . . . . . . . . . . . . . . . . . . . . . . 534System requirements. . . . . . . . . . . . . . . . . . . . . . . . . . . . . . . . . . . . . . . . . . . . . . . . 534
Managing Data Domain systems . . . . . . . . . . . . . . . . . . . . . . . . . . . . . . . . . . . . . . . . . . 535Preparing the Data Domain system. . . . . . . . . . . . . . . . . . . . . . . . . . . . . . . . . . . . . 535Adding a Data Domain system . . . . . . . . . . . . . . . . . . . . . . . . . . . . . . . . . . . . . . . . 536Editing a Data Domain system . . . . . . . . . . . . . . . . . . . . . . . . . . . . . . . . . . . . . . . . 539Deleting a Data Domain system . . . . . . . . . . . . . . . . . . . . . . . . . . . . . . . . . . . . . . . 539
Backup to a Data Domain system . . . . . . . . . . . . . . . . . . . . . . . . . . . . . . . . . . . . . . . . . 540Restore from a Data Domain system . . . . . . . . . . . . . . . . . . . . . . . . . . . . . . . . . . . . . . . 542System maintenance with Data Domain . . . . . . . . . . . . . . . . . . . . . . . . . . . . . . . . . . . . 543Replication with Data Domain . . . . . . . . . . . . . . . . . . . . . . . . . . . . . . . . . . . . . . . . . . . . 544
How replication works with Avamar and Data Domain . . . . . . . . . . . . . . . . . . . . . . 544Configuring replication . . . . . . . . . . . . . . . . . . . . . . . . . . . . . . . . . . . . . . . . . . . . . . . 548
Monitoring and reporting with Data Domain . . . . . . . . . . . . . . . . . . . . . . . . . . . . . . . . . . 551Troubleshooting Data Domain . . . . . . . . . . . . . . . . . . . . . . . . . . . . . . . . . . . . . . . . . . . . 552
Data Domain status and resolutions . . . . . . . . . . . . . . . . . . . . . . . . . . . . . . . . . . . . 553Monitoring status details . . . . . . . . . . . . . . . . . . . . . . . . . . . . . . . . . . . . . . . . . . . . . 558
Avamar File System (AvFS) . . . . . . . . . . . . . . . . . . . . . . . . . . . . . . . . . . . 562Hardware requirements . . . . . . . . . . . . . . . . . . . . . . . . . . . . . . . . . . . . . . . . . . . . . . . . . 562Capabilities and limitations. . . . . . . . . . . . . . . . . . . . . . . . . . . . . . . . . . . . . . . . . . . . . . . 562Security recommendations. . . . . . . . . . . . . . . . . . . . . . . . . . . . . . . . . . . . . . . . . . . . . . . 563Installing and enabling AvFS . . . . . . . . . . . . . . . . . . . . . . . . . . . . . . . . . . . . . . . . . . . . . 564
Installing and enabling AvFS on Avamar 6.0 and later utility nodes . . . . . . . . . . . . . . . . . . . . . . . . . . . . . . . . . . . . . 564Installing and enabling AvFS on Avamar 5.x and earlier utility nodes . . . . . . . . . . . . . . . . . . . . . . . . . . . . . . . . . . . . 565
Shutting down AvFS. . . . . . . . . . . . . . . . . . . . . . . . . . . . . . . . . . . . . . . . . . . . . . . . . . . . 565Configuring Samba for use with AvFS . . . . . . . . . . . . . . . . . . . . . . . . . . . . . . . . . . . . . . 566
Installing Samba on Avamar 6.0 and later utility nodes running SLES. . . . . . . . . . . . . . . . . . . . . . . . . . . . . . . . . . . . 566Installing Samba on Avamar 5.x and earlier utility nodes . . . . . . . . . . . . . . . . . . . . 567Configuring and starting Samba . . . . . . . . . . . . . . . . . . . . . . . . . . . . . . . . . . . . . . . 567Verifying Proper Operation . . . . . . . . . . . . . . . . . . . . . . . . . . . . . . . . . . . . . . . . . . . 569
Strengthening Samba security . . . . . . . . . . . . . . . . . . . . . . . . . . . . . . . . . . . . . . . . . . . . 570How AvFS works with VMware File level restore. . . . . . . . . . . . . . . . . . . . . . . . . . . 570Recommended methods for strengthening Samba share security . . . . . . . . . . . . . . . . . . . . . . . . . . . . . . . . . . . 570Example Samba configuration file . . . . . . . . . . . . . . . . . . . . . . . . . . . . . . . . . . . . . . 573
EMC AVAMAR 6.0 • ADMINISTRATION GUIDE 12

TABLE OF CONTENTS
Appendix A — Command Shell Server Logins . . . . . . . . . . . . . . . . . . . 575Starting command shell sessions. . . . . . . . . . . . . . . . . . . . . . . . . . . . . . . . . . . . . . . . . . 576Switching user IDs . . . . . . . . . . . . . . . . . . . . . . . . . . . . . . . . . . . . . . . . . . . . . . . . . . . . . 576sudo implementation . . . . . . . . . . . . . . . . . . . . . . . . . . . . . . . . . . . . . . . . . . . . . . . . . . . 577
Appendix B — Plug-in Options . . . . . . . . . . . . . . . . . . . . . . . . . . . . . . . . 578Important terms and concepts . . . . . . . . . . . . . . . . . . . . . . . . . . . . . . . . . . . . . . . . . . . . 578AIX filesystem plug-in options . . . . . . . . . . . . . . . . . . . . . . . . . . . . . . . . . . . . . . . . . . . . 580FreeBSD filesystem plug-in options . . . . . . . . . . . . . . . . . . . . . . . . . . . . . . . . . . . . . . . . 585HP-UX filesystem plug-in options. . . . . . . . . . . . . . . . . . . . . . . . . . . . . . . . . . . . . . . . . . 590Linux filesystem plug-in options . . . . . . . . . . . . . . . . . . . . . . . . . . . . . . . . . . . . . . . . . . . 595Macintosh filesystem plug-in options . . . . . . . . . . . . . . . . . . . . . . . . . . . . . . . . . . . . . . . 600NetWare filesystem plug-in options . . . . . . . . . . . . . . . . . . . . . . . . . . . . . . . . . . . . . . . . 605SCO OpenServer filesystem plug-in options . . . . . . . . . . . . . . . . . . . . . . . . . . . . . . . . . 611Solaris filesystem plug-in options . . . . . . . . . . . . . . . . . . . . . . . . . . . . . . . . . . . . . . . . . . 616Windows filesystem plug-in options . . . . . . . . . . . . . . . . . . . . . . . . . . . . . . . . . . . . . . . . 620DB2 plug-in options . . . . . . . . . . . . . . . . . . . . . . . . . . . . . . . . . . . . . . . . . . . . . . . . . . . . 628Lotus Domino plug-in options. . . . . . . . . . . . . . . . . . . . . . . . . . . . . . . . . . . . . . . . . . . . . 631NDMP plug-in options . . . . . . . . . . . . . . . . . . . . . . . . . . . . . . . . . . . . . . . . . . . . . . . . . . 637Oracle RMAN plug-in options. . . . . . . . . . . . . . . . . . . . . . . . . . . . . . . . . . . . . . . . . . . . . 637Microsoft Office SharePoint Server plug-in options . . . . . . . . . . . . . . . . . . . . . . . . . . . . 648Windows Exchange database plug-in options . . . . . . . . . . . . . . . . . . . . . . . . . . . . . . . . 649Windows Exchange message plug-in options . . . . . . . . . . . . . . . . . . . . . . . . . . . . . . . . 654SQL Server plug-in options . . . . . . . . . . . . . . . . . . . . . . . . . . . . . . . . . . . . . . . . . . . . . . 655Windows VSS plug-in options . . . . . . . . . . . . . . . . . . . . . . . . . . . . . . . . . . . . . . . . . . . . 661Replicate plug-in options . . . . . . . . . . . . . . . . . . . . . . . . . . . . . . . . . . . . . . . . . . . . . . . . 663Linux VMware Image plug-in options . . . . . . . . . . . . . . . . . . . . . . . . . . . . . . . . . . . . . . . 664Windows VMware Image plug-in options . . . . . . . . . . . . . . . . . . . . . . . . . . . . . . . . . . . . 665Windows VMware File-level Restore plug-in options . . . . . . . . . . . . . . . . . . . . . . . . . . . 666
Appendix C — MCS and EMS Database Views . . . . . . . . . . . . . . . . . . . 667Data types . . . . . . . . . . . . . . . . . . . . . . . . . . . . . . . . . . . . . . . . . . . . . . . . . . . . . . . . . . . 667MCS database views . . . . . . . . . . . . . . . . . . . . . . . . . . . . . . . . . . . . . . . . . . . . . . . . . . . 668
v_activities . . . . . . . . . . . . . . . . . . . . . . . . . . . . . . . . . . . . . . . . . . . . . . . . . . . . . . . . 668v_activities_2 . . . . . . . . . . . . . . . . . . . . . . . . . . . . . . . . . . . . . . . . . . . . . . . . . . . . . . 671v_activity_errors. . . . . . . . . . . . . . . . . . . . . . . . . . . . . . . . . . . . . . . . . . . . . . . . . . . . 675v_audits . . . . . . . . . . . . . . . . . . . . . . . . . . . . . . . . . . . . . . . . . . . . . . . . . . . . . . . . . . 675v_clients . . . . . . . . . . . . . . . . . . . . . . . . . . . . . . . . . . . . . . . . . . . . . . . . . . . . . . . . . . 677v_clients_2. . . . . . . . . . . . . . . . . . . . . . . . . . . . . . . . . . . . . . . . . . . . . . . . . . . . . . . . 680v_compatibility . . . . . . . . . . . . . . . . . . . . . . . . . . . . . . . . . . . . . . . . . . . . . . . . . . . . . 683v_datasets . . . . . . . . . . . . . . . . . . . . . . . . . . . . . . . . . . . . . . . . . . . . . . . . . . . . . . . . 684v_ddr_node_space . . . . . . . . . . . . . . . . . . . . . . . . . . . . . . . . . . . . . . . . . . . . . . . . . 684v_dpnsummary . . . . . . . . . . . . . . . . . . . . . . . . . . . . . . . . . . . . . . . . . . . . . . . . . . . . 684v_dpn_stats . . . . . . . . . . . . . . . . . . . . . . . . . . . . . . . . . . . . . . . . . . . . . . . . . . . . . . . 685v_ds_commands . . . . . . . . . . . . . . . . . . . . . . . . . . . . . . . . . . . . . . . . . . . . . . . . . . . 686v_ds_excludes . . . . . . . . . . . . . . . . . . . . . . . . . . . . . . . . . . . . . . . . . . . . . . . . . . . . . 686v_ds_includes . . . . . . . . . . . . . . . . . . . . . . . . . . . . . . . . . . . . . . . . . . . . . . . . . . . . . 686v_ds_targets . . . . . . . . . . . . . . . . . . . . . . . . . . . . . . . . . . . . . . . . . . . . . . . . . . . . . . 687v_ev_catalog . . . . . . . . . . . . . . . . . . . . . . . . . . . . . . . . . . . . . . . . . . . . . . . . . . . . . . 687v_ev_cus_body . . . . . . . . . . . . . . . . . . . . . . . . . . . . . . . . . . . . . . . . . . . . . . . . . . . . 688v_ev_cus_cc_list . . . . . . . . . . . . . . . . . . . . . . . . . . . . . . . . . . . . . . . . . . . . . . . . . . . 688v_ev_cus_codes . . . . . . . . . . . . . . . . . . . . . . . . . . . . . . . . . . . . . . . . . . . . . . . . . . . 689v_ev_cus_prof . . . . . . . . . . . . . . . . . . . . . . . . . . . . . . . . . . . . . . . . . . . . . . . . . . . . . 689v_ev_cus_prof_params . . . . . . . . . . . . . . . . . . . . . . . . . . . . . . . . . . . . . . . . . . . . . . 690v_ev_cus_rpt . . . . . . . . . . . . . . . . . . . . . . . . . . . . . . . . . . . . . . . . . . . . . . . . . . . . . . 690
EMC AVAMAR 6.0 • ADMINISTRATION GUIDE 13

TABLE OF CONTENTS
v_ev_cus_snmp_contact . . . . . . . . . . . . . . . . . . . . . . . . . . . . . . . . . . . . . . . . . . . . . 691v_ev_cus_syslog_contact . . . . . . . . . . . . . . . . . . . . . . . . . . . . . . . . . . . . . . . . . . . . 691v_ev_cus_to_list . . . . . . . . . . . . . . . . . . . . . . . . . . . . . . . . . . . . . . . . . . . . . . . . . . . 692v_ev_unack . . . . . . . . . . . . . . . . . . . . . . . . . . . . . . . . . . . . . . . . . . . . . . . . . . . . . . . 692v_events . . . . . . . . . . . . . . . . . . . . . . . . . . . . . . . . . . . . . . . . . . . . . . . . . . . . . . . . . 693v_gcstatus . . . . . . . . . . . . . . . . . . . . . . . . . . . . . . . . . . . . . . . . . . . . . . . . . . . . . . . . 694v_group_members. . . . . . . . . . . . . . . . . . . . . . . . . . . . . . . . . . . . . . . . . . . . . . . . . . 695v_groups . . . . . . . . . . . . . . . . . . . . . . . . . . . . . . . . . . . . . . . . . . . . . . . . . . . . . . . . . 695v_node_space . . . . . . . . . . . . . . . . . . . . . . . . . . . . . . . . . . . . . . . . . . . . . . . . . . . . . 696v_node_util . . . . . . . . . . . . . . . . . . . . . . . . . . . . . . . . . . . . . . . . . . . . . . . . . . . . . . . 697v_plugin_can_restore . . . . . . . . . . . . . . . . . . . . . . . . . . . . . . . . . . . . . . . . . . . . . . . 697v_plugin_catalog . . . . . . . . . . . . . . . . . . . . . . . . . . . . . . . . . . . . . . . . . . . . . . . . . . . 698v_plugin_depends_upon . . . . . . . . . . . . . . . . . . . . . . . . . . . . . . . . . . . . . . . . . . . . . 699v_plugin_flag_groups. . . . . . . . . . . . . . . . . . . . . . . . . . . . . . . . . . . . . . . . . . . . . . . . 699v_plugin_flag_pulldown . . . . . . . . . . . . . . . . . . . . . . . . . . . . . . . . . . . . . . . . . . . . . . 700v_plugin_flags . . . . . . . . . . . . . . . . . . . . . . . . . . . . . . . . . . . . . . . . . . . . . . . . . . . . . 700v_plugin_options . . . . . . . . . . . . . . . . . . . . . . . . . . . . . . . . . . . . . . . . . . . . . . . . . . . 701v_plugin_state . . . . . . . . . . . . . . . . . . . . . . . . . . . . . . . . . . . . . . . . . . . . . . . . . . . . . 702v_plugins . . . . . . . . . . . . . . . . . . . . . . . . . . . . . . . . . . . . . . . . . . . . . . . . . . . . . . . . . 702v_repl_activities . . . . . . . . . . . . . . . . . . . . . . . . . . . . . . . . . . . . . . . . . . . . . . . . . . . . 703v_repl_backups . . . . . . . . . . . . . . . . . . . . . . . . . . . . . . . . . . . . . . . . . . . . . . . . . . . . 706v_report_filter . . . . . . . . . . . . . . . . . . . . . . . . . . . . . . . . . . . . . . . . . . . . . . . . . . . . . . 707v_reports . . . . . . . . . . . . . . . . . . . . . . . . . . . . . . . . . . . . . . . . . . . . . . . . . . . . . . . . . 708v_retention_policies . . . . . . . . . . . . . . . . . . . . . . . . . . . . . . . . . . . . . . . . . . . . . . . . . 709v_sch_recurrence . . . . . . . . . . . . . . . . . . . . . . . . . . . . . . . . . . . . . . . . . . . . . . . . . . 710v_schedules. . . . . . . . . . . . . . . . . . . . . . . . . . . . . . . . . . . . . . . . . . . . . . . . . . . . . . . 711v_schedules_2. . . . . . . . . . . . . . . . . . . . . . . . . . . . . . . . . . . . . . . . . . . . . . . . . . . . . 712v_serial_numbers . . . . . . . . . . . . . . . . . . . . . . . . . . . . . . . . . . . . . . . . . . . . . . . . . . 714v_systems . . . . . . . . . . . . . . . . . . . . . . . . . . . . . . . . . . . . . . . . . . . . . . . . . . . . . . . . 714
EMS database views . . . . . . . . . . . . . . . . . . . . . . . . . . . . . . . . . . . . . . . . . . . . . . . . . . . 715v_avamar_server . . . . . . . . . . . . . . . . . . . . . . . . . . . . . . . . . . . . . . . . . . . . . . . . . . . 715v_compatibility . . . . . . . . . . . . . . . . . . . . . . . . . . . . . . . . . . . . . . . . . . . . . . . . . . . . . 716
Glossary . . . . . . . . . . . . . . . . . . . . . . . . . . . . . . . . . . . . . . . . . . . . . . . . . . 717
EMC AVAMAR 6.0 • ADMINISTRATION GUIDE 14
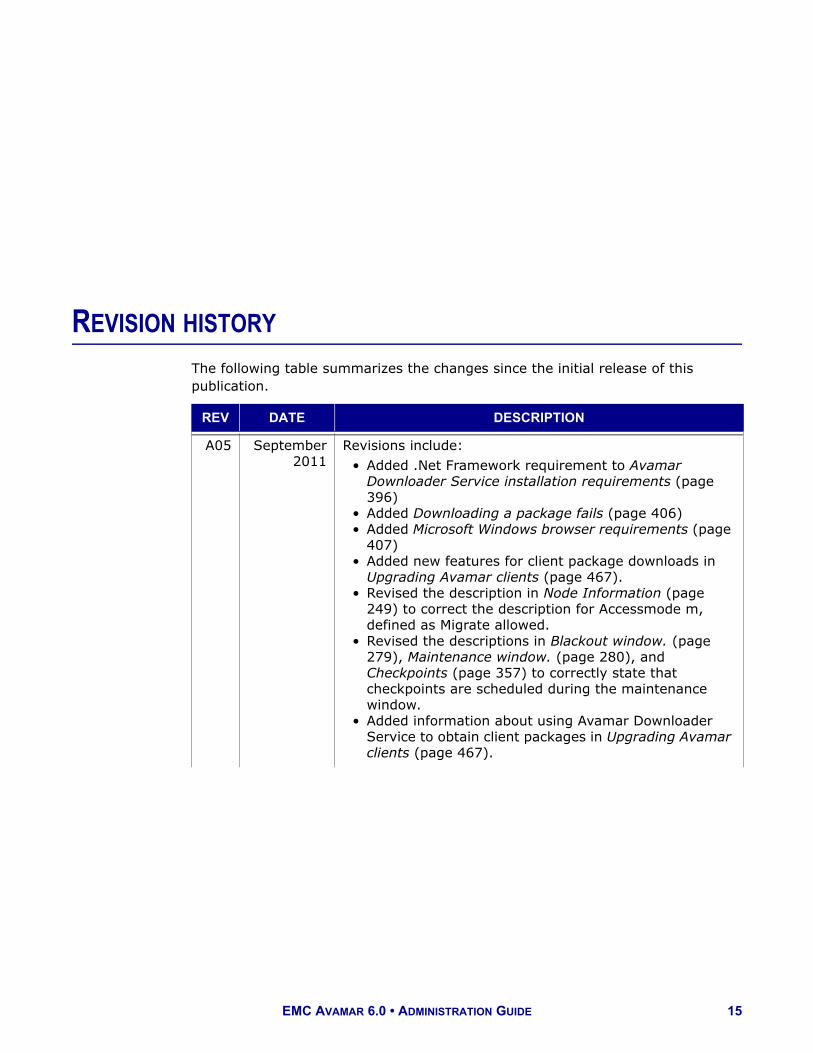
REVISION HISTORY
The following table summarizes the changes since the initial release of this publication.
REV DATE DESCRIPTION
A05 September2011
Revisions include:• Added .Net Framework requirement to Avamar
Downloader Service installation requirements (page 396)
• Added Downloading a package fails (page 406)• Added Microsoft Windows browser requirements (page
407)• Added new features for client package downloads in
Upgrading Avamar clients (page 467).• Revised the description in Node Information (page
249) to correct the description for Accessmode m, defined as Migrate allowed.
• Revised the descriptions in Blackout window. (page 279), Maintenance window. (page 280), and Checkpoints (page 357) to correctly state that checkpoints are scheduled during the maintenance window.
• Added information about using Avamar Downloader Service to obtain client packages in Upgrading Avamar clients (page 467).
EMC AVAMAR 6.0 • ADMINISTRATION GUIDE 15

REVISION HISTORY
A04 June 2011 Revisions include:• Revised section Server Management tab (page 245);
added a note regarding the display of total capacity and capacity used.
• Revised section Capabilities and limitations (page 430) in Avamar System Migration (page 429) to correct error regarding the software compatibility for migration.
• Revised procedure in Restoring data on the destination server (page 433) in Avamar System Migration (page 429) to correct the selection of the destination server in step 10.
• Revised section Run change-passwords (page 375) to remove references to the server lockbox administrative phrase, which is no longer used in the 6.0 release.
A03 June 2011 Revisions to Server Updates and Hotfixes (page 393):• Modified Avamar Downloader Service installation
requirements (page 396)• Added Defining an inbound rule for Microsoft Windows
7 hosts (page 399)• Modified Configuring the Avamar Downloader Service
(page 400)• Added Troubleshooting Avamar Downloader Service
issues (page 405)
A02 May 2011 Revisions to support 6.0 release:• Corrected minor errata• Added Configuring Avamar to use network address
translation (page 390)• In Server Updates and Hotfixes (page 393), clarified
installation requirements • In Using Avamar with Data Domain (page 530), added
information about deleting a Data Domain system• Revised Avamar File System (AvFS) (page 562) to
enhance usability
A01 April 2011 Initial publication.
REV DATE DESCRIPTION
EMC AVAMAR 6.0 • ADMINISTRATION GUIDE 16
PREFACE
Scope and intended audience
Scope. This guide describes how to administer an operational Avamar system after successful system installation, setup, and configuration.
Intended Audience. The information in this guide is primarily intended for system administrators who are responsible for maintaining servers and clients on a network, as well as operators who monitor daily backups and storage devices.
Product informationFor current documentation, release notes, software updates, information about EMC products, licensing, and service, go to the EMC Powerlink website at http://Powerlink.EMC.com.
Avamar SupportBefore contacting EMC Technical Support, please go to the Avamar Support landing page at https://support.EMC.com/products/Avamar and:
• Refer to the Product Documentation • Check the listed Support Topics for:
• How-to's • Troubleshooting
• Search the Avamar Knowledge Base (KB) for applicable solutions using the convenient search engine:
• Enter the KB solution number (for example, esgxxxxxx) • Enter keywords
EMC AVAMAR 6.0 • ADMINISTRATION GUIDE 17

Typographic conventionsPREFACE
If none of the previous resources resolve your issue, many issues can be successfully resolved through live interactive chat. You can engage EMC Technical Support using live interactive chat by selecting Additional Resources > Live Chat on the Avamar Support landing page.
If more in-depth help is required, or if you have an existing open Service Request (SR), you can submit or review a service request through Powerlink:
• To review an existing SR, go to http://Powerlink.EMC.com and select Support > Request Support > View Service Requests
• To open a new SR, go to: http://Powerlink.EMC.com and select Support > Request Support > Create Service Request
EMC recommends that all Avamar systems have ConnectEMC and Email Home enabled to facilitate the best possible support. Systems with ConnectEMC configured and enabled will be able to automatically generate SRs when appropriate and as noted in this guide.
Your commentsYour suggestions will help us continue to improve the accuracy, organization, and overall quality of our documentation. You may email comments to:
Please include the following information:
• Product name and version• Document name, part number, and revision (for example, A01)• Page numbers• Other details that will help us address the documentation issue
Typographic conventionsThe following table provides examples of standard typographic styles used in this guide to convey various kinds of information.
EXAMPLE DESCRIPTION
Click OK. orSelect File > Close.
Bold text denotes actual buttons, commands, menus, and options that initiate action.Sequential commands are separated by a greater-than (>) character. For example, the second example instructs you to select the Close command from the File menu.
Type: cd /tmp
Bold fixed-width text denotes shell commands that must be entered exactly as they appear.
--logfile=FILE All caps text often denotes a placeholder (token) for an actual value that must be supplied by the user. In this example, FILE would be an actual filename.
EMC AVAMAR 6.0 • ADMINISTRATION GUIDE 18

Safety admonitions and noticesPREFACE
Safety admonitions and noticesThe following safety admonitions and notices appear in this guide:
Danger safety admonitions indicate a hazardous situationwhich, if not avoided, will result in death or serious injury.
Warning safety admonitions indicate a hazardous situation which, if not avoided, could result in death or serious injury.
Caution safety admonitions indicate a hazardous situationwhich, if not avoided, could result in minor or moderateinjury.
IMPORTANT: Important notices contain information essential to software or hardware operation.
NOTE: Notes contain information intended to clarify a topic or procedure. Notes never contain information that will cause a failure if ignored.
TIP: Tips present optional information intended to improve your productivity or otherwise enhance your experience with the product. Tips never contain information that will cause a failure if ignored.
Installation Complete. Regular (not bold) fixed-width text denotes command shell messages, code, and file contents.
EXAMPLE DESCRIPTION
EMC AVAMAR 6.0 • ADMINISTRATION GUIDE 19

INTRODUCTION
This chapter introduces and discusses the Avamar online data protection solution. You should familiarize yourself with these concepts before you administer an Avamar system.
EMC® Avamar® solves the challenges associated with traditional backup, enabling fast, reliable backup and recovery for remote offices, data center LANs, and VMware® environments. Avamar is backup and recovery software that uses patented global data deduplication technology to identify redundant sub-file data segments at the source, reducing daily backup data by up to 500x—before it is transferred across the network and stored to disk. This enables companies to perform daily full backups even across congested networks and limited WAN links.
Key Avamar differentiators are:
• Deduplication of backup data at the source—before transfer across the network
• Enabling of fast, daily full backups across existing networks and infrastructure• Reduction of required daily network bandwidth by up to 500x
• Up to 10x faster backups• Encryption of data in flight and at rest• Patented RAIN technology that provides fault tolerance across nodes and
eliminates single points of failure• Scalable grid architecture• Reduction of total backup storage by up to 50x due to global data
deduplication• Daily verification of recoverability—no surprises• Centralized web-based management• Simple one-step recovery• Flexible deployment options, including EMC Corporation Avamar Data Store
package
EMC AVAMAR 6.0 • ADMINISTRATION GUIDE 20

Important terms and conceptsINTRODUCTION
Important terms and conceptsThis topic introduces and discusses important terms and concepts.
Avamar system. An Avamar system is a client/server network backup and restore solution that consists of one or more Avamar servers and the network servers or desktop clients that back up data to those servers. The Avamar system also provides centralized management through the Avamar Administrator graphical management console software application.
Avamar server. An Avamar server is a logical grouping of one or more nodes that is used to store and manage client backups.
NOTE: Hardware manufacturers typically call their equipment servers (for instance, the Dell PowerEdge 2950 server). In the context of an Avamar system, this equipment is called a "node."
Node. An Avamar node is a self-contained, rack-mountable, network-addressable computer that runs Avamar server software on the Linux operating system.
Hard disk storage. Avamar is a hard-disk based IP network backup and restore solution. Avamar servers manufactured by EMC use internal hard disk storage.
Stripes. A stripe is a unit of disk drive space managed by Avamar to ensure fault tolerance.
EMC AVAMAR 6.0 • ADMINISTRATION GUIDE 21

Important terms and conceptsINTRODUCTION
Object. In the Avamar system, an object is a single instance of deduplicated data. Each Avamar object inherently has a unique ID. Objects are stored and managed within stripes on the Avamar server.
Data deduplication. Data deduplication is a key feature of the Avamar system. Data deduplication ensures that each unique sub-file, variable length object is stored only once across sites and servers.
During backups, Avamar client software examines the client filesystem and applies a data deduplication algorithm that identifies redundant data sequences and breaks the client filesystem into sub-file, variable length data segments. Each data segment is assigned a unique ID. The client software then determines whether this unique ID has already been stored on the Avamar server. If this object resides on the Avamar server, a link to the stored object is referenced in the backup. Once an object has been stored on the server, it never has to be re-sent over the network, no matter how many times it is encountered on any number of clients. This feature significantly reduces network traffic and provides for greatly enhanced storage efficiency on the server.
Replication. Replication is a feature that enables efficient, encrypted, and asynchronous replication of data stored in an Avamar server to another Avamar server deployed in remote locations without the need to ship tapes. Replication is a scheduled process between two independent Avamar servers, providing a higher level of reliability for stored backups. Replication can be scheduled to run at off-peak hours to minimize bandwidth impact.
EMC AVAMAR 6.0 • ADMINISTRATION GUIDE 22

Functional overviewINTRODUCTION
Functional overviewThis topic provides detailed information about each part of the Avamar client/server system and describes how the parts interact with one another.
Avamar servers
All Avamar servers store client backups and also provide essential processes and services required for client access and remote system administration.
A word about Avamar server hardware configurations. Avamar servers are available in either single-node or scalable multi-node configurations. For the most part, when using Avamar Administrator management console software, all Avamar servers look and behave the same. The main differences among Avamar server configurations are the number of nodes and disk drives reported in the server monitor.
Documenting specific differences in Avamar server hardware configurations is beyond the scope of this guide. Whenever specific limitations and best practices for certain configurations are known, they are noted. However, these occasional notes should not be considered definitive or exhaustive. Consult EMC Technical Support or an EMC reseller for additional information about specific hardware.
Nodes. The primary building block in any Avamar server is a node. Each node is a self-contained, rack-mountable, network-addressable computer that runs Avamar server software on the Linux operating system. Nodes can also contain internal storage in the form of hard disk drives. If the node is configured with internal storage (that is, a single-node server), it is internally mirrored to provide robust fault tolerance.
Single-node servers. Single-node Avamar servers combine all of the features and functions of utility and storage nodes on a single node.
Utility Node
A node dedicated to scheduling and managing background Avamar server jobs. In scalable multi-node Avamar servers, a single utility node provides essential internal services for the server (Management Console Server [MCS], cronjob, External authentication, Network Time Protocol [NTP], and Web access). Because utility nodes are dedicated to running these essential services, they cannot be used to store backups.
StorageNodes
Nodes that store the actual backup data. Multiple storage nodes are configured with multi-node Avamar servers based upon performance and capacity requirements. Storage nodes can be added to an Avamar server over time to expand performance with no downtime required. Avamar clients connect directly with Avamar storage nodes; client connections and data are load balanced across storage nodes.
NDMPAccelerator
A specialized node that uses NDMP to provide data protection for certain NAS devices, including the EMC Celerra® IP storage systems and Network Appliance filers.
EMC AVAMAR 6.0 • ADMINISTRATION GUIDE 23

Functional overviewINTRODUCTION
Avamar clients
Avamar provides client software for various computing platforms. Each client comprises a client agent and one or more plug-ins.
Agents. Avamar agents are platform-specific software processes that run on the client and communicate with the Management Console Server (MCS) and any plug-ins installed on that client.
Plug-ins. There are two basic types of Avamar plug-ins:
Filesystem plug-ins
Filesystem plug-ins are used to browse, back up, and restore files or directories on a specific client filesystem. Avamar currently provides the following operating system plug-ins:
• Free BSD• HP-UX• IBM AIX• Linux• Mac OS X• Microsoft Windows• Microsoft Windows Volume Shadow Copy Service (VSS)• SCO OpenServer• SCO UnixWare• Sun Solaris• Novell NetWare• VMware
Applicationplug-ins
Application plug-ins support backup and restore of databases or other special applications. Avamar currently provides the following application plug-ins:
• IBM DB2• Lotus Domino• Microsoft Exchange• Microsoft Office SharePoint Server (MOSS)• Microsoft SQL Server• NDMP for NAS devices, including EMC Celerra IP storage
systems and Network Appliance filers• Oracle
EMC AVAMAR 6.0 • ADMINISTRATION GUIDE 24

Functional overviewINTRODUCTION
Avamar Administrator
Avamar Administrator is a graphical management console software application that is used to remotely administer an Avamar system from a supported Windows client computer.
Encryption
Avamar can encrypt all data sent between clients and the server “in flight.” Each individual Avamar server can also be configured to encrypt data stored on the server “at rest.”
“In-flight” encryption. To provide enhanced security during client/server data transfers, Avamar supports two levels of “in-flight” encryption: medium and high. You can set the encryption level on a client-by-client basis in client properties, or for an entire group of clients in group properties. You also can disable “in-flight” encryption entirely.
“At-rest” encryption. The decision to encrypt all data stored in an Avamar server is typically a one-time decision that is made when the server is initially deployed at a customer site.
EMC AVAMAR 6.0 • ADMINISTRATION GUIDE 25

AVAMAR ADMINISTRATOR
Avamar Administrator is a graphical management console software application that is used to remotely administer an Avamar system from a supported Windows or client computer.
Installing Avamar Administrator on Microsoft Windows
TIP: You also can launch Avamar Administrator from an Avamar Enterprise Manager session, as discussed in Launching Avamar Administrator from Avamar Enterprise Manager (page 328).
To install Avamar Administrator on Microsoft Windows:
1. Log in to the computer where the software will be installed.
2. Open a web browser and go to the following URL:
http://AVAMARSERVER
where AVAMARSERVER is the Avamar server network hostname (as defined in DNS) or IP address.
You are automatically redirected to the Avamar secure web server.
Depending on browser security settings, a security alert dialog box might appear.
3. If a security alert dialog box appears, click Yes or OK to allow redirection to the Avamar secure web server.
The Secure Log On page appears.
4. Scroll down until the Documents and Downloads hyperlink appears.
5. Click Documents and Downloads.
The Downloads and Documentation page appears.
6. Click the operating system hyperlink for the client computer.
EMC AVAMAR 6.0 • ADMINISTRATION GUIDE 26

Uninstalling and upgrading Avamar Administrator on Microsoft WindowsAVAMAR ADMINISTRATOR
A directory listing appears.
7. If necessary, install Java Runtime Environment (JRE) 1.6 Update 12:
(a) Click the jre-6u12-windows-i586-p install package.
You are prompted to either open the file “in-place” (on the server) or save it to the local computer. Either method works. However, if you save the file to the local computer, you must open the installation file to continue with this procedure.
(b) Follow the onscreen instructions to complete the JRE installation.
8. Click the AvamarConsoleMultiple install package.
9. Either open the installation file in place (on the server) or double-click the downloaded installation file to open it.
If a security warning appears, click Run. The installation wizard appears.
10.Click Accept for the license agreement.
The installation destination window appears.
11. (Optional) To change the installation directory, click Browse and select a different destination.
IMPORTANT: You can install multiple versions of Avamar Administrator on the same computer. Each version is identified by its full version number (for instance, 6.0.0.420). To ensure against inadvertently overwriting an existing version, select the destination folder carefully.
12.Click Install.
Uninstalling and upgrading Avamar Administrator on Microsoft Windows
You do not need to uninstall earlier versions of Avamar Administrator software from a Microsoft Windows computer before you install a new version.
If you decide to install Avamar Administrator on a computer where it is already installed, select a destination folder carefully during the installation procedure. To keep an older version, select a different installation destination. The two versions are identified by their full version numbers.
To uninstall Avamar Administrator, double-click Uninstall Avamar Administrator in the following path:
Start > Programs > EMC Avamar > Administrator > VERSION
where VERSION is the version to uninstall.
EMC AVAMAR 6.0 • ADMINISTRATION GUIDE 27

Installing Avamar Administrator on LinuxAVAMAR ADMINISTRATOR
Installing Avamar Administrator on Linux
IMPORTANT: Before you install a new version of Avamar Administrator software, uninstall any earlier version using the instructions in Uninstalling Avamar Administrator on Linux (page 30).
Downloading the install package
1. Log in to the computer where the software will be installed.
2. Open a web browser and go to the following URL:
http://AVAMARSERVER
where AVAMARSERVER is the Avamar server network hostname (as defined in DNS) or IP address.
You are automatically redirected to the Avamar secure web server.
Depending on browser security settings, a security alert dialog box might appear.
3. If a security alert dialog box appears, click Yes or OK to allow redirection to the Avamar secure web server.
The Secure Log On page appears.
4. Scroll down until the Documents and Downloads hyperlink appears.
5. Click Documents and Downloads.
The Downloads and Documentation page appears.
6. If necessary, install Java Runtime Environment (JRE) 1.6 Update 12:
(a) Click Downloads > Red Hat Enterprise Linux 3 and download jre-6u12-linux-amd64.rpm to a temporary install directory on the system, such as /tmp.
(b) Run the installation program from a command shell.
(c) Follow the onscreen instructions to complete the JRE installation.
7. Click Downloads > Linux.
Download the Avamar Administrator (AvamarConsole) install package to a temporary install directory on the system.
IMPORTANT: Use the Red Hat Enterprise Linux 3.0 installer for Red Hat Enterprise Linux 9.0.
8. Note the filename of the Avamar Administrator (AvamarConsole) install package.
EMC AVAMAR 6.0 • ADMINISTRATION GUIDE 28

Installing Avamar Administrator on LinuxAVAMAR ADMINISTRATOR
Installing Avamar Administrator software
1. Open a command shell and log in as root on the computer where the software will be installed.
2. Change directory to the temporary install directory. For example:
cd /tmp
3. Type:
rpm -ih AVAMARLINUXCONSOLE.rpm
where AVAMARLINUXCONSOLE.rpm is the filename for the Avamar Administrator (AvamarConsole) install package.
The following appears in the command shell:
Please run /usr/local/avamar/6.0.0-570/bin/avsetup_mcc to configure MC Client
4. Type:
/usr/local/avamar/VERSION/bin/avsetup_mcc
where VERSION is the specific version Avamar Administrator software you are installing.The following appears in the command shell:Enter the location of your JRE 1.5 installation [/usr/java/jre1.6u12]:
5. Press Enter to accept the default install location.
The following appears in the command shell:
Enter the root directory of your EMC installation [/usr/local/avamar/6.0.0-570]:
6. Press Enter to accept the default install location.
The following appears in the command shell:
Avamar Administrator 6.0.0.570 has been configured correctly. Type mcgui command to use it.
EMC AVAMAR 6.0 • ADMINISTRATION GUIDE 29

Upgrading Avamar Administrator on LinuxAVAMAR ADMINISTRATOR
Uninstalling Avamar Administrator on Linux1. Close Avamar Administrator.
IMPORTANT: You must close all open Avamar Administrator sessions before you can uninstall Avamar Administrator. Otherwise, the uninstall does not complete. An incomplete uninstall complicates future Avamar Administrator upgrades.
2. Open a command shell and log in to the computer that is currently running Avamar Administrator as root.
3. Type:
rpm -qa | grep Av
The following appears in the command shell:
AvamarConsole-VERSION
4. Note the package name.
5. Type:
rpm -e AvamarConsole-VERSION
where AvamarConsole-VERSION is the Avamar software install package returned in step 3.
Upgrading Avamar Administrator on LinuxTo upgrade the Avamar Administrator software on the Linux platform, completely uninstall the old software (page 30) and install the new software (page 28). Use of the Linux software upgrade command (rpm -Uh) is not supported.
EMC AVAMAR 6.0 • ADMINISTRATION GUIDE 30

Starting Avamar AdministratorAVAMAR ADMINISTRATOR
Starting Avamar Administrator1. Launch Avamar Administrator using one of the steps in the following table.
The login window appears.
2. Complete the settings as described in the following table.
PLATFORM STEP TO LAUNCH AVAMAR ADMINISTRATOR
Microsoft Windows Double-click the Avamar Administrator icon on the Windows desktop.
Linux Open a command shell and type:mcgui
SETTING DESCRIPTION
User Name The Avamar username.NOTE: To access all Avamar Administrator features and functions, this user account must be assigned the role of Administrator. Other roles provide reduced functionality. Roles (page 66) provides details.
If you use an external authentication system such as Network Information Service (NIS), Open Lightweight Directory Access Protocol (OpenLDAP), and Windows Active Directory, the entry must be in the following format:
USER@EXT-AUTH-SERVER
where USER is the username and EXT-AUTH-SERVER is the name of the external authentication server.
If you type only the username, the internal authentication system is used.
Password The Avamar password.
EMC AVAMAR 6.0 • ADMINISTRATION GUIDE 31

Starting Avamar AdministratorAVAMAR ADMINISTRATOR
TIP: If you consistently log in to the same Avamar server or domain, click Options and type that server name and domain in the Default Administrator Server and Default Domain fields, respectively. The next time that you start Avamar Administrator, the Administrator Server and Domain Name fields on the login window are prepopulated with this information.
3. Click Log On.
The Administrator launcher appears.
NOTE: Full launcher functionality is only available to users assigned the role of Administrator. Other roles provide reduced functionality. Roles (page 66) provides details.
Each of the buttons invokes a different persistent window to perform specific tasks. You can invoke and switch among the windows using the Navigation menu or status bar shortcuts.
Domain Name
Administrative domain (node on the client tree) to log in to. To log in to the root domain, use the default entry (that is, a single slash (/) character).To log in to a specific domain or subdomain, use the following syntax:
/domain/subdomain1/subdomain2Domains and subdomains (page 38) provides details.
Administrator Server
Avamar Administrator server name to log in to, as defined in the corporate Domain Name Server (DNS).
SETTING DESCRIPTION
EMC AVAMAR 6.0 • ADMINISTRATION GUIDE 32

Special featuresAVAMAR ADMINISTRATOR
Special featuresThis topic discusses time-saving features and shortcuts in the Avamar Administrator user interface.
Status bar
The status bar at the bottom of each Avamar Administrator persistent window conveys status information and provides a single-click shortcut to specific features and functions.
Launcher shortcuts
The icons on the left side of the status bar provide shortcuts to the six main Avamar Administrator windows. The following table provides details on the icons:
ICON WINDOW WINDOW DESCRIPTION
Policy The Policy window is used to create and manage groups, datasets, schedules, and retention policies. Groups and Group Policies (page 135) provides details.
Backup and Restore
The Backup and Restore window is used to perform on-demand backups and restores. Performing an on-demand client backup (page 80) and Performing a restore (page 91) provide details.
Administration The Administration window is used to create and manage domains, clients, users, system events, and services. Domains, Clients, and Users (page 38) and Advanced Server Administration and Maintenance (page 357) provide details.
Backup Management
The Backup Management window is used to change backup expiration dates, as well as validate backups or delete them from the system. Changing a backup expiration date (page 95), Validating a backup (page 99), and Deleting a backup (page 104) provide details.
Activity The Activity window is used to monitor backup and restore activity. Monitoring backup, restore, and validation activities (page 82) provides details.
Server The Server window is used to monitor server activity and client sessions. Advanced Server Administration and Maintenance (page 357) provides details.
EMC AVAMAR 6.0 • ADMINISTRATION GUIDE 33

Special featuresAVAMAR ADMINISTRATOR
Status messages
The right side of the status bar shows various status messages.
Scheduler and backup dispatching status
The scheduler controls whether scheduled backups occur. The backup dispatching status indicates whether backups can occur based on whether the health check limit has been reached. The following table lists the available status messages.
STATUS MESSAGE DESCRIPTION
Sch/Disp: Running/Running
Backups will occur at the scheduled time. Scheduled backups are enabled, and the health check limit has not been reached.
Sch/Disp: Running/Suspended
Even though scheduled backups are enabled, backups will not occur at the scheduled time because the health check limit has been reached. Resolve the system capacity issues and acknowledge the system event to resume backups. Capacity Management (page 331) and Acknowledging system events (page 281) provide details.
Sch/Disp: Suspended/Running
Even though the health check limit has not been reached, backups will not occur at the scheduled time because scheduled backups are disabled. Backups can resume when you resume scheduled operations.
Sch/Disp: Suspended/Suspended
Backups will not occur at the scheduled time because scheduled backups are disabled and the health check limit has been reached. Suspending and resuming scheduled operations (page 283) provides details on re-enabling the scheduler.Capacity Management (page 331) and Acknowledging system events (page 281) provide details on resolving the system capacity issues and acknowledging the system event to resume backups.
EMC AVAMAR 6.0 • ADMINISTRATION GUIDE 34

Special featuresAVAMAR ADMINISTRATOR
Unacknowledged events
You can configure certain system events to require acknowledgement by an Avamar server administrator each time they occur. The following table lists the available status messages:
Avamar server and Data Domain system status
This icon lists the operational status of either the Avamar server or any configured Data Domain systems. The following table lists the available status messages:
STATUS MESSAGE DESCRIPTION
Have Unacknowledged Events
There are entries in the unacknowledged events list that must be explicitly acknowledged by an Avamar server administrator.Click the Unacknowledged Events status icon or text label to display the Administration window Unacknowledged Events pane (tab). Acknowledging system events (page 281) provides details.
No Unacknowledged Events
There are no entries in the unacknowledged events list.
STATUS MESSAGE DESCRIPTION
Server: Full Access Normal operational state for an Avamar server. All operations are allowed.
Server: Admin Avamar server is in an administrative state in which the Avamar server and root user can read and write data; other users are only allowed to read data.
Server: Admin Only Avamar server is in an administrative state in which the Avamar server or root user can read or write data; other users are not allowed access.
Server: Admin Read Only
Avamar server is in an administrative read-only state in which the Avamar server or root user can read data; other users are not allowed access.
Server: Degraded Avamar server has experienced a disk failure on one or more nodes. All operations are allowed, but immediate action should be taken to fix the problem.
Server: Inactive Avamar Administrator was unable to communicate with the Avamar server.
Server: Node Offline One or more Avamar server nodes are in an OFFLINE state.
Server: Read Only Avamar server is in a read-only administrative state in which all users can read data, but writing data is not allowed.
EMC AVAMAR 6.0 • ADMINISTRATION GUIDE 35

Special featuresAVAMAR ADMINISTRATOR
To suspend or resume Avamar server activities, click the Server status icon or text label to display the Avamar Server window Session Monitor tab. From there, select Actions > Resume Backups/Restores or Actions > Suspend Backups/Restores to resume or suspend server activities, respectively. Suspending and resuming backups and restores (page 282) provides details.
To view additional details about Data Domain system status, open the Server window by clicking Navigation > Server. Select the Server Management tab, and then select the Data Domain system in the tree. The Monitoring Status of the Data Domain system appears in the right pane. Data Domain status and resolutions (page 553) provides details on the available detailed status messages.
Server: Suspended Avamar Administrator was able to communicate with the Avamar server, but normal operations have been temporarily suspended.
Server: Synchronizing Avamar server is in a transitional state. It is normal for the server to be in this state during startup and for short periods of time during maintenance operations.
Server: Unknown State Avamar Administrator could not determine the Avamar server state.
Data Domain System Unresponsive
Avamar can connect to a Data Domain system, but there is a problem with the connection.
DD System: Inactive Avamar cannot connect to a Data Domain system.
STATUS MESSAGE DESCRIPTION
EMC AVAMAR 6.0 • ADMINISTRATION GUIDE 36

Special featuresAVAMAR ADMINISTRATOR
Mouse shortcuts
The Avamar Administrator user interface supports context-sensitive left-click, right-click, and double-click shortcuts.
Right-click
All GUI elements that can enable features or functions when clicked, have right-click support added to them. However, if the GUI element only acts as a navigation mechanism, there is no right-click support. For example, the Policy window client tree has a right-click pop-up menu because specific features and functions become available based on which node of the tree is selected.
Double-click
For all tables where properties or edit dialog boxes can be invoked, double-click any row of the table to display the properties or edit dialog box. Additionally, when lists are used rather than tables, double-click an element in the list to display the edit dialog box.
Sort column headings
Click a table column heading to sort that display by values in that column. For example, double-click the Activity Monitor State column to sort the Activity Monitor display by the state of each backup.
Press Shift and then click any table column heading to reverse sort the values in a table column.
EMC AVAMAR 6.0 • ADMINISTRATION GUIDE 37

DOMAINS, CLIENTS, AND USERS
This chapter discusses how to administer Avamar domains, clients, and user accounts.
Domains and subdomainsAvamar domains are distinct zones within the Avamar server that are used to organize and segregate clients. This provides enhanced security by allowing administrative user accounts to be defined on a domain-by-domain basis.
It should be understood that Avamar domains are completely internal to the Avamar server and have nothing to do with Internet domains.
Nested structure. Domains can be nested to create a rich tree structure. Consider the example Avamar domain to the right.
The root domain, avamar-1.example.com, contains three departmental domains: Accounting, Engineering, and Operations. The Operations domain contains Maintenance and Shipping subdomains.
It should also be understood that there is no functional difference between domains and subdomains. “Subdomain” is merely a term that refers to any domain nested within another higher level domain.
Hierarchical management. The real power of domains is that you can add specific administrators to a specific level on the client tree. These domain-level administrators can then manage the clients and policies within that domain.
For example, any administrative user added to the root domain can administer clients and policies anywhere in the system. However, an administrative user added to a domain, such as the Operations domain in the example, can only administer clients and policies within that domain and below. In other words, that
EMC AVAMAR 6.0 • ADMINISTRATION GUIDE 38

Domains and subdomainsDOMAINS, CLIENTS, AND USERS
user can administer clients and policies in the Maintenance and Shipping subdomains, but not in the Accounting or Engineering domains.
The remainder of this guide assumes that you are logged in to the root domain. Be aware that if you log in to a lower-level domain, you may not have access to specific clients, datasets, groups, and event management features outside that particular domain.
Special domains. The following domains are permanent (they cannot be deleted or moved) and are used for special purposes:
Domain and client name length limitation. Within any domain, the sum of the domain and client names cannot exceed 63 characters. Therefore, it is best to use domain names that are short as practical.
MC_RETIRED MC_RETIRED contains clients that have been retired, as discussed in Retiring a client (page 54). Its primary purpose is to facilitate restores from retired client backups.
REPLICATE REPLICATE contains replicated data from other servers. Replication (page 341) provides details.
EMC AVAMAR 6.0 • ADMINISTRATION GUIDE 39

Creating a domainDOMAINS, CLIENTS, AND USERS
Creating a domainTo create a domain:
1. In Avamar Administrator, click the Administration launcher button.
The Administration window appears.
2. Click the Account Management tab.
3. Select the location in the tree to create the domain.
4. From the Actions menu, select Account Management > New Domain.
The New Domain dialog box appears.
IMPORTANT: The complete client name and domain path cannot exceed 63 characters. Therefore, when you create new domains, try to minimize the number of subdomains and keep domain names as short as practical.
EMC AVAMAR 6.0 • ADMINISTRATION GUIDE 40

Creating a domainDOMAINS, CLIENTS, AND USERS
5. Complete the settings as described in the following table.
6. Click OK.
A confirmation message appears.
7. Click OK.
SETTING DESCRIPTION
New Domain Name Name of the domain
Contact Optional contact name
Phone Optional contact telephone number
Email Optional contact email address
Location Optional contact location
EMC AVAMAR 6.0 • ADMINISTRATION GUIDE 41
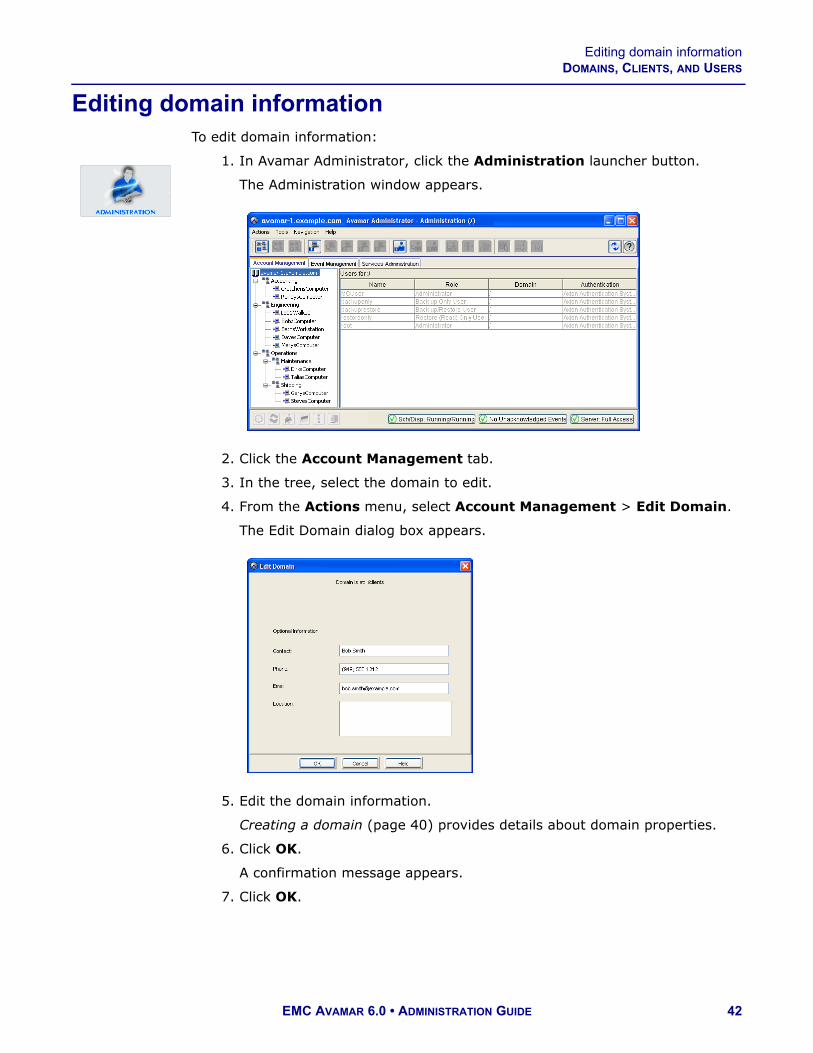
Editing domain informationDOMAINS, CLIENTS, AND USERS
Editing domain informationTo edit domain information:
1. In Avamar Administrator, click the Administration launcher button.
The Administration window appears.
2. Click the Account Management tab.
3. In the tree, select the domain to edit.
4. From the Actions menu, select Account Management > Edit Domain.
The Edit Domain dialog box appears.
5. Edit the domain information.
Creating a domain (page 40) provides details about domain properties.
6. Click OK.
A confirmation message appears.
7. Click OK.
EMC AVAMAR 6.0 • ADMINISTRATION GUIDE 42

Deleting a domainDOMAINS, CLIENTS, AND USERS
Deleting a domain
IMPORTANT: Deleting a domain also deletes any clients within that domain. Unless you want to permanently delete all clients within a domain, you should move the clients to a new domain (page 56) before you perform this procedure.
To delete a domain:
1. In Avamar Administrator, click the Administration launcher button.
The Administration window appears.
2. Click the Account Management tab.
3. In the tree, select the domain to delete.
4. From the Actions menu, select Account Management > Delete Domain.
A confirmation message appears.
5. Click Yes.
A second confirmation message appears.
6. Click OK.
EMC AVAMAR 6.0 • ADMINISTRATION GUIDE 43

ClientsDOMAINS, CLIENTS, AND USERS
ClientsAvamar clients are networked computers or workstations that access the Avamar server over a network connection.
Before a client can use the Avamar system to back up or restore data, it must be added to the system (registered), then activated.
To provide maximum flexibility in deploying Avamar clients, registration and activation are separate events that occur asynchronously. Although they often occur at nearly the same time, they can also occur hours, days, or even weeks apart.
Registration
Client registration is the process of establishing an identity with the Avamar server. Once Avamar “knows” the client, it assigns a unique client ID (CID), which it passes back to the client during activation.
There are three ways to register a client:
• Client-side registration• Interactive server-side registration• Batch client registration
Client-side registration. After client installation, Avamar Windows clients can initiate the registration process by right-clicking the Avamar server tray icon and selecting Activate.
During client software installation on Linux and UNIX platforms, installers are asked whether to register the client at that time.
Both client-side registration methods also activate the client at the same time. For this reason, client-side registration is very popular. However, because client-side registration uses certain inherited assignments (the client is added to the Default Group and must use the default dataset, schedule, and retention policy), this method may not provide enough control for some sites. Editing group properties (page 144) provides information about group properties such as datasets, schedules, and retention policies.
Interactive server-side registration. You can also interactively use Avamar Administrator to add the client to the system in a domain and group. This provides a high degree of control. For example, you can assign a specific dataset, schedule, and retention policy. However, it can be very time consuming if you need to add many clients.
Batch client registration. To support large sites with many clients, the batch client registration feature enables you to define multiple clients by way of a single “client definition” file, then import that file into the Avamar server. Batch client registration is very popular at large sites because it provides nearly as much control as interactively adding the client using Avamar Administrator but is much faster. Batch client registration (page 61) provides details.
EMC AVAMAR 6.0 • ADMINISTRATION GUIDE 44

ClientsDOMAINS, CLIENTS, AND USERS
Activation
Client activation is the process of passing the client ID (CID) back to the client, where it is stored in an encrypted file on the client filesystem. There are two ways to activate a client:
• You can wait for the client to initiate activation. For example, right-click the Avamar system tray icon and select Activate.
• You can invite the client to activate with the server using Avamar Administrator. To do this, open the Actions menu and select Account Management > Invite Client.
IMPORTANT: For immediate activation using Avamar Administrator to succeed, the client must be present on the network, the Avamar client software must be installed and running, and the Avamar server must be able to resolve the hostname that was used to register the client. Activating a client (page 48) provides information.
NOTE: HP-UX, Linux, and Solaris clients can either be activated during installation or from Avamar Administrator. There is no client-side command to initiate client activation on these computing platforms.
Important information about client names
In Avamar Administrator, the client name must always be the client hostname. Furthermore, if you need to change the client name in Avamar Administrator because the client hostname changed, you must first shut down the Avamar software on the client computer, change the client name by editing the client information (page 49), then restart the Avamar client software. This is the only way to ensure that the client maintains its registration with the Management Console Server (MCS) database, which ensures that past backups continue to be associated with the client.
EMC AVAMAR 6.0 • ADMINISTRATION GUIDE 45

Adding a clientDOMAINS, CLIENTS, AND USERS
Adding a clientTo add a client to the Avamar configuration:
1. In Avamar Administrator, click the Administration launcher button.
The Administration window appears.
2. Click the Account Management tab.
TIP: In the Account Management tree, the icons for the clients indicate status. An x appears for disabled clients, a question mark appears for unregistered clients, and there is no special icon designation for active clients.
3. In the tree, select the domain for the new client.
4. From the Actions menu, select Account Management > New Client.
The New Client dialog box appears.
5. From the Client Type list, select Normal.
NOTE: VMware vCenter™, Image Proxy, and Virtual Machine client types are discussed in the EMC Avamar for VMware Guide.
EMC AVAMAR 6.0 • ADMINISTRATION GUIDE 46

Adding a clientDOMAINS, CLIENTS, AND USERS
6. Complete the settings as described in the following table.
7. Click OK.
A confirmation message appears.
8. Click OK.
SETTING DESCRIPTION
New Client Name The client name.IMPORTANT: In Avamar Administrator, the client name must always be the client hostname. Additionally, the complete client name and domain path cannot exceed 63 characters. Therefore, try to keep client names as short as practical.
Contact Optional contact name.
Phone Optional contact telephone number.
Email Optional contact email address.
Location Optional contact location.
EMC AVAMAR 6.0 • ADMINISTRATION GUIDE 47

Activating a clientDOMAINS, CLIENTS, AND USERS
Activating a clientTo activate a client that you added to the Avamar configuration:
1. Ensure that Avamar client software is installed and running on the client.
2. In Avamar Administrator, click the Administration launcher button.
The Administration window appears.
3. Click the Account Management tab.
TIP: In the Account Management tree, the icons for the clients indicate status. An x appears for disabled clients, a question mark appears for unregistered clients, and there is no special icon designation for active clients.
4. In the tree, select the client to activate.
5. From the Actions menu, select Account Management > Invite Client.
The following status message appears: Client has been sent invitation to activate with the server.
6. Click OK.
EMC AVAMAR 6.0 • ADMINISTRATION GUIDE 48

Editing client informationDOMAINS, CLIENTS, AND USERS
Editing client information
Renaming clients. In Avamar Administrator, the client name must always be the client hostname. Furthermore, if you need to change the client name in Avamar Administrator because the client hostname changed, you must first shut down the Avamar software on the client computer, change the client name by way of this procedure, then restart the Avamar client software. This is the only way to ensure that the client maintains its registration with the Management Console Server (MCS) database, which ensures that past backups continue to be associated with the client.
To edit client information:
1. In Avamar Administrator, click the Administration launcher button.
The Administration window appears.
2. Click the Account Management tab.
TIP: In the Account Management tree, the icons for the clients indicate status. An x appears for disabled clients, a question mark appears for unregistered clients, and there is no special icon designation for active clients.
3. In the tree, select the client to edit.
EMC AVAMAR 6.0 • ADMINISTRATION GUIDE 49

Editing client informationDOMAINS, CLIENTS, AND USERS
4. From the Actions menu, select Account Management > Edit Client.
The Edit Client dialog box appears.
5. Edit the client information.
Adding a client (page 46) provides details about client properties.
6. Click OK.
A confirmation message appears.
7. Click OK.
EMC AVAMAR 6.0 • ADMINISTRATION GUIDE 50

Viewing client propertiesDOMAINS, CLIENTS, AND USERS
Viewing client propertiesTo view client properties:
1. In Avamar Administrator, click the Policy launcher button.
The Policy window appears.
2. Click the Policy Management tab.
3. Click the Clients tab.
4. Select the client.
The client properties appear in the main pane of the window.
Client Properties Summary
COLUMN DESCRIPTION
Client Descriptive client name.
Backups Disabled If yes, backups cannot be performed on this client. However, the client can restore files as long as a previous backup exists in the system.
Activated If yes, the client is activated (page 45).
Domain The Avamar domain (page 38) where this client resides.
OS The client computer operating system.
Paging If yes, the client has provided the Avamar server with a page address and port number, thereby allowing it to perform on-demand backups and restores. In addition, Avamar Administrator can browse its filesystem during Avamar Administrator-initiated backups and restores (page 78).
Version The version of Avamar client software on the client.
EMC AVAMAR 6.0 • ADMINISTRATION GUIDE 51

Viewing client propertiesDOMAINS, CLIENTS, AND USERS
Last Check-in The date and time that the Avamar client agent last checked in with the Avamar server.
Encryption The encryption method used for client/server data transfer. Choices are:
High The strongest available encryption setting for that client platform.
Medium Medium strength encryption.
None No encryption.
NOTE: The exact encryption technology and bit strength used for any given client/server connection depends on a number of factors, including the client platform and Avamar server version. The EMC Avamar Product Security Guide provides details.
CID The Client ID, a unique identifier for this client in the Avamar server. CIDs are assigned during client activation.
COLUMN DESCRIPTION
EMC AVAMAR 6.0 • ADMINISTRATION GUIDE 52

Enabling and disabling a clientDOMAINS, CLIENTS, AND USERS
Enabling and disabling a clientAn Avamar Administrator can disable a client so that it cannot use the Avamar server to back up files. This is typically done to place the system in a state that supports maintenance activities.
If a client has been disabled, you must reenable the client before backups for the client can resume.
To disable and enable a client:
1. In Avamar Administrator, click the Policy launcher button.
The Policy window appears.
2. Click the Policy Management tab.
3. Click the Clients tab.
4. Select the client to disable or enable.
5. From the Actions menu, select Client > Disable all backups of selected client.
A confirmation message appears.
6. Click Yes.
When the client is disabled, a checkmark appears next to the Disable all backups of selected client option on the Actions > Client menu. When the client is enabled, the checkmark does not appear.
EMC AVAMAR 6.0 • ADMINISTRATION GUIDE 53

Retiring a clientDOMAINS, CLIENTS, AND USERS
Retiring a clientRetiring a client is less destructive than deleting it. Retired clients do not actively participate in the Avamar system with regular backups. However, old backups associated with a retired client are maintained in the system (subject to backup retention settings), and files can still be restored using Avamar Administrator.
To retire a client:
1. In Avamar Administrator, click the Administration launcher button.
The Administration window appears.
2. Click the Account Management tab.
TIP: In the Account Management tree, the icons for the clients indicate status. An x appears for disabled clients, a question mark appears for unregistered clients, and there is no special icon designation for active clients.
3. In the tree, select the client to retire.
4. From the Actions menu, select Account Management > Retire Client.
The Retire Client dialog box appears.
EMC AVAMAR 6.0 • ADMINISTRATION GUIDE 54

Retiring a clientDOMAINS, CLIENTS, AND USERS
5. Choose how long to keep backups for this client.
6. Click OK.
A confirmation message appears.
7. Click Yes.
LENGTH OF TIME TO KEEP BACKUPS SETTINGS
Until their existing expiration dates. Select Retire client and retain backups with existing expiration date.
Indefinitely, regardless of the existing backup expiration dates
Select Retire client and retain all backups indefinitely.
Until a new expiration date Select Retire client and reset backup expiration date and select a new backup expiration date.
EMC AVAMAR 6.0 • ADMINISTRATION GUIDE 55

Moving a client to a new domainDOMAINS, CLIENTS, AND USERS
Moving a client to a new domain1. In Avamar Administrator, click the Administration launcher button.
The Administration window appears.
2. Click the Account Management tab.
TIP: In the Account Management tree, the icons for the clients indicate status. An x appears for disabled clients, a question mark appears for unregistered clients, and there is no special icon designation for active clients.
3. In the tree, select the client to move.
4. From the Actions menu, select Account Management > Move Client.
The Move Client dialog box appears.
5. Select the new domain for the client.
6. Click OK.
EMC AVAMAR 6.0 • ADMINISTRATION GUIDE 56

Deleting a clientDOMAINS, CLIENTS, AND USERS
Deleting a client
IMPORTANT: Deleting a client permanently deletes all backups stored for that client. Therefore, you should only delete a client when you are certain that there is no reason to retain the backups. If there is any doubt, retire the client (page 54) instead.
To delete a client:
1. In Avamar Administrator, click the Administration launcher button.
The Administration window appears.
2. Click the Account Management tab.
TIP: In the Account Management tree, the icons for the clients indicate status. An x appears for disabled clients, a question mark appears for unregistered clients, and there is no special icon designation for active clients.
3. In the tree, select the client to delete.
4. From the Actions menu, select Account Management > Delete Client.
A confirmation message appears.
5. Click Yes.
A second confirmation message appears.
6. Click OK.
EMC AVAMAR 6.0 • ADMINISTRATION GUIDE 57

Editing client paging settingsDOMAINS, CLIENTS, AND USERS
Editing client paging settingsPaging settings are used for communication between the MCS and the client. Avamar Administrator offers two client paging modes:
NOTE: Paging settings are completely independent of the method used to register or activate the client.
To edit client paging settings:
1. In Avamar Administrator, click the Policy launcher button.
The Policy window appears.
2. Click the Policy Management tab.
Automatic Automatic is the default mode. When paging is set to Automatic, the MCS attempts to automatically determine appropriate paging settings for the client. If it is successful in doing so, the MCS sets the Enabled option and populates the Address and Port Number fields with the hostname or IP address and data port values, respectively. In automatic mode, these fields are read-only.In automatic mode, if the MCS receives updated paging information from the client, it automatically updates these fields with the new values.
Manual When paging is set to Manual, the Enabled option can be cleared to turn off automatic client paging, and the Address and Port Number fields accept new entries.Turning off automatic client paging (by clearing the Enabled option) is useful to support clients that might be off the network for extended periods of time, as can be the case with laptop computers. If client paging is turned off, these clients must initiate their own on-demand backups. For this reason, client paging should be enabled whenever possible.If Network Address Translation (NAT) is used, the MCS probably cannot automatically determine the correct client paging settings. If this is the case, set the paging mode to manual and type the correct IP address and data port in the Address and Port Number fields, respectively.In manual mode, the MCS never overwrites the Address and Port Number settings.
EMC AVAMAR 6.0 • ADMINISTRATION GUIDE 58

Editing client paging settingsDOMAINS, CLIENTS, AND USERS
3. Click the Clients tab.
4. Select the client.
5. From the Actions menu, select Client > Edit Client.
The Edit Client window appears.
6. Click the Properties tab.
7. Select either the Automatic or Manual paging mode.
EMC AVAMAR 6.0 • ADMINISTRATION GUIDE 59

Editing client paging settingsDOMAINS, CLIENTS, AND USERS
8. If you selected the Manual paging mode, specify the client IP address and port number for client-MCS communications.
9. Click OK.
FIELD DESCRIPTION
Address A valid (un-NAT’d) IP address for this client.IMPORTANT: If the MCS was unable to automatically determine a hostname for this client in automatic mode, type an IP address in this field; a hostname is probably not resolvable.
Port Number The data port number for client-MCS communications. The default data port is 28002.
EMC AVAMAR 6.0 • ADMINISTRATION GUIDE 60

Batch client registrationDOMAINS, CLIENTS, AND USERS
Batch client registrationTo support large sites with many clients, Avamar provides a batch client registration feature that enables you to define multiple clients with a single “clients definition” file, then import that file into the Avamar server.
To import multiple clients:
1. Create the clients definition file.
2. Validate and import the clients definition file.
After batch client registration, you can activate these Avamar clients using either activation method (page 45).
Creating a clients definition file
Avamar supports two formats for the clients definition file:
• Extensible Markup Language (XML)• Comma-Separated Values (CSV)
XML format. Extensible Markup Language (XML) clients definition files must have a .xml file extension and conform to the following structure and format:
<?xml version="1.0" encoding="UTF-8" ?><registration_stream>
<registrants><entry
host_name="MyClient.Example.com"mcs_domain="clients"mcs_group="MyGroup"dataset="MyDataset"retention_policy="MyRetentionPolicy"contact_address="192.168.31.5"contact_port="28002"access_list="user1@avamar:password, user2@LDAP"encryption="high"encryption_override="false"
/> </registrants>
</registration_stream>
NOTE: The clients definition file shown here is for reference purposes only. Do not attempt to cut and paste this example into a clients definitions file. Invisible formatting characters will prevent you from successfully doing so.
EMC AVAMAR 6.0 • ADMINISTRATION GUIDE 61

Batch client registrationDOMAINS, CLIENTS, AND USERS
Each client is defined using a separate “entry” element. Attributes are:
ELEMENT DESCRIPTION
host_name Network hostname or IP address for this client.
mcs_domain Optional Avamar domain for this client; overrides default domain (clients).
mcs_group Optional default group for this client; overrides assignment to the Default Group. Groups and Group Policies (page 135) provides details.
dataset Optional default dataset for this client to use during backups; overrides the default dataset that would normally be inherited from the group.Datasets (page 106) provides details.
retention_policy Optional default backup retention policy for this client; overrides the default retention policy that would normally be inherited from the group. Retention policies (page 126) provides details.
contact_address Optional client IP address.
contact_port Set this to 28002, the default Avamar data port.
access_list Optional list of users who can access the Avamar server from this client. The format is:
USER@AUTHENTICATION:passwordIf using the internal authentication system, the word “password” must follow the colon. This causes the system to prompt users for authentication when they access the system.If using an external authentication system, omit “:password.”If defining multiple users, separate each user entry with a comma (,) and enclose the entire list of users in double-quotes.
encryption Encryption method for client/server data transfer. Choices are:
High The strongest available encryption setting for that specific client platform.
Medium Medium strength encryption.
None No encryption.
NOTE: The exact encryption technology and bit strength used for any given client/server connection depends on a number of factors, including the client platform and Avamar server version. The EMC Avamar Product Security Guide provides details.
encryption_override Optional encryption override. If TRUE, this client does not use the group encryption method.
EMC AVAMAR 6.0 • ADMINISTRATION GUIDE 62

Batch client registrationDOMAINS, CLIENTS, AND USERS
TIP: Optional elements may be completely omitted from an XML clients definition file.
CSV format. Comma-Separated Values (CSV) clients definition files use the same element and attribute names as the XML format. However, each client is defined on a single line, and each attribute value is separated by a comma, as follows:
host_name,mcs_domain,mcs_group,dataset,retention_policy,contact_address,contact_port,access_list,encryption,encryption_override
IMPORTANT: Space limitations in this guide prevent showing a client entry as it should appear, which is on a single line. However, a CSV file must define each client on a single line—no line feeds or carriage returns are allowed within a client entry. Actual values must be supplied in place of the attribute names, and NULL must be specified for fields that have no value. Do not leave any fields blank.
NOTE: The previous clients definition file is shown for reference purposes only. Do not attempt to cut and paste this example into a clients definitions file. Invisible formatting characters will prevent you from successfully doing so.
Validate and import clients definition file
1. In Avamar Administrator, click the Administration launcher button.
The Administration window appears.
2. Click the Account Management tab.
EMC AVAMAR 6.0 • ADMINISTRATION GUIDE 63

Batch client registrationDOMAINS, CLIENTS, AND USERS
3. From the Actions menu, select Account Management > Import Multiple Clients…
The Validate dialog box appears.
4. Browse to and select the saved clients definition file.
5. Click Validate.
The Validation Results dialog box appears.
6. Do one of the following:
The Validation Results dialog box closes, and the new clients appear in the Account Management tree.
IF DO THIS
The clients definition file contains errors.
Correct the errors, save the file again, and repeat the steps in this procedure.
The clients definition file is error-free.
Click Commit to import the client list.
EMC AVAMAR 6.0 • ADMINISTRATION GUIDE 64

Users and rolesDOMAINS, CLIENTS, AND USERS
Users and rolesThis topic introduces the concepts of users and roles. This material should be read and understood before adding new user accounts, or editing any of the default user accounts.
Users
In the Avamar system, user accounts can be added to domains or individual clients. When you add a user account to a domain, the account can administer that domain and any subdomains beneath it. When you add a user account to an individual clients, the account can perform backups and restores of that client, and access backups belonging to that client in the system.
Avamar user accounts comprise the following pieces of information:
• Username• Authentication system• Role
Username. The username must be in the format that the authentication system accepts. For example, the internal authentication system uses case-sensitive usernames, whereas Windows Active Directory usernames are case-insensitive.
IMPORTANT: Usernames cannot be longer than 31 characters.
Authentication system. An authentication system is a username/password system that is used to grant users access to the Avamar server. Avamar supports its own internal authentication system, as well as several external authentication systems such as Network Information Service (NIS), Open Lightweight Directory Access Protocol (OpenLDAP), and Windows Active Directory.
Roles are discussed in greater detail in Roles (page 66).
User access lists. In Avamar, users are not reusable objects; they are just entries in a domain or client access list. When you add a user account to the Avamar system, you are actually adding a new entry to the domain or client user access list. Consider the following example:
User “Gretchen” has been added to both the Accounting domain and her computer. However, the authentication system and role are different. These are in fact two completely separate user accounts that happen to have the same username.
EMC AVAMAR 6.0 • ADMINISTRATION GUIDE 65

Users and rolesDOMAINS, CLIENTS, AND USERS
Roles
Roles define various allowable operations for each user account. There are three basic categories of roles:
• Administrator roles• Operator roles• User roles
Administrator roles. Administrators are generally responsible for maintaining the system.
The role of administrator can only be assigned to user accounts at a domain level; this role cannot be assigned to user accounts at a client level. The role of administrator can be assigned to user accounts at the top-level (root) domain, or any other domain or subdomain.
Operator roles. Operator roles are generally implemented to allow certain users limited access to certain areas of the system to perform backups and restores, or obtain status and run reports. These roles allow greater freedom in assigning backup, restore, and reporting tasks to persons other than administrators.
As with administrator roles, operator roles can only be assigned to user accounts at the domain level; these roles cannot be assigned to user accounts at the client level. Furthermore, to add the user account to subdomains, you must have administrator privileges on the parent domain or above.
There are four operator roles:
• Restore only operator• Back up only operator• Back up/restore operator• Activity operator
Users with an operator role do not have access to all features in Avamar Administrator. Instead, after login, they are presented with a single window that provides access to the features that they are allowed to use.
Rootadministrators
Administrators at the top-level (root) domain have full control of the system. They are sometimes referred to as “root administrators.”
Domainadministrators
Administrators at lower level domains (other than root) generally have access to most of the features described in this guide, but typically can only view or operate on objects (backups, policy objects, and so forth) within that domain. Any activity that might allow a domain administrator to view data outside that domain is disallowed. Therefore, access to server features of a global nature (for example, suspending or resuming scheduled operations, changing runtimes for maintenance activities, and so forth) is disallowed. Furthermore, domain administrators:
• Cannot add or edit other subdomain administrators• Cannot change their assigned role• Can change their password
EMC AVAMAR 6.0 • ADMINISTRATION GUIDE 66

Users and rolesDOMAINS, CLIENTS, AND USERS
Restore only operator
Restore only operators are generally only allowed to perform restores and to monitor those activities to determine when they complete and if they completed without errors.
As with roles assigned to other domain user accounts, restore only operators at the top-level (root) domain can perform restores for any client in the system; restore only operators at lower level domains (other than root) can only perform restores for clients within that domain.
To enforce these constraints, restore only operators do not have access to all features in Avamar Administrator. Instead, after login, they are presented with the following window, which provides access to the features that they are allowed to use.
Restore only operators can perform the following tasks within the allowable domain:
• Perform a Restore (page 91)• Monitor Activities (page 82)
By default, restore only operators cannot browse backups from the command line or via the Avamar Web Restore interface. To enable these activities for a restore only operator, you must add the noticketrequired privilege using the avmgr chgv command:
avmgr chgv --acnt=LOCATION --u=NAME --ud=AUTH \--pv="enabled,read,mclogin,noticketrequired"
where LOCATION specifies sub-domain of the operator, NAME is the Avamar user name of the user whose privileges are being modified, and AUTH is external authentication system used to authenticate the user.
EMC AVAMAR 6.0 • ADMINISTRATION GUIDE 67

Users and rolesDOMAINS, CLIENTS, AND USERS
Back up only operator
Back up only operators are generally only allowed to perform backups and to monitor those activities to determine when they complete and if they completed without errors.
As with roles assigned to other domain user accounts, back up only operators at the top-level (root) domain can perform backups for any client or group in the system; back up only operators at lower level domains (other than root) can only perform backups for clients or groups within that domain.
To enforce these constraints, back up only operators do not have access to all features in Avamar Administrator. Instead, after login, they are presented with the following window, which provides access to the features that they are allowed to use.
Back up only operators can perform the following tasks within the allowable domain:
• Perform On-Demand Client Backups (page 80)• Monitor Activities (page 82)• Initiate On-Demand Group Backups (page 164)
By default, backup only operators cannot perform backups from the command line. To enable command line backups for a restore only operator, you must add the noticketrequired privilege using the avmgr chgv command:
avmgr chgv --acnt=LOCATION --u=NAME --ud=AUTH \--pv="enabled,read,mclogin,backup,noticketrequired"
where LOCATION specifies sub-domain of the operator, NAME is the Avamar user name of the user whose privileges are being modified, and AUTH is external authentication system used to authenticate the user.
EMC AVAMAR 6.0 • ADMINISTRATION GUIDE 68

Users and rolesDOMAINS, CLIENTS, AND USERS
Back up/restore operator
Back up/restore operators are generally only allowed to perform backups or restores and to monitor those activities to determine when they complete and if they completed without errors.
As with roles assigned to other domain user accounts, back up/restore operators at the top-level (root) domain can perform backups and restores for any client or group in the system; back up/restore operators at lower level domains (other than root) can only perform backups and restores for clients or groups within that domain.
To enforce these constraints, back up/restore operators do not have access to all features in Avamar Administrator. Instead, after login, they are presented with the following window, which provides access to the features that they are allowed to use.
Back up/restore operators can perform the following tasks within the allowable domain:
• Perform On-Demand Client Backups (page 80)• Monitor Activities (page 82)• Perform a Restore (page 91)• Initiate On-Demand Group Backups (page 164)
By default, back up/restore operators cannot browse backups from the command line or via the Avamar Web Restore interface and cannot perform backups from the command line. To enable these activities for a restore only operator, you must add the noticketrequired privilege using the avmgr chgv command:
avmgr chgv --acnt=LOCATION --u=NAME --ud=AUTH \--pv="enabled,read,mclogin,backup,noticketrequired"
where LOCATION specifies sub-domain of the operator, NAME is the Avamar user name of the user whose privileges are being modified, and AUTH is external authentication system used to authenticate the user.
EMC AVAMAR 6.0 • ADMINISTRATION GUIDE 69

Users and rolesDOMAINS, CLIENTS, AND USERS
Activity operator
Activity operators are generally only allowed to monitor backup and restore activities and to create certain reports.
Activity operators at the top-level (root) domain can view or create reports for backup and restore activities within the entire system (all domains and subdomains); activity operators at lower level domains (other than root) can only view or create reports for backup and restore activities within that domain.
To enforce these constraints, activity operators do not have access to all features in Avamar Administrator. Instead, after login, they are presented with the following window, which provides access to the features that they are allowed to use.
Activity operators can perform the following tasks within the allowable domain:
• Monitor Activities (page 82)• View the Group Status Summary (page 151)• View the Activity Report (page 215)• View the Replication Report (page 220)
EMC AVAMAR 6.0 • ADMINISTRATION GUIDE 70

Users and rolesDOMAINS, CLIENTS, AND USERS
User roles. User roles are always assigned to a user account for a specific client. As such, allowable operations are inherently constrained to that specific client.
IMPORTANT: Users assigned any of the following roles cannot log in to Avamar Administrator.
There are four user roles:
Back Up OnlyUser
Users assigned this role can initiate backups directly from the client using the avtar command line.
Restore (Read)Only User
Users assigned this role can initiate restores directly from the client using the avtar command line or Avamar Web Services.
Back Up/Restore User
Users assigned this role can initiate backups and restores directly from the client using the avtar command line or Avamar Web Services.
Restore (Read)Only/Ignore File
Permissions
This role is similar to the Restore (Read) Only User role except that operating system file permissions are ignored during restores, thereby effectively allowing this user to restore any file stored for that Avamar client.All Windows client user accounts should be assigned this role to ensure trouble-free restores.This role is only available when external authentication is used.
EMC AVAMAR 6.0 • ADMINISTRATION GUIDE 71

Adding a user to a clientDOMAINS, CLIENTS, AND USERS
Adding a user to a client
IMPORTANT: You cannot add any user accounts to clients within the MC_RETIRED domain.
To add a user to a client:
1. In Avamar Administrator, click the Administration launcher button.
The Administration window appears.
2. Click the Account Management tab.
3. In the tree, select the client for the new user.
4. From the Actions menu, select Account Management > New User(s).
The New User dialog box appears.
EMC AVAMAR 6.0 • ADMINISTRATION GUIDE 72

Adding a user to a clientDOMAINS, CLIENTS, AND USERS
5. Complete the settings as described in the following table.
6. Click OK.
A confirmation message appears.
7. Click OK.
SETTING DESCRIPTION
Authentication System
Select an authentication system.
Everyone Select this option to designate roles for all users on this client.This field is not used if you use the internal Avamar authentication system.
User Name Select this option and type the new username.IMPORTANT: If you use an external authentication system, this must be the username that you use to log in to that system.IMPORTANT: Usernames must be 31 characters or fewer.
Role Select a role (page 66) for this user.
Password Type a password for the user. If you use the internal authentication system, Avamar passwords are case-sensitive and must:
• Be 6–12 characters in length• Contain only alphanumeric, hyphen, period, or
underscore characters• Contain at least one alphanumeric character
This field is not used if you use an external authentication system.
Confirm Retype the password to confirm that you did not type it incorrectly in the Password field.This field is not used if you use an external authentication system.
EMC AVAMAR 6.0 • ADMINISTRATION GUIDE 73

Adding a user to a domainDOMAINS, CLIENTS, AND USERS
Adding a user to a domain
TIP: Before you add a user account, review Roles (page 66) to ensure that this user is assigned the correct role.
IMPORTANT: You cannot add user accounts to the MC_RETIRED domain.
To add a user to a domain:
1. In Avamar Administrator, click the Administration launcher button.
The Administration window appears.
2. Click the Account Management tab.
3. In the tree, select the domain for the new user.
4. From the Actions menu, select Account Management > New User(s).
The New User dialog box appears.
EMC AVAMAR 6.0 • ADMINISTRATION GUIDE 74

Adding a user to a domainDOMAINS, CLIENTS, AND USERS
5. Complete the settings as described in the following table.
6. Click OK.
A confirmation message appears.
7. Click OK.
SETTING DESCRIPTION
Authentication System
Select an authentication system.
User Name Select this option and type the new username.IMPORTANT: If you use an external authentication system, this must be the username that you use to log in to that system.IMPORTANT: Usernames must be 31 characters or fewer.
Role Select a role (page 66) for this user.
Password Type the password. If you use the internal authentication system, Avamar passwords are case-sensitive and must:
• Be 6–12 characters in length• Contain only alphanumeric, hyphen, period, or
underscore characters• Contain at least one alphanumeric character
This field is not used if you use an external authentication system.
Confirm Retype the password to confirm that you did not type it incorrectly in the Password field.This field is not used if you use an external authentication system.
EMC AVAMAR 6.0 • ADMINISTRATION GUIDE 75

Editing user informationDOMAINS, CLIENTS, AND USERS
Editing user information1. In Avamar Administrator, click the Administration launcher button.
The Administration window appears.
2. Click the Account Management tab.
TIP: In the Account Management tree, the icons for the clients indicate status. An x appears for disabled clients, a question mark appears for unregistered clients, and there is no special icon designation for active clients.
3. In the tree, select the domain or client with the user.
4. Select the user from the user data table.
5. From the Actions menu, select Account Management > Edit User.
The Edit User dialog box appears.
6. Edit the information as necessary.
Adding a user to a client (page 72) provides details about user account properties.
EMC AVAMAR 6.0 • ADMINISTRATION GUIDE 76

Deleting a userDOMAINS, CLIENTS, AND USERS
7. (Optional) Change the password for the user:
(a) Click Set Password.
The Set Password dialog box appears.
(b) Type the new password into both the New Password and Confirm Password fields.
(c) Click OK to return to the Edit User dialog box.
8. Click OK.
A confirmation message appears.
9. Click OK.
Deleting a user1. In Avamar Administrator, click the Administration launcher button.
The Administration window appears.
2. Click the Account Management tab.
3. In the tree, select the domain or client with the user.
4. Select the user to delete from the user data table.
5. From the Actions menu, select Account Management > Delete User.
A confirmation message appears.
6. Click Yes.
A second confirmation message appears.
7. Click OK.
EMC AVAMAR 6.0 • ADMINISTRATION GUIDE 77

BACKUP, RESTORE, AND BACKUP MANAGEMENT
After a client has been activated (page 44), you can perform “on-demand” client backups and file restores from Avamar Administrator.
TIP: You can also automate backups by implementing a group policy to perform regularly scheduled backups for an entire group of clients. Groups and Group Policies (page 135) provides details.
Backup retention settings. When a backup occurs, its retention settings control how long it is kept before it is purged. Possible retention settings are:
• No end date (keep backup indefinitely)• Keep backup for a specific number of days, weeks, months, or years• Keep backup until a specific calendar date
Retention types. To support certain advanced features, Avamar Administrator automatically assigns one or more retention types to every backup. For example, the very first backup created on an Avamar system is tagged as a daily, weekly, monthly, or yearly. You can manually change the retention types assigned to a backup after it resides in the system.
Validating backups. You can verify that files can be restored from a backup. This validation initiates a “virtual” restore of all files in the backup, but does not actually restore any files to the client filesystem.
Backup expiration and deletion. An Avamar backup is represented as a hierarchical tree structure with the tip of the tree containing a root hash that points to the highest level of the backup.
The data contained in a backup is referenced by starting at the top of the tree and recursively moving down the tree until it reaches the actual data. The process for traversing the data contained in a backup is similar to traversing a directory tree to files.
When a backup is expired, the root hash of the tree is deleted. At this point, Avamar users cannot recover data from the expired backup. A garbage collection process then runs on a nightly basis to clean up and reclaim space left over from
EMC AVAMAR 6.0 • ADMINISTRATION GUIDE 78

BACKUP, RESTORE, AND BACKUP MANAGEMENT
orphaned data (data that is unique to the backups being expired) for backups that have previously expired.
Client browse authentication. When performing an on-demand client backup (page 80), if your selections require browsing the client filesystem, you will be asked to supply a username and password. This username and password must have read permissions on all areas of the client filesystem you wish to mark for backup.
A word about international characters. Avamar generally supports the use of specific supported international characters in directory, folder, and filenames. However, proper display of international language characters is contingent on the client computer Java locale and installed system fonts being compatible with the original language. If you attempt to browse backups that were created with international characters and you do not have a compatible font installed on the system, any characters that cannot be resolved by the system are displayed as rectangles. This is a normal limitation of that particular situation and does not affect the ability to restore these directories, folders, or files. The EMC Avamar Release Notes provide additional international language support information.
EMC AVAMAR 6.0 • ADMINISTRATION GUIDE 79

Performing an on-demand client backupBACKUP, RESTORE, AND BACKUP MANAGEMENT
Performing an on-demand client backup1. In Avamar Administrator, click the Backup & Restore launcher button.
The Backup and Restore window appears.
2. Click the Select for Backup tab.
3. Select a client in the clients tree.
The client filesystem appears as a browsable directory tree to the right of the Clients tree. Selecting the checkbox next to a directory or file selects it for backup.
4. Select one or more directories and files.
5. If your selections require browsing the client filesystem (page 79), enter a valid client username and password, then click OK.
TIP: To view a summary of all directories and files that you selected for an on-demand backup, select Actions > Preview List.
6. Select Actions > Backup Now.
The On Demand Backup Options dialog box appears.
EMC AVAMAR 6.0 • ADMINISTRATION GUIDE 80

Performing an on-demand client backupBACKUP, RESTORE, AND BACKUP MANAGEMENT
7. Review the backup settings.
8. Select the client plug-in to use for this backup.
9. Select a backup retention setting.
10. From the Encryption method list, select the encryption method to use for client/server data transfer.
NOTE: The exact encryption technology and bit strength used for any given client/server connection depends on a number of factors, including the client platform and Avamar server version. The EMC Avamar Product Security Guide provides details.
11. To include plug-in options with this backup, click More Options, and then configure the settings where applicable. Appendix B — Plug-in Options (page 578) provides details.
12.Click OK.
A confirmation message appears.
13.Click OK.
SETTING DESCRIPTION
Retention period To automatically delete this backup from the Avamar server after a specific number of days, weeks, months, or years, select this option and type the number of days, weeks, months, or years.
End date To automatically delete this backup from the Avamar server on a specific calendar date, select this option and browse to that date on the calendar.
No end date To keep this backup for as long as this client remains active in the Avamar server, select this option.
SETTING DESCRIPTION
High The strongest available encryption setting for that specific client platform.
Medium Medium strength encryption.
None No encryption.
EMC AVAMAR 6.0 • ADMINISTRATION GUIDE 81

Monitoring backup, restore, and validation activitiesBACKUP, RESTORE, AND BACKUP MANAGEMENT
Monitoring backup, restore, and validation activities1. In Avamar Administrator, click the Activity launcher button.
The Activity window appears.
2. Click the Activity Monitor tab.
By default, the Activity Monitor tab shows the most recent 5,000 client activities during the past 72 hours.
TIP: You can increase or reduce the amount of information shown in the backup activity monitor by manually editing the com.avamar.mc.wo completed_job_retention_hours preference in the /usr/local/avamar/var/mc/server_data/prefs/mcserver.xml file, and then restarting the MCS.
The following table lists and describes information shown in the Activity window:
COLUMN DESCRIPTION
SE
SS
ION
Status One of the following:
Canceled The activity was canceled, either by the client or from Avamar Administrator.
Client Backup Disabled
All client-initiated backups have been disabled for this plug-in. Avamar Client Agent and Plug-in Management (page 230) provides details.
Completed The activity successfully completed.
EMC AVAMAR 6.0 • ADMINISTRATION GUIDE 82

Monitoring backup, restore, and validation activitiesBACKUP, RESTORE, AND BACKUP MANAGEMENT
SE
SS
ION
Status - continued Completed w/Exception(s)
The activity completed with minor errors or warnings.
Double-click the entry to view the full error log, which contains the activity failure codes.
Dropped Session
The activity was successfully initiated, but because MCS could not detect any progress, the activity was forcefully canceled.
Failed The client failed to perform the activity; the activity ended in an error condition.
Double-click the entry to view the full error log, which contains the activity failure codes.
Fault Tolerant The backup failed because the virtual machine client is running in fault tolerance mode.
To back up this virtual machine while in fault tolerance mode, install the correct type and version of Avamar client software and use guest backups to protect the data.
No Client Contact
The scheduled client did not check in.
No Data The dataset did not define any data to back up, or the client does not have matching data to back up.
COLUMN DESCRIPTION
EMC AVAMAR 6.0 • ADMINISTRATION GUIDE 83

Monitoring backup, restore, and validation activitiesBACKUP, RESTORE, AND BACKUP MANAGEMENT
SE
SS
ION
Status - continued No proxy The system failed to initiate a backup or restore for a virtual machine because no proxy was found to service the virtual machine.Verify that proxy clients have the datastores checked for protection. The selected proxy client datastores must match the datastores for virtual machines requiring protection. Additionally, for scheduled group backups, verify that the group has the proxies checked for protection of virtual machines belonging to the group. Verify that proxy clients are powered on, enabled, and registered. For restores, verify that there is an available proxy in the destination datacenter.
No Status The activity is not progressing as expected and the Avamar server cannot provide status.
No vm The activity failed because the virtual machine client does not exist in vCenter.
Option Incompatibility
The activity failed due to the specification of an incompatible plug-in option.This is often occurs when you use an older client version that does not support a particular plug-in option.
Partial Replication
Plugin Disabled All operations have been disabled for this plug-in. Avamar Client Agent and Plug-in Management (page 230) provides details.
COLUMN DESCRIPTION
EMC AVAMAR 6.0 • ADMINISTRATION GUIDE 84

Monitoring backup, restore, and validation activitiesBACKUP, RESTORE, AND BACKUP MANAGEMENT
SE
SS
ION
Status - continued Restore Disabled
All restore operations have been disabled for this plug-in. Avamar Client Agent and Plug-in Management (page 230) provides details.
Retention date expired
The backup failed because the retention policy has already expired. In other words, the retention policy is set to a past date.
Running The client is performing the activity.
Scheduled Backup Disabled
All scheduled backups have been disabled for this plug-in. Avamar Client Agent and Plug-in Management (page 230) provides details.
Stalled The activity is not progressing as expected. Because the Avamar server can provide status, the problem is assumed to be on the client.
Suspended The activity has been suspended (work order suspended).
Timed Out - End
The client did not complete the activity in the allotted time.
Timed Out - Response
The client checked in and was sent backup activity but did not acknowledge.
Timed Out - Start
The activity failed to start (work order start timeout).
Undefined The activity does not have a work order associated with it.
Unknown The activity was passed an unknown exit code from the client agent.
Unsupported backup
Some aspect of this backup activity is not supported. For example, attempting to back up a VMware proxy client with a VMware Image backup dataset returns a status of Unsupported.
COLUMN DESCRIPTION
EMC AVAMAR 6.0 • ADMINISTRATION GUIDE 85

Monitoring backup, restore, and validation activitiesBACKUP, RESTORE, AND BACKUP MANAGEMENT
SE
SS
ION
Status - continued Unsupported Number of Targets
Backup dataset has defined more backup targets than plug-in supports.
Validate Disabled
All backup validation operations have been disabled for this plug-in. Avamar Client Agent and Plug-in Management (page 230) provides details.
Waiting The server is waiting for the client to initiate this activity.
Error Code If the activity did not successfully complete, a numeric error code appears. Double-click the error code to view a detailed explanation.
Start Time Date and time that this activity was initiated, adjusted for the prevailing time zone, which is shown in parentheses.
Elapsed Time Elapsed time for this activity.
End Time Date and time that this activity completed, adjusted for the prevailing time zone, which is shown in parentheses.
Type This activity is one of the following:• On-Demand Backup (page 80)• Scheduled Backup (page 116)• Restore (page 91)• Validate (page 99)• Replication Source• Replication Destination
NOTE: Replication is an optional feature that might not be available to all users.
Server Server on which the activity occurred—either the Avamar server or a Data Domain® system.
Progress Bytes Total number of bytes examined during this activity.
New Bytes Percentage of new bytes backed up to either the Avamar server or a Data Domain system. Low numbers indicate high levels of data deduplication.
COLUMN DESCRIPTION
EMC AVAMAR 6.0 • ADMINISTRATION GUIDE 86
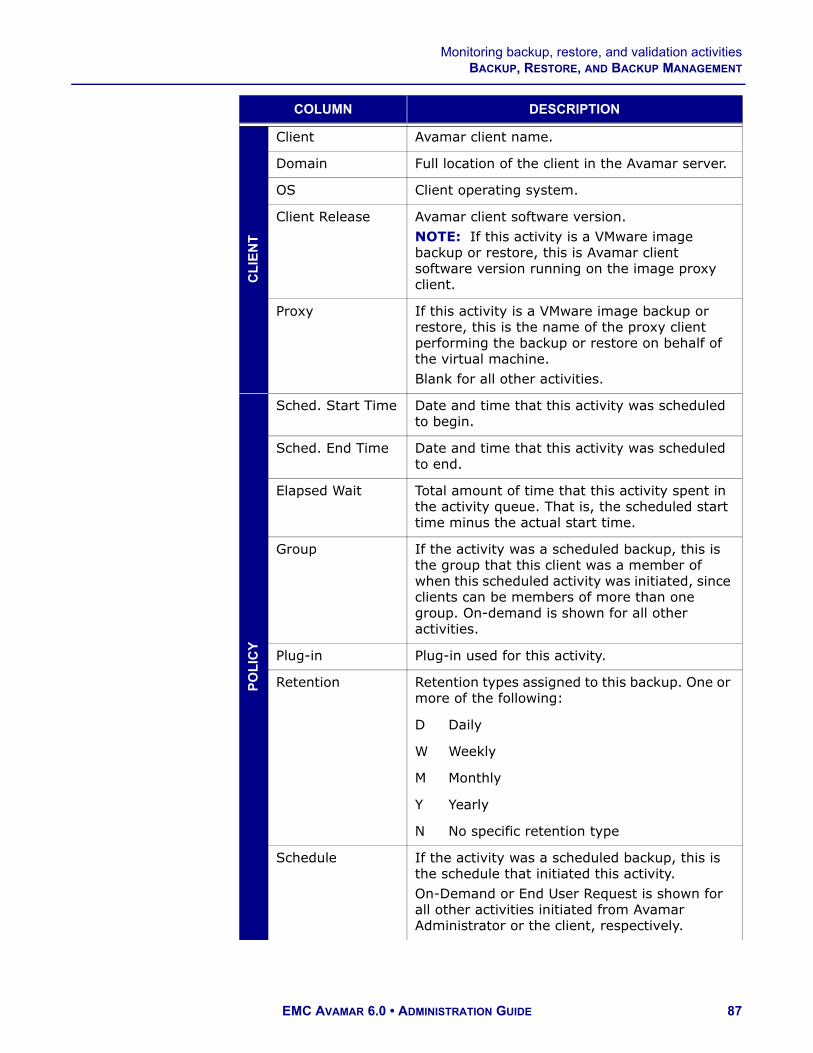
Monitoring backup, restore, and validation activitiesBACKUP, RESTORE, AND BACKUP MANAGEMENT
CL
IEN
T
Client Avamar client name.
Domain Full location of the client in the Avamar server.
OS Client operating system.
Client Release Avamar client software version.NOTE: If this activity is a VMware image backup or restore, this is Avamar client software version running on the image proxy client.
Proxy If this activity is a VMware image backup or restore, this is the name of the proxy client performing the backup or restore on behalf of the virtual machine.Blank for all other activities.
PO
LIC
Y
Sched. Start Time Date and time that this activity was scheduled to begin.
Sched. End Time Date and time that this activity was scheduled to end.
Elapsed Wait Total amount of time that this activity spent in the activity queue. That is, the scheduled start time minus the actual start time.
Group If the activity was a scheduled backup, this is the group that this client was a member of when this scheduled activity was initiated, since clients can be members of more than one group. On-demand is shown for all other activities.
Plug-in Plug-in used for this activity.
Retention Retention types assigned to this backup. One or more of the following:
D Daily
W Weekly
M Monthly
Y Yearly
N No specific retention type
Schedule If the activity was a scheduled backup, this is the schedule that initiated this activity. On-Demand or End User Request is shown for all other activities initiated from Avamar Administrator or the client, respectively.
COLUMN DESCRIPTION
EMC AVAMAR 6.0 • ADMINISTRATION GUIDE 87

Monitoring backup, restore, and validation activitiesBACKUP, RESTORE, AND BACKUP MANAGEMENT
3. (Optional) Reduce the amount of displayed information by filtering the Activity display to show only backups with a specific state, type, group, client, or plug-in:
(a) Select Actions > Filter.
The Filter Activity dialog box appears.
(b) Define the filtering criteria and click OK.
TIP: Click Reset Filter to clear any previous filter settings.
Polic
y
Dataset Name of the dataset used to take the backup. If the activity is a replication job, this column lists the source system name on the destination system, and the destination name on the source system.
WID Work order ID. Unique identifier for this activity.
COLUMN DESCRIPTION
EMC AVAMAR 6.0 • ADMINISTRATION GUIDE 88

Select for restore overviewBACKUP, RESTORE, AND BACKUP MANAGEMENT
Select for restore overviewThe Select for Restore tab of the Backup and Restore window provides two ways to locate and select a backup stored on the server:
• By calendar date (page 89)• By content (page 90)
Finding a backup by calendar date
To locate backups stored on the server by calendar date:
1. Select a client in the clients tree.
2. Click the By Date tab.
A browsable calendar appears.
3. In the Backup History pane, browse to and select a valid backup date in the Calendar.
Dates highlighted in yellow indicate that a backup was performed on that date.
Selecting a valid backup date populates the backups list to the right of the calendar.
4. Select the backup from which to restore directories, folders, or files.
EMC AVAMAR 6.0 • ADMINISTRATION GUIDE 89

Select for restore overviewBACKUP, RESTORE, AND BACKUP MANAGEMENT
Finding a backup by content
To locate backups by content, such as specific directories, folders, or files within a backup:
1. Select a client in the clients tree.
2. Click the By File/Folder tab.
A Backup History pane appears.
3. Click Browse to browse to the directory, folder, or file, or type the path in the Enter path to retrieve history for field.
4. Click Retrieve.
The Version History table lists all versions and sizes for that directory, folder, or file that have been backed up from this client.
5. Select a row in the Version History table to show all backups for the selected client that contain the selected version of the directory, folder, or file.
6. Select the backup from which to restore directories, folders, or files.
EMC AVAMAR 6.0 • ADMINISTRATION GUIDE 90

Performing a restoreBACKUP, RESTORE, AND BACKUP MANAGEMENT
Performing a restore1. In Avamar Administrator, click the Backup & Restore launcher button.
The Backup and Restore window appears.
2. Click the Select for Restore tab.
3. Select a client in the clients tree.
4. Locate and select a backup from which to restore directories or files, as discussed in the following topics:
• Finding a backup by calendar date (page 89)• Finding a backup by content (page 90)
5. Select the directories or files to restore.
TIP: To view a summary of all directories and files that you selected for an on-demand restore, select Actions > Preview List.
EMC AVAMAR 6.0 • ADMINISTRATION GUIDE 91
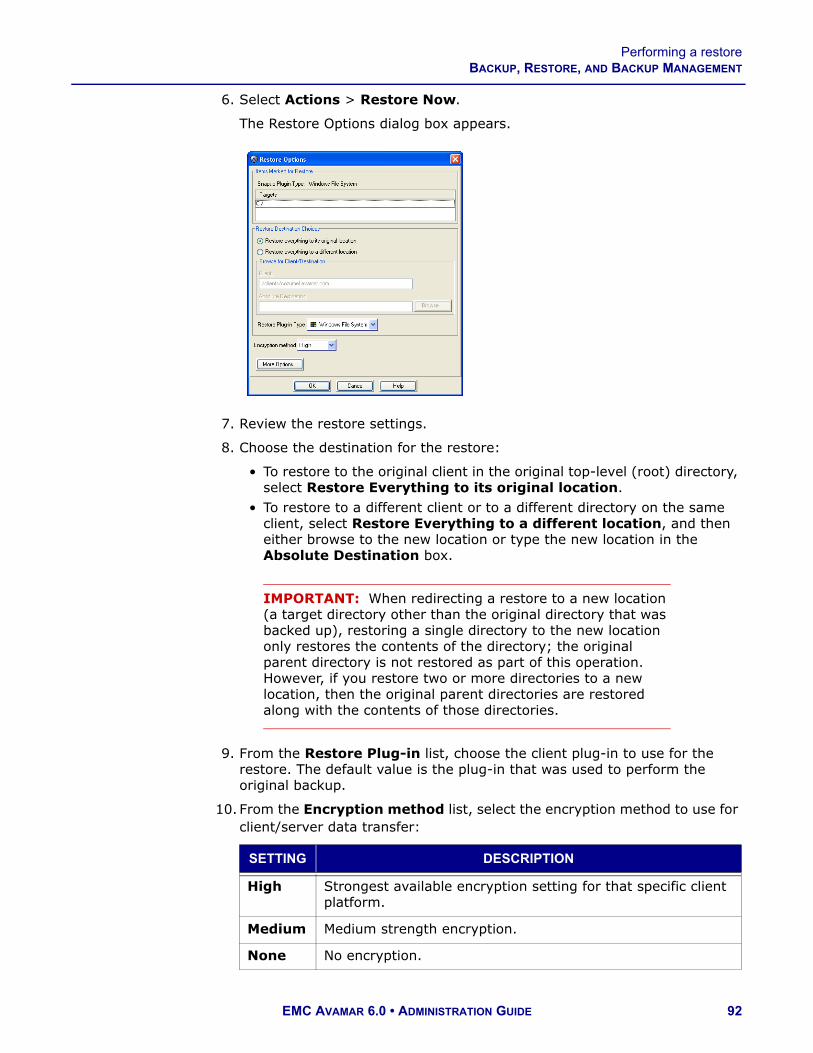
Performing a restoreBACKUP, RESTORE, AND BACKUP MANAGEMENT
6. Select Actions > Restore Now.
The Restore Options dialog box appears.
7. Review the restore settings.
8. Choose the destination for the restore:
• To restore to the original client in the original top-level (root) directory, select Restore Everything to its original location.
• To restore to a different client or to a different directory on the same client, select Restore Everything to a different location, and then either browse to the new location or type the new location in the Absolute Destination box.
IMPORTANT: When redirecting a restore to a new location (a target directory other than the original directory that was backed up), restoring a single directory to the new location only restores the contents of the directory; the original parent directory is not restored as part of this operation. However, if you restore two or more directories to a new location, then the original parent directories are restored along with the contents of those directories.
9. From the Restore Plug-in list, choose the client plug-in to use for the restore. The default value is the plug-in that was used to perform the original backup.
10. From the Encryption method list, select the encryption method to use for client/server data transfer:
SETTING DESCRIPTION
High Strongest available encryption setting for that specific client platform.
Medium Medium strength encryption.
None No encryption.
EMC AVAMAR 6.0 • ADMINISTRATION GUIDE 92

Performing a restoreBACKUP, RESTORE, AND BACKUP MANAGEMENT
NOTE: The encryption technology and bit strength used for any given client/server connection depends on a number of factors, including the client platform and Avamar server version. The EMC Avamar Product Security Guide provides details.
11. To include plug-in options with this restore, click More Options, and then configure the settings where applicable. Appendix B — Plug-in Options (page 578) provides details.
12.Click OK.
A confirmation message appears.
13.Click OK.
EMC AVAMAR 6.0 • ADMINISTRATION GUIDE 93

Backup Management window overviewBACKUP, RESTORE, AND BACKUP MANAGEMENT
Backup Management window overviewThe Backup Management window enables you to manage backups on the Avamar server. This includes:
• Changing a backup expiration date (page 95)• Validating a backup (page 99)• Backup statistics (page 101)• Deleting a backup (page 104)
In most cases, you should locate one or more backups belonging to a single client to perform these tasks.
The Backup Management window provides three ways to locate and select backups of interest:
• Calendar day (page 94)• Date range (page 94)• Retention type (page 95)
Finding backups by calendar date
To locate backups stored on the server by a specific calendar date:
1. Select a client in the Clients tree on the Backup Management window.
2. Select By Day.
3. Browse to a valid backup date in the Calendar. If a date is highlighted in yellow, then a backup was performed on that date.
4. Select a valid backup date on the calendar.
The Backup History list below the calendar shows the backups on that date.
Finding backups by date range
To locate backups stored on the server by a range of dates:
1. Select a client in the Clients tree on the Backup Management window.
2. Select By Date Range.
3. Click the From Date list, and browse to the date in the calendar.
4. Click the To Date list, and browse to the date in the calendar.
5. Click Retrieve.
EMC AVAMAR 6.0 • ADMINISTRATION GUIDE 94

Changing a backup expiration dateBACKUP, RESTORE, AND BACKUP MANAGEMENT
The Backup History list below the calendar shows the backups in the date range.
Finding backups by retention type
To locate backups stored on the server by the retention type:
1. Select a client in the Clients tree on the Backup Management window.
2. Select the By Retention option.
3. Select one or more retention type options.
4. Click Retrieve.
The Backup History list below the calendar shows the backups with the retention type.
Changing a backup expiration date1. In Avamar Administrator, click the Backup Management launcher button.
The Backup Management window appears.
2. Select a client in the clients tree.
EMC AVAMAR 6.0 • ADMINISTRATION GUIDE 95

Changing a backup expiration dateBACKUP, RESTORE, AND BACKUP MANAGEMENT
3. Locate and select one or more backups, as discussed in the following topics:
• Finding backups by calendar date (page 94)• Finding backups by date range (page 94)• Finding backups by retention type (page 95).
TIP: You can select multiple backups by pressing and holding Ctrl while you select the backups.
4. Select Actions > Change Expiration Date.
The Change Expiration Date dialog box appears.
5. Select the new expiration date:
6. Click OK.
A confirmation message appears.
7. Click Yes.
An event code dialog box appears.
8. Click OK.
SETTING DESCRIPTION
Retention period To automatically delete this backup from the Avamar server after a specific number of days, weeks, months, or years, select this option and select the number of days, weeks, months, or years.
End date To automatically delete this backup from the Avamar server on a specific calendar date, select this option and browse to that date on the calendar.
No end date To keep this backup for as long as this client remains active in the Avamar server, select this option.
EMC AVAMAR 6.0 • ADMINISTRATION GUIDE 96

Changing backup retention typesBACKUP, RESTORE, AND BACKUP MANAGEMENT
Changing backup retention types
IMPORTANT: When manually changing the retention types assigned to a backup, especially one that has multiple retention types, be certain that you are not inadvertently removing a weekly, monthly, or yearly from the system that you need to retain. For example, consider a backup that is assigned daily, weekly, monthly, and yearly retention types. If you remove the yearly retention type designation, you might not have another yearly backup in the system for quite a long time.
To change the retention types assigned to a backup:
1. In Avamar Administrator, click the Backup Management launcher button.
The Backup Management window appears.
2. Select a client in the clients tree.
3. Locate and select one or more backups, as discussed in the following topics:
• Finding backups by calendar date (page 94)• Finding backups by date range (page 94)• Finding backups by retention type (page 95).
TIP: You can select multiple backups by pressing and holding Ctrl while you select the backups.
EMC AVAMAR 6.0 • ADMINISTRATION GUIDE 97

Changing backup retention typesBACKUP, RESTORE, AND BACKUP MANAGEMENT
4. Select Actions > Change Retention Type.
The Change Retention Type dialog box appears.
5. Choose the retention type for the backups:
6. Click OK.
A confirmation message appears.
7. Click Yes.
A second confirmation message appears.
8. Click OK.
RETENTION TYPE DO THIS
To explicitly assign a daily, weekly, monthly or yearly retention type to this backup.
Select Tags, then select one or more retention type options.
To designate this backup as “untagged,” or not explicitly assigned a daily, weekly, monthly, or yearly retention type.
Select Not tagged.
EMC AVAMAR 6.0 • ADMINISTRATION GUIDE 98

Validating a backupBACKUP, RESTORE, AND BACKUP MANAGEMENT
Validating a backup1. In Avamar Administrator, click the Backup Management launcher button.
The Backup Management window appears.
2. Locate and select a backup, as discussed in the following topics:
• Finding backups by calendar date (page 94)• Finding backups by date range (page 94)• Finding backups by retention type (page 95).
3. Select Actions > Validate Backup.
The Select Client to Perform Validation dialog box appears.
The default settings are to validate the backup on the same client from which the backup was originally taken and to use the same data source plug-in that was used during the original backup. However, the encryption setting for backup validations always defaults to High, regardless of the encryption setting used for the original backup.
EMC AVAMAR 6.0 • ADMINISTRATION GUIDE 99

Validating a backupBACKUP, RESTORE, AND BACKUP MANAGEMENT
4. Choose the client on which to validate the backup:
• To validate the backup on the same client from which the backup was originally taken, select Validate using the snapup client.
• To validate the backup on a different client, select Validate using a different client, and then browse to the new client.
5. From the Validation Plug-in Type list, select the plug-in on which to validate the backup. Only the plug-ins that are installed on the selected client appear in the list.
6. From the Encryption method list, select the encryption method to use for client/server data transfer during the validation.
7. Click OK.
A confirmation message appears.
8. Click OK.
EMC AVAMAR 6.0 • ADMINISTRATION GUIDE 100

Backup statisticsBACKUP, RESTORE, AND BACKUP MANAGEMENT
Backup statisticsDetailed statistics for completed backups are available from both the Backup Management window (page 101) and the Activity window (page 103).
You can view statistics for any stored backup from the Backup Management window. However, the Activity window shows only recent backup activity. Typically, only the most recent backups within the past 72 hours appear in the Activity window.
Viewing backup statistics from the Backup Management window
1. In Avamar Administrator, click the Backup Management launcher button.
The Backup Management window appears.
2. Select a client in the clients tree.
3. Locate and select a backup, as discussed in the following topics:
• Finding backups by calendar date (page 94)• Finding backups by date range (page 94)• Finding backups by retention type (page 95).
EMC AVAMAR 6.0 • ADMINISTRATION GUIDE 101

Backup statisticsBACKUP, RESTORE, AND BACKUP MANAGEMENT
4. Select Actions > View Statistics.
The Backup Statistics dialog box appears.
5. Click Close.
TAB DESCRIPTION
Details Shows detailed information from the v_activities_2 database view, which is discussed in v_activities_2 (page 671).
Files Shows a list of files included in the backup.
File Aggregation Shows a representative sampling of resource-intensive file types included in the backup, and aggregates deduplication statistics by file type.
Options Shows any special options for the backup.
Errors Shows any errors that occurred during the backup.
EMC AVAMAR 6.0 • ADMINISTRATION GUIDE 102

Backup statisticsBACKUP, RESTORE, AND BACKUP MANAGEMENT
Viewing backup statistics from the Activity window
1. In Avamar Administrator, click the Activity launcher button.
The Activity window appears.
2. Click the Activity Monitor tab.
3. Select a backup activity from the list.
4. Select Actions > View Statistics.
The Backup Statistics dialog box appears.
TAB DESCRIPTION
Details Shows detailed information from the v_activities_2 database view, which is discussed in v_activities_2 (page 671).
Files Shows a list of files included in the backup.
File Aggregation Shows a representative sampling of resource-intensive file types included in the backup, and aggregates deduplication statistics by file type.
EMC AVAMAR 6.0 • ADMINISTRATION GUIDE 103

Deleting a backupBACKUP, RESTORE, AND BACKUP MANAGEMENT
5. Click Close.
Deleting a backup
IMPORTANT: Deleting a backup from the system immediately and permanently deletes all data in that backup.
To delete a backup:
1. In Avamar Administrator, click the Backup Management launcher button.
The Backup Management window appears.
2. Select a client in the clients tree.
3. Locate and select a backup, as discussed in the following topics:
• Finding backups by calendar date (page 94)• Finding backups by date range (page 94)• Finding backups by retention type (page 95).
4. Select Actions > Delete Backup.
A confirmation message appears.
5. Click OK.
Options Shows any special options for the backup.
Errors Shows any errors that occurred during the backup.
TAB DESCRIPTION
EMC AVAMAR 6.0 • ADMINISTRATION GUIDE 104

Canceling an activityBACKUP, RESTORE, AND BACKUP MANAGEMENT
Canceling an activityYou can cancel a backup, restore, or validation activity any time before it completes. However, it can take as many as five minutes to complete the cancellation. If the activity completes during this time, the cancellation does not occur.
To cancel an activity:
1. In Avamar Administrator, click the Activity launcher button.
The Activity window appears.
2. Click the Activity Monitor tab.
The most recent 5,000 client activities during the past 72 hours appear on the Activity Monitor tab.
3. Select one or more activities to cancel.
4. Select Actions > Cancel Activity.
A confirmation message appears.
5. Click Yes.
EMC AVAMAR 6.0 • ADMINISTRATION GUIDE 105

DATASETS, SCHEDULES, AND RETENTION POLICIES
Datasets, schedules, and retention policies are reusable objects that can be assigned to more than one client or group. This reusability greatly reduces the amount of labor needed to automate and customize the Avamar server.
DatasetsWhen you perform an on-demand backup, the selection of directories and files in a client filesystem for the backup are valid only for that backup. In other words, they are not saved for future backups.
Avamar datasets are a list of directories and files to back up from a client. Assigning a dataset to a client or group enables you to save backup selections.
Dataset properties
Each dataset defines:
• Source data list• Exclusion list• Inclusion list• Plug-in options
Source data list. Dataset definitions always start with a source data list, consisting of:
• Data from one or more plug-ins• A defined filesystem hierarchy, either the entire filesystem or selected
directories, within each plug-in
EMC AVAMAR 6.0 • ADMINISTRATION GUIDE 106

DatasetsDATASETS, SCHEDULES, AND RETENTION POLICIES
Exclusion and inclusion lists. Datasets can also narrow the scope of the source data list by explicitly defining certain directories and file types to exclude or include in each backup.
Because default dataset behavior is to include everything in the source data list, the explicit exclusion and inclusion lists typically contain only a few entries.
NOTE: When you specify exclusions and inclusions, case-sensitivity varies according to the target computing platform for the backup. Exclusions and inclusions for Windows platforms are not case-sensitive, while exclusions and inclusions for most other platforms are case-sensitive.
NOTE: You cannot define inclusion and exclusion lists for VMware Image Backups.
Processing relationship. Avamar processes these dataset elements in the following order:
1. Source data
2. Exclusion list
3. Inclusion list
First, source data from one or more plug-ins is defined. The default behavior is to include all data from all defined plug-ins.
Next, the exclusion list is used to eliminate certain directories and file types from the dataset.
Finally, the inclusion list is used to add back any files that were eliminated from the dataset in the exclusion list.
Plug-in options. Plug-in options enable you to further customize the behavior of a dataset. Appendix B — Plug-in Options (page 578) provides details on the options.
AVAMARCLIENT AGENT
EXCLUSIONLIST
INCLUSIONLIST
PLUG-IN
EMC AVAMAR 6.0 • ADMINISTRATION GUIDE 107

DatasetsDATASETS, SCHEDULES, AND RETENTION POLICIES
Dataset catalog
Base Dataset. The Base Dataset defines a set of minimum, or baseline, backup requirements. The initial settings in the Base Dataset are:
• No source data plug-ins• No explicit exclusion or inclusion list entries
This is essentially an empty dataset.
Default Dataset. The Default Dataset defines persistent backup selections for the Default Group (page 135). The initial settings in the Default Dataset are:
• All available source data plug-ins• No explicit exclusion or inclusion list entries
This ensures that all members of the Default Group can back up their client computers regardless of platform type.
If you edit these settings, the changes are enforced on all members of the Default Group (page 135), unless another dataset is assigned at the client level (page 154).
The following directories are also inherently excluded from all backups, even though they do not explicitly appear in the exclusion list:
Unix Dataset. The Unix dataset is optimized for use with AIX, FreeBSD, HP-UX, Linux, and Solaris clients. The initial settings in the Unix Dataset are:
• Only the AIX, FreeBSD, HP-UX, Linux, Macintosh OS X, and Solaris filesystem source data plug-ins
• Explicit exclusion of various temp directories (/tmp, /var/tmp, /usr/tmp), core dump files (core), and local cache files (*cache.dat, *scan.dat)
• No explicit inclusion list entries
The following directories are also inherently excluded from all Unix Dataset backups, even though they do not explicitly appear in the exclusion list:
EXCLUSION DESCRIPTION
.snapshot/ NetApp mounts.
VARDIR/f_cache.dat Local avtar file cache.
VARDIR/p_cache.dat Local avtar “is present” cache.
EXCLUSION DESCRIPTION
.snapshot/ NetApp mounts.
VARDIR/f_cache.dat Local avtar cache files.
VARDIR/p_cache.dat Local avtar cache files.
/proc Pseudo filesystem that cannot be restored.
/dev Excluded only if not running as root.
/devices Excluded only for Solaris.
EMC AVAMAR 6.0 • ADMINISTRATION GUIDE 108

DatasetsDATASETS, SCHEDULES, AND RETENTION POLICIES
Windows Dataset. The Windows Dataset is optimized for use with Microsoft Windows clients. The initial settings in the Windows Dataset are:
• Only Windows filesystem source data plug-in• No explicit exclusion or inclusion list entries
The following directories are also inherently excluded from all Windows Dataset backups, even though they do not explicitly appear in the exclusion list:
VMware Image Dataset. The VMware Image Dataset is the default dataset that is assigned to the Default Virtual Machine Group (page 135) and other vCenter groups (page 136) when they are first added.
In many respects, the VMware Image Dataset is simpler than most other datasets:
• The only available source data plug-ins are Linux and Windows virtual disks, and both are selected by default.
• The Select Files and/or Folders option, as well as the Exclusions and Inclusions tabs, are disabled.
• Change block tracking is enabled by default using an embedded utilize_changed_block_list=true plug-in option statement.
The EMC Avamar for VMware Guide provides details on using the VMware Image Dataset to back up virtual machine data.
EXCLUSION DESCRIPTION
.snapshot/ NetApp mounts.
VARDIR/f_cache.dat Local avtar cache files.
VARDIR/p_cache.dat Local avtar cache files.
All files referenced by the following registry keys:
• HKEY_LOCAL_MACHINE\SYSTEM\CurrentControlSet\Control\BackupRestore\FilesNotToBackup
• HKEY_CURRENT_USER\SYSTEM\CurrentControlSet\Control\BackupRestore\FilesNotToBackup
Files explicitly designated by Microsoft to not be backed up.
Temporary Internet files Internet Explorer temporary files.
outlook.ost Outlook local cache files.
outlook\*.ost Outlook local cache files.
EMC AVAMAR 6.0 • ADMINISTRATION GUIDE 109

Creating a datasetDATASETS, SCHEDULES, AND RETENTION POLICIES
Creating a dataset1. In Avamar Administrator, select Tools > Manage Datasets.
The Manage All Datasets window appears.
2. Click New.
The New Dataset dialog box appears.
3. Type a name for the dataset.
IMPORTANT: Do not use any of the following characters in the dataset name: ~!@$^%(){}[]|,`;#\/:*?<>'"&.
4. Click the Source Data tab, and then define the source data plug-ins that contribute data to this dataset:
• To include all plug-ins, select Select All Data for All Local File Systems. With this option, the dataset includes all data that is available using any of the plug-ins.
• To include only specific plug-ins and limit the dataset to specific folders and files, select Enter Explicitly.
EMC AVAMAR 6.0 • ADMINISTRATION GUIDE 110

Creating a datasetDATASETS, SCHEDULES, AND RETENTION POLICIES
Enter explicitly 5. If you selected Enter Explicitly in the previous step, specify the plug-ins and data path:
(a) Remove all unwanted plug-ins from the list by selecting each one and clicking -.
(b) To add a plug-in, select the plug-in from the Select Plug-In Type list, and then click +.
(c) Specify a data path for the plug-in by clicking Select Files and/or Folders, browsing to or typing a valid data path for the plug-in, and then clicking +.
NOTE: The Select Files and/or Folders option is not available for VMware Image Backups.
For the following plug-ins, the first occurrence of an asterisk in a path is treated as a folder wildcard:
• Macintosh Desktop/Laptop• Macintosh File System• Windows Desktop/Laptop• Windows File System
For example, to specify the My Documents folder for all users on a Windows computer, type:
C:\Documents and Settings\*\My Documents
To specify the Documents folder for all users on a Macintosh, type:
/Users/*/Documents
NOTE: When you specify a data path, only the first occurrence of an asterisk is treated as a folder wildcard. Subsequent occurrences are interpreted literally.
IMPORTANT: Except for using an asterisk character with the specified Macintosh and Windows filesystem plug-ins, do not use any of the following characters in the data path: ~!@$^%(){}[]|,`;#:*?<>'"&.
To handle the change in the default location of user directories that occurred between Windows XP and Windows Vista/Windows 7, a dereference flag is available in the following plug-ins:
• Windows Desktop/Laptop• Windows File System
The dereference flag acts as a substitute for the default location of user directories on those operating systems. The flag is:
#USERDOCS#
EMC AVAMAR 6.0 • ADMINISTRATION GUIDE 111

Creating a datasetDATASETS, SCHEDULES, AND RETENTION POLICIES
The following table provides examples of the dereference flag used in combination with the folder wildcard.
(d) Repeat steps (b) and (c) for each plug-in and data path to include in the dataset.
Exclusions list 6. Click the Exclusions tab, and then define the directories and files to exclude:
(a) Select a plug-in from the Select Plug-in Type list.
(b) Type a directory name or file type in the Select Files and/or Folders field. The entry may include wildcards.
(c) Click +.
(d) Repeat these steps for each exclusion.
Typical exclusion lists include /temp files and directories and UNIX core dumps.
NOTE: You cannot define exclusion lists for VMware Image Backups.
USE THIS... TO REPLACE...
#USERDOCS#\*\Desktop On Windows XP:C:\Documents and Settings\*\Desktop
On Windows Vista/Windows 7:C:\Users\*\Desktop
#USERDOCS#\*\Favorites On Windows XP:C:\Documents and Settings\*\Favorites
On Windows Vista/Windows 7: C:\Users\*\Favorites
#USERDOCS#\*\Documents On Windows XP:C:\Documents and Settings\*\Documents
On Windows Vista/Windows 7:C:\Users\*\Documents
#USERDOCS#\*\My Documents On Windows XP:C:\Documents and Settings\*\My Documents
On Windows Vista/Windows 7:C:\Users\*\My Documents
EMC AVAMAR 6.0 • ADMINISTRATION GUIDE 112

Creating a datasetDATASETS, SCHEDULES, AND RETENTION POLICIES
Inclusions list 7. Click the Inclusions tab, and then define the directories and files to include because they would otherwise have been excluded by the exclusion list:
(a) Select a plug-in from the Select Plug-in Type list.
(b) Type a directory name or file type in the Select Files and/or Folders field. The entry may include wildcards.
(c) Click +.
(d) Repeat these steps for each inclusion.
NOTE: You cannot define inclusion lists for VMware Image Backups.
Processing relationship (page 107) provides details on inclusions.
Plug-in options 8. Click the Options tab, and then set various plug-in options either by using the graphical controls or by typing option names and values as free text.
IMPORTANT: When typing option names and values as free text, it must be understood that no error checking or validation is performed on the entries. In addition, free text entries override settings made using the graphical controls.
Appendix B — Plug-in Options (page 578) provides details on specific plug-in options.
9. Click OK.
EMC AVAMAR 6.0 • ADMINISTRATION GUIDE 113

Editing a datasetDATASETS, SCHEDULES, AND RETENTION POLICIES
Editing a dataset1. In Avamar Administrator, select Tools > Manage Datasets.
The Manage All Datasets window appears.
2. Select a dataset and click Edit.
The Edit Dataset dialog box appears.
3. Edit the dataset information.
Creating a dataset (page 110) provides details on dataset properties.
4. Click OK.
Dataset changes take effect on the next scheduled backup. Backups that have already begun or have been completed are not affected.
EMC AVAMAR 6.0 • ADMINISTRATION GUIDE 114

Deleting a datasetDATASETS, SCHEDULES, AND RETENTION POLICIES
Copying a dataset1. In Avamar Administrator, select Tools > Manage Datasets.
The Manage All Datasets window appears.
2. Select the dataset and click Copy.
The Save As dialog box appears.
3. Type a name for the new dataset and click OK.
Deleting a dataset
IMPORTANT: You cannot delete a dataset if it is currently assigned to a client or group.
To delete a dataset:
1. In Avamar Administrator, select Tools > Manage Datasets.
The Manage All Datasets window appears.
2. Select the dataset and click Delete.
A confirmation message appears.
3. Click Yes.
EMC AVAMAR 6.0 • ADMINISTRATION GUIDE 115
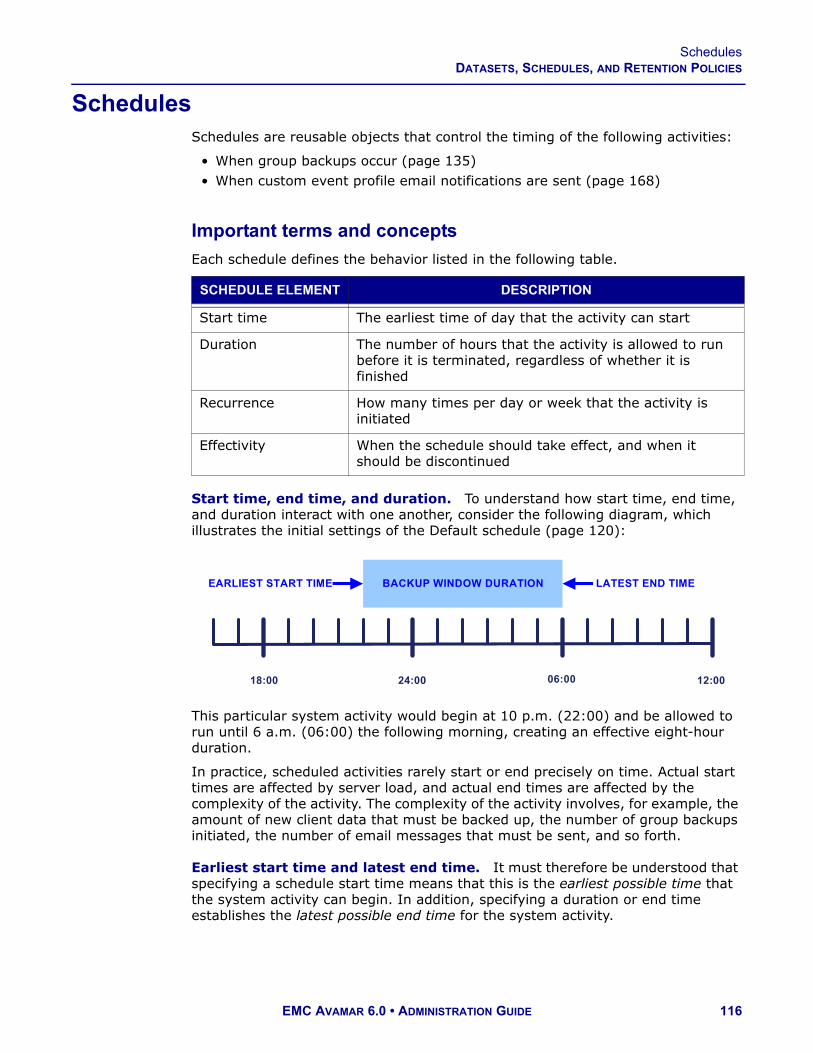
SchedulesDATASETS, SCHEDULES, AND RETENTION POLICIES
SchedulesSchedules are reusable objects that control the timing of the following activities:
• When group backups occur (page 135)• When custom event profile email notifications are sent (page 168)
Important terms and concepts
Each schedule defines the behavior listed in the following table.
Start time, end time, and duration. To understand how start time, end time, and duration interact with one another, consider the following diagram, which illustrates the initial settings of the Default schedule (page 120):
This particular system activity would begin at 10 p.m. (22:00) and be allowed to run until 6 a.m. (06:00) the following morning, creating an effective eight-hour duration.
In practice, scheduled activities rarely start or end precisely on time. Actual start times are affected by server load, and actual end times are affected by the complexity of the activity. The complexity of the activity involves, for example, the amount of new client data that must be backed up, the number of group backups initiated, the number of email messages that must be sent, and so forth.
Earliest start time and latest end time. It must therefore be understood that specifying a schedule start time means that this is the earliest possible time that the system activity can begin. In addition, specifying a duration or end time establishes the latest possible end time for the system activity.
SCHEDULE ELEMENT DESCRIPTION
Start time The earliest time of day that the activity can start
Duration The number of hours that the activity is allowed to run before it is terminated, regardless of whether it is finished
Recurrence How many times per day or week that the activity is initiated
Effectivity When the schedule should take effect, and when it should be discontinued
BACKUP WINDOW DURATION
12:0018:00 24:00 06:00
LATEST END TIMEEARLIEST START TIME
EMC AVAMAR 6.0 • ADMINISTRATION GUIDE 116

SchedulesDATASETS, SCHEDULES, AND RETENTION POLICIES
Recurrence. Schedule recurrence is the ability to repeat the designated system activity at regular predictable intervals. Avamar schedules enable you to repeat activities on designated hours of the day or days of the week.
For example, you could use various schedules to send noncritical event profile emails hourly during normal working hours, such as on the hour between 9 a.m. and 5 p.m. You also could schedule the backups for one group once per day at 10 p.m. and for another group only on Saturdays at 2 p.m.
Effectivity. Finally, it is sometimes useful to define a specific effectivity range for a schedule. For example, if you know that client computers used for a specific development project will be obsolete at some known future date, you could create a special schedule for those group backups that would automatically cease backups on a certain date. Similarly, if administering a large site, you could create schedules ahead of time, assign them to groups, then activate them on a certain date. These group backups would not occur until the schedule took effect.
All displayed times are relative to that Avamar Administrator client local-ity. When schedules are created or edited, all times are shown relative to the
local time zone for that Avamar Administrator client. For example, consider a schedule created by an administrative user in Pacific Standard Time zone, with a next runtime of 10 p.m. If an administrative user in Eastern Standard Time views that same schedule in his Avamar Administrator session, the next runtime would be localized and shown as 1 a.m. the following day (3 hours later).
Run now. You can initiate all actions associated with a particular schedule immediately using the Run Now button on the Manage All Schedules window. Running a schedule immediately does not affect the next time that the schedule is regularly run.
EMC AVAMAR 6.0 • ADMINISTRATION GUIDE 117

SchedulesDATASETS, SCHEDULES, AND RETENTION POLICIES
Schedule properties
Avamar schedules offer the following options to define recurrence:
• Daily• Weekly• Monthly• On-demand
Daily. The Daily option enables you to establish a scheduling pattern comprising one or more hours of the day. This pattern repeats daily. In other words, system activities occur at the specified times every day of the year.
TIP: If you need to schedule system activities for certain days of the week, use the Repeat this schedule weekly option.
Additionally, limit the duration of these activities to prevent job overlap. For example, if you schedule backups to occur every six hours (for example, at 1 a.m., 7 a.m., 1 p.m., and 7 p.m.), you should limit each run to no more than six hours so that the previous backup completes before the next backup starts.
EMC AVAMAR 6.0 • ADMINISTRATION GUIDE 118
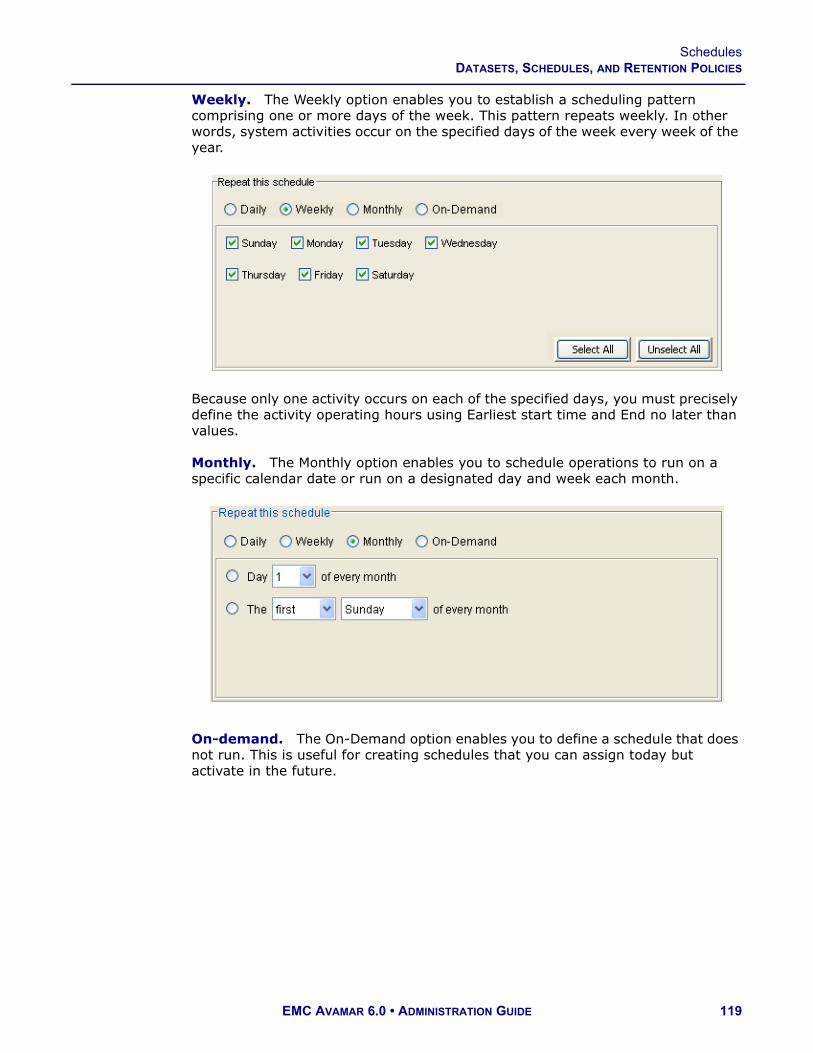
SchedulesDATASETS, SCHEDULES, AND RETENTION POLICIES
Weekly. The Weekly option enables you to establish a scheduling pattern comprising one or more days of the week. This pattern repeats weekly. In other words, system activities occur on the specified days of the week every week of the year.
Because only one activity occurs on each of the specified days, you must precisely define the activity operating hours using Earliest start time and End no later than values.
Monthly. The Monthly option enables you to schedule operations to run on a specific calendar date or run on a designated day and week each month.
On-demand. The On-Demand option enables you to define a schedule that does not run. This is useful for creating schedules that you can assign today but activate in the future.
EMC AVAMAR 6.0 • ADMINISTRATION GUIDE 119

SchedulesDATASETS, SCHEDULES, AND RETENTION POLICIES
Activation constraints. Schedule effectivity is controlled by the activation constraints:
• To make a schedule effective immediately, set the Delay until date to today.• To make a schedule run indefinitely, select the No End Date option.• To make a schedule obsolete at some future date, select the End after
option and then select a date.
Timing of activation constraints. Because scheduled activities often straddle two calendar days, it should be understood that Avamar allocates the full window of time to any activity initiated by a schedule. For example, consider a schedule with an earliest start time of 10 p.m., a latest end time of 6 a.m. (the following morning), and an end after date of December 31 of the current calendar year. On the evening of December 31, the activity starts as expected and runs until completed, typically sometime during the morning of January 1 the following year. However, beginning January 1 of the following year, no new scheduled activities are initiated by this schedule.
Schedule catalog
Default Schedule. The Default Schedule controls backup scheduling for the Default Group (page 135). It is initially configured to run once per day at 10 p.m. If you edit these settings, the changes are enforced on all members of the Default Group.
Daily Schedule. Avamar supplies a predefined Daily Schedule.
Evaluation Schedule. The Evaluation Schedule is primarily intended to support system evaluations by controlling when the Evaluation Profile (page 168) email notification is sent. It is initially configured to run every Monday at 6 a.m.
Notification Schedule. The Notification Schedule controls when custom event profile email notification messages are sent. Custom profiles (page 168) provides details.
Statistics Schedule. The Statistics Schedule controls how often various Avamar server statistics (for example, the Avamar server detail (page 246) Bytes protected value) are retrieved or calculated. The default setting for this schedule is hourly.
EMC AVAMAR 6.0 • ADMINISTRATION GUIDE 120

Creating a scheduleDATASETS, SCHEDULES, AND RETENTION POLICIES
Creating a schedule1. In Avamar Administrator, select Tools > Manage Schedules.
The Manage All Schedules window appears.
2. Click New.
The New Schedule dialog box appears.
EMC AVAMAR 6.0 • ADMINISTRATION GUIDE 121

Creating a scheduleDATASETS, SCHEDULES, AND RETENTION POLICIES
3. Complete the settings as described in the following table.
4. Ensure that the Next Run Time, which is a display-only field that appears below the Name field, is the expected date and time.
5. Click OK.
SETTING DESCRIPTION
Name Type a name for the schedule.IMPORTANT: Do not use any of the following characters in the name: ~!@$^%(){}[]|,`;#\/:*?<>'"&.
Repeat this schedule
Choose how often to repeat the schedule:• Select Daily to schedule operations to occur at any
hour of the day. You can also limit each run to a specified number of hours to prevent overlapping backups.
• Select Weekly to schedule operations to occur on any day of the week.
• Select Monthly to schedule operations to occur on any calendar day of the month.
• Select On-Demand to configure the schedule so that it does not run. Schedules with this setting are typically assigned to groups that only take on-demand backups, such as groups that only contain laptop clients.
Operating Hours
Specify an Earliest start time and an End no later than time for each scheduled backup. These two values define a logical window of time during which a backup can potentially be performed. Server workload affects the actual start time.NOTE: The first time that a backup is performed for any client, the backup is allowed to continue past the specified end time. The reason for this is that initial backups can take significantly longer than subsequent backups of the same client.
Activation Constraints
Specify schedule effectivity:
• To make a schedule effective immediately, select the Delay until date to today.
• To make a schedule run indefinitely, select the No End Date option.
• To make a schedule obsolete at some future date, select the End after option and then select a date.
EMC AVAMAR 6.0 • ADMINISTRATION GUIDE 122

Editing a scheduleDATASETS, SCHEDULES, AND RETENTION POLICIES
Editing a schedule1. In Avamar Administrator, select Tools > Manage Schedules.
The Manage All Schedules window appears.
2. Select a schedule from the list and click Edit.
The Edit Schedule dialog box appears.
3. Edit the schedule information.
Creating a schedule (page 121) provides details on schedule properties.
4. Click OK.
EMC AVAMAR 6.0 • ADMINISTRATION GUIDE 123

Deleting a scheduleDATASETS, SCHEDULES, AND RETENTION POLICIES
Copying a schedule1. In Avamar Administrator, select Tools > Manage Schedules.
The Manage All Schedules window appears.
2. Select the schedule from the list and click Copy.
The Save As dialog box appears.
3. Type a name for the new schedule and click OK.
Deleting a schedule
IMPORTANT: You cannot delete a schedule if it is currently assigned to a group.
To delete a schedule:
1. In Avamar Administrator, select Tools > Manage Schedules.
The Manage All Schedules window appears.
2. Select the schedule from the list and click Delete.
A confirmation message appears.
3. Click Yes.
EMC AVAMAR 6.0 • ADMINISTRATION GUIDE 124

Running a schedule nowDATASETS, SCHEDULES, AND RETENTION POLICIES
Running a schedule nowOccasionally, you might want to perform scheduled operations on an on-demand basis. By selecting a schedule and clicking Run Now, all operations associated with that schedule are run immediately.
NOTE: The scheduler does not need to be running for you to use the Run Now feature.
To run a schedule now:
1. In Avamar Administrator, select Tools > Manage Schedules.
The Manage All Schedules window appears.
2. Select a schedule from the list and click Run Now.
EMC AVAMAR 6.0 • ADMINISTRATION GUIDE 125

Retention policiesDATASETS, SCHEDULES, AND RETENTION POLICIES
Retention policiesBackup retention policies enable you to specify how long to keep a particular backup in the system. Backups are automatically marked for deletion after they expire. However, actual deletion from the system is done in batches during times of low system activity.
Expiration date. The result of a retention policy is always some future expiration date. Retention policies are merely a set of rules, applied as each backup is taken, for determining that future calendar expiration date.
IMPORTANT: Changing retention policy settings does not affect past backups in the system. Every backup is assigned an expiration date at the time the backup is taken. Although you can manually change any individual backup expiration date (page 95), this must be done on a backup-by-backup basis and can be very time-consuming for large sites. Therefore, it is extremely important that you carefully consider the best retention policy for your site and implement that retention policy before too many backups are performed.
Each retention policy defines:
• Basic settings for determining a fixed expiration date• Optional advanced settings, which specify the number of past backups to keep
of each type
Basic retention settings
Basic retention settings are used to assign a fixed expiration date to a backup using any one the following methods:
• The Retention period option enables you to define a fixed retention period, relative to the schedule start time. This retention period can be any number of days, weeks, months, or years. Expiration dates assigned in this manner create a moving window of backup retention. For example, this setting would be useful for always retaining the latest 30 days of backups in the system. Any backups older than 30 days would automatically be dropped from the system.
• The End date option enables you to assign a calendar date as the expiration date. All backups that are assigned this retention policy would expire on the same calendar date.
• The No end date option enables you to keep backups indefinitely. This setting is useful for ensuring that all backups that are assigned this retention policy are retained for the life of the system.
EMC AVAMAR 6.0 • ADMINISTRATION GUIDE 126

Retention policiesDATASETS, SCHEDULES, AND RETENTION POLICIES
Advanced retention settings
Advanced retention settings are an optional alternative set of rules for dynamically assigning backup expiration dates, based on the number of daily, weekly, monthly, and yearly backups to retain in the system.
Initial tagging of scheduled backups as one or more specific types (that is, daily, weekly, monthly, or yearly) is made when the backup is performed. You can also manually change the retention type assignment for a backup at any time. Changing backup retention types (page 97) provides details.
Advanced retention works best with daily backups. Retention policies that implement advanced retention settings should always be used in conjunction with daily scheduled backups. The reason for this is that the “Always keep: n weeks of daily backups” setting have no effect unless there are actually daily backups in the system. However, depending on which schedule you use, this may not always be the case. For example, if you assign a schedule to a group that only takes weekly backups, there are no daily backups in the system.
Advanced retention settings never apply to on-demand backups. Advanced retention settings cannot be applied to on-demand
backups. The reason for this is that on-demand backups can occur at any time, and are therefore inherently asynchronous—the system cannot assign a “type” (for example, daily, weekly, monthly, or yearly) to them.
Minimal retention
Minimal retention is a special feature that enforces a minimum basic retention setting across an entire site. For example, you can keep all backups for at least 90 days regardless of what other retention policies specify. This feature is intended to address the need of some enterprises to enforce site-wide minimum retention standards regardless of what individual organizations might decide to implement with other retention policies.
By default, the minimal retention feature is disabled. To use this feature, you must enable the Minimal Retention policy. Enabling the Minimal Retention policy (page 134) and Disabling the Minimal Retention policy (page 133) provide details.
EMC AVAMAR 6.0 • ADMINISTRATION GUIDE 127

Retention policiesDATASETS, SCHEDULES, AND RETENTION POLICIES
Retention policy catalog
Minimal Retention policy. The Minimal Retention policy is a special retention policy that controls the minimal retention feature (page 127).
IMPORTANT: The Minimal Retention policy is a global system object whose only purpose is to control the minimal retention feature. Therefore, you cannot assign the Minimal Retention policy to a group.
Default Retention policy. The Default Retention policy defines backup retention settings for the Default Group (page 135). It initially has the same settings as the Minimal Retention policy. If you edit these settings, the changes are enforced on all members of the Default Group, unless another dataset is assigned at the client level (page 154).
End User On Demand Retention policy. End User On Demand Retention is a special retention policy that controls how long on-demand backups initiated by the client (for example, using the Avamar Windows client Back Up Now command) are kept in the system. Advanced retention settings are disabled on this retention policy because advanced retention settings never apply to on-demand backups.
IMPORTANT: The End User On Demand Retention policy is a global system object whose only purpose is to control how long on-demand backups initiated by the client are retained in the system. Therefore, you cannot assign the End User On Demand Retention policy to a group.
Monthly and Weekly retention policies. The expiration dates for the Monthly and Weekly retention policies are 1 month and 1 week, respectively.
EMC AVAMAR 6.0 • ADMINISTRATION GUIDE 128

Creating a retention policyDATASETS, SCHEDULES, AND RETENTION POLICIES
Creating a retention policy1. In Avamar Administrator, select Tools > Manage Retention Policies.
The Manage All Retention Policies window appears.
2. Click New.
The New Retention Policy dialog box appears.
3. Complete the settings as described in the following table.
SETTING DESCRIPTION
Name Type a name for the retention policy.IMPORTANT: Do not use any of the following characters in the retention policy name: ~!@$^%(){}[]|,`;#\/:*?<>'"&.
Retention period To automatically delete backups from the Avamar server after a specific number of days, weeks, months, or years, select this option and type the number of days, weeks, months, or years.
End date To automatically delete backups from the Avamar server on a specific calendar date, select this option and browse to that date on the calendar.
No end date To keep future backups for as long as this client remains active in the Avamar server, select this option.
EMC AVAMAR 6.0 • ADMINISTRATION GUIDE 129

Creating a retention policyDATASETS, SCHEDULES, AND RETENTION POLICIES
4. (Optional) Specify advanced retention settings:
(a) Select Override basic retention policy for scheduled backups.
(b) Click Advanced.
The Edit Advanced Retention Policy dialog box appears.
(c) Specify the maximum number of daily, weekly, monthly, and yearly backups to retain on the Avamar server.
(d) Click OK.
The Edit Advanced Retention Policy dialog box closes.
5. On the New Retention Policy dialog box, click OK.
EMC AVAMAR 6.0 • ADMINISTRATION GUIDE 130

Editing a retention policyDATASETS, SCHEDULES, AND RETENTION POLICIES
Editing a retention policy1. In Avamar Administrator, select Tools > Manage Retention Policies.
The Manage All Retention Policies window appears.
2. Select a retention policy from the list and click Edit.
The Edit Retention Policy dialog box appears.
3. Edit the retention policy information.
Creating a retention policy (page 129) provides details about retention policy properties.
IMPORTANT: The End date and No end date options are not available on the Minimal Retention policy.
4. Click OK.
EMC AVAMAR 6.0 • ADMINISTRATION GUIDE 131

Deleting a retention policyDATASETS, SCHEDULES, AND RETENTION POLICIES
Copying a retention policy1. In Avamar Administrator, select Tools > Manage Retention Policies.
The Manage All Retention Policies window appears.
2. Select a retention policy from the list and click Copy.
The Save As dialog box appears.
3. Type a name for the new retention policy and click OK.
Deleting a retention policy
IMPORTANT: You cannot delete a retention policy if it is assigned to a client or group.
To delete a retention policy:
1. In Avamar Administrator, select Tools > Manage Retention Policies.
The Manage All Retention Policies window appears.
2. Select a retention policy from the list and click Delete.
A confirmation message appears.
3. Click Yes.
EMC AVAMAR 6.0 • ADMINISTRATION GUIDE 132

Disabling the Minimal Retention policyDATASETS, SCHEDULES, AND RETENTION POLICIES
Disabling the Minimal Retention policy1. In Avamar Administrator, select Tools > Manage Retention Policies.
The Manage All Retention Policies window appears.
2. Select the Minimal Retention policy from the list and click Edit.
The Edit Retention Policy dialog box appears.
3. Select Disable minimum retention policy.
4. Click OK.
EMC AVAMAR 6.0 • ADMINISTRATION GUIDE 133

Enabling the Minimal Retention policyDATASETS, SCHEDULES, AND RETENTION POLICIES
Enabling the Minimal Retention policy1. In Avamar Administrator, select Tools > Manage Retention Policies.
The Manage All Retention Policies window appears.
2. Select the Minimal Retention policy from the list and click Edit.
The Edit Retention Policy dialog box appears.
3. Select Retention period.
4. Select the minimal retention period.
The default setting is 60 days.
5. Click OK.
EMC AVAMAR 6.0 • ADMINISTRATION GUIDE 134

GROUPS AND GROUP POLICIES
Avamar uses groups to implement various policies to automate backups and enforce consistent rules and system behavior across an entire segment, or group, of the user community.
Group members. Group members are client machines that have been added to a particular group for the purposes of performing scheduled backups.
Because the normal rules for domain administrators apply, these clients must be located within the same domain or within a subdomain of where the group exists.
Group policy. In addition to specifying which clients belong to that group, groups also specify:
• Dataset (page 106)• Schedule (page 116)• Retention policy (page 126)
These three objects comprise the “group policy.” Group policy controls backup behavior for all members of the group unless these settings are overridden at the client level.
Default Group. Every client in the Avamar server is a member of at least one group. If no other groups have been created, new clients are automatically added to the Default Group.
In the default Avamar server configuration, the Default Group always uses the system default dataset, schedule, and retention policy. These system default assignments cannot be changed. However, you can edit the settings within the system default dataset, schedule, and retention policy, as discussed in Datasets, Schedules, and Retention Policies (page 106).
Default Proxy Group. The Default Proxy Group is where VMware Image Proxy clients reside by default. You cannot delete the Default Proxy Group. Enabling the Default Proxy Group does not conflict with scheduled backups performed by other plug-ins configured on the proxy client.
Default Virtual Machine Group. New virtual machine clients are automatically added to the Default Virtual Machine Group by default when they are registered. You cannot manually delete the Default Virtual Machine Group, but it is automatically deleted if you delete the vCenter Domain.
EMC AVAMAR 6.0 • ADMINISTRATION GUIDE 135

GROUPS AND GROUP POLICIES
vCenter groups. Any group created under the vCenter domain is considered a "vCenter" group, which behaves like any other group except that it contains provisions for specifying which VMware Image Proxy clients are assigned to perform backups on behalf of its group members.
The EMC Avamar for VMware Guide provides details about using the Default Proxy Group, Default Virtual Machine Group, and vCenter groups to manage the VMware Image backup and restore feature.
Inheritance and client overrides. Clients inherit dataset, schedule, and retention policy settings by way of their membership in a specific group. For example, all members of the Default Group inherit the system default dataset, Default Schedule, and retention policy.
You can override inherited dataset and retention policy settings by making explicit dataset (page 154) or retention policy (page 156) assignments on a client-by-client basis. However, schedules are only applicable to groups, not individual clients.
EMC AVAMAR 6.0 • ADMINISTRATION GUIDE 136

Policy window overviewGROUPS AND GROUP POLICIES
Policy window overviewThe Policy window enables you to assign clients to a group and specify which dataset, retention policy, and schedule each group should use.
Groups tab. The Groups tab shows the various groups in the system on a domain-by-domain basis, and enables you to view group properties in a tabular format.
TIP: Select Show sub-domain groups to view groups in the current domain and all subdomains.
The Groups tab also provides the action buttons described in the following table.
BUTTON DESCRIPTION
Select All Click Select All to select all groups for edit.
Clear All Click Clear All to clear the selection of all groups.
Edit Select one or more groups and click Edit to display the Edit Group dialog box, which enables you to edit group properties.If multiple groups are selected, you can edit the following properties for all selected groups:
• Disabled• Dataset• Schedule• Retention Policy• Encryption
IMPORTANT: Your login domain (page 32) controls which specific datasets, retention policies, and schedules are available for assignment in the Groups tab. Only those datasets, retention policies, and schedules residing at the current and higher level appear. Datasets, retention policies, and schedules residing in lower subdomains do not appear.
EMC AVAMAR 6.0 • ADMINISTRATION GUIDE 137

Policy window overviewGROUPS AND GROUP POLICIES
Clients tab. The clients tab shows clients assigned to various groups in the system on a domain-by-domain basis, and enables you to view client properties in a tabular format.
TIP: Select Show sub-domain clients to view clients assigned to groups in the current domain and all subdomains.
The Clients tab also provides the action buttons described in the following table.
Copy Select a group and click Copy to display the Save As dialog box, which you can use to copy this group and all its properties to another domain.IMPORTANT: You cannot copy more than one group at a time.
Delete Select a group and click Delete to permanently remove that group from the system.
Deleting a group does not affect any client backups stored in the system. However, a client must always be a member of at least one group. Therefore, if you attempt to delete a group in which client members do not belong to another group, you are advised to move those clients to another group before the delete operation can proceed.
IMPORTANT: You cannot delete more than one group at a time.
Back up Select a group and click Back up to initiate an on-demand backup of that group.
BUTTON DESCRIPTION
Select all Click Select All to select all clients for edit.
Clear all Click Clear All to clear the selection of all clients.
Details Select a client and click Details to display the Client Details dialog box, which shows the properties of the client.IMPORTANT: You cannot view details for more than one client at a time.Viewing client properties (page 51) provides details on specific client properties.
Edit Select one or more clients and click Edit to display the Edit Multiple Clients dialog box, which enables you to override various group policy settings on a client-by-client basis (page 154).If you select multiple clients, you can override the following group policy settings for the selected clients:
• Enable or disable all scheduled backups• Activate or deactivate a client• Allow or disallow client-initiated backups• Change the backup window overtime behavior• Change the encryption method
BUTTON DESCRIPTION
EMC AVAMAR 6.0 • ADMINISTRATION GUIDE 138

Creating a groupGROUPS AND GROUP POLICIES
Creating a group1. In Avamar Administrator, click the Policy launcher button.
The Policy window appears.
2. Select Actions > New Group.
The New Group wizard appears.
Back up Select a client and click Back up to initiate an on-demand backup of that client (page 80).
BUTTON DESCRIPTION
EMC AVAMAR 6.0 • ADMINISTRATION GUIDE 139

Creating a groupGROUPS AND GROUP POLICIES
3. Complete the settings as described in the following table.
The remaining wizard screens are used to select a dataset (page 106), schedule (page 116), and retention policy (page 126), as well as build a client list for this group.
You can click Finish at any time. Doing so will cause the new group to be created using system default settings and an empty client list. You can change those settings by editing the group properties (page 144).
SETTING DESCRIPTION
Name Type a name for the group.IMPORTANT: Do not use any of the following characters in the group name: ~!@$^%(){}[]|,`;#\/:*?<>'"&.
Disabled This option is selected by default. Clear this option to immediately enable regularly scheduled client backups for the group.
Encryption Method
Encryption method used for client/server data transfer. Choices are:
High Strongest available encryption setting for that specific client platform.
Medium Medium strength encryption.
None No encryption.
NOTE: The exact encryption technology and bit strength used for any given client-server connection depends on a number of factors, including the client platform and Avamar server version. The EMC Avamar Product Security Guide provides details.
Override Schedule
Select this option to override the assigned schedule for the group.You can also skip the next scheduled backup entirely (Skip Next Backup) or perform the next scheduled backup one time only (Run Next Backup Once).
Domain The location in the Avamar domain for the group.
EMC AVAMAR 6.0 • ADMINISTRATION GUIDE 140

Creating a groupGROUPS AND GROUP POLICIES
4. Click Next.
The next New Group wizard screen appears.
5. Select a dataset for the group from the Select an Existing Dataset list.
NOTE: You cannot edit dataset properties from this screen. Detailed dataset properties are shown so that you can review them before you make a selection. Editing a dataset (page 114) provides details on how to edit dataset properties.
6. Click Next.
The next New Group wizard screen appears.
EMC AVAMAR 6.0 • ADMINISTRATION GUIDE 141

Creating a groupGROUPS AND GROUP POLICIES
7. Select a schedule for the group from the Select an Existing Schedule list.
NOTE: You cannot edit schedules from this screen. Detailed schedule properties are shown so that you can review them before you make a selection. Editing a schedule (page 123) provides details on how to edit schedule properties.
8. Click Next.
The next New Group wizard screen appears.
9. Select a retention policy for the group from the Select an Existing Retention Policy list.
NOTE: You cannot edit retention policies from this screen. Detailed retention policy properties are shown so that you can review them before you make a selection. Editing a retention policy (page 131) provides details on how to edit retention policy properties.
EMC AVAMAR 6.0 • ADMINISTRATION GUIDE 142

Creating a groupGROUPS AND GROUP POLICIES
10.Click Next.
The final New Group wizard screen appears.
11.Select one or more clients for the group.
TIP: To select all clients, click Select All. Or, to clear the selection of all clients, click Clear All.
12.Click Finish.
EMC AVAMAR 6.0 • ADMINISTRATION GUIDE 143

Editing group propertiesGROUPS AND GROUP POLICIES
Editing group propertiesYou can edit properties for a single group or for multiple groups. However, you cannot edit all group properties when you select multiple groups. The following topics provide details.
The Default Proxy Group and the Default Virtual Machine Group contain special settings that are only of interest to persons managing the VMware Image backup and restore feature. The EMC Avamar for VMware Guide provides details on these special settings.
Editing a single group
1. In Avamar Administrator, click the Policy launcher button.
The Policy window appears.
2. Click the Policy Management tab.
3. Click the Groups tab.
4. Select the group to edit.
EMC AVAMAR 6.0 • ADMINISTRATION GUIDE 144

Editing group propertiesGROUPS AND GROUP POLICIES
5. Open the Actions menu and select Group > Edit Group.
The Edit Group dialog box appears.
6. Edit the group information.
NOTE: You can edit only basic group properties, such as the name, client list, and the dataset, schedule, and retention policy assigned to the group. You cannot edit dataset, schedule, and retention policy properties from this dialog box. Editing a dataset (page 114), Editing a schedule (page 123), and Editing a retention policy (page 131) provide details on how to edit those properties.
NOTE: You cannot edit Default Group (page 135) policy object assignments. The Default Group always uses the default dataset, default schedule, and default retention policy. Therefore, the Dataset, Schedule, and Retention Policy tabs do not appear when you edit the Default Group.
7. Click OK.
EMC AVAMAR 6.0 • ADMINISTRATION GUIDE 145

Editing group propertiesGROUPS AND GROUP POLICIES
Editing multiple groups
1. In Avamar Administrator, click the Policy launcher button.
The Policy window appears.
2. Click the Policy Management tab.
3. Click the Groups tab.
4. Select the groups to edit.
5. Open the Actions menu and select Group > Edit Group.
The Edit Multiple Groups dialog box appears.
NOTE: You can edit only basic group properties, such as whether the group is enabled or disabled, the encryption setting, and the dataset, schedule, and retention policy assigned to the groups. You cannot edit dataset, schedule, and retention policy properties from this dialog box. Editing a dataset (page 114), Editing a schedule (page 123), and Editing a retention policy (page 131) provide details on how to edit those properties.
EMC AVAMAR 6.0 • ADMINISTRATION GUIDE 146

Copying a groupGROUPS AND GROUP POLICIES
6. Choose whether to edit or leave the settings for the groups:
• To change a setting for all selected groups, select the new setting from the list.
• To leave a setting unchanged for all selected groups, ensure that Don’t Change is shown for that particular setting.
7. Click OK.
Copying a group
IMPORTANT: You must copy groups within the same domain. You cannot copy a group to another domain.
To copy a group:
1. In Avamar Administrator, click the Policy launcher button.
The Policy window appears.
2. Click the Policy Management tab.
3. Click the Groups tab.
4. Select the group to copy.
5. Open the Actions menu and select Group > Copy Group.
The Save As dialog box appears.
6. Complete the settings as described in the following table.
7. Click OK.
SETTING DESCRIPTION
Save As Type a name for the new group.
Domain Current domain. This field is read-only.
Include Client Members Select this option to copy the entire client list to this new group.
EMC AVAMAR 6.0 • ADMINISTRATION GUIDE 147

Enabling and disabling a groupGROUPS AND GROUP POLICIES
Enabling and disabling a groupYou can disable a group to prevent scheduled backups from occurring for the group. This is typically done to place the system in a state that supports various maintenance activities.
If you disable a group, you must reenable the group to resume scheduled group backups.
To disable or enable a group:
1. In Avamar Administrator, click the Policy launcher button.
The Policy window appears.
2. Click the Policy Management tab.
3. Click the Groups tab.
4. Right-click the group to disable, and then select Disable Group.
When the group is disabled, a checkmark appears next to the option on the right-click menu. When the group is enabled, the checkmark next to the option on the right-click menu is cleared.
A confirmation message appears.
5. Click Yes.
EMC AVAMAR 6.0 • ADMINISTRATION GUIDE 148

Deleting a groupGROUPS AND GROUP POLICIES
Deleting a group
TIP: Before you delete a group, you should make the clients in the group members of another group so that regularly scheduled backups for the clients continue uninterrupted. Editing client information (page 49) provides details on how to add clients to other groups.
To delete a group:
1. In Avamar Administrator, click the Policy launcher button.
The Policy window appears.
2. Click the Policy Management tab.
3. Click the Groups tab.
4. Select the group to delete.
5. Open the Actions menu and select Group > Delete Group.
A confirmation message appears.
6. Click Yes.
A second confirmation message appears.
7. Click OK.
EMC AVAMAR 6.0 • ADMINISTRATION GUIDE 149

Viewing the Group Summary ReportsGROUPS AND GROUP POLICIES
Viewing the Group Summary ReportsThe Group Summary Reports are a combined “at a glance” view of all current group properties and settings, including group policy overrides. The reports also display the datasets, schedules, and retention policies assigned to various groups.
To view the Group Summary Reports:
1. In Avamar Administrator, click the Policy launcher button.
The Policy window appears.
2. Click the Group Summary Reports tab.
The Group Summary Reports appear.
TAB DESCRIPTION
Datasets Shows which datasets are assigned to which groups, as well as the current properties for those datasets. Creating a dataset (page 110) provides details on dataset properties.
Schedules Shows which schedules are assigned to which groups, as well as the current properties for those schedules. Creating a schedule (page 121) provides details on schedule properties.
Retention Policies
Shows which retention policies are assigned to which groups, as well as the current properties for those retention policies. Creating a retention policy (page 129) provides details on retention policy properties.
Clients Shows which clients are assigned to which groups, as well as any group policy overrides in effect for a particular client. Creating a group (page 139) and Overriding group policy settings (page 154) provides details on assigning clients to a group and group policy override settings, respectively.
EMC AVAMAR 6.0 • ADMINISTRATION GUIDE 150

Viewing the Group Status SummaryGROUPS AND GROUP POLICIES
Viewing the Group Status SummaryThe Group Status Summary is a simplified presentation of all backup activity initiated as a result of group policies.
To view the Group Status Summary:
1. In Avamar Administrator, click the Activity launcher button.
The Activity window appears.
2. Click the Group Status Summary tab.
The following table lists the information that appears on the Group Status Summary tab.
COLUMN DESCRIPTION
Group Group name or “on-demand.”On-demand is a special logical grouping that summarizes all on-demand backup activity initiated from Avamar clients or Avamar Administrator. However, it is not an actual group in the Avamar server.
Start Time Time that this group became eligible to be run.
Total Total number of backups initiated by way of this group policy.
Queued Total number of backups, initiated by way of this group policy, that are currently in the scheduler queue.
Active Total number of backups, initiated by way of this group policy, that are currently being performed.
Succeeded Total number of backups, initiated by way of this group policy, that successfully completed.
Canceled Total number of backups, initiated by way of this group policy, that were canceled before they could complete.
EMC AVAMAR 6.0 • ADMINISTRATION GUIDE 151

Managing group membershipGROUPS AND GROUP POLICIES
Managing group membershipYou can add clients to or remove clients from a group either on the group or client properties in Avamar Administrator:
Either method supports multiple additions or deletions in the same operation, and either method accomplishes the same objective. However, the flexibility of performing either a group-centric or client-centric operation enables you to decide which method is most efficient in a given situation.
For example, if you are adding or deleting multiple clients from a single group, then the group-centric method of editing group properties is most efficient. Conversely, if you are adding or removing a single client from multiple groups, then the client-centric method of editing client properties is most efficient.
Adding and removing clients for a group
1. In Avamar Administrator, click the Policy launcher button.
The Policy window appears.
2. Click the Policy Management tab.
3. Click the Groups tab.
4. Select the group to edit.
5. Open the Actions menu and select Group > Edit Group.
The Edit Group dialog box appears.
Failed Total number of backups, initiated by way of this group policy, that did not successfully complete.
Time Queued Interval from start time until the first client work order is started by any client in this group.
Time Active Total amount of time used to perform all backup activities for this group. In other words, this is the interval from the time that the first client work order starts until the last client work order finishes.
COLUMN DESCRIPTION
Group-centric From group properties, you can add or remove member clients, as discussed in Adding and removing clients for a group (page 152).
Client-centric From client properties, you can add or remove groups of which the client is a member, as discussed in Adding and removing groups for a client (page 153).
EMC AVAMAR 6.0 • ADMINISTRATION GUIDE 152

Managing group membershipGROUPS AND GROUP POLICIES
6. Click the Clients tab.
7. Add and remove clients for the group:
• To add clients, click Add, select the clients to add, and then click OK.• To remove clients, select the clients and click Remove.
8. On the Edit Group dialog box, click OK.
Adding and removing groups for a client
1. In Avamar Administrator, click the Policy launcher button.
The Policy window appears.
2. Click the Policy Management tab.
3. Click the Clients tab.
4. Select the client to edit.
5. Open the Actions menu and select Client > Edit Client.
The Edit Client dialog box appears.
6. Click the Groups tab.
7. Add and remove groups for the client:
• To add groups, click Add, select the groups, and then click OK.• To remove groups, select the groups from which to remove the client,
and click Remove.
8. On the Edit Client dialog box, click OK.
EMC AVAMAR 6.0 • ADMINISTRATION GUIDE 153

Overriding group policy settingsGROUPS AND GROUP POLICIES
Overriding group policy settingsYou can override the following group policy settings for a particular client:
• Dataset (page 154)• Retention policy (page 156)• Encryption method (page 157)• Whether or not scheduled backups can run overtime (page 159)• Whether or not users can initiate backups (page 161)
IMPORTANT: It should be understood that too many overrides can make group policies less effective. Instead, it may be better to implement a new group policy rather than repeatedly overriding an existing policy at the client level.
Assigning a different dataset to a client
1. In Avamar Administrator, click the Policy launcher button.
The Policy window appears.
2. Click the Policy Management tab.
3. Click the Clients tab.
4. Select the client for which to override the dataset assignment.
5. Open the Actions menu and select Client > Edit Client.
The Edit Client window appears.
EMC AVAMAR 6.0 • ADMINISTRATION GUIDE 154

Overriding group policy settingsGROUPS AND GROUP POLICIES
6. Click the Dataset tab.
7. Select a dataset from the Select an Existing Dataset list.
NOTE: You cannot edit dataset properties in this window. Detailed dataset properties are shown so that you can review them before you make a selection. Editing a dataset (page 114) provides details on how to edit dataset properties.
8. Select Override group dataset.
9. Click OK.
EMC AVAMAR 6.0 • ADMINISTRATION GUIDE 155

Overriding group policy settingsGROUPS AND GROUP POLICIES
Assigning a different retention policy to a client
The retention policy assigned to the client is the retention policy that is used for on-demand backups (page 80) of the client.
To assign a different retention policy to a client:
1. In Avamar Administrator, click the Policy launcher button.
The Policy window appears.
2. Click the Policy Management tab.
3. Click the Clients tab.
4. Select the client for which to override the retention policy assignment.
5. Open the Actions menu and select Client > Edit Client.
The Edit Client window appears.
6. Click the Retention Policy tab.
7. Select a retention policy from the Select an Existing Retention Policy list.
EMC AVAMAR 6.0 • ADMINISTRATION GUIDE 156

Overriding group policy settingsGROUPS AND GROUP POLICIES
NOTE: You cannot edit retention policy properties in this window. Detailed retention policy properties are shown so that you can review them before you make a selection. Editing a retention policy (page 131) provides details on how to edit retention policy properties.
8. Select Override group retention policy.
9. Click OK.
Changing the client encryption method
1. In Avamar Administrator, click the Policy launcher button.
The Policy window appears.
2. Click the Policy Management tab.
3. Click the Clients tab.
4. Select the client for which to change the encryption method.
5. Open the Actions menu and select Client > Edit Client.
The Edit Client window appears.
EMC AVAMAR 6.0 • ADMINISTRATION GUIDE 157

Overriding group policy settingsGROUPS AND GROUP POLICIES
6. Click the Properties tab.
7. Select the encryption method to use for client/server data transfer:
NOTE: The exact encryption technology and bit strength used for any given client/server connection depends on a number of factors, including the client platform and Avamar server version. The EMC Avamar Product Security Guide provides details.
8. Select Override Group Encryption.
9. Click OK.
SETTING DESCRIPTION
High Strongest available encryption setting for that specific client platform.
Medium Medium strength encryption.
None No encryption.
EMC AVAMAR 6.0 • ADMINISTRATION GUIDE 158
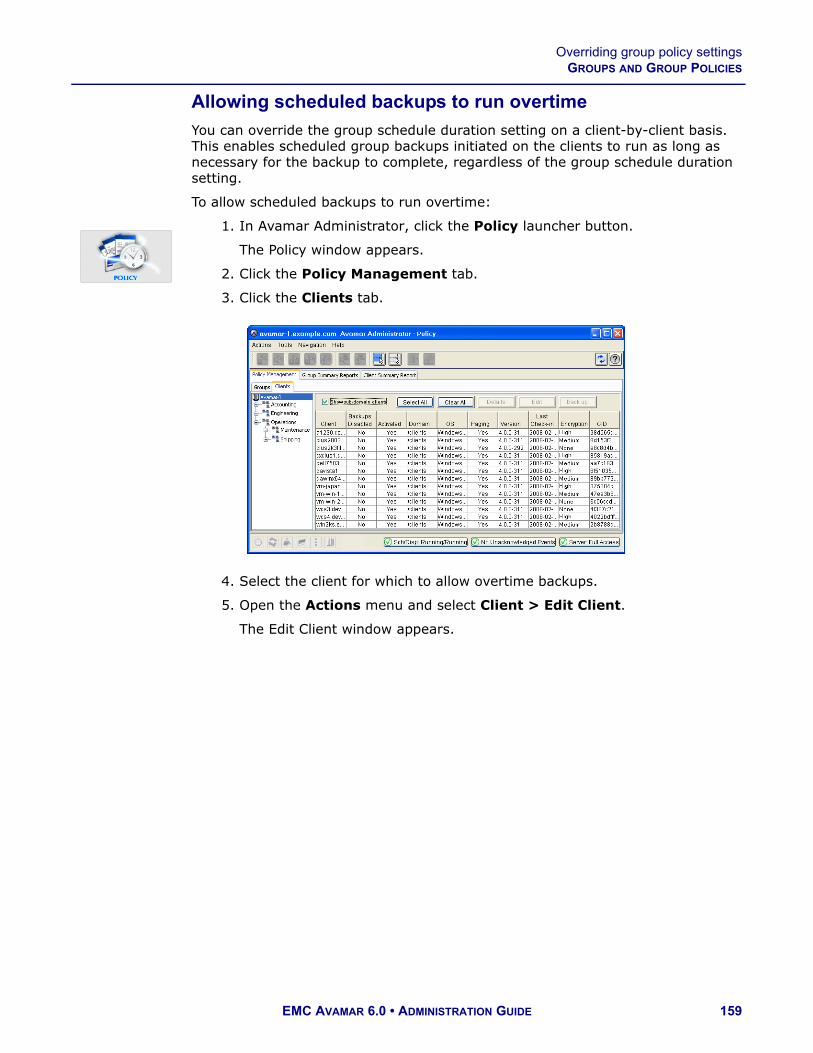
Overriding group policy settingsGROUPS AND GROUP POLICIES
Allowing scheduled backups to run overtime
You can override the group schedule duration setting on a client-by-client basis. This enables scheduled group backups initiated on the clients to run as long as necessary for the backup to complete, regardless of the group schedule duration setting.
To allow scheduled backups to run overtime:
1. In Avamar Administrator, click the Policy launcher button.
The Policy window appears.
2. Click the Policy Management tab.
3. Click the Clients tab.
4. Select the client for which to allow overtime backups.
5. Open the Actions menu and select Client > Edit Client.
The Edit Client window appears.
EMC AVAMAR 6.0 • ADMINISTRATION GUIDE 159

Overriding group policy settingsGROUPS AND GROUP POLICIES
6. Click the Properties tab.
7. Select one of these settings from the Overtime list:
8. Click OK.
SETTING DESCRIPTION
No overtime allowed
Scheduled group backups are never allowed to run past the schedule duration setting.
Always allow overtime
Scheduled group backups are always allowed to run past the schedule duration setting.
Overtime on next backup only
Only the next scheduled group backup is allowed to run past the schedule duration setting.
Overtime until successful backup
Scheduled group backups are allowed to run past the schedule duration setting until a successful backup completes.
EMC AVAMAR 6.0 • ADMINISTRATION GUIDE 160

Overriding group policy settingsGROUPS AND GROUP POLICIES
Allowing users to initiate backups
1. In Avamar Administrator, click the Policy launcher button.
The Policy window appears.
2. Click the Policy Management tab.
3. Click the Clients tab.
4. Select the client for which to allow users to initiate backups.
5. Open the Actions menu and select Client > Edit Client.
The Edit Client window appears.
6. Click the Properties tab.
EMC AVAMAR 6.0 • ADMINISTRATION GUIDE 161

Overriding group policy settingsGROUPS AND GROUP POLICIES
7. Select Allow client initiated backups.
If no additional configuration is performed, backups initiated by this client include only those files selected by the user at the time the backup is initiated. In addition, End User On-Demand Retention (page 128) is applied. However, you can enforce the use of a particular dataset and retention policy for all client-initiated backups.
8. To enforce the use of a particular dataset for all client-initiated backups:
(a) Click the Dataset tab.
NOTE: You cannot edit dataset properties in this window. Detailed dataset properties are shown so that you can review them before you make a selection. Editing a dataset (page 114) provides details on how to edit dataset properties.
(b) Choose whether to use the group dataset or a different dataset for all client-initiated backups:
• To use the dataset assigned to the group, clear the Override group dataset checkbox.
• To use a different dataset, select the dataset from the Select an Existing Dataset list and then select the Override group dataset checkbox.
EMC AVAMAR 6.0 • ADMINISTRATION GUIDE 162

Overriding group policy settingsGROUPS AND GROUP POLICIES
9. To enforce use of a particular retention policy for all client-initiated backups:
(a) Click the Retention Policy tab.
NOTE: You cannot edit retention policy properties in this window. Detailed retention policy properties are shown so that you can review them before you make a selection. Editing a retention policy (page 131) provides details on how to edit retention policy properties.
(b) Choose whether to use the group retention policy or a different retention policy for all client-initiated backups:
• To use the retention policy assigned to the group, clear the Override group retention policy checkbox.
• To use a different retention policy, select the retention policy from the Select an Existing Retention Policy list, select the Override group retention policy checkbox, and then select the Override retention policy on client initiated backups checkbox.
10.Click OK.
EMC AVAMAR 6.0 • ADMINISTRATION GUIDE 163
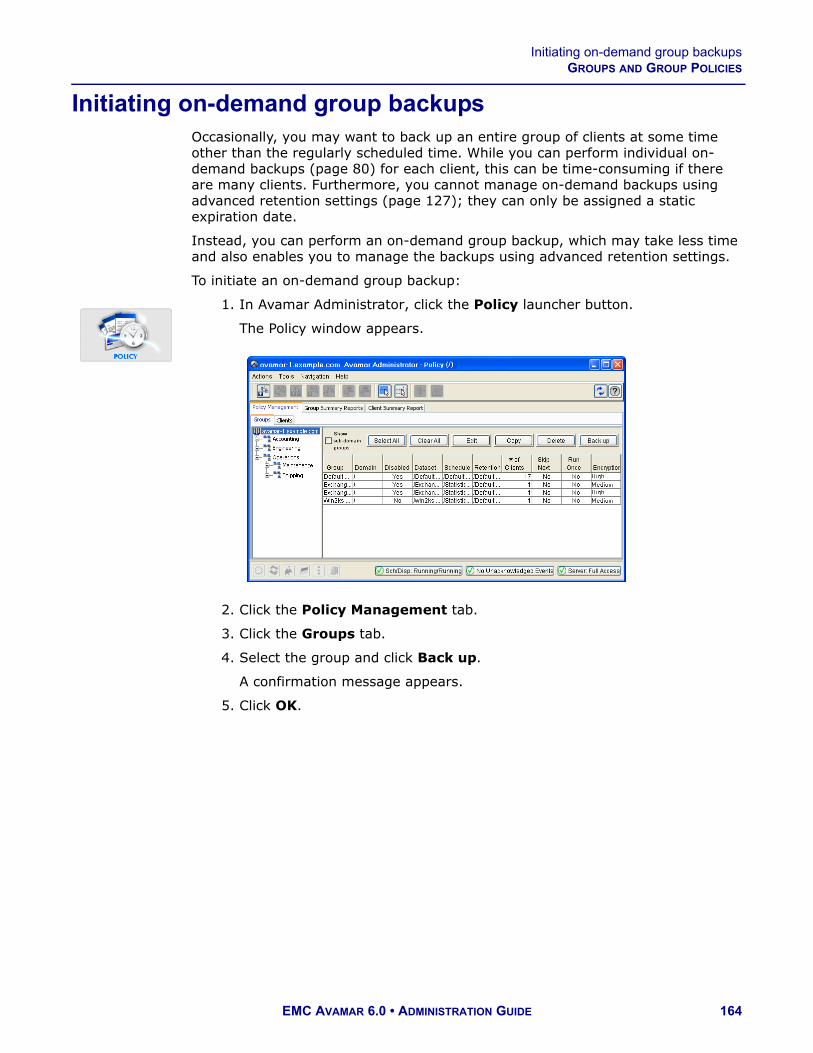
Initiating on-demand group backupsGROUPS AND GROUP POLICIES
Initiating on-demand group backupsOccasionally, you may want to back up an entire group of clients at some time other than the regularly scheduled time. While you can perform individual on-demand backups (page 80) for each client, this can be time-consuming if there are many clients. Furthermore, you cannot manage on-demand backups using advanced retention settings (page 127); they can only be assigned a static expiration date.
Instead, you can perform an on-demand group backup, which may take less time and also enables you to manage the backups using advanced retention settings.
To initiate an on-demand group backup:
1. In Avamar Administrator, click the Policy launcher button.
The Policy window appears.
2. Click the Policy Management tab.
3. Click the Groups tab.
4. Select the group and click Back up.
A confirmation message appears.
5. Click OK.
EMC AVAMAR 6.0 • ADMINISTRATION GUIDE 164

EVENTS, NOTIFICATIONS, AND PROFILES
This chapter discusses Avamar events and several features that generate notifications when specific events occur.
Important terms and conceptsThe following topics discuss the fundamental principles of Avamar events, notifications, and profiles.
Events
All Avamar system activity and operational status is reported as events to the MCS. Examples of Avamar events include client registration and activation, successful and failed backups, and hard disk status. Each event contains the following information:
Event code Unique identifier
Date and Time Date and time the event was reported
Category Category of event: • SYSTEM• APPLICATION• USER• SECURITY
Type Type of event:• INTERNAL• ERROR• WARNING• INFORMATION• DEBUG
Summary A one-line summary description of the event
EMC AVAMAR 6.0 • ADMINISTRATION GUIDE 165

Important terms and conceptsEVENTS, NOTIFICATIONS, AND PROFILES
A sequential listing of all event codes, including the previously described summary information, is available in /usr/local/avamar/doc/event_catalog.txt on your Avamar server.
Audit logging
System events with a category of SECURITY and type of AUDIT are used to implement the Avamar audit logging feature. This feature keeps a permanent log of system actions initiated by users. The data in this log enables enterprises that deploy Avamar to enforce security policies, detect security breaches or deviation from policies, and hold users accountable for those actions.
NOTE: Only actions that are initiated by users are logged; actions initiated by the system without a user account, such as scheduled backups, maintenance activities, and so forth, are not logged.
Because the underlying data for audit log entries are system events, this information is available in two places:
• Event Monitor (as with any other system event)• Audit Log (which only contains events that are also audit log entries)
Customizing error events
By default, Avamar software continually monitors /var/log/messages for any occurrence of the case-insensitive search string “error.” Any occurrences of “error” create an event code of the type ERROR.
You can customize this default behavior by defining additional search strings that also create Avamar ERROR events. These additional search case-insensitive strings must be added to /usr/local/avamar/var/mc/server_data/adminlogpattern.xml.
Notifications
The following features generate notifications when specific events occur.
Pop-up alerts. Events can be configured on an event-by-event basis to generate a graphical pop-up alert each time one of those events occurs. One significant limitation of this feature is that Avamar Administrator software must be running for the pop-up alerts to appear.
Acknowledgement required list. Events can be configured on an event-by-event basis such that when events of this type occur, an entry is added to a list of events that requires interactive acknowledgement by the Avamar system administrator.
Hardware source System node that reported the event
Software source System or application module that reported the event
EMC AVAMAR 6.0 • ADMINISTRATION GUIDE 166
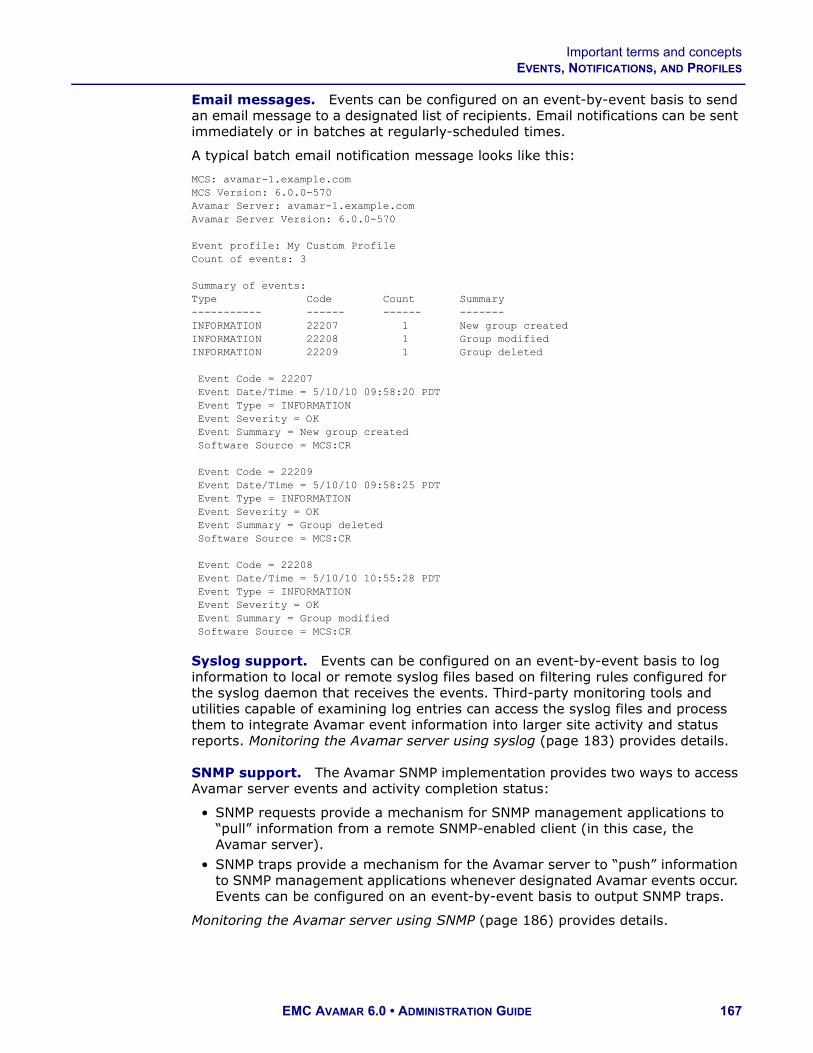
Important terms and conceptsEVENTS, NOTIFICATIONS, AND PROFILES
Email messages. Events can be configured on an event-by-event basis to send an email message to a designated list of recipients. Email notifications can be sent immediately or in batches at regularly-scheduled times.
A typical batch email notification message looks like this:
MCS: avamar-1.example.comMCS Version: 6.0.0-570Avamar Server: avamar-1.example.comAvamar Server Version: 6.0.0-570
Event profile: My Custom ProfileCount of events: 3
Summary of events: Type Code Count Summary----------- ------ ------ -------INFORMATION 22207 1 New group createdINFORMATION 22208 1 Group modifiedINFORMATION 22209 1 Group deleted
Event Code = 22207 Event Date/Time = 5/10/10 09:58:20 PDT Event Type = INFORMATION Event Severity = OK Event Summary = New group created Software Source = MCS:CR
Event Code = 22209 Event Date/Time = 5/10/10 09:58:25 PDT Event Type = INFORMATION Event Severity = OK Event Summary = Group deleted Software Source = MCS:CR
Event Code = 22208 Event Date/Time = 5/10/10 10:55:28 PDT Event Type = INFORMATION Event Severity = OK Event Summary = Group modified Software Source = MCS:CR
Syslog support. Events can be configured on an event-by-event basis to log information to local or remote syslog files based on filtering rules configured for the syslog daemon that receives the events. Third-party monitoring tools and utilities capable of examining log entries can access the syslog files and process them to integrate Avamar event information into larger site activity and status reports. Monitoring the Avamar server using syslog (page 183) provides details.
SNMP support. The Avamar SNMP implementation provides two ways to access Avamar server events and activity completion status:
• SNMP requests provide a mechanism for SNMP management applications to “pull” information from a remote SNMP-enabled client (in this case, the Avamar server).
• SNMP traps provide a mechanism for the Avamar server to “push” information to SNMP management applications whenever designated Avamar events occur. Events can be configured on an event-by-event basis to output SNMP traps.
Monitoring the Avamar server using SNMP (page 186) provides details.
EMC AVAMAR 6.0 • ADMINISTRATION GUIDE 167

Important terms and conceptsEVENTS, NOTIFICATIONS, AND PROFILES
Profiles
Profiles are a notification management feature that are used to logically group certain event codes together and specify which notifications should be generated when these events occur. There are two basic types of event profiles.
System profile. There is only one System event profile. It contains all possible system event codes.
Custom profiles. Custom profiles are used to send notifications when certain system events occur. You can create as many custom profiles as you need to organize system events and generate notifications when those events occur.
Profile catalog
System profile. There is only one System event profile. It contains all possible system event codes.
Evaluation profile. The default Avamar configuration includes a special Evaluation profile that is primarily intended to be used to support system evaluations. If enabled, this profile generates an email notification and attaches two weeks’ worth of Activities - DPN Summary report (page 202) information to the email message.
High Priority Events profile. The default Avamar configuration includes a special High Priority Events profile. The High Priority Events profile is enabled by default. This special event profile automatically emails the following information to EMC Technical Support ([email protected]) twice daily:
• Status of the daily data integrity check• Selected Avamar server warnings and information messages• Any Avamar server errors
IMPORTANT: The only change you can make to the High Priority Events profile is to add email addresses to the Recipient Email List. If you require custom High Priority Events profile settings, copy it and then edit the copy.
Modifying “Email Home” configuration (page 181) provides additional information.
Local SNMP Trap profile. The default Avamar configuration includes a special Local SNMP Trap profile. This profile is read-only. Furthermore, it is intended to be used for test purposes only, to verify that traps are successfully generated and received by the local snmptrapd process, which then writes the trap information to a syslog file. Monitoring the Avamar server using SNMP (page 186) provides details.
Local Syslog profile. The default Avamar configuration includes a special Local Syslog profile. If enabled, this profile reports status by way of the local syslogd process on the Avamar server. Monitoring the Avamar server using syslog (page 183) provides details.
EMC AVAMAR 6.0 • ADMINISTRATION GUIDE 168

Editing System event profile propertiesEVENTS, NOTIFICATIONS, AND PROFILES
Editing System event profile properties1. In Avamar Administrator, select Tools > Manage Profiles.
The Manage All Profiles dialog box appears.
2. Select the System Profile in the tree pane and click Edit.
The Edit Profile dialog box appears with a list of event codes.
3. To show a graphical pop-up alert on the Avamar Administrator client each time an event occurs, select the GUI Alert checkbox next to the event.
4. To add an entry to the common unacknowledged events list each time an event occurs, select the Acknowledgement Required checkbox.
5. Click OK.
EMC AVAMAR 6.0 • ADMINISTRATION GUIDE 169

Creating a custom event profileEVENTS, NOTIFICATIONS, AND PROFILES
Creating a custom event profile
IMPORTANT: You cannot view system events and profiles outside the domain. This affects the profiles that you can edit and the events that you can add to a profile.
To create a custom event profile:
1. In Avamar Administrator, select Tools > Manage Profiles.
The Manage All Profiles dialog box appears.
2. In the tree, select the domain for the custom event profile and click New.
The New Profile wizard appears.
EMC AVAMAR 6.0 • ADMINISTRATION GUIDE 170

Creating a custom event profileEVENTS, NOTIFICATIONS, AND PROFILES
3. Complete the settings as described in the following table.
4. Click Next.
The Event Codes wizard screen appears.Additionally, if you are adding this custom event profile at the top-level (that is, not to a domain or subdomain), you can also change the parameters used to control capacity forecast alerts.
Error codes 5. Specify which error codes should trigger notifications:
(a) Click the All Codes tab.
(b) Select the Notify option for one or more error codes.
NOTE: An asterisk (*) next to an event code indicates an event of such severity that a notification is sent when that event occurs, even if other event notifications are sent on a schedule.
SETTING DESCRIPTION
Profile Name Type a name for this event profile
Profile Enabled Clear this option to disable the event profile. You can enable it at a later time.
Syslog Notification - Enabled
Clear this option if you do not want to use the syslog notification feature with this profile.
SNMP Trap Notification - Enabled
Clear this option if you do not want to use the SNMP notification feature with this profile.
EMC AVAMAR 6.0 • ADMINISTRATION GUIDE 171

Creating a custom event profileEVENTS, NOTIFICATIONS, AND PROFILES
Audit codes 6. Specify which audit codes should trigger notifications:
(a) Click the Audit Codes tab.
(b) Select the Notify option for one or more error codes.
NOTE: An asterisk (*) next to an audit code indicates an event of such severity that a notification is sent when that event occurs, even if other event notifications are sent on a schedule.
Parameters 7. If you are adding this custom event profile at the top-level (that is, not to a domain or subdomain), specify the parameters to control capacity forecast alerts:
(a) Click the Parameters tab.
(b) Select the checkbox next to the parameter, and then type a new value for the parameter.
(c) Repeat the previous step as necessary for each parameter.
EMC AVAMAR 6.0 • ADMINISTRATION GUIDE 172

Creating a custom event profileEVENTS, NOTIFICATIONS, AND PROFILES
Attachments 8. Click Next.
The Attachments wizard screen appears.
9. (Optional) To include a report of overall Avamar server status in XML format in email notification messages, select the Attach Server status in email (XML) checkbox.
10. (Optional) To include Avamar server logs in email notification messages, select the Attach Server logs in email checkbox and then type the full path to the location of Avamar server logs in the Directory text box. The default location is /usr/local/avamar/var/cron/.
11.Specify the reports to include in email notification messages:
(a) Select the Attach checkbox next to the report.
(b) Select the checkbox next to the file format in which to send the report.
(c) Specify the number of historical reports of this type to send with each notification message using the Since Count and Since Unit fields. For example, send the past two months of these reports.
The following values are available from the Since Count list:
• day(s) ago • week(s) ago • month(s) ago • since last modified
FILEFORMAT DESCRIPTION
XML Extensible Markup Language (XML) file, useful for sharing data with other applications
CSV Comma-Separated Values (CSV) text file, useful for importing into a spreadsheet
TXT Plain text file
EMC AVAMAR 6.0 • ADMINISTRATION GUIDE 173

Creating a custom event profileEVENTS, NOTIFICATIONS, AND PROFILES
Email notification 12.Click Next.
The Email Notification wizard screen appears.
13.Specify the recipients and options for the email notification messages, as described in the following table.
SETTING DESCRIPTION
Email Subject Header Type an email subject line for the notification message.
Enter Recipient To add a recipient, type one or more email addresses in user@domain format and click +.TIP: To remove a recipient from the Recipient Email List, select the recipient and click -.
Inline attachments Select this option to insert all attachments into the body of the email notification message.IMPORTANT: When you insert the attachments, the email message may be very long.
Send Email Click this button to immediately send a test email message. If the test email message is sent successfully, an "Email accepted by transport layer" confirmation message appears.
EMC AVAMAR 6.0 • ADMINISTRATION GUIDE 174

Creating a custom event profileEVENTS, NOTIFICATIONS, AND PROFILES
syslog 14.Click Next.
The next wizard screen appears.
15.Specify syslog notification parameters, as described in the following table.
SETTING DESCRIPTION
Address (IP or hostname)
IP address or hostname of the Avamar server node running the syslogd process.
Port Number Port number used for syslog communication.
Include extended event data option
If selected, extended event code information is included in the syslog message. This extended information is delimited using the following tags:
• <Code> • <Type> • <Severity> • <Category> • <HwSource> • <Summary> • <active> • <lastEmailSendDate> • <domain> • <scheduleID> • <num_prefs> • <name> • <isSystem>
Facility One of the following: user, local0, local1, local2, local3, local4, local5, local6, or local7.
EMC AVAMAR 6.0 • ADMINISTRATION GUIDE 175

Creating a custom event profileEVENTS, NOTIFICATIONS, AND PROFILES
TIP: To test the syslog notification parameters, click Send Test Syslog Entry.
SMNP 16.Click Next.
The next wizard screen appears.
17.Specify SMNP notification parameters, as described in the following table.
TIP: To test the SMNP notification parameters, click Send Test SNMP Trap.
18.Click Finish.
SETTING DESCRIPTION
SNMP Trap Address (IP or hostname)
IP address or hostname of the computer running an application that is capable of receiving and processing an SNMP trap.
Port Number Port number on the host machine that is listening for SNMP traps. The default data port is 162.
SNMP Community Name of the SNMP community that the SNMP trap listener is configured to use.NOTE: The SNMP community is a text string that the local Net-SNMP agent uses to authenticate itself with the SNMP management application.
EMC AVAMAR 6.0 • ADMINISTRATION GUIDE 176

Editing custom event profile propertiesEVENTS, NOTIFICATIONS, AND PROFILES
Editing custom event profile properties
IMPORTANT: You cannot view system events and profiles outside your domain (page 38). This affects the profiles that you can edit and the specific events that you can add to any profile.
To edit the properties for a custom event profile:
1. In Avamar Administrator, select Tools > Manage Profiles.
The Manage All Profiles dialog box appears.
2. Select a custom event profile in the tree pane and click Edit.
The Edit Profile dialog box appears.
3. Edit the custom event profile information.
Creating a custom event profile (page 170) provides details on custom event profile properties.
4. Click OK.
EMC AVAMAR 6.0 • ADMINISTRATION GUIDE 177

Copying a custom event profileEVENTS, NOTIFICATIONS, AND PROFILES
Copying a custom event profile1. In Avamar Administrator, select Tools > Manage Profiles.
The Manage All Profiles dialog box appears.
2. In the tree, select the profile and click Copy.
The Save As dialog box appears.
3. Type a name for the new custom event profile in the Save As field.
By default, the domain field is populated with the domain of the custom event profile that you copy.
4. (Optional) To copy the new custom event profile to a different domain, click the ... button, browse to the new domain, and then click OK.
5. Click OK.
EMC AVAMAR 6.0 • ADMINISTRATION GUIDE 178

Testing custom event profile notificationsEVENTS, NOTIFICATIONS, AND PROFILES
Testing custom event profile notificationsYou can test custom event profile notification mechanisms by sending a short email message or writing a short message to the syslog file.
To test custom event profile notifications:
1. In Avamar Administrator, select Tools > Manage Profiles.
The Manage All Profiles dialog box appears.
2. Select a custom event profile in the tree pane and click Edit.
The Edit Profile dialog box appears.
3. Test the custom event profile notification as described in the following table.
4. Click OK.
TEST METHOD DO THIS
Send a test email message.
1. Click the Email Notification tab.2. Click Send Email.
If the test email message is successfully sent, an "Email accepted by transport layer" confirmation message appears.
3. Click OK.
Write a test message to the syslog file.
1. Click the Syslog Notification tab.2. Click Send Test Syslog Entry.
If the test syslog message is successfully written, an "Initiated syslog notification confirmation" message appears.
3. Click OK.
Send a test SNMP trap message.
1. Click the SNMP Trap Notification tab.2. Click Send Test SNMP Trap.
If the test SNMP trap message is successfully sent, an "Initiated SNMP trap notification" confirmation message appears.
3. Click OK.
EMC AVAMAR 6.0 • ADMINISTRATION GUIDE 179

Deleting a custom event profileEVENTS, NOTIFICATIONS, AND PROFILES
Enabling and disabling a custom event profileWhen you disable an event profile, no email notifications are sent until you reenable the profile. You can disable any profile except the System events profile.
To enable and disable a custom event profile:
1. In Avamar Administrator, select Tools > Manage Profiles.
The Manage All Profiles dialog box appears.
2. Select the event profile.
3. Click Disable to disable the event profile, or Enable to enable the event profile.
Deleting a custom event profileYou can permanently delete any custom event profile except the System events profile.
To delete a custom event profile:
1. In Avamar Administrator, select Tools > Manage Profiles.
The Manage All Profiles dialog box appears.
2. Select the event profile and click Delete.
A confirmation message appears.
3. Click Yes.
EMC AVAMAR 6.0 • ADMINISTRATION GUIDE 180

Modifying “Email Home” configurationEVENTS, NOTIFICATIONS, AND PROFILES
Modifying “Email Home” configurationWhen configured and enabled, the Email Home feature automatically emails configuration, capacity, and general system information to EMC Technical Support once daily, and critical alerts in near-real time on an as needed basis.
NOTE: The Email Home feature is configured and enabled during installation. This section is intended only for changes to the feature after initial installation.
Notification schedule. By default, these email messages are sent at 6 a.m. and 3 p.m. each day. The timing of these messages is controlled by the Notification Schedule, which is discussed in Schedules (page 116).
Mail settings. To properly configure the Email Home feature, you need the following information:
Outgoing SMTPMail Server Name
This is the corporate outgoing SMTP mail server that is used to send Email Home messages.Typically, the outgoing SMTP mail server name is specified during initial Avamar server deployment. However, you must verify this setting. You can change this setting, if necessary.IMPORTANT: In most cases, some arrangement must be made to enable emails originating from the Avamar server to be forwarded through the outgoing SMTP mail server to EMC Technical Support over the Internet.
Administrative MailSender Address
For Email Home messages to be received by EMC Technical Support, they must be sent using a valid email address with access to a corporate outgoing SMTP mail server.IMPORTANT: If you do not configure the Email Home feature to send messages from a valid email address, messages generated by the Email Home feature are rejected by the EMC incoming email server. EMC Technical Support is completely unaware that these programmatically-generated messages were rejected. In addition, because a valid sending email account is not known, programmatically-generated warnings to the sender that these messages could not be sent are never viewed by anyone who can correct the problem.
EMC AVAMAR 6.0 • ADMINISTRATION GUIDE 181

Modifying “Email Home” configurationEVENTS, NOTIFICATIONS, AND PROFILES
Modify mcserver.xml Email Home settings
User=admin 1. Open a command shell and log in:
2. Change directories by typing:
cd /usr/local/avamar/var/mc/server_data/prefs
3. Open mcserver.xml in a UNIX text editor.
4. Find the com.avamar.asn.module.mail node, as shown below:
<root type="system"><node name="com">
<node name="avamar"><node name="asn">
<node name="module"><node name="mail">
<entry key="smtpHost" value="mail"/><entry key="admin_mail_sender_address" value=""/>
NOTE: Substantial portions of mcserver.xml have been omitted for clarity.
5. Verify that the smtpHost entry, which is mail in the previous step, is the name of the outgoing SMTP mail server as defined in corporate DNS, such as smtp.example.com.
NOTE: The Avamar 6.0 server installation or upgrade fills in the smtpHost entry.
If this entry is not correct, edit it.
6. Change the admin_mail_sender_address entry to a valid email address, such as [email protected].
7. Save the changes.
8. Restart the MCS by typing:
dpnctl stop mcs
dpnctl start
9. Close the command shell.
SERVER TYPE LOGIN STEPS
Single-node Log in to the server as admin.
Multi-node 1. Log in to the utility node as admin, and then load the admin OpenSSH key by typing:ssh-agent bash
ssh-add ~admin/.ssh/admin_key
2. When prompted, type the admin_key passphrase and press Enter.
EMC AVAMAR 6.0 • ADMINISTRATION GUIDE 182

Monitoring the Avamar server using syslogEVENTS, NOTIFICATIONS, AND PROFILES
Monitoring the Avamar server using syslogUNIX and Linux systems provide a feature called syslog that is used to collect system log messages and write them to a designated log file. Avamar servers can output Avamar server event codes in syslog format.
The service used to implement this feature is the syslog daemon (syslogd). This service can be hosted locally on the Avamar server or on a remote client, as long as that client can communicate with the Avamar server over a network connection.
The following table shows how Avamar event data is mapped to various syslog fields.
The following is an example Avamar server syslog message:
Feb 9 08:23:57 MyAvamar MCS: <Code> 22254 <Category> SYSTEM <Summary> Client Adhoc Backup Request Error - Unknown ID. <Data> Client = ivory
To monitor an Avamar server using syslog:
1. Configure a custom event profile that outputs designated Avamar server events to a local or remote syslogd process, as discussed in Configure a custom event profile (page 184).
2. Configure syslogd so that it can collect information from the Avamar server, as discussed in Configure syslogd (page 185).
SYSLOG FIELD AVAMAR EVENT CODE DATA
Facility One of the following, set by way of the custom event profile Facility field:
• user• local#, where # is a number from 0 to 7
Priority One of the following, based on the Avamar event type:• debug, if the Avamar event type is DEBUG• err, if the Avamar event type is ERROR• info, if the Avamar event type is INFO• none, if the Avamar event type is INTERNAL• warning, if the Avamar event type is WARNING
Date Avamar event date
Time Avamar event time
Hardware Source Avamar event hardware source
Software Source Avamar event software source
Message The following fields from the Avamar event code: • event code• category• summary• event data
EMC AVAMAR 6.0 • ADMINISTRATION GUIDE 183
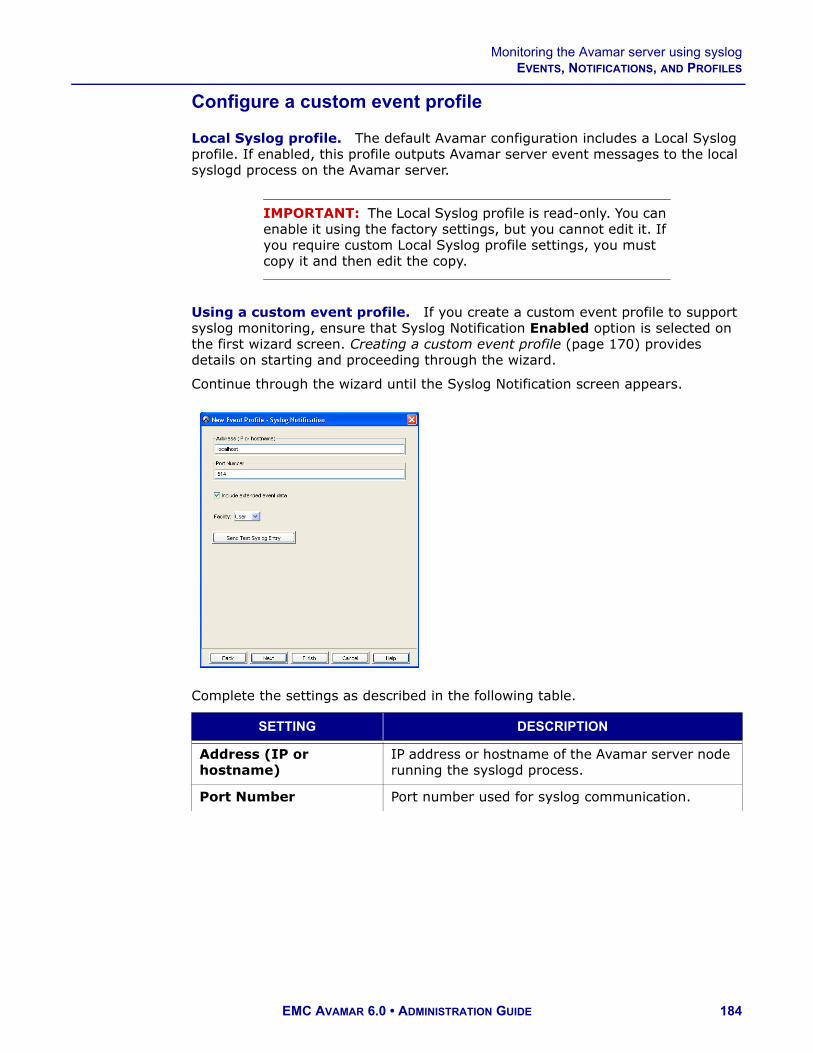
Monitoring the Avamar server using syslogEVENTS, NOTIFICATIONS, AND PROFILES
Configure a custom event profile
Local Syslog profile. The default Avamar configuration includes a Local Syslog profile. If enabled, this profile outputs Avamar server event messages to the local syslogd process on the Avamar server.
IMPORTANT: The Local Syslog profile is read-only. You can enable it using the factory settings, but you cannot edit it. If you require custom Local Syslog profile settings, you must copy it and then edit the copy.
Using a custom event profile. If you create a custom event profile to support syslog monitoring, ensure that Syslog Notification Enabled option is selected on the first wizard screen. Creating a custom event profile (page 170) provides details on starting and proceeding through the wizard.
Continue through the wizard until the Syslog Notification screen appears.
Complete the settings as described in the following table.
SETTING DESCRIPTION
Address (IP or hostname)
IP address or hostname of the Avamar server node running the syslogd process.
Port Number Port number used for syslog communication.
EMC AVAMAR 6.0 • ADMINISTRATION GUIDE 184

Monitoring the Avamar server using syslogEVENTS, NOTIFICATIONS, AND PROFILES
Configure syslogd
To configure the syslog daemon (syslogd), edit the settings in the /etc/sysconfig/syslog configuration file. These settings implement various filtering rules and control where syslog messages are logged.
By default, Avamar writes to syslogd using localhost udp port 514. To enable the local syslogd process to monitor these messages, edit the /etc/syslog.conf file to configure syslogd to listen on this data port.
The /etc/sysconfig/syslog file typically contains an entry similar to this:
SYSLOGD_OPTIONS="-m 0"
This entry line must be modified to add the -r parameter:
SYSLOGD_OPTIONS="-r -m 0"
After you edit /etc/sysconfig/syslog, restart the syslogd daemon using the following command:
kill -SIGHUP `cat /var/run/syslogd.pid`
A complete discussion of configuring syslogd is beyond the scope of this guide. The UNIX or Linux operating system documentation provides information.
Include extended event data
If selected, additional (extended) event code information is included in the syslog message. This extended information is delimited using the following tags:
• <Code> • <Type> • <Severity> • <Category> • <HwSource> • <Summary> • <active> • <lastEmailSendDate> • <domain> • <scheduleID> • <num_prefs> • <name> • <isSystem>
Facility One of the following: • user• local#, where # is a number from 0 to 7
SETTING DESCRIPTION
EMC AVAMAR 6.0 • ADMINISTRATION GUIDE 185

Monitoring the Avamar server using SNMPEVENTS, NOTIFICATIONS, AND PROFILES
Monitoring the Avamar server using SNMPSimple Network Management Protocol (SNMP) is a protocol for communicating and monitoring event notification information between an application, hardware device, or software application and any number of monitoring applications or devices.
Prerequisite knowledge. Persons configuring an Avamar server to send event information over SNMP should be familiar with basic SNMP concepts. A complete discussion of basic SNMP concepts and implementation is beyond the scope of this guide. The www.net-snmp.org website provides additional information.
The Avamar SNMP implementation provides two ways to access Avamar server events and activity status:
• SNMP requests• SNMP traps
SNMP requests. SNMP requests provide a mechanism for SNMP management applications to “pull” information from a remote SNMP-enabled application or device (in this case, the Avamar server). The SNMP management application sends a request to an SNMP master agent running on the Avamar server. The SNMP master agent then communicates with the Avamar SNMP sub-agent, which passes the request to the MCS. The MCS retrieves the data and sends it back to the Avamar SNMP sub-agent, which passes it back to the management application by way of the SNMP master agent. Data port 161 is the default data port for SNMP requests.
SNMP master agent. Avamar servers purchased directly from EMC use the Net-SNMP master agent. Avamar servers built with other industry standard hardware likely use an SNMP master agent provided by the hardware manufacturer.
SNMP traps. SNMP traps provide a mechanism for the Avamar server to “push” information to SNMP management applications whenever designated Avamar events occur. Data port 162 is the default data port for SNMP traps. Typically, the SNMP management application listens for any SNMP traps generated by designated remote hosts.
MCS
SNMP MASTER AGENT
AVAMAR SNMPSUB-AGENT
AVAMAR SERVER
SNMP TRAPS (PORT 162)
SNMP REQUESTS (PORT 161)
SNMPMANAGEMENTAPPLICATION
EMC AVAMAR 6.0 • ADMINISTRATION GUIDE 186

Monitoring the Avamar server using SNMPEVENTS, NOTIFICATIONS, AND PROFILES
Management Information Base (MIB). Each SNMP application or device defines what information can be monitored or which traps are sent, and stores this information in a Management Information Base (MIB). SNMP management applications load various MIBs to determine what information can be expected from the respective SNMP applications or devices.
To enable an SNMP management application to monitor an Avamar server, the Avamar MIB definition file (AVAMAR-MCS-MIB.txt) must be loaded into the master MIB used by the SNMP management application. The Avamar MIB definition file can be found in the following locations:
A copy of Avamar MIB definition file (AVAMAR-MCS-MIB.txt) also resides in the /usr/share/snmp/mibs directory on single-node servers and utility nodes. This copy is used by the Avamar SNMP sub-agent and should not be moved or distributed.
Task list. To monitor an Avamar server using SNMP:
1. Install and configure an AgentX compliant master agent:
• If the Avamar server was purchased directly from EMC, the Net-SNMP master agent is already installed. However, you must configure the Net-SNMP agent as discussed in Configuring the Net-SNMP agent (page 188).
• If the Avamar server is built with other industry standard hardware, you must install and configure the AgentX compliant master agent provided by the hardware vendor.
2. Configure a custom event profile to output designated Avamar server events to an SNMP trap as discussed in Configure a custom event profile (page 190).
COMPUTER/SERVER TYPE MIB LOCATION
Single-node server /usr/local/avamar/doc
Multi-node server /usr/local/avamar/doc on the utility node
Computer with Avamar Administrator
INSTALL-DIR/docwhere INSTALL-DIR is typically:
• C:\Program Files\avs\administrator on Microsoft Windows computers
• /usr/local/avamar on Linux computers• /opt/AVMRconsl on Solaris computers
EMC AVAMAR 6.0 • ADMINISTRATION GUIDE 187

Monitoring the Avamar server using SNMPEVENTS, NOTIFICATIONS, AND PROFILES
Configuring the Net-SNMP agent
Avamar provides a command line utility (avsetup_snmp) for configuring the Net-SNMP agent to communicate with the Avamar server using the Avamar SNMP sub-agent.
IMPORTANT: Run the avsetup_snmp utility from the /root directory as the root user.
To configure the Net-SNMP agent:
User=root 1. Open a command shell and log in:
2. Type:
cd /root
avsetup_snmp
The following information appears in the command shell:
avsetup_snmp will help you set up your snmpd config file: /etc/snmp/snmpd.conf
Enter the port to listen for SNMP requests on [161]:
3. Choose the SNMP request data port:
• To use port 161, the default SNMP request data port, press Enter.• To use a different SNMP request data port, type the data port number
and press Enter.If avsetup_snmp was not able to detect any SNMP communities, the following information appears in the command shell:No snmp v1/2 communities configured. Forcing access_control configuration.Running snmpconf to configure access_control group.reading: /etc/snmp/snmpd.confDo you want to allow SNMPv3 read-write user based access (default = y):
4. Type n and press Enter.
The following information appears in the command shell:Do you want to allow SNMPv3 read-only user based access (default = y):
5. Type n and press Enter.
The following information appears in the command shell:Do you want to allow SNMPv1/v2c read-write community access (default = y):
6. Type n and press Enter.
The following information appears in the command shell:Do you want to allow SNMPv1/v2c read-only community access (default = y):
SERVER TYPE LOGIN STEP
Single-node Log in to the server as root.
Multi-node Log in to the utility node as root.
EMC AVAMAR 6.0 • ADMINISTRATION GUIDE 188

Monitoring the Avamar server using SNMPEVENTS, NOTIFICATIONS, AND PROFILES
7. Press Enter.
The following information appears in the command shell:Configuring: rocommunityDescription:
a SNMPv1/SNMPv2c read-only access community namearguments: community [default|hostname|network/bits] [oid]
The community name to add read-only access for:
The SNMP community is a text string that the local Net-SNMP agent uses to authenticate itself with the SNMP management application. MyCommunity is used as an example SNMP community for the remainder of this procedure.
8. Type the SNMP community and press Enter.
The following information appears in the command shell:The hostname or network address to accept this community name from [RETURN for all]:
9. Press Enter.
The following information appears in the command shell:The OID that this community should be restricted to [RETURN for no-restriction]:
10. Press Enter.
The following information appears in the command shell:Finished Output: rocommunity public MyCommunityDo another rocommunity line? (default = y):
11.Type n and press Enter.
The following information appears in the command shell:
The following files were created:snmpd.conf installed in /etc/snmp
System settings not configured. Forcing system_setup configuration.Running snmpconf to configure system_setup group.reading: /etc/snmp/snmpd.conf
Configuring: syslocationDescription:
The [typically physical] location of the system.Note that setting this value here means that when trying to perform an snmp SET operation to the sysLocation.0 variablewill make the agent return the "notWritable" error code. IE,including this token in the snmpd.conf file will disablewrite access to the variable.
arguments: location_string
The location of the system:
12.Type the physical location of the Avamar server and press Enter.
The following information appears in the command shell:Finished Output: syslocation "MyLocation"
Configuring: syscontactDescription:
The contact information for the administratorNote that setting this value here means that when trying toperform an snmp SET operation to the sysContact.0 variablewill make the agent return the "notWritable" error code. IE,including this token in the snmpd.conf file will disable
EMC AVAMAR 6.0 • ADMINISTRATION GUIDE 189
Monitoring the Avamar server using SNMPEVENTS, NOTIFICATIONS, AND PROFILES
write access to the variable.arguments: contact_string
The contact information:
13.Type contact information (for example, email address, telephone extension, and so forth) and press Enter.
The following information appears in the command shell:Finished Output: syscontact "[email protected] Extension: 1234"Do you want to properly set the value of the sysServices.0 OID (if you don't know, just say no)? (default = y):
14.Type n and press Enter.
The following information appears in the command shell:The following files were created:snmpd.conf installed in /etc/snmpEnabling snmpd.
Configure a custom event profile
Local SNMP Trap profile. The default Avamar configuration includes a special Local SNMP Trap profile. If enabled, this profile outputs Avamar server event messages to the local Net-SNMP trap listener (snmptrapd process).
IMPORTANT: The Local SNMP Trap profile is read-only. You cannot edit it. Furthermore, it is intended to be used for test purposes only, to verify that traps are successfully generated and received by the local snmptrapd process, which then writes the trap information to a syslog file.
In most cases, you must configure another custom profile to send Avamar SNMP traps to a remote Net-SNMP trap listener.
EMC AVAMAR 6.0 • ADMINISTRATION GUIDE 190
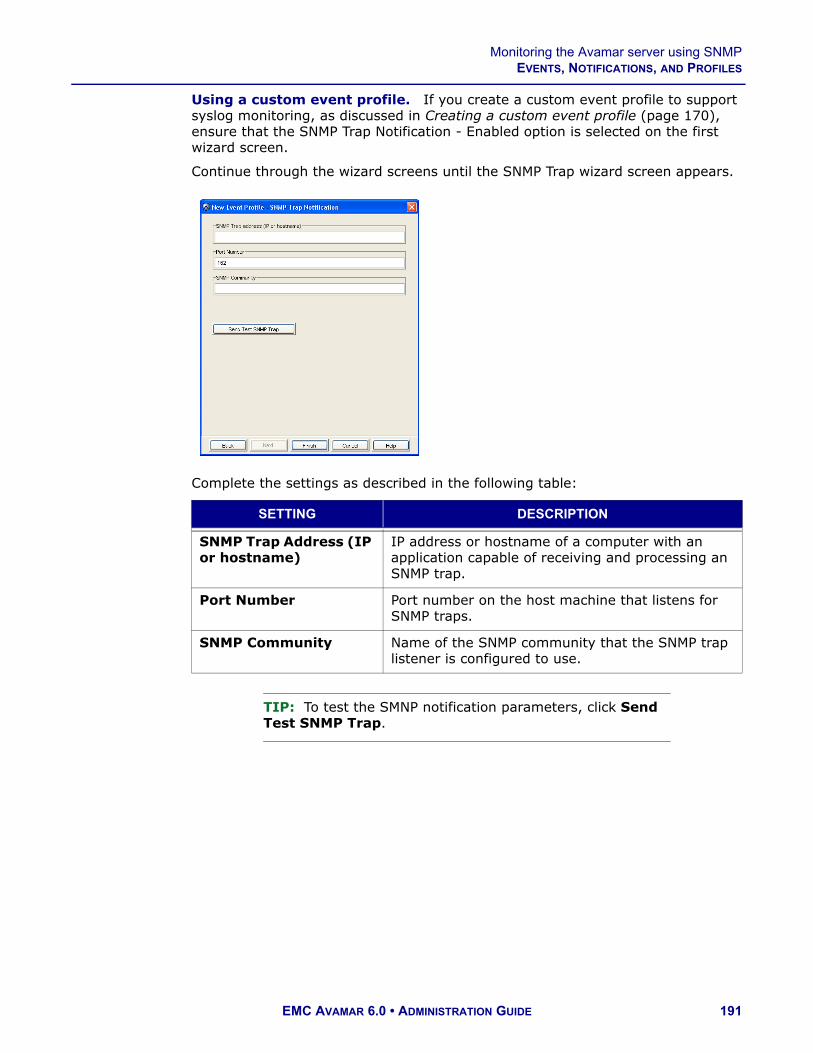
Monitoring the Avamar server using SNMPEVENTS, NOTIFICATIONS, AND PROFILES
Using a custom event profile. If you create a custom event profile to support syslog monitoring, as discussed in Creating a custom event profile (page 170), ensure that the SNMP Trap Notification - Enabled option is selected on the first wizard screen.
Continue through the wizard screens until the SNMP Trap wizard screen appears.
Complete the settings as described in the following table:
TIP: To test the SMNP notification parameters, click Send Test SNMP Trap.
SETTING DESCRIPTION
SNMP Trap Address (IP or hostname)
IP address or hostname of a computer with an application capable of receiving and processing an SNMP trap.
Port Number Port number on the host machine that listens for SNMP traps.
SNMP Community Name of the SNMP community that the SNMP trap listener is configured to use.
EMC AVAMAR 6.0 • ADMINISTRATION GUIDE 191
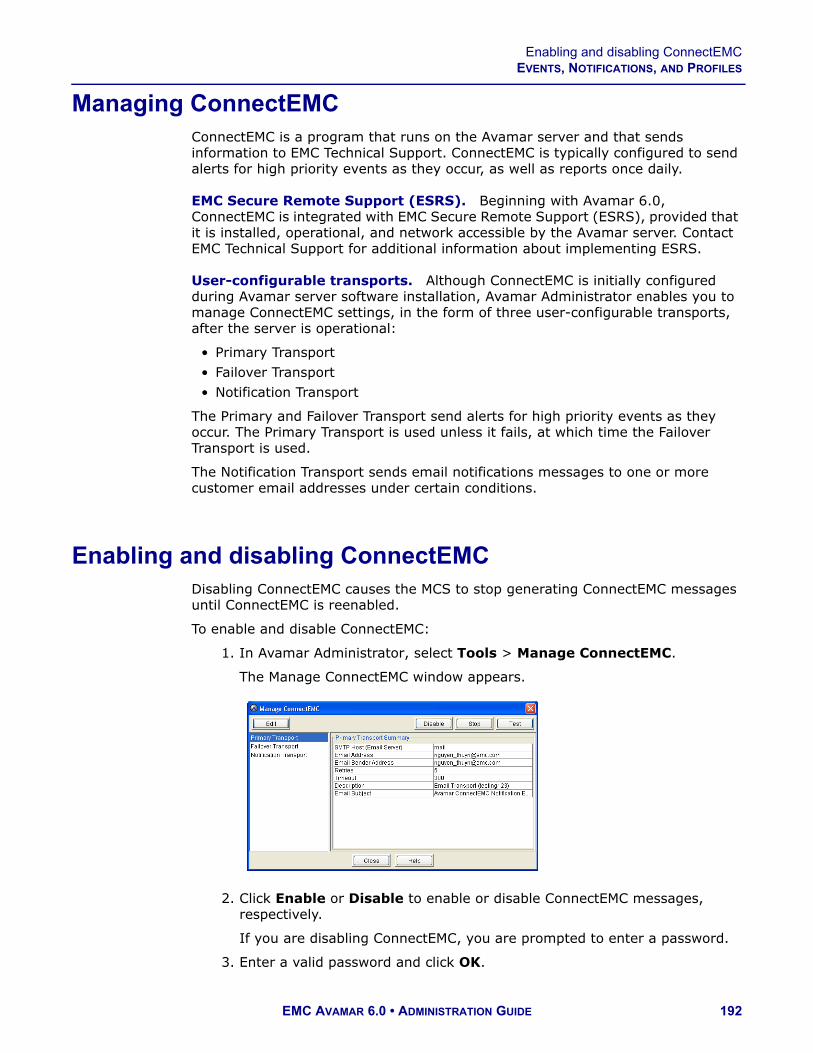
Enabling and disabling ConnectEMCEVENTS, NOTIFICATIONS, AND PROFILES
Managing ConnectEMCConnectEMC is a program that runs on the Avamar server and that sends information to EMC Technical Support. ConnectEMC is typically configured to send alerts for high priority events as they occur, as well as reports once daily.
EMC Secure Remote Support (ESRS). Beginning with Avamar 6.0, ConnectEMC is integrated with EMC Secure Remote Support (ESRS), provided that it is installed, operational, and network accessible by the Avamar server. Contact EMC Technical Support for additional information about implementing ESRS.
User-configurable transports. Although ConnectEMC is initially configured during Avamar server software installation, Avamar Administrator enables you to manage ConnectEMC settings, in the form of three user-configurable transports, after the server is operational:
• Primary Transport• Failover Transport• Notification Transport
The Primary and Failover Transport send alerts for high priority events as they occur. The Primary Transport is used unless it fails, at which time the Failover Transport is used.
The Notification Transport sends email notifications messages to one or more customer email addresses under certain conditions.
Enabling and disabling ConnectEMCDisabling ConnectEMC causes the MCS to stop generating ConnectEMC messages until ConnectEMC is reenabled.
To enable and disable ConnectEMC:
1. In Avamar Administrator, select Tools > Manage ConnectEMC.
The Manage ConnectEMC window appears.
2. Click Enable or Disable to enable or disable ConnectEMC messages, respectively.
If you are disabling ConnectEMC, you are prompted to enter a password.
3. Enter a valid password and click OK.
EMC AVAMAR 6.0 • ADMINISTRATION GUIDE 192

Editing Primary and Failover transportsEVENTS, NOTIFICATIONS, AND PROFILES
Stopping and starting ConnectEMCStopping ConnectEMC turns off the ConnectEMC process until such time as it is restarted. During this time, the MCS still generates ConnectEMC alerts. These alerts are queued until ConnectEMC is restarted.
To stop and start ConnectEMC:
1. In Avamar Administrator, select Tools > Manage ConnectEMC.
The Manage ConnectEMC window appears.
2. Click Stop or Start to stop or start the sending of ConnectEMC alerts, respectively.
Editing Primary and Failover transportsTo edit settings for the Primary and Failover transports:
1. In Avamar Administrator, select Tools > Manage ConnectEMC.
The Manage ConnectEMC window appears.
2. Select either the Primary Transport or the Failover Transport, and click Edit.
NOTE: The Primary Transport is used as an example for the remainder of this procedure.
The Edit Primary Transport dialog box appears.
EMC AVAMAR 6.0 • ADMINISTRATION GUIDE 193

Editing Primary and Failover transportsEVENTS, NOTIFICATIONS, AND PROFILES
3. Select one of the following from the Transport Type list:
• Email • FTP • HTTPS
IMPORTANT: An operational ESRS gateway is required to use FTP or HTTPS transport types.
4. Specify the transport type settings in the Edit Primary Transport dialog box as discussed in the following table.
TRANSPORT TYPE SETTINGS TO CONFIGURE
Email 1. In the SMTP Host (Email Server) field, specify the mail server hostname or IPv4 address.
2. In the Email Address field, specify one or more recipients of these emails. Separate multiple email addresses with commas.
3. In the Email Sender Address field, specify the email address from which to send the message.
4. (Optional) To configure advanced settings, click Advanced, and then specify the following settings in the Edit Advanced Email Settings dialog box:
• Retries – The number of retries to attempt before reporting a failure. The default setting is 5 retries.
• Timeout – The number of seconds to wait before reporting that the operation timed out. The default setting is 5 minutes (300 seconds).
• Description – A description of this transport that appears in the Manage ConnectEMC window. The default description is Email Transport.
• Email Subject – The subject line in the email. The default subject line is Avamar ConnectEMC Notification Email.
IMPORTANT: Do not change the Email Subject unless instructed to do so by EMC Technical Support. Email messages with other subject lines might be rejected by EMC spam filters.5. Click OK.
EMC AVAMAR 6.0 • ADMINISTRATION GUIDE 194

Editing Primary and Failover transportsEVENTS, NOTIFICATIONS, AND PROFILES
FTP 1. In the IP Address field, specify an IPv4 address.2. In the Username field, specify an FTP username. The
setting depends on the FTP server software.3. In the Password field, specify the password for the
username.4. (Optional) To configure advanced settings, click
Advanced, and then specify the following settings in the Edit Advanced FTP Settings dialog box:
• Retries – The number of retries to attempt before reporting a failure. The default setting is 5 retries.
• Timeout – The number of seconds to wait before reporting that the operation timed out. The default setting is 5 minutes (300 seconds).
• Description – A description of this transport that appears in the Manage ConnectEMC window. The default description is FTP Transport.
• FEP Folder – A unique customer UNIX path in the ConnectEMC Front End Processor (FEP). Use the folder location supplied by EMC Technical Support.
• FTP Port – An IP port. The default setting is port 21.
• Mode – Either Active or Passive. The default setting is Active.
5. Click OK.
TRANSPORT TYPE SETTINGS TO CONFIGURE
EMC AVAMAR 6.0 • ADMINISTRATION GUIDE 195
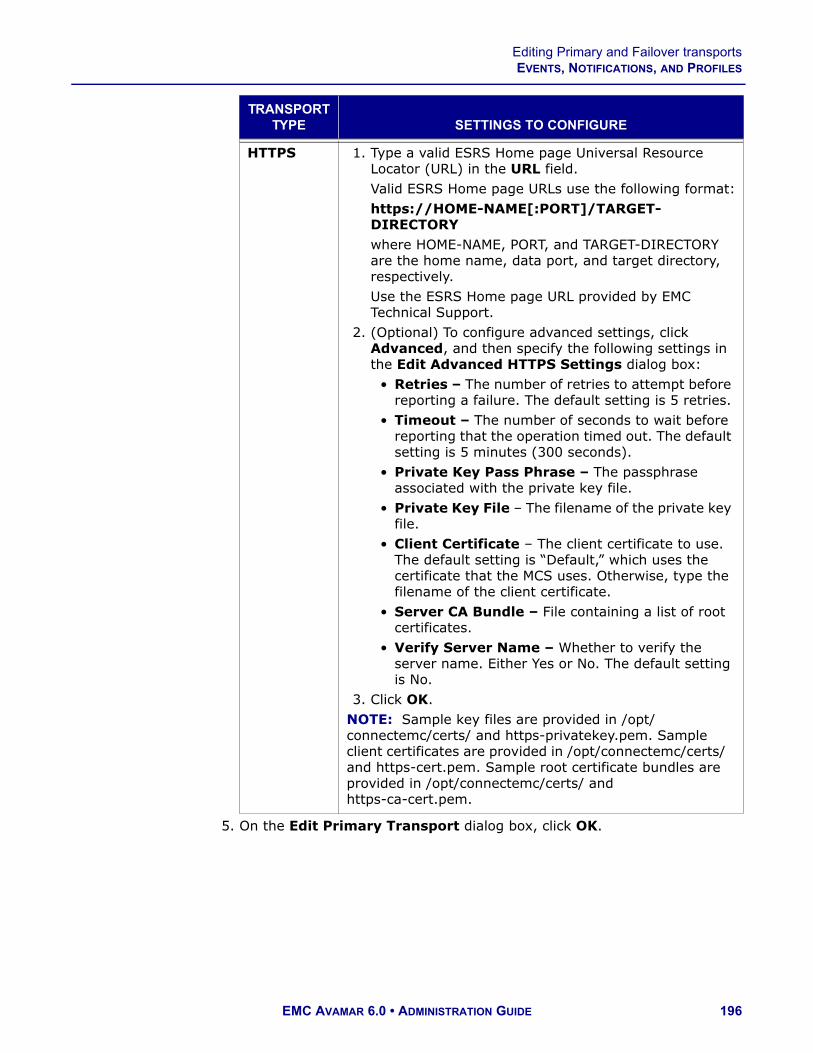
Editing Primary and Failover transportsEVENTS, NOTIFICATIONS, AND PROFILES
5. On the Edit Primary Transport dialog box, click OK.
HTTPS 1. Type a valid ESRS Home page Universal Resource Locator (URL) in the URL field.Valid ESRS Home page URLs use the following format:https://HOME-NAME[:PORT]/TARGET-DIRECTORYwhere HOME-NAME, PORT, and TARGET-DIRECTORY are the home name, data port, and target directory, respectively.Use the ESRS Home page URL provided by EMC Technical Support.
2. (Optional) To configure advanced settings, click Advanced, and then specify the following settings in the Edit Advanced HTTPS Settings dialog box:
• Retries – The number of retries to attempt before reporting a failure. The default setting is 5 retries.
• Timeout – The number of seconds to wait before reporting that the operation timed out. The default setting is 5 minutes (300 seconds).
• Private Key Pass Phrase – The passphrase associated with the private key file.
• Private Key File – The filename of the private key file.
• Client Certificate – The client certificate to use. The default setting is “Default,” which uses the certificate that the MCS uses. Otherwise, type the filename of the client certificate.
• Server CA Bundle – File containing a list of root certificates.
• Verify Server Name – Whether to verify the server name. Either Yes or No. The default setting is No.
3. Click OK.NOTE: Sample key files are provided in /opt/connectemc/certs/ and https-privatekey.pem. Sample client certificates are provided in /opt/connectemc/certs/ and https-cert.pem. Sample root certificate bundles are provided in /opt/connectemc/certs/ and https-ca-cert.pem.
TRANSPORT TYPE SETTINGS TO CONFIGURE
EMC AVAMAR 6.0 • ADMINISTRATION GUIDE 196

Editing the Notification transportEVENTS, NOTIFICATIONS, AND PROFILES
Editing the Notification transport1. In Avamar Administrator, select Tools > Manage ConnectEMC.
The Manage ConnectEMC window appears.
2. Select the Notification Transport and click Edit.
The Edit Notification Transport dialog box appears.
EMC AVAMAR 6.0 • ADMINISTRATION GUIDE 197

Editing the Notification transportEVENTS, NOTIFICATIONS, AND PROFILES
3. Complete the settings as described in the following table.
SETTING DESCRIPTION
Notification Type Choices are:
On Success Notify recipients when an event file is successfully transferred to EMC.
On Failure Notify recipients when an event file is not successfully transferred to EMC.
On Success or Failure
Notify recipients when an attempt is made to transfer an event file to EMC, regardless of the outcome.
On All Failure Notify recipients when all attempts to transfer an event file to EMC have failed.
SMTP Host (Email Server) Mail server hostname or IPv4 address.
Email Address One or more recipients of these emails. Separate multiple email addresses with commas.
Email Sender Address Email address from which the notification is sent.
EMC AVAMAR 6.0 • ADMINISTRATION GUIDE 198

Editing the Notification transportEVENTS, NOTIFICATIONS, AND PROFILES
4. (Optional) To specify advanced settings, click Advanced and then specify the settings in the Edit Advanced Email Settings dialog box.
The settings in the following table are available in the Edit Advanced Email Settings dialog box.
5. Click OK.
The Edit Advanced Email Settings dialog box closes.
6. On the Edit Notification Transport dialog box, click OK.
SETTING DESCRIPTION
Retries Number of retries to attempt before reporting a failure. The default setting is 5 retries.
Timeout Number of seconds to wait before reporting that the operation timed out. The default setting is 300 seconds (5 minutes).
Description Description of this transport in the Manage ConnectEMC window. The default description is Email Transport.
Email Subject The subject line in the email. The default subject line is Avamar ConnectEMC Notification Email.IMPORTANT: Do not change the Email Subject unless instructed to do so by EMC Technical Support. Email messages with other subject lines might be rejected by EMC spam filters.
Email Format The format of the email, either ASCII or HTML. The default setting is ASCII.
Include CallHome Data If yes, attachments sent to ConnectEMC will also be included in the notification email message.
EMC AVAMAR 6.0 • ADMINISTRATION GUIDE 199

Testing transportsEVENTS, NOTIFICATIONS, AND PROFILES
Testing transportsTo send test alerts and email messages:
1. In Avamar Administrator, select Tools > Manage ConnectEMC.
The Manage ConnectEMC window appears.
2. Click Test.
EMC AVAMAR 6.0 • ADMINISTRATION GUIDE 200
REPORTING
Avamar provides several features that enable you to output reports of system information in various formats. Each method of generating reports is covered in greater detail in this chapter. The following topics provide details about creating these reports:
• Avamar reports (page 202)• Viewing the Client Summary Report (page 211)• Viewing the Activity Report (page 215)• Viewing the Replication Report (page 220)• Exporting displayed tabular data as CSV files (page 223)• Support for third-party reporting tools (page 225)
EMC AVAMAR 6.0 • ADMINISTRATION GUIDE 201

Avamar reportsREPORTING
Avamar reportsThe Avamar reports feature enables you to create, manage, and run system reports. When Avamar reports are run, the results appear in a separate dialog box. The report results can also be exported as a Comma-Separated Values (CSV) text file.
Predefined reports. The following predefined reports are provided with the Avamar system:
REPORT REPORT CONTENTS
Activities - Bytes Protected Client
This report lists the quantity of primary data, in bytes, that is protected by the system for each client.
Activities - Bytes Protected Client - 2
This report is the same as the Activities - Bytes Protected Client report, except that you can specify an effective date range.
Activities - Bytes Protected Total
This report lists the total quantity of primary data, in bytes, that is protected by the system.
Activities - Bytes Protected Total - 2
This report is the same as the Activities - Bytes Protected Total report, except that you can specify an effective date range.
Activities - Client Stats This report lists client statistics.
Activities - Client Stats - 2 This report is the same as the Activities - Client Stats reports, except that you can specify an effective date range.
Activities - DPN Summary This report lists summary information about data stored in the Avamar server and statistical data for each client backup.
Activities - Exceptions This report lists all activities within a specified period that succeeded with exceptions.
Activities - Exceptions (Extended)
This report lists all activities within a specified period that completed with exceptions.
Activities - Failed This report lists all activities within a specified period that failed due to errors.
Activities - Licensed Bytes Protected Client
This report lists the quantity of primary data, in bytes, that is protected by the system for each client in the past 14 days. NOTE: This 14-day timeframe ensures that any backups that belong to clients that might have migrated to another Avamar server are not included in the licensing calculations for the server.
EMC AVAMAR 6.0 • ADMINISTRATION GUIDE 202

Avamar reportsREPORTING
Activities - Licensed Bytes Protected Total
This report lists the total quantity of primary data, in bytes, that has been protected by the system in the past 14 days. NOTE: This 14-day timeframe ensures that any backups that belong to clients that might have migrated to another Avamar server are not included in the licensing calculations for the server.
Activities - Licensed Client Stats
This report lists client statistics in the past 14 days. NOTE: This 14-day timeframe ensures that any backups that belong to clients that might have migrated to another Avamar server are not included in the licensing calculations for the server.
Activities - Licensed Plugin Stats
This report lists the total quantity of data protected, in bytes, by each data source plug-in. NOTE: This 14-day timeframe ensures that any backups that belong to clients that might have migrated to another Avamar server are not included in the licensing calculations for the server.
Activities - Plugin Client Stats
This report lists plug-in statistics in the past 14 days. NOTE: This 14-day timeframe ensures that any backups that belong to clients that might have migrated to another Avamar server are not included in the licensing calculations for the server.
Activities - Plugin Stats This report lists plug-in statistics.
Activities - Plugin Stats - 2 This report is the same as the Activities - Plugin Stats report, except that you can specify an effective date range.
Activities - Success This report lists all activities within a specified period that succeeded without exceptions.
Agents and Plugins - Client Count
This report lists all agents and plug-ins installed by all clients, and the count for each type.
Capacity Report This report lists the available capacity of each server node.
Clients - No Activities This report lists all clients that did not have any activities in specified period.
Clients - No Check Ins This report lists all clients that did not check in with the server in the specified period.
REPORT REPORT CONTENTS
EMC AVAMAR 6.0 • ADMINISTRATION GUIDE 203

Avamar reportsREPORTING
Report templates. In addition to the predefined reports, you can create new reports based on the following three templates:
Clients - Protected This report lists:• All clients with at least one backup stored on
the Avamar server• Plug-ins and counts for all clients• Client operating systems• Maximum bytes protected for each client• Total bytes protected for all clients
Clients - Unprotected This report lists all clients that are known to the MCS but are not actively being protected for various reasons.
Misc - Stats 1 For the specified period, this report lists:• Plug-ins installed on protected clients• Total bytes protected• Client operating systems protected• Maximum bytes protected for each client
System - Configuration Audit
This report lists all currently installed server operating system RPMs and a comparison against a master list that was used to initialize the system.
System - GSAN Perf Stats This report lists data server (also known as GSAN) performance statistics that are useful for system tuning and debugging purposes.By default, this report is enabled in the High Priority Events profile (page 168).
Activities Activities reports show detailed information about system activities, such as backups, restores, backup validations, and replication.
Clients Clients reports show detailed information about one or more backup clients.
Replicationactivities
Replication Activities reports are similar to Activities reports, but only show information related to replication.
Backendcapacity
Backend capacity reports show detailed information about the amount of backend capacity consumed by one or more clients. “Backend capacity” is the cumulative amount of client data that is currently being protected with no deduplication applied.
REPORT REPORT CONTENTS
EMC AVAMAR 6.0 • ADMINISTRATION GUIDE 204

Creating a reportREPORTING
Creating a report
IMPORTANT: If you intend to send this report as a custom event profile attachment (page 168), create the report in the root domain. You cannot send reports created at lower levels as custom event profile attachments.
To create a report:
1. In Avamar Administrator, select Tools > Manage Reports.
The Manage All Reports dialog box appears.
2. Select the domain for the report and click New.
The New Report dialog box appears.
3. Specify a name, display title, and optional short description for the report in the Name, Title, and Description fields.
EMC AVAMAR 6.0 • ADMINISTRATION GUIDE 205

Creating a reportREPORTING
4. From the Report View and Settings list, select a report template:
• Activities• Clients• Replication Activities• Backend Capacity
Report templates (page 204) provides details on each template.
5. Complete the settings that appear for the report template, as described in the following table.
REPORT TEMPLATE DESCRIPTION
Activities, Replication Activities
For an activities or replication activities report, customize the report using any of the following criteria:
• Status (for example, all statuses, all failures, all completed, and so forth)
• Type (all types, on-demand backup, restore, scheduled backup, validate, all backups)
• Group (all groups or a specific group)• Plug-in (for example, Microsoft Windows
filesystem, Solaris Oracle RMAN database, and so forth)
• Client name (all clients or a specific client)• Client’s Domain (all domains or a specific
domain)• Date (for example, scheduled start date,
scheduled end date, completed date, and so forth)
• Source (all sources, all Avamar servers, all Data Domain systems, or a specific Data Domain systems)
Clients For a clients report, customize the report using any of the following criteria:
• Pageable (whether the MCS can successfully page the client and receive a response)
• Date client was registered, last checked in, or last backed up
• Client name (all clients or a specific client)• Client’s Domain (all domains or a specific
domain)
EMC AVAMAR 6.0 • ADMINISTRATION GUIDE 206

Creating a reportREPORTING
6. Click OK.
Backend Capacity For a backend capacity report, select clients to include in the report:1. Click Edit.
The Edit Backend Capacity dialog box appears.
2. In the tree, select one or more domains.Clients within those domains appear in the right pane.
3. In the right pane, select one or more clients to include in the report.
4. Click OK.
REPORT TEMPLATE DESCRIPTION
EMC AVAMAR 6.0 • ADMINISTRATION GUIDE 207
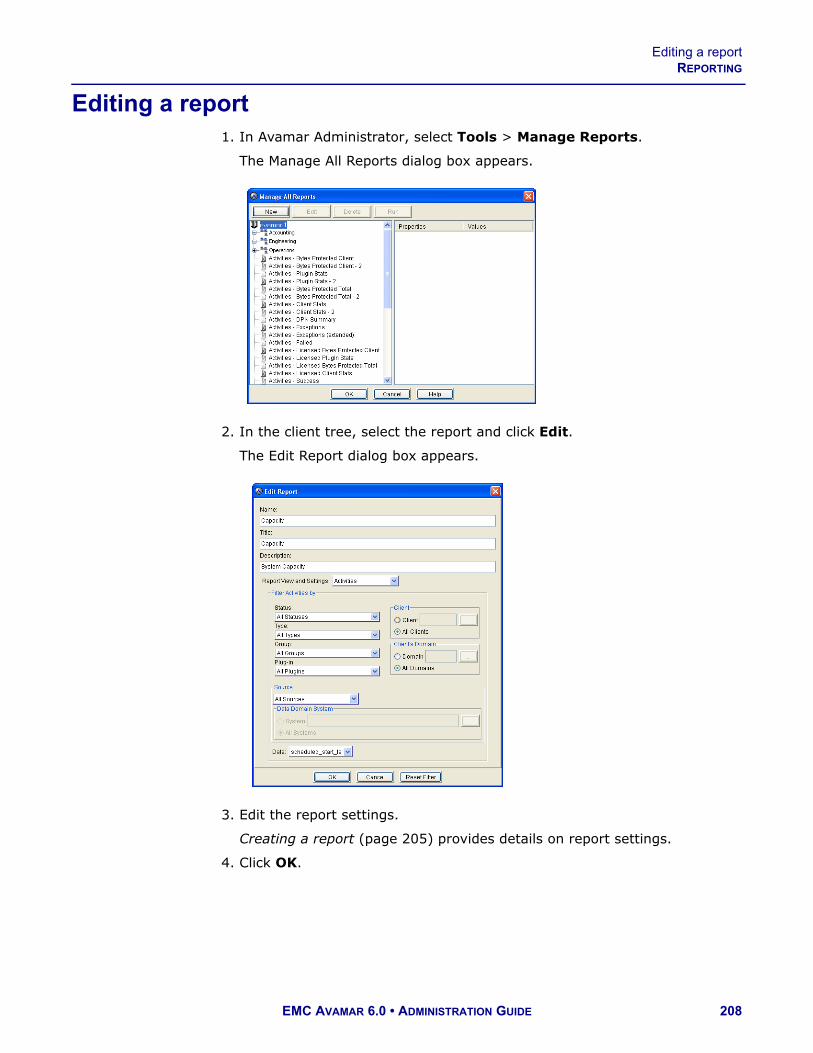
Editing a reportREPORTING
Editing a report1. In Avamar Administrator, select Tools > Manage Reports.
The Manage All Reports dialog box appears.
2. In the client tree, select the report and click Edit.
The Edit Report dialog box appears.
3. Edit the report settings.
Creating a report (page 205) provides details on report settings.
4. Click OK.
EMC AVAMAR 6.0 • ADMINISTRATION GUIDE 208

Running a reportREPORTING
Running a report
IMPORTANT: Backend capacity reports are very resource intensive. Never run more than one backend capacity report at the same time. Whenever possible, avoid running backend capacity reports during the blackout window (page 279).
To run a report:
1. In Avamar Administrator, select Tools > Manage Reports.
The Manage All Reports dialog box appears.
2. In the client tree, select the report and click Run.
The Run Report dialog box appears.
3. Click Retrieve to display the report output.
EMC AVAMAR 6.0 • ADMINISTRATION GUIDE 209

Deleting a reportREPORTING
4. (Optional) To export this data as a Comma-Separated Values (CSV) text file:
(a) Click Export.
The Save dialog box appears.
(b) Browse to the folder in which to save the file, and type a descriptive filename in the File name box.
(c) Click OK.
5. Click Close.
Deleting a report1. In Avamar Administrator, select Tools > Manage Reports.
The Manage All Reports dialog box appears.
2. In the client tree, select the report and click Delete.
A confirmation message appears.
3. Click Yes.
EMC AVAMAR 6.0 • ADMINISTRATION GUIDE 210

Viewing the Client Summary ReportREPORTING
Viewing the Client Summary ReportThe Client Summary Report is a combined view of important client properties for all clients registered with this Avamar server.
To view the Client Summary Report:
1. In Avamar Administrator, click the Policy launcher button.
The Policy window appears.
2. Click the Client Summary Report tab.
A blank Client Summary Report window appears.
3. Click Retrieve.
The client summary report displays the information in the following table for each client registered on this server.
COLUMN DESCRIPTION
agent_version Version of the agent that is installed.
allow_overtime True if the client can ignore the scheduling window end time.See also overtime_option (page 213).
allow_userinit_snapup_file_sel Allow file selection on user-initiated backups.
allow_userinit_snapups Allow user-initiated backups.
backed_up_ts Last backup date and time.
can_page True if MCS can call out to the client.
checkin_ts Last check-in date and time.
cid Client ID.
client_addr Client IP address.
client_name Client name.
EMC AVAMAR 6.0 • ADMINISTRATION GUIDE 211

Viewing the Client Summary ReportREPORTING
client_type Client type:• REGULAR• VMware vCenter• VMware Image Proxy• VMware Virtual Machine
contact_email Contact email address.
contact_location Contact location.
contact_name Person to contact regarding issues with this client.
contact_notes Contact notes.
contact_phone Contact phone number.
created Creation date.
ds_override True if the client can override the group dataset.
enabled True if the client can generate activities.
full_domain_name Fully qualified client location.
has_snapups True if the client has backups.
modified Date that client information was last edited.
os_type Client OS type.
override_userinit_retpol Override standard retention policy on user-initiated backups.
COLUMN DESCRIPTION
EMC AVAMAR 6.0 • ADMINISTRATION GUIDE 212

Viewing the Client Summary ReportREPORTING
overtime_option One of the following:
ALWAYS Scheduled group backups are always allowed to run past the schedule duration setting.
NEXT Only the next scheduled group backup is allowed to run past the schedule duration setting.
NEXT_SUCCESS Scheduled group backups are allowed to run past the schedule duration setting until a successful backup is completed.
NEVER Scheduled group backups are never allowed to run past the schedule duration setting.
This value is automatically set to NEXT_SUCCESS when the client initially registers and is cleared after one backup successfully completes.
page_addr IP address used to contact this client.
page_port Data port used to contact this client.
pageadr_locked
plugin_for_last_backup Plug-in used for the last backup.
rc_override True if the client can override the group retry count setting.
registered True if the client has checked in to MCS.
registered_ts Registered date and time.
restore_only True if the client can only do restores.
retry_cnt Connection retry count.
rp_override True if the client can override the group retention policy.
COLUMN DESCRIPTION
EMC AVAMAR 6.0 • ADMINISTRATION GUIDE 213

Viewing the Client Summary ReportREPORTING
TIP: To reduce the amount of report data, filter the report to show only records within a range of dates, for a client domain, or for a client.
4. (Optional) Select Actions > Filter.
The Report Filter dialog box appears.
5. Define the filtering criteria and click OK.
timeout Connection timeout value.
tp_override True if the client can override the group timeout period setting.
COLUMN DESCRIPTION
EMC AVAMAR 6.0 • ADMINISTRATION GUIDE 214

Viewing the Activity ReportREPORTING
Viewing the Activity ReportThe Activity Report provides detailed information for recent backup, restore, and validation activities.
To view the Activity Report:
1. In Avamar Administrator, click the Activity launcher button.
The Activity window appears.
2. Click the Activity Report tab.
A blank Activity Report window appears.
3. Click Retrieve.
The activity report displays the information in the following table for each activity.
COLUMN DESCRIPTION
backup_label Backup label. Blank for replication activities.
backup_number Backup number. Blank for replication activities.
bytes_excluded Total number of bytes intentionally excluded during this activity.
bytes_new Total number of bytes processed during this activity after data deduplication.
bytes_overhead Total number of overhead bytes.
bytes_scanned Total number of bytes processed during this activity.
bytes_skipped Total number of bytes unintentionally skipped (errors and so forth) during this activity.
EMC AVAMAR 6.0 • ADMINISTRATION GUIDE 215

Viewing the Activity ReportREPORTING
cid Client ID.
client_name Avamar client name.
client_os Client operating system.
client_ver Avamar client software version.
completed_ts Actual date and time that this activity ended, adjusted for the prevailing time zone, shown in parentheses.
current_retention Current retention types assigned to this backup:
D Daily
W Weekly
M Monthly
Y Yearly
N No specific retention type
dataset Dataset used to perform this backup.
dataset_override If true, the group dataset was not used for this activity.
domain Full location of the client in the Avamar server.
ddr_hostname Hostname of the Data Domain system on which the activity occurred, if the activity occurred on a Data Domain system.
effective_expiration Actual calendar date and time that this backup will expire.
effective_path For group-based backups, the dataset used in the backup.
encryption_method Encryption method used for client/server data transfer:
• proprietary• ssl
COLUMN DESCRIPTION
EMC AVAMAR 6.0 • ADMINISTRATION GUIDE 216

Viewing the Activity ReportREPORTING
encryption_method2 Encryption method used for client/server data transfer:
High Strongest available encryption setting for that specific client platform.
Medium Medium strength encryption.
None No encryption.
NOTE: The exact encryption technology and bit strength used for any given client-server connection depends on a number of factors, including the client platform and Avamar server version. The EMC Avamar Product Security Guide provides details.
encrypt_method2_sa
error_code If the activity successfully completed, zero appears in this column.If the activity did not successfully complete, a numeric error code appears.
error_code_summary If the activity did not successfully complete, a short summary of this error code.
group_name If the activity was a scheduled backup, this is the group that this client was a member of when this scheduled activity was initiated (clients can be members of more than one group). On-demand is shown for all other activities.
initiated_by For On-Demand Backup activity, the user that initiated the activity.
num_files_skipped Total number of files unintentionally skipped (errors and so forth) during this activity.
num_of_files Total number of files processed during this activity.
original_retention Original retention types that were programmatically assigned to this backup when it occurred:
D Daily
W Weekly
M Monthly
Y Yearly
N No specific retention type
COLUMN DESCRIPTION
EMC AVAMAR 6.0 • ADMINISTRATION GUIDE 217

Viewing the Activity ReportREPORTING
TIP: To reduce the amount of report data, filter the report to show only records within a range of dates, for a client domain, or for a client.
plugin_number Plug-in used for this activity.
proxy_cid VMware proxy client unique ID.
retention_policy Retention policy used to perform this backup.
retention_policy_override If true, the group retention policy was not used for this activity.
schedule If the activity was a scheduled backup, this is the schedule that initiated this activity. On-Demand or End User Request is shown for all other activities initiated from Avamar Administrator or the client, respectively.
scheduled_end_ts Latest date and time this activity was scheduled to end, adjusted for the prevailing time zone, which is shown in parentheses.
scheduled_start_ts Earliest date and time this activity was scheduled to begin, adjusted for the prevailing time zone, which is shown in parentheses.
server Server on which the activity occurred, either the Avamar server or a Data Domain system.
session_id Work order ID. Unique identifier for this activity.
started_ts Actual date and time that this activity started, adjusted for the prevailing time zone, which is shown in parentheses.
status_code Numeric event code describing latest status of this activity.
status_code_summary Short summary of this status code.
type Type of activity:• On-Demand Backup• Scheduled Backup• Restore• Validate
COLUMN DESCRIPTION
EMC AVAMAR 6.0 • ADMINISTRATION GUIDE 218

Viewing the Activity ReportREPORTING
4. (Optional) Select Actions > Filter.
The Report Filter dialog box appears.
5. Define the filtering criteria and click OK.
EMC AVAMAR 6.0 • ADMINISTRATION GUIDE 219

Viewing the Replication ReportREPORTING
Viewing the Replication ReportThe Replication Report provides detailed information for recent replication operations.
To view the Replication Report:
1. In Avamar Administrator, click the Activity launcher button.
The Activity window appears.
2. Click the Replication Report tab.
A blank Replication Report window appears.
3. Click Retrieve.
The Replication report displays the information in the following table for each replication operation.
COLUMN DESCRIPTION
bytes_excluded Total number of bytes intentionally excluded during this replication operation.
bytes_new Total number of bytes processed during this replication operation after data deduplication.
bytes_overhead Total number of overhead bytes.
bytes_scanned Total number of bytes processed during this replication operation.
bytes_skipped Total number of bytes unintentionally skipped (errors and so forth) during this replication operation.
cid Client ID.
client_name Avamar client name.
EMC AVAMAR 6.0 • ADMINISTRATION GUIDE 220

Viewing the Replication ReportREPORTING
client_os Client operating system.
client_ver Avamar client software version.
completed_ts Date and time this replication operation ended.
ddr_hostname Hostname of the Data Domain system on which the activity occurred, if the activity occurred on a Data Domain system.
domain Full location of the client in the Avamar server.
encryption_method Encryption method used for client/server data transfer:
• proprietary• ssl
encryption_method2 Encryption method used for client/server data transfer:
Medium Medium strength encryption.
High Strongest available encryption setting for that specific client platform.
None No encryption.
NOTE: The exact encryption technology and bit strength used for any given client-server connection depends on a number of factors, including the client platform and Avamar server version. The EMC Avamar Product Security Guide provides details.
encrypt_method2_sa
error_code If the replication operation did not successfully complete, a numeric error code appears.
error_code_summary If replication operation did not successfully complete, a short summary of this error code.
num_files_skipped Total number of files unintentionally skipped (errors and so forth) during this replication operation.
num_of_files Total number of files processed during this replication operation.
plugin_number Plug-in used for this replication operation.
scheduled_end_ts Date and time this replication operation was scheduled to end.
COLUMN DESCRIPTION
EMC AVAMAR 6.0 • ADMINISTRATION GUIDE 221

Viewing the Replication ReportREPORTING
TIP: To reduce the amount of report data, filter the report to show only records within a range of dates, for a client domain, or for a client.
4. (Optional) Select Actions > Filter.
The Report Filter dialog box appears.
5. Define the filtering criteria and click OK.
scheduled_start_ts Date and time this replication operation was scheduled to start.
server Server on which the activity occurred, either the Avamar server or a Data Domain system.
session_id Work order ID, which is a unique identifier for this replication operation.
started_ts Date and time this replication operation started.
status_code Numeric event code returned by this replication operation.
status_code_summary Short summary of this status code.
COLUMN DESCRIPTION
EMC AVAMAR 6.0 • ADMINISTRATION GUIDE 222

Exporting displayed tabular data as CSV filesREPORTING
Exporting displayed tabular data as CSV filesYou can export the following tabular data displayed within Avamar Administrator as Comma-Separated Values (CSV) text files:
• Activity Report (page 223)• Replication Report (page 223)• Client Summary Report (page 223)• Event Management (page 224)• Session Monitor (page 224)
Activity Report
1. In Avamar Administrator, click the Activity launcher button.
The Activity window appears.
2. Click the Activity Report tab.
3. Click Retrieve to populate this screen with information.
4. Select Actions > Export Report.
The Save dialog box appears.
5. Browse to the folder in which to save the report data, and type a descriptive filename in the File name field.
6. Click OK.
Replication Report
1. In Avamar Administrator, click the Activity launcher button.
The Activity window appears.
2. Click the Replication Report tab.
3. Click Retrieve to populate this screen with information.
4. Select Actions > Export Report.
The Save dialog box appears.
5. Browse to the folder in which to save the report data, and type a descriptive filename in the File name field.
6. Click OK.
Client Summary Report
1. In Avamar Administrator, click the Policy launcher button.
The Policy window appears.
2. Click the Client Summary Report tab.
3. Click Retrieve to populate this screen with information.
EMC AVAMAR 6.0 • ADMINISTRATION GUIDE 223

Exporting displayed tabular data as CSV filesREPORTING
4. Select Actions > Export Report.
The Save dialog box appears.
5. Browse to the folder in which to save the report data, and type a descriptive filename in the File name field.
6. Click OK.
Event Management
1. In Avamar Administrator, click the Administration launcher button.
The Administration window appears.
2. Click the Event Management tab.
3. Open the Actions menu and select Event Monitor > Export Events Report.
The Save dialog box appears.
4. Browse to the folder in which to save the report data, and type a descriptive filename in the File name field.
5. Click OK.
Session Monitor
1. In Avamar Administrator, click the Server launcher button.
The Server window appears.
2. Click the Session Monitor tab.
3. Select Actions > Export Sessions Report.
The Save dialog box appears.
4. Browse to the folder in which to save the report data, and type a descriptive filename in the File name field.
5. Click OK.
EMC AVAMAR 6.0 • ADMINISTRATION GUIDE 224

Setting up the PostgreSQL ODBC driverREPORTING
Support for third-party reporting tools
PostgreSQL. Avamar uses a PostgreSQL database to store various data. PostgreSQL is a highly regarded open-source Relational Database Management System (RDMS). Information in the Avamar database is accessible through any PostgreSQL-compliant Open DataBase Connectivity (ODBC) interface.
Crystal Reports templates. Crystal Reports is a popular database reporting tool. Avamar Administrator provides several Crystal Reports templates that you can use to quickly generate various Avamar system reports. You can also customize these templates or create new ones.
Setting up the PostgreSQL ODBC driverTo configure the Microsoft Windows PostgreSQL ODBC Driver on the local Windows client to support common third-party reporting packages such as Crystal Reports:
1. Download and install the latest driver from the PostgreSQL website (www.postgresql.org).
2. Open the Windows Start menu and select Settings > Control Panel > Administrative Tools.
The Administrative Tools window appears.
3. Double-click Data Sources (ODBC).
The ODBC Data Source Administrator appears.
4. Click the System DSN tab.
EMC AVAMAR 6.0 • ADMINISTRATION GUIDE 225

Setting up the PostgreSQL ODBC driverREPORTING
5. Click Add.
The Create New Data Source dialog box appears.
6. Select the PostgreSQL Driver and click Finish.
The PostgreSQL ODBC Driver (psqlODBC) Setup dialog box appears.
7. Complete the settings as described in the following table.
SETTING DESCRIPTION
Data Source Type a short name, such as MCDatabase.
Description Leave this blank.
Database Type mcdb.
Server Hostname where mcdb is running (for example, dpn50mcs).
Port Leave this set to 5555.
User name Type viewuser.
Password Type viewuser1.
EMC AVAMAR 6.0 • ADMINISTRATION GUIDE 226

Setting up the PostgreSQL ODBC driverREPORTING
8. Click Options > Datasource.
The Advanced Options (DSN 1 / 2) dialog box appears.
9. Select or clear the following:
(a) Under Unknown Sizes, select Don't Know.
(b) Clear Text as LongVarChar.
(c) Clear Bools as Char.
10.Click OK.
The Advanced Options (DSN 1 / 2) dialog box closes.
11.Switch to the PostgreSQL ODBC Driver (psqlODBC) Setup dialog box and click Save.
The PostgreSQL ODBC Driver (psqlODBC) Setup dialog box closes.
12.Switch to ODBC Data Source Administrator and click OK.
The ODBC Data Source Administrator closes.
13.Close the Administrative Tools and Control Panel windows.
EMC AVAMAR 6.0 • ADMINISTRATION GUIDE 227

Crystal Reports templatesREPORTING
Crystal Reports templatesAvamar provides a set of Crystal Reports templates that you can use to generate reports. The default location for these templates is:
• C:\Program Files\avs\administrator\doc on Windows• /usr/local/avamar/doc on Linux
TIP: A complete discussion of how to use Crystal Reports templates is beyond the scope of this guide. The Crystal Reports documentation provides information.
The following table lists the default Avamar Crystal Reports templates.
TEMPLATE NAME (FILENAME) DESCRIPTION
Client Installation Report (ClientInstallation.rpt)
This report contains information for all clients installed on the MCS when the report is run.
Errors and Warning Events Report (ErrorWarningEvents.rpt)
This report contains all events of warning or error severity within a specified date and time interval.
Events Report (AllEvents.rpt) This report contains all events recorded by the MCS within a specified date and time interval.
Failed Restores Report (FailedRestores.rpt)
This report contains information for all failed restores within a specified date and time interval for all clients or for a specific client.
Failed Backups Report (FailedBackup.rpt)
This report contains information for all failed backups within a specified date and time interval for all clients or for a specific client.
Group Backup By Group Report (GroupbackupByGroup.rpt)
This report contains group backup statistics for all groups or for a specific group.
Group Backup By Schedule Report (GroupbackupByScheduled.rpt)
This report contains group backup statistics for backups initiated within a specified date and time interval.
Server Drive Capacity Report (ServerDriveCapacity.rpt)
This report provides hard drive capacity statistics for each server node based on the specified date and time interval.
EMC AVAMAR 6.0 • ADMINISTRATION GUIDE 228

Other third-party supportREPORTING
Other third-party support
dbviews.sql. You can generate Avamar reports using any third-party PostgreSQL-compliant ODBC database reporting tool that runs on the platform. However, you must create report templates using the schema listings found in dbviews.sql. This file is located in the utility node /usr/local/avamar/lib/sql directory.
Appendix C — MCS and EMS Database Views (page 667) provides details on each view in dbviews.sql view and the individual columns storing data within each view.
Successful Restores Report (SuccessfulRestores.rpt)
This report contains information for all successful restores within a specified date and time interval for all clients or for a specific client.
Successful Backups Report (SuccessfulBackup.rpt)
This report contains information for all successful backups within a specified date and time interval for all clients or for a specific client.
TEMPLATE NAME (FILENAME) DESCRIPTION
EMC AVAMAR 6.0 • ADMINISTRATION GUIDE 229

AVAMAR CLIENT AGENT AND PLUG-IN MANAGEMENT
Each time a client communicates with an Avamar server, it identifies itself by sending the client ID, the specific agent version and build running on that client, and a list of plug-ins (version and build) currently installed on that client. Occasionally, because of known incompatibilities, you may want to deny Avamar server access to all clients running a specific version (all builds) or a specific build of a client agent or plug-in. The manage all client agents and plug-ins feature provides the mechanism for accomplishing this.
TIP: Avamar clients (page 24) provides a general discussion of client agents and plug-ins and their role in the Avamar system.
Disabling a version or build. You can deny access to the server on a version-by-version (all builds) or build-by-build basis. This is done by editing the properties for a particular agent or plug-in version or build and setting the Disable option.
Selective management of plug-in operations. You can also selectively allow or disallow the following plug-in operations for all clients running a specific plug-in version (all builds) or build:
• Client activations initiated from the client• On-demand backups initiated from the client• Scheduled backups• Restores• Backup validation• Ability to browse stored backups on the server
Editing version or build record settings (page 235) provides details.
Obsolete versions and builds. Any specific version (all builds) or build that is designated as obsolete is completely denied access to the Avamar server. A build is designated as obsolete only in cases of known incompatibility between the client agent or plug-in and the specific version of server software that was installed. Therefore, to prevent potential problems, this obsolete designation cannot be overridden using the feature to edit properties for that version or build.
EMC AVAMAR 6.0 • ADMINISTRATION GUIDE 230

Agents Summary viewAVAMAR CLIENT AGENT AND PLUG-IN MANAGEMENT
Agents Summary viewThe Agents Summary view lists all client agent versions and builds potentially known to this Avamar server.
IMPORTANT: Agent versions and builds that are not supported by this version of Avamar server software are shown as obsolete. Clients with these versions or builds are completely denied access to the server and must upgrade before they can access this server. Please refer to the EMC Avamar Compatibility and Interoperability Matrix, available on the Avamar Support landing page: https://support.emc.com/products/Avamar.
To display the Agents Summary view:
1. In Avamar Administrator, select Tools > Manage Agents & Plug-ins.
The Manage All Agents & Plug-ins window appears.
2. Click the Agents Summary tab.
The following table explains the properties for each client agent.
PROPERTY DESCRIPTION
Name Name of this client agent.
Version Specific version of this client agent.
Build Either the specific software build of this client agent, or ALL if this entry is applicable to all builds.
Obsolete Yes or no. If yes, the agents and plug-ins definition file has reported that this specific client agent version (all builds) or build has been superseded by a newer version or build.
EMC AVAMAR 6.0 • ADMINISTRATION GUIDE 231
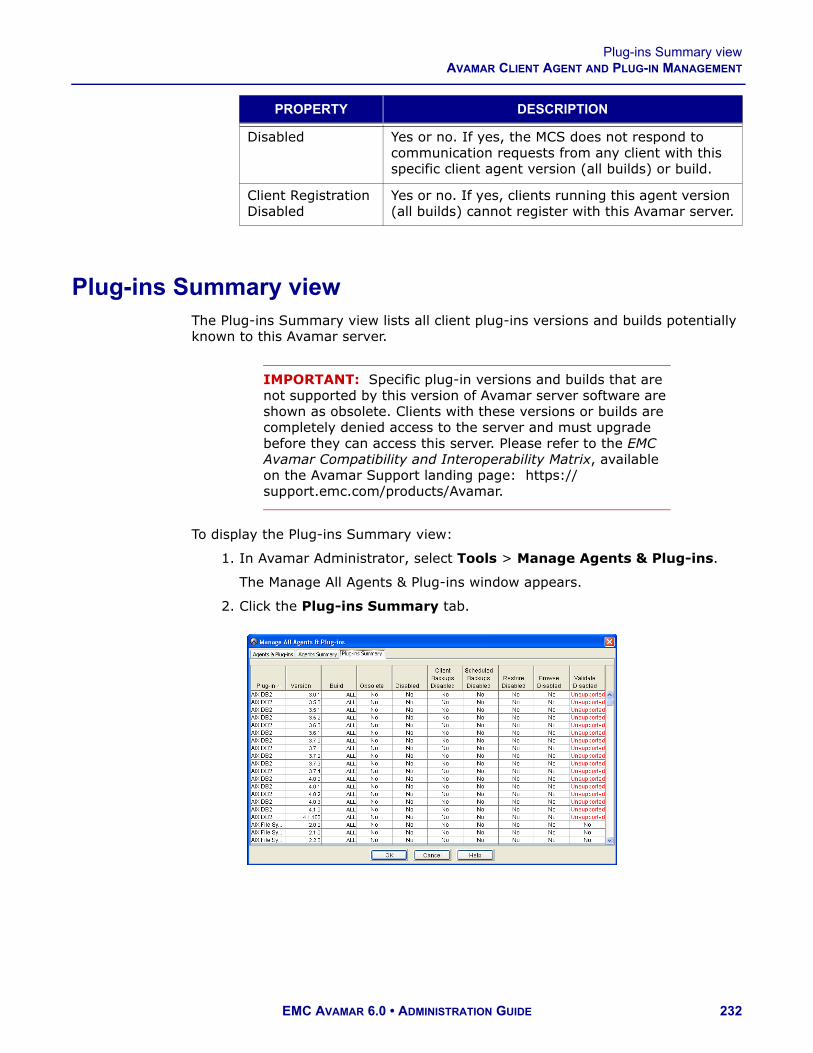
Plug-ins Summary viewAVAMAR CLIENT AGENT AND PLUG-IN MANAGEMENT
Plug-ins Summary viewThe Plug-ins Summary view lists all client plug-ins versions and builds potentially known to this Avamar server.
IMPORTANT: Specific plug-in versions and builds that are not supported by this version of Avamar server software are shown as obsolete. Clients with these versions or builds are completely denied access to the server and must upgrade before they can access this server. Please refer to the EMC Avamar Compatibility and Interoperability Matrix, available on the Avamar Support landing page: https://support.emc.com/products/Avamar.
To display the Plug-ins Summary view:
1. In Avamar Administrator, select Tools > Manage Agents & Plug-ins.
The Manage All Agents & Plug-ins window appears.
2. Click the Plug-ins Summary tab.
Disabled Yes or no. If yes, the MCS does not respond to communication requests from any client with this specific client agent version (all builds) or build.
Client Registration Disabled
Yes or no. If yes, clients running this agent version (all builds) cannot register with this Avamar server.
PROPERTY DESCRIPTION
EMC AVAMAR 6.0 • ADMINISTRATION GUIDE 232

Plug-ins Summary viewAVAMAR CLIENT AGENT AND PLUG-IN MANAGEMENT
The following table explains the properties shown for each plug-in.
PROPERTY DESCRIPTION
Name Name of this plug-in.
Version Specific version of this plug-in.
Build Specific software build of this plug-in, or ALL if this entry is applicable to all versions.
Obsolete Yes or no. If yes, the agents and plug-ins definition file has reported that this specific client plug-in version (all builds) or build has been superseded by a newer version or build.
Disabled Yes or no. If yes, any client running this specific client plug-in version (all builds) or build is prevented from performing any backup, restore, or validation activities.
Client Backups Disabled Yes or no. If yes, on-demand backups cannot be initiated by clients with this specific client plug-in version (all builds) or build.
Scheduled Backups Disabled Yes or no. If yes, scheduled backups are not performed on clients with this specific client plug-in version (all builds) or build.
Restore Disabled Yes or no. If yes, restores cannot be performed on clients with this specific client plug-in version (all builds) or build.
Browse Disabled Yes or no. If yes, clients with this specific plug-in version (all builds) or build are not allowed to browse the restore calendar.Unsupported denotes that this specific plug-in version does not support selective management of this feature.
Validate Disabled Yes or no. If yes, backup validations cannot be performed using this specific plug-in version.Unsupported denotes that this specific plug-in version does not support selective management of this feature.
Extended Cancel Timeout Yes or no. If yes, clients with this specific plug-in version (all builds) or build are allowed additional time to cancel a work order before Avamar Administrator forcibly cancels it.
EMC AVAMAR 6.0 • ADMINISTRATION GUIDE 233

Adding a build recordAVAMAR CLIENT AGENT AND PLUG-IN MANAGEMENT
Adding a build recordYou can add an MCS database record for a specific client agent or plug-in build. You can only add records at the build level; you cannot add a record for a new version (all builds). New version records are automatically added after Avamar server software upgrades.
To add a build record:
1. In Avamar Administrator, select Tools > Manage Agents & Plug-ins.
The Manage All Agents & Plug-ins window appears.
2. In the tree, select the agent or plug-in version for the build.
3. Click New.
The New Build dialog box appears.
EMC AVAMAR 6.0 • ADMINISTRATION GUIDE 234

Editing version or build record settingsAVAMAR CLIENT AGENT AND PLUG-IN MANAGEMENT
4. Complete the settings as described in the following table.
5. Click OK.
Editing version or build record settings1. In Avamar Administrator, select Tools > Manage Agents & Plug-ins.
The Manage All Agents & Plug-ins window appears.
2. In the tree, select the agent or plug-in version or build to edit.
3. Click Edit.
The Edit Build dialog box appears.
SETTING DESCRIPTION
Build Type a valid agent or plug-in build number.
Disable Select this option to deny Avamar server access to any clients with this agent or plug-in build.
Disable Client Initiated Registration
Select this option to prevent any clients with this agent or plug-in build from registering with the Avamar server.
Comment Type an optional descriptive comment.
EMC AVAMAR 6.0 • ADMINISTRATION GUIDE 235

Deleting a build recordAVAMAR CLIENT AGENT AND PLUG-IN MANAGEMENT
4. Edit the build information.
Adding a build record (page 234) provides details on agent and plug-in build settings.
5. Click OK.
Deleting a build recordYou can delete an MCS database record for a specific client agent or plug-in build. You can only delete records at the build level; you cannot delete a record for an entire version.
To delete a build record:
1. In Avamar Administrator, select Tools > Manage Agents & Plug-ins.
The Manage All Agents & Plug-ins window appears.
2. In the tree, select the agent or plug-in build to delete.
3. Click Delete.
EMC AVAMAR 6.0 • ADMINISTRATION GUIDE 236

Enabling and disabling all client initiated activationsAVAMAR CLIENT AGENT AND PLUG-IN MANAGEMENT
Enabling and disabling all client initiated activationsYou can temporarily disable all new client initiated client activations. This is typically done to place the system in a state that supports various maintenance activities.
You can then reenable client initiated activations.
To disable and enable client initiated activations:
1. In Avamar Administrator, select Tools > Manage Agents & Plug-ins.
The Manage All Agents & Plug-ins window appears.
2. Click either Enable All Client Initiated Activations or Disable All Client Initiated Activations.
EMC AVAMAR 6.0 • ADMINISTRATION GUIDE 237

Enabling and disabling all client initiated backupsAVAMAR CLIENT AGENT AND PLUG-IN MANAGEMENT
Enabling and disabling all client initiated backupsYou can temporarily prevent Avamar clients from initiating on-demand backups. This is typically done to place the system in a state that supports various maintenance activities.
You can then re-enable all client initiated backups.
To disable and enable all client initiated backups:
1. In Avamar Administrator, select Tools > Manage Agents & Plug-ins.
The Manage All Agents & Plug-ins window appears.
2. Click either Enable All Client Initiated Backups or Disable All Client Initiated Backups.
EMC AVAMAR 6.0 • ADMINISTRATION GUIDE 238

SERVER MONITORING
This chapter describes how to monitor various aspects of Avamar server performance.
Recommended daily server monitoringTo ensure that the Avamar server is working properly, EMC recommends that you perform the system monitoring tasks in the following table on a daily basis.
TIP: EMC recommends that you enable the Email Home feature (page 181) and the ConnectEMC feature (page 192), which automatically email EMC Technical Support with the status of the daily data integrity check and other important server messages.
MONITORING TOOL MONITORING TASK
Activity Monitor (page 82) Investigate any abnormal client activity.
Server Monitor (page 240) Confirm that the last checkpoint and validated checkpoint are recent. Ideally, they should have occurred within the past 24 hours.
Event Monitor (page 261) Investigate any error or warning messages.
Unacknowledged Events list (page 281)
Investigate and clear (acknowledge) any unacknowledged events.
EMC AVAMAR 6.0 • ADMINISTRATION GUIDE 239

Monitoring the serverSERVER MONITORING
Monitoring the server1. In Avamar Administrator, click the Server launcher button.
The Server window appears.
Server Monitor tab
The Server Monitor tab presents a summarized view of CPU, network, and hard drive performance statistics for the Avamar server, as well as any Data Domain system that might have been added to this system configuration.
EMC AVAMAR 6.0 • ADMINISTRATION GUIDE 240

Monitoring the serverSERVER MONITORING
Avamar tab
The Server Monitor Avamar tab presents a summarized view of CPU, network, and hard drive performance statistics for the Avamar server.
The following table describes the information available on the Server Monitor Avamar tab.
PROPERTY DESCRIPTIONN
OD
EStatus indicators
One of the following:
Online (green) The node is functioning properly.
Read-Only (blue) This status occurs normally as background operations are performed and when backups have been suspended (page 282).
Time-Out (gray) MCS could not communicate with this node.
Unknown (yellow) Node status cannot be determined.
Offline (red) The node has experienced a problem.a
NO
DE
ID Each node in the Avamar server has a unique logical identifier. This node ID is expressed in the following format:
MODULE.NODENOTE: Module and node numbering begins with zero. Therefore, the ID for the third node in the first module is 0.2.
CP
U
Load Average number of CPU threads over the past minute.
User Percentage of CPU capacity consumed by executing server instructions (anything other than operating system overhead).
Sys Percentage of CPU capacity consumed by operating system overhead.
NE
TW
OR
K Ping Time in seconds that this node took to respond to a ping request.
In Received packet throughput reported in KB per second.
Out Sent packet throughput reported in KB per second.
EMC AVAMAR 6.0 • ADMINISTRATION GUIDE 241
Monitoring the serverSERVER MONITORING
DIS
K
Reads Average number of hard drive reads per second as reported by the operating system.
Writes Average number of hard drive writes per second as reported by the operating system.
Utilization Percentage of total available server storage capacity currently used.
a. If ConnectEMC has been enabled, a Service Request (SR) should havebeen logged. Go to the EMC Powerlink website at http://Power-link.EMC.com to view existing SRs for your system. Search the knowl-edgebase for Avamar Data Node offline solution esg112792 or consultthe Administration link on the Avamar Support landing page, https://support.emc.com/products/Avamar, for additional troubleshooting in-formation.
PROPERTY DESCRIPTION
EMC AVAMAR 6.0 • ADMINISTRATION GUIDE 242

Monitoring the serverSERVER MONITORING
Data Domain tab
The Server Monitor Data Domain tab provides CPU, disk activity, and network activity for each node on the Data Domain system.
The following table describes the information available on the Server Monitor Data Domain tab.
PROPERTY DESCRIPTION
NO
DE
Status indicators
One of the following:
OK (green) The Data Domain system is functioning properly.
Warning (yellow) There is a problem with the Data Domain system, but backups and restores can continue.
Error (red) There is a problem with the Data Domain system, and backups and restores will not occur until the problem is resolved.
If the status is yellow or red, you can view additional status information so that you can determine and resolve the problem. Troubleshooting Data Domain (page 552) provides details.
Name Hostname of the Data Domain system as defined in corporate DNS.
CP
U
Busy Avg. Average CPU usage as a percentage of total possible CPU usage.
Max Maximum CPU usage that has occurred as a percentage of total possible CPU usage.
EMC AVAMAR 6.0 • ADMINISTRATION GUIDE 243

Monitoring the serverSERVER MONITORING
DIS
K (
KIB
/S) Read Disk read throughput in kilobytes per second.
Write Disk write throughput in kilobytes per second.
Busy Disk I/O usage as a percentage of total possible disk I/O usage.
NE
TW
OR
K (
KB
/S)
Eth#1 Desc Description of the network interface.
In/Out Network bandwidth usage in kilobytes per second on network interface 1.
Eth#2 Desc Description of the network interface.
In/Out Network bandwidth usage in kilobytes per second on network interface 2.
Eth#3 Desc Description of the network interface.
In/Out Network bandwidth usage in kilobytes per second on network interface 3.
Eth#4 Desc Description of the network interface.
In/Out Network bandwidth usage in kilobytes per second on network interface 4.
NOTE: The number of Eth# columns depends on the maximum number of network interfaces that the configured Data Domain systems support.
PROPERTY DESCRIPTION
EMC AVAMAR 6.0 • ADMINISTRATION GUIDE 244

Monitoring the serverSERVER MONITORING
Server Management tab
The Server Management tab shows a detailed view of the server hardware resources, including both the Avamar server and any configured Data Domain systems.
Avamar server information is listed under the Avamar folder in the tree, and configured Data Domain systems are listed under the Data Domain folder in the tree.
The information in the right pane of the window changes when you select different items in the tree:
• When you select the Servers node, the right pane shows a summary of bytes protected.
• When you select the Avamar or Data Domain nodes, the right pane is blank.
• When you select the Avamar server name, the right pane shows detailed information for the Avamar server.
• When you select a module, the right pane shows detailed information for that module.
• When you select a node, the right pane shows detailed information for that node.
• When you select a partition, the right pane shows detailed information for that logical hard drive partition.
• When you select a Data Domain system, the right pane shows detailed information for that Data Domain system.
NOTE: Avamar is licensed in decimal units, so "Total capacity" and "Capacity used" are displayed in decimal units. All other parts of the product that output capacity are displayed in binary units.
EMC AVAMAR 6.0 • ADMINISTRATION GUIDE 245

Monitoring the serverSERVER MONITORING
The following tables provide details on the information that appears for each item in the tree.
Bytes Protected Summary
Server information
PROPERTY DESCRIPTION
Properties Name of the Avamar server and configured Data Domain systems.
Values Number of bytes of protected data on the server or Data Domain system.
PROPERTY DESCRIPTION
SE
RV
ER
DE
TA
ILS
Active sessions Current number of active client sessions. Click the Session Monitor tab (page 258) for additional information.
Total capacity Total amount of server storage capacity.
Server utilization Percentage of total available server storage capacity currently used.NOTE: This value is derived from the largest Disk Utilization value shown in the Server Monitor Avamar tab (page 241) and therefore represents the absolute maximum Avamar server utilization. Actual utilization across all modules, nodes and drives might actually be slightly lower.
Bytes protected Total amount of client data in bytes that has been backed up (protected) on this server.
Bytes protected quota
Maximum amount of client data in bytes that is licensed for protection on this server.
License expiration Calendar date on which this server's licensing expires, or never if licensing is perpetual.
Time since Server initialization
Number of hours, days, and minutes that have elapsed since this Avamar server was initialized.
Last checkpoint Date and time that the last server checkpoint was performed. Checkpoints are typically performed twice daily.
EMC AVAMAR 6.0 • ADMINISTRATION GUIDE 246

Monitoring the serverSERVER MONITORING
SE
RV
ER
DE
TA
ILS
Last validated checkpoint
Date and time that the server checkpoint was last validated. Checkpoint validation normally occurs once per day. Therefore, the Last validated checkpoint time and Last checkpoint time might be different depending on the time of day that you view this information.IMPORTANT: If the Last validated checkpoint and Last checkpoint times are more than 36 hours apart, this indicates that checkpoint validation is not occurring. This is a problem.a
System Name User-assigned name of this Avamar server.
System ID Unique identifier for this Avamar server.
HFSAddr Hash Filesystem (HFS) address (Addr). This is the hostname or IP address that backup clients use to connect to this Avamar server.
HFSPort Hash Filesystem (HFS) data port. This is the data port that backup clients use to connect to this Avamar server. The default is port 27000.
IP Address IP address of this Avamar server. If the HFSAddr is an IP address, this value is the same as the HFSAddr.
MA
INT
EN
AN
CE
AC
TIV
ITIE
S D
ET
AIL
S Suspended One of the following:
No Server maintenance activities are not currently suspended (that is, server maintenance activities will run normally during the next maintenance (page 280) or blackout (page 279) window).
Yes Server maintenance activities are currently suspended.
PROPERTY DESCRIPTION
EMC AVAMAR 6.0 • ADMINISTRATION GUIDE 247

Monitoring the serverSERVER MONITORING
GA
RB
AG
E C
OL
LE
CT
ION
DE
TA
ILS
Status One of the following:
Idle Garbage collection is not currently taking place.
Processing Garbage collection is currently taking place.
Result One of the following:
OK Last garbage collection activity successfully completed.
Error code Last garbage collection activity did not successfully complete.
Start time Date and time that the last garbage collection activity began.
End time Date and time that the last garbage collection activity ended.
Passes Total number of passes during the last garbage collection activity.
Bytes recovered Total amount of storage space in bytes that was recovered during the last garbage collection activity.
Chunks deleted Total number of data chunks that were deleted during the last garbage collection activity.
Index stripes Total number of index stripes.
Index stripes processed
Total number of index stripes that were processed during the last garbage collection activity.
a. If ConnectEMC has been enabled, a Service Request (SR) should havebeen logged. Go to the EMC Powerlink website at http://Power-link.EMC.com to view existing SRs for your system. Consult the Admin-istration link on the Avamar Support landing page, https://support.emc.com/products/Avamar, for additional trouble-shooting information.
PROPERTY DESCRIPTION
EMC AVAMAR 6.0 • ADMINISTRATION GUIDE 248

Monitoring the serverSERVER MONITORING
Module Information
Node Information
PROPERTY DESCRIPTION
Total capacity Total amount of server storage capacity.
Server utilization Percentage of total available server storage capacity currently used.NOTE: This value is derived from the largest Disk Utilization value shown in the Server Monitor Avamar tab (page 241) and therefore represents the absolute maximum Avamar server utilization. Actual utilization across all modules, nodes and drives might actually be slightly lower.
Number of nodes Total number of nodes in this module.
IP address Base IP address of this module.
PROPERTY DESCRIPTION
Status indicators One of the following:
Online (green) Node is functioning properly.
Read-Only (blue) This occurs normally as background operations are performed and when backups have been suspended.
Time-Out (gray) MCS could not communicate with this node.
Unknown (yellow) Node status cannot be determined.
Offline (red) Node has experienced a problem.a
EMC AVAMAR 6.0 • ADMINISTRATION GUIDE 249

Monitoring the serverSERVER MONITORING
SE
RV
ER
DE
TA
ILS
State Current operational state of the server. One of the following:
ONLINE Node is functioning properly.
DEGRADED One or more disk errors have been detected.
OFFLINE Node has experienced a problem.b
READONLY This occurs normally as background operations are performed and when backups have been suspended.
AV
AM
AR
SE
RV
ER
DE
TA
ILS
Runlevel Current operational state of the server. One of the following:
fullaccess This Avamar server is fully operational.
admin Avamar server is fully operational but only the administrator root account can access the server.
adminonly Avamar server is fully operational but only the administrator root account can access the server.
adminreadonly Avamar server is in a read-only condition and only the administrator root account can access the server.
readonly Avamar server is in a read-only condition. Restores are allowed but no new backups can be taken.
suspended Scheduled backups are disabled and will not occur until you reenable the scheduler.
synchronizing Avamar server is priming or synchronizing stripes. This is a temporary condition. Some operations might be delayed.
PROPERTY DESCRIPTION
EMC AVAMAR 6.0 • ADMINISTRATION GUIDE 250

Monitoring the serverSERVER MONITORING
SE
RV
ER
DE
TA
ILS
Accessmode Current access level of the server.The full server access mode is typically represented as three four-bit fields. For example:
mhpu+mhpu+0000The most significant bits show server privileges, the middle bits show root user privileges and the least significant bits show privileges for all other users. Individual bits in these fields convey the following information:
m Migrate allowed.
h Hash Filesystem (HFS) is writable.
p Persistent store is writable.
u User accounting is writable.
Port Data port used for intra-node communication.
Dispatcher Data port used by various utilities to communicate with this node.
Server uptime Number of hours, days and minutes that have elapsed since this Avamar server was initialized.
Total capacity Total amount of server storage capacity.
Capacity used Total amount of server storage capacity that has been used for any reason.
Server utilization Percentage of total available node storage capacity currently used.
Number of stripes
Total number of stripes on this node.
Server version Version of Avamar software running on this node.
PROPERTY DESCRIPTION
EMC AVAMAR 6.0 • ADMINISTRATION GUIDE 251

Monitoring the serverSERVER MONITORING
OS
DE
TA
ILS
Version Current operating system version running on this node.
Node uptime Number of hours, days and minutes that have elapsed since this node was last booted.
Load average The average number of CPU threads over the past minute.
CPU % Percentage of this node’s CPU currently being used.
Ping time (sec) Time in seconds this node took to respond to a ping request.
Disk reads Number of hard drive read operations per second.
Disk writes Number of hard drive write operations per second.
Network reads Number of Kilobytes per second read by way of this node’s network connection.
Network writes Number of Kilobytes per second written by way of this node’s network connection.
HA
RD
WA
RE
DE
TA
ILS IP address IP address of this node.
MAC address Media Access Control (MAC) address. A low-level hardware address that uniquely identifies this node in the Avamar server.
Number of partitions
Total number of logical hard drive partitions in this node.
a. If ConnectEMC has been enabled, a Service Request (SR) should havebeen logged. Go to the EMC Powerlink website at http://Power-link.EMC.com to view existing SRs for your system. Search the knowl-edgebase for Avamar Data Node offline solution esg112792 or consultthe Administration link on the Avamar Support landing page, https://support.emc.com/products/Avamar, for additional troubleshooting in-formation.
b. If ConnectEMC has been enabled, a Service Request (SR) should havebeen logged. Go to the EMC Powerlink website at http://Power-link.EMC.com to view existing SRs for your system. Search the knowl-edgebase for Avamar Data Node offline solution esg112792 or consultthe Administration link on the Avamar Support landing page, https://support.emc.com/products/Avamar, for additional troubleshooting in-formation.
PROPERTY DESCRIPTION
EMC AVAMAR 6.0 • ADMINISTRATION GUIDE 252

Monitoring the serverSERVER MONITORING
Partition Information
PROPERTY DESCRIPTION
Status indicators
One of the following:
Online (green) The partition is functioning properly.
Offline (yellow) The partition has one or more offline stripes.a
Read-Only (blue) The partition is read-only.
Nonfunctional (red) The partition is not functioning.b
SE
RV
ER
DE
TA
ILS
Total capacity Total amount of server storage capacity.
Server utilization
Percentage of total available partition storage capacity that is currently used.
State Current operational state of this partition. One of the following:
ONLINE The partition is functioning properly.
MIGRATING Transitional state that might or might not be due to normal operation.
OFFLINE Transitional state that might or might not be due to normal operation.
READY Transitional state that might or might not be due to normal operation.
RESTARTING Transitional state that might or might not be due to normal operation.
Number of offline stripes
Total number of stripes on this partition that are offline due to media errors.
Number of transitioning stripes
Total number of stripes on this partition that are in a transitional state that might or might not be due to normal operation.
OS D
etai
ls Properties Various operating system properties (if known).
Values Settings for operating system properties (if known).
EMC AVAMAR 6.0 • ADMINISTRATION GUIDE 253

Monitoring the serverSERVER MONITORING
a. If ConnectEMC has been enabled, a Service Request (SR) should havebeen logged. Go to the EMC Powerlink website at http://Power-link.EMC.com to view existing SRs for your system. Consult the Admin-istration link on the Avamar Support landing page, https://support.emc.com/products/Avamar, for additional troubleshooting in-formation.
b. Search the knowledgebase at the EMC Powerlink website, http://Power-link.EMC.com, for solution esg108474 or consult the Administration linkon the Avamar Support landing page, https://support.emc.com/prod-ucts/Avamar, for additional troubleshooting information.
EMC AVAMAR 6.0 • ADMINISTRATION GUIDE 254

Monitoring the serverSERVER MONITORING
Data Domain system information
PROPERTY DESCRIPTION
DA
TA
DO
MA
IN S
ER
VE
R D
ET
AIL
S
Status indicators
One of the following:
Online (green) The Data Domain system is functioning properly.
Offline (yellow) The Data Domain system is offline. See the Data Domain Offline Diagnostics Suite User Guide, available through the https://my.datadomain.com, for more information.
Read-Only (blue) The Data Domain system is read-only.
Nonfunctional (red) The Data Domain system is not functioning. See the Data Domain Offline Diagnostics Suite User Guide, available through the https://my.datadomain.com, for more information.
Hostname The network hostname of the Data Domain system as defined in DNS.
Total Capacity (post-comp size)
The total capacity for compressed data on the Data Domain system.
Server Utilization (post-comp use%)
The percentage of capacity used on the Data Domain system for any reason after compression of the data.
Bytes Protected
The total number of bytes of data that are protected, or backed up, on the Data Domain system. This value is the number of bytes before the data is compressed.
File System Available (post-comp avail)
The total amount of disk space available for compressed data in the DDFS.
File System Used (post-comp used)
The total amount of disk space used in the DDFS for compressed data.
EMC AVAMAR 6.0 • ADMINISTRATION GUIDE 255

Monitoring the serverSERVER MONITORING
DA
TA
DO
MA
IN S
ER
VE
R D
ET
AIL
S
User Name The username of the Data Domain OpenStorage (OST) account that Avamar should use to access the Data Domain system for backups, restores, and replication, if applicable. This username is specified when you add the Data Domain system to the Avamar configuration.
Default Replication Storage System
Whether the Data Domain system is configured as default replication storage. This option is selected or cleared when you add the Data Domain system to the Avamar configuration.
Maximum Streams
The maximum number of Data Domain system streams that Avamar can use at any one time to perform backups and restores. This number is configured for the Data Domain system when you add the system to the Avamar configuration.
DDOS Version Version number of the Data Domain Operating System (DDOS) on the Data Domain system.
Serial Number The manufacturer’s serial number for the disk in the Data Domain system.
Model number Model number of the Data Domain system.
Monitoring Status
Monitoring status of the Data Domain system. Data Domain status and resolutions (page 553) provides details on the available values.
Monitoring status details
When the monitoring status is a value other than OK, then additional information appears in a list below the Monitoring Status row. The following rows describe the available values.NOTE: Monitoring status details (page 558) provides details on how to troubleshoot error conditions that result from each of these values.
DD Boost licensing status, either:• DDBoost Licensed• DDBoost not Licensed
DD Boost status, either:• DDBoost Enabled• DDBoost Disabled
Whether the DD Boost user is enabled or disabled, either:
• DDBoost User Enabled• DDBoost User Disabled
DD Boost user status, either:• DDBoost User Valid• DDBoost User Changed
PROPERTY DESCRIPTION
EMC AVAMAR 6.0 • ADMINISTRATION GUIDE 256
Monitoring the serverSERVER MONITORING
Replication Storage Mapping tab
The Replication Storage Mapping tab is used to map replicated clients to a Data Domain system. Replication with Data Domain (page 544) provides details.
DA
TA
DO
MA
IN S
ER
VE
R D
ET
AIL
S
Monitoring status details(continued)
DD Boost option status, either:• DDBoost Option Enabled• DDBoost Option Disabled• DDBoost Option not Available
Status of the non-OST user, if configured, either:• Non-ost user state is Unknown• Non-ost user Invalid• Non-ost user disabled• Non-ost user is not an admin user
NOTE: This row does not appear if the non-OST user has not been configured.
SNMP status, either:• SNMP Enabled• SNMP Disabled
Status of the Data Domain file system, either:• File System Running• File System Enabled• File System Disabled• File System Unknown• File system status unknown since SNMP is
disabled
Whether synchronization of maintenance operations, such as checkpoints, HFS checks, and Garbage Collection, between the Avamar server and the Data Domain system can occur, either:
• Synchronization of maintenance operations is off. • Synchronization of maintenance operations is on.
PROPERTY DESCRIPTION
EMC AVAMAR 6.0 • ADMINISTRATION GUIDE 257

Monitoring the serverSERVER MONITORING
Session Monitor tab
The Session Monitor tab shows a list of active client backup and restore sessions.
PROPERTY DESCRIPTION
US
ER
User Avamar user ID (account name).
Path Specifies a hierarchical location in the Avamar server. This option is relative to the user's home location unless slash (/) is prefixed to the path designation, in which case an absolute path is assumed.
Domain Avamar domain where this user resides.
Client ID Unique identifier for this Avamar client.
SE
SS
ION
Type This activity is one of the following:• avtarbackup• avtarrestore
Root Top level of the filesystem being backed up, restored, or validated.
Start time Date and time that this client session started.
Plug-in Plug-in used for this activity.
Session ID Unique identifier for this client session.
Work order ID Unique identifier for this activity.
Elapsed Length of time that this client session has been running.
Progress bytes Total number of bytes examined during this activity.
New bytes Percentage of new bytes backed up to either the Avamar server or a Data Domain system. Low numbers indicate high levels of data deduplication.
SY
ST
EM Name Client hostname.
OS name Operating system used by this client.
App version Avamar client software version.
EMC AVAMAR 6.0 • ADMINISTRATION GUIDE 258

Monitoring the serverSERVER MONITORING
Checkpoint Management tab
The Checkpoint Management tab shows detailed information for all system checkpoints performed for this Avamar server. Checkpoints (page 357) provides details on checkpoints.
Domains/Clients tab
The Domains/Clients tab shows the nested domain structure on this server and all clients currently registered to this server. Domains and subdomains (page 38) and Clients (page 44) provide details.
PROPERTY DESCRIPTION
Status indicators One of the following:
The checkpoint failed validation.
The checkpoint has not yet been validated.
Validation is currently being performed on this checkpoint.
The checkpoint passed validation.
Tag Unique identifier for this checkpoint.
Time Date and time that this checkpoint was taken.
Nodes Total number of nodes involved in this checkpoint.
Stripes Total number of stripes involved in this checkpoint.
CH
EC
KP
OIN
T V
AL
IDA
TIO
N
Start Time Date and time that this checkpoint validation was initiated.
Finished Time Date and time that this checkpoint validation completed.
Errors Number of errors encountered during this checkpoint validation.
Type One of the following:
Full Validation performed all checks.
Rolling All new and modified stripes were fully validated, and a subset of unmodified stripes were validated.
EMC AVAMAR 6.0 • ADMINISTRATION GUIDE 259

Verifying system integritySERVER MONITORING
Verifying system integrityTo verify Avamar server integrity, you must first ensure that a validated server checkpoint exists. You might also want to collect and examine the server log files (page 275) to ensure that no errors have occurred since that checkpoint was performed.
To very system integrity:
1. In Avamar Administrator, click the Server launcher button.
The Server window appears.
2. Click the Server Management tab.
3. Select the Avamar server name in the tree.
4. Verify that the Last validated checkpoint field shows a recent calendar date.
You should also manually collect and view server log files for errors. Collecting and viewing log files (page 275) provides additional information.
EMC AVAMAR 6.0 • ADMINISTRATION GUIDE 260

Viewing system eventsSERVER MONITORING
Viewing system events1. In Avamar Administrator, click the Administration launcher button.
The Administration window appears.
2. Click the Event Management tab.
The Event Monitor provides two basic display modes: query mode or monitor mode.
3. Click the Event Monitor tab (near the bottom).
Query Mode Setting the Query option places the Event Monitor in query mode, which shows the most recent 5,000 system events for a defined range of dates. Filtering the Event Monitor Display (page 263) provides additional information about displaying a specific range of dates in the Event Monitor.
Monitor Mode Setting the Monitor option places the Event Monitor in monitor mode, which shows the most recent 5,000 system events during the past 24 hours.
Filtered by The Filtered by fields show the current Event Monitor filtering settings. Filtering the Event Monitor Display (page 263) provides additional information about filtering the Event Monitor display to show specific events.
EMC AVAMAR 6.0 • ADMINISTRATION GUIDE 261

Viewing system eventsSERVER MONITORING
The information in the following table appears in the Event Monitor.
COLUMN DESCRIPTION
EID ID number for the event.
Date/Time Date and time that this event occurred.
Code Event code number.
Category Event category. One of the following:• System• Application• User• Security
Type Event type. One of the following:• Debug• Audit• Information• Warning• Error• Internal
Severity Event severity. One of the following:• OK• USER• PROCESS• NODE• USER_FATAL• PROCESS_FATAL• NODE_FATAL• SYSTEM_FATAL
Summary Short description of this event.
Domain Domain where this event occurred.
More Data If Yes, additional detailed information is available by double-clicking the event entry or selecting the event (row) in the list and selecting Actions > Event Management > View Detail.
EMC AVAMAR 6.0 • ADMINISTRATION GUIDE 262

Filtering the Event Monitor DisplaySERVER MONITORING
Filtering the Event Monitor Display1. In Avamar Administrator, click the Administration launcher button.
The Administration window appears.
2. Click the Event Management tab.
3. Click the Event Monitor tab near the bottom of the window.
4. Open the Actions menu and select Event Management > Filter.
The Filter dialog box appears.
EMC AVAMAR 6.0 • ADMINISTRATION GUIDE 263

Filtering the Event Monitor DisplaySERVER MONITORING
5. Define one or more of the filtering criteria described in the following table.
SETTING DESCRIPTION
From Date Used with the To Date field to define a specific range of dates in the Event Monitor.IMPORTANT: To type a range of dates, use the query mode for the Event Monitor (page 261). Otherwise, the From Date and To Date fields are disabled.
To Date Used with the From Date field to define a specific range of dates in the Event Monitor.IMPORTANT: To type a range of dates, use the query mode for the Event Monitor (page 261). Otherwise, the From Date and To Date fields are disabled.
Category Display events from the following categories:• All Categories • System • Application • User • Security
Type Display events of the following types:• All Types • Debug • Audit • Information• Warning• Error• Internal
Severity Display events of the following severities:• All Severities• OK• USER• PROCESS• NODE• USER_FATAL• PROCESS_FATAL • NODE_FATAL • SYSTEM_FATAL
Domains Select the All Domains option to display all events from all domains.To only show events from one domain, select the Domain option and type a domain name or click ... to browse to a domain.
EMC AVAMAR 6.0 • ADMINISTRATION GUIDE 264

Filtering the Event Monitor DisplaySERVER MONITORING
Data Only display events that contain these case-sensitive keywords in the event code data XML element.This promotes easy filtering on important keywords across event attributes. For example, filtering the Event Monitor display on “error” returns all events that contain the word “error” in any XML attribute (for example, category, type, or severity).
Source Display events from all sources, from only the Avamar server, from all Data Domain systems, or from a single Data Domain system:
• To view events from all sources, leave the default selection of All Sources in the list.
• To view events from only the Avamar server, select Avamar from the list.
• To view events from all Data Domain systems, select Data Domain Systems from the list and leave the default selection of All Systems.
• To view events from a single Data Domain system, select Data Domain Systems from the list, select the System option, and then either type or browse to the Data Domain system.
More/Less The More/Less button is used to display or hide advanced filtering features that enable you to include or exclude specific event codes.Clicking More displays an additional lower pane and the button name changes to Less, as shown in the following figure.
Clicking Less hides the additional lower pane and the button name changes to More.
SETTING DESCRIPTION
EMC AVAMAR 6.0 • ADMINISTRATION GUIDE 265

Filtering the Event Monitor DisplaySERVER MONITORING
IMPORTANT: To type a range of dates, use the query mode for the Event Monitor (page 261). Otherwise, the From Date and To Date fields are disabled.
6. Click OK.
Only include codes Setting Only include codes filters the Event Monitor to display only those event codes in the list.The Only include codes and Exclude codes options are mutually exclusive (you cannot both exclude and include specific event codes at the same time).
Exclude codes Setting Exclude codes causes the Event Monitor to not display any event codes in the list. The Only include codes and Exclude codes options are mutually exclusive (you cannot both exclude and include specific event codes at the same time).
Remove Selecting an event code from the list and clicking Remove removes it from the include or exclude list.
Add to List Typing a numeric event code in the entry field and clicking Add to list adds that event code to the include or exclude list.
SETTING DESCRIPTION
EMC AVAMAR 6.0 • ADMINISTRATION GUIDE 266

Viewing the Audit LogSERVER MONITORING
Viewing the Audit Log1. In Avamar Administrator, click the Administration launcher button.
The Administration window appears.
2. Click the Event Management tab.
3. Click the Audit Log tab toward the bottom of the window.
The audit log provides two basic display modes: query mode or monitor mode.
Query mode Setting the Query option places the audit log in query mode, which shows the most recent 5,000 audit log entries for a defined range of dates. Filtering the Audit Log display (page 269) provides details on displaying a specific range of dates in the audit log.
Monitor mode Setting the Monitor option places the audit log in monitor mode, which shows the most recent 5,000 audit log entries during the past 24 hours.
Filtered by The Filtered by fields show the current audit log filtering settings. Filtering the Audit Log display (page 269) provides additional information about filtering the audit log display to show specific audit log entries.
EMC AVAMAR 6.0 • ADMINISTRATION GUIDE 267

Viewing the Audit LogSERVER MONITORING
The following table describes the information that appears for each item in the audit log.
COLUMN DESCRIPTION
EID Unique identifier for the audit log entry.
Date/Time Date and time this action occurred.
Code Event code number.
User User ID that initiated this action.
Role Role in effect when this action was initiated.
Product One of the following:
EM Avamar Enterprise Manager.
EMS Avamar Enterprise Manager server.
END_USER
MCCLI Avamar Administrator Command Line Interface (CLI).
MCGUI Avamar Administrator.
MCS Avamar Administrator server.
NONE
SNMP_SUB_AGENT
TEST
WEB_RESTORE Avamar web restore feature.
Component Specific area within the product.
Operation Specific action taken.
Severity Event severity. One of the following:• OK• USER• PROCESS• NODE• USER_FATAL• PROCESS_FATAL• NODE_FATAL• SYSTEM_FATAL
Summary Short description of this action.
Domain Domain where this action occurred.
More Data If Yes, additional detailed information is available by double-clicking the event entry or selecting the event (row) in the list and selecting Actions > Event Management > View Detail.
EMC AVAMAR 6.0 • ADMINISTRATION GUIDE 268

Filtering the Audit Log displaySERVER MONITORING
Filtering the Audit Log display1. In Avamar Administrator, click the Administration launcher button.
The Administration window appears.
2. Click the Event Management tab.
3. Click the Audit Log tab near the bottom of the window.
4. Open the Actions menu and select Event Management > Filter.
The Filter dialog box appears.
EMC AVAMAR 6.0 • ADMINISTRATION GUIDE 269

Filtering the Audit Log displaySERVER MONITORING
5. Define one or more of the filtering criteria listed in the following table.
SETTING DESCRIPTION
From Date Used with the To Date field to define a specific range of dates in the audit log.IMPORTANT: To type a range of dates, use the query mode for the audit log (page 261). Otherwise, the From Date and To Date fields are disabled.
To Date Used with the From Date field to define a specific range of dates in the audit log.IMPORTANT: To type a range of dates, use the query mode for the audit log (page 261). Otherwise, the From Date and To Date fields are disabled.
Category Security is the only available selection.
Type Audit is the only available selection.
Severity Display audit log entries of the following severities:
• All Severities • OK • USER • PROCESS • NODE • USER_FATAL • PROCESS_FATAL • NODE_FATAL • SYSTEM_FATAL
Domains Select the All Domains option to display all audit log entries from all domains.
To only show audit log entries from one domain, select the Domain option and type the domain.TIP: Click ... to browse to a domain.
Data Only display audit log entries that contain these case-sensitive keywords in the event code data XML element.This promotes easy filtering on important keywords across audit log entry attributes. For example, filtering the audit log display on “error” returns all audit log entries that contain the word “error” in any XML attribute (for example, category, type, or severity).
EMC AVAMAR 6.0 • ADMINISTRATION GUIDE 270

Filtering the Audit Log displaySERVER MONITORING
IMPORTANT: To type a range of dates, use the query mode for the audit log (page 261). Otherwise, the From Date and To Date fields are disabled.
6. Click OK.
More/Less The More/Less button is used to display or hide advanced filtering features that enable you to include or exclude specific event codes.Clicking More displays an additional lower pane and the button name changes to Less, as shown in the following figure.
Clicking Less hides the additional lower pane and the button name changes to More.
Only include codes Setting Only include codes filters the audit log to display only those event codes in the list.The Only include codes and Exclude codes options are mutually exclusive (you cannot both exclude and include specific event codes at the same time).
Exclude codes Setting Exclude codes causes the audit log to not display any event codes in the list. The Only include codes and Exclude codes options are mutually exclusive (you cannot both exclude and include specific event codes at the same time).
Remove Selecting an event code from the list and clicking Remove removes it from the include or exclude list.
Add to list Typing a numeric event code in the entry field and clicking Add to list adds that event code to the include or exclude list.
SETTING DESCRIPTION
EMC AVAMAR 6.0 • ADMINISTRATION GUIDE 271

Viewing services informationSERVER MONITORING
Viewing services information1. In Avamar Administrator, click the Administration launcher button.
The Administration window appears.
2. Click the Services Administration tab.
The Services Administration tab provides information about essential Avamar services (for example, syslog, NTP, Login Manager, and so forth), as described in the following table.
SERVICE NAME DESCRIPTION
Hostname Avamar server network hostname as defined in DNS.
IP Address Avamar server IP address.
Load Average Average number of CPU threads over the past minute.
Last Administrator Datastore Flush
Date and time of the last MCS flush.
PostgreSQL database Status of the MCS database (page 293).
Web Services Status of the Avamar Web Access service.
Web Restore Disk Space Available
Number of hard drive bytes that Avamar Web Access can use to create the restore ZIP file. The EMC Avamar Backup Clients Guide provides additional information about restoring client files using the Avamar Web Access feature.
Login Manager Status of the Avamar Login Manager service.
snmp sub-agent Status of the Avamar SNMP sub-agent service
ConnectEMC Status of the ConnectEMC service.
EMC AVAMAR 6.0 • ADMINISTRATION GUIDE 272

Viewing services informationSERVER MONITORING
VMware vCenter Connection Monitor
Status of the VMware vCenter connections.NOTE: This service is only present if a vCenter client has been added to the system. The EMC Avamar for VMware Guide provides additional information.
snmp daemon Status of the Avamar SNMP master agent service.
ssh daemon Status of the Avamar Secure Shell (SSH) service.
syslog daemon Status of the Avamar syslog service.
Data Domain SNMP Manager
Status of the SNMP service for monitoring configured Data Domain systems.
Replication cron job Status of the Avamar replication cron job. Replication (page 341) provides additional information.
SERVICE NAME DESCRIPTION
EMC AVAMAR 6.0 • ADMINISTRATION GUIDE 273

Viewing a detailed client session logSERVER MONITORING
Viewing a detailed client session log1. In Avamar Administrator, click the Activity launcher button.
The Activity window appears.
2. Click the Activity Monitor tab.
By default, the Activity Monitor shows a detailed log of all client backup activity for the past 72 hours.
3. Select an activity in the list.
4. Select Actions > View Session Log.
The Activity Session Drill-down dialog box appears.
5. Click OK.
EMC AVAMAR 6.0 • ADMINISTRATION GUIDE 274
Collecting and viewing log filesSERVER MONITORING
Collecting and viewing log filesBy default, the Avamar storage process log file (gsan.log) is limited to 25 MB in size and always contains the most recent information. Additional historic log files (for example, gsan.log.1, gsan.log.2, and so forth) might also exist.
To collect and view log files:
User=admin 1. Open a command shell and log in:
2. Create a new user-defined temporary directory and change directory to it by typing:
mkdir DIR
cd DIR
where DIR is a new user-defined temporary directory. This directory is deleted after this procedure.
3. Retrieve copies of the storage node log files by typing:
getlogs
The getlogs command gathers the important log files from a particular node, compresses them into a single tar file (nodelogs.tgz), then copies these nodelogs.tgz files to numbered subdirectories in the current working directory.
4. Examine these nodelogs.tgz files for any entry that contains the string “ERROR.” To accomplish this, run the following shell commands, which write any nodelogs.tgz entries that contain the string “ERROR” to a user-defined temporary file:
for p in [01].[!sm]*/nodelogs.tgz; do
tar xzf $p
grep ERROR: cur/gsan.log*
rm -rf cur/*
done
5. Remove the user-defined temporary directory by typing:
cd ../
rm -rf DIR
where DIR is the user-defined temporary directory created in step 2.
SERVER TYPE LOGIN STEPS
Single-node Log in to the server as admin.
Multi-node 1. Log in to the utility node as admin, and then load the admin OpenSSH key by typing:ssh-agent bash
ssh-add ~admin/.ssh/admin_key
2. When prompted, type the admin_key passphrase and press Enter.
EMC AVAMAR 6.0 • ADMINISTRATION GUIDE 275

BASIC SERVER ADMINISTRATION
This chapter discusses basic Avamar server administrative concepts and tasks.
Avamar server functional block diagramThe following diagram shows the major Avamar server functional blocks.
Data server
When performing a backup, restore, or validation, Avamar backup clients communicate directly with the data server. All scheduled backups are initiated by the MCS scheduler.
AVAMAR SERVER-1
POSTGRESQLDATABASE
EVENTS
CLIENTREGISTRY
ACCOUNTMANAGEMENT
REPORTINGSCHEDULER/DISPATCHER
MANAGEMENT CONSOLE SERVER (MCS)
DATASERVER
AVAMARBACKUPCLIENT
AVAMAR ADMINISTRATOR(MANAGEMENT CONSOLE)
ENTERPRISEMANAGER
SERVER (EMS)
AVAMARENTERPRISE
MANAGER
AVAMARSERVER-2
AVAMARSERVER-3
AVAMARSERVER-4
EMC AVAMAR 6.0 • ADMINISTRATION GUIDE 276
Avamar server functional block diagramBASIC SERVER ADMINISTRATION
Management Console Server (MCS)
The Management Console Server (MCS) provides centralized administration (scheduling, monitoring, and management) for the Avamar server. The MCS also runs the server-side processes used by the Avamar Administrator graphical management console.
Client registry. The client registry function controls client registration and activation. Clients (page 44) provides details.
Account management. The account management function is used to create and manage domains, clients, users, and groups. Domains, Clients, and Users (page 38) and Groups and Group Policies (page 135) provide details.
Reporting. The reporting function is used to create and export various reports. Reporting (page 201) provides details.
Events. The events function is used to display various system events and activities. Viewing system events (page 261) provides details.
Scheduler/dispatcher. The scheduler/dispatcher function controls when backup and restore jobs are performed, or if they can be queued for processing. Backup, Restore, and Backup Management (page 78) provides details.
PostgreSQL database. The MCS uses a PostgreSQL database to store various kinds of data. PostgreSQL is an open architecture. Information in the MCS database is accessible through any PostgreSQL-compliant ODBC interface.
The MCS database filename is mcdb, and it is located on the utility node in the /usr/local/avamar/var/mc/server_data/postgres directory.
MCS database contents are fully backed up on the Avamar server and can be restored as needed should the MCS fail.
IMPORTANT: The MCS database is intended for read-only access for reporting or query purposes. Do not manually modify any data in mcdb tables unless instructed to do so by EMC Technical Support. Directly modifying MCS operational data can cause loss of referential integrity, which could result in irretrievable loss of data.
Enterprise Manager Server (EMS)
The Avamar Enterprise Manager Server (EMS) provides essential services required to display Avamar server information and provides a mechanism for managing Avamar servers using a standard web browser. The EMS also communicates directly with MCSs, which are an integral part of all Avamar systems in an enterprise. Avamar Enterprise Manager (page 294) provides details.
EMC AVAMAR 6.0 • ADMINISTRATION GUIDE 277

Avamar server maintenance activities and backup/maintenance windowsBASIC SERVER ADMINISTRATION
Avamar server maintenance activities and backup/maintenance windows
This topic discusses Avamar server maintenance activities and backup/maintenance windows.
Maintenance activities
Avamar server maintenance comprises three essential activities:
• Checkpoint• Checkpoint validation (also known as HFS check)• Garbage collection
Checkpoint. A checkpoint is a snapshot of the Avamar server taken for the express purpose of facilitating server rollbacks.
Checkpoint validation (also known as HFS check). A Hash Filesystem check (also known as HFS check) is an internal operation that validates the integrity of a specific checkpoint. Once a checkpoint has passed an HFS check, it can be considered reliable enough to be used for a server rollback.
Garbage collection. Garbage collection is an internal operation that recovers storage space from deleted or expired backups.
Backup/maintenance windows
Each 24-hour day is divided into three operational windows, during which various system activities are performed:
• Backup window• Blackout window• Maintenance window
The following figure shows the default backup, blackout, and maintenance windows.
EMC AVAMAR 6.0 • ADMINISTRATION GUIDE 278

Avamar server maintenance activities and backup/maintenance windowsBASIC SERVER ADMINISTRATION
Backup window. The backup window is that portion of each day reserved to perform normal scheduled backups.
Blackout window. The blackout window is that portion of each day reserved to perform server maintenance activities (primarily garbage collection) that require unrestricted access to the server.
Operational impact No maintenance activities are performed during the backup window.
Default settings The default backup window begins at 8 p.m. local server time and continues uninterrupted for 10 hours until 6 a.m. the following morning.
Customization Both backup window start time and duration can be customized.
Operational impact No backup or administrative activities are allowed during the blackout window. You can, however, perform restores.
Default settings The default blackout window begins at 6 a.m. local server time and continues uninterrupted for 4 hours until 10 a.m. that same morning.
Customization Blackout window duration can be customized. Any changes to blackout window duration also affect maintenance window duration. For example, changing the blackout window duration from 4 hours to 3 hours extends the maintenance window duration 1 hour because it begins 1 hour earlier. The backup window is not affected.IMPORTANT: Setting the blackout window duration too short might adversely impact the server’s ability to recover storage space from deleted or expired backups. If you shorten the blackout window duration, closely monitor server capacity utilization and forecasting on a regular basis (at least weekly) to ensure that adequate garbage collection is taking place. Capacity Management (page 331) provides details.
EMC AVAMAR 6.0 • ADMINISTRATION GUIDE 279

Avamar server maintenance activities and backup/maintenance windowsBASIC SERVER ADMINISTRATION
Maintenance window. The maintenance window is that portion of each day reserved to perform routine server maintenance activities (primarily checkpoint creation and validation).
Best practices
Do not schedule backups close to or during the blackout window. To ensure that all morning maintenance activities complete in a timely manner, do not schedule any group backups close to or during the blackout window (6-10 a.m. local time for most systems).
Limit on-demand backups during the maintenance window. You might want to advise users to avoid initiating any on-demand backups from their client computers during the first hour and thirty minutes of the maintenance window (10 a.m. to 8 p.m. local time for most systems).
Avoid initiating on-demand maintenance activities. Manually initiating maintenance activities such as checkpoint, checkpoint validation, or garbage collection temporarily disables all scheduled maintenance activities until the manually initiated operation completes. Unless there is a pressing need to initiate an on-demand maintenance activity, it is best to rely on scheduled maintenance activities to ensure that sufficient time is allocated for each activity daily.
Operational impact There might be brief periods of time when backup or administrative activities are not allowed. Although backups can be initiated during the maintenance window, doing so impacts both the backup and maintenance activities. For this reason, minimize any backup or administrative activities during the maintenance window. You can, however, perform restores.
Default settings The default maintenance window begins at 10 a.m. local server time and continues uninterrupted for 10 hours until 8 p.m.
Customization Although you cannot directly customize the maintenance window, its start time and duration are derived from backup and blackout window settings (that is, it starts immediately after the blackout window and continues until the backup window start time).
EMC AVAMAR 6.0 • ADMINISTRATION GUIDE 280

Acknowledging system eventsBASIC SERVER ADMINISTRATION
Acknowledging system eventsSystem events that are configured to require acknowledgement each time they occur, remain in the unacknowledged events list until they are explicitly cleared, or acknowledged, by an Avamar server administrator.
To acknowledge system events:
1. In Avamar Administrator, click the Administration launcher button.
The Administration window appears.
2. Click the Event Management tab.
3. Click the Unacknowledged Events tab near the bottom of the window.
4. Select one or more entries.
TIP: Press and hold the Shift key to select an entire range of entries; press and hold the Ctrl key to select several individual (noncontiguous) entries.
5. Open the Actions menu and select Event Management > Acknowledge Unacknowledged Events.
The events you selected no longer appear in the list.
TIP: Select Actions > Event Management > Clear All Alerts to clear the entire unacknowledged events list.
EMC AVAMAR 6.0 • ADMINISTRATION GUIDE 281
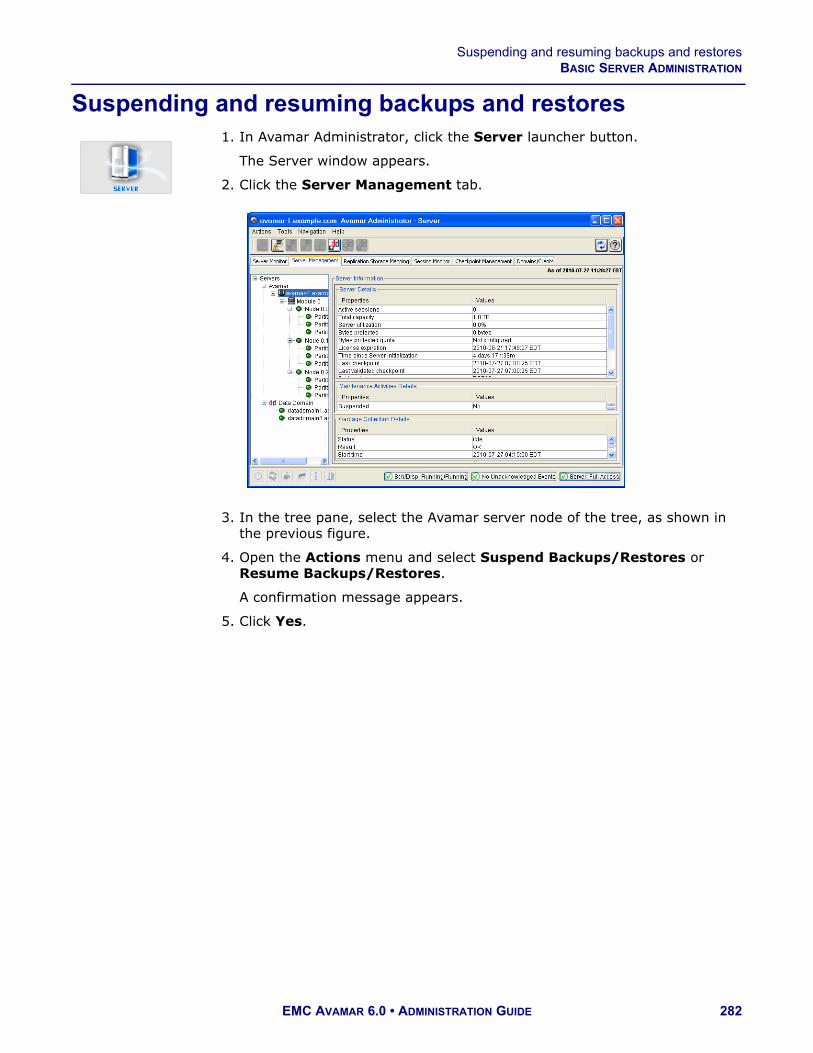
Suspending and resuming backups and restoresBASIC SERVER ADMINISTRATION
Suspending and resuming backups and restores1. In Avamar Administrator, click the Server launcher button.
The Server window appears.
2. Click the Server Management tab.
3. In the tree pane, select the Avamar server node of the tree, as shown in the previous figure.
4. Open the Actions menu and select Suspend Backups/Restores or Resume Backups/Restores.
A confirmation message appears.
5. Click Yes.
EMC AVAMAR 6.0 • ADMINISTRATION GUIDE 282

Enabling and disabling scheduled group backupsBASIC SERVER ADMINISTRATION
Suspending and resuming scheduled operations1. In Avamar Administrator, select Tools > Manage Schedules.
The Manage All Schedules window appears.
2. Click Suspend All or Resume All.
Enabling and disabling scheduled group backups1. In Avamar Administrator, click the Policy launcher button.
The Policy window appears.
2. Click the Policy Management tab.
3. Click the Groups tab.
4. Select the group.
5. Open the Actions menu and select Group > Disable Group.
When the group is disabled, a checkmark appears next to the Disable Group option on the Actions > Group menu. When the group is enabled, the checkmark is cleared next to the option.
A status message appears.
6. Click Yes.
EMC AVAMAR 6.0 • ADMINISTRATION GUIDE 283

Suspending and resuming maintenance activitiesBASIC SERVER ADMINISTRATION
Suspending and resuming maintenance activities1. In Avamar Administrator, click the Server launcher button.
The Server window appears.
2. Open the Actions menu and select Suspend Maintenance Activities or Resume Maintenance Activities.
A confirmation message appears.
3. Click OK.
EMC AVAMAR 6.0 • ADMINISTRATION GUIDE 284

Changing backup/maintenance window settingsBASIC SERVER ADMINISTRATION
Changing backup/maintenance window settingsYou can customize any of the following backup/maintenance window settings:
• Backup window start time • Backup window duration• Blackout window duration• Time zone
Any changes to blackout window duration also affect maintenance window duration. For example, changing the blackout window duration from 4 hours to 3 hours extends the maintenance window duration 1 hour because it begins 1 hour earlier.
IMPORTANT: Setting the blackout window duration too short might adversely impact the server’s ability to recover storage space from deleted or expired backups. If you shorten the blackout window duration, closely monitor server capacity utilization and forecasting on a regular basis (at least weekly) to ensure that adequate garbage collection is taking place. Capacity Management (page 331) provides details.
To change backup/maintenance window settings:
1. In Avamar Administrator, select Tools > Manage Schedules.
The Manage All Schedules window appears.
2. Click the Maintenance Window tab.
3. Change the backup window start time or duration, blackout window duration, or time zone by selecting a new value from the corresponding list.
4. Click OK.
EMC AVAMAR 6.0 • ADMINISTRATION GUIDE 285

Managing servicesBASIC SERVER ADMINISTRATION
Managing servicesThe Administration window Services Administration tab enables you to start, stop, suspend, or resume individual services.
To manage services:
1. In Avamar Administrator, click the Administration launcher button.
The Administration window appears.
2. Click the Services Administration tab.
3. Manage the service as described in the following table.
TO DO THIS
Start a service. Right-click the service and select Start.
Stop a service. Right-click the service and select Stop.
Temporarily suspend a service until you explicitly resume it.
Right-click the service and select Suspend.
Resume a service that you previously suspended.
Right-click the service and select Resume.
EMC AVAMAR 6.0 • ADMINISTRATION GUIDE 286

Canceling a client sessionBASIC SERVER ADMINISTRATION
Canceling a client sessionOccasionally, a client might experience unexpected system behavior while it is performing a backup or restoring files. In these cases, it might be necessary to force an end to these client sessions from Avamar Administrator.
To cancel a client session:
1. In Avamar Administrator, click the Server launcher button.
The Server window appears.
2. Click the Session Monitor tab.
A list of active client sessions appears.
3. Select the client session to cancel.
4. Select Actions > Cancel Session.
The Cancel Session Progress dialog box shows the progress of the cancel client operation. You can cancel the operation at any time by clicking Cancel.
5. When the Cancel Session Progress dialog box shows 100%, click Close.
TIP: If you cannot cancel this client session, resetting the client immediately and forcibly terminates (kill) any active avtar session on that client. Resetting a client (page 288) provides details.
EMC AVAMAR 6.0 • ADMINISTRATION GUIDE 287

Resetting a clientBASIC SERVER ADMINISTRATION
Resetting a clientResetting a client immediately and forcibly terminates (kills) any active client avtar session on that client. In most cases, you should try to cancel the client session, as discussed in Canceling a client session (page 287), before resetting it.
To reset a client:
1. In Avamar Administrator, click the Policy launcher button.
The Policy window appears.
2. Click the Policy Management tab.
3. Click the Clients tab.
4. Select the client to reset.
5. Open the Actions menu and select Client > Reset Client.
EMC AVAMAR 6.0 • ADMINISTRATION GUIDE 288

SERVER SHUTDOWN AND RESTART
This chapter describes how to use the dpnctl program to gracefully shut down and restart the entire Avamar server, or selected subsystems within the server.
Shutting down the server
Best practice. Whenever possible, perform the following tasks as part of a full system shutdown:
• Verify system integrity as discussed in Verifying system integrity (page 260).
• Create and validate a server checkpoint as discussed in Creating a checkpoint (page 358) and Validating a checkpoint (page 359).
NOTE: If the system passed integrity checks, you do not need to create or validate a server checkpoint. However, there is no harm in doing so.
EMC AVAMAR 6.0 • ADMINISTRATION GUIDE 289

Shutting down the serverSERVER SHUTDOWN AND RESTART
To shut down the server:
User=admin 1. Open a command shell and log in:
2. Type:
dpnctl stop
The following information might appear in the command shell.
3. Type y to shut down the local EMS instance, or n to leave the local EMS instance running.
4. Press Enter.
Information similar to the following appears in the command shell:
dpnctl: INFO: Suspending backup scheduler...dpnctl: INFO: Backup scheduler suspended.dpnctl: INFO: Suspending maintenance cron jobs...dpnctl: INFO: Checking for active checkpoint maintenance...dpnctl: INFO: Terminating hfs integrity maintenance (hfscheck)...dpnctl: INFO: Shutting down dtlt...dpnctl: INFO: dtlt shut down.dpnctl: INFO: Shutting down MCS...dpnctl: INFO: MCS shut down.dpnctl: INFO: Shutting down gsan...dpnctl: INFO: gsan shut down.
SERVER TYPE LOGIN STEPS
Single-node Log in to the server as admin.
Multi-node 1. Log in to the utility node as admin, and then load the admin OpenSSH key by typing:ssh-agent bash
ssh-add ~admin/.ssh/admin_key
2. When prompted, type the admin_key passphrase and press Enter.
Do you wish to shut down the local instance of EMS?
Answering y(es) will shut down the local instance of EMS
n(o) will leave up the local instance of EMS
q(uit) exits without shutting down
y(es), n(o), q(uit/exit):
EMC AVAMAR 6.0 • ADMINISTRATION GUIDE 290

Restarting the serverSERVER SHUTDOWN AND RESTART
Restarting the serverTo bring an Avamar server back online after a system shutdown:
User=admin 1. Open a command shell and log in:
2. Type:
dpnctl start
The following information appears in the command shell:
Identity added: /home/admin/.ssh/dpnid (/home/admin/.ssh/dpnid)dpnctl: INFO: Checking that gsan was shut down cleanly...dpnctl: INFO: Restarting the gsan (this may take some time)...dpnctl: INFO: To monitor progress, run in another window: tail -f /tmp/dpnctl-gsan-restart-output-7416dpnctl: INFO: Restarting gsan succeeded.dpnctl: INFO: gsan started.dpnctl: INFO: Updating MCS...dpnctl: INFO: To monitor progress, run in another window: tail -f /tmp/dpnctl-mcs-update-output-7416dpnctl: INFO: MCS updated.dpnctl: INFO: Starting MCS...dpnctl: INFO: To monitor progress, run in another window: tail -f /tmp/dpnctl-mcs-start-output-7416dpnctl: INFO: MCS started.dpnctl: INFO: Starting EMS...dpnctl: INFO: To monitor progress, run in another window: tail -f /tmp/dpnctl-ems-start-output-7416dpnctl: INFO: EMS started.dpnctl: INFO: Resuming scheduler...dpnctl: INFO: Scheduler resumed.dpnctl: INFO: Resuming maintenance cron jobs...dpnctl: INFO: Maintenance cron jobs resumed.
SERVER TYPE LOGIN STEPS
Single-node Log in to the server as admin.
Multi-node 1. Log in to the utility node as admin, and then load the admin OpenSSH key by typing:ssh-agent bash
ssh-add ~admin/.ssh/admin_key
2. When prompted, type the admin_key passphrase and press Enter.
EMC AVAMAR 6.0 • ADMINISTRATION GUIDE 291

Starting the MCSSERVER SHUTDOWN AND RESTART
Stopping the MCSUser=admin 1. Open a command shell and log in:
2. Type:
dpnctl stop mcs
Starting the MCSUser=admin 1. Open a command shell and log in:
2. Type:
dpnctl start mcs
3. Resume scheduled operations as discussed in Suspending and resuming scheduled operations (page 283).
SERVER TYPE LOGIN STEPS
Single-node Log in to the server as admin.
Multi-node 1. Log in to the utility node as admin, and then load the admin OpenSSH key by typing:ssh-agent bash
ssh-add ~admin/.ssh/admin_key
2. When prompted, type the admin_key passphrase and press Enter.
SERVER TYPE LOGIN STEPS
Single-node Log in to the server as admin.
Multi-node 1. Log in to the utility node as admin, and then load the admin OpenSSH key by typing:ssh-agent bash
ssh-add ~admin/.ssh/admin_key
2. When prompted, type the admin_key passphrase and press Enter.
EMC AVAMAR 6.0 • ADMINISTRATION GUIDE 292

Getting MCS StatusSERVER SHUTDOWN AND RESTART
Getting MCS StatusTo view the status of each MCS service and any available performance statistics:
User=admin 1. Open a command shell and log in:
2. Type:
dpnctl status mcs
SERVER TYPE LOGIN STEPS
Single-node Log in to the server as admin.
Multi-node 1. Log in to the utility node as admin, and then load the admin OpenSSH key by typing:ssh-agent bash
ssh-add ~admin/.ssh/admin_key
2. When prompted, type the admin_key passphrase and press Enter.
EMC AVAMAR 6.0 • ADMINISTRATION GUIDE 293

AVAMAR ENTERPRISE MANAGER
Avamar Enterprise Manager is a web-based multi-system management console application that provides centralized Avamar system administration capabilities for larger businesses and enterprises.
Capabilities and limitationsThis topic discusses various capabilities and limitations of Avamar Enterprise Manager.
Multi-system management. With Avamar Enterprise Manager, you can monitor all Avamar systems in the enterprise from a single web browser session. Monitoring other systems (page 322) provides additional information.
Dashboard. The integrated dashboard (page 298) provides an “at-a-glance” view that enables you to assess the operational status of each Avamar system and determine if backups are completing successfully.
Only one Avamar Enterprise Manager server is required. The Avamar Enterprise Manager Server (EMS) provides essential services required to display Avamar system information, and provides a mechanism to manage Avamar systems using a standard web browser. The EMS also communicates directly with MCSs, which are an integral part of all Avamar systems in an enterprise. Therefore, it is important to understand that only one operational EMS is required for an enterprise; you do not need to run EMS on every Avamar system, nor is it recommended to do so.
Monitoring multiple versions of Avamar systems. Beginning with version 6.0, Avamar Enterprise Manager can manage Avamar 4.1.x, 5.x, or 6.0 systems. However, Avamar 4.1.x and 5.x systems require additional configuration and setup before monitoring them is possible. Monitoring Avamar 4.1.x and 5.x systems (page 326) provides additional information.
EMC AVAMAR 6.0 • ADMINISTRATION GUIDE 294
Capabilities and limitationsAVAMAR ENTERPRISE MANAGER
Use local MCS to authenticate Avamar Enterprise Manager logins. Only one operational EMS is required per enterprise, and there is usually no good reason to authenticate Avamar Enterprise Manager logins using a remote MCS running on another Avamar host. Therefore, it is best to use the default installation and configuration options, which configure the EMS to use the local MCS (the MCS running on the same Avamar host) to authenticate Avamar Enterprise Manager logins.
Avamar Enterprise Manager is functionally similar to Avamar Administra-tor. Although the Avamar Enterprise Manager user interface is different from
Avamar Administrator, the fundamental administrative principles and operations are similar. When you are familiar with how to administer an Avamar system with Avamar Administrator, you should be able to perform those same tasks with Avamar Enterprise Manager. The primary difference is that you can centrally administer every Avamar system in the enterprise from a single application, rather than launching multiple Avamar Administrator sessions.
Web browser security settings. The information presented in the remainder of this chapter assumes that you use Microsoft Internet Explorer 6 with the default security settings. If you use another web browser or other security settings, be prepared to answer Yes when presented with additional or different security prompts.
Browser security settings may impact login. Certain web browser security settings (for example, the Internet Explorer High security setting) are known to interfere with the ability to log into Avamar Enterprise Manager. If you use another web browser or other security settings, be prepared to answer Yes when presented with additional or different security prompts.
Session time-out information. The default session timeout setting for most Avamar Enterprise Manager features and functions is 72 hours. However, the dashboard (page 298) and replicator (page 320) pages automatically refresh themselves every minute. Effectively, this means that if you leave the web browser pointed to the dashboard or replicator pages, the Avamar Enterprise Manager session continues indefinitely. However, if you leave the web browser pointed to any other page, the Avamar Enterprise Manager session automatically times out after 72 hours of inactivity. You can edit the default session timeout setting by changing the session-timeout preference in /usr/local/avamar-tomcat/webapps/cas/WEB-INF/web.xml.
EMC AVAMAR 6.0 • ADMINISTRATION GUIDE 295

Restarting the EMSAVAMAR ENTERPRISE MANAGER
Shutting down the EMSTo perform an orderly shutdown of the EMS:
User=admin 1. Open a command shell and log in:
2. Type:
dpnctl stop ems
3. Wait for dpnctl stop ems to complete.
Restarting the EMSTo restart the EMS following a shutdown:
1. Ensure that Avamar Enterprise Manager has been properly shut down.
User=admin 2. Open a command shell and log in:
3. Type:
dpnctl start ems
4. Wait for dpnctl start ems to complete.
SERVER TYPE LOGIN STEP
Single-node Log in to the server as admin.
Multi-node Log in to the utility node as admin.
SERVER TYPE LOGIN STEP
Single-node Log in to the server as admin.
Multi-node Log in to the utility node as admin.
EMC AVAMAR 6.0 • ADMINISTRATION GUIDE 296

Logging in to Avamar Enterprise ManagerAVAMAR ENTERPRISE MANAGER
Logging in to Avamar Enterprise Manager1. Point a web browser to the following URL:
http://AVAMARSERVER/em
where AVAMARSERVER is the hostname as defined in DNS. The Avamar Enterprise Manager Login page appears.
2. Type the Avamar administrative user account ID and password in the User Name and Password fields, respectively.
3. Click Log On.
4. If a Security Warning dialog box appears, click Yes to proceed with the login.
The Dashboard page (page 298) appears.
EMC AVAMAR 6.0 • ADMINISTRATION GUIDE 297

DashboardAVAMAR ENTERPRISE MANAGER
DashboardThe Dashboard page provides an “at-a-glance” view that enables you to assess each Avamar server’s operational status and capacity utilization, as well as determine if scheduled backups are successfully completing.
Selecting Dashboard from any other page displays the Dashboard page.
The following table explains the information shown on the Dashboard page.
INFORMATION DESCRIPTION
Backup period This list box allows you to select an effective period of time for status shown in the Backups column. Choices are:
• last 24 hours• last week• last 2 weeks• past month• past 3 months• past 6 months• past 9 months
Server This column shows each server hostname as defined in corporate DNS.Click the server name to view the system information page (page 303) for that Avamar server.
EMC AVAMAR 6.0 • ADMINISTRATION GUIDE 298

DashboardAVAMAR ENTERPRISE MANAGER
Last Contacted This column shows elapsed time since each Avamar server was last contacted by Avamar Enterprise Manager and data was collected.IMPORTANT: If the last updated indicator shows a status other than green, all other displayed information for that system should be considered stale and might not reflect actual Avamar system status.State icons communicate the following conditions:
Avamar Enterprise Manager is operating normally and is able to communicate and collect data at the specified refresh/polling interval from this Avamar server. The elapsed time since Avamar Enterprise Manager last communicated with this Avamar server is shown next to the status icon.
Last attempt by Avamar Enterprise Manager failed to communicate or collect data from this Avamar server.Avamar Enterprise Manager waits one minute and retries as many as three times before considering the refresh/polling cycle a failure. The specific reason for this condition appears next to the status icon.This condition can happen intermittently if network access to the Avamar server is slow or unreliable. It can also occur if that Avamar server is not running or has encountered an error or warning condition.
One of the following conditions:• Avamar Enterprise Manager failed to
communicate and or collect data from an Avamar server for a specified number of refresh/polling cycles.
• Avamar server hostname could not be resolved.• Avamar server login credentials (username or
password) were refused.The default polling setting is three cycles (30 minutes total elapsed time based on a 10-minute refresh/polling cycle). The specific reason for this condition appears next to the status icon.IMPORTANT: Investigate and remedy any red status condition immediately to ensure that system operation is not adversely affected.
INFORMATION DESCRIPTION
EMC AVAMAR 6.0 • ADMINISTRATION GUIDE 299

DashboardAVAMAR ENTERPRISE MANAGER
Status Overall status of the Avamar server and any configured Data Domain systems.
The Avamar server and all configured Data Domain systems are fully operational.
There is a problem with either the Avamar server, a configured Data Domain system, or both. However, backups and restores can continue.
There is a problem with either the Avamar server, a configured Data Domain system, or both, and backups and restores will not occur until the problem is resolved.
TIP: Click the status icon to view the System Information page (page 303), which contains detailed information about the server.
Version The version of the Avamar server software running on the server.
Capacity > Avamar > Used
This column shows summary status of how storage capacity is being used on the Avamar server.Detailed information includes the amount of storage capacity consumed in bytes and the amount of free storage capacity available as a percentage of total available storage capacity.Used state icons communicate the following conditions:
Avamar server has used less than 80% of total storage capacity.
Avamar server has used more than 80% but less than 95% of total storage capacity.
Consider adding capacity or deleting old backups.
Avamar server has used more than 95% of total storage capacity.IMPORTANT: No new backups are taken until you add capacity or delete old backups.a
TIP: Click a capacity forecast icon to view the Capacity Utilization and Forecast page (page 335).
INFORMATION DESCRIPTION
EMC AVAMAR 6.0 • ADMINISTRATION GUIDE 300

DashboardAVAMAR ENTERPRISE MANAGER
Capacity > Avamar > Forecast
Forecast state icons communicate the following conditions:
Avamar server is forecast to have 90 days or more storage capacity.
Avamar server is forecast to have less than 90 days of storage capacity.
Avamar server is forecast to have less than 30 days of storage capacity.
TIP: Click a capacity forecast icon to view the Capacity Utilization and Forecast page (page 335).
Capacity > Data Domain > Used
This column shows summary status of how storage capacity is being used on the configured Data Domain systems.Used state icons communicate the following conditions:
The Data Domain systems have used less than 80% of total storage capacity.
The Data Domain systems have used more than 80% but less than 95% of total storage capacity.Consider adding capacity or deleting old backups.
The Data Domain systems have used more than 95% of total storage capacity.IMPORTANT: No new backups are taken until you add capacity or delete old backups.a
TIP: Click a capacity forecast icon to view the Capacity Utilization and Forecast page (page 335).
Capacity > Data Domain > Forecast
Forecast state icons communicate the following conditions:
The Data Domain systems are forecast to have 90 days or more storage capacity.
The Data Domain systems are forecast to have less than 90 days of storage capacity.
The Data Domain systems are forecast to have less than 30 days of storage capacity.
TIP: Click a capacity forecast icon to view the Capacity Utilization and Forecast page (page 335).
Data Protected This column shows how much data is currently being protected on each Avamar server.
INFORMATION DESCRIPTION
EMC AVAMAR 6.0 • ADMINISTRATION GUIDE 301

DashboardAVAMAR ENTERPRISE MANAGER
Backups > Status This column provides a quick overview of scheduled backup status for each Avamar server.State icons communicate the following conditions:
All scheduled backups successfully completed within the allotted period of time.
One or more scheduled backups successfully completed with exceptions.
One or more scheduled backups did not successfully complete within the allowed period of time.
TIP: Click a backup status icon to view the Reports page (page 318).
Backups > Fail The number of failed backups.TIP: Click a backup status icon to view the Reports page (page 318).
Backups > Exceptions
The number of backups that successfully completed with exceptions.TIP: Click a backup status icon to view the Reports page (page 318).
Backups > Success The number of backups that completed successfully.
a. If ConnectEMC has been enabled, a Service Request (SR) should have beenlogged. Go to the EMC Powerlink website at http://Powerlink.EMC.com toview existing SRs for your system. Search the knowledgebase for AvamarUser and OS Capacity Management solution esg118578 or consult the Ad-ministration link on the Avamar Support landing page, https://sup-port.emc.com/products/Avamar, for additional troubleshooting information.
INFORMATION DESCRIPTION
EMC AVAMAR 6.0 • ADMINISTRATION GUIDE 302

SystemAVAMAR ENTERPRISE MANAGER
SystemAvamar Enterprise Manager offers two kinds of system information pages:
• Individual system information pages (page 303) enable you to view detailed information for a single Avamar server.
• The all systems information (detailed dashboard) page (page 315) provides a consolidated detailed view of all Avamar servers.
Individual system information page
The individual system information page enables you to view detailed information for a specific Avamar server.
Click a system name on the Dashboard page or select an Avamar server from the Systems list box to view the individual properties page for that server.
EMC AVAMAR 6.0 • ADMINISTRATION GUIDE 303

SystemAVAMAR ENTERPRISE MANAGER
Server status
The following table explains server status information.
INFORMATION DESCRIPTION
Last contacted Elapsed time since each Avamar server was last contacted by Avamar Enterprise Manager and data was collected.IMPORTANT: If Last updated shows a status other than green, all other information that appears for that server should be considered stale and might not reflect actual Avamar server status.State icons communicate the following conditions:
Avamar Enterprise Manager can communicate with and collect data from this Avamar server. The elapsed time since Avamar Enterprise Manager last communicated with this Avamar server is shown next to the status icon.
Last attempt by Avamar Enterprise Manager failed to communicate or collect data from this Avamar server failed.Dashboard (page 298) provides additional information about refresh/polling intervals and associated status conditions.
One of the following conditions:• Avamar Enterprise Manager failed to
communicate and or collect data from an Avamar server for a specified number of refresh/polling cycles.a
• Avamar server hostname could not be resolved.b
• Avamar server login credentials (username or password) were refused.b
IMPORTANT: Investigate and remedy any red status condition immediately to ensure that server operation is not adversely affected.Dashboard (page 298) provides additional information about refresh/polling intervals and associated status conditions.
EMC AVAMAR 6.0 • ADMINISTRATION GUIDE 304

SystemAVAMAR ENTERPRISE MANAGER
Avamar Server The operational run level for the Avamar server.State icons communicate the following conditions:
Full access. This Avamar server is fully operational.
This Avamar server is less than fully operational due to one of the following conditions:
Admin Avamar server is fully operational, but only the administrator root account can access the server.
Admin Only Avamar server is fully operational, but only the administrator root account can access the server.
Admin Read Only Avamar server is in a read-only condition, and only the administrator root account can access the server.
Read Only Avamar server is in a read-only condition. Restores are allowed, but no new backups can be performed.
Suspended Scheduled backups are disabled and will not occur until you re-enable the scheduler. Suspending and resuming scheduled operations (page 283) provides details.
Synchronizing Avamar server is priming or synchronizing stripes. This is a temporary condition. Some operations might be delayed.
INFORMATION DESCRIPTION
EMC AVAMAR 6.0 • ADMINISTRATION GUIDE 305

SystemAVAMAR ENTERPRISE MANAGER
Avamar Server(continued)
This Avamar server is experiencing one of the following conditions that requires immediate attention:
Inactive One or more storage nodes are unresponsive to communication requests from the local MCS (that is, nodes are functioning but frequently timing out on communication requests).c
Node Offline One or more storage nodes has experienced a problem.d
Not available Avamar Enterprise Manager cannot obtain any information from this Avamar server. This might indicate communication problems or errors in retrieving data.c
TIP: Ensure that the Last updated status indicator is green.
Unknown State Avamar server is in an unknown state. It is either not running or does not respond to communication requests.c
IMPORTANT: Investigate and remedy any red status condition immediately to ensure that server operation is not adversely affected.
System ID A system identification number for the Avamar server.
Capacity Forecast Forecast state icons communicate the following conditions:
Avamar server is forecast to have 90 days or more storage capacity.
Avamar server is forecast to have less than 90 days of storage capacity.
Avamar server is forecast to have less than 30 days of storage capacity.
INFORMATION DESCRIPTION
EMC AVAMAR 6.0 • ADMINISTRATION GUIDE 306

SystemAVAMAR ENTERPRISE MANAGER
Capacity Usage This row shows how much storage capacity is being used on that Avamar server.Detailed information includes:
• Total capacity• Capacity used• Total bytes protected
State icons communicate the following conditions:
Avamar server has used less than 80% of total storage capacity.
Avamar server has used more than 80% but less than 95% of total storage capacity.Consider adding capacity or deleting old backups.
Avamar server has used more than 95% of total storage capacity.IMPORTANT: No new backups are performed until you add capacity or delete old backups.e
All Unack. Events This row shows whether there are any unacknowledged events on the Avamar server.State icons communicate the following conditions:
No warning or error events have occurred on this Avamar server that have not been explicitly acknowledged by an Avamar server administrator.Acknowledging system events (page 281) provides details.
One or more warning events have been encountered on this Avamar server, and these events have not been acknowledged.Review the server logs to ensure that these conditions do not adversely affect server operation.
One or more serious error events have been encountered on this Avamar server, and these events have not been acknowledged.IMPORTANT: Investigate and remedy any red status condition immediately to ensure that server operation is not adversely affected.
INFORMATION DESCRIPTION
EMC AVAMAR 6.0 • ADMINISTRATION GUIDE 307

SystemAVAMAR ENTERPRISE MANAGER
Unack. Hardware Events
This row shows whether there are any unacknowledged hardware events on the Avamar server.State icons communicate the following conditions:
No hardware warning or error events have occurred on this Avamar server that have not been explicitly acknowledged by an Avamar server administrator.Acknowledging system events (page 281) provides details.
One or more hardware warning events have been encountered on this Avamar server, and these events have not been acknowledged.Review the server logs to ensure that these conditions do not adversely affect server operation.
One or more serious hardware error events have been encountered on this Avamar server, and these events have not been acknowledged.IMPORTANT: Investigate and remedy any red status condition immediately to ensure that server operation is not adversely affected. Contact EMC Technical Support.
Data Domain Server
The fully qualified domain name of the Data Domain system.
Status The overall status of the Data Domain system.
The Data Domain system is fully operational
The Data Domain system is experiencing problems. However, backups to and restores from the Data Domain system can continue.
The Data Domain system is experiencing problems, and backups and restores will not occur until the problem is resolved.
Data Domain status and resolutions (page 553) provides details on the available status messages.
INFORMATION DESCRIPTION
EMC AVAMAR 6.0 • ADMINISTRATION GUIDE 308

SystemAVAMAR ENTERPRISE MANAGER
Capacity Forecast Forecast state icons communicate the following conditions:
The Data Domain system is forecast to have 90 days or more storage capacity.
The Data Domain system is forecast to have less than 90 days of storage capacity.
The Data Domain system is forecast to have less than 30 days of storage capacity.
Capacity Usage This row shows how much storage capacity is being used on the Data Domain system.Detailed information includes:
• Total capacity• Capacity used• Total bytes protected
State icons communicate the following conditions:
Less than 80% of total storage capacity is in use on the Data Domain system.
More than 80% but less than 95% of total storage capacity is in use on the Data Domain system.Consider adding capacity or deleting old backups.
More than 95% of total storage capacity is in use on the Data Domain system.IMPORTANT: No new backups are taken until capacity is added or old backups are deleted.e
INFORMATION DESCRIPTION
EMC AVAMAR 6.0 • ADMINISTRATION GUIDE 309

SystemAVAMAR ENTERPRISE MANAGER
All Unack. Events This row shows whether there are any unacknowledged events for the Data Domain system.State icons communicate the following conditions:
No warning or error events have occurred on this Data Domain system that have not been explicitly acknowledged by an Avamar server administrator.Acknowledging system events (page 281) provides details.
One or more warning events have been encountered on this Data Domain system, and these events have not been acknowledged.Review the server logs to ensure that these conditions do not adversely affect system operation.
One or more serious error events have been encountered on this Data Domain system, and these events have not been acknowledged.IMPORTANT: Investigate and remedy any red status condition immediately to ensure that system operation is not adversely.
Unack. Hardware Events
This row shows whether there are any unacknowledged hardware events on the Data Domain system.State icons communicate the following conditions:
No hardware warning or error events have occurred on this Data Domain system that have not been explicitly acknowledged by an Avamar server administrator.Acknowledging system events (page 281) provides details.
One or more hardware warning events have been encountered on this Data Domain system, and these events have not been acknowledged.Review the server logs to ensure that these conditions do not adversely affect system operation.
One or more serious hardware error events have been encountered on this Data Domain system, and these events have not been acknowledged.IMPORTANT: Investigate and remedy any red status condition immediately to ensure that system operation is not adversely affected. Please investigate using https://my.datadomain.com/.
INFORMATION DESCRIPTION
EMC AVAMAR 6.0 • ADMINISTRATION GUIDE 310

SystemAVAMAR ENTERPRISE MANAGER
GC This row shows whether garbage collection (GC) is running or has successfully freed additional storage space on this Avamar server.Detailed information includes:
• Started timestamp• Ended timestamp• Number of passes• MB scanned• Bytes recovered• Chunks deleted• Number of index stripes affected• Total number of index stripes scanned
State icons communicate the following conditions:
Garbage collection successfully completed on this Avamar server within the past 30 hours.
Garbage collection has not successfully completed on this Avamar server within the past 30 hours, possibly due to one of the following conditions:
In progress Garbage collection is currently running.
None Garbage collection has never successfully completed on this Avamar server.
Garbage collection encountered an error the last time it was run.IMPORTANT: Investigate and remedy any red status condition immediately to ensure that server operation is not adversely affected. If ConnectEMC has been enabled, a Service Request (SR) should have been logged. Go to the EMC Powerlink website at http://Powerlink.EMC.com to view existing SRs for your system. Search the knowledgebase for solution esg112792 or consult the Administration link on the Avamar Support landing page, https://support.emc.com/products/Avamar, for additional troubleshooting information.
INFORMATION DESCRIPTION
EMC AVAMAR 6.0 • ADMINISTRATION GUIDE 311
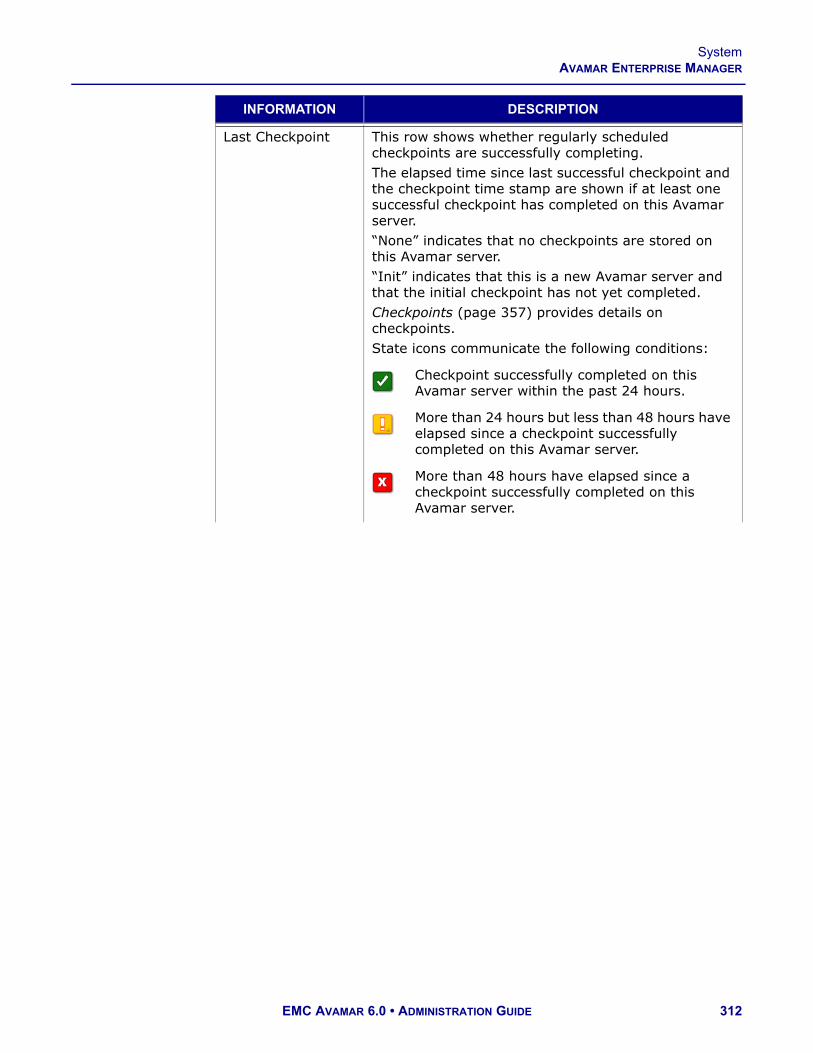
SystemAVAMAR ENTERPRISE MANAGER
Last Checkpoint This row shows whether regularly scheduled checkpoints are successfully completing.The elapsed time since last successful checkpoint and the checkpoint time stamp are shown if at least one successful checkpoint has completed on this Avamar server.“None” indicates that no checkpoints are stored on this Avamar server.“Init” indicates that this is a new Avamar server and that the initial checkpoint has not yet completed.Checkpoints (page 357) provides details on checkpoints.State icons communicate the following conditions:
Checkpoint successfully completed on this Avamar server within the past 24 hours.
More than 24 hours but less than 48 hours have elapsed since a checkpoint successfully completed on this Avamar server.
More than 48 hours have elapsed since a checkpoint successfully completed on this Avamar server.
INFORMATION DESCRIPTION
EMC AVAMAR 6.0 • ADMINISTRATION GUIDE 312

SystemAVAMAR ENTERPRISE MANAGER
Last Validated Checkpoint
This row shows whether regularly scheduled checkpoint validations are successfully completing on this Avamar server.“None” indicates that no checkpoints have ever successfully been validated on this Avamar server.“Errors” indicates that the last checkpoint validation operation failed.“Not configured” indicates that checkpoint validation is not enabled on this server.State icons communicate the following conditions:
Checkpoint validation successfully completed on this Avamar server within the past 48 hours.
More than 48 hours but less than 72 hours have elapsed since a checkpoint validation successfully completed on this Avamar server.
More than 72 hours have elapsed since a checkpoint validation successfully completed on this Avamar server.
Validation type describes the extent of checking performed during the checkpoint. One of the following:
Full A full checkpoint (all checks) was performed.
Rolling A rolling checkpoint (all new and modified stripes fully validated and a subset of unmodified stripes were validated) was performed.
INFORMATION DESCRIPTION
EMC AVAMAR 6.0 • ADMINISTRATION GUIDE 313

SystemAVAMAR ENTERPRISE MANAGER
Replication This row shows whether regularly scheduled replication is successfully completing on each Avamar server.“Failed” indicates that the last replication operation failed.“Disabled” indicates that the Avamar data replication feature is not enabled on this server.State icons communicate the following conditions:
Replication successfully completed on this Avamar server within the past 48 hours, or the Avamar data replication feature is not enabled on this server.
More than 48 hours but less than 72 hours have elapsed since replication successfully completed on this Avamar server.
More than 72 hours have elapsed since replication successfully completed on this Avamar server, or the last replication operation failed.IMPORTANT: Investigate and remedy any red status condition immediately to ensure that server operation is not adversely affected.a
TIP: The optional replication management feature is discussed in Replication (page 341).
a. Consult the Administration link on the Avamar Support landing page, https://support.emc.com/products/Avamar, for additional trouble-shooting information.
b. Search the knowledgebase at the EMC Powerlink website, http://Power-link.EMC.com, for solution esg114453 or consult the Administration linkon the Avamar Support landing page, https://support.emc.com/prod-ucts/Avamar, for additional troubleshooting information.
c. If ConnectEMC has been enabled, a Service Request (SR) should havebeen logged. Go to the EMC Powerlink website at http://Power-link.EMC.com to view existing SRs for your system. Consult the Admin-istration link on the Avamar Support landing page, https://support.emc.com/products/Avamar, for additional troubleshooting in-formation.
d. If ConnectEMC has been enabled, a Service Request (SR) should havebeen logged. Go to the EMC Powerlink website at http://Power-link.EMC.com to view existing SRs for your system. Search the knowl-edgebase for Avamar Data Node offline solution esg112792 or consultthe Administration link on the Avamar Support landing page, https://support.emc.com/products/Avamar, for additional trouble-shooting information.
INFORMATION DESCRIPTION
EMC AVAMAR 6.0 • ADMINISTRATION GUIDE 314

SystemAVAMAR ENTERPRISE MANAGER
System activity
The following table explains the System Activity information that appears on the System Status page in Avamar Enterprise Manager.
All servers information (detailed dashboard) page
The All systems information page provides a consolidated detailed view of all Avamar server status and information. This page is similar to the dashboard (page 298), but provides more detailed information.
Select System from any other page, or select All from the Systems list box on an individual system information page (page 303) to view the all systems information (detailed dashboard) page.
e. If ConnectEMC has been enabled, a Service Request (SR) should havebeen logged. Go to the EMC Powerlink website at http://Power-link.EMC.com to view existing SRs for your system. Search the knowl-edgebase for Avamar User and OS Capacity Management solutionesg118578 or consult the Administration link on the Avamar Supportlanding page, https://support.emc.com/products/Avamar, for additionaltroubleshooting information.
INFORMATION DESCRIPTION
Scheduler This column shows whether regularly scheduled server activities (for example, backups, maintenance activities) are enabled for this Avamar server.State icons communicate the following conditions:
Regularly scheduled activities are enabled (resumed) on this Avamar server.
Regularly scheduled activities are suspended on this Avamar server.Suspending and resuming scheduled operations (page 283) provides details.
Waiting Number of jobs in the server wait queue.
Running Number of server jobs that are currently running.
Sessions Number of active client sessions.
EMC AVAMAR 6.0 • ADMINISTRATION GUIDE 315

SystemAVAMAR ENTERPRISE MANAGER
The information is the same as the information that appears for individual servers. Individual system information page (page 303) provides additional information.
EMC AVAMAR 6.0 • ADMINISTRATION GUIDE 316

PolicyAVAMAR ENTERPRISE MANAGER
CapacityAvamar Enterprise Manager provides advanced capacity forecasting and reporting features that can assist you with monitoring and managing server storage capacity. Capacity Management (page 331) provides details.
PolicyThe Policy page lists the various policies (page 135) in use for each Avamar server that you monitor. Select Policy from any other page to view the Policy page.
Only one kind of policy object can be shown at a time. Select the kind of policy object to view by selecting Groups, Clients, Datasets, Schedules, or Retention Policies. You can further refine the display by showing policy objects that reside in all domains or a single domain by setting the All Domains or Single Domain options, respectively.
EMC AVAMAR 6.0 • ADMINISTRATION GUIDE 317

ReportsAVAMAR ENTERPRISE MANAGER
ReportsThe Reports page enables you to run various Avamar reports and export that information as a Comma-Separated Values (CSV) text file. Select Reports from any other page to view the Reports page.
Avamar reports (page 202) provides details on reports.
Date and time filtering. The Reports page provides two ways to specify an effective period of time each time a report is run:
• Set the Backup Period option to run a report that shows information for the past day (24 hours), past week, or past two weeks.
• Set the Date/Time Range option to define a specific range of calendar dates and times of day for a report. Only information occurring within that range of dates and times appears in the report.
EMC AVAMAR 6.0 • ADMINISTRATION GUIDE 318

ReportsAVAMAR ENTERPRISE MANAGER
Running a report
To run a system report:
1. Select a report from the Reports list.
2. Specify the time period for the report data.
3. Click Run.
Exporting a report as a CSV File
To export report information as a CSV file:
1. Run a report as discussed in Running a report (page 319).
2. Click Export this report.
NOTE: The remainder of this procedure uses Microsoft Internet Explorer 6 with the default security settings as an example. If you use another web browser or other security settings, the steps to perform this procedure might be different.
The File Download dialog box appears.
3. Click Save.
The Save As dialog box appears.
4. Browse to the appropriate location and click Save.
TO INCLUDE DATA FOR THIS TIME PERIOD DO THIS
The past day (24 hours), past week, or past two weeks
Select the Backup Period option and select the length of time from the list box.
A range of calendar dates Select the Date/Time Range option and use the From Date/Time and To Date/Time fields to define the range of calendar dates.TIP: Click ... to show a browsable calendar from which you can select a calendar date.
EMC AVAMAR 6.0 • ADMINISTRATION GUIDE 319

ConfigureAVAMAR ENTERPRISE MANAGER
ReplicatorReplication is a feature that enables one Avamar server to store a read-only copy of its data on another Avamar server in order to support future disaster recovery of that server. Replication (page 341) provides details.
ConfigureThe Configure page enables you to configure which Avamar systems to monitor.
Select Configure from any other page to view the Configure page.
The Configure page displays the information listed in the following table for each Avamar system that you have added to the Avamar Enterprise Manager configuration.
COLUMN DESCRIPTION
System Avamar server hostname (as defined in corporate DNS).
IP Avamar server IP address.
Port Data port used to communicate with this Avamar system.
Version Specific version of Avamar software that runs on this server.
Monitor If Yes, this Avamar system is being monitored with Avamar Enterprise Manager.If No, this Avamar system has been added to the Configure page Systems list, but is not being monitored.
Secure Protocol
If Yes, secure HTTPS protocol is used for all connections to this system.If No, unsecure HTTP protocol is used for all connections to this system.
EMC AVAMAR 6.0 • ADMINISTRATION GUIDE 320

System MaintenanceAVAMAR ENTERPRISE MANAGER
Client ManagerClient Manager is described in Avamar Client Manager (page 436).
System MaintenanceThe System Maintenance page enables you to install update and hot fix patches on the Avamar server. Server Updates and Hotfixes (page 393) provides more information.
Connection If OK, connection with this Avamar system is functioning properly.
Contact Elapsed time since this Avamar server was last contacted by Avamar Enterprise Manager and data was collected.
Note Optional note or comment.
COLUMN DESCRIPTION
EMC AVAMAR 6.0 • ADMINISTRATION GUIDE 321

Monitoring other systemsAVAMAR ENTERPRISE MANAGER
Monitoring other systemsBy default, Avamar Enterprise Manager only shows operational status for the Avamar system that is running this instance of the EMS. To manage other Avamar systems in the enterprise, add them to the Avamar Enterprise Manager configuration.
To add an Avamar system to Avamar Enterprise Manager:
1. Open a web browser and log in to Avamar Enterprise Manager.
The Dashboard page appears.
2. Select Configure.
The Configure page appears.
3. Click Add.
An Add block appears below the systems list.
EMC AVAMAR 6.0 • ADMINISTRATION GUIDE 322

Monitoring other systemsAVAMAR ENTERPRISE MANAGER
4. Complete the settings as described in the following table.
5. Click Save.
SETTING DESCRIPTION
System name or IP Type the Avamar server hostname (as defined in corporate DNS) or IP address.
Port Type the port used to communicate with this MCS.
Monitor Select this option to enable monitoring of this system with Avamar Enterprise Manager.Clear this option to add this system to the Configure page Systems list, but not monitor it.
Secure Protocol Select this option to use a Hypertext Transfer Protocol Secure (HTTPS) connection to this server.If the mcserver.xml sdk_protocol setting is https, set the Secure Protocol option.If the mcserver.xml sdk_protocol setting is http, clear the Secure Protocol option.Configure MCS web services (page 326) provides additional information.
Password Type the Avamar administrative user account password.
Note Type an optional note or comment.
EMC AVAMAR 6.0 • ADMINISTRATION GUIDE 323

Suspending and resuming system monitoringAVAMAR ENTERPRISE MANAGER
Suspending and resuming system monitoringAt some point, you might want to suspend or resume monitoring of one or more Avamar systems. This typically occurs when a system is taken offline and placed back in service at a later date.
To suspend or resume monitoring:
1. Open a web browser and log in to Avamar Enterprise Manager.
The Dashboard page appears.
2. Select Configure.
The Configure page appears.
3. Click the server name.
An Edit block appears below the systems list.
4. Clear the Monitor checkbox to suspend monitoring, or select the checkbox to resume monitoring.
EMC AVAMAR 6.0 • ADMINISTRATION GUIDE 324

Removing a system from the systems listAVAMAR ENTERPRISE MANAGER
Removing a system from the systems listTo remove a system from the list:
1. Open a web browser and log in to Avamar Enterprise Manager.
The Dashboard page appears.
2. Select Configure.
The Configure page appears.
3. Select the checkbox next to the system.
4. Click Remove.
EMC AVAMAR 6.0 • ADMINISTRATION GUIDE 325

Monitoring Avamar 4.1.x and 5.x systemsAVAMAR ENTERPRISE MANAGER
Monitoring Avamar 4.1.x and 5.x systemsTo monitor Avamar 4.1.x or 5.x systems with Avamar Enterprise Manager 6.0, enable web services on those systems by performing the following configuration and setup tasks:
• Obtain and install the server hotifx (page 326)• Configure MCS web services (page 326)• Add the system to Avamar Enterprise Manager (page 327)
Obtain and install the server hotifx
Obtain the correct hotfix for the Avamar server by contacting EMC Technical Support.
• Avamar 4.1.x systems require Hotfix 19759• Avamar 5.x systems require Hotfix 19760
Follow the instructions in the README file to install the hotfix.
Configure MCS web services
To enable web services, manually change settings in mcserver.xml:
User=admin 1. Open a command shell and log in:
2. Stop the MCS by typing:
dpnctl stop mcs
3. Open /usr/local/avamar/var/mc/server_data/prefs/mcserver.xml in a UNIX text editor.
SERVER TYPE LOGIN STEPS
Single-node Log in to the server as admin.
Multi-node 1. Log in to the utility node as admin, and then load the admin OpenSSH key by typing:ssh-agent bash
ssh-add ~admin/.ssh/admin_key
2. When prompted, type the admin_key passphrase and press Enter.
EMC AVAMAR 6.0 • ADMINISTRATION GUIDE 326

Monitoring Avamar 4.1.x and 5.x systemsAVAMAR ENTERPRISE MANAGER
4. Locate and change the settings in the following table, which are found in com.avamar.mc.mcsdk.
The EMC Avamar Product Security Guide provides additional information about the MCS key store file.
5. Save the changes.
6. Restart the MCS by typing:
dpnctl start mcs
Add the system to Avamar Enterprise Manager
Add the system you just configured according to the instructions found in Monitoring other systems (page 322).
Be sure to set the Secure Protocol as follows:
SETTING DESCRIPTION
axis_home Location (relative to the Avamar installation directory) where the packaged web application for apache axis2 and MCS web services components are installed. The default location is lib/axis2.war.
sdk_protocol Specifies whether to use secure (https) or unsecured (http) web protocol. The default setting is secure (https).
sdk_port Specifies the data port for web services communication. The default setting is data port 9443.
trust_keystore Location (relative to the Avamar installation directory) of the key store file. The default key store file is lib/rmi_ssi_keystore.
trust_keystore_ap Key store password.
MCSERVER.XML SDK_PROTOCOL SETTING
REQUIRED SECURE PROTOCOL OPTION SETTING
https Set the Secure Protocol option.
http Clear the Secure Protocol option.
EMC AVAMAR 6.0 • ADMINISTRATION GUIDE 327

Launching Avamar Administrator from Avamar Enterprise ManagerAVAMAR ENTERPRISE MANAGER
Launching Avamar Administrator from Avamar Enterprise Manager
You can launch Avamar Administrator directly from an Avamar Enterprise Manager session.
Avamar Enterprise Manager uses the Java Webstart technology from Sun Microsystems to implement this feature. Webstart is an environment for automatic downloading of the latest version of an application from the Web. By incorporating this technology into Avamar Enterprise Manager, you no longer have to manually install individual versions of Avamar Administrator software to maintain an Avamar system in the enterprise.
IMPORTANT: Under certain circumstances, stale Java temporary Internet files can cause errors when attempting to launch Avamar Administrator from an Avamar Enterprise Manager session. If this occurs on Windows computers, open the Windows Start menu and select Control Panel > Java. The Java Control Panel appears. In the Temporary Internet Files area, click Delete Files. A confirmation dialog box appears. Ensure that all temporary Internet file types are selected and click OK.
To launch Avamar Administrator from Avamar Enterprise Manager:
1. If you have not already done so, ensure that you are using the correct version Java Web Start Launcher:
(a) From Windows Explorer, select Tools > Folder Options.
The Folder Options dialog box appears.
(b) Select the File Types tab.
(c) In the Registered file types list, select the JNLP file type and click Change.
The Open With dialog box appears.
(d) Click Browse, then navigate to the directory where Java JRE 1.5.x is installed.
(e) In the bin folder, select javaws.exe and click Open.
The Open With dialog box closes.
(f) Click Apply on the Folder Options dialog box.
EMC AVAMAR 6.0 • ADMINISTRATION GUIDE 328

Launching Avamar Administrator from Avamar Enterprise ManagerAVAMAR ENTERPRISE MANAGER
2. Point a web browser to the following URL:
http://AVAMARSERVER:8080/em
where AVAMARSERVER is the hostname as defined in DNS. The default Enterprise Manager Login page appears.
3. Select the Administrator option.
The Avamar Enterprise Manager Login page for Avamar Administrator downloading appears.
4. Complete the settings as described in the following table.
TIP: Click Reset to clear the User Name and Domain Name fields.
5. Click Log On.
6. If you do not already have the required Java Runtime Environment (JRE) installed, install it.
You are redirected to a specific area of the Sun Microsystems website to download and install the correct version of the JRE.If this occurs, read and follow the instructions on the Sun Microsystems web page.
The Java loading... prompt appears.
SETTING DESCRIPTION
User Name Type the Avamar administrative user account ID.
Domain Name To log in to a domain other than the top-level (root) domain, type the domain path. For example, /clients/MyDomain.
Administrator Server Select the system to manage.
EMC AVAMAR 6.0 • ADMINISTRATION GUIDE 329

Launching Avamar Administrator from Avamar Enterprise ManagerAVAMAR ENTERPRISE MANAGER
7. If a Security Warning dialog box appears, click Yes to proceed with the login.
The Avamar Administrator login window appears.
8. Type the Avamar administrative user account password in the Password text box.
9. Click Log On.
The Administrator launcher appears.
EMC AVAMAR 6.0 • ADMINISTRATION GUIDE 330

CAPACITY MANAGEMENT
Managing server storage capacity is one of the most important aspects of administering an Avamar server. This chapter describes the available features and tools to assist you with properly monitoring and managing server storage capacity.
Limits and thresholdsThis topic describes how a server behaves as it crosses various consumed storage thresholds.
100% — the “server read-only limit”. When server utilization reaches 100% of total storage capacity, it automatically becomes read-only. This is done to protect the integrity of the data already stored on the server.
If ConnectEMC has been enabled, a Service Request (SR) should have been logged. Go to the EMC Powerlink website at http://Powerlink.EMC.com to view existing SRs for your system. Search the knowledgebase for Avamar User and OS Capacity Management solution esg118578, or consult the Administration link on the Avamar Support landing page, https://support.emc.com/products/Avamar, for additional troubleshooting information.
95% — the “health check limit”. Although an Avamar server could be allowed to consume 100% of available storage capacity (that is, reach the server read-only limit), it is not a good practice to actually let that occur. Consuming all available storage can prevent certain server maintenance activities from running, which might otherwise free additional storage capacity for backups.
For that reason, a second limit is established called the “health check limit.” This is the amount of storage capacity that can be consumed and still have a “healthy” server.
This health check limit is derived by subtracting some percentage of server storage capacity from the server read-only limit. The default health check limit is 95%. You can customize this setting as discussed in Customizing capacity limits and behavior (page 336). However, setting this limit higher than 95% is not recommended.
When server utilization reaches the health check limit, backups that are in progress are allowed to complete, but all new backup activity is suspended. A
EMC AVAMAR 6.0 • ADMINISTRATION GUIDE 331

Obtaining basic utilization informationCAPACITY MANAGEMENT
notification is sent in the form of a pop-up alert when you log in to Avamar Administrator. That system event must be acknowledged before future backup activity can resume. Acknowledging system events (page 281) provides details.
80% — capacity warning issued. When server utilization reaches 80%, a pop-up notification informs you that the server has consumed 80% of its available storage capacity. Avamar Enterprise Manager capacity state icons are yellow.
Obtaining basic utilization informationBoth Avamar Administrator and Avamar Enterprise Manager provide real-time basic capacity utilization information.
Avamar Administrator. In Avamar Administrator, basic capacity utilization information for a server is shown in the Server window on the Server Management tab when you select the Avamar server in the tree, as shown in the following example.
The Server Information table shows the total amount of server storage capacity and the percentage of total available server storage capacity currently used. Monitoring the server (page 240) provides information about the Server window.
EMC AVAMAR 6.0 • ADMINISTRATION GUIDE 332

Obtaining basic utilization informationCAPACITY MANAGEMENT
Similarly, if you select a Data Domain system from the tree, the total amount of storage capacity and the percentage of total available storage capacity in use is listed, as shown in the following example.
Avamar Enterprise Manager. In Avamar Enterprise Manager, consolidated capacity utilization information for all servers being monitored appears in the Dashboard, as shown in the following figure.
The Capacity column shows summary status of how storage capacity is being used on both the Avamar servers and configured Data Domain systems.
EMC AVAMAR 6.0 • ADMINISTRATION GUIDE 333

Capacity forecastingCAPACITY MANAGEMENT
There are three possible state icons in the Capacity > Avamar > Used and Capacity > Data Domain > Used columns:
Capacity utilization information is also shown on the information page for each server. Individual system information page (page 303) provides information about the Avamar Enterprise Manager Server information page.
Capacity forecastingTo help you understand how quickly storage capacity is consumed, each server continuously tracks and analyzes the rate at which storage capacity is consumed, and projects how long you can continue to consume storage capacity at that rate. This forecasting occurs continuously in the background.
The Avamar Enterprise Manager Dashboard (page 298) shows capacity forecasting results in the Capacity Forecast column for the Avamar server, as shown in the accompanying figure, and also for configured Data Domain systems.
Capacity Forecast state icons communicate the following:
The Avamar server or Data Domain systems have used less than 80% of total storage capacity.
The Avamar server or Data Domain systems have used more than 80% but less than 95% of total storage capacity.Consider adding capacity or deleting old backups.
The Avamar server or Data Domain systems have used more than 95% of total storage capacity.IMPORTANT: No new backups are allowed until you add capacity or delete old backups. If ConnectEMC has been enabled, a Service Request (SR) should have been logged. Go to the EMC Powerlink website at http://Powerlink.EMC.com to view existing SRs for your system. Search the knowledgebase for Avamar User and OS Capacity Management solution esg118578 or consult the Administration link on the Avamar Support landing page, https://support.emc.com/products/Avamar, for additional troubleshooting information.
The Avamar server or Data Domain systems are forecast to have 90 days or more storage capacity.
The Avamar server or Data Domain systems are forecast to have less than 90 days of storage capacity.
The Avamar server or Data Domain systems are forecast to have less than 30 days of storage capacity.
EMC AVAMAR 6.0 • ADMINISTRATION GUIDE 334

Detailed utilization and forecastingCAPACITY MANAGEMENT
Important limitation regarding capacity data following a rollback. When an Avamar system rollback occurs, the historical capacity graph and report will not have any data from the date of the rollback to the checkpoint date. As a result, the graph will show a flat line and the capacity forecasting information and graph will be skewed. In some cases, there will be insufficient data to provide any information or graph at all. Forecasting information and graph will become more accurate 30 days after the date of rollback.
Detailed utilization and forecastingAvamar Enterprise Manager also provides graphing capabilities for both capacity utilization (that is, server storage capacity that has already been consumed) and capacity forecasting (that is, server storage capacity that is projected to be used in the future).
Place the mouse cursor over the System menu until a sub-menu appears, and then select Capacity to display the Capacity Utilization and Forecast page, as shown in the following figure.
EMC AVAMAR 6.0 • ADMINISTRATION GUIDE 335

Customizing capacity limits and behaviorCAPACITY MANAGEMENT
You can customize this page as follows:
Customizing capacity limits and behaviorYou can customize many of the settings that control capacity limits and behavior by editing one or more application preference files.
Avamar Administrator settings
To customize Avamar Administrator capacity management settings, change one or more of the following preferences in the com.avamar.mc.mcsm section of the /usr/local/avamar/var/mc/server_data/prefs/mcserver.xml preferences file. The preferences are described in the following table.
Period or Date Range
If you select Period, menus control how much past utilization information appears. Available time periods are past month, 3 months, 6 months, and 9 months. If you select Date Range, you can type a custom range of dates for which to show capacity utilization.
Forecast out Capacity forecasting selections are 1 month, 3 months, 6 months, and 9 months in the future.
PREFERENCE DESCRIPTIONDEFAULTSETTING
capForecastDataDays Actual amount of historical capacity usage data used for forecasting.
30 days
capForecastDataMinDays Minimum amount of historical capacity usage data that is required to perform forecasting.
14 days
capForecastReachedDays When forecasted capacity falls below this number of days, Avamar Administrator begins generating events that require acknowledgement and displaying pop-up alerts at login.
30 days
capMonitorIntervalMin This setting controls how often the Avamar Administrator checks forecasted capacity.
1 day (daily)
capReachedPercentage When total capacity utilization reaches this percentage threshold, Avamar Administrator generates an event notification that the system is full.
95%
EMC AVAMAR 6.0 • ADMINISTRATION GUIDE 336

Customizing capacity limits and behaviorCAPACITY MANAGEMENT
Avamar Enterprise Manager settings
To customize Avamar Enterprise Manager capacity management settings, you can edit one or more of the preferences in the com.avamar.mc.dashboard section of the /usr/local/avamar/var/em/server_data/prefs/emserver.xml preferences file. The preferences are described in the following table.
hcMonitorIntervalMin This setting controls how often the Avamar Administrator performs a health check (that is, verifies whether consumed capacity has reached the health check limit).
1 day (daily)
hcOffsetROPercentage Percentage that, when subtracted from the server read-only limit (100%), produces the health check limit.
5%
hcReminderIntervalMin This setting controls how often the Avamar Administrator issues events and pop-up alerts once the health check limit has been reached.
60 minutes (hourly)
PREFERENCE DESCRIPTIONDEFAULTSETTING
capWarnPercent When capacity usage reaches this percentage, the capacity state icon is yellow.
80%
capErrPercent When capacity usage reaches this percentage, the capacity state icon is red.
95%
capForecastWarnDays When forecasted capacity falls below this number of days, the capacity forecast icon is yellow.
90 days
capForecastErrDays When forecasted capacity falls below this number of days, the capacity forecast icon is red.
30 days
PREFERENCE DESCRIPTIONDEFAULTSETTING
EMC AVAMAR 6.0 • ADMINISTRATION GUIDE 337

Customizing capacity limits and behaviorCAPACITY MANAGEMENT
Updating Avamar application preference files
User=admin 1. Open a command shell and log in:
2. Shut down the system component:
3. Open the preferences file in a UNIX text editor:
4. Save the changes.
5. Restart the system component:
SERVER TYPE LOGIN STEPS
Single-node Log in to the server as admin.
Multi-node 1. Log in to the utility node as admin, and then load the admin OpenSSH key by typing:ssh-agent bash
ssh-add ~admin/.ssh/admin_key
2. When prompted, type the admin_key passphrase and press Enter.
COMPONENT SHUTDOWN STEP
Avamar Administrator Type:dpnctl stop mcs
Avamar Enterprise Manager Type:dpnctl stop ems
COMPONENT RESTART STEP
Avamar Administrator 1. Type:cd /usr/local/avamar/var/mc/server_data/prefs
2. Open mcserver.xml in a text editor such as vi or Emacs.
Avamar Enterprise Manager 1. Type:cd /usr/local/avamar/var/em/server_data/prefs
2. Open emserver.xml in a text editor such as vi or Emacs.
COMPONENT RESTART STEP
Avamar Administrator Type:dpnctl start mcs
Avamar Enterprise Manager Type:dpnctl start ems
EMC AVAMAR 6.0 • ADMINISTRATION GUIDE 338

Server and client average daily change ratesCAPACITY MANAGEMENT
Server and client average daily change ratesWhen managing server capacity, it is useful to know the average daily change rate for both the server and for individual clients.
For example, the server average daily change rate can spike upward for a few days immediately after you add several new clients, particularly database clients. This is to be expected. After a few days, data deduplication optimizes server storage efficiency, and the server daily change rate typically returns to normal.
However, if the server average daily change rate remains high for an extended period of time, it might be necessary to determine if this is due to one or more individual clients that might be experiencing less than expected data deduplication efficiencies.
Server data
In Avamar Enterprise Manager, place the mouse cursor over the System menu until a sub-menu appears, and select Average Daily Change Rate > For Server. The Average Daily Change Rate For Server page appears, as shown in the following example.
EMC AVAMAR 6.0 • ADMINISTRATION GUIDE 339

Server and client average daily change ratesCAPACITY MANAGEMENT
You can control the amount of daily change rate data that appears:
• If you select Period, menus control how much past daily change rate information appear. Available time periods are past month, 3 months, 6 months, and 9 months.
• If you select Date Range, you can select a custom range of dates for which to show server daily change rate data.
Client data
In Avamar Enterprise Manager, place the mouse cursor over the System menu until a sub-menu appears, and select Average Daily Change Rate > For Clients with Maximum/Minimum rate/bytes. The average daily change rate for client with maximum/minimum rate/bytes page appears, as shown in the following example.
You can customize this page as follows:
Click a client name to display an average daily change rate graph for that client.
Number of Clients Select 5, 10, 20, or 50 clients for which to show daily change rate data.
Minimum or Maximum
Select whether to show clients with the most (Maximum) or least (Minimum) daily change rate.
Rate or New Bytes
Select whether to customize the display based on the percentage of new data (Rate) or absolute capacity used (New Bytes).
Period or Date Range
If you select Period, menus control how much past daily change rate information appears. Available time periods are past month, 3 months, 6 months, and 9 months. If you select Date Range, you can select a custom range of dates for which to show daily change rate data.
EMC AVAMAR 6.0 • ADMINISTRATION GUIDE 340

REPLICATION
The replication feature transfers data from a source Avamar server to a destination Avamar server. You can restore all data from the destination server back to primary storage without having to stage the data through the source Avamar server.
You can use either Avamar Administrator or Avamar Enterprise Manager to manage replication settings.
Efficient data transfers. Replication is accomplished by way of highly efficient, asynchronous Internet Protocol (IP) data transfers, which can be scheduled during off-peak hours to make optimum use of network bandwidth. Additionally, Avamar replication uses sophisticated data deduplication technology that finds and eliminates redundant sequences of data before it is sent to the destination server, thereby reducing network traffic and promoting efficient use of hard disk storage.
Remote branch disaster recovery. Replication enables the efficient replication of data stored in a single-node server to a multi-node server. Using replication, a distributed enterprise can centrally protect and manage multiple remote branch offices that use individual single-node servers for local backup and restore. The centralized multi-node server can then be used for disaster recovery, in the event of catastrophic data loss at any remote branch office.
Enterprise data center disaster recovery. Replication can also be used to replicate data stored in a multi-node server to any other multi-node server in the enterprise. In this manner, multi-node servers can provide peer-to-peer disaster recovery for each other.
EMC AVAMAR 6.0 • ADMINISTRATION GUIDE 341

Important terms and conceptsREPLICATION
Important terms and conceptsThis topic discusses the basic concepts and fundamental principles of Avamar server replication.
There are two basic kinds of replication:
• Normal replication• Full root-to-root replication
Normal replication. During normal replication, user data on the source Avamar server replicates to a destination Avamar server.
The REPLICATE domain. Replication automatically creates a REPLICATE domain on the destination server during the first replication operation. This domain contains a mirrored representation of the entire source server client tree on the destination server.
All data within the REPLICATE domain is read-only. The only operations allowed on these backups are:
• Redirecting restores to other clients not within the REPLICATE domain
• Changing a backup expiration date• Validating backups on other clients not
within the REPLICATE domain• Viewing backup statistics• Deleting a backup
In this example figure, a destination server called avamar-1 contains both local clients and clients replicated from the avamar-2 source server.
Full root-to-root replication. Full root-to-root replication is a kind of replication that creates a complete logical copy of an entire source server on the destination server. Furthermore, the replicated data is not copied to the REPLICATE domain, it is added directly to the root domain just as if source clients had registered with the destination server. Also, source server data replicated in this manner can be changed on the destination server.
NOTE: The remainder of this chapter deals exclusively with normal replication. Avamar System Migration (page 429) provides information on full root-to-root replication.
Source and destination servers. Replication always transfers data from a source Avamar server to a destination Avamar server. Furthermore, to maintain referential integrity on the source server, replicated data cannot be directly changed on the destination server. Replicated data is stored on the destination server only in case it is needed for future recovery.
EMC AVAMAR 6.0 • ADMINISTRATION GUIDE 342

Capabilities and limitationsREPLICATION
Normal replication is a scheduled event. Once replication is set up and configured on the source server, normal replication occurs automatically at predetermined scheduled intervals.
What data is replicated? To fully replicate an Avamar server, all of the following data must be copied from the source server to the destination server during each replication operation:
• Client backups• Domains, clients, and users• Groups, datasets, schedules, and retention policies• State of the server (for example, contents of the activity monitor and
server monitor databases at the time of the last MCS backup or “flush”)
Capabilities and limitations
Only static data is replicated. Each replication operation transfers all static data resident on the source Avamar server. The concept of “static data” is especially important. It must be understood that at the time a replication operation is initiated, the replication operation can only process quiescent, or static, data resident on the source server. Therefore, any operation that writes data to the source server and has not fully completed (for example, an in-process backup, adding a user, editing a dataset, and so forth) is, in most cases, not part of that replication operation. However, that data is replicated during the next replication operation.
You can replicate backups by retention type. To enhance the flexibility of the retention feature, you can configure replication operations to replicate all backups from the source Avamar server to the destination Avamar server, or only replicate daily, weekly, monthly, or yearly backups.
Avamar Administrator can manage only one server at a time. An important limitation of using Avamar Administrator to manage replication settings is that you are limited to managing one server at a time. If there is more than one Avamar system in the environment, you may prefer to use the Avamar Enterprise Manager multi-system management console instead.
Time zones. Be advised that when you schedule replication activities, the start time is displayed in the local time zone, not the source or destination server time zone. For example, consider a situation in which you are in the Pacific time zone and the replication source server is in the Eastern time zone. If you, in the Pacific time zone, set replication to begin at 8 p.m., then the server in the Eastern time zone compensates for the three-hour difference between time zones and starts the replication job at 11 p.m.
EMC AVAMAR 6.0 • ADMINISTRATION GUIDE 343

Best practicesREPLICATION
Best practices
If possible, avoid source/destination server incompatibilities. Although replication between different version servers is supported, for best results, ensure that the destination server has the same or a later version of the Avamar software than the source Avamar server.
Use a large timeout setting initially. If you specify an optional timeout value during installation and configuration, recent backups might not replicate. This is because the replication process can time out before all backups in the system successfully replicate. The timeout occurs because replication always replicates backups alphabetically by client name, and earliest backups before later backups.
Whenever possible, you should examine a sampling of recent replicated backups on the destination server to ensure that all are being replicated. It is often necessary to increase the optional timeout value during the first few weeks of replication sessions. Eventually, the replication process should normalize. As more data is replicated to the destination server, you can expect greater levels of data deduplication and decreased transfer times. At that time, you can decrease the timeout value.
IMPORTANT: Normal source server background maintenance tasks such as hfscheck and garbage collection should not be performed while a replication session is in progress. Therefore, once you determine that the nightly replication window has normalized, you should optimize the length of the replication window accordingly.
The default timeout setting is 20 hours (72,000 seconds).
Schedule replication during periods of low backup activity. Because only completed client backups are replicated, you should make every effort to schedule replication during periods of low backup activity. This ensures that the greatest number of client backups replicate during each replication session.
EMC AVAMAR 6.0 • ADMINISTRATION GUIDE 344

Managing replication with Avamar AdministratorREPLICATION
Managing replication with Avamar Administrator1. In Avamar Administrator, click the Administration launcher button.
The Administration window appears.
2. Click the Services Administration tab.
3. Double-click the Replication cron job entry in the properties table.
The Replication cron job dialog box appears.
EMC AVAMAR 6.0 • ADMINISTRATION GUIDE 345

Managing replication with Avamar AdministratorREPLICATION
The Replication cron job dialog box displays the following information:
FIELD DESCRIPTION
Status Current replication status. One of the following:
Running Scheduled replication operations are occurring normally.
Not Running Scheduled replication operations are not occurring normally.
Not Running, Suspended
Scheduled replication operations are not occurring normally, and replication operations will not occur until replication resumes on this Avamar server.
Running, Suspended
Replication operations were suspended while a replication job was running. When operations are resumed, this job will also resume from where it left off.
Suspended Indicates whether scheduled replication operations have been started (No) or stopped (Yes).
Configuration File Location of the repl_cron.cfg configuration file, which stores replication settings for this Avamar system.
Enabled Indicates whether scheduled replication is enabled (Yes) or disabled (No) on this source Avamar server.
Last Completed Elapsed time since last replication operation completed.
Last Status Status of last completed replication operation. One of the following:
None Status for last replication operation is not available.
Success Last replication operation successfully completed.
Failed One or more errors were encountered during the last replication operation.
TIP: In addition to viewing overall replication job status, you can view replication status on a client-by-client basis in the Activity window. Monitoring backup, restore, and validation activities (page 82) provides details.
EMC AVAMAR 6.0 • ADMINISTRATION GUIDE 346

Managing replication with Avamar AdministratorREPLICATION
4. Complete the settings as described in the following table.
5. Click OK.
SETTING DESCRIPTION
Destination Destination Avamar server hostname (as defined in corporate DNS).
Destination Directory: /REPLICATE
Destination directory on the destination Avamar server. The default location is /REPLICATE/SOURCE, where SOURCE is the source Avamar server hostname that you selected in the systems list.You can edit the destination. However, the destination must always exist under the /REPLICATE domain.
Destination User Id
Avamar administrative user account ID (repluser) that is used to log in to the destination Avamar server.
Destination User Password
The password for the Avamar administrative user account ID (repluser).NOTE: If you change the password for the repluser account on the target server, then remember to update the Destination User Password value in the replication configuration on the source server with the new password.
Timeout (seconds)
Maximum length of time that each replication operation should run.
Bandwidth (Mbps)
Network utilization throttling setting that specifies the maximum average network utilization allowed in Mega Bits Per Second (Mbps). If the replication operation exceeds this setting, it is “throttled back” by introducing delays until the average network utilization falls below the specified threshold.
Work directory
Full path to the temporary folder or directory that is used to store replication log files.
Include backups with the following retention:
This setting enables you to limit the replication operation to only backups that have been assigned a specific retention type. Select one or more of the following:
Daily Replicate daily backups.
Weekly Replicate weekly backups.
Monthly Replicate monthly backups.
Yearly Replicate yearly backups.
Not tagged Replicate backups that are not tagged as daily, weekly, monthly, or yearly.
Schedule Select the time of day at which to initiate replication, or Don’t Run to temporarily suspend replication.
EMC AVAMAR 6.0 • ADMINISTRATION GUIDE 347

Viewing replication statistics with Avamar AdministratorREPLICATION
Viewing replication statistics with Avamar Administrator1. In Avamar Administrator, click the Activity launcher button.
The Activity window appears.
2. Click the Activity Monitor tab.
3. Select a Replication Source or Replication Destination activity and select Actions > View Statistics.
The Replicate Statistics dialog box appears.
EMC AVAMAR 6.0 • ADMINISTRATION GUIDE 348

Managing replication with Avamar Enterprise ManagerREPLICATION
The following table describes the tabs in the Replicate Statistics dialog box.
4. Click Close.
Managing replication with Avamar Enterprise ManagerUnlike the Avamar Administrator replication management feature, which is inherently constrained to managing replication settings for only one Avamar system at a time, the Avamar Enterprise Manager replication management feature can manage replication for multiple Avamar systems.
The following table describes the Avamar Enterprise Manager replication management pages
TAB DESCRIPTION
Details Shows detailed information from the v_repl_activities database view, as discussed in v_repl_activities (page 703).
Backups Shows a list of backups included in this replication operation.
Errors Shows any errors that occurred during this replication operation.
PAGE PURPOSE STEPS TO OPEN
Replicator Status Shows status for replication operations
Place the mouse cursor over the Replicator menu until a sub-menu appears and select Status.
Replicator Setup Used to configure replication
Place the mouse cursor over the Replicator menu until a sub-menu appears and select Setup.
EMC AVAMAR 6.0 • ADMINISTRATION GUIDE 349

Managing replication with Avamar Enterprise ManagerREPLICATION
Replicator setup page
The Replicator Setup page, shown in the following figure, is used to manage replication settings for the Avamar systems in the Avamar Enterprise Manager configuration.
The following table lists the information that appears on the Replicator Setup page for each Avamar system in the Avamar Enterprise Manager configuration.
COLUMN DESCRIPTION
Source Source Avamar server hostname (as defined in corporate DNS).
Configured Indicates whether the source Avamar server has been configured and enabled for replication. One of the following:
Not Monitored
This Avamar system is currently not being monitored by Avamar Enterprise Manager.To use the Avamar Enterprise Manager replication management feature on this system, enable or resume monitoring as discussed in Suspending and resuming system monitoring (page 324).
No This Avamar system is not currently configured and enabled for replication operations. Configuring or modifying replication settings (page 352) provides information.
Yes This Avamar system is configured and enabled for replication operations.
Destination Destination Avamar server hostname (as defined in corporate DNS).
Schedule Hour of the day that replication is scheduled to occur, or Don’t Run if replication is temporarily suspended.
Timeout Maximum length of time that replication activity is allowed to run.
EMC AVAMAR 6.0 • ADMINISTRATION GUIDE 350

Managing replication with Avamar Enterprise ManagerREPLICATION
Replicator status page
The Replicator Status page shows consolidated daily replication status for each Avamar system in the Avamar Enterprise Manager configuration.
Retention Shows which types of backups are being replicated. One or more of the following:
Daily Daily backups are being replicated.
Weekly Weekly backups are being replicated.
Monthly Monthly backups are being replicated.
Yearly Yearly backups are being replicated.
Not tagged Backups that have not explicitly tagged as daily, weekly, monthly, or yearly are being replicated.
Bandwidth Network utilization throttling setting. This setting specifies the maximum average network utilization allowed in Mega Bits Per Second (Mbps). If the replication operation exceeds this setting, it is “throttled back” by introducing delays until the average network utilization falls below the specified threshold.
Work Directory Temporary folder or directory used to store replication log files.
Clients Number of clients that have been explicitly included or excluded.
Option True if clients are included. Otherwise, clients are excluded.
COLUMN DESCRIPTION
EMC AVAMAR 6.0 • ADMINISTRATION GUIDE 351

Managing replication with Avamar Enterprise ManagerREPLICATION
The following table lists the information that appears on the Replicator Status page for each Avamar system.
Configuring or modifying replication settings
To use Avamar Enterprise Manager to configure replication settings for an Avamar system:
1. Open a web browser and log in to Avamar Enterprise Manager.
The Dashboard page appears.
2. Place the mouse cursor over the Replicator menu until a sub-menu appears, then select Setup.
The Replicator Setup page appears.
COLUMN DESCRIPTION
Source Source Avamar server hostname (as defined in corporate DNS).
Status Current replication status. One of the following:
Running Scheduled replication operations are occurring normally.
Not Running Scheduled replication operations are not occurring normally.
Not Running and Suspended
Scheduled replication operations are occurring normally, and no future replication operations will occur until replication resumes on this Avamar server.
Suspended Indicates whether scheduled replication operations have been started (No) or stopped (Yes).
Destination Destination Avamar server hostname (as defined in corporate DNS).
Schedule Hour of the day that replication is scheduled to occur, or Don’t Run if replication is temporarily suspended.
Last Completed Elapsed time since the last replication operation completed.
Last Status Status of the last completed replication operation. One of the following:
None Status for the last replication operation is not available.
Success The last replication operation successfully completed.
Failed One or more errors were encountered during the last replication operation.
EMC AVAMAR 6.0 • ADMINISTRATION GUIDE 352

Managing replication with Avamar Enterprise ManagerREPLICATION
3. Click the Avamar system link in the Source column.
An Edit block appears below the systems list, which lists the replication settings for that Avamar system, as shown in the following example.
4. Complete the settings as described in the following table.
SETTING DESCRIPTION
Destination Select the destination Avamar server from the list.
Destination Directory: /REPLICATE
Select the destination directory on the destination Avamar server.The default location is /REPLICATE/SOURCE, where SOURCE is the source Avamar server hostname that you selected in the systems list.NOTE: The destination must always exist under the /REPLICATE domain.
Destination User ID
Type a valid Avamar administrative user account ID that is used to log in to the destination Avamar server for replication. The default is the repluser account.
Destination User Password
Type the password for the Avamar administrative user account ID (repluser).NOTE: The password for the repluser account must be the same on both the source and destination server. If you change the password on one server, then remember to change it on the other server.
EMC AVAMAR 6.0 • ADMINISTRATION GUIDE 353

Managing replication with Avamar Enterprise ManagerREPLICATION
Schedule Select the time of day at which to initiate replication for this server, or Don’t Run to temporarily suspend replication of this Avamar system.
Timeout Select the maximum length of time that each replication operation should run.
Work Directory
Type the full path to the temporary folder or directory for storage replication log files.
Bandwidth (Mbps)
Type a network utilization throttling setting in Mega Bits Per Second (Mbps). Replicator setup page (page 350) provides additional information about this setting.
Include backups with the following retention:
This setting enables you to limit the replication operation to only backups that have been assigned a specific retention type. Select one or more of the following:
Daily Replicate daily backups.
Weekly Replicate weekly backups.
Monthly Replicate monthly backups.
Yearly Replicate yearly backups.
Not tagged
Replicate backups that are not explicitly tagged as daily, weekly, monthly, or yearly.
Replication Type
One of the following:
Full Replicate data for all clients on the source Avamar server.
Selective Include or exclude certain clients from replication operations.
Select Clients If Replication Type is set to Selective, use this section to include all clients, or include or exclude only those clients that match a pattern matching expression.
SETTING DESCRIPTION
EMC AVAMAR 6.0 • ADMINISTRATION GUIDE 354

Managing replication with Avamar Enterprise ManagerREPLICATION
Getting replication status
To view the status of replication operations for one or more Avamar servers:
1. Open a web browser and log in to Avamar Enterprise Manager.
The Dashboard page appears.
2. Place the mouse cursor over the Replicator menu until a sub-menu appears, then select Status.
The Replicator Status page appears.
The Replicator Status page shows consolidated daily replication status for each Avamar system that you are monitoring.
Replicator status page (page 351) provides details on the information shown on this page.
EMC AVAMAR 6.0 • ADMINISTRATION GUIDE 355

Managing replication with Avamar Enterprise ManagerREPLICATION
Starting and stopping daily replications
IMPORTANT: When you stop replication, the process cancels any replication operation that is currently in progress if that replication operation was initiated using Avamar Enterprise Manager. However, if the replication operation was initiated by way of a cron mechanism and you stop replication on that server, the replication operation runs to completion.
To start or stop daily replications:
1. Open a web browser and log in to Avamar Enterprise Manager.
The Dashboard page appears.
2. Place the mouse cursor over the Replicator menu until a sub-menu appears, then select Status.
The Replicator Status page appears.
3. Select the checkbox next to the server for which to stop or start replication, and click either Start Replication or Stop Replication.
EMC AVAMAR 6.0 • ADMINISTRATION GUIDE 356

ADVANCED SERVER ADMINISTRATION AND MAINTENANCE
IMPORTANT: Avamar server maintenance commands should only be used by authorized personnel who are thoroughly familiar with their intended use.
CheckpointsCheckpoints are system-wide backups taken for the express purpose of assisting with disaster recovery. Checkpoints are typically scheduled during the maintenance window, which is discussed in Backup/maintenance windows (page 278).
In addition to the regularly scheduled twice daily checkpoints, you can create and validate additional server checkpoints at any time.
Checkpoint validation might take several hours, depending on the amount of data in the Avamar server. For this reason, each validation operation can be individually configured to perform all checks (full validation) or perform a partial "rolling" check, which fully validates all new and modified stripes, then partially checks a subset of unmodified stripes.
You can also delete checkpoints to reclaim server storage capacity.
Individual checkpoints shown in the Avamar Server window Checkpoint Management tab are always in one of the following states:
STATE DESCRIPTION
Checkpoint failed validation or was cancelled before it could complete.
Checkpoint has not yet been validated.
Validation is currently being performed on this checkpoint.
Checkpoint passed validation.
EMC AVAMAR 6.0 • ADMINISTRATION GUIDE 357

Creating a checkpointADVANCED SERVER ADMINISTRATION AND MAINTENANCE
Creating a checkpoint1. In Avamar Administrator, click the Server launcher button.
The Server window appears.
2. Click the Checkpoint Management tab.
3. Select Actions > Create Checkpoint.
The Create New Checkpoint dialog box appears and shows the progress of the operation.
4. When the Create New Checkpoint dialog box shows that the checkpoint is complete, click Close.
EMC AVAMAR 6.0 • ADMINISTRATION GUIDE 358

Validating a checkpointADVANCED SERVER ADMINISTRATION AND MAINTENANCE
Validating a checkpointCheckpoint validations can take several hours to perform and only one checkpoint can be validated at a time.
To validate a checkpoint:
1. In Avamar Administrator, click the Server launcher button.
The Server window appears.
2. Click the Checkpoint Management tab.
3. Select an unvalidated checkpoint and select Actions > Validate Checkpoint.
The Validation Type dialog box appears.
4. Select the validation type as discussed in the following table.
5. Click OK.
TYPE DESCRIPTION
Full Validation performs all checks.
Rolling A partial "rolling" check fully validates all new and modified stripes, then partially checks a subset of unmodified stripes.
EMC AVAMAR 6.0 • ADMINISTRATION GUIDE 359

Deleting a checkpointADVANCED SERVER ADMINISTRATION AND MAINTENANCE
Deleting a checkpointYou can delete checkpoints to reclaim additional server storage capacity. Generally, it is best to delete unvalidated checkpoints before you delete validated checkpoints.
To delete a checkpoint:
1. In Avamar Administrator, click the Server launcher button.
The Server window appears.
2. Click the Checkpoint Management tab.
3. Select the checkpoint to delete and select Actions > Delete Checkpoint.
A confirmation message appears.
4. Click Yes.
EMC AVAMAR 6.0 • ADMINISTRATION GUIDE 360

Rolling back to a checkpointADVANCED SERVER ADMINISTRATION AND MAINTENANCE
Rolling back to a checkpointRollback is the process of restoring the Avamar server to a known good state using data stored in a validated checkpoint.
If you added nodes to the Avamar server since the checkpoint occurred, remove the entries for the nodes from the probe.out file before the rollback.
To roll back to a checkpoint:
User=admin 1. Open a command shell and log in:
2. Shut down the server by typing:
dpnctl stop
3. Display a list of checkpoints by typing:
cplist
A list of checkpoints appears in the command shell, as shown in the following example:
In the list, each cp.YYYYMMDDHHMMSS entry is a checkpoint ID, valid hfs indicates a validated checkpoint, and valid par indicates a partially validated checkpoint.
Generally, you should roll the system back to the latest fully validated checkpoint unless you have a good reason to roll back to an earlier checkpoint.
4. Use the date/time stamps to find the latest validated checkpoint, and note the checkpoint ID.
5. Initiate the rollback by typing:
rollback.dpn --cptag=cp.YYYYMMDDHHMMSS >& FILE
where cp.YYYYMMDDHHMMSS is the checkpoint ID and FILE is a user-defined temporary file.
6. Wait for the rollback to complete.
The rollback might take up to one hour, depending on the amount of data present in the Avamar server. When the rollback is complete, the command prompt returns.
SERVER TYPE LOGIN STEPS
Single-node Log in to the server as admin.
Multi-node 1. Log in to the utility node as admin, and then load the admin OpenSSH key by typing:ssh-agent bash
ssh-add ~admin/.ssh/admin_key
2. When prompted, type the admin_key passphrase and press Enter.
cp.20080106170113 Fri Jan 6 17:01:13 2008 valid hfs del nodes 4 stripes 396
cp.20080107170042 Sat Jan 7 17:00:42 2008 valid hfs del nodes 4 stripes 396
cp.20080108170040 Sun Jan 8 17:00:40 2008 valid hfs ... nodes 4 stripes 396
cp.20080109170043 Mon Jan 9 17:00:43 2008 valid hfs ... nodes 4 stripes 396
EMC AVAMAR 6.0 • ADMINISTRATION GUIDE 361

MCS configuration settingsADVANCED SERVER ADMINISTRATION AND MAINTENANCE
7. Open the user-defined temporary file created during the rollback and verify that the rollback successfully completed without errors.
The server automatically restarts after a successful rollback.
MCS configuration settings
Server and client preferences files. Avamar Administrator consists of both client and server software applications. You can independently configure each application by editing the appropriate preferences file.
The server preferences file is mcserver.xml. The client preferences file is mcclient.xml. Both files conform to the preferences.dtd XML Document Type Description (DTD) referenced by the JSDK 1.4 API.
Changes made to the server preferences file affect all Avamar Administrator sessions; changes made to a client preferences file only affect Avamar Administrator sessions on that client.
Default and live copies. Two copies of each of these files are present on the system:
• An initial default copy is used to initialize each application after installation.• A live copy contains the current settings used by the application.
The default copies are located in the /lib directory for each application. The live copies are located in a “live file” directory. The default live file directory for each application is:
• /usr/local/avamar/var/mc/server_data/prefs (server live file directory)• INSTALL-DIR/var/mc/gui_data/prefs (client live file directory)
where INSTALL-DIR is typically C:\Program Files\avs\administrator on Microsoft Windows computers, /usr/local/avamar on Linux computers or /opt/AVMRconsl on Solaris computers.
Initialization behavior. When either the server or client application is initialized, the respective default preferences file in the lib directory is loaded into memory and replicated to the live file directory.
IMPORTANT: Reinitializing a running MCS is highly destructive. It completely overwrites any custom preference settings stored in the live file and reverts the system configuration back to default settings. If this occurs, you must recover custom preference settings from a previous flush (backup) if they are overwritten.
Upgrade behavior. During server upgrades, any mcserver.xml entry that is marked with the merge="delete" attribute in the new default mcserver.xml file is not merged into the new live copy. These entries are obsolete. They are retained in the default mcserver.xml file so that the MCS knows to delete the preferences on an upgraded customer system.
EMC AVAMAR 6.0 • ADMINISTRATION GUIDE 362

Performing an on-demand MCS flushADVANCED SERVER ADMINISTRATION AND MAINTENANCE
Backing up MCS dataTo protect itself from hardware failures, the MCS backs up, or “flushes,” its persistent data to the Avamar server that it manages. Flushes are done by way of an avtar client session.
Automatic Flushes. Automatic flushes are normally performed hourly and as part of system checkpoints.
flush.timestamp File. Before every flush, a special timestamp file (flush.timestamp) is created in the server_data directory. This file includes the time and date of the flush. On a server rollback, this file is restored and can be used to verify that the rollback was successful to the selected time and date. The contents of flush.timestamp are also accessible by way of the mcserver.sh --status command, which is discussed in Getting MCS Status (page 293).
init.timestamp File. During system initialization, the init.timestamp file is created or overwritten in the server_data directory. This file includes the time and date of the system initialization and can be used to verify that initialization was successful on the selected time and date.
Performing an on-demand MCS flushAutomatic flushes are normally performed hourly and as part of system checkpoints. You can also force an on-demand flush.
To force an on-demand flush:
User=admin 1. Open a command shell and log in:
2. Type:
mcserver.sh --flush
SERVER TYPE LOGIN STEPS
Single-node Log in to the server as admin.
Multi-node 1. Log in to the utility node as admin, and then load the admin OpenSSH key by typing:ssh-agent bash
ssh-add ~admin/.ssh/admin_key
2. When prompted, type the admin_key passphrase and press Enter.
EMC AVAMAR 6.0 • ADMINISTRATION GUIDE 363

Finding MCS backups in the systemADVANCED SERVER ADMINISTRATION AND MAINTENANCE
Finding MCS backups in the systemMCS flushes (backups) are stored under the /MC_BACKUPS account. You can get a list of MCS backups by browsing this account in the Avamar Administrator Backup & Restore window or by typing the following avtar command on a single command line:
avtar --backups --id=root --ap=PASSWORD --path=/MC_BACKUPS --hfsaddr=mydpn.Example.com --count=NUM
where PASSWORD is the Avamar root user account password (not the operating system root password) and NUM is the number of backups to list.
IMPORTANT: Space limitations in this guide cause the previous command example to wrap to more than one line. The command must be typed on a single command line (no line feeds or returns allowed).
--count=NUM Option. A typical Avamar server takes 26 MCS flushes (backups) per day (one per hour and one each during the morning and evening system checkpoints). Therefore, to list all MCS flushes (backups) stored in the system for a predictable past number of days, specify --count=NUM in increments of 26. For example, --count=26 lists all backups stored in the system during the past day, --count=52 lists all backups stored in the system during the past two days, and so forth.
EMC AVAMAR 6.0 • ADMINISTRATION GUIDE 364

Restoring MCS dataADVANCED SERVER ADMINISTRATION AND MAINTENANCE
Restoring MCS dataUser=admin 1. Open a command shell and log in:
2. Stop the MCS by typing:
dpnctl stop mcs
3. Restore the MCS to the latest flush (backup) by typing:
mcserver.sh --restore
TIP: You can also restore the MCS to a specific backup by including the --labelnum=NUM option. Finding MCS backups in the system (page 364) provides information on the option.
4. Open /usr/local/avamar/var/mc/server_log/restore.log to verify the success of the restore.
5. Restart the MCS by typing:
dpnctl start mcs
6. Resume scheduled operations as discussed in Suspending and resuming scheduled operations (page 283).
SERVER TYPE LOGIN STEPS
Single-node Log in to the server as admin.
Multi-node 1. Log in to the utility node as admin, and then load the admin OpenSSH key by typing:ssh-agent bash
ssh-add ~admin/.ssh/admin_key
2. When prompted, type the admin_key passphrase and press Enter.
EMC AVAMAR 6.0 • ADMINISTRATION GUIDE 365

Reverting to default MCS preference settingsADVANCED SERVER ADMINISTRATION AND MAINTENANCE
Reverting to default MCS preference settingsTo safely revert back to the initial default preference settings:
User=admin 1. Open a command shell and log in:
2. Stop the MCS by typing:
dpnctl stop mcs
3. Rename /usr/local/avamar/var/mc/server_data/prefs/mcserver.xml to old.mcserver.xml.
4. Copy the default server preferences file into the /usr/local/avamar/var/mc/server_data/prefs directory by typing:
cp /usr/local/avamar/lib/mcserver.xml/usr/local/avamar/var/mc/server_data/prefs/mcserver.xml
NOTE: Space limitations in this guide cause the previous cp command to wrap to more than one line. The cp command must be typed on a single command line (no line feeds or returns allowed).
5. Restart the MCS by typing:
dpnctl start mcs
6. Resume scheduled operations as discussed in Suspending and resuming scheduled operations (page 283).
SERVER TYPE LOGIN STEPS
Single-node Log in to the server as admin.
Multi-node 1. Log in to the utility node as admin, and then load the admin OpenSSH key by typing:ssh-agent bash
ssh-add ~admin/.ssh/admin_key
2. When prompted, type the admin_key passphrase and press Enter.
EMC AVAMAR 6.0 • ADMINISTRATION GUIDE 366

Updating server licensingADVANCED SERVER ADMINISTRATION AND MAINTENANCE
Manually changing Avamar Administrator client preferences
Some Avamar Administrator client preferences can be changed directly from Avamar Administrator. However, a number of preferences can only be changed by editing mcclient.xml.
To manually change Avamar Administrator client preferences:
1. Close Avamar Administrator.
2. Open var/mc/gui_data/prefs/mcclient.xml in a text editor such as vi or Emacs.
3. Edit the preference elements.
4. Save the changes.
The changes take effect the next time you start Avamar Administrator.
Updating server licensingAn Avamar server requires a license key for permanent operation. Upon acceptance of your order, EMC licensing provides you with assigned license keys for the Avamar software.
The assigned license keys are available from the Avamar download center: Subscribenet. To access Subscribenet, type the login credentials provided in the email sent to you from [email protected]. If you cannot find the email from [email protected], send an email to [email protected] to request the Avamar license keys. Include the EMC product SO number in the email. (The EMC product SO number is required.) The return time for an email response is 48 hours.
The following is an example of an assigned license key:
EMC Avamar Software License Key Information Avamar System Customer Account ID: CN-10062734404Avamar System Asset ID: A-2010014578
EMC AVAMAR 6.0 • ADMINISTRATION GUIDE 367

Updating server licensingADVANCED SERVER ADMINISTRATION AND MAINTENANCE
Installing the software without a license key
You can install the Avamar server software without a license key if you are replacing a failed utility node with a new utility node.
IMPORTANT: This is the only circumstance that warrants installing the Avamar software without a license key.
If an Avamar server experiences a hardware failure that requires you to replace the utility node, complete the following steps:
1. Install the software without a license key.
2. After a successful installation, start the Avamar server.
3. Contact EMC Licensing at [email protected] to obtain a permanent license key.
Installing the server software without a license key enables the Avamar system to operate for a 30-day grace period. After a 30-day grace period, the Avamar server stops performing several functions. To avoid any interruptions to the Avamar server, you must enter the assigned license key before the 30-day grace period ends.
A best practice is to enter the assigned license key at installation time to avoid expiration issues.
Generating and installing the license
To install an Avamar server license:
1. Generate a gsankeydata.xml license key information file, which is used to generate the permanent license key, as discussed in Generating a license key information file (page 369).
NOTE: You may have already generated this file during the Avamar server software installation and configuration. If so, then you do not need to perform the steps in this procedure.
2. If you completed the Avamar installation training class and received login credentials to the Avamar License Portal, then use the portal to generate a license key file as discussed in Generating a permanent license key file (page 370).
If you do not have login credentials to the Avamar License Portal, then contact EMC Licensing at [email protected] to request a license key generation. EMC Licensing then provides you with an XML file that contains an activated license key.
3. Install the license on the Avamar server as discussed in Installing the license (page 373).
EMC AVAMAR 6.0 • ADMINISTRATION GUIDE 368

Updating server licensingADVANCED SERVER ADMINISTRATION AND MAINTENANCE
Generating a license key information file
To generate a gsankeydata.xml license key information file:
User=admin 1. Open a command shell and log in:
2. Type:
gathergsankeydata
The following information appears in the command shell:Enter your Avamar system customer account number:
IMPORTANT: Use the same assigned license keys for each Avamar server for licenses received after June 1, 2010.
3. Type the Avamar system customer account number and press Enter.
A valid Avamar system customer account number (account ID) conforms to the following format:
CN-YYMMDDNNNNN
where:• YY is a two-digit year.
• MM is a two-digit month.• DD is a two-digit day of the month.• NNNNN is a five-digit numerical sequence.
The following information appears in the command shell:Enter your Avamar system asset ID number:
4. Type the Avamar system asset ID number and press Enter.
A valid Avamar system asset ID number (asset reference ID) conforms to the following format:
A-YYYYNNNNNN
where:
• YYYY is a four-digit year.• NNNNNN is a six-digit numerical sequence.
The following information appears in the command shell:
Please enter the Internet domain for this account:
SERVER TYPE LOGIN STEPS
Single-node Log in to the server as admin.
Multi-node 1. Log in to the utility node as admin, and then load the admin OpenSSH key by typing:ssh-agent bash
ssh-add ~admin/.ssh/admin_key
2. When prompted, type the admin_key passphrase and press Enter.
EMC AVAMAR 6.0 • ADMINISTRATION GUIDE 369

Updating server licensingADVANCED SERVER ADMINISTRATION AND MAINTENANCE
5. Type the corporate Internet domain and press Enter.
Information similar to the following appears in the command shell:Your answers were:Customer account ID: [CN-10062212345] Customer asset ID: [A-2010123456] Internet domain: [emc.com]Is this correct? [y(es), n(o), e(xit)]:
6. Type y and press Enter.
The local directory now contains the gsankeydata.xml license key information file. This file is used to generate the permanent license key.
Generating a permanent license key file
To generate a permanent license key file, you must have a login and password to the Avamar License Portal. Only users who have completed the Avamar installation training class receive login credentials to the Avamar License Portal.
If you do not have login credentials to the Avamar License Portal, then contact EMC Licensing at [email protected] and request a license key generation. EMC Technical Support then provides you with an XML file that contains an activated license key. You can skip the steps in this procedure and add the license key to the system, as discussed in Installing the license (page 373).
To generate a permanent license key file if you have login credentials to the Avamar License Portal:
1. Open a web browser and go to http://www.avamar.com/support1.html.
The EMC Avamar License Portal page appears.
2. Type the username and password and click Submit.
The EMC Avamar Support page appears.
3. Click Avamar Key Generation.
The EMC Avamar Key Generation page appears.
EMC AVAMAR 6.0 • ADMINISTRATION GUIDE 370

Updating server licensingADVANCED SERVER ADMINISTRATION AND MAINTENANCE
4. Click Browse, navigate to the license key information file that you generated either during Avamar server software installation and configuration or during Generating a license key information file (page 369), and then click Open.
The Upload Key Data XML text box now contains the license key information file.
5. In the Send To Email Address text box, type the email address to which EMC should send the license key file.
IMPORTANT: The email account must be an account from which you can save the attached license key file and copy it to the Avamar server.
6. Click Generate Key.
The EMC Avamar Support Enter Terabytes page appears.
NOTE: If the license key was issued before June 1, 2010, then the EMC Avamar Support final key generation page appears instead.
EMC AVAMAR 6.0 • ADMINISTRATION GUIDE 371

Updating server licensingADVANCED SERVER ADMINISTRATION AND MAINTENANCE
IMPORTANT: Use the same assigned license keys for each Avamar server. Type only the number of Capacity Terabyte Licenses that you purchased as specified in the contractual agreement and purchase quantity with EMC. Licensing is subject to audit. If you exceed the software TB license purchased, contact your EMC Account Manager or Reseller for order compliance.
7. In the Terabytes text box, type the number of capacity terabyte licenses to allocate to the Avamar server:
NOTE: If you purchase additional storage capacity, you must generate a new license key file.
8. Click Generate Key.
The EMC Avamar Support page displays a confirmation message that the license key file has been sent by email.
ENVIRONMENT REQUIRED TERABYTES VALUE
New Avamar capacity-based licenses
The number of terabytes. For example, type 10 for a 10 TB capacity license.
Upgrade to Avamar capacity-based licenses
Add the original terabytes with the add-on terabytes. For example, if the original order was 10 TB and the add-on is 2 TB, then type 12.TIP: To find the original number of terabytes, open a command shell and type: avmaint license --avamaronly
License information appears in the command shell. However, if you did not regenerate a license key after an upgrade, then the output from the command might not be accurate. In this case, check all purchase orders with EMC for verification.
Avamar Virtual Edition .5 TB .5
Avamar Virtual Edition 1 TB 1
Avamar Virtual Edition 2 TB 2
Avamar Data Transport (single virtual machine)
1NOTE: You must create a separate license for each transport node.
EMC AVAMAR 6.0 • ADMINISTRATION GUIDE 372

Updating server licensingADVANCED SERVER ADMINISTRATION AND MAINTENANCE
Installing the license
After you receive the license key file from either EMC Licensing or from the key generation process in Generating a permanent license key file (page 370), you can install and activate the license.
To install and activate the license:
1. Log in to the email account to which the license key file was sent.
2. Open the email message from [email protected] with a subject line of EMC Avamar Key Information.
The email message contains the license key file as an attachment. The file uses the following naming convention: ASSET-NAME_Key.xml
where ASSET-NAME is typically the Avamar server hostname as defined in the corporate DNS.
3. Save the ASSET-NAME.xml email attachment to a temporary directory or folder.
4. Use WinSCP or an equivalent program to copy the ASSET-NAME.xml license key file from the temporary directory or folder to the appropriate location described in the following table.
User=admin 5. Switch to the command shell session and ensure that you are still logged in as user admin, and that the admin OpenSSH key is loaded.
6. Ensure that the Avamar server subsystem (also known as GSAN) is running by typing:
dpnctl status gsan
If gsan is running, then the following information appears in the command shell:
dpnctl: INFO: gsan status: ready
SERVER TYPE LOCATION FOR THE LICENSE KEY FILE
Administering a single-node server.
/tmp directory on the Avamar server.
Administering a multi-node server.
/tmp directory on the Avamar server utility node.
EMC AVAMAR 6.0 • ADMINISTRATION GUIDE 373

Changing Avamar passwordsADVANCED SERVER ADMINISTRATION AND MAINTENANCE
7. Change file permissions on the ASSET-NAME.xml license key file and activate the license by typing the appropriate commands as listed in the following table.
where ASSET-NAME.xml is the license key file.
8. If the Avamar server is not running, then start the server.
9. Verify that the server license is correctly installed by typing:
avmaint license --avamaronly
License information appears in the command shell.
Changing Avamar passwordsThis procedure describes how to use the change-passwords interactive utility to change various operating user account and Avamar server user account passwords, as well as create new OpenSSH keys.
The change-passwords utility guides you through the following operations:
• Changing operating system login passwords for the admin, dpn, and root accounts
• Creating new admin and dpnid OpenSSH keys• Changing internal Avamar server passwords for the root and MCUser accounts
After you run the change-passwords utility, you must also manually update EMS settings as discussed in Manually update EMS settings (page 382).
SERVER STATUS COMMANDS TO ACTIVATE THE LICENSE
Running chmod 644 /tmp/ASSET-NAME.xml
avmaint license /tmp/ASSET-NAME.xml --avamaronly
Not running cd /usr/local/avamar/etc
mv license.xml license.xml.old
cp /tmp/ASSET-NAME.xml license.xml
chmod 644 license.xml
EMC AVAMAR 6.0 • ADMINISTRATION GUIDE 374

Changing Avamar passwordsADVANCED SERVER ADMINISTRATION AND MAINTENANCE
Run change-passwords
To change operating user account passwords or Avamar server user account passwords, or to create new OpenSSH keys:
User=dpn 1. Open a command shell and log in:
2. Type:
change-passwords
If you run change-passwords on a multi-node server, the following information appears in the command shell:
Do you wish to change passwords and/or passphrases on all nodes?Answering y(es) changes this set of nodes:
#.s -- all utility/services nodes#.# -- all data nodes.
Answering n(o) will afford you the opportunity to installexisting SSH keys onto other nodes.
y(es), n(o), h(elp), q(uit/exit):
3. Do one of the following:
The following information appears in the command shell:Identity added: /home/dpn/.ssh/dpnid (/home/dpn/.ssh/dpnid) Identity added: /home/dpn/.ssh/dpnid.prev (/home/dpn/.ssh/dpnid.prev) Identity added: /home/dpn/.ssh/dpnid.orig (/home/dpn/.ssh/dpnid.orig)
Do you wish to specify one or more additional SSH passphrase-lessprivate keys that are authorized for root operations?
Answer n(o) here unless there are known inconsistencies in~root/.ssh/authorized_keys2 files among the various nodes (as mightbe evident if you had been prompted for a root password in a previousrun of this program).
Note that the following keys will be used automatically (there isno need to re-specify them here):
/home/dpn/.ssh/dpnid/home/dpn/.ssh/dpnid.prev/home/dpn/.ssh/dpnid.orig
y(es), n(o), h(elp), q(uit/exit):--------------------------------------------------------
SERVER TYPE LOGIN STEP
Single-node Log in to the server as dpn.
Multi-node Log in to the utility node as dpn.
TO CHANGE PASSWORDS ON DO THIS
All nodes Type y and press Enter.
Selected nodes Type n and press Enter.
EMC AVAMAR 6.0 • ADMINISTRATION GUIDE 375

Changing Avamar passwordsADVANCED SERVER ADMINISTRATION AND MAINTENANCE
4. Type n and press Enter.
The following information appears in the command shell:
The following is a test of root authorization with the currentlyloaded SSH key(s).
If during this test you are prompted for an OS root password,then you might be missing an appropriate "dpnid" key for oneor more nodes.
-> In that event, re-run this program and, when prompted,specify as many SSH private key files as are necessaryin order to complete root operations on all nodes.
Starting root authorization test with 15 second timeout...End of root authorization test.--------------------------------------------------------
Change operatingsystem user
accountpasswords?
The following information appears in the command shell:--------------------------------------------------------Change OS (login) passwords?y(es), n(o), q(uit/exit):
5. Do one of the following:
The following information appears in the command shell:--------------------------------------------------------Change OS password for "admin"?
y(es), n(o), q(uit/exit):
Change adminlogin password?
6. Do one of the following:
The following information appears in the command shell:
Please enter a new OS (login) password for user "admin".(Entering an empty (blank) line twice quits/exits.)
7. Type the new admin operating system user account password and press Enter.
The following information appears in the command shell:
Please enter the same OS password again.(Entering an empty (blank) line twice quits/exits.)
IF DO THIS
You want to change admin, dpn, or root operating system user account passwords.
Type y and press Enter.
You do not want to change admin, dpn, or root operating system user account passwords.
Type n and press Enter.Proceed to step 16.
IF DO THIS
You want to change the admin operating system user account password.
Type y and press Enter.
You do not want to change the admin operating system user account password.
Type n and press Enter.Proceed to step 10.
EMC AVAMAR 6.0 • ADMINISTRATION GUIDE 376

Changing Avamar passwordsADVANCED SERVER ADMINISTRATION AND MAINTENANCE
8. Retype the new admin operating system user account password and press Enter.
The following information appears in the command shell:
Accepted OS password for "admin".--------------------------------------------------------Change OS password for "dpn"?y(es), n(o), q(uit/exit):
Change dpn loginpassword?
9. Do one of the following:
The following information appears in the command shell:Please enter a new OS (login) password for user "dpn".(Entering an empty (blank) line twice quits/exits.)
10.Type the new dpn operating system user account password and press Enter.
The following information appears in the command shell:
Please enter the same OS password again.(Entering an empty (blank) line twice quits/exits.)
11.Retype the new dpn operating system user account password and press Enter.
The following information appears in the command shell:
Accepted OS password for "dpn".--------------------------------------------------------Change OS password for "root"?y(es), n(o), q(uit/exit): y
Change root loginpassword?
12.Do one of the following:
The following information appears in the command shell:
Please enter a new OS (login) password for user "root".(Entering an empty (blank) line twice quits/exits.)
13.Type the new root operating system user account password and press Enter.
The following information appears in the command shell:
Please enter the same OS password again.(Entering an empty (blank) line twice quits/exits.)
IF DO THIS
You want to change the dpn operating system user account password.
Type y and press Enter.
You do not want to change the dpn operating system user account password.
Type n and press Enter.Proceed to step 13.
IF DO THIS
You want to change the root operating system user account password.
Type y and press Enter.
You do not want to change the root operating system user account password.
Type n and press Enter.Proceed to step 16.
EMC AVAMAR 6.0 • ADMINISTRATION GUIDE 377

Changing Avamar passwordsADVANCED SERVER ADMINISTRATION AND MAINTENANCE
14.Retype the new root operating system user account password and press Enter.
The following information appears in the command shell:
Accepted OS password for "root".========================================================Change SSH keys?y(es), n(o), q(uit/exit): y
Change OpenSSHkeys?
The following information appears in the command shell:
========================================================Change SSH keys?y(es), n(o), q(uit/exit):
15.Do one of the following:
16.Do one of the following:
The following information appears in the command shell:
--------------------------------------------------------Change SSH key for "admin"?y(es), n(o), q(uit/exit):
Create new adminOpenSSH Key?
17.Do one of the following:
The following information appears in the command shell:Please enter a new SSH key passphrase for user "admin".(Entering an empty (blank) line twice quits/exits.)
18.Type the new admin OpenSSH passphrase and press Enter.
The following information appears in the command shell:
Please enter the same SSH key again.(Entering an empty (blank) line twice quits/exits.)
IF DO THIS
You want to change admin or dpnid OpenSSH keys.
Type y and press Enter.
You do not want to change admin or dpnid OpenSSH keys.
Type n and press Enter.Proceed to step 22.
IF DO THIS
You want to create new admin or dpnid OpenSSH keys.
Type y and press Enter.
You do not want to create new admin or dpnid OpenSSH keys.
Type n and press Enter.Proceed to step 18.
IF DO THIS
You want to create a new admin OpenSSH key.
Type y and press Enter.
You do not want to create a new admin OpenSSH key.
Type n and press Enter.Proceed to step 21.
EMC AVAMAR 6.0 • ADMINISTRATION GUIDE 378

Changing Avamar passwordsADVANCED SERVER ADMINISTRATION AND MAINTENANCE
19.Retype the new admin OpenSSH passphrase and press Enter.
The following information appears in the command shell:
Accepted SSH key for "admin".--------------------------------------------------------Redo passphrase-less elevated-privilege SSH key "dpnid"?y(es), n(o), h(elp), q(uit/exit):
Create new dpnidOpenSSH Key?
20.Do one of the following:
IMPORTANT: This task requires knowledge of the internal Avamar server root user account password.
Change internalAvamar server
user accountpasswords?
The following information appears in the command shell:========================================================Change Avamar Server passwords?y(es), n(o), q(uit/exit):
21.Do one of the following:
The following information appears in the command shell:
Please enter the CURRENT Avamar Server password for "root"(Entering an empty (blank) line twice quits/exits.)
22.Type the current internal Avamar server root user account password (not the operating system root password) and press Enter.
The following information appears in the command shell:
Checking Avamar Server root password (300 second timeout)...Avamar Server current root password accepted.--------------------------------------------------------Change Avamar Server password for "MCUser"?y(es), n(o), q(uit/exit): y
IF DO THIS
You want to create a new dpnid OpenSSH key.
Type y and press Enter.
You do not want to create a new dpnid OpenSSH key.
Type n and press Enter.
IF DO THIS
You want to change the MCUser or internal root Avamar server user account passwords.
Type y and press Enter.
You do not want to change the MCUser or internal root Avamar server user account passwords.
Type n and press Enter.Proceed to step 30.
EMC AVAMAR 6.0 • ADMINISTRATION GUIDE 379

Changing Avamar passwordsADVANCED SERVER ADMINISTRATION AND MAINTENANCE
Change internalAvamar server
MCUserpassword?
23.Do one of the following:
The following information appears in the command shell:Please enter a new Avamar Server password for user "MCUser".(Entering an empty (blank) line twice quits/exits.)
24.Type the new internal Avamar server MCUser password and press Enter.
The following information appears in the command shell:
Please enter the same Avamar Server password again.(Entering an empty (blank) line twice quits/exits.)
25.Retype the new internal Avamar server MCUser password and press Enter.
The following information appears in the command shell:Accepted Avamar Server password for "MCUser".--------------------------------------------------------Change Avamar Server password for "root"?y(es), n(o), q(uit/exit):
Change internalAvamar server root
password?
26.Do one of the following:
The following information appears in the command shell:Please enter a new Avamar Server password for user "root".(Entering an empty (blank) line twice quits/exits.)
27.Type the new internal Avamar server root password and press Enter.
The following information appears in the command shell:
Please enter the same Avamar Server password again.(Entering an empty (blank) line twice quits/exits.)
IF DO THIS
You want to change the internal Avamar server MCUser password.
Type y and press Enter.
You do not want to change the internal Avamar server MCUser password.
Type n and press Enter.Proceed to step 27.
IF DO THIS
You want to change the internal Avamar server root password.
Type y and press Enter.
You do not want to change the internal Avamar server root password.
Type n and press Enter.Proceed to step 30.
EMC AVAMAR 6.0 • ADMINISTRATION GUIDE 380

Changing Avamar passwordsADVANCED SERVER ADMINISTRATION AND MAINTENANCE
28.Retype the new internal Avamar server root password and press Enter.
The following information appears in the command shell:
Accepted Avamar Server password for "root".--------------------------------------------------------Do you wish to proceed with your password changes on the selected node?
Answering y(es) will proceed with password updates.Answering n(o) or q(uit) will not proceed.
y(es), n(o), q(uit/exit): y
Accept changes? 29.Do one of the following:
The following information appears in the command shell:
Changing OS passwords...[Logging to /usr/local/avamar/var/change-passwords.log...]Done changing OS passwords...Changing Avamar Server passwords...Checking MCS Status...Stopping MCS...Starting process of updating Administrator configuration...Running script to update Administrator configuration on node 0.s...[Logging to /usr/local/avamar/var/change-passwords.log...]Done with updating Administrator configuration on node 0.s...Starting process of updating client configurations...Running script to update client configuration on 0.s...[Logging to /usr/local/avamar/var/change-passwords.log...]Updating client configuration on node 0.0...Done updating client configuration on 0.0...Checking MCS Status...Starting MCS...Starting process of changing SSH keys...Running script to update SSH keys on node 0.s...[Logging to /usr/local/avamar/var/change-passwords.log...]Done with updating SSH keys on node 0.s...--------------------------------------------------------Done.NOTES:- If you had custom public keys present in the
authorized_keys2 files of any Avamar OS users(admin, dpn, root) be aware that you may need to re-add your custom keys.
- Please be sure to resume schedules via theAdministrator GUI.
Resume scheduledoperations
30.Resume scheduled operations by performing the following:
(a) In Avamar Administrator, select Tools > Manage Schedules.
The Manage All Schedules window appears.
(b) Click Resume All.
IF DO THIS
You want to accept changes made to passwords or OpenSSH keys during this utility session.
Type y and press Enter.
You want to exit this utility session without making changes to passwords or OpenSSH keys.
Type n and press Enter.
EMC AVAMAR 6.0 • ADMINISTRATION GUIDE 381

Changing Avamar passwordsADVANCED SERVER ADMINISTRATION AND MAINTENANCE
Manually update EMS settings
After you use the change-passwords utility to change passwords, you must update the EMS with the new settings.
To manually update EMS settings:
1. Open a web browser and log in to Avamar Enterprise Manager (page 297).
The Dashboard page appears.
2. Click Configure.
The Configure page appears.
3. Click the server name to edit.
An Edit block appears below the systems list.
4. Type the new MCUser password in the Password field and click Save.
EMC AVAMAR 6.0 • ADMINISTRATION GUIDE 382

Changing Avamar passwordsADVANCED SERVER ADMINISTRATION AND MAINTENANCE
User=admin 5. Open a command shell and log in:
6. Type:
dpnctl stop ems
emserver.sh --renameserver --uselocalmcs
dpnctl start ems
SERVER TYPE LOGIN STEPS
Single-node Log in to the server as admin.
Multi-node 1. Log in to the utility node as admin, and then load the admin OpenSSH key by typing:ssh-agent bash
ssh-add ~admin/.ssh/admin_key
2. When prompted, type the admin_key passphrase and press Enter.
EMC AVAMAR 6.0 • ADMINISTRATION GUIDE 383

Changing single-node server network settingsADVANCED SERVER ADMINISTRATION AND MAINTENANCE
Changing single-node server network settingsThis topic describes how to properly use the dpnnetutil utility to change the following single-node server network settings:
• IP address• Domain name• DNS settings• Network gateway• NAT settings• Multi-NICs settings
Do not use dpnnetutil to change the node type.
IMPORTANT: This procedure cannot be used under any circumstances to change network settings for multi-node servers. If dpnnetutil is run against a multi-node server, operational readiness might be adversely affected. Contact EMC Technical Support for additional information.
To change single-node server network settings:
User=root 1. Open a command shell and log in to the server as root.
2. Type:
dpnnetutil
The following information appears in the command shell:
Do you want to configure AVAMARSERVER?
where AVAMARSERVER is the server hostname.
3. Use Tab or cursor keys to select Yes and press Enter.
Time zone The following information appears in the command shell:
The current default time zone is "TIMEZONE".Do you want to select a different time zone?
where TIMEZONE is the current default time zone.
EMC AVAMAR 6.0 • ADMINISTRATION GUIDE 384

Changing single-node server network settingsADVANCED SERVER ADMINISTRATION AND MAINTENANCE
4. Do one of the following:
SMTP server The following information appears in the command shell:
Enter the name or address of an SMTP server that will accept and relay e-mail submissions from this host.
5. Do one of the following:
Server IP address The following information appears in the command shell:
Do you want to create a bonded interface bond0 for this node?
6. Select No.
The following information appears in the command shell:Enter the new IP address for the system single-node server interface eth0:
7. Do one of the following:
Network mask The following information appears in the command shell:Enter the network mask for the system single-node server interface eth0.
IF DO THIS
You want to change the default server time zone.
1. Use Tab or cursor keys to select Yes.2. Press Enter.3. Use cursor keys to select a time zone
from the list.4. Use Tab or cursor keys to select OK.5. Press Enter.
You want to keep the default server time zone.
1. Use Tab or cursor keys to select No.2. Press Enter.
IF DO THIS
You want to change the SMTP server name.
1. Type the new SMTP server name.2. Press Tab to select OK.3. Press Enter.
You want to keep the SMTP server name.
1. Press Tab to accept the SMTP server name and select OK.
2. Press Enter.
IF DO THIS
You want to change the server IP address.
1. Type the new server IP address.2. Press Tab to select OK.3. Press Enter.
You want to keep the server IP address.
1. Press Tab to accept the server IP address and select OK.
2. Press Enter.
EMC AVAMAR 6.0 • ADMINISTRATION GUIDE 385

Changing single-node server network settingsADVANCED SERVER ADMINISTRATION AND MAINTENANCE
8. Do one of the following:
Server hostname The following information appears in the command shell:Enter the new hostname (without domain name) for the system single-node server.
9. Do one of the following:
Server domain The following information appears in the command shell:Enter the domain name for the system single-node server.
10.Do one of the following:
Network gatewayaddress
The following information appears in the command shell:Enter the network gateway address for the system single-node server.
IF DO THIS
You want to change the network mask.
1. Type the new network mask.2. Press Tab to select OK.3. Press Enter.
You want to keep the network mask.
1. Press Tab to accept the current network mask and select OK.
2. Press Enter.
IF DO THIS
You want to change the server hostname.
1. Type the new server hostname.Do not use a fully qualified hostname. The server domain name is specified in the next step.
2. Press Tab to select OK.3. Press Enter.
You want to keep the server hostname.
1. Press Tab to accept the server hostname and select OK.
2. Press Enter.
IF DO THIS
You want to change the server domain name.
1. Type the new server domain name.2. Press Tab to select OK.3. Press Enter.
You want to keep the server domain name.
1. Press Tab to accept the server domain name and select OK.
2. Press Enter.
EMC AVAMAR 6.0 • ADMINISTRATION GUIDE 386

Changing single-node server network settingsADVANCED SERVER ADMINISTRATION AND MAINTENANCE
11.Do one of the following:
Primary DNSresolver
The following information appears in the command shell:Enter the IP address of the primary DNS resolver for the system single-node server.
12.Do one of the following:
Secondary DNSresolver
The following information appears in the command shell:Enter the IP address of the secondary DNS resolver for the system single-node server.
13.Do one of the following:
Review/confirmchanges
The following information appears in the command shell:Accept settings and proceed to fix up the network configurations?Select Yes to proceed. No to quit. You may re-run "dpnnetutil".
14.Examine the settings shown.
IF DO THIS
You want to change the network gateway address.
1. Type the new network gateway address.
2. Press Tab to select OK.3. Press Enter.
You want to keep the network gateway address.
1. Press Tab to accept the network gateway address and select OK.
2. Press Enter.
IF DO THIS
You want to change the primary DNS resolver IP address.
1. Type the new primary DNS resolver IP address.
2. Press Tab to select OK.3. Press Enter.
You want to keep the primary DNS resolver IP address.
1. Press Tab to accept the primary DNS resolver IP address and select OK.
2. Press Enter.
IF DO THIS
You want to change the secondary DNS resolver IP address.
1. Type the new secondary DNS resolver IP address.
2. Press Tab to select OK.3. Press Enter.
You want to keep the secondary DNS resolver IP address.
1. Press Tab to accept the secondary DNS resolver IP address and select OK.
2. Press Enter.
EMC AVAMAR 6.0 • ADMINISTRATION GUIDE 387

Adding a custom security notification to web login pagesADVANCED SERVER ADMINISTRATION AND MAINTENANCE
15.Do one of the following:
The dpnnetutil program writes the configuration changes to the /usr/local/avamar/probe.xml directory.
NOTE: Use the nodedb print command to view the contents of probe.xml.
The Avamar server software automatically restarts upon completion of the reconfiguration.
16.Check and update as necessary the configurations of the external network infrastructure elements (switches and firewalls) to ensure that the single-node server remains reachable after it has been assigned the new IP address or new default network gateway. In particular, VLANs and ACLs might need to be updated.
Adding a custom security notification to web login pagesAvamar Enterprise Manager and the Avamar Web Access features enable you to include a custom security notification to users on their login pages. These notifications typically explain that only authorized users are permitted access. They also list the penalties for unauthorized access.
To implement these notifications, add the following plain-text files to the /usr/local/avamar/var/em/server_data/ directory:
• disclaimer_EM.txt• disclaimer_Web_Restore.txt
The disclaimer_EM.txt file stores the custom security notification for the Avamar Enterprise Manager login page. The disclaimer_Web_Restore.txt file stores the custom security notification for the Avamar Web Access login page.
To customize security notification language, create these files in a text editor, add content and save them to the /usr/local/avamar/var/em/server_data/ directory. Either file can contain plain text or HTML content.
To discontinue the display of the additional security notifications, remove these files. It is also permissible for these files to be empty.
IF DO THIS
You want to accept these settings and make these changes.
1. Use Tab or cursor keys to select Yes.2. Press Enter.
You want to exit dpnnetutil without making any changes.
1. Use Tab or cursor keys to select No.2. Press Enter.
EMC AVAMAR 6.0 • ADMINISTRATION GUIDE 388

Manually updating the plug-in catalogADVANCED SERVER ADMINISTRATION AND MAINTENANCE
Manually updating the plug-in catalogBeginning with Avamar 4.1, you can add new clients to an operational Avamar system without a system upgrade. When you add the new clients, Avamar 4.1 systems automatically update the consolidated plug-in catalog.
However, if you add new clients to an Avamar 4.0.x or earlier system, you must manually update the consolidated plug-in catalog for those clients to be recognized by the system.
To manually update the plug-in catalog:
User=admin 1. Open a command shell and log in:
2. Go to the directory that contains the plugin_catalog.xml file and rename it by typing:
cd /usr/local/avamar/lib
mv plugin_catalog.xml plugin_catalog.xml.old
3. Obtain the updated consolidated plug-in catalog.
In most cases, EMC Technical Support provides this for you.
4. Copy the updated consolidated plug-in catalog to the /usr/local/avamar/lib directory.
5. Ensure that the updated plugin_catalog.xml file has the correct ownership and permissions by typing:
ls -l plugin_catalog.xml
Correct ownership and permissions are:
304 -rw-r--r-- 1 root admin 305578 Jun 3 14:21 plugin_catalog.xml
6. If ownership and permissions are not correct, set them by typing:
chmod 644 plugin_catalog.xml
chown root:admin plugin_catalog.xml
7. Stop and then restart the MCS to enable the MCS to read the updated plugin_catalog.xml by typing:
dpnctl stop mcs
dpnctl start mcs
SERVER TYPE LOGIN STEPS
Single-node Log in to the server as admin.
Multi-node 1. Log in to the utility node as admin, and then load the admin OpenSSH key by typing:ssh-agent bash
ssh-add ~admin/.ssh/admin_key
2. When prompted, type the admin_key passphrase and press Enter.
EMC AVAMAR 6.0 • ADMINISTRATION GUIDE 389

Configuring Avamar to use network address translationADVANCED SERVER ADMINISTRATION AND MAINTENANCE
Configuring Avamar to use network address translation
NOTE: This topic applies only to Avamar configurations that use Network Address Translation (NAT).
Starting with version 5.0, some or all Avamar clients can access Avamar storage nodes by using a set of addresses that undergo NAT. To make NAT information known to the Avamar server, the probe.xml file must contain nat-address elements for storage nodes. After a client makes initial contact with the Avamar server’s utility node, the Avamar server provides a set of routable addresses for the storage nodes to each client. In the absence of a nat-address element, a client uses a pre-configured “real” (untranslated) network-interface address.
The following diagram shows an example of a 1x4 multi-node server configuration in which Avamar uses NAT.
The following instructions explain how to set up the probe.xml file (node resource database) to enable the Avamar server to use NAT. These instructions assume that each Avamar node has a unique address (from the Avamar clients’ perspective), and that you configure a router on the network to apply transparent one-to-one network address translation. You can also use these instructions to enable NAT for use in a single-node server configuration.
NOTE: Setting up the hardware for NAT is beyond the scope of the EMC Avamar Administration Guide.
Real: 10.6.250.90 0.3
Storage Node
Storage Node
Storage Node
Storage Node
Utility Node
Avamar ServerReal IP addressof each server
node
NAT IP addressof each server
node
NAT/real IPaddress
translation
ROUTER
AVAMARCLIENT 1
192.168.6.2
AVAMARCLIENT 2
192.168.6.3
SWITCH2
(NAT: 192.168.6.8)
Real: 10.6.250.89 0.2(NAT: 192.168.6.7)
Real: 10.6.250.88 0.1(NAT: 192.168.6.6)
Real: 10.6.250.87 0.0(NAT: 192.168.6.5)
Real: 10.6.250.86 0.s
10.6.250.88
(NAT: 192.168.6.4)
SWITCH1
192.168.6.6
192.168.6.7
192.168.6.8
192.168.6.5
192.168.6.4
192.168.6.6
192.168.6.7
192.168.6.8
192.168.6.5
192.168.6.4
10.6.250.87
10.6.250.89
10.6.250.90
10.6.250.91
192.168.6.1
10.6.250.86
EMC AVAMAR 6.0 • ADMINISTRATION GUIDE 390

Configuring Avamar to use network address translationADVANCED SERVER ADMINISTRATION AND MAINTENANCE
To configure Avamar to use NAT perform the following:
1. Use either the dpnnetutil or nodedb program to add NAT addresses to probe.xml.
• An example command using dpnnetutil:
su - root
dpnnetutil
Respond to the interactive prompts displayed by dpnnetutil.
• An example command using nodedb:
nodedb update if --addr=10.6.250.87 --new-nat=192.168.6.4=192.168.6.5
The nodedb command updates an existing network interface element in the probe.xml file with NAT information that corresponds to the example diagram.
The EMC Avamar Technical Addendum provides more information about dpnnetutil, nodedb, and the probe.xml file.
2. If the Avamar storage subsystem is currently stopped, restart it by typing:
dpnctl start gsan
3. If the Avamar storage subsystem is currently running, re-read the probe.xml file by typing:
avmaint networkconfig /usr/local/avamar/var/probe.xml --avamaronly
The EMC Avamar Technical Addendum provides more information about avmaint networkconfig.
4. Register clients by using the avregister (UNIX) or avregister.bat (Windows) command, or by using Avamar Administrator.
• An example command to register a UNIX client using avregister:
/usr/local/avamar/bin/avregister
Respond to the interactive prompts displayed by avregister.
To determine whether NAT is in use, the client and Avamar server must have a network connection.
• Registration (page 44) provides more information about registering clients from Avamar Administrator.
EMC AVAMAR 6.0 • ADMINISTRATION GUIDE 391
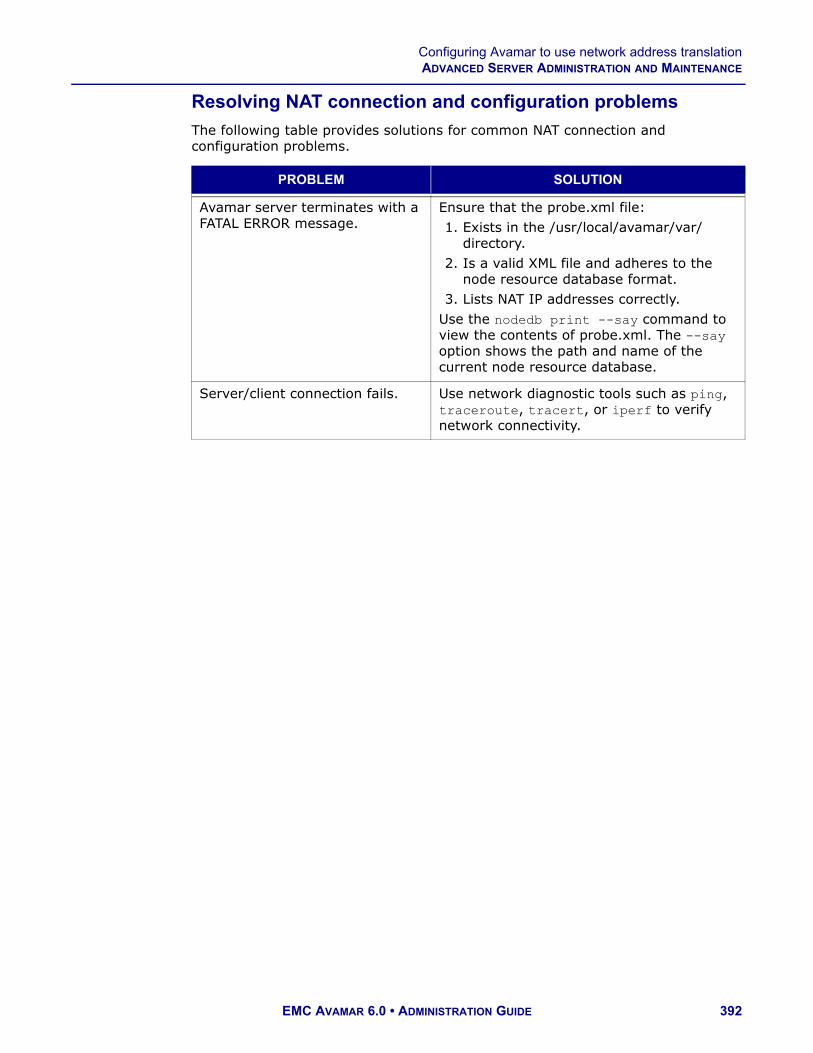
Configuring Avamar to use network address translationADVANCED SERVER ADMINISTRATION AND MAINTENANCE
Resolving NAT connection and configuration problems
The following table provides solutions for common NAT connection and configuration problems.
PROBLEM SOLUTION
Avamar server terminates with a FATAL ERROR message.
Ensure that the probe.xml file:1. Exists in the /usr/local/avamar/var/
directory.2. Is a valid XML file and adheres to the
node resource database format.3. Lists NAT IP addresses correctly.
Use the nodedb print --say command to view the contents of probe.xml. The --say option shows the path and name of the current node resource database.
Server/client connection fails. Use network diagnostic tools such as ping, traceroute, tracert, or iperf to verify network connectivity.
EMC AVAMAR 6.0 • ADMINISTRATION GUIDE 392

SERVER UPDATES AND HOTFIXES
This chapter describes how to install updates and hotfix patches on an Avamar server by using the System Maintenance page in Avamar Enterprise Manager.
Topics in this chapter include:
• Important terms (page 393)• Functional overview (page 394)• Avamar Downloader Service installation requirements (page 396)• Installing the Avamar Downloader Service (page 397)• Configuring the Avamar Downloader Service (page 400)• Using the Avamar Downloader Service (page 402)• Troubleshooting Avamar Downloader Service issues (page 405)• Uninstalling the Avamar Downloader Service (page 406)• Installing patches and hotfixes from the System Maintenance page (page 407)• Viewing installation history information (page 413)
Important termsThe following terms are relevant to the contents in this chapter.
Avamar Downloader Service. A Windows-based file distribution system that delivers OS patches, hotfix patches, and server updates to target Avamar systems.
Avamar Installation Manager. An web interface that manages installation packages. A successful Avamar 6.0 server software installation or upgrade, embeds the functionality in the Avamar Enterprise Manager as a new feature. This feature is called System Maintenance.
AvInstaller. A backend service that executes and reports package installations.
EMC repository. A repository that contains Avamar installation packages and manifest files.
EMC AVAMAR 6.0 • ADMINISTRATION GUIDE 393

Functional overviewSERVER UPDATES AND HOTFIXES
The repository is located on the EMC network. Each EMC customer has a download center that contains files available to them. These files are maintained by the EMC Subscribenet team. Outgoing communication from the Avamar Downloader Service to the EMC repository is encrypted with SSL over an HTTP connection.
Local repository. The /data01/avamar/repo/packages directory on the utility node or single-node server. This directory contains the most current manifest file from the EMC repository and software packages. The Avamar Downloader Service pushes packages from the EMC repository to the local repository.
Manifest file. An XML file listing all packages currently available for download from the EMC repository. When the EMC Subscribenet team adds a package to the EMC repository, it then adds an entry to the manifest file that describes the package. When EMC Subscribenet team removes a package from the repository, it then removes the entry for the package from the manifest file.
The Avamar Downloader Service automatically downloads the manifest file from the EMC repository once a day and determines if new download packages are available.
The Avamar Downloader Service sends the new manifest file to the local repository for each known Avamar system.
Packages. Avamar software installation files (new server installations, server upgrades, and hotfix patches) available from the EMC repository. Package files use the file extension, “avp.”
Functional overviewAs part of an Avamar 6.0 server software installation or upgrade, EMC Technical Support installs:
• Avamar Downloader Service software on a standalone Microsoft Windows server that allows network access to EMC sites on the Internet and all internal Avamar servers.
• AvInstaller on the utility node in a multi-node environment or the server in a single-node environment.
The AvInstaller installation provides the Avamar Installation Manager user interface.
The Avamar Downloader Service installation creates:
• Local repository in the installation directory.
This directory is where the Avamar Downloader Service puts packages it fetches from the EMC repository.
• Start menu group Programs > EMC > Avamar that contains:• Avamar Downloader Service Configuration• Start Avamar Downloader Service Monitor
• Desktop shortcut to the Avamar Downloader Service configuration application.
EMC AVAMAR 6.0 • ADMINISTRATION GUIDE 394

Functional overviewSERVER UPDATES AND HOTFIXES
The AvInstaller manages:
• EMC repository manifest file• Download packages from the Avamar Downloader Service• /data01/avamar/repo/packages directory • Dependency and version checks of the download packages• Temporary directory used to extract the packages
File distribution
The Avamar Downloader Service file distribution process uses minimal bandwidth by downloading only files that you request through the Avamar Installation Manager. The Avamar Downloader Service uses a local file cache to ensure that a file is fetched only once from the EMC repository no matter how many times an Avamar system requests the file. You can remove old files from the local repository to free disk space.
Avamar Downloader Service security
The Avamar Downloader Service validates each package it downloads to ensure the package has been properly signed and transmitted.
The Avamar Downloader Service accepts incoming requests only from Avamar systems that are on a known systems list. The Avamar Downloader Service encrypts outgoing communication to the EMC repository by using SSL (Secure Socket Layers) over an HTTP connection.
NOTE: If a site prohibits access to the Internet, you can manually copy packages to the /data01/avamar/repo directory, and then move them to the /packages directory on the utility node or single-node server instead of using the Avamar Downloader Service.
Avamar Downloader Service components
The Avamar Downloader Service comprises three components. The following table describes these components.
COMPONENT DESCRIPTION
AvamarDownloaderService Windows service
Monitors the EMC repository. When a package is available for an Avamar system, the AvamarDownloaderService service automatically downloads the package and pushes it to the local repository on the Avamar utility node or single-node server.
Avamar Downloader Service configuration application
A user interface that enables you to configure and modify Avamar Downloader Service configuration parameters.
EMC AVAMAR 6.0 • ADMINISTRATION GUIDE 395

Avamar Downloader Service installation requirementsSERVER UPDATES AND HOTFIXES
Avamar Downloader Service installation requirementsThe Avamar Downloader Service is available as either a 32-bit or 64-bit application. You install the Avamar Downloader Service on a Microsoft Windows server. This system can be a desktop or laptop system. The following table provides the installation requirements for the Avamar Downloader Service:
Avamar Downloader Service monitor
A process that provides status message about the Avamar Downloader Service
Task tray icon for the Avamar Downloader Service application.Moving the mouse over this icon displays status messages from the Avamar Downloader Service monitor. Monitoring Avamar Downloader Service status (page 402) provides more information.Right-clicking this icon displays three options:
Configure Avamar Downloader Service
Opens the Avamar Downloader Service configuration application.
Open Download Repository
Opens the local file cache directory on the Windows server:C:\Program Files\EMC\Avamar Downloader Service\repository
Close Notification Display
Closes the task tray application.
COMPONENT DESCRIPTION
SOFTWARE/HARDWARE REQUIREMENT
Operating system • Microsoft Windows Server 2003 SP1• Microsoft Windows Server 2003 SP2• Microsoft Windows Vista• Microsoft Windows 7• Microsoft Windows Server 2008• Microsoft Windows XP SP3
NOTE: The Avamar Downloader Service does not support R2 versions for Microsoft Windows Server.
.Net Framework Version 3.5 SP1 or later
Filesystem Any filesystem
Hard drive space 12 MB (minimum)
RAM 20 MB (minimum)
EMC AVAMAR 6.0 • ADMINISTRATION GUIDE 396

Installing the Avamar Downloader ServiceSERVER UPDATES AND HOTFIXES
Installing the Avamar Downloader ServiceYou install and configure the Avamar Downloader Service on a Microsoft Windows system that has network access to the Avamar server.
Downloading the software
To download the software:
1. Log in to the Windows host system as an administrator.
2. Type the URL of the Avamar server into the web browser:
http://AVAMARSERVER
where AVAMARSERVER is the Avamar system network hostname (as defined in DNS) or IP address.
The Avamar Web Restore page appears.
3. Click Download and Documents.
The Avamar Web Documents and Downloads page appears.
4. Click the correct operating system hyperlink for the Windows computer.
A directory listing appears.
5. Click the AvamarDownloaderService-windows-PLATFORM-VERSION.msi hyperlink.
where:
• PLATFORM is the type of Windows platform (32-bit or 64-bit).• VERSION is the version of the Avamar server software.
A dialog box appears that contains a prompt to either run the file or save it.
6. Click Save to save the file to a directory on the computer.
Installing the software
To install the software:
1. Navigate to the directory that contains AvamarDownloaderService-windows-PLATFORM-VERSION.msi, and then double-click the file to start the installation.
The Welcome to the Avamar Downloader Service Setup Wizard appears.
2. Click Next.
The Select Installation Folder page appears.
EMC AVAMAR 6.0 • ADMINISTRATION GUIDE 397

Installing the Avamar Downloader ServiceSERVER UPDATES AND HOTFIXES
3. Check the disk space requirement:
(a) Click Disk Cost to display the available disk space on the computer and the disk space required for the Avamar Downloader Service installation.
The Avamar Downloader Service Disk Space dialog box appears.
The required disk space is 19 MB.
(b) Click OK to close the Avamar Downloader Service Disk Space dialog box.
IMPORTANT: Before proceeding, ensure that the disk space requirement is adequate.
4. Select who will have access to the Avamar Downloader Service:
• Just Me allows access to the Avamar Downloader Service by the current user only.
• Everyone allows access to the Avamar Downloader Service by all users who use the computer.
5. Click Next to accept the default folder, C:\Program Files\EMC\Avamar Downloader Service.
To install the Avamar Downloader Service in a folder other than the default folder:
(a) Click Browse.
The Browse for Folder dialog box appears.
(b) Navigate to a folder to use for the installation.
(c) Click OK to accept the folder and to close the dialog box.
The Folder text box displays the new folder.
(d) Click Next to continue.
The Confirm Installation page appears.
6. Click Next.
The Installing Avamar Downloader Service page appears, which displays a progress bar as the installation proceeds.
If the installation fails with the following error:
(a) You must download and install the Microsoft Visual C++ 2008 Redistributable Package on the Windows host. Installing the Avamar Downloader Service fails (page 405) provides instructions.
(b) Then install the Avamar Downloader Service.
After the installation completes, the Installation Complete page appears.
EMC AVAMAR 6.0 • ADMINISTRATION GUIDE 398
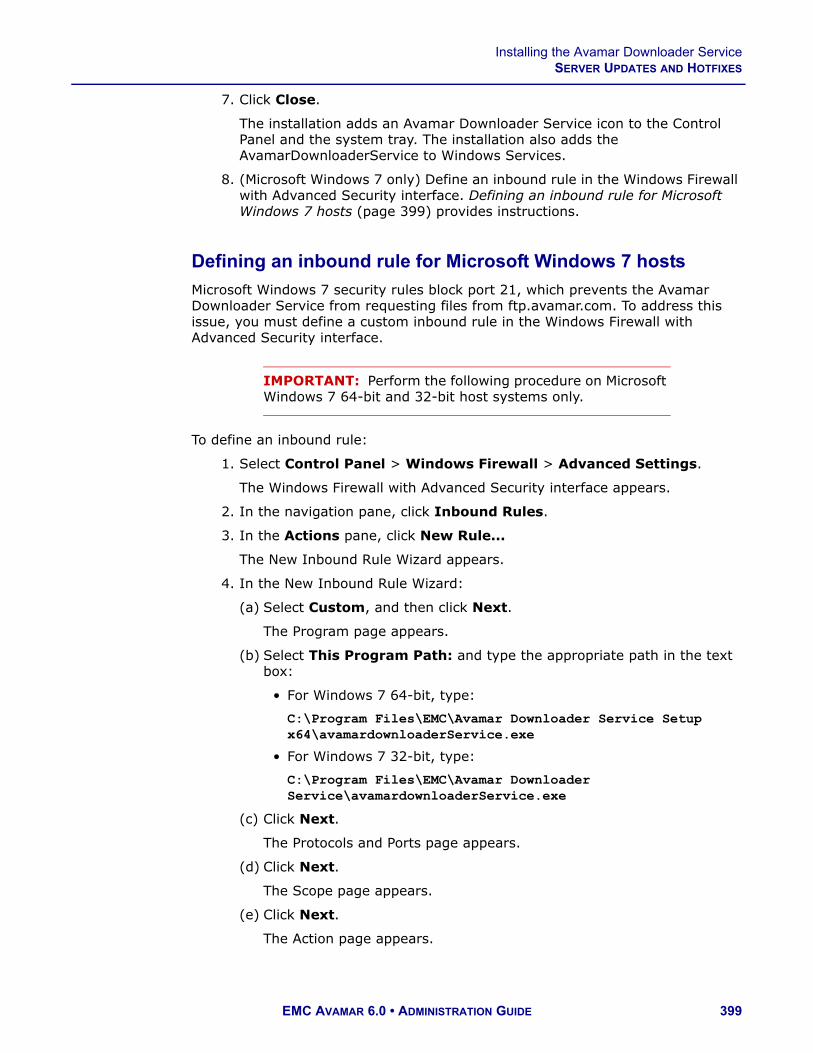
Installing the Avamar Downloader ServiceSERVER UPDATES AND HOTFIXES
7. Click Close.
The installation adds an Avamar Downloader Service icon to the Control Panel and the system tray. The installation also adds the AvamarDownloaderService to Windows Services.
8. (Microsoft Windows 7 only) Define an inbound rule in the Windows Firewall with Advanced Security interface. Defining an inbound rule for Microsoft Windows 7 hosts (page 399) provides instructions.
Defining an inbound rule for Microsoft Windows 7 hosts
Microsoft Windows 7 security rules block port 21, which prevents the Avamar Downloader Service from requesting files from ftp.avamar.com. To address this issue, you must define a custom inbound rule in the Windows Firewall with Advanced Security interface.
IMPORTANT: Perform the following procedure on Microsoft Windows 7 64-bit and 32-bit host systems only.
To define an inbound rule:
1. Select Control Panel > Windows Firewall > Advanced Settings.
The Windows Firewall with Advanced Security interface appears.
2. In the navigation pane, click Inbound Rules.
3. In the Actions pane, click New Rule...
The New Inbound Rule Wizard appears.
4. In the New Inbound Rule Wizard:
(a) Select Custom, and then click Next.
The Program page appears.
(b) Select This Program Path: and type the appropriate path in the text box:
• For Windows 7 64-bit, type:
C:\Program Files\EMC\Avamar Downloader Service Setup x64\avamardownloaderService.exe
• For Windows 7 32-bit, type:
C:\Program Files\EMC\Avamar Downloader Service\avamardownloaderService.exe
(c) Click Next.
The Protocols and Ports page appears.
(d) Click Next.
The Scope page appears.
(e) Click Next.
The Action page appears.
EMC AVAMAR 6.0 • ADMINISTRATION GUIDE 399

Configuring the Avamar Downloader ServiceSERVER UPDATES AND HOTFIXES
(f) Select Allow the connection, and then click Next.
The Profile page appears.
(g) Select the Domain, Private, and Public checkboxes, and then click Next.
The Name page appears.
(h) Type a name and description for the rule:
• In the Name text box, type Avamar Downloader Service Program from EMC.
• In the Description (optional) text box, type C:\Program Files\EMC\Avamar Downloader Service\.
(i) Click Finish to close the New Inbound Rule Wizard.
5. In the Windows Firewall with Advanced Security interface verify that the Inbound Rules list contains the Avamar Downloader Service Program from EMC entry.
Configuring the Avamar Downloader ServiceTo configure the Avamar Downloader Service:
1. Click the Avamar Downloader Service task tray icon.
The Welcome! page appears.
NOTE: The first time you run the Avamar Downloader Service application, the Current Avamar Downloader Service Status is “Downloader is Waiting For Configuration.”
2. Click Next.
The EMC FTP Credentials page appears.
EMC AVAMAR 6.0 • ADMINISTRATION GUIDE 400

Configuring the Avamar Downloader ServiceSERVER UPDATES AND HOTFIXES
IMPORTANT: Do not make any changes to the FTP username and password credentials. If you make changes to the FTP username or password, you must reinstall the Avamar Downloader Service to recover these credentials.
3. Accept the default FTP username and password, and then click Next.
The Proxy Configuration page appears.
4. (Optional) Complete the settings for the Proxy Configuration page:
(a) For Proxy Host, type the hostname or the IP address for the proxy server (for example, proxy.example.com or 11.2.345.67).
(b) For the Proxy Port, type the port number for the proxy server.
If the configuration does not use a proxy server, leave both fields blank.
5. Click Next.
The Avamar Systems page appears.
6. Add Avamar systems that will receive updates from the Avamar Downloader Service:
(a) Click Add.
The Avamar Downloader Service - Add Known System dialog box appears.
(b) Complete the settings as described in the following table:
(c) Click OK.
The system is added to the Known Systems list.
If the hostname cannot be resolved, the following informational dialog box appears:
Click Yes to add the system or No to cancel the add operation.
Systems with unresolvable hostnames can still be added to the Known Systems list. This capability enables you to add offline systems.
(d) Repeat steps (a) through (c) to add all remaining Avamar systems.
SETTING DESCRIPTION
Hostname Type the IP address or hostname.
Username Type root.
Password Type the root password.
Confirm Password Retype the root password.
EMC AVAMAR 6.0 • ADMINISTRATION GUIDE 401

Using the Avamar Downloader ServiceSERVER UPDATES AND HOTFIXES
7. Click Next.
The Review Configuration page appears.
8. Review the configuration details, and then click Finish.
The status from the Avamar Downloader Service changes to OK.
Using the Avamar Downloader ServiceThis topic describes how to use the Avamar Downloader Service to:
• Start the Avamar Downloader Service configuration application• Monitor status messages• Configure Avamar Downloader Service settings • Check the EMC repository for new files• Add new Avamar systems to the Known Systems list• Modify an Avamar system’s username and password • Remove an Avamar system from the Known Systems list
Starting the Avamar Downloader Service configuration application
To start the Avamar Downloader Service configuration application use any of the following methods:
• From the Start menu, select Programs > EMC > Avamar > Avamar Downloader Service Configuration
• Click the task tray icon• Double-click the Avamar Downloader Service desktop icon
Monitoring Avamar Downloader Service status
The Avamar Downloader Service monitor automatically starts when you log in to the Windows server that runs the Avamar Downloader Service. To view the status from the monitor, move the mouse over the task tray icon.
The following table lists Avamar Downloader Service monitor status messages.
STATUS MESSAGE DESCRIPTION
Authentication Failure with the EMC Repository.
HTTP basic authentication failure.
Authentication Failure with one or more “Known Systems.”
HTTP basic authentication failure including:• Failed communication with the EMC
repository. • SSL (Secure Socket Layers) handshake
failed.• HTTP dropped connection. • HTTP NAK (negatively acknowledged
message).
EMC AVAMAR 6.0 • ADMINISTRATION GUIDE 402

Using the Avamar Downloader ServiceSERVER UPDATES AND HOTFIXES
Starting the monitor
The monitor starts automatically when you log in to the Windows server.
To manually start the monitor, click Start and select Programs > EMC > Avamar > Avamar Downloader Service > Start Avamar Downloader Service Monitor.
Stopping the monitor
To stop the monitor, right-click the Avamar Downloader Service task tray icon, and then select Close Notification Display.
Failed communication with one or more “Known Systems.”
• SSL handshake failed.• HTTP dropped connection.• HTTP NAK.
Failed file download from the EMC repository.
File transfer was aborted.
Failed file transfer to one or more known systems.
File transfer was aborted.
Network Error Windows 7 firewall settings prevent the Avamar Downloader Service from requesting files from the Avamar FTP site.
Out of space. The Avamar Downloader Service file cache is full. To free up disk space, remove files from the local repository.
Running. The service is running and communicating with all known systems as well as the EMC repository.
Socket failure on host computer.
• Either the Microsoft Windows machine is out of socket resources or there is a binding problem with the NIC.
• Deadlock condition within Winsock.
Waiting for configuration. The Avamar Downloader Service was installed, but not configured.
STATUS MESSAGE DESCRIPTION
EMC AVAMAR 6.0 • ADMINISTRATION GUIDE 403

Using the Avamar Downloader ServiceSERVER UPDATES AND HOTFIXES
Checking the EMC repository
You can check the EMC repository for updates at any time.
To check the EMC repository for new updates:
1. Click the Avamar Downloader Service task tray icon.
The Welcome! page appears.
2. Click Check EMC Repository for new files now.
The Avamar Downloader Service:
• Downloads the manifest file to the local repository on the Windows server, and then pushes the installation packages to the Avamar systems that have been configured.
• Deletes expired files from the file cache. By default, the expiration time period is 30 days.
NOTE: You cannot click Check EMC Repository for new files now if the status of the Avamar Downloader Service is anything other than OK or “waiting for new files.”
3. Click Cancel to exit the configuration application.
Modifying the username or password
To modify the username or password:
1. Click the Avamar Downloader Service task tray icon.
The Welcome! page appears.
2. Click Next.
The EMC Credentials page appears. The program automatically fills in the username and password fields.
3. Type the password in the Confirm Password field, and then click Next.
The EMC FTP Credentials page appears. The program automatically fills in the username and password fields.
4. Type the password in the Confirm Password field, and then click Next.
The Avamar Systems page appears.
5. Select the system from the Known Systems list and click Modify.
The Avamar Downloader Service - Add Known Systems page appears.
6. Make the necessary changes and click OK.
7. Click Next.
The Review Configuration page appears.
8. Review the configuration details, and then click Finish.
EMC AVAMAR 6.0 • ADMINISTRATION GUIDE 404

Troubleshooting Avamar Downloader Service issuesSERVER UPDATES AND HOTFIXES
Removing an Avamar system from the Known Systems list
To remove an Avamar system from the Known Systems list:
1. Click the Avamar Downloader Service task tray icon.
The Welcome! page appears.
2. Click Next.
The EMC Credentials page appears. The program automatically fills in the username and password fields.
3. Type the password in the Confirm Password field, and then click Next.
The EMC FTP Credentials page appears. The program automatically fills in the username and password fields.
4. Type the password in the Confirm Password field, and then click Next.
The Avamar Systems page appears.
5. Select the system from the Known Systems list and click Remove.
A confirmation dialog box appears.
6. Click Yes to remove the system from the Known Systems list.
7. Click Next.
The Review Configuration page appears.
8. Review the configuration details, and then click Finish.
Troubleshooting Avamar Downloader Service issuesThis topic describes how to resolve common issues with the Avamar Downloader Service.
Installing the Avamar Downloader Service fails
The Avamar Downloader Service installation fails with the following error:
If you receive this error message:
1. Go to the Microsoft Download Center and download the Microsoft Visual C++ 2008 Redistributable Package:
• For a 64-bit system, download vcredist_x64.exe.• For a 32-bit system, download vcredist_x86.exe.
EMC AVAMAR 6.0 • ADMINISTRATION GUIDE 405

Uninstalling the Avamar Downloader ServiceSERVER UPDATES AND HOTFIXES
2. Run vcredist_x64.exe or vcredist_x86.exe on the Windows host system.
IMPORTANT: The Avamar Downloader Service is compatible with the Microsoft Visual C++ 2008 Redistributable Package. Do not install the Microsoft Visual C++ 2010 Redistributable Package instead of the Microsoft Visual C++ 2008 Redistributable Package.
The Microsoft website provides more information about the Microsoft Visual C++ 2008 Redistributable Package.
Not receiving files from the Avamar FTP site
After you click Check EMC Repository for new files now the Avamar Downloader Service writes the following error messages to the AvamarDownloaderService.log:
6/1/2011 13:36:38 PM [380] FtpOpenFile failed (errno=12002)6/1/2011 13:36:38 PM [380] SendManifest failed
Microsoft Windows 7 security rules block port 21, which prevents the Avamar Downloader Service from requesting files from the Avamar FTP site (ftp.avamar.com).
To resolve this issue, define an inbound rule in the Windows Firewall with Advanced Security interface. Defining an inbound rule for Microsoft Windows 7 hosts (page 399) provides instructions.
Downloading a package fails
If the utility node or single-node server cannot access the Windows host computer, a message similar to the following might appear when you attempt to download a package:
The selected package cannot be downloaded.
To correct this problem, add a new line to the /etc/hosts file on the utility node and enter the Windows computer’s IP address, fully-qualified name, and short name. See the following sample entry:
10.6.172.50 avamar-1.example.com avamar-1
Uninstalling the Avamar Downloader ServiceBefore uninstalling the Avamar Downloader Service exit any running applications.
To uninstall the Avamar Downloader Service:
1. From the Start menu, select Settings > Control Panel > Add or Remove Programs.
The Add or Remove Programs window appears.
2. Select Avamar Downloader Service from the list of currently installed programs, and then click Remove.
EMC AVAMAR 6.0 • ADMINISTRATION GUIDE 406

Installing patches and hotfixes from the System Maintenance pageSERVER UPDATES AND HOTFIXES
The uninstall process removes all files including file cache contents and configuration items.
Installing patches and hotfixes from the System Maintenance page
The System Maintenance page is an Avamar 6.0 feature that extends Avamar Enterprise Manager functionality by enabling you to:
• Download OS patches, hotfixes, and updates to Avamar servers.• Install OS patches, hotfixes, and updates on Avamar servers.• View history information for all packages installed on Avamar servers.• Delete packages from Avamar servers after a successful installation.
Select System Maintenance from any other page to view the System Maintenance page.
System Maintenance includes two pages:
• SW Updates (page 408) — Downloads and installs patches and hotfixes.• History (page 413) — Displays status information for all packages that have
been installed.
Microsoft Windows browser requirements
On Microsoft Windows, the Microsoft Internet Explorer or Mozilla Firefox browser requires a minimum of 2 GB of RAM for the System Maintenace page.
EMC Customer Support account
EMC AVAMAR 6.0 • ADMINISTRATION GUIDE 407

Installing patches and hotfixes from the System Maintenance pageSERVER UPDATES AND HOTFIXES
The System Maintenance page provides a special password-protected account for EMC Technical Support. This account enables EMC Technical Support access to restricted patches and upgrades for the Avamar server that must be installed only by EMC Technical Support. The gray lock icon in the tab bar provides access to EMC Customer Support account.
IMPORTANT: Only EMC Technical Support should access this account.
SW Updates page
The following table describes the items on the SW Updates page.
ITEM OR COLUMN DESCRIPTION
Indicates that packages are available for installation.
Systems pane Provides package availability and operational status about each Avamar server.
AVP Indicates that one or more packages are available to download and install on the Avamar server.
Status Indicates that the Avamar Installation Manager is running on the Avamar server.
Indicates one of the following:• The Avamar server is running a version of the
Avamar server software before 6.0.• The installation process has encountered an
issue and requires the user’s response.
Indicates that an Avamar package installation is in progress.
System Displays the Fully Qualified Domain Name for the Avamar server.
Version Displays the version of the Avamar server software.
Package List pane
Displays available installation packages for the Avamar server.
Grouping list Enables you to group packages by type: Show All or Hotfix.
Sort by list Enables you to sort the packages by title, status, or priority.
EMC AVAMAR 6.0 • ADMINISTRATION GUIDE 408

Installing patches and hotfixes from the System Maintenance pageSERVER UPDATES AND HOTFIXES
TIP: If you accidently close the browser during the package installation, the installation does not stop. To resume the installation, open a new browser window and log in to the Avamar Enterprise Manager. The installation continues from the point it was when the browser window terminated.
Installing packages
To install available packages:
1. Open a web browser and log in to Avamar Enterprise Manager.
2. Click System Maintenance.
The System Maintenance page appears.
3. Click SW Updates.
The SW Updates page appears.
4. Select an Avamar server from the Systems list.
If packages are available, they appear in the Package List.
5. (Optional) Filter the list of packages by selecting one of the options from the Show list.
6. Select a package.
7. Install the package on the Avamar server:
(a) If a package is not yet in the local repository, a Download button appears. Click Download to download the package to the local repository. Otherwise, continue to step (b).
Download button
Indicates that a package is available to download to the local repository. Clicking Download disables the button until the download transfer completes. Then the button changes to Install.TIP: You can download multiple packages at the same time, but install only one package at a time. You can also install a package while you are downloading packages.
Install button Starts the installation process. The Install button appears only after the package has been downloaded to the local repository.
Monitor button Displays the Installation Progress page.
Delete button Deletes the package from the local repository.
Continue button
Indicates that a package is in the initial installation phase (deployed but not yet started).Clicking Continue displays the Installation Setup page.
ITEM OR COLUMN DESCRIPTION
EMC AVAMAR 6.0 • ADMINISTRATION GUIDE 409

Installing patches and hotfixes from the System Maintenance pageSERVER UPDATES AND HOTFIXES
After the download completes, the Download button changes to the Install button.
(b) Click the Install button to start the installation.
The background color for the package changes to yellow and the initialization begins.
When the initialization process finishes, the Installation Setup page appears.
8. If requested, provide installation setup information.
NOTE: Installation setup requirements are specific to the type of package. Some packages do not require any installation setup.
9. If available, provide advanced settings:
(a) Select Show advanced settings to view optional settings.
(b) Provide the requested information.
NOTE: Advanced settings are specific to the type of package. Some packages do not have any advanced settings.
10.Click Continue.
The Installation Progress page appears. The following table describes this page.
ITEM DESCRIPTION
Progress bar Displays the installation’s progress as a percentage.
Status Messages The installation displays the current task in progress above the progress bar and the associated status message below the progress bar.
Action buttons When a problem occurs, the upgrade:• Stops and displays a status message about the
failure below the progress bar.• Displays action buttons relevant to the problem.
For example: Skip This Task, Undo This Task, Undo All Changes, or Call EMC support.
Details button Opens the error log file specific to the failure.NOTE: The Details button only appears if you are logged in to the EMC Customer Support account.
EMC AVAMAR 6.0 • ADMINISTRATION GUIDE 410

Installing patches and hotfixes from the System Maintenance pageSERVER UPDATES AND HOTFIXES
11.Respond to all installation problems.
The following figure shows a status message that appears after the package installation stops because of a failure.
The installation provides three option buttons in this particular example: Retry Current Task, Call EMC Support, and Undo All Changes.
(a) Click Call EMC Support.
The Call EMC Support dialog box appears.
(b) Contact EMC Technical Support for further assistance.
Installation Logs table
Provides details about each installation task.
Export Click Export to save log information to a file.The Export as dialog box appears.1. Choose one of command buttons: Excel or PDF.2. Follow the prompts to save the log information to
a file.
View Advanced Log
Click View Advanced Log to open the workflow file for this package installation.NOTE: The View Advanced Log button only appears if you are logged in to the EMC Customer Support account.
ITEM DESCRIPTION
EMC AVAMAR 6.0 • ADMINISTRATION GUIDE 411

Installing patches and hotfixes from the System Maintenance pageSERVER UPDATES AND HOTFIXES
NOTE: You can close the Call EMC Support dialog box and the browser. The installation resumes from the point of failure.
(c) After EMC Technical Support resolves the installation failure, open Avamar Enterprise Manager.
(d) Click System Maintenance, and then click SW Updates.
The Installation Progress page displays the same status message and option buttons that appeared when the failure occurred.
(e) Click Call EMC Support to display the Call EMC Support dialog box.
(f) Click Issue resolved, continuing the installation.
The installation resumes.
(g) Address all problems that occur during the installation by repeating steps (a)–(f).
Deleting packages
After you successfully install a package, you can delete the package from the Package List page. After a successful installation, the AvInstaller service automatically deletes the package from the packages folder on the Avamar system.
NOTE: Only EMC Technical Support can delete restricted packages.
To delete packages from the SW Updates page:
1. Open a web browser and log in to Avamar Enterprise Manager.
2. Click System Maintenance.
The System Maintenance page appears.
3. Click SW Updates.
The SW Updates page appears.
4. Select a system from the Systems list.
If packages are available for deletion, a Delete button appears.
5. Click Delete to delete the package.
A Confirmation dialog box appears.
6. In the Confirmation dialog box, click Yes to confirm the package deletion.
EMC AVAMAR 6.0 • ADMINISTRATION GUIDE 412

Viewing installation history informationSERVER UPDATES AND HOTFIXES
Viewing installation history informationThe History page displays a table that contains installation history for all packages. The default sort order of the table is ascending order based on the date in the Last Updated column. The most recently installed package, therefore, is listed as the last item in the table.
From the History page you can:
• Toggle the sort order from ascending to descending by clicking on the heading in any column.
An up or down arrow icon appears next to the heading to indicate the column’s sort order.
• Filter the history information in the table by selecting a filter option from the Show list box (top right corner).
• Show or hide column headings by clicking the arrow icon in a column heading to open the menu, and then by selecting or clearing column headings from the Columns menu option.
The following table describes the History table’s column headings.
COLUMN HEADING DESCRIPTION
Title The name of the package.
Version Version of Avamar server software.
Description A brief description of the package.
EMC AVAMAR 6.0 • ADMINISTRATION GUIDE 413

Viewing installation history informationSERVER UPDATES AND HOTFIXES
To view the History page:
1. Open a web browser and log in to Avamar Enterprise Manager.
2. Click System Maintenance.
The System Maintenance page appears.
3. Click History.
The History page appears.
4. Select a system from the Systems list.
All packages for the selected system appear in the History table.
TIP: To view a subset of packages for a system, you can set a filter. Click the arrow next to the Show list box and select a filter option.
5. Click a row in the History table to view more details about a specific package.
The following table describes the Details table’s column headings.
Status The current status of the package:
Available The package is in the manifest and is available to download.
Completed The package installation completed.
Ready The package is ready to install.
Removed The package has been deleted from the Avamar grid.
Last Updated The date and time of the last status update.
COLUMN HEADING DESCRIPTION
COLUMN HEADING DESCRIPTION
Status Status details for a package:
Available The package is in the manifest and is available to download.
Ready The package is ready to install.
Deployed The start of installation initialization.
Processing The start of the package installation.
Completed The completion of the package installation.
Removed The removal of the package.
Last Updated The corresponding date and time of the package status message.
EMC AVAMAR 6.0 • ADMINISTRATION GUIDE 414

Viewing installation history informationSERVER UPDATES AND HOTFIXES
6. In the Details table, click Logs to view log information about specific tasks.
A pop-up window appears. The following figure shows example log information.
TIP: To enlarge the window, click the icon (top right corner).
NOTE: If you use the Mozilla Firefox 3.x browser, it may become sluggish when scrolling through a log table that contains more that 200 lines or when the system has limited RAM available. The Internet Explorer 7 or 8 browser does not have this problem.
7. To save the log information to a file, click Export.
The Export as dialog box appears.
Logs Displays a Logs button for packages with a processing status.Clicking Logs opens a pop-up windows that provides details about the tasks performed to install the package.
COLUMN HEADING DESCRIPTION
EMC AVAMAR 6.0 • ADMINISTRATION GUIDE 415
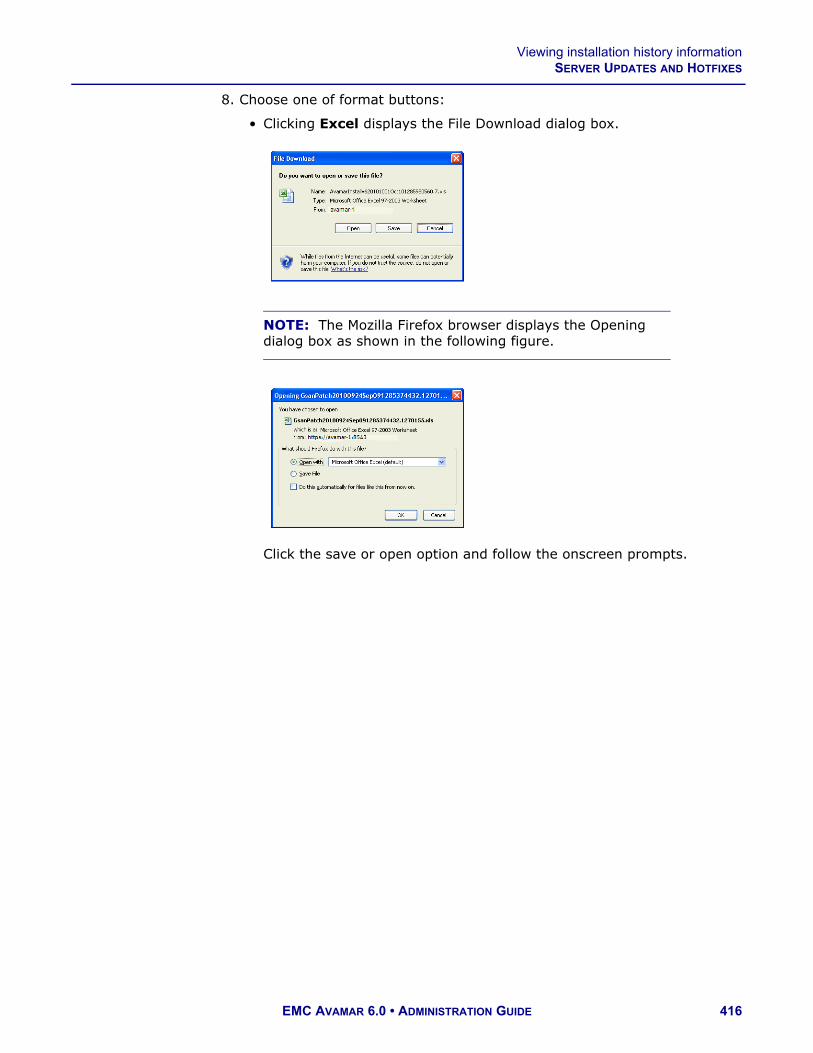
Viewing installation history informationSERVER UPDATES AND HOTFIXES
8. Choose one of format buttons:
• Clicking Excel displays the File Download dialog box.
NOTE: The Mozilla Firefox browser displays the Opening dialog box as shown in the following figure.
Click the save or open option and follow the onscreen prompts.
EMC AVAMAR 6.0 • ADMINISTRATION GUIDE 416

Viewing installation history informationSERVER UPDATES AND HOTFIXES
• Clicking PDF displays the log information in a new tab or window.
9. Switch back to the Export window and click Close.
EMC AVAMAR 6.0 • ADMINISTRATION GUIDE 417
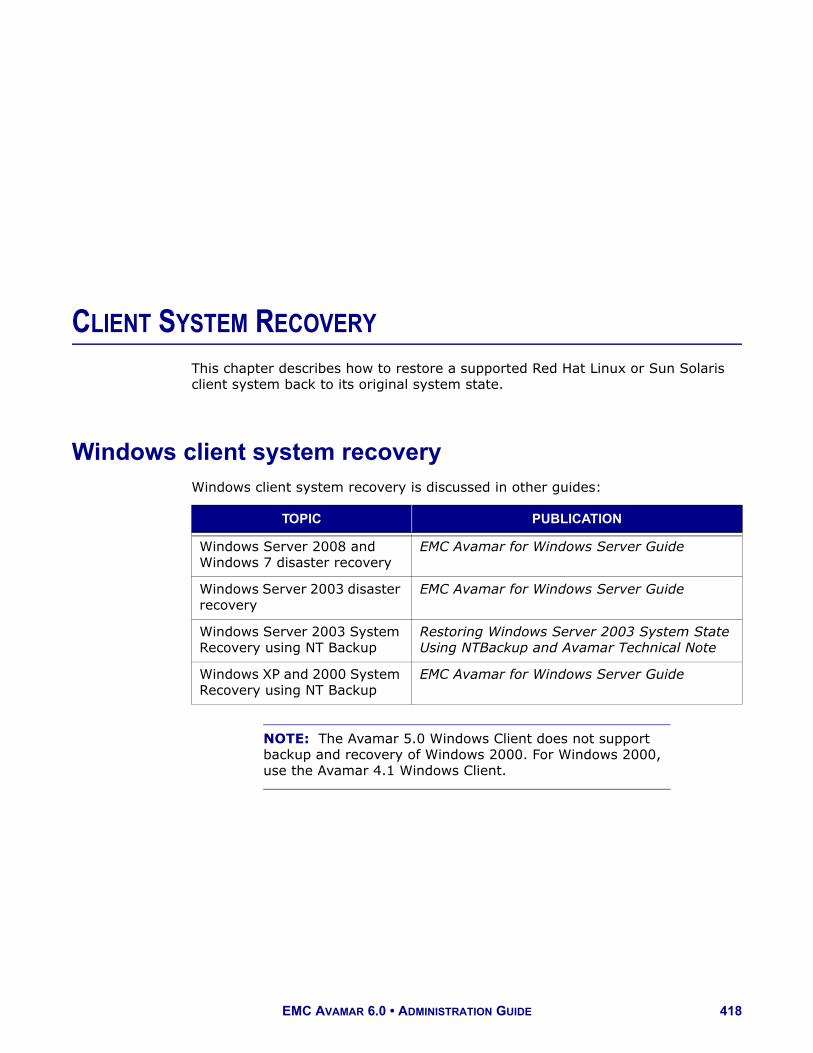
CLIENT SYSTEM RECOVERY
This chapter describes how to restore a supported Red Hat Linux or Sun Solaris client system back to its original system state.
Windows client system recoveryWindows client system recovery is discussed in other guides:
NOTE: The Avamar 5.0 Windows Client does not support backup and recovery of Windows 2000. For Windows 2000, use the Avamar 4.1 Windows Client.
TOPIC PUBLICATION
Windows Server 2008 and Windows 7 disaster recovery
EMC Avamar for Windows Server Guide
Windows Server 2003 disaster recovery
EMC Avamar for Windows Server Guide
Windows Server 2003 System Recovery using NT Backup
Restoring Windows Server 2003 System State Using NTBackup and Avamar Technical Note
Windows XP and 2000 System Recovery using NT Backup
EMC Avamar for Windows Server Guide
EMC AVAMAR 6.0 • ADMINISTRATION GUIDE 418

Red Hat Linux system recoveryCLIENT SYSTEM RECOVERY
Red Hat Linux system recoveryThis procedure describes how to restore a Red Hat Linux client system to its original system state.
Prerequisites
Ensure that the environment meets the following prerequisites before you perform system recovery for a Red Hat Linux client:
• A complete and recent Avamar backup of the original client local filesystem must exist on the Avamar server.
• The recovery destination disk must be connected to the recovery target client, and a minimal installation of a compatible operating system must have been performed. For purposes of this procedure, “compatible” means that if the original client backup on the Avamar server was performed against an RHEL3 client, then RHEL3 should be installed on the recovery target client.
• The Avamar for Linux Client must be installed on the recovery target client.
Procedure
1. Start the recovery target client from the install media (first CD) and type:
linux rescue
An RHEL install prompt appears in the command shell:
2. Follow the onscreen instructions.
Be sure to enable networking by providing IP address, network mask, default gateway, and DNS server when prompted.
3. Allow the installer to search for installations and mount the /mnt/sysimage filesystem as read-write.
This is the target of the restore, and is also referred to as the “recovery destination disk.”
NOTE: You cannot restore the root filesystem directly to /mnt/sysimage because there is currently no method that restricts the restore operation to only the local partition without traversing network mount points. Therefore, a restore directly to /mnt/sysimage might copy files from all the partitions, and /mnt/sysimage could fill up before all required files were restored.
4. Verify that /lib64, /usr/lib64, and /mnt/sysimage/lib64 are all present in the LD_LIBRARY_PATH system variable. If any directories are missing from LD_LIBRARY_PATH, add them to the LD_LIBRARY_PATH variable.
EMC AVAMAR 6.0 • ADMINISTRATION GUIDE 419

Red Hat Linux system recoveryCLIENT SYSTEM RECOVERY
5. Create a temporary /temp/avamar.cmd flag file with a text editor such as vi or Emacs.
For example:
cd /tmp
vi avamar.cmd
--bindir=/mnt/sysimage/usr/local/avamar/bin--vardir=/mnt/sysimage/usr/local/avamar/var--sysdir=/mnt/sysimage/usr/local/avamar/etc--server=AVAMARSERVER--account=/DOMAIN/MyClient--id=USERNAME--ap=PASSWORD--overwrite=always--target=.
where
• AVAMARSERVER is the Avamar server IP address or fully qualified hostname as defined in DNS.
• /DOMAIN/MyClient is the full location of the original Linux client on the Avamar server.
• USERNAME and PASSWORD are the login credentials for a user account with sufficient role and privileges to perform the restore operation.
6. In Avamar Administrator, click the Backup & Restore launcher button.
The Backup and Restore window appears.
7. Click the Select for Restore tab.
8. In the Clients tree, select the original Linux client.
9. Find and select the backup to use for this restore operation.
Restore mostdirectories
10.Restore most of the directories that originally existed under root (/):
IMPORTANT: Do not restore /boot, /dev, and /proc at this time. There are special instructions to restore these directories later in this procedure. There are also special instructions to restore /usr and /lib, as well as individual files in the root (/) directory.
(a) Create an identical directory under the client /mnt/sysimage directory.
For example:
mkdir /mnt/sysimage/directory
where directory is the directory to restore.
(b) Change directory into that directory.
For example:
cd /mnt/sysimage/directory
EMC AVAMAR 6.0 • ADMINISTRATION GUIDE 420

Red Hat Linux system recoveryCLIENT SYSTEM RECOVERY
(c) Restore the contents of the directory from the backup by typing the following command on a single command line:
/mnt/sysimage/usr/local/avamar/bin/avtar.bin -x --flagfile=/tmp/avamar.cmd /data
NOTE: Space limitations in this guide cause the previous command example to continue (wrap) to more than one line. The command must be typed on a single command line. No line feeds or returns are allowed.
11.Repeat the previous step for each directory under root (/) to restore.
Restore the /usrdirectory
12.Restore the /usr directory:
(a) Change directory to /mnt/sysimage/usr by typing.
cd /mnt/sysimage/usr
(b) Restore the contents of /usr, except for /local/avamar, by typing the following command on a single command line:
/mnt/sysimage/usr/local/avamar/bin/avtar.bin -x --flagfile=/tmp/avamar.cmd --exclude='./local/avamar/*' /usr
NOTE: Space limitations in this guide cause the previous command example to continue (wrap) to more than one line. The command must be typed on a single command line. No line feeds or returns are allowed.
You must exclude /local/avamar because the directory contains files that are actively used by the Avamar for Linux Client during the restore.
Restore individualfiles in the root (/)
directory
13.Restore individual files in the root (/) directory:
(a) Change directory to /mnt/sysimage by typing.
cd /mnt/sysimage
(b) Restore the individual files in the root (/) directory by typing the following command on a single command line:
/mnt/sysimage/usr/local/avamar/bin/avtar.bin -x --flagfile=/tmp/avamar.cmd --no-recursion /
NOTE: Space limitations in this guide cause the previous command example to continue (wrap) to more than one line. The command must be typed on a single command line. No line feeds or returns are allowed.
EMC AVAMAR 6.0 • ADMINISTRATION GUIDE 421

Red Hat Linux system recoveryCLIENT SYSTEM RECOVERY
Restore the /libdirectory
14.Restore the /lib directory:
NOTE: Because /lib contains files that are actively used by the Avamar for Linux Client during this procedure, you must create another directory (for example, /mnt/sysimage/libcopy) and restore files there. After the files are restored, you can delete /mnt/sysimage/lib and rename /mnt/sysimage/libcopy to /mnt/sysimage/lib.
(a) Change directory to /mnt/sysimage by typing.
cd /mnt/sysimage
(b) Create the libcopy directory by typing:
mkdir libcopy
(c) Change directory to /mnt/sysimage/libcopy by typing:
cd libcopy
(d) Restore the contents of /lib to /mnt/sysimage/libcopy by typing the following command on a single command line:
/mnt/sysimage/usr/local/avamar/bin/avtar.bin -x --flagfile=/tmp/avamar.cmd /lib
NOTE: Space limitations in this guide cause the previous command example to continue (wrap) to more than one line. The command must be typed on a single command line. No line feeds or returns are allowed.
(e) Change directory to /mnt/sysimage by typing:
cd /mnt/sysimage
(f) Delete /mnt/sysimage/lib by typing:
rm -rf ./lib
(g) Rename /mnt/sysimage/libcopy to /mnt/sysimage/lib by typing:
mv ./libcopy ./lib
15. Inspect /mnt/sysimage/etc/fstab, and verify that there are valid statements for each filesystem to be mounted on the new system.
16.Exit the shell.
The system restarts. Eject the CD and boot normally.
17.Confirm correct client operation.
EMC AVAMAR 6.0 • ADMINISTRATION GUIDE 422

Sun Solaris system recoveryCLIENT SYSTEM RECOVERY
Sun Solaris system recoveryThis procedure describes how to restore a Sun Solaris client system back to its original system state.
Prerequisites
Ensure that the following prerequisites have been met before you perform Solaris client system recovery.
A backup containing critical system files must be available. In order to successfully restore a Sun Solaris client system back to its original system state, an Avamar backup containing the entire local filesystem and the following critical system files and virtual filesystems must be available on the Avamar server. This is accomplished by forcing traversal of these targets during a backup:
This can be done from two ways:
• From Avamar Administrator, by explicitly adding these targets in the on-demand backup options or dataset
• From the avtar command line by including a --forcefs option
From AvamarAdministrator
In order to back up these critical system files and virtual filesystems from Avamar Administrator, you must explicitly include them in the on-demand backup options (page 80) or dataset plug-in options (page 113) as follows:
1. From the Backup Options dialog box or Edit Dataset dialog box Options tab, click Advanced.
2. Type mntfs,tmpfs in the Force traversal of the specified file system type(s) field.
3. Click OK.
From avtarcommand line
Alternatively, if you are backing up this Solaris client from the avtar command line, you can also include the following option:
--forcefs="mntfs,tmpfs"
TARGET DESCRIPTION
mntfs /etc/svc/volatile
tmpfs /etc/mnttab
EMC AVAMAR 6.0 • ADMINISTRATION GUIDE 423

Sun Solaris system recoveryCLIENT SYSTEM RECOVERY
Additionalparameters
Although not required in order to successfully restore a Sun Solaris client system back to its original system state, you can also include any of the following other system directories and virtual filesystems in your backup by forcing traversal of these targets:
/var and /opt filesystems must be available. If the client you are attempting to recover previously used network mounted /var and /opt filesystems, make every effort to mount and use those same network mounted /var and /opt filesystems during system recovery.
If this is not possible, install a minimal version of Solaris on the client hard disk drive in order to create local /var and /opt directories.
TARGET DESCRIPTION
cachefs Solaris Cache File System.
fdfs Solaris File Descriptor File System.
fifofs Solaris FIFO File System.
lofs Solaris Loopback File System (local NFS).
namefs Solaris Name File System.
proc Solaris /proc directory.
procfs Solaris Process Access File System.
specfs Solaris Device Special File System.
swapfs Solaris Swap File System.
tfs Solaris Translucent File System.
EMC AVAMAR 6.0 • ADMINISTRATION GUIDE 424

Sun Solaris system recoveryCLIENT SYSTEM RECOVERY
Procedure
1. Boot from CDROM by typing:
reboot -- cdrom
2. (Solaris 10 only) If you are restoring a Solaris 10 client, at the boot options menu, select either option 3. Solaris Interactive Text (Desktop session) or option 4. Solaris Interactive Text (Console session).
3. Proceed through the prompts, providing the client hostname, IP address, default gateway, and corporate DNS server name when prompted to do so.
4. Do one of the following:
Mount / 5. Mount the old / partition under /a by typing:
mount /dev/dsk/c1t0d0s0 /a
Use the correct site-specific disk partition and mount parameters for the root volume.
This will be the target of the restore.
Mount /opt 6. Mount the old /opt partition under /opt by typing:
mount /dev/dsk/c1t0d0s5 /opt
Use the correct site-specific disk partition and mount parameters for the /opt volume.
IF DO THIS
Restoring a Solaris 8 client.
The following appears in your command shell:Solaris Web Start will assist you in installing software for Solaris (! to quit)
Press ! to quit and return to a shell prompt.
Restoring a Solaris 10 client.
When prompted to select installation type, press F5 to exit. Then, press F2 to confirm exit and return to a shell prompt
EMC AVAMAR 6.0 • ADMINISTRATION GUIDE 425

Sun Solaris system recoveryCLIENT SYSTEM RECOVERY
Mount /var 7. Mount the old /var partition under /var by typing:
mount /dev/dsk/c1t0d0s4 /var
Use the correct site-specific disk partition and mount parameters for the /var volume.
This is so that pkgadd and pkgrm commands will not quit with errors such as nonexistent admin file or bad device (/var/sadm/pkg) specified.
Uninstall existingAvamar client
software
8. If a previous version of Avamar for Solaris Client software exists in /opt/AVMRclnt, uninstall it according to instructions found in the EMC Avamar Backup Clients Guide, then reboot from CDROM to continue.
Install Avamarclient software
9. Install the proper version Avamar for Solaris Client software according to instructions found in the EMC Avamar Backup Clients Guide.
The following table lists the correct install package for each version of Solaris:
where VERSION is the specific version of Avamar client software.
NOTE: The previous table is provided for informational purposes only and should not be considered a substitute for detailed installation instructions found in the EMC Avamar Backup Clients Guide.
NOTE: The installation program will display a warning about root (/) having 0 free bytes, as well as errors related to read-only filesystems when trying to create /etc/init.d/avagent and various links in /usr/bin and /etc/rc.d/rcX.d. However, despite these warnings, all the binaries are correctly installed in /opt/AVMRclnt/bin.
SOLARIS VERSION AVAMAR INSTALLATION PACKAGE
Solaris 8 or 9 AvamarClient-solaris8-sparc-VERSION.pkg
Solaris 10 SPARC AvamarClient-solaris10-x86-VERSION.pkg
Solaris 10 X86 AvamarClient-solaris10-x86-VERSION.pkg
EMC AVAMAR 6.0 • ADMINISTRATION GUIDE 426

Sun Solaris system recoveryCLIENT SYSTEM RECOVERY
Restore /etc fromAvamar backup
10.Restore /etc to /a/etc by typing:
mkdir /a/etc; cd /a/etc
/opt/AVMRclnt/bin/avtar -x --server=AVAMARSERVER --id=USER --password=PASSWORD --account=/DOMAIN/CLIENT-NAME--target=. /etc
where:• AVAMARSERVER is the hostname or IP address of your Avamar server• USER and PASSWORD are your Avamar login credentials• DOMAIN and CLIENT-NAME is the Solaris client you are restoring
Note this information for use in the remainder of this procedure.
IMPORTANT: These login credentials must be assigned a role (page 66) that allows access this client’s backups on the Avamar server.
NOTE: The root filesystem cannot be restored directly to /a, because there is currently no way to restrict the restore operation to only the local partition without traversing network mount points. A restore done directly to /a might copy files from all partitions, causing /a to fill up before all required files are restored.
Inspect/a/etc/vfstab
11. Inspect /a/etc/vfstab to verify the original mount points for the local filesystem.
12.Remove any mount points in the list of directories that will be restored from the Avamar backup.
13. In Avamar Administrator, click the Backup & Restore launcher button.
The Backup and Restore window appears.
14.Click the Select for Restore tab.
15. In the Clients tree, select the original Solaris client.
16. Find and select the backup to use for this restore operation.
17.Examine the directories and files that originally existed under /.
EMC AVAMAR 6.0 • ADMINISTRATION GUIDE 427

Sun Solaris system recoveryCLIENT SYSTEM RECOVERY
18. For each directory that originally existed under / (and therefore needs to be restored from the Avamar backup) perform the following:
(a) Manually create an empty directory with the same name under /a.
(b) Change directory that directory.
(c) From the command line, restore that directories contents from the backup.
For example, consider the following commands used to restore /dev:
mkdir /a/dev; cd /a/dev
/opt/AVMRclnt/bin/avtar -x --server=AVAMARSERVER --id=USER--password=PASSWORD --account=/DOMAIN/CLIENT-NAME--overwrite=always --restoresystem --target=. /dev
The --overwrite=always option forces existing files to be overwritten and the --restoresystem option causes system files, such as devices and named pipes, to be restored.
19.Reboot the client normally and confirm correct operation.
EMC AVAMAR 6.0 • ADMINISTRATION GUIDE 428

AVAMAR SYSTEM MIGRATION
This chapter discusses how to use replication to completely migrate all data on a source Avamar server to a new destination server, as well as how to migrate backup clients to the new server.
Important terms and concepts
System migration. System migration is a planned operation that permanently moves all backup clients and all backup data from one system to another. This is accomplished by performing a full root-to-root replication of all data residing on a source Avamar server to a new destination server. Full root-to-root replications preserve the domain structure and policy objects (for example, datasets, schedules, retention policies), as well as backup activity and system event databases.
Global client IDs. To facilitate seamless client migration from one Avamar server to another, Avamar 3.5.0 and later servers implement a feature called a global client ID (global CID). Global CIDs are completely unique Avamar backup client identifiers across all Avamar servers.
On Avamar 3.5.0 through 3.6 systems, global CIDs are an optional feature that is only enabled if --failover is supplied on the replicate command line. On Avamar 3.7 and later systems, global CIDs are the default.
While it is possible to perform server migrations on pre-3.5.0 servers, the procedure is more involved because all clients must reregister with the destination server.
During system migrations, if global CIDs are used at the site and if the destination server can assume the same DNS name or IP address as the original source server, then clients that formerly backed up to the source server can continue to operate transparently without reregistering with the new destination server.
Client migrations. Client migrations are typically unplanned operations, usually performed when a source server experiences a serious problem that compromises its operational effectiveness. A client migration forces a reregistration and activation of any source server backup client with a new destination server. This enables them to continue to protect their data.
EMC AVAMAR 6.0 • ADMINISTRATION GUIDE 429

Capabilities and limitationsAVAMAR SYSTEM MIGRATION
Furthermore, if regular normal replications had been occurring between the source and destination servers, then old backups are present in the special REPLICATE domain.
However, it must be understood, that as far as the Avamar server is concerned, there is no correlation whatsoever between a client account within the REPLICATE domain and any new account that might be created as the result of registering and activating with the new destination server.
Capabilities and limitations
IMPORTANT: If you successfully replicate data from a source Avamar server to a destination server and you subsequently roll the destination server back to a point in time before that replication, all replicated data is permanently lost. Therefore, it is strongly recommended that immediately following any successful replication, you create and validate a destination server checkpoint so that you have a reliable server rollback point that includes all replicated data. Creating a checkpoint (page 358) and Validating a checkpoint (page 359) provide instructions for creating and validating checkpoints.
Source and destination servers should be comparable sizes. For best results, the destination Avamar server should be the same size or larger than the source server.
Server software compatibility. The destination server in the migration must have the same or later Avamar software version as the source server. This ensures that backup clients function properly due to backward compatibility. It also prevents unexpected loss of data due to server software incompatibilities.
If possible, register backup clients with the Avamar server DNS name, notIP address. The typical practice at most sites is for all Avamar backup clients
to register with the Avamar server by resolving a DNS name to the server IP address. This is usually done to simplify the registration process so that backup users do not have to know an IP address to register their clients.
However, using the server DNS name also enables a more seamless client transition during system migration. The only required steps to transition clients are to take the old source server off the network and change the new destination server DNS name to the old source server DNS name.
Otherwise, if backup clients communicate with the Avamar server by way of an IP address, clients must manually reregister with the new destination server once it is deployed on the network.
EMC AVAMAR 6.0 • ADMINISTRATION GUIDE 430

Migrating an Avamar serverAVAMAR SYSTEM MIGRATION
Migrating an Avamar serverThis procedure to migrate an Avamar source server to a new destination server assumes that the following conditions are true:
• Both the source and destination servers are fully operational and are online at the beginning of the server migration operation.
• All source server clients were registered using the server hostname, and not the source server IP address.
• The source and destination servers have different hostnames at the beginning of the operation. The destination server hostname is changed to match the source server near the end of the operation.
To migrate an Avamar source server to a new destination server:
1. Perform a full root-to-root replication from the source server to the new destination server as discussed in Replicating the source server (page 432).
2. Perform a new-system restore on the destination server as discussed in Restoring data on the destination server (page 433).
3. Update the DNS server to redirect the original source hostname to the new destination server IP address.
4. Depending on the Avamar software version on the source server, you may need to manually migrate backup clients to the new server. The following table provides the requirements for client migration.
SOURCE AVAMAR SERVER VERSION CLIENT MIGRATION REQUIREMENTS
3.7 or later Global CIDs are enabled by default. Once the new destination server is online and has assumed the DNS name or IP address of the source server, clients that were formerly registered with the source server can communicate with the new destination server.
3.5.0 through 3.6 Include the --failover option on the replicate command line to enable global CIDs. If you do not, you must manually migrate the backup clients to the new server as discussed in Manually migrating backup clients to a new server (page 435).
3.0.1 or older Global CIDs are not available. Therefore, you must manually migrate the backup clients to the new server as discussed in Manually migrating backup clients to a new server (page 435).
EMC AVAMAR 6.0 • ADMINISTRATION GUIDE 431

Migrating an Avamar serverAVAMAR SYSTEM MIGRATION
Replicating the source server
User=admin 1. Open a command shell and log in:
2. On the source server, flush the MCS by typing:
mcserver.sh --flush
This ensures that all cached MCS data is saved to the MCS database. MCS data includes account information, logs, and so forth.
3. On the source server, initiate a full root-to-root replication to the destination server by typing the appropriate command from the following table.
where SRC-ROOT-PASSWORD and DST-ROOT-PASSWORD are the source and destination Avamar root passwords, respectively. The POSIX command nohup is included to prevent the replicate command from being canceled by hangup (HUP) signals.
NOTE: The only difference between the commands in the previous table is the --failover option on Avamar 3.5.0 through 3.6 servers. This option forces the use of optional global CIDs.
4. Wait for the replication operation to complete.
5. Perform a full system shutdown of the source server as discussed in Shutting down the server (page 289).
SERVER TYPE LOGIN STEPS
Single-node Log in to the server as admin.
Multi-node 1. Log in to the utility node as admin, and then load the admin OpenSSH key by typing:ssh-agent bash
ssh-add ~admin/.ssh/admin_key
2. When prompted, type the admin_key passphrase and press Enter.
SOURCE AVAMAR SERVER VERSION ROOT-TO-ROOT REPLICATION COMMAND
3.7 or later nohup replicate --dstaddr=DST --dstid=root --dstpassword=DST-ROOT-PASSWORD --id=root --ap=SRC-ROOT-PASSWORD --fullcopy
3.5.0 through 3.6 nohup replicate --dstaddr=DST --dstid=root --dstpassword=DST-ROOT-PASSWORD --id=root --ap=SRC-ROOT-PASSWORD --fullcopy --failover
3.0.1 or earlier nohup replicate --dstaddr=DST --dstid=root --dstpassword=DST-ROOT-PASSWORD --id=root --ap=SRC-ROOT-PASSWORD --fullcopy
EMC AVAMAR 6.0 • ADMINISTRATION GUIDE 432

Migrating an Avamar serverAVAMAR SYSTEM MIGRATION
Restoring data on the destination server
User=admin 1. Open a command shell and log in:
2. On the destination server, stop the MCS by typing:
dpnctl stop mcs
The following information appears in the command shell:Do you want to proceed with the stop Y/N? [Y]: y
3. Type y and press Enter.
The following information appears in the command shell:MCS shutdown initiated.Stopping MCS...MCS stopped.Stopping the database server.Database server stopped.
4. On the destination server, perform a new-system restore by typing:
mcserver.sh --restore --restoretype=new-system
The following information appears in the command shell:=== BEGIN === check.mcs (prerestore)check.mcs passed=== PASS === check.mcs PASSED OVERALL (preavsetup)--restore will modify your MCS database and preferences.Do you want to proceed with the restore Y/N? [Y]:
5. Type y and press Enter.
The following information appears in the command shell:
Database server stopped.removing data dir /usr/local/avamar/var/mc/server_datacreating /usr/local/avamar/var/mc/server_data with permissions 0755creating /usr/local/avamar/var/mc/server_data/prefs with permissions 0755creating /usr/local/avamar/var/mc/server_data/postgres with permissions 0700creating /usr/local/avamar/var/mc/server_data/postgres/data with permissions
0755Enter the Avamar Server IP address or fully-qualified domain name to restore from (i.e. dpn.your_company.com):
6. Type the fully qualified Avamar destination server name or IP address and press Enter.
7. Press Enter.
The following appears in the command shell:Enter the Avamar Server IP port to restore from [27000]:
SERVER TYPE LOGIN STEPS
Single-node Log in to the server as admin.
Multi-node 1. Log in to the utility node as admin, and then load the admin OpenSSH key by typing:ssh-agent bash
ssh-add ~admin/.ssh/admin_key
2. When prompted, type the admin_key passphrase and press Enter.
EMC AVAMAR 6.0 • ADMINISTRATION GUIDE 433

Migrating an Avamar serverAVAMAR SYSTEM MIGRATION
8. Press Enter to accept the default port.
The following appears in the command shell:
Using port '27000'.Enter password for MCUser:
9. Type the password for the MCUser administrative user account and press Enter.
The following appears in the command shell:
Select the Avamar server IP address or fully-qualified hostname to be used by backup clients:1) DESTINATION_SERVER.avamar.com2) SOURCE_SERVER.avamar.com3) Enter another address
Enter your selection(1-3):
10.Type 1 and press Enter.
The following appears in the command shell:
Enter the Avamar server accounting system root user password for Avamar server:
11.Type the Avamar server software root user password and press Enter.
The following appears in the command shell:
Performing restore administrative tasks...Restore administrative tasks complete.
12.On the destination server, start the MCS by typing:
dpnctl start mcs
EMC AVAMAR 6.0 • ADMINISTRATION GUIDE 434

Manually migrating backup clients to a new serverAVAMAR SYSTEM MIGRATION
Manually migrating backup clients to a new serverWhen a source server experiences a serious problem that compromises its operational effectiveness, you can force a registration and activation of any source server backup clients with new (destination) server. This enables them to continue to protect their data.
Furthermore, if regular normal replications had been occurring between the source and destination servers, old backups are present in the special REPLICATE domain.
However, it must be understood that as far as the Avamar server is concerned, there is no correlation whatsoever between a client account within the REPLICATE domain and any new account that might be created as the result of registering and activating with the new destination server.
Migrating pageable clients
A client is “pageable” when it is persistently connected to the same network as the Avamar server. A pageable client can be registered and activated using the methods described in Domains, Clients, and Users (page 38).
Migrating non-pageable clients
A client is considered “non-pageable” when it is disconnected from the same network as the Avamar server or it is using Network Address Translation (NAT).
To migrate a non-pageable client to the new server, perform the following while it is disconnected from the network:
1. Ensure that the client is disconnected from the network.
2. Erase the contents of the client CID.bin file.
3. Edit avagent.cfg to change mcsaddr=SOURCE-SERVER to mcsaddr=DESTINATION-SERVER.
4. Restart the Avamar client and agent applications to initiate registration with the new destination server.
EMC AVAMAR 6.0 • ADMINISTRATION GUIDE 435

AVAMAR CLIENT MANAGER
Avamar Client Manager is a web-based management application that provides centralized Avamar client administration capabilities for larger businesses and enterprises.
CapabilitiesAvamar Client Manager is designed to facilitate the management of large numbers of Avamar clients.
Management tasks. Avamar Client Manager enables you to work with large numbers of clients when performing the following tasks:
• Moving clients to a new server• Moving clients to a new domain• Retiring clients
• Deleting clients• Modifying the associations between clients and groups
Analysis tasks. Using Avamar Client Manager reports, you can quickly determine the status of large numbers of clients in the following areas:
• Backup and restore summaries by client• Successful backups• Clients with successful backups• Clients with failed backups• Restore activities• Clients with restore activity• Failed backups• Idle clients
You can filter the information in the reports by searching for a computer using all or part of a computer name or username. This enables you to focus the reports on specific computers.
EMC AVAMAR 6.0 • ADMINISTRATION GUIDE 436

Starting Avamar Client ManagerAVAMAR CLIENT MANAGER
Upgrade tasks. Avamar Client Manager enables you to remotely change the Avamar software on large numbers of Avamar client computers:
• Upgrade• Downgrade• Apply a hotfix
Activation tasks. Avamar Client Manager enables you to perform the following activation-related tasks for large numbers of computers:
• Search for computers• Activate selected computers• Activate computers by organizational unit• Create an Avamar domain• Create an Avamar group• Show all Avamar groups• Show all Avamar clients• Search for Avamar clients
Starting Avamar Client ManagerAvamar Client Manager is started from the Avamar Enterprise Manager menu bar.
To start Avamar Client Manager:
1. Log in to Avamar Enterprise Manager.
2. In the Avamar Enterprise Manager interface, click Client Manager.
The Avamar Client Manager opens, starting with the Manage page.
Connection security
To secure data transmissions between a computer and the Avamar server, a secure connection is created using HTTPS. This form of the HTTP protocol encrypts messages before they are sent and decrypts them when they are received. HTTPS is used for all login transmissions and for all transmission of data during registration and activation operations.
All attempts to access the Avamar server through the UI over standard HTTP protocol are redirected to HTTPS to prevent plain text transmissions.
EMC AVAMAR 6.0 • ADMINISTRATION GUIDE 437

Starting Avamar Client ManagerAVAMAR CLIENT MANAGER
Apache web server authentication
To protect user security, web browsers display an authentication warning when accessing a secure web page, unless the web server provides a trusted public key certificate with the page. The Avamar Client Manager UI uses only secure web pages, and this warning is seen in browsers that access those pages. To avoid the warning, install a trusted public key certificate on the Apache web server provided with Avamar.
The EMC Avamar Product Security Guide describes how to obtain and install a trusted public key certificate for the Apache web server.
Editing the session timeout period
To protect the security of the assets accessible through Avamar Client Manager, sessions time out after 72 hours (4,320 minutes) of inactivity. When a session has been running for 72 hours or more without any interaction between the web browser and the Avamar Client Manager server, the session times out. However, Avamar Client Manager does not time out while a commit task is in progress.
When a session times out, close the web browser window or tab in which the session was running, and restart Avamar Client Manager.
To edit the session timeout value:
User=root 1. Log in as root on the Avamar server utility node.
2. Stop the Apache Tomcat server by typing:
/usr/local/avamar/bin/emwebapp.sh --stop
3. Open the following file for editing:
/usr/local/avamar-tomcat/webapps/aam/WEB-INF/web.xml
4. Change the value of the session-timeout tag to a new value, in minutes.
For example, the default section is:
<session-config>
<session-timeout>4320</session-timeout>
</session-config>
To change the timeout value to 1 hour, edit the section to:
<session-config>
<session-timeout>60</session-timeout>
</session-config>
5. Restart the Apache Tomcat server by typing:
/usr/local/avamar/bin/emwebapp.sh --start
EMC AVAMAR 6.0 • ADMINISTRATION GUIDE 438

Starting Avamar Client ManagerAVAMAR CLIENT MANAGER
Increasing the JavaScript timeout period
The Avamar Client Manager UI uses JavaScript to perform many of its tasks. Sometimes an Avamar Client Manager UI script requires more time to finish than is permitted by a web browser’s default script timeout value.
When this happens, a message appears and the script is stopped. You can click continue to allow the script to finish its work.
To avoid seeing this message, increase the script timeout period.
Increasing the JavaScript timeout period in Internet Explorer
To increase the script timeout period for Internet Explorer on Windows:
1. Open a registry editor, such as Regedt32.exe.
2. Open the key:
HKEY_CURRENT_USER\Software\Microsoft\InternetExplorer\Styles
If the key does not exist, create it.
3. Create a DWORD value called "MaxScriptStatements" under this key
4. Set the value of the DWORD to 20,000,000.
This number represents the number of script statements.
5. Restart the browser.
Increasing the JavaScript timeout period in Firefox
To increase the script timeout period for Firefox:
1. In the browser address bar, type:
about:config
The about:config warning appears.
2. Click I’ll be careful, I promise!.
The preferences window opens.
3. In Filter, type:
dom.max_script_run_time
The script runtime preference appears.
4. Double-click the preference.
The Enter integer value dialog box appears.
5. Type 30 and click OK.
6. Restart the browser.
EMC AVAMAR 6.0 • ADMINISTRATION GUIDE 439

Starting Avamar Client ManagerAVAMAR CLIENT MANAGER
Showing and hiding tooltips
To show or hide global tooltips in Avamar Client Manager:
1. On the Avamar Client Manager banner bar, click .
2. Select Options.
3. Select or clear Show Tooltips.
Refreshing the window
Click the refresh icon, , to update the information in a window or log view.
Support for version 4 and 5 servers
Software changes and additions have enabled new features in Avamar Client Manager. Some of the features that are fully supported when working with clients activated to an Avamar server version 6.0 have limited support when working with clients activated to an Avamar server version 4.1.x or 5.x. The following features have limited support on Avamar server versions 4.1.x or 5.x:
• Move clients to a new server• Move clients to a new domain• Retire clients• Delete clients• Upgrade• Username search• Client details• Dataset, retention policy, and schedule details
Move clients to a new server
When a client is moved to a new server, as described in Moving clients to a new server (page 443), the original server must release the client's activation before the new server can activate the client. The ability to respond to a remote command to release an activation became available in Avamar server version 5.0.1.31.
EMC AVAMAR 6.0 • ADMINISTRATION GUIDE 440

Starting Avamar Client ManagerAVAMAR CLIENT MANAGER
The following table describes the support for moving clients to a new server in Avamar Client Manager. Support is based on the source server version, and is limited by the target server version.
Move clients to a new domain
Moving clients to a new domain, as described in Moving clients to a new domain (page 446), is not supported for clients activated to Avamar server version 4.1.x or 5.x.
Retire clients
Clients activated to an Avamar server older than version 5.0.1.31 cannot be retired using Avamar Client Manager. Clients activated to Avamar server version 5.0.1.31 or newer can be retired using Avamar Client Manager, however the task will fail when attempted immediately after the MCS is restarted and while it is still initializing. Wait until initialization is complete before using the Retire Clients feature.
Waiting for MCS initialization is not required for clients activated to Avamar server version 6.x.
Delete clients
Clients activated to an Avamar server older than version 5.0.1.31 cannot be deleted using Avamar Client Manager. Clients activated to Avamar server version 5.0.1.31 or newer can be deleted using Avamar Client Manager, however the task will fail when attempted immediately after the MCS is restarted and while it is still initializing. Wait until initialization is complete before using the Delete Clients feature.
Waiting for MCS initialization is not required for clients activated to Avamar server version 6.x.
SOURCE SERVER VERSION MOVE PERMITTED? LIMITATIONS
Version 4.1.x and version 5.x prior to version 5.0.1.31
No N/A
Version 5.x from 5.0.1.31
Yesa
a. Moving clients to a new server from an Avamar server version 5.0.1.31 ornewer will fail when attempted immediately after the MCS is restarted andwhile it is still initializing. Wait until initialization is complete before using theMove Clients to New Server feature. Waiting for MCS initialization is not re-quired for clients activated to Avamar server version 6.x.
Target server must be version 5.0.1.31 or newer.
Version 6.x Yes Target server must be version 6.0 or newer.
EMC AVAMAR 6.0 • ADMINISTRATION GUIDE 441

Starting Avamar Client ManagerAVAMAR CLIENT MANAGER
Upgrade
Avamar Client Manager cannot be used to upgrade clients activated to Avamar server version 4.1.x or 5.x. The remote upgrade process, as described in Upgrading Avamar client software (page 468), requires methods that are only available on Avamar server version 6.0 and newer.
Username search
Username search, as described in Managing clients (page 443), Upgrading Avamar clients (page 467), and Remote push install of the client software (page 485), is not available for clients activated to Avamar server version 4.1.x or 5.x. The method required to obtain account information for users of a specific client became available in Avamar server version 6.0.
Client details
For clients activated to Avamar server version 4.1.x or 5.x, the Client Details window provides no information in the Users on this Client field. The method required to obtain account information for users of a specific client became available in Avamar server version 6.0.
Dataset, retention policy, and schedule details
For clients activated to Avamar server version 4.1.x or 5.x, the dataset details, retention policy details, and schedule details windows may display some empty fields.
EMC AVAMAR 6.0 • ADMINISTRATION GUIDE 442

Managing clientsAVAMAR CLIENT MANAGER
Managing clientsAvamar Client Manager enables you to perform the following client management tasks for large numbers of clients:
• Moving clients to a new server (page 443)• Moving clients to a new domain (page 446)• Retiring clients (page 447)• Deleting clients (page 448)• Adding and removing groups for a client (page 449)• Adding and removing clients in a group (page 450)
Moving clients to a new server
IMPORTANT: When activation of the client on the new server fails, the client is, by design, left registered with the new server. This ensures that its replicated backups are associated with it on the new server. To complete the move, correct any problems that interfered with activation. Then activate the client with the new server.
To move an activated client to a different Avamar server:
1. On the Home window of the Manage page, click Move clients to a new server.
The Move clients to a new server window appears.
2. Filter the available Avamar clients:
• In Server, select the servers with clients to include in the task.• In OS, select the type of operating system for clients to include in the
task.• In Client by Name/Username, type a text string to match with the
hostname of Avamar client computers and usernames listed for Avamar client computers, and then click the button next to the text field to apply the text string filter.
Matches of both types are possible from a single text string. You can use an asterisk (*) wildcard character to match one or more characters.
NOTE: If you do not make a selection in Server than only clients for the first server in the sorted list appear. If you do not make a selection or entry in OS or Client by Name/Username, then all values in the category are included.
EMC AVAMAR 6.0 • ADMINISTRATION GUIDE 443

Managing clientsAVAMAR CLIENT MANAGER
3. In the Move clients to a new server pane, select the clients to move.
IMPORTANT: Limit client moves to no more than five clients at one time. This reserves sufficient system resources for other processes.
4. Click Server.
The Move client to Server window appears with the selected clients listed in the Source Client(s) pane.
5. In the server selection box on the Target Server Information pane title bar, select the target Avamar server.
6. In the Target Server Information pane, select a target domain, or click Create Domain to create a domain as described in Creating a domain (page 482).
7. Click Next.
The groups available in the selected domain, and all domains above it, appear.
8. Select groups for the clients.
To select all groups on the current page, select the box at the top of the selection column. To create a group, click Create Group, and complete that task as described in Creating a group (page 482).
9. In Replicate Existing Backups, choose the client backups to replicate to the new server:
• Select All to replicate all backups for the client.• Select Last to replicate only the last backup for the client.• Select None to not replicate any of the backups for the client.
10.Choose whether to delete or retain a client and its backups on the original server by selecting or clearing the Delete From Source checkbox.
11.Click Finish.
If you are replicating backups for the client to the new server, the Confirm Replication Authentication dialog box appears. Otherwise, the move is initiated as a background process.
12.On Confirm Replication Authentication, in Source Server, enter the password for the source server’s "repluser" or "MCUser" account.
The specific account is determined by Avamar Client Manager and the Username field is populated with the correct username for the replication role. The Username value is determined based on the server version. Avamar server version 4.x uses the "MCUser" account for replication. Avamar server versions 5.x and newer use the "repluser" account for this role.
EMC AVAMAR 6.0 • ADMINISTRATION GUIDE 444

Managing clientsAVAMAR CLIENT MANAGER
13.On Confirm Replication Authentication, in Target Server, enter the password for the target server’s "repluser" or "MCUser" account.
The specific account is determined by Avamar Client Manager and the Username field is populated with the correct username for the replication role. The Username value is determined based on the server version. Avamar server version 4.x uses the "MCUser" account for replication. Avamar server versions 5.x and newer use the "repluser" account for this role.
14.Click OK.
Move tasks are initiated as background processes. To check the status of the processes, use the Process viewer (page 451). To check the status of the tasks, use the Management Log, as described in Management and activation logs (page 452).
EMC AVAMAR 6.0 • ADMINISTRATION GUIDE 445

Managing clientsAVAMAR CLIENT MANAGER
Moving clients to a new domain
To move an activated client to a different Avamar domain on the same server:
1. On the Home window of the Manage page, click Move clients to a new domain.
The Move clients to a new domain window appears.
2. Filter the available Avamar clients:
• In Server, select the server with clients to include in the task.• In OS, select the type of operating system for clients to include in the
task.• In Client by Name/Username, type a text string to match with the
hostname of Avamar client computers and usernames listed for Avamar client computers, and then click the button next to the text field to apply the text string filter.
Matches of both types are possible from a single text string. You can use an asterisk (*) wildcard character to match one or more characters.
NOTE: If you do not make a selection in Server than only clients for the first server in the sorted list appear. If you do not make a selection or entry in OS or Client by Name/Username, then all values in the category are included.
3. In the Move clients to a new domain pane, select the clients to move.
4. Click Domain.
The Move client to Domain window appears with the selected clients listed in the Source Client(s) pane.
5. In the Target Server Information pane, select a target domain, or click Create Domain to create a domain as described in Creating a domain (page 482).
6. Click Next.
The groups available in the selected domain, and all domains above it, appear.
7. Select groups for the clients.
To select all groups on the current page, select the box at the top of the selection column. To create a group, click Create Group, and complete that task as described in Creating a group (page 482).
8. Click Finish.
Move tasks are initiated as background processes. To check the status of the processes, use the Process viewer (page 451). To check the status of the tasks, use the Management Log, as described in Management and activation logs (page 452).
EMC AVAMAR 6.0 • ADMINISTRATION GUIDE 446

Managing clientsAVAMAR CLIENT MANAGER
Retiring clients
To transfer an activated Avamar client to retired status:
1. On the Home window of the Manage page, click Retire clients.
The Retire clients window appears.
2. Filter the available Avamar clients:
• In Server, select the servers with clients to include in the task.• In OS, select the type of operating system for clients to include in the
task.• In Client by Name/Username, type a text string to match with the
hostname of Avamar client computers and usernames listed for Avamar client computers, and then click the button next to the text field to apply the text string filter.
Matches of both types are possible from a single text string. You can use an asterisk (*) wildcard character to match one or more characters.
NOTE: If you do not make a selection in Server than only clients for the first server in the sorted list appear. If you do not make a selection or entry in OS or Client by Name/Username, then all values in the category are included.
3. In the Retire clients pane, select the clients to retire.
4. Click Retire.
The Retire Client window appears.
5. Select the retention policy for the backups for the retired clients.
6. Click OK.
Retire client tasks are initiated. To check the status of the tasks, use the Management Log, as described in Management and activation logs (page 452).
RETENTION POLICY STEPS TO SELECT THE POLICY
Current retention period set for the backups
In Select Retention Policy, select Retire client and retain backups with existing expiration date.
Until the backups are manually deleted
In Select Retention Policy, select Retire client and retain all backups indefinitely.
Until a certain date In Select Retention Policy, select Retire client and reset backup expiration date, and then specify the date in New Expiration Date.
EMC AVAMAR 6.0 • ADMINISTRATION GUIDE 447

Managing clientsAVAMAR CLIENT MANAGER
Deleting clients
To remove an activated Avamar client and all of the backups for the client from the associated Avamar server:
1. On the Home window of the Manage page, click Delete clients.
The Delete clients window appears.
2. Filter the available Avamar clients:
• In Server, select the servers with clients to include in the task.• In OS, select the type of operating system for clients to include in the
task.• In Client by Name/Username, type a text string to match with the
hostname of Avamar client computers and usernames listed for Avamar client computers, and then click the button next to the text field to apply the text string filter.
Matches of both types are possible from a single text string. You can use an asterisk (*) wildcard character to match one or more characters.
NOTE: If you do not make a selection in Server than only clients for the first server in the sorted list appear. If you do not make a selection or entry in OS or Client by Name/Username, then all values in the category are included.
3. In the Delete clients pane, click next to the client name.
The first confirmation dialog appears.
NOTE: Client deletion removes the client, its backups, and its backup history from the server. To help avoid inadvertent deletions and loss of valuable data a two-step confirmation process is used
4. Click Yes.
The second confirmation dialog appears.
5. Type the password used to log in to Avamar Enterprise Manager for the current session.
The user account must have the Avamar role of Root Administrator or Administrator for the client’s domain. Roles (page 66) provides details.
6. Click OK.
Tasks to delete the client and all of its backups are initiated. To check the status of the tasks, use the Management Log, as described in Management and activation logs (page 452).
EMC AVAMAR 6.0 • ADMINISTRATION GUIDE 448

Managing clientsAVAMAR CLIENT MANAGER
Adding and removing groups for a client
To add or remove groups associated with a client:
1. On the Home window of the Manage page, click Modify client and group associations.
The Modify client and group associations window appears.
2. Select the Client tab.
3. Filter the available Avamar clients:
• In Server, select the servers with clients to include in the task.• In OS, select the type of operating system for clients to include in the
task.• In Client by Name/Username, type a text string to match with the
hostname of Avamar client computers and usernames listed for Avamar client computers, and then click the button next to the text field to apply the text string filter.
Matches of both types are possible from a single text string. You can use an asterisk (*) wildcard character to match one or more characters.
NOTE: If you do not make a selection in Server than only clients for the first server in the sorted list appear. If you do not make a selection or entry in OS or Client by Name/Username, then all values in the category are included.
4. In the Client pane, click next to the client being changed.
The Edit Client window appears.
TIP: To view information about the client, click the client name in the Client column.
5. Remove a group for the client by selecting the group and clicking Remove.
This removes the association between the client and the selected group but does not remove or delete the group.
NOTE: At least one group must be associated with a client.
6. Add groups for the client:
(a) Click Add Groups.
The Add Groups for Client window appears.
(b) Select additional groups to associate with the client.
To select all groups on the current page, select the box at the top of the selection column. To create a group, click Create Group, and complete that task as described in Creating a group (page 482).
EMC AVAMAR 6.0 • ADMINISTRATION GUIDE 449
Managing clientsAVAMAR CLIENT MANAGER
(c) Click Add.
The client association tasks are initiated.
(d) Click Close on the Add Groups for Client window.
7. Click Close on the Edit Client window.
Adding and removing clients in a group
To add and remove the clients associated with a group:
1. On the Home window of the Manage page, click Modify client and group associations.
The Modify client and group associations window appears.
2. Select the Group tab.
3. Filter the available Avamar clients:
• In Server, select the servers with clients to include in the task.• In OS, select the type of operating system for clients to include in the
task.• In Client by Name/Username, type a text string to match with the
hostname of Avamar client computers and usernames listed for Avamar client computers, and then click the button next to the text field to apply the text string filter.
Matches of both types are possible from a single text string. You can use an asterisk (*) wildcard character to match one or more characters.
NOTE: If you do not make a selection in Server than only clients for the first server in the sorted list appear. If you do not make a selection or entry in OS or Client by Name/Username, then all values in the category are included.
4. In the Group pane, click next to the group being changed.
The Edit Group window appears.
You can view group information by clicking a link in any of the following columns:
• Activated Clients• Dataset• Retention• Schedule
5. Remove a client from the group by selecting the client and clicking Remove.
6. Add clients to the group:
(a) Click Add Clients.
The Add Clients for Group window appears.
(b) Select clients to add to the group.
EMC AVAMAR 6.0 • ADMINISTRATION GUIDE 450

Managing clientsAVAMAR CLIENT MANAGER
To select all clients on the current page, select the box at the top of the selection column.
(c) Click Add.
The group association tasks are initiated.
7. Click Close on the Edit Group window.
Process viewer
Process Viewer displays information about background processes, including move and activation tasks.
To open Process Viewer:
1. On the Avamar Client Manager banner, click .
2. Click Process Viewer.
Process Viewer provides the information listed in the following table.
3. (Optional) To filter the information to show only process entries for selected processes, in the Process section of the Process Filter pane, select the processes.
The process list in this section is dynamically generated based on all processes currently tracked by Process Viewer.
4. (Optional) To filter the information to show only process entries for specified client status types, in the Client Status section of the Process Filter pane, select the status types.
The client status list in this section is dynamically generated based on the status types for all processes currently tracked by Process Viewer.
COLUMN DESCRIPTION
Description Type of task that started the process
User Login ID that started the process
Status Current state of the process: • Success - The task completed without error.• Failure - The task could not be completed.• Partial Success - The task succeeded for at least one
client and failed for at least one client. • Active - The task is in progress.• Queued - At least one of the activations associated with
the client move task is in the retry queue.
Start time Date and time that the process started
End time Date and time that the process finished
EMC AVAMAR 6.0 • ADMINISTRATION GUIDE 451

Managing clientsAVAMAR CLIENT MANAGER
5. (Optional) To filter the information to show only process entries for processes started by a specific username:
(a) In the Username section of the Process Filter pane, type a search string.
The search string is used to match all or part of a username. Use an asterisk (*) to represent zero or more characters. The search string must comply with the following rules:
• No more than 24 characters• Cannot start with a period character• Cannot contain any of the following characters:
/:?"<>,~!@#$%^|&’(){}_
(b) Click the button next to the text box.
6. (Optional) To clear all entries except Active entries from Process Viewer, click Clear.
7. Click Close.
Management and activation logs
The Management and Activation Logs provide the status and result of client management and activation tasks.
Viewing the management and activation logs
To view the Management and Activation Logs:
1. Click View Log on either the Manage or Activate page.
2. (Optional) Filter the log entries:
• To view only log entries for certain servers, select the checkbox next to the server names in the Server pane.
• To view only log entries for clients with a certain status, select the checkbox next to the status in the Client Status pane.
In the Activation Log, one or more of the following types is listed:
• Selected for Registration• Pending Client Response• Activation Failure• Activated Client
In the Management Log, one of more of the following types is listed:
• Success• Pending• Failure
EMC AVAMAR 6.0 • ADMINISTRATION GUIDE 452
Managing clientsAVAMAR CLIENT MANAGER
• To view only log entries with a certain status code, select the status codes in the Status Code pane.
• To search for log entries, select the log field by which to search in the Search pane, type a search string in the text box, and then click the button next to the text box.
3. Close the log window.
Exporting the management and activation logs
To export a log as a CSV file, click . The formatted file, named View_Log.xls, is sent to the web browser.
Archiving and clearing the management and activation logs
The log entries visible in Log Information can be cleared and archived, or all entries and archives can be deleted.
Log entries for the Activation and Management Logs are automatically written to an archive when the logs reach a combined total of 5,000 entries. Log archives reside at /usr/local/avamar/var/em/webapp_log and are named ACMActivationTIMESTAMP.xml, where TIMESTAMP is the current system time. Five log archives are preserved. When a new archive is created, the oldest archive is deleted.
To clear the entries in the Activation and Management Logs:
1. In either the Management or Activation Log, click .
The Clear or Delete Log Entries window appears.
2. Choose whether to clear only the entries in the log, or to clear the entries and delete all log archives.
• To force an archive of all entries in the log window and clear the window, select Archive and clear all entries.
• To delete all entries from the log window, and delete all log archives, select Delete all entries and archives.
3. Click OK.
EMC AVAMAR 6.0 • ADMINISTRATION GUIDE 453

Analyzing client activityAVAMAR CLIENT MANAGER
Analyzing client activityAvamar Client Manager provides several reports that enable you to view summary and detailed information about the performance of the Avamar servers, and about backup and restore activity on Avamar clients.
REPORT DESCRIPTION
Server Summary report (page 455)
Provides general client information for all available Avamar servers and serves as a springboard to more detailed information related to the data categories it contains.
Backup/Restore Summary by Client report (page 458)
Provides summary information about the backup and restore activity of active clients on a selected server.
Successful Backups report (page 460)
Provides information about successful backup workorders of selected clients for a specific Avamar server and time period.
Successful Clients report (page 457)
Lists clients of a specific Avamar server that meet the selected definition of a successful client.
Restore Activities report (page 465)
Provides information about restore workorders of selected clients for a specific Avamar server and time period.
Clients with Restore Activity report (page 464)
Lists clients on a specific Avamar server that have any restore activity during a specified time period.
Failed Clients report (page 461)
Lists clients on a specific Avamar server that do not meet the selected definition of a successful client during the specified time period.
Failed Backups report (page 462)
Provides information about failed backup workorders of selected clients for a specific Avamar server and time period.
Idle Clients report (page 463)
Lists the clients on an Avamar server that have no backup activity during the specified time period.
EMC AVAMAR 6.0 • ADMINISTRATION GUIDE 454

Analyzing client activityAVAMAR CLIENT MANAGER
Server Summary report
The Server Summary report provides general client information for all available Avamar servers. It also serves as a springboard to more detailed information related to the data categories it contains. Where a report containing more detailed information about a particular data category is available, the number in the column for that category acts as a link to the report.
For example, to view the Backup/Restore Summary by Client report for a particular server, click the number in the Active Clients column for that server.
Data that is linked to another report appears as a blue hyperlink. When the number is black, no additional report is available.
Viewing the Server Summary report
To view the Server Summary report:
1. On the Avamar Client Manager button bar, click Analyze.
The Analyze page appears and displays the Filters and the Server Summary report.
2. (Optional) Filter the data in the report:
(a) Choose whether to filter the data by a certain time period or range:
• To view data for a certain time period, select Period and then select a value from the Past list.
The minimum value is 1 day and the maximum is 3 months. The current date is the end of the time period that is defined by the value selected. For example, selecting 1 month defines a time period starting 1 month before the current date and ending on the current date.
• To view data for a certain time range, select Range and then select a start and end date for the range.
The maximum range is 3 months.
(b) Filter the report by the local hostname of a client by typing a search string in the Client box and clicking the button next to the box.
The search string is used to match all or part of the local hostname of clients. Use an asterisk (*) to represent zero or more characters. The search string must comply with the following rules:
• No more than 24 characters• Cannot start with a period character• Cannot contain any of the following characters:
/:?"<>\,~!@#$%^|&’(){}_
(c) Filter the report by the username on a client by typing a search string in the Username box and clicking the button next to the box.
The search string must meet the same requirements as the client search string, except that the \ character can be used.
(d) Filter the report by Avamar server by selecting the server from the Server list or select All Servers from the list to view data for all servers.
EMC AVAMAR 6.0 • ADMINISTRATION GUIDE 455

Analyzing client activityAVAMAR CLIENT MANAGER
NOTE: These filters apply to any detailed reports that you launch from the Server Summary report.
3. Select the definition to use for a successful client by clicking > Successful Clients, and then selecting an option to define a successful client:
• At least one successful backup• All backups successful• Last backup successful
4. (Optional) To set the maximum number of report rows, select > Entries Per Page, and then select a number.
5. View detailed reports by clicking data that appears in blue.
Server Summary report details
The Server Summary report contains the information listed in the following table.
COLUMN DESCRIPTION LINKED REPORT
Server Hostname or IP address of the Avamar server. The server must be registered in Enterprise Manager.
None
Total Clients Total number of clients registered with the server. Does not include retired clients.
None
Active Clients Total number of clients with backup and/or restore activity during the specified time period.
Backup/Restore Summary by Client
Idle Clients Total number of clients with no backup activity during the specified time period.
Idle Clients
Successful Clients Total number of clients that meet the selected definition of a successful client during the specified time period, and the average amount of time for the backups of those clients.
Successful Clients
Failed Clients Total number of clients that do not meet the selected definition of a successful client during the specified time period.
Failed Clients
Clients with Restore Total number of clients with restore activity during the specified time period, including successful and failed workorders.
Clients with Restore Activity
EMC AVAMAR 6.0 • ADMINISTRATION GUIDE 456

Analyzing client activityAVAMAR CLIENT MANAGER
Successful Clients report
The Successful Clients report lists clients of a specific Avamar server that meet the selected definition of a successful client during a specified time period. It also provides information about the backup activity on each client.
Viewing the Successful Clients report
To view the Successful Clients report:
1. Open the Server Summary report and optionally filter the data in the report, as discussed in Viewing the Server Summary report (page 455).
The report filters you set in the Server Summary report are used in the initial view of the Successful Clients report. These filters can be changed on the Successful Clients report itself.
2. (Optional) Click on the Server Summary report menu bar, click Successful Clients, and select one of the definitions of a successful client:
• At least one successful backup (default)• All backups successful• Last backup successful
3. Identify the report row for the server with the clients for which to view the report.
4. In the row, click the number in the Successful Clients column.
When the number in the Successful Clients column is 0, the server does not have a report for the specified view.
5. (Optional) Filter the report data further by the local hostname of a client or the username on a client by typing a search string in the Client or Username boxes and clicking the button next to the box.
The search string is used to match all or part of the local hostname of clients. Use an asterisk (*) to represent zero or more characters. The search string must comply with the following rules:
• No more than 24 characters• Cannot start with a period character• Cannot contain any of the following characters:
/:?"<>,~!@#$%^|&’(){}_
EMC AVAMAR 6.0 • ADMINISTRATION GUIDE 457

Analyzing client activityAVAMAR CLIENT MANAGER
Successful Clients Report detail
The Successful Clients Report contains the information listed in the following table.
Backup/Restore Summary by Client report
The Backup/Restore Summary by Client report provides a summary view of the backup and restore activity for each client on a selected server. The report can also be used to view reports for selected clients.
Viewing the Backup/Restore Summary by Client report
To view the Backup/Restore Summary by Client report:
1. Open the Server Summary report and optionally filter the data in the report, as discussed in Viewing the Server Summary report (page 455).
The report filters you set in the Server Summary report apply to the Backup/Restore Summary by Client report.
2. Identify the report row for the server with the clients for which to view the report.
3. In the row, click the number in the Active Clients column.
When the number in the Active Clients column is 0, the server does not have a report for the specified view.
4. (Optional) Filter the report data further by the local hostname of a client or the username on a client by typing a search string in the Client or Username boxes and clicking the button next to the box.
COLUMN DESCRIPTION
Client Name of the client.
Domain Domain on the Avamar server to which the client is assigned.
Successful Backups Total number of backups of the client during the specified time period.
Includes any of the following:
• Successful backups• Backups with exceptions• Backups with errors
Does not include failed backups.
Last Successful Backup Date and time of the end of the last successful backup of the client. This value is not limited by the selected time period.
Average Backup Duration Average amount of time required to complete a backup of the client.
Total Size Sum, in bytes, of all data processed in all of the successful backups of the client during the specified time period.
EMC AVAMAR 6.0 • ADMINISTRATION GUIDE 458

Analyzing client activityAVAMAR CLIENT MANAGER
The search string is used to match all or part of the local hostname of clients. Use an asterisk (*) to represent zero or more characters. The search string must comply with the following rules:
• No more than 24 characters• Cannot start with a period character• Cannot contain any of the following characters:
/:?"<>,~!@#$%^|&’(){}_
Backup/Restore Summary by Client report details
The Backup/Restore Summary by Client report contains the information listed in the following table.
COLUMN DESCRIPTION
Client Name of the client.
Domain Domain on the Avamar server to which the client is assigned.
Successful Backups Total number of backups of the client during the specified time period.
Includes any of the following:
• Successful backups• Backups with exceptions• Backups with errors
Does not include failed backups.
Failed Backups Total number of failed backup attempts for the client during the specified time period.
Restores Total number of restore workorders during the specified time period. Includes successful and failed workorders.
Last Successful Backup Date and time of the end of the last successful backup of the client.NOTE: This date is not limited by the specified time period.
Average Backup Duration Average amount of time to complete a backup of the client.
EMC AVAMAR 6.0 • ADMINISTRATION GUIDE 459

Analyzing client activityAVAMAR CLIENT MANAGER
Successful Backups report
The Successful Backups report lists information about successful backup workorders for a specific Avamar server and time period.
Viewing the Successful Backups report
To view the Successful Backups report:
1. Open either the Successful Clients report or the Backup/Restore Summary by Client report for the time period being analyzed. The following topics provide details:
• Viewing the Successful Clients report (page 457)• Viewing the Backup/Restore Summary by Client report (page 458)
2. Specify clients for the Successful Backups report by selecting the checkbox next to the client names.
3. Click Successful Backup.
Successful Backups Report details
The Successful Backups report contains the information listed in the following table.
COLUMN DESCRIPTION
Client Name of the client.
Domain Domain on the Avamar server to which the client is assigned.
Plug-in Plug-in type used for the workorder.
Dataset Dataset used for the workorder.
Type Type of backup, either On-Demand or Scheduled.
Start Date and time that the workorder started.
End Date and time that the workorder ended.
Elapsed Time Total time required to complete the workorder.
Data Size Size of all data transferred during the backup.
Changed Size of the data that changed since the last successful backup.
EMC AVAMAR 6.0 • ADMINISTRATION GUIDE 460

Analyzing client activityAVAMAR CLIENT MANAGER
Failed Clients report
The Failed Clients report lists clients on a specific Avamar server that do not meet the selected definition of a successful client during a specified time period.
Viewing the Failed Clients report
To view the Failed Clients report:
1. Open the Server Summary report and optionally filter the data in the report, as discussed in Viewing the Server Summary report (page 455).
The report filters you set in the Server Summary report are used in the initial view of the Failed Clients report. These filters can be changed on the Failed Clients report itself.
2. (Optional) Click on the Server Summary report menu bar, click Successful Clients, and select one of the definitions of a successful client:
• At least one successful backup (default)
• All backups successful• Last backup successful
Failed clients are those clients that do not qualify under the selected definition of a successful client.
3. Identify the report row for the server with the clients for which to view the report.
4. In the row, click the number in the Failed Clients column.
When the number in the Failed Clients column is 0, the server does not have a report for the specified view.
5. (Optional) Filter the report data further by the local hostname of a client or the username on a client by typing a search string in the Client or Username boxes and clicking the button next to the box.
The search string is used to match all or part of the local hostname of clients. Use an asterisk (*) to represent zero or more characters. The search string must comply with the following rules:
• No more than 24 characters• Cannot start with a period character• Cannot contain any of the following characters:
/:?"<>,~!@#$%^|&’(){}_
EMC AVAMAR 6.0 • ADMINISTRATION GUIDE 461

Analyzing client activityAVAMAR CLIENT MANAGER
Failed Clients Report details
The Failed Clients report contains the information listed in the following table.
Failed Backups report
The Failed Backups report lists information about failed backup workorders for a specific Avamar server and time period.
Viewing the Failed Backups report
To view the Failed Backups report for selected clients:
1. Open either the Backup/Restore Summary by Client report or the Failed Clients report for the time period being analyzed. The following topics provide details:
• Viewing the Backup/Restore Summary by Client report (page 458)• Viewing the Failed Clients report (page 461)
2. Specify clients for the Failed Backups report by selecting the checkbox next to the client names.
3. Click Failed Backup.
Failed Backups Report details
The Failed Backups report contains the information listed in the following table.
COLUMN DESCRIPTION
Client Name of the client.
Domain Domain on the Avamar server to which the client is assigned.
Failed Backups Total number of failed backups for the client during the specified time period.
Last Successful Backup
Date and time of the end of the last successful backup of the client. This value is not limited by the selected time period.
COLUMN DESCRIPTION
Client Name of the client.
Domain Domain on the Avamar server to which the client is assigned.
Plug-in Plug-in type used for the workorder.
Dataset Dataset used for the workorder.
Type Type of backup, either On-Demand or Scheduled.
Start Date and time that the workorder started.
End Date and time that the workorder ended.
EMC AVAMAR 6.0 • ADMINISTRATION GUIDE 462

Analyzing client activityAVAMAR CLIENT MANAGER
Idle Clients report
The Idle Clients report lists the clients on an Avamar server that have no backup activity during the specified time period.
Viewing the Idle Clients report
To view the Idle Clients report:
1. Open the Server Summary report and optionally filter the data in the report, as discussed in Viewing the Server Summary report (page 455).
The report filters you set in the Server Summary report apply to the Idle Clients report.
2. Identify the report row for the server with the clients for which to view the report.
3. In the row, click the number in the Idle column.
When the number in the Idle column is 0, the server does not have a report for the specified view.
4. (Optional) Filter the report data further by the local hostname of a client or the username on a client by typing a search string in the Client or Username boxes and clicking the button next to the box.
The search string is used to match all or part of the local hostname of clients. Use an asterisk (*) to represent zero or more characters. The search string must comply with the following rules:
• No more than 24 characters• Cannot start with a period character• Cannot contain any of the following characters:
/:?"<>,~!@#$%^|&’(){}_
Idle Clients Report details
The Idle Clients report contains the following information.
Status Code Backup workorder status code. Click the status code to view additional information.
Error Code Avamar server error code for the failed workorder. Click the error code to view additional information.
COLUMN DESCRIPTION
Client Name of the client.
Domain Domain on the Avamar server to which the client is assigned.
COLUMN DESCRIPTION
EMC AVAMAR 6.0 • ADMINISTRATION GUIDE 463

Analyzing client activityAVAMAR CLIENT MANAGER
Clients with Restore Activity report
The Clients with Restore Activity report lists clients on a specific Avamar server that have any restore activity during a specified time period. It also provides information about the restore activity on each client.
Clients are included on the Clients with Restore Activity report if they have at least one of the following:
• Successful restores• Restores with exceptions• Restores with errors• Failed Restores
Viewing the Clients with Restore Activity report
To view the Clients with Restore Activity report:
1. Open the Server Summary report and optionally filter the data in the report, as discussed in Viewing the Server Summary report (page 455).
The report filters you set in the Server Summary report apply to the Clients with Restore Activity report.
2. Identify the report row for the server with the clients for which to view the report.
3. In the row, click the number in the Clients with Restore column.
When the number in the Clients with Restore column is 0, the server does not have a report for the specified view.
4. (Optional) Filter the report data further by the local hostname of a client or the username on a client by typing a search string in the Client or Username boxes and clicking the button next to the box.
The search string is used to match all or part of the local hostname of clients. Use an asterisk (*) to represent zero or more characters. The search string must comply with the following rules:
• No more than 24 characters• Cannot start with a period character• Cannot contain any of the following characters:
/:?"<>,~!@#$%^|&’(){}_
EMC AVAMAR 6.0 • ADMINISTRATION GUIDE 464
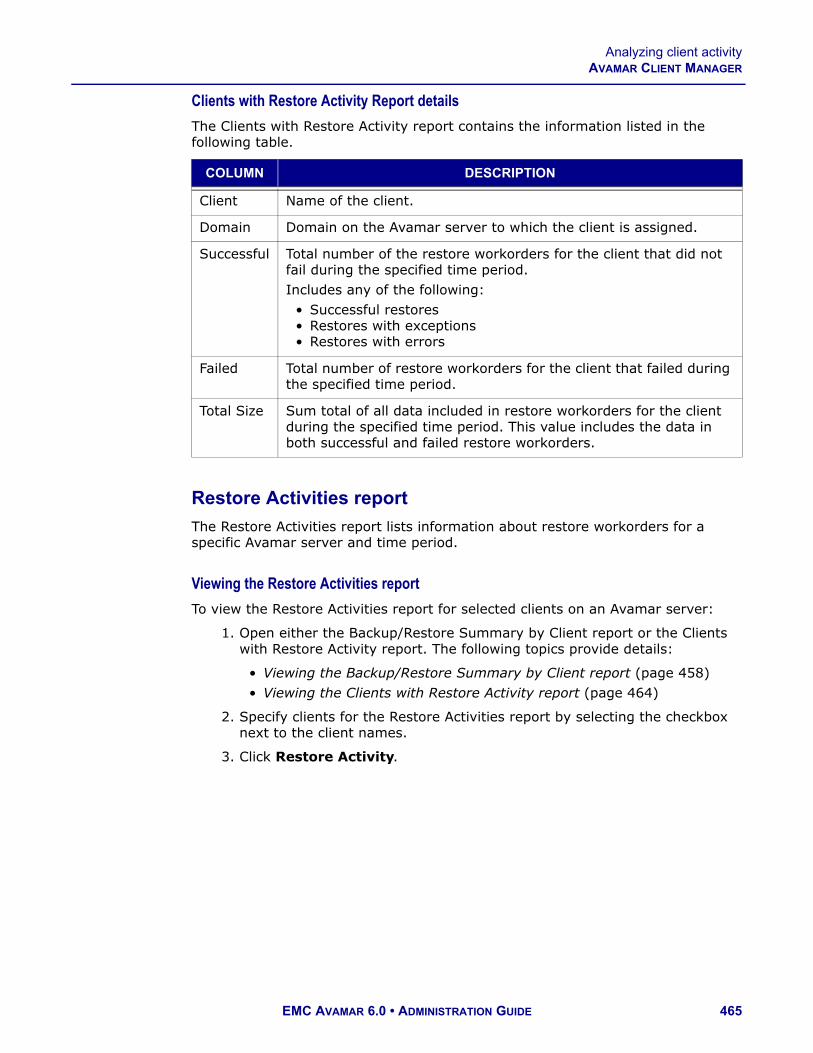
Analyzing client activityAVAMAR CLIENT MANAGER
Clients with Restore Activity Report details
The Clients with Restore Activity report contains the information listed in the following table.
Restore Activities report
The Restore Activities report lists information about restore workorders for a specific Avamar server and time period.
Viewing the Restore Activities report
To view the Restore Activities report for selected clients on an Avamar server:
1. Open either the Backup/Restore Summary by Client report or the Clients with Restore Activity report. The following topics provide details:
• Viewing the Backup/Restore Summary by Client report (page 458)• Viewing the Clients with Restore Activity report (page 464)
2. Specify clients for the Restore Activities report by selecting the checkbox next to the client names.
3. Click Restore Activity.
COLUMN DESCRIPTION
Client Name of the client.
Domain Domain on the Avamar server to which the client is assigned.
Successful Total number of the restore workorders for the client that did not fail during the specified time period.Includes any of the following:
• Successful restores• Restores with exceptions• Restores with errors
Failed Total number of restore workorders for the client that failed during the specified time period.
Total Size Sum total of all data included in restore workorders for the client during the specified time period. This value includes the data in both successful and failed restore workorders.
EMC AVAMAR 6.0 • ADMINISTRATION GUIDE 465

Analyzing client activityAVAMAR CLIENT MANAGER
Restore Activities report details
The Restore Activities report contains the information listed in the following table.
Saving reports
To save a report, you can print reports to a local or network printer, or export the report as a PDF or CSV file:
• To print a report, click .
• To export a report, click , select an output format, and then select the page orientation (PDF only).
COLUMN DESCRIPTION
Client Name of the client.
Domain Domain on the Avamar server to which the client is assigned.
Plug-in Plug-in type used for the workorder.
Start Date and time that the workorder started.
End Date and time that the workorder ended.
Elapsed Time Total time required to complete the workorder.
Status Code Restore workorder status code. For unsuccessful workorders, the status code is a link. Click the link to view additional information.
Error Code Avamar server error code for the restore workorder. For unsuccessful workorders, the error code is a link. Click the link to view additional information.
Files Total number of files in the restore.
Data Size Total size of the data restored in the workorder.
EMC AVAMAR 6.0 • ADMINISTRATION GUIDE 466

Upgrading Avamar clientsAVAMAR CLIENT MANAGER
Upgrading Avamar clientsAvamar Client Manager enables you to change the version of Avamar client that is installed on client computers to either a newer version or a hotfix. You also can downgrade the installed software, download a client package to all associated Avamar servers, and remove client packages from Avamar servers.
The following topics provide details:
• Requirements (page 467)• Obtaining client packages (page 467)• Upgrading Avamar client software (page 468)• Downloading a client package to all servers (page 470)• Removing a client package (page 471)• Client Upgrade Status report (page 472)
Requirements
The upgrade process described in this section requires the following:
• Avamar client version 6.0 and newer• Avamar server version 6.0 and newer
Avamar Client Manager cannot be used to upgrade clients activated to Avamar server version 4.1.x or 5.x. The upgrade process requires methods that are only available on Avamar server version 6.0 and newer.
Obtaining client packages
Client packages are obtained using the Avamar Downloader Service. This service pulls the packages from EMC and pushes them onto the utility node or single node server.
“Server Updates and Hotfixes” on page 393 describes the installation, configuration, and use of Avamar Downloader Service.
NOTE: For information about how to obtain packages without using the Avamar Downloader Service refer to the technical note Client-Only System Upgrades available through the Avamar Support landing page: https://support.emc.com/products/Avamar.
Once the packages are on the utility node or single node server they are visible in Avamar Client Manager’s Select Package window, and upgrades can be performed as described in “Upgrading Avamar client software” on page 468.
If packages do not appear in the Select Package window, follow the procedure in “Checking the EMC repository” on page 404.
EMC AVAMAR 6.0 • ADMINISTRATION GUIDE 467

Upgrading Avamar clientsAVAMAR CLIENT MANAGER
Upgrading Avamar client software
To upgrade Avamar clients:
1. On the Avamar Client Manager button bar, click Upgrade.
The Upgrade page appears with the Select Package window open. To open the Select Package window manually, on the Upgrade page, click Select Package.
2. In the Select Package window, select an Avamar client version or hotfix to install:
(a) (Optional) Filter the list of packages by selecting one of the following options in Show.
(b) Select a package by clicking Select next to the package listing.
The Select Package window closes, and the Select Servers window appears with the selected package as its focus.
3. Begin defining the pool of Avamar client computers that require the upgrade by selecting their associated Avamar servers.
Selected servers must display ready in the status column of the Select Servers window. To change a server’s status to ready, download the package to the server’s cache using the methods described in Downloading a client package to all servers (page 470) and Downloading a client package to selected servers (page 470).
4. Click OK.
The Client Filters window appears.
5. Filter the available Avamar clients for an upgrade or hotfix:
• In Server, select the servers with clients to include in the upgrade or hotfix.
• In OS, select the type of operating system for clients to include in the upgrade or hotfix.
• In Version, select the current Avamar client versions on clients to include in the upgrade or hotfix.
• In Plug-in, select the Avamar plug-in types used by clients to include in the upgrade or hotfix.
• In Client by Name/Username, type a text string to match with the hostname of Avamar client computers and usernames listed for Avamar client computers, and then click the button next to the text field to apply the text string filter.
Matches of both types are possible from a single text string. You can use an asterisk (*) wildcard character to match one or more characters.
FILTER DISPLAYS
All Both upgrade and hotfix packages
Upgrade Only upgrade packages
Hotfix Only hotfix packages
EMC AVAMAR 6.0 • ADMINISTRATION GUIDE 468

Upgrading Avamar clientsAVAMAR CLIENT MANAGER
NOTE: If you do not make a selection for a filter, then all values in the category are included. For example, if you make no selections in Server, then clients from all servers are included.
NOTE: Only computers with an upgrade-compliant version of Avamar client version 6.0 or later appear in the Clients pane.
6. Select the computers to upgrade.
• To select all computers on the current page of the Clients pane, select the box at the top of the selection column.
• To select all computers on all pages, click Select All.
Client selections are retained during page navigation.
7. Click OK.
The Client Upgrade window appears with all selected clients listed.
When necessary, click in the Remove column to remove a client.
8. Click Start Upgrade.
The upgrade or hotfix processes run in the background.
9. (Optional) Check the status of an upgrade or hotfix by clicking View Status on the Client Upgrade window.
The Client Upgrade Status report opens and displays the status of each upgrade and hotfix task.
You can also cancel an upgrade or hotfix task by clicking Cancel in the Action column of the Client Upgrade Status report. When an upgrade or hotfix task is canceled the client reverts back to the version in use at the time the task was scheduled.
EMC AVAMAR 6.0 • ADMINISTRATION GUIDE 469

Upgrading Avamar clientsAVAMAR CLIENT MANAGER
Downloading a client package to all servers
To transfer a client package from the Avamar package repository to the local cache on all Avamar servers:
1. On the Avamar Client Manager button bar, click Upgrade.
The Upgrade page appears with the Select Package window open. To open the Select Package window manually, on the Upgrade page, click Select Package.
2. In the Select Package window, select an Avamar client version or hotfix to install:
(a) (Optional) Filter the list of packages by selecting one of the following options in Show.
(b) Select a package by clicking Select next to the package listing.
The Select Package window closes, and the Select Servers window appears with the selected package as its focus.
3. Click Download To All.
The client package is downloaded to the local cache on all Avamar servers. A progress bar appears for each download.
To cancel an active download for a particular server, on that server's row, click Cancel.
4. After all downloads have finished, click Refresh to display the additional Avamar servers with the package.
Downloading a client package to selected servers
To transfer a client package from the Avamar package repository to the local cache on selected Avamar servers:
1. On the Avamar Client Manager button bar, click Upgrade.
The Upgrade page appears with the Select Package window open. To open the Select Package window manually, on the Upgrade page, click Select Package.
2. In the Select Package window, select an Avamar client version or hotfix to install:
(a) (Optional) Filter the list of packages by selecting one of the following options in Show.
FILTER DISPLAYS
All Both upgrade and hotfix packages
Upgrade Only upgrade packages
Hotfix Only hotfix packages
FILTER DISPLAYS
All Both upgrade and hotfix packages
EMC AVAMAR 6.0 • ADMINISTRATION GUIDE 470

Upgrading Avamar clientsAVAMAR CLIENT MANAGER
(b) Select a package by clicking Select next to the package listing.
The Select Package window closes, and the Select Servers window appears with the selected package as its focus.
3. On the row of each server the package that will receive the download, click Download.
The client package is downloaded to the local cache on the selected Avamar servers. A progress bar appears for each download.
To cancel an active download for a particular server, on that server's row, click Cancel.
NOTE: Servers that already have the package in their local cache have ready in the Status column. The Download button does not appear on the row of those servers.
4. After all downloads have finished, click Refresh to display the additional Avamar servers with the package.
Removing a client package
To remove a client package from the local cache on Avamar servers:
1. On the Avamar Client Manager button bar, click Upgrade.
The Upgrade page appears with the Select Package window open. To open the Select Package window manually, on the Upgrade page, click Select Package.
2. In the Select Package window, select an Avamar client version or hotfix to remove:
(a) (Optional) Filter the list of packages by selecting one of the following options in Show.
Upgrade Only upgrade packages
Hotfix Only hotfix packages
FILTER DISPLAYS
All Both upgrade and hotfix packages
Upgrade Only upgrade packages
Hotfix Only hotfix packages
FILTER DISPLAYS
EMC AVAMAR 6.0 • ADMINISTRATION GUIDE 471

Upgrading Avamar clientsAVAMAR CLIENT MANAGER
(b) Select a package by clicking Select next to the package listing.
The Select Package window closes, and the Select Servers window appears with the selected package as its focus.
3. Click Delete next to a server to remove the package from that server.
To delete the package from all Avamar servers, click Delete From All.
4. Click Yes on the confirmation message.
Client Upgrade Status report
The Client Upgrade Status Report provides information about each upgrade and hotfix launched from the Avamar Client Manager Upgrade process.
Viewing the Client Upgrade Status report
To view the Client Upgrade Status report:
1. On the Avamar Client Manager button bar, click Upgrade.
2. Complete an upgrade or hotfix task, as described in Upgrading Avamar client software (page 468).
Alternatively, to use the report without first completing an upgrade or hotfix, close any windows above the Client Upgrade window.
3. On the Client Upgrade window, click View Status.
The Client Upgrade Status Report appears with a set of filters on the left and the information pane on the right.
4. (Optional) Filter the report based on the servers and status:
• In the Server section of the filters, select the Avamar servers associated with the clients to include in the report.
• In the Status section of the filters, select each status type to include in the report.
5. (Optional) Perform one or more of the following tasks:
• To export the Client Upgrade Status Report as a CSV file,
click .
The formatted file, clientUpgradeReport.csv, is sent to the browser.
• To view a task log for a completed task, click View Log in the Action column for the task. Then click OK to close the log.
• To cancel an upgrade or hotfix after it starts, click Cancel in the Action column for the task.
EMC AVAMAR 6.0 • ADMINISTRATION GUIDE 472

Upgrading Avamar clientsAVAMAR CLIENT MANAGER
Client Upgrade Status Report details
The Client Upgrade Status Report contains the information listed in the following table.
The status types in the following table may appear in the Status column of the Client Upgrade Status report.
COLUMN DESCRIPTION
Name Hostname of the Avamar client.
Server Hostname of the Avamar server.
Version Version of the Avamar client or hotfix that is being installed.
Start Time Start time of the upgrade or hotfix.
End Time End time of the upgrade or hotfix.
Status Current status of the upgrade or hotfix.
Action Option to cancel an active process and view the log of a finished process.
STATUS TYPE DESCRIPTION
Active The task is in progress.
Waiting-client The client is busy. The task will start when the client is available.
Waiting-queued The Avamar server cannot contact the client. The task will start when the client can be contacted.
Timed out The client has taken too long to respond. The task must be restarted.
Dropped session The task started on the client, but then communication was lost. The task must be restarted.
Canceled The task was canceled. You can cancel a task by clicking Cancel in the Action column of the Client Upgrade Status Report or through Avamar Administrator.
Complete The task finished successfully.
Failed The task finished unsuccessfully.
EMC AVAMAR 6.0 • ADMINISTRATION GUIDE 473

Activating clientsAVAMAR CLIENT MANAGER
Activating clientsAvamar Client Manager enables you to activate a large number of clients at the same time.
To activate clients with Avamar Client Manager:
1. Load the list of clients for activation in Avamar Client Manager, as discussed in Loading the list of clients for activation (page 474).
This step provides Avamar Client Manager with information about the computers in the organization and the relationships between those computers. The information is used during the registration and activation of the computers as Avamar clients.
2. On the Server Information title bar of the Activate page, use the server list to select the Avamar server to which to add the clients.
3. Select the clients to activate. You can either browse for the clients or, if there is a large list of clients, search for specific client computers by all or part of a local hostname, as discussed in Searching for computers to activate (page 477).
4. Initiate the activation using one of the following methods:
• Activating selected computers (page 478)• Activating computers by organizational unit (page 479)
Loading the list of clients for activation
You can load the list of clients for activation in Avamar Client Manager using one of the following methods:
• Query an LDAP v.3 compliant directory service, such as Microsoft Active Directory, to obtain information about clients and, if available, directory service organizational units, such as directory domains and directory groups.
• Import a comma-separated values (CSV) file that you either create manually or output from a Systems management tool such as Microsoft System Center Configuration Manager or Systems Management Server.
Loading clients from a directory service
To query an LDAP v.3 compliant directory service, such as Microsoft Active Directory, for a list of clients to activate with Avamar Client Manager:
1. Ensure that you have completed LDAP server configuration for Avamar Client Manager as described in Authentication configuration tool (page 508).
2. On the Avamar Client Manager button bar, click Activate.
The Activate page appears.
3. On the Client Information title bar, click and select Directory Service from the menu.
The Directory Service dialog box appears.
4. In User Domain, select a directory service domain to use for directory service authentication.
EMC AVAMAR 6.0 • ADMINISTRATION GUIDE 474

Activating clientsAVAMAR CLIENT MANAGER
5. In User Name, type a username for directory service authentication.
6. In Password, type the password for the username.
7. In Directory Domain, select a directory domain to query for client information.
8. Click OK.
NOTE: Retrieving the directory service data can take some time. To stop the data retrieval, click Cancel.
The directory service authentication information is verified, client and organizational unit information is obtained from the specified directory domain, and Client Information is populated with this information.
Loading clients from a CSV file
You can load the list of clients for activation in Avamar Client Manager by importing a comma-separated values (CSV) file that you either create manually or output from a Systems management tool such as Microsoft System Center Configuration Manager or Systems Management Server.
CSV file format. The CSV file that you use to load a list of clients for activation in Avamar Client Manager should use the following format:
Hostname,Group
CLIENT-HOSTNAME1,GROUP1/GROUP2/GROUP3
CLIENT-HOSTNAME2,GROUP1/GROUP2
CLIENT-HOSTNAME3,
where:
• The first line (Hostname,Group) is an optional header value separated by a comma. You can leave this line blank, but it may make the file more accessible to others if you use the headers as shown.
IMPORTANT: Line 1 must contain the header names as shown, or a blank line. Otherwise, import fails with the following message: "Invalid file or invalid format".
• CLIENT-HOSTNAME1, CLIENT-HOSTNAME2, and CLIENT-HOSTNAME3 are the hostnames of the clients to add.
• GROUP1/GROUP2/GROUP3 and GROUP1/GROUP2 are the optional directory service logical group names to which to add the clients. A forward slash (/) is used to separate the hierarchical levels of the directory service logical group name. If you do not specify a directory service logical group name, then the client is added at the root level of the hierarchical display.
• A comma immediately follows the client hostname and precedes the directory service logical group name. The comma is required, even when a group is not listed.
• Each client is listed on a separate line.
EMC AVAMAR 6.0 • ADMINISTRATION GUIDE 475
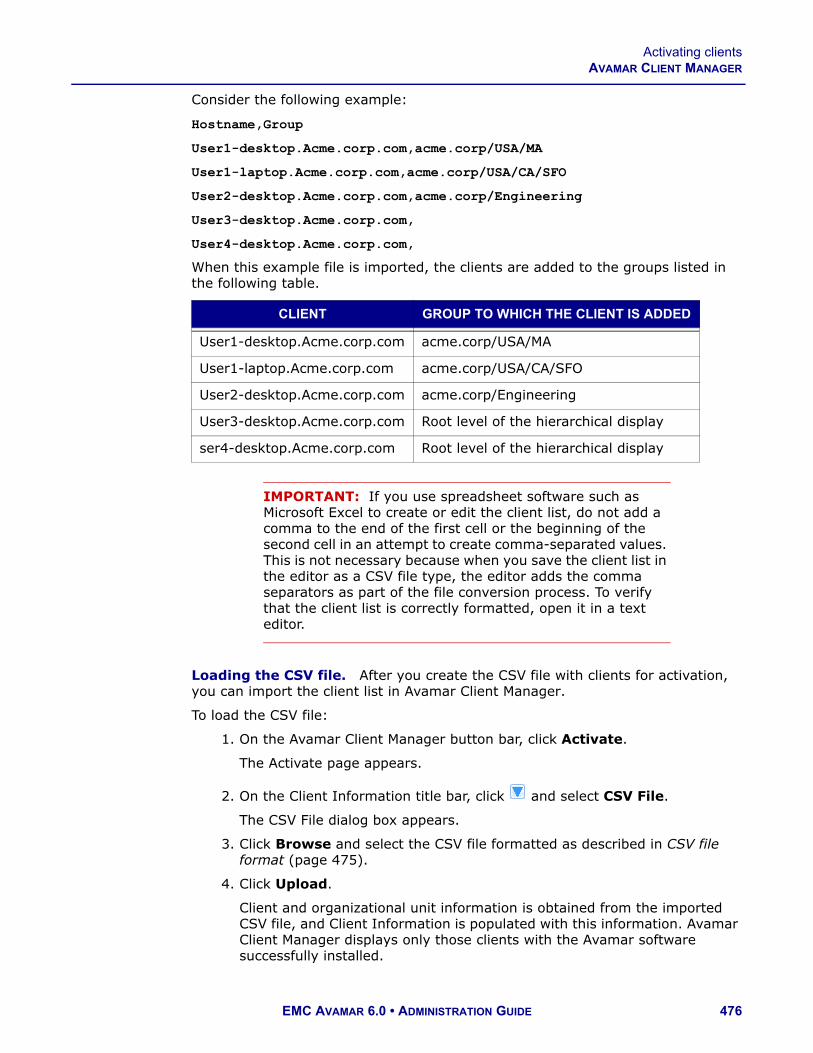
Activating clientsAVAMAR CLIENT MANAGER
Consider the following example:
Hostname,Group
User1-desktop.Acme.corp.com,acme.corp/USA/MA
User1-laptop.Acme.corp.com,acme.corp/USA/CA/SFO
User2-desktop.Acme.corp.com,acme.corp/Engineering
User3-desktop.Acme.corp.com,
User4-desktop.Acme.corp.com,
When this example file is imported, the clients are added to the groups listed in the following table.
IMPORTANT: If you use spreadsheet software such as Microsoft Excel to create or edit the client list, do not add a comma to the end of the first cell or the beginning of the second cell in an attempt to create comma-separated values. This is not necessary because when you save the client list in the editor as a CSV file type, the editor adds the comma separators as part of the file conversion process. To verify that the client list is correctly formatted, open it in a text editor.
Loading the CSV file. After you create the CSV file with clients for activation, you can import the client list in Avamar Client Manager.
To load the CSV file:
1. On the Avamar Client Manager button bar, click Activate.
The Activate page appears.
2. On the Client Information title bar, click and select CSV File.
The CSV File dialog box appears.
3. Click Browse and select the CSV file formatted as described in CSV file format (page 475).
4. Click Upload.
Client and organizational unit information is obtained from the imported CSV file, and Client Information is populated with this information. Avamar Client Manager displays only those clients with the Avamar software successfully installed.
CLIENT GROUP TO WHICH THE CLIENT IS ADDED
User1-desktop.Acme.corp.com acme.corp/USA/MA
User1-laptop.Acme.corp.com acme.corp/USA/CA/SFO
User2-desktop.Acme.corp.com acme.corp/Engineering
User3-desktop.Acme.corp.com Root level of the hierarchical display
ser4-desktop.Acme.corp.com Root level of the hierarchical display
EMC AVAMAR 6.0 • ADMINISTRATION GUIDE 476

Activating clientsAVAMAR CLIENT MANAGER
Searching for computers to activate
If there is a large list of clients to activate in Client Information, then you can search for specific client computers by all or part of a local hostname.
When you perform a search, the search string is compared to the local hostname of each computer, and not the fully qualified domain name. For example, the search string "*abc*" would match the computer "abc123.dfg.example.com" but not the computer "dfg456.abc.example.com."
To find computers in Client Information:
1. On the Client Information title bar, click .
2. On Find Computers, click Show to include computers that are already activated, or Hide to hide them.
3. Choose whether to produce standard or highlighted results.
• Clear Highlight Search to produce standard results.
The standard view displays all top-level computers that match the search criteria, and all top-level folder hierarchies that contain at least one matching computer at any level. To see matching computers contained in top-level folder hierarchies, expand the displayed folder and any subfolders until the computers appear.
• Select Highlight Search to produce highlighted results.
The highlighted view displays the results of a focused search of computers that are currently visible either on the top level or in open folders on an expanded branch. Computers that are not currently visible but are on a branch that was expanded and then collapsed during the current session are also included in the search.
The search does not include computers that are on a branch that has not been expanded during the current session.
The highlighted view displays and selects the computers that match the search criteria. The results may require scrolling to see every matching computer.
4. Type a search string to match all or part of a local hostname.
The search string must comply with the following rules:
• Be no more than 24 characters.• Cannot start with a period character.• May contain an asterisk (*) to represent zero or more characters.• Cannot contain any of the following characters:
/:?"<>\,~!@#$%^|&’(){}_
5. Click the button next to the search string text box to initiate the search.
The search process can take some time. To stop a search, click Cancel.
When the search is complete, Find Computers closes and the results are displayed in Client Information.
6. (Optional) To clear the search results and return to the full list, click on the Client Information title bar, and then click the X to the right of the text field on Find Computers.
EMC AVAMAR 6.0 • ADMINISTRATION GUIDE 477
Activating clientsAVAMAR CLIENT MANAGER
Activating selected computers
After you load the list of clients, select the Avamar server to which to add them, and select the clients for activation, you can initiate the activation of the selected computers.
To activate one or more selected computers with the Avamar client software installed:
1. Select the domain for the selected computers by dragging and dropping the selected computers in Client Information onto one of the domains shown in Server Information:
• To drag and drop matching computers in the standard results view, select the top-level computers and all top-level folder hierarchies, and drag that selection set. Selecting a folder in this view selects the matching computers that it contains. It does not select any non-matching computers that the folder contains.
• To drag and drop matching computers in the highlighted results view, drag any one of the selected computers. All selected computers at all levels are included. To drag a single computer, click the computer name to maintain its selection, and clear all other computers.
The Select Groups dialog box appears and lists the groups available in the domain.
2. Select the groups to which to assign the selected computers, or create a group for the computers.
To create a group:
(a) In the Group Name box on the Create Group dialog box, type a name for the new group.
IMPORTANT: The following characters are not allowed in a group name: ~!@$^%(){}[]|,`;#\/:*?<>'"&.
(b) Choose whether to enable scheduled backups of computers in the group as soon as they are activated by selecting or clearing the Enable checkbox.
(c) Select a dataset, schedule, and retention policy for the group.
(d) Click Create Group.
3. After you select the groups in the Select Groups dialog box, click Add Clients.
The Select Groups dialog box closes.
4. Click Activate.
Show Clients for Registration appears and lists all clients available for activation.
The Selected for Registration status indicates that the client was scheduled for activation during the current session but activation has not yet been attempted.
The Activation Failure status indicates that a previous activation task for the client has failed, both in the initial attempt and through the Activation
EMC AVAMAR 6.0 • ADMINISTRATION GUIDE 478

Activating clientsAVAMAR CLIENT MANAGER
Queue. Clients with Activation Failure status are selected for activation by default.
5. (Optional) Remove clients from the activation:
• To remove clients with either the Selected for Registration or Activation Failure status type, clear the appropriate checkbox.
• To remove a specific client, Clear the checkbox next to each client that should not be included in the activation, clear the checkbox next to its name and click Remove.
6. Click Commit.
Tasks to register and activate the selected computers are initiated as background processes. To check the status of the processes, use the Process viewer (page 451). To check the status of the tasks, use the Activation Log, as described in Management and activation logs (page 452).
Computers that are not activated during the first attempt are added to the Activation queue (page 481).
Activating computers by organizational unit
After you load the list of clients, select the Avamar server to which to add them, and select the clients for activation, you can use a directory service organizational unit to activate one or more computers with the Avamar client software installed.
To activate computers by organizational unit:
1. In Client Information, select the folder icon that represents the organizational unit with the computers to activate.
NOTE: When Client Information displays the results of a search, only those computers in the organizational unit that are also in the search results are included in the selection.
2. Select the domain for the computers in the organizational unit by dragging and dropping the organizational unit onto an Avamar server or domain in Server Information.
You are prompted whether to create a domain.
3. Click Yes to create a domain, or click No to assign the computers in the organizational unit to the existing domain.
To create a domain:
(a) In the New Domain Name box on the Create Domain dialog box, type a name for the domain.
(b) (Optional) Provide information in the Contact, Phone, Email, and Location fields.
(c) Click OK.
The Select Groups dialog box appears.
EMC AVAMAR 6.0 • ADMINISTRATION GUIDE 479

Activating clientsAVAMAR CLIENT MANAGER
4. Select the groups to which to assign the computers in the organizational unit, or create a group for the computers.
To create a group:
(a) In the Group Name box on the Create Group dialog box, type a name for the new group.
IMPORTANT: The following characters are not allowed in a group name: ~!@$^%(){}[]|,`;#\/:*?<>'"&+.
(b) Choose whether to enable scheduled backups of computers in the group as soon as they are activated by selecting or clearing the Enable checkbox.
(c) Select a dataset, schedule, and retention policy for the group.
(d) Click Create Group.
5. After you select the groups in the Select Groups dialog box, click Add Clients.
The Select Groups dialog box closes.
6. Click Activate.
Show Clients for Registration appears and lists all clients available for activation.
If a client has the Selected for Registration status, then the client was scheduled for activation during the current session but activation has not yet been attempted.
If a client has the Activation Failure status, then a previous activation attempt for the client has failed, both in the initial attempt and through the Activation Queue. Clients with Activation Failure status are selected for activation by default.
7. (Optional) Remove clients from the activation:
• To remove clients with either the Selected for Registration or Activation Failure status type, clear the appropriate checkbox.
• To remove a specific client, Clear the checkbox next to each client that should not be included in the activation, clear the checkbox next to its name and click Remove.
8. Click Commit.
Tasks to register and activate the selected computers are initiated as background processes. To check the status of the processes, use the Process viewer (page 451). To check the status of the tasks, use the Activation Log, as described in Management and activation logs (page 452).
Computers that are not activated during the first attempt are added to the Activation queue (page 481).
EMC AVAMAR 6.0 • ADMINISTRATION GUIDE 480

Activating clientsAVAMAR CLIENT MANAGER
Activation queue
An activation invitation that does not immediately succeed is added to the activation queue. The invitation is tried again every 2 hours until it succeeds or until the limit of 24 attempts is reached. The activation queue can be monitored through the Activation Log.
The following table lists the status code and description of the errors that cause an invitation to be added to the activation queue. This information appears in the Activation Log.
Removing a queued invitation. An invitation is removed from the queue if a second invitation command issued through Avamar Client Manager succeeds or if the client is removed from the pending activation state through Avamar Client Manager.
Log descriptions for queued invitations. The activation queue reports the progress of each invitation in the Activation Log. The possible entries for queued invitations are described in the following table.
STATUS CODE DESCRIPTION
22271 Invitation failed — Client software could not be contacted
22237 Activation failed — Client previously activated or cannot communicate with Avamar
22280 Client reconnect error — Hostname mismatch
22282 Client reconnect error — Unknown ID
22295 Client registration error — Server not available
ENTRY FORMAT DESCRIPTION
Activation at commit failed. Client scheduled for 24 retries. description
First entry displayed after an activation invitation fails when you click Commit. The description value is a message that describes the cause of the failure.
(n/24) - Activation failed - description Entry displayed after n attempts fail, where n is an integer starting with 1 and increased by 1 after each attempt. The description value is a message that describes the cause of the failure.
Invitation failed. - description Entry displayed after all 24 attempts fail. The description value is a message that describes the cause of the failure.
EMC AVAMAR 6.0 • ADMINISTRATION GUIDE 481

Activating clientsAVAMAR CLIENT MANAGER
Creating a domain
To create a domain or subdomain on an Avamar server:
1. In the Server Information pane on the Activate window in Avamar Client Manager, select the root domain or a subdomain in which to create the domain.
2. Click Create Domain.
The Create Domain dialog appears.
3. In New Domain Name, type a name for the domain.
IMPORTANT: The following characters are not allowed in a domain name: ~!@$^%(){}[]|,`;#\/:*?<>'"&+-.
4. (Optional) Provide information in the Contact, Phone, Email, and Location fields.
5. Click OK.
Creating a group
To create a group:
1. In the Server Information pane on the Activate window in Avamar Client Manager, select the root domain or a subdomain in which to create the group.
2. Click Create Group.
The Create Group dialog box appears.
3. In Group Name, type a name for the new group.
IMPORTANT: The following characters are not allowed in a group name: ~!@$^%(){}[]|,`;#\/:*?<>'"&+.
4. Choose whether to enable scheduled backups of computers in the group as soon as they are activated by selecting or clearing the Enable checkbox.
5. Select a dataset, schedule, and retention policy for the group.
6. Click OK.
EMC AVAMAR 6.0 • ADMINISTRATION GUIDE 482

Activating clientsAVAMAR CLIENT MANAGER
Viewing group information for a domain
To determine the appropriate group for the clients that you are activating, it may be helpful to view a list of groups for a domain, as well as group details, such as the dataset, schedule, retention policy, and status (enabled or disabled) for the group.
To view group information for a domain:
1. Select a domain in the Server Information pane on the Activation window, and click Show Groups.
Show Groups appears and lists all groups in the selected domain and any domains above it.
2. (Optional) Click Create Group to create a group, as discussed in Creating a group (page 482).
3. Click Close.
Viewing clients for a domain
To view a list of clients for a domain, as well as the groups to which those clients are assigned:
1. Select a domain in the Server Information pane on the Activation window, and click Show Clients.
2. (Optional) Filter the list of clients:
• To view the clients for certain Avamar server, select the checkbox next to the server names in the Server pane.
• To view only clients with a certain status, select the checkbox next to the status in the Client Status pane. The following table describes each status.
3. (Optional) Sort the client list in ascending or descending order by clicking a column header:
• Client (local hostname)• Domain• Group
4. Click Close.
CLIENT STATUS DESCRIPTION
Selected for Registration
Client has been dragged from Client Information and dropped in Server Information but has not yet been submitted for activation.
Pending Client Response
Client has been submitted for activation but has not yet responded. Client is in the activation queue.
Activation Failure All client activation attempts through the activation queue were unsuccessful.
Activated Client Client activation succeeded.
EMC AVAMAR 6.0 • ADMINISTRATION GUIDE 483

Activating clientsAVAMAR CLIENT MANAGER
Searching for clients
To search for clients:
1. Click the search icon ( ) to open the search dialog box:
• To search all clients of all servers available to Avamar Client Manager, click the search icon on the Server Information title bar.
• To search all clients in the selected Avamar domain, as well as all subdomains of the domain, click the search icon on the Show Clients dialog box.
• To search all clients available for activation, click the search icon on the Show Clients for Activation dialog box.
2. In the text box, type a search string to match all or part of a local hostname.
Use an asterisk (*) to represent zero or more characters.
The search string must comply with the following rules:
• No more than 24 characters• Cannot start with a period character• Cannot contain any of the following characters:
/:?"<>\,~!@#$%^|&’(){}_
3. Limit the search to only those clients with a certain status by selecting the checkbox next to the status:
• Selected for Registration• Pending Client Response• Activation Failure• Activated Client
NOTE: The Pending Client Response and Activated Client status types are not included when you search all clients available for activation.
4. Click the button next to the text field to initiate the search.
EMC AVAMAR 6.0 • ADMINISTRATION GUIDE 484

Remote push install of the client softwareAVAMAR CLIENT MANAGER
Remote push install of the client softwareIn environments with a large number of computers, it may be easier to install the Avamar client software using a Systems management tool instead of by running the installation locally on each computer.
When you use a Systems management tool you can remotely push install the software on large numbers of computers in a short amount of time.
Also, a Systems management tool can often generate a list of the computers where the software is successfully installed. This list can be used when you assign computers to groups as described in Activating clients (page 474).
Supported systems management tools
Remote installation has been tested and approved using the following Systems management tools:
• Microsoft Systems Management Server 2003 (SMS) on Windows Computers• SMS with Quest Software’s Quest Management Xtensions for SMS on
Macintosh computers
In addition, you may be able to use other Systems management tools to remotely push install the Avamar client software, including the following tools:
• Microsoft System Center Configuration Manager 2007• IBM Tivoli Management Framework• HP OpenView ServiceCenter• Symantec Altiris• Apple Remote Desktop
Systems management tools vary. The steps required to push software to a set of computers depend upon the tool. Consult the documentation for the tool to determine the steps required to perform these tasks.
Push install on Windows computers
To push install Avamar client software on supported Windows computers:
1. Copy the Avamar client for Windows installer package to a location that is accessible to the Systems management tool.
2. Configure the Systems management tool to copy the correct installer package to each computer.
3. Designate the computers on which to install the software.
EMC AVAMAR 6.0 • ADMINISTRATION GUIDE 485

Remote push install of the client softwareAVAMAR CLIENT MANAGER
4. Provide an installation launch command using the information in the following table, where path_to_MSI_pkg is the full path to the location of the installer package relative to the root of the computer filesystem.
NOTE: Specify the chosen command string all on one line, without the line break that is caused by the formatting of this guide.
INSTALLATION OPTION INSTALLATION LAUNCH COMMAND
Enable the basic Avamar interface.
msiexec /qn /I "path_to_MSI_pkg"Or:msiexec /qn /I "path_to_MSI_pkg" UICOMPONENT=1NOTE: This command can include any combination of the following additional options:
• PROGRESSBAR• BALLOONMESSAGES• BACKUPREMINDER
Enable Avamar as an agent process with no user interface.Subsequent user changes and upgrade specifications can change this setting.
msiexec /qn /I "path_to_MSI_pkg" UICOMPONENT=0NOTE: When UICOMPONENT is set to 0 all additional options are ignored.
Set the initial state of client’s progress window.Subsequent user changes and settings specified during an upgrade can change this setting.
msiexec /qn /I "path_to_MSI_pkg" PROGRESSBAR=stateWhere state is true or false. The default value is true.When state is true the progress window is shown during tasks. When state is false the progress window is hidden.
Set the initial state of client’s balloon messages.Subsequent user changes and settings specified during an upgrade can change this setting.
msiexec /qn /I "path_to_MSI_pkg" BALLOONMESSAGE=stateWhere state is true or false. The default value is true.When state is true balloon messages are shown. When state is false balloon messages are hidden.
Set the initial time value of the client’s backup reminder.Subsequent user changes and settings specified during an upgrade can change this setting.
msiexec /qn /I "path_to_MSI_pkg" BACKUPREMINDER=daysWhere days is the number of days after the last backup before a backup reminder is shown. The possible values for days are: 1, 2, 3, 4, 5, 6, 7, and Never. The default value is 3.
EMC AVAMAR 6.0 • ADMINISTRATION GUIDE 486

Remote push install of the client softwareAVAMAR CLIENT MANAGER
5. Launch the Systems management tool installation process.
Push Install on Macintosh computers
To push install Avamar client software on supported Macintosh computers:
1. Copy the Avamar client for Macintosh installer package to a location that is accessible to the Systems management tool.
2. Configure the Systems management tool to copy the correct installer package to each computer.
3. Designate the computers on which to install the software.
4. Provide the installation launch command:
/usr/sbin/installer -pkg "path_to_install_pkg" -target install_location
NOTE: Specify this command all on one line, without the line break that is caused by the formatting of this guide.
where path_to_install_pkg is the full path to the location of the installer package relative to the root of the computer filesystem and install_location is the location in which to install the software. Normally, install_location is the root (/), but any local volume is allowed.
5. Launch the Systems management tool installation process.
6. After installation of the Avamar client for Macintosh (with or without Avamar Desktop/Laptop), a restart of some clients may be required.
This is caused by a change to the process data size setting that is made on those computers. During installation, the installer determines if the process data size is less than 96 MB. A minimum process data size of 96 MB is required for optimal performance of the Avamar client for Macintosh. If the process data size is less than 96 MB, then the installer changes it to 96 MB and displays a restart reminder.
If a restart is required, a message appears.
EMC AVAMAR 6.0 • ADMINISTRATION GUIDE 487

Remote push install of the client softwareAVAMAR CLIENT MANAGER
7. Choose when to restart the computer:
• To restart the computer immediately and complete the process data size change, click Restart.
• To hide the reminder for 2 hours and restart at a later time, click Not Now.
NOTE: If you do not click either button within 30 seconds, then the reminder is hidden and appears again in 2 hours. If you click Restart but the restart process is interrupted for any reason, then the reminder does not appear again. You must remember to restart the computer to complete the process data size change.
Uninstalling the Avamar client software
The following topics explain how to uninstall the Avamar client and the Avamar Desktop/Laptop software.
Uninstalling on Windows
To uninstall the Avamar client and the Avamar Desktop/Laptop software from a Windows computer:
1. Open the Windows Add or Remove Programs applet.
2. In the list of currently installed programs, select EMC Avamar for Windows.
3. Click Remove.
A confirmation message appears.
4. Click Yes.
Uninstalling on Macintosh
To uninstall the Avamar client and the Avamar Desktop/Laptop software from a Macintosh computer:
1. Open a Terminal (shell) session.
2. Log in as an administrator.
The uninstall command requires root (super-user) permissions. The command "sudo" is used to run the command with root permissions. An administrator account or another account listed in sudoers is required by sudo.
3. Run the uninstall script:
sudo /usr/local/avamar/bin/avuninstall.sh
EMC AVAMAR 6.0 • ADMINISTRATION GUIDE 488

AVAMAR DESKTOP/LAPTOP
Avamar Desktop/Laptop is a version of the Avamar client software that adds enhanced features for enterprise desktop and laptop computers.
The Avamar Desktop/Laptop features are designed to improve functionality of Avamar client for Windows and Macintosh desktops and laptops. Many of the features are also supported on qualifying AIX, FreeBSD, HP-UX, Linux, SCO, and Solaris computers.
Single-click and interactive on-demand backups. Users can start an on-demand backup with a single-click on the client menu, or open the web browser UI for an interactive on-demand backup.
Web browser UI. Restore by search, restore by browse, on-demand backup, and activity history are all available through a convenient web browser user interface. This UI is available for Avamar clients on Windows, Mac, and qualifying AIX, FreeBSD, HP-UX, Linux, SCO, and Solaris computers.
User authentication and data security options. Authenticate users through the enterprise’s Active Directory or OpenLDAP-compliant directory service, with or without Kerberos encryption. Alternatively, authenticate users using built-in Avamar authentication, or a combination of Avamar authentication and LDAP authentication. Optionally, use NIS to authenticate users on AIX, FreeBSD, HP-UX, Linux, SCO, and Solaris computers
Transparent login. Enable users to access the web UI without using the login screen. A secure message mechanism is used to authenticate users based on information from the client computer. This also gives administrators the ability to allow non-domain users to restore files to their local account on the computer.
User selectable backup schedules. Avamar domains can be configured to enable users to select from a list of available backup schedules. The system runs the backup as soon as possible after the selected time.
Restore of folders and files to the original location. Users can restore folders and files to the original location. The same name can be used or, to avoid overwriting a file, a new name can be generated.
Restore of files to an alternate location. Users can restore files to an alternate location on their computer.
EMC AVAMAR 6.0 • ADMINISTRATION GUIDE 489

Environment requirementsAVAMAR DESKTOP/LAPTOP
Restore files from other computers. Domain users can restore files from any Windows or Mac computer on which they have a user profile to the Windows or Mac computer they are logged in to.
Creation of a restore set by search or directory tree browse. Users can use search or can browse a backup directory tree to create a set of folders and files to restore. Files can be restored to their original location or to a new location.
Activity history. Users can view a 14-day history of the status of restore and backup tasks, and listings of the folders and files backed up during that period.
Deploy Avamar clients using common systems management tools. In a corporate environment, Avamar Desktop/Laptop can be push installed on Windows and Macintosh desktop and laptop computers using systems management tools such as Microsoft Systems Management Server 2003 (SMS).
Manage using Avamar Client Manager. Activate, upgrade, analyze, and manage clients using the Avamar Client Manager web browser UI.
Environment requirementsThe Avamar Desktop/Laptop environment must meet the requirements in the following topics:
• Computers (page 490)• Network (page 492)• LDAP authentication (page 492)• Avamar system (page 493)
Computers
Avamar client computers using Avamar Desktop/Laptop must meet the minimum requirements in the following table.
CATEGORY REQUIREMENT
Operating system • Windows 7 Home Premium• Windows 7 Professional• Windows 7 Ultimate• Windows Vista Home basic• Windows Vista Premium• Windows Vista Enterprise (32- and 64-bit)• Microsoft Windows XP Professional (32- and 64-bit)• Microsoft Windows XP Home• Apple Macintosh OS X v10.6 Snow Leopard• Apple Macintosh OS X v10.5 Leopard
NOTE: AIX, FreeBSD, HP-UX, Linux, SCO, and Solaris computers that meet the requirements specified in the EMC Avamar Backup Clients Guide are supported as server-class clients, as described in Server-class clients (page 521).
EMC AVAMAR 6.0 • ADMINISTRATION GUIDE 490

Environment requirementsAVAMAR DESKTOP/LAPTOP
CPU 1 GHz
RAM 1 GB
Hard drive space 250 MB permanent hard drive space minimum for software installation.NOTE: Additional space may be required by snapshot technology and to back up system state.
Network interface Either of the following:• 10BaseT or higher, configured with the latest drivers
for the platform• IEEE 802.11a/b/g, configured with the latest drivers
for the platform
Ports TCP data port must allow bidirectional communication with the Avamar server.
Web browser JavaScript-enabled web browser.On Windows:
• Windows Internet Explorer versions 6.x.x, 7.x.x, 8.x.x, and 9.x.x
• Mozilla Firefox 3.x.xOn Macintosh:
• Apple Safari 3.x.x, 4.x.x, and 5.x.x
On AIX, FreeBSD, HP-UX, Linux, SCO, and Solarisa:• Mozilla Firefox 3.x.x
The browser must be configured to be launched by a call to one of the following environment variables:• (For KDE) kfmclient• (For GNOME) gnome-open• (Others) BROWSER
a. Refer to the Backup Clients Guide for information about using the web UIwith AIX, FreeBSD, HP-UX, Linux, SCO, and Solaris clients.
CATEGORY REQUIREMENT
EMC AVAMAR 6.0 • ADMINISTRATION GUIDE 491

Environment requirementsAVAMAR DESKTOP/LAPTOP
Network
The networks must meet the requirements in the following table.
LDAP authentication
To use LDAP authentication, as described in LDAP (page 494) and Mixed (page 497), the environment must meet the minimum requirements in the following table.
CATEGORY REQUIREMENT
Protocol TCP/IP.
Routers Must permit TCP packet routing between the Avamar server and each client computer.
Firewalls Must allow bidirectional communication between the Avamar server and each client computer using TCP data port 28002.
Naming system Must facilitate connections between each client and the Avamar server, including situations where IP address changes are caused by DHCP and VPN access.
CATEGORY REQUIREMENT
Directory service LDAP v.3 compliant systems, such as Microsoft Active Directory and OpenLDAP.
Domain components The configuration of the Avamar Desktop/Laptop server must correctly describe any domain components used to segregate authentication.Also, the Kerberos realm for LDAP user authentication from Macintosh computers must be the default Kerberos realm listed in ldap.properties.Authentication configuration tool (page 508) provides more information about these requirements.
User accounts Users must log in to the client computer using a domain account authenticated through the directory service. The account cannot be a generic local or domain administrator account, but can be an account with those privileges. For example, the "Administrator" account does not work, but an account named "smithb" with domain administrator rights does work.
EMC AVAMAR 6.0 • ADMINISTRATION GUIDE 492

Environment requirementsAVAMAR DESKTOP/LAPTOP
Avamar authentication
To use Avamar authentication, as described in Avamar (page 496), the environment must meet the minimum requirements in the following table.
NIS authentication
To provide NIS support, as described in User authentication (page 494), the environment must meet the minimum requirements in the following table.
Avamar system
You should work with an EMC field sales representatives when deciding on the characteristics of the Avamar system deployment that will work best to support an enterprise’s desktop and laptop clients.
IMPORTANT: Due to the wide range of differences in each enterprise’s desktop and laptop topology, a description of the requirements for an Avamar system to support desktops and laptops at any one enterprise is beyond the scope of this guide. However, certain basic requirements are common for all desktop and laptop deployments.
The following requirements are common to all Avamar systems supporting Avamar Desktop/Laptop:
CATEGORY REQUIREMENT
Naming system Client computers must have a static, resolvable, fully qualified domain name.
User accounts Users must have a local or domain login account for the client computer. Users must also have an account on the Avamar server domain associated with the client computer.
CATEGORY REQUIREMENT
NIS domain name Client computers must all use the same static, resolvable, fully qualified NIS domain name.
NIS domain Users must have properly configured user accounts in the NIS domain.
CATEGORY REQUIREMENT
Number of clients per Avamar server Maximum of 5,000 desktops and laptops
Avamar server software version Version 6.0 or later
Avamar client version Version 6.0 or later
Avamar Desktop/Laptop version Version 6.0 or later
EMC AVAMAR 6.0 • ADMINISTRATION GUIDE 493

User authenticationAVAMAR DESKTOP/LAPTOP
User authenticationThe Avamar Desktop/Laptop enhanced features use a separate server process running on the Avamar system. The Avamar Desktop/Laptop server is installed as part of every Avamar server installation and can be configured to authenticate users with any one of the following methods:
• LDAP (page 494)• Avamar (page 496)• Mixed (page 497)
Each authentication method can be modified to enable Network Information Service (NIS) authentication for supported AIX, FreeBSD, HP-UX, Linux, SCO, and Solaris clients. When NIS authentication is enabled, user who log in through clients on these platforms are authenticated through your company’s existing NIS system instead of the authentication method selected for other computers.
This section describes each method and directs you to detailed configuration instructions.
IMPORTANT: After completing authentication configuration tasks, restart Avamar Desktop/Laptop to apply the new settings. The avldap tool offers the option to do this automatically. Stopping and starting Avamar Desktop/Laptop server (page 513) describes how to do this manually.
LDAP
Avamar Desktop/Laptop can use a company’s LDAP-compliant directory service to authenticate users by domain username and password. The authentication process can use Kerberos in a Simple Authentication and Security Layer (SASL) Bind, the default, or it can use plaintext in a Simple Bind. Applying one of these types of authentication is described in LDAP authentication method (page 501).
NOTE: The LDAP authentication settings of Avamar Desktop/Laptop are shared with Avamar Client Manager.
On Windows and Mac computers the username of the account that is currently logged in to the computer is automatically entered in a read-only field on the Avamar Desktop/Laptop login screen. This enhances data protection on those platforms.
Pass-through
Pass-through authentication uses encrypted channels to transmit and associate Windows or Mac user account information with file ownership properties. Windows and Mac users are able to restore files that they own, without logging in through the Avamar Desktop/Laptop login screen. On Windows, if those users have local administrator privileges they are able to restore files owned by anyone on the computer without additional login.
EMC AVAMAR 6.0 • ADMINISTRATION GUIDE 494

User authenticationAVAMAR DESKTOP/LAPTOP
Pass-through authentication is the default authentication method used by Avamar Desktop/Laptop. However, it is specific to Windows and Mac operating systems. Users logged in to computers with other operating systems are authenticated through the Avamar Desktop/Laptop login screen.
Pass-through authentication requires information that is attached to backups generated by Avamar client, version 6.x and later. With pass-through authentication enabled, a user with at least one backup that was created by a pre-6.x version of Avamar client will continue to see the login screen. After all pre-6.x version backups expire, the login screen will no longer appear.
To enable pass-through authentication, configure LDAP support and disable the login screen for Windows and Mac users. Both of these tasks are described in LDAP authentication (page 492).
Local user access
The LDAP authentication method can be modified to support for local users access. In this context, a local user is one that logs on to a Windows or Mac computer using a local account rather than a domain account.
Configuration tasks
To configure Avamar Desktop/Laptop to use the LDAP authentication method complete the following tasks:
1. Provide information about the LDAP domain by completing the steps listed in Specifying LDAP domain information (page 498).
2. (Optional) Select and configure NIS support, by completing the steps listed in Specifying NIS server information (page 500).
NIS authentication support must also be enabled in the next task.
CONFIGURATION LOGIN REQUIRED
• OS is Windows or Mac• Pass-through authentication is enabled• All backups were created by a 6.x or newer version of
Avamar client
No
• OS is Windows or Mac• Pass-through authentication is enabled• At least one backup was created by a pre-6.x version of
Avamar client
Yes
• OS is Windows or Mac• Pass-through authentication is enabled• User logs in with a local (non-domain) account
Yes
• OS is not Windows or Mac• Pass-through authentication is enabled
Yes
• Pass-through authentication is disabled Yes
EMC AVAMAR 6.0 • ADMINISTRATION GUIDE 495

User authenticationAVAMAR DESKTOP/LAPTOP
3. Select and configure the LDAP authentication method, by completing the steps listed in LDAP authentication method (page 501).
This task includes the following configuration choices:
• Enable/disable pass-through authentication• Enable/disable NIS authentication support• Use LDAP with Kerberos or plain-text
4. (Optional) Change the default Kerberos encryption type, by completing the steps listed in Changing the default Kerberos encryption type (page 503).
5. (Optional) Enable local user access, by enabling pass-through authentication and completing the steps listed in Enable local users (page 507).
Avamar
The Avamar authentication implementation compares username/password combinations with user records that have been entered into Avamar server. When this form of authentication is used, the Avamar Desktop/Laptop login screen allows you to type both a username and a password. Users and roles (page 65) provides more information about the Avamar authentication implementation.
Avamar authentication works with users who authenticate at the Avamar root level, Avamar domain levels, or Avamar subdomain levels. The mechanism first checks at the subdomain level. If the username is found at that level, then authentication proceeds. If the username is not found, then the next level up is checked. This continues until the username is found, or the Avamar root is reached without finding the username.
For example, if the login computer, 123abc.example.com, is activated with the /clients/mountain Avamar subdomain, then the mechanism makes checks in the following order until the username is found:
1. /clients/mountain (activation subdomain)
2. /clients (next level up)
3. / (root)
Configuration tasks
To configure Avamar Desktop/Laptop to use the Avamar authentication method complete the following tasks:
1. (Optional) Select and configure NIS support, by completing the steps listed in Specifying NIS server information (page 500).
NIS authentication support must also be enabled in the next task.
2. Complete the steps listed in Avamar authentication method (page 504).
(Optional) Enable NIS authentication support.
EMC AVAMAR 6.0 • ADMINISTRATION GUIDE 496

User authenticationAVAMAR DESKTOP/LAPTOP
Mixed
Mixed authentication provides the ability to use LDAP with Kerberos authentication (with or without pass-through authentication) together with Avamar authentication. The domains that use Avamar authentication are specified in a KV pair in ldap.properties. All other domains use LDAP with Kerberos authentication.
Avamar authentication applies to all clients associated with the specified domains. Whether or not pass-through authentication is enabled, all users in the domains specified for Avamar authentication always see a login screen and must use their Avamar account information to log in.
Pass-through authentication, as described in Pass-through (page 494), is enabled by default in the LDAP authentication domains (all domains that are not specified for Avamar authentication).
The following LDAP authentication features cannot be used with the mixed authentication method:
• LDAP with plaintext authentication• NIS support• Local user access
Configuration tasks
To configure Avamar Desktop/Laptop to use the mixed authentication method complete the following tasks:
1. Provide information about the LDAP domain by completing the steps listed in Specifying LDAP domain information (page 498).
2. (Optional) Select and configure NIS support, by completing the steps listed in Specifying NIS server information (page 500).
NIS authentication support must also be enabled in the next task.
3. Select and configure the mixed authentication method, by completing the steps listed in Mixed authentication method (page 505).
This task includes the following configuration choices:
• Enable/disable pass-through authentication• Enable/disable NIS authentication support
4. (Optional) Change the default Kerberos encryption type, by completing the steps listed in Changing the default Kerberos encryption type (page 503).
EMC AVAMAR 6.0 • ADMINISTRATION GUIDE 497

Configuring authenticationAVAMAR DESKTOP/LAPTOP
Configuring authenticationThis section provides step-by-step authentication configuration information for each of the authentication methods described in User authentication (page 494).
Authentication configuration is simplified by using avldap, a configuration tool provided with Avamar Desktop/Laptop. This tool can be used to configure:
• Authentication domain information (page 498)• Authentication methods (page 501)
Avamar Desktop/Laptop is installed with template versions of the krb5.conf and ldap.properties LDAP server configuration files that you can use to manually configure authentication. However, the recommended approach is to use avldap. Detailed descriptions of this tool and the related configuration files are provided in Authentication configuration tool (page 508).
Authentication domain information
To use the LDAP or mixed authentication methods provide information about the LDAP domain. To use NIS authentication, provide information about the NIS domain server.
IMPORTANT: When configuring an organization’s LDAP server information, keep in mind that LDAP server names are usually assigned using all uppercase letters, and that these values are case-sensitive.
Specifying LDAP domain information
To use LDAP or Mixed authentication provide information about the LDAP domain.
User=root 1. Log in to the Avamar utility node as root.
2. Change the working directory to:
/usr/local/avamar/etc
3. Rename the two template files:
mv krb5.conf krb5.conf.template
mv ldap.properties ldap.properties.template
4. Run avldap with the LDAP domain configuration option:
/usr/local/avamar/bin/avldap --configdomain
The following prompt appears:
CONFIGURABLE OPTIONS:
[1] AD/LDAP
[2] NIS
Provide the option for configuration:
Choice 1 is for Active Directory/LDAP configuration. Choice 2 is for NIS configuration.
EMC AVAMAR 6.0 • ADMINISTRATION GUIDE 498
Configuring authenticationAVAMAR DESKTOP/LAPTOP
5. Type 1.
The following prompt appears:
Enter the Fully Qualified Domain Name and press <ENTER>
6. Type the fully qualified domain name of an LDAP server.
NOTE: To enable user authentication from Macintosh computers, the LDAP server assigned to Macintosh users must be configured as the default server.
The following prompt appears:
Enter the Username and press <ENTER>
7. Type the username for an account that is authorized to read the directory service’s database.
The following prompt appears:
Enter the Password and press <ENTER>
8. Type the password associated with the username.
The following prompt appears:Do you wish to configure domain domainname as default domain (y/n)?
Where domainname is the fully qualified domain name of an LDAP server that was entered in step 6.
9. Type y to set the domain as the default domain, or type n if the domain should not be the default domain.
The default domain value is used as the default LDAP server for clients that do not publish an LDAP server during authentication, for example, when the user has logged in through a local account.
The following prompt appears:
INFO: The DTLT and EMS services must be restarted to apply your changes.
Do you wish to restart dtlt and ems services (Y/N)?
10.Do one of the following:
• To configure additional LDAP servers, type n for no.
The following reminder appears:
INFO: Please manually restart DTLT and EMS services to apply your changes.
Do not restart. Instead, repeat steps 4 through 9.
• To finish the configuration, type y for yes.
The DTLT and EMS processes are restarted with the new values, the new values are tested, and the following success message appears:
SUCCESS: Changes to the Kerberos and LDAP configuration files were successfully applied.
Specifying the LDAP domain server information is complete.
EMC AVAMAR 6.0 • ADMINISTRATION GUIDE 499

Configuring authenticationAVAMAR DESKTOP/LAPTOP
Specifying NIS server information
Each authentication method can be modified to enable NIS authentication for supported AIX, FreeBSD, HP-UX, Linux, SCO, and Solaris clients. For a complete list of the tasks required to enable NIS authentication for that method, refer to the task list for each authentication method under the following headings:
• LDAP (page 494)• Avamar (page 496)• Mixed (page 497)
One of the required tasks is to specify information about the NIS server.
To specify NIS server information:
User=root 1. Log in to the Avamar utility node as root.
2. Change the working directory to:
/usr/local/avamar/etc
3. Rename the two template files:
mv krb5.conf krb5.conf.template
mv ldap.properties ldap.properties.template
4. Run avldap with the LDAP domain configuration option:
/usr/local/avamar/bin/avldap --configdomain
The following prompt appears:
CONFIGURABLE OPTIONS:
[1] AD/LDAP
[2] NIS
Provide the option for configuration:
Choice 1 is for Active Directory/LDAP configuration. Choice 2 is for NIS configuration.
5. Type 2.
The following prompt appears:
Enter the NIS Domain Name and press <ENTER>
6. Type the fully qualified domain name of the NIS server.
The following prompt appears:
Enter the NIS Domain IP Address and press <ENTER>
7. Type the IP address of the NIS server.
The following prompt appears:
Enter the NIS Username and press <ENTER>
8. Type the username for an account that is authorized to read the NIS server’s database.
The following prompt appears:
Enter the Password and press <ENTER>
EMC AVAMAR 6.0 • ADMINISTRATION GUIDE 500

Configuring authenticationAVAMAR DESKTOP/LAPTOP
9. Type the password associated with the username.
The following prompt appears:Do you wish to configure domain nis-domainname as default NIS domain (Y/N)?
Where nis-domainname is the fully qualified domain name of the NIS server that was entered in step 6.
10. Type y to set the domain as the default domain.
Only one NIS server can be configured under the current implementation of avldap.
The following prompt appears:
INFO: The DTLT and EMS services must be restarted to apply your changes.
Do you wish to restart dtlt and ems services (Y/N)?
11.Type y for yes.
The DTLT and EMS processes are restarted with the new values, the new values are tested, and the following success message appears:
SUCCESS: Changes to the Kerberos and LDAP configuration files were successfully applied.
SUCCESS: Parsing the configuration for NIS domain nis-domainname in ldap.properties was successful.
INFO: Verifying NIS authentication for DT/LT User Interface.
Specifying the NIS server information is complete.
Authentication methods
Use the avldap tool to select and configure:
• LDAP authentication method (page 501)• Avamar authentication method (page 504)• Mixed authentication method (page 505)
LDAP authentication method
To select and configure the LDAP authentication method:
1. Complete the configuration described in Specifying LDAP domain information (page 498).
User=root 2. Log in to the Avamar utility node as root.
3. Change the working directory to:
/usr/local/avamar/etc
4. Run avldap with the LDAP authentication configuration option:
/usr/local/avamar/bin/avldap --configauth
Depending on the current setting for the login screen, one of the following prompts appears.
When the login screen is enabled by the current setting:
The DT/LT login screen is currently enabled. Do you wish to disable DT/LT login screen (Y/N)?
EMC AVAMAR 6.0 • ADMINISTRATION GUIDE 501

Configuring authenticationAVAMAR DESKTOP/LAPTOP
When the login screen is disabled by the current setting:
The DT/LT login screen is currently disabled. Do you wish to enable DT/LT login screen (Y/N)?
To use pass-through authentication, the login screen should be disabled, as described in Pass-through (page 494).
5. To change the current setting, type Y.
To retain the current setting, type N.
When you type Y, the following messages appear:
Modifying the DT/LT login screen property in LDAP configuration file (ldap.properties).
Depending on the current setting for NIS authentication, one of the following prompts appears.
When NIS authentication is enabled:
INFO: The NIS Authentication mechanism for Unix clients is currently enabled.
Do you wish to disable NIS Authentication (Y/N)?
When NIS authentication is disabled:
INFO: The NIS Authentication mechanism for Unix clients is currently disabled.
Do you wish to enable NIS Authentication (Y/N)?
6. To change the current setting, type Y.
To retain the current setting, type N.
When you type Y, the following messages appear:
Modifying the DT/LT login screen property in LDAP configuration file (ldap.properties).
A message appears that indicates the authentication method that is currently set. The message relates to the following possible authentication methods:
• LDAP with Kerberos encryptionINFO: The existing authentication mechanism is KERBEROS Authentication.
• LDAP with plain-textINFO: The existing authentication mechanism is Non-KERBEROS Authentication.
• AvamarINFO: The existing authentication mechanism is AVAMAR Authentication.
• MixedINFO: The existing authentication mechanism is a mix of AVAMAR AND KERBEROS Authentication.
The following selection prompt appears:
CONFIGURABLE OPTIONS:
[1] Kerberos
[2] Non-Kerberos
[3] Avamar
[4] Mix
[5] No change
Provide the option for authentication:
EMC AVAMAR 6.0 • ADMINISTRATION GUIDE 502

Configuring authenticationAVAMAR DESKTOP/LAPTOP
7. Type 1 or 2.
To retain the current setting, type 5.
When you type 1 or 2, the following messages appear:
Configuring authentication mechanism in LDAP configuration file (ldap.properties).
The DTLT and EMS services must be restarted to apply your changes. Do you wish to restart dtlt and ems services (Y/N)?
8. To restart the services and apply the change, type Y.
The services restart and the following success message appears:
Changes to the LDAP configuration file are successfully applied.
Configuration of the LDAP authentication method is complete.
Changing the default Kerberos encryption type
The encryption type used with the LDAP with Kerberos authentication method can optionally be changed to a different type. The default configuration of krb5.conf specifies the use of MIT Kerberos encryption type "DES cbc mode with CRC-32" to communicate with LDAP servers. This encryption type may conflict with a key distribution center (KDC) in the Active Directory environment. If that occurs, the message "KDC has no support for encryption type" appears.
A possible solution to this conflict is to remove the specified encryption type from krb5.conf, thereby permitting the KDC to select the encryption type.
To change the default Kerberos encryption type:
User=root 1. Log in to the Avamar utility node as root.
2. Change the working directory to:
/usr/local/avamar/etc
3. Open krb5.conf in a text editor.
The file contains the following specification of encryption type:
[libdefaults]
default_tgs_enctypes = des3-cbc-sha1-kd des-cbc-crc des-cbc-md5
default_tkt_enctypes = des3-cbc-sha1-kd des-cbc-crc des-cbc-md5
4. Comment out the specification, as shown in the following example section:
#[libdefaults]
# default_tgs_enctypes = des3-cbc-sha1-kd des-cbc-crc des-cbc-md5
# default_tkt_enctypes = des3-cbc-sha1-kd des-cbc-crc des-cbc-md5
EMC AVAMAR 6.0 • ADMINISTRATION GUIDE 503

Configuring authenticationAVAMAR DESKTOP/LAPTOP
Avamar authentication method
To select and configure the Avamar authentication method:
User=root 1. Log in to the Avamar utility node as root.
2. Change the working directory to:
/usr/local/avamar/etc
3. Run avldap with the LDAP authentication configuration option:
/usr/local/avamar/bin/avldap --configauth
Depending on the current setting for the login screen, one of the following prompts appears.
When the login screen is enabled by the current setting:
The DT/LT login screen is currently enabled. Do you wish to disable DT/LT login screen (Y/N)?
When the login screen is disabled by the current setting:
The DT/LT login screen is currently disabled. Do you wish to enable DT/LT login screen (Y/N)?
NOTE: The login screen setting does not apply when the Avamar authentication method is used. A login screen is always displayed with this method.
4. Type N.
Depending on the current setting for NIS authentication, one of the following prompts appears.
When NIS authentication is enabled:
INFO: The NIS Authentication mechanism for Unix clients is currently enabled.
Do you wish to disable NIS Authentication (Y/N)?
When NIS authentication is disabled:
INFO: The NIS Authentication mechanism for Unix clients is currently disabled.
Do you wish to enable NIS Authentication (Y/N)?
5. To change the current setting, type Y.
To retain the current setting, type N.
When you type Y, the following messages appear:
Modifying the DT/LT login screen property in LDAP configuration file (ldap.properties).
A message appears that indicates the authentication method that is currently set. The message relates to the following possible authentication methods:
• LDAP with Kerberos encryptionINFO: The existing authentication mechanism is KERBEROS Authentication.
• LDAP with plain-textINFO: The existing authentication mechanism is Non-KERBEROS Authentication.
• Avamar
EMC AVAMAR 6.0 • ADMINISTRATION GUIDE 504

Configuring authenticationAVAMAR DESKTOP/LAPTOP
INFO: The existing authentication mechanism is AVAMAR Authentication.
• MixedINFO: The existing authentication mechanism is a mix of AVAMAR AND KERBEROS Authentication.
The following selection prompt appears:
CONFIGURABLE OPTIONS:
[1] Kerberos
[2] Non-Kerberos
[3] Avamar
[4] Mix
[5] No change
Provide the option for authentication:
6. Type 3.
To retain the current setting, type 5.
When you type 3, the following messages appear:
Configuring authentication mechanism in LDAP configuration file (ldap.properties).
The DTLT and EMS services must be restarted to apply your changes. Do you wish to restart dtlt and ems services (Y/N)?
7. To restart the services and apply the change, type Y.
The services restart and the following success message appears:
Changes to the LDAP configuration file are successfully applied.
Configuration of the Avamar authentication method is complete.
Mixed authentication method
To select and configure the mixed authentication method:
1. Complete the configuration described in Specifying LDAP domain information (page 498).
User=root 2. Log in to the Avamar utility node as root.
3. Change the working directory to:
/usr/local/avamar/etc
4. Run avldap with the LDAP authentication configuration option:
/usr/local/avamar/bin/avldap --configauth
Depending on the current setting for the login screen, one of the following prompts appears.
When the login screen is enabled by the current setting:
The DT/LT login screen is currently enabled. Do you wish to disable DT/LT login screen (Y/N)?
When the login screen is disabled by the current setting:
The DT/LT login screen is currently disabled. Do you wish to enable DT/LT login screen (Y/N)?
To use pass-through authentication, the login screen should be disabled, as described in Pass-through (page 494).
EMC AVAMAR 6.0 • ADMINISTRATION GUIDE 505

Configuring authenticationAVAMAR DESKTOP/LAPTOP
5. To change the current setting, type Y.
To retain the current setting, type N.
When you type Y, the following messages appear:
Modifying the DT/LT login screen property in LDAP configuration file (ldap.properties).
Depending on the current setting for NIS authentication, one of the following prompts appears.
When NIS authentication is enabled:
INFO: The NIS Authentication mechanism for Unix clients is currently enabled.
Do you wish to disable NIS Authentication (Y/N)?
When NIS authentication is disabled:
INFO: The NIS Authentication mechanism for Unix clients is currently disabled.
Do you wish to enable NIS Authentication (Y/N)?
6. To change the current setting, type Y.
To retain the current setting, type N.
When you type Y, the following messages appear:
Modifying the DT/LT login screen property in LDAP configuration file (ldap.properties).
A message appears that indicates the authentication method that is currently set. The message relates to the following possible authentication methods:
• LDAP with Kerberos encryptionINFO: The existing authentication mechanism is KERBEROS Authentication.
• LDAP with plain-textINFO: The existing authentication mechanism is Non-KERBEROS Authentication.
• AvamarINFO: The existing authentication mechanism is AVAMAR Authentication.
• MixedINFO: The existing authentication mechanism is a mix of AVAMAR AND KERBEROS Authentication.
The following selection prompt appears:
CONFIGURABLE OPTIONS:
[1] Kerberos
[2] Non-Kerberos
[3] Avamar
[4] Mix
[5] No change
Provide the option for authentication:
7. Type 4.
To retain the current setting, type 5.
When you type 4, the following prompt appears:
Enter the path of Avamar Domains to be configured for Avamar Authentication as a comma separated list.
EMC AVAMAR 6.0 • ADMINISTRATION GUIDE 506

Configuring authenticationAVAMAR DESKTOP/LAPTOP
8. Type the names of the Avamar domains that will use Avamar authentication as a comma-separated list.
For example, if the Avamar domains to use Avamar authentication are called: Louisville, Irvine, and Bangalore, type:
Louisville, Irvine, Bangalore
the following messages appear:
Configuring authentication mechanism in LDAP configuration file (ldap.properties).
The DTLT and EMS services must be restarted to apply your changes. Do you wish to restart dtlt and ems services (Y/N)?
9. To restart the services and apply the change, type Y.
The services restart and the following success message appears:
Changes to the LDAP configuration file are successfully applied.
Configuration to use the mixed authentication method is complete.
Enable local users
Avamar Desktop/Laptop provides the option to enable local user access. A local user is one who is authenticated through a local computer account instead of a domain account. When local user access is enabled, local users can access the Avamar client web UI to restore their data which was backed up from the authenticating computer.
This option is available for local users on supported Windows or Mac computers, and only when pass-through authentication is also enabled. By default this option is disabled.
IMPORTANT: Before enabling this option carefully consider its security implications within the context of your organization. Local user authentication is inherently less secure than domain authentication.
To permit local users:
1. Enable pass-through authentication.
Refer to Pass-through (page 494).
User=root 2. Log in to the Avamar utility node as root.
The following change applies to all clients and backups associated with the server.
3. Change the current working directory:
cd /usr/local/avamar/etc
4. Open the Avamar Desktop/Laptop properties file, dtlt.properties, in a text editor, such as vi or Emacs.
EMC AVAMAR 6.0 • ADMINISTRATION GUIDE 507

Configuring authenticationAVAMAR DESKTOP/LAPTOP
5. Uncomment the local user key and set its value to true.
Change:
#allowLocalUsers=false
To:
allowLocalUsers=true
6. Save and close the file.
7. Restart the Avamar Desktop/Laptop server:
dpnctl stop dtlt
dpnctl start dtlt
Authentication configuration tool
Both Avamar Desktop/Laptop and Avamar Client Manager require configuration to authenticate users through LDAP-compliant directory servers. LDAP authentication configuration is simplified by using avldap, an LDAP configuration tool provided with Avamar Desktop/Laptop. This tool configures Avamar Desktop/Laptop and Avamar Client Manager to use LDAP-compliant directory servers and to use either Kerberos or plaintext authentication.
This section provides an overview of the tool and describes the requirements for the LDAP configuration file: ldap.properties. The avldap tool makes changes to that file and to the Kerberos configuration file: krb5.conf. Direct editing of these files is not recommended and is not normally required.
Specifying LDAP domain information (page 498), and LDAP authentication method (page 501) or Mixed authentication method (page 505) describe using the tool to configure LDAP authentication for Avamar Desktop/Laptop and Avamar Client Manager.
The following table describes the arguments that can be used with avldap.
ARGUMENT VALUE DESCRIPTION
--test No value, or provide the following values in response to prompts:
• FQDN• username• password
Parses ldap.properties, depending upon the current configuration, verifies Kerberos authentication and LDAP queries for server, verifies plain-text authentication, and verifies NIS authentication.If no value is provided, the values for the default server are used. Otherwise the server and account information you provide is tested.
EMC AVAMAR 6.0 • ADMINISTRATION GUIDE 508
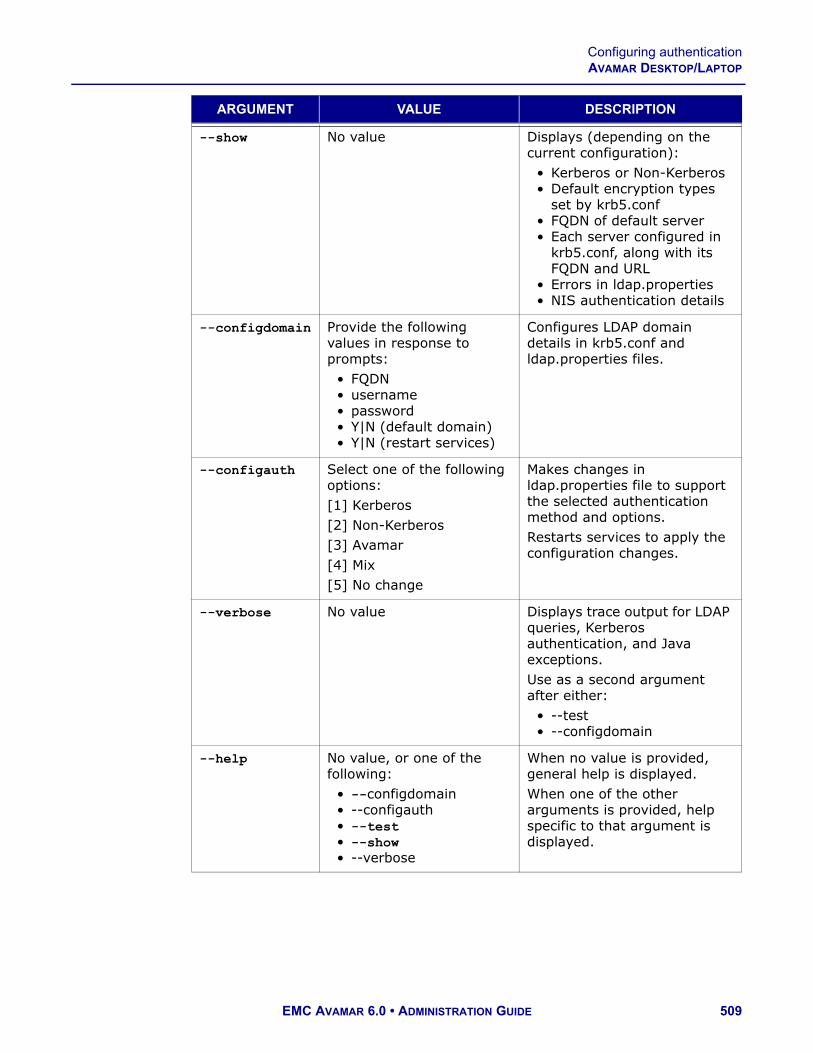
Configuring authenticationAVAMAR DESKTOP/LAPTOP
--show No value Displays (depending on the current configuration):
• Kerberos or Non-Kerberos• Default encryption types
set by krb5.conf• FQDN of default server• Each server configured in
krb5.conf, along with its FQDN and URL
• Errors in ldap.properties• NIS authentication details
--configdomain Provide the following values in response to prompts:
• FQDN• username• password• Y|N (default domain)• Y|N (restart services)
Configures LDAP domain details in krb5.conf and ldap.properties files.
--configauth Select one of the following options:[1] Kerberos[2] Non-Kerberos[3] Avamar[4] Mix[5] No change
Makes changes in ldap.properties file to support the selected authentication method and options.Restarts services to apply the configuration changes.
--verbose No value Displays trace output for LDAP queries, Kerberos authentication, and Java exceptions.Use as a second argument after either:
• --test• --configdomain
--help No value, or one of the following:
• --configdomain• --configauth• --test• --show• --verbose
When no value is provided, general help is displayed.When one of the other arguments is provided, help specific to that argument is displayed.
ARGUMENT VALUE DESCRIPTION
EMC AVAMAR 6.0 • ADMINISTRATION GUIDE 509

Configuring authenticationAVAMAR DESKTOP/LAPTOP
Formatting requirements of ldap.properties
The avldap tool creates a properly formatted ldap.properties file based on your input.
NOTE: The recommended method for configuring ldap.properties is to use avldap. However, manual configuration is possible.
A properly formatted ldap.properties complies with the following key and value (KV) pair rules:
• One LDAP URL KV pair for each LDAP server
The LDAP URL KV pair maps an LDAP server to a specific domain controller.
The LDAP URL KV pair format is:
ldap.url.r1.example.abc.com=ldap://dchost.r1.example.abc.com:389
where r1.example.abc.com is the FQDN of an LDAP server, dchost.example.abc.com is the FQDN of the domain controller for that server, and 389 is the port used by the LDAP service.
NOTE: Enter the KV pair on one line of ldap.properties, without the line break caused by the formatting of this guide.
• Exactly one default server KV pair
The default server KV pair is used during authentication of users on clients that are not mapped to a specific domain, such as local users and users logging in from a AIX, FreeBSD, HP-UX, Linux, SCO, or Solaris computer. The format is:
ldap.qualified-name-default=dchost.example.abc.com
where dchost.example.abc.com is the FQDN of the default LDAP server.
EMC AVAMAR 6.0 • ADMINISTRATION GUIDE 510

Configuring authenticationAVAMAR DESKTOP/LAPTOP
Other settings, in the form of KV pairs, can be added to ldap.properties. These settings are automatically added by avldap based on your input.
KEY VALUES DESCRIPTION
user-login-module kerberosldapavamarmix
Controls the authentication mechanism used.The options are:
• kerberos-LDAP authentication with Kerberos encryption
• ldap-Plaintext LDAP authentication
• avamar-Avamar authentication
• mix-Both kerberos and avamar
When this KV pair is missing from ldap.properties the default is:user-login-module=kerberos
avamar-authentication-domains Required when ldap properties contains: user-login-module=mix. It takes as its value a comma-separated list of domains. Avamar authentication is applied to users from each listed domain. LDAP authentication is applied to all other users.
user-login-required truefalse
Enables (false) or disables (true) pass-through authentication, as described in LDAP (page 494).When this KV pair is missing from ldap.properties the default is:user-login-required=false
support-nis-authentication truefalse
Enables (false) or disables (true) NIS authentication support.When this KV pair is missing from ldap.properties the default is:support-nis-authentication=false
nis.qualified-name-default Specifies the domain name of the NIS domain server. Takes as its value the FQDN of the server.
nis.url.nisdomainname Specifies the IP address of the NIS domain server, where nisdomainname is the value of nis.qualified-name-default.
EMC AVAMAR 6.0 • ADMINISTRATION GUIDE 511

Rebranding the Web UIAVAMAR DESKTOP/LAPTOP
Apache web server authenticationTo protect user security, web browsers display an authentication warning when accessing a secure web page, unless the web server provides a trusted public key certificate with the page. The Avamar Desktop/Laptop UI uses only secure web pages, and this warning is seen in browsers that access those pages. To avoid the warning, install a trusted public key certificate on the Apache web server provided with Avamar.
The EMC Avamar Product Security Guide describes how to obtain and install a trusted public key certificate for the Apache web server.
Rebranding the Web UIRebrand the Avamar client web UI by replacing the two logo graphics located at the top left corner of the UI.
To replace the logo graphics:
1. Create the two replacement graphics. The graphics should meet the following requirements:
• Portable Network Graphic (png) format• Transparent background to allow the background gradient to be seen
behind the graphic text and images• Named ProductNameAvamar.png and ProductNameDTLT.png• 97 px wide and 18 px tall for ProductNameAvamar.png, and 128 px
wide and 18 px tall for ProductNameDTLT.png
User=root 2. Log in to the Avamar utility node as root.
3. Change the working directory by typing:
cd /usr/local/avamar-dtlt-tomcat/webapps/dtlt/images/banner
4. Make backup copies of the original graphics by typing:
cp ProductNameAvamar.png ProductNameAvamar.png_orig
cp ProductNameDTLT.png ProductNameDTLT.png_orig
5. Move the logos into the current working directory as "ProductNameAvamar.png" and "ProductNameDTLT.png".
In some web browsers, with certain cache settings, the new graphic may not appear right away.
EMC AVAMAR 6.0 • ADMINISTRATION GUIDE 512

Stopping and starting Avamar Desktop/Laptop serverAVAMAR DESKTOP/LAPTOP
6. To view the new graphic on those browsers, delete cached copies of previously viewed files.
Checking the status of Avamar Desktop/Laptop serverTo check the status of Avamar Desktop/Laptop server:
User=root 1. Log in to the Avamar utility node as root.
2. Use dpnctl to obtain status information about the Avamar Desktop/Laptop server:
dpnctl status dtlt
Stopping and starting Avamar Desktop/Laptop serverWhen you restart the Avamar utility node, the Avamar Desktop/Laptop server restarts automatically. However, you also can manually stop and start the Avamar Desktop/Laptop server.
To stop and start Avamar Desktop/Laptop:
User=root 1. Log in to the Avamar utility node as root.
2. To stop Avamar Desktop/Laptop:
dpnctl stop dtlt
3. To start Avamar Desktop/Laptop:
dpnctl start dtlt
BROWSER STEPS TO DELETE CACHED COPIES OF FILES
IE6 1. Select Tools > Internet Options > General (tab) > Delete Files.
2. Click OK and click OK again.
IE 7 1. Select Tools > Delete Browsing History > Temporary Internet Files > Delete Files.
2. Click Close and click OK.
IE 8 Select Tools > Delete Browsing History > Temporary Internet Files > Delete.
Firefox 3.x Select Tools > Clear Private Data > Cache (checkbox) > Clear Private Data Now.
Firefox 3.5.x and 3.6.x Select Tools > Clear Recent History > Time range to clear (list box; choose: Everything) > Details (list box; choose: Cache) > Clear Now.
Safari 3, 4, and 5 for Macintosh
Select Safari (menu)> Empty Cache > Empty.
EMC AVAMAR 6.0 • ADMINISTRATION GUIDE 513

User selectable backup schedulesAVAMAR DESKTOP/LAPTOP
User selectable backup schedulesAvamar Desktop/Laptop enables you to permit users to select a backup schedule. Users can choose a schedule from any of the weekly recurrence schedules in their domain.
When a user chooses a new backup schedule, the user client is moved to the group associated with the schedule, and the schedule is applied. Access to previous backup data is not affected by the change.
When the selectable backup schedules feature is enabled for an Avamar server, it applies to clients and groups in all domains and subdomains on the server. Clients and groups that meet the following requirements have access to the feature.
To use selectable backup schedules:
1. Enable selectable backup schedules, as discussed in Enabling selectable backup schedules (page 515).
2. Configure the schedules, as discussed in Configure selectable backup schedules (page 515).
REQUIREMENT DESCRIPTION
Feature enabled by administrator The feature is disabled by default. Enable the feature and restart the Avamar Desktop/Laptop server process.
Single domain Only groups within the same domain as a client are displayed. A subdomain is considered a separate domain.
No multiple group memberships Clients that are a member of more than one group cannot access this feature.
Enabled groups Only the schedules for enabled groups are listed.
Weekly recurrence schedules Only weekly recurrence group schedules are listed, and only clients that currently have a weekly recurrence schedule can access this feature.
At least two different schedules This feature is available to qualified clients if there are at least two different weekly recurrence schedules in the domain.
Duplicate schedules only shown once If two or more groups in a domain share the same weekly recurrence schedule, only the schedule for the first group will be included in the selection list.
EMC AVAMAR 6.0 • ADMINISTRATION GUIDE 514

User selectable backup schedulesAVAMAR DESKTOP/LAPTOP
Enabling selectable backup schedules
To enable selectable backup schedules:
User=root 1. Log in to the Avamar utility node as root.
2. Change the current working directory:
cd /usr/local/avamar/etc
3. Open the Avamar Desktop/Laptop properties file, dtlt.properties, in a text editor, such as vi or Emacs.
4. Edit the value of the selectable backup schedules key:
Change:
userSelectableBackupTime=false
To:
userSelectableBackupTime=true
5. Save and close the file.
6. Restart the Avamar Desktop/Laptop server:
dpnctl stop dtlt
dpnctl start dtlt
Configure selectable backup schedules
Once enabled, the selectable backup schedules feature displays a button that gives access to a schedule list. This feature is enabled in each domain on the server, if the domain has groups that meet the requirements listed in the table in User selectable backup schedules (page 514). Any client in an enabled domain that meets the listed requirements has access to the selection list.
To simplify administration, and to decrease user problems due to changed datasets, the following best practices are recommended:
• Place clients that should not have access to this feature in a group that does not use a weekly recurrence schedule.
Only clients in a group that has a weekly recurrence schedule can view a domain selection list. To prevent clients from accessing this feature, place them in a group with a schedule that uses one of the other recurrence types, such as Daily, Monthly, or On-Demand.
• Create a special domain or subdomain to use this feature, and limit it to clients with the same dataset and retention policy.
A domain selection list includes the schedules for all qualified groups in the domain. If the domain contains groups with various datasets and retention policies, then the list could include the schedule for a group that has a different dataset or retention policy than the current group for a user. By selecting this schedule, the users could unintentionally change their client dataset and retention policy.
EMC AVAMAR 6.0 • ADMINISTRATION GUIDE 515

User selectable backup schedulesAVAMAR DESKTOP/LAPTOP
To create a domain and enable groups to effectively use the selectable backup schedules feature:
1. In Avamar Administrator, create a domain or subdomain, as described in Creating a domain (page 40).
2. Create a weekly schedule, as described in Creating a schedule (page 121).
3. Copy the schedule, as described in Copying a schedule (page 124).
Create a copy for each schedule time that should be on the schedule list.
4. Edit each schedule copy to change the start time to one of the start times that should be on the schedule list.
Editing a schedule is described in Editing a schedule (page 123).
5. Create a common dataset for all clients in the domain.
Creating a dataset is described in Creating a dataset (page 110). Create only one dataset. All clients will use this common dataset.
6. Create a common retention policy for all clients in the domain.
Creating a retention policy is described in Creating a retention policy (page 129). Create only one retention policy. All clients will use this common retention policy.
7. For each schedule you created, create a group.
Creating a group is described in Creating a group (page 139). While creating each group, do the following:
(a) On the first screen of the New Group wizard, clear Disabled.
(b) On the second screen of the New Group wizard, select the common dataset that you created.
(c) On the third screen of the New Group wizard, select one of the schedules that you created.
Do not assign a schedule to more than one group.
(d) On the fourth screen of the New Group wizard, select the common retention policy you created.
(e) On the fifth screen of the New Group wizard, assign clients to the group.
Assigning clients to every group is not required. However, all clients that use the selectable backup schedules feature should be assigned to a group in the domain. Users can use the feature to move their client to the group with the backup schedule that they want.
(f) Click Finish.
The New Group wizard closes and the new group appears in the Policy window.
The selectable backup schedules domain is ready. When a user with a client in that domain navigates to the Backup page of the Avamar client web UI, the Change Backup Time button appears. Use of the feature is described in the web UI help.
EMC AVAMAR 6.0 • ADMINISTRATION GUIDE 516

On-demand backupsAVAMAR DESKTOP/LAPTOP
On-demand backupsAvamar Desktop/Laptop enables on-demand backup functionality by default. This means that authenticated users of an Avamar client can initiate an on-demand backup whenever they choose.
Avamar client users can initiate an on-demand backup through the:
• System tray or menu bar icon (single-click backup)• Client backup reminder (single-click backup)• Web UI (interactive backup)
The dataset used by an on-demand backup is determined by the operating system of the computer.
To enable users to choose the folders and files included in an interactive on-demand backup, enable selectable backup sets, which is discussed in Selectable backup sets (page 518).
On-demand backups that start during daily server system maintenance are rejected with the following message:
Back Up Now is unavailable because daily system maintenance is running. Try your backup again later. Daily maintenance is configured to occur during a period of low system usage. For information about daily maintenance start and stop times contact your backup administrator.
Retention policy
The retention of data from on-demand backups is controlled by the End User On Demand Retention policy (page 128). By default, this policy retains data from on-demand backups for 60 days.
You can change the End User On Demand Retention policy on an Avamar server using Avamar Administrator. The change applies to all on-demand backups initiated by a client activated with that server. However, the change only applies to on-demand backups that occur after the change.
To change the End User On Demand Retention policy on an Avamar server:
1. In Avamar Administrator, select Tools > Manage Retention Policies.
The Manage All Retention Policies window appears.
2. Select End User On Demand Retention from the list and click Edit.
The Edit Retention dialog box appears.
3. In Retention period, enter a number and select a unit of time (days, weeks, months, or years).
4. Click OK.
OPERATING SYSTEM DATA BACKED UP
Non-server-class Windows and all Macintosh
Dataset for each assigned group
Server-class Windows, as discussed in Server-class clients (page 521)
Default dataset, as discussed in Datasets (page 106)
EMC AVAMAR 6.0 • ADMINISTRATION GUIDE 517

Selectable backup setsAVAMAR DESKTOP/LAPTOP
Disabling on-demand backups
You can disable on-demand backup capability for one or more clients. Users on a client for which this capability is disabled cannot initiate a backup from the client system tray or menu bar icon or from the web UI.
To disable on-demand backups for a single client:
1. In Avamar Administrator, click the Policy launcher button.
The Policy window appears.
2. Select the Clients tab.
3. Select the client and click Edit.
The Edit Client dialog box appears.
4. Clear Allow client initiated backups.
5. Click OK.
To disable on-demand backups for multiple clients:
1. In Avamar Administrator, click the Policy launcher button.
The Policy window appears.
2. Select the Clients tab.
3. Select the clients and click Edit.
The Edit Multiple Clients dialog box appears.
4. In Allow client initiated backups, select No.
5. In Allow client initiated backups, select Apply Change.
6. Click OK.
Selectable backup setsAvamar Desktop/Laptop provides the ability to permit users to create sets of folders and files to back up through an on-demand backup. When this feature is allowed, users can:
• Specify the folders and files to include in a backup set• Create multiple backup sets• Save backup sets for reuse• On demand, back up the folders and files in the backup sets they create
When enabled, selectable backup sets apply globally; all clients activated with the Avamar server can use it. The application of group policies is not affected by enabling this feature. Automatic backup of clients according to their group policies continues without change.
EMC AVAMAR 6.0 • ADMINISTRATION GUIDE 518

Selectable backup setsAVAMAR DESKTOP/LAPTOP
Enabling selectable backup sets
You enable selectable backup sets by editing the dtlt.properties file. When enabled, the setting permits all clients to use the feature, even when the Allow file selection on client initiated backups setting in Avamar Administrator is disabled for the client.
To enable selectable backup sets:
User=root 1. Log in to the Avamar utility node as root.
2. Change the current working directory by typing:
cd /usr/local/avamar/etc
3. Open the Avamar Desktop/Laptop properties file, dtlt.properties, in a text editor such as vi or Emacs:
4. Find the following line:
#allowUserSelectableDataset=all
5. Remove the comment designator "#":
allowUserSelectableDataset=all
6. Save and close the file.
7. Restart the Avamar Desktop/Laptop server:
dpnctl stop dtlt
dpnctl start dtlt
Enabling selectable backup sets for individual clients
The selectable backup set feature is disabled by default. While in this default state, you can enable selectable backup sets for individual clients through Avamar Administrator.
To enable selectable backup sets for an individual client:
1. In Avamar Administrator, click the Policy launcher button.
The Policy window appears.
2. Click the Policy Management tab.
3. Click the Clients tab.
4. Select the client for which to allow users to initiate backups.
5. Select Actions > Client > Edit Client.
The Edit Client window appears.
6. Click the Properties tab.
7. Select Allow client initiated backups.
8. Click the Dataset tab.
9. In the Client Assigned Dataset section, select Allow file selection on client initiated backups.
10.Click OK.
EMC AVAMAR 6.0 • ADMINISTRATION GUIDE 519

Restore from an alternate computerAVAMAR DESKTOP/LAPTOP
Restore from an alternate computerThe Avamar Desktop/Laptop enhancements allow restores from an alternate computer. This capability permits a user to log in to a computer (target) and restore backups from another computer (source).
To use restore from an alternate computer, the requirements in the following table must be met.
When these requirements are met, users can restore files that they own from the source computer to the target computer. Also, users who are local administrators on a Windows source computer at the time of a backup, can restore any file from that source computer, regardless of ownership, to a target computer.
Restoring from an alternate computer
To restore from an alternate computer:
1. Right-click the Avamar system tray icon.
The client menu opens.
2. Click Restore.
The Search page opens.
CATEGORY REQUIREMENT
Operating system • Windows operating system• Mac operating system
NOTE: Restores between Windows and Mac computers are supported.
Account type Domain
Profile Both source and target computers have a local profile for the user’s domain account.NOTE: A local profile for a domain account is created automatically at a user’s first login on the computer.
Avamar client Version 6.0 or later is installed on both source and target.
Avamar server Both source and target are activated with the same Avamar server and the server is running Avamar 6.0 or later.
Backup There is at least one qualifying backup.NOTE: A qualifying backup is one completed successfully after both:
• Avamar Desktop/Laptop 6.0 or later is installed on the source computer.
• A local profile for the user’s domain account is created on the source computer.
EMC AVAMAR 6.0 • ADMINISTRATION GUIDE 520

Server-class clientsAVAMAR DESKTOP/LAPTOP
3. In the computer list box, select the source computer.
The list box displays only computers that have at least one qualifying backup for the user logged in to the target computer.
4. Use the Search page or Browse page to select and restore files from the backups of the source computer to the target computer.
Viewing history for an alternate computer
To view the backup and restore history for an alternate computer:
1. Right-click the Avamar system tray icon.
The client menu opens.
2. Click Restore.
The Search page opens.
3. On the left-side menu, click History.
The History page opens.
4. In the computer list box, select the alternate computer.
Backup history information for the alternate computer appears.
Server-class clientsIn addition to support for traditional desktop and laptop computers, the Avamar Desktop/Laptop enhancements also support some server-class computers. Supported are computers that are running the server versions of the Windows and Macintosh operating systems.
Generally, the Avamar Desktop/Laptop enhancements function the same for server-class computers as for desktop and laptop computers. The differences are described in the following topics:
• (Windows servers only) Back up now dataset (page 521)• Backup of large number of files (page 522)• Backup on battery power (page 522)• Disable restores (page 522)
Back up now dataset
On Windows server-class computers only, clicking Back Up Now on the Client menu or on the Backup reminder launches a backup of the client’s dataset.
By default the dataset assigned to server-class computers is the Default Dataset. This is the dataset assigned to the Default Group.
The initial settings of the Default Dataset are designed to be as inclusive as possible. They are:
• Use all available source data plug-ins• Limited inherent exclusions and no explicit exclusions
EMC AVAMAR 6.0 • ADMINISTRATION GUIDE 521

Server-class clientsAVAMAR DESKTOP/LAPTOP
These default settings are described in Datasets, Schedules, and Retention Policies (page 106).
On Macintosh server-class computers and on Windows and Macintosh desktop and laptop computers, clicking Back Up Now on the client menu or on the backup reminder launches a backup of each dataset, for each of the groups for the computer.
Backup of large number of files
To accommodate server-class clients with backups that have a large number of files and directories, changes are made to the web UI when a threshold number of file and directory entries is reached. These changes automatically occur when the number of files and directories in a backup exceeds approximately 4 million. The actual threshold number is based on the available memory on the Avamar server.
When the threshold is reached, the following changes occur:
• Search page is removed from the web UI.• History page is removed from the web UI.• File versions are not available on the Browse page.• Restore is only allowed for users with local administrator rights on the
computer. Non-administrator users cannot restore any files, including those that they own locally on the server-class computer.
• Restore data size limits, described in Restore data size limit (page 524), are not enforced.
Backup on battery power
The Avamar Desktop/Laptop enhancements provide a Power setting that can be used to enable and disable backups for computers running on battery power. This feature is not available for server-class computers. Backups are always enabled on these computers.
Disable restores
You can disable locally initiated restores on both Windows and Macintosh server-class computers with the Avamar Desktop/Laptop enhancements installed by editing the dtlt.properties file. When server-class computer restores are disabled, a restore can only be initiated from Avamar Administrator, as described in Backup, Restore, and Backup Management (page 78).
Setting this option has the following impact:
• Prevents locally initiated restores• Removes the Search and Browse pages from the web UI• Hides previous versions• Displays Backup and History pages• Enables restores of its backups to another computer that is not a server-class
computer
EMC AVAMAR 6.0 • ADMINISTRATION GUIDE 522
Server-class clientsAVAMAR DESKTOP/LAPTOP
To restore to an alternate computer, users must have local administrative rights on the server-class computer. Restore from an alternate computer (page 520) provides details.
NOTE: Disabling restores for server-class computers does not remove the Restore item from the Avamar system tray or Menu bar icon. However, the Restore item’s action is blocked.
Disable restores for server-class computers
To disable restores on server-class computers:
User=root 1. Log in to the Avamar utility node as root.
2. Change the current working directory by typing:
cd /usr/local/avamar/etc
3. Open the Avamar Desktop/Laptop properties file, dtlt.properties, in a text editor such as vi or Emacs.
4. Edit the value of the allowServerRestores key:
Change:
allowServerRestores=true
to:
allowServerRestores=false
5. Save and close the file.
6. Restart the Avamar Desktop/Laptop server by typing:
dpnctl stop dtlt
dpnctl start dtlt
EMC AVAMAR 6.0 • ADMINISTRATION GUIDE 523

Restore data size limitAVAMAR DESKTOP/LAPTOP
Restore data size limitAvamar client users do not normally have a limit on the amount of data that is restored in a single task. This default setting allows a user to restore up to the entire backup in a single task. Very large restore tasks can, in some instances, cause undesirable load on the network.
Set a restore data size limit to control the network load caused by these large restore tasks. When a limit is set, individual users cannot restore more than the limit in any one restore task. If files in excess of the limit are selected to be restored, the following message appears:
The selected files exceed the restore data size limit set by your administrator. Use multiple tasks to restore the files in smaller groups. Contact your administrator for help with a very large restore.
To restore files that exceed the limit the user must either:
• Restore the files in multiple tasks that do not exceed the limit.• Have an administrator perform the restore.
NOTE: By design the restore data size limit does not apply to server-class clients (those clients with a very large backup data set). This is described in Server-class clients (page 521).
To set a restore data size limit:
User=root 1. Log in to the Avamar utility node as root.
2. Change the current working directory by typing:
cd /usr/local/avamar/etc
3. Open the Avamar Desktop/Laptop properties file, dtlt.properties, in a text editor such as vi or Emacs.
4. Uncomment and edit the value of the limitRestoreSize key:
Change:
#limitRestoreSize=500
To:
limitRestoreSize=n
Where n is the data size limit in megabytes.
5. Save and close the file.
6. Restart the Avamar Desktop/Laptop server:
dpnctl stop dtlt
dpnctl start dtlt
EMC AVAMAR 6.0 • ADMINISTRATION GUIDE 524

Downloads linkAVAMAR DESKTOP/LAPTOP
Downloads linkThe Downloads link is a hyperlink that appears on the Avamar Desktop/Laptop login window. This link provides access to a web page with client and plug-in installer package downloads. For computers that have Avamar Desktop/Laptop installed, this link can be hidden or visible. By default the link is hidden.
Users who log in from a Windows or Mac computer will not see the log in screen if they meet the requirements of pass-through authentication described in Pass-through (page 494). To ensure those users have access to the Downloads link use the user-login-required key in ldap.properties to force the log in screen to appear.
To show the Downloads link:
User=root 1. Log in to the Avamar utility node as root.
2. Change the current working directory by typing:
cd /usr/local/avamar/etc
3. Open the Avamar Desktop/Laptop properties file, dtlt.properties, in a text editor such as vi or Emacs.
4. Create or edit the value of the show.downloads.link key:
Change:
show.downloads.link=false
to:
show.downloads.link=true
5. Save and close the file.
6. Open the Avamar Desktop/Laptop LDAP properties file, ldap.properties, in a text editor such as vi or Emacs.
7. Create or edit the value of the user-login-required key:
Change:
user-login-required=false
to:
user-login-required=true
8. Save and close the file.
9. Restart the Avamar Desktop/Laptop server:
dpnctl stop dtlt
dpnctl start dtlt
EMC AVAMAR 6.0 • ADMINISTRATION GUIDE 525

Local installation of the clientAVAMAR DESKTOP/LAPTOP
Client installation using systems management toolsThe recommended method for installing the Avamar Desktop/Laptop client software on large numbers of computers is to use a Systems management tool. A Systems management tool can remotely push-install the software on large numbers of computers in a short amount of time.
Using Systems management tools with Avamar client is described further in Avamar Client Manager (page 436).
Remote installation is described in Remote push install of the client software (page 485).
Local installation of the client The Avamar Desktop/Laptop software can also be installed locally. This method launches a graphical installation interface. At the conclusion of the installation, the computer is ready to register and activate with an Avamar server.
To perform a local installation, you can download the client installer using the downloads link, which is discussed in Downloads link (page 525). If the downloads link is disabled, the client installer must be transferred to the computer by some other file transfer method.
The disadvantages of using local installation are:
• It is very time consuming when performed individually on thousands of computers.
• It does not provide a list that can be used to register and activate groups of computers using Avamar Client Manager.
Local installation, upgrading, and uninstalling of Avamar Desktop/Laptop is described in the EMC Avamar Backup Clients Guide.
EMC AVAMAR 6.0 • ADMINISTRATION GUIDE 526

Windows and Mac client log locationsAVAMAR DESKTOP/LAPTOP
Windows and Mac client log locationsLocal logs on Windows and Mac computers provide information about backup and restore operations and UI functionality. The available logs are:
• Workorder
The workorder log is named workorder_name.log, where workorder_name is the full name of a particular task. These logs provide detailed information about the specific task.
• Agent
The agent log is named avagent.log. This log provides information about the status of all backup and restore activity on the computer.
• Console
The console log is named avscc.log. A console log is created for each user on a computer. It provides information about the performance of the UI.
While these logs are readily accessible through the client UI you can also access them directly.
On Windows computers the logs are available through the following paths:
On Mac computers the logs are available through the following paths:
LOG PATH
Workorder %SystemDrive%\Program Files\avs\var\clientlogs\
Agent %SystemDrive%\Program Files\avs\var\
Console %APPDATA%\Avamar\
LOG PATH
Workorder /var/avamar/clientlogs/
Agent /var/avamar/
Console $HOME/.avamardata/
EMC AVAMAR 6.0 • ADMINISTRATION GUIDE 527

Macintosh clients with EntourageAVAMAR DESKTOP/LAPTOP
Macintosh clients with EntourageMicrosoft Entourage is a Macintosh email client that uses the Microsoft Database Daemon to manage its database. To protect the Entourage data, both Entourage and the Microsoft Database Daemon must be shut down during backups. The Avamar client software provides scripts to:
• Shut down Entourage and the Microsoft Database Daemon before running a backup.
• Restart the Microsoft Database Daemon when the backup is complete.
You must manually restart the Entourage program.
Dataset policies are used to run the scripts. Macintosh clients running Entourage should be assigned to groups using a dataset with these policies. Other clients should be assigned to groups using a dataset without these policies.
IMPORTANT: Assigning Macintosh clients running Entourage to groups without these policies causes the Entourage database to be skipped during backups, and errors to appear in the client logs.
Creating the dataset
All groups for Macintosh clients running Entourage should use a dataset that provides the necessary policies.
To create a dataset with the required policies:
1. Create a dataset as described in Creating a dataset (page 110).
The plug-in type must be Macintosh Desktop/Laptop.
2. Select the dataset Options tab.
3. Select Show Advanced Options.
4. In the Pre-Script section of that tab, in Run user-defined script at beginning of backup, type:
shutdown.sh
5. In the Pre-Script section of that tab, select Abort backup if script fails.
6. In the Post-Script section of that tab, in Run user-defined script at end of backup, type:
startup.sh
7. In the Post-Script section of that tab, select Exit process with script failure exitcode.
8. When all other configuration for the dataset is complete, click OK.
Assign this dataset, or one with the same changes on the Options tab, to each group for Macintosh clients with Entourage.
EMC AVAMAR 6.0 • ADMINISTRATION GUIDE 528

Macintosh clients with EntourageAVAMAR DESKTOP/LAPTOP
Client backup message
Macintosh clients that are assigned to a group that uses a dataset configured for Macintosh clients with Entourage see a message whenever a scheduled or on-demand backup task is initiated.
The options with this message are in the following table.
OPTION RESULT
Cancel The Microsoft Database Daemon is not shut down, and the backup task is canceled.
OK The Microsoft Database Daemon is immediately terminated, Entourage is shut down, and the backup task is started. At the conclusion of the backup, the Microsoft Database Daemon is restarted. Manual startup of Entourage is required.
No Action The message is displayed for 30 seconds, after which the Microsoft Database Daemon is terminated, Entourage is shut down, and the backup task is started. At the conclusion of the backup, the Microsoft Database Daemon is restarted. Manual startup of Entourage is required.
EMC AVAMAR 6.0 • ADMINISTRATION GUIDE 529

USING AVAMAR WITH DATA DOMAIN
The following topics provide details on how to use Avamar with Data Domain:
• How Avamar and Data Domain work together (page 530)• Managing Data Domain systems (page 535)• Backup to a Data Domain system (page 540)• Restore from a Data Domain system (page 542)• System maintenance with Data Domain (page 543)• Replication with Data Domain (page 544)• Monitoring and reporting with Data Domain (page 551)• Troubleshooting Data Domain (page 552)
How Avamar and Data Domain work togetherYou can store Avamar backups on one or more Data Domain systems, and then seamlessly restore data from the backups when necessary.
Avamar clients that support backup and restore to and from Data Domain include:
• Microsoft Exchange VSS• Microsoft SQL Server• Microsoft SharePoint VSS• Oracle• VMware image backup and restore
The storage and retrieval of backups on a Data Domain system may be faster than on an Avamar server in an environment with these products, especially if there is a large, active database in the environment.
A Data Domain system can manage large datasets and high change rates of data within a large dataset more effectively than an Avamar server. A dataset of greater than 5 TB is considered a large dataset, and a daily change rate of more than 5 percent is considered a high change rate.
EMC AVAMAR 6.0 • ADMINISTRATION GUIDE 530

How Avamar and Data Domain work togetherUSING AVAMAR WITH DATA DOMAIN
Architecture of Avamar with Data Domain
Avamar clients use the DD Boost API to access a Data Domain system. The DD Boost API is installed automatically on the client computer when you install the Avamar client.
The ddrmaint utility on the utility node of a multi-node server (or the single node of a single-node server) implements all required operations on the Data Domain system on behalf of the Avamar server. It is not installed on the data nodes of the Avamar server.
The ddrmaint utility also uses the DD Boost API to connect to a Data Domain system. The DD Boost API is installed with the ddrmaint utility automatically when you install Avamar.
Basic architecture. The following figure illustrates a basic Avamar environment with a Microsoft Exchange server that sends backup data to a Data Domain system.
NOTE: The connection between the Avamar client and the Data Domain system is not encrypted. The DD Boost library does not support data encryption between the client and the Data Domain system.
EMC AVAMAR 6.0 • ADMINISTRATION GUIDE 531

How Avamar and Data Domain work togetherUSING AVAMAR WITH DATA DOMAIN
Mixed client environment. It is likely, however, that there are other Avamar clients in the environment, some of which are sending backups to the Data Domain system, and some of which are sending backups to the Avamar server. In the following figure, Avamar client 1 sends backups to the Avamar server, and Avamar client 2 sends backups to the Data Domain system.
EMC AVAMAR 6.0 • ADMINISTRATION GUIDE 532

How Avamar and Data Domain work togetherUSING AVAMAR WITH DATA DOMAIN
Multiple Data Domain systems. To segregate data, you can also use multiple Data Domain systems with a single Avamar server. In the following figure, Avamar client 1 sends backups to Data Domain system 1, and Avamar client 2 sends backups to Data Domain system 2.
Shared Data Domain system. Avamar can share a Data Domain system with other backup solutions, as shown in the following figure.
The other backup solution can be any other backup product that uses a Data Domain system, or it can be another Avamar server.
EMC AVAMAR 6.0 • ADMINISTRATION GUIDE 533

How Avamar and Data Domain work togetherUSING AVAMAR WITH DATA DOMAIN
The architecture of an Avamar environment with Data Domain is flexible and can combine several different strategies. For example, there can be multiple Avamar clients that send backups to a single Data Domain system that is shared with another backup server, while other Avamar clients send backups to the Avamar server.
Supported backup types
You can perform full backups, incremental backups, differential backups, and VMware backups with change-block tracking enabled (for those clients that support those types of backups) when a Data Domain system is the backup target.
However, the full backup for a client and all subsequent incremental and differential backups must be stored on either the Avamar server or a single Data Domain system. Avamar does not support the following scenarios:
• Full backup on a Data Domain system and incremental or differential backups on the Avamar server
• Full backup on the Avamar server and incremental or differential backups on a Data Domain system
• Full backup on one Data Domain system and incremental or differential backups on another Data Domain system
As a result, if you change the device on which backups for a client are stored, then you must perform a full backup on the new device before any further incremental or differential backups.
There are two exceptions to the requirement for storing all backup types on a single server:
• If you use the Avamar for SQL Server Client and you perform a tail-log backup during a restore, then the tail-log backup is always stored on the Avamar server.
• If you use the Avamar Exchange VSS Client, then the Microsoft Exchange log files are always backed up to the Avamar server. In addition, files in Exchange VSS backups that are less than 10 MB are always stored on the Avamar server, regardless of the selected backup target.
System requirements
The EMC Avamar with Data Domain Guide provides details on system requirements to use Avamar with Data Domain, including:
• Supported Data Domain device types• Supported Data Domain Operating System (DDOS) version• DD Boost configuration requirements• Licensing requirements
EMC AVAMAR 6.0 • ADMINISTRATION GUIDE 534

Managing Data Domain systemsUSING AVAMAR WITH DATA DOMAIN
Managing Data Domain systemsThe following topics provide details on how to manage Data Domain systems in the Avamar configuration:
• Preparing the Data Domain system (page 535)• Adding a Data Domain system (page 536)• Editing a Data Domain system (page 539)• Deleting a Data Domain system (page 539)
Preparing the Data Domain system
Before you can add a Data Domain system to the Avamar configuration, you must prepare the Data Domain system by enabling DD Boost and creating a DD Boost user account for Avamar to use to access the Data Domain system for backups, restores, and replication, if applicable.
To prepare the Data Domain system:
1. Enable DD Boost on the Data Domain system by logging in to the Data Domain CLI as an administrative user and typing the following command:
2. Create a DD Boost account and password:
(a) Log in to the Data Domain CLI as an administrative user.
(b) Create the user account with admin privileges by typing the following command:
user add USER priv admin
where USER is the username for the new account.
(c) Set the new account as the DD Boost user by typing the following command:
where USER is the username for the account.
(d) Disable and then reenable DD Boost to allow the changes to take effect by typing the following commands:
DDOS VERSION COMMAND
4.9.x ost enable
5.0.0.x ddboost enable
DDOS VERSION COMMAND
4.9.x ost set user-name USER
5.0.0.x ddboost set user-name USER
DDOS VERSION COMMANDS
4.9.x ost disable
ost enable
EMC AVAMAR 6.0 • ADMINISTRATION GUIDE 535

Managing Data Domain systemsUSING AVAMAR WITH DATA DOMAIN
Adding a Data Domain system
When you add a Data Domain system, the process creates a Logical Storage Unit (LSU) on the Data Domain system for an Avamar server. The LSU refers to the directory created within the DD Boost path.
To add a Data Domain system to the Avamar configuration:
1. In Avamar Administrator, click the Server launcher button.
The Server window appears.
2. Select the Server Management tab.
5.0.0.x ddboost disable
ddboost enable
DDOS VERSION COMMANDS
EMC AVAMAR 6.0 • ADMINISTRATION GUIDE 536

Managing Data Domain systemsUSING AVAMAR WITH DATA DOMAIN
3. Select Actions > Add Data Domain System.
The Add Data Domain System dialog box appears.
4. On the System tab, complete the settings as described in the following table.
SETTING DESCRIPTION
Data Domain System Name
Fully qualified domain name of the Data Domain system to add.NOTE: Do not use an IP address or a secondary hostname that associates with alternative or local IP interfaces. It may limit the ability of Avamar to route optimized deduplication traffic.
DDBoost User Name Username of the DD Boost account that Avamar should use to access the Data Domain system for backups, restores, and replication, if applicable.
Password Password for the account that Avamar should use to access the Data Domain system for backups, restores, and replication, if applicable.
Verify Password Verification of the password.
EMC AVAMAR 6.0 • ADMINISTRATION GUIDE 537

Managing Data Domain systemsUSING AVAMAR WITH DATA DOMAIN
5. Click the SNMP tab.
6. On the SNMP tab, verify the SNMP configuration:
• The Getter/Setter Port Number text box lists the port on the Data Domain system from which to receive and on which to set SNMP objects. You should not need to change the default value of 161.
• The SNMP Community String text box lists the community string for Avamar to have read/write access to the Data Domain system. If necessary, you can edit the community string.
• The Trap Port Number text box lists the port on the Avamar server to which traps are sent. The default value is 163.
Max Streams Maximum number of Data Domain system streams that Avamar can use at any one time to perform backups and restores.Consider both the maximum number of streams that the Data Domain system supports, as well as whether other applications are using streams to send data to and receive data from the Data Domain system.NOTE: If the maximum number of streams is reached, then any additional backup or restore requests are queued until one or more streams become available.NOTE: Avamar uses multiple streams for backups to and restores from Data Domain for Oracle. Multiple streams are not supported for Microsoft Exchange VSS, Microsoft SharePoint VSS, Microsoft SQL Server, and VMware image backups.
Use system as default replication storage
If replication is used, whether the Data Domain system is the default destination to which Avamar replicates data when a destination Data Domain system is not identified. Replication with Data Domain (page 544) provides details.
SETTING DESCRIPTION
EMC AVAMAR 6.0 • ADMINISTRATION GUIDE 538

Managing Data Domain systemsUSING AVAMAR WITH DATA DOMAIN
SNMP configuration enables Avamar to collect and display data for health monitoring, system alerts, and capacity reporting.
7. Click OK.
Editing a Data Domain system
To edit the configuration for a Data Domain system that you are using as a target for Avamar backups:
1. In Avamar Administrator, click the Server launcher button.
The Server window appears.
2. Click the Server Management tab.
3. Select the Data Domain system to edit.
4. Select Actions > Edit Data Domain System.
The Edit Data Domain System dialog box appears.
5. Edit the settings for the Data Domain system as necessary.
Adding a Data Domain system (page 536) provides details on each setting.
NOTE: If the Re-add SSH Key and Re-add Trap Host buttons are enabled, then click the buttons to restore the SSH key and trap host values on the Data Domain system. When these buttons are enabled, then the configuration on the Avamar server is not synchronized with the configuration on the Data Domain system. Clicking the buttons restores the values to the Data Domain system to ensure synchronization.
6. Click OK.
Deleting a Data Domain system
You can delete a Data Domain system from the Avamar configuration if the Data Domain system is online and if there are multiple Data Domain systems configured on the Avamar server.
If you are deleting the only Data Domain system configured on the Avamar server, or if the Data Domain system is offline, then advanced service is required. Contact your EMC sales representative to purchase this service.
To delete a Data Domain system from the Avamar configuration:
1. Ensure that no backups are present on the Data Domain system:
• Delete each backup for all clients that use the Data Domain system as a backup target.
• Ensure that all backups on the Data Domain system are expired and deleted through the Avamar GC process.
• Ensure that there are no checkpoints for the Avamar server with backups on the Data Domain system. There are two ways to do this:
EMC AVAMAR 6.0 • ADMINISTRATION GUIDE 539

Backup to a Data Domain systemUSING AVAMAR WITH DATA DOMAIN
• Wait for all checkpoints that contain backups for the Data Domain system to expire.
• Perform and validate a new checkpoint after all backups to the Data Domain system are deleted, and then delete all other checkpoints.
2. Ensure that the Data Domain system is not designated as the default replication storage system.
Setting the default Data Domain destination (page 548) provides details on designating a default replication storage system.
3. In Avamar Administrator, click the Server launcher button.
The Server window appears.
4. Select the Server Management tab.
5. Select the Data Domain system to delete.
6. Select Actions > Delete Data Domain System.
A confirmation message appears.
7. Click OK.
Backup to a Data Domain systemTo configure backups from an Avamar client to a Data Domain system:
1. Add the Data Domain system to the Avamar configuration, as discussed in Adding a Data Domain system (page 536).
2. Select the Data Domain system as the target for the backup:
• For an on-demand backup, open the Backup Command Line Options dialog box, select Use Data Domain system, and then select the Data Domain system to use from the list, as shown in the following example.
Performing an on-demand client backup (page 80) provides details on on-demand backups.
EMC AVAMAR 6.0 • ADMINISTRATION GUIDE 540

Backup to a Data Domain systemUSING AVAMAR WITH DATA DOMAIN
• For a scheduled backup, select the Data Domain system on the Options tab for the dataset, as shown in the following example for a VMware Image Backup plug-in.
Creating a dataset (page 110) provides details on dataset settings.
NOTE: If you cancel a backup while it is in progress, then Avamar deletes the backup data that was written to the Data Domain system during the next cycle of the Garbage Collection (GC) process.
EMC AVAMAR 6.0 • ADMINISTRATION GUIDE 541

Restore from a Data Domain systemUSING AVAMAR WITH DATA DOMAIN
Restore from a Data Domain systemRestore of an Avamar backup from a Data Domain system is seamless. When a restore is initiated from Avamar, the restore data is streamed directly from the Data Domain system back to the Avamar client.
When you select a backup to restore, you can identify whether a backup is located on the Avamar server or on a Data Domain system by viewing the Server column on the Select for Restore tab of the Backup and Restore window, as shown in the following example.
If replication is enabled, you can restore seamlessly from a replicated Data Domain system, the same way that you would if the backup data were on a replicated Avamar server.
EMC AVAMAR 6.0 • ADMINISTRATION GUIDE 542

System maintenance with Data DomainUSING AVAMAR WITH DATA DOMAIN
System maintenance with Data DomainAvamar system maintenance operations include backup data that is stored on configured Data Domain systems.
Avamar performs the system maintenance operations for backup data on the Data Domain system. Data Domain maintenance operations may also run on the Data Domain system. However, these operations do not replace Avamar maintenance operations.
HFS check. When HFS check runs on the Avamar server, it also verifies Avamar backup data on the Data Domain system. However, the integrity check on the Data Domain system is limited to file existence, file size, and file modification time.
Checkpoints. When you perform a checkpoint on the Avamar server, then the checkpoint includes Avamar data on the Data Domain system. If a checkpoint succeeds on the Avamar server but fails for Avamar data on a configured Data Domain system associated with the Avamar server, then the checkpoint is considered a failed checkpoint. All checkpoint names on a Data Domain system match the checkpoint names on the Avamar server.
Rollbacks. When you perform a rollback on the Avamar server, then a rollback is performed on Avamar data on the Data Domain system. If a rollback succeeds on the Avamar server but fails for Avamar data on a configured Data Domain system associated with the Avamar server, then the rollback is considered a failed rollback.
Garbage collection. When Garbage Collection runs on the Avamar server, it also deletes expired Avamar backup data on the Data Domain system. Garbage Collection may perform other cleanup operations on the Data Domain system as required, such as removing deleted checkpoints and backups and removing incomplete, aborted, and failed backups. Space from data deleted through Avamar Garbage Collection is reclaimed on the Data Domain system when the Data Domain file system cleaning operation.
Secure deletion. Manual secure deletion is possible on both the Avamar and Data Domain servers, but data shredding is not currently supported with this solution, even though Data Domain has a data shredding feature. The EMC Avamar Product Security Guide provides details on how to securely delete backups from the Avamar server.
EMC AVAMAR 6.0 • ADMINISTRATION GUIDE 543

Replication with Data DomainUSING AVAMAR WITH DATA DOMAIN
Replication with Data DomainThe following topics provide details on replication of Avamar data on a Data Domain system.
How replication works with Avamar and Data Domain
The Avamar replication feature transfers data from a source Avamar server to a destination Avamar server. If you use a Data Domain system as a backup target for Avamar, then the replication process also transfers Avamar data from the source Data Domain system to a destination Data Domain system, as shown in the following figure.
If a Data Domain system is configured with a source Avamar server, then there must be a corresponding Data Domain system configured with a destination server. If there is no destination Data Domain system configured with the destination Avamar server, then replication fails for backups that are stored on the source Data Domain system.
Replication control belongs to Avamar. Avamar controls the replication of Avamar data from the source Data Domain system to the destination Data Domain system. The Data Domain replication feature is not used. As a result, configuration and monitoring of the replication process occurs on the Avamar server, and there is no way to track the replication through Data Domain administration tools. A Data Domain replication license is required, however, to enable the copying of data from one system to another.
Replication Is a direct copy. Avamar replicates the data directly from one Data Domain system to another. In other words, the data is not copied from the source Data Domain system to the Avamar server before it replicates to the destination Data Domain system.
EMC AVAMAR 6.0 • ADMINISTRATION GUIDE 544

Replication with Data DomainUSING AVAMAR WITH DATA DOMAIN
Replication occurs on the Avamar replication schedule. The replication of Avamar data on a Data Domain system occurs when data replicates from the source Avamar server to the destination Avamar server according to the schedule defined on the source Avamar server. You cannot schedule replication of data on the Data Domain system separately from the replication of the data on the Avamar server.
Replication is supported in multiple environments. If there is more than one Data Domain system configured with the source Avamar server, then you can use either a single destination Data Domain system or multiple destination systems. Also, if there is a single Data Domain system configured with the source Avamar server, then you can use either a single destination Data Domain system or multiple destination systems.
The following figure illustrates an environment where there are multiple Data Domain systems configured with the source Avamar system, all of which replicate to a single destination Data Domain system.
NOTE: The capacity of the destination Data Domain system must be able to accommodate the replicated data from both source Data Domain systems. Use caution when planning the architecture of such an environment.
EMC AVAMAR 6.0 • ADMINISTRATION GUIDE 545

Replication with Data DomainUSING AVAMAR WITH DATA DOMAIN
Alternatively, there can be multiple destination Data Domain systems, as shown in the following figure.
EMC AVAMAR 6.0 • ADMINISTRATION GUIDE 546

Replication with Data DomainUSING AVAMAR WITH DATA DOMAIN
You can also replicate data from a single source Data Domain system to multiple destination Data Domain systems, as shown in the following figure.
If there are multiple destination Data Domain systems, you can control which system receives the data that replicates from the source Data Domain system by mapping a domain on the source Avamar server to a destination Data Domain system. Mapping a domain to a Data Domain system (page 549) provides details.
EMC AVAMAR 6.0 • ADMINISTRATION GUIDE 547

Replication with Data DomainUSING AVAMAR WITH DATA DOMAIN
Configuring replication
To configure replication when you use a Data Domain system as a backup target for Avamar:
1. Configure replication from the source Avamar server to the destination Avamar server by using either Avamar Administrator or Avamar Enterprise Manager:
• On the Services Administration tab in the Administration window of Avamar Administrator, update the properties for the Replication cron job entry to include information about the destination server, backups to replicate, schedule, and other replication settings.
• On the Replicator Setup page in Avamar Enterprise Manager, click the link for the source Avamar server, and then specify information about the destination server, backups to replicate, schedule, and other replication settings.
Replication (page 341) provides detailed steps to configure replication in either Avamar Administrator or Avamar Enterprise Manager.
2. If there is more than one destination Data Domain system, specify which Data Domain system is the default destination. Setting the default Data Domain destination (page 548) provides detailed steps.
3. If there is more than one destination Data Domain system, map the domains on the source Avamar server to a destination Data Domain system. Mapping a domain to a Data Domain system (page 549) provides detailed steps.
Setting the default Data Domain destination
If there is more than one destination Data Domain system in a replication environment, you must specify which Data Domain system is the default destination. The default destination is the Data Domain system to which Avamar replicates data when a destination Data Domain system is not identified on the Replication Storage Mapping tab. Mapping a domain to a Data Domain system (page 549) provides details on mapping a domain on a source Avamar server to a destination Data Domain system for replication.
To set the Data Domain system that is the default replication destination:
1. In Avamar Administrator for the destination Avamar server, click the Server launcher button.
The Server window appears.
2. Select the Server Management tab.
3. Select the destination Data Domain system.
4. Select Actions > Edit Data Domain System.
The Edit Data Domain System dialog box appears.
5. On the System tab, select the Use system as default replication storage checkbox.
6. Click OK.
EMC AVAMAR 6.0 • ADMINISTRATION GUIDE 548

Replication with Data DomainUSING AVAMAR WITH DATA DOMAIN
Mapping a domain to a Data Domain system
If there are multiple destination Data Domain systems, then you can control which system receives the data that replicates from the source Data Domain system by mapping a domain on the source Avamar server to a destination Data Domain system. If you do not provide a mapping, then Avamar replicates the data from the source Data Domain system to the default destination that you identified in Setting the default Data Domain destination (page 548).
NOTE: You cannot map the domains on the source Avamar server to a destination Data Domain system until after the first replication occurs. During the first replication, the data replicates to the default destination.
To map a domain on a source Avamar server to a destination Data Domain system:
1. In Avamar Administrator, click the Server launcher button.
The Server window appears.
2. Select the Replication Storage Mapping tab.
EMC AVAMAR 6.0 • ADMINISTRATION GUIDE 549

Replication with Data DomainUSING AVAMAR WITH DATA DOMAIN
3. Click Add Domain.
The Select a Domain dialog box appears.
4. Browse to and select a domain from the tree.
5. From the Map to Data Domain System list, select the Data Domain system to use as the replication target.
6. Click OK.
Deleting a domain mapping
When you delete a mapping between a domain on a source Avamar server and a destination Data Domain system, any data that has already replicated to the destination system remains there. However, any new data replicates to the default destination system unless you create a new mapping to a different Data Domain system.
To delete a mapping between a domain on a source Avamar server and a destination Data Domain system:
1. In Avamar Administrator, click the Server launcher button.
The Server window appears.
2. Select the Replication Storage Mapping tab.
3. Select the mapping and click Delete.
4. Click Yes on the confirmation message.
EMC AVAMAR 6.0 • ADMINISTRATION GUIDE 550

Monitoring and reporting with Data DomainUSING AVAMAR WITH DATA DOMAIN
Monitoring and reporting with Data Domain
Monitoring Data Domain with SNMP. Avamar can collect and display data for health monitoring, system alerts, and capacity reporting on a configured Data Domain system using SNMP. To enable this functionality, specify the port number on which to receive traps when you add the Data Domain system to the Avamar configuration, as discussed in Adding a Data Domain system (page 536).
Activity monitoring. You can monitor recent backup, restore, and validation activities for a Data Domain system by using the Activity Monitor in Avamar Administrator. The Server column in the Activity Monitor lists the server—either the Avamar server or the Data Domain system—on which the activity occurred. If necessary, you can filter the Activity Monitor to view only activities for data on a Data Domain system. Monitoring backup, restore, and validation activities (page 82) provides details on activity monitoring.
Server monitoring. The Server Monitor in Avamar Administrator provides CPU, disk activity, and network activity for each node on the Data Domain system. Monitoring the server (page 240) provides details.
Event monitoring. You can monitor events associated with a Data Domain system by using the Event Monitor in Avamar Administrator. If necessary, you can filter the Event Monitor to view only events for a Data Domain system. Viewing system events (page 261) provides details.
Capacity monitoring. Avamar checks the capacity of each configured Data Domain system every 24 hours. If the capacity reaches 95% full, or if the forecast number of days until the capacity is full is less than or equal to 90 days, then an event is logged in the Event Monitor. You can also monitor the capacity of a configured Data Domain system using either Avamar Administrator or Enterprise Manager. In Avamar Administrator, Data Domain system capacity summary statistics are available on the Server Management tab in the Server window. The Capacity column on the Dashboard page in Avamar Enterprise Manager provides used and forecast capacity information for the Data Domain system. You can also view the percentage of used and forecast capacity for configured Data Domain systems during a specific time period by selecting the Data Domain Capacity Usage Report and Data Domain Capacity Forecast Report, respectively, in the Reports list on the Avamar Enterprise Manager Reports page. Finally, the System Status page in Avamar Enterprise Manager provides details on forecast capacity and capacity usage. Viewing system events (page 261) and Avamar Enterprise Manager (page 294) provide details.
Replication monitoring. There are several ways to monitor replication activity in Avamar, including replication activities associated with a Data Domain system. The Avamar Activity Monitor in Avamar Administrator provides a list of recent replication activities. If you select a Replication Source or Replication Destination activity and select Actions > View Statistics, then you can view additional statistics about the replication, including a list of backups that replicated, the clients associated with the backups, the scheduled and actual start and end times for the replication, and a list of errors that occurred, if any. The Replication Report in Avamar Administrator also provides details on recent replication activities. You can filter the report to view only replication activities associated with a Data Domain system. Finally, the Replicator Status page in Avamar Enterprise Manager provides
EMC AVAMAR 6.0 • ADMINISTRATION GUIDE 551
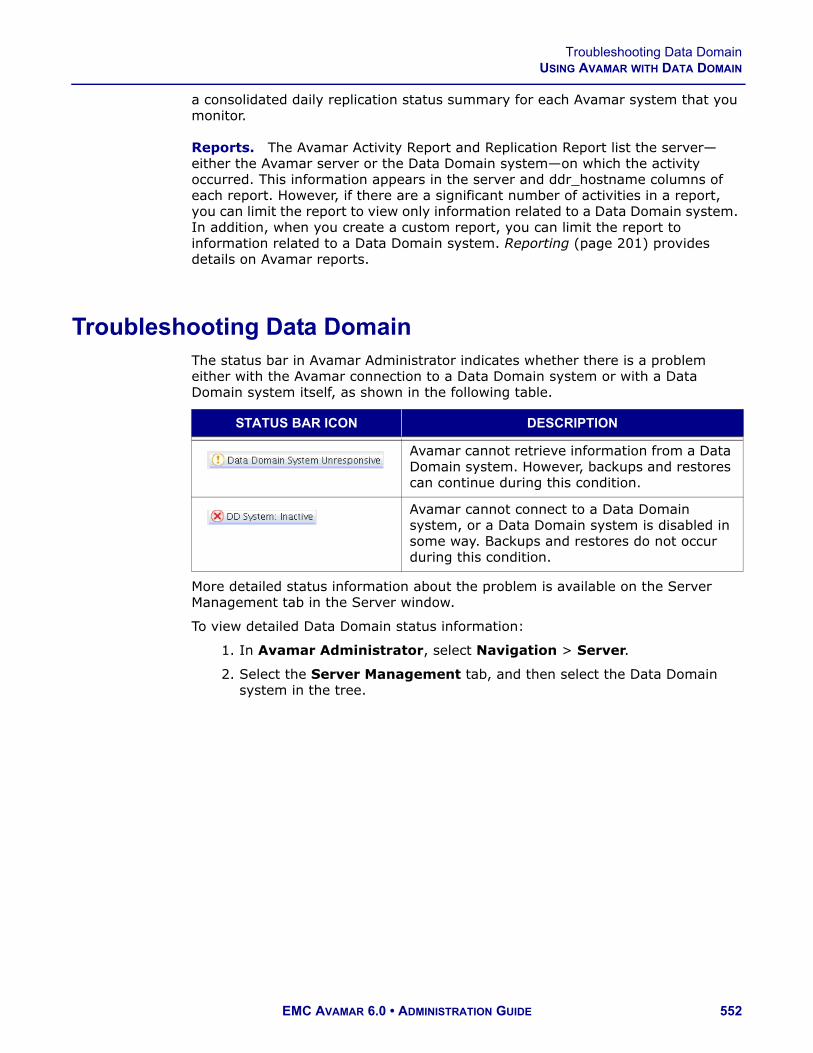
Troubleshooting Data DomainUSING AVAMAR WITH DATA DOMAIN
a consolidated daily replication status summary for each Avamar system that you monitor.
Reports. The Avamar Activity Report and Replication Report list the server—either the Avamar server or the Data Domain system—on which the activity occurred. This information appears in the server and ddr_hostname columns of each report. However, if there are a significant number of activities in a report, you can limit the report to view only information related to a Data Domain system. In addition, when you create a custom report, you can limit the report to information related to a Data Domain system. Reporting (page 201) provides details on Avamar reports.
Troubleshooting Data DomainThe status bar in Avamar Administrator indicates whether there is a problem either with the Avamar connection to a Data Domain system or with a Data Domain system itself, as shown in the following table.
More detailed status information about the problem is available on the Server Management tab in the Server window.
To view detailed Data Domain status information:
1. In Avamar Administrator, select Navigation > Server.
2. Select the Server Management tab, and then select the Data Domain system in the tree.
STATUS BAR ICON DESCRIPTION
Avamar cannot retrieve information from a Data Domain system. However, backups and restores can continue during this condition.
Avamar cannot connect to a Data Domain system, or a Data Domain system is disabled in some way. Backups and restores do not occur during this condition.
EMC AVAMAR 6.0 • ADMINISTRATION GUIDE 552

Troubleshooting Data DomainUSING AVAMAR WITH DATA DOMAIN
The Monitoring Status row in the right pane provides a detailed status of the Data Domain system, as shown in the following figure.
Data Domain status and resolutions
The following table lists the available values for the Monitoring Status row on the Server Management tab in the Server window in Avamar Administrator. If the status indicates a problem, a proposed resolution is provided.
MONITORING STATUS RESOLUTION
OK No resolution is required.
SNMP Getter/Setter disabled
Use the Data Domain SSH CLI to enable SNMP by typing: snmp enable
Unable to get CPU, disk, and network statistics data
Use the Data Domain SSH CLI to enable SNMP by typing: snmp enable
Unable to get CPU and disk statistics data
Use the Data Domain SSH CLI to enable SNMP by typing: snmp enable
Unable to get network statistics data
Use the Data Domain SSH CLI to enable SNMP by typing: snmp enable
Unable to get file system statistics data
Use the Data Domain SSH CLI to enable SNMP by typing: snmp enable
EMC AVAMAR 6.0 • ADMINISTRATION GUIDE 553

Troubleshooting Data DomainUSING AVAMAR WITH DATA DOMAIN
Error invoking ssh cli command
Review the system log files to try to determine the cause of the problem. You should also review the Data Domain Command Reference Guide, which is available through https://my.datadomain.com.
File system disabled Use the Data Domain SSH CLI to enable Data Domain file system operations by typing: filesys enable
When the Data Domain file system is disabled, Avamar cannot perform backups to and restores from the device.
Unable to get SNMP file system status
Verify that the SNMP getter/setter port is valid. This is the port that you specified when you added the Data Domain system to the Avamar configuration.
Failed to authenticate ssh cli connection with ssh key
Verify that the SSH public/private key pair was set up correctly on both the Avamar server and the Data Domain system. The EMC Avamar with Data Domain Guide provides details on configuring the SSH public/private key pair.
Failed to authenticate SSH CLI connection with credentials
Verify that the Data Domain DD Boost user credentials are correct. This is the username and password that you specified when you added the Data Domain system to the Avamar configuration.
Unable to retrieve ssh key file pair
Verify that the SSH public/private key pair was set up correctly on both the Avamar server and the Data Domain system, and that the public key was copied to the correct location on the Data Domain system. The EMC Avamar with Data Domain Guide provides details on configuring the SSH public/private key pair.
Unable to retrieve ssh public key file
Verify that the SSH public/private key pair was set up correctly on both the Avamar server and the Data Domain system, and that the public key was copied to the correct location on the Data Domain system. The EMC Avamar with Data Domain Guide provides details on configuring the SSH public/private key pair.
Unable to retrieve ssh private key file
Verify that the SSH public/private key pair was set up correctly on both the Avamar server and the Data Domain system. The EMC Avamar with Data Domain Guide provides details on configuring the SSH public/private key pair.
MONITORING STATUS RESOLUTION
EMC AVAMAR 6.0 • ADMINISTRATION GUIDE 554

Troubleshooting Data DomainUSING AVAMAR WITH DATA DOMAIN
DDBoost disabled Enable DD Boost using either the Data Domain SSH CLI or the web-based Data Domain Enterprise Manager.To enable DD Boost using the SSH CLI:
• For DDOS 4.9.x, type:ost enable
• For DDOS 5.0.0.x, type:ddboost enable
When DD Boost is disabled, Avamar cannot perform backups to and restores from the device.
DDBoost user disabled Use the Data Domain SSH CLI to enable the DD Boost user by typing: user enable USERNAME
where USERNAME is the username of the DD Boost user.When the DD Boost user is disabled, Avamar cannot perform backups to and restores from the device.
DDBoost user changed on Data Domain system
If you edited the DD Boost user account information on the Data Domain system, then you must edit the DD Boost user account information in the Data Domain configuration on the Avamar server using the instructions in Editing a Data Domain system (page 539).When you edit the DD Boost user account information in Avamar Administrator, the SSH key may fail. To resolve this issue, re-add the SSH key using the instructions in the EMC Avamar with Data Domain Guide.
DDBoost option disabled Use the Data Domain SSH CLI to enable DD Boost by typing one of the following commands:
• For DDOS 4.9.x, type:ost option set boost enabled
• For DDOS 5.0.0.x, type the following command on a single line:ddboost option set distributed-segment-processing enabled
Backups continue when DD Boost is disabled. However, performance decreases.
DDBoost option not available
No resolution is required. The Data Domain system is in a cluster, and DD Boost is not available in a cluster.
MONITORING STATUS RESOLUTION
EMC AVAMAR 6.0 • ADMINISTRATION GUIDE 555

Troubleshooting Data DomainUSING AVAMAR WITH DATA DOMAIN
DDBoost not licensed Use the Data Domain SSH CLI to add the license for DD Boost by typing:license add LICENSE
where LICENSE is the license code.
Invalid SNMP port Verify that you specified the correct getter/setter port when you added the Data Domain system to the Avamar configuration, and ensure that the getter/setter port is open on the Data Domain system by typing:snmp show trap-hosts
Invalid SNMP trap host or trap port
Use the Data Domain SSH CLI to verify that the Avamar server is configured as a trap host on the Data Domain system by typing:snmp show trap-hosts
If necessary, use the Data Domain SSH CLI to add the Avamar server as a trap host on the Data Domain system by typing:snmp add trap-host HOSTNAME
where HOSTNAME is the hostname of the Avamar server. By default, port 163 is used.Verify that you specified the correct trap port when you added the Data Domain system to the Avamar configuration.
Invalid SNMP community string
Use the Data Domain SSH CLI to verify the SNMP community string by typing:snmp show ro-communities
Verify that you specified the correct SNMP community string when you added the Data Domain system to the Avamar configuration.
Error getting SNMP objects Review the system log files to try to determine the cause of the problem. Using the error message, search the Data Domain knowledgebase at https://my.datadomain.com for information.
Non-ost user state is Unknown
Use the user show commands in the Data Domain SSH CLI to verify the status of the user. The DD OS Command Reference Guide provides details.
Non-ost user Invalid Use the Data Domain SSH CLI to create the user by typing:user add USERNAME priv admin
where USERNAME is the name of the user account.
MONITORING STATUS RESOLUTION
EMC AVAMAR 6.0 • ADMINISTRATION GUIDE 556
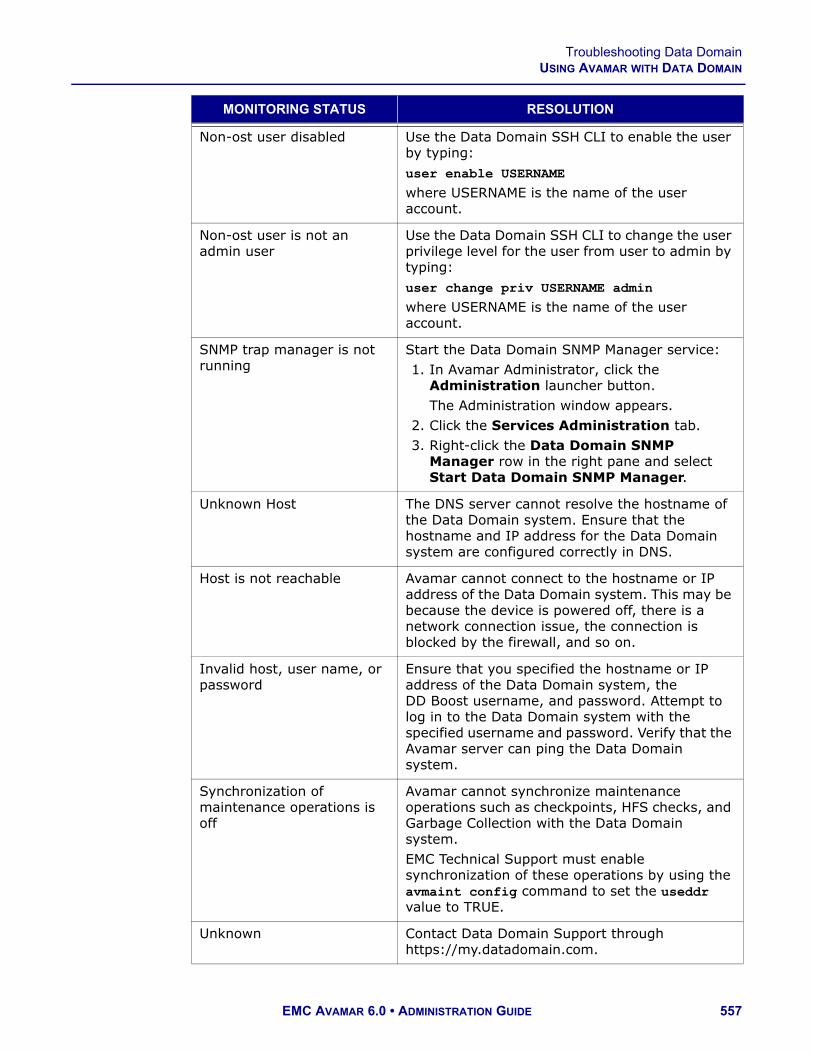
Troubleshooting Data DomainUSING AVAMAR WITH DATA DOMAIN
Non-ost user disabled Use the Data Domain SSH CLI to enable the user by typing:user enable USERNAME
where USERNAME is the name of the user account.
Non-ost user is not an admin user
Use the Data Domain SSH CLI to change the user privilege level for the user from user to admin by typing:user change priv USERNAME admin
where USERNAME is the name of the user account.
SNMP trap manager is not running
Start the Data Domain SNMP Manager service:1. In Avamar Administrator, click the
Administration launcher button.The Administration window appears.
2. Click the Services Administration tab.3. Right-click the Data Domain SNMP
Manager row in the right pane and select Start Data Domain SNMP Manager.
Unknown Host The DNS server cannot resolve the hostname of the Data Domain system. Ensure that the hostname and IP address for the Data Domain system are configured correctly in DNS.
Host is not reachable Avamar cannot connect to the hostname or IP address of the Data Domain system. This may be because the device is powered off, there is a network connection issue, the connection is blocked by the firewall, and so on.
Invalid host, user name, or password
Ensure that you specified the hostname or IP address of the Data Domain system, the DD Boost username, and password. Attempt to log in to the Data Domain system with the specified username and password. Verify that the Avamar server can ping the Data Domain system.
Synchronization of maintenance operations is off
Avamar cannot synchronize maintenance operations such as checkpoints, HFS checks, and Garbage Collection with the Data Domain system. EMC Technical Support must enable synchronization of these operations by using the avmaint config command to set the useddr value to TRUE.
Unknown Contact Data Domain Support through https://my.datadomain.com.
MONITORING STATUS RESOLUTION
EMC AVAMAR 6.0 • ADMINISTRATION GUIDE 557

Troubleshooting Data DomainUSING AVAMAR WITH DATA DOMAIN
Monitoring status detailsWhen the monitoring status on the Server Management tab in the Server window in Avamar Administrator is a value other than OK, then additional information appears in a list below the Monitoring Status:
MONITORING STATUS DETAILS DESCRIPTION
• DDBoost Licensed, or• DDBoost not Licensed
DD Boost licensing status.If the value is DDBoost not licensed, then use the Data Domain SSH CLI to add the license for DD Boost by typing:license add LICENSE
where LICENSE is the license code.
• DDBoost Enabled, or• DDBoost Disabled
DD Boost status.If the value is DDBoost Disabled, then enable DD Boost using either the Data Domain SSH CLI or the web-based Data Domain Enterprise Manager.To enable DD Boost using the SSH CLI: To enable DD Boost using the SSH CLI:
• For DDOS 4.9.x, type:ost enable
• For DDOS 5.0.0.x, type:ddboost enable
When DD Boost is disabled, Avamar cannot perform backups to and restores from the device.
• DDBoost User Enabled, or• DDBoost User Disabled
Whether the DD Boost user is enabled or disabled.If the value is DDBoost User Disabled, then use the Data Domain SSH CLI to enable the DD Boost user by typing: user enable USERNAME
where USERNAME is the username of the DD Boost user.When the DD Boost user is disabled, Avamar cannot perform backups to and restores from the device.
EMC AVAMAR 6.0 • ADMINISTRATION GUIDE 558

Troubleshooting Data DomainUSING AVAMAR WITH DATA DOMAIN
• DDBoost User Valid, or• DDBoost User Changed
DD Boost user status.If the value is DDBoost User Changed and you edited the DD Boost user account information on the Data Domain system, then you must edit the DD Boost user account information in the Data Domain configuration on the Avamar server using the instructions in Editing a Data Domain system (page 539).When you edit the DD Boost user account information in Avamar Administrator, the SSH key may fail. To resolve this issue, re-add the SSH key using the instructions in the EMC Avamar with Data Domain Guide.
• DDBoost Option Enabled, or• DDBoost Option Disabled, or• DDBoost Option not Available
DD Boost option status.If the value is DDBoost Option Disabled, then use the Data Domain SSH CLI to enable DD Boost by typing one of the following commands:
• For DDOS 4.9.x, type:ost option set boost enabled
• For DDOS 5.0.0.x, type the following command on a single line:ddboost option set distributed-segment-processing enabled
Backups continue when DD Boost is disabled. However, performance decreases.If the value is DDBoost Option not Available, then the Data Domain system is in a cluster, and DD Boost is not available in a cluster.
MONITORING STATUS DETAILS DESCRIPTION
EMC AVAMAR 6.0 • ADMINISTRATION GUIDE 559

Troubleshooting Data DomainUSING AVAMAR WITH DATA DOMAIN
• Non-ost user state is Unknown, or
• Non-ost user Invalid, or• Non-ost user disabled, or• Non-ost user is not an admin
user
Status of the non-OST user.If the value is Non-ost user state is Unknown, then Use the user show commands in the Data Domain SSH CLI to verify the status of the user. The DD OS Command Reference Guide provides details.If the value is Non-ost user Invalid, Non-ost user disabled, or Non-ost user is not an admin user, then use the Data Domain SSH CLI to create, enable, or change the user privilege level from user to admin, respectively, by typing one of the following commands:
• user add USERNAME priv admin• user enable USERNAME• user change priv USERNAME admin
where USERNAME is the name of the user account.NOTE: This row does not appear if the non-OST user has not been configured.
• SNMP Enabled, or• SNMP Disabled
SNMP status.If the value is SNMP Disabled, then use the Data Domain SSH CLI to enable SNMP by typing: snmp enable
• File System Running, or• File System Enabled, or• File System Disabled, or• File System Unknown, or• File system status unknown
since SNMP is disabled
Status of the Data Domain file system.When the Data Domain file system is disabled, Avamar cannot perform backups to and restores from the device.
If the value is File System Disabled, then use the Data Domain SSH CLI to enable Data Domain file system operations by typing: filesys enable
If the value is File system status unknown since SNMP is disabled, then use the Data Domain SSH CLI to enable SNMP by typing: snmp enable
If the value is File System Unknown, then verify that the SNMP getter/setter port is valid. This is the port that you specified when you added the Data Domain system to the Avamar configuration.
MONITORING STATUS DETAILS DESCRIPTION
EMC AVAMAR 6.0 • ADMINISTRATION GUIDE 560
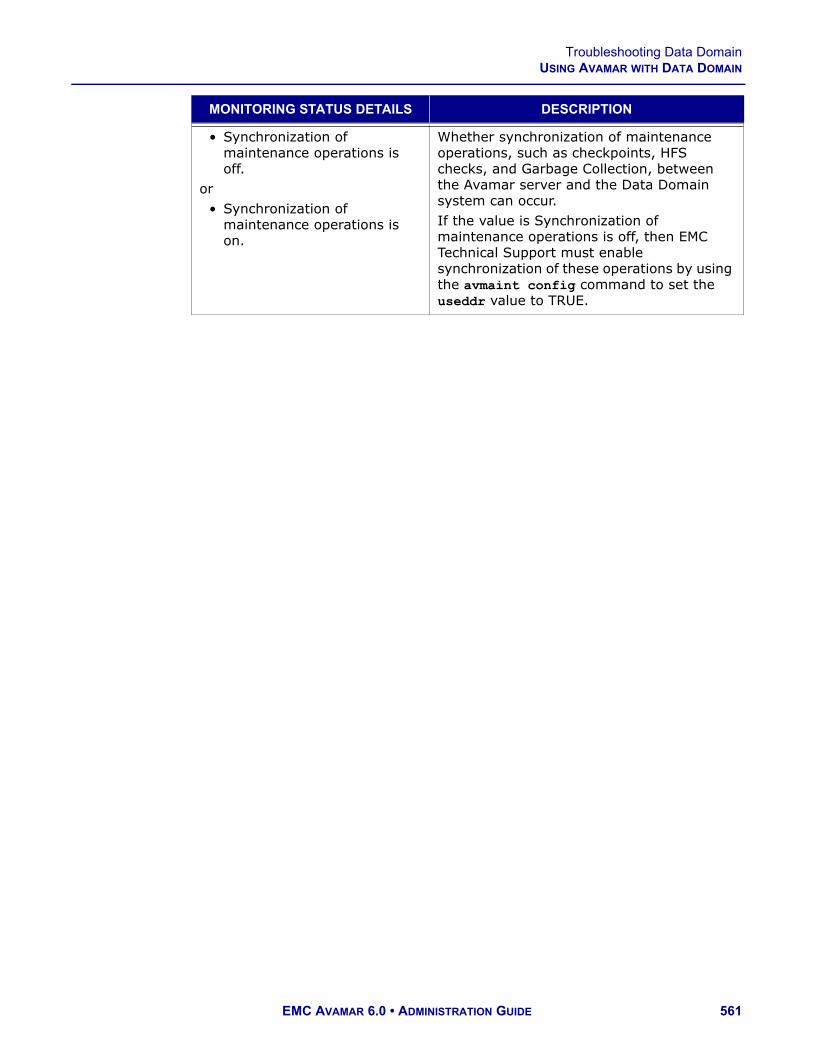
Troubleshooting Data DomainUSING AVAMAR WITH DATA DOMAIN
• Synchronization of maintenance operations is off.
or• Synchronization of
maintenance operations is on.
Whether synchronization of maintenance operations, such as checkpoints, HFS checks, and Garbage Collection, between the Avamar server and the Data Domain system can occur.If the value is Synchronization of maintenance operations is off, then EMC Technical Support must enable synchronization of these operations by using the avmaint config command to set the useddr value to TRUE.
MONITORING STATUS DETAILS DESCRIPTION
EMC AVAMAR 6.0 • ADMINISTRATION GUIDE 561

AVAMAR FILE SYSTEM (AVFS)The Avamar File System (AvFS) provides a browsable virtual filesystem view of the normally inaccessible Avamar server filesystem.
The Avamar File System provides read-only accessibility to all backups stored on an Avamar server down to the individual file level.
Hardware requirementsFor all applications except supporting VMware file level restore, a second dedicated utility node is required to implement AvFS functionality.
If you use AvFS strictly to support Avamar for VMware file level restore, you can install the AvFS on the utility node.
Capabilities and limitationsThis topic discusses various capabilities and limitations of Avamar File System (AvFS).
Samba is supported with limitations. Samba exports of AvFS are supported. However, be advised that certain characters that are not allowed in Windows filenames are not translated properly. Configuring Samba for use with AvFS (page 566) provides information.
NFS mounts not supported. NFS mounting AvFS is not supported. This is primarily due to in order caching on clients and the difficulties converting a 20-byte hash into a 6-byte in order value.
Windows volume names. By default, when Windows volumes are displayed, all root-level colons (:) are converted to dollar signs ($). For example, volume C: becomes C$.
EMC AVAMAR 6.0 • ADMINISTRATION GUIDE 562

Security recommendationsAVAMAR FILE SYSTEM (AVFS)
Security recommendationsYou cannot limit file access in AvFS on a user-by-user basis. All files within all backups stored on that server are potentially viewable by any user with access to AvFS.
IMPORTANT: It is vitally important that you limit access to AvFS to authorized users only. Any user with access to AvFS can potentially view any file stored within any backup on that Avamar server.
Furthermore, if you are configuring AvFS for use with Samba, especially if you use AvFS to support the optional Avamar VMware Windows file-level restore feature, you should strengthen the default Samba security by implementing one or all of the suggested security measures described in Strengthening Samba security (page 570).
EMC AVAMAR 6.0 • ADMINISTRATION GUIDE 563

Installing and enabling AvFSAVAMAR FILE SYSTEM (AVFS)
Installing and enabling AvFSThe procedure for installing and enabling AvFS differs according to which version Avamar software you are running.
Installing and enabling AvFS on Avamar 6.0 and later utility nodes
If installing and enabling the Avamar File System on Avamar 6.0 and later utility nodes, perform the following:
1. Use the Avamar Enterprise Manager System Maintenance page to install the Avamar File System software.
Server Updates and Hotfixes (page 393) provides details.
User=root 2. Open a command shell and log in to the utility node as root.
3. Start AvFS by typing:
service axionfs start
The following information appears in the command shell:axionfs Info: Loading fuse module. axionfs Info: Avamarfs started on /mnt/axion.[ OK ]
AvFS appears as /mnt/axion; it is read-only.
4. Verify that the axionfs service is running by typing:
ps -ef | grep axionfs
The following information appears in the command shell:root 29454 1 0 15:16 ? 00:00:00 /usr/local/avamar/bin/axionfs --vardir=/usr/local/avamar/var --bindir=/usr/local/avamar/bin --sysdir=/usr/local/avamar/etc --mountpoint=/mnt/axion
5. Verify that AvFS is being exported by typing:
cd /mnt/axion
ls
A listing of the /mnt/axion directory should appear in the command shell.
6. (Optional) To enable AvFS to start automatically on reboot, type:
/sbin/chkconfig --add axionfs
/sbin/chkconfig --level 345 axionfs on
EMC AVAMAR 6.0 • ADMINISTRATION GUIDE 564

Shutting down AvFSAVAMAR FILE SYSTEM (AVFS)
Installing and enabling AvFS on Avamar 5.x and earlier utility nodes
1. Ensure that the Avamar utility node has been configured in accordance with the instructions found in the Avamar installation documentation.
User=root 2. Open a command shell and log in to the utility node as root.
3. Install AvFS by typing:
cd /usr/local/avamar/src/RHEL4_64
rpm -hi ./dpnaxionfs-VERSION.rhel4_64.x86_64.rpm
where VERSION is the version you are installing.
The following information appears in the command shell:########################################### [100%]########################################### [100%]
4. Start AvFS by typing:
service axionfs start
The following information appears in the command shell:axionfs Info: Loading fuse module. axionfs Info: Avamarfs started on /mnt/axion.[ OK ]
AvFS appears as /mnt/axion; it is read-only.
5. Verify that the axionfs service is running by typing:
ps -ef | grep axionfs
The following information appears in the command shell:root 29454 1 0 15:16 ? 00:00:00 /usr/local/avamar/bin/axionfs --vardir=/usr/local/avamar/var --bindir=/usr/local/avamar/bin --sysdir=/usr/local/avamar/etc --mountpoint=/mnt/axion
6. Verify that AvFS is being exported by typing:
cd /mnt/axion
ls
A listing of the /mnt/axion directory should appear in the command shell.
7. (Optional) To enable AvFS to start automatically on reboot, type:
/sbin/chkconfig --add axionfs
/sbin/chkconfig --level 345 axionfs on
Shutting down AvFSUser=root 1. Open a command shell and log in to the utility node as root.
2. Type:
service axionfs stop
EMC AVAMAR 6.0 • ADMINISTRATION GUIDE 565

Configuring Samba for use with AvFSAVAMAR FILE SYSTEM (AVFS)
Configuring Samba for use with AvFSTask list Configuring Samba for use with AvFScomprises the following tasks:
• Installing Samba software, one of the following:• Installing Samba on Avamar 6.0 and later utility nodes running SLES
(page 566)• Installing Samba on Avamar 5.x and earlier utility nodes (page 567)
NOTE: Samba software is installed by default on all Avamar 6.0 and later utility nodes running Red Hat Enterprise Linux (RHEL).
• Configuring and starting Samba (page 567)• Verifying Proper Operation (page 569)
Installing Samba on Avamar 6.0 and later utility nodes running SLES
To configure Samba for use with AvFS on Avamar 6.0 and later utility nodes running SUSE Linux Enterprise Server (SLES), perform the following:
1. Ensure that AvFS has been properly installed and enabled according to the instructions in Installing and enabling AvFS (page 564)
User=root 2. Open a command shell and log in to the utility node as root.
3. Install the following packages in the following order by typing:
cd /usr/local/avamar/src/SLES11_64
rpm -ivh fam-2.7.0-130.21.x86_64.rpm
rpm -ivh libiniparser0-2.17-87.17.x86_64.rpm
rpm -ivh libnscd-32bit-2.0.2-73.18.x86_64.rpm
rpm -ivh libtalloc1-32bit-3.4.3-1.17.2.x86_64.rpm
rpm -ivh libtdb1-32bit-3.4.3-1.17.2.x86_64.rpm
rpm -ivh libwbclient0-32bit-3.4.3-1.17.2.x86_64.rpm
rpm -ivh samba-32bit-3.4.3-1.17.2.x86_64.rpm
rpm -ivh samba-client-32bit-3.4.3-1.17.2.x86_64.rpm
rpm -ivh samba-client-3.4.3-1.17.2.x86_64.rpm
rpm -ivh samba-3.4.3-1.17.2.x86_64.rpm
EMC AVAMAR 6.0 • ADMINISTRATION GUIDE 566

Configuring Samba for use with AvFSAVAMAR FILE SYSTEM (AVFS)
4. If your server has the avfirewall hardening package installed, perform the following:
(a) Open /etc/firewall.base in a UNX text editor (such as vi or emacs).
(b) Locate the following entries:
# 7. Allow DNS and NTP access from any servers# NOTE: add a "-s <ip address>" before the "-j" to specify which# DNS and NTP servers may be allowed$IPT -A INPUT -p udp --dport 53 -j ACCEPT$IPT -A INPUT -p tcp --dport 53 -j ACCEPT$IPT -A INPUT -p udp --dport 123 -j ACCEPT$IPT -A INPUT -p tcp --dport 123 -j ACCEPT
(c) Add the following line:
$IPT -A INPUT -p tcp -m multiport --dport 139,445 -j ACCEPT
(d) Save your changes.
(e) Restart the avfirewall service by typing:
service avfirewall restart
Refer to your EMC Avamar Product Security Guide for additional information about the avfirewall hardening package.
Installing Samba on Avamar 5.x and earlier utility nodesTo configure Samba for use with AvFS on Avamar 5.0 and earlier utility nodes, perform the following:
1. Ensure that AvFS has been properly installed and enabled according to the instructions in Installing and enabling AvFS (page 564).
User=root 2. Open a command shell and log in to the utility node as root.
3. Install new samba packages, using --replacefiles to override the smb.conf file, by typing:
cd /usr/local/avamar/src/RHEL4_64
rpm -U --replacefiles samba-* --force
Configuring and starting Samba
User=root 1. Ensure that you are still logged in to the utility node as root.
2. Save a backup copy of the /etc/samba/smb.conf file by typing:
cd /etc/samba/
cp -p ./smb.conf ./smb.conf.orig
3. If configuring an Avamar 5.0 and earlier utility node, rename /etc/samba/smb.conf.rpmnew to /etc/samba/smb.conf by typing:
mv smb.conf.rpmnew smb.conf
EMC AVAMAR 6.0 • ADMINISTRATION GUIDE 567

Configuring Samba for use with AvFSAVAMAR FILE SYSTEM (AVFS)
4. Grant access to the Samba mount by performing the following:
(a) Open /etc/samba/smb.conf in a text editor such as vi or Emacs.
(b) Add the following entry to the [global] section of /etc/samba/smb.conf:
hosts allow = IP-ADDRESS
where IP-ADDRESS is the Windows machine IP address. Mulitple IP addresses should be listed on the same line separated by spaces:
hosts allow = IP-ADDRESS1 IP-ADDRESS2 IP-ADDRESS3
IMPORTANT: In order to use Avamar for VMware file level restore, you must add the IP addresses for each file level restore proxy client you will be using.
(c) Add following entries to the end of /etc/samba/smb.conf:
[axionfs]path = /mnt/axionread only = yesbrowseable = nopublic = no
(d) Save the changes.
5. Create a user account that is used to access the AvFS Samba mount (/etc/passwd):
(a) Add the user account by typing:
useradd USERNAME
where USERNAME is the name of the account to add.
(b) Assign a Samba password for the new user account by typing:
smbpasswd -a USERNAME
where USERNAME is the name of the account you created
The following information appears in the command shell:
New SMB password:
(c) Type a password for the account and press Enter.
The following information appears in the command shell:
Retype new SMB password:
(d) Retype the password and press Enter.
The following information appears in the command shell:
startsmbfilepwent_internal: file /etc/samba/smbpasswd did not exist. File successfully created.
Added user preview.
6. Start AvFS by typing:
service axionfs start
The following information appears in the command shell:axionfs Info: Loading fuse module. axionfs Info: Avamarfs started on /mnt/axion.[ OK ]
EMC AVAMAR 6.0 • ADMINISTRATION GUIDE 568

Configuring Samba for use with AvFSAVAMAR FILE SYSTEM (AVFS)
7. Start the samba service by typing:
service smb start
The following information appears in the command shell:Starting SMB services: [ OK ]Starting NMB services: [ OK ]
If the Samba mount is properly configured, you should be able to connect to the Avamar server from Windows Explorer, as described in the following steps.
8. (Optional) To enable AvFS and the Samba mount to start automatically on reboot, type:
/sbin/chkconfig --add axionfs
/sbin/chkconfig --level 345 axionfs on
/sbin/chkconfig --add smb
/sbin/chkconfig --level 345 smb on
Verifying Proper Operation
Verify that the AvFS Samba mount is functioning properly by performing the following:
1. From a PC, open the Windows Start menu and select Run.
A command prompt appears.
2. Type:
\\AVAMARSERVER
where AVAMARSERVER is the Avamar server name as defined in corporate DNS.
TIP: If there is a DNS resolution issue, type the Avamar server IP address instead.
A Connect to dialog box appears.
3. Type the username and password and click OK.
Windows Explorer launches.A top-level axion folder is present, which shows the contents of /mnt/axion.
Various subdirectories list all backups stored on the server indexed according to various attributes. For example:
• The by-date directory lists backups stored on the server indexed according to their creation dates.
• The by-label directory lists all backups stored on the server indexed according to their name (label).
• The by-number directory lists backups stored on the server indexed according to their numerical ID.
EMC AVAMAR 6.0 • ADMINISTRATION GUIDE 569
Strengthening Samba securityAVAMAR FILE SYSTEM (AVFS)
Strengthening Samba securityIf you are configuring AvFS for use with Samba, especially if you use AvFS to support the optional Avamar VMware Windows file-level restore feature, you should strengthen the default Samba security by implementing one or all of the suggested security measures described in this topic.
IMPORTANT: In most cases, to use AvFS to support the optional Avamar VMware Windows file-level restore feature, you should implement all of the suggested security measures described in this topic.
How AvFS works with VMware File level restore
The optional Avamar VMware Windows file-level restore feature is implemented using a a Windows proxy client virtual machine. The Avamar and VMware software running on the Windows proxy requires a CIFS share that is exported by the Avamar server. This CIFS share provides a remote hierarchical filesystem view of the backups stored on the Avamar server. VMware Image Backups are accessed by way of the CIFS share to browse and restore their contents.
The CIFS share exported by the Avamar server requires AvFS to be installed and configured as described earlier in this chapter.
Access to the CIFS share requires a Samba username and password, which you should have created in Configuring Samba for use with AvFS (page 566). An Avamar Management Console Server (MCS) is configured with the Samba credentials as described in the EMC Avamar for VMware Guide.
During restore operations, the Avamar MCS server passes the Samba credentials to the Windows proxy client to perform the file level browses and restores.
Recommended methods for strengthening Samba share security
This topic discusses methods to strengthen Samba share security.
All methods involve logging in to the utility node as root, opening the Samba configuration file (/etc/samba/smb.conf) in a text editor, and either adding new entries or editing entries.
Example Samba configuration file (page 573) provides an example listing of a fully strengthened Samba configuration file.
EMC AVAMAR 6.0 • ADMINISTRATION GUIDE 570

Strengthening Samba securityAVAMAR FILE SYSTEM (AVFS)
Requiring a Samba username and password
If you have not already done so, configure Samba to require that a valid Samba username and password must be provided for access.
The default smb.conf file currently installed by AvFS requires valid Samba credentials to connect to the share. Adding the null passwords setting further strengthens security.
If you are configuring AvFS to support the optional Avamar VMware Windows file-level restore feature, you must also add the encrypt passwords setting.
To configure Samba to require that a valid Samba username and password are provided for access:
1. Edit the security global setting:
security = user
2. Add the null passwords global setting:
null passwords = no
3. Add the encrypt passwords global setting:
encrypt passwords = yes
Limiting access to listed hosts and networks
The hosts allow and hosts deny settings are used to allow or deny access to only the listed networks or IP addresses, respectively.
The hosts allow setting is the method used by the default smb.conf file currently installed by AvFS.
For VMware file-level restore, only the Windows proxy client virtual machine requires access to the Samba share.
To limit access to listed hosts and networks:
1. Add the hosts deny global setting:
Hosts deny 0.0.0.0/0
2. Edit the hosts allow global setting:
Hosts allow 127.0.0.1 PROXY-CLIENT-IP-ADDRESS
Specifying the Windows proxy client IP address is more secure than specifying the network that the proxy client is a member of. The loopback or localhost IP address is required for local utilities to work. Hostnames can be used instead of IP addresses, but verify that name lookups work first.
EMC AVAMAR 6.0 • ADMINISTRATION GUIDE 571

Strengthening Samba securityAVAMAR FILE SYSTEM (AVFS)
Limiting access to specific interfaces
If the Avamar server has more than one network interface card installed, Samba can be configured to answer requests on specific interfaces.
For example, if you have an interface connected to a private network to which the Windows proxy client is also connected, Samba can be configured to only answer requests from the interface connected to the private network.
To configure Samba to answer requests on specific interfaces, add the bind interfaces only and interfaces global settings:
bind interfaces only = yes
interfaces = lo PRIVATE-NETWORK-NAME-OR-IP-ADDRESS
Interface device names such as lo, eth0, eth1, or the IP address of an interface, for example, 127.0.0.1 for lo, or 192.168.100.33 for eth1, can be used. The loopback lo interface or IP address 127.0.0.1 is required for local utilities to work.
A private network between the Samba server (that is, Avamar utility node) and the Windows proxy client might require multiple interfaces or subnetworks on the Windows proxy client.
Bear in mind that the Windows proxy client virtual machine requires network access to the following servers:
• VMware vSphere™ or vCenter server (by way of primary interface)• Avamar server and Avamar MCS (by way of eth0 interface)• Samba server running on utility node (by way of eth0 or eth1 interface)• Running virtual machines selected as restore destinations (by way of
primary interface)
Limiting share visibility
Another method to make the exported share more secure is to prevent uninformed users from knowing of its existence. The share does not have to be public, which enables guest access. Instead, Samba can be configured to require a specific set of user credentials to access the share.
Furthermore, you can also configure the share to not be browsable, which further hides the share name.
IMPORTANT: Although Samba supports defining alternative share names, for Avamar VMware Windows file-level restore, the share name must be axionfs, which is the default share name. Do not change the share name, or Avamar VMware Windows file-level restore does not work.
To limit share visibility:
1. Add the browseable share setting:
browseable = no
2. Edit the public share setting:
public = no
EMC AVAMAR 6.0 • ADMINISTRATION GUIDE 572

Strengthening Samba securityAVAMAR FILE SYSTEM (AVFS)
Example Samba configuration file
The following is an example listing of a fully strengthened Samba configuration file (/etc/samba/smb.conf).
Important settings discussed in previous topics are shown in bold.
# This is the main Samba configuration file.
# Read the smb.conf(5) manual page for additional information# on the options used.# For a guide on installing and configuring AvFS and Samba on an# Avamar Server see Tech Note Avamar File System (AvFS) P/N# 300-009-660.# Any line which starts with a ; (semi-colon) or a # (hash) # is a comment.# After modifying this file run the command "testparm" to check for# basic syntax errors.# Run as root 'service smb restart' to apply the changes.
#======================= Global Settings =====================================[global]# Workgroup = NT-Domain-Name or Workgroup-Name. workgroup = AXIONFS# Server string is the equivalent of the NT Description field. server string = Samba Server# Define in which mode Samba will operate. Select user level security.
security = user# Use a separate log file for each machine that connects. log file = /var/log/samba/%m.log# Put a limit on the size of the log files (in Kb). max log size = 50# Default. Do not allow null passwords.
null passwords = no encrypt passwords = yes# 'hosts allow' and 'hosts deny' allows restrictions on connections.# 'allow hosts' and 'deny hosts' are synonyms. Note that access still# requires suitable user-level credentials. The localhost address# 127.0.0.1 will always be allowed access unless specifically denied# by a 'hosts deny' option. Specify host names, ip, network/netmask# pairs, and netgroup. Use of host names is not recommended. Fully# test name resolution before using host names. The EXCEPT keyword# can be used to limit an allow list.# Default: hosts allow = # none (i.e., all hosts permitted access)# Example: allow all IPs in 192.168.*.* except one# hosts allow = 192.168. EXCEPT 192.168.100.66# Example: allow hosts that match the given network/netmask# hosts allow = 192.168.100.0/255.255.255.0# Example: allow a couple of hosts# hosts allow = hostname1, hostname2# Example: allow IPs in 192.168.100.* plus one specific host# hosts allow = 192.168.100. myhost.mynet.edu# Example: allow only hosts in NIS netgroup "somenet", but deny# access from one particular host# hosts allow = @somenet# hosts deny = hostname3# Deny everything first including loopback
hosts deny = 0.0.0.0/0 # Specify exactly what to allow
hosts allow = 127.0.0.1 PROXY-CLIENT-IP-ADDRESS# Only listen on the interfaces specified by 'interfaces'. By default# Samba queries the kernel for all active interfaces and uses# interfaces that are broadcast capable except 127.0.0.1 (lo).
bind interfaces only = yes# Configure Samba to use specific interfaces. Each network interface
EMC AVAMAR 6.0 • ADMINISTRATION GUIDE 573

Strengthening Samba securityAVAMAR FILE SYSTEM (AVFS)
# to be used must be listed here.# · A network interface name such as eth0. This may include wildcards# so eth* will match any interface starting with "eth".# · An interface IP/mask pair.# · An interface IP address. The netmask is determined from the list# of interfaces obtained from the kernel.# · A broadcast/mask pair.# The "mask" parameter can be a bit length or a full netmask in dotted# decimal form.# The "IP" parameter can be a full dotted decimal IP address or a# hostname. Hostnames are not recommended. Fully test name resolution # before using hostnames.# Default: interfaces =# Example: interfaces = eth0 192.168.100.10/24 # Example: interfaces = 192.168.100.10/255.255.255.0 eth1# Specify loopback so local access continues to work. Specify# device name or IP of the interfaces to use.
interfaces = lo PRIVATE-NETWORK-NAME-OR-IP-ADDRESS# Set local master to no so that Samba won't become a master# browser on a network. Otherwise the normal election rules apply. local master = no# Tell Samba whether or not to try to resolve NetBIOS names via DNS# nslookups. dns proxy = no
#============================ Share Definitions ==============================
# This is the share defined for the default AvFS mountpoint.# Edit the 'hosts allow' and 'interfaces' entries above to enable and control access.[axionfs] path = /mnt/axion# Default. Inverted synonym is writeable = no or writable = no. read only = yes# Do not list shares. Share names must be known for access. (browsable is a synonym)
browseable = no# Default. Password is required to connect (guest ok is a synonym for public)
public = no
EMC AVAMAR 6.0 • ADMINISTRATION GUIDE 574

APPENDIX A — COMMAND SHELL SERVER LOGINS
User accounts. The following user accounts are commonly used for system administration and maintenance tasks:
• root• admin• dpn
The admin and dpn user accounts require authentication by way of Secure Shell (SSH).
EMC AVAMAR 6.0 • ADMINISTRATION GUIDE 575

Switching user IDsAPPENDIX A — COMMAND SHELL SERVER LOGINS
Starting command shell sessionsThis example procedure describes how to log in to an Avamar server or utility node as user admin through SSH.
To start a command shell session:
User=admin 1. Open a command shell and log in:
Switching user IDsSwitch user to root You can switch to user root by typing su, and switch back to the previous login ID
by typing exit.
Switch user to dpn To switch to the dpn user account:
1. Switch user to the dpn user account and login shell by typing:
su - dpn
2. When prompted for a password, type the dpn password and press Enter.
3. Load the dpn OpenSSH key by typing:
ssh-agent bash
ssh-add ~dpn/.ssh/dpnid
TIP: To determine the active user account (login ID) of a shell session, type whoami.
SERVER TYPE LOGIN STEPS
Single-node Log in to the server as admin.
Multi-node 1. Log in to the utility node as admin, and then load the admin OpenSSH key by typing:ssh-agent bash
ssh-add ~admin/.ssh/admin_key
2. When prompted, type the admin_key passphrase and press Enter.
EMC AVAMAR 6.0 • ADMINISTRATION GUIDE 576

sudo implementationAPPENDIX A — COMMAND SHELL SERVER LOGINS
sudo implementationOn Gen4 and later Avamar Data Stores, the admin and dpn user accounts are automatically added to the sudoers file. This enables admin and dpn users to execute a limited set of commands that would otherwise require operating system root permission.
Prefixing commands with “sudo”. Instead of switching user to root with the su command, admin and dpn users can directly issue commands normally requiring root permissions by prefixing each command with sudo. For example, the following command installs MyPackage.rpm:
sudo rpm -ivh MyPackage.rpm
If prompted for a password, type the password and press Enter.
You might be periodically prompted to retype the admin or dpn password when prefixing other commands with sudo. This is normal.
Spawning a sudo Bash subshell. If you need to execute several commands that normally require root permissions, you can spawn a persistent sudo Bash subshell by typing sudo bash.
Commands that normally require root permissions can now be typed directly with no additional modifications to the command line syntax. For example:
sudo bash
rpm -ivh MyPackage1.rpm
rpm -ivh MyPackage2.rpm
rpm -ivh MyPackage3.rpm
exit
EMC AVAMAR 6.0 • ADMINISTRATION GUIDE 577

APPENDIX B — PLUG-IN OPTIONS
Important terms and conceptsPlug-in options provide additional control of backups and restores. These options are context-sensitive to both the operation being performed and the specific plug-in selected for that operation.
You can specify these options during on-demand backup and restore operations, or persistently set the options in datasets for scheduled backups.
Backup or restore option dialog boxes automatically appear when you initiate on-demand backups or restores, respectively.
When you create a new dataset, the new dataset wizard offers an opportunity to configure persistent backup plug-in option settings for that dataset.
To view or set plug-in options for an existing dataset:
1. In Avamar Administrator, select Tools > Manage Datasets.
The Manage All Datasets window appears.
2. Select a dataset from the list and click Edit.
The Edit Dataset dialog box appears.
3. Click the Options tab.
4. Set the plug-in options either using the graphical controls or by typing option names and values as free text.
Setting plug-in options using graphical controls. Click the Options tab and select a plug-in to display options for the plug-in.
These settings are represented by graphical controls such as options, radio buttons, list boxes, and so forth.
The advantage of using graphical controls to set plug-in options is that you cannot type an option name or value incorrectly. Only valid states are shown.
To set advanced options that are normally only necessary to debug an Avamar system, click Show Advanced Options. The advanced options are shown in red.
EMC AVAMAR 6.0 • ADMINISTRATION GUIDE 578

Important terms and conceptsAPPENDIX B — PLUG-IN OPTIONS
Typing option names and values as free text. You can also set plug-in options by typing option names and values as free text.
Click More to expand the dialog box to include Enter Attribute and Attribute Value fields, which can be used to input plug-in options and values as free text.
However, it must be understood that no error checking or validation is performed on these free text entries. In addition, free text entries override settings made by way of the graphical controls.
EMC AVAMAR 6.0 • ADMINISTRATION GUIDE 579

AIX filesystem plug-in optionsAPPENDIX B — PLUG-IN OPTIONS
AIX filesystem plug-in optionsThis topic describes the available options for the Avamar plug-in for the AIX filesystem.
Backup options
SETTING DESCRIPTION
Backup label Assigns this descriptive label to the backup.
LO
GG
ING
List backup contents Specifies how much information about the backup contents should be included in the log files. One of the following:
• No file listing• List file names• List files and dates
Informational message level
Specifies how many informational messages should be included in the log files. One of the following:
No informationals All informational messages are suppressed. However, errors and warnings are included in the log files.
Some informationals Some informational messages are included in the log files.
Many informationals Additional status information is included in the log files.
All informationals Provides maximum information. In addition to errors and warnings, all informational messages are included in the log files.
Report advanced statistics
If selected, advanced timing and deduplication statistics are written to log files.
Enable debugging messages
If selected, maximum information is written to log files.IMPORTANT: If selected, very large log files are created.
EMC AVAMAR 6.0 • ADMINISTRATION GUIDE 580

AIX filesystem plug-in optionsAPPENDIX B — PLUG-IN OPTIONS
FIL
ES
YS
TE
M T
RA
VE
RS
AL
Do not traverse any mounts
If selected, no mount points are traversed during this backup.
Traverse fixed-disk mounts
If selected, only fixed-disk filesystem mount points are traversed during this backup.
Traverse fixed-disk and remote network mounts
If selected, both fixed-disk and NFS network mount points are traversed during this backup.
Force traversal of specified file system type(s)
Accepts a comma-separated list of one or more filesystem types (for example, nfs, ext2, jfs, xfs) that should be traversed during this backup.
Force non-traversal of specified file system type(s)
Accepts a comma-separated list of one or more filesystem types (for example, nfs, ext2, jfs, xfs) that should not be traversed during this backup.
PR
E-S
CR
IPT
Run user-defined script at beginning of backup
Runs a user-defined script at the beginning of the backup session.IMPORTANT: The script must be located in /usr/local/avamar/etc/scripts.
Abort backup if script fails
If selected, stop the backup if the script returns a non-zero status code.
PO
ST
-SC
RIP
T
Run user-defined script at end of backup
Runs a user-defined script at the end of the backup session.IMPORTANT: The script must be located in/usr/local/avamar/etc/scripts.
Exit process with script failure exitcode
If selected, avtar exits with the exit code of the script instead of a standard avtar exit code.
CL
IEN
T C
AC
HE
OP
TIO
NS
Check client-side caches and report inconsistencies
If selected, a backup is not performed. Instead, it forces a validation check of the client-side cache with the Avamar server.
Check and repair client-side caches
If selected, a backup is not performed. Instead, it forces a validation check of the client-side cache with the Avamar server, and repairs inconsistencies.
Maximum client file cache size (MBs)
Specifies the maximum client file cache size in MBs. A negative value indicates a fraction of RAM. For example, -8 specifies that no more than 1/8th of physical RAM be allocated to the client file cache.
Maximum client hash cache size (MBs)
Specifies the maximum client hash cache size in MBs. A negative value indicates a fraction of RAM. For example, -8 specifies that no more than 1/8th of physical RAM be allocated to the client hash cache.
SETTING DESCRIPTION
EMC AVAMAR 6.0 • ADMINISTRATION GUIDE 581

AIX filesystem plug-in optionsAPPENDIX B — PLUG-IN OPTIONS
AD
VA
NC
ED
OP
TIO
NS Client-side flag file Specifies the path to a flag file on the client that
contains additional option settings.
Network usage throttle (Mbps)
Specifies a setting that reduces network usage to a specified rate, expressed as megabits/second (for example, 0 = unrestricted, 50% of a T1 = 0.772).
Directly connect to all server nodes
If selected, establish multiple connections to the server. This can improve backup performance under certain circumstances.
SETTING DESCRIPTION
EMC AVAMAR 6.0 • ADMINISTRATION GUIDE 582

AIX filesystem plug-in optionsAPPENDIX B — PLUG-IN OPTIONS
Restore options
SETTING DESCRIPTION
Overwrite existing files Controls behavior when file to be restored already exists. One of the following:
• Never• Always• Generate New Name• If Modified• If Newer
LO
GG
ING
List backup contents Specifies how much information about the backup contents should be included in the log files. One of the following:
• No file listing• List file names• List files and dates
Informational message level
Specifies how many informational messages should be included in the log files. One of the following:
No informationals All informational messages are suppressed. However, errors and warnings are included in the log files.
Some informationals Some informational messages are included in the log files.
Many informationals Additional status information is included in the log files.
All informationals Provides maximum information. In addition to errors and warnings, all informational messages are included in the log files.
Report advanced statistics
If selected, advanced timing and deduplication statistics are written to log files.
Enable debugging messages
If selected, maximum information is written to log files.IMPORTANT: If selected, very large log files are created.
PR
E-S
CR
IPT
Run user-defined script at beginning of restore
Runs a user-defined script at the beginning of the restore session.IMPORTANT: The script must be located in /usr/local/avamar/etc/scripts.
Abort restore if script fails
If selected, stop the restore if the script returns a non-zero status code.
EMC AVAMAR 6.0 • ADMINISTRATION GUIDE 583

AIX filesystem plug-in optionsAPPENDIX B — PLUG-IN OPTIONS
PO
ST
-SC
RIP
T
Run user-defined script at end of restore
Runs a user-defined script at the end of the restore session.IMPORTANT: The script must be located in/usr/local/avamar/etc/scripts.
Exit process with script failure exitcode
If selected, avtar exits with the exit code of the script instead of a standard avtar exit code.
CL
IEN
T C
AC
HE
OP
TIO
NS Check client-side
caches and report inconsistencies
If selected, a restore is not performed. Instead, it forces a validation check of the client-side cache with the Avamar server.
Check and repair client-side caches
If selected, a restore is not performed. Instead, it forces a validation check of the client-side cache with the Avamar server, and repairs inconsistencies.
Rebuild client-side caches from most recent backup
Does not restore data. If selected, the contents of the last backup are used to re-create the client-side file cache.
AD
VA
NC
ED
OP
TIO
NS
Do not descend into subdirectories
If selected, restore only the specified top-level directory; do not restore any subdirectories.
Recreate original path beneath target directory
If selected, re-create the original path to files and directories beneath the specified target directory.For example, if you restore /usr/MyDir/MyFile to /tmp and you select this option, the full path to the restored file is /tmp/usr/MyDir/MyFile.
Directly connect to all server nodes
If selected, establish multiple connections to the server. This can improve restore performance under certain circumstances.
SETTING DESCRIPTION
EMC AVAMAR 6.0 • ADMINISTRATION GUIDE 584

FreeBSD filesystem plug-in optionsAPPENDIX B — PLUG-IN OPTIONS
FreeBSD filesystem plug-in optionsThis topic describes the available options for the Avamar plug-in for the FreeBSD filesystem.
Backup options
SETTING DESCRIPTION
Backup label Assigns this descriptive label to backup.
LO
GG
ING
List backup contents Specifies how much information about the backup contents should be included in the log files. One of the following:
• No file listing• List file names• List files and dates
Informational message level
Specifies how many informational messages should be included in the log files. One of the following:
No informationals All informational messages are suppressed. However, errors and warnings are included in the log files.
Some informationals Some informational messages are included in the log files.
Many informationals Additional status information is included in the log files.
All informationals Provides maximum information. In addition to errors and warnings, all informational messages are included in the log files.
Report advanced statistics
If selected, advanced timing and deduplication statistics are written to log files.
Enable debugging messages
If selected, maximum information is written to log files.IMPORTANT: If selected, very large log files are created.
EMC AVAMAR 6.0 • ADMINISTRATION GUIDE 585
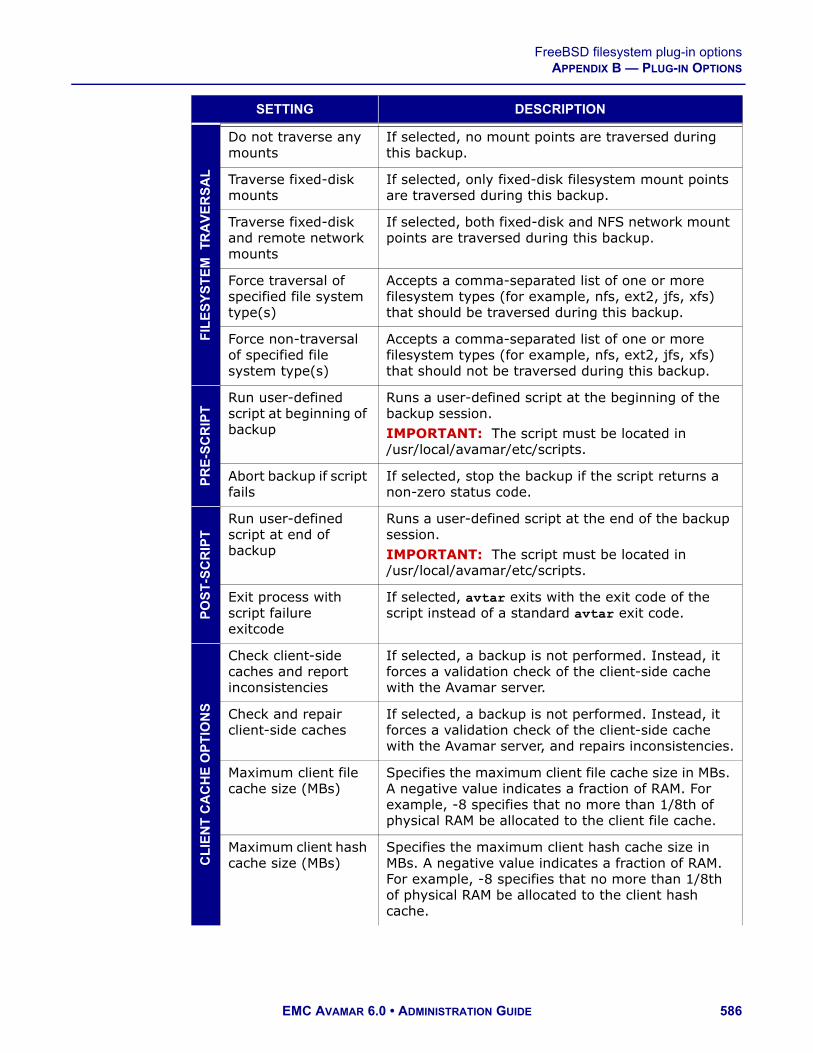
FreeBSD filesystem plug-in optionsAPPENDIX B — PLUG-IN OPTIONS
FIL
ES
YS
TE
M
TR
AV
ER
SA
L
Do not traverse any mounts
If selected, no mount points are traversed during this backup.
Traverse fixed-disk mounts
If selected, only fixed-disk filesystem mount points are traversed during this backup.
Traverse fixed-disk and remote network mounts
If selected, both fixed-disk and NFS network mount points are traversed during this backup.
Force traversal of specified file system type(s)
Accepts a comma-separated list of one or more filesystem types (for example, nfs, ext2, jfs, xfs) that should be traversed during this backup.
Force non-traversal of specified file system type(s)
Accepts a comma-separated list of one or more filesystem types (for example, nfs, ext2, jfs, xfs) that should not be traversed during this backup.
PR
E-S
CR
IPT
Run user-defined script at beginning of backup
Runs a user-defined script at the beginning of the backup session.IMPORTANT: The script must be located in /usr/local/avamar/etc/scripts.
Abort backup if script fails
If selected, stop the backup if the script returns a non-zero status code.
PO
ST
-SC
RIP
T
Run user-defined script at end of backup
Runs a user-defined script at the end of the backup session.IMPORTANT: The script must be located in/usr/local/avamar/etc/scripts.
Exit process with script failure exitcode
If selected, avtar exits with the exit code of the script instead of a standard avtar exit code.
CL
IEN
T C
AC
HE
OP
TIO
NS
Check client-side caches and report inconsistencies
If selected, a backup is not performed. Instead, it forces a validation check of the client-side cache with the Avamar server.
Check and repair client-side caches
If selected, a backup is not performed. Instead, it forces a validation check of the client-side cache with the Avamar server, and repairs inconsistencies.
Maximum client file cache size (MBs)
Specifies the maximum client file cache size in MBs. A negative value indicates a fraction of RAM. For example, -8 specifies that no more than 1/8th of physical RAM be allocated to the client file cache.
Maximum client hash cache size (MBs)
Specifies the maximum client hash cache size in MBs. A negative value indicates a fraction of RAM. For example, -8 specifies that no more than 1/8th of physical RAM be allocated to the client hash cache.
SETTING DESCRIPTION
EMC AVAMAR 6.0 • ADMINISTRATION GUIDE 586

FreeBSD filesystem plug-in optionsAPPENDIX B — PLUG-IN OPTIONS
AD
VA
NC
ED
OP
TIO
NS Client-side flag file Specifies the path to a flag file on the client that
contains additional option settings.
Network usage throttle (Mbps)
Specifies a setting that reduces network usage to a specified rate, expressed as megabits/second (for example, 0 = unrestricted, 50% of a T1 = 0.772).
Directly connect to all server nodes
If selected, establish multiple connections to the server. This can improve backup performance under certain circumstances.
SETTING DESCRIPTION
EMC AVAMAR 6.0 • ADMINISTRATION GUIDE 587

FreeBSD filesystem plug-in optionsAPPENDIX B — PLUG-IN OPTIONS
Restore options
SETTING DESCRIPTION
Overwrite existing files Controls behavior when file to be restored already exists. One of the following:
• Never• Always• Generate New Name• If Modified• If Newer
LO
GG
ING
List backup contents Specifies how much information about the backup contents should be included in the log files. One of the following:
• No file listing• List file names• List files and dates
Informational message level
Specifies how many informational messages should be included in the log files. One of the following:
No informationals All informational messages are suppressed. However, errors and warnings are included in the log files.
Some informationals Some informational messages are included in the log files.
Many informationals Additional status information is included in the log files.
All informationals Provides maximum information. In addition to errors and warnings, all informational messages are included in the log files.
Report advanced statistics
If selected, advanced timing and deduplication statistics are written to log files.
Enable debugging messages
If selected, maximum information is written to log files.IMPORTANT: If selected, very large log files are created.
PR
E-S
CR
IPT
Run user-defined script at beginning of restore
Runs a user-defined script at the beginning of the restore session.IMPORTANT: The script must be located in /usr/local/avamar/etc/scripts.
Abort restore if script fails
If selected, stop the restore if the script returns a non-zero status code.
EMC AVAMAR 6.0 • ADMINISTRATION GUIDE 588

FreeBSD filesystem plug-in optionsAPPENDIX B — PLUG-IN OPTIONS
PO
ST
-SC
RIP
T
Run user-defined script at end of restore
Runs a user-defined script at the end of the restore session.IMPORTANT: The script must be located in/usr/local/avamar/etc/scripts.
Exit process with script failure exitcode
If selected, avtar exits with the exit code of the script instead of a standard avtar exit code.
CL
IEN
T C
AC
HE
OP
TIO
NS Check client-side
caches and report inconsistencies
If selected, a restore is not performed. Instead, it forces a validation check of the client-side cache with the Avamar server.
Check and repair client-side caches
If selected, a restore is not performed. Instead, it forces a validation check of the client-side cache with the Avamar server, and repairs inconsistencies.
Rebuild client-side caches from most recent backup
Does not restore data. If selected, the contents of the last backup are used to re-create the client-side file cache.
AD
VA
NC
ED
OP
TIO
NS
Do not descend into subdirectories
If selected, restore only the specified top-level directory; do not restore any subdirectories.
Recreate original path beneath target directory
If selected, re-create the original path to files and directories beneath the specified target directory.For example, if you restore /usr/MyDir/MyFile to /tmp and you select this option, the full path to the restored file is /tmp/usr/MyDir/MyFile.
Directly connect to all server nodes
If selected, establish multiple connections to the server. This can improve restore performance under certain circumstances.
SETTING DESCRIPTION
EMC AVAMAR 6.0 • ADMINISTRATION GUIDE 589

HP-UX filesystem plug-in optionsAPPENDIX B — PLUG-IN OPTIONS
HP-UX filesystem plug-in optionsThis topic describes the available options for the Avamar plug-in for the HP-UX filesystem.
Backup options
SETTING DESCRIPTION
Backup label Assigns this descriptive label to the backup.
LO
GG
ING
List backup contents Specifies how much information about the backup contents should be included in the log files. One of the following:
• No file listing• List file names• List files and dates
Informational message level
Specifies how many informational messages should be included in the log files. One of the following:
No informationals All informational messages are suppressed. However, errors and warnings are included in the log files.
Some informationals Some informational messages are included in the log files.
Many informationals Additional status information is included in the log files.
All informationals Provides maximum information. In addition to errors and warnings, all informational messages are included in the log files.
Report advanced statistics
If selected, advanced timing and deduplication statistics are written to log files.
Enable debugging messages
If selected, maximum information is written to log files.IMPORTANT: If selected, very large log files are created.
EMC AVAMAR 6.0 • ADMINISTRATION GUIDE 590

HP-UX filesystem plug-in optionsAPPENDIX B — PLUG-IN OPTIONS
FIL
ES
YS
TE
M T
RA
VE
RS
AL
Do not traverse any mounts
If selected, no mount points are traversed during this backup.
Traverse fixed-disk mounts
If selected, only fixed-disk filesystem mount points are traversed during this backup.
Traverse fixed-disk and remote network mounts
If selected, both fixed-disk and NFS network mount points are traversed during this backup.
Force traversal of specified file system type(s)
Accepts a comma-separated list of one or more filesystem types (for example, nfs, ext2, jfs, xfs) that should be traversed during this backup.
Force non-traversal of specified file system type(s)
Accepts a comma-separated list of one or more filesystem types (for example, nfs, ext2, jfs, xfs) that should not be traversed during this backup.
PR
E-S
CR
IPT
Run user-defined script at beginning of backup
Runs a user-defined script at the beginning of the backup session.IMPORTANT: The script must be located in /usr/local/avamar/etc/scripts.
Abort backup if script fails
If selected, stop the backup if the script returns a non-zero status code.
PO
ST
-SC
RIP
T
Run user-defined script at end of backup
Runs a user-defined script at the end of the backup session.IMPORTANT: The script must be located in/usr/local/avamar/etc/scripts.
Exit process with script failure exitcode
If selected, avtar exits with the exit code of the script instead of a standard avtar exit code.
CL
IEN
T C
AC
HE
OP
TIO
NS
Check client-side caches and report inconsistencies
If selected, a backup is not performed. Instead, it forces a validation check of the client-side cache with the Avamar server.
Check and repair client-side caches
If selected, a backup is not performed. Instead, it forces a validation check of the client-side cache with the Avamar server, and repairs inconsistencies.
Maximum client file cache size (MBs)
Specifies the maximum client file cache size in MBs. A negative value indicates a fraction of RAM. For example, -8 specifies that no more than 1/8th of physical RAM be allocated to the client file cache.
Maximum client hash cache size (MBs)
Specifies the maximum client hash cache size in MBs. A negative value indicates a fraction of RAM. For example, -8 specifies that no more than 1/8th of physical RAM be allocated to the client hash cache.
SETTING DESCRIPTION
EMC AVAMAR 6.0 • ADMINISTRATION GUIDE 591

HP-UX filesystem plug-in optionsAPPENDIX B — PLUG-IN OPTIONS
AD
VA
NC
ED
OP
TIO
NS Client-side flag file Specifies the path to a flag file on the client that
contains additional option settings.
Network usage throttle (Mbps)
Specifies a setting that reduces network usage to a specified rate, expressed as megabits/second (for example, 0 = unrestricted, 50% of a T1 = 0.772).
Directly connect to all server nodes
If selected, establish multiple connections to the server. This can improve backup performance under certain circumstances.
SETTING DESCRIPTION
EMC AVAMAR 6.0 • ADMINISTRATION GUIDE 592

HP-UX filesystem plug-in optionsAPPENDIX B — PLUG-IN OPTIONS
Restore options
SETTING DESCRIPTION
Overwrite existing files Controls behavior when file to be restored already exists. One of the following:
• Never• Always• Generate New Name• If Modified• If Newer
LO
GG
ING
List backup contents Specifies how much information about the backup contents should be included in the log files. One of the following:
• No file listing• List file names• List files and dates
Informational message level
Specifies how many informational messages should be included in the log files. One of the following:
No informationals All informational messages are suppressed. However, errors and warnings are included in the log files.
Some informationals Some informational messages are included in the log files.
Many informationals Additional status information is included in the log files.
All informationals Provides maximum information. In addition to errors and warnings, all informational messages are included in the log files.
Report advanced statistics
If selected, advanced timing and deduplication statistics are written to log files.
Enable debugging messages
If selected, maximum information is written to log files.IMPORTANT: If selected, very large log files are created.
PR
E-S
CR
IPT
Run user-defined script at beginning of restore
Runs a user-defined script at the beginning of the restore session.IMPORTANT: The script must be located in /usr/local/avamar/etc/scripts.
Abort restore if script fails
If selected, stop the restore if the script returns a non-zero status code.
EMC AVAMAR 6.0 • ADMINISTRATION GUIDE 593

HP-UX filesystem plug-in optionsAPPENDIX B — PLUG-IN OPTIONS
PO
ST
-SC
RIP
T
Run user-defined script at end of restore
Runs a user-defined script at the end of the restore session.IMPORTANT: The script must be located in/usr/local/avamar/etc/scripts.
Exit process with script failure exitcode
If selected, avtar exits with the exit code of the script instead of a standard avtar exit code.
CL
IEN
T C
AC
HE
OP
TIO
NS Check client-side
caches and report inconsistencies
If selected, a restore is not performed. Instead, it forces a validation check of the client-side cache with the Avamar server.
Check and repair client-side caches
If selected, a restore is not performed. Instead, it forces a validation check of the client-side cache with the Avamar server, and repairs inconsistencies.
Rebuild client-side caches from most recent backup
Does not restore data. If selected, the contents of the last backup are used to re-create the client-side file cache.
AD
VA
NC
ED
OP
TIO
NS
Do not descend into subdirectories
If selected, restore only the specified top-level directory; do not restore any subdirectories.
Recreate original path beneath target directory
If selected, re-create the original path to files and directories beneath the specified target directory.For example, if you restore /usr/MyDir/MyFile to /tmp and you select this option, the full path to the restored file is /tmp/usr/MyDir/MyFile.
Directly connect to all server nodes
If selected, establish multiple connections to the server. This can improve restore performance under certain circumstances.
SETTING DESCRIPTION
EMC AVAMAR 6.0 • ADMINISTRATION GUIDE 594

Linux filesystem plug-in optionsAPPENDIX B — PLUG-IN OPTIONS
Linux filesystem plug-in optionsThis topic describes the available options for the Avamar plug-in for the Linux filesystem.
Backup options
SETTING DESCRIPTION
Backup label Assigns this descriptive label to the backup.
LO
GG
ING
List backup contents Specifies how much information about the backup contents should be included in the log files. One of the following:
• No file listing• List file names• List files and dates
Informational message level
Specifies how many informational messages should be included in the log files. One of the following:
No informationals All informational messages are suppressed. However, errors and warnings are included in the log files.
Some informationals Some informational messages are included in the log files.
Many informationals Additional status information is included in the log files.
All informationals Provides maximum information. In addition to errors and warnings, all informational messages are included in the log files.
Report advanced statistics
If selected, advanced timing and deduplication statistics are written to log files.
Enable debugging messages
If selected, maximum information is written to log files.IMPORTANT: If selected, very large log files are created.
EMC AVAMAR 6.0 • ADMINISTRATION GUIDE 595

Linux filesystem plug-in optionsAPPENDIX B — PLUG-IN OPTIONS
FIL
ES
YS
TE
M T
RA
VE
RS
AL
Do not traverse any mounts
If selected, no mount points are traversed during this backup.
Traverse fixed-disk mounts
If selected, only fixed-disk filesystem mount points are traversed during this backup.
Traverse fixed-disk and remote network mounts
If selected, both fixed-disk and NFS network mount points are traversed during this backup.
Force traversal of specified file system type(s)
Accepts a comma-separated list of one or more filesystem types (for example, nfs, ext2, jfs, xfs) that should be traversed during this backup.
Force non-traversal of specified file system type(s)
Accepts a comma-separated list of one or more filesystem types (for example, nfs, ext2, jfs, xfs) that should not be traversed during this backup.
PR
E-S
CR
IPT
Run user-defined script at beginning of backup
Runs a user-defined script at the beginning of the backup session.IMPORTANT: The script must be located in /usr/local/avamar/etc/scripts.
Abort backup if script fails
If selected, stop the backup if the script returns a non-zero status code.
PO
ST
-SC
RIP
T
Run user-defined script at end of backup
Runs a user-defined script at the end of the backup session.IMPORTANT: The script must be located in/usr/local/avamar/etc/scripts.
Exit process with script failure exitcode
If selected, avtar exits with the exit code of the script instead of a standard avtar exit code.
CL
IEN
T C
AC
HE
OP
TIO
NS
Check client-side caches and report inconsistencies
If selected, a backup is not performed. Instead, it forces a validation check of the client-side cache with the Avamar server.
Check and repair client-side caches
If selected, a backup is not performed. Instead, it forces a validation check of the client-side cache with the Avamar server, and repairs inconsistencies.
Maximum client file cache size (MBs)
Specifies the maximum client file cache size in MBs. A negative value indicates a fraction of RAM. For example, -8 specifies that no more than 1/8th of physical RAM be allocated to the client file cache.
Maximum client hash cache size (MBs)
Specifies the maximum client hash cache size in MBs. A negative value indicates a fraction of RAM. For example, -8 specifies that no more than 1/8th of physical RAM be allocated to the client hash cache.
SETTING DESCRIPTION
EMC AVAMAR 6.0 • ADMINISTRATION GUIDE 596

Linux filesystem plug-in optionsAPPENDIX B — PLUG-IN OPTIONS
AD
VA
NC
ED
OP
TIO
NS Client-side flag file Specifies the path to a flag file on the client that
contains additional option settings.
Network usage throttle (Mbps)
Specifies a setting that reduces network usage to a specified rate, expressed as megabits/second (for example, 0 = unrestricted, 50% of a T1 = 0.772).
Directly connect to all server nodes
If selected, establish multiple connections to the server. This can improve backup performance under certain circumstances.
SETTING DESCRIPTION
EMC AVAMAR 6.0 • ADMINISTRATION GUIDE 597
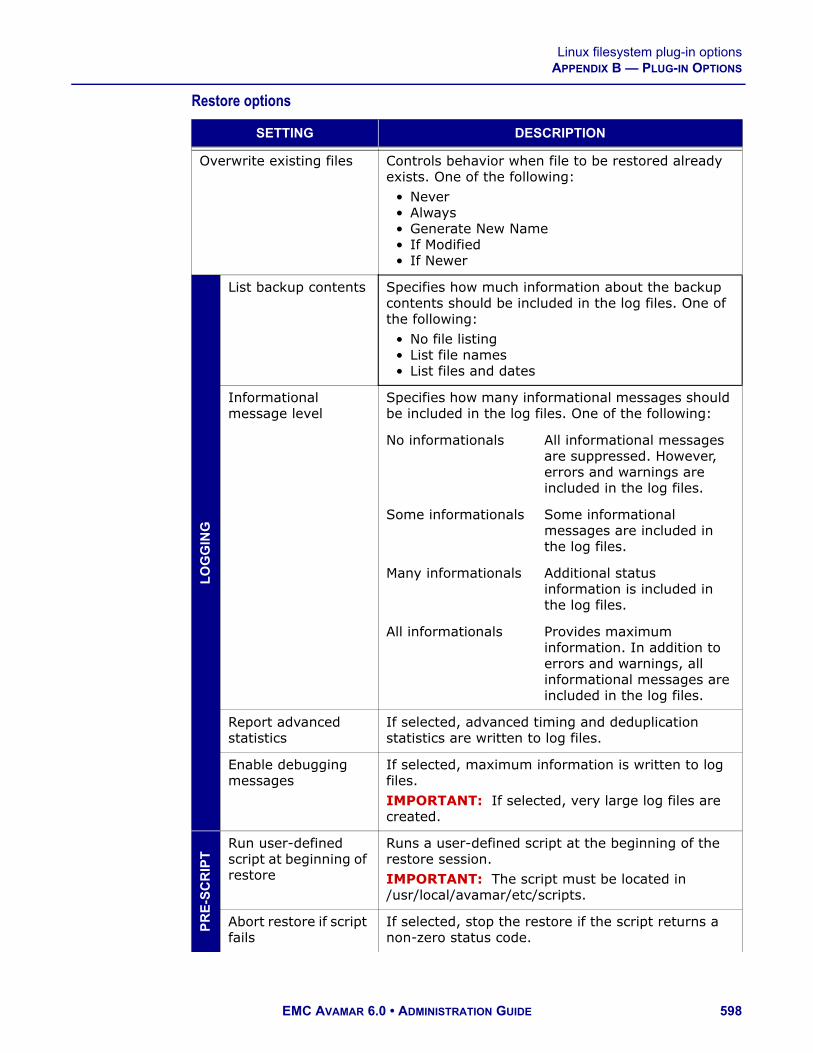
Linux filesystem plug-in optionsAPPENDIX B — PLUG-IN OPTIONS
Restore options
SETTING DESCRIPTION
Overwrite existing files Controls behavior when file to be restored already exists. One of the following:
• Never• Always• Generate New Name• If Modified• If Newer
LO
GG
ING
List backup contents Specifies how much information about the backup contents should be included in the log files. One of the following:
• No file listing• List file names• List files and dates
Informational message level
Specifies how many informational messages should be included in the log files. One of the following:
No informationals All informational messages are suppressed. However, errors and warnings are included in the log files.
Some informationals Some informational messages are included in the log files.
Many informationals Additional status information is included in the log files.
All informationals Provides maximum information. In addition to errors and warnings, all informational messages are included in the log files.
Report advanced statistics
If selected, advanced timing and deduplication statistics are written to log files.
Enable debugging messages
If selected, maximum information is written to log files.IMPORTANT: If selected, very large log files are created.
PR
E-S
CR
IPT
Run user-defined script at beginning of restore
Runs a user-defined script at the beginning of the restore session.IMPORTANT: The script must be located in /usr/local/avamar/etc/scripts.
Abort restore if script fails
If selected, stop the restore if the script returns a non-zero status code.
EMC AVAMAR 6.0 • ADMINISTRATION GUIDE 598

Linux filesystem plug-in optionsAPPENDIX B — PLUG-IN OPTIONS
PO
ST
-SC
RIP
T
Run user-defined script at end of restore
Runs a user-defined script at the end of the restore session.IMPORTANT: The script must be located in/usr/local/avamar/etc/scripts.
Exit process with script failure exitcode
If selected, avtar exits with the exit code of the script instead of a standard avtar exit code.
CL
IEN
T C
AC
HE
OP
TIO
NS Check client-side
caches and report inconsistencies
If selected, a restore is not performed. Instead, it forces a validation check of the client-side cache with the Avamar server.
Check and repair client-side caches
If selected, a restore is not performed. Instead, it forces a validation check of the client-side cache with the Avamar server, and repairs inconsistencies.
Rebuild client-side caches from most recent backup
Does not restore data. If selected, the contents of the last backup are used to re-create the client-side file cache.
AD
VA
NC
ED
OP
TIO
NS
Do not descend into subdirectories
If selected, restore only the specified top-level directory; do not restore any subdirectories.
Recreate original path beneath target directory
If selected, re-create the original path to files and directories beneath the specified target directory.For example, if you restore /usr/MyDir/MyFile to /tmp and you select this option, the full path to the restored file is /tmp/usr/MyDir/MyFile.
Directly connect to all server nodes
If selected, establish multiple connections to the server. This can improve restore performance under certain circumstances.
SETTING DESCRIPTION
EMC AVAMAR 6.0 • ADMINISTRATION GUIDE 599

Macintosh filesystem plug-in optionsAPPENDIX B — PLUG-IN OPTIONS
Macintosh filesystem plug-in optionsThis topic describes the available options for the Avamar plug-in for the Macintosh filesystem.
Backup options
SETTING DESCRIPTION
Backup label Assigns this descriptive label to the backup.
LO
GG
ING
List backup contents Specifies how much information about the backup contents should be included in the log files. One of the following:
• No file listing• List file names• List files and dates
Informational message level
Specifies how many informational messages should be included in the log files. One of the following:
No informationals All informational messages are suppressed. However, errors and warnings are included in the log files.
Some informationals Some informational messages are included in the log files.
Many informationals Additional status information is included in the log files.
All informationals Provides maximum information. In addition to errors and warnings, all informational messages are included in the log files.
Report advanced statistics
If selected, advanced timing and deduplication statistics are written to log files.
Enable debugging messages
If selected, maximum information is written to log files.IMPORTANT: If selected, very large log files are created.
EMC AVAMAR 6.0 • ADMINISTRATION GUIDE 600

Macintosh filesystem plug-in optionsAPPENDIX B — PLUG-IN OPTIONS
FIL
ES
YS
TE
M T
RA
VE
RS
AL
Do not traverse any mounts
If selected, no mount points are traversed during this backup.
Traverse fixed-disk mounts
If selected, only fixed-disk filesystem mount points are traversed during this backup.
Traverse fixed-disk and remote network mounts
If selected, both fixed-disk and NFS network mount points are traversed during this backup.
Force traversal of specified file system type(s)
Accepts a comma-separated list of one or more filesystem types (for example, nfs, ext2, jfs, xfs) that should be traversed during this backup.
Force non-traversal of specified file system type(s)
Accepts a comma-separated list of one or more filesystem types (for example, nfs, ext2, jfs, xfs) that should not be traversed during this backup.
PR
E-S
CR
IPT
Run user-defined script at beginning of backup
Runs a user-defined script at the beginning of the backup session.IMPORTANT: The script must be located in /usr/local/avamar/etc/scripts.
Abort backup if script fails
If selected, stop the backup if the script returns a non-zero status code.
PO
ST
-SC
RIP
T
Run user-defined script at end of backup
Runs a user-defined script at the end of the backup session.IMPORTANT: The script must be located in/usr/local/avamar/etc/scripts.
Exit process with script failure exitcode
If selected, avtar exits with the exit code of the script instead of a standard avtar exit code.
CL
IEN
T C
AC
HE
OP
TIO
NS
Check client-side caches and report inconsistencies
If selected, a backup is not performed. Instead, it forces a validation check of the client-side cache with the Avamar server.
Check and repair client-side caches
If selected, a backup is not performed. Instead, it forces a validation check of the client-side cache with the Avamar server, and repairs inconsistencies.
Maximum client file cache size (MBs)
Specifies the maximum client file cache size in MBs. A negative value indicates a fraction of RAM. For example, -8 specifies that no more than 1/8th of physical RAM be allocated to the client file cache.
Maximum client hash cache size (MBs)
Specifies the maximum client hash cache size in MBs. A negative value indicates a fraction of RAM. For example, -8 specifies that no more than 1/8th of physical RAM be allocated to the client hash cache.
SETTING DESCRIPTION
EMC AVAMAR 6.0 • ADMINISTRATION GUIDE 601

Macintosh filesystem plug-in optionsAPPENDIX B — PLUG-IN OPTIONS
AD
VA
NC
ED
OP
TIO
NS Client-side flag file Specifies the path to a flag file on the client that
contains additional option settings.
Network usage throttle (Mbps)
Specifies a setting that reduces network usage to a specified rate, expressed as megabits/second (for example, 0 = unrestricted, 50% of a T1 = 0.772).
Directly connect to all server nodes
If selected, establish multiple connections to the server. This can improve backup performance under certain circumstances.
SETTING DESCRIPTION
EMC AVAMAR 6.0 • ADMINISTRATION GUIDE 602

Macintosh filesystem plug-in optionsAPPENDIX B — PLUG-IN OPTIONS
Restore options
SETTING DESCRIPTION
Overwrite existing files Controls behavior when file to be restored already exists. One of the following:
• Never• Always• Generate New Name• If Modified• If Newer
LO
GG
ING
List backup contents Specifies how much information about the backup contents should be included in the log files. One of the following:
• No file listing• List file names• List files and dates
Informational message level
Specifies how many informational messages should be included in the log files. One of the following:
No informationals All informational messages are suppressed. However, errors and warnings are included in the log files.
Some informationals Some informational messages are included in the log files.
Many informationals Additional status information is included in the log files.
All informationals Provides maximum information. In addition to errors and warnings, all informational messages are included in the log files.
Report advanced statistics
If selected, advanced timing and deduplication statistics are written to log files.
Enable debugging messages
If selected, maximum information is written to log files.IMPORTANT: If selected, very large log files are created.
PR
E-S
CR
IPT
Run user-defined script at beginning of restore
Runs a user-defined script at the beginning of the restore session.IMPORTANT: The script must be located in /usr/local/avamar/etc/scripts.
Abort restore if script fails
If selected, stop the restore if the script returns a non-zero status code.
EMC AVAMAR 6.0 • ADMINISTRATION GUIDE 603

Macintosh filesystem plug-in optionsAPPENDIX B — PLUG-IN OPTIONS
PO
ST
-SC
RIP
T
Run user-defined script at end of restore
Runs a user-defined script at the end of the restore session.IMPORTANT: The script must be located in/usr/local/avamar/etc/scripts.
Exit process with script failure exitcode
If selected, avtar exits with the exit code of the script instead of a standard avtar exit code.
CL
IEN
T C
AC
HE
OP
TIO
NS Check client-side
caches and report inconsistencies
If selected, a restore is not performed. Instead, it forces a validation check of the client-side cache with the Avamar server.
Check and repair client-side caches
If selected, a restore is not performed. Instead, it forces a validation check of the client-side cache with the Avamar server, and repairs inconsistencies.
Rebuild client-side caches from most recent backup
Does not restore data. If selected, the contents of the last backup are used to re-create the client-side file cache.
AD
VA
NC
ED
OP
TIO
NS
Do not descend into subdirectories
If selected, restore only the specified top-level directory; do not restore any subdirectories.
Recreate original path beneath target directory
If selected, re-create the original path to files and directories beneath the specified target directory.For example, if you restore /usr/MyDir/MyFile to /tmp and you select this option, the full path to the restored file is /tmp/usr/MyDir/MyFile.
Directly connect to all server nodes
If selected, establish multiple connections to the server. This can improve restore performance under certain circumstances.
SETTING DESCRIPTION
EMC AVAMAR 6.0 • ADMINISTRATION GUIDE 604

NetWare filesystem plug-in optionsAPPENDIX B — PLUG-IN OPTIONS
NetWare filesystem plug-in optionsThis topic describes the available options for the Avamar plug-in for the NetWare filesystem.
Backup options
SETTING DESCRIPTION
SM
S A
UT
HE
NT
ICA
TIO
N Server login ID SMS login username. For example, CN=admin.O=HOSTNAME_CTX.
Server password Server login ID password.
Snapshot stored-on pool Specifies the snapshot stored-on pool name.
Backup label Assigns this descriptive label to the backup.
EMC AVAMAR 6.0 • ADMINISTRATION GUIDE 605

NetWare filesystem plug-in optionsAPPENDIX B — PLUG-IN OPTIONS
LO
GG
ING
List backup contents Specifies how much information about the backup contents should be included in the log files. One of the following:
• No file listing• List file names• List files and dates
Informational message level
Specifies how many informational messages should be included in the log files. One of the following:
No informationals All informational messages are suppressed. However, errors and warnings are included in the log files.
Some informationals Some informational messages are included in the log files.
Many informationals Additional status information is included in the log files.
All informationals Provides maximum information. In addition to errors and warnings, all informational messages are included in the log files.
Report advanced statistics
If selected, advanced timing and deduplication statistics are written to log files.
Enable debugging messages
If selected, maximum information is written to log files.IMPORTANT: If selected, very large log files are created.
FIL
ES
YS
TE
M
TR
AV
ER
SA
L
Do not traverse any mounts
If selected, no mount points are traversed during this backup.
Traverse fixed-disk mounts
If selected, only fixed-disk filesystem mount points are traversed during this backup.
Traverse fixed-disk and remote network mounts
If selected, both fixed-disk and NFS network mount points are traversed during this backup.
Force traversal of specified file system type(s)
Accepts a comma-separated list of one or more filesystem types (for example, nfs, ext2, jfs, xfs) that should be traversed during this backup.
Force non-traversal of specified file system type(s)
Accepts a comma-separated list of one or more filesystem types (for example, nfs, ext2, jfs, xfs) that should not be traversed during this backup.
SETTING DESCRIPTION
EMC AVAMAR 6.0 • ADMINISTRATION GUIDE 606

NetWare filesystem plug-in optionsAPPENDIX B — PLUG-IN OPTIONS
PR
E-S
CR
IPT
Run user-defined script at beginning of backup
Runs a user-defined script at the beginning of the backup session.IMPORTANT: The script must be located in /usr/local/avamar/etc/scripts.
Abort backup if script fails
If selected, stop the backup if the script returns a non-zero status code.
PO
ST
-SC
RIP
T
Run user-defined script at end of backup
Runs a user-defined script at the end of the backup session.IMPORTANT: The script must be located in/usr/local/avamar/etc/scripts.
Exit process with script failure exitcode
If selected, avtar exits with the exit code of the script instead of a standard avtar exit code.
CL
IEN
T C
AC
HE
OP
TIO
NS
Check client-side caches and report inconsistencies
If selected, a backup is not performed. Instead, it forces a validation check of the client-side cache with the Avamar server.
Check and repair client-side caches
If selected, a backup is not performed. Instead, it forces a validation check of the client-side cache with the Avamar server, and repairs inconsistencies.
Maximum client file cache size (MBs)
Specifies the maximum client file cache size in MBs. A negative value indicates a fraction of RAM. For example, -8 specifies that no more than 1/8th of physical RAM be allocated to the client file cache.
Maximum client hash cache size (MBs)
Specifies the maximum client hash cache size in MBs. A negative value indicates a fraction of RAM. For example, -8 specifies that no more than 1/8th of physical RAM be allocated to the client hash cache.
AD
VA
NC
ED
OP
TIO
NS
Client-side flag file Specifies the path to a flag file on the client that contains additional option settings.
Network usage throttle (Mbps)
Specifies a setting that reduces network usage to a specified rate, expressed as megabits/second (for example, 0 = unrestricted, 50% of a T1 = 0.772).
Directly connect to all server nodes
If selected, establish multiple connections to the server. This can improve backup performance under certain circumstances.
Suspend NSS Compression
If selected, NSS compression is suspended during backups and automatically resumed after backups.
SETTING DESCRIPTION
EMC AVAMAR 6.0 • ADMINISTRATION GUIDE 607
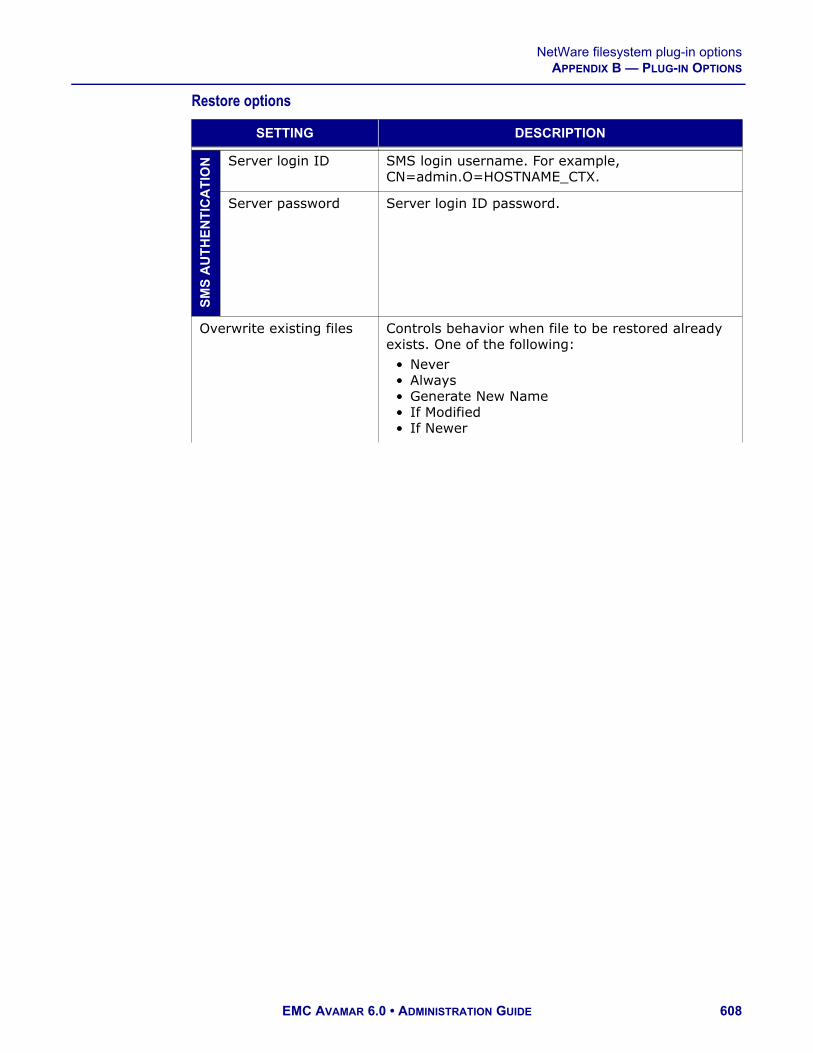
NetWare filesystem plug-in optionsAPPENDIX B — PLUG-IN OPTIONS
Restore options
SETTING DESCRIPTION
SM
S A
UT
HE
NT
ICA
TIO
N Server login ID SMS login username. For example, CN=admin.O=HOSTNAME_CTX.
Server password Server login ID password.
Overwrite existing files Controls behavior when file to be restored already exists. One of the following:
• Never• Always• Generate New Name• If Modified• If Newer
EMC AVAMAR 6.0 • ADMINISTRATION GUIDE 608

NetWare filesystem plug-in optionsAPPENDIX B — PLUG-IN OPTIONS
LO
GG
ING
List backup contents Specifies how much information about the backup contents should be included in the log files. One of the following:
• No file listing• List file names• List files and dates
Informational message level
Specifies how many informational messages should be included in the log files. One of the following:
No informationals All informational messages are suppressed. However, errors and warnings are included in the log files.
Some informationals Some informational messages are included in the log files.
Many informationals Additional status information is included in the log files.
All informationals Provides maximum information. In addition to errors and warnings, all informational messages are included in the log files.
Report advanced statistics
If selected, advanced timing and deduplication statistics are written to log files.
Enable debugging messages
If selected, maximum information is written to log files.IMPORTANT: If selected, very large log files are created.
PR
E-S
CR
IPT
Run user-defined script at beginning of restore
Runs a user-defined script at the beginning of the restore session.IMPORTANT: The script must be located in /usr/local/avamar/etc/scripts.
Abort restore if script fails
If selected, stop the restore if the script returns a non-zero status code.
PO
ST
-SC
RIP
T
Run user-defined script at end of restore
Runs a user-defined script at the end of the restore session.IMPORTANT: The script must be located in/usr/local/avamar/etc/scripts.
Exit process with script failure exitcode
If selected, avtar exits with the exit code of the script instead of a standard avtar exit code.
SETTING DESCRIPTION
EMC AVAMAR 6.0 • ADMINISTRATION GUIDE 609

NetWare filesystem plug-in optionsAPPENDIX B — PLUG-IN OPTIONS
CL
IEN
T C
AC
HE
OP
TIO
NS Check client-side
caches and report inconsistencies
If selected, a restore is not performed. Instead, it forces a validation check of the client-side cache with the Avamar server.
Check and repair client-side caches
If selected, a restore is not performed. Instead, it forces a validation check of the client-side cache with the Avamar server, and repairs inconsistencies.
Rebuild client-side caches from most recent backup
Does not restore data. If selected, the contents of the last backup are used to re-create the client-side file cache.
AD
VA
NC
ED
OP
TIO
NS
Do not descend into subdirectories
If selected, restore only the specified top-level directory; do not restore any subdirectories.
Recreate original path beneath target directory
If selected, re-create the original path to files and directories beneath the specified target directory.For example, if you restore /usr/MyDir/MyFile to /tmp and you select this option, the full path to the restored file is /tmp/usr/MyDir/MyFile.
Directly connect to all server nodes
If selected, establish multiple connections to the server. This can improve restore performance under certain circumstances.
SETTING DESCRIPTION
EMC AVAMAR 6.0 • ADMINISTRATION GUIDE 610

SCO OpenServer filesystem plug-in optionsAPPENDIX B — PLUG-IN OPTIONS
SCO OpenServer filesystem plug-in optionsThis topic describes the available options for the Avamar plug-in for the SCO OpenServer filesystem.
Backup options
SETTING DESCRIPTION
Backup label Assigns this descriptive label to the backup.
LO
GG
ING
List backup contents Specifies how much information about the backup contents should be included in the log files. One of the following:
• No file listing• List file names• List files and dates
Informational message level
Specifies how many informational messages should be included in the log files. One of the following:
No informationals All informational messages are suppressed. However, errors and warnings are included in the log files.
Some informationals Some informational messages are included in the log files.
Many informationals Additional status information is included in the log files.
All informationals Provides maximum information. In addition to errors and warnings, all informational messages are included in the log files.
Report advanced statistics
If selected, advanced timing and deduplication statistics are written to log files.
Enable debugging messages
If selected, maximum information is written to log files.IMPORTANT: If selected, very large log files are created.
EMC AVAMAR 6.0 • ADMINISTRATION GUIDE 611

SCO OpenServer filesystem plug-in optionsAPPENDIX B — PLUG-IN OPTIONS
FIL
ES
YS
TE
M T
RA
VE
RS
AL
Do not traverse any mounts
If selected, no mount points are traversed during this backup.
Traverse fixed-disk mounts
If selected, only fixed-disk filesystem mount points are traversed during this backup.
Traverse fixed-disk and remote network mounts
If selected, both fixed-disk and NFS network mount points are traversed during this backup.
Force traversal of specified file system type(s)
Accepts a comma-separated list of one or more filesystem types (for example, nfs, ext2, jfs, xfs) that should be traversed during this backup.
Force non-traversal of specified file system type(s)
Accepts a comma-separated list of one or more filesystem types (for example, nfs, ext2, jfs, xfs) that should not be traversed during this backup.
PR
E-S
CR
IPT
Run user-defined script at beginning of backup
Runs a user-defined script at the beginning of the backup session.IMPORTANT: The script must be located in /usr/local/avamar/etc/scripts.
Abort backup if script fails
If selected, stop the backup if the script returns a non-zero status code.
PO
ST
-SC
RIP
T
Run user-defined script at end of backup
Runs a user-defined script at the end of the backup session.IMPORTANT: The script must be located in/usr/local/avamar/etc/scripts.
Exit process with script failure exitcode
If selected, avtar exits with the exit code of the script instead of a standard avtar exit code.
CL
IEN
T C
AC
HE
OP
TIO
NS
Check client-side caches and report inconsistencies
If selected, a backup is not performed. Instead, it forces a validation check of the client-side cache with the Avamar server.
Check and repair client-side caches
If selected, a backup is not performed. Instead, it forces a validation check of the client-side cache with the Avamar server, and repairs inconsistencies.
Maximum client file cache size (MBs)
Specifies the maximum client file cache size in MBs. A negative value indicates a fraction of RAM. For example, -8 specifies that no more than 1/8th of physical RAM be allocated to the client file cache.
Maximum client hash cache size (MBs)
Specifies the maximum client hash cache size in MBs. A negative value indicates a fraction of RAM. For example, -8 specifies that no more than 1/8th of physical RAM be allocated to the client hash cache.
SETTING DESCRIPTION
EMC AVAMAR 6.0 • ADMINISTRATION GUIDE 612

SCO OpenServer filesystem plug-in optionsAPPENDIX B — PLUG-IN OPTIONS
AD
VA
NC
ED
OP
TIO
NS Client-side flag file Specifies the path to a flag file on the client that
contains additional option settings.
Network usage throttle (Mbps)
Specifies a setting that reduces network usage to a specified rate, expressed as megabits/second (for example, 0 = unrestricted, 50% of a T1 = 0.772).
Directly connect to all server nodes
If selected, establish multiple connections to the server. This can improve backup performance under certain circumstances.
SETTING DESCRIPTION
EMC AVAMAR 6.0 • ADMINISTRATION GUIDE 613

SCO OpenServer filesystem plug-in optionsAPPENDIX B — PLUG-IN OPTIONS
Restore options
SETTING DESCRIPTION
Overwrite existing files Controls behavior when file to be restored already exists. One of the following:
• Never• Always• Generate New Name• If Modified• If Newer
LO
GG
ING
List backup contents Specifies how much information about the backup contents should be included in the log files. One of the following:
• No file listing• List file names• List files and dates
Informational message level
Specifies how many informational messages should be included in the log files. One of the following:
No informationals All informational messages are suppressed. However, errors and warnings are included in the log files.
Some informationals Some informational messages are included in the log files.
Many informationals Additional status information is included in the log files.
All informationals Provides maximum information. In addition to errors and warnings, all informational messages are included in the log files.
Report advanced statistics
If selected, advanced timing and deduplication statistics are written to log files.
Enable debugging messages
If selected, maximum information is written to log files.IMPORTANT: If selected, very large log files are created.
PR
E-S
CR
IPT
Run user-defined script at beginning of restore
Runs a user-defined script at the beginning of the restore session.IMPORTANT: The script must be located in /usr/local/avamar/etc/scripts.
Abort restore if script fails
If selected, stop the restore if the script returns a non-zero status code.
EMC AVAMAR 6.0 • ADMINISTRATION GUIDE 614

SCO OpenServer filesystem plug-in optionsAPPENDIX B — PLUG-IN OPTIONS
PO
ST
-SC
RIP
T
Run user-defined script at end of restore
Runs a user-defined script at the end of the restore session.IMPORTANT: The script must be located in/usr/local/avamar/etc/scripts.
Exit process with script failure exitcode
If selected, avtar exits with the exit code of the script instead of a standard avtar exit code.
CL
IEN
T C
AC
HE
OP
TIO
NS Check client-side
caches and report inconsistencies
If selected, a restore is not performed. Instead, it forces a validation check of the client-side cache with the Avamar server.
Check and repair client-side caches
If selected, a restore is not performed. Instead, it forces a validation check of the client-side cache with the Avamar server, and repairs inconsistencies.
Rebuild client-side caches from most recent backup
Does not restore data. If selected, the contents of the last backup are used to re-create the client-side file cache.
AD
VA
NC
ED
OP
TIO
NS
Do not descend into subdirectories
If selected, restore only the specified top-level directory; do not restore any subdirectories.
Recreate original path beneath target directory
If selected, re-create the original path to files and directories beneath the specified target directory.For example, if you restore /usr/MyDir/MyFile to /tmp and you select this option, the full path to the restored file is /tmp/usr/MyDir/MyFile.
Directly connect to all server nodes
If selected, establish multiple connections to the server. This can improve restore performance under certain circumstances.
SETTING DESCRIPTION
EMC AVAMAR 6.0 • ADMINISTRATION GUIDE 615

Solaris filesystem plug-in optionsAPPENDIX B — PLUG-IN OPTIONS
Solaris filesystem plug-in optionsThis topic describes the available options for the Avamar plug-in for the Solaris filesystem.
Backup options
SETTING DESCRIPTION
Backup label Assigns this descriptive label to the backup.
LO
GG
ING
List backup contents Specifies how much information about the backup contents should be included in the log files. One of the following:
• No file listing• List file names• List files and dates
Informational message level
Specifies how many informational messages should be included in the log files. One of the following:
No informationals All informational messages are suppressed. However, errors and warnings are included in the log files.
Some informationals Some informational messages are included in the log files.
Many informationals Additional status information is included in the log files.
All informationals Provides maximum information. In addition to errors and warnings, all informational messages are included in the log files.
Report advanced statistics
If selected, advanced timing and deduplication statistics are written to log files.
Enable debugging messages
If selected, maximum information is written to log files.IMPORTANT: If selected, very large log files are created.
EMC AVAMAR 6.0 • ADMINISTRATION GUIDE 616

Solaris filesystem plug-in optionsAPPENDIX B — PLUG-IN OPTIONS
FIL
ES
YS
TE
M T
RA
VE
RS
AL
Do not traverse any mounts
If selected, no mount points are traversed during this backup.
Traverse fixed-disk mounts
If selected, only fixed-disk filesystem mount points are traversed during this backup.
Traverse fixed-disk and remote network mounts
If selected, both fixed-disk and NFS network mount points are traversed during this backup.
Force traversal of specified file system type(s)
Accepts a comma-separated list of one or more filesystem types (for example, nfs, ext2, jfs, xfs) that should be traversed during this backup.
Force non-traversal of specified file system type(s)
Accepts a comma-separated list of one or more filesystem types (for example, nfs, ext2, jfs, xfs) that should not be traversed during this backup.
PR
E-S
CR
IPT
Run user-defined script at beginning of backup
Runs a user-defined script at the beginning of the backup session.IMPORTANT: The script must be located in /usr/local/avamar/etc/scripts.
Abort backup if script fails
If selected, stop the backup if the script returns a non-zero status code.
PO
ST
-SC
RIP
T
Run user-defined script at end of backup
Runs a user-defined script at the end of the backup session.IMPORTANT: The script must be located in/usr/local/avamar/etc/scripts.
Exit process with script failure exitcode
If selected, avtar exits with the exit code of the script instead of a standard avtar exit code.
CL
IEN
T C
AC
HE
OP
TIO
NS
Check client-side caches and report inconsistencies
If selected, a backup is not performed. Instead, it forces a validation check of the client-side cache with the Avamar server.
Check and repair client-side caches
If selected, a backup is not performed. Instead, it forces a validation check of the client-side cache with the Avamar server, and repairs inconsistencies.
Maximum client file cache size (MBs)
Specifies the maximum client file cache size in MBs. A negative value indicates a fraction of RAM. For example, -8 specifies that no more than 1/8th of physical RAM be allocated to the client file cache.
Maximum client hash cache size (MBs)
Specifies the maximum client hash cache size in MBs. A negative value indicates a fraction of RAM. For example, -8 specifies that no more than 1/8th of physical RAM be allocated to the client hash cache.
SETTING DESCRIPTION
EMC AVAMAR 6.0 • ADMINISTRATION GUIDE 617

Solaris filesystem plug-in optionsAPPENDIX B — PLUG-IN OPTIONS
AD
VA
NC
ED
OP
TIO
NS Client-side flag file Specifies the path to a flag file on the client that
contains additional option settings.
Network usage throttle (Mbps)
Specifies a setting that reduces network usage to a specified rate, expressed as megabits/second (for example, 0 = unrestricted, 50% of a T1 = 0.772).
Directly connect to all server nodes
If selected, establish multiple connections to the server. This can improve backup performance under certain circumstances.
SETTING DESCRIPTION
EMC AVAMAR 6.0 • ADMINISTRATION GUIDE 618

Solaris filesystem plug-in optionsAPPENDIX B — PLUG-IN OPTIONS
Restore options
SETTING DESCRIPTION
Overwrite existing files Controls behavior when file to be restored already exists. One of the following:
• Never• Always• Generate New Name• If Modified• If Newer
LO
GG
ING
List backup contents Specifies how much information about the backup contents should be included in the log files. One of the following:
• No file listing• List file names• List files and dates
Informational message level
Specifies how many informational messages should be included in the log files. One of the following:
No informationals All informational messages are suppressed. However, errors and warnings are included in the log files.
Some informationals Some informational messages are included in the log files.
Many informationals Additional status information is included in the log files.
All informationals Provides maximum information. In addition to errors and warnings, all informational messages are included in the log files.
Report advanced statistics
If selected, advanced timing and deduplication statistics are written to log files.
Enable debugging messages
If selected, maximum information is written to log files.IMPORTANT: If selected, very large log files are created.
PR
E-S
CR
IPT
Run user-defined script at beginning of restore
Runs a user-defined script at the beginning of the restore session.IMPORTANT: The script must be located in /usr/local/avamar/etc/scripts.
Abort restore if script fails
If selected, stop the restore if the script returns a non-zero status code.
EMC AVAMAR 6.0 • ADMINISTRATION GUIDE 619

Windows filesystem plug-in optionsAPPENDIX B — PLUG-IN OPTIONS
Windows filesystem plug-in optionsThis topic describes the available options for the Avamar plug-in for the Windows filesystem.
Backup options
PO
ST
-SC
RIP
T
Run user-defined script at end of restore
Runs a user-defined script at the end of the restore session.IMPORTANT: The script must be located in/usr/local/avamar/etc/scripts.
Exit process with script failure exitcode
If selected, avtar exits with the exit code of the script instead of a standard avtar exit code.
CL
IEN
T C
AC
HE
OP
TIO
NS Check client-side
caches and report inconsistencies
If selected, a restore is not performed. Instead, it forces a validation check of the client-side cache with the Avamar server.
Check and repair client-side caches
If selected, a restore is not performed. Instead, it forces a validation check of the client-side cache with the Avamar server, and repairs inconsistencies.
Rebuild client-side caches from most recent backup
Does not restore data. If selected, the contents of the last backup are used to re-create the client-side file cache.
AD
VA
NC
ED
OP
TIO
NS
Do not descend into subdirectories
If selected, restore only the specified top-level directory; do not restore any subdirectories.
Recreate original path beneath target directory
If selected, re-create the original path to files and directories beneath the specified target directory.For example, if you restore /usr/MyDir/MyFile to /tmp and you select this option, the full path to the restored file is /tmp/usr/MyDir/MyFile.
Directly connect to all server nodes
If selected, establish multiple connections to the server. This can improve restore performance under certain circumstances.
SETTING DESCRIPTION
SETTING DESCRIPTION
Backup label Assigns this descriptive label to the backup.
EMC AVAMAR 6.0 • ADMINISTRATION GUIDE 620

Windows filesystem plug-in optionsAPPENDIX B — PLUG-IN OPTIONS
LO
GG
ING
List backup contents Specifies how much information about the backup contents should be included in the log files. One of the following:
• No file listing• List file names• List files and dates
Informational message level
Specifies how many informational messages should be included in the log files. Select one of the following:
No informationals All informational messages are suppressed. However, errors and warnings are included in the log files.
Some informationals Some informational messages are included in the log files.
Many informationals Additional status information is included in the log files.
All informationals Provides maximum information. In addition to errors and warnings, all informational messages are included in the log files.
Report advanced statistics
If selected, advanced timing and deduplication statistics are written to log files.
Enable debugging messages
If selected, maximum information is written to log files.IMPORTANT: If selected, very large log files are created.
Back up System State (Windows 2003 only)
If selected, include Windows 2003 and XP system state information so that this backup can be used for future disaster recovery.
SETTING DESCRIPTION
EMC AVAMAR 6.0 • ADMINISTRATION GUIDE 621

Windows filesystem plug-in optionsAPPENDIX B — PLUG-IN OPTIONS
FIL
ES
YS
TE
M
TR
AV
ER
SA
L
Do not traverse any mounts
If selected, no mount points are traversed during this backup.
Traverse fixed-disk mounts
If selected, only fixed-disk filesystem mount points are traversed during this backup.
Traverse fixed-disk and remote network mounts
If selected, both fixed-disk and NFS network mount points are traversed during this backup.
Force traversal of specified file system type(s)
Accepts a comma-separated list of one or more filesystem types (for example, nfs, ext2, jfs, xfs) that should be traversed during this backup.
Force non-traversal of specified file system type(s)
Accepts a comma-separated list of one or more filesystem types (for example, nfs, ext2, jfs, xfs) that should not be traversed during this backup.
PR
E-S
CR
IPT
Run user-defined script at beginning of backup
Runs a user-defined script at the beginning of the backup session.IMPORTANT: The script must be located in C:\Program Files\avs\etc\scripts on Windows and must have a .bat, .js, or .vbs extension.
Abort backup if script fails
If selected, stop the backup if the script returns a non-zero status code.
-SC
RIP
T A
FT
ER
FR
EE
ZE Run user-defined
script after volumes have been frozen
Runs a user-defined script after volumes have been frozen.IMPORTANT: The script must be located in C:\Program Files\avs\etc\scripts on Windows and must have a .bat, .js, or .vbs extension.
Abort backup if script fails
If selected, stop the backup if the script returns a non-zero status code.
PO
ST
-SC
RIP
T
Run user-defined script at end of backup
Runs a user-defined script at the end of the backup session.IMPORTANT: Script must be located in C:\Program Files\avs\etc\scripts on Windows and must have a .bat, .js or .vbs extension.
Exit process with script failure exitcode
If selected, avtar exits with the exit code of the script instead of a standard avtar exit code.
SETTING DESCRIPTION
EMC AVAMAR 6.0 • ADMINISTRATION GUIDE 622

Windows filesystem plug-in optionsAPPENDIX B — PLUG-IN OPTIONS
VO
LU
ME
FR
EE
ZIN
G
Method to freeze volumes
One of the following:• Best• Microsoft VSS• OTM• None
OTM freezewait: File activity quiescent time
OTM only: Number of seconds that volume(s) must be quiescent to establish a freeze.
OTM freezetimeout: Maximum time to wait when trying to freeze volume(s)"
OTM only: Maximum number of seconds to wait for volumes to freeze.
OTM freezecachesize: Size in MBs of OTM transaction cache
OTM only: Size of the disk transaction cache. A negative value is a fraction of used disk space. For example, -50 is 1/50th or 2%.
OTM freezecachedir: Folder to use for the OTM transaction cache
OTM only: Path of a folder to store the OTM transaction cache. The default location is the Avamar VAR folder.
Freeze exclude devices
Comma separated list of devices (for example, \Device\mydevice\*) to exclude from volume freezing.
Freeze exclude volumes
Comma separated list of volume names (for example, C:) to exclude from freezing.
CL
IEN
T C
AC
HE
OP
TIO
NS
Check client-side caches and report inconsistencies
If selected, a backup is not performed. Instead, it forces a validation check of the client-side cache with the Avamar server.
Check and repair client-side caches
If selected, a backup is not performed. Instead, it forces a validation check of the client-side cache with the Avamar server, and repairs inconsistencies.
Maximum client file cache size (MBs)
Specifies the maximum client file cache size in MBs. A negative value indicates a fraction of RAM. For example, -8 specifies that no more than 1/8th of physical RAM be allocated to the client file cache.
Maximum client hash cache size (MBs)
Specifies the maximum client hash cache size in MBs. A negative value indicates a fraction of RAM. For example, -8 specifies that no more than 1/8th of physical RAM be allocated to the client hash cache.
SETTING DESCRIPTION
EMC AVAMAR 6.0 • ADMINISTRATION GUIDE 623

Windows filesystem plug-in optionsAPPENDIX B — PLUG-IN OPTIONS
AD
VA
NC
ED
OP
TIO
NS
Client-side flag file Specifies the path to a flag file on the client that contains additional option settings.
Network usage throttle (Mbps)
Specifies a setting that reduces network usage to a specified rate, expressed as megabits/second (for example, 0 = unrestricted, 50% of a T1 = 0.772).
Directly connect to all server nodes
If selected, establish multiple connections to the server. This can improve backup performance under certain circumstances.
Use Last Access Time to detect ACL-only changes
If selected, it forces a rescan of any files in which the Access Time has changed since the previous backup.
SETTING DESCRIPTION
EMC AVAMAR 6.0 • ADMINISTRATION GUIDE 624

Windows filesystem plug-in optionsAPPENDIX B — PLUG-IN OPTIONS
Restore options
SETTING DESCRIPTION
Overwrite existing files Controls behavior when file to be restored already exists. Select one of the following:
• Never• Always• Generate New Name• If Modified• If Newer
Restoration of open files Select one of the following:
Never Do not restore.
Defer until reboot Defer restore until the system is rebooted.
Generate new name Restore the file with a different name.
If newer defer until reboot
EMC AVAMAR 6.0 • ADMINISTRATION GUIDE 625

Windows filesystem plug-in optionsAPPENDIX B — PLUG-IN OPTIONS
LO
GG
ING
List backup contents Specifies how much information about the backup contents should be included in the log files. Select one of the following:
• No file listing• List file names• List files and dates
Informational message level
Specifies how many informational messages should be included in the log files. Select one of the following:
No informationals All informational messages are suppressed. However, errors and warnings are included in the log files.
Some informationals Some informational messages are included in the log files.
Many informationals Additional status information is included in the log files.
All informationals Provides maximum information. In addition to errors and warnings, all informational messages are included in the log files.
Report advanced statistics
If selected, advanced timing and deduplication statistics are written to log files.
Enable debugging messages
If selected, maximum information is written to log files.IMPORTANT: If selected, very large log files are created.
PR
E-S
CR
IPT
Run user-defined script at beginning of restore
Runs a user-defined script at the beginning of the restore session.IMPORTANT: The script must be located in C:\Program Files\avs\etc\scripts on Windows and must have a .bat, .js, or .vbs extension.
Abort restore if script fails
If selected, stop the restore if the script returns a non-zero status code.
SETTING DESCRIPTION
EMC AVAMAR 6.0 • ADMINISTRATION GUIDE 626

Windows filesystem plug-in optionsAPPENDIX B — PLUG-IN OPTIONS
PO
ST
-SC
RIP
T
Run user-defined script at end of restore
Runs a user-defined script at the end of the restore session.IMPORTANT: The script must be located in C:\Program Files\avs\etc\scripts on Windows and must have a .bat, .js, or .vbs extension.
Exit process with script failure exitcode
If selected, avtar exits with the exit code of the script instead of a standard avtar exit code.
CL
IEN
T C
AC
HE
OP
TIO
NS Check client-side
caches and report inconsistencies
If selected, a restore is not performed. Instead, it forces a validation check of the client-side cache with the Avamar server.
Check and repair client-side caches
If selected, a restore is not performed. Instead, it forces a validation check of the client-side cache with the Avamar server, and repairs inconsistencies.
Rebuild client-side caches from most recent backup
Does not restore data. If selected, the contents of the last backup are used to re-create the client-side file cache.
AD
VA
NC
ED
OP
TIO
NS
Do not descend into subdirectories
If selected, restore only the specified top-level directory; do not restore any subdirectories.
Recreate original path beneath target directory
If selected, re-create the original path to files and directories beneath the specified target directory.For example, if you restore F:\Temp\MyFile.txt to C:\Temp and you select this option, then the full path to the restored file is C:\Temp\F\Temp\MyFile.txt.
Restore hidden folders and files
If selected, also restore folders and files that have the HIDDEN attribute set in the backup.
Restore folders and files with SYSTEM attribute
If selected, also restore folders and files that have the SYSTEM attribute set in the backup.
Directly connect to all server nodes
If selected, establish multiple connections to the server. This can improve restore performance under certain circumstances.
SETTING DESCRIPTION
EMC AVAMAR 6.0 • ADMINISTRATION GUIDE 627

DB2 plug-in optionsAPPENDIX B — PLUG-IN OPTIONS
DB2 plug-in optionsThis topic describes the available options for the following Avamar AIX DB2 plug-ins:
• AIX DB2• Windows DB2• Linux DB2
Backup options
SETTING DESCRIPTION
Create an ONLINE backup
If selected, the database can be backed up while it is operational. This is also known as a “hot backup”.IMPORTANT: DB2 Archive Logging must already be enabled to successfully perform online backups.
Exclude archive logs in ONLINE backup
IMPORTANT: By default, the archive logs are included in the backup. If you do not include the archive logs in the backup, select Exclude archive logs in ONLINE backup. However, if you do not include archive logs in the database backup, ensure that archive logs are included in filesystem backups. Failure to do so might result in loss of data.
Instance Admin Username
Instance Admin Password
Password for the Instance Admin Username.
AD
VA
NC
ED
OP
TIO
NS Enable debugging
messagesIf selected, maximum information is written to log files.IMPORTANT: If selected, very large log files are created.
EMC AVAMAR 6.0 • ADMINISTRATION GUIDE 628

DB2 plug-in optionsAPPENDIX B — PLUG-IN OPTIONS
Restore options
SETTING DESCRIPTION
RE
CO
VE
R O
R R
ES
TO
RE
Restore and Recover For online backups that have archive logs, restores both the database and the archive logs, and rolls the database forward (recovers it). If this option is selected, you must select one of the options from the Type of Recovery list and specify a value in the Directory path to restore archive logs field.
Restore Only Performs only a restore of the backups (no recovery). Select this option to restore a backup without recovery, to restore offline backups, or to restore online backups that do not have archive logs.
Restore only archive logs from ONLINE backup
Restores only the archive logs from the backup image. It does not restore the database.
RE
CO
VE
RY
TY
PE
Type of Recovery When the Restore and Recover option is selected, select a recovery option from the list:
End of Logs The database is rolled forward until the end of the archive logs.
Point In Time The database is rolled forward until a certain point in time, which should be specified in the Date and Time field.
End of Backup The database is rolled forward until the end of the backup. This option is available only for DB2 v9.5 and later.
Date and Time When Point In Time is selected from the Type of Recovery list, specify the recovery date and time in yyyy-mm-dd hh:mm:ss format in this field. The time should be in the timezone of the client system.The entry can be truncated to the desired precision level. For example, minutes and seconds can be omitted for convenience.
GE
NE
RA
L
Instance Admin Username
Instance Admin Password
Password for the Instance Admin Username.
Database Name If Restore everything to a different location is selected (redirected restore), then specify the new name for the database in this field.
Directory path to restore archive logs
Full path to the location on the target filesystem to which archive logs are written.
EMC AVAMAR 6.0 • ADMINISTRATION GUIDE 629

DB2 plug-in optionsAPPENDIX B — PLUG-IN OPTIONS
AD
VA
NC
ED
OP
TIO
NS Enable debugging
messagesIf selected, maximum information is written to log files.IMPORTANT: If selected, very large log files are created.
SETTING DESCRIPTION
EMC AVAMAR 6.0 • ADMINISTRATION GUIDE 630

Lotus Domino plug-in optionsAPPENDIX B — PLUG-IN OPTIONS
Lotus Domino plug-in optionsThis topic describes the available options for the Avamar plug-ins for AIX Lotus Domino and Windows Lotus Domino.
Backup options
SETTING DESCRIPTION
Backup label Assign this descriptive label to the backup.
Follow links If selected, back up databases and directories pointed to by links.
Backup Type One of the following:
Full Back up all databases and files required for a complete recovery.
Incremental Back up transaction logs and new database files that were created since the last full or incremental backup.
Subset Back up selected database files.
Full path of the Domino server’s notes.ini file
Type the full pathname of the notes.ini file on the Domino server.
• On Windows, the default folder is C:\Program Files\IBM\Lotus\Domino\data\.
• On AIX, the default directory is /data/notesdata/.
Full path of the Domino directory
Type the full path of the Domino directory.• On Windows, the default folder is
C:\Program Files\IBM\Lotus\Domino\.• On AIX, the default directory path is
/opt/ibm/lotus/notes/80010/ibmpow/.
Domino user name Type the Domino username.This is the OS user, which has permissions to start and stop the Domino server on the IBM AIX machine.The default username is notes.NOTE: This field is specific to the AIX Lotus Domino plug-in.
Enable debugging messages
If selected, maximum information is written to log files.IMPORTANT: If selected, very large log files are created.
EMC AVAMAR 6.0 • ADMINISTRATION GUIDE 631

Lotus Domino plug-in optionsAPPENDIX B — PLUG-IN OPTIONS
TRA
NS
AC
TIO
N L
OG
S Back up transaction logs with full backup
If selected, include transaction logs with the backup.By default, this option is selected.
Archive transaction logs
If selected, archive transaction logs following the backup.By default, this option is selected.
Terminate backup on error
If selected, terminate the backup if an error occurs.
SETTING DESCRIPTION
EMC AVAMAR 6.0 • ADMINISTRATION GUIDE 632

Lotus Domino plug-in optionsAPPENDIX B — PLUG-IN OPTIONS
Restore options
SETTING DESCRIPTION
Bring all databases online after restore
If selected, all databases are automatically brought online following a successful restore.By default, this option is selected.
Overwrite files If selected, the restore operation overwrites existing databases or files with the restored data. Clear this option to prevent the restore operation from overwriting existing database or files (that is, no data is restored to these databases or files). Any skipped databases or files are noted in log entries.By default, this option is not set.
Domino user name Type the Domino username.This is the OS user, which has permissions to start and stop the Domino server on the IBM AIX machine.The default username is notes.NOTE: This field is specific to the AIX Lotus Domino plug-in.
Enable debugging messages
If selected, write maximum information to log files.IMPORTANT: If set, large files are created.
Restore system databases
If selected, system databases are restored. You must stop the Domino server to restore system databases.NOTE: System databases include busytime.nsf, ddm.nsf, events4.nsf, log.nsf, mail.box, names.nsf, and mailjrn.nsf.
Specifies full paths for the Domino configuration file and directory
If selected, the restore operation uses the pathnames specified by the Full path of the Domino server’s notes.ini file and Full path of the Domino directory fields.IMPORTANT: The use of this option is usually necessary only if the Lotus Domino configuration has changed or the Domino server has been reinstalled in a new location. In these instances, you must provide the current pathnames to restore database files.NOTE: A restore operation, by default, uses the same pathnames for the notes.ini file and Domino directory as the ones that were used for the backup.
EMC AVAMAR 6.0 • ADMINISTRATION GUIDE 633

Lotus Domino plug-in optionsAPPENDIX B — PLUG-IN OPTIONS
Full path of the Domino server’s notes.ini file
If Specify full paths for the Domino configuration file and directory is selected, type the full pathname to the notes.ini file on the Domino server.
• On Windows, the default folder is C:\Program Files\IBM\Lotus\Domino\data\.
• On AIX, the default directory is /data/notesdata/.
Full path of the Domino directory
If Specify full paths for the Domino configuration file and directory is selected, type the full pathname of the Domino directory.
• On Windows, the default folder is C:\Program Files\IBM\Lotus\Domino\.
• On AIX, the default directory path is /opt/ibm/lotus/notes/80010/ibmpow/.
RE
CO
VE
R
Recover the databases by using transaction logs
If selected, the restore operation uses transaction logs to recover database files to a specific date and time.By default, this option is selected.
Recover the databases in batch
If selected, restore databases in a batch process. This option enables faster recovery times.If any one database encounters a problem during a batch recovery, the recovery fails for all databases that were selected.IMPORTANT: This option is intended for advanced users who are familiar with the recovery of Domino databases.
Create new DBIID during recovery
If selected, the Domino server assigns new DBIIDs to recovered databases. By default, this option is not selected.IMPORTANT: Because database transactions are specific to the DBIID, transaction logs prior to the recovery cannot be applied. Avamar recognizes a database with a new DBIID as an entirely new database.
Create new DBIID and ReplicaID during recovery
If selected, the Domino server assigns new ReplicaIDs and DBIIDs to recovered databases.By default, this option is not selected.IMPORTANT: Because transactions are specific to the DBIID, transaction logs prior to the recovery cannot be applied. Avamar recognizes a database with a new DBIID as an entirely new database.
SETTING DESCRIPTION
EMC AVAMAR 6.0 • ADMINISTRATION GUIDE 634

Lotus Domino plug-in optionsAPPENDIX B — PLUG-IN OPTIONS
RE
CO
VE
R T
IME
Now If selected, restore each database to its original state at the time of the backup. Then, transaction logs are used to recover all data until now.By default, this option is selected.
Other date/time If selected, restore each database to its original state at the time of the backup. Then, transaction logs are used to recover all data up to the date and time specified in the Recover date/time (yyyy-mm-dd hh:mm:ss) field.
Backup date/time If selected, restore each database to its original state at the time of its backup.
Recover date/time(yyyy-mm-dd hh:mm:ss)
If Other date/time is selected, type the calendar date to which to recover data. Entry must be in the following format:
YYYY-MM-DD hh:mm:ss:mmm
where:• YYYY is a four-digit year.• MM is a two-digit month of the year.• DD is a two-digit day of the month (date).• hh is a two-digit hour of the day.• mm is the two-digit number of minutes past the
hour.• ss is the two-digit number of seconds past the
minute.Dashes (-) must separate year, month, and dates.Colons (:) must separate hours, minutes, and seconds.You can truncate this entry to the desired precision. For example, if no minutes are supplied, the top of the hour is assumed.
DA
OS
OP
TIO
NS
Restore missing NLO files
If selected, restores missing NLO files referenced by the databases that are successfully restored.By default, this option is selected.NOTE: The process of finding NLO files might take a long time.
Synchronize DAOS catalog files
If selected, synchronizes the DAOS catalog file.NOTE: The process of synchronizing the DAOS catalog file might take a long time.
SETTING DESCRIPTION
EMC AVAMAR 6.0 • ADMINISTRATION GUIDE 635

Lotus Domino plug-in optionsAPPENDIX B — PLUG-IN OPTIONS
NU
MB
ER
OF
DA
TA
BA
SE
S T
O R
ES
TO
RE
PE
R B
AT
CH Controls the number of databases that are restored in a single restore pass
(iteration). Smaller settings (fewer databases per batch) enable you to bring those databases online sooner to reduce downtime, but require more iterations. Select one of the following:
Default If selected, each restore pass (iteration) processes 10 databases.By default, this option is selected.
All If selected, restore all databases in a single pass (iteration).
User Defined If selected, the number of databases that you specify in the Number of databases to restore per batch field are restored in a single pass (iteration).
Number of databases to restore per batch
If User Defined is selected, type the number of databases to restore for each pass (iteration).
SETTING DESCRIPTION
EMC AVAMAR 6.0 • ADMINISTRATION GUIDE 636
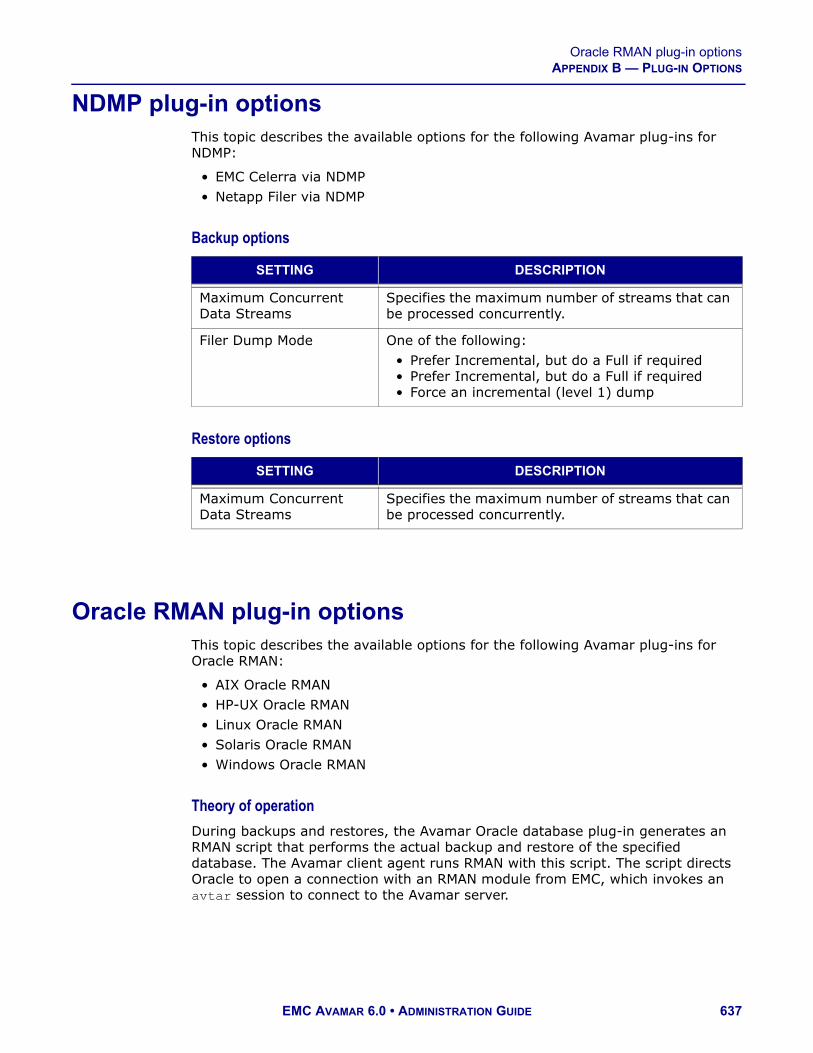
Oracle RMAN plug-in optionsAPPENDIX B — PLUG-IN OPTIONS
NDMP plug-in optionsThis topic describes the available options for the following Avamar plug-ins for NDMP:
• EMC Celerra via NDMP• Netapp Filer via NDMP
Backup options
Restore options
Oracle RMAN plug-in optionsThis topic describes the available options for the following Avamar plug-ins for Oracle RMAN:
• AIX Oracle RMAN• HP-UX Oracle RMAN• Linux Oracle RMAN• Solaris Oracle RMAN• Windows Oracle RMAN
Theory of operation
During backups and restores, the Avamar Oracle database plug-in generates an RMAN script that performs the actual backup and restore of the specified database. The Avamar client agent runs RMAN with this script. The script directs Oracle to open a connection with an RMAN module from EMC, which invokes an avtar session to connect to the Avamar server.
SETTING DESCRIPTION
Maximum Concurrent Data Streams
Specifies the maximum number of streams that can be processed concurrently.
Filer Dump Mode One of the following:• Prefer Incremental, but do a Full if required • Prefer Incremental, but do a Full if required • Force an incremental (level 1) dump
SETTING DESCRIPTION
Maximum Concurrent Data Streams
Specifies the maximum number of streams that can be processed concurrently.
EMC AVAMAR 6.0 • ADMINISTRATION GUIDE 637

Oracle RMAN plug-in optionsAPPENDIX B — PLUG-IN OPTIONS
The following is an example RMAN script that might be generated as part of an Oracle database backup:
configure controlfile autobackup on;run {allocate channel c1 type sbt;send 'connect information for avtar to connect to the Avamar server'; backup database; }
During the backup or restore operation, RMAN creates a log file that can be viewed from Avamar Administrator. For example:
Recovery Manager: Release 10.1.0.2.0 - Production
Copyright (c) 1995, 2004, Oracle. All rights reserved.
connected to target database: ORACLE (DBID=1420649215)using target database controlfile instead of recovery catalog
RMAN> configure controlfile autobackup on;2> run {3> allocate channel c1 type sbt;4> send '... ';6> backup database;7> }8> old RMAN configuration parameters:CONFIGURE CONTROLFILE AUTOBACKUP OFF;new RMAN configuration parameters:CONFIGURE CONTROLFILE AUTOBACKUP OFF;new RMAN configuration parameters are successfully stored
allocated channel: c1channel c1: sid=142 devtype=SBT_TAPEchannel c1: AVTAR/Avamar backup (EMC)
sent command to channel: c1
Starting backup at 21-MAR-05channel c1: starting full datafile backupsetchannel c1: specifying datafile(s) in backupsetinput datafile fno=00001 name=D:\ORACLE\PRODUCT\10.1.0\ORADATA\ORACLE\ORACLE\SYSTEM01.DBFinput datafile fno=00003 name=D:\ORACLE\PRODUCT\10.1.0\ORADATA\ORACLE\ORACLE\SYSAUX01.DBFinput datafile fno=00002 name=D:\ORACLE\PRODUCT\10.1.0\ORADATA\ORACLE\ORACLE\UNDOTBS01.DBFinput datafile fno=00004 name=D:\ORACLE\PRODUCT\10.1.0\ORADATA\ORACLE\ORACLE\USERS01.DBFchannel c1: starting piece 1 at 21-MAR-05channel c1: finished piece 1 at 21-MAR-05
EMC AVAMAR 6.0 • ADMINISTRATION GUIDE 638

Oracle RMAN plug-in optionsAPPENDIX B — PLUG-IN OPTIONS
piece handle=15gfs32k_1_1 comment=API Version 2.0,MMS Version 2.2.0.108 channel c1: backup set complete, elapsed time: 00:00:45 channel c1: starting full datafile backupset channel c1: specifying datafile(s) in backupset including current controlfile in backupset including current SPFILE in backupset channel c1: starting piece 1 at 21-MAR-05 channel c1: finished piece 1 at 21-MAR-05 piece handle=16gfs341_1_1 comment=API Version 2.0,MMS Version 2.2.0.108 channel c1: backup set complete, elapsed time: 00:00:17 Finished backup at 21-MAR-05 released channel: c1
Recovery Manager complete.
EMC AVAMAR 6.0 • ADMINISTRATION GUIDE 639

Oracle RMAN plug-in optionsAPPENDIX B — PLUG-IN OPTIONS
Backup options
SETTING DESCRIPTION
Oracle instance name Specifies the Oracle server name. This field can normally be left blank because the Oracle instance name is automatically stored when the target client is browsed during on-demand backup or when a dataset is applied to a member of a group during a scheduled backup.
User name Specifies the username that is used to authenticate with the Oracle database. If left blank, RMAN tries to log in with the same username and password that the Avamar client agent uses and attempts to assume SYSDBA privileges.Typically, this field should contain the special account name (backupuser) that was created manually as part of database preparation.
Username and password comprise a connection string to Oracle. The connection string must specify a user that has backup privileges for the database.
Password Specifies the password for the User name account.
Number of RMAN channels Specifies the number of channels to allocate during a backup or restore. The maximum number is 6. The default is one.This option, if specified, impacts the number of streams that Data Domain systems use. The formula that determines the number of streams is:
NUMBER OF RMAN CHANNELS x NUMBER OF DATA DOMAIN STREAMS
NOTE: The number of Data Domain streams is set when you add a Data Domain system to the Avamar configuration. NOTE: Allocating multiple channels for backups and restores may improve performance. Performance improvements for backups and restores, however, depend on the Oracle server configuration.IMPORTANT: In some instances, allocating too many channels may lock out processes, which can result in a timeout error. This problem does not occur when using RMAN scripts.
Back up archive logs with database
If selected, Oracle archive logs are automatically backed up during the database backup.
EMC AVAMAR 6.0 • ADMINISTRATION GUIDE 640
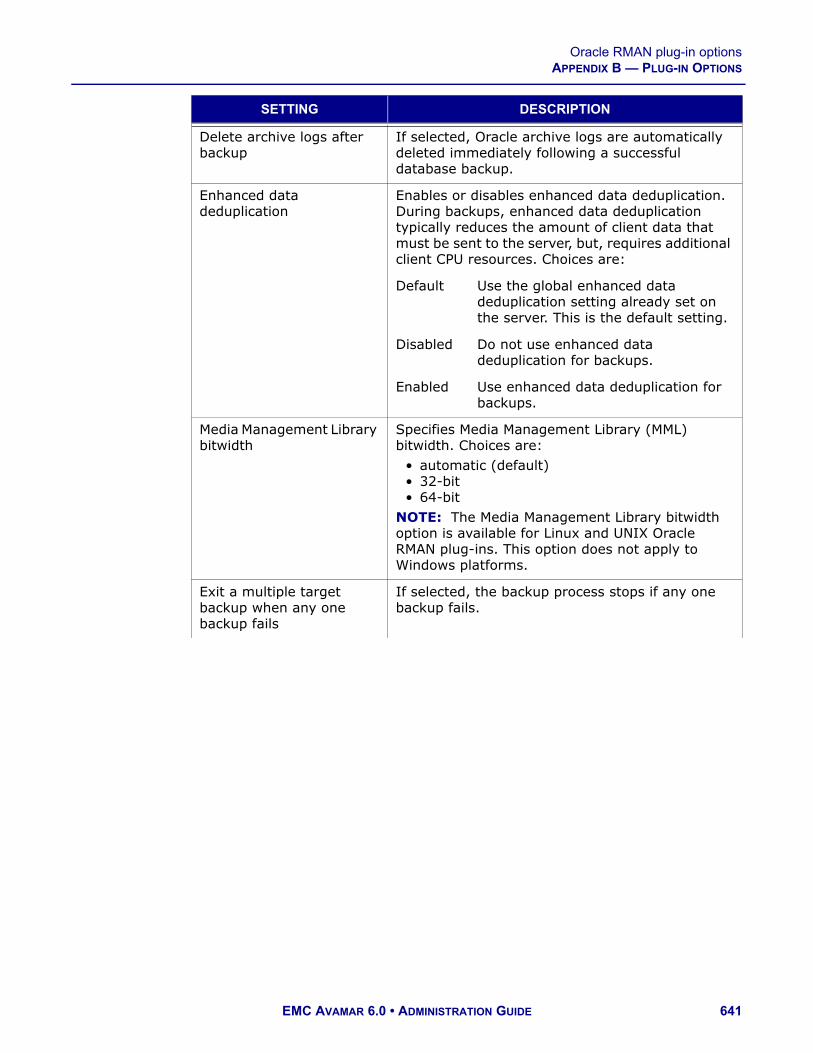
Oracle RMAN plug-in optionsAPPENDIX B — PLUG-IN OPTIONS
Delete archive logs after backup
If selected, Oracle archive logs are automatically deleted immediately following a successful database backup.
Enhanced data deduplication
Enables or disables enhanced data deduplication. During backups, enhanced data deduplication typically reduces the amount of client data that must be sent to the server, but, requires additional client CPU resources. Choices are:
Default Use the global enhanced data deduplication setting already set on the server. This is the default setting.
Disabled Do not use enhanced data deduplication for backups.
Enabled Use enhanced data deduplication for backups.
Media Management Library bitwidth
Specifies Media Management Library (MML) bitwidth. Choices are:
• automatic (default) • 32-bit • 64-bit
NOTE: The Media Management Library bitwidth option is available for Linux and UNIX Oracle RMAN plug-ins. This option does not apply to Windows platforms.
Exit a multiple target backup when any one backup fails
If selected, the backup process stops if any one backup fails.
SETTING DESCRIPTION
EMC AVAMAR 6.0 • ADMINISTRATION GUIDE 641

Oracle RMAN plug-in optionsAPPENDIX B — PLUG-IN OPTIONS
INC
RE
ME
NT
AL
BA
CK
UP
Full backup If selected, back up all datafiles, redo logs, and archive logs. Full backups do not use Block Change Tracking.This option is the default.
Level 0 backup If selected, perform a level 0 backup. Level 0 backups save all datafiles, redo logs, and archive logs.A level 0 backup is required before performing level 1 backups. You must enable the RMAN Change Block Tracking feature before performing a level 0 backup.
Level 1 backup If selected, perform a level 1 backup. Level 1 backups save only changed blocks of the database.A level 0 backup is required before you perform a level 1 backup. Selecting the Level 1 backup option before creating a level 0 backup results in a level 0 backup.You must enable the RMAN Change Block Tracking feature before performing a level 1 backup.
Use Data Domain system Select the checkbox, and then choose a Data Domain system from the list. If selected, the Avamar for Oracle Client backs up the data to the Data Domain system rather than to the Avamar server.
RE
CO
VE
RY
CA
TA
LO
G
Use recovery catalog If selected, Recovery catalog server name, Recovery catalog username, and Recovery catalog password settings are used to specify a recovery catalog server connection string for RMAN. By using a recovery catalog server, many specialized features of RMAN may be used. A thorough discussion of these features is beyond the scope of this guide. The Oracle documentation provides information.
Recovery catalog server name
Specifies the recovery catalog server name.
Recovery catalog user name
Specifies the recovery catalog username.
Recovery catalog password
Specifies the recovery catalog password.
SETTING DESCRIPTION
EMC AVAMAR 6.0 • ADMINISTRATION GUIDE 642

Oracle RMAN plug-in optionsAPPENDIX B — PLUG-IN OPTIONS
Restore options
AD
VA
NC
ED
OP
TIO
NS Enable debugging
messagesIf selected, maximum information is written to log files.IMPORTANT: If selected, very large log files are created.
NLS_DATE_FORMAT Specifies a valid timestamp format for the target machine. For example: MM/DD/YYYY.
SETTING DESCRIPTION
Oracle instance name Specifies the Oracle server name. This field can normally be left blank because the Oracle instance name is automatically stored when the target client is browsed during on-demand backup or when a dataset is applied to a member of a group during a scheduled backup.
User name Specifies the username that is used to authenticate with the Oracle database. If left blank, RMAN tries to log in with the same username and password that the Avamar client agent is running under, and attempts to assume SYSDBA privileges. Typically, this field should contain the special account name (backupuser) that was created manually as part of database preparation.Username and password comprise a connection string to Oracle. The connection string must specify a user that has backup privileges for the database.
Password Specifies the password for the User name account.
Media Management Library bitwidth
Specifies Media Management Library (MML) bitwidth. Choices are:
• automatic (default) • 32-bit • 64-bit
NOTE: The Media Management Library bitwidth option is available for Linux and UNIX Oracle RMAN plug-ins. This option does not apply to Windows platforms.
SETTING DESCRIPTION
EMC AVAMAR 6.0 • ADMINISTRATION GUIDE 643
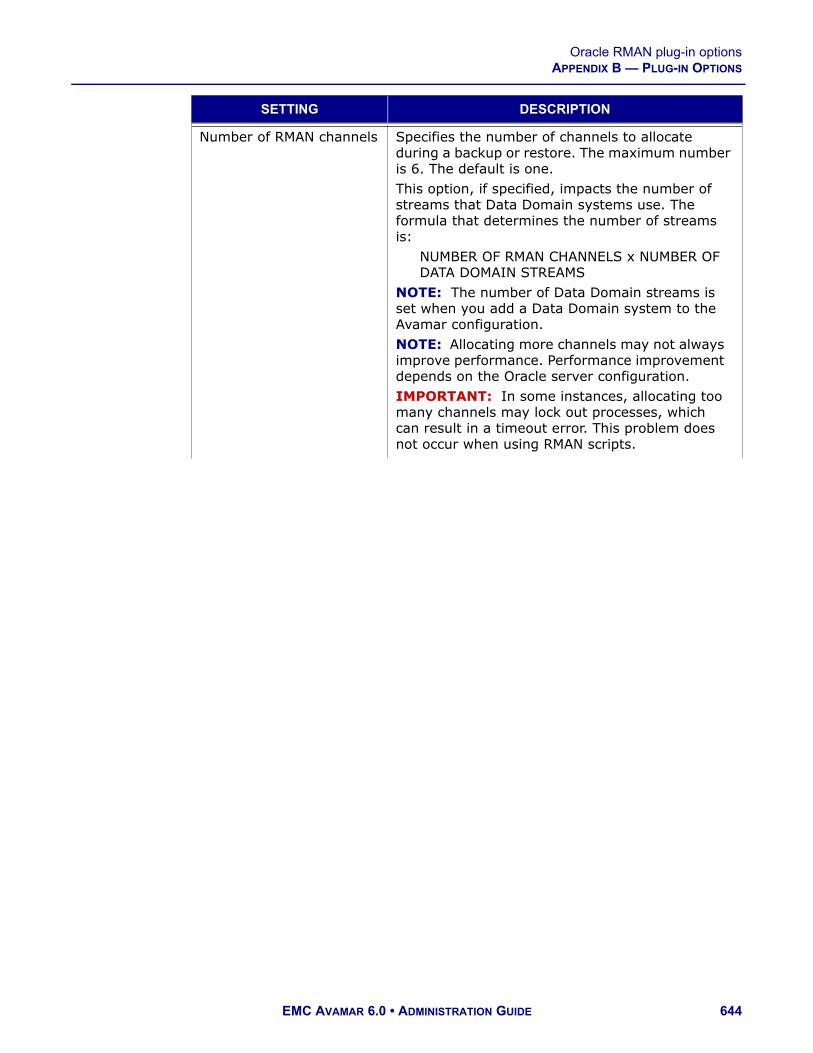
Oracle RMAN plug-in optionsAPPENDIX B — PLUG-IN OPTIONS
Number of RMAN channels Specifies the number of channels to allocate during a backup or restore. The maximum number is 6. The default is one.This option, if specified, impacts the number of streams that Data Domain systems use. The formula that determines the number of streams is:
NUMBER OF RMAN CHANNELS x NUMBER OF DATA DOMAIN STREAMS
NOTE: The number of Data Domain streams is set when you add a Data Domain system to the Avamar configuration. NOTE: Allocating more channels may not always improve performance. Performance improvement depends on the Oracle server configuration.IMPORTANT: In some instances, allocating too many channels may lock out processes, which can result in a timeout error. This problem does not occur when using RMAN scripts.
SETTING DESCRIPTION
EMC AVAMAR 6.0 • ADMINISTRATION GUIDE 644

Oracle RMAN plug-in optionsAPPENDIX B — PLUG-IN OPTIONS
Point-in-time recovery mode
Specifies the type of recovery.Do not specify a point-in-time option if you selected multiple databases for the restore. IMPORTANT: Before using a point-in-time recovery option other than Default, ensure that relevant backups are available on the Avamar server. The recovery operation fails if a backup has expired or has been deleted from the Avamar server. Choices are:
Default Recovers the database to the most recent SCN. Avamar for Oracle Client automatically determines the SCN from the control file.
SCN Recovers the database to the specified SCN. Specify the SCN in the Point-in-time recovery value field.
Log sequence Recovers the database to the specified log sequence number. Specify the log sequence number in the Point-in-time recovery value field.By default, Avamar for Oracle Client uses thread 1. To specify a different thread number:1. Click More.2. Type THREAD in the Enter
Attribute field.3. Type the specific thread
number in the Enter Attribute Value field.
4. Click +.
SETTING DESCRIPTION
EMC AVAMAR 6.0 • ADMINISTRATION GUIDE 645

Oracle RMAN plug-in optionsAPPENDIX B — PLUG-IN OPTIONS
Point-in-time recovery mode (continued)
Time stamp Recovers the database to the specified timestamp.Specify the timestamp in the Point-in-time recovery value field. The timestamp format must conform to the localization settings on the target machine and locale configuration setting for the Oracle server.The timestamp order of precedence rules from highest to lowest are as follows:Highest — A timestamp format specified by the NLS_DATE_FORMAT field (advanced option).Lower — A timestamp format specified by the NLS_DATE_FORMAT variable in environment settings.Lowest — The built-in default timestamp format uses american_america.us7asci. The format is:MM DD YYYY HH24:MI:SSwhere:
• MM is a two-digit month.• DD is a two-digit day of the
month.• YYYY is a four-digit year.• HH24 is the hour using a 24-
hour format.• MI is minutes.• SS is seconds.
Avamar for Oracle Client generates a script by using the timestamp specification and the format (determined by the precedence rules) and sends the script to RMAN. The timestamp format specified in the NLS_DATE_FORMAT field is also added to the ENV setting before RMAN is called.The Oracle documentation provides information about Oracle and RMAN localization.
SETTING DESCRIPTION
EMC AVAMAR 6.0 • ADMINISTRATION GUIDE 646

Oracle RMAN plug-in optionsAPPENDIX B — PLUG-IN OPTIONS
Point-in-time recovery value
Specifies the SCN, log sequence number, or timestamp, depending on which point-in-time recovery mode is selected.
Exit a multiple target restore when any one restore fails
If selected, the restore process stops when any one restore fails.
AD
VA
NC
ED
OP
TIO
NS Enable debugging
messagesIf selected, maximum information is written to log files.IMPORTANT: If selected, very large log files are created.
NLS_DATE_FORMAT Specifies a valid timestamp format for the target machine. For example: MM/DD/YYYY.
SETTING DESCRIPTION
EMC AVAMAR 6.0 • ADMINISTRATION GUIDE 647

Microsoft Office SharePoint Server plug-in optionsAPPENDIX B — PLUG-IN OPTIONS
Microsoft Office SharePoint Server plug-in optionsThis topic describes the available options for the Avamar plug-in for Microsoft Office SharePoint Server.
Backup options
Restore options
SETTING DESCRIPTION
Temporary backup directory
Temporary backup directory.
Backup Type The backup level, either Full or Differential.
Remove temporary backup files after backup completes
AD
VA
NC
ED
OP
TIO
NS Enable debugging
messagesIf selected, maximum information is written to log files.IMPORTANT: If selected, very large log files are created.
SETTING DESCRIPTION
Username Username with admin rights on the farm.
Password
Restore Type Restore by overwriting existing data (Overwrite) or restore just the new data (New).
AD
VA
NC
ED
OP
TIO
NS Enable debugging
messagesIf selected, maximum information is written to log files.IMPORTANT: If selected, very large log files are created.
EMC AVAMAR 6.0 • ADMINISTRATION GUIDE 648

Windows Exchange database plug-in optionsAPPENDIX B — PLUG-IN OPTIONS
Windows Exchange database plug-in optionsThis topic describes the available options for the Avamar plug-in for the Windows Exchange database. This plug-in supports both Exchange 2007 and 2003 database backup and restore.
Backup options
SETTING DESCRIPTION
Set when backup occurs on clustered systems
Choices are:
Always Backs up all nodes in the cluster. This is the default setting.
Active node only
Backs up only the active node in the cluster.
Passive node only
Backs up only passive nodes in the cluster.
The EMC Avamar Backup Clients Guide provides information about Avamar support for Microsoft Windows Clusters.
Delete log files after snapup
IMPORTANT: Do not select this option if you perform concurrent incremental backups.
Enhanced Data Deduplication
Enables or disables enhanced data deduplication. During backups, enhanced data deduplication typically reduces the amount of client data that must be sent to the server, but requires additional client CPU resources. Choices are:
Default Use the global enhanced data deduplication setting already set on the server. This is the default setting.
Disabled Do not use enhanced data deduplication for backups.
Enabled Use enhanced data deduplication for backups.
EMC AVAMAR 6.0 • ADMINISTRATION GUIDE 649

Windows Exchange database plug-in optionsAPPENDIX B — PLUG-IN OPTIONS
AD
VA
NC
ED
OP
TIO
NS
Server Name This field can normally be left blank because the Exchange server name is automatically stored when the target client is browsed during on-demand backups or when a dataset is applied to a member of a group during a scheduled backup.
Annotation (Microsoft Information Store)
This field names the portion of Extensible Storage Engine (ESE) backup to perform. Choices are:
Microsoft Information Store
This is the default setting.
Microsoft Site Replication Service
Site replication service used for mixed Exchange 5.5 and 2000/2003 environments.
Microsoft Key Management Service
This is the local activation service that provides Windows activation, instead of using the Microsoft external product activation.
Storage Group Name
This field can normally be left blank because the Exchange storage group name is automatically stored when the target client is browsed during on-demand backups or when a dataset is applied to a member of a group during a scheduled backup.
Pipe input/output to avtar
If selected, backups and restores are performed directly by the Avamar backup process (avtar).If cleared, an intermediate local backup file can be used.
Enable debugging messages
If selected, maximum information is written to log files.IMPORTANT: If selected, very large log files are created.
SETTING DESCRIPTION
EMC AVAMAR 6.0 • ADMINISTRATION GUIDE 650

Windows Exchange database plug-in optionsAPPENDIX B — PLUG-IN OPTIONS
Restore options
SETTING DESCRIPTION
Automatically dismount and allow overwrite of existing database file
If selected, the restore operation will automatically dismount the existing target database and enable the Exchange option "This database can be overwritten by a restore." Otherwise, these steps must be done manually before performing a restore.
Perform Database Recovery after restore making Exchange consistent
Performs soft recovery (performs a consistency check and prepares to put the database online) after the database is restored. This is the default setting.
Wait for Database Recovery to Complete
If Perform Database Recovery after restore making Exchange consistent is selected, specifies whether to wait for the recovery process to complete or complete the restore session asynchronously with the recovery process. This option is dependent on the previous option. This is the default setting.
EMC AVAMAR 6.0 • ADMINISTRATION GUIDE 651

Windows Exchange database plug-in optionsAPPENDIX B — PLUG-IN OPTIONS
Mount the database(s) after successful restore
If selected, databases are mounted following a successful restore. This is not the default setting.
Create storage group
If enabled, the storage group being restored will be automatically created on the Exchange server if it does not already exist.
Re-link mailboxes
When performing a redirected restore to a different Exchange server, enabling this option will modify Active Directory to re-link the restored mailboxes to their new destination server.
Keep logs after Restore
If selected, restore log files are written to the location specified in the Restore logs path field.
Restore logs path
Specifies the location for restore log files. Specify this alternative location if C:\TMP if drive is low on disk space.
Adjust for gaps when existing log files are not contiguous
If selected, the restore operation includes a check for contiguous log files error and corrects the error. This is the default setting.
Move logs path Specifies the location for old restore log files. Existing log files are moved to this location prior to the restore. This prevents log file conflicts during restore.
Restore into Recovery Storage Group
If selected, restores the selected backup to the Recovery Storage Group.
Create Recovery Storage Group
If the Restore into Recovery Storage Group option is selected, enabling this option will automatically create a new Recovery Storage Group.
Recovery Storage Group Name
Specifies the Recovery Storage Group that is created during the restore. The default name is RSG.
Redirected storage group path
Specifies the location for redirected restores that include a Recovery Storage Group. The Recovery Storage Group name specified in the Recovery Storage Group Name field is created under this location.
Recovery Storage Group discovery time out
If RSG restores fail due to a delay in retrieving information from Active Directory, this time out value can be increased.
SETTING DESCRIPTION
EMC AVAMAR 6.0 • ADMINISTRATION GUIDE 652

Windows Exchange database plug-in optionsAPPENDIX B — PLUG-IN OPTIONS
AD
VA
NC
ED
OP
TIO
NS
Server Name This field can normally be left blank because the Exchange server name is automatically stored when the target client is browsed during restore.However, this field can be used to specify another server hostname when performing directed restores to another network host.
Annotation (Microsoft Information Store)
This field names the portion of (Extensible Storage Engine (ESE) backup to perform. Choices are:
Microsoft Information Store
This is the default setting.
Microsoft Site Replication Service
Site replication service used for mixed Exchange 5.5 and 2000/2003 environments.
Microsoft Key Management Service
This is the local activation service that provides Windows product activation in place of product activation over the Internet through Microsoft servers.
Local Backup File Name
If Pipe input/output to avtar is cleared, this field defines the filename used to send and receive data.
This can be used to restore the exchstream file in one step to a local file, then perform a Exchange restore using that file.
Pipe input/output to avtar
If selected, backups and restores are performed directly by the Avamar backup process (avtar).If cleared, an intermediate local backup file can be used.
Enable debugging messages
If selected, maximum information is written to log files.IMPORTANT: If selected, very large log files are created.
SETTING DESCRIPTION
EMC AVAMAR 6.0 • ADMINISTRATION GUIDE 653

Windows Exchange message plug-in optionsAPPENDIX B — PLUG-IN OPTIONS
Windows Exchange message plug-in optionsThis topic describes the available options for the Avamar plug-in for Windows Exchange messages.
Backup options
Restore options
SETTING DESCRIPTION
AD
VA
NC
ED
OP
TIO
NS Enable debugging
messagesIf selected, maximum information is written to log files.IMPORTANT: If selected, very large log files are created.
SETTING DESCRIPTION
Overwrite existing messages
Controls behavior when the message to be restored already exists. One of the following:
• Never• Always• If Modified• If Newer
Checking for already restored items
Checks if the items or messages have been restored earlier. This prevents the creation of duplicate items.
AD
VA
NC
ED
OP
TIO
NS Enable debugging
messagesIf selected, maximum information is written to log files.IMPORTANT: If selected, very large log files are created.
EMC AVAMAR 6.0 • ADMINISTRATION GUIDE 654
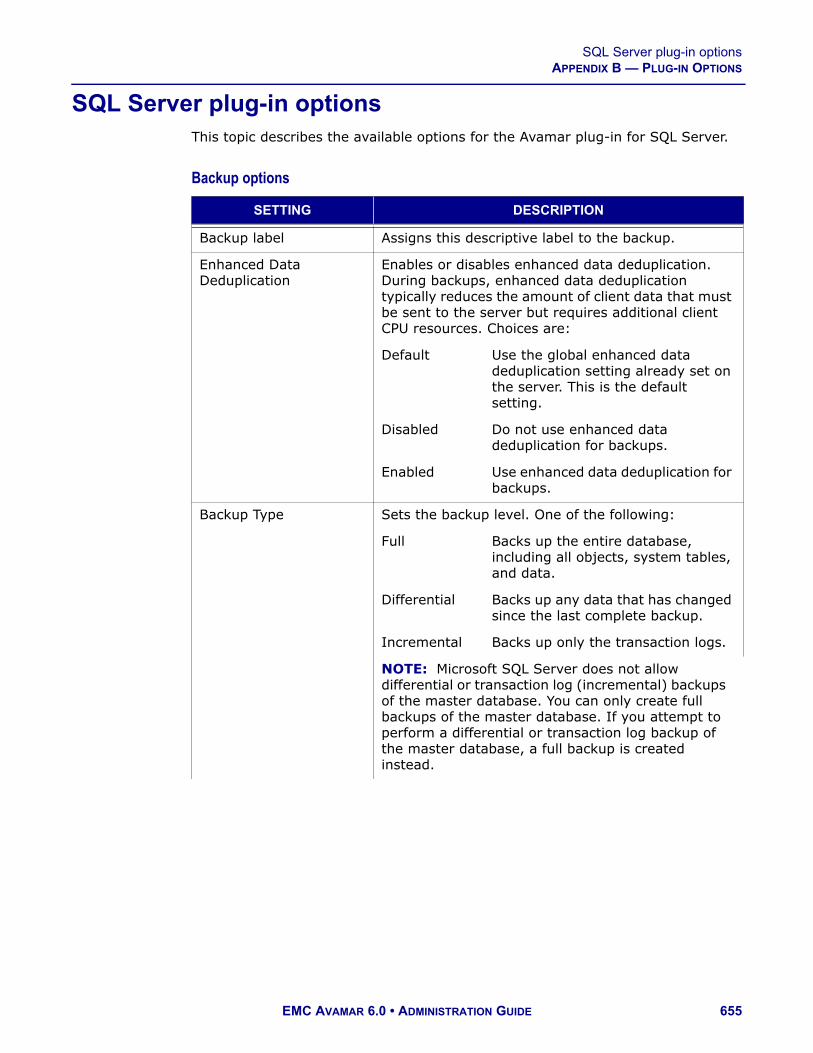
SQL Server plug-in optionsAPPENDIX B — PLUG-IN OPTIONS
SQL Server plug-in optionsThis topic describes the available options for the Avamar plug-in for SQL Server.
Backup options
SETTING DESCRIPTION
Backup label Assigns this descriptive label to the backup.
Enhanced Data Deduplication
Enables or disables enhanced data deduplication. During backups, enhanced data deduplication typically reduces the amount of client data that must be sent to the server but requires additional client CPU resources. Choices are:
Default Use the global enhanced data deduplication setting already set on the server. This is the default setting.
Disabled Do not use enhanced data deduplication for backups.
Enabled Use enhanced data deduplication for backups.
Backup Type Sets the backup level. One of the following:
Full Backs up the entire database, including all objects, system tables, and data.
Differential Backs up any data that has changed since the last complete backup.
Incremental Backs up only the transaction logs.
NOTE: Microsoft SQL Server does not allow differential or transaction log (incremental) backups of the master database. You can only create full backups of the master database. If you attempt to perform a differential or transaction log backup of the master database, a full backup is created instead.
EMC AVAMAR 6.0 • ADMINISTRATION GUIDE 655

SQL Server plug-in optionsAPPENDIX B — PLUG-IN OPTIONS
Force Incremental backup
If a full backup exists and then another full backup occurs, this option creates a transaction log (incremental) backup that contains transactions that occur from the end of the first full backup or the most recent transaction log backup, whichever is later, until the time that the forced transaction log backup occurs (after the first backup of the new backup cycle). This ensures that a point-in-time recovery to a point in time between the two full backups can occur, if necessary.Two backup sessions are created when a forced transaction log backup occurs. The first session contains transactions that occur from the end of the first full backup until the start time of the forced transaction log backup. The second session contains transactions that occur from the end of the second full backup until the time that the forced transaction log backup occurs.To restore and recover the database to a point after the forced transaction log backup, select the last backup from the last backup session that has the most recent full backup, during the restore process.IMPORTANT: You cannot perform a transaction log backup on databases that use the simple recovery model because those databases do not support transaction log backups. This includes system databases such as the master, msdb, and model databases. As a result, ensure that the Force Incremental backup checkbox is clear when you back up a database that uses the simple recovery model.
Use Data Domain system
Stores the backup on a configured Data Domain system instead of on the Avamar server. To store the backup on a Data Domain system, select the checkbox and then choose the Data Domain system from the list.
SETTING DESCRIPTION
EMC AVAMAR 6.0 • ADMINISTRATION GUIDE 656

SQL Server plug-in optionsAPPENDIX B — PLUG-IN OPTIONS
AD
VA
NC
ED
OP
TIO
NS
Use NT Authentication
If selected, use NT authentication to connect to SQL Server. If cleared, use SQL Server authentication.
SQL server address Connect to this SQL server hostname or IP address.
SQL login ID If the Use NT Authentication option is cleared, connect to the SQL server using this login ID.
SQL password If the Use NT Authentication option is cleared, type the password for the SQL login account.
Enable debugging messages
If selected, maximum information is written to log files.IMPORTANT: If selected, very large log files are created.
Truncate database log
Controls database transaction log truncation behavior. One of the following:
Default log truncation
The database transaction log is truncated if the backup type is set to incremental (transaction log); no log truncation occurs if the backup type is full or differential.This is the default setting.
Perform log truncation
The database transaction log is truncated regardless of the backup type setting. IMPORTANT: This setting breaks the chain of log backups and should not be used unless the backup type is set to full.
Suppress log truncation
The database transaction log is not truncated under any circumstances.
Force full backup If selected, a full backup is performed if a previous full backup, from which a transaction log/differential backup can be applied, could not be found on the server.Effectively, this option automates taking a full backup when necessary.IMPORTANT: If you perform transaction log and differential backups, EMC strongly recommends that you leave this option selected (the default setting) for all backups. Otherwise, you might not be able to restore data in the event that no existing full backup is present on the Avamar server.
SETTING DESCRIPTION
EMC AVAMAR 6.0 • ADMINISTRATION GUIDE 657

SQL Server plug-in optionsAPPENDIX B — PLUG-IN OPTIONS
Restore options
SETTING DESCRIPTION
Use SQL replace option If selected, an SQL WITH REPLACE clause statement is added to the restore Transact-SQL command. This specifies that SQL Server should create any necessary database and related files even if another database or file already exists with the same name. IMPORTANT: This option overrides an SQL Server safety check that is intended to prevent you from accidentally overwriting a different database or file. This safety check is described in the Microsoft Transact-SQL Reference Manual under the RESTORE command section.This option might be required if a previous database restore exited with the following SQL Server error, which is visible in the Avamar SQL restore log:One or more devices or files already exist.Reissue the statement using the WITH REPLACEoption to overwrite these files and devices.
Restore system databases
If selected, the plug-in creates an expanded list of databases to restore that includes system databases and non-system databases. By default, this option is cleared, and only non-system databases are expanded from the restore targets.
Log Tail backup Backs up the tail of the transaction log to capture the log records that have not been backed up. The log tail backup is then used after the database restore to recover the transactions that were not included in the backup.Log tail backup is available only for databases that use the full and bulk-logged recovery models. It should be used for a direct restore without the SQL replace option.Clear the checkbox if you are performing a redirected restore to a different SQL Server instance.
EMC AVAMAR 6.0 • ADMINISTRATION GUIDE 658

SQL Server plug-in optionsAPPENDIX B — PLUG-IN OPTIONS
AD
VA
NC
ED
OP
TIO
NS
Use NT Authentication
If selected, use NT authentication for connecting to SQL server. If cleared, use SQL Server authentication.
SQL server address Connect to this SQL server hostname or IP address.
SQL login ID If the Use NT Authentication option is cleared, connect to the SQL server using this login ID.
SQL password If the Use NT Authentication option is cleared, type the password for the SQL login account.
Enable debugging messages
If selected, maximum information is written to log files.IMPORTANT: If selected, very large log files are created.
New database name To rename this database, type the new name here.
Alternate database/log location
If you are relocating the database, type the full path of the new database file (*.mdf) location.If the Alternate database/log location field contains an entry and the Alternate database log location field is empty, then both the database and the log files are restored to this new location.
If both the Alternate database/log location and Alternate database log location field contain entries, then the database files and log files are restored to their respective (and likely different) locations.
Alternate database log location
If you are relocating the database, type the full path of the new database log file (*.ldf) location.
Point-in-Time A specific date and time to which to recover the database. Available only if the database uses the full recovery model. Specify the date and time in yyyy-mm-ddThh:mm:ss format. For example, 2009-10-25T14:15:45 is October 25, 2009 at 2:15:45 p.m.
Mark name If named marks are inserted in the transaction log for recovery purposes, then you can recover to a specific mark. This feature is available only if the database uses the full recovery model. Specify the mark name.IMPORTANT: Specify either a point in time or a named mark, but not both. If you specify both, then the restore fails to complete and an error message is written to the log file.
SETTING DESCRIPTION
EMC AVAMAR 6.0 • ADMINISTRATION GUIDE 659

SQL Server plug-in optionsAPPENDIX B — PLUG-IN OPTIONS
AD
VA
NC
ED
OP
TIO
NS
After date/time If named marks are not unique in the transaction log, then you can specify a date and time to locate the mark to recover to. The recovery process stops at the first mark with the specified name, exactly at or after the specified date and time. Specify the date and time in yyyy-mm-ddThh:mm:ss format. For example, 2009-10-25T14:15:45 is October 25, 2009 at 2:15:45 p.m.
STOPBEFOREMARK Specifies that the log record immediately before the mark is the recovery point. In other words, the recovery rolls forward to the mark and excludes the marked transaction.
STOPATMARK Specifies that the marked transaction is the recovery point. In other words, the recovery rolls forward to the mark and includes the marked transaction.
SETTING DESCRIPTION
EMC AVAMAR 6.0 • ADMINISTRATION GUIDE 660

Windows VSS plug-in optionsAPPENDIX B — PLUG-IN OPTIONS
Windows VSS plug-in optionsThis topic describes the available options for the Avamar plug-in for Windows VSS.
Backup options
SETTING DESCRIPTION
Backup Type Sets the backup level. IMPORTANT: Full is the only backup level supported by the Avamar plug-in for Windows VSS.
Create Disaster Recovery Backup Selected by default. If the checkbox is cleared, a disaster recovery backup is not performed when the system state backup is processed. IMPORTANT: Do not disable this option. Disabling this option makes backups faster. However, the backups are not valid for performing a disaster recovery.One exception is when you perform a backup of Active Directory. For Active Directory backups, you can clear this checkbox.
Backup label Assigns this descriptive label to the backup.
AD
VA
NC
ED
OP
TIO
NS Temporary directory for the
plug-inUser-defined temporary directory.
Enable debugging messages If selected, maximum information is written to log files.IMPORTANT: If selected, very large log files are created.
EMC AVAMAR 6.0 • ADMINISTRATION GUIDE 661

Windows VSS plug-in optionsAPPENDIX B — PLUG-IN OPTIONS
Restore options
SETTING DESCRIPTION
AD
VA
NC
ED
OP
TIO
NS Temporary directory for the
plug-inUser-defined temporary directory.
Enable debugging messages If selected, maximum information is written to log files.IMPORTANT: If selected, very large log files are created.
EMC AVAMAR 6.0 • ADMINISTRATION GUIDE 662

Replicate plug-in optionsAPPENDIX B — PLUG-IN OPTIONS
Replicate plug-in optionsThis topic describes the available options for the Avamar Replicate plug-in.
Backup options
IMPORTANT: Restore operations are not supported by the Avamar Replicate plug-in.
SETTING DESCRIPTION
Domain name on the target server
Specifies where backups are stored on the target server. The replicated backups appear in the specified domain (directory) under REPLICATE on the target server.
Destination server Specifies the target (destination) server that receives replicated backups.
User ID on destination server
Specifies the Avamar administrative user account on the target (destination) server with sufficient privileges to allow the replication operation.
Password on destination server
Specifies the password for the Avamar administrative user account on the target (destination) server.
EMC AVAMAR 6.0 • ADMINISTRATION GUIDE 663

Linux VMware Image plug-in optionsAPPENDIX B — PLUG-IN OPTIONS
Linux VMware Image plug-in optionsThis topic describes the available options for the Avamar Linux VMware Image plug-in.
Backup options
Restore options
SETTING DESCRIPTION
Use changed block tracking to increase performance
If selected, the VMware changed block tracking feature is used to identify areas of the virtual machine filesystem that have changed since the last backup and only process those changed areas during the next backup.IMPORTANT: Changed block tracking must be enabled at the virtual machine level in order for this feature to work.
Use Data Domain system If this Avamar server is configured to support storing backups on a Data Domain system, selecting this option directs this backup to the selected Data Domain system.
SETTING DESCRIPTION
Use changed block tracking to increase performance
If selected, the VMware changed block tracking feature is used to identify areas of the virtual machine filesystem that have changed since the last backup and only process those changed areas during this restore operation.IMPORTANT: Changed block tracking must enabled at the virtual machine level in order for this feature to work.
EMC AVAMAR 6.0 • ADMINISTRATION GUIDE 664

Windows VMware Image plug-in optionsAPPENDIX B — PLUG-IN OPTIONS
Windows VMware Image plug-in optionsThis topic describes the available options for the Avamar Windows VMware Image plug-in.
Backup options
Restore options
SETTING DESCRIPTION
Use changed block tracking to increase performance
If selected, the VMware changed block tracking feature is used to identify areas of the virtual machine filesystem that have changed since the last backup and only process those changed areas during the next backup.IMPORTANT: Changed block tracking must be enabled at the virtual machine level in order for this feature to work.
Use Data Domain system If this Avamar server is configured to support storing backups on a Data Domain system, selecting this option directs this backup to the selected Data Domain system.
SETTING DESCRIPTION
Use changed block tracking to increase performance
If selected, the VMware changed block tracking feature is used to identify areas of the virtual machine filesystem that have changed since the last backup and only process those changed areas during this restore operation.IMPORTANT: Changed block tracking must enabled at the virtual machine level in order for this feature to work.
EMC AVAMAR 6.0 • ADMINISTRATION GUIDE 665

Windows VMware File-level Restore plug-in optionsAPPENDIX B — PLUG-IN OPTIONS
Windows VMware File-level Restore plug-in optionsBackup operations are not supported by the Avamar Windows VMware File-level Restore plug-in, and no user-configurable restore options are available.
EMC AVAMAR 6.0 • ADMINISTRATION GUIDE 666

APPENDIX C — MCS AND EMS DATABASE VIEWS
This appendix lists each MCS and EMS database view and describes the columns within each view. This information is intended to support report creation using these views.
Data typesEach column in a database view stores one of the data types listed in the following table.
TYPE DESCRIPTION
bool Logical Boolean value (true or false).
date Specific calendar date (year, month, day).
float8 8-byte floating-point number.
int2 Signed 2-byte integer (whole number).
int4 Signed 4-byte integer (whole number).
int8 Signed 8-byte integer (whole number).
numeric Exact numeric value with selectable precision.
text Variable-length character string.
time Specific time of day.
timestamp Specific calendar date and time of day.
varchar Variable-length character string.
EMC AVAMAR 6.0 • ADMINISTRATION GUIDE 667

MCS database viewsAPPENDIX C — MCS AND EMS DATABASE VIEWS
MCS database viewsThe following topics describe the columns in each MCS database view.
v_activities
This view contains a record (row) for each backup, restore, or validation activity that has taken place.
IMPORTANT: Beginning with version 4.0, use of this database view is deprecated in favor of v_activities_2 (page 671). Official support for this database view is likely to be discontinued in a future release.
COLUMN TYPE DESCRIPTION
axionsystemid varchar Avamar system ID.
bytes_excluded float8 Number of bytes intentionally excluded.Not relevant for replication activities.
bytes_modified_sent float8 Not relevant for replication activities.
bytes_modified_not_sent float8 Not relevant for replication activities.
bytes_new float8 Number of bytes processed after data deduplication.
bytes_overhead float8 Number of bytes of overhead.Not relevant for replication activities.
bytes_scanned float8 Number of bytes processed.
Not relevant for replication activities.
bytes_skipped float8 Number of bytes unintentionally skipped (errors and so forth).
cid varchar Client ID (subject to change, avoid storing externally).
client_name varchar Client name.
client_os varchar Client operating system.
client_ver varchar Avamar client software version.
completed_date date Completed or terminated date.
completed_time time Completed or terminated time.
completed_ts timestamp Completed or terminated date and time.
createtime numeric Avamar server timestamp for when backup was created.
EMC AVAMAR 6.0 • ADMINISTRATION GUIDE 668

MCS database viewsAPPENDIX C — MCS AND EMS DATABASE VIEWS
dataset varchar Dataset used to perform this backup (applies to group-based backups only).
dataset_override bool True if a client dataset was used instead of a group dataset to perform this backup.
display_name varchar VMware client display name.
domain varchar Client domain.
effective_expiration varchar Expiration of the backup as calculated at the time of the backup.
effective_expiration_ts timestamp Expiration of the backup as calculated at the time of the backup.
effective_path varchar Actual dataset used in the backup (applies to group-based backups only).
encryption_method varchar Encryption method used. Valid values are:
• proprietary• ssl
error_code int4 Numeric activity status completion code.
error_code_summary varchar If the activity did not successfully complete, a short summary of the error code.
expiration text Current expiration date.
expiration_ts timestamp Current expiration timestamp.
group_name varchar Group name (applies to group-based backups only).
initiated_by varchar Activity initiated by (applies to on-demand backup only).
num_files_skipped float8 Number of files unintentionally skipped (errors and so forth).Not relevant for replication activities.
num_of_files float8 Number of files processed. Can be zero for replication activities.Not relevant for replication activities.
plugin_name varchar Name of the plug-in used to perform this activity.
plugin_number int4 Numeric plug-in ID.
recorded_date date Date the activity was recorded.
COLUMN TYPE DESCRIPTION
EMC AVAMAR 6.0 • ADMINISTRATION GUIDE 669

MCS database viewsAPPENDIX C — MCS AND EMS DATABASE VIEWS
recorded_date_time timestamp Date and time the activity was recorded.
recorded_time time Time the activity was recorded.
retention_policy varchar Retention policy used to perform this backup (applies to group-based backups only).
retention_policy_override bool True if a client retention policy was used instead of a group retention policy to perform this backup.
schedule varchar Schedule used for scheduled backups.
schedule_recurrence varchar Recurrence interval, either daily, weekly, yearly, or monthly.
scheduled_end_date date Expected end date of the activity.
scheduled_end_time time Expected end time of the activity.
scheduled_end_ts timestamp Expected end date and time of the activity.
scheduled_start_date date Scheduled start date.
scheduled_start_time time Scheduled start time.
scheduled_start_ts timestamp Scheduled start date and time.
session_id varchar Unique identifier for this activity.
snapup_label varchar Backup label.Blank for replication activities.
snapup_number varchar Backup number.Blank for replication activities.
started_date date Actual start date of the activity.
started_time time Actual start time of the activity.
started_ts timestamp Actual start date and time of the activity.
status_code int4 Last known status code of the activity.
status_code_summary varchar Short summary of this status code.
COLUMN TYPE DESCRIPTION
EMC AVAMAR 6.0 • ADMINISTRATION GUIDE 670

MCS database viewsAPPENDIX C — MCS AND EMS DATABASE VIEWS
v_activities_2
This view contains a record (row) for each non-replication activity (that is, backup, restore, or validation) that has taken place. Replication activities are stored in v_repl_actitivities (page 703).
type varchar Type of activity. Valid values are: • On-Demand Snapup• Scheduled Snapup• Restore• Validate
NOTE: Value “Archive Source” deprecated in version 3.7.
COLUMN TYPE DESCRIPTION
axionsystemid varchar Avamar system ID.
bytes_excluded float8 Number of bytes intentionally excluded.
bytes_modified_sent float8 Number of bytes modified and sent.
bytes_modified_not_sent float8 Number of bytes modified but not sent.
bytes_new float8 Number of bytes processed after data deduplication.
bytes_overhead float8 Number of bytes of overhead.
bytes_scanned float8 Number of bytes processed.
bytes_skipped float8 Number of bytes unintentionally skipped (errors and so forth).
cid varchar Client ID (subject to change, avoid storing externally).
client_name varchar Client name.
client_os varchar Client operating system.
client_ver varchar Avamar client software version.NOTE: If this activity is a VMware image backup or restore, this is the Avamar client software version running on the proxy server.
completed_date date Completed or terminated date.
completed_time time Completed or terminated time.
completed_ts timestamp Completed or terminated date and time.
COLUMN TYPE DESCRIPTION
EMC AVAMAR 6.0 • ADMINISTRATION GUIDE 671

MCS database viewsAPPENDIX C — MCS AND EMS DATABASE VIEWS
createtime numeric Avamar server timestamp for when the backup was created.
dataset varchar Dataset used to perform this backup (applies to group-based backups only).
dataset_override bool True if a client dataset was used instead of a group dataset to perform this backup.
ddr_hostname varchar If the server column value is DD, then this is the Data Domain system name.
display_name varchar VMware client display name.
domain varchar Client domain.
effective_expiration varchar Expiration of the backup as calculated at the time of the backup.
effective_expiration_ts timestamp Expiration of the backup as calculated at the time of the backup.
effective_path varchar Actual dataset used in the backup (applies to group-based backups only).
encryption_method varchar Encryption method used for client/server data transfer. Choices are:
• proprietary• ssl
encryption_method2 varchar Encryption method used for client/server data transfer. Choices are:
High Strongest available encryption setting for that specific client platform.
Medium Medium strength encryption.
None No encryption.
NOTE: The exact encryption technology and bit strength used for any given client-server connection depends on a number of factors, including the client platform and Avamar server version. The EMC Avamar Product Security Guide provides information.
COLUMN TYPE DESCRIPTION
EMC AVAMAR 6.0 • ADMINISTRATION GUIDE 672

MCS database viewsAPPENDIX C — MCS AND EMS DATABASE VIEWS
encrypt_method2_sa bool True if the mcserver.xml encrypt_server_authenticate preference is set to true. Otherwise, false.
error_code int4 Numeric activity status completion code.
error_code_summary varchar If the activity did not successfully complete, a short summary of the error code.
expiration text Current expiration date.
expiration_ts timestamp Current expiration timestamp.
group_name varchar Group name (applies to group-based backups only).
initiated_by varchar Activity initiated by (applies to On-Demand Backup only).
num_files_skipped float8 Number of files unintentionally skipped (errors and so forth).
num_of_files float8 Number of files processed.
plugin_name varchar Name of the plug-in used to perform this activity.
plugin_number int4 Numeric plug-in ID.
proxy_cid varchar VMware proxy client unique ID.
recorded_date date Date the activity was recorded.
recorded_date_time timestamp Date and time the activity was recorded.
recorded_time time Time the activity was recorded.
retention_policy varchar Retention policy used to perform the backup (applies to group-based backups only).
retention_policy_override bool True if a client retention policy was used instead of a group retention policy to perform this backup.
server varchar Specifies the destination Data Domain system for backups, or source Data Domain system for restores. Valid values are:
• Avamar - Avamar server• DD - Data Domain system
schedule varchar Schedule used for scheduled backups.
COLUMN TYPE DESCRIPTION
EMC AVAMAR 6.0 • ADMINISTRATION GUIDE 673

MCS database viewsAPPENDIX C — MCS AND EMS DATABASE VIEWS
schedule_recurrence varchar Recurrence interval, either daily, weekly, yearly, or monthly.
scheduled_end_date date Expected end date of the activity.
scheduled_end_time time Expected end time of the activity.
scheduled_end_ts timestamp Expected end date and time of the activity.
scheduled_start_date date Scheduled start date.
scheduled_start_time time Scheduled start time.
scheduled_start_ts timestamp Scheduled start date and time.
session_id varchar Unique identifier for this activity.
snapup_label varchar Backup label.Blank for replication activities.
snapup_number varchar Backup number.Blank for replication activities.
started_date date Actual start date of the activity.
started_time time Actual start time of the activity.
started_ts timestamp Actual start date and time of the activity.
status_code int4 Last known status code of the activity.
status_code_summary varchar Short summary of this status code.
type varchar Type of activity. Valid values are: • On-Demand Backup• Scheduled Backup• Restore• Validate
NOTE: Value “Archive Source” deprecated in version 3.7.
wid varchar Unique workorder identifier for this activity.
COLUMN TYPE DESCRIPTION
EMC AVAMAR 6.0 • ADMINISTRATION GUIDE 674

MCS database viewsAPPENDIX C — MCS AND EMS DATABASE VIEWS
v_activity_errors
This view contains a record (row) that stores the total number of times a specific event code is encountered during a specific activity.
v_audits
This view contains a record (row) for each audit log entry.
COLUMN TYPE DESCRIPTION
cid varchar Client ID.
cnt int4 Count of the number of times that this event code occurred.
code int4 Event code.
pid_number int4 Plug-in number.
session_id varchar Session ID.
COLUMN TYPE DESCRIPTION
audit_id int4 Internally generated unique ID for this audit entry.
date_time timestamp Date and time of the event.
domain varchar Domain associated with this event.
ecode int4 Event code.
product varchar Values include:• EM• EMS• END_USER• MCCLI• MCGUI• MCS• SNMP_SUB_AGENT• WEB_RESTORE
role varchar Values include:• Administrator• Activity Operator• Restore Only Operator
EMC AVAMAR 6.0 • ADMINISTRATION GUIDE 675

MCS database viewsAPPENDIX C — MCS AND EMS DATABASE VIEWS
object varchar Values include:• ACTIVITY• AGENT• BACKUP• CLIENT• CP• CPV• CRG• CRON• DATASET• DOMAIN• EMS• EVENT• GC• GROUP• HFSCHECK• MCS• PLUGIN• PROFILE• REPL• REPORT• RETENTION• SCHEDULE• SNMP_SUB_AGENT• SNMPD• SYSLOGD• USER
operation varchar Values include:• ACK• ACTIVATE• ADD• AUTH• BACKUP• BROWSE• CANCEL• COPY• DELETE• DISABLE• EDIT• ENABLE• EXPORT• LOGON• RESTART• RESUME• RETIRE• RUN• START• STOP• SUSPEND• VALIDATE
user_name varchar User ID that initiated this action.
COLUMN TYPE DESCRIPTION
EMC AVAMAR 6.0 • ADMINISTRATION GUIDE 676

MCS database viewsAPPENDIX C — MCS AND EMS DATABASE VIEWS
v_clients
This view contains a record (row) for each client known to the MCS.
IMPORTANT: Beginning with version 4.0, use of this database view is deprecated in favor of v_clients_2 (page 680). All official support for this database view is likely to be discontinued in a future release.
COLUMN TYPE DESCRIPTION
agent_version varchar Version of the agent installed.
allow_overtime bool True if the client can ignore the scheduling window end time.See also overtime_option (page 679).
allow_userinit_snapup_file_sel varchar Allow file selection on user initiated backups.
allow_userinit_snapups varchar Allow user initiated backups.
backed_up_ts timestamp Last backup date and time.
can_page bool True if MCS can call out to the client.
checkin_ts timestamp Last checkin date and time.
cid varchar Client ID (subject to change, avoid storing externally).
client_addr varchar Client IP address.
client_name varchar Client name.
client_type varchar Client type. One of the following:
• REGULAR• VCENTER• VMACHINE• VPROXY• VREGULAR
contact_email varchar Contact email address.
contact_location varchar Contact location.
contact_name varchar Person to contact regarding issues with this client.
contact_notes varchar Contact notes.
contact_phone varchar Contact phone number.
created date Creation date.
EMC AVAMAR 6.0 • ADMINISTRATION GUIDE 677

MCS database viewsAPPENDIX C — MCS AND EMS DATABASE VIEWS
ds_override bool True if the client can override the group dataset.
enabled bool True if the client can generate activities.
full_domain_name varchar Fully qualified client location.
has_snapups bool True if the client has backups.
modified date Date that client information was last modified.
os_type varchar Client OS type.
override_userinit_retpol varchar Override standard retention policy on user initiated backups.
COLUMN TYPE DESCRIPTION
EMC AVAMAR 6.0 • ADMINISTRATION GUIDE 678

MCS database viewsAPPENDIX C — MCS AND EMS DATABASE VIEWS
overtime_option varchar One of the following:
ALWAYS Scheduled group backups are always allowed to run past the schedule duration setting.
NEXT Only the next scheduled group backup is allowed to run past the schedule duration setting.
NEXT_SUCCESS Scheduled group backups are allowed to run past the schedule duration setting until a successful backup is completed.
NEVER Scheduled group backups are never allowed to run past the schedule duration setting.
This value is automatically set to NEXT_SUCCESS when the client initially registers, and is cleared after one backup successfully completes.
page_addr varchar IP address used to contact this client.
COLUMN TYPE DESCRIPTION
EMC AVAMAR 6.0 • ADMINISTRATION GUIDE 679

MCS database viewsAPPENDIX C — MCS AND EMS DATABASE VIEWS
v_clients_2
This view contains a record (row) for each client known to the MCS.
page_port varchar Data port used to contact this client.
pageadr_locked bool True if the address cannot be updated automatically by MCS.
plugin_for_last_backup varchar Plug-in used for the last backup.
rc_override bool True if the client can override the group retry count setting.
registered bool True if the client has checked in to MCS.
registered_ts timestamp Registered date and time.
restore_only bool True if the client can only do restores.
retry_cnt int4 Connection retry count.
rp_override bool True if the client can override the group retention policy.
timeout int4 Connection timeout value.
tp_override bool True if the client can override the group timeout period setting.
COLUMN TYPE DESCRIPTION
agent_version varchar Version of the agent installed.
allow_overtime bool True if the client can ignore the scheduling window end time.See also overtime_option (page 682).
allow_userinit_snapup_file_sel varchar Allow file selection on user initiated backups.
allow_userinit_snapups varchar Allow user initiated backups.
backed_up_ts timestamp Last backup date and time.
can_page bool True if MCS can call out to the client.
checkin_ts timestamp Last checkin date/time.
cid varchar Client ID (subject to change, avoid storing externally).
COLUMN TYPE DESCRIPTION
EMC AVAMAR 6.0 • ADMINISTRATION GUIDE 680

MCS database viewsAPPENDIX C — MCS AND EMS DATABASE VIEWS
client_addr varchar Client IP address.
client_name varchar Client name.
client_type varchar Client type. One of the following:
• REGULAR• VCENTER• VMACHINE• VPROXY• VREGULAR
contact_email varchar Contact email address.
contact_location varchar Contact location.
contact_name varchar Person to contact regarding issues with this client.
contact_notes varchar Contact notes.
contact_phone varchar Contact phone number.
created date Creation date.
display_client_name varchar Virtual machine displayable node name.
display_full_domain varchar Fully qualified domain and client display name.
ds_override bool True if the client can override the group dataset.
enabled bool True if the client can generate activities.
full_domain_name varchar Fully qualified client location.
has_snapups bool True if the client has backups.
modified date Date that client information was last modified.
os_type varchar Client OS type.
override_userinit_retpol varchar Override standard retention policy on user initiated backups.
COLUMN TYPE DESCRIPTION
EMC AVAMAR 6.0 • ADMINISTRATION GUIDE 681

MCS database viewsAPPENDIX C — MCS AND EMS DATABASE VIEWS
overtime_option varchar One of the following:
ALWAYS Scheduled group backups are always allowed to run past the schedule duration setting.
NEXT Only the next scheduled group backup is allowed to run past the schedule duration setting.
NEXT_SUCCESS Scheduled group backups are allowed to run past the schedule duration setting until a successful backup is completed.
NEVER Scheduled group backups are never allowed to run past the schedule duration setting.
This value is automatically set to NEXT_SUCCESS when the client initially registers, and is cleared after one backup successfully completes.
page_addr varchar IP address used to contact this client.
COLUMN TYPE DESCRIPTION
EMC AVAMAR 6.0 • ADMINISTRATION GUIDE 682
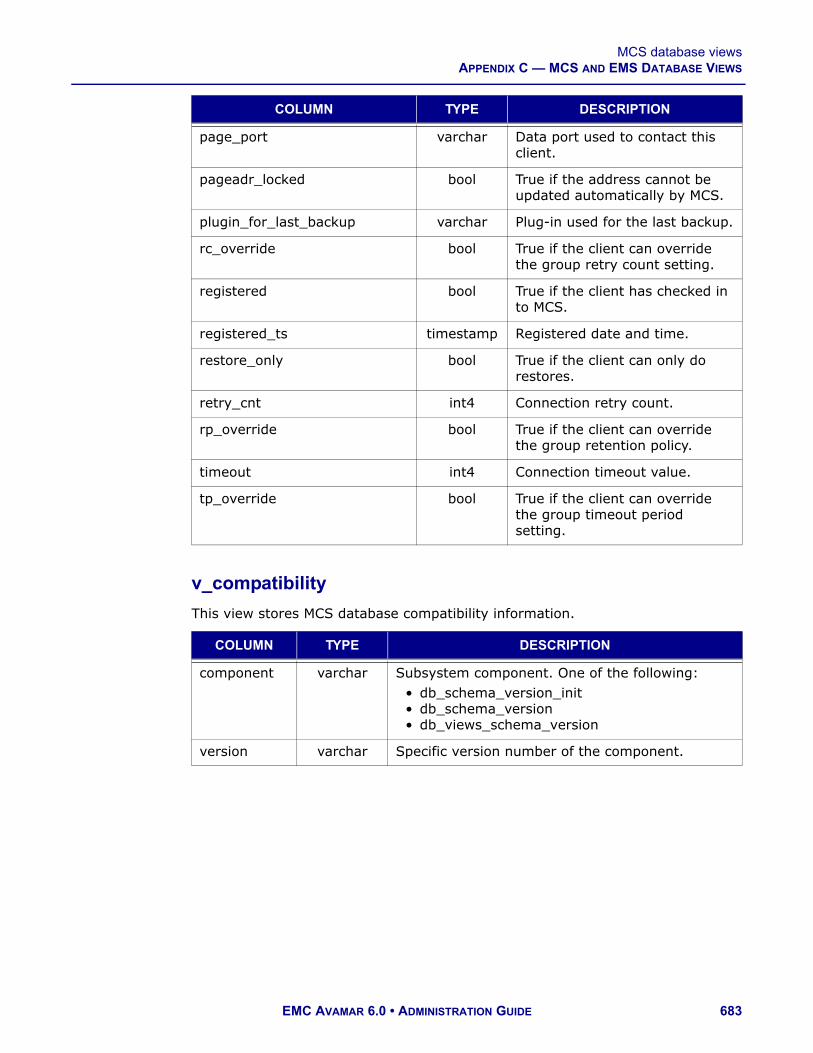
MCS database viewsAPPENDIX C — MCS AND EMS DATABASE VIEWS
v_compatibility
This view stores MCS database compatibility information.
page_port varchar Data port used to contact this client.
pageadr_locked bool True if the address cannot be updated automatically by MCS.
plugin_for_last_backup varchar Plug-in used for the last backup.
rc_override bool True if the client can override the group retry count setting.
registered bool True if the client has checked in to MCS.
registered_ts timestamp Registered date and time.
restore_only bool True if the client can only do restores.
retry_cnt int4 Connection retry count.
rp_override bool True if the client can override the group retention policy.
timeout int4 Connection timeout value.
tp_override bool True if the client can override the group timeout period setting.
COLUMN TYPE DESCRIPTION
component varchar Subsystem component. One of the following:• db_schema_version_init• db_schema_version• db_views_schema_version
version varchar Specific version number of the component.
COLUMN TYPE DESCRIPTION
EMC AVAMAR 6.0 • ADMINISTRATION GUIDE 683

MCS database viewsAPPENDIX C — MCS AND EMS DATABASE VIEWS
v_datasets
This view contains a record (row) for each dataset known to the MCS.
v_ddr_node_spaceThis view tracks Data Domain system utilization and capacity.
v_dpnsummary
This view contains a record (row) for each backup, restore, or validation activity on a client-by-client basis.
COLUMN TYPE DESCRIPTION
all_data bool True if the dataset saves all data.
domain varchar Avamar domain associated with the dataset.
is_link bool True if the dataset is a pointer to another dataset.
is_read_only bool True if the dataset cannot be modified.
link_name varchar Name of the dataset if is_link is true.
name varchar Name of the dataset.
COLUMN TYPE DESCRIPTION
date date Date.
time time Time.
date_time timestamp Date and time.
ddr_id varchar Unique Data Domain system ID.
ddr_hostname varchar Data Domain system hostname.
utilization numeric /backup: post-comp percentage of space utilized.
capacity_gib float8 /backup: post-comp size in GiB.
COLUMN TYPE DESCRIPTION
clientver varchar Version of agent software running on the client.
host varchar Client name.
mod_sent float8 Bytes modified and sent.
modnotsent float8 Bytes modified but not sent.
numfiles float8 Number of files processed.
nummodfiles float8 Number of files modified.
operation varchar Type of activity reported by this entry.
EMC AVAMAR 6.0 • ADMINISTRATION GUIDE 684

MCS database viewsAPPENDIX C — MCS AND EMS DATABASE VIEWS
v_dpn_stats
This view contains a record (row) for Avamar server statistics.
os varchar Client operating system.
overhead float8 Number of bytes of overhead sent and stored on the storage subsystem.
pcntcommon int4 Percentage of data deduplication.
reduced float8 Bytes reduced by compression.
root varchar Dataset used in the backup (applies to group-based backups only).
seconds float8 Completed or terminated date and time.
sessionid varchar Unique identifier for the client to storage subsystem session for this activity.
starttime timestamp Date and time the job was actually dispatched to the client by Avamar Administrator. NOTE: Start time in the client log might be slightly later due to communication and job setup latency.
startvalue float8 Scheduled start date and time, expressed as elapsed time (in seconds) since the beginning of the UNIX epoch.
status varchar Success or failure result of this activity.
totalbytes float8 Number of bytes processed.
workorderid varchar Unique workorder identifier for this activity.
COLUMN TYPE DESCRIPTION
data_protected_mb float8 Megabytes protected.
date date Date.
date_time timestamp Date and time.
dpn_name varchar Avamar server name.
time time Time.
COLUMN TYPE DESCRIPTION
EMC AVAMAR 6.0 • ADMINISTRATION GUIDE 685

MCS database viewsAPPENDIX C — MCS AND EMS DATABASE VIEWS
v_ds_commands
This view contains a record (row) for each optional plug-in command defined for each dataset.
v_ds_excludes
This view contains a record (row) for each exclude definition defined for each dataset.
v_ds_includes
This view contains a record (row) for each include definition defined for each dataset.
COLUMN TYPE DESCRIPTION
command_name varchar Name of the command.
dataset_name varchar Name of the dataset.
domain varchar Domain.
plugin_name varchar Name of the plug-in.
type varchar Type of optional plug-in command.
value varchar Value associated with the command name.
COLUMN TYPE DESCRIPTION
dataset_name varchar Name of the dataset.
domain varchar Domain.
plugin_name varchar Name of the plug-in.
value varchar Exclude value for the dataset or plug-in.
COLUMN TYPE DESCRIPTION
dataset_name varchar Name of the dataset.
domain varchar Domain.
plugin_name varchar Name of the plug-in.
value varchar Include value for the dataset or plug-in.
EMC AVAMAR 6.0 • ADMINISTRATION GUIDE 686

MCS database viewsAPPENDIX C — MCS AND EMS DATABASE VIEWS
v_ds_targets
This view contains a record (row) for each source target defined for each dataset.
v_ev_catalog
This view contains a record (row) for each event code in the events catalog.
COLUMN TYPE DESCRIPTION
dataset_name varchar Name of the dataset.
domain varchar Domain.
plugin_name varchar Name of the plug-in.
value varchar Target value for the dataset or plug-in.
COLUMN TYPE DESCRIPTION
category varchar Event category.
code int4 Event code.
name varchar Event name.
object varchar Values include:• ACTIVITY• AGENT• BACKUP• CLIENT• CP• CPV• CRG • CRON• DATASET• DOMAIN• EMS• EVENT• GC• GROUP• HFSCHECK• MCS• PLUGIN• PROFILE• REPL• REPORT• RETENTION• SCHEDULE• SNMP_SUB_AGENT• SNMPD• SYSLOGD• USER
EMC AVAMAR 6.0 • ADMINISTRATION GUIDE 687
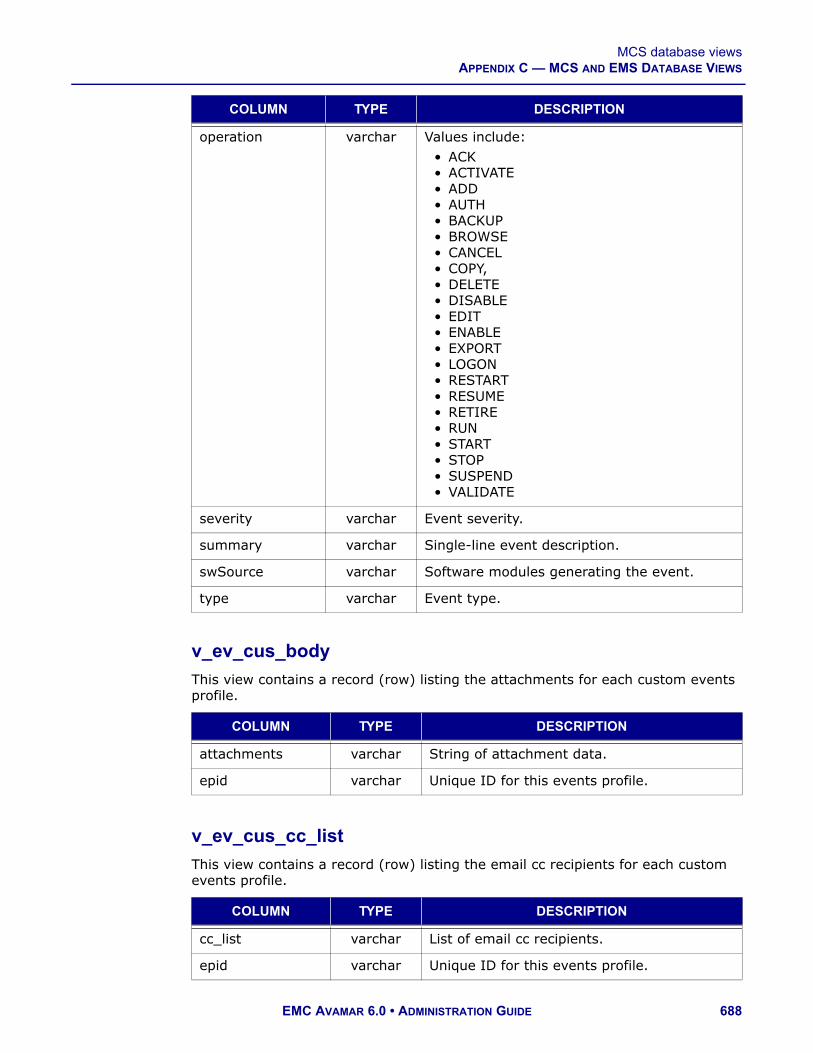
MCS database viewsAPPENDIX C — MCS AND EMS DATABASE VIEWS
v_ev_cus_body
This view contains a record (row) listing the attachments for each custom events profile.
v_ev_cus_cc_list
This view contains a record (row) listing the email cc recipients for each custom events profile.
operation varchar Values include:• ACK• ACTIVATE• ADD• AUTH• BACKUP• BROWSE• CANCEL• COPY,• DELETE• DISABLE• EDIT• ENABLE• EXPORT• LOGON• RESTART• RESUME• RETIRE• RUN• START• STOP• SUSPEND• VALIDATE
severity varchar Event severity.
summary varchar Single-line event description.
swSource varchar Software modules generating the event.
type varchar Event type.
COLUMN TYPE DESCRIPTION
attachments varchar String of attachment data.
epid varchar Unique ID for this events profile.
COLUMN TYPE DESCRIPTION
cc_list varchar List of email cc recipients.
epid varchar Unique ID for this events profile.
COLUMN TYPE DESCRIPTION
EMC AVAMAR 6.0 • ADMINISTRATION GUIDE 688

MCS database viewsAPPENDIX C — MCS AND EMS DATABASE VIEWS
v_ev_cus_codes
This view contains a record (row) for each event code that should be included in a custom events profile.
v_ev_cus_prof
This view contains a record (row) for each custom events profile.
COLUMN TYPE DESCRIPTION
code int4 Event code to monitor.
cur_value bool True if the code triggers email and syslog notification.
default_value bool Original default setting for the email and syslog notification.
epid varchar Unique ID for this events profile.
COLUMN TYPE DESCRIPTION
active bool True if the profile is enabled.
connectemc_channel varchar ConnectEMC configuration channel used for this profile.
connectemc_notify_enabled bool True if ConnectEMC Notification is enabled for this profile.
domain varchar Profile domain.
email_notify_enabled bool True if email notification should occur.
epid varchar Unique ID for this events profile.
include_logs bool True if logs are included in the email.
include_nodelist bool True if nodelist is included in the email.
inline_email_attachments bool True if email attacments are included in the body of the email.
log_dir varchar Directory location of log files.
name varchar Name of the custom profile.
read_only bool True if you cannot edit the profile.
sched_id varchar Email schedule.
snmp_notify_enabled bool True if snmp notification should be enabled.
subject varchar Email subject header string.
EMC AVAMAR 6.0 • ADMINISTRATION GUIDE 689

MCS database viewsAPPENDIX C — MCS AND EMS DATABASE VIEWS
v_ev_cus_prof_params
This view contains event code-specific parameters for custom event profiles.
v_ev_cus_rpt
This view contains a record (row) for each report emailed with an event profile.
syslog_notify_enabled bool True if syslog notification should occur.
timestamp numeric Date and time of the last email check, expressed as elapsed time in seconds since the beginning of the UNIX epoch.
COLUMN TYPE DESCRIPTION
ecode int4 Event code.
epid varchar Profile ID.
param varchar Parameter.
value varchar Value.
COLUMN TYPE DESCRIPTION
enabled bool True if the option to email the report was set.
epid varchar Profile ID.
output_csv bool True if the report was emailed in Comma-Separated Values (CSV) format.
output_txt bool True if the report was emailed in plain text format.
output_xml bool True if the report was emailed in XML format.
rptid varchar Report ID.
since_count int4 Number of days, weeks, or months since the last email was sent, or 0 if since_option is last_notified.
since_option varchar Unit of measure for since_count. Values include:• day• week• month• last_notified
COLUMN TYPE DESCRIPTION
EMC AVAMAR 6.0 • ADMINISTRATION GUIDE 690

MCS database viewsAPPENDIX C — MCS AND EMS DATABASE VIEWS
v_ev_cus_snmp_contact
This view contains a record (row) for the snmp trap configuration for each profile.
v_ev_cus_syslog_contact
This view contains a record (row) for each custom event profile that uses syslog as the notification mechanism.
COLUMN TYPE DESCRIPTION
community varchar Name of the snmp community to send traps as.
epid varchar Profile ID.
snmp_host varchar Host to send snmp traps to.
snmp_port varchar Data port to send snmp traps to. The default is 162.
COLUMN TYPE DESCRIPTION
epid varchar Unique ID for this events profile.
facility int4 Syslog facility. Valid values are:
1 user.
16 local0.
17 local1.
18 local2.
19 local3.
20 local4.
21 local5.
22 local6.
23 local7.
format int4 Output format. Valid values are:
1 XML.
2 Plain text.
syslog_host varchar Default value is localhost.
syslog_port int4 Default value is port 514.
EMC AVAMAR 6.0 • ADMINISTRATION GUIDE 691

MCS database viewsAPPENDIX C — MCS AND EMS DATABASE VIEWS
v_ev_cus_to_list
This view contains a record (row) listing the email recipients for each custom events profile.
v_ev_unack
This view contains a record (row) for each unacknowledged event logged by the MCS.
COLUMN TYPE DESCRIPTION
epid varchar Unique ID for this events profile.
to_list varchar List of email recipients.
COLUMN TYPE DESCRIPTION
audience varchar Intended audience of the event.
category varchar Event category. Valid values are:• APPLICATION• SECURITY• SYSTEM• USER
code int4 Event code.
data varchar Event data.
date date Date of the event.
description varchar Long event description.
domain varchar Domain associated with the event.
event_id int4 Internally-generated event ID.
notes varchar Event notes text.
remedy varchar Event remedy text.
severity varchar Event severity. Valid values are:• NODE• NODE_FATAL• OK• PROCESS• PROCESS_FATAL• SYSTEM_FATAL• USER• USER_FATAL
software_source varchar Software modules generating the event.
source varchar Host generating the event.
summary varchar Single-line event description.
time time Time of event.
EMC AVAMAR 6.0 • ADMINISTRATION GUIDE 692

MCS database viewsAPPENDIX C — MCS AND EMS DATABASE VIEWS
v_events
This view contains a record (row) for each event logged by the MCS.
timestamp numeric Date and time of the event, expressed as the elapsed time in seconds since the beginning of the UNIX epoch.
type varchar Event type. Valid values are:• INTERNAL• ERROR• WARNING• INFORMATION• DEBUG
COLUMN TYPE DESCRIPTION
audience varchar Intended audience of the event.
category varchar Event category. Valid values are:• APPLICATION• SECURITY• SYSTEM• USER
code int4 Event code.
data varchar Event data.
date date Date of the event.
description varchar Long event description.
domain varchar Domain associated with the event.
event_id int4 Internally-generated event ID.
notes varchar Event notes text.
remedy varchar Event remedy text.
severity varchar Event severity. Valid values are:• NODE• NODE_FATAL• OK• PROCESS• PROCESS_FATAL• SYSTEM_FATAL• USER• USER_FATAL
software_source varchar Software modules generating the event.
source varchar Host generating the event.
summary varchar Single-line event description.
COLUMN TYPE DESCRIPTION
EMC AVAMAR 6.0 • ADMINISTRATION GUIDE 693

MCS database viewsAPPENDIX C — MCS AND EMS DATABASE VIEWS
v_gcstatus
This view contains a record (row) for each garbage collection (GC) operation.
time time Time of the event.
timestamp numeric Date and time of the event, expressed as the elapsed time in seconds since the beginning of the UNIX epoch.
type varchar Event type. Valid values are:• INTERNAL• ERROR• WARNING• INFORMATION• DEBUG
COLUMN TYPE DESCRIPTION
bytes_recovered int8 Number of bytes recovered in this garbage collection operation.
chunks_deleted int4 Number of chunks deleted in this garbage collection operation.
elapsed_time int8 Total elapsed time in seconds for this garbage collection operation.
end_time timestamp Date and time this garbage collection operation ended.
gcstatusid int8 Unique ID for this garbage collection operation.
indexstripes_processed int4 Number of index stripes involved in this garbage collection operation.
indexstripes_total int4 Number of index stripes.
node_count int4 Number of nodes involved in this garbage collection operation.
result varchar String result code.
start_time timestamp Date and time this garbage collection operation started.
COLUMN TYPE DESCRIPTION
EMC AVAMAR 6.0 • ADMINISTRATION GUIDE 694

MCS database viewsAPPENDIX C — MCS AND EMS DATABASE VIEWS
v_group_members
This view contains a record (row) for each client organized by group assignment.
NOTE: One client can be a member of more than one group.
v_groups
This view contains a record (row) for each group known to the MCS.
COLUMN TYPE DESCRIPTION
cid varchar Client ID (subject to change, avoid storing externally).
client_name varchar Client name.
dataset_name varchar Dataset name.
enabled bool True if the client is enabled in the group.
full_client_name varchar Client domain and hostname.
group_name varchar Group name.
restore_only bool True if the client has been deleted and is available only for restore.
retention_name varchar Retention policy name.
use_client_ds bool True if the client dataset should be used.
use_client_retry bool True if the client retry should be used.
use_client_rp bool True if the client retention policy should be used.
use_client_timeout bool True if the client timeout should be used.
COLUMN TYPE DESCRIPTION
created date Creation date.
dataset_name varchar Dataset name.
dataset_domain varchar Dataset domain.
domain varchar Domain.
enabled bool True if the group is active and enabled.
failed_stop bool True if group backups should stop on a failed backup.
group_type varchar One of the following:• REGULAR• VCENTER
EMC AVAMAR 6.0 • ADMINISTRATION GUIDE 695

MCS database viewsAPPENDIX C — MCS AND EMS DATABASE VIEWS
v_node_space
This view contains a record (row) of disk capacity data retrieved or calculated per disk and per node.
modified date Last modified date.
name varchar Group name.
priority int4 Group priority.
read_only bool True if the group cannot be modified.
retention_name varchar Retention policy name.
retention_domain varchar Retention policy domain.
retry_cnt int4 Retry count.
run_once bool True if running only one backup.
schedule_name varchar Schedule name.
schedule_domain varchar Schedule domain.
skip_next bool True if skipping the next scheduled backup.
target_dpn varchar Avamar server to be used for this group.
timeout_min int4 Timeout in minutes.
COLUMN TYPE DESCRIPTION
capacity_mb float8 Disk size.
date date Date.
date_time timestamp Date and time.
disk int2 Disk number.
diskreadonly int2 Value applied to normalize percent full.
node varchar Node number.
stripes_reserved_mb float8 Bytes reserved for stripe usage.
stripes_used_mb float8 Amount of reserved stripe bytes used.
time time Time.
used_mb float8 Disk capacity used.
utilization numeric Percentage of storage space used.
COLUMN TYPE DESCRIPTION
EMC AVAMAR 6.0 • ADMINISTRATION GUIDE 696

MCS database viewsAPPENDIX C — MCS AND EMS DATABASE VIEWS
v_node_util
This view contains a record (row) of node statistics retrieved or calculated per node at a particular date and time.
v_plugin_can_restore
This view contains a record (row) of allowable plug-in substitutions for restores. Each record is a one-to-one allowable substition in which the orignal backup plug-in (build, version) is matched with an allowable substitute plug-in ID (can_restore_pid).
COLUMN TYPE DESCRIPTION
cpu_sys_percentage numeric Percentage of node utilization by operating system.
cpu_user_percentage numeric Percentage of node utilization by user.
date date Date.
date_time timestamp Date and time.
disk_reads_per_sec int4 Disk reads per second.
disk_writes_per_sec int4 Disk writes per second.
diskreadonly int2 Value applied to normalize percent full.
load_avg numeric Load average.
net_in_kbytes_per_sec int4 Network received in KB/s.
net_out_kbytes_per_sec int4 Network transmitted in KB/s.
net_ping numeric Node ping time.
node varchar Node ID.
state varchar Node state.
time time Time.
utilization numeric Percentage of storage space used.
COLUMN TYPE DESCRIPTION
build varchar An exception to the plug-in version value if not ALL.
can_restore_pid int4 PID of the plug-in which this plug-in can use to perform restores.
pid_number int4 Numeric plug-in ID.
version varchar Plug-in version.
EMC AVAMAR 6.0 • ADMINISTRATION GUIDE 697

MCS database viewsAPPENDIX C — MCS AND EMS DATABASE VIEWS
v_plugin_catalog
This view contains a record (row) for each known plug-in.
COLUMN TYPE DESCRIPTION
content varchar Content description of the plug-in.
description varchar Descriptive name of the plug-in.
encryption_mode varchar Encryption method used. Valid values are:
• proprietary• ssl
explicit_target_supported bool True if targets for the plug-in can be entered when creating or editing a dataset for the plug-in.
implicit_target_supported bool True if the concept of all systems for the plug-in is supported when creating or editing a dataset.
include_implicit_as_default bool True if the implicit target is included by default when creating or editing a dataset.
multiple_restore_targets_supported bool True if multiple restore targets can be entered when restoring a backup.
multiple_targets_supported bool True if multiple targets can be entered when creating or editing a dataset for the plug-in.
pid varchar Name of the plug-in.
pid_number int4 Unique plug-in identification.
version varchar Plug-in version.
EMC AVAMAR 6.0 • ADMINISTRATION GUIDE 698

MCS database viewsAPPENDIX C — MCS AND EMS DATABASE VIEWS
v_plugin_depends_upon
This view contains a record (row) for each known plug-in dependency. Each record is a one-to-one match of a plug-in ID (build, version) and the plug-in ID on which it is dependent (dependence_on_pid).
v_plugin_flag_groups
This view contains a record (row) for each grouping of plug-in options (flags).
COLUMN TYPE DESCRIPTION
build varchar An exception to the plug-in version value if not ALL.
dependence_on_pid int4 PID of the plug-in that this plug-in depends upon.
pid_number int4 Numeric plug-in ID.
version varchar Plug-in version.
COLUMN TYPE DESCRIPTION
cgid varchar Control group ID.
description varchar
group_order int4 Order of group.
tooltip varchar Text shown when the cursor hovers over the plug-in.
type varchar One of the following:• logical• radio
EMC AVAMAR 6.0 • ADMINISTRATION GUIDE 699

MCS database viewsAPPENDIX C — MCS AND EMS DATABASE VIEWS
v_plugin_flag_pulldown
This view contains a record (row) for each entry in a pulldown plug-in option (flag).
v_plugin_flags
This view contains a record (row) for each plug-in option (flag) available for backups and restores for each plug-in.
COLUMN TYPE DESCRIPTION
build varchar An exception to the plug-in version value if not ALL.
command varchar One of the following:• browse• restore• snapup• validate
description varchar Displayable value of the entry.
entry varchar Entry in the pulldown menu.
fid varchar Flag ID.
flag_order int4 Order of the flag in the pulldown.
plugin_number int4 Numeric plug-in ID.
version varchar Plug-in version.
COLUMN TYPE DESCRIPTION
build varchar An exception to the plug-in version value if not ALL.
cgid varchar Control grouping.
command varchar One of the following:• restore• backup
description varchar
fid varchar Flag ID.
flag_order int4 Order of group.
max int4 Maximum value of the flag, if applicable.
min int4 Minimum value of the flag, if applicable.
name varchar
plugin_number int4 Numeric plug-in ID.
EMC AVAMAR 6.0 • ADMINISTRATION GUIDE 700

MCS database viewsAPPENDIX C — MCS AND EMS DATABASE VIEWS
v_plugin_options
This view contains a record (row) for each available plug-in option.
pidnum int4 Plug-in number that this flag should be directed to.
tooltip varchar Text shown when the cursor hovers over the plug-in.
type varchar One of the following:• boolean (checkbox)• integer (field)• string (field)
value varchar Default value of the flag.
version varchar Plug-in version.
COLUMN TYPE DESCRIPTION
build varchar An exception to the version if not ALL.
can_modify bool For disable options only. True if the option value is preserved on upgrades.
option_name varchar Valid values are:• browse_supported• disable_browse• disable_mc_adhoc_snapups• disable_restore disable_validate• disable_scc_adhoc_snapups• disable_scheduled_snapups• restore_supported• snapup_supported• snapup_supports_cl_options• snapup_supports_exclusion• snapup_supports_inclusion• validate_supports
option_value bool True or false.
pid_number int4 Numeric plug-in ID.
version varchar Plug-in version.
COLUMN TYPE DESCRIPTION
EMC AVAMAR 6.0 • ADMINISTRATION GUIDE 701

MCS database viewsAPPENDIX C — MCS AND EMS DATABASE VIEWS
v_plugin_state
This view contains a record (row) that stores the state of each plug-in.
v_plugins
This view contains a record (row) for each plug-in installed on any client known to the MCS.
COLUMN TYPE DESCRIPTION
build varchar An exception to the plug-in version values if not ALL.
obsolete bool True if the plug-in is obsolete.
obsolete_comment varchar Comment as to why the plug-in became obsolete.
pid_number int4 Numeric plug-in ID.
user_added bool True if the user added the build.
version varchar Plug-in version.
COLUMN TYPE DESCRIPTION
backed_up_ts timestamp Last backup date using this plug-in.
build varchar Plug-in build.
cid varchar Client ID (subject to change, avoid storing externally).
client_name varchar Name of the client.
full_client_name varchar Client domain and hostname.
installed_ts timestamp Date this plug-in type was first registered with MCS.
lastupdate_ts timestamp Date this current plug-in version was first registered with MCS.
name varchar Description of the plug-in.
pid_number int4 Plug-in number.
plugin_name varchar Name of the plug-in.
version varchar Plug-in version.
EMC AVAMAR 6.0 • ADMINISTRATION GUIDE 702

MCS database viewsAPPENDIX C — MCS AND EMS DATABASE VIEWS
v_repl_activities
This view contains a record (row) for each replication activity that has taken place.
COLUMN TYPE DESCRIPTION
bytes_excluded float8 Number of bytes intentionally excluded.
bytes_modified_sent float8 Number of bytes modified and sent.
bytes_modified_not_sent float8 Number of bytes modified but not sent.
bytes_new float8 Number of bytes processed after data deduplication.
bytes_overhead float8 Number of bytes of overhead.
bytes_reduced_comp float8 Number of bytes reduced by compression.
bytes_scanned float8 Number of bytes processed.
bytes_skipped float8 Number of bytes unintentionally skipped (errors and so forth).
cid varchar Client ID (subject to change, avoid storing externally).
client_name varchar Client name.
client_os varchar Client operating system.
client_ver varchar Avamar client software version.
completed_ts timestamp Date and time this replication operation actually ended.
ddr_hostname varchar If server column value is DD, then this is the Data Domain system name.
dpn_domain varchar Client domain.
encryp_method text Encryption method used for client/server data transfer. Choices are:
• proprietary• ssl
NOTE: This column is deprecated and exists for historical purposes only. Use encryp_method2 instead.
EMC AVAMAR 6.0 • ADMINISTRATION GUIDE 703

MCS database viewsAPPENDIX C — MCS AND EMS DATABASE VIEWS
encryp_method2 varchar Encryption method used for client/server data transfer. Choices are:
High Strongest available encryption setting for that specific client platform.
Medium Medium strength encryption.
None No encryption.
NOTE: The exact encryption technology and bit strength used for any given client-server connection depends on a number of factors, including the client platform and Avamar server version. The EMC Avamar Product Security Guide provides information.
encrypt_method2_sa bool True if server authentication was enforced at the time of the backup (that is, mcserver.xml encrypt_server_authenticate preference is set true).
error_code int4 Numeric activity status completion code.
error_code_summary varchar Last known error code summary.
initiated_by varchar Activity initiated by this user or MCS.
num_files_skipped float8 Number of file unintentionally skipped (errors and so forth).
num_mod_files float8 Number of files modified.
num_of_files float8 Number of files processed. Can be zero for replication activities.
plugin_name varchar Plug-in name.
plugin_number int4 Plug-in number.
recorded_date date Date replication occurred.
COLUMN TYPE DESCRIPTION
EMC AVAMAR 6.0 • ADMINISTRATION GUIDE 704

MCS database viewsAPPENDIX C — MCS AND EMS DATABASE VIEWS
retention_type varchar This replication activity included one or more of the following retention types:
D Daily backups.
W Weekly backups.
M Monthly backups.
Y Yearly backups.
N Backups not tagged as having a specific retention type.
server varchar Specifies the destination Data Domain system for backups, or source Data Domain system for restores. Valid values are:
• Avamar - Avamar server• DD - Data Domain system
scheduled_end_ts timestamp Date and time this replication operation was scheduled to end.
scheduled_start_ts timestamp Date and time this replication operation was scheduled to occur.
session_id varchar Unique identifier for this activity.
started_ts timestamp Date and time this replication operation actually started.
status_code int4 Numeric status code.
status_code_summary varchar Status code summary.
systemid varchar Avamar system ID.
type varchar Type of activity. Valid values are: • Replication Destination• Replication Source
wid varchar Unique workorder identifier for this activity.
COLUMN TYPE DESCRIPTION
EMC AVAMAR 6.0 • ADMINISTRATION GUIDE 705

MCS database viewsAPPENDIX C — MCS AND EMS DATABASE VIEWS
v_repl_backups
This view contains a record (row) for each replicated backup.
COLUMN TYPE DESCRIPTION
bytes_excluded float8 Number of bytes intentionally excluded from the original backup.
bytes_modified_not_sent float8 Number of bytes in the orginal backup modified but not sent.
bytes_modified_sent float8 Number of bytes in the orginal backup modified and sent.
bytes_new float8 Number of bytes processed after data deduplication.
bytes_overhead float8 Number of bytes of overhead in the orginal backup.
bytes_reduced_comp float8 Number of bytes in the orginal backup reduced by compression.
bytes_scanned float8 Number of bytes processed when the backup was taken.
bytes_skipped float8 Number of bytes unintentionally skipped when the backup was taken.
cid varchar Client ID (subject to change, avoid storing externally).
current_expiration varchar Current expiration date of the backup.
current_retention varchar Current backup retention type. One of the following:
D Daily backup.
W Weekly backup.
M Monthly backup.
Y Yearly backup.
N Backup not tagged as having a specific retention type.
date_time timestamp Date and time of the original backup.
dst_label_num varchar Numeric backup identifier (label) on destination system.
files_skipped float8 Number of file unintentionally skipped when the backup was taken.
label varchar Backup label.
mod_files float8 Number of files modified when the backup was taken.
EMC AVAMAR 6.0 • ADMINISTRATION GUIDE 706

MCS database viewsAPPENDIX C — MCS AND EMS DATABASE VIEWS
v_report_filter
This view contains a record (row) for each report identifying its filter options.
num_of_files float8 Number of files in backup.
original_expiration varchar Expiration date of the backup as calculated at the time of the backup.
original_retention varchar Original backup retention type. One of the following:
D Daily backup.
W Weekly backup.
M Monthly backup.
Y Yearly backup.
N Backup not tagged as having a specific retention type.
pid int4 Numeric plug-in ID.
repl_end_ts timestamp Replication end date and time.
repl_start_ts timestamp Replication start date and time.
size float8 Backup size in bytes.
src_label_num varchar Numeric backup identifier (label) on source system.
systemid varchar Avamar source system ID.
wid varchar Unique workorder identifier for this backup.
COLUMN TYPE DESCRIPTION
filter_name varchar Filter name.
filter_value varchar Filter value.
rptid varchar Report ID.
COLUMN TYPE DESCRIPTION
EMC AVAMAR 6.0 • ADMINISTRATION GUIDE 707

MCS database viewsAPPENDIX C — MCS AND EMS DATABASE VIEWS
v_reports
This view contains a record (row) for each report.
COLUMN TYPE DESCRIPTION
adhoc_query bool True if a query statement is being used instead of filtering options.
domain varchar Report domain.
graphs_allowed varchar Not currently supported.
name varchar Report name.
readonly bool True if the report cannot be edited or deleted. Used for reports that are provided with the product.
rptid varchar Report ID.
sql varchar SQL statement if adhoc_query is true.
view_name varchar Database view used by this report.
EMC AVAMAR 6.0 • ADMINISTRATION GUIDE 708

MCS database viewsAPPENDIX C — MCS AND EMS DATABASE VIEWS
v_retention_policies
This view contains a record (row) for each retention policy known to the MCS.
COLUMN TYPE DESCRIPTION
daily int4 Advanced policy daily retention.
domain varchar Domain.
duration numeric Duration of retention.
enabled bool True if enabled.
expiration_date numeric Expiration date.
is_link bool True if this is a reference to another retention policy.
link_name varchar Name of the retention policy if is_link is true.
monthly int4 Advanced policy monthly retention.
name varchar Name of the retention policy.
override bool True if the advanced policy is used for scheduled backups.
policy_no int4 Policy number. Valid policy numbers are:
0 Undefined.
1 Compute expiration date.
2 Static expiration date.
3 No expiration date.
read_only bool True if the retention policy cannot be modified.
unit int4 Duration unit. Valid duration units are:
0 No expiration
1 Days
2 Weeks
3 Months
4 Years
weekly int4 Advanced policy weekly retention.
yearly int4 Advanced policy yearly retention.
EMC AVAMAR 6.0 • ADMINISTRATION GUIDE 709

MCS database viewsAPPENDIX C — MCS AND EMS DATABASE VIEWS
v_sch_recurrence
This view contains a record (row) for each recurring schedule known to the MCS.
COLUMN TYPE DESCRIPTION
domain varchar Schedule domain.
modifier text Qualifies entries in the value column as follows:
day Indicates that this is a monthly schedule that runs on every numerical calendar day specified by the value column entry.
hour Indicates that this is a daily schedule that runs on every hour of the day specified by the value column entry.
every Indicates that this is a weekly schedule that runs on every day of the week specified by the value column entry.
first Indicates that this is a monthly schedule that runs during the first week of the month on the day of the week specified by the value column entry.
second Indicates that this is a monthly schedule that runs during the second week of the month on the day of the week specified by the value column entry.
third Indicates that this is a monthly schedule that runs during the third week of the month on the day of the week specified by the value column entry.
fourth Indicates that this is a monthly schedule that runs during the fourth week of the month on the day of the week specified by the value column entry.
last Indicates that this is a monthly schedule that runs during the last week of the month on the day of the week specified by the value column entry.
name varchar Name of the schedule.
EMC AVAMAR 6.0 • ADMINISTRATION GUIDE 710

MCS database viewsAPPENDIX C — MCS AND EMS DATABASE VIEWS
v_schedules
This view contains a record (row) for each schedule known to the MCS.
IMPORTANT: Beginning with version 4.0, use of this database view is deprecated in favor of v_schedules_2 (page 712). Official support for this database view is likely to be discontinued in a future release.
recur_interval text Recurrence interval. Valid recurrence intervals are:
• DAILY• HOURLY• WEEKLY• MONTHLY• YEARLY
value text Recurrence value:• For DAILY schedules, this value is the hour
of the day.• For WEEKLY schedules, this value is the
day of week, such as Saturday, Sunday, Monday, Tuesday, Wednesday, Thursday, and Friday.
• For MONTHLY schedules that repeat on a specific day of the month, this numerical value is the day of the month.
• For MONTHLY schedules that repeat on a specific day of a specific week, this value is the day of week, such as Saturday, Sunday, Monday, Tuesday, Wednesday, Thursday, and Friday.
COLUMN TYPE DESCRIPTION
description varchar Schedule description.
domain varchar Domain.
enabled bool True if the schedule is enabled and active.
end_policy int4 Type of schedule termination setting. Valid values are:
2 Never end.
3 Run N number of times.
4 End on a specific date.
COLUMN TYPE DESCRIPTION
EMC AVAMAR 6.0 • ADMINISTRATION GUIDE 711

MCS database viewsAPPENDIX C — MCS AND EMS DATABASE VIEWS
v_schedules_2
This view contains a record (row) for each schedule known to the MCS.
end_recur numeric End recurrence. This is a specific date or a count of the number of times the schedule should run or 0 if the schedule never ends. This value is related to the value of end_policy.
first_start timestamp First start.
is_link bool True if this is a reference to another schedule.
last_check timestamp Last check.
last_start timestamp Last started.
link_name varchar Schedule name if is_link is true.
min_interval timestamp Minimum interval.
name varchar Name of the schedule.
overtime bool True if the schedule end time can be overridden.
read_only bool True if the schedule cannot be modified.
recur_counter numeric Recurrence counter.
recur_interval varchar Recurrence interval. Valid recurrence intervals are:
• DAILY• HOURLY• WEEKLY• MONTHLY• YEARLY
start_duration timestamp Duration of the start scheduling window.
start_time timestamp Start time for the scheduling window.
time_zone_id varchar Timezone where the schedule was created or last modified.
total_duration timestamp Total duration of the scheduling window.
type_enum varchar Type of schedule. The only valid schedule type is CALENDAR.
COLUMN TYPE DESCRIPTION
description varchar Schedule description.
domain varchar Domain.
enabled bool True if the schedule is enabled and active.
COLUMN TYPE DESCRIPTION
EMC AVAMAR 6.0 • ADMINISTRATION GUIDE 712

MCS database viewsAPPENDIX C — MCS AND EMS DATABASE VIEWS
end_policy int4 Type of schedule termination setting. Valid values are:
2 Never end.
3 Run N number of times.
4 End on a specific date.
end_recur numeric End recurrence. This is a specific date or a count of the number of times the schedule should run or 0 if the schedule never ends. This value is related to the value of end_policy.
first_start timestamp First start.
is_link bool True if this is a reference to another schedule.
last_check timestamp Last check.
last_start timestamp Last started.
link_name varchar Schedule name if is_link is true.
min_interval timestamp Minimum interval.
name varchar Name of the schedule.
overtime bool True if the schedule end time can be overridden.
read_only bool True if the schedule cannot be modified.
recur_counter numeric Recurrence counter.
recur_interval varchar Recurrence interval. Valid recurrence intervals are:
• DAILY• WEEKLY• MONTHLY• ADHOC
start_duration timestamp Duration of the start scheduling window.
start_time timestamp Start time for the scheduling window.
time_zone_id varchar Timezone where the schedule was created or last modified.
total_duration timestamp Total duration of the scheduling window.
type_enum varchar Type of schedule. The only valid schedule type is CALENDAR.
COLUMN TYPE DESCRIPTION
EMC AVAMAR 6.0 • ADMINISTRATION GUIDE 713

MCS database viewsAPPENDIX C — MCS AND EMS DATABASE VIEWS
v_serial_numbersThis view stores a list of all Avamar server node serial numbers.
v_systems
This view contains a record (row) for each Avamar system.
COLUMN TYPE DESCRIPTION
nodeid varchar Avamar logical node designation. For example, 0.0, 0.1, 0.s, and so forth.
serial_number varchar Avamar server node serial number.
serial_numbers_id bigint Unique Avamar server node ID.
COLUMN TYPE DESCRIPTION
gsansystemid varchar Avamar server ID.
gsansystemname varchar User assigned name.
hfsaddr varchar IP address of the server.
hfsport int4 Port address of the server.
lastupdate timestamp Last updated timestamp.
local_hfsaddr varchar Local IP address of the server.
mcsport int4 Port address of MCS for the server from axion_systems.
systemid int8 Numeric system ID (automatically assigned by MCS).
EMC AVAMAR 6.0 • ADMINISTRATION GUIDE 714

EMS database viewsAPPENDIX C — MCS AND EMS DATABASE VIEWS
EMS database viewsThe following topics describes each column within each EMS database view.
v_avamar_server
This view contains a record (row) for each Avamar server monitored by Avamar Enterprise Manager.
COLUMN TYPE DESCRIPTION
adaurl varchar Universal Resource Locator (URL) for an optional Avamar Data Archive (ADA).
avamar_server_id bigint Unique Avamar server ID.
hfsport integer Avamar Hash File System (HFS) port number.
hostname varchar Avamar server hostname.
ip varchar Avamar server IP address.
lastcontact timestamp Time in UTC time that the Avamar system was last succesfully polled
local boolean True if this Avamar server is running on the same system as the Avamar Enterprise Manager server.
mcport integer Management Console Server (MCS) Remote Method Invocation (RMI) port number.
monitoring boolean True if monitoring this Avamar server.
note varchar Note about the Avamar server entered by administrator.
rollbacktime bigint UNIX time of the last rollback.
status varchar Current polling status.
statusdetails varchar Detailed polling status.
systemid varchar Avamar system ID.
systemname varchar Avamar system name.
version varchar Avamar server version.
EMC AVAMAR 6.0 • ADMINISTRATION GUIDE 715

EMS database viewsAPPENDIX C — MCS AND EMS DATABASE VIEWS
v_compatibility
This view stores Avamar Enterprise Manager server database compatibility information.
COLUMN TYPE DESCRIPTION
component varchar
version varchar
EMC AVAMAR 6.0 • ADMINISTRATION GUIDE 716

GLOSSARY
Activation. See Client Activation (page 717).
Authentication System. A username and password system that is used to grant user access to the Avamar server. Avamar supports its own internal authentication system (avs), as well as several external authentication systems (OpenLDAP, Windows Active Directory, NIS, and SMB).
Avamar Administrator. Avamar Administrator is a graphical management console software application that is used to remotely administer an Avamar system from a supported Windows or client computer.
Avamar Client. A computer or workstation that runs Avamar software and accesses the Avamar server over a network connection. Avamar client software comprises a client agent and one or more plug-ins.
Avamar Enterprise Manager. Avamar Enterprise Manager is a multi-server management console application that provides centralized Avamar server administration capabilities for larger businesses and enterprises.
Avamar Server. The server component of the Avamar client/server system. Avamar server is a fault-tolerant, high-availability system that efficiently stores the backups from all protected clients. It also provides essential processes and services required for data restores, client access, and remote system administration. Avamar server runs as a distributed application across multiple networked storage nodes.
Avamar Web Access. A browser-based user interface that provides access to the Avamar server for the express purpose of restoring files to a client.
Backup. A point-in-time copy of client data that can be restored as individual files, selected directories, or as entire filesystems. Although more efficient than a conventional incremental backup, a backup is always a full, just copy of client data that can be restored immediately from an Avamar server.
Client Activation. The process of passing the client ID (CID) back to the client, where it is stored in an encrypted file on the client filesystem.
Client Agent. An Avamar client agent is a platform-specific software process that runs on the client and communicates with the MCS (page 169) and with any plug-ins installed on that client.
EMC AVAMAR 6.0 • ADMINISTRATION GUIDE 717

GLOSSARY
Client Registration. The process of establishing an identity with the Avamar server. When Avamar recognizes the client, it assigns a unique client ID (CID), which it passes back to the client during activation.
ConnectEMC. A program that runs on the Avamar server and that sends information to EMC Technical Support. ConnectEMC is typically configured to send alerts for high priority events as they occur, as well as reports once daily.
Dataset. A policy that defines a set of files, directories, and filesystems for each supported platform that are included or excluded in backups across a group of clients. A dataset is a persistent and reusable Avamar policy that can be named and attached to multiple groups.
DNS . Domain Name Server. A dynamic and distributed directory service for assigning domain names to specific IP addresses.
Domain. A feature in Avamar Administrator that is used to organize large numbers of clients into named areas of control and management.
Email Home feature. An optional feature that uses the High Priority Events profile and Notification schedule to regularly send server error and status messages to EMC Technical Support.
Enterprise Manager Server (EMS). The Avamar Enterprise Manager Server (EMS) provides essential services required to display Avamar system information, and provides a mechanism for managing Avamar systems using a standard web browser. The EMS also communicates directly with MCSs.
ESRS. EMC Secure Remote Support.
Full Replication. A full “root-to-root” replication creates a complete logical copy of an entire source system on the destination system. The replicated data is not copied to the REPLICATE domain. Instead, it is added to the root domain just as if source clients had registered with the destination system. Also, source server data replicated in this manner is fully modifiable on the destination system. This replication method is typically used for system migration (from a smaller Avamar configuration to a larger, possibly multi-node configuration) or system replacement (for instance, in a case of disaster recovery).
Group. A level of organization in Avamar Administrator for one or more Avamar clients. All clients in an Avamar group use the same group policies, which include the dataset, backup schedule, and retention policy.
Group Policy. The dataset, schedule, and backup retention policy attached to a group that is used by all clients in a group, unless these policy settings are overridden by an administrator at the client level.
HFS. Hash Filesystem. The content addressed storage area inside the Avamar server used to store client backups.
HFS Check. An Avamar Hash Filesystem check (HFS check) is an internal operation that validates the integrity of a specific checkpoint. Once a checkpoint has passed an HFS check, it can be considered reliable enough to be used for a server rollback.
JRE. Java Runtime Environment.
LAN. Local Area Network.
LOFS. Loopback Filesystem.
MAC Address. Media Access Control Address. A unique hardware address, typically embedded at the lowest level in a hardware assembly, that uniquely identifies each device on a network.
EMC AVAMAR 6.0 • ADMINISTRATION GUIDE 718

GLOSSARY
Management Console Server (MCS). The MCS provides centralized administration (scheduling, monitoring, and management) for the Avamar server. The MCS also runs the server-side processes used by the Avamar Administrator graphical management console.
Module. Avamar 1.2.0 and earlier multi-node Avamar servers utilized a dual-module synchronous RAIN architecture in which nodes were equally distributed in two separate equipment cabinets on separate VLANs. The term “module” is a logical construct used to describe and support this architecture (older multi-node Avamar servers comprised a primary module and a secondary module). These legacy systems continue to be supported. However, newer multi-node Avamar servers use a single module architecture, and even though Avamar Administrator provides “module detail” information, a module is therefore logically equivalent to the entire server.
NAT. Network Address Translation.
NDMP. Network Data Management Protocol.
NDMP Accelerator. Avamar NDMP Accelerator (accelerator) is a dedicated single-node Avamar client that, when used as part of an Avamar system, provides a complete backup and recovery solution for Network Appliance filers (filers) by way of the Network Data Management Protocol (NDMP).
NFS. Network Filesystem.
NIS. Network Information Service. An external authentication system that can be used to log in to an Avamar server.
Node. A networked storage subsystem that consists of both processing power and hard drive storage, and runs Avamar software.
NTP. Network Time Protocol. Controls the time synchronization of a client or server computer to another reference time source.
ODBC. Open DataBase Connectivity. A standard database access method that makes it possible to access any data from any application, regardless of which database management system (DBMS) is handling the data.
OpenLDAP. Open Lightweight Directory Access Protocol. An external authentication system that can be used to log in to an Avamar server.
PAM. Pluggable Authentication Module. A Linux library that enables a local system administrator to define how individual applications authenticate users.
Plug-in. An Avamar plug-in is a software process that recognizes a particular kind of data resident on that client.
Policy. A set of defined rules for client backups that can be named and applied to multiple groups. Groups have dataset, schedule, and retention policies.
RAIN. Redundant Array of Independent Nodes. A flexible, fault-tolerant architecture that enables an Avamar server to maintain availability and preserve data storage if single nodes fail in an Avamar module.
RDMS. Relational Database Management System.
Registration. See Client Registration (page 718).
Replication. Replication is an optional feature that enables one Avamar server to store a read-only copy of its data on another Avamar server to support future disaster recovery of that server.
Restore. File or object restore. An operation that retrieves one or more filesystems, directories, files, or data objects from a backup and writes the data to a designated location.
EMC AVAMAR 6.0 • ADMINISTRATION GUIDE 719

GLOSSARY
Retention. The ability to control the length of time that backups are kept in an Avamar server before automated deletion. Retention can be set to permanent for backups that should not be deleted from an Avamar server. Retention is a persistent and reusable Avamar policy that can be named and attached to multiple groups.
Roles. A setting in Avamar Administrator that controls which operations each user can perform in the Avamar server. Roles are assigned on a user-by-user basis.
Schedule. The ability to control the frequency and the start and end time each day for backups of clients in a group. A schedule is a persistent and reusable Avamar policy that can be named and attached to multiple groups.
System Migration. A planned operation that uses full “root-to-root” replication to copy all data residing on a source Avamar server to a new destination server. If global client IDs (global CIDs) are used, clients that formerly backed up to the source server can continue to operate transparently without reregistering with the new destination server.
SSH. Secure Shell. A remote login utility that authenticates by way of encrypted security keys instead of prompting for passwords. This prevents passwords from traveling across networks in an unprotected manner.
Storage Node. A node in the Avamar server that provides storage of data.
TFTP. Trivial File Transfer Protocol. A version of the TCP/IP FTP protocol that has no directory or password capabilities.
Utility Node. In scalable multi-node Avamar servers, a single utility node provides essential internal services for the server. These services include MCS, cronjob, Domain Name Server (DNS), External authentication, Network Time Protocol (NTP), and Web access. Because utility nodes are dedicated to running these essential services, they cannot be used to store backups.
VLAN. Virtual Local Area Network.
EMC AVAMAR 6.0 • ADMINISTRATION GUIDE 720