Embed Size (px)
Citation preview
Computing for Engineering
Prepared by: Eng. Shireen Mansour
Petroleum DepartmentChemical DepartmentCivil Department
Faculty of Engineering
12/28/2014 1

Contents:
1. Booting.2. BIOS System3. Computer Casing4. Introduction5. Formatting Hard-Disk6. Check Disk7. Partitioning Hard-Disk
12/28/2014 2

Booting (power-on startup)
12/28/2014 3
Loading the system files of the operation system from the diskinto the computer memory.
Types of Booting:
1. Cold Booting: turn ‘’ ON’’ the computer by pressing onthe power switch ’ ’ON’’ in front of the Case.
2. Warm Booting: if the computer is already ‘ON’ and werestart it.

BIOS
12/28/2014 4
BIOS ( Basic Input Output System): It is type of Firmware thatstored in a ROM Chip (or BIOS Chip) on the motherboard containsinstructions and setup for how your system should boot (power-onstartup) and how it operates like; POST (Power-On Self Test ) andloading operating system etc.
Firmware: It is a permanentsoftware programmed intothe ROM.

Computer Casing
12/28/2014 5
It is a box (or enclosure) that contains the most of the computercomponents and connecting them with the peripherals devices.
What does it contain?
1. Power Supply2. Hard Disk Drive3. Diskette Drive4. CD/ DVD– ROM Drive5. Motherboard

12/28/2014 6
Switch Mode Power Supply: Supplying and regulating the powerthat needed to all computer components to perform the requiredprocess for the system to operate properly.
The Models of Power Supply (according to theMotherboard Form Factor):
1. AT (Advanced Technology).2. ATX (Advanced Technology eXtended).
1. Power Supply (or SMPS)
Uninterruptible Power Supply (UPS): It is a device that stores theelectricity and automatically supports the computer component bypower when the electricity failures in order to not damage thecomputer component and loss the data
UPS

12/28/2014 7
1. Power Supply (or SMPS)
A Power Supply has three types of connectors used to power thevarious devices inside the Computer Casing:
1. Molex Connector: for (HDD and CD/ DVD- ROM).2. Berg Connector: for FDD (Floppy Disk Drive).3. System Connector: for the motherboard power supply.
The back of Power Supply contains of:1. Exhaust Fan Port.2. Monitor Power Connector.3. Computer Power Connector.

Internal HDD
PowerCables
SATA Cable
IDE CableData Cables
12/28/2014 8
2. Hard Disk Drive
Internal Hard Disk Drive (HDD): is housed inside the Casing and isconnected directly to the motherboard across Data Cable IDE(Integrated Drive Electronics) or SATA (Serial Advanced TechnologyAttachment) cable. And it is connected to the power supply a cross thePower Supply Cable (Molex).

12/28/2014 9
3. Diskette Drive
Diskette Drive: is housed inside the Casing and is connected directlyto the motherboard across Data Cable and to the power supply a crossthe Power Supply Cable (Berg Connector).
Power CableData Cable
FDD

12/28/2014 10
4. CD/DVD- ROM
CD/DVD- ROM: It is a device that is used to read CDs/ DVDs, Ifcapable of writing to the DVD, then it is often referred to as aCD/DVD- Burner or CD/DVD- RW.
Connected directly to the motherboard across data cable and to thepower supply a cross the power supply cable (Molex).
DVD- RW

5. Motherboard
12/28/2014 11
Motherboard: It is a printed circuit board (PCB) in form of physicalarrangement that holds the computer `s basic circuitry andcomponents. It is placed inside the computer Casing .

5. Motherboard (Cont.)
12/28/2014 12
The motherboard design (Form Factor) in desktopcomputer are: AT, ATX etc.
The modern Motherboard include:
1. CPU Socket: used for installing the microprocessors .
2. DIMM Slots: Dual In-line Memory Module used forinstalling the main memory (RAM).
3. ROM Chip(Flash Chip): used for installing ROM
ROM CPU Socket

12/28/2014 13
The modern Motherboard include:
4. AGP slot : Accelerated Graphic Port an advanced port designed forVideo cards and 3D accelerators.
5. PCI slots: Peripheral Component Interconnect, connectingother devices such as modems, sound and graphic cards. Used toadd/improve functionality to the computer
6. CPU Fan Connector: used for installing the microprocessors` Fanto keep the CPU cool and dissipates excess heat.
5. Motherboard (Cont.)
Fan Connector PCI Slots

12/28/2014 14
The modern Motherboard include:
7. ATX Power Connector : Connecting the power supply with themotherboard.
8. ATX Data Connector: (IDE or SATA): Connecting (Hard disk drive,Diskette drive, CD/ DVD- ROM) to exchange and transfer the data inbetween.
5. Motherboard (Cont.)
SATA Connector Power Connector
12/28/2014 15
The modern Motherboard include:
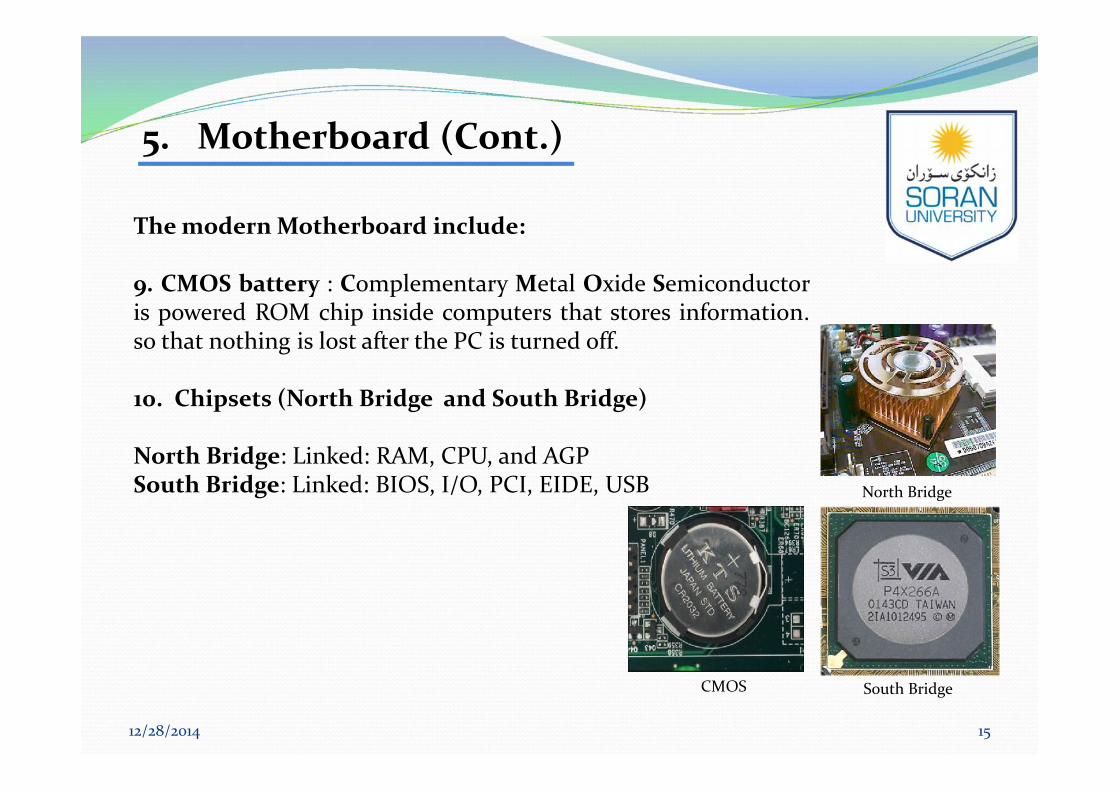
9. CMOS battery : Complementary Metal Oxide Semiconductoris powered ROM chip inside computers that stores information.so that nothing is lost after the PC is turned off.
10. Chipsets (North Bridge and South Bridge)
North Bridge: Linked: RAM, CPU, and AGPSouth Bridge: Linked: BIOS, I/O, PCI, EIDE, USB North Bridge
South BridgeCMOS
5. Motherboard (Cont.)

12/28/2014 16
11. The little parts: Capacitors –store energy, Resistors – allows acurrent through, Transistors – avalve which allows currents to beturned on or off.
12. The Peripheral devices ports:is connected the peripheral devicesto the motherboard .
5. Motherboard (Cont.)

12. Peripheral devices ports.
12/28/2014 17
12. Peripheral devices ports.
12/28/2014 18
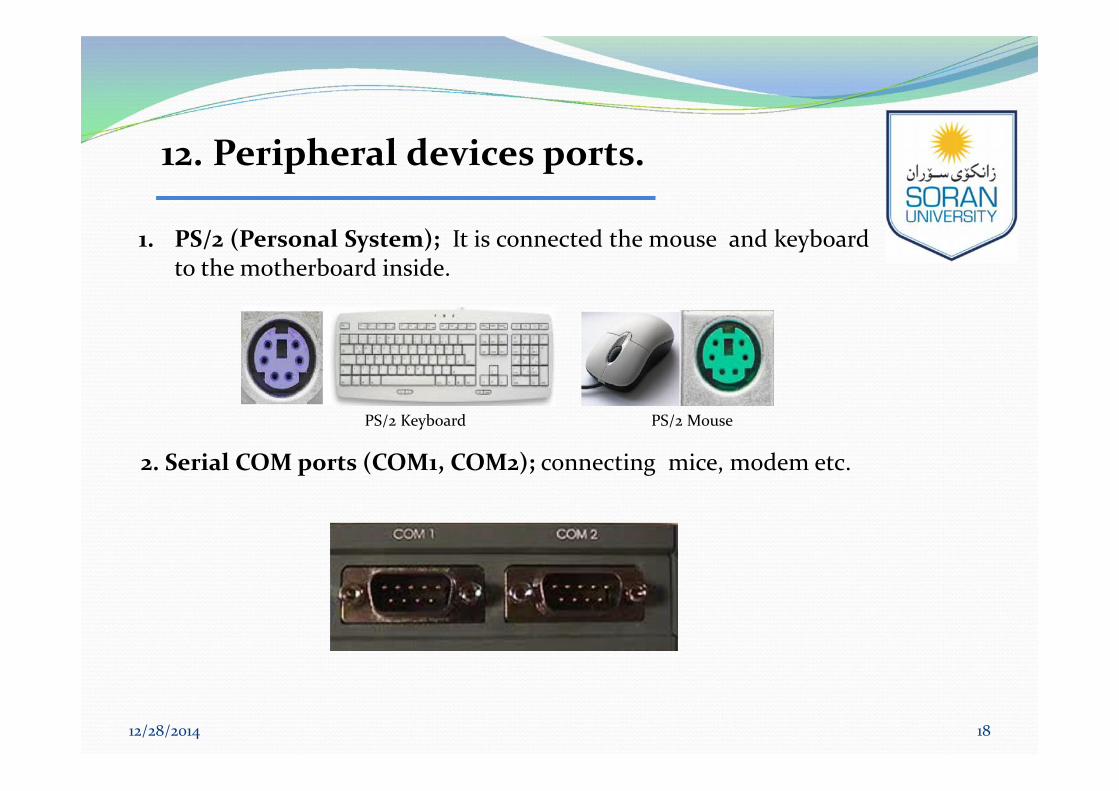
1. PS/2 (Personal System); It is connected the mouse and keyboardto the motherboard inside.
PS/2 MousePS/2 Keyboard
2. Serial COM ports (COM1, COM2); connecting mice, modem etc.

12/28/2014 19
3. USB2 (Universal Serial Bus): connectingthe Pen Drive, mouse, external hard disketc.
4. IEEE 1394 (Fire Wire) ; using to connectthe scanner, printer etc.
12. Peripheral devices ports.
IEEE 1394 Card
USB ports

12/28/2014 20
5. Parallel port ( LPT1 ); Line Printer Terminal,connecting the printer.
6. RJ- 45 Ethernet; using to connect thecomputer to the internet and network.
7. RJ14 Modem: using to connect the computerto the internet via phone line, very slow.
12. Peripheral devices ports.
Parallel port

12/28/2014 21
8. Microphone, Headphone, and Speakers ports.
9. Game port (or Joystick port).
12. Peripheral devices ports.

12/28/2014 22
10. VGA port; Video Graphic Array connecting the monitor.
12. Peripheral devices ports.
Serial Port
All these ports replacedby USBs ports.

12/28/2014 23
Today windows 7 is the most used Operating system .It has a lot ofdifference version :
Introduction
1. Windows 7 Starter2. Windows 7 Home Basic3. Windows 7 Home Premium4. Windows 7 Professional5. Windows 7 Enterprise6. Windows 7 Ultimate
12/28/2014 24
What does Format mean?
Formatting Hard-Disk

12/28/2014 25
Disk Format:Preparing the chosen partition on the drive (hard disk, flash drive,etc.) to be used by an operating system by deleting all of the data andsetting up a file system.
Page Format: can also used to describe the page layout or style textin a word processing document like; changing the size, underline,bold of the font for text and changing the page size, page margin forthe page, etc.
File Format: Data saving way within a file in order to prevent using itin another application
What does Format mean?
Formatting Hard-Disk

12/28/2014 26
1. Select the partition thatyou need to format it.
2. Right click on it and chooseFormat...
Formatting Hard-Disk
How to Quick Format the Partitions orFlash disk:

12/28/2014 27
Formatting Hard-Disk
How to Quick Format the Partitionsor Flash disk:
3. Pick ‘Quick Format’, Then press‘Start’. Wait till it be finished, afterthat you can use the formatting drivefor storing.

12/28/2014 28
Check Disk
Some times your computer work slowly, can not open the filesproperly, etc. All these problems can happened because the harddisk have some errors on it. Windows 7 has a tool that can use itto Check and test the drives then fix the errors on itautomatically.

12/28/2014 29
Check Disk
How to Check the Partitions or Flash disk :
1. Select the Startbutton.
12/28/2014 30
Check Disk
How to Check the Partitions or Flash disk :
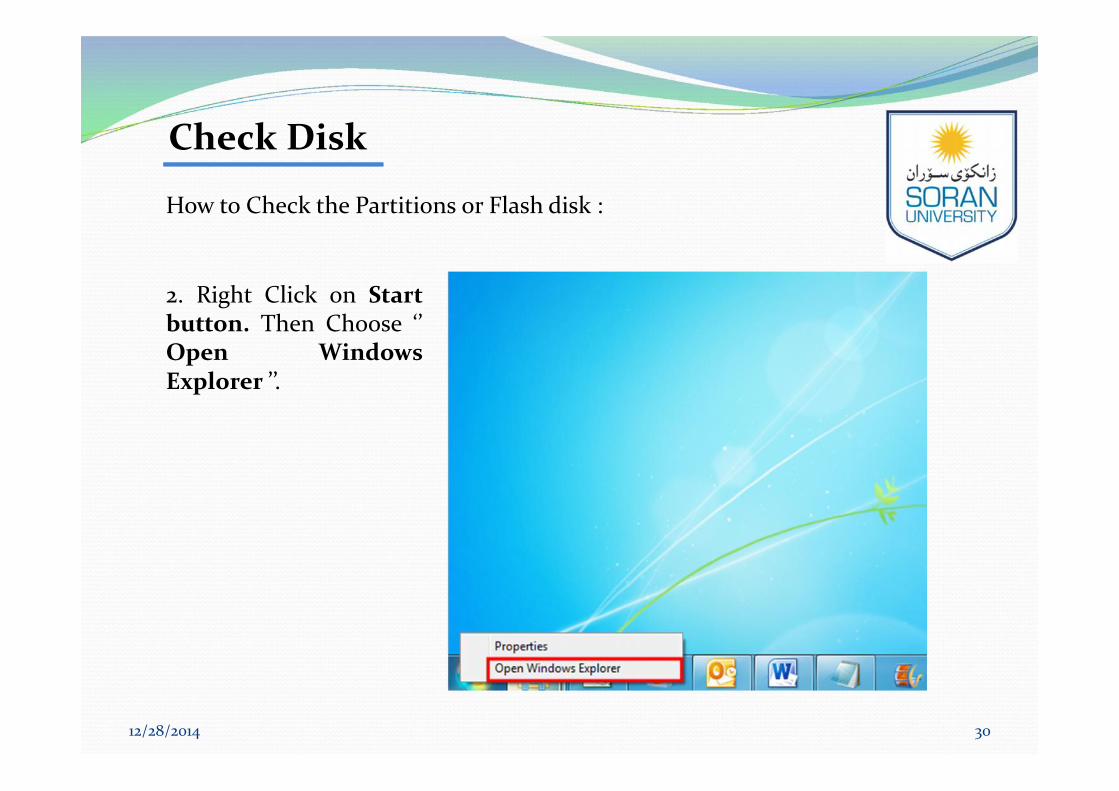
2. Right Click on Startbutton. Then Choose ‘’Open WindowsExplorer ’’.

12/28/2014 31
Check Disk
How to Check the Partitions or Flash disk :
3. Choose ‘’Computer ‘’.

12/28/2014 32
Check Disk
How to Check the Partitions or Flash disk :
4. Select the partitionthat you want to checkit.

12/28/2014 33
Check Disk
How to Check the Partitions or Flash disk :
5. Right click on it andchoose Properties.
12/28/2014 34
Check Disk
How to Check the Partitions or Flash disk :
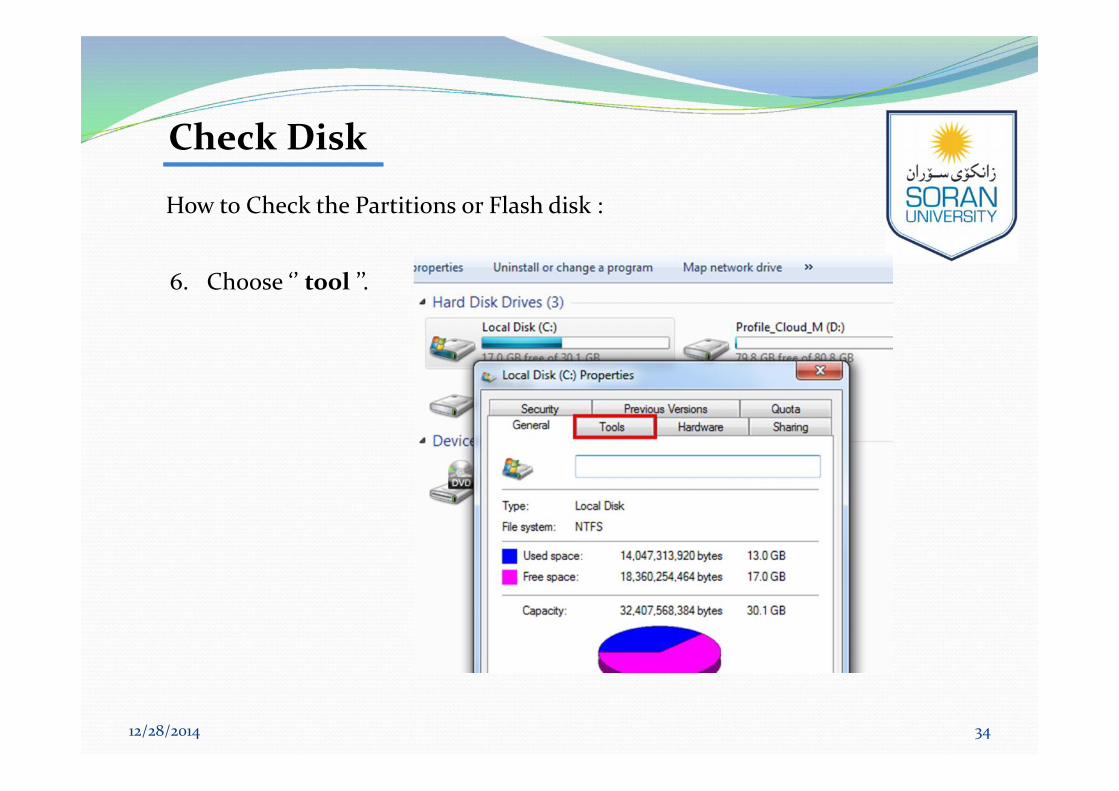
6. Choose ‘’ tool ’’.

12/28/2014 35
Check Disk
How to Check the Partitions or Flash disk :
7. Press ‘’ Check Now ‘’.

12/28/2014 36
Check Disk
How to Check the Partitions or Flash disk :
8. Pick ‘’ Automaticallyfix file system errors ’’.
9. Then press ‘’ Start ’’ tostart test.

12/28/2014 37
Check Disk
How to Check the Partitions or Flash disk :
Till this part the Checkthe flash disk or anypartition(except thepartition that hasinstalled the operatingsystem on it) is finishedand the results willdisplay.

12/28/2014 38
Check Disk
How to Check the Partitions or Flash disk :
10. If the drive you want tocheck is currently in use, asystem drive, you'll see adialog box with a warningmessage. In this case, click ‘’Schedule disk check ‘’.

12/28/2014 39
Check Disk
How to Check the Partitions or Flash disk :
11. Close all the opened programs andthen restart the computer.
12. Examination will automaticallystart before the start of the nextWindows operating and theresults will display uponcompletion.

12/28/2014 40
Partition Disk
How to partition the disk :
1. Select ‘’ Computer ‘’ andpressing the right click onbutton and choose Manageto enter the ComputerManagement

12/28/2014 41
Partition Disk
How to partition the disk :
2. Press ‘’ Disk Management’’.

12/28/2014 42
Partition Disk
How to partition the disk :
3. Choose the partition that youwant to change the size of it,Then press Right click on itand choose Shrink Volume…
12/28/2014 43
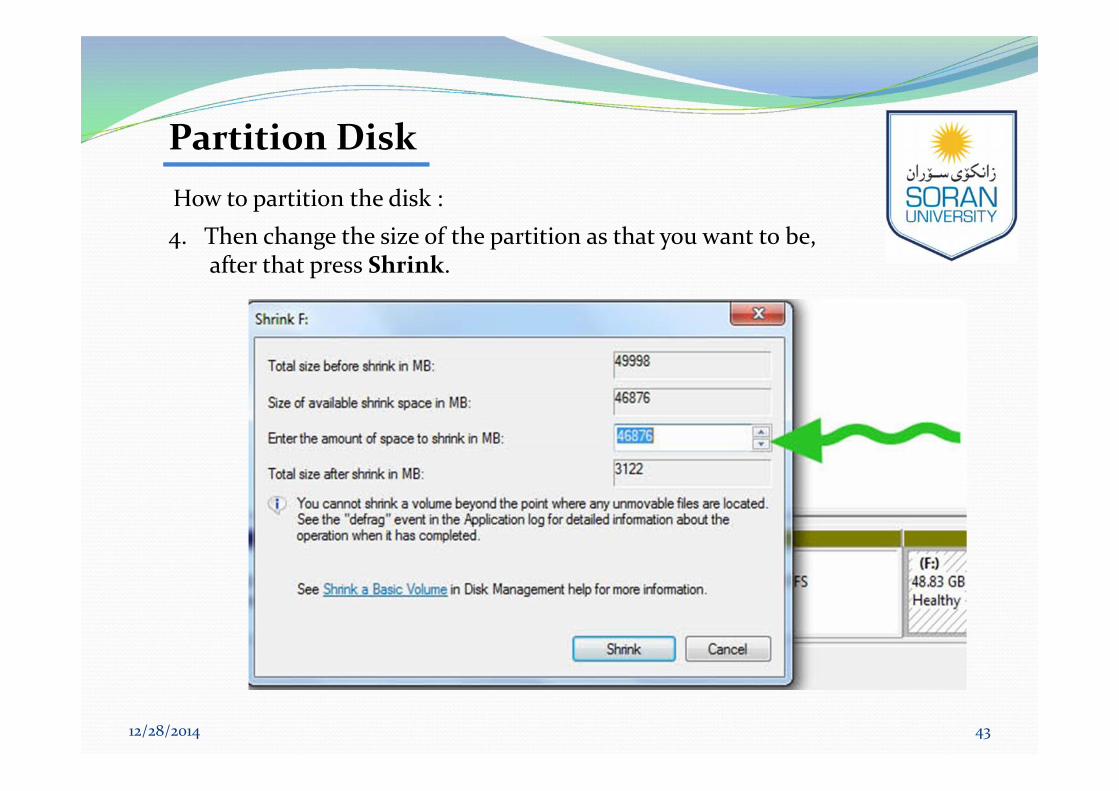
Partition DiskHow to partition the disk :4. Then change the size of the partition as that you want to be,
after that press Shrink.

12/28/2014 44
Partition Disk
How to partition the disk :
5. After that the newpartition will appear in blackundefined ‘’ Unallocated ‘’.

12/28/2014 45
Partition Disk
How to partition the disk :
6. After that you can continue tocreate partition by clickingright click then choose thecommand "new simple volume“.

12/28/2014 46
Partition Disk
How to partition the disk :
6. The Wizardwindow will appear,just press ‘’ Next’’.
12/28/2014 47
Partition Disk
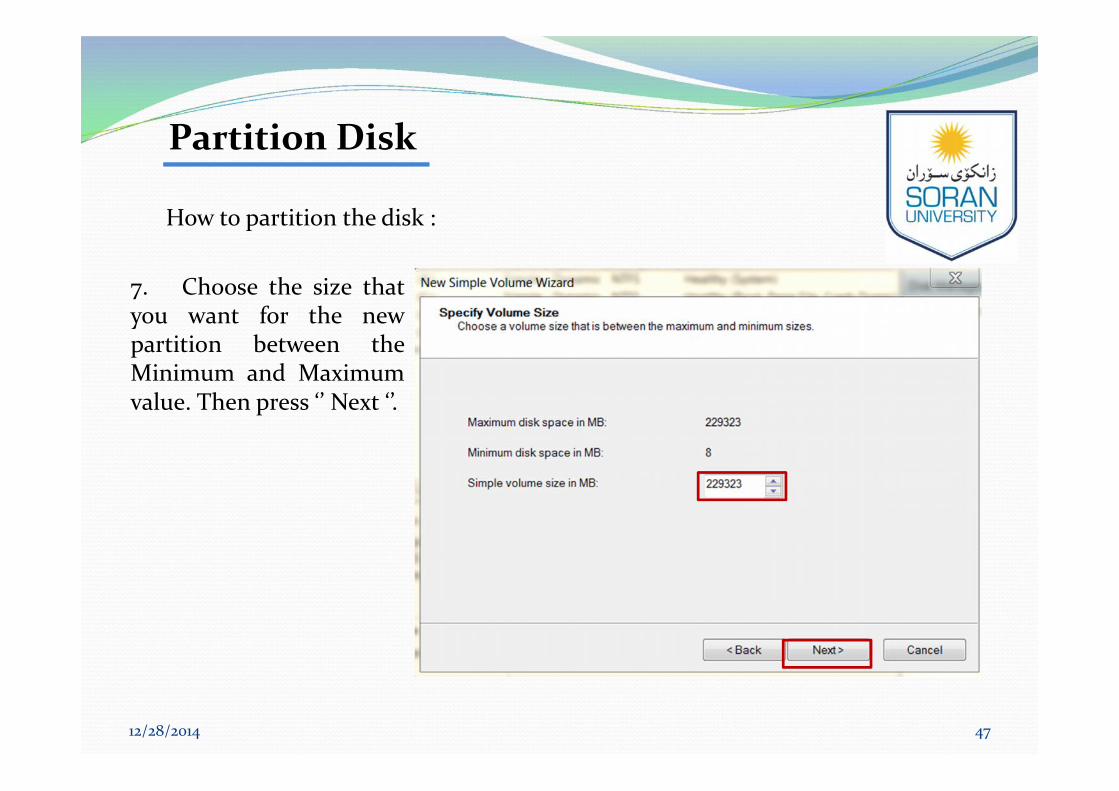
How to partition the disk :
7. Choose the size thatyou want for the newpartition between theMinimum and Maximumvalue. Then press ‘’ Next ‘’.

12/28/2014 48
Partition Disk
How to partition the disk :
8. Assign the driveletter as you want forthe new partition thenpress ‘’ Next ‘’.

12/28/2014 49
Partition Disk
How to partition the disk :
9. Pick formatting thisvolume and you canchange the File Systemtype ‘’ NTFS or FAT’’.Then press ‘’ Next’’.

12/28/2014 50
Partition Disk
How to partition the disk :
10. Be sure about theinformation thatdisplayed in thiswindow, Then press ‘’Next’’. Or you can press‘’ Back ‘’ to go back andchange the information.