Embed Size (px)
Citation preview

High Specialized VM on OpenStack Cloud
Gabriele Baldoni
Tw: @_gabryUrl: www.gabrielebaldoni.itTelegram: @Gakbri

Cosa è OpenStack?OpenStack è un sistema operativo cloud, modulare, in grado di offrire servizi di gestione di processi e storage secondo il modello IaaS (Infrastructure as a Service). (cit. Wikipedia)

Architettura OpenStack
Componenti base:
nova
neutron
keystone
glance
cinder
horizon
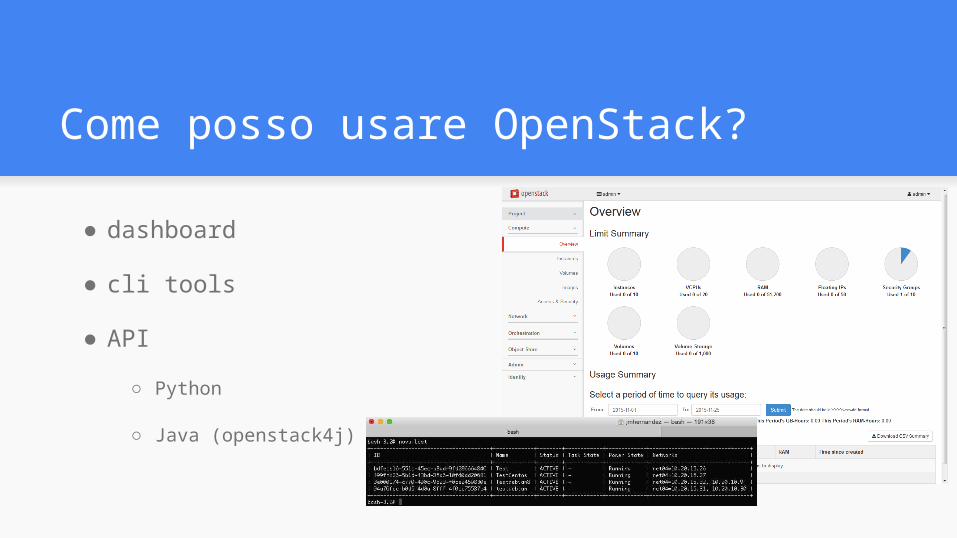
Come posso usare OpenStack?
●dashboard
●cli tools
●API ○ Python
○ Java (openstack4j)

Dove posso provare OpenStack?
Devstack
Trystack
…
farti un datacenter :D
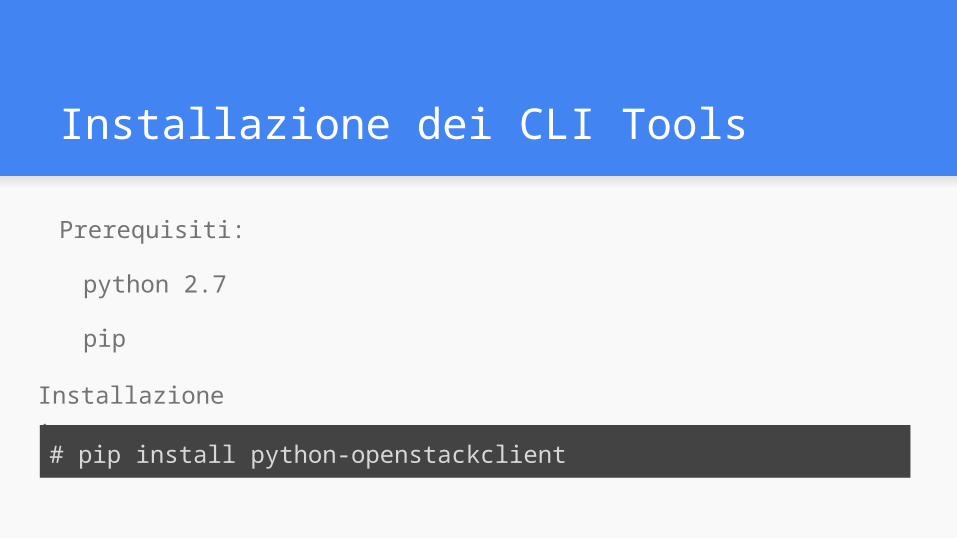
Installazione dei CLI Tools
Prerequisiti:
python 2.7
pip
Installazione:
# pip install python-openstackclient

Configurazione CLI Tools
E’ consigliato creare un file per settare le variabili d’ambiente che verranno usate dal client OpenStack per connettersi
export OS_USERNAME=usernameexport OS_PASSWORD=passwordexport OS_TENANT_NAME=projectNameexport OS_AUTH_URL=https://identityHost:portNumber/v2.0# The following lines can be omittedexport OS_TENANT_ID=tenantIDStringexport OS_REGION_NAME=regionNameexport OS_CACERT=/path/to/cacertFile
es. os_user.sh

Configurazione CLI Tools (2)
Dopo di che si caricano le variabili d’ambiente
$ . os_user.sh
Oppure$ source ./os_user.sh

Uso dei CLI Tools
Vediamo qualche esempio di uso dei CLI Tools$ openstack image list+--------------------------------------+---------------------------------+--------+| ID | Name | Status |+--------------------------------------+---------------------------------+--------+| dfc1dfb0-d7bf-4fff-8994-319dd6f703d7 | cirros-0.3.2-x86_64-uec | active || a3867e29-c7a1-44b0-9e7f-10db587cad20 | cirros-0.3.2-x86_64-uec-kernel | active || 4b916fba-6775-4092-92df-f41df7246a6b | cirros-0.3.2-x86_64-uec-ramdisk | active || d07831df-edc3-4817-9881-89141f9134c3 | myCirrosImage | active |+--------------------------------------+---------------------------------+--------+
$ openstack image create --disk-format qcow2 --container-format bare \ --public --file ./centos63.qcow2 centos63-image
$ openstack flavor list+-----+-----------+-------+------+-----------+-------+-----------+| ID | Name | RAM | Disk | Ephemeral | VCPUs | Is_Public |+-----+-----------+-------+------+-----------+-------+-----------+| 1 | m1.tiny | 512 | 1 | 0 | 1 | True || 2 | m1.small | 2048 | 20 | 0 | 1 | True || 3 | m1.medium | 4096 | 40 | 0 | 2 | True || 4 | m1.large | 8192 | 80 | 0 | 4 | True || 5 | m1.xlarge | 16384 | 160 | 0 | 8 | True |+-----+-----------+-------+------+-----------+-------+-----------+
nova boot --flavor FLAVOR_ID --image IMAGE_ID --key-name KEY_NAME \ --user-data USER_DATA_FILE --security-groups SEC_GROUP_NAME --meta KEY=VALUE \ INSTANCE_NAME
Documentazione: http://docs.openstack.org/user-guide/cli.html
Lista delle immagini disponibili
Creazione immagine
Lista dei flavor disponibili
Creazione di una istanza

Let’s try!
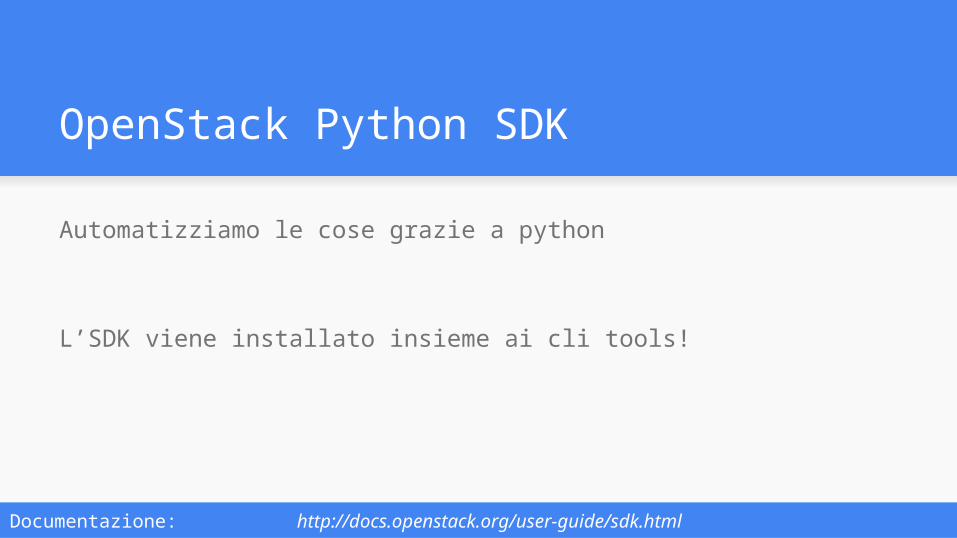
OpenStack Python SDK
Automatizziamo le cose grazie a python
L’SDK viene installato insieme ai cli tools!
Documentazione: http://docs.openstack.org/user-guide/sdk.html

OpenStack Python SDK
Vediamo come funziona:
from openstack import connectionconn = connection.Connection(auth_url="http://openstack:5000/v3", project_name="big_project", username="SDK_user", password="Super5ecretPassw0rd")
import glanceclient.v2.client as glclientglance = glclient.Client(...)images = glance.images.list()
Autentichiamoci: Listiamo le immagini:
import glanceclient.v2.client as glclientimagefile = "/tmp/myimage.img"glance = glclient.Client(...)with open(imagefile) as fimage: glance.images.create(name="myimage", is_public=False, disk_format="qcow2", container_format="bare", data=fimage)
Upload di un immagine

OpenStack Python SDK (2)
Avvio di un'istanza
import timefrom credentials import get_nova_credentials_v2from novaclient.client import Client
credentials = get_nova_credentials_v2() nova_client = Client(**credentials)
image = nova_client.images.find(name="cirros") flavor = nova_client.flavors.find(name="m1.tiny") net = nova_client.networks.find(label="private") nics = [{'net-id': net.id}] instance = nova_client.servers.create(name="vm2", image=image,flavor=flavor, key_name="keypair-1", nics=nics)
Autentichiamoci:

Let's try!

Cloudinit
Come possiamo automatizzare l’installazione e l’esecuzione di comandi di configurazione su una istanza appena creata?
Semplice!
Usiamo cloudinit
Con cloudinit possiamo creare un file da passare come “user data” durante la creazione della vm, in cui specificare tutti i passaggi per la configurazione
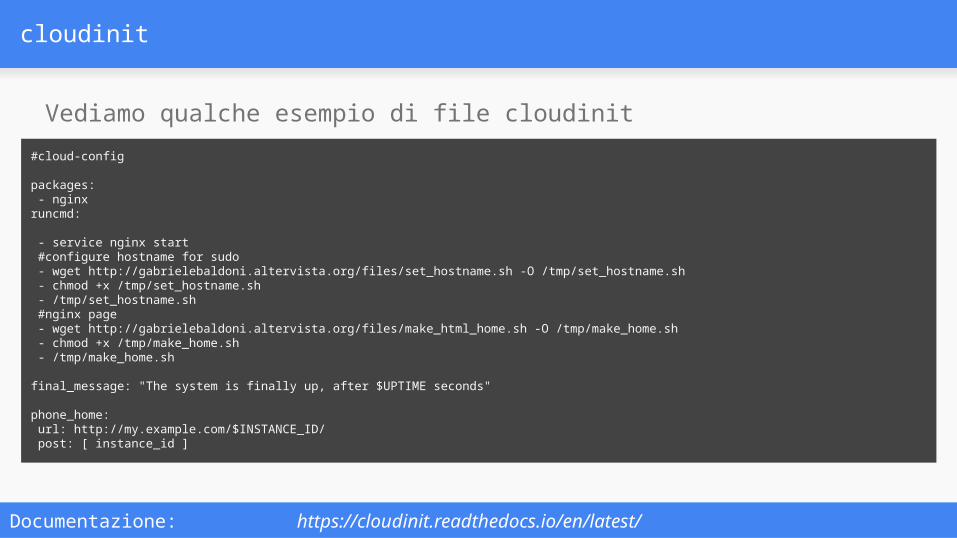
cloudinit
Vediamo qualche esempio di file cloudinit#cloud-config
packages: - nginxruncmd:
- service nginx start #configure hostname for sudo - wget http://gabrielebaldoni.altervista.org/files/set_hostname.sh -O /tmp/set_hostname.sh - chmod +x /tmp/set_hostname.sh - /tmp/set_hostname.sh #nginx page - wget http://gabrielebaldoni.altervista.org/files/make_html_home.sh -O /tmp/make_home.sh - chmod +x /tmp/make_home.sh - /tmp/make_home.sh
final_message: "The system is finally up, after $UPTIME seconds"
phone_home: url: http://my.example.com/$INSTANCE_ID/ post: [ instance_id ]
Documentazione: https://cloudinit.readthedocs.io/en/latest/

Let's try!
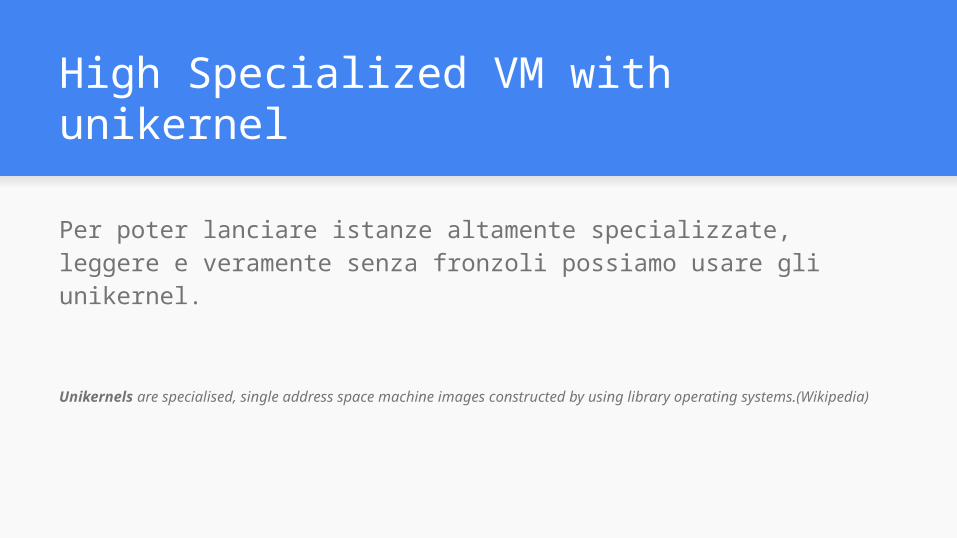
High Specialized VM with unikernel
Per poter lanciare istanze altamente specializzate, leggere e veramente senza fronzoli possiamo usare gli unikernel.
Unikernels are specialised, single address space machine images constructed by using library operating systems.(Wikipedia)

Unikernel
Vantaggi di usare gli unikernels
sicurezza
immagini piccole
alta ottimizzazione
boot velocissimi
Riferimenti: http://unikernel.org/

UniK
UniK è un tool per complilare applicazioni direttamente in unikernel, in questo modo anziché ottenere un binario si ottiene un immagine bootabile, permette di far girare queste immagini su un sacco di servizi cloud.
E’ un progetto opensouce
https://github.com/emc-advanced-dev/unik
Unik
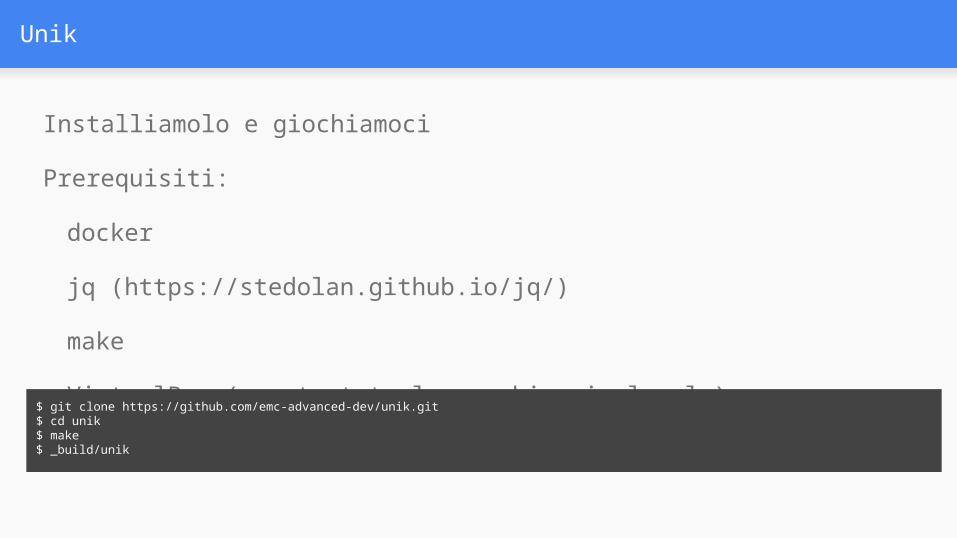
Installiamolo e giochiamoci
Prerequisiti:
docker
jq (https://stedolan.github.io/jq/)
make
VirtualBox (per testate le macchine in locale)$ git clone https://github.com/emc-advanced-dev/unik.git$ cd unik$ make$ _build/unik

UniK
Che linguaggi supporta?
Python
Go
Node.js
JavaDove posso avviare le mie macchine?VirtualBox
AWS
vSpere
QEMU
UKVM
XEN
OpenStack
PhotonController
UniK
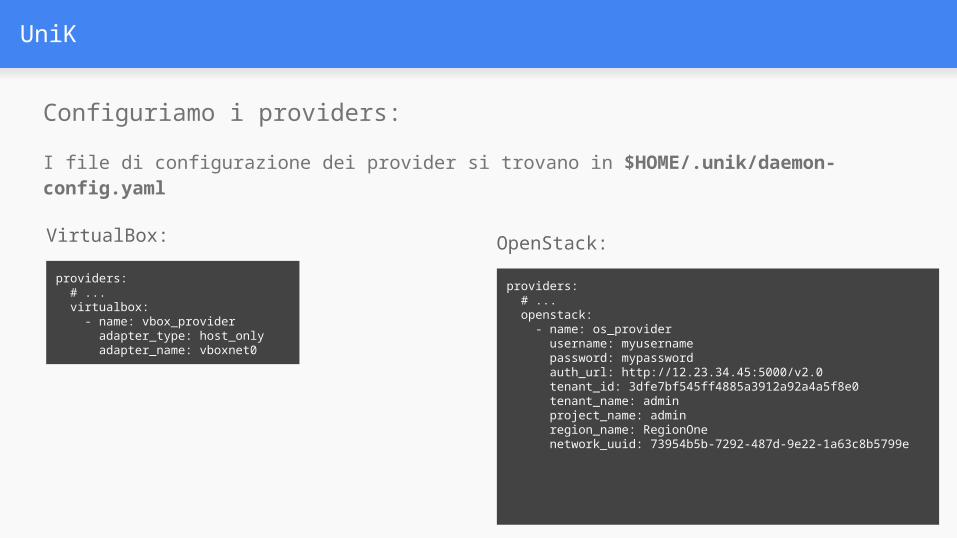
Configuriamo i providers:I file di configurazione dei provider si trovano in $HOME/.unik/daemon-config.yaml
VirtualBox:
providers: # ... virtualbox: - name: vbox_provider adapter_type: host_only adapter_name: vboxnet0
OpenStack:
providers: # ... openstack: - name: os_provider username: myusername password: mypassword auth_url: http://12.23.34.45:5000/v2.0 tenant_id: 3dfe7bf545ff4885a3912a92a4a5f8e0 tenant_name: admin project_name: admin region_name: RegionOne network_uuid: 73954b5b-7292-487d-9e22-1a63c8b5799e
UniK
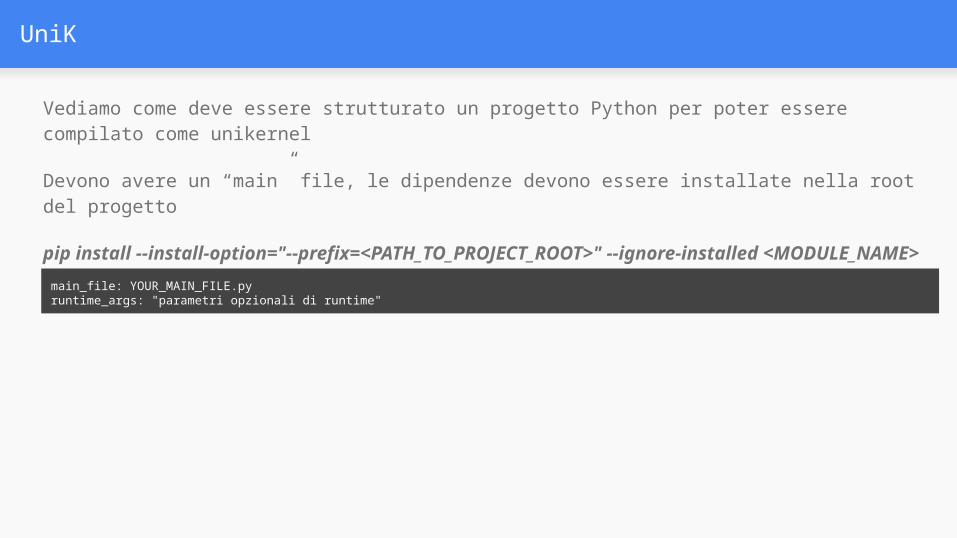
Vediamo come deve essere strutturato un progetto Python per poter essere compilato come unikernel
Devono avere un “main” file, le dipendenze devono essere installate nella root del progetto
pip install --install-option="--prefix=<PATH_TO_PROJECT_ROOT>" --ignore-installed <MODULE_NAME>
Deve essere presente un file manifest.yamlmain_file: YOUR_MAIN_FILE.pyruntime_args: "parametri opzionali di runtime"

UniK
Esempio directory progetto:$ tree myproject/.├── bin│ └── bottle.py├── lib│ └── python3.5│ └── site-packages│ ├── __pycache__│ │ └── bottle.cpython-35.pyc│ ├── bottle-0.12.9-py3.5.egg-info│ │ ├── PKG-INFO│ │ ├── SOURCES.txt│ │ ├── dependency_links.txt│ │ ├── installed-files.txt│ │ └── top_level.txt│ └── bottle.py├── manifest.yaml└── server.py
manifest.yaml:main_file: ./server.py
UniK
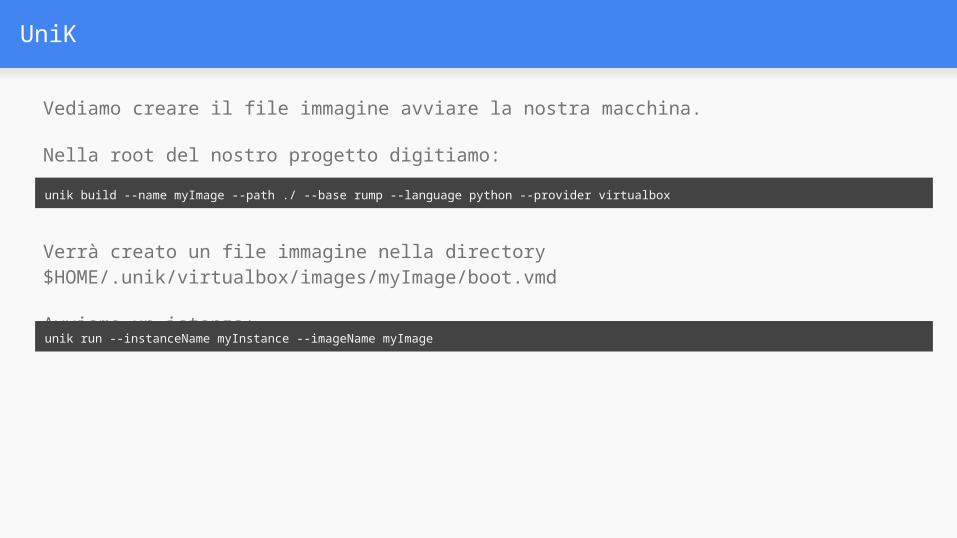
Vediamo creare il file immagine avviare la nostra macchina.
Nella root del nostro progetto digitiamo:unik build --name myImage --path ./ --base rump --language python --provider virtualbox
Verrà creato un file immagine nella directory $HOME/.unik/virtualbox/images/myImage/boot.vmd
Avviamo un istanza:unik run --instanceName myInstance --imageName myImage

Domande?

Proviamo qualcosa

Grazie per l’attenzione
Gabriele Baldoni
Tw: @_gabry
Url: www.gabrielebaldoni.it/
LinkedIn: it.linkedin.com/in/gbaldoni
Telegram: @GakbriCompila il Google Form
https://goo.gl/forms/US7A0F0mmmBqNBJo1


![CICADA - USENIX · 1 vm 2 vm 3 vm 4 vm 5vm 6 vm 7 vm 8 vm 9 vm 2 vm 3 vm 4 vm 5 vm 6 vm 7 vm 8 vm 9 vm 1 rigid application (similar to VOC [1]) vm 1 vm 2 vm 3 vm 4 vm 5vm 6 vm 7 vm](https://img.pdfslide.net/doc/110x75/5f3ade2be7477529602b0cb3/cicada-usenix-1-vm-2-vm-3-vm-4-vm-5vm-6-vm-7-vm-8-vm-9-vm-2-vm-3-vm-4-vm-5-vm.jpg)