
MK-90CRS005-01
Hitachi Compute Rack 220S Windows Installation Guide
FASTFIND LINK S
Getting Help
Contents

ii
Hitachi Compute Rack 220S Windows Installation Guide
© 2012-2014 Hitachi, Ltd. All rights reserved. No part of this publication may be reproduced or transmitted in any form or by any means, electronic or mechanical, including photocopying and recording, or stored in a database or retrieval system for any purpose without the express written permission of Hitachi, Ltd. Hitachi, Ltd., reserves the right to make changes to this document at any time without notice and assumes no responsibility for its use. This document contains the most current information available at the time of publication. When new or revised information becomes available, this entire document will be updated and distributed to all registered users. Some of the features described in this document might not be currently available. Refer to the most recent product announcement for information about feature and product availability, or contact Hitachi Data Systems at https://portal.hds.com. Notice: Hitachi, Ltd., products and services can be ordered only under the terms and conditions of the applicable Hitachi Data Systems agreements. The use of Hitachi, Ltd., products is governed by the terms of your agreements with Hitachi Data Systems. Hitachi is a registered trademark of Hitachi, Ltd., in the United States and other countries. Hitachi Data Systems is a registered trademark and service mark of Hitachi, Ltd., in the United States and other countries. Archivas, Essential NAS Platform, HiCommand, Hi-Track, ShadowImage, Tagmaserve, Tagmasoft, Tagmasolve, Tagmastore, TrueCopy, Universal Star Network, and Universal Storage Platform are registered trademarks of Hitachi Data Systems. AIX, AS/400, DB2, Domino, DS6000, DS8000, Enterprise Storage Server, ESCON, FICON, FlashCopy, IBM, Lotus, MVS, OS/390, RS6000, S/390, System z9, System z10, Tivoli, VM/ESA, z/OS, z9, z10, zSeries, z/VM, and z/VSE are registered trademarks or trademarks of International Business Machines Corporation. All other trademarks, service marks, and company names in this document or website are properties of their respective owners. Microsoft product screen shots are reprinted with permission from Microsoft Corporation.

Contents iii
Hitachi Compute Rack 220S Windows Installation Guide
Contents
Contents.................................................................................................iii Preface ................................................................................................... v
Intended Audience ..............................................................................................vi Release Notes .....................................................................................................vi Referenced Documents........................................................................................vi Document Conventions ....................................................................................... vii Convention for storage capacity values................................................................ viii Getting Help ..................................................................................................... viii Comments ........................................................................................................ viii
Windows Server 2008 R2 ...................................................................... 1-1 Installing Windows Server 2008 R2.....................................................................1-2 Before installation .............................................................................................1-4 OS installation...................................................................................................1-5 Installing drivers/utilities ..................................................................................1-15 Installing Windows Server 2008 R2 SP1 ............................................................1-20 After Installation .............................................................................................1-21 Turning on/off power.......................................................................................1-22 Resetting Application/System forcibly ................................................................1-25 Bundled Software............................................................................................1-26 Restrictions for using Windows Server 2008 R2..................................................1-27 Using Windows Hypervisor 2.0 .........................................................................1-39

iv Contents
Hitachi Compute Rack 220S Windows Installation Guide

Preface v
Hitachi Compute Rack 220S Windows Installation Guide
Preface
This document provides installation procedures of Windows Server 2008 R2 and related software products to the Compute Rack 220S (CR 220S) using the Driverkit CD-ROM. When installing Windows Server using the Driver & Utility for Windows DVD-ROM, see Hitachi Compute Blade Series / Hitachi Compute Rack Series OS installation Guide for Windows Server.
This preface includes the following information:
Intended Audience
Release Notes
Referenced Documents
Document Conventions
Convention for storage capacity values
Getting Help
Comments
Notice: The use of Compute Rack and all other Hitachi Data Systems products is governed by the terms of your agreement(s) with Hitachi Data Systems.

vi Preface
Hitachi Compute Rack 220S Windows Installation Guide
Intended Audience This document is intended for the personnel who are involved in planning, managing, and performing the tasks to prepare your site for Compute Rack installation and to install the same.
This document assumes the following:
The reader has a background in hardware installation of computer systems.
The reader is familiar with the location where the Compute Rack will be installed, including knowledge of physical characteristics, power systems and specifications, and environmental specifications.
Release Notes
Read the release notes before installing and using this product. They may contain requirements or restrictions that are not fully described in this document or updates or corrections to this document.
Referenced Documents
Compute Rack 220S (CR 220S) documents:
Hitachi Compute Rack 220S Getting Started Giode, MK-90CRS001
Hitachi Compute Rack 220S User's Guide, MK-90CRS002
Hitachi Compute Rack 220S CRU Replacement Guide, MK-90CRS003
Hitachi Compute Rack 220S BIOS Guide, MK-90CRS000
Hitachi Compute Rack 220S Remote Management User's Guide, MK-90CRS004
Hitachi Compute Blade Series / Hitachi Compute Rack Series OS Installation Guide for Windows Server, MK-99COM076

Preface vii
Hitachi Compute Rack 220S Windows Installation Guide
Document Conventions The term “Compute Rack” refers to all Compute Rack models, unless otherwise noted.
This document uses the following typographic conventions:
Convention Description
Regular text bold In text: keyboard key, parameter name, property name, hardware labels, hardware button, hardware switch.
In a procedure: user interface item
Italic Variable, emphasis, reference to document title, called-out term
Screen text Command name and option, drive name, file name, folder name, directory name, code, file content, system and application output, user input
< > (angled brackets) Variable (used when italic is not enough to identify variable).
[ ] (square bracket) Optional values
{ } braces Required or expected value
| vertical bar Choice between two or more options or arguments
_(underline) Default value, for example, [a | b]
This document uses the following symbols to emphasize certain information.
Symbol Label Description
WARNING
This indicates the presence of a potential risk that might cause death or severe injury.
CAUTION
This indicates the presence of a potential risk that might cause relatively mild or moderate injury.
NOTICE NOTICE This indicates the presence of a potential risk that might cause severe damage to the equipment and/or damage to surrounding properties.
Note
This indicates notes not directly related to injury or severe damage to equipment.
Tip This indicates advice on how to make the best use of the equipment.

viii Preface
Hitachi Compute Rack 220S Windows Installation Guide
Convention for storage capacity values
Physical storage capacity values (for example, disk drive capacity) are calculated based on the following values:
Physical capacity unit Value
1 kilobyte (KB) 1,000 (103) bytes
1 megabyte (MB) 1,000 KB or 1,0002 bytes
1 gigabyte (GB) 1,000 MB or 1,0003 bytes
1 terabyte (TB) 1,000 GB or 1,0004 bytes
1 petabyte (PB) 1,000 TB or 1,0005 bytes
1 exabyte (EB) 1,000 PB or 1,0006 bytes
Logical storage capacity values (for example, logical device capacity) are calculated based on the following values:
Logical capacity unit Value
1 block 512 bytes
1 KB 1,024 (210) bytes
1 MB 1,024 KB or 1,0242 bytes
1 GB 1,024 MB or 1,0243 bytes
1 TB 1,024 GB or 1,0244 bytes
1 PB 1,024 TB or 1,0245 bytes
1 EB 1,024 PB or 1,0246 bytes
Getting Help
The Hitachi Data Systems customer support staff is available 24 hours a day, seven days a week. If you need technical support log on to the Hitachi Data Systems Portal for contact information: https://portal.hds.com.
Comments
Please send us your comments on this document: [email protected]. Include the document title and number including the revision level (for example, -07), and refer to specific sections and paragraphs whenever possible. All comments become the property of Hitachi Data Systems Corporation.
Thank you!

1
Windows Server 2008 R2 1-1
Hitachi Compute Rack 220S Windows Installation Guide
Windows Server 2008 R2
This chapter provides installation procedures of Windows server 2008 R2 and related software products.
Installing Windows Server 2008 R2
Before installation
OS installation
Installing drivers/utilities
Installing Windows Server 2008 R2 SP1
After Installation
Turning on/off power
Resetting Application/System forcibly
Bundled Software
Restrictions for using Windows Server 2008 R2
Using Windows Hypervisor 2.0

1-2 Windows Server 2008 R2
Hitachi Compute Rack 220S Windows Installation Guide
Installing Windows Server 2008 R2
Overview of installation and requirements
Install both OS and Driver/Utility using the Setup DVD-ROM and the DriverKit CD-ROM.
Install the Driver/Utility after the OS installation. Otherwise Windows Server 2008 R2 cannot operate properly.
When installing Windows Server using the Driver & Utility for Windows DVD-ROM, see Hitachi Compute Blade Series / Hitachi Compute Rack Series OS installation Guide for Windows Server.
Select appropriate Setup DVD-ROMs for your system in the following tables.
Table 1-1: Windows Server 2008 R2 Standard
Representation Target DVD-ROM
Setup DVD DVD-ROM for Microsoft Windows Server 2008 R2 Standard, Retail Edition or Volume License
Table 1-2: Windows Server 2008 R2 Enterprise Windows
Representation Target DVD-ROM
Setup DVD DVD-ROM for Microsoft Windows Server 2008 R2 Enterprise, Retail Edition or Volume License
Table 1-3: Windows Server 2008 R2 Datacenter
Representation Target DVD-ROM
Setup DVD DVD-ROM for Microsoft Windows Server 2008 R2 Datacenter, Retail Edition or Volume License
Table 1-4: Windows Server 2008 R2 Service Pack1
Representation Target DVD-ROM
Service Pack DVD
DVD-ROM for Microsoft Windows Server 2008 R2 Service Pack 1
The DVD-ROM drive letter is usually after the HDD/SSD. In the following steps, the d: indicates the DVD drive name. For example: d:\Win2008R2\Drivers\RAID\MegaSAS_03\x64

Windows Server 2008 R2 1-3
Hitachi Compute Rack 220S Windows Installation Guide
Installation general flow
Figure 1-1: Installation workflow
Before Installation ● Back up necessary files. ● Set partition to the disk array as necessary. ● Initialize BIOS settings as necessary.
OS Installation ● Install the OS completely.
Installing drivers/utilities
After Installation ● Installing Hotfix ● Updating the OS using Windows Update. ● Setting up each component and utility. ● Installing other applications as necessary.
Disabling Windows Recovery Environment
Updating registry
Installing the drivers● Installing Chipset driver ● Installing LAN driver ● Installing Display driver ● Installing SEL Manager
Installing the utilities● Installing MegaRAID Storage Manager ● Installing Hardware Maintenance Agent
Installing Expander Link Check tool
Installing Service Pack 1 as necessary

1-4 Windows Server 2008 R2
Hitachi Compute Rack 220S Windows Installation Guide
Before installation
This section describes the setup before installation.
Back up necessary files
Re-setup causes the hard disk data to disappear. Back up data that you need in advance.
Set partition to the disk array
Set the partition to the installed disk array that you need in advance.
Initialize BIOS configuration
Set the BIOS configuration that you need in advance.

Windows Server 2008 R2 1-5
Hitachi Compute Rack 220S Windows Installation Guide
OS installation
This section describes the procedures to install Windows Server 2008 R2.
For the installation procedure of the driver for optional PCI card, see the manual of optional PCI card before installing OS and Driver/Utility.
Restrictions and specification Logical capacity of the install drive
Set the logical drive capacity of installing OS to less than 2 TB. OS does not recognize the capacity of over 2 TB on the logical drive. Rebuild the disk array and logical drive through the RAID management utility or RAID BIOS.
Setting partition (drive)
All programs and data in the partition are deleted, when you install the OS to the first partition of the boot disk.
Setting write cache
When use the RAID controller without cache backup module, confirm that the write cache of a logical drive, in which Windows Server 2008 R2 is installed, is in the write through mode (write cache is invalid) before the installation.
If it is in the write back mode (write cache is valid), change it to the write through mode. See MegaRAID Storage Manager Instruction Manual for more information about changing the write cache mode.
DVD-ROM ejection
Press the eject button of the DVD drive only when changing the DVD-ROM or CD-ROM media. Otherwise, you must re-install the OS.
Multiple disks and partitions (drives)
When multiple disks or partitions (drives) are installed in the system unit, multiple disks are displayed as the candidates of the OS installation. The disk number and the displayed order of disks are unstable and always change. When performing the installation in the multiple disks environment, determine the target disk for installation by its size not by the order or its number.
We recommend that you configure the disk drives with different capacity for each drives in the disk array.
When you select an incorrect disk or partition as the OS installation target, the existing partitions or data in the disk may be deleted. For more details about the multiple disks and partitions, see the following Microsoft website.
http://support.microsoft.com/kb/937251/en
You can identify the disk capacity with MegaRAID WebBIOS. For more details about identifying the disk capacity, see Hitachi Compute Rack 220S BIOS Guide.
1-6 Windows Server 2008 R2
Hitachi Compute Rack 220S Windows Installation Guide
Necessary device
An external DVD-ROM drive is necessary to install OS. Prepare before installation.
In addition, it is necessary to change the boot devices priority by system BIOS to boot from an external DVD-ROM drive. For details, see Hitachi Compute Rack 220S BIOS Guide.
Installation Steps
NOTICE Re-installation causes the storage drive data to be deleted. Back up data that you need in advance.
When external disk array device or SCSI device is connected, turn off the device power before starting the installation. Otherwise, the installing destination may not be recognized correctly.
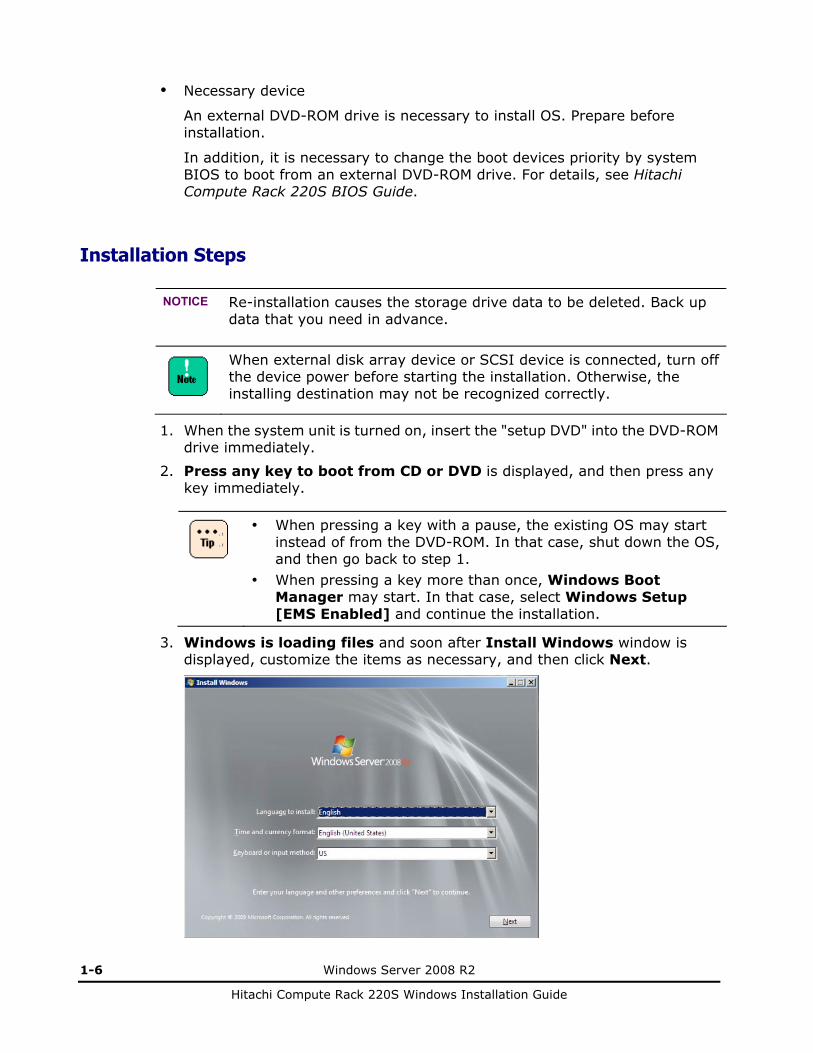
1. When the system unit is turned on, insert the "setup DVD" into the DVD-ROM drive immediately.
2. Press any key to boot from CD or DVD is displayed, and then press any key immediately.
When pressing a key with a pause, the existing OS may start instead of from the DVD-ROM. In that case, shut down the OS, and then go back to step 1.
When pressing a key more than once, Windows Boot Manager may start. In that case, select Windows Setup [EMS Enabled] and continue the installation.
3. Windows is loading files and soon after Install Windows window is displayed, customize the items as necessary, and then click Next.

Windows Server 2008 R2 1-7
Hitachi Compute Rack 220S Windows Installation Guide
4. The following window is displayed, click Install now.
This Step 4 may not be displayed in some OS installation media. When Windows RE (Recovery Environment) need to start, see
Repairing the computer.
5. The following window is displayed. Click the edition you need to install, and then click Next.
Do not select Server Core Installation that is not supported.

1-8 Windows Server 2008 R2
Hitachi Compute Rack 220S Windows Installation Guide
6. Please read the license terms is displayed, read the contents, click I accept the license terms if you agree to the terms, and then click Next.
7. Which type of installation do you want? is displayed, and then click
Custom (advanced).
When the window above is not displayed, go to step 8.

Windows Server 2008 R2 1-9
Hitachi Compute Rack 220S Windows Installation Guide
8. Where do you want to install Windows? is displayed, and then click Load Driver.
9. The following Load Driver window is displayed. Remove the "setup DVD"
from the DVD-ROM drive, and then insert the DriverKit CD-ROM. Click Browse.

1-10 Windows Server 2008 R2
Hitachi Compute Rack 220S Windows Installation Guide
10. The following Browse for Folder is displayed. Select an appropriate location described in the following, and then click OK.
d:\Win2008R2\Drivers\RAID\MegaSAS_03\x64
11. Select the driver to be installed. is displayed, select a driver based on the
following, and then click Next.
– RAID controller without cache backup module: LSI MegaRAID SAS 9267-8i (d:\Win2008R2\Drivers\RAID\MegaSAS_03\x64\megasas2.inf)
– RAID controller with cache backup module: LSI MegaRAID SAS 9266-8i (d:\Win2008R2\Drivers\RAID\MegaSAS_03\x64\megasas2.inf)

Windows Server 2008 R2 1-11
Hitachi Compute Rack 220S Windows Installation Guide
12. Where do you want to install Windows? is displayed, remove the DriverKit CD-ROM from the DVD-ROM drive, insert the "setup DVD", and then click Refresh.
If you do not change the media, Unable to install Windows in the disk is displayed in the bottom of the window. You cannot continue the installation.
13. In the following window, click an appropriate partition from the window, and then click Next.
You can identify the disk capacity with MegaRAID WebBIOS. For more details about identifying the disk capacity, see Hitachi Compute Rack 220S BIOS Guide. If there are some disks with the same size, follow the steps below to find out a target disk.
a. Press Shift + F10 keys to display the command prompt.
b. Enter the following command in the command line to start diskpart. >diskpart
c. Enter the following command in diskpart. >select disk=system. Disk n is selected. is displayed.
d. Install the OS in an appropriate partition in the disk n displayed in the previous step.

1-12 Windows Server 2008 R2
Hitachi Compute Rack 220S Windows Installation Guide
When multiple disks are displayed, the order and the number of disks are not always same. Select the target disk for installation by size not by the order of disks or the disk number. If possible, change the disk settings to recognize only the target disk beforehand. See Restrictions and specification in advance. If you select an incorrect disk or partition, the existing data in the disk may be deleted. For more details about the multiple disks and partitions environment, see the following Web site. http://support.microsoft.com/kb/937251/en
The Delete cannot be used to partitions in the dynamic disk. See the following URL for more details about partitions in the dynamic disk. http://support.microsoft.com/kb/926190/en
To specify the size of an installed partition, click Drive Options (advanced).
When you select a disk without specifying the partition size and click Next, or you click OK when Another partition may be added for the system file to work all functions of Windows properly. is displayed, another 100 MB partition is created. This partition is called “system partition”. For more details about the system partition, see the following URL. http://technet.microsoft.com/en-us/library/dd799232(WS.10).aspx
14. Installing Windows… is displayed. OS setup will be completed.

Windows Server 2008 R2 1-13
Hitachi Compute Rack 220S Windows Installation Guide
15. When boot the OS on the first time after the installation, The user’s password must be changed before logging on the first time. is displayed, and then click OK.
16. Enter any Administrator password into New password and Confirm
password, and then click button.
A password is required to satisfy the following conditions. Combine at least 3 characters among the followings:
English capital letters (A to Z); English lower case (a to z); numbers (1 to 9); comma, period
Do not contain 3 or more consecutive letters from the user name or full name.

1-14 Windows Server 2008 R2
Hitachi Compute Rack 220S Windows Installation Guide
17. Your password has been changed is displayed, and then click OK.
OS Installation is completed. Go on to the Installing drivers/utilities.

Windows Server 2008 R2 1-15
Hitachi Compute Rack 220S Windows Installation Guide
Installing drivers/utilities
This subsection describes the installation procedures of drivers/utilities for Windows Server 2008 R2 using the DriverKit CD-ROM.
Install the following drivers, utilities, and registry update respectively.
Drivers – Chipset driver
– LAN driver
– Display driver
– SEL Manager
Utilities – MegaRAID Storage Manager
– Hardware Maintenance Agent
Registry update
Windows Recovery Environment (RE)
Expander Link Check tool
For the installation procedure of the driver for optional PCI card, see the manual of optional PCI card before installing OS and Driver/Utility.Install a PCI card driver after installation of the above drivers and utilities is completed. Perform registry update after installation of the PCI card.
Installing drivers
Installing Chipset driver
Install the chipset driver using the following steps.
1. Insert the DriverKit CD-ROM into the DVD-ROM drive.
2. Click Start > Run.
3. Enter the following, and then click OK.
d:\Win2008R2\Drivers\chipset\INTEL_03\infinst_autol.exe
The Setup window is displayed.
4. Click Next.
License Agreement Terms is displayed.

1-16 Windows Server 2008 R2
Hitachi Compute Rack 220S Windows Installation Guide
5. Read the license agreement, and then click Yes if you agree.
Install the chipset driver following to the instructions in windows.
Setup completed is displayed in the end of the installation.
6. Remove the DriverKit CD-ROM from the DVD-ROM drive.
7. If a restart request is issued, restart the system unit in accordance with the window. Otherwise, close the window.
Installing LAN driver
Install the LAN driver using the following steps.
1. Insert the DriverKit CD-ROM into the DVD-ROM drive.
2. Click Start > Administrative Tools > Server Manager.
Server Manager window is displayed.
3. Click Diagnostics > Device Manager.
4. Right-click the network adapter, of which driver has not been applied, and then click Update Driver Software.
Update Wizard is displayed.
5. Click Browse my computer for driver software.
6. Enter the following in Browse for driver software on your computer, and then click Next.
d:\Win2008R2\Drivers\LAN\BROAD_01\x64
Uncheck Search subfolders.
7. Confirm Windows has successfully updated your driver software. is displayed, and then click Close.
8. If there are some network adapters of which LAN driver has not been applied, repeat the steps from 4 to 7 for each network adapters.
9. Remove the DriverKit CD-ROM from the DVD-ROM drive, and then restart the system unit.
This hardware cannot be started. may be displayed during the driver installation. In this case, restart the system unit, so that it operates correctly. Confirm that the device runs correctly using the Device Manager.

Windows Server 2008 R2 1-17
Hitachi Compute Rack 220S Windows Installation Guide
Installing Display driver
Install the Display driver using the following steps.
1. Insert the DriverKit CD-ROM into the DVD-ROM drive.
2. Click Start > Run.
3. Enter the following, and then click OK.
d:\Win2008R2\Drivers\SVGA\Matrox_02\install.bat
4. Complete the installation following to the instructions in the window.
5. Remove the DriverKit CD-ROM from the DVD-ROM drive, and then restart the system unit.
6. Change the screen resolution to a value that you like within the range of your display specifications.
Installing SEL Manager
This driver is needed for the system unit logging. See SEL Manager Instruction Manual for details, and installation.
If the SEL Manager is not installed, an error analysis will be unreliable.
Installing utilities
Installing MegaRAID Storage Manager
MegaRAID Storage Manager is a utility to monitor a disk array device. See MegaRAID Storage Manager Instruction Manual for details, and installation.
If this utility is not installed, double fault may occur because an HDD/SSD failure cannot be detected, and also the failure cannot be analyzed correctly.
1-18 Windows Server 2008 R2
Hitachi Compute Rack 220S Windows Installation Guide
Installing Hardware Maintenance Agent
The Hardware Maintenance Agent is a utility necessary for maintenance of the system unit. If a failure occurs on the system unit, this utility analyzes such a failure automatically, thus facilitating identification of this failure and shortening system recovery time. See Hardware Maintenance Agent Windows Edition User’s Guide for details, and installation.
To use the Hardware Maintenance Agent, the SEL Manager is required. Install the SEL Manager to the system unit in advance.
Updating registry
Insert the DriverKit CD-ROM into the DVD-ROM drive, and then install the Registry Update using following steps.
The purpose of the following step is dumps to be collected when NMI is issued.
1. Click Start > Run.
2. Enter the following, and then click OK.
d:\utility\NMIDump\NMID.bat
To enabling the updates above, restart the system unit.
Disabling Windows Recovery Environment (RE)
With Windows Server 2008 R2, when the system unit restarts due to a failure during the OS startup, a message appears, saying that the computer failed to start and that Windows will attempt to repair it. With no operation, Windows RE (Recovery Environment) starts 30 seconds later instead of Windows Server 2008 R2. When Windows RE starts up, you need to start Windows Server 2008 R2 manually. If you manage the system with a setting, which automatically restart the system with Windows Server 2008 R2 after a failure is detected during the OS startup, the startup of Windows RE can be troublesome.
We recommend you that you should disable the setting because features provided by Windows RE are available by booting up from the installation medium.

Windows Server 2008 R2 1-19
Hitachi Compute Rack 220S Windows Installation Guide
Insert the DriverKit CD-ROM into the DVD-ROM drive, and then perform the following steps.
1. Click Start > Run.
2. Enter the following, and then click OK.
d:\utility\WinRE\WinRE.cmd
Installing Expander Link Check tool
Insert the DriverKit CD-ROM into the DVD-ROM drive, and then install the Expander Link Check tool using following steps.
3. Click Start > Run.
4. Enter the following, and then click OK.
d:\utility\ExpanderLinkCheck_xM\ExpanderLinkChk.exe -install

1-20 Windows Server 2008 R2
Hitachi Compute Rack 220S Windows Installation Guide
Installing Windows Server 2008 R2 SP1
This subsection describes the installation procedures of Windows Server 2008 R2 SP1. Install components as necessary.
Download the SP1 installer in the Microsoft web site page if you do not have the SP1 DVD-ROM.
If you use the setup DVD slipstreaming Windows Server 2008 R2 SP1 when installing the OS, you do not have to install SP1.
Preparation
You must apply the update module KB2487426 before installing Windows Server 2008 R2 SP1. An application error occurs in 32-bit applications when you do not apply the update module.
Download the update module in the following Microsoft web site.
http://support.microsoft.com/kb/2487426/en
Installing SP1 1. Turn on the system unit, start Windows, and log on as Administrator.
2. Insert the Service Pack DVD into the DVD-ROM drive.
3. Click Start > Run.
4. Enter d: \setup.exe, and then click OK.
Welcome to Windows Server® R2 Service Pack1 is displayed.
5. Click Next.
License Agreement Terms is displayed.
6. Read the license agreement, and then click Yes if you agree.
7. Welcome to Windows Server® R2 Service Pack1 is displayed.
8. Click Install.
Installation proceeds. Soon after the system unit is restart. When you log on, Windows Server® R2 Service Pack 1 has been successfully installed is displayed
9. Click Close to close the window.
10. Remove the Service Pack DVD from the DVD-ROM drive.

Windows Server 2008 R2 1-21
Hitachi Compute Rack 220S Windows Installation Guide
After Installation Installing Hotfix
Install the Windows Hotfix in reference to Applying Hotfix on page 1-35.
Updating the OS using Windows Update.
Update using Windows Update.
Setting up each component and utility.
Set up each component and utility as necessary.
Installing other applications as necessary.
Install other applications as necessary.

1-22 Windows Server 2008 R2
Hitachi Compute Rack 220S Windows Installation Guide
Turning on/off power
This section describes to the procedures to turning on the system, starting the OS, turning off the system after the OS shutdown, and forcibly terminating the applications and system.
See Turning on/off Power in the Hitachi Compute Rack 220S Getting Started Guide for power operations.
Turning on power 1. Turn on the Power of peripheral units such as a display unit.
2. Press the POWER switch on the front side of the system unit.
Start Logon window is displayed.
Do not press the keys repeatedly when booting the system. Otherwise, an error message may be displayed.
It may take about 10 minutes to display the Start Logon window.
3. Press Ctrl + Alt + Delete keys.
Logon Information is displayed.
4. Enter your user name and password, and then press Enter.
Windows boots itself and the Desktop window appears.

Windows Server 2008 R2 1-23
Hitachi Compute Rack 220S Windows Installation Guide
Turning off power
Follow to the steps below after completing all tasks on the system unit to turn off the power.
NOTICE Do not press the POWER switch without the shutdown. It may cause data loss or Windows not to start. Perform the shutdown process before turning off the power.
1. Click Start > > Shutdown.
Shutdown Windows window is displayed.
2. Select a reason for shutdown from Option: in Shutdown Event Tracker.

1-24 Windows Server 2008 R2
Hitachi Compute Rack 220S Windows Installation Guide
When you click Other in the Option: box for shutdown, enter the reason in the Comment: box.
3. Click OK.
The system unit is powered off.
4. Turn off the peripherals.

Windows Server 2008 R2 1-25
Hitachi Compute Rack 220S Windows Installation Guide
Resetting Application/System forcibly
When the system function fails during it is processing applications, resetting the system, which includes terminating applications forcibly or restarting the system unit forcibly, may effect to regain the system for the normal operation.
Terminating Application forcibly
Right-click the task bar and click Task Manager of the shortcut menu. Click the Application, select an application you want to terminate, and then click End Task.
After you terminate an application forcibly, the OS or other applications may not work normally or a data security problem may occur. In such a case, try to reinstall the OS or applications, or restore the system unit from backup data.
Turning off the server unit power forcibly
When Windows runs abnormally, press the POWER switch for more than four seconds to turn off the power. You may be required formatting the HDD/SSD to enabling the system.
After you turn off the system unit forcibly, the OS or other applications may not work normally or a data security problem may occur. In such a case, try to reinstall the OS or applications, or restore the system unit from backup data.
Do not press the POWER switch until Windows restart is completed except emergency.
When resetting, boot up and terminate Windows properly, and then restart it. Otherwise, Windows may not work normally.

1-26 Windows Server 2008 R2
Hitachi Compute Rack 220S Windows Installation Guide
Bundled Software
This section describes the usages of software products bundled with the system unit.
MegaRAID Storage Manager
This utility is necessary to manage disk array devices. If this utility is not installed, no HDD/SSD failure can be detected, which will cause a double failure and loss of data. For details about using this utility, see MegaRAID Storage Manage Instruction Manual.
Hardware Maintenance Agent
The Hardware Maintenance Agent is a utility necessary for maintenance of the system unit. If a failure occurs on the system unit, this utility analyzes such a failure automatically, thus facilitating identification of this failure and shortening system recovery time. For details about using this utility, see Hardware Maintenance Agent Windows Edition User’s Guide.
Broadcom Advanced Control Suite 4 (BACS4)
This utility is a LAN tool for using the extended functions of a network adapter. For details about using this utility, see Windows Server 2008 R2 LAN Extended Functions User’s Guide.

Windows Server 2008 R2 1-27
Hitachi Compute Rack 220S Windows Installation Guide
Restrictions for using Windows Server 2008 R2
This section describes the restrictions for using Windows Server 2008 R2.
Restrictions for using of Windows Server 2008 R2
The number of processors recognizable by the Windows Server 2008 R2
There are the following restrictions on the number of processors recognizable by the OS:
Table 1-5: Restrictions on the number of processors recognizable
Edition Max. number of sockets
(Total of physical processors)
Max. number of logical processors
(Total of multi-core, hyper threading processors)
Windows Server 2008 R2 Standard 4 256
Windows Server 2008 R2 Enterprise 8 256
Windows Server 2008 R2 Datacenter 64 256
Server Core
Do not install Server Core, which is not supported.
Shutting down Windows Server
If you shut down Windows while the services registered to start at the boot are still activated, the shut down may not operate normally. Wait more than five minutes after booting Windows before shutting down.
Repairing the computer
Step 4 of the installation procedure (click here.) may not be displayed in some OS installation media. When this happens, Repair your computer in the step 4 window is not displayed, so that Windows Recovery Environment (Windows RE) cannot be started.
See the following URL for more details about the problem. http://support.microsoft.com/kb/951495/en
An attempt to read the boot driver on the Windows RE may cause an error output. Start Windows RE as follows, if necessary.

1-28 Windows Server 2008 R2
Hitachi Compute Rack 220S Windows Installation Guide
1. In the window of Select OS to install, press Shift + F10 keys simultaneously.
A command prompt is displayed.
2. Enter the following in the command prompt to execute recenv.exe.
> cd /d %SystemDrive%¥sources¥recovery > RecEnv.exe
Windows RE starts.
Fault tolerant
The system unit does not support a span volume, a stripe volume, a RAID-5 volume, or a mirror volume. Periodically make a backup.
Making backup file
Windows Server Backup does not support backing up to the tape media. When backing up data to a tape device, purchase the backup software.
Backing up to the DVD±R/RW/RAM is not also supported.
Displaying window
After switching the window display for changing tasks, the previous display may remain depending on the timing. In such a case, redraw the point in question to display properly.
Depending on the status of use, the message box may be hidden behind other windows.
To change the display color, terminate the application. Otherwise, it can cause strange display of the application. In such a case, redraw by switching the window for proper display.
When changing the refresh rates, confirm that your monitor can display a window properly.
A window may remain displayed after stopping the movie on some movie applications. When this happens, change the windows such as by maximizing another window.

Windows Server 2008 R2 1-29
Hitachi Compute Rack 220S Windows Installation Guide
Functioning power saving
Do not select System Standby, Hybrid Sleep, and Hibernate. These three functions are not supported.
Among power supply options, you can only change the time-out period before the display shutdown.
If you fail to observe two restrictions above, the monitor may not operate properly.
Setting recovery operation after system shutdown
We recommend that the Automatically restart check box is unchecked. The procedure is as follows:
1. Click Start > Management Tool > Server Manager.
2. Click Change System Property, and open System Property.
3. Click Details Setting > Set in Start and Recovery. Start and Recovery window is displayed.
4. Remove the check mark in Automatically restart, and click OK.
Getting complete memory dump of physical memory exceeding 2 GB
When Windows is set on a system unit installed with greater than 2 GB memory, Complete Memory Dump cannot be selected from Write Debug Information in Start and Recovery. Perform the following procedure when getting Complete Memory Dump in an environment where greater than 2 GB physical memory is installed. Complete Memory Dump is not displayed in the Write Debug Information list.
1. Insert the DriverKit CD-ROM into the DVD-ROM drive.
2. Click Run in the Start menu, enter following file name, and then click OK.
d:\utility\Dump\PMDE.bat
3. Press any key when the following message appears.
Change the setting to get Complete Memory Dump. Press any key to continue the operation. Press the Ctrl + C keys to cancel the setting.
4. Set virtual memory size.
For more details about virtual memory size, see the following Setting virtual memory size.

1-30 Windows Server 2008 R2
Hitachi Compute Rack 220S Windows Installation Guide
Setting virtual memory size
When set virtual memory to get the complete memory dump, set the virtual memory file size to a size greater than the physical memory size. If you try to set the file size of the virtual memory smaller than the physical memory, a warning message If the paging file is disabled or the virtual memory's initial page size: is smaller than xxx MB, system error can occur and useful information to identify the problem cannot be saved. Do you like to continue? is displayed. If you select this xxx MB, the complete memory dump may not be obtained correctly. Set the file size to greater than xxx +400 MB.
When set virtual memory to get the kernel memory dump, set enough size for the virtual memory. Otherwise, the kernel memory dump may not be properly collected. See the following URL for more details about setting the virtual memory size for kernel memory dump. http://support.microsoft.com/kb/949052/en-us
1. Click Start > Management Tool > Server manager.
2. Click Change System Property.
3. Click Details > Setting in Performance pane.
4. Click Details > Setting in Virtual Memory pane.
5. Remove the check mark in Manage automatically all the drive paging file sizes box.
6. Click Custom Size, and then enter the value greater than <xxx+400>MB to Initial size and Maximum size boxes.
The Maximum size must be grater than Initial size.
7. Restart the system unit.

Windows Server 2008 R2 1-31
Hitachi Compute Rack 220S Windows Installation Guide
Checking System Event viewer logs
The following error logs may be recorded in the System event log.
Table 1-6: Error logs
Event type
Event ID
Event source
Description Effects Remarks
Error 10 Microsoft-Windows-
WMI
Event filter with query "SELECT * FROM __InstanceModificationEvent WITHIN 60 WHERE TargetInstance ISA "Win32_Processor" AND TargetInstance.LoadPercentage > 99" could not be reactivated in namespace "//./root/CIMV2" because of error 0x80041003. Events cannot be delivered through this filter until the problem is corrected.
See the following Website for further details. http://support.microsoft.com/kb/950375/en-us
It may happen when you use the setup DVD slipstreaming Windows Server 2008 R2 SP1 when installing the OS.
Error 49 volmgr Configuring the Page file for crash dump failed. Make sure there is a page file on the boot partition and that is large enough to contain all physical memory.
Recommended file size by Windows is different depending on the physical memory. When the C-drive capacity or space cannot satisfy the recommended size, this event is recorded. No problem in the usual OS operation. But complete memory dump cannot be obtained. When large physical memory is required, set the C: drive to a larger size.
It may happen immediately after the OS installation.
Setting C-drive to larger size is recommendable before installing physical memory with large capacity.
Error 4202 Microsoft-Windows- Iphlpsvc
The IP address on Isatap interface isatap.{8E208284-65BF--43D8-92DD-89FFAAF47DF0} could not be updated. Update type: 0; Error code: 0x57. A figure in {} (GUID) may be different depending on the environment.
Ignore this event.
Error 7030 Service Control Manager Eventlog provider
The RAID Monitor service is marked as an interactive service. However, the system is configured to not allow interactive services. This service may not function properly.
Ignore this event.
1-32 Windows Server 2008 R2
Hitachi Compute Rack 220S Windows Installation Guide
Event type
Event ID
Event source
Description Effects Remarks
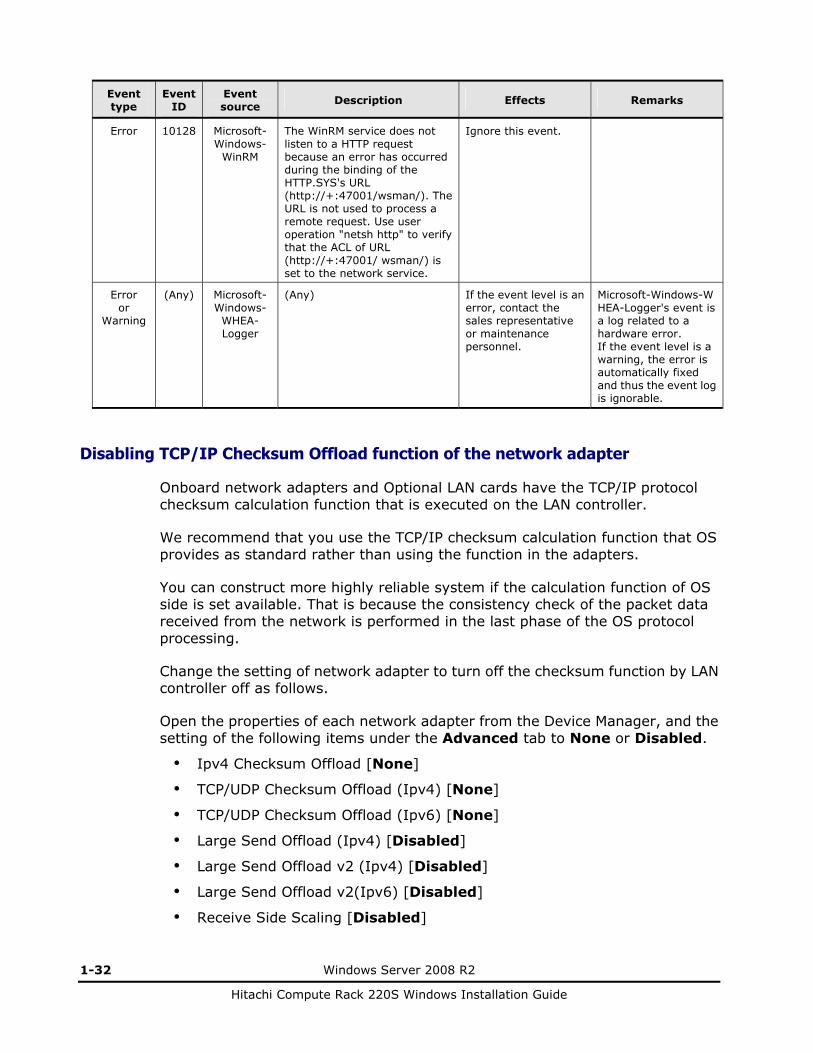
Error 10128
Microsoft-Windows-
WinRM
The WinRM service does not listen to a HTTP request because an error has occurred during the binding of the HTTP.SYS's URL (http://+:47001/wsman/). The URL is not used to process a remote request. Use user operation "netsh http" to verify that the ACL of URL (http://+:47001/ wsman/) is set to the network service.
Ignore this event.
Error or
Warning
(Any) Microsoft-Windows-
WHEA- Logger
(Any) If the event level is an error, contact the sales representative or maintenance personnel.
Microsoft-Windows-WHEA-Logger's event is a log related to a hardware error. If the event level is a warning, the error is automatically fixed and thus the event log is ignorable.
Disabling TCP/IP Checksum Offload function of the network adapter
Onboard network adapters and Optional LAN cards have the TCP/IP protocol checksum calculation function that is executed on the LAN controller.
We recommend that you use the TCP/IP checksum calculation function that OS provides as standard rather than using the function in the adapters.
You can construct more highly reliable system if the calculation function of OS side is set available. That is because the consistency check of the packet data received from the network is performed in the last phase of the OS protocol processing.
Change the setting of network adapter to turn off the checksum function by LAN controller off as follows.
Open the properties of each network adapter from the Device Manager, and the setting of the following items under the Advanced tab to None or Disabled.
Ipv4 Checksum Offload [None]
TCP/UDP Checksum Offload (Ipv4) [None]
TCP/UDP Checksum Offload (Ipv6) [None]
Large Send Offload (Ipv4) [Disabled]
Large Send Offload v2 (Ipv4) [Disabled]
Large Send Offload v2(Ipv6) [Disabled]
Receive Side Scaling [Disabled]

Windows Server 2008 R2 1-33
Hitachi Compute Rack 220S Windows Installation Guide
After the setting, restart the system unit.
Depending on a type of network adapter, some items are not displayed. Set the displayed items for your adapter.
Restriction on changing the network adapter parameter
When the network adapter configuration is changed, the communication with the all the network adapters may break down until the setup is saving, or an error may be recorded in the OS event log. After the setup, make sure that communication is normal.
When the network adapter setting has been changed, communication may not be done properly through the adapter. Check the network adapter with the changed setting in the Device Manager. If ! is displayed, right-click the adapter, disable it, and then enable it again. When rebooting OS, the adapter can communicate properly.
Device location of onboard network adapter
The location relationship between the onboard network adapters (LAN controllers) and network interface connecters is as follows:
Table 1-7: Device location of onboard network adapter
LAN controller Connector number and location
Broadcom BCM5719 - Network interface connecter 1: PCI bus 6, Device 0, function 0
- Network interface connecter 2: PCI bus 6, Device 0, function 1
- Network interface connecter 3: PCI bus 6, Device 0, function 2
- Network interface connecter 4: PCI bus 6, Device 0, function 3
Link speed of network adapter
The network adapter link speed is specified in Auto Negotiation by default. If the network adapter is not connected to the hub normally, specify a line speed appropriate to the normal communication with the hub.
To set up the adapter, click Device Manager > Network Adapters. And then click the Properties of a target network adapter to change. Select Link Speed & Duplex or Sped & Duplex of Property on the Advanced tab, and select a proper line speed from Value. You can change the line speed.

1-34 Windows Server 2008 R2
Hitachi Compute Rack 220S Windows Installation Guide
Displaying event log of network adapter
\DEVICE \354C76B6-E426-4CEB-8015-BF991BA8D75F\ may be displayed instead of a network adapter name such as Broadcom NetXtreme Gigabit Ethernet in the event log describing the network adapter. This occurs due to the specification, which is not affected the operation. The network adapter name and the number enclosed by \\ (GUID) may be different depending on your environment.
Displaying network adapter connection status
The network connection status in the Network Connection window or Task tray may not be quickly updated at the network adapter linkup. Click View in Network Connections > Latest Update to update and display the current status.
Confirming network adapter event log at OS boot
Error event may occur in the network adapter at the system boot. The network adapter may be linked down. Click Network Connections, and then confirm that the targeted network adapter is connected.
A linkup event may be recorded at the system boot in whatever the link status of the network adapter. Click Network Connections, and then confirm the link status of the network adapter.
Updating firmware of external disk array
When using an external disk array with Windows Server 2008 R2, updating the firmware or change the settings for Windows Server 2008 R2 may be required.
See the documents of the using disk array for more details about the updates.
Displaying file properties
Details of File Properties by Explorer may not display the File Version, Product Information, or Product Version. Reboot the OS or change the screen resolution or number of the color bits, and then not-displayed items may be displayed.

Windows Server 2008 R2 1-35
Hitachi Compute Rack 220S Windows Installation Guide
Confirming SAN Storage Manager availability
A disk array that supports VDS (Virtual Disk Service) is necessary to use SAN storage manager.
See the documents of the using disk array for more details about the support status of VDS.
Confirming physical memory capacity
Microsoft recommends that Windows Server 2008 R2 should have 2 GB memory. If the memory is not enough, processing may not be completed by the time expected or may be interrupted due to resource shortage at the overload.
Applying Hotfix
Install all of the following hotfixes before operating Windows Server 2008 R2.
KB974672 (Target: without SP1)
Modifies a problem that a virtual machine hangs up at its startup time. See following URL for details:
http://support.microsoft.com/kb/974672
This hotfix is applicable only after the role of Hyper-V is enabled. Install this hotfix without fail if the role of Hyper-V is enabled.
KB982383 (Target: without SP1)
Modifies a problem that may degrade the I/O performance. See following URL for details:
http://support.microsoft.com/kb/982383
This hotfix has corrected other problems including KB974598.
KB2487426 (Target: With/Without SP1)
Modifies a problem that a 32-bit application terminates abnormally when a service pack is applied. See following URL for details:
http://support.microsoft.com/kb/2487426

1-36 Windows Server 2008 R2
Hitachi Compute Rack 220S Windows Installation Guide
KB2517374 (Target: without SP1)
Modifies various Hyper-V problems. See following URL for details:
http://support.microsoft.com/kb/2517374
A problem that the Hyper-V virtual machine cannot be started in a specific environment is described on the reference Web site but other problems including KB975530/KB2133637/KB2264080 are also modified.
This hotfix is applicable only after the role of Hyper-V is enabled. Install this hotfix without fail if the role of Hyper-V is enabled.
KB2528357 (Target: With/Without SP1)
Modifies a memory leak problem of a storage device. See following URL for details:
http://support.microsoft.com/kb/2528357
KB2528507 (Target: With SP1)
Modifies a crash problem of a memory dump file. See following URL for details:
http://support.microsoft.com/kb/2528507
KB2553549 (Target: With/Without SP1)
Modifies a problem that cannot communicate after 497 days from system startup. See following URL for details:
http://support.microsoft.com/kb/2553549
Using USB memory
With a USB memory connected, do not power on the system unit or perform reboot-up. Boot the OS and then connect the USB memory. After that, confirm that drive letters of other drives are not changed.

Windows Server 2008 R2 1-37
Hitachi Compute Rack 220S Windows Installation Guide
BitLocker drive encryption function
The BitLocker drive encryption function is supported only when the TPM (Trusted Platform Module) is used. The TPM is an optional, provided the TPM board (EQ7001-R). Install the TPM board in the system unit before using the BitLocker drive encryption function.
By default, the TPM is disabled. Before use, enable the TPM. For details on how to enable the TPM, see Hitachi Compute Rack 220S BIOS Guide.
After the BitLocker drive encryption function is enabled when not installing Service Pack 1, you should also install the following hotfix without fail: http://support.microsoft.com/kb/975496/
The BitLocker drive encryption function encrypts drives. Some applications or middleware do not support this function, or there are operational precautions. Confirm with the sales representative.
You should disable the BitLocker drive encryption function before hardware maintenance work or expansion work.
Strictly manage your recovery password. If the recovery password is lost, you cannot start the OS or access data. Also, you may not conduct hardware maintenance work or expansion work.
When the BitLocker drive encryption function is enabled, an overhead by encryption/decryption process occurs. If this function is used with a database where performance is required, or in the Hyper-V 2.0 environment, expected performance may not achieve. Before use, verify the BitLocker drive encryption function.
Defragmenting SSD
Unlike the HDD, the SSD (Solid State drive) may be decreased the life of SSD if optimized using the defragmentation tool. Do not run the defragmentation tool on the SSD.
Before applying Service Pack 1
Apply the hotfix KB2487426 before installing Service Pack 1. Otherwise, a 32-bit application will issue an application error. For details, see the following URL: http://support.microsoft.com/kb/2487426

1-38 Windows Server 2008 R2
Hitachi Compute Rack 220S Windows Installation Guide
Display resolution
The Windows Server 2008 R2 automatically sets the maximum number of colors supported by hardware when you set a display resolution. The set number of colors is retained as it is, and the number of bits is not reduced automatically.
Therefore, if you attempt to change the resolution from a high value to a low one and then from a low value to a high one, you may not select the high resolution due to hardware restrictions. If you should not select a high resolution, click Screen resolution > Advanced > Adapter tab > List All Modes… Match the solution with the number of colors.

Windows Server 2008 R2 1-39
Hitachi Compute Rack 220S Windows Installation Guide
Using Windows Hypervisor 2.0
Windows Hypervisor 2.0 (Hyper-V 2.0) is a virtualization function provided as a part of Windows Server 2008 R2. Hyper-V 2.0 allows you to run multiple Windows OS on a physical server, which can improve efficiency of a physical server and reduce IT costs.
Hyper-V 2.0 overview
Hyper-V 2.0 adopts the hypervisor-based virtualization architecture. Hypervisor is a software layer between hardware and OS.
Figure 1-2: Hyper-V 2.0 overview
Terms used in this guide is defined as follows: Physical hardware:
Physical server Virtual machine:
Virtual hardware that operates virtually on a physical hardware Management OS:
Operating system installed in a physical hardware for managing Hyper-V 2.0
Guest OS: Operating systems installed in a virtual machine
Physical Hardware
Windows Hypervisor
Management
OS
Virtual
Machine
GuestOS
Virtual
Machine
GuestOS
Virtual Machine
GuestOS
Compute Rack
Management
1-40 Windows Server 2008 R2
Hitachi Compute Rack 220S Windows Installation Guide
Accessing further information for Hyper-V 2.0
Access the following URL for further details of Hyper-V.
http://www.microsoft.com/windowsserver2008/en/us/hyperv-main.aspx
Configuring system for Hyper-V 2.0
This section describes the system configuration to use Hyper-V 2.0.
Requirements for software configuration
Following software requirements should be satisfied to configure Hyper-V 2.0.
Requirements for Software
Windows Server 2008 R2 Standard/Enterprise/Datacenter for the management OS.
Windows Server 2008 R2 SP1 Standard/Enterprise/Datacenter for the management OS.
Requirement for physical hardware configuration
In addition to the system requirements for Windows Server 2008 R2, the following hardware requirements should be satisfied to use Hyper-V 2.0.
See the following URL for the system requirements for Windows Server 2008 R2. http://technet.microsoft.com/en-us/library/dd379511(v=ws.10).aspx
Requirements for Hardware
Data Execute Prevention (DEP): DEP settings of the system unit are all enabled by default. Use it as is.
Intel 64 (x64-based processor): The CPU mounted in the system unit supports Intel x64 features. Use it as is.
Intel Virtualization Technology (Intel VT): Intel VT settings to the CPU are all enabled by default. Use it as is.
It is recommended that the system unit should use the physical hardware that satisfies the requirements shown below or more for configuration. See Guaranteed virtual machine configuration as well.

Windows Server 2008 R2 1-41
Hitachi Compute Rack 220S Windows Installation Guide
Number of CPU core: In addition to the total number of CPUs to be assigned to each guest OS running simultaneously, at least one CPU for the management OS is required.
Memory capacity: In addition to the total capacity of the memory, which is recommended by Microsoft to each guest OS running simultaneously, at least another 2 GB for the management OS is required.
Partitions: Separate partitions are required for the management OS and the virtual hard disk file (.vhd) of a virtual machine.
Recommendations above are just general standards and do not guarantee that the system will work well at any condition. They may be insufficient depending on an application to run on the guest OS. Give the system test run and check if it works properly beforehand.
Recommendations above are just general standards. When using the system for a specific purpose such as a test environment, it may not necessarily satisfy the recommended requirements. Examine the configuration depending on your purpose.
Guaranteed virtual machine configuration
The following guest OSs confirmed that ran properly on the system unit.
Windows 2000 Server with Service Pack 4
Windows 2000 Advanced Server with Service Pack 4
Windows Server 2003, Standard Edition with Service Pack 2 (including R2)
Windows Server 2003, Enterprise Edition with Service Pack 2 (including R2)
Windows Server 2003, x64 Standard Edition with Service Pack 2 (including R2)
Windows Server 2003, x64 Enterprise Edition with Service Pack 2 (including R2)
Windows Server 2008 Standard 32-bit
Windows Server 2008 Enterprise 32-bit
Windows Server 2008 Datacenter 32-bit
Windows Server 2008 Standard 64-bit
Windows Server 2008 Enterprise 64-bit
Windows Server 2008 Datacenter 64-bit
Windows Server 2008 Standard 32-bit with Service Pack 2
Windows Server 2008 Enterprise 32-bit with Service Pack 2
Windows Server 2008 Datacenter 32-bit with Service Pack 2
Windows Server 2008 Standard 64-bit with Service Pack 2

1-42 Windows Server 2008 R2
Hitachi Compute Rack 220S Windows Installation Guide
Windows Server 2008 Enterprise 64-bit with Service Pack 2
Windows Server 2008 Datacenter 64-bit with Service Pack 2
Windows Server 2008 R2 Standard
Windows Server 2008 R2 Enterprise
Windows Server 2008 R2 Datacenter
Windows Server 2008 R2 Standard with Service Pack 1
Windows Server 2008 R2 Enterprise with Service Pack 1
Windows Server 2008 R2 Datacenter with Service Pack 1
Windows XP Professional x86 Edition +Service Pack 3
Windows Vista Business x86 Edition +Service Pack 2
Windows Vista Enterprise x86 Edition +Service Pack 2
Windows Vista Ultimate x86 Edition +Service Pack 2
Windows 7 Professional x86 Editions
Windows 7 Enterprise x86 Editions
Windows 7 Ultimate x86 Editions
Windows 7 Professional x64 Editions
Windows 7 Enterprise x64 Editions
Windows 7 Ultimate x64 Editions
Windows 7 Professional x86 Edition +Service Pack 1
Windows 7 Enterprise x86 Edition +Service Pack 1
Windows 7 Ultimate x86 Edition +Service Pack 1
Windows 7 Professional x64 Edition +Service Pack 1
Windows 7 Enterprise x64 Edition +Service Pack 1
Windows 7 Ultimate x64 Edition +Service Pack 1
In addition to the above, other guest OSs supported by Microsoft Corporation are installable. However, their installation and operation are out of our support. The system may not work normally.
We recommend that you configure a virtual machine that has at least the Microsoft Corporation's recommended system requirements in accordance with a guest OS.
Windows Server 2008 R2 1-43
Hitachi Compute Rack 220S Windows Installation Guide
Guest OSs, not included in the list above but supported by Microsoft, can be installed in the server blade. However, we do not support the installation and operation. We recommend that virtual machine should be configured in the server blade better than Microsoft recommend to a guest OS.
The virtual hard disk file (.vhd) has three forms such as fixed-size, variable-size, and differentiating vhds. In the variable-size or differentiating vhds, the file size of the virtual hard disk file expands dynamically according to the using capacity of the virtual machine. If the size cannot be expanded due to the capacity shortage of the physical disk, the virtual machine is halted. Confirm that the capacity of the physical disk is sufficient in the production environment. Otherwise, the virtual machine may stop unexpectedly. We recommend that the virtual hard disk should be configured with the fixed-size in the production environment.
The two types of virtual network adapters, the "network" adapter or "legacy network adapter", is selectable. Select the "network adapter" for the blade server. When setting up the integrated service in Windows 2000 described in Applying hotfix for Windows 2000 or applications specify the using of a legacy network adapter, use the legacy network adaptor for that purpose.
See the following URLs for the system requirements for each OS recommended by Microsoft. Windows Server 2008 R2
http://technet.microsoft.com/en-us/library/dd379511(v=ws.10).aspx
Windows Server 2008 http://technet.microsoft.com/en-us/windowsserver/bb414778
Windows Server 2003 (See Windows Server 2003 R2.)] http://technet.microsoft.com/en-us/windowsserver/bb430827
Windows 2000 Server http://support.microsoft.com/kb/304297/en
Windows 2000 Advanced Serve http://support.microsoft.com/kb/304297/en
Windows 7 http://windows.microsoft.com/en-us/windows7/products/system-requirements
Windows Vista http://windows.microsoft.com/en-us/windows-vista/products/system-requirements
Windows XP http://support.microsoft.com/kb/314865/en-us

1-44 Windows Server 2008 R2
Hitachi Compute Rack 220S Windows Installation Guide
The maximum number of processors that can be assigned depends on a guest OS. One processor for Windows 2000 Server or Windows 2000
Advanced Server Maximum two processors for Windows Server 2003 R2, Windows
Server 2003, Windows Vista, or Windows XP + SP3 Maximum four processors for Windows Server 2008 R2, Windows
Server 2008, or Windows 7

Windows Server 2008 R2 1-45
Hitachi Compute Rack 220S Windows Installation Guide
Installing Hyper-V 2.0
This section describes the installation procedure of Hyper-V 2.0.
Always log on to the management OS with the administrator privilege.
See Configuring system for Hyper-V 2.0 before the installation. For the details of how to use the Hyper-V 2.0 manager, see the
management OS help.
Preparation
Make sure both DEP and Intel VT are enabled in the system BIOS of the system unit. If disabled, enable their configurations. For details, see Requirement for physical hardware configuration on page 1-40.
Installing management OS
For the procedure of installing management OS, see Installing Windows Server 2008 R2 on page 1-2.
Installing Hyper-V 2.0
Follow the steps shown below to install Hyper-V 2.0.
1. Start the server manager on the management OS Click Start > Administrative Tools > Server Manager.
2. Add the Hyper-V role. Click Roles > Roles Summary > Add Roles to start the Add Roles Wizard. Click Hyper-V, and then proceed to the completion of the wizard following to the instructions in the Server Roles windows.
The following event is recorded in the system event when you add Hyper-V roles. The event is negligible.
Event ID: 6004 Source: Winlogon Event Level: Warning Description: The Winlogon notification subscriber <TrustedInstaller> failed a critical notification event.
3. When prompted, restart the OS to complete the installation.

1-46 Windows Server 2008 R2
Hitachi Compute Rack 220S Windows Installation Guide
Installing virtual hard disk
Follow the steps shown below to install a virtual hard disk.
1. Click Start > Administrative Tools > Hyper-V Manager to start the Hyper-V manager.
2. Click Action > New > Hard Disk to open the new Virtual Hard Disk wizard.
3. Create a new virtual hard disk following to the wizard.
We recommend you that the virtual hard disk should be configured with the fixed-size. See Guaranteed virtual machine configuration for further details.
Installing virtual machine
Follow the steps shown below to install a virtual machine.
1. Click Start > Administrative Tools > Hyper-V Manager to start the Hyper-V manager.
2. Click Action > New > Virtual Machines to open the new Virtual Machine wizard.
3. Create a new virtual machine following to the wizard.
While executing Connect Virtual Hard Disk, Click Use an existing virtual hard disk, and then click the hard disk created in Installing virtual hard disk.
For the recommended virtual machine configuration for the server blade, see Guaranteed virtual machine configuration.
4. When completing the wizard, add hardware if needed.
For the details such as the procedure, see the management OS help.

Windows Server 2008 R2 1-47
Hitachi Compute Rack 220S Windows Installation Guide
Installing guest OS
Install a guest OS following to the steps shown below in the virtual machine created in Installing virtual machine.
There are restrictions on OS media to be used as a guest OS. See Restrictions of guest OS Restrictions of guest OS
1. In the Virtual Machines section of Hyper-V Manager, right-click a virtual machine name to install a guest OS. Click Connect to open Virtual Machine Connection.
2. Insert the OS setup medium into the DVD drive that is configured in the virtual machine.
If a DVD drive is not included in the virtual machine, configure a DVD drive in the virtual machine. For the procedure, see the management OS help. To configure it, for example, click Media > DVD Drive > D: Capture in Virtual Machine Connection.
3. Click Action > Start. The virtual machine starts.
4. Boot up from the OS setup medium, proceed to install the guest OS following to the instructions in the windows.
If the guest OS is Windows Server 2008 R2, omit steps 5 and 6.
5. After completing the guest OS installation, click Action > Insert Integration Services Setup Disk in the Virtual Machine Connection when the guest OS is running.
6. Install the integrated service following to the window instructions. See Help for the details of how to install the integrated service.
See Applying hotfix for Windows 2000 when using VLAN IDs with Hyper-V.
For Windows 2000, execute step 5 after setting up Service Pack 4.
For Windows Server 2003 including R2, execute step 5 after setting up Service Pack 2.

1-48 Windows Server 2008 R2
Hitachi Compute Rack 220S Windows Installation Guide
Restrictions for using Hyper-V 2.0
This section describes restrictions when using Hyper-V 2.0 on the server blade.
General Restrictions
Planning maintenance
As advancing the integration using the virtual environment, multiple tasks and environments run in a single machine. Make a plan for the schedule management including to ensure the maintenance work. Maintenance tasks include applying security patches, updating application and drivers, and installing service packs for virtual machines and management OS.
The number of processors available with Hyper-V 2.0
There are the following restrictions on the number of processors recognizable by the OS:
Table 1-8: Number of processors available with Hyper-V 2.0
Edition Max. number of sockets
(Total of physical processors)
Max. number of logical processors
(Total of multi-core, hyper threading processors)
Windows Server 2008 R2 Standard 4 64
Windows Server 2008 R2 Enterprise 8 64
Windows Server 2008 R2 Datacenter 64 64
Server Core
Installation of Windows Server 2008 R2/Windows Server 2008 Server Core is not supported.
Using application programs
Some application or middleware may have notice when using with Hyper-V 2.0. See the documents of application distributor from which you have bought it for more details.

Windows Server 2008 R2 1-49
Hitachi Compute Rack 220S Windows Installation Guide
Configuring cluster
When configuring a cluster using Hyper-V 2.0, we strongly recommend you to configure Windows Failover Cluster (WSFC) between the management OSs. See the management OS Help for configuring a cluster between management OSs.
Cluster configuration between a guest OS and a physical machine is not supported.
Cluster failover is executed when connection failure, such as FC cable disconnection, occurs between the management OS and a shared disk, but the failover may be unsuccessful when the shared quorum disk access fails because of the overload to the disk by guest OSs.
Proceeding live migration
When a series of live migrations is done in a short period, it may fail. Perform a series of live migration at the intervals of a few minutes.
Using Broadcom Advanced Control Suite 4
When you install Broadcom Advanced Control Suite 4 (BACS4) in the management OS to use, see Windows Server 2008 R2 LAN Extended Functions User’s Guide.
Do not install BACS4 in any guest OS.
Monitoring events related to physical hardware
Monitor events related to the physical hardware on the management OS, not on the guest OS.
Shutting down and restarting management OS
We recommend you to shut down all guests OS explicitly before restarting and shutting down the management OS. Especially when multiple guests OS are running, shutting down the management OS at the same time puts high workload on CPU. This may cause trouble such as too much time to take or improper shutdown.

1-50 Windows Server 2008 R2
Hitachi Compute Rack 220S Windows Installation Guide
Using dynamic memory
Dynamic Memory is available when you install Windows Server 2008 R2 SP1 or later as the management OS. Hitachi confirmed that the following guest OSs ran properly.
Windows Server 2003, Standard Edition with Service Pack 2 (including R2)
Windows Server 2003, Enterprise Edition with Service Pack 2 (including R2)
Windows Server 2003, x64 Standard Edition with Service Pack 2 (including R2)
Windows Server 2003, x64 Enterprise Edition with Service Pack 2 (including R2)
Windows Server 2008 Standard 32-bit with Service Pack 2
Windows Server 2008 Enterprise 32-bit with Service Pack 2
Windows Server 2008 Datacenter 32-bit with Service Pack 2
Windows Server 2008 Standard 64-bit with Service Pack 2
Windows Server 2008 Enterprise 64-bit with Service Pack 2
Windows Server 2008 Datacenter 64-bit with Service Pack 2
Windows Server 2008 R2 Standard with Service Pack 1
Windows Server 2008 R2 Enterprise with Service Pack 1
Windows Server 2008 R2 Datacenter with Service Pack 1
Windows Vista Enterprise x86 Edition + Service Pack 2
Windows Vista Ultimate x86 Edition + Service Pack 2
Windows 7 Enterprise x86 Edition + Service Pack 1
Windows 7 Ultimate x86 Edition + Service Pack 1
Windows 7 Enterprise x64 Edition + Service Pack 1
Windows 7 Ultimate x64 Edition + Service Pack 1
When you use following OSs as the guest OS, you must adapt the hotfix before activating dynamic memory.
Windows Server 2008 Standard 32-bit with Service Pack 2
Windows Server 2008 Standard 64-bit with Service Pack 2
For more details about the hotfix, see the following website:
http://support.microsoft.com/kb/2230887/en
RemoteFX
RemoteFX function is not supported.
Windows Server 2008 R2 1-51
Hitachi Compute Rack 220S Windows Installation Guide
Other restrictions
Search in the following URL Microsoft Help and Support using Hyper-V as a keyword.
http://support.microsoft.com/
Restrictions of management OS
Not installing software products on the management OS
We recommend you not to install task application (middleware), such as a database or application server, on the management OS with Hyper-V enabled.
Enabling role
We recommend you to disabling any role but Hyper-V in Windows Server 2008 R2 on the management OS with Hyper-V enabled.
Restrictions of guest OS
Saving VM status
When click Action > Save in the management window of the virtual machine, the virtual machine status is saved and the virtual machine halts. To restart the virtual machine from the halting point, click Action > Start. However, this operation is different from the guest OS shutdown and reboot. Applications communicating with the outside may detect an error.
Notes for Active Directory on the guest OS
Microsoft Help and Support provides Considerations when hosting Active Directory domain controller in virtual hosting environments in the following URL. Access the following URL and read it in advance.
http://support.microsoft.com/kb/888794/en-us
Installing 32-bit OS installation media
When using Windows Server 2003 32-bit with Service Pack2 as a guest OS, use the OS medium to which Service Pack 1 or 2 has been applied. Otherwise, the guest OS may display the STOP error and halt during installation.

1-52 Windows Server 2008 R2
Hitachi Compute Rack 220S Windows Installation Guide
Using snapshot
We do not recommend that you use the snapshot. If using the snapshot, performance overhead or inconsistency may occur where multiple servers combined.
We also do not recommend that you use snapshot in the guest OS where Active Directory is configured. If using the snapshot, inconsistency in database may occur.
Using virtual hard disk file (.vhd)
When multiple virtual hard disk files (.vhd) are on a physical hard disk, IO bottleneck may occur depending on processes on the guest OSs. This may affect the entire guest OS processes.
When using multiple guest OSs, execute careful test runs in advance. We recommend you to deploy virtual hard disk files (.vhd) on separate physical disks if necessary.
Installing virtual SCSI controller
A guest OS cannot be installed in a virtual hard disk connected to a virtual SCSI controller. With Windows 2000 Server as a guest OS, the virtual SCSI controller connected to a virtual machine is not available. Connect all virtual hard disks to the virtual IDE controller with Windows 2000 Server as a guest OS.
Applying hotfix for Windows 2000
When using Windows 2000 with service pack 4, in which the integrated service has been installed, and applying the following hotfixes to the guest OS, stop code 0xCE is displayed and the guest OS may halt.
Apply following hotfixes before setting up the integrated service if necessary.
KB891861 http://support.microsoft.com/kb/891861/en
KB905590 http://support.microsoft.com/kb/905590/en
KB922582 http://support.microsoft.com/kb/922582/en
Since hotfixes KB891861 and KB922582 are prioritized in Windows update programs, perform Windows update before the integrated service. When hotfixes KB891861 and KB922582 have been applied, there is no problem if you perform the integrated service and then Windows updates.

Windows Server 2008 R2 1-53
Hitachi Compute Rack 220S Windows Installation Guide
Use the legacy network adapter as a virtual network adapter on a virtual machine before setting up the integrated service. After setting up the integrated service, delete the legacy network adapter from the virtual machine and use a network adapter.
If trouble occurs, the guest OS may have to be re-installed.
Sound playback with a guest OS
When playing back sounds with a guest OS, you cannot play them on Hyper-V manager. If you need to play a sound, connect to the guest OS using an application such as a remote desktop client from a PC with a sound device to play the sound.
When using a remote connecting application which cannot play a sound if some connecting destinations have no physical sound device, you cannot replay a sound even though using remote connection. See your application manual for details.

1-54 Windows Server 2008 R2
Hitachi Compute Rack 220S Windows Installation Guide

Hitachi Compute Rack 220S Windows Installation Guide

MK-90CRS005-01
Hitachi Data Systems
Corporate Headquarters 2845 Lafayette Street Santa Clara, California 95050-2639 U.S.A. www.hds.com
Regional Contact Information
Americas +1 408 970 1000 [email protected]
Europe, Middle East, and Africa +44 (0) 1753 618000 [email protected]
Asia Pacific +852 3189 7900 [email protected]
Recommended


